45059 americana classic - rockler woodworking and...
TRANSCRIPT

45059Visit Rockler.com for the most current product information and videos or call 1-800-260-9663.
Blank Preparation1. Cut the blank about 1/8" longer than the Brass Tube to allow for “blow-out” or hole elongation.
2. Drill the blank with a 9mm drill bit at a speed of 900 to 1200 RPM.
3. Polish the Brass Tube with 220 grit sandpaper to remove oxidation and roughen the Tube for better adhesion. This can be done by hand or by chucking it in a drill press or portable hand drill.
4. Prepare to glue with medium CA (cyanoacrylate) glue or two-part fast drying epoxy.
5. Apply the glue to the outside of the Brass Tube, with a liberal amount around the end that is inserted first. Do not apply glue to the inside of the blank, as this will cause the glue
to get inside the Brass Tube and ruin it.
6. Insert the Brass Tube with a twisting motion into the blank until the Tube is centered between both ends of the blank. Wipe off any excess glue on the ends of the blank. Allow
the glue to dry.
7. Using a barrel trimmer, disk, or belt sander, trim the ends of the blank until you can just see the bright brass ends of the Tube. The faces of the ends must be perpendicular to the Brass Tube and parallel with each other. It is imperative that the length of the trimmed blank matches the original length of the Brass Tube and that the inside of the Brass Tube is clean and free of any glue.
Turning the Blank1. Assemble the blank on the mandrel with the bushings placed
on either side of the blank. Each bushing has a step that is designed to be inserted into the Brass Tube for stability while turning, as the inner diameter of the tube is larger than the mandrel. Note that all of the bushings are the same size.
Note: Either Wood Spacers or extra Bushings may be used to fill the extra space on the mandrel.
2. Tighten the tailstock and then tighten the mandrel nut that holds the blank. Do not over-tighten the tailstock or mandrel nut as this may cause the mandrel to flex, causing the blank to go out of round.
3. Turn the blank to the desired shape, making sure that the surfaces next to the bushings are turned to the same diameter as the bushings.
4. After turning, sand the surfaces in progressive steps of 220, 400, 600, and 1000 grit. If a higher finish is desired,
micromesh sandpaper may be used.
5. Apply the finish of choice and polish.
6. Remove the blank from the mandrel.
Americana Classic Pen Preparation and Turning
Brass TubeMandrel “A”
Americana Classic Bushing Set
Americana Classic Bushing Set
10.5 mm
10.5 mm
10.5 mm
10.5 mm
Wood Spacer
Brass Tube NutAdjustable Mandrel “A”
Mandrel “A” Setup:
Adjustable Mandrel Setup:
Nut
© Rockler Companies Inc. 2013
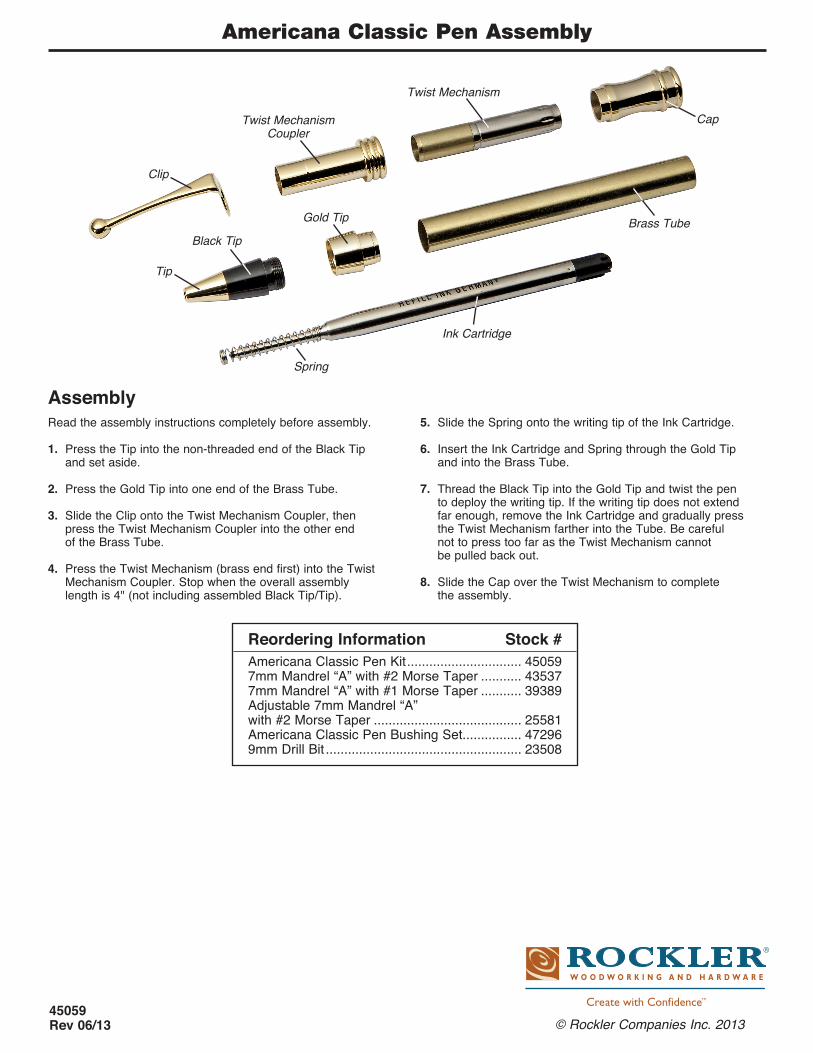
AssemblyRead the assembly instructions completely before assembly.
1. Press the Tip into the non-threaded end of the Black Tip and set aside.
2. Press the Gold Tip into one end of the Brass Tube.
3. Slide the Clip onto the Twist Mechanism Coupler, then press the Twist Mechanism Coupler into the other end of the Brass Tube.
4. Press the Twist Mechanism (brass end first) into the Twist Mechanism Coupler. Stop when the overall assembly
length is 4" (not including assembled Black Tip/Tip).
5. Slide the Spring onto the writing tip of the Ink Cartridge.
6. Insert the Ink Cartridge and Spring through the Gold Tip and into the Brass Tube.
7. Thread the Black Tip into the Gold Tip and twist the pen to deploy the writing tip. If the writing tip does not extend far enough, remove the Ink Cartridge and gradually press the Twist Mechanism farther into the Tube. Be careful not to press too far as the Twist Mechanism cannot be pulled back out.
8. Slide the Cap over the Twist Mechanism to complete the assembly.
Reordering Information Stock #Americana Classic Pen Kit ............................... 450597mm Mandrel “A” with #2 Morse Taper ........... 435377mm Mandrel “A” with #1 Morse Taper ........... 39389Adjustable 7mm Mandrel “A” with #2 Morse Taper ........................................ 25581Americana Classic Pen Bushing Set................ 472969mm Drill Bit ..................................................... 23508
Americana Classic Pen Assembly
Clip
Cap
Tip
Ink Cartridge
Twist Mechanism Coupler
Brass TubeGold Tip
Spring
Twist Mechanism
Black Tip
45059Rev 06/13 © Rockler Companies Inc. 2013