4ge+2pots+wifi gpon ont user manual - c-data | gpon...
TRANSCRIPT

1
4GE+2POTs+WiFi GPON ONT User Manual
2
Contens 1. Introduce ..................................................................................................................................... 3
1.1 Applications ....................................................................................................................... 3 1.2 Function ............................................................................................................................. 3 1.3 Interface ............................................................................................................................ 4 1.4 LED Description ............................................................................................................... 5 1.5 environmental parameter ................................................................................................ 5
2. Introduce configuring the network ........................................................................................... 5 2.1 Prepare for login the ONT web management .............................................................. 5 2.2 Login ONT ......................................................................................................................... 6 2.3 ONT Authentication ......................................................................................................... 7 2.3 LAN Configuration ........................................................................................................... 9 2.4 WAN Configuration .......................................................................................................... 9
2.4.1 Add WAN Connection PPPOE ......................................................................... 10 2.4.2 Add WAN Connection IPOE .............................................................................. 13 2.4.2 Add WAN Connection As Bridging ................................................................... 14
2.5 Voice Configuration ....................................................................................................... 15 2.5.1 Select Protocol .................................................................................................... 15 2.5.2H.248 Setting ........................................................................................................ 15 2.5.3 SIP Setting ........................................................................................................... 16
2.6 IPTV Configuration ........................................................................................................ 18 2.6.1IGMP Proxy .......................................................................................................... 18 2.6.2 IGMP Snooping ................................................................................................... 18 2.6.3 IGMP Snooping ................................................................................................... 19
2.7 Wireless setting ........................................................................................................... 19 2.7.1 Basic setting ........................................................................................................ 19 2.7.2 Security Setting ................................................................................................... 20 2.7.3 MAC filter ............................................................................................................. 22 2.7.4 Wireless Bridge ................................................................................................... 22 2.7.5 Advanced Setting ................................................................................................ 23 2.7.6 Station information ............................................................................................. 23
2.8 Equipment Management .............................................................................................. 24 2.8.1 Restore Default ................................................................................................... 24 2.8.2 Update software .................................................................................................. 24 2.8.3 Equipment Reboot .............................................................................................. 25
3
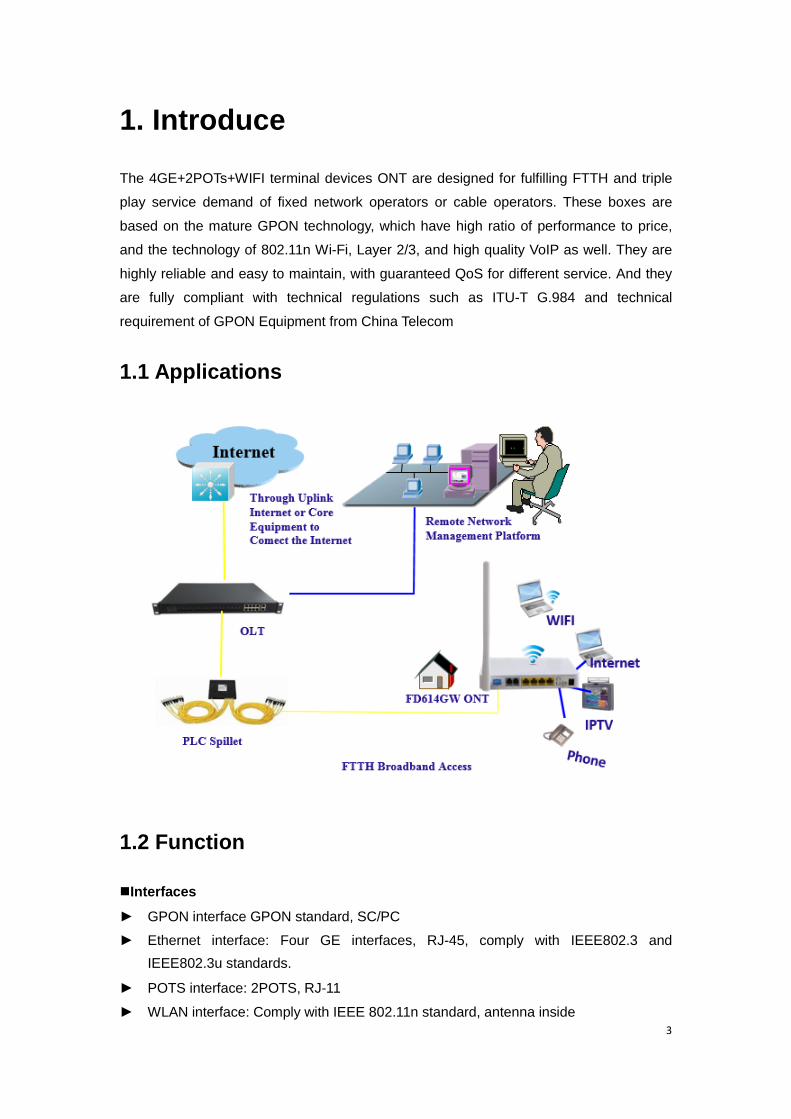
1. Introduce
The 4GE+2POTs+WIFI terminal devices ONT are designed for fulfilling FTTH and triple
play service demand of fixed network operators or cable operators. These boxes are
based on the mature GPON technology, which have high ratio of performance to price,
and the technology of 802.11n Wi-Fi, Layer 2/3, and high quality VoIP as well. They are
highly reliable and easy to maintain, with guaranteed QoS for different service. And they
are fully compliant with technical regulations such as ITU-T G.984 and technical
requirement of GPON Equipment from China Telecom
1.1 Applications
1.2 Function
Interfaces
► GPON interface GPON standard, SC/PC
► Ethernet interface: Four GE interfaces, RJ-45, comply with IEEE802.3 and IEEE802.3u standards.
► POTS interface: 2POTS, RJ-11
► WLAN interface: Comply with IEEE 802.11n standard, antenna inside
4
Technical Features
4GE+2POTS+WiFi has the following features.
► Broadband service access: connected to Internet through the GPON access method.
► Ethernet service access: Provides GE/FE Ethernet interfaces, connected to the there to devices, such as the user PC. Provides the Internet access and IPTV services.
► POTS service access: Supports SIP, H.248 protocol.
► WLAN service access: Provides Internet service for the users through the WLAN method.
► Security: Provides multi-level authentication based on the device, user and service, and provides the data channel encryption for safety.
► QoS: Provides QoS services meeting the requirements of various services for the local devices and network
► Network management: Provides multi-mode network management.
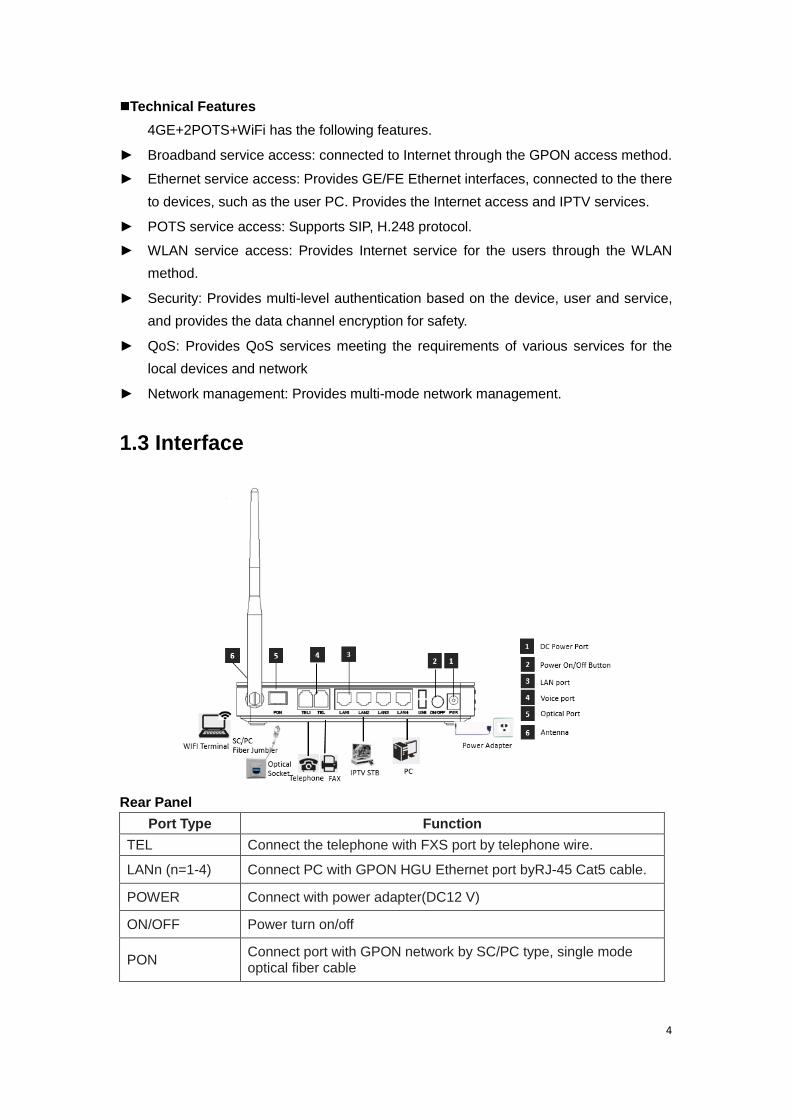
1.3 Interface
Rear Panel
Port Type Function TEL Connect the telephone with FXS port by telephone wire.
LANn (n=1-4) Connect PC with GPON HGU Ethernet port byRJ-45 Cat5 cable.
POWER Connect with power adapter(DC12 V)
ON/OFF Power turn on/off
PON Connect port with GPON network by SC/PC type, single mode optical fiber cable
5
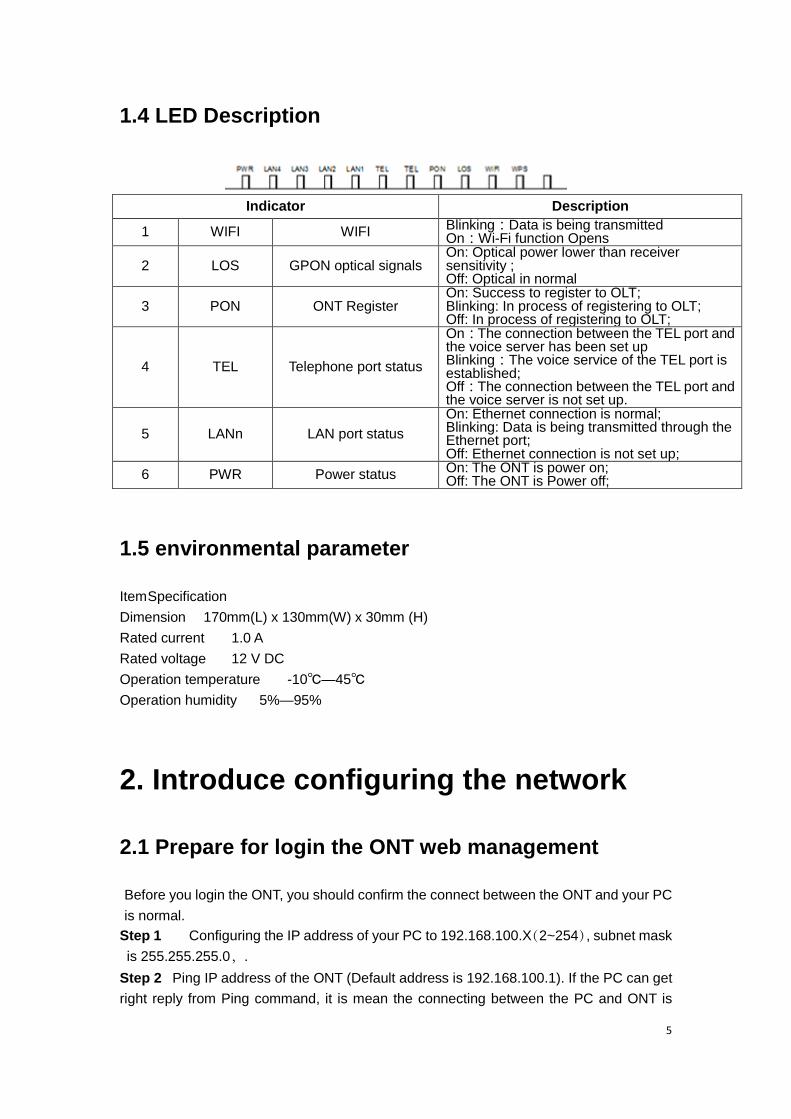
1.4 LED Description
Indicator Description
1 WIFI WIFI Blinking:Data is being transmitted On:Wi-Fi function Opens
2 LOS GPON optical signals On: Optical power lower than receiver sensitivity ; Off: Optical in normal
3 PON ONT Register On: Success to register to OLT; Blinking: In process of registering to OLT; Off: In process of registering to OLT;
4 TEL Telephone port status
On:The connection between the TEL port and the voice server has been set up Blinking:The voice service of the TEL port is established; Off:The connection between the TEL port and the voice server is not set up.
5 LANn LAN port status On: Ethernet connection is normal; Blinking: Data is being transmitted through the Ethernet port; Off: Ethernet connection is not set up;
6 PWR Power status On: The ONT is power on; Off: The ONT is Power off;
1.5 environmental parameter
Item Specification Dimension 170mm(L) x 130mm(W) x 30mm (H) Rated current 1.0 A Rated voltage 12 V DC Operation temperature -10℃—45℃ Operation humidity 5%—95%
2. Introduce configuring the network
2.1 Prepare for login the ONT web management
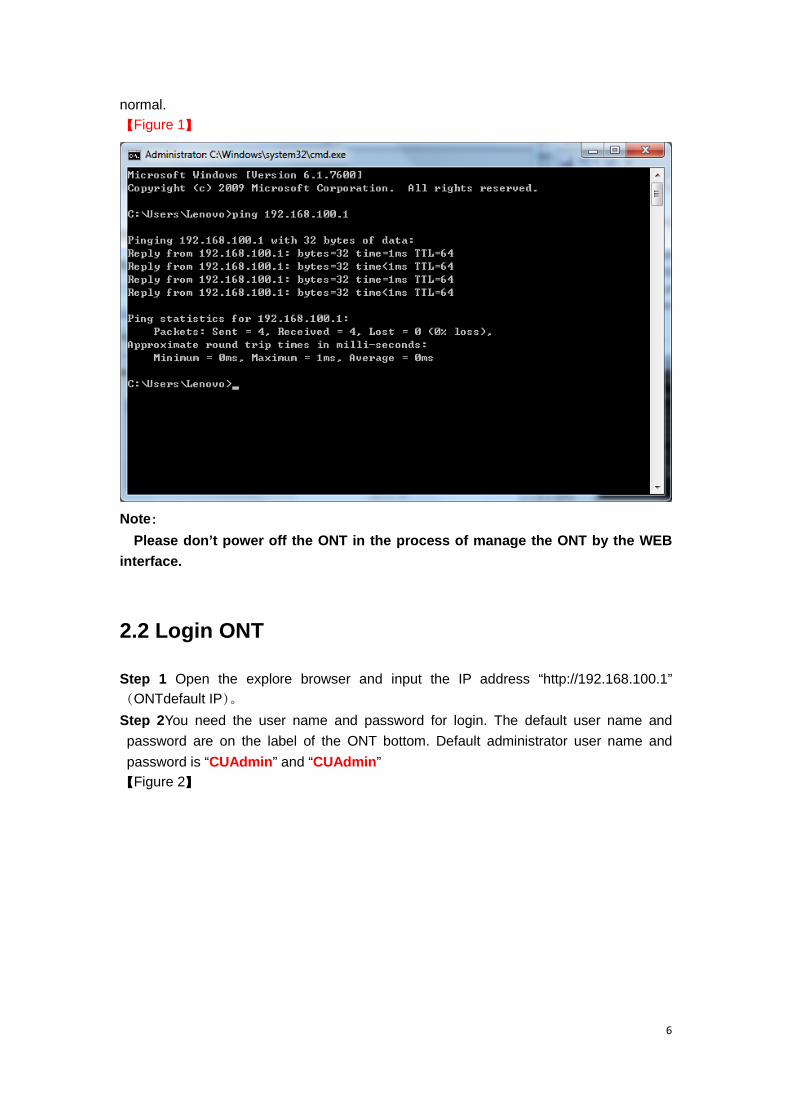
Before you login the ONT, you should confirm the connect between the ONT and your PC is normal.
Step 1 Configuring the IP address of your PC to 192.168.100.X(2~254), subnet mask is 255.255.255.0,.
Step 2 Ping IP address of the ONT (Default address is 192.168.100.1). If the PC can get right reply from Ping command, it is mean the connecting between the PC and ONT is
6
normal. 【Figure 1】
Note:
Please don’t power off the ONT in the process of manage the ONT by the WEB interface.
2.2 Login ONT
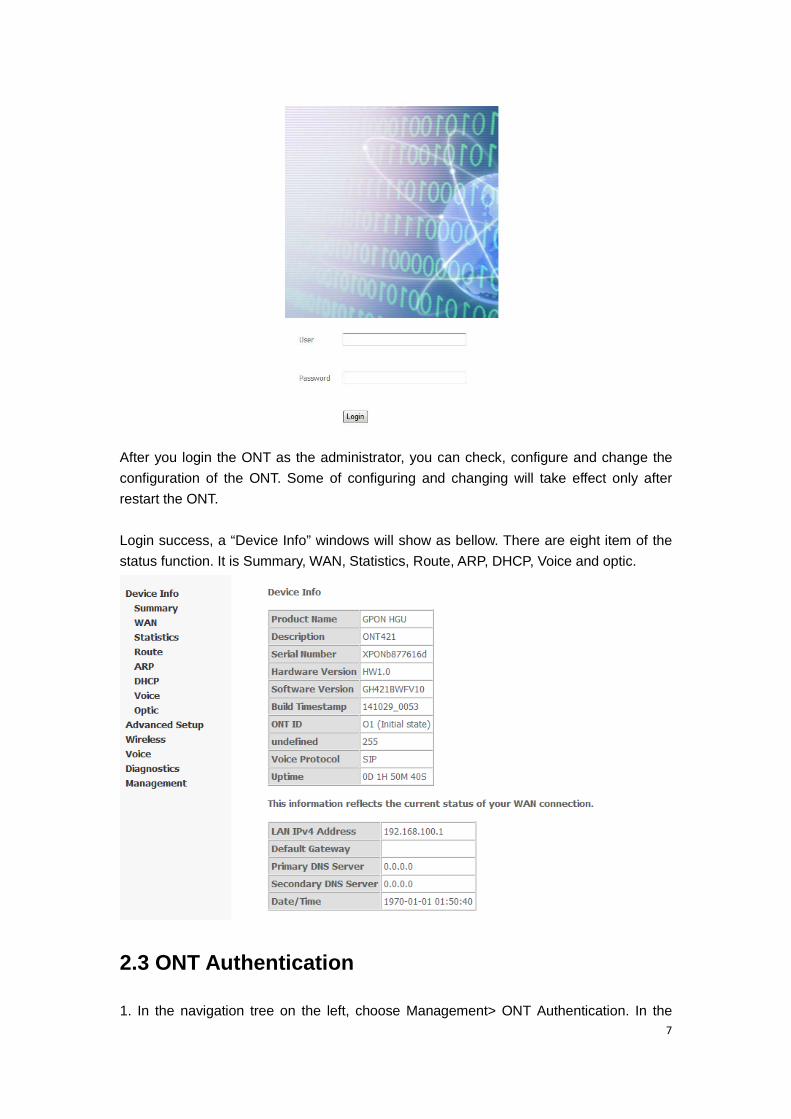
Step 1 Open the explore browser and input the IP address “http://192.168.100.1”(ONTdefault IP)。 Step 2You need the user name and password for login. The default user name and password are on the label of the ONT bottom. Default administrator user name and password is “CUAdmin” and “CUAdmin” 【Figure 2】
7
After you login the ONT as the administrator, you can check, configure and change the configuration of the ONT. Some of configuring and changing will take effect only after restart the ONT. Login success, a “Device Info” windows will show as bellow. There are eight item of the status function. It is Summary, WAN, Statistics, Route, ARP, DHCP, Voice and optic.
2.3 ONT Authentication
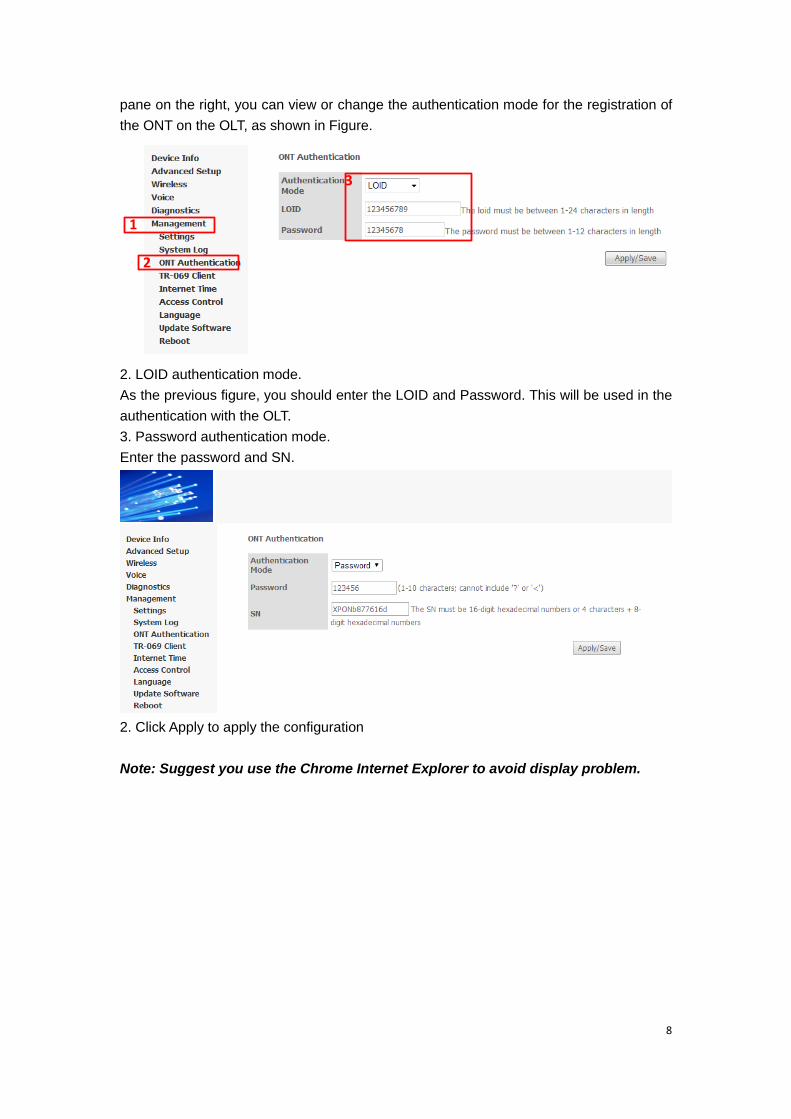
1. In the navigation tree on the left, choose Management> ONT Authentication. In the
8
pane on the right, you can view or change the authentication mode for the registration of the ONT on the OLT, as shown in Figure.
2. LOID authentication mode. As the previous figure, you should enter the LOID and Password. This will be used in the authentication with the OLT. 3. Password authentication mode. Enter the password and SN.
2. Click Apply to apply the configuration Note: Suggest you use the Chrome Internet Explorer to avoid display problem.
1
2
3
9
2.3 LAN Configuration
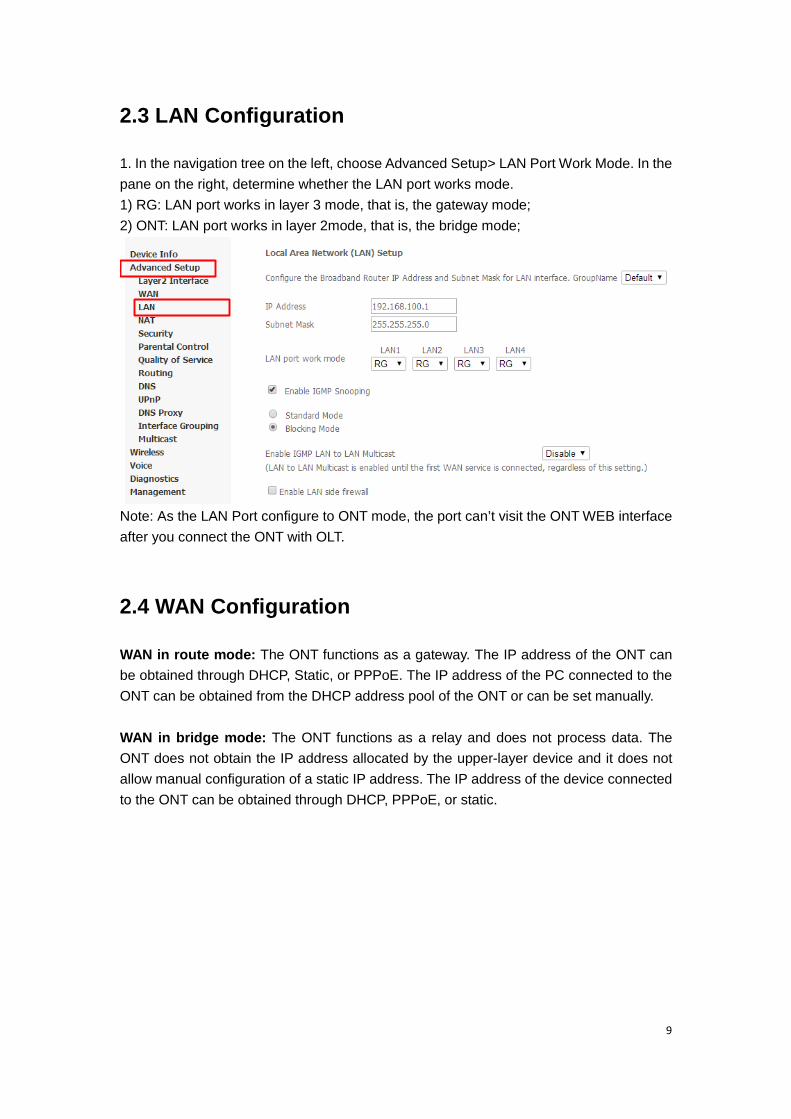
1. In the navigation tree on the left, choose Advanced Setup> LAN Port Work Mode. In the pane on the right, determine whether the LAN port works mode. 1) RG: LAN port works in layer 3 mode, that is, the gateway mode; 2) ONT: LAN port works in layer 2mode, that is, the bridge mode;
Note: As the LAN Port configure to ONT mode, the port can’t visit the ONT WEB interface after you connect the ONT with OLT.
2.4 WAN Configuration
WAN in route mode: The ONT functions as a gateway. The IP address of the ONT can be obtained through DHCP, Static, or PPPoE. The IP address of the PC connected to the ONT can be obtained from the DHCP address pool of the ONT or can be set manually. WAN in bridge mode: The ONT functions as a relay and does not process data. The ONT does not obtain the IP address allocated by the upper-layer device and it does not allow manual configuration of a static IP address. The IP address of the device connected to the ONT can be obtained through DHCP, PPPoE, or static.
10
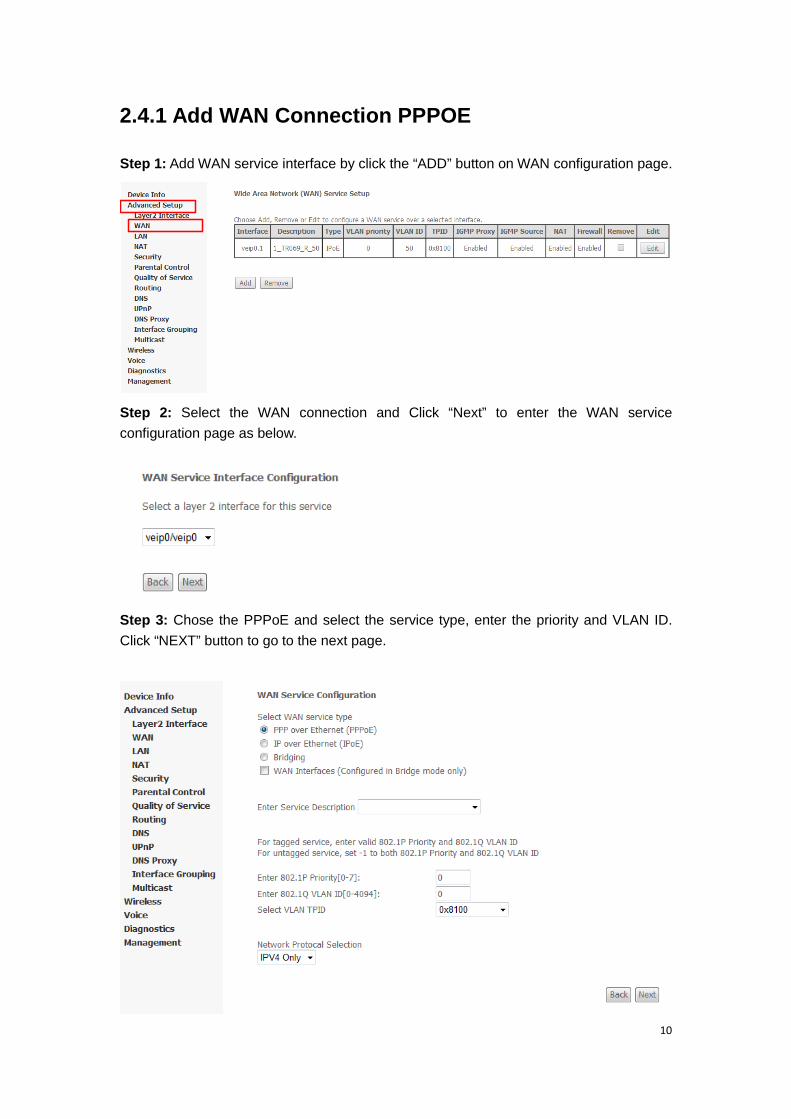
2.4.1 Add WAN Connection PPPOE
Step 1: Add WAN service interface by click the “ADD” button on WAN configuration page.
Step 2: Select the WAN connection and Click “Next” to enter the WAN service configuration page as below.
Step 3: Chose the PPPoE and select the service type, enter the priority and VLAN ID. Click “NEXT” button to go to the next page.
11
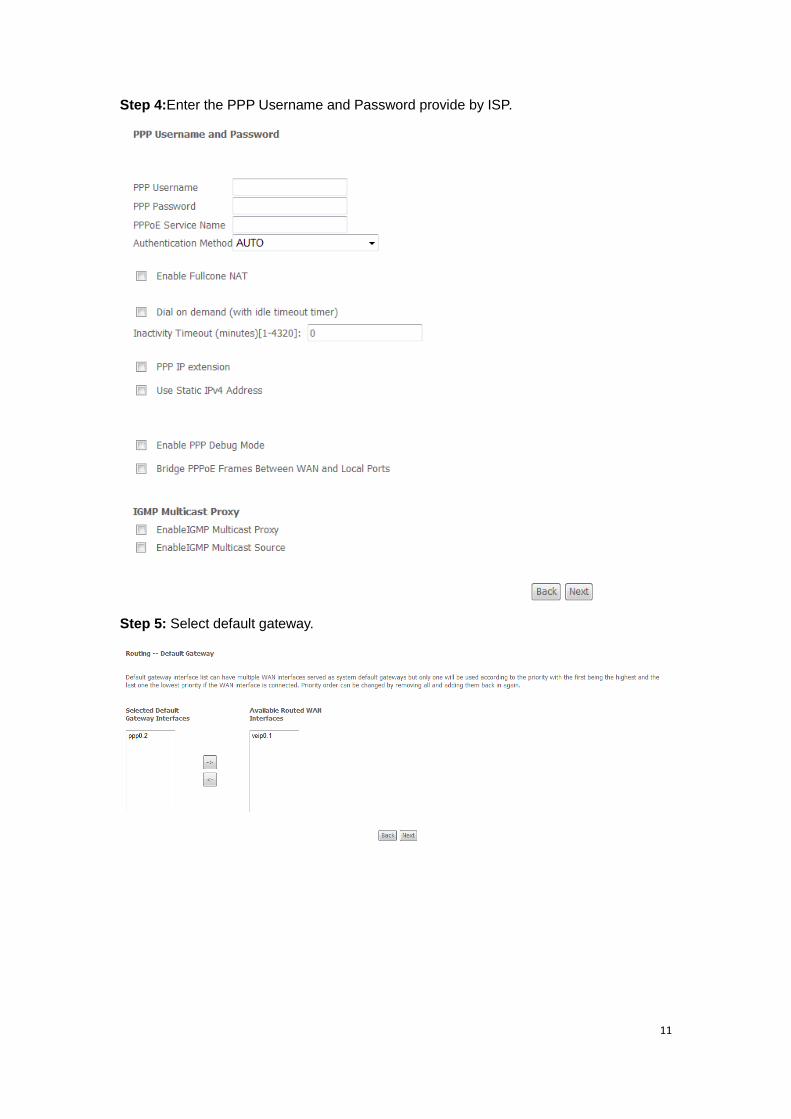
Step 4:Enter the PPP Username and Password provide by ISP.
Step 5: Select default gateway.
12
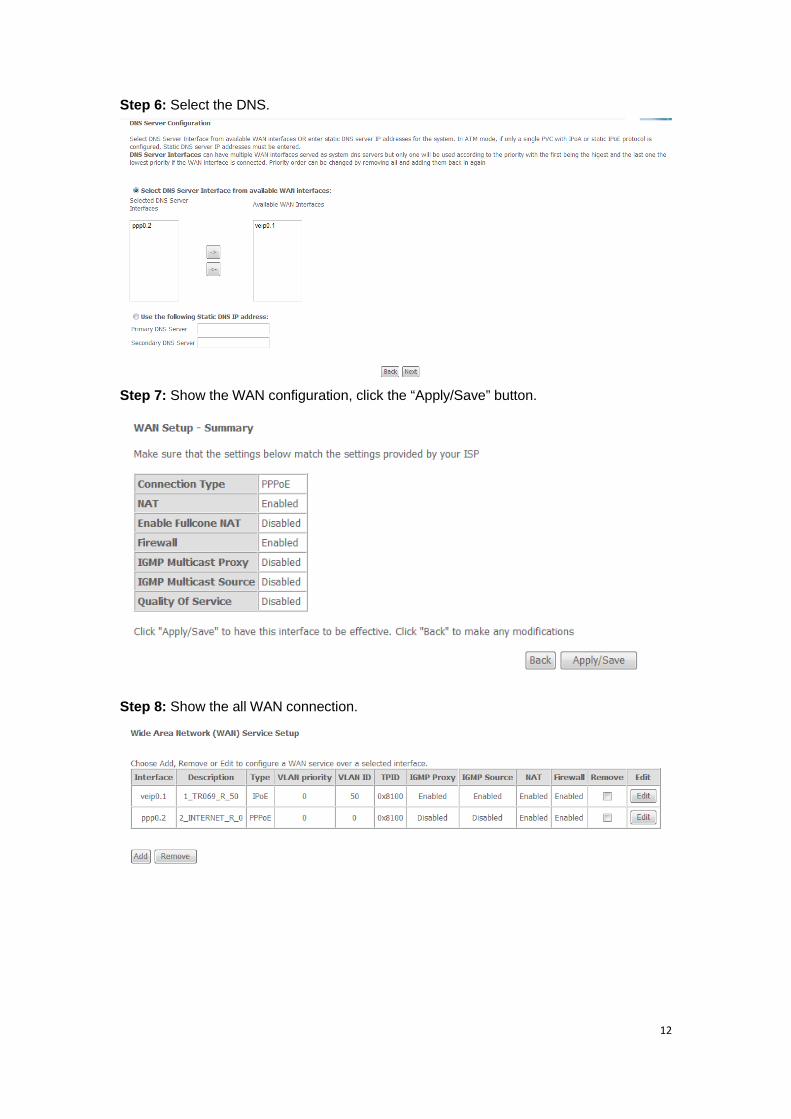
Step 6: Select the DNS.
Step 7: Show the WAN configuration, click the “Apply/Save” button.
Step 8: Show the all WAN connection.
13
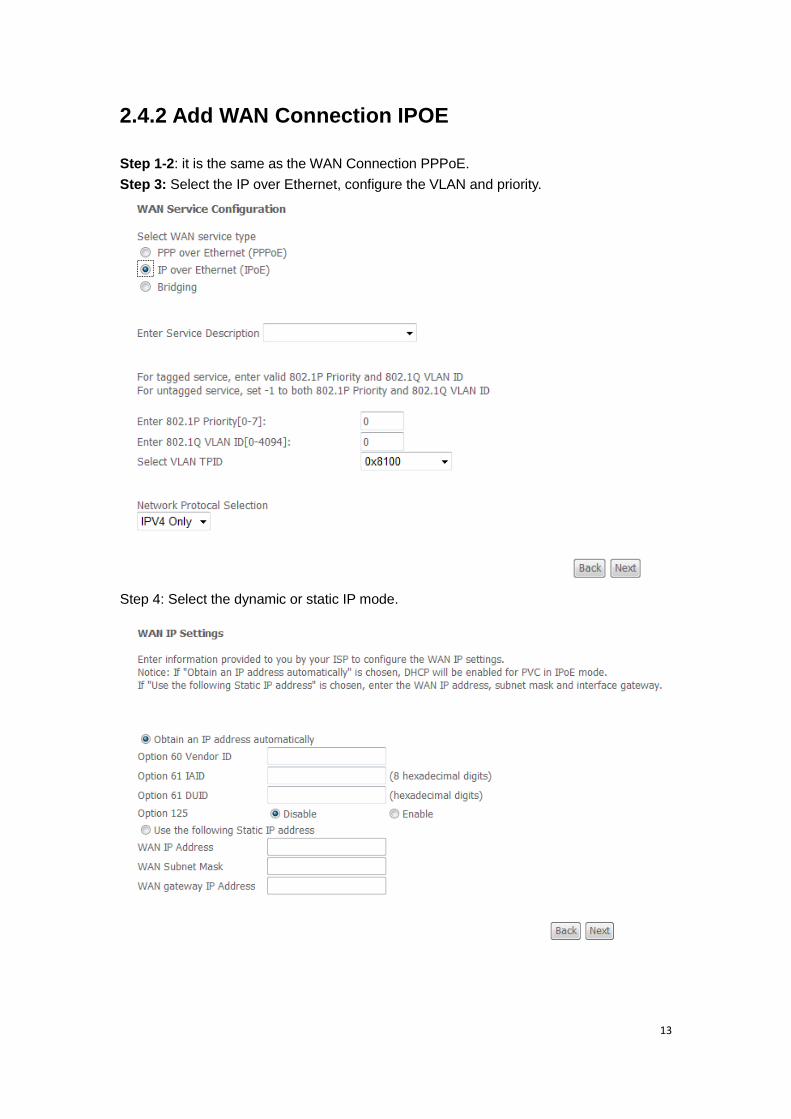
2.4.2 Add WAN Connection IPOE
Step 1-2: it is the same as the WAN Connection PPPoE. Step 3: Select the IP over Ethernet, configure the VLAN and priority.
Step 4: Select the dynamic or static IP mode.
14
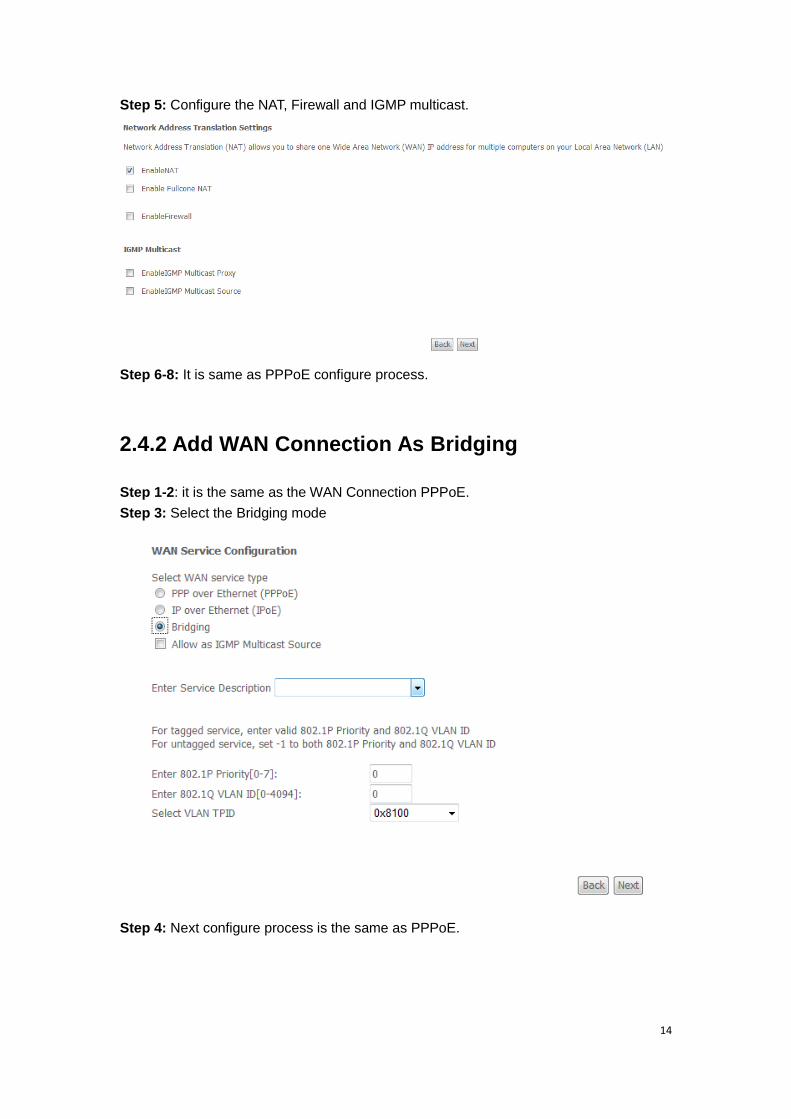
Step 5: Configure the NAT, Firewall and IGMP multicast.
Step 6-8: It is same as PPPoE configure process.
2.4.2 Add WAN Connection As Bridging
Step 1-2: it is the same as the WAN Connection PPPoE. Step 3: Select the Bridging mode
Step 4: Next configure process is the same as PPPoE.
15
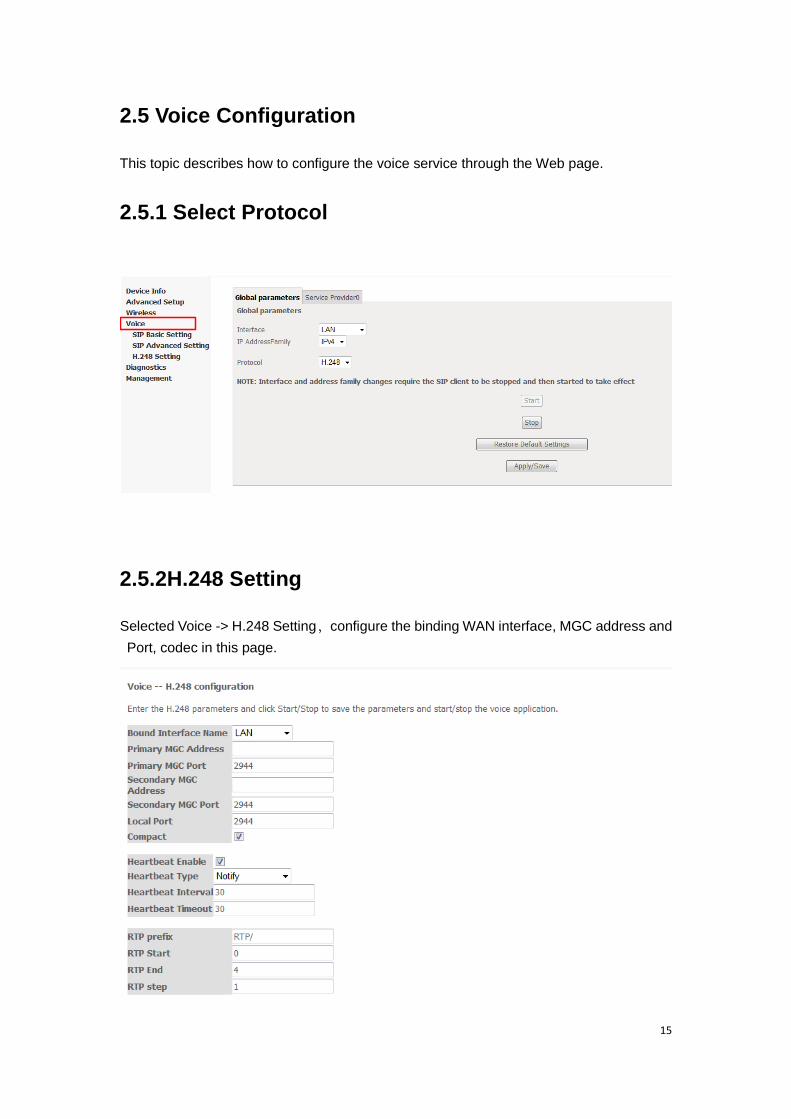
2.5 Voice Configuration
This topic describes how to configure the voice service through the Web page.
2.5.1 Select Protocol
2.5.2H.248 Setting
Selected Voice -> H.248 Setting,configure the binding WAN interface, MGC address and Port, codec in this page.
16
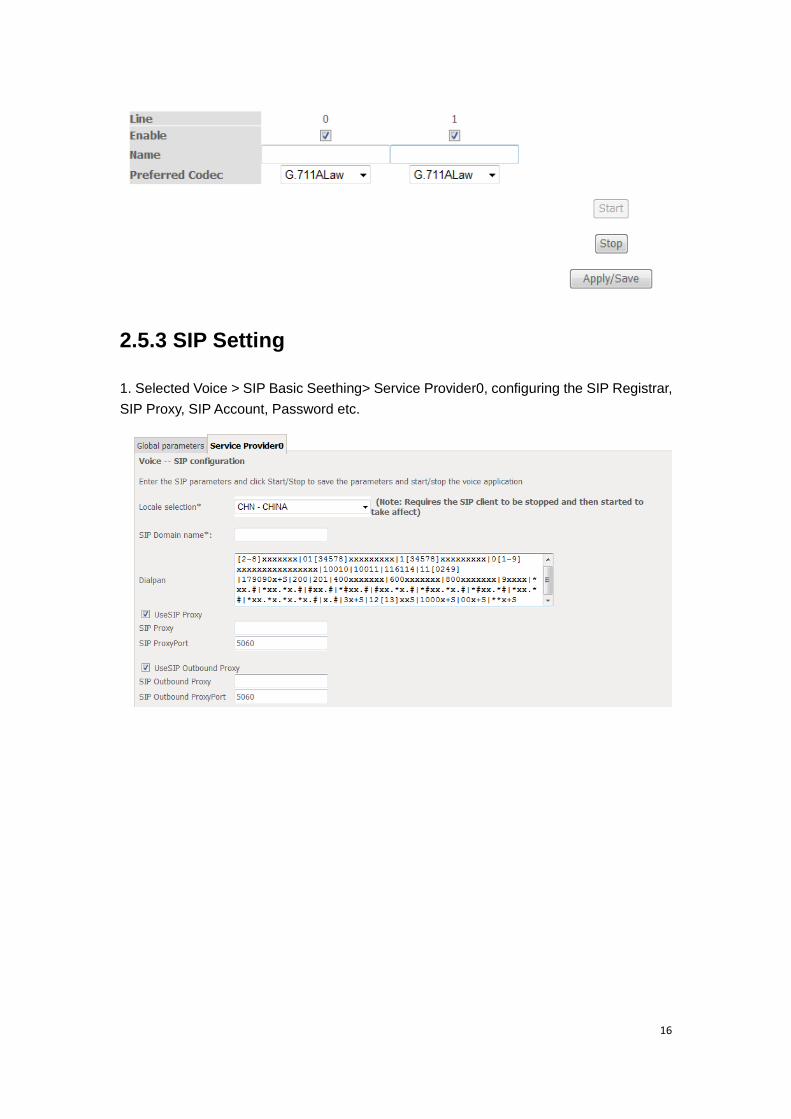
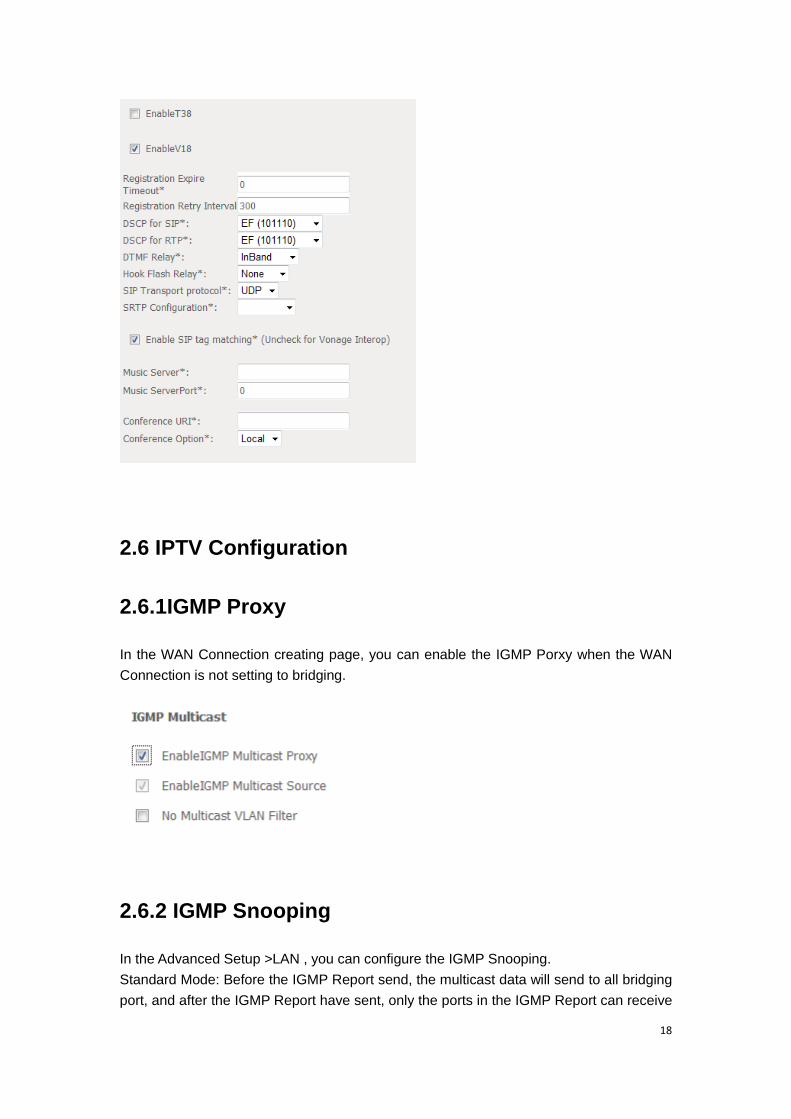
2.5.3 SIP Setting
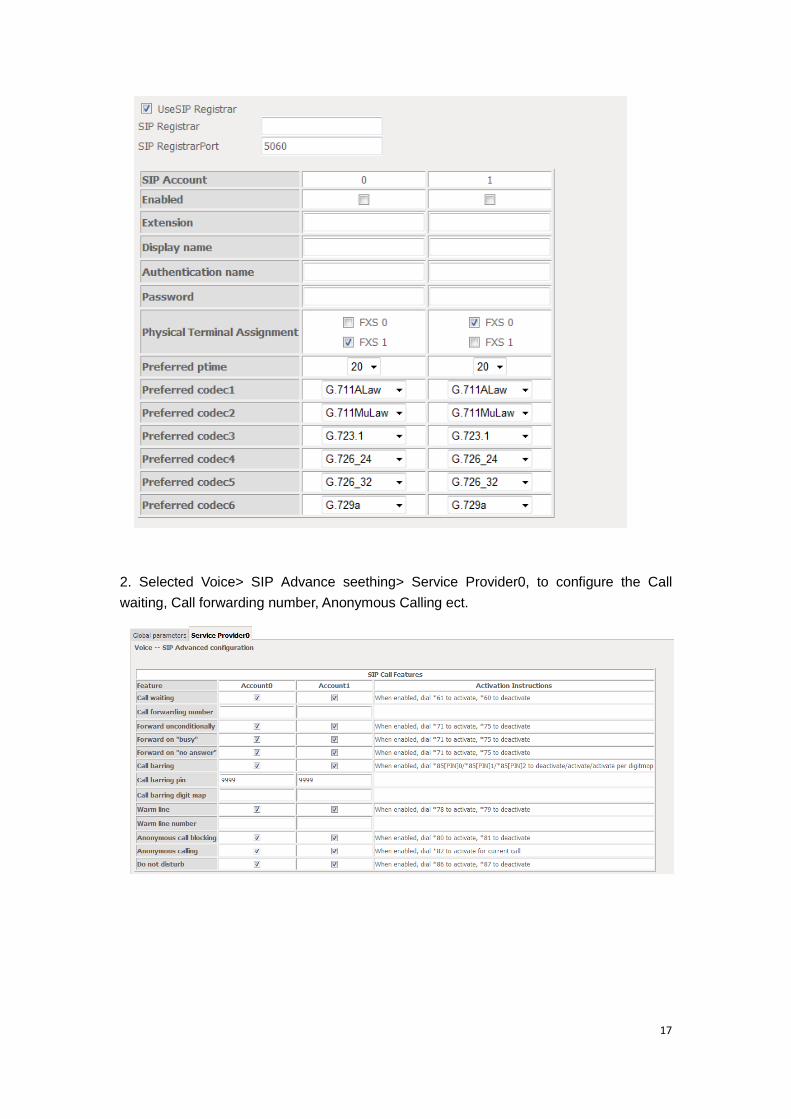
1. Selected Voice > SIP Basic Seething> Service Provider0, configuring the SIP Registrar, SIP Proxy, SIP Account, Password etc.
17
2. Selected Voice> SIP Advance seething> Service Provider0, to configure the Call waiting, Call forwarding number, Anonymous Calling ect.
18
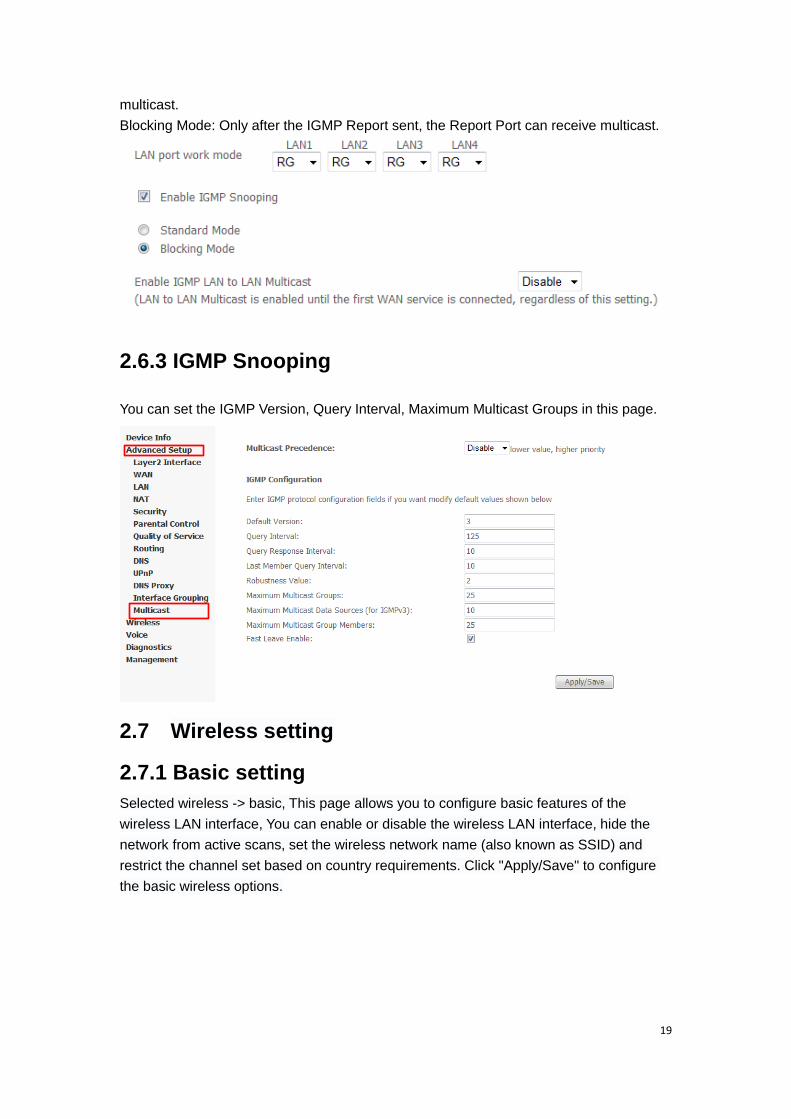
2.6 IPTV Configuration
2.6.1IGMP Proxy
In the WAN Connection creating page, you can enable the IGMP Porxy when the WAN Connection is not setting to bridging.
2.6.2 IGMP Snooping
In the Advanced Setup >LAN , you can configure the IGMP Snooping. Standard Mode: Before the IGMP Report send, the multicast data will send to all bridging port, and after the IGMP Report have sent, only the ports in the IGMP Report can receive
19
multicast. Blocking Mode: Only after the IGMP Report sent, the Report Port can receive multicast.
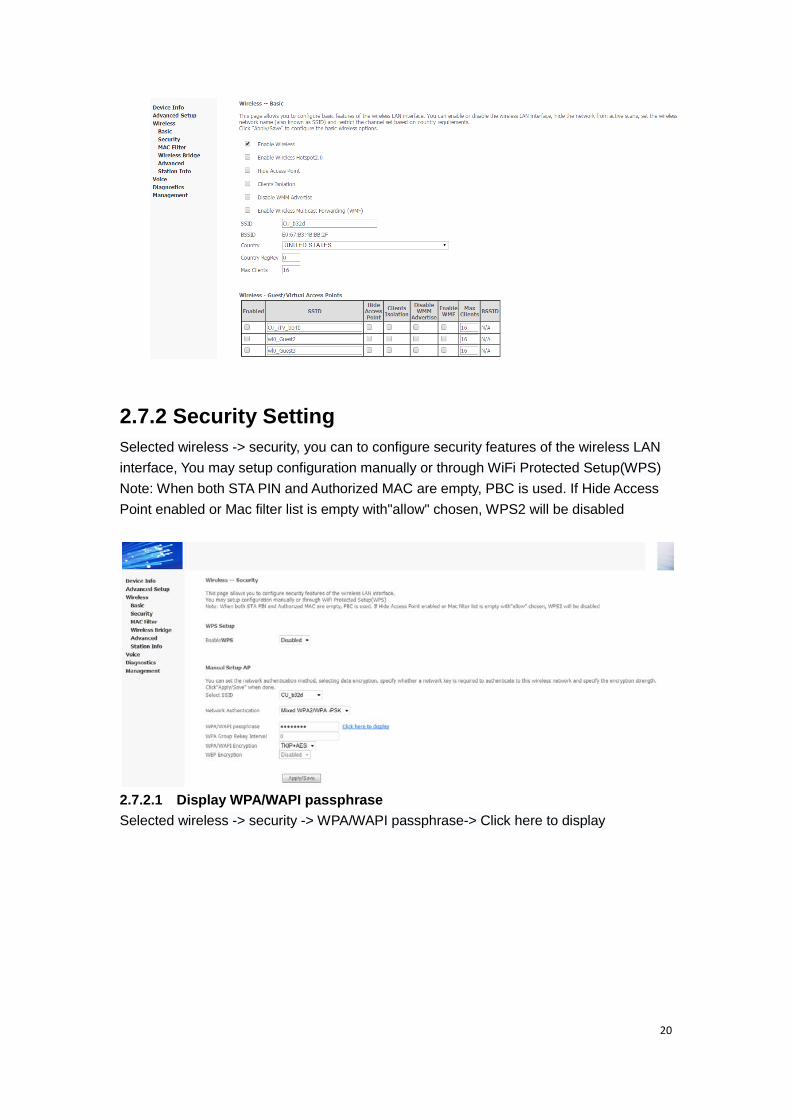
2.6.3 IGMP Snooping
You can set the IGMP Version, Query Interval, Maximum Multicast Groups in this page.
2.7 Wireless setting
2.7.1 Basic setting Selected wireless -> basic, This page allows you to configure basic features of the wireless LAN interface, You can enable or disable the wireless LAN interface, hide the network from active scans, set the wireless network name (also known as SSID) and restrict the channel set based on country requirements. Click "Apply/Save" to configure the basic wireless options.
20
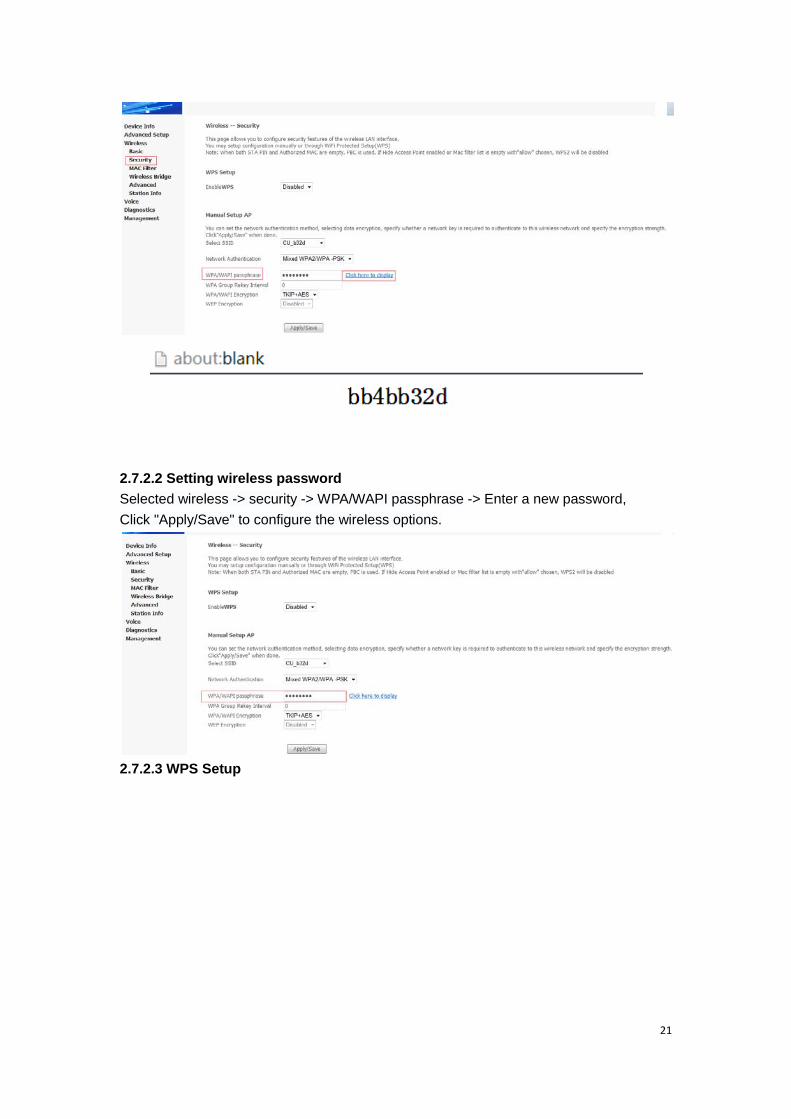
2.7.2 Security Setting Selected wireless -> security, you can to configure security features of the wireless LAN interface, You may setup configuration manually or through WiFi Protected Setup(WPS) Note: When both STA PIN and Authorized MAC are empty, PBC is used. If Hide Access Point enabled or Mac filter list is empty with"allow" chosen, WPS2 will be disabled
2.7.2.1 Display WPA/WAPI passphrase Selected wireless -> security -> WPA/WAPI passphrase-> Click here to display
21
2.7.2.2 Setting wireless password Selected wireless -> security -> WPA/WAPI passphrase -> Enter a new password, Click "Apply/Save" to configure the wireless options.
2.7.2.3 WPS Setup

22
2.7.3 MAC filter Selected wireless -> MAC filter,Set MAC Restrict Mode, if you need to add MAC address limit, click "add" button, enter the required MAC address segment, Click "Apply/Save" to configure the wireless options.
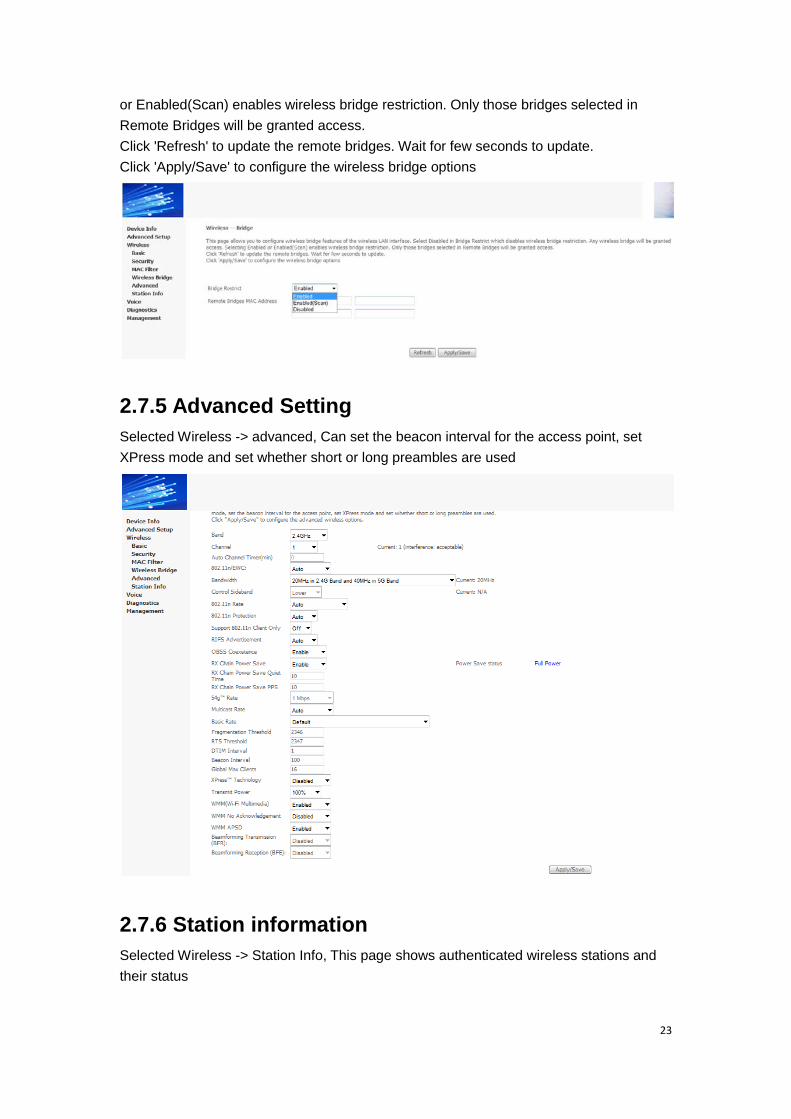
2.7.4 Wireless Bridge Selected Wireless -> Wireless Bridge, This page allows you to configure wireless bridge features of the wireless LAN interface. Select Disabled in Bridge Restrict which disables wireless bridge restriction. Any wireless bridge will be granted access. Selecting Enabled
23
or Enabled(Scan) enables wireless bridge restriction. Only those bridges selected in Remote Bridges will be granted access. Click 'Refresh' to update the remote bridges. Wait for few seconds to update. Click 'Apply/Save' to configure the wireless bridge options
2.7.5 Advanced Setting Selected Wireless -> advanced, Can set the beacon interval for the access point, set XPress mode and set whether short or long preambles are used
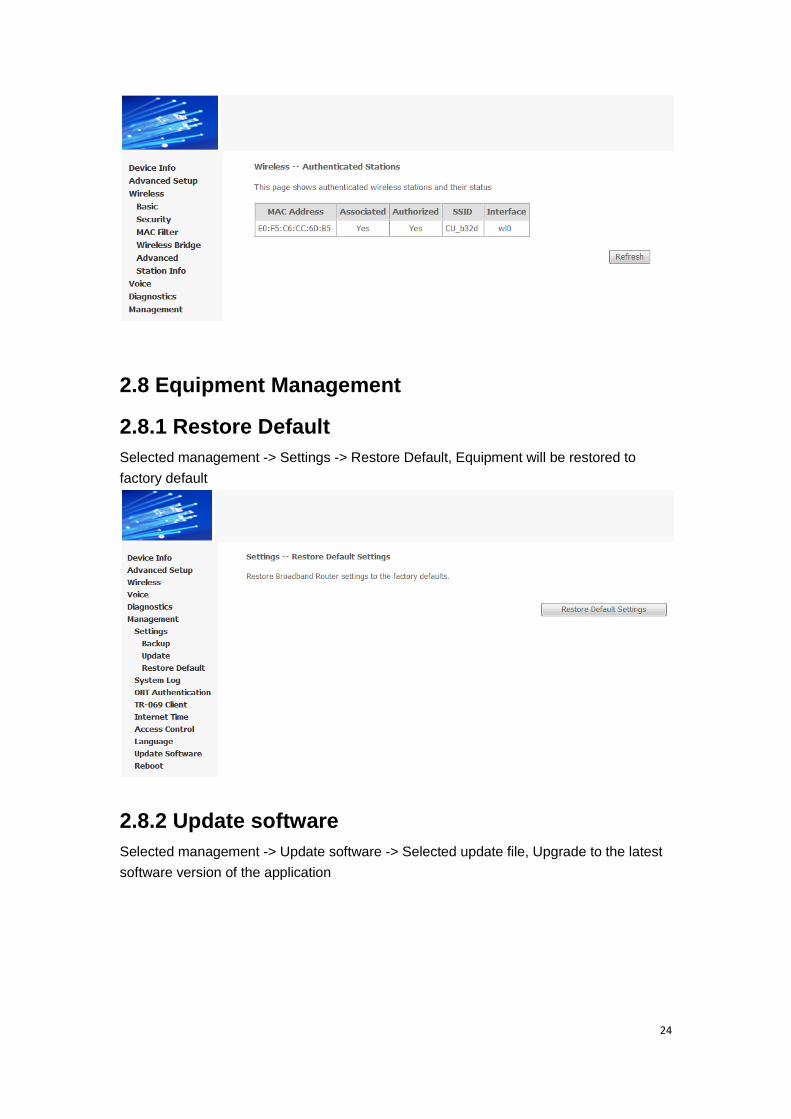
2.7.6 Station information Selected Wireless -> Station Info, This page shows authenticated wireless stations and their status
24
2.8 Equipment Management
2.8.1 Restore Default Selected management -> Settings -> Restore Default, Equipment will be restored to factory default
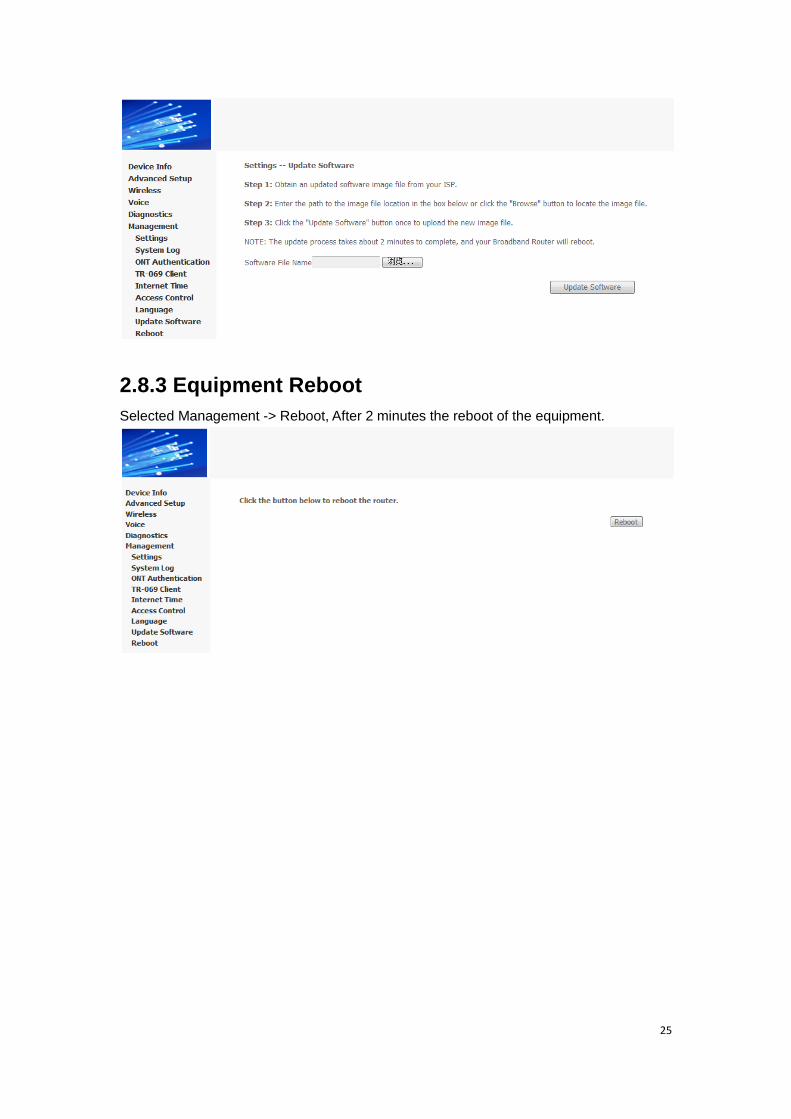
2.8.2 Update software Selected management -> Update software -> Selected update file, Upgrade to the latest software version of the application
25
2.8.3 Equipment Reboot Selected Management -> Reboot, After 2 minutes the reboot of the equipment.