4sight group cameras & driver safety users manual...2. in video mode, pressing the up button...
TRANSCRIPT

About this manual....................................................................1
Notices for use.........................................................................1
Know the product.....................................................................2
Using the Original Dash Cam 2..................................................3
Charging.................................................................................3
Inserting the microSD card........................................................4
Powering ON/OFF the Dash Cam................................................4
Installing in-vehicle bracket.......................................................5
Rotating lenses........................................................................5
Basic operation........................................................................6
A. Switching between modes...............................................6
B. System settings..............................................................6
C. Video mode....................................................................6
C-1. Operation of the emergency storage function..........7
C-2. Muting function....................................................7
D. Application of G-sensor....................................................7
E. Using the GPS tracking function.......................................7
F. Video playback and playback setting.................................8
F-1. Video playback.....................................................8
F-2. Playback setting options........................................8
Accessories...........................................................................18
G. Using the custom video player..........................................9
G-1. Minimum system requirements......................................9
G-2. Player interface and use...............................................9
Video output...........................................................................18
Resetting the system...............................................................18
Contents
About this manual 4Sight continually makes updates and improvements to their devices, thus some functions of your device may vary slightly from what is contained within this manual. 4Sight shall be entitled to modify the content or software without prior notice and the manufacturer shall be entitled to modify technical specifications without prior notice. The accessories included with your device may differ with what is outlined in this manual.
Do not charge in extreme temperatures or high-humidity environments. Do not leave outdoors or exposed in direct sunlight for a long period of time. Charge the unit fully prior to first use. An initial charge time of 6 hours is recommended.Do not make adjustment to the Dash Cam in any way while driving, be sure to make any necessary adjustments to the cameras settings before driving.Please keep the lens clean and clear, do not use foreign objects, oils, or cleaners to clean the lens. If necessary use a certified microfiber cloth to clean the lens without scratching.When using a new microSD card, format the card in the camera to be sure it is set to the correct settings. Please use a correct microSD/SDHC card (suggested minimum 4GB card with a class of 6 or above).It is recommended that you perform a format of the microSD card once a week to ensure it is in proper working order.If you will be out of the vehicle for a long period of time in direct sunlight, it is recommended that the Dash Cam is removed and placed in a cooler area.
Notices for use
1
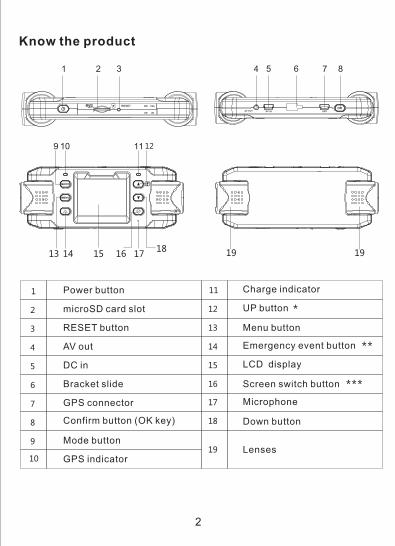
Know the product
Power button
UP button microSD card slot
Menu button
AV out
DC in
Bracket slide
GPS connector
Confirm button (OK key)
Mode button
GPS indicator
Charge indicator
Emergency event button
LCD display
Screen switch button
Microphone
Down button
Lenses
RESET button
2
*
**
***

Pressing the emergency event button while recording will store the currently recorded video immediately, and a protection mark will appear on the screen. The recorded video files will then be locked, stored, and not deleted as to ensure the completeness of your video.
Using
Charging
When the unit is powered off and charging, the red indicator light will illuminate. When charging is complete, the red light will go off. While the unit is powered on, charging is indicated by the appearance of a power chord in the top right of the screen.
- An initial charge of 6 hours is recommended.- Leaving the Dash Cam constantly connected to the car charger will not harm the battery.- To charge the Dash Cam, connect the 12v car charger to your car’s 12v port and connect the other end to the Dash Cam.- The Dash Cam is designed to automatically power on and record when plugged in.- The Dash Cam is designed to automatically power off and save your video when unplugged
3
*
**
***
While recording, pressing the UP button will mute the cameras microphone. Pressing the UP button again will reactivate the microphone.
The screen switch button can only be used when both lenses are in use simultaneously. The user can switch between displaying only lens 1, only lens 2, or displaying both simultaneously. The switch screen button is useless when only one lens is being used to record.
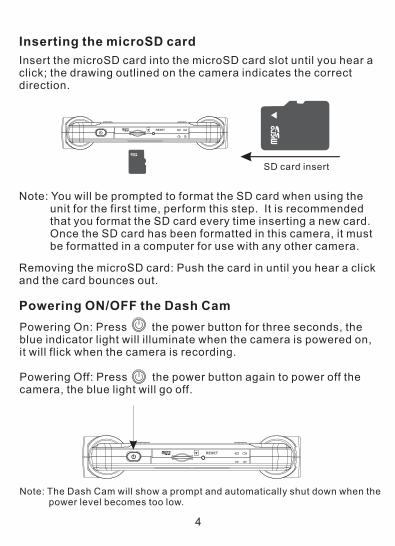
Inserting the microSD card
Insert the microSD card into the microSD card slot until you hear a click; the drawing outlined on the camera indicates the correct direction.
Note: You will be prompted to format the SD card when using the unit for the first time, perform this step. It is recommended that you format the SD card every time inserting a new card. Once the SD card has been formatted in this camera, it must be formatted in a computer for use with any other camera.
Removing the microSD card: Push the card in until you hear a click and the card bounces out.
Powering ON/OFF the Dash Cam
Powering On: Press the power button for three seconds, the blue indicator light will illuminate when the camera is powered on, it will flick when the camera is recording.
Powering Off: Press the power button again to power off the camera, the blue light will go off.
SD card insert
Note: The Dash Cam will show a prompt and automatically shut down when the power level becomes too low.
4

The included suction cup bracket can be affixed to the windshield to securely place the Dash Cam. Please follow these steps to mount the Dash Cam effectively:
A. Insert the sliding bracket into the port on the top of the Dash Cam and slide them together until they are locked into place. B. After locking the camera and mount, apply slight moisture to the rubber suction cup and place the camera in your desired location.C. Press down the plastic locking rod and the mount will lock into place.
Installing in-vehicle bracket
Rotating lenses
The lenses can rotate up to 180 degrees as shown in the picture
5
Basic operation
A. Switching between modes
Press the MODE button to switch between video and playback modes.
B. System settings
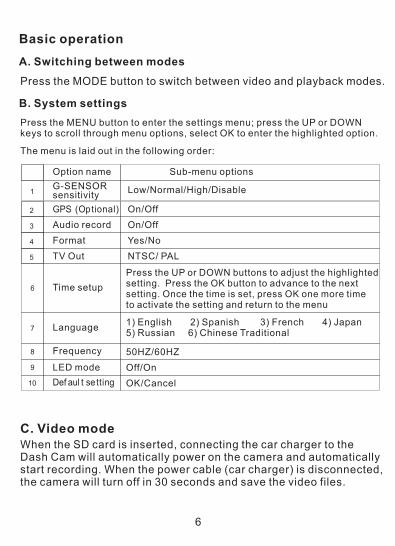
Press the MENU button to enter the settings menu; press the UP or DOWN keys to scroll through menu options, select OK to enter the highlighted option.
The menu is laid out in the following order:
Option name
G-SENSOR sensitivity
GPS (Optional)
Audio record
Format
TV Out
Time setup
Language
LED mode
Def aul t setting
Frequency
Sub-menu options
Low/Normal/High/Disable
On/Off
On/Off
Yes/No
NTSC/ PAL
Press the UP or DOWN buttons to adjust the highlighted setting. Press the OK button to advance to the next setting. Once the time is set, press OK one more time to activate the setting and return to the menu
50HZ/60HZ
Off/On
OK/Cancel
When the SD card is inserted, connecting the car charger to the Dash Cam will automatically power on the camera and automatically start recording. When the power cable (car charger) is disconnected, the camera will turn off in 30 seconds and save the video files.
C. Video mode
6
1) English 2) Spanish 3) French 4) Japan5) Russian 6) Chinese Traditional
1. Pressing the OK button will start and stop recording2. In video mode, pressing the UP button will turn off the camera’s
microphone, pressing the UP key again will turn it back on.3. In video mode, pressing the DOWN button will turn off the display
screen to save power.
C-1. Operation of the emergency storage function
While recording, pressing the emergency button will immediately store the video file being recorded. The video for 60 seconds before and after pressing the button will be captured and stored, and will not be deleted. One third of the device’s memory will be set aside for this function, when it indicates full, use the custom media player through your computer to unlock and delete the video.
C-2. Muting function
While recording video, press the UP button to turn off the record sound option. Press the UP button again to turn back on the record sound option.
D. Application of G-sensor
In system settings, the G-sensor can be set to ON or OFF; When choosing on, the screen will display this icon :When an emergency event is sensed (violent shake or abrupt breaking) on the screen will appear the following icon which indicates that the file will be saved .The video file being recorded will be stored and will not be recorded over.
E. Using the GPS tracking function(Optional)
When connected with the external GPS unit, GPS can be set to ON or OFF in the system settings. When choosing ON, the GPS icon will appear on the screen. When the signal of GPS is connected fully, the GPS icon will flicker, ensuring that your location and speed are being recorded.
7
F. Video playback and playback setting F-1. Video playback
1. Press the MODE button to enter video playback mode,on screen will appear the last video that you recorded. 2. Use the UP and DOWN buttons to select the video you wish to playback .3. Press the OK button to play or stop playing video.4. During playback, use the UP and DOWN buttons to fast forward
or rewind the video5. If the video you wish to playback is locked, use the MENU button
to unlock the video6. During playback, use the MENU key to adjust the volume.
F-2. Playback setting options
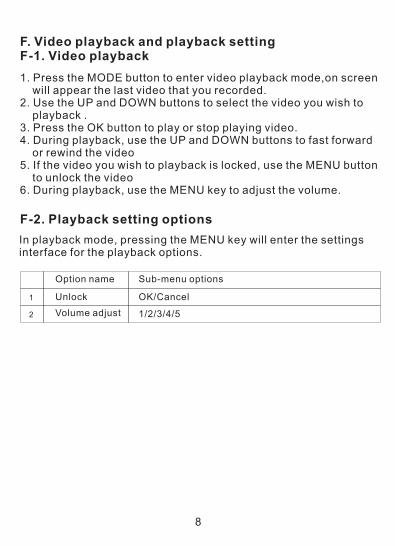
In playback mode, pressing the MENU key will enter the settings interface for the playback options.
Option name Sub-menu options
Unlock OK/Cancel
Volume adjust 1/2/3/4/5
8
G. Using the custom video player
CPU: Pentium 4 2.4 G H z Screen: 1024* 768 resolutionRAM: 1GB OS: support Windows XP, Windows Vista (32bit & 64bit), Windows 7 (32bit & 64bit)
G-1. Minimum system requirements
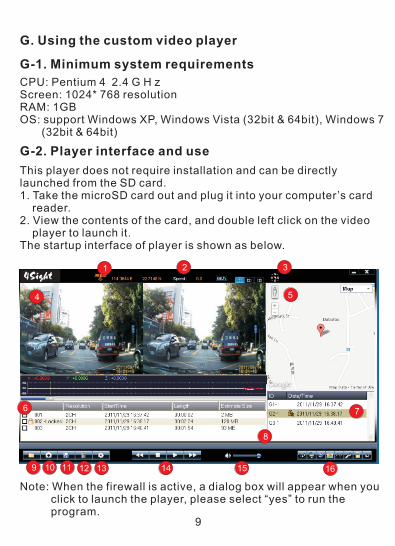
This player does not require installation and can be directly launched from the SD card.1. Take the microSD card out and plug it into your computer’s card reader.2. View the contents of the card, and double left click on the video player to launch it.The startup interface of player is shown as below.
G-2. Player interface and use
1 2 3
5
6
8
7
9 10 11 12 13 14 15 16
4
Note: When the firewall is active, a dialog box will appear when you click to launch the player, please select “yes” to run the program.
9
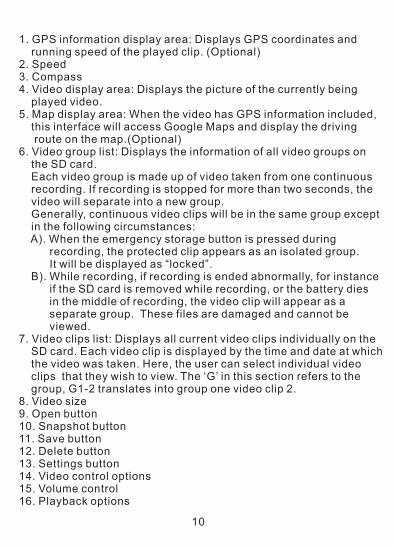
1. GPS information display area: Displays GPS coordinates andrunning speed of the played clip. (Optional)
2. Speed3. Compass4. Video display area: Displays the picture of the currently being
played video.5. Map display area: When the video has GPS information included,
this interface will access Google Maps and display the drivingroute on the map.(Optional)
6. Video group list: Displays the information of all video groups onthe SD card.Each video group is made up of video taken from one continuousrecording. If recording is stopped for more than two seconds, thevideo will separate into a new group.Generally, continuous video clips will be in the same group exceptin the following circumstances:
A). When the emergency storage button is pressed during recording, the protected clip appears as an isolated group.
It will be displayed as “locked”. B). While recording, if recording is ended abnormally, for instance
if the SD card is removed while recording, or the battery dies in the middle of recording, the video clip will appear as a separate group. These files are damaged and cannot be viewed.
7. Video clips list: Displays all current video clips individually on theSD card. Each video clip is displayed by the time and date at whichthe video was taken. Here, the user can select individual videoclips that they wish to view. The ‘G’ in this section refers to thegroup, G1-2 translates into group one video clip 2.
8. Video size9. Open button10. Snapshot button11. Save button12. Delete button13. Settings button14. Video control options15. Volume control16. Playback options
10
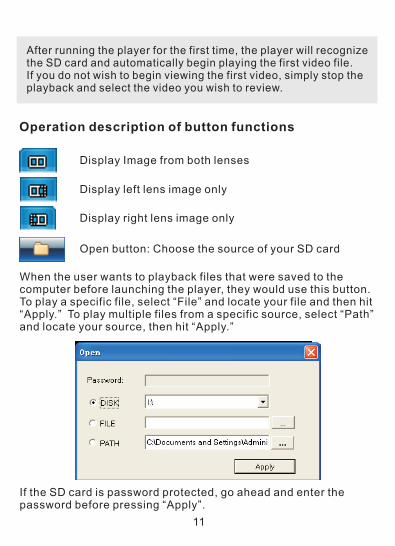
After running the player for the first time, the player will recognize the SD card and automatically begin playing the first video file. If you do not wish to begin viewing the first video, simply stop the playback and select the video you wish to review.
Operation description of button functions
Display Image from both lenses
Display left lens image only
Display right lens image only
Open button: Choose the source of your SD card
When the user wants to playback files that were saved to the computer before launching the player, they would use this button. To play a specific file, select “File” and locate your file and then hit “Apply.” To play multiple files from a specific source, select “Path” and locate your source, then hit “Apply.”
If the SD card is password protected, go ahead and enter the password before pressing “Apply”.
11
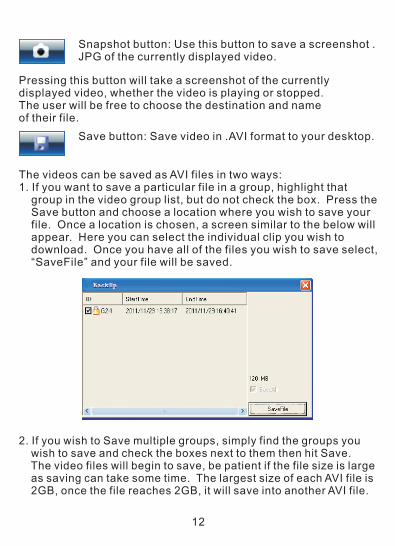
Snapshot button: Use this button to save a screenshot .JPG of the currently displayed video.
Pressing this button will take a screenshot of the currently displayed video, whether the video is playing or stopped. The user will be free to choose the destination and name of their file.
Save button: Save video in .AVI format to your desktop.
The videos can be saved as AVI files in two ways: 1. If you want to save a particular file in a group, highlight that group in the video group list, but do not check the box. Press the Save button and choose a location where you wish to save your file. Once a location is chosen, a screen similar to the below will appear. Here you can select the individual clip you wish to download. Once you have all of the files you wish to save select, “SaveFile” and your file will be saved.
2. If you wish to Save multiple groups, simply find the groups youwish to save and check the boxes next to them then hit Save.The video files will begin to save, be patient if the file size is largeas saving can take some time. The largest size of each AVI file is2GB, once the file reaches 2GB, it will save into another AVI file.
12
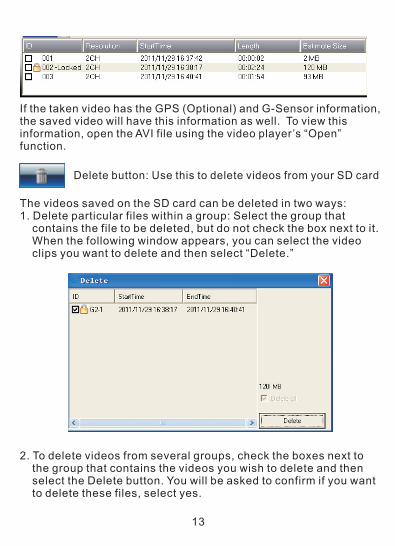
If the taken video has the GPS (Optional) and G-Sensor information, the saved video will have this information as well. To view this information, open the AVI file using the video player’s “Open” function.
Delete button: Use this to delete videos from your SD card
The videos saved on the SD card can be deleted in two ways:1. Delete particular files within a group: Select the group that contains the file to be deleted, but do not check the box next to it. When the following window appears, you can select the video clips you want to delete and then select “Delete.”
2. To delete videos from several groups, check the boxes next tothe group that contains the videos you wish to delete and thenselect the Delete button. You will be asked to confirm if you wantto delete these files, select yes.
13
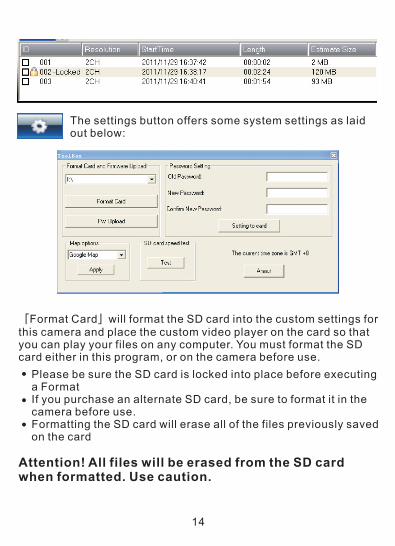
The settings button offers some system settings as laid out below:
「Format Card」will format the SD card into the custom settings for this camera and place the custom video player on the card so that you can play your files on any computer. You must format the SD card either in this program, or on the camera before use.
Please be sure the SD card is locked into place before executing a FormatIf you purchase an alternate SD card, be sure to format it in the camera before use.Formatting the SD card will erase all of the files previously saved on the card
Attention! All files will be erased from the SD card when formatted. Use caution.
14
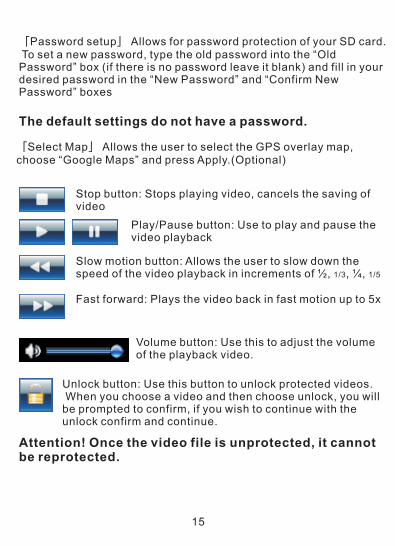
「Password setup」 Allows for password protection of your SD card. To set a new password, type the old password into the “Old Password” box (if there is no password leave it blank) and fill in your desired password in the “New Password” and “Confirm New Password” boxes
The default settings do not have a password.
「Select Map」 Allows the user to select the GPS overlay map, choose “Google Maps” and press Apply.(Optional)
Stop button: Stops playing video, cancels the saving of video
Play/Pause button: Use to play and pause the video playback
Slow motion button: Allows the user to slow down the speed of the video playback in increments of ½, 1/3, ¼, 1/5
Fast forward: Plays the video back in fast motion up to 5x
Volume button: Use this to adjust the volume of the playback video.
Unlock button: Use this button to unlock protected videos. When you choose a video and then choose unlock, you will be prompted to confirm, if you wish to continue with the unlock confirm and continue.
Attention! Once the video file is unprotected, it cannot be reprotected.
15
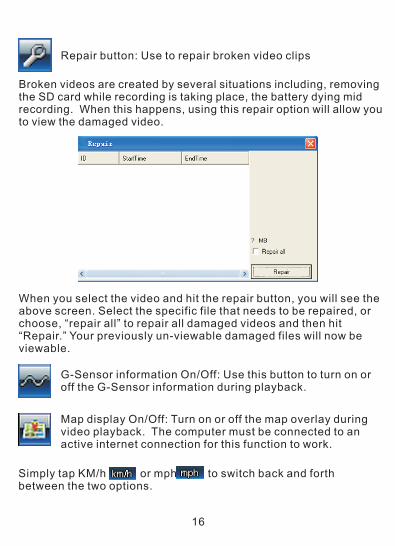
Repair button: Use to repair broken video clips
Broken videos are created by several situations including, removing the SD card while recording is taking place, the battery dying mid recording. When this happens, using this repair option will allow you to view the damaged video.
When you select the video and hit the repair button, you will see the above screen. Select the specific file that needs to be repaired, or choose, “repair all” to repair all damaged videos and then hit “Repair.” Your previously un-viewable damaged files will now be viewable.
G-Sensor information On/Off: Use this button to turn on or off the G-Sensor information during playback.
Map display On/Off: Turn on or off the map overlay during video playback. The computer must be connected to an active internet connection for this function to work.
Simply tap KM/h or mph to switch back and forth between the two options.
16
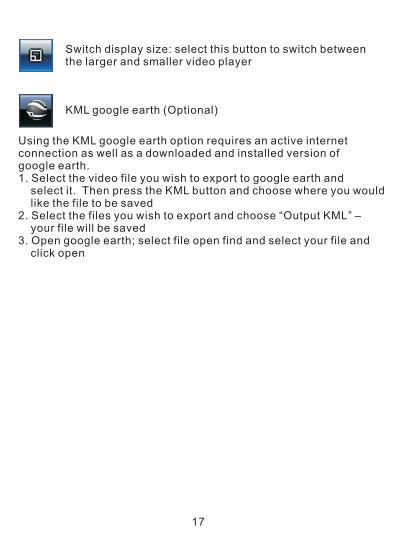
Switch display size: select this button to switch between the larger and smaller video player
KML google earth (Optional)
Using the KML google earth option requires an active internet connection as well as a downloaded and installed version of google earth. 1. Select the video file you wish to export to google earth and
select it. Then press the KML button and choose where you wouldlike the file to be saved
2. Select the files you wish to export and choose “Output KML” –your file will be saved
3. Open google earth; select file open find and select your file andclick open
17
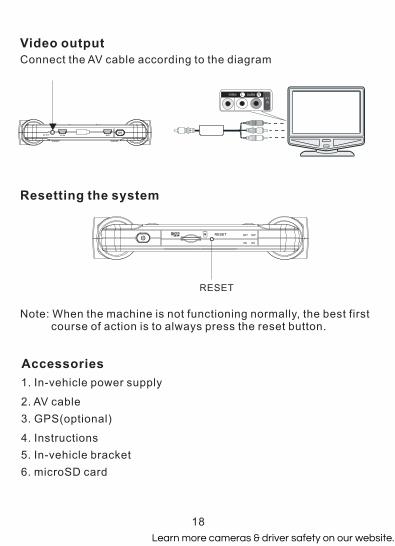
Video outputConnect the AV cable according to the diagram
Resetting the system
Note: When the machine is not functioning normally, the best first course of action is to always press the reset button.
18
RESET
Accessories
1. In-vehicle power supply
5. In-vehicle bracket
6. microSD card
4. Instructions
3. GPS(optional)
2. AV cable
Learn more cameras & driver safety on our website.