501 pr344: processing purchase orders - virginia...501 pr344: processing purchase orders instructor...
TRANSCRIPT

501 PR344: Processing
Purchase Orders
Instructor Led Training
Rev 02/18/2017

Welcome
Welcome to Cardinal Training!
This training provides employees with the skills and information necessary to use Cardinal. It is not intended to replace
existing Commonwealth and/or agency policies.
This course provides information on the Purchase Order process.
These training materials include diagrams, charts, screenshots, etc. that clarify various tasks and processes. The
screenshots are taken from Cardinal and show pages that not all users can access. They are included here so you can see
how your specific responsibilities relate to the overall transaction or process being discussed. See your agency’s Cardinal
Security Handbook for a list of available roles and descriptions.
2

Course Objectives
After completing this course, you will be able to:
• Describe Purchase Order Concepts, Processes, Integration, and Interfaces
• Create Purchase Orders
• Review and Manage Purchase Orders
• Cancel Purchase Orders
• Create a Purchase Order Change Order
• Reconcile / Close a PO
3

Course Topics
This course includes the following lessons:
• Lesson 1: Understand Purchase Orders
• Lesson 2: Process Purchase Orders
• Lesson 3: Maintain and Modify (Change Orders) Purchase Orders
• Lesson 4: Reconcile / Close a PO – 3 Way Match
• Lesson 5: Review Purchase Order Information, History, and Activities
4

Lesson 1: Understanding Purchase Orders
This lesson covers the following topics:
• Procurement Overview
• Key Concepts
• Procurement Process Overview
• Purchase Order Process
• Integration with Accounts Payable
• Interfaces with eVA and SiteManager
5

Procurement Overview
The Procurement functional area of Cardinal includes four modules:
Purchasing
The Purchasing module includes the buying of goods and services
(Procurement) by creating and processing requisitions, purchase orders
(PO), receipts, procurement card (PCard), and Integrated Supply
Services Program (ISSP) transactions.
eProcurement
Like Purchasing, the eProcurement module provides for Procurement
but is web-based. It is similar to an online shopping cart experience for
users requesting goods and/or services.
Strategic Sourcing
The Strategic Sourcing module allows users to create
and award bids / proposals to purchase orders or
contracts.
Procurement Contracts
The Procurement Contracts module builds, manages, and archives all
Cardinal contract related information.
6

Key Concepts
• Cardinal interfaces with external systems (eVA, SiteManager, etc.) daily, which eliminates duplicate entries in multiple
systems.
• The Statewide procurement supplier database is updated by eVA daily and maintained by the Commonwealth Supplier
Group (CVG). It is shared with all agencies. Fiscal suppliers (non-procurement suppliers) are created directly in
Cardinal by the Commonwealth Vendor Group (CVG). The suppliers are shared between the Accounts Payable and
the Procurement functional areas.
7

Procurement Process Overview
There are seven key processes in procurement:
8
• Add / Update Requisitions
• Create Strategic Sourcing
Events
• Add / Update Contracts
• Add / Update Purchase Orders
• Receive / Inspect Goods
• Procurement Card Processing
• Integrated Supply Services
Program (ISSP) Processing
Cardinal Items
& Suppliers
Add / Update
Requisitions
Add / Update
Purchase
Orders
Receive and
Inspect Goods
Accounts
Payable
Create
Strategic
Sourcing Event
Add / Update
Contracts
ISSP
Transactions
PCard
Transactions
Procurement
Card / ISSP
Processing
SiteManagerWebIMS
eVACardinal
SuppliersInterfaced
Vendors
FleetFocus M5
General
Ledger
Confirming Order
POs
Doc Id / Inventory Item
Stock Issuance Requisitions
A
AReceive
Goods?
Yes
No

Procurement Process Overview (continued)
9
Cardinal Items
& Suppliers
Add / Update
Requisitions
Add / Update
Purchase
Orders
Receive and
Inspect Goods
Accounts
Payable
Create
Strategic
Sourcing Event
Add / Update
Contracts
ISSP
Transactions
PCard
Transactions
Procurement
Card / ISSP
Processing
SiteManagerWebIMS
eVACardinal
SuppliersInterfaced
Vendors
FleetFocus M5
General
Ledger
Confirming Order
POs
Doc Id / Inventory Item
Stock Issuance Requisitions
A
AReceive
Goods?
Yes
No

Purchase Order Process
Using the Purchasing module, you can create a
PO online that converts requests for goods and/or
services into POs.
As POs proceed from entry to dispatch, Cardinal
tracks details and collects analysis information to
facilitate future purchases.
• PO key components include: a header, lines,
schedules, and distributions.
• A PO is identified by an ID that is unique
within a purchasing business unit.
• Cardinal automatically generates a PO ID
number.
Note: POs keyed into Cardinal, Strategic Sourcing
POs, and SiteManager POs are interfaced to eVA
after being dispatched. (Only R01 type POs
transmit to eVA.)
10
Cardinal
Strategic
Sourcing
Approved?
Start
Yes
SiteManager
PO
(Interfaced)
eVA
PO
(Interfaced)
End
No
Add/Update PO
(Copy Req.,
Contract,
PO or Key)
Submit PO for
Approval (if not
created from
Req.)
Edit & Resubmit
or Cancel
Dispatch (Batch
or Manual)
Receive Items (if
required)
Set eVA PO
Type, Update PO
(Acctg. Distrib,
Buyer Name,
Etc.)
Note: POs keyed into Cardinal, Strategic Sourcing POs and SiteManager POs are interfaced to eVA
after being dispatched. (Only R01 type POs transmit to eVA.)

Cardinal Strategic Sourcing
Approved?
Start
Yes
SiteManager PO
(Interfaced)
eVAPO
(Interfaced)
End
No
Add/Update PO (Copy Req.,
Contract,PO or Key)
Submit PO for Approval (if not created from
Req.)
Edit & Resubmit or Cancel
Dispatch (Batch or Manual)
Receive Items (if required)
Set eVA PO Type, Update PO
(Acctg. Distrib, Buyer Name,
Etc.)
Purchase Order Process (continued)
11
Note: Cardinal POs, Strategic Sourcing POs, and SiteManager POs are interfaced to eVA after being dispatched. (Only
R01 type POs transmit to eVA.)

Integration with Accounts Payable
Processing a PO involves the Accounts Payable module in the matching process. Matching ensures that you are paying for
what you ordered and received by comparing vouchers with POs and receiving documents.
• Two-way matching: For POs that do not require receiving, the PO and voucher are compared. (i.e. professional
services and SiteManager).
• Three-way matching: For POs that have receiving, the PO, receipt, and voucher are compared.
12
General Ledger
Accounts Payable
General
Ledger
Accounts Receivable
Funds
Receipt
Expenses
Accounts
Payable
Project Accounting
Project
Costing
Customer
Contracts
Billing and
Receivables
Time & Attendance
Payroll
Human
ResourcesTime & Labor
Absence
Management
Procurement
Purchasing
Strategic
Sourcing
Procurement
Contracts
eProcurement

Integration with Accounts Payable (continued)
13

Interfaces with eVA and SiteManager
The PO process interfaces with eVA:
• POs and change orders that are created in eVA are
imported daily from eVA.
• POs and change orders created in Cardinal are exported
to eVA.
This interface does not send attachments.
• When required, a designated Administrative Services
Division (ASD) staff member needs to upload
attachments into eVA.
• In Cardinal only accounting distribution changes can be
made to POs that originated in eVA. All other changes to
an eVA PO are made in the eVA system and interfaced
back into Cardinal.
The PO process interfaces with SiteManager:
• SiteManager sends construction and maintenance
contract records to Cardinal, where it is used to create
contracts and POs.
14

Lesson 1: Checkpoint
Now is your opportunity to check your understanding of the course material.
Answer the review questions below:
Questions:
1. I am a commitment from an agency to suppliers to purchase goods or services from that supplier. _____
2. I am the four components of a purchase order. _____
3. I can create a PO. Who am I? ______
4. I can create a requisition. Who am I? ______
Answer Choices:
a) Header, lines, schedules, and distributions
b) A PO
c) user
d) Buyer
15

Lesson 1: Summary
In this lesson, you learned about:
• Processing Purchase Orders
• Purchasing Key Concepts
• Procurement functional areas modules: Purchasing, eProcurement, Strategic Sourcing, and Procurement Contracts
• Change orders are used to add items, increase / decrease quantities, and change prices or ship to values
• How Purchasing integrates with Accounts Payable
• How Purchasing interfaces with eVA and SiteManager
16

Lesson 2: Processing Purchase Orders
This lesson covers the following topics:
• Purchase Order Basics
• Creating Purchase Orders
• Managing eVA Purchase Orders
• Submitting Purchase Orders for Approval
• Dispatching and Printing Purchase Orders
17

Purchase Order Basics
• Purchase Orders (POs) are commitments from an organization to suppliers to purchase goods or services from that
supplier. The purchase information, such as item, quantity, freight terms, shipping terms, payments terms, and
shipping instructions, is listed on the document and is part of the contractual nature of the PO.
• All purchases must have a purchase order, but not all purchase orders need a requisition. If a good or a service is
already on contract, a requisition is not generally required. Exception: All inventory issue and restock transactions
must be done using a requisition.
18
Create PO
Create
Requisition
PO
ContractCreate
Requisition
or
PO

Purchase Order Basics (continued)
• When a contract already exists, a requisition is not always necessary. You can create a purchase order against the
contract and avoid additional steps.
• When a contract does not exist, the end user has two options after the requisition is created:
• Create a Sourcing Event: Once approved, the requisition goes through a solicitation process, which involves
creating a sourcing event. This process allows suppliers to bid against the event. Winning bidders are awarded a
contract or purchase order.
• Copy the Requisition to Purchase Order: When the value of goods or services falls within the range of a small
purchase, or is otherwise permitted in accordance with the Agency Procurement and Surplus Property Manual
(APSPM), the Buyer can copy the requisition directly into the PO, rather than creating a sourcing event and
awarding a contract.
19
Copy
Requisition
to
PO
Create
PO
Create
Sourcing Event
PORequisition
(No Contract Exists)
Create
Contract
Create
Sourcing Event
or
PO?
Create
Contract
or
PO?

Creating Purchase Orders
There are three ways to create a PO:
• Key directly into Cardinal
• Copy:
• Copy a requisition: Use an existing requisition as a template
to create a new PO. This creates an electronic link from the
PO to the requisition.
• Copy a purchase order: Copy an existing PO if you want to
order the same items.
• Copy a contract: Copy from an existing contract to save time
on data entry. You can copy multiple contracts into an
existing PO.
• Award a Strategic Sourcing event to a PO
(i.e. Invitation For Bid).
20
You can navigate to create a PO using the following path:
Main Menu > Purchasing > Purchase Orders > Add/Update POs

Creating Purchase Orders (continued)
Purchase Orders can be set to quantity or to amount only. Using amount only allows for the receipt by invoice amount.
Receive by Quantity
If you are ordering inventory or items that are specific by count, you would establish a PO with a predetermined quantity of
items at a fixed rate / price per item. Therefore, you would set your PO to receive based on the quantities delivered or
completed.
Receive by Amount
If you are ordering a service or project that is based on a lump sum, you would establish a PO that allows you to receive the
invoice amounts (dollar), not the quantity. Therefore, you would set your PO to Amount Only and receive the invoice
amount based on the dollars only.
For additional information, refer to the job aid entitled 501 PR344: Purchase Orders. Job aids are located on the Cardinal
website in the VDOT Toolbox.
21

Creating Purchase Orders (continued)
The first page of the Purchase Order opens to the Add a New Value tab. The Business Unit field defaults to your agency
(i.e., 50100 for VDOT) and PO ID defaults to NEXT. Cardinal will create the PO ID number automatically. Do not change
the PO ID.
22

Creating Purchase Orders (continued)
Purchase Order:
A Purchase Order is composed of several
sections, including the Header, Lines,
Schedule, and Distribution information.
We will also discuss Supplier Details, Header
Details, PO Defaults, and Line Details.
You can add, update, and cancel PO lines, as
well as correct PO data such as PO lines,
quantities, price, distributions, ship to locations,
eVA purchase order type, and comments, as
needed.
23

Creating Purchase Orders (continued)
24

Creating Purchase Orders: Supplier Details
From the Maintain Purchase Order – Purchase Order page,
clicking on the Supplier Details hyperlink takes you to the
Maintain Purchase Order – Supplier Details pop-up window.
This window allows you to view or edit the supplier Location,
Address, Contacts, and payment terms.
For construction and professional services purchase orders, the
Terms are set to 00 (Due Immediately) and the Basis Date
Type is set to Inv Date. For goods and services, the payment
terms are set to 30 Days and Prompt Payment type.
25

Creating Purchase Orders: Header Details
From the Maintain Purchase Order – Purchase Order page, clicking on the Header Details hyperlink takes you to the PO
Header Details pop-up window. This window displays the Billing Location which defaulted based on preconfigured Buyer
preferences. You can view or edit the location as necessary.
The PO Type, Currency Code, and Tax Exempt ID should not be changed.
26

Creating Purchase Orders: PO Defaults
From the Maintain Purchase Order – Purchase Order
page, clicking on the PO Defaults hyperlink takes you to
the Purchase Order Defaults pop-up window. This
window displays the Ship To location which defaulted
based on preconfigured Buyer preferences. You can view
or edit the location as necessary.
In the Default Options section, you may set a Default
chart of accounts for all line items on the PO or Override
defaulting values or existing chart of accounts when
copying in a PO.
In the Schedule section, the Ship Via and Freight Terms
Code default and should generally not be changed.
27

Creating Purchase Orders: Line Details
From the Maintain Purchase Order – Purchase
Order page, clicking on the Line Details icon to the left
of each PO line takes you to the Details for Line pop-
up window. This window allows you to see all
information related to your PO line on just one page,
instead of clicking through the tabs. Use the Expand
All hyperlink to expand the page.
In this example, the Amount Only checkbox is
checked.
28

Creating Purchase Orders: Line Details (continued)
29

30
Creating Purchase Orders: Additional Details
After clicking on Expand All on the Maintain Purchase Order – Line Details page by scrolling down, you can see
additional details related to the PO line.

Creating Purchase Orders: Copy From
From the Maintain Purchase Order – Purchase Order page, you can create a PO by copying it from an existing document
using the Copy From drop-down menu.
31

Creating Purchase Orders: Copy From (continued)
Steps to copy from an existing document:
• When copying from a Requisition or Contract, enter the Supplier ID first.
• Click the Copy From drop-down menu.
• Select the type of document to be copied from (Contract, Purchase Order, or Requisition). The Copy Purchase
Order from Requisition, Purchase Order, or Contract page will open. When copying from a Contract, you will
copy the entire contract. To copy only a single line from the contract, and for more details on creating POs, see the
job aid entitled 501 PR344: Purchase Orders.
• When copying a line from a contract, note that the contract selection displays on one tab. After you complete the
copy you can enter the Contract ID on the Maintain Purchase Order – Purchase Order page in the Lines section,
Contract tab, to associate it to the contract.
32

Creating Purchase Orders: Copy From (continued)
After you select the type of document to be copied from, a search page appears. The page will be based on the type of
document you have chosen to copy .
33

Creating Purchase Orders: Copy From (continued)
Enter search criteria as required in the Selection Criteria section of the page and click the Search button.
34

Creating Purchase Orders: Copy From (continued)
After you click the Search button, the items matching your search criteria appear in the list at the bottom of the page.
Review the items and click the checkbox in the Select column for each item you want to copy. You can copy multiple items,
such as multiple lines, if desired.
After selecting the items to be copied, click the Copy to PO button.
35

Creating Purchase Orders: Copy From (continued)
The Purchase Order page returns with the item(s) you selected copied in.
36

Creating Purchase Orders: Copy From (continued)
After you copy the existing document information into the PO, you will probably need to add or change some information,
such as:
• Update the Buyer
• Date values which default and are not copied into the PO
• Shipping and freight information that defaulted from the copied document
• Schedule and distribution that defaulted from the copied document
• Enter the Quantity or Amount
Note: When copying from a contract, note that the contract selection displays on one tab. The contract number can be
entered on the PO line to associate it to the contract.
After you update the fields as needed, click Save and a new PO is created. A PO ID is generated by Cardinal.
37

Creating Purchase Orders: Items
Once the PO Header section is complete, identify the
items that need to be associated with the PO.
The Lines section contains links that allow you to select
items for the PO. You can add or delete items in this
section. Items can be selected or added by:
• Key in, or look up, the National Institute of
Governmental Purchasing (NIGP) Item number,
i.e., Item. This is the most common method to
select an Item. On each line, click on the
magnifying glass next to the Item field. The items
listed will be narrowed down to items related to the
supplier you previously selected. The UOM and
Description field values default from the item
table.
• Key in or look up the NIGP Category, i.e.
Category. On each line, click on the magnifying
glass next to the Category field. This method will
not be limited to items related to the chosen
supplier. You will need to complete the UOM and
Description fields. These fields become available
for entry after the Category is selected.
38

Creating Purchase Orders: Items (continued)
Close short processing is not used. Do not use the Close Short All Lines button.
The accounting distribution can be accessed from the Maintain Purchase Orders – Purchase Order page by clicking the
Schedule icon. From the Schedules page, click the Distributions/ChartFields icon.
39

Creating Purchase Orders - Items (continued)
40

Creating Purchase Orders: Distributions
A schedule may have one or more accounting distributions. ChartField values determine what fund, account, department,
etc. the schedule amount is charged to. If a PO line needs to use multiple SpeedCharts, click on the Multi-SpeedCharts
link and split as necessary.
Do not split or add additional schedules for a PO line. There should be only one schedule per PO line.
41

Creating Purchase Orders: Distributions (continued)
42

Creating Purchase Orders: Send for Approval
After you update the fields, return to the Maintain Purchase Order – Purchase Order page, click Save, and your PO is
saved. A PO ID value will be generated. The final step is to send the PO forward for supervisor approval.
• Click the PO Approval checkmark. The checkmark will disappear and the words Pend Appr will appear.
43

Simulation: Creating a Purchase Order
You are now about to view a simulation that demonstrates the purchase order creation process. Click the Cardinal logo
below to start the simulation.
44

Managing eVA Purchase Orders
eVA Direct Orders (DOs) are loaded directly into Cardinal,
where corresponding purchase orders are created. This
allows for receiving and vouchering to occur.
The end user must update the PO with a valid Chart of
Accounts and Buyer name. Important PO field information
includes:
• PO ID: When an eVA PO is loaded into Cardinal, it is
assigned a PO ID.
• Purchase Order Reference: The eVA PO number
is loaded into the Purchase Order Reference field,
which can be used to search for the PO.
• Buyer: The Buyer name assigned to the PO is EVA
BUYER when the PO is first loaded. The Buyer
should update this name to their own name.
45

Managing eVA Purchase Orders (continued)
Changing the Buyer value prompts a message to appear, asking if you want to change the default Ship To, Department ID,
Location, and Origin values. Click Cancel to maintain the prior default values.
46

Managing eVA Purchase Orders (continued)
To complete the PO, the Buyer must enter the accounting distribution for each line on the PO. You can click the PO
Defaults link to enter the accounting distribution for all lines. Or, you may update the distributions for each PO line one at a
time by clicking on the Schedule icon at the end of each PO line and then clicking on the Distribution icon at the end of the
schedule line.
47

Managing eVA Purchase Orders (continued)
48

Managing eVA Purchase Orders: PO Defaults
Enter the accounting distribution for all PO lines by entering the information on the Maintain Purchase Order - Purchase
Order Defaults pop-up window. Click OK. The Maintain Purchase Order - Retrofit field changes to "all" existing PO
lines/schedules/distributions..... page will open.
49

Managing eVA Purchase Orders: Distributions
On the Maintain Purchase Order - Retrofit field changes to "all" existing PO lines/schedules/distributions..... pop-
up:
• Select the Apply to All Distribs checkbox next to all ChartField values you want applied to all
distributions lines.
• If a value cannot be selected to Apply to All Distribs, be sure to Click the Apply checkbox to include it.
• Click OK.
50

Once you have added the distribution values:
• Deselect the Hold From Further Processing checkbox.
• Click Save.
Managing eVA Purchase Orders: Distributions (continued)
51

Managing eVA Purchase Orders (continued)
eVA Direct Orders (DOs) come into Cardinal
with an Approved status. Material modifications
(such as adding a line, changing quantities or
prices, etc.) made to an eVA PO are not done in
Cardinal. When changes are required, they
must be performed on the PO in eVA, and then
the PO change order will be interfaced back to
Cardinal.
A dispatched PO flows to eVA for reporting
purposes. If the supplier is set up in eVA as
URL dispatch, the PO is sent electronically to
the supplier. If not, the Buyer should print the
PO and send it to the supplier. Dispatching POs
is discussed later in the course.
52

Submitting Purchase Orders for Approval
POs created without a requisition require an approval.
POs created from a requisition or awarded from a Strategic Sourcing event are built with an approved status, since they
have already been approved.
POs interfaced from eVA are loaded with an approved status, since the POs were created in eVA and have already been
approved.
53

Submitting Purchase Orders for Approval (continued)
Email notifications, with links to their worklists, are sent
to Supervisors notifying them that POs require their
approval.
Supervisors are also notified via their worklists in
Cardinal. From their worklists, Supervisors can click
the link next to the PO that requires approval. This link
takes them to the Purchase Order Approval page,
where they can Approve, Deny, or Hold the PO. The
Supervisor clicks the desired button at the bottom of
the page to approve, hold, or deny the PO. If the
Supervisor denies the PO, it is routed back to the
Buyer to be updated or cancelled.
Cardinal sends a reminder email if the PO is not
worked within 24 hours. POs must be approved within
48 hours, or the PO is routed to the Supervisor’s
Supervisor.
For detailed information on PO approvals, refer to the
course entitled 501 PR343: Procurement Approvals.
54

Dispatching and Printing Purchase Orders
Approved POs must be dispatched. A dispatched PO sets flags so the PO can be received and vouchered against.
Dispatching a PO does not send the PO to the supplier.
Dispatching the PO involves either the Buyer running the PO Dispatch process from the Maintain Purchase Order -
Purchase Order page or letting the batch process automatically dispatch the PO.
A dispatched PO flows to eVA for reporting purposes. If the supplier is set up in eVA as URL dispatch, the PO is sent
electronically to the supplier. If not, the Buyer should print the PO and send it to the supplier. This process involves the
following steps:
• PO Dispatch is a batch process that runs throughout the day.
• The status of the PO changes to Dispatched.
• The Buyer can print out the PO, or if the eVA order method is URL, the PO is sent to the supplier by eVA.
All POs are interfaced to eVA, except POs with eVA order method of Exception and originating in eVA.
55

Dispatching and Printing Purchase Orders (continued)
You may dispatch a PO by either going to the Maintain Purchase Order - Purchase Order page and clicking on the
Dispatch button, or by waiting for the automatic dispatch process to be run.
56
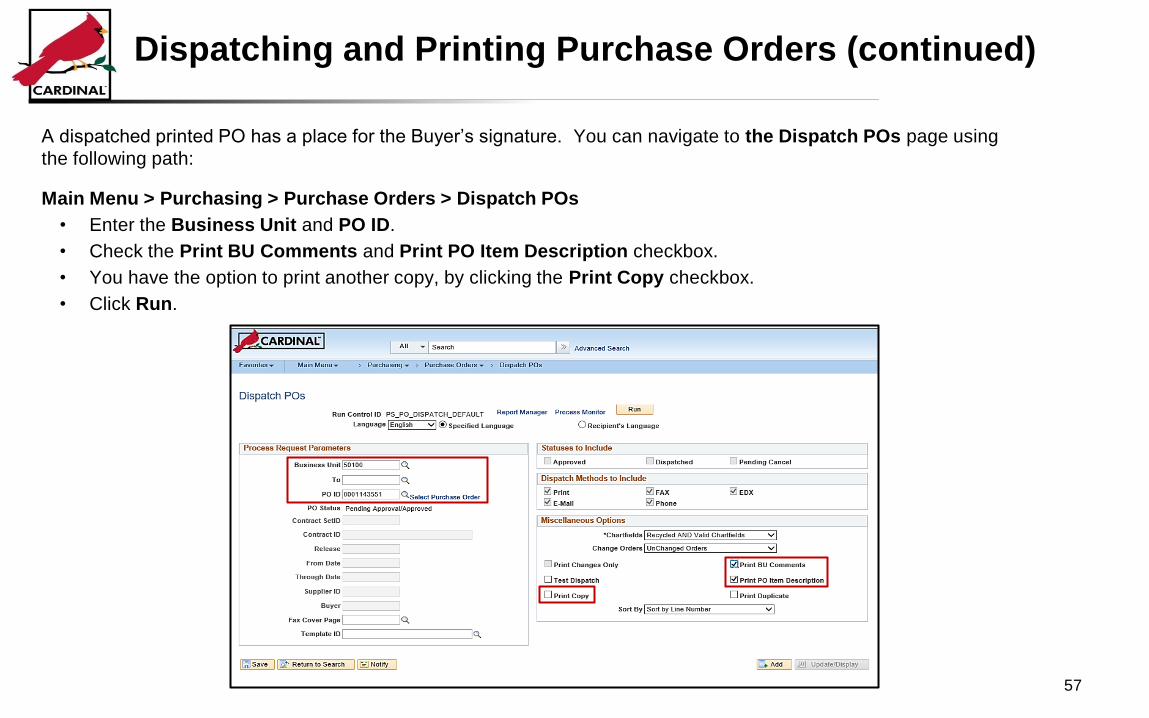
Dispatching and Printing Purchase Orders (continued)
A dispatched printed PO has a place for the Buyer’s signature. You can navigate to the Dispatch POs page using
the following path:
Main Menu > Purchasing > Purchase Orders > Dispatch POs
• Enter the Business Unit and PO ID.
• Check the Print BU Comments and Print PO Item Description checkbox.
• You have the option to print another copy, by clicking the Print Copy checkbox.
• Click Run.
57

Dispatching and Printing Purchase Orders (continued)
You can also print a PDF version of the PO, as a copy only. This printed version does not have a Buyer signature box.
You can navigate to the Print POs page using the following path:
Main Menu > Purchasing > Purchase Orders > Review PO Information > Print POs
58

Lesson 2: Checkpoint
Now is your opportunity to check your understanding of the course material.
Answer the review questions below:
1. Material changes to POs interfaced from eVA into Cardinal are completed in eVA.
a) True
b) False
2. Once the creation of the PO is started, you can identify the following and associate to the PO (select all that apply):
a) Items
b) Suppliers
c) Pricing
d) Comments
e) Approvers
3. Match the correct answer to each question:
a) POs created without a requisition _____
b) POs interfaced from eVA _____
c) POs created by the purchase order build process from a requisition_____
59
Answers:
1) are loaded with an approved status.
2) require an approval.
3) are built with an approved status.

Lesson 2: Summary
In this lesson, you learned:
• You can create a PO without a requisition by awarding a Strategic Sourcing event or by copying a requisition,
purchase order, or contract.
• POs that you create without a requisition require approval.
• POs created by the PO build process from a requisition are built with an Approved status.
60

Lesson 3: Maintain and Modify Purchase Orders (Change
Orders)
This lesson covers the following topics:
• Create Change Orders for Purchase Order
• Approve Change Orders
• Purchase Order – Modify Accounting Distribution
• Change Order Helpful Hints
61

Create Change Orders for a PO
Except if interfaced from eVA or SiteManager, a change order is created manually when a dispatched PO requires
modifications that affect any of the following:
62
• PO quantities
• Dollar values
• Shipping / billing addresses
• Add / cancel line items
In addition, since suppliers and agencies are charged eVA fees
based on the values of a PO, all PO’s must be reconciled to
match the received and paid amounts. If an update is needed
based on the reconciliation, it also creates a change order.
To make a change to a PO that has been dispatched, i.e.,
change order, use the Add/Update POs pages using the
following path:
Main Menu > Purchasing > Purchase Orders > Add/Update
POs
Using the Find Existing tab, search for the PO you wish to change.

Create Change Orders for a PO (continued)
There are several ways to create a change order
from the Maintain Purchase Order – Purchase
Order page:
• Click the blue triangle in the top right corner
to change header information.
• Add a line / cancel a line using the +/- icons
to the right of the line.
• Change the quantity or price on a PO line or
PO schedule.
• Click the blue triangle on the Lines –
Statuses tab to change line information.
• Click the blue triangle on the Maintain
Purchase Order - Schedules page to make
changes to a line schedule. You can
navigate to this page by clicking on the
Schedule icon.
Do not change the price on a line that has been
received against.
63
Once you make your changes and Save, the change order is ready for dispatch, or will be submitted for approval.

Create Change Orders for a PO (continued)
64
From the Maintain Purchase Order – Purchase Order page, click on the Schedule icon to jump to the Maintain Purchase
Order - Schedules page. To modify the schedule Due Date or Ship To fields, go to the Statuses tab in the Schedules
section of the page and click on the Blue Triangle icon.
When you have completed your updates, click Return to Main Page to return to the prior page.

Create Change Orders for a PO (continued)
From the Maintain Purchase Order - Purchase Order page, you may increase or decrease the quantity of a PO:
• Click on the Change Order icon, i.e., the blue triangle, in the top right hand corner of the Maintain Purchase Order -
Purchase Order page. The Maintain Purchase Order - Purchase Order page remains displayed and you may make
changes.
65

Create Change Orders for a PO (continued)
On the Maintain Purchase Order - Purchase Order page:
• Make the needed changes to the existing line(s). In this example the PO Qty is increased from 125 to 130.
• Click Save.
66
The Change Reason pop-up window displays:
• Enter a Reason Code and Comment to explain the change(s).
• Click OK.

Create Change Orders for a PO (continued)
Upon Save, a Change Order number displays, fields are updated, and amounts recalculated.
In the example below, the PO value did not increase by more than 25% and therefore its status remains Approved.
See the section in this lesson entitled Change Order Helpful Hints for additional details on change order approval
processing.
67
• The Dispatch Method defaults to Print.
• Click on the Dispatch button.

Create Change Orders for a PO (continued)
The Dispatch Options pop-up window displays:
• Check Print BU Comments to display line and header comments, to include eVA terms and conditions.
• Click OK.
68
A pop-up message regarding waiting for confirmation will be displayed:
• Click Yes. Once the PO Dispatch process has completed, the Maintain Purchase Order – Purchase Order page will
display.

Create Change Orders for a PO (continued)
On the Maintain Purchase Order - Purchase Order page, the PO Status has been updated to Dispatched.
A dispatched PO flows to eVA for reporting purposes. If the supplier is set up in eVA as URL dispatch, the PO is sent
electronically to the supplier. If not, the Buyer should print the PO and send it to the supplier.
69

Create Change Orders for a PO: Cancel PO
Cancel PO:
To cancel a PO, click on the red X on the Maintain Purchase Order – Purchase Order page. This begins the
cancellation process, which includes changing the lines to a Cancel status and changing the header to a Pending
Cancel status.
In order to cancel the PO:
• The PO cannot be on hold
• There cannot be any matched PO line schedules
• There cannot be any receipts against the PO
• There cannot be any open vouchers against the PO
When canceling a PO from a Strategic Sourcing event, Cardinal asks you if you would like to move the quantity back
into the Sourcing event. If yes, the quantity is put back to the award and you can either re-award the quantity to another
bidder or manually close it.
Once cancelled, the Buyer or a batch process will dispatch the PO to complete the cancellation process. This step is
required to officially cancel the PO.
70

Create Change Orders for a PO: Cancel PO (continued)
71

Create Change Orders for a PO: Cancel PO Line
Cancel PO Line:
Canceling the PO Line is available if the PO status is Dispatched. If you cancel a dispatched line, a change order is
created. Canceling is also available when the PO status is Approved, but only if the PO was previously dispatched and
subsequently changed and approved.
From the Maintain Purchase Order – Purchase Order page, navigate to the Details for Line page using the Line
Details icon. Click the red X to cancel the PO Line. The system cancels the PO line.
72

Create Change Orders for a PO: Cancel PO Schedule
Cancel PO Schedule:
Canceling the PO Schedule is available if the PO status is Dispatched. If you cancel a dispatched schedule, a change
order is created. Canceling is also available when the PO status is Approved, but only if the PO was previously
dispatched and subsequently changed and approved.
From the Maintain Purchase Order – Purchase Order page, navigate to the Schedules page using the Schedule
icon. Click on the Schedule Details icon to take you to the Details for Schedule pop-up window. Click the red X to
cancel the purchase order schedule. The system cancels the PO schedule.
73

Approve Change Orders
After a change order is created, it should be approved (if necessary) and dispatched to the supplier. The change order
dispatch process is the same as with the original PO. Remember to check the Approval check box to send the change
order for approval.
POs that have change orders attached to them go through a specific approval routing that depends on the difference
between the originally approved PO amount, the change order amount, or if a line was added. If a new line is added to a
PO, it will require the Buyer’s Supervisor approval at a minimum. Any change to a PO that affects the Quantity, Price, or
Ship To fields may require approval.
The change order appears on the approver’s work list and an email is sent to the approver with a link to approve the change
order. The approval process for change orders is the same as for POs.
After approval, the change order must be dispatched and any changes made to the PO are in bold print on the printed
change order.
For more details on change order approval requirements, see the course entitled 501 PR343: Procurement Approvals.
74

Change Order Helpful Hints
Change Order Approvals Summary:
• Adding a line to a PO will require Supervisor approval.
• Changes < 25% do not need Supervisor approval.
• Changes > 25% will escalate to the Supervisor for approval.
• Changes > 25% or $50,000 (whichever is greater) to PO with original value > $50,000 will escalate to the ASD Director
for Approval
Helpful Hints:
• The following will automatically cancel an eVA order and create a new eVA order:
• Change to the Bill To Address
• Change to a different address location for the same supplier
• Never change the unit price on an item that has already been received and vouchered. Close out the line amount to what
has been matched and insert a new line for the remaining items at a changed price.
75

Approve Change Orders (continued)
Change orders are approved on the Purchase Order
Approval page. You can access this page through your
worklist using the hyperlink at the bottom of every page.
You can also navigate to the Purchase Order Approval page
using the following path:
Main Menu > Worklist > Worklist
Click the Purchase Order hyperlink to access the change
order you want to approve.
For detailed information on change order approvals, refer to
the course entitled 501 PR343: Procurement Approvals.
76

Approve Change Orders (continued)
77

Simulation: Creating Purchase Order Change Orders
You are now about to view a simulation demonstrating the purchase order change order process. Click the Cardinal logo
below to start the simulation.
78

Purchase Order: Modify Accounting Distribution
Accounting entries may be modified for PO lines that have not yet been received or matched and vouchered in Accounts
Payable. Changing accounting distributions does not trigger the change order approval process.
There are instances when a PO has been partially received / vouchered and, due to fiscal changes in budgets or project
coding, it is necessary to change / edit the chart of accounts distribution for the remaining balance. For instructions on
making these changes please see the job aid entitled 501 PR344: Update ChartFields on Partially Vouchered Purchase
Orders.
Modify Accounting Distributions: Single Line
To modify the accounting distribution for a single line, navigate to this page using the following path:
Purchasing > Purchase Orders > Add/Update POs
• Select the Schedule icon from the Details tab which will take you to the Schedules page.
• Select the Distributions/ChartFields icon on the line you wish to change.
• Enter the new ChartField values.
• Click OK to save.
79

Purchase Order: Modify Accounting Distribution
(continued)
80
Modify Accounting Distributions: Single Line

Purchase Order: Modify Accounting Distribution
(continued)
In the event a pop-up message is displayed, use the information found within the message to resolve the error. In the
example below, the Department is required.
For additional details on combination edits see the General Ledger job aid entitled 501 GL332 Combination Edits Review
Tools.
81

Purchase Order: Modify Accounting Distribution
(continued)
Modify Accounting Distribution: Multiple Lines
Accounting entries may be modified for PO lines that have not
yet been received or matched and vouchered in Accounts
Payable. Changing accounting distributions does not trigger
the change order approval process.
You can access the accounting distribution lines from the
Maintain Purchase Order – Purchase Order pop-up window
by clicking on the PO Defaults hyperlink. New values entered
on this page will override default values. Only fields with new
values will be updated.
82

Purchase Order: Modify Accounting Distribution
(continued)
83

Lesson 3: Checkpoint
Now is your opportunity to check your understanding of the course material.
Answer the review questions below:
1. Modifying the accounting distribution does not trigger change order approval.
a) True
b) False
2. When you need to change a PO that has already been ___________, you create a change order.
a) Started
b) Dispatched
c) Approved
d) Closed
84

Lesson 3: Summary
In this lesson, you learned:
• To modify a PO that has already been dispatched, you need to create a change order.
• You can create a change order (modify a purchase order) using the Add/Update POs page.
• To cancel a PO Line, navigate to the Details for Line page for that PO line you want to cancel and click on the Red X.
This cancels the line only.
• If the chart of accounts distribution is not valid, an error message will be displayed.
85

Lesson 4: Reconciling / Close the PO
This lesson covers the following topic:
• Reconcile / Close a PO
86

Reconciling / Close a PO
Once a PO is complete, if the amount / quantity received differs from what was ordered, received, and ultimately invoiced
by the supplier, you must decrease or increase the quantities, or amounts, to match the actual amount / quantity received.
To reconcile / close a PO you navigate using the following path:
Main Menu > Purchasing > Purchase Orders > Add/Update POs
87
• Select the Find an Existing Value tab.
• Enter the PO ID # that you wish to close out.
• Click Search button. The Maintain Purchase
Order – Purchase Order page displays.
• The details of the PO you selected are
displayed.
• Click on the Activity Summary hyperlink. The
Activity Summary page will display.

• The Activity Summary header displays the Merchandise Amount, Merchandise Receipt, Merchandise Returned,
Merchandise Invoice, and Merchandise Matched values.
• The Details tab displays the Order Qty. Scroll to the right and make note of the quantity ordered.
• Click on the Receipt tab.
Reconciling / Close a PO (continued)
88

Reconciling / Close a PO (continued)
• The Receipt tab displays the Qty Received. Make note of the quantity received.
• Click on the Invoice tab.
89

Reconciling / Close a PO (continued)
• The Invoice tab displays the Quantity Invoiced and Amt Invoiced from the supplier.
• For each line compare: the Order Qty on the Details tab with the Qty Received on the Receipt tab, along with the
Quantity Invoiced on the Invoice tab.
• Click on the Matched tab.
90

Reconciling / Close a PO (continued)
• The Matched tab displays the Qty Matched and Amt Matched as vouchered / paid from the Accounts Payable
module. Matching is an automated process that is handled within the Accounts Payable module. The matching process
is used to compare vouchers. i.e., supplier invoices, with purchase orders, and receiving documents. In this example
matching has not yet occurred therefore the values remain at zero.
• Close or minimize the page and go back to the Maintain Purchase Order – Purchase Order page.
91

Reconciling / Close a PO (continued)
• For each line, enter the Qty Received from the Receipt tab on the Activity Summary in the PO Qty field.
• Click on the Schedule icon.
92

Reconciling / Close a PO (continued)
• A change order confirmation message is
displayed. This message is displayed when the
purchase order is being changed but the blue
triangle was not used to create the change order.
• Click Yes. The Maintain Purchase Order –
Schedules page will display.
93
• The Schedules are displayed.
• Verify that the PO Qty field on each
schedule matches your changes you
just made on the on the Purchase
Order page to the PO Qty field.
• Click the Distribution icon on the first
line. The Maintain Purchase Order -
Distributions for Schedule X pop-up
window is displayed.
• You will need to click the
Distribution icon for each line.

Reconciling / Close a PO (continued)
• Verify that the PO Qty field on each distribution line matches your changes you just made to the PO Qty field on the on
the Schedules page and the Purchase Order page.
• Click OK. The Maintain Purchase Order – Schedules page will display.
94

Reconciling / Close a PO (continued)
• Click on the Return to Main Page hyperlink. The Maintain Purchase Order – Purchase Order page will display.
95

Reconciling / Close a PO (continued)
• Confirm that the PO Qty field for each line on the Details tab of the Purchase Order page still matches the changes you
made to the PO Qty field on the on the Schedules page and the Distributions for Schedule X page.
96

Reconciling / Close a PO (continued)
Once your updates to the PO have been made you must ensure that the sum of accounting distribution matches your
changes to the schedules. From the Maintain Purchase Order – Purchase Order page:
• Click on the Details tab.
• Click on the Schedule icon for the line you wish to review. The Schedules page for the line will display. You will
need to review each line’s accounting distribution.
• From the Details tab, click on the Distribution icon. The Distributions for Schedule X pop-up window will
display.
97

Reconciling / Close a PO (continued)
The Distributions for Schedule X pop-up window will display:
• Verify or update the sum of the accounting distribution(s) to match the Line Schedule.
• Click OK. The Schedules page will display.
98
• Click on the Return to Main Page hyperlink. The
Purchase Order page will display.
• Click Save. The Change Reason page will display.

Reconciling / Close a PO (continued)
• Enter / update the Reason Code and Comment.
• Click OK.
• The Maintain Purchase Order – Purchase Order page will
display.
99
• The reconciliation changes have been saved.
• The Change Order field value is updated to 1.
• Click on the PO Submit for Approval checkbox
(the green checkmark) which is next to the PO
Status field.

Reconciling / Close a PO (continued)
• The PO Status updates to Approved and is ready for dispatch.
• Once dispatched, either manually or by batch process, the PO will be reconciled / closed out.
100

Lesson 4: Summary
In this lesson, you learned:
• How to reconcile / close a PO by matching the quantity ordered, quantity received, and quantity matched / vouchered
for a PO.
101

Lesson 5: Review PO Information, History, and Activities
This lesson covers the following topics:
• Review PO Information, History, and Activities
• Purchase Order Inquiry page
102

Review PO Information, History, and Activities
After creating a PO, you can view all future transactions and related activities. You can view the header, line, schedule, and
distribution details. This can be done through the following pages:
• Purchase Order Inquiry page
• Activity Summary page
• Review Change History and Review Change Orders pages
103

Purchase Order Inquiry Page
The Purchase Order Inquiry page lets you view details of the
PO. This page is a display-only version of the Maintain
Purchase Order – Purchase Order page. From this page,
you can display other pages, such as Activity Summary and
Change Order, where you can view additional details of the
PO.
You can navigate to this page using the following path:
Main Menu > Purchasing > Purchase Orders > Review PO
Information > Purchase Orders
Enter your search criteria and click Search.
104

Purchase Order Inquiry Page (continued)
105

Purchase Order Inquiry Page: Supplier Details
Click the Supplier Details link on the Purchase Order
Inquiry page to display the Supplier Details pop-up
window. This page displays more details about the supplier
for the PO.
You can click the Return button on the page to return to the
Purchase Order Inquiry page when you are done.
106

Purchase Order Inquiry Page: Supplier Details (continued)
107

Purchase Order Inquiry Page: Header Details
Click the Header Details link on the Purchase Order
Inquiry page to display the Purchase Order Header
Details pop-up window. This page displays the PO defaults
and the rules for the PO.
You can click the Return button on the page to return to the
Purchase Order Inquiry page when you are done.
108

Purchase Order Inquiry Page: Header Details (continued)
109

Purchase Order Inquiry Page: Bill To Address
Click the Billing Address link on the Header Details page to display details for the billing location. You can click the OK
button to return to the Purchase Order Inquiry page when you are done.
110

Purchase Order Inquiry Page: Header Comments
If the Header Comments link on the Purchase Order Inquiry page is active, you can click it to display comments
associated with the PO header. If this link is not active, there are no comments.
Click the OK button to return to the Purchase Order Inquiry pop-up window.
111

Purchase Order Inquiry Page: Change Order
Click the Change Order link on the Purchase Order Inquiry page to display the Review Change Order page. This page
displays change order history for the PO, if any.
The Change Order page opens up as a separate internet tab. To return to the Purchase Order Inquiry page, click on the
Purchase Orders internet tab. You may also close the Change Order internet tab and return to the Purchase Order
Inquiry page.
112

Purchase Order Inquiry Page: Document Status
Click the Document Status link on the Purchase Order Inquiry page to access and review information about
procurement documents associated with the PO. These documents may include contracts, vouchers, receipts, and
payments and links to each of the associated documents will be available.
The Document Status page opens up as a separate internet tab. To return to the Purchase Order Inquiry page, click on
the Purchase Orders internet tab. You may also close the Document Status internet tab and return to the Purchase
Order Inquiry page.
113

Purchase Order Inquiry Page: Lines
There are numerous details associated with the PO line that you can display from the Lines section on the Purchase Order
Inquiry page.
114

Purchase Order Inquiry Page: Line Details
When you click on a Line Details icon in the Lines section of the Purchase Order Inquiry page, the Details for Line pop-
up window will be displayed. This page displays additional details associated with the selected PO line. Click the Return
button to return to the Purchase Order Inquiry page.
115

Purchase Order Inquiry Page: Item Description
The Item Description for a Line on the Purchase Order
Inquiry page includes only the first 30 characters of the item’s
full description. By clicking on the Item Description link for
the desired line, the Item Description pop-up window will be
displayed with the full Transaction Item Description text.
Click the Return button to return to the Purchase Order
Inquiry page.
116

Purchase Order Inquiry Page: Line Comments
From the Purchase Order Inquiry page, click the Line Comments icon on the desired line to view comments that were
entered for the item. The PO Line Comments pop-up window will be displayed. From the PO Line Comments page, click
OK to return to the Purchase Order Inquiry page.
117

Purchase Order Inquiry Page: Schedule
There are many details associated with the schedule(s) for each PO line. To display the PO schedule(s) for a line, from the
Purchase Order Inquiry page click the Schedule Details icon on the line you wish to view. The Schedules page displays
for the PO line. Each schedule has links (icons) to more detailed information including schedule details, miscellaneous
charges, and accounting distributions. The Price Adjustment, Miscellaneous Charges, and Sched Sales/Use tax icons
are generally not used.
118

Purchase Order Inquiry Page: Schedule Details
From the Purchase Order Inquiry – Schedules page, click the Schedule Details icon for the desired schedule to view
details about the schedule, including the Freight Terms.
To return to the Purchase Order Inquiry page, click Return and then from the Schedules page click the Return to Main
Page link.
119

Purchase Order Inquiry Page: Distributions
Accounting distributions are associated with schedules. Clicking the Distributions/ChartFields icon on the Schedules
page displays the associated distributions.
The ChartFields tab displays the chart of accounts information related to the schedule. Typically you will need to scroll right
to see all the fields.
The Details/Tax and Asset Information tabs are not used.
120

Purchase Order Inquiry Page: Distributions, Req/Detail
Tab
On the Distributions page, the Req/Detail tab displays information about associated requisitions. If there is a requisition,
the Req ID is displayed here as a hyperlink. You can click it to get more information about the requisition.
121

Activity Summary Page
On the Activity Summary page, you can view what has been received. The page will include information as well as links to
more information for the associated receipt(s) and voucher(s).
The Merchandise Amount, Merchandise Receipt, Merchandise Returned, Merchandise Invoice, and Merchandise
Matched values will be displayed on the Activity Summary page.
You can navigate to this page using the following path:
Main Menu > Purchasing > Purchase Orders > Review PO Information > Activity Summary
Or, from the Purchase Order Inquiry page, you can click on the Activity Summary link.
122

Activity Summary Page (continued)
123

Activity Summary Page: Receipt Tab
The Receipt tab is used to view additional information about receipt documents associated with the PO, such as quantity
received and accepted. Click a Receipt icon to open the page that provides a list of all receipts and links that take you to a
Receipts page where you can view detailed receipt information.
124

Activity Summary Page: Invoice Tab
The Invoice tab is used to view additional information about vouchers associated with the PO. Click an Invoice icon to
open the page that provides a list of all the vouchers and links that take you to a Voucher Inquiry page where you can view
detailed voucher information.
125

Review Change History and Review Change Orders Pages
You can review the history (changes) of a purchase order on the Review Change History page or the Review Change
Orders page.
Both pages allow you to search for the desired PO and lists the change(s) that occurred to it on tabs which are almost
identical. On the Review Change History page, you can search using PO Number and/or Change Order Number. This
page provides details on the original PO, as well as changes.
The information is virtually the same on both pages, however the Review Change History page contains a Batch tab that is
not included on the Review Change Orders page. The Batch tab displays the date that the change was made and the
Batch ID of the batch that created the change order.
You can navigate to the Review Change History page using the following path:
Main Menu > Purchasing > Purchase Orders > Manage Change Orders > Review Change History
Or, you can navigate to the Review Change Orders page using the following path:
Main Menu > Purchasing > Purchase Orders > Manage Change Orders > Review Change Orders
Enter your search criteria on either page and click Search.
126

Review Change History Page: Batch Tab
The Review Change History page includes four tabs that display different information about the change to the PO.
The Batch tab displays the date that the change was made and the Batch ID of the batch that created the change order.
127

Review Change History Page: Header Changes Tab
The Header Changes tab is on both the Review Change History and Review Change Orders pages and displays the
changes to the header, which user issued the change, and the date of change.
128

The Line Changes tab is on both the Review Change History and Review Change Orders pages and displays the
changes to the PO line(s), the user who created the change, and the date of change.
Change History Page: Line Changes Tab
129

The Ship Changes tab is on both the Review Change History and Review Change Orders pages and displays changes
to the quantity and/or price, the user who created the change, and the date of change.
Change History Page: Ship Changes Tab
130

Lesson 5: Summary
In this lesson, you learned:
• How to view details of a PO using the Purchase Order Inquiry.
• How to review the change order history of a PO using the Review Change History and Review Change Orders
pages.
131

Course Summary
In this course, you learned how to:
• Describe Purchase Order Concepts, Processes, Integration, and Interfaces
• Create Purchase Orders
• Review and Manage Purchase Orders
• Cancel Purchase Orders
• Create a Purchase Order Change Order
• Reconcile / Close POs – 3 Way Match
132

Course Evaluation
Congratulations! You successfully completed the 501 PR344: Processing Purchase Orders course. Please use the
evaluation link to assess this course.
133

Appendix
• Key Terms
• Flowchart Key
134

Key Terms
Change Order: A change order is created when you make a change to a PO that affects the Quantity, Price, or Ship To
fields or when a Line is added.
Matching: Matching purchasing documents for key values lends assurance to the validity and correctness of transactions
and cash payments. The matching process compares vouchers with POs and receiving documents. This helps ensure that
you pay for only the goods and services that you order and receive.
Purchase Order: Purchase Orders (POs) are commitments from an agency to suppliers to purchase goods or services
from that supplier. The purchase information, such as item, quantity, freight terms, shipping terms, payments terms, and
shipping instructions, is listed on the document and is part of the contractual nature of the PO.
135

Flowchart Key
136