6-68330-02 rev y stornext 6.x xcellis workflow director ...€¦ · fixed issues, notes, and...
TRANSCRIPT
StorNext 6x Xcellis Workflow DirectorRelease Notes
May 2020 6-68330-02 Rev Y
Contents
Revision History 2
About the Xcellis Workflow Director 3
Training and Documentation Resources 3
About StorNext 6 3
What StorNext Releases are compatible with my system 4
Upgrade StorNext Software and System Firmware 4
General Notes 4
Quantum Appliance Licenses 4
Fixed Issues Notes and Enhancements ndash StorNext 6x 5
Known Issues ndash StorNext 6x 20
Known Issues Workarounds and Additional Information 48
Contacting Quantum 70
copy 2020 Quantum Corporation All rights reserved Your right to copy this manual is limited by copyright law Making copies or adaptations without prior written authorization of Quantum Corporation is prohibited by law and constitutes a punishable violation of the law Artico Be Certain (and the Q brackets design) DLT DXi DXi Accent DXi V1000 DXi V2000 DXi V4000 DXiV-Series FlexSync FlexTier Lattus the Q logo the Q Quantum logo Q-Cloud Quantum (and the Q brackets design) the Quantum logo Quantum Be Certain (and the Q brackets design) Quantum Vision Scalar StorageCare StorNext SuperLoader Symform the Symform logo (and design) vmPRO and Xcellis are either registered trademarks or trademarks of Quantum Corporation and its affiliates in the United States andor other countries All other trademarks are the property of their respective owners Products mentioned herein are for identification purposes only and may be registered trademarks or trademarks of their respective companies All other brand names or trademarks are the property of their respective owners Quantum specifications are subject to change
Revision History
Xcellis Workflow Director Release Notes 2
Revision HistoryThe following StorNext Releases are supported by these Release Notes
StorNext 6 Releases Supported Release Notes Date
StorNext 640 May 2020
StorNext 6311 December 2019
StorNext 631 November 2019
StorNext 630 August 2019
StorNext 621 June 2019
StorNext 620 March 2019
StorNext 611 February 2019
StorNext 610 September 2018
StorNext 6061 May 2018
StorNext 606 March 2018
StorNext 6051 February 2018
StorNext 605 January 2018
StorNext 6011 September 2017
StorNext 601 August 2017
StorNext 60 July 2016
About the Xcellis Workflow Director
Xcellis Workflow Director Release Notes 3
About the Xcellis Workflow DirectorThe Quantum Xcellis Workflow Director system is a workflow storage system with various configurations and options to meet your evolving storage performance and capacity needs StorNext Connect which is used to perform initial configuration of the server provides ongoing holistic monitoring of your entire StorNext environment after initial configuration The system can operate as a StorNext SAN Client in a StorNext Metadata Network providing LAN client access to the StorNext disk SAN It can also provide NFS and SMB NAS access using StorNext NAS software
Training and Documentation ResourcesXcellis Workflow Director (R630) training and documentation
About StorNext 6
What is StorNextStorNextreg is high-performance multi-tier shared storage designed for large data-intensive workloads It includes Xcellis workflow storage extended online storage and tape archivesmdashall powered by StorNext the industryrsquos fastest streaming file system and policy-driven data management software
At the core of all Quantum scale-out storage is StorNext advanced data managementmdashengineered to tackle the worldrsquos most demanding workloads with the performance and efficiency needed to cost-effectively achieve desired business results
StorNext 6 delivers the unique combination of high performance and advanced data management providing cost-effective scalability and access for a wide variety of workloads and use cases including media production genomics research video surveillance geospatial imaging VR content and more
Learn More on the WebLearn more about StorNext 6 and Scale-Out Storage and take a look at the StorNext 6 Documentation Center which includes training and documentation resources for StorNext 6 including Release Notes
What StorNext Releases are compatible with my system
Xcellis Workflow Director Release Notes 4
What StorNext Releases are compatible with my systemSee the StorNext Release Compatibility page on quantumcom for further information
Upgrade StorNext Software and System FirmwareBefore upgrading your system refer to Known Issues ndash StorNext 6x on page 20 This section contains important information you need to know before upgrading
See Upgrade the System (Upgrade Firmware) for the steps necessary to upgrade to the latest StorNext release and hardware firmware for your system
General NotesRefer to the General Notes page on quantumcom for important information you should know about your system
Quantum Appliance LicensesSee Quantum Appliance Licenses page on quantumcom
Fixed Issues Notes and Enhancements ndash StorNext 6x
Xcellis Workflow Director Release Notes 5
Fixed Issues Notes and Enhancements ndash StorNext 6x This section lists the fixed issues enhancements and notes for different StorNext Releases supported for your system
l Fixed Issues Notes and Enhancements for StorNext 640 below
l Fixed Issues Notes and Enhancements for StorNext 6311 on the next page
l Fixed Issues Notes and Enhancements for StorNext 631 on the next page
l Fixed Issues Notes and Enhancements for StorNext 630 on page 7
l Fixed Issues and Enhancements for StorNext 621 on page 8
l Fixed Issues and Enhancements for StorNext 620 on page 10
l Fixed Issues and Enhancements for StorNext 611 on page 12
l Fixed Issues and Enhancements for StorNext 610 on page 12
l Fixed Issues and Enhancements for StorNext 6061 on page 14
l Fixed Issues and Enhancements for StorNext 606 on page 15
l Fixed Issues and Enhancements for StorNext 6051 on page 16
l Fixed Issues and Enhancements for StorNext 605 on page 17
l Fixed Issues and Enhancements for StorNext 6011 on page 18
l Fixed Issues and Enhancements for StorNext 601 on page 19
l Fixed Issues and Enhancements for StorNext 60 on page 19
Fixed Issues Notes and Enhancements for StorNext 640
CR Number SR Number(s) Description
77096 na New entries in the etcmultipathconf file now support new Quantum storage array models
76484 540318 DAE VMs are now correctly managed from the StorNext GUI and No content error messages are no longer generated
75394 517419 DAE now correctly handles multiple configured StorNext file systems when VMs are started
Table 1 Fixed IssuesEnhancements for StorNext 640
Fixed Issues Notes and Enhancements ndash StorNext 6x
Xcellis Workflow Director Release Notes 6
l See the StorNext 640 Release Notes for information about StorNext software updates for this release
l See the Upgrade the System (Upgrade Firmware) for the instructions for upgrading system firmware
Fixed Issues Notes and Enhancements for StorNext 6311StorNext 631 has been superseded and is replaced by StorNext 6311 All of the fixes and enhancements for StorNext 631 still apply to 6311
Note Quantum recommends you upgrade to StorNext 6311 if you have a system with Mellanox Connect CX4-Lx cards configured for 25G connections and running 631 These cards can fail to operate when running StorNext 631
CR Number SR Number(s) Description
76354 na Firmware upgrade now reports and detects Mellanox LSPCI device ID correctly
76353 na StorNext 6311 upgrade includes the Mellanox CX4-Lx 25 GbE firmware for 25 GbE networks
Table 2 Fixed IssuesEnhancements for StorNext 6311
l See the StorNext 6311 Release Notes for information about StorNext software updates for this release
l See the Upgrade the System (Upgrade Firmware) for the instructions for upgrading system firmware
Fixed Issues Notes and Enhancements for StorNext 631StorNext 631 has been superseded and is replaced by StorNext 6311 All of the fixes and enhancements for StorNext 631 still apply to 6311
Note Quantum recommends you upgrade to Appliance Controller 232 if you have one or more F2000 storage arrays 232 includes updates to the qstorage drive attachdetach commands to work with the F2000 storage array RAID configuration See the Appliance Controller upgrade page
CR Number SR Number(s) Description
75477 518583 Upgraded to iDRAC version 2616060 from 2212121 due to security vulnerabilities in the earlier release
75627 520429 Health output is now provided when the qstorage show health command is run from the Appliance Controller console
Table 3 Fixed IssuesEnhancements for StorNext 631
Fixed Issues Notes and Enhancements ndash StorNext 6x
Xcellis Workflow Director Release Notes 7
l See the StorNext 631 Release Notes for information about StorNext software updates for this release
l See the Upgrade the System (Upgrade Firmware) for the instructions for upgrading system firmware
Fixed Issues Notes and Enhancements for StorNext 630Note Quantum recommends you upgrade to Appliance Controller 231 if you have one or more QXS 12G 484 or F2000 storage arrays 231 includes RAS alert support for these storage arrays See the Appliance Controller upgrade page
CR Number SR Number(s) Description
75158 na A new SSL certificate is now included in the 630 release for Cloud-Based Analytics
75094 na Firmware upgrade will now include a status of Incomplete if a step in the StorNext Connect upgrade times out or is incomplete
74888 499350
494119
488583
reg show lines in the messages log are no longer captured every 4 hours after upgrading to 630
For 62x this was known issue
74838 na Managed configuration files due to system time issues
This fixes an issue where after an upgrade to 621 NTP changed the system time which resulted in FC HBA 0 is missing RAS created for server node1
74792 na The Admin Alert column in the validation table in the StorNext GUI now correctly shows only the important information about the alert during validation of a firmware upgrade file Previously a few unnecessary items were included in the validation table when firmware upgrade files with incorrect checksums were uploaded to the system and Validate was clicked
74649 na The Appliance Controller no longer throws an exception when it is unable to reach a QXS array
Table 4 Fixed IssuesEnhancements for StorNext 630
Fixed Issues Notes and Enhancements ndash StorNext 6x
Xcellis Workflow Director Release Notes 8
CR Number SR Number(s) Description
74526 na Enhancement iSCSI is now supported for multiple QXS RAID arrays
Note This fix requires upgrading to Appliance Controller 230
74316 na Firmware upgrade to StorNext 630 upgrades OMSA (OpenManage server administrator) to 920
74269 na Complete RAS messages are now created for unsupported PCIe cards installed in the system
74258 na In the presence of bad drive the qxsarray show health command results in correct output
Note This fix requires upgrading to Appliance Controller 230
74245 na Firmware upgrade process no longer changes slot configuration information card slot configuration settings are kept
74201 na CX-3 card ports mode settings no longer changed after firmware upgrades original configuration settings are kept
l See the StorNext 630 Release Notes for information about StorNext software updates for this release
l See the Upgrade the System (Upgrade Firmware) for the instructions for upgrading system firmware
Fixed Issues and Enhancements for StorNext 621Note StorNext 621 replaces StorNext 620 and includes all fixes issues and enhancements completed for StorNext 620 StorNext 620 firmware upgrade files are no longer available
This release addresses the following vulnerabilityCentOS7 Docker (runc) vulnerability ndash versions prior to 18092 (see 74017 on the next page)
CR Number SR Number(s) Description
74780 500550 The Appliance Controller now restarts correctly after applying the firmware upgrade and snmp and Cloud-based Analytics function normally
Table 5 Fixed IssuesEnhancements for StorNext 621
Fixed Issues Notes and Enhancements ndash StorNext 6x
Xcellis Workflow Director Release Notes 9
CR Number SR Number(s) Description
74724 498766496820
The system will now boot correctly after upgrading firmware
74721CON-4344
498766 Upgrades to StorNext 621 are successful even if there are duplicate entries in etchosts
74697 498571497610
The StorNext Connect Docker installation during upgrade no longer fills up the var directory on the server so upgrades will no longer fail due to this issue
74667 496820 StorNext Connect failures occurring during firmware upgrades now generate an admin alert and the upgrade will complete successfully Admin alert message displayed on StorNext Connect docker upgrade failure
Connect upgrade is incompleteFailed to upgrade to Connect dockers
74626 0489653 The NAS controller in the Appliance Controller is now restarted correctly after firmware upgrades fully supporting pre-upgrade checks of the system
74543 501460 The StorNext ConnectGUI now appears correctly and Discover complete properly and stats are displayed correctly
74303 na Autoflexconfig now supports either type of port mode setting (Ethernet or Infiniband) that may be used with the ConnectX-3 card
74017 na Docker (runc) upgraded to CVE-2019-5736 to address a security vulnerability in the CentOS7 Docker (versions prior to 18092) where the host runc binary could be overwritten and allow host root access
74010 na The connecthostname is no longer set to 10112 on server node1 and server node2 after firmware upgrades for systems that previously was not configured for StorNext Connect
72147 For systems already upgraded to StorNext 620 or later the Validate button on the Upgrade Firmware page in the StorNext GUI now executes pre-upgrade checks before initiating the upgrade process This is the first release where this button initiates this pre-upgrade check
Fixed Issues Notes and Enhancements ndash StorNext 6x
Xcellis Workflow Director Release Notes 10
l See the StorNext 621 Release Notes for information about StorNext software updates for this release
l See the Upgrade the System (Upgrade Firmware) for the instructions for upgrading system firmware
Fixed Issues and Enhancements for StorNext 620Note StorNext 621 replaces StorNext 620 and includes all fixes issues and enhancements completed for StorNext 620 StorNext 620 firmware upgrade files are no longer available
The new appliance-specific code fixes or enhancements for this release are
CR Number SR Number(s) Description
73712 Added time-stamp logging for each of the steps in the upgrade process to more easily identify which steps take longer to run
73485 469076 The qxsarray feature in the Appliance Controller console (CLI) now correctly handles both Fibre Channel and iSCSI-connected QXS array information when the qxsarray show command is run
73476 snupdatelog no longer consumes most of the root file system previously caused when the Appliance Controller ran the optquantumsnupdatebinsnupdate show versions command every minute
73194 Enhanced the Network Menu within the Service Menu to allow reconfiguring of previously-configured interfaces
72983 Updated the StorNext GUI Networking page (Configuration gt System) to remove metadata-specific selections and to add activebackup bonding support
72977 Better handling of manually-configured VLANs in the StorNext GUI
72919 Simplified and enhanced the Network Menu within the Service Menuwith an activebackup bonding option
72800 443258443259443260433261 470240
Fixed CVE-2014-3566 Nexpose scan for SSLv3 and POODLE warnings ndash port 33777 (CentOS7)
72624 Added the PERC controller log to the RAS emails for server boot drive failures
Table 6 Fixed IssuesEnhancements for StorNext 620
Fixed Issues Notes and Enhancements ndash StorNext 6x
Xcellis Workflow Director Release Notes 11
CR Number SR Number(s) Description
72586 The Appliance Controller qxsarray show iscsi command executes correctly for QXS arrays with firmware release names containing a GFS prefix (for iSCSI-connected systems ONLY)
72421 424025 Security Scanner now leaves the FSM operating correctly on the secondary (failover) server node (typically node 2)
72240 (HYDRA-3672 3716 3717 3740)
RAS tickets for QXS drive failures are now generated with the same detail that is provided in RAS tickets for system boot drive failures
72147 Add a pre-upgrade check feature on the GUI and in the upgrade scripts enables the Validate button on the Upgrade Firmware page in the StorNext GUI (for systems upgrading from releases after StorNext 620) to execute pre-upgrade checks before beginning the upgrade process
72006 Updated the firmware upgrade code to include fixes for SpectreMeltdown vulnerabilities (R630 models ONLY)
71981 Background DAE jobs that the StorNext GUI initiates now show success for the job status even though the command may fail
71809 431853 Fixed the QUANTUM-STORNEXT-APPLIANCE-MIB for snaFileSystemActive OID so it no longer returns a bad data type for SNMB
71299 456036 459515 460901
Running a Nexpose scan no longer results in a fs_copymandfs_moverd core dump
71147 451310 Clients using NSS2 can now see file systems that are not on same subnet as coordinators
70915 409963 455314 For upgrades to 62 tmp has been changed to a symbolic link which points to scratchtmp which prevents the root file system () from getting filled up This prevents processes like pse_snapshot or fsmedscan (see 72726 on page 24) from overwhelming the root file system with data
70212 Integrate QXS and metadata storage array hardware events into StorNext RAS system to generate RAS tickets for array drive failures
Fixed Issues Notes and Enhancements ndash StorNext 6x
Xcellis Workflow Director Release Notes 12
CR Number SR Number(s) Description
69255(HYDRA-2004)
349873 Implemented a fix to address the SSLTLS server factoring RSA export keys (FREAK) vulnerability
53486 425247 Srvclog RAS tickets are created even if the hafs (HA shared file system) is not mounted
l See the StorNext 620 Release Notes for information about StorNext software updates for this release
l See the Upgrade the System (Upgrade Firmware) for the instructions for upgrading system firmware
Fixed Issues and Enhancements for StorNext 611Note StorNext 611 replaces StorNext 610 and includes all fixes issues and enhancements completed for StorNext 610 including the Spectre and Meltdown vulnerabilities addressed in that release StorNext 610 firmware upgrade files are no longer available
There are no new appliance-specific code fixes or enhancements for this release However you can reference the following
l See the StorNext 611 Release Notes for information about StorNext software updates for this release
l See the Upgrade the System (Upgrade Firmware) for the instructions for upgrading system firmware
Fixed Issues and Enhancements for StorNext 610Note StorNext 611 replaces StorNext 610 and includes all fixes issues and enhancements completed for StorNext 610 including the Spectre and Meltdown vulnerabilities addressed in that release StorNext 610 firmware upgrade files are no longer available
Note StorNext 610 was the initial release supporting server hardware With 610 being replaced by 611 please upgrade to 611 as soon as possible
This release addresses Spectre and Meltdown vulnerabilities as follows
CentOS Version Kernel Vulnerability Variant Addressed
CentOS7 Update 4 3100-693211 123
This applies to Xcellis Workflow Director (R630)
Fixed Issues Notes and Enhancements ndash StorNext 6x
Xcellis Workflow Director Release Notes 13
CR Number SR Number(s) Description
71708 440392 Enhanced card discovery to reflect when PCI slot addresses change Update configuration files with the new addresses
71599 425749 Firmware upgrade now ensures autoconfig is enabled
71507 421334 Firmware upgrade now upgrades PHP on server nodes
71469 421581 Firmware upgrades previously failed during OS Update due to insufficient space on localroot filesystem Available space is now checked during the system pre-upgrade check and if not enough free space is available the firmware upgrade does not attempt to begin
Note You will still need to make 5 GB free space available for the upgrade and restart the upgrade process
71328 403647 Systems with large LUNs no longer take excessive time to boot
71230 414352 429898 Nexpose security scan previously reported HTTP Header was missing on port 443
71125 410540 Rsyslog stopped logging into varlogmessages but all logs were included in systemd-journald
71012 0399206 The StorNext Connect GUI showed the status of an appliance server node being undefined and was displayed as a gray dot on the dashboard as a result of a Fibre Channel card being part of the expected hardware installed for the system The Fibre Channel requirement has been removed so for systems upgraded to StorNext 61 and later refresh the dashboard page and it will correctly display the system as a green dot
70854 383195 blacklist_exceptions and entries for EMCNetApp arrays are now included in the reference multipathconf file provided on appliances to support EMC VNX7600 EMC VNX8000 EMC VMAX 20k and NETAPP FAS6240 arrays
Note See also the new How to Modify the multipathconf File for External Storage Arrays page released for StorNext 610
Table 7 Fixed IssuesEnhancements for StorNext 610
Fixed Issues Notes and Enhancements ndash StorNext 6x
Xcellis Workflow Director Release Notes 14
CR Number SR Number(s) Description
70649 398896 The Promise array path_checker definition has been updated in the reference multipathconf file provided on appliances
Note See also the new How to Modify the multipathconf File for External Storage Arrays page released for StorNext 610
70588 396789 tsunamilog and servicelog files are now rotated to prevent these logs and snapshot files becoming too large and helps snapshot files to be generated more quickly
70526 398061 396903 398206 397045 399232 and 401331
Kernel Page Table Security Problems addressed for CVE-2017-5753 CVE-2017-5715 and CVE-2017-5754
l See the StorNext 610 Release Notes for information about StorNext software updates for this release
l See the Upgrade the System (Upgrade Firmware) for the instructions for upgrading system firmware
Fixed Issues and Enhancements for StorNext 6061Note StorNext 6061 replaced previous 6x StorNext releases and firmware upgrade files will only be provided for StorNext 6061 or later
Note Spectre and Meltdown vulnerabilities were not addressed in this release
CR Number SR Number(s) Description
71394 0421219 Can now successfully install a Mellanox ConnectX-3 VPI InfiniBandEthernet card in the system The MLNX_OFED HBA driver was replaced for StorNext 6061 The new driver allows the Mellanox HBA card to be configured
71350 na For dual-server node and for NAS clustered systems after upgrading the system to 6x StorNext file systems (snfs) mounts correctly on server node 2 when over a billion files are present on the snfs
Table 8 Fixed IssuesEnhancements for StorNext 6061
Fixed Issues Notes and Enhancements ndash StorNext 6x
Xcellis Workflow Director Release Notes 15
CR Number SR Number(s) Description
71346 na For systems running StorNext 53x upgrading to StorNext 6061 and configured as a single-node NAS cluster (a cluster of one) running NAS 121 the NASController software should first be upgraded to 141 or later but will not cause the firmware (fw) upgrade to fail
Note Before applying firmware upgrades for NAS-clustered systems Quantum recommends upgrading to the latest version of the Appliance Controller
l See the StorNext 6061 Release Notes for information about StorNext software updates for this release
l See the Upgrade the System (Upgrade Firmware) for the instructions for upgrading system firmware
Fixed Issues and Enhancements for StorNext 606Note StorNext 6061 replaced previous 6x StorNext releases and firmware upgrade files will only be provided for StorNext 6061 or later
This release includes the following software updates
l CentOS 74 for the server node(s)
l CentOS 74 SAN and DLC clients
l Appliance Controller 201 (and supports CentOS 74)
The following new appliance-specific code fixes and enhancements are included in this release
CR Number SR Number(s) Description
71002 na RAS ticket for an IPMI controller failure is no longer shown after the firmware upgrade
70902 na The system prevents firmware upgrades when NAS clusters are configured for Appliance ControllerNAS versions prior to 141 You will stil need to upgrade the Appliance ControllerNAS prior to applying the firmware upgrade See Upgrade Required for Clustered StorNext NAS Systems
70773 na The etcresolvconf configuration file is now included when collect files are created (in the targz file at usradictmpplatformhw-infoetcresolvconf)
Table 9 Fixed IssuesEnhancements for StorNext 606
Fixed Issues Notes and Enhancements ndash StorNext 6x
Xcellis Workflow Director Release Notes 16
CR Number SR Number(s) Description
70770 na aiWARE agent failures are no longer included in system log files for non-aiWARE CentOS7-based systems
70455 na For systems with multiple Ethernet NIC ports active when an Ethernet cable is unplugged from a port the admin alert now contains the affected NIC port number
70340 na PHP upgraded to php56w-5633-1
70338 na Dracut updated to dracut-033-502el7 included with CentOS74
70335 na YUM help output is no longer displayed in varlogmessages during fw upgrade failures
70291 na A root mailbox junk filter is included in this release A new daily cron job trims mailboxes with over 1000 email messages amp improves functionality of the logrotate cron job
70208 na Admin alerts are now created in the StorNext GUI when NIC ports go down
70194 na For systems using snmpwalk the time taken by SNMP Agent MIB processing has been greatly reduced
70178 na During the system firmware upgrade the current etcmultipathconf file now remains on the system as-is
69478 na Update server code to CentOS 74
l See the StorNext 606 Release Notes for information about StorNext software updates for this release
l See the Upgrade the System (Upgrade Firmware) for the instructions for upgrading system firmware
Fixed Issues and Enhancements for StorNext 6051Note StorNext 6061 replaced previous 6x StorNext releases and firmware upgrade files will only be provided for StorNext 6061 or later
There are no new appliance-specific code fixes or enhancements for this release However you can reference the following
l See the StorNext 6051 Release Notes for information about StorNext software updates for this release
l See the Upgrade the System (Upgrade Firmware) for the instructions for upgrading system firmware
Fixed Issues Notes and Enhancements ndash StorNext 6x
Xcellis Workflow Director Release Notes 17
Fixed Issues and Enhancements for StorNext 605Note StorNext 6061 replaced previous 6x StorNext releases and firmware upgrade files will only be provided for StorNext 6061 or later
Because of security vulnerabilities found in testing (highlighted below in CR 69866 below and CR 69869 below) Quantum recommends upgrading to 6051 or later
The following new appliance-specific code fixes and enhancements are included in this release
CR Number SR Number(s) Description
70300 385040 Simultaneous Fibre Channel-connected QSX and Netapp arrays attached to Quantum appliances no longer prevent system boot after firmware upgrades to 605 from supported 5x releases The basedefault SCSI enclosure drivers provided by CentOS which previously caused this issue are no longer referenced in system configuration files The specific drivers used for QXS and NetApp array FC connections are used instead
69869 na Updated Apache HTTPD to the latest CentOS 69 and 74 versions to resolve some HTTPD security vulnerabilities found by Nexpose
69866 na Updated php56w from version 5629-1 to version 5631-2 to resolve some PHP security vulnerabilities found by Nexpose
69506 na RAS tickets are no longer created when the system is unable to obtain fan status from the iDRAC
Note This fix applies to CentOS7 (Xcellis Workflow Director (R630) Xcellis Foundation aiWARE for Xcellis Embedded (DAE) aiWARE for Xcellis Standard and High Performance Artico (R630) and Xcellis Workflow Extender (R630) systems) only
Table 10 Fixed issuesEnhancements for StorNext 605
Fixed Issues Notes and Enhancements ndash StorNext 6x
Xcellis Workflow Director Release Notes 18
CR Number SR Number(s) Description
69492 na The RAS ticket for a failed server drive now contains several new attributes including the drive size as shown in this example of a failed drive
Node 1 The Drive PHYSICAL_DISK_011 has failed Capacity 46525GB Media HDD Encrypted NA Vendor DELL(tm) VendorPN MY01KWKJ1255523P091GA0 VendorSN WD-WMAYP3387029 Model WDC WD5003ABYX-18WERA0 PowerStatus Spun Up Status Offline
69473 na Updated the build to include a new CentOS 7 (73) kernel with an additional patch This corrects an issue int`roduced with the RHEL73 kernel that failed to display and manipulate ACLs from NFS NAS clients
Note This fix applies to CentOS7 (Xcellis Workflow Director (R630) Xcellis Foundation aiWARE for Xcellis Embedded (DAE) aiWARE for Xcellis Standard and High Performance Artico (R630) and Xcellis Workflow Extender (R630) systems) only
67895 na Added elapsed time for firmware upgrades in the StorNext GUI upgrade firmware status page and in the upgrade_progress log file
66799 322817 342909 362343
In the StorNext GUI the Reports gt Hardware page now correctly shows system board information for node1 and node2 after StorNext 605 installation StorNext
l See the StorNext 605 Release Notes for information about StorNext software updates for this release
l See the Upgrade the System (Upgrade Firmware) for the instructions for upgrading system firmware
Fixed Issues and Enhancements for StorNext 6011Note StorNext 6061 replaced previous 6x StorNext releases and firmware upgrade files will only be provided for StorNext 6061 or later
The following new appliance-specific code fixes and enhancements are included in this release
Fixed Issues Notes and Enhancements ndash StorNext 6x
Xcellis Workflow Director Release Notes 19
CR Number SR Number(s) Description
69706 363354 After rebooting the system configured with iSCSI connections the iSCSI connection will now re-establish correctly and StorNext file systems will also restart
Table 11 Fixed IssuesEnhancements for StorNext 6011
Note The StorNext 6011 release only applied to R630 server models (which run on CentOS7) and not R520 server models (which run on CentOS6)
l See the StorNext 601 Release Notes for information about StorNext software updates
l See the Upgrade the System (Upgrade Firmware) for the instructions for upgrading system firmware
Fixed Issues and Enhancements for StorNext 601Note StorNext 6061 replaced previous 6x StorNext releases and firmware upgrade files will only be provided for StorNext 6061 or later
The StorNext 601 for Appliances release adds support for aiWAREVeritone running on Xcellis Workflow Director systems These systems are configured with aiWAREVeritone with the aiWARE for Xcellis Embedded (DAE) product name
CR Number SR Number(s) Description
69365 na Enable the aiware-agent so it starts on boot
69396 na Disable the docker-prune service and timer on node 1 since the docker service is disabled
69388 na Include signed Samba 4212 rpms for CVE-2017-11103 in the build
69374 358555 Linux NFS servers operate correctly when an exported SNFS file system was configured as case-insensitive
Table 12 Fixed IssuesEnhancements for StorNext 601
l See the StorNext 601 Release Notes for information about StorNext software updates for this release
l See the Upgrade the System (Upgrade Firmware) for the instructions for upgrading system firmware
Fixed Issues and Enhancements for StorNext 60Note StorNext 6061 replaced previous 6x StorNext releases and firmware upgrade files will only be provided for StorNext 6061 or later
The following table lists the fixed issuesenhancements for StorNext 60
Known Issues ndash StorNext 6x
Xcellis Workflow Director Release Notes 20
CR Number SR Number(s) Description
68994 na Once 10 GbE ports are configured for use as iSCSI ports they are reserved for iSCSI configuration use only
69158 na Gateway network menu for 40GbE ports supported as individual non-bonded ports
68943 na Xcellis and Artico single-servers Provisioning Storage option no longer prompts to rescan secondary node for new LUNs
68961 na sernet samba 4212-20 security patch version for NAS 130 - 141 included in 60 appliance code
Table 13 Fixed IssuesEnhancements for StorNext 60
Notes l See the StorNext 60 Release Notes for information about StorNext software updates for this release
l See the Upgrade the System (Upgrade Firmware) for the instructions for upgrading system firmware
Known Issues ndash StorNext 6xThis section lists the known issues that could potentially affect your system
CR Number
SR Number
Description
77317 na Adding a DAE virtual machine to a file system created on a QXS or P-Series LUN can create a RAS alert stating
Excessive fragmentation detected in file DAE_Boot_Disk_locationpk-DAE-vmqcow2 inode 0x4e800000ef0b19 (decimal inum 15665945)
Workaround
While this issue is not currently fixed the message itself may be disabled To disable the RAS alert change the value of the extentCountThreshold parameter in the file system configuration file to 0 For information about file system configuration files see
httpsqsupportquantumcomkbflareContentstornextSN6_DocSiteDefaulthtmGuide_TuningTopicsExample_FSM_Configuratiohtm
Known Issues ndash StorNext 6x
Xcellis Workflow Director Release Notes 21
CR Number
SR Number
Description
76675 543978 If your system is running as a FlexSync host and you upgrade StorNext it also installs the latest version of FlexSync If there are other systems configured as FlexSync hosts FlexSync will not function on those other systems until they are upgraded to the latest available FlexSync version
Error message displayed
Host Unreachable Upgrade Required
The same FlexSynch version must be installed on ALL FlexSync hosts (see Can different versions of FlexSync be installed or upgraded within a configuration on the FlexSync Documentation Center)
Workaround
Upgrade FlexSync on ALL FlexSync hosts See Upgrade FlexSync in the FlexSync Documentation Center
7635376354
na Mellanox Connect CX4-Lx cards can fail to operate if configured for 25 GbE connections and running 631
Note This issue has been fixed in 6311 See 76353 on page 6 in the Fixed Issues section Upgrade recommended
Workaround
Upgrade to StorNext 6311
Known Issues ndash StorNext 6x
Xcellis Workflow Director Release Notes 22
CR Number
SR Number
Description
74024 470777 479905 The following applies to Xcellis Workflow Director (R630) systems ONLY It does not
apply to other server model namesgenerations
Upgrade between StorNext releases prior to 621 removes custom Infiniband configuration settings
Note This issue was Fixed in 630 Upgrades to StorNext 630 DO NOT experience this issue If this has not happened to your system you can upgrade to 630 without this issue affecting your systemNote Because the workaround is required after every upgrade to StorNext releases prior to 621 Quantum strongly recommends you to upgrade the system to 621 or later prior to contacting Quantum Support about this issue so the fix will be applied to a release that no longer removes the Infiniband settings and it only has to be applied once
After upgrading to 621 or later (prior to 630)
If you have this problem and have upgraded the system to 621 or later contact Quantum Support and reference TSB (Technical Service Bulletin) 3065
Once the system is upgraded to 621 and the fix is applied future upgrades will perform successfully and will not remove the Infiniband configuration settings
74571 na For StorNext 630 and Appliance Controller 230 there is a situation where the firmware upgrade process pre-stages Appliance Controller upgrade file(s) on server node 1 but the same files are not pre-staged to server node 2 which can create a failure for firmware upgrades This can happen if you click Validate on the firmware upgrade page or the function that checks for upgrade dependencies when you click Activate on the firmware upgrade page
If this happens and Node 2 was the master node of a NAS cluster you will not be able to run the Appliance Controller upgrade local command on node 2 to upgrade to the current controller release pre-staged on the server and you will have to manually move the nas rpms from the varupgrade or scratchsavedNAS directory on node 1 to the varupgrade directory on node 2 and upgrade the NAS cluster manually from Node 2
See httpqsupportquantumcomkbFlareContentappliancesACCDocSiteUpgradesACC_Upgradeshtm
Note See About firmware upgrades and pre-staged Appliance Controller upgrades for server nodes on page 48 for information about how these files are pre-staged to enable you to upgrade Appliance Controller manually separate from the firmware upgrade process
Known Issues ndash StorNext 6x
Xcellis Workflow Director Release Notes 23
CR Number
SR Number
Description
74202
67955
HYDRA-4326
na If NAS is configured on the system and StorNext services are stopped StorNext services can fail to stop completely This can block server fail-over and potentially leaves managed file systems without running FSMs
See 74202 ndash StorNext services can fail to stop completely when NAS is Configured and StorNext services are stopped on page 48 for an in-depth explanation of the issue and several alternate workarounds
73688 na When the var directory on the appliance gets full the following serious errors can occur
l Network communication errors on the server node
l iDRAC is not accessible
l The server node gets stuck during reboot and require a physical power cycle
See also Leave Space on Appliance File Systems on the Appliance InfoHub
Workaround
Keep additional space available on var
73485 469076 The qxsarray show feature in the Appliance Controller console (CLI) no longer returns the following error Operation failure Failed to retrieve all QXS array configuration data Space required after the Public Identifier line 1 column 47 (E-2003)
73036 naThe following does not apply to Xcellis Workflow Director Gen 2 systems
Systems running Java 171 181 or later are no longer able to launch the iDRAC Virtual Console using StorNext 620 or later due to an increase in Java security
Workaround
Uninstall the current Java version and install Java 170 iDRAC should work properly again
Known Issues ndash StorNext 6x
Xcellis Workflow Director Release Notes 24
CR Number
SR Number
Description
72726 3734274 336772 409963 430039 455314
If you run fsmedscan -R the root file system on the active server node (typically node 1) can fill up and the node will become unresponsive This is because fsmedscan creates copious log files and by default places them in tmplogs which will eventually fill up the root system drive
Note This issue was fixed in StorNext 62 See 70915 on page 11 in the Fixed Issues section Upgrade recommended
Workarounds
l Upgrade to StorNext 62
l Prior to 62 you could create a symbolic link from tmplogs to something like scratchfsmedscan_logs since scratch should contain plenty of available space
72591
72583
na Issue
When setting the IPMI network settings you may see errors after applying changes If this happens you will see something similar to the following (in green)
Note This issue affects Gen 2 appliances only
Setting LAN IP Address to 10172152
Setting LAN Subnet Mask to 25525500
LAN Parameter Data does not match Write may have failed
Setting LAN Default Gateway IP to 101721254
LAN Parameter Data does not match Write may have failed
Set User Password command successful (user 2)
Waiting for IPMI to be rebooted (30 sec)
IPMI did not properly reset within 30 seconds
Done setting up IPMI
WorkaroundThere is no current workaround for display of these error messages However this message is benign and can be ignored Even though there appears to be an issue the IPMI values are actually applied to the system and the IPMI does open using the new IP settings
Known Issues ndash StorNext 6x
Xcellis Workflow Director Release Notes 25
CR Number
SR Number
Description
71809 431853 snaFileSystemActive OID can return a bad data type for SNMB informationNote This issue was fixed in StorNext 62 See 71809 on page 11 in the Fixed Issues section Upgrade recommended
Workaround
Upgrade to StorNext 62
71708 440392 Issue
When slot PCI addresses change need to reflect their new location in the systemNote This issue was fixed in StorNext 610 See 71708 on page 13 in the Fixed Issues section Upgrade recommended
WorkaroundUpgrade to StorNext 610 There is no other workaround available
71469 421581 Issue
Firmware upgrade failed during the OSUpdate step of the upgrade process due to insufficient space on localroot filesystem
Note Free space is now checked before continuing with the firmware upgrade in StorNext 610 See 71469 on page 13 in the Fixed Issues section Upgrade recommended
Workaround
1 Determine which directory on the root directory has files that can be removed
df -h
Notice any directories you have created that consume GBs of data
2 Remove files so you ensure the system has at least 5 GB of free space for the firmware upgrade to use before attempting the upgrade
3 Restart the failed upgrade
Known Issues ndash StorNext 6x
Xcellis Workflow Director Release Notes 26
CR Number
SR Number
Description
71328 403647 Issue
Systems can a very long time to get from POST until the filesystems are mounted with large LUNs present since all devices are added to the sysfs and on udev During boot a message similar to the the following is displayed
mam-node-1 udevd-work[39397] inotify_add_watch(6 devdm-2699 10) failed No space left on device
Note This issue was fixed in StorNext 61 See 71328 on page 13 in the Fixed Issues section Upgrade recommended
Workaround
Upgrade to StorNext 610
OR
Increase the amount of notify watches Do the following
1 Run the following command
cat procsysfsinotifymax_user_watches
This should return a value similar to
10240
2 Edit the etcsysctlconf file to allow for a longer boot time
fsinotifymax_user_watches=32768
71299 456036 459515 460901
Running a Nexpose scan on systems running StorNext 606x can result in a fs_copymandfs_moverd core dump
Note This issue was fixed in StorNext 62 See 71299 on page 11 in the Fixed Issues section Upgrade recommended
Workarounds
l Exclude the system from security scans
l Upgrade to StorNext 62
Known Issues ndash StorNext 6x
Xcellis Workflow Director Release Notes 27
CR Number
SR Number
Description
71230 414352 429898
IssueNexpose security scan reports HTTP Header is missing on port 443
Note This issue was fixed in StorNext 61 See 71230 on page 13 in the Fixed Issues section Upgrade recommended
WorkaroundUpgrade to StorNext 610 There is no other workaround available
71125 410540 Issuevarlogmessages can omit expected information beginning with a specific point in time
Note This issue was fixed in StorNext 61 See 71125 on page 13 in the Fixed Issues section Upgrade recommended
Workaround
To correct this issue
Upgrade to StorNext 610
OR
1 Remove imjournalstate
rm -f varlibrsyslogimjournalstate
Restart rsyslog
sbinservice rsyslog restart
Then rotate the log
$logrotate etclogrotateconf
2 If the logging stops again disable the imjournal input To do this edit the etcrsyslogconf file and comment out OmitLocalLogging on as shown
$OmitLocalLogging on
Known Issues ndash StorNext 6x
Xcellis Workflow Director Release Notes 28
CR Number
SR Number
Description
71012 0399206 IssueThe StorNext Connect GUI shows the status of an appliance server node being undefined and is displayed as a gray dot on the dashboard as a result of a Fibre Channel card being part of the expected hardware installed for the system
Note This issue was fixed in StorNext 61 See 71012 on page 13 in the Fixed Issues section Upgrade recommended
Workaround
Upgrade to StorNext 610
OR
Remove fibre_channel from the list of components and run monitor_appliancepy Next go to the StornStorNext ConnectDashboard and refresh the page The system status will be displayed as a green dot on the Dashboard
70854 383195 Issueblacklist_exceptions and entries for EMCNetApp arrays are not included in the default multipathconf file to support EMC VNX7600 EMC VNX8000 EMC VMAX 20k and NETAPP FAS6240 arrays
Note This issue was fixed in StorNext 61 See 70854 on page 13 in the Fixed Issues section Upgrade recommendedNote See also the new How to Modify the multipathconf File for External Storage Arrays page released for StorNext 610
Workaround
Upgrade to StorNext 610 and modify the new EMC andor NetApp array entries in the multipathconf file and move it to the correct directory on your system
OR
Manually update the multipathconf file by hand for the array settings you need and move it to the correct directory on your system
Known Issues ndash StorNext 6x
Xcellis Workflow Director Release Notes 29
CR Number
SR Number
Description
70649 398896 IssueThe Promise array path_checker definition needs to be updated in the reference multipathconf file provided with our systems and firmware upgrades
Note This issue was fixed in StorNext 61 See 70649 on page 14 in the Fixed Issues section Upgrade recommendedNote See also the new How to Modify the multipathconf File for External Storage Arrays page released for StorNext 610
WorkaroundUpgrade to StorNext 610OR
Edit the multipathconf file and change the path_checker value from its current setting (such as readsector0) to tur for the Promise Array definition
70588 396789 Issue
tsunamilog and servicelog files can become large are now rotated to prevent these logs and snapshot files becoming too large and can significantly increase the time it takes to generate snapshot files
Note This issue was fixed in StorNext 61 See 70588 on page 14 in the Fixed Issues section Upgrade recommended
WorkaroundUpgrade to StorNext 610OR
Manually trim data from these log files when needed
70526 398061 396903 398206 397045 399232 and 401331
Issue
Kernel Page Table Security Problems CVE-2017-5753 CVE-2017-5715 and CVE-2017-5754
Note This issue was fixed in StorNext 61 See 70526 on page 14 in the Fixed Issues section Upgrade recommended
WorkaroundUpgrade to StorNext 610 There is no other workaround
Known Issues ndash StorNext 6x
Xcellis Workflow Director Release Notes 30
CR Number
SR Number
Description
71093 na Issue
Unused NIC ports can be reported as down in an admin alert during appliance firmware upgrades which creates about 20 RAS emails
Note This issue was fixed in StorNext 61 See Fixed Issues Notes and Enhancements ndash StorNext 6x on page 5 in the Fixed Issues section Upgrade recommended
Workaround
Upgrade to StorNext 610 There is no other workaround
Known Issues ndash StorNext 6x
Xcellis Workflow Director Release Notes 31
CR Number
SR Number
Description
72287 72286 72277
naThis applies to Xcellis Workflow Director (R630) systems
Issue
After an appliance is upgraded to StorNext 610 (see Upgrade Firmware) sometimes one of the nodes on the NAS cluster is not able to re-join the cluster
Log on to the Appliance Controller and issue the following command
nascluster show
If the node has not joined the NAS cluster the following message is displayed in the controller output
stornext initiated stop
Workaround
1 From the command line of the system issue the following command where ltmyfsgt is the mount path of the file system you would like to join to the cluster
nascluster join ltmyfsgt
The server should be rejoined to the cluster
2 Run the following command
nascluster show
You should see the following in the output (in bold green)
NAS Cluster IP 1010100100eth0 Master No SNFS Root ltmyfsgt Joined Yes
Known Issues ndash StorNext 6x
Xcellis Workflow Director Release Notes 32
CR Number
SR Number
Description
71644
Issue
After the Apply button is clicked during a firmware upgrade on the StorNext GUI there are certain instances where the firmware upgrade will fail to complete and server node 2 may be upgraded but node 1 will fail to upgrade causing a mismatch of StorNext releases between the nodes When this happens the Firmware Upgrade page in StorNext an error message similar to the following may display when the firmware upgrade is being applied
Note This issue was fixed in the upgrade code for StorNext 610 See Fixed Issues Notes and Enhancements ndash StorNext 6x on page 5 in the Fixed Issues section Upgrade recommended
Workaround
The secondary node web service timeout needs to be increased from the default value 5 minutes300 seconds) to 10 minutes600 to account for additional processing in the pre-upgrade script See Change the componentproperties Timeout Setting on page 55 for how to change this setting and begin the firmware upgrade process again
Known Issues ndash StorNext 6x
Xcellis Workflow Director Release Notes 33
CR Number
SR Number
Description
71599 425749 Issue
For systems being upgraded from StorNext 606 to 6061 from a fresh install of the server with a StorNext 606 image the firmware upgrade to support some expansion cards is not applied Future card changes in the system will not get automatically configured since the firmware and autoconfig services which support some cards were disabled after the upgrade toStorNext 6061
You can verify this issue by logging into the command line of the server node (or on both servers for dual-server node systems) with the stornext user account and stornext user password and issuing the following command from the command line of the system If you see the Virtual (as shown here in green) your system is affected by this issue
Example
optDXiutilseer VendorModel
Virtual
Note This has been fixed in StorNext 610 See 71599 on page 13 in the Fixed Issues section Upgrade recommended
Workaround
If the system has not been upgraded yet
1 Log in to the command line of a server node See Launch the Command Line
2 Issue the following command This will correct the initial fresh install issue and avoid a subsequent upgrade issue
cp -f optDXitheSeervendorinfoconf13G optDXitheSeervendorinfoconf
If the system was fresh installed with 606 and then upgraded to 6061 the following needs to be done
a Remove the three touch files
rm varoptDXifwb-onboot-disable
rm varoptDXihwdetect-onboot-disable
Known Issues ndash StorNext 6x
Xcellis Workflow Director Release Notes 34
CR Number
SR Number
Description
rm varoptDXistartup_autoconfig_disable
b Reboot the node so the Firmware Bundle updates will be performed and autoconfig and hwdetect will be enabled and run
3 Repeat these steps for the other server node (dual-server node systems only)
71507 421334 Issue
Firmware upgrade did not upgrade PHP on server nodes Note This has been fixed for StorNext 610 See 71507 on page 13 in the Fixed Issues section Upgrade recommended
Workaround
1 Log in to the command line of a server node ( see Launch the Command Line) and upgrade php56w
cd scratchsavedPHP
ls
php56wUpgrade-5633-1tgz php56wUpgradetgz
tar xzf php56wUpgrade-5633-1tgz
rpm -Uhv php56wrpm
Updating installing
1php56w-common-5633-1w7 [ 4]
2 Remove the upgrade warning touch file
rm -f varDXiupgrade_notify rpm tgz
rpm -q php56w
php56w-5633-1w7x86_64
3 Repeat for the other server node (for dual-node systems)
Known Issues ndash StorNext 6x
Xcellis Workflow Director Release Notes 35
CR Number
SR Number
Description
71464 na Issue
Platform upgrade is currently allowed to the StorNext 6061 release for systems currently configured and running StorNext 53x and as a clustered NAS system running NAS 12x Even though StorNext upgrades the NAS software does not upgrade NAS is left running 125 and NASController software 201 is incorrectly staged for upgrade in varupgrade
Workaround
To upgrade NAS after the StorNext firmware upgrade
1 Delete the contents of varupgrade on both nodes (for dual-node systems)
2 Download the offline 1413 NAS upgrade rpm
3 Copy the 1413 NAS upgrade file to varupgrade on the NAS master and other node as well
4 Upgrade NAS to 1413 (see Upgrades for the offline upgrade procedure)
5 Delete the contents of varupgrade on both nodes (for dual-node systems)
6 Copy the offline 201 NASController software upgrade rpm saved in scratchsavedNAS to varupgrade
7 Upgrade the NASController software to 201 (see Upgrades for the offline upgrade procedure)
71394 0421219 IssueNote This issue affects R630 (CentOS7) systems only not R520 (CentOS6) systemsNote This issue was fixed in StorNext 6061 See 71394 on page 14 Upgrade recommendedNote For StorNext 606 the included the MLNX_OFED HBA driver for Mellanox Connect X-3 VPI InfiniBandEthernet cards was incompatible with the system kernel version Because of this the software failed to install resulting in missing Mellanox software components needed to configure the card
Workaround
l For Systems prior to StorNext 606 the correct driver was shipped with StorNext so no further action is necessary for Mellanox HBA card configuration
l For systems running StorNext 606 upgrade to StorNext 6061 for the correct driver version for this card
Known Issues ndash StorNext 6x
Xcellis Workflow Director Release Notes 36
CR Number
SR Number
Description
71350 na IssueNote This issue applies to dual-server node systems onlyNote This issue was fixed in StorNext 6061 See 71350 on page 14 in the Fixed Issues section Upgrade recommended
For 606 systems StorNext file systems (snfs) can potentially fail to mount on the secondary server node (typically server node 2) when over a billion files are present on the snfs This could occur when cvfs is stopped and then restarted after a hard stop of the system HA failovers or when the primary server node restartsreboots
If the snfs had file locking enabled and was used to create a NAS cluster then the server node will also be shown in the not ready state on the NAS cluster
Workaround
If your system was upgraded to a StorNext release earlier than 6061 and your system exhibits this issue heres the workaround
Do the following on the server node that did not mount the file system
Mount the File System on the Server Node
1 Log in to node 2 (or node 1 if currently acting as the secondary node) See Launch the Command Line
2 Manually mount the file system on the server
Example
mount snfs1-fs
Re-Join the Server to the NAS Cluster if Needed
If the server is part of a NAS cluster
1 Log into the NAS controller (see Acces the Appliance Controller Console) and join that node to the cluster
Example
nascluster join stornextsnfs1-fs
2 Ensure this is joined by running the following command
nascluster show
Known Issues ndash StorNext 6x
Xcellis Workflow Director Release Notes 37
CR Number
SR Number
Description
Look for the following (in green bold) in the output (ellipses indicate additional information not shown) Note that snfs1-fs is the file system that did not mount before
NAS Cluster IP 1065166215em2 Master No SNFS Root stornextsnfs1-fs Joined
1 1065166216 (Joined MDC) test-bh3amdhquantumcom
2 1065166215 (Joined MDC) test-bh3bmdhquantumcom
71346 na IssueNote This was fixed in StorNext 6061 See 71346 on page 15 in the Fixed Issues section Upgrade recommended
For systems running StorNext 53x and NAS 12x upgrading to 606 or later
Workaround
Upgrade to Appliance ControllerNAS 141 or later prior to upgrading to StorNext 6x or later
71333 na Issue
Caution A system running StorNext 606 or later with a clustered NAS environment should not run NASAppliance Controller 130 or earlier Running these configurations may produce unpredictable results
If you are running StorNext 606 with NAS 130 or earlier you might experience one of the following scenarios
1 Controller configuration commands are not available for iSCSI and SNMP configuration even though the Appliance Controller Doc Center states that these commands are available
2 If your system is running with NAS enabled NAS may not work properly and you will have to upgrade NAS locally with the latest Appliance Controller release
Workaround
An upgrade to the Controller software is REQUIRED when running StorNext 606 See Appliance Controller Upgrades
Known Issues ndash StorNext 6x
Xcellis Workflow Director Release Notes 38
CR Number
SR Number
Description
71002 na IssueAfter upgrading to StorNext 605 and StorNext 6051 systems a RAS ticket might be created for an IPMI failure
Note This was fixed in StorNext 606 See 71002 on page 15 in the Fixed Issues section Upgrade recommended
Workaround
This RAS message is benign and can be ignored Upgrade to StorNext 606 to correct this issue
70902 na IssueStorNext 606 requires the appliance controller to be upgraded for clustered NAS environments running Appliance ControllerNAS versions earlier than 141 before upgrading appliance firmwareIf you attempt to upgrade the system to StorNext 606 prior to upgrading the controller the appliance upgrade will fail and the system will generate an Operation failure RAS ticket in the StorNext GUI on the server (for both server nodes on dual-node systems) the upgrade log will include a message about the upgrade attempt and an admin alert will be generatedExample (dual-node system with NAS 130 installed)
10
2018-02-22 151222 PST
136
Upgrade Minimum NAS version not satisfied for a clustered system Node 2 NAS clustering is enabled but installed NAS version is 130 NAS must be upgraded to version 141x before this upgrade is allowed A NAS 1413 offline upgrade bundle has been placed in scratchsavedNAS
Workaround
Upgrade Appliance ControllerNAS to 141 or later prior to upgrading the system See How to Upgrade on the Appliance Controller Documentation Center
Known Issues ndash StorNext 6x
Xcellis Workflow Director Release Notes 39
CR Number
SR Number
Description
70338 na Issue
During a firmware upgrade the secondary server node (typically Node 2) will upgrade successfully but the other server node (typically Node 1) can become stuck on reboot and unable to restart If you dont have an SSH session open when this happens you will notice that the server node will not respond for a long time If you happen to have an SSH session open during the upgrade you will see an error message similar to the following shown repeatedly on-screen
[ 189398035] dracut-initqueue[402] Warning dracut-initqueue timeout - starting timeout scripts
Workaround
The server node will have to be manually upgraded Contact Contacting Quantum on page 70 and refer them to TSB 3015
Known Issues ndash StorNext 6x
Xcellis Workflow Director Release Notes 40
CR Number
SR Number
Description
70300 385040385789
Issue
After a firmware upgrade the system cannot boot
This does not need to be applied to all systems connected to storage arrays only impacted systems as described here
Systems Impacted
l This ONLY affects systems upgrading from StorNext 5x releases to 6x (prior to 605)
l This ONLY affects systems upgrading that are Fibre Channel-connected to BOTH NetApp and QXS arrays
Note This issue was fixed in StorNext 605 See 70300 on page 17 If you are upgrading to StorNext 605 you will not see this issue and do not have to perform this workaround
Messages on the boot screen and in the KDUMP (the trace of server boot activities on the sysfs) shows messages similar to
Wrong diagnostic page asked for 7 got 0
OR
Wrong diagnostic page asked for 10 got 0
Workaround
DO NOT upgrade your system to StorNext 6x before first applying the workaroundSee Server Boot (QXSNetApp)
Known Issues ndash StorNext 6x
Xcellis Workflow Director Release Notes 41
CR Number
SR Number
Description
70287 na Issue
StorNext upgrades can fail due to a slowdown of the StorNext HA file system (HAFS) when attempting to apply upgrade firmware to StorNext 6x from supported StorNext 5x and 60x releases in the StorNext GUI This only occurs when attempting to upgrade the system while jobs with a lot of metadata changes are running This can happen when
l The system is running with StorNext 6x file systems with metadata archive enabled and heavy client activity
l The sytem is running with StorNext 50x file systems with the restore journal enabled and heavy client activity
Workaround
DO NOT upgrade your system to StorNext 6x before first applying one of the workarounds below if your system is processing a lot of metadata jobs
l To fix this issue edit the componentproperties file on one node of the system and increase the wsapplyfwupgradetimeout value to 2 hours
See Change Upgrade Timeout Setting
70178 Issue
The multipathconf file is overwritten for StorNext 531 through 605x Any custom-configured settings added to the file for those StorNext releases are available in etcmultipathconfbak The upgrade code added correct multipath settings to the etcmultipathconf file required for SAS-attached NetApp metadata arrays
Note The overwrite issue was changed in StorNext 606 See 70178 on page 16 in the Fixed Issues section Upgrade recommended
Workaround
1 If you dont have a backup of your multipathconf file you will have to add the settings into the file
2 If you have a backup of the custom multipath settings copy the settings into the new multipathconf file using a command-line editor like vi
Known Issues ndash StorNext 6x
Xcellis Workflow Director Release Notes 42
CR Number
SR Number
Description
70067 na Issue
CentOS 7 systems display log files with the journalctl command Any commands executed as the rootsh user are logged to the system log file A syslog filter sends all rootsh log commands to varlogrootshell This causes excessive information to be captured in the journalctl log file and makes the log file difficult to read
WorkaroundThere is a script to use which removes unnecessary command line output from the syslog file for CentOS7 systems running StorNext 605See the journalctl Filter ScriptFor StorNext releases prior to 605 contact Contacting Quantum on page 70
Known Issues ndash StorNext 6x
Xcellis Workflow Director Release Notes 43
CR Number
SR Number
Description
69189 na IssueAfter upgrading to StorNext 60ndash6011 node 2 may report a hardware failure in the StorNext GUI
When clicked this hardware failure displays multiple fan failures on the System Board tab of the Reports gt Hardware Status in the StorNext GUI
Note This issue has been fixed in StorNext 605 See 69506 on page 17 in the Fixed Issues section Upgrade recommended
WorkaroundFor systems on StorNext releases prior to 605 do the following on node 2
1 Open an SSH connection to the appropriate server node and use the IP address assigned to the node on the Management or LAN Client network
Note Node 2 used for dual-node systems only
2 Log in to the command line using the following credentials
l User name stornext
l Password ltstornext user account passwordgt
Note password is the default password for the stornext user account If the password has been changed use the current password
3 Enter sudo rootsh to gain root user access
Known Issues ndash StorNext 6x
Xcellis Workflow Director Release Notes 44
CR Number
SR Number
Description
4 Enter the password for the stornext user account again
5 Enter the following
racadm racreset soft
6 Wait 5 to 10 minutes for the reset to complete
7 Refresh the StorNext GUI The hardware status will no longer display the error for node 2
68773 na Issue
If a configured bridge device assigned to a DAE virtual machine (VM) is removed on the Networking page of the StorNext GUI you will not be able to start the DAE VM
Workaround
If the virtual machine cannot be started because the bridge was removed do the following
1 Recreate the bridge in the StorNext GUI OR
a Open an ssh session to the command line of the system and run virsh edit ltvmnamegt This opens the ltvmnamegt file for editing using vi commands
b Remove the bridge entries from the XML file using vi commands
2 When finished making the changes enter the following to save the changes and exit the editor
wq
Known Issues ndash StorNext 6x
Xcellis Workflow Director Release Notes 45
CR Number
SR Number
Description
68729 na Issue
Systems which used the StorNext Connect Install App prior to StorNext 60 may encounter the message ntp not running when upgrading to or rebooting the system running StorNext 6x
Note This was fixed via an update to the Connect Install App (v8) Xcellis Workflow Director (R630) systems installed using v8 or later will not have this issue Upgrade is recommended However this does not fix the issue for Xcellis Workflow Director (R630) systems installed using the Connect Install App prior to v8
Workaround
See StorNext Connect NTP not Running
68075 na Issue
After upgrading to StorNext 60 from 522 and uploading new licenses the NAS cluster could not be enabled on one of the nodes because the Appliance Controller failed to start
Workaround
See Restart the Appliance Controller
67997 na Issue
For Xcellis Workflow Director systems configured with NAS failover for NFS clusters (NFS-HA) after StorNext services are restarted NAS shares are not accessible from NAS clients
WorkaroundTo fix this condition
1 Restart the NAS controller services on the NAS Master (See the Restart the Appliance Controller section
See Restart the Appliance Controller
2 Access the NAS shares using the nas_vip address from NAS clients
67729 na Issue
When upgrading to StorNext 60 systems running NAS clustered will not automatically upgrade NAS to version 141
Workaround
For these systems run the NAS upgrade before rather than after the StorNext 60 upgrade
Known Issues ndash StorNext 6x
Xcellis Workflow Director Release Notes 46
CR Number
SR Number
Description
66799 322817 342909 362343
Issue
On the StorNext GUI Reports gt Hardware page node1 system board information is shown but information for node2 is not after an upgrade to StorNext 5x and later
Note This issue is fixed in StorNext 605 See 66799 on page 18 in the Fixed Issues section Upgrade recommended
WorkaroundTo fix this issue create the usradicHAMsharedHwMonStatus directory on the primary server node (typically node 1) and restart the hwmond serviceSee Create the HW Monitor Directory
60614
na Issue
Your system and all other Connect-managed Linux StorNext SAN clients must have the latest Connector installed so that statistics can be passed to StorNext Connect If a system is managed by StorNext Connect and you upgrade the firmware on that system to StorNext 5 Release 530 firmware PRIOR to upgrading the StorNext Connect Connector the Volume Storage widget on the StorNext Connect Dashboard will display no data for those systems
Workaround
For steps to take to update the Connect Connector(s) before upgrading system firmware
See Update the StorNext Connect Connector before doing a firmware upgrade
For steps to take if you have already upgraded firmware but did not first update the Connector(s)
See Repair StorNext Connect After Upgrade
55384 na Issue
If dmnfsthreads is not set on mount nfsds may be over-commited when there are many NFS processes waiting for offline files
Workaround
For managed file systems serving NFS Quantum recommends using the dmnfsthreads=16 mount option This setting ensures that NFS remains responsive when Storage Manager is retrieving data from an archive tier
Known Issues ndash StorNext 6x
Xcellis Workflow Director Release Notes 47
CR Number
SR Number
Description
55318 na Issue
Strange UID on ACL when file created on non ads client
Workaround
All systems accessing the StorNext SAN or LAN clients or the NAS clients must be part of the same identity domain Accessing StorNext from different identity domains can result in inconsistent file ownership attributes as well as potential access problems
55220 na Issue(See CR Known Issues ndash StorNext 6x on page 20)
Workaround
na
54451 na IssueStorNext supports case-sensitive file names For configurations with different client types such as Windows and Mac sharing the same files the default case type may be different
WorkaroundThere currently is no workaround for this issue SMB is operating as expected
53486 425247 Srvclog RAS tickets are lost if the hafs (HA shared file system) is not mounted on the system
Note This issue was fixed in StorNext 62 See 53486 on page 12 in the Fixed Issues section Upgrade recommended
Workaround
Upgrade to StorNext 62
45702 na Issue
If you replace an HDD drive with an SSD or vice versa the StorNext GUI will show a status of Missing and an equivalent RAS ticket instead of displaying an Incompatible status
Workaround
Replacement drives must be the identical type of drive removed HDDs can only use HDD spares and SSDs can only use SSD spares Replacement drives must also be the same size or larger than the failed drive The array controller will generate errors if an incompatible drive is used as a replacement
Known Issues Workarounds and Additional Information
Xcellis Workflow Director Release Notes 48
CR Number
SR Number
Description
38128 1395540
IssueUsing the GUI while a large Media import is kicked off via the command line can cause the StorNext GUI to timeout or crash
Workaround
Wait until a bulk load from tape is finished prior to opening the StorNext GUI
Known Issues Workarounds and Additional Information
About firmware upgrades and pre-staged Appliance Controller upgrades for server nodesWhen NAS is enabled detected and is configured on a sever node as part of a NAS cluster and a firmware upgrade is attempted an offline targz file is copied into the scratchsavedNAS directory and is then unzipped and untarred into the varupgrade directory Based on the installed version of NAS on the system the appropriate valid upgrade bundle for NAS will be unpacked to varupgrade for the user to perform the upgrade If a multi-version upgrade is required then the next applicable version will be unpacked into varupgrade and you will be instructed to perform the cluster upgrade first and then retry the firmware upgrade If the cluster state of the node cannot be determined then it looks like no versions are unpacked on the system and the upgrade is aborted (in this case you would have to upgrade the cluster manually using instructions in the Appliance Controller Doc Center (see Appliance Controller Upgrades) and then retry the firmware upgrade
If NAS clustering is not configured the firmware upgrade will perform the direct upgrade to the current version of Appliance Controller shipped with the firmware upgrade
74202 ndash StorNext services can fail to stop completely when NAS is Configured and StorNext services are stoppedHow might this be seenThere are two basic scenarios where this might be exposed
Scenario 1When StorNext stops it signals NAS to vacate the StorNext file systems that NAS is using However if these file systems remain available for too long the Appliance Controller will attempt to automatically restart NAS services This is what happens in order
Known Issues Workarounds and Additional Information
Xcellis Workflow Director Release Notes 49
1 Restarting NAS services can resume use of StorNext resources
2 Resuming StorNext resources interferes with attempts to stop StorNext
3 Continued use of these StorNext resources can result in mounted StorNext file systems that do not have a running fsm process which blocks access to the StorNext file system
If experience this on your system temporarily stop NAS services
1 Log in to the command line of the server (as sudo rootsh)
Launch the Command Line With an SSH Utility a Open an SSH connection to the appropriate server and use the IP address assigned to the
node on the ManagementLAN Client network
b Log in to the command line using the following credentials
l User name stornext
l Password ltstornext user account passwordgt
Note password is the default password for the stornext user account If the password has been changed use the current password
c Enter sudo rootsh to gain root user access
d Enter the password for the stornext user account again
2 Stop NAS by executing the following command
usrcvfslibsnnas_control stop
3 Stop the Appliance Controller by executing the following command
usrlocalquantumbinsml_service_tool stop snnas_controller
4 When you have finished Restart NAS and the Appliance Controller
a Start NAS by executing the following command
usrcvfslibsnnas_control start
b Start the Appliance Controller by executing the following command
usrlocalquantumbinsml_service_tool start snnas_controller
Known Issues Workarounds and Additional Information
Xcellis Workflow Director Release Notes 50
Scenario 2If you need to stop the system during a maintenance window This is an extension of Scenario 1 but NAS must vacate the file systems for an extended period of time If NAS services are resumed when they should be suspended those service processes may interfere with maintenance operations
To affect both scenarios timers exist that you can adjust to extend the amount of time required between the stornext stop operation and before NAS services resume The timers are controlled by the following Controller Registry values
l nasheartbeatcheck_state_secs l stornext_servicestop_periodTo see what values are currently assigned enter
su sysadmin -c reg show nasheartbeatcheck_state_secs
to display the setting of the frequency interval of the NAS heartbeat state check or enter
su sysadmin -c reg show stornext_servicestop_period
to display the duration that StorNext services are stopped
Note By default both timers are set to 120 (in seconds=2 minutes)
WorkaroundsWorkaround 1If StorNext fails to stop due to NAS resource usage do the following
1 Log in to the command line of the server
Launch the Command Line With an SSH Utility a Open an SSH connection to the appropriate server and use the IP address assigned to the
node on the ManagementLAN Client network
b Log in to the command line using the following credentials
l User name stornext
l Password ltstornext user account passwordgt
Note password is the default password for the stornext user account If the password has been changed use the current password
c Enter sudo rootsh to gain root user access
d Enter the password for the stornext user account again
Known Issues Workarounds and Additional Information
Xcellis Workflow Director Release Notes 51
2 Verify that the StorNext file systems are mounted
grep cvfs procmounts
If any StorNext file systems are not mounted mount them now
3 Mount the HA shared file system
mount usradicHAMshared
4 Start fsm for each StorNext file system (shown below as ltFSNAMEgt) mounted on the server node
cvadmin -e start ltFSNAMEgt on localhost
5 Stop StorNext services
For CentOS7 systems enter
systemctl stop cvfs
For CentOS6 systems enter
service cvfs stop
6 To stop NAS enter
usrcvfslibsnnas_control stop
7 To stop the Appliance Controller enter
usrlocalquantumbinsml_service_tool stop snnas_controller
When you are ready restart the Appliance Controller and NAS services
8 To restart the Appliance Controller enter
Known Issues Workarounds and Additional Information
Xcellis Workflow Director Release Notes 52
usrlocalquantumbinsml_service_tool start snnas_controller
9 To restart NAS enter
usrcvfslibsnnas_control start
Workaround 2For Scenario 1 Quantum recommends that you extend the time period to a value of 10 minutes (600 seconds) for both variables Set a value that exceeds the amount of time necessary for typical StorNext shutdown
To set new values
1 Log in to the command line
Launch the Command Line With an SSH Utility a Open an SSH connection to the appropriate server and use the IP address assigned to the
node on the ManagementLAN Client network
b Log in to the command line using the following credentials
l User name stornext
l Password ltstornext user account passwordgt
Note password is the default password for the stornext user account If the password has been changed use the current password
c Enter sudo rootsh to gain root user access
d Enter the password for the stornext user account again
2 Change the frequency interval of the NAS heartbeat state check to 600 seconds (10 minutes) Enter
su sysadmin -c reg set nasheartbeatcheck_state_secs 600
Note This is run with a temporary log in to the Appliance Controller as the sysadmin user
3 Change the duration that StorNext services are stopped to 600 seconds (10 minutes) Enter
Known Issues Workarounds and Additional Information
Xcellis Workflow Director Release Notes 53
su sysadmin -c reg set stornext_servicestop_period 600
4 Note This is run with a temporary log in to the Appliance Controller as the sysadmin user
Workaround 3For Scenario 2 to eliminate the confusion of setting a long duration for a maintenance window and then having to change the values back again to a shorter value again you can simply stop NAS services and the Appliance Controller and then restart these services when you are finished
To stop the services and restart them
1 Log in to the command line
Launch the Command Line With an SSH Utility a Open an SSH connection to the appropriate server and use the IP address assigned to the
node on the ManagementLAN Client network
b Log in to the command line using the following credentials
l User name stornext
l Password ltstornext user account passwordgt
Note password is the default password for the stornext user account If the password has been changed use the current password
c Enter sudo rootsh to gain root user access
d Enter the password for the stornext user account again
2 Stop NAS by executing the following command
usrcvfslibsnnas_control stop
3 Stop the Appliance Controller by executing the following command
usrlocalquantumbinsml_service_tool stop snnas_controller
When you are ready restart the Appliance Controller and NAS services
4 To restart the Appliance Controller enter
usrlocalquantumbinsml_service_tool start snnas_controller
Known Issues Workarounds and Additional Information
Xcellis Workflow Director Release Notes 54
5 To restart NAS enter
usrcvfslibsnnas_control start
6 Change the settings for the NAS heartbeat state check and the duration that StorNext services are stopped according to Workaround 2 on page 52
Workaround 4An alternate method for maintenance windows instead of implementing workaround 3 for Scenario 2 you can choose a much longer value if you need the NAS heartbeat state check interval and StorNext services stopped for a long period of time (for example during a planned maintenance window in a data center) While this is another option the downside of this is that you will need to know how much downtime to expect maintenance to take and then set these times to be less than what is needed for that maintenance It is also difficult to extend the maintenance period reliably once those timers have started In addition you will most likely have to reset the values back to their original settings when the maintenance window is complete which could be a hassle
Here is one example which extends the time values to 2 hours (7200 seconds)
1 Log in to the command line
Launch the Command Line With an SSH Utility a Open an SSH connection to the appropriate server and use the IP address assigned to the
node on the ManagementLAN Client network
b Log in to the command line using the following credentials
l User name stornext
l Password ltstornext user account passwordgt
Note password is the default password for the stornext user account If the password has been changed use the current password
c Enter sudo rootsh to gain root user access
d Enter the password for the stornext user account again
2 Change the frequency interval of the NAS heartbeat state check to 7200 seconds (10 minutes) Enter
su sysadmin -c reg set nasheartbeatcheck_state_secs 7200
Note This is run with a temporary log in to the Appliance Controller as the sysadmin user
3 Change the duration that StorNext services are stopped to 7200 seconds (10 minutes) Enter
Known Issues Workarounds and Additional Information
Xcellis Workflow Director Release Notes 55
su sysadmin -c reg set stornext_servicestop_period 7200
4 Note This is run with a temporary log in to the Appliance Controller as the sysadmin user
Change the componentproperties Timeout Setting 1 Log in to the command line of the primary server node (typically node 1) See Launch the Command
Line (for Xcellis Workflow DirectorGen 2) or Launch the Command Line (for R630 systems)
2 Open the componentproperties file with the vi editor
vi usradicguiconfigcomponentproperties
Pro Tip 1 Edit With vi
The vi editor is included in CentOS If you are unfamiliar with using vi to open edit (copypastedelete) exit with or without saving changes use the following Google search URL to find related links for editing with vi
httpswwwgooglecomsearchq=edit+with+vi
3 Scroll down to the web services timeouts section It should look similar to (note the default firmware upgrade value is 300 seconds - highlighted in green)
Web Services Timeouts (seconds)
wsconverttohatimeout=300 wsapplyfwupgradetimeout=300 wsgetsystemidtimeout=10 wsntptimeout=30 wsdatetimetimeout=30 wsnetworkconfigtimeout=180 wsnetworkhapeertimeout=30 wsloggingleveltimeout=30 wscapturestatetimeout=600 wsjobclosetimeout=30 wsnasclosetimeout=60
4 Move the cursor to sit over the number 3 enter ltSHIFTgt+ and then R (for replace) and enter the number 6 to change the wsapplyfwupgradetimeout= value from 300 seconds (5 minutes) to 600 seconds (10 minutes)
wsapplyfwupgradetimeout=600
Known Issues Workarounds and Additional Information
Xcellis Workflow Director Release Notes 56
5 Save the changes to the file by entering SHIFTwq to write the file and quit the vi editor
The setting change will be replicated to the other server node in 2-3 minutes after the file change is saved so this only has to be applied to server node 1
6 Run the Firmware Upgrade process again
Note Even though the upgrade failed previously the firmware upgrade files are still available for the upgrade
a Select either of the uploaded files click Apply In the case of a single file select the one file uploaded and click Apply
b Click Yes to confirm the installation For two-file upgrades both firmware files are applied to the system during the upgrade
The upgrade should complete after the timeout setting is changed However if the firmware upgrade fails again contact Contacting Quantum on page 70 for assistance with manually upgrading the node that failed to upgrade
Server Boot (QXSNetApp)This does not need to be applied to all systems connected to storage arrays only impacted systems as described here
Systems Impacted l This ONLY affects systems upgrading from StorNext 5x releases to 6x (prior to 605)
l This ONLY affects systems upgrading that are Fibre Channel-connected to BOTH NetApp and QXS arrays
Note This issue was fixed in StorNext 605 See 70300 on page 17 If you are upgrading to StorNext 605 you will not see this issue and do not have to perform this workaround
BEFORE applying the upgrade to StorNext 6x do the following
Log in to the system command line 1 Open an SSH connection to the appropriate server and use the IP address assigned to the node on the
Management or LAN Client network or use the Service Port IP address if connected to the Service Port
Service Port IP addresses l Node 1 1017211 (dual-server node systems)
l Node 2 1017212 (dual-server node or HA-ready single-server node systems)
Note Node 2 is the server node sold with single-node (non-HA) Xcellis Workflow Director and Artico systems It is also used for installation using the StorNext Connect Install app for both single-node and dual-node systems only
Known Issues Workarounds and Additional Information
Xcellis Workflow Director Release Notes 57
2 Log in to the command line using the following credentials
l User name stornext
l Password ltstornext user account passwordgt
Note password is the default password for the stornext user account If the password has been changed use the current password
3 Enter sudo rootsh to gain root user access
4 Enter the password for the stornext user account again
Edit the Grub Configuration File 1 Create a backup copy of the CentOS7 grubd40_custom configuration file Enter the following
cp etcgrubd40_custom scratch40_customorig
2 Create a backup copy of the CentOS7 grubcfg file Enter the following
cp bootgrub2grubcfg bootgrub2grubcfgorig
3 Edit the etcgrubd40_custom file using the vi editor included in CentOS7x Enter the following
vi etcgrubd40_custom
4 To enter vi insert mode enter i
5 Look for the lines beginning with linux16 as shown in bold blue below and add ltspacegtrdblacklist=ses rdblacklist=enclosure to the end of those lines as shown in green in the following example (Ellipses included below denote code prior to and after the linux16 sections)
Known Issues Workarounds and Additional Information
Xcellis Workflow Director Release Notes 58
linux16 vmlinuz-3100-51462el7qtmx86_64 root=UUID=3d9116b2-c5de-41fd-bd38-2042c0f8ebad ro console=tty1 vconsolekeymap=us crashkernel=768M0M vconsolefont=latarcyrheb-sun16 selinux=0 enforcing=0 intel_idlemax_cstate=0 processormax_cstate=1 elevator=deadline transparent_hugepage=never quiet LANG=en_USUTF-8 rdblacklist=ses rdblacklist=enclosure
initrd16 initramfs-3100-51462el7qtmx86_64img
menuentry Xcellis SOL --class centos --class gnu-linux --class os --unrestricted load_videoset gfxpayload=keepinsmod gzioinsmod part_msdosinsmod ext2set root=hd0msdos1if [ x = xy ] thensearch --no-floppy --fs-uuid --set=root --hint-bios=hd0msdos1 --hint-efi=hd0msdos1 --hint-baremetal=ahci0msdos1 --hint=hd0msdos1 a0467663-8cf0-48be-b967-d5ef7eb486e2elsesearch --no-floppy --fs-uuid --set=root a0467663-8cf0-48be-b967-d5ef7eb486e2filinux16 vmlinuz-3100-51462el7qtmx86_64 root=UUID=3d9116b2-c5de-41fd-bd38-2042c0f8ebad ro console=ttyS1115200n8 vconsolekeymap=us crashkernel=768M0M vconsolefont=latarcyrheb-sun16 selinux=0 enforcing=0 intel_idlemax_cstate=0 processormax_cstate=1 elevator=deadline transparent_hugepage=never quiet LANG=en_USUTF-8 rdblacklist=ses rdblacklist=enclosureinitrd16 initramfs-3100-51462el7qtmx86_64img
6 To exit insert mode and return to command mode press ltEscgt
7 To save changes and exit vi enter wq and press ltEntergt You will return to the command prompt (To exit vi without saving changes enter q and press ltEntergt)
8 Repeat Log in to the system command line on page 56 and Edit the Grub Configuration File on the previous page for the other server node
Edit the Blacklist Configuration File and Enable the Changes 1 Enter the following to create a backup copy of the blacklist configuration file
Known Issues Workarounds and Additional Information
Xcellis Workflow Director Release Notes 59
cp etcmodprobedblacklistconf scratchblacklistconforig
2 Enter the following to edit the etcmodprobedblacklistconf file using vi
vi etcmodprobedblacklistconf
3 To edit change to the vi insert mode Enter i
4 Add a separate line for rdblacklist ses and another line for rdblacklist enclosure to the file as shown in green in the following example
blacklist rivafb
blacklist savagefb
blacklist sstfb
blacklist neofb
blacklist tridentfb
blacklist tdfxfb
blacklist virgefb
blacklist vga16fb
blacklist viafb
ISDN - see bugs 154799 159068
blacklist hisax
blacklist hisax_fcpcipnp
sound drivers
blacklist snd-pcsp
IO dynamic configuration support for s390x (bz 563228)
blacklist chsc_sch
Known Issues Workarounds and Additional Information
Xcellis Workflow Director Release Notes 60
blacklist sb_edac
blacklist edac_core
blacklist sesblacklist enclosure
5 To exit insert mode and return to command mode press ltEscgt
6 To save changes and exit vi enter wq and press ltEntergt You will return to the command prompt (To exit vi without saving changes enter q and press ltEntergt)
7 To enable the changes enter
dracut -f
8 Continue to Reboot the system below
Workaround System Already UpgradedIf the system has been upgraded and cannot boot do the following to recover the system
1 Detachdisconnect the FC ports from the nodes or disable the FC zoning configuration for the QXS array(s)
2 Boot the system and enter the following to stop cvfs
systemctl stop cvfs
3 Edit the grub configuration file for your version of CentOS See Edit the Grub Configuration File on page 57
4 Edit the blacklist configuration file See Edit the Blacklist Configuration File and Enable the Changes on page 58
5 Reattach or re-enable FC zoning configuration for the QXS array(s)
6 Continue to Reboot the system below
Reboot the system 1 Reboot the server you are already logged into
systemctl reboot
Continue to Step 3 for single-node systems For dual-node systems continue to the next step
Known Issues Workarounds and Additional Information
Xcellis Workflow Director Release Notes 61
2 Log in to the other server node See Log in to the system command line on page 56
systemctl reboot
3 For dual-node systems repeat Step 3 for server node 2 The process is complete
Change Upgrade Timeout SettingBEFORE applying the upgrade to StorNext 6x do the following
Log in to the system command line 1 Open an SSH connection to the appropriate server and use the IP address assigned to the node on the
Management or LAN Client network or use the Service Port IP address if connected to the Service Port
Service Port IP addresses l Node 1 1017211 (dual-server node systems)
l Node 2 1017212 (dual-server node or HA-ready single-server node systems)
Note Node 2 is the server node sold with single-node (non-HA) Xcellis Workflow Director and Artico systems It is also used for installation using the StorNext Connect Install app for both single-node and dual-node systems only
2 Log in to the command line using the following credentials
l User name stornext
l Password ltstornext user account passwordgt
Note password is the default password for the stornext user account If the password has been changed use the current password
3 Enter sudo rootsh to gain root user access
4 Enter the password for the stornext user account again
1 Change to the config directory
cd usradicguiconfig
2 Copy the componentproperties file
cp componentproperties componentpropertiesorig
Known Issues Workarounds and Additional Information
Xcellis Workflow Director Release Notes 62
3 Edit the file using vi
vi componentproperties
4 Scroll down the file until you get to the Web Services Timeouts (seconds) section and the upgrade timeout line shown in bold text The current value should be similar to the value shown in bold green
Web Services Timeouts (seconds) wsconverttohatimeout=300wsapplyfwupgradetimeout=300 wsgetsystemidtimeout=10 wsntptimeout=30 wsdatetimetimeout=30 wsnetworkconfigtimeout=180 wsnetworkhapeertimeout=30 wsloggingleveltimeout=30 wscapturestatetimeout=600 wsjobclosetimeout=30 wsnasclosetimeout=60
5 To edit change to the vi insert mode Enter i
6 Change the value to 1200
Known Issues Workarounds and Additional Information
Xcellis Workflow Director Release Notes 63
Web Services Timeouts (seconds) wsconverttohatimeout=300wsapplyfwupgradetimeout=1200 wsgetsystemidtimeout=10 wsntptimeout=30 wsdatetimetimeout=30 wsnetworkconfigtimeout=180 wsnetworkhapeertimeout=30 wsloggingleveltimeout=30 wscapturestatetimeout=600 wsjobclosetimeout=30 wsnasclosetimeout=60
7 To exit insert mode and return to command mode press ltEscgt
8 To save changes and exit vi enter wq and press ltEntergt You will return to the command prompt (To exit vi without saving changes enter q and press ltEntergt)
9 Continue to Reboot the system below
Reboot the system 1 Reboot the server you are already logged into
systemctl reboot
Continue to Step 3 for single-node systems For dual-node systems continue to the next step
2 Log in to the other server node See Log in to the system command line on page 61
3 Reboot the other server node 2
systemctl reboot
4 Repeat Step 3 for server node 2
The process is complete
journalctl Filter ScriptStep 1 Upgrade to StorNext 605
Known Issues Workarounds and Additional Information
Xcellis Workflow Director Release Notes 64
Note StorNext 605 provides the script so you need to upgrade to StorNext 605 to access the file
See Upgrade a Gateway System (Upgrade Firmware) Using the Service Menu
Step 2 Log in to the System Command Line 1 Open an SSH connection to the appropriate server and use the IP address assigned to the node on the
Management or LAN Client network or use the Service Port IP address if connected to the Service Port
Service Port IP addresses l Node 1 1017211 (dual-server node systems)
l Node 2 1017212 (dual-server node or HA-ready single-server node systems)
Note Node 2 is the server node sold with single-node (non-HA) Xcellis Workflow Director and Artico systems It is also used for installation using the StorNext Connect Install app for both single-node and dual-node systems only
2 Log in to the command line using the following credentials
l User name stornext
l Password ltstornext user account passwordgt
Note password is the default password for the stornext user account If the password has been changed use the current password
3 Enter sudo rootsh to gain root user access
4 Enter the password for the stornext user account again
5 Continue to Step 3 Run the Journal Filter Script and View the Script Help below
Step 3 Run the Journal Filter Script and View the Script Help l Enter the following to use the script to view the log output in a way that filters out all the rootsh
commands
optDXiscriptsjournalctl_filtersh -f
l Enter the following to view the scripts help file
optDXiscriptsjournalctl_filtersh --help
Note The journalctl_filtersh output can also be saved to a file
Known Issues Workarounds and Additional Information
Xcellis Workflow Director Release Notes 65
StorNext Connect NTP not RunningWorkaround 1 If you encounter this issue when rebooting the system reboot or after a firmware upgrade do the following
1 Log in to the StorNext GUI and select gtConfiguration gt System
2 Click the Date amp Time tab
3 Set the NTP protocol options as follows Select either the Select a Timeserver Pool option and select the pool from the options available OR select the Specify a Timeserver or Pool option and enter the IP address of the time server
4 Click Apply which will reboot the node (or both nodes in dual-server systems) and re-enable and start NTP
Workaround 2Another alternative enables ntp when the system is rebooted
1 Using an SSH connection log in to the command line of the server
2 Enter the following command
usrbinsystemctl ntpdservice enable
3 Repeat for the other server (for dual-server node systems only)
4 Manually reboot the server (or both server nodes for dual-server node systems)
Restart the Appliance ControllerOn the server node hosting NAS do the following (use node 2 on dual-server node systems)
1 Open an SSH connection to the appropriate server node and use the IP address assigned to the node on the Management or LAN Client network
2 Log in to the command line using the following credentials
l User name stornext
l Password ltstornext user account passwordgt
Note password is the default password for the stornext user account If the password has been changed use the current password
3 Enter sudo rootsh to gain root user access
4 Enter the password for the stornext user account again
5 Enter the following
chown -R ldapldap varlibldap
Known Issues Workarounds and Additional Information
Xcellis Workflow Director Release Notes 66
6 Enter the following
systemctl restart slapd
7 Restart the appliance controller
systemctl start snnas_controller
systemctl stop snnas_controller
Create the Missing Hardware Monitor DirectoryDo the following to check if the directory is missing and re-create the directory if it is and restart the hwmond service
1 Open an SSH connection to the appropriate server and use the IP address assigned to the node on the Management or LAN Client network or use the Service Port IP address if connected to the Service Port
Service Port IP addresses l Node 1 1017211 (dual-server node systems)
l Node 2 1017212 (dual-server node or HA-ready single-server node systems)
Note Node 2 is the server node sold with single-node (non-HA) Xcellis Workflow Director and Artico systems It is also used for installation using the StorNext Connect Install app for both single-node and dual-node systems only
2 Log in to the command line using the following credentials
l User name stornext
l Password ltstornext user account passwordgt
Note password is the default password for the stornext user account If the password has been changed use the current password
3 Enter sudo rootsh to gain root user access
4 Enter the password for the stornext user account again
5 Enter the following on the command line
cd usradicHAMsharedHwMonStatus
If you see the following message the directory does not exist Continue to the next step
Known Issues Workarounds and Additional Information
Xcellis Workflow Director Release Notes 67
bash cd usradicHAMsharedHwMonStatus No such file or directory
6 Enter the following on the command line to create the directory
mkdir usradicHAMsharedHwMonStatus
7 Enter the following to verify the directory has been created
cd usradicHAMsharedHwMonStatus
8 Change the permission of the hwmond service to read-only
chmod -r 775 HwMonStatus
9 Restart the hwmond service
systemctl restart quantum-hwmondservice
How to Disable NFS v4To disable NFSv4 on Xcellis Workflow Director systems especially those systems running NAS 120 or earlier perform the following on node 2
Edit the nfs File 1 Open an SSH connection to the appropriate server and use the IP address assigned to the node on the
Management or LAN Client network or use the Service Port IP address if connected to the Service Port
Service Port IP addresses l Node 1 1017211 (dual-server node systems)
l Node 2 1017212 (dual-server node or HA-ready single-server node systems)
Note Node 2 is the server node sold with single-node (non-HA) Xcellis Workflow Director and Artico systems It is also used for installation using the StorNext Connect Install app for both single-node and dual-node systems only
Known Issues Workarounds and Additional Information
Xcellis Workflow Director Release Notes 68
2 Log in to the command line using the following credentials
l User name stornext
l Password ltstornext user account passwordgt
Note password is the default password for the stornext user account If the password has been changed use the current password
3 Enter sudo rootsh to gain root user access
4 Enter the password for the stornext user account again
5 Edit etcsysconfignfs file (See Example Use vi to Edit the nfs File on the next page)
6 Change the value for RPCNFSDARGS to -N 4 When finished the line must be RPCNFSDARGS=-N 4
7 Change the value for RPCMOUNTDOPTS to -N 4 When finished the line must be RPCMOUNTDOPTS=-N 4
8 Save the file
Restart NFS
For Xcellis Workflow Director (R630) systems
1 Enter the following to restart the NFS configuration
systemctl restart nfs-config
2 Enter the following to restart the NFS server
systemctl restart nfs-server
After You Restart NFS on Node 2Repeat both the Edit the nfs File on the previous page and Known Issues ndash StorNext 6x on page 20 sections on node 1( for dual-node systems)
If you need to create new NFS shares to export for user access you may do this now See the About the NAS App section of the StorNext Connect Documentation Center for information about NAS configuration using StorNext Connect
Known Issues Workarounds and Additional Information
Xcellis Workflow Director Release Notes 69
Example Use vi to Edit the nfs File 1 Enter the following
vi etcsysconfignfs
2 Move the cursor to the closing quotation mark in RPCNFSDARGS
3 Enter the following
i -N 4
4 Write the file and quit vi as follows
wq
5 For this example you would have to Restart NFS on the previous page and repeat the Edit the nfs File on page 67 and Restart NFS on the previous page again on node 1 (for dual-node systems)
6 Close the SSH session for the server(s) ( for dual-node systems)
Re-enable DDM on the Secondary Node After HA FailoverOnce the MDC node acting as secondary finishes rebooting and becomes functional again use fsddmconfig (or the GUI) from the server node currently acting as primary to re-enable DDM for the standby server node as follows
1 Open an SSH connection to the appropriate server and use the IP address assigned to the node on the Management or LAN Client network or use the Service Port IP address if connected to the Service Port
Service Port IP addresses l Node 1 1017211 (dual-server node systems)
l Node 2 1017212 (dual-server node or HA-ready single-server node systems)
Note Node 2 is the server node sold with single-node (non-HA) Xcellis Workflow Director and Artico systems It is also used for installation using the StorNext Connect Install app for both single-node and dual-node systems only
Contacting Quantum
Xcellis Workflow Director Release Notes 70
2 Log in to the command line using the following credentials
l User name stornext
l Password ltstornext user account passwordgt
Note password is the default password for the stornext user account If the password has been changed use the current password
3 Enter sudo rootsh to gain root user access
4 Enter the password for the stornext user account again
5 On the command line of the system enter the following
fsddmconfig -u -s e
standby_system_hostname
If a system running DDMs periodically displays an Admin Alert when it fails over cycles a client node or upgrades while the server node operating as secondary is rebooting but not completely down change the timeout value to allow more time to communicate with the node Update the TSM configuration parameter DDM_CLIENT_RETRY_TIMEOUT from the default 30 seconds to a larger value depending on how long the node is taking to reboot In the event the server node acting as secondary will be down for an extended period of time the node should be taken offline Additionally if this parameter is set too high and the standby server does not come back the command that is currently running (eg store or retrieve) will not return until after the specified timeout
For more information about the DDM_CLIENT_RETRY_TIMEOUT parameter that can be placed into the fs_sysparm_override configuration file refer to the usradicTSMconfigfs_sysparmREADME file
Caution Incorrect modification of the fs_sysparm_override configuration file can cause a serious adverse effect on StorNext functionality Before modifying this file we recommend you contact Contacting Quantum below
Contacting QuantumFor further assistance contact the Quantum Customer Support Center
Region Support Contact
North America 1-800-284-5101 (toll free)+1-720-249-5700
Contacting Quantum
Xcellis Workflow Director Release Notes 71
Region Support Contact
EMEA +800-7826-8888 (toll free)
+49 6131 324 185
Asia Pacific +800-7826-8887 (toll free)+603-7953-3010
For worldwide support
httpswwwquantumcomserviceandsupportget-helpindexaspxcontact-support
- Revision History
- About the Xcellis Workflow Director
- Training and Documentation Resources
- About StorNext 6
-
- What is StorNext
- Learn More on the Web
-
- What StorNext Releases are compatible with my system
- Upgrade StorNext Software and System Firmware
- General Notes
- Quantum Appliance Licenses
- Fixed Issues Notes and Enhancements ndash StorNext 6x
- Known Issues ndash StorNext 6x
- Known Issues Workarounds and Additional Information
- Contacting Quantum
-

Fixed Issues Notes and Enhancements ndash StorNext 6x
Xcellis Workflow Director Release Notes 15
CR Number SR Number(s) Description
71346 na For systems running StorNext 53x upgrading to StorNext 6061 and configured as a single-node NAS cluster (a cluster of one) running NAS 121 the NASController software should first be upgraded to 141 or later but will not cause the firmware (fw) upgrade to fail
Note Before applying firmware upgrades for NAS-clustered systems Quantum recommends upgrading to the latest version of the Appliance Controller
l See the StorNext 6061 Release Notes for information about StorNext software updates for this release
l See the Upgrade the System (Upgrade Firmware) for the instructions for upgrading system firmware
Fixed Issues and Enhancements for StorNext 606Note StorNext 6061 replaced previous 6x StorNext releases and firmware upgrade files will only be provided for StorNext 6061 or later
This release includes the following software updates
l CentOS 74 for the server node(s)
l CentOS 74 SAN and DLC clients
l Appliance Controller 201 (and supports CentOS 74)
The following new appliance-specific code fixes and enhancements are included in this release
CR Number SR Number(s) Description
71002 na RAS ticket for an IPMI controller failure is no longer shown after the firmware upgrade
70902 na The system prevents firmware upgrades when NAS clusters are configured for Appliance ControllerNAS versions prior to 141 You will stil need to upgrade the Appliance ControllerNAS prior to applying the firmware upgrade See Upgrade Required for Clustered StorNext NAS Systems
70773 na The etcresolvconf configuration file is now included when collect files are created (in the targz file at usradictmpplatformhw-infoetcresolvconf)
Table 9 Fixed IssuesEnhancements for StorNext 606
Fixed Issues Notes and Enhancements ndash StorNext 6x
Xcellis Workflow Director Release Notes 16
CR Number SR Number(s) Description
70770 na aiWARE agent failures are no longer included in system log files for non-aiWARE CentOS7-based systems
70455 na For systems with multiple Ethernet NIC ports active when an Ethernet cable is unplugged from a port the admin alert now contains the affected NIC port number
70340 na PHP upgraded to php56w-5633-1
70338 na Dracut updated to dracut-033-502el7 included with CentOS74
70335 na YUM help output is no longer displayed in varlogmessages during fw upgrade failures
70291 na A root mailbox junk filter is included in this release A new daily cron job trims mailboxes with over 1000 email messages amp improves functionality of the logrotate cron job
70208 na Admin alerts are now created in the StorNext GUI when NIC ports go down
70194 na For systems using snmpwalk the time taken by SNMP Agent MIB processing has been greatly reduced
70178 na During the system firmware upgrade the current etcmultipathconf file now remains on the system as-is
69478 na Update server code to CentOS 74
l See the StorNext 606 Release Notes for information about StorNext software updates for this release
l See the Upgrade the System (Upgrade Firmware) for the instructions for upgrading system firmware
Fixed Issues and Enhancements for StorNext 6051Note StorNext 6061 replaced previous 6x StorNext releases and firmware upgrade files will only be provided for StorNext 6061 or later
There are no new appliance-specific code fixes or enhancements for this release However you can reference the following
l See the StorNext 6051 Release Notes for information about StorNext software updates for this release
l See the Upgrade the System (Upgrade Firmware) for the instructions for upgrading system firmware
Fixed Issues Notes and Enhancements ndash StorNext 6x
Xcellis Workflow Director Release Notes 17
Fixed Issues and Enhancements for StorNext 605Note StorNext 6061 replaced previous 6x StorNext releases and firmware upgrade files will only be provided for StorNext 6061 or later
Because of security vulnerabilities found in testing (highlighted below in CR 69866 below and CR 69869 below) Quantum recommends upgrading to 6051 or later
The following new appliance-specific code fixes and enhancements are included in this release
CR Number SR Number(s) Description
70300 385040 Simultaneous Fibre Channel-connected QSX and Netapp arrays attached to Quantum appliances no longer prevent system boot after firmware upgrades to 605 from supported 5x releases The basedefault SCSI enclosure drivers provided by CentOS which previously caused this issue are no longer referenced in system configuration files The specific drivers used for QXS and NetApp array FC connections are used instead
69869 na Updated Apache HTTPD to the latest CentOS 69 and 74 versions to resolve some HTTPD security vulnerabilities found by Nexpose
69866 na Updated php56w from version 5629-1 to version 5631-2 to resolve some PHP security vulnerabilities found by Nexpose
69506 na RAS tickets are no longer created when the system is unable to obtain fan status from the iDRAC
Note This fix applies to CentOS7 (Xcellis Workflow Director (R630) Xcellis Foundation aiWARE for Xcellis Embedded (DAE) aiWARE for Xcellis Standard and High Performance Artico (R630) and Xcellis Workflow Extender (R630) systems) only
Table 10 Fixed issuesEnhancements for StorNext 605
Fixed Issues Notes and Enhancements ndash StorNext 6x
Xcellis Workflow Director Release Notes 18
CR Number SR Number(s) Description
69492 na The RAS ticket for a failed server drive now contains several new attributes including the drive size as shown in this example of a failed drive
Node 1 The Drive PHYSICAL_DISK_011 has failed Capacity 46525GB Media HDD Encrypted NA Vendor DELL(tm) VendorPN MY01KWKJ1255523P091GA0 VendorSN WD-WMAYP3387029 Model WDC WD5003ABYX-18WERA0 PowerStatus Spun Up Status Offline
69473 na Updated the build to include a new CentOS 7 (73) kernel with an additional patch This corrects an issue int`roduced with the RHEL73 kernel that failed to display and manipulate ACLs from NFS NAS clients
Note This fix applies to CentOS7 (Xcellis Workflow Director (R630) Xcellis Foundation aiWARE for Xcellis Embedded (DAE) aiWARE for Xcellis Standard and High Performance Artico (R630) and Xcellis Workflow Extender (R630) systems) only
67895 na Added elapsed time for firmware upgrades in the StorNext GUI upgrade firmware status page and in the upgrade_progress log file
66799 322817 342909 362343
In the StorNext GUI the Reports gt Hardware page now correctly shows system board information for node1 and node2 after StorNext 605 installation StorNext
l See the StorNext 605 Release Notes for information about StorNext software updates for this release
l See the Upgrade the System (Upgrade Firmware) for the instructions for upgrading system firmware
Fixed Issues and Enhancements for StorNext 6011Note StorNext 6061 replaced previous 6x StorNext releases and firmware upgrade files will only be provided for StorNext 6061 or later
The following new appliance-specific code fixes and enhancements are included in this release
Fixed Issues Notes and Enhancements ndash StorNext 6x
Xcellis Workflow Director Release Notes 19
CR Number SR Number(s) Description
69706 363354 After rebooting the system configured with iSCSI connections the iSCSI connection will now re-establish correctly and StorNext file systems will also restart
Table 11 Fixed IssuesEnhancements for StorNext 6011
Note The StorNext 6011 release only applied to R630 server models (which run on CentOS7) and not R520 server models (which run on CentOS6)
l See the StorNext 601 Release Notes for information about StorNext software updates
l See the Upgrade the System (Upgrade Firmware) for the instructions for upgrading system firmware
Fixed Issues and Enhancements for StorNext 601Note StorNext 6061 replaced previous 6x StorNext releases and firmware upgrade files will only be provided for StorNext 6061 or later
The StorNext 601 for Appliances release adds support for aiWAREVeritone running on Xcellis Workflow Director systems These systems are configured with aiWAREVeritone with the aiWARE for Xcellis Embedded (DAE) product name
CR Number SR Number(s) Description
69365 na Enable the aiware-agent so it starts on boot
69396 na Disable the docker-prune service and timer on node 1 since the docker service is disabled
69388 na Include signed Samba 4212 rpms for CVE-2017-11103 in the build
69374 358555 Linux NFS servers operate correctly when an exported SNFS file system was configured as case-insensitive
Table 12 Fixed IssuesEnhancements for StorNext 601
l See the StorNext 601 Release Notes for information about StorNext software updates for this release
l See the Upgrade the System (Upgrade Firmware) for the instructions for upgrading system firmware
Fixed Issues and Enhancements for StorNext 60Note StorNext 6061 replaced previous 6x StorNext releases and firmware upgrade files will only be provided for StorNext 6061 or later
The following table lists the fixed issuesenhancements for StorNext 60
Known Issues ndash StorNext 6x
Xcellis Workflow Director Release Notes 20
CR Number SR Number(s) Description
68994 na Once 10 GbE ports are configured for use as iSCSI ports they are reserved for iSCSI configuration use only
69158 na Gateway network menu for 40GbE ports supported as individual non-bonded ports
68943 na Xcellis and Artico single-servers Provisioning Storage option no longer prompts to rescan secondary node for new LUNs
68961 na sernet samba 4212-20 security patch version for NAS 130 - 141 included in 60 appliance code
Table 13 Fixed IssuesEnhancements for StorNext 60
Notes l See the StorNext 60 Release Notes for information about StorNext software updates for this release
l See the Upgrade the System (Upgrade Firmware) for the instructions for upgrading system firmware
Known Issues ndash StorNext 6xThis section lists the known issues that could potentially affect your system
CR Number
SR Number
Description
77317 na Adding a DAE virtual machine to a file system created on a QXS or P-Series LUN can create a RAS alert stating
Excessive fragmentation detected in file DAE_Boot_Disk_locationpk-DAE-vmqcow2 inode 0x4e800000ef0b19 (decimal inum 15665945)
Workaround
While this issue is not currently fixed the message itself may be disabled To disable the RAS alert change the value of the extentCountThreshold parameter in the file system configuration file to 0 For information about file system configuration files see
httpsqsupportquantumcomkbflareContentstornextSN6_DocSiteDefaulthtmGuide_TuningTopicsExample_FSM_Configuratiohtm
Known Issues ndash StorNext 6x
Xcellis Workflow Director Release Notes 21
CR Number
SR Number
Description
76675 543978 If your system is running as a FlexSync host and you upgrade StorNext it also installs the latest version of FlexSync If there are other systems configured as FlexSync hosts FlexSync will not function on those other systems until they are upgraded to the latest available FlexSync version
Error message displayed
Host Unreachable Upgrade Required
The same FlexSynch version must be installed on ALL FlexSync hosts (see Can different versions of FlexSync be installed or upgraded within a configuration on the FlexSync Documentation Center)
Workaround
Upgrade FlexSync on ALL FlexSync hosts See Upgrade FlexSync in the FlexSync Documentation Center
7635376354
na Mellanox Connect CX4-Lx cards can fail to operate if configured for 25 GbE connections and running 631
Note This issue has been fixed in 6311 See 76353 on page 6 in the Fixed Issues section Upgrade recommended
Workaround
Upgrade to StorNext 6311
Known Issues ndash StorNext 6x
Xcellis Workflow Director Release Notes 22
CR Number
SR Number
Description
74024 470777 479905 The following applies to Xcellis Workflow Director (R630) systems ONLY It does not
apply to other server model namesgenerations
Upgrade between StorNext releases prior to 621 removes custom Infiniband configuration settings
Note This issue was Fixed in 630 Upgrades to StorNext 630 DO NOT experience this issue If this has not happened to your system you can upgrade to 630 without this issue affecting your systemNote Because the workaround is required after every upgrade to StorNext releases prior to 621 Quantum strongly recommends you to upgrade the system to 621 or later prior to contacting Quantum Support about this issue so the fix will be applied to a release that no longer removes the Infiniband settings and it only has to be applied once
After upgrading to 621 or later (prior to 630)
If you have this problem and have upgraded the system to 621 or later contact Quantum Support and reference TSB (Technical Service Bulletin) 3065
Once the system is upgraded to 621 and the fix is applied future upgrades will perform successfully and will not remove the Infiniband configuration settings
74571 na For StorNext 630 and Appliance Controller 230 there is a situation where the firmware upgrade process pre-stages Appliance Controller upgrade file(s) on server node 1 but the same files are not pre-staged to server node 2 which can create a failure for firmware upgrades This can happen if you click Validate on the firmware upgrade page or the function that checks for upgrade dependencies when you click Activate on the firmware upgrade page
If this happens and Node 2 was the master node of a NAS cluster you will not be able to run the Appliance Controller upgrade local command on node 2 to upgrade to the current controller release pre-staged on the server and you will have to manually move the nas rpms from the varupgrade or scratchsavedNAS directory on node 1 to the varupgrade directory on node 2 and upgrade the NAS cluster manually from Node 2
See httpqsupportquantumcomkbFlareContentappliancesACCDocSiteUpgradesACC_Upgradeshtm
Note See About firmware upgrades and pre-staged Appliance Controller upgrades for server nodes on page 48 for information about how these files are pre-staged to enable you to upgrade Appliance Controller manually separate from the firmware upgrade process
Known Issues ndash StorNext 6x
Xcellis Workflow Director Release Notes 23
CR Number
SR Number
Description
74202
67955
HYDRA-4326
na If NAS is configured on the system and StorNext services are stopped StorNext services can fail to stop completely This can block server fail-over and potentially leaves managed file systems without running FSMs
See 74202 ndash StorNext services can fail to stop completely when NAS is Configured and StorNext services are stopped on page 48 for an in-depth explanation of the issue and several alternate workarounds
73688 na When the var directory on the appliance gets full the following serious errors can occur
l Network communication errors on the server node
l iDRAC is not accessible
l The server node gets stuck during reboot and require a physical power cycle
See also Leave Space on Appliance File Systems on the Appliance InfoHub
Workaround
Keep additional space available on var
73485 469076 The qxsarray show feature in the Appliance Controller console (CLI) no longer returns the following error Operation failure Failed to retrieve all QXS array configuration data Space required after the Public Identifier line 1 column 47 (E-2003)
73036 naThe following does not apply to Xcellis Workflow Director Gen 2 systems
Systems running Java 171 181 or later are no longer able to launch the iDRAC Virtual Console using StorNext 620 or later due to an increase in Java security
Workaround
Uninstall the current Java version and install Java 170 iDRAC should work properly again
Known Issues ndash StorNext 6x
Xcellis Workflow Director Release Notes 24
CR Number
SR Number
Description
72726 3734274 336772 409963 430039 455314
If you run fsmedscan -R the root file system on the active server node (typically node 1) can fill up and the node will become unresponsive This is because fsmedscan creates copious log files and by default places them in tmplogs which will eventually fill up the root system drive
Note This issue was fixed in StorNext 62 See 70915 on page 11 in the Fixed Issues section Upgrade recommended
Workarounds
l Upgrade to StorNext 62
l Prior to 62 you could create a symbolic link from tmplogs to something like scratchfsmedscan_logs since scratch should contain plenty of available space
72591
72583
na Issue
When setting the IPMI network settings you may see errors after applying changes If this happens you will see something similar to the following (in green)
Note This issue affects Gen 2 appliances only
Setting LAN IP Address to 10172152
Setting LAN Subnet Mask to 25525500
LAN Parameter Data does not match Write may have failed
Setting LAN Default Gateway IP to 101721254
LAN Parameter Data does not match Write may have failed
Set User Password command successful (user 2)
Waiting for IPMI to be rebooted (30 sec)
IPMI did not properly reset within 30 seconds
Done setting up IPMI
WorkaroundThere is no current workaround for display of these error messages However this message is benign and can be ignored Even though there appears to be an issue the IPMI values are actually applied to the system and the IPMI does open using the new IP settings
Known Issues ndash StorNext 6x
Xcellis Workflow Director Release Notes 25
CR Number
SR Number
Description
71809 431853 snaFileSystemActive OID can return a bad data type for SNMB informationNote This issue was fixed in StorNext 62 See 71809 on page 11 in the Fixed Issues section Upgrade recommended
Workaround
Upgrade to StorNext 62
71708 440392 Issue
When slot PCI addresses change need to reflect their new location in the systemNote This issue was fixed in StorNext 610 See 71708 on page 13 in the Fixed Issues section Upgrade recommended
WorkaroundUpgrade to StorNext 610 There is no other workaround available
71469 421581 Issue
Firmware upgrade failed during the OSUpdate step of the upgrade process due to insufficient space on localroot filesystem
Note Free space is now checked before continuing with the firmware upgrade in StorNext 610 See 71469 on page 13 in the Fixed Issues section Upgrade recommended
Workaround
1 Determine which directory on the root directory has files that can be removed
df -h
Notice any directories you have created that consume GBs of data
2 Remove files so you ensure the system has at least 5 GB of free space for the firmware upgrade to use before attempting the upgrade
3 Restart the failed upgrade
Known Issues ndash StorNext 6x
Xcellis Workflow Director Release Notes 26
CR Number
SR Number
Description
71328 403647 Issue
Systems can a very long time to get from POST until the filesystems are mounted with large LUNs present since all devices are added to the sysfs and on udev During boot a message similar to the the following is displayed
mam-node-1 udevd-work[39397] inotify_add_watch(6 devdm-2699 10) failed No space left on device
Note This issue was fixed in StorNext 61 See 71328 on page 13 in the Fixed Issues section Upgrade recommended
Workaround
Upgrade to StorNext 610
OR
Increase the amount of notify watches Do the following
1 Run the following command
cat procsysfsinotifymax_user_watches
This should return a value similar to
10240
2 Edit the etcsysctlconf file to allow for a longer boot time
fsinotifymax_user_watches=32768
71299 456036 459515 460901
Running a Nexpose scan on systems running StorNext 606x can result in a fs_copymandfs_moverd core dump
Note This issue was fixed in StorNext 62 See 71299 on page 11 in the Fixed Issues section Upgrade recommended
Workarounds
l Exclude the system from security scans
l Upgrade to StorNext 62
Known Issues ndash StorNext 6x
Xcellis Workflow Director Release Notes 27
CR Number
SR Number
Description
71230 414352 429898
IssueNexpose security scan reports HTTP Header is missing on port 443
Note This issue was fixed in StorNext 61 See 71230 on page 13 in the Fixed Issues section Upgrade recommended
WorkaroundUpgrade to StorNext 610 There is no other workaround available
71125 410540 Issuevarlogmessages can omit expected information beginning with a specific point in time
Note This issue was fixed in StorNext 61 See 71125 on page 13 in the Fixed Issues section Upgrade recommended
Workaround
To correct this issue
Upgrade to StorNext 610
OR
1 Remove imjournalstate
rm -f varlibrsyslogimjournalstate
Restart rsyslog
sbinservice rsyslog restart
Then rotate the log
$logrotate etclogrotateconf
2 If the logging stops again disable the imjournal input To do this edit the etcrsyslogconf file and comment out OmitLocalLogging on as shown
$OmitLocalLogging on
Known Issues ndash StorNext 6x
Xcellis Workflow Director Release Notes 28
CR Number
SR Number
Description
71012 0399206 IssueThe StorNext Connect GUI shows the status of an appliance server node being undefined and is displayed as a gray dot on the dashboard as a result of a Fibre Channel card being part of the expected hardware installed for the system
Note This issue was fixed in StorNext 61 See 71012 on page 13 in the Fixed Issues section Upgrade recommended
Workaround
Upgrade to StorNext 610
OR
Remove fibre_channel from the list of components and run monitor_appliancepy Next go to the StornStorNext ConnectDashboard and refresh the page The system status will be displayed as a green dot on the Dashboard
70854 383195 Issueblacklist_exceptions and entries for EMCNetApp arrays are not included in the default multipathconf file to support EMC VNX7600 EMC VNX8000 EMC VMAX 20k and NETAPP FAS6240 arrays
Note This issue was fixed in StorNext 61 See 70854 on page 13 in the Fixed Issues section Upgrade recommendedNote See also the new How to Modify the multipathconf File for External Storage Arrays page released for StorNext 610
Workaround
Upgrade to StorNext 610 and modify the new EMC andor NetApp array entries in the multipathconf file and move it to the correct directory on your system
OR
Manually update the multipathconf file by hand for the array settings you need and move it to the correct directory on your system
Known Issues ndash StorNext 6x
Xcellis Workflow Director Release Notes 29
CR Number
SR Number
Description
70649 398896 IssueThe Promise array path_checker definition needs to be updated in the reference multipathconf file provided with our systems and firmware upgrades
Note This issue was fixed in StorNext 61 See 70649 on page 14 in the Fixed Issues section Upgrade recommendedNote See also the new How to Modify the multipathconf File for External Storage Arrays page released for StorNext 610
WorkaroundUpgrade to StorNext 610OR
Edit the multipathconf file and change the path_checker value from its current setting (such as readsector0) to tur for the Promise Array definition
70588 396789 Issue
tsunamilog and servicelog files can become large are now rotated to prevent these logs and snapshot files becoming too large and can significantly increase the time it takes to generate snapshot files
Note This issue was fixed in StorNext 61 See 70588 on page 14 in the Fixed Issues section Upgrade recommended
WorkaroundUpgrade to StorNext 610OR
Manually trim data from these log files when needed
70526 398061 396903 398206 397045 399232 and 401331
Issue
Kernel Page Table Security Problems CVE-2017-5753 CVE-2017-5715 and CVE-2017-5754
Note This issue was fixed in StorNext 61 See 70526 on page 14 in the Fixed Issues section Upgrade recommended
WorkaroundUpgrade to StorNext 610 There is no other workaround
Known Issues ndash StorNext 6x
Xcellis Workflow Director Release Notes 30
CR Number
SR Number
Description
71093 na Issue
Unused NIC ports can be reported as down in an admin alert during appliance firmware upgrades which creates about 20 RAS emails
Note This issue was fixed in StorNext 61 See Fixed Issues Notes and Enhancements ndash StorNext 6x on page 5 in the Fixed Issues section Upgrade recommended
Workaround
Upgrade to StorNext 610 There is no other workaround
Known Issues ndash StorNext 6x
Xcellis Workflow Director Release Notes 31
CR Number
SR Number
Description
72287 72286 72277
naThis applies to Xcellis Workflow Director (R630) systems
Issue
After an appliance is upgraded to StorNext 610 (see Upgrade Firmware) sometimes one of the nodes on the NAS cluster is not able to re-join the cluster
Log on to the Appliance Controller and issue the following command
nascluster show
If the node has not joined the NAS cluster the following message is displayed in the controller output
stornext initiated stop
Workaround
1 From the command line of the system issue the following command where ltmyfsgt is the mount path of the file system you would like to join to the cluster
nascluster join ltmyfsgt
The server should be rejoined to the cluster
2 Run the following command
nascluster show
You should see the following in the output (in bold green)
NAS Cluster IP 1010100100eth0 Master No SNFS Root ltmyfsgt Joined Yes
Known Issues ndash StorNext 6x
Xcellis Workflow Director Release Notes 32
CR Number
SR Number
Description
71644
Issue
After the Apply button is clicked during a firmware upgrade on the StorNext GUI there are certain instances where the firmware upgrade will fail to complete and server node 2 may be upgraded but node 1 will fail to upgrade causing a mismatch of StorNext releases between the nodes When this happens the Firmware Upgrade page in StorNext an error message similar to the following may display when the firmware upgrade is being applied
Note This issue was fixed in the upgrade code for StorNext 610 See Fixed Issues Notes and Enhancements ndash StorNext 6x on page 5 in the Fixed Issues section Upgrade recommended
Workaround
The secondary node web service timeout needs to be increased from the default value 5 minutes300 seconds) to 10 minutes600 to account for additional processing in the pre-upgrade script See Change the componentproperties Timeout Setting on page 55 for how to change this setting and begin the firmware upgrade process again
Known Issues ndash StorNext 6x
Xcellis Workflow Director Release Notes 33
CR Number
SR Number
Description
71599 425749 Issue
For systems being upgraded from StorNext 606 to 6061 from a fresh install of the server with a StorNext 606 image the firmware upgrade to support some expansion cards is not applied Future card changes in the system will not get automatically configured since the firmware and autoconfig services which support some cards were disabled after the upgrade toStorNext 6061
You can verify this issue by logging into the command line of the server node (or on both servers for dual-server node systems) with the stornext user account and stornext user password and issuing the following command from the command line of the system If you see the Virtual (as shown here in green) your system is affected by this issue
Example
optDXiutilseer VendorModel
Virtual
Note This has been fixed in StorNext 610 See 71599 on page 13 in the Fixed Issues section Upgrade recommended
Workaround
If the system has not been upgraded yet
1 Log in to the command line of a server node See Launch the Command Line
2 Issue the following command This will correct the initial fresh install issue and avoid a subsequent upgrade issue
cp -f optDXitheSeervendorinfoconf13G optDXitheSeervendorinfoconf
If the system was fresh installed with 606 and then upgraded to 6061 the following needs to be done
a Remove the three touch files
rm varoptDXifwb-onboot-disable
rm varoptDXihwdetect-onboot-disable
Known Issues ndash StorNext 6x
Xcellis Workflow Director Release Notes 34
CR Number
SR Number
Description
rm varoptDXistartup_autoconfig_disable
b Reboot the node so the Firmware Bundle updates will be performed and autoconfig and hwdetect will be enabled and run
3 Repeat these steps for the other server node (dual-server node systems only)
71507 421334 Issue
Firmware upgrade did not upgrade PHP on server nodes Note This has been fixed for StorNext 610 See 71507 on page 13 in the Fixed Issues section Upgrade recommended
Workaround
1 Log in to the command line of a server node ( see Launch the Command Line) and upgrade php56w
cd scratchsavedPHP
ls
php56wUpgrade-5633-1tgz php56wUpgradetgz
tar xzf php56wUpgrade-5633-1tgz
rpm -Uhv php56wrpm
Updating installing
1php56w-common-5633-1w7 [ 4]
2 Remove the upgrade warning touch file
rm -f varDXiupgrade_notify rpm tgz
rpm -q php56w
php56w-5633-1w7x86_64
3 Repeat for the other server node (for dual-node systems)
Known Issues ndash StorNext 6x
Xcellis Workflow Director Release Notes 35
CR Number
SR Number
Description
71464 na Issue
Platform upgrade is currently allowed to the StorNext 6061 release for systems currently configured and running StorNext 53x and as a clustered NAS system running NAS 12x Even though StorNext upgrades the NAS software does not upgrade NAS is left running 125 and NASController software 201 is incorrectly staged for upgrade in varupgrade
Workaround
To upgrade NAS after the StorNext firmware upgrade
1 Delete the contents of varupgrade on both nodes (for dual-node systems)
2 Download the offline 1413 NAS upgrade rpm
3 Copy the 1413 NAS upgrade file to varupgrade on the NAS master and other node as well
4 Upgrade NAS to 1413 (see Upgrades for the offline upgrade procedure)
5 Delete the contents of varupgrade on both nodes (for dual-node systems)
6 Copy the offline 201 NASController software upgrade rpm saved in scratchsavedNAS to varupgrade
7 Upgrade the NASController software to 201 (see Upgrades for the offline upgrade procedure)
71394 0421219 IssueNote This issue affects R630 (CentOS7) systems only not R520 (CentOS6) systemsNote This issue was fixed in StorNext 6061 See 71394 on page 14 Upgrade recommendedNote For StorNext 606 the included the MLNX_OFED HBA driver for Mellanox Connect X-3 VPI InfiniBandEthernet cards was incompatible with the system kernel version Because of this the software failed to install resulting in missing Mellanox software components needed to configure the card
Workaround
l For Systems prior to StorNext 606 the correct driver was shipped with StorNext so no further action is necessary for Mellanox HBA card configuration
l For systems running StorNext 606 upgrade to StorNext 6061 for the correct driver version for this card
Known Issues ndash StorNext 6x
Xcellis Workflow Director Release Notes 36
CR Number
SR Number
Description
71350 na IssueNote This issue applies to dual-server node systems onlyNote This issue was fixed in StorNext 6061 See 71350 on page 14 in the Fixed Issues section Upgrade recommended
For 606 systems StorNext file systems (snfs) can potentially fail to mount on the secondary server node (typically server node 2) when over a billion files are present on the snfs This could occur when cvfs is stopped and then restarted after a hard stop of the system HA failovers or when the primary server node restartsreboots
If the snfs had file locking enabled and was used to create a NAS cluster then the server node will also be shown in the not ready state on the NAS cluster
Workaround
If your system was upgraded to a StorNext release earlier than 6061 and your system exhibits this issue heres the workaround
Do the following on the server node that did not mount the file system
Mount the File System on the Server Node
1 Log in to node 2 (or node 1 if currently acting as the secondary node) See Launch the Command Line
2 Manually mount the file system on the server
Example
mount snfs1-fs
Re-Join the Server to the NAS Cluster if Needed
If the server is part of a NAS cluster
1 Log into the NAS controller (see Acces the Appliance Controller Console) and join that node to the cluster
Example
nascluster join stornextsnfs1-fs
2 Ensure this is joined by running the following command
nascluster show
Known Issues ndash StorNext 6x
Xcellis Workflow Director Release Notes 37
CR Number
SR Number
Description
Look for the following (in green bold) in the output (ellipses indicate additional information not shown) Note that snfs1-fs is the file system that did not mount before
NAS Cluster IP 1065166215em2 Master No SNFS Root stornextsnfs1-fs Joined
1 1065166216 (Joined MDC) test-bh3amdhquantumcom
2 1065166215 (Joined MDC) test-bh3bmdhquantumcom
71346 na IssueNote This was fixed in StorNext 6061 See 71346 on page 15 in the Fixed Issues section Upgrade recommended
For systems running StorNext 53x and NAS 12x upgrading to 606 or later
Workaround
Upgrade to Appliance ControllerNAS 141 or later prior to upgrading to StorNext 6x or later
71333 na Issue
Caution A system running StorNext 606 or later with a clustered NAS environment should not run NASAppliance Controller 130 or earlier Running these configurations may produce unpredictable results
If you are running StorNext 606 with NAS 130 or earlier you might experience one of the following scenarios
1 Controller configuration commands are not available for iSCSI and SNMP configuration even though the Appliance Controller Doc Center states that these commands are available
2 If your system is running with NAS enabled NAS may not work properly and you will have to upgrade NAS locally with the latest Appliance Controller release
Workaround
An upgrade to the Controller software is REQUIRED when running StorNext 606 See Appliance Controller Upgrades
Known Issues ndash StorNext 6x
Xcellis Workflow Director Release Notes 38
CR Number
SR Number
Description
71002 na IssueAfter upgrading to StorNext 605 and StorNext 6051 systems a RAS ticket might be created for an IPMI failure
Note This was fixed in StorNext 606 See 71002 on page 15 in the Fixed Issues section Upgrade recommended
Workaround
This RAS message is benign and can be ignored Upgrade to StorNext 606 to correct this issue
70902 na IssueStorNext 606 requires the appliance controller to be upgraded for clustered NAS environments running Appliance ControllerNAS versions earlier than 141 before upgrading appliance firmwareIf you attempt to upgrade the system to StorNext 606 prior to upgrading the controller the appliance upgrade will fail and the system will generate an Operation failure RAS ticket in the StorNext GUI on the server (for both server nodes on dual-node systems) the upgrade log will include a message about the upgrade attempt and an admin alert will be generatedExample (dual-node system with NAS 130 installed)
10
2018-02-22 151222 PST
136
Upgrade Minimum NAS version not satisfied for a clustered system Node 2 NAS clustering is enabled but installed NAS version is 130 NAS must be upgraded to version 141x before this upgrade is allowed A NAS 1413 offline upgrade bundle has been placed in scratchsavedNAS
Workaround
Upgrade Appliance ControllerNAS to 141 or later prior to upgrading the system See How to Upgrade on the Appliance Controller Documentation Center
Known Issues ndash StorNext 6x
Xcellis Workflow Director Release Notes 39
CR Number
SR Number
Description
70338 na Issue
During a firmware upgrade the secondary server node (typically Node 2) will upgrade successfully but the other server node (typically Node 1) can become stuck on reboot and unable to restart If you dont have an SSH session open when this happens you will notice that the server node will not respond for a long time If you happen to have an SSH session open during the upgrade you will see an error message similar to the following shown repeatedly on-screen
[ 189398035] dracut-initqueue[402] Warning dracut-initqueue timeout - starting timeout scripts
Workaround
The server node will have to be manually upgraded Contact Contacting Quantum on page 70 and refer them to TSB 3015
Known Issues ndash StorNext 6x
Xcellis Workflow Director Release Notes 40
CR Number
SR Number
Description
70300 385040385789
Issue
After a firmware upgrade the system cannot boot
This does not need to be applied to all systems connected to storage arrays only impacted systems as described here
Systems Impacted
l This ONLY affects systems upgrading from StorNext 5x releases to 6x (prior to 605)
l This ONLY affects systems upgrading that are Fibre Channel-connected to BOTH NetApp and QXS arrays
Note This issue was fixed in StorNext 605 See 70300 on page 17 If you are upgrading to StorNext 605 you will not see this issue and do not have to perform this workaround
Messages on the boot screen and in the KDUMP (the trace of server boot activities on the sysfs) shows messages similar to
Wrong diagnostic page asked for 7 got 0
OR
Wrong diagnostic page asked for 10 got 0
Workaround
DO NOT upgrade your system to StorNext 6x before first applying the workaroundSee Server Boot (QXSNetApp)
Known Issues ndash StorNext 6x
Xcellis Workflow Director Release Notes 41
CR Number
SR Number
Description
70287 na Issue
StorNext upgrades can fail due to a slowdown of the StorNext HA file system (HAFS) when attempting to apply upgrade firmware to StorNext 6x from supported StorNext 5x and 60x releases in the StorNext GUI This only occurs when attempting to upgrade the system while jobs with a lot of metadata changes are running This can happen when
l The system is running with StorNext 6x file systems with metadata archive enabled and heavy client activity
l The sytem is running with StorNext 50x file systems with the restore journal enabled and heavy client activity
Workaround
DO NOT upgrade your system to StorNext 6x before first applying one of the workarounds below if your system is processing a lot of metadata jobs
l To fix this issue edit the componentproperties file on one node of the system and increase the wsapplyfwupgradetimeout value to 2 hours
See Change Upgrade Timeout Setting
70178 Issue
The multipathconf file is overwritten for StorNext 531 through 605x Any custom-configured settings added to the file for those StorNext releases are available in etcmultipathconfbak The upgrade code added correct multipath settings to the etcmultipathconf file required for SAS-attached NetApp metadata arrays
Note The overwrite issue was changed in StorNext 606 See 70178 on page 16 in the Fixed Issues section Upgrade recommended
Workaround
1 If you dont have a backup of your multipathconf file you will have to add the settings into the file
2 If you have a backup of the custom multipath settings copy the settings into the new multipathconf file using a command-line editor like vi
Known Issues ndash StorNext 6x
Xcellis Workflow Director Release Notes 42
CR Number
SR Number
Description
70067 na Issue
CentOS 7 systems display log files with the journalctl command Any commands executed as the rootsh user are logged to the system log file A syslog filter sends all rootsh log commands to varlogrootshell This causes excessive information to be captured in the journalctl log file and makes the log file difficult to read
WorkaroundThere is a script to use which removes unnecessary command line output from the syslog file for CentOS7 systems running StorNext 605See the journalctl Filter ScriptFor StorNext releases prior to 605 contact Contacting Quantum on page 70
Known Issues ndash StorNext 6x
Xcellis Workflow Director Release Notes 43
CR Number
SR Number
Description
69189 na IssueAfter upgrading to StorNext 60ndash6011 node 2 may report a hardware failure in the StorNext GUI
When clicked this hardware failure displays multiple fan failures on the System Board tab of the Reports gt Hardware Status in the StorNext GUI
Note This issue has been fixed in StorNext 605 See 69506 on page 17 in the Fixed Issues section Upgrade recommended
WorkaroundFor systems on StorNext releases prior to 605 do the following on node 2
1 Open an SSH connection to the appropriate server node and use the IP address assigned to the node on the Management or LAN Client network
Note Node 2 used for dual-node systems only
2 Log in to the command line using the following credentials
l User name stornext
l Password ltstornext user account passwordgt
Note password is the default password for the stornext user account If the password has been changed use the current password
3 Enter sudo rootsh to gain root user access
Known Issues ndash StorNext 6x
Xcellis Workflow Director Release Notes 44
CR Number
SR Number
Description
4 Enter the password for the stornext user account again
5 Enter the following
racadm racreset soft
6 Wait 5 to 10 minutes for the reset to complete
7 Refresh the StorNext GUI The hardware status will no longer display the error for node 2
68773 na Issue
If a configured bridge device assigned to a DAE virtual machine (VM) is removed on the Networking page of the StorNext GUI you will not be able to start the DAE VM
Workaround
If the virtual machine cannot be started because the bridge was removed do the following
1 Recreate the bridge in the StorNext GUI OR
a Open an ssh session to the command line of the system and run virsh edit ltvmnamegt This opens the ltvmnamegt file for editing using vi commands
b Remove the bridge entries from the XML file using vi commands
2 When finished making the changes enter the following to save the changes and exit the editor
wq
Known Issues ndash StorNext 6x
Xcellis Workflow Director Release Notes 45
CR Number
SR Number
Description
68729 na Issue
Systems which used the StorNext Connect Install App prior to StorNext 60 may encounter the message ntp not running when upgrading to or rebooting the system running StorNext 6x
Note This was fixed via an update to the Connect Install App (v8) Xcellis Workflow Director (R630) systems installed using v8 or later will not have this issue Upgrade is recommended However this does not fix the issue for Xcellis Workflow Director (R630) systems installed using the Connect Install App prior to v8
Workaround
See StorNext Connect NTP not Running
68075 na Issue
After upgrading to StorNext 60 from 522 and uploading new licenses the NAS cluster could not be enabled on one of the nodes because the Appliance Controller failed to start
Workaround
See Restart the Appliance Controller
67997 na Issue
For Xcellis Workflow Director systems configured with NAS failover for NFS clusters (NFS-HA) after StorNext services are restarted NAS shares are not accessible from NAS clients
WorkaroundTo fix this condition
1 Restart the NAS controller services on the NAS Master (See the Restart the Appliance Controller section
See Restart the Appliance Controller
2 Access the NAS shares using the nas_vip address from NAS clients
67729 na Issue
When upgrading to StorNext 60 systems running NAS clustered will not automatically upgrade NAS to version 141
Workaround
For these systems run the NAS upgrade before rather than after the StorNext 60 upgrade
Known Issues ndash StorNext 6x
Xcellis Workflow Director Release Notes 46
CR Number
SR Number
Description
66799 322817 342909 362343
Issue
On the StorNext GUI Reports gt Hardware page node1 system board information is shown but information for node2 is not after an upgrade to StorNext 5x and later
Note This issue is fixed in StorNext 605 See 66799 on page 18 in the Fixed Issues section Upgrade recommended
WorkaroundTo fix this issue create the usradicHAMsharedHwMonStatus directory on the primary server node (typically node 1) and restart the hwmond serviceSee Create the HW Monitor Directory
60614
na Issue
Your system and all other Connect-managed Linux StorNext SAN clients must have the latest Connector installed so that statistics can be passed to StorNext Connect If a system is managed by StorNext Connect and you upgrade the firmware on that system to StorNext 5 Release 530 firmware PRIOR to upgrading the StorNext Connect Connector the Volume Storage widget on the StorNext Connect Dashboard will display no data for those systems
Workaround
For steps to take to update the Connect Connector(s) before upgrading system firmware
See Update the StorNext Connect Connector before doing a firmware upgrade
For steps to take if you have already upgraded firmware but did not first update the Connector(s)
See Repair StorNext Connect After Upgrade
55384 na Issue
If dmnfsthreads is not set on mount nfsds may be over-commited when there are many NFS processes waiting for offline files
Workaround
For managed file systems serving NFS Quantum recommends using the dmnfsthreads=16 mount option This setting ensures that NFS remains responsive when Storage Manager is retrieving data from an archive tier
Known Issues ndash StorNext 6x
Xcellis Workflow Director Release Notes 47
CR Number
SR Number
Description
55318 na Issue
Strange UID on ACL when file created on non ads client
Workaround
All systems accessing the StorNext SAN or LAN clients or the NAS clients must be part of the same identity domain Accessing StorNext from different identity domains can result in inconsistent file ownership attributes as well as potential access problems
55220 na Issue(See CR Known Issues ndash StorNext 6x on page 20)
Workaround
na
54451 na IssueStorNext supports case-sensitive file names For configurations with different client types such as Windows and Mac sharing the same files the default case type may be different
WorkaroundThere currently is no workaround for this issue SMB is operating as expected
53486 425247 Srvclog RAS tickets are lost if the hafs (HA shared file system) is not mounted on the system
Note This issue was fixed in StorNext 62 See 53486 on page 12 in the Fixed Issues section Upgrade recommended
Workaround
Upgrade to StorNext 62
45702 na Issue
If you replace an HDD drive with an SSD or vice versa the StorNext GUI will show a status of Missing and an equivalent RAS ticket instead of displaying an Incompatible status
Workaround
Replacement drives must be the identical type of drive removed HDDs can only use HDD spares and SSDs can only use SSD spares Replacement drives must also be the same size or larger than the failed drive The array controller will generate errors if an incompatible drive is used as a replacement
Known Issues Workarounds and Additional Information
Xcellis Workflow Director Release Notes 48
CR Number
SR Number
Description
38128 1395540
IssueUsing the GUI while a large Media import is kicked off via the command line can cause the StorNext GUI to timeout or crash
Workaround
Wait until a bulk load from tape is finished prior to opening the StorNext GUI
Known Issues Workarounds and Additional Information
About firmware upgrades and pre-staged Appliance Controller upgrades for server nodesWhen NAS is enabled detected and is configured on a sever node as part of a NAS cluster and a firmware upgrade is attempted an offline targz file is copied into the scratchsavedNAS directory and is then unzipped and untarred into the varupgrade directory Based on the installed version of NAS on the system the appropriate valid upgrade bundle for NAS will be unpacked to varupgrade for the user to perform the upgrade If a multi-version upgrade is required then the next applicable version will be unpacked into varupgrade and you will be instructed to perform the cluster upgrade first and then retry the firmware upgrade If the cluster state of the node cannot be determined then it looks like no versions are unpacked on the system and the upgrade is aborted (in this case you would have to upgrade the cluster manually using instructions in the Appliance Controller Doc Center (see Appliance Controller Upgrades) and then retry the firmware upgrade
If NAS clustering is not configured the firmware upgrade will perform the direct upgrade to the current version of Appliance Controller shipped with the firmware upgrade
74202 ndash StorNext services can fail to stop completely when NAS is Configured and StorNext services are stoppedHow might this be seenThere are two basic scenarios where this might be exposed
Scenario 1When StorNext stops it signals NAS to vacate the StorNext file systems that NAS is using However if these file systems remain available for too long the Appliance Controller will attempt to automatically restart NAS services This is what happens in order
Known Issues Workarounds and Additional Information
Xcellis Workflow Director Release Notes 49
1 Restarting NAS services can resume use of StorNext resources
2 Resuming StorNext resources interferes with attempts to stop StorNext
3 Continued use of these StorNext resources can result in mounted StorNext file systems that do not have a running fsm process which blocks access to the StorNext file system
If experience this on your system temporarily stop NAS services
1 Log in to the command line of the server (as sudo rootsh)
Launch the Command Line With an SSH Utility a Open an SSH connection to the appropriate server and use the IP address assigned to the
node on the ManagementLAN Client network
b Log in to the command line using the following credentials
l User name stornext
l Password ltstornext user account passwordgt
Note password is the default password for the stornext user account If the password has been changed use the current password
c Enter sudo rootsh to gain root user access
d Enter the password for the stornext user account again
2 Stop NAS by executing the following command
usrcvfslibsnnas_control stop
3 Stop the Appliance Controller by executing the following command
usrlocalquantumbinsml_service_tool stop snnas_controller
4 When you have finished Restart NAS and the Appliance Controller
a Start NAS by executing the following command
usrcvfslibsnnas_control start
b Start the Appliance Controller by executing the following command
usrlocalquantumbinsml_service_tool start snnas_controller
Known Issues Workarounds and Additional Information
Xcellis Workflow Director Release Notes 50
Scenario 2If you need to stop the system during a maintenance window This is an extension of Scenario 1 but NAS must vacate the file systems for an extended period of time If NAS services are resumed when they should be suspended those service processes may interfere with maintenance operations
To affect both scenarios timers exist that you can adjust to extend the amount of time required between the stornext stop operation and before NAS services resume The timers are controlled by the following Controller Registry values
l nasheartbeatcheck_state_secs l stornext_servicestop_periodTo see what values are currently assigned enter
su sysadmin -c reg show nasheartbeatcheck_state_secs
to display the setting of the frequency interval of the NAS heartbeat state check or enter
su sysadmin -c reg show stornext_servicestop_period
to display the duration that StorNext services are stopped
Note By default both timers are set to 120 (in seconds=2 minutes)
WorkaroundsWorkaround 1If StorNext fails to stop due to NAS resource usage do the following
1 Log in to the command line of the server
Launch the Command Line With an SSH Utility a Open an SSH connection to the appropriate server and use the IP address assigned to the
node on the ManagementLAN Client network
b Log in to the command line using the following credentials
l User name stornext
l Password ltstornext user account passwordgt
Note password is the default password for the stornext user account If the password has been changed use the current password
c Enter sudo rootsh to gain root user access
d Enter the password for the stornext user account again
Known Issues Workarounds and Additional Information
Xcellis Workflow Director Release Notes 51
2 Verify that the StorNext file systems are mounted
grep cvfs procmounts
If any StorNext file systems are not mounted mount them now
3 Mount the HA shared file system
mount usradicHAMshared
4 Start fsm for each StorNext file system (shown below as ltFSNAMEgt) mounted on the server node
cvadmin -e start ltFSNAMEgt on localhost
5 Stop StorNext services
For CentOS7 systems enter
systemctl stop cvfs
For CentOS6 systems enter
service cvfs stop
6 To stop NAS enter
usrcvfslibsnnas_control stop
7 To stop the Appliance Controller enter
usrlocalquantumbinsml_service_tool stop snnas_controller
When you are ready restart the Appliance Controller and NAS services
8 To restart the Appliance Controller enter
Known Issues Workarounds and Additional Information
Xcellis Workflow Director Release Notes 52
usrlocalquantumbinsml_service_tool start snnas_controller
9 To restart NAS enter
usrcvfslibsnnas_control start
Workaround 2For Scenario 1 Quantum recommends that you extend the time period to a value of 10 minutes (600 seconds) for both variables Set a value that exceeds the amount of time necessary for typical StorNext shutdown
To set new values
1 Log in to the command line
Launch the Command Line With an SSH Utility a Open an SSH connection to the appropriate server and use the IP address assigned to the
node on the ManagementLAN Client network
b Log in to the command line using the following credentials
l User name stornext
l Password ltstornext user account passwordgt
Note password is the default password for the stornext user account If the password has been changed use the current password
c Enter sudo rootsh to gain root user access
d Enter the password for the stornext user account again
2 Change the frequency interval of the NAS heartbeat state check to 600 seconds (10 minutes) Enter
su sysadmin -c reg set nasheartbeatcheck_state_secs 600
Note This is run with a temporary log in to the Appliance Controller as the sysadmin user
3 Change the duration that StorNext services are stopped to 600 seconds (10 minutes) Enter
Known Issues Workarounds and Additional Information
Xcellis Workflow Director Release Notes 53
su sysadmin -c reg set stornext_servicestop_period 600
4 Note This is run with a temporary log in to the Appliance Controller as the sysadmin user
Workaround 3For Scenario 2 to eliminate the confusion of setting a long duration for a maintenance window and then having to change the values back again to a shorter value again you can simply stop NAS services and the Appliance Controller and then restart these services when you are finished
To stop the services and restart them
1 Log in to the command line
Launch the Command Line With an SSH Utility a Open an SSH connection to the appropriate server and use the IP address assigned to the
node on the ManagementLAN Client network
b Log in to the command line using the following credentials
l User name stornext
l Password ltstornext user account passwordgt
Note password is the default password for the stornext user account If the password has been changed use the current password
c Enter sudo rootsh to gain root user access
d Enter the password for the stornext user account again
2 Stop NAS by executing the following command
usrcvfslibsnnas_control stop
3 Stop the Appliance Controller by executing the following command
usrlocalquantumbinsml_service_tool stop snnas_controller
When you are ready restart the Appliance Controller and NAS services
4 To restart the Appliance Controller enter
usrlocalquantumbinsml_service_tool start snnas_controller
Known Issues Workarounds and Additional Information
Xcellis Workflow Director Release Notes 54
5 To restart NAS enter
usrcvfslibsnnas_control start
6 Change the settings for the NAS heartbeat state check and the duration that StorNext services are stopped according to Workaround 2 on page 52
Workaround 4An alternate method for maintenance windows instead of implementing workaround 3 for Scenario 2 you can choose a much longer value if you need the NAS heartbeat state check interval and StorNext services stopped for a long period of time (for example during a planned maintenance window in a data center) While this is another option the downside of this is that you will need to know how much downtime to expect maintenance to take and then set these times to be less than what is needed for that maintenance It is also difficult to extend the maintenance period reliably once those timers have started In addition you will most likely have to reset the values back to their original settings when the maintenance window is complete which could be a hassle
Here is one example which extends the time values to 2 hours (7200 seconds)
1 Log in to the command line
Launch the Command Line With an SSH Utility a Open an SSH connection to the appropriate server and use the IP address assigned to the
node on the ManagementLAN Client network
b Log in to the command line using the following credentials
l User name stornext
l Password ltstornext user account passwordgt
Note password is the default password for the stornext user account If the password has been changed use the current password
c Enter sudo rootsh to gain root user access
d Enter the password for the stornext user account again
2 Change the frequency interval of the NAS heartbeat state check to 7200 seconds (10 minutes) Enter
su sysadmin -c reg set nasheartbeatcheck_state_secs 7200
Note This is run with a temporary log in to the Appliance Controller as the sysadmin user
3 Change the duration that StorNext services are stopped to 7200 seconds (10 minutes) Enter
Known Issues Workarounds and Additional Information
Xcellis Workflow Director Release Notes 55
su sysadmin -c reg set stornext_servicestop_period 7200
4 Note This is run with a temporary log in to the Appliance Controller as the sysadmin user
Change the componentproperties Timeout Setting 1 Log in to the command line of the primary server node (typically node 1) See Launch the Command
Line (for Xcellis Workflow DirectorGen 2) or Launch the Command Line (for R630 systems)
2 Open the componentproperties file with the vi editor
vi usradicguiconfigcomponentproperties
Pro Tip 1 Edit With vi
The vi editor is included in CentOS If you are unfamiliar with using vi to open edit (copypastedelete) exit with or without saving changes use the following Google search URL to find related links for editing with vi
httpswwwgooglecomsearchq=edit+with+vi
3 Scroll down to the web services timeouts section It should look similar to (note the default firmware upgrade value is 300 seconds - highlighted in green)
Web Services Timeouts (seconds)
wsconverttohatimeout=300 wsapplyfwupgradetimeout=300 wsgetsystemidtimeout=10 wsntptimeout=30 wsdatetimetimeout=30 wsnetworkconfigtimeout=180 wsnetworkhapeertimeout=30 wsloggingleveltimeout=30 wscapturestatetimeout=600 wsjobclosetimeout=30 wsnasclosetimeout=60
4 Move the cursor to sit over the number 3 enter ltSHIFTgt+ and then R (for replace) and enter the number 6 to change the wsapplyfwupgradetimeout= value from 300 seconds (5 minutes) to 600 seconds (10 minutes)
wsapplyfwupgradetimeout=600
Known Issues Workarounds and Additional Information
Xcellis Workflow Director Release Notes 56
5 Save the changes to the file by entering SHIFTwq to write the file and quit the vi editor
The setting change will be replicated to the other server node in 2-3 minutes after the file change is saved so this only has to be applied to server node 1
6 Run the Firmware Upgrade process again
Note Even though the upgrade failed previously the firmware upgrade files are still available for the upgrade
a Select either of the uploaded files click Apply In the case of a single file select the one file uploaded and click Apply
b Click Yes to confirm the installation For two-file upgrades both firmware files are applied to the system during the upgrade
The upgrade should complete after the timeout setting is changed However if the firmware upgrade fails again contact Contacting Quantum on page 70 for assistance with manually upgrading the node that failed to upgrade
Server Boot (QXSNetApp)This does not need to be applied to all systems connected to storage arrays only impacted systems as described here
Systems Impacted l This ONLY affects systems upgrading from StorNext 5x releases to 6x (prior to 605)
l This ONLY affects systems upgrading that are Fibre Channel-connected to BOTH NetApp and QXS arrays
Note This issue was fixed in StorNext 605 See 70300 on page 17 If you are upgrading to StorNext 605 you will not see this issue and do not have to perform this workaround
BEFORE applying the upgrade to StorNext 6x do the following
Log in to the system command line 1 Open an SSH connection to the appropriate server and use the IP address assigned to the node on the
Management or LAN Client network or use the Service Port IP address if connected to the Service Port
Service Port IP addresses l Node 1 1017211 (dual-server node systems)
l Node 2 1017212 (dual-server node or HA-ready single-server node systems)
Note Node 2 is the server node sold with single-node (non-HA) Xcellis Workflow Director and Artico systems It is also used for installation using the StorNext Connect Install app for both single-node and dual-node systems only
Known Issues Workarounds and Additional Information
Xcellis Workflow Director Release Notes 57
2 Log in to the command line using the following credentials
l User name stornext
l Password ltstornext user account passwordgt
Note password is the default password for the stornext user account If the password has been changed use the current password
3 Enter sudo rootsh to gain root user access
4 Enter the password for the stornext user account again
Edit the Grub Configuration File 1 Create a backup copy of the CentOS7 grubd40_custom configuration file Enter the following
cp etcgrubd40_custom scratch40_customorig
2 Create a backup copy of the CentOS7 grubcfg file Enter the following
cp bootgrub2grubcfg bootgrub2grubcfgorig
3 Edit the etcgrubd40_custom file using the vi editor included in CentOS7x Enter the following
vi etcgrubd40_custom
4 To enter vi insert mode enter i
5 Look for the lines beginning with linux16 as shown in bold blue below and add ltspacegtrdblacklist=ses rdblacklist=enclosure to the end of those lines as shown in green in the following example (Ellipses included below denote code prior to and after the linux16 sections)
Known Issues Workarounds and Additional Information
Xcellis Workflow Director Release Notes 58
linux16 vmlinuz-3100-51462el7qtmx86_64 root=UUID=3d9116b2-c5de-41fd-bd38-2042c0f8ebad ro console=tty1 vconsolekeymap=us crashkernel=768M0M vconsolefont=latarcyrheb-sun16 selinux=0 enforcing=0 intel_idlemax_cstate=0 processormax_cstate=1 elevator=deadline transparent_hugepage=never quiet LANG=en_USUTF-8 rdblacklist=ses rdblacklist=enclosure
initrd16 initramfs-3100-51462el7qtmx86_64img
menuentry Xcellis SOL --class centos --class gnu-linux --class os --unrestricted load_videoset gfxpayload=keepinsmod gzioinsmod part_msdosinsmod ext2set root=hd0msdos1if [ x = xy ] thensearch --no-floppy --fs-uuid --set=root --hint-bios=hd0msdos1 --hint-efi=hd0msdos1 --hint-baremetal=ahci0msdos1 --hint=hd0msdos1 a0467663-8cf0-48be-b967-d5ef7eb486e2elsesearch --no-floppy --fs-uuid --set=root a0467663-8cf0-48be-b967-d5ef7eb486e2filinux16 vmlinuz-3100-51462el7qtmx86_64 root=UUID=3d9116b2-c5de-41fd-bd38-2042c0f8ebad ro console=ttyS1115200n8 vconsolekeymap=us crashkernel=768M0M vconsolefont=latarcyrheb-sun16 selinux=0 enforcing=0 intel_idlemax_cstate=0 processormax_cstate=1 elevator=deadline transparent_hugepage=never quiet LANG=en_USUTF-8 rdblacklist=ses rdblacklist=enclosureinitrd16 initramfs-3100-51462el7qtmx86_64img
6 To exit insert mode and return to command mode press ltEscgt
7 To save changes and exit vi enter wq and press ltEntergt You will return to the command prompt (To exit vi without saving changes enter q and press ltEntergt)
8 Repeat Log in to the system command line on page 56 and Edit the Grub Configuration File on the previous page for the other server node
Edit the Blacklist Configuration File and Enable the Changes 1 Enter the following to create a backup copy of the blacklist configuration file
Known Issues Workarounds and Additional Information
Xcellis Workflow Director Release Notes 59
cp etcmodprobedblacklistconf scratchblacklistconforig
2 Enter the following to edit the etcmodprobedblacklistconf file using vi
vi etcmodprobedblacklistconf
3 To edit change to the vi insert mode Enter i
4 Add a separate line for rdblacklist ses and another line for rdblacklist enclosure to the file as shown in green in the following example
blacklist rivafb
blacklist savagefb
blacklist sstfb
blacklist neofb
blacklist tridentfb
blacklist tdfxfb
blacklist virgefb
blacklist vga16fb
blacklist viafb
ISDN - see bugs 154799 159068
blacklist hisax
blacklist hisax_fcpcipnp
sound drivers
blacklist snd-pcsp
IO dynamic configuration support for s390x (bz 563228)
blacklist chsc_sch
Known Issues Workarounds and Additional Information
Xcellis Workflow Director Release Notes 60
blacklist sb_edac
blacklist edac_core
blacklist sesblacklist enclosure
5 To exit insert mode and return to command mode press ltEscgt
6 To save changes and exit vi enter wq and press ltEntergt You will return to the command prompt (To exit vi without saving changes enter q and press ltEntergt)
7 To enable the changes enter
dracut -f
8 Continue to Reboot the system below
Workaround System Already UpgradedIf the system has been upgraded and cannot boot do the following to recover the system
1 Detachdisconnect the FC ports from the nodes or disable the FC zoning configuration for the QXS array(s)
2 Boot the system and enter the following to stop cvfs
systemctl stop cvfs
3 Edit the grub configuration file for your version of CentOS See Edit the Grub Configuration File on page 57
4 Edit the blacklist configuration file See Edit the Blacklist Configuration File and Enable the Changes on page 58
5 Reattach or re-enable FC zoning configuration for the QXS array(s)
6 Continue to Reboot the system below
Reboot the system 1 Reboot the server you are already logged into
systemctl reboot
Continue to Step 3 for single-node systems For dual-node systems continue to the next step
Known Issues Workarounds and Additional Information
Xcellis Workflow Director Release Notes 61
2 Log in to the other server node See Log in to the system command line on page 56
systemctl reboot
3 For dual-node systems repeat Step 3 for server node 2 The process is complete
Change Upgrade Timeout SettingBEFORE applying the upgrade to StorNext 6x do the following
Log in to the system command line 1 Open an SSH connection to the appropriate server and use the IP address assigned to the node on the
Management or LAN Client network or use the Service Port IP address if connected to the Service Port
Service Port IP addresses l Node 1 1017211 (dual-server node systems)
l Node 2 1017212 (dual-server node or HA-ready single-server node systems)
Note Node 2 is the server node sold with single-node (non-HA) Xcellis Workflow Director and Artico systems It is also used for installation using the StorNext Connect Install app for both single-node and dual-node systems only
2 Log in to the command line using the following credentials
l User name stornext
l Password ltstornext user account passwordgt
Note password is the default password for the stornext user account If the password has been changed use the current password
3 Enter sudo rootsh to gain root user access
4 Enter the password for the stornext user account again
1 Change to the config directory
cd usradicguiconfig
2 Copy the componentproperties file
cp componentproperties componentpropertiesorig
Known Issues Workarounds and Additional Information
Xcellis Workflow Director Release Notes 62
3 Edit the file using vi
vi componentproperties
4 Scroll down the file until you get to the Web Services Timeouts (seconds) section and the upgrade timeout line shown in bold text The current value should be similar to the value shown in bold green
Web Services Timeouts (seconds) wsconverttohatimeout=300wsapplyfwupgradetimeout=300 wsgetsystemidtimeout=10 wsntptimeout=30 wsdatetimetimeout=30 wsnetworkconfigtimeout=180 wsnetworkhapeertimeout=30 wsloggingleveltimeout=30 wscapturestatetimeout=600 wsjobclosetimeout=30 wsnasclosetimeout=60
5 To edit change to the vi insert mode Enter i
6 Change the value to 1200
Known Issues Workarounds and Additional Information
Xcellis Workflow Director Release Notes 63
Web Services Timeouts (seconds) wsconverttohatimeout=300wsapplyfwupgradetimeout=1200 wsgetsystemidtimeout=10 wsntptimeout=30 wsdatetimetimeout=30 wsnetworkconfigtimeout=180 wsnetworkhapeertimeout=30 wsloggingleveltimeout=30 wscapturestatetimeout=600 wsjobclosetimeout=30 wsnasclosetimeout=60
7 To exit insert mode and return to command mode press ltEscgt
8 To save changes and exit vi enter wq and press ltEntergt You will return to the command prompt (To exit vi without saving changes enter q and press ltEntergt)
9 Continue to Reboot the system below
Reboot the system 1 Reboot the server you are already logged into
systemctl reboot
Continue to Step 3 for single-node systems For dual-node systems continue to the next step
2 Log in to the other server node See Log in to the system command line on page 61
3 Reboot the other server node 2
systemctl reboot
4 Repeat Step 3 for server node 2
The process is complete
journalctl Filter ScriptStep 1 Upgrade to StorNext 605
Known Issues Workarounds and Additional Information
Xcellis Workflow Director Release Notes 64
Note StorNext 605 provides the script so you need to upgrade to StorNext 605 to access the file
See Upgrade a Gateway System (Upgrade Firmware) Using the Service Menu
Step 2 Log in to the System Command Line 1 Open an SSH connection to the appropriate server and use the IP address assigned to the node on the
Management or LAN Client network or use the Service Port IP address if connected to the Service Port
Service Port IP addresses l Node 1 1017211 (dual-server node systems)
l Node 2 1017212 (dual-server node or HA-ready single-server node systems)
Note Node 2 is the server node sold with single-node (non-HA) Xcellis Workflow Director and Artico systems It is also used for installation using the StorNext Connect Install app for both single-node and dual-node systems only
2 Log in to the command line using the following credentials
l User name stornext
l Password ltstornext user account passwordgt
Note password is the default password for the stornext user account If the password has been changed use the current password
3 Enter sudo rootsh to gain root user access
4 Enter the password for the stornext user account again
5 Continue to Step 3 Run the Journal Filter Script and View the Script Help below
Step 3 Run the Journal Filter Script and View the Script Help l Enter the following to use the script to view the log output in a way that filters out all the rootsh
commands
optDXiscriptsjournalctl_filtersh -f
l Enter the following to view the scripts help file
optDXiscriptsjournalctl_filtersh --help
Note The journalctl_filtersh output can also be saved to a file
Known Issues Workarounds and Additional Information
Xcellis Workflow Director Release Notes 65
StorNext Connect NTP not RunningWorkaround 1 If you encounter this issue when rebooting the system reboot or after a firmware upgrade do the following
1 Log in to the StorNext GUI and select gtConfiguration gt System
2 Click the Date amp Time tab
3 Set the NTP protocol options as follows Select either the Select a Timeserver Pool option and select the pool from the options available OR select the Specify a Timeserver or Pool option and enter the IP address of the time server
4 Click Apply which will reboot the node (or both nodes in dual-server systems) and re-enable and start NTP
Workaround 2Another alternative enables ntp when the system is rebooted
1 Using an SSH connection log in to the command line of the server
2 Enter the following command
usrbinsystemctl ntpdservice enable
3 Repeat for the other server (for dual-server node systems only)
4 Manually reboot the server (or both server nodes for dual-server node systems)
Restart the Appliance ControllerOn the server node hosting NAS do the following (use node 2 on dual-server node systems)
1 Open an SSH connection to the appropriate server node and use the IP address assigned to the node on the Management or LAN Client network
2 Log in to the command line using the following credentials
l User name stornext
l Password ltstornext user account passwordgt
Note password is the default password for the stornext user account If the password has been changed use the current password
3 Enter sudo rootsh to gain root user access
4 Enter the password for the stornext user account again
5 Enter the following
chown -R ldapldap varlibldap
Known Issues Workarounds and Additional Information
Xcellis Workflow Director Release Notes 66
6 Enter the following
systemctl restart slapd
7 Restart the appliance controller
systemctl start snnas_controller
systemctl stop snnas_controller
Create the Missing Hardware Monitor DirectoryDo the following to check if the directory is missing and re-create the directory if it is and restart the hwmond service
1 Open an SSH connection to the appropriate server and use the IP address assigned to the node on the Management or LAN Client network or use the Service Port IP address if connected to the Service Port
Service Port IP addresses l Node 1 1017211 (dual-server node systems)
l Node 2 1017212 (dual-server node or HA-ready single-server node systems)
Note Node 2 is the server node sold with single-node (non-HA) Xcellis Workflow Director and Artico systems It is also used for installation using the StorNext Connect Install app for both single-node and dual-node systems only
2 Log in to the command line using the following credentials
l User name stornext
l Password ltstornext user account passwordgt
Note password is the default password for the stornext user account If the password has been changed use the current password
3 Enter sudo rootsh to gain root user access
4 Enter the password for the stornext user account again
5 Enter the following on the command line
cd usradicHAMsharedHwMonStatus
If you see the following message the directory does not exist Continue to the next step
Known Issues Workarounds and Additional Information
Xcellis Workflow Director Release Notes 67
bash cd usradicHAMsharedHwMonStatus No such file or directory
6 Enter the following on the command line to create the directory
mkdir usradicHAMsharedHwMonStatus
7 Enter the following to verify the directory has been created
cd usradicHAMsharedHwMonStatus
8 Change the permission of the hwmond service to read-only
chmod -r 775 HwMonStatus
9 Restart the hwmond service
systemctl restart quantum-hwmondservice
How to Disable NFS v4To disable NFSv4 on Xcellis Workflow Director systems especially those systems running NAS 120 or earlier perform the following on node 2
Edit the nfs File 1 Open an SSH connection to the appropriate server and use the IP address assigned to the node on the
Management or LAN Client network or use the Service Port IP address if connected to the Service Port
Service Port IP addresses l Node 1 1017211 (dual-server node systems)
l Node 2 1017212 (dual-server node or HA-ready single-server node systems)
Note Node 2 is the server node sold with single-node (non-HA) Xcellis Workflow Director and Artico systems It is also used for installation using the StorNext Connect Install app for both single-node and dual-node systems only
Known Issues Workarounds and Additional Information
Xcellis Workflow Director Release Notes 68
2 Log in to the command line using the following credentials
l User name stornext
l Password ltstornext user account passwordgt
Note password is the default password for the stornext user account If the password has been changed use the current password
3 Enter sudo rootsh to gain root user access
4 Enter the password for the stornext user account again
5 Edit etcsysconfignfs file (See Example Use vi to Edit the nfs File on the next page)
6 Change the value for RPCNFSDARGS to -N 4 When finished the line must be RPCNFSDARGS=-N 4
7 Change the value for RPCMOUNTDOPTS to -N 4 When finished the line must be RPCMOUNTDOPTS=-N 4
8 Save the file
Restart NFS
For Xcellis Workflow Director (R630) systems
1 Enter the following to restart the NFS configuration
systemctl restart nfs-config
2 Enter the following to restart the NFS server
systemctl restart nfs-server
After You Restart NFS on Node 2Repeat both the Edit the nfs File on the previous page and Known Issues ndash StorNext 6x on page 20 sections on node 1( for dual-node systems)
If you need to create new NFS shares to export for user access you may do this now See the About the NAS App section of the StorNext Connect Documentation Center for information about NAS configuration using StorNext Connect
Known Issues Workarounds and Additional Information
Xcellis Workflow Director Release Notes 69
Example Use vi to Edit the nfs File 1 Enter the following
vi etcsysconfignfs
2 Move the cursor to the closing quotation mark in RPCNFSDARGS
3 Enter the following
i -N 4
4 Write the file and quit vi as follows
wq
5 For this example you would have to Restart NFS on the previous page and repeat the Edit the nfs File on page 67 and Restart NFS on the previous page again on node 1 (for dual-node systems)
6 Close the SSH session for the server(s) ( for dual-node systems)
Re-enable DDM on the Secondary Node After HA FailoverOnce the MDC node acting as secondary finishes rebooting and becomes functional again use fsddmconfig (or the GUI) from the server node currently acting as primary to re-enable DDM for the standby server node as follows
1 Open an SSH connection to the appropriate server and use the IP address assigned to the node on the Management or LAN Client network or use the Service Port IP address if connected to the Service Port
Service Port IP addresses l Node 1 1017211 (dual-server node systems)
l Node 2 1017212 (dual-server node or HA-ready single-server node systems)
Note Node 2 is the server node sold with single-node (non-HA) Xcellis Workflow Director and Artico systems It is also used for installation using the StorNext Connect Install app for both single-node and dual-node systems only
Contacting Quantum
Xcellis Workflow Director Release Notes 70
2 Log in to the command line using the following credentials
l User name stornext
l Password ltstornext user account passwordgt
Note password is the default password for the stornext user account If the password has been changed use the current password
3 Enter sudo rootsh to gain root user access
4 Enter the password for the stornext user account again
5 On the command line of the system enter the following
fsddmconfig -u -s e
standby_system_hostname
If a system running DDMs periodically displays an Admin Alert when it fails over cycles a client node or upgrades while the server node operating as secondary is rebooting but not completely down change the timeout value to allow more time to communicate with the node Update the TSM configuration parameter DDM_CLIENT_RETRY_TIMEOUT from the default 30 seconds to a larger value depending on how long the node is taking to reboot In the event the server node acting as secondary will be down for an extended period of time the node should be taken offline Additionally if this parameter is set too high and the standby server does not come back the command that is currently running (eg store or retrieve) will not return until after the specified timeout
For more information about the DDM_CLIENT_RETRY_TIMEOUT parameter that can be placed into the fs_sysparm_override configuration file refer to the usradicTSMconfigfs_sysparmREADME file
Caution Incorrect modification of the fs_sysparm_override configuration file can cause a serious adverse effect on StorNext functionality Before modifying this file we recommend you contact Contacting Quantum below
Contacting QuantumFor further assistance contact the Quantum Customer Support Center
Region Support Contact
North America 1-800-284-5101 (toll free)+1-720-249-5700
Contacting Quantum
Xcellis Workflow Director Release Notes 71
Region Support Contact
EMEA +800-7826-8888 (toll free)
+49 6131 324 185
Asia Pacific +800-7826-8887 (toll free)+603-7953-3010
For worldwide support
httpswwwquantumcomserviceandsupportget-helpindexaspxcontact-support
- Revision History
- About the Xcellis Workflow Director
- Training and Documentation Resources
- About StorNext 6
-
- What is StorNext
- Learn More on the Web
-
- What StorNext Releases are compatible with my system
- Upgrade StorNext Software and System Firmware
- General Notes
- Quantum Appliance Licenses
- Fixed Issues Notes and Enhancements ndash StorNext 6x
- Known Issues ndash StorNext 6x
- Known Issues Workarounds and Additional Information
- Contacting Quantum
-
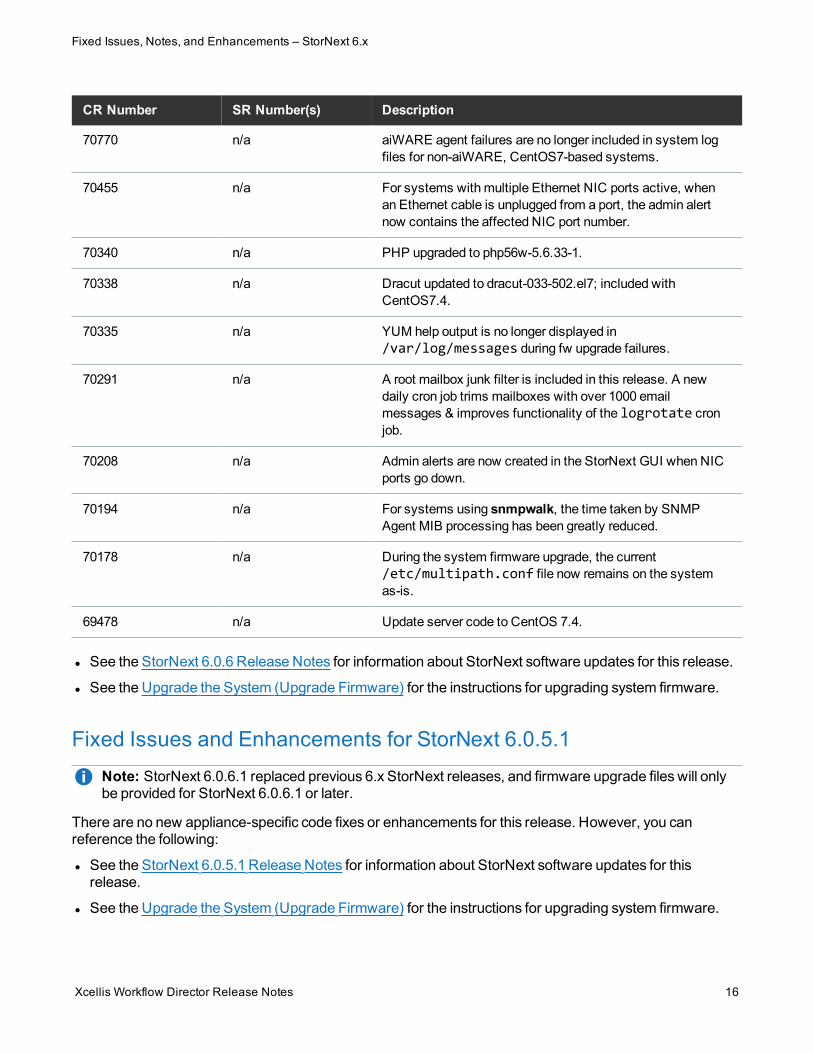
Fixed Issues Notes and Enhancements ndash StorNext 6x
Xcellis Workflow Director Release Notes 19
CR Number SR Number(s) Description
69706 363354 After rebooting the system configured with iSCSI connections the iSCSI connection will now re-establish correctly and StorNext file systems will also restart
Table 11 Fixed IssuesEnhancements for StorNext 6011
Note The StorNext 6011 release only applied to R630 server models (which run on CentOS7) and not R520 server models (which run on CentOS6)
l See the StorNext 601 Release Notes for information about StorNext software updates
l See the Upgrade the System (Upgrade Firmware) for the instructions for upgrading system firmware
Fixed Issues and Enhancements for StorNext 601Note StorNext 6061 replaced previous 6x StorNext releases and firmware upgrade files will only be provided for StorNext 6061 or later
The StorNext 601 for Appliances release adds support for aiWAREVeritone running on Xcellis Workflow Director systems These systems are configured with aiWAREVeritone with the aiWARE for Xcellis Embedded (DAE) product name
CR Number SR Number(s) Description
69365 na Enable the aiware-agent so it starts on boot
69396 na Disable the docker-prune service and timer on node 1 since the docker service is disabled
69388 na Include signed Samba 4212 rpms for CVE-2017-11103 in the build
69374 358555 Linux NFS servers operate correctly when an exported SNFS file system was configured as case-insensitive
Table 12 Fixed IssuesEnhancements for StorNext 601
l See the StorNext 601 Release Notes for information about StorNext software updates for this release
l See the Upgrade the System (Upgrade Firmware) for the instructions for upgrading system firmware
Fixed Issues and Enhancements for StorNext 60Note StorNext 6061 replaced previous 6x StorNext releases and firmware upgrade files will only be provided for StorNext 6061 or later
The following table lists the fixed issuesenhancements for StorNext 60
Known Issues ndash StorNext 6x
Xcellis Workflow Director Release Notes 20
CR Number SR Number(s) Description
68994 na Once 10 GbE ports are configured for use as iSCSI ports they are reserved for iSCSI configuration use only
69158 na Gateway network menu for 40GbE ports supported as individual non-bonded ports
68943 na Xcellis and Artico single-servers Provisioning Storage option no longer prompts to rescan secondary node for new LUNs
68961 na sernet samba 4212-20 security patch version for NAS 130 - 141 included in 60 appliance code
Table 13 Fixed IssuesEnhancements for StorNext 60
Notes l See the StorNext 60 Release Notes for information about StorNext software updates for this release
l See the Upgrade the System (Upgrade Firmware) for the instructions for upgrading system firmware
Known Issues ndash StorNext 6xThis section lists the known issues that could potentially affect your system
CR Number
SR Number
Description
77317 na Adding a DAE virtual machine to a file system created on a QXS or P-Series LUN can create a RAS alert stating
Excessive fragmentation detected in file DAE_Boot_Disk_locationpk-DAE-vmqcow2 inode 0x4e800000ef0b19 (decimal inum 15665945)
Workaround
While this issue is not currently fixed the message itself may be disabled To disable the RAS alert change the value of the extentCountThreshold parameter in the file system configuration file to 0 For information about file system configuration files see
httpsqsupportquantumcomkbflareContentstornextSN6_DocSiteDefaulthtmGuide_TuningTopicsExample_FSM_Configuratiohtm
Known Issues ndash StorNext 6x
Xcellis Workflow Director Release Notes 21
CR Number
SR Number
Description
76675 543978 If your system is running as a FlexSync host and you upgrade StorNext it also installs the latest version of FlexSync If there are other systems configured as FlexSync hosts FlexSync will not function on those other systems until they are upgraded to the latest available FlexSync version
Error message displayed
Host Unreachable Upgrade Required
The same FlexSynch version must be installed on ALL FlexSync hosts (see Can different versions of FlexSync be installed or upgraded within a configuration on the FlexSync Documentation Center)
Workaround
Upgrade FlexSync on ALL FlexSync hosts See Upgrade FlexSync in the FlexSync Documentation Center
7635376354
na Mellanox Connect CX4-Lx cards can fail to operate if configured for 25 GbE connections and running 631
Note This issue has been fixed in 6311 See 76353 on page 6 in the Fixed Issues section Upgrade recommended
Workaround
Upgrade to StorNext 6311
Known Issues ndash StorNext 6x
Xcellis Workflow Director Release Notes 22
CR Number
SR Number
Description
74024 470777 479905 The following applies to Xcellis Workflow Director (R630) systems ONLY It does not
apply to other server model namesgenerations
Upgrade between StorNext releases prior to 621 removes custom Infiniband configuration settings
Note This issue was Fixed in 630 Upgrades to StorNext 630 DO NOT experience this issue If this has not happened to your system you can upgrade to 630 without this issue affecting your systemNote Because the workaround is required after every upgrade to StorNext releases prior to 621 Quantum strongly recommends you to upgrade the system to 621 or later prior to contacting Quantum Support about this issue so the fix will be applied to a release that no longer removes the Infiniband settings and it only has to be applied once
After upgrading to 621 or later (prior to 630)
If you have this problem and have upgraded the system to 621 or later contact Quantum Support and reference TSB (Technical Service Bulletin) 3065
Once the system is upgraded to 621 and the fix is applied future upgrades will perform successfully and will not remove the Infiniband configuration settings
74571 na For StorNext 630 and Appliance Controller 230 there is a situation where the firmware upgrade process pre-stages Appliance Controller upgrade file(s) on server node 1 but the same files are not pre-staged to server node 2 which can create a failure for firmware upgrades This can happen if you click Validate on the firmware upgrade page or the function that checks for upgrade dependencies when you click Activate on the firmware upgrade page
If this happens and Node 2 was the master node of a NAS cluster you will not be able to run the Appliance Controller upgrade local command on node 2 to upgrade to the current controller release pre-staged on the server and you will have to manually move the nas rpms from the varupgrade or scratchsavedNAS directory on node 1 to the varupgrade directory on node 2 and upgrade the NAS cluster manually from Node 2
See httpqsupportquantumcomkbFlareContentappliancesACCDocSiteUpgradesACC_Upgradeshtm
Note See About firmware upgrades and pre-staged Appliance Controller upgrades for server nodes on page 48 for information about how these files are pre-staged to enable you to upgrade Appliance Controller manually separate from the firmware upgrade process
Known Issues ndash StorNext 6x
Xcellis Workflow Director Release Notes 23
CR Number
SR Number
Description
74202
67955
HYDRA-4326
na If NAS is configured on the system and StorNext services are stopped StorNext services can fail to stop completely This can block server fail-over and potentially leaves managed file systems without running FSMs
See 74202 ndash StorNext services can fail to stop completely when NAS is Configured and StorNext services are stopped on page 48 for an in-depth explanation of the issue and several alternate workarounds
73688 na When the var directory on the appliance gets full the following serious errors can occur
l Network communication errors on the server node
l iDRAC is not accessible
l The server node gets stuck during reboot and require a physical power cycle
See also Leave Space on Appliance File Systems on the Appliance InfoHub
Workaround
Keep additional space available on var
73485 469076 The qxsarray show feature in the Appliance Controller console (CLI) no longer returns the following error Operation failure Failed to retrieve all QXS array configuration data Space required after the Public Identifier line 1 column 47 (E-2003)
73036 naThe following does not apply to Xcellis Workflow Director Gen 2 systems
Systems running Java 171 181 or later are no longer able to launch the iDRAC Virtual Console using StorNext 620 or later due to an increase in Java security
Workaround
Uninstall the current Java version and install Java 170 iDRAC should work properly again
Known Issues ndash StorNext 6x
Xcellis Workflow Director Release Notes 24
CR Number
SR Number
Description
72726 3734274 336772 409963 430039 455314
If you run fsmedscan -R the root file system on the active server node (typically node 1) can fill up and the node will become unresponsive This is because fsmedscan creates copious log files and by default places them in tmplogs which will eventually fill up the root system drive
Note This issue was fixed in StorNext 62 See 70915 on page 11 in the Fixed Issues section Upgrade recommended
Workarounds
l Upgrade to StorNext 62
l Prior to 62 you could create a symbolic link from tmplogs to something like scratchfsmedscan_logs since scratch should contain plenty of available space
72591
72583
na Issue
When setting the IPMI network settings you may see errors after applying changes If this happens you will see something similar to the following (in green)
Note This issue affects Gen 2 appliances only
Setting LAN IP Address to 10172152
Setting LAN Subnet Mask to 25525500
LAN Parameter Data does not match Write may have failed
Setting LAN Default Gateway IP to 101721254
LAN Parameter Data does not match Write may have failed
Set User Password command successful (user 2)
Waiting for IPMI to be rebooted (30 sec)
IPMI did not properly reset within 30 seconds
Done setting up IPMI
WorkaroundThere is no current workaround for display of these error messages However this message is benign and can be ignored Even though there appears to be an issue the IPMI values are actually applied to the system and the IPMI does open using the new IP settings
Known Issues ndash StorNext 6x
Xcellis Workflow Director Release Notes 25
CR Number
SR Number
Description
71809 431853 snaFileSystemActive OID can return a bad data type for SNMB informationNote This issue was fixed in StorNext 62 See 71809 on page 11 in the Fixed Issues section Upgrade recommended
Workaround
Upgrade to StorNext 62
71708 440392 Issue
When slot PCI addresses change need to reflect their new location in the systemNote This issue was fixed in StorNext 610 See 71708 on page 13 in the Fixed Issues section Upgrade recommended
WorkaroundUpgrade to StorNext 610 There is no other workaround available
71469 421581 Issue
Firmware upgrade failed during the OSUpdate step of the upgrade process due to insufficient space on localroot filesystem
Note Free space is now checked before continuing with the firmware upgrade in StorNext 610 See 71469 on page 13 in the Fixed Issues section Upgrade recommended
Workaround
1 Determine which directory on the root directory has files that can be removed
df -h
Notice any directories you have created that consume GBs of data
2 Remove files so you ensure the system has at least 5 GB of free space for the firmware upgrade to use before attempting the upgrade
3 Restart the failed upgrade
Known Issues ndash StorNext 6x
Xcellis Workflow Director Release Notes 26
CR Number
SR Number
Description
71328 403647 Issue
Systems can a very long time to get from POST until the filesystems are mounted with large LUNs present since all devices are added to the sysfs and on udev During boot a message similar to the the following is displayed
mam-node-1 udevd-work[39397] inotify_add_watch(6 devdm-2699 10) failed No space left on device
Note This issue was fixed in StorNext 61 See 71328 on page 13 in the Fixed Issues section Upgrade recommended
Workaround
Upgrade to StorNext 610
OR
Increase the amount of notify watches Do the following
1 Run the following command
cat procsysfsinotifymax_user_watches
This should return a value similar to
10240
2 Edit the etcsysctlconf file to allow for a longer boot time
fsinotifymax_user_watches=32768
71299 456036 459515 460901
Running a Nexpose scan on systems running StorNext 606x can result in a fs_copymandfs_moverd core dump
Note This issue was fixed in StorNext 62 See 71299 on page 11 in the Fixed Issues section Upgrade recommended
Workarounds
l Exclude the system from security scans
l Upgrade to StorNext 62
Known Issues ndash StorNext 6x
Xcellis Workflow Director Release Notes 27
CR Number
SR Number
Description
71230 414352 429898
IssueNexpose security scan reports HTTP Header is missing on port 443
Note This issue was fixed in StorNext 61 See 71230 on page 13 in the Fixed Issues section Upgrade recommended
WorkaroundUpgrade to StorNext 610 There is no other workaround available
71125 410540 Issuevarlogmessages can omit expected information beginning with a specific point in time
Note This issue was fixed in StorNext 61 See 71125 on page 13 in the Fixed Issues section Upgrade recommended
Workaround
To correct this issue
Upgrade to StorNext 610
OR
1 Remove imjournalstate
rm -f varlibrsyslogimjournalstate
Restart rsyslog
sbinservice rsyslog restart
Then rotate the log
$logrotate etclogrotateconf
2 If the logging stops again disable the imjournal input To do this edit the etcrsyslogconf file and comment out OmitLocalLogging on as shown
$OmitLocalLogging on
Known Issues ndash StorNext 6x
Xcellis Workflow Director Release Notes 28
CR Number
SR Number
Description
71012 0399206 IssueThe StorNext Connect GUI shows the status of an appliance server node being undefined and is displayed as a gray dot on the dashboard as a result of a Fibre Channel card being part of the expected hardware installed for the system
Note This issue was fixed in StorNext 61 See 71012 on page 13 in the Fixed Issues section Upgrade recommended
Workaround
Upgrade to StorNext 610
OR
Remove fibre_channel from the list of components and run monitor_appliancepy Next go to the StornStorNext ConnectDashboard and refresh the page The system status will be displayed as a green dot on the Dashboard
70854 383195 Issueblacklist_exceptions and entries for EMCNetApp arrays are not included in the default multipathconf file to support EMC VNX7600 EMC VNX8000 EMC VMAX 20k and NETAPP FAS6240 arrays
Note This issue was fixed in StorNext 61 See 70854 on page 13 in the Fixed Issues section Upgrade recommendedNote See also the new How to Modify the multipathconf File for External Storage Arrays page released for StorNext 610
Workaround
Upgrade to StorNext 610 and modify the new EMC andor NetApp array entries in the multipathconf file and move it to the correct directory on your system
OR
Manually update the multipathconf file by hand for the array settings you need and move it to the correct directory on your system
Known Issues ndash StorNext 6x
Xcellis Workflow Director Release Notes 29
CR Number
SR Number
Description
70649 398896 IssueThe Promise array path_checker definition needs to be updated in the reference multipathconf file provided with our systems and firmware upgrades
Note This issue was fixed in StorNext 61 See 70649 on page 14 in the Fixed Issues section Upgrade recommendedNote See also the new How to Modify the multipathconf File for External Storage Arrays page released for StorNext 610
WorkaroundUpgrade to StorNext 610OR
Edit the multipathconf file and change the path_checker value from its current setting (such as readsector0) to tur for the Promise Array definition
70588 396789 Issue
tsunamilog and servicelog files can become large are now rotated to prevent these logs and snapshot files becoming too large and can significantly increase the time it takes to generate snapshot files
Note This issue was fixed in StorNext 61 See 70588 on page 14 in the Fixed Issues section Upgrade recommended
WorkaroundUpgrade to StorNext 610OR
Manually trim data from these log files when needed
70526 398061 396903 398206 397045 399232 and 401331
Issue
Kernel Page Table Security Problems CVE-2017-5753 CVE-2017-5715 and CVE-2017-5754
Note This issue was fixed in StorNext 61 See 70526 on page 14 in the Fixed Issues section Upgrade recommended
WorkaroundUpgrade to StorNext 610 There is no other workaround
Known Issues ndash StorNext 6x
Xcellis Workflow Director Release Notes 30
CR Number
SR Number
Description
71093 na Issue
Unused NIC ports can be reported as down in an admin alert during appliance firmware upgrades which creates about 20 RAS emails
Note This issue was fixed in StorNext 61 See Fixed Issues Notes and Enhancements ndash StorNext 6x on page 5 in the Fixed Issues section Upgrade recommended
Workaround
Upgrade to StorNext 610 There is no other workaround
Known Issues ndash StorNext 6x
Xcellis Workflow Director Release Notes 31
CR Number
SR Number
Description
72287 72286 72277
naThis applies to Xcellis Workflow Director (R630) systems
Issue
After an appliance is upgraded to StorNext 610 (see Upgrade Firmware) sometimes one of the nodes on the NAS cluster is not able to re-join the cluster
Log on to the Appliance Controller and issue the following command
nascluster show
If the node has not joined the NAS cluster the following message is displayed in the controller output
stornext initiated stop
Workaround
1 From the command line of the system issue the following command where ltmyfsgt is the mount path of the file system you would like to join to the cluster
nascluster join ltmyfsgt
The server should be rejoined to the cluster
2 Run the following command
nascluster show
You should see the following in the output (in bold green)
NAS Cluster IP 1010100100eth0 Master No SNFS Root ltmyfsgt Joined Yes
Known Issues ndash StorNext 6x
Xcellis Workflow Director Release Notes 32
CR Number
SR Number
Description
71644
Issue
After the Apply button is clicked during a firmware upgrade on the StorNext GUI there are certain instances where the firmware upgrade will fail to complete and server node 2 may be upgraded but node 1 will fail to upgrade causing a mismatch of StorNext releases between the nodes When this happens the Firmware Upgrade page in StorNext an error message similar to the following may display when the firmware upgrade is being applied
Note This issue was fixed in the upgrade code for StorNext 610 See Fixed Issues Notes and Enhancements ndash StorNext 6x on page 5 in the Fixed Issues section Upgrade recommended
Workaround
The secondary node web service timeout needs to be increased from the default value 5 minutes300 seconds) to 10 minutes600 to account for additional processing in the pre-upgrade script See Change the componentproperties Timeout Setting on page 55 for how to change this setting and begin the firmware upgrade process again
Known Issues ndash StorNext 6x
Xcellis Workflow Director Release Notes 33
CR Number
SR Number
Description
71599 425749 Issue
For systems being upgraded from StorNext 606 to 6061 from a fresh install of the server with a StorNext 606 image the firmware upgrade to support some expansion cards is not applied Future card changes in the system will not get automatically configured since the firmware and autoconfig services which support some cards were disabled after the upgrade toStorNext 6061
You can verify this issue by logging into the command line of the server node (or on both servers for dual-server node systems) with the stornext user account and stornext user password and issuing the following command from the command line of the system If you see the Virtual (as shown here in green) your system is affected by this issue
Example
optDXiutilseer VendorModel
Virtual
Note This has been fixed in StorNext 610 See 71599 on page 13 in the Fixed Issues section Upgrade recommended
Workaround
If the system has not been upgraded yet
1 Log in to the command line of a server node See Launch the Command Line
2 Issue the following command This will correct the initial fresh install issue and avoid a subsequent upgrade issue
cp -f optDXitheSeervendorinfoconf13G optDXitheSeervendorinfoconf
If the system was fresh installed with 606 and then upgraded to 6061 the following needs to be done
a Remove the three touch files
rm varoptDXifwb-onboot-disable
rm varoptDXihwdetect-onboot-disable
Known Issues ndash StorNext 6x
Xcellis Workflow Director Release Notes 34
CR Number
SR Number
Description
rm varoptDXistartup_autoconfig_disable
b Reboot the node so the Firmware Bundle updates will be performed and autoconfig and hwdetect will be enabled and run
3 Repeat these steps for the other server node (dual-server node systems only)
71507 421334 Issue
Firmware upgrade did not upgrade PHP on server nodes Note This has been fixed for StorNext 610 See 71507 on page 13 in the Fixed Issues section Upgrade recommended
Workaround
1 Log in to the command line of a server node ( see Launch the Command Line) and upgrade php56w
cd scratchsavedPHP
ls
php56wUpgrade-5633-1tgz php56wUpgradetgz
tar xzf php56wUpgrade-5633-1tgz
rpm -Uhv php56wrpm
Updating installing
1php56w-common-5633-1w7 [ 4]
2 Remove the upgrade warning touch file
rm -f varDXiupgrade_notify rpm tgz
rpm -q php56w
php56w-5633-1w7x86_64
3 Repeat for the other server node (for dual-node systems)
Known Issues ndash StorNext 6x
Xcellis Workflow Director Release Notes 35
CR Number
SR Number
Description
71464 na Issue
Platform upgrade is currently allowed to the StorNext 6061 release for systems currently configured and running StorNext 53x and as a clustered NAS system running NAS 12x Even though StorNext upgrades the NAS software does not upgrade NAS is left running 125 and NASController software 201 is incorrectly staged for upgrade in varupgrade
Workaround
To upgrade NAS after the StorNext firmware upgrade
1 Delete the contents of varupgrade on both nodes (for dual-node systems)
2 Download the offline 1413 NAS upgrade rpm
3 Copy the 1413 NAS upgrade file to varupgrade on the NAS master and other node as well
4 Upgrade NAS to 1413 (see Upgrades for the offline upgrade procedure)
5 Delete the contents of varupgrade on both nodes (for dual-node systems)
6 Copy the offline 201 NASController software upgrade rpm saved in scratchsavedNAS to varupgrade
7 Upgrade the NASController software to 201 (see Upgrades for the offline upgrade procedure)
71394 0421219 IssueNote This issue affects R630 (CentOS7) systems only not R520 (CentOS6) systemsNote This issue was fixed in StorNext 6061 See 71394 on page 14 Upgrade recommendedNote For StorNext 606 the included the MLNX_OFED HBA driver for Mellanox Connect X-3 VPI InfiniBandEthernet cards was incompatible with the system kernel version Because of this the software failed to install resulting in missing Mellanox software components needed to configure the card
Workaround
l For Systems prior to StorNext 606 the correct driver was shipped with StorNext so no further action is necessary for Mellanox HBA card configuration
l For systems running StorNext 606 upgrade to StorNext 6061 for the correct driver version for this card
Known Issues ndash StorNext 6x
Xcellis Workflow Director Release Notes 36
CR Number
SR Number
Description
71350 na IssueNote This issue applies to dual-server node systems onlyNote This issue was fixed in StorNext 6061 See 71350 on page 14 in the Fixed Issues section Upgrade recommended
For 606 systems StorNext file systems (snfs) can potentially fail to mount on the secondary server node (typically server node 2) when over a billion files are present on the snfs This could occur when cvfs is stopped and then restarted after a hard stop of the system HA failovers or when the primary server node restartsreboots
If the snfs had file locking enabled and was used to create a NAS cluster then the server node will also be shown in the not ready state on the NAS cluster
Workaround
If your system was upgraded to a StorNext release earlier than 6061 and your system exhibits this issue heres the workaround
Do the following on the server node that did not mount the file system
Mount the File System on the Server Node
1 Log in to node 2 (or node 1 if currently acting as the secondary node) See Launch the Command Line
2 Manually mount the file system on the server
Example
mount snfs1-fs
Re-Join the Server to the NAS Cluster if Needed
If the server is part of a NAS cluster
1 Log into the NAS controller (see Acces the Appliance Controller Console) and join that node to the cluster
Example
nascluster join stornextsnfs1-fs
2 Ensure this is joined by running the following command
nascluster show
Known Issues ndash StorNext 6x
Xcellis Workflow Director Release Notes 37
CR Number
SR Number
Description
Look for the following (in green bold) in the output (ellipses indicate additional information not shown) Note that snfs1-fs is the file system that did not mount before
NAS Cluster IP 1065166215em2 Master No SNFS Root stornextsnfs1-fs Joined
1 1065166216 (Joined MDC) test-bh3amdhquantumcom
2 1065166215 (Joined MDC) test-bh3bmdhquantumcom
71346 na IssueNote This was fixed in StorNext 6061 See 71346 on page 15 in the Fixed Issues section Upgrade recommended
For systems running StorNext 53x and NAS 12x upgrading to 606 or later
Workaround
Upgrade to Appliance ControllerNAS 141 or later prior to upgrading to StorNext 6x or later
71333 na Issue
Caution A system running StorNext 606 or later with a clustered NAS environment should not run NASAppliance Controller 130 or earlier Running these configurations may produce unpredictable results
If you are running StorNext 606 with NAS 130 or earlier you might experience one of the following scenarios
1 Controller configuration commands are not available for iSCSI and SNMP configuration even though the Appliance Controller Doc Center states that these commands are available
2 If your system is running with NAS enabled NAS may not work properly and you will have to upgrade NAS locally with the latest Appliance Controller release
Workaround
An upgrade to the Controller software is REQUIRED when running StorNext 606 See Appliance Controller Upgrades
Known Issues ndash StorNext 6x
Xcellis Workflow Director Release Notes 38
CR Number
SR Number
Description
71002 na IssueAfter upgrading to StorNext 605 and StorNext 6051 systems a RAS ticket might be created for an IPMI failure
Note This was fixed in StorNext 606 See 71002 on page 15 in the Fixed Issues section Upgrade recommended
Workaround
This RAS message is benign and can be ignored Upgrade to StorNext 606 to correct this issue
70902 na IssueStorNext 606 requires the appliance controller to be upgraded for clustered NAS environments running Appliance ControllerNAS versions earlier than 141 before upgrading appliance firmwareIf you attempt to upgrade the system to StorNext 606 prior to upgrading the controller the appliance upgrade will fail and the system will generate an Operation failure RAS ticket in the StorNext GUI on the server (for both server nodes on dual-node systems) the upgrade log will include a message about the upgrade attempt and an admin alert will be generatedExample (dual-node system with NAS 130 installed)
10
2018-02-22 151222 PST
136
Upgrade Minimum NAS version not satisfied for a clustered system Node 2 NAS clustering is enabled but installed NAS version is 130 NAS must be upgraded to version 141x before this upgrade is allowed A NAS 1413 offline upgrade bundle has been placed in scratchsavedNAS
Workaround
Upgrade Appliance ControllerNAS to 141 or later prior to upgrading the system See How to Upgrade on the Appliance Controller Documentation Center
Known Issues ndash StorNext 6x
Xcellis Workflow Director Release Notes 39
CR Number
SR Number
Description
70338 na Issue
During a firmware upgrade the secondary server node (typically Node 2) will upgrade successfully but the other server node (typically Node 1) can become stuck on reboot and unable to restart If you dont have an SSH session open when this happens you will notice that the server node will not respond for a long time If you happen to have an SSH session open during the upgrade you will see an error message similar to the following shown repeatedly on-screen
[ 189398035] dracut-initqueue[402] Warning dracut-initqueue timeout - starting timeout scripts
Workaround
The server node will have to be manually upgraded Contact Contacting Quantum on page 70 and refer them to TSB 3015
Known Issues ndash StorNext 6x
Xcellis Workflow Director Release Notes 40
CR Number
SR Number
Description
70300 385040385789
Issue
After a firmware upgrade the system cannot boot
This does not need to be applied to all systems connected to storage arrays only impacted systems as described here
Systems Impacted
l This ONLY affects systems upgrading from StorNext 5x releases to 6x (prior to 605)
l This ONLY affects systems upgrading that are Fibre Channel-connected to BOTH NetApp and QXS arrays
Note This issue was fixed in StorNext 605 See 70300 on page 17 If you are upgrading to StorNext 605 you will not see this issue and do not have to perform this workaround
Messages on the boot screen and in the KDUMP (the trace of server boot activities on the sysfs) shows messages similar to
Wrong diagnostic page asked for 7 got 0
OR
Wrong diagnostic page asked for 10 got 0
Workaround
DO NOT upgrade your system to StorNext 6x before first applying the workaroundSee Server Boot (QXSNetApp)
Known Issues ndash StorNext 6x
Xcellis Workflow Director Release Notes 41
CR Number
SR Number
Description
70287 na Issue
StorNext upgrades can fail due to a slowdown of the StorNext HA file system (HAFS) when attempting to apply upgrade firmware to StorNext 6x from supported StorNext 5x and 60x releases in the StorNext GUI This only occurs when attempting to upgrade the system while jobs with a lot of metadata changes are running This can happen when
l The system is running with StorNext 6x file systems with metadata archive enabled and heavy client activity
l The sytem is running with StorNext 50x file systems with the restore journal enabled and heavy client activity
Workaround
DO NOT upgrade your system to StorNext 6x before first applying one of the workarounds below if your system is processing a lot of metadata jobs
l To fix this issue edit the componentproperties file on one node of the system and increase the wsapplyfwupgradetimeout value to 2 hours
See Change Upgrade Timeout Setting
70178 Issue
The multipathconf file is overwritten for StorNext 531 through 605x Any custom-configured settings added to the file for those StorNext releases are available in etcmultipathconfbak The upgrade code added correct multipath settings to the etcmultipathconf file required for SAS-attached NetApp metadata arrays
Note The overwrite issue was changed in StorNext 606 See 70178 on page 16 in the Fixed Issues section Upgrade recommended
Workaround
1 If you dont have a backup of your multipathconf file you will have to add the settings into the file
2 If you have a backup of the custom multipath settings copy the settings into the new multipathconf file using a command-line editor like vi
Known Issues ndash StorNext 6x
Xcellis Workflow Director Release Notes 42
CR Number
SR Number
Description
70067 na Issue
CentOS 7 systems display log files with the journalctl command Any commands executed as the rootsh user are logged to the system log file A syslog filter sends all rootsh log commands to varlogrootshell This causes excessive information to be captured in the journalctl log file and makes the log file difficult to read
WorkaroundThere is a script to use which removes unnecessary command line output from the syslog file for CentOS7 systems running StorNext 605See the journalctl Filter ScriptFor StorNext releases prior to 605 contact Contacting Quantum on page 70
Known Issues ndash StorNext 6x
Xcellis Workflow Director Release Notes 43
CR Number
SR Number
Description
69189 na IssueAfter upgrading to StorNext 60ndash6011 node 2 may report a hardware failure in the StorNext GUI
When clicked this hardware failure displays multiple fan failures on the System Board tab of the Reports gt Hardware Status in the StorNext GUI
Note This issue has been fixed in StorNext 605 See 69506 on page 17 in the Fixed Issues section Upgrade recommended
WorkaroundFor systems on StorNext releases prior to 605 do the following on node 2
1 Open an SSH connection to the appropriate server node and use the IP address assigned to the node on the Management or LAN Client network
Note Node 2 used for dual-node systems only
2 Log in to the command line using the following credentials
l User name stornext
l Password ltstornext user account passwordgt
Note password is the default password for the stornext user account If the password has been changed use the current password
3 Enter sudo rootsh to gain root user access
Known Issues ndash StorNext 6x
Xcellis Workflow Director Release Notes 44
CR Number
SR Number
Description
4 Enter the password for the stornext user account again
5 Enter the following
racadm racreset soft
6 Wait 5 to 10 minutes for the reset to complete
7 Refresh the StorNext GUI The hardware status will no longer display the error for node 2
68773 na Issue
If a configured bridge device assigned to a DAE virtual machine (VM) is removed on the Networking page of the StorNext GUI you will not be able to start the DAE VM
Workaround
If the virtual machine cannot be started because the bridge was removed do the following
1 Recreate the bridge in the StorNext GUI OR
a Open an ssh session to the command line of the system and run virsh edit ltvmnamegt This opens the ltvmnamegt file for editing using vi commands
b Remove the bridge entries from the XML file using vi commands
2 When finished making the changes enter the following to save the changes and exit the editor
wq
Known Issues ndash StorNext 6x
Xcellis Workflow Director Release Notes 45
CR Number
SR Number
Description
68729 na Issue
Systems which used the StorNext Connect Install App prior to StorNext 60 may encounter the message ntp not running when upgrading to or rebooting the system running StorNext 6x
Note This was fixed via an update to the Connect Install App (v8) Xcellis Workflow Director (R630) systems installed using v8 or later will not have this issue Upgrade is recommended However this does not fix the issue for Xcellis Workflow Director (R630) systems installed using the Connect Install App prior to v8
Workaround
See StorNext Connect NTP not Running
68075 na Issue
After upgrading to StorNext 60 from 522 and uploading new licenses the NAS cluster could not be enabled on one of the nodes because the Appliance Controller failed to start
Workaround
See Restart the Appliance Controller
67997 na Issue
For Xcellis Workflow Director systems configured with NAS failover for NFS clusters (NFS-HA) after StorNext services are restarted NAS shares are not accessible from NAS clients
WorkaroundTo fix this condition
1 Restart the NAS controller services on the NAS Master (See the Restart the Appliance Controller section
See Restart the Appliance Controller
2 Access the NAS shares using the nas_vip address from NAS clients
67729 na Issue
When upgrading to StorNext 60 systems running NAS clustered will not automatically upgrade NAS to version 141
Workaround
For these systems run the NAS upgrade before rather than after the StorNext 60 upgrade
Known Issues ndash StorNext 6x
Xcellis Workflow Director Release Notes 46
CR Number
SR Number
Description
66799 322817 342909 362343
Issue
On the StorNext GUI Reports gt Hardware page node1 system board information is shown but information for node2 is not after an upgrade to StorNext 5x and later
Note This issue is fixed in StorNext 605 See 66799 on page 18 in the Fixed Issues section Upgrade recommended
WorkaroundTo fix this issue create the usradicHAMsharedHwMonStatus directory on the primary server node (typically node 1) and restart the hwmond serviceSee Create the HW Monitor Directory
60614
na Issue
Your system and all other Connect-managed Linux StorNext SAN clients must have the latest Connector installed so that statistics can be passed to StorNext Connect If a system is managed by StorNext Connect and you upgrade the firmware on that system to StorNext 5 Release 530 firmware PRIOR to upgrading the StorNext Connect Connector the Volume Storage widget on the StorNext Connect Dashboard will display no data for those systems
Workaround
For steps to take to update the Connect Connector(s) before upgrading system firmware
See Update the StorNext Connect Connector before doing a firmware upgrade
For steps to take if you have already upgraded firmware but did not first update the Connector(s)
See Repair StorNext Connect After Upgrade
55384 na Issue
If dmnfsthreads is not set on mount nfsds may be over-commited when there are many NFS processes waiting for offline files
Workaround
For managed file systems serving NFS Quantum recommends using the dmnfsthreads=16 mount option This setting ensures that NFS remains responsive when Storage Manager is retrieving data from an archive tier
Known Issues ndash StorNext 6x
Xcellis Workflow Director Release Notes 47
CR Number
SR Number
Description
55318 na Issue
Strange UID on ACL when file created on non ads client
Workaround
All systems accessing the StorNext SAN or LAN clients or the NAS clients must be part of the same identity domain Accessing StorNext from different identity domains can result in inconsistent file ownership attributes as well as potential access problems
55220 na Issue(See CR Known Issues ndash StorNext 6x on page 20)
Workaround
na
54451 na IssueStorNext supports case-sensitive file names For configurations with different client types such as Windows and Mac sharing the same files the default case type may be different
WorkaroundThere currently is no workaround for this issue SMB is operating as expected
53486 425247 Srvclog RAS tickets are lost if the hafs (HA shared file system) is not mounted on the system
Note This issue was fixed in StorNext 62 See 53486 on page 12 in the Fixed Issues section Upgrade recommended
Workaround
Upgrade to StorNext 62
45702 na Issue
If you replace an HDD drive with an SSD or vice versa the StorNext GUI will show a status of Missing and an equivalent RAS ticket instead of displaying an Incompatible status
Workaround
Replacement drives must be the identical type of drive removed HDDs can only use HDD spares and SSDs can only use SSD spares Replacement drives must also be the same size or larger than the failed drive The array controller will generate errors if an incompatible drive is used as a replacement
Known Issues Workarounds and Additional Information
Xcellis Workflow Director Release Notes 48
CR Number
SR Number
Description
38128 1395540
IssueUsing the GUI while a large Media import is kicked off via the command line can cause the StorNext GUI to timeout or crash
Workaround
Wait until a bulk load from tape is finished prior to opening the StorNext GUI
Known Issues Workarounds and Additional Information
About firmware upgrades and pre-staged Appliance Controller upgrades for server nodesWhen NAS is enabled detected and is configured on a sever node as part of a NAS cluster and a firmware upgrade is attempted an offline targz file is copied into the scratchsavedNAS directory and is then unzipped and untarred into the varupgrade directory Based on the installed version of NAS on the system the appropriate valid upgrade bundle for NAS will be unpacked to varupgrade for the user to perform the upgrade If a multi-version upgrade is required then the next applicable version will be unpacked into varupgrade and you will be instructed to perform the cluster upgrade first and then retry the firmware upgrade If the cluster state of the node cannot be determined then it looks like no versions are unpacked on the system and the upgrade is aborted (in this case you would have to upgrade the cluster manually using instructions in the Appliance Controller Doc Center (see Appliance Controller Upgrades) and then retry the firmware upgrade
If NAS clustering is not configured the firmware upgrade will perform the direct upgrade to the current version of Appliance Controller shipped with the firmware upgrade
74202 ndash StorNext services can fail to stop completely when NAS is Configured and StorNext services are stoppedHow might this be seenThere are two basic scenarios where this might be exposed
Scenario 1When StorNext stops it signals NAS to vacate the StorNext file systems that NAS is using However if these file systems remain available for too long the Appliance Controller will attempt to automatically restart NAS services This is what happens in order
Known Issues Workarounds and Additional Information
Xcellis Workflow Director Release Notes 49
1 Restarting NAS services can resume use of StorNext resources
2 Resuming StorNext resources interferes with attempts to stop StorNext
3 Continued use of these StorNext resources can result in mounted StorNext file systems that do not have a running fsm process which blocks access to the StorNext file system
If experience this on your system temporarily stop NAS services
1 Log in to the command line of the server (as sudo rootsh)
Launch the Command Line With an SSH Utility a Open an SSH connection to the appropriate server and use the IP address assigned to the
node on the ManagementLAN Client network
b Log in to the command line using the following credentials
l User name stornext
l Password ltstornext user account passwordgt
Note password is the default password for the stornext user account If the password has been changed use the current password
c Enter sudo rootsh to gain root user access
d Enter the password for the stornext user account again
2 Stop NAS by executing the following command
usrcvfslibsnnas_control stop
3 Stop the Appliance Controller by executing the following command
usrlocalquantumbinsml_service_tool stop snnas_controller
4 When you have finished Restart NAS and the Appliance Controller
a Start NAS by executing the following command
usrcvfslibsnnas_control start
b Start the Appliance Controller by executing the following command
usrlocalquantumbinsml_service_tool start snnas_controller
Known Issues Workarounds and Additional Information
Xcellis Workflow Director Release Notes 50
Scenario 2If you need to stop the system during a maintenance window This is an extension of Scenario 1 but NAS must vacate the file systems for an extended period of time If NAS services are resumed when they should be suspended those service processes may interfere with maintenance operations
To affect both scenarios timers exist that you can adjust to extend the amount of time required between the stornext stop operation and before NAS services resume The timers are controlled by the following Controller Registry values
l nasheartbeatcheck_state_secs l stornext_servicestop_periodTo see what values are currently assigned enter
su sysadmin -c reg show nasheartbeatcheck_state_secs
to display the setting of the frequency interval of the NAS heartbeat state check or enter
su sysadmin -c reg show stornext_servicestop_period
to display the duration that StorNext services are stopped
Note By default both timers are set to 120 (in seconds=2 minutes)
WorkaroundsWorkaround 1If StorNext fails to stop due to NAS resource usage do the following
1 Log in to the command line of the server
Launch the Command Line With an SSH Utility a Open an SSH connection to the appropriate server and use the IP address assigned to the
node on the ManagementLAN Client network
b Log in to the command line using the following credentials
l User name stornext
l Password ltstornext user account passwordgt
Note password is the default password for the stornext user account If the password has been changed use the current password
c Enter sudo rootsh to gain root user access
d Enter the password for the stornext user account again
Known Issues Workarounds and Additional Information
Xcellis Workflow Director Release Notes 51
2 Verify that the StorNext file systems are mounted
grep cvfs procmounts
If any StorNext file systems are not mounted mount them now
3 Mount the HA shared file system
mount usradicHAMshared
4 Start fsm for each StorNext file system (shown below as ltFSNAMEgt) mounted on the server node
cvadmin -e start ltFSNAMEgt on localhost
5 Stop StorNext services
For CentOS7 systems enter
systemctl stop cvfs
For CentOS6 systems enter
service cvfs stop
6 To stop NAS enter
usrcvfslibsnnas_control stop
7 To stop the Appliance Controller enter
usrlocalquantumbinsml_service_tool stop snnas_controller
When you are ready restart the Appliance Controller and NAS services
8 To restart the Appliance Controller enter
Known Issues Workarounds and Additional Information
Xcellis Workflow Director Release Notes 52
usrlocalquantumbinsml_service_tool start snnas_controller
9 To restart NAS enter
usrcvfslibsnnas_control start
Workaround 2For Scenario 1 Quantum recommends that you extend the time period to a value of 10 minutes (600 seconds) for both variables Set a value that exceeds the amount of time necessary for typical StorNext shutdown
To set new values
1 Log in to the command line
Launch the Command Line With an SSH Utility a Open an SSH connection to the appropriate server and use the IP address assigned to the
node on the ManagementLAN Client network
b Log in to the command line using the following credentials
l User name stornext
l Password ltstornext user account passwordgt
Note password is the default password for the stornext user account If the password has been changed use the current password
c Enter sudo rootsh to gain root user access
d Enter the password for the stornext user account again
2 Change the frequency interval of the NAS heartbeat state check to 600 seconds (10 minutes) Enter
su sysadmin -c reg set nasheartbeatcheck_state_secs 600
Note This is run with a temporary log in to the Appliance Controller as the sysadmin user
3 Change the duration that StorNext services are stopped to 600 seconds (10 minutes) Enter
Known Issues Workarounds and Additional Information
Xcellis Workflow Director Release Notes 53
su sysadmin -c reg set stornext_servicestop_period 600
4 Note This is run with a temporary log in to the Appliance Controller as the sysadmin user
Workaround 3For Scenario 2 to eliminate the confusion of setting a long duration for a maintenance window and then having to change the values back again to a shorter value again you can simply stop NAS services and the Appliance Controller and then restart these services when you are finished
To stop the services and restart them
1 Log in to the command line
Launch the Command Line With an SSH Utility a Open an SSH connection to the appropriate server and use the IP address assigned to the
node on the ManagementLAN Client network
b Log in to the command line using the following credentials
l User name stornext
l Password ltstornext user account passwordgt
Note password is the default password for the stornext user account If the password has been changed use the current password
c Enter sudo rootsh to gain root user access
d Enter the password for the stornext user account again
2 Stop NAS by executing the following command
usrcvfslibsnnas_control stop
3 Stop the Appliance Controller by executing the following command
usrlocalquantumbinsml_service_tool stop snnas_controller
When you are ready restart the Appliance Controller and NAS services
4 To restart the Appliance Controller enter
usrlocalquantumbinsml_service_tool start snnas_controller
Known Issues Workarounds and Additional Information
Xcellis Workflow Director Release Notes 54
5 To restart NAS enter
usrcvfslibsnnas_control start
6 Change the settings for the NAS heartbeat state check and the duration that StorNext services are stopped according to Workaround 2 on page 52
Workaround 4An alternate method for maintenance windows instead of implementing workaround 3 for Scenario 2 you can choose a much longer value if you need the NAS heartbeat state check interval and StorNext services stopped for a long period of time (for example during a planned maintenance window in a data center) While this is another option the downside of this is that you will need to know how much downtime to expect maintenance to take and then set these times to be less than what is needed for that maintenance It is also difficult to extend the maintenance period reliably once those timers have started In addition you will most likely have to reset the values back to their original settings when the maintenance window is complete which could be a hassle
Here is one example which extends the time values to 2 hours (7200 seconds)
1 Log in to the command line
Launch the Command Line With an SSH Utility a Open an SSH connection to the appropriate server and use the IP address assigned to the
node on the ManagementLAN Client network
b Log in to the command line using the following credentials
l User name stornext
l Password ltstornext user account passwordgt
Note password is the default password for the stornext user account If the password has been changed use the current password
c Enter sudo rootsh to gain root user access
d Enter the password for the stornext user account again
2 Change the frequency interval of the NAS heartbeat state check to 7200 seconds (10 minutes) Enter
su sysadmin -c reg set nasheartbeatcheck_state_secs 7200
Note This is run with a temporary log in to the Appliance Controller as the sysadmin user
3 Change the duration that StorNext services are stopped to 7200 seconds (10 minutes) Enter
Known Issues Workarounds and Additional Information
Xcellis Workflow Director Release Notes 55
su sysadmin -c reg set stornext_servicestop_period 7200
4 Note This is run with a temporary log in to the Appliance Controller as the sysadmin user
Change the componentproperties Timeout Setting 1 Log in to the command line of the primary server node (typically node 1) See Launch the Command
Line (for Xcellis Workflow DirectorGen 2) or Launch the Command Line (for R630 systems)
2 Open the componentproperties file with the vi editor
vi usradicguiconfigcomponentproperties
Pro Tip 1 Edit With vi
The vi editor is included in CentOS If you are unfamiliar with using vi to open edit (copypastedelete) exit with or without saving changes use the following Google search URL to find related links for editing with vi
httpswwwgooglecomsearchq=edit+with+vi
3 Scroll down to the web services timeouts section It should look similar to (note the default firmware upgrade value is 300 seconds - highlighted in green)
Web Services Timeouts (seconds)
wsconverttohatimeout=300 wsapplyfwupgradetimeout=300 wsgetsystemidtimeout=10 wsntptimeout=30 wsdatetimetimeout=30 wsnetworkconfigtimeout=180 wsnetworkhapeertimeout=30 wsloggingleveltimeout=30 wscapturestatetimeout=600 wsjobclosetimeout=30 wsnasclosetimeout=60
4 Move the cursor to sit over the number 3 enter ltSHIFTgt+ and then R (for replace) and enter the number 6 to change the wsapplyfwupgradetimeout= value from 300 seconds (5 minutes) to 600 seconds (10 minutes)
wsapplyfwupgradetimeout=600
Known Issues Workarounds and Additional Information
Xcellis Workflow Director Release Notes 56
5 Save the changes to the file by entering SHIFTwq to write the file and quit the vi editor
The setting change will be replicated to the other server node in 2-3 minutes after the file change is saved so this only has to be applied to server node 1
6 Run the Firmware Upgrade process again
Note Even though the upgrade failed previously the firmware upgrade files are still available for the upgrade
a Select either of the uploaded files click Apply In the case of a single file select the one file uploaded and click Apply
b Click Yes to confirm the installation For two-file upgrades both firmware files are applied to the system during the upgrade
The upgrade should complete after the timeout setting is changed However if the firmware upgrade fails again contact Contacting Quantum on page 70 for assistance with manually upgrading the node that failed to upgrade
Server Boot (QXSNetApp)This does not need to be applied to all systems connected to storage arrays only impacted systems as described here
Systems Impacted l This ONLY affects systems upgrading from StorNext 5x releases to 6x (prior to 605)
l This ONLY affects systems upgrading that are Fibre Channel-connected to BOTH NetApp and QXS arrays
Note This issue was fixed in StorNext 605 See 70300 on page 17 If you are upgrading to StorNext 605 you will not see this issue and do not have to perform this workaround
BEFORE applying the upgrade to StorNext 6x do the following
Log in to the system command line 1 Open an SSH connection to the appropriate server and use the IP address assigned to the node on the
Management or LAN Client network or use the Service Port IP address if connected to the Service Port
Service Port IP addresses l Node 1 1017211 (dual-server node systems)
l Node 2 1017212 (dual-server node or HA-ready single-server node systems)
Note Node 2 is the server node sold with single-node (non-HA) Xcellis Workflow Director and Artico systems It is also used for installation using the StorNext Connect Install app for both single-node and dual-node systems only
Known Issues Workarounds and Additional Information
Xcellis Workflow Director Release Notes 57
2 Log in to the command line using the following credentials
l User name stornext
l Password ltstornext user account passwordgt
Note password is the default password for the stornext user account If the password has been changed use the current password
3 Enter sudo rootsh to gain root user access
4 Enter the password for the stornext user account again
Edit the Grub Configuration File 1 Create a backup copy of the CentOS7 grubd40_custom configuration file Enter the following
cp etcgrubd40_custom scratch40_customorig
2 Create a backup copy of the CentOS7 grubcfg file Enter the following
cp bootgrub2grubcfg bootgrub2grubcfgorig
3 Edit the etcgrubd40_custom file using the vi editor included in CentOS7x Enter the following
vi etcgrubd40_custom
4 To enter vi insert mode enter i
5 Look for the lines beginning with linux16 as shown in bold blue below and add ltspacegtrdblacklist=ses rdblacklist=enclosure to the end of those lines as shown in green in the following example (Ellipses included below denote code prior to and after the linux16 sections)
Known Issues Workarounds and Additional Information
Xcellis Workflow Director Release Notes 58
linux16 vmlinuz-3100-51462el7qtmx86_64 root=UUID=3d9116b2-c5de-41fd-bd38-2042c0f8ebad ro console=tty1 vconsolekeymap=us crashkernel=768M0M vconsolefont=latarcyrheb-sun16 selinux=0 enforcing=0 intel_idlemax_cstate=0 processormax_cstate=1 elevator=deadline transparent_hugepage=never quiet LANG=en_USUTF-8 rdblacklist=ses rdblacklist=enclosure
initrd16 initramfs-3100-51462el7qtmx86_64img
menuentry Xcellis SOL --class centos --class gnu-linux --class os --unrestricted load_videoset gfxpayload=keepinsmod gzioinsmod part_msdosinsmod ext2set root=hd0msdos1if [ x = xy ] thensearch --no-floppy --fs-uuid --set=root --hint-bios=hd0msdos1 --hint-efi=hd0msdos1 --hint-baremetal=ahci0msdos1 --hint=hd0msdos1 a0467663-8cf0-48be-b967-d5ef7eb486e2elsesearch --no-floppy --fs-uuid --set=root a0467663-8cf0-48be-b967-d5ef7eb486e2filinux16 vmlinuz-3100-51462el7qtmx86_64 root=UUID=3d9116b2-c5de-41fd-bd38-2042c0f8ebad ro console=ttyS1115200n8 vconsolekeymap=us crashkernel=768M0M vconsolefont=latarcyrheb-sun16 selinux=0 enforcing=0 intel_idlemax_cstate=0 processormax_cstate=1 elevator=deadline transparent_hugepage=never quiet LANG=en_USUTF-8 rdblacklist=ses rdblacklist=enclosureinitrd16 initramfs-3100-51462el7qtmx86_64img
6 To exit insert mode and return to command mode press ltEscgt
7 To save changes and exit vi enter wq and press ltEntergt You will return to the command prompt (To exit vi without saving changes enter q and press ltEntergt)
8 Repeat Log in to the system command line on page 56 and Edit the Grub Configuration File on the previous page for the other server node
Edit the Blacklist Configuration File and Enable the Changes 1 Enter the following to create a backup copy of the blacklist configuration file
Known Issues Workarounds and Additional Information
Xcellis Workflow Director Release Notes 59
cp etcmodprobedblacklistconf scratchblacklistconforig
2 Enter the following to edit the etcmodprobedblacklistconf file using vi
vi etcmodprobedblacklistconf
3 To edit change to the vi insert mode Enter i
4 Add a separate line for rdblacklist ses and another line for rdblacklist enclosure to the file as shown in green in the following example
blacklist rivafb
blacklist savagefb
blacklist sstfb
blacklist neofb
blacklist tridentfb
blacklist tdfxfb
blacklist virgefb
blacklist vga16fb
blacklist viafb
ISDN - see bugs 154799 159068
blacklist hisax
blacklist hisax_fcpcipnp
sound drivers
blacklist snd-pcsp
IO dynamic configuration support for s390x (bz 563228)
blacklist chsc_sch
Known Issues Workarounds and Additional Information
Xcellis Workflow Director Release Notes 60
blacklist sb_edac
blacklist edac_core
blacklist sesblacklist enclosure
5 To exit insert mode and return to command mode press ltEscgt
6 To save changes and exit vi enter wq and press ltEntergt You will return to the command prompt (To exit vi without saving changes enter q and press ltEntergt)
7 To enable the changes enter
dracut -f
8 Continue to Reboot the system below
Workaround System Already UpgradedIf the system has been upgraded and cannot boot do the following to recover the system
1 Detachdisconnect the FC ports from the nodes or disable the FC zoning configuration for the QXS array(s)
2 Boot the system and enter the following to stop cvfs
systemctl stop cvfs
3 Edit the grub configuration file for your version of CentOS See Edit the Grub Configuration File on page 57
4 Edit the blacklist configuration file See Edit the Blacklist Configuration File and Enable the Changes on page 58
5 Reattach or re-enable FC zoning configuration for the QXS array(s)
6 Continue to Reboot the system below
Reboot the system 1 Reboot the server you are already logged into
systemctl reboot
Continue to Step 3 for single-node systems For dual-node systems continue to the next step
Known Issues Workarounds and Additional Information
Xcellis Workflow Director Release Notes 61
2 Log in to the other server node See Log in to the system command line on page 56
systemctl reboot
3 For dual-node systems repeat Step 3 for server node 2 The process is complete
Change Upgrade Timeout SettingBEFORE applying the upgrade to StorNext 6x do the following
Log in to the system command line 1 Open an SSH connection to the appropriate server and use the IP address assigned to the node on the
Management or LAN Client network or use the Service Port IP address if connected to the Service Port
Service Port IP addresses l Node 1 1017211 (dual-server node systems)
l Node 2 1017212 (dual-server node or HA-ready single-server node systems)
Note Node 2 is the server node sold with single-node (non-HA) Xcellis Workflow Director and Artico systems It is also used for installation using the StorNext Connect Install app for both single-node and dual-node systems only
2 Log in to the command line using the following credentials
l User name stornext
l Password ltstornext user account passwordgt
Note password is the default password for the stornext user account If the password has been changed use the current password
3 Enter sudo rootsh to gain root user access
4 Enter the password for the stornext user account again
1 Change to the config directory
cd usradicguiconfig
2 Copy the componentproperties file
cp componentproperties componentpropertiesorig
Known Issues Workarounds and Additional Information
Xcellis Workflow Director Release Notes 62
3 Edit the file using vi
vi componentproperties
4 Scroll down the file until you get to the Web Services Timeouts (seconds) section and the upgrade timeout line shown in bold text The current value should be similar to the value shown in bold green
Web Services Timeouts (seconds) wsconverttohatimeout=300wsapplyfwupgradetimeout=300 wsgetsystemidtimeout=10 wsntptimeout=30 wsdatetimetimeout=30 wsnetworkconfigtimeout=180 wsnetworkhapeertimeout=30 wsloggingleveltimeout=30 wscapturestatetimeout=600 wsjobclosetimeout=30 wsnasclosetimeout=60
5 To edit change to the vi insert mode Enter i
6 Change the value to 1200
Known Issues Workarounds and Additional Information
Xcellis Workflow Director Release Notes 63
Web Services Timeouts (seconds) wsconverttohatimeout=300wsapplyfwupgradetimeout=1200 wsgetsystemidtimeout=10 wsntptimeout=30 wsdatetimetimeout=30 wsnetworkconfigtimeout=180 wsnetworkhapeertimeout=30 wsloggingleveltimeout=30 wscapturestatetimeout=600 wsjobclosetimeout=30 wsnasclosetimeout=60
7 To exit insert mode and return to command mode press ltEscgt
8 To save changes and exit vi enter wq and press ltEntergt You will return to the command prompt (To exit vi without saving changes enter q and press ltEntergt)
9 Continue to Reboot the system below
Reboot the system 1 Reboot the server you are already logged into
systemctl reboot
Continue to Step 3 for single-node systems For dual-node systems continue to the next step
2 Log in to the other server node See Log in to the system command line on page 61
3 Reboot the other server node 2
systemctl reboot
4 Repeat Step 3 for server node 2
The process is complete
journalctl Filter ScriptStep 1 Upgrade to StorNext 605
Known Issues Workarounds and Additional Information
Xcellis Workflow Director Release Notes 64
Note StorNext 605 provides the script so you need to upgrade to StorNext 605 to access the file
See Upgrade a Gateway System (Upgrade Firmware) Using the Service Menu
Step 2 Log in to the System Command Line 1 Open an SSH connection to the appropriate server and use the IP address assigned to the node on the
Management or LAN Client network or use the Service Port IP address if connected to the Service Port
Service Port IP addresses l Node 1 1017211 (dual-server node systems)
l Node 2 1017212 (dual-server node or HA-ready single-server node systems)
Note Node 2 is the server node sold with single-node (non-HA) Xcellis Workflow Director and Artico systems It is also used for installation using the StorNext Connect Install app for both single-node and dual-node systems only
2 Log in to the command line using the following credentials
l User name stornext
l Password ltstornext user account passwordgt
Note password is the default password for the stornext user account If the password has been changed use the current password
3 Enter sudo rootsh to gain root user access
4 Enter the password for the stornext user account again
5 Continue to Step 3 Run the Journal Filter Script and View the Script Help below
Step 3 Run the Journal Filter Script and View the Script Help l Enter the following to use the script to view the log output in a way that filters out all the rootsh
commands
optDXiscriptsjournalctl_filtersh -f
l Enter the following to view the scripts help file
optDXiscriptsjournalctl_filtersh --help
Note The journalctl_filtersh output can also be saved to a file
Known Issues Workarounds and Additional Information
Xcellis Workflow Director Release Notes 65
StorNext Connect NTP not RunningWorkaround 1 If you encounter this issue when rebooting the system reboot or after a firmware upgrade do the following
1 Log in to the StorNext GUI and select gtConfiguration gt System
2 Click the Date amp Time tab
3 Set the NTP protocol options as follows Select either the Select a Timeserver Pool option and select the pool from the options available OR select the Specify a Timeserver or Pool option and enter the IP address of the time server
4 Click Apply which will reboot the node (or both nodes in dual-server systems) and re-enable and start NTP
Workaround 2Another alternative enables ntp when the system is rebooted
1 Using an SSH connection log in to the command line of the server
2 Enter the following command
usrbinsystemctl ntpdservice enable
3 Repeat for the other server (for dual-server node systems only)
4 Manually reboot the server (or both server nodes for dual-server node systems)
Restart the Appliance ControllerOn the server node hosting NAS do the following (use node 2 on dual-server node systems)
1 Open an SSH connection to the appropriate server node and use the IP address assigned to the node on the Management or LAN Client network
2 Log in to the command line using the following credentials
l User name stornext
l Password ltstornext user account passwordgt
Note password is the default password for the stornext user account If the password has been changed use the current password
3 Enter sudo rootsh to gain root user access
4 Enter the password for the stornext user account again
5 Enter the following
chown -R ldapldap varlibldap
Known Issues Workarounds and Additional Information
Xcellis Workflow Director Release Notes 66
6 Enter the following
systemctl restart slapd
7 Restart the appliance controller
systemctl start snnas_controller
systemctl stop snnas_controller
Create the Missing Hardware Monitor DirectoryDo the following to check if the directory is missing and re-create the directory if it is and restart the hwmond service
1 Open an SSH connection to the appropriate server and use the IP address assigned to the node on the Management or LAN Client network or use the Service Port IP address if connected to the Service Port
Service Port IP addresses l Node 1 1017211 (dual-server node systems)
l Node 2 1017212 (dual-server node or HA-ready single-server node systems)
Note Node 2 is the server node sold with single-node (non-HA) Xcellis Workflow Director and Artico systems It is also used for installation using the StorNext Connect Install app for both single-node and dual-node systems only
2 Log in to the command line using the following credentials
l User name stornext
l Password ltstornext user account passwordgt
Note password is the default password for the stornext user account If the password has been changed use the current password
3 Enter sudo rootsh to gain root user access
4 Enter the password for the stornext user account again
5 Enter the following on the command line
cd usradicHAMsharedHwMonStatus
If you see the following message the directory does not exist Continue to the next step
Known Issues Workarounds and Additional Information
Xcellis Workflow Director Release Notes 67
bash cd usradicHAMsharedHwMonStatus No such file or directory
6 Enter the following on the command line to create the directory
mkdir usradicHAMsharedHwMonStatus
7 Enter the following to verify the directory has been created
cd usradicHAMsharedHwMonStatus
8 Change the permission of the hwmond service to read-only
chmod -r 775 HwMonStatus
9 Restart the hwmond service
systemctl restart quantum-hwmondservice
How to Disable NFS v4To disable NFSv4 on Xcellis Workflow Director systems especially those systems running NAS 120 or earlier perform the following on node 2
Edit the nfs File 1 Open an SSH connection to the appropriate server and use the IP address assigned to the node on the
Management or LAN Client network or use the Service Port IP address if connected to the Service Port
Service Port IP addresses l Node 1 1017211 (dual-server node systems)
l Node 2 1017212 (dual-server node or HA-ready single-server node systems)
Note Node 2 is the server node sold with single-node (non-HA) Xcellis Workflow Director and Artico systems It is also used for installation using the StorNext Connect Install app for both single-node and dual-node systems only
Known Issues Workarounds and Additional Information
Xcellis Workflow Director Release Notes 68
2 Log in to the command line using the following credentials
l User name stornext
l Password ltstornext user account passwordgt
Note password is the default password for the stornext user account If the password has been changed use the current password
3 Enter sudo rootsh to gain root user access
4 Enter the password for the stornext user account again
5 Edit etcsysconfignfs file (See Example Use vi to Edit the nfs File on the next page)
6 Change the value for RPCNFSDARGS to -N 4 When finished the line must be RPCNFSDARGS=-N 4
7 Change the value for RPCMOUNTDOPTS to -N 4 When finished the line must be RPCMOUNTDOPTS=-N 4
8 Save the file
Restart NFS
For Xcellis Workflow Director (R630) systems
1 Enter the following to restart the NFS configuration
systemctl restart nfs-config
2 Enter the following to restart the NFS server
systemctl restart nfs-server
After You Restart NFS on Node 2Repeat both the Edit the nfs File on the previous page and Known Issues ndash StorNext 6x on page 20 sections on node 1( for dual-node systems)
If you need to create new NFS shares to export for user access you may do this now See the About the NAS App section of the StorNext Connect Documentation Center for information about NAS configuration using StorNext Connect
Known Issues Workarounds and Additional Information
Xcellis Workflow Director Release Notes 69
Example Use vi to Edit the nfs File 1 Enter the following
vi etcsysconfignfs
2 Move the cursor to the closing quotation mark in RPCNFSDARGS
3 Enter the following
i -N 4
4 Write the file and quit vi as follows
wq
5 For this example you would have to Restart NFS on the previous page and repeat the Edit the nfs File on page 67 and Restart NFS on the previous page again on node 1 (for dual-node systems)
6 Close the SSH session for the server(s) ( for dual-node systems)
Re-enable DDM on the Secondary Node After HA FailoverOnce the MDC node acting as secondary finishes rebooting and becomes functional again use fsddmconfig (or the GUI) from the server node currently acting as primary to re-enable DDM for the standby server node as follows
1 Open an SSH connection to the appropriate server and use the IP address assigned to the node on the Management or LAN Client network or use the Service Port IP address if connected to the Service Port
Service Port IP addresses l Node 1 1017211 (dual-server node systems)
l Node 2 1017212 (dual-server node or HA-ready single-server node systems)
Note Node 2 is the server node sold with single-node (non-HA) Xcellis Workflow Director and Artico systems It is also used for installation using the StorNext Connect Install app for both single-node and dual-node systems only
Contacting Quantum
Xcellis Workflow Director Release Notes 70
2 Log in to the command line using the following credentials
l User name stornext
l Password ltstornext user account passwordgt
Note password is the default password for the stornext user account If the password has been changed use the current password
3 Enter sudo rootsh to gain root user access
4 Enter the password for the stornext user account again
5 On the command line of the system enter the following
fsddmconfig -u -s e
standby_system_hostname
If a system running DDMs periodically displays an Admin Alert when it fails over cycles a client node or upgrades while the server node operating as secondary is rebooting but not completely down change the timeout value to allow more time to communicate with the node Update the TSM configuration parameter DDM_CLIENT_RETRY_TIMEOUT from the default 30 seconds to a larger value depending on how long the node is taking to reboot In the event the server node acting as secondary will be down for an extended period of time the node should be taken offline Additionally if this parameter is set too high and the standby server does not come back the command that is currently running (eg store or retrieve) will not return until after the specified timeout
For more information about the DDM_CLIENT_RETRY_TIMEOUT parameter that can be placed into the fs_sysparm_override configuration file refer to the usradicTSMconfigfs_sysparmREADME file
Caution Incorrect modification of the fs_sysparm_override configuration file can cause a serious adverse effect on StorNext functionality Before modifying this file we recommend you contact Contacting Quantum below
Contacting QuantumFor further assistance contact the Quantum Customer Support Center
Region Support Contact
North America 1-800-284-5101 (toll free)+1-720-249-5700
Contacting Quantum
Xcellis Workflow Director Release Notes 71
Region Support Contact
EMEA +800-7826-8888 (toll free)
+49 6131 324 185
Asia Pacific +800-7826-8887 (toll free)+603-7953-3010
For worldwide support
httpswwwquantumcomserviceandsupportget-helpindexaspxcontact-support
- Revision History
- About the Xcellis Workflow Director
- Training and Documentation Resources
- About StorNext 6
-
- What is StorNext
- Learn More on the Web
-
- What StorNext Releases are compatible with my system
- Upgrade StorNext Software and System Firmware
- General Notes
- Quantum Appliance Licenses
- Fixed Issues Notes and Enhancements ndash StorNext 6x
- Known Issues ndash StorNext 6x
- Known Issues Workarounds and Additional Information
- Contacting Quantum
-

Known Issues ndash StorNext 6x
Xcellis Workflow Director Release Notes 27
CR Number
SR Number
Description
71230 414352 429898
IssueNexpose security scan reports HTTP Header is missing on port 443
Note This issue was fixed in StorNext 61 See 71230 on page 13 in the Fixed Issues section Upgrade recommended
WorkaroundUpgrade to StorNext 610 There is no other workaround available
71125 410540 Issuevarlogmessages can omit expected information beginning with a specific point in time
Note This issue was fixed in StorNext 61 See 71125 on page 13 in the Fixed Issues section Upgrade recommended
Workaround
To correct this issue
Upgrade to StorNext 610
OR
1 Remove imjournalstate
rm -f varlibrsyslogimjournalstate
Restart rsyslog
sbinservice rsyslog restart
Then rotate the log
$logrotate etclogrotateconf
2 If the logging stops again disable the imjournal input To do this edit the etcrsyslogconf file and comment out OmitLocalLogging on as shown
$OmitLocalLogging on
Known Issues ndash StorNext 6x
Xcellis Workflow Director Release Notes 28
CR Number
SR Number
Description
71012 0399206 IssueThe StorNext Connect GUI shows the status of an appliance server node being undefined and is displayed as a gray dot on the dashboard as a result of a Fibre Channel card being part of the expected hardware installed for the system
Note This issue was fixed in StorNext 61 See 71012 on page 13 in the Fixed Issues section Upgrade recommended
Workaround
Upgrade to StorNext 610
OR
Remove fibre_channel from the list of components and run monitor_appliancepy Next go to the StornStorNext ConnectDashboard and refresh the page The system status will be displayed as a green dot on the Dashboard
70854 383195 Issueblacklist_exceptions and entries for EMCNetApp arrays are not included in the default multipathconf file to support EMC VNX7600 EMC VNX8000 EMC VMAX 20k and NETAPP FAS6240 arrays
Note This issue was fixed in StorNext 61 See 70854 on page 13 in the Fixed Issues section Upgrade recommendedNote See also the new How to Modify the multipathconf File for External Storage Arrays page released for StorNext 610
Workaround
Upgrade to StorNext 610 and modify the new EMC andor NetApp array entries in the multipathconf file and move it to the correct directory on your system
OR
Manually update the multipathconf file by hand for the array settings you need and move it to the correct directory on your system
Known Issues ndash StorNext 6x
Xcellis Workflow Director Release Notes 29
CR Number
SR Number
Description
70649 398896 IssueThe Promise array path_checker definition needs to be updated in the reference multipathconf file provided with our systems and firmware upgrades
Note This issue was fixed in StorNext 61 See 70649 on page 14 in the Fixed Issues section Upgrade recommendedNote See also the new How to Modify the multipathconf File for External Storage Arrays page released for StorNext 610
WorkaroundUpgrade to StorNext 610OR
Edit the multipathconf file and change the path_checker value from its current setting (such as readsector0) to tur for the Promise Array definition
70588 396789 Issue
tsunamilog and servicelog files can become large are now rotated to prevent these logs and snapshot files becoming too large and can significantly increase the time it takes to generate snapshot files
Note This issue was fixed in StorNext 61 See 70588 on page 14 in the Fixed Issues section Upgrade recommended
WorkaroundUpgrade to StorNext 610OR
Manually trim data from these log files when needed
70526 398061 396903 398206 397045 399232 and 401331
Issue
Kernel Page Table Security Problems CVE-2017-5753 CVE-2017-5715 and CVE-2017-5754
Note This issue was fixed in StorNext 61 See 70526 on page 14 in the Fixed Issues section Upgrade recommended
WorkaroundUpgrade to StorNext 610 There is no other workaround
Known Issues ndash StorNext 6x
Xcellis Workflow Director Release Notes 30
CR Number
SR Number
Description
71093 na Issue
Unused NIC ports can be reported as down in an admin alert during appliance firmware upgrades which creates about 20 RAS emails
Note This issue was fixed in StorNext 61 See Fixed Issues Notes and Enhancements ndash StorNext 6x on page 5 in the Fixed Issues section Upgrade recommended
Workaround
Upgrade to StorNext 610 There is no other workaround
Known Issues ndash StorNext 6x
Xcellis Workflow Director Release Notes 31
CR Number
SR Number
Description
72287 72286 72277
naThis applies to Xcellis Workflow Director (R630) systems
Issue
After an appliance is upgraded to StorNext 610 (see Upgrade Firmware) sometimes one of the nodes on the NAS cluster is not able to re-join the cluster
Log on to the Appliance Controller and issue the following command
nascluster show
If the node has not joined the NAS cluster the following message is displayed in the controller output
stornext initiated stop
Workaround
1 From the command line of the system issue the following command where ltmyfsgt is the mount path of the file system you would like to join to the cluster
nascluster join ltmyfsgt
The server should be rejoined to the cluster
2 Run the following command
nascluster show
You should see the following in the output (in bold green)
NAS Cluster IP 1010100100eth0 Master No SNFS Root ltmyfsgt Joined Yes
Known Issues ndash StorNext 6x
Xcellis Workflow Director Release Notes 32
CR Number
SR Number
Description
71644
Issue
After the Apply button is clicked during a firmware upgrade on the StorNext GUI there are certain instances where the firmware upgrade will fail to complete and server node 2 may be upgraded but node 1 will fail to upgrade causing a mismatch of StorNext releases between the nodes When this happens the Firmware Upgrade page in StorNext an error message similar to the following may display when the firmware upgrade is being applied
Note This issue was fixed in the upgrade code for StorNext 610 See Fixed Issues Notes and Enhancements ndash StorNext 6x on page 5 in the Fixed Issues section Upgrade recommended
Workaround
The secondary node web service timeout needs to be increased from the default value 5 minutes300 seconds) to 10 minutes600 to account for additional processing in the pre-upgrade script See Change the componentproperties Timeout Setting on page 55 for how to change this setting and begin the firmware upgrade process again
Known Issues ndash StorNext 6x
Xcellis Workflow Director Release Notes 33
CR Number
SR Number
Description
71599 425749 Issue
For systems being upgraded from StorNext 606 to 6061 from a fresh install of the server with a StorNext 606 image the firmware upgrade to support some expansion cards is not applied Future card changes in the system will not get automatically configured since the firmware and autoconfig services which support some cards were disabled after the upgrade toStorNext 6061
You can verify this issue by logging into the command line of the server node (or on both servers for dual-server node systems) with the stornext user account and stornext user password and issuing the following command from the command line of the system If you see the Virtual (as shown here in green) your system is affected by this issue
Example
optDXiutilseer VendorModel
Virtual
Note This has been fixed in StorNext 610 See 71599 on page 13 in the Fixed Issues section Upgrade recommended
Workaround
If the system has not been upgraded yet
1 Log in to the command line of a server node See Launch the Command Line
2 Issue the following command This will correct the initial fresh install issue and avoid a subsequent upgrade issue
cp -f optDXitheSeervendorinfoconf13G optDXitheSeervendorinfoconf
If the system was fresh installed with 606 and then upgraded to 6061 the following needs to be done
a Remove the three touch files
rm varoptDXifwb-onboot-disable
rm varoptDXihwdetect-onboot-disable
Known Issues ndash StorNext 6x
Xcellis Workflow Director Release Notes 34
CR Number
SR Number
Description
rm varoptDXistartup_autoconfig_disable
b Reboot the node so the Firmware Bundle updates will be performed and autoconfig and hwdetect will be enabled and run
3 Repeat these steps for the other server node (dual-server node systems only)
71507 421334 Issue
Firmware upgrade did not upgrade PHP on server nodes Note This has been fixed for StorNext 610 See 71507 on page 13 in the Fixed Issues section Upgrade recommended
Workaround
1 Log in to the command line of a server node ( see Launch the Command Line) and upgrade php56w
cd scratchsavedPHP
ls
php56wUpgrade-5633-1tgz php56wUpgradetgz
tar xzf php56wUpgrade-5633-1tgz
rpm -Uhv php56wrpm
Updating installing
1php56w-common-5633-1w7 [ 4]
2 Remove the upgrade warning touch file
rm -f varDXiupgrade_notify rpm tgz
rpm -q php56w
php56w-5633-1w7x86_64
3 Repeat for the other server node (for dual-node systems)
Known Issues ndash StorNext 6x
Xcellis Workflow Director Release Notes 35
CR Number
SR Number
Description
71464 na Issue
Platform upgrade is currently allowed to the StorNext 6061 release for systems currently configured and running StorNext 53x and as a clustered NAS system running NAS 12x Even though StorNext upgrades the NAS software does not upgrade NAS is left running 125 and NASController software 201 is incorrectly staged for upgrade in varupgrade
Workaround
To upgrade NAS after the StorNext firmware upgrade
1 Delete the contents of varupgrade on both nodes (for dual-node systems)
2 Download the offline 1413 NAS upgrade rpm
3 Copy the 1413 NAS upgrade file to varupgrade on the NAS master and other node as well
4 Upgrade NAS to 1413 (see Upgrades for the offline upgrade procedure)
5 Delete the contents of varupgrade on both nodes (for dual-node systems)
6 Copy the offline 201 NASController software upgrade rpm saved in scratchsavedNAS to varupgrade
7 Upgrade the NASController software to 201 (see Upgrades for the offline upgrade procedure)
71394 0421219 IssueNote This issue affects R630 (CentOS7) systems only not R520 (CentOS6) systemsNote This issue was fixed in StorNext 6061 See 71394 on page 14 Upgrade recommendedNote For StorNext 606 the included the MLNX_OFED HBA driver for Mellanox Connect X-3 VPI InfiniBandEthernet cards was incompatible with the system kernel version Because of this the software failed to install resulting in missing Mellanox software components needed to configure the card
Workaround
l For Systems prior to StorNext 606 the correct driver was shipped with StorNext so no further action is necessary for Mellanox HBA card configuration
l For systems running StorNext 606 upgrade to StorNext 6061 for the correct driver version for this card
Known Issues ndash StorNext 6x
Xcellis Workflow Director Release Notes 36
CR Number
SR Number
Description
71350 na IssueNote This issue applies to dual-server node systems onlyNote This issue was fixed in StorNext 6061 See 71350 on page 14 in the Fixed Issues section Upgrade recommended
For 606 systems StorNext file systems (snfs) can potentially fail to mount on the secondary server node (typically server node 2) when over a billion files are present on the snfs This could occur when cvfs is stopped and then restarted after a hard stop of the system HA failovers or when the primary server node restartsreboots
If the snfs had file locking enabled and was used to create a NAS cluster then the server node will also be shown in the not ready state on the NAS cluster
Workaround
If your system was upgraded to a StorNext release earlier than 6061 and your system exhibits this issue heres the workaround
Do the following on the server node that did not mount the file system
Mount the File System on the Server Node
1 Log in to node 2 (or node 1 if currently acting as the secondary node) See Launch the Command Line
2 Manually mount the file system on the server
Example
mount snfs1-fs
Re-Join the Server to the NAS Cluster if Needed
If the server is part of a NAS cluster
1 Log into the NAS controller (see Acces the Appliance Controller Console) and join that node to the cluster
Example
nascluster join stornextsnfs1-fs
2 Ensure this is joined by running the following command
nascluster show
Known Issues ndash StorNext 6x
Xcellis Workflow Director Release Notes 37
CR Number
SR Number
Description
Look for the following (in green bold) in the output (ellipses indicate additional information not shown) Note that snfs1-fs is the file system that did not mount before
NAS Cluster IP 1065166215em2 Master No SNFS Root stornextsnfs1-fs Joined
1 1065166216 (Joined MDC) test-bh3amdhquantumcom
2 1065166215 (Joined MDC) test-bh3bmdhquantumcom
71346 na IssueNote This was fixed in StorNext 6061 See 71346 on page 15 in the Fixed Issues section Upgrade recommended
For systems running StorNext 53x and NAS 12x upgrading to 606 or later
Workaround
Upgrade to Appliance ControllerNAS 141 or later prior to upgrading to StorNext 6x or later
71333 na Issue
Caution A system running StorNext 606 or later with a clustered NAS environment should not run NASAppliance Controller 130 or earlier Running these configurations may produce unpredictable results
If you are running StorNext 606 with NAS 130 or earlier you might experience one of the following scenarios
1 Controller configuration commands are not available for iSCSI and SNMP configuration even though the Appliance Controller Doc Center states that these commands are available
2 If your system is running with NAS enabled NAS may not work properly and you will have to upgrade NAS locally with the latest Appliance Controller release
Workaround
An upgrade to the Controller software is REQUIRED when running StorNext 606 See Appliance Controller Upgrades
Known Issues ndash StorNext 6x
Xcellis Workflow Director Release Notes 38
CR Number
SR Number
Description
71002 na IssueAfter upgrading to StorNext 605 and StorNext 6051 systems a RAS ticket might be created for an IPMI failure
Note This was fixed in StorNext 606 See 71002 on page 15 in the Fixed Issues section Upgrade recommended
Workaround
This RAS message is benign and can be ignored Upgrade to StorNext 606 to correct this issue
70902 na IssueStorNext 606 requires the appliance controller to be upgraded for clustered NAS environments running Appliance ControllerNAS versions earlier than 141 before upgrading appliance firmwareIf you attempt to upgrade the system to StorNext 606 prior to upgrading the controller the appliance upgrade will fail and the system will generate an Operation failure RAS ticket in the StorNext GUI on the server (for both server nodes on dual-node systems) the upgrade log will include a message about the upgrade attempt and an admin alert will be generatedExample (dual-node system with NAS 130 installed)
10
2018-02-22 151222 PST
136
Upgrade Minimum NAS version not satisfied for a clustered system Node 2 NAS clustering is enabled but installed NAS version is 130 NAS must be upgraded to version 141x before this upgrade is allowed A NAS 1413 offline upgrade bundle has been placed in scratchsavedNAS
Workaround
Upgrade Appliance ControllerNAS to 141 or later prior to upgrading the system See How to Upgrade on the Appliance Controller Documentation Center
Known Issues ndash StorNext 6x
Xcellis Workflow Director Release Notes 39
CR Number
SR Number
Description
70338 na Issue
During a firmware upgrade the secondary server node (typically Node 2) will upgrade successfully but the other server node (typically Node 1) can become stuck on reboot and unable to restart If you dont have an SSH session open when this happens you will notice that the server node will not respond for a long time If you happen to have an SSH session open during the upgrade you will see an error message similar to the following shown repeatedly on-screen
[ 189398035] dracut-initqueue[402] Warning dracut-initqueue timeout - starting timeout scripts
Workaround
The server node will have to be manually upgraded Contact Contacting Quantum on page 70 and refer them to TSB 3015
Known Issues ndash StorNext 6x
Xcellis Workflow Director Release Notes 40
CR Number
SR Number
Description
70300 385040385789
Issue
After a firmware upgrade the system cannot boot
This does not need to be applied to all systems connected to storage arrays only impacted systems as described here
Systems Impacted
l This ONLY affects systems upgrading from StorNext 5x releases to 6x (prior to 605)
l This ONLY affects systems upgrading that are Fibre Channel-connected to BOTH NetApp and QXS arrays
Note This issue was fixed in StorNext 605 See 70300 on page 17 If you are upgrading to StorNext 605 you will not see this issue and do not have to perform this workaround
Messages on the boot screen and in the KDUMP (the trace of server boot activities on the sysfs) shows messages similar to
Wrong diagnostic page asked for 7 got 0
OR
Wrong diagnostic page asked for 10 got 0
Workaround
DO NOT upgrade your system to StorNext 6x before first applying the workaroundSee Server Boot (QXSNetApp)
Known Issues ndash StorNext 6x
Xcellis Workflow Director Release Notes 41
CR Number
SR Number
Description
70287 na Issue
StorNext upgrades can fail due to a slowdown of the StorNext HA file system (HAFS) when attempting to apply upgrade firmware to StorNext 6x from supported StorNext 5x and 60x releases in the StorNext GUI This only occurs when attempting to upgrade the system while jobs with a lot of metadata changes are running This can happen when
l The system is running with StorNext 6x file systems with metadata archive enabled and heavy client activity
l The sytem is running with StorNext 50x file systems with the restore journal enabled and heavy client activity
Workaround
DO NOT upgrade your system to StorNext 6x before first applying one of the workarounds below if your system is processing a lot of metadata jobs
l To fix this issue edit the componentproperties file on one node of the system and increase the wsapplyfwupgradetimeout value to 2 hours
See Change Upgrade Timeout Setting
70178 Issue
The multipathconf file is overwritten for StorNext 531 through 605x Any custom-configured settings added to the file for those StorNext releases are available in etcmultipathconfbak The upgrade code added correct multipath settings to the etcmultipathconf file required for SAS-attached NetApp metadata arrays
Note The overwrite issue was changed in StorNext 606 See 70178 on page 16 in the Fixed Issues section Upgrade recommended
Workaround
1 If you dont have a backup of your multipathconf file you will have to add the settings into the file
2 If you have a backup of the custom multipath settings copy the settings into the new multipathconf file using a command-line editor like vi
Known Issues ndash StorNext 6x
Xcellis Workflow Director Release Notes 42
CR Number
SR Number
Description
70067 na Issue
CentOS 7 systems display log files with the journalctl command Any commands executed as the rootsh user are logged to the system log file A syslog filter sends all rootsh log commands to varlogrootshell This causes excessive information to be captured in the journalctl log file and makes the log file difficult to read
WorkaroundThere is a script to use which removes unnecessary command line output from the syslog file for CentOS7 systems running StorNext 605See the journalctl Filter ScriptFor StorNext releases prior to 605 contact Contacting Quantum on page 70
Known Issues ndash StorNext 6x
Xcellis Workflow Director Release Notes 43
CR Number
SR Number
Description
69189 na IssueAfter upgrading to StorNext 60ndash6011 node 2 may report a hardware failure in the StorNext GUI
When clicked this hardware failure displays multiple fan failures on the System Board tab of the Reports gt Hardware Status in the StorNext GUI
Note This issue has been fixed in StorNext 605 See 69506 on page 17 in the Fixed Issues section Upgrade recommended
WorkaroundFor systems on StorNext releases prior to 605 do the following on node 2
1 Open an SSH connection to the appropriate server node and use the IP address assigned to the node on the Management or LAN Client network
Note Node 2 used for dual-node systems only
2 Log in to the command line using the following credentials
l User name stornext
l Password ltstornext user account passwordgt
Note password is the default password for the stornext user account If the password has been changed use the current password
3 Enter sudo rootsh to gain root user access
Known Issues ndash StorNext 6x
Xcellis Workflow Director Release Notes 44
CR Number
SR Number
Description
4 Enter the password for the stornext user account again
5 Enter the following
racadm racreset soft
6 Wait 5 to 10 minutes for the reset to complete
7 Refresh the StorNext GUI The hardware status will no longer display the error for node 2
68773 na Issue
If a configured bridge device assigned to a DAE virtual machine (VM) is removed on the Networking page of the StorNext GUI you will not be able to start the DAE VM
Workaround
If the virtual machine cannot be started because the bridge was removed do the following
1 Recreate the bridge in the StorNext GUI OR
a Open an ssh session to the command line of the system and run virsh edit ltvmnamegt This opens the ltvmnamegt file for editing using vi commands
b Remove the bridge entries from the XML file using vi commands
2 When finished making the changes enter the following to save the changes and exit the editor
wq
Known Issues ndash StorNext 6x
Xcellis Workflow Director Release Notes 45
CR Number
SR Number
Description
68729 na Issue
Systems which used the StorNext Connect Install App prior to StorNext 60 may encounter the message ntp not running when upgrading to or rebooting the system running StorNext 6x
Note This was fixed via an update to the Connect Install App (v8) Xcellis Workflow Director (R630) systems installed using v8 or later will not have this issue Upgrade is recommended However this does not fix the issue for Xcellis Workflow Director (R630) systems installed using the Connect Install App prior to v8
Workaround
See StorNext Connect NTP not Running
68075 na Issue
After upgrading to StorNext 60 from 522 and uploading new licenses the NAS cluster could not be enabled on one of the nodes because the Appliance Controller failed to start
Workaround
See Restart the Appliance Controller
67997 na Issue
For Xcellis Workflow Director systems configured with NAS failover for NFS clusters (NFS-HA) after StorNext services are restarted NAS shares are not accessible from NAS clients
WorkaroundTo fix this condition
1 Restart the NAS controller services on the NAS Master (See the Restart the Appliance Controller section
See Restart the Appliance Controller
2 Access the NAS shares using the nas_vip address from NAS clients
67729 na Issue
When upgrading to StorNext 60 systems running NAS clustered will not automatically upgrade NAS to version 141
Workaround
For these systems run the NAS upgrade before rather than after the StorNext 60 upgrade
Known Issues ndash StorNext 6x
Xcellis Workflow Director Release Notes 46
CR Number
SR Number
Description
66799 322817 342909 362343
Issue
On the StorNext GUI Reports gt Hardware page node1 system board information is shown but information for node2 is not after an upgrade to StorNext 5x and later
Note This issue is fixed in StorNext 605 See 66799 on page 18 in the Fixed Issues section Upgrade recommended
WorkaroundTo fix this issue create the usradicHAMsharedHwMonStatus directory on the primary server node (typically node 1) and restart the hwmond serviceSee Create the HW Monitor Directory
60614
na Issue
Your system and all other Connect-managed Linux StorNext SAN clients must have the latest Connector installed so that statistics can be passed to StorNext Connect If a system is managed by StorNext Connect and you upgrade the firmware on that system to StorNext 5 Release 530 firmware PRIOR to upgrading the StorNext Connect Connector the Volume Storage widget on the StorNext Connect Dashboard will display no data for those systems
Workaround
For steps to take to update the Connect Connector(s) before upgrading system firmware
See Update the StorNext Connect Connector before doing a firmware upgrade
For steps to take if you have already upgraded firmware but did not first update the Connector(s)
See Repair StorNext Connect After Upgrade
55384 na Issue
If dmnfsthreads is not set on mount nfsds may be over-commited when there are many NFS processes waiting for offline files
Workaround
For managed file systems serving NFS Quantum recommends using the dmnfsthreads=16 mount option This setting ensures that NFS remains responsive when Storage Manager is retrieving data from an archive tier
Known Issues ndash StorNext 6x
Xcellis Workflow Director Release Notes 47
CR Number
SR Number
Description
55318 na Issue
Strange UID on ACL when file created on non ads client
Workaround
All systems accessing the StorNext SAN or LAN clients or the NAS clients must be part of the same identity domain Accessing StorNext from different identity domains can result in inconsistent file ownership attributes as well as potential access problems
55220 na Issue(See CR Known Issues ndash StorNext 6x on page 20)
Workaround
na
54451 na IssueStorNext supports case-sensitive file names For configurations with different client types such as Windows and Mac sharing the same files the default case type may be different
WorkaroundThere currently is no workaround for this issue SMB is operating as expected
53486 425247 Srvclog RAS tickets are lost if the hafs (HA shared file system) is not mounted on the system
Note This issue was fixed in StorNext 62 See 53486 on page 12 in the Fixed Issues section Upgrade recommended
Workaround
Upgrade to StorNext 62
45702 na Issue
If you replace an HDD drive with an SSD or vice versa the StorNext GUI will show a status of Missing and an equivalent RAS ticket instead of displaying an Incompatible status
Workaround
Replacement drives must be the identical type of drive removed HDDs can only use HDD spares and SSDs can only use SSD spares Replacement drives must also be the same size or larger than the failed drive The array controller will generate errors if an incompatible drive is used as a replacement
Known Issues Workarounds and Additional Information
Xcellis Workflow Director Release Notes 48
CR Number
SR Number
Description
38128 1395540
IssueUsing the GUI while a large Media import is kicked off via the command line can cause the StorNext GUI to timeout or crash
Workaround
Wait until a bulk load from tape is finished prior to opening the StorNext GUI
Known Issues Workarounds and Additional Information
About firmware upgrades and pre-staged Appliance Controller upgrades for server nodesWhen NAS is enabled detected and is configured on a sever node as part of a NAS cluster and a firmware upgrade is attempted an offline targz file is copied into the scratchsavedNAS directory and is then unzipped and untarred into the varupgrade directory Based on the installed version of NAS on the system the appropriate valid upgrade bundle for NAS will be unpacked to varupgrade for the user to perform the upgrade If a multi-version upgrade is required then the next applicable version will be unpacked into varupgrade and you will be instructed to perform the cluster upgrade first and then retry the firmware upgrade If the cluster state of the node cannot be determined then it looks like no versions are unpacked on the system and the upgrade is aborted (in this case you would have to upgrade the cluster manually using instructions in the Appliance Controller Doc Center (see Appliance Controller Upgrades) and then retry the firmware upgrade
If NAS clustering is not configured the firmware upgrade will perform the direct upgrade to the current version of Appliance Controller shipped with the firmware upgrade
74202 ndash StorNext services can fail to stop completely when NAS is Configured and StorNext services are stoppedHow might this be seenThere are two basic scenarios where this might be exposed
Scenario 1When StorNext stops it signals NAS to vacate the StorNext file systems that NAS is using However if these file systems remain available for too long the Appliance Controller will attempt to automatically restart NAS services This is what happens in order
Known Issues Workarounds and Additional Information
Xcellis Workflow Director Release Notes 49
1 Restarting NAS services can resume use of StorNext resources
2 Resuming StorNext resources interferes with attempts to stop StorNext
3 Continued use of these StorNext resources can result in mounted StorNext file systems that do not have a running fsm process which blocks access to the StorNext file system
If experience this on your system temporarily stop NAS services
1 Log in to the command line of the server (as sudo rootsh)
Launch the Command Line With an SSH Utility a Open an SSH connection to the appropriate server and use the IP address assigned to the
node on the ManagementLAN Client network
b Log in to the command line using the following credentials
l User name stornext
l Password ltstornext user account passwordgt
Note password is the default password for the stornext user account If the password has been changed use the current password
c Enter sudo rootsh to gain root user access
d Enter the password for the stornext user account again
2 Stop NAS by executing the following command
usrcvfslibsnnas_control stop
3 Stop the Appliance Controller by executing the following command
usrlocalquantumbinsml_service_tool stop snnas_controller
4 When you have finished Restart NAS and the Appliance Controller
a Start NAS by executing the following command
usrcvfslibsnnas_control start
b Start the Appliance Controller by executing the following command
usrlocalquantumbinsml_service_tool start snnas_controller
Known Issues Workarounds and Additional Information
Xcellis Workflow Director Release Notes 50
Scenario 2If you need to stop the system during a maintenance window This is an extension of Scenario 1 but NAS must vacate the file systems for an extended period of time If NAS services are resumed when they should be suspended those service processes may interfere with maintenance operations
To affect both scenarios timers exist that you can adjust to extend the amount of time required between the stornext stop operation and before NAS services resume The timers are controlled by the following Controller Registry values
l nasheartbeatcheck_state_secs l stornext_servicestop_periodTo see what values are currently assigned enter
su sysadmin -c reg show nasheartbeatcheck_state_secs
to display the setting of the frequency interval of the NAS heartbeat state check or enter
su sysadmin -c reg show stornext_servicestop_period
to display the duration that StorNext services are stopped
Note By default both timers are set to 120 (in seconds=2 minutes)
WorkaroundsWorkaround 1If StorNext fails to stop due to NAS resource usage do the following
1 Log in to the command line of the server
Launch the Command Line With an SSH Utility a Open an SSH connection to the appropriate server and use the IP address assigned to the
node on the ManagementLAN Client network
b Log in to the command line using the following credentials
l User name stornext
l Password ltstornext user account passwordgt
Note password is the default password for the stornext user account If the password has been changed use the current password
c Enter sudo rootsh to gain root user access
d Enter the password for the stornext user account again
Known Issues Workarounds and Additional Information
Xcellis Workflow Director Release Notes 51
2 Verify that the StorNext file systems are mounted
grep cvfs procmounts
If any StorNext file systems are not mounted mount them now
3 Mount the HA shared file system
mount usradicHAMshared
4 Start fsm for each StorNext file system (shown below as ltFSNAMEgt) mounted on the server node
cvadmin -e start ltFSNAMEgt on localhost
5 Stop StorNext services
For CentOS7 systems enter
systemctl stop cvfs
For CentOS6 systems enter
service cvfs stop
6 To stop NAS enter
usrcvfslibsnnas_control stop
7 To stop the Appliance Controller enter
usrlocalquantumbinsml_service_tool stop snnas_controller
When you are ready restart the Appliance Controller and NAS services
8 To restart the Appliance Controller enter
Known Issues Workarounds and Additional Information
Xcellis Workflow Director Release Notes 52
usrlocalquantumbinsml_service_tool start snnas_controller
9 To restart NAS enter
usrcvfslibsnnas_control start
Workaround 2For Scenario 1 Quantum recommends that you extend the time period to a value of 10 minutes (600 seconds) for both variables Set a value that exceeds the amount of time necessary for typical StorNext shutdown
To set new values
1 Log in to the command line
Launch the Command Line With an SSH Utility a Open an SSH connection to the appropriate server and use the IP address assigned to the
node on the ManagementLAN Client network
b Log in to the command line using the following credentials
l User name stornext
l Password ltstornext user account passwordgt
Note password is the default password for the stornext user account If the password has been changed use the current password
c Enter sudo rootsh to gain root user access
d Enter the password for the stornext user account again
2 Change the frequency interval of the NAS heartbeat state check to 600 seconds (10 minutes) Enter
su sysadmin -c reg set nasheartbeatcheck_state_secs 600
Note This is run with a temporary log in to the Appliance Controller as the sysadmin user
3 Change the duration that StorNext services are stopped to 600 seconds (10 minutes) Enter
Known Issues Workarounds and Additional Information
Xcellis Workflow Director Release Notes 53
su sysadmin -c reg set stornext_servicestop_period 600
4 Note This is run with a temporary log in to the Appliance Controller as the sysadmin user
Workaround 3For Scenario 2 to eliminate the confusion of setting a long duration for a maintenance window and then having to change the values back again to a shorter value again you can simply stop NAS services and the Appliance Controller and then restart these services when you are finished
To stop the services and restart them
1 Log in to the command line
Launch the Command Line With an SSH Utility a Open an SSH connection to the appropriate server and use the IP address assigned to the
node on the ManagementLAN Client network
b Log in to the command line using the following credentials
l User name stornext
l Password ltstornext user account passwordgt
Note password is the default password for the stornext user account If the password has been changed use the current password
c Enter sudo rootsh to gain root user access
d Enter the password for the stornext user account again
2 Stop NAS by executing the following command
usrcvfslibsnnas_control stop
3 Stop the Appliance Controller by executing the following command
usrlocalquantumbinsml_service_tool stop snnas_controller
When you are ready restart the Appliance Controller and NAS services
4 To restart the Appliance Controller enter
usrlocalquantumbinsml_service_tool start snnas_controller
Known Issues Workarounds and Additional Information
Xcellis Workflow Director Release Notes 54
5 To restart NAS enter
usrcvfslibsnnas_control start
6 Change the settings for the NAS heartbeat state check and the duration that StorNext services are stopped according to Workaround 2 on page 52
Workaround 4An alternate method for maintenance windows instead of implementing workaround 3 for Scenario 2 you can choose a much longer value if you need the NAS heartbeat state check interval and StorNext services stopped for a long period of time (for example during a planned maintenance window in a data center) While this is another option the downside of this is that you will need to know how much downtime to expect maintenance to take and then set these times to be less than what is needed for that maintenance It is also difficult to extend the maintenance period reliably once those timers have started In addition you will most likely have to reset the values back to their original settings when the maintenance window is complete which could be a hassle
Here is one example which extends the time values to 2 hours (7200 seconds)
1 Log in to the command line
Launch the Command Line With an SSH Utility a Open an SSH connection to the appropriate server and use the IP address assigned to the
node on the ManagementLAN Client network
b Log in to the command line using the following credentials
l User name stornext
l Password ltstornext user account passwordgt
Note password is the default password for the stornext user account If the password has been changed use the current password
c Enter sudo rootsh to gain root user access
d Enter the password for the stornext user account again
2 Change the frequency interval of the NAS heartbeat state check to 7200 seconds (10 minutes) Enter
su sysadmin -c reg set nasheartbeatcheck_state_secs 7200
Note This is run with a temporary log in to the Appliance Controller as the sysadmin user
3 Change the duration that StorNext services are stopped to 7200 seconds (10 minutes) Enter
Known Issues Workarounds and Additional Information
Xcellis Workflow Director Release Notes 55
su sysadmin -c reg set stornext_servicestop_period 7200
4 Note This is run with a temporary log in to the Appliance Controller as the sysadmin user
Change the componentproperties Timeout Setting 1 Log in to the command line of the primary server node (typically node 1) See Launch the Command
Line (for Xcellis Workflow DirectorGen 2) or Launch the Command Line (for R630 systems)
2 Open the componentproperties file with the vi editor
vi usradicguiconfigcomponentproperties
Pro Tip 1 Edit With vi
The vi editor is included in CentOS If you are unfamiliar with using vi to open edit (copypastedelete) exit with or without saving changes use the following Google search URL to find related links for editing with vi
httpswwwgooglecomsearchq=edit+with+vi
3 Scroll down to the web services timeouts section It should look similar to (note the default firmware upgrade value is 300 seconds - highlighted in green)
Web Services Timeouts (seconds)
wsconverttohatimeout=300 wsapplyfwupgradetimeout=300 wsgetsystemidtimeout=10 wsntptimeout=30 wsdatetimetimeout=30 wsnetworkconfigtimeout=180 wsnetworkhapeertimeout=30 wsloggingleveltimeout=30 wscapturestatetimeout=600 wsjobclosetimeout=30 wsnasclosetimeout=60
4 Move the cursor to sit over the number 3 enter ltSHIFTgt+ and then R (for replace) and enter the number 6 to change the wsapplyfwupgradetimeout= value from 300 seconds (5 minutes) to 600 seconds (10 minutes)
wsapplyfwupgradetimeout=600
Known Issues Workarounds and Additional Information
Xcellis Workflow Director Release Notes 56
5 Save the changes to the file by entering SHIFTwq to write the file and quit the vi editor
The setting change will be replicated to the other server node in 2-3 minutes after the file change is saved so this only has to be applied to server node 1
6 Run the Firmware Upgrade process again
Note Even though the upgrade failed previously the firmware upgrade files are still available for the upgrade
a Select either of the uploaded files click Apply In the case of a single file select the one file uploaded and click Apply
b Click Yes to confirm the installation For two-file upgrades both firmware files are applied to the system during the upgrade
The upgrade should complete after the timeout setting is changed However if the firmware upgrade fails again contact Contacting Quantum on page 70 for assistance with manually upgrading the node that failed to upgrade
Server Boot (QXSNetApp)This does not need to be applied to all systems connected to storage arrays only impacted systems as described here
Systems Impacted l This ONLY affects systems upgrading from StorNext 5x releases to 6x (prior to 605)
l This ONLY affects systems upgrading that are Fibre Channel-connected to BOTH NetApp and QXS arrays
Note This issue was fixed in StorNext 605 See 70300 on page 17 If you are upgrading to StorNext 605 you will not see this issue and do not have to perform this workaround
BEFORE applying the upgrade to StorNext 6x do the following
Log in to the system command line 1 Open an SSH connection to the appropriate server and use the IP address assigned to the node on the
Management or LAN Client network or use the Service Port IP address if connected to the Service Port
Service Port IP addresses l Node 1 1017211 (dual-server node systems)
l Node 2 1017212 (dual-server node or HA-ready single-server node systems)
Note Node 2 is the server node sold with single-node (non-HA) Xcellis Workflow Director and Artico systems It is also used for installation using the StorNext Connect Install app for both single-node and dual-node systems only
Known Issues Workarounds and Additional Information
Xcellis Workflow Director Release Notes 57
2 Log in to the command line using the following credentials
l User name stornext
l Password ltstornext user account passwordgt
Note password is the default password for the stornext user account If the password has been changed use the current password
3 Enter sudo rootsh to gain root user access
4 Enter the password for the stornext user account again
Edit the Grub Configuration File 1 Create a backup copy of the CentOS7 grubd40_custom configuration file Enter the following
cp etcgrubd40_custom scratch40_customorig
2 Create a backup copy of the CentOS7 grubcfg file Enter the following
cp bootgrub2grubcfg bootgrub2grubcfgorig
3 Edit the etcgrubd40_custom file using the vi editor included in CentOS7x Enter the following
vi etcgrubd40_custom
4 To enter vi insert mode enter i
5 Look for the lines beginning with linux16 as shown in bold blue below and add ltspacegtrdblacklist=ses rdblacklist=enclosure to the end of those lines as shown in green in the following example (Ellipses included below denote code prior to and after the linux16 sections)
Known Issues Workarounds and Additional Information
Xcellis Workflow Director Release Notes 58
linux16 vmlinuz-3100-51462el7qtmx86_64 root=UUID=3d9116b2-c5de-41fd-bd38-2042c0f8ebad ro console=tty1 vconsolekeymap=us crashkernel=768M0M vconsolefont=latarcyrheb-sun16 selinux=0 enforcing=0 intel_idlemax_cstate=0 processormax_cstate=1 elevator=deadline transparent_hugepage=never quiet LANG=en_USUTF-8 rdblacklist=ses rdblacklist=enclosure
initrd16 initramfs-3100-51462el7qtmx86_64img
menuentry Xcellis SOL --class centos --class gnu-linux --class os --unrestricted load_videoset gfxpayload=keepinsmod gzioinsmod part_msdosinsmod ext2set root=hd0msdos1if [ x = xy ] thensearch --no-floppy --fs-uuid --set=root --hint-bios=hd0msdos1 --hint-efi=hd0msdos1 --hint-baremetal=ahci0msdos1 --hint=hd0msdos1 a0467663-8cf0-48be-b967-d5ef7eb486e2elsesearch --no-floppy --fs-uuid --set=root a0467663-8cf0-48be-b967-d5ef7eb486e2filinux16 vmlinuz-3100-51462el7qtmx86_64 root=UUID=3d9116b2-c5de-41fd-bd38-2042c0f8ebad ro console=ttyS1115200n8 vconsolekeymap=us crashkernel=768M0M vconsolefont=latarcyrheb-sun16 selinux=0 enforcing=0 intel_idlemax_cstate=0 processormax_cstate=1 elevator=deadline transparent_hugepage=never quiet LANG=en_USUTF-8 rdblacklist=ses rdblacklist=enclosureinitrd16 initramfs-3100-51462el7qtmx86_64img
6 To exit insert mode and return to command mode press ltEscgt
7 To save changes and exit vi enter wq and press ltEntergt You will return to the command prompt (To exit vi without saving changes enter q and press ltEntergt)
8 Repeat Log in to the system command line on page 56 and Edit the Grub Configuration File on the previous page for the other server node
Edit the Blacklist Configuration File and Enable the Changes 1 Enter the following to create a backup copy of the blacklist configuration file
Known Issues Workarounds and Additional Information
Xcellis Workflow Director Release Notes 59
cp etcmodprobedblacklistconf scratchblacklistconforig
2 Enter the following to edit the etcmodprobedblacklistconf file using vi
vi etcmodprobedblacklistconf
3 To edit change to the vi insert mode Enter i
4 Add a separate line for rdblacklist ses and another line for rdblacklist enclosure to the file as shown in green in the following example
blacklist rivafb
blacklist savagefb
blacklist sstfb
blacklist neofb
blacklist tridentfb
blacklist tdfxfb
blacklist virgefb
blacklist vga16fb
blacklist viafb
ISDN - see bugs 154799 159068
blacklist hisax
blacklist hisax_fcpcipnp
sound drivers
blacklist snd-pcsp
IO dynamic configuration support for s390x (bz 563228)
blacklist chsc_sch
Known Issues Workarounds and Additional Information
Xcellis Workflow Director Release Notes 60
blacklist sb_edac
blacklist edac_core
blacklist sesblacklist enclosure
5 To exit insert mode and return to command mode press ltEscgt
6 To save changes and exit vi enter wq and press ltEntergt You will return to the command prompt (To exit vi without saving changes enter q and press ltEntergt)
7 To enable the changes enter
dracut -f
8 Continue to Reboot the system below
Workaround System Already UpgradedIf the system has been upgraded and cannot boot do the following to recover the system
1 Detachdisconnect the FC ports from the nodes or disable the FC zoning configuration for the QXS array(s)
2 Boot the system and enter the following to stop cvfs
systemctl stop cvfs
3 Edit the grub configuration file for your version of CentOS See Edit the Grub Configuration File on page 57
4 Edit the blacklist configuration file See Edit the Blacklist Configuration File and Enable the Changes on page 58
5 Reattach or re-enable FC zoning configuration for the QXS array(s)
6 Continue to Reboot the system below
Reboot the system 1 Reboot the server you are already logged into
systemctl reboot
Continue to Step 3 for single-node systems For dual-node systems continue to the next step
Known Issues Workarounds and Additional Information
Xcellis Workflow Director Release Notes 61
2 Log in to the other server node See Log in to the system command line on page 56
systemctl reboot
3 For dual-node systems repeat Step 3 for server node 2 The process is complete
Change Upgrade Timeout SettingBEFORE applying the upgrade to StorNext 6x do the following
Log in to the system command line 1 Open an SSH connection to the appropriate server and use the IP address assigned to the node on the
Management or LAN Client network or use the Service Port IP address if connected to the Service Port
Service Port IP addresses l Node 1 1017211 (dual-server node systems)
l Node 2 1017212 (dual-server node or HA-ready single-server node systems)
Note Node 2 is the server node sold with single-node (non-HA) Xcellis Workflow Director and Artico systems It is also used for installation using the StorNext Connect Install app for both single-node and dual-node systems only
2 Log in to the command line using the following credentials
l User name stornext
l Password ltstornext user account passwordgt
Note password is the default password for the stornext user account If the password has been changed use the current password
3 Enter sudo rootsh to gain root user access
4 Enter the password for the stornext user account again
1 Change to the config directory
cd usradicguiconfig
2 Copy the componentproperties file
cp componentproperties componentpropertiesorig
Known Issues Workarounds and Additional Information
Xcellis Workflow Director Release Notes 62
3 Edit the file using vi
vi componentproperties
4 Scroll down the file until you get to the Web Services Timeouts (seconds) section and the upgrade timeout line shown in bold text The current value should be similar to the value shown in bold green
Web Services Timeouts (seconds) wsconverttohatimeout=300wsapplyfwupgradetimeout=300 wsgetsystemidtimeout=10 wsntptimeout=30 wsdatetimetimeout=30 wsnetworkconfigtimeout=180 wsnetworkhapeertimeout=30 wsloggingleveltimeout=30 wscapturestatetimeout=600 wsjobclosetimeout=30 wsnasclosetimeout=60
5 To edit change to the vi insert mode Enter i
6 Change the value to 1200
Known Issues Workarounds and Additional Information
Xcellis Workflow Director Release Notes 63
Web Services Timeouts (seconds) wsconverttohatimeout=300wsapplyfwupgradetimeout=1200 wsgetsystemidtimeout=10 wsntptimeout=30 wsdatetimetimeout=30 wsnetworkconfigtimeout=180 wsnetworkhapeertimeout=30 wsloggingleveltimeout=30 wscapturestatetimeout=600 wsjobclosetimeout=30 wsnasclosetimeout=60
7 To exit insert mode and return to command mode press ltEscgt
8 To save changes and exit vi enter wq and press ltEntergt You will return to the command prompt (To exit vi without saving changes enter q and press ltEntergt)
9 Continue to Reboot the system below
Reboot the system 1 Reboot the server you are already logged into
systemctl reboot
Continue to Step 3 for single-node systems For dual-node systems continue to the next step
2 Log in to the other server node See Log in to the system command line on page 61
3 Reboot the other server node 2
systemctl reboot
4 Repeat Step 3 for server node 2
The process is complete
journalctl Filter ScriptStep 1 Upgrade to StorNext 605
Known Issues Workarounds and Additional Information
Xcellis Workflow Director Release Notes 64
Note StorNext 605 provides the script so you need to upgrade to StorNext 605 to access the file
See Upgrade a Gateway System (Upgrade Firmware) Using the Service Menu
Step 2 Log in to the System Command Line 1 Open an SSH connection to the appropriate server and use the IP address assigned to the node on the
Management or LAN Client network or use the Service Port IP address if connected to the Service Port
Service Port IP addresses l Node 1 1017211 (dual-server node systems)
l Node 2 1017212 (dual-server node or HA-ready single-server node systems)
Note Node 2 is the server node sold with single-node (non-HA) Xcellis Workflow Director and Artico systems It is also used for installation using the StorNext Connect Install app for both single-node and dual-node systems only
2 Log in to the command line using the following credentials
l User name stornext
l Password ltstornext user account passwordgt
Note password is the default password for the stornext user account If the password has been changed use the current password
3 Enter sudo rootsh to gain root user access
4 Enter the password for the stornext user account again
5 Continue to Step 3 Run the Journal Filter Script and View the Script Help below
Step 3 Run the Journal Filter Script and View the Script Help l Enter the following to use the script to view the log output in a way that filters out all the rootsh
commands
optDXiscriptsjournalctl_filtersh -f
l Enter the following to view the scripts help file
optDXiscriptsjournalctl_filtersh --help
Note The journalctl_filtersh output can also be saved to a file
Known Issues Workarounds and Additional Information
Xcellis Workflow Director Release Notes 65
StorNext Connect NTP not RunningWorkaround 1 If you encounter this issue when rebooting the system reboot or after a firmware upgrade do the following
1 Log in to the StorNext GUI and select gtConfiguration gt System
2 Click the Date amp Time tab
3 Set the NTP protocol options as follows Select either the Select a Timeserver Pool option and select the pool from the options available OR select the Specify a Timeserver or Pool option and enter the IP address of the time server
4 Click Apply which will reboot the node (or both nodes in dual-server systems) and re-enable and start NTP
Workaround 2Another alternative enables ntp when the system is rebooted
1 Using an SSH connection log in to the command line of the server
2 Enter the following command
usrbinsystemctl ntpdservice enable
3 Repeat for the other server (for dual-server node systems only)
4 Manually reboot the server (or both server nodes for dual-server node systems)
Restart the Appliance ControllerOn the server node hosting NAS do the following (use node 2 on dual-server node systems)
1 Open an SSH connection to the appropriate server node and use the IP address assigned to the node on the Management or LAN Client network
2 Log in to the command line using the following credentials
l User name stornext
l Password ltstornext user account passwordgt
Note password is the default password for the stornext user account If the password has been changed use the current password
3 Enter sudo rootsh to gain root user access
4 Enter the password for the stornext user account again
5 Enter the following
chown -R ldapldap varlibldap
Known Issues Workarounds and Additional Information
Xcellis Workflow Director Release Notes 66
6 Enter the following
systemctl restart slapd
7 Restart the appliance controller
systemctl start snnas_controller
systemctl stop snnas_controller
Create the Missing Hardware Monitor DirectoryDo the following to check if the directory is missing and re-create the directory if it is and restart the hwmond service
1 Open an SSH connection to the appropriate server and use the IP address assigned to the node on the Management or LAN Client network or use the Service Port IP address if connected to the Service Port
Service Port IP addresses l Node 1 1017211 (dual-server node systems)
l Node 2 1017212 (dual-server node or HA-ready single-server node systems)
Note Node 2 is the server node sold with single-node (non-HA) Xcellis Workflow Director and Artico systems It is also used for installation using the StorNext Connect Install app for both single-node and dual-node systems only
2 Log in to the command line using the following credentials
l User name stornext
l Password ltstornext user account passwordgt
Note password is the default password for the stornext user account If the password has been changed use the current password
3 Enter sudo rootsh to gain root user access
4 Enter the password for the stornext user account again
5 Enter the following on the command line
cd usradicHAMsharedHwMonStatus
If you see the following message the directory does not exist Continue to the next step
Known Issues Workarounds and Additional Information
Xcellis Workflow Director Release Notes 67
bash cd usradicHAMsharedHwMonStatus No such file or directory
6 Enter the following on the command line to create the directory
mkdir usradicHAMsharedHwMonStatus
7 Enter the following to verify the directory has been created
cd usradicHAMsharedHwMonStatus
8 Change the permission of the hwmond service to read-only
chmod -r 775 HwMonStatus
9 Restart the hwmond service
systemctl restart quantum-hwmondservice
How to Disable NFS v4To disable NFSv4 on Xcellis Workflow Director systems especially those systems running NAS 120 or earlier perform the following on node 2
Edit the nfs File 1 Open an SSH connection to the appropriate server and use the IP address assigned to the node on the
Management or LAN Client network or use the Service Port IP address if connected to the Service Port
Service Port IP addresses l Node 1 1017211 (dual-server node systems)
l Node 2 1017212 (dual-server node or HA-ready single-server node systems)
Note Node 2 is the server node sold with single-node (non-HA) Xcellis Workflow Director and Artico systems It is also used for installation using the StorNext Connect Install app for both single-node and dual-node systems only
Known Issues Workarounds and Additional Information
Xcellis Workflow Director Release Notes 68
2 Log in to the command line using the following credentials
l User name stornext
l Password ltstornext user account passwordgt
Note password is the default password for the stornext user account If the password has been changed use the current password
3 Enter sudo rootsh to gain root user access
4 Enter the password for the stornext user account again
5 Edit etcsysconfignfs file (See Example Use vi to Edit the nfs File on the next page)
6 Change the value for RPCNFSDARGS to -N 4 When finished the line must be RPCNFSDARGS=-N 4
7 Change the value for RPCMOUNTDOPTS to -N 4 When finished the line must be RPCMOUNTDOPTS=-N 4
8 Save the file
Restart NFS
For Xcellis Workflow Director (R630) systems
1 Enter the following to restart the NFS configuration
systemctl restart nfs-config
2 Enter the following to restart the NFS server
systemctl restart nfs-server
After You Restart NFS on Node 2Repeat both the Edit the nfs File on the previous page and Known Issues ndash StorNext 6x on page 20 sections on node 1( for dual-node systems)
If you need to create new NFS shares to export for user access you may do this now See the About the NAS App section of the StorNext Connect Documentation Center for information about NAS configuration using StorNext Connect
Known Issues Workarounds and Additional Information
Xcellis Workflow Director Release Notes 69
Example Use vi to Edit the nfs File 1 Enter the following
vi etcsysconfignfs
2 Move the cursor to the closing quotation mark in RPCNFSDARGS
3 Enter the following
i -N 4
4 Write the file and quit vi as follows
wq
5 For this example you would have to Restart NFS on the previous page and repeat the Edit the nfs File on page 67 and Restart NFS on the previous page again on node 1 (for dual-node systems)
6 Close the SSH session for the server(s) ( for dual-node systems)
Re-enable DDM on the Secondary Node After HA FailoverOnce the MDC node acting as secondary finishes rebooting and becomes functional again use fsddmconfig (or the GUI) from the server node currently acting as primary to re-enable DDM for the standby server node as follows
1 Open an SSH connection to the appropriate server and use the IP address assigned to the node on the Management or LAN Client network or use the Service Port IP address if connected to the Service Port
Service Port IP addresses l Node 1 1017211 (dual-server node systems)
l Node 2 1017212 (dual-server node or HA-ready single-server node systems)
Note Node 2 is the server node sold with single-node (non-HA) Xcellis Workflow Director and Artico systems It is also used for installation using the StorNext Connect Install app for both single-node and dual-node systems only
Contacting Quantum
Xcellis Workflow Director Release Notes 70
2 Log in to the command line using the following credentials
l User name stornext
l Password ltstornext user account passwordgt
Note password is the default password for the stornext user account If the password has been changed use the current password
3 Enter sudo rootsh to gain root user access
4 Enter the password for the stornext user account again
5 On the command line of the system enter the following
fsddmconfig -u -s e
standby_system_hostname
If a system running DDMs periodically displays an Admin Alert when it fails over cycles a client node or upgrades while the server node operating as secondary is rebooting but not completely down change the timeout value to allow more time to communicate with the node Update the TSM configuration parameter DDM_CLIENT_RETRY_TIMEOUT from the default 30 seconds to a larger value depending on how long the node is taking to reboot In the event the server node acting as secondary will be down for an extended period of time the node should be taken offline Additionally if this parameter is set too high and the standby server does not come back the command that is currently running (eg store or retrieve) will not return until after the specified timeout
For more information about the DDM_CLIENT_RETRY_TIMEOUT parameter that can be placed into the fs_sysparm_override configuration file refer to the usradicTSMconfigfs_sysparmREADME file
Caution Incorrect modification of the fs_sysparm_override configuration file can cause a serious adverse effect on StorNext functionality Before modifying this file we recommend you contact Contacting Quantum below
Contacting QuantumFor further assistance contact the Quantum Customer Support Center
Region Support Contact
North America 1-800-284-5101 (toll free)+1-720-249-5700
Contacting Quantum
Xcellis Workflow Director Release Notes 71
Region Support Contact
EMEA +800-7826-8888 (toll free)
+49 6131 324 185
Asia Pacific +800-7826-8887 (toll free)+603-7953-3010
For worldwide support
httpswwwquantumcomserviceandsupportget-helpindexaspxcontact-support
- Revision History
- About the Xcellis Workflow Director
- Training and Documentation Resources
- About StorNext 6
-
- What is StorNext
- Learn More on the Web
-
- What StorNext Releases are compatible with my system
- Upgrade StorNext Software and System Firmware
- General Notes
- Quantum Appliance Licenses
- Fixed Issues Notes and Enhancements ndash StorNext 6x
- Known Issues ndash StorNext 6x
- Known Issues Workarounds and Additional Information
- Contacting Quantum
-
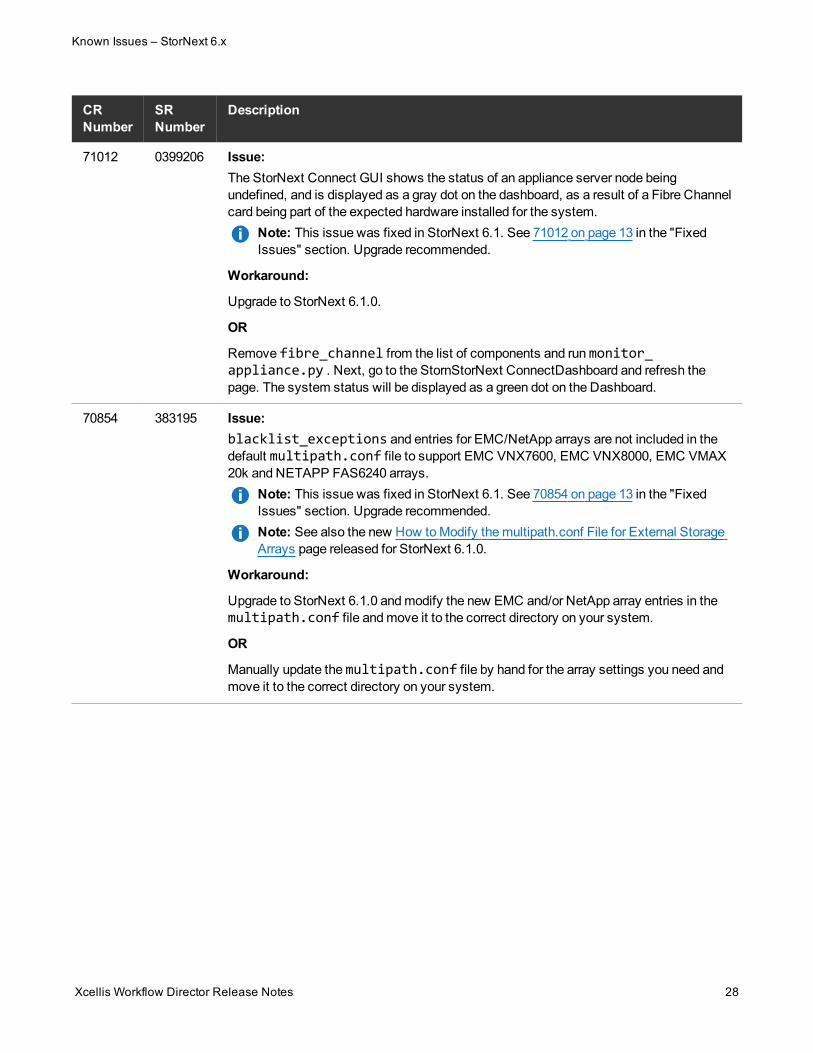
Known Issues ndash StorNext 6x
Xcellis Workflow Director Release Notes 34
CR Number
SR Number
Description
rm varoptDXistartup_autoconfig_disable
b Reboot the node so the Firmware Bundle updates will be performed and autoconfig and hwdetect will be enabled and run
3 Repeat these steps for the other server node (dual-server node systems only)
71507 421334 Issue
Firmware upgrade did not upgrade PHP on server nodes Note This has been fixed for StorNext 610 See 71507 on page 13 in the Fixed Issues section Upgrade recommended
Workaround
1 Log in to the command line of a server node ( see Launch the Command Line) and upgrade php56w
cd scratchsavedPHP
ls
php56wUpgrade-5633-1tgz php56wUpgradetgz
tar xzf php56wUpgrade-5633-1tgz
rpm -Uhv php56wrpm
Updating installing
1php56w-common-5633-1w7 [ 4]
2 Remove the upgrade warning touch file
rm -f varDXiupgrade_notify rpm tgz
rpm -q php56w
php56w-5633-1w7x86_64
3 Repeat for the other server node (for dual-node systems)
Known Issues ndash StorNext 6x
Xcellis Workflow Director Release Notes 35
CR Number
SR Number
Description
71464 na Issue
Platform upgrade is currently allowed to the StorNext 6061 release for systems currently configured and running StorNext 53x and as a clustered NAS system running NAS 12x Even though StorNext upgrades the NAS software does not upgrade NAS is left running 125 and NASController software 201 is incorrectly staged for upgrade in varupgrade
Workaround
To upgrade NAS after the StorNext firmware upgrade
1 Delete the contents of varupgrade on both nodes (for dual-node systems)
2 Download the offline 1413 NAS upgrade rpm
3 Copy the 1413 NAS upgrade file to varupgrade on the NAS master and other node as well
4 Upgrade NAS to 1413 (see Upgrades for the offline upgrade procedure)
5 Delete the contents of varupgrade on both nodes (for dual-node systems)
6 Copy the offline 201 NASController software upgrade rpm saved in scratchsavedNAS to varupgrade
7 Upgrade the NASController software to 201 (see Upgrades for the offline upgrade procedure)
71394 0421219 IssueNote This issue affects R630 (CentOS7) systems only not R520 (CentOS6) systemsNote This issue was fixed in StorNext 6061 See 71394 on page 14 Upgrade recommendedNote For StorNext 606 the included the MLNX_OFED HBA driver for Mellanox Connect X-3 VPI InfiniBandEthernet cards was incompatible with the system kernel version Because of this the software failed to install resulting in missing Mellanox software components needed to configure the card
Workaround
l For Systems prior to StorNext 606 the correct driver was shipped with StorNext so no further action is necessary for Mellanox HBA card configuration
l For systems running StorNext 606 upgrade to StorNext 6061 for the correct driver version for this card
Known Issues ndash StorNext 6x
Xcellis Workflow Director Release Notes 36
CR Number
SR Number
Description
71350 na IssueNote This issue applies to dual-server node systems onlyNote This issue was fixed in StorNext 6061 See 71350 on page 14 in the Fixed Issues section Upgrade recommended
For 606 systems StorNext file systems (snfs) can potentially fail to mount on the secondary server node (typically server node 2) when over a billion files are present on the snfs This could occur when cvfs is stopped and then restarted after a hard stop of the system HA failovers or when the primary server node restartsreboots
If the snfs had file locking enabled and was used to create a NAS cluster then the server node will also be shown in the not ready state on the NAS cluster
Workaround
If your system was upgraded to a StorNext release earlier than 6061 and your system exhibits this issue heres the workaround
Do the following on the server node that did not mount the file system
Mount the File System on the Server Node
1 Log in to node 2 (or node 1 if currently acting as the secondary node) See Launch the Command Line
2 Manually mount the file system on the server
Example
mount snfs1-fs
Re-Join the Server to the NAS Cluster if Needed
If the server is part of a NAS cluster
1 Log into the NAS controller (see Acces the Appliance Controller Console) and join that node to the cluster
Example
nascluster join stornextsnfs1-fs
2 Ensure this is joined by running the following command
nascluster show
Known Issues ndash StorNext 6x
Xcellis Workflow Director Release Notes 37
CR Number
SR Number
Description
Look for the following (in green bold) in the output (ellipses indicate additional information not shown) Note that snfs1-fs is the file system that did not mount before
NAS Cluster IP 1065166215em2 Master No SNFS Root stornextsnfs1-fs Joined
1 1065166216 (Joined MDC) test-bh3amdhquantumcom
2 1065166215 (Joined MDC) test-bh3bmdhquantumcom
71346 na IssueNote This was fixed in StorNext 6061 See 71346 on page 15 in the Fixed Issues section Upgrade recommended
For systems running StorNext 53x and NAS 12x upgrading to 606 or later
Workaround
Upgrade to Appliance ControllerNAS 141 or later prior to upgrading to StorNext 6x or later
71333 na Issue
Caution A system running StorNext 606 or later with a clustered NAS environment should not run NASAppliance Controller 130 or earlier Running these configurations may produce unpredictable results
If you are running StorNext 606 with NAS 130 or earlier you might experience one of the following scenarios
1 Controller configuration commands are not available for iSCSI and SNMP configuration even though the Appliance Controller Doc Center states that these commands are available
2 If your system is running with NAS enabled NAS may not work properly and you will have to upgrade NAS locally with the latest Appliance Controller release
Workaround
An upgrade to the Controller software is REQUIRED when running StorNext 606 See Appliance Controller Upgrades
Known Issues ndash StorNext 6x
Xcellis Workflow Director Release Notes 38
CR Number
SR Number
Description
71002 na IssueAfter upgrading to StorNext 605 and StorNext 6051 systems a RAS ticket might be created for an IPMI failure
Note This was fixed in StorNext 606 See 71002 on page 15 in the Fixed Issues section Upgrade recommended
Workaround
This RAS message is benign and can be ignored Upgrade to StorNext 606 to correct this issue
70902 na IssueStorNext 606 requires the appliance controller to be upgraded for clustered NAS environments running Appliance ControllerNAS versions earlier than 141 before upgrading appliance firmwareIf you attempt to upgrade the system to StorNext 606 prior to upgrading the controller the appliance upgrade will fail and the system will generate an Operation failure RAS ticket in the StorNext GUI on the server (for both server nodes on dual-node systems) the upgrade log will include a message about the upgrade attempt and an admin alert will be generatedExample (dual-node system with NAS 130 installed)
10
2018-02-22 151222 PST
136
Upgrade Minimum NAS version not satisfied for a clustered system Node 2 NAS clustering is enabled but installed NAS version is 130 NAS must be upgraded to version 141x before this upgrade is allowed A NAS 1413 offline upgrade bundle has been placed in scratchsavedNAS
Workaround
Upgrade Appliance ControllerNAS to 141 or later prior to upgrading the system See How to Upgrade on the Appliance Controller Documentation Center
Known Issues ndash StorNext 6x
Xcellis Workflow Director Release Notes 39
CR Number
SR Number
Description
70338 na Issue
During a firmware upgrade the secondary server node (typically Node 2) will upgrade successfully but the other server node (typically Node 1) can become stuck on reboot and unable to restart If you dont have an SSH session open when this happens you will notice that the server node will not respond for a long time If you happen to have an SSH session open during the upgrade you will see an error message similar to the following shown repeatedly on-screen
[ 189398035] dracut-initqueue[402] Warning dracut-initqueue timeout - starting timeout scripts
Workaround
The server node will have to be manually upgraded Contact Contacting Quantum on page 70 and refer them to TSB 3015
Known Issues ndash StorNext 6x
Xcellis Workflow Director Release Notes 40
CR Number
SR Number
Description
70300 385040385789
Issue
After a firmware upgrade the system cannot boot
This does not need to be applied to all systems connected to storage arrays only impacted systems as described here
Systems Impacted
l This ONLY affects systems upgrading from StorNext 5x releases to 6x (prior to 605)
l This ONLY affects systems upgrading that are Fibre Channel-connected to BOTH NetApp and QXS arrays
Note This issue was fixed in StorNext 605 See 70300 on page 17 If you are upgrading to StorNext 605 you will not see this issue and do not have to perform this workaround
Messages on the boot screen and in the KDUMP (the trace of server boot activities on the sysfs) shows messages similar to
Wrong diagnostic page asked for 7 got 0
OR
Wrong diagnostic page asked for 10 got 0
Workaround
DO NOT upgrade your system to StorNext 6x before first applying the workaroundSee Server Boot (QXSNetApp)
Known Issues ndash StorNext 6x
Xcellis Workflow Director Release Notes 41
CR Number
SR Number
Description
70287 na Issue
StorNext upgrades can fail due to a slowdown of the StorNext HA file system (HAFS) when attempting to apply upgrade firmware to StorNext 6x from supported StorNext 5x and 60x releases in the StorNext GUI This only occurs when attempting to upgrade the system while jobs with a lot of metadata changes are running This can happen when
l The system is running with StorNext 6x file systems with metadata archive enabled and heavy client activity
l The sytem is running with StorNext 50x file systems with the restore journal enabled and heavy client activity
Workaround
DO NOT upgrade your system to StorNext 6x before first applying one of the workarounds below if your system is processing a lot of metadata jobs
l To fix this issue edit the componentproperties file on one node of the system and increase the wsapplyfwupgradetimeout value to 2 hours
See Change Upgrade Timeout Setting
70178 Issue
The multipathconf file is overwritten for StorNext 531 through 605x Any custom-configured settings added to the file for those StorNext releases are available in etcmultipathconfbak The upgrade code added correct multipath settings to the etcmultipathconf file required for SAS-attached NetApp metadata arrays
Note The overwrite issue was changed in StorNext 606 See 70178 on page 16 in the Fixed Issues section Upgrade recommended
Workaround
1 If you dont have a backup of your multipathconf file you will have to add the settings into the file
2 If you have a backup of the custom multipath settings copy the settings into the new multipathconf file using a command-line editor like vi
Known Issues ndash StorNext 6x
Xcellis Workflow Director Release Notes 42
CR Number
SR Number
Description
70067 na Issue
CentOS 7 systems display log files with the journalctl command Any commands executed as the rootsh user are logged to the system log file A syslog filter sends all rootsh log commands to varlogrootshell This causes excessive information to be captured in the journalctl log file and makes the log file difficult to read
WorkaroundThere is a script to use which removes unnecessary command line output from the syslog file for CentOS7 systems running StorNext 605See the journalctl Filter ScriptFor StorNext releases prior to 605 contact Contacting Quantum on page 70
Known Issues ndash StorNext 6x
Xcellis Workflow Director Release Notes 43
CR Number
SR Number
Description
69189 na IssueAfter upgrading to StorNext 60ndash6011 node 2 may report a hardware failure in the StorNext GUI
When clicked this hardware failure displays multiple fan failures on the System Board tab of the Reports gt Hardware Status in the StorNext GUI
Note This issue has been fixed in StorNext 605 See 69506 on page 17 in the Fixed Issues section Upgrade recommended
WorkaroundFor systems on StorNext releases prior to 605 do the following on node 2
1 Open an SSH connection to the appropriate server node and use the IP address assigned to the node on the Management or LAN Client network
Note Node 2 used for dual-node systems only
2 Log in to the command line using the following credentials
l User name stornext
l Password ltstornext user account passwordgt
Note password is the default password for the stornext user account If the password has been changed use the current password
3 Enter sudo rootsh to gain root user access
Known Issues ndash StorNext 6x
Xcellis Workflow Director Release Notes 44
CR Number
SR Number
Description
4 Enter the password for the stornext user account again
5 Enter the following
racadm racreset soft
6 Wait 5 to 10 minutes for the reset to complete
7 Refresh the StorNext GUI The hardware status will no longer display the error for node 2
68773 na Issue
If a configured bridge device assigned to a DAE virtual machine (VM) is removed on the Networking page of the StorNext GUI you will not be able to start the DAE VM
Workaround
If the virtual machine cannot be started because the bridge was removed do the following
1 Recreate the bridge in the StorNext GUI OR
a Open an ssh session to the command line of the system and run virsh edit ltvmnamegt This opens the ltvmnamegt file for editing using vi commands
b Remove the bridge entries from the XML file using vi commands
2 When finished making the changes enter the following to save the changes and exit the editor
wq
Known Issues ndash StorNext 6x
Xcellis Workflow Director Release Notes 45
CR Number
SR Number
Description
68729 na Issue
Systems which used the StorNext Connect Install App prior to StorNext 60 may encounter the message ntp not running when upgrading to or rebooting the system running StorNext 6x
Note This was fixed via an update to the Connect Install App (v8) Xcellis Workflow Director (R630) systems installed using v8 or later will not have this issue Upgrade is recommended However this does not fix the issue for Xcellis Workflow Director (R630) systems installed using the Connect Install App prior to v8
Workaround
See StorNext Connect NTP not Running
68075 na Issue
After upgrading to StorNext 60 from 522 and uploading new licenses the NAS cluster could not be enabled on one of the nodes because the Appliance Controller failed to start
Workaround
See Restart the Appliance Controller
67997 na Issue
For Xcellis Workflow Director systems configured with NAS failover for NFS clusters (NFS-HA) after StorNext services are restarted NAS shares are not accessible from NAS clients
WorkaroundTo fix this condition
1 Restart the NAS controller services on the NAS Master (See the Restart the Appliance Controller section
See Restart the Appliance Controller
2 Access the NAS shares using the nas_vip address from NAS clients
67729 na Issue
When upgrading to StorNext 60 systems running NAS clustered will not automatically upgrade NAS to version 141
Workaround
For these systems run the NAS upgrade before rather than after the StorNext 60 upgrade
Known Issues ndash StorNext 6x
Xcellis Workflow Director Release Notes 46
CR Number
SR Number
Description
66799 322817 342909 362343
Issue
On the StorNext GUI Reports gt Hardware page node1 system board information is shown but information for node2 is not after an upgrade to StorNext 5x and later
Note This issue is fixed in StorNext 605 See 66799 on page 18 in the Fixed Issues section Upgrade recommended
WorkaroundTo fix this issue create the usradicHAMsharedHwMonStatus directory on the primary server node (typically node 1) and restart the hwmond serviceSee Create the HW Monitor Directory
60614
na Issue
Your system and all other Connect-managed Linux StorNext SAN clients must have the latest Connector installed so that statistics can be passed to StorNext Connect If a system is managed by StorNext Connect and you upgrade the firmware on that system to StorNext 5 Release 530 firmware PRIOR to upgrading the StorNext Connect Connector the Volume Storage widget on the StorNext Connect Dashboard will display no data for those systems
Workaround
For steps to take to update the Connect Connector(s) before upgrading system firmware
See Update the StorNext Connect Connector before doing a firmware upgrade
For steps to take if you have already upgraded firmware but did not first update the Connector(s)
See Repair StorNext Connect After Upgrade
55384 na Issue
If dmnfsthreads is not set on mount nfsds may be over-commited when there are many NFS processes waiting for offline files
Workaround
For managed file systems serving NFS Quantum recommends using the dmnfsthreads=16 mount option This setting ensures that NFS remains responsive when Storage Manager is retrieving data from an archive tier
Known Issues ndash StorNext 6x
Xcellis Workflow Director Release Notes 47
CR Number
SR Number
Description
55318 na Issue
Strange UID on ACL when file created on non ads client
Workaround
All systems accessing the StorNext SAN or LAN clients or the NAS clients must be part of the same identity domain Accessing StorNext from different identity domains can result in inconsistent file ownership attributes as well as potential access problems
55220 na Issue(See CR Known Issues ndash StorNext 6x on page 20)
Workaround
na
54451 na IssueStorNext supports case-sensitive file names For configurations with different client types such as Windows and Mac sharing the same files the default case type may be different
WorkaroundThere currently is no workaround for this issue SMB is operating as expected
53486 425247 Srvclog RAS tickets are lost if the hafs (HA shared file system) is not mounted on the system
Note This issue was fixed in StorNext 62 See 53486 on page 12 in the Fixed Issues section Upgrade recommended
Workaround
Upgrade to StorNext 62
45702 na Issue
If you replace an HDD drive with an SSD or vice versa the StorNext GUI will show a status of Missing and an equivalent RAS ticket instead of displaying an Incompatible status
Workaround
Replacement drives must be the identical type of drive removed HDDs can only use HDD spares and SSDs can only use SSD spares Replacement drives must also be the same size or larger than the failed drive The array controller will generate errors if an incompatible drive is used as a replacement
Known Issues Workarounds and Additional Information
Xcellis Workflow Director Release Notes 48
CR Number
SR Number
Description
38128 1395540
IssueUsing the GUI while a large Media import is kicked off via the command line can cause the StorNext GUI to timeout or crash
Workaround
Wait until a bulk load from tape is finished prior to opening the StorNext GUI
Known Issues Workarounds and Additional Information
About firmware upgrades and pre-staged Appliance Controller upgrades for server nodesWhen NAS is enabled detected and is configured on a sever node as part of a NAS cluster and a firmware upgrade is attempted an offline targz file is copied into the scratchsavedNAS directory and is then unzipped and untarred into the varupgrade directory Based on the installed version of NAS on the system the appropriate valid upgrade bundle for NAS will be unpacked to varupgrade for the user to perform the upgrade If a multi-version upgrade is required then the next applicable version will be unpacked into varupgrade and you will be instructed to perform the cluster upgrade first and then retry the firmware upgrade If the cluster state of the node cannot be determined then it looks like no versions are unpacked on the system and the upgrade is aborted (in this case you would have to upgrade the cluster manually using instructions in the Appliance Controller Doc Center (see Appliance Controller Upgrades) and then retry the firmware upgrade
If NAS clustering is not configured the firmware upgrade will perform the direct upgrade to the current version of Appliance Controller shipped with the firmware upgrade
74202 ndash StorNext services can fail to stop completely when NAS is Configured and StorNext services are stoppedHow might this be seenThere are two basic scenarios where this might be exposed
Scenario 1When StorNext stops it signals NAS to vacate the StorNext file systems that NAS is using However if these file systems remain available for too long the Appliance Controller will attempt to automatically restart NAS services This is what happens in order
Known Issues Workarounds and Additional Information
Xcellis Workflow Director Release Notes 49
1 Restarting NAS services can resume use of StorNext resources
2 Resuming StorNext resources interferes with attempts to stop StorNext
3 Continued use of these StorNext resources can result in mounted StorNext file systems that do not have a running fsm process which blocks access to the StorNext file system
If experience this on your system temporarily stop NAS services
1 Log in to the command line of the server (as sudo rootsh)
Launch the Command Line With an SSH Utility a Open an SSH connection to the appropriate server and use the IP address assigned to the
node on the ManagementLAN Client network
b Log in to the command line using the following credentials
l User name stornext
l Password ltstornext user account passwordgt
Note password is the default password for the stornext user account If the password has been changed use the current password
c Enter sudo rootsh to gain root user access
d Enter the password for the stornext user account again
2 Stop NAS by executing the following command
usrcvfslibsnnas_control stop
3 Stop the Appliance Controller by executing the following command
usrlocalquantumbinsml_service_tool stop snnas_controller
4 When you have finished Restart NAS and the Appliance Controller
a Start NAS by executing the following command
usrcvfslibsnnas_control start
b Start the Appliance Controller by executing the following command
usrlocalquantumbinsml_service_tool start snnas_controller
Known Issues Workarounds and Additional Information
Xcellis Workflow Director Release Notes 50
Scenario 2If you need to stop the system during a maintenance window This is an extension of Scenario 1 but NAS must vacate the file systems for an extended period of time If NAS services are resumed when they should be suspended those service processes may interfere with maintenance operations
To affect both scenarios timers exist that you can adjust to extend the amount of time required between the stornext stop operation and before NAS services resume The timers are controlled by the following Controller Registry values
l nasheartbeatcheck_state_secs l stornext_servicestop_periodTo see what values are currently assigned enter
su sysadmin -c reg show nasheartbeatcheck_state_secs
to display the setting of the frequency interval of the NAS heartbeat state check or enter
su sysadmin -c reg show stornext_servicestop_period
to display the duration that StorNext services are stopped
Note By default both timers are set to 120 (in seconds=2 minutes)
WorkaroundsWorkaround 1If StorNext fails to stop due to NAS resource usage do the following
1 Log in to the command line of the server
Launch the Command Line With an SSH Utility a Open an SSH connection to the appropriate server and use the IP address assigned to the
node on the ManagementLAN Client network
b Log in to the command line using the following credentials
l User name stornext
l Password ltstornext user account passwordgt
Note password is the default password for the stornext user account If the password has been changed use the current password
c Enter sudo rootsh to gain root user access
d Enter the password for the stornext user account again
Known Issues Workarounds and Additional Information
Xcellis Workflow Director Release Notes 51
2 Verify that the StorNext file systems are mounted
grep cvfs procmounts
If any StorNext file systems are not mounted mount them now
3 Mount the HA shared file system
mount usradicHAMshared
4 Start fsm for each StorNext file system (shown below as ltFSNAMEgt) mounted on the server node
cvadmin -e start ltFSNAMEgt on localhost
5 Stop StorNext services
For CentOS7 systems enter
systemctl stop cvfs
For CentOS6 systems enter
service cvfs stop
6 To stop NAS enter
usrcvfslibsnnas_control stop
7 To stop the Appliance Controller enter
usrlocalquantumbinsml_service_tool stop snnas_controller
When you are ready restart the Appliance Controller and NAS services
8 To restart the Appliance Controller enter
Known Issues Workarounds and Additional Information
Xcellis Workflow Director Release Notes 52
usrlocalquantumbinsml_service_tool start snnas_controller
9 To restart NAS enter
usrcvfslibsnnas_control start
Workaround 2For Scenario 1 Quantum recommends that you extend the time period to a value of 10 minutes (600 seconds) for both variables Set a value that exceeds the amount of time necessary for typical StorNext shutdown
To set new values
1 Log in to the command line
Launch the Command Line With an SSH Utility a Open an SSH connection to the appropriate server and use the IP address assigned to the
node on the ManagementLAN Client network
b Log in to the command line using the following credentials
l User name stornext
l Password ltstornext user account passwordgt
Note password is the default password for the stornext user account If the password has been changed use the current password
c Enter sudo rootsh to gain root user access
d Enter the password for the stornext user account again
2 Change the frequency interval of the NAS heartbeat state check to 600 seconds (10 minutes) Enter
su sysadmin -c reg set nasheartbeatcheck_state_secs 600
Note This is run with a temporary log in to the Appliance Controller as the sysadmin user
3 Change the duration that StorNext services are stopped to 600 seconds (10 minutes) Enter
Known Issues Workarounds and Additional Information
Xcellis Workflow Director Release Notes 53
su sysadmin -c reg set stornext_servicestop_period 600
4 Note This is run with a temporary log in to the Appliance Controller as the sysadmin user
Workaround 3For Scenario 2 to eliminate the confusion of setting a long duration for a maintenance window and then having to change the values back again to a shorter value again you can simply stop NAS services and the Appliance Controller and then restart these services when you are finished
To stop the services and restart them
1 Log in to the command line
Launch the Command Line With an SSH Utility a Open an SSH connection to the appropriate server and use the IP address assigned to the
node on the ManagementLAN Client network
b Log in to the command line using the following credentials
l User name stornext
l Password ltstornext user account passwordgt
Note password is the default password for the stornext user account If the password has been changed use the current password
c Enter sudo rootsh to gain root user access
d Enter the password for the stornext user account again
2 Stop NAS by executing the following command
usrcvfslibsnnas_control stop
3 Stop the Appliance Controller by executing the following command
usrlocalquantumbinsml_service_tool stop snnas_controller
When you are ready restart the Appliance Controller and NAS services
4 To restart the Appliance Controller enter
usrlocalquantumbinsml_service_tool start snnas_controller
Known Issues Workarounds and Additional Information
Xcellis Workflow Director Release Notes 54
5 To restart NAS enter
usrcvfslibsnnas_control start
6 Change the settings for the NAS heartbeat state check and the duration that StorNext services are stopped according to Workaround 2 on page 52
Workaround 4An alternate method for maintenance windows instead of implementing workaround 3 for Scenario 2 you can choose a much longer value if you need the NAS heartbeat state check interval and StorNext services stopped for a long period of time (for example during a planned maintenance window in a data center) While this is another option the downside of this is that you will need to know how much downtime to expect maintenance to take and then set these times to be less than what is needed for that maintenance It is also difficult to extend the maintenance period reliably once those timers have started In addition you will most likely have to reset the values back to their original settings when the maintenance window is complete which could be a hassle
Here is one example which extends the time values to 2 hours (7200 seconds)
1 Log in to the command line
Launch the Command Line With an SSH Utility a Open an SSH connection to the appropriate server and use the IP address assigned to the
node on the ManagementLAN Client network
b Log in to the command line using the following credentials
l User name stornext
l Password ltstornext user account passwordgt
Note password is the default password for the stornext user account If the password has been changed use the current password
c Enter sudo rootsh to gain root user access
d Enter the password for the stornext user account again
2 Change the frequency interval of the NAS heartbeat state check to 7200 seconds (10 minutes) Enter
su sysadmin -c reg set nasheartbeatcheck_state_secs 7200
Note This is run with a temporary log in to the Appliance Controller as the sysadmin user
3 Change the duration that StorNext services are stopped to 7200 seconds (10 minutes) Enter
Known Issues Workarounds and Additional Information
Xcellis Workflow Director Release Notes 55
su sysadmin -c reg set stornext_servicestop_period 7200
4 Note This is run with a temporary log in to the Appliance Controller as the sysadmin user
Change the componentproperties Timeout Setting 1 Log in to the command line of the primary server node (typically node 1) See Launch the Command
Line (for Xcellis Workflow DirectorGen 2) or Launch the Command Line (for R630 systems)
2 Open the componentproperties file with the vi editor
vi usradicguiconfigcomponentproperties
Pro Tip 1 Edit With vi
The vi editor is included in CentOS If you are unfamiliar with using vi to open edit (copypastedelete) exit with or without saving changes use the following Google search URL to find related links for editing with vi
httpswwwgooglecomsearchq=edit+with+vi
3 Scroll down to the web services timeouts section It should look similar to (note the default firmware upgrade value is 300 seconds - highlighted in green)
Web Services Timeouts (seconds)
wsconverttohatimeout=300 wsapplyfwupgradetimeout=300 wsgetsystemidtimeout=10 wsntptimeout=30 wsdatetimetimeout=30 wsnetworkconfigtimeout=180 wsnetworkhapeertimeout=30 wsloggingleveltimeout=30 wscapturestatetimeout=600 wsjobclosetimeout=30 wsnasclosetimeout=60
4 Move the cursor to sit over the number 3 enter ltSHIFTgt+ and then R (for replace) and enter the number 6 to change the wsapplyfwupgradetimeout= value from 300 seconds (5 minutes) to 600 seconds (10 minutes)
wsapplyfwupgradetimeout=600
Known Issues Workarounds and Additional Information
Xcellis Workflow Director Release Notes 56
5 Save the changes to the file by entering SHIFTwq to write the file and quit the vi editor
The setting change will be replicated to the other server node in 2-3 minutes after the file change is saved so this only has to be applied to server node 1
6 Run the Firmware Upgrade process again
Note Even though the upgrade failed previously the firmware upgrade files are still available for the upgrade
a Select either of the uploaded files click Apply In the case of a single file select the one file uploaded and click Apply
b Click Yes to confirm the installation For two-file upgrades both firmware files are applied to the system during the upgrade
The upgrade should complete after the timeout setting is changed However if the firmware upgrade fails again contact Contacting Quantum on page 70 for assistance with manually upgrading the node that failed to upgrade
Server Boot (QXSNetApp)This does not need to be applied to all systems connected to storage arrays only impacted systems as described here
Systems Impacted l This ONLY affects systems upgrading from StorNext 5x releases to 6x (prior to 605)
l This ONLY affects systems upgrading that are Fibre Channel-connected to BOTH NetApp and QXS arrays
Note This issue was fixed in StorNext 605 See 70300 on page 17 If you are upgrading to StorNext 605 you will not see this issue and do not have to perform this workaround
BEFORE applying the upgrade to StorNext 6x do the following
Log in to the system command line 1 Open an SSH connection to the appropriate server and use the IP address assigned to the node on the
Management or LAN Client network or use the Service Port IP address if connected to the Service Port
Service Port IP addresses l Node 1 1017211 (dual-server node systems)
l Node 2 1017212 (dual-server node or HA-ready single-server node systems)
Note Node 2 is the server node sold with single-node (non-HA) Xcellis Workflow Director and Artico systems It is also used for installation using the StorNext Connect Install app for both single-node and dual-node systems only
Known Issues Workarounds and Additional Information
Xcellis Workflow Director Release Notes 57
2 Log in to the command line using the following credentials
l User name stornext
l Password ltstornext user account passwordgt
Note password is the default password for the stornext user account If the password has been changed use the current password
3 Enter sudo rootsh to gain root user access
4 Enter the password for the stornext user account again
Edit the Grub Configuration File 1 Create a backup copy of the CentOS7 grubd40_custom configuration file Enter the following
cp etcgrubd40_custom scratch40_customorig
2 Create a backup copy of the CentOS7 grubcfg file Enter the following
cp bootgrub2grubcfg bootgrub2grubcfgorig
3 Edit the etcgrubd40_custom file using the vi editor included in CentOS7x Enter the following
vi etcgrubd40_custom
4 To enter vi insert mode enter i
5 Look for the lines beginning with linux16 as shown in bold blue below and add ltspacegtrdblacklist=ses rdblacklist=enclosure to the end of those lines as shown in green in the following example (Ellipses included below denote code prior to and after the linux16 sections)
Known Issues Workarounds and Additional Information
Xcellis Workflow Director Release Notes 58
linux16 vmlinuz-3100-51462el7qtmx86_64 root=UUID=3d9116b2-c5de-41fd-bd38-2042c0f8ebad ro console=tty1 vconsolekeymap=us crashkernel=768M0M vconsolefont=latarcyrheb-sun16 selinux=0 enforcing=0 intel_idlemax_cstate=0 processormax_cstate=1 elevator=deadline transparent_hugepage=never quiet LANG=en_USUTF-8 rdblacklist=ses rdblacklist=enclosure
initrd16 initramfs-3100-51462el7qtmx86_64img
menuentry Xcellis SOL --class centos --class gnu-linux --class os --unrestricted load_videoset gfxpayload=keepinsmod gzioinsmod part_msdosinsmod ext2set root=hd0msdos1if [ x = xy ] thensearch --no-floppy --fs-uuid --set=root --hint-bios=hd0msdos1 --hint-efi=hd0msdos1 --hint-baremetal=ahci0msdos1 --hint=hd0msdos1 a0467663-8cf0-48be-b967-d5ef7eb486e2elsesearch --no-floppy --fs-uuid --set=root a0467663-8cf0-48be-b967-d5ef7eb486e2filinux16 vmlinuz-3100-51462el7qtmx86_64 root=UUID=3d9116b2-c5de-41fd-bd38-2042c0f8ebad ro console=ttyS1115200n8 vconsolekeymap=us crashkernel=768M0M vconsolefont=latarcyrheb-sun16 selinux=0 enforcing=0 intel_idlemax_cstate=0 processormax_cstate=1 elevator=deadline transparent_hugepage=never quiet LANG=en_USUTF-8 rdblacklist=ses rdblacklist=enclosureinitrd16 initramfs-3100-51462el7qtmx86_64img
6 To exit insert mode and return to command mode press ltEscgt
7 To save changes and exit vi enter wq and press ltEntergt You will return to the command prompt (To exit vi without saving changes enter q and press ltEntergt)
8 Repeat Log in to the system command line on page 56 and Edit the Grub Configuration File on the previous page for the other server node
Edit the Blacklist Configuration File and Enable the Changes 1 Enter the following to create a backup copy of the blacklist configuration file
Known Issues Workarounds and Additional Information
Xcellis Workflow Director Release Notes 59
cp etcmodprobedblacklistconf scratchblacklistconforig
2 Enter the following to edit the etcmodprobedblacklistconf file using vi
vi etcmodprobedblacklistconf
3 To edit change to the vi insert mode Enter i
4 Add a separate line for rdblacklist ses and another line for rdblacklist enclosure to the file as shown in green in the following example
blacklist rivafb
blacklist savagefb
blacklist sstfb
blacklist neofb
blacklist tridentfb
blacklist tdfxfb
blacklist virgefb
blacklist vga16fb
blacklist viafb
ISDN - see bugs 154799 159068
blacklist hisax
blacklist hisax_fcpcipnp
sound drivers
blacklist snd-pcsp
IO dynamic configuration support for s390x (bz 563228)
blacklist chsc_sch
Known Issues Workarounds and Additional Information
Xcellis Workflow Director Release Notes 60
blacklist sb_edac
blacklist edac_core
blacklist sesblacklist enclosure
5 To exit insert mode and return to command mode press ltEscgt
6 To save changes and exit vi enter wq and press ltEntergt You will return to the command prompt (To exit vi without saving changes enter q and press ltEntergt)
7 To enable the changes enter
dracut -f
8 Continue to Reboot the system below
Workaround System Already UpgradedIf the system has been upgraded and cannot boot do the following to recover the system
1 Detachdisconnect the FC ports from the nodes or disable the FC zoning configuration for the QXS array(s)
2 Boot the system and enter the following to stop cvfs
systemctl stop cvfs
3 Edit the grub configuration file for your version of CentOS See Edit the Grub Configuration File on page 57
4 Edit the blacklist configuration file See Edit the Blacklist Configuration File and Enable the Changes on page 58
5 Reattach or re-enable FC zoning configuration for the QXS array(s)
6 Continue to Reboot the system below
Reboot the system 1 Reboot the server you are already logged into
systemctl reboot
Continue to Step 3 for single-node systems For dual-node systems continue to the next step
Known Issues Workarounds and Additional Information
Xcellis Workflow Director Release Notes 61
2 Log in to the other server node See Log in to the system command line on page 56
systemctl reboot
3 For dual-node systems repeat Step 3 for server node 2 The process is complete
Change Upgrade Timeout SettingBEFORE applying the upgrade to StorNext 6x do the following
Log in to the system command line 1 Open an SSH connection to the appropriate server and use the IP address assigned to the node on the
Management or LAN Client network or use the Service Port IP address if connected to the Service Port
Service Port IP addresses l Node 1 1017211 (dual-server node systems)
l Node 2 1017212 (dual-server node or HA-ready single-server node systems)
Note Node 2 is the server node sold with single-node (non-HA) Xcellis Workflow Director and Artico systems It is also used for installation using the StorNext Connect Install app for both single-node and dual-node systems only
2 Log in to the command line using the following credentials
l User name stornext
l Password ltstornext user account passwordgt
Note password is the default password for the stornext user account If the password has been changed use the current password
3 Enter sudo rootsh to gain root user access
4 Enter the password for the stornext user account again
1 Change to the config directory
cd usradicguiconfig
2 Copy the componentproperties file
cp componentproperties componentpropertiesorig
Known Issues Workarounds and Additional Information
Xcellis Workflow Director Release Notes 62
3 Edit the file using vi
vi componentproperties
4 Scroll down the file until you get to the Web Services Timeouts (seconds) section and the upgrade timeout line shown in bold text The current value should be similar to the value shown in bold green
Web Services Timeouts (seconds) wsconverttohatimeout=300wsapplyfwupgradetimeout=300 wsgetsystemidtimeout=10 wsntptimeout=30 wsdatetimetimeout=30 wsnetworkconfigtimeout=180 wsnetworkhapeertimeout=30 wsloggingleveltimeout=30 wscapturestatetimeout=600 wsjobclosetimeout=30 wsnasclosetimeout=60
5 To edit change to the vi insert mode Enter i
6 Change the value to 1200
Known Issues Workarounds and Additional Information
Xcellis Workflow Director Release Notes 63
Web Services Timeouts (seconds) wsconverttohatimeout=300wsapplyfwupgradetimeout=1200 wsgetsystemidtimeout=10 wsntptimeout=30 wsdatetimetimeout=30 wsnetworkconfigtimeout=180 wsnetworkhapeertimeout=30 wsloggingleveltimeout=30 wscapturestatetimeout=600 wsjobclosetimeout=30 wsnasclosetimeout=60
7 To exit insert mode and return to command mode press ltEscgt
8 To save changes and exit vi enter wq and press ltEntergt You will return to the command prompt (To exit vi without saving changes enter q and press ltEntergt)
9 Continue to Reboot the system below
Reboot the system 1 Reboot the server you are already logged into
systemctl reboot
Continue to Step 3 for single-node systems For dual-node systems continue to the next step
2 Log in to the other server node See Log in to the system command line on page 61
3 Reboot the other server node 2
systemctl reboot
4 Repeat Step 3 for server node 2
The process is complete
journalctl Filter ScriptStep 1 Upgrade to StorNext 605
Known Issues Workarounds and Additional Information
Xcellis Workflow Director Release Notes 64
Note StorNext 605 provides the script so you need to upgrade to StorNext 605 to access the file
See Upgrade a Gateway System (Upgrade Firmware) Using the Service Menu
Step 2 Log in to the System Command Line 1 Open an SSH connection to the appropriate server and use the IP address assigned to the node on the
Management or LAN Client network or use the Service Port IP address if connected to the Service Port
Service Port IP addresses l Node 1 1017211 (dual-server node systems)
l Node 2 1017212 (dual-server node or HA-ready single-server node systems)
Note Node 2 is the server node sold with single-node (non-HA) Xcellis Workflow Director and Artico systems It is also used for installation using the StorNext Connect Install app for both single-node and dual-node systems only
2 Log in to the command line using the following credentials
l User name stornext
l Password ltstornext user account passwordgt
Note password is the default password for the stornext user account If the password has been changed use the current password
3 Enter sudo rootsh to gain root user access
4 Enter the password for the stornext user account again
5 Continue to Step 3 Run the Journal Filter Script and View the Script Help below
Step 3 Run the Journal Filter Script and View the Script Help l Enter the following to use the script to view the log output in a way that filters out all the rootsh
commands
optDXiscriptsjournalctl_filtersh -f
l Enter the following to view the scripts help file
optDXiscriptsjournalctl_filtersh --help
Note The journalctl_filtersh output can also be saved to a file
Known Issues Workarounds and Additional Information
Xcellis Workflow Director Release Notes 65
StorNext Connect NTP not RunningWorkaround 1 If you encounter this issue when rebooting the system reboot or after a firmware upgrade do the following
1 Log in to the StorNext GUI and select gtConfiguration gt System
2 Click the Date amp Time tab
3 Set the NTP protocol options as follows Select either the Select a Timeserver Pool option and select the pool from the options available OR select the Specify a Timeserver or Pool option and enter the IP address of the time server
4 Click Apply which will reboot the node (or both nodes in dual-server systems) and re-enable and start NTP
Workaround 2Another alternative enables ntp when the system is rebooted
1 Using an SSH connection log in to the command line of the server
2 Enter the following command
usrbinsystemctl ntpdservice enable
3 Repeat for the other server (for dual-server node systems only)
4 Manually reboot the server (or both server nodes for dual-server node systems)
Restart the Appliance ControllerOn the server node hosting NAS do the following (use node 2 on dual-server node systems)
1 Open an SSH connection to the appropriate server node and use the IP address assigned to the node on the Management or LAN Client network
2 Log in to the command line using the following credentials
l User name stornext
l Password ltstornext user account passwordgt
Note password is the default password for the stornext user account If the password has been changed use the current password
3 Enter sudo rootsh to gain root user access
4 Enter the password for the stornext user account again
5 Enter the following
chown -R ldapldap varlibldap
Known Issues Workarounds and Additional Information
Xcellis Workflow Director Release Notes 66
6 Enter the following
systemctl restart slapd
7 Restart the appliance controller
systemctl start snnas_controller
systemctl stop snnas_controller
Create the Missing Hardware Monitor DirectoryDo the following to check if the directory is missing and re-create the directory if it is and restart the hwmond service
1 Open an SSH connection to the appropriate server and use the IP address assigned to the node on the Management or LAN Client network or use the Service Port IP address if connected to the Service Port
Service Port IP addresses l Node 1 1017211 (dual-server node systems)
l Node 2 1017212 (dual-server node or HA-ready single-server node systems)
Note Node 2 is the server node sold with single-node (non-HA) Xcellis Workflow Director and Artico systems It is also used for installation using the StorNext Connect Install app for both single-node and dual-node systems only
2 Log in to the command line using the following credentials
l User name stornext
l Password ltstornext user account passwordgt
Note password is the default password for the stornext user account If the password has been changed use the current password
3 Enter sudo rootsh to gain root user access
4 Enter the password for the stornext user account again
5 Enter the following on the command line
cd usradicHAMsharedHwMonStatus
If you see the following message the directory does not exist Continue to the next step
Known Issues Workarounds and Additional Information
Xcellis Workflow Director Release Notes 67
bash cd usradicHAMsharedHwMonStatus No such file or directory
6 Enter the following on the command line to create the directory
mkdir usradicHAMsharedHwMonStatus
7 Enter the following to verify the directory has been created
cd usradicHAMsharedHwMonStatus
8 Change the permission of the hwmond service to read-only
chmod -r 775 HwMonStatus
9 Restart the hwmond service
systemctl restart quantum-hwmondservice
How to Disable NFS v4To disable NFSv4 on Xcellis Workflow Director systems especially those systems running NAS 120 or earlier perform the following on node 2
Edit the nfs File 1 Open an SSH connection to the appropriate server and use the IP address assigned to the node on the
Management or LAN Client network or use the Service Port IP address if connected to the Service Port
Service Port IP addresses l Node 1 1017211 (dual-server node systems)
l Node 2 1017212 (dual-server node or HA-ready single-server node systems)
Note Node 2 is the server node sold with single-node (non-HA) Xcellis Workflow Director and Artico systems It is also used for installation using the StorNext Connect Install app for both single-node and dual-node systems only
Known Issues Workarounds and Additional Information
Xcellis Workflow Director Release Notes 68
2 Log in to the command line using the following credentials
l User name stornext
l Password ltstornext user account passwordgt
Note password is the default password for the stornext user account If the password has been changed use the current password
3 Enter sudo rootsh to gain root user access
4 Enter the password for the stornext user account again
5 Edit etcsysconfignfs file (See Example Use vi to Edit the nfs File on the next page)
6 Change the value for RPCNFSDARGS to -N 4 When finished the line must be RPCNFSDARGS=-N 4
7 Change the value for RPCMOUNTDOPTS to -N 4 When finished the line must be RPCMOUNTDOPTS=-N 4
8 Save the file
Restart NFS
For Xcellis Workflow Director (R630) systems
1 Enter the following to restart the NFS configuration
systemctl restart nfs-config
2 Enter the following to restart the NFS server
systemctl restart nfs-server
After You Restart NFS on Node 2Repeat both the Edit the nfs File on the previous page and Known Issues ndash StorNext 6x on page 20 sections on node 1( for dual-node systems)
If you need to create new NFS shares to export for user access you may do this now See the About the NAS App section of the StorNext Connect Documentation Center for information about NAS configuration using StorNext Connect
Known Issues Workarounds and Additional Information
Xcellis Workflow Director Release Notes 69
Example Use vi to Edit the nfs File 1 Enter the following
vi etcsysconfignfs
2 Move the cursor to the closing quotation mark in RPCNFSDARGS
3 Enter the following
i -N 4
4 Write the file and quit vi as follows
wq
5 For this example you would have to Restart NFS on the previous page and repeat the Edit the nfs File on page 67 and Restart NFS on the previous page again on node 1 (for dual-node systems)
6 Close the SSH session for the server(s) ( for dual-node systems)
Re-enable DDM on the Secondary Node After HA FailoverOnce the MDC node acting as secondary finishes rebooting and becomes functional again use fsddmconfig (or the GUI) from the server node currently acting as primary to re-enable DDM for the standby server node as follows
1 Open an SSH connection to the appropriate server and use the IP address assigned to the node on the Management or LAN Client network or use the Service Port IP address if connected to the Service Port
Service Port IP addresses l Node 1 1017211 (dual-server node systems)
l Node 2 1017212 (dual-server node or HA-ready single-server node systems)
Note Node 2 is the server node sold with single-node (non-HA) Xcellis Workflow Director and Artico systems It is also used for installation using the StorNext Connect Install app for both single-node and dual-node systems only
Contacting Quantum
Xcellis Workflow Director Release Notes 70
2 Log in to the command line using the following credentials
l User name stornext
l Password ltstornext user account passwordgt
Note password is the default password for the stornext user account If the password has been changed use the current password
3 Enter sudo rootsh to gain root user access
4 Enter the password for the stornext user account again
5 On the command line of the system enter the following
fsddmconfig -u -s e
standby_system_hostname
If a system running DDMs periodically displays an Admin Alert when it fails over cycles a client node or upgrades while the server node operating as secondary is rebooting but not completely down change the timeout value to allow more time to communicate with the node Update the TSM configuration parameter DDM_CLIENT_RETRY_TIMEOUT from the default 30 seconds to a larger value depending on how long the node is taking to reboot In the event the server node acting as secondary will be down for an extended period of time the node should be taken offline Additionally if this parameter is set too high and the standby server does not come back the command that is currently running (eg store or retrieve) will not return until after the specified timeout
For more information about the DDM_CLIENT_RETRY_TIMEOUT parameter that can be placed into the fs_sysparm_override configuration file refer to the usradicTSMconfigfs_sysparmREADME file
Caution Incorrect modification of the fs_sysparm_override configuration file can cause a serious adverse effect on StorNext functionality Before modifying this file we recommend you contact Contacting Quantum below
Contacting QuantumFor further assistance contact the Quantum Customer Support Center
Region Support Contact
North America 1-800-284-5101 (toll free)+1-720-249-5700
Contacting Quantum
Xcellis Workflow Director Release Notes 71
Region Support Contact
EMEA +800-7826-8888 (toll free)
+49 6131 324 185
Asia Pacific +800-7826-8887 (toll free)+603-7953-3010
For worldwide support
httpswwwquantumcomserviceandsupportget-helpindexaspxcontact-support
- Revision History
- About the Xcellis Workflow Director
- Training and Documentation Resources
- About StorNext 6
-
- What is StorNext
- Learn More on the Web
-
- What StorNext Releases are compatible with my system
- Upgrade StorNext Software and System Firmware
- General Notes
- Quantum Appliance Licenses
- Fixed Issues Notes and Enhancements ndash StorNext 6x
- Known Issues ndash StorNext 6x
- Known Issues Workarounds and Additional Information
- Contacting Quantum
-
Known Issues ndash StorNext 6x
Xcellis Workflow Director Release Notes 35
CR Number
SR Number
Description
71464 na Issue
Platform upgrade is currently allowed to the StorNext 6061 release for systems currently configured and running StorNext 53x and as a clustered NAS system running NAS 12x Even though StorNext upgrades the NAS software does not upgrade NAS is left running 125 and NASController software 201 is incorrectly staged for upgrade in varupgrade
Workaround
To upgrade NAS after the StorNext firmware upgrade
1 Delete the contents of varupgrade on both nodes (for dual-node systems)
2 Download the offline 1413 NAS upgrade rpm
3 Copy the 1413 NAS upgrade file to varupgrade on the NAS master and other node as well
4 Upgrade NAS to 1413 (see Upgrades for the offline upgrade procedure)
5 Delete the contents of varupgrade on both nodes (for dual-node systems)
6 Copy the offline 201 NASController software upgrade rpm saved in scratchsavedNAS to varupgrade
7 Upgrade the NASController software to 201 (see Upgrades for the offline upgrade procedure)
71394 0421219 IssueNote This issue affects R630 (CentOS7) systems only not R520 (CentOS6) systemsNote This issue was fixed in StorNext 6061 See 71394 on page 14 Upgrade recommendedNote For StorNext 606 the included the MLNX_OFED HBA driver for Mellanox Connect X-3 VPI InfiniBandEthernet cards was incompatible with the system kernel version Because of this the software failed to install resulting in missing Mellanox software components needed to configure the card
Workaround
l For Systems prior to StorNext 606 the correct driver was shipped with StorNext so no further action is necessary for Mellanox HBA card configuration
l For systems running StorNext 606 upgrade to StorNext 6061 for the correct driver version for this card
Known Issues ndash StorNext 6x
Xcellis Workflow Director Release Notes 36
CR Number
SR Number
Description
71350 na IssueNote This issue applies to dual-server node systems onlyNote This issue was fixed in StorNext 6061 See 71350 on page 14 in the Fixed Issues section Upgrade recommended
For 606 systems StorNext file systems (snfs) can potentially fail to mount on the secondary server node (typically server node 2) when over a billion files are present on the snfs This could occur when cvfs is stopped and then restarted after a hard stop of the system HA failovers or when the primary server node restartsreboots
If the snfs had file locking enabled and was used to create a NAS cluster then the server node will also be shown in the not ready state on the NAS cluster
Workaround
If your system was upgraded to a StorNext release earlier than 6061 and your system exhibits this issue heres the workaround
Do the following on the server node that did not mount the file system
Mount the File System on the Server Node
1 Log in to node 2 (or node 1 if currently acting as the secondary node) See Launch the Command Line
2 Manually mount the file system on the server
Example
mount snfs1-fs
Re-Join the Server to the NAS Cluster if Needed
If the server is part of a NAS cluster
1 Log into the NAS controller (see Acces the Appliance Controller Console) and join that node to the cluster
Example
nascluster join stornextsnfs1-fs
2 Ensure this is joined by running the following command
nascluster show
Known Issues ndash StorNext 6x
Xcellis Workflow Director Release Notes 37
CR Number
SR Number
Description
Look for the following (in green bold) in the output (ellipses indicate additional information not shown) Note that snfs1-fs is the file system that did not mount before
NAS Cluster IP 1065166215em2 Master No SNFS Root stornextsnfs1-fs Joined
1 1065166216 (Joined MDC) test-bh3amdhquantumcom
2 1065166215 (Joined MDC) test-bh3bmdhquantumcom
71346 na IssueNote This was fixed in StorNext 6061 See 71346 on page 15 in the Fixed Issues section Upgrade recommended
For systems running StorNext 53x and NAS 12x upgrading to 606 or later
Workaround
Upgrade to Appliance ControllerNAS 141 or later prior to upgrading to StorNext 6x or later
71333 na Issue
Caution A system running StorNext 606 or later with a clustered NAS environment should not run NASAppliance Controller 130 or earlier Running these configurations may produce unpredictable results
If you are running StorNext 606 with NAS 130 or earlier you might experience one of the following scenarios
1 Controller configuration commands are not available for iSCSI and SNMP configuration even though the Appliance Controller Doc Center states that these commands are available
2 If your system is running with NAS enabled NAS may not work properly and you will have to upgrade NAS locally with the latest Appliance Controller release
Workaround
An upgrade to the Controller software is REQUIRED when running StorNext 606 See Appliance Controller Upgrades
Known Issues ndash StorNext 6x
Xcellis Workflow Director Release Notes 38
CR Number
SR Number
Description
71002 na IssueAfter upgrading to StorNext 605 and StorNext 6051 systems a RAS ticket might be created for an IPMI failure
Note This was fixed in StorNext 606 See 71002 on page 15 in the Fixed Issues section Upgrade recommended
Workaround
This RAS message is benign and can be ignored Upgrade to StorNext 606 to correct this issue
70902 na IssueStorNext 606 requires the appliance controller to be upgraded for clustered NAS environments running Appliance ControllerNAS versions earlier than 141 before upgrading appliance firmwareIf you attempt to upgrade the system to StorNext 606 prior to upgrading the controller the appliance upgrade will fail and the system will generate an Operation failure RAS ticket in the StorNext GUI on the server (for both server nodes on dual-node systems) the upgrade log will include a message about the upgrade attempt and an admin alert will be generatedExample (dual-node system with NAS 130 installed)
10
2018-02-22 151222 PST
136
Upgrade Minimum NAS version not satisfied for a clustered system Node 2 NAS clustering is enabled but installed NAS version is 130 NAS must be upgraded to version 141x before this upgrade is allowed A NAS 1413 offline upgrade bundle has been placed in scratchsavedNAS
Workaround
Upgrade Appliance ControllerNAS to 141 or later prior to upgrading the system See How to Upgrade on the Appliance Controller Documentation Center
Known Issues ndash StorNext 6x
Xcellis Workflow Director Release Notes 39
CR Number
SR Number
Description
70338 na Issue
During a firmware upgrade the secondary server node (typically Node 2) will upgrade successfully but the other server node (typically Node 1) can become stuck on reboot and unable to restart If you dont have an SSH session open when this happens you will notice that the server node will not respond for a long time If you happen to have an SSH session open during the upgrade you will see an error message similar to the following shown repeatedly on-screen
[ 189398035] dracut-initqueue[402] Warning dracut-initqueue timeout - starting timeout scripts
Workaround
The server node will have to be manually upgraded Contact Contacting Quantum on page 70 and refer them to TSB 3015
Known Issues ndash StorNext 6x
Xcellis Workflow Director Release Notes 40
CR Number
SR Number
Description
70300 385040385789
Issue
After a firmware upgrade the system cannot boot
This does not need to be applied to all systems connected to storage arrays only impacted systems as described here
Systems Impacted
l This ONLY affects systems upgrading from StorNext 5x releases to 6x (prior to 605)
l This ONLY affects systems upgrading that are Fibre Channel-connected to BOTH NetApp and QXS arrays
Note This issue was fixed in StorNext 605 See 70300 on page 17 If you are upgrading to StorNext 605 you will not see this issue and do not have to perform this workaround
Messages on the boot screen and in the KDUMP (the trace of server boot activities on the sysfs) shows messages similar to
Wrong diagnostic page asked for 7 got 0
OR
Wrong diagnostic page asked for 10 got 0
Workaround
DO NOT upgrade your system to StorNext 6x before first applying the workaroundSee Server Boot (QXSNetApp)
Known Issues ndash StorNext 6x
Xcellis Workflow Director Release Notes 41
CR Number
SR Number
Description
70287 na Issue
StorNext upgrades can fail due to a slowdown of the StorNext HA file system (HAFS) when attempting to apply upgrade firmware to StorNext 6x from supported StorNext 5x and 60x releases in the StorNext GUI This only occurs when attempting to upgrade the system while jobs with a lot of metadata changes are running This can happen when
l The system is running with StorNext 6x file systems with metadata archive enabled and heavy client activity
l The sytem is running with StorNext 50x file systems with the restore journal enabled and heavy client activity
Workaround
DO NOT upgrade your system to StorNext 6x before first applying one of the workarounds below if your system is processing a lot of metadata jobs
l To fix this issue edit the componentproperties file on one node of the system and increase the wsapplyfwupgradetimeout value to 2 hours
See Change Upgrade Timeout Setting
70178 Issue
The multipathconf file is overwritten for StorNext 531 through 605x Any custom-configured settings added to the file for those StorNext releases are available in etcmultipathconfbak The upgrade code added correct multipath settings to the etcmultipathconf file required for SAS-attached NetApp metadata arrays
Note The overwrite issue was changed in StorNext 606 See 70178 on page 16 in the Fixed Issues section Upgrade recommended
Workaround
1 If you dont have a backup of your multipathconf file you will have to add the settings into the file
2 If you have a backup of the custom multipath settings copy the settings into the new multipathconf file using a command-line editor like vi
Known Issues ndash StorNext 6x
Xcellis Workflow Director Release Notes 42
CR Number
SR Number
Description
70067 na Issue
CentOS 7 systems display log files with the journalctl command Any commands executed as the rootsh user are logged to the system log file A syslog filter sends all rootsh log commands to varlogrootshell This causes excessive information to be captured in the journalctl log file and makes the log file difficult to read
WorkaroundThere is a script to use which removes unnecessary command line output from the syslog file for CentOS7 systems running StorNext 605See the journalctl Filter ScriptFor StorNext releases prior to 605 contact Contacting Quantum on page 70
Known Issues ndash StorNext 6x
Xcellis Workflow Director Release Notes 43
CR Number
SR Number
Description
69189 na IssueAfter upgrading to StorNext 60ndash6011 node 2 may report a hardware failure in the StorNext GUI
When clicked this hardware failure displays multiple fan failures on the System Board tab of the Reports gt Hardware Status in the StorNext GUI
Note This issue has been fixed in StorNext 605 See 69506 on page 17 in the Fixed Issues section Upgrade recommended
WorkaroundFor systems on StorNext releases prior to 605 do the following on node 2
1 Open an SSH connection to the appropriate server node and use the IP address assigned to the node on the Management or LAN Client network
Note Node 2 used for dual-node systems only
2 Log in to the command line using the following credentials
l User name stornext
l Password ltstornext user account passwordgt
Note password is the default password for the stornext user account If the password has been changed use the current password
3 Enter sudo rootsh to gain root user access
Known Issues ndash StorNext 6x
Xcellis Workflow Director Release Notes 44
CR Number
SR Number
Description
4 Enter the password for the stornext user account again
5 Enter the following
racadm racreset soft
6 Wait 5 to 10 minutes for the reset to complete
7 Refresh the StorNext GUI The hardware status will no longer display the error for node 2
68773 na Issue
If a configured bridge device assigned to a DAE virtual machine (VM) is removed on the Networking page of the StorNext GUI you will not be able to start the DAE VM
Workaround
If the virtual machine cannot be started because the bridge was removed do the following
1 Recreate the bridge in the StorNext GUI OR
a Open an ssh session to the command line of the system and run virsh edit ltvmnamegt This opens the ltvmnamegt file for editing using vi commands
b Remove the bridge entries from the XML file using vi commands
2 When finished making the changes enter the following to save the changes and exit the editor
wq
Known Issues ndash StorNext 6x
Xcellis Workflow Director Release Notes 45
CR Number
SR Number
Description
68729 na Issue
Systems which used the StorNext Connect Install App prior to StorNext 60 may encounter the message ntp not running when upgrading to or rebooting the system running StorNext 6x
Note This was fixed via an update to the Connect Install App (v8) Xcellis Workflow Director (R630) systems installed using v8 or later will not have this issue Upgrade is recommended However this does not fix the issue for Xcellis Workflow Director (R630) systems installed using the Connect Install App prior to v8
Workaround
See StorNext Connect NTP not Running
68075 na Issue
After upgrading to StorNext 60 from 522 and uploading new licenses the NAS cluster could not be enabled on one of the nodes because the Appliance Controller failed to start
Workaround
See Restart the Appliance Controller
67997 na Issue
For Xcellis Workflow Director systems configured with NAS failover for NFS clusters (NFS-HA) after StorNext services are restarted NAS shares are not accessible from NAS clients
WorkaroundTo fix this condition
1 Restart the NAS controller services on the NAS Master (See the Restart the Appliance Controller section
See Restart the Appliance Controller
2 Access the NAS shares using the nas_vip address from NAS clients
67729 na Issue
When upgrading to StorNext 60 systems running NAS clustered will not automatically upgrade NAS to version 141
Workaround
For these systems run the NAS upgrade before rather than after the StorNext 60 upgrade
Known Issues ndash StorNext 6x
Xcellis Workflow Director Release Notes 46
CR Number
SR Number
Description
66799 322817 342909 362343
Issue
On the StorNext GUI Reports gt Hardware page node1 system board information is shown but information for node2 is not after an upgrade to StorNext 5x and later
Note This issue is fixed in StorNext 605 See 66799 on page 18 in the Fixed Issues section Upgrade recommended
WorkaroundTo fix this issue create the usradicHAMsharedHwMonStatus directory on the primary server node (typically node 1) and restart the hwmond serviceSee Create the HW Monitor Directory
60614
na Issue
Your system and all other Connect-managed Linux StorNext SAN clients must have the latest Connector installed so that statistics can be passed to StorNext Connect If a system is managed by StorNext Connect and you upgrade the firmware on that system to StorNext 5 Release 530 firmware PRIOR to upgrading the StorNext Connect Connector the Volume Storage widget on the StorNext Connect Dashboard will display no data for those systems
Workaround
For steps to take to update the Connect Connector(s) before upgrading system firmware
See Update the StorNext Connect Connector before doing a firmware upgrade
For steps to take if you have already upgraded firmware but did not first update the Connector(s)
See Repair StorNext Connect After Upgrade
55384 na Issue
If dmnfsthreads is not set on mount nfsds may be over-commited when there are many NFS processes waiting for offline files
Workaround
For managed file systems serving NFS Quantum recommends using the dmnfsthreads=16 mount option This setting ensures that NFS remains responsive when Storage Manager is retrieving data from an archive tier
Known Issues ndash StorNext 6x
Xcellis Workflow Director Release Notes 47
CR Number
SR Number
Description
55318 na Issue
Strange UID on ACL when file created on non ads client
Workaround
All systems accessing the StorNext SAN or LAN clients or the NAS clients must be part of the same identity domain Accessing StorNext from different identity domains can result in inconsistent file ownership attributes as well as potential access problems
55220 na Issue(See CR Known Issues ndash StorNext 6x on page 20)
Workaround
na
54451 na IssueStorNext supports case-sensitive file names For configurations with different client types such as Windows and Mac sharing the same files the default case type may be different
WorkaroundThere currently is no workaround for this issue SMB is operating as expected
53486 425247 Srvclog RAS tickets are lost if the hafs (HA shared file system) is not mounted on the system
Note This issue was fixed in StorNext 62 See 53486 on page 12 in the Fixed Issues section Upgrade recommended
Workaround
Upgrade to StorNext 62
45702 na Issue
If you replace an HDD drive with an SSD or vice versa the StorNext GUI will show a status of Missing and an equivalent RAS ticket instead of displaying an Incompatible status
Workaround
Replacement drives must be the identical type of drive removed HDDs can only use HDD spares and SSDs can only use SSD spares Replacement drives must also be the same size or larger than the failed drive The array controller will generate errors if an incompatible drive is used as a replacement
Known Issues Workarounds and Additional Information
Xcellis Workflow Director Release Notes 48
CR Number
SR Number
Description
38128 1395540
IssueUsing the GUI while a large Media import is kicked off via the command line can cause the StorNext GUI to timeout or crash
Workaround
Wait until a bulk load from tape is finished prior to opening the StorNext GUI
Known Issues Workarounds and Additional Information
About firmware upgrades and pre-staged Appliance Controller upgrades for server nodesWhen NAS is enabled detected and is configured on a sever node as part of a NAS cluster and a firmware upgrade is attempted an offline targz file is copied into the scratchsavedNAS directory and is then unzipped and untarred into the varupgrade directory Based on the installed version of NAS on the system the appropriate valid upgrade bundle for NAS will be unpacked to varupgrade for the user to perform the upgrade If a multi-version upgrade is required then the next applicable version will be unpacked into varupgrade and you will be instructed to perform the cluster upgrade first and then retry the firmware upgrade If the cluster state of the node cannot be determined then it looks like no versions are unpacked on the system and the upgrade is aborted (in this case you would have to upgrade the cluster manually using instructions in the Appliance Controller Doc Center (see Appliance Controller Upgrades) and then retry the firmware upgrade
If NAS clustering is not configured the firmware upgrade will perform the direct upgrade to the current version of Appliance Controller shipped with the firmware upgrade
74202 ndash StorNext services can fail to stop completely when NAS is Configured and StorNext services are stoppedHow might this be seenThere are two basic scenarios where this might be exposed
Scenario 1When StorNext stops it signals NAS to vacate the StorNext file systems that NAS is using However if these file systems remain available for too long the Appliance Controller will attempt to automatically restart NAS services This is what happens in order
Known Issues Workarounds and Additional Information
Xcellis Workflow Director Release Notes 49
1 Restarting NAS services can resume use of StorNext resources
2 Resuming StorNext resources interferes with attempts to stop StorNext
3 Continued use of these StorNext resources can result in mounted StorNext file systems that do not have a running fsm process which blocks access to the StorNext file system
If experience this on your system temporarily stop NAS services
1 Log in to the command line of the server (as sudo rootsh)
Launch the Command Line With an SSH Utility a Open an SSH connection to the appropriate server and use the IP address assigned to the
node on the ManagementLAN Client network
b Log in to the command line using the following credentials
l User name stornext
l Password ltstornext user account passwordgt
Note password is the default password for the stornext user account If the password has been changed use the current password
c Enter sudo rootsh to gain root user access
d Enter the password for the stornext user account again
2 Stop NAS by executing the following command
usrcvfslibsnnas_control stop
3 Stop the Appliance Controller by executing the following command
usrlocalquantumbinsml_service_tool stop snnas_controller
4 When you have finished Restart NAS and the Appliance Controller
a Start NAS by executing the following command
usrcvfslibsnnas_control start
b Start the Appliance Controller by executing the following command
usrlocalquantumbinsml_service_tool start snnas_controller
Known Issues Workarounds and Additional Information
Xcellis Workflow Director Release Notes 50
Scenario 2If you need to stop the system during a maintenance window This is an extension of Scenario 1 but NAS must vacate the file systems for an extended period of time If NAS services are resumed when they should be suspended those service processes may interfere with maintenance operations
To affect both scenarios timers exist that you can adjust to extend the amount of time required between the stornext stop operation and before NAS services resume The timers are controlled by the following Controller Registry values
l nasheartbeatcheck_state_secs l stornext_servicestop_periodTo see what values are currently assigned enter
su sysadmin -c reg show nasheartbeatcheck_state_secs
to display the setting of the frequency interval of the NAS heartbeat state check or enter
su sysadmin -c reg show stornext_servicestop_period
to display the duration that StorNext services are stopped
Note By default both timers are set to 120 (in seconds=2 minutes)
WorkaroundsWorkaround 1If StorNext fails to stop due to NAS resource usage do the following
1 Log in to the command line of the server
Launch the Command Line With an SSH Utility a Open an SSH connection to the appropriate server and use the IP address assigned to the
node on the ManagementLAN Client network
b Log in to the command line using the following credentials
l User name stornext
l Password ltstornext user account passwordgt
Note password is the default password for the stornext user account If the password has been changed use the current password
c Enter sudo rootsh to gain root user access
d Enter the password for the stornext user account again
Known Issues Workarounds and Additional Information
Xcellis Workflow Director Release Notes 51
2 Verify that the StorNext file systems are mounted
grep cvfs procmounts
If any StorNext file systems are not mounted mount them now
3 Mount the HA shared file system
mount usradicHAMshared
4 Start fsm for each StorNext file system (shown below as ltFSNAMEgt) mounted on the server node
cvadmin -e start ltFSNAMEgt on localhost
5 Stop StorNext services
For CentOS7 systems enter
systemctl stop cvfs
For CentOS6 systems enter
service cvfs stop
6 To stop NAS enter
usrcvfslibsnnas_control stop
7 To stop the Appliance Controller enter
usrlocalquantumbinsml_service_tool stop snnas_controller
When you are ready restart the Appliance Controller and NAS services
8 To restart the Appliance Controller enter
Known Issues Workarounds and Additional Information
Xcellis Workflow Director Release Notes 52
usrlocalquantumbinsml_service_tool start snnas_controller
9 To restart NAS enter
usrcvfslibsnnas_control start
Workaround 2For Scenario 1 Quantum recommends that you extend the time period to a value of 10 minutes (600 seconds) for both variables Set a value that exceeds the amount of time necessary for typical StorNext shutdown
To set new values
1 Log in to the command line
Launch the Command Line With an SSH Utility a Open an SSH connection to the appropriate server and use the IP address assigned to the
node on the ManagementLAN Client network
b Log in to the command line using the following credentials
l User name stornext
l Password ltstornext user account passwordgt
Note password is the default password for the stornext user account If the password has been changed use the current password
c Enter sudo rootsh to gain root user access
d Enter the password for the stornext user account again
2 Change the frequency interval of the NAS heartbeat state check to 600 seconds (10 minutes) Enter
su sysadmin -c reg set nasheartbeatcheck_state_secs 600
Note This is run with a temporary log in to the Appliance Controller as the sysadmin user
3 Change the duration that StorNext services are stopped to 600 seconds (10 minutes) Enter
Known Issues Workarounds and Additional Information
Xcellis Workflow Director Release Notes 53
su sysadmin -c reg set stornext_servicestop_period 600
4 Note This is run with a temporary log in to the Appliance Controller as the sysadmin user
Workaround 3For Scenario 2 to eliminate the confusion of setting a long duration for a maintenance window and then having to change the values back again to a shorter value again you can simply stop NAS services and the Appliance Controller and then restart these services when you are finished
To stop the services and restart them
1 Log in to the command line
Launch the Command Line With an SSH Utility a Open an SSH connection to the appropriate server and use the IP address assigned to the
node on the ManagementLAN Client network
b Log in to the command line using the following credentials
l User name stornext
l Password ltstornext user account passwordgt
Note password is the default password for the stornext user account If the password has been changed use the current password
c Enter sudo rootsh to gain root user access
d Enter the password for the stornext user account again
2 Stop NAS by executing the following command
usrcvfslibsnnas_control stop
3 Stop the Appliance Controller by executing the following command
usrlocalquantumbinsml_service_tool stop snnas_controller
When you are ready restart the Appliance Controller and NAS services
4 To restart the Appliance Controller enter
usrlocalquantumbinsml_service_tool start snnas_controller
Known Issues Workarounds and Additional Information
Xcellis Workflow Director Release Notes 54
5 To restart NAS enter
usrcvfslibsnnas_control start
6 Change the settings for the NAS heartbeat state check and the duration that StorNext services are stopped according to Workaround 2 on page 52
Workaround 4An alternate method for maintenance windows instead of implementing workaround 3 for Scenario 2 you can choose a much longer value if you need the NAS heartbeat state check interval and StorNext services stopped for a long period of time (for example during a planned maintenance window in a data center) While this is another option the downside of this is that you will need to know how much downtime to expect maintenance to take and then set these times to be less than what is needed for that maintenance It is also difficult to extend the maintenance period reliably once those timers have started In addition you will most likely have to reset the values back to their original settings when the maintenance window is complete which could be a hassle
Here is one example which extends the time values to 2 hours (7200 seconds)
1 Log in to the command line
Launch the Command Line With an SSH Utility a Open an SSH connection to the appropriate server and use the IP address assigned to the
node on the ManagementLAN Client network
b Log in to the command line using the following credentials
l User name stornext
l Password ltstornext user account passwordgt
Note password is the default password for the stornext user account If the password has been changed use the current password
c Enter sudo rootsh to gain root user access
d Enter the password for the stornext user account again
2 Change the frequency interval of the NAS heartbeat state check to 7200 seconds (10 minutes) Enter
su sysadmin -c reg set nasheartbeatcheck_state_secs 7200
Note This is run with a temporary log in to the Appliance Controller as the sysadmin user
3 Change the duration that StorNext services are stopped to 7200 seconds (10 minutes) Enter
Known Issues Workarounds and Additional Information
Xcellis Workflow Director Release Notes 55
su sysadmin -c reg set stornext_servicestop_period 7200
4 Note This is run with a temporary log in to the Appliance Controller as the sysadmin user
Change the componentproperties Timeout Setting 1 Log in to the command line of the primary server node (typically node 1) See Launch the Command
Line (for Xcellis Workflow DirectorGen 2) or Launch the Command Line (for R630 systems)
2 Open the componentproperties file with the vi editor
vi usradicguiconfigcomponentproperties
Pro Tip 1 Edit With vi
The vi editor is included in CentOS If you are unfamiliar with using vi to open edit (copypastedelete) exit with or without saving changes use the following Google search URL to find related links for editing with vi
httpswwwgooglecomsearchq=edit+with+vi
3 Scroll down to the web services timeouts section It should look similar to (note the default firmware upgrade value is 300 seconds - highlighted in green)
Web Services Timeouts (seconds)
wsconverttohatimeout=300 wsapplyfwupgradetimeout=300 wsgetsystemidtimeout=10 wsntptimeout=30 wsdatetimetimeout=30 wsnetworkconfigtimeout=180 wsnetworkhapeertimeout=30 wsloggingleveltimeout=30 wscapturestatetimeout=600 wsjobclosetimeout=30 wsnasclosetimeout=60
4 Move the cursor to sit over the number 3 enter ltSHIFTgt+ and then R (for replace) and enter the number 6 to change the wsapplyfwupgradetimeout= value from 300 seconds (5 minutes) to 600 seconds (10 minutes)
wsapplyfwupgradetimeout=600
Known Issues Workarounds and Additional Information
Xcellis Workflow Director Release Notes 56
5 Save the changes to the file by entering SHIFTwq to write the file and quit the vi editor
The setting change will be replicated to the other server node in 2-3 minutes after the file change is saved so this only has to be applied to server node 1
6 Run the Firmware Upgrade process again
Note Even though the upgrade failed previously the firmware upgrade files are still available for the upgrade
a Select either of the uploaded files click Apply In the case of a single file select the one file uploaded and click Apply
b Click Yes to confirm the installation For two-file upgrades both firmware files are applied to the system during the upgrade
The upgrade should complete after the timeout setting is changed However if the firmware upgrade fails again contact Contacting Quantum on page 70 for assistance with manually upgrading the node that failed to upgrade
Server Boot (QXSNetApp)This does not need to be applied to all systems connected to storage arrays only impacted systems as described here
Systems Impacted l This ONLY affects systems upgrading from StorNext 5x releases to 6x (prior to 605)
l This ONLY affects systems upgrading that are Fibre Channel-connected to BOTH NetApp and QXS arrays
Note This issue was fixed in StorNext 605 See 70300 on page 17 If you are upgrading to StorNext 605 you will not see this issue and do not have to perform this workaround
BEFORE applying the upgrade to StorNext 6x do the following
Log in to the system command line 1 Open an SSH connection to the appropriate server and use the IP address assigned to the node on the
Management or LAN Client network or use the Service Port IP address if connected to the Service Port
Service Port IP addresses l Node 1 1017211 (dual-server node systems)
l Node 2 1017212 (dual-server node or HA-ready single-server node systems)
Note Node 2 is the server node sold with single-node (non-HA) Xcellis Workflow Director and Artico systems It is also used for installation using the StorNext Connect Install app for both single-node and dual-node systems only
Known Issues Workarounds and Additional Information
Xcellis Workflow Director Release Notes 57
2 Log in to the command line using the following credentials
l User name stornext
l Password ltstornext user account passwordgt
Note password is the default password for the stornext user account If the password has been changed use the current password
3 Enter sudo rootsh to gain root user access
4 Enter the password for the stornext user account again
Edit the Grub Configuration File 1 Create a backup copy of the CentOS7 grubd40_custom configuration file Enter the following
cp etcgrubd40_custom scratch40_customorig
2 Create a backup copy of the CentOS7 grubcfg file Enter the following
cp bootgrub2grubcfg bootgrub2grubcfgorig
3 Edit the etcgrubd40_custom file using the vi editor included in CentOS7x Enter the following
vi etcgrubd40_custom
4 To enter vi insert mode enter i
5 Look for the lines beginning with linux16 as shown in bold blue below and add ltspacegtrdblacklist=ses rdblacklist=enclosure to the end of those lines as shown in green in the following example (Ellipses included below denote code prior to and after the linux16 sections)
Known Issues Workarounds and Additional Information
Xcellis Workflow Director Release Notes 58
linux16 vmlinuz-3100-51462el7qtmx86_64 root=UUID=3d9116b2-c5de-41fd-bd38-2042c0f8ebad ro console=tty1 vconsolekeymap=us crashkernel=768M0M vconsolefont=latarcyrheb-sun16 selinux=0 enforcing=0 intel_idlemax_cstate=0 processormax_cstate=1 elevator=deadline transparent_hugepage=never quiet LANG=en_USUTF-8 rdblacklist=ses rdblacklist=enclosure
initrd16 initramfs-3100-51462el7qtmx86_64img
menuentry Xcellis SOL --class centos --class gnu-linux --class os --unrestricted load_videoset gfxpayload=keepinsmod gzioinsmod part_msdosinsmod ext2set root=hd0msdos1if [ x = xy ] thensearch --no-floppy --fs-uuid --set=root --hint-bios=hd0msdos1 --hint-efi=hd0msdos1 --hint-baremetal=ahci0msdos1 --hint=hd0msdos1 a0467663-8cf0-48be-b967-d5ef7eb486e2elsesearch --no-floppy --fs-uuid --set=root a0467663-8cf0-48be-b967-d5ef7eb486e2filinux16 vmlinuz-3100-51462el7qtmx86_64 root=UUID=3d9116b2-c5de-41fd-bd38-2042c0f8ebad ro console=ttyS1115200n8 vconsolekeymap=us crashkernel=768M0M vconsolefont=latarcyrheb-sun16 selinux=0 enforcing=0 intel_idlemax_cstate=0 processormax_cstate=1 elevator=deadline transparent_hugepage=never quiet LANG=en_USUTF-8 rdblacklist=ses rdblacklist=enclosureinitrd16 initramfs-3100-51462el7qtmx86_64img
6 To exit insert mode and return to command mode press ltEscgt
7 To save changes and exit vi enter wq and press ltEntergt You will return to the command prompt (To exit vi without saving changes enter q and press ltEntergt)
8 Repeat Log in to the system command line on page 56 and Edit the Grub Configuration File on the previous page for the other server node
Edit the Blacklist Configuration File and Enable the Changes 1 Enter the following to create a backup copy of the blacklist configuration file
Known Issues Workarounds and Additional Information
Xcellis Workflow Director Release Notes 59
cp etcmodprobedblacklistconf scratchblacklistconforig
2 Enter the following to edit the etcmodprobedblacklistconf file using vi
vi etcmodprobedblacklistconf
3 To edit change to the vi insert mode Enter i
4 Add a separate line for rdblacklist ses and another line for rdblacklist enclosure to the file as shown in green in the following example
blacklist rivafb
blacklist savagefb
blacklist sstfb
blacklist neofb
blacklist tridentfb
blacklist tdfxfb
blacklist virgefb
blacklist vga16fb
blacklist viafb
ISDN - see bugs 154799 159068
blacklist hisax
blacklist hisax_fcpcipnp
sound drivers
blacklist snd-pcsp
IO dynamic configuration support for s390x (bz 563228)
blacklist chsc_sch
Known Issues Workarounds and Additional Information
Xcellis Workflow Director Release Notes 60
blacklist sb_edac
blacklist edac_core
blacklist sesblacklist enclosure
5 To exit insert mode and return to command mode press ltEscgt
6 To save changes and exit vi enter wq and press ltEntergt You will return to the command prompt (To exit vi without saving changes enter q and press ltEntergt)
7 To enable the changes enter
dracut -f
8 Continue to Reboot the system below
Workaround System Already UpgradedIf the system has been upgraded and cannot boot do the following to recover the system
1 Detachdisconnect the FC ports from the nodes or disable the FC zoning configuration for the QXS array(s)
2 Boot the system and enter the following to stop cvfs
systemctl stop cvfs
3 Edit the grub configuration file for your version of CentOS See Edit the Grub Configuration File on page 57
4 Edit the blacklist configuration file See Edit the Blacklist Configuration File and Enable the Changes on page 58
5 Reattach or re-enable FC zoning configuration for the QXS array(s)
6 Continue to Reboot the system below
Reboot the system 1 Reboot the server you are already logged into
systemctl reboot
Continue to Step 3 for single-node systems For dual-node systems continue to the next step
Known Issues Workarounds and Additional Information
Xcellis Workflow Director Release Notes 61
2 Log in to the other server node See Log in to the system command line on page 56
systemctl reboot
3 For dual-node systems repeat Step 3 for server node 2 The process is complete
Change Upgrade Timeout SettingBEFORE applying the upgrade to StorNext 6x do the following
Log in to the system command line 1 Open an SSH connection to the appropriate server and use the IP address assigned to the node on the
Management or LAN Client network or use the Service Port IP address if connected to the Service Port
Service Port IP addresses l Node 1 1017211 (dual-server node systems)
l Node 2 1017212 (dual-server node or HA-ready single-server node systems)
Note Node 2 is the server node sold with single-node (non-HA) Xcellis Workflow Director and Artico systems It is also used for installation using the StorNext Connect Install app for both single-node and dual-node systems only
2 Log in to the command line using the following credentials
l User name stornext
l Password ltstornext user account passwordgt
Note password is the default password for the stornext user account If the password has been changed use the current password
3 Enter sudo rootsh to gain root user access
4 Enter the password for the stornext user account again
1 Change to the config directory
cd usradicguiconfig
2 Copy the componentproperties file
cp componentproperties componentpropertiesorig
Known Issues Workarounds and Additional Information
Xcellis Workflow Director Release Notes 62
3 Edit the file using vi
vi componentproperties
4 Scroll down the file until you get to the Web Services Timeouts (seconds) section and the upgrade timeout line shown in bold text The current value should be similar to the value shown in bold green
Web Services Timeouts (seconds) wsconverttohatimeout=300wsapplyfwupgradetimeout=300 wsgetsystemidtimeout=10 wsntptimeout=30 wsdatetimetimeout=30 wsnetworkconfigtimeout=180 wsnetworkhapeertimeout=30 wsloggingleveltimeout=30 wscapturestatetimeout=600 wsjobclosetimeout=30 wsnasclosetimeout=60
5 To edit change to the vi insert mode Enter i
6 Change the value to 1200
Known Issues Workarounds and Additional Information
Xcellis Workflow Director Release Notes 63
Web Services Timeouts (seconds) wsconverttohatimeout=300wsapplyfwupgradetimeout=1200 wsgetsystemidtimeout=10 wsntptimeout=30 wsdatetimetimeout=30 wsnetworkconfigtimeout=180 wsnetworkhapeertimeout=30 wsloggingleveltimeout=30 wscapturestatetimeout=600 wsjobclosetimeout=30 wsnasclosetimeout=60
7 To exit insert mode and return to command mode press ltEscgt
8 To save changes and exit vi enter wq and press ltEntergt You will return to the command prompt (To exit vi without saving changes enter q and press ltEntergt)
9 Continue to Reboot the system below
Reboot the system 1 Reboot the server you are already logged into
systemctl reboot
Continue to Step 3 for single-node systems For dual-node systems continue to the next step
2 Log in to the other server node See Log in to the system command line on page 61
3 Reboot the other server node 2
systemctl reboot
4 Repeat Step 3 for server node 2
The process is complete
journalctl Filter ScriptStep 1 Upgrade to StorNext 605
Known Issues Workarounds and Additional Information
Xcellis Workflow Director Release Notes 64
Note StorNext 605 provides the script so you need to upgrade to StorNext 605 to access the file
See Upgrade a Gateway System (Upgrade Firmware) Using the Service Menu
Step 2 Log in to the System Command Line 1 Open an SSH connection to the appropriate server and use the IP address assigned to the node on the
Management or LAN Client network or use the Service Port IP address if connected to the Service Port
Service Port IP addresses l Node 1 1017211 (dual-server node systems)
l Node 2 1017212 (dual-server node or HA-ready single-server node systems)
Note Node 2 is the server node sold with single-node (non-HA) Xcellis Workflow Director and Artico systems It is also used for installation using the StorNext Connect Install app for both single-node and dual-node systems only
2 Log in to the command line using the following credentials
l User name stornext
l Password ltstornext user account passwordgt
Note password is the default password for the stornext user account If the password has been changed use the current password
3 Enter sudo rootsh to gain root user access
4 Enter the password for the stornext user account again
5 Continue to Step 3 Run the Journal Filter Script and View the Script Help below
Step 3 Run the Journal Filter Script and View the Script Help l Enter the following to use the script to view the log output in a way that filters out all the rootsh
commands
optDXiscriptsjournalctl_filtersh -f
l Enter the following to view the scripts help file
optDXiscriptsjournalctl_filtersh --help
Note The journalctl_filtersh output can also be saved to a file
Known Issues Workarounds and Additional Information
Xcellis Workflow Director Release Notes 65
StorNext Connect NTP not RunningWorkaround 1 If you encounter this issue when rebooting the system reboot or after a firmware upgrade do the following
1 Log in to the StorNext GUI and select gtConfiguration gt System
2 Click the Date amp Time tab
3 Set the NTP protocol options as follows Select either the Select a Timeserver Pool option and select the pool from the options available OR select the Specify a Timeserver or Pool option and enter the IP address of the time server
4 Click Apply which will reboot the node (or both nodes in dual-server systems) and re-enable and start NTP
Workaround 2Another alternative enables ntp when the system is rebooted
1 Using an SSH connection log in to the command line of the server
2 Enter the following command
usrbinsystemctl ntpdservice enable
3 Repeat for the other server (for dual-server node systems only)
4 Manually reboot the server (or both server nodes for dual-server node systems)
Restart the Appliance ControllerOn the server node hosting NAS do the following (use node 2 on dual-server node systems)
1 Open an SSH connection to the appropriate server node and use the IP address assigned to the node on the Management or LAN Client network
2 Log in to the command line using the following credentials
l User name stornext
l Password ltstornext user account passwordgt
Note password is the default password for the stornext user account If the password has been changed use the current password
3 Enter sudo rootsh to gain root user access
4 Enter the password for the stornext user account again
5 Enter the following
chown -R ldapldap varlibldap
Known Issues Workarounds and Additional Information
Xcellis Workflow Director Release Notes 66
6 Enter the following
systemctl restart slapd
7 Restart the appliance controller
systemctl start snnas_controller
systemctl stop snnas_controller
Create the Missing Hardware Monitor DirectoryDo the following to check if the directory is missing and re-create the directory if it is and restart the hwmond service
1 Open an SSH connection to the appropriate server and use the IP address assigned to the node on the Management or LAN Client network or use the Service Port IP address if connected to the Service Port
Service Port IP addresses l Node 1 1017211 (dual-server node systems)
l Node 2 1017212 (dual-server node or HA-ready single-server node systems)
Note Node 2 is the server node sold with single-node (non-HA) Xcellis Workflow Director and Artico systems It is also used for installation using the StorNext Connect Install app for both single-node and dual-node systems only
2 Log in to the command line using the following credentials
l User name stornext
l Password ltstornext user account passwordgt
Note password is the default password for the stornext user account If the password has been changed use the current password
3 Enter sudo rootsh to gain root user access
4 Enter the password for the stornext user account again
5 Enter the following on the command line
cd usradicHAMsharedHwMonStatus
If you see the following message the directory does not exist Continue to the next step
Known Issues Workarounds and Additional Information
Xcellis Workflow Director Release Notes 67
bash cd usradicHAMsharedHwMonStatus No such file or directory
6 Enter the following on the command line to create the directory
mkdir usradicHAMsharedHwMonStatus
7 Enter the following to verify the directory has been created
cd usradicHAMsharedHwMonStatus
8 Change the permission of the hwmond service to read-only
chmod -r 775 HwMonStatus
9 Restart the hwmond service
systemctl restart quantum-hwmondservice
How to Disable NFS v4To disable NFSv4 on Xcellis Workflow Director systems especially those systems running NAS 120 or earlier perform the following on node 2
Edit the nfs File 1 Open an SSH connection to the appropriate server and use the IP address assigned to the node on the
Management or LAN Client network or use the Service Port IP address if connected to the Service Port
Service Port IP addresses l Node 1 1017211 (dual-server node systems)
l Node 2 1017212 (dual-server node or HA-ready single-server node systems)
Note Node 2 is the server node sold with single-node (non-HA) Xcellis Workflow Director and Artico systems It is also used for installation using the StorNext Connect Install app for both single-node and dual-node systems only
Known Issues Workarounds and Additional Information
Xcellis Workflow Director Release Notes 68
2 Log in to the command line using the following credentials
l User name stornext
l Password ltstornext user account passwordgt
Note password is the default password for the stornext user account If the password has been changed use the current password
3 Enter sudo rootsh to gain root user access
4 Enter the password for the stornext user account again
5 Edit etcsysconfignfs file (See Example Use vi to Edit the nfs File on the next page)
6 Change the value for RPCNFSDARGS to -N 4 When finished the line must be RPCNFSDARGS=-N 4
7 Change the value for RPCMOUNTDOPTS to -N 4 When finished the line must be RPCMOUNTDOPTS=-N 4
8 Save the file
Restart NFS
For Xcellis Workflow Director (R630) systems
1 Enter the following to restart the NFS configuration
systemctl restart nfs-config
2 Enter the following to restart the NFS server
systemctl restart nfs-server
After You Restart NFS on Node 2Repeat both the Edit the nfs File on the previous page and Known Issues ndash StorNext 6x on page 20 sections on node 1( for dual-node systems)
If you need to create new NFS shares to export for user access you may do this now See the About the NAS App section of the StorNext Connect Documentation Center for information about NAS configuration using StorNext Connect
Known Issues Workarounds and Additional Information
Xcellis Workflow Director Release Notes 69
Example Use vi to Edit the nfs File 1 Enter the following
vi etcsysconfignfs
2 Move the cursor to the closing quotation mark in RPCNFSDARGS
3 Enter the following
i -N 4
4 Write the file and quit vi as follows
wq
5 For this example you would have to Restart NFS on the previous page and repeat the Edit the nfs File on page 67 and Restart NFS on the previous page again on node 1 (for dual-node systems)
6 Close the SSH session for the server(s) ( for dual-node systems)
Re-enable DDM on the Secondary Node After HA FailoverOnce the MDC node acting as secondary finishes rebooting and becomes functional again use fsddmconfig (or the GUI) from the server node currently acting as primary to re-enable DDM for the standby server node as follows
1 Open an SSH connection to the appropriate server and use the IP address assigned to the node on the Management or LAN Client network or use the Service Port IP address if connected to the Service Port
Service Port IP addresses l Node 1 1017211 (dual-server node systems)
l Node 2 1017212 (dual-server node or HA-ready single-server node systems)
Note Node 2 is the server node sold with single-node (non-HA) Xcellis Workflow Director and Artico systems It is also used for installation using the StorNext Connect Install app for both single-node and dual-node systems only
Contacting Quantum
Xcellis Workflow Director Release Notes 70
2 Log in to the command line using the following credentials
l User name stornext
l Password ltstornext user account passwordgt
Note password is the default password for the stornext user account If the password has been changed use the current password
3 Enter sudo rootsh to gain root user access
4 Enter the password for the stornext user account again
5 On the command line of the system enter the following
fsddmconfig -u -s e
standby_system_hostname
If a system running DDMs periodically displays an Admin Alert when it fails over cycles a client node or upgrades while the server node operating as secondary is rebooting but not completely down change the timeout value to allow more time to communicate with the node Update the TSM configuration parameter DDM_CLIENT_RETRY_TIMEOUT from the default 30 seconds to a larger value depending on how long the node is taking to reboot In the event the server node acting as secondary will be down for an extended period of time the node should be taken offline Additionally if this parameter is set too high and the standby server does not come back the command that is currently running (eg store or retrieve) will not return until after the specified timeout
For more information about the DDM_CLIENT_RETRY_TIMEOUT parameter that can be placed into the fs_sysparm_override configuration file refer to the usradicTSMconfigfs_sysparmREADME file
Caution Incorrect modification of the fs_sysparm_override configuration file can cause a serious adverse effect on StorNext functionality Before modifying this file we recommend you contact Contacting Quantum below
Contacting QuantumFor further assistance contact the Quantum Customer Support Center
Region Support Contact
North America 1-800-284-5101 (toll free)+1-720-249-5700
Contacting Quantum
Xcellis Workflow Director Release Notes 71
Region Support Contact
EMEA +800-7826-8888 (toll free)
+49 6131 324 185
Asia Pacific +800-7826-8887 (toll free)+603-7953-3010
For worldwide support
httpswwwquantumcomserviceandsupportget-helpindexaspxcontact-support
- Revision History
- About the Xcellis Workflow Director
- Training and Documentation Resources
- About StorNext 6
-
- What is StorNext
- Learn More on the Web
-
- What StorNext Releases are compatible with my system
- Upgrade StorNext Software and System Firmware
- General Notes
- Quantum Appliance Licenses
- Fixed Issues Notes and Enhancements ndash StorNext 6x
- Known Issues ndash StorNext 6x
- Known Issues Workarounds and Additional Information
- Contacting Quantum
-

Known Issues ndash StorNext 6x
Xcellis Workflow Director Release Notes 47
CR Number
SR Number
Description
55318 na Issue
Strange UID on ACL when file created on non ads client
Workaround
All systems accessing the StorNext SAN or LAN clients or the NAS clients must be part of the same identity domain Accessing StorNext from different identity domains can result in inconsistent file ownership attributes as well as potential access problems
55220 na Issue(See CR Known Issues ndash StorNext 6x on page 20)
Workaround
na
54451 na IssueStorNext supports case-sensitive file names For configurations with different client types such as Windows and Mac sharing the same files the default case type may be different
WorkaroundThere currently is no workaround for this issue SMB is operating as expected
53486 425247 Srvclog RAS tickets are lost if the hafs (HA shared file system) is not mounted on the system
Note This issue was fixed in StorNext 62 See 53486 on page 12 in the Fixed Issues section Upgrade recommended
Workaround
Upgrade to StorNext 62
45702 na Issue
If you replace an HDD drive with an SSD or vice versa the StorNext GUI will show a status of Missing and an equivalent RAS ticket instead of displaying an Incompatible status
Workaround
Replacement drives must be the identical type of drive removed HDDs can only use HDD spares and SSDs can only use SSD spares Replacement drives must also be the same size or larger than the failed drive The array controller will generate errors if an incompatible drive is used as a replacement
Known Issues Workarounds and Additional Information
Xcellis Workflow Director Release Notes 48
CR Number
SR Number
Description
38128 1395540
IssueUsing the GUI while a large Media import is kicked off via the command line can cause the StorNext GUI to timeout or crash
Workaround
Wait until a bulk load from tape is finished prior to opening the StorNext GUI
Known Issues Workarounds and Additional Information
About firmware upgrades and pre-staged Appliance Controller upgrades for server nodesWhen NAS is enabled detected and is configured on a sever node as part of a NAS cluster and a firmware upgrade is attempted an offline targz file is copied into the scratchsavedNAS directory and is then unzipped and untarred into the varupgrade directory Based on the installed version of NAS on the system the appropriate valid upgrade bundle for NAS will be unpacked to varupgrade for the user to perform the upgrade If a multi-version upgrade is required then the next applicable version will be unpacked into varupgrade and you will be instructed to perform the cluster upgrade first and then retry the firmware upgrade If the cluster state of the node cannot be determined then it looks like no versions are unpacked on the system and the upgrade is aborted (in this case you would have to upgrade the cluster manually using instructions in the Appliance Controller Doc Center (see Appliance Controller Upgrades) and then retry the firmware upgrade
If NAS clustering is not configured the firmware upgrade will perform the direct upgrade to the current version of Appliance Controller shipped with the firmware upgrade
74202 ndash StorNext services can fail to stop completely when NAS is Configured and StorNext services are stoppedHow might this be seenThere are two basic scenarios where this might be exposed
Scenario 1When StorNext stops it signals NAS to vacate the StorNext file systems that NAS is using However if these file systems remain available for too long the Appliance Controller will attempt to automatically restart NAS services This is what happens in order
Known Issues Workarounds and Additional Information
Xcellis Workflow Director Release Notes 49
1 Restarting NAS services can resume use of StorNext resources
2 Resuming StorNext resources interferes with attempts to stop StorNext
3 Continued use of these StorNext resources can result in mounted StorNext file systems that do not have a running fsm process which blocks access to the StorNext file system
If experience this on your system temporarily stop NAS services
1 Log in to the command line of the server (as sudo rootsh)
Launch the Command Line With an SSH Utility a Open an SSH connection to the appropriate server and use the IP address assigned to the
node on the ManagementLAN Client network
b Log in to the command line using the following credentials
l User name stornext
l Password ltstornext user account passwordgt
Note password is the default password for the stornext user account If the password has been changed use the current password
c Enter sudo rootsh to gain root user access
d Enter the password for the stornext user account again
2 Stop NAS by executing the following command
usrcvfslibsnnas_control stop
3 Stop the Appliance Controller by executing the following command
usrlocalquantumbinsml_service_tool stop snnas_controller
4 When you have finished Restart NAS and the Appliance Controller
a Start NAS by executing the following command
usrcvfslibsnnas_control start
b Start the Appliance Controller by executing the following command
usrlocalquantumbinsml_service_tool start snnas_controller
Known Issues Workarounds and Additional Information
Xcellis Workflow Director Release Notes 50
Scenario 2If you need to stop the system during a maintenance window This is an extension of Scenario 1 but NAS must vacate the file systems for an extended period of time If NAS services are resumed when they should be suspended those service processes may interfere with maintenance operations
To affect both scenarios timers exist that you can adjust to extend the amount of time required between the stornext stop operation and before NAS services resume The timers are controlled by the following Controller Registry values
l nasheartbeatcheck_state_secs l stornext_servicestop_periodTo see what values are currently assigned enter
su sysadmin -c reg show nasheartbeatcheck_state_secs
to display the setting of the frequency interval of the NAS heartbeat state check or enter
su sysadmin -c reg show stornext_servicestop_period
to display the duration that StorNext services are stopped
Note By default both timers are set to 120 (in seconds=2 minutes)
WorkaroundsWorkaround 1If StorNext fails to stop due to NAS resource usage do the following
1 Log in to the command line of the server
Launch the Command Line With an SSH Utility a Open an SSH connection to the appropriate server and use the IP address assigned to the
node on the ManagementLAN Client network
b Log in to the command line using the following credentials
l User name stornext
l Password ltstornext user account passwordgt
Note password is the default password for the stornext user account If the password has been changed use the current password
c Enter sudo rootsh to gain root user access
d Enter the password for the stornext user account again
Known Issues Workarounds and Additional Information
Xcellis Workflow Director Release Notes 51
2 Verify that the StorNext file systems are mounted
grep cvfs procmounts
If any StorNext file systems are not mounted mount them now
3 Mount the HA shared file system
mount usradicHAMshared
4 Start fsm for each StorNext file system (shown below as ltFSNAMEgt) mounted on the server node
cvadmin -e start ltFSNAMEgt on localhost
5 Stop StorNext services
For CentOS7 systems enter
systemctl stop cvfs
For CentOS6 systems enter
service cvfs stop
6 To stop NAS enter
usrcvfslibsnnas_control stop
7 To stop the Appliance Controller enter
usrlocalquantumbinsml_service_tool stop snnas_controller
When you are ready restart the Appliance Controller and NAS services
8 To restart the Appliance Controller enter
Known Issues Workarounds and Additional Information
Xcellis Workflow Director Release Notes 52
usrlocalquantumbinsml_service_tool start snnas_controller
9 To restart NAS enter
usrcvfslibsnnas_control start
Workaround 2For Scenario 1 Quantum recommends that you extend the time period to a value of 10 minutes (600 seconds) for both variables Set a value that exceeds the amount of time necessary for typical StorNext shutdown
To set new values
1 Log in to the command line
Launch the Command Line With an SSH Utility a Open an SSH connection to the appropriate server and use the IP address assigned to the
node on the ManagementLAN Client network
b Log in to the command line using the following credentials
l User name stornext
l Password ltstornext user account passwordgt
Note password is the default password for the stornext user account If the password has been changed use the current password
c Enter sudo rootsh to gain root user access
d Enter the password for the stornext user account again
2 Change the frequency interval of the NAS heartbeat state check to 600 seconds (10 minutes) Enter
su sysadmin -c reg set nasheartbeatcheck_state_secs 600
Note This is run with a temporary log in to the Appliance Controller as the sysadmin user
3 Change the duration that StorNext services are stopped to 600 seconds (10 minutes) Enter
Known Issues Workarounds and Additional Information
Xcellis Workflow Director Release Notes 53
su sysadmin -c reg set stornext_servicestop_period 600
4 Note This is run with a temporary log in to the Appliance Controller as the sysadmin user
Workaround 3For Scenario 2 to eliminate the confusion of setting a long duration for a maintenance window and then having to change the values back again to a shorter value again you can simply stop NAS services and the Appliance Controller and then restart these services when you are finished
To stop the services and restart them
1 Log in to the command line
Launch the Command Line With an SSH Utility a Open an SSH connection to the appropriate server and use the IP address assigned to the
node on the ManagementLAN Client network
b Log in to the command line using the following credentials
l User name stornext
l Password ltstornext user account passwordgt
Note password is the default password for the stornext user account If the password has been changed use the current password
c Enter sudo rootsh to gain root user access
d Enter the password for the stornext user account again
2 Stop NAS by executing the following command
usrcvfslibsnnas_control stop
3 Stop the Appliance Controller by executing the following command
usrlocalquantumbinsml_service_tool stop snnas_controller
When you are ready restart the Appliance Controller and NAS services
4 To restart the Appliance Controller enter
usrlocalquantumbinsml_service_tool start snnas_controller
Known Issues Workarounds and Additional Information
Xcellis Workflow Director Release Notes 54
5 To restart NAS enter
usrcvfslibsnnas_control start
6 Change the settings for the NAS heartbeat state check and the duration that StorNext services are stopped according to Workaround 2 on page 52
Workaround 4An alternate method for maintenance windows instead of implementing workaround 3 for Scenario 2 you can choose a much longer value if you need the NAS heartbeat state check interval and StorNext services stopped for a long period of time (for example during a planned maintenance window in a data center) While this is another option the downside of this is that you will need to know how much downtime to expect maintenance to take and then set these times to be less than what is needed for that maintenance It is also difficult to extend the maintenance period reliably once those timers have started In addition you will most likely have to reset the values back to their original settings when the maintenance window is complete which could be a hassle
Here is one example which extends the time values to 2 hours (7200 seconds)
1 Log in to the command line
Launch the Command Line With an SSH Utility a Open an SSH connection to the appropriate server and use the IP address assigned to the
node on the ManagementLAN Client network
b Log in to the command line using the following credentials
l User name stornext
l Password ltstornext user account passwordgt
Note password is the default password for the stornext user account If the password has been changed use the current password
c Enter sudo rootsh to gain root user access
d Enter the password for the stornext user account again
2 Change the frequency interval of the NAS heartbeat state check to 7200 seconds (10 minutes) Enter
su sysadmin -c reg set nasheartbeatcheck_state_secs 7200
Note This is run with a temporary log in to the Appliance Controller as the sysadmin user
3 Change the duration that StorNext services are stopped to 7200 seconds (10 minutes) Enter
Known Issues Workarounds and Additional Information
Xcellis Workflow Director Release Notes 55
su sysadmin -c reg set stornext_servicestop_period 7200
4 Note This is run with a temporary log in to the Appliance Controller as the sysadmin user
Change the componentproperties Timeout Setting 1 Log in to the command line of the primary server node (typically node 1) See Launch the Command
Line (for Xcellis Workflow DirectorGen 2) or Launch the Command Line (for R630 systems)
2 Open the componentproperties file with the vi editor
vi usradicguiconfigcomponentproperties
Pro Tip 1 Edit With vi
The vi editor is included in CentOS If you are unfamiliar with using vi to open edit (copypastedelete) exit with or without saving changes use the following Google search URL to find related links for editing with vi
httpswwwgooglecomsearchq=edit+with+vi
3 Scroll down to the web services timeouts section It should look similar to (note the default firmware upgrade value is 300 seconds - highlighted in green)
Web Services Timeouts (seconds)
wsconverttohatimeout=300 wsapplyfwupgradetimeout=300 wsgetsystemidtimeout=10 wsntptimeout=30 wsdatetimetimeout=30 wsnetworkconfigtimeout=180 wsnetworkhapeertimeout=30 wsloggingleveltimeout=30 wscapturestatetimeout=600 wsjobclosetimeout=30 wsnasclosetimeout=60
4 Move the cursor to sit over the number 3 enter ltSHIFTgt+ and then R (for replace) and enter the number 6 to change the wsapplyfwupgradetimeout= value from 300 seconds (5 minutes) to 600 seconds (10 minutes)
wsapplyfwupgradetimeout=600
Known Issues Workarounds and Additional Information
Xcellis Workflow Director Release Notes 56
5 Save the changes to the file by entering SHIFTwq to write the file and quit the vi editor
The setting change will be replicated to the other server node in 2-3 minutes after the file change is saved so this only has to be applied to server node 1
6 Run the Firmware Upgrade process again
Note Even though the upgrade failed previously the firmware upgrade files are still available for the upgrade
a Select either of the uploaded files click Apply In the case of a single file select the one file uploaded and click Apply
b Click Yes to confirm the installation For two-file upgrades both firmware files are applied to the system during the upgrade
The upgrade should complete after the timeout setting is changed However if the firmware upgrade fails again contact Contacting Quantum on page 70 for assistance with manually upgrading the node that failed to upgrade
Server Boot (QXSNetApp)This does not need to be applied to all systems connected to storage arrays only impacted systems as described here
Systems Impacted l This ONLY affects systems upgrading from StorNext 5x releases to 6x (prior to 605)
l This ONLY affects systems upgrading that are Fibre Channel-connected to BOTH NetApp and QXS arrays
Note This issue was fixed in StorNext 605 See 70300 on page 17 If you are upgrading to StorNext 605 you will not see this issue and do not have to perform this workaround
BEFORE applying the upgrade to StorNext 6x do the following
Log in to the system command line 1 Open an SSH connection to the appropriate server and use the IP address assigned to the node on the
Management or LAN Client network or use the Service Port IP address if connected to the Service Port
Service Port IP addresses l Node 1 1017211 (dual-server node systems)
l Node 2 1017212 (dual-server node or HA-ready single-server node systems)
Note Node 2 is the server node sold with single-node (non-HA) Xcellis Workflow Director and Artico systems It is also used for installation using the StorNext Connect Install app for both single-node and dual-node systems only
Known Issues Workarounds and Additional Information
Xcellis Workflow Director Release Notes 57
2 Log in to the command line using the following credentials
l User name stornext
l Password ltstornext user account passwordgt
Note password is the default password for the stornext user account If the password has been changed use the current password
3 Enter sudo rootsh to gain root user access
4 Enter the password for the stornext user account again
Edit the Grub Configuration File 1 Create a backup copy of the CentOS7 grubd40_custom configuration file Enter the following
cp etcgrubd40_custom scratch40_customorig
2 Create a backup copy of the CentOS7 grubcfg file Enter the following
cp bootgrub2grubcfg bootgrub2grubcfgorig
3 Edit the etcgrubd40_custom file using the vi editor included in CentOS7x Enter the following
vi etcgrubd40_custom
4 To enter vi insert mode enter i
5 Look for the lines beginning with linux16 as shown in bold blue below and add ltspacegtrdblacklist=ses rdblacklist=enclosure to the end of those lines as shown in green in the following example (Ellipses included below denote code prior to and after the linux16 sections)
Known Issues Workarounds and Additional Information
Xcellis Workflow Director Release Notes 58
linux16 vmlinuz-3100-51462el7qtmx86_64 root=UUID=3d9116b2-c5de-41fd-bd38-2042c0f8ebad ro console=tty1 vconsolekeymap=us crashkernel=768M0M vconsolefont=latarcyrheb-sun16 selinux=0 enforcing=0 intel_idlemax_cstate=0 processormax_cstate=1 elevator=deadline transparent_hugepage=never quiet LANG=en_USUTF-8 rdblacklist=ses rdblacklist=enclosure
initrd16 initramfs-3100-51462el7qtmx86_64img
menuentry Xcellis SOL --class centos --class gnu-linux --class os --unrestricted load_videoset gfxpayload=keepinsmod gzioinsmod part_msdosinsmod ext2set root=hd0msdos1if [ x = xy ] thensearch --no-floppy --fs-uuid --set=root --hint-bios=hd0msdos1 --hint-efi=hd0msdos1 --hint-baremetal=ahci0msdos1 --hint=hd0msdos1 a0467663-8cf0-48be-b967-d5ef7eb486e2elsesearch --no-floppy --fs-uuid --set=root a0467663-8cf0-48be-b967-d5ef7eb486e2filinux16 vmlinuz-3100-51462el7qtmx86_64 root=UUID=3d9116b2-c5de-41fd-bd38-2042c0f8ebad ro console=ttyS1115200n8 vconsolekeymap=us crashkernel=768M0M vconsolefont=latarcyrheb-sun16 selinux=0 enforcing=0 intel_idlemax_cstate=0 processormax_cstate=1 elevator=deadline transparent_hugepage=never quiet LANG=en_USUTF-8 rdblacklist=ses rdblacklist=enclosureinitrd16 initramfs-3100-51462el7qtmx86_64img
6 To exit insert mode and return to command mode press ltEscgt
7 To save changes and exit vi enter wq and press ltEntergt You will return to the command prompt (To exit vi without saving changes enter q and press ltEntergt)
8 Repeat Log in to the system command line on page 56 and Edit the Grub Configuration File on the previous page for the other server node
Edit the Blacklist Configuration File and Enable the Changes 1 Enter the following to create a backup copy of the blacklist configuration file
Known Issues Workarounds and Additional Information
Xcellis Workflow Director Release Notes 59
cp etcmodprobedblacklistconf scratchblacklistconforig
2 Enter the following to edit the etcmodprobedblacklistconf file using vi
vi etcmodprobedblacklistconf
3 To edit change to the vi insert mode Enter i
4 Add a separate line for rdblacklist ses and another line for rdblacklist enclosure to the file as shown in green in the following example
blacklist rivafb
blacklist savagefb
blacklist sstfb
blacklist neofb
blacklist tridentfb
blacklist tdfxfb
blacklist virgefb
blacklist vga16fb
blacklist viafb
ISDN - see bugs 154799 159068
blacklist hisax
blacklist hisax_fcpcipnp
sound drivers
blacklist snd-pcsp
IO dynamic configuration support for s390x (bz 563228)
blacklist chsc_sch
Known Issues Workarounds and Additional Information
Xcellis Workflow Director Release Notes 60
blacklist sb_edac
blacklist edac_core
blacklist sesblacklist enclosure
5 To exit insert mode and return to command mode press ltEscgt
6 To save changes and exit vi enter wq and press ltEntergt You will return to the command prompt (To exit vi without saving changes enter q and press ltEntergt)
7 To enable the changes enter
dracut -f
8 Continue to Reboot the system below
Workaround System Already UpgradedIf the system has been upgraded and cannot boot do the following to recover the system
1 Detachdisconnect the FC ports from the nodes or disable the FC zoning configuration for the QXS array(s)
2 Boot the system and enter the following to stop cvfs
systemctl stop cvfs
3 Edit the grub configuration file for your version of CentOS See Edit the Grub Configuration File on page 57
4 Edit the blacklist configuration file See Edit the Blacklist Configuration File and Enable the Changes on page 58
5 Reattach or re-enable FC zoning configuration for the QXS array(s)
6 Continue to Reboot the system below
Reboot the system 1 Reboot the server you are already logged into
systemctl reboot
Continue to Step 3 for single-node systems For dual-node systems continue to the next step
Known Issues Workarounds and Additional Information
Xcellis Workflow Director Release Notes 61
2 Log in to the other server node See Log in to the system command line on page 56
systemctl reboot
3 For dual-node systems repeat Step 3 for server node 2 The process is complete
Change Upgrade Timeout SettingBEFORE applying the upgrade to StorNext 6x do the following
Log in to the system command line 1 Open an SSH connection to the appropriate server and use the IP address assigned to the node on the
Management or LAN Client network or use the Service Port IP address if connected to the Service Port
Service Port IP addresses l Node 1 1017211 (dual-server node systems)
l Node 2 1017212 (dual-server node or HA-ready single-server node systems)
Note Node 2 is the server node sold with single-node (non-HA) Xcellis Workflow Director and Artico systems It is also used for installation using the StorNext Connect Install app for both single-node and dual-node systems only
2 Log in to the command line using the following credentials
l User name stornext
l Password ltstornext user account passwordgt
Note password is the default password for the stornext user account If the password has been changed use the current password
3 Enter sudo rootsh to gain root user access
4 Enter the password for the stornext user account again
1 Change to the config directory
cd usradicguiconfig
2 Copy the componentproperties file
cp componentproperties componentpropertiesorig
Known Issues Workarounds and Additional Information
Xcellis Workflow Director Release Notes 62
3 Edit the file using vi
vi componentproperties
4 Scroll down the file until you get to the Web Services Timeouts (seconds) section and the upgrade timeout line shown in bold text The current value should be similar to the value shown in bold green
Web Services Timeouts (seconds) wsconverttohatimeout=300wsapplyfwupgradetimeout=300 wsgetsystemidtimeout=10 wsntptimeout=30 wsdatetimetimeout=30 wsnetworkconfigtimeout=180 wsnetworkhapeertimeout=30 wsloggingleveltimeout=30 wscapturestatetimeout=600 wsjobclosetimeout=30 wsnasclosetimeout=60
5 To edit change to the vi insert mode Enter i
6 Change the value to 1200
Known Issues Workarounds and Additional Information
Xcellis Workflow Director Release Notes 63
Web Services Timeouts (seconds) wsconverttohatimeout=300wsapplyfwupgradetimeout=1200 wsgetsystemidtimeout=10 wsntptimeout=30 wsdatetimetimeout=30 wsnetworkconfigtimeout=180 wsnetworkhapeertimeout=30 wsloggingleveltimeout=30 wscapturestatetimeout=600 wsjobclosetimeout=30 wsnasclosetimeout=60
7 To exit insert mode and return to command mode press ltEscgt
8 To save changes and exit vi enter wq and press ltEntergt You will return to the command prompt (To exit vi without saving changes enter q and press ltEntergt)
9 Continue to Reboot the system below
Reboot the system 1 Reboot the server you are already logged into
systemctl reboot
Continue to Step 3 for single-node systems For dual-node systems continue to the next step
2 Log in to the other server node See Log in to the system command line on page 61
3 Reboot the other server node 2
systemctl reboot
4 Repeat Step 3 for server node 2
The process is complete
journalctl Filter ScriptStep 1 Upgrade to StorNext 605
Known Issues Workarounds and Additional Information
Xcellis Workflow Director Release Notes 64
Note StorNext 605 provides the script so you need to upgrade to StorNext 605 to access the file
See Upgrade a Gateway System (Upgrade Firmware) Using the Service Menu
Step 2 Log in to the System Command Line 1 Open an SSH connection to the appropriate server and use the IP address assigned to the node on the
Management or LAN Client network or use the Service Port IP address if connected to the Service Port
Service Port IP addresses l Node 1 1017211 (dual-server node systems)
l Node 2 1017212 (dual-server node or HA-ready single-server node systems)
Note Node 2 is the server node sold with single-node (non-HA) Xcellis Workflow Director and Artico systems It is also used for installation using the StorNext Connect Install app for both single-node and dual-node systems only
2 Log in to the command line using the following credentials
l User name stornext
l Password ltstornext user account passwordgt
Note password is the default password for the stornext user account If the password has been changed use the current password
3 Enter sudo rootsh to gain root user access
4 Enter the password for the stornext user account again
5 Continue to Step 3 Run the Journal Filter Script and View the Script Help below
Step 3 Run the Journal Filter Script and View the Script Help l Enter the following to use the script to view the log output in a way that filters out all the rootsh
commands
optDXiscriptsjournalctl_filtersh -f
l Enter the following to view the scripts help file
optDXiscriptsjournalctl_filtersh --help
Note The journalctl_filtersh output can also be saved to a file
Known Issues Workarounds and Additional Information
Xcellis Workflow Director Release Notes 65
StorNext Connect NTP not RunningWorkaround 1 If you encounter this issue when rebooting the system reboot or after a firmware upgrade do the following
1 Log in to the StorNext GUI and select gtConfiguration gt System
2 Click the Date amp Time tab
3 Set the NTP protocol options as follows Select either the Select a Timeserver Pool option and select the pool from the options available OR select the Specify a Timeserver or Pool option and enter the IP address of the time server
4 Click Apply which will reboot the node (or both nodes in dual-server systems) and re-enable and start NTP
Workaround 2Another alternative enables ntp when the system is rebooted
1 Using an SSH connection log in to the command line of the server
2 Enter the following command
usrbinsystemctl ntpdservice enable
3 Repeat for the other server (for dual-server node systems only)
4 Manually reboot the server (or both server nodes for dual-server node systems)
Restart the Appliance ControllerOn the server node hosting NAS do the following (use node 2 on dual-server node systems)
1 Open an SSH connection to the appropriate server node and use the IP address assigned to the node on the Management or LAN Client network
2 Log in to the command line using the following credentials
l User name stornext
l Password ltstornext user account passwordgt
Note password is the default password for the stornext user account If the password has been changed use the current password
3 Enter sudo rootsh to gain root user access
4 Enter the password for the stornext user account again
5 Enter the following
chown -R ldapldap varlibldap
Known Issues Workarounds and Additional Information
Xcellis Workflow Director Release Notes 66
6 Enter the following
systemctl restart slapd
7 Restart the appliance controller
systemctl start snnas_controller
systemctl stop snnas_controller
Create the Missing Hardware Monitor DirectoryDo the following to check if the directory is missing and re-create the directory if it is and restart the hwmond service
1 Open an SSH connection to the appropriate server and use the IP address assigned to the node on the Management or LAN Client network or use the Service Port IP address if connected to the Service Port
Service Port IP addresses l Node 1 1017211 (dual-server node systems)
l Node 2 1017212 (dual-server node or HA-ready single-server node systems)
Note Node 2 is the server node sold with single-node (non-HA) Xcellis Workflow Director and Artico systems It is also used for installation using the StorNext Connect Install app for both single-node and dual-node systems only
2 Log in to the command line using the following credentials
l User name stornext
l Password ltstornext user account passwordgt
Note password is the default password for the stornext user account If the password has been changed use the current password
3 Enter sudo rootsh to gain root user access
4 Enter the password for the stornext user account again
5 Enter the following on the command line
cd usradicHAMsharedHwMonStatus
If you see the following message the directory does not exist Continue to the next step
Known Issues Workarounds and Additional Information
Xcellis Workflow Director Release Notes 67
bash cd usradicHAMsharedHwMonStatus No such file or directory
6 Enter the following on the command line to create the directory
mkdir usradicHAMsharedHwMonStatus
7 Enter the following to verify the directory has been created
cd usradicHAMsharedHwMonStatus
8 Change the permission of the hwmond service to read-only
chmod -r 775 HwMonStatus
9 Restart the hwmond service
systemctl restart quantum-hwmondservice
How to Disable NFS v4To disable NFSv4 on Xcellis Workflow Director systems especially those systems running NAS 120 or earlier perform the following on node 2
Edit the nfs File 1 Open an SSH connection to the appropriate server and use the IP address assigned to the node on the
Management or LAN Client network or use the Service Port IP address if connected to the Service Port
Service Port IP addresses l Node 1 1017211 (dual-server node systems)
l Node 2 1017212 (dual-server node or HA-ready single-server node systems)
Note Node 2 is the server node sold with single-node (non-HA) Xcellis Workflow Director and Artico systems It is also used for installation using the StorNext Connect Install app for both single-node and dual-node systems only
Known Issues Workarounds and Additional Information
Xcellis Workflow Director Release Notes 68
2 Log in to the command line using the following credentials
l User name stornext
l Password ltstornext user account passwordgt
Note password is the default password for the stornext user account If the password has been changed use the current password
3 Enter sudo rootsh to gain root user access
4 Enter the password for the stornext user account again
5 Edit etcsysconfignfs file (See Example Use vi to Edit the nfs File on the next page)
6 Change the value for RPCNFSDARGS to -N 4 When finished the line must be RPCNFSDARGS=-N 4
7 Change the value for RPCMOUNTDOPTS to -N 4 When finished the line must be RPCMOUNTDOPTS=-N 4
8 Save the file
Restart NFS
For Xcellis Workflow Director (R630) systems
1 Enter the following to restart the NFS configuration
systemctl restart nfs-config
2 Enter the following to restart the NFS server
systemctl restart nfs-server
After You Restart NFS on Node 2Repeat both the Edit the nfs File on the previous page and Known Issues ndash StorNext 6x on page 20 sections on node 1( for dual-node systems)
If you need to create new NFS shares to export for user access you may do this now See the About the NAS App section of the StorNext Connect Documentation Center for information about NAS configuration using StorNext Connect
Known Issues Workarounds and Additional Information
Xcellis Workflow Director Release Notes 69
Example Use vi to Edit the nfs File 1 Enter the following
vi etcsysconfignfs
2 Move the cursor to the closing quotation mark in RPCNFSDARGS
3 Enter the following
i -N 4
4 Write the file and quit vi as follows
wq
5 For this example you would have to Restart NFS on the previous page and repeat the Edit the nfs File on page 67 and Restart NFS on the previous page again on node 1 (for dual-node systems)
6 Close the SSH session for the server(s) ( for dual-node systems)
Re-enable DDM on the Secondary Node After HA FailoverOnce the MDC node acting as secondary finishes rebooting and becomes functional again use fsddmconfig (or the GUI) from the server node currently acting as primary to re-enable DDM for the standby server node as follows
1 Open an SSH connection to the appropriate server and use the IP address assigned to the node on the Management or LAN Client network or use the Service Port IP address if connected to the Service Port
Service Port IP addresses l Node 1 1017211 (dual-server node systems)
l Node 2 1017212 (dual-server node or HA-ready single-server node systems)
Note Node 2 is the server node sold with single-node (non-HA) Xcellis Workflow Director and Artico systems It is also used for installation using the StorNext Connect Install app for both single-node and dual-node systems only
Contacting Quantum
Xcellis Workflow Director Release Notes 70
2 Log in to the command line using the following credentials
l User name stornext
l Password ltstornext user account passwordgt
Note password is the default password for the stornext user account If the password has been changed use the current password
3 Enter sudo rootsh to gain root user access
4 Enter the password for the stornext user account again
5 On the command line of the system enter the following
fsddmconfig -u -s e
standby_system_hostname
If a system running DDMs periodically displays an Admin Alert when it fails over cycles a client node or upgrades while the server node operating as secondary is rebooting but not completely down change the timeout value to allow more time to communicate with the node Update the TSM configuration parameter DDM_CLIENT_RETRY_TIMEOUT from the default 30 seconds to a larger value depending on how long the node is taking to reboot In the event the server node acting as secondary will be down for an extended period of time the node should be taken offline Additionally if this parameter is set too high and the standby server does not come back the command that is currently running (eg store or retrieve) will not return until after the specified timeout
For more information about the DDM_CLIENT_RETRY_TIMEOUT parameter that can be placed into the fs_sysparm_override configuration file refer to the usradicTSMconfigfs_sysparmREADME file
Caution Incorrect modification of the fs_sysparm_override configuration file can cause a serious adverse effect on StorNext functionality Before modifying this file we recommend you contact Contacting Quantum below
Contacting QuantumFor further assistance contact the Quantum Customer Support Center
Region Support Contact
North America 1-800-284-5101 (toll free)+1-720-249-5700
Contacting Quantum
Xcellis Workflow Director Release Notes 71
Region Support Contact
EMEA +800-7826-8888 (toll free)
+49 6131 324 185
Asia Pacific +800-7826-8887 (toll free)+603-7953-3010
For worldwide support
httpswwwquantumcomserviceandsupportget-helpindexaspxcontact-support
- Revision History
- About the Xcellis Workflow Director
- Training and Documentation Resources
- About StorNext 6
-
- What is StorNext
- Learn More on the Web
-
- What StorNext Releases are compatible with my system
- Upgrade StorNext Software and System Firmware
- General Notes
- Quantum Appliance Licenses
- Fixed Issues Notes and Enhancements ndash StorNext 6x
- Known Issues ndash StorNext 6x
- Known Issues Workarounds and Additional Information
- Contacting Quantum
-

Known Issues Workarounds and Additional Information
Xcellis Workflow Director Release Notes 49
1 Restarting NAS services can resume use of StorNext resources
2 Resuming StorNext resources interferes with attempts to stop StorNext
3 Continued use of these StorNext resources can result in mounted StorNext file systems that do not have a running fsm process which blocks access to the StorNext file system
If experience this on your system temporarily stop NAS services
1 Log in to the command line of the server (as sudo rootsh)
Launch the Command Line With an SSH Utility a Open an SSH connection to the appropriate server and use the IP address assigned to the
node on the ManagementLAN Client network
b Log in to the command line using the following credentials
l User name stornext
l Password ltstornext user account passwordgt
Note password is the default password for the stornext user account If the password has been changed use the current password
c Enter sudo rootsh to gain root user access
d Enter the password for the stornext user account again
2 Stop NAS by executing the following command
usrcvfslibsnnas_control stop
3 Stop the Appliance Controller by executing the following command
usrlocalquantumbinsml_service_tool stop snnas_controller
4 When you have finished Restart NAS and the Appliance Controller
a Start NAS by executing the following command
usrcvfslibsnnas_control start
b Start the Appliance Controller by executing the following command
usrlocalquantumbinsml_service_tool start snnas_controller
Known Issues Workarounds and Additional Information
Xcellis Workflow Director Release Notes 50
Scenario 2If you need to stop the system during a maintenance window This is an extension of Scenario 1 but NAS must vacate the file systems for an extended period of time If NAS services are resumed when they should be suspended those service processes may interfere with maintenance operations
To affect both scenarios timers exist that you can adjust to extend the amount of time required between the stornext stop operation and before NAS services resume The timers are controlled by the following Controller Registry values
l nasheartbeatcheck_state_secs l stornext_servicestop_periodTo see what values are currently assigned enter
su sysadmin -c reg show nasheartbeatcheck_state_secs
to display the setting of the frequency interval of the NAS heartbeat state check or enter
su sysadmin -c reg show stornext_servicestop_period
to display the duration that StorNext services are stopped
Note By default both timers are set to 120 (in seconds=2 minutes)
WorkaroundsWorkaround 1If StorNext fails to stop due to NAS resource usage do the following
1 Log in to the command line of the server
Launch the Command Line With an SSH Utility a Open an SSH connection to the appropriate server and use the IP address assigned to the
node on the ManagementLAN Client network
b Log in to the command line using the following credentials
l User name stornext
l Password ltstornext user account passwordgt
Note password is the default password for the stornext user account If the password has been changed use the current password
c Enter sudo rootsh to gain root user access
d Enter the password for the stornext user account again
Known Issues Workarounds and Additional Information
Xcellis Workflow Director Release Notes 51
2 Verify that the StorNext file systems are mounted
grep cvfs procmounts
If any StorNext file systems are not mounted mount them now
3 Mount the HA shared file system
mount usradicHAMshared
4 Start fsm for each StorNext file system (shown below as ltFSNAMEgt) mounted on the server node
cvadmin -e start ltFSNAMEgt on localhost
5 Stop StorNext services
For CentOS7 systems enter
systemctl stop cvfs
For CentOS6 systems enter
service cvfs stop
6 To stop NAS enter
usrcvfslibsnnas_control stop
7 To stop the Appliance Controller enter
usrlocalquantumbinsml_service_tool stop snnas_controller
When you are ready restart the Appliance Controller and NAS services
8 To restart the Appliance Controller enter
Known Issues Workarounds and Additional Information
Xcellis Workflow Director Release Notes 52
usrlocalquantumbinsml_service_tool start snnas_controller
9 To restart NAS enter
usrcvfslibsnnas_control start
Workaround 2For Scenario 1 Quantum recommends that you extend the time period to a value of 10 minutes (600 seconds) for both variables Set a value that exceeds the amount of time necessary for typical StorNext shutdown
To set new values
1 Log in to the command line
Launch the Command Line With an SSH Utility a Open an SSH connection to the appropriate server and use the IP address assigned to the
node on the ManagementLAN Client network
b Log in to the command line using the following credentials
l User name stornext
l Password ltstornext user account passwordgt
Note password is the default password for the stornext user account If the password has been changed use the current password
c Enter sudo rootsh to gain root user access
d Enter the password for the stornext user account again
2 Change the frequency interval of the NAS heartbeat state check to 600 seconds (10 minutes) Enter
su sysadmin -c reg set nasheartbeatcheck_state_secs 600
Note This is run with a temporary log in to the Appliance Controller as the sysadmin user
3 Change the duration that StorNext services are stopped to 600 seconds (10 minutes) Enter
Known Issues Workarounds and Additional Information
Xcellis Workflow Director Release Notes 53
su sysadmin -c reg set stornext_servicestop_period 600
4 Note This is run with a temporary log in to the Appliance Controller as the sysadmin user
Workaround 3For Scenario 2 to eliminate the confusion of setting a long duration for a maintenance window and then having to change the values back again to a shorter value again you can simply stop NAS services and the Appliance Controller and then restart these services when you are finished
To stop the services and restart them
1 Log in to the command line
Launch the Command Line With an SSH Utility a Open an SSH connection to the appropriate server and use the IP address assigned to the
node on the ManagementLAN Client network
b Log in to the command line using the following credentials
l User name stornext
l Password ltstornext user account passwordgt
Note password is the default password for the stornext user account If the password has been changed use the current password
c Enter sudo rootsh to gain root user access
d Enter the password for the stornext user account again
2 Stop NAS by executing the following command
usrcvfslibsnnas_control stop
3 Stop the Appliance Controller by executing the following command
usrlocalquantumbinsml_service_tool stop snnas_controller
When you are ready restart the Appliance Controller and NAS services
4 To restart the Appliance Controller enter
usrlocalquantumbinsml_service_tool start snnas_controller
Known Issues Workarounds and Additional Information
Xcellis Workflow Director Release Notes 54
5 To restart NAS enter
usrcvfslibsnnas_control start
6 Change the settings for the NAS heartbeat state check and the duration that StorNext services are stopped according to Workaround 2 on page 52
Workaround 4An alternate method for maintenance windows instead of implementing workaround 3 for Scenario 2 you can choose a much longer value if you need the NAS heartbeat state check interval and StorNext services stopped for a long period of time (for example during a planned maintenance window in a data center) While this is another option the downside of this is that you will need to know how much downtime to expect maintenance to take and then set these times to be less than what is needed for that maintenance It is also difficult to extend the maintenance period reliably once those timers have started In addition you will most likely have to reset the values back to their original settings when the maintenance window is complete which could be a hassle
Here is one example which extends the time values to 2 hours (7200 seconds)
1 Log in to the command line
Launch the Command Line With an SSH Utility a Open an SSH connection to the appropriate server and use the IP address assigned to the
node on the ManagementLAN Client network
b Log in to the command line using the following credentials
l User name stornext
l Password ltstornext user account passwordgt
Note password is the default password for the stornext user account If the password has been changed use the current password
c Enter sudo rootsh to gain root user access
d Enter the password for the stornext user account again
2 Change the frequency interval of the NAS heartbeat state check to 7200 seconds (10 minutes) Enter
su sysadmin -c reg set nasheartbeatcheck_state_secs 7200
Note This is run with a temporary log in to the Appliance Controller as the sysadmin user
3 Change the duration that StorNext services are stopped to 7200 seconds (10 minutes) Enter
Known Issues Workarounds and Additional Information
Xcellis Workflow Director Release Notes 55
su sysadmin -c reg set stornext_servicestop_period 7200
4 Note This is run with a temporary log in to the Appliance Controller as the sysadmin user
Change the componentproperties Timeout Setting 1 Log in to the command line of the primary server node (typically node 1) See Launch the Command
Line (for Xcellis Workflow DirectorGen 2) or Launch the Command Line (for R630 systems)
2 Open the componentproperties file with the vi editor
vi usradicguiconfigcomponentproperties
Pro Tip 1 Edit With vi
The vi editor is included in CentOS If you are unfamiliar with using vi to open edit (copypastedelete) exit with or without saving changes use the following Google search URL to find related links for editing with vi
httpswwwgooglecomsearchq=edit+with+vi
3 Scroll down to the web services timeouts section It should look similar to (note the default firmware upgrade value is 300 seconds - highlighted in green)
Web Services Timeouts (seconds)
wsconverttohatimeout=300 wsapplyfwupgradetimeout=300 wsgetsystemidtimeout=10 wsntptimeout=30 wsdatetimetimeout=30 wsnetworkconfigtimeout=180 wsnetworkhapeertimeout=30 wsloggingleveltimeout=30 wscapturestatetimeout=600 wsjobclosetimeout=30 wsnasclosetimeout=60
4 Move the cursor to sit over the number 3 enter ltSHIFTgt+ and then R (for replace) and enter the number 6 to change the wsapplyfwupgradetimeout= value from 300 seconds (5 minutes) to 600 seconds (10 minutes)
wsapplyfwupgradetimeout=600
Known Issues Workarounds and Additional Information
Xcellis Workflow Director Release Notes 56
5 Save the changes to the file by entering SHIFTwq to write the file and quit the vi editor
The setting change will be replicated to the other server node in 2-3 minutes after the file change is saved so this only has to be applied to server node 1
6 Run the Firmware Upgrade process again
Note Even though the upgrade failed previously the firmware upgrade files are still available for the upgrade
a Select either of the uploaded files click Apply In the case of a single file select the one file uploaded and click Apply
b Click Yes to confirm the installation For two-file upgrades both firmware files are applied to the system during the upgrade
The upgrade should complete after the timeout setting is changed However if the firmware upgrade fails again contact Contacting Quantum on page 70 for assistance with manually upgrading the node that failed to upgrade
Server Boot (QXSNetApp)This does not need to be applied to all systems connected to storage arrays only impacted systems as described here
Systems Impacted l This ONLY affects systems upgrading from StorNext 5x releases to 6x (prior to 605)
l This ONLY affects systems upgrading that are Fibre Channel-connected to BOTH NetApp and QXS arrays
Note This issue was fixed in StorNext 605 See 70300 on page 17 If you are upgrading to StorNext 605 you will not see this issue and do not have to perform this workaround
BEFORE applying the upgrade to StorNext 6x do the following
Log in to the system command line 1 Open an SSH connection to the appropriate server and use the IP address assigned to the node on the
Management or LAN Client network or use the Service Port IP address if connected to the Service Port
Service Port IP addresses l Node 1 1017211 (dual-server node systems)
l Node 2 1017212 (dual-server node or HA-ready single-server node systems)
Note Node 2 is the server node sold with single-node (non-HA) Xcellis Workflow Director and Artico systems It is also used for installation using the StorNext Connect Install app for both single-node and dual-node systems only
Known Issues Workarounds and Additional Information
Xcellis Workflow Director Release Notes 57
2 Log in to the command line using the following credentials
l User name stornext
l Password ltstornext user account passwordgt
Note password is the default password for the stornext user account If the password has been changed use the current password
3 Enter sudo rootsh to gain root user access
4 Enter the password for the stornext user account again
Edit the Grub Configuration File 1 Create a backup copy of the CentOS7 grubd40_custom configuration file Enter the following
cp etcgrubd40_custom scratch40_customorig
2 Create a backup copy of the CentOS7 grubcfg file Enter the following
cp bootgrub2grubcfg bootgrub2grubcfgorig
3 Edit the etcgrubd40_custom file using the vi editor included in CentOS7x Enter the following
vi etcgrubd40_custom
4 To enter vi insert mode enter i
5 Look for the lines beginning with linux16 as shown in bold blue below and add ltspacegtrdblacklist=ses rdblacklist=enclosure to the end of those lines as shown in green in the following example (Ellipses included below denote code prior to and after the linux16 sections)
Known Issues Workarounds and Additional Information
Xcellis Workflow Director Release Notes 58
linux16 vmlinuz-3100-51462el7qtmx86_64 root=UUID=3d9116b2-c5de-41fd-bd38-2042c0f8ebad ro console=tty1 vconsolekeymap=us crashkernel=768M0M vconsolefont=latarcyrheb-sun16 selinux=0 enforcing=0 intel_idlemax_cstate=0 processormax_cstate=1 elevator=deadline transparent_hugepage=never quiet LANG=en_USUTF-8 rdblacklist=ses rdblacklist=enclosure
initrd16 initramfs-3100-51462el7qtmx86_64img
menuentry Xcellis SOL --class centos --class gnu-linux --class os --unrestricted load_videoset gfxpayload=keepinsmod gzioinsmod part_msdosinsmod ext2set root=hd0msdos1if [ x = xy ] thensearch --no-floppy --fs-uuid --set=root --hint-bios=hd0msdos1 --hint-efi=hd0msdos1 --hint-baremetal=ahci0msdos1 --hint=hd0msdos1 a0467663-8cf0-48be-b967-d5ef7eb486e2elsesearch --no-floppy --fs-uuid --set=root a0467663-8cf0-48be-b967-d5ef7eb486e2filinux16 vmlinuz-3100-51462el7qtmx86_64 root=UUID=3d9116b2-c5de-41fd-bd38-2042c0f8ebad ro console=ttyS1115200n8 vconsolekeymap=us crashkernel=768M0M vconsolefont=latarcyrheb-sun16 selinux=0 enforcing=0 intel_idlemax_cstate=0 processormax_cstate=1 elevator=deadline transparent_hugepage=never quiet LANG=en_USUTF-8 rdblacklist=ses rdblacklist=enclosureinitrd16 initramfs-3100-51462el7qtmx86_64img
6 To exit insert mode and return to command mode press ltEscgt
7 To save changes and exit vi enter wq and press ltEntergt You will return to the command prompt (To exit vi without saving changes enter q and press ltEntergt)
8 Repeat Log in to the system command line on page 56 and Edit the Grub Configuration File on the previous page for the other server node
Edit the Blacklist Configuration File and Enable the Changes 1 Enter the following to create a backup copy of the blacklist configuration file
Known Issues Workarounds and Additional Information
Xcellis Workflow Director Release Notes 59
cp etcmodprobedblacklistconf scratchblacklistconforig
2 Enter the following to edit the etcmodprobedblacklistconf file using vi
vi etcmodprobedblacklistconf
3 To edit change to the vi insert mode Enter i
4 Add a separate line for rdblacklist ses and another line for rdblacklist enclosure to the file as shown in green in the following example
blacklist rivafb
blacklist savagefb
blacklist sstfb
blacklist neofb
blacklist tridentfb
blacklist tdfxfb
blacklist virgefb
blacklist vga16fb
blacklist viafb
ISDN - see bugs 154799 159068
blacklist hisax
blacklist hisax_fcpcipnp
sound drivers
blacklist snd-pcsp
IO dynamic configuration support for s390x (bz 563228)
blacklist chsc_sch
Known Issues Workarounds and Additional Information
Xcellis Workflow Director Release Notes 60
blacklist sb_edac
blacklist edac_core
blacklist sesblacklist enclosure
5 To exit insert mode and return to command mode press ltEscgt
6 To save changes and exit vi enter wq and press ltEntergt You will return to the command prompt (To exit vi without saving changes enter q and press ltEntergt)
7 To enable the changes enter
dracut -f
8 Continue to Reboot the system below
Workaround System Already UpgradedIf the system has been upgraded and cannot boot do the following to recover the system
1 Detachdisconnect the FC ports from the nodes or disable the FC zoning configuration for the QXS array(s)
2 Boot the system and enter the following to stop cvfs
systemctl stop cvfs
3 Edit the grub configuration file for your version of CentOS See Edit the Grub Configuration File on page 57
4 Edit the blacklist configuration file See Edit the Blacklist Configuration File and Enable the Changes on page 58
5 Reattach or re-enable FC zoning configuration for the QXS array(s)
6 Continue to Reboot the system below
Reboot the system 1 Reboot the server you are already logged into
systemctl reboot
Continue to Step 3 for single-node systems For dual-node systems continue to the next step
Known Issues Workarounds and Additional Information
Xcellis Workflow Director Release Notes 61
2 Log in to the other server node See Log in to the system command line on page 56
systemctl reboot
3 For dual-node systems repeat Step 3 for server node 2 The process is complete
Change Upgrade Timeout SettingBEFORE applying the upgrade to StorNext 6x do the following
Log in to the system command line 1 Open an SSH connection to the appropriate server and use the IP address assigned to the node on the
Management or LAN Client network or use the Service Port IP address if connected to the Service Port
Service Port IP addresses l Node 1 1017211 (dual-server node systems)
l Node 2 1017212 (dual-server node or HA-ready single-server node systems)
Note Node 2 is the server node sold with single-node (non-HA) Xcellis Workflow Director and Artico systems It is also used for installation using the StorNext Connect Install app for both single-node and dual-node systems only
2 Log in to the command line using the following credentials
l User name stornext
l Password ltstornext user account passwordgt
Note password is the default password for the stornext user account If the password has been changed use the current password
3 Enter sudo rootsh to gain root user access
4 Enter the password for the stornext user account again
1 Change to the config directory
cd usradicguiconfig
2 Copy the componentproperties file
cp componentproperties componentpropertiesorig
Known Issues Workarounds and Additional Information
Xcellis Workflow Director Release Notes 62
3 Edit the file using vi
vi componentproperties
4 Scroll down the file until you get to the Web Services Timeouts (seconds) section and the upgrade timeout line shown in bold text The current value should be similar to the value shown in bold green
Web Services Timeouts (seconds) wsconverttohatimeout=300wsapplyfwupgradetimeout=300 wsgetsystemidtimeout=10 wsntptimeout=30 wsdatetimetimeout=30 wsnetworkconfigtimeout=180 wsnetworkhapeertimeout=30 wsloggingleveltimeout=30 wscapturestatetimeout=600 wsjobclosetimeout=30 wsnasclosetimeout=60
5 To edit change to the vi insert mode Enter i
6 Change the value to 1200
Known Issues Workarounds and Additional Information
Xcellis Workflow Director Release Notes 63
Web Services Timeouts (seconds) wsconverttohatimeout=300wsapplyfwupgradetimeout=1200 wsgetsystemidtimeout=10 wsntptimeout=30 wsdatetimetimeout=30 wsnetworkconfigtimeout=180 wsnetworkhapeertimeout=30 wsloggingleveltimeout=30 wscapturestatetimeout=600 wsjobclosetimeout=30 wsnasclosetimeout=60
7 To exit insert mode and return to command mode press ltEscgt
8 To save changes and exit vi enter wq and press ltEntergt You will return to the command prompt (To exit vi without saving changes enter q and press ltEntergt)
9 Continue to Reboot the system below
Reboot the system 1 Reboot the server you are already logged into
systemctl reboot
Continue to Step 3 for single-node systems For dual-node systems continue to the next step
2 Log in to the other server node See Log in to the system command line on page 61
3 Reboot the other server node 2
systemctl reboot
4 Repeat Step 3 for server node 2
The process is complete
journalctl Filter ScriptStep 1 Upgrade to StorNext 605
Known Issues Workarounds and Additional Information
Xcellis Workflow Director Release Notes 64
Note StorNext 605 provides the script so you need to upgrade to StorNext 605 to access the file
See Upgrade a Gateway System (Upgrade Firmware) Using the Service Menu
Step 2 Log in to the System Command Line 1 Open an SSH connection to the appropriate server and use the IP address assigned to the node on the
Management or LAN Client network or use the Service Port IP address if connected to the Service Port
Service Port IP addresses l Node 1 1017211 (dual-server node systems)
l Node 2 1017212 (dual-server node or HA-ready single-server node systems)
Note Node 2 is the server node sold with single-node (non-HA) Xcellis Workflow Director and Artico systems It is also used for installation using the StorNext Connect Install app for both single-node and dual-node systems only
2 Log in to the command line using the following credentials
l User name stornext
l Password ltstornext user account passwordgt
Note password is the default password for the stornext user account If the password has been changed use the current password
3 Enter sudo rootsh to gain root user access
4 Enter the password for the stornext user account again
5 Continue to Step 3 Run the Journal Filter Script and View the Script Help below
Step 3 Run the Journal Filter Script and View the Script Help l Enter the following to use the script to view the log output in a way that filters out all the rootsh
commands
optDXiscriptsjournalctl_filtersh -f
l Enter the following to view the scripts help file
optDXiscriptsjournalctl_filtersh --help
Note The journalctl_filtersh output can also be saved to a file
Known Issues Workarounds and Additional Information
Xcellis Workflow Director Release Notes 65
StorNext Connect NTP not RunningWorkaround 1 If you encounter this issue when rebooting the system reboot or after a firmware upgrade do the following
1 Log in to the StorNext GUI and select gtConfiguration gt System
2 Click the Date amp Time tab
3 Set the NTP protocol options as follows Select either the Select a Timeserver Pool option and select the pool from the options available OR select the Specify a Timeserver or Pool option and enter the IP address of the time server
4 Click Apply which will reboot the node (or both nodes in dual-server systems) and re-enable and start NTP
Workaround 2Another alternative enables ntp when the system is rebooted
1 Using an SSH connection log in to the command line of the server
2 Enter the following command
usrbinsystemctl ntpdservice enable
3 Repeat for the other server (for dual-server node systems only)
4 Manually reboot the server (or both server nodes for dual-server node systems)
Restart the Appliance ControllerOn the server node hosting NAS do the following (use node 2 on dual-server node systems)
1 Open an SSH connection to the appropriate server node and use the IP address assigned to the node on the Management or LAN Client network
2 Log in to the command line using the following credentials
l User name stornext
l Password ltstornext user account passwordgt
Note password is the default password for the stornext user account If the password has been changed use the current password
3 Enter sudo rootsh to gain root user access
4 Enter the password for the stornext user account again
5 Enter the following
chown -R ldapldap varlibldap
Known Issues Workarounds and Additional Information
Xcellis Workflow Director Release Notes 66
6 Enter the following
systemctl restart slapd
7 Restart the appliance controller
systemctl start snnas_controller
systemctl stop snnas_controller
Create the Missing Hardware Monitor DirectoryDo the following to check if the directory is missing and re-create the directory if it is and restart the hwmond service
1 Open an SSH connection to the appropriate server and use the IP address assigned to the node on the Management or LAN Client network or use the Service Port IP address if connected to the Service Port
Service Port IP addresses l Node 1 1017211 (dual-server node systems)
l Node 2 1017212 (dual-server node or HA-ready single-server node systems)
Note Node 2 is the server node sold with single-node (non-HA) Xcellis Workflow Director and Artico systems It is also used for installation using the StorNext Connect Install app for both single-node and dual-node systems only
2 Log in to the command line using the following credentials
l User name stornext
l Password ltstornext user account passwordgt
Note password is the default password for the stornext user account If the password has been changed use the current password
3 Enter sudo rootsh to gain root user access
4 Enter the password for the stornext user account again
5 Enter the following on the command line
cd usradicHAMsharedHwMonStatus
If you see the following message the directory does not exist Continue to the next step
Known Issues Workarounds and Additional Information
Xcellis Workflow Director Release Notes 67
bash cd usradicHAMsharedHwMonStatus No such file or directory
6 Enter the following on the command line to create the directory
mkdir usradicHAMsharedHwMonStatus
7 Enter the following to verify the directory has been created
cd usradicHAMsharedHwMonStatus
8 Change the permission of the hwmond service to read-only
chmod -r 775 HwMonStatus
9 Restart the hwmond service
systemctl restart quantum-hwmondservice
How to Disable NFS v4To disable NFSv4 on Xcellis Workflow Director systems especially those systems running NAS 120 or earlier perform the following on node 2
Edit the nfs File 1 Open an SSH connection to the appropriate server and use the IP address assigned to the node on the
Management or LAN Client network or use the Service Port IP address if connected to the Service Port
Service Port IP addresses l Node 1 1017211 (dual-server node systems)
l Node 2 1017212 (dual-server node or HA-ready single-server node systems)
Note Node 2 is the server node sold with single-node (non-HA) Xcellis Workflow Director and Artico systems It is also used for installation using the StorNext Connect Install app for both single-node and dual-node systems only
Known Issues Workarounds and Additional Information
Xcellis Workflow Director Release Notes 68
2 Log in to the command line using the following credentials
l User name stornext
l Password ltstornext user account passwordgt
Note password is the default password for the stornext user account If the password has been changed use the current password
3 Enter sudo rootsh to gain root user access
4 Enter the password for the stornext user account again
5 Edit etcsysconfignfs file (See Example Use vi to Edit the nfs File on the next page)
6 Change the value for RPCNFSDARGS to -N 4 When finished the line must be RPCNFSDARGS=-N 4
7 Change the value for RPCMOUNTDOPTS to -N 4 When finished the line must be RPCMOUNTDOPTS=-N 4
8 Save the file
Restart NFS
For Xcellis Workflow Director (R630) systems
1 Enter the following to restart the NFS configuration
systemctl restart nfs-config
2 Enter the following to restart the NFS server
systemctl restart nfs-server
After You Restart NFS on Node 2Repeat both the Edit the nfs File on the previous page and Known Issues ndash StorNext 6x on page 20 sections on node 1( for dual-node systems)
If you need to create new NFS shares to export for user access you may do this now See the About the NAS App section of the StorNext Connect Documentation Center for information about NAS configuration using StorNext Connect
Known Issues Workarounds and Additional Information
Xcellis Workflow Director Release Notes 69
Example Use vi to Edit the nfs File 1 Enter the following
vi etcsysconfignfs
2 Move the cursor to the closing quotation mark in RPCNFSDARGS
3 Enter the following
i -N 4
4 Write the file and quit vi as follows
wq
5 For this example you would have to Restart NFS on the previous page and repeat the Edit the nfs File on page 67 and Restart NFS on the previous page again on node 1 (for dual-node systems)
6 Close the SSH session for the server(s) ( for dual-node systems)
Re-enable DDM on the Secondary Node After HA FailoverOnce the MDC node acting as secondary finishes rebooting and becomes functional again use fsddmconfig (or the GUI) from the server node currently acting as primary to re-enable DDM for the standby server node as follows
1 Open an SSH connection to the appropriate server and use the IP address assigned to the node on the Management or LAN Client network or use the Service Port IP address if connected to the Service Port
Service Port IP addresses l Node 1 1017211 (dual-server node systems)
l Node 2 1017212 (dual-server node or HA-ready single-server node systems)
Note Node 2 is the server node sold with single-node (non-HA) Xcellis Workflow Director and Artico systems It is also used for installation using the StorNext Connect Install app for both single-node and dual-node systems only
Contacting Quantum
Xcellis Workflow Director Release Notes 70
2 Log in to the command line using the following credentials
l User name stornext
l Password ltstornext user account passwordgt
Note password is the default password for the stornext user account If the password has been changed use the current password
3 Enter sudo rootsh to gain root user access
4 Enter the password for the stornext user account again
5 On the command line of the system enter the following
fsddmconfig -u -s e
standby_system_hostname
If a system running DDMs periodically displays an Admin Alert when it fails over cycles a client node or upgrades while the server node operating as secondary is rebooting but not completely down change the timeout value to allow more time to communicate with the node Update the TSM configuration parameter DDM_CLIENT_RETRY_TIMEOUT from the default 30 seconds to a larger value depending on how long the node is taking to reboot In the event the server node acting as secondary will be down for an extended period of time the node should be taken offline Additionally if this parameter is set too high and the standby server does not come back the command that is currently running (eg store or retrieve) will not return until after the specified timeout
For more information about the DDM_CLIENT_RETRY_TIMEOUT parameter that can be placed into the fs_sysparm_override configuration file refer to the usradicTSMconfigfs_sysparmREADME file
Caution Incorrect modification of the fs_sysparm_override configuration file can cause a serious adverse effect on StorNext functionality Before modifying this file we recommend you contact Contacting Quantum below
Contacting QuantumFor further assistance contact the Quantum Customer Support Center
Region Support Contact
North America 1-800-284-5101 (toll free)+1-720-249-5700
Contacting Quantum
Xcellis Workflow Director Release Notes 71
Region Support Contact
EMEA +800-7826-8888 (toll free)
+49 6131 324 185
Asia Pacific +800-7826-8887 (toll free)+603-7953-3010
For worldwide support
httpswwwquantumcomserviceandsupportget-helpindexaspxcontact-support
- Revision History
- About the Xcellis Workflow Director
- Training and Documentation Resources
- About StorNext 6
-
- What is StorNext
- Learn More on the Web
-
- What StorNext Releases are compatible with my system
- Upgrade StorNext Software and System Firmware
- General Notes
- Quantum Appliance Licenses
- Fixed Issues Notes and Enhancements ndash StorNext 6x
- Known Issues ndash StorNext 6x
- Known Issues Workarounds and Additional Information
- Contacting Quantum
-
Known Issues Workarounds and Additional Information
Xcellis Workflow Director Release Notes 50
Scenario 2If you need to stop the system during a maintenance window This is an extension of Scenario 1 but NAS must vacate the file systems for an extended period of time If NAS services are resumed when they should be suspended those service processes may interfere with maintenance operations
To affect both scenarios timers exist that you can adjust to extend the amount of time required between the stornext stop operation and before NAS services resume The timers are controlled by the following Controller Registry values
l nasheartbeatcheck_state_secs l stornext_servicestop_periodTo see what values are currently assigned enter
su sysadmin -c reg show nasheartbeatcheck_state_secs
to display the setting of the frequency interval of the NAS heartbeat state check or enter
su sysadmin -c reg show stornext_servicestop_period
to display the duration that StorNext services are stopped
Note By default both timers are set to 120 (in seconds=2 minutes)
WorkaroundsWorkaround 1If StorNext fails to stop due to NAS resource usage do the following
1 Log in to the command line of the server
Launch the Command Line With an SSH Utility a Open an SSH connection to the appropriate server and use the IP address assigned to the
node on the ManagementLAN Client network
b Log in to the command line using the following credentials
l User name stornext
l Password ltstornext user account passwordgt
Note password is the default password for the stornext user account If the password has been changed use the current password
c Enter sudo rootsh to gain root user access
d Enter the password for the stornext user account again
Known Issues Workarounds and Additional Information
Xcellis Workflow Director Release Notes 51
2 Verify that the StorNext file systems are mounted
grep cvfs procmounts
If any StorNext file systems are not mounted mount them now
3 Mount the HA shared file system
mount usradicHAMshared
4 Start fsm for each StorNext file system (shown below as ltFSNAMEgt) mounted on the server node
cvadmin -e start ltFSNAMEgt on localhost
5 Stop StorNext services
For CentOS7 systems enter
systemctl stop cvfs
For CentOS6 systems enter
service cvfs stop
6 To stop NAS enter
usrcvfslibsnnas_control stop
7 To stop the Appliance Controller enter
usrlocalquantumbinsml_service_tool stop snnas_controller
When you are ready restart the Appliance Controller and NAS services
8 To restart the Appliance Controller enter
Known Issues Workarounds and Additional Information
Xcellis Workflow Director Release Notes 52
usrlocalquantumbinsml_service_tool start snnas_controller
9 To restart NAS enter
usrcvfslibsnnas_control start
Workaround 2For Scenario 1 Quantum recommends that you extend the time period to a value of 10 minutes (600 seconds) for both variables Set a value that exceeds the amount of time necessary for typical StorNext shutdown
To set new values
1 Log in to the command line
Launch the Command Line With an SSH Utility a Open an SSH connection to the appropriate server and use the IP address assigned to the
node on the ManagementLAN Client network
b Log in to the command line using the following credentials
l User name stornext
l Password ltstornext user account passwordgt
Note password is the default password for the stornext user account If the password has been changed use the current password
c Enter sudo rootsh to gain root user access
d Enter the password for the stornext user account again
2 Change the frequency interval of the NAS heartbeat state check to 600 seconds (10 minutes) Enter
su sysadmin -c reg set nasheartbeatcheck_state_secs 600
Note This is run with a temporary log in to the Appliance Controller as the sysadmin user
3 Change the duration that StorNext services are stopped to 600 seconds (10 minutes) Enter
Known Issues Workarounds and Additional Information
Xcellis Workflow Director Release Notes 53
su sysadmin -c reg set stornext_servicestop_period 600
4 Note This is run with a temporary log in to the Appliance Controller as the sysadmin user
Workaround 3For Scenario 2 to eliminate the confusion of setting a long duration for a maintenance window and then having to change the values back again to a shorter value again you can simply stop NAS services and the Appliance Controller and then restart these services when you are finished
To stop the services and restart them
1 Log in to the command line
Launch the Command Line With an SSH Utility a Open an SSH connection to the appropriate server and use the IP address assigned to the
node on the ManagementLAN Client network
b Log in to the command line using the following credentials
l User name stornext
l Password ltstornext user account passwordgt
Note password is the default password for the stornext user account If the password has been changed use the current password
c Enter sudo rootsh to gain root user access
d Enter the password for the stornext user account again
2 Stop NAS by executing the following command
usrcvfslibsnnas_control stop
3 Stop the Appliance Controller by executing the following command
usrlocalquantumbinsml_service_tool stop snnas_controller
When you are ready restart the Appliance Controller and NAS services
4 To restart the Appliance Controller enter
usrlocalquantumbinsml_service_tool start snnas_controller
Known Issues Workarounds and Additional Information
Xcellis Workflow Director Release Notes 54
5 To restart NAS enter
usrcvfslibsnnas_control start
6 Change the settings for the NAS heartbeat state check and the duration that StorNext services are stopped according to Workaround 2 on page 52
Workaround 4An alternate method for maintenance windows instead of implementing workaround 3 for Scenario 2 you can choose a much longer value if you need the NAS heartbeat state check interval and StorNext services stopped for a long period of time (for example during a planned maintenance window in a data center) While this is another option the downside of this is that you will need to know how much downtime to expect maintenance to take and then set these times to be less than what is needed for that maintenance It is also difficult to extend the maintenance period reliably once those timers have started In addition you will most likely have to reset the values back to their original settings when the maintenance window is complete which could be a hassle
Here is one example which extends the time values to 2 hours (7200 seconds)
1 Log in to the command line
Launch the Command Line With an SSH Utility a Open an SSH connection to the appropriate server and use the IP address assigned to the
node on the ManagementLAN Client network
b Log in to the command line using the following credentials
l User name stornext
l Password ltstornext user account passwordgt
Note password is the default password for the stornext user account If the password has been changed use the current password
c Enter sudo rootsh to gain root user access
d Enter the password for the stornext user account again
2 Change the frequency interval of the NAS heartbeat state check to 7200 seconds (10 minutes) Enter
su sysadmin -c reg set nasheartbeatcheck_state_secs 7200
Note This is run with a temporary log in to the Appliance Controller as the sysadmin user
3 Change the duration that StorNext services are stopped to 7200 seconds (10 minutes) Enter
Known Issues Workarounds and Additional Information
Xcellis Workflow Director Release Notes 55
su sysadmin -c reg set stornext_servicestop_period 7200
4 Note This is run with a temporary log in to the Appliance Controller as the sysadmin user
Change the componentproperties Timeout Setting 1 Log in to the command line of the primary server node (typically node 1) See Launch the Command
Line (for Xcellis Workflow DirectorGen 2) or Launch the Command Line (for R630 systems)
2 Open the componentproperties file with the vi editor
vi usradicguiconfigcomponentproperties
Pro Tip 1 Edit With vi
The vi editor is included in CentOS If you are unfamiliar with using vi to open edit (copypastedelete) exit with or without saving changes use the following Google search URL to find related links for editing with vi
httpswwwgooglecomsearchq=edit+with+vi
3 Scroll down to the web services timeouts section It should look similar to (note the default firmware upgrade value is 300 seconds - highlighted in green)
Web Services Timeouts (seconds)
wsconverttohatimeout=300 wsapplyfwupgradetimeout=300 wsgetsystemidtimeout=10 wsntptimeout=30 wsdatetimetimeout=30 wsnetworkconfigtimeout=180 wsnetworkhapeertimeout=30 wsloggingleveltimeout=30 wscapturestatetimeout=600 wsjobclosetimeout=30 wsnasclosetimeout=60
4 Move the cursor to sit over the number 3 enter ltSHIFTgt+ and then R (for replace) and enter the number 6 to change the wsapplyfwupgradetimeout= value from 300 seconds (5 minutes) to 600 seconds (10 minutes)
wsapplyfwupgradetimeout=600
Known Issues Workarounds and Additional Information
Xcellis Workflow Director Release Notes 56
5 Save the changes to the file by entering SHIFTwq to write the file and quit the vi editor
The setting change will be replicated to the other server node in 2-3 minutes after the file change is saved so this only has to be applied to server node 1
6 Run the Firmware Upgrade process again
Note Even though the upgrade failed previously the firmware upgrade files are still available for the upgrade
a Select either of the uploaded files click Apply In the case of a single file select the one file uploaded and click Apply
b Click Yes to confirm the installation For two-file upgrades both firmware files are applied to the system during the upgrade
The upgrade should complete after the timeout setting is changed However if the firmware upgrade fails again contact Contacting Quantum on page 70 for assistance with manually upgrading the node that failed to upgrade
Server Boot (QXSNetApp)This does not need to be applied to all systems connected to storage arrays only impacted systems as described here
Systems Impacted l This ONLY affects systems upgrading from StorNext 5x releases to 6x (prior to 605)
l This ONLY affects systems upgrading that are Fibre Channel-connected to BOTH NetApp and QXS arrays
Note This issue was fixed in StorNext 605 See 70300 on page 17 If you are upgrading to StorNext 605 you will not see this issue and do not have to perform this workaround
BEFORE applying the upgrade to StorNext 6x do the following
Log in to the system command line 1 Open an SSH connection to the appropriate server and use the IP address assigned to the node on the
Management or LAN Client network or use the Service Port IP address if connected to the Service Port
Service Port IP addresses l Node 1 1017211 (dual-server node systems)
l Node 2 1017212 (dual-server node or HA-ready single-server node systems)
Note Node 2 is the server node sold with single-node (non-HA) Xcellis Workflow Director and Artico systems It is also used for installation using the StorNext Connect Install app for both single-node and dual-node systems only
Known Issues Workarounds and Additional Information
Xcellis Workflow Director Release Notes 57
2 Log in to the command line using the following credentials
l User name stornext
l Password ltstornext user account passwordgt
Note password is the default password for the stornext user account If the password has been changed use the current password
3 Enter sudo rootsh to gain root user access
4 Enter the password for the stornext user account again
Edit the Grub Configuration File 1 Create a backup copy of the CentOS7 grubd40_custom configuration file Enter the following
cp etcgrubd40_custom scratch40_customorig
2 Create a backup copy of the CentOS7 grubcfg file Enter the following
cp bootgrub2grubcfg bootgrub2grubcfgorig
3 Edit the etcgrubd40_custom file using the vi editor included in CentOS7x Enter the following
vi etcgrubd40_custom
4 To enter vi insert mode enter i
5 Look for the lines beginning with linux16 as shown in bold blue below and add ltspacegtrdblacklist=ses rdblacklist=enclosure to the end of those lines as shown in green in the following example (Ellipses included below denote code prior to and after the linux16 sections)
Known Issues Workarounds and Additional Information
Xcellis Workflow Director Release Notes 58
linux16 vmlinuz-3100-51462el7qtmx86_64 root=UUID=3d9116b2-c5de-41fd-bd38-2042c0f8ebad ro console=tty1 vconsolekeymap=us crashkernel=768M0M vconsolefont=latarcyrheb-sun16 selinux=0 enforcing=0 intel_idlemax_cstate=0 processormax_cstate=1 elevator=deadline transparent_hugepage=never quiet LANG=en_USUTF-8 rdblacklist=ses rdblacklist=enclosure
initrd16 initramfs-3100-51462el7qtmx86_64img
menuentry Xcellis SOL --class centos --class gnu-linux --class os --unrestricted load_videoset gfxpayload=keepinsmod gzioinsmod part_msdosinsmod ext2set root=hd0msdos1if [ x = xy ] thensearch --no-floppy --fs-uuid --set=root --hint-bios=hd0msdos1 --hint-efi=hd0msdos1 --hint-baremetal=ahci0msdos1 --hint=hd0msdos1 a0467663-8cf0-48be-b967-d5ef7eb486e2elsesearch --no-floppy --fs-uuid --set=root a0467663-8cf0-48be-b967-d5ef7eb486e2filinux16 vmlinuz-3100-51462el7qtmx86_64 root=UUID=3d9116b2-c5de-41fd-bd38-2042c0f8ebad ro console=ttyS1115200n8 vconsolekeymap=us crashkernel=768M0M vconsolefont=latarcyrheb-sun16 selinux=0 enforcing=0 intel_idlemax_cstate=0 processormax_cstate=1 elevator=deadline transparent_hugepage=never quiet LANG=en_USUTF-8 rdblacklist=ses rdblacklist=enclosureinitrd16 initramfs-3100-51462el7qtmx86_64img
6 To exit insert mode and return to command mode press ltEscgt
7 To save changes and exit vi enter wq and press ltEntergt You will return to the command prompt (To exit vi without saving changes enter q and press ltEntergt)
8 Repeat Log in to the system command line on page 56 and Edit the Grub Configuration File on the previous page for the other server node
Edit the Blacklist Configuration File and Enable the Changes 1 Enter the following to create a backup copy of the blacklist configuration file
Known Issues Workarounds and Additional Information
Xcellis Workflow Director Release Notes 59
cp etcmodprobedblacklistconf scratchblacklistconforig
2 Enter the following to edit the etcmodprobedblacklistconf file using vi
vi etcmodprobedblacklistconf
3 To edit change to the vi insert mode Enter i
4 Add a separate line for rdblacklist ses and another line for rdblacklist enclosure to the file as shown in green in the following example
blacklist rivafb
blacklist savagefb
blacklist sstfb
blacklist neofb
blacklist tridentfb
blacklist tdfxfb
blacklist virgefb
blacklist vga16fb
blacklist viafb
ISDN - see bugs 154799 159068
blacklist hisax
blacklist hisax_fcpcipnp
sound drivers
blacklist snd-pcsp
IO dynamic configuration support for s390x (bz 563228)
blacklist chsc_sch
Known Issues Workarounds and Additional Information
Xcellis Workflow Director Release Notes 60
blacklist sb_edac
blacklist edac_core
blacklist sesblacklist enclosure
5 To exit insert mode and return to command mode press ltEscgt
6 To save changes and exit vi enter wq and press ltEntergt You will return to the command prompt (To exit vi without saving changes enter q and press ltEntergt)
7 To enable the changes enter
dracut -f
8 Continue to Reboot the system below
Workaround System Already UpgradedIf the system has been upgraded and cannot boot do the following to recover the system
1 Detachdisconnect the FC ports from the nodes or disable the FC zoning configuration for the QXS array(s)
2 Boot the system and enter the following to stop cvfs
systemctl stop cvfs
3 Edit the grub configuration file for your version of CentOS See Edit the Grub Configuration File on page 57
4 Edit the blacklist configuration file See Edit the Blacklist Configuration File and Enable the Changes on page 58
5 Reattach or re-enable FC zoning configuration for the QXS array(s)
6 Continue to Reboot the system below
Reboot the system 1 Reboot the server you are already logged into
systemctl reboot
Continue to Step 3 for single-node systems For dual-node systems continue to the next step
Known Issues Workarounds and Additional Information
Xcellis Workflow Director Release Notes 61
2 Log in to the other server node See Log in to the system command line on page 56
systemctl reboot
3 For dual-node systems repeat Step 3 for server node 2 The process is complete
Change Upgrade Timeout SettingBEFORE applying the upgrade to StorNext 6x do the following
Log in to the system command line 1 Open an SSH connection to the appropriate server and use the IP address assigned to the node on the
Management or LAN Client network or use the Service Port IP address if connected to the Service Port
Service Port IP addresses l Node 1 1017211 (dual-server node systems)
l Node 2 1017212 (dual-server node or HA-ready single-server node systems)
Note Node 2 is the server node sold with single-node (non-HA) Xcellis Workflow Director and Artico systems It is also used for installation using the StorNext Connect Install app for both single-node and dual-node systems only
2 Log in to the command line using the following credentials
l User name stornext
l Password ltstornext user account passwordgt
Note password is the default password for the stornext user account If the password has been changed use the current password
3 Enter sudo rootsh to gain root user access
4 Enter the password for the stornext user account again
1 Change to the config directory
cd usradicguiconfig
2 Copy the componentproperties file
cp componentproperties componentpropertiesorig
Known Issues Workarounds and Additional Information
Xcellis Workflow Director Release Notes 62
3 Edit the file using vi
vi componentproperties
4 Scroll down the file until you get to the Web Services Timeouts (seconds) section and the upgrade timeout line shown in bold text The current value should be similar to the value shown in bold green
Web Services Timeouts (seconds) wsconverttohatimeout=300wsapplyfwupgradetimeout=300 wsgetsystemidtimeout=10 wsntptimeout=30 wsdatetimetimeout=30 wsnetworkconfigtimeout=180 wsnetworkhapeertimeout=30 wsloggingleveltimeout=30 wscapturestatetimeout=600 wsjobclosetimeout=30 wsnasclosetimeout=60
5 To edit change to the vi insert mode Enter i
6 Change the value to 1200
Known Issues Workarounds and Additional Information
Xcellis Workflow Director Release Notes 63
Web Services Timeouts (seconds) wsconverttohatimeout=300wsapplyfwupgradetimeout=1200 wsgetsystemidtimeout=10 wsntptimeout=30 wsdatetimetimeout=30 wsnetworkconfigtimeout=180 wsnetworkhapeertimeout=30 wsloggingleveltimeout=30 wscapturestatetimeout=600 wsjobclosetimeout=30 wsnasclosetimeout=60
7 To exit insert mode and return to command mode press ltEscgt
8 To save changes and exit vi enter wq and press ltEntergt You will return to the command prompt (To exit vi without saving changes enter q and press ltEntergt)
9 Continue to Reboot the system below
Reboot the system 1 Reboot the server you are already logged into
systemctl reboot
Continue to Step 3 for single-node systems For dual-node systems continue to the next step
2 Log in to the other server node See Log in to the system command line on page 61
3 Reboot the other server node 2
systemctl reboot
4 Repeat Step 3 for server node 2
The process is complete
journalctl Filter ScriptStep 1 Upgrade to StorNext 605
Known Issues Workarounds and Additional Information
Xcellis Workflow Director Release Notes 64
Note StorNext 605 provides the script so you need to upgrade to StorNext 605 to access the file
See Upgrade a Gateway System (Upgrade Firmware) Using the Service Menu
Step 2 Log in to the System Command Line 1 Open an SSH connection to the appropriate server and use the IP address assigned to the node on the
Management or LAN Client network or use the Service Port IP address if connected to the Service Port
Service Port IP addresses l Node 1 1017211 (dual-server node systems)
l Node 2 1017212 (dual-server node or HA-ready single-server node systems)
Note Node 2 is the server node sold with single-node (non-HA) Xcellis Workflow Director and Artico systems It is also used for installation using the StorNext Connect Install app for both single-node and dual-node systems only
2 Log in to the command line using the following credentials
l User name stornext
l Password ltstornext user account passwordgt
Note password is the default password for the stornext user account If the password has been changed use the current password
3 Enter sudo rootsh to gain root user access
4 Enter the password for the stornext user account again
5 Continue to Step 3 Run the Journal Filter Script and View the Script Help below
Step 3 Run the Journal Filter Script and View the Script Help l Enter the following to use the script to view the log output in a way that filters out all the rootsh
commands
optDXiscriptsjournalctl_filtersh -f
l Enter the following to view the scripts help file
optDXiscriptsjournalctl_filtersh --help
Note The journalctl_filtersh output can also be saved to a file
Known Issues Workarounds and Additional Information
Xcellis Workflow Director Release Notes 65
StorNext Connect NTP not RunningWorkaround 1 If you encounter this issue when rebooting the system reboot or after a firmware upgrade do the following
1 Log in to the StorNext GUI and select gtConfiguration gt System
2 Click the Date amp Time tab
3 Set the NTP protocol options as follows Select either the Select a Timeserver Pool option and select the pool from the options available OR select the Specify a Timeserver or Pool option and enter the IP address of the time server
4 Click Apply which will reboot the node (or both nodes in dual-server systems) and re-enable and start NTP
Workaround 2Another alternative enables ntp when the system is rebooted
1 Using an SSH connection log in to the command line of the server
2 Enter the following command
usrbinsystemctl ntpdservice enable
3 Repeat for the other server (for dual-server node systems only)
4 Manually reboot the server (or both server nodes for dual-server node systems)
Restart the Appliance ControllerOn the server node hosting NAS do the following (use node 2 on dual-server node systems)
1 Open an SSH connection to the appropriate server node and use the IP address assigned to the node on the Management or LAN Client network
2 Log in to the command line using the following credentials
l User name stornext
l Password ltstornext user account passwordgt
Note password is the default password for the stornext user account If the password has been changed use the current password
3 Enter sudo rootsh to gain root user access
4 Enter the password for the stornext user account again
5 Enter the following
chown -R ldapldap varlibldap
Known Issues Workarounds and Additional Information
Xcellis Workflow Director Release Notes 66
6 Enter the following
systemctl restart slapd
7 Restart the appliance controller
systemctl start snnas_controller
systemctl stop snnas_controller
Create the Missing Hardware Monitor DirectoryDo the following to check if the directory is missing and re-create the directory if it is and restart the hwmond service
1 Open an SSH connection to the appropriate server and use the IP address assigned to the node on the Management or LAN Client network or use the Service Port IP address if connected to the Service Port
Service Port IP addresses l Node 1 1017211 (dual-server node systems)
l Node 2 1017212 (dual-server node or HA-ready single-server node systems)
Note Node 2 is the server node sold with single-node (non-HA) Xcellis Workflow Director and Artico systems It is also used for installation using the StorNext Connect Install app for both single-node and dual-node systems only
2 Log in to the command line using the following credentials
l User name stornext
l Password ltstornext user account passwordgt
Note password is the default password for the stornext user account If the password has been changed use the current password
3 Enter sudo rootsh to gain root user access
4 Enter the password for the stornext user account again
5 Enter the following on the command line
cd usradicHAMsharedHwMonStatus
If you see the following message the directory does not exist Continue to the next step
Known Issues Workarounds and Additional Information
Xcellis Workflow Director Release Notes 67
bash cd usradicHAMsharedHwMonStatus No such file or directory
6 Enter the following on the command line to create the directory
mkdir usradicHAMsharedHwMonStatus
7 Enter the following to verify the directory has been created
cd usradicHAMsharedHwMonStatus
8 Change the permission of the hwmond service to read-only
chmod -r 775 HwMonStatus
9 Restart the hwmond service
systemctl restart quantum-hwmondservice
How to Disable NFS v4To disable NFSv4 on Xcellis Workflow Director systems especially those systems running NAS 120 or earlier perform the following on node 2
Edit the nfs File 1 Open an SSH connection to the appropriate server and use the IP address assigned to the node on the
Management or LAN Client network or use the Service Port IP address if connected to the Service Port
Service Port IP addresses l Node 1 1017211 (dual-server node systems)
l Node 2 1017212 (dual-server node or HA-ready single-server node systems)
Note Node 2 is the server node sold with single-node (non-HA) Xcellis Workflow Director and Artico systems It is also used for installation using the StorNext Connect Install app for both single-node and dual-node systems only
Known Issues Workarounds and Additional Information
Xcellis Workflow Director Release Notes 68
2 Log in to the command line using the following credentials
l User name stornext
l Password ltstornext user account passwordgt
Note password is the default password for the stornext user account If the password has been changed use the current password
3 Enter sudo rootsh to gain root user access
4 Enter the password for the stornext user account again
5 Edit etcsysconfignfs file (See Example Use vi to Edit the nfs File on the next page)
6 Change the value for RPCNFSDARGS to -N 4 When finished the line must be RPCNFSDARGS=-N 4
7 Change the value for RPCMOUNTDOPTS to -N 4 When finished the line must be RPCMOUNTDOPTS=-N 4
8 Save the file
Restart NFS
For Xcellis Workflow Director (R630) systems
1 Enter the following to restart the NFS configuration
systemctl restart nfs-config
2 Enter the following to restart the NFS server
systemctl restart nfs-server
After You Restart NFS on Node 2Repeat both the Edit the nfs File on the previous page and Known Issues ndash StorNext 6x on page 20 sections on node 1( for dual-node systems)
If you need to create new NFS shares to export for user access you may do this now See the About the NAS App section of the StorNext Connect Documentation Center for information about NAS configuration using StorNext Connect
Known Issues Workarounds and Additional Information
Xcellis Workflow Director Release Notes 69
Example Use vi to Edit the nfs File 1 Enter the following
vi etcsysconfignfs
2 Move the cursor to the closing quotation mark in RPCNFSDARGS
3 Enter the following
i -N 4
4 Write the file and quit vi as follows
wq
5 For this example you would have to Restart NFS on the previous page and repeat the Edit the nfs File on page 67 and Restart NFS on the previous page again on node 1 (for dual-node systems)
6 Close the SSH session for the server(s) ( for dual-node systems)
Re-enable DDM on the Secondary Node After HA FailoverOnce the MDC node acting as secondary finishes rebooting and becomes functional again use fsddmconfig (or the GUI) from the server node currently acting as primary to re-enable DDM for the standby server node as follows
1 Open an SSH connection to the appropriate server and use the IP address assigned to the node on the Management or LAN Client network or use the Service Port IP address if connected to the Service Port
Service Port IP addresses l Node 1 1017211 (dual-server node systems)
l Node 2 1017212 (dual-server node or HA-ready single-server node systems)
Note Node 2 is the server node sold with single-node (non-HA) Xcellis Workflow Director and Artico systems It is also used for installation using the StorNext Connect Install app for both single-node and dual-node systems only
Contacting Quantum
Xcellis Workflow Director Release Notes 70
2 Log in to the command line using the following credentials
l User name stornext
l Password ltstornext user account passwordgt
Note password is the default password for the stornext user account If the password has been changed use the current password
3 Enter sudo rootsh to gain root user access
4 Enter the password for the stornext user account again
5 On the command line of the system enter the following
fsddmconfig -u -s e
standby_system_hostname
If a system running DDMs periodically displays an Admin Alert when it fails over cycles a client node or upgrades while the server node operating as secondary is rebooting but not completely down change the timeout value to allow more time to communicate with the node Update the TSM configuration parameter DDM_CLIENT_RETRY_TIMEOUT from the default 30 seconds to a larger value depending on how long the node is taking to reboot In the event the server node acting as secondary will be down for an extended period of time the node should be taken offline Additionally if this parameter is set too high and the standby server does not come back the command that is currently running (eg store or retrieve) will not return until after the specified timeout
For more information about the DDM_CLIENT_RETRY_TIMEOUT parameter that can be placed into the fs_sysparm_override configuration file refer to the usradicTSMconfigfs_sysparmREADME file
Caution Incorrect modification of the fs_sysparm_override configuration file can cause a serious adverse effect on StorNext functionality Before modifying this file we recommend you contact Contacting Quantum below
Contacting QuantumFor further assistance contact the Quantum Customer Support Center
Region Support Contact
North America 1-800-284-5101 (toll free)+1-720-249-5700
Contacting Quantum
Xcellis Workflow Director Release Notes 71
Region Support Contact
EMEA +800-7826-8888 (toll free)
+49 6131 324 185
Asia Pacific +800-7826-8887 (toll free)+603-7953-3010
For worldwide support
httpswwwquantumcomserviceandsupportget-helpindexaspxcontact-support
- Revision History
- About the Xcellis Workflow Director
- Training and Documentation Resources
- About StorNext 6
-
- What is StorNext
- Learn More on the Web
-
- What StorNext Releases are compatible with my system
- Upgrade StorNext Software and System Firmware
- General Notes
- Quantum Appliance Licenses
- Fixed Issues Notes and Enhancements ndash StorNext 6x
- Known Issues ndash StorNext 6x
- Known Issues Workarounds and Additional Information
- Contacting Quantum
-

Known Issues Workarounds and Additional Information
Xcellis Workflow Director Release Notes 69
Example Use vi to Edit the nfs File 1 Enter the following
vi etcsysconfignfs
2 Move the cursor to the closing quotation mark in RPCNFSDARGS
3 Enter the following
i -N 4
4 Write the file and quit vi as follows
wq
5 For this example you would have to Restart NFS on the previous page and repeat the Edit the nfs File on page 67 and Restart NFS on the previous page again on node 1 (for dual-node systems)
6 Close the SSH session for the server(s) ( for dual-node systems)
Re-enable DDM on the Secondary Node After HA FailoverOnce the MDC node acting as secondary finishes rebooting and becomes functional again use fsddmconfig (or the GUI) from the server node currently acting as primary to re-enable DDM for the standby server node as follows
1 Open an SSH connection to the appropriate server and use the IP address assigned to the node on the Management or LAN Client network or use the Service Port IP address if connected to the Service Port
Service Port IP addresses l Node 1 1017211 (dual-server node systems)
l Node 2 1017212 (dual-server node or HA-ready single-server node systems)
Note Node 2 is the server node sold with single-node (non-HA) Xcellis Workflow Director and Artico systems It is also used for installation using the StorNext Connect Install app for both single-node and dual-node systems only
Contacting Quantum
Xcellis Workflow Director Release Notes 70
2 Log in to the command line using the following credentials
l User name stornext
l Password ltstornext user account passwordgt
Note password is the default password for the stornext user account If the password has been changed use the current password
3 Enter sudo rootsh to gain root user access
4 Enter the password for the stornext user account again
5 On the command line of the system enter the following
fsddmconfig -u -s e
standby_system_hostname
If a system running DDMs periodically displays an Admin Alert when it fails over cycles a client node or upgrades while the server node operating as secondary is rebooting but not completely down change the timeout value to allow more time to communicate with the node Update the TSM configuration parameter DDM_CLIENT_RETRY_TIMEOUT from the default 30 seconds to a larger value depending on how long the node is taking to reboot In the event the server node acting as secondary will be down for an extended period of time the node should be taken offline Additionally if this parameter is set too high and the standby server does not come back the command that is currently running (eg store or retrieve) will not return until after the specified timeout
For more information about the DDM_CLIENT_RETRY_TIMEOUT parameter that can be placed into the fs_sysparm_override configuration file refer to the usradicTSMconfigfs_sysparmREADME file
Caution Incorrect modification of the fs_sysparm_override configuration file can cause a serious adverse effect on StorNext functionality Before modifying this file we recommend you contact Contacting Quantum below
Contacting QuantumFor further assistance contact the Quantum Customer Support Center
Region Support Contact
North America 1-800-284-5101 (toll free)+1-720-249-5700
Contacting Quantum
Xcellis Workflow Director Release Notes 71
Region Support Contact
EMEA +800-7826-8888 (toll free)
+49 6131 324 185
Asia Pacific +800-7826-8887 (toll free)+603-7953-3010
For worldwide support
httpswwwquantumcomserviceandsupportget-helpindexaspxcontact-support
- Revision History
- About the Xcellis Workflow Director
- Training and Documentation Resources
- About StorNext 6
-
- What is StorNext
- Learn More on the Web
-
- What StorNext Releases are compatible with my system
- Upgrade StorNext Software and System Firmware
- General Notes
- Quantum Appliance Licenses
- Fixed Issues Notes and Enhancements ndash StorNext 6x
- Known Issues ndash StorNext 6x
- Known Issues Workarounds and Additional Information
- Contacting Quantum
-

Contacting Quantum
Xcellis Workflow Director Release Notes 71
Region Support Contact
EMEA +800-7826-8888 (toll free)
+49 6131 324 185
Asia Pacific +800-7826-8887 (toll free)+603-7953-3010
For worldwide support
httpswwwquantumcomserviceandsupportget-helpindexaspxcontact-support
- Revision History
- About the Xcellis Workflow Director
- Training and Documentation Resources
- About StorNext 6
-
- What is StorNext
- Learn More on the Web
-
- What StorNext Releases are compatible with my system
- Upgrade StorNext Software and System Firmware
- General Notes
- Quantum Appliance Licenses
- Fixed Issues Notes and Enhancements ndash StorNext 6x
- Known Issues ndash StorNext 6x
- Known Issues Workarounds and Additional Information
- Contacting Quantum
-