6) cut them into 4– 2 strips- make sure you are cutting the · careful not to cut off your...
TRANSCRIPT


Instructions:
Background: Cut 4– 8 1/2" X 8 1/2"
Mountain: Cut 4– 8 1 /2" X 8 1/2" {for a mix of mountains, I cut 2 squares out of 4 different fabrics
Thanks for Betty for reminding me this: The cool thing is.. you can get 4 mountains out of 1 fat quarter-moun-tains and 1 fat quarter-background fabric.
1) Draw a line from corner to corner on the wrong side of the lighter fabric
2) Lay one light square on dark square 3) Sew on each side of the drawn line 1/4" from the line
4) Cut down drawn line. Iron
5) Lay the half square triangles right sides together- lights and darks are opposite each other

6) Cut them into 4– 2" strips- make sure you are cutting thecorrect direction!
7) Re-arrange the order of the 4 strips so they will make a delectable mountain
Each section will measure 6 1/2" X 8" tall. Sew the two sections of 4 strips each together-
Repeat the steps with each background and mountain fabric for 4 mountains.
Sew each delectable mountain block into a row 4 blocks wide

Round Robin Winter Wonderland by
We live on a lake and in the winter, I can see & hear the geese from my sewingnook window. So flying geese were the obvious choice for my winter wonderland
row!
Fabrics:
I used Kona Coal and White for my “geese”. For the different “skies” I used KonaPeridot, Kona Candy Green, and a print from my stash.
Cutting:
5 – 5 1/4” squares coal2 – 5 1/4” squares white5 – 2 7/8” squares teal7 – 2 7/8” squares green12 – 2 7/8” squares print
2 – 2 1/2” x 49” strips white
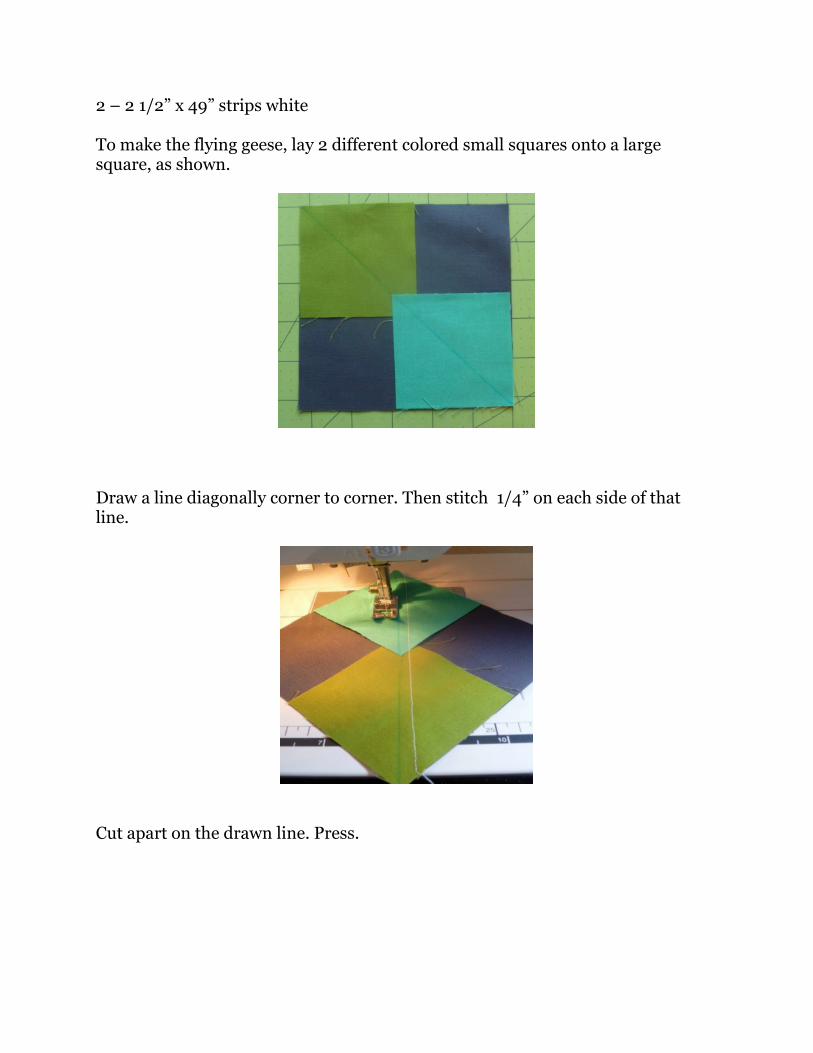
To make the flying geese, lay 2 different colored small squares onto a largesquare, as shown.
Draw a line diagonally corner to corner. Then stitch 1/4” on each side of thatline.
Cut apart on the drawn line. Press.

Now lay a print square in the remaining corner, and draw a line diagonally. Stitch1/4” on both sides of the line.
Cut on the drawn line, and press. You just made 2 flying geese! They shouldmeasure 2 1/2” x 4 1/2”. Continue until you have made 24. I made a few extras,using the white, but you could make them all using the same geese fabric.
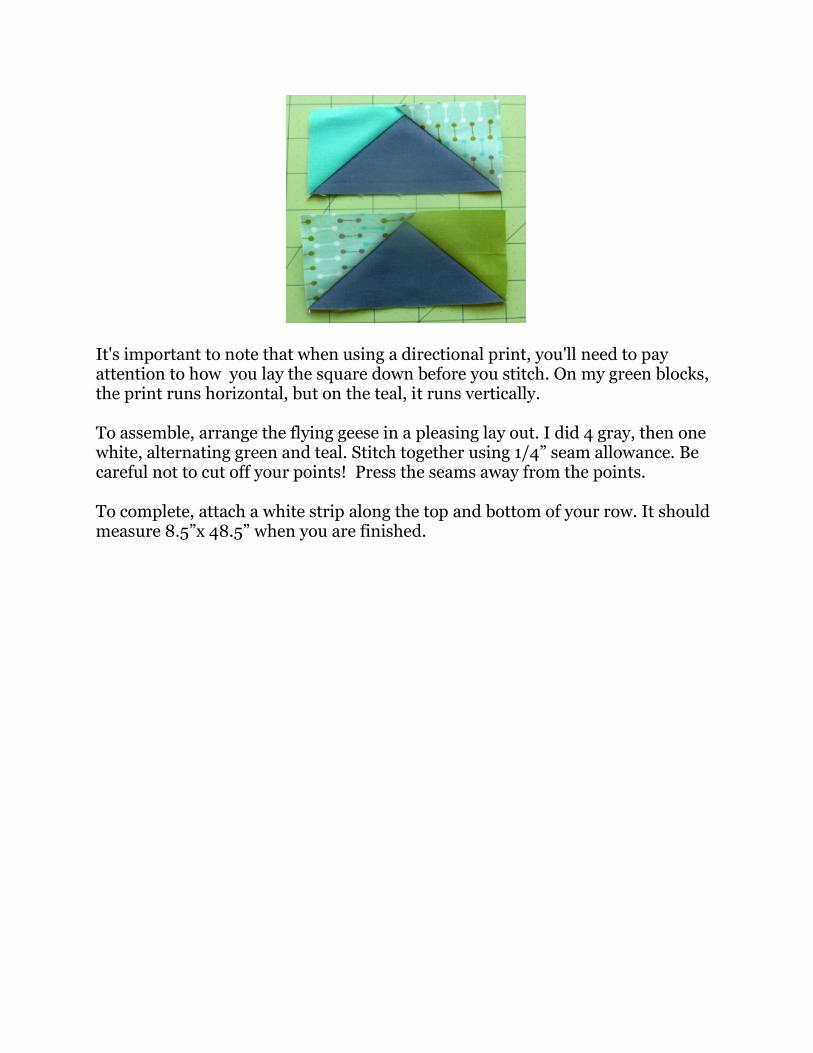
It's important to note that when using a directional print, you'll need to payattention to how you lay the square down before you stitch. On my green blocks,the print runs horizontal, but on the teal, it runs vertically.
To assemble, arrange the flying geese in a pleasing lay out. I did 4 gray, then onewhite, alternating green and teal. Stitch together using 1/4” seam allowance. Becareful not to cut off your points! Press the seams away from the points.
To complete, attach a white strip along the top and bottom of your row. It shouldmeasure 8.5”x 48.5” when you are finished.

Walking in aWinter Wonderland
Forest RowInstructions written by Dawn Stewart
Spring Water Designswww.springwaterdesigns.com
Paper Pieced Row for the Winter WonderlandRow Robin found at
http://www.patchworkposse.com/blog/
To familiarize yourself with the project, read through the entire instruction packet before you beginto cut fabric or stitch.
Refer to the photo for additional clarification. Seam allowance is 1/4".
Materials Needed:
5/8 yard Background fabricCut (2) 3” x 7-1/2” rectangles, and (6) 2” x 7-1/2” rectanglesUse the rest for paper piecing the background of the tree and trunk units
1/4 yard edge border fabric (I used Green)Cut (3) 1-1/2” x Width of Fabric Strips
Scraps for Trees ~ Various colors at least 6” square (I used 13 different prints)
Scraps of Brown for Tree Trunks (I used two different prints)
8 copies of the paper template (7 to stitch, and 1 to cut up for size reference)
Page 1 of 5 Walking in a Winter Wonderland Forest Row © 2013 Dawn M. Stewart

Paper Piecing your Trees ~First, cut out the shapes from One of the printed paper templates to use as a size reference forchoosing your scraps. (For example I use these to lay on my scraps and make sure that myfabric is plenty big enough all the way around the shape. This saves me from having toprecisely measure if I’m just using fabric scraps anyway).
Next, lay fabric piece #2 right side down on fabric #1, making sure that the edges by the seamline between piece numbers 1 & 2 are at least ¼” past the line, and that piece #2 will cover theentire shape after it is sewn and pressed out. (Again use your light source to look through thepaper and see the overlap).
Page 2 of 5 Walking in a Winter Wonderland Forest Row © 2013 Dawn M. Stewart
With the front of the paper template (side with printing on it)toward yourself, hold the paper template up to a light, andposition the first fabric piece behind the Diamond spot (#1),making sure that the fabric covers all the lines around theedge of the shape. Fabric should be placed back side offabric to back side of paper. A pin is helpful to hold this firstfabric piece in place on the paper.
(These will be constructed by making the tree unit, then thetree trunk unit and then sewing the units together)

Page 3 of 5 Walking in a Winter Wonderland Forest Row © 2013 Dawn M. Stewart
Trim the excess fabric away leaving aquarter inch seam allowance. I likeusing the Add a Quarter Ruler for thisbecause it has a little “ledge” that canbe put against the paper and auto-matically cuts a quarter inch away ~Quick and Easy :)
Then from the back side of the paper,press piece #2 out.
Repeat this process, working innumerical order, for the remainingpieces through #5 for the tree unit,and for pieces 1 - 3 for the tree trunkunit.
Using a shortened straight stitch onyour sewing machine, sew on the lineon the front side of the paper betweenpiece numbers 1 & 2. After sewing onthe line, fold the paper back on thesewn line.

Page 3 of 5 Walking in a Winter Wonderland Forest Row © 2013 Dawn M. Stewart
Sew a 2” x 7-1/2” rectangle of background fabric to the right side of six trees. Sew themtogether side by side. Then sew a 3” x 7-1/2” rectangle to the ends of the tree row. Pressthe seams toward the background rectangles. Measure and trim the ends of the tree row soit measures 48-1/2” long.
Sew the (3) 1-1/2” x Width of Fabric Green Strips together end to end and press the seamallowances open. Cut this long strip into two 1-1/2” x 48-1/2”. Sew a green strip to the topand bottom of the tree row. Press toward the green strips.
After sewing all of the fabric pieces to thepaper template, use a ruler and rotary cutterand trim around all the outer most edges ofthe unit to square it up. Then fold back thepaper sections on all the seam lines andtear on the perforations that your smallerstitch length created to remove all the paperfrom the back side of your block units.
Sew the Tree Trunk units to the bottomside of the Tree units. Press the seamallowances toward the tree trunk.

Page 3 of 5 Walking in a Winter Wonderland Forest Row © 2013 Dawn M. Stewart

Copyright © 2013 Robin Quilts, etc.All rights reserved.
Round Robin 5 – Row 3
6” x 48” (unfinished 6 ½” x 48 ½”)
Mock Crazy Patch - Stack and Slash Method
This mock crazy patch row is simple to make and fun to decorate. if you’d like, use the decorative stitches on your ma-chine or some hand embroidery to embellish it. The 8 - 6” finished blocks are made oversized and then trimmed so thatthey all end up exactly the same size and easy to assemble into your row. Each block will be a wonky 9 patch. Sincewe’re only using 8 fabrics, 1 of the fabrics will be in the block twice but will not be sewn next to itself.
Supplies needed:
� 8 - 8” squares of fabrics
� Square up ruler that allows you to square your blocks to 6 1/2”
� Spray Starch
1. Place a number (1 - 8) in the upper and lower left corner of each square and repeat with the other two stacks. I pre-fer using blue painters tape for my labels. It is less tacky than most other labels and is easily removed without leav-ing unwanted residue.
You should have a total
of 8 fabrics in your
stack, the example only
shows 2.
2. Neatly stack all 8 fabrics so all edges are even.
3. Pick a vertical angle to make your first cut and cut through all eight layers.
4. Keep your stacks in order and move the first fabric on the right to the bottom of the stack. Sew the two sides backtogether (1 to 2, 2 to 3, 3 to 4, etc.)
21

Copyright © 2013 Robin Quilts, etc.All rights reserved.
1 2
5. Press to either side and restack your blocks so that the #1 is on top.
6. Now make a second vertical cut at a different angle. Once again move the fabric on the right to the bottom of thestack. Sew back together (1, 2 to 3) (2,3 to 4) etc. Press to either side and restack with 1 on top.
7. Your next two cuts will be made horizontally across your blocks. Remember to keep #1 in the upper left corner.
8. Now make your third cut. This time take the top two fabrics from the lower half and move to the bottom of the stack.You will now be sewing (1,2,3 to 3,4,5), 2,3,4 to 4,5,6), etc. Press to either side and restack with #1 in the upper leftcorner.
9. Make the final and forth cut. This time take the top three fabrics from the lower portion and move to the bottom ofthe stack. Using this method you will end up with only one fabric repeated in the square, however, it will not be nextto itself. Press to either side.

Copyright © 2013 Robin Quilts, etc.All rights reserved.
10. At this point your blocks will be anything but square, but don’t worry we’re going to fix that right now.
11. Prior to trimming your blocks, I recommend that you give them each a good spray of spray starch and iron them dry.
12. Using a 6 1/2” ruler, Square up each block individually. Be sure to take your time and trim all 4 sides (they’re goingto need it).
13. Now it’s time to lay them out prior to sewing your row together. Take your time to play with the arrangement so thatyour fabrics are well distributed throughout. Sew, press and Ta-Dah! Your row is finished.
14. If you’d like, this row is a perfect place to play with all those decorative stitches you have on your sewing machine.You can either add them now or when you quilt your quilt top. Have some fun and…………
Enjoy,
I hope you enjoyed making this row. This method is similar to the one used in my Wacky Devine Nine pattern and myWacky Nine Patch. I hope you take the time to visit my website www.robinquiltsetrc.com. I have various free tutorials,information about my lecture and workshops as well as a variety of patterns available for sale. I try to update my Bloghttp://robingallagher.blogspot.com on a regular basis. I’d love to hear from you either via email
[email protected] or with a comment on my Blog.

�
�
Row made up of combination of the below two patterns – the cardinal and thetree branch.
Copyright Kristy @ Quiet Play 2013�
Email: [email protected]�
Blog: http://quietplay.blogspot.com.au�
�
�


��
��
��
�� �
�
��
��
�
�
��
��
���
� ��
��
��
��
��
��
� ��
�����
��
����
���
�����
����
���
�� ��
��
����
������
�� ��
�����
���
����
�����
�����
����
����
����
�����
��� �
!" "
" �#
$� !
" " "
�%���
&� '
�#��
�( )�
*���
����
���+
�, -
�.

/ �
/ �
/ �
/ �
, �
, �
��
��
0 �
���� �
���
��
��
��
�
�
��
��
��
��
��
��
��
��
��
��
� ��
�����
��
����
���
����
����
����
���
��
��
����
������
�� ��
�����
���
����
�����
���
����
� ��
���
����
�����
���! �
"##
#�$%
� "#
##�&�
� ��
! '�$
�� (
)�*�
����
�����
+ �,
- �.

/ �
/ �
/ �
/ �
, �
, �
��
��
0 �

��
��
��
��
��
� ��
�����
��
����
���
�����
����
����
����
����
�
��
��
��
��
��

��
��
��
��
��
� ��
�����
��
����
���
����
����
����
����
����
���

��
��
��
��
��

G e n e r a l I n s tr u c t io n s
1 .Ple a s e re a d th ro u g h a ll d ire c tio n s b e fo reb e g in n in g .
2. A ll s e a m a llo w a n c e s a re ¼ ” u n le s s o th erw is e s ta te d .
3. W O F= w id th o f fa b ric
F a b r ic R e q u ir e m e n ts :
¼ y a rd o f fo c a l fa b r ic A¼ y a rd o f fo c a l fa b r ic B¼ y a rd o f b a c k g ro u n d fa b r ic
C u t t in g I n s tr u c t io n s
1 .Fro m e a c h o f th e 2 fo c a l fa b ric s c u t:a .(3)5 ¼ ” x 5 ¼ ” s q u a reb .(1 8 )3” x 3” sq u a re s
2. Fro m th e b a c k g ro u n d fa b r ic c u t:
w w w .h a p p y q u iltin g m e lis s a .b loh a p p y q in g m e lis s a @ g m
H a p p y Q u iltin g .201 3. De s ig n e d b y M e lis s aC o rry

S e w in g U n its – F ly in g G e e s e
1 .Pla c e (2)2 7/8 ” x 2 7/8 ” b a c k g ro u n d s q u a re s o n a fo c a l fa b r ic 5 ¼ ” x 5 ¼ ” s q u a re w ith rig h t s id e sto g e th e r a s s h o w n .
2. Dra w a lin e d ia g o n a lly fro m th e to p le ft c o rn e r to th e b o tto m rig h t c o rn e r3. Stitc h o n e ith e r s id e o f th e d ra w n lin e
5. Pre ss s e a m s to w a rd b a c k g ro u n d fa b r ic .6. Pla c e (1 )2 7/8 ” x 2 7/8 ” b a c k g ro u n d s q u a re o n to e a c h o f th e 2 p ie c e d u n its w ith r ig h t s id e s to
g e th e r a s s h o w n .7. Dra w a lin e d ia g o n a lly fro m th e to p le ft c o rn e r to th e b o tto m rig h t c o rn e r8 .Stitc h o n e ith e r s id e o f th e d ra w n lin e o n e a c h o f th e 2 p ie c e d u n its
1 0.Pre s s se a m s to w a rd s b a c k g ro u n d fa bric .
1 2.R e p e a t to m a k e a to ta l o f 24 f ly in g g e e s e u n its in th e fo llo w in g fa b r ic la y ou ts
1 2 fo c a l fa b ric A f ly in g g e e s e 1 2 fo ca l fa b r ic B f ly in g g e e s e
S e w in g U n its – H a lf S q u a r e T r ia n g le s
1 . Dra w a d ia g o n a l lin e o n th e w ro n g s id e o f th e lig h te r fo c a l fa b r ic 3” x 3”s q u a re .
5 . R e p e a t to m a k e a to ta l o f 48 H a lf Sq u a re Tria n g le u n its in th e fo llo w in g fa b ric la y ou ts

S e w in g B lo c k s
1 . La y o u t b lo c k a s fo llo w s ,in e ith e r c o lo r
2.Stitc h 4 c e n te r H ST’s in to c e n te r s q u a re . 3. Se w p ie c e d u n its in to
4. Se w ro w s in to b lo
5 . R e p e a t to m a k e a to ta l o f 6 b lo c k s ,3o f e a c h c o lo rla y o u t.

From 6 dif f erent blues cut:8 ~ 2" squaresCut 4 ~ 1/1/2" stripsFrom 6 dif f erent whites cut:4 ~ 3" squares4 ~ 1 1/2" x 3" rectanglesFrom red cut:6 ~ 1 1/2" x 1 1/2" squares
Trace the design onto whitef abric. Embroider in red.Trim to 12 1/2" x 6 1/2"
Put blue squares on the white squares. Sew along the diagonal.Trim. Press the corner out creating the block. Create f our.
Read our daily blog posts at http://www.joscountryjunction.com/
Sew the units together with the white rectangles as shown.
Sew the white rectangles with the red squares.
Sew the units together to create the block. Repeat to make six blocks.Sew the blocks and embroidery together. Add a 1 1/2" strip to each side.


Winter Wonderland Row QuiltBy Jenifer Dick of www.42quilts.com
Starry Starry Night
Fabrics· 16-64 Shades of blue (or any other color you like) in all values – light, medium and dark
Dig through your stash to find as many fabrics as you can in the color of your choice. I used 16different prints, florals, solids and shirtings. If you have a lot of scraps and want no repeats, use upto 64 different fabrics.
· 8-24 soft yellows
CuttingFour-Patch BlocksFrom the blues, cut 96 – 2” squares
Friendship Star BlocksFrom the blues, cut32 – 1 1/2” squares16 – 1 7/8” squares
From the yellows, cut8 – 1 1/2” squares16 – 1 7/8” squares
PiecingFour-Patch BlocksMake 24 – 3” finished Four-Patch blocks
I chose randomly from my pile of 2” squares to make the four-patch blocks. The only rule was Ididn’t want the same fabric to touch. But even then, some touching ones snuck in! Create your ownrules to make your blocks.
Make 243 1/2” unfinishedFour-Patch Blocks
Sew 2 squarestogether and press toone side. Repeat with2 more squares. Join
the rows and press toone side to complete
the block.

Friendship BlocksMake 8 – 3” finished friendship Star blocks
Half-Square Triangle UnitsMake 32 – 1” finished half-square triangle units
Finishing the Friendship Star block:
FinishingRefer to the photo for layout or lay out your blocks in another pleasing way. Sew units together tocreate the 6” x 48” panel.
Stack 1 blue and 1 yellow 17/8” square, right sides
together. Draw a line fromcorner to corner on the
backside of the top square.
Sew ¼” fromthe drawn lineon both sides.Cut apart on thedrawn line.
Make 32 units1 1/2” unfinished
Half-Square Triangle Units
Lay out each block asshown in the diagram
using the 1 1/2” squaresand 1 1/2” half-square
triangle units. Sewtogether into rows and
join the rows. Presseach unit toward the
plain square.
Make 83 1/2” unfinishedFriendship Star Blocks

Round Robin 5-
10” x 48” (un>nished 10 1/2” x 481/2”)
English Paper Piecing (EPP) is not only a classic, but recently become very popular inthe Modernquilt circles too. The best thing about EPP is that it is a great way to keep your handsbusy whenyou can’t be in front of your sewing machine. There are many EPP basting methods,so pleaseknow that this method might be di erent than others you have seen before.
This row is unique in this Round Robin in that it is not made up of blocks, but cut froma solid pieceof fabric. Each appliqued snow?ake is made up of di erent sizes of hexagons to makedi erentshapes...because every snow?ake should be unique, right? This row is also a greatscrap buster ifyou already have some funny shaped pieces from previous rows/blocks for the roundrobin.
Supplies needed:
-10 1/2” x 48 1/2” piece of background fabric-5 di erent fabrics. No larger than1/8 ydor fatquarter each.-Card stock-Printer

Steps:Note: Please read through all the steps carefully before you begin!!
1. First print the four .pdfs that are a ached using cardstock. One of the four you willprint twice(marked on that particular .pdf) to make a total of Ave snow?akes.
• Snow?ake #1• Snow?ake #2• Snow?ake #3&4 (print this page twice)• Snow?ake #5
2. Cut each hexagon from the .pfs for each snow?ake justinside the lines. I suggest you keep your snow?ake hexagons ina plastic baggie with your intended fabrics to ensure you don’t
3. Choose your Ave snow?ake fabrics. I have been inspired to use brighter colors thannormalthanks to all of the other great Winter Wonderland rows I have seen on Flickr. I amtaking my
Copyright © 2013 Bu ons and Bu er?ies. All rights

4. Cut each piece of fabric for your hexagons with roughly 1/4”-3/8” seam allowancesaround allsix sides. Not necessary to be exact, but avoid a seam allowances less than 1/4”.
5. Secure one side of the hexagon to the cardstock
You can use just about anything! Paperclips. Hair clips from your curler set. Cloverbinding clips. Orpin in the center. My favorite is a tiny paper clip set that I found in the scrapbook aisle.
The paperclip/pin is just to hold it in place. The important thing to know is that as youwork your
Copyright © 2013 Bu ons and Bu er?ies. All rights

6. Baste the fabric around your
Start at the Arst corner and secure it with a quick
Travel your thread to the next corner and do another quick stitch. It is okay for thethread toshow because it will be all hidden on the back. Travel all the corners until you reachthe last withthe clip on it.
Complete all of your hexagons for all Avesnow?akes.

10. Stitch each hexagon to each other using a whipstitch to create the snow?akedesign that I
I used white thread so you could see it, but I suggest you use a thread color thatcomplementsyour fabric. Even the tightest stitches can sometimes show through when you pull the
I also recommend traveling under the various seam allowances “?aps” if you have togo from one toanother instead of tying o on one hexagon and then re-kno ing and moving toanother.

11. Layout your snow?akes. Keep the shapes of the di erent snow?akes and yourfabric color
12. Pop out the paper piece templates by slipping the end of your snips under one ofthe basted
If your seam allowances are larger than 3/8”, this could be a potential problem. Onepossible wayto avoid it is to punch holes in the center of your hexagons when you cut them outinitially.
13. Pin your snow?akes hexagons to the background.
It is deAnitely a personal choice and I am always game to do any style, but forthis project, Ipreferred needle-turn.
Your row is all set for the Arst four rows!

I hope you enjoyed this process. You can And another detailed tutorial on EnglishPaper Piecingwith a hoop project at my blog at www.bu onsandbu er?ies.com . I also have otherblock andquilt project tutorials, including my Spiders and Webs quilt at the Moda Bake Shop. Inthe verynear future, I will have my longarm quilting services website open and available toeveryone and willpost links on my blog! Right now, I have a few friends that are my guinea pigs helpingwork out thebusiness ends of things!
If you have any questions or just want to chat? I am atboysbu onsandbu [email protected] .
Make sure you continue to scroll down to access the four snow>ake pa erns .
Copyright © 2013 Bu ons and Bu er?ies. All rights

Winter Wonderland Round
7/8”
7.5
7.5
7.5” 7.5”
7.5
Snow>ake
www.bu? onsandbu?
1.5
Copyright © 2013 Bu ons and Bu er?ies. All rights

Winter Wonderland Round
www.bu? onsandbu?
1
Copyright © 2013 Bu ons and Bu er?ies. All rights

Winter Wonderland RoundRobin
www.bu? onsandbu?
3/4”
Copyright © 2013 Bu ons and Bu er?ies. All rights

Winter Wonderland Round
www.bu? onsandbu?
3/4 in
7/8 in
1.5 inch1.5”
3/4”
7/8”
Copyright © 2013 Bu ons and Bu er?ies. All rights

©May 2013 Clover & Violet, LLC For personal, non-commercial use only.Designed by Clara Jung & Jennifer Pickett Duplication of any kind prohibited.www.cloverandviolet.com This pattern is for the use of the purchaser only.
Merry Gift
Merry Gift Boxes is Row 8 in the Winter Wonderland Sew-Along at Patchwork Posse. One 8” x 48” row is madefrom 3 blocks, each with 3 boxes. The blocks are foundation paper pieced, but could be pieced out of rectanglesand half square triangles as well.
Materials {for 3 blocks}{ 3/8 yard white{ ¼ yard gray{ 1/8 yard pink{ 1/8 yard red{ 1/8 yard aqua
Notes:{ Read all directions before beginning.{ Make sure all pieces are scaled at 100%.{ All seam allowances are ¼” unless otherwise noted.{ Set stitch length to a short stitch to perforate the papers for easy removal {we prefer 1.5}.{ Stitch fabric to the back of paper for ease of stitching along the lines.{ Visit http://www.cloverandviolet.com/pattern-corrections to check for any corrections or updates.{ Please e-mail questions to: [email protected]
Finished Single Block:

©May 2013 Clover & Violet, LLC For personal, non-commercial use only.Designed by Clara Jung & Jennifer Pickett Duplication of any kind prohibited.www.cloverandviolet.com This pattern is for the use of the purchaser only.

3
©May 2013 Clover & Violet, LLC For personal, non-commercial use only.Designed by Clara Jung & Jennifer Pickett Duplication of any kind prohibited.www.cloverandviolet.com This pattern is for the use of the purchaser only.
4
©May 2013 Clover & Violet, LLC For personal, non-commercial use only.Designed by Clara Jung & Jennifer Pickett Duplication of any kind prohibited.www.cloverandviolet.com This pattern is for the use of the purchaser only.

“ It Snowed!”Snowman block:1. From a snow>ake print fabric, cut a rectangle, 6 1/2” x 18 1/2”.2. Appliqué the snowman body, then the head with a white print fabric. (I o -centered
thesnowman slightly.) Appliqué the hat with a black print fabric, and appliqué the hatbandwith a red print fabric.
3. Do all embroidery using 2 strands of >oss. Embroider the arms with dark brown in a
Snow>ake/Square-in-a-square blocks1. For each block cut:
One 4 1/4” square from one print for the centerTwo 3 7/8” squares from a contrasting print, cut in half diagonally to yield 4triangles for sides.
2. Sew a 3 7/8” triangle to one side of the 4 1/4” square. Repeat for all 4 sides. Presstoward thetriangle. Make 5 blocks.
3. Appliqué a snow>ake into the center of a block with a white print fabric. (To simplifythe
Row Assembly1. Sew a snow>ake block to each side of a square-in-a-square block. Press seams
open.2. Sew a snow>ake block to the right side of a square-in-a-square block. Press seam
open.


Here are the fabrics you will need:
1 2"x 18" strip of brown (tree trunk) fabric
8 5"x7" rectangles of background fabric
2 2.75"x18" strips of background fabric
about a fat quarter of scraps in the color green…you can piece the size you need from strings, orphans, orscraps…or just use a fat quarter of new fabric.
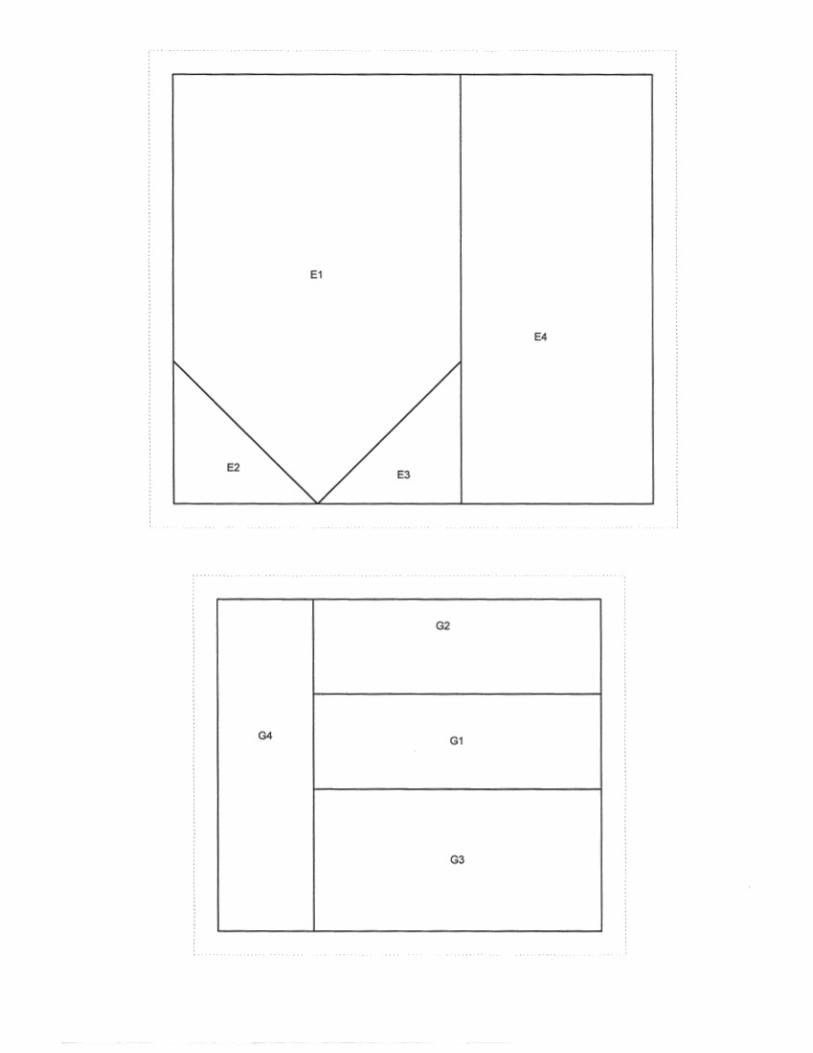
First sew your 2 strips of background fabric to either side of your tree trunk fabric to make a strip set.
Cut your strip set down into 8 2" long sections. Set these aside for now.
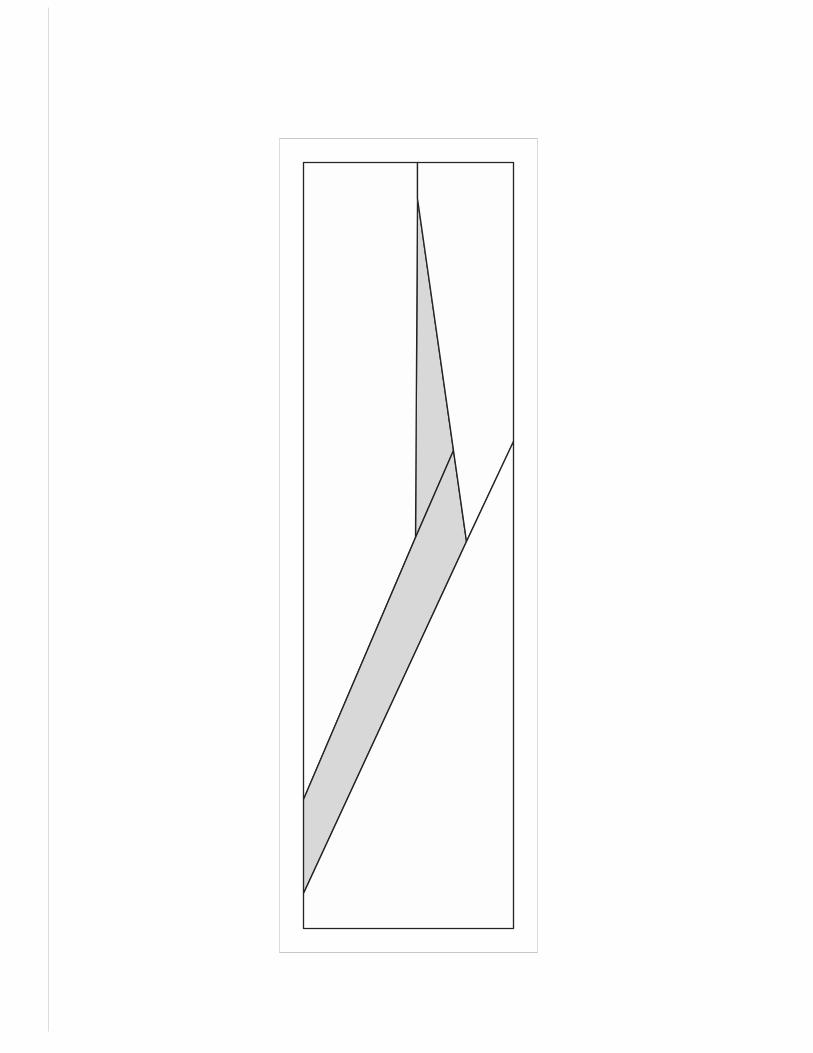
Now print off 9 foundation papers. You will use 8 of these for actual foundations. The 9th one will be forcreating a crude template for cutting your tree fabric…precision isn't important here…we will square it all uplater!

If you have an old set of rotary blades, this is the perfect time to bring them out. I use old blades whenever Iwill be working with paper. I actually use one cutter just for paper, the other for fabric. I cut up my templateby cutting a line 1/2" away from the boundaries of the tree top.
Now you can lay this template out over your green fabric choice and roughly cut…I like to give myself plentyof room to work with. It's a lot easier to trim fabric than trying to unpick something that is too small…with pa-per piecing you use very small stitches.
Cut your eight 5"x7" rectangles of background fabric now. If you are using a solid or two-sided fabric, you canslice all 8 diagonally like the picture above. If you are using a fabric that has an ugly side & a pretty side, youwill want to slice 4 rectangles from the bottom left corner to the top right corner and another 4 rectangles fromthe bottom right corner to the top left corner.

Now put your paper up to a light source (window or light box). You will be placing your fabric on the UN-PRINTED side of the paper, so the light helps you see to the other side to align everything. Add a little glue inthe tree area (or pin) and place your tree fabric on the paper. You will place the UGLY side of the tree fabric nextto the back side of the paper.
Now take one of your rectangle sections and pin it to your tree section. If you are using the light you will beable to tell where the seam line should be.. overlap the background fabric at least 1/4" from the seam line. Youwill be pinning the background fabric pretty side to pretty side (RSF), both on the backside of your fabric. Thisfabric is 2 sided so it's a little hard to tell.
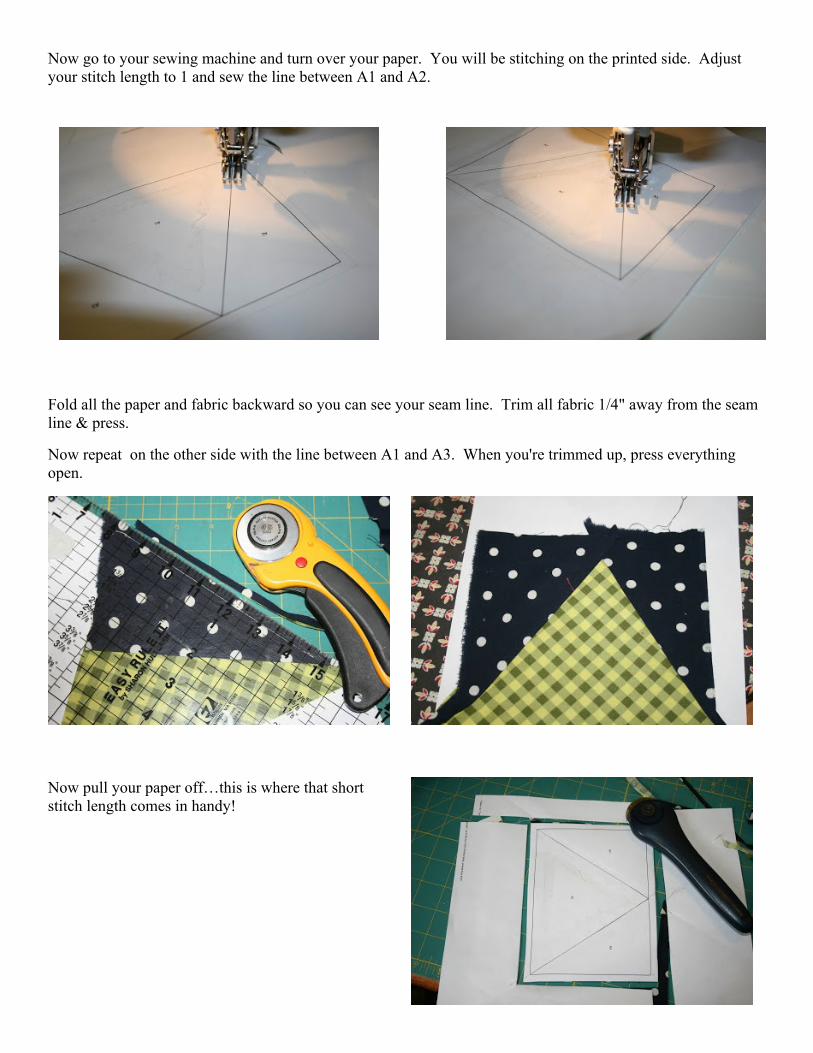
Now go to your sewing machine and turn over your paper. You will be stitching on the printed side. Adjustyour stitch length to 1 and sew the line between A1 and A2.
Fold all the paper and fabric backward so you can see your seam line. Trim all fabric 1/4" away from the seamline & press.
Now repeat on the other side with the line between A1 and A3. When you're trimmed up, press everythingopen.
Now pull your paper off…this is where that shortstitch length comes in handy!

We are just missing our trunk sections, so fetch those and return your stitch length to normal (about 2 or2.5…whatever you like!).
Stitch the trunk RSF to the base of your treetop. Press open and…
http://tulip-patch.blogspot.com/


Quick instructions on how to finish this super cute quilt top-- what do you do with all of those rows?
First, you really need to measure each row and find out which one is the longest. I found that there was one rowwhich measured the largest.
This is what I used as the default size for all the other rows.
1} measure the row you are adding to.
2} Subtract this measurement from the default number
3} Add ½” to the number. This will be your seam allowance.
4} Cut your background or spacing pieces this new number
5} Sew to the row
6} Sew this row in place.
Thanks everyone for designing and sewing along! Check out the photo gallery for finishedrows and upload your so we can see it!
http://www.flickr.com/groups/patchworkroundrobin/