67-68 cougar installation - mustang project - … taillight installation 67-68.pdf · 67-68 cougar...
TRANSCRIPT
67-68 COUGAR INSTALLATION
All of the equipment illus-
trated in this manual was
proudly manufactured in
the USA by Mustang Project
a SafeCode Inc. enterprise.
For accessories and spare
parts please visit us on the
web at:
www.mustangproject.com
with original factory wiring
which have damaged or non
functional electro-mechanical
sequential modules. If the
cars wiring has been modi-
fied you will have to correct
those modifications to some
degree to make the
kit work. We have
attached wiring dia-
grams for this pur-
pose.
NOTE: LED Mod-
ules may be dif-
ferent than those
pictured.
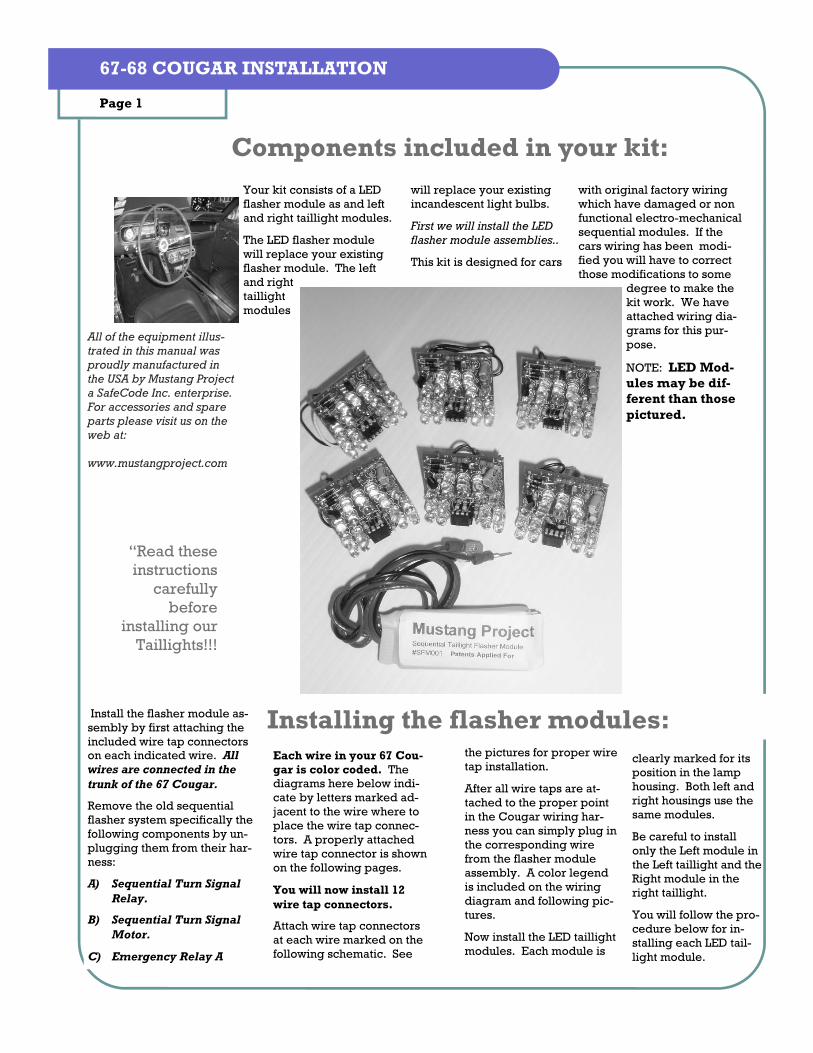
Flasher Module
Your kit consists of a LED
flasher module as and left
and right taillight modules.
The LED flasher module
will replace your existing
flasher module. The left
and right
taillight
modules
will replace your existing
incandescent light bulbs.
First we will install the LED
flasher module assemblies..
This kit is designed for cars
Components included in your kit:
Each wire in your 67 Cou-
gar is color coded. The
diagrams here below indi-
cate by letters marked ad-
jacent to the wire where to
place the wire tap connec-
tors. A properly attached
wire tap connector is shown
on the following pages.
You will now install 12
wire tap connectors.
Attach wire tap connectors
at each wire marked on the
following schematic. See
the pictures for proper wire
tap installation.
After all wire taps are at-
tached to the proper point
in the Cougar wiring har-
ness you can simply plug in
the corresponding wire
from the flasher module
assembly. A color legend
is included on the wiring
diagram and following pic-
tures.
Now install the LED taillight
modules. Each module is
Installing the flasher modules: Install the flasher module as-
sembly by first attaching the
included wire tap connectors
on each indicated wire. All wires are connected in the
trunk of the 67 Cougar.
Remove the old sequential
flasher system specifically the
following components by un-
plugging them from their har-
ness:
A) Sequential Turn Signal
Relay.
B) Sequential Turn Signal
Motor.
C) Emergency Relay A
“Read these
instructions
carefully
before
installing our
Taillights!!!
Page 1
67-68 COUGAR INSTALLATION
clearly marked for its
position in the lamp
housing. Both left and
right housings use the
same modules.
Be careful to install
only the Left module in
the Left taillight and the
Right module in the
right taillight.
You will follow the pro-
cedure below for in-
stalling each LED tail-
light module.

67-68 COUGAR INSTALLATION
Page 2
WWW.MUSTANGPROJECT.COM
If the sockets in your car have
been replaced or rewired make
sure that they are wired so that
the socket provides the wiring
as shown below to the sequen-
tial taillight module.
All Mustang sockets are de-
signed to be “polarized” so that
the same pins are connected to
the brake/tail light and driving
light lines.
The socket needs to move
freely as you insert the LED
module. IF the taillight socket
has boots on the back . RE-
MOVE the boots before you
insert the LED module.
After the module is properly
seated replace the boot. These
sockets become rusty over the
years and do not adjust freely.
Spray with PB blaster to ensure
free movement.
67-68 COUGAR INSTALLATION
Page 3
WWW.MUSTANGPROJECT.COM
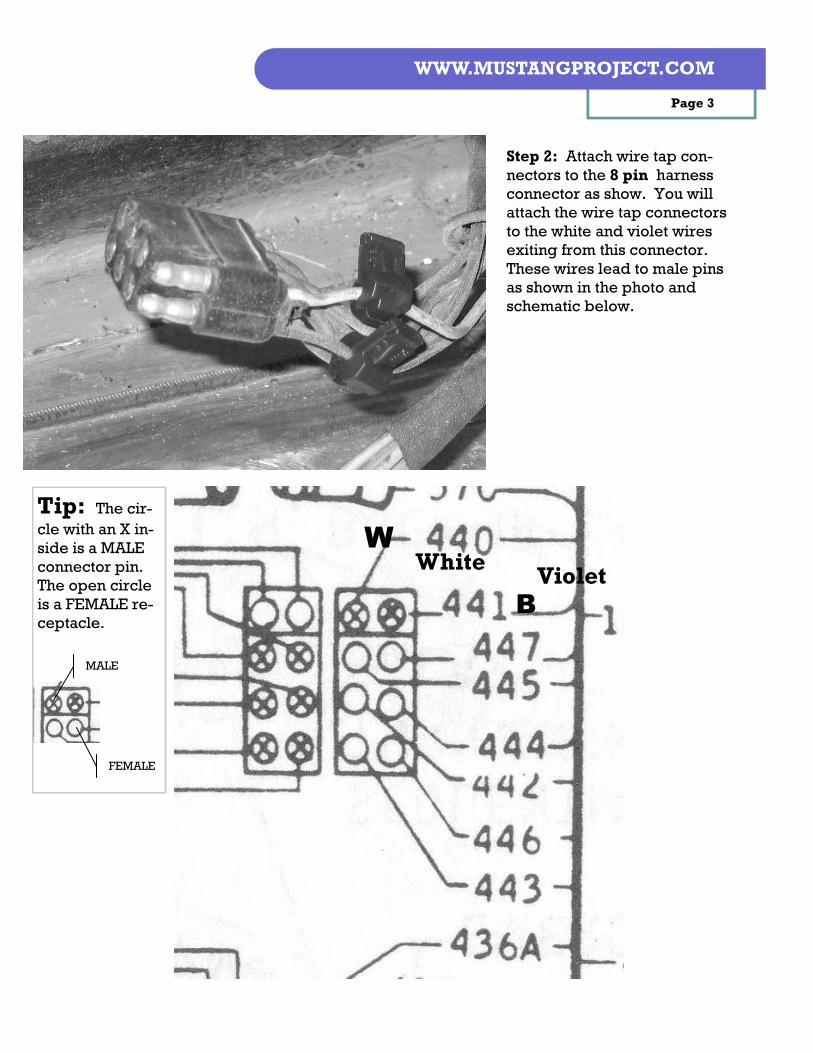
Step 2: Attach wire tap con-
nectors to the 8 pin harness
connector as show. You will
attach the wire tap connectors
to the white and violet wires
exiting from this connector.
These wires lead to male pins
as shown in the photo and
schematic below.
W
B
White Violet
Tip: The cir-cle with an X in-
side is a MALE
connector pin.
The open circle
is a FEMALE re-
ceptacle.
MALE
FEMALE
67-68 COUGAR INSTALLATION
Page 4
WWW.MUSTANGPROJECT.COM
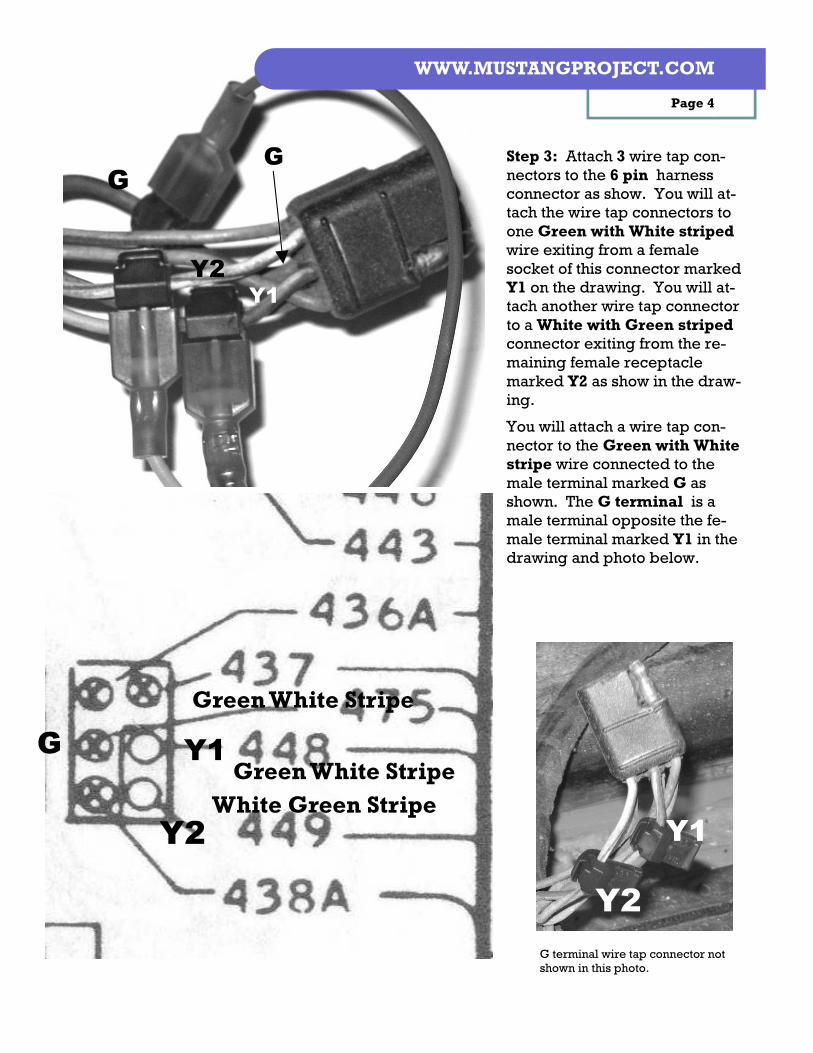
Step 3: Attach 3 wire tap con-
nectors to the 6 pin harness
connector as show. You will at-
tach the wire tap connectors to
one Green with White striped
wire exiting from a female
socket of this connector marked
Y1 on the drawing. You will at-
tach another wire tap connector
to a White with Green striped
connector exiting from the re-
maining female receptacle
marked Y2 as show in the draw-
ing.
You will attach a wire tap con-
nector to the Green with White
stripe wire connected to the
male terminal marked G as
shown. The G terminal is a
male terminal opposite the fe-
male terminal marked Y1 in the
drawing and photo below.
Y1
Y2
G
Green White Stripe
Green White Stripe
White Green Stripe
Y2
Y1
G terminal wire tap connector not
shown in this photo.
G G
Y1
Y2

67-68 COUGAR INSTALLATION
Page 5
WWW.MUSTANGPROJECT.COM
BK
Step 4: Attach a wire tap connec-
tor to the ground wire pin as
shown.
Step 5: Attach wire tap terminals
to the lamp wires on each side of
the car as shown. These are at-
tached to the Orange Red, Or-
ange White, and Orange Blue
wires on one side of the car. Also
attach wire tap connectors to the
Green Orange, Green Red, and
Green Black lamp wires.
Page 5
GR
GR GR
O O
O
O
GR
GR
GR
Green Orange Stripe
Green Red Stripe
Green Black Stripe
Orange Red Stripe
Orange White
Orange Blue
O
O
O
67-68 COUGAR INSTALLATION
Page 6
WWW.MUSTANGPROJECT.COM
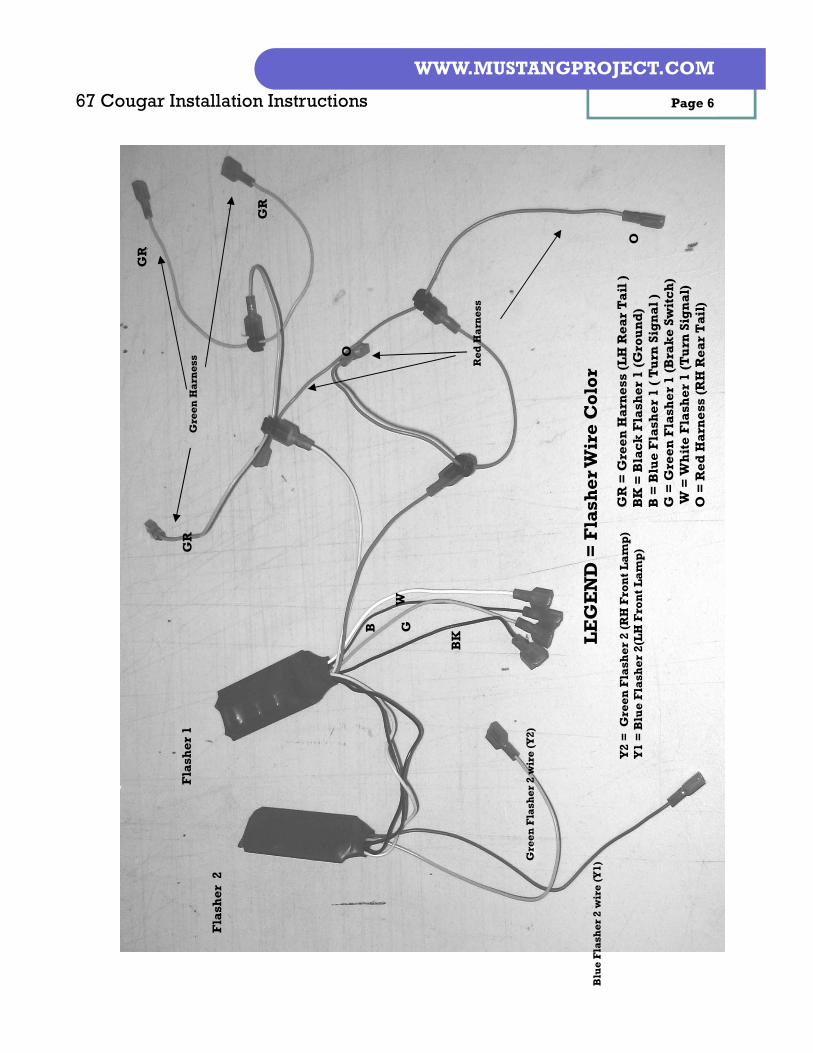
Fla
sher 2
Fla
sher 1
Gre
en F
lasher 2 w
ire (Y2)
Blu
e Fla
sher 2 w
ire (Y1)
Gre
en H
arn
ess
LEGEND =
Fla
sher W
ire C
olo
r
Y2 =
Gre
en Fla
sher 2 (RH Fro
nt Lam
p)
Y1 =
Blu
e Fla
sher 2(L
H Fro
nt Lam
p)
GR =
Gre
en H
arn
ess (LH R
ear Tail )
BK =
Bla
ck F
lasher 1 (Ground)
B =
Blu
e F
lasher 1 ( T
urn
Sig
nal )
G =
Gre
en F
lasher 1 (Bra
ke Switch)
W =
White F
lasher 1 (Turn
Sig
nal)
O =
Red H
arn
ess (RH R
ear Tail)
Red H
arn
ess
G
GR
GR
O
O
GR
BK B
W
67 Cougar Installation Instructions
67-68 COUGAR INSTALLATION
Page 7
WWW.MUSTANGPROJECT.COM
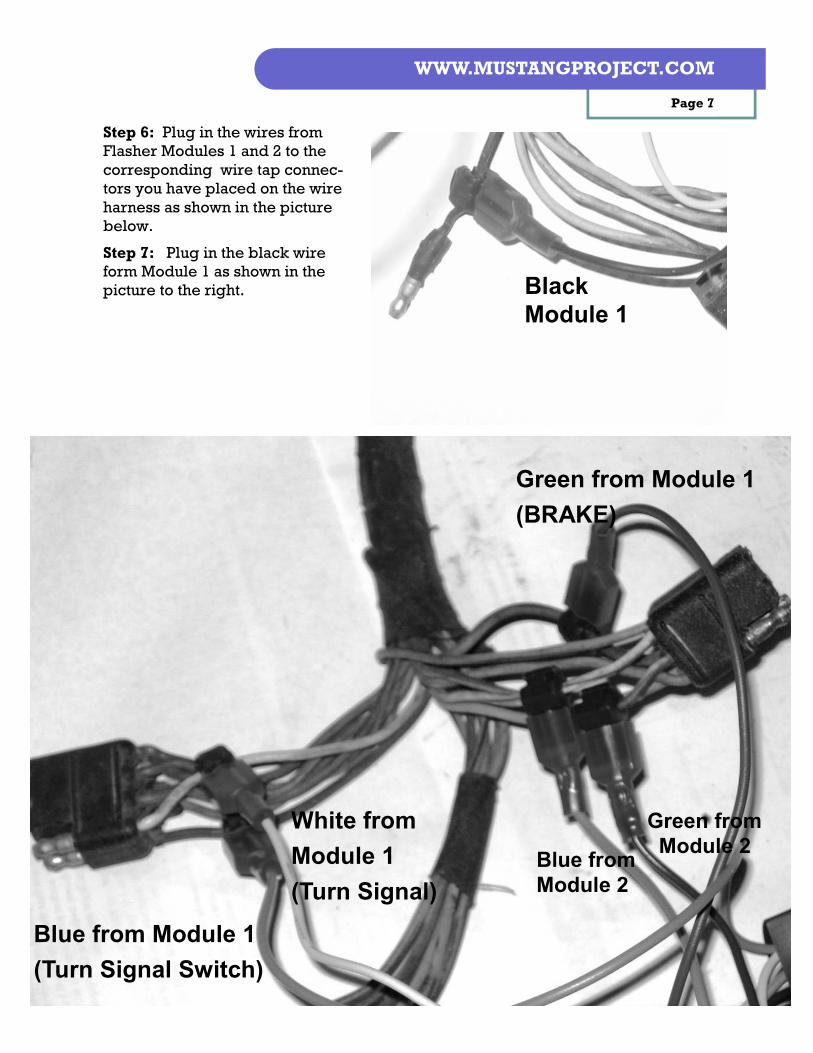
Step 6: Plug in the wires from
Flasher Modules 1 and 2 to the
corresponding wire tap connec-
tors you have placed on the wire
harness as shown in the picture
below.
Step 7: Plug in the black wire
form Module 1 as shown in the
picture to the right.
White from
Module 1
(Turn Signal)
Blue from Module 1
(Turn Signal Switch)
Green from Module 1
(BRAKE)
Green from
Module 2 Blue from
Module 2
Black
Module 1

67-68 COUGAR INSTALLATION
Page 8
WWW.MUSTANGPROJECT.COM
Step 8: Plug in the wire harness from Module 1 to the wire tap connectors you applied to the
lamp housing wires. The green wire from the module harness attaches to the green wires on the
lamp sockets and the red wires from the module harness attach to the orange wires on the lamp
sockets. Step 9: Make sure all bare terminals on the various connectors are insulated.

67-68 COUGAR INSTALLATION
Page 9
WWW.MUSTANGPROJECT.COM
The finished installation can now be
tested.
1) First test the driving and brake
lights. Turn on the driving lights
and check to see that all 6 lamps
are dim. The Mustang Project
sequential system does not control
the driving lights at all so if you
see lights out or bright instead of
dim you have some wiring prob-
lems or socket/lamp problems
that must be corrected.
2) Press on the brake and ensure that
all lights become bright when this
is done. If you do not see this
check to be sure that all of the
male tabs are properly inserted
into the wire tap connectors. Its is
common for the male tap to slide
past the female retainer in the
wire tap connector. You should not
be able to see the majority of the
male tab by looking through the
translucent wire tap connector.
3) If the brake lights do not function
properly that entire system needs to
be checked for wiring problems.
4) Activate the turn signal for right and
left sides and ensure that the lamps
sequence on each side.
5) Activate the emergency flasher
switch mounted on the steering col-
umn and ensure that all rear lamps
flash on and off.
6) Do steps 4 and 5 checking the front
turn signals.
DONE!
67-68 COUGAR INSTALLATION
Y1
Y2
G Green-White Stripe
W
B
BK
Black
GR
GR
GR
Green Orange Stripe
Green Red Stripe
Green Black Stripe
White Blue
Green-White Stripe
White Blue Stripe
O
Orange Red Stripe
Orange White Stripe
Orange Blue Stripe
O
O
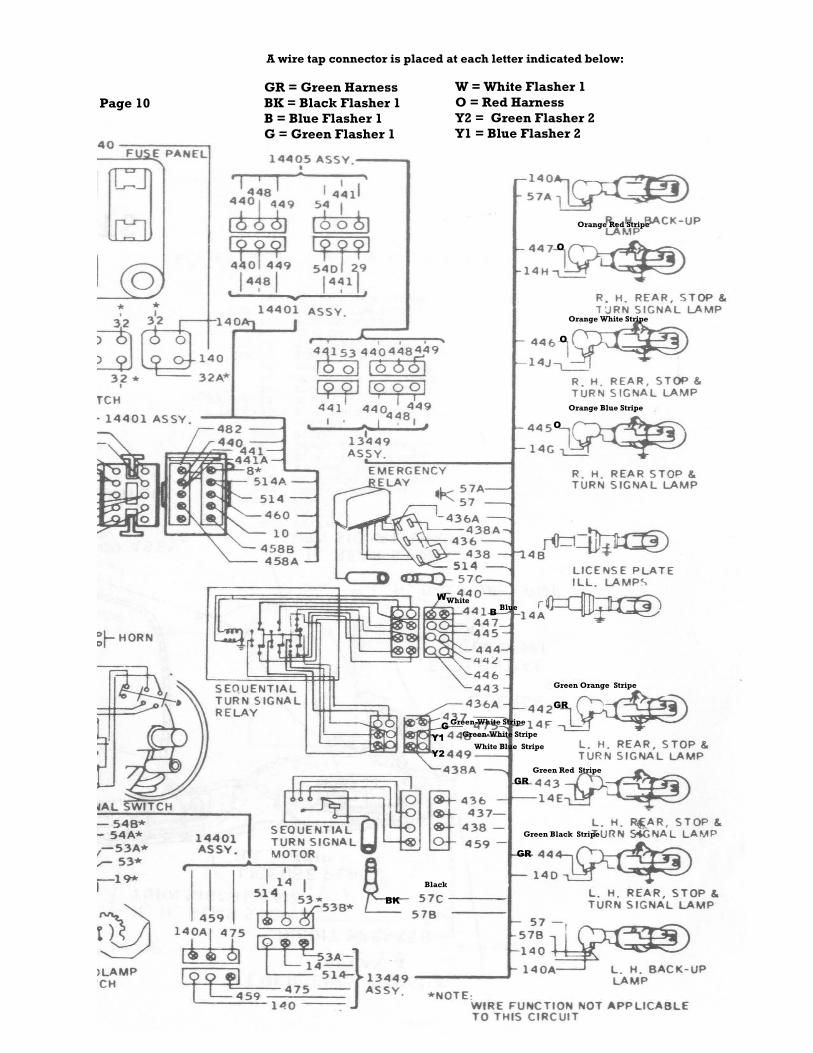
Page 10
W = White Flasher 1
O = Red Harness
Y2 = Green Flasher 2
Y1 = Blue Flasher 2
GR = Green Harness
BK = Black Flasher 1
B = Blue Flasher 1
G = Green Flasher 1
A wire tap connector is placed at each letter indicated below:

67-68 COUGAR INSTALLATION
Page 11
67-68 COUGAR INSTALLATION
For reference only no flasher module wires or
wire tap connectors are installed in this area.

67-68 COUGAR INSTALLATION
Page 12
67-68 COUGAR INSTALLATION
Installing the Taillights
NOTE: LED
Modules may be
different than those
pictured.
“Do not force the
module installation.
Make sure the LED
taillight base pin
and the lamp socket
slot is aligned. Also
ensure that you are
using the “right”
module in the right
side etc. .

67-68 COUGAR INSTALLATION
Remember to check our
web board for new instal-
lation tips!
www.mustangproject.com
Water is the enemy of any-
thing electronic.
Your taillight modules
have been coated with a
conformal coating which
makes the modules resis-
tant to water.
A correct installation will
ensure that no water will
enter the taillight housing.
Make sure your taillight
gaskets are in good order
and that their seal is work-
ing properly.
You can test this by spray-
ing you taillight housings
with a hose with the lens,
gasket and trim in place.
After spraying the housing
for several minutes dry the
outside and remove the
trim and lens.
If there is any significant
water inside the housing
or on the taillight module
you will need a new gas-
ket or you will need to add
some RTV around the lens.
While the taillight mod-
ules will operate correctly
with quite a large amount
of water on their surfaces
because of the special
conformal coating applied
during manufacturing they
are not warranted to oper-
ate wet.
So if you drive you Mus-
tang in the wet weather
check the seal and ensure
that little or no water en-
ters the housing!
Water in the lamp hous-
ings is a prime source of
rust so preserve you Mus-
tang and don’t let water
enter!
SPECIAL NOTES:
ONLY follow the adjustment in-structions below if your lamp sockets are
misaligned!
Installing your Taillight Modules:
Page 13
67-68 COUGAR INSTALLATION

67-68 COUGAR INSTALLATION
Follow the following steps
when checking the alignment.
Step 1. Loosen the nut
pointed to below just enough
for the LED taillight PCB
( Printed Circuit Board ) to
rotate. Now adjust the base
by moving it slightly to the
right or left to ensure that
there is proper alignment
between the base and the
Mustang socket with the
board tilted down to the left.
the module into the Mustang
lamp socket.
Step 2. Insert the tail-
light module into the
socket but do not push
down and engage yet.
Step 3. With the base
inserted into the
socket but not engaged
rotate the taillight
module down on its
left side as shown be-
low. While holding the
board in this tilted po-
sition tighten the nut.
65/66 Modules shown
below.
All the Mustangs we have
tested have the taillight
sockets aligned in the same
manner. The LED taillight
modules you have received
are already aligned to fit
standard Mustang lamp
sockets.
However, if for some rea-
son your lamp sockets are
misaligned you can adjust
the position of the LED tail-
light module by loosening
and tightening the nut
pointed to in the photo be-
low.
Adjustments and Alignment:
Page 14
67-68 COUGAR INSTALLATION
67-68 COUGAR INSTALLATION
1968 Cougar Connection Guide: Page 15
WWW.MUSTANGPROJECT.COM
The 1968 Cougar wiring is identical electri-
cally to the 1967. However, the 1968 se-
quencer module utilized a slightly different
plug configuration. The following pages
will describe how to attach the wire tap
connectors. Utilize the 1967 instructions as
a reference for the following instructions.
Show here is the 1968 wiring diagram we
will reference. The wire colors for the wire
tap attachment points are identical to those
on the 67.
Instead of connecting two wire tap connec-
tors to the while and violet wires( 440 and
441 ) on an 8 pin connector you will find
two 4 pin connectors on the 68 that you
unplugged from the sequential turn signal
relay. Simply connect wire tap connectors
to the same color wires( on the harness ) as
you see in the instructions for the 67 Cou-
gar. These will be connected to male pins
on each of these two 4 pin connectors.
Again one is violet and one is white.
Now rather than connect two additional
wire tap connectors on the 6 pin harness as
in the 67 you connect one on a ( green with
white stripe - 448 ) wire which is a female
pin on the 6 pin connector. You will also
connect a wire tap connector on the two
pin connector you unplugged from the se-
quential turn signal relay to a white with
blue stripe wire ( 449 ). Now you are al-
most done.
You simply find an additional wire (475)
Green with white Stripe on the 6 pin con-
nector and install a wire tap connect on that
wire. It will be connected to a male pin on
the harness connector.
All that is left is to install a wire tap connec-
tor on the ground wire which is a black
wire connected to a one pin connector that
you will find is eventually connected to the
chassis in the trunk.
Now just connect the wires from the mod-
ules to the appropriate color just as de-
scribed in the instructions sheets.
The following pages describe the place-
ment of the wire tap connectors and mod-
ule connection in a step by step process.

67-68 COUGAR INSTALLATION
1968 Cougar Connection Guide: Page 16
WWW.MUSTANGPROJECT.COM
Step 1: The 1968 Cougar
sequential motor and se-
quential relay are re-
moved as an assembly just
as in Step 1 on page 3. The
68 relay assembly has a
slightly different appear-
ance. Note the names of
the plugs and the colors
referenced .
We will be attaching the
wire tap connectors to the
matching plug on the car’s
wiring harness which re-
mains in the trunk after the
sequential relay assembly
is removed.
You will also remove the
emergency relay just as
shown on page 3.
D4 BLACK(4 PIN)
D3 RED (6 pin)
D4 WHITE (4 pin)
Ground(1 pin)
Motor
D3 BLACK (4 pin)
Sequential Relay

67-68 COUGAR INSTALLATION
1968 Cougar Connection Guide: Page 17
WWW.MUSTANGPROJECT.COM
Step 2: Attach wire tap connectors
to the points on the wiring harness
indicated by the bold letters. Refer
to the page 18 photograph to match
the connector shape and color to
this diagram. Remember to only
attach wire tap connectors to the
wire harness not the sequential
module which you will have re-
moved.
You will attach wire tap connectors
to the car’s harness at the D-41 con-
nector ( Black 2 pin). The D3 (Red
6 pin) connector. The D4(Black 4
Pin) and the D4(White 4 Pin ) con-
nectors. You will also attach a wire
tap connector to the Black 1 pin
connector.
Wire tap connectors are attached to
the lamp wires as show here and on
page 6.
Step 3: Finally attach the flasher
modules to the wire tap connectors
as shown on pages 7, 8, and 9. See
the LEGEND below to match the
wires from the flasher modules.
Now you are ready to test!
Please see page 10.
W
Violet
White
B
Y1 Green/White Stripe
Y2 White/Green Stripe
G Green/White Stripe
Orange Red Stripe
Orange White Stripe
Orange Blue Stripe
O
O
O
GR
GR
GR
Green Orange Stripe
Green Red Stripe
Green Black Stripe
BK Black
Remove this relay by
unplugging it from the
harness as described on
page 3.
LEGEND = Flasher Wire Color to wire taps
W = White Flasher 1
O = Red Harness
Y2 = Green Flasher 2
Y1 = Blue Flasher 2
GR = Green Harness
BK = Black
B = Blue Flasher 1
G = Green
67-68 COUGAR INSTALLATION
Page 18
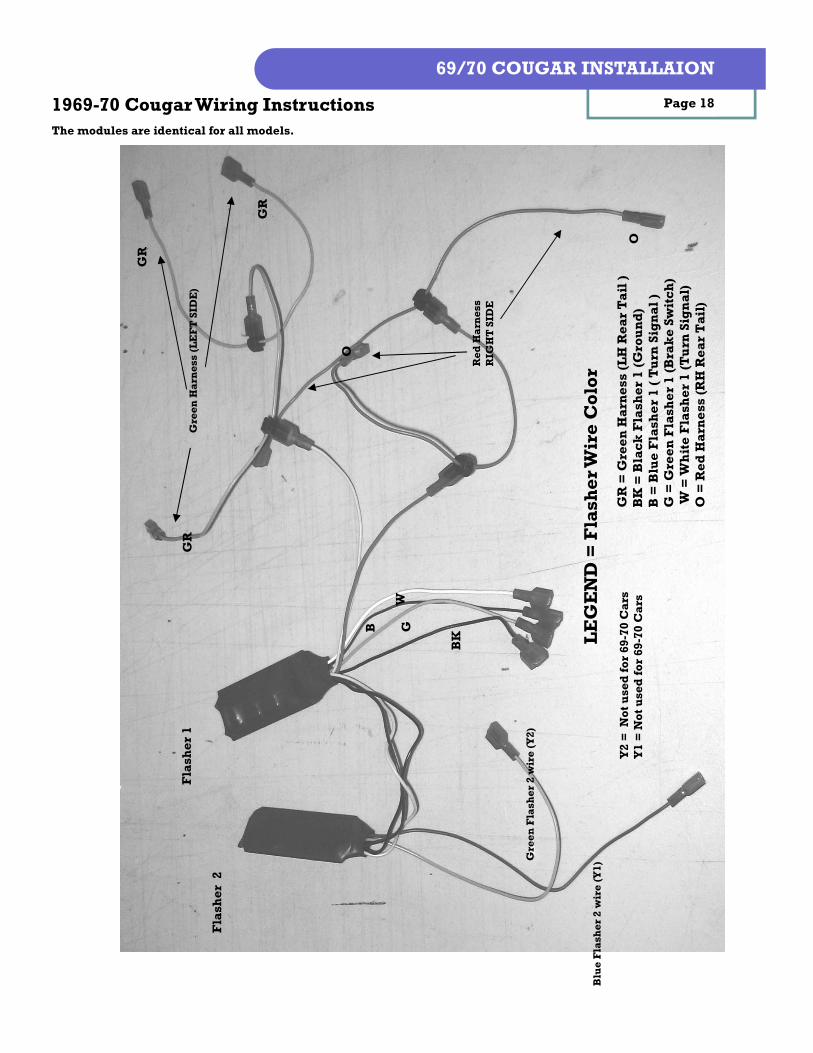
69/70 COUGAR INSTALLAION
Fla
sher 2
Fla
sher 1
Gre
en F
lasher 2 w
ire (Y2)
Blu
e Fla
sher 2 w
ire (Y1)
Gre
en H
arn
ess (LEFT SID
E)
LEGEND =
Fla
sher W
ire C
olo
r
Y2 =
Not used for 69-70 C
ars
Y1 =
Not used for 69-70 C
ars
GR =
Gre
en H
arn
ess (LH R
ear Tail )
BK =
Bla
ck F
lasher 1 (Ground)
B =
Blu
e F
lasher 1 ( T
urn
Sig
nal )
G =
Gre
en F
lasher 1 (Bra
ke Switch)
W =
White F
lasher 1 (Turn
Sig
nal)
O =
Red H
arn
ess (RH R
ear Tail)
Red H
arn
ess
RIG
HT SID
E
G
GR
GR
O
O
GR
BK B
W
1969-70 Cougar Wiring Instructions
The modules are identical for all models.

67-68 COUGAR INSTALLATION
Page 19
WWW.MUSTANGPROJECT.COM
If you have any problems
with your installation
please feel free to give us a
call at 800-631-0507.
You can also check our web
-page at
www.mustangproject.com
for updated Trouble Shoot-
ing Guides for all of our
products.
Most Taillight problems are
due to faulty wiring or bad
socket connections.
Remember unless you have
replaced the wiring or tail-
light sockets in your Mus-
tang you are dealing with
electrical components that
are over 40 years old!
Corrosion and rust can take
their toll. If you have any
troubles first re-install the
standard incandescent
lamps and ensure that the
signals, brake, and light
functions work properly. If
you see any problem with
the brake or signal light
functionality using the in-
candescent lights your sys-
tem will not work with the
new Mustang Project LED
taillight modules.
Carefully check for bad or
rusted sockets. If you see
evidence of corrosion care-
fully clean the contacts and
re-test.
Old wiring can also be a
source of problems. Look
for broken or frayed insula-
tion if you see intermittent
functionality.
Below is a list of trouble
shooting keys:
Problem: Lights flicker.
Flickering lights are often
caused by failing alterna-
tors or bad regulators. The
alternator may still function
well enough to marginally
charge the battery but di-
ode failure in the alternator
can cause flickering tail-
lights.
It is also possible that the
regulator is failing. The
original Mustang electro-
mechanical regulators are
famous for unusually fail-
ures. Always replace your
regulator with a Motorcraft
direct replacement regula-
tor available at most auto
parts stores.
If you suspect a regulator
or alternator problem you
need to replace these items
before you car is stranded!
Doing so will also prevent
flickering of the LED tail-
lights.
Problem: Taillights don’t
sequence but do light if
headlights are on.
Most likely this is due to a
bad socket. It can also be
caused by incorrect instal-
lation of the Mustang Pro-
ject flasher module or im-
proper connection of the
flasher module ground.
Carefully clean the socket
and use a mild sandpaper
on the Taillight Module
contacts to clean off any
debris left by a dirty
socket.
Problem: Taillights se-
quence but taillights do
not illuminate when head-
lamps are on.
Most likely this is due to a
bad socket. Carefully
clean the socket and use a
mild sandpaper on the Tail-
light Module contacts to
clean off any debris left by
a dirty socket.
Problem: Taillights func-
tion abnormally in the
rain.
This is probably caused by
water in the Taillight
bucket. Check for evi-
dence of water and repair
any gasket leaks. The Mus-
tang Project Taillight mod-
ules are coated to protect
against water damage but
they will not operate if too
much water is allowed to
cling to the circuit boards.
Problem: Taillights don’t
fit properly into sockets.
Review the socket section
at the beginning of this in-
struction sheet for adjust-
ment with misaligned sock-
ets.
Be careful to al-
ways ensure that
you have re-
moved the boot
connector in the
back of the light
housing BE-
FORE inserting
the taillight
modules. Fail-
ure to do so can
cause any or all
of the above
symptoms!
Trouble Shooting Guide:
“Remember...
you are
dealing with
electrical
components
that are over
40 years old!”