7장. form 처리와파일업로드 -...
TRANSCRIPT

7장. Form 처리와 파일 업로드
제7장

1. 폼(Form) 태그 소개HTML <form> 태그
사용자에게 정보를 요청하고 적당한 대답을 얻어낼 수 있는텍스트박스나 체크박스 등을 제공한다.
사용자로부터의 정보를 서버에게 전달할 수 있는 submit(전달) 버튼을제공한다.
submit 버튼은 새 페이지(JSP에 의해 생성되는 동적 페이지)를 열기위해 사용된다.
제1장2/33

1. 폼(Form) 태그 소개
3/33 제7장
<form action="Target JSP Page" method="get|post" enctype="…">
<input [type=text(default)|password|checkbox|radio|hidden|submit|reset]
name="name"
[value="value"]
[size="n"]
[maxlength="n"]>
<select name="name" [size="n"] [multiple]>
<option [selected]>value
</select>
<textarea name="name" [rows="n"] [cols="n"]>
...
</textare>
</form> | 는 그 양쪽의 것들 중 하나만을 선택하라는 의미, [ ] 는 선택사항
<form> 태그 형식
action: submit 버튼을 누를 때 서버쪽에서 실행 가능한 프로그램의 URL
method: get 또는 post
enctype: method가 post일 때만 적용
사용자 입력 데이터에 대한 인코딩 (encoding) 방법
기본 인코딩: application/x-www-form-urlencoded

1. 폼(Form) 태그 소개
get 전달 방식
사용자의 입력 값들은 URL 뒷부분의 물음표(?) 다음에 다음과 같이쿼리스트링 (Querystring)으로서 저장되어 넘겨진다.
보통 입력 값들이 많지 않은 경우나 공개적으로 URL에 붙는 파라미터로넘겨도 무방한 경우에 사용된다.
get 전달 방식의 다른 방법
form 없이 직접 브라우저에 주소 작성후 실행
4/33 제7장
http://www.abc.com/abc.jsp?First=foo&Last=bar
http://www.google.co.kr/search?complete=1&hl=ko&q=jsp&lr=&aq=f
http://www.google.co.kr/search?complete=1&hl=ko&q=java&lr=&aq=f

1. 폼(Form) 태그 소개
post 전달 방식
HTTP 요청 헤더 뒤에 입력스트림을 통해서 정보를 전달하는 방식
입력스트림은 운영 체제상에서 일종의 표준 입력(Standard Input, stdin)과 같은 방식으로 JSP 또는 Servlet 내에 전달
전달 데이터의 양에 제한이 없다.
브라우저에서 전달되는 데이터들의 모습을 사용자가 전혀 볼 수가 없다
로그인 정보, 즉 비밀번호 전달에 사용됨
post 방식때 사용하는 enctype 속성
Enctype은 폼의 내용이 코드화 되는 방법을 나타내는 속성이다.
post 방식으로 전달되는 데이터를 클라이언트와 서버 간에 상호정의되어 있는 방식으로 인코딩한 다음 서버로 전달
기본값: application/x-www-form-urlencoded
여러 파일을 업로드할 때: multipart/form-data (7.3절)
5/33 제7장

1. 폼(Form) 태그 소개
get과 post 방식 정리
6/33 제7장
get 방식 (기본 방식) post 방식
특징
- 데이터는 URL 뒤에 쿼리스트링으로
추가되어 전달
- 입력 값들이 많지 않은 경우나 공개
적으로 URL에 붙여 넘겨도 무방한 경
우에 사용
- URL과 별도로 전송
- HTTP 헤더 뒤에 입력스트림 데이터
로 전달
장점- 간단한 데이터를 빠르게 처리할 수
있다.
- GET방식보다 많은 데이터를 전송할
수 있다. (데이터 양에 제한이 없다.)
- 최소한의 보안유지에 효과가 있다.
단점
- 데이터 양에 제한이 있다.
(URL 전체 데이터 사이즈는 2048바이
트로 제한된다.)
- 같은 데이터 양이면 get 방식보다 처
리 속도가 느리다.

1. 폼(Form) 태그 소개
Type 간단한 이름 설 명 모 습
text 글 입력상자일반적인 텍스트 입력, 즉 사용자의 ID 및 주소, 주민등록번
호 등을 입력받을 때 이용된다.
password 암호 입력 상자
입력된 문자가 암호형식 즉, 애스테리스크(*)로 표시되게 하
기 위한 것으로서 사용자의 비밀번호 등을 입력받는 데 사용
된다.
checkbox 체크박스On/Off 형식의 선택으로 네모난 상자에 ∨ 표시를 하여 항목
선택을 할 수 있다.
radio 라디오 단추 2개 이상의 항목들 중 하나만을 택하기 위해 사용된다.
submit 전송버튼입력된 내용을 Action 이 지정하는 JSP 파일에 전달하기 위
한 것으로 버튼 모양으로 되어있다.
reset 취소버튼입력된 내용을 초기화시키기 위한 것으로 역시 버튼 모양으
로 되어있다.
hidden 숨김
브라우저에는 아무 모양이 나오지 않지만, Action 이 지정하
는 JSP 파일에 전달할 값이 있을 경우 Value를 이용하여 값을
지정해 줄 수 있다.
모양 없음
<input> 태그의 Type 속성 종류
7/33 제7장

1. 폼(Form) 태그 소개
<select>와 <textarea> 태그
8/33 제7장
태그 종류 HTML 코드 모 습
<Select> 태그
<select name="select">
<option selected>item1</option>
<option>item2</option>
<option>item3</option>
</select>
<select name="select2" size="3">
<option selected>item1</option>
<option>item2</option>
<option>item3</option>
</select>
<Textarea> 태그 <textarea name="textfield"></textarea>

2. 폼(Form)을 사용한 사용자 정보 처리
<input>의 text와 password 및 <textarea>로부터정보 가져오기
9/33 제7장
01
02
03
04
05
06
07
08
09
10
11
12
13
14
15
16
17
18
19
<html>
<head>
<meta http-equiv="Content-Type" content="text/html;charset=utf-8">
<title>textform</title>
</head>
<body>
가입할 ID 와 Password 및 자기소개를 입력하세요.
<form action="textform.jsp" method="post" name="textform"> //submit 버튼을 누르면 textform.jsp으로 내용전달
ID : <input type="text" name="id"><br/>
Password : <input type="password" name="pw"><br/>
자기소개<br/>
<textarea name="desc" cols="50" rows="4"></textarea><br>
<center>
<input type="submit" value="전송" name="submitbtn">
<input type="reset" value="초기화" name="resetbtn">
</center>
</form>
</body>
</html>
[예제 7.1-1] jspbook\ch07\textform.html

2. 폼(Form)을 사용한 사용자 정보 처리
<input>의 text와 password 및 <textarea>로부터정보 가져오기
10/33 제7장
01
02
03
04
05
06
07
08
09
10
11
12
13
14
<%@ page contentType="text/html; charset=utf-8" %>
<%
request.setCharacterEncoding("utf-8"); // 한글 처리를 위한 구문
%>
<html>
<head><title>Textform 처리</title></head>
<body>
당신이 입력한 정보입니다.<br/>
<b>ID</b> : <%= request.getParameter("id") %><br/> // ID 정보 가져오기
<b>Password</b> : <%= request.getParameter("pw")%><br/> // password 정보 가져오기
<b>자기소개</b><br/>
<%= request.getParameter("desc") %> <br/> // 자기소개 가져오기
</body>
</html>
[예제 7.1-2] jspbook\ch07\textform.jsp

2. 폼(Form)을 사용한 사용자 정보 처리
<input>의 text와 password 및 <textarea>로부터정보 가져오기
textform.jsp에서 가장 중요한 jsp 코드
request 객체는 웹브라우저에서 웹 서버로 요청을 전달하는 것과 관련된모든 정보(파라미터)를 담고 있는 Jsp/Servlet 기본 객체
request 객체의 가장 기본적인 메소드
name 파라미터 값: HTML 문서의 각각의 <input> 태그에서 사용한 name 속성
11/33 제7장
<%= request.getParameter("id") %>
<%= request.getParameter("pw") %>
<%= request.getParameter("desc") %>
public java.lang.String getParameter( java.lang.String name)

2. 폼(Form)을 사용한 사용자 정보 처리
[note] get 방식과 post 방식의 한글처리
get 방식으로 전달되는 파라미터 한글처리를 위한 설정
server.xml 파일 내용 중 일부를 다음과 같이 수정
post 방식으로 전달되는 파라미터 한글처리 방법
request 객체의 setCharacterEncoding("utf-8")을 호출한 뒤 한글 입력내용을 가져옴.
12/33 제7장
<Connector port="8080" protocol="HTTP/1.1" connectionTimeout="20000" redirectPort="8443" URIEncoding="utf-8"/>

2. 폼(Form)을 사용한 사용자 정보 처리
<input>의 checkbox 및 radio 로부터 정보 가져오기
13/33 제7장
01
02
03
04
05
06
07
08
09
10
11
12
13
14
15
16
17
18
<html>
<head>
<meta http-equiv="Content-Type" content="text/html;charset=utf-8">
<title>rcform</title>
</head>
<body>
<form action="rcform.jsp" method="post" name="textform">
<table border=1> // 화면을 일정하게 배열하기 위해 <table> 태그를 사용
<tr>
<td>관심분야</td>
<td>
<input type="checkbox" name="cp" value="엔터테인먼트">엔터테인먼트<br/>
<input type="checkbox" name="cp" value="컴퓨터/인터넷" checked>컴퓨터/인터넷<br/>
<input type="checkbox" name="cp" value="경제/비지니스">경제/비지니스<br/>
<input type="checkbox" name="cp" value="스포츠/건강">스포츠/건강<br/>
<input type="checkbox" name="cp" value="여행/관광">여행/관광<br/>
</td>
</tr>
[예제 7.2-1] jspbook\ch07\rcform.html
2. 폼(Form)을 사용한 사용자 정보 처리
<input>의 checkbox 및 radio 로부터 정보 가져오기
14/33 제7장
19
20
21
22
23
24
25
26
27
28
29
30
31
32
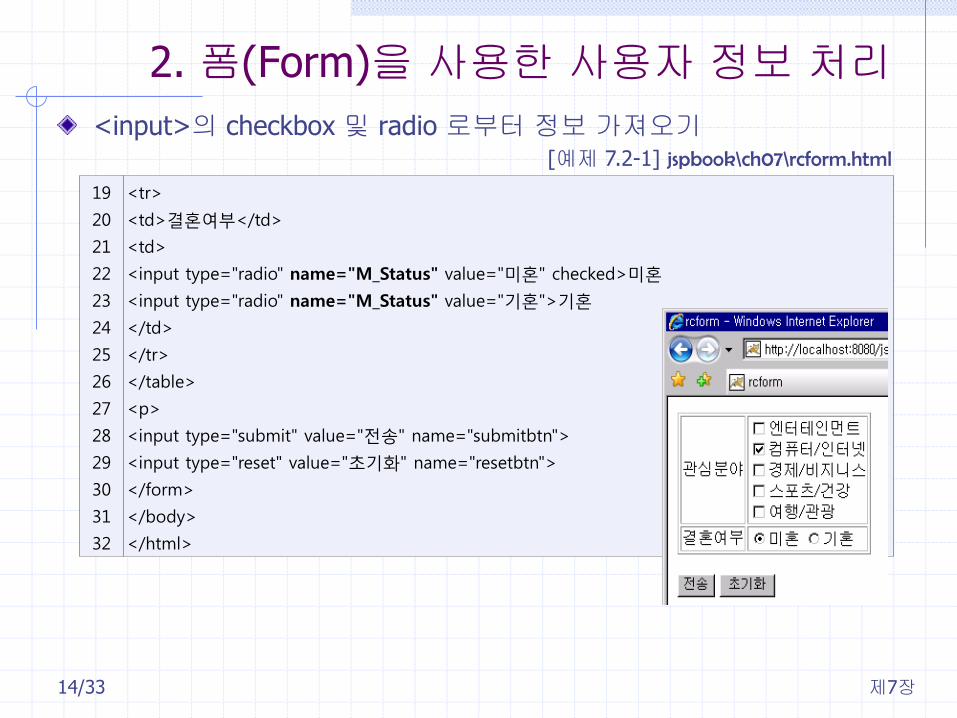
<tr>
<td>결혼여부</td>
<td>
<input type="radio" name="M_Status" value="미혼" checked>미혼
<input type="radio" name="M_Status" value="기혼">기혼
</td>
</tr>
</table>
<p>
<input type="submit" value="전송" name="submitbtn">
<input type="reset" value="초기화" name="resetbtn">
</form>
</body>
</html>
[예제 7.2-1] jspbook\ch07\rcform.html

2. 폼(Form)을 사용한 사용자 정보 처리
<input>의 checkbox 및 radio 로부터 정보 가져오기
15/33 제7장
01
02
03
04
05
06
07
08
09
10
11
12
13
14
15
16
17
18
<%@ page contentType="text/html;charset=utf-8" %>
<%
request.setCharacterEncoding("utf-8"); // 한글 처리 구문
%>
<html>
<head><title>reform_jsp</title></head>
<body>
당신의 관심분야와 결혼여부는 다음과 같습니다.<br/>
<%
String[] interest = request.getParameterValues("cp"); // 복수개의 cp 값 받아오기
for (int i = 0; i < interest.length-1; i++) {
%>
<b><%=interest[i]%></b>, // 마지막 바로 이전까지 ","와 함께 출력
<%}%>
<b><%=interest[interest.length-1]%></b>과 // 마지막 항목 출력
<b><%=request.getParameter("M_Status")%></b> // 결혼여부 출력
</body>
</html>
[예제 7.2-2] jspbook\ch07\rcform.jsp

2. 폼(Form)을 사용한 사용자 정보 처리
<input>의 checkbox 및 radio 로부터 정보 가져오기
16/33 제7장
01
02
03
04
05
06
07
08
09
10
11
12
13
14
15
16
17
<html>
<head>
<meta http-equiv="Content-Type" content="text/html;charset=utf-8">
<title>checkboxform</title>
</head>
<body>
<form name="myform" action="checkboxform.jsp" method="get">
<br/>
<input type="checkbox" name="option1" value="Milk">Milk<br/>
<input type="checkbox" name="option2" value="Butter" checked>Butter<br/>
<input type="checkbox" name="option3" value="Cheese" checked>Cheese<br/>
<br/>
<input type="submit" value="전송" name="submitbtn">
<input type="reset" value="초기화" name="resetbtn">
</form>
</body>
</html>
[예제 7.3-1] jspbook\ch07\checkboxform.html

2. 폼(Form)을 사용한 사용자 정보 처리
<input>의 checkbox 및 radio 로부터 정보 가져오기
17/33 제7장
01
02
03
04
05
06
07
08
09
10
11
12
13
14
15
16
17
18
19
20
21
<%@ page contentType="text/html;charset=utf-8" %>
<%@ page import="java.util.Enumeration" %> // java.util.Enumeration 클래스 사용하기 위한 import
<%
request.setCharacterEncoding("utf-8"); // get방식으로 전달될때엔 꼭 적을 필요 없음
%>
<html><head><title>checkboxform_jsp</title></head>
<body>
당신이 체크한 것은 아래와 같습니다.
<br/><br/>
<%
Enumeration enums = request.getParameterNames(); // 모든 name 속성 이름을 Enumeration 객체로 얻어오기
while (enums.hasMoreElements()) {
String name = (String)enums.nextElement();
if (name.startsWith("option")) {
String value = request.getParameter(name); // option으로 시작하는 name 속성의 실제 값 얻어오기
out.println(value + "<br/>");
}
}
%>
</body>
</html>
[예제 7.3-2] jspbook\ch07\checkboxform.jsp

2. 폼(Form)을 사용한 사용자 정보 처리
<input>의 checkbox 및 radio 로부터 정보 가져오기
18/33 제7장
getParameterNames()의 동작 모습

2. 폼(Form)을 사용한 사용자 정보 처리
<input>의 checkbox 및 radio 로부터 정보 가져오기
19/33 제7장
Enumeration 객체 enum에 대한 메소드 호출시의 동작 모습

2. 폼(Form)을 사용한 사용자 정보 처리
<select>로부터정보 가져오기
20/33 제7장
01
02
03
04
05
06
07
08
09
10
11
12
13
14
15
16
17
18
19
<html>
<head>
<meta http-equiv="Content-Type" content="text/html;charset=utf-8">
<title>selectform</title>
</head>
<body>
<form action="selectform.jsp" method="get" name="textform">
<table border=1>
<tr><td>학력</td>
<td>
<select name="edu">
<option selected>재학생</option>
<option>학사</option>
<option>석사</option>
<option>박사</option>
</select>
</td>
</tr>
<tr><td>소속국가</td>
[예제 7.4-1] jspbook\ch07\selectform.html

2. 폼(Form)을 사용한 사용자 정보 처리
<select>로부터정보 가져오기
21/33 제7장
20
21
22
23
24
25
26
27
28
29
30
31
32
33
34
35
36
37
38
39
40
41
42
<td>
<select name="na" size="3">
<option selected>Korea</option>
<option>USA</option>
<option>Japan</option>
</select></td>
</tr>
<tr><td>관심분야</td>
<td>
<select name="like" size="4" multiple>
<option>광고/ 미디어</option>
<option selected>프로듀서</option>
<option selected>컨설팅</option>
<option>그래픽디자이너</option>
</select>
</td>
</tr>
</table>
<input type="submit" value="전송" name="submitbtn">
<input type="reset" value="초기화" name="resetbtn">
</form>
</body>
</html>
[예제 7.4-1] jspbook\ch07\selectform.html

2. 폼(Form)을 사용한 사용자 정보 처리
<select>로부터정보 가져오기
22/33 제7장
01
02
03
04
05
06
07
08
09
10
11
12
13
14
15
16
17
18
19
20
<%@page contentType="text/html;charset=utf-8" %>
<%
request.setCharacterEncoding("utf-8");
String edu = request.getParameter("edu");
String na = request.getParameter("na");
String[] like = request.getParameterValues("like");
%>
<html>
<body>
당신의 학력, 소속국가 및 관심분야는 다음과 같습니다.<br/>
<b><%=edu %></b> 과 <b><%=na %></b><br/>
<b><%
if (like != null) {
for (int i=0;i<like.length;i++) {
out.println(like[i]);
}
}
%></b>
</body>
</html>
[예제 7.4-2] jspbook\ch07\selectform.jsp
// 사용자 입력 정보를 JSP 변수인 edu, na에 할당
// 관심분야 리스트에서 선택된여러 개의 값을 like 배열에 할당

3. 파일 업로드와 MultipartRequest
post 방식의 multipart/form-data 인코딩
post 방식의 인코딩 종류
application/x-www-form-urlencoded (기본 방식)
multipart/form-data
23/33 제7장
<form action="..." method="post">
...
</form>
<form action="..." method="post" enctype="multipart/form-data">
...
</form>

3. 파일 업로드와 MultipartRequestpost 방식의 multipart/form-data 인코딩
24/33 제7장
01
02
03
04
05
06
07
08
09
10
11
12
13
14
15
16
<html>
<head>
<meta http-equiv="Content-Type" content="text/html;charset=utf-8">
<title>인코딩 방식의 차이점</title>
</head> // enctype의 디폴트 값은 "application/x-www-form-urlencoded"
<body>
<h2>인코딩 방식: application/x-www-form-urlencoded</h2>
<form action="upload.jsp" method="post"> // 파일 업로드를 위한 <input> 태그
Name: <input type="text" name="name"> <br>
Age: <input type="text" name="age"> <br>
File: <input type="file" name="file"> <br>
<input type="submit" value="SUBMIT">
</form>
<hr/>
[예제 7.5-1] jspbook\ch07\encoding.html

3. 파일 업로드와 MultipartRequestpost 방식의 multipart/form-data 인코딩
25/33 제7장
17
18
19
20
21
22
23
24
25
<h2>인코딩 방식: multipart/form-data</h2>
<form action="upload.jsp" method="post" enctype="multipart/form-data">
Name: <input type="text" name="name"> <br>
Age: <input type="text" name="age"> <br>
File: <input type="file" name="file"> <br> // 파일 업로드를 위한 <input> 태그
<input type="submit" value="SUBMIT">
</form>
</body>
</html>
[예제 7.5-1] jspbook\ch07\encoding.html
// enctype 속성을 "multipart/form-data"로 지정

3. 파일 업로드와 MultipartRequest
post 방식의 multipart/form-data 인코딩
26/33 제7장
01
02
03
04
05
06
07
08
09
10
11
<%@ page contentType="text/html;charset=utf-8" %>
<%@ page import = "java.io.*" %>
<%
out.print("<h2>" + request.getContentType() + "</h2>");
InputStream ins = request.getInputStream();
int data = -1;
while ( (data = ins.read()) != -1 ) {
out.print((char)data);
}
%>
[예제 7.5-2] jspbook\ch07\upload.jsp
3. 파일 업로드와 MultipartRequest
post 방식의 multipart/form-data 인코딩
27/33 제7장
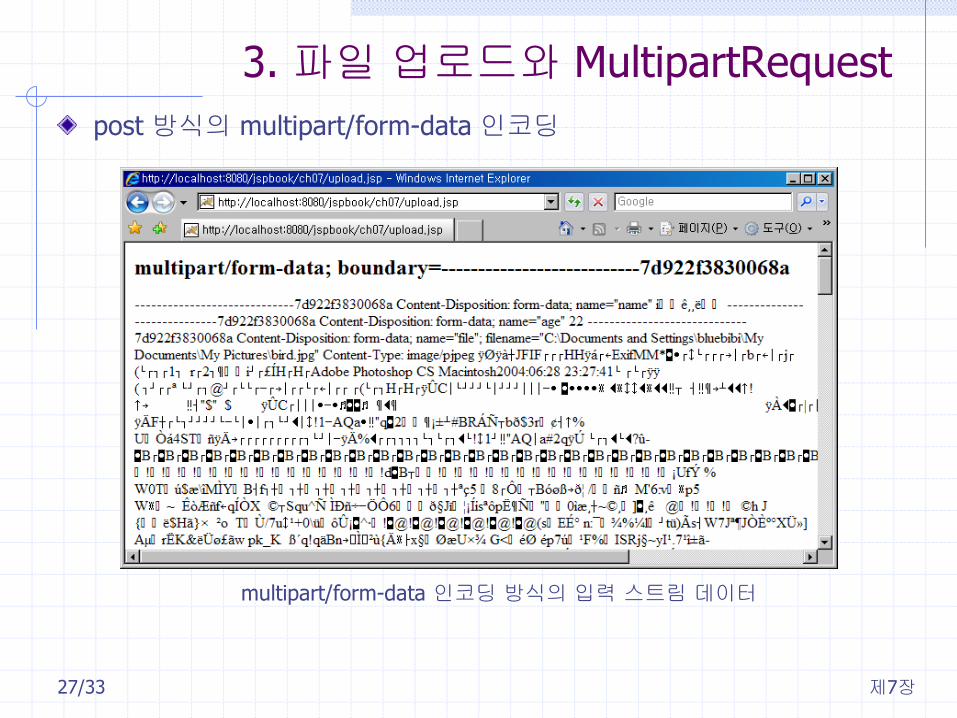
multipart/form-data 인코딩 방식의 입력 스트림 데이터

3. 파일 업로드와 MultipartRequest
파일 업로드 구현
사용할 라이브러리
oreilly 회사에서 개발한 cos 라이브러리
다운로드할 라이브러리 주소
라이브러리 설치하기
다운받아야 할 파일
cos-26Dec2008.zip
압축푼 이후 이용해야 할 파일
cos.jar
cos.jar를 저장해두어야 하는 위치
Tomcat 어플리케이션기본 폴더 밑의 lib 폴더에복사
jspbook 어플리케이션 뿐만 아니라 Tomcat 어플리케이션밑의 모든 웹어플리케이션에서이 라이브러리를활용가능
28/33 제7장
http://www.servlets.com/cos/

3. 파일 업로드와 MultipartRequest
파일 업로드 구현
29/33 제7장
01
02
03
04
05
06
07
08
09
10
11
12
13
<html>
<head>
<meta http-equiv="Content-Type" content="text/html;charset=utf-8">
<title>file-upload</title>
</head>
<body>
<form action="up.jsp" enctype="multipart/form-data" method="post">
이름 : <input type="text" name="userName"> <BR>
파일 : <input type="file" name="upfile">
<input type="submit" value="Upload">
</form>
</body>
</html>
[예제 7.6-1] jspbook\ch07\fileup.html

3. 파일 업로드와 MultipartRequest
파일 업로드 구현
30/33 제7장
파일 업로드를 위하여 이미지 bird.jpg를 선택하는 화면

3. 파일 업로드와 MultipartRequest
파일 업로드 구현
31/33 제7장
01
02
03
04
05
06
07
08
09
10
11
12
-
13
14
15
<%@ page contentType="text/html;charset=utf-8" %>
<%@ page import="com.oreilly.servlet.MultipartRequest,
com.oreilly.servlet.multipart.DefaultFileRenamePolicy,
java.io.File" %>
<%@ page import="thinkonweb.util.*" %>
<html>
<body>
<%
String savePath=application.getRealPath("/ch07"); // 업로드 파일을 저장할 폴더 지정
int sizeLimit = 5 * 1024 * 1024 ; // 5메가까지 제한 넘어서면 예외 발생
MultipartRequest multi = new MultipartRequest(request, savePath, sizeLimit, "utf-8",
new DefaultFileRenamePolicy()); // 파일 업로드는 이 시점에 이루어짐
File file = multi.getFile("upfile"); // 파일의 이름 얻어옴
[예제 7.6-2] jspbook\ch07\up.jsp

3. 파일 업로드와 MultipartRequest
파일 업로드 구현
32/33 제7장
16
17
18
19
20
21
22
23
24
25
26
27
28
String fileName=file.getName();
long fileSize=file.length();
if(fileName == null) { // 파일이 업로드 되지 않았을 때
out.print("파일 업로드 되지 않았음 (이유: 파일 사이즈 초과 등)");
} else {
out.print("User Name : " + multi.getParameter("userName") + "<br>");
out.print("File Name : " + fileName + "<br>");
out.print("File Size : " + fileSize + "<br>");
}
%>
</body>
</html>
[예제 7.6-2] jspbook\ch07\up.jsp

3. 파일 업로드와 MultipartRequest
파일 업로드 구현
MultipartRequest 객체에 호출할 수 있는 메소드에 대한 설명
File 객체에 호출할 수 있는 메소드에 대한 설명
업로드된 파일 화일
33/33 제7장
http://www.servlets.com/cos/javadoc/com/oreilly/servlet/MultipartRequest.html
http://java.sun.com/javase/6/docs/api/java/io/File.html
업로드되어진 bird.jpg 파일이 ch07 폴더에 저장된 모습