7 solve problems - partshere.com · 190 chapter 7 solve problems enww. ... use the...
TRANSCRIPT

7 Solve problems
To use the information in this chapter, you should have a basic understanding of the HP LaserJet printingprocess. Explanations of each mechanical assembly, the product systems, and the basic theory ofoperation are contained in Theory of operation on page 79. Do not perform any of these troubleshootingprocesses unless you understand the function of each product component.
NOTE: Unless otherwise noted, all illustrations depicting the HP LaserJet P2050 Series Printers arealso valid for the HP LaserJet P2030 Series Printers.
● Solve general problems
● Menu map (HP LaserJet P2050 Series Printers only)
● Troubleshooting process
● Tools for troubleshooting
● Problem-solve diagrams
● Status-light patterns (HP LaserJet P2030 Series Printers only)
● Status-alert messages (HP LaserJet P2030 Series Printers only)
● Interpret control-panel messages (HP LaserJet P2050 Series Printers only)
● Event-log messages
● Paper-handling problems
● Solve image-quality problems
● Solve print-quality problems
● Solve performance problems
● Solve connectivity problems
● Service mode functions
ENWW 185

Solve general problemsIf the product is not responding correctly, complete the steps in the following checklist, in order. If theproduct does not pass a step, follow the corresponding troubleshooting suggestions. If a step resolvesthe problem, you can stop without performing the other steps on the checklist.
Troubleshooting checklist1. Make sure the product Ready light is on. If no lights are on, complete these steps:
a. Check the power-cable connections.
b. Check that the power switch is on.
c. Make sure that the line voltage is correct for the product power configuration. (See the labelthat is on the back of the product for voltage requirements.) If you are using a power strip andits voltage is not within specifications, plug the product directly into the wall. If it is alreadyplugged into the wall, try a different outlet.
d. Verify that connectors J2 and J7 on the formatter PCA are seated. See Figure 7-3Components on the left side of the product on page 196.
e. Perform an engine test. If the test is successful, replace the control panel and then theformatter PCA. See Top-cover assembly on page 124, Formatter PCA; HP LaserJet P2030Series on page 130, or Formatter PCA; HP LaserJet P2050 Series on page 132.
2. Check the cables.
a. Check the cable connection between the product and the computer or network port. Makesure that the connection is secure.
b. Make sure that the cable itself is not faulty by using a different cable, if possible.
c. Check the network connection. See Solve network problems on page 249.
3. Check to see if any messages appear on the control-panel display. If any error messages appear,see Interpret control-panel messages (HP LaserJet P2050 Series Printers only) on page 219.
4. Check to see if any control-panel lights are lit. See Status-light patterns (HP LaserJet P2030 SeriesPrinters only) on page 209.
5. Make sure that the print media that you are using meets specifications.
6. Print a configuration page. See Print the information pages on page 48.
a. If the pages do not print, check that at least one tray contains print media.
b. If the page jams in the product, see Clear jams on page 230.
7. If the configuration page prints, check the following items.
� If the page prints correctly, then the product hardware is working. The problem is with thecomputer that you are using, with the printer driver, or with the program.
8. Select one of the following options:
Windows: Click Start, click Settings, and then click Printers, or Printers and Faxes. Double-click the name of the product.
186 Chapter 7 Solve problems ENWW

-or-
Mac OS X: Open Print Center or Printer Setup Utility, and double-click the line for the product.
9. Verify that you have installed the printer driver for this product. Check the program to make surethat you are using the printer driver for this product.
10. Print a short document from a different program that has worked in the past. If this solution works,then the problem is with the program that you are using. If this solution does not work (the documentdoes not print), complete these steps:
a. Try printing the job from another computer that has the product software installed.
b. If you connected the product to the network, connect the product directly to a computer witha USB cable. Redirect the product to the correct port, or reinstall the software, selecting thenew connection type that you are using.
Factors that affect product performanceSeveral factors affect the time it takes to print a job:
● Maximum product speed, measured in pages per minute (ppm)
● The use of special paper (such as transparencies, heavy paper, and custom-size paper)
● Product processing and download time
● The complexity and size of graphics
● The speed of the computer you are using
● The USB connection
● The product I/O configuration
● The amount of memory installed in the product
● The network operating system and configuration (if applicable)
NOTE: Although additional memory can improve how the product handles complex graphics andimprove download times, it will not increase maximum product speed (ppm).
ENWW Solve general problems 187

Basic problem solvingTable 7-1 Basic problem solving
Problem Cause Solution
When the product is connected to acorrectly grounded power source, theLEDs on the control panel do notilluminate and the main motor does notrotate.
The product does not turn on.
No power to the product. 1. Verify that the power switch isturned on.
2. Verify that the power cable iscorrectly plugged into the outlet andthe product.
3. Verify that the power outlet has thecorrect voltage.
The power inlet/switch cable assembly isdefective.
Replace the power inlet/switch cableassembly. See Inlet-cable assemblyon page 150.
The ECU is defective. Replace the ECU. See Engine controllerunit (ECU) on page 163.
When turned on, the LEDs on the controlpanel light up, but the main motor doesnot rotate.
The product turns on, but the motor doesnot rotate.
The print-cartridge door is open. Close the print-cartridge door.
Media is jammed in the paper path. Clear all media from the paper path, andmake sure that all sensors are workingcorrectly.
The cable is not connected correctly. Reconnect the motor cable.
The motor is not mounted correctly in theproduct chassis.
Verify that the motor is connectedcorrectly and that it rotates freely.
A gear is damaged or jammed. Replace the gear assembly. See Paper-pickup-gear assembly on page 134.
The ECU is defective. Replace the ECU. See Engine controllerunit (ECU) on page 163.
The main motor is defective. Replace the motor. See Main motoron page 174.
The product turns on and the motorrotates, but none of the control-panellights turn on, and pressing the control-panel buttons has no effect.
The product is unresponsive.
The control-panel cable is not connectedcorrectly.
Reconnect the control panel cable.
The control panel is defective. Replace the control panel. See Top-cover assembly on page 124.
The formatter is defective. Replace the formatter. See FormatterPCA; HP LaserJet P2030 Serieson page 130 or Formatter PCA; HPLaserJet P2050 Series on page 132.
The product is on, but the control-panellights indicate that the product is not inthe "ready" state.
The product is not "ready."
The product has an internal error thatwas detected during the Power-On Self-Test sequence.
Consult the list of control-panel lightpatterns to identify and correct the error.
188 Chapter 7 Solve problems ENWW

Problem Cause Solution
The product turns on, the motor rotates,and the control panel indicates the"ready" state, but the product does notprint.
The product does not print.
A component is defective. Perform an engine test to verify print-engine components.
1. Print an engine test page. SeeEngine test page on page 251.
2. If the engine test page does notprint, check all the connectors onthe ECU, and reconnect any cablesthat are connected incorrectly.
3. If, after checking the connectors,the error persists, replace the ECU.See Engine controller unit (ECU)on page 163.
The formatter is defective. Press the Go button to print a Demopage. If the Demo page does not print,replace the formatter. See FormatterPCA; HP LaserJet P2030 Serieson page 130 or Formatter PCA; HPLaserJet P2050 Series on page 132.
The product prints the engine test andthe Demo page, but does not print jobssent from a computer.
The product does not print from acomputer.
The cable is not connected correctly. Reconnect the cable.
An incorrect driver is selected. Select the correct printer driver.
The printer driver is not installedcorrectly.
Remove and then reinstall the productsoftware. Make sure that you use thecorrect procedure and port setting.
Other devices are connected to theproduct (for example, through a switch orhub) that are interfering with thecomputer-product communications.
Disconnect the other devices, switches,or hubs.
There is a computer-portcommunications problem.
Reset the computer port settings (seethe computer user guide for moreinformation).
The formatter is defective. Replace the formatter. See FormatterPCA; HP LaserJet P2030 Serieson page 130 or Formatter PCA; HPLaserJet P2050 Series on page 132.
Table 7-1 Basic problem solving (continued)
ENWW Solve general problems 189

Menu map (HP LaserJet P2050 Series Printers only)Print a menu map
1. Press OK to open the menus.
2. Use the arrow buttons to navigate to the Reports submenu, and then press OK.
3. Use the arrow buttons to navigate to the Menu structure submenu, and then press OK to print themenu structure.
4. Press X to exit the menus.
190 Chapter 7 Solve problems ENWW

Troubleshooting processWhen the product malfunctions or encounters an unexpected situation, the product control panel alertsyou to the situation. This chapter contains information to help diagnose and solve problems.
● Use the pre-troubleshooting checklist to evaluate the source of the problem and to reduce thenumber of steps that are required to fix the problem.
● Use the troubleshooting flowchart to pinpoint the root cause of hardware malfunctions. Theflowchart guides you to the appropriate section of this chapter that provides steps for correctingthe malfunction.
Before beginning any troubleshooting procedure, check the following conditions:
● Are supply items within their rated life?
● Does the configuration page reveal any configuration errors?
NOTE: The customer is responsible for checking supplies and for using supplies that are in goodcondition.
Pre-troubleshooting checklist The following table includes basic questions to ask the customer to quickly help define the problem orproblems.
General topic Questions
Environment ● Is the product installed on a solid, level surface (+/- 1°)?
● Is the power-supply voltage within ± 10 volts of the specified power source?
● Is the power-supply plug inserted in the product and the outlet?
● Is the operating environment within the specified parameters?
● Is the product exposed to ammonia gas, such as that produced by diazo copiersor office cleaning materials?
NOTE: Diazo copiers produce ammonia gas as part of the coping processes.Ammonia gas (from cleaning supplies or a diazo copier) can have an adverseaffect on some product components (for example, the print-cartridge OPC).
● Is the product exposed to direct sunlight?
Media ● Does the customer use only supported media?
● Is the media in good condition (no curls, folds, or distortion)?
● Is the media stored correctly and within environmental limits?
Input trays ● Is the amount of media in the tray within specifications?
● Is the media placed in the tray correctly?
● Are the paper guides aligned with the media?
● Is the cassette correctly installed in the product?
Print cartridges ● Is each print cartridge correctly installed?
Transfer unit and fuser ● Are the transfer unit and fuser installed correctly?
ENWW Troubleshooting process 191

General topic Questions
Covers ● Is the front cover closed?
Condensation ● Does condensation occur following a temperature change (particularly in winterfollowing cold storage)? If so, wipe affected area dry or leave the product onfor 10 to 20 minutes.
● Was a print cartridge installed soon after being moved from a cold to a warmroom? If so, allow the print cartridge to sit at room temperature for 1 to 2 hours.
Miscellaneous ● Check for and remove any non-HP components (print cartridges, memorymodules, and EIO cards) from the product.
● Remove the product from the network and make sure that the failure isassociated with the product before beginning troubleshooting.
● For any print-quality issues, calibrate the product.
192 Chapter 7 Solve problems ENWW

Tools for troubleshootingThe section describes the tools that can help you solve problems with your device.
Continuous self-test (HP LaserJet P2050 Series only)The continuous self-test puts the device into a continuous printing mode without having to send jobs toit.
1. Confirm that the product is in a Ready state. Press OK to enter the main menu.
2. Simultaneously press and hold the down arrow and Cancel button .
3. Press OK to re-enter the main menu.
4. Navigate to the secondary service menu.
5. Select Service Reports and then Cont. Self-Test.
To terminate the continuous self-test, press the Cancel button .
Half self-test functional checkThe half self-test check determines which printing process is malfunctioning.
1. Print a Configuration page.
2. Press the print-cartridge-door button after the paper advances halfway through the product (aboutfive seconds after the motor begins rotating). The leading edge of the paper should have advancedpast the print cartridge.
3. Remove the print cartridge.
4. Open the print cartridge drum shield to view the drum surface. If a dark and distinct toner image ispresent on the drum surface, assume that the first two functions of the electrophotographic processare functioning (image formation and development). Troubleshoot the failure as a transfer or fusingproblem.
If there is no image on the photosensitive drum, perform these checks:
1. Make sure you removed the entire length of the sealing tape from the print cartridge before youinstalled the cartridge.
2. Perform a drum rotation functional check to make sure that the drum is rotating.
3. Perform a high-voltage contacts check.
Drum rotation functional check The photosensitive drum, located in the print cartridge, must rotate for the print process to work. Thephotosensitive drum receives its drive from the main drive assembly.
NOTE: This test is especially important if refilled print cartridges have been used.
1. Open the print-cartridge door.
2. Remove the print cartridge.
ENWW Tools for troubleshooting 193

3. Mark the drive gear on the cartridge with a felt-tipped marker. Note the position of the mark.
4. Replace the print cartridge and close the print-cartridge door. The startup sequence should rotatethe drum enough to move the mark.
5. Open the print-cartridge door and inspect the gear that was marked in step 3. Verify that the markmoved.
If the mark did not move, inspect the main drive assembly to make sure that it is meshing with the printcartridge gears. If the drive gears appear functional and the drum does not move, replace the printcartridge. See Print cartridge on page 102.
Heating element checkPaper passes between the heating element and a soft pressure roller to fuse toner to the paper.
1. Unplug the product for at least ten minutes.
2. Verify that the thermistor connector is seated into both the product chassis and the ECU.
3. Remove the heating element connector from the ECU. To measure the continuity of the heatingelement, measure the resistance between the two pins at the end of the cable.
NOTE: Normal resistance is 25 ohms +/- 10 ohms for the 110 V product and 80 ohms +/- 20 ohmsfor the 220 V product.
If no resistance is measured, replace the fuser. See Fuser on page 158.
4. Remove the thermistor connector, and then measure the resistance between J206 pins one andtwo and between J206 pins three and four.
NOTE: Normal resistance between both pairs of pins is 370K ohms +/- 50K ohms at 20° C (68° F).
5. If no resistance is measured, replace the fuser. See Fuser on page 158,
High-voltage contacts checkThe high-voltage contacts in the product must have a good connection with the contacts on the printcartridge to provide the necessary voltages for the electrophotographic processes.
Checking the print cartridge contacts When the product is turned on, high voltage is placed on the developer roller of the print cartridge. If theantenna does not detect this voltage, the product displays an Install Black Cartridge message. Removethe print cartridge and visually inspect the three connection points on the ends of the print cartridge:primary charging contact (callout 1), developer roller contact (callout 2), and antenna contact (callout 3).
194 Chapter 7 Solve problems ENWW

If one is dirty or corroded, clean the connection with isopropyl alcohol. If one is damaged, replace theprint cartridge. See Print cartridge on page 102.
Figure 7-1 High-voltage contact points (on the print cartridge)
2
1
3
Figure 7-2 High-voltage contact points (on the product)
2
3
1
CAUTION: After removing the print cartridge, handle it only on the ends.
ENWW Tools for troubleshooting 195
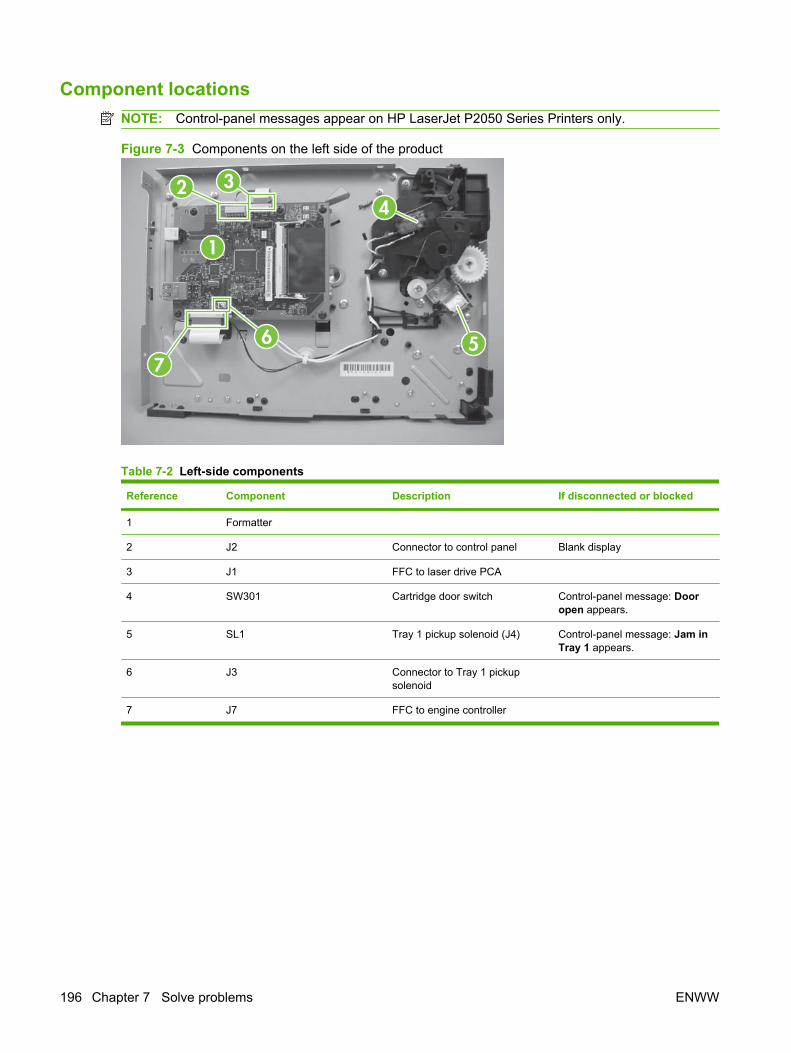
Component locationsNOTE: Control-panel messages appear on HP LaserJet P2050 Series Printers only.
Figure 7-3 Components on the left side of the product
2 3
1
76 5
4
Table 7-2 Left-side components
Reference Component Description If disconnected or blocked
1 Formatter
2 J2 Connector to control panel Blank display
3 J1 FFC to laser drive PCA
4 SW301 Cartridge door switch Control-panel message: Dooropen appears.
5 SL1 Tray 1 pickup solenoid (J4) Control-panel message: Jam inTray 1 appears.
6 J3 Connector to Tray 1 pickupsolenoid
7 J7 FFC to engine controller
196 Chapter 7 Solve problems ENWW

Figure 7-4 Components on the right side of the product
1 2
34
5
Table 7-3 Right-side components
Reference Component Description If disconnected or blocked
1 Connector PCA See Figure 7-5 Components onthe connector PCA on page 198for more information.
2 FM1 Main fan Control-panel message: 57 Fanerror appears.
Fan rotates about 30 secondsafter being turned on.
3 Paper feeder connector Connector to optional Tray 3
4 SL2 Tray 2 solenoid (J1104) Control-panel message: Jam inTray 2 appears.
5 SW1001 Power switch
ENWW Tools for troubleshooting 197

Figure 7-5 Components on the connector PCA
12
34
Table 7-4 Connector PCA components
Reference Component Description
1 J1101 Duplex reverse solenoid (SL3)
2 J1103 Connector to scanner motor
3 J1105 Connector to main cooling fan
4 J1104 Connector to Tray 2 solenoid (SL2)
Figure 7-6 Components on the rear side of the product
1 23
4
198 Chapter 7 Solve problems ENWW

Table 7-5 Rear-side components
Reference Component Description If disconnected or blocked
1 PS918 Duplex reverse sensor flag (J208)(HP LaserJet P2050 SeriesPrinters only)
Control-panel message: Jam inoutput bin appears.
2 PS915 Photosensor flag for fuser (J206) Control-panel message: Jam inoutput bin appears.
3 White lever When the rear door is closed, thislever positions the photosensorflag for the fuser (PS915) todetect paper exiting the fuser.
4 Reverse sensor assembly Detects paper during theduplexing process (HP LaserJetP2050 Series Printers only)
Figure 7-7 Components in the print cartridge cavity
1 2
Table 7-6 Print cartridge components
Reference Component Description If disconnected or blocked
1 PS912 Top of page photosensor flag(J203)
Control-panel message: Jam incartridge area appears.
2 PS913 Paper-width photosensor flag(J203)
Control-panel message: Jam incartridge area appears.
ENWW Tools for troubleshooting 199

Figure 7-8 Components on the top of the product
1
2
Table 7-7 Top components
Reference Component Description If disconnected or blocked
1 PS911 Output bin media full sensor Control-panel message: Outputbin full appears.
2 Flag Rotates to block sensor as theoutput bin fills
Figure 7-9 Components on Tray 1 and Tray 2
2
1
3
200 Chapter 7 Solve problems ENWW

Table 7-8 Tray 1 and Tray 2 components
Reference Component Description
1 Flag Photosensor flag for Tray 1 paper present sensor(PS916)
2 Flag Photosensor flag for Tray 2 paper present sensor(PS914)
3 PS916 Photosensor (J205)
ENWW Tools for troubleshooting 201

Problem-solve diagrams● Repetitive image defect ruler
● Engine controller PCA
● Major components
● PCAs
● General timing chart
● Circuit diagram
Repetitive image defect rulerDefects on product rollers can cause image defects to appear at regular intervals on the page,corresponding to the circumference of the roller that is causing the defect. Measure the distance betweendefects that recur on a page. Use the following table or the repetitive-defect ruler to determine whichroller is causing the defect. To resolve the problem, try cleaning the roller first. If the roller remains dirtyafter cleaning or if it is damaged, replace the part that is indicated in Table 7-9 Repetitive defectson page 202.
CAUTION: Do not use solvents or oils to clean rollers. Instead, rub the roller with lint-free paper. If dirtis difficult to remove, rub the roller with lint-free paper that has been dampened with water.
NOTE: The following table replaces the graphical repetitive defect ruler. You can make your own rulerby using these measurements. For the most accurate results, use a metric ruler.
Table 7-9 Repetitive defects
Component Distance between defects
Primary charging roller 38 mm (1.5 in)
Transfer roller 39 mm (1.54 in)
Developer roller 42 mm (1.65 in)
Registration roller 43 mm (1.69 in)
Fuser film 57 mm (2.24 in)
Pressure roller 63 mm (2.48 in)
Photosensitive drum 75 mm (2.95 in)
202 Chapter 7 Solve problems ENWW

Engine controller PCAFigure 7-10 Engine controller connectors
J102J101J215J202
J207
J211J208
J581J205
J204
J203
J206 J210J213
J201
J2142
J2141
NOTE: Control-panel messages appear on HP LaserJet P2050 Series Printers only.
Table 7-10 Engine controller connectors
Item Description When disconnected
J101 AC voltage to engine controller No AC voltage to engine controller
J102 AC voltage to fuser No AC voltage to fuser
J201 Formatter PCA
J202 Main motor (M1) Control-panel message: Initializing... appears1
J203 Top of page (PS912) Control-panel message: Jam in cartridge areaappears1
Media width sensors (PS913) Control-panel message: Open door and clear jamappears1
ENWW Problem-solve diagrams 203

Item Description When disconnected
J204 Tray 2 paper present sensor (PS914) Control-panel message:Load paper appears1
J205 Tray 1 paper present sensor (PS916) No message appears unless you request paper fromTray 1.
J206 Fusing assembly exit sensor (PS915) Product attempts to pull paper.
Control-panel message: Jam in cartridge area orOpen door and clear jam appear1
J207 Connecting PCA Control-panel message: Initializing... appears1
J208 Duplex reverse sensor (PS918) (HP LaserJet P2050Series Printers only)
Print simplex, but not duplex.
J210 Thermistor (TH1) Control-panel message: Initializing... appears1
J211 Optional paper feeder accessory (PS911)
J213 Media tray full sensor (PS911) Control-panel message: Output bin full appears1
J215 Power switch LED (LED1001) The product stays on. You cannot turn it off.
J581 Toner memory reader A page prints and then the control-panel message:10.X Supply memory error appears1
J2141 Voltage in top cover switch (+24 V) No voltage to top cover switch
J2142 Voltage out top cover switch (+24 V) No voltage from top cover switch
1 Control-panel messages appear on HP LaserJet P2050 Series Printers only.
Table 7-10 Engine controller connectors (continued)
204 Chapter 7 Solve problems ENWW

Major componentsFigure 7-11 Major components
1 3
4
2
65
Table 7-11 Major components
Item Description
1 Fuser
2 Laser/scanner assembly
3 Registration assembly
4 Duplex feed unit (HP LaserJet P2050 Series Printers only)
5 Duplex-drive-unit assembly (HP LaserJet P2050 Series Printers only)
Face-down-drive assembly (HP LaserJet P2030 Series Printers only)
6 Main drive unit
ENWW Problem-solve diagrams 205

PCAsFigure 7-12 PCAs
Table 7-12 PCAs
Item Description
1 Engine controller unit
206 Chapter 7 Solve problems ENWW

General timing chartFigure 7-13 General timing chart
I. G
EN
ER
AL
TIM
ING
CH
AR
TTi
min
g ch
art
for
two
con
secu
tive
pri
nts
on
lett
er p
aper
STB
YRTSL
TNIRPRTNI
YBTSTIA
W
19 2017 1815 1613Tr
ay 2
pic
kup
sole
noid
(SL2
)
14M
ain
Fan
(FM
1)
11Tr
ansf
er C
harg
ing
Bia
s
12Fu
sing
Hea
ter
9P
rimar
y C
harg
ing
Bia
s (D
C)
10D
evel
opin
g B
ias
7M
ain
Mot
or (M
1)
8P
rimar
y C
harg
ing
Bia
s (A
C)
5La
ser D
iode
6B
D O
utpu
t sig
nal (
BD
O)
3P
rint s
tart
com
man
d (E
EC
12)
4S
cann
er M
otor
Ope
ratio
n
1TO
P s
enso
r (P
S91
2)
2Fu
sing
del
iver
y se
nsor
(PS
915)
Pow
er s
witc
h O
N
ENWW Problem-solve diagrams 207
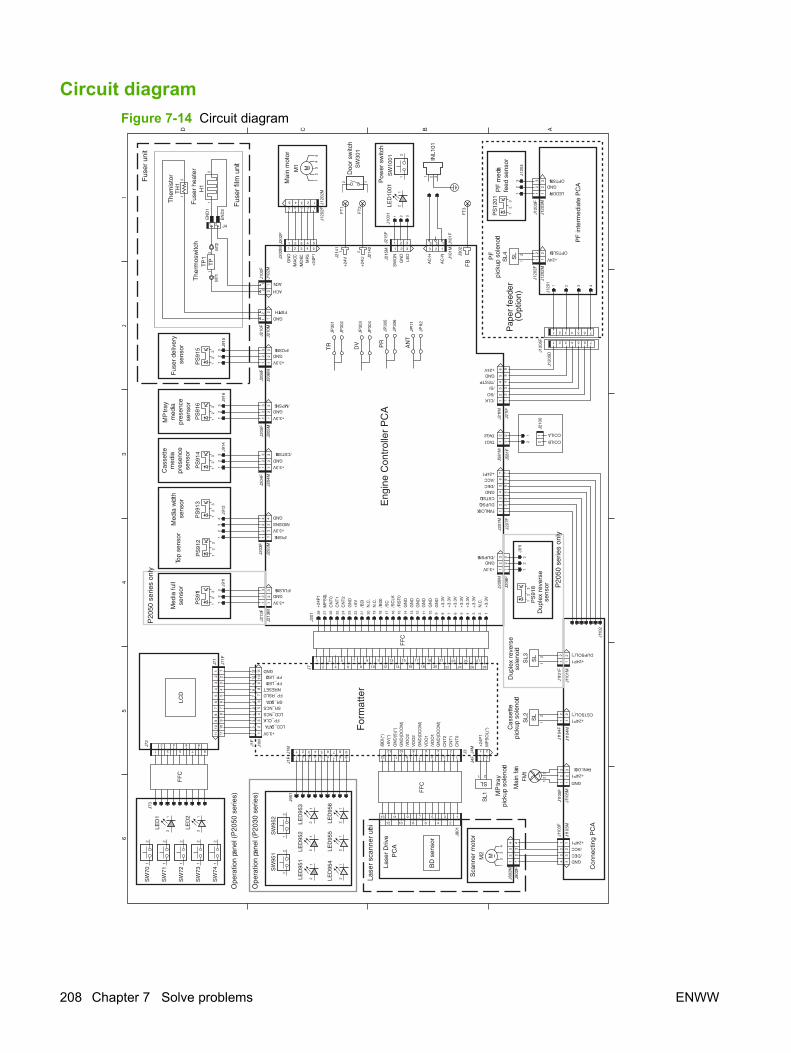
Circuit diagramFigure 7-14 Circuit diagram
A
65
43
BCD
SL
21
34
56
21 1
23
45
6
12
12
1 2 3 4 5 6 7
1 2 3 4 5 6 7
211
2
12
421 3
12
3
32
1
12
3 32
1
123
23 1
321
31 2
1 2 3
1 2 3
21
M
12
34
5
23 15 4
12345
1 2 3 4 5
1 2 3 4 5
21
21
12
12
MT1
12
21
21
EN
D1
EN
D2
12
MT2
12
332
1
12
332
1
32
112
3
32
112
3
32
112
3
12
332
1
42
13
32
13
21
41
23
12
34
12
332
1
32
112
3
1110
98
76
54
32
1
1110
98
23
45
61
7
1
2
3
4
5
6
7
8
9
23
45
67
81
910
111110
98
23
45
61
7
201816
1
2
3
4
5
6
7
8
9
10
11 13 15 17 19 21
12 14 24 2826
23 25 27
22
12459 38 7 610111213141516171819202122232425262728
12
34
56
7
12
34
56
7
12
3
32
1 12
3
42
13
12
34
42
13
12
34
12
34
1 2
M
SL
1 2
1 2
1
2
3
4
5
6
7
8
9
10
1113
12
1 2 3 4 5 6 7 8 9
21
12
33
21
12
3
12
3
SL 2
112
12
1 2 3 4 5 6 7 8 9
12
12
12
SL
M1
Mai
n m
otor
SW
301
12
12
12
Lase
r D
rive
PC
A
Sca
nner
mot
or
Lase
r sc
anne
r un
it
MP
tray
pick
up s
olen
oid
Fus
er h
eate
rT
herm
osw
itch
The
mis
tor
Fus
er u
nit
Fus
er fi
lm u
nit
Eng
ine
Con
trol
ler
PC
A
PF
pick
up s
olen
oid
Pap
er fe
eder
(O
ptio
n)M
ain
fan
12
12
12
12
For
mat
ter
SW
702
1
SW
712
1
SW
722
1
SW
732
1
SW
742
1
12
12
21
21
21
12
1
2
3
4
5
6
7
8
9
10
1113
12
J73
J71
J71F
LCD
J72
+3.3V
GND
LCD_DATA
FP_CLK
SR_DATASR_NCS
LCD_NCS
FP_RSLDNRESET
FP_LED2
FP_LED1
J1M
J1F
GN
D(D
CO
M)
/VD
O2
VD
O2
GN
D(D
CO
M)
VD
O1
/VD
O1
GN
D(D
CO
M)
CN
T2
CN
T1
CN
T0
GN
D(5
)(*)
+5V
(*)
/BD
I(*)
J3
J7
J801
J4M +
24P
1
MP
SO
L(*)
J4F
J802
M
J802
F
M2
+24P1
GND
FANLOCK
J110
5MJ1
103M
/ACC
/DECGND
+24P1
J110
3F
FM
1
J110
5F
J201
J207
M
J207
F
+3.
3V
+3.
3V
FANLOCK
DUPSOL
CSTSOL
GND/DEC
/ACC+24P1
N.C
.
+3.
3V
/BD
0
/SC
/SC
LK
/RS
T0
GN
D
GN
DG
ND
GN
D
GN
D
GN
D+
3.3V
+3.
3V+
3.3V
+3.
3V
N.C
.
/BD
I
N.C
.
/WDSNS
MP
SOL
CN
T0
CN
T1
CN
T2
GN
D+
5V
+3.3V
/PISNS
GND
+24
P1
J912
J203
M
J203
F
PS
913
PS
912
+3.3V
J206
M
J206
F
GND
FSRTH
J915
/POSNSGND
J210
MJ1
02M
J102
FJ2
10F
PS
915
J202
M
ACN
ACH
J202
F
J120
2MJ1
202F
MFG
GN
D
/MA
CC
/MD
EC
+24
U
+24
V
+24
P1 J214
2
J214
1
FT
2
FT
1
GN
D
J215
M
SW
ON
LED
J100
1LE
D10
01S
W10
01J2
15F
AC
-N
AC
-H
FB
J101
M
J302
J101
F
FT
3
INL1
01
JP30
1
JP30
2
JP30
3
JP30
4
JP30
5
JP30
6
JP11
1
JP11
2
DV PR
TR AN
T
J211
M
J211
F
/SI
GND
/SO/CLK
+24V
/TESTP
TAG2
TAG1
J581
M
COILA
COILB
J581
F
J120
5F
J120
5D
Ope
ratio
n pa
nel (
P20
50 s
erie
s)
LED
1
LED
2F
FC
Cas
sette
pick
up s
olen
oid
CSTSOL(*)
J110
4M
+24P1
J110
4F
SL2
SL1
TP
J4
H1
TP
1
TH
1
+3.3V
J205
M
J205
F
J916
/MPSNSGND
PS
916
+3.3V
J204
M
J204
F
J914
/CSTSNS
GND
PS
914
+3.3V
J213
M
J213
F
J911
/FULSNSGND
PS
911
LEDDRV
J120
3M
J120
3F
J120
4
OPTSNSGND
PS
1201
OPTSLON
J120
2M
+24V
J120
2F
SL4
FF
C
FF
C
J120
1
J951
SW
951
SW
952
LED
951
LED
954
LED
952
LED
955
Ope
ratio
n pa
nel (
P20
30 s
erie
s)
LED
953
LED
956
Doo
r sw
itch
Pow
er s
witc
h
Fus
er d
eliv
ery
sen
sor
Cas
sette
med
iapr
esen
cese
nsor
Med
ia fu
llse
nsor
Med
ia w
idth
sens
orTo
p se
nsor
PF
inte
rmed
iate
PC
A
PF
med
iafe
ed s
enso
r
Con
nect
ing
PC
A
J210
0
J208
M
+3.3V
GND/DUPSNS
J208
F
PS
918
Dup
lex
reve
rse
sens
or
J911
J1M
J1F
BD
sen
sor
P20
50 s
erie
s on
ly
MP
tray
med
iapr
esen
cese
nsor
P20
50 s
erie
s on
ly
Dup
lex
reve
rse
sole
noid
J110
1M
J110
1F
DUPSOL(*)
J110
2
+24P1SL3
208 Chapter 7 Solve problems ENWW

Status-light patterns (HP LaserJet P2030 Series Printersonly)
Table 7-13 Status-light legend
Symbol for "light off"
Symbol for "light on"
Symbol for "light blinking"
Table 7-14 Control-panel light messages
Light status State of the product Action
Initialization/Startup
While in the Startup state, the Go, Ready,and Attention lights cycle (at the rate of500 ms) one after another.
Reconfiguration Initialization
During the product start up, you canrequest special initialization sequencesthat reconfigure the product. When one ofthe sequences is requested, such as coldreset, the lights cycle as in theInitialization/Startup state.
Job Cancel
After the cancellation process has beencompleted, the product returns to theReady state.
During the Initialization, Reconfiguration,and Job Cancel processes, pressingbuttons has no effect.
ENWW Status-light patterns (HP LaserJet P2030 Series Printers only) 209

Light status State of the product Action
Ready
The product is ready with no job activity.
To print a Configuration page, press andhold the Go button for 5 seconds whilethe device Ready light is on and no otherjobs are printing.
Processing Data
The product is processing or receivingdata.
To cancel the current job, press theCancel button.
Table 7-14 Control-panel light messages (continued)
210 Chapter 7 Solve problems ENWW

Light status State of the product Action
Manual Feed or Continuable Error
This state can be reached in the followingcircumstances:
● Manual feed
● General continuable error
● Memory configuration error
● Personality/Job related error
To recover from the error and printwhatever data is possible, press the Gobutton.
If the recovery is successful, the productgoes to the Processing Data state andcompletes the job.
If the recovery is unsuccessful, theproduct returns to the Continuable Errorstate.
Attention
The print-cartridge door is open.
Close the print-cartridge door.
Table 7-14 Control-panel light messages (continued)
ENWW Status-light patterns (HP LaserJet P2030 Series Printers only) 211

Light status State of the product Action
Fatal Error ● Turn off the product, wait 10seconds, and turn on the product.
● If you are unable to resolve theproblem, contact HP. SeeCustomer support on page 287.
Toner Low
The Go, Ready, and Attention lights actindependently of the Toner Low state.
Order a new print cartridge.
Table 7-14 Control-panel light messages (continued)
212 Chapter 7 Solve problems ENWW

Light status State of the product Action
Toner Missing
The print cartridge has been removedfrom the product.
Reinsert the print cartridge in theproduct.
Jam Clear the jam. See Clear jamson page 230.
Table 7-14 Control-panel light messages (continued)
ENWW Status-light patterns (HP LaserJet P2030 Series Printers only) 213

Light status State of the product Action
Paper Out Load paper or other media.
Paper Mount
The loaded paper or other media is notsupported.
Load acceptable paper or other media.See Supported paper and print mediaon page 32.
Press the Go button to override thecondition.
Table 7-14 Control-panel light messages (continued)
214 Chapter 7 Solve problems ENWW

Status-alert messages (HP LaserJet P2030 Series Printersonly)
Status-alert messages appear on the computer screen when the product has certain problems. Use theinformation in the following table to solve these problems.
Alert message Description Recommended action
10.X Supply memory error The product has experienced a print cartridgeerror.
The two cartridge memory contacts on theright-rear side of the print cartridge contactthe reader contacts on the product.
1. Make sure that a genuine HP printcartridge is installed.
2. When installing the print cartridge, makesure that the memory contacts on theprint cartridge and reader contacts onthe product make a solid connection.
3. Verify that connector J581 on the enginecontroller PCA is seated.
4. Replace the print cartridge. See Printcartridge on page 102.
13.XX Jam in <location>
(<location> indicates the area where the jamhas occurred)
The product has detected a jam. Clear the jam from the area indicated in themessage. The job should continue to print. Ifit does not, try reprinting the job. See Jamson page 229.
50.X Fuser error The product has experienced an error withthe fuser.
1. Turn the product power off and then on.
2. If you have replaced the fuser, makesure that the correct voltage version isinstalled (110 V or 220 V).
3. Make sure the following connectors areseated:
◦ J102 on the engine controller PCA(AC voltage)
◦ J210 on the engine controller PCA(TH1)
4. Replace the fuser. See Fuseron page 158.
52.0 Scanner Error An internal error has occurred. Turn off the power by using the power switch,wait at least 30 seconds, and then turn on thepower and wait for the product to initialize.
If you are using a surge protector, remove it.Plug the product directly into the wall socket.Use the power switch to turn the product on.
ENWW Status-alert messages (HP LaserJet P2030 Series Printers only) 215

Alert message Description Recommended action
Door Open Opening the front door opens the front doorswitch (SW301) and disables the +24 V to thehigh-voltage contacts on the print cartridges.
1. Remove the left cover, and then openand close the front door. Determine ifSW301 closes when the door closes.
2. Make sure that the two connectors fromthe engine control PCA to the switch aresecurely installed on the switchcontacts.
3. Replace the front door switch (SW301).if the message persists. See Cartridge-door switch on page 137.
Engine communication error The product experienced an internalcommunication error.
Turn off the power by using the power switch,wait at least 30 seconds, and then turn on thepower and wait for the product to initialize.
If you are using a surge protector, remove it.Plug the product directly into the wall socket.Use the power switch to turn the product on.
Install black cartridge The product checks for the presence of a printcartridge at start up and anytime the top coveris closed. At start up or when the top cover isclosed, a high voltage bias is placed on theprint cartridge's developer roller. Thismessage appears if the print cartridge'santenna is unable to detect the high voltagebias.
1. Make sure that the sealing tape on theprint cartridge has been removed.
2. Verify that the print cartridge is correctlyinstalled.
3. Inspect the high voltage contact on theprint cartridge and in the print cartridgecavity to make sure that they are notdamaged.
4. If the messages persists, install anotherHP print cartridge.
5. Make sure that the engine controllerPCA is correctly installed.
Jam in cartridge area Photosensors PS913 (media width sensor),PS912 (top of page sensor), and PS915(fusing assembly exit sensor) detect paper inthe cartridge area of the product. See Figure7-7 Components in the print cartridge cavityon page 199 and Figure 7-6 Components onthe rear side of the product on page 198. Ifpaper arrives at these sensors too early,leaves the sensors too late, or is present atthe sensor when not expected, an errormessage is displayed.
1. Make sure that the paper meetsspecifications. See Supported paperand print media on page 32. SeeCommon causes of jams on page 229.
2. Open the top cover, and remove theprint cartridge. Remove any paper orpaper fragments present.
3. Lift the registration flap. Make suresensors PS913 and PS912 move freely.See Figure 7-7 Components in the printcartridge cavity on page 199.
4. Open the straight-through output doorand verify that PS915 moves freely. SeeFigure 7-6 Components on the rear sideof the product on page 198.
5. Make sure that the connector at J203and J206 on the engine controller PCAare seated.
216 Chapter 7 Solve problems ENWW

Alert message Description Recommended action
Jam in output bin This error occurs if the duplex reversephotosensor (PS918) or fusing exit sensor(PS915) detect unexpected paper.
1. Make sure that the paper meetsspecifications. See Specificationson page 291.
2. Open the rear duplex jam-release doorand clear any visible paper. Verify thatthe duplex-release sensor flag movesfreely. You might need a pen light toobserve the flags.
3. Open the face-up output door, and verifythat the exit sensor flag in the fusingassembly moves freely. You might needa pen light to observe the flag.
4. Verify that the following connectors areseated on the engine controller PCA:
◦ J208 duplex reverse
◦ J206 fusing exit
Jam in Tray 1 The Tray 1 pickup solenoid (SL1) controls thefeeding of paper from Tray 1. When thesolenoid is engaged, the Tray 1 pickup rollermakes one rotation and advances paper intothe paper path. See Figure 7-3 Componentson the left side of the product on page 196).
1. Inspect the Tray 1 pick roller. Verify thatthe roller is installed correctly and ingood condition.
2. Print from Tray 1. Determine if the Tray 1roller rotates. Listen to determine if thesolenoid (SL1) is engaged.
3. Remove the left cover. Determine if thesolenoid (SL1) is correctly installed.Make sure that the connectors on thesolenoid and at J4 on the formatter PCAare seated.
4. If the error persists, replace the Tray 1pickup solenoid (SL1). See Tray 1pickup solenoid on page 138.
Jam in Tray 2 Solenoid (SL2) controls the feeding of paperfrom Tray 1. When the solenoid is engaged,the Tray 1 pick roller makes one rotation andadvances paper into the paper path. SeeFigure 7-3 Components on the left side of theproduct on page 196).
1. Inspect the Tray 2 pick roller. Verify thatthe roller is installed correctly and ingood condition.
2. Remove Tray 2. Lift the Tray 2 paperpresent sensor flag while printing fromTray 2. Determine if the Tray 2 rollerrotates. Listen to determine if thesolenoid (SL2) is engaged.
3. Remove the left cover. Determine if thesolenoid (SL2) is correctly installed.Make sure that the connectors on thesolenoid and at J1104 on the connectorPCA are seated.
4. If the error persists, replace the solenoid(SL2).
ENWW Status-alert messages (HP LaserJet P2030 Series Printers only) 217

Alert message Description Recommended action
Load paper The product did not detect paper in Tray 1 orTray 2. PS916 detects paper in Tray 1.PS914 detects paper in Tray 2. See Figure7-7 Components in the print cartridge cavityon page 199.
1. Verify that paper is loaded in the inputtray.
2. Make sure that the photosensor flagsare not hindered.
3. Make sure that connectors J205 (forTray 1) and J204 (for Tray 2) on theengine controller PCA are seated.
Manual feed The product is set for manual feed mode. Load the correct paper into the tray, and thenpress the OK button to clear the message.
No paper pickup The print engine has failed to pick up a pieceof paper.
Reload the paper in the input tray and pressthe OK button to continue the job.
Non-HP supply installed A new, non-HP supply has been installed.This message appears until an HP supply isinstalled or you press the OK button.
If you believe you purchased an HP supply,go to www.hp.com/go/anticounterfeit.
Service or repairs that are required as a resultof using non-HP supplies are not coveredunder HP warranty.
To continue printing, press the OK button.
Not Connected The product software cannot communicatewith the product.
1. Make sure the product is turned on.
2. Make sure the USB cable is connectedsecurely to the product and thecomputer.
Order black cartridge The identified print cartridge is nearing theend of its useful life.
Order a new print cartridge. You can continueprinting with the current print cartridge untilredistributing the toner no longer yieldsacceptable print quality.
Page too complex The product cannot process the page. Press the OK button to continue printing thejob, but output might be affected.
Printing The product is printing a document. Wait for printing to finish.
218 Chapter 7 Solve problems ENWW

Interpret control-panel messages (HP LaserJet P2050Series Printers only)
The control-panel messages indicate the current product status or situations that might require action.
Control-panel messages appear temporarily and might require that you acknowledge the message bypressing OK to resume printing or by pressing X to cancel the job. With certain messages, the job mightnot finish printing or the print quality might be affected. If the message is related to printing and the auto-continue feature is on, the product will try to resume printing after the message has appeared for 10seconds without acknowledgment.
For some messages, restarting the product might fix the problem. If a critical error persists, the productmight require service.
Control-panel messages
Control-panel message Event code Description Recommended action
10.X Supply memory error The product has experienced aprint cartridge error.
The two cartridge memorycontacts on the right-rear side ofthe print cartridge contact thereader contacts on the product.
1. Make sure that a genuineHP print cartridge isinstalled.
2. When installing the printcartridge, make sure thatthe memory contacts on theprint cartridge and readercontacts on the productmake a solid connection.
3. Verify that connector J581on the engine controllerPCA is seated.
4. Replace the print cartridge.See Print cartridgeon page 102.
13.XX Jam in <location> 13.0000 The product has detected a jam. Clear the jam from the locationindicated. The job shouldcontinue to print. If it does not, tryreprinting the job.
21.X Print failure
Press [OK]
If error repeats turn off then on
21.0000 The product cannot process thepage.
Press OK to continue printing thejob, but output might be affected.
If the error persists, turn thepower off and then on. Resendthe print job.
41.2 Engine error
Press [OK]
The product experienced aninternal error.
Turn the product power off, waitat least 30 seconds, and then turnthe product power on and wait forit to initialize.
If you are using a surge protector,remove it. Plug the productdirectly into the wall socket. Turnthe product power on.
41.3 Unexpected size in tray x
Load <SIZE>
41.3000 The product has detected printmedia in the tray that does not
Load the correct media into thetray, or configure the tray for the
ENWW Interpret control-panel messages (HP LaserJet P2050 Series Printers only) 219

Control-panel message Event code Description Recommended action
Press [OK] match the configuration for thetray.
size that you have loaded. SeeLoad trays on page 38.
41.X.Error A temporary printing error hasoccurred.
1. Make sure that the papermeets specifications. SeeSupported paper and printmedia on page 32. If pagesstick together, the papersensors might detect asheet of paper longer thanexpected.
2. Verify that the paper sizesettings in the control panel,printer driver, and softwareprogram match.
3. Verify that the correct papersize is loaded in the product.
49 Error
Turn off then on
The product experienced aninternal error.
Turn the product off, wait at least30 seconds, and then turn theproduct on and wait for it toinitialize.
If you are using a surge protector,remove it. Plug the productdirectly into the wall socket. Turnthe product power on.
50.X Fuser error
Turn off then on
50.0000
50.1000
50.3000
50.4000
50.7000
50.8000
50.9000
The product has experienced anerror with the fuser.
1. Turn the product power offand then on.
2. If you have replaced thefuser, make sure that thecorrect voltage version isinstalled (110 V or 220 V).
3. Make sure that the followingconnectors are seated:
◦ J102 on the enginecontroller PCA (ACvoltage)
◦ J210 on the enginecontroller PCA (TH1)
4. Replace the fuser. SeeFuser on page 158.
220 Chapter 7 Solve problems ENWW

Control-panel message Event code Description Recommended action
51.XX Error
Turn off then on
51.0000 The product has experienced alaser/scanner assembly error.
1. Turn the product power off,wait at least 30 seconds,and then turn the productpower on and wait for it toinitialize.
2. Make sure that the followingconnectors are seated:
◦ J1103. See Figure 7-5Components on theconnector PCAon page 198.
◦ J1. See Figure 7-3Components on theleft side of the producton page 196.
◦ All connectors on thelaser/scannerassembly
3. If all connectors are seatedand the error persists,replace the laser/scannerassembly. See Laser/scanner assemblyon page 156.
57 Fan error
Turn off then on
57.0000 The cooling fan (FM1) rotates forapproximately 35 seconds atinitial start up and during a printjob. The fan rotates about 30seconds after a print jobconcludes.
1. Turn the product on. Listento determine if the fan isoperating. The fan is locatedon the upper right-side ofthe product. See Figure 7-4Components on the rightside of the producton page 197.
2. Make sure that the fanconnector is securityconnected to J1105 on theconnector PCA. See Figure7-5 Components on theconnector PCAon page 198.
3. Replace the fan. See Fanon page 140.
59.X Error A malfunction has been detectedwith the product's main motor.During normal operation, themain motor should rotate forabout six seconds after theproduct is turned on.
1. Turn the product off andthen on.
2. Make sure that connectorJ202 on the enginecontroller PCA is seated.
3. If the error persists, replacethe main motor. See Mainmotor on page 174.
ENWW Interpret control-panel messages (HP LaserJet P2050 Series Printers only) 221

Control-panel message Event code Description Recommended action
79 Service error
Turn off then on
79.0000
79.0001
An incompatible DIMM isinstalled.
1. Turn the product power off.
2. Install a DIMM that theproduct supports. See Partsand diagrams on page 253for a list of supportedDIMMs. See Install memory(HP LaserJet P2050 SeriesPrinters only) on page 64 forDIMM installationinstructions.
3. Turn the product on.
Device error
Press [OK]
An internal error occurred. Press OK to resume the job.
Door open Opening the cartridge dooropens the cartridge door switch(SW301) and disables the +24 Vto the high-voltage contacts onthe print cartridges.
1. Remove the left cover, andthen open and close thecartridge door. Determine ifSW301 closes when thedoor closes.
2. Make sure that the twoconnectors from the enginecontrol PCA to the switchare securely installed on theswitch contacts.
3. Replace SW301 if themessage persists.
Genuine HP supply installed A genuine HP supply wasinstalled. This message appearsbriefly after the supply is installedand then is replaced by themessage Ready.
No action necessary.
Install black cartridge The product checks for thepresence of a print cartridge atstart up and anytime the topcover is closed. At start up orwhen the top cover is closed, ahigh-voltage bias is placed on theprint cartridge's developer roller.This message appears if the printcartridge's antenna is unable todetect the high-voltage bias.
1. Make sure that the sealingtape on the print cartridgehas been removed.
2. Verify that the print cartridgeis correctly installed.
3. Inspect the high-voltagecontact on the printcartridge and in the print-cartridge cavity to makesure that they are notdamaged.
4. If the messages persists,install another HP printcartridge.
5. Make sure that the enginecontroller PCA is correctlyinstalled.
222 Chapter 7 Solve problems ENWW

Control-panel message Event code Description Recommended action
Jam in cartridge area Photosensors PS913 (mediawidth sensor), PS912 (top ofpage sensor) and PS915 (fusingassembly exit sensor) detectpaper in the cartridge area of theproduct. See Figure 7-7Components in the print cartridgecavity on page 199 and Figure7-6 Components on the rear sideof the product on page 198. Ifpaper arrives at these sensorstoo early, leaves the sensors toolate, or is present at the sensorwhen not expected, an errormessage is displayed.
1. Make sure that the papermeets specifications. SeeSpecificationson page 291. See Commoncauses of jamson page 229.
2. Open the top cover andremove the print cartridge.Remove any paper or paperfragments present.
3. Lift the registration flap.Make sure sensors PS913and PS912 move freely.See Figure 7-7Components in the printcartridge cavityon page 199.
4. Open the straight-throughoutput door and verify thatPS915 moves freely. SeeFigure 7-6 Components onthe rear side of the producton page 198.
5. Make sure that theconnector at J203 and J206on the engine controllerPCA are seated.
Jam in output bin This error occurs if the duplexreverse photosensor (PS918) orfusing exit sensor (PS915) detectunexpected paper.
1. Make sure that the papermeets specifications. SeeSupported paper and printmedia on page 32.
2. Open the rear duplex jam-release door and clear anyvisible paper. Verify theduplex-release sensor flagmoves freely. You mightneed a pen light to observethe flags.
3. Open the face-up outputdoor and the verify the exitsensor flag in the fusingassembly moves freely. Youmight need a pen light toobserve the flag.
4. Verify that the followingconnectors are seated onthe engine controller PCA:
◦ J208 duplex reverse
◦ J206 fusing exit
ENWW Interpret control-panel messages (HP LaserJet P2050 Series Printers only) 223

Control-panel message Event code Description Recommended action
Jam in Tray 1 Solenoid (SL1) controls thefeeding of paper from Tray 1.When the solenoid is engaged,the Tray 1 pick roller makes onerotation and advances paper intothe paper path. See Figure 7-3Components on the left side ofthe product on page 196).
1. Inspect the Tray 1 pickroller. Verify the roller isinstalled correctly and ingood condition.
2. Print from Tray 1. Determineif the Tray 1 roller rotates.Listen to determine if thesolenoid (SL1) is engaged.
3. Remove the left cover.Determine if solenoid (SL1)is correctly installed. Makesure that the connectors onthe solenoid and at J4 of theformatter PCA are seated.
4. If the error persists, replacethe solenoid (SL1).
Jam in Tray 2 Solenoid (SL2) controls thefeeding of paper from Tray 1.When the solenoid is engaged,the Tray 1 pick roller makes onerotation and advances paper intothe paper path. See Figure 7-3Components on the left side ofthe product on page 196.
1. Inspect the Tray 2 pickroller. Verify the roller isinstalled correctly and ingood condition.
2. Remove Tray 2. Lift the Tray2 paper present sensor flagwhile printing from Tray 2.Determine if the Tray 2 rollerrotates. Listen to determineif the solenoid (SL2) isengaged.
3. Remove the right cover.Determine if solenoid (SL2)is correctly installed. Makesure that the connectors onthe solenoid and at J1104 ofthe connector PCA areseated.
4. If the error persists, replacethe product. See Whole unitreplacement on page 256.
Load paper The product did not detect paperin Tray 1 or Tray 2. PS916detects paper in Tray 1. PS914detects paper in Tray 2. SeeFigure 7-7 Components in theprint cartridge cavityon page 199.
1. Make sure that paper isloaded in the tray.
2. Make sure that thephotosensor flags are nothindered.
3. Make sure that connectorsJ205 (for Tray 1) and J204(for Tray 2) on the enginecontroller PCA are seated.
Load tray # <TYPE> <SIZE>
Press [OK] for available media
A tray is configured for the mediatype and size that the print job isrequesting, but that tray is empty.
Load the correct media into thetray, or press OK to use media ina different tray.
Load tray 1 plain <SIZE>
Cleaning mode [OK] to start
The product is ready to processthe cleaning operation.
Load Tray 1 with plain paper inthe size indicated, and then pressOK.
224 Chapter 7 Solve problems ENWW

Control-panel message Event code Description Recommended action
Load tray 1 <TYPE> <SIZE>
Press [OK] for available media
No trays are configured for themedia type and size that the printjob is requesting.
Load the correct media intotray 1, or press OK to use mediain a different tray.
Manual duplex
Load tray x
Press [OK]
The first side of a manual duplexjob has printed, and the pageneeds to be loaded to process thesecond side.
Load the page in the indicatedtray with the side to be printedface up, and the top of the pageaway from you and then pressOK.
Manual feed <TYPE> <SIZE>
Press [OK] for available media
The product is set for manualfeed mode.
Press OK to clear the messageor load the correct media intotray 1.
Memory is low
Press [OK]
The product memory is almostfull.
Press OK to finish the job, orpress the Cancel button tocancel the job.
For information about increasingthe product memory, see Installmemory (HP LaserJet P2050Series Printers only) on page 64.
Misprint
Press [OK]
Print media has been delayed asit moves through the product.
Press OK to clear the message.
Non-HP supply installed A non-HP supply is installed. If you believe you purchased anHP supply, go to www.hp.com/go/anticounterfeit.
Service or repairs that arerequired as a result of using non-HP supplies are not coveredunder HP warranty.
Order black cartridge
Ready
The print cartridge is nearing theend of its useful life.
Order a new print cartridge. Youcan continue printing with thecurrent print cartridge untilredistributing the toner no longeryields acceptable print quality.
See Parts and diagramson page 253 for moreinformation.
Output bin full
Remove all paper from bin
As the output bin accumulatespaper, the output bin delivery flaprises until a flag blocks thephotosensor (PS911). When thephotosensor is blocked, thismessage appears.
1. Rotate the output bindelivery flap up and down.The flap must move freely. Ifthe top cover has beenreplaced, make sure that ithas been installed correctly.
2. Make sure that theconnector at J213 on theengine controller PCA areseated.
Remove all paper from the bin.
Rear door open The product rear door is open. Close the door.
Remove shipping lock fromblack cartridge
A print cartridge shipping lock isinstalled.
Be sure that the print cartridgeshipping lock has been removed.
ENWW Interpret control-panel messages (HP LaserJet P2050 Series Printers only) 225

Control-panel message Event code Description Recommended action
Used cartridge in use A refilled print cartridge wasdetected and accepted.
No action necessary.
Used cartridge installed
To accept press [OK]
A refilled print cartridge isinstalled.
Press OK to continue.
226 Chapter 7 Solve problems ENWW

Event-log messagesPrint the event log (HP LaserJet P2050 Series Printers only)
1. Open the secondary service menu. See Open the secondary service menu on page 250.
2. Use the arrow buttons to select Service Reports, and then press OK.
3. Use the arrow buttons to select Error Report, and then press OK.
NOTE: You can use HP ToolboxFX to view the event log from a computer. See Event logon page 51.
Print an event log (HP LaserJet P2030 Series Printers only)The configuration page displays the last five events. To print a configuration page, see Print theinformation pages (HP LaserJet P2030 Series Printers only) on page 48.
Event log messagesThe following table contains all event log codes for this product.
Table 7-15 Event-log messages
Event code Description
10.0000 Black label error
10.1000 Black e-label missing
10.3000 Non-HP black
10.3100 Non-HP cloned black
10.3200 Unauthorized black supply
13.0000 Paper jam
20.0000 Memory out
21.0000 Page misfeed or mispick
41.2000 Beam detect malfunction
41.3000 Unexpected size
49 Firmware asserts
50.0000 Fuser error
50.1000 Low fuser temperature error
50.2000 Slow fuser error
50.3000 High fuser temperature error
50.4000 Fuser drive circuit error
50.7000 Fuser open error
50.8000 Low sub-thermistor fuser error
50.9000 High sub-thermistor fuser error
ENWW Event-log messages 227

Event code Description
51.0000 Beam detect or laser error
52.0000 Scanner error
55.0000 Engine internal communication error
55.3000 Engine formatter/communication error
55.4000 Engine communication timeout error
57.0000 Fan motor error
79.0000 79 service, firmware exception
79.0001 79 service, firmware ASIC fault
84.0000 JDI FW assert
Table 7-15 Event-log messages (continued)
228 Chapter 7 Solve problems ENWW

Paper-handling problemsJams
Common causes of jamsMany jams are caused by using paper that does not meet HP specifications. For complete paperspecifications for all HP LaserJet products, see the HP LaserJet Printer Family Print Media Guide. Thisguide is available at www.hp.com/support/ljpaperguide.
The product is jammed.1
Cause Solution
The paper does not meet specifications. Use only paper that meets HP specifications. See Supportedpaper and print media on page 32.
A component is installed incorrectly. Verify that the print cartridge is correctly installed.
You are using paper that has already passed through a productor copier.
Do not use paper that has been previously printed on or copied.
A tray is loaded incorrectly. Remove any excess paper from the tray. Make sure that thestack is below the maximum stack height mark in the tray. SeeLoad trays on page 38.
The paper is skewed. The tray guides are not adjusted correctly. Adjust them so theyhold the stack firmly in place without bending it.
The paper is binding or sticking together. Remove the paper, flex it, rotate it 180°, or flip it over. Reloadthe paper into the tray.
NOTE: Do not fan paper. Fanning can create staticelectricity, which can cause paper to stick together.
The paper is removed before it settles into the output bin. Reset the product. Wait until the page completely settles in theoutput bin before removing it.
During two-sided printing, you removed the paper before thesecond side of the document was printed.
Reset the product and print the document again. Wait until thepage completely settles in the output bin before removing it.
The paper is in poor condition. Replace the paper.
The internal rollers from the tray are not picking up the paper. Remove the top sheet of paper. If the paper is too heavy, itmight not be picked from the tray.
The paper has rough or jagged edges. Replace the paper.
The paper is perforated or embossed. Perforated or embossed paper does not separate easily. Feedsingle sheets from Tray 1.
Product supply items have reached the end of their useful life. Check the product control panel for messages prompting youto replace supplies, or print a supplies status page to verify theremaining life of the supplies. See Print the information pageson page 48.
Paper was not stored correctly. Replace the paper in the trays. Paper should be stored in theoriginal packaging in a controlled environment.
1 If the product continues to jam, contact HP Customer Support or your authorized HP service provider.
ENWW Paper-handling problems 229

Jam locationsJams can occur at the following locations in the product.
1
3 2
1 Internal areas
2 Input trays
3 Output bins
Clear jamsWhen clearing jams, be careful not to tear jammed paper. If a small piece of paper remains in the product,it could cause additional jams.
CAUTION: Before clearing jams, turn the product off and disconnect the power cord.
Internal areas
Print-cartridge area and paper path
1. Push the button to open the print-cartridge door, and then remove the print cartridge.
CAUTION: To prevent damage, do not expose the print cartridge to light. Cover it with a pieceof paper.
230 Chapter 7 Solve problems ENWW

2. If jammed paper is visible, grasp it with both hands and slowly pull it out of the product.
3. Replace the print-cartridge, and close the print-cartridge door.
4. If no paper was jammed inside the print-cartridge door, open the jam-release door at the back ofthe product.
ENWW Paper-handling problems 231

5. If jammed paper is visible, grasp it with both hands and slowly pull it out of the product.
6. Close the jam-release door.
Duplex paper path (HP LaserJet P2050 Series Printers only)
1. At the front of the product, remove Tray 2.
232 Chapter 7 Solve problems ENWW

2. Push down on the green lever to release the duplex paper-path door on the front of the product.
3. Check for jammed paper at the front of the product. With both hands, grasp the jammed paper andslowly pull it out of the product.
4. Push up on the duplex paper-path door to close it.
ENWW Paper-handling problems 233

5. Replace Tray 2.
6. Open the duplex jam-release door on the back of the product.
7. Check for jammed paper at the back of the product. With both hands, grasp the jammed paper andslowly pull it out of the product.
234 Chapter 7 Solve problems ENWW

8. Close the jam-release door.
Input trays
Tray 1
1. Push the button to open the print-cartridge door, and then remove the print cartridge.
CAUTION: To prevent damage, do not expose the print cartridge to light. Cover it with a pieceof paper.
2. Lift the Tray 1 roller cover, grasp the jammed paper, and slowly pull it out of the product.
ENWW Paper-handling problems 235

3. Replace the print-cartridge, and close the print-cartridge door.
Tray 2
1. Open the tray.
2. With both hands, grasp the jammed paper and slowly pull it out of the product.
236 Chapter 7 Solve problems ENWW

3. Close the tray.
4. If no jammed paper is visible in the tray area, open the print-cartridge door, remove the printcartridge, and pull down the upper media guide. With both hands, grasp the jammed paper andslowly pull it out of the product.
5. Replace the print-cartridge, and close the print-cartridge door.
ENWW Paper-handling problems 237

Tray 3 (HP LaserJet P2050 Series Printers only)
1. Remove Tray 2 and Tray 3.
2. With both hands, grasp the jammed paper and slowly pull it out of the product.
3. Replace the trays.
238 Chapter 7 Solve problems ENWW

4. If no jammed paper is visible in the tray area, open the print-cartridge door, remove the printcartridge, and pull down the upper media guide. With both hands, grasp the jammed paper andslowly pull it out of the product.
5. Replace the print-cartridge, and close the print-cartridge door.
Output bins
CAUTION: To avoid damaging the product, do not attempt to clear a jam in the top output bin by pullingthe paper straight out.
1. At the back of the product, open the jam-release door.
ENWW Paper-handling problems 239

2. With both hands, grasp the jammed paper and slowly pull it out of the product.
3. Close the jam-release door.
240 Chapter 7 Solve problems ENWW

Solve image-quality problemsPrinted page is different from what appeared onscreen
Table 7-16 Printed page is different from what appeared onscreen
Problem Cause Solution
Garbled, incorrect, or incomplete text The wrong printer driver might have beenselected when the software wasinstalled.
Make sure that the appropriate printerdriver is selected.
If a specific file prints garbled text, theremight be a problem with that specific file.
Try printing from another file.
If a specific program prints garbled text,there might be a problem with thatprogram.
Try printing from another softwareprogram.
The USB cable might be loose ordefective.
● Disconnect the cable andreconnect it at both ends.
● Try a print job that you know works.
● If possible, attach the cable andproduct to another computer, andtry printing a job that you knowworks.
● Try using a new USB 2.0 cable thatis 3 m (10 ft) or less in length.
● Turn off the product and thecomputer. Remove the USB cable,and inspect both ends of the cablefor damage. Reconnect the cable,making sure that the connectionsare tight. Make sure that the productis directly connected to thecomputer. Remove anyswitchboxes, tape backup drives,security keys, or any other devicesthat are attached between the USBport on the computer and theproduct. These devices cansometimes interfere withcommunication between thecomputer and the product. Restartthe product and the computer.
ENWW Solve image-quality problems 241

Problem Cause Solution
Missing graphics or text, or blank pages The file may contain blank pages. Make sure that your file does not containblank pages.
The sealing tape might still be in the printcartridge.
Remove the print cartridge, and pull thetab on the end of the cartridge until theentire length of the tape is removed.Reinstall the print cartridge. To check theproduct, print a Demo page.
The graphic settings in the productProperties might not be correct for thetype of job that you are printing.
Try a different graphic setting in theproduct Properties.
The product may require cleaning. Clean the product, particularly thecontacts between the print cartridge andthe power supply.
Page format is different from anotherHP LaserJet product
If you used an older or differentHP LaserJet printer driver (productsoftware) to create the document, or ifthe product Properties settings in thesoftware are different, the page formatmight change when you try to print usingyour new printer driver or settings.
● Create documents and print themusing the same printer driver(product software) and productProperties settings regardless ofwhich HP LaserJet product you useto print them.
● Change the resolution, paper size,font settings, and other settings.
Graphics quality The graphics settings might beunsuitable for your print job. Check thegraphic settings, such as resolution, inthe product Properties and adjust themas necessary.
Check the graphic settings, such asresolution, in the product Properties andadjust them as necessary.
NOTE: You might lose some resolutionwhen converting from one graphicsformat to another.
Image defect examplesThis section provides information about identifying and correcting print defects.
NOTE: If these steps do not correct the problem, contact an HP-authorized dealer or servicerepresentative.
Light print or faded
● The print cartridge is nearing end of life.
● Redistribute the toner to extend the life.
● The media might not meet Hewlett-Packard's mediaspecifications (for example, the media is too moist or toorough).
● If the whole page is light, the print density adjustment istoo light or EconoMode might be turned on. Adjust theprint density, and disable EconoMode in the printerProperties.
Table 7-16 Printed page is different from what appeared onscreen (continued)
242 Chapter 7 Solve problems ENWW

Toner specks
● The media might not meet Hewlett-Packard's mediaspecifications (for example, the media is too moist or toorough).
● The printer might need to be cleaned.
● The print cartridge might be defective.
Dropouts
● A single sheet of media might be defective. Try reprintingthe job.
● The media moisture content is uneven or the media hasmoist spots on its surface. Try printing with new media.
● The media lot is bad. The manufacturing processes cancause some areas to reject toner. Try a different type orbrand of media.
● The print cartridge might be defective.
Vertical lines
The photosensitive drum inside the print cartridge has probablybeen scratched. Install a new HP print cartridge.
Gray background
● Change the media to a lighter basis weight.
● Check the printer's environment. Very dry (low humidity)conditions can increase the amount of backgroundshading.
● The density setting might be too high. Adjust the densitysetting.
● Install a new HP print cartridge.
ENWW Solve image-quality problems 243

Toner smear
● If toner smears appear on the leading edge of the media,the media guides might be dirty. Wipe the media guideswith a dry, lint-free cloth.
● Check the media type and quality.
● The fuser temperature might be too low. In your printerdriver, make sure the appropriate media type is selected.
● Try installing a new HP print cartridge.
Loose toner
● The fuser temperature might be too low. In your printerdriver, make sure the appropriate media type is selected.
● Clean the inside of the printer.
● Check the media type and quality.
● In your printer driver, make sure the appropriate mediatype is selected.
● Plug the printer directly into an AC outlet instead of into apower strip.
Vertical repetitive defects
● The print cartridge might be damaged. If a repetitive markoccurs at the same spot on the page, install a newHP print cartridge.
● The internal parts might have toner on them. If the defectsoccur on the back of the page, the problem will probablycorrect itself after a few more printed pages.
● In your printer driver, make sure the appropriate mediatype is selected.
Misformed characters
● If characters are improperly formed, producing hollowimages, the media stock might be too slick. Try a differentmedia.
● If characters are improperly formed, producing a wavyeffect, the printer might need service. Print a configurationpage. If the characters are improperly formed, contact anHP-authorized dealer or service representative.
244 Chapter 7 Solve problems ENWW

Page skew
● Make sure that the media is loaded correctly and themedia guides are not too tight or too loose against themedia stack.
● The input bin might be too full.
● Check the media type and quality.
Curl or wave
● Check the media type and quality. Both high temperatureand high humidity cause media to curl.
● The media might have been in the input tray too long.Turn over the stack of media in the tray. Also, try rotatingthe media 180° in the input tray.
● Open the straight-through output door and try printingstraight through.
● The fuser temperature might be too high. In your printerdriver, make sure the appropriate media type is selected.If the problem persists, select a media type that uses alower fuser temperature, such as transparencies or lightmedia.
Wrinkles or creases
● Make sure that media is loaded properly.
● Check the media type and quality.
● Open the straight-through output door and try printingstraight through.
● Turn over the stack of media in the tray. Also, try rotatingthe media 180° in the input tray.
● For envelopes, this can be caused by air pockets insidethe envelope. Remove the envelope, flatten theenvelope, and try printing again.
ENWW Solve image-quality problems 245

Toner scatter outline
● If large amounts of toner have scattered around thecharacters, the media might be resisting the toner. (Asmall amount of toner scatter is normal for laser printing.)Try a different media type.
● Turn over the stack of media in the tray.
● Use media that is designed for laser printers.
246 Chapter 7 Solve problems ENWW

Solve print-quality problemsYou can prevent most print-quality problems by following these guidelines.
● Configure the trays for the correct paper-type setting. See Configure trays (HP LaserJet P2050Series Printers only) on page 43.
● Use paper that meets HP specifications. See Supported paper and print media on page 32.
● Clean the product as necessary. See Clean the paper path (HP LaserJet P2050 Series Printersonly) on page 70.
Print-quality problems associated with paperSome print-quality problems arise from using paper that does not meet HP specifications.
● The surface of the paper is too smooth.
● The moisture content of the paper is uneven, too high, or too low. Use paper from a different sourceor from an unopened ream.
● Some areas of the paper reject toner. Use paper from a different source or from an unopened ream.
● The letterhead you are using is printed on rough paper. Use a smoother, xerographic paper. If thissolves your problem, ask the supplier of your letterhead to use paper that meets HP specifications.
● The paper is excessively rough. Use a smoother, xerographic paper.
● The paper is too heavy for the paper-type setting that you selected, so the toner is not fusing tothe paper.
For complete paper specifications for all HP LaserJet products, see the HP LaserJet Printer Family PrintMedia Guide. This guide is available at www.hp.com/support/ljpaperguide.
Print-quality problems associated with the environmentIf the product is operating in excessively humid or dry conditions, verify that the printing environment iswithin specifications. See Operating environment on page 293.
Print-quality problems associated with jamsMake sure that all sheets are cleared from the paper path.
● If the product recently jammed, print two to three pages to clean the paper path.
● If the sheets do not pass through the fuser and cause image defects on subsequent documents,print two to three pages to clean the paper path. If the problem persists, print and process a cleaningpage. See Clean the paper path (HP LaserJet P2050 Series Printers only) on page 70.
ENWW Solve print-quality problems 247

Solve performance problemsProblem Cause Solution
Pages print but are totally blank. The sealing tape might still be in the printcartridges.
Verify that the sealing tape has beencompletely removed from the printcartridges.
The document might contain blankpages.
Check the document that you are printingto see if content appears on all of thepages.
The product might be malfunctioning. To check the product, print aConfiguration page.
Pages print very slowly. Heavier paper types can slow the printjob.
Print on a different type of paper.
Complex pages can print slowly. Proper fusing may require a slower printspeed to ensure the best print quality.
Pages did not print. The product might not be pulling papercorrectly.
Make sure paper is loaded in the traycorrectly.
The paper is jamming in the product. Clear the jam. See Jams on page 229.
The USB cable might be defective orincorrectly connected.
● Disconnect the USB cable at bothends and reconnect it.
● Try printing a job that has printed inthe past.
● Try using a different USB cable.
Other devices are running on yourcomputer.
The product might not share a USB port.If you have an external hard drive ornetwork switchbox that is connected tothe same port as the product, the otherdevice might be interfering. To connectand use the product, you mustdisconnect the other device or you mustuse two USB ports on the computer.
248 Chapter 7 Solve problems ENWW

Solve connectivity problemsSolve direct-connect problems
If you have connected the product directly to a computer, check the cable.
● Verify that the cable is connected to the computer and to the product.
● Verify that the cable is not longer than 2 meters (6 feet). Replace the cable if necessary.
● Verify that the cable is working correctly by connecting it to another product. Replace the cable ifnecessary.
Solve network problemsCheck the following items to verify that the product is communicating with the network. Before beginning,print a configuration page. See Print the information pages on page 48.
1. Are there any physical connection problems between the workstation or file server and the product?
Verify that the network cables, connections, and router configurations are correct. Verify that thenetwork cable lengths meet network specifications.
2. Are the network cables connected properly?
Make sure that the product is attached to the network using the appropriate port and cable. Checkeach cable connection to make sure that it is secure and in the right place. If the problem continues,try a different cable or ports on the hub or transceiver. The amber activity light and the green linkstatus light next to the port connection on the back of the product should be lit.
3. Are the product link speed and duplex settings set correctly?
Hewlett-Packard recommends leaving this setting in automatic mode (the default setting).
4. Can you "ping" the product?
Use the command prompt to ping the product from the computer. For example:
ping 192.168.45.39
Make sure that the ping displays round-trip times.
If you are able to ping the product, verify that the IP address configuration for the product is correcton the computer. If it is correct, delete and then add the product again.
If the ping command failed, verify that the network hubs are on, and then verify that the networksettings, the product, and the computer are all configured for the same network.
5. Have any software programs been added to the network?
Make sure they are compatible and that they are installed correctly with the correct printer drivers.
6. Are other users able to print?
The problem might be workstation-specific. Check the workstation network drivers, printer drivers,and redirection (capture in Novell NetWare).
7. If other users are able to print, are they using the same network operating system?
ENWW Solve connectivity problems 249
Check your system for proper network operating system setup.
8. Is your protocol enabled?
Check the status of your protocol on the Configuration page. You can also use the embedded Webserver to check the status of other protocols. See Embedded Web server (HP LaserJet P2055dn,HP LaserJet P2055x, and HP LaserJet P2035n only) on page 57.
9. Does the product appear in HP Web Jetadmin or other management program?
● Verify network settings on the Network configuration page.
● Confirm the network settings for the product using the product control panel (for products withcontrol panels).
Service mode functionsSecondary service menu (HP LaserJet P2050 Series Printers only)
Use the secondary service menu to print service-related reports and to run special tests. Customers donot have access to this menu.
Open the secondary service menu1. Make sure that the product is in the Ready state. Press OK to enter the main menu.
2. Simultaneously press and hold the down arrow and Cancel button .
3. Press OK to re-enter the main menu.
4. Navigate to the secondary service menu.
Secondary service menu structureTable 7-17 Secondary Service menu
Menu item Sub-menu item Description
Service Reports Cont. Self-Test Print a continuous configuration page.
Error report Print an error report.
Location A list of available locationsappears
This item sets certain product parameters that are dependent on thelocation, such as the default paper size and the symbol set.
Scroll to the desired location and select Yes to set the location. Theproduct automatically restarts after you change the location.
Display test Use this test to verify that the LEDs and characters on the control-paneldisplay function correctly.
At the beginning of the test, each of the LEDs is turned on one-at-time.Press OK to continue to the next LED.
After the LED test is complete, the character test begins by testing thepixels on each line. Then, each of the 255 characters is displayed ingroups of 16. Press OK to continue to the next group of 16 characters.You can cancel the test at any time by pressing X.
Button test Use this test to verify that the control-panel buttons function correctly. Thedisplay prompts you to press each button.
250 Chapter 7 Solve problems ENWW

Menu item Sub-menu item Description
Show FW Version This item shows the current date code of the firmware.
Ethernet reset This item resets the ethernet hardware and causes it to reacquire an IPaddress.
Engine resets
Engine test page
Simplex engine test page
1. Open and close the print-cartridge door three times within 2 seconds.
2. The engine-test page prints with a test pattern on one side of the paper.
Duplex engine test page (HP LaserJet P2050 Series Printers only)
1. Open and close the print-cartridge door five times within 2 seconds.
2. The engine-test page prints with a test pattern on both sides of the paper.
Restore defaults
● For HP LaserJet P2050 Series Printers, restore defaults from the service menu. See Service menuon page 27.
● For HP LaserJet P2030 Series Printers, restore defaults by pressing and holding the Go buttonand Cancel button for 10 seconds while turning on the product.
NVRAM initialization (HP LaserJet P2050 Series Printers only)CAUTION: Only perform the following procedure if absolutely necessary. Performing an NVRAMinitialization resets some parameters that cannot be restored later.
NVRAM initialization does the following:
● Resets all customer-accessible menu settings via the control panel and software back to the factorydefault settings
● Resets the language to the value set at the factory or through the generic product prompts
● Resets the default media size to cold reset media size
● Resets the symbol set to PC-8
Use the following procedure to perform an NVRAM initialization.
1. Turn the product off.
2. Simultaneously press and hold the up arrow and Cancel button .
3. Turn on the product.
4. When the message Permanent storage init displays, release the buttons. When the NVRAMinitialization is completed, the product goes to a Ready state.
Table 7-17 Secondary Service menu (continued)
ENWW Service mode functions 251