7: the programs tab: taa - employ florida · the trade adjustment assistance (taa) program provides...
TRANSCRIPT
Virtual OneStop – Staff Services User Guide 7-1 V18 – 05/2018
7: The Programs Tab: TAA Chapter Contents
TAA Program Overview ............................................................................................................................... 7-1 TAA Application Form ................................................................................................................................. 7-3
Viewing the TAA Application ........................................................................................................................... 7-13 TAA Participation Form ............................................................................................................................. 7-16 TAA Service Enrollment ............................................................................................................................ 7-17 TAA Bona Fide Sub-Application Form ....................................................................................................... 7-27 TAA Waiver Entry Form ............................................................................................................................ 7-29 TAA Approved Training Sub-Application Form ......................................................................................... 7-33 TAA Case Closure ...................................................................................................................................... 7-34 TAA Enrollment – Reset Options................................................................................................................ 7-39 TAA Outcome ............................................................................................................................................ 7-41
Deleting TAA Outcomes .................................................................................................................................... 7-42 Using the TRA Payment View .................................................................................................................... 7-43
TAA Program Overview The Trade Adjustment Assistance (TAA) program provides federally funded reemployment benefits to assist workers whose jobs have been impacted by foreign imports and trade. Individuals who have lost their jobs due to positions being moved out of the country, or even out of their specific region, can benefit from this program. Certified workers may be eligible to receive one or more of the following services: reemployment services, job search allowances, relocation allowances, health coverage tax credits (HCTC), and training, if required for an individual to obtain suitable employment. TAA includes a variety of benefits and reemployment services to help unemployed workers prepare for and obtain suitable employment. This can include Basic Trade Readjustment Assistance (income support), Additional TRA, Remedial TRA, etc. In addition to TAA, workers may be eligible for related programs – Alternative Trade Adjustment Assistance (ATAA) and Reemployment Trade Adjustment Assistance (RTAA). The ATAA/RTAA programs focus on workers 50 years of age or older who return to work paying less than their trade-impacted employment. Individuals who enroll in TAA, ATAA, and RTAA must undergo a process of creating an application and a participation record, and enrolling in activities. Depending on the activities needed, and funding available, other sub-applications and forms may also be required. The system will determine eligibility at the end of the application process. The applications, participations, enrollment, and related sub-applications for the TAA program available to staff members assisting individuals who are eligible for TAA/ATAA/RTAA enrollment, are indicated in the table below, followed by sections and steps for each related form. Note: The forms are listed in a suggested sequence. Your internal policies or customer business rules
may require using the forms in a different sequence than listed below.
Step Form Name Reason for Use
1 TAA Program Application
This form is used to gather basic data and determine customer eligibility for the federal TAA/ATAA/RTAA programs. Staff members will record information (e.g., general, contact, individual, veteran, employment, barriers, and staff data). This includes entering the TAA Petition number, the qualifying separation date, and other key data that determine the individual’s eligibility.

The Programs Tab: TAA
Virtual OneStop – Staff Services User Guide 7-2 V18 – 05/2018
Step Form Name Reason for Use
2 TAA Participation This participation form is used to gather details of the participant’s status. It is required before the individual can be enrolled in any TAA activities/services. The completion of this form will enforce enrolling in the first service.
Note: For some customers, this first service may typically be a waiver, after which any necessary sub-applications for the individual will be made.
3 TAA Activity Records (Activity Enrollment Form)
This form is a series of tabs used to supply details of each activity in the TAA participant’s service record. The enrollment form is opened for a single service/activity, and displays tabs to enter/maintain enrollment data (including areas for general, service provider, cost, financial aid, budget, and closure data). Each entered service is displayed in a table with completion status, begin and end dates, and links to view/modify existing activities. Service/activity records can be entered or maintained for the main TAA application or for sub-applications or waivers (e.g., assessments of abilities, waiver for current marketable skills, approved training activities).
4 TAA Bona Fide Application
This form is used to gather required data to ensure that the individual will be qualified for Additional Trade Readjustment Allowances (TRA) when those allowances are due. To be eligible for Additional TRA, the individual must submit a bona fide application within 210 days of the Petition Certification date or Qualifying Separation date, whichever is later. Since this Additional TRA is payable after exhausting unemployment and Basic TRA (well beyond the 210 days), customer policies will frequently require completing this application immediately after the TAA Participation and first enrollment occur. The Additional TRA is available/payable to an individual/worker who is participating in TAA-approved training and applied for training by the "210" date, or who has an appropriate waiver for the training. This occurs after they have exhausted their Basic TRA (26 weeks) following the exhaustion of unemployment insurance, or after the 2-year Basic TRA period.
Note: Your internal policies or customer business rules may require you to make a waiver or other activity the first enrollment, then immediately do the Bona Fide Application.
5 TAA Waiver Entry This form is used to enter data about a TAA Waiver for reporting purposes, as well as the waiver’s review status. Updating the review status is required by defined time periods (e.g., 30 days) and includes entering any changes in the reasons for, or status of, the waiver.
Note: The TAA Waiver Entry follows an actual enrollment in a “Waiver” activity. The activity will have detailed data on the Waiver, but all of the Waiver Review data will be entered and adjusted through the TAA Waiver Entry form.
In the context of TAA, a Waiver is mainly used as a reason for not requiring (and being enrolled into) an approved training activity. Initiation of a Waiver is done as an enrollment in a Waiver activity (frequently as the first required activity). However, once the activity is created, the TAA Waiver Entry form must be filled in to maintain the 30-day reviews for the status/review of the waiver.

The Programs Tab: TAA
Virtual OneStop – Staff Services User Guide 7-3 V18 – 05/2018
Step Form Name Reason for Use
6 TAA Approved Training Application
This form is used to gather required data to create an application for TAA-approved training, including answering questions about the worker’s suitability and qualification for the training, and the school, program, and provider of the training.
Note: An Approved Training Application should always be created before enrolling the individual in any Training activities. Although business rules may not enforce this, the Approved Training application is required to comply with federal TAA reporting requirements.
7 Case Closure Form Allows staff to record federal and local performance measures before the program exit occurs.
8 Exit (Outcome) Form Officially terminates participant involvement in a federal program and provides details of the participant’s status after program participation (for Common Measures reporting).
TAA Application Form Use the TAA Application Form to determine customer eligibility for the federal TAA/ATAA/RTAA programs.
The TAA Application Form, when started by clicking the application wizard icon, initially displays segments of a progress bar to help you see your progress as you step through the application, gather data, and determine eligibility (9 steps shown below). Each segment is a separate page that helps to determine the individual’s eligibility.
The application, and the 9 tabs are rewritten to be consistent with the similar look and feel for tabs and fields in WIOA, and in other program applications. The first Wagner-Peyser application tab will include the four eligibility types: Registration Only, Wagner-Peyser, JSVG and MFSW.
To create a TAA Application: 1 From the Programs tab screen, click the Create Trade Adjustment Assistance (TAA) Application
link.
Programs Tab: TAA Application Link
TAA Application Form Progress Bar (showing Step 2 of 9)

The Programs Tab: TAA
Virtual OneStop – Staff Services User Guide 7-4 V18 – 05/2018
This starts the TAA Application wizard and displays the first TAA Application screen for General Information (shown in the following figure). Note: Your staff privileges and system business rules play a pivotal role in successfully
completing the TAA Application. Check with your supervisor for more details.
For example, depending on your system configuration, some data created from other federal program applications may pre-populate application fields (e.g., SSN verification, demographic data, and employment data).
TAA Application Screen Step 1 (Start Page)
2 Use the boxes, drop-down lists, verification links, or other controls to enter required data, and any optional data that you can supply.
Note: Any boxes/controls with a red asterisk (*) are required fields. If you do not enter anything, a message will indicate what data is missing when you try to advance to the next screen.
The Application Date and Eligibility Date cannot be greater than your system lockdown dates, nor can they be greater than the current date. If you do not follow these system rules, when you attempt to proceed, you may be stopped with a warning in red text similar to the following:
If you cannot complete an application and return to it before an enrollment has occurred, this field will be active.

The Programs Tab: TAA
Virtual OneStop – Staff Services User Guide 7-5 V18 – 05/2018
3 Click Next to continue. The second TAA Application screen is displayed for Contact Information.
TAA Application Screen 2 (Contact Information)
4 Click in the boxes, then use the drop-down lists, verification links, or other controls to enter all required Contact Information data and any optional information that you can supply.
Note: Address information may be standardized based on a database containing known addresses. If the Mailing Address is the same as the Residential Address, check a box to pre-fill the information.
Note: The Edit SSN link is only available to staff with proper privileges. When you click Verify SSN to confirm the individual’s SSN, the screen will expand to display a list of items to choose from. Click Reset to re-select another radio button. If you click Verify again, the system will hide the display list.
Note: An Alternate Contact can be added in the Alternate Contacts section at the bottom of the form. Click the link to expand the screen and enter all required data, and any optional data. Then click the Save button. When the screen refreshes, the Alternate Contact will appear in the Contact List.
When you edit the email address, it will be verified as being from a valid provider.
When you check the box to use residential data, the address will be standardized, if possible.

The Programs Tab: TAA
Virtual OneStop – Staff Services User Guide 7-6 V18 – 05/2018
5 Click Next to continue. The third TAA Application screen is displayed for Demographic Information.
TAA Application Screen 3 (Demographic – Individual Data)
6 Click in the boxes, use the drop-down lists, verification links, or other controls to enter all required Individual Information data, and any optional information that you can supply. If the individual self-identifies as having a disability, the screen will expand and you will be asked to enter more information pertaining to the disability.
7 Click Next to continue. The fourth TAA Application screen is displayed for Veteran Information. 8 Click the appropriate radio buttons to complete the military service questions.
If the answers to all three questions is No, you can proceed to the next screen. If any of the questions are set to Yes, the screen will expand and you will be asked to enter more information pertaining to military service.
If Disability is selected, you will need to click the link and select a verification type.

The Programs Tab: TAA
Virtual OneStop – Staff Services User Guide 7-7 V18 – 05/2018
TAA Application Screen 4 (Veteran Information)
9 Click Next to continue. The fifth TAA Application screen is displayed (as shown in the following figure), for Individual Employment.
10 Click in the boxes, then use the drop-down lists, verification links, or other controls to enter all required employment information data, and any optional information that you can supply.
Required information includes Rapid Response Orientation and Liable/Agent State information.
Note: In order to receive TAA services, there must already be a TAA Petition filed with the office from the client’s employer. Click the Find TAA Petition link to locate the petition that is on file and that corresponds with the client.
Click the Verify TAA Petition link to verify the information.
Note: If the valid TAA Petition that you are looking for cannot be found, contact your supervisor or administrator. They can enter the Petition through the Program Administration portion of the Administration module.
If you cannot find the petition, and permissions have been set for you, you can click an Add link to add the petition as a staff member. A screen opens to enter petition information. However, valid petitions are normally set up and maintained in the Administration system, and not entered by staff members in this application.

The Programs Tab: TAA
Virtual OneStop – Staff Services User Guide 7-8 V18 – 05/2018
TAA Application Screen 5 (Employment Information)
11 A required field near the end of the page requires you to indicate if the individual has been reemployed since layoff from the trade-affected job. If the answer is Yes, enter the appropriate new employment fields (start date, annual wage, age at reemployment), and click below the Employment History table to add data for the new employment.
12 Click Next to continue. The sixth TAA Application screen is displayed for Education.
You can click to locate the individual’s company petition. You can view all petitions or filter by company name, impact date, etc.

The Programs Tab: TAA
Virtual OneStop – Staff Services User Guide 7-9 V18 – 05/2018
TAA Application Screen 6 (Education Information)
13 Click in the boxes, then use the drop-down lists and radio buttons to enter all required employment information data.
14 Click Next to continue. The seventh TAA Application screen is displayed for Public Assistance.

The Programs Tab: TAA
Virtual OneStop – Staff Services User Guide 7-10 V18 – 05/2018
15 Select the correct radio button to indicate any public assistance the individual is currently receiving (e.g., TANF, SSI, General Assistance, SNAP, RCA, SSDI, Services under SNAP, or Pell Grant).
TAA Application Screen 6 (Public Assistance)
16 Click Next to continue. The seventh TAA Application screen is displayed for the Individual
Barriers and Barriers to Employment.

The Programs Tab: TAA
Virtual OneStop – Staff Services User Guide 7-11 V18 – 05/2018
TAA Application Screen 7 (Individual Barrier and Barriers to Employment)
17 Select the correct radio button to indicate a barrier due to limited reading, speaking, or writing skills, or understanding of the English language.
18 Select whether the individual is a single parent. 19 Click Next to continue.
The ninth TAA Application screen is displayed for Application Eligibility. This screen displays Eligibility Information for TAA, ATAA, and RTAA (as shown in the sample figure below). Where the eligibility is No, a red message indicates a reason.
The Programs Tab: TAA
Virtual OneStop – Staff Services User Guide 7-12 V18 – 05/2018
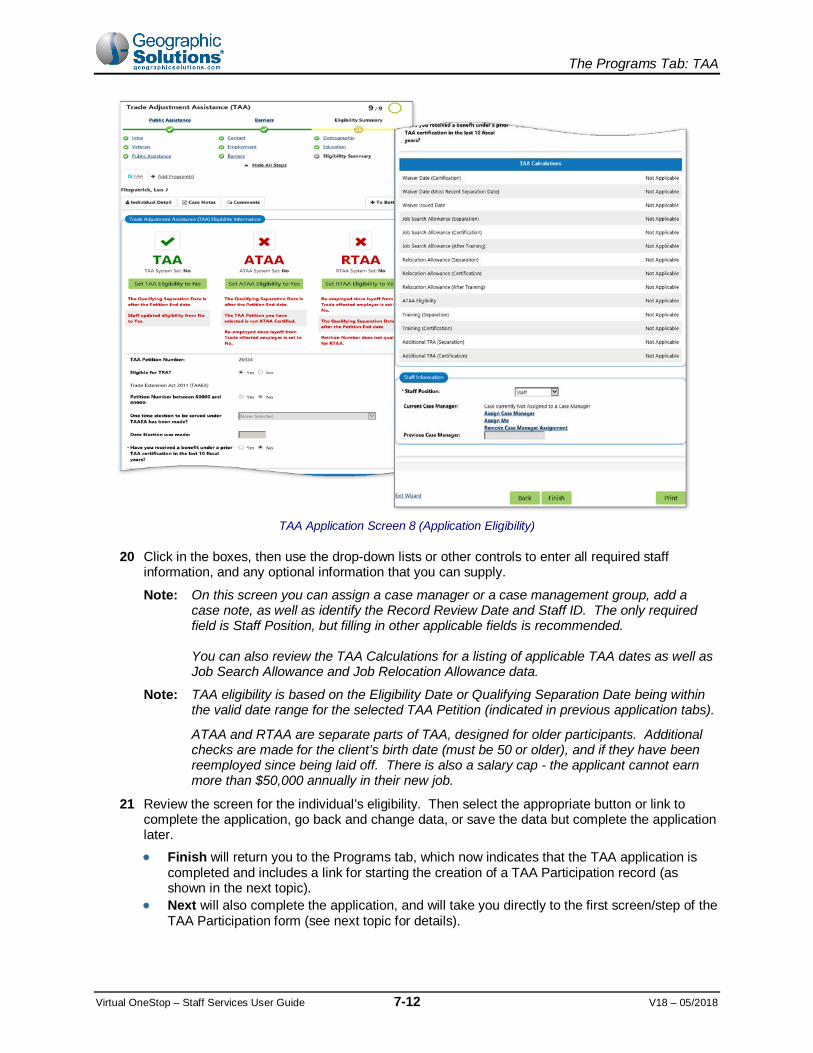
TAA Application Screen 8 (Application Eligibility)
20 Click in the boxes, then use the drop-down lists or other controls to enter all required staff information, and any optional information that you can supply.
Note: On this screen you can assign a case manager or a case management group, add a case note, as well as identify the Record Review Date and Staff ID. The only required field is Staff Position, but filling in other applicable fields is recommended. You can also review the TAA Calculations for a listing of applicable TAA dates as well as Job Search Allowance and Job Relocation Allowance data.
Note: TAA eligibility is based on the Eligibility Date or Qualifying Separation Date being within the valid date range for the selected TAA Petition (indicated in previous application tabs).
ATAA and RTAA are separate parts of TAA, designed for older participants. Additional checks are made for the client’s birth date (must be 50 or older), and if they have been reemployed since being laid off. There is also a salary cap - the applicant cannot earn more than $50,000 annually in their new job.
21 Review the screen for the individual’s eligibility. Then select the appropriate button or link to complete the application, go back and change data, or save the data but complete the application later. • Finish will return you to the Programs tab, which now indicates that the TAA application is
completed and includes a link for starting the creation of a TAA Participation record (as shown in the next topic).
• Next will also complete the application, and will take you directly to the first screen/step of the TAA Participation form (see next topic for details).

The Programs Tab: TAA
Virtual OneStop – Staff Services User Guide 7-13 V18 – 05/2018
• Back can be used to return backward through as many tabs as you want, where you can review and change data.
• Exit Wizard will prompt you to confirm your exit (and warn you that you could lose data on the current tab). The Next button saves data on each tab, so if you cannot complete the TAA application, you can click Exit Wizard and return when you can finish the form. All data in the previous wizard steps is saved.
Viewing the TAA Application Once the TAA application is complete and successful, a link will display for the application (indicating Complete), followed by a link for starting a participation form. You can click the application link to view application data.
Programs Tab: TAA Application View Link

The Programs Tab: TAA
Virtual OneStop – Staff Services User Guide 7-14 V18 – 05/2018
From the displayed View screen you can scroll through each area that was used to collect Application Information during the original application, and (if appropriate) click the edit link to return to the editable version of the area and make changes. You can also see “TAA Calculations” at the bottom of this area, which lists critical dates related to the application.

The Programs Tab: TAA
Virtual OneStop – Staff Services User Guide 7-15 V18 – 05/2018
Programs Tab: TAA Application and Eligibility Summary Area (Expanded)
Note: Once DOL has the Trade application/petition, it has 60 days to certify it as a trade-impacted layoff. When DOL does approve the petition, it provides a certification date, along with beginning and ending impact dates. For example, if DOL sets the certification date to 10/14/2008, it will set 01/01/2008 as a beginning impact date and possibly 06/01/2010 as the ending impact date. Additionally, there are two critical dates to keep in mind for applying individuals:
• Certification date (when DOL certified the company as trade-impacted) • Individual’s Qualifying Separation date These dates are important due to the rules associated to them. To view a list of system-calculated critical dates, click the View link for the completed TAA application and scroll to the bottom section titled “TAA Calculations.”
The bottom of the Application in View Mode includes a TAA Calculations area for critical Certification and Separation dates.

The Programs Tab: TAA
Virtual OneStop – Staff Services User Guide 7-16 V18 – 05/2018
TAA Participation Form Staff must complete the participation form to provide details of the participant’s status before they enroll in the program. Ultimately this offers a “before and after” starting point for Common Measures reporting. Most of the required data on this form is pre-filled, based on previously entered information. Upon successful completion of the TAA Participation form, the system will display the next mandatory step – TAA Enrollment. To create a TAA Participation:
1 From the Programs tab screen, click the Create Participation link.
Programs Tab: TAA Participation Link
This opens a TAA Participation form with participant information (similar to the following figure). 2 Enter the Participation Date and any other participation data that is not already populated or is not
correct.
Note: The Participation Date becomes locked down once saved, so the date entered should represent the participant’s initial activity or service that you will manually enter in the next step.

The Programs Tab: TAA
Virtual OneStop – Staff Services User Guide 7-17 V18 – 05/2018
TAA Participation Form
3 Click Next. The system will display the first tab of the Enrollment Wizard for enrolling in a TAA Activity/Service. For details, see the next topic. Note: If you exit the Enrollment before saving data on the first tab (clicking Next), the
Participation will not be saved.
TAA Service Enrollment Upon successfully completing the TAA Participation Record, the system will automatically display the first tab of the TAA Enrollment Wizard (a sample of which follows). This form is a series of tabs for recording each activity in the TAA participant’s service record. Each entered service is displayed in a table with completion status, begin and end dates, and links to view or modify the existing activity.

The Programs Tab: TAA
Virtual OneStop – Staff Services User Guide 7-18 V18 – 05/2018
To create a TAA Activity Enrollment: 1 From the Programs tab screen, click the Create Particpation link (under the TAA Participation).
Programs Tab – Create Activity
This starts the TAA Enrollment Wizard, and displays the first TAA Activity Enrollment tab for General Information (shown in the following figure). Note: For your first enrollment, you will go here directly from the Participation form.
General Information and Participation Information 2 In the screen’s Participation Information area, enter the Participation Date, then click Next to
proceed to the next screen.
3 In the screen’s General Information area:
• Select the appropriate customer program group. (The choices displayed result from program eligibility determined during the TAA application process.)
• Select the staff member LWIA region • Select the staff member office location

The Programs Tab: TAA
Virtual OneStop – Staff Services User Guide 7-19 V18 – 05/2018
4 In the tab’s Enrollment Information area:
• Select whether this activity service falls under a Partner Program
If Yes, the page will refresh. Use the Select Partner drop-down list that displays to select a desired program name from the pop-up window (as shown in the following figure).
Note: Selected Partner Program agencies fund activity services; therefore, no fund tracking will occur in the system for these selections.
• Click Select Activity Code and choose the desired program activity or service from the list displayed (as shown in the following figure).
Note: Depending on your system’s business rules, the initial TAA enrollment may be reduced to “102 Initial Assessment.” The system relies on critical data relationships (customer program group, LWIA, provider type) to determine which service activities staff may select from. In the case above, the TAA Application determined TAA eligibility only, so the system won’t display ATAA-specific activity services.

The Programs Tab: TAA
Virtual OneStop – Staff Services User Guide 7-20 V18 – 05/2018
Enrollment Information Section of TAA Activity Screen
• Record the activity’s Actual Start Date or Projected (future) Start Date. Note: This date is normally “locked down” for the initial activity, and reflects the “Participation
Date” recorded previously. • Record the activity’s Projected End Date. • If this is a training activity where there may be a break in training, indicate the number of
weeks for that break in training. Based on the activity, it may be a required entry. 5 In the tab’s Staff Information area:
• Select the staff member position, if applicable. • To perform case assignment, click Assign Staff, Assign Group, or Assign Me. • Type comments, if necessary. • Click to add a case note, if necessary.
6 Review all data and click Next to save the data and proceed to the next tab.
The TAA Enrollment – Service Provider tab is displayed (shown in the following figure). Note: If you click Next, the data is saved and you cannot change the Activity Code, Region, or
Customer Group after that. If you click Exit Wizard, all changes on the current tab will be lost. If this is the first tab for the first enrollment activity, the Participation Record will also not be saved.
Service Provider Tab 1 Click the links to identify the required service provider and service data (as shown in the following
figure).
• Click Select Provider to choose the appropriate service provider.

The Programs Tab: TAA
Virtual OneStop – Staff Services User Guide 7-21 V18 – 05/2018
• Click Select Service, Course or Contract to define the selected activity. • Click Select Provider Locations to record where the individual will be serviced. • Click Select Provider Contacts to record the contact person associated with the activity
service/course. • Click Occupational Training Code to search for and select the desired occupational code.
(This is only required for training activities.)
TAA Enrollment Form − Enrollment Service Provider Tab
Note: The provider data available for selection depends on information you recorded on the former tab. The system displays eligible provider program information based on the Customer Program Group, the LWDA, and the activity service code recorded in the former step.
2 Click Next to save the data and proceed to the next screen.
If the activity is a fundable one, the TAA Enrollment – Enrollment Cost tab is displayed (as shown in the following figure). If not, the system will display the final tab, Closure Information.
Enrollment Cost Tab The next four enrollment cost/budget tabs (Enrollment Cost tab, Financial Aid tab, Enrollment Budget tab, and Budget Planning tab) will only appear if your configuration includes Individual Fund Tracking (IFT) and if the activity enrollment is a fundable enrollment (i.e., “Track Enrollment Costs” is set to “Yes’ for the provider for this service). If the activity, such as Activity Code 102 Initial Assessment, is not associated with any funding, the system will bypass these four tabs and take the staff member straight to the Closure Information tab, the final tab in TAA Enrollment. If your configuration does not have Advanced IFT, the Enrollment Budget and Budget Planning tab will only show as display tabs that summarize enrollment data and the planned enrollment costs and financial aid contributions.
For services that require an Occupation Code, use the Occupational Training Code link to view the O*NET codes.

The Programs Tab: TAA
Virtual OneStop – Staff Services User Guide 7-22 V18 – 05/2018
TAA Enrollment Form – Enrollment Cost Tab
1 Review the enrollment costs. If applicable, adjust the listed Line Item costs. • Click in each applicable box to enter an adjusted amount. Press the TAB key or click
anywhere else on the screen to update the total amount.
To enter line item costs with a mouse, click the calculator icon next to an amount.
Note: If eligible, staff may select from an additional Line Items drop-down and Add button, to add the additional line items available through the drop-down list.
2 Click Next to continue. The Financial Aid tab is displayed.
Financial Aid Tab Note: This tab is used to add financial aid sources as a part of the overall funding costs. By default, no
aid is available. When staff clicks the Yes radio button, the system displays current enrollment costs and enables the Click Here to Add Financial Aid link. When staff clicks this link, the system displays a list of financial aid sources.

The Programs Tab: TAA
Virtual OneStop – Staff Services User Guide 7-23 V18 – 05/2018
1 If financial aid is applicable, click the Yes radio button. 2 Click the Add Financial Aid link and pick the appropriate financial aid source.
TAA Enrollment Form − Financial Aid Tab
3 From the Financial Aid area that is displayed: • Select the appropriate Recipient and Status radio buttons. • Enter the awarded amount and budget towards service cost, if applicable.
(Staff cannot enter the amount of aid applicable unless they select the Awarded status.) • If any amounts were entered to budget toward service cost, click Calculate. This adjusts the
Total Financial Aid Contribution and New Planning Cost.
Note: If there is more than one financial aid source that may apply as a contribution to enrollment cost, repeat the step above to open an area for each type of financial aid. Click Next to continue. The Enrollment Budget tab is displayed.
Note: To delete the financial aid once staff saves this form, they may click the Remove link next to the financial aid title.
Enrollment Budget Tab For customers with Advanced IFT, this tab is used to add a fund stream from which funds are planned to pay for enrollment costs (i.e., not covered by means such as financial aid). For customers with Basic IFT, this is a read-only summary screen of costs and financial aid portions budgeted for this enrollment. Staff will simply review the screen and click Next.
1 From the Enrollment Budget tab, click the Select a Budget link.
If the amount is Awarded and applied to the Service Cost, staff can enter the aid amount, click Calculate, and have the Aid Contribution calculated as part of the New Planning Cost.
Clicking the link and selecting a code opens an area for entering a financial aid amount to apply to the Service Cost (i.e., the provider) or to the Participant (i.e., the individual).

The Programs Tab: TAA
Virtual OneStop – Staff Services User Guide 7-24 V18 – 05/2018
TAA Enrollment Form − Enrollment Budget Tab
Note: The system displays the applicable budget options / fund streams (based on LWDA/one-stop, customer program group, activity code, service dates, service costs, and the budget or fund stream setup).
This will normally be one budget item, but it can list more than one fund stream. If the time period for the enrollment fits within two fund streams for the same fund for two program years, both program year fund streams may display and can be selected.
2 Click the Edit link in the Action column for the Budget item. A separate box displays to enter/edit the funded cost.
• Enter the appropriate Funded Amount, Allocation, or Obligation, as appropriate. • Select Save. Changes to the funded amount are redisplayed in the Budget Allocations row.
Note: Specific funds related to this budget are allocated on the next tab. If you return to this tab after those allocations are made, a second line under the fund stream will display to indicate those allocations.
3 Click Next to save the changes and proceed. The Budget Planning tab is then displayed.
Budget Planning Tab For customers with Advanced IFT, the Budget Planning tab is used to display enrollment cost summary information, based on data entry in the three former tab screens, and lets staff allocate amounts from the funding stream selected in the previous tab. Staff can also add a voucher, payment, or receipt at this point by clicking the appropriate link.
This area will display once the budget is selected. After the budget is selected, the Edit link will allow changes to the funded amount, as well as the ability to delete the funded amount if there are no obligations or allocations saved to it yet.

The Programs Tab: TAA
Virtual OneStop – Staff Services User Guide 7-25 V18 – 05/2018
For customers with Basic IFT, staff could not select a funding stream in the previous tab. Therefore, staff can add a voucher, payment, or receipt at this point by clicking the Add New Voucher link, keeping in mind that there is not an identified funding stream or entry field for an allocated amount to the funding stream.
1 Review the enrollment, contributions, or any funding costs.
• If the enrollment cost, contributions, or the fund stream for funding costs are incorrect, click the Back button to return to the correct screen to fix them.
• From the previous tab, update allocated amount for this program service, as necessary, and click Next.
The system calculates new funded and obligated amounts.
TAA Enrollment Form − Enrollment Budget Plan Tab
2 Click Next to continue. The Closure Information tab is displayed.
Closure Information Tab The Closure Information tab is used to complete enrollment. Staff need only to click Finish from this tab to complete the activity enrollment.
1 Enter any appropriate closure data
• If the individual has completed the activity, the last Activity Date and a completion status must be entered to close out the activity. Note: No Completion Code selection is required to enroll in the activity. But a completion
code will be required before closing the enrollment in this activity. • If the activity requires credential information to be entered, additional required fields will
appear for a completion code.
Changes made to obligations or funding (on the last tab) are reflected in areas on this tab.

The Programs Tab: TAA
Virtual OneStop – Staff Services User Guide 7-26 V18 – 05/2018
• If the activity is ongoing and the individual has not completed it, staff can simply click the Finish button.
Note: Certain activities will not require credential data to close the activity (e.g., TAA Waiver for Marketable Skills).
TAA Enrollment Form − Closure Information Tab
2 Click the Finish button. Clicking Finish returns staff to the updated Programs tab, with the activity listed in the Activity Records tables (as shown in the following figure). Upon successful completion of the first TAA enrollment, the system re-displays the Programs tab screen with a TAA Registration/Activity Record table that lists the first enrollment activity. The screen will also now include TAA Closure, TAA Outcome, and any TAA sub-application links that are configured for your system.

The Programs Tab: TAA
Virtual OneStop – Staff Services User Guide 7-27 V18 – 05/2018
Updated Programs Tab for TAA
You can continue to record additional services for individuals by clicking Create Activity and following the previous steps for additional enrollment in TAA activities.
Note: In this example, the individual is officially a TAA customer because their first TAA activity service has been successfully recorded. Waiver Entry, Approved Training, and Bona Fide Application links will display after the first enrollment, depending on your site configuration.
TAA Bona Fide Sub-Application Form The TAA Bona Fide Application form (referred to as a sub-application of TAA) is used to gather required data to ensure that the individual will be qualified for Additional Trade Readjustment Allowances (TRA) when those allowances are due.
Note: To be eligible for Additional TRA, individuals must submit a bona fide application within 210 days of the Petition Certification date or Qualifying Separation date, whichever is greater. Since this Additional TRA is payable after exhausting unemployment and Basic TRA (well beyond the 210 days), customer policies will frequently require completing this application immediately after the TAA Participation (and first enrollment) occur. Policies may even identify a specific first enrollment to be entered, so that the TAA participant can immediately enter the Bona Fide Application while still in the one-stop.

The Programs Tab: TAA
Virtual OneStop – Staff Services User Guide 7-28 V18 – 05/2018
To create a TAA Bona Fide Application: 1 Click the Create Bona Fide link from the Programs tab screen.
Programs Tab: TAA Bona Fide Application Link
This displays the Bona Fide Application screen (shown in the figure below).
TAA Bona Fide Application screen
2 Enter the Bona Fide date and the training being requested.
Note: You will be able to change the training being requested if you are unsure of your entry at this time. You can also review the other information from this screen. If petition or qualifying separation data are wrong, you can cancel this application and return to the main TAA Application to change that data.
3 Click Save to continue.
The system re-displays the Programs tab screen with a link under the Create TAA Bona Fide Application heading, which indicates the application date and can be used to re-open and edit the existing Bona Fide application.
Programs Tab: TAA Bona Fide Application Link

The Programs Tab: TAA
Virtual OneStop – Staff Services User Guide 7-29 V18 – 05/2018
TAA Waiver Entry Form If a TAA-eligible worker is not participating in an approved training program, staff can create a training waiver to preserve their Basic Trade Readjustment Allowance (TRA) or income support. To initiate the waiver protocol, staff first enroll the customer in a TAA Waiver activity service. The service begin/end dates can be flexible, to eclipse the total duration of the waiver review period, for example, so that staff don’t have to create multiple waiver activity services on a weekly or monthly basis.
Note: The TAA service codes in your system might have pre-defined durations that cannot exceed a specified number of days.
Once the waiver activity is created, the TAA Waiver Entry form must be completed monthly to meet federal requirements. Updating the review status is required by defined time periods (e.g., 30 days) and includes entering any changes in the reasons for, or the status of, the waiver.
Note: The TAA Waiver Entry follows an actual enrollment in a waiver activity. Even though the TAA Waiver Entry link displays after application, it should not be used to record waiver activity without enrolling in the waiver activity. The activity will have detailed data on the waiver, but all of the Waiver Review data will be entered and adjusted through the TAA Waiver Entry form.
TAA Waiver Entry screen (Initial Waiver Entry and Edit/Review Lines after Entry)
To Create a TAA Waiver Entry Form: 1 Click the Create Waiver Entry link from the Programs tab (directly under the Create Activity table).
Once a waiver entry is created, clicking the Edit link will display the possible waiver reviews for entering review data enrollment.

The Programs Tab: TAA
Virtual OneStop – Staff Services User Guide 7-30 V18 – 05/2018
This displays the TAA Waiver Entry screen (shown in the figure below). 2 Enter the Waiver Issued Date.
Note: This cannot be greater than 16 weeks from the qualifying separation date. Depending on your privileges, this field may not be modifiable after initial entry.
3 Select the Waiver Reason.
This should match the type of waiver activity in which the applicant is currently enrolled. 4 If applicable, select an occupation code. 5 If applicable, enter a case note. 6 Click Save to continue.
The system re-displays the Programs tab screen with a link under the Create Waiver Entry heading, which indicates the waiver issue date, and can be used to reopen and edit the existing Waiver Entry application and the related Waiver Entry reviews.
Programs Tab: TAA Waiver Application Link
To Edit Reviews in a TAA Waiver Entry Form: 1 Click the Edit Waiver Entry for TAA link, from the Programs tab screen.
This displays the TAA Waiver Entry screen listing the 26 weeks for required reviews (shown in the figure below).
2 Click the Edit link for the appropriate review date.
The Waiver Review Entry form is displayed (shown in the figure below). 3 Enter the actual review date.

The Programs Tab: TAA
Virtual OneStop – Staff Services User Guide 7-31 V18 – 05/2018
TAA Waiver Entry screen and Waiver Review Entry screen (after several reviews)
4 Answer the review questions. Note: When you are completing a waiver with a standard reason (e.g., waiver requirements met
and waiver is still in effect), once it is saved, the Review Status is changed to “Complete” for that review. If you change the status to “Revoked” (since the waiver is no longer in effect), once the revoked status is saved, every subsequent Review Status is changed to Closed (with the same Reviewed Date as the date of the Revoked review).
If you use the Reinstate button to reinstate the waiver, then every Review Status from that one on is changed back to Pending, with the Reviewed date cleared.
5 If applicable, enter a case note. 6 Click Save to continue.
The Waiver Review Entry form is re-displayed with the review status and date changed. 7 Click Save on the TAA Waiver Entry screen to continue.
The system redisplays the Programs Tab screen.
Revoking at any review point will close all pending reviews.
Waiver General Information is redisplayed at the top of the screen.

The Programs Tab: TAA
Virtual OneStop – Staff Services User Guide 7-32 V18 – 05/2018
TAA Waiver Extenuating Circumstances or Good Cause Reasons A “Good Cause” provision, which was added to the Trade and Globalization Adjustment Assistance Act of 2009 (and the associated TEGL 22-08 and TAA 2011 rules), made possible TAA Waiver Reasons for waiver extensions that can be approved (on a case-by-case basis) when there are extenuating circumstances beyond the trade-affected worker’s control for missing his or her training enrollment deadline. This can occur for 3 possible waiver reasons. The waiver reason controls are activated depending upon:
• Extenuating Circumstances: These Waiver Reason controls are activated when the waiver’s issue date is 1 to 45 days later than the maximum date of the Waiver Issued by Certification, or the Waiver Issued by Qualifying Separation Date. ♦ Reasons include natural disaster, serious illness, injury, military duty, or improper user
notifications • Maximum Extenuating Circumstances: These Waiver Reason controls are activated when
the TAA application petition number attached to the Trade application is between 70000 and 79999 and the waiver’s issue date is 45 to 90 days later than the maximum date of the Waiver Issued by Certification, or the Waiver Issued by Qualifying Separation Date. ♦ Reasons include military duty or improper user notifications
• Good Cause: These Waiver Reason controls are activated when the waiver’s issue date is 1 or more days later than the maximum date of the Waiver Issued by Certification or the Waiver Issued by Qualifying Separation Date. ♦ Reasons include retirement, health issues, or unemployment compensation-related
delays outside of the user’s control
Waiver Reasons for Extenuating Circumstances or Good Cause

The Programs Tab: TAA
Virtual OneStop – Staff Services User Guide 7-33 V18 – 05/2018
TAA Approved Training Sub-Application Form This TAA Approved Training form (referred to as a sub-application of TAA) is used to gather required answers to questions about the worker’s suitability and qualification for the training, as well as the school, program, and provider of the training. Note: An Approved Training Application should always be created before enrolling the individual in any
Training activities. Although business rules may not enforce this, the Approved Training application is required to comply with federal requirements.
To create a TAA Approved Training Application: 1 Click the Create Approved Training Application link from the Programs tab screen
(below the Activity table and Waiver Entry link). This displays the TAA Approved Training Application screen (shown in the figure below).
TAA Approved Training Application Screen (Initial and Edit Approved Training with Provider Area)
When adding a program, you begin by selecting a provider.
Initially, only 6 questions display. If you edit after application, the School/Program link is also available.

The Programs Tab: TAA
Virtual OneStop – Staff Services User Guide 7-34 V18 – 05/2018
2 Enter the Training Application Date. 3 Enter the Occupation Goal (use the Search Onet link). 4 Click Yes or No to answer each of the listed questions. 5 If applicable, enter a case note. 6 Click Save to continue.
The system redisplays the Programs tab screen with an Edit Approved Training Application link under the Create Approved Training Application link.
The link (which indicates the Approved Training issue date) can be used to reopen and edit the existing Approved Training application (including adding the school/program).
Programs Tab: TAA Approved Training Screen
TAA Case Closure The Create Closure link appears after the first service is recorded for an individual. However, Case Closure may only be completed when each activity has an actual end date. Staff may use the case closure link (in much the same way as the WIOA Case Closure link is used) to record the following:
• Customer Satisfaction data, if applicable. • Credential attainment, including diploma attainment, built around federal reporting
requirements. • Employment information prior to customer’s program exit.
To Complete a TAA Case Closure: 1 Click the Create Closure link.
If all TAA activities are properly closed, the General Info tab of the TAA Closure form displays (as shown in the figure on the following page).
Note: If there are activities with no actual end date, the TAA Case Closure CANNOT be created. Since credential and diploma information can also be recorded in enrollment records, the TAA Case Closure interface will not be available for data entry when there is an open activity (defined as a valid activity with an actual start date but no actual end date) or a projected activity (defined as having a projected start date, a projected end date, no actual start date, and no actual end date).
If you click Create Case Closure from the Programs Tab and TAA activities are still open, the system displays a pop-up alert similar to the following.

The Programs Tab: TAA
Virtual OneStop – Staff Services User Guide 7-35 V18 – 05/2018
To continue, staff must click OK to clear the alert, and then manually close each open activity.
For details about closing program activities, refer to “Enrollment Closure” in Chapter 6 of this guide. Requirements for closing activities are the same for both programs.
Once a TAA Case Closure is created, a new program activity cannot be created for this enrollment. The TAA Case Closure must be deleted before a new program activity may be recorded.
TAA Closure Screen (General Info Tab)
2 Review information on the General Info tab, select your office location, and click the Next button.
The Credentials tab is displayed (as shown below).

The Programs Tab: TAA
Virtual OneStop – Staff Services User Guide 7-36 V18 – 05/2018
TAA Closure Screen (Credentials Tab – N/A and Required Credentials)
3 If no information needs to be added, click Next to proceed.
If the individual was enrolled in an activity that led to a credential, and the credential still needs to be entered, enter the required credential information and verification for the individual, and click Next.
The Employment tab is displayed (as shown below).
TAA Closure Screen (Employment Tab - Top)
4 Click the appropriate radio button. If you indicate Yes (the individual entered employment or was recalled to employment by the original employer), then click the Add Employer link.
The screen will expand for Employer and Job Information (as shown in the following figure).

The Programs Tab: TAA
Virtual OneStop – Staff Services User Guide 7-37 V18 – 05/2018
TAA Closure Screen (Employment Tab – Add Employer)
Note: Staff can use this tab to maintain entered employment details. If employment information
since program enrollment was previously entered, the system will display this information below the Entered Employment radio button options. If this is the staff member’s first attempt to record employment information, they must click the appropriate radio button.
TAA Closure Screen (Staff Info Tab)
5 Enter the required employer and job information.
Clicking Save will save the employer and job information and display it at the top of the tab. It will not close the tab. You can click Add Employer again if applicable (e.g., the individual is working two jobs).

The Programs Tab: TAA
Virtual OneStop – Staff Services User Guide 7-38 V18 – 05/2018
Note: You can click the Search Employer link to search for employers registered in the system. If an employer is selected this way, the required employer information will be filled in.
6 Click Save to save the employment record (which displays at the top of the tab). 7 When all employment is recorded, click Next to proceed to the final tab.
Note: The Delete button will be disabled when an Outcome/Exit record exists.
8 Complete any necessary staff information and click Finish.
Note: The Delete button is only available once you have saved this form. By deleting the form, the individual may continue to receive TAA services.
Upon successfully completing the TAA Case Closure form, the system displays the updated Programs tab screen, a sample of which follows:
Updated Programs Screen with TAA Closure link

The Programs Tab: TAA
Virtual OneStop – Staff Services User Guide 7-39 V18 – 05/2018
TAA Enrollment – Reset Options Staff can modify an enrollment activity’s status, provided they have the appropriate privileges. (For details on similar reset options, refer to the “Enrollment – Reset Options” in Chapter 6 of this guide.) The system provides editing options based on specific line-item privileges in the Administration system that allow staff members to edit TAA activity records. In this capacity, staff may perform the following:
• Re-open a closed TAA activity record • Reset an activity’s actual end date • Reset the completion status • Reset credential attainment status • Void an activity (except the first federal program enrollment)
Note: Your system may not have the configuration settings in place for these reset options
To complete all or any of these edits, staff perform the following steps: 1 From the individual’s Programs tab screen, click an edit link for the desired TAA enrollment
record. (Note: This topic assumes use of the Edit Wizard tool.)
TAA Enrollment Records
2 Starting from the enrollment General Information tab, click Next to access the Closure Information tab.

The Programs Tab: TAA
Virtual OneStop – Staff Services User Guide 7-40 V18 – 05/2018
Viewing a TAA Enrollment Record using the Wizard
3 To reopen the activity (and thus reset the last activity date, completion code, and/or credential attainment status), staff must:
• Clear the last activity date. • Click Select Completion Code, and reselect from the drop-down list to remove/reset the
previous Completion Code value. • Click No to indicate a credential was not attained (if applicable). • Click No – Not Verified if you selected No in the previous step (if applicable). • Click Select Credential Received, and reselect from the drop-down list, to remove/reset the
previous Credential Received value (if applicable). • Click Finish. The system will display the updated Programs tab screen, a sample of which
follows:
Note: Some reset menu options may include “Void.” This edit type may NOT be used for the first enrollment service, regardless of the federal program associated. Depending on system configuration, an Administrator may have the rights to change the chronology of the first enrollment service so that the staff member can void that service/activity.
Reviewing Activities to Close

The Programs Tab: TAA
Virtual OneStop – Staff Services User Guide 7-41 V18 – 05/2018
TAA Outcome According to provisions established by the federal government, staff need only create a TAA Outcome or hard exit if the individual satisfies one of the established global exclusions. Otherwise, staff need not complete any forms to initiate the individual’s soft exit from the TAA program. Note: For more information regarding program exit, refer to “The WIOA Outcome (Hard Exit)” in
Chapter 6 of this guide.
To manually create a TAA Outcome: To manually terminate the individual’s participation in the TAA program (i.e., create a hard exit), perform the following steps:
1 Click the Create Exit/Outcome link on the Programs tab (see sample below).
Programs Screen with Create Exit/Outcome Link
The system will check to ensure that all TAA activities have been closed properly. If any remain open, the system will display an alert similar to the following:
Open Activities Alert
To continue, staff must manually close out open TAA activity services. For details about closing program activities, refer to “Enrollment Closure” Chapter 6 of this guide. Otherwise, the system will display the Outcome form, similar to the following figure:

The Programs Tab: TAA
Virtual OneStop – Staff Services User Guide 7-42 V18 – 05/2018
TAA Outcome Form
2 Complete the General Information, Exit Information, and Staff Information sections. 3 When finished, click the Save button to secure your edits and return to the updated Programs tab
screen. Based on your completion of the TAA Outcome form, the system displays an updated link as shown in the following sample figure:
TAA Edit Outcome Link
If the individual is co-enrolled in this program along with others (e.g., WIOA, Wagner-Peyser), you should also ensure that they have equivalent Outcome records created to exit them from those programs.
Deleting TAA Outcomes After creation of an outcome record, it may be possible to delete a TAA Outcome record (depending on your permissions). To Delete the TAA Outcome Record: In an instance where a TAA Outcome record needs to be removed after initial creation, the bottom of the outcome screen will include a Delete button.

The Programs Tab: TAA
Virtual OneStop – Staff Services User Guide 7-43 V18 – 05/2018
1 Click Delete at the bottom of the Outcome screen.
Delete Button on the TAA Outcome Screen
2 Click OK on the displayed confirmation box. The Programs tab is redisplayed with the TAA Outcome record deleted (the TAA Closure record will remain).
If the individual is co-enrolled in this program along with others (e.g., WIOA, Wagner-Peyser), you should also ensure that they have equivalent Outcome records deleted if they exist in the other programs.
Using the TRA Payment View The Trade Readjustment Allowance (TRA) View within the TAA program section on the Programs tab is an area for viewing the actual TRA income support payments to the individual who has exhausted unemployment compensation and who is an active participant in the TAA program. These actual TRA income support payments are not part of the benefits tracked and managed in the other case management components of the Virtual OneStop TAA system. However, staff members can click the TRA Payment View link to view data on TRA payments made to individuals from outside/legacy systems such as the TRA Benefits system.
Note: These benefits are typically imported into Virtual OneStop for this payment view via a digital file received on a quarterly basis. The TRA Payment View may be configured to also allow select staff members in certain state systems to make corrections and enter data through this view when bad data was provided through the digital interface file, without waiting for a new digital file.
The Programs Tab: TAA
Virtual OneStop – Staff Services User Guide 7-44 V18 – 05/2018
To use the TRA Payment View:
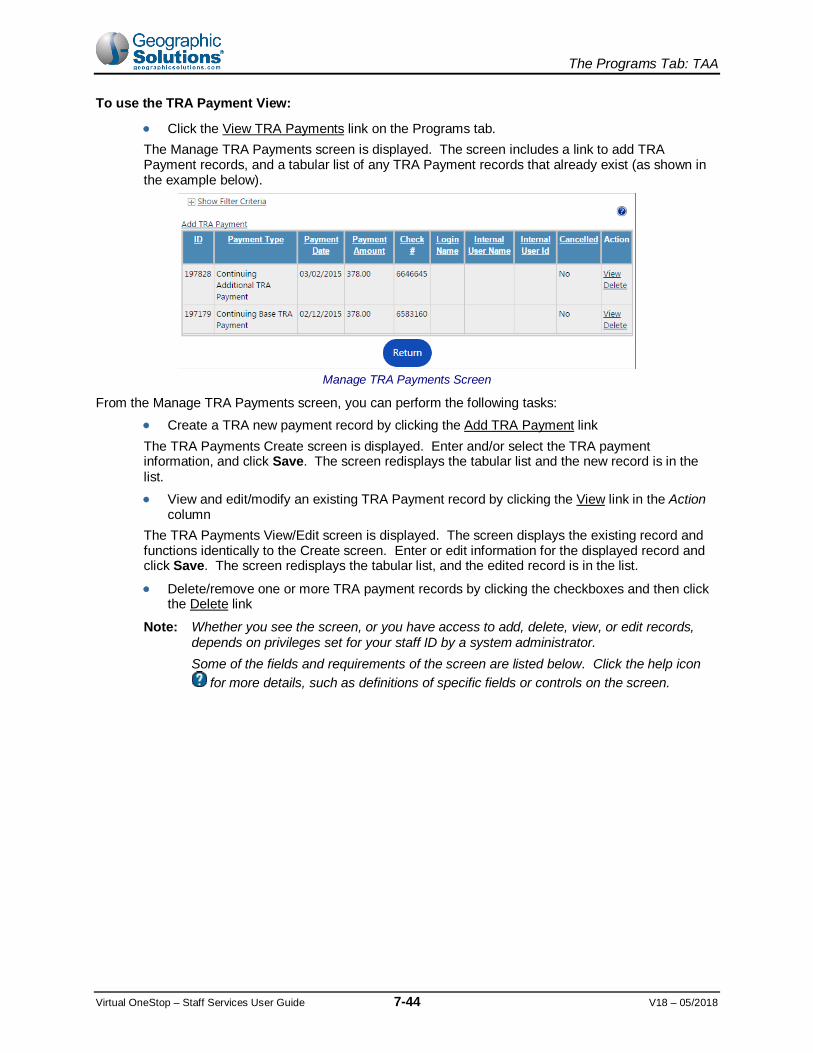
• Click the View TRA Payments link on the Programs tab. The Manage TRA Payments screen is displayed. The screen includes a link to add TRA Payment records, and a tabular list of any TRA Payment records that already exist (as shown in the example below).
Manage TRA Payments Screen
From the Manage TRA Payments screen, you can perform the following tasks: • Create a TRA new payment record by clicking the Add TRA Payment link The TRA Payments Create screen is displayed. Enter and/or select the TRA payment information, and click Save. The screen redisplays the tabular list and the new record is in the list. • View and edit/modify an existing TRA Payment record by clicking the View link in the Action
column The TRA Payments View/Edit screen is displayed. The screen displays the existing record and functions identically to the Create screen. Enter or edit information for the displayed record and click Save. The screen redisplays the tabular list, and the edited record is in the list.
• Delete/remove one or more TRA payment records by clicking the checkboxes and then click the Delete link
Note: Whether you see the screen, or you have access to add, delete, view, or edit records, depends on privileges set for your staff ID by a system administrator.
Some of the fields and requirements of the screen are listed below. Click the help icon for more details, such as definitions of specific fields or controls on the screen.

The Programs Tab: TAA
Virtual OneStop – Staff Services User Guide 7-45 V18 – 05/2018
TRA Payment View (for View/Edit a Payment)
• Payment Date – Payment dates are critical to TAA reporting and must be provided. Dates
are entered in MM/DD/YYYY format; you can also click the calendar icon to select a date, or click the Today link to enter today's date.
• Payment Type – Select a payment type from the drop-down list. Payment types are required in order to identify how specific payments and critical dates are to be reported. Therefore, payment types have been established to meet all reporting requirements for Trade Adjustment Assistance under the Participant Individual Record Layout (PIRL).
• Payment Amount – Enter the amount of the payment in dollars and cents (e.g. 125.46 or 9.67). Payment amounts are used to report Quarterly and Cumulative costs for each of the established reporting requirements.

The Programs Tab: TAA
Virtual OneStop – Staff Services User Guide 7-46 V18 – 05/2018
This page intentionally left blank.