8. tcruise field and office procedures.ppt
TRANSCRIPT

8 - 1
TCruise Field and Office
Procedures
Page #
A. Intro to TCruiseCE 8-1
B. Collecting Field Data 8-8
C. Transferring Cruise Data to the PC 8-19
D. Calculating Volumes in TCruise Office 8-20
E. Using the LandMark TCruise Reports 8-26
A. Intro to TCruiseCEOpening TCruiseCE
To open TCruiseCE, select
Start > TC Pro Pocket.
If you programmed TCruise
as one of your Button
shortcuts, you may also
open it by selecting the
upper left button on the
Recon X or Ranger X.

8 - 2
The first screen you will encounter
in TCruise gives you 5 initial
options.
1. Take No initial action
2. Create a new cruise – This will
prompt you to save a .tce
file. I do not recommend
this choice.
3. Open an existing cruise – This
allows you to open a cruise
that you have already started.
4. Import a code-param file –
This is where you want to go
to begin a new cruise.
5. Exit the program
Intro to TCruiseCELoading a .tcc file
Intro to TCruiseCELoading a .tcc file
You should then be sent to the TCruiseCE
folder where you placed your .tcc file.
Click on that file and load it.
Once it is loaded, you will get the
following message: Codes are loaded.
Click OK.

8 - 3
Intro to TCruiseCESetting up TCruise on the Handheld
File Menu
The File Menu has basic file operations like
New, Open, Save and Exit.
Also there is a Backup Options menu which
will automatically prompt you to do a backup
on the specified time interval. This is
especially useful with a 100% Tally or Strip
cruise where you are entering lots of trees in
one plot.
Intro to TCruiseCESetting up TCruise on the Handheld
Edit Menu
The Edit Menu gives you access to the Tract Info screen
and Current Parameters that are in the template you set
up. Both of these selections can be filled out or modified
in the field or office. At a minimum, you ought to fill in
the Cruiser cell, because whatever is here will
automatically fill in the Cruiser cell on each Plot.
NOTE: Because TCruise saves the Cruise Method on a plot by plot basis, you can
change the cruise method in the field at the beginning of the cruise or between
different stratums. It is better, however, for most people to have a Plot template
and a BAF 10 template and a BAF 20 template, etc.

8 - 4
Intro to TCruiseCESetting up TCruise on the Handheld
Edit MenuThe Edit Menu also gives you access to
some advanced functions like checking the
Scaling end diameter of any log of any
stem.
In this example, we input the following
parameters:
-Dbh of 16”
-Outside bark form class of 80
-3 log merch height tree
-Double bark thickness of 10%
We want to know the scaling end diameter of
the top log (#3). Click Calculate scaling
diams and TC gives us the inside and
outside diameters at that height.
Intro to TCruiseCESetting up TCruise on the Handheld
Edit Menu
Although TCruise does not bring the volume
calculators you selected in the .tct file to the
field, you can get an infield STAND level
Volume Report based on VBARS. The
VBAR values can be edited under the Edit
VBARS dialogue box.

8 - 5
Intro to TCruiseCESetting up TCruise on the Handheld
1. After you have tallied 12 plots you can access the Sample Size Estimate in the Edit
Menu.
2. Select the Volume Basis and type in your desired Confidence Percentage and press OK
3. You will then get sample size estimates for being within 5, 10, 15, and 20 percent of
the sample mean at your specified confidence level. The count points field is only
used if you are using double point sampling method.
Edit Menu – Sample Size Estimates
Intro to TCruiseCESetting up TCruise on the Handheld
Opts Menu
The Options menu gives you access to the
Misc. Settings screen. Most of these
parameters can be customized to the
preference of the user.
The List box input Box is where
you turn on the Rapid Data
Entry menu in TCruiseCE.
The Paper Tally
Settings is
where you set up
the DBH and hm
Log classes for
the List box
input and Tally
Screen Entry
Methods.
Be sure a check Suppress initial help.

8 - 6
Intro to TCruiseCESetting up TCruise on the Handheld
Opts Menu
The Options menu also gives you access to the
Error Checks screen and the Current Grade
Parameters. Both of these screens can be
customized to the preference of the user.
Intro to TCruiseCESetting up TCruise on the Handheld
Opts Menu
The Options menu also allows you to change the
columns that you see and the order of those
columns. Select Set Display Columns do so this.
Note: The Display columns that are set up in the
.tct file become the columns in the .tcc file and,
therefore, should be set as detailed in the template
creation section of the manual to reflect the type
of cruise you are doing. If you click Yes you can
select the correct columns. If you select No, you
can change the order of the columns.
The Default segment type and Default stopper
height of the Grade Parameters can also be set.

8 - 7
Intro to TCruiseCESetting up TCruise on the Handheld
Opts Menu
The Options menu also gives you access
to the same Plot Info Prompt box that
is found in TCruise Office as well. If
you check this, then you will be
prompted to check and/or enter Stratum
and Plot ID at the beginning of each
plot.
If you are using RTI, the Plot id and
Lat./Long. of plot center from SoloField
CE will automatically be entered into
these fields.
Intro to TCruiseCESetting up TCruise on the Handheld
Ops Menu
The Operations menu gives you basic
choices like New plot, Save, and Cancel.
This menu also gives you access to the
Tally function of TCruiseCE and the
Limiting Distance calculator if you are
using a Point template and a prism.
The Tally function will be discussed later in
this section of the manual. The Limiting
Distance calculator works by entering the
dbh of the tree in question. Your BAF
should be auto-recognized from the .tcc file.
Once you click Calculate radius, TCruise
shows you the maximum distance from plot
center that is that size tree is included.

8 - 8
B. Collecting Field DataGetting Started
Now that we have our codes loaded and
TCruiseCE set up, we can begin cruising
timber. Select the + (New Plot) button on
the toolbar to create a new plot.
If you selected the Plot Info prompt on create
earlier, you will see the Plot Info screen.
Here you can select the Stratum and Plot
ID.
If you are using RTI as explained in Section
VIII, the Plot ID and Lat Lng will
automatically be filled out for you.
Lastly, select OK.
Collecting Field DataGetting Started
Three Data Entry Methods in TCruiseCE
1. Spreadsheet Data Entry – This is the method at
right where you simply use your stylus and/or your
keyboard to enter data. This is the preferred method
for the Ranger.
2. List Box Input – This is a rapid data entry method
which allows you to pick predetermined values off of
lists. It is the preferred method for the Recon.
3. Tally Card Data Entry – This method provides a
dbh by log lenth Tally card for every species and
product in your list. It works very well for uniform
stands like Pine plantations.

8 - 9
Collecting Field DataGetting Started
List box input MethodIf you selected the List box input menu under Opts >
Misc. Settings, then you will see a list automatically
pop up when you start entering data. The list
represents the data entries for that column. When you
touch an entry in one column, the next list pops ups
and so on.
Note:
1. You will want to turn the No. column off if you
plan on using this method of data entry.
2. The actual range of data in the dbh and hm
columns can be set in the Opts > Misc. Settings >
Paper Tally Settings
3. You can use the < > arrows at the top of each
column to go to the previous or next column.
4. If you select the enter button on the handheld,
it temporarily cancels the Rapid Data Entry menu
allowing you to edit or save the plot.
Collecting Field DataGetting Started
Tally Card MethodIf you select Ops > Tally from the spreadsheet data
entry screen, a Tally Card will appear like the one here.
A quick stylus tap in the upper part of each cell
increases the number in that cell. A quick tap in the
Lower part of each cell decreases the number in that
cell.
Note:
1. You will want to turn the No. column on if you plan
on using this method of data entry.
2. The actual range of data in the dbh and hm columns
can be set in the Edit > Misc. Settings > Paper Tally
Settings
3. Don’t forget that you can change the Species and
Products as you enter this data.
Click OK when you are through and the spreadsheet
will automatically be filled out for you.
8 - 10
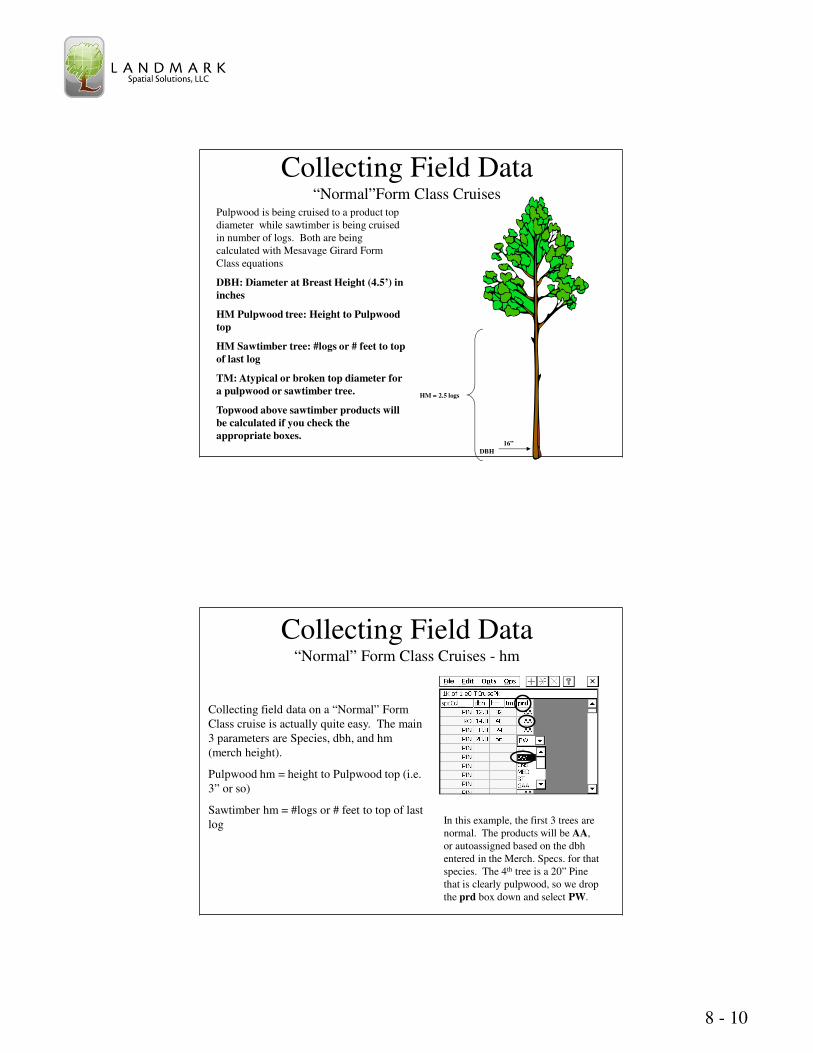
Collecting Field Data“Normal”Form Class Cruises
DBH
Pulpwood is being cruised to a product top
diameter while sawtimber is being cruised
in number of logs. Both are being
calculated with Mesavage Girard Form
Class equations
DBH: Diameter at Breast Height (4.5’) in
inches
HM Pulpwood tree: Height to Pulpwood
top
HM Sawtimber tree: #logs or # feet to top
of last log
TM: Atypical or broken top diameter for
a pulpwood or sawtimber tree.
Topwood above sawtimber products will
be calculated if you check the
appropriate boxes.16”
HM = 2.5 logs
Collecting Field Data“Normal” Form Class Cruises - hm
Collecting field data on a “Normal” Form
Class cruise is actually quite easy. The main
3 parameters are Species, dbh, and hm
(merch height).
Pulpwood hm = height to Pulpwood top (i.e.
3” or so)
Sawtimber hm = #logs or # feet to top of last
log In this example, the first 3 trees are
normal. The products will be AA,
or autoassigned based on the dbh
entered in the Merch. Specs. for that
species. The 4th tree is a 20” Pine
that is clearly pulpwood, so we drop
the prd box down and select PW.

8 - 11
Collecting Field Data“Normal” Form Class Cruises - Grading
As mentioned in the Template Design
section, if we want to GRADE or
MULTI-SORT a 24” Pine tree, we will
go to the GAA, or Grade Auto-Assign
box under Product. Please note that we
do not enter an hm if we go to GAA,
because we will enter the hm in log
segments in the grading screen.
In the grading screen, we can enter log
segments and Grades or Sort,
depending upon how we set up the
template.
With Form Class cruises, the Stopper
Top should be set to SW (saw wood),
so be sure and enter all of the log
segments that you normally would
account for if you were not grading.
Collecting Field Data“Normal” Form Class Cruises - Grading
Stump = 2ft.
Segment 1 = 12 ft.
#1 Log Grade
Segment 2 = 14 ft.
#2 Log Grade
Segment 3 = 18 ft.
#3 Log Grade
Here is another example where three
log segments, 12’, 14’ and 18’ in
length were graded. Also note that the
trunk was jump-butted to 2’.

8 - 12
Collecting Field Data“Normal” Form Class Cruises - tm
The last parameter to consider on a
“Normal” Form Class cruise is the tm
column. In this example, we had a 6” Gum
tree, 24’ tall that will be autoassigned to
Pulpwood based on the Merch. Specs. in the
template. However, this pulpwood tree had
a broken, or atypical, top and will only go to
6” instead of the 4” top we had specified in
the Merch. Specs. So, we enter 6 in the tm
column and TC knows to stop calculating
volume at 6” for that pulpwood tree.
NOTE: Because TCruise uses a Profile
Function to calculate topwood, if you are
calculating topwood above your sawtimber
products and you encounter a broken top
tree, you will need to enter an approximate
tm so that the calculated topwood value for
that tree stops at that diameter.
Collecting Field Data“Normal” Profile Function Cruises - hm
DBH=16”
A “Normal” Profile Function cruise consists of
Pulpwood and sawtimber being cruised to a
Record Top diameter (usually 0-4”) and profile
functions being used to calculate the volumes.
DBH: Diameter at Breast Height (4.5’) in inches
HM: Height to Record top (i.e. 0”)
HS: Sawtimber height for atypical tree. Used with
HM.
HP: Pulpwood height for atypical tree. Used with
TM but not HM. Rarely used.
TM: Atypical or broken top diameter. Can be
used in conjunction with HM or HP.
TCruise will use the species, dbh, and hm to build
the profile of that tree. It will then determine
where the sawtimber and pulpwood top diameters
are for that stem and calculate the volumes for
each of those segments (if the appropriate boxes
are checked for topwood).
HS = 3 Logs
HM = 60 ft
HP = 55 ft
TM=5”

8 - 13
Collecting Field Data“Normal” Profile Function Cruises - hm
Collecting field data on a “Normal” Profile
Function cruise is actually quite easy as well.
The goal is to describe the profile of the tree
as accurately as possible. The main 3
parameters are still Species, dbh, and hm
(merch height), but hm now is the same for
Pulpwood and Sawtimber products.
hm = height to Record top (i.e. 0-4”
depending upon what you set the Height
Record Top to in the Merch Specs. for that
species). Usually hm = total height for
profile functions.
In this example, the first 3 trees are
normal. The products will be AA,
or autoassigned based on the dbh
entered in the Merch. Specs. for that
species. The 4th tree is a 20” Pine
that is clearly pulpwood, so we drop
the prd box down and select PW.
DBH=16”
HM = 60 ft
Collecting Data with TCruise
Input screen if Hm only is used:
You call this height, Hm: 60 ft.
Profile function calculates this
height to the pulpwood top
diameter
3”
If there is no input in Hs, the profile
function calculates this height to the
sawtimber top diameter and estimates
sawtimber volume to this point
10”
ST
PW

8 - 14
Collecting Field Data“Normal” Profile Function Cruises – hs
In this example, the 5th tree entered has an hm and an
hs. In this case the hs represents an atypical tree (like
a fork) where the sawtimber will not follow the
normal profile. The Sawtimber volume stops at 48’
irregardless of what the Merch. Specs. Sawlog top
diameter is set to. Basically, hs gives you a way to
override where TCruise will stop calculating sawwood
and start calculating topwood, if the correct boxes are
checked.
DBH=16”
HS = 2.5 Logs
HM = 60 ft
Collecting Data with TCruise
Input screen if Hm and Hs are
used:
TCruise, in this scenario will estimate
the volume of sawtimber in the
You call this height, Hm: 60 ft.
Profile function calculates this
height to the pulpwood top
diameter
3”
User inputs height of
sawtimber as 40’ (2.5 logs) so
the profile functions will
calculate the diameter at this
point and calculate volume of
sawtimber to this height
10.8”
ST
PW

8 - 15
Collecting Field Data“Normal” Profile Function Cruises –hp
In this example, the 6th tree has an an hp, and a tm. In this case, the hp represents an atypical
tree where the topwood will not follow the normal profile. The topwood of that tree will not
make a 3” top, for instance, and so hp allows you to tell TCruise to create the profile with the
Pulpwood top stopping at a Merch. Top (tm) of 5”. No topwood will be calculated above 5”.
Never enter an hm if you use hp. Always enter a tm with hp. In this example you could
have entered hm = 50 and tm = 5 and gotten the same answer.
Note about hp. Most people turn the hp column off.
Hp does give you a way to more accurately describe a
total stem in that you can enter a total height (hm), a
sawtimber height (hs), and a pulpwood height (hp).
However, if you are going to enter hp to tell TCruise
to stop calculating topwood at a given height instead
of the stated Pulpwood top end diameter, you might as
well just make merch height (hm) be that same given
height and then enter a merch top diameter (tm). Then
TCruise will calculate the profile using dbh, hm, and
tm and topwood will go from the top of the last log up
to the tm diameter.
DBH=16”
Collecting Data with TCruise
Input screen if Hp and Tm are
used:You call this
height, Hp: 50’
User inputs this height to the
measurable top (hp) and inputs
the diameter at that height
TM = 5”
10.0”
ST
PW
If there is no input in Hs,
the profile function
calculates this height to
the sawtimber top
diameter and estimates
sawtimber volume to this
point
HP = 50 ft
TM=5”

8 - 16
DBH=16”
Collecting Data with TCruise
Input screen if Hp, Tm and Hs are
used:You call this
height, Hp: 50’
User inputs this height to the
measurable top (hp) and inputs
the diameter at that height
TM = 5”
10.8”
ST
PW
HP = 50 ft
TM=5”
HS = 2.5 Logs
User inputs height of
sawtimber as 40’ (2.5 logs) so
the profile functions will
calculate the diameter at this
point and calculate volume of
sawtimber to this height
Collecting Field Data“Normal” Profile Function Cruises - tm
We have already seen how tm can be used in
conjunction with hp, but it is important to note
that tm can also be used with hm or hm + hs.
In this example, the 7th tree has an hm and a tm.
The tm here indicates that there is probably a
broken top at 48’ and the diameter at that point is
~12”. The profile and volume will be calculated
accordingly, with no topwood being calculated
since the Sawlog Top diameter was set to 12” in
the Merch. Specs.
In this example, the 8th tree has an hm, an hs,
and a tm. The tm here indicates that the tree
probably has a broken top at 60’ and the diameter
at that point is ~6”. The sawtimber volume was
also atypical and only went to 40’. Topwood will
be calculated on this stem from 40’ to 60’.
It is important to note that tm will always be
associated with the tallest height reported.

8 - 17
Collecting Field Data“Normal” Profile Function Cruises - Grading
As mentioned in the Template Design
section, if we want to GRADE or MULTI-
SORT a 24” Pine tree, we will go to the
GAA, or Grade Auto-Assign box under
Product. Please note that we do not enter an
hm if we go to GAA, because we will enter
the hm in log segments in the grading screen.
In the grading screen, we can enter log
segments and Grades or Sort, depending
upon how we set up the template.
With Profile Function cruises, the Stopper
Top is extremely important. In this example,
the last log segment entered is PW and
Stopper is set to PW. Because the Pulpwood
top for the Sawtimber Product was set to 3”,
in the Merch Specs., TCruise knows that the
tree is 3” at 64’.
Collecting Field Data“Normal” Profile Function Cruises - Grading
The three other choices for Stopper and
their explanation are as follows:
SW – Stopper is Sawwood and so
TCruise knows from the Merch. Specs.
that this tree is 12” at 42’. No topwood
will be calculated above this Sawwood.
HM – Stopper is merch height or Height
to Record Top. Notice that the last
segment is called Tip, indicating that it
goes to 0”. If hm was the same as the
Pulpwood top (i.e. 3”), then you could
have PW where TIP is.
BR – Stopper is a broken top pulpwood
segment. Note also that the Broken Top
diameter is 5” at 54’.

8 - 18
Collecting Field DataProfile Function and Form Class Cruises
The data for a Profile Function and Form Class Cruise is
entered the same way as a “Normal” Form Class Cruise
except that hm for Pulpwood is Height to Record Top instead
of Height to Pulpwood Top. In most cases this number is the
same.
Collecting Field DataAll Cruises – Saving Plot Data
Each additional plot in this cruise will
be saved in the same training.tce file
when you click the Plot Finished
button, ->F.
Once you have entered all trees on a plot, click the ->F button (Plot Finished) to save that plot.
The first time you do this, you will be prompted to save the cruise as a .tce file. In this case we named the file Training. Do not add the .tce extension because TCruiseCE will automatically add it.
The Default Folder for TCruiseCE will always be Built-in Storage\My Documents (Pocket PC) or just My Documents (Windows Mobile). It is best to go ahead and select the TCruiseCE folder under Folder so that you know where your cruise will be stored.
Select Save after you name the cruise and put it in the TCruiseCE folder.
8 - 19
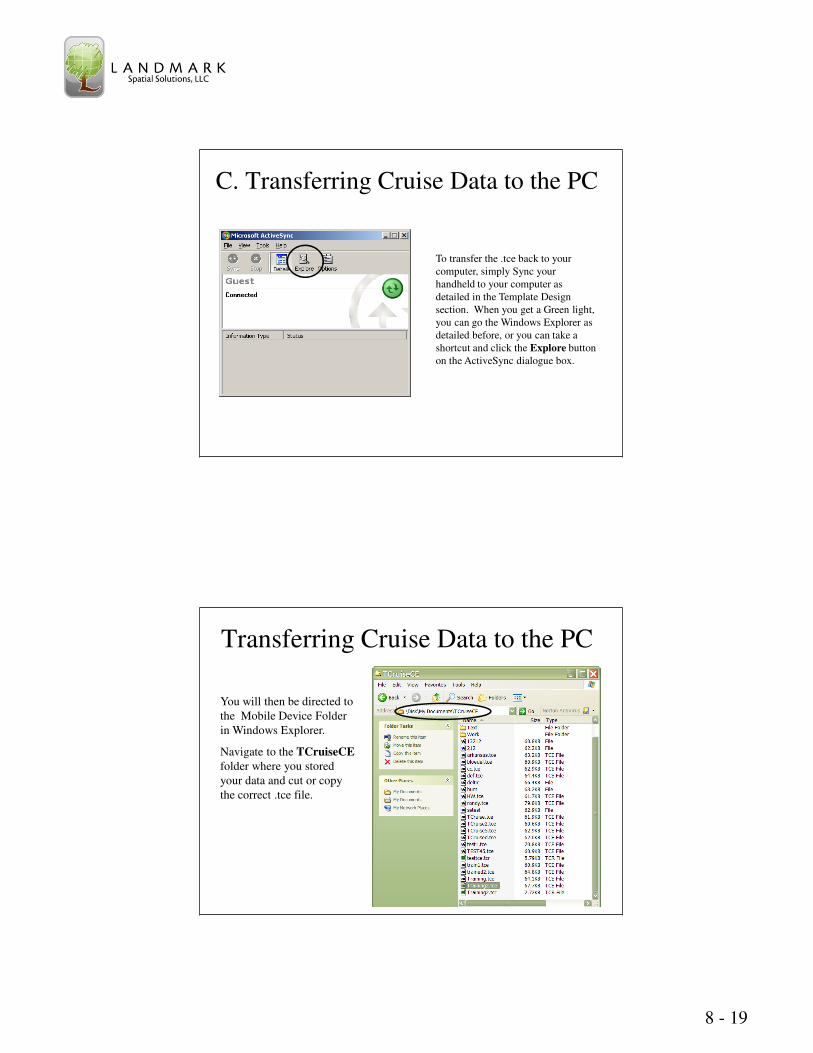
C. Transferring Cruise Data to the PC
To transfer the .tce back to your
computer, simply Sync your
handheld to your computer as
detailed in the Template Design
section. When you get a Green light,
you can go the Windows Explorer as
detailed before, or you can take a
shortcut and click the Explore button
on the ActiveSync dialogue box.
Transferring Cruise Data to the PC
You will then be directed to
the Mobile Device Folder
in Windows Explorer.
Navigate to the TCruiseCE
folder where you stored
your data and cut or copy
the correct .tce file.

8 - 20
Transferring Cruise Data to the PCNext, drop down the Address Bar
and navigate to the C:\My
Documents \TCruisePC\
Tce_DocsTemplate folder on
your PC and then paste the.tce file
copied from the handheld into that
new folder.
Sometimes you may want to
create a new folder for each cruise
under the Tce_DocsTemplate
folder. To do this select File >
New > Folder and then type in the
name of that cruise and then paste
the .tce files into that folder.
D. Calculating Volumes for a “Normal” Cruise
Step #1 - Open the Template File
We are now ready to calculate volumes using
TCruise. Open TCruise office by double clicking
the icon on the desktop.
The following dialogue box will appear. We need
to select the 2nd option, Create a new cruise.
If we select this, TCruise will automatically send us
to the .tct folder so that we can select the template
that matches our cruise.
If the program is already open for some reason, you
can also select the Load .tct shortcut button from
the Workup Toolbar.
Note that TCruise 5.0 now has a special Workup
toolbar that corresponds to the steps outlined in this
section.

8 - 21
Calculating Volumes for a “Normal” CruiseStep #2 – Import the .tce Field Data File
Next you need to import
the field data file that you
just transferred to your
computer.
Select the Import .tce
shortcut button from the
Workup Toolbar.
TCruise will automatically
take you to the .tce folder
where you can open the
correct cruise subfolder, if
necessary, and then select
the correct .tce file.
Calculating Volumes for a “Normal” CruiseStep #3 – Inputting Tract Acres
Once you open the .tce file, TCruise will automatically
prompt you to input the correct Tract acres in the Tract
Information screen.
To open the Tract dialogue screen, the Tract Info shortcut
button on the Workup Toolbar and input the correct Land Area.

8 - 22
Calculating Volumes for a “Normal” CruiseStep #4 – Checking the Plot List
Before you run your cruise, it is
sometimes helpful to view all of the
tree data that was entered. TCruise
allows you to do this by selecting the
Print Tree Data shortcut button on
the Workup Toolbar.
TCruise will then prompt you to save
your template and field data in a .tcd
file, or TCruise Document.
Once you name the .tcd file and save
it, the Plot list will appear. You
cannot edit the plot data here, but you
can print it or export it to Excel.
Calculating Volumes for a “Normal” CruiseStep #5 – Editing Plot Data
Sometimes it is also useful to edit Plot data before you run your cruise. To do this select
the Edit Plot shortcut button from the Workup Toolbar and then choose which plot number
you want to edit. The data that was entered in the field for that plot will then show up and
you can edit it and resave it by clicking OK.

8 - 23
If you need to make global plot changes select Edit > Edit Plot Level Info
and highlight the cells in a column that need to be modified and then use the
Change dialogue at the top to make a change to all the selected plots at the
same time.
Calculating Volumes for a “Normal” CruiseEditing Plot Data
Calculating Volumes for a “Normal” CruiseStep #6 – Deleting or Erasing Plots
From time to time you may want to Delete a plot from
being used in the cruise workup, or you may simply want
to erase to plot altogether, because you made a mistake
in the field.
To do this, go to Edit > Delete Plot or Edit > Erase Plot
Data.
The following dialogues will appear and you can select
the plot to delete or erase.
8 - 24
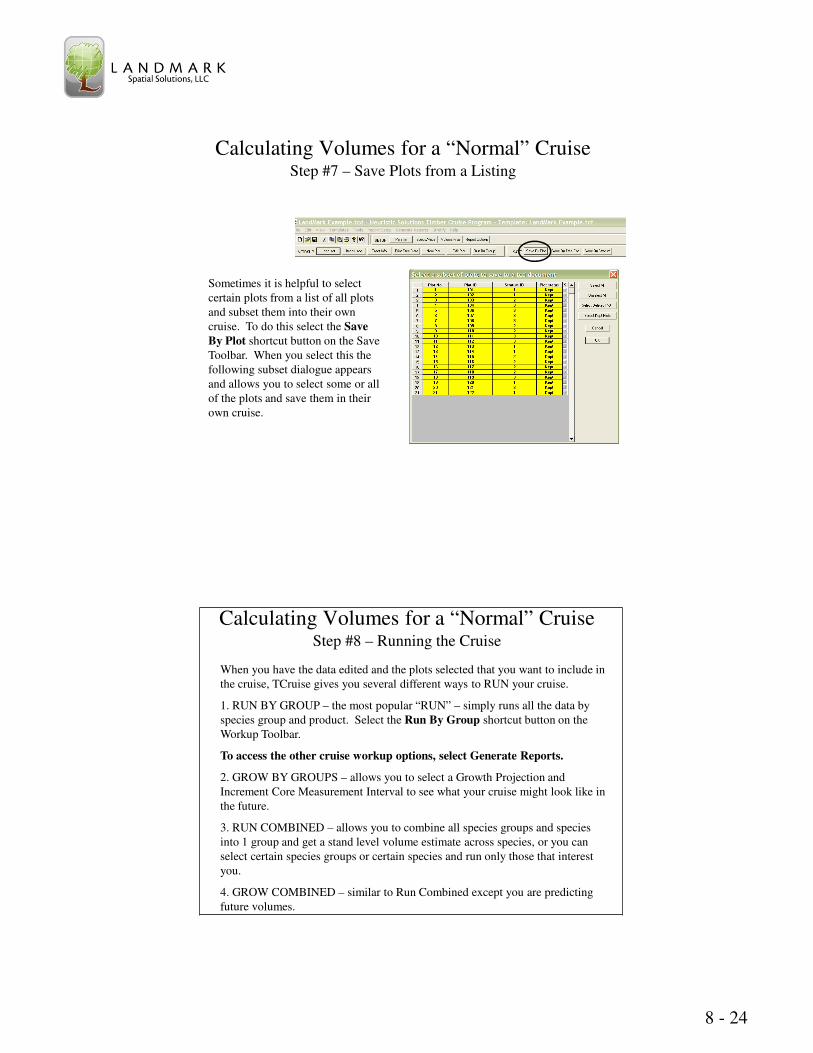
Calculating Volumes for a “Normal” CruiseStep #7 – Save Plots from a Listing
Sometimes it is helpful to select
certain plots from a list of all plots
and subset them into their own
cruise. To do this select the Save
By Plot shortcut button on the Save
Toolbar. When you select this the
following subset dialogue appears
and allows you to select some or all
of the plots and save them in their
own cruise.
Calculating Volumes for a “Normal” CruiseStep #8 – Running the Cruise
When you have the data edited and the plots selected that you want to include in
the cruise, TCruise gives you several different ways to RUN your cruise.
1. RUN BY GROUP – the most popular “RUN” – simply runs all the data by
species group and product. Select the Run By Group shortcut button on the
Workup Toolbar.
To access the other cruise workup options, select Generate Reports.
2. GROW BY GROUPS – allows you to select a Growth Projection and
Increment Core Measurement Interval to see what your cruise might look like in
the future.
3. RUN COMBINED – allows you to combine all species groups and species
into 1 group and get a stand level volume estimate across species, or you can
select certain species groups or certain species and run only those that interest
you.
4. GROW COMBINED – similar to Run Combined except you are predicting
future volumes.

8 - 25
Calculating Volumes for a “Normal” CruiseStep #9 – The Generic Cruise Report
Once you select RUN by GROUPS (or
something else), TCruise will calculate
your volumes, stats, stumpage, etc. based
on what you selected in the Report
Options dialogue.
The Executive Summary gives a concise
report of the Volume Variables you
selected by Species Group on a per acre
and total tract basis.
If you selected Sample Size Estimates,
Raw Stats, and Merch Specs. then that
will be reported as well.
NOTE: If you had errors and do not see
your report, go to View > View Output.
NOTE: You must use the Page Up and
Page Down keys to toggle between report
pages.
Calculating Volumes for a “Normal” Cruise–
The Generic Cruise Report
If you created a Custom Report in
the template, it will show up at the
end of the regular reports.
NOTE: Somewhere during these
steps you will be prompted to save
what you are doing as a .tcd file
(TCruise document). Don’t forget
that the .tcd file contains the
template and the plot data.
Consequently, if you ever want to
rerun a cruise at a later time, simply
Open an Existing Cruise or .tcd file
and click Run by Groups.

8 - 26
E. Using The LandMark TCruise ReportsAnother reporting option that LandMark Systems now offers is the LandMark TCruise reports. For complete instructions on how to download and install these reports, go tohttp://www.landmarksystems.org/support/downloads_updates.htm#3 and then download the TCruise Reports Install Guide, TCruise_Reports, and the LandMark Export Module. Contact Tech Support for help in setting up and registering the Export Module and Reports.
Note: If you have Access installed on your PC, then you download and use the Auto
link version of the reports which automatically loads the current cruise in TCruise into
the reporting module. If you don’t have Access, download the regular reports and
follow all the steps in the subsequent directions.
Using The LandMark TCruise Reports
Step #1 – Select Run by Groups
Step#2 – Select the Table to Write
When you correctly register the LandMark
Export Module, you will get the screen to
the right.
The Tables to write dialog box will appear.
Select ALL table options and press
TCruise is writing all cruise data to the
LandMark Export database files.
Depending on the size of your cruise, this
process could take a few minutes. Please be
patient.

8 - 27
Using The LandMark TCruise Reports
Step #3 – Select OK.
The LandMarkExportRNF.dll creates the database, renames it to match the name of the
open .tcd file and places it in the same folder as the .tcd. This is confirmed by the dialog
box as shown above.
Step #4 – Select No and Open (if necessary)
After you press OK, the LandMark Systems TCruise Reports will Auto Launch.
If you see security messages like the ones below, tell the program Not to block unsafe
expressions and to Open the reports.
Using The LandMark TCruise ReportsStep #5 – Select Load TCruise
Tables
If you are using the Autolink
version of the reports then the
current cruise in TCruise will
automatically be loaded in the
reporting module and you can skip
to Step #7. If you are using the
Regular reports, the follow these
directions:
To view the reports of the cruise
just processed, select the Load
TCruise Tables button. Navigate to
the folder that contained your .tcd
file and select the corresponding
.mdb file. Usually this will be the
My
Documents\TCruisePC\tcd_Docum
ents folder.
8 - 28
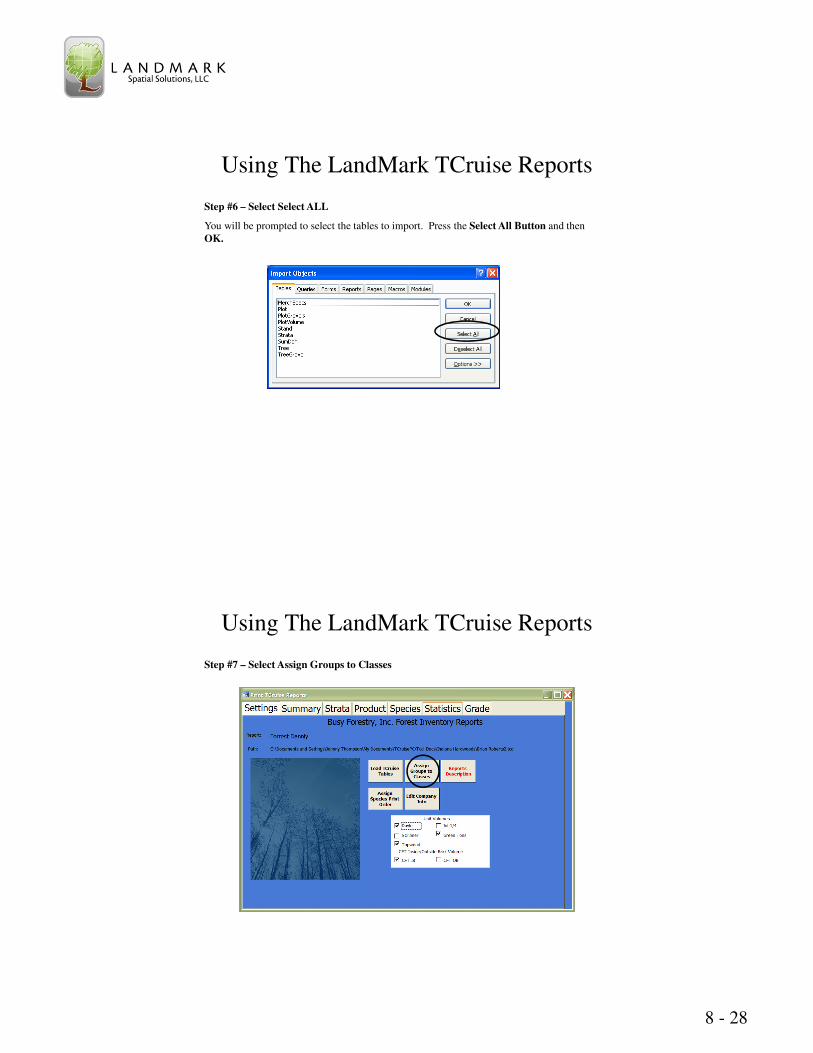
Using The LandMark TCruise Reports
Step #6 – Select Select ALL
You will be prompted to select the tables to import. Press the Select All Button and then
OK.
Using The LandMark TCruise Reports
Step #7 – Select Assign Groups to Classes

8 - 29
Using The LandMark TCruise Reports
Step #8 – Select either a Pine or Softwood Class and then Assign the correct
Species Groups to the correct classes.
Next, select the Save button and then the Close button.
Using The LandMark TCruise Reports
Step #9 – Preview and print the reports you want.