802.11b wireless desktop network card - belkin · other 802.11b-compliant wireless devices. •...
TRANSCRIPT

User ManualF5D6001
802.11b WirelessDesktop Network CardConnect your desktop to a wireless network
P743056-D_F5D6001v3kMan8_03.qxd 9/5/03 4:58 PM Page 2
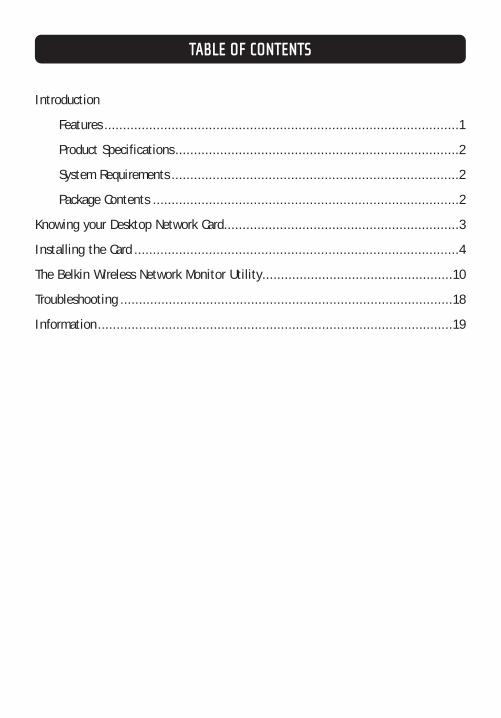
TABLE OF CONTENTS
Introduction
Features ...............................................................................................1
Product Specifications............................................................................2
System Requirements .............................................................................2
Package Contents ..................................................................................2
Knowing your Desktop Network Card...............................................................3
Installing the Card .......................................................................................4
The Belkin Wireless Network Monitor Utility...................................................10
Troubleshooting .........................................................................................18
Information...............................................................................................19
P743056-D_F5D6001v3kMan8_03.qxd 9/5/03 4:58 PM Page 3

1
INTRODUCTION
Thank you for purchasing the Belkin Wireless Desktop Network Card (the Card).This high-speed Card provides you with an innovative wireless networkingsolution that is easy to set up and use. The Card transmits at a rate of 11, 5.5, 2,or 1Mbps to let you share files and printers on the network—without the hassleand inconvenience of connecting wires! Operating in the ISM band using DirectSequence Spread Spectrum (DSSS) transmission, the Card implements the IEEE802.11b standard and supports Windows 98SE, 2000, Me, or XP operatingsystems.
FeaturesThe Card complies with the IEEE 802.11b standard in order to communicate withother 802.11b-compliant wireless devices.• 2.4GHz ISM (Industrial, Science, and Medical) band operation
• Includes an easy-to-use profile manager for storing multiple wireless networksettings for work, school, home, etc.
• Wireless interface compliance with the IEEE 802.11b standard
• PCI interface, complies with PCI specification 2.1
• 64- or 128-bit wireless (WEP) encryption
• Wireless access to networked resources
• Support for both Infrastructure and Ad-Hoc (peer-to-peer) networking modes
• Data rate of up to 11Mbps o Supports 11, 5.5, 2, or 1Mbps rates (Auto-Rollback)
• Easy to install and use
• External detachable antenna
• LED link indicator
P743056-D_F5D6001v3kMan8_03.qxd 9/5/03 4:58 PM Page 1

Product SpecificationsHost Interface: 32-bit, PCI 2.2-compliantPower Consumption: 300mA (max.)OS Support: Windows© 98SE, 2000, Me, or XP operating systemsCertification: FCC Class B, CE Mark, C-TickOperating Temperature: 0° C to 55° CStorage Temperature: –25° C to 70° CTypical Operating Range: Indoors: 160 ft. (50m) @ 11Mbps, 260 ft. (80m)
@ 5.5Mbps or lowerOutdoors: 490 ft. (150m) @ 11Mbps, 980 ft. (300m) @ 5.5Mbps or lowerHumidity 10% to 90% non-condensing
System Requirements• PC with available PCI expansion slot
• PC running Windows 98SE, 2000, Me, or XP
• CD-ROM drive (for loading software)
Package Contents• Belkin Wireless Desktop Network Card
• External Antenna
• Software CD
• Quick Installation Guide
• User Manual
• Product Registration Card
INTRODUCTION
2
P743056-D_F5D6001v3kMan8_03.qxd 9/5/03 4:58 PM Page 2
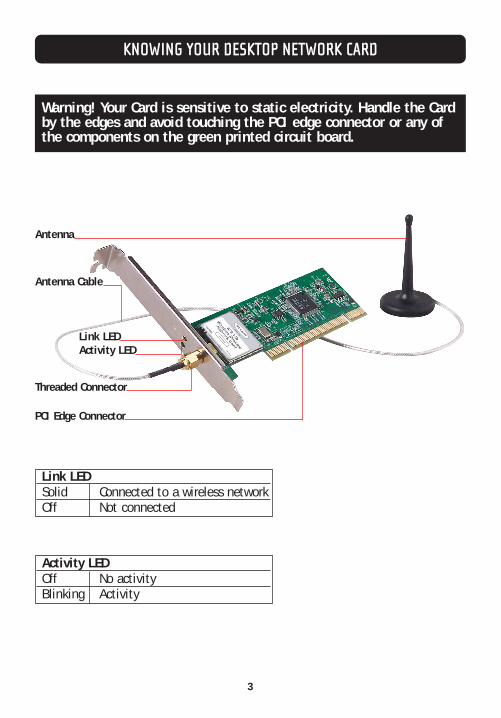
Activity LEDOff No activityBlinking Activity
Link LEDSolid Connected to a wireless networkOff Not connected
Antenna
Antenna Cable
Link LEDActivity LED
Threaded Connector
PCI Edge Connector
Warning! Your Card is sensitive to static electricity. Handle the Cardby the edges and avoid touching the PCI edge connector or any ofthe components on the green printed circuit board.
KNOWING YOUR DESKTOP NETWORK CARD
3
P743056-D_F5D6001v3kMan8_03.qxd 9/5/03 4:58 PM Page 3

INSTALLING THE CARD
4
Installing your Card is done in three easy steps.
1. Install the software FIRST. If you install your Card into your computer beforeyou install the software, it will not work until you install the software.
2. Install the Card inside of your computer.
3. Let Windows finish installing the Card.
Step 1: Software and Driver Installation1. Insert the CD into your CD-ROM drive.
2. The Belkin Wireless Desktop Network Card Setup Utility screen willautomatically appear. If it does not appear within 15-20 seconds, then select your CD-ROM drive and double-click on the folder named “Files”. Next double-click on the icon named “start.exe”.
3. In the menu window, drag your mouse over the “Install” button then select“Click here” to start the software installation program.
NOTE: INSTALL THE SOFTWARE FIRST BEFORE YOU INSTALL THE CARDINTO YOUR COMPUTER.
P743056-D_F5D6001v3kMan8_03.qxd 9/5/03 4:58 PM Page 4

INSTALLING THE CARD
5
4. The installer will start. You will see a progress screen. Go to the next step.
5. Next, you will see an introduction screen. Click “Next” to continue with theinstallation of the Card.
6. If you are using Windows 2000 or Windows XP, you may see a screen similarto the one below. This does not mean there is a problem. Select “Continue Anyway”.
P743056-D_F5D6001v3kMan8_03.qxd 9/5/03 4:58 PM Page 5

7. When the software installation is complete, you will see a screen promptingyou to finish. Click “Finish”.
8. A message will appear telling you that you need to shut down your computerto install the Card. Choose “Yes, I want to shut down my computer now” toshut down your computer. Follow the directions in the next section to installyour Card inside of your computer.
INSTALLING THE CARD
6
P743056-D_F5D6001v3kMan8_03.qxd 9/5/03 4:58 PM Page 6

INSTALLING THE CARD
Step 2: Installing the Card into your PC1. POWER OFF THE COMPUTER AND DISCONNECT THE POWER CORD.
2. Remove the screws that secure the computer cover and remove the cover.
3. Touch any metal part of the case to ground yourself. This will discharge anystatic electricity that could damage your product or your computer.
4. Locate an empty PCI expansion slot. Confirm that the Card will fit into theslot you have chosen.
5. Remove the port cover from the back of the PC that corresponds to the PCIslot you selected. If there is a screw, place it in a safe place as you will beusing it to attach the Card to the computer chassis later.
6. Push the Card firmly into the PCI slot that you have chosen. Apply pressureas needed until the connector is fully seated.
7. Now secure the Card with the screw that you previously placed in a safe place.
8. Carefully screw the antenna’s goldconnector onto the threaded connector on the Card until it is finger-tight. Do not use a wrench to tighten the connector.Place the antenna on top of the computer’s case or on top of your desktop while taking care to keep it away from any solid metal objects.
9. Replace the computer’s cover.
10. Now that the Card is installed, you can reconnect all of the cables and turn the computer back on. Proceed to Step 3.
7
P743056-D_F5D6001v3kMan8_03.qxd 9/5/03 4:58 PM Page 7

INSTALLING THE CARD
8
Step 3: Finishing the Installation1. After you have installed your Card and replaced the cover on your computer,
turn your computer back on and let it boot up.2. Windows will detect that new hardware has been installed. Depending on
which version of Windows you are using, a window similar to the onepictured below will appear. Select the option that will automatically installthe software.
3. If you are using Windows 2000 or Windows XP, you may see a screen similarto the one below. This does not mean there is a problem. Select“Continue Anyway”.
P743056-D_F5D6001v3kMan8_03.qxd 9/5/03 4:58 PM Page 8

INSTALLING THE CARD
9
4. When the installation is complete, you will see a screen prompting you tofinish. Click “Finish”.
Windows 98SE or Me users: You may be asked to restart the computer. Letthe computer restart before going to the next step.
5. When the installation is complete or your computer has restarted, the BelkinWireless Network Utility icon will appear on your desktop. To open theMonitor Utility, double-click on this icon. For information about using theUtility, see the next section in this manual.
6. A small icon in your system tray (bottom right corner of most screens) willappear. This is your shortcut to the Belkin Wireless Network Monitor. It alsoindicates the status of your connection:
Green: Connected to a wireless network.Red: No connection to a wireless network.
Uninstalling the Software and DriversIf you need to remove the software and drivers for any reason, you can easilyaccomplish this in one of two ways. You can insert the software CD and clickon the Uninstall option in the menu, or you can go to the Windows ControlPanel and select the “Add/Remove Programs” option. The Belkin Wizard willwalk you through the removal process.
P743056-D_F5D6001v3kMan8_03.qxd 9/5/03 4:58 PM Page 9

The Wireless Network Monitor Utility is a central point on your computer thatallows you to control your Wireless Notebook Network Card. Among the thingsyou can do using the Utility, you can: • Choose the wireless network you want to connect to
• See a list of all available networks in the area
• See information about the networks in the area that are available to you
• Store profiles for each network that you connect to
• Set power saving options
• Enable/Disable the Card’s radio
• Select the default view you will use to connect to your networks
• View and refresh the Card’s network IP information
Opening the Wireless Network Monitor UtilityAfter you have installed the Card and the Utility, you will see an icon in thelower right corner of your screen (near the clock). This is called the system tray.The icon will be green when your Card is connected to a network and it will bered when there is no connection to a wireless network. After installation, theCard will connect to your wireless network automatically. Double-clicking on thesystem tray icon will open the Utility. Also, the installation software placed ashortcut icon on your desktop. Double-clicking this shortcut will open the Utility.
System Tray icon Shortcut icon
THE BELKIN WIRELESS NETWORK MONITOR UTILITY
10
P743056-D_F5D6001v3kMan8_03.qxd 9/5/03 4:58 PM Page 10

Windows XP Users
If you are using Windows XP, please read this section first.
Windows XP integrates a wireless management utility referred to as Windows XPWireless Zero Configuration service (WZC). The WZC can be used to control yourCard or you can use the Belkin Wireless Network Monitor Utility. We suggest thatyou use the Belkin Utility to control your Card. If you choose to use the WZC,directions for operation of the WZC are available in the Windows XP help file.When you first install the Card, the Belkin Utility will be enabled. If you want todisable the Belkin Utility in order to use the WZC, follow the steps below todisable the Belkin Utility.
Disabling the Belkin Wireless Network Monitor Utility in Windows XP
1. Right-click on the system tray icon ( ).
2. Select “Use Windows to Configure my Wireless Connection”.
3. The Belkin Utility will disable itself and enable the WZC. This may take up to30 seconds.
4. To re-enable the Belkin Utility, double-click on the desktop shortcut ( ). This will disable the WZC and enable the Belkin Utility. This may take up to30 seconds.
THE BELKIN WIRELESS NETWORK MONITOR UTILITY
11
P743056-D_F5D6001v3kMan8_03.qxd 9/5/03 4:58 PM Page 11

THE BELKIN WIRELESS NETWORK MONITOR UTILITY
12
Using the Belkin Utility (Windows 98SE, Me, 2000, XP)When the Utility opens, you will see the Utility screen. The view will be of theConfiguration screen. This is the screen you will use most often to choose andchange networks.
a
b
c
d
e
f
g
h
a. Available Networks: Displays the available networks and their settings.
b. Navigation Buttons: Pressing these buttons will change the view.
c. Connect Button: Select a network from the Available Networks window andclick “Connect” to connect to the network.
d. Update Button: Re-scans for more wireless networks in the area.
e. “Connected to” Window: Shows you the name and MAC address of thenetwork you are currently connected to.
f. Signal Strength: Shows you the signal strength (in real time) of the networkyou are currently connected to.
g. Link Speed: The Card is operating at the speed indicated in this window.
h. Refresh Button: Pressing this button will refresh the IP settings of the Card.The IP information is displayed next to the button. This button is sometimesused when you switch from one network to another.
P743056-D_F5D6001v3kMan8_03.qxd 9/5/03 4:58 PM Page 12

THE BELKIN WIRELESS NETWORK MONITOR UTILITY
13
Connecting to a Wireless Network
After you install your Card for the first time, it will connect to your wirelessnetwork automatically. You should not have to do anything further to connect toa network. To manually connect to a wireless network, see the steps below.
1. Open the Utility by double-clicking the system tray icon ( ) or the desktopshortcut. ( )
2. All networks in your area will be displayed in the “Available Networks”window. Select the network that you want to connect to by clicking the name(under the SSID column) of the network. Once you have selected thenetwork, click the “Connect” button. Note: If the network that you areattempting to connect to is using encryption, you will be prompted to enterthe network key. If you don’t know the key, you will need to obtain it fromthe system administrator. Also, see the section of this manual called“Creating and Using a Profile” for advanced encryption setup options.
3. The name of the network will appear in the “Connected to” window and theSignal Strength indicator will show the network’s signal strength. Yourcomputer is now connected to the wireless network.
Using the Quick Connect Screen
The Utility was designed to offer you two methods of connecting to a wirelessnetwork. The Card ships with the Utility configured so you use Configuration viewto select wireless networks. A second option allows you to choose to have theUtility open to the Quick Connect screen. The Quick Connect screen (picturedbelow) is a simplified window that shows you the names of the availablenetworks only, excluding other information like signal strength, MAC address,network type, channel, etc.
Available NetworksDisplays the available networks in the area.
Network NameThis is the name of the wireless network.
Connect ButtonSelect a network from the Available Networks window and click “Connect” to connect to the network.
Advanced ButtonClick this button to go to the Advanced configuration window.
P743056-D_F5D6001v3kMan8_03.qxd 9/5/03 4:58 PM Page 13

THE BELKIN WIRELESS NETWORK MONITOR UTILITY
14
You may find it easier to use the Quick Connect screen to connect to networks.To switch to the Quick Connect screen, right-click on the Utility system tray icon( ). In the menu that appears, select “Use Quick Connect screen”. After youhave selected this option, the next time you double-click on the system tray icon( ) or the desktop shortcut ( ) to open the Utility, you will be presentedwith the Quick Connect screen.
Connecting to a Network Using the Quick Connect Screen
When the Quick Connect screen appears, you will see all of the availablenetworks in the window. Select a network by clicking on the name, then clickthe “Connect” button.
Note: If the network that you are attempting to connect to is using encryption, youwill be prompted to enter the network key. If you don’t know the key, you will needto obtain it from the system administrator. Also, see the section of this manualcalled “Creating and Using a Profile” for advanced encryption setup options.
Using the Profiles Manager View
Using profiles is a convenient way to quickly and easily connect to networks ifyou travel between multiple wireless networks. For example, your primary wirelessnetwork may be at home, but you also use a wireless network at work and also atthe local café. Each of these networks likely has different settings. For instance,the network at your workplace uses encryption, but home and the café don’t.Also, each of these networks has a different name. Trying to keep track of thesedifferences just got easier with the profile manager. Every time you successfullyconnect to a network, the profile manager will remember that network’s settingsfor a later time. This means that after the first time you connect your computerto the network at your workplace, you won’t have to reenter the encryptionsettings again. The profile manager will recognize the network and automaticallyconnect to it. You can also create custom profiles, delete profiles, and editprofiles when needed.
P743056-D_F5D6001v3kMan8_03.qxd 9/5/03 4:58 PM Page 14

THE BELKIN WIRELESS NETWORK MONITOR UTILITY
15
Creating and Using a Profile
Profiles are automatically created when you connect to a network. From thefactory, Belkin has also created one profile called “Default”. This is a specialprofile that will connect to the first wireless network that the Card detects. Youcan remove this profile if you wish. If you want to create the default profileagain, simply create a profile with the name “Default” and the SSID is “ANY” (allcaps). Here is how:
1. Open the Utility.
2. Click the “Profiles” button. You will see the below screen.
3. Click “Add”. The following screen will appear.
P743056-D_F5D6001v3kMan8_03.qxd 9/5/03 4:58 PM Page 15
THE BELKIN WIRELESS NETWORK MONITOR UTILITY
16
4. Name the profile by typing in a name in the Profile Name field.
5. Type in the name of the wireless network in the Network Name (SSID) field.
6. If the network you are going to be connecting to uses an access point (thisis the most common configuration), leave the box next to “This Network usesan Access Point” checked. If it is a peer-to-peer network that you arecreating a profile for, check that box.
7. If the network uses encryption, select the type of encryption (64-bit or 128-bit) by placing a check mark next to the type you need.
8. Type in the network key for the network in the Network Key field. If thenetwork key is a hexadecimal key, check “Hex Key”. If your key is in the formof a passphrase, check “Passphrase”. Check the number of the key that youneed to use. Most of the time, this is “1”. Note: The network key and formatare determined by the network administrator. If you don’t have the key, contactyour administrator.
9. Click “Save” to save the profile.
10. Your profile will now appear in the Profiles window. To use the profile, selectthe profile by clicking on it, then press the “Use” button. The Utility willswitch to the Configuration view again. Your Card will now be connected tothe network specified in your profile.
Prioritizing your Profiles
You can change the priority of your profiles so the Utility will connect to the firstnetwork in the profile priority list. This feature is useful if you are in an areawhere you use more than one wireless network. Put simply, the profile at the topof the list will be the first network that the Utility automatically connects to. Ifthe network in the top of the priority list is not available (you are not near it)then the Utility will go to the next profile in the list, and so on.
Advanced Options
Clicking on the “Advanced” button will take you to the Advanced view. In theAdvanced view you can do the following:• Enable Power Save mode
• Enable/disable the system tray icon
• Turn off the radio on the Card
• Select the default Ad-Hoc channel
P743056-D_F5D6001v3kMan8_03.qxd 9/5/03 4:58 PM Page 16

THE BELKIN WIRELESS NETWORK MONITOR UTILITY
17
Power Save ModeAllows you to select the Power Save mode. Default is OFF.
Show icon in system trayChoose to display or NOT display the icon in the system tray.
Default Ad-Hoc ChannelAllows you to select the default Ad-Hoc channel.
Radio OffAllows you to turn the radio (the Card) on or off.
Using Power Save ModeEnabling Power Save will help reduce battery consumption on a laptop by turningthe Card or parts of the Card OFF after each data set is sent or received to orfrom the network. Enabling this mode will decrease performance of the Card, butmay greatly enhance your battery life. Use this feature only if necessary.Minimum Power Save mode will partially shut the Card off to reduce powerconsumption, but the radio will still be on, ready to transmit or receive.Maximum Power Save mode will completely shut the Card down when there is noactivity. When there is activity, the Card will turn itself back on and begintransmitting or receiving data. This introduces a short delay, but will save themost battery power on your laptop.
Showing the Icon in System TrayYou can choose to display the Utility icon in the system tray. By placing a checkin the box, the icon will be displayed in the system tray. Removing the check willremove the icon. When there is no icon in the system tray, you can access theUtility by using the desktop shortcut.
Turning the Radio OffYou can manually turn the radio off by placing a check in the box. This willdisable the Card until you turn it back on.
Setting the Default Ad-Hoc ChannelYou can select the channel you want the Card to operate in when it is set for Ad-Hoc (peer-to-peer) mode. In an Ad-Hoc configuration, one client initiates the connection by broadcasting its presence as an Ad-Hoc client. The rest of theclients will connect to the initial client, making the initial client’s channel thechannel that all of the clients will operate on. The default Ad-Hoc channel is 11.
P743056-D_F5D6001v3kMan8_03.qxd 9/5/03 4:58 PM Page 17

TROUBLESHOOTING
18
Technical Support
You can find technical support information at www.belkin.com/networking orwww.belkin.com through the tech support area. If you want to contact technicalsupport by phone, please call 877-736-5771. Technical support is available 24hours a day, 7 days a week.
P743056-D_F5D6001v3kMan8_03.qxd 9/5/03 4:58 PM Page 18

Belkin Corporation Limited Lifetime Product Warranty
Belkin Corporation warrants this product against defects in materials and workmanship for its lifetime. If a defect is discovered, Belkin will, at its option, repair or replace the product at nocharge provided it is returned during the warranty period, with transportation charges prepaid, tothe authorized Belkin dealer from whom you purchased the product. Proof of purchase may berequired.
This warranty does not apply if the product has been damaged by accident, abuse, misuse, ormisapplication; if the product has been modified without the written permission of Belkin; or ifany Belkin serial number has been removed or defaced.
THE WARRANTY AND REMEDIES SET FORTH ABOVE ARE EXCLUSIVE IN LIEU OF ALL OTHERS,WHETHER ORAL OR WRITTEN, EXPRESSED OR IMPLIED. BELKIN SPECIFICALLY DISCLAIMS ANY ANDALL IMPLIED WARRANTIES, INCLUDING, WITHOUT LIMITATION, WARRANTIES OF MERCHANTABILITYAND FITNESS FOR A PARTICULAR PURPOSE.
No Belkin dealer, agent, or employee is authorized to make any modification, extension, oraddition to this warranty.
BELKIN IS NOT RESPONSIBLE FOR SPECIAL, INCIDENTAL, OR CONSEQUENTIAL DAMAGES RESULTINGFROM ANY BREACH OF WARRANTY, OR UNDER ANY OTHER LEGAL THEORY, INCLUDING BUT NOTLIMITED TO, LOST PROFITS, DOWNTIME, GOODWILL, DAMAGE TO OR REPROGRAMMING ORREPRODUCING ANY PROGRAM OR DATA STORED IN, OR USED WITH, BELKIN PRODUCTS.
Some states do not allow the exclusion or limitation of incidental or consequential damages orexclusions of implied warranties, so the above limitations of exclusions may not apply to you. Thiswarranty gives you specific legal rights, and you may also have other rights that vary from stateto state.
INFORMATION
19
P743056-D_F5D6001v3kMan8_03.qxd 9/5/03 4:58 PM Page 19

20
INFORMATION
FCC Statement
DECLARATION OF CONFORMITY WITH FCC RULES FOR ELECTROMAGNETIC COMPATIBILITY
We, Belkin Corporation, of 501 West Walnut Street, Compton, CA 90220, declare under our soleresponsibility that the product,
F5D6001
to which this declaration relates,complies with Part 15 of the FCC Rules. Operation is subject to the following two conditions: (1) thisdevice may not cause harmful interference, and (2) this device must accept any interference received,including interference that may cause undesired operation.
Caution: Exposure to Radio Frequency Radiation.The radiated output power of this device is far below the FCC radio frequency exposure limits.Nevertheless, the device shall be used in such manner that the potential for human contact normal operation is minimized.When connecting an external antenna to the device, the antenna shall be placed in such a manner to minimize the potential for human contact during normal operation. In order to avoidthe possibility of exceeding the FCC radio frequency exposure limits, human proximity to theantenna shall not be less than 20cm (8 inches) during normal operation.
Federal Communications Commission NoticeThis equipment has been tested and found to comply with the limits for a Class B digital device,pursuant to Part 15 of the FCC Rules. These limits are designed to provide reasonable protectionagainst harmful interference in a residential installation.This equipment generates, uses, and can radiate radio frequency energy. If not installed and usedin accordance with the instructions, it may cause harmful interference to radio or televisionreception, which can be determined by turning the equipment off and on, the user is encouragedto try and correct the interference by one or more of the following measures:
• Reorient or relocate the receiving antenna.• Increase the distance between the equipment and the receiver.• Connect the equipment to an outlet on a circuit different from
that to which the receiver is connected.• Consult the dealer or an experienced radio/TV technician for help.
ModificationsThe FCC requires the user to be notified that any changes or modifications to this device that arenot expressly approved by Belkin Corporation may void the users authority to operate the equipment.
P743056-D_F5D6001v3kMan8_03.qxd 9/5/03 4:58 PM Page 20

Canada-Industry Canada (IC)The wireless radio of this device complies with RSS 139 & RSS 210 Industry Canada. This Class Bdigital complies with Canadian ICES-003.
Cet appareil numérique de la classe B conforme á la norme NMB-003 du Canada.
Europe-European Union NoticeRadio products with the CE 0470 or CE alert marking comply with the R&TTE Directive (1995/5/EC) issued by the Commission of the European Community.
Compliance with this directive implies conformity to the following European Norms (in bracketsare the equivalent international standards).
• EN 60950 (IEC60950) – Product Safety
• EN 300 328 Technical requirement for radio equipment
• ETS 300 826 General EMC requirements for radio equipment.
To determine the type of transmitter, check the identification label on your Belkin product.
Products with the CE marking comply with the EMC Directive (89/336/EEC) and the Low VoltageDirective (72/23/EEC) issued by the Commission of the European Community. Compliance withthese directives implies conformity to the following European Norms (in brackets are the equivalent international standards).
• EN 55022 (CISPR 22) – Electromagnetic Interference
• EN 55024 (IEC61000-4-2,3,4,5,6,8,11)- Electromagnetic Immunity
• EN 61000-3-2 (IEC610000-3-2) - Power Line Harmonics
• EN 61000-3-3 (IEC610000) – Power Line Flicker
• EN 60950 (IEC60950) – Product Safety
Products that contain the radio transmitter are labeled with CE 0560 or CE alert marking and mayalso carry the CE logo.
21
INFORMATION
P743056-D_F5D6001v3kMan8_03.qxd 9/5/03 4:58 PM Page 21

Belkin Corporation501 West Walnut Street
Compton • CA • 90220 • USATel: 310.898.1100Fax: 310.898.1111
Belkin Components, Ltd.Express Business Park • Shipton Way
Rushden • NN10 6GL • United KingdomTel: +44 (0) 1933 35 2000Fax: +44 (0) 1933 31 2000
Belkin Components B.V.Starparc Building • Boeing Avenue 333
1119 PH Schiphol-Rijk • The NetherlandsTel: +31 (0) 20 654 7300Fax: +31 (0) 20 654 7349
Belkin, Ltd.7 Bowen Crescent • West Gosford
NSW 2250 • AustraliaTel: +61 (0) 2 4372 8600Fax: +61 (0) 2 4372 8603
Belkin Tech SupportUS: 877.736.5771
310.898.1100 ext. 2263Europe: 00 800 223 55 460
Australia: 1800 666 040
P74056-D
© 2003 Belkin Corporation. All rights reserved. All trade names are registered trademarks of respective manufacturers listed.
belkin.com
P743056-D_F5D6001v3kMan8_03.qxd 9/5/03 4:58 PM Page 1