80mm series thermal receipt printer -instruction manual · 2019-04-27 · 80 mm thermal receipt...
TRANSCRIPT
80mm Series Thermal Receipt Printer
-Instruction Manual
Version Number
Jul,2016
All rights reserved & Intellectual Property Rights Protected
It contains proprietary information protected by Copyright, No part of this
publication may be reproduced, stored in a retrieval system, or transmitted in
any form or by any means, electronic, mechanical, photocopying, recording,
or otherwise, without the prior written permission from us.
Statement
While every precaution has been taken in the preparation of this manual, but
we can not guarantee the contents of this manual entirely correct, becaus e our
products have been continuously improved and updated, so it can not be amended
at any time the company reserves the right to promptly notify the user if necessary
with the product-related Further information can be linked with the dealer.
Safety Precautions
This section presents important information intended to ensure safe and
effective use of this printer.
WARMING:
Scratch Warning: Never try to touch the auto cutter or jagged teeth.
Scald Warning:To avoid been burned, please do not touch the printer head .
Shock Warning:Please cut off the power before you Plug/Unplug the power
cable from the printer.
1) Please apply the power adapter to a stable voltage (110-220V ), please
do not use other devices on the same power outlet to avoid voltage fluctuation.
2) Install the printer on a flat and stable surface to avoid printer suffered from any
vibration and shocks.
3) If water or other liquid spills into the printer, unplug the power cord immediately
and contact your dealer or service center for advice.
4) Disconnect the power cord if the printer is idle for a long time.
5) Please ensure the switch button is “off”before you plug the power cord.
6) The printer should only be disassembled or repaired by a technician.
7) Please strictly follow the recommended use tips of this manual.
Cautions:
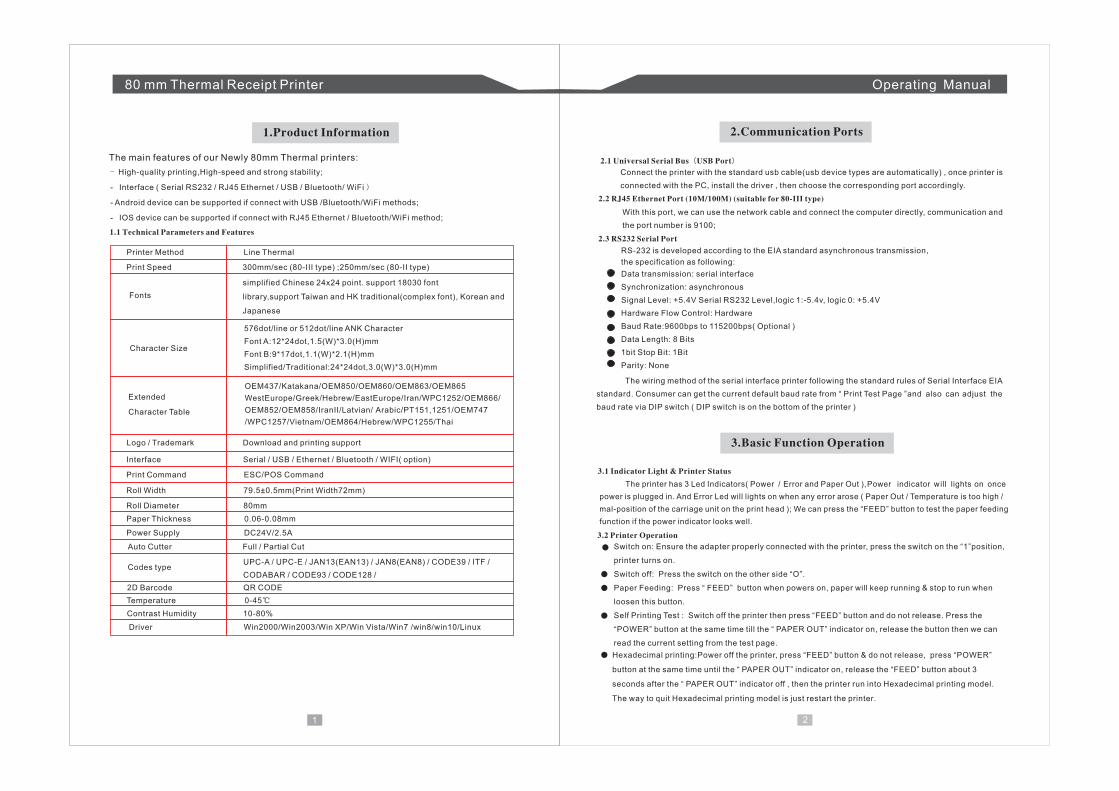
Printer Method Line Thermal
Print Speed 300mm/sec (80-III type) ;250mm/sec (80-II type)
Fonts
simplified Chinese 24x24 point. support 18030 font
library,support Taiwan and HK traditional(complex font), Korean and
Japanese
Character Size
576dot/line or 512dot/line ANK Character
Font A:12*24dot,1.5(W)*3.0(H)mm
Font B:9*17dot,1.1(W)*2.1(H)mm
Simplified/Traditional:24*24dot,3.0(W)*3.0(H)mm
Extended
Character Table
OEM437/Katakana/OEM850/OEM860/OEM863/OEM865
WestEurope/Greek/Hebrew/EastEurope/Iran/WPC1252/OEM866/
OEM852/OEM858/IranII/Latvian/ Arabic/PT151,1251/OEM747
/WPC1257/Vietnam/OEM864/Hebrew/WPC1255/Thai
Logo / Trademark Download and printing support
Interface Serial / USB / Ethernet / Bluetooth / WIFI( option)
Print Command ESC/POS Command
Roll Width 79.5±0.5mm(Print Width72mm)
Roll Diameter 80mm
Paper Thickness 0.06-0.08mm
Power Supply DC24V/2.5A
Auto Cutter Full / Partial Cut
Codes typeUPC-A / UPC-E / JAN13(EAN13) / JAN8(EAN8) / CODE39 / ITF /
CODABAR / CODE93 / CODE128 /
2D Barcode QR CODE
Temperature 0-45℃
Contrast Humidity 10-80%
Driver Win2000/Win2003/Win XP/Win Vista/Win7 /win8/ Linuxwin10/
80 mm Thermal Receipt Printer Operating Manual
1 2
1.Product Information
The main features of our Newly 80mm Thermal printers:
- High-quality printing,High-speed and strong stability;
- Interface ( Serial RS232 / RJ45 Ethernet / USB / Bluetooth/ WiFi )
- Android device can be supported if connect with USB /Bluetooth/WiFi methods;
- IOS device can be supported if connect with RJ45 Ethernet / Bluetooth/WiFi method;
1.1 Technical Parameters and Features
2.Communication Ports
2.1 Universal Serial Bus(USB Port)
Connect the printer with the standard usb cable(usb device types are automatically) , once printer is
connected with the PC, install the driver , then choose the corresponding port accordingly.
2.2 RJ45 Ethernet Port (10M/100M) (suitable for 80-III type)
With this port, we can use the network cable and connect the computer directly, communication and
the port number is 9100;
2.3 RS232 Serial Port
RS-232 is developed according to the EIA standard asynchronous transmission,
the specification as following:
Data transmission: serial interface
Synchronization: asynchronous
Signal Level: +5.4V Serial RS232 Level,logic 1:-5.4v, logic 0: +5.4V
Hardware Flow Control: Hardware
Baud Rate:9600bps to 115200bps( Optional )
Data Length: 8 Bits
1bit Stop Bit: 1Bit
Parity: None
The wiring method of the serial interface printer following the standard rules of Serial Interface EIA
standard. Consumer can get the current default baud rate from “ Print Test Page ”and also can adjust the
baud rate via DIP switch ( DIP switch is on the bottom of the printer )
3.Basic Function Operation
The printer has 3 Led Indicators( Power / Error and Paper Out ),Power indicator will lights o n once
power is plugged in. And Error Led will lights on when any error arose ( Paper Out / Temperature is too high /
mal-position of the carriage unit on the print head ); We can press the “FEED” button to test the paper feeding
function if the power indicator looks well.
3.1 Indicator Light & Printer Status
3.2 Printer Operation
Switch on: Ensure the adapter properly connected with the printer, press the switch on the “1”position,
printer turns on.
Switch off: Press the switch on the other side “O”.
Paper Feeding: Press “ FEED” button when powers on, paper will keep running & stop to run when
loosen this button.
Self Printing Test : Switch off the printer then press “FEED” button and do not release. Press the
“POWER” button at the same time till the “ PAPER OUT” indicator on, release the button then we can
read the current setting from the test page.
Hexadecimal printing:Power off the printer, press “FEED” button & do not release, press “POWER”
button at the same time until the “ PAPER OUT” indicator on, release the “FEED” button about 3
seconds after the “ PAPER OUT” indicator off , then the printer run into Hexadecimal printing model.
The way to quit Hexadecimal printing model is just restart the printer.
80 mm Thermal Receipt Printer Operating Manual
43
DIP Switches and Instruction
115200
38400
19200
9600
Item
1
2
3
Function
Cutter
Buzzer
Print Density
ON
YES
YES
YES
OFF
NO
NO
NO
4 CH ENCN/EN Conver t
5
6
7
8
Empty
Baud Rate Set
Baud Rate
Baud Rate
YES NO
Baud Rate Selection Instruction
No.6 No.7 No.8Baud Rate
ON
ON
ON
ON
ON
ON
OFF
OFF
ON
OFF
ON
OFF
4.Cleaning Of the Printer
We need to clean the print head if problems as below.
① Printing is not clear, but thermal paper is ok;
② Some columns on the printed pages are not clear
③ Noisy paper feeding
Cleaning steps
1.Turn off the power,open the printer cover and take off the paper roll.
2.We have to wait for a while if we just finished the printing.
3.Use a soft brush or wrung-out ethanol immerged cotton to clean the print head. Remember to turn on the
gear while lubricating to ensure a completely lubricated;
4.Close the cover once cleaning done and try it later.
Cautions:
Make sure the power of the printer is turned of during the maintenance.
Hands or other metal tools away from the surface of the printer head,do not use tweezers to scratch the
surface of the printer head and other sensitive parts.
Do not use gasoline,acetone and other organic solvents for printer head cleaning.
5.Installation Wizard
5.1 Hardware Connection
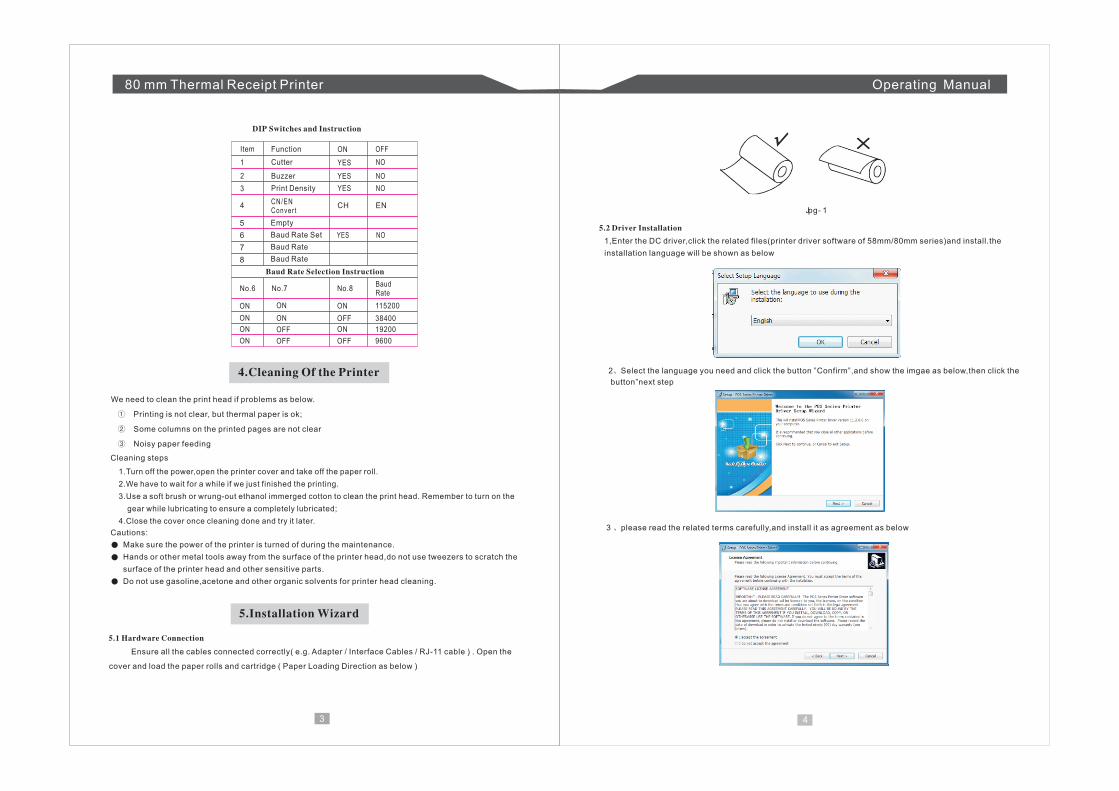
Ensure all the cables connected correctly( e.g. Adapter / Interface Cables / RJ-11 cable ) . Open the
cover and load the paper rolls and cartridge ( Paper Loading Direction as below )
Jpg- 1
5.2 Driver Installation
1,Enter the DC driver,click the related files(printer driver software of 58mm/80mm series)and install.the
installation language will be shown as below
80 mm Thermal Receipt Printer
2、Select the language you need and click the button ”Confirm”,and show the imgae as below,then click the
button”next step
3 、please read the related terms carefully,and install it as agreement as below
Operating Manual
5 6
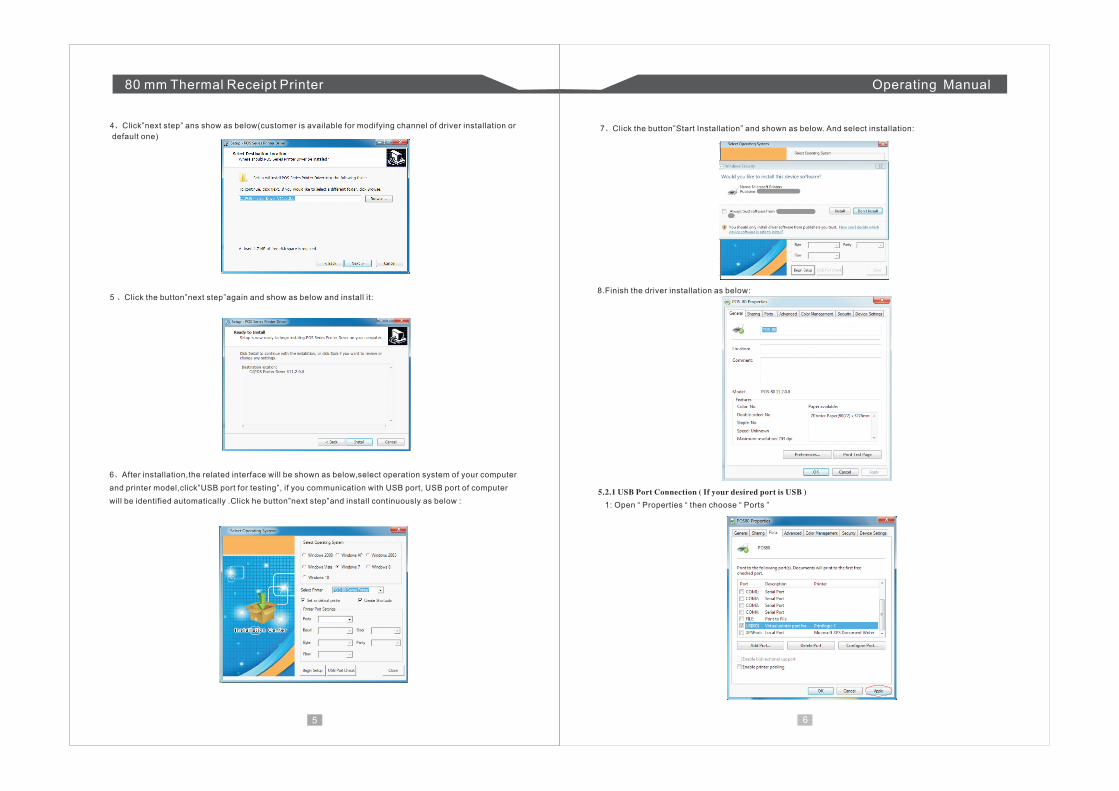
4、Click”next step” ans show as below(customer is available for modifying channel of driver installation or
default one)
5 、Click the button”next step”again and show as below and install it:
6、After installation,the related interface will be shown as below,select operation system of your computer
and printer model,click”USB port for testing”, if you communication with USB port, USB port of computer
will be identified automatically .Click he button”next step”and install continuously as below :
7、Click the button”Start Installation” and shown as below. And select installation:
8.Finish the driver installation as below:
5.2.1 USB Port Connection ( If your desired port is USB )
1: Open “ Properties “ then choose “ Ports ”
80 mm Thermal Receipt Printer
80 mm Thermal Receipt Printer Operating Manual
7 8
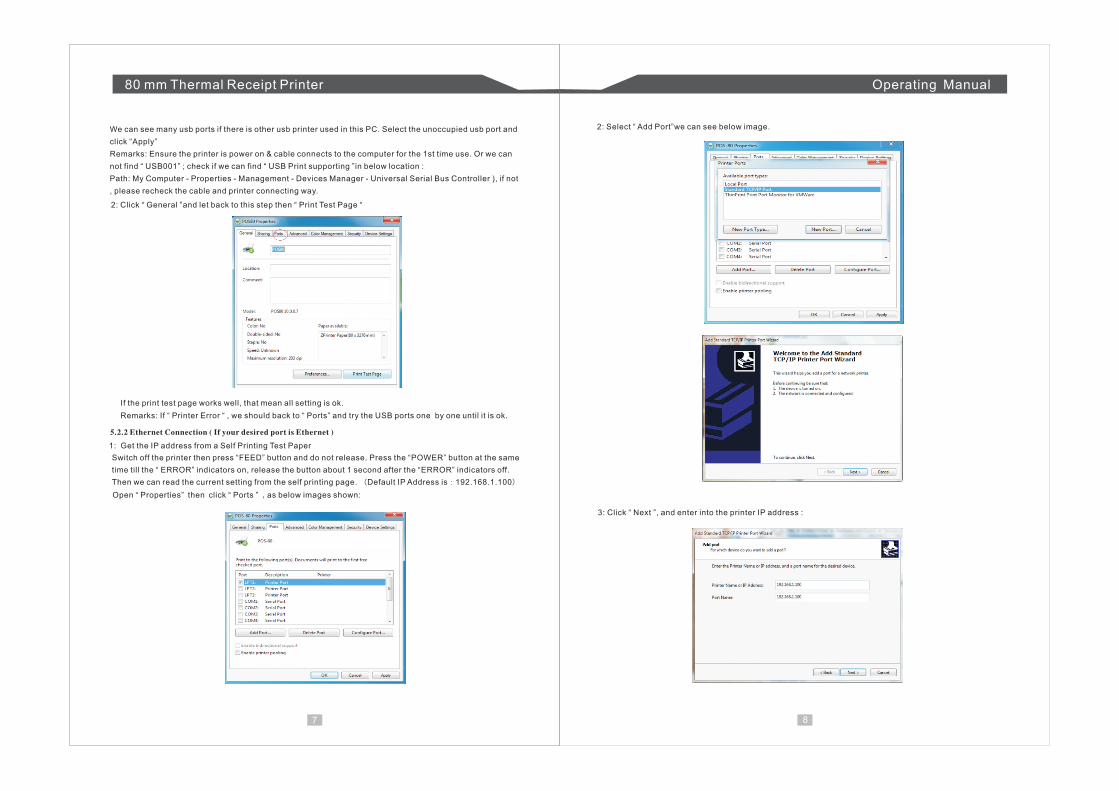
We can see many usb ports if there is other usb printer used in this PC. Select the unoccupied usb port and
click “Apply”
Remarks: Ensure the printer is power on & cable connects to the computer for the 1st time use. Or we can
not find “ USB001” ; check if we can find “ USB Print supporting ”in below location :
Path: My Computer - Properties - Management - Devices Manager - Universal Serial Bus Controller ), if not
, please recheck the cable and printer connecting way.
2: Click “ General ”and let back to this step then “ Print Test Page “
If the print test page works well, that mean all setting is ok.
Remarks: If “ Printer Error “ , we should back to “ Ports” and try the USB ports one by one until it is ok.
2: Select “ Add Port”we can see below image.
5.2.2 Ethernet Connection ( If your desired port is Ethernet )
1: Get the IP address from a Self Printing Test Paper
Switch off the printer then press “FEED” button and do not release. Press the “POWER” button at the same
time till the “ ERROR” indicators on, release the button about 1 second after the “ERROR” indicators off.
Then we can read the current setting from the self printing page. (Default IP Address is:192.168.1.100)
Open “ Properties” then click “ Ports ” ,as below images shown:
3: Click “ Next ”, and enter into the printer IP address :
80 mm Thermal Receipt Printer Operating Manual
9 10
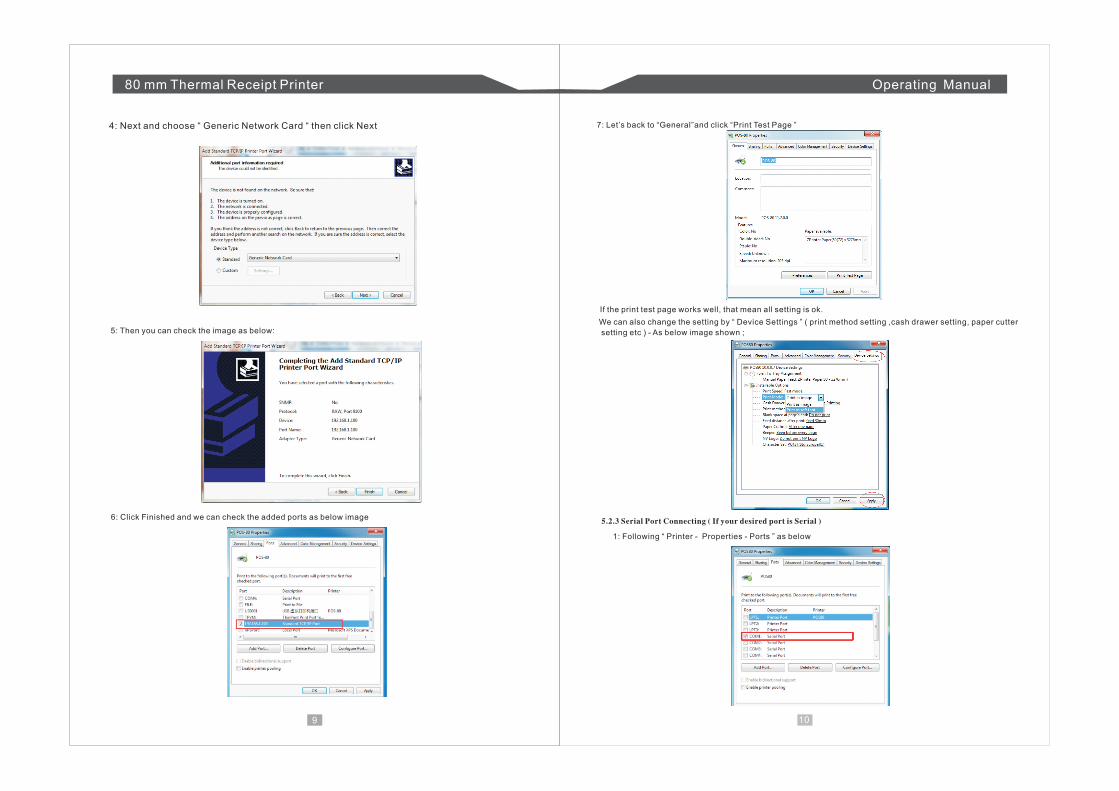
4: Next and choose “ Generic Network Card “ then click Next
5: Then you can check the image as below:
6: Click Finished and we can check the added ports as below image
We can also change the setting by “ Device Settings ” ( print method setting ,cash drawer setting, paper cutter
setting etc ) - As below image shown ;
7: Let’s back to “General”and click “Print Test Page ”
If the print test page works well, that mean all setting is ok.
1: Following “ Printer - Properties - Ports ” as below
5.2.3 Serial Port Connecting ( If your desired port is Serial )
80 mm Thermal Receipt Printer Operating Manual
11 12
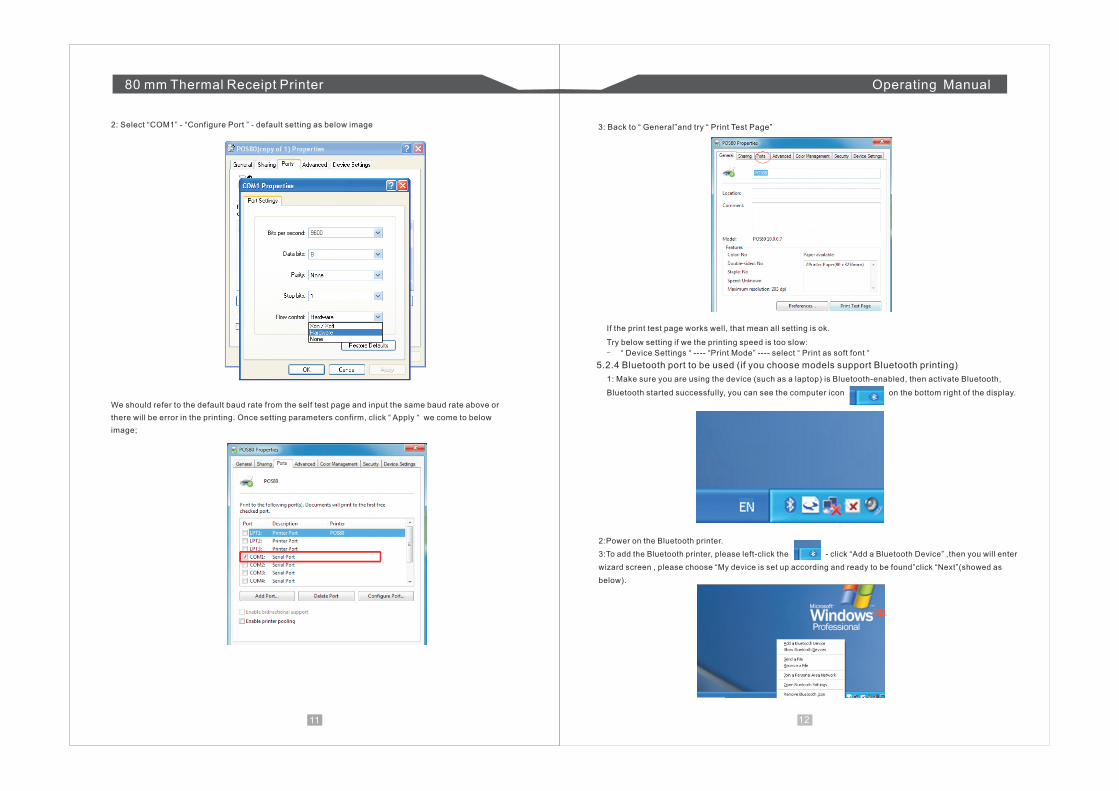
2: Select “COM1” - “Configure Port ” - default setting as below image 3: Back to “ General”and try “ Print Test Page”
If the print test page works well, that mean all setting is ok.
Try below setting if we the printing speed is too slow:
- “ Device Settings “ ---- “Print Mode” ---- select “ Print as soft font “
We should refer to the default baud rate from the self test page and input the same baud rate above or
there will be error in the printing. Once setting parameters confirm, click “ Apply “ we come to below
image;
1: Make sure you are using the device (such as a laptop) is Bluetooth-enabled, then activate Bluetooth,
Bluetooth started successfully, you can see the computer icon on the bottom right of the display.
2:Power on the Bluetooth printer.
3:To add the Bluetooth printer, please left-click the - click “Add a Bluetooth Device” ,then you will enter
wizard screen , please choose “My device is set up according and ready to be found”click “Next”(showed as
below).
5.2.4 Bluetooth port to be used (if you choose models support Bluetooth printing)
80 mm Thermal Receipt Printer Operating Manual
13 14
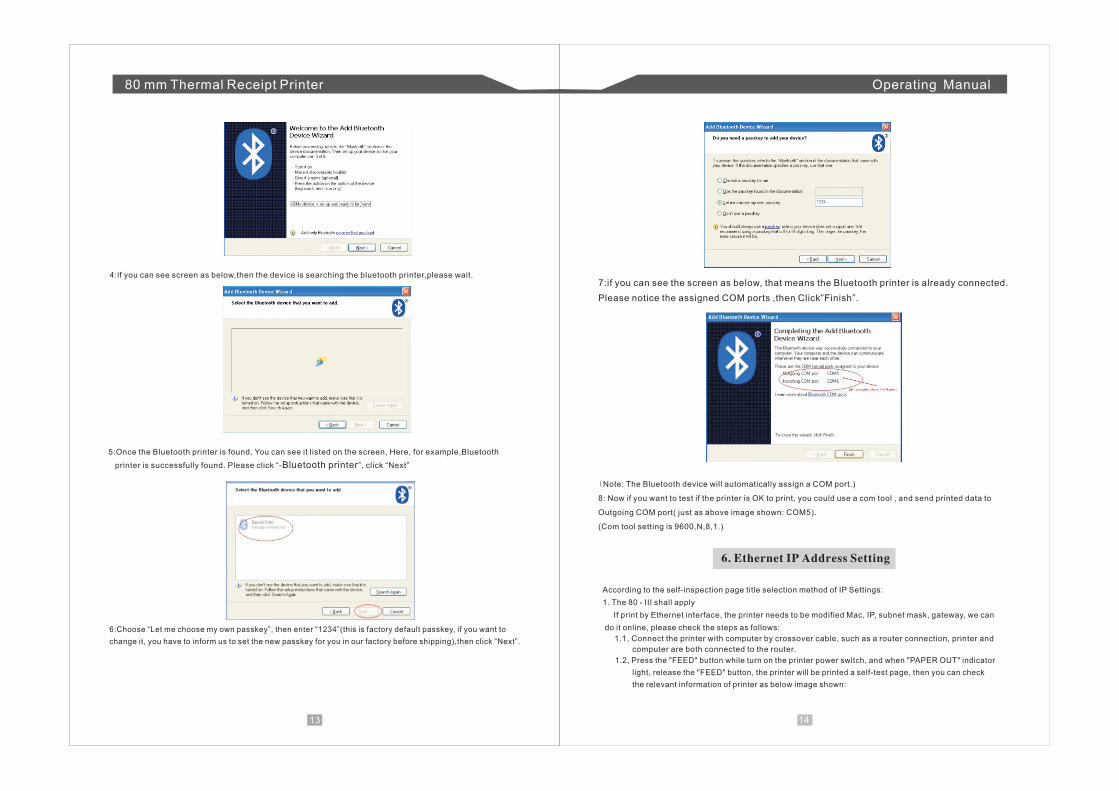
4:if you can see screen as below,then the device is searching the bluetooth printer,please wait.
5:Once the Bluetooth printer is found. You can see it listed on the screen, Here, for example,Bluetooth
printer is successfully found. Please click “- ”, click “Next”Bluetooth printer
6:Choose “Let me choose my own passkey”, then enter “1234”(this is factory default passkey, if you want to
change it, you have to inform us to set the new passkey for you in our factory before shipping),then click “Next”.
7:if you can see the screen as below, that means the Bluetooth printer is already connected.
Please notice the assigned COM ports ,then Click”Finish”.
(Note: The Bluetooth device will automatically assign a COM port.)
8: Now if you want to test if the printer is OK to print, you could use a com tool , and send printed data to
Outgoing COM port( just as above image shown: COM5).
(Com tool setting is 9600,N,8,1.)
6. Ethernet IP Address Setting
According to the self-inspection page title selection method of IP Settings:
1. The 80 - III shall apply
If print by Ethernet interface, the printer needs to be modified Mac, IP, subnet mask, gateway, we can
do it online, please check the steps as follows:
1.1, Connect the printer with computer by crossover cable, such as a router connection, printer and
computer are both connected to the router.
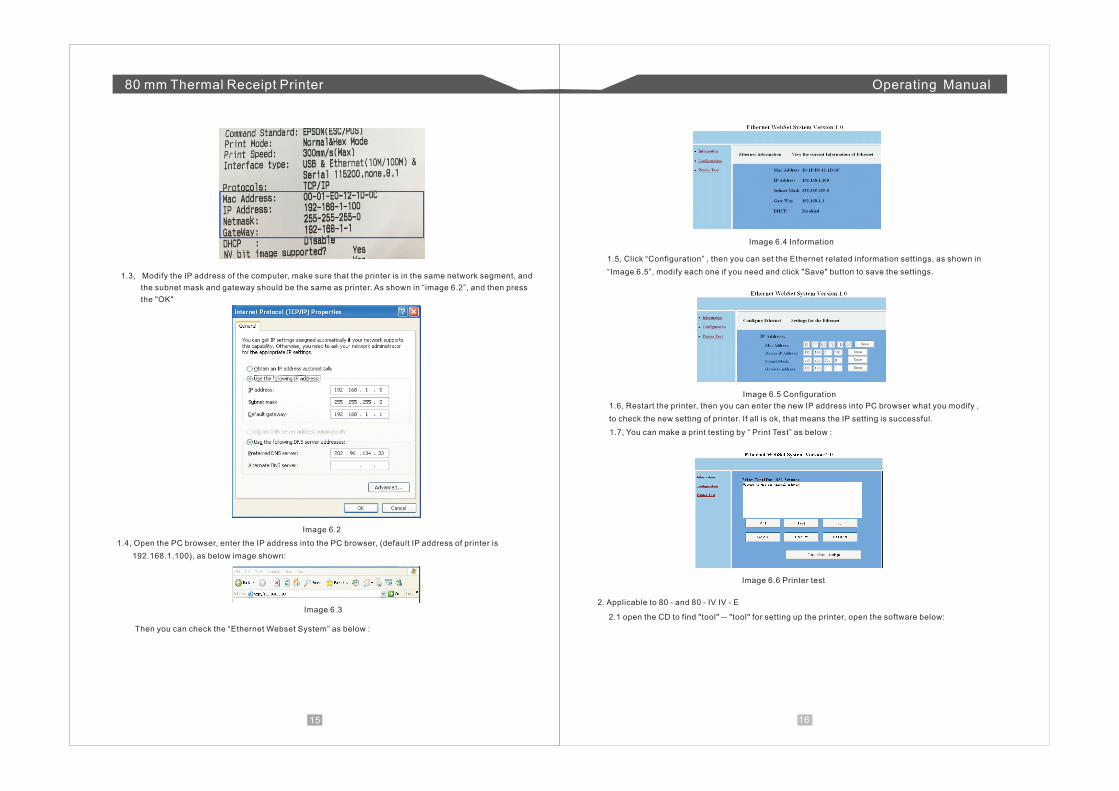
1.2, Press the "FEED" button while turn on the printer power switch, and when "PAPER OUT" indicator
light, release the "FEED" button, the printer will be printed a self-test page, then you can check
the relevant information of printer as below image shown:
80 mm Thermal Receipt Printer Operating Manual
15 16
1.3, Modify the IP address of the computer, make sure that the printer is in the same network segment, and
the subnet mask and gateway should be the same as printer. As shown in “image 6.2”, and then press
the "OK"
Image 6.2
1.4, Open the PC browser, enter the IP address into the PC browser, (default IP address of printer is
192.168.1.100), as below image shown:
Image 6.3
Then you can check the “Ethernet Webset System” as below :
Image 6.4 Information
1.5, Click “Configuration” , then you can set the Ethernet related information settings, as shown in
“Image 6.5”, modify each one if you need and click "Save" button to save the settings.
Image 6.5 Configuration
1.6, Restart the printer, then you can enter the new IP address into PC browser what you modify ,
to check the new setting of printer. If all is ok, that means the IP setting is successful.
1.7, You can make a print testing by “ Print Test” as below :
Image 6.6 Printer test
2. Applicable to 80 - and 80 - IV IV - E
2.1 open the CD to find "tool" -- "tool" for setting up the printer, open the software below:
80 mm Thermal Receipt Printer Operating Manual
17 18
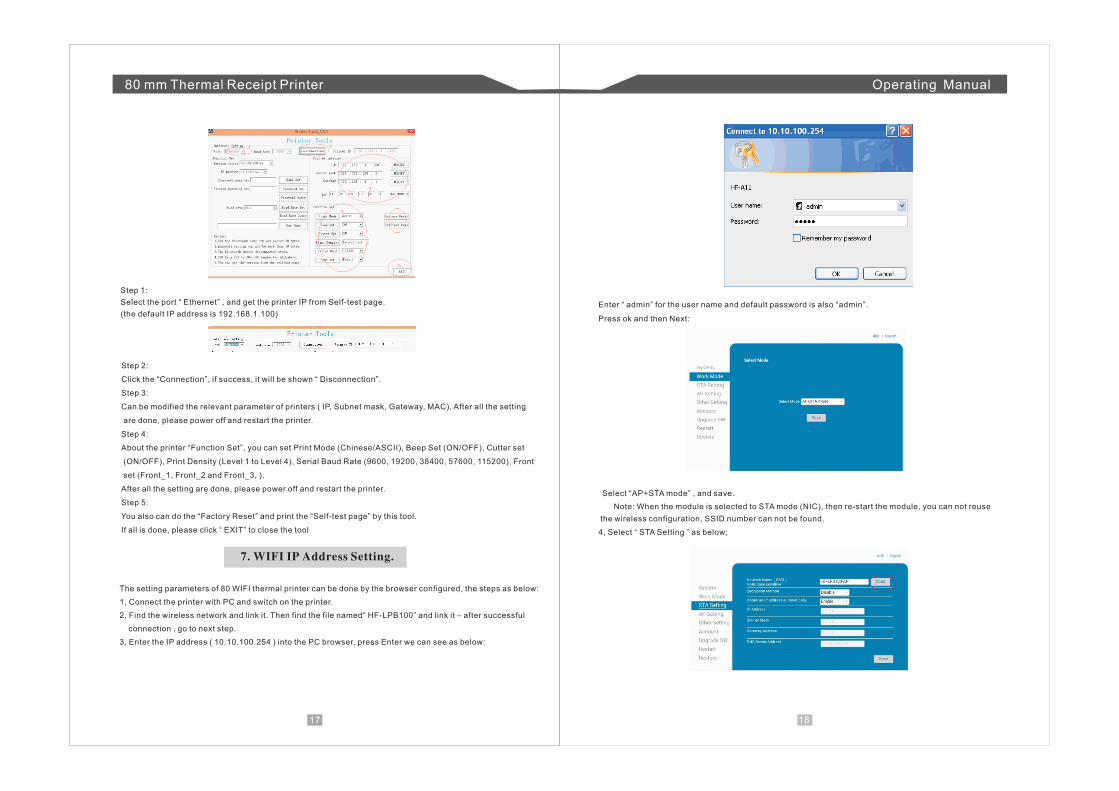
Step 1:
Select the port “ Ethernet” , and get the printer IP from Self-test page.
(the default IP address is 192.168.1.100)
Step 2:
Click the “Connection”, if success, it will be shown “ Disconnection”.
Step 3:
Can be modified the relevant parameter of printers ( IP, Subnet mask, Gateway, MAC), After all the setting
are done, please power off and restart the printer.
Step 4:
About the printer “Function Set”, you can set Print Mode (Chinese/ASCII), Beep Set (ON/OFF), Cutter set
(ON/OFF), Print Density (Level 1 to Level 4), Serial Baud Rate (9600, 19200, 38400, 57600, 115200), Front
set (Front_1, Front_2 and Front_3, ).
After all the setting are done, please power off and restart the printer.
Step 5:
You also can do the “Factory Reset” and print the “Self-test page” by this tool.
If all is done, please click “ EXIT” to close the tool
7. WIFI IP Address Setting.
The setting parameters of 80 WIFI thermal printer can be done by the browser configured, the steps as below:
1, Connect the printer with PC and switch on the printer.
2, Find the wireless network and link it. Then find the file named“ HF-LPB100” and link it – after successful
connection , go to next step.
3, Enter the IP address ( 10.10.100.254 ) into the PC browser, press Enter we can see as below:
Enter “ admin” for the user name and default password is also “admin”.
Press ok and then Next:
Select “AP+STA mode” , and save.
Note: When the module is selected to STA mode (NIC), then re-start the module, you can not reuse
the wireless configuration, SSID number can not be found.
4, Select “ STA Setting ” as below;
80 mm Thermal Receipt Printer Operating Manual
19 20
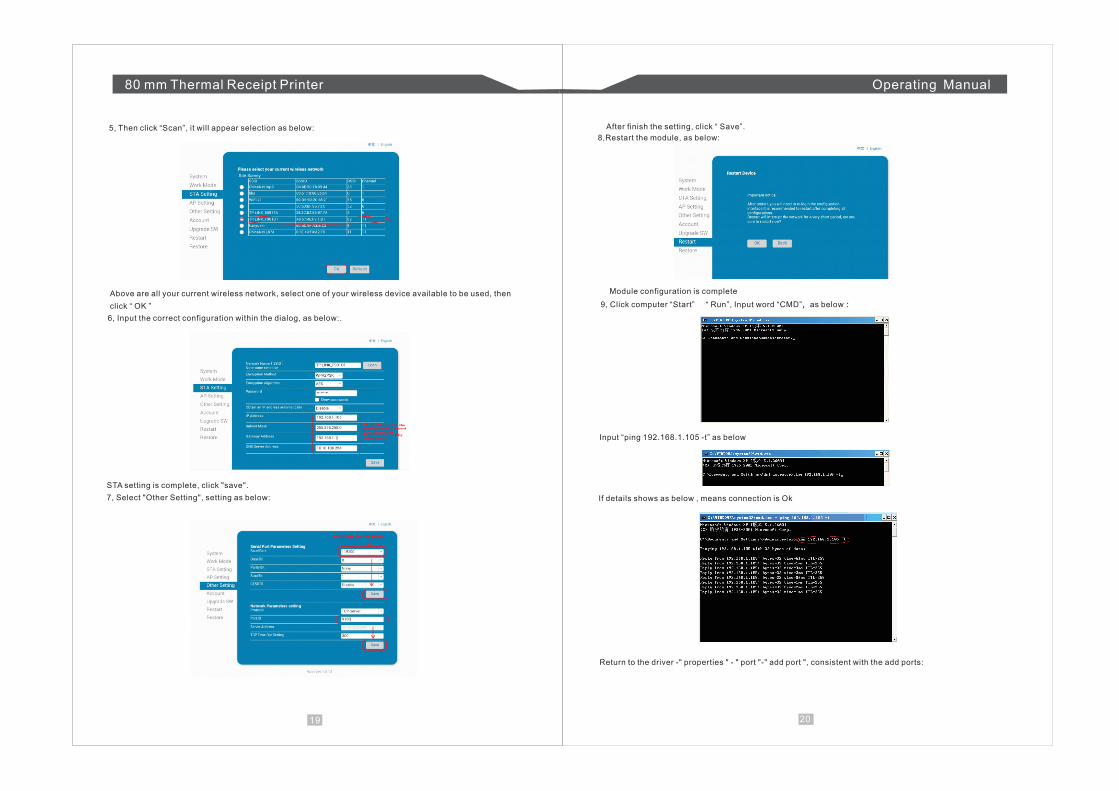
5, Then click “Scan”, it will appear selection as below:
Above are all your current wireless network, select one of your wireless device available to be used, then
click “ OK ”
6, Input the correct configuration within the dialog, as below:.
STA setting is complete, click "save".
7, Select "Other Setting", setting as below:
After finish the setting, click “ Save”.
8,Restart the module, as below:
Module configuration is complete
9, Click computer “Start” “ Run”, Input word “CMD”,as below:
Input “ping 192.168.1.105 -t” as below
If details shows as below , means connection is Ok
Return to the driver -" properties " - " port "-" add port ", consistent with the add ports:
80 mm Thermal Receipt Printer Operating Manual
21 22
8.Operating Manual for Android OS
This manual applies to all of our android OS compatible printers ( both 58mm & 80mm width printer)
Currently, the common communication ports we used for android OS are ( USB、Ethernet、Bluetooth and
WiFi )
If you want to use Android Device connected with our printer, first of all make sure that
printers can be supported Android Operate System, proceed as follows ( Bluetooth as example):
Step 1:
- Insert the CD driver disc into the CD-ROM, connect your Android device with your computer;
Step 2:
- Find the File Named “ SDK” from the CD driver, Then follow the path :
“ BLUETOOTHDEMO ----bin----BT-POSPrinter.APK “ , and install it into your Android device.
Step 3:
- Connect your Android device with our printer once the installation done .
Step 4:
- Find this icon on the Android device, and click “Connect Printer” to search the Bluetooth printer,
(Default pairing password for Bluetooth connection is “ 1234” ) . After the connection successfully, click on
the "Print Test Page", the printer will work.
If you use the "Ethernet interface", "USB", "WIFI" communication, replace "BLUETOOTHDEMO" from
"Step 2" into the corresponding "NETDEMO", "USBDEMO" and "WIFIDEMO".
Please noted, the customers can get all the original code from below path if you need to develop your
own APK ( Path is: )src com zj printdemo
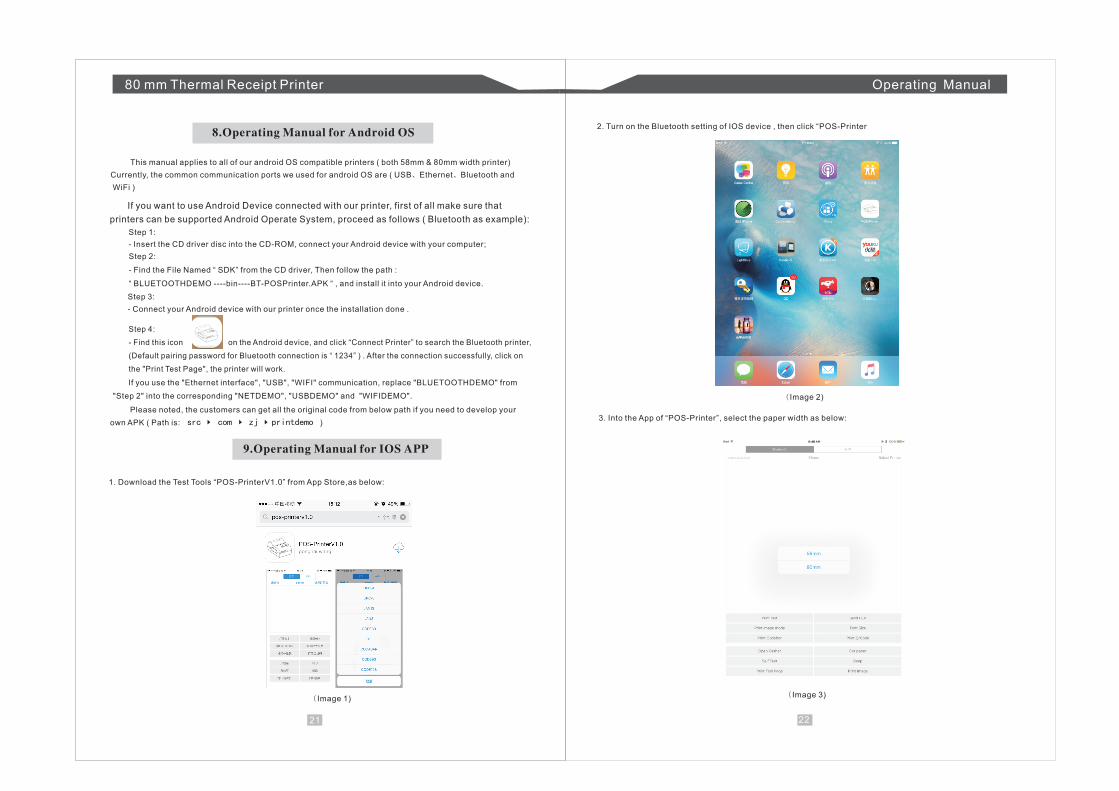
9.Operating Manual for IOS APP
1. Download the Test Tools “POS-PrinterV1.0” from App Store,as below:
( Image 1)
2. Turn on the Bluetooth setting of IOS device , then click “POS-Printer
( Image 2)
3. Into the App of “POS-Printer”, select the paper width as below:
( Image 3)
80 mm Thermal Receipt Printer Operating Manual
23 24
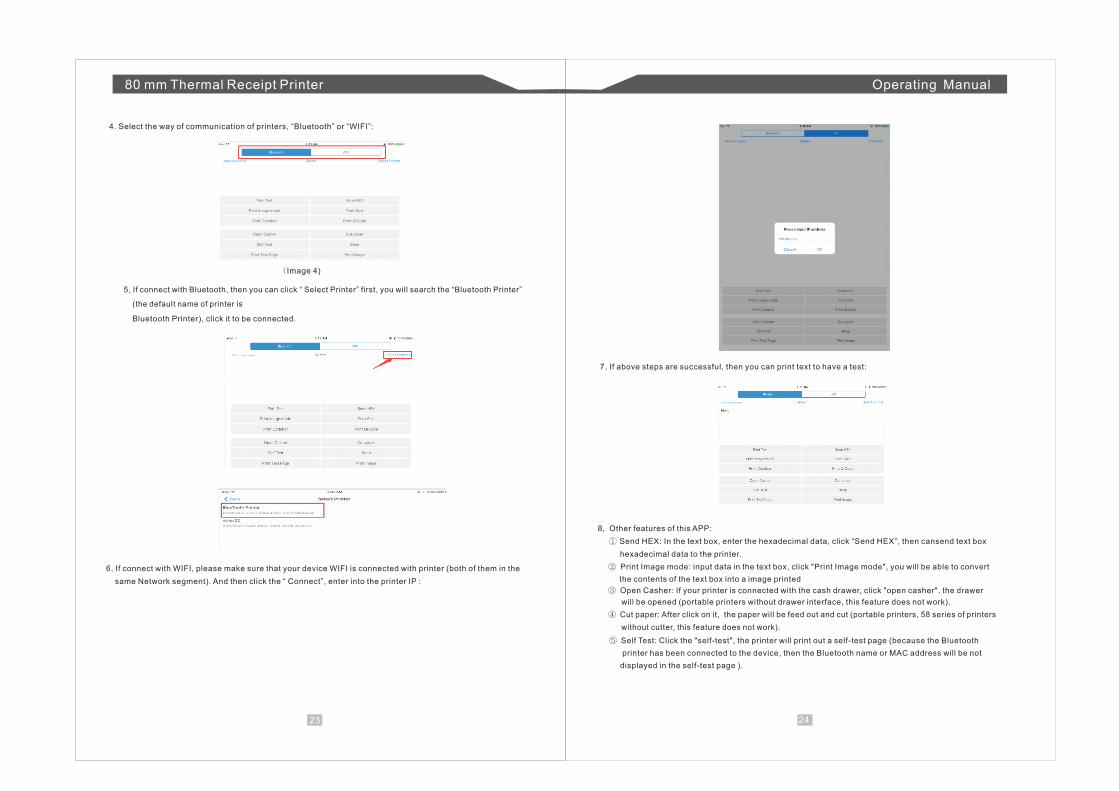
4. Select the way of communication of printers, “Bluetooth” or “WIFI”:
( Image 4)
5, If connect with Bluetooth, then you can click “ Select Printer” first, you will search the “Bluetooth Printer”
(the default name of printer is
Bluetooth Printer), click it to be connected.
6, If connect with WIFI, please make sure that your device WIFI is connected with printer (both of them in the
same Network segment). And then click the “ Connect”, enter into the printer IP :
7, If above steps are successful, then you can print text to have a test:
8, Other features of this APP:
① Send HEX: In the text box, enter the hexadecimal data, click “Send HEX”, then cansend text box
hexadecimal data to the printer.
② Print Image mode: input data in the text box, click "Print Image mode", you will be able to convert
the contents of the text box into a image printed
③ Open Casher: If your printer is connected with the cash drawer, click "open casher", the drawer
will be opened (portable printers without drawer interface, this feature does not work).
④ Cut paper: After click on it, the paper will be feed out and cut (portable printers, 58 series of printers
without cutter, this feature does not work).
⑤ Self Test: Click the "self-test", the printer will print out a self-test page (because the Bluetooth
printer has been connected to the device, then the Bluetooth name or MAC address will be not
displayed in the self-test page ).
80 mm Thermal Receipt Printer Operating Manual
25 26
⑥ Beep: Click the "Beep", the printer will beep sound (portable printers, 58 series of printers without buzzer,
this feature does not work).
⑦ Print test page: Click the "Print Test Page", the text will print a section of the test, to confirm that the printer
is connected and normal print successfully.
9.The applicable version: can be compatible with IOS6.0 or above versions.
10.General Troubleshooting
2: Self printing test is ok,but printer does not work after driver installation.
A: Recheck the installation according to above installation izard and see if we selected the right port or
ask service center for advice if needed.
3: Cash drawer does not open?
A: Please enable the cash drawer function from device settings and check the cable connecting way or
contact service center for advice if needed.
4: Malfunction of paper feeding?
A: Use soft brush to clean the paper sensor and try again or send it to the service center for repair.
5: Messy code printing after a period of time
A: Interface board damaged , please replace or repair it.
6: Malfunction of the indicator light
A: Check the cable connecting way / adapter / power cord / switch on or off? Or contact the service center
for repair.
7: Ethernet printer does not printer after linked with a router.
A:Make sure the network cable and router port works well, does the printer IP and router IP are on the same
network segment? Is the printer IP occupied by other device ? We can modify the ip with our ip setter software
attached in the cd driver. Test once modify the ip : Start - Run - input the 8printer IP - see if any response; or
contact our service center for repair.
8: Messy code printing except Arabic numeral printing.
A: language switching incorrectly,please turn on the SW-4 switch on the DIP switches.
9: Fuzzy printing of Chinese character
A: ON Please turn on the SW-3 switch ( DIP switches on the bottom of the printer )
10: Malfunction of the auto paper cutting
A: See if the SW-1 is off and ensure the cutting function is Enabled or contact the service center for repair.
1: Why serial port printer printing messy code?
A: Ensure the baud rate setting in the PC is same as the printer baud rate. ( we can see printer baud rate
from self test page)
11: Red indicator keep flashing during the printing.
A: Usually it is due to the high temperature of the print head. If printing stopped,please contact the service
center for repair.
12: How to install a network shared printer driver?
A: Find the driver file of the shared printer from network neighborhood and click it.
13: Communication interrupts and can not print if multiple ethernet printers works simultaneously, How to
solve this problem?
A: First check if the network then get the printer ethernet ID, to see if any conflicts of the ethernet ID. Give
a specified Ethernet ID to each printer to avoid this problem.
14: Printing speed is very slow for serial printer
A: follow this path and change the set accordingly : Driver -- Properties -- Device Settings -- Print Mode
-- Print as soft font
15:Water or other liquid spills into the printer
A: Cut off the power,we can dry the main board or printer head with a hair dryer, careful of the temperature
( average 50 degree is ok )
16: Print page without any content (White)
A:1.Connect printing is ok but self printing test is white
2.Without any contents for both printing method
Solution for 1. Font damaged & replace the font chips.
17: How can we reset to default setting?
A: Find the card slot on the bottom of the printer.Press the black key ( just press and release ---Reset the
IP to default Only )
18: How to reset the WiFi default setting?
A:Find the card slot on the bottom of the printer.Press the black key & Hold on ( about 10 seconds ---Reset
the WiFi to default )
Solution for 2. Please replace the printer head and try again. Contact service center for repair if same
problem after replace the printer head.
