9 admission, transfer, discharge, and physical exams 1. define important words in this chapter...
TRANSCRIPT

9Admission, Transfer, Discharge, and Physical Exams
1. Define important words in this chapter
abdominal girth a measurement of the circumference around the abdomen at the umbilicus (navel).
admission pack personal care items supplied upon a resident’s admission.
baseline initial value that can be compared to future measurements.
bedriddenconfined to bed.

9Admission, Transfer, Discharge, and Physical Exams
1. Define important words in this chapter
contracture the permanent and often painful shortening of a muscle, usually due to a lack of activity.
dorsal recumbent position with the person flat on her back with knees flexed and slightly separated and her feet flat on the bed.
kilograma unit of mass equal to 1000 grams; one kilogram equals 2.2 pounds.
knee-chestposition in which a person is lying on his abdomen with knees pulled up towards the abdomen and with legs separated; arms are pulled up and flexed and the head is turned to one side.

9Admission, Transfer, Discharge, and Physical Exams
1. Define important words in this chapter
lithotomyposition in which a person is on her back with her hips at the edge of the exam table; legs are flexed and feet are in padded stirrups.
metric system of weights and measures based upon the meter.
pound a unit of weight equal to 16 ounces.

9Admission, Transfer, Discharge, and Physical Exams
2. List factors for families in choosing a facility
REMEMBER:Choosing the right facility for a loved one can be a challenging, emotional, and difficult process.

9Admission, Transfer, Discharge, and Physical Exams
2. List factors for families in choosing a facility
Here are some of the questions families might consider when choosing a facility for a loved one:
• Do the staff seem courteous and friendly?• Do most of the staff speak the resident’s native language? Is an interpreter available?
• Are there enough staff members on duty at the facility? What is the ratio of nurses and nursing assistants to residents? How is the facility staffed on evenings and weekends?
• Are foul odors present?

9Admission, Transfer, Discharge, and Physical Exams
2. List factors for families in choosing a facility
Questions families might consider when choosing a facility for a loved one (cont’d.):• What is the food like at the facility? Is attention paid to individual food preferences? Is a dietician available for meetings?
• Are residents up and dressed in the morning?• Do staff interact positively with the residents?• Do staff speak courteously to other staff members?• Do residents look groomed, taken care of, and happy?

9Admission, Transfer, Discharge, and Physical Exams
2. List factors for families in choosing a facility
Questions families might consider when choosing a facility for a loved one (cont’d.):
• How are residents’ complaints resolved?• Is the facility licensed?• Have the state survey and other inspection results been satisfactory?
• Does the facility explain Residents’ Rights?• Are physical, occupational, and speech therapists available?
• How often do falls, infections, and pressure ulcers occur?

9Admission, Transfer, Discharge, and Physical Exams
2. List factors for families in choosing a facility
Questions families might consider when choosing a facility for a loved one (cont’d.):
• Do volunteers work with residents? If so, are their interactions positive?
• How involved can the family be in creating the resident’s care plan?
• Does the facility provide the level of care the resident needs? What about future needs?
• Does the facility provide assistance with activities of daily living (ADLs)? If so, how is it provided, and what are the associated fees?

9Admission, Transfer, Discharge, and Physical Exams
2. List factors for families in choosing a facility
Questions families might consider when choosing a facility for a loved one (cont’d.):• Is the environment safe, functional, and homelike?
• Is there an activities department? What kinds of activities are offered?
• What are the steps to take if a resident wants to move out of the facility?
• What policies does the facility have on advance directives and end-of-life decisions?

9Admission, Transfer, Discharge, and Physical Exams
2. List factors for families in choosing a facility
Think about this question:If you were choosing a facility for a loved one, which factors would matter most to you?

9Admission, Transfer, Discharge, and Physical Exams
3. Explain the nursing assistant’s role in the emotional adjustment of a new resident
REMEMBER:Moving into a facility requires a big adjustment. New residents may have been independent for a long time, and they may be moving from their own or a family member’s home. It can be a time of loss.

9 Admission, Transfer, Discharge, and Physical Exams
Handout 9-1: Quiz: You are Moving!
Your house has been sold and you need to move in with your sister and her family for about six months or more. You need to work out some problems; perhaps you will even be staying with them permanently. You don’t know for sure. You will share a room with your niece. Your space is six feet wide by 12 feet long. There is a single bed, a chest of drawers, and a soft chair that you can use. There is also a screen available for your privacy. Decide what you will take with you. You can store anything you don’t take, but you will not have access to any stored items until you move again.Name six things you will take with you. (Seven outfits of clothing count as one item.) Think of space. All six items must fit into your small room, or in your half of the closet, which is a 5x3 feet space.1.2.3.4.5.6.

9 Admission, Transfer, Discharge, and Physical Exams
Handout 9-1: Quiz: You are Moving! (cont’d.)
During the first week, your niece, who is five years old, is looking at one of your treasured things, and accidentally drops and breaks it. How do you feel?
It is now the second week. You have still not received any of your mail, even though you notified the post office to forward it. You mention this to your sister and she says offhandedly, “Oh, I did see some here yesterday. I don’t know where it got to.” Then she walks out of the room. What is your response?

9Admission, Transfer, Discharge, and Physical Exams
3. Explain the nursing assistant’s role in the emotional adjustment of a new resident
After reviewing the Quiz (Handout 9-1), think about these questions:• How did you feel when deciding what to take and what to leave behind?
• What did you decide to take, and what are some things that you would be upset about leaving behind?
• How did you feel about the loss of your mail and your sister’s response?

9Admission, Transfer, Discharge, and Physical Exams
3. Explain the nursing assistant’s role in the emotional adjustment of a new resident
There are many losses which residents may experience when moving into a facility. Here are some of the reasons why adjusting to life in a facility may be difficult for residents:• Move may have been sudden, due to health reasons.
• Resident may have had to leave home and give up personal belongings and beloved pets.
• Resident may have had loved ones who have died.• Residents may be experiencing a decline in health and independence.
9Admission, Transfer, Discharge, and Physical Exams
3. Explain the nursing assistant’s role in the emotional adjustment of a new resident
REMEMBER:As a nursing assistant, it is important to empathize with residents to help make the adjustment to facility life easier. Your sensitivity will make this change easier.
9Admission, Transfer, Discharge, and Physical Exams
3. Explain the nursing assistant’s role in the emotional adjustment of a new resident
Remember these guidelines for helping new residents adjust:• Have a positive attitude.• Be tactful.• Communicate clearly.• Show respect for residents’ belongings.• Be responsible.

9Admission, Transfer, Discharge, and Physical Exams
3. Explain the nursing assistant’s role in the emotional adjustment of a new resident
Guidelines for helping new residents adjust (cont’d.):• Be honest.• Listen to residents.• Pay attention to residents’ wishes.• Respect residents’ privacy.• Be patient and kind.

9Admission, Transfer, Discharge, and Physical Exams
Define the following terms:admission pack personal care items supplied upon a resident’s admission.
baseline initial value that can be compared to future measurements.
4. Describe the nursing assistant’s role in the admission process

9Admission, Transfer, Discharge, and Physical Exams
REMEMBER:Admission is often the first time you meet a new resident. When the resident arrives, give a good first impression of the staff and the facility. Welcome the new resident in a friendly manner.
4. Describe the nursing assistant’s role in the admission process

9Admission, Transfer, Discharge, and Physical Exams
4. Describe the nursing assistant’s role in the admission processRemember these guidelines for admission:
• Wash hands and gather necessary equipment to bring to resident’s room.
• Prepare the resident’s room before he arrives.• Prepare the bed and open curtains or blinds.• Notify roommate of new resident’s arrival.• Introduce yourself to resident and call him by his formal name.
• Do not rush the process.

9Admission, Transfer, Discharge, and Physical Exams
4. Describe the nursing assistant’s role in the admission processGuidelines for admission (cont’d.):• Introduce the new resident to other residents.• Explain day-to-day life in the facility.• Show resident how to work bed controls.• Make sure call light is close to bed and explain how to use it.
• Explain how to work television and phone.• Handle personal items with care and respect.

Admitting a resident
Equipment: may include admission paperwork (checklist and inventory form), gloves, and vital signs equipment
1. Identify yourself by name. Identify the resident. Greet the resident by name.
2. Wash your hands.
3. Explain procedure to the resident. Speak clearly, slowly, and directly. Maintain face-to-face contact whenever possible.
Admitting a resident
4. Provide for the resident’s privacy with a curtain, screen, or door. Ask the family to step outside until the initial admission process is complete. Show them where they may wait and let them know approximately how long they will have to wait. Tell them where they can get refreshments.

Admitting a resident
5. If instructed, do these things:
Take the resident’s height, weight, and vital signs. (Height and weight procedures follow; vitals signs are in Chapter 13.) Most facilities require baseline height, weight, and vital sign measurements. Baseline signs are initial values that can be compared to future measurements. Document on admission form and elsewhere per facility policy.

Admitting a resident
Obtain a urine specimen if required (see Chapter 16).
Complete the paperwork. Take an inventory of all of the personal items. Help the resident put personal items away. Label each item if it is facility policy. If the resident has valuables, ask the nurse for instructions.
Fill the water pitcher with fresh water. Add ice if requested.

Admitting a resident
6. When the initial portion of the admission is complete, locate the family and let them know they may return to the resident’s room.
7. Show the resident the room and bathroom. Explain how to work the bed controls and the call light. Point out the lights, telephone, and television and how to work them. Give the resident information on menus, dining times, and activity schedules.

Admitting a resident
8. Introduce the resident to his roommate, if there is one. Introduce other residents and staff.
9. Make resident comfortable. Remove privacy measures.
10. Leave call light within resident’s reach.

Admitting a resident
11. Wash your hands.
12. Be courteous and respectful at all times. Let the resident know when you are leaving. Ask if he needs anything else.
13. Document procedure using facility guidelines.

9Admission, Transfer, Discharge, and Physical Exams
4. Describe the nursing assistant’s role in the admission processDefine the following terms:pounda unit of weight equal to 16 ounces.
kilogram a unit of mass equal to 1000 grams; one kilogram equals 2.2 pounds.
metric system of weights and measures based upon the meter.

9Admission, Transfer, Discharge, and Physical Exams
Define the following terms:bedridden confined to bed.
contracture the permanent and often painful shortening of a muscle, usually due to a lack of activity.
abdominal girth a measurement of the circumference around the abdomen at the umbilicus (navel).
4. Describe the nursing assistant’s role in the admission process

9Admission, Transfer, Discharge, and Physical Exams
4. Describe the nursing assistant’s role in the admission processThink about this question:Why should any change in a resident’s weight be reported right away?

Measuring and recording weight of an ambulatory resident
Equipment: standing/upright scale, pen and paper to record your findings
1. Identify yourself by name. Identify the resident. Greet the resident by name.
2. Wash your hands.
3. Explain procedure to the resident. Speak clearly, slowly, and directly. Maintain face-to-face contact whenever possible.
4. Provide for the resident’s privacy with a curtain, screen, or door.

Measuring and recording weight of an ambulatory resident
5. Make sure resident is wearing non-skid shoes before walking to scale.
6. Start with the scale balanced at zero. If you do not know how to balance the scale, ask the nurse.
7. Help the resident step onto the center of the scale, facing the scale. Once on the scale, his arms must hang free.

Measuring and recording weight of an ambulatory resident
8. Determine resident’s weight. This is done by balancing the scale by making the balance bar level. Move the small and large weight indicators until the bar balances. Read the two numbers shown (on the small and large weight indicators) when the bar is balanced. Add these two numbers together. This is the resident’s weight.

Measuring and recording weight of an ambulatory resident
9. Help the resident off the scale before recording weight.
10. Record the resident’s weight.
11. Remove privacy measures.
12. Leave call light within resident’s reach.
13. Wash your hands.
14. Be courteous and respectful at all times.
15. Report any changes in the resident to the nurse. Document procedure using facility guidelines.
Measuring and recording weight of a bedridden resident
Equipment: scale, pen and paper to record findings
Have another co-worker assist you.
1. Identify yourself by name. Identify the resident. Greet the resident by name.
2. Wash your hands.
3. Explain procedure to the resident. Speak clearly, slowly, and directly. Maintain face-to-face contact whenever possible.
4. Provide for the resident’s privacy with a curtain, screen, or door.

Measuring and recording weight of a bedridden resident
5. Adjust the bed to a safe level, usually waist high. Lock the bed wheels.
6. Start with the scale balanced at zero. If you do not know how to balance the scale, ask the nurse.
7. Examine the sling, straps, chains, and/or pad for any damage. Do not use the scale if you find damage.
8. Turn linen down so that it is off the resident.

Measuring and recording weight of a bedridden resident
9. Turn resident to one side away from you (Chapter 11) or if flat pad scale is used, slide resident onto pad using a helper. If a sling is used, remove from the scale and place underneath the resident without wrinkling it.
10. When using a sling, turn the resident back on his back and straighten sling.
11. Attach the sling to the scale or, if using a flat pad scale, position resident securely on the pad.

Measuring and recording weight of a bedridden resident
12. Check the straps or other connectors, and raise the sling or the pad until the resident is clear of the bed. With some scales, you can keep the resident directly over the bed while weighing him. With others, you have to move the scale away from the bed. Secure the resident before moving the scale.
13. For digital scales, turn them on and note reading. With other scales, move the weights until you get a reading. Note the weight.

Measuring and recording weight of a bedridden resident
14. Lower the resident back down on the bed. If using a sling, turn resident to both sides to remove the sling. If using a pad scale, carefully slide the resident back onto the bed.
15. Record the resident’s weight.
16. Make resident comfortable. Replace bed linens.
17. Return bed to lowest position. Remove privacy measures.

Measuring and recording weight of a bedridden resident
18. Leave call light within resident’s reach.
19. Wash your hands.
20. Be courteous and respectful at all times.
21. Report any changes in the resident to the nurse. Document procedure using facility guidelines.

Measuring and recording height of an ambulatory resident
Equipment: standing/upright scale, pen and paper to record your findings
1. Identify yourself by name. Identify the resident. Greet the resident by name.
2. Wash your hands.
3. Explain procedure to the resident. Speak clearly, slowly, and directly. Maintain face-to-face contact whenever possible.
4. Provide for the resident’s privacy with a curtain, screen, or door.

Measuring and recording height of an ambulatory resident
5. Help the resident to step onto scale, facing away from the scale.
6. Ask the resident to stand straight, if possible. Help as needed.
7. Pull up measuring rod from back of scale. Gently lower measuring rod until it rests flat on the resident’s head.
8. Determine resident’s height.

Measuring and recording height of an ambulatory resident
9. Help the resident off scale before recording height. Make sure measuring rod does not hit resident in the head while helping resident off the scale.
10. Record height.
11. Remove privacy measures.
12. Leave call light within resident’s reach.
13. Wash your hands.
14. Be courteous and respectful at all times.

Measuring and recording height of an ambulatory resident
15. Report any changes in the resident to the nurse. Document procedure using facility guidelines.
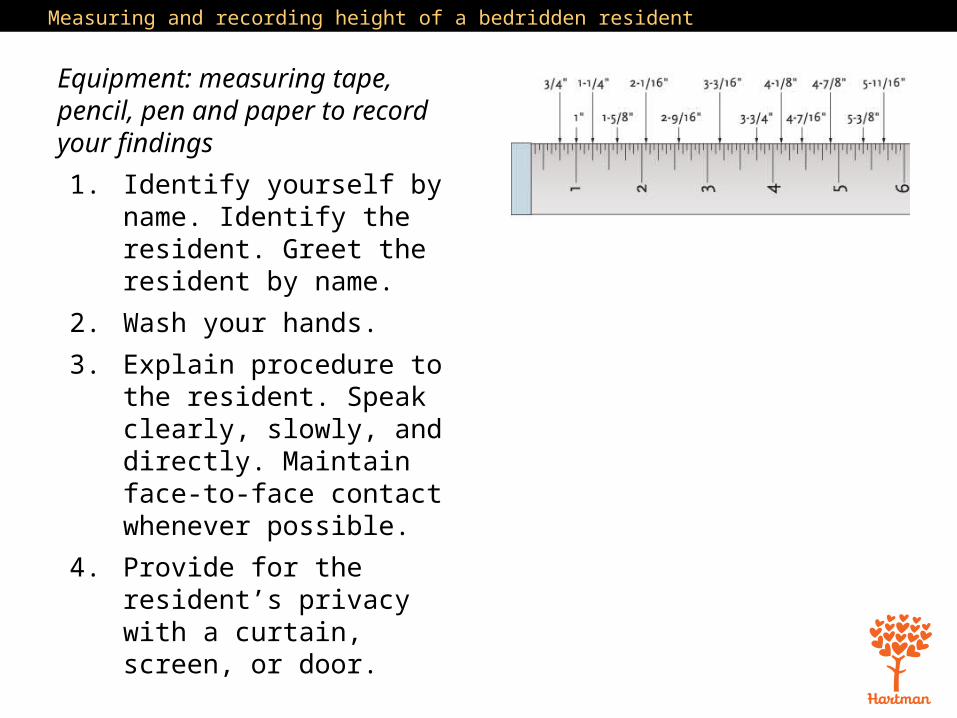
Measuring and recording height of a bedridden resident
Equipment: measuring tape, pencil, pen and paper to record your findings
1. Identify yourself by name. Identify the resident. Greet the resident by name.
2. Wash your hands.
3. Explain procedure to the resident. Speak clearly, slowly, and directly. Maintain face-to-face contact whenever possible.
4. Provide for the resident’s privacy with a curtain, screen, or door.

Measuring and recording height of a bedridden resident
5. Adjust the bed to a safe level, usually waist high. Lock the bed wheels.
6. Turn linen down so it is off the resident.
7. Position resident lying straight in the supine (back) position. Be sure the bed sheet is smooth underneath the resident.
8. Using a pencil, make a small mark on the bottom sheet at the top of the resident’s head.

Measuring and recording height of a bedridden resident
9. Make another pencil mark at the resident’s heel.
10. Using the tape measure, measure the area between the pencil marks. This is the resident’s height.
11. Record the resident’s height.
12. Make resident comfortable. Replace bed linen.
13. Return bed to lowest position. Remove privacy measures.

Measuring and recording height of a bedridden resident
14. Leave call light within resident’s reach.
15. Wash your hands.
16. Be courteous and respectful at all times.
17. Report any changes in the resident to the nurse. Document procedure using facility guidelines.

Measuring abdominal girth
Equipment: measuring tape, pen and paper to record your findings
1. Identify yourself by name. Identify the resident. Greet the resident by name.
2. Wash your hands.
3. Explain procedure to the resident. Speak clearly, slowly, and directly. Maintain face-to-face contact whenever possible.
4. Provide for the resident’s privacy with a curtain, screen, or door.

Measuring abdominal girth
5. Adjust the bed to a safe level, usually waist high. Lock the bed wheels.
6. Position resident lying straight in the supine (back) position.
7. Turn linen down and raise gown or top enough to expose only the abdomen. Keep all areas covered that do not need to be exposed. Promote resident’s right to dignity and privacy.
8. Gently wrap measuring tape around the resident’s abdomen at the level of the navel.

Measuring abdominal girth
9. Read the number where the ends of the tape meet.
10. Carefully remove the tape measure. Record abdominal girth measurement.
11. Make resident comfortable. Replace clothing and bed linen.
12. Return bed to lowest position. Remove privacy measures.

Measuring abdominal girth
13. Leave call light within resident’s reach.
14. Wash your hands.
15. Be courteous and respectful at all times.
16. Report any changes in the resident to the nurse. Document procedure using facility guidelines.

9Admission, Transfer, Discharge, and Physical Exams
5. Explain the nursing assistant’s role during an in-house transfer of a resident
Residents may be transferred to another room within a facility, or they may need to be transferred to a different unit that offers more skilled care. Whatever the reason for the transfer, it may be a difficult time for the resident. As a nursing assistant, you should try to make the transfer as smooth as possible for residents.

9Admission, Transfer, Discharge, and Physical Exams
5. Explain the nursing assistant’s role during an in-house transfer of a resident
Remember these important points about transfers:• Notify the resident as soon as possible of the transfer.
• Explain all the details you know about the transfer.
• Pack the resident’s personal items carefully.• Find out the method of transfer and plan the move.• Introduce the resident to everyone at the new unit.• When leaving the room, report to the nurse in charge of the resident.

Transferring a resident
Equipment: may include wheelchair or stretcher, cart for belongings, all of the resident’s personal care items
1. Identify yourself by name. Identify the resident. Greet the resident by name.
2. Wash your hands.
3. Explain procedure to the resident. Speak clearly, slowly, and directly. Maintain face-to-face contact whenever possible.
4. Provide for the resident’s privacy with a curtain, screen, or door.

Transferring a resident
5. Collect the items to be moved onto the cart, and ask another staff member to help take them to the new location.
6. Lock wheelchair or stretcher wheels. Help the resident into the wheelchair or onto the stretcher. Take him or her to the new area.
7. Introduce the resident to the new residents and staff.
8. Lock wheelchair or stretcher wheels. Transfer the resident to the new bed, if needed.

Transferring a resident
9. Unpack all belongings. Help the resident to put personal items away.
10. Make resident comfortable. Remove privacy measures.
11. Leave call light within resident’s reach.
12. Wash your hands.
13. Be courteous and respectful at all times.
14. Report any changes in the resident to the nurse. Document procedure using facility guidelines.

9Admission, Transfer, Discharge, and Physical Exams
6. Explain the nursing assistant’s role in the discharge of a resident
REMEMBER:A discharge is official after the doctor writes the discharge order that releases the resident to leave.

9Admission, Transfer, Discharge, and Physical Exams
6. Explain the nursing assistant’s role in the discharge of a resident
Remember these nursing assistant responsibilities during the discharge of a resident:• Collect resident’s belongings and pack them carefully.
• Be positive and reassuring.• Know if the resident will need a wheelchair or stretcher.

9Admission, Transfer, Discharge, and Physical Exams
6. Explain the nursing assistant’s role in the discharge of a resident
Think about this question:Why are you, as the nursing assistant, responsible for the resident until she is safely in the vehicle, with the vehicle’s doors closed?

Discharging a resident
Equipment: may include a wheelchair or stretcher, cart for belongings, the discharge paperwork, including the inventory list done on admission, all of the resident’s personal care items
1. Identify yourself by name. Identify the resident. Greet the resident by name.
2. Wash your hands.
3. Explain procedure to the resident. Speak clearly, slowly, and directly. Maintain face-to-face contact whenever possible.

Discharging a resident
4. Provide for the resident’s privacy with a curtain, screen, or door.
5. Compare the inventory list to the items being packed. Ask the resident to sign if all items are there.
6. Carefully put the items to be taken onto the cart, and ask another staff member to help transport items to the pick-up area.

Discharging a resident
7. Help the resident dress in clothing of his choice. Make sure the nurse has removed all dressings, IVs and tubes that need to be removed prior to discharge.
8. Lock wheelchair or stretcher wheels. Help him safely into the wheelchair or onto the stretcher (Chapter 11).
9. Help the resident say his goodbyes to other residents and the staff.

Discharging a resident
10. Take him to the pick-up area. Lock wheelchair or stretcher wheels. Help the resident into the vehicle. Transfer personal items into the vehicle.
11. Say goodbye to the resident. You are responsible for the resident until he or she is safely in the vehicle and the door is closed.
12. Wash your hands.
13. Document procedure using facility guidelines.

9Admission, Transfer, Discharge, and Physical Exams
7. Describe the nursing assistant’s role during physical examsSome residents need a physical exam when arriving at a facility. Others need a physical exam after they have been there for a while. Doctors or nurses will do part or all of the exam. Nursing assistants may be asked to help.

9Admission, Transfer, Discharge, and Physical Exams
7. Describe the nursing assistant’s role during physical examsREMEMBER:Knowing your role during a physical exam will make the process run smoothly.

9Admission, Transfer, Discharge, and Physical Exams
7. Describe the nursing assistant’s role during physical examsREMEMBER:Physical exams can be embarrassing and uncomfortable. Part of your role during an exam will be to help residents by listening to them, talking to them, or holding their hand.

9Admission, Transfer, Discharge, and Physical Exams
7. Describe the nursing assistant’s role during physical examsNursing assistants may be responsible for gathering this equipment for the nurse or doctor before a physical exam:• Sphygmomanometer• Stethoscope• Alcohol wipes• Flashlight• Thermometer• Tongue depressor• Eye chart • Tuning fork

9Admission, Transfer, Discharge, and Physical Exams
7. Describe the nursing assistant’s role during physical examsEquipment for a physical exam (cont’d.):• Reflex hammer• Otoscope• Ophthalmoscope• Specimen containers• Lubricant• Hemoccult card• Vaginal speculum• Gloves• Drape

9Admission, Transfer, Discharge, and Physical Exams
7. Describe the nursing assistant’s role during physical examsDefine the following terms:dorsal recumbent position with the person flat on her back with knees flexed and slightly separated and her feet flat on the bed.
lithotomy position in which a person is on her back with her hips at the edge of the exam table; legs are flexed and feet are in padded stirrups.
knee-chest position in which a person is lying on his abdomen with knees pulled up towards the abdomen and with legs separated; arms are pulled up and flexed and the head is turned to one side.

9 Admission, Transfer, Discharge, and Physical Exams
Transparency 9-1: Body Positions for Exams
DORSAL RECUMBENT
LITHOTOMY
KNEE-CHEST
9Admission, Transfer, Discharge, and Physical Exams
7. Describe the nursing assistant’s role during physical examsREMEMBER:Body positions used for exams may be uncomfortable or embarrassing for residents. Be sure to explain why the position is needed and how long the resident can expect to stay in the position. Expose only the parts of the body being examined.

9Admission, Transfer, Discharge, and Physical Exams
7. Describe the nursing assistant’s role during physical examsRemember these additional guidelines for assisting during an exam:
• Wash hands before and after exam.• Provide privacy measures.• Provide light for doctor or nurse.• Collect and label specimens as needed.• Listen to resident and help him remain calm.• Follow doctor’s or nurse’s instructions.• Make sure resident does not fall.• Put instruments in proper place and hand them to doctor or nurse.
• Follow Standard Precautions.

9Admission, Transfer, Discharge, and Physical Exams
ExamMultiple Choice. Choose the correct answer.1. One thing that would make a positive impression on a family visiting a facility is:(A) Lack of physical, occupational, and speech therapists available(B) No interpreters available who speak the resident’s native language(C) A safe and homelike atmosphere(D) Poor results from previous inspections
2. Which of the following is a reason that new residents may have trouble adjusting to life in a healthcare facility?(A) They will have more independence in a facility.(B) Their health is improving.(C) They have had to leave their home(D) The other residents and staff are people they already know well.

9Admission, Transfer, Discharge, and Physical Exams
Exam (cont’d.)3. A good way to help new residents adjust to life in the facility is:(A) Think about how it would feel to have to move into a facility(B) Tell the resident how much work it is to care for him(C) Cover up any mistakes to make the resident feel more confident about the facility’s care(D) Push residents to join in activities even if they say they don’t want to
4. One way to make a good first impression on a new resident is to:(A) Place his personal items where you think they look best.(B) Get the admission process completed as quickly as possible.(C) Allow the resident to introduce himself to everyone in the facility.(D) Prepare his room before his arrival so that he feels expected and welcome.

9Admission, Transfer, Discharge, and Physical Exams
Exam (cont’d.)5. When beginning to weigh a resident, the scale should be balanced at:(A) Zero(B) Five pounds(C) Ten pounds(D) Negative two pounds
6. There are _____ inches in a foot.(A) 10(B) 12(C) 15(D) 20

9Admission, Transfer, Discharge, and Physical Exams
Exam (cont’d.)7. The permanent and often painful shortening of a muscle is called a(n):(A) Abdominal girth(B) Sternal notch(C) Contracture(D) Demi-span
8. How will a nursing assistant measure the height of a resident who cannot get out of bed?(A) The NA will use a scale.(B) The NA will use a tape measure.(C) The NA will estimate height by looking at the resident.(D) The NA will not be able to measure height.

9Admission, Transfer, Discharge, and Physical Exams
Exam (cont’d.)9. What is a nursing assistant’s responsibility during transfer of a resident?(A) The NA decides that the resident must be transferred.(B) The NA must keep the fact that a transfer will occur a secret.(C) The NA packs all of the resident’s belongings. (D) The NA tells the resident’s roommate about the transfer.
10. When does a resident’s discharge become official?(A) After the doctor writes the discharge order that releases the resident to leave the facility(B) After the nurse completes the instructions for the resident to follow after the discharge(C) After the resident’s belongings are packed(D) After the resident is safely in the vehicle

9Admission, Transfer, Discharge, and Physical Exams
Exam (cont’d.)11. How can a nursing assistant help make discharge easier for a resident?(A) Allow him to pack his belongings himself(B) Be positive and reassuring about the change(C) Let the resident walk to the car by himself(D) Recommend exercises for the resident to do after discharge
12. A nursing assistant’s responsibility for the resident during discharge ends:(A) When the doctor writes the discharge order(B) When the resident’s belongings are packed(C) When the resident is seated in the vehicle(D) When the vehicle’s doors are closed

9Admission, Transfer, Discharge, and Physical Exams
Exam (cont’d.)13. In which position is the resident placed for examination of the breasts, chest, and abdomen?(A) Knee-chest position(B) Lithotomy position(C) Dorsal recumbent(D) Trendelenburg position
14. Why might a resident need emotional support during a physical exam?(A) Residents are always frightened of exams.(B) Doctors are not very sensitive to their patients’ emotions.(C) The resident has probably never had a physical exam before.(D) The resident may fear what the examiner will find.