9 reasons to own a shoulder plane - fine woodworking€¦ · reasons to own a shoulder plane...
TRANSCRIPT
It’s easy to dismiss the shoulder plane as a “spe-cialty” plane, another way of saying it has limited use in most shops. But that has not been my expe-
rience. I use this tool almost every day in my furniture- making shop. When I teach woodworking and show students what the shoulder plane can do, it quickly be-comes the most borrowed tool from my tool chest.
Early in its history, the shoulder plane was used most often to plane the shoulders of hand-cut tenons, hence its name. The blade is bedded at a low angle, with the bevel facing up, making it well-suited for planing end grain. It can be used one- or two-handed.
What really sets the shoulder plane apart from other handplanes is its narrow body profile, with the sole precisely milled square to its side and a blade that spans ever-so-slightly beyond the full width of the sole (see drawings, facing page). That means the blade is sure to cut fully into a corner without producing an unsightly cut line. Granted, you can use a chisel to get into a corner, but a shoulder plane does it faster with more control. Because the side of the plane and the sole are square to each other, each face of the corner remains square. Also, compared to a chisel, the plane makes it easier to keep the surfaces perfectly flat.
I reach for my shoulder plane all the time. Indeed, when making a wall cabinet recently, I used the plane in nine different places. For many of these tasks, the shoulder plane simply is the best tool for the job. The following pages illustrate some of the more common ways I put a shoulder plane work. No doubt there are other applications as well.
Chris Gochnour builds furniture and teaches furniture making in Murray, Utah.
Reasons to Own a Shoulder Plane
Fine-tune your joinery with these tips and techniques
B y C h r i s G o C h n o u r
9
COPYRIGHT 2006 by The Taunton Press, Inc. Copying and distribution of this article is not permitted.
F I N E W O O d W O R k I N G64 Photos: Tom Begnal; drawings: kelly J. dunton
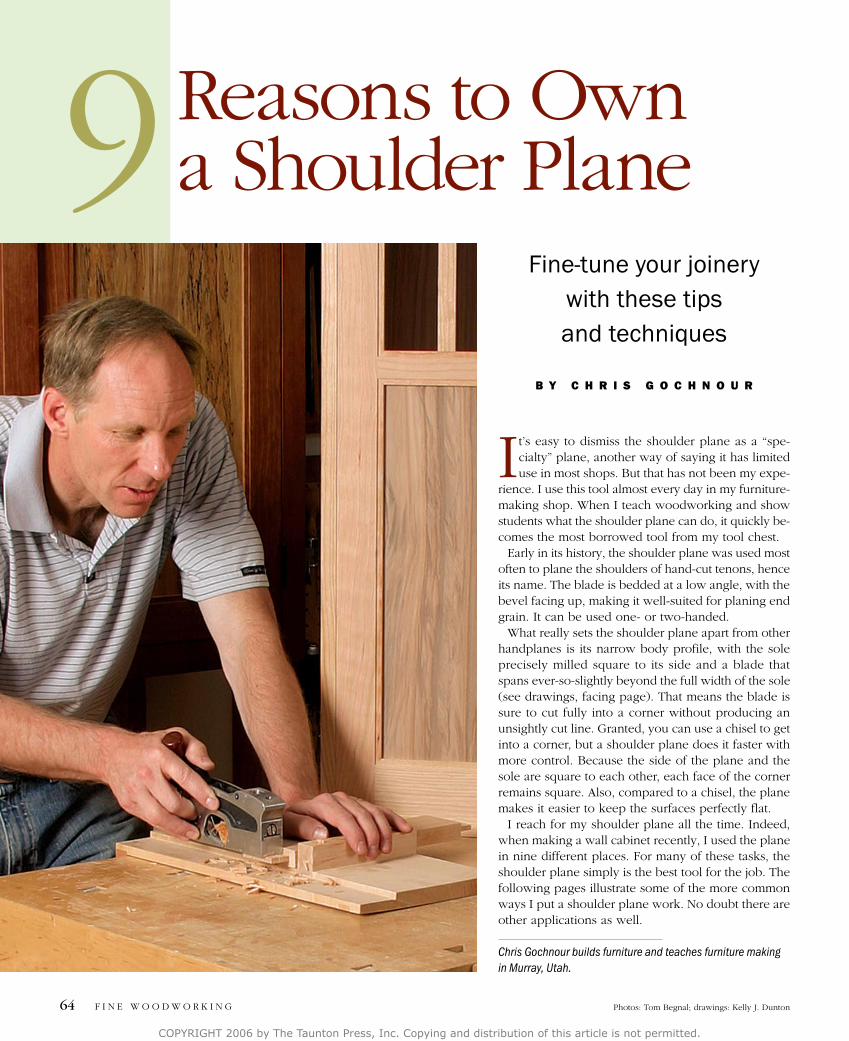
Trim tenon cheeks. No matter if the workpiece is narrow or wide, a few light passes with the shoulder plane on each tenon cheek will transform a tight-fitting joint into one that fits perfectly.
Perhaps the task where I use a shoulder plane the
most is fine-tuning the fit of tenons to their respective
mortises. I use machinery to cut the tenons. But I
don’t aim for a perfect fit from the machines, mainly
because there are enough slight variables in the
process to make perfection hit or miss. Instead, I use
the machines to produce a very tight fit. Then, when
it’s time to dry-assemble the parts, I use the shoulder
plane to shave each tenon cheek. This gives me com-
plete control, and I end up with a perfect fit every time.
Before starting, set the plane for a very light cut.
Check to make sure the blade is parallel with the sole
of the plane. Plane across the grain, taking light pass-
es. If the tenon is longer than the plane is wide, use
slightly overlapping passes, starting at the shoulder
and working toward the tenon end.
Be sure to plane the same amount from both
cheeks. If you don’t, the position of the tenon rela-
tive to the face surfaces of the workpiece will change
slightly, and the face surfaces of the mating parts
won’t be perfectly flush when assembled.
There’s another advantage to starting with a tight
fit. If, during dry-assembly, I discover any misalignment
of the face surfaces of the mating parts, I can make a
correction. This is done by identifying where the joint
is misaligned and planing one cheek of the tenon until
the misalignment is corrected.
While I’m at it, I use the plane to chamfer the tenon
end. This helps reduce the amount of glue that gets
scraped to the bottom of the mortise during glue-up.
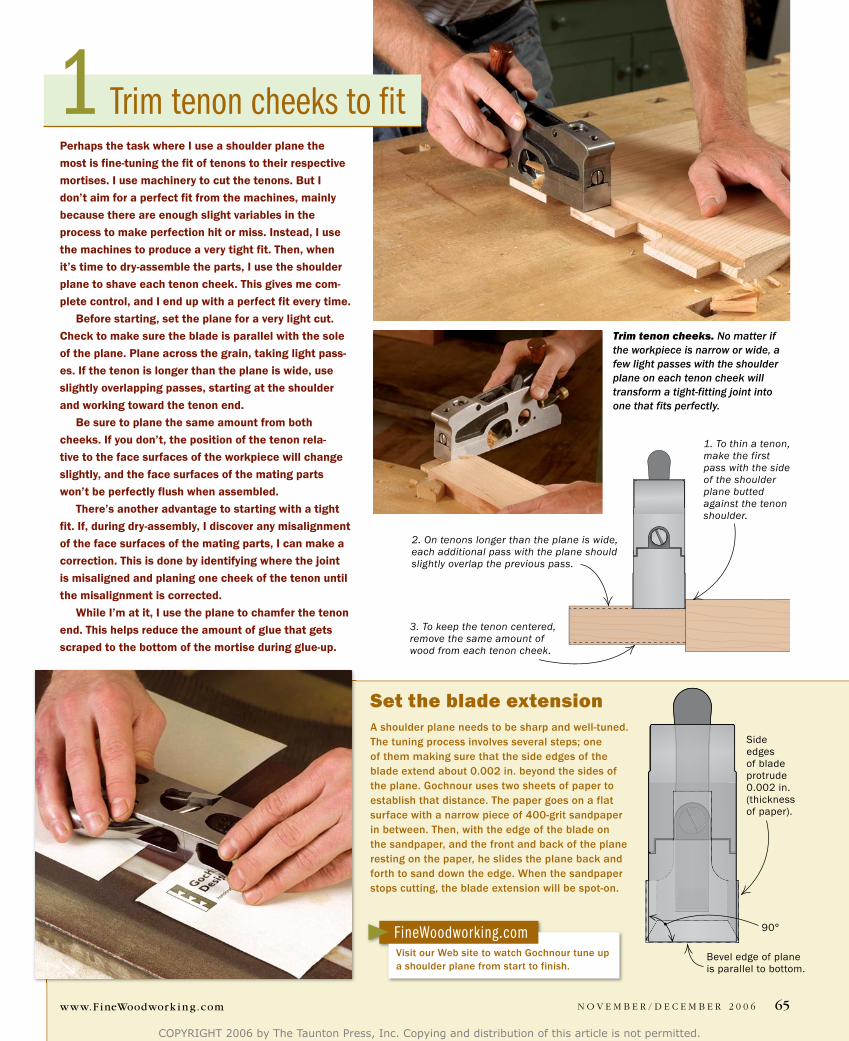
A shoulder plane needs to be sharp and well-tuned. The tuning process involves several steps; one of them making sure that the side edges of the blade extend about 0.002 in. beyond the sides of the plane. Gochnour uses two sheets of paper to establish that distance. The paper goes on a flat surface with a narrow piece of 400-grit sandpaper in between. Then, with the edge of the blade on the sandpaper, and the front and back of the plane resting on the paper, he slides the plane back and forth to sand down the edge. When the sandpaper stops cutting, the blade extension will be spot-on.
Side edges of blade protrude 0.002 in. (thickness of paper).
Bevel edge of plane is parallel to bottom.
90°
1. To thin a tenon, make the first pass with the side of the shoulder plane butted against the tenon shoulder.
2. On tenons longer than the plane is wide, each additional pass with the plane should slightly overlap the previous pass.
3. To keep the tenon centered, remove the same amount of wood from each tenon cheek.
set the blade extension
Trim tenon cheeks to fit1
FineWoodworking.comVisit our Web site to watch Gochnour tune up a shoulder plane from start to finish.
COPYRIGHT 2006 by The Taunton Press, Inc. Copying and distribution of this article is not permitted.
65www.F ineWoodwork i n g.com N O v E m B E R / d E c E m B E R 2 0 0 6
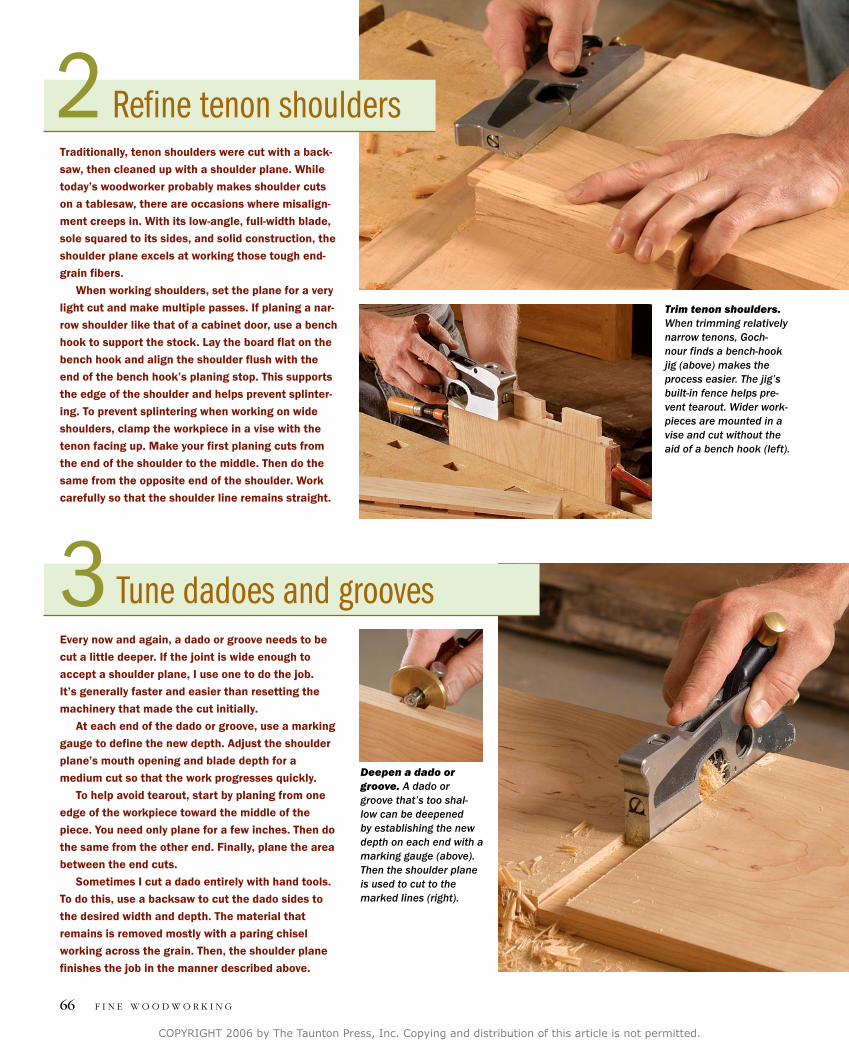
Trim tenon shoulders. When trimming relatively narrow tenons, Goch-nour finds a bench-hook jig (above) makes the process easier. The jig’s built-in fence helps pre-vent tearout. Wider work-pieces are mounted in a vise and cut without the aid of a bench hook (left).
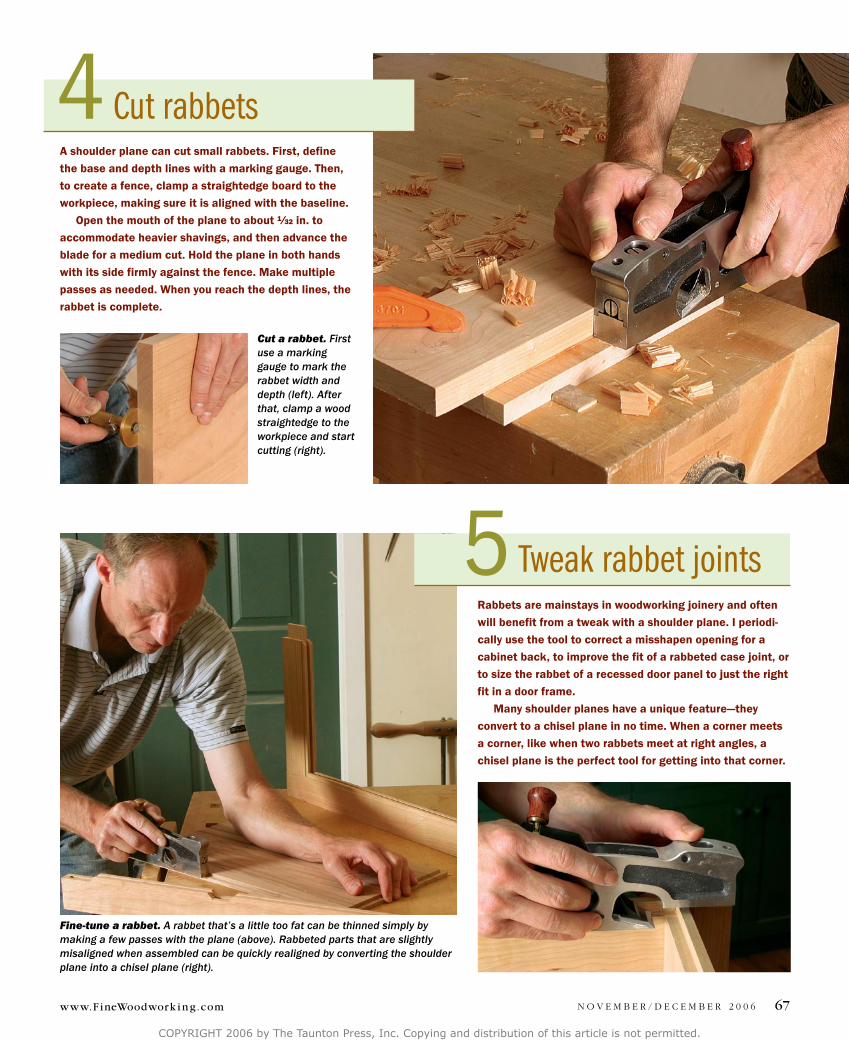
Deepen a dado or groove. A dado or groove that’s too shal-low can be deepened by establishing the new depth on each end with a marking gauge (above). Then the shoulder plane is used to cut to the marked lines (right).
Traditionally, tenon shoulders were cut with a back-
saw, then cleaned up with a shoulder plane. While
today’s woodworker probably makes shoulder cuts
on a tablesaw, there are occasions where misalign-
ment creeps in. With its low-angle, full-width blade,
sole squared to its sides, and solid construction, the
shoulder plane excels at working those tough end-
grain fibers.
When working shoulders, set the plane for a very
light cut and make multiple passes. If planing a nar-
row shoulder like that of a cabinet door, use a bench
hook to support the stock. Lay the board flat on the
bench hook and align the shoulder flush with the
end of the bench hook’s planing stop. This supports
the edge of the shoulder and helps prevent splinter-
ing. To prevent splintering when working on wide
shoulders, clamp the workpiece in a vise with the
tenon facing up. Make your first planing cuts from
the end of the shoulder to the middle. Then do the
same from the opposite end of the shoulder. Work
carefully so that the shoulder line remains straight.
Every now and again, a dado or groove needs to be
cut a little deeper. If the joint is wide enough to
accept a shoulder plane, I use one to do the job.
It’s generally faster and easier than resetting the
machinery that made the cut initially.
At each end of the dado or groove, use a marking
gauge to define the new depth. Adjust the shoulder
plane’s mouth opening and blade depth for a
medium cut so that the work progresses quickly.
To help avoid tearout, start by planing from one
edge of the workpiece toward the middle of the
piece. You need only plane for a few inches. Then do
the same from the other end. Finally, plane the area
between the end cuts.
Sometimes I cut a dado entirely with hand tools.
To do this, use a backsaw to cut the dado sides to
the desired width and depth. The material that
remains is removed mostly with a paring chisel
working across the grain. Then, the shoulder plane
finishes the job in the manner described above.
Refine tenon shoulders2
Tune dadoes and grooves3
COPYRIGHT 2006 by The Taunton Press, Inc. Copying and distribution of this article is not permitted.
F I N E W O O d W O R k I N G66
Fine-tune a rabbet. A rabbet that’s a little too fat can be thinned simply by making a few passes with the plane (above). Rabbeted parts that are slightly misaligned when assembled can be quickly realigned by converting the shoulder plane into a chisel plane (right).
A shoulder plane can cut small rabbets. First, define
the base and depth lines with a marking gauge. Then,
to create a fence, clamp a straightedge board to the
workpiece, making sure it is aligned with the baseline.
Open the mouth of the plane to about 1⁄32 in. to
accommodate heavier shavings, and then advance the
blade for a medium cut. Hold the plane in both hands
with its side firmly against the fence. Make multiple
passes as needed. When you reach the depth lines, the
rabbet is complete.
Rabbets are mainstays in woodworking joinery and often
will benefit from a tweak with a shoulder plane. I periodi-
cally use the tool to correct a misshapen opening for a
cabinet back, to improve the fit of a rabbeted case joint, or
to size the rabbet of a recessed door panel to just the right
fit in a door frame.
Many shoulder planes have a unique feature—they
convert to a chisel plane in no time. When a corner meets
a corner, like when two rabbets meet at right angles, a
chisel plane is the perfect tool for getting into that corner.
Cut a rabbet. First use a marking gauge to mark the rabbet width and depth (left). After that, clamp a wood straightedge to the workpiece and start cutting (right).
Cut rabbets4
Tweak rabbet joints5
COPYRIGHT 2006 by The Taunton Press, Inc. Copying and distribution of this article is not permitted.
N O v E m B E R / d E c E m B E R 2 0 0 6 67www.F ineWoodwork i n g.com
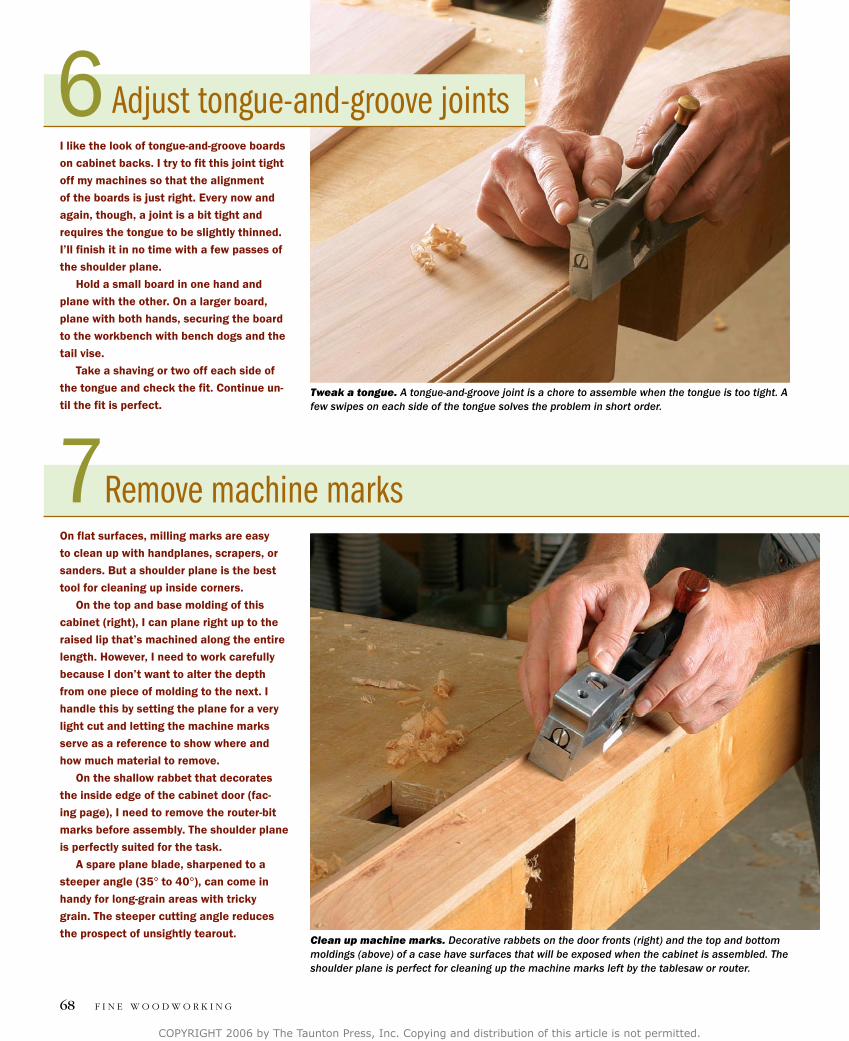
Tweak a tongue. A tongue-and-groove joint is a chore to assemble when the tongue is too tight. A few swipes on each side of the tongue solves the problem in short order.
Clean up machine marks. Decorative rabbets on the door fronts (right) and the top and bottom moldings (above) of a case have surfaces that will be exposed when the cabinet is assembled. The shoulder plane is perfect for cleaning up the machine marks left by the tablesaw or router.
On flat surfaces, milling marks are easy
to clean up with handplanes, scrapers, or
sanders. But a shoulder plane is the best
tool for cleaning up inside corners.
On the top and base molding of this
cabinet (right), I can plane right up to the
raised lip that’s machined along the entire
length. However, I need to work carefully
because I don’t want to alter the depth
from one piece of molding to the next. I
handle this by setting the plane for a very
light cut and letting the machine marks
serve as a reference to show where and
how much material to remove.
On the shallow rabbet that decorates
the inside edge of the cabinet door (fac-
ing page), I need to remove the router-bit
marks before assembly. The shoulder plane
is perfectly suited for the task.
A spare plane blade, sharpened to a
steeper angle (35° to 40°), can come in
handy for long-grain areas with tricky
grain. The steeper cutting angle reduces
the prospect of unsightly tearout.
I like the look of tongue-and-groove boards
on cabinet backs. I try to fit this joint tight
off my machines so that the alignment
of the boards is just right. Every now and
again, though, a joint is a bit tight and
requires the tongue to be slightly thinned.
I’ll finish it in no time with a few passes of
the shoulder plane.
Hold a small board in one hand and
plane with the other. On a larger board,
plane with both hands, securing the board
to the workbench with bench dogs and the
tail vise.
Take a shaving or two off each side of
the tongue and check the fit. Continue un-
til the fit is perfect.
Remove machine marks7
Adjust tongue-and-groove joints6
COPYRIGHT 2006 by The Taunton Press, Inc. Copying and distribution of this article is not permitted.
F I N E W O O d W O R k I N G68
Go places other planes can’t. The sharp edge adjacent to the beaded edge of the cabinet back-board is easy to soften with a shoulder plane.
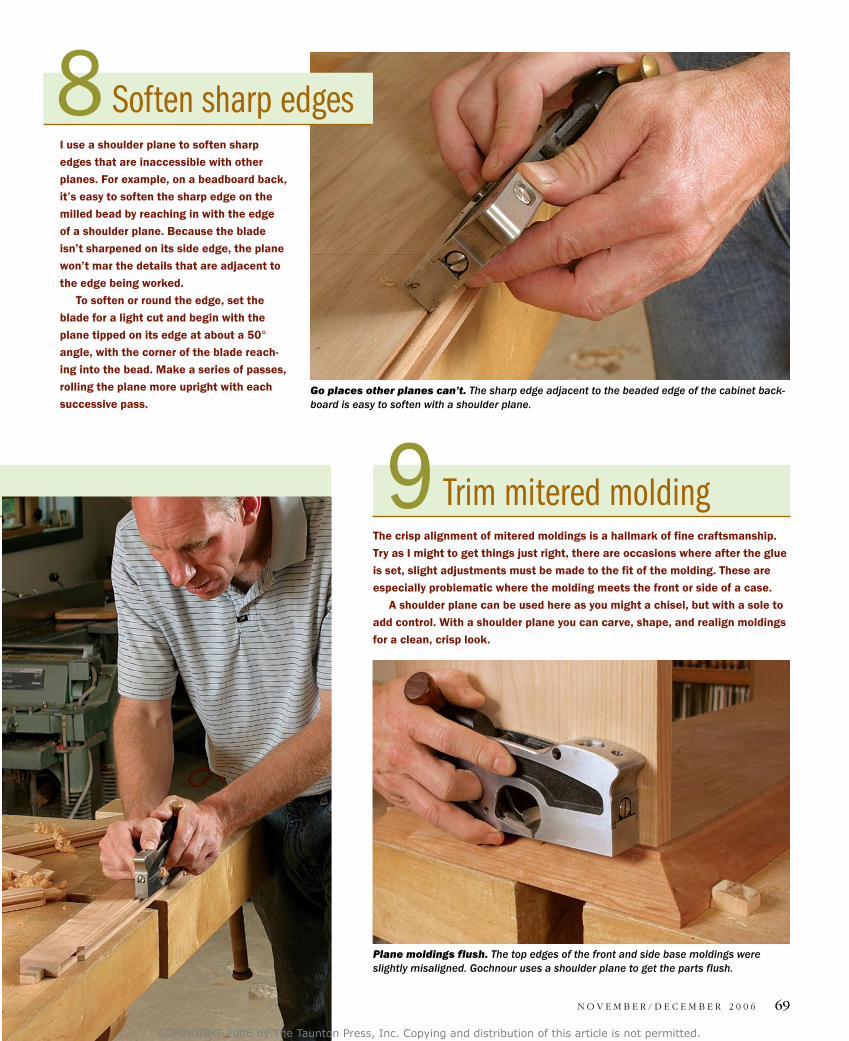
Plane moldings flush. The top edges of the front and side base moldings were slightly misaligned. Gochnour uses a shoulder plane to get the parts flush.
I use a shoulder plane to soften sharp
edges that are inaccessible with other
planes. For example, on a beadboard back,
it’s easy to soften the sharp edge on the
milled bead by reaching in with the edge
of a shoulder plane. Because the blade
isn’t sharpened on its side edge, the plane
won’t mar the details that are adjacent to
the edge being worked.
To soften or round the edge, set the
blade for a light cut and begin with the
plane tipped on its edge at about a 50°
angle, with the corner of the blade reach-
ing into the bead. Make a series of passes,
rolling the plane more upright with each
successive pass.
The crisp alignment of mitered moldings is a hallmark of fine craftsmanship.
Try as I might to get things just right, there are occasions where after the glue
is set, slight adjustments must be made to the fit of the molding. These are
especially problematic where the molding meets the front or side of a case.
A shoulder plane can be used here as you might a chisel, but with a sole to
add control. With a shoulder plane you can carve, shape, and realign moldings
for a clean, crisp look.
Trim mitered molding9
Soften sharp edges8
COPYRIGHT 2006 by The Taunton Press, Inc. Copying and distribution of this article is not permitted.
N O v E m B E R / d E c E m B E R 2 0 0 6 69