a bristolian's guide to solid wall...
TRANSCRIPT

A guide to the responsible retrofit of traditional homes in Bristol
Solid Wall Insulation
A Bristolian's guide to

ABOUT THIS GUIDEThis guide was commissioned by Bristol City Council, which is keen to promote robust, responsible and appropriate energy efficiency improvements across the city. The guide was developed by a team of professionals led by the Sustainable Traditional Buildings Alliance (STBA), who likewise have ‘responsible retrofit’ at the heart of their agenda – you will find out more about this principle when you read this guide.
ACKNOWLEDGEMENTSBristol City Council would like to thank the following organisations for developing this guidance:• Sustainable Traditional Buildings
Alliance (STBA)• Prewett Bizley Architects• NDM Heath Ltd• Fourwalls• SteersMcGillanEves
© Bristol City Council 2015
A BRISTOLIAN’S GUIDE TO SOLID WALL INSULATION

A BRISTOLIAN'S GUIDE TO SOLID WALL INSULATION
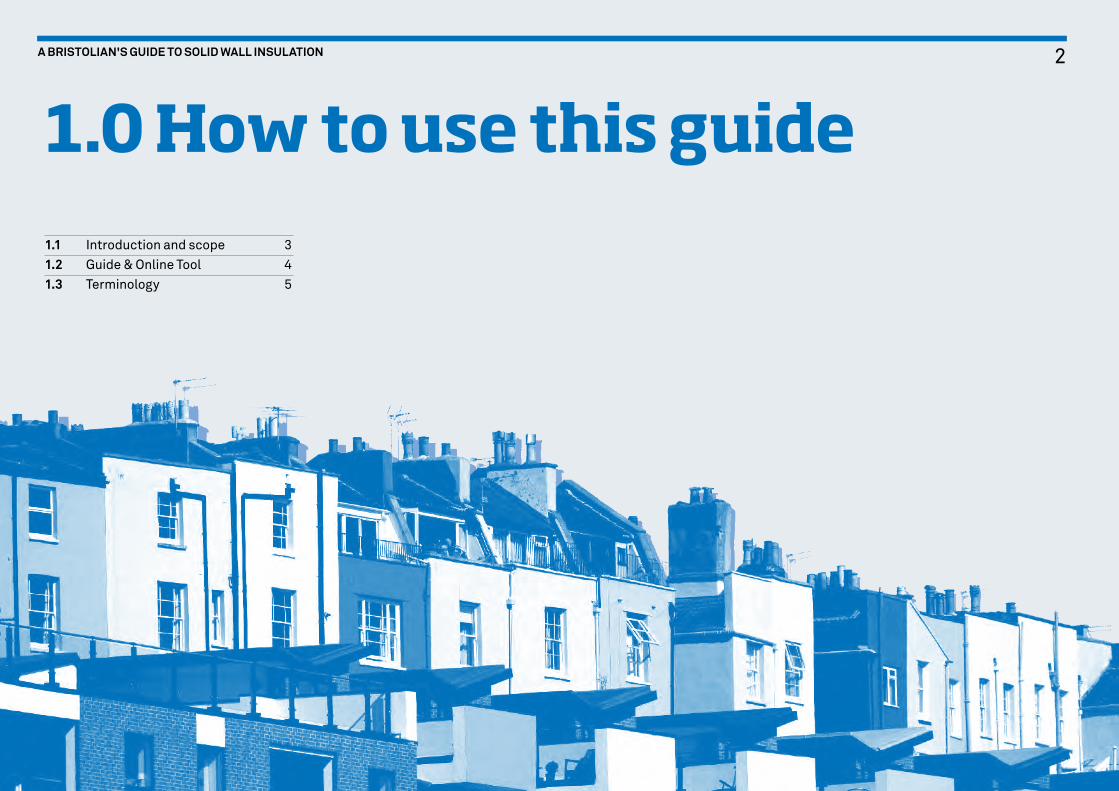
1.0 How to use this guide 2
1.1 Introduction and scope 3
1.2 Guide & Online Tool 4
1.3 Terminology 5
2.0 Introduction 6
2.1 Why retrofit your home? 7
2.2 What is solid wall insulation? 9
3.0 Responsible retrofit 11
3.1 What is ‘responsible retrofit’? 12
3.2 UnderstandWing your home 14
3.3 Understanding retrofit: principles for insulating traditional homes 16
3.4 Understanding ventilation and airtightness 19
3.5 Local considerations: Bristol 20
4.0 Developing a retrofit plan for you home 23
4.1 Key considerations 24
4.2 When should you consider insulating your walls? 30
4.3 Choosing your designer / contractor 31
5.0 Getting permission and consents 32
5.1 Permissions and consents 33
5.2 Permitted development for external wall insulation in Bristol 34
5.3 Building regulations 35
6.0 Solid wall insulation: when, where and how 36
6.1 The basics of solid wall insulation 37
6.2 When is solid wall insulation NOT appropriate? 40
6.3 Principles and design details 41
6.3.1 External wall insulation 42
6.3.1.1 Example details for external wall insulation 45
6.3.2 Internal wall insulation 57
6.3.2.1 Example details for internal wall insulation 60
6.3.3 Hybrid (internal and external) wall insulation 69
6.3.4 Windows 70
6.4 Related measures – Ventilation 73
6.5 Managing your retrofit project 80
6.6 Monitoring – ‘Look & Learn’ 82
7.0 Support and further information 83
7.1 Resources and support 84
7.2 Further reading 85
Contents
1
1.0 How to use this guide1.1 Introduction and scope 3
1.2 Guide & Online Tool 4
1.3 Terminology 5
2A BRISTOLIAN'S GUIDE TO SOLID WALL INSULATION
WHO IS THIS GUIDE FOR?This guidance has been produced specifically for people living in and working on solid-walled houses in Bristol. Its primary audience is householders, but professionals and installers will also benefit from reading the guidance as many of the details are vital for effective retrofit projects.
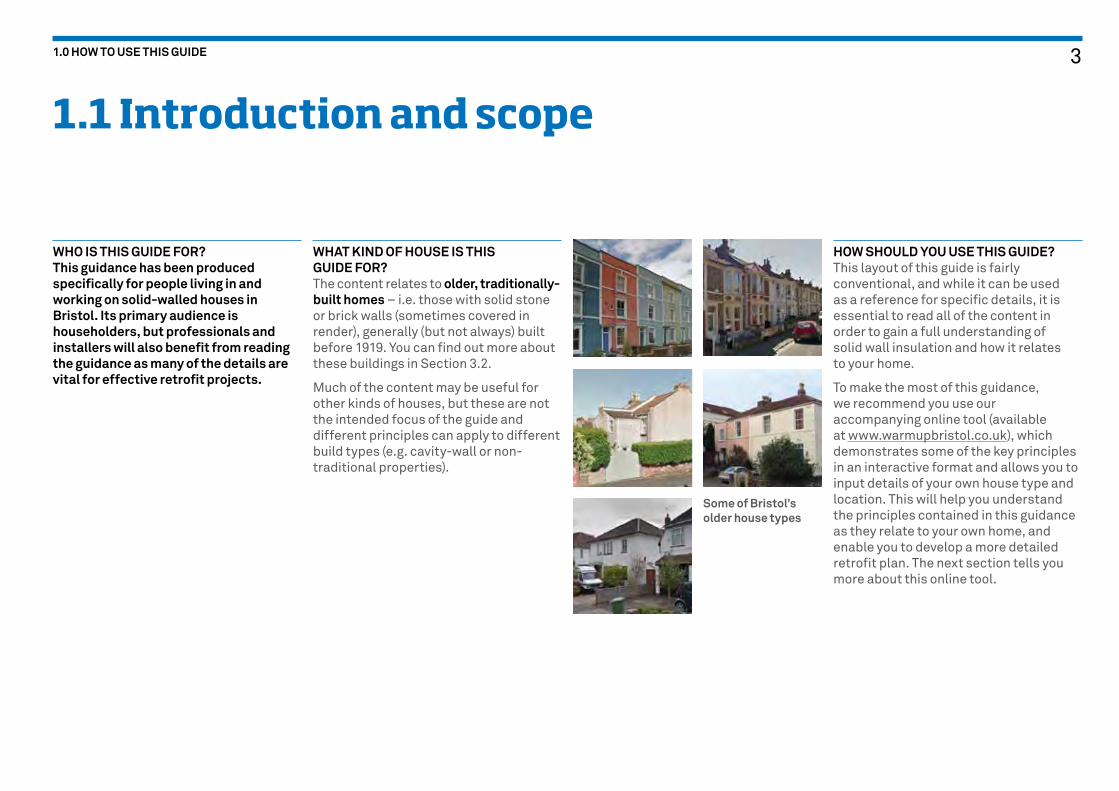
WHAT KIND OF HOUSE IS THIS GUIDE FOR?The content relates to older, traditionally- built homes – i.e. those with solid stone or brick walls (sometimes covered in render), generally (but not always) built before 1919. You can find out more about these buildings in Section 3.2.
Much of the content may be useful for other kinds of houses, but these are not the intended focus of the guide and different principles can apply to different build types (e.g. cavity-wall or non-traditional properties).
HOW SHOULD YOU USE THIS GUIDE?This layout of this guide is fairly conventional, and while it can be used as a reference for specific details, it is essential to read all of the content in order to gain a full understanding of solid wall insulation and how it relates to your home.
To make the most of this guidance, we recommend you use our accompanying online tool (available at www.warmupbristol.co.uk), which demonstrates some of the key principles in an interactive format and allows you to input details of your own house type and location. This will help you understand the principles contained in this guidance as they relate to your own home, and enable you to develop a more detailed retrofit plan. The next section tells you more about this online tool.
1.1 Introduction and scope
Some of Bristol’s older house types
31.0 HOW TO USE THIS GUIDE

The online tool is free to use, and has been developed as part of this guidance for people in Bristol. You can access the tool at www.warmupbristol.co.uk.
The tool and this guide give you two different ways to find out about solid wall insulation. This guide is for reading, and digesting at your leisure, but written guidance is always limited to words and pictures. The online tool provides an engaging way of explaining some of the key principles about retrofit, Moreover it will give you specific answers and options for your own building, leading you through a series of quick questions to identify what the key issues are for you and how to resolve them. You can use the feedback as the basis of talks with your designer or installer, to make sure the problem areas of your own home are addressed as part of your retrofit project.
1.2 Guide & Online Tool
Once you have used the online tool, you can return to this guide for detailed guidance and drawings showing how to address complex areas of your home. The online tool also links you to some of this guidance directly.
If you have any questions about this guide or the online tool, you can get in touch with the Council using the contact details at the back of this guide.
41.0 HOW TO USE THIS GUIDE
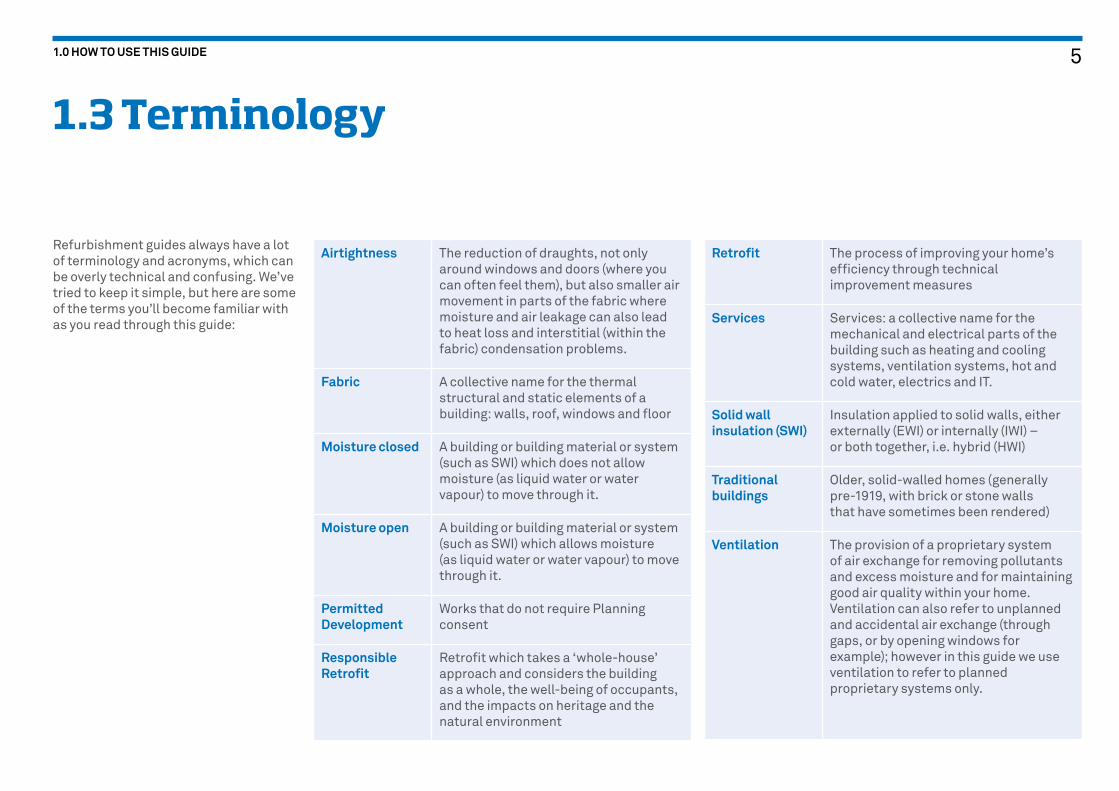
Refurbishment guides always have a lot of terminology and acronyms, which can be overly technical and confusing. We’ve tried to keep it simple, but here are some of the terms you’ll become familiar with as you read through this guide:
1.3 Terminology
Airtightness The reduction of draughts, not only around windows and doors (where you can often feel them), but also smaller air movement in parts of the fabric where moisture and air leakage can also lead to heat loss and interstitial (within the fabric) condensation problems.
Fabric A collective name for the thermal structural and static elements of a building: walls, roof, windows and floor
Moisture closed A building or building material or system (such as SWI) which does not allow moisture (as liquid water or water vapour) to move through it.
Moisture open A building or building material or system (such as SWI) which allows moisture (as liquid water or water vapour) to move through it.
Permitted Development
Works that do not require Planning consent
Responsible Retrofit
Retrofit which takes a ‘whole-house’ approach and considers the building as a whole, the well-being of occupants, and the impacts on heritage and the natural environment
Retrofit The process of improving your home’s efficiency through technical improvement measures
Services Services: a collective name for the mechanical and electrical parts of the building such as heating and cooling systems, ventilation systems, hot and cold water, electrics and IT.
Solid wall insulation (SWI)
Insulation applied to solid walls, either externally (EWI) or internally (IWI) – or both together, i.e. hybrid (HWI)
Traditional buildings
Older, solid-walled homes (generally pre-1919, with brick or stone walls that have sometimes been rendered)
Ventilation The provision of a proprietary system of air exchange for removing pollutants and excess moisture and for maintaining good air quality within your home. Ventilation can also refer to unplanned and accidental air exchange (through gaps, or by opening windows for example); however in this guide we use ventilation to refer to planned proprietary systems only.
51.0 HOW TO USE THIS GUIDE

2.1 Why retrofit your home? 7
2.2 What is solid wall insulation? 9
2.0 Introduction6A BRISTOLIAN'S GUIDE TO SOLID WALL INSULATION
When we talk about making our homes more efficient and comfortable, a bewildering array of terms can be bandied about – energy efficiency, renewable energy, refurbishment, low-carbon, zero-carbon, sustainability, fuel poverty, health & wellbeing, and so on. This can be confusing! The term ‘retrofit’ is used in this guide as a way to describe the improvement of a building’s energy use through technical interventions, such as insulation or solar panels. ‘Responsible retrofit’ is a holistic way of describing the improvement process and encompassing all the other terms listed above, while retaining or enhancing our built heritage. There is often a focus on the technical steps we can take to improve our homes, but these generally need to be combined with an understanding of efficient behaviours, as well as the important matter of repairs and maintenance, so we can make positive changes to how we use and live in buildings.
2.1 Why retrofit your home?
WHY RETROFIT?There are many reasons for retrofitting. You may be more interested in improved comfort, while your neighbour might have more of a focus on lowering fuel bills, for example; other reasons for retrofitting might include concern for the environment, health, a legal requirement (e.g. for rented homes), income generation or just basic maintenance.
The important thing to remember here is that your reason for retrofitting will determine your upgrade strategy – i.e. the measures you choose to adopt. Also, addressing one area may not automatically address others – you could improve comfort without lowering your bills (think about your thermostat setting), or generate income without making your home warmer. So the first step is to work out what your priorities are.
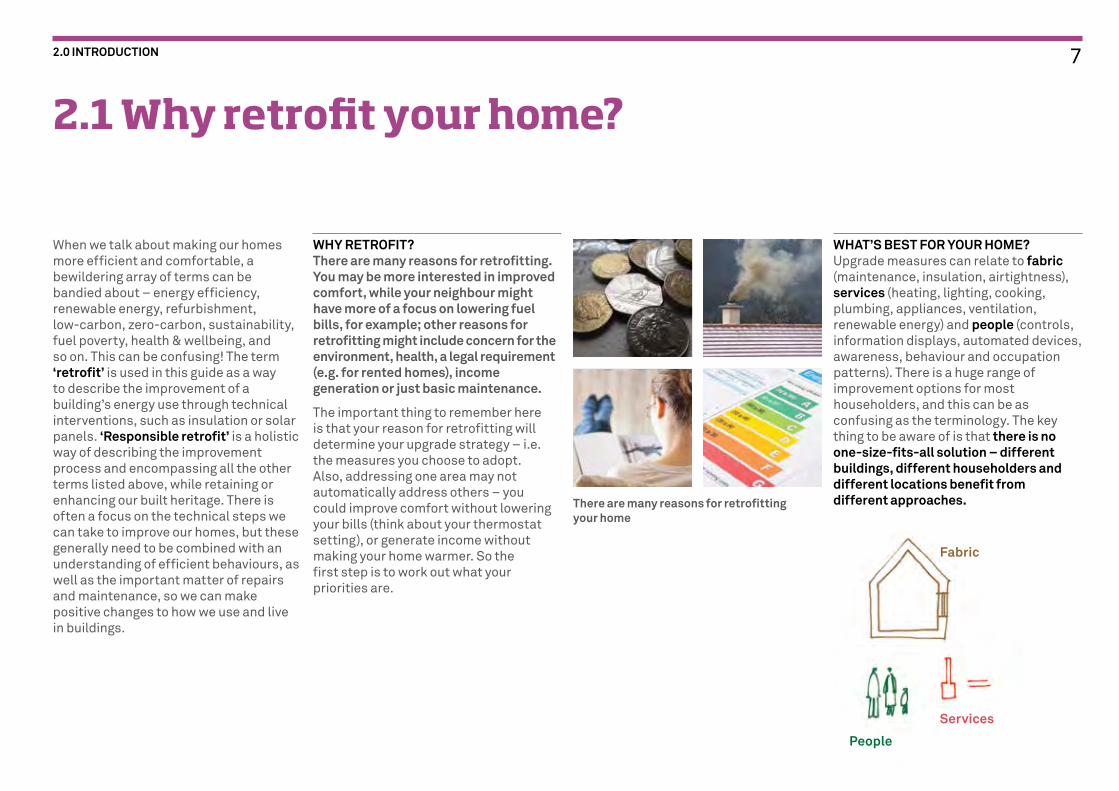
WHAT’S BEST FOR YOUR HOME?Upgrade measures can relate to fabric (maintenance, insulation, airtightness), services (heating, lighting, cooking, plumbing, appliances, ventilation, renewable energy) and people (controls, information displays, automated devices, awareness, behaviour and occupation patterns). There is a huge range of improvement options for most householders, and this can be as confusing as the terminology. The key thing to be aware of is that there is no one-size-fits-all solution – different buildings, different householders and different locations benefit from different approaches.There are many reasons for retrofitting
your home
People
Services
Fabric
72.0 INTRODUCTION

THE BENEFITS OF RETROFITThis section may equally be called ‘the benefits of responsible retrofit’, because jumping at retrofit without thinking it through can mean that a lot of the potential benefits aren’t ever realised.
However, with a bit of thought and attention to detail, retrofitting your home can bring about all sorts of good things:
• Warmth• Comfort• Lower energy bills• Improved health & wellbeing• Lower environmental impact• A beautiful home• A more valuable home
RETROFIT FOR THE LONG TERMAs well as considering quality and longevity of the measures you install, this also means thinking about your local climate. The changing global climate has various implications for the UK: some of these are better understood than others, but there are trends already in evidence. These include warmer, wetter weather, and an increase in stormy and extreme weather conditions (both hot and cold).
What does this mean for your retrofit? As well as thinking about wet conditions (do you need larger guttering, for example?), it means that you should be designing for warm as well as cold weather. An over-emphasis on insulation without ventilation or shading can sometimes cause overheating problems in hot weather. An effective ventilation strategy, consideration of glazing and shading, and the use of appropriate levels of insulation therefore become even more important, to be able to control internal conditions in an increasingly unstable climate, and allow excess heat to escape.
It is important to have a balance between these benefits and therefore a balanced approach to retrofit, to avoid ticking one box but compromising one or more of the others.
The best way to translate these benefits into reality is to adopt an approach that’s suitable for you and your home, make sure it is planned and delivered to a high standard, and understand how to live in your new, improved home.
It’s also important for you to treat predicted financial savings with some caution. Most predicted benefits are fairly generic, and can often be over-stated – as long as you’re aware of this, it will be easier to manage expectations and take a realistic approach. This is certainly not to say that you won’t benefit, but it’s worth thinking about overall benefits in terms of long-term quality rather than just numbers.
THE KEY TO SUCCESSFUL RETROFITRegardless of your reasons for retrofitting, the key to success is understanding. Understand your home, your lifestyle, your environment, your priorities, the upgrade measures available, the importance of careful planning and detailing, and the ‘whole-house approach’ and joined-up process described in this guidance – and you should achieve a retrofit that makes your home warmer, healthier, more comfortable, cheaper to run, more environmentally friendly, and of course beautiful.
Your retrofitted home will have to cater for all these conditions
82.0 INTRODUCTION > 2.1 WHY RETROFIT YOUR HOME?
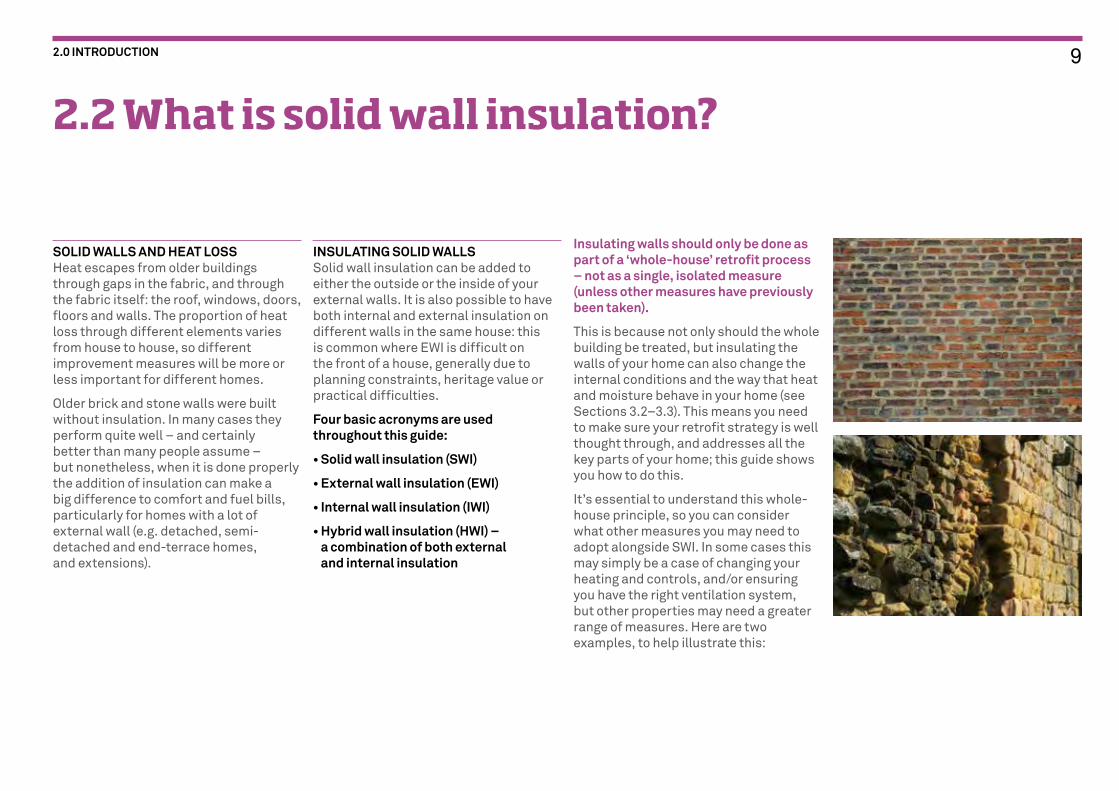
SOLID WALLS AND HEAT LOSSHeat escapes from older buildings through gaps in the fabric, and through the fabric itself: the roof, windows, doors, floors and walls. The proportion of heat loss through different elements varies from house to house, so different improvement measures will be more or less important for different homes.
Older brick and stone walls were built without insulation. In many cases they perform quite well – and certainly better than many people assume – but nonetheless, when it is done properly the addition of insulation can make a big difference to comfort and fuel bills, particularly for homes with a lot of external wall (e.g. detached, semi-detached and end-terrace homes, and extensions).
Insulating walls should only be done as part of a ‘whole-house’ retrofit process – not as a single, isolated measure (unless other measures have previously been taken).
This is because not only should the whole building be treated, but insulating the walls of your home can also change the internal conditions and the way that heat and moisture behave in your home (see Sections 3.2–3.3). This means you need to make sure your retrofit strategy is well thought through, and addresses all the key parts of your home; this guide shows you how to do this.
It’s essential to understand this whole-house principle, so you can consider what other measures you may need to adopt alongside SWI. In some cases this may simply be a case of changing your heating and controls, and/or ensuring you have the right ventilation system, but other properties may need a greater range of measures. Here are two examples, to help illustrate this:
2.2 What is solid wall insulation?
INSULATING SOLID WALLSSolid wall insulation can be added to either the outside or the inside of your external walls. It is also possible to have both internal and external insulation on different walls in the same house: this is common where EWI is difficult on the front of a house, generally due to planning constraints, heritage value or practical difficulties.
Four basic acronyms are used throughout this guide:
• Solid wall insulation (SWI)
• External wall insulation (EWI)
• Internal wall insulation (IWI)
• Hybrid wall insulation (HWI) – a combination of both external and internal insulation
92.0 INTRODUCTION

Whether you’re thinking about EWI, IWI or HWI, there is a lot to think about before you decide to go ahead. Section 6 of this guide covers all approaches in detail.
Where SWI is appropriate, well planned, well designed and well implemented in a joined-up process, with good communication between everyone involved in the project, it can be a very beneficial and positive measure that considerably enhances a property. However, if this approach is not followed SWI can risk causing ‘unintended consequences’, some of which can be very problematic (see Section 3.1). The best way to minimise these risks is to understand them, and then you will know how to minimise them – the rest of this guide explains more about these risks and how they can be resolved.
Old house – previously improved
Old house – no improvements
Current condition:
• Well maintained
• Loft insulation
• Floor insulation
• Double or secondary glazing
• Draught proofing
• New boiler and flue
•New heating controls
Current condition:
• Uninsulated loft and floors
• Single-glazed windows
• No draught proofing
• Old boiler and flue
• Old heating controls
• Poorly maintained (e.g. blocked, leaking gutters and downpipes; damp wall areas; failing mortar)
Is SWI appropriate for this home?
A house like this may be appropriate for SWI, and may need relatively few other measures such as a ventilation system (or at least a check of current ventilation provision) and ‘enabling works’ needed for SWI (see Section 6).
Is SWI appropriate for this home?
SWI should not be considered for a house like this until other measures have been carried out first, or are going to be carried out alongside SWI. This is partly to avoid ‘trapping’ problems caused by poor maintenance, and partly to avoid the cost and disruption of SWI when the majority of heat would continue to be lost through inefficiencies elsewhere the house.
102.0 INTRODUCTION

3.0 Responsible retrofit3.1 What is ‘responsible retrofit’? 12
3.2 Understanding your home 14
3.3 Understanding retrofit: principles for insulating traditional homes 16
3.4 Understanding ventilation and airtightness 19
3.5 Local considerations: Bristol 20
11A BRISTOLIAN'S GUIDE TO SOLID WALL INSULATION

1. Taking a holistic, whole-house approach that considers the whole building (fabric and services, including ventilation) along with the people who live in it and its environment. This extends to not adopting measures (even if they are free or subsidised) without first checking they are appropriate, and checking what other measures may or should be adopted at the same time or in the future
2. Understanding a) the building, b) its current performance, c) how it is used, d) its context and e) the retrofit measures being proposed
3. Adopting retrofit measures that are appropriate for traditional buildings – both technically and aesthetically. In particular, this means considering risks and benefits to i) Energy and Environment, ii) Health (buildings and people) and iii) Heritage
3.1 What is ‘responsible retrofit’?
RESPONSIBLE RETROFIT
‘Retrofitting’ a home means improving its energy performance, through a range of technical measures (e.g. insulation, heating systems, renewables and so on).
While buildings have been undergoing improvements for many years, improving the comfort and efficiency of older, solid-walled buildings requires particular care to avoid inappropriate and potentially damaging measures being installed. As such, traditional buildings require ‘responsible retrofit’.
Responsible retrofit means:
Exposure
Building condition and formStandards
Local Conditions
Grants
Orientation
Community heritage
Lifestyle and culture
Energy/Environment
Heritage/Community
Building Health
123.0 RESPONSIBLE RETROFIT

4.Using a joined-up process which ensures communication between assessor, designer, installer and homeowner. It is important that the homeowner is involved at each stage of the process, so that the retrofit is both appropriate and user-friendly. All parties also need to talk together about any problems or unexpected issues that arise during the retrofit, and re-assess the project to ensure a balance of benefits
5. Taking a look-and-learn approach – which means keeping an eye on whether new systems are working, maintaining your home properly and learning from mistakes, and adapting your behaviour where needed to ensure your home works as it should
N.B. Not adopting a responsible approach to retrofit can increase the risk of creating problems in your home. The wrong type of insulation, a partial or ‘quick-fix’ approach, the cheapest option – these are all things that can end up causing problems such as damp, condensation, mould growth, air quality problems, discomfort and health issues, repair costs and so on. (For more information about risks you can read the STBA’s Planning Responsible Retrofit booklet, referenced at the end of this guide.)
All these risks can be minimised by responsible retrofit.
By retrofitting your home responsibly, you are far more likely to achieve the benefits you want (e.g. improved comfort, lower fuel costs and environmental impact, a beautiful home) and far less likely to create ‘unintended consequences’ (e.g. damp and mould, reduced air quality, damage to its appearance, failure to achieve the predicted savings) – which you certainly don’t want!
Ultimately, responsible retrofit means achieving long-term, broad-based, positive outcomes for:
a) the houses themselves;
b) the people who live in the houses;
c) their communities;
d) the people involved in retrofit work;
e) the environment; and consequently
f) future generations.
Joined up process
Access Design Install Use
133.0 RESPONSIBLE RETROFIT > 3.1 WHAT IS ‘RESPONSIBLE RETROFIT’?

In terms of heating and moisture movement older, solid-walled homes work in a very different way to more modern homes – and understanding this is essential when you’re thinking about retrofitting your home. Is your home old, modern – or a mixture of the two (e.g. an old house with a new extension or new internal elements)?
Modern homes tend to be made of impermeable materials, be well-sealed and have lots of insulation, so the air inside them heats up very quickly and stays in the house for longer. Excess moisture in the air should be removed by deliberate ventilation routes (mechanical extract fans), as well as by householders opening windows.
3.2 Understanding your home
Older homes are constructed from different, permeable materials (e.g. solid brick and stone, lime mortar, render and plaster), have more natural ventilation (sometimes too much!) and were built without insulation. These features mean they tend to heat up and cool down more slowly (depending on their condition) than modern homes. The heavyweight nature of brick and stone means that unimproved older homes store more heat more in their fabric than modern homes (where the warmth is in the air rather than the materials). Excess moisture in the air escapes through chimneys and gaps in the fabric, householders opening windows, and through the fabric itself (water vapour passes through brick and stone). Older homes also rely more on sunshine, wind, heating and adequate ventilation in order to keep dry. Sometimes this characteristic of old buildings is described as their ‘breathability’, or need to breathe: technically we call this being ‘moisture open’, rather than ‘moisture closed’ which is how most modern buildings are designed and operate.
Modern Historic
143.0 RESPONSIBLE RETROFIT

In reality most older homes have been adapted over time, and they are now a combination of old and new – think of them as hybrid homes! This complicates the retrofit picture. Your old house is fairly likely to have various modern materials in it – plasterboard, insulation, plastic, concrete, cement, carpets, laminate floors, paint and so on – and these will change the way it behaves, particularly in relation to thermal performance and moisture movement. Notably, most of the above modern materials are impermeable to moisture – so a permeable (moisture open) stone wall that has been covered in cement render is no longer fully permeable, for example.
Lastly, the heritage value of older homes cannot be overstated. While some buildings are protected through listing, conservation areas and so on, the majority of older homes have little formal protection but form an essential component of our neighbourhoods and the way we feel about where we live. This makes their character and appearance very important, and this too has to be considered when thinking about retrofitting your home.
Before you start retrofitting, walk around your home and get to grips with how it was built, how it’s changed over the years, how the use of it has changed, how it behaves now, and its setting. This will give you a solid platform from which to build a retrofit plan that is right for your house. (Section 4 goes into more detail on how to develop your own retrofit plan.)
153.0 RESPONSIBLE RETROFIT > 3.2 UNDERSTANDING YOUR HOME

Once you’ve established the characteristics of your home, you can start thinking about how best to retrofit it.
Before you start choosing improvement measures, however, there are a number of key principles that you need to take on board. Rather than providing detail on specific measures, these are holistic ‘rules’ that apply to every traditional building retrofit – so they are things you should think about regardless of the improvement measures you have in mind:
didn’t work. Feedback from householders, particularly after living in the retrofit for some time, is especially useful and important. Again if there are problems then these can be addressed at this stage. A project is not ‘finished’ until at least a couple of years after physical completion: ‘finished’ means that things are all working well and any snags or misunderstandings have been resolved safely and satisfactorily.
3.3 Understanding retrofit: principles for insulating traditional homes
1. A whole-house approach is essential. This is perhaps the most important principle of traditional building retrofit. Measures should not be selected or installed on a one-off basis, but as part of an approach that considers the whole building (fabric and services), and the impacts of one measure on other aspects of the building. It should also be noted that this approach isn’t just for the building, but also extends to the people using the building, and its setting (i.e. neighbouring houses and environmental context). Of course, you may not be able to afford to treat your whole house at once, but it could be staged over time, and as a minimum it will help reduce risks if you understand the principles of the whole-house approach.
2. A joined-up process is essential. This is the second guiding principle of responsible retrofit. It means ensuring good communication between all parties, in particular Assessors, Designers, Installers and Home Owners. Good communication means that each should understand the overall aims of the project and work together to achieve these. If problems or unexpected issues arise (for example, discovering rotten timbers when insulating the building or having to deal with bad weather delays), then it is important that any changes to the project are discussed with all relevant parties, and new measures agreed. Just as important is feedback after the project as to what worked, what was difficult or expensive, and what
Joined up process
Access Design Install Use
163.0 RESPONSIBLE RETROFIT

5. Understand building and moisture conditions before you start. If you know where the weak spots or damp patches are, you can find out what’s causing them (e.g. blocked gutters, excessive moisture build-up, inadequate ventilation), resolve the root causes, factor in drying time and associated behavioural/technical fixes, and so on. This principle can add time and money to your retrofit project, but is essential to avoid problems later on.
6. If your home was ‘moisture open’ before retrofit, it should be moisture open afterwards! As explained previously, older buildings were meant to ‘breathe’. Introducing moisture-closed materials (e.g. some insulation systems) changes this dynamic, and can increase the risk of trapped moisture and associated problems. Keeping your home moisture open will have a strong influence on the insulation materials and systems you choose – see Section 6 for more details.
3. Basic maintenance should always be the first improvement measure. It’s not exciting, but it is important! A well-maintained home – with properly-functioning windows, doors, walls, roof, floor, rainwater goods and heating system – will be more comfortable and thermally efficient than a poorly-maintained home. (Damp walls, for example, lose heat quicker than dry walls, and can create more problems if insulation is added before they are remedied. Drying-out time will depend on the individual house, but this should be factored into any retrofit project time plans.) Addressing these areas is also likely to reduce the number of other improvement measures you need to implement. Note that while identification of maintenance issues should be the first step, improvement works can often be done at the same time as other works, as part of an overall retrofit project (see point 6).
7. It’s all about balance! In a whole house approach it is important not to only focus on one thing (like insulation) or one aim (like cost saving or heritage) but to find a balance which keeps you and your home healthy. Sometimes there may be conflicts between health issues and energy use, or between energy and heritage or appearance, which mean that a compromise has to be made. However a balanced compromise, is much better than one thing being perfect, but the whole building being out of balance. This can have bad consequences for everyone. Of course retrofit can also be an occasion to re-balance a house that has problems.
4.Behaviour and lifestyle affect the efficiency and health of your home. It costs nothing, but can change a lot. As well as improving efficiency (e.g. turning off unused lights and appliances, programming and controlling your heating properly), your daily habits can control the health of your home and reduce the risk of unintended consequences. This mainly relates to moisture and air quality – minimise moisture build-up, allow moisture to get out and let fresh air get in.
• Do: cook with lids on your pans; open windows; use extract fans; dry washing outside (where possible – this is Britain, after all!)
• Don’t: dry clothes on radiators if at all possible (if you do, ensure there is adequate ventilation to allow the wet air to escape); seal trickle vents in windows; block other deliberate ventilation routes, e.g. carpet obstructing air path at the bottom of internal doors (there should be a 10mm gap)
173.0 RESPONSIBLE RETROFIT > 3.2 UNDERSTANDING YOUR HOME

8. ‘Thermal bridging’ should be avoided wherever possible. This relates to the whole-house approach and a joined-up installation process. Missing areas of insulation (e.g. around gas meters, around windows and doors, at ground / roof / floor junctions), create ‘thermal bridges’, or cold spots – these areas increase heat loss, are more likely to attract condensation and subsequent mould growth, and can increase the risk of trapping moisture within the building fabric. It is generally very hard to avoid thermal bridging completely, particularly with IWI, but a good designer should be able to do much to tackle this. (Section 6 covers this in more detail.)
11. There are many ways to improve the energy use of buildings, some of them don’t involve technology. It’s important to understand that not all buildings are suitable for insulation or other retrofit measures such as solar panels or heat pumps. But nearly all buildings can benefit from good repair and maintenance combined with efficient and usable services (e.g. heating and hot water systems, easy-to-use controls), and from appropriate use (e.g. more efficient heating management, drawing curtains or closing shutters at night). Remember: it is people who use energy, not buildings.
If you apply the above principles to your own home, you will increase the chances of a successful, safe, comfortable and beautiful home in the long term. If these principles aren’t followed, the risk of unintended consequences will increase – these can cause problems not only to appearance, building fabric, indoor air quality and health, but also in terms of the cost and hassle of putting it right.
9. A responsible retrofit project must address insulation, airtightness and ventilation together. This is an important but often overlooked element of retrofit projects – retrofit isn’t just about insulation! (In fact, as mentioned in point 10 below, it might not be about insulation at all.) However, if you do insulate your home, then you will change the internal conditions and the way the building works. If you make your home more airtight but forget about ventilation, moisture levels in the air could increase and cause problems such as damp, mould, poor air quality (including high radon levels – see section 3.5) and so on. If you insulate your home but don’t address airtightness, you could still lose a lot of heat and significantly reduce the impact of the insulation that you have invested in. A balanced insulation retrofit project considers all these elements together – more detail on ventilation and airtightness is provided in Sections 3.4 and 6.3.
10. Traditional buildings are vital to our heritage and sense of place. Retrofitting our homes isn’t just about technical measures, it’s about retaining or enhancing the feel of individual homes and whole neighbourhoods. It’s about buildings, people, places, culture and the environment. This can present both challenges and opportunities for SWI: while in many cases a change in appearance may not be desirable in some situations it can be very beneficial for everyone. The unique character of many areas of Bristol, for example, could increase the opportunities for well-thought-out EWI.
183.0 RESPONSIBLE RETROFIT > 3.3 UNDERSTANDING RETROFIT: PRINCIPLES FOR INSULATING TRADITIONAL HOMES
As mentioned previously this is an essential but often-overlooked area of retrofit. Ventilation and airtightness are covered in more detail in Section 6.3, but the general principles and considerations are provided below.
VENTILATION PRINCIPLESYour home needs fresh air to maintain a healthy indoor environment, control condensation, remove pollutants and ensure the safe operation of some combustion appliances. Ventilation inevitably involves some heat loss and can require electricity, but both of these can be minimised: the aim is to provide the correct amount of ventilation for the minimum energy demand.
The layout, size and shape of your home determine how well air can circulate: these factors will have a bearing on the indoor air quality. When you’re thinking about your ventilation requirements, it’s vital that you consider air circulation around the whole house.
AIRTIGHTNESS AND VENTILATIONTraditionally, many older homes have relied on natural air infiltration to provide ventilation, through gaps in the fabric and around windows and doors. This can
sufficient for the provision of background ventilation. Of course, it is both a logical and very helpful measure, but particularly for major retrofits it cannot be relied upon.
LEGAL & SAFETY REQUIREMENTSIt’s important to know that the provision of ventilation is a requirement under the Building Regulations. Minimum specifications are provided in Building Regulations Part F – Ventilation (see Further Reading at the end of this guide), and you are required to notify Bristol Council’s Building Control team (see contact details at the end of this guide).
Fresh air is also an important consideration to ensure safe and efficient operation of some heating equipment (e.g. a solid-fuel stove, or some older boilers). If in doubt you are strongly recommended to make appropriate checks to ensure your home is safe in this respect – check your boiler manual, or contact a professional for advice.
result in excessive and uncontrollable ventilation rates, significantly increasing the energy used to heat your home adequately and creating cold draughts and discomfort.
If your home is poorly insulated, heat losses from draughts can account for around 20% of your heating bill. Once you have retrofitted your home and have better levels of insulation, if you haven’t addressed ‘airtightness’ it’s quite possible that these draughts could become the dominant cause of heat loss (as the heat can no longer escape through the insulated building elements) and account around half of your overall heat loss.
In order to maximise the benefits of any insulation, and reduce the risk of condensation within the insulation layer, it’s important that you also address airtightness to reduce draughts. More information on airtightness measures is provided in Section 6.3.
N.B. You might hear people arguing that draughts provide air flow and therefore contribute to ventilation. This is a weak argument against addressing airtightness: relying on this type of air movement can leave some parts of your
home under-ventilated, as you can’t control when or where this air movement occurs; this in turn could lead to poor air quality and other problems such as condensation and mould, as well as uncomfortable draughts. If you’re going to do it, do it properly!
VENTILATION AND RETROFITThe whole-house approach means taking a holistic view – and ventilation is an essential element for the success of your retrofit project.
Look carefully at the ventilation provision you already have in your home. How is air supplied at the moment? It’s possible that you don’t have any specific ventilation provision, instead relying on air movement through gaps (e.g. loose-fitting doors and windows) and open chimneys. This is known as ‘air leakage’, and is likely to be reduced as part of your retrofit project, and so is unlikely to be sufficient once the works have finished. It is also uncontrolled / uncontrollable, as mentioned above. Section 4.1 tells you how to assess your current ventilation set-up.
For the purposes of this guide, just opening windows is not considered
193.0 RESPONSIBLE RETROFIT
3.4 Understanding ventilation and airtightness

HOUSE TYPES & DETAILSBristol’s buildings give the city a very distinctive character, and it is important that retrofitting these buildings should retain and/or enhance this character. Although local houses can be broadly grouped into a handful of different types (e.g. detached, terraced, stone, brick etc.), in reality most houses are different and a one-size fits-all approach to retrofit is unlikely to be either appropriate or successful.
Noting the above caveats, we have grouped Bristol’s traditional housing stock into five broad types:
• Flat-backed terrace• Terrace with extension• End terrace• Semi-detached• Detached
When you’re thinking about your own house, consider its appearance (brick, stone, render, architectural features) and setting (adjacent properties, character of neighbourhood) – this will help you determine whether SWI is appropriate, and if so whether it should be external or internal. (There are lots of other considerations as well – you’ll find out about these as you read this guide.)
Flat-backed terrace
Semi-detached
Terrace with extension End terrace
Detached
203.0 RESPONSIBLE RETROFIT
3.5 Local considerations: Bristol

CONSERVATION AREAS AND LISTED BUILDINGSIf your home is listed you will have to plan your retrofit with particular care – and make sure a Bristol Council conservation officer is engaged throughout to make sure they are happy with your proposals. If you live in a conservation area the same applies, but to a lesser degree. Contact details for your conservation team are included at the back of this guide, and the map below shows the city’s conservation areas. You can see a bigger version of this map: http://maps.bristol.gov.uk/knowyourplace/?service=HER&maptype=js&layer=Conservation+areas&extent=14312. 928625857224
Care and attention are also required outside conservation areas. Our built ‘heritage’ is not confined to conservation areas and buildings with formal protection – all of the streets of traditional houses in Bristol are what make up its history and character, and most of these have little formal protection. So even if you don’t live in a conservation area, it’s vital that you consider your surroundings and make sure that what you do to your home retains or enhances its character and appearance.
CLIMATE AND EXPOSUREBristol has a lot of hills. This means that different houses, even close by one another, can have very different micro-climates and exposure to the elements – which are driven predominantly from the South-West. Weather exposure (mainly rain and wind) can have a dramatic effect on building fabric and energy performance – a house exposed to more wind and driving rain is likely to be wetter and need more heating than one in a sheltered, sunny position.
Exposure and orientation are also important determining factors in the suitability and type of SWI. This is covered in more detail in Section 6 of this guide.
213.0 RESPONSIBLE RETROFIT > 3.5 LOCAL CONSIDERATIONS: BRISTOL

RADONSome people are aware of radon, but may not know if they live in a risk area or what the potential effects are. In Bristol, it is something you’re likely to have to think about, as many areas of the city lie within a radon risk zone (see map below) and it can potentially cause severe health problems with prolonged exposure.
What is radon? Radon is a natural radioactive gas which you can’t see, smell or taste. In outside air the levels of radon are low, but it can accumulate inside buildings, and some areas of the country are more prone to it than others. However, even within the same area neighbouring properties can have different radon levels. For around £50, you can order a Radon Home Measurement pack to measure the radon levels in your own home. This is available from Public Health England’s radon
website www.ukradon.org, which is very accessible and has a lot more information on radon. If you have any concerns about radon in your own home, we would strongly recommend that you access one of these packs.
What has radon got to do with retrofit? The ground is the main source of radon. If you make your home better-insulated and more airtight, but don’t have adequate ventilation, your home could be at increased risk of radon build-up as it will be harder for it to escape. There are various remedial measures available to deal with radon (see the above website), but for retrofit projects the key things are to ensure adequate ventilation is in place and that it is regularly maintained, and to consider your plan for insulating and draught-proofing / sealing your floors with great care (consulting a radon specialist if necessary).
LOCAL ENERGY EFFICIENCY PROGRAMMESBefore you start your retrofit project, it’s always worth checking what local energy efficiency programmes or grants are running in Bristol, as these could help make it easier arranging works, choosing contractors or getting help with funding. These change over time, but you can find out what’s running at any point by getting in touch with the Council – contact details are provided at the back of this guide.
223.0 RESPONSIBLE RETROFIT > 3.5 LOCAL CONSIDERATIONS: BRISTOL
4.1 Key Considerations 24
4.2 When should you consider insulating your walls? 30
4.3 Choosing your designer / contractor 31
4.0 Developing a retrofit plan for your home
23A BRISTOLIAN'S GUIDE TO SOLID WALL INSULATION

WHAT ARE YOUR GOALS?As mentioned previously (see Section 2.1) there are many different reasons for retrofitting your home. Make sure you’re very clear on what you want to get out of your own retrofit, as this will increase your chances of achieving it. For most people it’s a combination of reasons, but comfort and fuel costs often come close to the top of the list.
The joined-up process of SWI – but there are lots of things you need to think about before you even get to this stage!
Assess Design Install Use
Knowing your goals will also help you have a clear view on any short-term insulation offers that may come your way. Even if it’s free, think carefully about whether you want or need it, and about whether it’s right for your home. This particularly applies to SWI, for all the reasons discussed in this guide.
WHAT IS YOUR HOUSE LIKE?The drawings in Section 3.5 give an idea of the range of different house types in Bristol. Have a look at these, and decide which best fits your own home. Be aware that these are very generic, and your home is likely to have differences and extra features – these might include bay windows, overhanging eaves, parapet walls, rear extensions and so on. These are catered for in more detail in Section 6, and in the online SWI tool that accompanies this guide (available at www.warmupbristol.co.uk; see Section 1.2 for more details).
Once you’ve identified your house type, you can start thinking about the relative benefits of treating different areas of your home. You will know from experience which rooms feel coldest, but the heat loss breakdowns opposite will help give you a clearer picture of where your priorities might lie.
(As with all estimates these are relatively generic – consider them as indicative proportions rather than absolute figures. For the purposes of this modelling, each house type is assumed to have single-glazed windows, 100mm loft insulation and an uninsulated floor.)
As you can see, if you live in a mid-terraced house heat loss through single-glazed windows and air leakage is likely to be a bigger issue than heat loss through walls alone, particularly if you have large windows. This makes a very strong case for installing secondary or double glazing and addressing airtightness, before you consider SWI. However, if you live in a house with much more external wall SWI becomes a much more serious consideration. (This is not to say other areas of your home stop being important – as you know, responsible retrofit means adopting a whole-house approach.)
24
4.1 Key considerations
4.0 DEVELOPING A RETROFIT PLAN FOR YOUR HOME

These charts give an estimate of the relative heat loss from different areas of Bristol’s five house types
Terrace flat backed Terrace with extension Terrace end Semi detached Detached
kWh/
m2 /a
0
20
40
60
80
100
120
140
160
180
200
Heat loss kWh/m2/a external wall Heat loss kWh/m2/a window Heat loss kWh/m2/a floor Heat losskWh/m2/a roof Heat loss kWh/m2/a ventilation
254.0 DEVELOPING A RETROFIT PLAN FOR YOUR HOME > 4.0 DEVELOPING A RETROFIT PLAN FOR YOUR HOME

If you are thinking about SWI, the particular details and features of your house become more important. Bay windows, parapet walls, ornate window surrounds or eaves brickwork, internal cornicing, and so on – all these features are common in Bristol’s housing and make SWI more complex. These are the sort of features you’ll have to talk about with your designer to make sure they are appropriately treated (and not ignored).
If your house is rendered, EWI is far more likely to be an appropriate measure, as the change in appearance should be considerably less than on walls with exposed brick or stone. ‘Should’, because you will still need to make sure that the detailing is meticulous and appropriate – you can find out more about this in Section 6.
If your house has exposed brick or stone walls of any quality, particularly where they are easily visible from the street (mainly at the front of the building), and you want to insulate these, IWI or HWI (with IWI at the front and EWI at the back) are often more likely to be appropriate for aesthetic reasons. There are also often practical reasons (e.g. when houses face directly onto pavements, or have lots of meter boxes, pipes and similar on the walls) which mean that IWI is often preferred on house fronts. IWI requires particular attention to detail to minimise technical risks – again, Section 6 goes into far more detail on this.
WHERE ARE THE WEAK / PROBLEM AREAS?You should know your home better than anyone, particularly if you’ve been living in it for a long time. Before you decide on your retrofit measures, think about where the ‘weak points’ are.
• Is there any evidence of damp? If so, where? Identify this, and try and establish the cause (you may need to hire an approved professional) and make sure this is resolved before you go any further
• Which rooms are coldest? And why? You’re likely to have particular rooms, or parts of rooms, that feel less comfortable than other areas – this could be rooms with large single-glazed windows, excessive draughts, damp areas, insufficient heating, lots of external wall, or North-facing rooms that don’t receive direct sunlight. Try and work out why they are uncomfortable, and this will help you identify the best upgrade strategy – and this may not always be SWI. An extension with lots of external wall, for example, could also have draughts, single-glazed windows, a small radiator, a cold concrete floor and no roof insulation – it’s likely to be easier to tackle all of these before you think about SWI
• How do you use the different rooms in your home? This will also determine your priority areas. A bedroom, for example, may be more appropriate to keep cooler and therefore be less of a priority for insulation. In a study or living room, on the other hand, you’ll often sit still for long periods of time, and this will make you feel colder even if the temperature is no different from other areas of the house. Rooms like this may be more of a priority in your retrofit plan – but again, insulation may not be top of the list until simple measures like better draught proofing or more efficient heating have been addressed.
Render, brick and stone fronts: which is most suitable for EWI
Ornate features like this will affect your retrofit strategy
264.0 DEVELOPING A RETROFIT PLAN FOR YOUR HOME > 4.0 DEVELOPING A RETROFIT PLAN FOR YOUR HOME

WHAT SORT OF VENTILATION PROVISION DO YOU CURRENTLY HAVE?
If you fall into category 0, you will need to install some form of proprietary ventilation (as per categories 1-4) as part of your retrofit project. If you are in categories 1-2, you can probably stick with this as long as it works well and you use it properly, although you may need some alterations. However, if you’re planning a major retrofit that will significantly
improve your home’s airtightness, you may well need continuous mechanical ventilation as described in categories 3-4. More detail on airtightness levels and available ventilation systems is provided in Section 6.3.
WHAT’S ALREADY BEEN DONE?Again, you should be aware of what has already been done in your home, even if it was done by a previous owner. If you’re not sure, it’s often easy to check – either in the paperwork that came with your house, or by sticking your head up into the loft space, looking at your windows and radiators, peering up the chimney and so on. Some measures are harder to identify, mainly where they are hidden from view (e.g. IWI, under-floor insulation) – but you should be able to get a rough idea.
Before you think about SWI, the sort of things you should be checking (and installing, where needed) are listed below. If they have been done already, check to make sure they’ve been done properly or don’t need upgrading:
• Maintenance – particularly clearing of gutters, drains and air vents, fixing any leaking downpipes, masonry repairs and repointing, roof repairs and resolution of any damp problems
• Heating system and controls – programmer and individual radiator controls, efficient boiler (may need re-siting), flue replacement or extension
• Lighting and appliances – efficient lighting and appliances can make a big difference to your running costs (and low-energy lighting has improved considerably in recent years)
• Airtightness – installation of draught proofing around windows and doors, sealing of cracks and other unintentional gaps
• Ventilation – ensuring all deliberate ventilation routes are clear, and any mechanical ventilation is properly installed and working properly
• Insulating other areas – loft, floor and windows can often be insulated without too much trouble (you can find advice on these measures in the Further Reading section at the end of this guide)
Have you done all these things? If so, you’re ready to think about SWI.
DOES YOUR HOUSE HAVE CONSERVATION OR LISTED STATUS?The principles of retrofitting conservation-grade homes are outlined in Section 3.5 (along with a map of Bristol’s conservation areas). If you live in a home like this, some of the more detailed considerations for you to think about are outlined below:
• Contact a Bristol Council conservation officer at an early stage, and work with them throughout the planning of your project if needed
• Appearance is particularly important. While a sensitive approach is needed
for all areas of your home, windows in particular are notoriously contentious. As well as draught-proofing, insulation is also important – either temporary (curtains, internal shutters) or permanent (secondary or double glazing) – but with a bit of research, you should be able to find sensitive, appropriate and effective solutions for most windows. The sources of further information at the end of this guide can give you more advice on this
• EWI is unlikely to be acceptable, particularly at the front of your house, but appropriate IWI or HWI may be possible depending on the nature and level of protection of your home. There may be cases where EWI is possible even at the front (if your home is already rendered, for example), but these would require careful detailing and negotiations with a Bristol Council conservation officer
It’s worth repeating that even if you don’t live in a designated conservation area, your home contributes to the feel and character of your street and your
Which of the following best describes the ventilation provision you have in your home?
0. No specific ventilation system, relying on air movement through gaps in the fabric and around windows
1. Trickle vents fitted in windows and/or air bricks in external walls, plus extract fans in ‘wet rooms’ (bathrooms, WCs and kitchen)
2. Air inlets as above, but no extract fans. Air is naturally extracted through vertically ducted outlets on the ceiling (sometimes called ‘passive stacks’) in wet rooms
3. Any other system that employs a continuously-running fan at low speed, extracting air from wet rooms
4. As above, but also supplying fresh air to living rooms and bedrooms via a ‘heat recovery’ unit
A good candidate for HWI?
274.0 DEVELOPING A RETROFIT PLAN FOR YOUR HOME > 4.0 DEVELOPING A RETROFIT PLAN FOR YOUR HOME

House 1: Terraced house, stone walls, large windows, floor void inaccessible from below
Measure Install cost Payback Comfort benefit Disruption
Loft insulation Low Quick High Low
Floor insulation High Long High High
Draught proofing
Medium Long High Low
Secondary / Double glazing
High Long High Medium
New boiler and controls
Medium Medium Medium Low
EWI High Long Medium Medium
IWI High Long Medium High
HWI High Long Medium High
Ventilation High n/a High Medium
House 2: Detached house, brick walls, average windows, floor void accessible from below
Measure Install cost Payback Comfort benefit Disruption
Loft insulation Low Quick High Low
Floor insulation Low Medium High Low
Draught proofing
Medium Long High Low
Secondary / Double glazing
High Long High Medium
New boiler and controls
Medium Medium High Low
EWI Very high Long High Medium
IWI Very high Long High High
HWI Very high Long High High
Ventilation High n/a High Medium
neighbourhood. In these cases it is your responsibility, not that of a conservation officer, to ensure that you adapt your home appropriately.
As part of this responsibility, think about consulting with your local community wherever you can – you might find others thinking about the same thing. Community- based and street-by-street schemes can have real cost and technical advantages, as well as being more beneficial to community character and heritage.
WHAT’S YOUR BUDGET?Retrofit projects normally boil down to money – how much have you got to spend, and how much will you save? Let’s be up-front about these fundamental questions:
• For older buildings, thorough, well-planned, well-executed whole-house retrofit projects are not cheap – although there are many low-cost steps you can implement in the first instance
• On a purely financial basis, thorough, well-planned, well-executed whole-house retrofit projects don’t have a quick payback – costs are unlikely to be recouped by financial savings in the short term
Luckily, there are many other benefits to taking the right approach. Consider some of the other determining factors:
• Comfort, health, building character and overall wellbeing can be huge benefits and numbers can’t be put on these. Think qualitative, not quantitative
• While short-term payback may be a challenge, a good retrofit will reap rewards in the longer term. As energy prices continue to rise, your savings will increase and payback time reduce; a good retrofit is less likely to require extra money to be spent on remedial works; and as energy-efficient homes become more and more of a priority for people, your home is likely to be worth more.
Poorly planned, single-measure or partial retrofits are unlikely to pay back quickly, and can sometimes lose you money and property value, as well as causing discomfort and ill health. Don’t go down the cheap route thinking it will save you money. Of course, we can’t all afford to go the whole hog – not in one go, at least. But a long-term view is essential. Once you’ve worked out a sound, whole-house retrofit plan for your own home, you might decide to spread the cost by doing it in stages: low-cost measures first, then more expensive ones gradually – and incorporating them into general maintenance projects as opportunities present themselves.
It impossible to give precise costs or savings for any measure, as it depends so much on your home, and on how well things are installed and operated. However, as a guideline, the tables here give an idea of the relative costs and savings you could expect for different measures, based on two different, unimproved property types. These tables give you an idea of the variability of any such estimates, and assume the following:
284.0 DEVELOPING A RETROFIT PLAN FOR YOUR HOME > 4.0 DEVELOPING A RETROFIT PLAN FOR YOUR HOME

• Properties currently unimproved (i.e. leaky, no insulation, old heating systems)
• High-quality measures installed
• Measures installed individually (N.B. This is only to show a comparison – we don’t recommend this approach!)
HOW MUCH DISRUPTION ARE YOU HAPPY WITH?The ‘hassle factor’ is an important consideration, and one which is often overlooked until work has started and you find yourself in the middle of a building site! If you’re planning a comprehensive retrofit project you can expect dirt, dust, noise and redecoration. However, you can do a lot to control and minimise this – use good contractors; organise works to happen while you’re out; make sure different jobs are joined up wherever possible and trades overlap (an experienced designer/ supervising professional can help a lot here); and most importantly remember that the hassle factor is relatively short term but the benefits will last you a long time.
We all have different tolerance levels. If ‘anything goes’ outside but you don’t want mess to come inside your home, this will affect your retrofit plan – IWI and lifting floors to add insulation underneath are likely to be out of the question, but EWI may be an option. If you don’t want any disruption anywhere, this could limit your plans to lower-level measures – although even for some more major interventions disruption can be minimised by planning works when
you are out. (But a word of caution: if you’re organising works to happen while you’re out, do check progress and detailing each day, to make sure no corners are being cut.) Talk with contractors or designers before you agree the works, to get a realistic idea of what’s involved and how messy it’s likely to be. And if you are expecting some disruption anyway then take advantage of the opportunity to get maintenance works carried out at the same time.
Hassle doesn’t just apply to the physical works, however. Do remember that planning and overseeing a whole-house retrofit project will take up a fair amount of your time – this is good as it greatly increases your own depth of understanding and reduces the chance of making mistakes, but you need to be aware of it.
Lastly, take a realistic approach to timetabling works. Projects involving work on buildings commonly overrun, for all sorts of reasons, so factor this in – it may be excessive to suggest working out your timetable and then doubling it, but you get the idea!
HOW DO YOU LIVE IN YOUR HOME?This should go without saying, but knowing how you live, your daily habits and the level of engagement you’re happy to have with your retrofitted house will all help identify the best way forward for you and your home.
If you have a technical mind and a good understanding of buildings and retrofit measures, you’re better-suited to high-tech measures or services that require understanding and control. If you prefer just to be comfortable in your home without having to get involved in such nuances, a more passive retrofit plan targeting simpler insulation and heating measures is likely to suit you better. Either way, knowing yourself and your habits before you start will help avoid complications further down the line.
Even if you’re not technically minded, knowing how to use your heating and ventilation systems – and checking that they are working properly – is essential. This applies particularly to renewable heating systems such as heat pumps, where appropriate control and behaviour are particularly important – but if you’re thinking of something like that then chances are you’re keen on technology in any case.
Before you get to this stage, consider your daily behaviour and habits. What do you do now, and what else could you do? In many cases you will find that you can make savings before you’ve even touched your heating system or the fabric of your house. You’ll find more advice on this in the 'Further Resources' at the end of this guide.
Low-tech or high-tech: which one suits you?
294.0 DEVELOPING A RETROFIT PLAN FOR YOUR HOME > 4.0 DEVELOPING A RETROFIT PLAN FOR YOUR HOME

If you’ve read this guide from page 1, you should have gone through a fair amount of questioning by now, about you, your home and the retrofit measures available to you. If you’ve done this, your answers should give you a reasonable indication of whether SWI is something you should be thinking about – either now or in the future.
SWI is something you can be thinking about if you can answer ‘yes’ to the following questions. Do you know:
4.2 When should you consider insulating your walls?
Why you want to retrofit your home?
What your key goals are?
How your house was built, and how it’s changed over time?
How efficient your house is now and how it ‘behaves’?
Where the weak areas and problems are?
What maintenance needs to be done?
Your house type, conservation status and local conditions?
The principles for the responsible retrofit of traditional buildings?
About the balance between insulation, ventilation and airtightness?
What measures are likely to be best for your lifestyle?
What other measures you should be installing before / as well as SWI?
What your budget is, and whether you need to stage works?
Your tolerance levels to disruption?
Having gone through all of the above, you can now go into more detail on SWI. You’ll need to know whether it will be permitted on your home, what consents and fees you’re likely to need, and the technical details of EWI and IWI. All of this is covered in more detail in the rest of this guide and the online SWI tool.
✓
304.0 DEVELOPING A RETROFIT PLAN FOR YOUR HOME

When you’ve decided on your outline retrofit plan, it’s important to choose the right people to help you understand the options more fully, investigate areas where specialist knowledge is required and then to design and install the measures you’ve chosen. Depending on the scale of your retrofit, it may well be helpful to work with a professional (e.g. architect) in the planning stages as well, to help you get the right measures for your home.
For older homes, and for SWI in particular, relevant experience is essential when it comes to initial assessment, design and installation. When you’re looking for professional help, asking questions about the sorts of things covered in this guide will help you get a feel for their depth of understanding – and if you have doubts, look elsewhere! Lastly, don’t be overly swayed by low prices, either for materials or expertise – as with most things, you’re likely to have to pay a bit more to get the quality your home deserves.
4.3 Choosing your designer/contractor
WHAT OR WHO IS AN ‘EXPERT’?This is a tricky question to answer. It’s often hard to know who to trust – the cynical, but perhaps most sensible advice is to be wary, and seek word-of-mouth recommendations. There are plenty of excellent tradespeople around, from surveyors to designers to installers, but unfortunately there are also some not-so-good ones. To make things more complicated, inaccuracies in the way retrofit risks and impacts are assessed means that even respected professionals can, unintentionally, be using flawed assessment methods.
One of the best ways people in Bristol can find the right professionals is to check the new ‘kitemark’ system being set up by the Council.
BE YOUR OWN PROJECT MANAGEROnce you’ve chosen who you want to do the work to your home, it’s important that you monitor the process from start to finish. Again, asking designers and installers questions about how they will deal with complicated details, moisture movement, ventilation strategy, usability of any controls and so on will help ensure everyone pays attention to detail throughout. You can find out more about this in Section 6.4.
The Bristol kitemark
Bristol City Council is working to introduce ‘kitemark’ systems for designers and installers of SWI in the city. This will act as a quality assurance system, both for householders and the Council, providing peace of mind that an approved individual has the knowledge and skills to be able to design and/or install SWI appropriately on traditional buildings. These kitemarks will be based on training and site visits, and development is underway at the time of writing this guide. Ask the Council for more details (see contact details at the back of this guide).
314.0 DEVELOPING A RETROFIT PLAN FOR YOUR HOME > 4.2 WHEN SHOULD YOU CONSIDER INSULATING YOUR WALLS?

5.0 Getting permission and consents
A BRISTOLIAN'S GUIDE TO SOLID WALL INSULATION
5.1 Permitted development 33
5.2 Permitted development for external wall insulation in Bristol 34
5.3 Building regulations 35
32

You may need to get permission (either informally or formally) for certain retrofit measures – particularly solid wall insulation. This could include any of the following:
• Planning Permission – needed for most building work that affects external appearance (e.g. external wall insulation) or public highways (e.g. encroachment onto pavements)
• Listed Building Consent – needed for most works (internal and external) to a listed building
• Building Regulation Approval – needed to make sure the works are safe and meet regulatory standards
• Neighbour consent – may be needed where your planned works would affect neighbours (a Party Wall Agreement may also be needed)
• Highways – may need signoff where works would affect a public highway (e.g. encroachment onto pavement)
5.1 Permissions and consents
5.0 GETTING PERMISSION AND CONSENTS
DO YOU NEED CONSENT?You can find out more about Planning Permission and Building Regulations requirements for different measures by looking on the Government’s online Planning Portal www.planningportal.gov.uk/permission. If you want to know about EWI specifically, you can go straight to www.planningportal.gov.uk/permission/commonprojects/externalwalls – more detail is also provided in Section 5.2 below, which also covers Permitted Development Rights.
If you’re still not clear, or want to know about other consents, get in touch with Bristol’s Planning, Conservation or Building Control teams (see Section 7 for contact details).
APPLYING FOR CONSENTIf you do need formal consent, you will need to complete the relevant application forms and submit them to your local authority. This can take a bit of time, but it’s worth being thorough as it increases the chances of a prompt and clear decision. You may also need some supporting material (e.g. drawings, survey report, heritage statement) so this should be planned into your project as well.
Here are a couple of other things to remember, and build into your retrofit plan:
• Costs – some permissions have costs attached, and the preparatory works involved in making an application may also attract further costs (e.g. fees for preparation of drawings, surveys or statements)
• Timing – if you have to apply for formal consent, assessment of your application could take a couple of months. If you need professional supporting material this will also need to be built into your timescales
For neighbour consents, even if there are no formal requirements it always helps to make sure they are aware of your plans, particularly where there will be an impact on their property. The online tool (see Section 1.2) can also help identify the consents that may be needed for your own home.
PERMITTED DEVELOPMENTSome works do not require Planning Permission – these are called Permitted Development Rights. For the purposes of this guide, Permitted Development mainly relates to EWI, as it can apply in certain circumstances.
There are many caveats attached to Permitted Development Rights (they do not apply to flats, for example, or conservation areas), so you should make sure you’re familiar with the detail of these rights before starting a retrofit project. Official guidance for householders is available at here www.planningportal.gov.uk/uploads/ 100806_PDforhouseholders_Technical Guidance.pdf – although it can be hard to understand if you are not familiar with the planning system. The rest of this section, therefore, aims to help you interpret Permitted Development regulations for EWI as they may apply to common situations in Bristol.
N.B. Even if the retrofit measures you have in mind do not require Planning Permission, remember you may still need other consents.
33

EWI can sometimes fall under Permitted Development, i.e. you can install it without applying for Planning Permission. However, this only applies under certain conditions, and in Bristol it is more common that Planning Permission will be required for EWI.
The following table tells you when EWI is a Permitted Development in Bristol. These conditions follow national Permitted Development guidelines, and have been clarified by Bristol City Council to support the installation of locally appropriate, robust and low-risk EWI across the city.
If your proposals do not meet these criteria for Permitted Development, you will need to apply for Planning Permission. In these cases, it will be particularly important to demonstrate how your proposals will address any complex details, and comply with the principles and details covered in Section 6.3 of this guide – Bristol Council is keen to promote the uptake of these principles and details.
5.2 Permitted Development for external wall insulation (EWI) in Bristol
PERMITTED DEVELOPMENT FOR EWI IN BRISTOL
External wall insulation is a Permitted Development in Bristol in the following situations:✓ Flat, rendered front elevations that
do not front directly onto a pavement✓ Flat, rendered side elevations that do
not front directly onto a pavement✓ Simple, rendered rear elevations that
do not face onto a road
QUALIFYING CONDITIONSThe conditions required to qualify for the above are as follows:
1. ‘Flat’ front and side elevations means no protruding features (e.g. bay windows, porch roofs)
2. ‘Simple’ rear elevations means no ornate features (e.g. bay windows, masonry porch roofs, decorative brick or stone work) – this also covers any building extensions
3. The whole elevation will be insulated
4. The new finish will have a similar appearance to the existing finish (e.g. a rendered façade must be re-finished in a similar render)*
5. There will not be any encroachment onto a public highway (e.g. pavement), at any height
6. The building in question is single occupancy (e.g. a house)**
7. The building in question is not listed or in a conservation area
If your proposals do not meet these conditions, you will have to apply for Planning Permission. If you are in any doubt, get in touch with the Planning team to discuss your proposals.
Examples of areas not qualifying for Permitted Development are:
• Elevations with exposed stone or brick
• Ornate elevations – e.g. presence of bay windows, decorative brickwork or architraves
• Use of artificial or imitation brick or stone finishes
• Listed buildings or buildings in conservation areas
• Finishing materials that would not be of a similar appearance to the existing property
Where Planning Permission is required, Bristol City Council is likely to be more supportive of applications that demonstrate adherence to the principles and details provided in Section 6.3 of this guide (subject to an acceptable appearance being achieved).
* The official wording on this subject (in the Government’s technical guidance) is as follows: ‘the materials used in any exterior work … shall be of a similar appearance to those used in the construction of the exterior of the existing dwellinghouse’. This is to minimise visual impact and ensure a sympathetic appearance.
** Permitted Development Rights do not apply to flats, maisonettes, divided houses (even those with a single owner) or other buildings
N.B. There are numerous situations where EWI is not appropriate for older buildings, regardless of whether permission is required. Planning Permission is unlikely to be granted where walls have exposed brick or stone, for example, or where the building is in a conservation area (although there may be acceptable solutions in the latter case). In these instances, you should consider IWI, or a range of other measures if neither is considered appropriate.
345.0 GETTING PERMISSION AND CONSENTS

5.0 GETTING PERMISSION AND CONSENTS
The installation of EWI or IWI is ‘controllable building work’ under the Building Regulations, as it falls under their definition of ‘renovation of a thermal element’.
There are two routes to obtaining consent:
1. You can submit an application (building notice) for the works to the council’s Building Control team. They will then inspect the works during installation, through to completion. Upon satisfactory completion a completion certificate will be issued. The application fee is currently £156 (incl. VAT) and is payable when you submit your application
5.3 Building regulations
2. The alternative is to use a registered installer, registered as a ‘Competent Person’ under Schedule 3 of the Building Regulations self-certification scheme. This allows a registered contractor to self-certify their own installation. It is then not necessary to make an application to Building Control, but a fee may still be payable to the registered contractor carrying out the works. On completion of the works, the installer’s registration body will notify the Council of the works carried out, and this will be added to their records so they are aware that the works have been undertaken at your property
35

A BRISTOLIAN'S GUIDE TO SOLID WALL INSULATION
6.0 Solid wall insulation: When, where and how6.1 The basics of solid wall
insulation 37
6.2 When is solid wall insulation NOT appropriate? 40
6.3 Principles and design details 41
6.3.1 External wall insulation 42
6.3.1.1 Example details for external wall insulation 45
6.3.2 Internal Wall Insulation 57
6.3.2.1 Example details for internal wall insulation 60
6.3.3 Hybrid (internal and external) wall insulation 69
6.3.4 Windows 70
6.4 Related measures 73
6.5 Managing your retrofit project 80
6.6 Monitoring – ‘Look & Learn’ 82
36

To repeat a statement from earlier in this guide: Insulating walls should only be done as part of a ‘whole-house’ retrofit process – not as a single, isolated measure (unless other measures have previously been taken). It should also be carried out as part of a joined-up process. If you’ve read the rest of this guide you’ll have a good understanding of the whole-house approach and joined-up process and know why these are so important – if you haven’t, you should go back and read the rest of the guide now!
EXTERNAL WALL INSULATION (EWI)EWI changes the external appearance of a house. Depending on the way this is done, these changes can be either positive or negative, not only for the house being insulated but also for the houses next to it and indeed the whole street or area.
Most EWI is finished with render, and these are the systems covered in this guide. The appearance and performance of different insulation materials and render systems can vary considerably. (There are also ‘cladding’ options, which may be appropriate in some situations: these include brick slips or other brick effects, ceramic tiles, timber and metal
6.1 The basics of solid wall insulation
6.0 SOLID WALL INSULATION: WHEN, WHERE AND HOW
cladding. However, no cladding options are currently recommended in Bristol without first consulting the Planning team. Cladding options are therefore not covered in this guidance, although most of the principles in this section may apply equally to cladding and render EWI systems.)
EWI systems are put up from the outside and require scaffolding. While there is minimal disruption inside the house for EWI by itself, adopting a whole-house approach is likely to require other measures such as ventilation systems, so some internal works are likely to be needed.
INTERNAL WALL INSULATION (IWI) IWI preserves the external appearance of a house, but can change its internal appearance, reduce room sizes and may require changes to fitting and furnishings. Again, changes in appearance can be either positive or negative depending on how the works are designed and installed.
IWI systems are typically finished with plasterboard or wet plaster, giving a neat finish. Before this stage, however, internal linings and fittings (cornicing,
dado rails, skirting, sockets and switches, and so on) may need to be removed, so a fair amount of short-term disruption is likely.
Even more than EWI, IWI must be considered as part of a whole-house approach, and consideration needs to be given to insulating window and door surrounds, improving the windows themselves, detailing at ‘junctions’ where floors and roofs meet the external walls, and in particular ventilation systems.
While IWI is being installed, there can be considerable disruption to the daily routines of the people living in the house, but with careful planning and efficient installation this can be minimised. No scaffolding is required, and the work can be done on a room-by-room basis which allows different parts of the house to be accessible at different stages. Appropriate care and consideration of the installers is especially important for IWI.
Inappropriate EWI affects the whole street
If IWI is well designed you shouldn’t even know it’s there
37

HYBRID WALL INSULATION (HWI)HWI is often appropriate where EWI is not suitable for the front of a building (usually on grounds of appearance), but is suitable elsewhere. In these cases, IWI may be applied at the front of the house while the sides and back can have EWI applied.
MATERIALSThe materials specified and used in a SWI project should be selected on two main criteria: a) technical compatibility and b) environmental impact. Cost and appearance are also important –but cost should not override the other factors, particularly where the incorrect specification of a product may lead to risks to human health, building fabric or heritage value.
The criterion of technical compatibility of systems means that the traditional building should not be compromised by inappropriate materials. Much of this compatibility relates to the way moisture moves in traditional buildings: it is extremely difficult to change the moisture system of a building without causing significant risks. It is therefore the recommendation of this guidance that moisture open insulation systems are used wherever possible, as these are most compatible with traditional buildings and have greater capacity for moisture absorbance and drying than moisture closed systems. However, it should also be noted that in certain situations (such as areas below ground or at ground level, either for EWI or
6.0 SOLID WALL INSULATION: WHEN, WHERE AND HOW > 6.1 THE BASICS OF SOLID WALL INSULATION
IWI) moisture-closed systems may be necessary.
Environmental impact is another important consideration, but more for your overall impact on the environment than for their effect on your building. If you are mainly motivated by concern for nature or by climate change issues, then it would be counter-productive if the energy and resources you save by insulating your home are outweighed by the environmental impact of the works. This partly depends on the materials you use, but also on the type of house you live in and the way you live. If you already don’t use that much energy because you are very careful with your energy use and lifestyle, then insulating your building may not improve energy use much, but it will use up resources and generate pollution nonetheless.
As a general rule, however, it’s sensible to consider the environmental impact of all materials and processes used in your project. Don’t let this affect the quality of your project, but do take an interest in it. Think about:
• What are the materials made of?
• How much energy has been used in their production?
• How much CO2 has been generated by their production and is any ‘locked up’ in the products (as it is with timber and plant materials, and to some extent with lime products)?
• How far have they travelled?
• How far have the installers travelled?
• How much material is wasted (through offcuts, and so on)?
You can find out more about the environmental impact of materials from the Alliance for Sustainable Building Products (ASBP) at www.asbp.org.uk.
Examples of moisture-open (wood fibre board) and moisture-closed (EPS) insulation materials
38

CHOOSING YOUR SWI SYSTEMOne of the principles of this guide is that EWI should always be considered before IWI in the first instance, unless there are particular reasons (e.g. planning issues, heritage value, building complexity) why IWI is deemed preferable. The main reasons for this are that, if detailed and installed appropriately, EWI should have the following advantages over IWI:
• It is more thermally efficient (because there are fewer unavoidable thermal bridges than with IWI, so greater surface coverage should be achievable)
• There is less disruption to the householder
• The risks of condensation and trapped moisture should be less than with IWI
• It protects the existing wall from rain absorption.
You should also consider however, that the planning, heritage and building complexity issue reasons for preferring IWI to EWI are both significant and common, particularly on the front of many brick and stone buildings which are not rendered. It is not a minor matter to alter the look of a house, as it affects the history and future of the house, and the appearance of the whole street. For this reason, HWI is a common recommendation and a good solution for many traditional as well as more modern properties in Bristol.
6.0 SOLID WALL INSULATION: WHEN, WHERE AND HOW > 6.1 THE BASICS OF SOLID WALL INSULATION
The online tool www.warmupbristol.co.uk that sits alongside this guidance will help you understand the context and conditions of your home. These are critical to making the right decisions, about a) whether SWI is appropriate at all, and b) whether EWI, IWI or HWI is the best option for your home. The online tool will also give you a list of house-specific benefits, and important things to consider in regard to i) Planning & Heritage, ii) Health & Comfort, iii) Cost and Energy and iv) Hassle.
REMEMBER THE HOLISTIC APPROACHOnce you have worked out what type of SWI is best for your home, remember that it must be considered as part of a whole-house approach that follows a joined-up process:
• The first principle of following a joined-up process is to carry out a proper assessment of the building, to ensure that whatever works are planned are appropriate. The online tool will help with an ‘in-principle’ decision, but this will need to be confirmed as part of the design and specification process, as the devil is often in the detail
• You will need a detailed design and specification that is appropriate to your specific building (i.e. not just a generic design) and appropriate to your specific aims and needs
PeopleServices
Context Whole House
Fabric
• It is essential then that the detailed design and specification is carried out by the installer, and that any outstanding issues discovered during the installation are integrated safely with the overall design and follow a whole-house approach
• Finally, the homeowner and occupants must be aware of how things work, what to maintain, how to make alterations, and how to live most comfortably and healthily in the retrofitted building. Any issues or risks which have arisen during construction need to be monitored, and all problems (and benefits, particularly where recorded) should be reported back to the contractor, designer and assessor. In this way the retrofit has the maximum chance of success.
39

6.0 SOLID WALL INSULATION: WHEN, WHERE AND HOW
6.2 When is solid wall insulation NOT appropriate?
analysis can confirm that this would improve thermal performance without creating other risks)
• Buildings with a listed status of Grade I or II (this may extend to some Grade II listed buildings as well)
TECHNICAL BARRIERS:• Complex building shapes that make
coherent coverage of SWI (either internally or externally) impossible or very difficult
• Buildings in poor or fragile condition, where significant repairs or strengthening are required prior to any application of SWI
There are some situations where SWI is not appropriate for a traditionally-built house, either internally or externally. The situations can broadly be divided into a) aesthetic / cultural considerations (sometimes described as ‘heritage’ considerations) and b) technical considerations. These are outlined below:
AESTHETIC / CULTURAL BARRIERS:• Heritage or historic features on both
the inside and outside of external walls that cannot be sensitively addressed through design when SWI is applied – outside features may include bay windows, decorative window and door surrounds, ornate brick/stone work, or overall appearance, while inside features might include historic cornicing, wood panelling, paintwork, stone mullions and so on. Even if these features are only present on both sides of some of the external walls, and there are other walls that could be insulated, following the whole-house approach means that partial SWI is not recommended (unless a specialist
Building defects affecting SWI
Outside damp
Leaky gutter or pipes
Brick pointing loose
Brick capping stone
Inside damp Rotten windows
Cracked and loose render
Ground above ground floor level
• Buildings where there is excessive dampness – repairs, lowering of external ground levels, installation of rainwater goods and drainage, and other measures may be required, and buildings should then be allowed to dry before SWI is considered
It should also be said that where there are only small amounts of external wall (and large amounts of windows) SWI is often not appropriate for reasons of high cost and low energy benefit.
These issues are all raised in the online tool www.warmupbristol.co.uk, which can help you decide whether or not SWI is appropriate for your building.
Where there are major problems with these issues, they should be resolved and the building repaired and allowed to dry out before going ahead with SWI. Where the issues are minor they can sometimes be addressed as part of an SWI whole house retrofit.
40

This section refers to numerous building details that you may not be familiar with. The most commonly used terms are shown in the drawing below; you can use this as a key.
In both the EWI and IWI sections, drawings follow the text to illustrate the issues and type of detailing required to address the risks highlighted.
6.3 Principles and design details
6.0 SOLID WALL INSULATION: WHEN, WHERE AND HOW
Battens and feltRafterEaves
Parapet
Gutter
Rain water down pipe
Dwarf wall
Wall plate
Stepped flashing
Coping
Dentil course
Reveal
Cill
FlueLintel
Quoin
Floor ventService cupboard
Joist
41
6.0 SOLID WALL INSULATION: WHEN, WHERE AND HOW
Earlier sections of this guide have covered the principles of the whole-house approach and joined-up processes, and the issues of planning and building conservation. This section is concerned with principles covering assessment, design, application and use of EWI.
Initial assessment is critical. Design should be based on a whole-house survey of your home (i.e. not relying on generic details and assumptions), and installation should not commence until all details have been confirmed and installers have been given a specification to work to.
6.3.1 External wall insulation
Assessment issues
Heritage and community valueAlthough the assessment of the heritage and community value of a house is sometimes covered by designated status in planning, often beautiful buildings are not listed or part of conservation areas. It is essential in all cases that you think about the beauty and character not only of your building, but also of the street and surrounding area, and how EWI might impact on this. If you need to, talk to your neighbours and to people with expertise in heritage.
Building formThe more geometrically complex a building form, the more difficult it will be to insulate with a whole-house approach. Bay windows, for example, are very difficult to insulate externally without either creating cold bridges or radically changing their appearance. Brickwork which stands out from the face of the wall, or ornate door posts are also very difficult to deal with. Building form is therefore important in assessing whether EWI is viable, and how much care and cost will be needed to get it right. Basically, the simpler the form (flat, square), the better in terms of EWI design and installation.
Exposure and orientationIt is important to understand not only how a building is performing when visited, but also what the likely challenges are in the middle of Winter, for example, or during an Autumn storm. This requires an understanding of your local weather and differences depending on orientation (i.e. South-facing façades often receive more sun and rain than North-facing façades). Traditional buildings sometimes demonstrate this understanding and have different finishes or protections on different sides according to exposure and orientation. In Bristol, some areas are much more exposed to driven rain (particularly on the South-West side) than houses in the centre, so more care in detailing to prevent rain ingress is essential here – this may include wider gutters, more care at the bottom of walls and around windows and cills in particular.
Materials and construction methodKnowing what your building is made of, how it was constructed and how it has been altered over time will help inform what’s possible and what risks may be involved. For example, some wall materials are much more porous than others, and some are very soft. Some walls are very well built and some are not so good. These all make a difference to how you insulate with EWI, as well as determining where the risks might be.
The following issues need to be considered as part of the assessment, design, application and in-use processes – each of these steps is critical to minimise the risk of inappropriate installations and unintended consequences and to maximise benefits such as comfort, health and ease of installation.
42

6.0 SOLID WALL INSULATION: WHEN, WHERE AND HOW > 6.3.1 EXTERNAL WALL INSULATION
Assessment issues continued
ConditionBuilding condition is one of the most important considerations is deciding whether or not to proceed with EWI (or any retrofit measure). If a building is in poor condition it is much more likely that there will be problems with a retrofit. On the other hand, a retrofit project can sometimes be a good opportunity to address both superficial and underlying problems. The key point is that if there are structural or moisture problems in your existing building, they must be fully investigated and taken into account in any work that is planned. If there is excessive moisture in your walls, then it is always best to address the cause of this moisture and to let the building dry out before undertaking any EWI work.
UseUse is also an important context. First, understand how the building was used in the past, what it was designed for and how that differs from today’s use. Secondly be aware that moisture risks and potential energy savings are very different in a house which has a large young family living in it, compared with that of a single occupant who is often out of the building. This context makes a lot of difference to the benefits of EWI, and to the disruption of application. Projects should take account of the use of the building throughout the design and installation.
Design issues
RainRain ingress can lead to damp, damage to building fabric and the EWI system, harm to human health and also loss of insulation effectiveness (a wet wall, and wet insulation material, will lose more heat than if they were dry).
The main risk areas to be addressed through robust detailing are as follows:
• The junction between the roof and external wall – particularly with regard to how eaves and verges are extended, and how the rainwater goods will work
• At ground level – particularly with regard to splashing
• Around openings (e.g. windows and doors) – particularly with regard to how insulation can be added within what is normally a limited space
• Existing architectural details – i.e. building features such as raised bands, historic plaques, decorative brickwork, protruding cills and so on. (Replication of certain features may or may not be an option, depending on the individual situation.) In most cases leaving any such features exposed would create a risk of moisture ingress as well as introducing thermal bridges; in such cases IWI should be considered instead of EWI (possibly leading to the use of HWI)
• Boiler flues – Some older boiler flues may need to be replaced, to avoid having to leave an uninsulated area around the flue which again creates a vulnerable area for rain penetration
• Existing moisture within the walls – this can be trapped by EWI and result in damp and rot within the walls
The severity of these issues is largely dependent on context, particularly the local exposure and orientation of your home: in Bristol, for example, Clifton is much more exposed than the centre, and the South-West side of the city is more exposed than the North-East side. The presence or otherwise of other buildings, trees and the general local landscape can also significantly affect the risk of rain problems. However, regardless of the local area and conditions outlined above, if the detailing or subsequent application is incorrect, then rain is likely to cause problems in the future.
Where there is a possibility of moisture getting into or behind the EWI system, or where there are minor problems with existing dampness in walls, then a moisture-open insulation system should be preferred as this will allow drying of the wall to the outside.
Insulation coherence Uninsulated areas create cold areas or ‘thermal bridges’. These can lead not only to heat loss, but also to moisture problems such as mould growth and condensation.
The main risk areas to be addressed through robust detailing are as follows:
• The whole façade should be insulated. Leaving certain features, such as dentil courses or floor plinths (ie the area of wall just above ground) and especially around windows, uninsulated leads to considerable thermal bridging and should be avoided. Where such features cannot be insulated, IWI should be considered instead of EWI (possibly leading to the use of HWI)
• Pipes, service boxes, boiler vents and similar – these must be removed and replaced over the insulation; this may require building regulations consent, permissions or separate work contracts from utility companies or the Council. The same applies to lampposts, road signs, fence posts and similar features on or adjacent to the walls being insulated, where access to install EWI would otherwise be impossible. If these cannot be addressed EWI should not be installed
• Fixings should be ‘thermally broken’ (i.e. not create a thermal bridge from inside to outside) and non-conductive, well-sealed and system-compatible rails, beads and so on should be used. This includes fixings for external lights, drainpipes, hanging baskets, satellite dishes and similar
43

6.0 SOLID WALL INSULATION: WHEN, WHERE AND HOW > 6.3.1 EXTERNAL WALL INSULATION
Design issues continued
AirtightnessYour home’s airtightness should be improved wherever necessary and possible, or the effectiveness of the insulation will be compromised. The application of EWI presents an opportunity to do this, as shown in the following examples:
• Closing air leakage around windows, doors and areas where services penetrate the walls
• For poorly-pointed buildings, using a ‘bonding’ or ‘slurry’ coat behind the insulation
WindtightnessIt is important to stop air movement between the insulation and the wall (known as ‘thermal bypass’), as this will reduce the effectiveness of the insulation. Ensuring that the insulation is fully bonded to the wall should remove this risk.
VentilationIn increasing airtightness of the building it is essential to also ensure that the building has an effective ventilation system. This is covered in detail in Section 6.3.
Homogeneity and streetscapesThis is an aesthetic rather than technical design concern. It is essential that any EWI application is sensitive to its surroundings; this must be determined on a case-by-case basis. This principle extends to avoiding ‘pepper-potting’ of EWI on terraced houses – i.e. some frontages treated and others not – as this breaks up the homogeneity of streets and generally creates an unsympathetic appearance. The long term risk here is of creating a radical, immediate and effectively irreversible change to whole streets and areas.
In reality, this means applying EWI at the fronts of detached buildings only, or semi-detached / terraced homes where all properties will be treated. For terraced houses, HWI will generally be more appropriate, with IWI at the front and EWI at the sides / rears.
Replication / reinstatement of featuresWhere there are features on buildings, such as banding, stone quoins at corners, or even particular historic render finishes, these can often be reproduced in the new render work. In some cases, this becomes an opportunity to reinstate features which have been lost, and this can considerably enhance the appearance and value of a property as well as benefitting the streetscape and community. The appropriateness of such replication is dependent on the individual home, and it may be advisable to consult with the Planning team to help guide your decision on this.
Application issues
Quality of installationThis is essential in any SWI project, and is key to a successful and happy retrofit project. Firstly this means that the contractors should strictly follow the design and specification – if they find a problem with this, then they must consult with both you and the designer before proceeding further.
Of course installers should also be suitably trained and experienced. If there are inexperienced workers on site, then at least they should be supervised by a trained and experienced colleague or manager. Ideally there should be someone on site with a sound understanding of the principles and details in this guide, who is able to liaise with you and the designer if needed.
WeatherIt is important that application of insulation is not undertaken where the insulation gets wet or if there is a risk of freeze-thaw damage to the render (many render systems specify a minimum application temperature, 5°C for example). For this reason Winter work needs to be carefully controlled, and may be best avoided where possible.
Capacity and cautionProjects often fail because of unexpected or unplanned factors. If there is not sufficient capacity (i.e. time or money) to deal with these, then a job is more likely to be poorly done, with corners being cut or some areas just left out altogether. So ensure that there is a contingency fund if at all possible, and make sure your timescales have some flexibility.
In-use and maintenance issues
In UseOnce EWI has been installed, it is essential that owners and occupants know what can and can’t be done to their walls, for example if they want to add lights, hanging baskets, signs and similar to the outside of their house.
On a more general note, it is very important that the end users of the house are a) involved throughout and b) well informed about the changes they are likely to notice and any different behaviours they should adopt (e.g. being more aware of ventilation). If a dedicated ventilation system is installed as part of the project, it must have simple, user-friendly, reliable controls and its operation and maintenance should be explained clearly to the occupant, so they can use it properly and identify any faults quickly.
MaintenanceEWI is not a ‘fit and forget’ measure. Many EWI systems are likely to require repainting or sealing every few years, particularly in exposed areas. The most robust systems will not use mastic joints around openings and junctions – but if mastic joints cannot be avoided, these will require renewal at frequent intervals.
Capacity and cautionProjects often fail because of unexpected or unplanned factors. If there is not sufficient capacity (i.e. time or money) to deal with these, then a job is more likely to be poorly done, with corners being cut or some areas just left out altogether. So ensure that there is a contingency fund if at all possible, and make sure your timescales have some flexibility.
44

6.0 SOLID WALL INSULATION: WHEN, WHERE AND HOW
EXAMPLE DETAIL DRAWINGSEvery home is different, so no guide can show you how all building details should be treated. However, principles do not change, and the following drawings will give you an idea of the sort of considerations and detailing you are likely to need. These are indicative illustrations only, based on the principles of responsible retrofit – they are not necessarily the details you will need for your own home. But look at them carefully – if you are offered a design that either doesn’t relate directly to your building (i.e. is generic) or doesn’t address the problem areas highlighted in these drawings, you should ask whether they can be amended accordingly, or look elsewhere.
Eaves6.3.1.1 Example details for external wall insulation
TYPICAL EXISTING ARRANGEMENT
WATCH POINTS• Check roof covering is weather proof• Check condition of timber• Check condition of wall• Check that loft is ventilated at eaves.• High heat loss but likely to be free of moisture
problems so long as fabric in good condition
No cold bridge as whole wall is conductive. This energy transfer help keep the wall relatively ‘dry’.
Eaves board which protect rafter ends and provides tidy edge.
Partially protected by gutter. Water can freely drip from it.
Masonry wall originally moisture open and still likely to be so now.
45
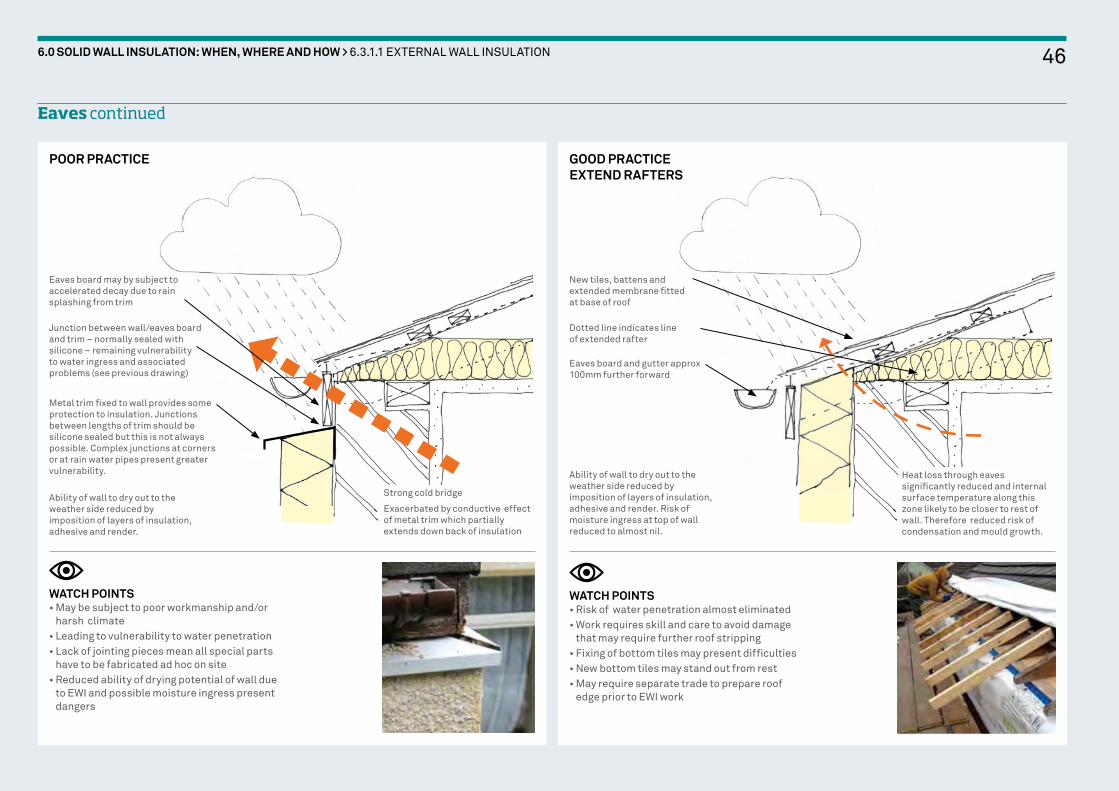
6.0 SOLID WALL INSULATION: WHEN, WHERE AND HOW > 6.3.1.1 EXTERNAL WALL INSULATION
Eaves continued
WATCH POINTS• Risk of water penetration almost eliminated• Work requires skill and care to avoid damage
that may require further roof stripping• Fixing of bottom tiles may present difficulties• New bottom tiles may stand out from rest• May require separate trade to prepare roof
edge prior to EWI work
POOR PRACTICE
Eaves board may by subject to accelerated decay due to rain splashing from trim
WATCH POINTS• May be subject to poor workmanship and/or
harsh climate • Leading to vulnerability to water penetration• Lack of jointing pieces mean all special parts
have to be fabricated ad hoc on site• Reduced ability of drying potential of wall due
to EWI and possible moisture ingress present dangers
Ability of wall to dry out to the weather side reduced by imposition of layers of insulation, adhesive and render.
Ability of wall to dry out to the weather side reduced by imposition of layers of insulation, adhesive and render. Risk of moisture ingress at top of wall reduced to almost nil.
Metal trim fixed to wall provides some protection to insulation. Junctions between lengths of trim should be silicone sealed but this is not always possible. Complex junctions at corners or at rain water pipes present greater vulnerability.
Junction between wall/eaves board and trim – normally sealed with silicone – remaining vulnerability to water ingress and associated problems (see previous drawing)
Dotted line indicates line of extended rafter
Strong cold bridge
Exacerbated by conductive effect of metal trim which partially extends down back of insulation
Heat loss through eaves significantly reduced and internal surface temperature along this zone likely to be closer to rest of wall. Therefore reduced risk of condensation and mould growth.
GOOD PRACTICE EXTEND RAFTERS
New tiles, battens and extended membrane fitted at base of roof
Eaves board and gutter approx 100mm further forward
46

6.0 SOLID WALL INSULATION: WHEN, WHERE AND HOW > 6.3.1.1 EXTERNAL WALL INSULATION
WATCH POINTS• Check roof covering is weather proof• Check edge tiles along verge for asbestos
undercloak• Check condition of rafters and battens• Check condition of wall particularly at top
High heat loss through wall.
Wall moisture open to inside and out and likely to be ‘in balance’.
Eaves continued Verge
WATCH POINTS• Risk of water penetration almost eliminated
at head• Less intervention with existing roof may
reduce risks and costs• Eaves work likley to be within skill set of
EWI installer
Ability of wall to dry out to the weather side reduced by imposition of layers of insulation, adhesive and render.
Risk of moisture entering at top of wall eliminated.
Heat loss through eaves significantly reduced and internal surface temperature along this zone likely to be closer to rest of wall. Therefore reduced risk of condensation and mould growth.
Wide gutter section protects insulation below
Eaves board removed, and with it weak junction with trim. Water ingress risk reduced
Roof membrane extended into gutter with proprietary eaves piece
Ventilation to roof strip
Insulation installed behind gutter
Assumed 100mm glass wool insulation.
Tiles typically extend 40mm over face of wall
Mortar fill at edge, sometimes bedded onto under cloak board.
GOOD PRACTICE MODULAR GUTTER EXTENSION
TYPICAL EXISTING
47
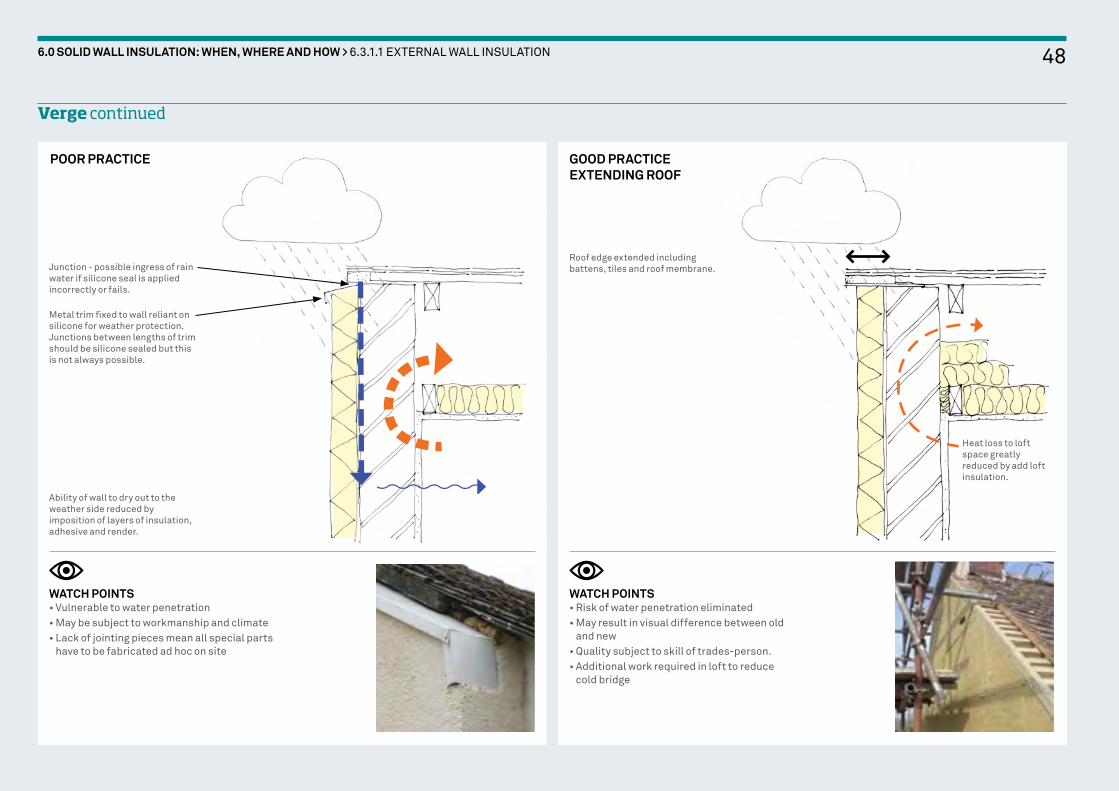
6.0 SOLID WALL INSULATION: WHEN, WHERE AND HOW > 6.3.1.1 EXTERNAL WALL INSULATION
WATCH POINTS• Vulnerable to water penetration• May be subject to workmanship and climate• Lack of jointing pieces mean all special parts
have to be fabricated ad hoc on site
WATCH POINTS• Risk of water penetration eliminated• May result in visual difference between old
and new• Quality subject to skill of trades-person.• Additional work required in loft to reduce
cold bridge
Verge continued
Ability of wall to dry out to the weather side reduced by imposition of layers of insulation, adhesive and render.
Metal trim fixed to wall reliant on silicone for weather protection. Junctions between lengths of trim should be silicone sealed but this is not always possible.
Junction - possible ingress of rain water if silicone seal is applied incorrectly or fails.
Roof edge extended including battens, tiles and roof membrane.
POOR PRACTICE
Heat loss to loft space greatly reduced by add loft insulation.
GOOD PRACTICE EXTENDING ROOF
48

WATCH POINTS• Avoids risk of undoing roof edge• Avoid risk associated with asbestos
undercloak• Less prone to lack of skill• Still require care when fitting• Can be integrated with modular
gutter system
WATCH POINTS• Check roof covering is weather proof• Check condition of coping• Check condition of wall
Verge continued Parapet
6.0 SOLID WALL INSULATION: WHEN, WHERE AND HOW > 6.3.1.1 EXTERNAL WALL INSULATION
GOOD PRACTICE MODULAR PROFILE
Heat loss to loft space greatly reduced by add loft insulation.
Profiled tray with upstand to channel rain water down verge and to prevent water entering behind insulation under gravity.
Masonry wall originally moisture open and still likely to be so now, on the whole.
No cold bridge as such, but entire wall conductive. This energy transfer probably means that the wall is relatively ‘dry’.
EXISTING TYPICAL ARRANGEMENT
Coping stone likely to be heavily weathered, with possible damage and cracking – possible ingress of water.
49

WATCH POINTS• Vulnerable to water penetration• May be subject to workmanship and climate• Lack of jointing pieces mean all special parts
have to be fabricated ad hoc on site• Condition of coping stone remains exposed
WATCH POINTS• Risk of water penetration reduced• EWI requires careful alignment with
existing coping• ‘Best fit’ coping covering required• Condition of coping stone remains,
but concealed• Materiality of parapet will alter
Parapet continued
6.0 SOLID WALL INSULATION: WHEN, WHERE AND HOW > 6.3.1.1 EXTERNAL WALL INSULATION
Existing coping stone condition remains exposed.
Junction between parapet and trim prone to water ingress.
Metal trim fixed to wall protect edge of insulation. Junctions between lengths of trim should be silicone sealed but this is not always possible.
Ability of wall to dry out to the weather side reduced by imposition of layers of insulation, adhesive and render.
Water ingress may cause damp in the wall and possible damage to insulation, ceiling joists and wall plate.
Ability of wall to dry out to the weather side reduced by imposition of layers of insulation, adhesive and render.
Risk of moisture entering at top of wall reduced to almost nil.
Careful alignment required between EWI and existing coping.
POOR PRACTICE GOOD PRACTICE
New coping/flashing over existing or replacing existing in order to prevent moisture ingress at top of wall.
50
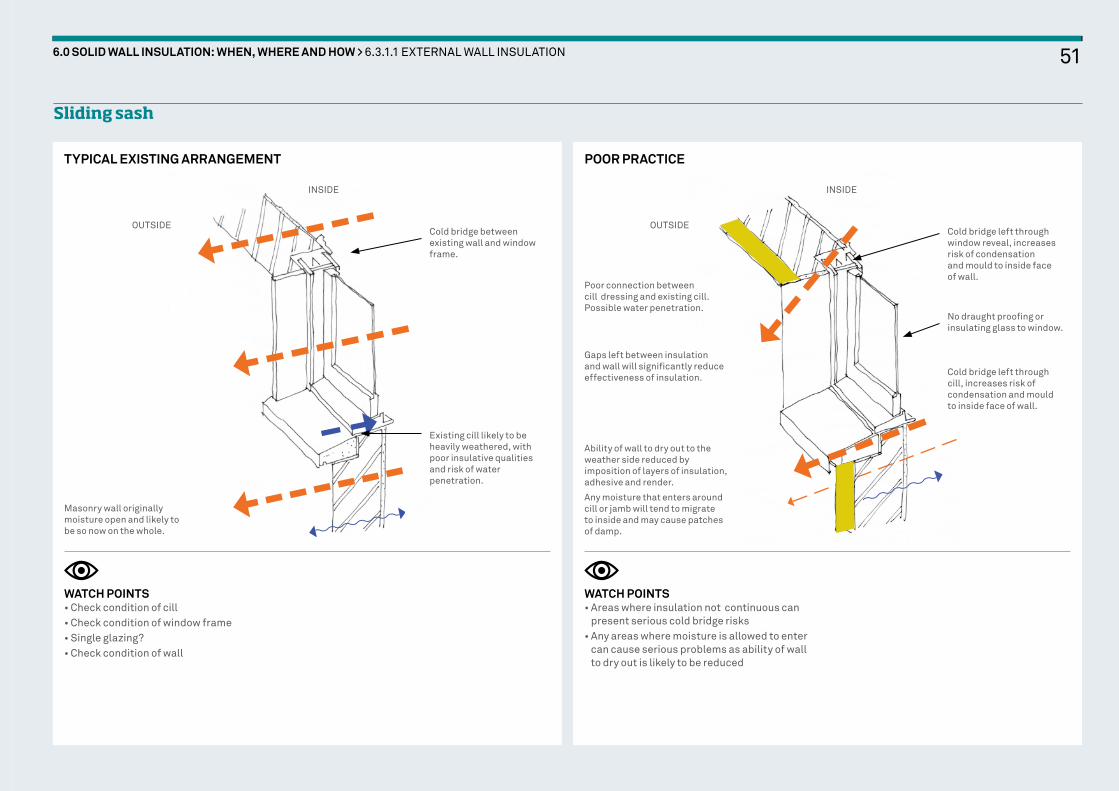
TYPICAL EXISTING ARRANGEMENT
WATCH POINTS• Check condition of cill• Check condition of window frame• Single glazing?• Check condition of wall
WATCH POINTS• Areas where insulation not continuous can
present serious cold bridge risks• Any areas where moisture is allowed to enter
can cause serious problems as ability of wall to dry out is likely to be reduced
Sliding sash
6.0 SOLID WALL INSULATION: WHEN, WHERE AND HOW > 6.3.1.1 EXTERNAL WALL INSULATION
Masonry wall originally moisture open and likely to be so now on the whole.
Ability of wall to dry out to the weather side reduced by imposition of layers of insulation, adhesive and render.
Any moisture that enters around cill or jamb will tend to migrate to inside and may cause patches of damp.
Existing cill likely to be heavily weathered, with poor insulative qualities and risk of water penetration.
Cold bridge left through cill, increases risk of condensation and mould to inside face of wall.
Cold bridge between existing wall and window frame.
Cold bridge left through window reveal, increases risk of condensation and mould to inside face of wall.
No draught proofing or insulating glass to window.
INSIDE INSIDE
OUTSIDE OUTSIDE
POOR PRACTICE
Poor connection between cill dressing and existing cill. Possible water penetration.
Gaps left between insulation and wall will significantly reduce effectiveness of insulation.
51

WATCH POINTS• Check condition of cill• Check condition of window frame• Single glazing?• Check condition of wall
WATCH POINTS• Check condition of cill and frame
Existing cill likely to be heavily weathered, with poor insulative qualities and risk of water penetration.
Cold bridge between existing wall and window frame.
INSIDE
OUTSIDE
Masonry wall originally moisture open and likely to be so now on the whole.
GOOD PRACTICE TYPICAL EXISTING ARRANGEMENT
Sliding sash continued Casement
6.0 SOLID WALL INSULATION: WHEN, WHERE AND HOW > 6.3.1.1 EXTERNAL WALL INSULATION
Insulating glass reduces condensation on inside of glass
Reduced cold bridging reduces risk of moisture and mould.
Better cill and jamb weather proofing keeps moisture out of wall.
Cold bridging through window frame and existing wall junction reduced by insulation.
Insulating glass or new sash window if original has been lost or is beyond repair.
INSIDE
OUTSIDE
Cill weather proofed at junction to timber cill and reveal edge.
52

POOR PRACTICE GOOD PRACTICE
WATCH POINTS• Check condition of cill and frame
WATCH POINTS• Check condition of cill and frame
Casement continued
6.0 SOLID WALL INSULATION: WHEN, WHERE AND HOW > 6.3.1.1 EXTERNAL WALL INSULATION
Over cill poorly weather proofed at edges.
Cill let into reveal edge and fitted to timber cill with weather proofing.
Cold bridge between existing wall and window frame.
Insulation lapped over timber window frame to eliminated cold bridge. If new window inward opener will provide the best overlap.
INSIDE INSIDE
OUTSIDE OUTSIDE
Masonry wall originally moisture open and likely to be so now on the whole.
Masonry wall originally moisture open and likely to be so now on the whole.
53
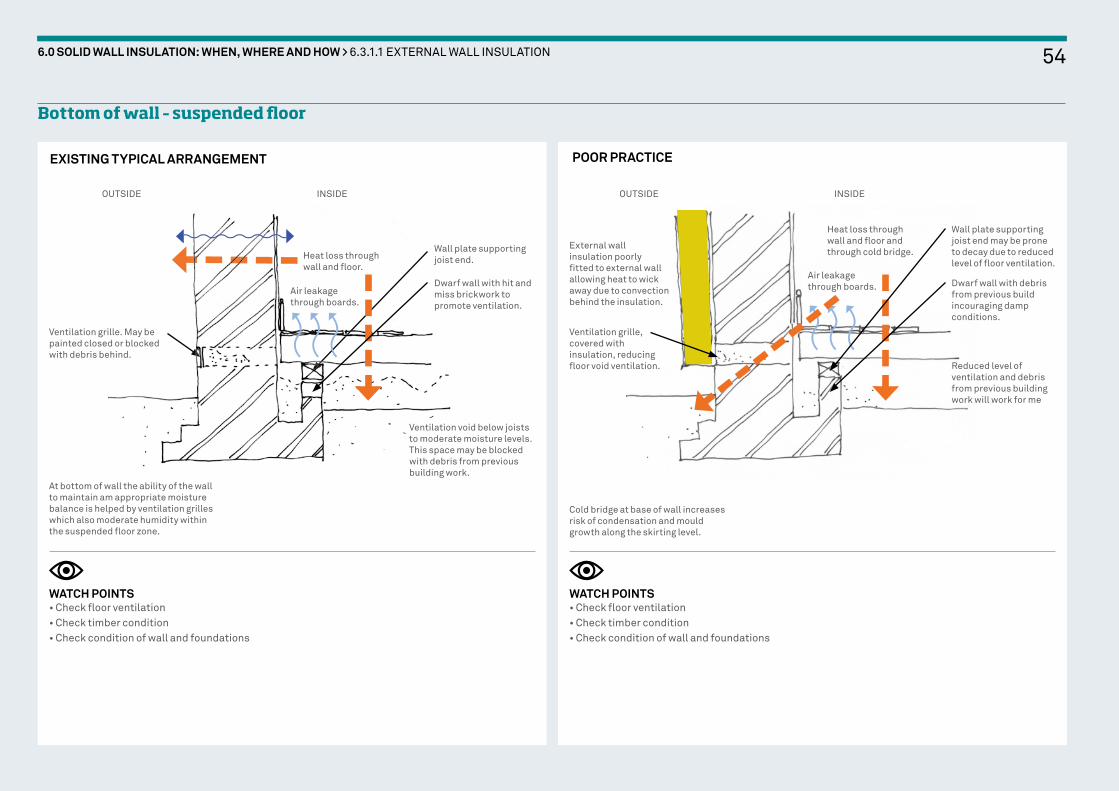
EXISTING TYPICAL ARRANGEMENT POOR PRACTICE
WATCH POINTS• Check floor ventilation• Check timber condition• Check condition of wall and foundations
WATCH POINTS• Check floor ventilation• Check timber condition• Check condition of wall and foundations
Bottom of wall – suspended floor
6.0 SOLID WALL INSULATION: WHEN, WHERE AND HOW > 6.3.1.1 EXTERNAL WALL INSULATION
INSIDE INSIDEOUTSIDE OUTSIDE
At bottom of wall the ability of the wall to maintain am appropriate moisture balance is helped by ventilation grilles which also moderate humidity within the suspended floor zone.
Cold bridge at base of wall increases risk of condensation and mould growth along the skirting level.
Air leakage through boards.
Air leakage through boards.
Heat loss through wall and floor.
Heat loss through wall and floor and through cold bridge.Wall plate supporting
joist end.
Wall plate supporting joist end may be prone to decay due to reduced level of floor ventilation.
Ventilation grille. May be painted closed or blocked with debris behind.
Ventilation grille, covered with insulation, reducing floor void ventilation.
External wall insulation poorly fitted to external wall allowing heat to wick away due to convection behind the insulation.
Ventilation void below joists to moderate moisture levels. This space may be blocked with debris from previous building work.
Reduced level of ventilation and debris from previous building work will work for me
Dwarf wall with hit and miss brickwork to promote ventilation.
Dwarf wall with debris from previous build incouraging damp conditions.
54

EXISTING TYPICAL ARRANGEMENT
WATCH POINTS• Ventilation to floor improved• Cold bridge at base of wall minimised• Floor insulation and draft proofing fitted as
part of whole house approach
Bottom of wall – suspended floor continued Bottom of wall – solid floor
6.0 SOLID WALL INSULATION: WHEN, WHERE AND HOW > 6.3.1.1 EXTERNAL WALL INSULATION
INSIDEOUTSIDE
Cold bridge at base of wall minimised to reduce condensation risk along skirting.
Floor void adequately ventilated.
Air tightness membrane or new sheathing layer eliminate drafts.
Ventilation grille fitted with external wall insulation.
Water impermeable insulation such as XPS fitted below DPC level and as deep as feasible into the the ground. Ensure waterproof render applied to brickwork first.
External wall insulation well fitted to external wall tp prevent heat loss due to convection behind the insulation.
Floor void cleared of debris to allow air flow under floor and promotes dying of wall at low level.
Dwarf wall with debris removed from around it and hit and miss brickwork open to air flow.
EXISTING TYPICAL ARRANGEMENT
WATCH POINTS• Check for DPC and condition of wall at base• Check for moisture problems below floor
finish and behind skirting
INSIDEOUTSIDE
At bottom of wall the ability of the wall to maintain an appropriate moisture balance is helped by DPC. If no DPC there may be moisture build up at skirting level.
DPC
Concrete slab
Floor coveringScreed
Heat loss through wall and floor.
55

Bottom of wall – solid floor continued
POOR PRACTICE GOOD PRACTICE
WATCH POINTS• Check for DPC and condition of wall at base• Check for moisture problems below floor
finish and behind skirting
WATCH POINTS• Cold bridge reduced to minimum• Floor insulation included as part of whole
house insulation approach
INSIDE INSIDEOUTSIDE OUTSIDE
The cold bridge at the base of the wall increases the risk of condensation and mould growth along the skirting zone.
At bottom of wall the ability of the wall to maintain am appropriate moisture balance is helped by ventilation grilles which also moderate humidity within the suspended floor zone.
DPC Water impermeable insulation such as XPS fitted below DPC level and as deep as feasible into the the ground. Ensure waterproof render applied to brickwork first.
Concrete slabConcrete slab
Floor covering Floor coveringScreed Closed cell
insulation on DPM
Heat loss through wall and strong cold bridge at base of wall.
Heat loss through corner reduced along with condensation risk.
6.0 SOLID WALL INSULATION: WHEN, WHERE AND HOW > 6.3.1.1 EXTERNAL WALL INSULATION
External wall insulation poorly applied with gaps against wall surface, increasing heat loss.
Starter track for EWI to be made from low conductive material, not a metal.
External wall insulation fitted snugly so that no gaps exist over face of wall.
56

Many of the basic principles of IWI are similar to those for EWI, however they occur within an internal context so the way they are dealt with will be different.
As with EWI, many risks are increased or decreased depending on a house’s location and orientation. For houses in Bristol, research (prepared for this guide) suggests that IWI should be an acceptable and relatively safe measure, and can be a very useful retrofit option, provided that the principles and details in this guide are followed.
The importance of following a whole-house approach and using a joined-up process has already been covered in detail. However, for IWI this must be re-emphasised – IWI is a retrofit measure that must also include:
a) the outside of the wall (checking condition and treating where necessary, to ensure the wall doesn’t get too wet or damp);
b) all junctions (where the external wall meets windows, doors, floors, internal walls, service pipes & cables, etc.); and
6.3.2 Internal wall insulation
c) the ventilation system of the house (current status and any additional need post-retrofit).
The reason this is so important is that the risk of moisture-related problems is generally increased with IWI: adding insulation to the inside of solid walls means less internal heat will reach the walls, so they will often be colder than before, and this reduces the ability of the wall to dry out if it gets wet (through driving rain, for example). If moisture is trapped or condensation forms within the wall, this reduces the effectiveness of the insulation and can affect the health of both the building and its occupants. Floor joists and any timbers embedded in the wall are particularly vulnerable, as they are susceptible to mould and rot with long-term exposure to excessive moisture.
The following issues need to be considered as part of the application, design, application and in-use processes.
Assessment issues
Heritage and community valueAlthough the assessment of the heritage and community value of a house is sometimes covered by designated status in planning, often beautiful buildings are not listed or part of conservation areas. It is essential that before undertaking IWI you think about the beauty and character of the inside of the rooms being insulated, and see if there is anything of significance which will be damaged or adversely affected. If you need to, talk to people with expertise in heritage.
Building FormThe more geometrically complex a building form, the more difficult it will be to insulate with a whole-house approach. However, IWI can often be applied to complex buildings more easily than EWI as walls tend to be flatter and less ornate inside houses than outside, particularly on front façades. Bay windows are easier to insulate internally, although they remain complex and still require great care and attention to detail.
Exposure and orientationIt is important to understand not only how a building is performing when visited, but also what the likely challenges are in the middle of winter, for example, or during an autumn storm. This requires an understanding of your local weather and differences depending on orientation (i.e. South-facing façades often receive more sun and rain than North-facing façades). Traditional buildings sometimes demonstrate this understanding and have different finishes or protections on different sides according to exposure and orientation. In Bristol, some outlying areas are much more exposed to driven rain (particularly on the South-West side) than houses in the centre, so a lot of care must be taken with ensuring the pointing or render, the rainwater goods and the seals around openings are all in good condition, whereas this is less critical in sheltered locations.
Materials and Construction MethodKnowing what your building is made of, how it was constructed and how it has been altered over time will help inform what’s possible and what risks may be involved. For example, some wall materials are much more porous than others; some walls have a lot of timber embedded in them (such as lintels and ties, as well as joists and wall plates), and some have less. Although this guidance is designed to minimise risk, it is still important to be aware of higher-risk areas are and take particular care where they are present.
576.0 SOLID WALL INSULATION: WHEN, WHERE AND HOW

6.0 SOLID WALL INSULATION: WHEN, WHERE AND HOW > 6.3.2 INTERNAL WALL INSULATION
Design issues
External Wall• Ensure that the outside wall is in good
condition (and if it is not, ensure that it is repaired properly with lime-based mortars and plasters – not cement, as this is impermeable), all rainwater goods and drains are working, under-floor vents are clear of debris and external ground levels are below the internal ground floor level
• All sources of acute damp should be explored and addressed before installing IWI. The wall should always be dry on the inside (and most of the way through to the outside) before any IWI installation
Insulation thickness• Do not target a finished (i.e. post-
insulation) wall U-value of lower than 0.6 W/m2K – this typically means a maximum insulation thickness of around 60mm. This is because the more insulation you put on the wall the greater the heat resistance and the colder the wall, thereby reducing drying potential and increasing condensation risks. In addition, heat loss modelling has demonstrated that, due to unavoidable thermal bridging with IWI, applying larger amounts of insulation will generally have reduced effectiveness (i.e. there is an optimum insulation depth, beyond which the cost-benefit ratio reduces signifcantly)
Insulation coherence• The whole façade should be insulated
wherever possible – this extends to adding insulation at floor-wall junctions and considering treating joist ends (see drawings below)
• Always insulate windows and door reveals with at least 10mm of high-performance insulation or 20mm of average-resistance insulation (your designer should be able to advise on specific materials)
• Where the IWI meets partition or party walls, insulation should be applied to these walls as well for at least 100mm to minimise the impact of these unavoidable thermal bridges, unless otherwise specified by experts
• ‘Thermally-broken’ fixings should be used (as per EWI)
• Services (e.g. pipes and wiring) should be run in conduits in the existing wall, or removed and reinstated onto the surface of the new insulation system where possible
Moisture quality of insulation systemAlways use ‘moisture-open’ insulation systems for IWI, to ensure that walls can dry to the inside as well as the outside of the building – this will help minimise the risk of moisture-related problems outlined previously. Using moisture-closed insulation systems reduces the wall's capacity to dry, which is particularly important if the wall is wet in any way due to driving rain, residual damp, or condensation. In this case, ‘moisture open’ means both vapour permeable and capillary active. If insulation systems are not capillary active then further advice should be sought – if in doubt, check and consult expert advice.
Airtightness• As part of the IWI design, ensure that
airtightness is also addressed – in particular, ensure that air cannot leak into joist ends, wall plates and other timbers which are embedded in the wall
• Use an IWI system that is affixed directly to the wall with no air gaps, and use a moisture-open bonding coat to affix the insulation to the wall – this should significantly reduce the risk of mould growth behind the insulation, and reduces the risk of thermal bypass
• A levelling coat of lime plaster (applied to the wall prior to insulation) can greatly assist with airtightness, while continuing to allow moisture movement
Assessment issues continued
ConditionBuilding condition is one of the most important considerations is deciding whether or not to proceed with IWI (or any retrofit measure). If a building is in poor condition it is much more likely that there will be problems with a retrofit. On the other hand, a retrofit project can sometimes be a good opportunity to address both superficial and underlying problems. The key point is that if there are structural or moisture problems in your existing building, they must be fully investigated and taken into account in any work that is planned. If there is excessive moisture in your walls, then it is always best to address the cause of this moisture and to let the building dry out before undertaking any IWI work.
UseUse is also an important context. First, understand how the building was used in the past, what it was designed for and how that differs from today’s use. Secondly be aware that moisture risks and potential energy savings are very different in a house which has a large young family living in it, compared with that of a single occupant who is often out of the building. This context makes a lot of difference to the benefits of IWI, and to the disruption of application. Projects should take account of the use of the building throughout the design and installation.
58

Design issues continued
VentilationIn increasing airtightness of the building it is essential to also ensure that the building has an effective ventilation system. For IWI an active ventilation system should be specified. This is covered in detail in Section 6.3.
Replication / reinstatement of featuresWhere there are features on the internal walls being insulated, such as cornice details, historic skirting, these should where possible be preserved and re-fixed over the IWI system or in some cases can be reproduced new. In certain situations, this becomes an opportunity to re-instate features which have been lost, and this can considerably enhance the appearance and value of a property. The appropriateness of such replication is dependent on the individual home, and it may be advisable to consult with the Planning team to help guide your decision on this.
6.0 SOLID WALL INSULATION: WHEN, WHERE AND HOW > 6.3.2 INTERNAL WALL INSULATION
Application issues
Quality of installationThis is essential in any SWI project, and is key to a successful and happy retrofit project. Firstly this means that the contractors should strictly follow the design and specification – if they find a problem with this, then they must consult with both you and the designer before proceeding further.
Of course installers should also be suitably trained and experienced. If there are inexperienced workers on site, then at least they should be supervised by a trained and experienced colleague or manager. Ideally there should be someone on site with a sound understanding of the principles and details in this guide, who is able to liaise with you and the designer if needed.
Capacity and CautionProjects often fail because of unexpected or unplanned factors. If there is not sufficient capacity (i.e. time or money) to deal with these, then a job is more likely to be poorly done, with corners being cut or some areas just left out altogether. So ensure that there is a contingency fund if at all possible, and make sure your timescales have some flexibility.
In-use and Maintenance issues
In UseOnce IWI has been installed, it is essential that owners and occupants know what can and can’t be done to their walls, for example if they want to add lights, services, shelves and so on.
On a more general note, it is very important that the end users of the house are a) involved throughout and b) well informed about the changes they are likely to notice and any different behaviours they should adopt (e.g. being more aware of ventilation). If a dedicated ventilation system is installed as part of the project, it must have simple, user-friendly, reliable controls and its operation and maintenance should be explained clearly to the occupant, so they can use it properly and identify any faults quickly.
MaintenanceIWI is not a ‘fit and forget’ measure:
• Wherever possible, you should make simple visual checks on vulnerable areas (areas where you know there is a thermal bridge, for example) every few months. While it is generally hard to see behind the insulation, if you can lift a floorboard to check the condition of the floor joists and ends for any dampness or mould that would be a good starting point. Expert advice should be sought for any more invasive or extensive monitoring
• As stated above, the condition of the external wall, rainwater goods, drains, under-floor vents and so on should have regular checks and maintenance where needed
59

6.0 SOLID WALL INSULATION: WHEN, WHERE AND HOW
EXAMPLE DETAIL DRAWINGSEvery home is different, so no guide can show you how all building details should be treated. However, principles do not change, and the following drawings will give you an idea of the sort of considerations and detailing you are likely to need. These are indicative illustrations only, based on the principles of responsible retrofit – they are not necessarily the details you will need for your own home. But look at them carefully – if you are offered a design that doesn’t address the problem areas highlighted in these drawings, you should ask whether they can be amended accordingly, or look elsewhere.
Key considerations, before and during installation
6.3.2.1 Example details for internal wall insulation
Check coping and parapet for moisture ingress
Check gutter and flashings
Check roof timbers and wall plates
Fitted furniture in way of IWI.
Sometimes the opportunity to fit IWI is triggered by the fitting of a new kitchen or similar.
Check Bressumer beam and joists for signs of moisture and decay
Bay window roof and flashings
Radiator and electric sockets will need moving and re fitting
Check lower wall for signs of damp
Ensure that floor vents are open and clear of debris.
Check joist end too.
Check brickwork and pointing are in good condition.
Repair/flash copings
Repair flashings and gutter
Ensure any damaged timber replaced and source of decay addressed. Ensure ventilation throughout roof is maintained
Fitted furniture moved.
Extend lime parge into joist zone to minimise air leakage paths.
Radiator and ‘tails’ moved.
If bottom of wall has chronic damp which cannot be addressed through lowering ground level or by other repairs, consider use of XPS insulation internally up to maximum 300mm above floor level. Otherwise extend moisture open insulation.
Ensure wall and floor insulation are well connected and draught proof.
Ensure all joints in insulation and all joints with wall, floor, windows, roof etc are airtight.
Consider repointing brickwork (lime mortar)
Moisture open IWI, 60mm thick maximum to minimise risk of moisture being trapped.
Secondary glazing or new window possible. Avoid thermal bridges around windows.
Ventilation system installed
Insulation returned along party wall to prevent thermal bridge.
BEFORE INSTALLING IWI, CONSIDER WHEN INSTALLING OUT IWI, CONSIDER
60
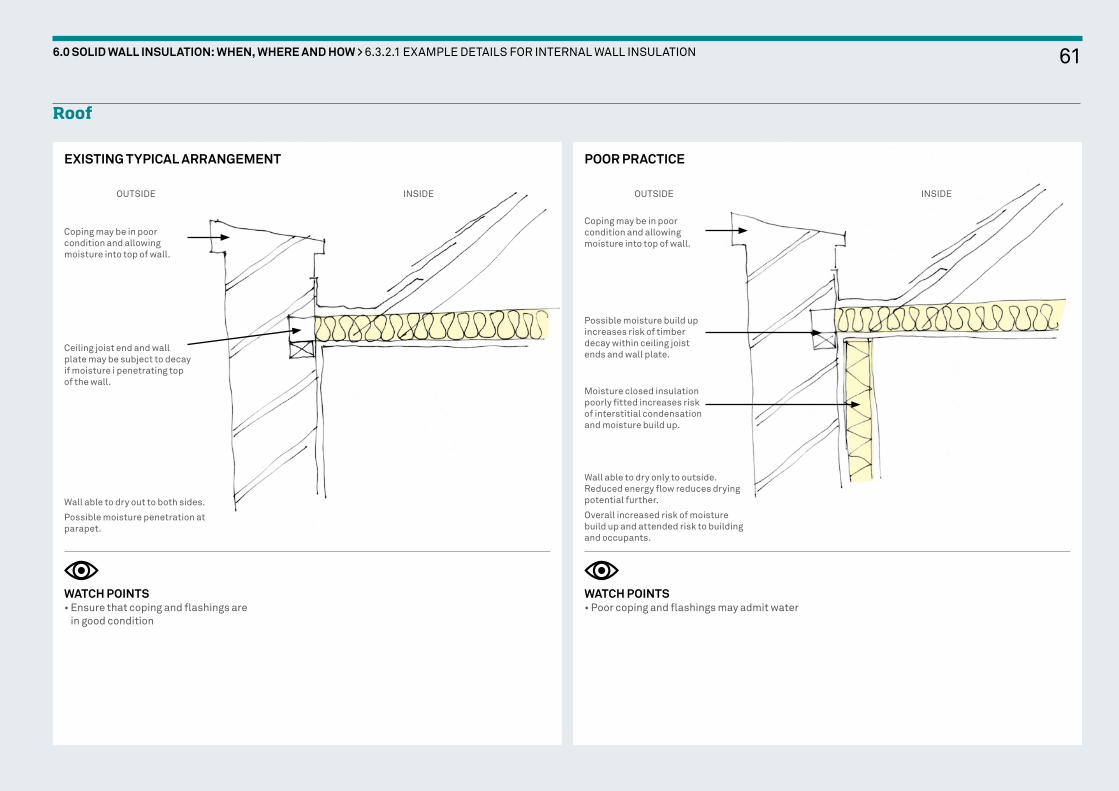
6.0 SOLID WALL INSULATION: WHEN, WHERE AND HOW > 6.3.2.1 EXAMPLE DETAILS FOR INTERNAL WALL INSULATION
Roof
EXISTING TYPICAL ARRANGEMENT POOR PRACTICE
WATCH POINTS• Ensure that coping and flashings are
in good condition
WATCH POINTS• Poor coping and flashings may admit water
Wall able to dry out to both sides.
Possible moisture penetration at parapet.
Wall able to dry only to outside. Reduced energy flow reduces drying potential further.
Overall increased risk of moisture build up and attended risk to building and occupants.
Ceiling joist end and wall plate may be subject to decay if moisture i penetrating top of the wall.
Moisture closed insulation poorly fitted increases risk of interstitial condensation and moisture build up.
Coping may be in poor condition and allowing moisture into top of wall.
Possible moisture build up increases risk of timber decay within ceiling joist ends and wall plate.
Coping may be in poor condition and allowing moisture into top of wall.
INSIDE INSIDEOUTSIDE OUTSIDE
61
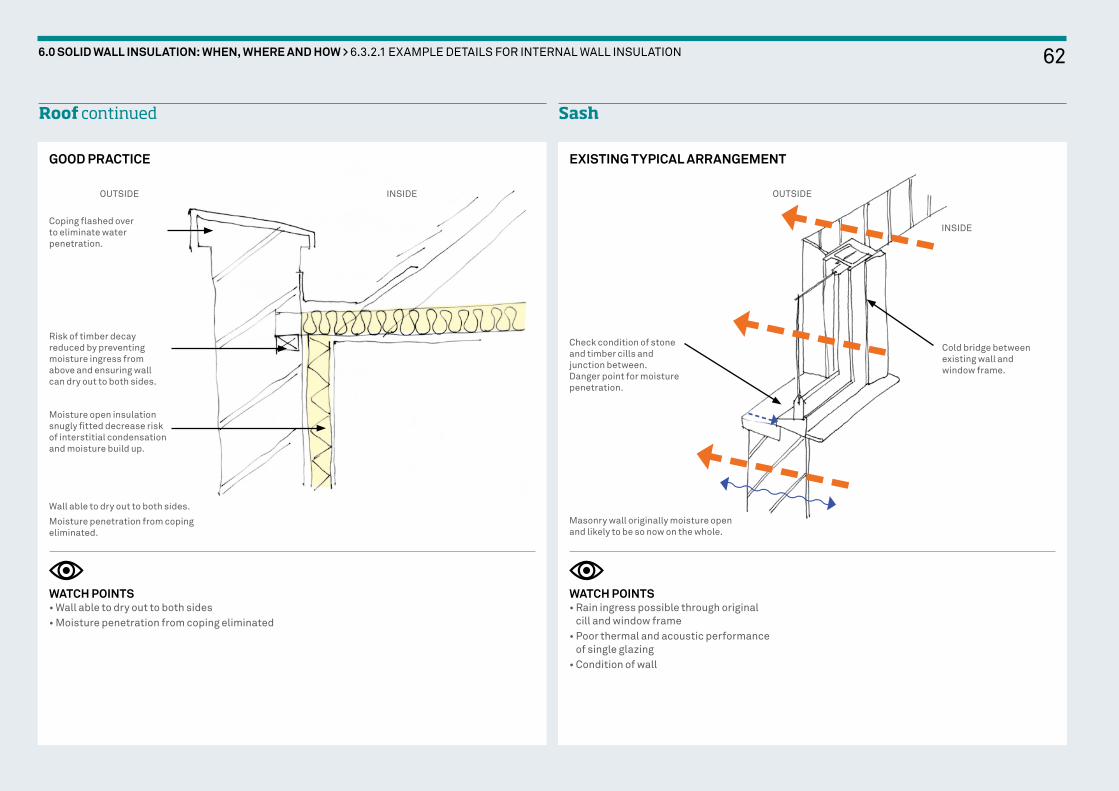
6.0 SOLID WALL INSULATION: WHEN, WHERE AND HOW > 6.3.2.1 EXAMPLE DETAILS FOR INTERNAL WALL INSULATION
Roof continued Sash
GOOD PRACTICE EXISTING TYPICAL ARRANGEMENT
WATCH POINTS• Wall able to dry out to both sides• Moisture penetration from coping eliminated
WATCH POINTS• Rain ingress possible through original
cill and window frame• Poor thermal and acoustic performance
of single glazing• Condition of wall
Wall able to dry out to both sides.
Moisture penetration from coping eliminated.
Masonry wall originally moisture open and likely to be so now on the whole.
Moisture open insulation snugly fitted decrease risk of interstitial condensation and moisture build up.
Risk of timber decay reduced by preventing moisture ingress from above and ensuring wall can dry out to both sides.
Check condition of stone and timber cills and junction between. Danger point for moisture penetration.
Coping flashed over to eliminate water penetration.
INSIDE
INSIDE
OUTSIDE OUTSIDE
Cold bridge between existing wall and window frame.
62

Sash continued
6.0 SOLID WALL INSULATION: WHEN, WHERE AND HOW > 6.3.2.1 EXAMPLE DETAILS FOR INTERNAL WALL INSULATION
POOR PRACTICE
WATCH POINTS• Thermal bridge• Lack of air tightness• Moisture trapped by vapour closed insulation
Masonry wall no longer able to dry towards both sides.
Water penetration through poorly maintained cills has not been addressed giving rise to moisture build up behind insulation.
INSIDE
OUTSIDE
Cold bridge between existing wall and window frame.
No air tightness measure carried out between window and wall, incrasing risk of interstitial condensation.
Moisture closed insulation increases risk of trapping moisture at wall interface.
Cill board not replaced possible giving rise to ugly junction.
GOOD PRACTICE WITH IMPROVED PRIMARY
WATCH POINTS• Rain ingress still possible through original
cill and window frame• Condition of external wall• Poor thermal performance through window
retained• Drying potential maximised through external
wall maintained
Ability of wall to dry out maintained with the use of moisture open internal wall insulation . No greater than 60mm thick (unless additional assessments are undertaken)
INSIDE
OUTSIDE
IWI reduces cold bridging through original window frame.
63
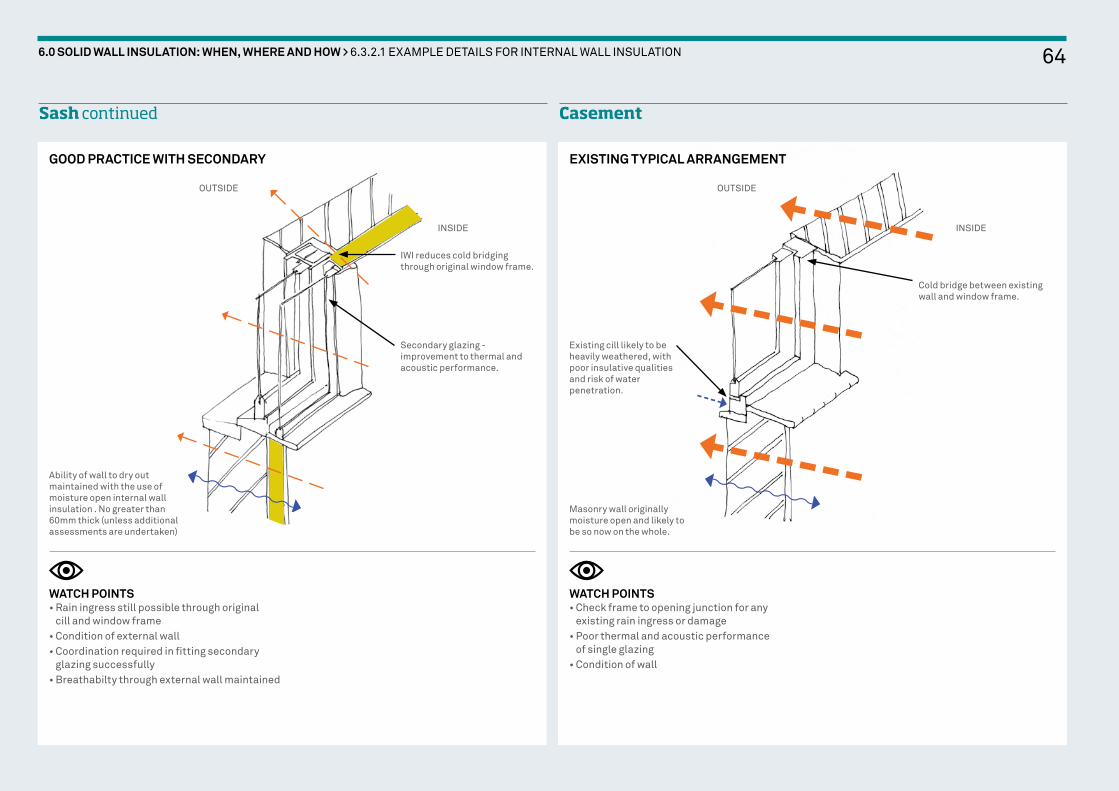
Sash continued Casement
6.0 SOLID WALL INSULATION: WHEN, WHERE AND HOW > 6.3.2.1 EXAMPLE DETAILS FOR INTERNAL WALL INSULATION
GOOD PRACTICE WITH SECONDARY
WATCH POINTS• Rain ingress still possible through original
cill and window frame• Condition of external wall• Coordination required in fitting secondary
glazing successfully• Breathabilty through external wall maintained
Ability of wall to dry out maintained with the use of moisture open internal wall insulation . No greater than 60mm thick (unless additional assessments are undertaken)
INSIDE
OUTSIDE
Secondary glazing - improvement to thermal and acoustic performance.
IWI reduces cold bridging through original window frame.
EXISTING TYPICAL ARRANGEMENT
WATCH POINTS• Check frame to opening junction for any
existing rain ingress or damage• Poor thermal and acoustic performance
of single glazing• Condition of wall
Masonry wall originally moisture open and likely to be so now on the whole.
INSIDE
OUTSIDE
Cold bridge between existing wall and window frame.
Existing cill likely to be heavily weathered, with poor insulative qualities and risk of water penetration.
64

Casement continued
6.0 SOLID WALL INSULATION: WHEN, WHERE AND HOW > 6.3.2.1 EXAMPLE DETAILS FOR INTERNAL WALL INSULATION
WATCH POINTS• Cold bridge leads to possible condensation
and mould around reveal• Moisture closed insulation tends to trap
moisture
WATCH POINTS• Ensure that not rain penetration and jamb and
cill are possible• Ensure condition of external wall is good and
all pointing is good and mositure open• Ensure wall can dry out to botn faces by using
moisture open insulation
POOR PRACTICE
Masonry wall originally moisture open and likely to be so now on the whole.
Ability of wall to dry out maintained with the use of vapour open internal wall insulation.
INSIDE INSIDE
OUTSIDE OUTSIDE
Gaps between insulation boards allowing warm moist air to pass through insulation to masonry creating risk of interstitial condensation.
Insulated jambs reduce cold bridging and mould risk.
Cold bridge along reveal and frame leading to condensation and mould risk.
Air tightness tape between frame and lime parging to wall.
Moisture closed insulation making reducing drying capacity of wall to inside creating risk of moisture build up.
60mm max moisture open insulation maximises drying potentail to both sides, helping reduce risk of moisture build up.
Existing cill likely to be heavily weathered, with poor insulation qualities and risk of water penetration.
External face of wall made good including poiting remediationa and replacement of nay fractured and spalling brickwork.
New insulating glass or possible whole new window.
GOOD PRACTICE
65

Intermediate floor
6.0 SOLID WALL INSULATION: WHEN, WHERE AND HOW > 6.3.2.1 EXAMPLE DETAILS FOR INTERNAL WALL INSULATION
WATCH POINTS• Check for timber decay within joist end
and wallplate before installing insulation• Check condition of pointing• Check make up of plaster (lime, sand/cement
or gyspum)• Check for services that may need moving• Check for mechanically fixed lining that may
need moving
WATCH POINTS• Ensure external face of wall prevent
driving rain• Ensure moisture within wall can migrate
towards inside and outside
Ability of wall to dry out is good as drying potential to inside and outside. Temperature gradient across wall in winter helps drying during the cold wet months and helps guard against frost action.
Ability of wall to dry out is reduced significantly by moisture close insulation and reduced temperature gradient across wall.
INSIDE INSIDEOUTSIDE OUTSIDE
EXISTING TYPICAL ARRANGEMENT POOR PRACTICE APPLICATION OF IWI
Continuous wall plate
Joist embedded within wall and secured to wall plate.
Pointing between bricks essential to prevent liquid water penetrating easily.
Plaster work
No plaster ‘behind scenes’
High heat transfer along entire floor zone significantly undermines effect of insulation either side.
Pointing left with gaps that allow liquid water into wall.
Moistures closed insulation giving rise to moisture build up
Air leakage through un-plastered zone may give rise interstitial condensation within brick wall
Thick layer of insulation causing masonry wall to remain cold during winter exacerbating problems moisture.
Insulation board poorly fitted to wall creating air voids that promote heat loss and interstitial condensation.
66

Intermediate floor continued Bottom of wall – suspended floor
6.0 SOLID WALL INSULATION: WHEN, WHERE AND HOW > 6.3.2.1 EXAMPLE DETAILS FOR INTERNAL WALL INSULATION
WATCH POINTS• Ensure external face of wall prevent driving
rain• Ensure moisture within wall can migrate
towards inside and outside• Ensure air leakage around joist zone is
reduced
WATCH POINTS• Check floor ventilation• Check timber condition• Check condition of wall
INSIDE INSIDEOUTSIDE OUTSIDE
Extend plaster using moisture open material in order to create air tight layer over entire wall
Ensure pointing in good condition to prevent liquid water penetrating easily
Ensure substrate is moisture open. Level surface and ensure no air gaps
Expanding tape between insulation and joist
Moisture open insulation max 60mm thick – extended through joist zone.
Joist embedded within wall and secured to wall plate
Continuous wall plate
GOOD PRACTICE APPLICATION OF IWI EXISTING TYPICAL ARRANGEMENT
At bottom of wall the ability of the wall to maintain am appropriate moisture balance is helped by ventilation grilles which also moderate humidity within the suspended floor zone.
Wall plate supporting joist end.
Dwarf wall with hit and miss brickwork to promote ventilation.
Ventilation grille. May be painted closed or blocked with debris behind.
Air leakage through boards.
Heat loss through wall and floor.
Debris within floor left in place reducing drying potential to wall base and timber
67
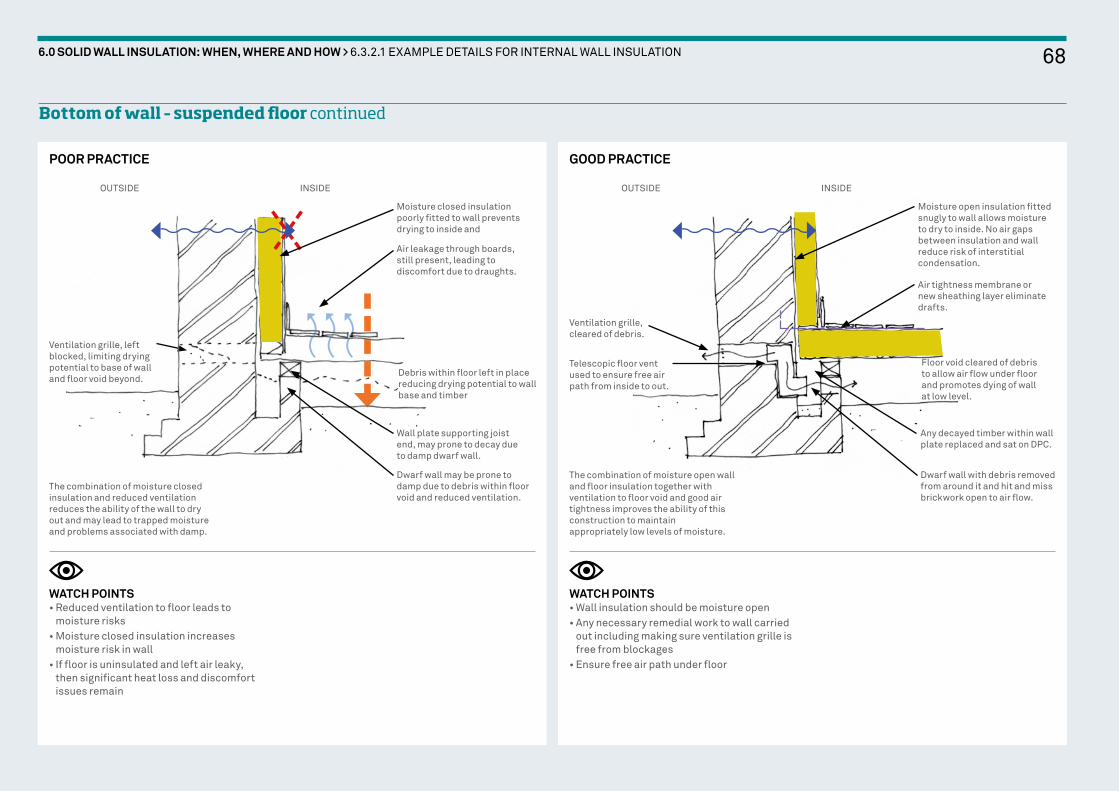
Bottom of wall – suspended floor continued
6.0 SOLID WALL INSULATION: WHEN, WHERE AND HOW > 6.3.2.1 EXAMPLE DETAILS FOR INTERNAL WALL INSULATION
WATCH POINTS• Reduced ventilation to floor leads to
moisture risks• Moisture closed insulation increases
moisture risk in wall• If floor is uninsulated and left air leaky,
then significant heat loss and discomfort issues remain
WATCH POINTS• Wall insulation should be moisture open• Any necessary remedial work to wall carried
out including making sure ventilation grille is free from blockages
• Ensure free air path under floor
INSIDEOUTSIDE
The combination of moisture closed insulation and reduced ventilation reduces the ability of the wall to dry out and may lead to trapped moisture and problems associated with damp.
Wall plate supporting joist end, may prone to decay due to damp dwarf wall.
Any decayed timber within wall plate replaced and sat on DPC.
Debris within floor left in place reducing drying potential to wall base and timber
Dwarf wall may be prone to damp due to debris within floor void and reduced ventilation.
Dwarf wall with debris removed from around it and hit and miss brickwork open to air flow.
Air leakage through boards, still present, leading to discomfort due to draughts.
Moisture closed insulation poorly fitted to wall prevents drying to inside and
Ventilation grille, left blocked, limiting drying potential to base of wall and floor void beyond.
INSIDEOUTSIDE
POOR PRACTICE GOOD PRACTICE
Air tightness membrane or new sheathing layer eliminate drafts.
Moisture open insulation fitted snugly to wall allows moisture to dry to inside. No air gaps between insulation and wall reduce risk of interstitial condensation.
The combination of moisture open wall and floor insulation together with ventilation to floor void and good air tightness improves the ability of this construction to maintain appropriately low levels of moisture.
Ventilation grille, cleared of debris.
Telescopic floor vent used to ensure free air path from inside to out.
Floor void cleared of debris to allow air flow under floor and promotes dying of wall at low level.
68

HWI is a combination of EWI and IWI. It can be a very useful approach and is increasingly common, particularly where the front of the building has heritage value or planning constraints.
The key principles of HWI relate to those for EWI and IWI given above. The only part of this application which is not covered by the above text is the possible junction between IWI and EWI, on a corner. In these instances the two different insulation systems should overlap by at least 300mm, to minimise or eliminate the thermal bridge.
6.3.3 Hybrid (internal and external insulation)
6.0 SOLID WALL INSULATION: WHEN, WHERE AND HOW
IWI returning along the side wall to reduce the thermal bridging in this corner
69
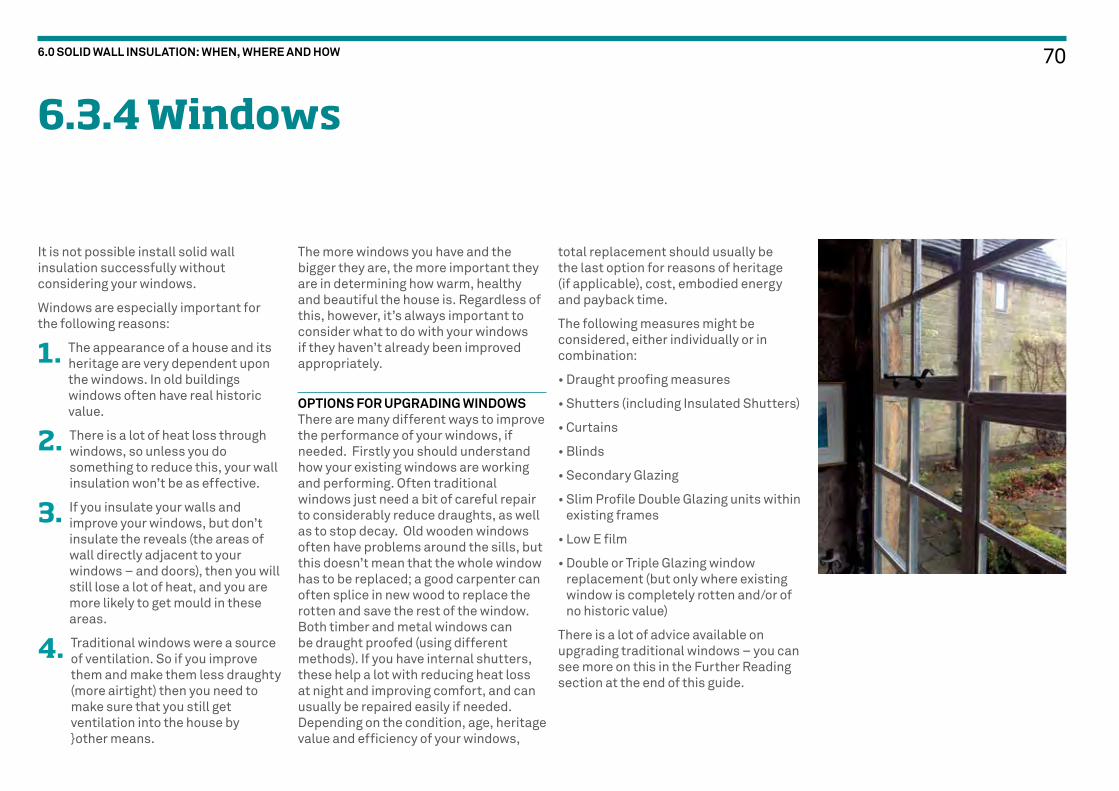
6.3.4 Windows
6.0 SOLID WALL INSULATION: WHEN, WHERE AND HOW
total replacement should usually be the last option for reasons of heritage (if applicable), cost, embodied energy and payback time.
The following measures might be considered, either individually or in combination:
• Draught proofing measures
• Shutters (including Insulated Shutters)
• Curtains
• Blinds
• Secondary Glazing
• Slim Profile Double Glazing units within existing frames
• Low E film
• Double or Triple Glazing window replacement (but only where existing window is completely rotten and/or of no historic value)
There is a lot of advice available on upgrading traditional windows – you can see more on this in the Further Reading section at the end of this guide.
The more windows you have and the bigger they are, the more important they are in determining how warm, healthy and beautiful the house is. Regardless of this, however, it’s always important to consider what to do with your windows if they haven’t already been improved appropriately.
OPTIONS FOR UPGRADING WINDOWSThere are many different ways to improve the performance of your windows, if needed. Firstly you should understand how your existing windows are working and performing. Often traditional windows just need a bit of careful repair to considerably reduce draughts, as well as to stop decay. Old wooden windows often have problems around the sills, but this doesn’t mean that the whole window has to be replaced; a good carpenter can often splice in new wood to replace the rotten and save the rest of the window. Both timber and metal windows can be draught proofed (using different methods). If you have internal shutters, these help a lot with reducing heat loss at night and improving comfort, and can usually be repaired easily if needed. Depending on the condition, age, heritage value and efficiency of your windows,
It is not possible install solid wall insulation successfully without considering your windows.
Windows are especially important for the following reasons:
1. The appearance of a house and its heritage are very dependent upon the windows. In old buildings windows often have real historic value.
2. There is a lot of heat loss through windows, so unless you do something to reduce this, your wall insulation won’t be as effective.
3. If you insulate your walls and improve your windows, but don’t insulate the reveals (the areas of wall directly adjacent to your windows – and doors), then you will still lose a lot of heat, and you are more likely to get mould in these areas.
4. Traditional windows were a source of ventilation. So if you improve them and make them less draughty (more airtight) then you need to make sure that you still get ventilation into the house by }other means.
70

6.0 SOLID WALL INSULATION: WHEN, WHERE AND HOW > 6.3.4 WINDOWS
JUNCTIONSIf you are installing Solid Wall Insulation as well as carrying out window upgrades, it is essential to consider the junction between the insulation and the window. Your designer and installer will have to consider the detailing for these areas, and work out what might be appropriate in different situations. The kind of window frame also makes a lot of difference – metal frames are much colder than wood, for example, so secondary glazing may often be required in these instances to reduce the risk of condensation. However, this section focuses on details for timber windows as these are most common in Bristol.
For EWI and IWI, one of the main considerations is the position of the window in the wall: is the window in the middle of the wall, or level with the outside or inside of the wall? This makes a difference to what can be done with secondary glazing and shutters; but more importantly it means you have to think about the insulation of the window reveals in different ways. Often there are several different types of windows and positions of windows in the same house (sometimes on the same wall!). the following drawings show insulation options for each of these scenarios.
IWI FOR DIFFERING WINDOW POSITIONS
Potential for secondary glazing or new double glazing
Insulation returned into reveal. This is usually possible with outward opening casement frames.
Insulation lapped over window frame.
This is usually relatively easy though does require removal of architrave.
Potential for secondary glazing or new double glazing
Insulation returned into reveal. This is usually possible with outward opener.
The short length of this return reduce the thermal bridge.
Casement window towards outside face of masonry wall.
Casement window towards middle of masonry wall.
Casement window towards inside face of masonry wall.
Potential for secondary glazing or new double glazing
Insulation lapped over window frame.
This is usually relatively easy though does require removal of architrave.
Potential for secondary glazing or new double glazing
Sliding sash window normally located inside face of masonry wall.
71

WINDOW REPLACEMENTThe above drawings don’t cover the installation of new windows. This should usually only be considered if:
a) the existing windows are completely beyond repair
b) the existing windows can’t usefully form part of a whole-house approach (e.g. if none of the upgrade measures is possible and they have no historic value)
c) if you are doing a significant retrofit with very low airtightness targets and highly insulated walls
If you are replacing windows, make sure they are properly integrated with the SWI and any ventilation system, and that you obtain all necessary consents (see Section 5).
Paying proper attention to your windows and junctions will minimise the chances of any unnecessary heat loss or moisture problems. Make sure your designer and installer understand why windows are important, so that they can identify a design and installation which are suited to the particular windows in your house.
6.0 SOLID WALL INSULATION: WHEN, WHERE AND HOW > 6.3.4 WINDOWS
EWI FOR DIFFERING WINDOW POSITIONS
Casement window towards outside face of masonry wall.
Casement window towards middle of masonry wall.
Casement window towards inner face of masonry wall.
Potential for secondary glazing or new double glazing
Insulation lapped over frame of window provides a simple way of minimising thermal bridge
Potential for secondary glazing or New window may be worth more consideration as character of building will be significantly affected.
Insulation returned into reveal and onto frame edge. This can be difficult to achieve particularly with outward opening windows commonly found in the UK.
Secondary glazing difficult to install as no reveal left for it.
New window may be worth more consideration as character of building will be significantly affected. An inward opening window will allow the reveal insulation to be thicker and more effective
Insulation returned into reveal and onto frame edge. This can be difficult to achieve particularly with outward opening windows commonly found in the UK.
72

Here are a few additional self-checks you can make to give you a fuller picture of your own home:
• Do you keep any of your internal doors shut? If so, is there a sufficient gap (10-20mm) at the bottom of the door to aid air flow?
• Do you have ventilators in the window / wall of each room? If so, these should always be left open apart from in strong winds (if it causes discomfort draughts). If not, refer back to Section 4.1 for advice on the level of ventilation you’re likely to need.
• If you have intermittent extract fans (normally triggered by turning a light on), do they work and do you use them? They should be on for showering, bathing, washing and drying as a
post-insulation; flues, services and other measures should be installed in the correct order to ensure the robustness of the SWI system. One of the key additional measures is often likely to be ventilation; this is covered in this section.
VENTILATION AND AIRTIGHTNESS MEASURESThe whole-house approach is the only route recommended in this guide, and this includes a ventilation strategy – this is not an optional extra! Some form of proprietary ventilation is essential in order to maintain a healthy environment in a retrofitted older home, and to dilute pollutants, including radon (see Section 3.5).
INITIAL VENTILATION CHECKSSection 4.1 gave you a rough guide to assessing your current ventilation set-up.
If a whole-house approach is being followed, other retrofit measures are also likely to be installed alongside SWI. Wherever these will meet or interact with the SWI fabric (e.g. where new windows meet the SWI, or service pipes penetrate the SWI), the design should ensure that junctions and seals are meticulously detailed. For long-term maintenance purposes, it may also be advisable for any householder information packs to include guidance for installers on reinstating any seals and junction details where these other measures are likely to be replaced or moved in the future.
Where additional measures are being installed, a joined-up approach and logical sequencing of works is essential. For example, any new boiler should be sized for the heat load of the house
6.4 Related measures – Ventilation
6.0 SOLID WALL INSULATION: WHEN, WHERE AND HOW
minimum. Extract fans should operate for approximately 15 minutes after the light is switched off. Many fans have in built-in timer for this.
• Do you have an extract fan in the kitchen? If so, is this a wall / window unit or a canopy above the hob (cooker hood)? If it’s a canopy, make sure it extracts air to the outside (often v ia ducting) as some systems just re-circulate air and you shouldn’t consider this as ventilation. Regardless of the type of fan you have, it should always be used when cooking especially if you have gas cooking appliances. The highest available fan speed should normally be selected, particularly if there is more than one pan on the hob, and if steam is visible.
73

MEASURING FOR AIRTIGHTNESSIf you’re going for a more significant retrofit project – e.g. one that includes SWI – you should be thinking about specifically targeting air leakage. Measuring your current airtightness levels will help you determine the best ventilation strategy for your home.
The approved way of testing airtightness is known as the fan pressurisation method. This is relatively quick and straightforward: a temporary fan is fitted (usually within your front door opening), and this pressurises and de-pressurises your home to quantify its ‘air permeability’. A summary of the different ratings for existing homes is shown below:
6.0 SOLID WALL INSULATION: WHEN, WHERE AND HOW > 6.4 RELATED MEASURES – VENTILATION
Many older and unimproved homes are likely to be in Band D. A retrofit project that includes SWI and good-quality windows will probably increase this to at least a Band C, even without specifically targeting airtightness measures. If you want to achieve Band A you’ll need a holistic airtightness strategy, to reduce air leakage significantly.
Either way, it’s hard to predict the exact level of airtightness you’ll achieve. The best way to find out is by testing, at various stages:
• Before – to identify current performance and specific areas of air leakage. This will help you carry out sealing works during the retrofit, and develop your airtightness strategy
• During – to identify any remaining gaps, so these can be filled before finishes are applied
• After – to identify the new performance, confirm you have chosen the right ventilation system (see below) and check how successful the project has been
Band Air permeability (m3/hr/m2@50Pa) Described condition
A Less than 3 Very airtight
B Between 3 and 5 Fairly airtight
C Between 5 and 10 Acceptably airtight
D Between 10 and 20 Not airtight – a leaky building
E Above 20 Very leaky
When it comes to choosing the right ventilation system for your home, you may face a dilemma: how can you plan a ventilation strategy if you don’t know how airtight your upgraded home will be? One option is to estimate your home’s approximate existing air permeability band through inspection (either by you or a professional) and then set a target band you want to reach. If your home is a Band E, for example, you may wish to get it up to a Band C through identification and treatment of common air paths. Whatever your strategy, you need to ensure that the ventilation system you choose (see below) is appropriate for your target band. This strengthens the case for an airtightness test once the works are complete, to ensure your home is within the band you targeted, and that you have created the optimal environmental and performance conditions for your chosen ventilation system.
CHOOSING A VENTILATION SYSTEMWhen choosing your ventilation strategy you have two options: natural ventilation or continuous mechanical ventilation.
Natural ventilation relies on natural driving forces (e.g. wind, convection currents) to provide general background ventilation, and can be supplemented by intermittent fans in areas of high need (e.g. bathrooms, kitchens (known as wet rooms).
Continuous mechanical ventilation systems have either a central fan connected to wet rooms by ducting, or multiple local fans sited in wet rooms. Both types are available with at least two fan speed settings, where the lower speed is the default option to maintain appropriate background ventilation conditions, and the higher speed options act as a boost (manually or automatically) for periods of high humidity or to rapidly remove other pollutants. Some systems also provide ‘heat recovery’, recycling the heat in the extracted air to increase efficiency and lower your running costs;
Ceiling-mounted extract and supply terminals (MVHR)
74

6.0 SOLID WALL INSULATION: WHEN, WHERE AND HOW > 6.4 RELATED MEASURES – VENTILATION
1 INTERMITTENT EXTRACT SYSTEM
• Most common domestic system• Extract fans in wet rooms• Usually sited on wall or ceiling• Ceiling-mounted fans need to be ducted to outside
Pros
• Easy to install• Low cost• Easy to use
Cons
• Fan noise• User can choose not to use
Suitable BandB – E
these systems require an additional supply air fan (normally within the same unit as the extract fan) to bring fresh air into your home.
The benefit of continuous mechanical ventilation systems is that they provide continuous ventilation, and are not reliant on the variability of natural driving forces. They do however incur greater running costs of between £15 (MEV) and £30 (MVHR) per year – but there is reduced risk of moisture and pollutant build-up.
The main natural ventilation systems available are as follows:
1 Intermittent Extract System
2 Passive Stack Ventilation (PSV)
The main continuous mechanical ventilation systems available are as follows:
3 Centralised Mechanical Extract Ventilation (MEV)
4 Decentralised Mechanical Extract Ventilation (dMEV)
5 Whole-house Mechanical Heat Recovery Ventilation (MVHR)
Each system has its pros and cons and will be more or less suitable for your home, depending upon the scale of your retrofit. The following pages summarise some of the key features of each system – it also shows you which system is suitable for which airtightness banding, to help you narrow your choice.
In all but the last system, replacement air enters via background ventilators (e.g. window trickle vents) and air leakage. In the last system (MVHR), replacement air is normally ducted to living rooms and bedrooms so there is no need for background ventilators.
Other systems are available (e.g. Demand Control Ventilation, Positive Input Ventilation, etc.), but we recommend you seek professional advice before selecting these (see Section 4.3).
75
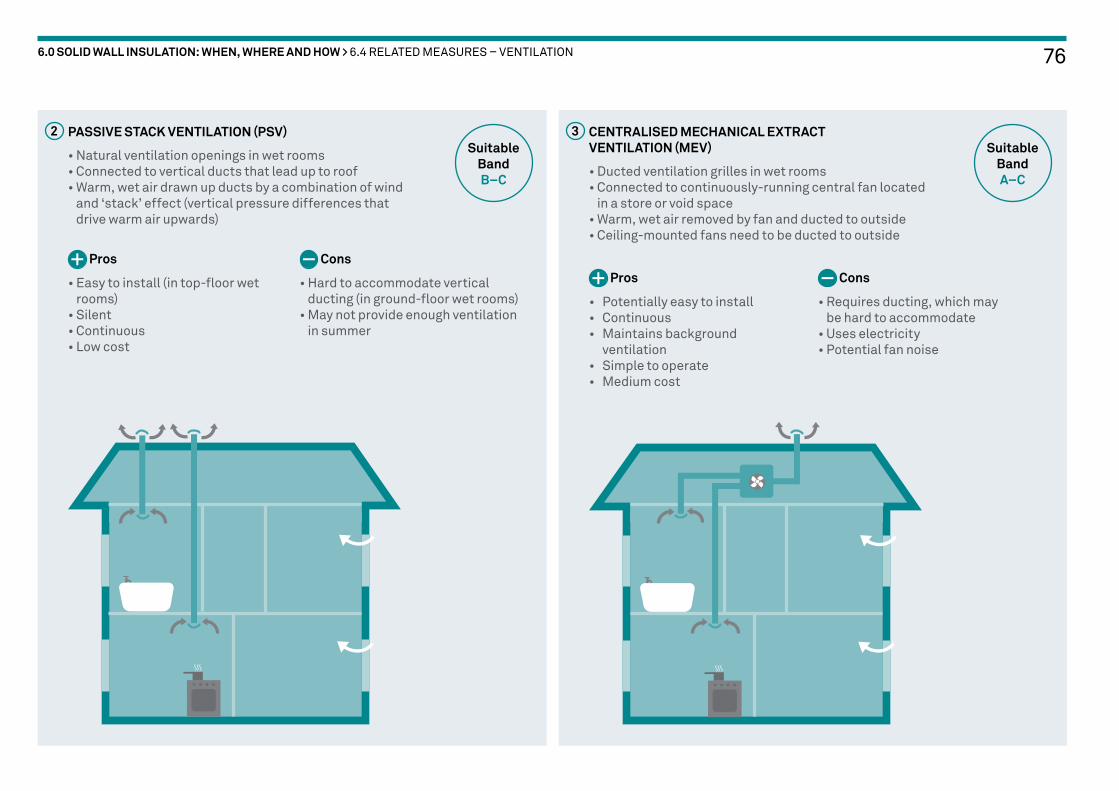
2 PASSIVE STACK VENTILATION (PSV)
• Natural ventilation openings in wet rooms• Connected to vertical ducts that lead up to roof• Warm, wet air drawn up ducts by a combination of wind
and ‘stack’ effect (vertical pressure differences that drive warm air upwards)
Pros
• Easy to install (in top-floor wet rooms)
• Silent• Continuous• Low cost
Cons
• Hard to accommodate vertical ducting (in ground-floor wet rooms)
• May not provide enough ventilation in summer
Suitable BandB–C
6.0 SOLID WALL INSULATION: WHEN, WHERE AND HOW > 6.4 RELATED MEASURES – VENTILATION
3 CENTRALISED MECHANICAL EXTRACT VENTILATION (MEV)
• Ducted ventilation grilles in wet rooms• Connected to continuously-running central fan located
in a store or void space• Warm, wet air removed by fan and ducted to outside• Ceiling-mounted fans need to be ducted to outside
Pros
• Potentially easy to install• Continuous• Maintains background
ventilation• Simple to operate• Medium cost
Cons
• Requires ducting, which may be hard to accommodate
• Uses electricity• Potential fan noise
Suitable BandA–C
76

5 WHOLE-HOUSE MECHANICAL HEAT RECOVERY VENTILATION (MVHR)
• Combines supply and extract ventilation in one system• Air extracted from wet rooms via ducting• Heat from extracted air is recovered and transferred into
supply air• Only suitable for airtight homes
Pros
• Air quality – intake air is filtered• Comfort – air movement and
exchange throughout home• Efficiency – heat recovery reduces
heat demand and tempers incoming air
Cons
• Requires ducting to most rooms in the house
• Most expensive system • Correct commissioning can be
complex• Potential fan noise• Uses electricity
Suitable BandA–B
4 DECENTRALISED MECHANICAL EXTRACT VENTILATION (DMEV)
• Similar to centralised MEV but fans installed in wet rooms rather than one centralised unit
• Similar in simplicity to Intermittent Extract System, as local fans require only local ducting
• Can be suitable replacement for Intermittent Extract System
Pros
• Easy to install• Less ducting than centralised
system• Continuous• Maintains background ventilation• Simple to operate• Low cost
Cons
• Uses electricity• Room-side fan: increased potential
for fan noise
Suitable BandA–C
6.0 SOLID WALL INSULATION: WHEN, WHERE AND HOW > 6.4 RELATED MEASURES – VENTILATION 77

SO WHICH VENTILATION SYSTEM IS RIGHT FOR YOU?For a comprehensive whole-house retrofit project, the target banding for air permeability is likely to be between C and A. This means the full range of ventilation systems described above is open to you.
If you are targeting bands B or A, you should consider a continuous mechanical system to maintain good air quality.
If you’re targeting band B but only want to consider a natural ventilation system, you should definitely seek professional advice (see Section 4.3), as the air movement in, through and out of your home is greatly affected by its layout and volume, and by how much moisture your household generates.–Example: In an airtight home with a low-to-medium moisture load (e.g. 3-5 washing loads per week, tumble dried), a well-designed natural ventilation system may be effective. However, if that same home had a higher moisture load (>5 washing loads per week, tumble dried), such a system could be less effective and lead to problems including lower air quality, higher humidity, condensation and so on.–A well-designed, well-installed continuous mechanical system will reduce the risk of lower air quality. Such systems are particularly well suited to airtight homes (e.g. major retrofit), as air movement induced by the continual fan helps to ensure correct air flow and exchange at all times. However, the
ducting associated with most of these systems requires careful thought, particularly in older homes: a poorly-installed system may not deliver the required air flow and could be noisy. This usually occurs where it is complex to route and conceal the ducting, so you are strongly recommended to consider the practicalities and implications of installing ducting in your home (see images on right).
• MVHR systems are the most complex to install and are only appropriate for homes in airtightness bands A-B. The need to accommodate considerable amounts of ducting (all rooms will need some form of ducting) may mean that this approach is not suitable for your home. The central fan unit should ideally be sited within the heated area of your home – it can be sited in a loft space, although the system and any supply and extract ducts running through unheated spaces will need to be well insulated. Ducts can be run inside intermediate floors (between the joists), but it’s likely that you will have to create lower areas of ceiling (‘bulkheads’) when the ducts run across joists. (See bottom image)
• MEV systems require less ducting, but ground-floor wet rooms can present challenges to incorporating extract ducting, and you will probably have to find space for vertical ducting between floors.
• Many continuous mechanical systems will need ducting sizes somewhere
between 80–160mm, which makes their installation in older homes a particular challenge.
If you have concerns over accommodating ducting or the central fan unit, or over the installation costs, you may prefer to choose a decentralised system (e.g. dMEV). These have the same simplicity of installation as Intermittent Extract Systems (although some extra commissioning will be needed), and can be suitable as a direct replacement for these. It should be noted that decentralised system fans are usually located inside the ventilated room, which means they can be noisier in operation than centralised systems.
Do you have space for a central fan unit and ducting?
6.0 SOLID WALL INSULATION: WHEN, WHERE AND HOW > 6.4 RELATED MEASURES – VENTILATION 78

Some systems, mainly continuous mechanical systems, require ‘commissioning’. This is an essential step to ensure that the fan speeds are correctly set to deliver the required ventilation rates. Commissioning should be undertaken using suitably calibrated air flow instruments. You will need to employ a professional to commission these systems.
Further information on installation can be found in the Domestic Ventilation Compliance Guide, which is available at www.planningportal.gov.uk/buildingregulations/approveddocuments /partf/associated
INSTALLING THE VENTILATION SYSTEMSequencing the ventilation installation is crucial, and needs to be co-ordinated with any SWI work. The ventilation system will need to penetrate to the outside, possibly at more than one location. These points will present a very high condensation risk, and it is important that the insulation layer and airtightness details around these openings are carefully planned.
Installing a ventilation system will cause variable degrees of hassle, depending on the type of system you opt for. The least hassle will probably be those that use the least amount of ducts, e.g. through-the-wall type fans, whereas centralised mechanical systems that may require a lot of ducting will create a greater degree of hassle for installing the ducts. Make
sure that the installation of the ducting is joined up with other activities, so that the installation of ducting is not compromised. Major causes of an under-performing or noisy ventilation system are a) poor installation, and b) under-sized ducting, i.e. ducting is the weak link in a ventilation system.
It is important that the manufacturer’s guidance is followed for installing fan units, and that the unit(s) is wired by a suitably qualified person. Particular attention should be paid to condensate connections on fan units and vertical ducting (in unheated zones), and ensure that the condensate discharges to an appropriate drain point. Ensure your installer is aware of condensation connections and that this forms part of their works.
THE LEGAL BITSRemember that correct ventilation capacity (fan size, number of ventilators etc.) must follow the minimum guidance contained in the Building Regulations Part F – Ventilation (see Further Reading at the end of this guide).
The installation must also be inspected, tested and commissioned, and evidence of this should be given to Bristol’s Council’s Building Control team.
Stub duct for a through-the-wall fan with air tight seal to surrounding masonry
Ventilation commissioning in progress
6.0 SOLID WALL INSULATION: WHEN, WHERE AND HOW > 6.4 RELATED MEASURES – VENTILATION 79

6.5 Managing your retrofit project
6.0 SOLID WALL INSULATION: WHEN, WHERE AND HOW
As noted before, your approach and retrofit processes need to be logical, coherent and joined-up. This means that assessment, design and specification, installation and use need to be integrated in a way that ensures everyone in the process understands what is important and carries out their work (or uses their building) in the best possible way. It also means that proper feedback is given at each stage:
• If the designer finds that the assessment has missed something important, then the assessor should be informed and the assessment adjusted
• The designer should of course always talk to you about the design and how it fits with your lifestyle, budget and retrofit aims
• If the installer, when he/ she is carrying out the work finds that something is different from the assessment or that a design detail cannot work, then this should be reported back to the designer, who should change his design and specification accordingly. This can be in discussion with the installer and with you, as changes may affect how things work or are used or maintained
• Ultimately it will also be very useful to everyone if you feed back information about how much you enjoy the retrofitted building, how comfortable it is, how healthy it feels, how much energy you are saving and how easy it is to live in and maintain. This will enable assessors, designers and installers to learn about what works and what should be done differently in the future, and pass this on to other householders.
In this joined-up process, if you can make the time and effort to talk to all those involved, the project is much more likely to go smoothly and have better results – and you might even enjoy it!
Here are some key things for you to consider when overseeing your retrofit project:
Key things for you to consider when overseeing your retrofit project
• Are you clear on the aims of your retrofit project – i.e. why you’re doing it and what you want to get out of it?
• Are your assessor, designer and installer all part of the SWI kitemark system being set up by Bristol City Council, which includes training and post-training assessment on site?
• Has the assessor looked at the whole house, not just the walls? In particular have they looked at the windows, ventilation system, roof and rainwater goods, floor – and pipes and boxes (for EWI) / internal fittings and services (for IWI)?
• Has the assessor looked at the issues of water (dampness, water leakage etc.) and radon within your building?
• Has the assessor considered the location and exposure of your home, its condition and how it is used?
✓
80

If you are not sure about any of these questions, then look again through this guidance, and refer to the list of further advice and guidance in Section 7. You could also contact some of the organisations listed in Section 7 for further advice, or go on a SWI training course.
Below are some final, more general considerations to help you when managing your retrofit project:
• Remember that no-one knows everything about buildings and retrofit, so working together is essential. You will probably know more about your house than the assessor, designer and installer, but they will know more about their own areas of work, so consider your retrofit project as a partnership, where everyone can learn
• Be clear about what is important to you, and convey this to everyone else in the project
• Make sure you allow plenty of time to manage the retrofit project – this helps everyone
• Make sure everyone living in / owning the house knows what is going on, and that everyone is involved in important decisions where necessary
• Be prepared for some frustrations along the way, but also be prepared to enjoy the work!
6.0 SOLID WALL INSULATION: WHEN, WHERE AND HOW > 6.5 MANAGING YOUR RETROFIT PROJECT
Key things for you to consider when overseeing your retrofit project (continued)
• Has the designer covered all these issues in his design and specification (particularly ventilation, roof and rainwater goods, and building use)?
• Are you happy with the design of the SWI and the effect on the look of your home? Will it affect the look of the street or of your immediate neighbours’ houses? If so, how – good or bad? Either way, you should consult with your neighbours and any local community groups before proceeding.
• Has the designer covered all the junctions between your external walls and your windows, floors, roof and internal / party walls, and specified clearly how these should be addressed? (The drawings in this section will show what to look for)
• Has the designer dealt properly with airtightness? Do you know how leaky your building is? Has the designer dealt with the ventilation in accordance with this plan?
• Has the designer or installer obtained the permissions required for the work if there are planning or building consents required? In particular have they dealt with the ventilation consent from Building Regulations, and any Planning consents needed?
• Where EWI is being installed, has the designer or installer planned and enabled the moving of any gas pipes, meters, electrical cables, telephone lines, satellite cables, road signs, garden walls or fence posts, lampposts or other things on or adjacent to the outside walls? This can take several months sometimes, and must be co-ordinated with the work programme to minimise costs and disruption
• Has the installer fully quoted for all the works specified, including a contingency for unknowns?
• Does the installer understand the importance of a whole-house approach and the need for all works to be joined up and properly sequenced, as per this guidance?
• Has the installer carried out all the work, and particularly the detailing, correctly?
• Has the installer installed and commissioned any services (such as ventilation systems or new electrical layouts) according to professional and legal standards?
• Have you been given adequate advice and instructions on how to live in your retrofitted home and how to work any new controls or programmers?
✓MORE LEGAL BITSIn April 2015 the Construction (Design & Management) Regulations 2015 (CDM 2015) came into force. These could apply to many retrofit projects, but place certain responsibilities on domestic clients to ensure health and safety. In most cases these responsibilities can be delegated to your designer or contractor, but you will have to appoint these and you may have to have a written agreement for this. More information is available online – but if in doubt have a talk with your designer or contractor while you’re agreeing the works.
81

6.6 Monitoring – ‘Look & Learn’
6.0 SOLID WALL INSULATION: WHEN, WHERE AND HOW
Once retrofit works have been completed, it is important to observe the effects on the building, both intended and unintended, to monitor results and to learn from both successes and failures. In order to understand how things change it is helpful to look at how things are working before you undertake the retrofit measures. This can also be part of any assessment process.
A) ENERGY SAVINGS – CHECK ENERGY BILLS BEFORE AND AFTER RETROFITSavings can only be assessed where there is adequate record of energy use prior to retrofit. This is a common mistake in retrofit projects and more than one year’s data either side of retrofit is needed to take account of variations in heat demand from one year to the next. Any changes in occupation, use or weather conditions need to be taken into account too.
B) TECHNICAL RISKS – CHECK ANNUALLY Technical risks can be simple to monitor in some situations. Renewable energy systems can be checked for working by meter readings and fuel bills, although underperformance due to technical fault may require an expert review.
For fabric measures, if the insulation in the loft has been increased then annual checks for any signs of mould forming on rafters would be advisable. Inside the property, surface mould and condensation on any cold spots are easy to see. The most challenging areas are in wall, floor and rafter insulation, where failures can build up over years. It is therefore advisable to leave access in the most
vulnerable areas (for example by a floorboard which can be easily lifted) to check for mould and damp. You can often smell and feel damp problems even if you haven’t got a damp probe meter! If in doubt consult an expert who understands old buildings.
C) MAINTENANCEAppropriate maintenance is essential both before and after retrofit projects. Faulty rainwater systems are one of the most common causes of building failures and this becomes even more critical where solid wall insulation has been introduced. An annual clean of gutters and drains is highly recommended. Chimneys and gable ends are especially vulnerable to water penetration, so render, pointing, flashings, overhangs, and caps should all be maintained regularly. Appropriate repair of roofs, masonry walls and render, maintenance of seals around windows and doors and regular painting of external timber will all reduce the risk of water entering and becoming trapped in the building fabric.
D) LEARNINGLearning is essential at all levels in the retrofit process, among owners, designers, contractors and subcontractors. As stated in section 6.4 above, feedback is essential between everyone who is involved. Learning also needs to be documented and shared between current and future occupants of buildings so that the history of use and alteration is not lost and so that technical risks can continue to be monitored in the longer term. Learning about buildings in the widest and deepest sense protects you from risks, improves energy use and can bring real pleasure to how you live in or work on buildings.
Checking these downpipes revealed they were embedded in cement render and had rotted at the back
82

7.1 Resources and support 84
7.2 Further reading 85
7.0 Support and further information
83A BRISTOLIAN'S GUIDE TO SOLID WALL INSULATION

7.1 Resources and support
ONLINE TOOLNow you’ve read through this guide, you can go into more detail on your own home by looking at our online SWI tool, available at www.warmupbristol.co.uk.
The online tool is interactive, and will give you specific answers and options for your own building, leading you through a series of quick questions to identify what the key issues are for you, and how to resolve them.
BRISTOL CITY COUNCILOn the right are some of the key contact details you are likely to need:
What for? Contact details
Advice on local energy efficiency programmes and support
Energy DepartmentE: [email protected]
T: 0117 352 5010
www.bristol.gov.uk/page/housing/improving-energy-efficiency-your-home
Advice and guidance on consent, fees, applications etc.
Planning DepartmentE: [email protected]
Building Control DepartmentE: [email protected]
Conservation DepartmentE: [email protected]
T: 0117 922 3000
www.bristol.gov.uk/page/planning-and-building-regulations
www.planningportal.gov.uk
847.0 SUPPORT AND FURTHER INFORMATION

7.2 Further reading
7.0 SUPPORT AND FURTHER INFORMATION
This guide and the online SWI tool condense a lot of the current thinking and research in this area. However, if you want to find out more – always recommended! – then the resources below will give you a more detailed understanding of traditional building retrofit, and specifically SWI:
ONLINE TOOLSResponsible Retrofit Guidance Wheel (STBA) – online tool identifying and explaining risk in traditional building retrofit, providing recommended actions and links for more information: http://responsible-retrofit.org/wheel
READING
BRE• Reducing Thermal Bridging at Junctions
when Designing and Installing Solid Wall Insulation (2014)
• In-situ measurements of Wall U-values in English Housing (2015)
• Unintended Consequences in Traditional Buildings (pending)
Changeworks• Energy Heritage – A Guide to Improving
Energy Efficiency in Traditional and Historic Homes (2008)
• Renewable Heritage – A Guide to Microgeneration in Traditional and Historic Homes (2009)
• Solid Wall Insulation in Scotland: Exploring Barriers, Solutions & New Approaches (2012)
Historic England (formerly English Heritage)• Energy Efficiency and Historic Buildings
(2012) – series of 14 guides
• External Wall Insulation in Traditional Buildings: Case Studies of Three Large-Scale Projects in the North of England (2014)
• Practical Building Conservation: Building Environment (2014)
Historic Environment Scotland (formerly Historic Scotland)• Short Guide 1: Fabric Improvements
for Energy Efficiency in Traditional Buildings (2012)
• Technical Papers (2008–present)
• Refurbishment Case Studies (2012–present)
HM Government• Building Regulations Part F – Ventilation
• Building Regulations Part L1B – Conservation of Fuel and Power in Existing Dwellings
SPAB• The SPAB Research Report 1: U-value
Report (revised 2012)
• The SPAB Research Report 2: The SPAB Building Performance Survey: Interim Reports (2011 / 2012 / 2013 / 2014)
• The SPAB Research Report 3: Hygrothermal Modelling: Interim Report (2012)
STBA• Responsible Retrofit of Traditional
Buildings (2012)
• Conventions & Standards for the Refurbishment of Traditional Buildings (2012)
• Moisture Risk Assessment & Guidance (2014)
• Heat Loss from Thermal Bridging in Internal Wall Insulation of Solid Buildings (pending)
• Planning Responsible Retrofit in Traditional Buildings
Suhr, M. & Hunt, R.• Old House Eco Handbook (2013)
UCL• Solid Wall U-values: Heat Flux
Measurements compared with Standard Assumptions (2014)
University of Exeter• Higher Energy Efficient Homes are
associated with increased risk of Doctor Diagnosed Asthma in a UK Subpopulation (2014)
85

IMAGE CREDITSAereco p18 ventilation diagram
Anna-Marie Pagano p36 image 1
Arboreal Architects p36 images 2–3
Arc Architects p29 image 3
Corinne Welch pp.69–91 ventilation diagrams
Historic Scotland p26 image 5
Ian Mawditt p29 image 4 / pp.73-74 / pp.78-79
Isabel Carmona All illustrations, unless otherwise stated
NBT pp.17 image 2, 37 image 2
Nicholas Heath p8 image 1 / p9 / p16 / p17 image 1 / p18 images 1,3,4 / p26 images 1–4 / p27 / p31 / p37 image 1 / p70 / p82
Nigel Mykura (Creative Commons) p39
Robert Prewett p3 / pp.45–49 / p69 / all design drawings
Robyn Pender p14 modern-old houses diagram
Urbed p29 image 1
86A BRISTOLIAN’S GUIDE TO SOLID WALL INSULATION

CARDBOARD BACK

CARDBOARD BACK