a clog, low water pressure—a nonfunctioning sink can practically...
TRANSCRIPT

EXPRESS FACELIFT I CHAPTER 1 I
SinksA clog, low water pressure—a nonfunctioning sink can practically shut
down a kitchen. It’s good to know that minor repairs can get your sink
up and running in no time.
COPYRIG
HTED M
ATERIAL

Faucet Aerator MaintenanceIs the water fl ow at your faucet so low that it takes 10 minutes to rinse one dish? Th e lack of pressurized fl ow is probably due to a clogged aerator. Th e aerator is a small fi ltering device at the tip of your faucet. It contains one or more screens that serve two functions—fi ltering out particles and creating a smooth, neat fl ow of water.
Over time, these screens become clogged, which causes the water to lose pressure as it fl ows out of the faucet. Th e particles clogging the screens may also cause the spout to sputter. Simply cleaning the screens will get that full fl ow going again.
Express Facelift l Sinks 17
CONSIDER THIS• Whenever you take something apart, be sure to remember
what order the parts go in. In this instance, place the aerator parts down one at a time and in order from left to right, as if you’re creating an exploded view of the aerator and all its parts. Th en work in reverse when putting it back together.
• Some aerators are fl ush within a wider nozzle, making them less obvious to locate and remove. Look for fl at ridges on the aerator where you’ll grip the pliers.
• You may fi nd various types of aerators to replace your existing one that off er special features like an on/off lever and directional sprayer. Low-fl ow replacement aerators are also a great choice to reduce water consumption (see the “High-Effi ciency Aerators” sidebar on page 18).
PREP WORK• Close the drain so you don’t lose any parts.
• If the faucet is old or you see mineral deposits around the aerator, spray the aerator with penetrating oil and let it soak in for about 15 minutes to make the unscrewing easier.
WHAT YOU’LL NEED
Tongue-and-groove pliers (with taped jaws so as not to mar the faucet fi nish)
Penetrating oil*
Old toothbrush* If applicable
DVD
18 Norma Vally’s Kitchen Fix-ups
THE PROJECT
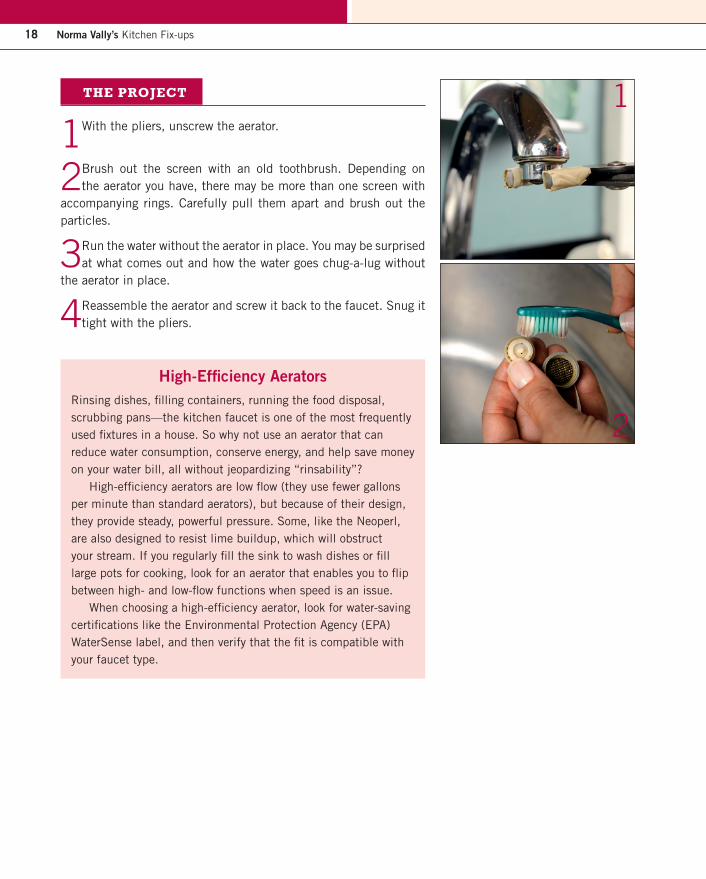
1 With the pliers, unscrew the aerator.
2 Brush out the screen with an old toothbrush. Depending on the aerator you have, there may be more than one screen with
accompanying rings. Carefully pull them apart and brush out the particles.
3 Run the water without the aerator in place. You may be surprised at what comes out and how the water goes chug-a-lug without
the aerator in place.
4 Reassemble the aerator and screw it back to the faucet. Snug it tight with the pliers.
1
2
High-Effi ciency AeratorsRinsing dishes, fi lling containers, running the food disposal, scrubbing pans—the kitchen faucet is one of the most frequently used fi xtures in a house. So why not use an aerator that can reduce water consumption, conserve energy, and help save money on your water bill, all without jeopardizing “rinsability”?
High-effi ciency aerators are low fl ow (they use fewer gallons per minute than standard aerators), but because of their design, they provide steady, powerful pressure. Some, like the Neoperl, are also designed to resist lime buildup, which will obstruct your stream. If you regularly fi ll the sink to wash dishes or fi ll large pots for cooking, look for an aerator that enables you to fl ip between high- and low-fl ow functions when speed is an issue.
When choosing a high-effi ciency aerator, look for water-saving certifi cations like the Environmental Protection Agency (EPA) WaterSense label, and then verify that the fi t is compatible with your faucet type.
Express Facelift l Sinks 19
CONSIDER THISTo keep your faucet from loosening in the future, it’s important not to jar or tug on the handles or spout—as when kids use the spout like a grab handle to help hoist themselves up high enough to reach the sink. Aggressive wear and tear may lead to a more serious problem that won’t be easily fi xed with a simple project like this one.
PREP WORK • Working under a sink is always cramped and awkward. To
make more room for yourself, remove all your under-the-sink articles. (How do we accumulate so much stuff ?)
• Put down an old pillow or blanket to lie on so you can be more comfortable as you work.
• Stand a lit fl ashlight under the sink for better visibility.
• If the nuts seem corroded and unmovable, spray them with penetrating oil and let them soak.
Tighten a Loose FaucetAggressive wear and tear on a kitchen faucet can cause the faucet to loosen and end up wiggling around the sink or countertop. Th is problem must be corrected to prevent future damage to the faucet and to stop water from dripping under it and into your cabinet. What’s happening is that the nuts of the faucet under the sink have loosened and are no longer securing it snugly to the sink or countertop. Snugging this connection back down is a quick-and-easy fi x.
WHAT YOU’LL NEED
Basin wrench or tongue-and-groove pliers
Installation tool*
Penetrating oil*
Flashlight
Old pillow or blanket
Rubber washers** If applicable

20 Norma Vally’s Kitchen Fix-ups
THE PROJECT
1 Examine the locking nuts under your faucet. With your pliers or basin wrench, tighten the
nuts under the faucet until they’re snug.
2 If the nuts have bottomed out, add a couple of rubber washers to each nut. This will add
more depth to enable the nut to grab against the sink and pull down the faucet. To do so, fi rst shut off the water at the shut-off valves, unscrew the supply lines with tongue-and-groove pliers, and then unscrew the nuts. Now you can add a couple of rubber washers inside the nuts. Note: Some faucets have a mounting nut(s) or plate that may be tightened where no supply line needs to be removed. Also certain faucets come with a special installation tool that is used to tighten this nut or plate.
3 Screw everything back into place, being careful not to overtighten.
1
2

Express Facelift l Sinks 21
Unclog a DrainKitchen sink clogs are practically a given with all the food and grease that fi nd their way down the drain (especially around the holidays when a clog is the last thing you need). Plunging a clog clear is highly eff ective when done properly. Follow these little tricks and save yourself a call to the plumber—and a ruined dinner party.
CONSIDER THIS• When your sink fi rst shows signs of a slow drain, try pouring
boiling water down it to break up the formation of a clog.
• Th e best way to avoid clogs is not to let food debris—especially coff ee grounds and grease—go down the drain to begin with.
• If you’ve already poured a chemical drain cleaner down the sink, you must wear eye protection and gloves in case there is splashing when plunging.
PREP WORK• Make sure the sink has
enough water in it so that the rubber of the plunger is submerged under water.
• Apply a bead of pet- roleum jelly around the rubber ring of the plunger to help cre-ate a better seal (a).
WHAT YOU’LL NEED
Classic-style plunger (not the fl anged type for toilets)
Petroleum jelly
Gloves and safety glasses** If applicable
a

22 Norma Vally’s Kitchen Fix-ups
THE PROJECT
1 At an angle, place the plunger over the drain. Try to prevent air from being trapped in the plunger. Remember that water, not
air, will force the clog down.
2 Thrust the plunger up and down about 20 times, always maintaining a seal.
3 On the last plunge, thrust the plunger up in one forceful motion.
4 Repeat if necessary. Add water if the rubber is no longer submerged in water.
5 Once the drain is clear, run hot water down it to clear any remaining debris.
2
A Word on Chemical Drain CleanersChemical drain cleaners sound like the quick-and-easy solution to a clog—just pour it and forget it, right? Wrong. These products are extremely corrosive and can damage pipes as well as the user if not handled properly.
When poured in a standing clog, the product can sit at the bottom of a pipe and actually eat through it instead of the clog. Then, if the chemical fails to break through the clog and snaking is necessary, you run the risk of splashing these harsh chemicals everywhere while trying to clear the blockage.
Consider using an enzymatic drain cleaner that uses biological forms of chemical reactions to “metabolize” and clear the clog. These cleaners do take longer to respond to a clog, but they’re noncorrosive, making them safer for you, your pipes, and the environment.
If you do choose to use a chemical drain cleaner, follow these safety tips:
• Never look down over the drain during or after pouring in a chemical drain cleaner—it can give off toxic fumes and actually erupt.
• Never mix chemical products—a chemical reaction could cause boiling and splattering.• Choose the right cleaner for the specifi c clog—for example, some products work better on grease as
opposed to hair.• Always wear safety glasses and gloves, and work in a ventilated area.• Always follow all the manufacturer’s safety precautions.

Express Facelift l Sinks 23
WHAT YOU’LL NEED
Toothbrush
White vinegar
Small container for soaking
Replacement washer/rings** If applicable
Fix a SprayerWhen a sprayer leaks or loses its ability to spray, it’s usually due to mineral deposits that build up around the nozzle and/or washers and rings. A good soak and brushing makes for an easy fi x.
Sprayerhead
Retainingclip(under washer)
Washer
Handlemount
Sprayerbase
Hose
CONSIDER THISIf you’re having diffi culty pulling out the sprayer, check the hose under the cabinet. It’s probably getting tangled around some plumbing or under-the-sink paraphernalia.

24 Norma Vally’s Kitchen Fix-ups
THE PROJECT
1 Unscrew the sprayer from the hose.
2 Brush the nozzle with vinegar. If there is a lot of buildup, soak it in vinegar. Be careful not to let it soak for too long, because
this may mar the fi nish.
3 Run water through the sprayer to clear out any debris.
4 Inspect any washers or rings. (Remember in what order you remove them.) Soak and scrub these if there’s buildup. These
parts may need to be replaced if they’re highly corroded.
5 Screw back the sprayer, turn on the water, and check for leaks.
1
2