a crash course in mixing - cloud object storage ... crash course in mixing written by janne...
TRANSCRIPT

1
A CRASH COURSE IN MIXING
Written by Janne ‘Fanu’ Hatula
2
TABLE OF CONTENTS
Foreword
Mixing Drums
Mixing Bass
Mixing Vocals
Master Channel Processing
General Mixing Tips And Topics
1
2
3
4
5
!
3
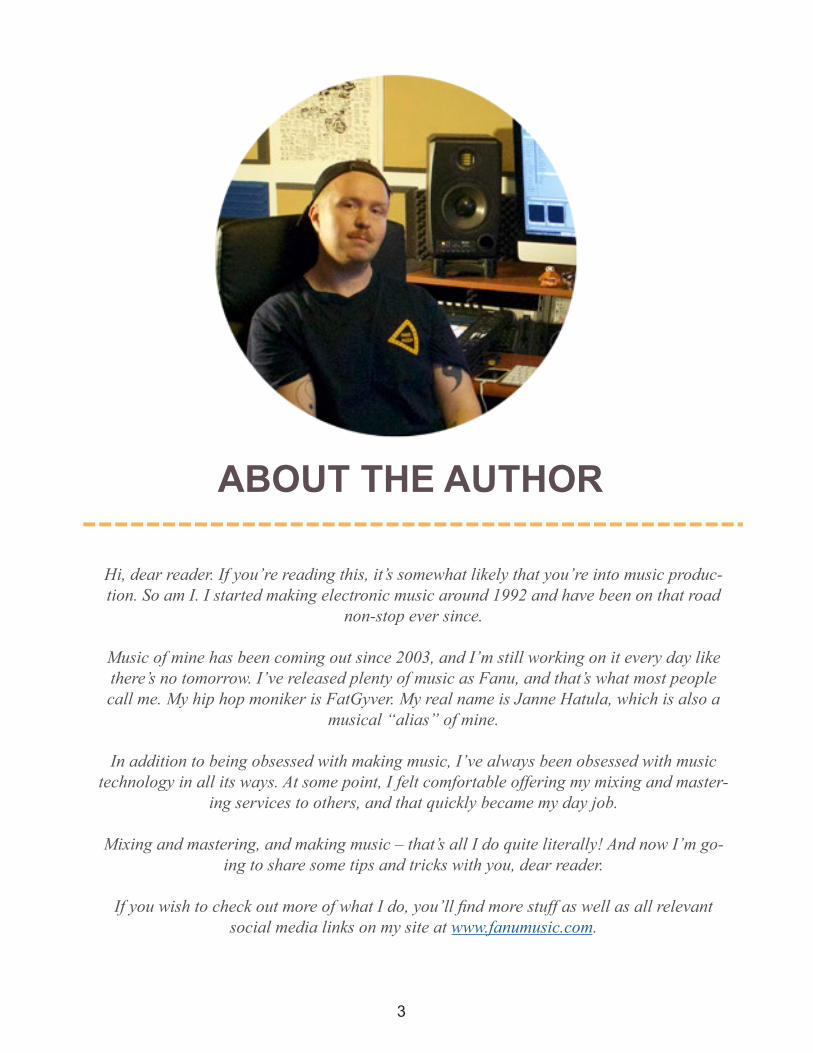
Hi, dear reader. If you’re reading this, it’s somewhat likely that you’re into music produc-tion. So am I. I started making electronic music around 1992 and have been on that road
non-stop ever since.
Music of mine has been coming out since 2003, and I’m still working on it every day like there’s no tomorrow. I’ve released plenty of music as Fanu, and that’s what most people call me. My hip hop moniker is FatGyver. My real name is Janne Hatula, which is also a
musical “alias” of mine.
In addition to being obsessed with making music, I’ve always been obsessed with music technology in all its ways. At some point, I felt comfortable offering my mixing and master-
ing services to others, and that quickly became my day job.
Mixing and mastering, and making music – that’s all I do quite literally! And now I’m go-ing to share some tips and tricks with you, dear reader.
If you wish to check out more of what I do, you’ll find more stuff as well as all relevant social media links on my site at www.fanumusic.com.
ABOUT THE AUTHOR
4
FOREWORD
Writing “a quick mixing guide” had been in the back of my mind for the longest time. Cloudbounce is run by a friend of mine, and I had promised to him that I’d write this guide for them sooner or later, as I appreciate their business. I never got to start with it, as it felt like a massive project, and I was always busy. When audio engineering, discussing it with your clients, and making music is your everyday job, writing about it on your free time may not be the most enticing thought. I had to fool myself to think it’d be quick and easy. How? I needed to give myself a tight timeframe and narrow down the topic.
First: a timeframe. A week. Write about a topic as big and broad as mixing in a week – isn’t that insane? Yes. Very. But to come up with a quick guide, that was it. The content in this guide was written in seven days – Friday to Friday (plenty of coffee was needed).
Second: I was faced with a decision as to how to narrow the scope down so I wouldn’t end up writing a massive book. Instead of writing a comprehensive mixing guide, I needed to slim the focus down. I decided to write based on a recent project. This guide was written right after mixing and mastering an album in reference to that. It helped me determine what to write about and what not instead of addressing every possible mixing topic.
Therefore, this guide is not trying to be comprehensive. It’s a quick one that addresses the most common mixing tech-niques used while mixing one album of ten songs. That way it is tied to actual work instead of being a list of general tips.
The album in question is sample-based hip hop that stylistically and sound-wise falls somewhere between nineties and modern hip hop. Good punch was desired – that is important in hip hop, after all – and sub bass was used on almost all songs. The drums were more organic and sample-based rather than synthesized or “trappy”. The “music” track provid-ed was mostly one sample track or two per song, which is common in sample-based hip hop (due to time constraints, discussing these was left out). There were several vocal tracks per song.
Technically, what was done to the album was both mixing and mastering, as the songs were mixed from stems, from which a final master result was created. Everything was done in one single project per song, so no separate mastering session was needed. The better your mix is, the less master(ing) work it needs, and this is the essence of my stem mixing/mastering work. This guide documents that process, leaning more on mixing than mastering.
Before getting busy with the content, I’d like to say this. Not to downplay one mixing guide or book or a list of tips out there, but it’s a fact that no guide or the most secret and special tips from the most seasoned pros will ever make up for the actual skill and “sense” that comes from actually listening to music for years and years (instead of just hearing it). That often sets the professional apart from a less seasoned listener: a professional has heard more and listened to more music – and more analytically – than a less experienced person. Your ears and hearing will develop, and you will learn to pinpoint issues in your mix. When you have heard 1,500 songs in one genre (that is a totally hypothetical figure that was totally pulled out of a sweaty hat), you will know how it should sound, and you will be able to mix your song closer to that, guided by the gut feeling, your ears, and your taste way better than you can after reading a guide. You will understand that all songs and scenarios are different – and that is also why it is hard to give very specific tips, which this guide does not do either.
I highly subscribe to Dave Pensado’s way of working – “I just mess with it until it sounds right” – which emphasizes feeling it instead of seeing it, and that is what I am trying to teach instead of telling someone to EQ a sound at 1,214.15 Hz. This is key.
This guide discusses mixing drums, bass, vocals, touching the master channel a bit, and gives some extra tips and shares some general thoughts relating to mixing in the end. I hope you find something you useful in this guide. I’d love to hear your comments about it.
Now – let’s get crackin’!
5
CHAPTER ONE
MIXING DRUMS
6
When starting to mix a song, I usually start with something specific instead of letting all tracks play and working with them all – in the beginning, I find that chaotic. Most often, when working with music where drums need to form a strong backbone, I start with the drums, then bass, and then the rest. All engineers have their own specific ways of working and their own sound.
The reason I prefer this way is I come from a musical background that has always celebrated strong drums: drum and bass, hip hop, downbeat, etc., and I consider them to be the field I spe-cialize in. I fell in love with them in early 1990s and have been listening to and hearing them ever since.
That is why I like to make everything work around the drums to an extent. So I make sure the backbone is strong and go from there. So, let’s start with the drums.
DRUM BUSDrums are often provided for the engineer as separate stems, which makes mixing easier: kick, snare, hihat, claps, ride, etc. In this project, for some songs, a secondary drum loop (not the sum of the separate parts provided; another breakbeat) was also provided to contribute to the tone and feel of the drums. That is a good way of adding a bit of vibe into your drums if they feel lack-ing a bit.
In mixing, drums are most often grouped or “bussed”, so they all play through the same channel.
Chapter 1 - Mixing Drums
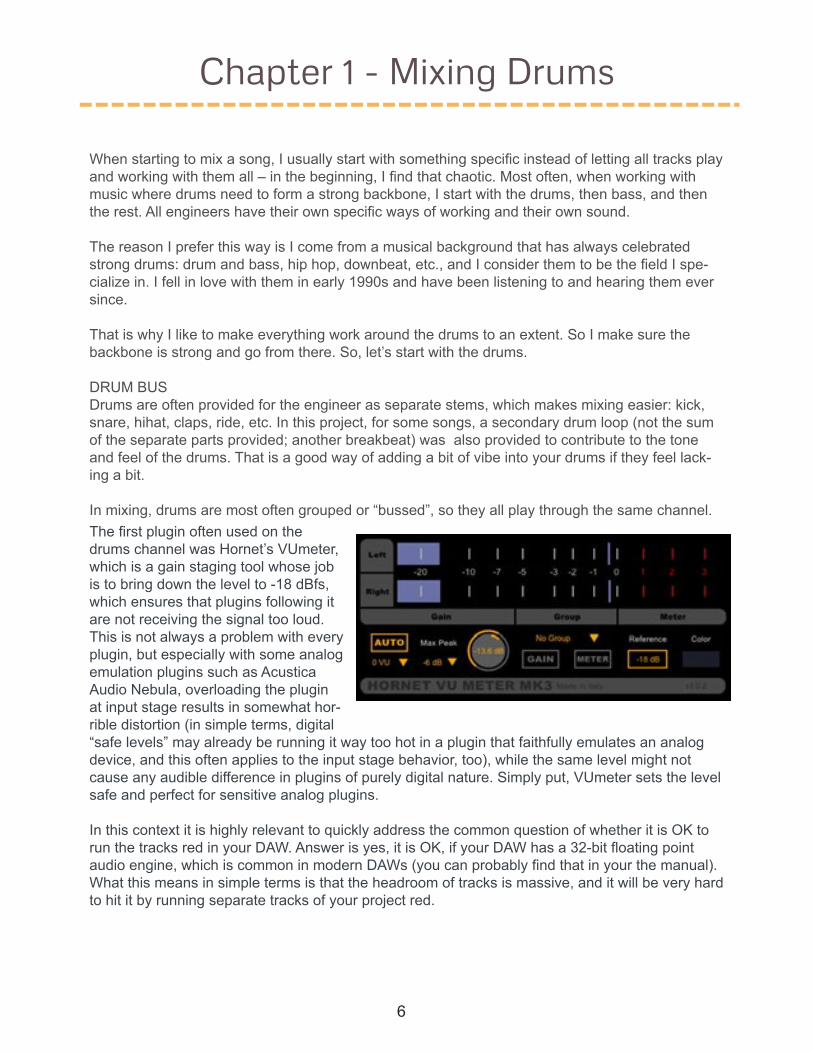
The first plugin often used on the drums channel was Hornet’s VUmeter, which is a gain staging tool whose job is to bring down the level to -18 dBfs, which ensures that plugins following it are not receiving the signal too loud. This is not always a problem with every plugin, but especially with some analog emulation plugins such as Acustica Audio Nebula, overloading the plugin at input stage results in somewhat hor-rible distortion (in simple terms, digital “safe levels” may already be running it way too hot in a plugin that faithfully emulates an analog device, and this often applies to the input stage behavior, too), while the same level might not cause any audible difference in plugins of purely digital nature. Simply put, VUmeter sets the level safe and perfect for sensitive analog plugins.
In this context it is highly relevant to quickly address the common question of whether it is OK to run the tracks red in your DAW. Answer is yes, it is OK, if your DAW has a 32-bit floating point audio engine, which is common in modern DAWs (you can probably find that in your the manual). What this means in simple terms is that the headroom of tracks is massive, and it will be very hard to hit it by running separate tracks of your project red.
7
However, there are two extremely important considerations relating to this that must be understood in order to handle levels correctly:
1. running signal red between plugins is NOT advisable, as some plugins may not handle loud levels well, as stated earlier (many DAWs indicate the level between plugins by a color, so stay on the green, and
2. it is NOT fine to run your master red. That will make your song clip, and in digital domain that will sound bad, and your audio interface putting it out will not make it sound pretty either.
There are geekier technicalities relating to how different DAWs and audio interfaces may handle a hot master signal, but those two points are all you need to know in order to keep your levels right.
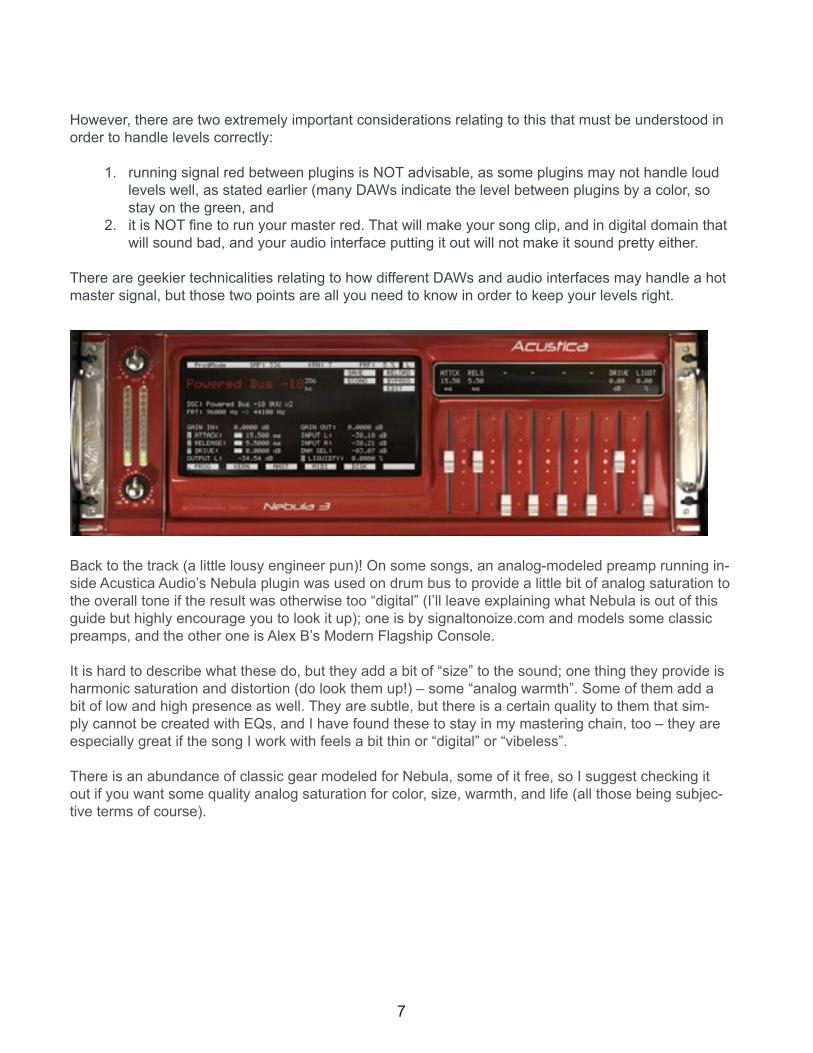
Back to the track (a little lousy engineer pun)! On some songs, an analog-modeled preamp running in-side Acustica Audio’s Nebula plugin was used on drum bus to provide a little bit of analog saturation to the overall tone if the result was otherwise too “digital” (I’ll leave explaining what Nebula is out of this guide but highly encourage you to look it up); one is by signaltonoize.com and models some classic preamps, and the other one is Alex B’s Modern Flagship Console.
It is hard to describe what these do, but they add a bit of “size” to the sound; one thing they provide is harmonic saturation and distortion (do look them up!) – some “analog warmth”. Some of them add a bit of low and high presence as well. They are subtle, but there is a certain quality to them that sim-ply cannot be created with EQs, and I have found these to stay in my mastering chain, too – they are especially great if the song I work with feels a bit thin or “digital” or “vibeless”.
There is an abundance of classic gear modeled for Nebula, some of it free, so I suggest checking it out if you want some quality analog saturation for color, size, warmth, and life (all those being subjec-tive terms of course).
8
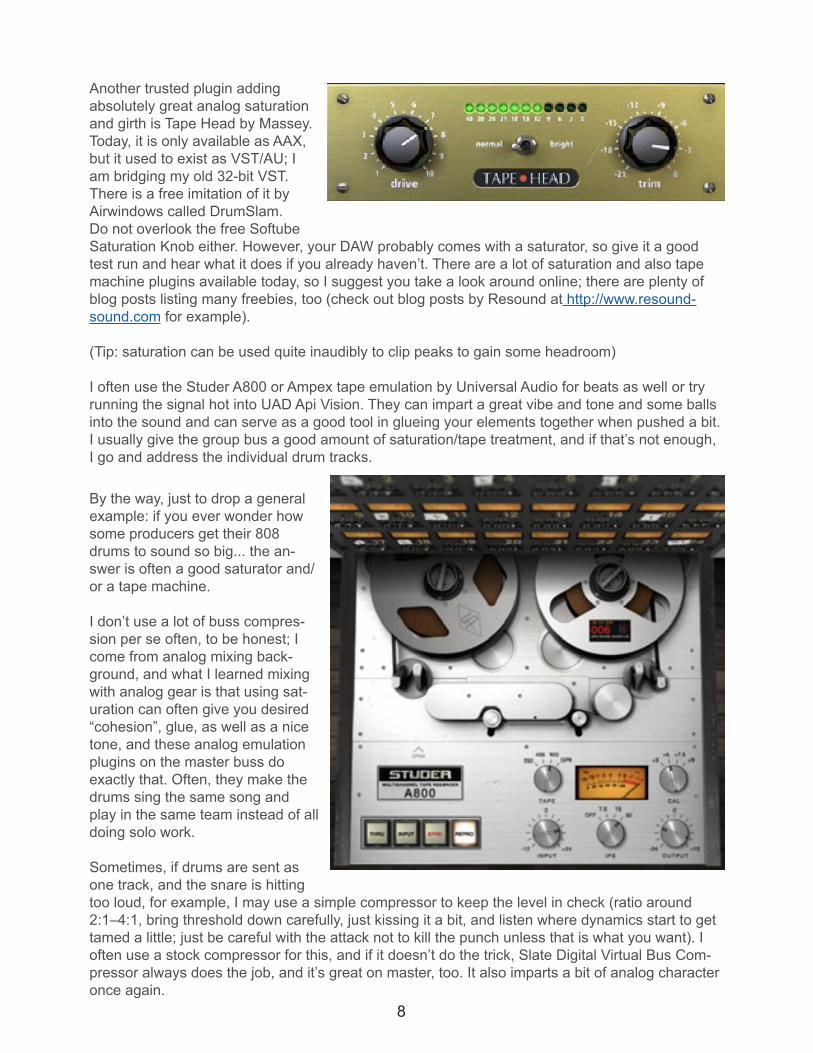
Another trusted plugin adding absolutely great analog saturation and girth is Tape Head by Massey. Today, it is only available as AAX, but it used to exist as VST/AU; I am bridging my old 32-bit VST. There is a free imitation of it by Airwindows called DrumSlam. Do not overlook the free Softube Saturation Knob either. However, your DAW probably comes with a saturator, so give it a good test run and hear what it does if you already haven’t. There are a lot of saturation and also tape machine plugins available today, so I suggest you take a look around online; there are plenty of blog posts listing many freebies, too (check out blog posts by Resound at http://www.resound-sound.com for example). (Tip: saturation can be used quite inaudibly to clip peaks to gain some headroom)
I often use the Studer A800 or Ampex tape emulation by Universal Audio for beats as well or try running the signal hot into UAD Api Vision. They can impart a great vibe and tone and some balls into the sound and can serve as a good tool in glueing your elements together when pushed a bit. I usually give the group bus a good amount of saturation/tape treatment, and if that’s not enough, I go and address the individual drum tracks.
By the way, just to drop a general example: if you ever wonder how some producers get their 808 drums to sound so big... the an-swer is often a good saturator and/or a tape machine.
I don’t use a lot of buss compres-sion per se often, to be honest; I come from analog mixing back-ground, and what I learned mixing with analog gear is that using sat-uration can often give you desired “cohesion”, glue, as well as a nice tone, and these analog emulation plugins on the master buss do exactly that. Often, they make the drums sing the same song and play in the same team instead of all doing solo work.
Sometimes, if drums are sent as one track, and the snare is hitting too loud, for example, I may use a simple compressor to keep the level in check (ratio around 2:1–4:1, bring threshold down carefully, just kissing it a bit, and listen where dynamics start to get tamed a little; just be careful with the attack not to kill the punch unless that is what you want). I often use a stock compressor for this, and if it doesn’t do the trick, Slate Digital Virtual Bus Com-pressor always does the job, and it’s great on master, too. It also imparts a bit of analog character once again.
9
“Get bigger sounding 808’s with a good saturator and a tape machine.FANU
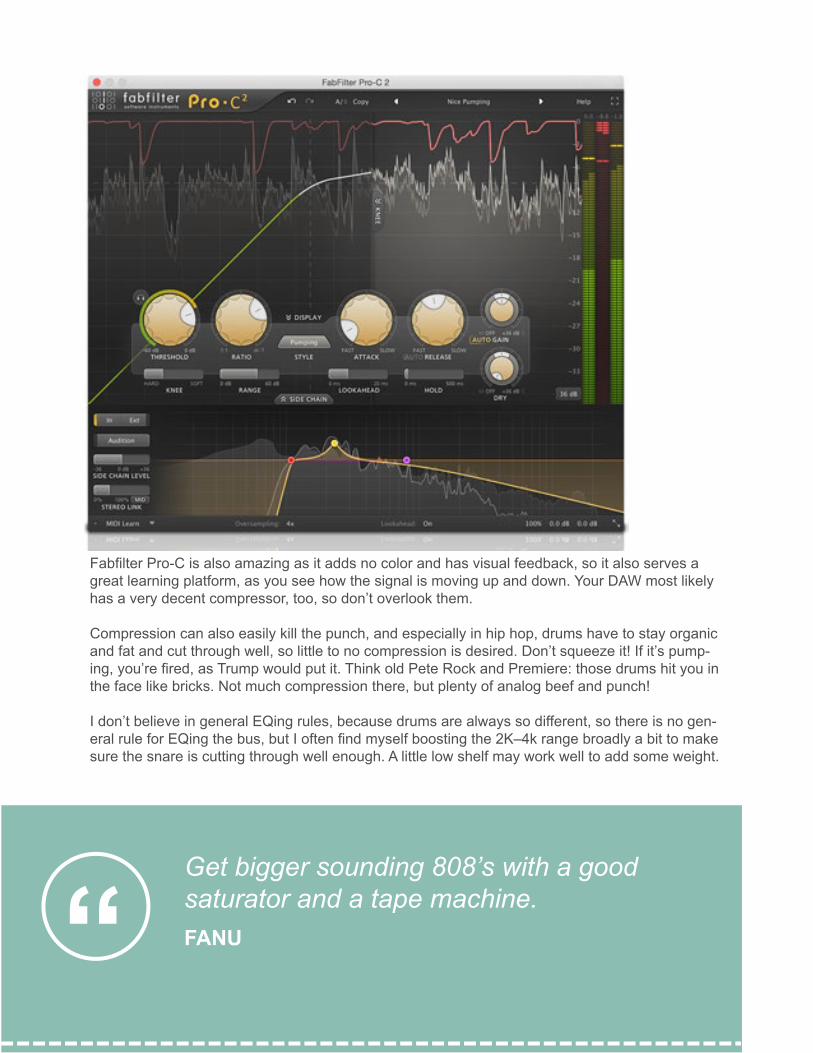
Fabfilter Pro-C is also amazing as it adds no color and has visual feedback, so it also serves a great learning platform, as you see how the signal is moving up and down. Your DAW most likely has a very decent compressor, too, so don’t overlook them.
Compression can also easily kill the punch, and especially in hip hop, drums have to stay organic and fat and cut through well, so little to no compression is desired. Don’t squeeze it! If it’s pump-ing, you’re fired, as Trump would put it. Think old Pete Rock and Premiere: those drums hit you in the face like bricks. Not much compression there, but plenty of analog beef and punch!
I don’t believe in general EQing rules, because drums are always so different, so there is no gen-eral rule for EQing the bus, but I often find myself boosting the 2K–4k range broadly a bit to make sure the snare is cutting through well enough. A little low shelf may work well to add some weight.
10
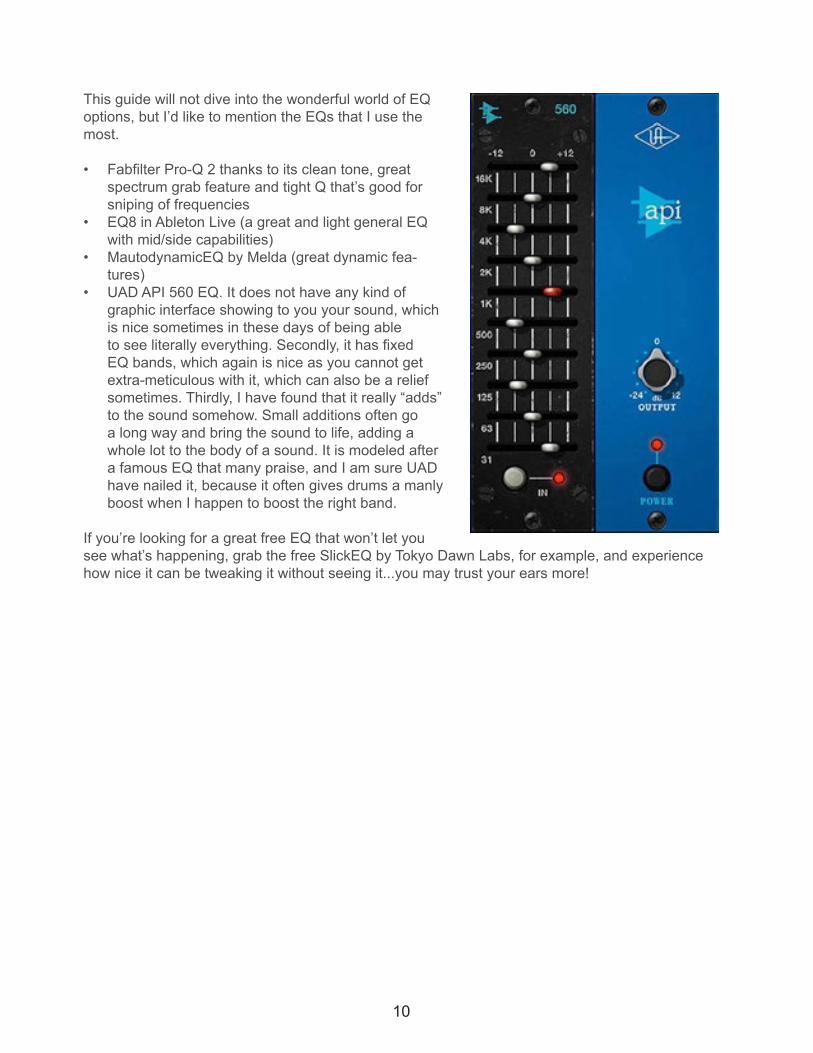
This guide will not dive into the wonderful world of EQ options, but I’d like to mention the EQs that I use the most.
• Fabfilter Pro-Q 2 thanks to its clean tone, great spectrum grab feature and tight Q that’s good for sniping of frequencies
• EQ8 in Ableton Live (a great and light general EQ with mid/side capabilities)
• MautodynamicEQ by Melda (great dynamic fea-tures)
• UAD API 560 EQ. It does not have any kind of graphic interface showing to you your sound, which is nice sometimes in these days of being able to see literally everything. Secondly, it has fixed EQ bands, which again is nice as you cannot get extra-meticulous with it, which can also be a relief sometimes. Thirdly, I have found that it really “adds” to the sound somehow. Small additions often go a long way and bring the sound to life, adding a whole lot to the body of a sound. It is modeled after a famous EQ that many praise, and I am sure UAD have nailed it, because it often gives drums a manly boost when I happen to boost the right band.
If you’re looking for a great free EQ that won’t let you see what’s happening, grab the free SlickEQ by Tokyo Dawn Labs, for example, and experience how nice it can be tweaking it without seeing it...you may trust your ears more!

11
One other thing I may try and do on the drum bus just to see how it’d sound a bit “tighter” is use a multiband gate such as the one in Ableton Live (that is the DAW I use), using downward ex-pansion; it allows you to gate three different bands (low, mid, high) and make the sound slightly tighter. What this does it pushes down the quiet parts of the signal of three different bands, mak-ing it “tighter”. Set the threshold of a band high enough, and set the “below” compression ratio of the band to less than one and hear the “tightening” magic! This is good for getting rid of some excessive noise or air or “looseness” in the sound for example, or tightening the low end. This can be done using any multiband gate.
In terms of reverb, often a very dry drum bus is desired, especially in hip hop. In general, espe-cially big reverbs don’t sound that good on drums unless you’re looking for an eighties rock vibe or just an intentionally “washy” and effected drums; big reverbs on drums can make it messy, and I hardly ever send the drum bus to my main reverb send bus. Most of the time I keep the drum bus dry, but every now and then, I may try out a very short room reverb that almost works like a chorus. I often use UAD Precision Reflection Engine for this, as it is a really short reverb that I have found works marvelously well for this purpose: a really short and tight reverb but it “expands” the sound a bit and creates a little bit of space for it. Pretty much any reverb should be good for this (tip: cut off some of the low end of your drum reverb).
12
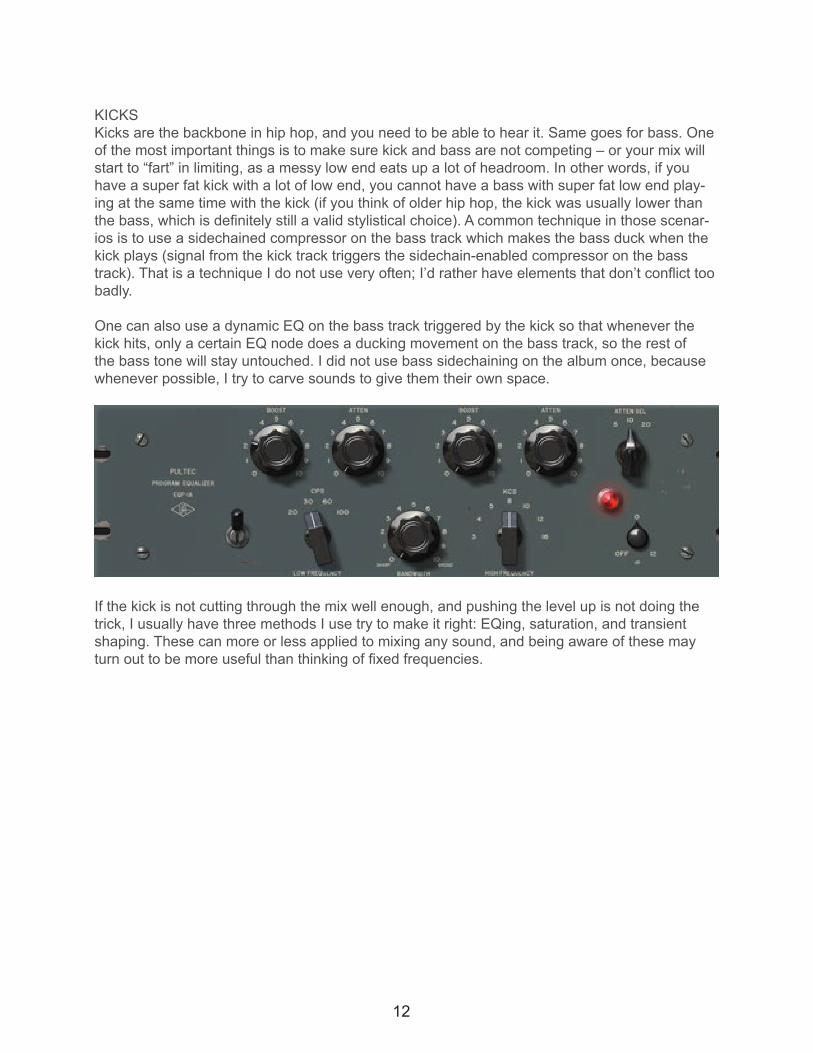
KICKSKicks are the backbone in hip hop, and you need to be able to hear it. Same goes for bass. One of the most important things is to make sure kick and bass are not competing – or your mix will start to “fart” in limiting, as a messy low end eats up a lot of headroom. In other words, if you have a super fat kick with a lot of low end, you cannot have a bass with super fat low end play-ing at the same time with the kick (if you think of older hip hop, the kick was usually lower than the bass, which is definitely still a valid stylistical choice). A common technique in those scenar-ios is to use a sidechained compressor on the bass track which makes the bass duck when the kick plays (signal from the kick track triggers the sidechain-enabled compressor on the bass track). That is a technique I do not use very often; I’d rather have elements that don’t conflict too badly.
One can also use a dynamic EQ on the bass track triggered by the kick so that whenever the kick hits, only a certain EQ node does a ducking movement on the bass track, so the rest of the bass tone will stay untouched. I did not use bass sidechaining on the album once, because whenever possible, I try to carve sounds to give them their own space.
If the kick is not cutting through the mix well enough, and pushing the level up is not doing the trick, I usually have three methods I use try to make it right: EQing, saturation, and transient shaping. These can more or less applied to mixing any sound, and being aware of these may turn out to be more useful than thinking of fixed frequencies.
13
EQing kicks: On kicks, I often use a Pultec EQ for boosts if the kick is thin; you can add won-derful analog character to it with the Pultec. I use a UAD one, but there are lots of emulations out there (e.g., get the free and praised PTEq-X by Ignite Amps). A traditional EQ will do, too, if you are only looking to add frequencies.
However, sometimes adding low frequencies may not help to boost the kick in the mix, as some-times it may only clutter the mix by adding unnecessary weight (this is case-specific). Some-times filtering a kick with a resonant high-pass filter will create clarity, as unnecessary low end mud is reduced (move it around and find out what works).
What else might help? The common misconception is that kicks needs a ton of low end to come through, but sometimes that won’t help – try adding a good amount of high shelf or boost high mids, because, after all, kicks do have “a body”, and often it’s the body of the kick you need to hear more of (a common mixing mistake I hear is a “bloated”, subby kick, whose body is ig-nored).
Saturation on kicks: What if they don’t have that body or presence – what’s going to help? Once again, saturation/distortion. As said before, I absolutely love Tape Head by Massey but any good tape emulation will yield similar results, or a good saturator. That way you can add a bit of life to a kick, and then try EQing the body up, as at that stage it may actually have some more audible body. But don’t overcook its transients! Speaking of which...
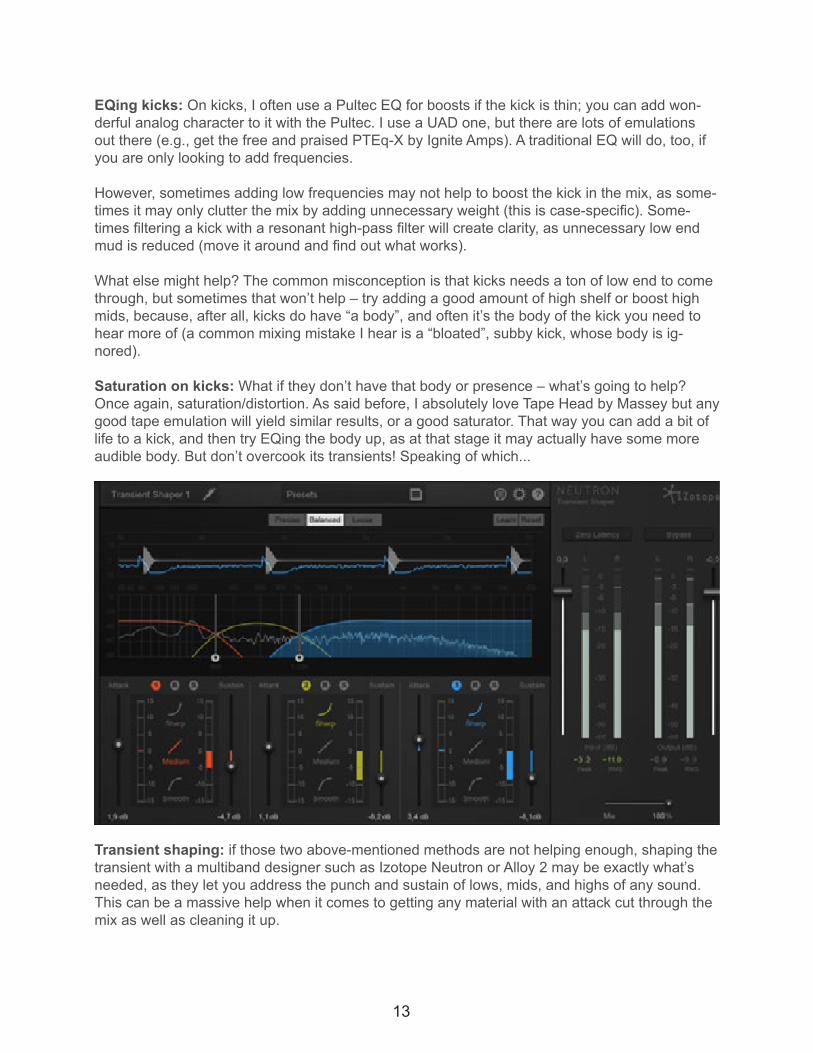
Transient shaping: if those two above-mentioned methods are not helping enough, shaping the transient with a multiband designer such as Izotope Neutron or Alloy 2 may be exactly what’s needed, as they let you address the punch and sustain of lows, mids, and highs of any sound. This can be a massive help when it comes to getting any material with an attack cut through the mix as well as cleaning it up.
14
In general, the longer the kick, the more problems it may cause, as the chances are there will be some overlapping with the bass. Simply shortening the sustain can address that (note that you can most often shorten the sustain on the actual instrument you may be using to generate the sound, but with audio, this is a great tool). Shorter kick = cleaner bottom end.
Sometimes slightly pushing up the attack part of mids and highs can be highly beneficial for kick clarity, so it is definitely worth trying. Also, when it comes to hearing music from small speakers, it is good to keep in mind that something should definitely be heard from smaller speakers, too, and subby parts are often not heard at all, so keep in mind the mid presence (more about moni-toring tips later on in the guide).
Even though it does make sense to listen to mix changes like this in isolation (i.e., kick channel soloed), always make sure to listen to the result in context, i.e., how your changes sound in the mix – if at all. For example, by overdoing transient emphasis, it is fairly easy to make the drums sound too snappy and sort of unrealistic and even thin; especially in styles such as hip hop where organic sound is preferred, you don’t want that, so remember that less is often more, and 1 dB boost can be just what you need. A good general rule with any sweetening is to mess with it until it sounds really good, then back off the effect a little bit, and that’s probably where it should be. Our ears are quickly fooled by the “sweet ear candy”, and that is best applied in moderation.
Also remember to take breaks from your mixing as well as do plenty of on/off comparisons with the applied effect to hear how drastic the changes are.
Relating to this: as a mastering engineer, I never send out a master after the first session on the first day (unless the client wants it ASAP and is fine with a bit of a “rushed session”); I like listen-ing to what I have done the next day with fresh ears, so the second session is always about last little tweaks such as refining exciter amounts and such. They can sound really good, and I want to make sure I can check the result with objective ears and that I didn’t fall victim of going too crazy with “ear candy” (plugins such as exciters can sound really damn good!).
So, the big question: where to actually EQ a kick, then? A big producer may tell you to EQ your kick at X Hz to make it punch, but it may be that your kick needs a boost at Y Hz. Today, we enjoy the luxury of digital EQs that make it extremely easy to slide EQ nodes around and listen to where it makes an impact. I’ve never been a huge fan of “fixed-frequency advice”, and I’ve always advised producers to play with it to hear the change.
15
It may be useful to make a more radical, over-exaggerated boost and scan with that sometimes to hear where the goodies lie; find the right spot and back down the boost. So, just like Pensado, it’s often good to just mess around with it till it sounds good. And if it sounds good, it is good (I admit sometimes it gets a bit crazy and I may have up to five plugins all working towards one little thing, but hey, the result is what matters). I’ve found that although broad boosts are good for natural sound when boosting your master EQ, sometimes slightly more narrow boosts help to create a defined boost for the kick punch.
What is more important than thinking of an exact spot where to boost a kick is to understand the relationship of kick and bass – which can be happy, or one where the couple doesn’t get along at all. The choice you have to make is whether your bassline is lower than your kick or the other way around. In bass music – or hip hop with sub bass – the bassline plays lower, and the kick plays above it.
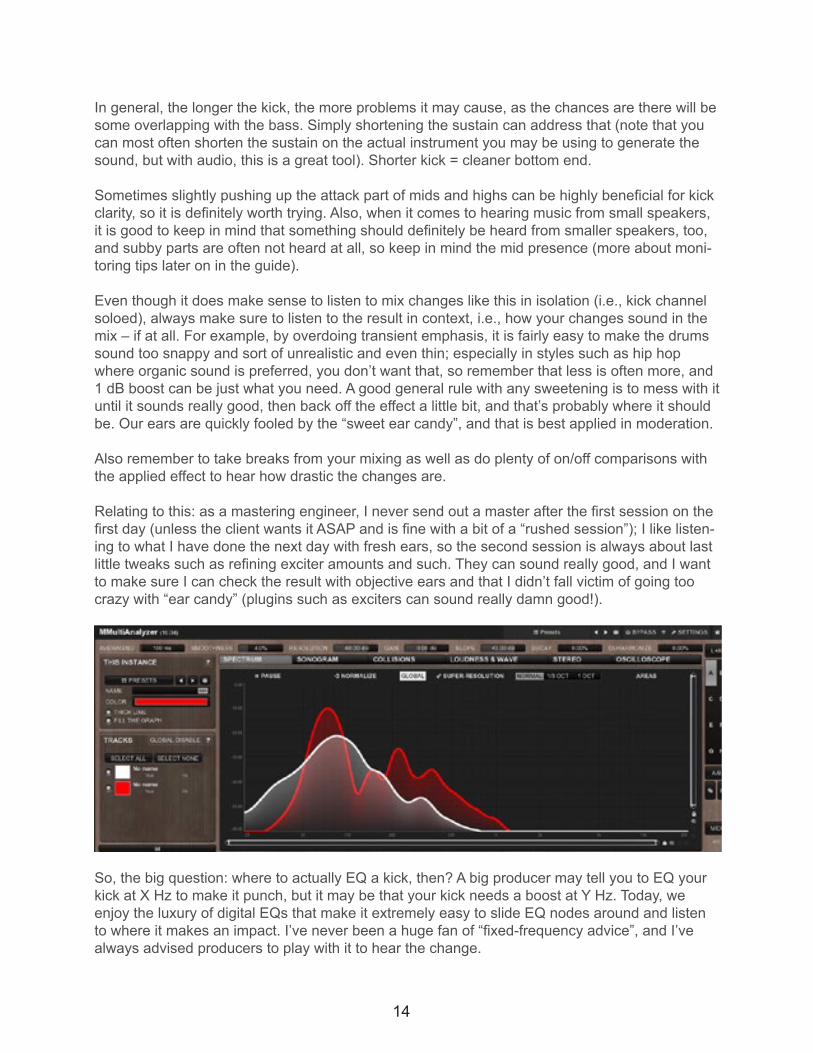
Use an analyzer to see where the kick and bass fundamentals are peaking; you can view them in an analyzer on either the particular track or have one on the master and then solo the chan-nels you want to take a look at and make a note where their lowest and loudest peak is hitting (this is called the fundamental frequency). Tools such as MMultiAnalyzer by Melda Production or Neutron by Izotope can be great tools in seeing two or more tracks and their possibly overlap-ping frequencies at the same time (MMultiAnalyzer lets you see many channels; Neutron shows you only two but also the magnitude of the clashing and lets you correct it in its view).
A good general tip, if your bassline is playing frequencies lower than your kick, is to have your kick peak roughly an octave higher than your bass. E.g., if your bass is peaking around 60 Hz, have your kick roughly peak around 120 Hz. It is often impossible to aim for exact numbers, so only take this as a guideline; e.g., an interplay of bass at 65 Hz and kick peaking at 105 Hz but with great presence and upper harmonics can sound great, clean, and powerful. Aim for at least a “30 Hz difference” between your bass and kick. Try giving your kick presence where it does not clash with bass (using the methods mentioned); that will help with the separation and mix clarity.Also, if none of these tips help…sometimes just letting go of a sound that isn’t working is a valu-able skill as well. If you’re trying to make your kick fit with the bass for 45 minutes, it is probably not working well enough, and it may be best just to try another kick, which may solve your problem immediately.
Replacing a sound isn’t always possible for an engineer, though, and drum replacement tools such as Slate Digital Trigger could be used in buses for a bit of added presence and body, so that is also something to consider if nothing else helps and you’re left to work your best with what you’ve been given. But where an engineer should draw the line between giving the mix all he’s got and telling the producer the mix just isn’t good enough – that’d be a topic for another book.
16
MIXING SNARES
I love beefing up snares. A lot of the tips relating to kicks mentioned above are just as useful with snares (no problem of clashing with bass, of course).
To me, Massey Tape Head once again is the boss at it, but any tape emulation or saturator will do (mentioned before). Softube Saturation Knob is good, too. I used to use PredatOHM by Ohm Force for this back in the day as well.
At this point I’d like to say that saturation + a bit of EQ will most often solve the problem of a weak snare better than what some seem to think should do it: compression. On music forums, I often see people suggest compressing a drumsound to get fat beats, but I’ll say that’s not the way to get a bigger drumsound – at least not for me – while saturation might just be your ticket. More about compression later in the guide.
Just as with kicks, I love touching the transient of a drumsound a little sometimes, and that’s where Izotope Alloy or Neutron is a massive help, as they allow you to get meticulous with three-band transient shaping. Sometimes I receive a drum track that is too snappy, and then I’ll mess with the transient part and make it softer. Go easy with it, because just as with compression, this one is easy to overdo and may result in a sound that’s a little too tight and snappy, and you dont want to end up in the thin league. A snare that’s a bit loose or “flappy” may benefit from transient emphasis. If it’s a total pancake – just ditch it and get a new one. Building a big library of snares is well worth it. I have more I’ll ever get to use in my life, but I love browsing for the perfect one when making music.
Every now and then a mixing project I receive has two (or more) snare tracks, and even though layering is all fine and good, it is good to real-ize that you often have to make a decision about which one is the main snare and which one has the role of a secondary snare only adding to the character but not always to the punch, as “double punch” does not always work.
Sometimes reducing the attack on one of them creates space and clarity and reduces the struggle for power between them (I’m struggling not to add a Trump vs Hillary joke here), as two “competing” snares may create a sort of unclear result. Experiment, and decrease the attack on the one whose job is to only add vibe to the sound, and you may well find that your combo of snares may start to work better.
You can create fairly complex and interesting drumsounds if you just make enough space for them all.
I can’t say there are many general rules to EQing snares, but what I sometimes find myself doing – in addition to saturation/distortion – if the snare is a bit weak and thin is boosting it with a low-shelf or raising its low mids a bit, as it may improve its “weight”.
When it comes to main drums – kick and snare – I high-pass very carefully, if at all, as high-passing something slightly too high is a surefire way to make it sound slightly hollow and lifeless. We are told to high-pass everything these days, but be really careful when doing that to your main drum sounds. If you do high-pass, sometimes doing it with resonance may help with
17
finding a resonant sweet spot that actually adds to the punch. This tech-nique both gets rid of excessive low end and adds a bit of meat where it’s needed – this can work really well with your kick, too, so do give it a shot! Essentially you’re throwing out the information you don’t need and adding emphasis where it matters.
Sometimes saturating a snare may bring up a bit of boxiness or wood-iness, and that may reside anywhere between 200 to 500 Hz; that is easy to find using a sweeping EQ technique (explained later).
Depending on the mood of the song, a snare may have to be quite bright – or more muffled if it’s more in the background instead of being an element adding energy. If the song is very energet-ic, a somewhat bright snare is often desired (high frequencies are great in introducing energy to music) while a more chilled-out song may better with a less bright one – but it is case-spe-cific and comes down to matter of taste. Filtering the highs out of the snare or the whole beat somewhat drastically to give it an “underwater sound” can also be a great tool for decreasing the energy in some sections of the song (intro / main beat etc.) – check “Aston Martin Music” by Rick Ross, for example.
If I want it bright and regular EQ isn’t doing it, my best bets in brightening the very top end and adding some good “sheen” (not Charlie Sheen on snares, though, please) are Slate Digital’s free Revival (one of the plugins in every single project I handle), Acustica Audio’s free Ochre EQ, or Maag EQ by UAD (also available native).
If your DAW has an analog-emulation filter (available in Ableton Live at least), you can try adding resonance to a low-pass filter and keeping the cutoff somewhat high; this may be great in emphasizing the very highs in drums and adding some good energy.
Best to keep in mind these are suggestions, and you may not need these; after all, all drum sounds are different. The charts telling you where to EQ this and that are suggestions at best, so always mix using your ears first and foremost.
18
HIHATS & CYMBALSHihats are the parts that you can high-pass way more if you wish, and it’s in them that some extra low-end can often be found, especially if they have been recorded using a microphone. It’s harder to destroy a hihat than a kick by carving out low-end.
Once again, I love to beef hihats up by saturation. A lot of hihat samples these days sound super tinny, clean and sterile, lacking soul. Saturation is your friend once again (if you ask me). I find myself using Head Crusher by Audio Assault a lot for this, as in addition to being a decent saturator, it also features tone-shaping tools and low and high pass filters (there used to be a free version of it at least). Another good freebie is Drumslam by Airwindows. Your DAW stock saturator proba-bly does a good job, too.
Sometimes I also find myself using the classic UAD 1176 compressor only for crunch; you can do that by deactivating the ratio buttons and cranking up the input gain. Sounds sweet! Try this on kicks, too, or anything that needs a bit of life.
Sometimes sample degradation plugins such as a simple sample rate and bit depth reducer found in most DAWs may be just what you need for that hihat presence. A popular one with a great sound is Decimort 2 by D16, and I highly recommend it when you need to lo-fi your sounds; often a slightly dirty and rugged hi-hat sound cuts through the mix a bit better than a clean one. It is good to get rid of really high frequencies in sounds anyways, as when they pile up in your mix, it often creates a very unpleasant and unnecessary layer of noisy energy.
19
Transient emphasis often helps to bring hihats come up in the mix, so that is definitely a good tool in making it cut through. If you don’t need a multiband transient tool, a simple one such as SPL Transient Designer may work very well. Some DAWs have one built in. I wish all DAWs had one built in!
Some harsh resonance (not always in the very highest of high frequencies) not pleasant on the ears can often be found in hihats and cymbals, and a great tool for actually seeing them is Fabilter’s Pro-Q 2 EQ, which is my most used clinical workhorse EQ; it freezes its display to show any pointy peaks in the sound and allows the user to literally drag them down. I find myself doing cuts to those pointy peaks found in hihats and cymbals often. If you don’t have Pro-Q 2, you can use the free Voxengo SPAN to see resonance peaks in a similar way; just switch it to average mode for a moment (good for seeing the master, too), hover your cursor over the peak, and you’ll know where to cut. Also, just about any EQ will do – I’m covering EQ sweeping tech-nique soon below.
On the album that I handled, hihats and cymbals were often panned on the provided stems. Per-sonally, I am not a huge fan of panning drum sounds. At least to me, it always sounds “wrong” unless we are talking about seventies funk type of music where it happened naturally because of the mic techniques – although there definitely are no rules to this. However, just for an exam-ple, I have mixed funk and soul, where the client specifically asked me to freely pan instruments and drums around “a bit too much” and ditch the rules for a fitting and “authentic” vibe. However, on the album, I pulled most of them to the centre.
Adding stereo width on drum sounds is a different thing, and sometimes it can work well when done in moderation, but always make sure your mix stays strong when played back in mono (I’ll address this in Mono Mixing section).
I said earlier that reverb may not always sound great on drum sounds, but adding a bit of re-verb on crashes may work well in making the crash even bigger and letting it live a bit longer. It is definitely a sound that can benefit from some stereo width and reverb. Speaking of crashes, they often contain a ton of high-end energy – and that’s what their purpose is anyways: to intro-duce sudden bursts of energy into the music – that sometimes has to be controlled.
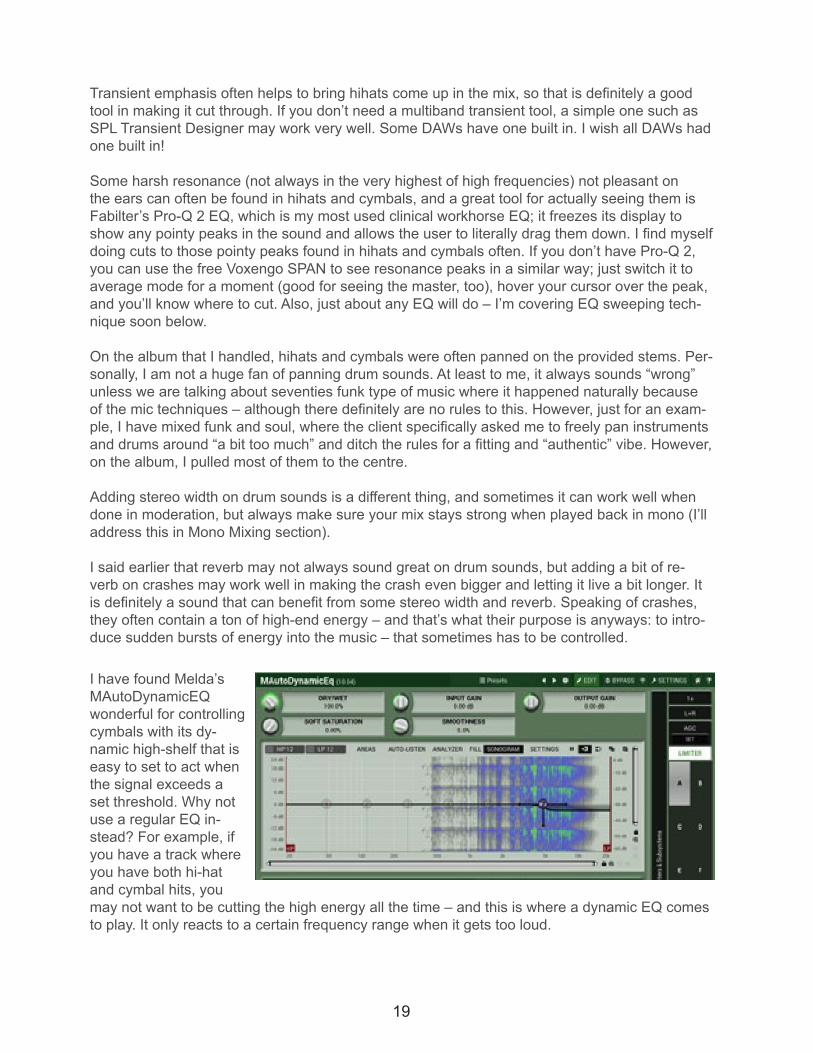
I have found Melda’s MAutoDynamicEQ wonderful for controlling cymbals with its dy-namic high-shelf that is easy to set to act when the signal exceeds a set threshold. Why not use a regular EQ in-stead? For example, if you have a track where you have both hi-hat and cymbal hits, you may not want to be cutting the high energy all the time – and this is where a dynamic EQ comes to play. It only reacts to a certain frequency range when it gets too loud.
20
If you are looking for an absolutely great free dynamic EQ option, look no further than Tokyo Dawn Nova, which should work wonders in this job. What was said about sample rate and bit depth degradation in terms of hihats can also work wonders on cymbals, and good old low-pass-ing often helps to get rid of excess high end energy. Whether to use dynamic EQing, de-essing or low-passing, sometimes you just have to see what sounds the most transparent. Pushing it hard on a tape emulation plugin may help to soften the blow as well.
SECONDARY DRUMSFor many songs on the album, a secondary drum loop was provided as one track (as opposed to the main drum elements as separate tracks). Its purpose was to add vibe and energy to the overall vibe and body of the drums.
It is often good to realize that if you have two equally strong drum loops / drum tracks, they may be competing in terms of frequencies and punch. Sometimes I softened the transients (the punch) of the secondary drum loop so that it would not be competing with the main drums. This is an important realization sometimes when layering very strong drum loops.
So, softening transients may help, as well as using a sidechained compressor on the second-ary drum loop. Essentially, the compressor is activated by a signal from the main drums, and it pushes down the secondary drum loop every time the main drum hits play. What I often do is use a fast attack, as its job is to soften the transients. I set a compressor so that its sidechain is triggered by a kick. Then I usually duplicate the compressor and set the other instance to react to a snare. This way every time the kick and the snare play, the secondary drum loop gives way to the main hits so they will come out more clearly for a short period of time.
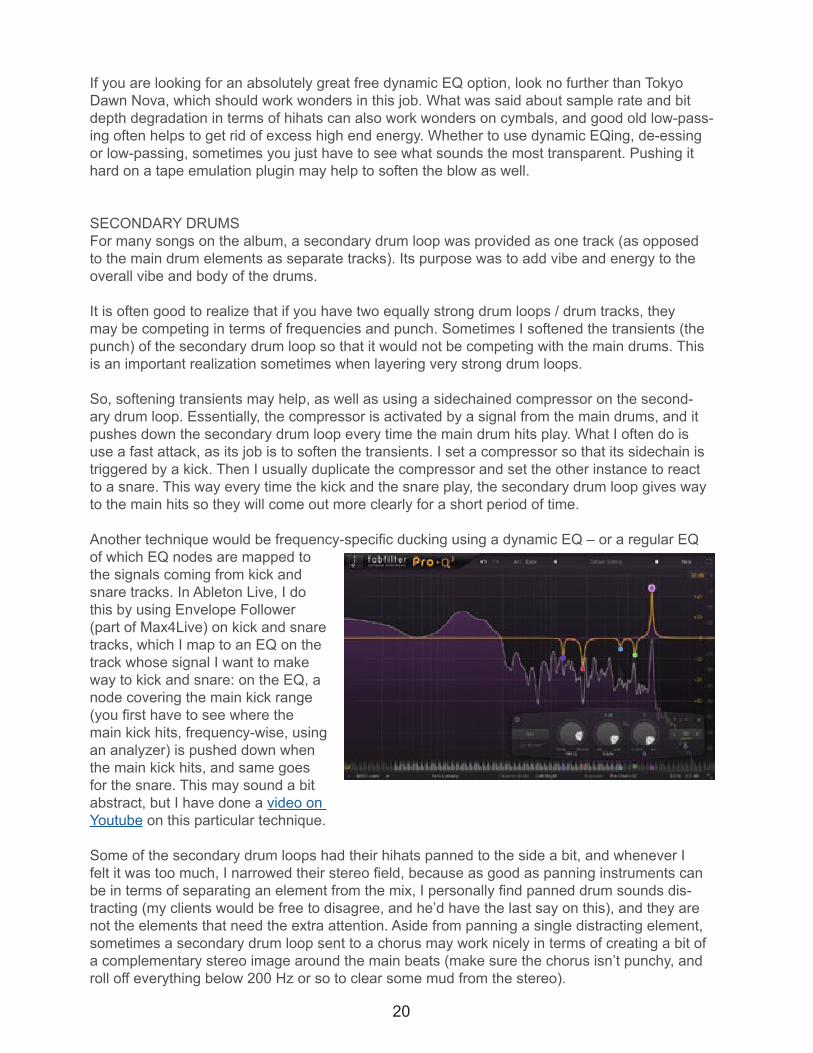
Another technique would be frequency-specific ducking using a dynamic EQ – or a regular EQ of which EQ nodes are mapped to the signals coming from kick and snare tracks. In Ableton Live, I do this by using Envelope Follower (part of Max4Live) on kick and snare tracks, which I map to an EQ on the track whose signal I want to make way to kick and snare: on the EQ, a node covering the main kick range (you first have to see where the main kick hits, frequency-wise, using an analyzer) is pushed down when the main kick hits, and same goes for the snare. This may sound a bit abstract, but I have done a video on Youtube on this particular technique.
Some of the secondary drum loops had their hihats panned to the side a bit, and whenever I felt it was too much, I narrowed their stereo field, because as good as panning instruments can be in terms of separating an element from the mix, I personally find panned drum sounds dis-tracting (my clients would be free to disagree, and he’d have the last say on this), and they are not the elements that need the extra attention. Aside from panning a single distracting element, sometimes a secondary drum loop sent to a chorus may work nicely in terms of creating a bit of a complementary stereo image around the main beats (make sure the chorus isn’t punchy, and roll off everything below 200 Hz or so to clear some mud from the stereo).
21
FINDING AND CUTTING OUT RESONANCESThe sounds we use in music often contain a bit of useless noise and resonance that only fills up the bandwidth; this is especially common with sounds that have been recorded using a mic, as room resonances and such are often there to an extent. It is not always a matter of just a single resonant sound, but sometimes the frequencies pile up in buses, as there are several sounds playing at once. That is why it makes sense to scan your buses for those resonances. Our ears get so used to hearing our songs, we may not hear these things while we’re mixing, so this is a good way of removing what’s unnecessary.
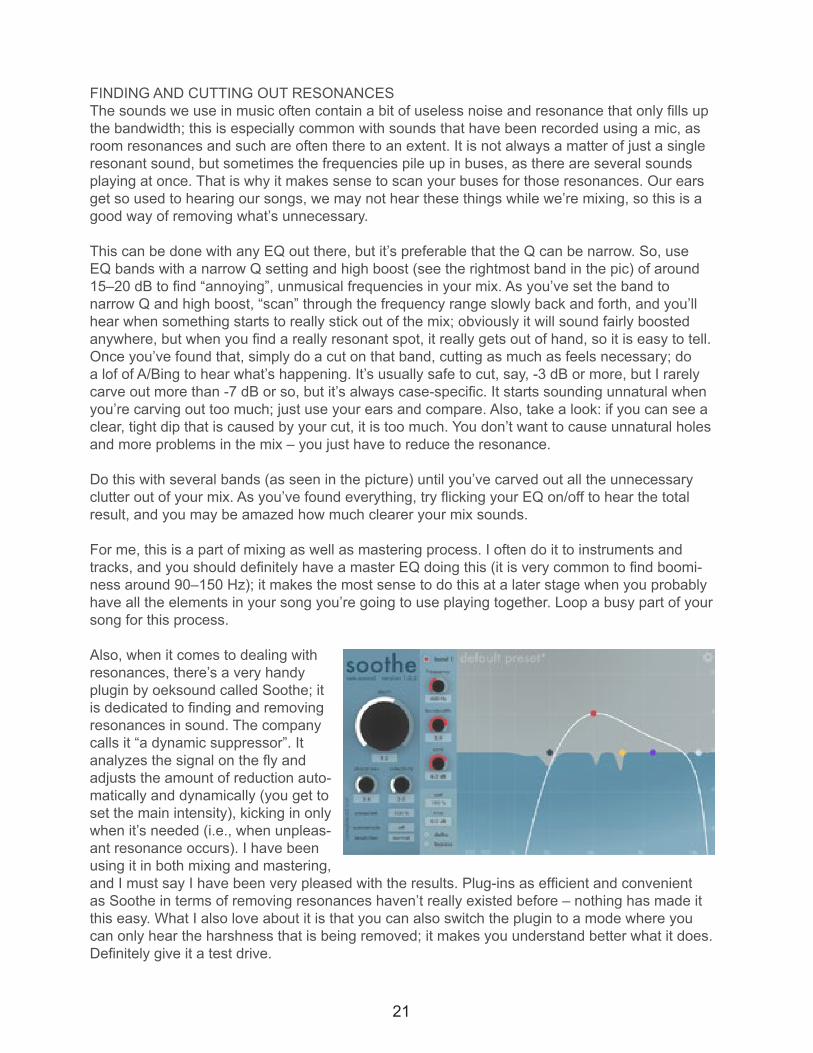
This can be done with any EQ out there, but it’s preferable that the Q can be narrow. So, use EQ bands with a narrow Q setting and high boost (see the rightmost band in the pic) of around 15–20 dB to find “annoying”, unmusical frequencies in your mix. As you’ve set the band to narrow Q and high boost, “scan” through the frequency range slowly back and forth, and you’ll hear when something starts to really stick out of the mix; obviously it will sound fairly boosted anywhere, but when you find a really resonant spot, it really gets out of hand, so it is easy to tell. Once you’ve found that, simply do a cut on that band, cutting as much as feels necessary; do a lof of A/Bing to hear what’s happening. It’s usually safe to cut, say, -3 dB or more, but I rarely carve out more than -7 dB or so, but it’s always case-specific. It starts sounding unnatural when you’re carving out too much; just use your ears and compare. Also, take a look: if you can see a clear, tight dip that is caused by your cut, it is too much. You don’t want to cause unnatural holes and more problems in the mix – you just have to reduce the resonance.
Do this with several bands (as seen in the picture) until you’ve carved out all the unnecessary clutter out of your mix. As you’ve found everything, try flicking your EQ on/off to hear the total result, and you may be amazed how much clearer your mix sounds.
For me, this is a part of mixing as well as mastering process. I often do it to instruments and tracks, and you should definitely have a master EQ doing this (it is very common to find boomi-ness around 90–150 Hz); it makes the most sense to do this at a later stage when you probably have all the elements in your song you’re going to use playing together. Loop a busy part of your song for this process.
Also, when it comes to dealing with resonances, there’s a very handy plugin by oeksound called Soothe; it is dedicated to finding and removing resonances in sound. The company calls it “a dynamic suppressor”. It analyzes the signal on the fly and adjusts the amount of reduction auto-matically and dynamically (you get to set the main intensity), kicking in only when it’s needed (i.e., when unpleas-ant resonance occurs). I have been using it in both mixing and mastering, and I must say I have been very pleased with the results. Plug-ins as efficient and convenient as Soothe in terms of removing resonances haven’t really existed before – nothing has made it this easy. What I also love about it is that you can also switch the plugin to a mode where you can only hear the harshness that is being removed; it makes you understand better what it does. Definitely give it a test drive.
22
CHAPTER TWO
MIXING BASS
23
On the album I faced very few issues with mixing bass. To be honest, I found myself using very few plugins for bass tracks in general. One reason for this is that the bass was never too thin harmonics-wise (I believe the bass was created using an analog Korg synth), which meant that the lows were fat while the tone of the bass was always cutting quite nicely though the mix, so what I mostly did was to enhance the good qualities of it.
The producer had obviously made it clear for himself where his kick and bass would reside frequency-wise, and, as discussed earlier in the kick section, a good separation of kick and bass from the get-go means fewer problems ahead down the mixing and mastering road, as you won’t be getting a lot of clashing around a frequency range taking up a lot of headroom – the lows.
So, to repeat to an extent what was already covered: a good sample selection in terms of those two main elements is one huge “mixing trick” in itself that should never be overlooked as it may save you tons of time and hassle.
If you find yourself fixing a problem for too long, it usually means you simply have wrong/inade-quate/clashing sounds, and the best way to remedy that is to go to the source and pick the right sounds instead of trying to fix it.
Every now and then I receive a master where the kick and bass clearly peak around the same frequency. That is a problem with limiting the song as the sound always starts to distort. If the mix itself cannot be fixed, carving of frequencies and multiband dynamics control are usually needed, but in a good mix and master, you’d rather let the bass and kick come through naturally and nicely without clamping down on them. Hence, do not use a kick and bass that clash.
The album was definitely leaning towards bass music in terms of its bass and kick “placement”; not quite dubstep levels of heaviness, but basses on all songs peaked lower than their kicks. So what I did was enhanced the good qualities of them both and often carved some small-ish pock-et for the kick: even though there may not be an actual clash of some ungodly magnitude, it’s worth it sometimes trying to make a little cut on the bass where the kick peaks, meaning even if your kick peaks at 90 Hz and your bass at 50 Hz, you can still try creating a little dip on the bass track around 90 Hz, and sometimes you may notice the low-end clarity improve a little.
On some bass tracks, I added a bit of saturation/distortion for tone; I usually do that before EQing, as tone-wise, it takes the bass where I want it to be, and then I proceed to do EQ en-hancements. I covered saturation options before, but there are two very nice plugins for saturat-ing bass I use.
Chapter 2 - Mixing Bass

24
Softube’s Saturation Knob is a free one, and the reason it is great for saturating bass (in addition to just sounding good) is that it allows the user to determine what parts of the signal should be saturated and what should be kept untouched. So you can just turn the knob and hear it work its magic on the upper harmonics of the bass while leaving the sub intact. I would strongly advise not trying to satu-rate the sub region (below 70 Hz, roughly) because that usually just doesn’t sound good or make sense anyways: always aim for a clean sub, but saturate your sound above the sub region.
It should be mentioned, though, that every DAW these days comes with a saturator, so do not look overlook those. Many of the plugins mentioned in this guide are personal preferences, often for workflow reasons and always for reasons having to do with inferior sound (when audio is your everyday task, it does make a difference if a third party plugin allows you to get the result you want in, say, 30 seconds, and if the stock plugin takes 60 seconds or has a more convoluted work-flow for that certain task). A great example of a saturation/distortion plugin that beats most stock ones is Saturn by Fabfilter. It is a superb choice, which features way deeper options and a feature set for working with the tone of the signal (can be really good for any type of material; for example vocals and synths). It allows you to work with the saturation/distortion in a multiband fashion, meaning you can create several bands, set their crossover points, and saturate/distort each band to your liking (ranging from mild coloration to absolute roasting) and control their levels and even have an LFO modulate its parameters. It is a great tool for keeping the sub region clean and coloring up the frequencies above it. Works for any type of sound: think about shaking up the very highs of your drums, for example.
Another great option is Slate Digital’s Virtual Console Channel, which is meticulously modeled after famous analog desks; I’ve found it sounds really good when pushing bass loud.
A common way to treat bass and breathe some life to it is parallel compression. This often works well with organic bass tracks, which often have quite a bit of snap to them (not that useful with square wave bass and such). Essentially, all parallel compression (also known as New York compression) does is it allows you to blend the compressed signal with the untreated one. In parallel compression, the compressed signal is usually somewhat squashed, which brings up nice character, but it is mixed with the original signal, so what you get is a combination of the dynamic content as well as the compressed mix, which raises up the low parts in the sound.
25
A few words about compression. Essentially, what it does is it reduces the dynamic range of au-dio. There are always peaks in audio when something “happens” quickly: when someone plucks the guitar, when the drummer plays his drums, when a singer produces a voice – and so on. That is not a problem per se, but if the signal is too dynamic, it doesn’t always sound very pleas-ant, and some volume changes may be too drastic: think of a vocalist singing really quiet on some parts and super loud on some. Even though one might find a good middle ground in terms of its volume fader, some parts might not be heard well enough, while some parts would come through too loud and distort. That is a problem that compressor is looking to remedy. It turns the loudest parts down and brings the quieter parts up, making the signal more even. Simply put, it keeps the signal level somewhat steady. We are all very used to hearing professionally treated music, and our ears can somewhat easily notice if it’s less professional; especially with vocal tracks it is very easy to hear if at some parts you’re struggling to hear the vocalist (e.g., a rapper in hip hop), while at some parts you’d like to turn it down. Some recorded bass are just like this, and compression often makes it way smoother.
When I have the “vibe” of the bass right, I may sometimes use a little bit of chorus to widen it up a bit (a quick mention here to say that you should always make sure that the bass retains all the desired power when the song is played back in mono; this is addressed in Mono Mixing section). Every DAW has a chorus plugin, which may work well for the job. It is good practice to make sure that low end is cut off of the chorus; some plugins have controls for this. In more organic styles, you’ll find that there is very little widening on bass, while more contemporary bass music often widens up the “noisier” sections of the bass. There is a free plugin by Xfer Records called Dimension Expander which I’ve found to work wonders when it comes to widening bass, espe-cially more electronic type of bass.
Traditionally, bass is one of the elements that many engineers want to keep in the middle instead of going really wide with it – especially its sub section. One of the most well-known reasons for that is that it causes problems when cutting the material to vinyl. Not every song is cut on vinyl these days, but in my opinion, stereo sub just doesn’t “make sense” – to my ears. It doesn’t sound that good, and human ear is not very capable of pointing out which direction sub frequen-cies come from, which may well be the reason stereo sub may sound quite “confusing” to us. So, if you want to add sub widening, listen to it and pay a moment to think whether you think it makes sense or not.
26
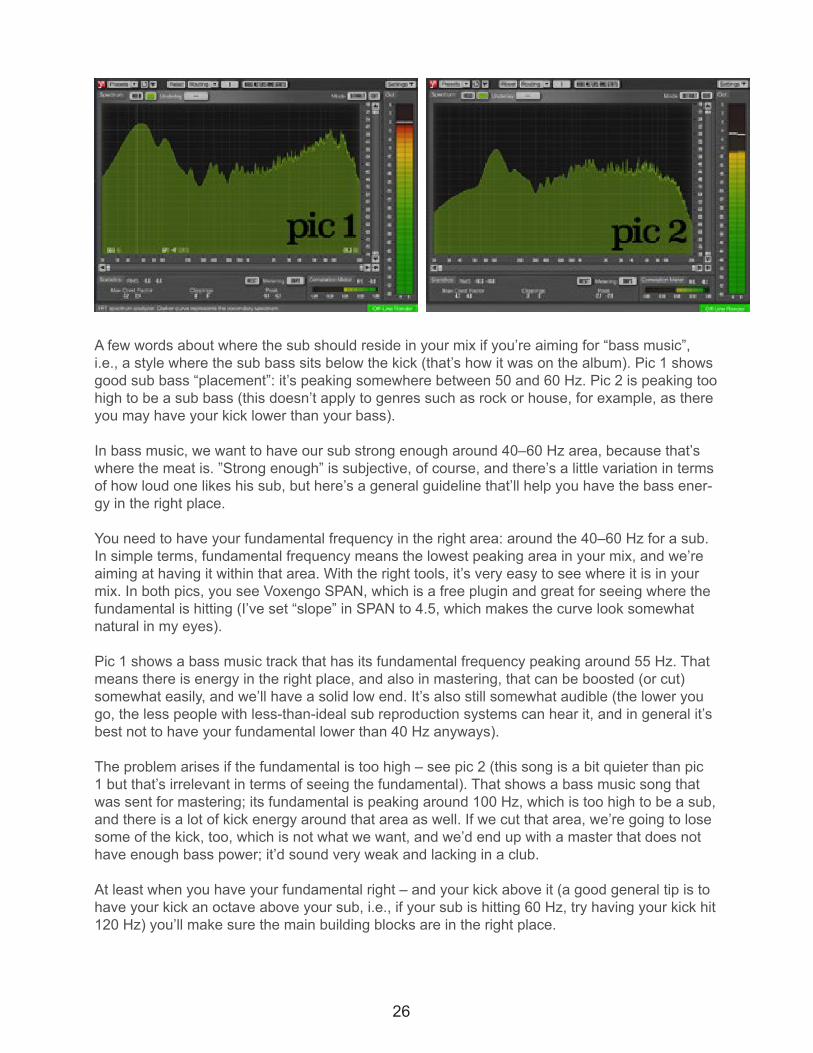
A few words about where the sub should reside in your mix if you’re aiming for “bass music”, i.e., a style where the sub bass sits below the kick (that’s how it was on the album). Pic 1 shows good sub bass “placement”: it’s peaking somewhere between 50 and 60 Hz. Pic 2 is peaking too high to be a sub bass (this doesn’t apply to genres such as rock or house, for example, as there you may have your kick lower than your bass).
In bass music, we want to have our sub strong enough around 40–60 Hz area, because that’s where the meat is. ”Strong enough” is subjective, of course, and there’s a little variation in terms of how loud one likes his sub, but here’s a general guideline that’ll help you have the bass ener-gy in the right place.
You need to have your fundamental frequency in the right area: around the 40–60 Hz for a sub. In simple terms, fundamental frequency means the lowest peaking area in your mix, and we’re aiming at having it within that area. With the right tools, it’s very easy to see where it is in your mix. In both pics, you see Voxengo SPAN, which is a free plugin and great for seeing where the fundamental is hitting (I’ve set “slope” in SPAN to 4.5, which makes the curve look somewhat natural in my eyes).
Pic 1 shows a bass music track that has its fundamental frequency peaking around 55 Hz. That means there is energy in the right place, and also in mastering, that can be boosted (or cut) somewhat easily, and we’ll have a solid low end. It’s also still somewhat audible (the lower you go, the less people with less-than-ideal sub reproduction systems can hear it, and in general it’s best not to have your fundamental lower than 40 Hz anyways).
The problem arises if the fundamental is too high – see pic 2 (this song is a bit quieter than pic 1 but that’s irrelevant in terms of seeing the fundamental). That shows a bass music song that was sent for mastering; its fundamental is peaking around 100 Hz, which is too high to be a sub, and there is a lot of kick energy around that area as well. If we cut that area, we’re going to lose some of the kick, too, which is not what we want, and we’d end up with a master that does not have enough bass power; it’d sound very weak and lacking in a club.
At least when you have your fundamental right – and your kick above it (a good general tip is to have your kick an octave above your sub, i.e., if your sub is hitting 60 Hz, try having your kick hit 120 Hz) you’ll make sure the main building blocks are in the right place.
27
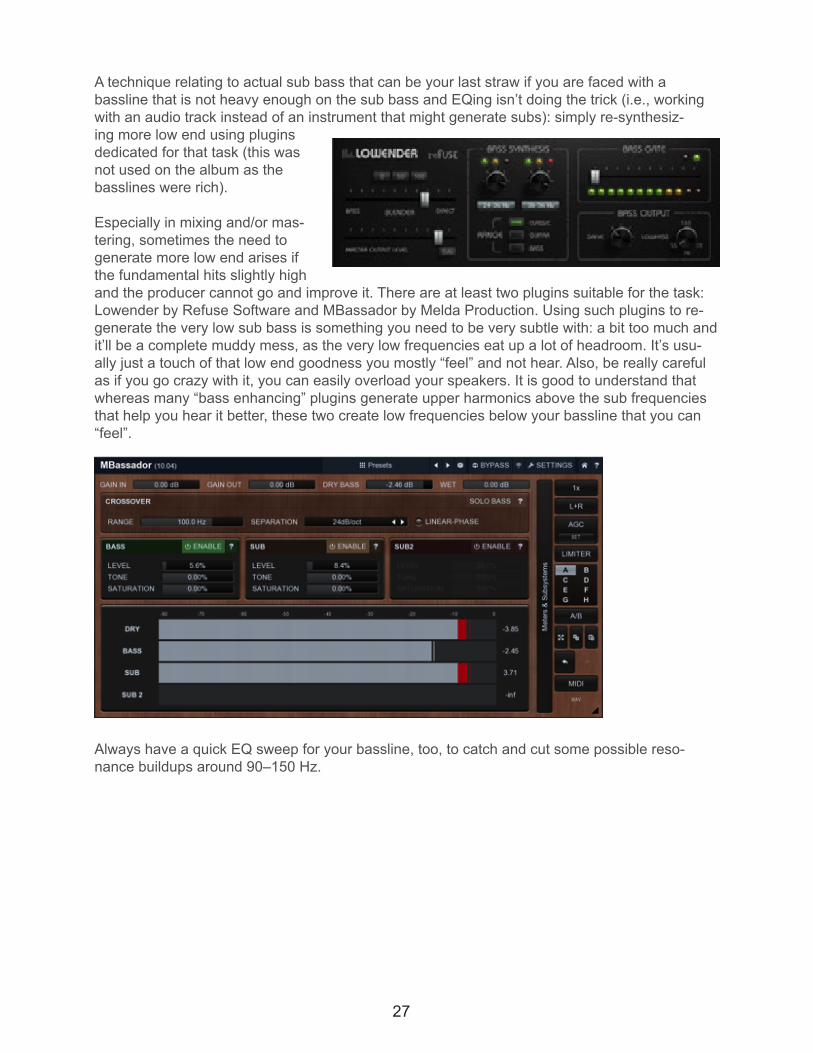
A technique relating to actual sub bass that can be your last straw if you are faced with a bassline that is not heavy enough on the sub bass and EQing isn’t doing the trick (i.e., working with an audio track instead of an instrument that might generate subs): simply re-synthesiz-ing more low end using plugins dedicated for that task (this was not used on the album as the basslines were rich).
Especially in mixing and/or mas-tering, sometimes the need to generate more low end arises if the fundamental hits slightly high and the producer cannot go and improve it. There are at least two plugins suitable for the task: Lowender by Refuse Software and MBassador by Melda Production. Using such plugins to re-generate the very low sub bass is something you need to be very subtle with: a bit too much and it’ll be a complete muddy mess, as the very low frequencies eat up a lot of headroom. It’s usu-ally just a touch of that low end goodness you mostly “feel” and not hear. Also, be really careful as if you go crazy with it, you can easily overload your speakers. It is good to understand that whereas many “bass enhancing” plugins generate upper harmonics above the sub frequencies that help you hear it better, these two create low frequencies below your bassline that you can “feel”.
Always have a quick EQ sweep for your bassline, too, to catch and cut some possible reso-nance buildups around 90–150 Hz.
28
CHAPTER THREE
MIXING VOCALS
29
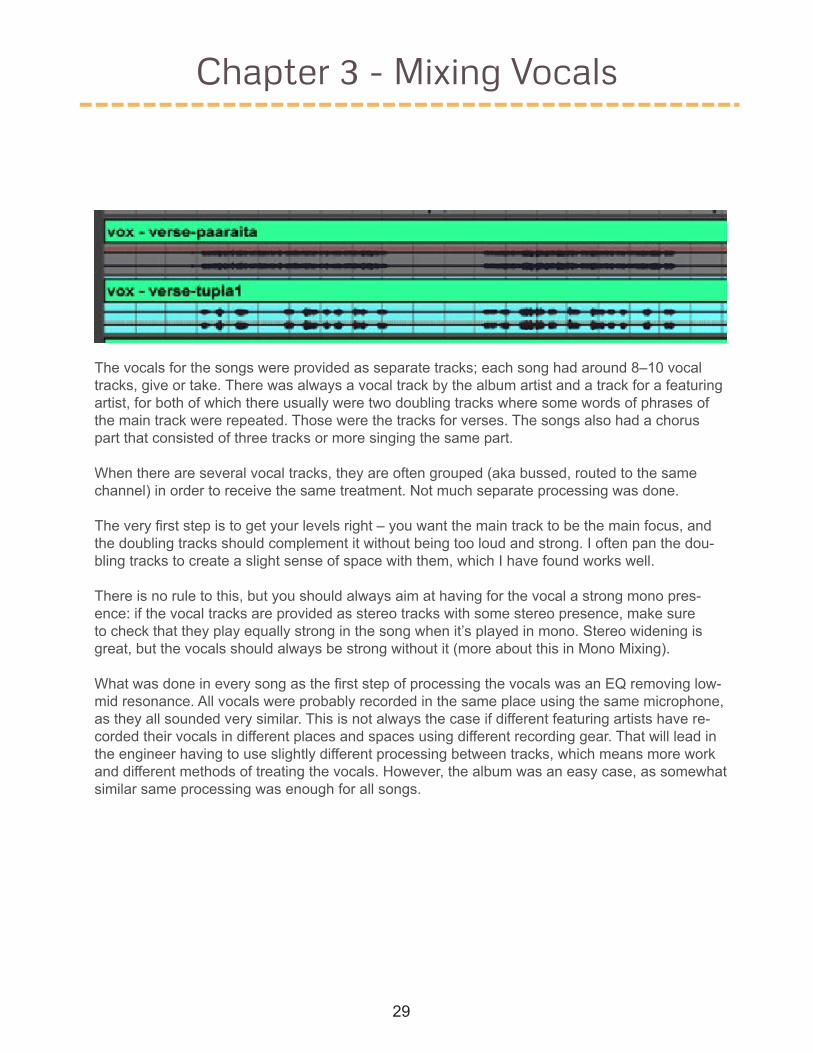
The vocals for the songs were provided as separate tracks; each song had around 8–10 vocal tracks, give or take. There was always a vocal track by the album artist and a track for a featuring artist, for both of which there usually were two doubling tracks where some words of phrases of the main track were repeated. Those were the tracks for verses. The songs also had a chorus part that consisted of three tracks or more singing the same part.
When there are several vocal tracks, they are often grouped (aka bussed, routed to the same channel) in order to receive the same treatment. Not much separate processing was done.
The very first step is to get your levels right – you want the main track to be the main focus, and the doubling tracks should complement it without being too loud and strong. I often pan the dou-bling tracks to create a slight sense of space with them, which I have found works well.
There is no rule to this, but you should always aim at having for the vocal a strong mono pres-ence: if the vocal tracks are provided as stereo tracks with some stereo presence, make sure to check that they play equally strong in the song when it’s played in mono. Stereo widening is great, but the vocals should always be strong without it (more about this in Mono Mixing).
What was done in every song as the first step of processing the vocals was an EQ removing low-mid resonance. All vocals were probably recorded in the same place using the same microphone, as they all sounded very similar. This is not always the case if different featuring artists have re-corded their vocals in different places and spaces using different recording gear. That will lead in the engineer having to use slightly different processing between tracks, which means more work and different methods of treating the vocals. However, the album was an easy case, as somewhat similar same processing was enough for all songs.
Chapter 3 - Mixing Vocals

30
There was always more or less reso-nance around 125 Hz, roughly, which seems to be quite common in male vocal tracks. Some resonance could be heard an octave higher, around 250 Hz, too. What this means is that some frequency areas were coming through too strong, creating a slightly unnatural sound. Also, what is very common in untreat-ed tracks recorded with a microphone is some very low rumble, which should be removed with a high-pass filter. The resonances can be cut using any EQ out there (it is always best to use a some-what narrow EQ node when cutting out specific resonances, while for boosting, more broad EQ curves are best to achieve a natural sound).
What is one of the best tools for removing the low-mid resonances from vocals is SurferEQ by SoundRadix. How it differs from many regular EQs is by actually tracking the pitch instead of staying in one place. An EQ node that stays in one place without following the pitch is not usually much of a problem with rap vocals, as traditionally in rap, there is not that much pitch variation: rap vocals usually aren’t very “melodic”. However, when you are dealing with singing (which was often found in the choruses of the album), it is melodic, which means that there is more variation in pitch. In this scenario, an EQ node that does not follow the pitch is not doing a very exact job because the resonance is moving up and down a bit. SurferEQ is great because it follows the pitch, so all you have to do is apply a reasonable amount of cutting when the vocalist is performing his root note, and the EQ will follow the pitch when it starts changing.
Another good dynamic way to deal with resonances would be to use a multiband compressor that only reacts to the signal when it exceeds a certain threshold (e.g., it could be used to target the low mid band of the vocal track, where vocal “muddiness” often resides, and keep its level in check). However, on this album, SurferEQ was used for the job.
It’s best to be careful when cutting out the resonances, as the vocal sound becomes too thin and loses power very easily if the cuts are too strong. If you are submitting your tracks to an engi-neer for mixing, it’s good practice to leave the cuts up to the engineer – in general, it’s easier for an engineer to cut something if it’s too strong than it is to add back something that has been carved out a little too much (especially if you create a “hole” in your audio with aggressive notch-ing, it ain’t coming back!).
It’s fairly easy to find the offending frequencies by EQ sweeps (see the dedicated section in this guide). Most often I did the cutting on the group track instead of touching the separate tracks; there was only one or two cases where a separate track had to be addressed, too, due to some very strong resonances around 125/250 Hz.
A good general guideline is to perform the required cleaning-up EQing before compression. Why? It is good practice not to feed into the compressor any frequency content we don’t need; i.e., we should only compress the signal that has been “cleaned”.
31
Compression shouldn’t be a process that is done to tracks by default unless it’s needed, but es-pecially with recorded vocals, compression is needed very often. This is because for a human it is impossible to concentrate on a good performance and keep his level steady. There will always be more or less level variation in vocal level, and to achieve a steady level that is useful in music and easy for the listener to hear, a compressor is needed. Compression was briefly explained earlier, and will be addressed again in a later section in this guide, so I won’t get into it here.
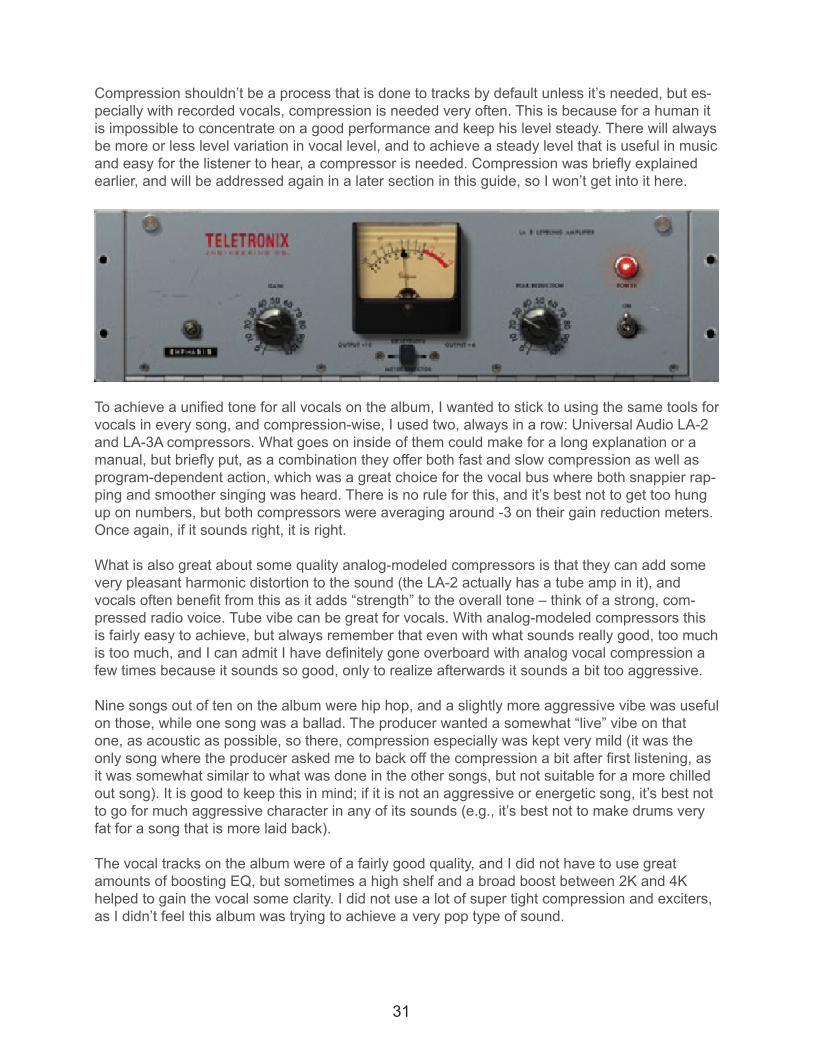
To achieve a unified tone for all vocals on the album, I wanted to stick to using the same tools for vocals in every song, and compression-wise, I used two, always in a row: Universal Audio LA-2 and LA-3A compressors. What goes on inside of them could make for a long explanation or a manual, but briefly put, as a combination they offer both fast and slow compression as well as program-dependent action, which was a great choice for the vocal bus where both snappier rap-ping and smoother singing was heard. There is no rule for this, and it’s best not to get too hung up on numbers, but both compressors were averaging around -3 on their gain reduction meters. Once again, if it sounds right, it is right.
What is also great about some quality analog-modeled compressors is that they can add some very pleasant harmonic distortion to the sound (the LA-2 actually has a tube amp in it), and vocals often benefit from this as it adds “strength” to the overall tone – think of a strong, com-pressed radio voice. Tube vibe can be great for vocals. With analog-modeled compressors this is fairly easy to achieve, but always remember that even with what sounds really good, too much is too much, and I can admit I have definitely gone overboard with analog vocal compression a few times because it sounds so good, only to realize afterwards it sounds a bit too aggressive.
Nine songs out of ten on the album were hip hop, and a slightly more aggressive vibe was useful on those, while one song was a ballad. The producer wanted a somewhat “live” vibe on that one, as acoustic as possible, so there, compression especially was kept very mild (it was the only song where the producer asked me to back off the compression a bit after first listening, as it was somewhat similar to what was done in the other songs, but not suitable for a more chilled out song). It is good to keep this in mind; if it is not an aggressive or energetic song, it’s best not to go for much aggressive character in any of its sounds (e.g., it’s best not to make drums very fat for a song that is more laid back).
The vocal tracks on the album were of a fairly good quality, and I did not have to use great amounts of boosting EQ, but sometimes a high shelf and a broad boost between 2K and 4K helped to gain the vocal some clarity. I did not use a lot of super tight compression and exciters, as I didn’t feel this album was trying to achieve a very pop type of sound.
32
What should be taken into account is that vocal and the instruments in the song may often be clashing in terms of frequency ranges. Monitoring this was discussed in kick section. So, some-times you may have to make space for the vocal by carving little “pockets” for it in the instrument tracks, which can often create more space and clarity for the vocal. For example, if you have a really strong guitar – especially a shredding solo! – and a strong vocal going on at the same time, it may be needed to have the instruments duck the vocal a little bit. Sidechain compression may work here, too, where the whole signal (instead of frequency-specific treatment) is pushed down whenever needed. So, you could have a compressor on the guitar track and have its side-chain react to the signal of the vocal. Often, you just have to experiment and see (listen!) what works best – sometimes EQing does it, sometimes dynamic EQing may be the most transparent choice, sometimes a sidechained compression.
For de-essing some of the vocal tracks, the same methods were used that handled de-essing for cymbals (discussed earlier in this guide). With vocals, though, the resonant spikes may be slight-ly narrower than with cymbals, so it’s good to find out where the sharp “essing” occurs using an analyzer and address that range (by far the best choice for this is Fabfilter Pro-Q 2 with its great peak display, which isn’t dynamic, however, so if you’re looking for a good free dynamic option, you could try Tokyo Dawn Nova). However, a broadband handling can work, too, and as always with audio, things are case-specific.
One thing that may often be overlooked in mixing is simple leveling of tracks, and especially with vocals, it may make sense to give the vocal a little more level in chorus sections if more energy is needed. A 1–2 dB boost can often work well in giving the vocal a little more energy in desired sections, so do not overlook that free and easy method when it comes to slightly emphasizing the energy of a track (after all, human ear easily perceives louder as “better” and more powerful).
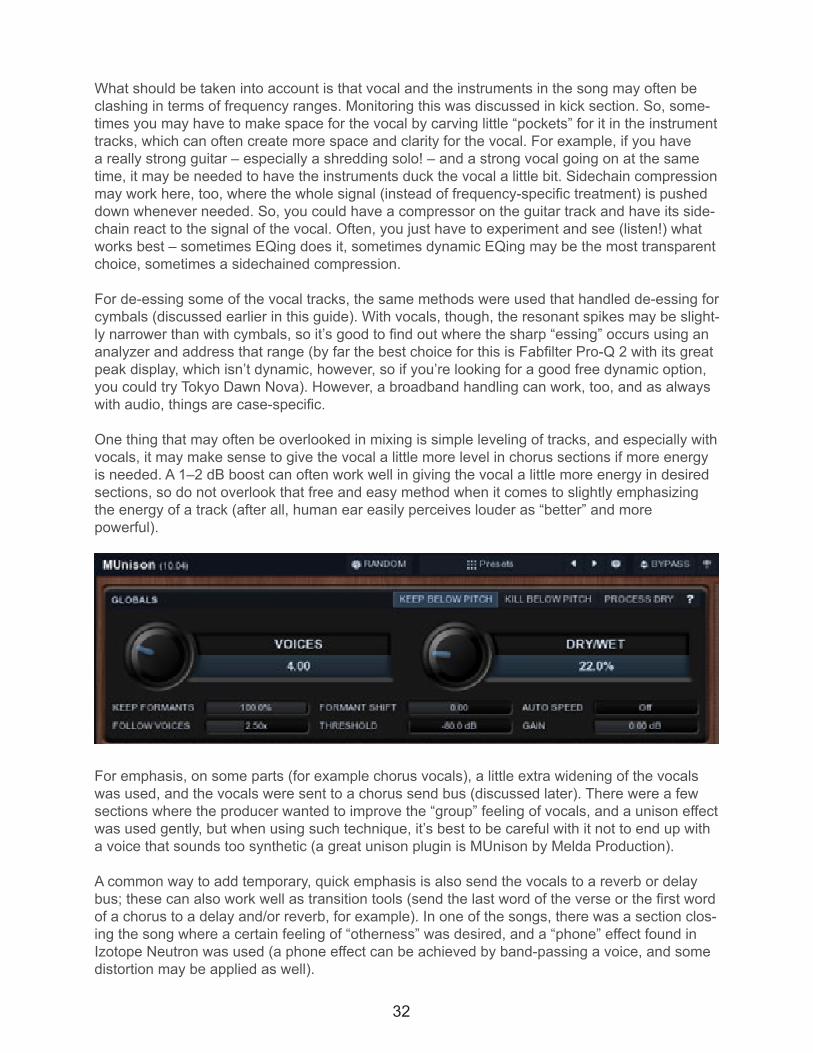
For emphasis, on some parts (for example chorus vocals), a little extra widening of the vocals was used, and the vocals were sent to a chorus send bus (discussed later). There were a few sections where the producer wanted to improve the “group” feeling of vocals, and a unison effect was used gently, but when using such technique, it’s best to be careful with it not to end up with a voice that sounds too synthetic (a great unison plugin is MUnison by Melda Production).
A common way to add temporary, quick emphasis is also send the vocals to a reverb or delay bus; these can also work well as transition tools (send the last word of the verse or the first word of a chorus to a delay and/or reverb, for example). In one of the songs, there was a section clos-ing the song where a certain feeling of “otherness” was desired, and a “phone” effect found in Izotope Neutron was used (a phone effect can be achieved by band-passing a voice, and some distortion may be applied as well).

33
Strong reverb is not used very often on main vocals (especially in hip hop), but a lush reverb on human voice always works for a smooth background effect that’s “far away” (check the voice during intro beats on Drake’s “Hold On, We’re Going Home”, for example).
Sometimes in mixing projects, a client may ask the engineer to correct the pitch of the vocal track where the vocalist is missing the key a bit. A great, free tool for that can be Vielklang CM by zplane, and you can get it free if you’re a Computer Music reader. It is a handy tool that lets the user move the vocal content as blocks – much like you’d move midi notes around – and eas-ily make them match the desired key. This was not needed on the album project.
34
CHAPTER FOUR
MASTER CHANNEL PROCESSING

35
This is not a mastering guide – it must be emphasized. Rather, so far this guide has presented some mixing techniques based on work done for an album, and this chapter lists the things that were commonly used on the master channel on all ten songs on the album and mentions briefly why.
Why isn’t this about mastering that much? Whenever I am mixing and mastering a song, I aim to get the mix as good as I can before master channel processing, and that is how the album was treated. In doing mixing and mastering, to me they are one process, so I don’t “only mix” as some other engineers may do. I do plenty of mastering-only sessions working with just the premaster, i.e., one bounced file of the song, and that would differ from what was described in this guide, as there is always a way bigger arsenal of tools to choose from on the master channel, and listing all that and techniques used with all of them would bloat this guide to a great extent.
Back to mixing a song versus its master treatment: in mixing, you can address most of the sounds and tracks used in the song, so it’s more precise, while mastering always treats the whole song. Using an EQ, for example, on the master channel is like adding spice to your meal: it gets added on everything. But if your meal consists of a few different elements and one of them already has too much spice while the others need more, it’d be easier to go and fix that particular element at its source (if you could) instead of treating the whole bunch. That may be a lousy analogy and not fitting 1:1, but you probably get the idea.
Every song was treated as one project by giving it a good mix, then applying a bit of processing on master channel and finally limiting it to make it loud enough. There was no separate mixing and mastering project. If you are the person mixing and mastering your song, you can do it in the
Chapter 4 - Master Channel Processing
36
same exact project you used to write the song – that’s what I very often do to my own produc-tions. However, what can be the downside of that? There are two things at least. Firstly: many producers bounce their tracks to audio for a separate new project to regain CPU power. The song you are working on may have a lot of effects, instruments, and processing, which does ask for some CPU juice. It may be experiencing audio dropout and hiccups. So, it may be a smoother experience restarting with all the CPU power regained. Secondly, another thing is committing to what you have done and working further with it – without the chance to immediately go and tweak small things about the instruments/effects/etc. in your song. That is not a bad thing per se, but being able to adjust everything may not always help us, as it’ll allow for an infinite number of further tweaks for the elements in our songs, and it may be counterproductive in terms of actually progressing with final mixing. At some point it may be helpful to “leave it all behind” in a way and enter a stage where you cannot go back to fine-tune something anymore (often, “good” is bet-ter than “perfect” – the latter being often unattainable). Well, surely you can, by opening the old project and then tweaking and bouncing the track(s), but it is not as close to you as it could be. We are all different, and some producers benefit from this greatly, as they won’t be tweaking that snare for two hours (been there!).
The first thing, a very important one, on the master channel was Hornet VUmeter (it was dis-cussed early on in this guide) to bring down the signal to a safe working level. No matter how loud the sum of the individual tracks would be, VUmeter makes the working level just fine.
Every now and then I use an analog-modeled preamp as the first device of the master channel. This was explained in the very beginning, in Mixing Drums section, so I won’t go into it anymore. Essentially, it is doing the same job here, but for the whole master signal.
Then, there’s Slate Digital’s Virtual Tape Machine that models a magnetic tape. It adds a little bit of size and “warmth” to the mix as well, being another of those things that are very hard to describe with words, but what analog tape does to the sound – in very simple terms – is a bit of distortion, compression, “cohesion”, and EQ. It does it all very “musically”, which again is a highly vague and subjective term. Describing sound is often as hard as would be describing the taste of vanilla ice cream to someone who has never had it before, so I won’t even try to do it any further. VTM can also be used on individual tracks. It can also be pushed really hard, which emphasizes the effect going up to extremities if you want. VTM does add some low end to the sound, and somehow it makes it bigger and fuller, but not really that much louder; another thing hard to de-scribe or recreate with an EQ.
Pro-Q 2 is a mainstay on the master thanks to its Spectrum Grab feature showing resonant peaks and allowing the user to pull them down in a very quick and easy fashion (I really want to try Soothe for this, too; mentioned earlier). Finding and cutting out resonances could be done with any EQ, but Pro-Q 2 takes the cake by making it so effortless. It’s often between around 6K and 12K that resonances pop up; these days, there is a lot of unnecessary high frequency content in many sounds, and it tends to build up. You don’t always recognize it on separate tracks, so that’s why it’s good to check it out and address it on the master, where frequencies build up cumulative-ly. It’s also a good idea to scan (explained later) through 90–150 Hz, where boominess very often resides, and cutting out some of it often creates low-mid clarity. Pro-Q 2 is also used in the chain for desired boosts; it is great for that as it is as clean as it gets and adds nothing extra to the sound. Gentle high and low shelving is often needed in final adjustments, and broad boost around 2–4K often brings up “the music” (or tames it a notch if needed). One tip if you want to low-pass and high-pass your song: be somewhat gentle. Taking a look at how released songs look in an analyzer can be a great guide in this (every now and then I receive premasters that have been brickwall-filtered too steep, and that cannot be remedied).
37
If it feels like the song is lacking in that high-end sheen, Slate Digital’s free Revival is used. It is one of those tools that I personally find indispensable, and haven’t been able to create the same type of high-end crispness with any other EQ – because it’s not really an EQ. It’s an exciter, and that’s what it does: it does make the very top end more “exciting”. While this type of high end is heard on countless electronic songs today, hip hop does not always necessarily need a lot of it, but a little pinch of it can bring the high end up just a touch (think hihats, snare tops, vocal high frequencies, etc). Another EQ I very recently downloaded and used on one or two songs on the album, and which was also free prior to the writing this guide, was Sie-Q by Soundtoys, which is more of an EQ (which Revival isn’t), though, and Ochre, a free EQ by Acustica Audio can also provide similarly bright high end. Any filter, if it’s analog-modeled (like Auto Filter in Ableton Live), may also sound really sweet if you apply a fair amount of resonance to it and low-pass it around the very high frequencies: it adds some great energy to the very top.
I like running the signal onto UAD Ampex tape. It is another analog tape emulation. The signal is not pushed too hard onto it, as too much is too much, but it definitely adds a bit of “cohesion” and “glue” to the sound. The harder you push into it, the greater the effect, and especially in low-fi type of sound (think Madlib, Damu, MF doom) it works wonders when pushed, but in mastering, these things are best in moderation. The Ampex also features a fair amount of controls such as EQ, wow, and flutter, being loyal to the original machine it was modeled after. I think these ana-log-modeled tape machines add a hint of “realness” to the sound; a lot of songs that are mastered today are fully digital, meaning they have been made with synthesized sounds and sometimes with few to none “organic” sounds in them. That is why I favor the analog flavor so much. By using a few analog-modeled devices, one can add a fair amount of analog color into the sound, which our ears find very pleasant. A lot of contemporary music can sound very sterile, and sand-ing its perfect corners can often work wonders. Think about a white color, as clean and pure as you can: it may great like that, but often, when it gets “broken” and stirred up just a little a bit, the added texture may make it more pleasant to our perception. That is one vague description, I know, but words often fail in describing sound just as much as they fail in describing a color.
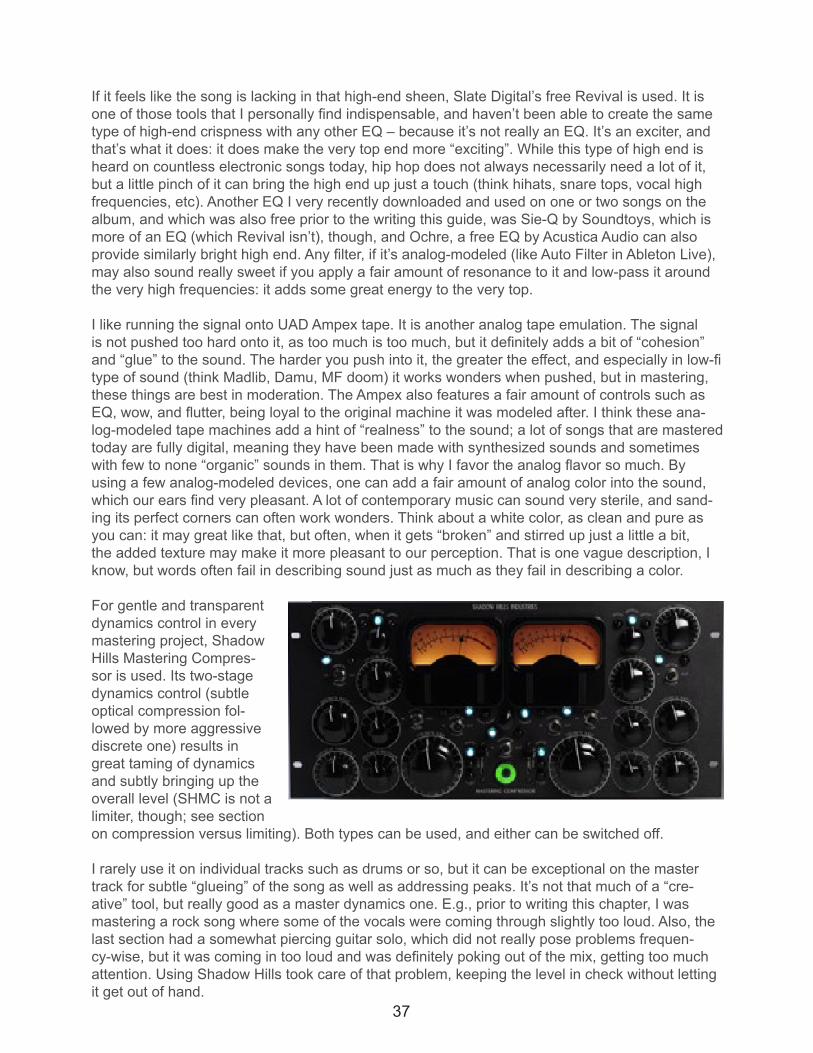
For gentle and transparent dynamics control in every mastering project, Shadow Hills Mastering Compres-sor is used. Its two-stage dynamics control (subtle optical compression fol-lowed by more aggressive discrete one) results in great taming of dynamics and subtly bringing up the overall level (SHMC is not a limiter, though; see section on compression versus limiting). Both types can be used, and either can be switched off.
I rarely use it on individual tracks such as drums or so, but it can be exceptional on the master track for subtle “glueing” of the song as well as addressing peaks. It’s not that much of a “cre-ative” tool, but really good as a master dynamics one. E.g., prior to writing this chapter, I was mastering a rock song where some of the vocals were coming through slightly too loud. Also, the last section had a somewhat piercing guitar solo, which did not really pose problems frequen-cy-wise, but it was coming in too loud and was definitely poking out of the mix, getting too much attention. Using Shadow Hills took care of that problem, keeping the level in check without letting it get out of hand.
38
What is good to keep in mind about any compressor on the master track is that they should have an internal high-pass filter. That does not mean it filters the output signal, but it filters out sub frequencies from the signal that it reacts to, which is needed to compress the song “right” (sub pushing into a master compressor makes it freak out and makes it messy). This high-pass filter is often called a “sidechain” on some compressors, which can be misleading in this use (other meaning of sidechain discussed earlier in this guide).
Those looking for good free compressors suitable for mastering use shouldtake a look at Limiter No6 by VladG (which can also work as a limiter) or Kotelnikov by Tokyo Dawn Labs, which should also provide good results.
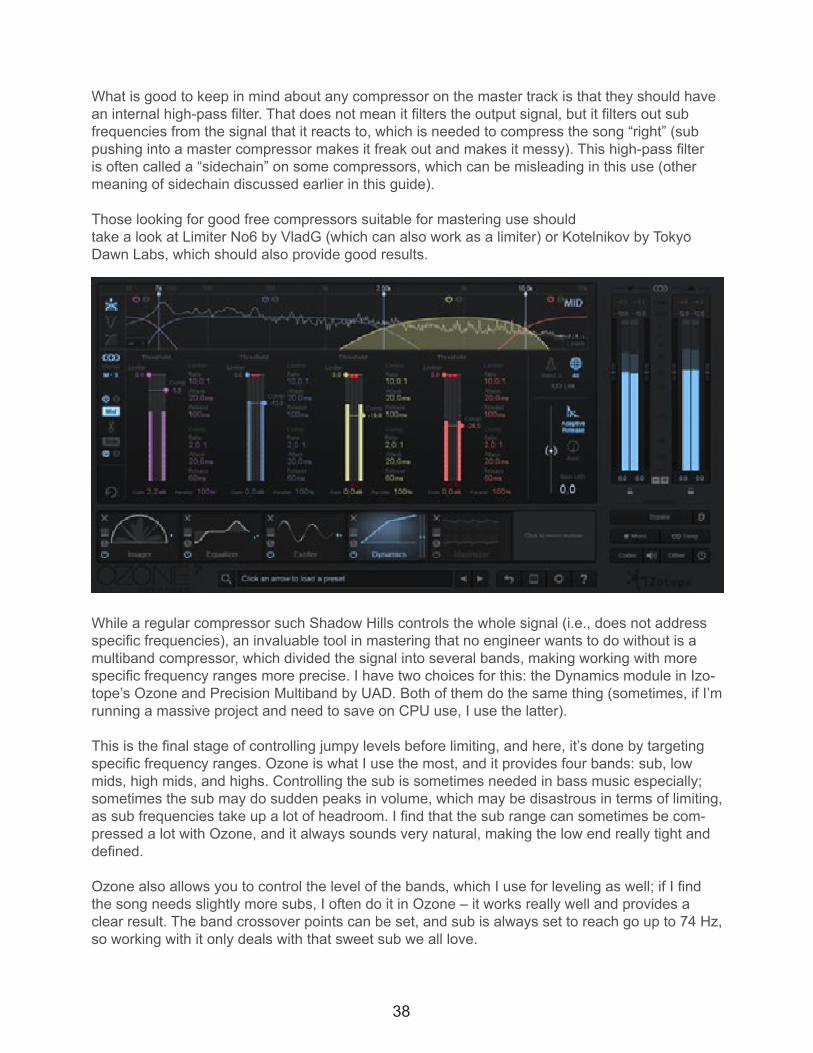
While a regular compressor such Shadow Hills controls the whole signal (i.e., does not address specific frequencies), an invaluable tool in mastering that no engineer wants to do without is a multiband compressor, which divided the signal into several bands, making working with more specific frequency ranges more precise. I have two choices for this: the Dynamics module in Izo-tope’s Ozone and Precision Multiband by UAD. Both of them do the same thing (sometimes, if I’m running a massive project and need to save on CPU use, I use the latter).
This is the final stage of controlling jumpy levels before limiting, and here, it’s done by targeting specific frequency ranges. Ozone is what I use the most, and it provides four bands: sub, low mids, high mids, and highs. Controlling the sub is sometimes needed in bass music especially; sometimes the sub may do sudden peaks in volume, which may be disastrous in terms of limiting, as sub frequencies take up a lot of headroom. I find that the sub range can sometimes be com-pressed a lot with Ozone, and it always sounds very natural, making the low end really tight and defined.
Ozone also allows you to control the level of the bands, which I use for leveling as well; if I find the song needs slightly more subs, I often do it in Ozone – it works really well and provides a clear result. The band crossover points can be set, and sub is always set to reach go up to 74 Hz, so working with it only deals with that sweet sub we all love.
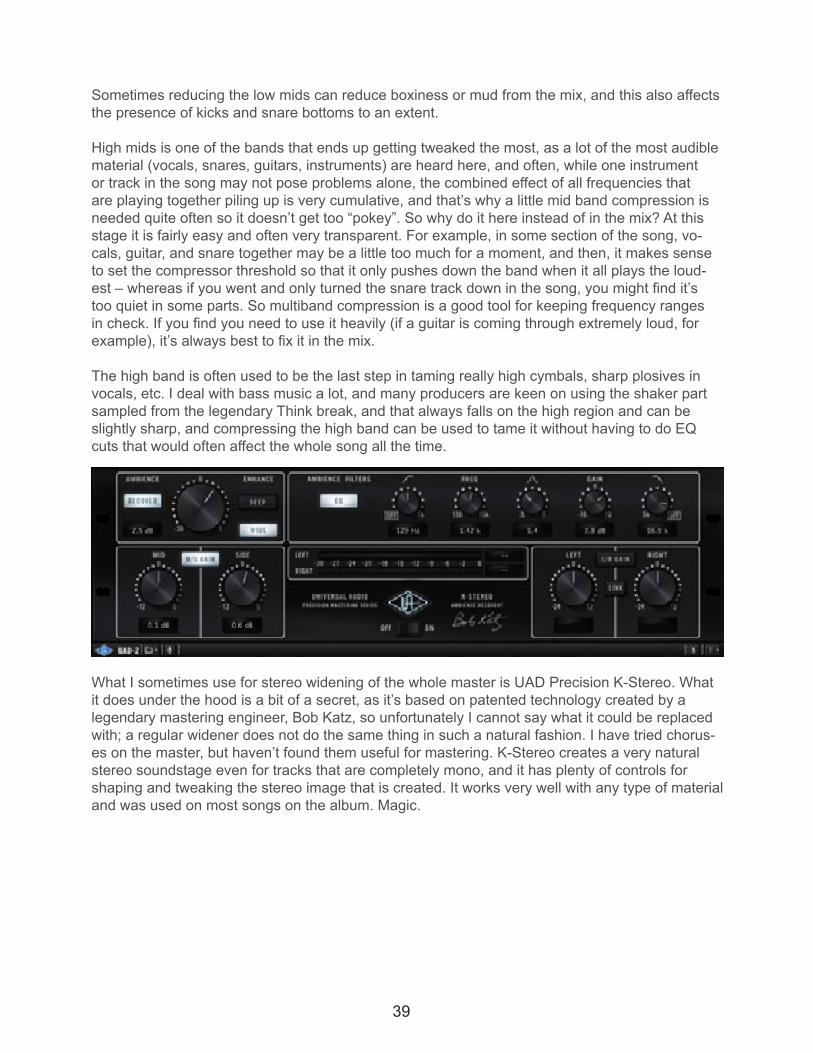
39
Sometimes reducing the low mids can reduce boxiness or mud from the mix, and this also affects the presence of kicks and snare bottoms to an extent.
High mids is one of the bands that ends up getting tweaked the most, as a lot of the most audible material (vocals, snares, guitars, instruments) are heard here, and often, while one instrument or track in the song may not pose problems alone, the combined effect of all frequencies that are playing together piling up is very cumulative, and that’s why a little mid band compression is needed quite often so it doesn’t get too “pokey”. So why do it here instead of in the mix? At this stage it is fairly easy and often very transparent. For example, in some section of the song, vo-cals, guitar, and snare together may be a little too much for a moment, and then, it makes sense to set the compressor threshold so that it only pushes down the band when it all plays the loud-est – whereas if you went and only turned the snare track down in the song, you might find it’s too quiet in some parts. So multiband compression is a good tool for keeping frequency ranges in check. If you find you need to use it heavily (if a guitar is coming through extremely loud, for example), it’s always best to fix it in the mix.
The high band is often used to be the last step in taming really high cymbals, sharp plosives in vocals, etc. I deal with bass music a lot, and many producers are keen on using the shaker part sampled from the legendary Think break, and that always falls on the high region and can be slightly sharp, and compressing the high band can be used to tame it without having to do EQ cuts that would often affect the whole song all the time.
What I sometimes use for stereo widening of the whole master is UAD Precision K-Stereo. What it does under the hood is a bit of a secret, as it’s based on patented technology created by a legendary mastering engineer, Bob Katz, so unfortunately I cannot say what it could be replaced with; a regular widener does not do the same thing in such a natural fashion. I have tried chorus-es on the master, but haven’t found them useful for mastering. K-Stereo creates a very natural stereo soundstage even for tracks that are completely mono, and it has plenty of controls for shaping and tweaking the stereo image that is created. It works very well with any type of material and was used on most songs on the album. Magic.
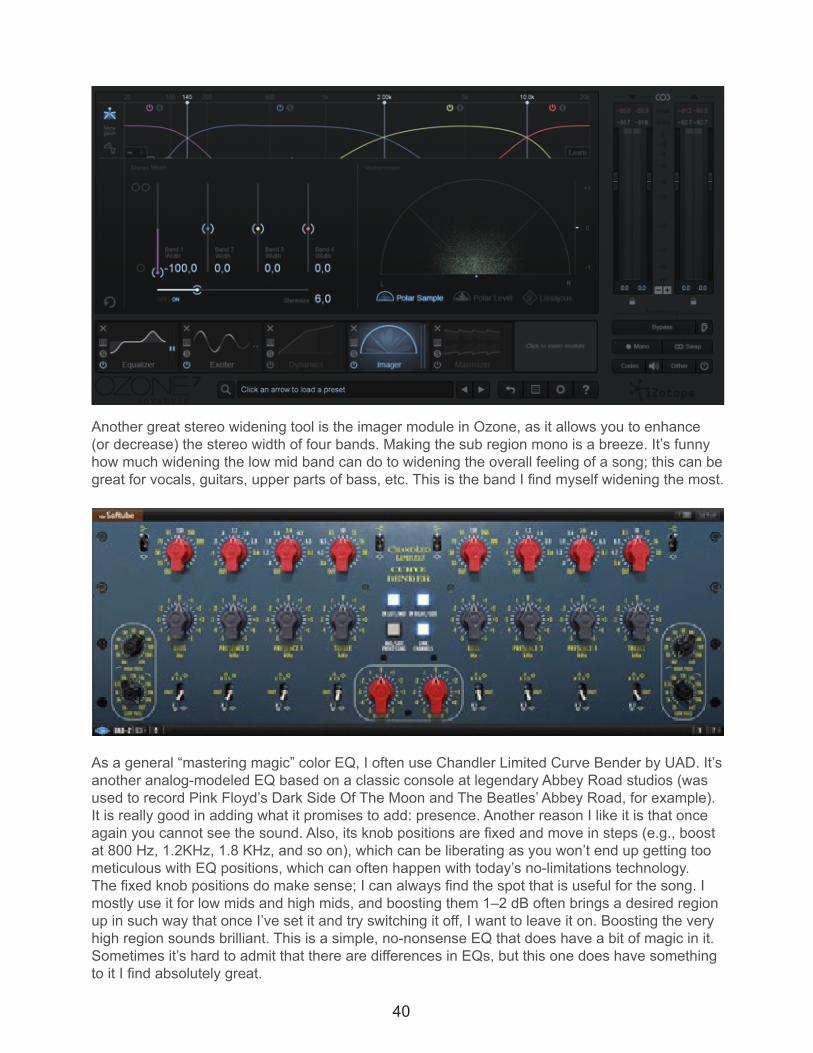
40
Another great stereo widening tool is the imager module in Ozone, as it allows you to enhance (or decrease) the stereo width of four bands. Making the sub region mono is a breeze. It’s funny how much widening the low mid band can do to widening the overall feeling of a song; this can be great for vocals, guitars, upper parts of bass, etc. This is the band I find myself widening the most.
As a general “mastering magic” color EQ, I often use Chandler Limited Curve Bender by UAD. It’s another analog-modeled EQ based on a classic console at legendary Abbey Road studios (was used to record Pink Floyd’s Dark Side Of The Moon and The Beatles’ Abbey Road, for example). It is really good in adding what it promises to add: presence. Another reason I like it is that once again you cannot see the sound. Also, its knob positions are fixed and move in steps (e.g., boost at 800 Hz, 1.2KHz, 1.8 KHz, and so on), which can be liberating as you won’t end up getting too meticulous with EQ positions, which can often happen with today’s no-limitations technology. The fixed knob positions do make sense; I can always find the spot that is useful for the song. I mostly use it for low mids and high mids, and boosting them 1–2 dB often brings a desired region up in such way that once I’ve set it and try switching it off, I want to leave it on. Boosting the very high region sounds brilliant. This is a simple, no-nonsense EQ that does have a bit of magic in it. Sometimes it’s hard to admit that there are differences in EQs, but this one does have something to it I find absolutely great.
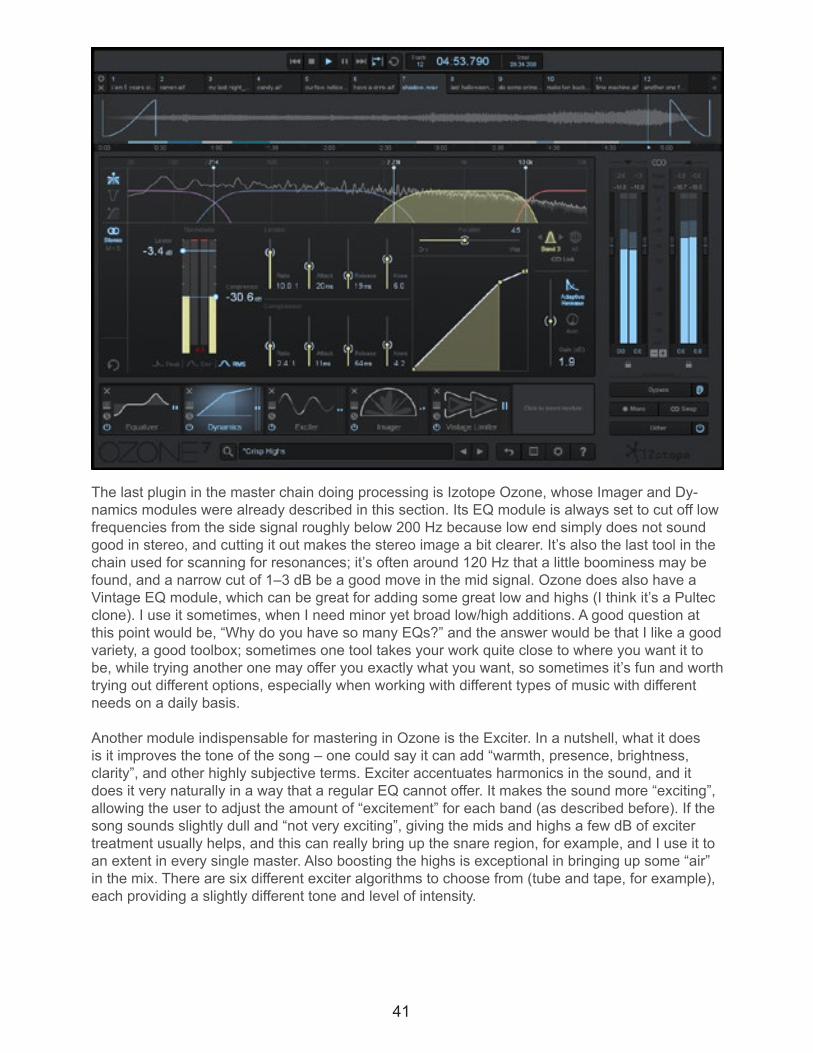
41
The last plugin in the master chain doing processing is Izotope Ozone, whose Imager and Dy-namics modules were already described in this section. Its EQ module is always set to cut off low frequencies from the side signal roughly below 200 Hz because low end simply does not sound good in stereo, and cutting it out makes the stereo image a bit clearer. It’s also the last tool in the chain used for scanning for resonances; it’s often around 120 Hz that a little boominess may be found, and a narrow cut of 1–3 dB be a good move in the mid signal. Ozone does also have a Vintage EQ module, which can be great for adding some great low and highs (I think it’s a Pultec clone). I use it sometimes, when I need minor yet broad low/high additions. A good question at this point would be, “Why do you have so many EQs?” and the answer would be that I like a good variety, a good toolbox; sometimes one tool takes your work quite close to where you want it to be, while trying another one may offer you exactly what you want, so sometimes it’s fun and worth trying out different options, especially when working with different types of music with different needs on a daily basis.
Another module indispensable for mastering in Ozone is the Exciter. In a nutshell, what it does is it improves the tone of the song – one could say it can add “warmth, presence, brightness, clarity”, and other highly subjective terms. Exciter accentuates harmonics in the sound, and it does it very naturally in a way that a regular EQ cannot offer. It makes the sound more “exciting”, allowing the user to adjust the amount of “excitement” for each band (as described before). If the song sounds slightly dull and “not very exciting”, giving the mids and highs a few dB of exciter treatment usually helps, and this can really bring up the snare region, for example, and I use it to an extent in every single master. Also boosting the highs is exceptional in bringing up some “air” in the mix. There are six different exciter algorithms to choose from (tube and tape, for example), each providing a slightly different tone and level of intensity.
42
The very last module in Ozone and also the very last device doing any sort of processing to the sound is the Maximizer module of Ozone. It is a limiter. In simple terms, limiting lifts the overall perceived audio level while preventing it from clipping and distorting. If you pushed up the mas-ter level to reach a perceived level comparable to released music without limiting it, you would end up completely destroying the sound, because in very simple layman terms, you would be trying to cram into a limited space something that does not in there; to be able to fit the audio in that space, some of the information in it has to be chopped off, and in this case it’s the audio peaks. That’s the job of a limiter, and Maximizer in Ozone does it very well, offering the user a few different algorithms for the job. I have always found its IRC III algorithm to work the best. How well a limiter works is put to a test when pushing material really loud; especially very loud styles like EDM can really test the capabilities of a limiter, which should not start to pump or soften the punch of the music. In addition to Ozone Maximizer, a trusted limiter I love is Invisible Limiter 2 by A.O.M., and I highly recommend it, especially if you don’t own Ozone; it can give very transparent and loud results when needed.
Sometimes in limiting, it may be a good idea to share the limiting between two limiters instead of using just one; you could think of two guys sharing heavy lifting instead of one guy doing it: the result is smoother.
After limiting, I have an instance of a plugin that makes the signal mono, and another that lets you hear the side signal only. I’ll address this in Mono Mixing section.
The very last device in the chain is Voxengo SPAN analyzer, so I can take a look at how the song looks and also get an idea of its loudness (RMS). Even here, resonant peaks can be spotted by setting the display mode to Average, which will freeze the display based on average peaking of frequencies, revealing any possible pointy resonant peaks I can then go and address earlier on in the master chain (or in the mix).
43
CHAPTER FIVE
GENERAL MIXING TIPS & TOPICS
44
USING EFFECTS TRACKSIn mixing, return tracks are most often used for effects, so any track in the project can have its signal sent to any effects track (also called “a bus”, meaning the signal of more than one track are being sent to it). This makes sense from CPU perspective: instead of adding a chorus on every track, for example, every track can be sent to a shared chorus track instead (whenev-er they need it). I won’t go into discussing using other effects on return tracks, but I’ll present chorus here because it was the only shared return track on all of the songs on the album, it’s a very common effect, and having it on a return track is highly useful.
Chorus is a stereo effect used to give sounds width, size, and “layers”; the effect of a good cho-rus sounds like it’s multiplying the voices of your sound and spreading them around. It can make a synth sound bigger and more expensive and also give the vocals their own space in the mix. Chorus can be used on tracks, but it is very common to have one on a return bus, so several tracks of the project can be sent to that bus by varying amounts (this also saves CPU instead of using a chorus on every track).
In general, you should realize that the sounds that you apply widening to will be receiving more attention in the mix – which can be used to a good effect – so think of what you want to keep in the middle and which sounds work better when they’re wider. Pay attention to how this happens in music you listen to. Traditionally, synth sounds often enjoy a bit of widening, as well as in-struments and vocals, while drums and bass generally stay more in the middle as they may not make that much sense when they are really wide – although this is massively subject to taste and debate and there certainly are exceptions. There is no rule to this, as is often the case in music (if we had to play this game by rules, I’d be out!).
On the album, I usually got the level of the main sample right in mono, then applied chorus as desired. It’s very hard to jot down any rule for how much is enough; sometimes you may feel that something may sound just perfect when it’s totally mono in the center. If it doesn’t sound good widened, don’t force it, as chorus is definitely not a must, and some of the greatest mixes can be very narrow.
A good and free chorus is Multiply by Acon Digital, which actually displays the number of voices the chorus is using. It also lets you EQ the sound, so you can cut and enhance the frequency areas to your liking. Another great one is the free chorus by Tal, and a noteworthy and a very mo-no-compatible one (more on that in mono mixing section) is Sidewidener by Joey Sturgis Tones, which you get for free if you happen to buy and read Computer Music (a mag I highly recommend reading if you are into electronic music production to any extent).

45
Use your own judgement as to what sounds good when it comes to adding stereo width to dif-ferent sounds; giving sounds some width is a good way of separating them from the middle and giving them some special attention, but as always, less is more, and if everything is widened, the effect may lose its power.
In terms of drum sounds, chorus is most often used on snares and claps, but sometimes it can work well with a kick, too – just make sure to cut off the very low end from your chorus.
Pay attention to your chorus in solo mode sometimes to hear what it’s doing; it’s not “doing” much you can monitor, but one particular thing I would strongly suggest to avoid is strong, punchy tran-sient content in chorus. It simply does sound like a mess sometimes and does not compliment your beats the way you might expect. If you find the chorus really punchy, tone down the tran-sients in the stereo field, because they can be very distracting. Keep the punch in the middle.
Always make sure the level of the sound is right before applying chorus, and make sure that ev-erything still has its place and level right in mono.
A great alternative to chorus to separate sounds in the mix is simply panning them to the side. This often sounds good with percussion (bongos, congas, etc.), special FX, little vocal “fillers”, glitches, and sounds of that nature. I usually use chorus for main sounds, while the cool little fillers end up getting panned; think of a small bleep or a breath sample that appears every 16 or 32 bars – if it’s panned to far right, it will get some attention every time it plays (while if it comes in panned all the time, it may lose its power once again, so less can be more).
MIXING BY NUMBERSYou may have noticed that this guide does not mention numerical values very often. Why? We live in an information-rich world where everything can be expressed in values, numbers and statistics, faders can be moved by precise 0.01 dB steps et cetera. We can “see” sound. We can look at sound way more analytically than ever before. We can get very hung up on numerical information.
Producers often ask, “When you mix, where do you have your kick peak in terms of level? Where should I EQ my kick, and where should my kick frequencies be peaking? Any EQ or compression settings for snares?” Even though certain things are definitely necessary to know in numbers (RMS being a useful guideline), I have always been a strong advocate of mixing with my ears and feeling first and foremost instead of numbers. Humans have a tendency to get very hung up on numbers and precise data that they are given. I find that can be very detrimental in mixing, and those numbers might override your senses (“I’m not close to where another producer said it should be in numbers, but it sounds good, so am I wrong?”). Also, some of the numerical data re-lating to mixing music that is being shared is not always “correct”, helpful, or fitting for your exact needs, and some misinformation is shared all the time. So trust your ears and how you feel about music.
With the first example question, “Where should my kick be peaking in terms of level?” the answer might vary a lot. Why? Some kicks might be super dynamic and hitting quite loud level-wise, while some others might sound way louder and heavier to you while producing less level on your me-ters as they might be way more squashed and limited. All that matters is that it sounds good and works in your mix. If I opened a project and took a look at what level a kick would be producing in a particular project and told somebody to do the same thing, it might be less suitable for someone
46
else and their kick and mix. Kicks are different, mixes are different, so how could one fixed value be “right”? It can’t.
If you need further proof for this, see how different songs of the same genre look in an analyzer while they all may sound just right. Take a few commercially released whose songs you find good and which roughly sound equally loud. Take, say, 10 songs. See how they look in the analyzer. You may see that they have peaks in different places; e.g., some trusted reference songs of mine peak way differently. When I was writing this, I randomly picked two trusted reference songs from my reference tunes folder and gave them a quick look in SPAN. For example, there is a huge difference in where their snares show frequency peaks in an analyzer. They sound very different – and they both sound very right and I definitely wouldn’t correct them. The snare in one of them is hitting fairly high around 200 Hz. The other reference tune I picked barely has any life around 200 Hz. In the first one, the “boxy” snare is actually a big part of how the beat sounds. If I was to cut it (uh-oh, I said earlier that’s an area I might cut if it gets too loud and boxy) or if I was to boost that range in the second tune just because it sounds so right in the first one but doesn’t show up on the second one, I would most likely end up with results that would sound very wrong. I proba-bly couldn’t create that 200 Hz snare peak for the song where there is no strong 200 Hz content on the snare, and trying to force it would just sound plain bad.
My point here is that decisions regarding your mix should always be based on what you hear and how you feel about it – not necessarily how they “should” look. Sometimes deviating from the norm can be a great thing, and sometimes a funny character to a sound can be great; after all, a lot of contemporary music sounds quite “samey” (which is not a bad thing per se), so it’s OK if your song sounds a bit different. If we go back some 20 or 30 years in time, the music sounded way different because everybody was using different gear and signal paths, all with their own color and tone and quirks, which resulted in a lot of variation in how music sounded, and I find it great. Some older mixes might not be perfect by today’s standards, but they can be great. Now-adays, in general, we work with tools that don’t color the music that much, and that’s why a lot of today’s music sounds somewhat similar compared to how it used to be some decades ago.
For a further example of looking at sound too much, I’ll admit it myself – as I have mastered a lot of bass music and have been paying attention to it in every possible way for years – that I’m fairly aware of where the sub range should roughly peak level-wise in Voxengo SPAN (in contemporary bass music, it often peaks around -30 dB in SPAN’s own metering on commercial levels), but I must say there’s been a few times that I’ve stuck to the number while thinking it may sound like there’s a bit too much of it, just to have the producer tell me later on, “It’s good but I think the sub is a bit too much”. Proves my point once again – I should have trusted my ears and not the “right” numbers. So, use numbers as useful guidelines and tools, but let your ears and senses be the final stage of judgment. It is good to keep in mind that music should evoke emotions – not match fixed and provided statistical figures. I find music to be the total opposite of math: in math, wrong and right exist, everything is rule-governed, there is little room for interpretation, while in music, wrong and right do not exist, there are hardly any rules, and interpretation and emotions are kings.
This section can be wrapped up by busting a myth that is numerical and relates to mixing. It is not necessarily hurtful, though. It is a fairly common belief that when you deliver a song for mas-tering, it should be peaking at -6 dB. That is not necessary or governed by any rule or need or such. Many mastering chains use auto-leveling plugins (or manual adjusting of the level in analog chains) which bring the signal level down to a safe working level in the beginning of the chain, providing the chain with ample headroom. This is simply good practice and ensures that the level won’t be too hot going into plugins (this was mentioned earlier when discussing mixing kicks), but not a numerical “truth”.
47
REFERENCE SONGSI’m a strong advocate of reference songs. Actually, I’m going to suggest never working without them when it’s time to properly mix (and master) your song. Why? They tell you how music “should” sound. Instead of asking for numerical help with levels etc., start with using good reference songs and your ears.
I have folders of reference tunes for the main genres I work with (electronic, hip hop, bass music, drum and bass, house, etc.), and they keep me on the right path with mixing and mastering for others as well as doing that for my own productions.
It is absolutely correct to “go with the flow” for a while and get things in the ballpark, because es-pecially when making music, it is important to separate the session where you’re writing down the musical story from the one where you are refining and polishing its covers. Getting too deep with one can be detrimental to the other.
There is always a time when you have to start and try to get things “right” and get more precise (if you’re an engineer, your pay depends on it, after all), and I’m an advocate of taking care of the music and the content first, because no music is good even with the perfect mix and mastering job if the content is poor. There is already enough music out there that is like an audio engineer’s final work: technically perfect, but no emotion or story in it. So put “the story” in there first! That’s what people will remember.
Reference songs are your best friend when it comes to getting the sound right. You probably have heard music all your life – not always from an ideal monitoring system, but still, you subcon-sciously have developed a sense of balance in a mix. You also may have a favorite genre and style you are more or less committing to when making music (if not, that is fine!), and that may be what you know more of, and that is probably the style of music you have been paying more conscious attention to. Still, you don’t always have to be the master of knowing exactly how your music should sound, because your energy level and perception skills vary. You should have some reference songs of relevant style and make good use of them to assist you in your tasks. Even the pros who have been making, mixing, and mastering music do use reference songs, so there is definitely no shame in doing that. I do it all the time and wouldn’t want to be without my trusted selection.
Reference songs do not have to be musically good songs. They don’t have to be “good music” or something you can admit liking – instead, their purpose is to give you some pointers as to where your songs and the sounds in them should be in terms of loudness, balance, levels of elements, tone, weight, clarity, stereo width, and so on. You could compare using reference songs to carving wood based on a given model: let’s say you have a great sculpture that you admire – it is really round and smooth, and its finish is just perfect – and your song is your woodblock that you want to carve, sand, and polish to appear as much like your reference woodblock in terms of its finish.
48
Listen to how the snares are coming through, how well the kicks are defined in the mix, how loud the hihats are playing, how loud the vocal comes through (or is it slightly more in the background if it’s more of a “filler” type of sound?), how clear the synths are – et cetera. Are the main sounds playing the main role, with background contributors nicely in the background, not getting too much attention? Also listen to the differences between your references to understand that often there is no one fixed sound or solution to an element; realizing this leaves you with a bit of lee-way, which is great. It is often advisable to have a few songs and switch between them quickly, as then you’ll perceive a more common middle ground instead of listening to one song too much – unless that is your specific goal. I can admit that many years ago, there was a time for me when I was using one song as a strict reference for my own productions for a while, and they always ended up sounding very close to the reference. However, later on, as my taste, hearing, and monitoring improved, I realized that reference did not actually sound that good anymore, but also then many of my songs sounded like it. That’s why these days I always have a few: it offers me a more general view into how it should or could sound and I’m trying to place my decisions some-where between them.
It is highly advisable – simply a must – to play reference songs at a useful and comparable level, because if you are hearing your song at a level that’s even just one or two decibels quieter than your references, it will sound weaker to your ears. This means the level of your reference songs must match that of the song you are working on when you play them. The easiest way to achieve this is to open the reference songs in an external audio editor (or iTunes playlist or such – may-be make a playlist of them) and bring its main level down so that when you play them back, their level matches that of your song. What is important here the level that you perceive – not the level that the audio editor or your DAW might show, because the commercial songs you are referenc-ing with have been mastered and limited; they are not peaking as strongly as yours if you are in mixing stage and not limiting the song as heavily as the released songs have been limited.When you are in the middle of a session and you’re referencing, listening to the busy part of a song for a few seconds is usually enough. When I come back to a session (open up yesterday’s mixing/mastering process to revise it and do last minor tweaks, for example), I usually let my ears get used to the sound of my reference tune(s) first. A minute or two is often enough. Then, after hearing the reference(s) for a while, I switch to hearing my project, and it’s often very easy to hear the differences – for example, if the project needs more high end. It all becomes very evident very quickly when you approach a project with fresh ears like this.
Relating to that, taking a few weeks off of your song after it’s been finished musically and ar-rangement-wise before you approach it mixing-wise is highly recommended, as writing a song often takes a lot of time, and we get very used to hearing the song, which leads in our ears losing objectivity and “filling in the gaps” – our ears become very forgiving and unable to hear what should be fixed in the mix. Hence, allow yourself a few weeks, ideally, before giving your song a serious mixing session. This is actually one of the main reasons why some producers let others mix and master their song: it is easy for an engineer to approach the project with totally objective ears and hear all the flaws in the mix as they have not heard it before, and also, there is no emo-tional attachment to anything (e.g., you might work on a problematic vocal track for a long time, kind of knowing it sounds very poor but as you have spent a lot of time on it, you start to think it must be good at this point).
49
MIXING INTO A LIMITER/COMPRESSOR – IS IT OK? AND WHAT ARE THEY ANYWAYS?
On the master channel processing section, compression was mentioned, and limiting was listed as the last stage of processing the song. As concepts at least, they are what most people making music know, but “Should I be mixing into a limiter/compressor?” is what many seem to ask on music production forums. “How do you master?” is another hot and somewhat related topic, and often, among the first five replies is an answer, “Basically you just gotta compress the master to get it loud” which is not exactly true.
Compressing and limiting would make for a big guide, and there are tons of them already. For the sake of brevity, it is not my intention to write a compressor/limiter manual. I only want to address the question of whether it makes sense to mix into a limiter or a compressor, but to get there, some explanatory words are very necessary. Let’s have a few quick words on what compressor and limiter are and what their main purposes are. Anyone willing to get proficient with them will need way more than what this guide says, but let’s go through the basics really quickly.
A compressor handles dynamics; its main purpose is to reduce the dynamic range / level of a track. It can be a great choice for musical dynamics control and produce very transparent results when handled correctly. Think about a vocalist whose output volume varies a lot: on the quietest parts, you might be struggling to hear what she says, while the loudest parts where she gives it all she’s got with all the volume she can produce might be very uncomfortably loud. Or think about this scenario: there’s someone mowing the lawn outside while you are listening to that singer’s (uncompressed) vocal track at home. You may be able to hear some parts of her singing over the lawnmower noise, while some of them might drown under the noise of the lawnmower; some parts would exceed your hearing/noise threshold while some would not. A compressor is a tool that can help fix that in a way: it reduces the dynamic variation and evens it out, helping bring up the quiet parts of a signal while pushing down the loudest parts so you don’t have to be adjusting your volume knob all the time. It evens out the level.
A compressor does have a ceiling, a “threshold”. A compressor only acts when audio level ex-
50
ceeds that threshold; its parameters determine the speed and intensity of that “pushing-down-the-audio process”. E.g., attack time determines how fast the audio is pushed down.
A limiter does handle dynamics, but compared to a compressor, it is more ruthless: while a com-pressor pushes down the audio that exceeds the set threshold, a limiter, due to its more aggres-sive settings, essentially chops off the audio exceeding the threshold as its attack time is so fast that instead of pushing down the peaks that exceed the threshold, they are chopped off. That is the most drastic difference. Basically, a compressor’s gain changes are more gentle, and it acts more like a fader moving up and down (that’s what compressors were designed to do, as be-fore them, that job was handled by humans) while a limiter doesn’t give the audio exceeding the threshold a chance of survival: it chops it off.
Limiting lifts the overall perceived audio level while preventing it from clipping and distorting ((this was discussed in master channel processing). To be able to fit the audio in that space, some of the information in it has to be chopped off, and this is what a limiter does and a compressor doesn’t.
The most radical difference between a limiter and a compressor is the ratio setting, which cannot be set in limiters. In a compressor, a ratio indicates how many decibels the audio level has to exceed the set threshold to produce an actual 1 dB increase in level. E.g., if the ratio is 3:1, you need to have the level exceed the compressor threshold by 3 dB in order to see a 1 dB increase after the compressor. 6:1 ratio means that audio level would have to exceed the set compressor threshold by 6 dB to see a 1 dB increase. So the ratio has to do with how aggressively the device behaves. Think of a compressor as a bouncer at the club that lets some people in when they re-ally push it, while a limiter lets no-one in (I’m fine with taking the prize for the worst audio analogy of the year).
Compressors are used more on individual tracks where dynamics control is needed, while a lim-iter is more often used for mastering purpose, i.e., making the song loud, as it helps chops off its peaks, which makes it possible to make it loud without hitting the headroom and making the audio distort horribly.
Every now and then you see producers or engineers – even those with decades of experience under their belt – say they like mixing into a compressor or a limiter; this is fine if you know what you are doing and if you can come up with a great mix. My firm view is that you must be able to come up with a decent mix without using a compressor from the get-go if you are not very versed in mixing/mastering. Why? Why isn’t mixing into a compressor or a limiter on the master channel necessarily a good idea from the get-go, considering they can be wonderful tools? The reason is that essentially, a compressor can be seen as a corrective tool that helps in evening out the dynamic variation that is too strong in the signal. Having a compressor as a “safety net” on your master may lead in you making some fairly “uninformed” choices. For example, you may find that the snare isn’t cutting through loud enough in your mix. Logically, you want to bring its level up by 2–3 dB, as that should help, right? Well, if you have a compressor on your master channel, raising the level may not do what you expect it to do, because it is hitting the compressor, which is actually pushing the level of the snare down, which is not what you want. Same could happen with bass, which already takes a lot of space in your song, so if you were to push it up while the compressor is already clamping down on your level, you’re effective going to destroy your song, as the signal is trying to force itself through “the bouncer” that is holding it back.
You might end up in a situation where you deliver your mix to a mastering engineer who tells you it’s been compressed too tight in his opinion and he asks you to disable compression – and then the whole mix falls apart. This is what we want to avoid.
51
Fact is, you need to be able to come up with a balanced mix without any sort of master compres-sor (personally, I have very rarely used one in my own productions). If you rely on a compressor to hold it together for you, the fact is your skills in terms of setting the levels and balance of your mix right need improvement.
Lastly, why not use a limiter from the get-go? As explained earlier, it’s used to get your song com-petitively loud (i.e., making it as loud as commercially released music), which is done by chopping off unnecessary peaks in it so it can be pushed loud enough. This is always the very last opera-tion in mastering, not an early one.
I do admit using a limiter somewhat early on in my own productions to push the mix competitively loud (always comparing to reference songs to tell me how loud I should go) and check if it can take the required amount of limiting. If it starts to distort when the level is right, it means there’s a problem in the mix. Which will be a good topic for another guide altogether!
MONO MIXINGAlways make sure to check how your mixes work when played back in mono. Why? Many musical reproduction systems out there are mono: many club sound systems, public PA’s, many systems in public spaces, public trans-portation, etc. And many less than ideal loudspeakers at home and cheap earbuds that are very popular today do not necessarily boast with the greatest stereo reproduction capabilities any-ways. That is why it is extremely good practice to ensure a good mono mix: you cannot be sure that your music will be heard through a very good system that is faithful to your stereo content.
You can use this by using on the master of your DAW or audio editor a plugin that sets the mix width to 0%. Most DAWs allow for this, but if your does not, grab the free bx_solo by Brainworx. It lets you quickly hear your mix in mono, hear its side (or stereo) content in isolation as well as lis-ten to left or right channel only. You can also try listening to your mix from one speaker only every once in awhile – just mute the other one.
But stereo sounds nice, you might say. Yes, we all like to spread sounds in the mix, but there are some wideners out there that are not “mono compatible”, which means that even though they make the sound nice, loud, and wide in stereo mix, the sound may drop drastically in level when played back in mono.
Also, in many sample packs there are sounds that are super wide for the sake of instant “wow factor”, but not all of them sound that strong in mono. Make sure to check them out in mono, too. Same applies for many sounds in movies, for example, as they are mostly made for stereo sys-tems, so if you sample movies (I’m not saying you should...), give them a mono check.
So, how to approach mono mixing in all its simplicity? A good and trusted mixing tip is to get lev-els right when mixing in mono, so simply set your master channel to mono as described above, and then get all levels right. This means that now everything that has to come loud and nice should be heard loud and well – applies specifically to main elements such as drums, bass, lead sounds, vocal, strings etc.
52
When you have done that, flick the master back to stereo. If some sounds appear too wide at this point, no problem: just reduce their individual width to taste. If you wish to widen some sounds that are “too mono”, just set the stereo width of individual tracks to taste using a widener; at this point you already have them loud enough in mono, so now is a good moment to give them some width. By doing this, you make sure that playing it back in mono does not make your song and its elements weaker.
This is especially important for drums and bass, which are the backbone of most rhythm-based music out there. There are plenty of drums out there in sample packs that collapse and lose a lot of their volume and presence in mono. Same goes for so many “impressive” synth sounds, vocal samples etc.
Every now and then I do receive songs for mastering where the main melody almost disappears when I play it back in mono, and in that case I always ask the producer to fix his mono power (this is easier to fix in stem mastering), because that will be hard to correct; it can be addressed by EQing, for example, but not completely fixed. It’s good to remember that trying to EQ that area up will bring other sounds up, too, and if the other sounds in the mix are already playing at good vol-ume, the balance of the elements will become uneven. And heavy EQ boosting does not always sound that good or natural anyways. So always make sure you have mono in check.
POOR MONITORING CHECKRelating to mono mixing in a way, checking your mix from a pretty poor pair of speakers is al-ways a good mixing technique. Why? If your mix sounds halfway decent and listenable from poor speakers, chances are its levels are OK at least – it can be a great tool that will also give you an idea how your music may sound to many other listeners (hearing it from iPhone earbuds, for example).
I often play my mixes and masters from my iMac speaker(s) (to be honest, I’m still not even sure if it’s stereo or not!), which I detest in any sort of enjoyable listening attempts, but what I do is play my tune among trusted reference songs from the iMac, pay attention to the balance of the sounds – how loud the snare usually hits, how I perceive the kick, how loud the vocal or synths seem to come through – and do a bit of comparing. It’s also great because you won’t even be paying attention to the lowest lows or highest highs because, coming from those speakers, they proba-bly are not there, but hey, your good reference tunes probably sound quite OK from those poor speakers, so make sure yours does, too.
From poor speakers, it will be impossible to determine if the sub bass is heavy enough, for exam-ple, but then again, this is a great general bassline test: do you hear the harmonics of the bass? Can you make out the notes the bassline is playing, or is it too distant, messy, or hard to hear? This may mean you have to go back to work with the bassline and give it some upper harmonic content by saturation or distortion.
53
QUIET/LOUD MONITORING CHECKAs for quiet monitoring: it is very simple: you only are to play your song at a very quiet volume – play it too quiet to be regular, enjoyable listening. Ridiculously quiet works, too! Pay attention to the sound: do you hear all the main elements that make your song what it is and convey the emotion to your ear? Can you still hear the kick? Even the hihats? Is the vocal clear enough? That bass again – did it disappear or can you still hear its notes? Can you still hear the melody in your mix while frying bacon and eggs and shotgunning beers in the kitchen? Chances are, if your mix sounds clear enough at a quiet volume from crappy monitors while you do that, it may be a great, balanced mix, and you may be an absolute mixing lord not to be messed with! Balance is what we’re aiming for, and speaking of which, let me slip in my favorite Dave Pensado quote: “Balance, balance, balance. You don’t want spaghetti sauce that just tastes all garlicky. It’s gotta be balanced.”
The complete opposite of this is loud monitoring (almost too loud), great with reference songs. Play a trusted reference song, and keep raising the volume of your playback system slowly until you start to find a level that starts to feel slightly uncomfortable. When you start getting the “This is too loud and I don’t like music this loud” feeling (this doesn’t mean anything ridiculously loud; most of us like listening to music at relatively moderate levels, which I highly recommend any-ways), you know you have reached the level useful for this method. Listen to a well-balanced ref-erence song or a few for around 20–30 seconds or so in total (first making sure they’ll be playing at a level comparable to your own song/project), then switch to your song. It is often through this method that you can very easily realize if it sounds too bright or “annoying”. If it sounds harsh, it is often somewhere around 4–8 KHz that a little dip with an EQ may work wonders. At this volume, it becomes very easy to hear such things.
Word of common sense here: do not destroy your ears or harass your neighbors with this (but if you do, make sure the mix and music are dope and tight so they’ll enjoy it too!).

54
CloudBounceMusicians from 60+ countries use CloudBounce as the weapon of choice for quick, online master-
ing.
Get a sense of how your track sounds mastered with CloudBounce.
SIGN UP FOR FREE