a guide to deconstruction - deconstruction institute
TRANSCRIPT

A GUIDE TO DECONSTRUCTION
January 2003
Prepared by:
Bradley Guy, Associate Director University of Florida Center for Construction and Environment
M. E. Rinker, Sr., School of Building Construction College of Design, Construction and Planning
101 FAC PO Box 115703
Gainesville, FL 32611-5703 [email protected]
And
Eleanor M. Gibeau, Environmental Specialist
Resource Management Group, Inc. 1143 Central Avenue Sarasota, FL 34236
This “Guide for Deconstruction” was made possible by a grant to Charlotte County Florida from the Florida Department of Environmental Protection Innovative Recycling Grant Program.

TABLE OF CONTENTS
Introduction.........................................................................................................7
Deconstruction Overview...................................................................................9 Safety First ...................................................................................................................9 Survey ..........................................................................................................................9 Environmental Health and Compliance ........................................................................9 Asbestos Abatement ..................................................................................................10 Contracts and Specifications......................................................................................10 Historic Preservation ..................................................................................................10 Permitting and Utilities................................................................................................11 Engineering Survey ....................................................................................................11 Organizational Plan ....................................................................................................11 Site Plan .....................................................................................................................11 Site Security ...............................................................................................................11 Materials Management Plan.......................................................................................12 Deconstruction Process .............................................................................................13 Pete Hendrick’s Seven Samurai Principles of Deconstruction ...................................14
Section 1: Safety ...............................................................................................15 Pre-Planning...............................................................................................................15 Safety - First Line of Defense.....................................................................................17 Safety - Last Line of Defense .....................................................................................18 Safety - Bottom Line...................................................................................................19 Fall Prevention ...........................................................................................................20 Ladder Use.................................................................................................................21 Safety Training ...........................................................................................................22 Emergency Planning ...............................................................................................22 Medical Services and First Aid ...................................................................................22 Police and Fire ...........................................................................................................23 Fire Prevention and Protection...................................................................................23 OSHA Coverage.........................................................................................................24
Section 2: Survey..............................................................................................26 The Estimating Survey ...............................................................................................26 First Walk Through .....................................................................................................27 Second Walk Through................................................................................................28
Section 3: Environmental Issues.....................................................................31 Asbestos Safety Protocol ...........................................................................................31 Lead Safety Protocol ..................................................................................................32
Section 4: Contracts ........................................................................................33
Section 5: Permitting and Utilities...................................................................35

Demolition Permit .......................................................................................................35 Historic Preservation ..................................................................................................35 Utility Location ............................................................................................................35 Engineering Survey ....................................................................................................37
Section 6: Organizational Plan ........................................................................38 Site Plan .....................................................................................................................40 Materials Management Plan.......................................................................................42 Job Site Daily Checklist..............................................................................................45
Section 7: The Deconstruction Process .........................................................49 Basic Principals in Deconstruction .............................................................................51 Deconstruction Process for Concrete Masonry Unit (CMU) House with Pool Cage ..54 Pete Hendrick’s Rules for Deconstruction..................................................................55 Safe Work Practices When Demolishing a Chimney .................................................56
Appendix I: General Organizational and Safety Plan.....................................57 Safety Rules for All Employees ..................................................................................60
Appendix II: Basic Tools Necessary ...............................................................65
Appendix III: Sample Fall Protection Plan ......................................................67
Appendix IV: OSHA and Nonprofit Organizations ........................................73
Appendix V: Sample Survey after First Walk Through ..................................75
Appendix VI: Sample Building Engineering Survey .....................................77
Appendix VII: Sample Agreement....................................................................83
Appendix VIII: Inventory of Materials Diverted...............................................87
Appendix IX: Deconstruction Checklist .........................................................88
Appendix X: Web site References and Sources.............................................91
The information in this deconstruction guide is superseded by all Local, State and Federal regulations related to construction and demolition activities and the creation, handling, transport and disposal of construction and demolition salvage and debris, including hazardous materials.

Some Facts
• US EPA has estimated that U.S. companies generate 136 million tons of building-related construction and demolition (C&D) waste per year.
• 92% of building-related C&D waste is from renovation and demolition. • C&D waste is approximately 30% of all solid waste produced in this country
excluding road and bridge debris. • US EPA has estimated that only 20-30% of C&D waste is presently recycled. • Excluding food and fuel, construction activities consume 60% of the total
materials used in the U.S. economy. • About 245,000 residential structures and 44,000 commercial structures are
demolished each year in the US. • Many older buildings contain asbestos and lead-based paint both hazardous to
human health in renovation and demolition processes. • Heavily leaded paint was used in about 1/3 of homes constructed before 1940,
about 1/2 of homes constructed between 1940 and 1960, and then to a lesser extent until it was limited to 0.06% in any product in 1978.
• Landfills and incinerators are increasingly more expensive and problematic to open, operate and close.
• In order to sustain human society into the next century, resource efficiency will have to increase by a factor of 10.
Log on to www.deconstructioninstitute.com for an interactive benefits calculator with more facts.
Dumpster full of C&D waste


Guide to Deconstruction Introduction
Introduction
This deconstruction guide will work best if read through first to get an overview and then it can be used as a reference guide or series of checklists during a deconstruction project.
Safety and administrative tips are highlighted with a wide bar in the left margin. Purpose of this deconstruction guide The purpose of this deconstruction guide is to provide guidance to deconstruction managers, supervisors and workers who are planning or who are already conducting deconstructions. It is also appropriate for anyone who resells or redistributes salvaged materials from buildings. This guide is designed to be used in conjunction with the website which includes a Feasibility Tool, Benefits Calculator, Links for additional information and Case Studies. Log onto: www.deconstructioninstitute.com What is deconstruction? Deconstruction is a process of building disassembly in order to recover the maximum amount of materials for their highest and best re-use. Re-use is the preferred outcome because it requires less energy, raw materials, and pollution than recycling does in order to continue the life of the material. As a consequence of deconstruction, there are also many opportunities for recycling other materials along the way. Why do we want to deconstruct? Deconstruction combines the recovery of both quality and quantity of reusable and recyclable materials. The re-use of materials can serve a broad set of goals including the provision of low-cost building materials to a community, and the avoidance of demolition debris going to landfills. The benefits of reuse and recycling building materials include:
• Reduces the overall costs of building removals. • Provides lower cost building materials to the community. • Extends the life of landfills. • Protects the natural environment by reducing the need for the extraction of new
resources. • Job creation and economic development.
Goals of Deconstruction
• Safety: All construction and environmental health and safety regulations and processes are followed and no injuries result during the process.
• Materials: The recovery of the maximum amount of reusable materials in a cost-effective manner.
• Site: Remove the building from the site.
Page 7


Guide to Deconstruction Deconstruction Overview
Deconstruction Overview
Below is an overview for preparing and carrying-out a deconstruction project. This checklist provides a quick overview of the basic steps. This is a general list only. Please refer to each section for more details. Safety First You will see the word safety throughout this deconstruction guide. Important safety points are noted with an orange bar. Before considering a deconstruction program, the person who will manage the program must create a Deconstruction Safety Plan. For each new project, a Project Safety Plan will be created to handle any additional requirements to maintain safety at that specific project site. Elements of the Safety Plan will include worker orientation, hazard identification and training, guidelines for the use of tools, respiratory protection, fall protection, etc. The Safety Plan will contain procedures to handle emergencies, the proper OSHA forms, a job-site daily log, Personal Protective Equipment (PPE) use, and procedures for correcting unsafe behavior.
The Safety Plan is an accident prevention plan. Safety is a daily activity, and should be incorporated through DAILY safety talks at the beginning of the workday.
Survey The first step in a potential deconstruction is a site visit to examine the building. This consists of visually surveying the building (inside and out) to estimate the basic material types and the overall condition of the structure. The next step is a building materials estimate that is comprised of inventorying the building material types and quantities, by number of items and by measuring the building. It is also helpful to note basic conditions such as fire damage, water damage, rot, obvious leaks, and possible biological hazards such as bird or rat droppings. Environmental Health and Compliance Environmental surveys for lead and asbestos must be completed for any building built before 1978. The US EPA, OSHA and HUD all have regulations for dealing with asbestos containing materials (ACM) and lead-based paint materials (LBP). Although the EPA NESHAPS regulations exempt demolitions from the removal of non-friable ACM, deconstruction and salvage necessitate the removal of ALL asbestos before work begins. The deconstruction costs and processes will be heavily influenced by the presence of ACM and LBP materials. (Refer to www.epa.gov or www.osha.gov for detailed information on regulations or contact your local agency representative)
Page 9

Guide to Deconstruction Deconstruction Overview
Workers should receive asbestos awareness training in order to be able to recognize “suspect” ACM both before and during the deconstruction. The presence of LBP will require worker protection and care in the handling of these materials.
Asbestos Abatement Follow the law! All asbestos containing materials (ACM) must be removed before work begins. Be aware of all health and safety regulations for asbestos handling and disposal and handling of lead-based materials if they are in the building. Be sure that the abatement contractor makes proper notifications and permit applications to the state environmental protection department and that the abatement receives a proper clearance certifying that the building is safe to work in before starting the deconstruction. It is important to coordinate with the abatement contractor if their activities might damage salvageable materials. Plan for the time required for notification and abatement within the overall project schedule. (Refer to www.epa.gov/region4/air/asbestos for local regulations and contacts) Contracts and Specifications Estimating costs and finalizing a contract are the final pre-planning steps before agreeing to the deconstruction. There are many considerations in figuring out the project costs - starting with who is responsible for which costs. For example, if the Owner pays directly for necessary lead and asbestos surveys and asbestos abatement, then this does not need to be figured into the deconstruction costs. If the deconstruction is done by a non-profit, and the recovered materials are going to be a tax-deductible donation by the building Owner, this is also a major determining factor in how to price the deconstruction. The contract also determines the scope of work for the deconstructor. It should be determined who is responsible for the complete removal of all building-related debris such as foundations, septic tanks, site cleaning, etc. as well as who will get any recovered materials. The costs of the deconstruction itself will be determined by the answers to these questions. Historic Preservation If a building is in an older part of the town or looks older than 50 years it may have historic preservation oversight by the local municipality. After determining the address, the municipal planning department or historic preservation organization should be contacted to research any historic building or district designations and the local demolition or deconstruction permits processes associated with historic buildings.
Page 10

Guide to Deconstruction Deconstruction Overview
Permitting and Utilities Disconnection of all utilities must take place before any work can begin. This includes - electricity, natural gas, water, wastewater, telephone and cable. Check with local utilities to determine the requirements and to have the work completed. Often the completion of the disconnection of the utilities is included in the demolition permit approval process. If activities such as on-site sales of materials are planned, there may be a required permit to carry out this activity as well. Engineering Survey According to OSHA, a demolition must have a building engineering survey and dismantling plan completed before work starts. The engineering survey and plan is completed and signed off on by a competent person who will oversee the deconstruction itself. This plan indicates known hazards at the time of the inspection, the structural make-up of the building and the general schedule, tasks, techniques and tools to be used to conduct the deconstruction.
The most critical aspect of the engineering plan is the identification of anything that is part of the building’s structure and how these structural elements will be removed so as to not cause any unplanned collapses. The survey and plan are updated as the project progresses.
Organizational Plan The organizational plan is the plan for dealing with all the management and worker issues and the specifics of how the deconstruction will take place. Taking the time to plan ahead can prevent many hardships later on. This plan is divided into several components that are described in the detailed section. Specific topics include Schedule, Labor and Responsibilities, Tools and Equipment, Sub-Contractors, Training, and Safety. Site Plan The Site Plan will determine the locations of everything that will happen on the site. The Site Plan can begin when the Building Survey is completed. The Site Plan has to work within the physical constraints of the project site and should be sensitive to neighboring properties and roads. The location of the site in the community will determine a lot about the site plan as well. For example, a highly visible site can facilitate on-site sales but increases opportunities for pilferage. It is not a bad idea to sketch out the site ahead of time and label it in order to communicate the site plan to others involved in the project. Site Security Planning for the site is the time to consider Site Security. Site Security includes preventing the theft of equipment and tools, as well as the safety of anyone trespassing onto the site. A partially dismantled house can be a temptation to vandals. Before any deconstruction begins, the decision about whether salvaged materials will remain
Page 11

Guide to Deconstruction Deconstruction Overview
overnight will determine the needs for fencing, and lockable containers for storage or the time that it will take each day to remove materials from the site. Signage and warning tape should be used as due diligence to protect the public from the hazards of a deconstruction site.
MRethepecokefoanno Al Pl
Posting Signs
aterials Management Plan covered materials have three places to go: Reus detailed section describe ways to efficiently ma
rsons responsible for managing the materials, andmmunicating efficient materials “flow” on the sity to a successful and safe project. Remember thar reuse in the most cost-effective manner. Removd keeping them in good condition when handlingt wasted.
ways ask before any deconstruction: how will m
an ahead so that materials are not handled any mo• First time: take it off the building. • Second time: de-nail, trim and clean at the s
or stack on the site sale for reuse. • Third time: take it off the transport for reuse
type of efficiency will happen only by plann
Removal De-nailing
Warning tape for hazardous area
e, Recycle or Disposal. The steps in nage the materials, allocation of the methods for planning and e. The materials management is the t deconstruction is creating materials ing materials without damaging them them will insure that your effort is
aterials be distributed for reuse?
re than three times !!
ame time, and/or put it on the trailer,
or for storing at the reuse store. This ing ahead.
Transport for reuse
Page 12

Guide to Deconstruction Deconstruction Overview
Deconstruction Process Once all of the planning has been completed, the actual deconstruction can begin. Each deconstruction project is different. For resources, case studies, links and online tools to help in the deconstruction process, log onto www.deconstructioninstitute.com.
Page 13

Guide to Deconstruction Deconstruction Overview
Pete Hendrick’s Seven Samurai Principles of Deconstruction 1. Accumulation technique - As you take down the building you will get different types of materials. Store materials according to dimension and from each project or part of the same project, keep adding that type of material until you have a critical mass large enough to use or sell as a large unit, i.e. pallet, forklift, square of roofing, room’s worth. A critical mass is equivalent to what is found in a retail store, 1,000 BF for example. 2. Personality phenomenon - Apply your labor to the job that suits them. There are two parts; people who have to be pulling stuff off of the building are Type A. Those who can do the more mundane task like de-nailing are Type B. Third type carries the materials, cleans up, always moving from task to task and that is Type C. 3. Excitement code - Clean up as you go. Don’t become so involved in doing the whole roof for example that you end up with large backlog of dangerous, and dirty and in the way stuff. Do not allow materials to be piled up between the Type A and the Type B people/ tasks. 4. Monday morning conceptual and organizational lecture - Periodically stop and talk about the next phase of the deconstruction; why it’s next, so everybody understands not to go off on their own. How the crews are organized for each phase of the materials is very important and should be communicated so that everyone understands. 5. Fatigue factor - There are certain things you do not do when you are tired: Such as working on a roof or a ladder. Pace the hard stuff by switching off between jobs. For instance if you have three Type A’s, instead of them all doing the hard tasks together, switch them around so that they can relieve each other over time and one is always fresher. Be aware of the heat factor get out of the sun whenever possible, put the de-nailing station in the shade or on the porch if you have one. 6. Daily briefing of theories - Every morning check out everyone for general health, sore body parts, and coordinate what is coming off the building and how much space is left for that phase. Decide the materials flow, when and where de-nailing stations are needed. Arrange how the crew is arranged between areas of the buildings. Everybody needs to know what everybody else is doing for that day. If one person or group gets caught up, they will know how to go to the next phase or help somebody else. 7. Doing the right one - Walk around and get a general view of the building you are considering deconstructing to determine age, species of wood and types. Look at the whole building. Look at the practicality of taking the building apart. Figure out the number of people and how long it will take. If two houses are the same size and both made of pine for instance, look at the amount of time they have been exposed, the older the house is, the better it is, it will have higher quality materials so if you get less, it will be worth more of your time if considering two similar buildings in size and type of construction.
Page 14

Guide to Deconstruction Section 1: Safety
Section 1: Safety
When dismantling a building element, it is helpful to know how it was put together and what tools were used. This means that in general the deconstruction will follow the rule of “last on - first off” (LOFO) sometimes including the additions to the building.
Pre-Planning
Safety starts with planning for the worminor incidents. It is reasonable to expreasonable to expect falls, electrical shdeconstruction that differentiates it froof predominantly hand labor. In the cprocess, the greatest care must be takeoperation of mechanical equipment. A competent person must always be oauthority to take corrective action. A competent person “means one whohazards in the surroundings or workindangerous to employees, and who haseliminate them.” (OSHA29 CFR 1926 The location of the nearest medical ememergency services should be known has a valid certificate in first aid traini The deconstruction process begins witof lead-based painted materials (buildhazards, and any asbestos containing m
Remember - It rains in Florida! The roof should be left in place as long as possible during the process, and all salvageable interiorfinishes should be removed before the roof is taken off.
Deconstruction is considered demolition and is coveredby the OSHA Code of Federal Regulations (CFR) 29 Part 1926 for Labor. See OSHA for more details. http://www.osha.gov/st and taking every measure to prevent even the most ect small minor cuts, scrapes, bruises, etc. but it is not ocks, any major cuts or impact injuries. One aspect of m more traditional and mechanized demolition is the use ase of an integrated hand labor and mechanical labor n to insure the separation of people activities from the
n site to assess any potential safety hazard and have the
is capable of identifying existing and predictable g conditions which are unsanitary, hazardous, or authorization to take prompt corrective measures to .32)
ergency treatment and telephone numbers for by all workers, or if one is not available, a person who ng must be on the site.
h protecting worker health in the removal and handling ings built before 1978), exposure to possible biological
aterials that were missed by the asbestos survey.
Page 15
Guide to Deconstruction Section 1: Safety
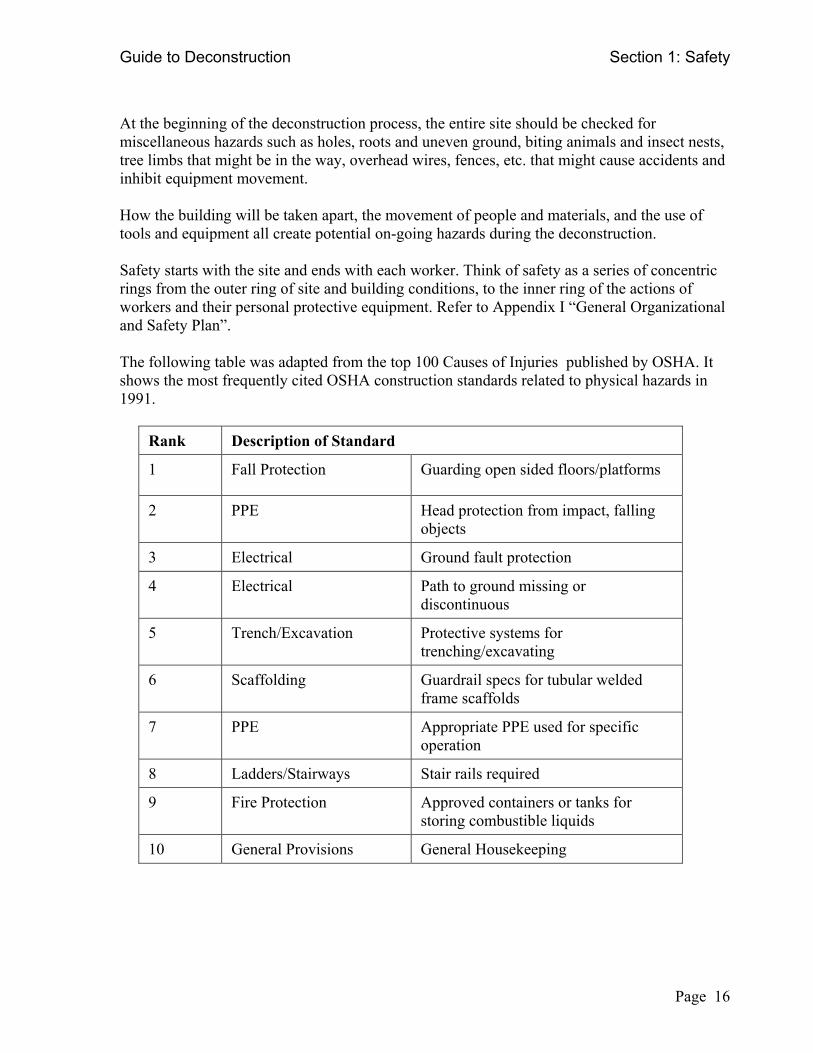
At the beginning of the deconstruction process, the entire site should be checked for miscellaneous hazards such as holes, roots and uneven ground, biting animals and insect nests, tree limbs that might be in the way, overhead wires, fences, etc. that might cause accidents and inhibit equipment movement. How the building will be taken apart, the movement of people and materials, and the use of tools and equipment all create potential on-going hazards during the deconstruction. Safety starts with the site and ends with each worker. Think of safety as a series of concentric rings from the outer ring of site and building conditions, to the inner ring of the actions of workers and their personal protective equipment. Refer to Appendix I “General Organizational and Safety Plan”. The following table was adapted from the top 100 Causes of Injuries published by OSHA. It shows the most frequently cited OSHA construction standards related to physical hazards in 1991.
Rank Description of Standard
1 Fall Protection Guarding open sided floors/platforms
2 PPE Head protection from impact, falling objects
3 Electrical Ground fault protection
4 Electrical Path to ground missing or discontinuous
5 Trench/Excavation Protective systems for trenching/excavating
6 Scaffolding Guardrail specs for tubular welded frame scaffolds
7 PPE Appropriate PPE used for specific operation
8 Ladders/Stairways Stair rails required
9 Fire Protection Approved containers or tanks for storing combustible liquids
10 General Provisions General Housekeeping
Page 16

Guide to Deconstruction Section 1: Safety
Safety - First Line of Defense The Building The first aspect of preventative safety is that the building has been abated of all asbestos (see photo) and that any possible and accessible biological hazards have been dealt with. The building elements should be physically sound and able to support the weight of workers, and not present a danger of collapse wherever workers might be present. Any shoring or stabilizing should be completed prior to the deconstruction and as needed during the process. No worker should contribute to the instability of the building by (for example) removing load-bearing walls when they are still supporting a floor or roof above. Do not remove vertical or horizontal structural elements “before their time.” The Environment Rain and wet conditions pose immediate hazards and work should not take place in the rain or in excessively wet conditions. Wet conditions can cause slips and electrical shocks. Extremely hot and or humid conditions and lack of ventilation are sources of heat exhaustion and stroke, and care should always be taken to insure adequate water consumption, as much shade as possible, and not overtaxing workers to the point that they might make serious mistakes. Tools The tools to be used should be adequate to the tasks, in proper working condition and used properly. Power tools must have proper insulation and grounding. The proper tools also include safety systems such as grounding for electrical generators, harnesses for fall protection, lock-out tags, warning tape, medical first aid kit, and fire extinguishers. (See Appendix II for “Basic Tools Necessary”). Supervision and Training The persons supervising the work (competent person) must know how to spot hawhat to do about them, the proper order and techniques for the deconstruction, acommunicate tasks to the workers. Training should always be given and acknownew worker and then again for each new task and piece of equipment. Safety is the result of communicating to workers how to do things in a safe mannalso the result of communication between workers. Everyone on a deconstructioconstant “heads up” attitude about what and where people are in relation to the bground, the materials, pieces of equipment, and to each other.
zards and nd how to ledged for any
er. Safety is n site needs a uilding, the
Page 17
Guide to Deconstruction Section 1: Safety
Clean Site A clean job site is a safe one. The simplest cause of nail punctures and tripping is when salvaged wood members with nails still in them are allowed to pile up or are allowed to sit in areas where people are walking. Tripping and slipping comes from allowing debris to pile up in the work areas. Always remove nails from wood at the earliest opportunity and stack materials for denailing away from where people are working or walking.
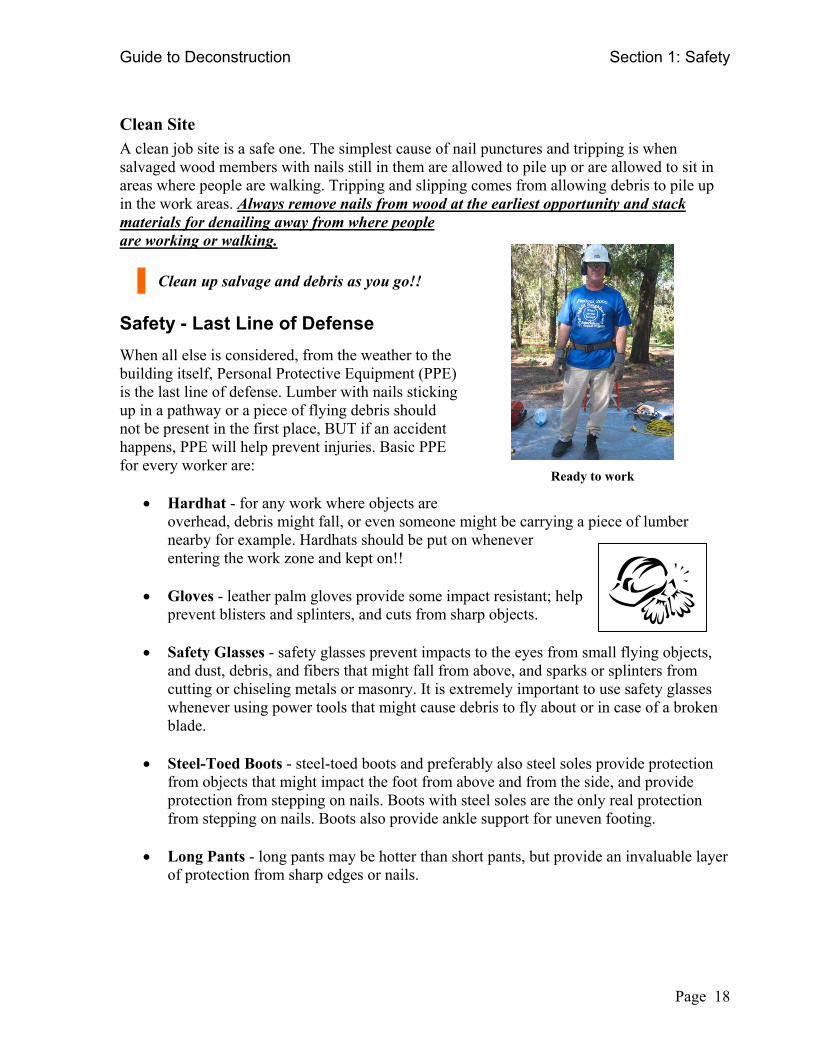
Clean up salvage and debris as you go!! Safety - Last Line of Defense When all else is considered, from the weather to the building itself, Personal Protective Equipment (PPE) is the last line of defense. Lumber with nails sticking up in a pathway or a piece of flying debris should not be present in the first place, BUT if an accident happens, PPE will help prevent injuries. Basic PPE for every worker are:
• Hardhat - for any work where objects are overhead, debris might fall, or even someone might bnearby for example. Hardhats should be put on whenentering the work zone and kept on!!
• Gloves - leather palm gloves provide some impact re
prevent blisters and splinters, and cuts from sharp ob
• Safety Glasses - safety glasses prevent impacts to thand dust, debris, and fibers that might fall from abovcutting or chiseling metals or masonry. It is extremelwhenever using power tools that might cause debris tblade.
• Steel-Toed Boots - steel-toed boots and preferably afrom objects that might impact the foot from above aprotection from stepping on nails. Boots with steel sofrom stepping on nails. Boots also provide ankle sup
• Long Pants - long pants may be hotter than short pan
of protection from sharp edges or nails.
Ready to work
e carrying a piece of lumber ever
sistant; help jects.
e eyes from sme, and sparks ory important to uo fly about or i
lso steel soles pnd from the sidles are the only
port for uneven
ts, but provide
all flying objects, splinters from se safety glasses
n case of a broken
rovide protection e, and provide real protection footing.
an invaluable layer
Page 18
Guide to Deconstruction Section 1: Safety
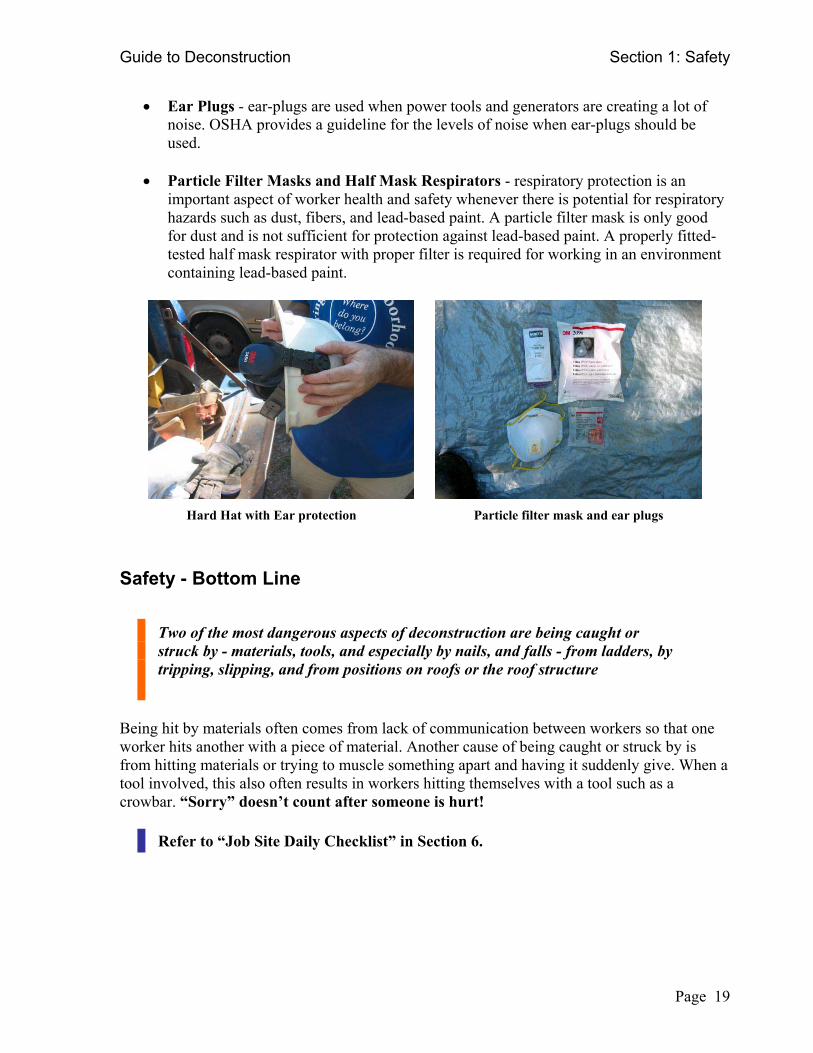
• Ear Plugs - ear-plugs are used when power tools and generators are creating a lot of noise. OSHA provides a guideline for the levels of noise when ear-plugs should be used.
• Particle Filter Masks and Half Mask Respirators - respiratory protection is an
important aspect of worker health and safety whenever there is potential for respiratory hazards such as dust, fibers, and lead-based paint. A particle filter mask is only good for dust and is not sufficient for protection against lead-based paint. A properly fitted-tested half mask respirator with proper filter is required for working in an environment containing lead-based paint.
Hard Hat with Ear protection Particle filter mask and ear plugs
Safety - Bottom Line
Two of the most dangerous aspects of deconstruction are being caught or struck by - materials, tools, and especially by nails, and falls - from ladders, by tripping, slipping, and from positions on roofs or the roof structure
Being hit by materials often comes from lack of communication between workers so that one worker hits another with a piece of material. Another cause of being caught or struck by is from hitting materials or trying to muscle something apart and having it suddenly give. When a tool involved, this also often results in workers hitting themselves with a tool such as a crowbar. “Sorry” doesn’t count after someone is hurt!
Refer to “Job Site Daily Checklist” in Section 6.
Page 19

Guide to Deconstruction Section 1: Safety
Fall Prevention
OSHA requires fall protection for hebelow.
Many people are uncomfortable with heightunless they are comfortable doing so. Care sto high heat and humidity, which can reducestrategy to begin with is a healthy and alert Fall protection comes in several forms - froaccess zones and monitoring. Personal bodyeffective.
Fall protection gear
Deconstruction is unique in that it involves worker. This means creating a “leading edgplace a railing and to stand safely - all at the In the case of removing a roof structure or sopenings through which to fall!! At some powill be necessary to start working from belohazard.
It is not the fall that hurts - it’s what you land on at the end of the fall!!
Do not leave dangerous things for yourself or others to be tripped by, or to fall on!!
ights starting at 6 feet above the surface
s. No workers should be asked to work at heights, hould be taken when workers are tired, or exposed alertness and balance. The best fall protection
worker.
m personal body harnesses to railings, to controlled harnesses must be properly anchored to be
Side view on Back view on
removing the building elements from around the e” - reducing the places to secure a body harness or same time!!
econd floor, the worker is actually creating more int during the removal of roofs and upper floors, it w on scaffold or ladders, thereby reducing the fall
Page 20

Guide to Deconstruction Section 1: Safety
Follow OSHA regulations for using ladders and fall protection. Do not use ladders that are broken or too short for the task. Minimize dragging and banging ladders around.
When using extension ladders always tie the ladder off to the edge that it is leaning against. Use buddies to help hold the extension ladder from the backside, hold a regular ladder, and to hand up tools. Holding a ladder from the backside, the opposite side from the person on the ladder will insure that if the person on the ladder does fall, they do not fall on the person holding the ladder. (Refer to Appendix III “Sample Fall Protection Plan” for how to set up a fall protection plan for the deconstruction project). OSHA provides guidelines for the placement and angle, and extension of extension ladders - the angle should be 70 degrees, feet placed on firm ground, and the top of the rail should extend 36 inches above the level where stepping off of the ladder. Ladder Use Rules of Thumb:
• Keep passageways clear and clean-up debris. This prevents slips and also allows for placing ladders on a flat clear surface.
• Know where you are stepping, know where edges and steps are, mark them and use rails.
• Check floors and roofs for holes and rotted wood or weaknesses before using them for support. Take the time to reinforce, stabilize, and cover holes with plywood, etc.
• Always work facing into a ladder, if something gives, you will fall into the ladder, which is the strongest position. Never assume that a ladder is latched properly, set on the ground properly. Always check it yourself.
• Standing at the base and extending your arms straight in front of you can approximate the proper angle of an extension ladder. Your fingers should comfortably touch the ladder. If you do not reach the ladder, the angle is too low. If you reach past the ladder it is too steep.
Proper use of step ladder Proper angle of extension ladder
Page 21

Guide to Deconstruction Section 1: Safety
Safety Training A safe deconstruction project requires that all those present on the site know the Safety Plan and know how to accomplish the work. It is also necessary to assign clear roles and responsibilities so that each worker knows who is responsible for specific tasks such as Supervision, Safety, Medical and First Aid, Tools, Materials Management, Deconstruction - and knows where information is and what to do in special circumstances. This deconstruction guide is part of the training process.
Specialized training may be required for such things as Fall Protection and Respiratory Protection.
Do not allow untrained persons to work at the site, even for a moment. If an untrained person is hurt the deconstruction contractor is responsible for not properly preparing the worker. Train all workers and make sure that they acknowledge this training in writing. Job site safety includes not only the actual process of being safe but also the formalities of training and record keeping that serve for legal requirements. These formal structures serve an invaluable purpose of giving structure to job site safety training and consequently the process of the deconstruction itself. Emergency Planning The American National Standards Institute (ANSI) in its ANSI A10.6-1983 - Safety Requirements For Demolition Operations states: "No employee shall be permitted in any area that can be adversely affected when demolition operations are being performed. Only those employees necessary for the performance of the operations shall be permitted in these areas." Medical Services and First Aid Prior to starting work, provisions should be made for prompt medical attention in case of serious injury.
• The nearest hospital, infirmary, clinic, or physician • Instructions for the most direct route to these facilities. • Proper equipment for prompt transportation of an injured
worker, as well as a communication system to contact any necessary ambulance service, must be available at the job site.
• Post the telephone numbers of the hospitals, physicians, or ambulances in a conspicuous spot.
• A properly stocked first aid kit must be available at the job site. The first aid kit should contain approved supplies in a weatherproof container with individually sealed packages for each type of item. It should also include rubber gloves to prevent the transfer of infectious diseases.
Page 22

Guide to Deconstruction Section 1: Safety
• Provisions should be made to provide for quick drenching or flushing of the eyes should any person be working around corrosive materials. Eye flushing must be done with water containing no additives.
Check the contents of the first aid kit on each job and at least weekly to ensure that expended items are replaced.
Police and Fire
• The telephone numbers of the local police, ambulance, and fire departments should be available at each job site.
• Notify police in the event of any traffic problems, such as the movement of equipment to the job, uncontrolled fires, or other police/fire matters.
• Notify police to report any vandalism, unlawful entry to the job site, or accidents requiring police assistance.
Fire Prevention and Protection A "fire plan" should be set up prior to beginning a deconstruction job. This plan should outline the assignments of key personnel in the event of a fire and provide an evacuation plan for workers on the site. Common sense should be the general rule in all fire p
• All potential sources of ignition should be evaluated and the necesmeasures taken.
• Electrical wiring and equipment for providing light, heat, or poweby a competent person and inspected regularly.
• Equipment powered by an internal combustion engine should be loexhausts discharge well away from combustible materials and awa
• All internal combustion equipment should be shut down prior to re• Fuel for this equipment should be stored in a safe location. • Sufficient firefighting equipment should be located near any flamm
liquid storage area. • Only approved containers and portable tanks should be used for th
handling of flammable and combustible liquids. • Heating devices should be situated so that they are not likely to ov
installed in accordance with their listing, including clearance to coequipment.
• Competent personnel should maintain temporary heating equipme• Smoking should be prohibited at or in the vicinity of hazardous op• Roadways between and around combustible storage piles should b
and maintained free from accumulation of rubbish, equipment, or • When storing debris or combustible material inside a structure, suc
obstruct or adversely affect the means of exit. • A suitable location at the job site should be designated and provid
emergency information, and equipment, as needed.
revention planning.
sary corrective
r should be installed
cated so that the y from workers. fueling.
able or combustible
e storage and
erturn and shall be mbustible material or
nt, when utilized. erations or materials. e at least 15 feet wide other materials. h storage shall not
ed with plans,
Page 23

Guide to Deconstruction Section 1: Safety
• Access for heavy fire-fighting equipment should be provided on the immediate job site at the start of the job and maintained until the job is completed.
• An ample number of fully charged portable fire extinguishers should be provided throughout the operation.
• All motor-driven mobile equipment should be equipped with an approved fire extinguisher.
OSHA Coverage One very important consideration for a non-profit organization is the use of the term “employee” for the requirement to follow OSHA regulations. If the deconstruction is carried out by an organization with at least one employed person and/or one or more employed persons are supervising or working at the deconstruction project, OSHA regulations apply to the deconstruction project, no matter how many volunteers may be engaged in the work, and regardless of whether the organization is a non-profit or a for-profit. Safety Rules of Thumb:
COMMUNICATION Knowing where you are in relation to others, walls, roof edges, steps, or changes in level, overhangs, any building element on the ground, OTHER workers and their activities, is probably the most important concept of all.
• Workers must be alert and invested in the work they are performing. • Cleanup of debris on all work surfaces will occur after each phase of deconstruction. • Piles of debris will not be allowed to accumulate in work areas where they could
generate a hazard or impediment to the workers. • One person will be appointed Job Safety Officer and will have overall responsibility for
job safety. • Every person on the site must act responsibly. • Understanding of the Deconstruction process and Goals. • Stabilizing weakened sections of buildings, and working in such as way as to keep the
structures as stable as possible via the order of the deconstruction. • Taking care in handling windows (glass), long items, heavy items, and objects with the
nails still in them. • Understanding how components are connected and the best method and tool to use in
removing it to minimize force that in turn can result in sudden movements, creating projectiles, slipping, etc.
• Importance of cleaning debris and removing materials from areas where they can be hazards either off or on the ground.
• Understanding load bearing components and stresses produced by gravity, including awareness of damaged components and weak points caused by termite, water damage, etc.
• Use of safety harnesses, scaffolding, ladders, guardrails, and 2x4s nailed horizontally for footholds when working on roofs.
Page 24
Guide to Deconstruction Section 1: Safety
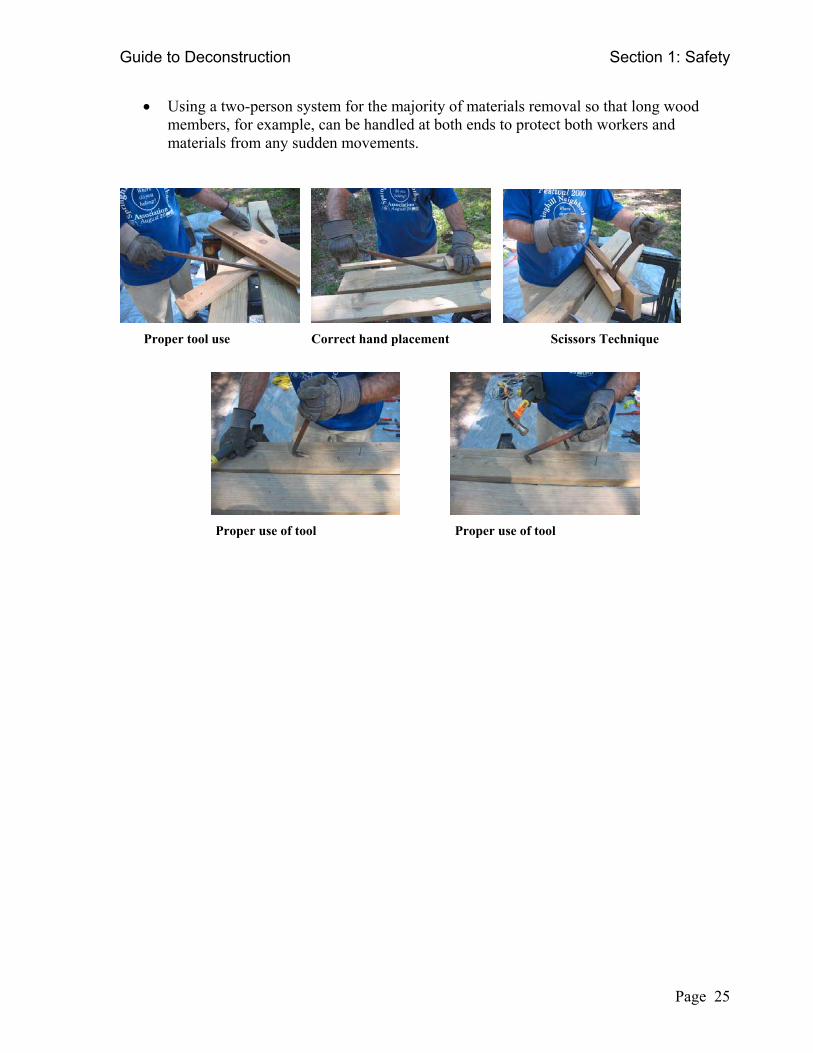
• Using a two-person system for the majority of materials removal so that long wood members, for example, can be handled at both ends to protect both workers and materials from any sudden movements.
Proper tool use Correct hand placement Scissors Technique
Proper use of tool Proper use of tool
Page 25

Guide to Deconstruction Section 2: Survey
Section 2: Survey
The Estimating SurveBefore any deconstruction caplace. This is an overall survto decide whether the deconsof the building indicate its videtailed estimate for the purpschedule and workforce and salvage. The costs of the deconstructthe Owner, as well as providdeconstructor is a non-profitpreparing a scope of work foplace on the site. Things to look for:
• Note if the structure i• Visual survey of poss
other hazardous mate• Look for water, fire, • Look for signs of stru• Look for specific salv• Examine attic space f
direction of structurefrom non-load bearindetritus, possible fire
• Examine roof (outsid• Examine roof structu
dry and brittle and lo• Examine walls for ty
floor or walls).
Many older buildings cbead board or other his
Is it worth it? Evaluate the building to decide whether or not it makes sense to deconstruct and salvage. Does the value of the materials exceed the cost of recovering them and the amount that the Owner will pay to have the building removed?
y n begin, an estimating survey of the building should take ey and can be done in stages to minimize the upfront effort truction is a feasible alternative. If the general characteristics ability for deconstruction, then more effort can be put into a oses of calculating the cost of deconstruction, a time equipment requirements, and expected amount and types of
ion and the estimated salvage can be used to prepare a bid to e the Owner with the estimated tax-deductible donation if the entity. An estimated time of the work is also important for r the Owner, especially when new construction will take
s obviously older than 1978. ible lead-based paint and asbestos containing materials and rials. or insect damage. ctural instability. age materials you know will sell or have a potential market. or type of roof materials and construction, working room, and the bearing points, (in order to distinguish load-bearing g walls) insulation, possible rodent, bird, bat, and insect damage, extent of wiring and ductwork. e and inside for preliminary determination of bearing walls) re for salvage value (often older wood roof sheathing can be w salvage value). pe of framing and finishes (appearance of multiple layers on
an have newer layers of drywall installed over wood toric components that have high value. Another
Page 26

Guide to Deconstruction Section 2: Survey
situation might be visible large structural timbers in a raised floor that at first glance are high value, but upon further exploration have internal rot or termite damage, making them not worth recovering. Both cases illustrate where first appearances do not tell the whole story!!
First Walk Through Identify the best reusable materials in order of importance for whole house deconstruction. (See Appendix V for sample Initial Survey completed after First Walk Through).
When doing a walk through of an older, damaged, or abandoned building, be extremely careful of damaged flooring and support structures that may give way, causing a fall or dropping something onto you.
• Flooring – re-milled or reused as is. • Tongue &Groove wall and ceiling finish • Roofing material: terra cotta tiles, metal shingles, 5 v-crimp metal roofing, or
slate. Anything else not reusable. • Brick yes or no. Stone, Concrete/masonry. How easy will it be to remove and
clean? • Rafters and joist condition and dressed of rough, grade mark, no grade mark - if it
has a grade, more likely you will be able to re-grade it or is good enough to be reused in light construction. How good is the condition - termite damage and water damage?
• Wall studs (same for grade mark) • Windows, doors and trim – sashes and muntins condition and age, stair rails, chair
rails, mantles, porch posts. • Ceiling light fixtures, toilets, sinks, tubs various electrical and plumbing
equipment, electrical For 1” thick lumber, save a minimum of 3’ length and if 2” thick lumber save 4’ lengths. Save siding at a minimum of 3’ lengths. 10-15% of perfect salvage of very good floors is not reusable. Common problems that are difficult to see before the deconstruction:
• Water damage causing rot • Termite damage • Fire damage
It is rare to find an older building that does not have some moisture-induced rot, particularly around bathrooms, kitchens, window and doors.
Water Damage
Page 27

Guide to Deconstruction Section 2: Survey
Second Walk Through An inventory form such as the one following this section is helpful to record the salvageable materials in the building. If there are also recyclables, you can note those as well. By using this form you can estimate the total salvage value in this building. Recyclable materials may or may not be a net value but the cost of pick-up or delivery will be less than disposal. Use another set of forms (also shown) to track the actual revenues or costs from selling salvageables, recyclables and the disposal of waste from the project. These forms are a guide and can be varied for your particular needs. In order to estimate the possible salvage value in the building, you will want to make an inventory. For each item, a description and the amount of that material can be created in the form of a table. Different units quantify different materials. For example, a window has a size (width x height), the type of material (ex. aluminum or wood) and each window is one unit (each).
Kitchen cabinets Windows
Recyclable aluminum Solid wood doors
Page 28

Guide to Deconstruction Section 2: Survey
Tracking Forms for Salvaged. Recycled and Waste Materials Recycled or Diverted Material Summary Material Recycled, Amount/ Receiving Transportation Amount Paid or Total Disposal
Cost/ Date Removed
Reused, or Diverted
Quantity Party Cost Received for Material
Savings (net)
EX. 1/1/2000 Miscellaneous Metals
30 cu yds ABC Recycling $100 ($200) ($100)
Landfilled Material Summary Amount Rental/Delivery
/
Date Hauled (tons or cubic yds) Landfill Tipping Fee Tax/Container Rental
Total Disposal Cost
EX. 1/1/2000 30 cubic yards ABC Landfill $245.00 $105.00 $350.00
Page 29

Guide to Deconstruction Section 2: Survey
The following table highlights the materials that are most likely to be worth salvaging relative to their resale value and salability. Every community is different and you might develop your own list of the most easy to sell items with the lowest cost to benefit effort.
Item Cost/Benefit Ratio Doors 0.46 Cabinetry 0.35 2 x 6 lumber 0.29 Windows 0.29 Wood stair (as one piece) 0.16 6 x 8 lumber 0.07
3x10 floor beam 0.03 Ceiling and attic fans 0.03-0.04 Claw foot tub 0.08-0.10 2 x 8 lumber 0.27-0.32 1 x? Novelty siding 0.37-0.45 1 x 12 planking 0.15-0.24 4 x? lumber 0.13-0.24 1 x 3 bead board 0.32-0.71 Brick 0.33-0.72 1x3 T&G flooring 0.11-0.58
The detailed walk through and estimates are important in order to help estimate the total value of the project for the purpose of estimating the cost and bid to the Owner. A non-profit organization can use the deconstruction salvage estimate to provide a building Owner with the value of the materials if they are going to be a tax-deductible donation to the non-profit. The materials value estimate is also important to decide between two projects and when the organization has limited resources and needs to be sure it gets the most value for the expenditure of these resources.
Page 30

Guide to Deconstruction Section 3: Environmental Issues
Section 3: Environmental Issues
Eba Tigot A
nvironmental surveys for lead and asbestos should be completed for any building built efore 1978. The US EPA, OSHA and HUD all have regulations for dealing with sbestos containing materials (ACM) and lead-based paint materials (LBP).
Environmental issues related to hazardous materials can be quite complex, with regulations at the Federal, State and local levels. Deconstruction practitioners should contact their State and local environmental agencies to check and follow all applicable regulations.
he following protocols highlight the two most relevant hazardous materials to be found n deconstruction, asbestos and lead base paint. These checklists are meant to be a general uide to addressing these concerns. The checklists are superseded by any Federal, State r local regulations as they pertain to demolition and the creation, handling, storage, ransport, and disposal of hazardous materials.
sbestos Safety Protocol • Buildings will be assessed for both friable and non-friable asbestos by a certified
environmental consultant as needed (older than 1981) • If building has friable or non-friable asbestos it will be abated by a licensed
asbestos abatement contractor • After asbestos abatement, the abatement contractor will be required to indicate
that all asbestos has been removed. Inspections by the Florida Department of Environmental
• Any deficiencies found by the FDEP will be corrected before deconstruction can commence.
• If Safety Officer, FDEP, or any other competent or responsible party suspects that asbestos containing material (ACM) is present, or uncovered at any time during the deconstruction all work will be halted.
• An environmental consultant will be requested to test suspect ACM, and further abatement will be required if ACM is found at regulated levels.
• Upon completion of additional asbestos abatement, deconstruction work will be allowed to continue Note: Sometimes workers uncover ACM under layers of non-ACM material
• A certified asbestos abatement contractor will be used for any asbestos abatement required during the project.
• At no time is any sanding, grinding, abrading, cutting, burning or heating of the LBP wood materials permitted.
• The primary threat of worker exposure to LBP is through ingestion - inhaling, eating, drinking and smoking while in proximity to the LBP.
• A hand washing station is established on the job-site and personal protective equipment (gloves) and filter masks are required of all workers.
Page 31

Guide to Deconstruction Section 3: Environmental Issues
Lead Safety Protocol Methods to insure the removal of LBP and worker protection are primarily building engineering and mitigation techniques. OSHA and EPA recognize that deconstruction is a less destructive process than mechanical demolition, but conversely has the potential for greater worker exposure. Because of the limited exposure and turnover of workers, the following protocol is recommended:
• All workers receive ACM and LBP awareness training. • All exterior windows and doors are opened or removed to allow ventilation and
prevent accumulation and concentrations of LBP particulate matter during deconstruction activities.
• All workers in the LBP environment are provided personal fit-tested and approved respirators and protective clothing until personal air samples are analyzed and record lead levels below the acceptable threshold for worker exposure.
• A HEPA vacuum is utilized throughout the building interior to remove all dust and particulate matter to the maximum extent feasible.
• Indoor air quality analysis is completed using approved personal air sampling devices to determine TWA-PEL of lead within the work environment.
• At such time as air sampling is recorded which shows airborne lead levels below OSHA thresholds, respirators and protective clothing will be removed.
• In all cases, workers will be rotated out of LBP environments on a short-cycle and regular basis.
• Job-site hand washing station will be provided. • Smoking is prohibited inside the structure and near any salvaged materials.
Workers are required to wash hands before breaks and lunch breaks. • Sanding, cutting, grinding, abraded, burning and heat-gun stripping of LBP
surfaces is not permitted. • Workers are provided with uniform T-shirts and required to change them at the
completion of the work shift and before leaving the job-site.
In the event of known Lead based paint (LBP) in an interior environment, (See OSHA Lead Regulations 29 FCR 1926.26), workers are assumed to be exposed to LBP above acceptable levels until proven otherwise through personal air sampling.
Other hazardous materials that can be found include PCBs, mercury in thermostats and switches, refrigerants, and various corrosive or flammable liquids. Biological hazards can also be common in older buildings.
Page 32

Guide to Deconstruction Section 4: Contracts
Section 4: Contracts
Any deconstruction project will require a contract between the Owner of the building and the company that removes the building. For the deconstructor this might mean a contract directly with the Owner or it may operate under a sub-contract to a larger construction or demolition company. Since the deconstruction will be predominantly the hand labor removamaterials and a deconstruction entity such as Habitat for Humanity wiequipment as part of their normal tools, it is necessary to be clear withOwner or prime contractor who will be responsible for such parts of thmasonry walls, slabs-on-grade, driveways, etc. The deconstructor can provide a project contract and price for only thecomponent with clear language of what they are not responsible for. Sincludes “all building related materials up to five 5’ feet from the builabove first floor elevation level.” This would prevent a misunderstanddeconstruction includes removing slabs, driveways, utility piping belotanks, trees, etc. Any tree within 5 feet of the building would likely haorder to carry out the deconstruction. When the deconstruction is being carried out by a non-profit organizaon the recoverable materials upfront is an important part of the contrathe Owner. The value of this donation of materials by the Owner to thorganization is an important tool for convincing the Owner to considea cost equal to or even greater than traditional demolition. Since the dsalvage is a tax-deduction, even a price for deconstruction that is highcan result in a net lower cost to the Owner after accounting for the taxcases the non-profit will provide a receipt for the materials and in anothe Owner to fill out a form or letter for the amount of the donation. Any contract will have basic elements including but not limited to:
• The price of the contract. • The amounts and schedule of payments tied to the percentage
completed. • A time frame for the beginning and end of the project. • Who owns what materials in the building and what materials w
the Owner and the deconstruction contractor. • The physical boundaries of the work that the deconstructor is r
as 5’ from the building perimeter and above-grade. (If the decocontractor, they may wish to exclude masonry and concrete orrequires heavy equipment).
l of salvageable ll not carry heavy the building e building as
hand labor ample language ding perimeter, and ing that the w grade, septic ve to be removed in
tion, placing a value ct negotiations with e non-profit r deconstruction at onation of the er than demolition -deduction. In some ther case may ask
of work that is
ill be recovered by
esponsible for such nstructor is a sub-
other sitework that
Page 33

Guide to Deconstruction Section 4: Contracts
• If there are targets or required diversions rates that are either legally mandated or a requirement of the Owner (such as to meet regulatory diversion rates by a local government).
• Any other goals or requirements such as meeting regulatory purchasing guidelines or policies.
• The terms for termination of the contract. • The terms for licensing, insurance, liability and bonding if necessary. • The persons who are responsible for the contract.
(See Appendix VII for a Sample Agreement).
Page 34

Guide to Deconstruction Section 5: Permitting and Utilities
Section 5: Permitting and Utilities
Check with your local building departments and agencies for all permits and regulations.
Demolition Permit Some demolition permits require that all utilities have been disconnected and signed-off on by the appropriate utility authority before they are approved. A deconstruction permit might require that a minimum amount of materials be diverted from the landfill or an indication of how much will be salvaged. In this case, an estimating survey (See Survey section of this Guide) will have provided this information. Additional permits beyond the demolition permit will be required if there is the presence of asbestos in the building. Asbestos abatement will require a 10-day pre-notification to the Florida Department of Environmental Protection. Being aware of this possibility can help in planning the schedule for the project. Additionally, if there is any possibility that the site is or was a commercial entity and may have created any environmental contamination, the permitting process may require a Phase One environmental survey. A phase one environmental survey is an analysis of historic property records and a visual observation or walk-through of the site to determine if the site was used for something that would produce possible environmental contaminants. Examples might be a gas station, a dry cleaning business, a manufacturing business. Check with the local environmental or building regulatory agency to determine if any additional environmental review is required before commencing deconstruction. If a Phase One survey has to be completed, contact a licensed and certified environmental engineering firm. Historic Preservation As a deconstruction enterprise, it is probably a good idea to be sensitive to historic preservation issues. Deconstruction is not as good as preservation or adaptive reuse of an entire structure from an environmental perspective, yet preservation and adaptive reuse or relocation can be an expensive proposition.
Many municipalities have designated historic buildings or historic districts. In these cases, the local government may place restrictions on demolition or deconstruction and incentives for renovation or relocation of a building.
Utility Location Obviously you would not wish to endanger the health of workers or anyone else in the process of removing a building from its site. As buildings are serviced by electrical, telephone, television cable, water, natural gas and wastewater connections, it will require diligence on the part of the deconstructor to insure that all of these connections are properly removed and capped at the point of connection to the distribution system to avoid a problem for other property owners or workers. It goes without saying that live electrical wires, and
Page 35
Guide to Deconstruction Section 5: Permitting and Utilities
natural gas lines can be sources of very serious injuries or even death. Electrical and natural gas disconnects should only be performed by the utility company. If temporary power is desired, a separate temporary power pole can be installed by the utility company to provide power to the job site. The utility company will permit and install temporary power.
Before any deconstruction commences contact the local utility to locate and remove all utility services from the building.
Utility Disconnect Rules of Thumb
• All electric, gas, water, steam, sewer, and other services lines should be shut off, capped, or otherwise controlled, at or outside the building before demolition work is started.
• In each case, any utility company that is involved should be notified in advance. • If it is necessary to maintain any power, water, or other utilities during demolition,
such lines shall be temporarily relocated as necessary and/or protected. • The location of all overhead power sources should also be determined, as they can
prove especially hazardous during any machine demolition. • All workers should be informed of the location of any existing or relocated utility
service. • Use a licensed contractor to pump/ crush & fill the septic tank if one is present. • Leave old site of septic tank with a location flag. • Call building inspector to approve and close septic system permit • Cut sewer pipe flush to grade • Fill the end of the sewer pipe with concrete or call utility company to cap the sewer
line • Leave pipe with location flag in its location to prevent accidental damage • Call building inspector to approve and close permit for sewer connection.
Page 36

Guide to Deconstruction Section 5: Permitting and Utilities
Engineering Survey Prior to starting all demolition operations, OSHA Standard 1926.850(a) requires that a competent person conduct an engineering survey of the structure.
The purpose of this survey is to determine the condition of the framing, floors, and walls so that measures can be taken, if necessary, to prevent the premature collapse of any portion of the structure.
• The engineering survey provides the demolition contractor with the opportunity to
evaluate the job in its entirety. • Any adjacent structure(s) or improvements should be checked. • The demolition contractor must maintain a written copy of this survey. • Photographing existing damage in neighboring structures is also advisable. • The contractor should plan for the wrecking of the structure, the equipment to do the
work, manpower requirements, and the protection of the public. • The safety of all workers on the job site should be a prime consideration. • During the preparation of the engineering survey, the contractor should plan for
potential hazards such as fires, cave-ins, and injuries. • Determine if any type of hazardous chemicals, gases, explosives, flammable
material, or similar dangerous substances have been used or stored on the site. • If the nature of any substance cannot be easily determined, samples should be taken
and analyzed by a qualified person prior to demolition. • The required number and type of respirators, lifelines, warning signs, safety nets,
special face and eye protection, hearing protection, and other worker protection devices outlined in this manual should be determined during the preparation of the engineering survey.
• A comprehensive plan is necessary for any confined space entry. See Appendix VI for an example of an engineering survey
Page 37

Guide to Deconstruction Section 6: Organizational Plan
Section 6: Organizational Plan
Planning is as important as actually doing the work! Before beginning any job, the contractor should take a number of steps in the overall planning of the deconstruction/demolition job. Steps to consider:
• The methods to be used to bring the structure down • The equipment necessary to do the job • The measures necessary to perform the work safely
Deconstruction is considered construction with regard to regulatory approvals, environmental health and safety, contracts, estimating, resource planning, and scheduling planning.
The Organizational Plan starts with a checklist of internal and external resources needed to do the work. □ Insure a plan for the storage, transport, sale of recovered materials □ Consider training needs based on the experience and knowledge of your workers. □ Conduct worker training including environmental health training. □ Confirm insurance, worker’s compensation, waivers of liability, licenses, regulatory
approvals are all in place before commences. (as appropriate) □ Plan for and order heavy equipment, disposal roll-offs, generator, forklift, rentals, etc. □ Determine access to landfill including for hazardous materials □ Determine nearest medical care facility, fire services. □ Complete tool inventory and purchase of any known additional tools needed (See list
of recommended tools at the end of this section) □ Complete generic and job specific safety plan - includes respiratory protection, fall
protection (See appendix for more details) □ Assign personnel roles and responsibilities. □ Determine schedule and time-line for project.
Competent Person A competent person experienced in all phases of the work to be performed should conduct all organizational planning. The competent person on the project is the ultimate responsible person for recognizing and taking any actions necessary to correct hazards. A Competent Person must be on-site at all times during the project. The other most important roles on the site are the Safety Officer and the Tool Person.
Page 38
Guide to Deconstruction Section 6: Organizational Plan
Safety Person Every project should have an assigned Safety Officer who is responsible for overall safety on the project. EVERY PERSON is RESPONSIBLE for THEMSELVES and EVERYONE ELSE. The Safety Officer insures that every person on the project has their basic Personal Protective Equipment (PPE) at the beginning of every day and uses it as appropriate throughout each workday. The Safety Officer must also inspect the site with materials areas and roll-offs, each individual’s activities, and the building itself on a continuous basis to prevent unsafe conditions from arising. In the case of unsafe behavior by workers either for themselves or those around them, a procedure should be developed for warnings, providing instruction in corrective actions, and documentation. Tool Person In a situation involving volunteers or any larger number of people, tools can readily get misplaced and consistent communication can be difficult. One management strategy is to assign a Tool Person who is responsible for inventorying all of the tools at the beginning of the project, checking for wear and damage, taking responsibility for either removing or repairing tools, and keeping track of all tools, their condition and additional needs on a daily basis.
Page 39
Guide to Deconstruction Section 6: Organizational Plan
Site Plan Conceptualize a site plan that works for the order and types of salvage and equipment for this particular deconstruction project. Remember that deconstruction is the creation of quantities of reusable materials. In order to avoid chaos, the materials stock must be planned for at the deconstruction site.
• Determine locations for all recyclables such as wood, metals, and concrete. • Determine which trees and plants will be salvaged. • Consider and plan for the weight of roll-off trucks, overhead space for drop-off and
removal, room for backing, room for the directional placement of the door of the roll-off.
• Plan for and establish de-nailing stations that can be in the shade if possible and work well for minimizing the distance from the point of removal to the point at which nails are removed.
• Pre-plan for everything that will be removed from the building. • Minimize the difficulty or distance materials have to move. • Think ahead to insure that salvage does not have to be moved because it is in the way. • Proceed in a methodical and pre-planned way. • Let everyone on the deconstruction crew know the whole process so that they can use
their own initiative to know what needs to be done next. • Consider and plan for the fact that salvage for reuse requires different tools and
procedures than salvage for recycling. • Consider the order, how and what equipment and tools might have been used in the
construction process. • Consider and plan for where salvage will go, consider where recycle will go, consider
where disposal will go. • Plan for all employee needs such as drinking water, water for cleaning up, a shaded
area and toilet facilities. Separating the general work site into special zones can help to make the site safer for workers. The first zone is the posting of the job-site sign that will often include the demolition permit. The demolition permit can also be stored in the job-site trailer on the job-site safety book. The job-site sign informs the general public that a deconstruction project is taking place.
Page 40
Guide to Deconstruction Section 6: Organizational Plan
A quick checklist for what to include in a site plan:
□ Entrance and exit to site for people and equipment, including loading materials □ Worker and visitor parking that does not conflict with other vehicles such as roll-off
hauler □ Tool location for a central storage facility overnight □ Hauling material from site should be convenient to the generation of materials and
flexible as the materials will be coming from different locations in the building □ Deconstruction activity must be safely demarcated and workers should not be in
conflict with machinery □ Processing location will be flexible depending upon where and what activities are
taking place. Take into account providing shade and areas to capture nails and off-cuts - convenient to both waste disposal and the removal of processed materials from the site
□ Temporary storage location for materials left on the site should be secure from pilferage, protected from weather and the ground
□ Metal recycling location should be able to remain in one location throughout the project and easily accessible for removal when enough metals have been accumulated to make a sufficient load
□ Hazardous material location should be in approved containers, safe from damage from other activities and aware from workers rest areas, etc. Hazardous materials should be removed for disposal as quickly as possible.
□ Site security may or not include fencing but will include signage, warning tape and barricades as necessary. Signage and security must be maintained on a daily basis with a walk-through and check at the end of every workday.
□ Tree protection should be considered for significant or heritage trees on the site. Roll-offs and heavy equipment can damage tree roots. It may happen that trees must removed to insure the safety of workers for instance when tree branches overhang a roof where workers are present.
□ Temporary toilet should be within a close enough distance to be readily accessible but provider some relief from odors.
The next layer of job site safety and protection is the posting of signs that say CAUTION around the perimeter of the job-site to warn of potential hazards and to discourage unsafe practices. These signs should be placed in such as way as to not have any blind spots. For example they should be posted at driveway entrances, door entrances, and on all four sides of a building, at a minimum.
Yellow caution tape or danger tape should be used when there is an imminent hazard such as to prevent someone from walking where roof materials are being dropped to the ground below, or where heavy equipment is in use to carry out mechanical demolition or removal activities.
Page 41
Guide to Deconstruction Section 6: Organizational Plan
Materials Management Plan Deconstruction is not the end in itself; recovering materials for reuse is the end goal.
Deconstruction is a process of building disassembly for the purpose of recovering the maximum amount of materials for their highest and best re-use. As a by-product of deconstruction, materials may also be recovered for recycling. Re-use is the preferred outcome. Reuse requires less energy, raw materials, and pollution in order to continue the life of the material than recycling. The materials follow a hierarchy of possible options – reuse, recycling, use for fuel, biodegradation, non-hazardous materials disposal, and hazardous materials disposal. A hierarchical approach to managing the materials from a building deconstruction is inherent in the process of site separation.
The US EPA and Florida Department of Environmental Protection regulate the management of both hazardous and non-hazardous wastes.
Separating Materials on Site
• Everyone on the site should know where the reusable, recyclable, hazardous disposal, C&D disposal, and solid waste disposal will go on the site and the means to get it there.
• Understand and prepare specific outlets (contacts), general markets (advertisement) and methods (equipment, labor, sub-contracts) for removal of all materials from site.
• Pre-selling materials help reduce the risk of committing to the deconstruction and can save time and energy in processing, transporting and storing materials.
• The use of recovered lumber for structural purposes will involve regulatory oversight. • There is no established standard for the re-grading of salvaged lumber or re-
certification of a recovered engineered wood product.
• Some building departments are willing to accept signed and sealed documents from the structural engineer of the new building to approve the reuse of lumber for structural purposes. (Check with your building department).
• Anything made of wood should be protected from moisture and termites • Consider all materials and the possible market for them, even plants, landscape
pavers, etc.
We do not recommend the reuse of non-code compliant and inefficient windows, plumbing and electrical fixtures that may pose hazards and cause the waste of resources through continued use. This includes lead-based painted windows and older single-glazed wood windows, unless the lead-based paint is abated and the glazing can be augmented through storm windows.
Page 42

Guide to Deconstruction Section 6: Organizational Plan
Household Waste Disposal A separate disposal container and daily clean-up should be arranged for household waste such as lunch wrappers, plastic bags, cardboard, cups, paper towels, etc. Do not place household waste into construction and demolition debris containers, as this will contaminate the C&D materials. Contaminated C&D debris becomes household waste and the waste hauler will take it to a municipal solid waste landfill at a much higher disposal rate than C&D debris. (Refer to Appendix X for a link to “Recommended Management Practices for the Removal of Hazardous Materials from Buildings Prior to Demolition”).
All workers should be constantly reminded to keep all C&D debris, recycling (in separate containers by materials), hazardous waste, and household waste SEPARATE.
Contact Waste Hauler To insure that there are no surprises, the hauler and the processor or landfill should be contacted before the project begins:
• What materials do they handle • What condition or purity must it be in, • How must it be contained, • What times of day and hours they operate, • How much lead time is required to arrange a container pick-up or drop-off, • Do they require the materials to be dropped off at their location?
Free Wood Although a general rule of thumb is not to recover dimensional lumber less than 4 feet long, (a 4 foot piece can take as much effort as an 8 foot piece), a kind of waste and cost avoidance strategy might be to place the short lumber pieces into a bin with a sign FREE WOOD at a safe and visible location at the site. This may take some effort and should be weighed against the fact that if it is not taken away for free, it would still cost something to be removed for disposal or mulching.
Page 43

Guide to Deconstruction Section 6: Organizational Plan
Hazardous Materials The Consumer Product Safety Commission is responsible for oversight regarding the reuse of materials that might pose a hazard to the general public. The CPSC and US EPA recommend the abatement of lead-based paint from any reusable material, not to exceed 0.06% LBP content, or the complete encapsulation of the material.
A rule of thumb is for known hazardous materials to be removed from the building before work begins, including asbestos containing materials, mercury switches, PCB ballasts, pesticides and herbicides, solvents, fuels, paints, etc.
Be prepared- this means putting on a mask or respirator before you generate dusty conditions, putting on gloves before exposure to hazards, putting in ear protection before making loud noises, and supporting the other end of that joist before it falls on you.
Page 44
Guide to Deconstruction Section 6: Organizational Plan
Job Site Daily Checklist Job Site Safety
A pre-start site meeting will be held every day to review procedures and the day’s activities / responsibilities.
Deconstruction hazards shall be identified and appropriate actions taken to prevent any possible injuries from these hazards, including proper equipment, signage, and barriers.
Medical emergency information and cell phone location will be noted. First aid kit will be placed in visible / accessible location. Fire extinguisher will be placed in a visible / accessible location. Hand washing station and drinking water station will be set up. Reusable cups will
not be used. Smoking is prohibited in or near any building under deconstruction and is prohibited
on any site where lead-based paint has been identified. Work in lead environment will require lead and asbestos awareness training, use of
half-mask respirator, blood lead level test before and after project (short term less than 6 months).
Other lead environment engineering control protocols and procedures will be followed including providing maximum ventilation, use of HEPA vacuum and wetting as needed, smoking prohibition, hand washing and glove use protocol, change of clothing at end of work day.
Basic job site cleanliness, removal techniques, and materials /tools storage practices will be followed including:
Do not leave tools underfoot or in a door or passageway. Do not place a board or material with nails pointing up and do not place these
materials where someone is working (unless pulling nails), near or sticking into a doorway or passageway.
All workers are responsible for their own and others safety and shall inform the supervisor of any conditions that they deem unsafe for themselves or for any other.
Safety and health violations will be noted. Repeated violations or failure to take corrective action as instructed by supervisor will be grounds for dismissal.
Personal Safety and Protection
Check and distribute - hardhat, gloves, ear plugs, safety glasses, steel-toed boots, and absence of personal jewelry that may pose a hazard.
Hard hats are to be worn at all times within 10 feet of the building perimeter and whenever working under or near objects overhead, such as ladders, scaffolding, heavy equipment that may be present at the site.
Long sleeves shirts should be worn when there is exposure to fibrous materials. Fall protection will be used for any surface 6 feet above the surface below. Fall protection will be used by those properly trained in its use. Half-mask respirators rated at least N-95 as per NIOSH standards for particulate filter
efficiency shall be worn whenever there is possible exposure to dust, fibers, particulates, microbial agents, oils, etc.
Page 45

Guide to Deconstruction Section 6: Organizational Plan
Use of half-mask respirator will require physical check-up, training in care and use, fit testing.
Hands shall be washed before taking a break or eating food, and at the end of the workday.
Tools and Equipment
Tools will only be used by those trained and competent in their use. Instruction on proper use of hand tools will be conducted in accordance with
manufacturer’s instructions. Instruction and proper use of ladders and scaffolding will be conducted in accordance
with manufacturer’s instructions. Ladders with broken parts will not be used. Instruction and proper use of power tools, including but not limited to power saws,
drills, and generator. Tools with damaged or broken parts will not be used. Power tools and cords that are damaged or broken will not be used. Damaged or broken tools, ladders and power tools will be taken out of service, tagged
and locked as needed to warn against and prevent further use and removed for repair or replacement.
Generator will be provided with a ground fault interrupter. Site and Building
Remove the first layer of materials that you can see before removing anything behind it, for example, remove ALL trim and electrical socket or switch plate covers before removing drywall.
Treat any salvage as though it is yours and you are using it in your own house. Keep the structure as stable as possible via the order of the deconstruction. Do not throw away materials to be salvaged. Do not throw away any materials unless throwing directly into the dumpster. Remove nails as soon as possible, either from materials still in place or after taking
directly to a de-nailing area. Do not hit materials or have a material in a position that horizontal projectiles can be
created. Always control both ends of the material as it is being removed, either by someone
holding on to it at the other end or with one end already resting on the ground. Do not remove structural walls or any walls or materials which are supporting
something else until they are no longer acting in this structural capacity. Cleanup debris on all work surfaces CONSTANTLY. If you are walking on top of debris and cannot see the ground below, it is past time to
clean up!! After materials have been removed either waste or salvage they should be removed in
a timely fashion from the work area, either to 1) a dumpster, 2) a de-nailing station, or 3) a storage location for reusable materials.
A material is not reusable until it has had all nails removed.
Page 46

Guide to Deconstruction Section 6: Organizational Plan
When removing components that have parts such as screws or a light fixture with a glass lamp and separate fixture, keep the parts together by taping them, wrapping them in plastic or paper, or placing into a plastic bag, box, etc.
Crowbar, flat bars, pry bar, shovel are to be used for removing materials. A sledgehammer is to be used for limited purposes and primarily to remove non-reusable items.
Page 47


Guide to Deconstruction Section 7: The Deconstruction Process
Section 7: The Deconstruction Process
The definition of deconstruction is the “un-construction” of a building from “in to out” and from “top to bottom,” down to basic materials of the building such as dimensional lumber and components such as a piece of mechanical equipment or a window, maintaining the integrity of the materials to the greatest extent possible. It is essentially “the opposite of construction”. The non-structural aspects of a deconstruction project can occur simultaneously, while the structural aspects of the building must be removed in a careful and sequential manner to maintain the integrity of the building.
Before Deconstruction Sheetrock and Windows removed
Outer siding removed Clean workspace
Down to the sheathing and rafters Roof has been removed
Page 49

Guide to Deconstruction Section 7: The Deconstruction Process
Walls secured against collapse Clean and secure work area
Walls and siding removed The last wall comes down
Preparing to remove decking Decking removed - insulation
Down to the supports Salvaged lumber
Page 50
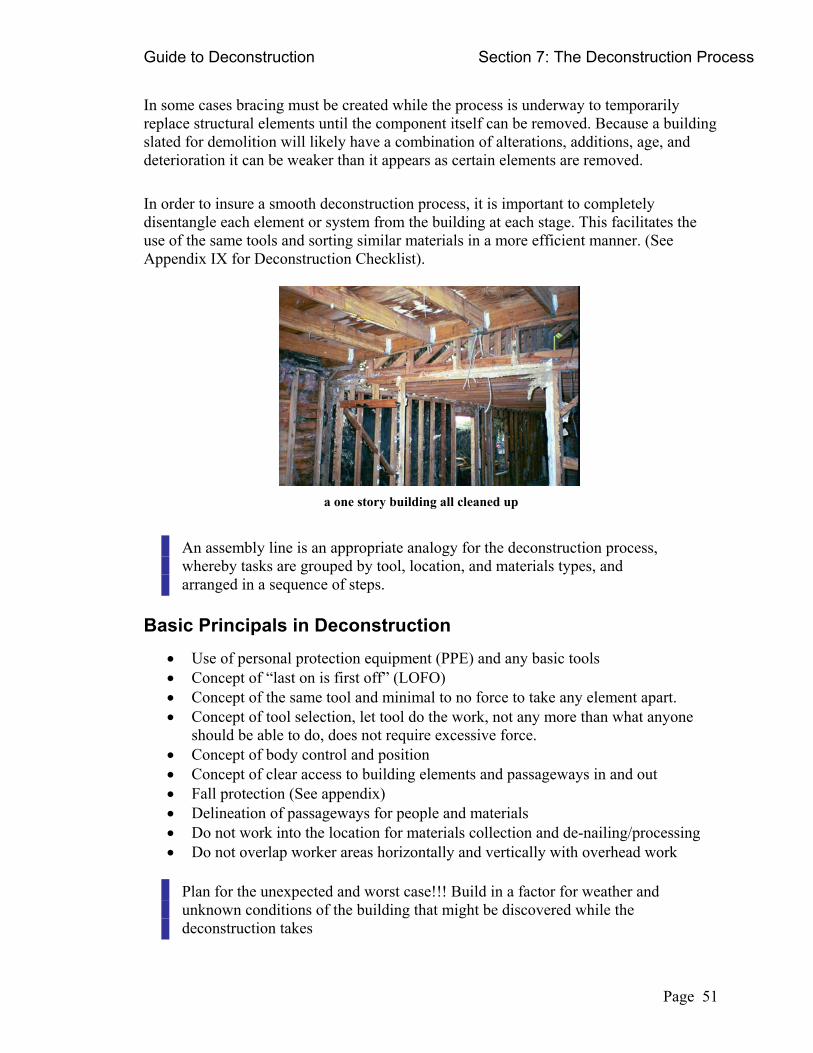
Guide to Deconstruction Section 7: The Deconstruction Process
In some cases bracing must be created while the process is underway to temporarily replace structural elements until the component itself can be removed. Because a building slated for demolition will likely have a combination of alterations, additions, age, and deterioration it can be weaker than it appears as certain elements are removed. In order to insure a smooth deconstruction process, it is important to completely disentangle each element or system from the building at each stage. This facilitates the use of the same tools and sorting similar materials in a more efficient manner. (See Appendix IX for Deconstruction Checklist).
a one story building all cleaned up
An assembly line is an appropriate analogy for the deconstruction process, whereby tasks are grouped by tool, location, and materials types, and arranged in a sequence of steps.
Basic Principals in Deconstruction
• Use of personal protection equipment (PPE) and any basic tools • Concept of “last on is first off” (LOFO) • Concept of the same tool and minimal to no force to take any element apart. • Concept of tool selection, let tool do the work, not any more than what anyone
should be able to do, does not require excessive force. • Concept of body control and position • Concept of clear access to building elements and passageways in and out • Fall protection (See appendix) • Delineation of passageways for people and materials • Do not work into the location for materials collection and de-nailing/processing • Do not overlap worker areas horizontally and vertically with overhead work
Plan for the unexpected and worst case!!! Build in a factor for weather and unknown conditions of the building that might be discovered while the deconstruction takes
Page 51
Guide to Deconstruction Section 7: The Deconstruction Process
Deconstruction Process for One-Story Wood Framed Building DAY 1 - Abatement Asbestos Tile and Mastic - Abatement by certified abatement contractor DAY 2 - General Clean-up inside and out Site Cleanup and House Cleaning - The location was scattered with debris since the house was abandoned. The yard was cleaned allowing adequate space for the dumpsters and the denailing/processing station to be established. In addition, No Trespassing sighs and job-site signs were posted. DAY 3 - Doors and Windows Doors, Windows, Trim, Ext. Awnings - Remove all doors and windows with frame and associated trim. Doors and windows will be maintained as a complete package DAY 4 - Interior Fixtures and Finishes Oak floor, Doors, Windows, Ceiling Fans, Baseboards, Crown molding - The oak floor was laid on top of original pine floor. Baseboards were removed before plaster and lathe. DAY 5 - Interior Finishes Plaster, Floor felt, lathe - Wall plaster removal with lathe left in place as best as possible. Lathe is easiest to push out from behind rather than rip out and away from the stud nailing surface. Floor felt under oak floor must be peeled up as it is adhered with a water based glue. DAY 6 - Roof Finish and insulation Lathe, sheet metal roofing, batt insulation, beadboard walls - Sheet metal roofing is difficult to remove due to the 10:12 pitch of the original structure. DAY 7 - Roof Finishes, Sheathing and Structure 1 x 8 roof deck, double layer of asphalt shingles, lathe, transfer plaster debris - 1 x 8 roof deck on the 10:12 original roof is punched out from below by crews of 3 to 4 standing on plywood decking. The plywood is positioned to make a continuous work surface on top of the ceiling joists. A secondary roof of two layers of asphalt shingles was left on the 1 x 8's as they easily shattered when punched out. DAY 8 - Roof Structure 2 x 4 rafters, 1 x 8 roof deck - 2 x 4 roof rafters are removed from 10:12 roof. Rest of 1 x 8 roof deck is removed. After removal of the roof structure, the stud walls can be dropped to the ground level for disassembly. DAY 9 - Roof Structure, upper chimney 1 x 4 roof deck, top of chimney, transport materials to storage - Small amounts of 1 x 4 roof deck removed from 10:12 original roof, top of the chimney deconstructed. DAY 10 - Ceiling Finish Ceiling plaster and lathe, 2 x 4 rafters - Ceiling plaster is removed by standing on plywood deck on top of the ceiling joists and pushing down between joists with a sledge hammer DAY 11 - Additions - roof, ceiling, and walls Remove Kitchen addition to the floor deck - Take kitchen addition down. Roof, Ceiling, Walls removed
Page 52
Guide to Deconstruction Section 7: The Deconstruction Process
DAY 12 - Additions - roof Porch roof tin, asphalt shingles, mixed type wood roof deck, transport materials to storage - West porch addition metal roof is removed. Asphalt shingles are removed using shingle shovels. 1 x 6's and 1 x 3's roof deck is removed DAY 14 - Additions, roofs, walls and siding Porch rafters, 2 x 4 studs, 1 x 6 novelty siding - Deconstruct West Porch rafters and walls. Sections of the original exterior wall is laid down. DAY 15 - Additions, rafters, walls, siding 2 x 4 studs, porch rafters, 1 x 6 novelty siding, front porch canopy - Continue deconstructing porch additions down to floor deck. DAY 16 - Additions - floor structure Floor deck, 2 x 8 floor joists, foundation block and concrete - 1 x 3 porch floor deck is removed. DAY 17 - Ceiling Structure and Walls 2 x 4 studs, 2 x 4 ceiling joists - Removal of original structure ceiling 2 x 4 rafters then 2 x 4 studs. The original house is divided in four equal quadrants by the stud walls. The 2 x 4 ceiling joists were removed in one quadrant leaving the next to brace the exterior wall. Next the surrounding exterior stud wall in the quadrant was cut with a skill saw. The stud wall could then be easily pushed over for deconstruction on the ground. DAY 18 - Floor Structure 1 x 3 floor deck, 2 x 6 floor joists, 4 x 6 floor beams, transport materials to storage - Removal of 1 x 3 floor deck of porch and support joists continues. Brick foundation pillars left in place. DAY 19 - Floor Structure 1 x 3 floor deck, 2 x 8 floor joists, 3 x 10 and 6 x 8 floor beams - 1 x 3 floor deck of original structure removed along with floor support beams. 1 x 3 decking appears to cup more when there is less resin in the wood. Every other board of 1 x 3 is cupped due to water damage from rain DAY 20 - Foundation and Chimney Foundation and chimney brick, garage demo of roof and walls - Pull remaining chimney over following OSHA guidelines. Pick up as many brick's from chimney and foundation as possible. The rest of the brick are left to the community to harvest. Final unload at the storage facility.
Page 53

Guide to Deconstruction Section 7: The Deconstruction Process
Deconstruction Process for Concrete Masonry Unit (CMU) House with Pool Cage Always remove the item that is over, in front of, in the way of, supported by, any other material or component.
• Remove pool cage, gutters and downspouts and placement into a metals roll-off. • Remove aluminum roof soffits and place into metals roll-off. • Remove exterior doors and windows • Remove interior fixtures such as diffusers, lights, ceiling fans, interior doors,
bathroom fixtures: lights, mirrors, medicine cabinets, toilets, sinks, vanities, shelving, and miscellaneous hardware.
• Remove carpet and placement into the swimming pool, except for pieces of carpet to use as ground clothes for catching nails during the de-nailing activities and for padding for windows or other breakable, scratchable components in transport.
• Remove ceiling drywall to the slab below and pile in middle of rooms for disposal.
• Remove batt ceiling insulation (to the inside) cutting out first any wires or conduit that are in the way, and cutting whatever else is found along the way.
• Remove any ductwork that is feasible for recycling. • Remove clay roofing tile for reuse • Remove roofing tile mortar • Remove asphalt and roofing felt (over one piece of plywood, try to center over the
center of a room) to make a drop area for the roof tile mortar and the asphalt and roofing felt to the floor below.
• Drop mortar and roofing felt to floor below. Keep this debris away from any side wall and insure that no other work is being performed in this area, nor will the areas where debris is dropped impede anyone else. Be sure to use yellow caution tape to close off this drop area.
• Remove plywood roof sheathing. • Remove blocking and bracing for trusses. • Remove wiring, ductwork, piping, and vents in attic space. • Remove trusses. • Remove gable end last, and remember to work towards the work processing areas,
not way from them, unless you have more than one way to get there. • Use rubber tired Bobcat to demolish interior walls and “sweep” studs, drywall,
roofing mortar and felt, all other miscellaneous debris with bucket into roll-offs for disposal.
• Use heavy equipment to demolish remaining masonry walls and concrete slab for recycling as mixed concrete and masonry rubble.
Page 54

Guide to Deconstruction Section 7: The Deconstruction Process
Pete Hendrick’s Rules for Deconstruction Every conceivable type of material to be found in a residential structure has some trick relative to its removal and handling that has to do with using the right tool, for removing and cleaning it for reuse, or preparing it for disposal. 1. There is one best way to handle each material and the job is to learn how to handle each
material in the best way. 2. If you are struggling, you are not doing it right. Use lever, wheels, incline plane, fulcrums to
reduce the brute force needed. 3. Two bar method is to place the first pry bar and make a gap and hold it, then slip the other
pry bar one in the gap further down, then work hand over hand down the line. (need pictures) 4. Using the edge of a stud or rafter and angle the bar next to it and under the attached piece,
levering against the stud as close as possible to the nail but not digging between the board and the stud. Pulling nails from the studs and joist in place is easier that removing it and pulling the nails on a sawhorse. And nails falling on the floor inside are easier to deal with than out on the ground and/or over the piece of carpet.
5. Pull carpet out and turn it upside down to use it under de-nailing station to catch nails. Or anything to catch nails, do not want to leave them or have to throw each one into a bucket.
6. Use lathe strips from plaster and lathe walls as spacers for stacking lumber. 7. Have four different bars with four different types of prying end and angle for different
situations. 8. Always work from the tongue side with any T&G material. 9. Always pull the nail in the direction that it went into the material. 10. Apply the building technique and tools to the deconstruction. 11. The material should come off in your hand as though “unlaying” it as it was put up. 12. For drywall, get an edge and try to pull off as big a sheet as possible that can be handled.
Don’t punch it. 13. Use the same tool that was used to place it - use a screwdriver if a screw, use a pry device if
hammered, use a pipe wrench if a pipe fitting, use cutters for wire, etc. 14. When you are going to do a section of throwaway like asphalt shingles, stage a separate
dumpster as close to building as possible. 15. Take off the middle rafter and leave the gable end, then push over the gable end as a unit and
take apart on the ground. 16. Schedule the de-nailing and deconstruction so that the last nail come out as the last building
material is removed. Everything ends at the same time, panelizing makes a mess. 17. Don’t let the materials pile up waiting for de-nailing. 18. Take off roof joist with person at each end on a ladder inside the house. Loosen the
connection and where bird’s mouth is. Slide over to free one end and walk down the ladder with it, as opposed to knocking it off and letting it fall to the ground.
19. Remove siding from inside; place bar parallel to the ground pry the bottom of the board on top, away from the board below. Lever down the wall and loosen it up then come back and lever the top off and pull it out and to the inside.
20. Stud wall: take the top plate off, leave the bottom plate on. Can try to remove the bottom plate down the wall and remove the studs as you go, angling the plate. If interior walls, then break out bottom and pull from the top.
21. A longer movement arm provides more levering force. Pull attachment out at same angle it went into the attachment point.
Page 55
Guide to Deconstruction Section 7: The Deconstruction Process
Safe Work Practices When Demolishing a Chimney
When preparing to demolish any chimney, the first step must be a careful, detailed inspection of the structure by an experienced person.
• Particular attention should be paid to the condition of the chimney. • Workers should be on the lookout for any structural defects such as weak or acid-
laden mortar joints, and any cracks or openings. • The interior brickwork in some sections of chimney shafts can be extremely
weak. • If chimney has been banded with steel straps, these bands should be removed only
as the work progresses from the top down. • The area around the chimney should be roped off or barricaded and secured with
appropriate warning signs posted. • No unauthorized entry should be permitted to this area. • It is also good practice to keep a worker, i.e., a supervisor, operating engineer,
another worker, or a "safety person," on the ground with a form of communication to the workers above.
• Special attention should be paid to weather conditions when working on a chimney.
• No work should be done during inclement weather such as during lightning or high wind situations.
• The work site should be wetted down, as needed, to control dust. • If debris is dropped inside the shaft, it can be removed through an opening in the
chimney at grade level. • The opening at grade must be kept relatively small in order not to weaken the
structure. • If machines are used for removal of debris, proper overhead protection for the
operator should be used. • Excessive debris should not be allowed to accumulate inside or outside the shaft
of the chimney as the excess weight of the debris can impose pressure on the wall of the structure and might cause the shaft to collapse.
• The foreman should determine when debris is to be removed, halt all demolition during debris removal, and make sure the area is clear of cleanup workers before continuing demolition.
Page 56
Guide to Deconstruction Appendix I: General Organizational and Safety Plan
Appendix I: General Organizational and Safety Plan
Personnel Policy Minimum responsibilities for each worker are to provide proper personal clothing as stated in this document. The deconstruction site is a drug-free environment. Any presence of illegal or intoxicating substances will be cause for immediate removal from the deconstruction site. Grievance procedure - any issues of concern shall be brought to the Job Supervisor immediately. Areas of Job Responsibility Every crew member will be assigned at least one area of responsibility, and over the first few months crew members will be encouraged to cross train each other so there is always at least one back-up person. A crew of “supervisors in training” is very different from a crew of “employees.” The supervisor will review each person’s area of responsibility at the morning meetings. The following seven areas of site responsibility offer one way to divide up tasks: Site Supervisor Responsibilities
• Do pre-work site review and write up list of prerequisite work for supervisor to give to owner.
• Develop contact with neighbors. This includes explaining the project and reporting problems or potential problems to supervisor.
• Review work order on-site before a job starts to confirm all special-ordered materials are on hand and all specs are clear.
• Set up job site – containment, isolation, dust room, rubbish area, etc. • Assure someone is taking responsibility for all other job assignments. • Establish and maintain production schedule. When a production goal is not met the
supervisor will, in consultation with the crew, write up a memo on what needs to be done to improve production or change the schedule.
Supply/Inventory Responsibilities
• Review supply list with supervisor to be clear on quantity, specifications, source, order time, etc., of each supply item held in inventory.
• Maintain a supply of materials on truck or trailer for at least two days. Make sure storage area has a supply for a month.
• Make additions, deletions, changes on inventory form as crew requests. If possible, work with administration to computerize a working system that may include inventory software.
• Maintain on-site storage areas. Tool & Equipment Inventory and Maintenance Responsibility
• Train people on use of equipment, particularly ladders, power tools and electrical cords. If equipment is damaged, tag and have it repaired before use.
Page 57

Guide to Deconstruction Appendix I: General Organizational and Safety Plan
• Keep an inventory of all crew tools and materials. Be sure there is a replacement for critical tools in the warehouse. Check inventory of major tools daily.
• Keep tools clean and sharp. Keep a full supply of new blades. • Evaluate tools and make recommendations for replacement or additional tools. • This person may also be responsible for vehicle maintenance (checking air, gas, oil,
etc.) on a regular basis. Health and Safety Responsibility
• Inspect site for any health and safety problems before and during job. This person may do the pre-work site review rather than the supervisor.
• Responsible for implementing weekly safety meetings and maintaining injury/accident reports.
• Maintaining first aid kit, drinking water supply, a safe, clean, well-lit break area and clean toilets.
• Implement respirator maintenance program as required by OSHA. • Inspect use of ladders, scaffolding, power equipment, etc.
Quality Control Responsibility This position would be circulated throughout the crew on a job-by-job basis. The crew will produce a “punch list” of items and monitor the list’s completion at each phase of work. Site Data Collection and Salvaged Material Inventory Responsibility
• Maintain site log. • Record time spent as compared to estimated time. To the degree possible, break work
into components such as set-up, windows, clean up, etc. using data collection form provided
• Record materials used out of inventory or special purchase. • Based on a distribution schedule, what material gets sold on-site, warehoused,
processed, etc. Material will be bundled, palletized or placed in racks. • Where materials will be processed on-site (de-nailed, ends cut, mortar removed, etc.),
quality control and inventory will be kept. Worker, Safety, Health & Comfort
• Clean up Area - The clean up area is to be located at the entrance/exit area of the job site. It contains:
• Wash up supplies - rinse buckets, soap, a pump sprayer for final rinse, paper towels, a 2-bottle eye wash station and a first aid kit.
• Worker protection - spare goggles, painter’s caps, respirators, tyvec suits and cleaning pads.
• Clothes rack - a place to leave tyvec suits, dusk masks, respirators, and shoe covers. Work clothing can be vacuumed until it can be changed.
• Emergency numbers - local hospital, property owners, utilities, etc.
Page 58
Guide to Deconstruction Appendix I: General Organizational and Safety Plan
• Workers will leave and enter the job site through the door at the clean up area. Workers must wash their hands before eating, drinking, or smoking and clean up thoroughly before going home.
• Break Area - Where this is located depends on the site, the size of the job and the weather. It could be under a tree or in a heated construction trailer. It should include at least
• Good air circulation and shade in hot weather • Safe heat when it’s cold • Comfortable places to sit • A place to store food, preferably refrigerated • Easy access to clean toilets • A private area for men and a private area for women to change clothes • A secure place to park - this might include negotiations with neighbors or a contract
with a parking facility. • Good lighting, preferably natural light.
Page 59
Guide to Deconstruction Appendix I: General Organizational and Safety Plan
Safety Rules for All Employees It is the policy of Center for Construction & Environment (University of Florida) that everything possible will be done to protect you from accidents, injuries and/or occupational disease while on the job. Safety is a cooperative undertaking requiring an ever-present safety consciousness on the part of every employee. If an employee is injured, positive action must be taken promptly to see that the employee receives adequate treatment. No one likes to see a fellow employee injured by an accident. Therefore, all operations must be planned to prevent accidents. To carry out this policy, the following rules will apply: All employees shall follow the safe practices and rules contained in this manual and such
other rules and practices communicated on the job. All employees shall report all unsafe conditions or practices to the proper authority, including the supervision on the project, and, if corrective action is not taken immediately, a governmental authority with proper jurisdiction over such practices.
The job-site supervisor shall be responsible for implementing these policies by insisting that employees observe and obey all rules and regulations necessary to maintain a safe work place and safe work habits and practices.
Good housekeeping must be practiced at all times in the work area. Clean up all waste and eliminate any dangers in the work area.
Suitable clothing and footwear must be worn at all times. Personal protection equipment (hardhats, respirators, eye protection) will be worn whenever needed.
All employees will participate in a safety meeting conducted by their supervisor once every week.
Anyone under the influence of intoxicating liquor or drugs, including prescription drugs which might impair motor skills and judgment, shall not be allowed on the job.
Horseplay, scuffling, and other acts which tend to have an adverse influence on safety or well-being of other employees are prohibited.
Work shall be well planned and supervised to avoid injuries in the handling of heavy materials and while using equipment.
No one shall be permitted to work while the employee's ability or alertness is so impaired by fatigue, illness, or other causes that it might expose the employee or others to injury.
There will be no consumption of liquor or beer on the job. Employees should be alert to see that all guards and other protective devices are in proper
places and adjusted, and shall report deficiencies promptly to the job-site supervisor. Employees shall not handle or tamper with any electrical equipment, machinery, or air or
water lines in a manner not within the scope of their duties, unless they have received specific instructions.
All injuries should be reported to the job-site supervisor so that arrangements can be made for medical or first aid treatment.
When lifting heavy objects, use the large muscles of the leg instead of the smaller muscles of the back.
Do not throw things, especially material and equipment. Dispose of all waste properly and carefully. Bend/pull all exposed nails so they do not hurt anyone removing the waste.
Do not wear shoes with thin or torn soles.
Page 60
Guide to Deconstruction Appendix I: General Organizational and Safety Plan
Periodic Safety Training Meetings Center for Construction & Environment (University of Florida) has safety meetings every week. The purpose of the meeting is to convey safety information and answer employee questions. The format of most meetings will be to review, in language understandable to every employee, the content of the injury prevention program, special work site hazards, serious concealed dangers, and material safety data sheets. Each week, the job-site supervisor will review a portion of the company's safe work practices contained in this booklet, or other safety related information. Whenever a new practice or procedure is introduced into the workplace, it will be thoroughly reviewed for safety. A sign-up sheet will be passed around each meeting, and notes of the meeting will be distributed afterwards. Employee Responsibility for Training Teaching safety is a two-way street. Remember, the following general rules apply in all situations: No employee should undertake a job that appears to be unsafe. No employee is expected to undertake a job until he/she has received adequate safety instructions, and is authorized to perform the task. No employee should use chemicals without fully understanding their toxic properties and without the knowledge required to work with these chemicals safely. Mechanical safeguards must be kept in place. Employees must report any unsafe conditions to the job site supervisor and the Responsible Safety Officer. Any work-related injury or illness must be reported to management at once. Personal protective equipment must be used when and where required. All such equipment must be properly maintained. Communication Employers should communicate to employees their commitment to safety and to make sure that employees are familiar with the elements of the safety program. Center for Construction & Environment (University of Florida) communicates with its employees orally, in the form of directions and statements from your supervisor, written, in the form of directives and this manual, and by example. If you see a supervisor or management do something unsafe, please tell that person. We sometimes forget actions speak louder than words. Accident Prevention Policy Posting
Each employee has a personal responsibility to prevent accidents. You have a responsibility to your family, to your fellow workers and to the Company. You will be expected to observe safe practice rules and instructions relating to the efficient handling of your work. Your responsibilities include the following:
Incorporate safety into every job procedure. No job is done efficiently unless it has been done safely.
Know and obey safe practice rules. Know that disciplinary action may result from a violation of the safety rules. Report all injuries immediately, no matter how slight the injury may be. Caution fellow workers when they perform unsafe acts.
Page 61
Guide to Deconstruction Appendix I: General Organizational and Safety Plan
Don't take chances. Ask questions when there is any doubt concerning safety. Don't tamper with anything you do not understand. Report all unsafe conditions or equipment to your supervisor immediately.
Accident Prevention Policy Posting A copy of this manual will be posted in the work area. It is the policy of to provide a safe and clean workplace and to maintain sound operating practices. Concentrated efforts shall produce safe working conditions and result in efficient, productive operations. Safeguarding the health and welfare of our employees cannot be stressed too strongly. Accident prevention is the responsibility of all of us. Department heads and supervisors at all levels shall be responsible for continuous efforts directed toward the prevention of accidents. Employees are responsible for performing their jobs in a safe manner. The observance of safe and clean work practices, coupled with ongoing compliance of all established safety standards and codes, will reduce accidents and make our Company a better place to work. Hazard Identification & Abatement This written safety and health plan sets out a system for identifying workplace hazards and correcting them in a timely fashion. Please review it carefully with your supervisor. Remember, safety is everyone's responsibility. Since many of the buildings to be demolished/deconstructed have not been cleaned out, many unmarked abandoned jars, cans, bottles and more are still located on site for us to dispose of properly. Any chemicals, solvents and gases must be put to the side for the job site supervisor to review and decide how it should be handled and removed form the job site. All asbestos abatements will be complete before workers will come on the site and work on problem areas. If asbestos is found on the site while work is underway the job will be stopped and a consultant will verify it is safe to proceed. Workplace Inspections In addition to the examination of records, work place safety inspections will occur periodically every week, when conditions change, or when a new process or procedure is implemented. During these inspections, there will be a review of the injury and illness prevention policy and Center for Construction & Environment (University of Florida) code of safe work practices. OSHA Records Required Copies of required accident investigations and certification of employee safety training should be maintained by the Responsible Safety Officer. A written report will be maintained on each accident, injury or on-the-job illness requiring medical treatment. A record of each such injury or illness is recorded on OSHA Log and Summary of Occupational Injuries Form 200 according to its instructions. Supplemental records of each injury are maintained on OSHA Form 101, or Employers Report of Injury or Illness Form 5020. Every year, a summary of all reported injuries or illnesses is posted no later than February 1, for one
Page 62
Guide to Deconstruction Appendix I: General Organizational and Safety Plan
month, until March 1, on OSHA Form 200. These records are maintained for five years from the date of preparation. Smoking & Fire Safety Fire is one of the worst enemies of any facility. Learn the location of the fire extinguishers. Learn how to use them. You can help prevent fires by observing the smoking rules: Smoking is not allowed on the site. Smoking is not permitted in toilets. Reporting All serious accidents must be reported to OSHA. In cases of hospitalization or death, a full investigation with copies to governmental authorities will be required. In less serious cases, the investigation report must be presented to the company for disclosure to its insurance carrier and for remedial action at the work site. Ladders Check ladders each and every time before you climb. Ladders should be maintained in good condition: joints between steps and side rails should be tight; hardware and fittings securely attached; and movable parts operating freely without binding or undue play. Non-slip safety feet are provided on each ladder. Ladder rungs and steps should be free of grease and oil. Employees are prohibited from using ladders that are broken, missing steps, rungs, or cleats, or that have broken side rails or other faulty equipment. It is prohibited to place a ladder in front of doors opening toward the ladder except when the door is blocked open, locked or guarded. It is prohibited to place ladders on boxes, barrels, or other unstable bases to obtain additional height. Face the ladder when ascending or descending. Be careful when you climb a ladder. Do not use the top step of ordinary stepladders as a step. When portable rung ladders are used to gain access to elevated platforms, roofs, etc., the ladder must always extend at least 3 feet above the elevated surface. It is required that when portable rung or cleat type ladders are used, the base must be so placed that slipping will not occur, unless it is lashed or otherwise held in place. All portable metal ladders must be legibly marked with signs reading "CAUTION" - "Do Not Use Around Electrical Equipment." Employees are prohibited from using ladders as guys, braces, skids, gin poles, or for other than their intended purposes. Only adjust extension ladders while standing at a base (not while standing on the ladder or from a position above the ladder). Metal ladders should be inspected for tears and signs of corrosion. Rungs of ladders should be uniformly spaced at 12 inches, center to center.
Page 63

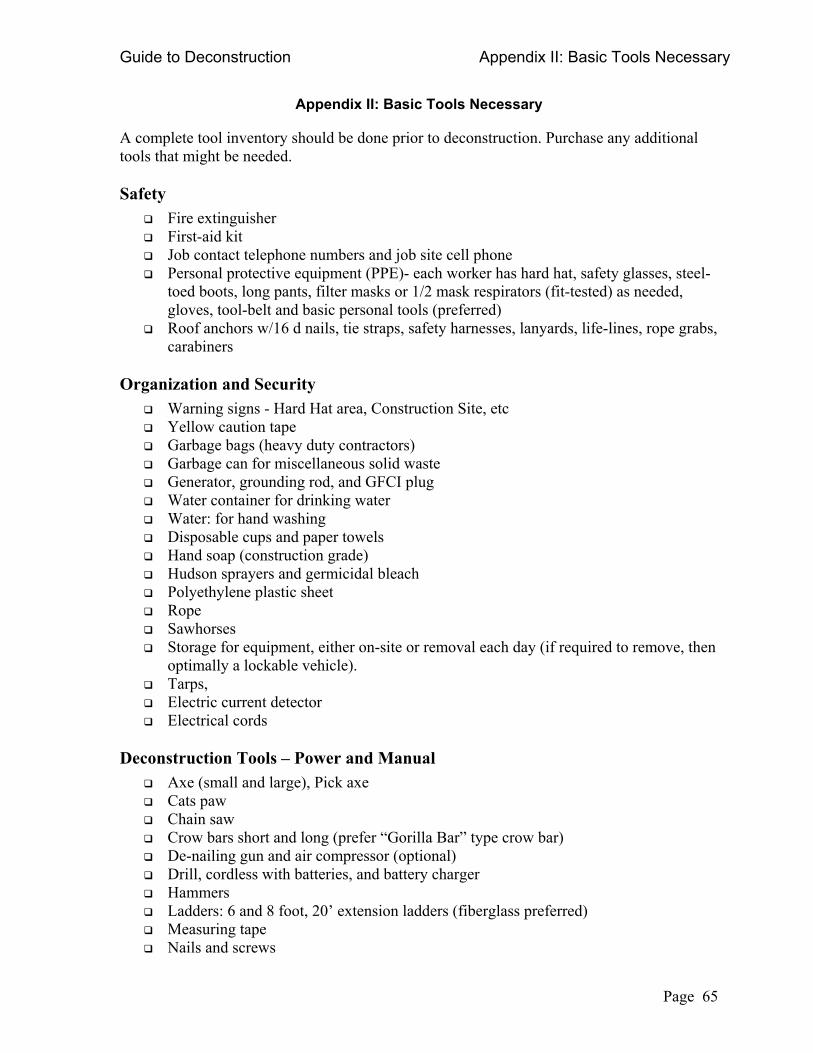
Guide to Deconstruction Appendix II: Basic Tools Necessary
Appendix II: Basic Tools Necessary
A complete tool inventory should be done prior to deconstruction. Purchase any additional tools that might be needed. Safety
Fire extinguisher First-aid kit Job contact telephone numbers and job site cell phone Personal protective equipment (PPE)- each worker has hard hat, safety glasses, steel-
toed boots, long pants, filter masks or 1/2 mask respirators (fit-tested) as needed, gloves, tool-belt and basic personal tools (preferred)
Roof anchors w/16 d nails, tie straps, safety harnesses, lanyards, life-lines, rope grabs, carabiners
Organization and Security
Warning signs - Hard Hat area, Construction Site, etc Yellow caution tape Garbage bags (heavy duty contractors) Garbage can for miscellaneous solid waste Generator, grounding rod, and GFCI plug Water container for drinking water Water: for hand washing Disposable cups and paper towels Hand soap (construction grade) Hudson sprayers and germicidal bleach Polyethylene plastic sheet Rope Sawhorses Storage for equipment, either on-site or removal each day (if required to remove, then
optimally a lockable vehicle). Tarps, Electric current detector Electrical cords
Deconstruction Tools – Power and Manual
Axe (small and large), Pick axe Cats paw Chain saw Crow bars short and long (prefer “Gorilla Bar” type crow bar) De-nailing gun and air compressor (optional) Drill, cordless with batteries, and battery charger Hammers Ladders: 6 and 8 foot, 20’ extension ladders (fiberglass preferred) Measuring tape Nails and screws
Page 65

Guide to Deconstruction Appendix II: Basic Tools Necessary
Pliers Saws: bow saw, hand saw, hack saw rotary saw, Skil saw with grinder and wood
cutting blades Sawz-alls with bi-metal blades Screw drivers regular and phillips head Shovels: regular and specialty Snow shovels Roofing shovels Sledgehammers (small and large) Post-hole digger Pry bars Rakes Tamping bar or “Grizzly Bar” Tin snips Vise grips Wheelbarrows Wire and bolt cutters Wrenches adjustable
Equipment Rental as needed
20 C.Y. to 40 C.Y. roll-off Covered truck to remove salvage Debris chutes Man-lift, Hi-lift, Fork Lift Pneumatic or electric hammer with chisels Rolling scaffold Fall protection safety equipment Respiratory protection safety suits and equipment
Page 66

Guide to Deconstruction Appendix III: Sample Fall Protection Plan
Appendix III: Sample Fall Protection Plan
Name of Project: Location of Job: Deconstruction Company: Date Plan Prepared or Modified: Plan Prepared By: Plan Approved By: Plan Supervised By: The following Fall Protection Plan is prepared for the prevention of injuries associated with falls. A Fall Protection Plan must be developed and evaluated on a site-by-site basis. Statement of company policy (Name of demolition/deconstruction company) is dedicated to the protection of its employees from on-the-job injuries. All employees of the _________________________ have the responsibility to work safely on the job. The purpose of this plan is: (a) To supplement our standard safety policy by providing safety standards specifically designed to cover fall protection on this job and; (b) To ensure that each employee is trained and made aware of the safety provisions which are to be implemented by this plan prior to the start of deconstruction. This Fall Protection Plan addresses the use of conventional and non-conventional fall protection at a number of areas on the project, as well as, identifying specific activities that require non-conventional means of fall protection. These areas include: a. Removal of high wall and ceiling interior finish materials and components b. Leading edge work. c. Unprotected sides or edge. d. Dismantling of roof finish materials and structures. e. Use of ladders or scaffolding for removal of exterior high wall components.
Page 67
Guide to Deconstruction Appendix III: Sample Fall Protection Plan
This plan is designed to enable employers and employees to recognize the fall hazards on this job and to establish the procedures that are to be followed in order to prevent falls to lower levels or through holes and openings in walking/working surfaces. Each employee will be trained in these procedures and strictly adhere to them except when doing so would expose the employee to a greater hazard. If, in the employee’s opinion, this is the case, the employee is to notify the foreman of the concern and the concern addressed before proceeding. Safety policy and procedure on any one project cannot be administered, implemented, monitored and enforced by any one individual. The total objective of a safe, accident free work environment can only be accomplished by a dedicated, concerted effort by every individual involved with the project from management down to the last employee. Each employee must understand their value to the company; the costs of accidents, both monetary, physical, and emotional;
• The objective of the safety policy and procedures; • The safety rules that apply to the safety policy and procedures; • And what their individual role is in administering, implementing, monitoring, and
compliance of their safety policy and procedures. This allows for a more personal approach to compliance through planning, training, understanding and cooperative effort, rather than by strict enforcement. If for any reason an unsafe act persists, strict enforcement will be implemented. It is the responsibility of __________ to implement this Fall Protection Plan. __________ is responsible for continual observational safety checks of their work operations and to enforce the safety policy and procedures. The foreman also is responsible to correct any unsafe acts or conditions immediately. It is the responsibility of the employee to understand and adhere to the procedures of this plan and to follow the instructions of the foreman. It is also the responsibility of the employee to bring to management’s attention any unsafe or hazardous conditions or acts that may cause injury to either themselves or any other employees. Any changes to this Fall Protection Plan must be approved by: Fall protection systems to be used on this project The following fall hazards are present in the deconstruction process:
• Removal of window trim, ceiling and high wall fixtures and appurtenances using ladders or rolling scaffolding.
• Removal high wall and ceiling plaster or drywall, ceiling insulation, attic wiring and ductwork by use of ladders or rolling scaffolding.
• Removal of roof finish, sheathing and rafters from either a platform created by roof joists or beams and planking.
• Removal of roof finish and sheathing materials from a working platform of the roof itself.
Page 68
Guide to Deconstruction Appendix III: Sample Fall Protection Plan
• Removal of roof fascia, soffits, rakes, high-level exterior trim, high-level exterior siding by use of ladders.
• Removal of roof structural members using rolling scaffolding or an adjacent structural roof, supported independently from the roof being removed.
• Use of extension ladders for access to working heights 6 feet above the level below. • Removal of second floor windows and exterior siding where openings in the wall
surface are created, from adjacent roof surfaces or the second floor interior surface. Where conventional fall protection is infeasible or creates a greater hazard at the leading edge and during structural dismantling activity, we plan to do this work using a safety monitoring system and expose only a minimum number of employees for the time necessary to actually accomplish the job. The maximum number of workers to be monitored by one safety monitor is two (2). We are designating the following trained employees as designated deconstructors for heights above at 6 feet or higher than the level below and they are permitted to enter the controlled access zones and work without the use of conventional fall protection. Safety monitor: Designated high-level deconstructor: Designated high-level deconstructor: *high-level indicates any work performed at or above 6 feet above the level below or when using scaffolds at 10 feet or more above the level below. The safety monitor shall be identified by _________. Only individuals with the appropriate experience, skills, and training will be authorized as designated high-level deconstructors. All employees that will be working as designated high-level dismantlers under the safety monitoring system shall have been trained and instructed in the following areas:
1. Recognition of the fall hazards in the work area (at the leading edge and when making initial connections-point for tie-off).
2. Avoidance of fall hazards using established work practices which have been made known to the employees.
3. Recognition of unsafe practices or working conditions that could lead to a fall, such as windy conditions.
4. The function, use, and operation of safety monitoring systems, guardrail systems, body belt/harness systems, control zones and other protection to be used.
5. The correct procedure for erecting, maintaining, disassembling and inspecting the system(s) to be used.
6. Knowledge of deconstruction sequence or the deconstruction plan.
Page 69

Guide to Deconstruction Appendix III: Sample Fall Protection Plan
A conference will take place prior to starting work involving all members of the high-level deconstruction crew, supervisors of any other concerned contractors. This conference will be conducted by the Supervisor in charge of the project. During the pre-work conference, deconstruction procedures and sequences pertinent to this job will be thoroughly discussed and safety practices to be used throughout the project will be specified. Further, all personnel will be informed that the controlled access zones are off limits to all personnel other than those designated deconstructors specifically trained to work in that area. Safety Monitoring System A safety monitoring system means a fall protection system in which a competent person is responsible for recognizing and warning employees of fall hazards. This system will be employed when using rolling tower scaffolding at heights less than 10 feet above the level below. The duties of the safety monitor are to:
7. Warn by voice when approaching the open edge in an unsafe manner. 8. Warn by voice if there is a dangerous situation developing which cannot be seen by
another person involved with product removal, such as a member getting out of control.
9. Make the designated deconstructors aware they are in a dangerous area. 10. Be competent in recognizing fall hazards. 11. Warn employees when they appear to be unaware of a fall hazard or are acting in an
unsafe manner. 12. Be on the same walking/working surface as the monitored employees or within visual
sighting distance of the monitored employees and able to see both the deconstructor and any openings or leading edges that pose a hazard to the deconstructor.
13. Be close enough to communicate orally with the employees. 14. Not allow other responsibilities to encumber monitoring. If the safety monitor
becomes too encumbered with other responsibilities, the monitor shall (1) stop the erection process; and (2) turn over other responsibilities to a designated safety monitor; or (3) turn over the safety monitoring function to another designated, competent person.
The safety monitoring system shall not be used when the wind is strong enough to cause loads with large surface areas to swing out of radius, or result in loss of control of the load, or when weather conditions cause the walking-working surfaces to become icy or slippery. Control Zone System A controlled access zone means an area designated and clearly marked, in which leading edge work may take place without the use of guardrail, safety net or personal fall arrest systems to protect the employees in the area. Control zone systems shall comply with the following provisions:
Page 70

Guide to Deconstruction Appendix III: Sample Fall Protection Plan
1. When used to control access to areas where leading edge and other operations are taking place the controlled access zone shall be defined by a control line or by any other means that restricts access.
2. When control lines are used, they shall be erected not less than 6 feet (l.8 m) nor more than 60 feet (18 m) or half the length of the member being erected, whichever is less, from the leading edge.
3. The control line shall extend along the entire length of the unprotected or leading edge and shall be approximately parallel to the unprotected or leading edge.
4. The control line shall be connected on each side to a guardrail system or wall. 5. Control lines shall consist of ropes, wires, tapes, or equivalent materials, and
supporting stanchions as follows: 6. Each line shall be flagged or otherwise clearly marked at not more than 6-foot (1.8 m)
intervals with high-visibility material. 7. Each line shall be rigged and supported in such a way that its lowest point (including
sag) is not less than 39 inches (1 m) from the walking/working surface and its highest point is not more than 45 inches (1.3 m) from the walking/working surface.
8. Each line shall have a minimum breaking strength of 200 pounds (.88 kN). Holes All openings greater than 12 in. x 12 in. will have perimeter guarding or covering. All predetermined holes will have the plywood covers made in the precasters’ yard and shipped with the member to the jobsite. Prior to cutting holes on the job, proper protection for the hole must be provided to protect the workers. Perimeter guarding or covers will not be removed without the approval of the erection foreman. Precast concrete column erection through the existing deck requires that many holes be provided through this deck. These are to be covered and protected. Except for the opening being currently used to erect a column, all opening protection is to be left undisturbed. The opening being uncovered to erect a column will become part of the point of erection and will be addressed as part of this Fall Protection Plan. This uncovering is to be done at the erection foreman’s direction and will only occur immediately prior to "feeding" the column through the opening. Once the end of the column is through the slab opening, there will no longer exist a fall hazard at this location. Implementation of fall protection plan The structure being erected is a multistory total precast concrete building consisting of columns, beams, wall panels and hollow core slabs and double tee floor and roof members. The following is a list of the products and erection situations on this job:
Page 71
Guide to Deconstruction Appendix III: Sample Fall Protection Plan
Columns For columns 10 ft to 36 ft long, employees disconnecting crane hooks from columns will work from a ladder and wear a body belt/harness with lanyard and be tied off when both hands are needed to disconnect. For tying off, a vertical lifeline will be connected to the lifting eye at the top of the column, prior to lifting, to be used with a manually operated or mobile rope grab. For columns too high for the use of a ladder, 36 ft and higher, an added cable will be used to reduce the height of the disconnecting point so that a ladder can be used. This cable will be left in place until a point in erection that it can be removed safely. In some cases, columns will be unhooked from the crane by using an erection tube or shackle with a pull pin which is released from the ground after the column is stabilized. The column will be adequately connected and/or braced to safely support the weight of a ladder with an employee on it. Inverted Tee Beams Employees erecting inverted tee beams, at a height of 6 to 40 ft, will erect the beam, make initial connections, and final alignment from a ladder. If the employee needs to reach over the side of the beam to bar or make an adjustment to the alignment of the beam, they will mount the beam and be tied off to the lifting device in the beam after ensuring the load has been stabilized on its bearing. To disconnect the crane from the beam an employee will stand a ladder against the beam. Because the use of ladders is not practical at heights above 40 ft, beams will be initially placed with use of tag lines and their final alignment made by a person on a manlift or similar employee positioning systems.
Page 72

Guide to Deconstruction Appendix IV: OSHA and Nonprofit Organizations
Appendix IV: OSHA and Nonprofit Organizations
Coverage of Employees under the Williams-Steiger OSHA 1970 Regulations (Standards - 29 CFR) Coverage. - 1975.4 1975.4(a) General. Any employer employing one or more employees would be an "employer engaged in a business affecting commerce who has employees" and, therefore, he is covered by the Act as such. Nonprofit and charitable organizations. The basic purpose of the Williams-Steiger Act is to improve working environments in the sense that they impair, or could impair, the lives and health of employees. Therefore, certain economic tests such as whether the employer's business is operated for the purpose of making a profit or has other economic ends may not properly be used as tests for coverage of an employer's activity under the Williams-Steiger Act. To permit such economic tests to serve as criteria for excluding certain employers, such as nonprofit and charitable organizations which employ one or more employees, would result in thousands of employees being left outside the protections of the Williams-Steiger Act in disregard of the clear mandate of Congress to assure "every working man and woman in the Nation safe and healthful working conditions . . .". Therefore, any charitable or non-profit organization that employs one or more employees is covered under the Williams-Steiger Act and is required to comply with its provisions and the regulations issued thereunder. (Some examples of covered charitable or non-profit organizations would be disaster relief organizations, philanthropic organizations, trade associations, private educational institutions, labor organizations, and private hospitals.)
Page 73

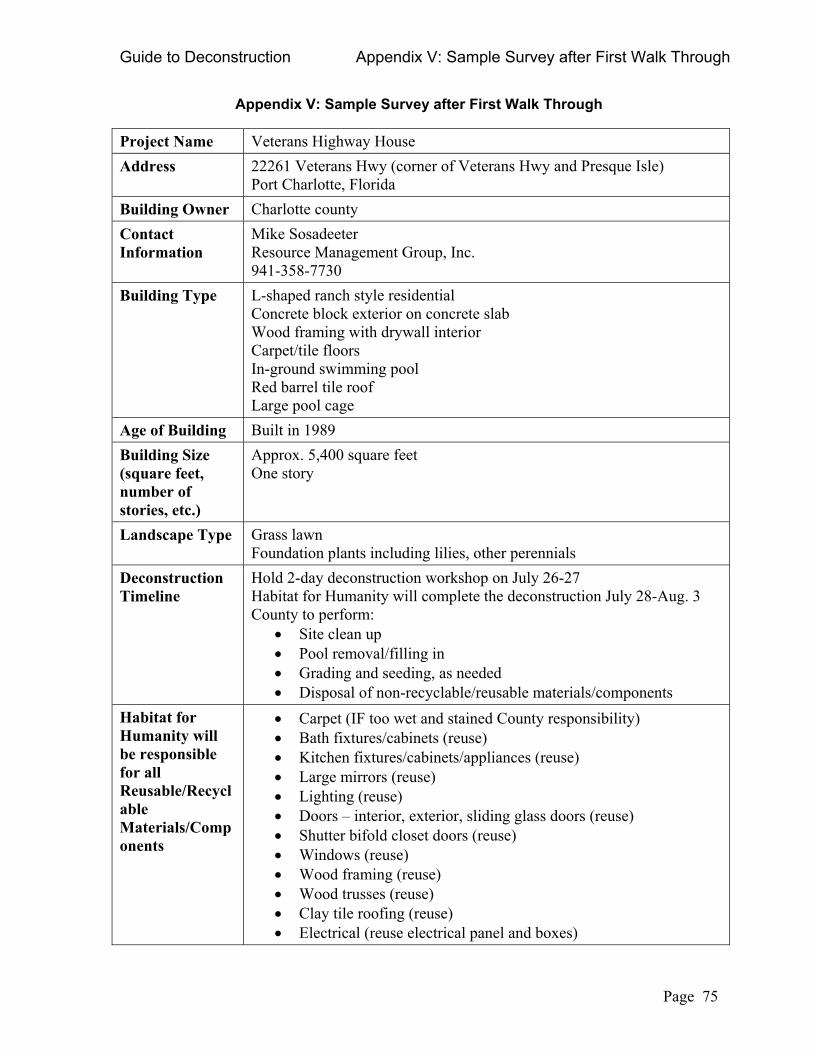
Guide to Deconstruction Appendix V: Sample Survey after First Walk Through
Appendix V: Sample Survey after First Walk Through
Project Name Veterans Highway House Address 22261 Veterans Hwy (corner of Veterans Hwy and Presque Isle)
Port Charlotte, Florida Building Owner Charlotte county Contact Information
Mike Sosadeeter Resource Management Group, Inc. 941-358-7730
Building Type L-shaped ranch style residential Concrete block exterior on concrete slab Wood framing with drywall interior Carpet/tile floors In-ground swimming pool Red barrel tile roof Large pool cage
Age of Building Built in 1989 Building Size (square feet, number of stories, etc.)
Approx. 5,400 square feet One story
Landscape Type Grass lawn Foundation plants including lilies, other perennials
Deconstruction Timeline
Hold 2-day deconstruction workshop on July 26-27 Habitat for Humanity will complete the deconstruction July 28-Aug. 3 County to perform:
• Site clean up • Pool removal/filling in • Grading and seeding, as needed • Disposal of non-recyclable/reusable materials/components
Habitat for Humanity will be responsible for all Reusable/Recyclable Materials/Components
• Carpet (IF too wet and stained County responsibility) • Bath fixtures/cabinets (reuse) • Kitchen fixtures/cabinets/appliances (reuse) • Large mirrors (reuse) • Lighting (reuse) • Doors – interior, exterior, sliding glass doors (reuse) • Shutter bifold closet doors (reuse) • Windows (reuse) • Wood framing (reuse) • Wood trusses (reuse) • Clay tile roofing (reuse) • Electrical (reuse electrical panel and boxes)
Page 75

Guide to Deconstruction Appendix V: Sample Survey after First Walk Through
• Plumbing (reuse/recycle) • Pool cage (recycle the frame) • Tile roof (reuse) • Insulation (reuse) • Plywood sheathing on roof (reuse) • Plants, shrubs, flowers, trees (reuse) • Pool pump/filter (to Demolition company) • Water filter/pump (to Demolition company)
Charlotte County Responsibilities
Arrange for all necessary permits Disconnect all utilities:
• Sewer/septic • Electrical • Water • Cable • Phone
Dispose of all hazardous materials/components on site that could include (no hazardous materials were identified during the initial site visit): Paint
• Oils, Refrigerants, Solvents Supply a 30 yard dumpster at start of project (additional pulls necessary depending on amount of material) to dispose of all materials that cannot be reused/recycled to include but not limited to:
• Carpet (if it is too wet or stained) • HVAC (AC unit doesn’t work) • Pool cage (screen material) • Electrical (wiring) • Plumbing (valves, connections, other non-reusable/recyclable
parts) • Tile flooring • Swimming pool tile • Swimming pool (remove or fill in) • Concrete block • Concrete slab & driveway • Stone fireplace • Miscellaneous materials left at the site that cannot be
reused/recycled Project Close Out:
• Site clean up • Pool removal/filling in • Grading and seeding, as needed • Disposal of non-recyclable/reusable materials/components\
Page 76
Guide to Deconstruction Appendix VI: Sample Building Engineering Survey
Appendix VI: Sample Building Engineering Survey
Deconstruction Building Engineering Survey – 15 SW 2nd Place, Gainesville, Florida Before any work commences, a competent person will perform a building engineering survey. Due to the nature of deconstruction, i.e. the building may be old and have had building additions and layers of materials added over time, some factors may not be determined until work has commenced. After work has begun an engineering survey will take place daily, and additional procedure and safety requirements will be determined as the need arises. The process of reviewing the 3 houses for deconstruction from November 7, 2001 to December 15, 2001 is comprised of:
• A lead and asbestos survey completed by the Owner • Visual inspection including access to attics and crawlspaces • General and building element-specific photographs • Measurements and creation of “as-built” floor plan(s), and elevations • Written record of hazards and potential hazards, including damage to the building • Identification of load-bearing and non-load-bearing structure. • Identification of the chronological process for each building • Identification of primary disposal and salvage components • Identification of site conditions, access, and disposal, storage and processing areas • Identification of site constraints
The purpose of the building engineering survey is to insure an adequate understanding of all major conditions and potential conditions that may pose a hazard and to assist in the determination of the process and techniques of the deconstruction. It is used to identify potential hazards (occupational health hazards, premature collapse, fall hazards, fire or electrical hazards, etc.) and develop control to prevent accidents. A written engineering survey must be prepared before work is begun, maintained on site, and updated as work progresses. The building engineering survey must be signed and dated by the person(s) performing the survey. A walk-through will be conducted at the end of every work day and a worker tool talk will talk place at the beginning of every shift. Construction type and structure size: The location of the building is: 15 SW 2nd Place, Gainesville, Florida 32601 Ground Floor = 2,904 SF Second Floor = 1,052 SF Covered Entrance porch = 37 SF Wood Access Ramps/Deck = 630 SF Inspection November 2, 2001 The structure is comprised of light-wood framing walls (2x4) and raised wood floor system (2x6, 2x8 joists) approximately 18” to 24” above grade on brick piers. The original portion of
Page 77

Guide to Deconstruction Appendix VI: Sample Building Engineering Survey
the structure is 2 stories and several later additions are all 1 story. All second floor windows are below 20’ above the grade below. This building was occupied until very recently before it was slated or demolition and therefore is in excellent condition. There was no observable fire damage and minimal water damage was isolated to a few locations. Second Floor Conditions The southwest room has a jalousie type door (opening with glass panes) with several panes missing and no landing outside the door. The vertical glass opening sill is below 18” above the floor. There was apparent water damage in the ceiling where a portion of the wood lathe and plaster was sagging. This area did not appear to be in eminent danger of collapse and an inspection of the attic did not reveal any structural damage of the roof beams at this location. There was considerable debris in the front room on the north side immediately over the downstairs stair entry vestibule. Vandals had removed the second floor landing railing creating an unprotected edge over the stair. This edge is about 8’ long and runs parallel to the direction of the stairs starting at the top of the landing. Several windows in the southeast room had sills below 12” above the floor presenting a potential fall hazard when the windows are removed. One window has missing sash but glass in the frame which might break when trying to remove window. One window in the northeast room was broken with plastic sheeting taped in the opening. There was jagged glass in this window frame. There was evidence of, and the person conducting the survey had observed homeless persons in the second floor. This evidence consisted of possible body fluids, clothing and food and beverage objects on the floor of several rooms. First Floor Conditions The kitchen area had considerable debris underfoot, overhead duct work and various jars with unknown liquids in them. The floor appeared to have remains of dirt and possible grease. This room also had minimal to no natural light access. There was a large refrigeration unit outside in the lean-to shed area that probably has freon or other refrigerant that will be a hazardous material. There is a restroom located in the center of the first floor area that does not have access to natural light and any degree of ventilation except for the doorway. This area has toilets, sinks, etc.
Page 78
Guide to Deconstruction Appendix VI: Sample Building Engineering Survey
Behind the bar there was considerable broken glass on the floor and a long wall mounted mirror. The bar and kitchen area in general contained considerable debris and possible food and beverage waste in various containers. There was one broken window on the east side of the building that had been partially closed off with plywood. Site Conditions The access ramp on the east side of the building has a section of top railing broken off leaving an open edge at about 24” above the grade below. The posts on this elevated walkway were several feet apart and there was no mid-rail. The small covered entryway platform on the southwest corner of the south-side 1 story addition had several rail stiles broken off of the railing. There are considerable number of trees and brush including palmettos mainly on the east and north side of the building with branches protruding at eye-level. These bushes will be removed and/or trimmed to allow access to the sides of the building and remove eye and tripping hazards. There are sections of chain-link fence and wood fence that limit clear access around the perimeter of the building, on the west and south sides, that will be removed through mechanical means at the beginning of the project and before the hand labor team begins work. Overhead power lines will remain in place along the west edge of the property. These do not pose a hazard to workers, but may pose a hazard for the use of heavy equipment and the dropping and pulling of roll-offs along that side of the building. There is a brick wall of an adjacent building that limits access for heavy equipment and roll-off containers on the east side of the building. It is about 20’ from the east side of the building. The south side of the building is open area, which is formed by this building and adjacent buildings on the block. It currently has some debris including metal roofing and miscellaneous wood and masonry. This area will be cleared to make room for work activities. Structural Layout The building has 4 clearly defined sections. The original structure is a T-shaped 2-story building which appears to have had a first story front porch at the NE corner and a porch at the back or south side, on the second floor. Both of these porch areas were enclosed. Two 1 story sections were added extending south from the south side of the 2-story building and another partially open 1 story addition was added to the west side of the structure. The building has one central stairway providing access to the second story and directly to the outside via a separate entrance door.
Page 79

Guide to Deconstruction Appendix VI: Sample Building Engineering Survey
Condition of wall framing, floors, roofs Condition of wall framing, floors, roofs are all sound, no major damage or danger of imminent collapse. Small holes in the roof were recently created by the abatement of asbestos caulking and mastic around several chimneys, at the intersection of the chimney and the roof finish. Wall and floor framing are intact. Possibility of unplanned collapse The building is structurally sound as is. Deconstruction process will create weakened sections as supporting elements are removed, such as roof sheathing, wall sheathing. Cross-bracing and supports will be added to insure any structural elements remain sound during the process. The table on the next page illustrates the deconstruction process.
Page 80

Guide to Deconstruction Appendix VI: Sample Building Engineering Survey
Schedule and Process for dismantling 15 SW 2nd Place
Date Major Tasks Workers/Super M 11/05 Site clearing, get tools on-site, confirm agreements, other
equipment, roll-off locations, demolition fencing and wood deck on east side, make entry ramps for workers.
1/1
T 11/06 Remove bushes, demolish the open-air addition on the west side
1/1
W 11/07 Clean-out interior garbage, fixtures, bar, appliances, remove all windows and doors
6/2
Th 11/08 Remove windows and doors, interior fixtures, interior trim, lathe/plaster
6/2
F 11/09 Remove trim, lathe/plaster, dropped ceilings, ductwork, wiring, insulation
6/2
S 11/10 Remove lathe/plaster, dropped ceilings, ductwork, wiring, insulation
6/2
T 11/13 Remove 2nd floor non-load-bearing walls, 2nd floor roof
finish, chimneys above roof line 6/2
W 11/14 Remove 2nd floor exterior sheathing, 2nd floor exterior walls
6/2
Th 11/15 Remove 2nd floor exterior walls, 1st story roof finish 6/2 F 11/16 Remove 1st story roofs, remove 2nd floor structure,
chimneys down to second floor, wood processing 12/2
S 11/17 Remove 2nd floor structure, remove 1st floor exterior siding 6/2 M 11/19 Remove 1st floor exterior siding, 1st floor non-load-bearing
walls, 1st floor exterior walls 12/2
T 11/20 Remove 1st floor exterior siding, walls, floor finish 6/2 W 11/21 Remove 1st floor structure, 1st floor piers, chimneys 6/2
Page 81


Guide to Deconstruction Appendix VII: Sample Agreement
Appendix VII: Sample Agreement
This Agreement made and entered into on January 2001, by Alachua County Public Works Department, and the University of Florida (UF) on behalf of the Center for Construction and Environment (CCE), a part of the M.E. Rinker, Sr. School of Building Construction, College of Design, Construction and Planning, for the CCE to conduct research and training via the deconstruction of the structure at 1521 NW 71st Street, Gainesville, Florida, 32605. The work will entail field training/supervision, data collection, and the deconstruction of the aforementioned structure during a period from February 1, 2001 to March 26, 2001. The deconstruction of the structure will hereafter be referred to as The Project in this document. Alachua County will hereafter be referred to as The Owner in this document. The structure at 1521 NW 71st Street will hereafter be referred to as The Building in this document. Period of Performance This Agreement shall become effective on February 1, 2001 and shall terminate on June 5, 2001. Project Director The Project Director at Alachua County Name Street City, State Tel: Fax: The Project Director for Administrative matters at the University of Florida Sandra Goldstein, Associate Director for Research Division of Sponsored Research 219 Grinter Hall PO Box 115500 University of Florida Gainesville, Florida 32611-5703 The Project Manager for Technical matters at the Center for Construction and Environment Bradley Guy, Research Associate Center for Construction and Environment PO Box 115703 Gainesville, Florida 32611-5703 Tel: (352)-392-7502 Fax: (352)-392-9606
Page 83

Guide to Deconstruction Appendix VII: Sample Agreement
Scope of Work The Scope of Work of The Project will be: 1) a certified lead and asbestos survey, 2) abatement of asbestos containing materials (ACM) if required before commencement of work, 3) all permits and waivers required for the removal of The Building, 4) the removal of The Building and all building-related debris within three (3) feet of The Building perimeter, above ground, and excluding the building slab-on-grade, sidewalks, parking areas, septic tanks, and utilities. Allocation of Funds It is agreed to and understood by the parties that this Agreement will be for a Contract Amount not-to-exceed $9,500.00. The CCE shall make invoices for the project based on two project phases, 1) Fifty percent (50%) completion of the work, and 2) One hundred percent (100%) completion of the work. Total project costs will be due within 30 days of the final completion of The Project. If The Project is terminated before the first invoice is submitted, through no fault of UF-CCE, all documented costs incurred by UF-CCE will be paid in full. If The Project is terminated after the first invoice is submitted, but before the final completion of The Project, through no fault of UF-CCE, additional costs will be paid in full by The Owner upon submittal of invoices by UF-CCE. UF will submit Invoice #1 of $4,750.00 (50%) due at the fifty percent (50%) completion of The Project. UF will submit Invoice #2 of $4,750.00 (50%) due at the final (100%) completion of The Project. Responsibilities of the Parties
• Pre-deconstruction job meeting(s), and job-site meetings as needed. • Coordination of required permits, waste disposal, utility disconnects, asbestos and
lead survey, and ACM abatement (if required) • Coordination of selected building salvage removal and disposition for items as
requested by The Owner. The Responsibilities of The Owner
• The Owner will require waivers of liability for all workers and consultants who will enter the project site.
• Secure demolition permit and utility disconnects, as required. • Provide up to eight (8) - twenty (20) cubic yard roll-off containers on site as needed
in coordination with CCE Job Supervisor and with adequate (three (3) working days) notice.
The Responsibilities of UF-CCE
• Complete removal of the structure at 1521 NW 71st Street, Gainesville, Florida and all building –related debris within three (3) feet of the building perimeter, above grade, excluding slab-on-grade, sidewalks, parking areas, septic tanks, and utilities.
Page 84

Guide to Deconstruction Appendix VII: Sample Agreement
• Removal and delivery of selected salvage items to The Owner, as agreed upon before commencement of work.
Financial Records/Reports Both The Owner and UF-CCE shall maintain books, records, documents, invoices, and other evidence and accounting procedures and practices as will permit UF to sufficiently and properly reflect all costs and materials quantities of any nature associated with the project, and permit such records to be subject to inspection, review, and audit by the either The Owner or UF, or their respective representatives. Activity and Final Reports UF shall keep records and make a final report to The Owner if requested. Insurance During the term of this agreement, the UF shall provide and maintain, at its own expense, worker’s compensation and unemployment insurance as required by law. Said insurance policies (worker’s compensation, unemployment, liability, and other insurance) shall be and remain in full force and effect for the duration of this agreement, including any extensions or renewals thereof. UF shall provide proof of such insurance coverage upon request. UF shall notify The Owner of any cancellation or reduction in such insurance coverage. Indemnification The UF assumes any and all risks of personal injury (including death) and property damages (including destruction) attributable to negligent acts or omissions of the CCE and the officers, employees, servants, and agents thereof in the performance of this agreement. The UF and The Owner further agree that nothing contained herein shall be construed or interpreted as, (a) denying to either party any remedy or defense available to such party under the laws of the State of Florida; (b) the consent of the State of Florida or its agents and agencies to be sued or the consent of the University of Florida, its officers, agents, and employees to be sued; or (c) a waiver of sovereign immunity of the State of Florida or of the University of Florida beyond the waiver provided on Section 768.28, Florida Statutes (1993). Termination The failure of either party to comply with any provision of this agreement shall place that party in default. Prior to terminating this agreement, the non-defaulting party shall notify the defaulting party in writing. The defaulting party shall be given seven (7) days in which to cure the default. Notification shall make specific reference to the provision, which gave rise to the default. Either party may terminate this agreement without cause by first providing at least fifteen (15) days prior written notice (received in writing) to the other party prior to the termination date.
Page 85

Guide to Deconstruction Appendix VII: Sample Agreement
Entire Agreement This agreement constitutes the entire Agreement between the UF and The Owner. Any modifications, amendments or alterations shall be in writing and executed by both parties prior to becoming effective. The parties have executed this Agreement the day and year first written above. UNIVERSITY OF FLORIDA ALACHUA COUNTY Witness: Witness: Acknowledged by Bradley Guy, CCE
Page 86
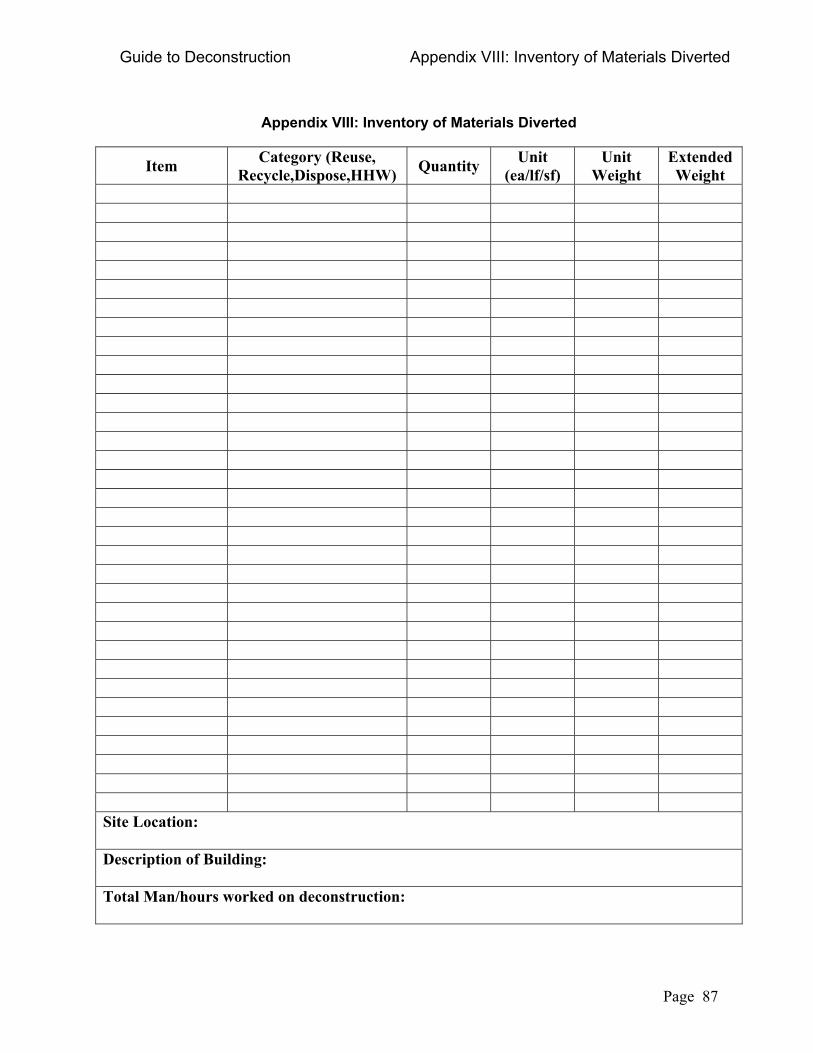
Guide to Deconstruction Appendix VIII: Inventory of Materials Diverted
Appendix VIII: Inventory of Materials Diverted
Item Category (Reuse, Recycle,Dispose,HHW) Quantity Unit
(ea/lf/sf) Unit
Weight Extended Weight
Site Location: Description of Building: Total Man/hours worked on deconstruction:
Page 87

Guide to Deconstruction Appendix IX: Deconstruction Checklist
Appendix IX: Deconstruction Checklist
Inventory materials in building and assign to categories with estimated quantity and
value. Categories are: reuse, recycle, hazardous disposal, C&D disposal, solid waste disposal. (See Appendix VIII)
Know where the reusable, recyclable, hazardous disposal, C&D disposal, and solid
waste disposal will go and the means to get it there. Understand and prepare specific outlets (contacts), general markets (advertisement) and methods (equipment, labor, sub-contracts) for removal of all materials from site.
Determine if the building is has a historic designation, is in a historic district, or the
local municipality has a review process, delay, or variable fee structure for demolition permits.
Estimate cost and finalize contract, this can vary, as with the preference to have the
Owner pay directly for lead and asbestos surveys and any asbestos abatement, given the unknown cost. The contract also determines the scope of work for the deconstructor as either a sub-contractor or the contractor responsible for the complete removal of all building-related debris including foundations, septic tanks, site cleaning, etc. Lastly, the contract can stipulate ownership, donation value of the salvaged materials by the Owner, or revenue-sharing between Owner and Contractor depending upon scope, for-profit versus non-profit, potential reuse of the materials.
Do lead and asbestos surveys by certified environmental firm if building built before
1981.
Disconnect all utilities and obtain demolition permit. These are often intertwined - i.e. a demolition permit must have a certification that utilities have been disconnected in order for it to be issued.
Do building engineering survey and dismantling process plan. This is completed and
signed off on by the competent person who will oversee the deconstruction itself. This plan indicates known hazards at the time of the inspection and the general schedule, tasks, techniques and tools to be used to conduct the deconstruction. The survey and plan are updated as the project progresses.
Complete asbestos abatements (if needed)
Secure labor, and materials storage areas both on and off-site. This includes security
against pilferage during project if needed.
Secure use of heavy equipment and disposal roll-offs, access to landfill, i.e. sub-contractors, includes Porta-Potty for duration of project.
Page 88

Guide to Deconstruction Appendix IX: Deconstruction Checklist
Determine locations and arrangements of delivery or pick-up for recyclables such as metals, concrete including possible trees and plants salvage.
Determine locations for disposal of any additional hazardous materials found such as
paint, oils, refrigerants, and solvents.
Determine nearest medical care facility, routes and telephone.
Complete any site access arrangements and/or site security arrangements.
Complete job site plan for ingress and egress, locations of worker parking, roll-offs, tool storage and dispersal, job “office” (can be a table or bed of pick-up, etc.) job-site sign, metals “pile,” denailing and processing stations, materials lay down area(s) for processed materials or materials not requiring processing, “sales area” for on-site sales, and loading area for materials removal. (Roll-offs, de-nailing will change the most over the duration of project.)
Storage and inventory areas should be as out of way as possible for duration of project to avoid double moving. Organizational and job specific safety plan includes respiratory protection, fall protection, etc. as well as OSHA 200 forms, job-site daily log, job site hazard analysis and personal protective equipment certification forms.
Conduct worker training pre-deconstruction and sign waivers of liability (if
appropriate)
Prepare site with any site clearing, signage placement, drop-off of roll-offs, placement of sawhorses for processing, materials storage areas, etc.
Insure adequate clear area around building, shade for processing areas, no overhead
hazards such as branches, powerlines that will interfere with roll-off deliver and pick-up, workers on roof. Inspect site for holes, tripping hazards, animal hazards, etc. and remediate all potential hazards.
Removal of windows and doors, simultaneously inspect and remove all biological
hazards, miscellaneous interior and exterior trash, insure water lines are drained, electrical, natural gas, etc. are off and flushed out.
Continue with daily safety training, tool talks, and task-based safety analysis and
training throughout the deconstruction.
Page 89


Guide to Deconstruction Appendix X: Web site References and Sources
Appendix X: Web site References and Sources
Alameda County Waste Management Authority http://www.stopwaste.org/fsbuild.html Building Savings: Strategies for Waste Reduction of Construction and Demolition Debris from Buildings www.ilsr.org/recycling/buildingdebris.pdf Building Deconstruction Consortium https://www.denix.osd.mil/denix/Public/Library/Sustain/BDC/bdc.html California Integrated Waste Management Board (CIWMB) www.ciwmb.ca.gov/condemo/ Center for Construction and Environment www.cce.ufl.edu City of Austin – Deconstruction and Green Building http://www.ci.austin.tx.us/sustainable/deconstruction.htm Community Woodworks www.communitywoodworks.org Construction Materials Recycling Association (CMRA) www.cdrecycling.org Deconstruction Institute www.deconstructioninstitute.com Defense Reutilization and Marketing Service www.drms.dla.mil/ Demolition Practices Under the Asbestos NESHAP http://www.epa.gov/region4/air/asbestos/demolish.htm FDEP Innovative Recycling Program Grants http://www.dep.state.fl.us/dwm/programs/recycling/igg2k/default.htm Ft. Ord Military Base Pilot Deconstruction Project www.fora.org/pilot.html Ft. McCoy Army Base Demolition Program http://www.mccoy.army.mil/factsheets/BLDGDEMO.asp Greater Vancouver Regional District – Job-site Recycling Program
Page 91

Guide to Deconstruction Appendix X: Web site References and Sources
http://www.gvrd.bc.ca/waste/bro/dlcgde.html Green Building Information Council of Canada http://greenbuilding.ca/ A Guide to Deconstruction. U.S. Department of Housing and Urban Development www.huduser.org/publications/pdf/decon.pdf Habitat ReStore Network http://www.habitat.org/env/restore.html INFORM Reports: Building for the Future: Strategies to Reduce C&D Wastes in Municipal Projects http://www.informinc.org/ Institute for Local Self Reliance’s (ILSR’s) Building Deconstruction Page www.ilsr.org/recycling/builddecon.html King County, Washington C&D Recycling http://dnr.metrokc.gov/swd/bizprog/sus_build/how_others.htm The Materials for the Future Foundation www.materials4future.org National Association of Home Builder’s Research Center http://www.nahbrc.org/builders/green/index.html Online Building Materials Exchange www.building99.com OSHA Demolition Guidelines http://www.osha-slc.gov/SLTC/demolition/index.html Recommended Management Practices for the Removal of Hazardous Materials from Buildings Prior to Demolition http://www.uwm.edu/Dept/EHSRM/PROJECT/Demolition.PDF Smart Growth Network – Series of Reports on Deconstruction http://www.smartgrowth.org/ISSUEAREAS/buildings.html Sources of Asbestos in Buildings http://www.worksafe.org/Training/bldgmaterials.shtml Sustainable Architecture Compendium. National Pollution Prevention Center for Higher Education, University of Michigan
Page 92
Guide to Deconstruction Appendix X: Web site References and Sources
Page 93
www.umich.edu/~nppcpub/resources/compendia/architecture.html#ranr Sustainability at University of British Columbia http://www.sustain.ubc.ca/whatsnew_archive.html Used Building Materials Association (UBMA) www.ubma.org U.S. Environmental Protection Agency Construction and Demolition Debris www.epa.gov/epaoswer/non-hw/debris US EPA Asbestos Web page http://www.epa.gov/opptintr/asbestos/ US EPA Jobs Through Recycling www.epa.gov/jtr/comm/construc.htm US EPA Lead-Based Paint Regulations http://www.epa.gov/opptintr/asbestos/ WasteSpec. Model Specifications for Construction Waste Reduction, Reuse, and Recycling. Triangle J Council of Governments www.tjcog.dst.nc.us/cdwaste.htm