a guide to home insulation and noise...
TRANSCRIPT

ECOTOUCH®
PINK® FIBERGLAS® INSULATIONThe best choice for home energy savings.
A GUIDE TO HOME INSULATION AND NOISE CONTROL
• Guaranteed thermal performance for the life of your home†
• 73% recycled content* 3rd party SCS Certified
• GREENGUARD Gold certified for indoor air quality and is verified to be formaldehyde-free
ATTIC • BASEMENT • WALLS • CEILINGS • FLOORS • NOISE CONTROL

Pub. No. 400104C. Printed in Canada. April 2015. THE PINK PANTHER™ & ©1964–2015 Metro-Goldwyn-Mayer Studios Inc. All Rights Reserved. The colour PINK is a registered trademark of Owens Corning. © 2015 Owens Corning. All Rights Reserved.
Some of the leaders in energy efficiency
are leading a new movement towards greater
environmental sustainability. Owens Corning
EcoTouch® PINK® FIBERGLAS® Insulation
uses 73% recycled content* and provides the
same outstanding thermal performance
Canadians have come to rely on.
And it’s also GREENGUARD Gold certified
for indoor air quality and verified to be
formaldehyde-free. EcoTouch® by
Owens Corning.
Just one more reason
to Think PINK®.
OWENS CORNING CANADA LP3450 McNicoll AvenueScarborough, ON M1V 1Z5
1-800-GET-PINK®
www.owenscorning.ca
1
FLIP! See flip side of brochure for FOAMULAR® Extruded Polystyrene Rigid Insulation products.
Owens Corning products overview 2–3
PRODUCT INFORMATION
EcoTouch® PINK® FIBERGLAS® Insulation Batts 4
QuietZone® Acoustic Batt Insulation 5
Small Projects and Accessories: 6–7 Multi-Purpose & PINK-PAK® Insulation 6 raft-R-mate® Attic Rafter Vents 7 FoamSealR™ Sill Gasket 7
Calculate your needs 8
Installation and safety tips 9
Insulation FAQs 29–33
HOW TO INSULATEStep-by-step instructions
Attic 10–17 The uninsulated attic 11 Topping up your attic insulation 13 Finishing your attic 15 Cathedralandflatceilings 16–17
Exterior walls 18–19
Basement walls and crawlspace 20–22
Floors 23–24
Interior walls and noise control 25–26
Small projects 27
Accessories 28
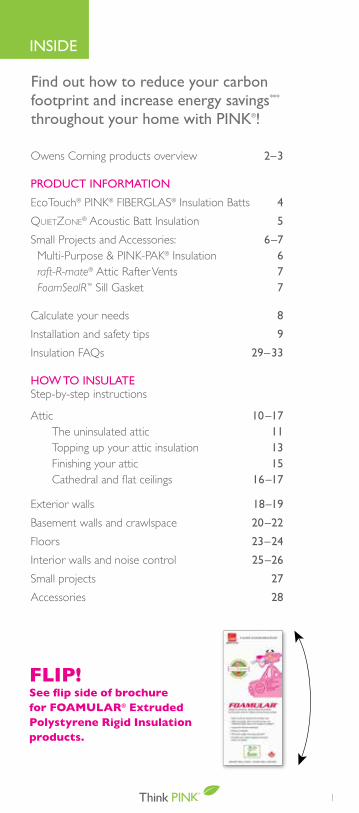
Find out how to reduce your carbonfootprint and increase energy savings*** throughout your home with PINK®!
INSIDE

2
PRODUCTINFO
PRE-INSULATION FAQS ATTIC CEILINGS WALLS BASEMENT/ CRAWLSPACE
FLOORS NOISECONTROL
SMALLPROJECTS
COMPLETE ENERGY EFFICIENCY AND NOISE CONTROL SOLUTIONS FOR YOUR HOME
ATTICSAttiCat® Expanding Blown-In Insulation System R-60 = 221/4"
BASEMENT WALLS® ®
Extruded Polystyrene Rigid Insulation R-20 (4")
BASEMENT FLOORSFOAMULAR CodeBord ® ®FOAMULAR CodeBord C-200C-300 Extruded Polystyrene Rigid Insulation R-10 (2")
BASEMENT WALLS1" (R-5) FOAMULAR® CodeBord®
Extruded Polystyrene Rigid InsulationPlus R-20 EcoTouch® PINK®
FIBERGLAS® BattsFOR HVAC SYSTEMSQuietR® DuctBoardFlexible Duct Media
EXTERIOR WALL SHEATHINGFOAMULAR® CodeBord® Extruded Polystyrene Rigid Insulation R-10 (2")
SILL PLATEFoamSealRTM Sill Gasket
SMALL GAPSEcoTouch® PINK® Multi-PurposeFIBERGLAS® Insulation
ATTICSraft-R-mate®
Attic Rafter Vents
ATTICSPROPINK® FIBERGLAS®
Blown Insulation R-60 = 221/4"
EXTERIOR WALLS
ATTICSEcoTouch® PINK® FIBERGLAS®
Insulation R-60 = 18"
INTERIOR WALLS AND FLOORSEcoTouch® QuietZone® PINK® FIBERGLAS®
Acoustic Insulation
FLOORS OVER UNHEATED SPACESEcoTouch® PINK® FIBERGLAS® Insulation R-40
CATHEDRAL CEILINGSEcoTouch® PINK® FIBERGLAS® Insulation R-40
R-24 EcoTouch® PINK®
FIBERGLAS® Insulation
3
PRODUCTINFO
PRE-INSULATION FAQS ATTIC CEILINGS WALLS BASEMENT/ CRAWLSPACE
FLOORS NOISECONTROL
SMALLPROJECTS
• Guaranteed thermal performance for the life of your home• 73% recycled content* 3rd party SCS Certified• GREENGUARD Gold certified for indoor air quality
and is verified to be formaldehyde-free• PLUS: Save up to 28%*** on your heating and cooling costs
Seeflipsideofbrochurefor FOAMULAR® Extruded Polystyrene Rigid Insulation products
EcoTouch® PINK® FIBERGLAS® Insulation
ATTICSAttiCat® Expanding Blown-In Insulation System R-60 = 221/4"
BASEMENT WALLS® ®
Extruded Polystyrene Rigid Insulation R-20 (4")
BASEMENT FLOORSFOAMULAR CodeBord ® ®FOAMULAR CodeBord C-200C-300 Extruded Polystyrene Rigid Insulation R-10 (2")
BASEMENT WALLS1" (R-5) FOAMULAR® CodeBord®
Extruded Polystyrene Rigid InsulationPlus R-20 EcoTouch® PINK®
FIBERGLAS® BattsFOR HVAC SYSTEMSQuietR® DuctBoardFlexible Duct Media
EXTERIOR WALL SHEATHINGFOAMULAR® CodeBord® Extruded Polystyrene Rigid Insulation R-10 (2")
SILL PLATEFoamSealRTM Sill Gasket
SMALL GAPSEcoTouch® PINK® Multi-PurposeFIBERGLAS® Insulation
ATTICSraft-R-mate®
Attic Rafter Vents
ATTICSPROPINK® FIBERGLAS®
Blown Insulation R-60 = 221/4"
EXTERIOR WALLS
ATTICSEcoTouch® PINK® FIBERGLAS®
Insulation R-60 = 18"
INTERIOR WALLS AND FLOORSEcoTouch® QuietZone® PINK® FIBERGLAS®
Acoustic Insulation
FLOORS OVER UNHEATED SPACESEcoTouch® PINK® FIBERGLAS® Insulation R-40
CATHEDRAL CEILINGSEcoTouch® PINK® FIBERGLAS® Insulation R-40
R-24 EcoTouch® PINK®
FIBERGLAS® Insulation

4
ATTIC, WALLS, CEILINGS, FLOORSBENEFITS• Guaranteed thermal performance for the life of your home• 73% recycled content*3rdpartySCSCertified•GREENGUARDGoldcertifiedforindoorairquality andisverifiedtobeformaldehyde-free
• Save up to 28%*** on your heating and cooling costs• Canada’s No. 1 Insulationˆ• Easy to install • Safe for your home – non-combustible
Calculate your needs: page 8 How to instructions: pages 10–27
Product Specifications
mm in mm in mm in sq ft sq m
381 15 1194 47 88.1 8.2
381 15 1194 47 97.9 9.1^
483 19 1194 47 124 11.5
1194 47 135.1 12.6
1194 47 150.1 13.9^
406 16 1219 48 106.7 9.9
610 24 1219 48 160 14.9
381 15 1194 47 78.3 7.3^
584 23 1194 47 120.1 11.2
1194 47 49 4.6
1194 47 78.3 7.3^
483 19 1194 47 99.2 9.2^
584 23 1194 47 120.1 11.2^
584 23 1194 47 75.1 7.0
381 15 1194 47 49 4.6
584 23 1194 47 75.1 7.0
375 14 3/4 1194 47 33.7 3.1
578 22 3/4 1194 47 52 4.8
406 16 1219 48 53.3 5.0^
610 24 1219 48 80 7.4^
406 16 1219 48 42.7 4.0
610 24 1219 48 64 5.9
R-35 267 10 1/2 610 24 1219 48 56 5.2
R-40 279 11 610 24 1219 48 48 4.5^
381
5 1/2140 R-24 (2x6 Wood Frame)
241 9 1/2
23
216 8 1/2
584
140 5 1/2
15
R-28
R-31
92 3 5/8
R-22 (2x6 Wood Stud)
CoverageWidth LengthThickness
89 3 1/2
R-Value
R-12 (2x4 Steel Stud)
R-12 (2x4 Wood Stud)
89 3 1/2
R-20/19 (2x6 Wood Stud) 152 6
R-14 (2x4 Wood Stud)
PINK® FIBERGLAS® INSULATION
THERMAL BATTS
^ coverage based on SpaceSaver® packaging format
PRODUCTINFO
PRE-INSULATION FAQS ATTIC CEILINGS WALLS BASEMENT/ CRAWLSPACE
FLOORS NOISECONTROL
SMALLPROJECTS

5
PRODUCTINFO
PRE-INSULATION FAQS ATTIC CEILINGS WALLS BASEMENT/ CRAWLSPACE
FLOORS NOISECONTROL
SMALLPROJECTS
QuietZone® ACOUSTIC BATT INSULATION
NOISE CONTROL
INTERIOR WALLS, CEILINGS, FLOORSBENEFITS• Minimizes unwanted noise in - bedrooms - bathrooms - basements -hometheatres -laundryrooms -homeoffice
Calculate your needs: page 8 How to instructions: page 26
• Guaranteed thermal performance for the life of your home• 73% recycled content*3rdpartySCSCertified•GREENGUARDGoldcertifiedforindoorairquality andisverifiedtobeformaldehyde-free
• Save up to 28%*** on your heating and cooling costs• Canada’s No. 1 Insulationˆ• Easy to install • Safe for your home – non-combustible
Aquiethomenotonlymeanscomfort for its occupantsbutcanalsoyieldotherbenefits–noiselevels above 85 dB can harm hearing over time. The effectiveness in reducing or blocking sound
transmission through the assembly structures in a house – the walls,floorsandceilings–ismeasuredbymeansofadecibelrating called Sound Transmission Class or STC. For example, a wall with a rating of STC 50 would reduce the noise of a portable stereo set on high from 112 dB to about 62 dB – the level of a normal conversation – and reduce the noise level of a loud alarm clock from 80 dB to about 30 dB – the level of a soft whisper. Learn more about QuietZone® Noise Control Solutions for your home. Visit www.owenscorning.ca
QUICK FACTS: DID YOU KNOW?
Application Width Length Thicknessin/mm in/mm in/mm in mm
Wood Stud 15/381 23/584 48/1219 1½/2½/3½/6 38/65/89/152
Steel Stud 16/406 24/610 48/1219 1½/2½/3½/6 38/65/89/152
Product Specifications

6
PINK® FIBERGLAS® INSULATION SMALL PROJECTS: DOORS, WINDOWS, PIPES, HEATING AND COOLING DUCTS, AIR CONDITIONER
BENEFITS• Guaranteed thermal performance for the life of your home• 73% recycled content*3rdpartySCSCertified•GREENGUARDGoldcertifiedforindoorairquality andisverifiedtobeformaldehyde-free
• Handy size• Easy to transport, easy to install• Prevents energy leaks at small gaps• Safe for your home – non-combustible
Product SpecificationsProduct Thickness Width Length Coverage
in mm in mm ft mm ft2 m2
Multi-Purpose 2 51 16 406 4 1219 5.33 .0495PINK-PAK™ 3.5 89 15 381 20 1219 252 2.32
How to instructions: page 27
PRODUCTINFO
PRE-INSULATION FAQS ATTIC CEILINGS WALLS BASEMENT/ CRAWLSPACE
FLOORS NOISECONTROL
SMALLPROJECTS
PINKTM products annually reduceover a billion tons of greenhousegas emissions – equaling 200 millioncars’ worth of CO2 emissions andtwo billion barrels of oil use‡.
QUICK FACTS: DID YOU KNOW?

7
PRODUCTINFO
PRE-INSULATION FAQS ATTIC CEILINGS WALLS BASEMENT/ CRAWLSPACE
FLOORS NOISECONTROL
SMALLPROJECTS
BENEFITS• Saves money on heating and cooling costs***
• Fills gap between sill plate and foundation wall• Made in Canada and easy to install• Reduces air leakage in your home• Polyethylene foam is durable and moisture-resistant
How to instructions: page 28 Calculate your needs: Measure the perimeter of your foundation wall. Divide the total perimeter in feet by 82 ft/roll to obtain the total numberofrollsrequired.
BENEFITS• Increases attic ventilation• Easy to install• High resistance to moisture• Will not decay over time
How to instructions: page 15 Calculate your needs: Tocalculatethenumberofatticrafterventsrequired,pleaseconsultapplicablebuildingcodesforrequiredventilationarea.
RAFT-R-MATE®: ATTIC RAFTER VENTS
Thickness Width Lengthin mm in mm ft m2 51 22½ 572 4 1.2
Product Specifications
Thickness Width Length
in mm in mm ft m3/16 4.7 3½ 89 82 25
3/16 4.7 5½ 140 82 25
Product Specifications
FOAMSEALR™ SILL GASKET: SILL PLATE

8
QUICK & EASY
WOOD STUD WALL EXAMPLE YOUR HOME
Attic length 22 ft (6.7 m)
Multiply by attic width 40 ft (12.2 m) x
Total area 880 ft2 (81.7 m2) =
Divided by ft2/m2 per pkg. 80 ft2 (7.43 m2) ÷ SpaceSaver® Bag: R-20/15" width = 80 ft2 (7.43 m2)
Number of packages required: 11 =
CALCULATING YOUR NEEDS IS EASY AS 1, 2, 3…
It’s easy to calculate the number of insulation packages you’ll need to complete your project. Here’s how:
1. TOTAL AREADeterminetheareainsquarefeet/metrestobeinsulatedby multiplying the length by the width in ft/m.LENGTH _____ X WIDTH _____ = _____ FT2/M2
2. WIDTH OF INSULATION Measure the distance between joists to determine the insulation width for the job. DISTANCE BETWEEN JOISTS = _____ INCHES/MM
3. CHOOSE YOUR PRODUCTDetermine which insulation product (R-value and width) is appropriate for your project. (Choose product width to match distance between joists.) PRODUCT WIDTH = _____ INCHES/MM
4. CALCULATE HOW MANY PACKAGES YOU NEEDDivide total area in ft2/m2 to be insulated by the coverage area per package in ft2/m2. Round up to the next whole number to determinethetotalnumberofpackagesrequired.TOTAL AREA IN FT2/M2 _____ ÷ COVERAGE AREA IN FT2/M2 PER PKG. _____ = TOTAL NUMBER OF PACKAGES _____
PRODUCTINFO
PRE-INSULATION FAQS ATTIC CEILINGS WALLS BASEMENT/ CRAWLSPACE
FLOORS NOISECONTROL
SMALLPROJECTS
PINK® FIBERGLAS® INSULATION
CALCULATE YOUR NEEDS

9
PRODUCTINFO
PRE-INSULATION FAQS ATTIC CEILINGS WALLS BASEMENT/ CRAWLSPACE
FLOORS NOISECONTROL
SMALLPROJECTS
Wear protective gear: goggles, gloves, dust mask or respirator, long pants and sleeves.
Ensure there’s proper lighting.
Never cover vents, recessed light fixtures,ceilingfans,outlets or other access points.†
Ensure installation area is accessible and easy to move around in. You may need something sturdy to kneel or walk on such as a plank or a sheet of plywood.
Seal gaps and air leaks with a foam sealant. Also check for water leaks and repair if existing insulation is wet.
Do not open batt packaging outside of workspace, insulation will expand significantly.
Keep the following tools on hand: Hammer, putty knife, caulking gun, tape measure, straight edge, utility knife, lightweight stapler and a pole or rake (for hard-to-reach places).
SAFETY FIRST
PROPER FIT
WORKING AREA
KEEP PACKAGE INTACT
TOOLS
INSTALLATION & SAFETY TIPS
AIR & WATER LEAKS
†Keep away from vents and allow 3" (76 mm) of clearance around exhaust fans, chimneys and heat-emitting objects and light fixtures. Use approved CSA insulated boxes for recessed lighting. Consult applicable building code, standards or regulations for specific required clearances to chimneys, flue pipes and all other heat-emitting devices and combustion exhaust equipment.
QUICK & EASY
10
PRODUCTINFO
PRE-INSULATION FAQS ATTIC CEILINGS WALLS BASEMENT/ CRAWLSPACE
FLOORS NOISECONTROL
SMALLPROJECTS
Is your attic costing you money?Ifyouratticfloorisinsulatedbutthewoodbeams(joists)arestill visible, you probably don’t have enough insulation. Even if you can’t see your beams, that’s still no guarantee that you have enough insulation. The best thing to do is measure.
Topping up your attic to 18 inches of PINK® FIBERGLAS® Insulation will make your home comfortable while cutting down on your heating and cooling costs.
TOP IT OFF WITH PINK® INSULATION AND SAVE! • A great way to reduce energy costs*** with savings of up to 28%*** on heating & cooling costs• Keeps your home cooler in the summer and warmer in the winter. • Quick and easy weekend project • Safe for your home – non combustible
PLUS: Government grants available. Visit www.showmethegreen.ca
Insulating your attic to R-60 or topping up your attic insulation to 18" saves half a ton of greenhouse gases per year, year after year.
QUICK FACTS: DID YOU KNOW?

11
PINK® FIBERGLAS® INSULATION
1. Installing vapour barrier. Install a continuous layer of polyethylene vapour barrier on the warm-in-winter side of the cavity.
2. Installing batts. Lay R-40 batts at outer edge of area, ensuring they cover top plate of the wall, then work toward the middle of the attic. Do not block the ventilation space leading up from the eave vents. Butt pieces together tightly; gaps reduce R-valuesignificantly.
3. Adding a second layer. When using two layers of insulation, lay the second layer perpendicular to the first(e.g.,placeonelayerofR-20ontop of and perpendicular to bottom layer of R-40).
4. Insulating end/kneel walls. Install batts in end and kneel walls. At the perimeter of the attic, lay the insulation up to the roof rafters, but keep it away from plywood roof sheathing.
THE UNINSULATED ATTIC
Recommended R-value and thickness: R-60 or 18" (457 mm)
• Product specifications: page 4 • Calculate your needs: page 8
PRODUCTINFO
PRE-INSULATION FAQS ATTIC CEILINGS WALLS BASEMENT/ CRAWLSPACE
FLOORS NOISECONTROL
SMALLPROJECTS
12
QUICK FACTS: DID YOU KNOW?
PRODUCTINFO
PRE-INSULATION FAQS ATTIC CEILINGS WALLS BASEMENT/ CRAWLSPACE
FLOORS NOISECONTROL
SMALLPROJECTS
See page 9for pre-insulation and safety check list
5. Wiring and detail areas. Slip insulation under wiring and electrical where necessary. Keep away from vents and allow 3" (76 mm) of clearance around exhaust fans, chimneys and heat-emittingobjectsandlightfixtures.Use approved CSA insulated boxes for recessed lighting. Consult applicable building code, standards orregulationsforspecificrequiredclearancestochimneys,fluepipesand all other heat-emitting devices andcombustionexhaustequipment.
6. Sealing windows. Use a foam sealant for sealing and insulating around windows.
7. Ventilation. Staple raft-R-mate®
Attic Rafter Vents as you go, at the eaves of every joist to ensure appropriate ventilation area.
Cut batts so that they fit closely up against wood cross-bracing members.
Keep 3" (76 mm) of clearance around exhaust fans, chimneys and heat-emitting objects and light fixtures.
QUICK & EASY INSTALLATION TIPS
Every pound of glass fiber insulation annually saves 12 times more energy than was originally used to produce it within its first 4-5 weeks of usage in the home.
13
Recommended R-value and thickness: R-60 or 18" (457 mm)
• Product specifications: page 4 • Calculate your needs: page 8
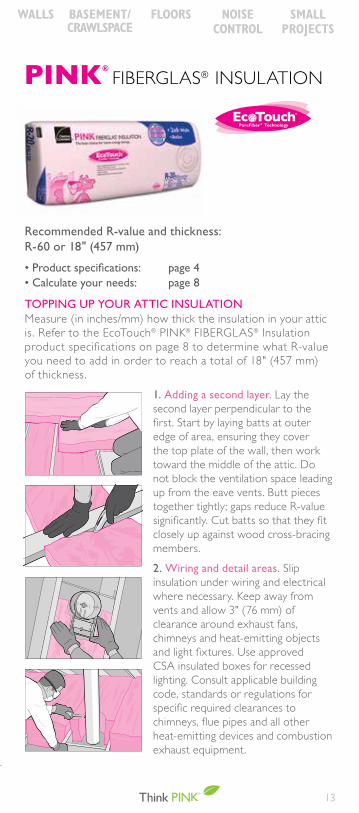
1. Adding a second layer. Lay the second layer perpendicular to the first.Startbylayingbattsatouteredge of area, ensuring they cover the top plate of the wall, then work toward the middle of the attic. Do not block the ventilation space leading up from the eave vents. Butt pieces together tightly; gaps reduce R-value significantly.Cutbattssothattheyfitclosely up against wood cross-bracing members.
2. Wiring and detail areas. Slip insulation under wiring and electrical where necessary. Keep away from vents and allow 3" (76 mm) of clearance around exhaust fans, chimneys and heat-emitting objects andlightfixtures.Useapproved CSA insulated boxes for recessed lighting. Consult applicable building code, standards or regulations for specificrequiredclearancestochimneys,fluepipesandallotherheat-emitting devices and combustion exhaustequipment.
Measure (in inches/mm) how thick the insulation in your attic is. Refer to the EcoTouch® PINK® FIBERGLAS® Insulation productspecificationsonpage8todeterminewhatR-valueyou need to add in order to reach a total of 18" (457 mm) of thickness.
TOPPING UP YOUR ATTIC INSULATION
PRODUCTINFO
PRE-INSULATION FAQS ATTIC CEILINGS WALLS BASEMENT/ CRAWLSPACE
FLOORS NOISECONTROL
SMALLPROJECTS
PINK® FIBERGLAS® INSULATION

14
PRODUCTINFO
PRE-INSULATION FAQS ATTIC CEILINGS WALLS BASEMENT/ CRAWLSPACE
FLOORS NOISECONTROL
SMALLPROJECTS
Government Grants and Rebates available, visit www.showmethegreen.ca PLUS: Save up to 28%*** on heating and cooling costs when you insulate with EcoTouch® PINK® FIBERGLAS® Insulation.
3. Sealing windows. Use a foam sealant for sealing and insulating around windows.
4. Installing rafter vents. Staple raft-R-mate® Attic Rafter Vents, as you go, at the eaves of every joist. Ensure you leave 2½" (64 mm) of ventilation space between the insulation and the roof sheathing.

15
1. Installing rafter vents. Install eave vents such as raft-R-mate® AtticRafterVentsandsoffitandridge vents.
2. Installing batts. Use separate pieces of FIBERGLAS® insulation for rafters and collar beams. Don’t trytofitacontinuousstripofinsulation where collar beams and raftersmeet–hard-to-fillgapsmay be the result. Push the batts between the rafters until they are flushwiththebottomedgeofthewood.
3. Insulating flat ceilings. Ifaflatceiling is being installed, place batts between joists.
4. Insulating end/kneel walls. Install batts in end and kneel walls. Insert cut strips into narrow details. (Expanding foam is best for sealing and insulating around windows.)
5. Air/Vapour Barrier. Install sealed and continuous polyethylene air/vapour barrier on the warm-in-winter side of the living area of the house.
6. Finishing the walls. As soon as the insulation has been installed, finishthewallsandceilingwithanapprovedinteriorfinish,suchasgypsum wallboard.
PRODUCTINFO
PRE-INSULATION FAQS ATTIC CEILINGS WALLS BASEMENT/ CRAWLSPACE
FLOORS NOISECONTROL
SMALLPROJECTS
PINK® FIBERGLAS® INSULATION
Recommended R-value and thickness: R-60 or 18" (457 mm)
• Product specifications: page 4 • Calculate your needs: page 8
FINISHING YOUR ATTIC
16
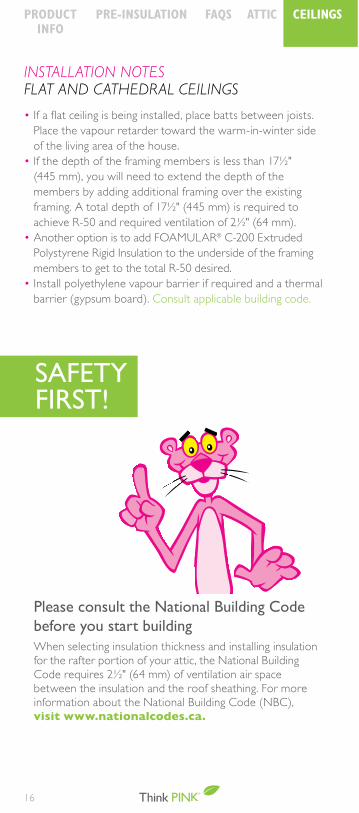
INSTALLATION NOTESFLAT AND CATHEDRAL CEILINGS
• Ifaflatceilingisbeinginstalled,placebattsbetweenjoists.Place the vapour retarder toward the warm-in-winter side of the living area of the house.
• If the depth of the framing members is less than 17½" (445 mm), you will need to extend the depth of the members by adding additional framing over the existing framing.Atotaldepthof17½"(445mm)isrequiredtoachieveR-50andrequiredventilationof2½"(64mm).
• Another option is to add FOAMULAR® C-200 Extruded Polystyrene Rigid Insulation to the underside of the framing members to get to the total R-50 desired.
• Installpolyethylenevapourbarrierifrequiredandathermalbarrier (gypsum board). Consult applicable building code.
Please consult the National Building Code before you start buildingWhen selecting insulation thickness and installing insulation for the rafter portion of your attic, the National Building Coderequires2½"(64mm)ofventilationairspacebetween the insulation and the roof sheathing. For more information about the National Building Code (NBC), visit www.nationalcodes.ca.
SAFETY FIRST!
PRODUCTINFO
PRE-INSULATION FAQS ATTIC CEILINGS WALLS BASEMENT/ CRAWLSPACE
FLOORS NOISECONTROL
SMALLPROJECTS

17
Recommended R-value and thickness: R-50 or 15" (381 mm)
• Product specifications: page 4 • Calculate your needs: page 8
PRODUCTINFO
PRE-INSULATION FAQS ATTIC CEILINGS WALLS BASEMENT/ CRAWLSPACE
FLOORS NOISECONTROL
SMALLPROJECTS
1. Installing rafter vents. Install eave vents, such as raft-R-mate® Attic RafterVentsorsoffitandridgeventsat the eave of every joist.
2. Installing batts. Use separate pieces of FIBERGLAS® insulation for rafters and collar beams. Don’t try tofitacontinuousstripofinsulationwhere collar beams and rafters meet –hard-to-fillgapsmaybetheresult.Push the batts between the rafters untiltheyareflushwiththebottomedge of the wood.
3. Wiring and detail areas. Slip insulation under wiring and electrical where necessary. Keep away from vents and allow 3" (76 mm) of clearance around exhaust fans, chimneys (refer to specific clearance requirements of the chimney flue manufacturer) and heat-emitting objectsandlightfixtures(unlessICrated). Use approved CSA insulated boxes for recessed lighting.
4. Installing air/vapour barrier. Install a continuous layer of polyethylene vapour barrier on the warm-in-winter side of the cavity. Overlap the joints by at least 6" and seal with approved caulking or tape.†
CATHEDRAL AND FLAT CEILINGS
PINK® FIBERGLAS® INSULATION
†Consult applicable building code, standards or regulations for specific required clearances to chimneys, flue pipes and all other heat-emitting devices and combustion exhaust equipment.

18
Want to insulate your exterior walls for maximum energy savings?
Insulate with EcoTouch® PINK® FIBERGLAS® and FOAMULAR® CodeBord® Extruded Polystyrene Rigid Insulation and save up to 28%*** on energy bills!
PRODUCTINFO
PRE-INSULATION FAQS ATTIC CEILINGS WALLS BASEMENT/ CRAWLSPACE
FLOORS NOISECONTROL
SMALLPROJECTS
Ifyou’rebuildinganewhomeoraddition,first,installFOAMULAR® CodeBord® Extruded Polystyrene Rigid Insulation directly to the outside of the entire stud wall frame.It’seasy.ThenfilltheinteriorwallswithEcoTouch® PINK® FIBERGLAS® batts. It’s safe for your home, non-combustible and highly resistant to moisture. And Canadian-made, it’s designed to keep the weather out and the comfort in.
Savings and comfort when you Think PINK®.
PINK® FIBERGLAS® Insulation is packaged in material that is recycled into products such as grocery bags, garbage bags and plastic lumber.
QUICK FACTS: DID YOU KNOW?

19
Recommended R-value and thickness: 2x4 Walls: 1 layer of R-12 or R-14 2x6 Walls: 1 layer of R-20 or R-22 or R-24
• Product specifications: page 4 • Calculate your needs: page 8
1. Installing batts. Be careful not to compress insulation beyond edges of the studs. The insulation shouldfitsnuglyagainstthestudsandcompletelyfillthecavityto the top and bottom plates.
2. Wiring cables. Split the batts and place behind and in front of wiring cables and use small strips for narrow areas. Stuff small pieces of insulation around plumbing, vents and around windows and doors.
3. Installing vapour barrier. Install a continuous polyethylene vapour barrier over entire wall area. Seal joints if vapour barrier is also acting as the air barrier in the assembly.
4. Installing drywall. Install drywall orotherwallfinishontopofthevapour barrier as soon as you have finishedinstallingtheinsulation.
PRODUCTINFO
PRE-INSULATION FAQS ATTIC CEILINGS WALLS BASEMENT/ CRAWLSPACE
FLOORS NOISECONTROL
SMALLPROJECTS
PINK® FIBERGLAS® INSULATION
BASIC INSIDE EXTERIOR WALL INSULATION(SEE PAGE 44 FOR EXTRA INSULATING POWER)

20
PRODUCTINFO
PRE-INSULATION FAQS ATTIC CEILINGS WALLS BASEMENT/ CRAWLSPACE
FLOORS NOISECONTROL
SMALLPROJECTS
Transform that cavernous basement into a cozy family room,sparebedroom,workshoporhomeoffice. Uninsulated, any basement or heated crawlspace is a major energy drain. But you could save on energy costs, plus increase the comfort and resale value of your home just by insulating§.
Make any necessary repairs, then insulate the walls with Canada’s No. 1 Insulationˆ, EcoTouch® PINK® FIBERGLAS® batts and/or FOAMULAR® C-200 Rigid Insulation. Then, for even greater savings and comfort§, wrap the ducts and pipes with PINK® FIBERGLAS® Insulation. Increase the comfort of your home and reduce your carbon footprint with PINK® Insulation.
Savings and comfort when you Think PINK®.
Want to put more space in your home and money in your pocket?
Insulate your basement and crawlspace with EcoTouch® PINK® FIBERGLAS® Insulation, FOAMULAR® C-200 and C-300 Extruded Polystyrene Rigid Insulation.

21
PRODUCTINFO
PRE-INSULATION FAQS ATTIC CEILINGS WALLS BASEMENT/ CRAWLSPACE
FLOORS NOISECONTROL
SMALLPROJECTS
Recommended R-value and thickness: R-12, R-14 – 3.5"(89 mm) or R-20 – 6" (152 mm)
• Product specifications: page 4 • Calculate your needs: page 8
1. Applying moisture barrier. Apply moisture barrier from the flooruptothefinishedlevelof the ground outside.
2. Building a standard wall. Build a frame using studs around basement and place against the concrete wall. Fasten to joists aboveandtothefloor.Stud spacing can be 16" (400 mm) or 24" (600 mm).
3. Cutting batts.Cutbattstofitthe band joists between the top plateandundersideofthefloor.
4. Installing batts. Place batts betweenstuds,flushwithinsideface of studs. Ensure band joists are covered with insulation becauseheatlosscanbesignificant.
5. Installing vapour barrier. Staple vapour barrier over the entire wall to edge of the studs and plates. Ensure it covers joints between wallandupperfloorceilingsandover insulation at header between floorjoists.
6. Applying wall finish. Apply drywallorotherwallfinishontopof the vapour barrier.
PINK® FIBERGLAS® INSULATION
2X4 WOOD STUD BASEMENT WALLS

22
PRODUCTINFO
PRE-INSULATION FAQS ATTIC CEILINGS WALLS BASEMENT/ CRAWLSPACE
FLOORS NOISECONTROL
SMALLPROJECTS
Recommended R-value and thickness: R-12, R-14 – 3.5"(89 mm) or R-20 – 6" (152 mm)
• Product specifications: page 4 • Calculate your needs: page 8
PINK® FIBERGLAS® INSULATION
1. Applying vapour/moisture barrier to the floor. Spread vapour/moisture barrier over the entire floorareaofthecrawlspace,overlap-ping sheets by 12" (300 mm).
2. Cutting batts for joists. Measure, cut and place small pieces ofbattstofitbetweenceilingfloorjoists and band joist.
3. Installing batts for walls. Cut pieces of insulation long enough to hang down the wall and extend out about 24" (600 mm) over the crawl-spacefloor.
4. Attaching batts to sill. Attach batts to sill using long furring strips. Attach pieces of insulation to the edge of sill. Allow top ends of insulation to extend above sill. Trim tofitsnuglyaroundbottomedgesof joists. For walls running parallel to the joists, use longer strips of insulation and secure them directly to the band joist with furring strips. Drive the nails in just far enough to hold the furring strip securely – the insulation should not be compressed to less than half its thickness. On the walls that run parallel to the joists, use longer lengths of insulation and secure them directly to the band joist with furring strips.
5. Applying air/vapour barrier. Staple poly-ethylene air/vapour barrieroverfloorandwall insulation. Slit and closely staple at joists andfloorsheathing.Sealall joints.
CRAWLSPACE: INSULATED, HEATED

23
PRODUCTINFO
PRE-INSULATION FAQS ATTIC CEILINGS WALLS BASEMENT/ CRAWLSPACE
FLOORS NOISECONTROL
SMALLPROJECTS
Uninsulatedfloorscanchillyourtoesandrobyour homeofpreciousenergy.Especiallyifthefloorisoveran unheated garage, basement or crawlspace. Wherever yourflooriscoldordamptothetouch,youneedtoinsulate.
Get to the bottom of this very Canadian problem with a Canadian-made solution: EcoTouch® PINK® FIBERGLAS® Insulation and C-300 Extruded Polystyrene Rigid Insulation. Easytoinstall,andGREENGUARDCertified.Meaning?By saving energy to warm your feet, you’re reducing your carbon footprint.
Savings and comfort when you Think PINK®.
Thinkingofinsulatingyourbasementfloor? Insulate with FOAMULAR® C-300 Extruded Polystyrene Insulation. Refer to how-to instructions on page 48.
Coldfloorsfreezingyourtootsies?
InsulateyourfloorswithEcoTouch® PINK® FIBERGLAS® Insulation or FOAMULAR® C-300 Extruded Polystyrene Rigid Insulation

24
Recommended R-value and thickness: R-31 or 9.5" (241 mm)
• Product specifications: page 4 • Calculate your needs: page 8
1. Sealing air leaks. Seal air leaks between unheated/heated area (garages, basements, crawlspaces) before insulating. Leaks include basement stairs, electrical wiring, plumbing and ductwork.
2. Applying vapour barrier. Apply a 6 mil. vapour barrier to the warm-in-winter side (against the floorabove).Consultapplicablebuilding code for air barrier requirementsandlocation.
3. Installing batts. Place batts betweenfloorjoists,wheretheywill stay in place temporarily. Ensureinsulationfitssnuglyagainstthe band joists and the underside ofthefloorandthatitoverlapsthebottom plate.
4. Holding batts in place. To hold insulation in place, nail wire mesh atrightanglestothefloorjoists.Continue adding adjacent strips until insulated area is covered.
5. Finishing walls. Installfinishoverframing structure.
FLOORS OVER UNHEATED SPACES
Cut batts so that they fit closely up against wood cross-bracing members, electrical wiring and lighting fixtures.
QUICK & EASY INSTALLATION TIPS
PRODUCTINFO
PRE-INSULATION FAQS ATTIC CEILINGS WALLS BASEMENT/ CRAWLSPACE
FLOORS NOISECONTROL
SMALLPROJECTS
PINK® FIBERGLAS® INSULATION

25
PRODUCTINFO
PRE-INSULATION FAQS ATTIC CEILINGS WALLS BASEMENT/ CRAWLSPACE
FLOORS NOISECONTROL
SMALLPROJECTS
EcoTouch® QuietZone® PINK® FIBERGLAS®
Acoustic Insulation
Have teenagers or pets? Noisy appliances or home entertainmentequipment?Youcanreducethenoiseinyourhome by installing EcoTouch® QuietZone® PINK® FIBERGLAS® AcousticInsulationbetweeninteriorwalls,floorsandceilings.Non-combustible and safe for your home, EcoTouch® QuietZone® PINK® FIBERGLAS® Acoustic Insulation is made from 73% recycled content* and is GREENGUARD Gold Certifiedandverifiedtobeformaldehyde-free,whichmeansourproductsmeetindoorairqualitystandards.OwensCorning is proud to be at the forefront of our industry when it comestoindoorairqualityandenvironmentalinitiatives.Sotakecomfortinknowingthatwhileyou’remakingthingsquietaround home, you’re being easy on the environment.
PEACE AND COMFORT WITH QuietZone® INSULATION • Minimizes unwanted noise• Safe for your home• Non-combustible
Want to reduce noise in your home?
Insulateyourinteriorwalls,ceilingsandfloors with EcoTouch® QuietZone® PINK® FIBERGLAS® Acoustic Insulation.
26
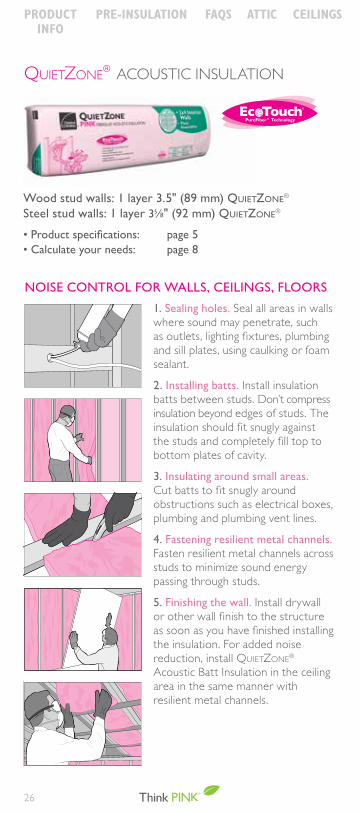
NOISE CONTROL FOR WALLS, CEILINGS, FLOORS
1. Sealing holes. Seal all areas in walls where sound may penetrate, such asoutlets,lightingfixtures,plumbingand sill plates, using caulking or foam sealant.
2. Installing batts. Install insulation batts between studs. Don’t compress insulation beyond edges of studs. The insulationshouldfitsnuglyagainst thestudsandcompletelyfilltoptobottom plates of cavity.
3. Insulating around small areas. Cutbattstofitsnuglyaround obstructions such as electrical boxes, plumbing and plumbing vent lines.
4. Fastening resilient metal channels. Fasten resilient metal channels across studs to minimize sound energy passing through studs.
5. Finishing the wall. Install drywall orotherwallfinishtothestructureassoonasyouhavefinishedinstallingthe insulation. For added noise reduction, install QuietZone® Acoustic Batt Insulation in the ceiling area in the same manner with resilient metal channels.
Wood stud walls: 1 layer 3.5" (89 mm) QuietZone®
Steel stud walls: 1 layer 35⁄8" (92 mm) QuietZone®
• Product specifications: page 5 • Calculate your needs: page 8
QuietZone® ACOUSTIC INSULATION
PRODUCTINFO
PRE-INSULATION FAQS ATTIC CEILINGS WALLS BASEMENT/ CRAWLSPACE
FLOORS NOISECONTROL
SMALLPROJECTS
27
SMALL PROJECTS
QuietZone® ACOUSTIC INSULATION
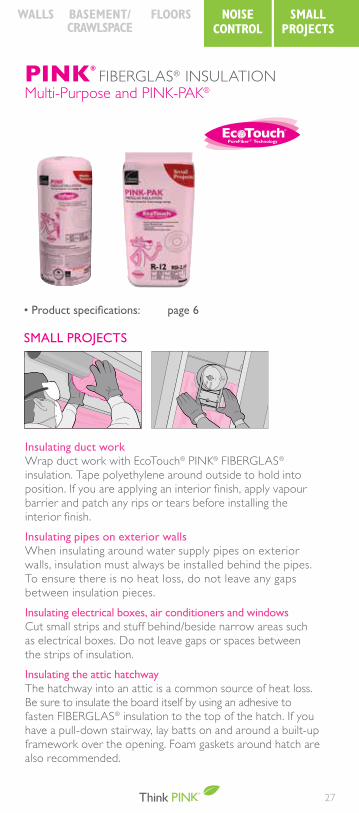
Insulating duct work Wrap duct work with EcoTouch® PINK® FIBERGLAS® insulation. Tape polyethylene around outside to hold into position.Ifyouareapplyinganinteriorfinish,applyvapourbarrier and patch any rips or tears before installing the interiorfinish.
Insulating pipes on exterior walls When insulating around water supply pipes on exterior walls, insulation must always be installed behind the pipes. To ensure there is no heat loss, do not leave any gaps between insulation pieces.
Insulating electrical boxes, air conditioners and windows Cut small strips and stuff behind/beside narrow areas such as electrical boxes. Do not leave gaps or spaces between the strips of insulation.
Insulating the attic hatchway The hatchway into an attic is a common source of heat loss. Be sure to insulate the board itself by using an adhesive to fasten FIBERGLAS® insulation to the top of the hatch. If you have a pull-down stairway, lay batts on and around a built-up framework over the opening. Foam gaskets around hatch are also recommended.
• Product specifications: page 6
PINK® FIBERGLAS® INSULATIONMulti-Purpose and PINK-PAK®
PRODUCTINFO
PRE-INSULATION FAQS ATTIC CEILINGS WALLS BASEMENT/ CRAWLSPACE
FLOORS NOISECONTROL
SMALLPROJECTS

28
Recommended thickness: 3½" (89 mm) or 5½" (140 mm)
• Product specifications: page 7 • Calculate your needs: page 7
28
1. Smooth top surface of foundation wall to no greater variation than ¼" and brush off loose debris.
2. Unroll FoamSealR™ Sill Gasket on top surface of foundation wall or fasten to bottom of sill plate on tilt-up wall sections.
3. Butt all end and perpendicular joints tightly.
4. Pierce FoamSealR™ Sill Gasket at anchor bolt locations.
5. Set and anchor sill plate to foundation wall.
TOP OF FOUNDATION WALL
Sub-floor
Rim board
Floor joists
Anchor bolts
FoamSealR™
Foundation
FOUNDATION WALL: SILL PLATE
FoamSealR™ SILL GASKET
PRODUCTINFO
PRE-INSULATION FAQS ATTIC CEILINGS WALLS BASEMENT/ CRAWLSPACE
FLOORS NOISECONTROL
SMALLPROJECTS
Government grants and rebates can help to reduce your renovation costs. Visit www.showmethegreen.ca
QUICK FACTS: DID YOU KNOW?

29
Air pockets formed between FIBERGLAS®
Insulation strands trap air
PINK® FIBERGLAS® Insulation
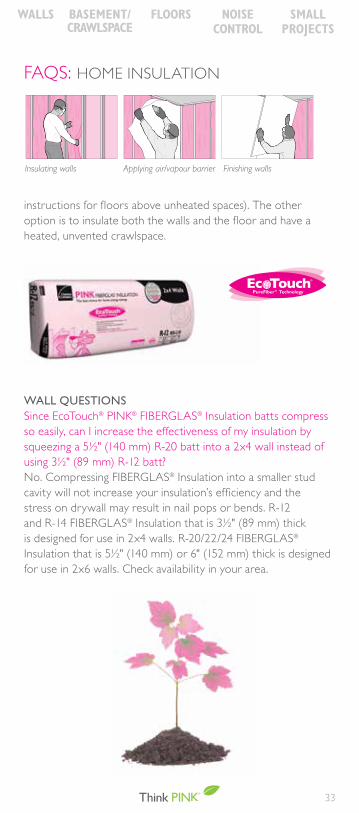
FAQS: HOME INSULATION
GENERAL INSULATING QUESTIONS
How does EcoTouch® PINK® FIBERGLAS® Insulation work? Millions of tiny air pockets form between tangled strands of insulation. These trapped air pockets resist the passage of heatflow,reducingheatlossinthewinterandheatgainin the summer. In general, the thicker the insulation, the more air pockets and the higher the R-value.
What is thermal performance? All insulation materials respond to a single basic principle: heat moves from warmer areas to cooler areas. On cold days, heat from inside tries to get out, and on warm days, the heat outside tries to get in. Properly installed insulation helps reduce costly heating and cooling bills.
What is R-value? R-valuemeasuresresistancetoheatflow,andisdeterminedby the thickness and density of the insulation. The higher the R-value, the greater the insulating power. (See page 4 for R-value chart).
Which R-value should I choose for my project? Newandretrofitinsulationprojectsmustalwaysmeetlocal building code insulation levels. Higher levels are recommended toincreaseenergyefficiency,occupantcomfortandhelpsave the planet. See how-to pages for recommended insulation levels.
Remember! The higher the R-value, the greater the insulating power and the savings.
Do higher insulation levels create condensation problems? No. Insulation is not a source of condensation problems. Properly ventilated areas, the use of vapour barriers/retarders and a continuous air barrier system help to reduce the risk of condensation.
What is the purpose of a vapour barrier/retarder? Vapourbarriers/retarders,madefrompolyethylenefilmandplaced on the warm side of the insulation, help control the
PRODUCTINFO
PRE-INSULATION FAQS ATTIC CEILINGS WALLS BASEMENT/ CRAWLSPACE
FLOORS NOISECONTROL
SMALLPROJECTS

30
amount of water vapour passing through insulation, minimizing theriskofcondensationwithinexteriorwalls,ceilingsandfloors.
I am in the middle of an insulation project, and I accidentally tore the vapour barrier. Do I need to repair it? Yes, seal all punctures with contractor sheathing tape or duct tape.Thepolyethylenefilmactsasavapourbarrierandcanalsoact as the air barrier if it is sealed and continuous.
Detectingandfixingairleaksbeforeinsulatingisveryimportantand doing so can result in an annual energy cost savings of 10%. HowdoIdetectairleaks?HowdoIfixairleaks? Cold and windy days are the best time to check for air leaks. Attach a piece of tissue or light paper to a string, and then hold it close to an area where you suspect a draft. If the tissue moves, you’ve found a leak. Problem areas include the edges of doors and windows, and plumbing and electrical wiring access throughwalls,floorsandceilings. Weather-stripping, caulking and sealing doors, windows, cracks and openings can reduce or stop air leakage. When building a new home, remodelling or re-siding, ensure that a continuous air barrier system exists or is installed.
Why is ventilation important? When your attic or crawlspace is properly ventilated, a positive airflowiscreated,allowingthehousetobreathe,andthus preventingmoisturebuild-up.Soffitvents(openingsundertheeaves) combined with roof vents or gable vents create positive movement of air out of the attic. Allow for at least two vent openings,soaircanflowinoneandouttheother.
Ventarearequirements:Consult your local building codes for requirements.Theunobstructedventareamustnotbelessthan 1/300 of insulated ceiling area. For roof slopes less than 1 in 6 or for cathedral ceilings, the unobstructed vent area must not belessthan1/150oftheinsulatedceilingarea.Battsandloosefillinsulation in attics must not restrict the ventilation air at eaves. raft-R-mate® Attic Rafter Vents retain the insulation and provide passage for ventilation air. See page 15 for installation instructions.
Applying vapour barrier Sealing air leaks Installing rafter vents
FAQS: HOME INSULATION
PRODUCTINFO
PRE-INSULATION FAQS ATTIC CEILINGS WALLS BASEMENT/ CRAWLSPACE
FLOORS NOISECONTROL
SMALLPROJECTS

31
ATTIC & CATHEDRAL CEILING QUESTIONS
My attic currently has about six inches of insulation. If I want to add another six inches of insulation, what type should I use? Before installing a layer of unfaced batts or having a contractor installloosefillinsulation,checkroofsheathingforevidenceof moisture accumulation. Seal any leaks into the attic at light fixturesbytapingtheedgesofapieceofpolyethylenefilmoverthefixturestobackofceilingfinishandbyinstallingafoamgasket around any hatches. Check to see that the air/vapour barrier is intact and repair if necessary.
The recommended R-value in the attic for optimum energy efficiencyisR-60.SixinchesofinsulationhasanR-valueofR-20.To get to R-60, add 11.8" (R-40) of batt insulation or 14.75" ofloosefillinsulationoverexistingbattinsulation.Besuretoprovideadequateventilation.
How do I add additional layers of insulation to a joist cavity that is only half full? If the joist cavity is only half full and the recommended insulation levelinyourareaisR-60(equivalenttoapproximately18"(457mm) of EcoTouch® PINK® FIBERGLAS®Insulation),fillthejoistcavityflushtothetopofthejoistusingtheappropriatethicknessof PINK® FIBERGLAS® Insulation . Then lay a second layer of insulation perpendicular to the existing layer, for a total of 18" (457mm)(oranR-valueof60)inthejoistcavity.Ifafirstlayerofretrofitinsulationisnotavailableinanappropriatethicknesssothatit’sflushwiththetopofthejoists,installappropriatewidthlayers of batts between and parallel to the joists. Covering the attic joists with the second layer will reduce heat loss through the wood. See page 11 for installation instructions.
Adding a second layer Applying air/vapour barrier Installing attic rafter vents
FAQS: HOME INSULATION
PRODUCTINFO
PRE-INSULATION FAQS ATTIC CEILINGS WALLS BASEMENT/ CRAWLSPACE
FLOORS NOISECONTROL
SMALLPROJECTS

32
In winter, there is a wet spot on my ceiling where it meets the inside of the exterior wall. The attic area above this room is insulated. What might be causing this moisture problem? Check to see if your attic insulation completely covers your ceiling area. (Attic insulation should extend out over the wall top plate, but not over the eave.) You may have a cold spot caused by a lack of insulation over this area, or you may have a ventilation problem or “ice damming.” Insulation should extend out over the exterior wall, right up totheroofline,butshouldnotcovertheeavevents.Installeavebaffleswhereverthereareeaveventstoensureairflow.Foradditional ventilation, install roof vents.
Do I need ventilation air space between the insulation and the roof deck in cathedral ceilings? Rafters in cathedral ceilings are usually made of 2x10s or 2x12s, and Owens Corning has installation products designed specificallyfortheserafters.Theseproductshelppreventmoisture damage, help ensure the durability of roof shingles and provide a minimum of 2½" (63 mm) of ventilation space between the top of insulation and underside of roof sheathing. Checklocalbuildingcodesforadditionalrequirements.
CRAWLSPACE QUESTIONS HowdoIinsulatethedirtfloorofmycrawlspace? Adirtfloorofacrawlspaceshouldbecoveredwitha6mil. polyethylene vapour retarder.
If my crawlspace is ventilated, can I still insulate the walls of the crawlspace,orisitbettertoinsulatethefloor? If there are insulated ducts and no pipes, the best course of actionistoinsulatethefloorabove(seepage24forinstallation
Insulating floor above Insulating cathedral ceiling Plywood for walking on
FAQS: HOME INSULATION
PRODUCTINFO
PRE-INSULATION FAQS ATTIC CEILINGS WALLS BASEMENT/ CRAWLSPACE
FLOORS NOISECONTROL
SMALLPROJECTS
33
instructionsforfloorsaboveunheatedspaces).Theotheroptionistoinsulateboththewallsandthefloorandhaveaheated, unvented crawlspace.
WALL QUESTIONS Since EcoTouch® PINK® FIBERGLAS® Insulation batts compress so easily, can I increase the effectiveness of my insulation by squeezinga5½"(140mm)R-20battintoa2x4wallinsteadofusing 3½" (89 mm) R-12 batt? No. Compressing FIBERGLAS® Insulation into a smaller stud cavitywillnotincreaseyourinsulation’sefficiencyandthe stress on drywall may result in nail pops or bends. R-12 and R-14 FIBERGLAS® Insulation that is 3½" (89 mm) thick is designed for use in 2x4 walls. R-20/22/24 FIBERGLAS® Insulation that is 5½" (140 mm) or 6" (152 mm) thick is designed for use in 2x6 walls. Check availability in your area.
FAQS: HOME INSULATION
Insulating walls Applying air/vapour barrier Finishing walls
PRODUCTINFO
PRE-INSULATION FAQS ATTIC CEILINGS WALLS BASEMENT/ CRAWLSPACE
FLOORS NOISECONTROL
SMALLPROJECTS

Th
e b
est ch
oice
for h
om
e e
ne
rgy sav
ings.
Batts
ECO
TOU
CH
® PINK
® FIBERG
LAS
® INSU
LAT
ION

FOA
MU
LAR
® E
xtru
ded
Poly
styr
ene
Rig
id In
sula
tion
– A
gre
at d
efen
se a
gain
st e
nerg
y lo
ss in
hom
es.
ENER
GY-
SAV
ING
, MO
IST
UR
E R
ESIS
TAN
TRig
id F
oam
THE
PINK
PAN
THER
™ &
© 1
964
- 201
5 Me
tro-Gold
wyn-Ma
yer Stu
dios Inc
. All Rig
hts Re
serve
d. Th
e colou
r PINK
is a registered
trad
emark of
Owen
s Co
rning
. Certified
The
rmal
Insula
tion Ma
terial
CCD
-016
. * 73% recycled
con
tent i
s ba
sed on
the averag
e recycle
d gla
ss conten
t in all
Owe
ns Cornin
g fib
ergla
ss ba
tts, r
olls an
d un
bond
ed lo
osefi
ll ins
ulatio
n ma
nufac
tured
in Ca
nada
. SCS certified
. *** Sa
vings vary de
pend
ing o
n the origi
nal a
moun
t of
insula
tion
in your h
ome,
clima
te, h
ouse size
, air
leaks, a
nd p
ersona
l ene
rgy use an
d living
hab
its.**
**Th
e ins
ulatio
n is
manu
factured
with a
blow
ing a
gent w
ith 7
0% le
ss glo
bal w
armi
ng p
oten
tial a
s comp
ared
to O
wens Cornin
g previou
s blo
wing
agents.
† See actual
warra
nty for
com
plete
details, l
imita
tions and
req
uirem
ents. ^ B
ased
on
Stats
Cana
da R
eport C
S44-00
4-IN, A
pril
2013
. ‡ Energy and
Enviro
nmen
tal b
enefi
ts of
Extru
ded
Polys
tyren
e Fo
am and
Fibe
rglas
s Ins
ulatio
n Prod
ucts
in U.S.
Resid
entia
l and
Com
merci
al Bu
ilding
s by Me
rle F. M
cBrid
e, Ph
.D, P
.E. (4
-27-20
04).
Sim
aPro 7
.0 da
ta base:
TRAC
I-OC V2
.00, d
ated
9/8/200
6: CO
2 Eq
uivale
nce Cu
mulat
ive E
nergy De
mand
- OC
V1.0
3 8/22
/200
6. § Ve
rsus a
non
-insulat
ed basem
ent.
GREE
NGUA
RD Certifi
ed produ
cts are certifi
ed to
GRE
ENGU
ARD
stand
ards fo
r low
che
mical e
missi
ons i
nto
indoo
r air
during
produ
ct usag
e. Fo
r mo
re in
forma
tion,
visit
ul.com/
gg. O
wens Cornin
g PINK
® in
sulat
ion is
GRE
ENGU
ARD
Certifie
d for
indo
or air
quali
ty, excep
t bo
nded
loosefi
ll prod
ucts. This
produ
ct ha
s achie
ved
GREE
NGUA
RD G
OLD
Certification
and
is verifie
d to b
e for
malde
hyde
free. *
Based
on the
average recycled
gla
ss conten
t in
all O
wens C
ornin
g fib
ergla
ss ba
tts, r
olls an
d un
bond
ed lo
osefi
ll ins
ulatio
n ma
nufac
tured
in Cana
da. ©
201
5 Ow
ens Co
rning
. All
Rights Re
serve
d.

• Saves money on heating and cooling costs***
• 20% recycled content and GREENGUARD Gold certified for indoor air quality
• Long term thermal resistance
• Moisture resistant
BASEMENT WALLS, FLOORS • EXTERIOR WALLS, SHEATHING
ENERGY-SAVING, MOISTURE RESISTANT EXTRUDED POLYSTYRENE RIGID INSULATION
A GUIDE TO HOME INSULATION

ENERGY-SAVING, MOISTURE RESISTANT EXTRUDED POLYSTYRENE RIGID INSULATION
SAVE MONEY, SAVE ENERGY, HELP SAVE THE PLANET.
Insulate your home with FOAMULAR® Extruded
Polystyrene Rigid Insulation, a moisture-resistant,
rigid foam insulation, which can be installed on interior
or exterior of walls, foundation walls and under concrete
floor slabs. With a thermal resistance of R-5 per inch of
thickness, it will help you save money*** on energy bills.
Lightweight, durable and impact-resistant, FOAMULAR®
products are easy to handle, and install. Choose
FOAMULAR® Rigid Insulation for your next renovation
and feel confident that you are helping to make
a more energy-efficient world.

36pink is greenTM
FLIP! See flip side of brochure for EcoTouch® PINK® FIBERGLAS® Insulation
ENERGY-SAVING, MOISTURE RESISTANT EXTRUDED POLYSTYRENE RIGID INSULATION
Owens Corning products overview 37–38
PRODUCT INFORMATION
FOAMULAR® Extruded Polystyrene Rigid Insulation
FOAMULAR® C-200 Insulation 39
FOAMULAR® C-300 Insulation 39
FOAMULAR® InsulPink® Insulation 39
FOAMULAR® CodeBord® Insulation 40
BEFORE YOU INSULATE
Calculate your needs 41– 42
Installation and safety tips 9
HOW TO INSULATEStep-by-step instructions
Attic 43
Exterior walls 44
Basement walls 45–47
Basement Floors 48
INSIDE
Find out how to save money, save energy AND help save the planet with FOAMULAR® Extruded Polystyrene Rigid Insulation products!

37 pink is greenTM
PRODUCTINFO
PRE-INSULATION FAQS ATTIC CEILINGS WALLS BASEMENT/ CRAWLSPACE
FLOORS NOISECONTROL
SMALLPROJECTS
COMPLETE ENERGY EFFICIENCY AND NOISE CONTROL SOLUTIONS FOR YOUR HOME
ATTICSAttiCat® Expanding Blown-In Insulation System R-60 = 221/4"
BASEMENT WALLS® ®
Extruded Polystyrene Rigid Insulation R-20 (4")
BASEMENT FLOORSFOAMULAR CodeBord ® ®FOAMULAR CodeBord C-200C-300 Extruded Polystyrene Rigid Insulation R-10 (2")
BASEMENT WALLS1" (R-5) FOAMULAR® CodeBord®
Extruded Polystyrene Rigid InsulationPlus R-20 EcoTouch® PINK®
FIBERGLAS® BattsFOR HVAC SYSTEMSQuietR® DuctBoardFlexible Duct Media
EXTERIOR WALL SHEATHINGFOAMULAR® CodeBord® Extruded Polystyrene Rigid Insulation R-10 (2")
SILL PLATEFoamSealRTM Sill Gasket
SMALL GAPSEcoTouch® PINK® Multi-PurposeFIBERGLAS® Insulation
ATTICSraft-R-mate®
Attic Rafter Vents
ATTICSPROPINK® FIBERGLAS®
Blown Insulation R-60 = 221/4"
EXTERIOR WALLS
ATTICSEcoTouch® PINK® FIBERGLAS®
Insulation R-60 = 18"
INTERIOR WALLS AND FLOORSEcoTouch® QuietZone® PINK® FIBERGLAS®
Acoustic Insulation
FLOORS OVER UNHEATED SPACESEcoTouch® PINK® FIBERGLAS® Insulation R-40
CATHEDRAL CEILINGSEcoTouch® PINK® FIBERGLAS® Insulation R-40
R-24 EcoTouch® PINK®
FIBERGLAS® Insulation

38pink is greenTM
PRODUCTINFO
PRE-INSULATION FAQS ATTIC CEILINGS WALLS BASEMENT/ CRAWLSPACE
FLOORS NOISECONTROL
SMALLPROJECTS
See flip side of brochure for PINK® FIBERGLAS® Insulation products
• Saves money on heating and cooling costs***
• Reduces carbon footprint• Lessens noise
ATTICSAttiCat® Expanding Blown-In Insulation System R-60 = 221/4"
BASEMENT WALLS® ®
Extruded Polystyrene Rigid Insulation R-20 (4")
BASEMENT FLOORSFOAMULAR CodeBord ® ®FOAMULAR CodeBord C-200C-300 Extruded Polystyrene Rigid Insulation R-10 (2")
BASEMENT WALLS1" (R-5) FOAMULAR® CodeBord®
Extruded Polystyrene Rigid InsulationPlus R-20 EcoTouch® PINK®
FIBERGLAS® BattsFOR HVAC SYSTEMSQuietR® DuctBoardFlexible Duct Media
EXTERIOR WALL SHEATHINGFOAMULAR® CodeBord® Extruded Polystyrene Rigid Insulation R-10 (2")
SILL PLATEFoamSealRTM Sill Gasket
SMALL GAPSEcoTouch® PINK® Multi-PurposeFIBERGLAS® Insulation
ATTICSraft-R-mate®
Attic Rafter Vents
ATTICSPROPINK® FIBERGLAS®
Blown Insulation R-60 = 221/4"
EXTERIOR WALLS
ATTICSEcoTouch® PINK® FIBERGLAS®
Insulation R-60 = 18"
INTERIOR WALLS AND FLOORSEcoTouch® QuietZone® PINK® FIBERGLAS®
Acoustic Insulation
FLOORS OVER UNHEATED SPACESEcoTouch® PINK® FIBERGLAS® Insulation R-40
CATHEDRAL CEILINGSEcoTouch® PINK® FIBERGLAS® Insulation R-40
R-24 EcoTouch® PINK®
FIBERGLAS® Insulation

39 pink is greenTM
BENEFITS• Saves money on heating and cooling costs***
• Long term thermal resistance – R-5 per inch of thickness• Easy to install, lightweight and durable • Moisture-resistant • 20% recycled content• GREENGUARD Gold certified for indoor air quality
SPECIFICATIONS- Below grade/interior/exterior- Concrete floor slabs- 20 PSI (C-200); 30 PSI (C-300)- Butt and shiplap edges
FOAMULAR® C-200, C-300, INSULPINK®
EXTRUDED POLYSTYRENE RIGID INSULATIONBASEMENT, FLOORS AND WALLS EXTERIOR INSULATING SHEATHING
Thickness Width Lengthin mm in mm ft mm1 25 24 610 96 2438
1.5 38 24 610 96 24382 51 24 610 96 2438
2.5 64 24 610 96 2438
3 76 24 610 96 2438
3.5 89 24 610 96 2438
4 102 24 610 96 2438
Product Specifications
Calculate your needs: page 41 How to instructions: Attics page 43 Basement floors page 48
PRODUCTINFO
PRE-INSULATION FAQS ATTIC CEILINGS WALLS BASEMENT/ CRAWLSPACE
FLOORS NOISECONTROL
SMALLPROJECTS

40pink is greenTM
Thickness Width Length
in mm in mm in mm in mm0.8 20 48 1220 96 2438 108 2743
1 25 48 1220 96 2438 108 2743
1½ 38 48 1220 96 2438 108 2743
2 51 48 1220 96 2438 108 2743
Product Specifications
FOAMULAR® CODEBORD® EXTRUDED POLYSTYRENE RIGID INSULATION 4' X 8' OR 4' X 9' ABOVE GRADE EXTERIOR WALLS OR BASEMENT INTERIOR WALLS
BENEFITS• Saves money on heating and cooling costs***
• Long term thermal resistance – R-5 per inch of thickness• Easy to install, lightweight and durable • Moisture-resistant • 20% recycled content• GREENGUARD Gold certified for indoor air quality
Calculate your needs: page 42 How to instructions: page 44
QUICK FACTS: DID YOU KNOW?Government grants and rebates can help to reduce your renovation costs. Visit www.showmethegreen.ca
PRODUCTINFO
PRE-INSULATION FAQS ATTIC CEILINGS WALLS BASEMENT/ CRAWLSPACE
FLOORS NOISECONTROL
SMALLPROJECTS
41 pink is greenTM
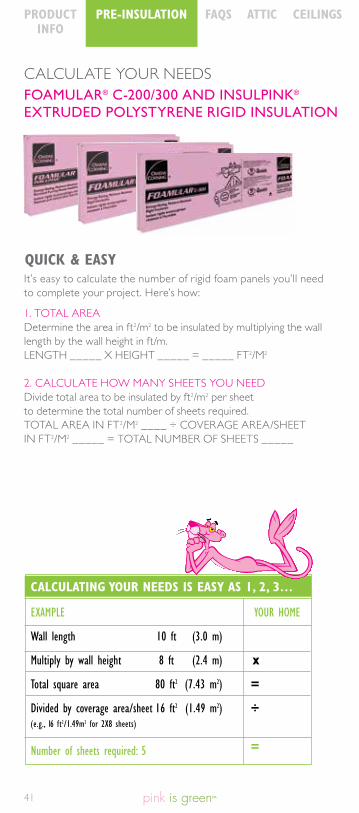
QUICK & EASY
FOAMULAR® C-200/300 AND INSULPINK® EXTRUDED POLYSTYRENE RIGID INSULATION
It’s easy to calculate the number of rigid foam panels you’ll need to complete your project. Here’s how:
1. TOTAL AREADetermine the area in ft2/m2 to be insulated by multiplying the wall length by the wall height in ft/m.LENGTH _____ X HEIGHT _____ = _____ FT2/M2
2. CALCULATE HOW MANY SHEETS YOU NEEDDivide total area to be insulated by ft2/m2 per sheet to determine the total number of sheets required.TOTAL AREA IN FT2/M2 ____ ÷ COVERAGE AREA/SHEET IN FT2/M2 _____ = TOTAL NUMBER OF SHEETS _____
CALCULATING YOUR NEEDS IS EASY AS 1, 2, 3…
EXAMPLE YOUR HOME
Wall length 10 ft (3.0 m)
Multiply by wall height 8 ft (2.4 m) x
Total square area 80 ft2 (7.43 m2) =
Divided by coverage area/sheet 16 ft2 (1.49 m2) ÷ (e.g., 16 ft2/1.49m2 for 2X8 sheets)
Number of sheets required: 5 =
CALCULATE YOUR NEEDS
PRODUCTINFO
PRE-INSULATION FAQS ATTIC CEILINGS WALLS BASEMENT/ CRAWLSPACE
FLOORS NOISECONTROL
SMALLPROJECTS
42pink is greenTM
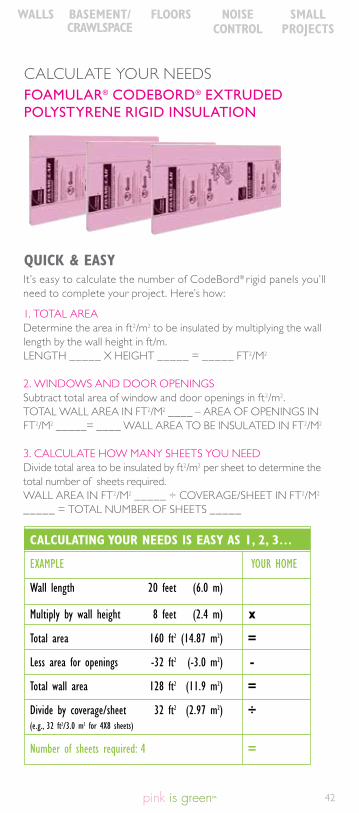
QUICK & EASY
FOAMULAR® CODEBORD® EXTRUDED POLYSTYRENE RIGID INSULATION
It’s easy to calculate the number of CodeBord® rigid panels you’ll need to complete your project. Here’s how:
1. TOTAL AREADetermine the area in ft2/m2 to be insulated by multiplying the wall length by the wall height in ft/m.LENGTH _____ X HEIGHT _____ = _____ FT2/M2
2. WINDOWS AND DOOR OPENINGSSubtract total area of window and door openings in ft2/m2. TOTAL WALL AREA IN FT2/M2 ____ – AREA OF OPENINGS IN FT2/M2 _____= ____ WALL AREA TO BE INSULATED IN FT2/M2
3. CALCULATE HOW MANY SHEETS YOU NEEDDivide total area to be insulated by ft2/m2 per sheet to determine the total number of sheets required.WALL AREA IN FT2/M2 _____ ÷ COVERAGE/SHEET IN FT2/M2 _____ = TOTAL NUMBER OF SHEETS _____
CALCULATING YOUR NEEDS IS EASY AS 1, 2, 3…
EXAMPLE YOUR HOME
Wall length 20 feet (6.0 m)
Multiply by wall height 8 feet (2.4 m) x
Total area 160 ft2 (14.87 m2) =
Less area for openings -32 ft2 (-3.0 m2) -
Total wall area 128 ft2 (11.9 m2) =
Divide by coverage/sheet 32 ft2 (2.97 m2) ÷ (e.g., 32 ft2/3.0 m2 for 4X8 sheets)
Number of sheets required: 4 =
CALCULATE YOUR NEEDS
PRODUCTINFO
PRE-INSULATION FAQS ATTIC CEILINGS WALLS BASEMENT/ CRAWLSPACE
FLOORS NOISECONTROL
SMALLPROJECTS

43 pink is greenTM
Recommended thickness: 2" (51 mm)
• Product specifications: page 39 • Calculate your needs: page 41
1. Once the batt insulation has been installed flush with the underside of the framing, install FOAMULAR® C-200 or InsulPink® Rigid Insulation boards against the framing, using nails and washers.
2. Install a continuous and sealed polyethylene air/vapour barrier over FOAMULAR® Insulations (need one over both C-200 and Insulpink). Install gypsum board over wood strapping. FOAMULAR® C-200 or InsulPink® can act as the air/vapour barrier with sealed joints. Consult applicable building code.
FOAMULAR® C-200 or InsulPink® boards may be installed below the attic rafters to achieve maximum assembly thermal resistance while maintaining ventilation space above the installed batts. It is a good practice to fasten strapping through the foam boards to the rafters for easy attachment of drywall.
QUICK FACTS: DID YOU KNOW?FOAMULAR® Extruded Polystyrene Rigid Insulation contains20% recycled content.
SEE PAGE 15 FOR EcoTouch® PINK® FIBERGLAS® INSULATION
ATTIC, BELOW RAFTERS
FOAMULAR® C-200 or InsulPink® Extruded Polystyrene Rigid Insulation
PRODUCTINFO
PRE-INSULATION FAQS ATTIC CEILINGS WALLS BASEMENT/ CRAWLSPACE
FLOORS NOISECONTROL
SMALLPROJECTS

44pink is greenTM
Recommended thickness and R-values
FOAMULAR® CodeBord® Extruded Polystyrene Rigid Insulation
Product Specifications Calculate your needs
CodeBord® page 40 page 42
PINK® FIBERGLAS® page 4 page 8
1. Installing CodeBord®. Install insulation panels vertically on the outside exterior walls. Begin installation in a corner of the wall and trim off shiplap edge of panel so it is flush with the outer edge of the stud. Fasten panels to frame with nails and washers at 6" (152 mm) centres on vertical edges of panels and at 12" (300 mm) on intermediate stud supports. Slide panels together ensuring vertical edges meet at and are supported by studs at 16" or 24" (400 or 600 mm) on centre. Tape all joints with Owens Corning approved JointSealR™ tape.
2. Applying exterior finish. To prevent discoloration caused by exposure to direct sunlight, apply exterior finish as soon as possible.
OUTSIDE & INSIDE WALLS
INSIDE WALLS To complete the installation on the inside exterior walls, follow instructions 1 to 4 on page 19 for EcoTouch® PINK® FIBERGLAS® Insulation.
Extra insulating power and more energy savings!
2x4 Walls: 1 layer of 2"/50 mm FOAMULAR® CodeBord® Extruded Polystyrene Rigid Insulation plus 1 layer of R-12 or R-14 PINK® FIBERGLAS® Insulation
2x6 Walls: 1 layer of 11/2"/38 mm FOAMULAR® CodeBord® plus 1 layer of R-19, R-22 or R-24 PINK® FIBERGLAS® Insulation
+
PRODUCTINFO
PRE-INSULATION FAQS ATTIC CEILINGS WALLS BASEMENT/ CRAWLSPACE
FLOORS NOISECONTROL
SMALLPROJECTS

45 pink is greenTM
Recommended thickness: 2.5" (63 mm)
• Product specifications: page 39 • Calculate your needs: page 41
BASIC WALL INSULATION SEE PAGE 47 FOR EXTRA INSULATING POWER
UNFINISHED CONCRETE BASEMENT WALLS
1. Preparing walls. Ensure concrete walls are as flat as possible; hammer off rough spots.
2. Trim and place C-200 or InsulPink® insulation to wall height. Measure the height of the wall. Trim insulation to correct length. Place insulation vertically on the wall starting in a corner. Use a spot adhesive to temporarily hold the foam boards in place against foundation wall ensuring that foam boards are level. Trim shiplap edge to fit the corner.
3. Insert wood furring strips. Insert wood furring strips in insulation voids (for InsulPink® product) or over insulation (for C-200 product) and anchor to concrete wall using appropriate masonry anchors a maximum of 24" (600 mm) o.c. vertically.
4. Installing electrical boxes and wiring. See next page.
5. Filling joints with foam sealant. Fill joint at the perimeter of the insulated wall as well as all perforations made in the insulating panel (e.g., electrical boxes and windows). Cut off protruding foam sealant with a knife
FOAMULAR® C-200 or InsulPink® Extruded Polystyrene Rigid Insulation
PRODUCTINFO
PRE-INSULATION FAQS ATTIC CEILINGS WALLS BASEMENT/ CRAWLSPACE
FLOORS NOISECONTROL
SMALLPROJECTS

46pink is greenTM
Install polyethylene vapour barrier over foam if required. Consult applicable building Code.
1. Prepping electrical box location. At the location of the electrical outlet, cut out a 2" x 6" void in the insulation.
2. Fastening electrical box. Insert a wood filler piece in the opening to fill the void and fasten to concrete wall with appropriate masonry fasteners. Next cut out another void in the insulation next to the wood filler piece in order to be able to insert the electrical box and screw box into side of wood filler piece to hold it in place. Position the electrical box so that it will sit flush with the gypsum board once installed.
3. Bringing wire from junction box to outlet. Create a groove in the insulation board to inset
electrical wire coming from junction box to outlet. Wire should be embedded 1/2" (13 mm) minimum (i.e., electrical wire should be at least 1" [25.4 mm] from drywall surface). Connect the wire to the electrical box.
4. Filling & sealing. Use a foam sealant to fill the enlarged groove, the area behind the electrical box and the perimeter of the piece of wood and the electrical box.
INSTALLING ELECTRICAL BOXES AND WIRING
or hacksaw blade to ensure gypsum board can be installed properly.
6. Vapour retarder. Install polyethylene vapour retarder or seal joints in foam board to act as vapour retarder. Consult applicable building code for requirements. Use Owens Corning JointSealR™ tape approved for taping joints on foam board insulations.
7. Finishing walls. When installation is complete, install 1/2" (13 mm) drywall or other approved thermal barrier material using appropriate fasteners into wood furring strips. Finish the drywall according to manufacturers instructions. Consult the National Building Code for requirements when using other finishes.
PRODUCTINFO
PRE-INSULATION FAQS ATTIC CEILINGS WALLS BASEMENT/ CRAWLSPACE
FLOORS NOISECONTROL
SMALLPROJECTS

pink is greenTM47
INSTALLATION OVERVIEW
2" FOAMULAR® CodeBord® or C-200 Insulation is R-10 plus R-12 or R-14 batts give you a total of R-22 or R-24.
Follow step-by-step how-to instructions for each of the above recommended products as referenced below.
1. Installing FOAMULAR® insulation panels. (See how-to instructions on page 45)
2. Building a 2x4 wood stud wall. (See how-to instructions on page 21)
3. Installing FIBERGLAS® batts. (See how-to instructions on page 19)
4. Finishing the walls. (See how-to instructions on page 19)
Recommended R-value and thickness: 1 layer of 2" (50 mm) FOAMULAR® C-200 or FOAMULAR® CodeBord® Extruded Polystyrene Rigid Insulation and 1 layer of R-14 PINK® FIBERGLAS® Insulation
Product Specifications Calculate your needs
C-200 CodeBord®
page 39 page 39
page 41 page 41
PINK® FIBERGLAS® page 4 page 8
FOAMULAR® CodeBord® or C-200 Extruded Polystyrene Rigid Insulation and R-12 or R-14 EcoTouch® PINK® FIBERGLAS Insulation
+
Extra insulating power and more energy savings!UNFINISHED CONCRETE BASEMENT WALLS
PRODUCTINFO
PRE-INSULATION FAQS ATTIC CEILINGS WALLS BASEMENT/ CRAWLSPACE
FLOORS NOISECONTROL
SMALLPROJECTS

pink is greenTM 48
FOAMULAR® C-200 or C-300 Extruded Polystyrene Rigid Insulation
Recommended thickness: 1½" or 2" (38 mm or 50 mm)
• Product specifications: page 39 • Calculate your needs: page 41
1. Laying gravel. Lay at least 6" (152 mm) of coarse, clean, gravel on the top of the undisturbed soil and ensure that it is level.
2. Applying vapour retarder. Apply a 6 mil. vapour retarder on top of the gravel.
3. Installing C-200 or C-300. Ensure panels are butted together as tight as possible.
4. Pouring concrete. Pour concrete over the panels to an even and level depth of 4–6" (100–150 mm).
4321
Note: Local Building Code and Building Officials should be consulted regarding minimum construction requirements in your municipality.
CONCRETE BASEMENT FLOORS
QUICK FACTS: DID YOU KNOW?Government grants and rebates can help to reduce your renovation costs. Visit www.showmethegreen.ca
PRODUCTINFO
PRE-INSULATION FAQS ATTIC CEILINGS WALLS BASEMENT/ CRAWLSPACE
FLOORS NOISECONTROL
SMALLPROJECTS