a guide to styling strategi in mapinfo tab and esri shapefile · mapinfo professional 11.0.4 has...
TRANSCRIPT

Strategi styling guide v1.0 Dec 2012 © Crown copyright
D10201 Page 1 of 25
Strategi styling guide
A guide to styling Strategi in MapInfo TAB and ESRI Shapefile
Styling guide

Style guide
Strategi styling guide v1.0 Dec 2012 © Crown copyright
D10201 Page 2 of 25
Responsibility for this document James Terry is responsible for the content of this document.
Change history Version Date Summary of change 1.0 Dec 2012 First issue
Distribution
This document is for use by all users of Strategi.
Approval for issue
James Terry, Technical Product Manager.
Issued by James Terry.
Trademarks Ordnance Survey, the OS Symbol, OS VectorMap and Strategi are registered trademarks and Meridian and OS OpenData are trademarks of Ordnance Survey, the national mapping agency of Great Britain.

Style guide
Strategi styling guide v1.0 Dec 2012 © Crown copyright
D10201 Page 3 of 25
Contents Section Page no 1 Introduction .................................................................................................................................. 4 2 Background .................................................................................................................................. 4 3 MapInfo TAB ................................................................................................................................ 4
3.1 Loading Strategi fonts ..................................................................................................... 4 3.2 How to load the styles ..................................................................................................... 5 3.3 How to set the scale range ............................................................................................. 7 3.4 How to customise the styling .......................................................................................... 8
3.4.1 How to style the data using a Style Override ................................................... 8 3.4.2 How to style the data using selections ............................................................. 9 3.4.3 How to add labels ...........................................................................................11 3.4.4 How to create road casings using Stacked Styles .........................................12 3.4.5 Setting the colour (RGB) value .......................................................................14 3.4.6 How to create road casings and customise the road fills using
multiple layers ................................................................................................15 4 ESRI Shapefile ..........................................................................................................................17
4.1 How to load the styles ...................................................................................................17 4.1.1 Set a reference scale......................................................................................18 4.1.2 Ordering the ESRI layers................................................................................20
4.2 How to customise the styling ........................................................................................21 4.2.1 How to add labels ...........................................................................................21 4.2.2 How to style the data ......................................................................................22 4.2.3 How to save a Layer File or MXD ...................................................................24
5 Future plans ...............................................................................................................................25
Style guide
Strategi styling guide v1.0 Dec 2012 © Crown copyright
D10201 Page 4 of 25
1 Introduction This styling guide has been created to explain how to load and manage the styles that accompany Strategi®. Within this document the customer will find an explanation of the styles Ordnance Survey has opted to use, information about loading the styles and altering the styles to suit their needs.
2 Background Responding to customer feedback about our OS OpenData™ products Ordnance Survey has produced styled data for Strategi in two major formats: MapInfo TAB and ESRI Layer files. These two formats are widely used and will serve a large proportion of OpenData users. Customers can opt to use the styles Ordnance Survey has provided or they can customise them to suit their individual needs. Within this styling guide you will find details of how to achieve this.
Ordnance Survey has adopted the backdrop styles applied to the OS VectorMap® products. The styles have been designed to aid customers in their representation of the data for a variety of purposes. Primarily they enable customers to view the data in a geographical information system (GIS) and overlay their own data onto Strategi. They also aid in the combination of Meridian 2 with other similarly styled products in the OS OpenData range, like Meridian™ 2 (mid scale) and OS VectorMap® District (mid scale) within a GIS.
MapInfo and ESRI manage the data and styles in slightly different ways and consequently there will be minor differences between some of the feature styles. For example, roads in ESRI have road casings applied but they don’t in MapInfo, however, these can be applied by the customer upon receipt of the data.
3 MapInfo TAB The styled data will open in versions of MapInfo back to MapInfo Professional v7.5. Ordnance Survey has not tested it back further than this.
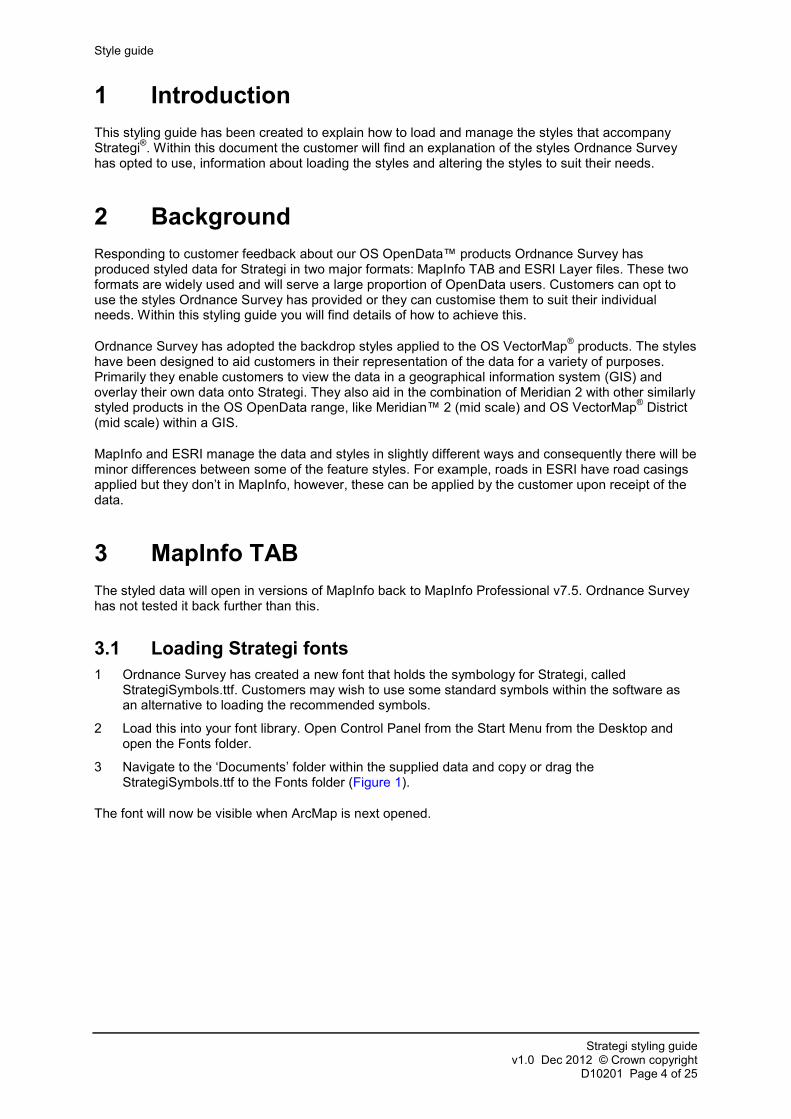
3.1 Loading Strategi fonts 1 Ordnance Survey has created a new font that holds the symbology for Strategi, called
StrategiSymbols.ttf. Customers may wish to use some standard symbols within the software as an alternative to loading the recommended symbols.
2 Load this into your font library. Open Control Panel from the Start Menu from the Desktop and open the Fonts folder.
3 Navigate to the ‘Documents’ folder within the supplied data and copy or drag the StrategiSymbols.ttf to the Fonts folder (Figure 1).
The font will now be visible when ArcMap is next opened.
Style guide
Strategi styling guide v1.0 Dec 2012 © Crown copyright
D10201 Page 5 of 25
Figure 1 Strategi fonts
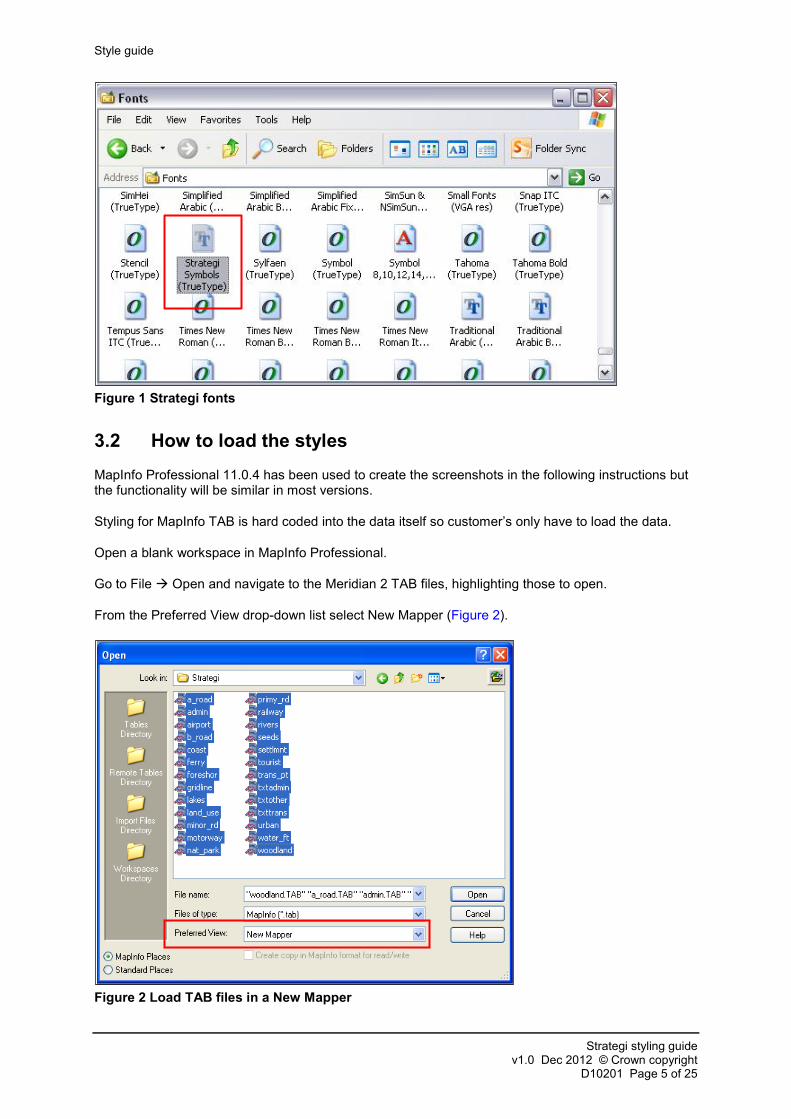
3.2 How to load the styles MapInfo Professional 11.0.4 has been used to create the screenshots in the following instructions but the functionality will be similar in most versions.
Styling for MapInfo TAB is hard coded into the data itself so customer’s only have to load the data.
Open a blank workspace in MapInfo Professional.
Go to File Open and navigate to the Meridian 2 TAB files, highlighting those to open.
From the Preferred View drop-down list select New Mapper (Figure 2).
Figure 2 Load TAB files in a New Mapper

Style guide
Strategi styling guide v1.0 Dec 2012 © Crown copyright
D10201 Page 6 of 25
Click Open.
In the Layer Control window arrange the layers as they appear in Figure 3. The layers do not open in this order when you load them. The TAB files load in the following order:
1 By geometry type: Point Line Polygon
2 Then alphanumerically.
3 Several layers are not displayed because they detract from the overall effectiveness of the styling. They can be displayed by checking the tick box before the layer name.
Figure 3 Suggested layer order for TAB file
This is only a recommendation and the customer’s requirements for layer order and layer visibility may differ.
The optimum viewing scale for Strategi is 1:150 000 and our recommended viewing range is 1:125 000–1:175 000 although there are no minimum and maximum scale restrictions set.
Viewing the data at scales larger than 1:125 000 works reasonably but when viewing it at scales smaller than 1:175 000 the styles start to degrade.
Style guide
Strategi styling guide v1.0 Dec 2012 © Crown copyright
D10201 Page 7 of 25
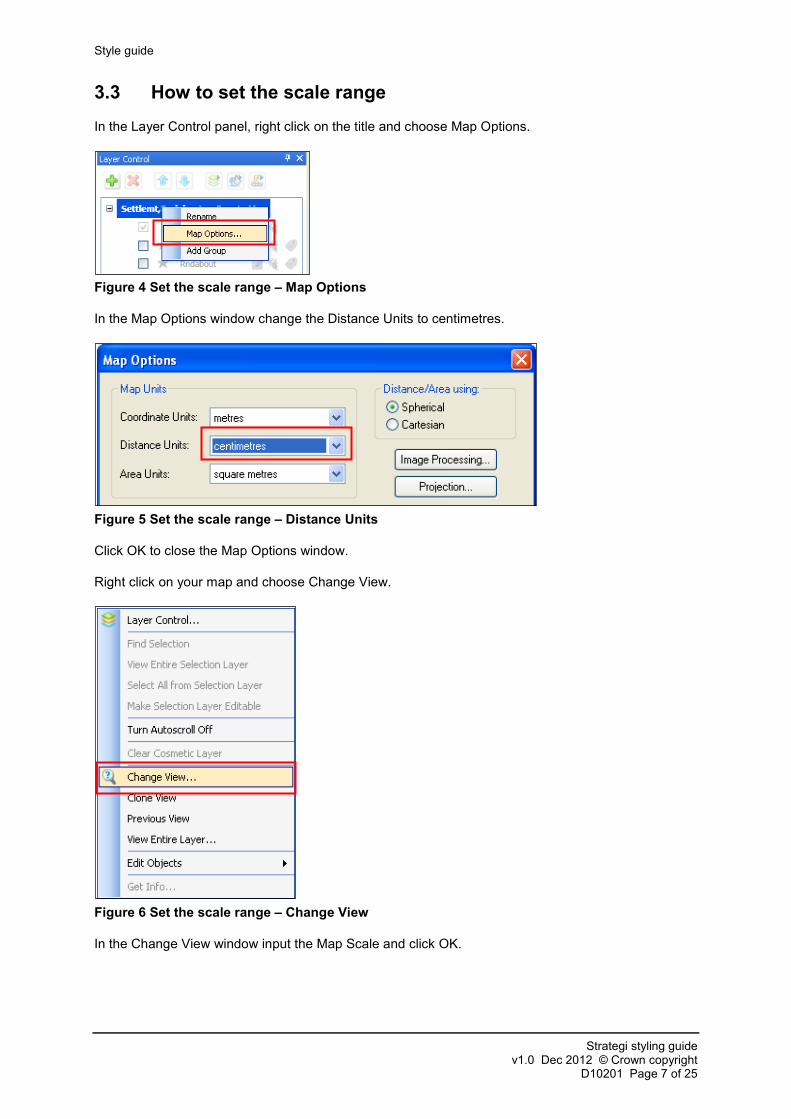
3.3 How to set the scale range In the Layer Control panel, right click on the title and choose Map Options.
Figure 4 Set the scale range – Map Options
In the Map Options window change the Distance Units to centimetres.
Figure 5 Set the scale range – Distance Units
Click OK to close the Map Options window.
Right click on your map and choose Change View.
Figure 6 Set the scale range – Change View
In the Change View window input the Map Scale and click OK.

Style guide
Strategi styling guide v1.0 Dec 2012 © Crown copyright
D10201 Page 8 of 25
Figure 7 Set the scale range – Map Scale
3.4 How to customise the styling
3.4.1 How to style the data using a Style Override
Using Style Override will alter the styling in a particular edit session or in a saved Workspace without permanently overriding the default styles. Users can revert back to the default styling.
In the Layer Control panel select the layer to style and right mouse click to open its Layer Properties window.
On the Layer Display tab tick the box for Style Override.
Figure 8 Style Override
Click on the button below the Style Override to open the Style window (this could be Region, Line or Symbol depending on the type of feature selected).
In the Style window, set the desired style then click OK.

Style guide
Strategi styling guide v1.0 Dec 2012 © Crown copyright
D10201 Page 9 of 25
Figure 9 Style Window
Click OK on the Layer Properties window and the new style will appear in the Map Window. To remove the Style Override, untick the box in the Layer Properties window.
Styles set using a Style Override can be saved in a Workspace but will not be hard-coded to the data.
3.4.2 How to style the data using selections
This method of styling gives the User the ability to style features in the same layer differently based on a selection. Default styles using selections will be permanently removed as they are hard coded in the data.
In the Layer Control panel select the layer to style and make it editable by clicking on the button.
Figure 10 Editable layer
On the main toolbar click on Query Select to open the Select window (you can also use SQL Select to build more complex queries).

Style guide
Strategi styling guide v1.0 Dec 2012 © Crown copyright
D10201 Page 10 of 25
Figure 11 Select Query location
In the Select window, add an expression to filter the data. If required use the Assist button to help. This opens up an Expression window (Figure 12).
Figure 12 Expression window
Make sure that the Browse Results and Find Results in Current Map Window boxes are unticked and click OK.
Figure 13 Select query example
On the main toolbar click Options and select the style option that is relevant to the layer being styled – line, region, symbol or text (Figure 14).

Style guide
Strategi styling guide v1.0 Dec 2012 © Crown copyright
D10201 Page 11 of 25
Figure 14 Styling Options
Select your desired style in the style window (Figure 15).
Figure 15 Styling Example
Click OK and the new style will appear in the Map Window.
It is possible to make multiple selections on the same layer and style its features differently.
In order to save this new styling it needs to be hard-coded to the data. On the main toolbar click File Save Table, select the relevant table and click Save.
NOTE: this will overwrite the default style of the TAB which will not be retrievable once saved.
3.4.3 How to add labels
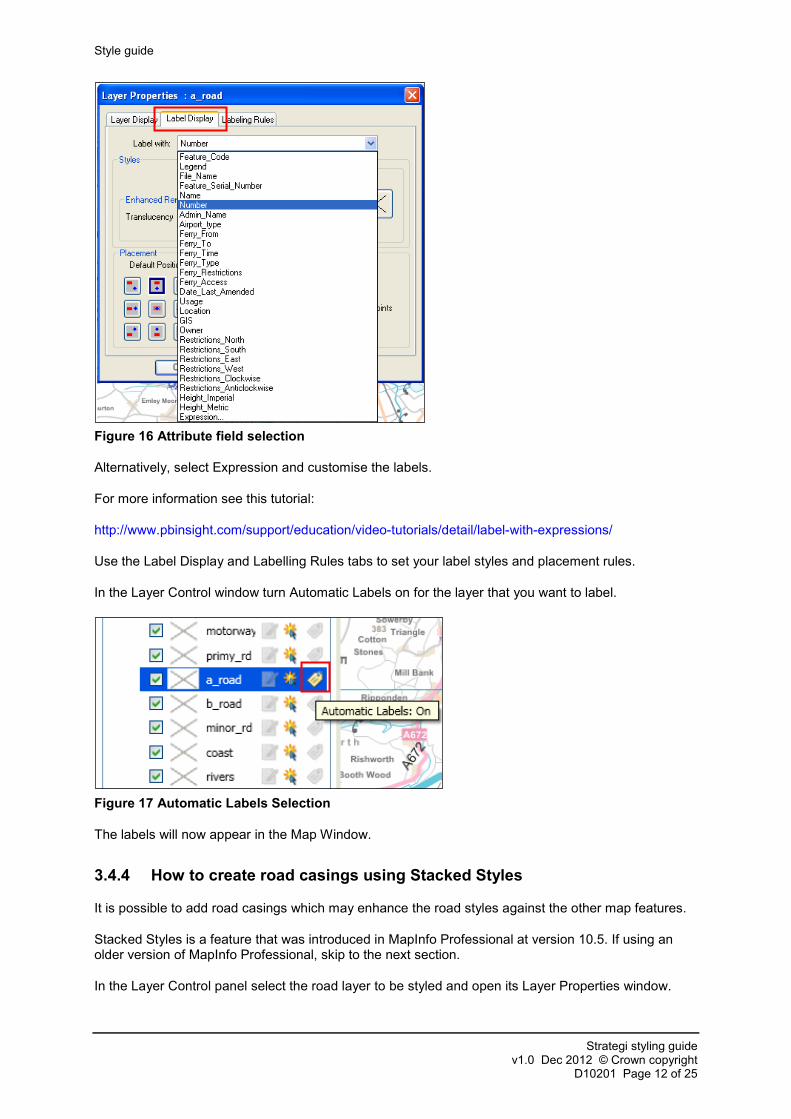
In the Layer Control panel select the layer to be labelled and right mouse click to open its Layer Properties window (Figure 16).
Click on the Label Display tab and select the attribute field to be used for labelling.
Style guide
Strategi styling guide v1.0 Dec 2012 © Crown copyright
D10201 Page 12 of 25
Figure 16 Attribute field selection
Alternatively, select Expression and customise the labels.
For more information see this tutorial:
http://www.pbinsight.com/support/education/video-tutorials/detail/label-with-expressions/
Use the Label Display and Labelling Rules tabs to set your label styles and placement rules.
In the Layer Control window turn Automatic Labels on for the layer that you want to label.
Figure 17 Automatic Labels Selection
The labels will now appear in the Map Window.
3.4.4 How to create road casings using Stacked Styles
It is possible to add road casings which may enhance the road styles against the other map features.
Stacked Styles is a feature that was introduced in MapInfo Professional at version 10.5. If using an older version of MapInfo Professional, skip to the next section.
In the Layer Control panel select the road layer to be styled and open its Layer Properties window.
Style guide
Strategi styling guide v1.0 Dec 2012 © Crown copyright
D10201 Page 13 of 25
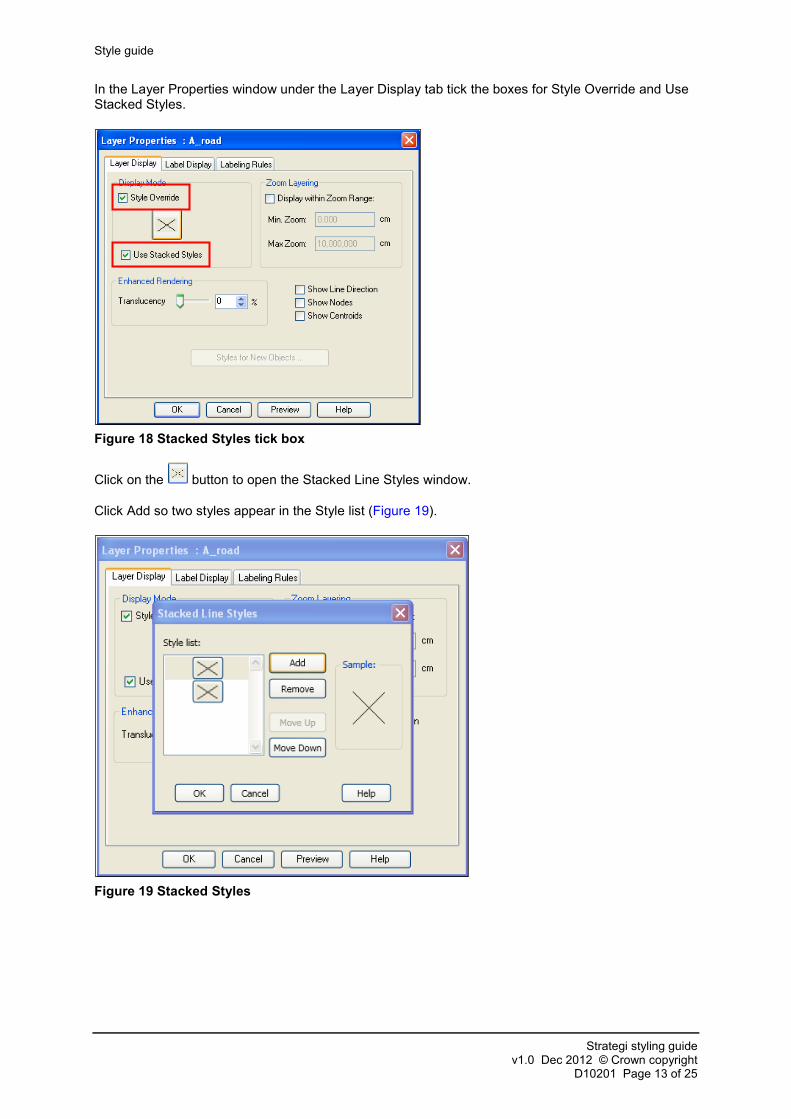
In the Layer Properties window under the Layer Display tab tick the boxes for Style Override and Use Stacked Styles.
Figure 18 Stacked Styles tick box
Click on the button to open the Stacked Line Styles window.
Click Add so two styles appear in the Style list (Figure 19).
Figure 19 Stacked Styles

Style guide
Strategi styling guide v1.0 Dec 2012 © Crown copyright
D10201 Page 14 of 25
Click on each button in turn and select the style, colour and width. The style for the layer on top, the road fill, should be thinner than the style underneath for the road casing so the casing style is visible. See 3.4.5 for amending the Colour (RGB) values. These are the recommended values. Road feature Colour (R,G,B)
Motorway fill 99, 200, 221
Motorway casing 133, 133, 133
Primary Road fill 163, 210, 169
Primary Road casing 150, 150, 150
A Road fill 255, 187, 210
A Road casing 150, 150, 150
B Road fill 253, 211, 177
B Road casing 150, 150, 150
Minor Road fill 255, 244, 225
Minor Road casing 176, 176, 176
Other Track or Road fill 252, 252, 252
Other Track or Road casing 176, 176, 176
Table 1 Recommended road casing values
Click OK on the Layer Properties window and the new style will appear in the Map Window. To remove the Style Override, untick the box in the Layer Properties window.
Repeat these steps for each of the road layers.
3.4.5 Setting the colour (RGB) value
Click on each button to open the Style window.
Click on the Color drop-down to open the colour palette.
Figure 20 Style window

Style guide
Strategi styling guide v1.0 Dec 2012 © Crown copyright
D10201 Page 15 of 25
Figure 21 Colour palette
To set a new colour value click on the three dots in the bottom right-hand corner of the Colour palette (Figure 21) to open the Pick Color window (Figure 22) and enter either the recommended values or some new values.
Figure 22 Pick Color window
3.4.6 How to create road casings and customise the road fills using multiple layers
The following instructions explain how to style roads with road casings. This type of styling cannot be hard coded to the data by Ordnance Survey prior to supply but can be implemented and saved in the Workspace by the Customer. Two copies of each road TAB file will need to be loaded into the Workspace; one for the road casings and the other for the road fill.
On the main toolbar go to File Open and navigate to the Meridian 2 TAB files, highlighting the road file to be opened (the one to add a casing to). From the drop-down list select Current Mapper as the Preferred View.
In the Layer Control panel, move the new road layer so it sits below the matching one that was already open in the Layer Control list Figure 23).
Figure 23 Multiple layers
Style guide
Strategi styling guide v1.0 Dec 2012 © Crown copyright
D10201 Page 16 of 25
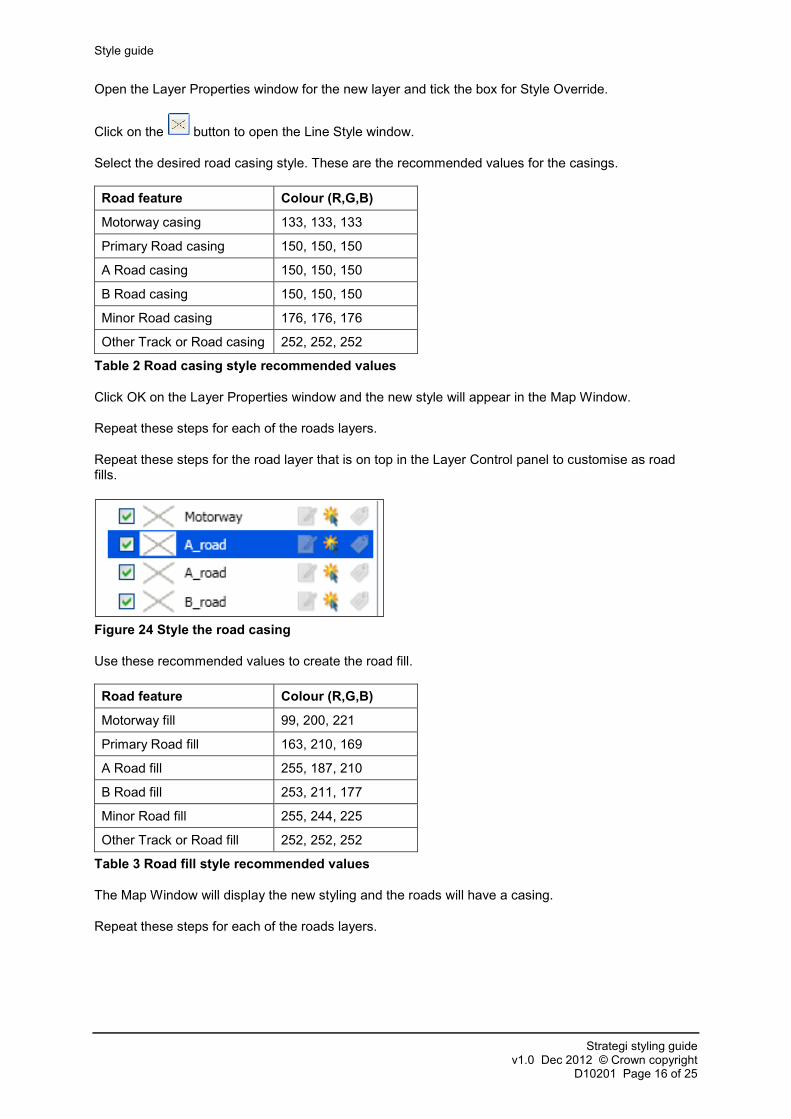
Open the Layer Properties window for the new layer and tick the box for Style Override.
Click on the button to open the Line Style window.
Select the desired road casing style. These are the recommended values for the casings. Road feature Colour (R,G,B)
Motorway casing 133, 133, 133
Primary Road casing 150, 150, 150
A Road casing 150, 150, 150
B Road casing 150, 150, 150
Minor Road casing 176, 176, 176
Other Track or Road casing 252, 252, 252
Table 2 Road casing style recommended values
Click OK on the Layer Properties window and the new style will appear in the Map Window.
Repeat these steps for each of the roads layers.
Repeat these steps for the road layer that is on top in the Layer Control panel to customise as road fills.
Figure 24 Style the road casing
Use these recommended values to create the road fill. Road feature Colour (R,G,B)
Motorway fill 99, 200, 221
Primary Road fill 163, 210, 169
A Road fill 255, 187, 210
B Road fill 253, 211, 177
Minor Road fill 255, 244, 225
Other Track or Road fill 252, 252, 252
Table 3 Road fill style recommended values
The Map Window will display the new styling and the roads will have a casing.
Repeat these steps for each of the roads layers.
Style guide
Strategi styling guide v1.0 Dec 2012 © Crown copyright
D10201 Page 17 of 25
4 ESRI Shapefile For ESRI Users Ordnance Survey has produced a Layer file (.lyr) which, when stored with the data enables users to drag and drop the file into ESRI ArcMap to draw up the styles automatically. This is dependent on the User storing the data together with the Layer file. If this doesn’t happen the User can re-link one of the styles in such a way that the rest will re-link automatically, as long as all of the product ESRI Shapefiles are stored in the same folder.
The ESRI styles have been created using ArcMap 10 and have been made backwards compatible as far as ArcMap 8.3. ESRI ArcMap’s standard labelling engine has been used rather than Maplex as this is not available in older versions of the software and users may not have this additional functionality in their GIS. Text placement has been partially controlled when designing the styles but much of it is automatically placed by the software depending on the position of other text and features.
4.1 How to load the styles The ESRI Shapefiles for Strategi and an ESRI ArcGIS Layer File called Strategi.lyr are in the folder called DATA.
This Layer File is compatible with versions of ESRI ArcGIS 10 back to version 8.3 (released in 2002).
ESRI ArcMap10 has been used to create the screenshots in the following instructions but the functionality will be similar in most versions.
NOTE: before loading the layer file into ArcMap please ensure the layer file is contained within the same folder as the data.
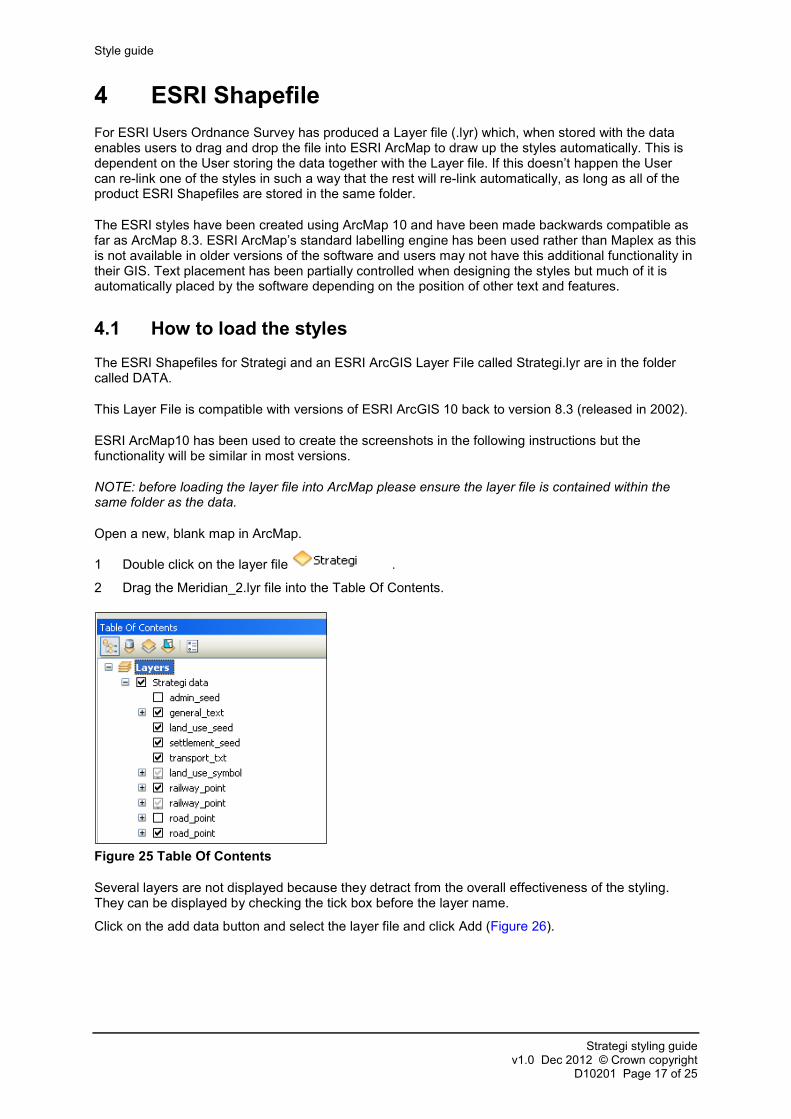
Open a new, blank map in ArcMap.
1 Double click on the layer file .
2 Drag the Meridian_2.lyr file into the Table Of Contents.
Figure 25 Table Of Contents
Several layers are not displayed because they detract from the overall effectiveness of the styling. They can be displayed by checking the tick box before the layer name.
Click on the add data button and select the layer file and click Add (Figure 26).

Style guide
Strategi styling guide v1.0 Dec 2012 © Crown copyright
D10201 Page 18 of 25
Figure 26 Add data button
NOTE: if the layers do not automatically link to the data, re-link to the data source by following the next instructions.
To fix broken links to multiple layers right click on the layer name next to the red exclamation mark. Click on Data Repair Data Source.
Figure 27 Repair data source
In the Data Source window browse for the relevant ESRI Shapefile and click Add.
4.1.1 Set a reference scale.
In the Table Of Contents panel right click on Layers and choose Properties to open the Data Frame Properties window (Figure 28).
Style guide
Strategi styling guide v1.0 Dec 2012 © Crown copyright
D10201 Page 19 of 25
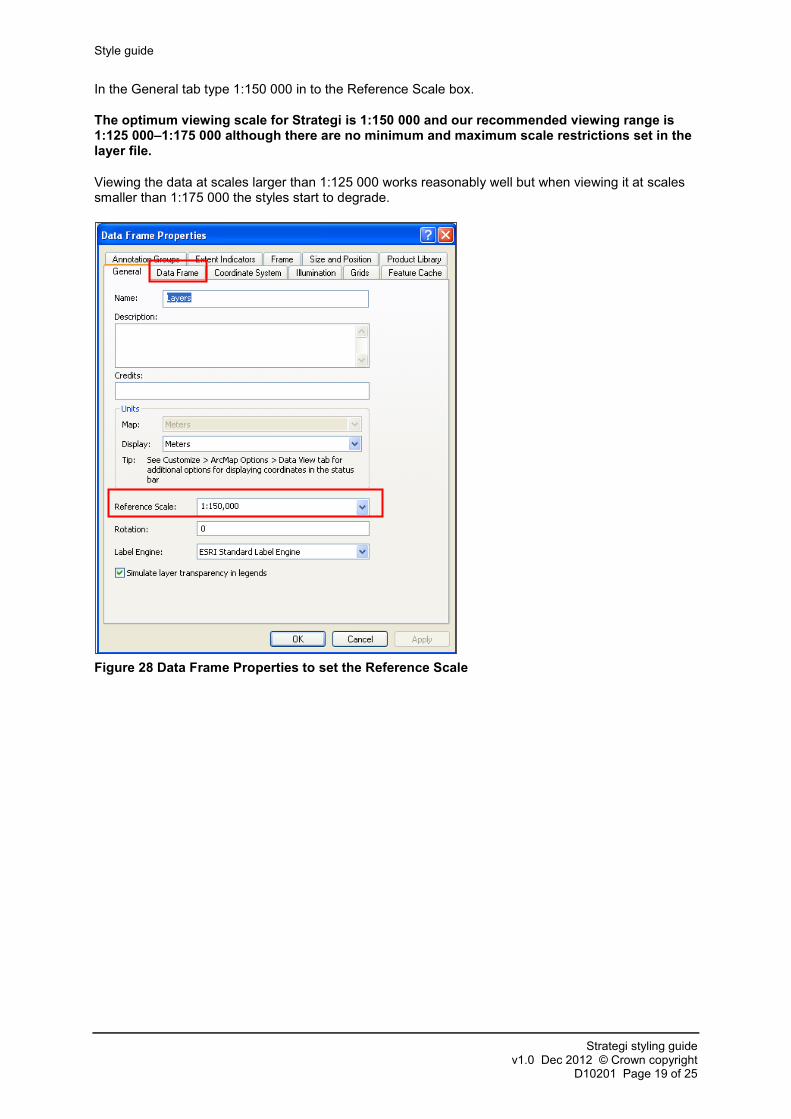
In the General tab type 1:150 000 in to the Reference Scale box.
The optimum viewing scale for Strategi is 1:150 000 and our recommended viewing range is 1:125 000–1:175 000 although there are no minimum and maximum scale restrictions set in the layer file.
Viewing the data at scales larger than 1:125 000 works reasonably well but when viewing it at scales smaller than 1:175 000 the styles start to degrade.
Figure 28 Data Frame Properties to set the Reference Scale

Style guide
Strategi styling guide v1.0 Dec 2012 © Crown copyright
D10201 Page 20 of 25
4.1.2 Ordering the ESRI layers
When the Layer file is loaded there are layers that have been turned off and some that have grey ticks next to them.
Figure 29 Layer ordering
The layer order and visibility of the layers have been set to suit Ordnance Survey’s recommended viewing scales of between 1:125 000–1:175 000. This is only a recommendation and each customer’s requirement for layer order and layer visibility may differ.
The layers with grey ticks have scale ranges set. These layers will turn on automatically if the data is viewed at a scale of 1:100 000 or larger.
Style guide
Strategi styling guide v1.0 Dec 2012 © Crown copyright
D10201 Page 21 of 25
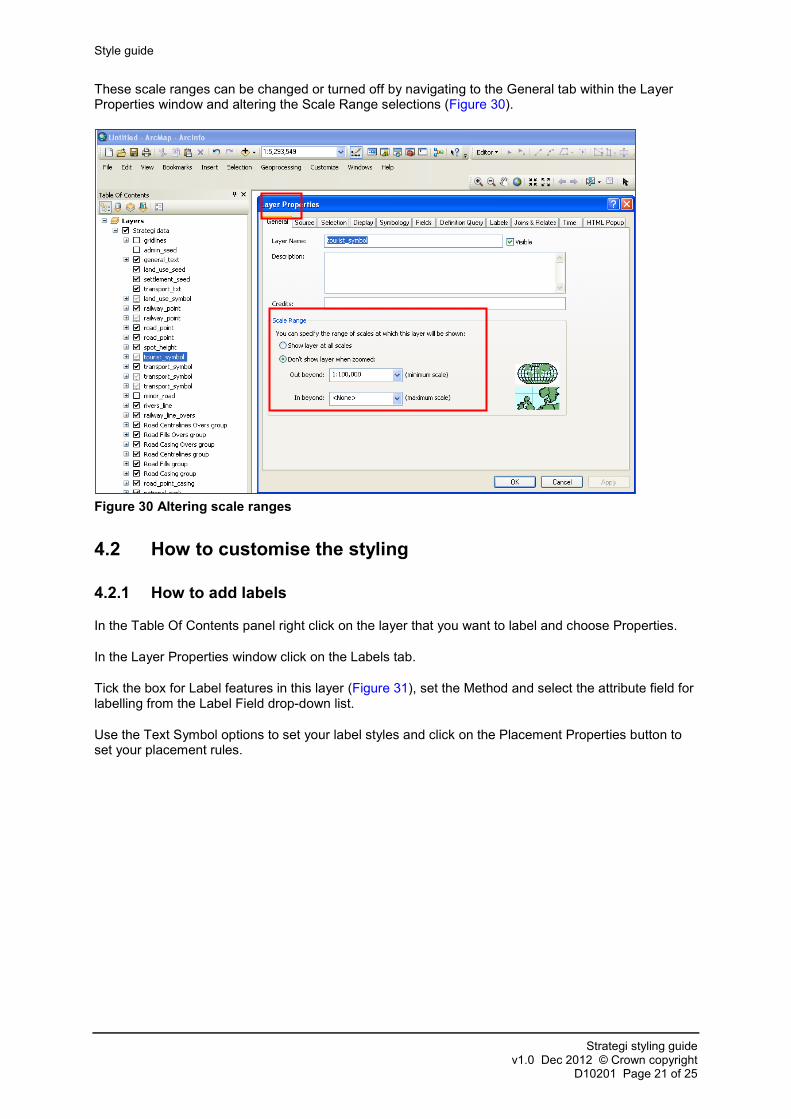
These scale ranges can be changed or turned off by navigating to the General tab within the Layer Properties window and altering the Scale Range selections (Figure 30).
Figure 30 Altering scale ranges
4.2 How to customise the styling
4.2.1 How to add labels
In the Table Of Contents panel right click on the layer that you want to label and choose Properties.
In the Layer Properties window click on the Labels tab.
Tick the box for Label features in this layer (Figure 31), set the Method and select the attribute field for labelling from the Label Field drop-down list.
Use the Text Symbol options to set your label styles and click on the Placement Properties button to set your placement rules.

Style guide
Strategi styling guide v1.0 Dec 2012 © Crown copyright
D10201 Page 22 of 25
Figure 31 Labelling features
Search for help on labelling text here: http://webhelp.esri.com/arcgisdesktop
4.2.2 How to style the data
These instructions use a point feature as an example but the same steps can be followed to style a line or polygon too.
In the Table Of Contents panel expand the layer for styling and click on the symbol to be changed.
Figure 32 Customising a point feature

Style guide
Strategi styling guide v1.0 Dec 2012 © Crown copyright
D10201 Page 23 of 25
This will open the Symbol Selector window (Figure 33).
Figure 33 Symbol selector
In this window the Customer can select a desired style by changing the colour, size and angle.
The customer can use pre-defined styles or create their own. To further edit the feature click on the Edit Symbol button to open the Symbol Property Editor window (Figure 34).
Figure 34 Symbol Property Editor
Additional changes to the style can be made here, including adding masks.

Style guide
Strategi styling guide v1.0 Dec 2012 © Crown copyright
D10201 Page 24 of 25
4.2.3 How to save a Layer File or MXD
There are two ways to save the Layer file.
Layer File
One of the main features of a layer file is that it can exist outside a map as a file on disk. This makes it easy for others to access the layers that have been built.
When a layer is saved to disk, everything about it is saved, such as the symbolisation and labelling. When a Layer file is added to a workspace it will draw exactly as it was saved. Other Users can drop these layers onto their maps without having to know how to access the database or classify the data.
Right-click the layer (or group of layers) in the Table Of Contents panel and click Save As Layer File. In the Save Layer window, navigate to where the file is to be saved and give it a name.
In the Save as type drop-down list specify which versions of ArcMap it should be compatible with. If the User chooses Layer files (the option without a version number) the layer will be saved in the version of the software that is being used.
Figure 35 Saving Layer files
Click Save.
MXD
An MXD allows Users to save a map as a document and store it on a hard disk. ArcMap automatically appends a file extension (.mxd) to the map document name.
The data displayed on a map is not saved with it. Map layers reference the data sources in a GIS database. This helps keep map documents relatively small in size.
To save the map as an MXD click on File and then Save as. In the Save As window, navigate to where the file is to be saved and give it a name.
Style guide
Strategi styling guide v1.0 Dec 2012 © Crown copyright
D10201 Page 25 of 25
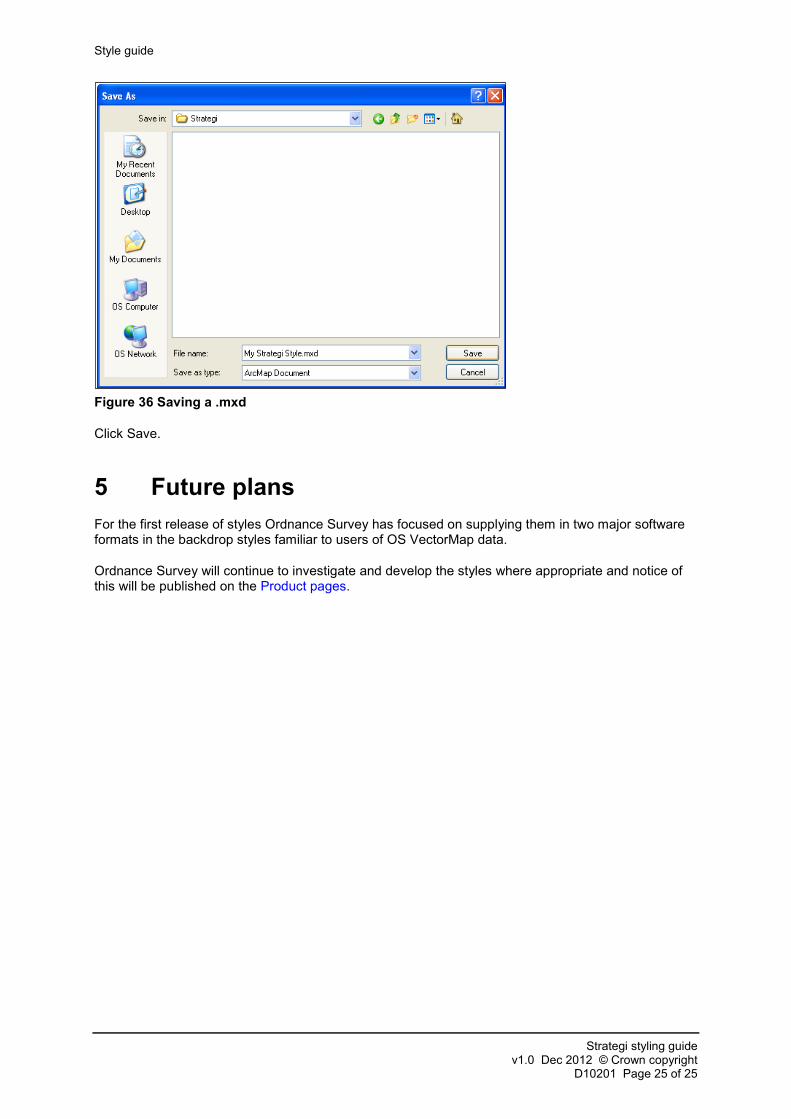
Figure 36 Saving a .mxd
Click Save.
5 Future plans For the first release of styles Ordnance Survey has focused on supplying them in two major software formats in the backdrop styles familiar to users of OS VectorMap data.
Ordnance Survey will continue to investigate and develop the styles where appropriate and notice of this will be published on the Product pages.