a guide to thatching in south africa - sa-thatchers
TRANSCRIPT

A GUIDE TO THATCHING IN SOUTH AFRICA
Page 0
A GUIDE TO THATCH CONSTRUCTION IN SOUTH AFRICA
Page 1
A GUIDE TO THATCH CONSTRUCTION IN SOUTH AFRICA – 2016 Edition 1
This document is a must for Owners, Thatching Contractors, Building
Contractors, Architects, Decision Makers, Engineers and Certification
Bodies.
For further information on the material in this guide, please contact:
Thatchers Association of South Africa
Private Bag X 1015
Lyttelton
0140
South Africa
+27 (0)83-283-8429
ALL RIGHTS RESERVED
This Guide to Thatch Construction in South Africa is a publication of the Thatchers Association of South Africa and is not a specification.
The Specification for Thatch roofs is SANS 10407 – 2015 Edition 2
This Guide is the property of the Thatchers Association of South Africa and no part of this publication may be removed or changed or added except by the majority decision of the Executive Committee of the TASA.

A GUIDE TO THATCH CONSTRUCTION IN SOUTH AFRICA
Page 2
FOREWORD
The Thatchers Association of South Africa (TASA) developed this document to meet
the growing need for definite guidelines on the erection and maintenance of
thatched roofs of a quality in compliance with the requirements of the different
South African National Standards
Compliance with minimum standards is a necessity. This practical guide explains the
material, processes and test methods to be used in order to comply with those
requirements
This document compliments the National Building regulations as well as SANS 10407
– 2015 Edition 2. We can expect these standards to become compulsory in the near
future. This document will assist the industry to prepare for this.
More important, this document will also create a sense of confidence in the industry.
End users and Thatchers will be able to use this as a reference document supporting
the National Standards.
This became extremely necessary as the level of competency of new incomers into
the industry as well as the changing characteristics of the raw material have an
enormous effect on the quality of the end product.
This document is a must for thatchers, building contractors, architects decision
makers, engineers and certification bodies. TASA needs to be complimented for the
effort and the completeness of this document which will contribute to a healthier
and more reliable Industry by levelling the playing field.
We at SATAS are proud to be associated with TASA through Certification of its
members. For us as a Certification Body it is important to be fair and consequent in
our certifications and evaluations and these guidelines will also assist us to act in an
impartial and fair way.
Congratulations and thank you to all who contributed to make this document an
outstanding guidance document that will make a difference in the industry
Abe Stears
Managing Director
SATAS
SOUTH AFRICAN TECHNICAL AUDITING SERVICES (PTY) LTD
PO BOX 4443
RIETVALLEIRAND
0174
A GUIDE TO THATCH CONSTRUCTION IN SOUTH AFRICA
Page 3
ACKNOWLEDGEMENT
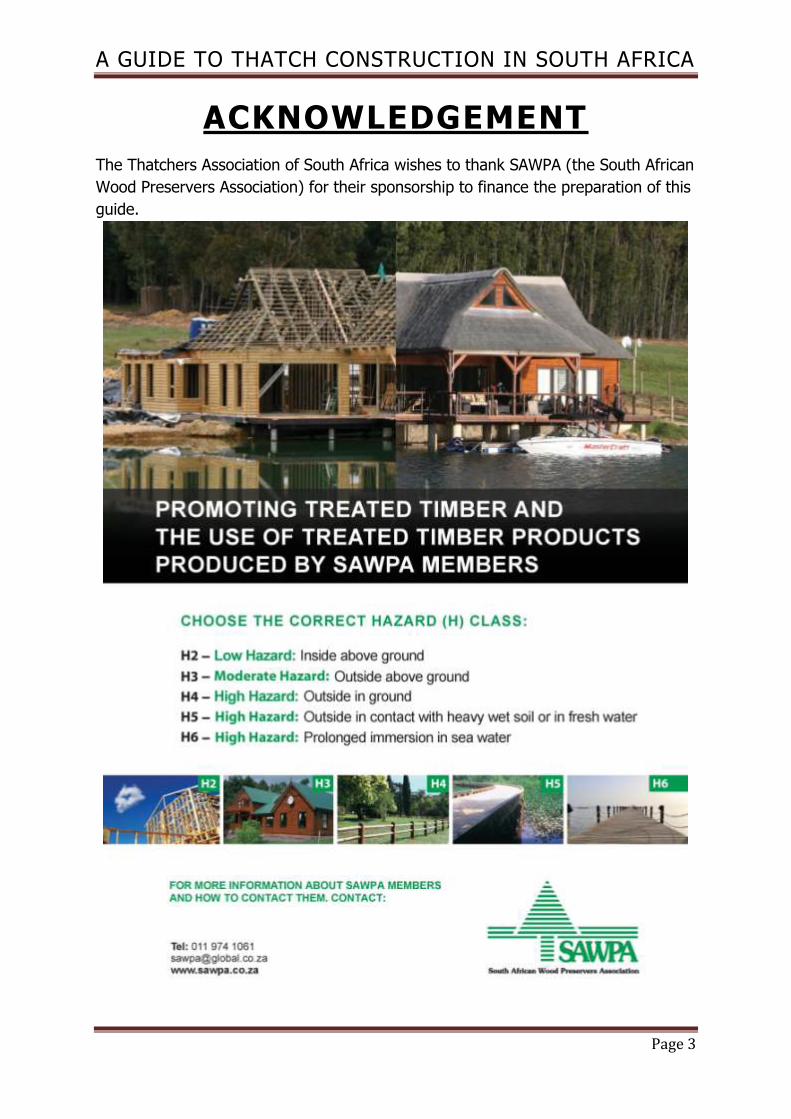
The Thatchers Association of South Africa wishes to thank SAWPA (the South African
Wood Preservers Association) for their sponsorship to finance the preparation of this
guide.

A GUIDE TO THATCH CONSTRUCTION IN SOUTH AFRICA
Page 4
ACKNOWLEDGEMENT

A GUIDE TO THATCH CONSTRUCTION IN SOUTH AFRICA
Page 5
ACKNOWLEDGEMENT
TASA MEMBERS
CAPE REGION
Cintsa Thatching
082 780 5725
Highveld Cape Thatchers
021 850 0779
Jason Lucas Master Thatchers
0817055014
Lucas Quality Thatchers
021 919 8397
Thatchscapes cc
021 9821234
Theunissen Thatching
021 883 8383
GAUTENG
Con-Thatch (Pty) Ltd
011 958 1634

A GUIDE TO THATCH CONSTRUCTION IN SOUTH AFRICA
Page 6
KWAZULU NATAL
Biggarsberg Thatchers
034 651 1664
LIMPOPO
Waterfront Pole & Thatch
014 736 4991
MPUMALANGA
Hoffmans’ Thatching Specialists cc
082 608 2053
FREE STATE
Recon Thatchers
051 451 1291

A GUIDE TO THATCH CONSTRUCTION IN SOUTH AFRICA
Page 7
CONTENTS
Page number
DEFINITIONS 10
PROJECT PROCESS 12
Requirements 12
Architects and Engineers 12
Thatching Contractors 13
Helpful Questions when Appointing a Contractor 14
Questions Insurance Companies might ask 15
Process to a Successful Project 16
Contractor Responsibilities 17
Client Responsibilities 17
THATCH DESIGNS 18
THATCHING MATERIAL 21
Thatching Grass & Reeds General 21
Thatching Grass Specification 22
Cape Reed Specification 25
Water Reed Specification 26
Storage of Thatch on Site 26
Cleaning & Bundling 28
THE ROOF STRUCTURE 29
Setting out of the Structure 29
Timber Requirements 32
Planting Posts 32
Upright Columns 34
King Posts 34
Rafter Spacing 36
Truss Spacing 36
Tie Beam Spacing & Positioning 37

A GUIDE TO THATCH CONSTRUCTION IN SOUTH AFRICA
Page 8
Ring Beam Connections 37
Deflection 39
Wind Braces 40
Battens and Laths 41
Lath Spacing 41
Valleys 42
Hips 44
Verges 44
Chimneys 45
Steel Flue Pipes 46
Chimney Stacks 49
Thatch Rolls 49
THATCHING 52
Spray Layer 52
Thatch Binding 54
Binding Spacing 55
Wire Binding Tension 55
Twine Binding Tension 56
Sway 57
Thatching over Sways 57
Thickness of Thatch Layers 58
Laying of Thatch 59
RIDGES 60
General 60
Grass Ridges 62
Fibre Glass Ridges 62
Sand & Cement Ridges 63
GENERAL INSTALLATIONS 66
Flashing Installations 66
Bird Mesh Installations 66
Dormer Window Installations 67

A GUIDE TO THATCH CONSTRUCTION IN SOUTH AFRICA
Page 9
Box Gutters 67
Thatch Façade 68
Ceilings in Thatch roofs 68
Geyser Installations 69
Site Safety 70
THATCH ROOF MAINTENANCE 71
THATCH ROOF REPAIR-OVER/RE-THATCH 74
FIRE SAFETY 76
Safety distances 76
Services 77
Use of Conductors 77
Lightning Protection System (LPS) 78
Lightning Ground Flash Density 79
Spark Arrestors 87
Drencher Systems 88
Fire blanket 88
ENERGY VALUES 89
Minimum Total R-Values of Roof Assemblies 90
Climate Zones in South Africa 92
CONCLUSION 93
ACKNOWLEDGEMENT AND REFERENCES 94
DISCLAIMER 96

A GUIDE TO THATCH CONSTRUCTION IN SOUTH AFRICA
Page 10
DEFINITIONS
For the purposes of this guide, the following definitions apply.
Butt end
lower, cut end of a stem of thatch
Competent person
someone who has sufficient training, experience, knowledge and qualifications to
assist adequately with a specific requirement
Deviation
difference between the actual (i.e. measured) dimension or position and the
specified dimension or position
Dress
action of tapping the butt ends of thatch or thatching reed upwards with a leggatt to
produce the correct surface slope
Lath
small round timber member, fixed parallel to the line of the ridge, at right angles to
the rafters, and onto which thatch is fixed
Overlay
over thatch
second layer of thatch over original layer
Spray layer
layer immediately above the thatching battens or laths, where the underside will
often be exposed in a room
Supporting wall
structural wall that functions as a load-bearing wall suitable to support a thatched
roof
Sway
rod that is parallel to the lath in the thatch layer tie and binds material to the lath to
secure the thatch

A GUIDE TO THATCH CONSTRUCTION IN SOUTH AFRICA
Page 11
Rational assessment
assessment by a competent person of the adequacy of the performance of a solution
in relation to requirements including as necessary, a process of reasoning,
calculation and consideration of accepted analytical principles, based on a
combination of deductions from available information, research and data,
appropriate testing and service experience
Rational design (fire engineering)
design by a person who is registered in terms of the Engineering Profession Act,
2000 (Act No. 46 of 2000), as either a Professional Engineer or a Professional
Engineering Technologist, and is generally recognized as having the necessary
experience and training to undertake rational assessments or rational designs in the
field of fire engineering
NOTE: This is a generic definition, to be used where no other definition is given, or
no references are made to other standards. Other parts of SANS 10400 contain
definitions of a more specific nature relevant to their disciplines.

A GUIDE TO THATCH CONSTRUCTION IN SOUTH AFRICA
Page 12
PROJECT PROCESS
REQUIREMENTS
The building of thatch roofs and structures is a specialized trade. No matter how big
or small the structure may be. The Regulations stipulates that a design and plan of
what the structure will look like first needs to be drawn up by an architect or
structural engineer. The design has to comply with Municipal and National Building
regulations (SANS 10400-L and SANS 10407 (Thatched Roof Construction
Specification).
ARCHITECTS AND ENGINEERS
The architect will submit plans to the municipality as only a qualified and registered
person with SACAP, South African Council of Architectural Profession, can submit
plans. The registered home owner will be required to sign various municipal forms
giving the architect permission to submit plans on their behalf. With each
submission a copy of a property title deed is also required as basic submission
requirements.
The plan must be approved by the Municipality and the structural engineer
(competent person) has to inspect the structure again to verify whether it confirms
to all the standards and regulations after completion. The engineer will then issue an
A19 Certificate of compliance meaning the structure complies with all the standards
and regulations. Without such a certificate the municipality will not sign off any
structure for approval. The building inspector will also issue a Completion Certificate
from the Municipality on completion when all requirements have been met. A
property may not be bought or sold without this certificate.
Using a competent person also allows you to have a structure designed with all fire
regulations in mind which benefits the home owner when it comes to insurance.
Once proper fire protection methods are in place, insurance companies look at lower
premiums benefitting the owner not only financially but also giving complete peace
of mind. A competent person, someone registered in terms of the Engineering
Profession Act, 2000 (Act No.46 of 2000), as either a Professional Engineer or a
Professional Engineering Technologist, and has the necessary experience in the field
of fire engineering, will also provide the Municipality with a Rational Design which is

A GUIDE TO THATCH CONSTRUCTION IN SOUTH AFRICA
Page 13
often requested by the fire department within the municipalities, to show various
calculations of how the thatch roof will not hold any risk to neighbouring buildings.
The occurrence of bad workmanship, quality of materials used and absence of
approved plans and not providing the above mentioned designs and certificates,
tarnished the image of the Industry. Since the re-institution of TASA on 1 January
2006, two major determining factors for success or failure of a Thatching company
came to the fore, namely:
1. Supervision on site by a knowledgeable person
2. Quality of material and workmanship
Thatched roofs built in the absence of approved plans and without the supervision of
a qualified engineer caused headaches for clients and TASA. Bad workmanship,
construction problems and inferior materials used provides enough evidence for a
client to sue the contractor. Every thatched roof built in South Africa must be built
according to the specification requirements of SANS 10407 – 2015 Edition 2
(Thatched Roof Construction) and SANS 10400 (National Building Regulations with
special reference to part L)
It is in the client’s best interest to ensure all the above mentioned requirements are
met and to furthermore to enquire if the thatcher is registered with TASA as a
member. By starting a Thatching project with this foundation, you are ensuring a
successful outcome and a trouble free process.
THATCHING CONTRACTORS
Choosing a thatching contractor is a crucial step in the process. It is important to
make sure the contractor is registered with TASA, Thatchers Association of South
Africa. Thatchers registered with TASA all comply with the requirements and
standards of a quality thatch roof. As mentioned, the thatch roof industry is a
specialised field and choosing the cheapest contractor might be the most expensive
mistake an owner can make.
There are basic principles unique to thatch roofs that need to be adhered to. To
obtain the optimum life span from the roof, certain criteria, not obvious to non-
specialists need to be followed such as roof angles, the position and angle of valleys
relative to other features of the initial concept. The floor plan and elevations of the
building affect the structural design of the roof often affecting the structural stability
of the roof especially where there are varied ridge heights and roof junctions. These

A GUIDE TO THATCH CONSTRUCTION IN SOUTH AFRICA
Page 14
junctions do not allow for the placement of effective bracing and very often there
are no support walls to counter the lack of efficient bracing.
Given the above, the architect, at sketch plan stage, should consult with an authority
in the industry to rectify or modify the design ensuring optimum stability of the
structure and to maximise water runoff due to correct roof slopes and position of
valleys in relation to the overall roof design.
To analyse a thatch structure the engineer will require a structural design of the
proposed roof to calculate pole sizes and the number and diameter of bolts required
for the varied connections.
Very often today thatch roofs are constructed without structural drawings and
analysis and as a result are, after the fact, difficult and expensive to modify,
sometimes impossible. With detailed drawings the architect can also assess the
aesthetics of the structure and in conjunction with the engineer alter the detail to
the benefit of the client.
HELPFUL QUESTIONS WHEN APPOINTING A
CONTRACTOR
Whether the Contractor:
1. Is conversant with the SANS 10407 – 2015 Edition 2 Specification
2. Is conversant with the National Building Regulations
3. Is member of the Thatchers Association of South Africa
4. What is his membership number
5. Is the Contractor registered for VAT
6. How long has his firm been in operation
7. Has references from :
a. Architects
b. Engineers
c. Clients
8. Projects completed, Portfolio
9. Has the necessary infrastructure and trained staff
10. Will provide a written contract for the acceptance of both parties

A GUIDE TO THATCH CONSTRUCTION IN SOUTH AFRICA
Page 15
11. Agree on who would be responsible to provide the necessary structural
drawings, and building plans and arrange for the approval thereof by the
relevant and appropriate authorities
12. Arrange for the required inspections and obtain the necessary and
required clearance and engineering certificates
13. Who will take responsibility for insurance during construction
14. Does the contractor issue any guarantees on workmanship and materials.
QUESTIONS INSURANCE COMPANIES MIGHT ASK
Typical questions that an Insurance Company will ask:
- What is the name of your Thatching Company?
- What is the present condition of the roof?
- Has the building been rewired?
- Construction of the walls (brick & mortar, timber)?
- Does the kitchen have a concrete ceiling?
- Does the building have a chimney?
- If YES, does it extend above the roofline?
- Do you use open fires, fuelled by solid fuels (e.g. wood)?
- Are the chimneys fitted with spark arrestors?
- Does the building have an approved lightning conductor?
- Has the thatch been provided with a fire retardant system?
- Is the building protected by a drencher system?
- Is any fire fighting hose reels installed at the premises?
- Do you have a Certificate of Compliance from a competent or accredited
source; or alternatively; an Engineers Certificate?
- What is the distance to your nearest Fire Station?
A GUIDE TO THATCH CONSTRUCTION IN SOUTH AFRICA
Page 16
PROCESS TO A SUCCESFUL PROJECT
1. Structural drawings or a plan drawn up by an Architect / Structural Engineer
and approved by the appropriate authorities must be provided.
(Municipalities will not issue an occupation certificate without approved
building plans and transfer of property will not take place in the absence of
the above.)
1.1 In quoting for the project the Contractor must be well aware of what is
expected and all specifications issued to him for calculating all
quantities.
1.2 The Contractor must ascertain whether the drawings or design is in
accordance with the regulations pertaining to a thatch roof.
1.3 The Contractor must comply with all requirements / specifications as
determined by the structural engineer or architect so that a final
certificate of approval can be obtained from them on completion of the
project.
2. Specification
Construction must comply with the requirements of the SANS10407 – 2015
Edition 2
3. Written Contract
A written contract accepted and signed by both parties is a prerequisite
before commencement of the project.
4. Complaints and Communication
4.1 Frequent and constructive communication between both Client and
Contractor is encouraged.
4.2 Proper, complete and clear documentation regarding requests and
alterations is of utmost importance throughout the project to avoid
misunderstandings.

A GUIDE TO THATCH CONSTRUCTION IN SOUTH AFRICA
Page 17
CONTRACTOR RESPONSIBILITIES
1. Effective and frequent feedback during progress.
2. Clients must be made fully aware of the work to be undertaken as well as
specification and legal requirements.
3. Clients must be provided with a detailed document indicating the price as well
as payment requirements. This includes estimates and written quotes.
4. Clients must also be provided with detailed time estimates as well as the
expected date of completion. A complete timetable must be provided.
5. Clients must throughout be advised of any changes that may affect the
proposed completion date and update the timetable accordingly.
6. The Contractor must accept responsibility for the actions of his workers/staff
inclusive of sub-contractors, advisors or agents appointed by him.
CLIENT RESPONSIBILITIES
1. The client is to require all relevant approvals from authorities to avoid any delays.
2. Timely progress payments and final payment as agreed.
3. Co-operation and assistance as needed.

A GUIDE TO THATCH CONSTRUCTION IN SOUTH AFRICA
Page 18
THATCH DESIGNS
Members of the South African Thatchers Association have constructed various
creative designs and have proven that thatch can be so much more than the
conventional designs. These are only a few examples.
Thatch is an aesthetically
pleasing material medium
Note the Curved Rafters

A GUIDE TO THATCH CONSTRUCTION IN SOUTH AFRICA
Page 19
Lathe Cladding to gable
walls.
Creative and rustic way
to hide bolts and nuts.

A GUIDE TO THATCH CONSTRUCTION IN SOUTH AFRICA
Page 20
A Thatched
Hotel
A thatch roof
with rustic
finishes.
Spectacular
structure on a
curved building
with beautiful
finishing.

A GUIDE TO THATCH CONSTRUCTION IN SOUTH AFRICA
Page 21
THATCHING MATERIAL
THATCHING GRASS AND REEDS- GENERAL
In the Western Cape area treated South African Pine structures are built where in
the rest of South Africa structures are built with Blue Gum/Eucalyptus.
The most commonly used South African grasses with their main geographical
locations are listed below:
Hyparrhenia hirta (generally known as common thatching grass) - Natal Berg
area, in abundance;
Hyperphilia dissoluta (commonly known as yellow thatching grass) - Northern
Province, Mpumalanga, Northern KwaZulu-Natal and Swaziland;
Thamnochortus insignis (or Cape thatching reed, commonly known as
“dekriet”,) - Albertinia and Riversdale districts of the Cape;
Hyparrhenia dregeana - Natal midlands and Berg area;
Hyparrhenia filipendula (commonly known as fine thatching grass) - KwaZulu-
Natal, Zululand coastal regions;
Thamnochortus erectus and Thamnochortus specigerus (dekriet or thatch
reed) – Cape coastal regions;
Chondropetalum tectorum - Cape area, widespread; (Not recommended)
Phragmites australis (Norfolk reed or swamp grass, known locally as
Umhlanga grass) - widespread in South Africa. (Not Recommended)
Thatching materials, unless otherwise specified, must comply with the list of most
commonly used grasses and reeds in South Africa and their geographical locations.
This means the thatch must be of a type that has a history of successful use as a
roof covering in the relevant geographical locations and it has to be harvested at the
time when growth has stopped, or the seed has ripened and dispersed.
Any application to the thatch and all fire retardant systems used, must not affect the
lifespan of the thatching material, nor change the nature of the material
prematurely.
Thatch should be stored in a manner to ensure no damage to the stem surface,
clear from the ground and not unduly exposed to the weather.

A GUIDE TO THATCH CONSTRUCTION IN SOUTH AFRICA
Page 22
THATCHING GRASS SPECIFICATION
Common or fine thatching grass (Hyperrhenia Hirta and Hyperrhenia Phillependula)
for use shall:
1. Have a cut length of not less than 0,8m (measured from the butt end and
including tips of seed ends)
Incorrect cut length of 0.75m
Correct cut length longer than 0.8m
2. Have a minimum diameter and maximum diameter at the butt end of 1,2mm
and 2,5mm respectively;
Incorrect diameter of butt end: 1mm.

A GUIDE TO THATCH CONSTRUCTION IN SOUTH AFRICA
Page 23
Correct diameter of butt end between 1.2mm and
2.5mm.
3. Be acceptably straight (cut above the first node);
Incorrectly cut below first node, see bent thatch.
This will produce an unfinished surface on the
exterior of your roof.
Correctly cut above first node

A GUIDE TO THATCH CONSTRUCTION IN SOUTH AFRICA
Page 24
4. Be free of loose material;
Poor thatch uncombed at harvesting contains loose material
Properly harvested thatch free of any loose material
5. Must not be in the growing season;
6. Must be free of seed heads when cut.
Sample contains seed heads after being cut

A GUIDE TO THATCH CONSTRUCTION IN SOUTH AFRICA
Page 25
Sample free of any seed heads at harvesting
CAPE REED SPECIFICATION
Thatching reed (Thamnochortus species) for use shall:
1. have a minimum cutting length of 1,0 m (measured from butt end and
including tips of seed ends)
2. have a minimum diameter of 1,2 mm and a maximum diameter of 5 mm at
the butt end;
3. be acceptably straight;
Sample not acceptably straight 4. be workable;
5. not be cut in the growing season (to ensure that the nodes are tight);
This slide shows that this reed has been cut in the
growing season
(therefore the nodes are loose)
Intact nodes cut out of the growing season
(Therefore nodes are tight)

A GUIDE TO THATCH CONSTRUCTION IN SOUTH AFRICA
Page 26
6. be mature and ligneous;
7. be free of sand and silt;
8. be sun-dried for at least 7 days before bundling.
Cape reed wrong storage method Full of seeds and leaves
Difference in quality of reed
Immature reed’s color change
WATER REED SPECIFICATION
Water reed (Phragmites australis or Phragmites communis) for use shall:
1. have a minimum length and maximum length of 1,5 m and 1,8 m, espectively
(measured from butt end and including tips of seed ends)
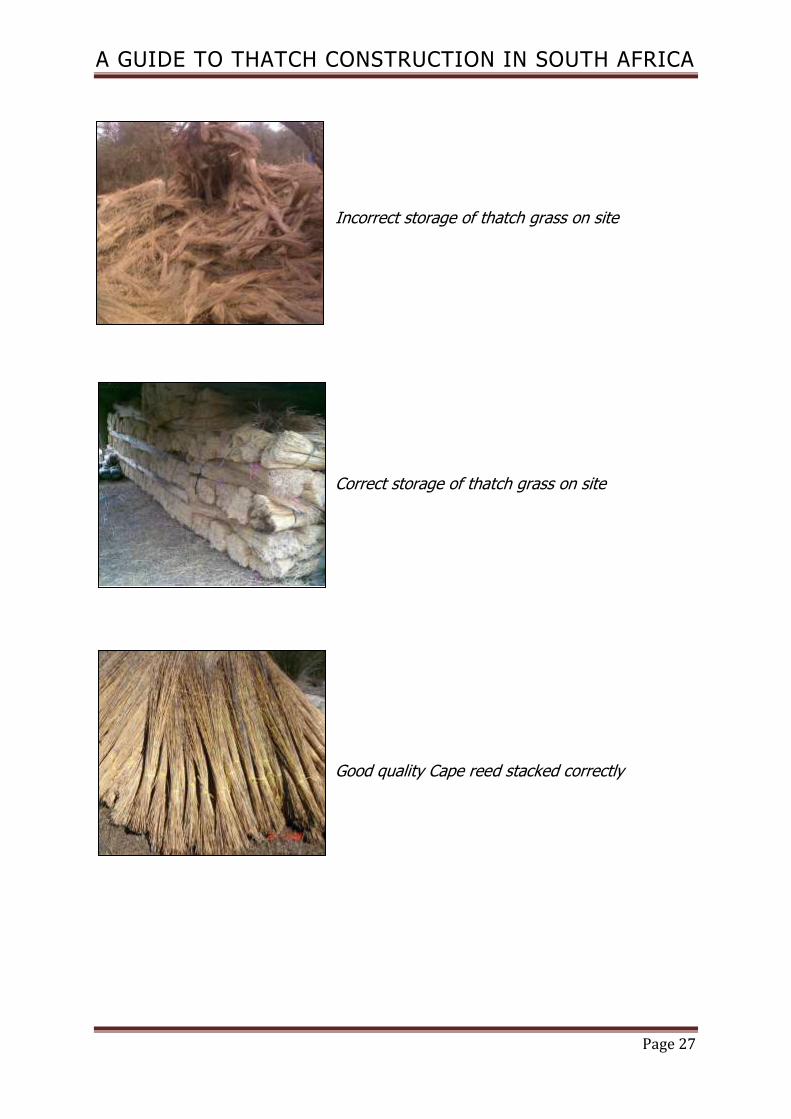
STORAGE OF THATCH ON SITE
Thatching materials shall be stored such that:
1. the stem surface is not physically damaged,
2. the bundles are clear off the ground,
3. the bundles are not unduly exposed to moisture and the sun.
A GUIDE TO THATCH CONSTRUCTION IN SOUTH AFRICA
Page 27
Incorrect storage of thatch grass on site
Correct storage of thatch grass on site
Good quality Cape reed stacked correctly

A GUIDE TO THATCH CONSTRUCTION IN SOUTH AFRICA
Page 28
CLEANING AND BUNDLING
After the grass has been cut and loosely bundled, each bundle is shaken vigorously
to dislodge all loose material. The bundles are then cleaned by passing a sickle
through them, working from top to bottom. Grass bundles are between 75 and 100
mm in diameter. These bundles are each tied with a thong of twisted grass or with
twine and packed in heaps.
Thatch bundles are approximately 75mm in diameter, tied with twine and stacked
upright.

A GUIDE TO THATCH CONSTRUCTION IN SOUTH AFRICA
Page 29
THE ROOF STRUCTURE
SETTING OUT OF THE STRUCTURE
When poles are planted it is critical to make sure your angles are at 90 deg. The
easiest way to ensure this is by using the dimensions in the sketch below to ensure
an accurate 90 deg corner.
It is far easier to plot your hip and rafter layout on site by using your centre line of
the building on the floor and marking all pole positions on this centre line and then
making the same on the walls.
A = 6,100 ÷ 2 = B 3,050
Hip position = C 3,050 (same as B 3,050)
D 7,800 is the total distance between hip positions.
To calculate rafter spacing D 7,800 ÷ 900mm (max rafter spacing) = 8,666 gaps
between rafters. (Always less but never more than 900mm),
Therefore D 7,800 ÷ 9 gaps = E 866mm spacing of rafters.
King post and truss calculated at no more than 2,700 in this case it is F 2,600.

A GUIDE TO THATCH CONSTRUCTION IN SOUTH AFRICA
Page 30
A thatch roof should have a minimum pitch of 45°. The steep slope is needed so
that water will run off from the roof surface with minimum penetration into the body
of the thatch coat. At a pitch of less than 45° the thatch will decay rapidly.
Advantage may be taken of this steep pitch to utilise the roof space for an extra
room.
To calculate the pitch length of a roof the factors below can be used depending on
the angle of the roof. A = width, B = height, C = factor to calculate pitched length
ANGLE A B C
35 deg 1.000 0.700 1.221
40 deg 1.000 0.839 1.305
45 deg 1.000 1.000 1.414
50 deg 1.000 1.192 1.556
55 deg 1.000 1.428 1.743
60 deg 1.000 1.732 2.000

A GUIDE TO THATCH CONSTRUCTION IN SOUTH AFRICA
Page 31
This problem is often caused by incorrect planning and lack of knowledge. If the
correct length of poles are not calculated properly, shortcuts are going to happen i.e.
dropping the height to accommodate short rafters. These pitch dials can be
purchased from any hardware store and is inexpensive.
Incorrect Roof Pitch @ less than the required 45°
Correct Primary Roof Pitch @ 45° or more
Incorrect pitch for a thatch roof.
Correct pitch for a thatch roof.

A GUIDE TO THATCH CONSTRUCTION IN SOUTH AFRICA
Page 32
TIMBER REQUIREMENTS
Timber poles shall comply with the requirements of SANS 457-2 or SANS 457-3, as
relevant. Laths and battens shall comply with the requirements of SANS 1288,
1707-2 (eucalyptus), or SANS 1783-4 (pine), as relevant. All timber shall be
preservative treated in accordance with the requirements of SANS 10005.
Poles for use as structural elements shall have a diameter of at least 100 mm
measured at thin ends.
PLANTING POSTS
The science of treating timber properly provides for the preservative to be deeply
impregnated into the sapwood thereby giving a deep envelope of treatment around
the central heartwood. It is preferable that your treated timber is purchased in the
size in which you intend to use it. If this is not the case and you subsequently cut
the timber, you may expose the untreated heartwood of the timber.
It is important that to retain the integrity of the treatment that you liberally swab or
brush a suitable preservative e.g. Creosote or CCA, into the cut surface. The cut end
of a pole or plank shall not be the end which you plant into the ground. Rather use
the other uncut end. Anti-split plates should be replaced if you cut off an end of a
pole.
If timber, e.g. a treated post is planted in the ground it is essential that you allow for
drainage of rainwater through the timber.
Any pole planted in the ground should be a minimum classification of H4.
If a treated pole is planted into the ground, it is essential to look at the drainage of
rainwater.
STAND: If a pole is planted on top of a concrete
base make sure the base is completely dry before
the pole is planted.

A GUIDE TO THATCH CONSTRUCTION IN SOUTH AFRICA
Page 33
COLLAR: If concrete is used allow the concrete to
form a collar with the pole protruding at the
bottom to allow moisture to drain.
CUP: Do not allow the pole to stand in a closed
bottom concrete base as it will rot in the moisture
which cannot drain.
The details in these diagrams above assists proper drainage of any free moisture
that may be absorbed by a wooden pole. A structural engineer must be consulted
for detailed structural requirements in planting poles.
Do not enclose the planted end of the post in the concrete. If you need to use
concrete then let the concrete form a collar around the post with the end of the post
protruding through the concrete.
If you plant the post on concrete at the bottom of the hole, let the concrete set
before planting the post.
The use and application of the correct H class of preservative treated timber will give
you many years of satisfactory service which will be extended even further with
proper maintenance.

A GUIDE TO THATCH CONSTRUCTION IN SOUTH AFRICA
Page 34
UPRIGHT COLUMNS
Upright columns are to be spaced at no more than 3.5 meters apart and shall not be
less than 175 mm (top diameter) or as specified by the Structural Engineer.
KING POSTS All king posts are to have plum bobs attached at the top during the entire
construction period. This will alleviate skew roofs.
Correct plumb bob position.

A GUIDE TO THATCH CONSTRUCTION IN SOUTH AFRICA
Page 35
Incorrect plum bob position.
Uprights are not to be spaced more than 3.500 meters apart and minimum ring
beam thickness to be not less than 150mm Ø on any building. As the building
increases in width the ring beam thickness will increase (subject to engineer’s
approval).
Poles for use as rafters shall have a diameter of at least 100mm measured at the
thin end of the pole.

A GUIDE TO THATCH CONSTRUCTION IN SOUTH AFRICA
Page 36
RAFTER SPACING
800 mm
Correct rafter spacing, max is 900mm centre to
centre
1 000 mm
Incorrect rafter spacing, shows more than the
allowable 900 mm centres.
TRUSS SPACING
Intermediate Ringbeam
Trusses spaced correctly no more than 2.700m
apart.

A GUIDE TO THATCH CONSTRUCTION IN SOUTH AFRICA
Page 37
TIE BEAM SPACES AND POSITIONING
Span too great, showing deflection in the ridge
pole
Totally inadequate tie beam spaces and
positioning. Only one tie beam visible and no king
posts.
Adequate tie beam and king posts.
RING BEAM CONNECTIONS

A GUIDE TO THATCH CONSTRUCTION IN SOUTH AFRICA
Page 38
There are many ring beam failures and there are 3 main reasons:
1. The size of ring beam is too small.
2. The uprights are placed to far apart. (Where possible plan trusses above
uprights).
3. No proper tie beams in place causing extra stress on the ring beam.
Shows example of bolting and connection of Ring Beam onto upright.
Improper ring beam connection to upright. Note only nails!
Shows an additional upright, which supports the lower ring beam.

A GUIDE TO THATCH CONSTRUCTION IN SOUTH AFRICA
Page 39
Shows poor connection of ring beam to upright.
Minimum ring beam thickness to be not less than 150mm diameter measured at the thin end of the pole. As the building increases in width the ring beam thickness will increase (subject to engineer’s design)
DEFLECTION
Ring beam with deflection. Ring beam without deflection.

A GUIDE TO THATCH CONSTRUCTION IN SOUTH AFRICA
Page 40
Shows no deflection on 14m pole. Long spans during construction need to be supported to alleviate deflection.
Deflection
Shows deflection. Caused by thin poles and loading before tie beams are in place.
WIND BRACES
Wind Brace
Shows wind brace support beams bolted to the underside of rafter poles.

A GUIDE TO THATCH CONSTRUCTION IN SOUTH AFRICA
Page 41
Collapsed roof structure due to no wind brace supports.
BATTENS AND LATHS
Battens or laths shall be continuous over at least three rafters (i.e. a spacing of two
rafters) and shall be fixed to every rafter that they cross. Battens shall be nailed to
rafters with 75 or 100 mm wire nails. Care shall be taken not to split any of the
members during the nailing process.
The ends of battens shall be sawn square and butt-jointed centrally over the rafter
member. Joints in battens shall be arranged so that not more than one batten in any
three is joined on any one rafter.
The battens and laths used shall have a minimum diameter of 38x38 mm and 25mm
(top diameter) respectively and be spaced in accordance with the requirements for
the respective types of thatching material used.
LATHS SPACING

A GUIDE TO THATCH CONSTRUCTION IN SOUTH AFRICA
Page 42
As per the above table.
Incorrect spacing of laths as it exceeds max limit
as shown in table above, also shows poor thatch
finishing.
VALLEYS
Thatch valleys shall be formed by gradually orientating the thatching bundles in each
layer from the normal vertical alignment direction to one that is parallel to the valley.
Additional material shall be laid in the valley to provide extra thickness to prevent
water penetration into the thatch layer and to provide a gradual sweep rather than a
sharp bend.
Section through a grass valley showing the
thickening of the thatching layer over the valley.

A GUIDE TO THATCH CONSTRUCTION IN SOUTH AFRICA
Page 43
Valley liners are permissible using either galvanised (not suitable with Cape Reed),
sheeting, aluminium sheeting, copper or brass valley liners are acceptable. Thickness
of these materials should be no less than:
0.4mm for Copper sheeting
0.5 mm for Galvanised sheeting
0.7 mm for Aluminium sheeting
Valleys are the first to deteriorate in any thatch
roof.
Valley liner being installed to the deteriorated
valley.
Completed valley liner installation.

A GUIDE TO THATCH CONSTRUCTION IN SOUTH AFRICA
Page 44
HIPS
Care should be taken when thatching roof hips to ensure that the grass bundles at
the end of a hip plane run parallel to the hip rafter. On each side of the hip, as the
course proceeds away from it, the bundles are gradually orientated until they are
aligned perpendicularly to the battens. Care should also be taken to ensure that the
full thickness of the thatch is maintained as it progresses around the bend of the hip.
The density of the thatch layer on the hips tends to be lower than over the flat
sections and additional thatch may be required. The thatch at the hips may require
more regular maintenance because of accelerated weathering normally associated
with low density. The use of two hip beams, one at each side of the corner, will
provide an acceptable alternative to the problems caused by the 90° angle.
Section through hip showing a single pole
and the thinner thatch layer over the
corner.
Section through hip showing a double pole
construction with a thicker and denser
thatch layer over a 135deg corner.
VERGES
The angle at which the bundles are laid, where eaves and verge join, should be
maintained for the full sweep of the roof, up to ridge level.

A GUIDE TO THATCH CONSTRUCTION IN SOUTH AFRICA
Page 45
CHIMNEYS
Chimneys shall be designed and built using only non-combustible materials with
suitable insulation properties equal to that of a solidly built 200mm think masonry
wall unless based upon a rational design, prepared by a competent person.
The top of the stack must extend for a radius of at least one metre (measured from
the top of the stack, closest to the roof covering) above the thatch covering of the
roof. Securely build into the flue around the edges, or support on mild steel dowels,
a spark-arrester consisting of a piece of 10 x 10 x 1 mm (minimum) stainless steel
wire mesh, fitted 700 mm from the top, covering the full width of the flue.
Cross-section through chimney, showing secret gutter and flashing details
Preventing the thatch from sliding down
Alternative chimney detail to minimize water leaks.

A GUIDE TO THATCH CONSTRUCTION IN SOUTH AFRICA
Page 46
STEEL FLUE PIPES
It is critical to ensure the flue pipe design and installation is one in such a manner
that it will not cause a fire hazard to adjacent material. The flue pipe should not be
connected to a shaft or duct which forms part of any ventilation system.
Where a chimney is provided with a flue lining, such lining shall be made of material
which will withstand any action of the flue gases and will resist, without cracking or
softening, the temperatures to which it might be subjected, and it shall extend
throughout the full height of the chimney.
40 x 3 mm flat bar
Welded to underside
200 mm deep or at least
Thatch thickness
3mm box angled to roof pitch
(Normally 45 deg)
Alternatively the steel shutter box can be replaced using 20 mm shutter board.
Steel shutter box
6 mm Fibre Cement Board
Remove all loose thatch material before fire
blanket is placed

A GUIDE TO THATCH CONSTRUCTION IN SOUTH AFRICA
Page 47
1100 deg Fire blanket lining steel shutter
box with fibre cement board base.
Fibre blanket wrapped at least 20mm up
flue
Netting wire to be pulled over shuttered
area before concrete capping is placed. Concrete capping chipped back to expose
netting wire in capping.
50mm shutter for boxing mortar mix
Thatch tied back on itself, this ensures that
birds are not able to pull loose thatch from
under concrete capping.

A GUIDE TO THATCH CONSTRUCTION IN SOUTH AFRICA
Page 48
6mm Fiber Cement board.
Note: All combustible materials cut back
from flue by at least 230mm Steel Shutter for Box fitted to laths by using
screws.
Example of a correctly installed flue pipe.

A GUIDE TO THATCH CONSTRUCTION IN SOUTH AFRICA
Page 49
CHIMNEY STACKS
Special care is required where elements such as chimney stacks and vent pipes
penetrate the roof plane. Such features should be dressed/lined with a sheet metal
or fibreglass reinforced polyester flashing under, between and over the top surface
of the thatch. The width of the flashing should be at least 250 to 300 mm. In case of
chimney stacks a secret gutter is then formed against the upper face of the chimney
and flashed against it. The higher end of the sheet metal or fibreglass gutter is
dressed up under the thatch to about 300 mm in width.
The side flashing (both sides of the chimney) will connect the upper flashing (under
the thatch layer) with the bottom flashing (above the thatch layer), to allow the
water to drain over the thatch surface. To prevent the thatch above and below the
side flashing from sliding down, the thatch should be laid at an angle to secure the
thatch to the laths adjacent to the flashing and at the same time also cover the side
flashing.
The thatch layer should never be in contact with the top and the two sides of the
chimney so as to allow water from the upper flashing to flow down. The thatch
should be fixed around the chimney (the top and the two sides) to form a channel of
at least 50 mm between the thatch and chimney.
Alternatively, to prevent any possible leak normally associated with chimneys, the
buildings and/or roof should be such that the chimney stack always penetrates the
roof at ridge level. Should this not be possible, the stack can be twisted by 45°, and
not constructed parallel with the roof structure, thus eliminating the problem of
creating concealed gutters and complicated flashings, etc, to allow water to run off
without spilling over the flashings.
THATCH ROLLS
Nail Staples into ring beam spaced evenly between rafters allowing small gap to
thread twine through staples and then around lath. Place thatch to form roll. Tie
twine tightly, cut excess twine. Pull twine around to conceal knots behind lath. Cut
rope to size and nail around rafter.

A GUIDE TO THATCH CONSTRUCTION IN SOUTH AFRICA
Page 50
Thatch rolls can replace brick or mortar beam filling. Braided thatch rope to
aesthetically enhance metal beams.
An example below of a beam filling finish using a thatch roll.

A GUIDE TO THATCH CONSTRUCTION IN SOUTH AFRICA
Page 51
An example of rolled thatch gable ends.

A GUIDE TO THATCH CONSTRUCTION IN SOUTH AFRICA
Page 52
THATCHING
SPRAY LAYER “SPREILAAG”
Before thatching proceeds, a layer of selected reed, cleaned thatching stems or Cape
thatching reed, known as the spray layer (spreilaag), is spread evenly on the roof
battens to a thickness of about 5 to 8 mm.
For grass a comb is made by driving a few 75 x 3.5 mm-diameter round wire nails
into a horizontal pole about 300 mm long. The nails are spaced about 12 mm apart,
in a straight line. The bundles of grass are placed across the top of the comb and
pressed down so that the stalks are separated by the nails. The bundle is then pulled
through the comb from the top to the bottom end.
A loose spray layer, cut to fit between the timber laths on the inside of the roof at
ridge level, is used to finish off the ridge from the inside. If no spray layer of
selected reed is used, it is recommended that ordinary clean thatching grass be used
as a bottom layer to create a neat surface on the inside of the roof, (enough to
conceal the top layer). This imparts an aesthetic appearance to the inside of the roof
covering.
Thatch or thatching reed used in a spray layer shall be combed with a suitable comb
to ensure that the stalks are clean before installation.
NOTE: A comb may be made by driving 75 mm wire nails into a horizontal pole.
Bundles of thatch or thatching reed should be placed on top of the comb and
pressed down so that the stalks are separated by the nails. The bundle should then
be pulled through the comb from the top to the bottom end. Each bundle of
thatching or thatching reed shall be butted against a butting board or level ground
to ensure that the butt end is even and all sharp ends are blunted before
installation.

A GUIDE TO THATCH CONSTRUCTION IN SOUTH AFRICA
Page 53
Poor finish to sprei layer butt ends not concealed
by batten or laths. Note loose binding twine.
Poorly finished, seed ends are visible.
Good example butt and seed ends are not visible. The butt ends are concealed. Twine is tight around the lath.
Neat finish to sprei layer

A GUIDE TO THATCH CONSTRUCTION IN SOUTH AFRICA
Page 54
THATCH BINDING
The materials used shall be tar-treated sisal twine or stainless steel wire with a
diameter of between 1mm and 1,2mm or galvanized wire with a diameter of 0.9mm.
Stitching spaced at a maximum of 110 mm.
The binding or fastening of the thatch on the battens should be in accordance with
the method of thatching used. And not be spaced more than 110mm apart. The
materials used shall either be tar-treated sisal twine or stainless steel or galvanised
wire with a diameter of between 0.9 mm and 1,2 mm.
Sisal tar twine binding
Wire binding

A GUIDE TO THATCH CONSTRUCTION IN SOUTH AFRICA
Page 55
BINDING SPACING
Incorrect binding spacing, greater than 110mm.
Note the loosely stitched twine.
Correct binding spacing at 110mm. Note the twine
is tightly around the lath
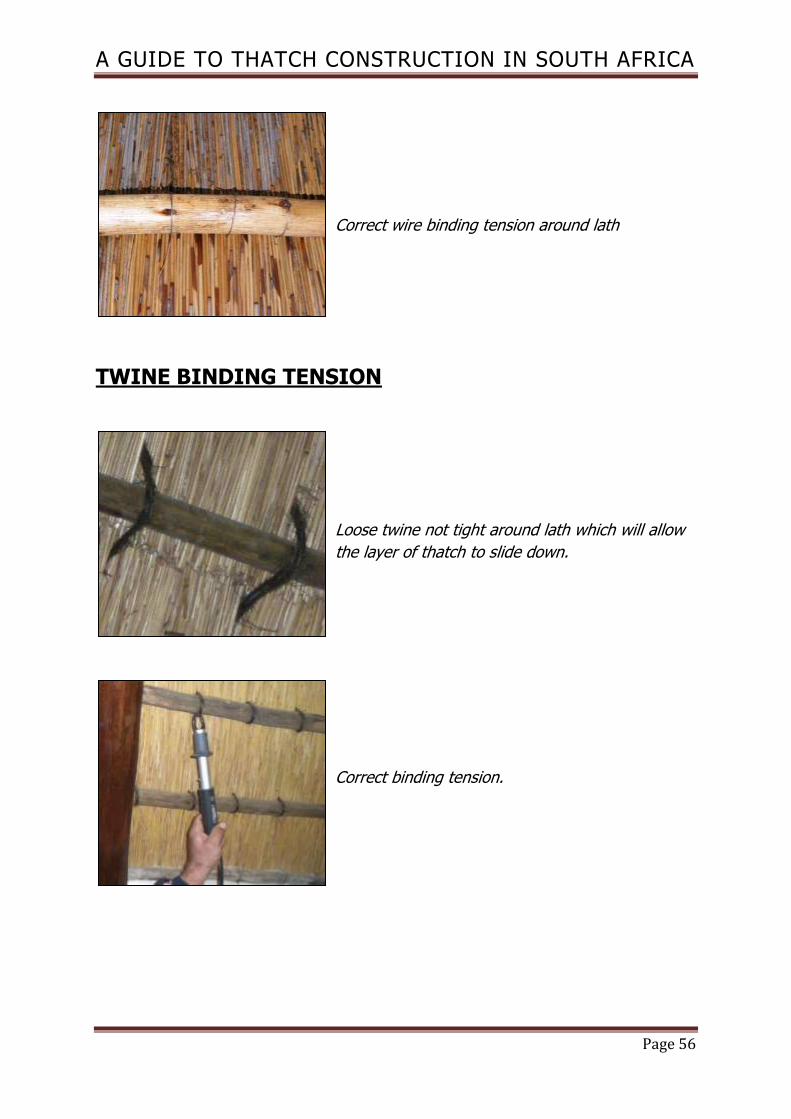
WIRE BINDING TENSION
Loose wire is not tight around lath
A GUIDE TO THATCH CONSTRUCTION IN SOUTH AFRICA
Page 56
Correct wire binding tension around lath
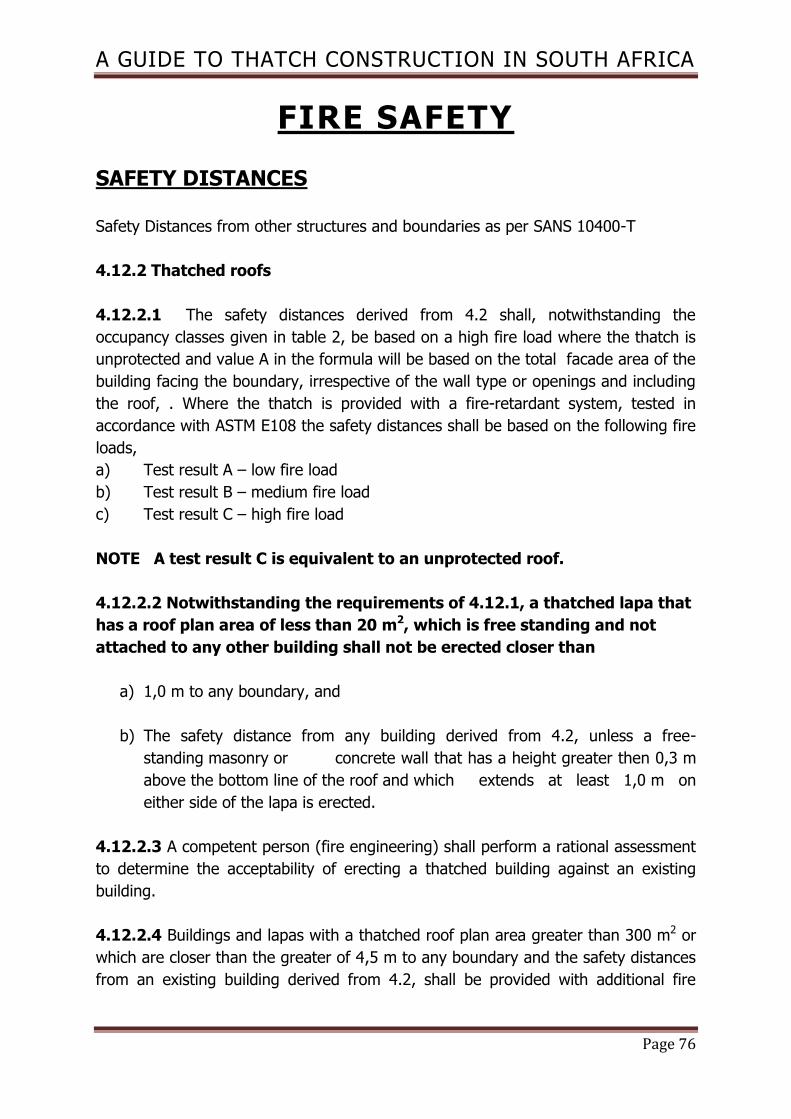
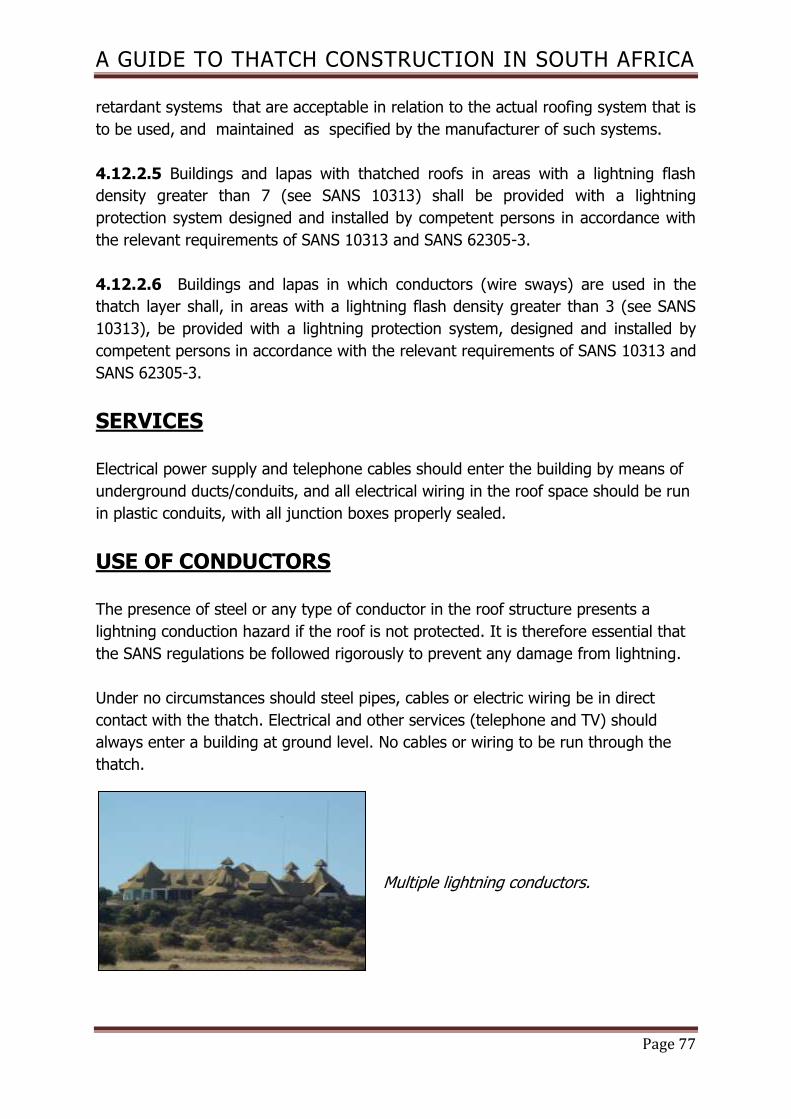
TWINE BINDING TENSION
Loose twine not tight around lath which will allow
the layer of thatch to slide down.
Correct binding tension.

A GUIDE TO THATCH CONSTRUCTION IN SOUTH AFRICA
Page 57
SWAY
Sways shall consist of either:
1. Galvanized wire with a minimum diameter of 3,15mm
2. Cape reed in bundles of at least 10mm.
Galvanised wire sway of min 3.15mm
THATCHING OVER SWAYS
The thatch cover over the sways depends on the type of material used and the
thickness of the layer, and should be at least 40 % of the thickness of the specific
layer. The minimum cover, however, shall not be less than table 2

A GUIDE TO THATCH CONSTRUCTION IN SOUTH AFRICA
Page 58
THICKNESS OF THATCH LAYERS
The thickness of the finished layer for the respective thatching materials shall be as
follows:
Species
Thickness of
thatch layers
(mm)
Also subject to
the thickness in
table shown in
SANS 10400 XA
Cover over sways or
twine
(mm)
Stem/butt diameter of
individual reeds
(mm)
Common or
fine
thatching
grass
175 70 1,2 to 2,5
Thatching
reed
180 80 2,5 to 4
Cover over sway.
The overall thickness Functional thickness of newly laid thatch of thatch above
may not be less than sways not less
175mm. than70mm. (Cover
over sway)

A GUIDE TO THATCH CONSTRUCTION IN SOUTH AFRICA
Page 59
LAYING OF THATCH
Thatching shall commence from a verge at the bottom of the roof and shall be laid
parallel to the rafters or trusses.
The thatching bundles at the end of the hip plane shall run parallel to the hip rafters.
The full thickness of the thatch shall be maintained around the bend of the hip.
Unless otherwise specified in the specification data, the thickness and minimum
mass per square metre of the finished layer for the respective thatching materials
shall be in accordance with the requirements.
Showing thatch bundles over laths during
thatching process. Bundle length to span at least 3
gaps i.e.the tip must reach at least 4 laths.
This photo shows newly laid thatch, which has
from the beginning been laid incorrectly. Note the
distance from the binding to the butt ends.
(Approximately 100mm). This incorrect laid thatch
will shorten the lifespan of the roof.
The optimal length to ensure maximum roof life is
250mm to 300mm. This detail should carefully be
monitored throughout the thatching installation.
Care should be taken not to exceed the 300mm in
common thatching grass, as it could be prone to
wind damage.
2
12
3
4

A GUIDE TO THATCH CONSTRUCTION IN SOUTH AFRICA
Page 60
RIDGES
GENERAL
The ridge construction shall be as specified in the scope of work.
1. Ridgepole construction must be either single or double ridge.
2. On both ridge constructions, the last two laths must be spaced at 150mm
above your last line of thatch. This line must also be stitched down to secure
the thatch in two places. It is also suggested that if cape reed is used as
sways the last line of thatch should be fixed with a 3.15mm wire sway. This
will ensure that the thatch is tightened properly without compromising the
sway. Where the 3.15mm wire is joined, cape reed can be used as circuit
breakers.
3. The last line must not be cut. The top ends of the grass must be folded over
the ridgepole and fixed to the opposite side, covering the thatch on the hip
end of the roof. The lath that was installed 300mm above the last line of
thatch must be used to stitch down the opposite last layer of thatch.
4. This must be done from both sides of the roof.
5. The thatch on the hip end of the roof must be folded over the ridge pole and
tied to the ridge pole and be stitched to the pole by means of a hook needle.
Note that the thatch has been cut at ridge and not
bent over as required.

A GUIDE TO THATCH CONSTRUCTION IN SOUTH AFRICA
Page 61
The bundles of ridging grass should be bent over
the ridge and securely anchored by means of
stitching onto the opposite two top most battens.
6. After the above has been completed all the thatch must be stitched to the
ridgepole with a hook needle of scomple.
7. The above process is necessary to ensure that the last line of thatch does not
slip out under the ridging. This process will also prevent birds from pulling
out the thatch.
8. Before the ridge is installed the thatch and twine fixings must be rechecked to
make sure that it is tight and that the last line of thatch is straight and in
place.
9. In areas where birds are a problem, it is suggested that bird mesh with a hole
diameter of no more than 25mm is placed over the last line of thatch and
must extend at least 900mm from the center of the ridge down to the
overhang. This bird mesh should also be stitched to the ridgepole to hold this
in place, before installing the ridge over.
10. Different size roofs use different size ridging. Roofs up to a span of 4m use
lapa ridging that is 700mm wide and can cover this size ridge with ease.
Roofs that span between 4 and 10 meters should use a universal ridge which
is 950mm wide. House ridging can also be used where roof are not at a 45
degree angle or have very wide span widths. The last two options are a
matter of taste as both of the ridings can be successfully used.
11. Ridging should be used in as long as possible sections, to reduce the use of
joins.
12. The ridging can now be fitted to the roof and the following must be taken in
to consideration when fitting the ridge. Ridging should be placed loosely in its
correct position and must be tightly stuffed with loose bundles of grass, the
reason for this is to fill any void caused between the ridging and the thatch
roof.

A GUIDE TO THATCH CONSTRUCTION IN SOUTH AFRICA
Page 62
13. After the ridge has been stuffed the ridge can be pulled down onto the
thatch. Every third wire must be pulled tight and tied to last lath, the wire
must be stitched through the thatch at an angle as to eliminate the water
flowing from following the fixing through the roof. By fixing it to the last lath,
it is ensure that the fixing is under the ridging and cannot be effected by the
water. The reason why only every third wire is fixed, is to hole the ridging in
place while a spotter on the ground co-ordinates with the Thatcher, to aligns
the ridge at the correct angle and level. (It is essential to use two thatchers,
as it is impossible to install the ridge correctly if only one Thatcher is used.)
14. The installation of a rondawel or square cap is the same as a normal ridge
with the exception being that the thatch is to be stitched to the king pole
which protrudes a minimum of 200mm above the last line of thatch.
GRASS RIDGES
The bundles of ridging grass shall be bent over the ridge and securely anchored onto
the two topmost battens with sways and a suitable method of binding or fastening.
FIBRE GLASS RIDGES
1. Fibre-glass ridging can be made in lengths of up to 9 meters.
2. 2 x 2mm Holes bust be punched or drilled into the bottom 50mm reinforced
part of the fibre-glass ridging.
3. It is suggested that the following be the minimum standard for raw material
used to manufacture fiberglass ridging.
4. General purpose resin or resins deemed necessary by a competent person for
a certain application.
5. A minimum glass content of 600grams per square meter.
6. The minimum glass to resin ratio must be 2:1.
7. The lowest 50mm of the ridging must be reinforced with an additional layer of
600 gram glass.
8. The ridge design must be of such a nature, that when installed the top of the
ridge fits firmly on the ridge pole.
9. A minimum standard of FR202 resin must be used when manufacturing a fire
retardant ridging.

A GUIDE TO THATCH CONSTRUCTION IN SOUTH AFRICA
Page 63
SAND-CEMENT RIDGES
The ridge capping shall be a 40 mm (minimum) thick sand-cement ridge capping
(one part common cement to four parts of sand), extending at least 750 mm from
the ridge down each side of the thatching, laid on a single polyolefin membrane
layer, reinforced with a galvanized metal lath or galvanized wire mesh, with a cover
to the lath not less than 20 mm and suitably shaped and thickened at the ridge as
shown in figure 2.
Lapping of joints in the polyolefin membrane shall not be less than 200 mm.
The materials in sand-cement ridges shall comprise
1. common cement that complies with SANS 50197-1;
2. sand that complies with the relevant requirements of SANS 1083;
3. galvanized wire mesh with a thickness not less than 0,8 mm and an opening
that does not exceed 25 mm;
4. polyolefin membranes that have a thickness of not less than 250mm.

A GUIDE TO THATCH CONSTRUCTION IN SOUTH AFRICA
Page 64
Capping should have extended down to butt
ends . (This detail does not apply to roofs
thatched with Cape Reed)
Note Rotten Furrows marked in red.
Concrete must at all times cover the butt ends.
Maintain thickness of no less than 40mm over
entire ridge.
Netting wire on 250 micron plastic.
100mm spacing between shuttering and start of
plastic.
150 mm shuttering
Mortar Mix: 2 wheelbarrows concrete sand to one bag Cement. 4:1 Ratio
Incorrect
Correct

A GUIDE TO THATCH CONSTRUCTION IN SOUTH AFRICA
Page 65
Sprei Layer tied to laths prior to placing ridge capping.
Correct lower ridge capping. Note upward angle of concrete to discharge water.
Thatch over lower ridge capping not less than 150 mm.

A GUIDE TO THATCH CONSTRUCTION IN SOUTH AFRICA
Page 66
GENERAL INSTALLATIONS
FLASHING INSTALLATIONS
Flashings frequently result in waterproofing problem areas. Features that intrude in
the roof plane should consequently be avoided as far as possible.
Correct way to install flashings cut into wall
and used silicon to seal spray grass under flashing
plus minus 10mm thick and fit 200 mm thatch
grass on top of flashing.
BIRD MESH INSTALLATIONS
Correct way to fit bird mesh for baboons
(maximum size of holes: 25 mm)
Bird mesh fitted around ‘voetlaag’ stitch
around first batten with thin galvanize wire.

A GUIDE TO THATCH CONSTRUCTION IN SOUTH AFRICA
Page 67
DORMER WINDOW INSTALLATIONS
Dormer windows should be built at a minimum of 30 degrees. Dormer windows, set
into the roof slope, and “eyebrow” windows at eave level should, for maximum
thatch durability, be avoided. They invariably have a shallower pitch than the rest of
the roof, so that the thatch above them decays at a more rapid rate.
Any installation less than 45 degrees will have higher maintenance than a roof of 45
degrees or more.
Correct installation of dormer windows.
BOX GUTTERS It is preferable to not have valleys discharging rain water over the front door.
A steel box gutter was made to fit this problem area over a front door and concealed by using poles and laths.

A GUIDE TO THATCH CONSTRUCTION IN SOUTH AFRICA
Page 68
THATCH FAÇADE Old uninteresting buildings can be given a face lift by constructing a façade. Dull and
uninteresting buildings can be enhanced with a thatch façade.
This photo was captured at
the service entry to this hotel,
showing the existing iron roof
in place. Note the new
aesthetic look to the building.
CEILINGS IN THATCH ROOFS
When using a ceiling in a thatch roof a spacing of 50mm should be kept between the
laths and the ceiling. This allows enough “breathing space” to avoid condensation.

A GUIDE TO THATCH CONSTRUCTION IN SOUTH AFRICA
Page 69
GEYSER INSTALLATIONS
The sketch below is a guide to how solar geysers and geysers should be installed
onto thatch.

A GUIDE TO THATCH CONSTRUCTION IN SOUTH AFRICA
Page 70
SITE SAFETY
Safety harnesses should always be worn by anyone working on the roof. Site safety
should conform to construction site safety and security regulations.
Correct, with safety harnesses
Incorrect, without safety harnesses

A GUIDE TO THATCH CONSTRUCTION IN SOUTH AFRICA
Page 71
THATCH ROOF SERVICING AND MAINTENANCE
The Thatchers Association of South Africa, strongly recommends that only
experienced thatch contractors be appointed to install and service thatch roofs. The
Pull & Combing process must be well supervised, since inexperienced or uninformed
thatchers could take shortcuts that could ultimately destroy the roof.
The Insurance companies request that maintenance must and should be done
regularly on a thatch roof. The question arises as to what is expected that should be
done to maintain the roof. There has always been a controversy about the brushing
and combing method. As there are two types of thatch roofs, namely Cape reed and
thatching grass. Is there a golden rule that applies, and at what intervals should this
maintenance happen? Presently many of the methods used actually reduces the life
span of the roof.
With proper maintenance at required intervals, a well-constructed thatch roof should
have a long lifespan.
Apart from keeping the surface of the thatch clear of creepers and other vegetation,
maintenance has to be done on the thatch itself. Deterioration is usually evident
from the untidy appearance of the covering.
Inspections of the roof, in particular of areas such as valleys, the areas under trees,
and areas with slopes of less than 45°, should be carried out regularly to determine
the condition of the thatch layer. In general, the rate of loss in thickness may be
assumed to be in the order of 20 mm to 25 mm in cover over seven to nine years.
For a 175 mm-thick thatch layer, the thatching twine will generally be located in the
middle of the layer (about 80-100 mm below the top surface) as the twine could
eventually become exposed after 20 years or so.
The lifespan of the thatch will be prolonged by regular inspections which will indicate
when a Pull & Comb is required, with a thatching spade (leggatt).
One needs to understand the technical detail of a thatch roof before you merely
allow an unqualified thatcher comb a roof. Every combing process, unless properly
done, reduces the cover over the sway, in other words the functional thickness of a
roof and thus lifespan.

A GUIDE TO THATCH CONSTRUCTION IN SOUTH AFRICA
Page 72
The very first course of action to take is to inspect the general length of the thatch
or reed. If found to be long enough, the thatch layers can be pulled down.
This aspect of a thatch roof is critical, because the length of the stem below the
twine actually has a direct bearing on the lifespan of the roof. Next, the binding
twine must be tightened on the underside of the roof, and only then can the
combing process begin. See photos below.
Looking at the photo above one can see top left part of the roof already serviced,
the middle part still needing to be serviced and the bottom area with layers pulled
back.
Tightening of twine after pulling down of outer
layer of bundles

A GUIDE TO THATCH CONSTRUCTION IN SOUTH AFRICA
Page 73
The photo below clearly showing how the thatch is raised after servicing.

A GUIDE TO THATCH CONSTRUCTION IN SOUTH AFRICA
Page 74
THATCH ROOF REPAIRS –
OVER/RE-THATCH
(The following does not apply to Cape Reed roofs, there must never be a
second layer added to buildings thatched with Cape Reed)
All rotted thatching material should be completely stripped out during maintenance
and replaced with new, tightly packed, mature material. The entire roof should then
be cleaned of loose material, by brushing prior to the application of any new thatch
layer.
The original design of the roof structure needs to be adequate to take the
additional load of a second layer of thatch. IT IS IMPORTANT TO INSPECT
THE INTEGRITY OF THE TIMBER STRUCTURE TO CARRY THE ADDITIONAL
LOAD OF A SECOND LAYER BEFORE IT IS ADDED.
Re-dressing of the thatch cover (adding of a new thatch layer over the original layer)
becomes necessary when decay has reached the stage when the fixings become
exposed on the surface.
Once the fixings are exposed, rainwater can be channelled down through the thatch
by running down the stitching twine into the thatch layer and into the building.
Exposure of the fixings will result not only in the weathering of the twine stitching,
but also in the deterioration of the entire roof cover when the compaction of the
thatch is lost. Because thatch is a natural material, it will deteriorate at a given rate,
depending on the environmental conditions for that area.
The thickness of a second layer, termed either an overlay or an over thatch, shall be
in accordance with table 2 (see columns 2, 3 and 5 of table 2 in SANS 10407:2015
Edition 2) The most important point being, that the cover over the sway, be no less
than 70 mm.
If a second layer is found it shall first be removed before the overlay or over thatch
is applied (i.e. there shall never be more than 2 layers of thatch on the roof
structure).

A GUIDE TO THATCH CONSTRUCTION IN SOUTH AFRICA
Page 75
It is important to cut back any trees or bushes overhanging a thatch roof, to ensure that shadowing is not cast on the roof and thus cause rotting. Branches too close or touching the roof will also damage the thatch when the wind blows. Keeping the roof clear of branches, will increase the lifespan of the roof.
A GUIDE TO THATCH CONSTRUCTION IN SOUTH AFRICA
Page 76
FIRE SAFETY
SAFETY DISTANCES
Safety Distances from other structures and boundaries as per SANS 10400-T
4.12.2 Thatched roofs
4.12.2.1 The safety distances derived from 4.2 shall, notwithstanding the
occupancy classes given in table 2, be based on a high fire load where the thatch is
unprotected and value A in the formula will be based on the total facade area of the
building facing the boundary, irrespective of the wall type or openings and including
the roof, . Where the thatch is provided with a fire-retardant system, tested in
accordance with ASTM E108 the safety distances shall be based on the following fire
loads,
a) Test result A – low fire load
b) Test result B – medium fire load
c) Test result C – high fire load
NOTE A test result C is equivalent to an unprotected roof.
4.12.2.2 Notwithstanding the requirements of 4.12.1, a thatched lapa that
has a roof plan area of less than 20 m2, which is free standing and not
attached to any other building shall not be erected closer than
a) 1,0 m to any boundary, and
b) The safety distance from any building derived from 4.2, unless a free-
standing masonry or concrete wall that has a height greater then 0,3 m
above the bottom line of the roof and which extends at least 1,0 m on
either side of the lapa is erected.
4.12.2.3 A competent person (fire engineering) shall perform a rational assessment
to determine the acceptability of erecting a thatched building against an existing
building.
4.12.2.4 Buildings and lapas with a thatched roof plan area greater than 300 m2 or
which are closer than the greater of 4,5 m to any boundary and the safety distances
from an existing building derived from 4.2, shall be provided with additional fire
A GUIDE TO THATCH CONSTRUCTION IN SOUTH AFRICA
Page 77
retardant systems that are acceptable in relation to the actual roofing system that is
to be used, and maintained as specified by the manufacturer of such systems.
4.12.2.5 Buildings and lapas with thatched roofs in areas with a lightning flash
density greater than 7 (see SANS 10313) shall be provided with a lightning
protection system designed and installed by competent persons in accordance with
the relevant requirements of SANS 10313 and SANS 62305-3.
4.12.2.6 Buildings and lapas in which conductors (wire sways) are used in the
thatch layer shall, in areas with a lightning flash density greater than 3 (see SANS
10313), be provided with a lightning protection system, designed and installed by
competent persons in accordance with the relevant requirements of SANS 10313 and
SANS 62305-3.
SERVICES
Electrical power supply and telephone cables should enter the building by means of
underground ducts/conduits, and all electrical wiring in the roof space should be run
in plastic conduits, with all junction boxes properly sealed.
USE OF CONDUCTORS
The presence of steel or any type of conductor in the roof structure presents a
lightning conduction hazard if the roof is not protected. It is therefore essential that
the SANS regulations be followed rigorously to prevent any damage from lightning.
Under no circumstances should steel pipes, cables or electric wiring be in direct
contact with the thatch. Electrical and other services (telephone and TV) should
always enter a building at ground level. No cables or wiring to be run through the
thatch.
Multiple lightning conductors.

A GUIDE TO THATCH CONSTRUCTION IN SOUTH AFRICA
Page 78
LIGHTNING PROTECTION SYSTEM (LPS)
For Fire safety reference must be made to SANS 10400-T. It is crucial to ensure
your design and installation is LPS compliant.
At least lightning protection level III (see SANS 62305-3) will apply in the case of
thatched structures. If a metallic mast is used as an LPS, it shall be designed in
Accordance with SANS 10225. Protection shall be arranged by one or more free-
standing masts. The zone of protection of the mast(s) shall include gable ends,
chimneys, antennas, vent pipes and any other metal object. Telephone wires,
overhead service connections to the electricity supply or other overhead metal wires
or pipes shall not enter the structure through or close to the thatch. The distance
from the mast to the thatch shall be not less than 1 000 mm.
Metals used in the construction of a thatched roof shall be bonded and earthed.
Water pipes, vent pipes, tanks, gas pipes, antennas, telephone and bell wires,
burglar alarms and electrical wiring and conduit within 1 000 mm of the thatch shall
be shielded, bonded and earthed, according to SANS 10142-1.
A GUIDE TO THATCH CONSTRUCTION IN SOUTH AFRICA
Page 79
LIGHTNING GROUND FLASH DENSITY NG
Table C.1 — Lightning ground flash density
1 2 3 4 5 6
Town Ng Town Ng Town Ng
Aberdeen 1,8 Gobabis 2,6 Paarl 0,2
Albertinia 0,5 Golden Gate 6,4 Petrus Steyn 4,4
Alexandria 0,8 Grabouw 0,2 Pietermaritzburg 7,0
Aliwal North 5,3 Graaff-Reinet 2,5 Piet Retief 11,7
Aranos 1,6 Grahamstown 1,4 Piketberg 0,2
Aroab 1,7 Greytown 5,5 Polokwane (Pietersburg) 3,6
Barberton 7,5 Groblersdal 5,1 Pongola 6,3
Beaufort West 1,7 Harding 5,5 Port Alfred 1,4
Belfast 7,3 Harrismith 9,4 Port Elizabeth 0,9
Bela Bela 7,5 Heidelberg (WC) 8,0 Potchefstroom 7,0
Benoni 7,5 Heilbron 5,8 Pretoria 7,5
Bergville 6,3 Hermanus 0,1 Prieska 3,0
Bethal 8,6 Hluhluwe 6,0 Prince Albert 0,6
Bethlehem 6,4 Hoedspruit 2,8 Queenstown 5,2
Bethulie 3,3 Humansdorp 1,1 Reddersburg 6,4

A GUIDE TO THATCH CONSTRUCTION IN SOUTH AFRICA
Page 80
Bloemfontein 5,2 Irene 7,2 Richards Bay 5,2
Bloemhof 4,8 Jagersfontein 2,2 Richmond (KZN) 8,0
Blyderivierspoort 4,5 Johannesburg 7,5 Riversdale 0,2
Boksburg 7,5 Jozini 5,6 Roedtan 4,9
Brakpan 7,5 Keetmanshoop 1,2 Rustenburg 8,1
Brandvlei 0,9 Kempton Park 7,5 Sabie 3,2
Brits 8,0 Keiskammahoek 2,0 Satara 1,5
Bultfontein 3,6 Kimberley 4,8 Schweizer-Reneke 5,6
Burgersdorp 3,3 King William’s Town 1,1 Scottburgh 3,0
Butterworth 0,9 Klerksdorp 7,0 Senekal 4,7
Cala 5,2 Knysna 0,4 Sishen 3,4
Caledon 0,2 Komatipoort 2,6 Skukuza 2,3
Calvinia 0,7 Kroonstad 5,8 Somerset East 0,8
Cape Town 0,3 Krugersdorp 7,0 Springbok 0,6
Carletonville 7,5 Kuruman 3,0 Springs 7,5
Carnarvon 1,1 Ladybrand 5,4 Standerton 7,6
Carolina 9,0 Ladismith (WC) 0,7 Stanger 3,5
Cathcart 1,6 Ladysmith (KZN) 9,0 Stellenbosch 0,3
Cedara 8,0 Laingsburg 0,6 Steytlerville 1,7

A GUIDE TO THATCH CONSTRUCTION IN SOUTH AFRICA
Page 81
Ceres 0,2 Lichtenburg 5,5 Sutherland 0,9
Christiana 6,4 Loskop 4,3 Swakopmund 0,5
Colenso 7,8 Lüderitz 0,4 Tarkastad 3,4
Colesberg 3,0 Lydenburg 5,0 Thabazimbi 2,1
Cradock 5,8 Machadodorp 8,7 Theunissen 5,2
De Aar 2,5 Mafikeng 5,6 Touws River 0,3
Delareyville 5,4 Makhado 1,5 Tsumeb 4,0
Donnybrook 8,5 Malmesbury 0,1 Tzaneen 4,1
Doornfontein 7,3 Mandini 3,4 Umtata 3,0
Dordrecht 2,6 Margate 1,8 Uniondale 0,6
Douglas 4,0 Marikana 6,9 Upington 2,2
Dundee 9,2 Matatiele 6,6 Utrecht 9,0
Durban 4,4 Middelburg (EC) 3,3 Ventersdorp 5,6
East London 1,6 Middelburg (Mpumalanga) 4,6 Vereeniging 7,5
Edenvale 5,6 Modimolle 7,0 Victoria West 1,4
Elliott 4,2 Mokopane 3,4 Villiersdorp 0,4
Empangeni 4,1 Molteno 1,6 Vredendal 0,213
Ermelo
9,0 Montagu 0,2 Vryburg 3,0
Eshowe 5,3 Mooi River 6,9 Vryheid 8,9

A GUIDE TO THATCH CONSTRUCTION IN SOUTH AFRICA
Page 82
Evander 8,5 Mookgopong 6,0 Walvis Bay 0,2
Flagstaff 4,9 Mossel Bay 0,5 Welkom 5,0
Fort Beaufort 1,4 Murraysburg 1,9 Willowmore 1,5
Fraserburg 1,3 Nelspruit 2,7 Windhoek 2,3
George 1,5 Nossop 2,2 Witbank 7,5
Georgedale 5,6 Noupoort 7,4 Zeerust 4,2
Germiston 7,5 Ohrigstad 4,2
Giant’s Castle 13,0 Oshakati 2,3
Gobabes 0,2 Oudtshoorn 0,5
A GUIDE TO THATCH CONSTRUCTION IN SOUTH AFRICA
Page 83
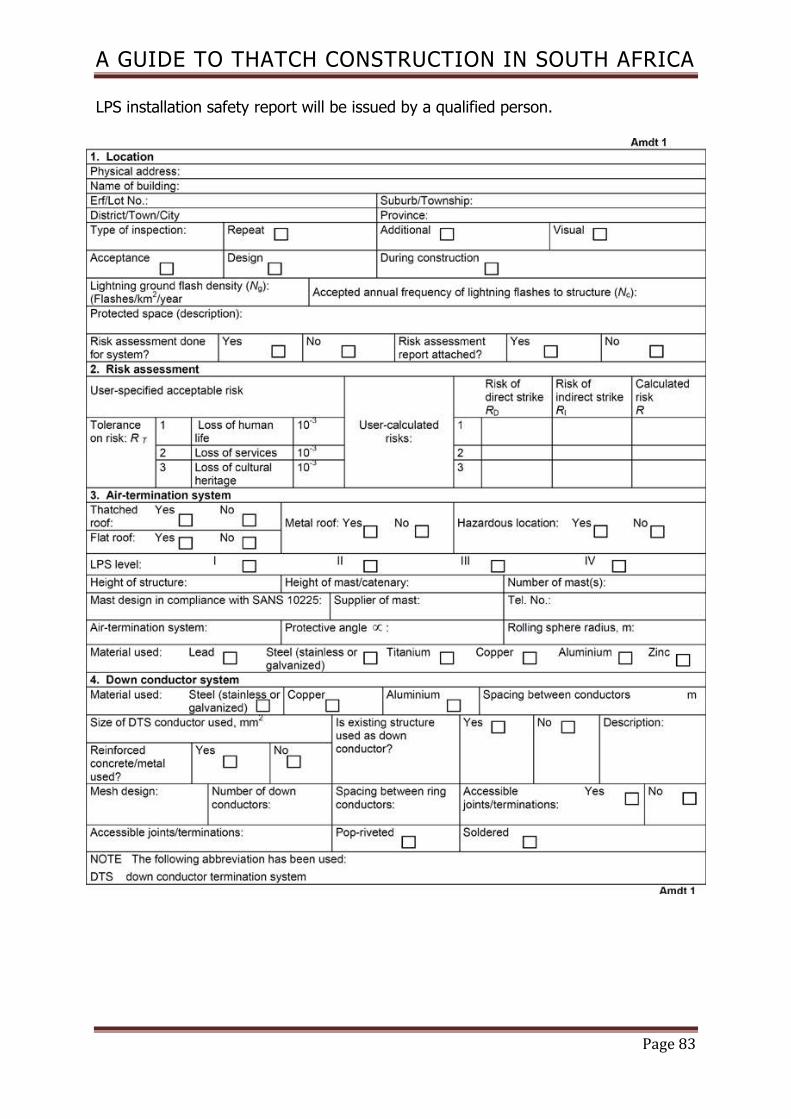
LPS installation safety report will be issued by a qualified person.

A GUIDE TO THATCH CONSTRUCTION IN SOUTH AFRICA
Page 84

A GUIDE TO THATCH CONSTRUCTION IN SOUTH AFRICA
Page 85
LPS installation maintenance certificate will be issued by a qualified person.

A GUIDE TO THATCH CONSTRUCTION IN SOUTH AFRICA
Page 86

A GUIDE TO THATCH CONSTRUCTION IN SOUTH AFRICA
Page 87
SPARK ARRESTORS
A Spark Arrestor is stainless steel wire mesh inserted into the chimney at a minimum
of 700 deep.
Typical Position of a Spark Arrestor.
It is recommended to have chimneys cleaned/swept at least once a year before
winter season.

A GUIDE TO THATCH CONSTRUCTION IN SOUTH AFRICA
Page 88
Typical section through chimney showing
the minimum height above the thatch layer,
1000 mm as per National Building
Regulations.
DRENCHER SYSTEMS
One of the best measures for preventing fires from spreading between thatched
roofs is the installation of a drencher water system at the highest part of the roof. A
dedicated drencher water system cascades water over and down all the exposed
thatch in the event of a fire. While this may not save the property where a fire
starts, it can prevent the spread of fire from one roof to another.
A manual or automatic system can be installed. Automatic systems often include
smoke sensors which triggers the drencher from fire inside the dwelling. In areas
where water pressure is not strong enough pumps can be installed or water can be
pumped from swimming pools.
FIRE BLANKETS
The fire retardant blanket is an imported cloth, capable of resisting temperatures
greater than 750 degrees centigrade is used. The cloth is woven continually
throughout the thatched area and is completely covered with thatch and is therefore
not visible. It is suggested that galvanized binding material is used instead of the
traditional tarred twine which is highly flammable and therefore a fire hazard.
Using a fire blanket in the thatch roof is also taken into consideration by insurance
companies when calculating insurance premiums.

A GUIDE TO THATCH CONSTRUCTION IN SOUTH AFRICA
Page 89
ENERGY VALUES
Thatching in South Africa is a fast growing industry as we find more people looking
for natural alternatives in construction. With it being a completely natural roofing
product, thatching is growing in popularity in an environment where more members
of the public are leaning towards natural materials used in construction, commonly
known as “green design”.
Thatch is by far the most natural product to use on your roof as it is harvested off
the land and used without going through processes to create an actual roof
covering. With the high thermal values of thatch there is no need for ANY other
products to create insulation.
Looking at roofs from a “green” point of view the best roof one can put on a building
would be a thatch roof. The structure is of timber poles storing CO2 for the life of
the building and then the actual thatch is also a natural product storing CO2 with an
added advantage. This being the fact that thatch grass is perennial. The thatch is
expected to last for many years during which most of the CO2 is not released.
By using thatch the roof is therefore designed for present use but also for future
recycling. Dependence on resource intensive products and materials are also
reduced. Thatch is an earth friendly, recyclable material. It is carbon free and a local
material and by using the product we are truly supporting not only environmentally
friendly construction but also supporting locally supplied materials.
Due to global warming, temperature variations in seasons are becoming more
extreme. More insulation products are brought onto the market regularly but thatch
still remains the most natural and eco-friendly solution. Aesthetically it is one of the
most pleasing roof construction finishes. There is no other product which has these
two characteristics as a raw product. With high thermal values, energy saving is
guaranteed, dramatically reducing usage of heating and cooling. With talk of ever
increasing electricity costs and possible power failures, a thatch roof impacts
dramatically on energy savings.
High costs for s thatch roof compared to tiled roofs have also been a myth busted in
recent projects. Thatch is proving to be a most effective roof covering with many
costing items taken into consideration. Thatch requires no thermal insulation,
guttering systems, fascias, soffits, ceilings, painting, etc. and thatch provides extra
ceiling space due to the 45 deg pitch, giving a building a strong sense of volume.

A GUIDE TO THATCH CONSTRUCTION IN SOUTH AFRICA
Page 90
With all these items taken into consideration a thatch roof is one of the most
economical choices for a roof finish on the market.
Thatching makes use of materials that are naturally obtainable, i.e. grass or reed. In
South Africa, only certain indigenous grasses are normally used.
There are many benefits to using thatch rather than a conventional roof. Thatch is a
natural insulator and with a roof pitch of 45 deg. a great deal of extra loft space can
be created. Various other materials are not required when using a thatch roof such
as gutters, downpipes, fascias, soffits, ceilings, cornices, painting of such finishing
etc. Taking all this into consideration makes a thatch roof option a very viable one
and adding the fact that it is an energy saving option as well, should be reason
enough for more people to opt for a thatch roof. Part of the calculations submitted
to the municipality is what the architect will calculate which includes various energy
level calculations.
Another myth about thatch which is being busted on a regular basis is the cost of
insurance. With various ways to incorporate fire protection systems into the roof,
insurance is brought down drastically by insurance companies.
Going “green” one need to consider opting for more natural solutions to construction
methods and materials. There is no overnight cure to restoring our planet, but by
opting for a thatch roof one is definitely on the right track to making a difference.
MINIMUM TOTAL R-VALUES OF ROOFS
U Values and R Values are calculated on submission of building plans to the
municipality by the architect as part of the calculations required. Both are energy
values. U Value measures how effective a material is an insulator, thermal
conductivity. The lower the U-value is, the better the material is as a heat insulator.
This thermal conductivity is all about how quickly heat is lost from it, and is
measured in watts per m² per Kelvin.
The R Value refers to thermal resistance. The R-value depends on the type of
material, its density and thickness. Tiny air particles trapped in the insulating
material resist the movement of heat (and cold). The higher the R-value, the better
the insulation is at reducing heat flow.
A thatch roof functions as both an insulated roof and a ceiling. The roof will ensure
that the building is cool in summer and warm in winter, since thatch has a high

A GUIDE TO THATCH CONSTRUCTION IN SOUTH AFRICA
Page 91
insulation value. A thatch roof shall receive the minimum total R Value specified in
the table below for the direction of heat flow.
From the results of a test report ASTM C 518-10 by TTL dated 11 June 2013, the K
Value of a thatched roof is:
K = 0.056 W/(m.K)
The required thickness (D(m)) to comply with SANS 10400- XA is therefore:
D(m) = R(m2.K/W) x k(W/(m.K)
However, if the thickness calculations above are less than the requirement in SANS
10407-2015 Edition 2 then the greater of the two shall apply. The difference in
thickness will then have a positive energy influence on the building holistically.
The deemed-to-satisfy provisions are based on climate zones, including dry bulb
temperatures; thermal neutrality; humidity and southern coastal condensation risk.
DESCRIPTION
Climatic
Zone
1
Climatic
Zone
2
Climatic
Zone
3
Climatic
Zone
4
Climatic
Zone
5
Climatic
Zone
6
Minimum required R-Value
(m2.K/W) 3.7 3.2 2.7 3.7 2.7 3.5
Minimum required thickness for
thatched roofs (mm) 207 179 151 207 151 196
Direction of heat flow up up up &
down up down up

A GUIDE TO THATCH CONSTRUCTION IN SOUTH AFRICA
Page 92
CLIMATE ZONES IN SOUTH AFRICA
OVERVIEW OF CLIMATIC ZONES
Zone Description Major Centres
Zone 1 Cold Interior Johannesburg, Bloemfontein
Zone 2 Temperate Interior Pretoria, Polokwane
Zone 3 Hot Interior Louis Trichardt, Nelspruit
Zone 4 Temperate Coastal Cape Town, Port Elizabeth
Zone 5 Sub-Tropical Coastal East London, Durban, Richards Bay
Zone 6 Arid Interior Upington, Kimberley

A GUIDE TO THATCH CONSTRUCTION IN SOUTH AFRICA
Page 93
CONCLUSION
Thatching is a specialised field and professional guidance and workmanship is
essential to ensure a successful project.
The Thatchers Association of South Africa (TASA) is there to assist the public as well
as architects, engineers and other professionals with any queries.

A GUIDE TO THATCH CONSTRUCTION IN SOUTH AFRICA
Page 94
ACKNOWLEDGMENTS &
REFERENCES
SABS
Thatched roof construction: SANS 10407 - 2015 Edition 2
This standard covers the design of the supporting roofing structure and installation
of thatch on roofing structures.
NOTE SANS 10400-L:2011 Edition 3 covers the design of roof structures, SANS
10400-T covers fire protection requirements, and SANS 10400-V covers chimney
requirements. SANS 2001-CT2 covers the construction of the structural timberwork
in the roof.
The following referenced documents are indispensable for the application of this
document. For dated references, only the edition cited applies. For undated
references, the latest edition of the referenced document (including any
amendments) applies. Information on currently valid national and international
standards can be obtained from the SABS Standards Division.
SANS 457-2, Wooden poles, droppers, guardrail posts and spacer blocks – Part 2:
Softwood species.
SANS 457-3, Wooden poles, droppers, guardrail posts and spacer blocks – Part 3:
Hardwood species.
SANS 820, Mild steel nails.
SANS 1083, Aggregates from natural sources – Aggregates for concrete.
SANS 1288, Preservative-treated timber.
SANS 1707-2, Sawn eucalyptus timber – Part 2: Brandering and battens.
SANS 1783-4, Sawn softwood timber – Part 4: Brandering and battens.
SANS 2001-CT2, Construction works – Part CT2: Structural timberwork (roofing).
SANS 10005, The preservative treatment of timber.
SANS 10155, Accuracy in buildings.
SANS 10183-1, Adhesives for wood – Part 1: Terminology.
SANS 10183-2, Adhesives for wood – Part 2: Requirements for structural
applications.
SANS 10400-B, The application of the National Building Regulations – Part B:
Structural design.
SANS 10400-K, The application of the National Building Regulations – Part K: Walls.
SANS 10400-L, The application of the National Building Regulations – Part L: Roofs.
A GUIDE TO THATCH CONSTRUCTION IN SOUTH AFRICA
Page 95
SANS 10400-T, The application of the National Building Regulations – Part T: Fire
protection.
SANS 10400-V, The application of the National Building Regulations – Part V: Space
heating.
SANS 50197-1/EN 197-1, Cement – Part 1: Composition, specifications and
conformity criteria for common cements.
Author of Main content and Photographs:
JOHN SMITH
Additional Information and Photographs contributed by:
TASA MEMBERS
“GUIDE TO GOOD THATCHING PRACTICE”
Published by the division of Building and Construction Technology
CSIR, Po box 395, Pretoria, 0001
Copyright vests in the CSIR
© 1998, CSIR, Pretoria
Boutek report no bou/e9806
SAWPA How to plant a pole

A GUIDE TO THATCH CONSTRUCTION IN SOUTH AFRICA
Page 96
DISCLAIMER All thatched roofs are required to comply to the SANS 10407: 2015 Edition 2
specification pertaining to thatch roof construction. It must be built according to
building plans designed and approved by a competent and registered professional
engineer. The formal approval must be clearly visible on the design drawings and
the latter must be duly signed by a competent person.
After completion of the construction of the thatched roof, a competent and qualified
person must certify that the construction complies with the SANS 10407
specification, that it has been done according to the design drawings and that the
quality of workmanship was of professional standard.
TASA cannot be held responsible for any structural defects, design failures, inferior
workmanship or consequential damage that may directly or indirectly result from the
above.