a keystroke (or a mouse-click) and the screen (or the ... remove_____30 5.1.3.12 window /...
TRANSCRIPT

Version 14.7.05
Hardcopy – Documentation (This documentation can be printed in back page printout.)
A keystroke (or a mouse-click) and the screen (or the window)
is printed out or saved.

2 Contents Program Functions Copyright 2002 sw4you. All rights reserved.
Adobe® is a registered trademark of Adobe Systems Inc.
Microsoft®, WINDOWS®, EXCEL®, Word®, PowerPoint®, and SQL Server® are registered trademarks of the Microsoft Corporation.
ORACLE® is a registered trademark of the ORACLE Corporation.
SAP®, R/3®, are registered trademarks of the SAP AG.
All other names of products and services are trademarks and service marks of the respective companies.

Contents Program Functions 3
1 Contents
1 Contents _________________________________________________________ 3
2 General _________________________________________________________ 11 2.1 Program Functions ___________________________________________________11 2.2 System Requirements_________________________________________________12 2.3 Possible Applications: ________________________________________________12
3 First Steps_______________________________________________________ 13 3.1 Installation Already Existing ___________________________________________13 3.2 After the Installation __________________________________________________13 3.3 Settings ____________________________________________________________14
3.3.1 Example „Settings Functions“ ______________________________________14 3.4 Some Example-Settings _______________________________________________18
3.4.1 You Want to See before, What is Printed________________________________18 3.4.2 Set a Key (e.g. Pause with Cut (Rectangle)) _____________________________18 3.4.3 Open a File _______________________________________________________18 3.4.4 No Printout with a Click onto the Hardcopy Icon in the System Tray ___________18 3.4.5 Eliminate Printer Icon in the Foreground Window _________________________18 3.4.6 Display a Printer Icon in the Foreground Window _________________________19
4 Working with Hardcopy____________________________________________ 21 4.1 Start Hardcopy ______________________________________________________21 4.2 The Hardcopy Window ________________________________________________22 4.3 Positioning Toolbar / Color Palette ______________________________________23 4.4 The Color Palette / Select Color_________________________________________24
5 Menus __________________________________________________________ 25 5.1 File ________________________________________________________________25
5.1.1 New_____________________________________________________________25 5.1.2 Open____________________________________________________________25
5.1.2.1 Several Images in One File _______________________________________26 5.1.2.2 Open Several Files______________________________________________27
5.1.3 Image Explorer ____________________________________________________29 5.1.3.1 Refresh / F5 ___________________________________________________29 5.1.3.2 Find _________________________________________________________29 5.1.3.3 Copy File(s) ___________________________________________________30 5.1.3.4 Copy File(s) (Add) ______________________________________________30 5.1.3.5 Paste File(s) ___________________________________________________30 5.1.3.6 Double-click ___________________________________________________30 5.1.3.7 Open ________________________________________________________30 5.1.3.8 New Window __________________________________________________30 5.1.3.9 Print _________________________________________________________30 5.1.3.10 Mail _________________________________________________________30 5.1.3.11 Remove ______________________________________________________30 5.1.3.12 Window / Show-Functions ________________________________________31
5.1.3.12.1 Sort ______________________________________________________31 5.1.3.12.2 Image Size / Column Width____________________________________31
5.1.3.13 Canon Digital Camera Support ____________________________________32 5.1.4 Close____________________________________________________________32

4 Contents Program Functions
5.1.5 Save As _________________________________________________________ 33 5.1.6 Save Automatically ________________________________________________ 35 5.1.7 Save in Database__________________________________________________ 35 5.1.8 Mass Convert_____________________________________________________ 35 5.1.9 Create Internet – Photographic Gallery _________________________________ 37 5.1.10 Slide Show _____________________________________________________ 39
5.1.10.1 Also Work in Subdirectories ______________________________________ 39 5.1.10.2 Sort _________________________________________________________ 39 5.1.10.3 Full Screen Mode ______________________________________________ 39 5.1.10.4 Enlarge Images________________________________________________ 39 5.1.10.5 Show Title ____________________________________________________ 39 5.1.10.6 Show Text Extension ___________________________________________ 39 5.1.10.7 Show Text Extension Only First Line _______________________________ 39 5.1.10.8 Time Settings _________________________________________________ 39 5.1.10.9 Play the Sound ________________________________________________ 40 5.1.10.10 Integration into the Hardcopy Help Menu ___________________________ 40 5.1.10.11 Command File________________________________________________ 40 5.1.10.12 Start with Explorer / File Manager_________________________________ 41
5.1.11 Print __________________________________________________________ 41 5.1.12 Print Preview____________________________________________________ 41 5.1.13 Print Setup _____________________________________________________ 41 5.1.14 Mail ___________________________________________________________ 41 5.1.15 FTP___________________________________________________________ 41 5.1.16 Last Files ______________________________________________________ 41 5.1.17 Exit ___________________________________________________________ 41
5.2 Edit________________________________________________________________ 43 5.2.1 Undo ___________________________________________________________ 43 5.2.2 Redo ___________________________________________________________ 43 5.2.3 Cut _____________________________________________________________ 43 5.2.4 Auto Trim ________________________________________________________ 43 5.2.5 Copy____________________________________________________________ 43 5.2.6 Copy to WinWord, Excel, … _________________________________________ 43 5.2.7 Paste ___________________________________________________________ 44 5.2.8 Paste into Image __________________________________________________ 44 5.2.9 New Window _____________________________________________________ 44 5.2.10 Macro _________________________________________________________ 45 5.2.11 Basic__________________________________________________________ 45 5.2.12 Select _________________________________________________________ 46
5.2.12.1 Copy Region into the Clipboard ___________________________________ 46 5.2.12.2 Cut Region ___________________________________________________ 46 5.2.12.3 Copy Region within the Window ___________________________________ 47 5.2.12.4 Move Region__________________________________________________ 48 5.2.12.5 Increase or Decrease Region _____________________________________ 49 5.2.12.6 Move Area____________________________________________________ 50
5.2.13 Select Rectangle Transparent ______________________________________ 51 5.2.14 Select Rounded Rectangle_________________________________________ 51 5.2.15 Select Ellipse ___________________________________________________ 52 5.2.16 Select Color ____________________________________________________ 52 5.2.17 Select Freehand _________________________________________________ 52 5.2.18 Select Screen Ratio ______________________________________________ 53 5.2.19 Select Video Ratio _______________________________________________ 53 5.2.20 Select Ratio 16:9 ________________________________________________ 54 5.2.21 Center Region___________________________________________________ 55 5.2.22 Center Region (delete old) _________________________________________ 55 5.2.23 Increase Region _________________________________________________ 56 5.2.24 Decrease Region ________________________________________________ 56 5.2.25 Invert Region ___________________________________________________ 56 5.2.26 Border Inside Region _____________________________________________ 57 5.2.27 Border Outside Region ____________________________________________ 57

Contents Program Functions 5
5.2.28 Border Inside + Outside Region _____________________________________57 5.2.29 Insert Text ______________________________________________________58 5.2.30 Create/Update Title _______________________________________________59 5.2.31 Create/Update/Insert Text Extension _________________________________61 5.2.32 Add Audio File ___________________________________________________63 5.2.33 Insert Cursor ____________________________________________________63 5.2.34 Set Size of the Mouse Cursor to Insert ________________________________63 5.2.35 Start Tool_______________________________________________________64 5.2.36 One Image per Page ______________________________________________64 5.2.37 Set Next Number to 1 _____________________________________________64 5.2.38 Set Next Number_________________________________________________64 5.2.39 Reset Page Counter ______________________________________________64 5.2.40 Set Page Counter ________________________________________________64 5.2.41 Empty Clipboard _________________________________________________64
5.3 Image ______________________________________________________________65 5.3.1 Flip Vertical_______________________________________________________65 5.3.2 Flip Horizontal_____________________________________________________65 5.3.3 Vertical + Horizontal ________________________________________________65 5.3.4 Rotate ___________________________________________________________66 5.3.5 Rotate Right ______________________________________________________67 5.3.6 Rotate Left _______________________________________________________67 5.3.7 Rotate 180 ° ______________________________________________________67 5.3.8 Size_____________________________________________________________68
5.3.8.1 Size _________________________________________________________68 5.3.8.2 Size background _______________________________________________68 5.3.8.3 Enlarge_______________________________________________________68 5.3.8.4 Reduce_______________________________________________________68
5.3.9 Zoom____________________________________________________________68 5.3.9.1 Fit ___________________________________________________________68 5.3.9.2 Zoom In ______________________________________________________69 5.3.9.3 Zoom Factor 1:1________________________________________________69 5.3.9.4 Zoom Out _____________________________________________________69
5.3.10 Average ________________________________________________________69 5.3.11 Median_________________________________________________________69 5.3.12 Sharpen________________________________________________________69 5.3.13 Gamma Correction _______________________________________________69 5.3.14 Brightness ______________________________________________________69 5.3.15 Contrast________________________________________________________70 5.3.16 Histo Contrast ___________________________________________________70 5.3.17 Hard Shadow____________________________________________________71 5.3.18 Posterize _______________________________________________________72 5.3.19 Mosaic _________________________________________________________72 5.3.20 Oil Painting Effect ________________________________________________72 5.3.21 Half-Tone_______________________________________________________72 5.3.22 Tile____________________________________________________________72 5.3.23 Wallpaper ______________________________________________________72 5.3.24 Noise __________________________________________________________72 5.3.25 Emboss ________________________________________________________72 5.3.26 Watermark______________________________________________________72 5.3.27 Underlay Image __________________________________________________72 5.3.28 Share Horizontal _________________________________________________72 5.3.29 Share Vertical ___________________________________________________72 5.3.30 Perspective Horizontal ____________________________________________72 5.3.31 Perspective Vertical_______________________________________________72 5.3.32 Special_________________________________________________________73
5.3.32.1 Full Screen ___________________________________________________73 5.3.32.2 Hardcopy Every n Seconds _______________________________________73 5.3.32.3 Read Hardcopy File Every n Seconds_______________________________73

6 Contents Program Functions
5.4 Color ______________________________________________________________ 75 5.4.1 Invert ___________________________________________________________ 75 5.4.2 Gray Scale _______________________________________________________ 75 5.4.3 Black and White ___________________________________________________ 75 5.4.4 Swap Black and White ______________________________________________ 75 5.4.5 Hue ____________________________________________________________ 75 5.4.6 Saturation________________________________________________________ 75 5.4.7 Solarize _________________________________________________________ 75 5.4.8 RGB Merge ______________________________________________________ 75 5.4.9 Dye_____________________________________________________________ 75 5.4.10 Fill ____________________________________________________________ 76 5.4.11 Equalize Color __________________________________________________ 76 5.4.12 Increase Contrast ________________________________________________ 76 5.4.13 Number of Colors ________________________________________________ 76
5.5 Effects _____________________________________________________________ 79 5.5.1 Show Effects Menu ________________________________________________ 79 5.5.2 Use Effect Menu __________________________________________________ 79
5.6 Capture ____________________________________________________________ 81 5.6.1 Screen Object ____________________________________________________ 81 5.6.2 Rectangle________________________________________________________ 81 5.6.3 From an EXE or DLL _______________________________________________ 81
5.7 Scan_______________________________________________________________ 83 5.7.1 Choose Scanner __________________________________________________ 83 5.7.2 Scan with GUI ____________________________________________________ 83 5.7.3 Multi Scan with Scan-Software _______________________________________ 83 5.7.4 Multi Scan to Image List_____________________________________________ 83 5.7.5 Start Scan _______________________________________________________ 83
5.8 Image List __________________________________________________________ 85 5.8.1 Next Image_______________________________________________________ 85 5.8.2 Previous Image ___________________________________________________ 85 5.8.3 First Image _______________________________________________________ 85 5.8.4 Last Image _______________________________________________________ 85 5.8.5 Update Image ____________________________________________________ 85 5.8.6 Insert Image ______________________________________________________ 85 5.8.7 Append Image ____________________________________________________ 85 5.8.8 Delete Image _____________________________________________________ 85 5.8.9 Create Image List__________________________________________________ 85 5.8.10 Create AVI File __________________________________________________ 85 5.8.11 Create from Video________________________________________________ 85 5.8.12 Animate________________________________________________________ 85 5.8.13 Open Animation _________________________________________________ 86 5.8.14 Image List Dialog ________________________________________________ 86 5.8.15 Tips: Create Image List____________________________________________ 86 5.8.16 Tips: Print Image List _____________________________________________ 86
5.9 Paint_______________________________________________________________ 87 5.9.1 Procedure _______________________________________________________ 87 5.9.2 Draw a Rectangle _________________________________________________ 88 5.9.3 Draw a Filled Rectangle_____________________________________________ 88 5.9.4 Draw a Circle / Ellipse ______________________________________________ 88 5.9.5 Draw a Filled Circle / Ellipse _________________________________________ 88 5.9.6 Draw a Filled Rounded Rectangle _____________________________________ 89 5.9.7 Draw a Pixel / Freehand Paint ________________________________________ 89 5.9.8 Draw a Line ______________________________________________________ 89 5.9.9 Line Width _______________________________________________________ 90 5.9.10 Fill ____________________________________________________________ 90 5.9.11 Fill with Tolerance________________________________________________ 91 5.9.12 Color Picker ____________________________________________________ 91

Contents Program Functions 7
5.9.13 Color Palette ____________________________________________________91 6 Settings_________________________________________________________ 93
6.1 Settings - Functions __________________________________________________93 6.1.1 Keys / Symbols____________________________________________________93 6.1.2 Function _________________________________________________________95 6.1.3 Processing _______________________________________________________97
6.1.3.1 Print _________________________________________________________97 6.1.3.2 Select Printer __________________________________________________97 6.1.3.3 Ask for Printer _________________________________________________97 6.1.3.4 Open Hardcopy Window _________________________________________97 6.1.3.5 Call „Save As…“________________________________________________97 6.1.3.6 Copy to the Clipboard ___________________________________________97 6.1.3.7 Insert into the Current Image ______________________________________97 6.1.3.8 Request Title __________________________________________________97 6.1.3.9 Request Text Extension __________________________________________97 6.1.3.10 Text Extension from File _________________________________________97 6.1.3.11 All Monitors ___________________________________________________98 6.1.3.12 This Monitor___________________________________________________98 6.1.3.13 Save Automatically _____________________________________________98 6.1.3.14 View File Name ________________________________________________98 6.1.3.15 File Name ____________________________________________________98 6.1.3.16 File Format ___________________________________________________98 6.1.3.17 File Compression_______________________________________________98 6.1.3.18 Copy to WinWord ______________________________________________98 6.1.3.19 Copy to Excel _________________________________________________98 6.1.3.20 Copy to PowerPoint_____________________________________________98 6.1.3.21 Copy to ? _____________________________________________________98 6.1.3.22 Start Tool _____________________________________________________99 6.1.3.23 Send by E-mail ________________________________________________99 6.1.3.24 Transfer with FTP ______________________________________________99 6.1.3.25 Create/Add to Image List_________________________________________99 6.1.3.26 Insert Cursor _________________________________________________101 6.1.3.27 Gray Scale___________________________________________________101 6.1.3.28 Black and White_______________________________________________101 6.1.3.29 Invert Black and White__________________________________________101 6.1.3.30 Invert _______________________________________________________101 6.1.3.31 No Taskbar __________________________________________________101 6.1.3.32 Landscape___________________________________________________101 6.1.3.33 Delete SAP® Background _______________________________________101 6.1.3.34 Delete Color__________________________________________________101 6.1.3.35 Resolution ___________________________________________________101 6.1.3.36 Macro_______________________________________________________101 6.1.3.37 Basic Script __________________________________________________101 6.1.3.38 Settings Sets _________________________________________________102 6.1.3.39 Reset _______________________________________________________102 6.1.3.40 Size ________________________________________________________102
6.2 Settings - Options ___________________________________________________105 6.2.1 Print ___________________________________________________________105
6.2.1.1 Font ________________________________________________________105 6.2.1.2 Page Number _________________________________________________105 6.2.1.3 Date ________________________________________________________105 6.2.1.4 Host Name ___________________________________________________105 6.2.1.5 User Name ___________________________________________________105 6.2.1.6 File Name____________________________________________________105 6.2.1.7 SAP® - Info __________________________________________________105 6.2.1.8 Printout Accompanying Text _____________________________________105
6.2.2 Margins_________________________________________________________107 6.2.2.1 Set Margins __________________________________________________107

8 Contents Program Functions
6.2.2.2 Display Ruler _________________________________________________ 107 6.2.3 Alignment _______________________________________________________ 109
6.2.3.1 Print 1:1 _____________________________________________________ 109 6.2.3.2 Print Border __________________________________________________ 109 6.2.3.3 Printout Centered Horizontally____________________________________ 109 6.2.3.4 Printout Centered Vertically______________________________________ 109 6.2.3.5 Print Landscape ______________________________________________ 109 6.2.3.6 Automatic Landscape __________________________________________ 109
6.2.4 Title ___________________________________________________________ 111 6.2.4.1 Print Title ____________________________________________________ 111
6.2.5 Text Extension ___________________________________________________ 113 6.2.5.1 Print Text Extension ___________________________________________ 113
6.2.5.1.1 Logging___________________________________________________ 113 6.2.5.1.2 Output Only Right up to "|“ ____________________________________ 113 6.2.5.1.3 Text Extension into the Image _________________________________ 113 6.2.5.1.4 Directory for “Text Extension from File” __________________________ 113
6.2.6 Logo___________________________________________________________ 115 6.2.6.1 Logo Position_________________________________________________ 115 6.2.6.2 Logo Height __________________________________________________ 115 6.2.6.3 Logo File Name _______________________________________________ 115
6.2.7 Number per Page_________________________________________________ 117 6.2.7.1 Number of Images Horizontally ___________________________________ 117 6.2.7.2 Number of Images Vertically _____________________________________ 117 6.2.7.3 Time in Seconds ______________________________________________ 117
6.2.8 Printer _________________________________________________________ 119 6.2.8.1 Floyd-Steinberg Dithering _______________________________________ 119 6.2.8.2 Enable Fast Printout ___________________________________________ 119
6.2.9 Scanner ________________________________________________________ 119 6.2.9.1 Standard ____________________________________________________ 119 6.2.9.2 This Setting __________________________________________________ 119
6.2.10 Color _________________________________________________________ 121 6.2.10.1 Optimize Color Reduction_______________________________________ 121 6.2.10.2 Black and White Transition ______________________________________ 122
6.2.11 Mail __________________________________________________________ 125 6.2.11.1 Standard E-mail Address _______________________________________ 125 6.2.11.2 Send Directly ________________________________________________ 125 6.2.11.3 File Format __________________________________________________ 125 6.2.11.4 File Compression _____________________________________________ 125 6.2.11.5 Use Temporary File only________________________________________ 125 6.2.11.6 MAPI / SMTP ________________________________________________ 125 6.2.11.7 SMTP-Server ________________________________________________ 125 6.2.11.8 Your E-mail Address___________________________________________ 125 6.2.11.9 Server with Authentication ______________________________________ 125 6.2.11.10 User Name _________________________________________________ 125 6.2.11.11 Password __________________________________________________ 125
6.2.12 FTP__________________________________________________________ 127 6.2.12.1 Host _______________________________________________________ 127 6.2.12.2 User Name __________________________________________________ 127 6.2.12.3 Password ___________________________________________________ 127 6.2.12.4 Subdirectory _________________________________________________ 127 6.2.12.5 File Format __________________________________________________ 127 6.2.12.6 File Compression _____________________________________________ 127 6.2.12.7 Use Temporary File only________________________________________ 127
6.2.13 Tool__________________________________________________________ 129 6.2.13.1 Tool________________________________________________________ 129 6.2.13.2 PowerPoint Version ___________________________________________ 129 6.2.13.3 Copy to ? ___________________________________________________ 129
6.2.14 File Types _____________________________________________________ 131 6.2.14.1 Assign File Types to the Program Hardcopy ________________________ 131

Contents Program Functions 9
6.2.15 Explorer _______________________________________________________133 6.2.15.1 Test All Files _________________________________________________133 6.2.15.2 Also Multimedia files ___________________________________________133 6.2.15.3 Canon Digital Camera Support ___________________________________133 6.2.15.4 Turning on Device Starts Hardcopy________________________________133 6.2.15.5 Zoom Little Images ____________________________________________133 6.2.15.6 Show Preview Images (Thumbnails) _______________________________133 6.2.15.7 Prefix for Database Table Names _________________________________133 6.2.15.8 Test ________________________________________________________134
6.2.16 Database ______________________________________________________137 6.2.16.1 Create or Select_______________________________________________137 6.2.16.2 New ________________________________________________________137 6.2.16.3 Delete ______________________________________________________137 6.2.16.4 Select Table__________________________________________________137 6.2.16.5 Format ______________________________________________________137
6.2.17 Save _________________________________________________________139 6.2.17.1 Message Box, if the File Exists ___________________________________139 6.2.17.2 DPI (Dots per Inch) ____________________________________________139
6.2.18 Automatic Save _________________________________________________139 6.2.18.1 View File Name _______________________________________________139 6.2.18.2 File Name ___________________________________________________139 6.2.18.3 Format ______________________________________________________139 6.2.18.4 File Compression______________________________________________139
6.2.19 Characterize SAP® Application_____________________________________141 6.2.20 Canon Digital Camera Support _____________________________________147
6.2.20.1 Export Format ________________________________________________147 6.2.20.2 Accept Entries from the Camera __________________________________147
6.2.21 Language _____________________________________________________149 6.2.22 Monitor Definition _______________________________________________151 6.2.23 System Tray ___________________________________________________153
6.2.23.1 Use System Tray ______________________________________________153 6.2.23.2 Use Menu in System Tray _______________________________________153 6.2.23.3 Swap Mouse Buttons___________________________________________153 6.2.23.4 System Tray Text _____________________________________________153 6.2.23.5 System Tray Icon______________________________________________153
6.2.24 Close Button Processing __________________________________________155 6.2.24.1 First Hardcopy Window _________________________________________155 6.2.24.2 Remaining Hardcopy Windows ___________________________________155
6.2.25 Logging _______________________________________________________157 6.2.25.1 Enable Logging _______________________________________________157 6.2.25.2 Name of the Log File ___________________________________________157 6.2.25.3 Display of Log File _____________________________________________157
6.2.26 Intern _________________________________________________________159 6.2.26.1 Last Class Name ______________________________________________159
6.2.27 Extra Settings __________________________________________________161 6.2.27.1 Position Printer Icon ___________________________________________161 6.2.27.2 With Start Reset Page Counter ___________________________________161 6.2.27.3 Set Page Counter to Image List Number____________________________161 6.2.27.4 Beep when Command Completed_________________________________161 6.2.27.5 Delete Clipboard after Printout ___________________________________161 6.2.27.6 Number of Undo / Redo_________________________________________161 6.2.27.7 Settings Sets _________________________________________________161 6.2.27.8 Number of Seconds for Generating Next Hardcopy ___________________161 6.2.27.9 Number of Seconds for Reading Next Hardcopy _____________________161 6.2.27.10 Begin Hardcopy from Startup ___________________________________161 6.2.27.11 No Message with Save Error____________________________________162
6.3 Settings Toolbar ____________________________________________________165 6.3.1 Toolbars ________________________________________________________165 6.3.2 Buttons _________________________________________________________165

10 Contents Program Functions
6.4 Overview Functions _________________________________________________ 167 6.5 Settings Sets_______________________________________________________ 169
6.5.1 Set Selection ____________________________________________________ 169 6.5.2 Copy 1. Set _____________________________________________________ 169 6.5.3 Reset __________________________________________________________ 169
6.6 Show Color Selection________________________________________________ 170 6.7 Show Effects Menu__________________________________________________ 170 6.8 Show Scanner Menu ________________________________________________ 170
7 Installation______________________________________________________ 171 7.1 Start of the Installation_______________________________________________ 171 7.2 Installation Directory ________________________________________________ 171 7.3 Program Group_____________________________________________________ 171 7.4 Uninstall __________________________________________________________ 171 7.5 Requirements of Resources Depending on the Type of Installation__________ 171
8 Start Hardcopy as System Service __________________________________ 172 8.1 Disadvantages _____________________________________________________ 172 8.2 Procedure _________________________________________________________ 172 8.3 Tips / Remarks _____________________________________________________ 172
9 Appendix _______________________________________________________ 173 9.1 File Formats _______________________________________________________ 173

General Program Functions 11
2 General 2.1 Program Functions
PrintScreen Key If the PrintScreen key is pressed, the actual screen will be printed out.
Alt + PrintScreen Key If the Alt key is hold down and the PrintScreen key is pressed, the actual window will be printed out.
Mouse Click A mouse click onto the printer icon in the title bar prints out this window.
Mouse Click A mouse click onto the Hardcopy icon in the System Tray prints out the actual screen.
A click with the right mouse button onto this icon opens the Hardcopy window. If required a menu with the most important functions can also be put at disposal (see Settings Options System Tray).

12 General System Requirements
2.2 System Requirements
The program Hardcopy can be installed under each of the following operating systems: • Windows 95 • Windows 98 • Windows Me • Windows NT • Windows 2000 • Windows XP
2.3 Possible Applications:
• Documentation of errors • Documentation of programs • Documentation for the revision / commercial requirements • If SAP® is used the revision will be pleased in particular about the additional
SAP® – information! (This is in particular important with tests of new SAP®-releases or with new projects like introduction of the Euro, ...)
• Printout in programs, which don’t contain any print functions • Printout of all visible information, even if this is not provided in that program • Archive: saving in files or in a data base • The same functions are available with a scanner.

First Steps Installation Already Existing 13
3 First Steps
3.1 Installation Already Existing
If a preceding version is installed on the computer, it will be not necessary to uninstall or to delete this version.
If there are problems during the installation: • Install the new version without the option "Add to Start Up group“ • Restart the PC • Install the new version once more
(if required now with the option "Start Up group“).
3.2 After the Installation
After a standard-installation some Hardcopy functions are directly available: • With pressing of the PrintScreen key the actual screen is printed out • If the Alt key is hold down and the PrintScreen key is pressed, then the actual window
will be printed out • A click onto the printer icon in the title bar prints out
this window.
If you want to open the Hardcopy window, for example in order to have a look at an image or to change the settings, please use
Start Programs Hardcopy Print Screen Hardcopy You can use the Hardcopy icon in the System Tray as well: click onto the Hardcopy icon with the right mouse button, if you want to open the Hardcopy window.
If you move the mouse above that icon, a corresponding text will be displayed.
14 First Steps Settings
3.3 Settings
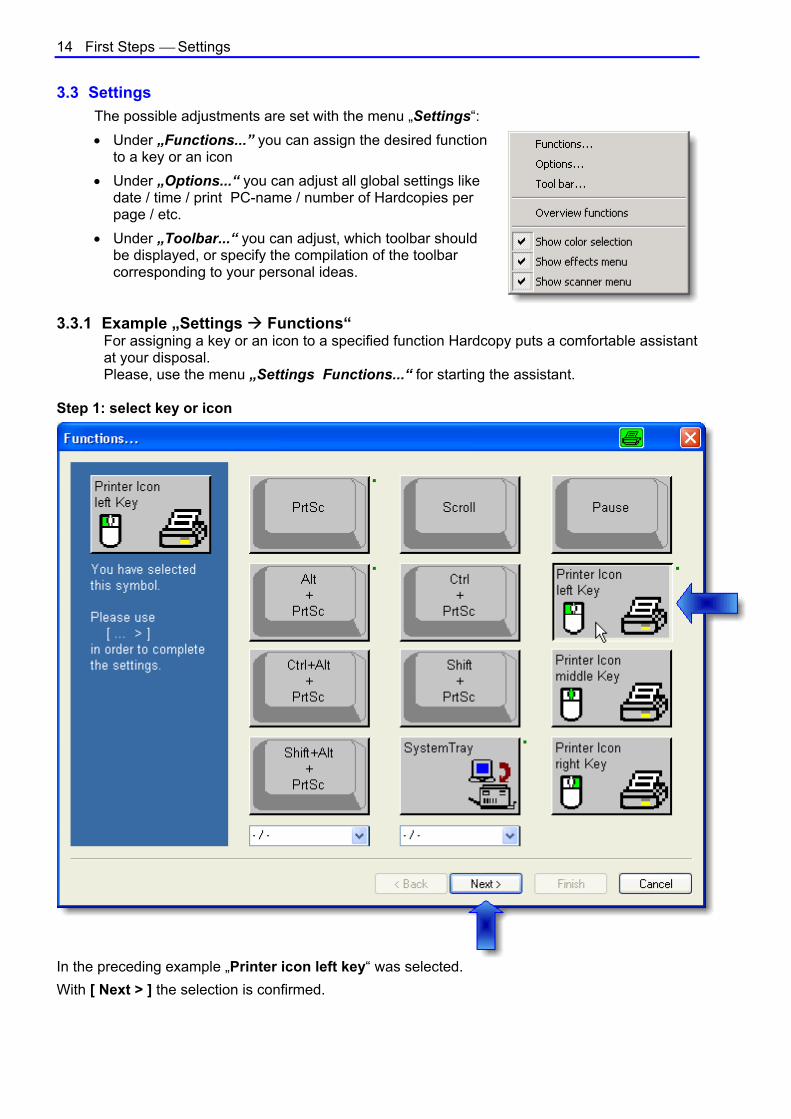
The possible adjustments are set with the menu „Settings“:
• Under „Functions...” you can assign the desired function to a key or an icon
• Under „Options...“ you can adjust all global settings like date / time / print PC-name / number of Hardcopies per page / etc.
• Under „Toolbar...“ you can adjust, which toolbar should be displayed, or specify the compilation of the toolbar corresponding to your personal ideas.
3.3.1 Example „Settings Functions“
For assigning a key or an icon to a specified function Hardcopy puts a comfortable assistant at your disposal. Please, use the menu „Settings Functions...“ for starting the assistant.
Step 1: select key or icon
In the preceding example „Printer icon left key“ was selected.
With [ Next > ] the selection is confirmed.

First Steps Settings 15
Step 2: select area
In the preceding example „Window“ was selected. (This is the common set for the printer icon in the foreground window.) With [ Next > ] the selection is confirmed.

16 First Steps Settings Step 3: select functions
In the preceding example (only) „Print” was selected. With [ Next > ] the selection is confirmed and you can carry out further selections. With [ Finish ] the selections are saved and the assistant is closed.

First Steps Settings 17
Step 4: if required, you can select additional functions
In the preceding example „Landscape“ was selected. (This selected function is also displayed to you correspondingly.) With [ Finish ] the settings are saved and the assistant is closed. If you click now into another window, the printer icon will be displayed in the title bar of this window. A click onto this icon prints out this window.

18 First Steps Some Example-Settings
3.4 Some Example-Settings 3.4.1 You Want to See before, What is Printed
• Right mouse button onto the Hardcopy icon in the System Tray • Menu Settings Functions • Click the desired key, e.g.: Alt+PrintScreen key • Click "Next >" twice • Deselect "Print“ • Select "Open Hardcopy window" • Click on "Finish“ • Minimize Hardcopy window • Press the key • The Hardcopy window is opened; if you want to print really now, click on the printer icon
in the Hardcopy toolbar.
3.4.2 Set a Key (e.g. Pause with Cut (Rectangle))
• Right mouse button onto the Hardcopy icon in the System Tray • Menu Settings Functions • Click on "Pause" • Click on "Next >" • Select "Rectangle" • Click on "Next >" • Select "Print" (if required) • Select further option (if required) • Click on "Finish“.
3.4.3 Open a File
• Right mouse button onto the Hardcopy icon in the System Tray • Select either in the menu File Open • Or select in the menu File Image Explorer.
3.4.4 No Printout with a Click onto the Hardcopy Icon in the System Tray
• Right mouse button onto the Hardcopy icon in the System Tray • Menu Settings Functions • Click on "System Tray" • Click on "Next >" • Select "No function" • Click on "Finish“.
3.4.5 Eliminate Printer Icon in the Foreground Window
• Right mouse button onto the Hardcopy icon in the System Tray • Menu Settings Functions • Click on "Printer icon left key" • Click on "Next >" • Select "No function" • Click on "Finish“.

First Steps Some Example-Settings 19
3.4.6 Display a Printer Icon in the Foreground Window
• Right mouse button onto the Hardcopy icon in the System Tray • Menu Settings Functions • Click on "Printer icon left key" • Click on "Next >" • Select "Window" • Click on "Next >" • Select "Print" • Click on "Finish“.

20 First Steps Some Example-Settings
Working with Hardcopy Start Hardcopy 21
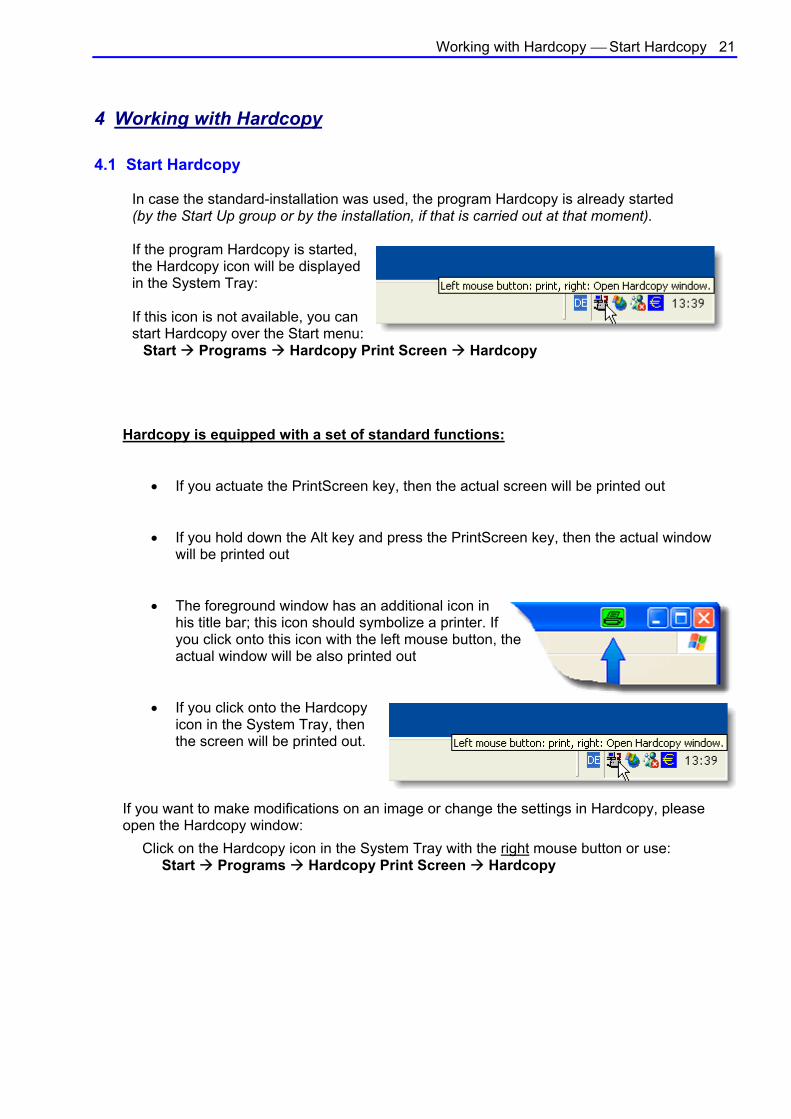
4 Working with Hardcopy 4.1 Start Hardcopy
In case the standard-installation was used, the program Hardcopy is already started (by the Start Up group or by the installation, if that is carried out at that moment).
If the program Hardcopy is started, the Hardcopy icon will be displayed in the System Tray:
If this icon is not available, you can start Hardcopy over the Start menu:
Start Programs Hardcopy Print Screen Hardcopy Hardcopy is equipped with a set of standard functions:
• If you actuate the PrintScreen key, then the actual screen will be printed out
• If you hold down the Alt key and press the PrintScreen key, then the actual window will be printed out
• The foreground window has an additional icon in his title bar; this icon should symbolize a printer. If you click onto this icon with the left mouse button, the actual window will be also printed out
• If you click onto the Hardcopy icon in the System Tray, then the screen will be printed out.
If you want to make modifications on an image or change the settings in Hardcopy, please open the Hardcopy window:
Click on the Hardcopy icon in the System Tray with the right mouse button or use: Start Programs Hardcopy Print Screen Hardcopy

22 Working with Hardcopy The Hardcopy Window 4.2 The Hardcopy Window
Toolbar Printer Icon
Size in Pixel and KB The width and height of the image and the needed storage allocation
Color Resolution / Number of Colors The color resolution and the number of colors that are used in this image
Color Palette Click onto a color with the left mouse button in order to select this color.
Position The current position of the mouse pointer in the image
Paint Tools Rectangle, circle, line, fill, etc.
1/4 Up to now 1 of 4 possible Hardcopies was / were created.

Working with Hardcopy Positioning Toolbar / Color Palette 23
4.3 Positioning Toolbar / Color Palette
With pressed mouse button you can move the toolbar or the color palette. If you push a toolbar onto the window frame, then it is “fixed” on the frame.

24 Working with Hardcopy The Color Palette / Select Color
4.4 The Color Palette / Select Color
Foreground Color The paint functions use this color, if you work with the left mouse button.
Background Color The paint functions use this color, if you work with the right mouse button.
Color Selection Click with the left mouse button onto a color in order to use this color as the foreground color. Click with the right mouse button onto a color in order to use this color as the background color. With a double-click (left or right) you can select another color.
Exceptional Feature with Less than 257 Colors If you change a special color, possibly the corresponding color of the image is changed. If you don’t want this, please use the menu: Colors >> Number of colors >> 24 Bit
Color Picker In order to select a color from the image
Paint Functions

Menus File 25
5 Menus 5.1 File
5.1.1 New
Delete an image and/or put an empty image at disposal with the selected background color.
5.1.2 Open
Opens an image file.
Tips: • You can open a Hardcopy file (with the extension .hcp) by a double-click in the
Explorer; from that any one time a further Hardcopy window is opened. Further information under:
6.2.14.1 Assign File Types to the Program Hardcopy
• It is also possible to drag a file into the Hardcopy window directly from the Explorer (Drag + Drop). With Drag + Drop you can push every file into the Hardcopy window; Hardcopy will open this file, if the format is supported.
• You can open a Hardcopy file (with the extension .hcd) by a double-click in the Explorer; this starts a slide show of the current directory.