a quick and easy guide to online cash management
TRANSCRIPT

By Paul A. Murphy, Author of Banking Online For Dummies®
A Quick and Easy Guide to
Online Cash Management

1
Welcome
Welcome to Business Banking. With Business Banking, you may access your accounts 24 hours a day, 7 days a week, anywhere a computer and an Internetconnection are available.
This guide is designed to help you navigate through the Business Banking system. By utilizing our system features, you’ll find you are able to reduce the amount of timespent managing your finances.
We offer a sophisticated set of online tools that can be customized to suit any business,ensuring your cash balances are constantly working hard for you. Our Business Bankingfeatures will give you an unprecedented level of control, freedom and flexibility.
We look forward to seeing you online!
Published by Murphy & Company, Inc.459 Sovereign CourtBallwin, MO 63011www.mcompany.com
© 2009 Murphy & Company, Inc.“Dummies” and “For Dummies” are registered trademarks of Wiley Publishing, Inc. Microsoft, Windows, Excel andInternet Explorer are registered trademarks of Microsoft Corporation. Firefox is a registered trademark of the MozillaFoundation. Adobe Reader are registered trademarks of Adobe Systems Incorporated in the United States and/or othercountries. THIS PRODUCT IS NOT ENDORSED OR SPONSORED BY ADOBE SYSTEMS INCORPORATED, PUBLISHER OFADOBE READER.
DisclaimerConcepts, strategies and procedures outlined in this guide can and do change and may not be applicable to allreaders. The content in this guide is not warranted to offer a particular result or benefit. Neither the author/publisher,nor any other party associated with this product shall be liable for any damages arising out of the use of this guide,including but not limited to loss of profit, commercial, special, incidental or other damages. For complete product andservice information, please refer to the terms, conditions and disclosures for each product and service.

32
Security
Depend on Us for Security There is nothing more important to us than knowing that our end users’ online financialtransactions are private and secure. Our systems are secured with encryption, perimeterand internal firewalls, screening and filtering routers, intrusion detection, strictauthentication, virus protection, as well as application security. Application securityincludes a double-blind process for issuing PINs, user lockouts due to failed login, and additional encryption of sensitive user data during sessions. Our networkarchitecture is structured so the servers that store actual account information are notdirectly connected to the Internet.
ConfidentialitySecurity is strengthened by your efforts in keeping all account and login dataconfidential. Never share your password with anyone and never include account specific details within an unsecured email.
PasswordsThe most secure passwords are those which use a combination of both alpha andnumeric characters. Avoid using easily obtained personal data within your password,such as initials and birth dates or loved ones’ names.
Enhanced Login Security In addition to password security, additional security steps to verify your identity havebeen installed on our system called Enhanced Login Security. Part of this identificationprocess includes recognizing the computer you normally use to access Business Banking.This information, coupled with your normal login details, is incorporated into your onlineidentity profile. With these extra layers of security in place, you’ll be able to restassured your account information is protected from a broad range of security issues.
Signing OffIf you must step away from your workstation for even a moment while using theBusiness Banking system, be sure to sign off from your session to ensure your accountdata is not reviewed or altered by unauthorized individuals.
NOTE: For increased security, the navigation of each user’s login can be customized to displayonly the functions to which they have been granted access.
Table of Contents
General InformationSecurity . . . . . . . . . . . . . . . . . . . . . . . . . . . . . . . . . . . . . . . . . . . . . . . . . . . . . . . . .3Logging In . . . . . . . . . . . . . . . . . . . . . . . . . . . . . . . . . . . . . . . . . . . . . . . . . . . . . . .4General Navigation . . . . . . . . . . . . . . . . . . . . . . . . . . . . . . . . . . . . . . . . . . . . . . . . 5
Administration User Maintenance . . . . . . . . . . . . . . . . . . . . . . . . . . . . . . . . . . . . . . . . . . . . . . . . .6Account Maintenance . . . . . . . . . . . . . . . . . . . . . . . . . . . . . . . . . . . . . . . . . . . . . .7Password Change . . . . . . . . . . . . . . . . . . . . . . . . . . . . . . . . . . . . . . . . . . . . . . . . . .8Activity Reporting . . . . . . . . . . . . . . . . . . . . . . . . . . . . . . . . . . . . . . . . . . . . . . . . . .9Sweeps . . . . . . . . . . . . . . . . . . . . . . . . . . . . . . . . . . . . . . . . . . . . . . . . . . . . . . . . .10Balance Alerts . . . . . . . . . . . . . . . . . . . . . . . . . . . . . . . . . . . . . . . . . . . . . . . . . . .11Account Reconciliation . . . . . . . . . . . . . . . . . . . . . . . . . . . . . . . . . . . . . . . . . . . . .12
Balance ReportingAccount Summary . . . . . . . . . . . . . . . . . . . . . . . . . . . . . . . . . . . . . . . . . . . . . . . .13Account Detail . . . . . . . . . . . . . . . . . . . . . . . . . . . . . . . . . . . . . . . . . . . . . . . . . . .14Check Imaging . . . . . . . . . . . . . . . . . . . . . . . . . . . . . . . . . . . . . . . . . . . . . . . . . . .15Transaction Search . . . . . . . . . . . . . . . . . . . . . . . . . . . . . . . . . . . . . . . . . . . . . . . .16Create a Report . . . . . . . . . . . . . . . . . . . . . . . . . . . . . . . . . . . . . . . . . . . . . . . . . .17Run a Report . . . . . . . . . . . . . . . . . . . . . . . . . . . . . . . . . . . . . . . . . . . . . . . . . . . . .18
Funds TransferBook Transfer . . . . . . . . . . . . . . . . . . . . . . . . . . . . . . . . . . . . . . . . . . . . . . . . . . . .19ACH
ACH Overview . . . . . . . . . . . . . . . . . . . . . . . . . . . . . . . . . . . . . . . . . . . . . . . . .20Participant Maintenance . . . . . . . . . . . . . . . . . . . . . . . . . . . . . . . . . . . . . . . . .21Batch Template Maintenance . . . . . . . . . . . . . . . . . . . . . . . . . . . . . . . . . . . . .22Transaction Entry Maintenance . . . . . . . . . . . . . . . . . . . . . . . . . . . . . . . . . . . .23ACH Import . . . . . . . . . . . . . . . . . . . . . . . . . . . . . . . . . . . . . . . . . . . . . . . . . . . .24ACH Batch Initiation . . . . . . . . . . . . . . . . . . . . . . . . . . . . . . . . . . . . . . . . . . . .25ACH Batch Approval . . . . . . . . . . . . . . . . . . . . . . . . . . . . . . . . . . . . . . . . . . . .26
TaxTax Payment Initiation . . . . . . . . . . . . . . . . . . . . . . . . . . . . . . . . . . . . . . . . . . .27Tax Payment Approval . . . . . . . . . . . . . . . . . . . . . . . . . . . . . . . . . . . . . . . . . . .28
ServicesGlossary . . . . . . . . . . . . . . . . . . . . . . . . . . . . . . . . . . . . . . . . . . . . . . . . . . . . . . . .29Notes . . . . . . . . . . . . . . . . . . . . . . . . . . . . . . . . . . . . . . . . . . . . . . . . . . . . . . . . . .31

5
General Navigation
Navigating the system is simplified by the main menu navigation bar at the top of yourscreen. Move your cursor over a menu item to reveal submenu options from which to select. Navigation may vary based on the functions to which you have been granted access.
1 � The Administration menu provides access to high-level system functions andallows users to customize their experience in certain areas.
2 � The Account Services menu allows access to account management functions.
3 � The Balance Reporting function gives an overview of all account information,provides options to see details and filters the overview by account and activity type.
4 � Use the Funds Transfer menu to access various methods of moving funds between accounts.
5 � The Online Services menu options vary for each account.
6 � Email a representative.
7 � Online Help is just a click away.
8 � Always Sign Off from your session before leaving your computer unattended.
1
2
3
4
5
6
7
8
4
Logging In
Logging in to Business Banking is easy. Just launch your web browser, (Microsoft®
Internet Explorer or Firefox®) and go to your Business Banking login address.
1 � Enter your Company ID and Password, your UserID and Password, then click Submit.
2 � If you are logging in from a computer unknown to us,you will be presented withthis screen so that you canaccess your accounts usinga temporary Security Code.Click here to open a newbrowser window to obtainyour temporary SecurityCode from the emailaddress you have on file.
3 � Enter the temporarySecurity Code in the fieldprovided. The temporarySecurity Code is only goodfor 30 minutes or until your session times out,whichever comes first.
4 � Choose whether to addsecurity to the computerfrom which you arelogging in. If you chooseto bypass the security, youwill be required to use atemporary Security Codethe next time you log infrom this computer. Youwill be required to set up security for eachcomputer and browserwhich you log in from toavoid being challenged.
5 � Click Continue to access your accounts.
NOTE: As a security measure, if you or someone attempting to gain access to your account uses an incorrect ID and/orPassword several times in a row, your account will be locked from access. If this occurs, contact us to reset your ID andPassword for re-entry.
1
2
3
4
5

76
User Maintenance
The User Maintenance option is used to add, modify and delete end-users and assignthe services and accounts they can access. User Maintenance controls allow thecompany administrator to create a “profile” for each user. This profile includes a uniqueID and secure Password, as well as permission settings that enable the user to accesscertain accounts and user-specific services.
From the Administration menu, select the User Maintenance link.
1 � To add a new user, clickNew. To edit a user,select the name fromthe drop-down menu.
2 � Enter or edit the User Name, User ID, Password and Email information.
3 � Select the accounts and functions to grantaccess to this user.
4 � Enter an amount here to set a limit amount for the user’s daily andtransaction limits.
5 � Click Add or Update to save the informationfor this user. ClickDelete to remove this user and theirsystem privileges.
NOTE: Changes in User Maintenance do not affect sessions that are already underway. Userswith active sessions must log out and then log back in to see modifications made in UserInformation and Feature/Services.
12
3
4
5
Account Maintenance
The Account Maintenance function provides the company administrator with the abilityto rename any of the available accounts. All references to the account within the systemwill use the administrator-defined name.
From the Administration menu, select the Account Maintenance link.
1 � Select the account fromthe drop-down menu.
2 � Enter the new name for the account in the field provided.
3 � Click Update to save the change.
NOTE: User-defined account descriptions can be up to 32 characters in length. The descriptionwill display throughout the system, including drop-down menus, where applicable.
1 23
98
1 � Enter the Old Password.
2 � Enter a New Password,and confirm your NewPassword by re-entering.
3 � Click Update to save the new Password.
4 � Repeat steps 1-3 to change a User Password.
NOTE: The Business Banking system’s password validation is case-sensitive; users must exactlyreplicate the pattern of upper- and lower-case letters to gain entry to the system. Use mixed casefor your passwords to help make them more secure.
1 2
3
Password Change
The company administrator can change the company password at any time. He or shewill be required to change the company password the first time they log in to the systemas well as any other time the system requires you to update the password information.Users are also required to change their passwords on a recurring basis. Specialpassword characteristics may be imposed to provide a greater degree of security.
From the Administration menu, select the Login Credentials link, then Change Company Password or Change User Password.
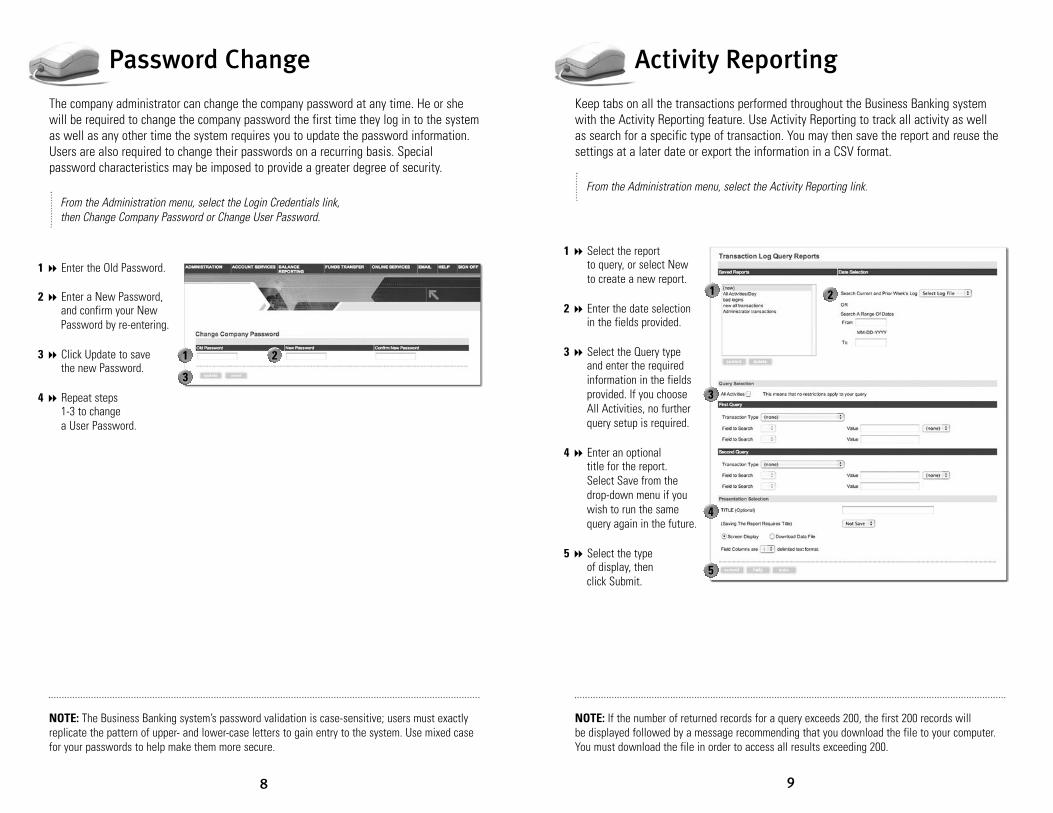
Activity Reporting
Keep tabs on all the transactions performed throughout the Business Banking systemwith the Activity Reporting feature. Use Activity Reporting to track all activity as well as search for a specific type of transaction. You may then save the report and reuse thesettings at a later date or export the information in a CSV format.
From the Administration menu, select the Activity Reporting link.
1 � Select the report to query, or select New to create a new report.
2 � Enter the date selectionin the fields provided.
3 � Select the Query typeand enter the requiredinformation in the fieldsprovided. If you chooseAll Activities, no furtherquery setup is required.
4 � Enter an optional title for the report.Select Save from thedrop-down menu if youwish to run the samequery again in the future.
5 � Select the type of display, then click Submit.
NOTE: If the number of returned records for a query exceeds 200, the first 200 records will be displayed followed by a message recommending that you download the file to your computer. You must download the file in order to access all results exceeding 200.
2
3
4
5
1

1110
Sweeps
The Sweeps function provides the ability to set up an automated funds transfer to orfrom internal accounts in order to keep their balances within certain limits. When a limitis reached, the system transfers just enough money between the specified accounts tobring the monitored account back to the threshold level, then sends you an emailmessage to indicate the activity.
From the Administration menu, select the Sweeps link to set up automated sweeps on accounts.
1 � To update an existingsweep, select the checkbox for the sweep(s),edit the information as necessary, then click Update.
2 � To delete an existingsweep, select the checkbox for the sweep(s),then click Delete.
3 � To add a new sweep,select the account to check, enter thecondition, threshold, the account to drawfrom for the adjustmentand a notification emailaddress, then click Add.
1 2
3
Balance Alerts
Business Banking can help you track account activity with Balance Alerts. Set up an email or text message alert to be sent to you when an account level exceeds a setthreshold. Balance alert notifications are sent throughout the day and are not availablefor loan accounts.
From the Administration menu, click the Balance Alerts link to set up automated notifications.
1 � To update an existingbalance alert, select the check box for the alert(s), edit the information as necessary, then click Update.
2 � To delete an existingbalance alert, select the check box for the alert(s), then click Delete.
3 � To add a new balancealert, select the account,enter the conditions andalert email address,then click Add.
1 2
3

1312
Account Summary
You can view your current checking, savings, money market and commercial loanbalances as well as view several months of transaction history for each account. This is a great reference and filing system.
From the Balance Reporting menu, click the Account Summarylink to view all accounts and balances.
1 � Click a specific accountname to view theAccount Detail.
2 � Click a magnifying glass icon to view more information or a statement in a secondary window.
3 � Click Print to send thedisplayed data to yourprinter. Click Export to generate an Excelspreadsheet of the data.
�i�Column headings are configurable and may not be identical to those displayed.
1 2
3
�i�
Account Reconciliation
Account Reconciliation is a service that helps safeguard against check fraud and forgery.With Account Reconciliation, presented checks are compared with a list of checks youhave issued, ensuring that the information contained on the presented check exactlymatches the issued check. When a discrepancy between a presented check and anissued check is found, it is flagged as an exception. With the Positive Pay ExceptionDecisions feature, you can view exceptions and then choose to Pay or Return the check exception.
From the Account Services menu, select the ReconciliationServices link, then select Positive Pay Exception Decision.
1 � Select each transactionyou wish to make a decision upon.
2 � Select the action.
3 � Click Send to notify your financial institutionthat a decision has been made and is nowready for processing.
1 2
3
NOTE: By default, the system initially displays 50 records. You can search for and display issuerecords from up to 180 days in the past.

15
Check Imaging
The check imaging function allows you to view the front and back of a cleared check.
Click a check image number link on the Account Detailscreen to view a check image.
1 � Click the front or back button to view the reverse side.
1
14
Account Detail
Account transaction data can be viewed and sorted for quick, convenient access. Thedata can be saved to your network or hard drive in a variety of formats to meet yourparticular expense reporting needs.
Click an account name on the Account SummaryScreen to view the Account Detail.
1 � Quickly view the history details foranother account by selecting it from the drop-down menu.
2 � To view transactionswithin a different daterange, enter the range,then click Submit.
3 � Account specific data can be exported in a format compatiblewith your businessfinancial software by selecting the format from the drop-down menu and clicking Export.
1
2
3

17
Create a Report
The Create Reports function lets you create, edit and delete customized settings that apply to the Account Summary screen so you see only specific accounts andtransactions. A report is comprised of a group of Account and Transaction settings and is saved by a descriptive name. The report acts as a filter for the Account Summaryscreen, providing you a customized view. Once a report is created, you can save thereport to run again on future dates.
From the Balance Reporting menu, select the Create Reports link.
1 � Select the accounts to include in the report.
2 � Select the transactionsto include in the report.
3 � Assign a name to thereport, then click Add to save the report.
NOTE: If account category codes are not available, the transaction types displayed will be Debitand Credit.
1
2
3
16
Transaction Search
Transaction Search allows for querying on transactions. Search by any combination of date range, check or serial number of a transaction as well as transaction type.
From the Balance Reporting menu, select the Transaction Search link to submit a query.
1 � Select the account to search.
2 � Enter one or more of thesearch criteria, includingdate, check or serialnumber, amount andtransaction type.
3 � Click Submit to displaythe results of yoursearch. Click Reset to clear the fields and search again.
1
2
3

19
Book Transfer
The Book Transfer service allows you to move funds between accounts within the same financial institution. Transfers can be scheduled for the current day or a date in the future, up to one year in advance. Recurring transfers may also be set up toautomate loan payments. Scheduled transfers can be reviewed and deleted anytimeprior to processing.
From the Funds Transfer menu, select the Book Transfer link, then Add Transfer.
1 � Select the source anddestination accounts for the funds transfer.
2 � Enter the transfer amount.
3 � Enter the processingdate for the transfer.
4 � Enter up to twoadditional transactions to transmit at once.
5 � Click Add to process the transfer(s).
NOTE: You can schedule recurring transfers by selecting the Book Transfer link, then AddRecurring Book Transfer. Follow steps 1-3 above, then enter the date, number of transfers and email address. Next, click Add to process the transfer.
1 2 3
4
5
18
Run a Report
The Run Selected Report option lets you display the results from your saved reports.
From the Balance Reporting menu, select the Run Selected Report link.
1 � Select the report to run from the drop-downmenu and the resultswill appear in asecondary window.
1
21
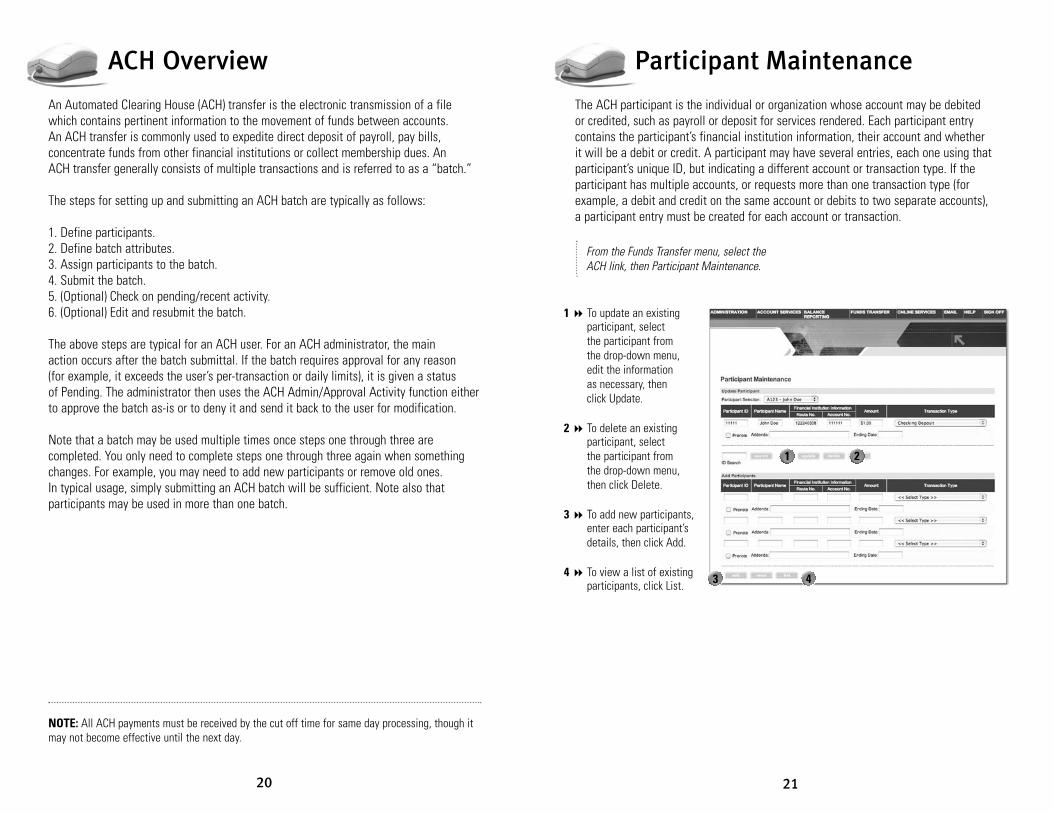
Participant Maintenance
The ACH participant is the individual or organization whose account may be debited or credited, such as payroll or deposit for services rendered. Each participant entrycontains the participant’s financial institution information, their account and whether it will be a debit or credit. A participant may have several entries, each one using thatparticipant’s unique ID, but indicating a different account or transaction type. If theparticipant has multiple accounts, or requests more than one transaction type (forexample, a debit and credit on the same account or debits to two separate accounts), a participant entry must be created for each account or transaction.
From the Funds Transfer menu, select the ACH link, then Participant Maintenance.
1 � To update an existingparticipant, select the participant from the drop-down menu, edit the information as necessary, then click Update.
2 � To delete an existingparticipant, select the participant from the drop-down menu,then click Delete.
3 � To add new participants,enter each participant’sdetails, then click Add.
4 � To view a list of existingparticipants, click List.
1 2
3 4
20
ACH Overview
An Automated Clearing House (ACH) transfer is the electronic transmission of a filewhich contains pertinent information to the movement of funds between accounts. An ACH transfer is commonly used to expedite direct deposit of payroll, pay bills,concentrate funds from other financial institutions or collect membership dues. An ACH transfer generally consists of multiple transactions and is referred to as a “batch.”
The steps for setting up and submitting an ACH batch are typically as follows:
1. Define participants.2. Define batch attributes.3. Assign participants to the batch.4. Submit the batch.5. (Optional) Check on pending/recent activity.6. (Optional) Edit and resubmit the batch.
The above steps are typical for an ACH user. For an ACH administrator, the main action occurs after the batch submittal. If the batch requires approval for any reason (for example, it exceeds the user’s per-transaction or daily limits), it is given a status of Pending. The administrator then uses the ACH Admin/Approval Activity function eitherto approve the batch as-is or to deny it and send it back to the user for modification.
Note that a batch may be used multiple times once steps one through three arecompleted. You only need to complete steps one through three again when somethingchanges. For example, you may need to add new participants or remove old ones. In typical usage, simply submitting an ACH batch will be sufficient. Note also thatparticipants may be used in more than one batch.
NOTE: All ACH payments must be received by the cut off time for same day processing, though itmay not become effective until the next day.

23
Transaction Entry Maintenance
Use the Transaction Entry Maintenance screen to “attach” participants to a specific ACHbatch. Individual participants may be attached to multiple batches. Each ACH transactionincludes a reference to the participant, the transaction type and the amount.
From the Funds Transfer menu, select the ACH link, then Transaction Entry Maintenance.
1 � Select the templatename from the drop-down menu.
2 � Select the individualparticipants to attach to the batch. Or, click the Select All box to quickly attach all participants.
3 � Click Update to associate theparticipants with the selected batch.
1
2
3
22
Batch Template Maintenance
The Batch Template Maintenance function allows you to define the essentialcharacteristics of the ACH batch for efficient entry. This screen allows you to create new templates and update or delete existing templates.
From the Funds Transfer menu, select the ACH link, then Batch Template Maintenance.
1 � To update an existingtemplate, select thetemplate name from the drop-down menu.Click New to add a new template.
2 � Enter or edit thetemplate details as required.
3 � Click Add to insert a new template or clickUpdate to modify theselected template.
4 � Click Delete to removethe selected template.
1
2
3 4

25
ACH Batch Initiation
The Initiate Batch function lets you set up an ACH batch and submit it for processing.Multiple ACH payments can be entered and sent. Files received after the cut off timewill be processed the next business day.
From the Funds Transfer menu, select the ACH link, then Initiate Batch.
1 � The daily transactionlimit and running totaldisplays here.
2 � Select the TemplateName from the drop-down menu.
3 � Click the Hold check box to omit theparticipant from the batch transmittal.
4 � Edit the batch data for participants as necessary, including the effective date,amount value, prenote setting andaddenda message, then click Initiate.
NOTE: An ACH batch may require approval due to limitations set by the system administrator.
1
2
3
4
24
ACH Import
The Import ACH Data function allows you to create a new or update an existing batchtemplate using a file created by another application. This feature is extremely useful for initiating large batches and keeps you from rekeying information, which couldintroduce errors. Plus, it saves time!
From the Funds Transfer menu, select the ACH link, then Import ACH Data.
1 � To update an existing batch, select the file name.
2 � To create a newdelimited map, click here.
3 � Click here to create a new fixed map.
4 � Click Choose File toselect a file from yourcomputer to import.
5 � Select the offsetaccount from the drop-down menu.
6 � Click Import to complete the process.
1
2 3
5
6
NOTE: Importing a batch does not initiate the batch. Batch Initiation can only be achieved by following the batch initiation procedure.
4

27
Tax Payment Initiation
Never run to the local branch with a tax payment check again. Initiate a tax payment to the IRS through EFTPS up to 30 days in advance from your home or office. Federal tax type is supported.
From the Funds Transfer menu, select the Tax Payments link, then Add EFTPS.
1 � Select the taxpayername, the debit account,the payment effectivedate and the tax period.
2 � Select the Tax Typeand/or Excise Tax Type from the drop-down menus.
3 � Enter the amount of the tax payment, then click Add.
NOTE: The cut off time for same day tax payment processing is the same as the cut off time setfor ACH transactions.
1
2
3
26
ACH Batch Approval
Business Banking provides all the information you need to make informed approvaldecisions from one convenient screen. Verify batch details, totals, offset account and the initiator. Feature-rich approval controls include: dual approval authority, the ability to deny transactions, resubmit, and modify the effective date. Emailnotifications are sent to all approvers when batches are pending. You can even monitor a batch’s status after it leaves your company.
From the Funds Transfer menu, select the ACH link, then ACH Admin Approval/Activity.
NOTE: When a batch is denied, an email notification will be sent to the batch initiator formodification and resubmittal.
1 � A reference display of your approval limitsappears at the top of the screen.
2 � To approve a pendingACH submittal, check its Select box, then click Approve.
3 � To deny a pending ACH submittal, check its Select box, fill in a Deny Message, then click Deny.
4 � To see details for any batch listed on the screen, click its magnifying glass in the Details column. The system launches a second browserwindow, from which you can view or print the batch data.
1
2 3
4

29
Glossary
Automated Clearing House (ACH): A network of regional associations, inter-bank associationsand private-sector processors. ACH payments are processed and settled electronically, therebyincreasing reliability, efficiency and cost-effectiveness. ACH payments are generally settled in one day or greater.
ACH Template: The template contains the essential characteristics of the ACH batch, such as the name of the template, the type (class code) of ACH transmission (CCD or PPD) and the offset account. Although Business Banking only lists CCD and PPD, Business Banking will create the appropriate CCD+/PPD+ ACH Batch if a participant with an addendum is associated with this batch.
ACH Template Cash Concentration or Disbursement (CCD): ACH payment format used for concentration of funds between or within companies. A single 94-character record contains the standard entry class indicating the type of transaction, routing and transit numbers of theODFI and RDFI, the originator and receiver account numbers. CCD is the only corporate ACHformat with no space for additional addenda information, but it does contain a space for a reference number.
Cash Concentration or Disbursement Plus Addendum (CCD+): ACH payment format used when additional information is required for a particular corporate-to-corporate payment. The format is additional to CCD, but with an addenda record. The addenda record is a free-formspace for up to 80 characters of descriptive data. CCD+ can be used for such things as FederalTax Payments and conforms to the Tax payment (TXP) banking conventions.
Clearing House Interbank Payments System (CHIPS): An independent, large-dollar fundstransfer network operated by the New York Automated Clearing House (NYACH).
Company Administrator: The Business Banking user who will have system administration responsibilities.
Daylight Overdrafts: An intra-day exposure occurring when an account is in an overdraft positionduring the business day.
FedWire: The Federal Reserve funds transfer system. FedWire transactions involve immediate,same day settlement of funds. FedWire instructions are irrevocable.
Float: Time interval, or delay, between the start and completion of a specific phase or process(check or electronic deposits, clearings, etc.) that occurs along the cash flow timeline.
Full Reconciliation: The matching of checks paid against a company’s check issue file. A report detailing paid and outstanding items in check serial number order completes the full reconciliation process.
Initiate Batch: The Business Banking end-user initiates an ACH batch by reviewing the transferinformation and assigning a settlement date. Once all of the information is deemed correct by the user, the system creates a formatted NACHA file with all of the batch information.
Magnetic Ink Character Recognition (MICR) Line: The information necessary to processchecks by machine is maintained in the MICR line, which is printed with special characters in the lower portion of the check. These characters can be read by magnetic or optical scanning equipment.
Memo Posting: Posting electronic transactions early in the day when the actual debits or creditswill not be posted until later that day.
National Automated Clearing House (NACHA): A membership organization that providesmarketing and education assistance and establishes the rules, standards and procedures thatenable financial institutions to exchange ACH payments on a national basis.
28
Tax Payment Approval
The EFTPS Admin Activity/Approval function is intended for use by the Tax Paymentadministrators. It is similar to the EFTPS Activity function, but adds the capability to approve or deny pending EFTPS submittals.
From the Funds Transfer menu, select the Tax Payments link, then EFTPS Admin Approval/Activity.
1 � A reference display of your approval limitsappears at the top of the screen.
2 � To approve a pendingTax Payment submittal,check its Select box,then click Approve.
3 � To delete a pending Tax Payment submittal,check its Select box,then click Delete.
4 � To deny a pending Tax Payment submittal,check its Select box, fill in the Deny message,then click Deny.
NOTE: Revisions can be made to any pending scheduled payment. Historical payments cannot be edited or deleted.
1
23 4

30
Glossary
Non-Repetitive (Free Form) Wire Transfers: A wire transfer in which all information containedwithin the instruction is different each time the transaction takes place.
On-Us Transactions: Items, either check or electronic, paid or deposited to and drawn or debitedon accounts from the same financial institution.
Originating Depository Financial Institution (ODFI): The Financial Institution issuing an ACH File(s) on behalf of its client.
Partial Reconciliation: A listing or file of checks paid sorted in numerical order by check number or date paid.
Participant: The individual or organization that will be affected by the ACH transaction (payee or draftee). An ACH transaction may debit or credit a participant’s account, such as a payrolldeposit or a payment for services rendered. The participant information is referenced by theACH transaction.
Positive Pay: A service used to combat check fraud. The FI pays only those items with serialnumbers and dollar amounts matching the company’s issue file.
Prearranged Payment or Deposit (PPD): The ACH payment format by which consumers mayauthorize credits or debits to their accounts by a company or financial institution. These arenormally recurring payments in fixed amounts.
Prenotification (Prenotes): Optional, zero-dollar entries that are sent to the ACH system to verify instructions prior to sending live entries.
Receiving Depository Financial Institution (RDFI): The FI that receives the ACH debits or credits on behalf of an individual or business client.
Regulation D: Imposes uniform reserve requirements on all depository institutions with differentlevels of reserves for different types of deposits. The Fed can use this regulation in controllingthe supply of money.
Regulation E: Establishes the rights, liabilities and responsibilities of parties to consumer-relatedelectronic funds transfer (EFT) and protects consumers using EFT systems, such as those involvedin ATM, ACH and credit card transactions. Reg E also established the guidelines fordocumentation of electronic transfers.
Repetitive Wire Transfers: Transfers in which debit and credit parties, as well as all otherpayment related information is fixed. Only the effective date and dollar amount may be changed.
Reverse Positive Pay: A company’s check issue file is matched against all items being presentedfor payment. Exception items are presented to the company for review and decision making. Themost common forms of exception are checks that are not on an issue file (Paid No Issue), check amounts differ and duplicated checks.
Semi-Repetitive Wire Transfers: Transfers in which debit and credit parties are fixed but descriptive information, effective date and dollar amount may be changed.
Society for Worldwide Interbank Financial Telecommunications (S.W.I.F.T.): The majorinternational Interbank telecommunications network that transmits international paymentinstructions as well as other financial messages.
Transit Routing Number: Contained in the MICR line on a check, which the depository financialinstitution uses to route the check back to the drawee financial institution.
Zero Balance Account (ZBA): A disbursement account on which checks are written eventhough the balance in the accounts are maintained at zero. Debits are covered by a transfer of funds from a master account at the same financial institution.
Notes
31