“a simple guide to facebook and...
TRANSCRIPT

helpbooklet
“A simple guide to Facebook
and Skype…”
Principals Message
The Queensland Academy for Science Mathematics and Technology (QASMT) is
one of the most successful and prestigious selective entry state high schools in
Australia. Our Academy is one of three conceived under the Smart State Agenda,
aimed at providing a genuine transition for highly capable students in years 10,
11 and 12 between senior school and university. It is a school whose exceptional
academic standards rest easily beside great endeavor and success in a wide
range of activities.
We are fortunate to have outstanding teachers who consistently contribute to the lives of our students.
Inspirational teaching and quality learning are our cornerstones ensuring that our Academy is ranked as
one of Australia's finest schools, consistently achieving outstanding learning outcomes.
Our Academy aims to extend students’ learning by blurring the line between school and university. The
curriculum is rigorous and was developed in partnership with The University of Queensland ensuring our
students experience a smooth transition to tertiary education. Our core curriculum is the International
Baccalaureate Diploma; a program that has earned a reputation for rigorous learning and assessment,
enabling IB diploma recipients’ access to the world's leading universities.
As one would expect, our curriculum has a strong emphasis on the sciences and mathematics. Our
partnership with The University of Queensland ensures students have access to and use technologies to
gain exposure to the cutting-edge of these disciplines in a manner which values academic rigor.
Underpinning our academic success is an outstanding pastoral care system supporting every student and
helping each one to feel a vital part of the QASMT ‘family’. Student welfare is implemented through a
Mentor Program ensuring all students achieve to their potential. We believe in the importance of guiding
students to become responsible and caring individuals, who are sensitive, open minded and respectful of
all cultures. QASMT aims to develop tomorrow’s leaders; individuals who will be internationally-minded
citizens.
Choosing a school for your child is one of the most important decisions you will make as a parent. At
QASMT, we understand this responsibility, and that is why we are committed to and passionate about
nurturing our students’ academic, social and personal development in a caring and safe community.
We provide a world class education in an environment where we nurture excellence, foster innovation
and celebrate diversity.
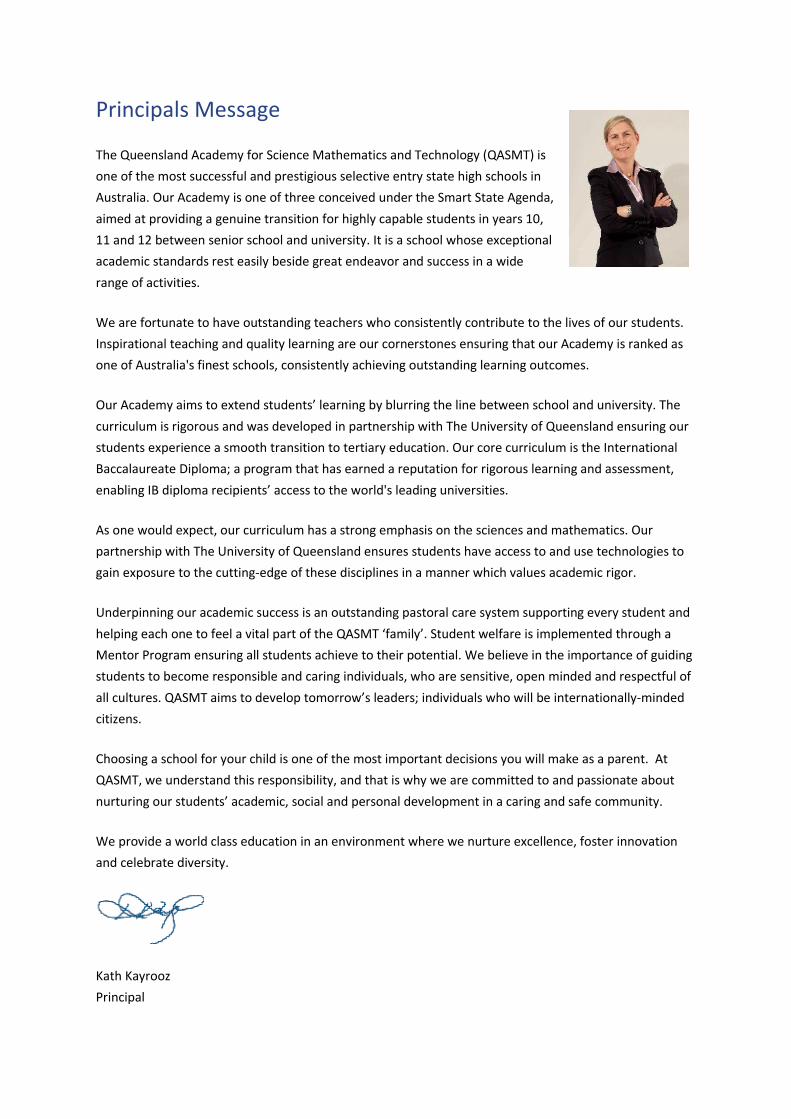
Kath Kayrooz
Principal
Contents for Facebook
Signing up Chapter 1
Getting Started Chapter 2
Status updates Chapter 3
Thank you to all the students who have been part of this working party
h
elpbooklet

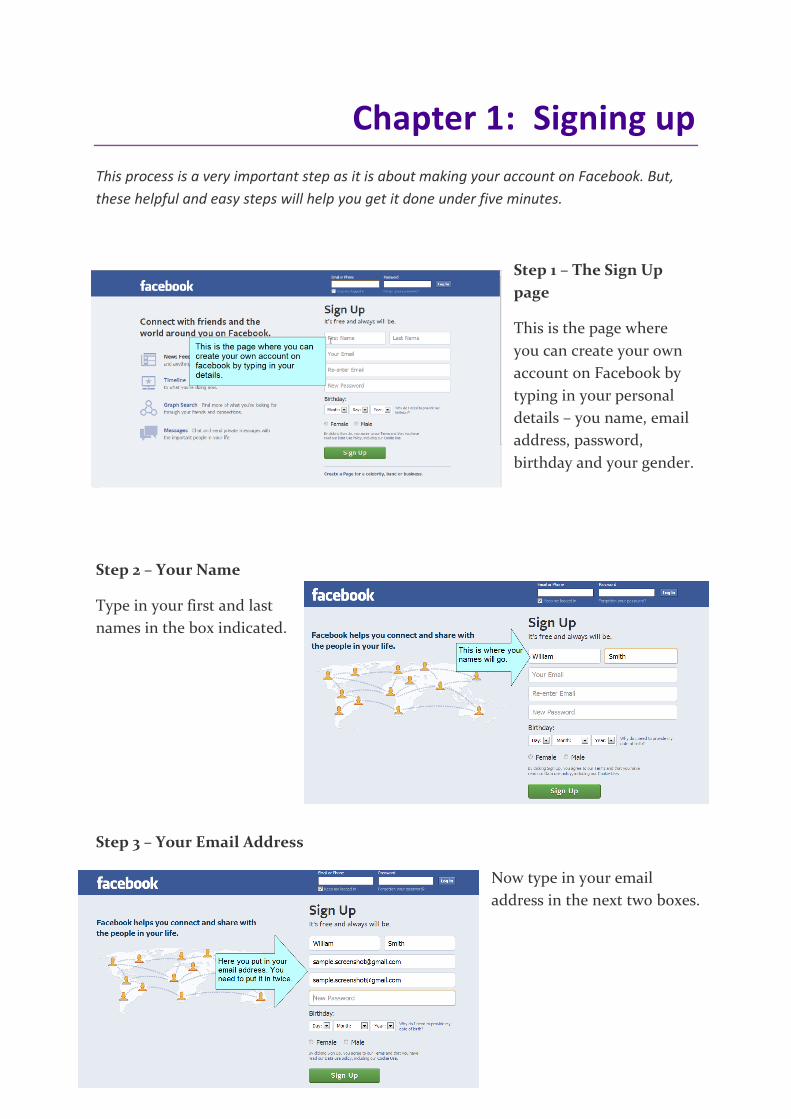
Chapter 1: Signing up
This process is a very important step as it is about making your account on Facebook. But,
these helpful and easy steps will help you get it done under five minutes.
Step 1 – The Sign Up
page
This is the page where
you can create your own
account on Facebook by
typing in your personal
details – you name, email
address, password,
birthday and your gender.
Step 2 – Your Name
Type in your first and last
names in the box indicated.
Step 3 – Your Email Address
Now type in your email
address in the next two boxes.
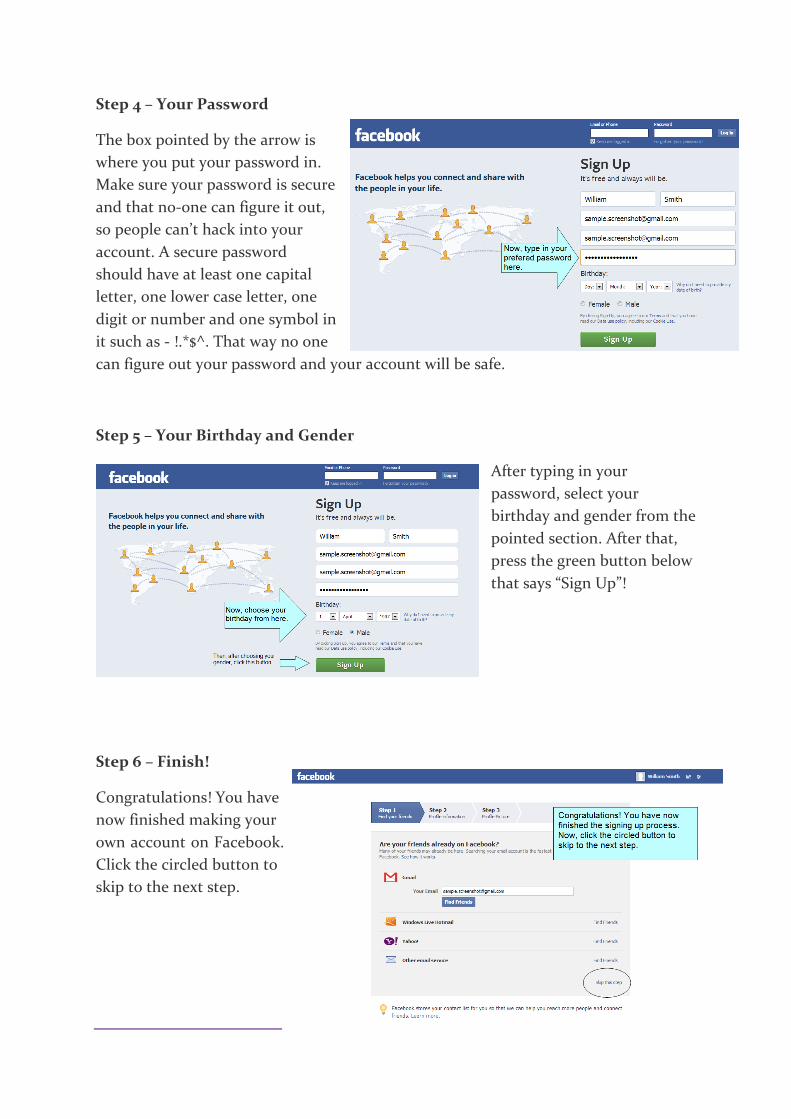
Step 4 – Your Password
The box pointed by the arrow is
where you put your password in.
Make sure your password is secure
and that no-one can figure it out,
so people can’t hack into your
account. A secure password
should have at least one capital
letter, one lower case letter, one
digit or number and one symbol in
it such as - !.*$^. That way no one
can figure out your password and your account will be safe.
Step 5 – Your Birthday and Gender
After typing in your
password, select your
birthday and gender from the
pointed section. After that,
press the green button below
that says “Sign Up”!
Step 6 – Finish!
Congratulations! You have
now finished making your
own account on Facebook.
Click the circled button to
skip to the next step.
Chapter 2: Getting Started
This is when you set up your profile page, your privacy settings and adding some friends.
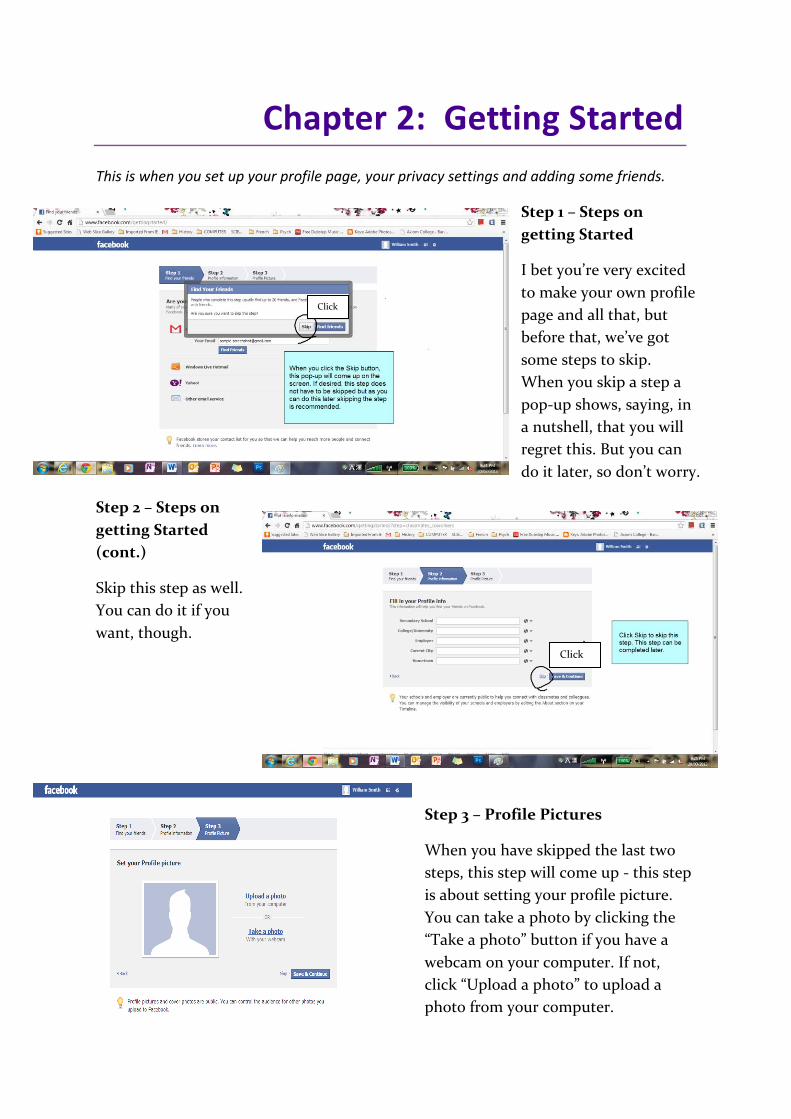
Step 1 – Steps on
getting Started
I bet you’re very excited
to make your own profile
page and all that, but
before that, we’ve got
some steps to skip.
When you skip a step a
pop-up shows, saying, in
a nutshell, that you will
regret this. But you can
do it later, so don’t worry.
Step 2 – Steps on
getting Started
(cont.)
Skip this step as well.
You can do it if you
want, though.
Step 3 – Profile Pictures
When you have skipped the last two
steps, this step will come up - this step
is about setting your profile picture.
You can take a photo by clicking the
“Take a photo” button if you have a
webcam on your computer. If not,
click “Upload a photo” to upload a
photo from your computer.
Click
Click
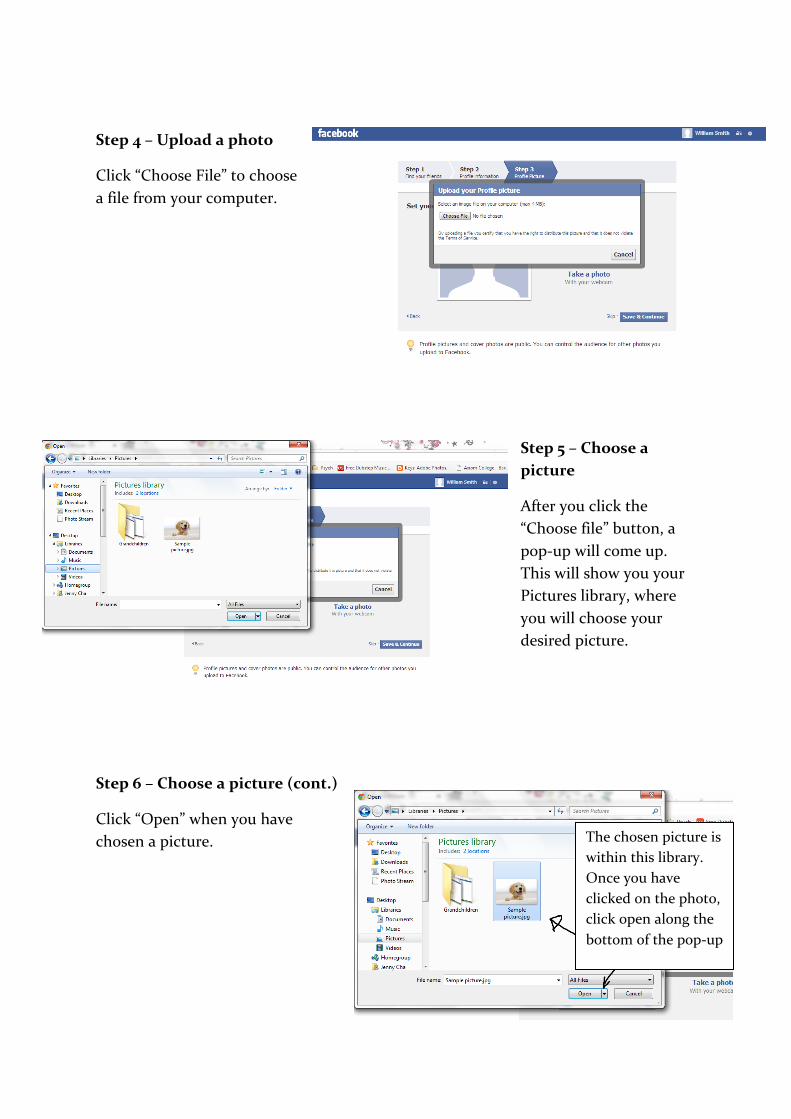
Step 4 – Upload a photo
Click “Choose File” to choose
a file from your computer.
Step 5 – Choose a
picture
After you click the
“Choose file” button, a
pop-up will come up.
This will show you your
Pictures library, where
you will choose your
desired picture.
Step 6 – Choose a picture (cont.)
Click “Open” when you have
chosen a picture.
The chosen picture is
within this library.
Once you have
clicked on the photo,
click open along the
bottom of the pop-up

Step 7 – Waiting for your picture to upload
When you have clicked
“Open”, you will be
back on the page you
were before with
another pop-up saying
“Uploading picture”.
Step 8 – Done!
You can now see that your
profile picture has changed,
not to mention the little
icon on the top right corner,
next to your name, has
changed as well. Click the
“Save & Continue” button
on the bottom right corner
to save your picture and
continue on to build your
profile.
Step 9 – Done! (cont.)
When you have clicked
the button, the page
will redirect you to a
‘Welcome’ page, to give
you a tour of the site.
Here you can find your
friends, take a privacy
tour, and add people
that you may know.
As you can see,
the picture along
the top right has
been changed to
your choosing and
will remain there
after you click
save and continue
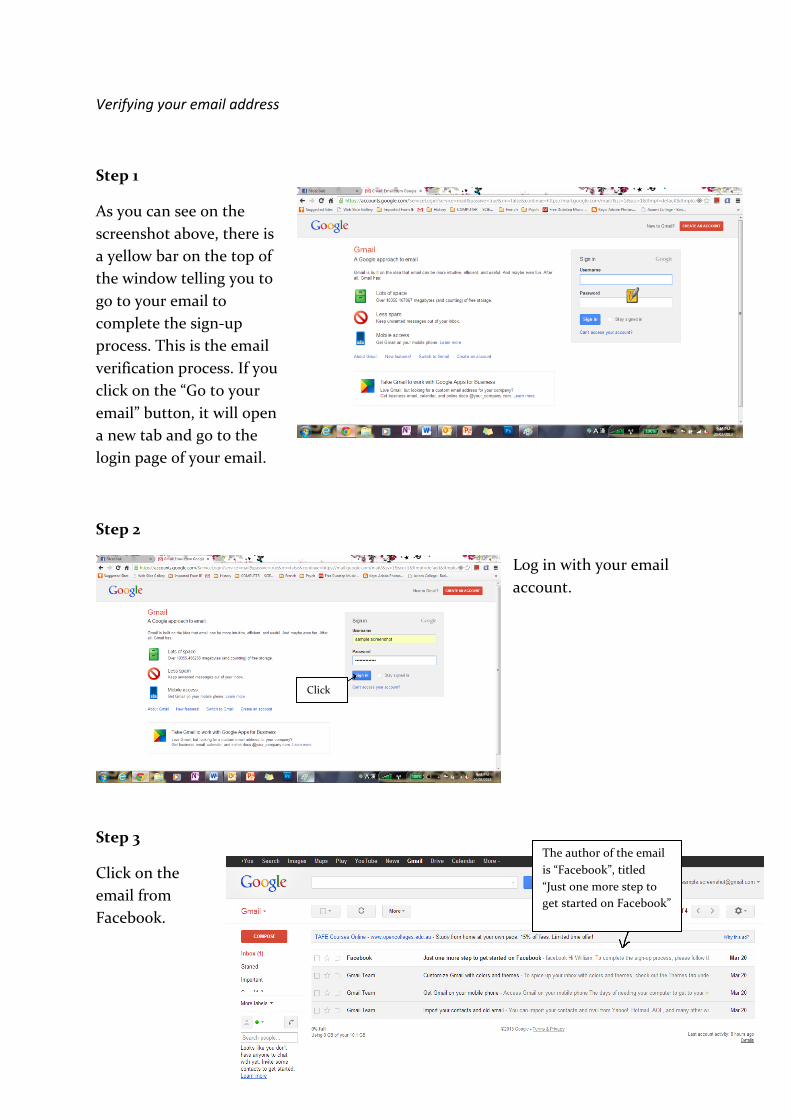
Verifying your email address
Step 1
As you can see on the
screenshot above, there is
a yellow bar on the top of
the window telling you to
go to your email to
complete the sign-up
process. This is the email
verification process. If you
click on the “Go to your
email” button, it will open
a new tab and go to the
login page of your email.
Step 2
Log in with your email
account.
Step 3
Click on the
email from
Facebook.
Click
The author of the email
is “Facebook”, titled
“Just one more step to
get started on Facebook”
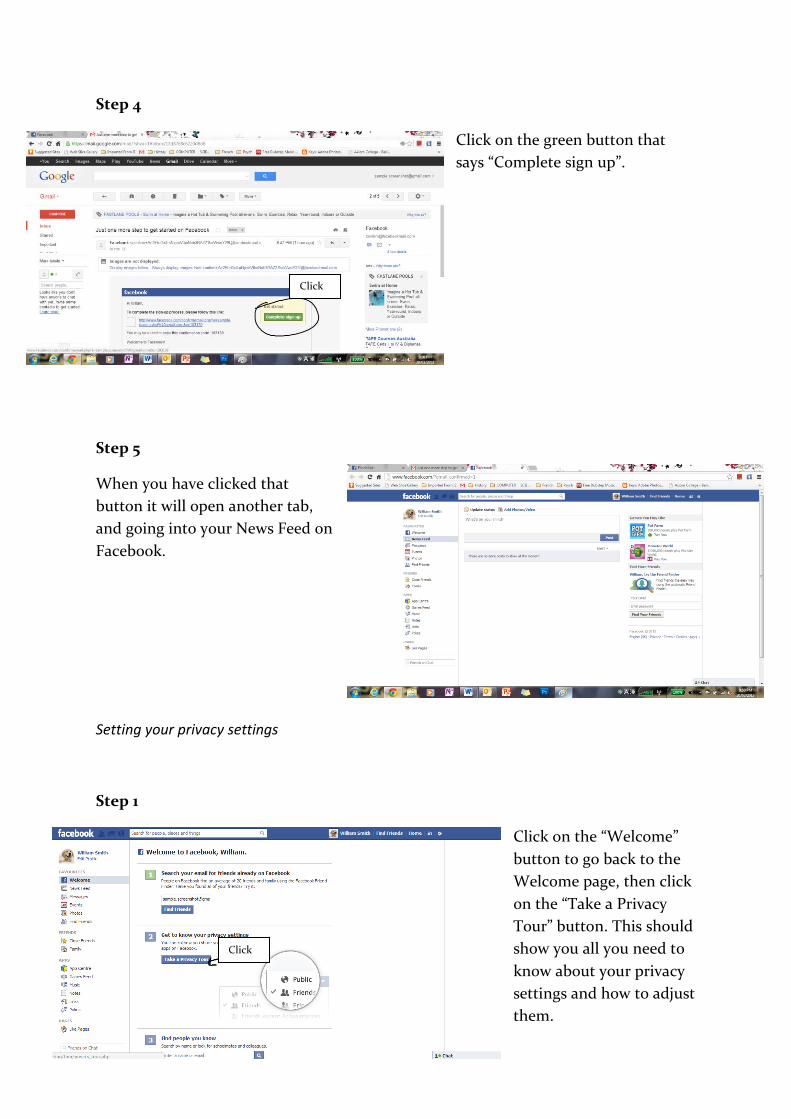
Step 4
Click on the green button that
says “Complete sign up”.
Step 5
When you have clicked that
button it will open another tab,
and going into your News Feed on
Facebook.
Setting your privacy settings
Step 1
Click on the “Welcome”
button to go back to the
Welcome page, then click
on the “Take a Privacy
Tour” button. This should
show you all you need to
know about your privacy
settings and how to adjust
them.
Click
Click
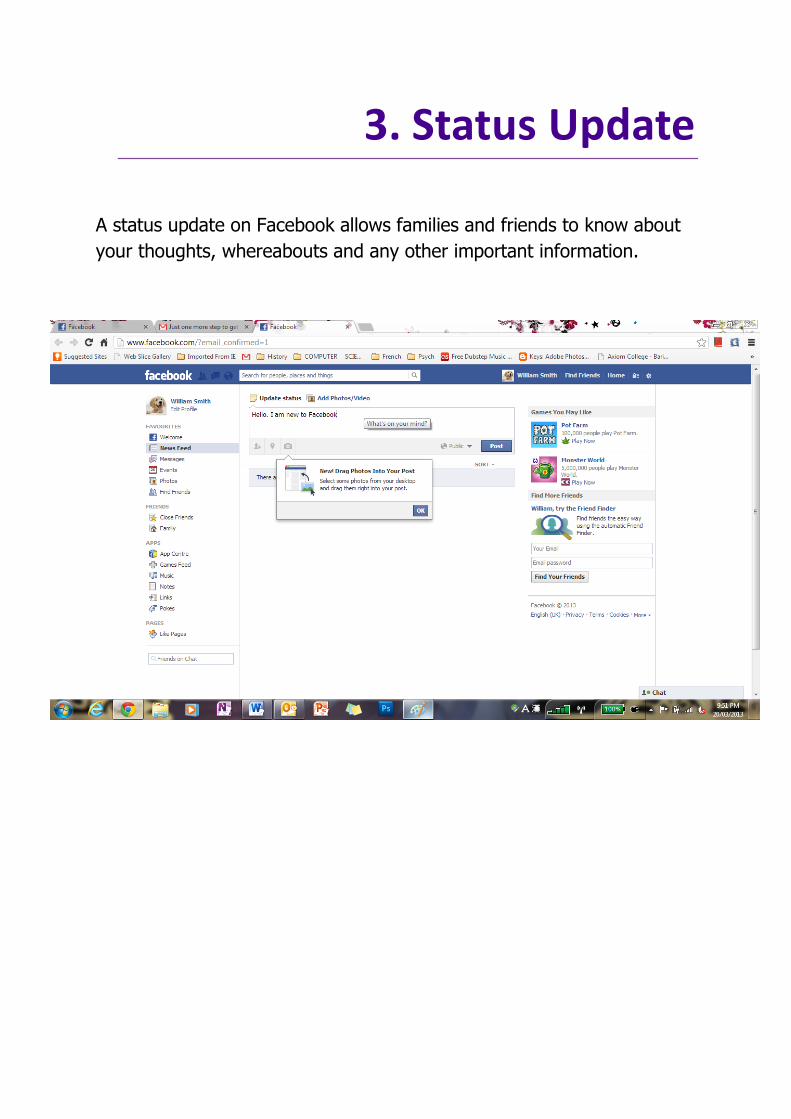
3. Status Update
A status update on Facebook allows families and friends to know about
your thoughts, whereabouts and any other important information.
Contents for Skype
Signing up Chapter 1
Downloading the app Chapter 2
Signing in Chapter 3
Adding Contacts Chapter 4
h
elpbooklet

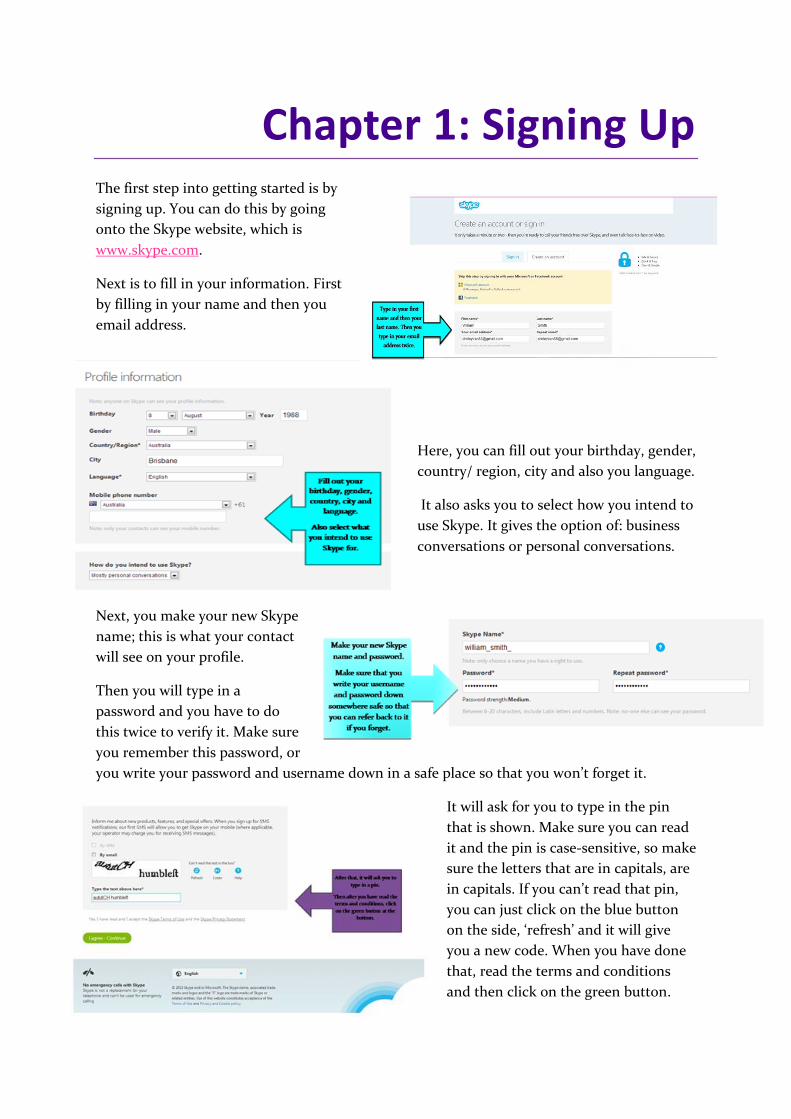
Chapter 1: Signing Up The first step into getting started is by
signing up. You can do this by going
onto the Skype website, which is
www.skype.com.
Next is to fill in your information. First
by filling in your name and then you
email address.
Here, you can fill out your birthday, gender,
country/ region, city and also you language.
It also asks you to select how you intend to
use Skype. It gives the option of: business
conversations or personal conversations.
Next, you make your new Skype
name; this is what your contact
will see on your profile.
Then you will type in a
password and you have to do
this twice to verify it. Make sure
you remember this password, or
you write your password and username down in a safe place so that you won’t forget it.
It will ask for you to type in the pin
that is shown. Make sure you can read
it and the pin is case-sensitive, so make
sure the letters that are in capitals, are
in capitals. If you can’t read that pin,
you can just click on the blue button
on the side, ‘refresh’ and it will give
you a new code. When you have done
that, read the terms and conditions
and then click on the green button.
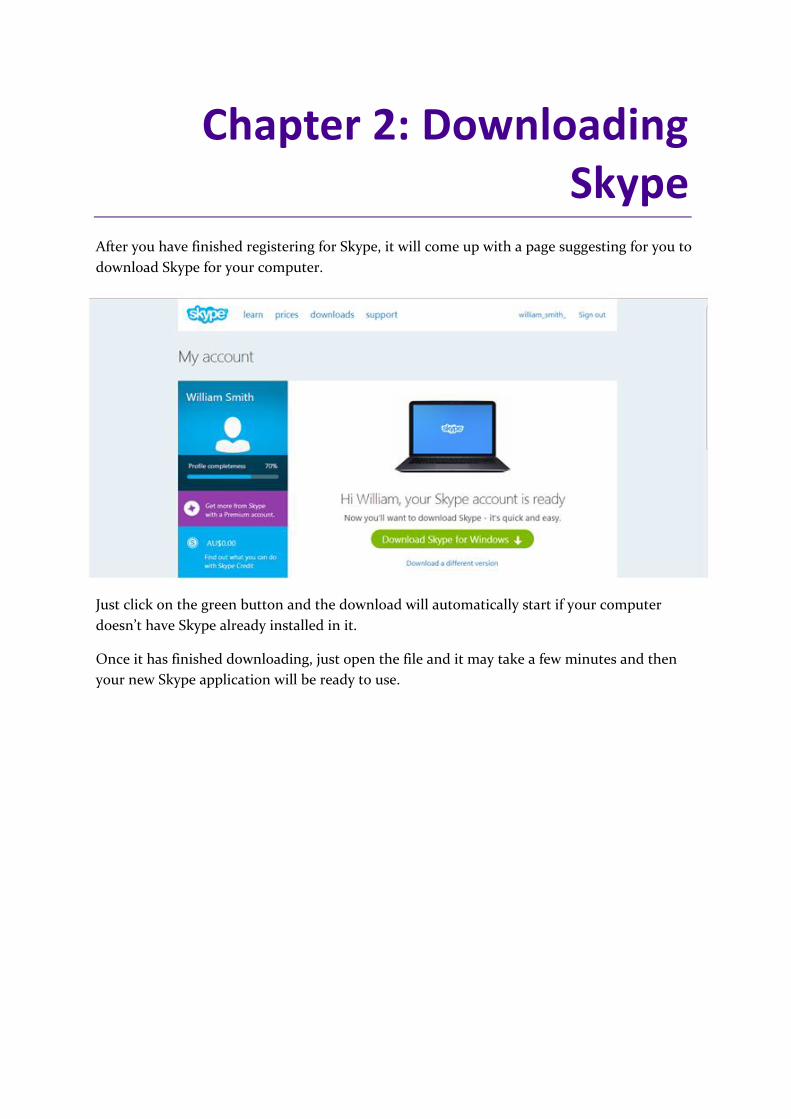
Chapter 2: Downloading Skype
After you have finished registering for Skype, it will come up with a page suggesting for you to
download Skype for your computer.
Just click on the green button and the download will automatically start if your computer
doesn’t have Skype already installed in it.
Once it has finished downloading, just open the file and it may take a few minutes and then
your new Skype application will be ready to use.
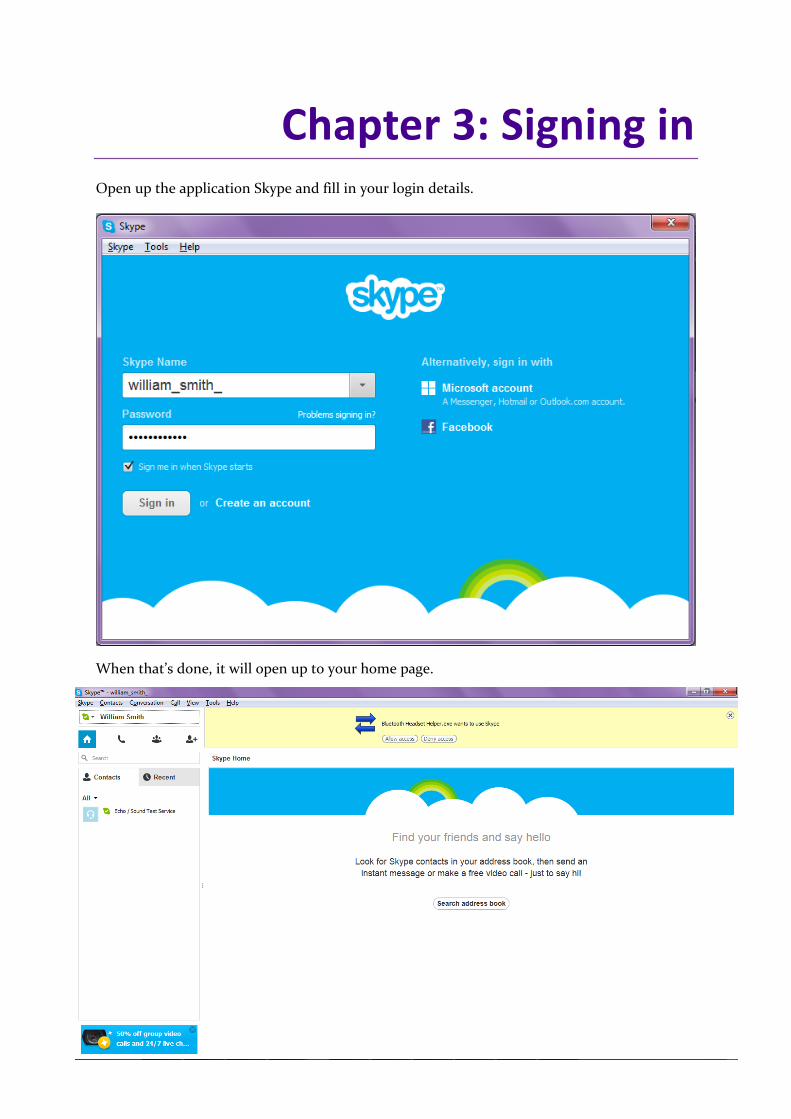
Chapter 3: Signing in Open up the application Skype and fill in your login details.
When that’s done, it will open up to your home page.
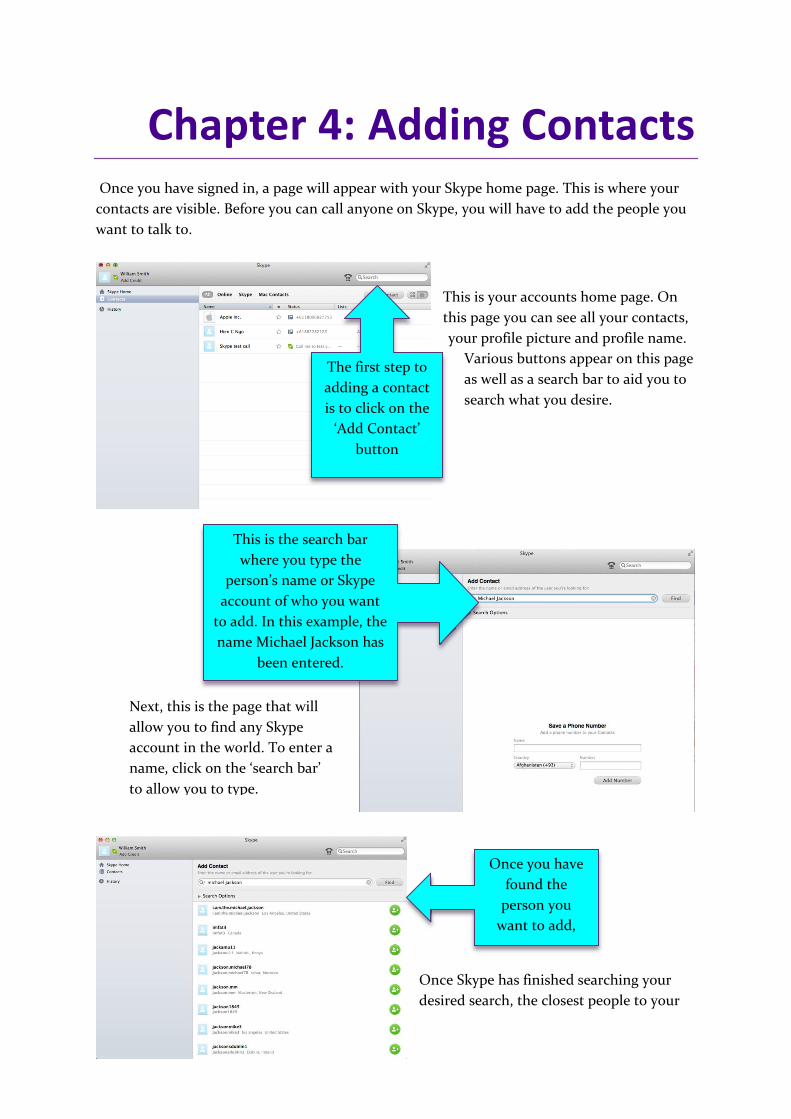
Chapter 4: Adding Contacts Once you have signed in, a page will appear with your Skype home page. This is where your
contacts are visible. Before you can call anyone on Skype, you will have to add the people you
want to talk to.
This is your accounts home page. On
this page you can see all your contacts,
your profile picture and profile name.
Various buttons appear on this page
as well as a search bar to aid you to
search what you desire.
Once Skype has finished searching your
desired search, the closest people to your
The first step to
adding a contact
is to click on the
‘Add Contact’
button
Next, this is the page that will
allow you to find any Skype
account in the world. To enter a
name, click on the ‘search bar’
to allow you to type.
This is the search bar
where you type the
person’s name or Skype
account of who you want
to add. In this example, the
name Michael Jackson has
been entered.
Once you have
found the
person you
want to add,
click the green
search will appear first. Under each account name is their city and country.
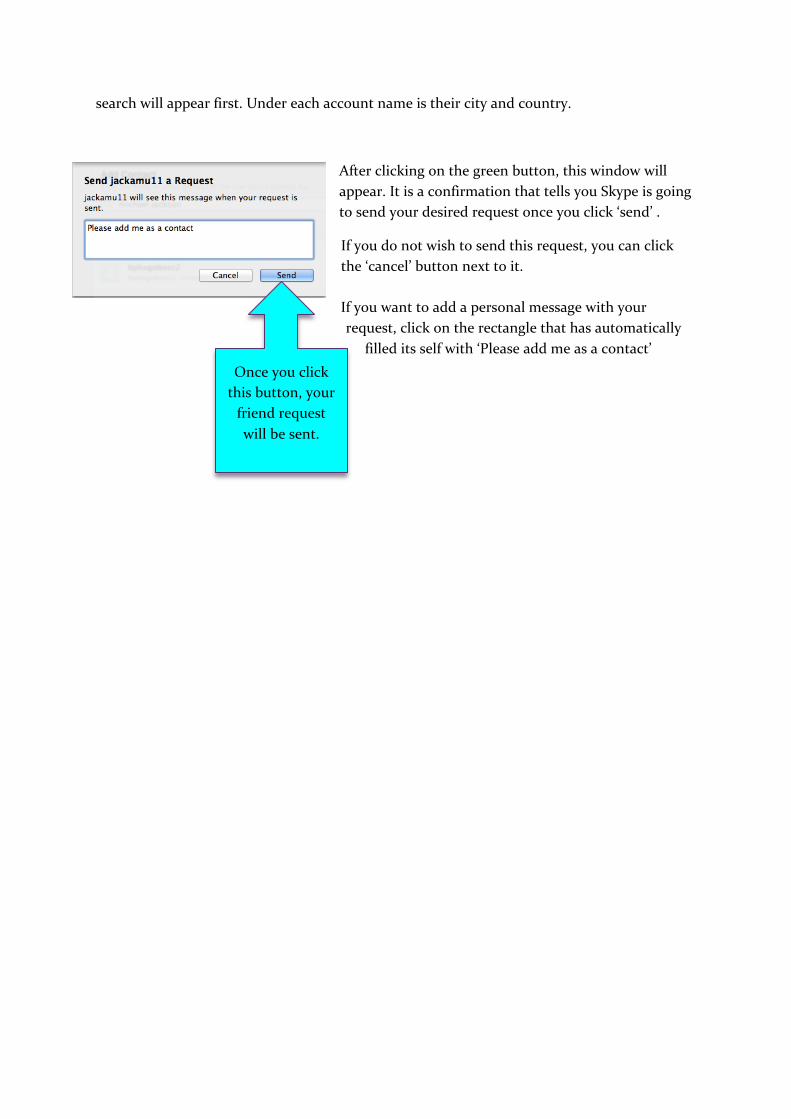
After clicking on the green button, this window will
appear. It is a confirmation that tells you Skype is going
to send your desired request once you click ‘send’ .
If you do not wish to send this request, you can click
the ‘cancel’ button next to it.
If you want to add a personal message with your
request, click on the rectangle that has automatically
filled its self with ‘Please add me as a contact’
Once you click
this button, your
friend request
will be sent.