a step by step guide to email marketing part 2 - design & set up autoresponders
TRANSCRIPT

matthewwoodward.co.uk http://www.matthewwoodward.co.uk/tutorials/email-marketing-part-2/
Practical Guide To Email Marketing Part 2 - Designing EngagingAutoresponders
In the previous part of the email marketing guide we took a look at why it is critical to your business, my personalstrategy & how you can get started.
Now we have the foundations setup we can take the next steps to to start to automating our relationship buildingwhile extracting as much value from subscribers as possible.
What You Will Learn
How to design your autoresponder series
The best time & day to schedule your emails for maximum impact
How to personalize emails
The call to action trick I use in every single email
How to set it all up
Creating Your Autoresponder Series
In the previous part of the series we explored the magic of autoresponders & how I use them personally.
Remember, an autoresponder is just a pre-written series of emails that gets sent to every new subscriber on aschedule you decide.
Taking the time to setup an autoresponder series is a critical step in your email marketing campaign as it will helpto build relationships on auto pilot while bringing constant streams of traffic, comments, social signals, sales &more!
Once you have set your autoresponder sequence up you can forget about it and let it do the heavy lifting for youday in day out while you spend your time doing other things.
Competitor Research
It is always a good idea to get a feel of what your competition is doing when it comes to doing anything onlinewhich holds true with email marketing & autoresponders.
I suggest you setup an email account dedicated to this and sign up to as many of your competitors email lists aspossible.
Spend some time going through the emails you receive and note down what you like and what you don’t like abouteach of your competitors approaches.

In the internet marketing world you will getflooded with long promotional hypey buy thisproduct type emails, usually every single dayof the week without fail rarely offering anyvalue.
You will also notice that if you try to reply tomost emails in this niche they bounce back &it is difficult to contact the sender. Email is a 2way communication method, it is not a 1 waystreet.
This will vary niche to niche so sign up to all ofyour competitors email lists and see whattypes of emails you get remembering to notedown what you like & don’t like.
The goal here isn’t to copy what your competitor does, you will fail if you do that – but to get a feeling for the‘experience’ they provide to their subscribers for you to build on.
Rules Of Engagement
Once you have a good feeling for what your competitors do with their subscribers you should define what yourrules of engagement are for your own subscribers.
What we want to create here is a short list of rules that we will apply to our email marketing to make sure we don’tfall into the same pitfalls as our competitors.
These rules of engagement will allow us to stand out from the crowd.
We want our email subscribers to open every single email we send to them, in fact we want them to be hungry formore!
There is no point building an email list if people just ignore, delete or even worse – mark our emails as spam.
Looking through the list of things you like and don’t like about your competitors approaches come up with rules ofengagement for your own subscribers, here are mine-
1. Treat subscribers with respect
2. Never send an affiliate offer
3. Always send helpful content
4. Try to engage the subscriber
5. Get straight to the point
6. Ensure people can reply
Putting those rules in place will ensure your email list is always responsive & provide life long benefits to you/yourwebsite.
Don’t get me wrong, I could make a lot of money if I sent out an affiliate offer directly but if you use email as asales tool your subscriber list will lose it’s value over time.
Instead, use it to connect & engage with people – treat it as a form of social media!
Designing Your Autoresponder Series

Now we know what not to do and have our own rules of engagement in place we can spend some time designingour autorepsonder sequence.
Engagement Emails
The first thing you should do is think about the types of emails you could send that a subscriber would want torespond to in one way or another.
Think about the emails you could send with the purpose of engaging subscribers & building a closer relationshipwith them.
As you think of an idea write it down!
If you are struggling with that here are some of the types of engagement emails that I have in my autoresponderseries.
Welcome Email – The email that welcomes people to the email list, sets their expectations & engages them onsocial media.
How Can I Help – Emails that asks people how I can help & invites them to join the forum.
Content Ideas – Emails that asks the subscriber which tutorials they would like to see next.
Blog Improvement – Emails designed to collect feedback about the blog to improve it.
Testimonials – Emails that ask the user to submit a testimonial for the blog/tutorials.
Gratitude – Emails that say thank you to the subscriber for being part of the growth/community.
Social Followers – Emails that get the subscriber to follow you on a range of social networks.
You can see some actual examples of these emails in the first part of the series.
Everyones website/audience is different so really spend some time thinking about how to get your audience torespond.
If you run a site about cars for example – ask them what their favourite car is, how much they spend onpetrol/insurance, what problems they have had buying/selling a car etc
Content Emails
Once you have a list of potential engagement focused emails you can send we then want to move onto creating alist of content focused emails.
You have a few options here, you can create unique content to send out to your subscribers or you can sendemails to old posts/pages on your site.
With this blog I have chosen to send emails linking to my old content because the nature of blogs means yourolder content gets buried away even though it is still relevant.
It also means I can direct a constant stream of new traffic to them driving new comments, social signals, affiliateclicks & so forth.
So I went through every single post on this blog and made a note of-
1. The URL’s of my best posts
2. What category they fall into (SEO, social media, conversion etc)
3. If they feature a free product or a paid product

This is what it looked like-
I ended up with a total of 50 posts in my list out of the 157 I have published in total.
Putting It All Together
With a list of possible engagement emails and my best blog posts I then started piecing together my emailautoresponder sequence using a spreadsheet.
I wanted to get a good mix of blog posts with free products, blog posts with paid products and engagement typeemails while maintaining my rules of engagement.
Doing everything in a spreadsheet makes it really easy to get a complete overview of the sequence and movethings around.
The ‘premium’ column lets me know if the tutorial focuses on a paid solution or not and you will notice that forevery few non-premium tutorials there is 1 premium tutorial that gets sent out.
The engagement emails are mixed between all of that to balance everything out nicely.
The last column is labelled ‘day sent’ which represents when each email gets sent. So the 1st email gets sentimmediately, the 2nd gets sent 2 days after that, then each email after that gets sent 7 days after the previous.
Now we have a firm plan in hand we can move onto setting up the autoresponder itself.
Setting Up Your Autoresponder Series
I use Aweber for all of my email marketing and they make setting up an autoresponder easy!
Setting Up Your Welcome Email
The welcome email is the email that gets sent immediately to every single new subscriber. This should just be afriendly welcome that set’s expectations.
To set it up just login to your account and go to Messages > Follow Up Series–

Then click on the big green button that says Create A Follow Up .
This will present you with the message editor and you can write out the first email in your autorespondersequence.
Looking at my spreadsheet the first email to write is the welcome email-
Once you have finished writing your welcome email then click on the big green Next button & then Save & Exit.
That’s all there is to it! When someone subscribes they will receive your welcome email immediately.
Setting Up The Other Emails
Now all you need to do is work through your spreadsheet and set up each of the other emails in yourautoresponder sequence.
However this time we have a slightly different set of options to choose from.
Like last time click on the big green Create A Follow Up button and write out the email you want to send next-

When you have finished writing it click on the big green Next button but this time you will see this screen-
There are a few settings here that you need to select.
Interval – this is how many days the autoresponder will wait to send the email after sending the previousemail
Send Window – this lets you choose what days/times to send the email
Click Tracking – this lets you choose to track clicks on links inside the email

It really is up to you what you choose here and based on my spreadsheet plan the second email gets sent 2 daysafter the welcome email.
All of the emails after this get sent out 7 days after the previous email according to my plan.
Just work through your plan and setup each of your emails in the auto responder sequence one at a time!
Personalizing Your Emails
Whilst you are setting up your autoresponder sequence you might also want to add some kind of personalization tothe subject line or email body.
Aweber provides a number of options to do this and it is really easy to setup! For example at the end of my email Ialways include this piece of text-
You have received this email because you subscribed to my blogsnewsletter at www.MatthewWoodward.co.uk
Your subscription details are-
Email: {!email}Subscribed on: {!signdate long}
If you do not want to receive any more helpful tips, tutorials andcase studies then you can unsubscribe by clicking the link below.
Thanks!!
Take note of the bolded sections {!email} and {!signdate long} – when an email goes out these get replaced withthe subscribers email address and the date they subscribed.
This is what it looks like when an email from the autoresponder gets sent out-
Aweber provides a range of personalizationoptions for you to play with for example if youhave collected the subscribers name when theyoptin you can personalize each email with theirname using the {!firstname} tag.
However sometimes someone might haveentered their name as matt but you want tocapitalise it to display as Matt.
In this case you can use {!firstname_fix} whichwill automatically capitalise the first letter foryou.
If you use the {!name} tag it will use the subscribers full name, again if the subscriber entered matthew woodwardbut you wanted it to display as Matthew Woodward you would change it to {!name_fix}.
There are personalization tags for a range of things like today’s date, the IP the subscriber signed up from, thecountry they signed up from (Aweber works this out automatically based on their IP) and so on!
How To Personalize Your Emails

Personalizing your emails is really easy to do just create/edit a follow up email and click on the blue personalizebutton.
You will see a range of options to choose from & insert into your email-
You can use them in both the subject line and the email body itself.
Here is an example of something you could do-
When that email gets sent out it will automatically replace the name in the subject line & the name/country in theemail body.
This is what it would look like when it is sent out-
Pretty cool right?
You can get really creative with the variouspersonalization options that Aweber offers.
The Call To Action Trick
When you are writing your autorespondersequence it is possible to place a global textsnippet in every single email.
The global text snippet is a piece of text that gets inserted into all of the emails in your autoresponder that you canchange easily without having to edit every single one individually.

If you run a brick and mortar business you might want to define your opening hours as a global text snippet, so ifthey ever change you only have to update them in one place.
For this blog I use the global text snippet to automatically insert a Ps line at the end of every email in theautoresponder.
Right now I’m using it to promote something that will become part of a future case study.
Sometimes I use it to help grow social followers, promote a specific post or get votes in a contest etc
If I ever want to change it I just need to change the text in one place and it automatically updates every singleemail in the autoresponder sequence for me!
How You Can Do It
Setting it up is really easy and only takes a couple of minutes!
Just go to List Options > List Settings > Personalize Your List then scroll down to the Global Text Snippets section.
You can see I have already set one up called calltoaction along with some text.
To create yours just give it a name in the name field, then enter the text you want to appear in the snippet text field& click on add.
Once you have done that go back to your autoresponder sequence & edit the emails you have setup.
Click on the blue personalize button and scroll down to Your Snippets then select the global text snippet youcreated-

You can see I have added the {!global calltoaction} tag right underneath my name.
Now every time that email gets sent out that tag will get replaced with the text I have setup in List Options > ListSettings > Personalize Your List > Global Text Snippets.
I have this tag added underneath my name in every single one of my autoresponder emails so I can easily updateit across all of my emails in a couple of clicks.
If you want to update it just go back to the Global Text Snippets, mouse over your snippet, click on Edit andupdate the text to whatever you want!
The Best Time To Send Email

When your setting up your autoresponder sequence you can choose a specific ‘sendwindow’ so your emails go out on a certain day/time frame.
There are some general rules of thumb for you to follow here to ensure as manypeople as possible open your emails and take action.
First of all most people work a 9am-5pm job 5 days per week Monday-Friday.
That means you should avoid sending email on a Saturday or Sunday. These daysalways have terrible response rates because people are out doing things/catching upwith things.
Secondly you should also avoid sending them in the early evening. For example around 5pm-6pm most peopleare on their way home from work, at 6pm-7pm people are eating & at 7pm-8pm taking care of the kids.
You also want to avoid sending emails on a Monday because this is the ‘reset day’ in many peoples routines andis usually the busiest day of the week for them.
In general the best times to send your emails are mid week on a Tuesday, Wednesday or Thursday.
You can then choose to target people before work around 7am-8am, mid morning around 10am-12noon or after7:30-8:30 in the evening.
Now I know that all of the above makes a lot of assumptions and it is hard to generalise your entire list in thismanner but use those rules of thumb as a start point.
Once you have enough data you can use Awebers Opens and Clicks Over Time report to get some actionableinformation on finding the best send window for your audience-
Use that report to your advantage and tweak your send window times accordingly.
Don’t be afraid to experiment with your send windows!
ATTENTION: Download My Email Sequence To Use In Your Own Campaigns Here!!
Wrapping It Up
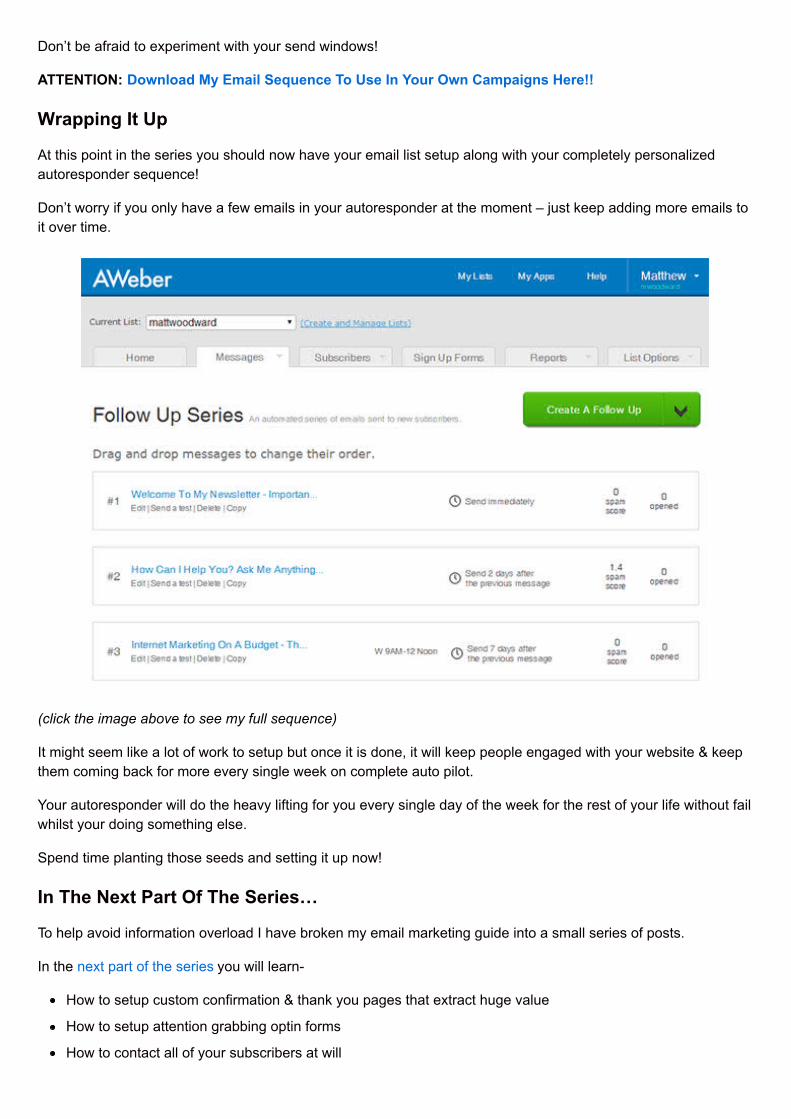
At this point in the series you should now have your email list setup along with your completely personalizedautoresponder sequence!
Don’t worry if you only have a few emails in your autoresponder at the moment – just keep adding more emails toit over time.
(click the image above to see my full sequence)
It might seem like a lot of work to setup but once it is done, it will keep people engaged with your website & keepthem coming back for more every single week on complete auto pilot.
Your autoresponder will do the heavy lifting for you every single day of the week for the rest of your life without failwhilst your doing something else.
Spend time planting those seeds and setting it up now!
In The Next Part Of The Series…
To help avoid information overload I have broken my email marketing guide into a small series of posts.
In the next part of the series you will learn-
How to setup custom confirmation & thank you pages that extract huge value
How to setup attention grabbing optin forms
How to contact all of your subscribers at will
