a techincal manual for lifting bags -...
TRANSCRIPT
LIFTING BAGS
A TECHINCAL MANUAL
FOR LIFTING BAGS
- HOW THEY WORK
- DIFFERENT TYPES
- LIFTING TECHNIQUES
- CRIBBING SUMMARY
- DO’S AND DON’TS
TABLE OF CONTENTS
HOW IT WORKS 1
TYPES OF AIRBAGS IN GENERAL
3
AIRBAG DESIGNS & THEIR FUNCTION
4
LIFTING WITH AIRBAGS…
5
AIRBAGS AND CRIBBING
6
BASIC CRIBBING 9
HOW TO CRIB AN AIRBAG 10
DO’S AND DON’T 11
TO SUMMARIZE
12
HOW IT WORKS
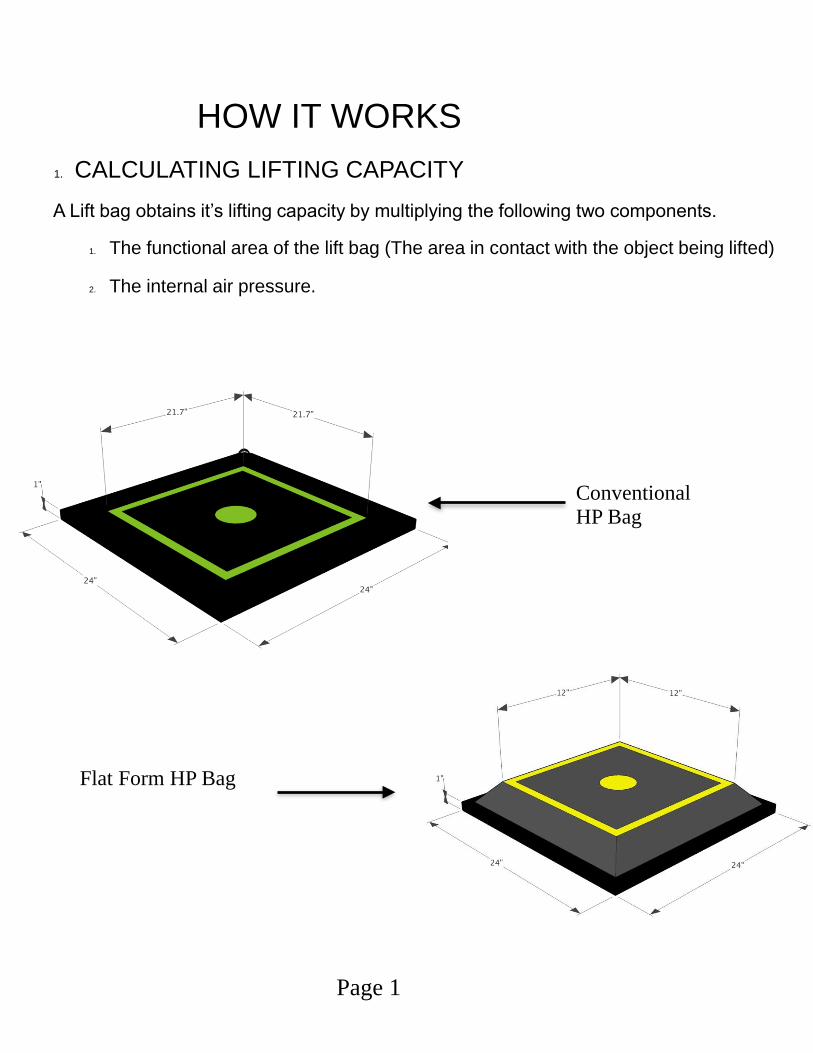
1. CALCULATING LIFTING CAPACITY
A Lift bag obtains it’s lifting capacity by multiplying the following two components.
1. The functional area of the lift bag (The area in contact with the object being lifted)
2. The internal air pressure.
Conventional HP Bag
Flat Form HP Bag
Page 1
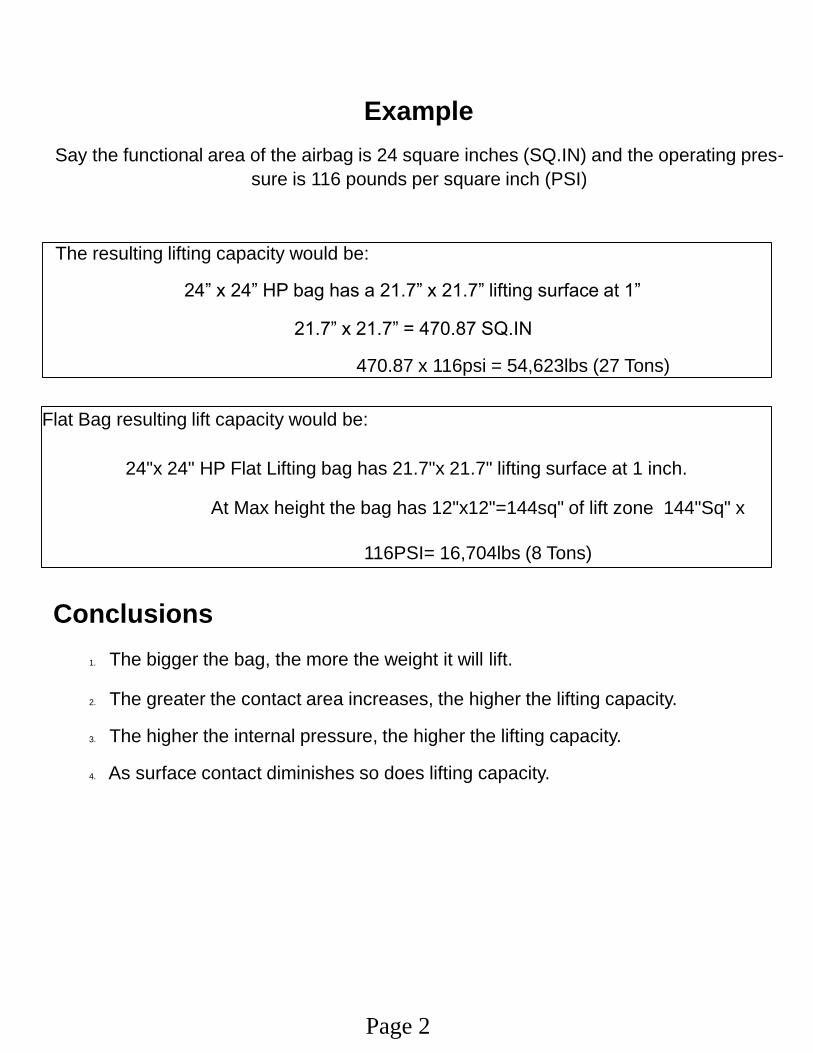
Example
Say the functional area of the airbag is 24 square inches (SQ.IN) and the operating pres-
sure is 116 pounds per square inch (PSI)
Conclusions
1. The bigger the bag, the more the weight it will lift.
2. The greater the contact area increases, the higher the lifting capacity.
3. The higher the internal pressure, the higher the lifting capacity.
4. As surface contact diminishes so does lifting capacity.
The resulting lifting capacity would be:
24” x 24” HP bag has a 21.7” x 21.7” lifting surface at 1”
21.7” x 21.7” = 470.87 SQ.IN
470.87 x 116psi = 54,623lbs (27 Tons)
Flat Bag resulting lift capacity would be:
24"x 24" HP Flat Lifting bag has 21.7"x 21.7" lifting surface at 1 inch.
At Max height the bag has 12"x12"=144sq" of lift zone 144"Sq" x
116PSI= 16,704lbs (8 Tons)
Page 2
2. Hoop Stress
Hoop stress is the stress in the material caused by the internal pressure and is directly re-
lated to the size of the pressure vessel (In this case, your liftbag)
Even with a constant internal pressure, the stress in the material increases with the size (di-
ameter) of the liftbag.
This greatly limits the size of the lift bags. Especially high pressure bags. The biggest high
pressure lift bag you'll find are in the 65 to 70 ton range. If they get any bigger, the material
as to be so thick, it is no longer useful as an lift bag. For the same reason, on the far larger
high lift, lift bags, the operating pressure us greatly reduced to accommodate this problem.
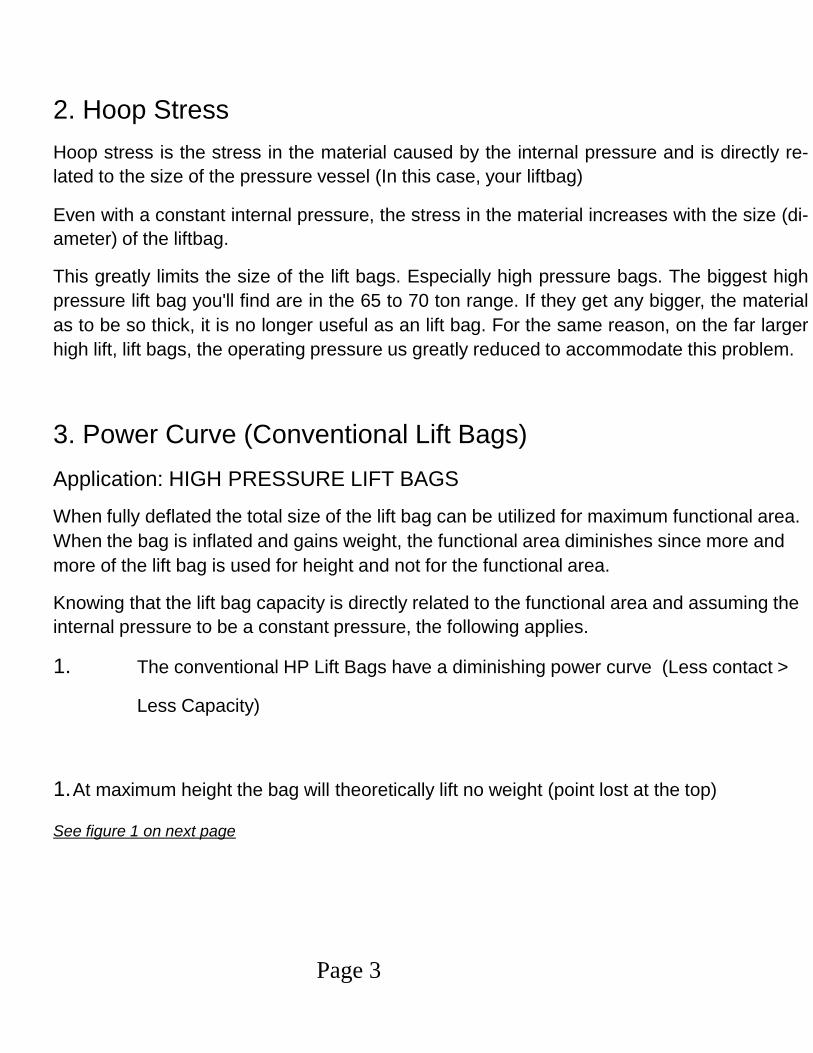
3. Power Curve (Conventional Lift Bags)
Application: HIGH PRESSURE LIFT BAGS
When fully deflated the total size of the lift bag can be utilized for maximum functional area.
When the bag is inflated and gains weight, the functional area diminishes since more and
more of the lift bag is used for height and not for the functional area.
Knowing that the lift bag capacity is directly related to the functional area and assuming the
internal pressure to be a constant pressure, the following applies.
1. The conventional HP Lift Bags have a diminishing power curve (Less contact >
Less Capacity)
1.At maximum height the bag will theoretically lift no weight (point lost at the top)
See figure 1 on next page
Page 3
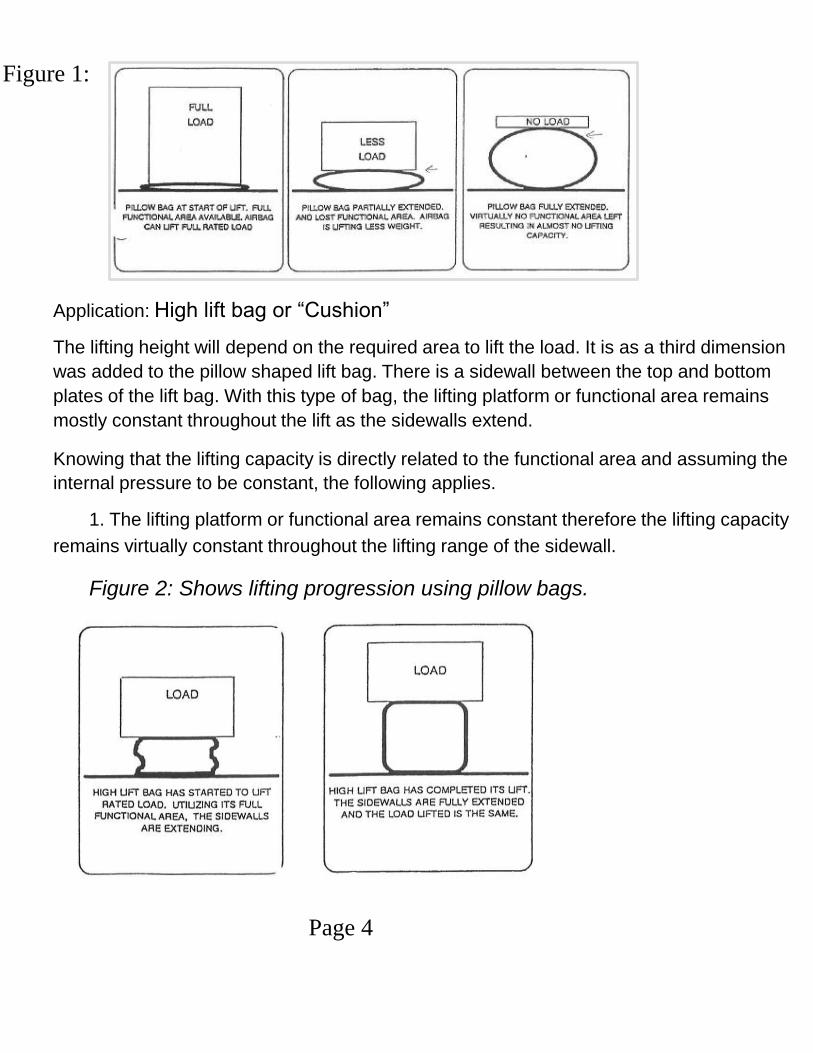
Application: High lift bag or “Cushion”
The lifting height will depend on the required area to lift the load. It is as a third dimension
was added to the pillow shaped lift bag. There is a sidewall between the top and bottom
plates of the lift bag. With this type of bag, the lifting platform or functional area remains
mostly constant throughout the lift as the sidewalls extend.
Knowing that the lifting capacity is directly related to the functional area and assuming the
internal pressure to be constant, the following applies.
1. The lifting platform or functional area remains constant therefore the lifting capacity
remains virtually constant throughout the lifting range of the sidewall.
Figure 2: Shows lifting progression using pillow bags.
Figure 1:
Page 4
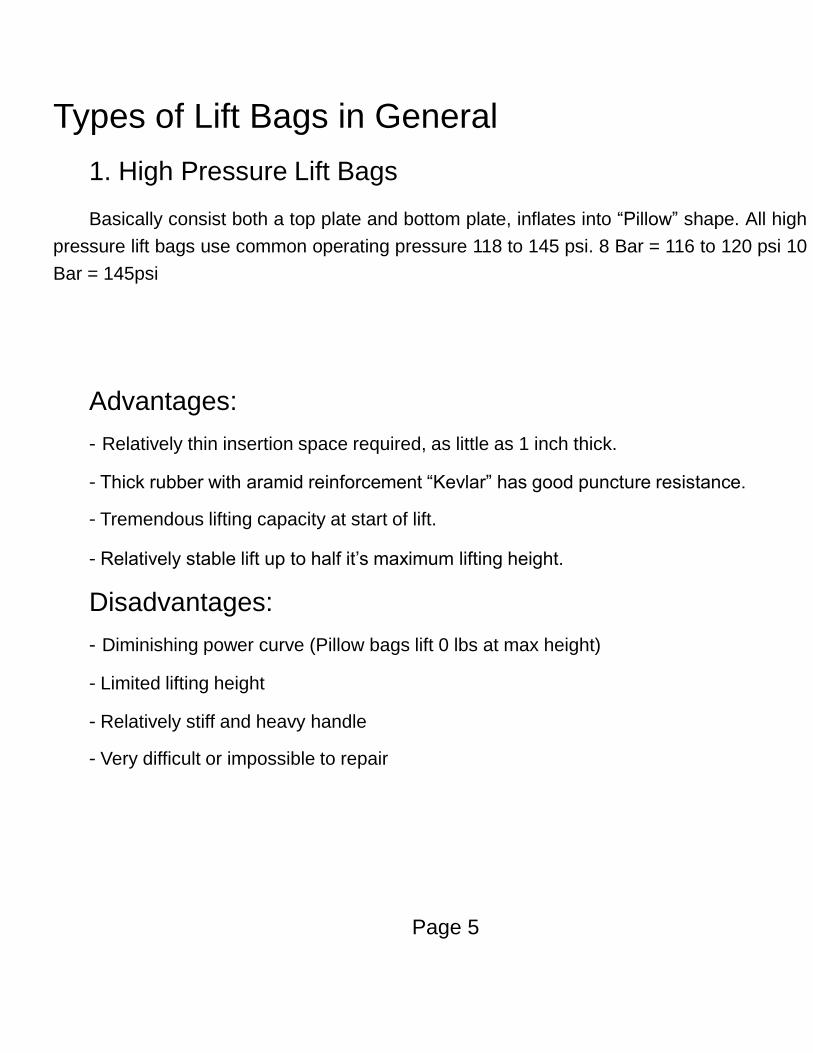
Types of Lift Bags in General
1. High Pressure Lift Bags
Basically consist both a top plate and bottom plate, inflates into “Pillow” shape. All high
pressure lift bags use common operating pressure 118 to 145 psi. 8 Bar = 116 to 120 psi 10
Bar = 145psi
Advantages:
- Relatively thin insertion space required, as little as 1 inch thick.
- Thick rubber with aramid reinforcement “Kevlar” has good puncture resistance.
- Tremendous lifting capacity at start of lift.
- Relatively stable lift up to half it’s maximum lifting height.
Disadvantages:
- Diminishing power curve (Pillow bags lift 0 lbs at max height)
- Limited lifting height
- Relatively stiff and heavy handle
- Very difficult or impossible to repair
Page 5
Disadvantages:
- Limited lifting height
- Relatively stiff and heavy to handle
- Very difficult or impossible to repair
1A. Flat form Lift Bag
The Flat Form Lifting bag is constructed the same as the conventional high pressure lifting
bag except it has a specially constructed inner system. Another difference is that the Flat
Form Lifting Bag has a square flat zone top and bottom.
The flat zone does not decrease when air pressure is increased. Therefore the Flat Form Lift-
ing bag maintains a pre-calculated lifting capacity.
The Flat Form Lifting bag will never be reduced to a zero lifting capacity. Also because of the
flat zone of the Flat Form Lifting Bag. These bags will maintain a level lifting foot print. That
means a stable lift. Operating pressure of 116 psi (8 bar) or 145 psi (10 bar).
ADVANTAGES:
- Very thin insertion, as little as 1 inch
- Thick rubber with aramid reinforcement “Kevlar” has good puncture resistance
- Tremendous lifting capacity, remains consistent through the lift
- Very stable which allows for stacking up to 3 bags
Page 6
3. High Lift Air Cushions
Consists of top and bottom plate with “side wall” in between. Sidewall extends as bag is in-
flated. Available in cubical or cylindrical shape. Common operating pressure is 15psi. These
bags may be configured to follow pressure.
Advantages:
- Constant lifting force as total top plate area is used when sidewalls extend.
- Tremendous lifting weight and height
- Low pressure allows use against sheet metal and on soft ground.
Disadvantages:
- Requires more insertion space. Typical 2 inches
- Less powerful the high pressure lift bags
- Specialized air source
Common shape of lift bags
Square HP Bag Shape
- Used mostly for high pressure lifting bags.
- This shape offers bed power versus lifting height ratio.
-Relatively stable at low lifting heights with heavy
loads.
- Unstable with lighter loads and or greater lifting heights. Bag takes shape of a
ball and becomes very unstable in all directions.
Page 7
Rectangular HP Bag Shape
- Used for both high and low pressure lift bags
- Not as good power versus height ratio as square bag
- This shape has a big advantage in that when it inflates. It
shapes like a long and is there- fore stable in one direction at any
height.
Cylindrical Sidewall Shape
- Used for some high lift bags.
- Should not be considered stable at any height, especially during lifting process.
- Some stability will be obtained at full lifting height when the
sidewalls are fully extended, provided the bag is not higher than its
maximum diameter.
Rectangular Sidewall Shape
- Used for high lift bags
- Should not be considered stable at any height, especially during the lifting process.
- Considerable stability can be obtained when the sidewalls are fully extended. Again, the
full height of the bag should not exceed the base width of the bag.
INTERNAL TIE DOWNS
High lift bags with internal tie down
Some sidewall bags have internal ties between top and bottom plate. The main reason for
these ties is to eliminate the hoop stress on the top and bottom plate of the bags. (See
“Hoop Stress” Page 2) Allowing the manufacturer to use less costly seams.
This design adds some stability to the bag only when full height is reached and the internal
ties are under tension and only when lifting a light load. In general vertical strands do not
provide lateral stability. (As any structural bridge or roof support design) So caution should
still be taken against lateral shifting of the load
High Lift Bags Without Internal Tie Downs
The manufacturers has produced a more complex seam the can overcome the hoop stress-
es at the top an bottom plates. Lack of internal strands allows the bag uninterrupted contact
area with the load. However, when raising lighter loads caution should be taken not to ex-
ceed the height of sidewall in order to maintain shape.
Multiple Pillow Shape:
A new concept whereby multiple low pressure lift bags have been vulcanized together.
When multiple “cells” are inflated, considerable lifting height is obtained.
Note: This style bag has a far greater lifting height than its lifting platform and is there-
fore less stable at any height. Also, this design is more subject to side loads exerted by angled
loads on the top cell. Great caution should be taken at higher lifts.
Basic Lifting Rules:
- While lifting an object, no point of that object should come down.
- No lateral movement of the object can be allowed.
- Any height gained must be secured and maintained.
- Conventional or HP Lift bags alone should not be considered stable
- Avoid being under the lift.
Page 9
Stability:
Airbags are basically unstable. By lifting a load and assuming the lift bag is not stable, the
burden of stability rests on proper cribbing.
Flat lift air bag is far more stable than a conventional HP type lifting bag. As they cannot be
rounded or point loaded
Cribbing is essential when using lift bags. Stability using cribbing will be explained for the
different shapes of bags in a different chapter.
Stacking Conventional Lifting Bags
- High lift and/or low pressure lift bags should never be
stacked.
- High pressure conventional lift bags should should never be stacked.
NOTE: In some cases they can be stacked to a max of two bags only when:
*The object is positively secured against lateral movement
* The bags are not inflated more than two thirds their max weight
*The object will not undergo a significant angle change, causing the lift bags to lift
against an angled surface
- Flat lift high pressure bags can be stacked 3 high when required
Side Loading:
Sometime high pressure lift bags are stacked to gain lifting height. Great caution should be
taken the the above rules are adhered to. Stacking lift bags should not be standard operat-
ing procedure and should be used as a last resort to gain lifting height.
Page 10
4. Lift Bags & Cribbing:
To obtain stability and safety during a lifting procedure, cribbing is essential in general it is
good practice to:
- Crib as you go -OR-
- Lift an inch then crib an inch
To do effective cribbing, a variety of crib- bing blocks need to be on hand. Usually
consisting of 4x4, 2x4 and 2x6 lumber, at least 18” long. Plus wedges and star steps.
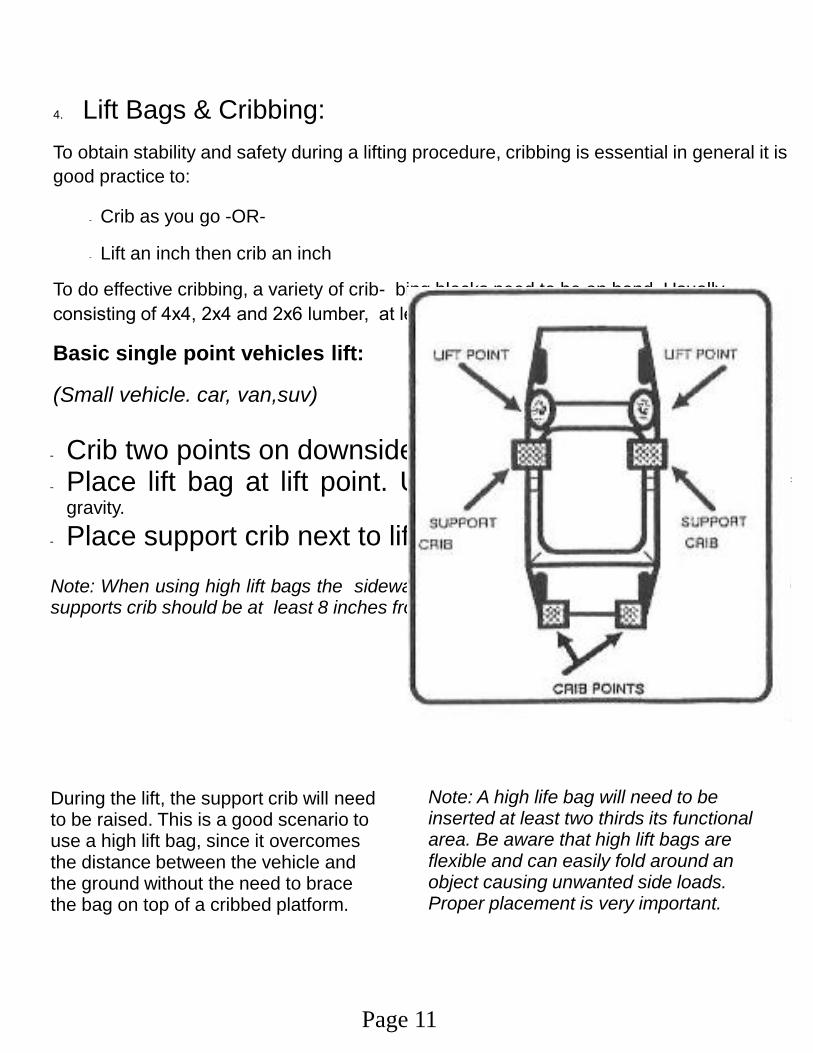
Basic single point vehicles lift:
(Small vehicle. car, van,suv)
- Crib two points on downside. This crib needs to be laterally stable.
- Place lift bag at lift point. Usually under driver area. Note center of
gravity.
- Place support crib next to lift bag.
Note: When using high lift bags the sidewalls will “balloon” out at the start of the lift. Thesupports crib should be at least 8 inches from the lift bag.
Note: A high life bag will need to be inserted at least two thirds its functional area. Be aware that high lift bags are flexible and can easily fold around an object causing unwanted side loads.Proper placement is very important.
During the lift, the support crib will need to be raised. This is a good scenario to use a high lift bag, since it overcomes the distance between the vehicle and the ground without the need to brace the bag on top of a cribbed platform.
Page 11

Page 12
Dual Point Front or Rear Vehicle Lift
Due to the length of the vehicle, this type of lift is more subject to lateral shifting. The bags should be as close as possible to the crib points. However, they must be clearly on one side of the center of gravity so as not to lift the vehicle backwards.
Try to put the crib points at the wides point of the vehicle for max side load support.
By placing the support or the safety of the crib on the downside if the lift bag, less cribbing height needs to be obtained. Again helping the overall stability of the lift.
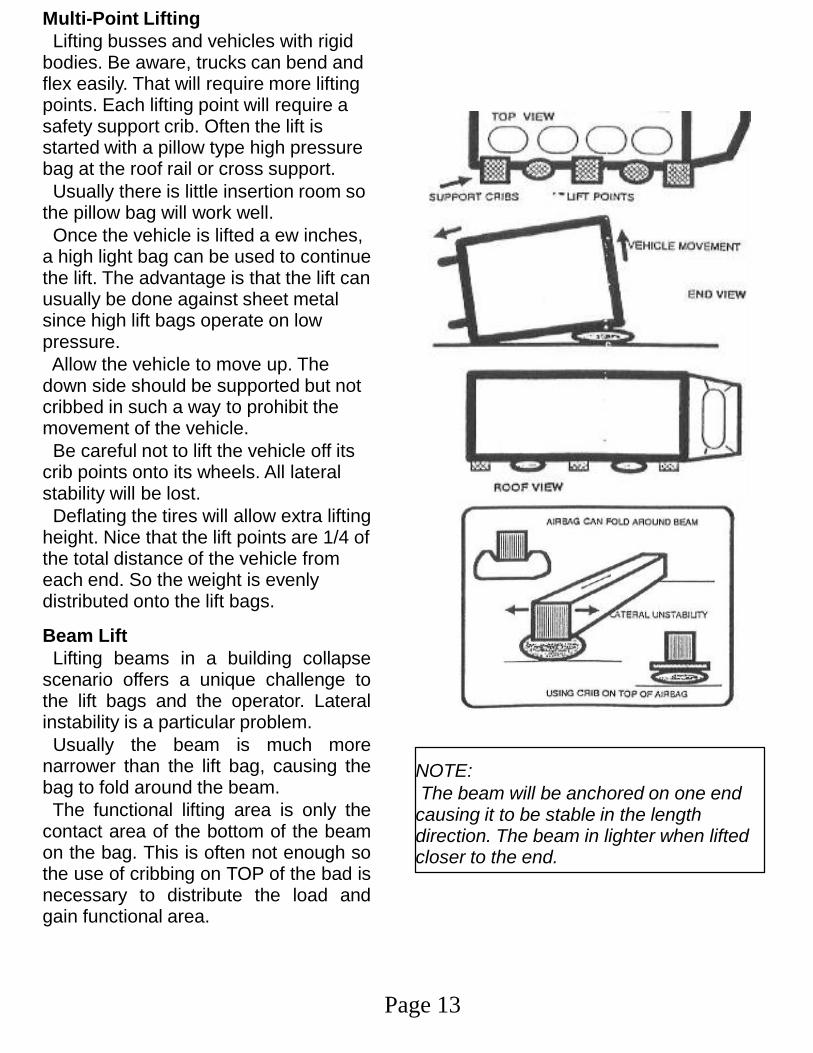
Multi-Point Lifting
Lifting busses and vehicles with rigid bodies. Be aware, trucks can bend and flex easily. That will require more lifting points. Each lifting point will require a safety support crib. Often the lift is started with a pillow type high pressure bag at the roof rail or cross support.
Usually there is little insertion room so the pillow bag will work well.
Once the vehicle is lifted a ew inches, a high light bag can be used to continue the lift. The advantage is that the lift can usually be done against sheet metal since high lift bags operate on low pressure.
Allow the vehicle to move up. The down side should be supported but not cribbed in such a way to prohibit the movement of the vehicle.
Be careful not to lift the vehicle off its crib points onto its wheels. All lateral stability will be lost.
Deflating the tires will allow extra lifting height. Nice that the lift points are 1/4 of the total distance of the vehicle from each end. So the weight is evenly distributed onto the lift bags.
Beam Lift
Lifting beams in a building collapsescenario offers a unique challenge tothe lift bags and the operator. Lateralinstability is a particular problem.
Usually the beam is much morenarrower than the lift bag, causing thebag to fold around the beam.
The functional lifting area is only thecontact area of the bottom of the beamon the bag. This is often not enough sothe use of cribbing on TOP of the bad isnecessary to distribute the load andgain functional area.
NOTE:
The beam will be anchored on one end causing it to be stable in the length direction. The beam in lighter when lifted closer to the end.
Page 13

Tank and Pipe Lift
1. Place the pillow bags on both sides of the object. Note: Bags may NOT be stacked for this scenario.
1. Inflate them simultaneously to create an even lift.
If more lifting height is required, you can:
1. Place larger pillow bags next to the existing bags. Do NOT use high lift bags. Note: Be sure to keep the bags a sufficient distance from the center to maintain good platform width.
1. Both bags may be places on a single platform crib at least the same width as the lifting platform distance. Note: Due to the angled forces, individual cribs beneath the lift bag could push out and should therefore be avoided.
Since the bags will be working at severe angles, great caution should be taken to avoid slipping. Unfortunately, practice shows, that special surface designs do very little against slipping since the bags are of softer material than the usual steel or concrete surface about to be lifted.
-Be sure that the bags are clean for best grip.- Do not use cribbing on top of bag.
-In general, it is better to NOT cover the bag (Consult manufacturers recommendations)
- When possible, bags should be tied to prevent any travel distance should they slip.
Note: Allow slack so the bag can move up and down unrestricted.
Page 14
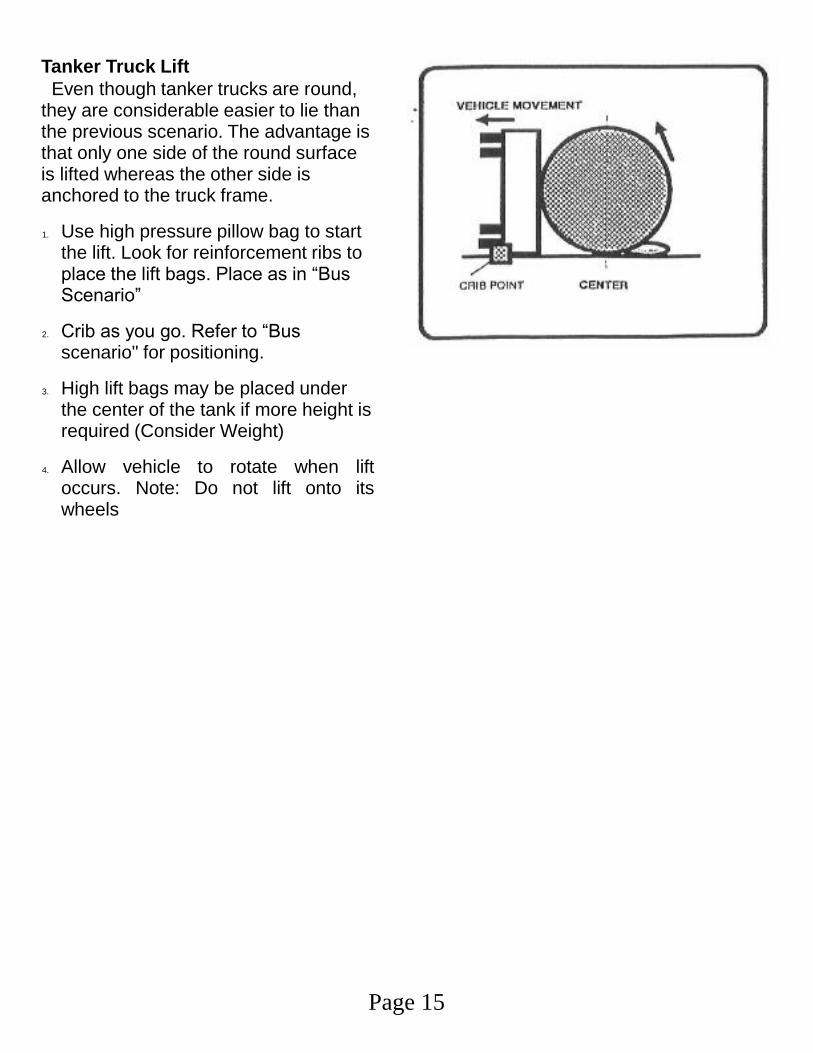
Tanker Truck Lift
Even though tanker trucks are round, they are considerable easier to lie than the previous scenario. The advantage is that only one side of the round surface is lifted whereas the other side is anchored to the truck frame.
1. Use high pressure pillow bag to start the lift. Look for reinforcement ribs to place the lift bags. Place as in “Bus Scenario”
2. Crib as you go. Refer to “Bus scenario" for positioning.
3. High lift bags may be placed under the center of the tank if more height is required (Consider Weight)
4. Allow vehicle to rotate when liftoccurs. Note: Do not lift onto itswheels
Page 15
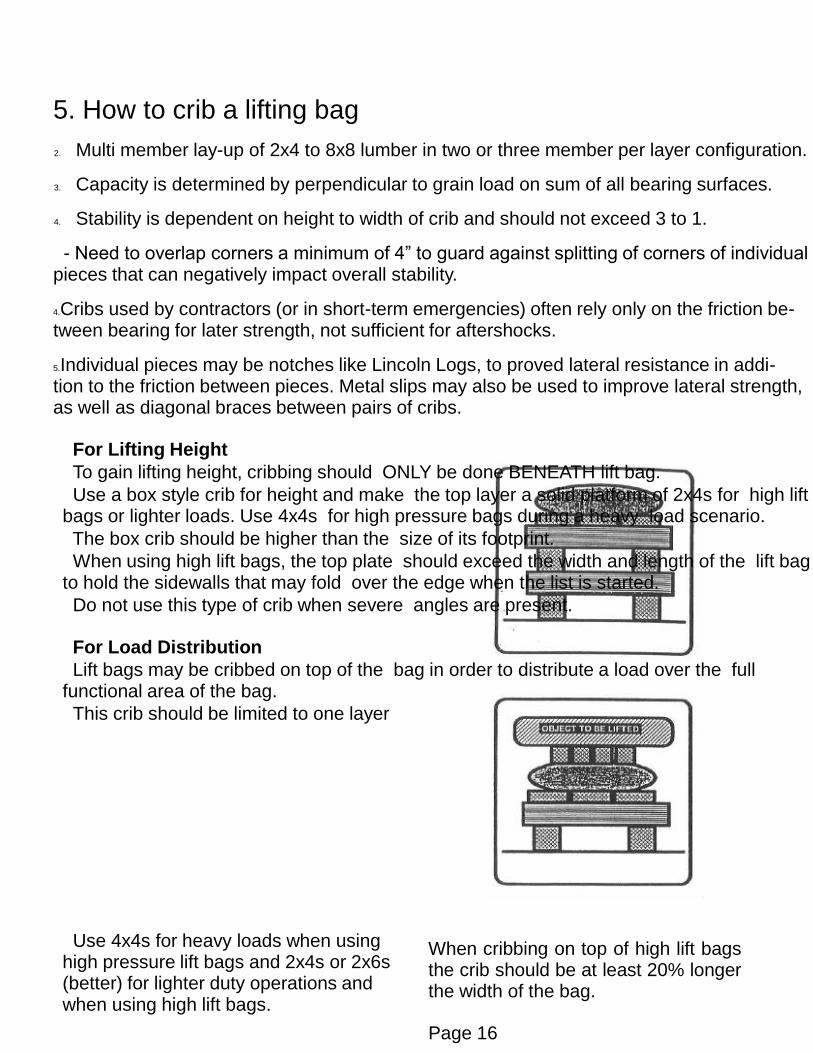
When cribbing on top of high lift bagsthe crib should be at least 20% longerthe width of the bag.
Page 16
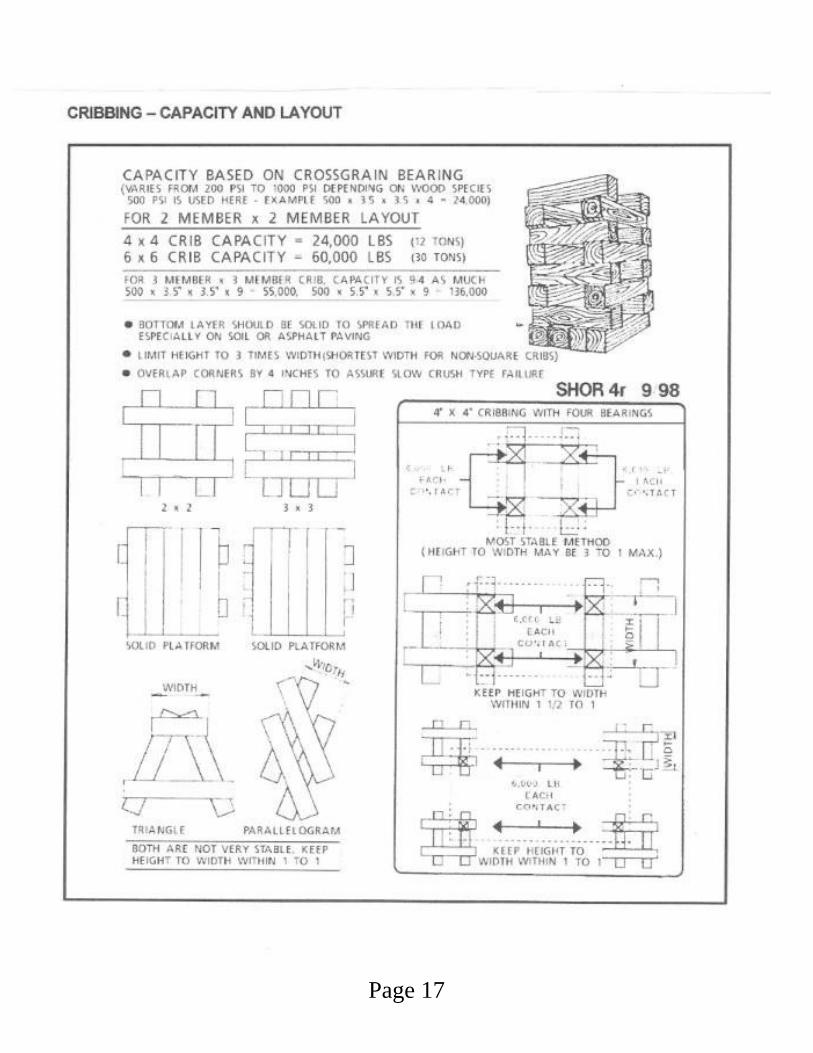
5. How to crib a lifting bag
2. Multi member lay-up of 2x4 to 8x8 lumber in two or three member per layer configuration.
3. Capacity is determined by perpendicular to grain load on sum of all bearing surfaces.
4. Stability is dependent on height to width of crib and should not exceed 3 to 1.
- Need to overlap corners a minimum of 4” to guard against splitting of corners of individual pieces that can negatively impact overall stability.
4.Cribs used by contractors (or in short-term emergencies) often rely only on the friction be-tween bearing for later strength, not sufficient for aftershocks.
5.Individual pieces may be notches like Lincoln Logs, to proved lateral resistance in addi-tion to the friction between pieces. Metal slips may also be used to improve lateral strength, as well as diagonal braces between pairs of cribs.
For Lifting Height
To gain lifting height, cribbing should ONLY be done BENEATH lift bag.
Use a box style crib for height and make the top layer a solid platform of 2x4s for high lift bags or lighter loads. Use 4x4s for high pressure bags during a heavy load scenario.
The box crib should be higher than the size of its footprint.
When using high lift bags, the top plate should exceed the width and length of the lift bag to hold the sidewalls that may fold over the edge when the list is started.
Do not use this type of crib when severe angles are present.
For Load Distribution
Lift bags may be cribbed on top of the bag in order to distribute a load over the full functional area of the bag.
This crib should be limited to one layer
Use 4x4s for heavy loads when using high pressure lift bags and 2x4s or 2x6s (better) for lighter duty operations and when using high lift bags.
Page 17
-
-
-
DOAlways use safety crib follow object being lifted
Stabilize vehicle on down side against lateral and downward movement
Use full functional area of the lift bag whenever possible
DO NOT- Stack high lift bags and/or low pressure bags
- Stack high pressure bags (Unless Flat Lift Bags)
- Lift vehicles to severe angles
- Turn vehicles over
(That is for recovery bags, not rescue bags)
- Lift against sharp edges
To Summarize
As you can see there are a few things to keep in mind when lifting a load. Lifting with lift bags is a combination of anticipating angles, physics, and common sense. None of it is diffi-
cult but all of it is dangerous. Experience is your best tool to do an effective and safe lift.
Spend some time with cribbing and lift bags at on of your future training classes.
Page 18