a5 e:pjmu ,c fpj:. - iviano.comiviano.com/media/catalog/product/l/e/ledtv15hd_manul_1.pdf · 12)...
TRANSCRIPT
R : A5 E:PJmU ,c fPJ:. B L A C K . PANTONE 286C . P A N T O N E C o o l Gray 8C

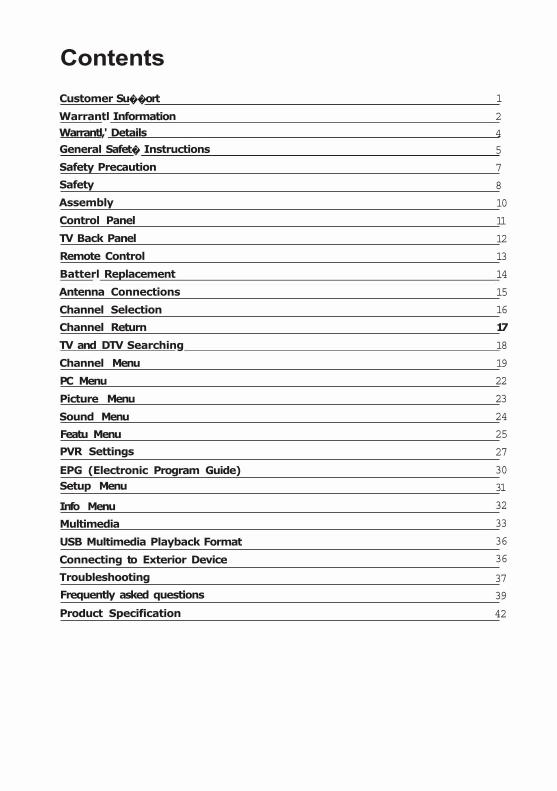
Contents Customer Su��ort 1
Warrantl Information 2 Warrantl,' Details 4 General Safet� Instructions 5 Safety Precaution 7 Safety 8 Assembly 10
Control Panel 11
TV Back Panel 12
Remote Control 13
Batterl Replacement 14
Antenna Connections 15
Channel Selection 16
Channel Return 17 TV and DTV Searching 18
Channel Menu 19
PC Menu 22
Picture Menu 23
Sound Menu 24
Featu Menu 25
PVR Settings 27
EPG (Electronic Program Guide) 30 Setup Menu 31
Info Menu 32
Multimedia 33
USB Multimedia Playback Format 36
Connecting to Exterior Device 36
Troubleshooting 37 Frequently asked questions 39
Product Specification 42

CUSTOMER SUPPORT
1
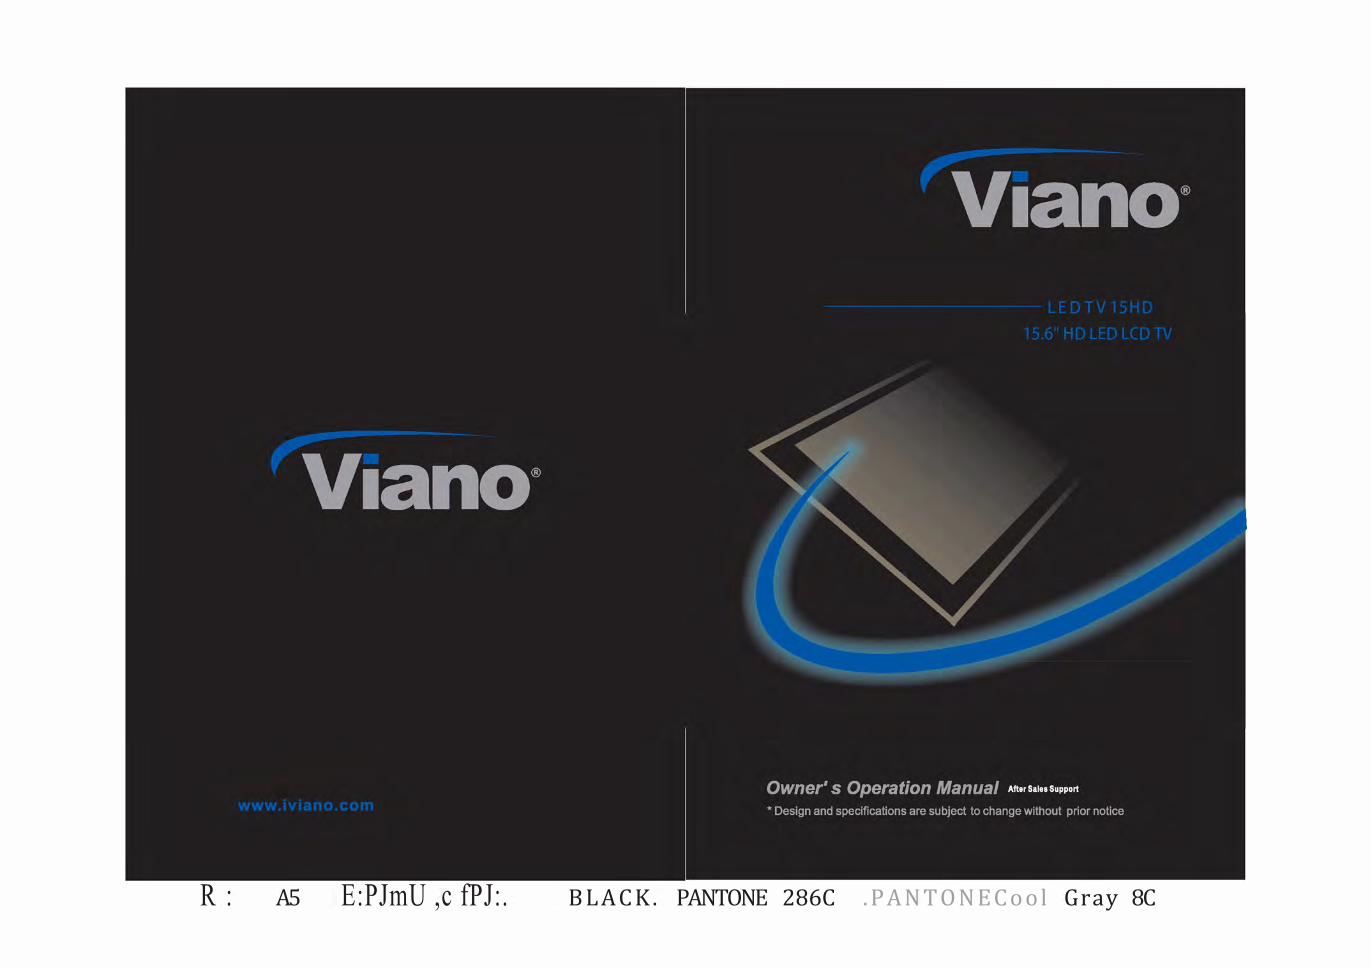
Thank you for purchasing a Viano Television
Should you encounter any problem before returning this product to the store please read User Manual carefully or contact us directly.
Our Customer Support team will be happy to assist you
• CUSTOMER SUPPORT HOTLINE
1800 33 00 64 Toll Free when you call from any land line in Australia (Mon-Fri 9am-5pm AET)
E-MAIL US
[email protected] www.iviano.com
VISIT US O R CONTACT US
VIANO CORPORATION PTY LTD 9-13 Bibby Street,Chiswick NSW 2046P (+61) 2 9713 8350F (+61) 2 8753 0524
After Sales Support Telephone: 1800 33 0064
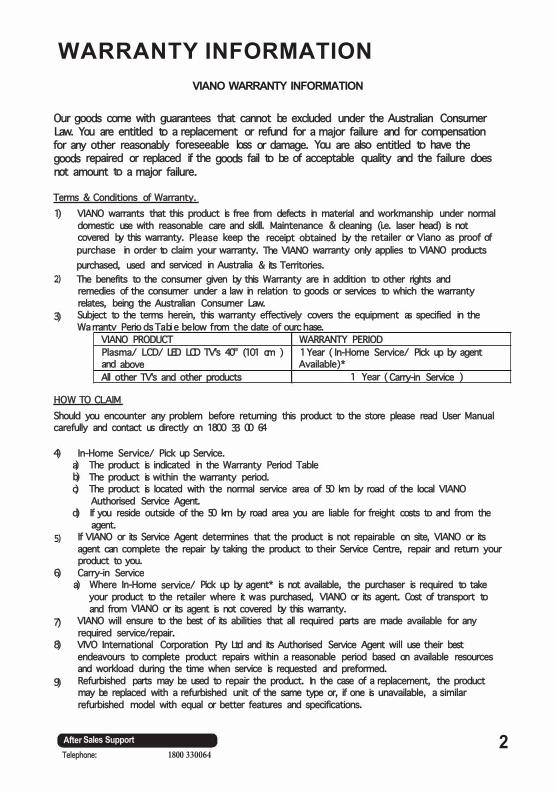
WARRANTY INFORMATION VIANO WARRANTY INFORMATION
Our goods come with guarantees that cannot be excluded under the Australian Consumer Law. You are entitled to a replacement or refund for a major failure and for compensation for any other reasonably foreseeable loss or damage. You are also entitled to have the goods repaired or replaced if the goods fail to be of acceptable quality and the failure does not amount to a major failure.
Terms & Conditions of Warranty. 1) VIANO warrants that this product is free from defects in material and workmanship under normal
domestic use with reasonable care and skill. Maintenance & cleaning (i.e. laser head) is not covered by this warranty. Please keep the receipt obtained by the retailer or Viano as proof of purchase in order to claim your warranty. The VIANO warranty only applies to VIANO products purchased, used and serviced in Australia & its Territories.
2) The benefits to the consumer given by this Warranty are in addition to other rights and remedies of the consumer under a law in relation to goods or services to which the warranty relates, being the Australian Consumer Law.
3) Subject to the terms herein, this warranty effectively covers the equipment as specified in the Wa P . d T bi b I f h d f h rrantv erio s a e e ow rom t e ate o ourc ase.
VIANO PRODUCT WARRANTY PERIOD Plasma/ LCD/ LED LCD TV's 40" (101 cm ) 1 Year ( In-Home Service/ Pick up by agent and above Available)* All other TV's and other products 1 Year ( Carry-in Service )
HOW TO CLAIM Should you encounter any problem before returning this product to the store please read User Manual carefully and contact us directly on 1800 33 00 64
4) In-Home Service/ Pick up Service. a) The product is indicated in the Warranty Period Table b) The product is within the warranty period. c) The product is located with the normal service area of 50 km by road of the local VIANO
Authorised Service Agent. d) If you reside outside of the 50 km by road area you are liable for freight costs to and from the
agent. 5) If VIANO or its Service Agent determines that the product is not repairable on site, VIANO or its
agent can complete the repair by taking the product to their Service Centre, repair and return your product to you.
6) Carry-in Service a) Where In-Home service/ Pick up by agent* is not available, the purchaser is required to take
your product to the retailer where it was purchased, VIANO or its agent. Cost of transport to and from VIANO or its agent is not covered by this warranty.
7) VIANO will ensure to the best of its abilities that all required parts are made available for any required service/repair.
8) VIVO International Corporation Pty Ltd and its Authorised Service Agent will use their best endeavours to complete product repairs within a reasonable period based on available resources and workload during the time when service is requested and preformed.
9) Refurbished parts may be used to repair the product. In the case of a replacement, the product may be replaced with a refurbished unit of the same type or, if one is unavailable, a similarrefurbished model with equal or better features and specifications.
After Sales Support Telephone: 1800 330064
2
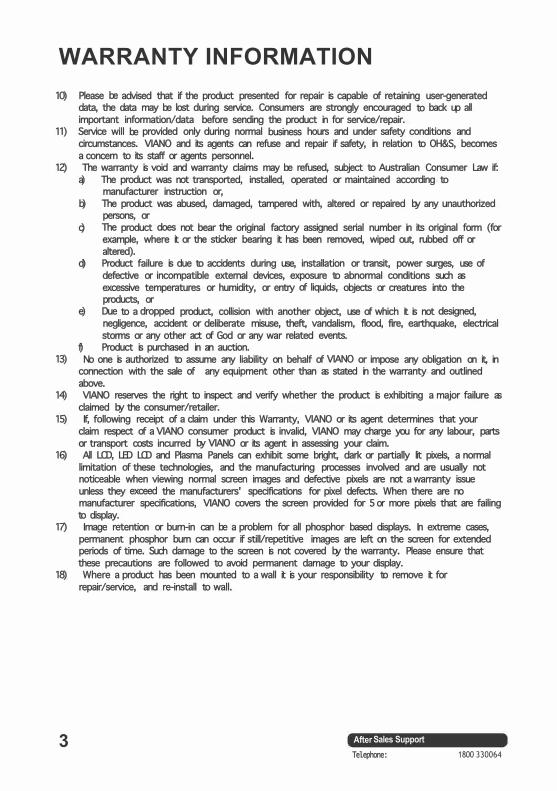
WARRANTY INFORMATION 10) Please be advised that if the product presented for repair is capable of retaining user-generated
data, the data may be lost during service. Consumers are strongly encouraged to back up all important information/data before sending the product in for service/repair.
11) Service will be provided only during normal business hours and under safety conditions and circumstances. VIANO and its agents can refuse and repair if safety, in relation to OH&S, becomes a concern to its staff or agents personnel.
12) The warranty is void and warranty claims may be refused, subject to Australian Consumer Law if: a) The product was not transported, installed, operated or maintained according to
manufacturer instruction or, b) The product was abused, damaged, tampered with, altered or repaired by any unauthorized
persons, or c) The product does not bear the original factory assigned serial number in its original form (for
example, where it or the sticker bearing it has been removed, wiped out, rubbed off or altered).
d) Product failure is due to accidents during use, installation or transit, power surges, use of defective or incompatible external devices, exposure to abnormal conditions such as excessive temperatures or humidity, or entry of liquids, objects or creatures into the products, or
e) Due to a dropped product, collision with another object, use of which it is not designed, negligence, accident or deliberate misuse, theft, vandalism, flood, fire, earthquake, electrical storms or any other act of God or any war related events.
f) Product is purchased in an auction. 13) No one is authorized to assume any liability on behalf of VIANO or impose any obligation on it, in
connection with the sale of any equipment other than as stated in the warranty and outlined above.
14) VIANO reserves the right to inspect and verify whether the product is exhibiting a major failure as claimed by the consumer/retailer.
15) If, following receipt of a claim under this Warranty, VIANO or its agent determines that your claim respect of a VIANO consumer product is invalid, VIANO may charge you for any labour, parts or transport costs incurred by VIANO or its agent in assessing your claim.
16) All LCD, LED LCD and Plasma Panels can exhibit some bright, dark or partially lit pixels, a normal limitation of these technologies, and the manufacturing processes involved and are usually not noticeable when viewing normal screen images and defective pixels are not a warranty issue unless they exceed the manufacturers' specifications for pixel defects. When there are no manufacturer specifications, VIANO covers the screen provided for 5 or more pixels that are failing to display.
17) Image retention or burn-in can be a problem for all phosphor based displays. In extreme cases, permanent phosphor burn can occur if still/repetitive images are left on the screen for extended periods of time. Such damage to the screen is not covered by the warranty. Please ensure that these precautions are followed to avoid permanent damage to your display.
18) Where a product has been mounted to a wall it is your responsibility to remove it for repair/service, and re-install to wall.
3 After Sales Support Telephone: 1800 330064

fVianO®15.6" HD LED LCD TV
Warranty Details The Product is guaranteed to be free from defects in workmanship and parts for a period of 12 months from date of purchase. Defects that occur within this warranty period, under normal use and care, will be repaired or refunded at our discretion, solely at our option with no charge for parts and labor. The benefits conferred by this warranty are in addition to all rights and remedies in respect of the product that the consumer has under the Competition and Consumer Act 2010 and similar state and territory laws.
After Sales Support Telephone: 1800 330064
4

General Safety Instructions Read this manual thoroughly before first use and keep it in a safe place for future reference, along with the warranty card, purchase receipt and carton. The safety precautions enclosed herein reduce the risk of fire, electric shock and injury when correctly adhered to.
RISK OF ELECTRIC SHOCK DO NOT OPEN
CAUTION! To prevent the risk of electric shock,do not
remove the cover (or back).This unit contains no user-serviceable parts inside. Refer all
servicing to qualified service personnel only.
Electrical safety and cord handling
/ , \ This symbol is intended to alert you � to the presence of non-insulated
dangerous voltage within the product's enclosure that may be of sufficient magnitude to constitute a risk of electric shock to persons.
Ii\ This symbol is intended to alert � you to the presence of important
operating and servicing instructions in the documentation accompanying this unit.
• Before installing this TV set, make sure your outlet voltage corresponds to the voltage stated on the appliance rating label
• Only use this TV with the cord and plug supplied. Do not alter the plug, thethird grounding prong is provided for your safety. If the plug does not fit into your outlet, consult an electrician for replacement of the outlet.
• Only connect this TV set to a mains socket with a protective earthingconnection.
• Do not overload the power outlet.• CAUTION: To reduce the risk of fire or electric shock, do not expose this TV
set, the power supply cord, plug and antenna cable to rain or moisture: do not use it anywhere near water, do not touch the power plug with wet hands.
• Do not let the cord hang over the edge of a table or counter, or touch hot surfaces.
• Do not allow anything to rest on or roll over the power cord and antenna cable.Protect the cord and run all cables so that no one steps on or trips over them.
• Do not run the cord near heat-producing appliances such as radiators, stovesor irons. The excessive heat could melt the insulation and expose live wires.
• This TV set can only be disconnected from the power supply by unplugging it from the wall socket. Make sure the plug and socket are readily accessible.
• When not in use, disconnect the power cord from the outlet. Turn off the plug at the wall. Grasp the plug, not the cord, when disconnecting the unit. Pullingthe cord can damage the internal wires and may cause a fire.
• Never touch the TV screen, antenna or cord during thunderstorms. Stop use during thunderstorms; unplug the unit when a thunderstorm is approaching.
5 After Sales Support Telephone: 1800 330064
General Safety Instructions (Cont.} Usage conditions and restrictions • Follow the instructions in this manual when installing and adjusting the
TV set.• Only adjust those controls that are covered in this instruction manual;
improper adjustment of other controls may result in damage. If thishappens, unplug the TV and have it serviced by appropriately qualifiedpersonnel.
• Do not change or modify the TV set in any way. Only use theattachments/accessories specified by the manufacturer.
• Do not cover the ventilation openings with items such as newspapers,tablecloths, curtains etc., as this could impede ventilation.
• Do not insert any objects of any kind into this unit through the ventilationslots, as they could touch the current-carrying parts or short-circuit parts,resulting in fire, electric shock or damage to the unit.
• Do not impact the screen with hard pressure, as this may damage thescreen severely.
• Do not expose the batteries (or battery pack) to excessive heat such as sunshine, fire or the like.
• Unplug the TV set in all of the following circumstances:-If you will not use it for a long period of time.-If it has been subject to impact or has been dropped and is damaged.-If its power cord or plug, or the wall socket, are damaged.
The appliance is not intended for use by persons (including children) with reduced physical, sensory or mental capabilities, or lack of experience and knowledge, unless they have been given supervision or instruction concerning use of the appliance by a person responsible for their safety.
Position • If a television is not positioned in a sufficiently stable location, it can be
potentially hazardous due to falling. Many injuries, particularly to children,can be avoided by taking simple precautions such as:
-Securely attaching the TV to a wall mount fastened on the wall.-Only using furniture that can safely support the television.-Ensuring the TV is not overhanging the edge of the supporting furniture.-Educating children about the dangers of climbing up to reach the TV
controls.-Not standing the TV on cloth or other materials placed between the TV
and supporting furniture.-Not placing the TV on tall furniture (for example, cupboards or bookcases)
without anchoring both the furniture and the TV to a suitable support.
After Sales Support 6 Telephone: 1800 330064
Safety Precaution • Do not place the TV on unstable places from which it may fall off. • Do not expose the TV to extreme temperature and humid environment.• Avoid subjecting the TV to direct sunlight and other heat sources.• Do not put the TV into any liquid.• Avoid overload of the exterior electric outlet to prevent fire hazard of
electric shock.• Clean the TV with dry and soft cloth (without evaporative matter).• If your TV is broken, do not repair it by yourself, but contact the maintenance
personnel.• If the remote control is left unused for a long time, please take the batteries
out and store them in dry places.• Please disconnect the power cord when not using for a long time.
Basic operations Power on/off 1. Use AC 100-240V power outlet for the TV power supply.2. If the screen of TV is not on, please press the power button on the remote
control or on the TV. 3. If you want to turn off the TV temporary, please press the power button on
the remote control or on the TV. 4. If you want to turn off the TV completely, please unplug the power cable
from the wall.
Auto screen turn off function 1. In TV/AV state, the TV will enter idle state iUhere is no signal input within
15 minutes.2. In VGA state the TV will enter idle state if there is no signal input within 2
minutes.
Pre-turn off memory 1. The setting and tuning of picture and sound will be saved when the TV is
turned off. It will be in this pre-turn off state when the TV is turned on again.
Precaution of signal source application 1. If PC signal source is used, please first set the resolution of the PC display
card as the following modes:(1920 x 1080 60Hz, 1360 x 768 60Hz, 1024 x 768 60Hz, 800 x 600 60Hz, 640 x 480 60Hz)
2. If there is line-by-line output of the signal used by the user, signal sourcewith line-by-line output is recommended.
7 After Sales Support Telephone: 1800 330064

Safety
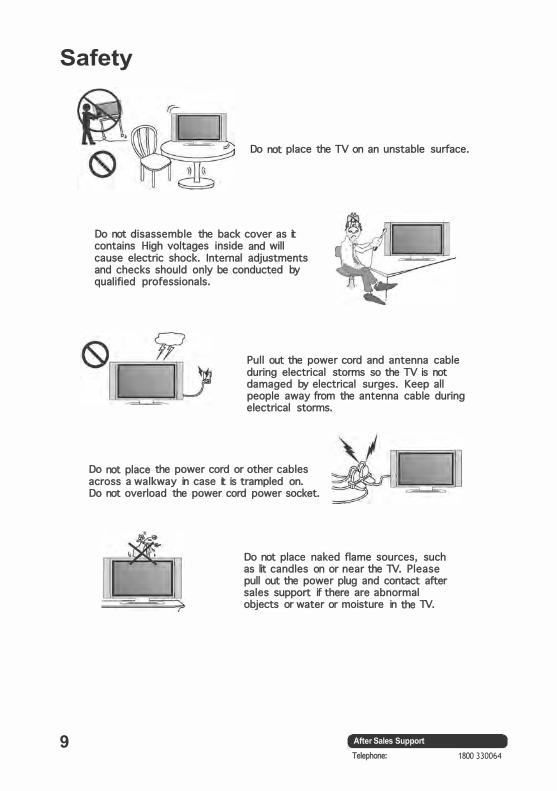
Please immediately pull out the AC power plug from adapter if there is an abnormal sound or smell or the TV has sound but no picture, and contact after sales support.
The TV should be kept from high Temperature heat in objects or direct sunlight. It requires good ventilation. Allow 10cm between the TV and other appliances or built-in cabinet walls.
Do not wipe the TV with any petrol, chemical or alcohol based solvents as it will lead to product damage of the panel and cabinet.
The TV should be kept free from rain, damp and dust to prevent electrical shock and short circuits. Do not cover the ventilation openings with table clothes, curtains, newspapers etc.
You may clean the display panel with a soft clean cloth after pulling out the power plug. Do not repeatedly wipe. Do not scrape, tap or strike the panel with a hard Object.
After Sales Support Telephone: 1800 330064
8
Safety
9
Do not place the TV on an unstable surface.
Do not disassemble the back cover as it contains High voltages inside and will cause electric shock. Internal adjustments and checks should only be conducted by qualified professionals.
Pull out the power cord and antenna cable during electrical storms so the TV is not damaged by electrical surges. Keep all people away from the antenna cable during electrical storms.
Do not place the power cord or other cables across a walkway in case it is trampled on. Do not overload the power cord power socket.
Do not place naked flame sources, such as lit candles on or near the TV. Please pull out the power plug and contact after sales support if there are abnormal objects or water or moisture in the TV.
After Sales Support Telephone: 1800 330064
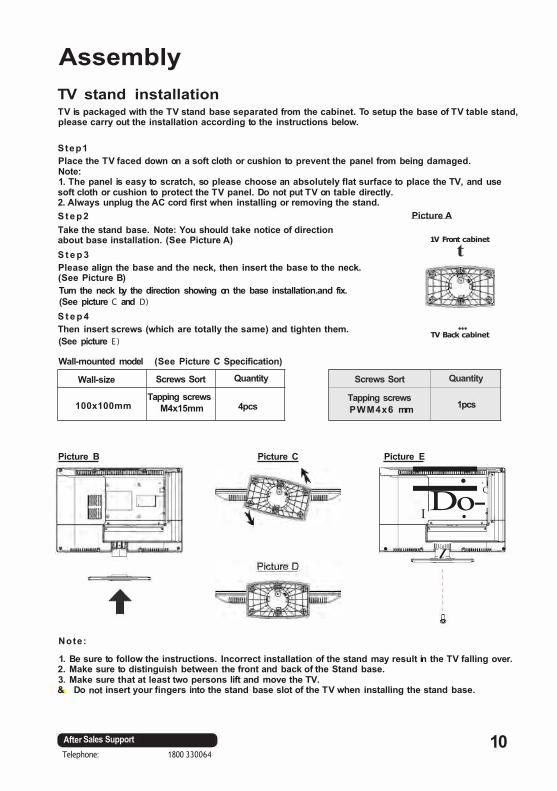
Assembly TV stand installation TV is packaged with the TV stand base separated from the cabinet. To setup the base of TV table stand, please carry out the installation according to the instructions below.
Step1 Place the TV faced down on a soft cloth or cushion to prevent the panel from being damaged. Note: 1. The panel is easy to scratch, so please choose an absolutely flat surface to place the TV, and use soft cloth or cushion to protect the TV panel. Do not put TV on table directly. 2. Always unplug the AC cord first when installing or removing the stand. S t e p 2 Picture A Take the stand base. Note: You should take notice of direction about base installation. (See Picture A) S t e p 3 Please align the base and the neck, then insert the base to the neck. (See Picture B) Turn the neck by the direction showing on the base installation.and fix. (See picture C and D) S t e p 4 Then insert screws (which are totally the same) and tighten them. (See picture E )
Wall-mounted model (See Picture C Specification)
Wall-size Screws Sort Quantity
100x100mm Tapping screws
M4x15mm 4pcs
Screws Sort
Tapping screws PWM4x6 mm
Picture B Picture C Picture E r , = I
.
Note:
1V Front cabinet
t
... TV Back cabinet
Quantity
1pcs
• C Do-
. IIUollll
l .
1. Be sure to follow the instructions. Incorrect installation of the stand may result in the TV falling over. 2. Make sure to distinguish between the front and back of the Stand base. 3. Make sure that at least two persons lift and move the TV. & Do not insert your fingers into the stand base slot of the TV when installing the stand base.
After Sales Support 10 Telephone: 1800 330064
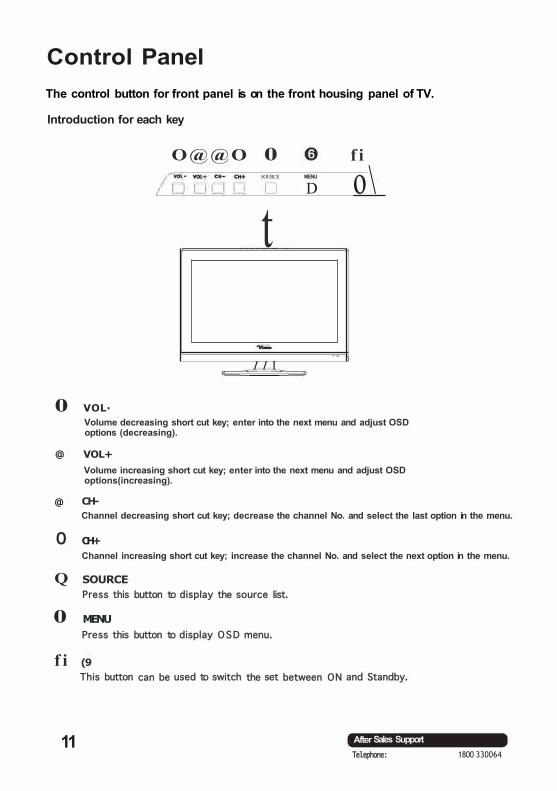
Control Panel The control button for front panel is on the front housing panel of TV.
Introduction for each key
O@@O 0 f i SOURCE MENU
D o\ t
I I I
0 VOL· Volume decreasing short cut key; enter into the next menu and adjust OSD options (decreasing).
@ VOL+ Volume increasing short cut key; enter into the next menu and adjust OSD options(increasing).
@ CH-Channel decreasing short cut key; decrease the channel No. and select the last option in the menu.
0 CH+ Channel increasing short cut key; increase the channel No. and select the next option in the menu.
Q SOURCE Press this button to display the source list.
0 MENU Press this button to display OSD menu.
f i (9 This button can be used to switch the set between ON and Standby.
11 After Sales Support Telephone: 1800 330064

TV Back Panel
This LED 1V has digital multimedia perfonnance and can be connected to multiple external devices. The connections to other video and audio appliances.
0 ®
PC (1)
,1 -f (1) (2)
= o o= = · @ I
(3) (4) (5) VGA I PC Audio I P C IIIPUT
1) DC IN: DC power input terminal.
(6) (7) VIDEO L-AUDIO-R MlnlYPbPr AV Ill AUDIO Ill - - 1•
2) USB: USB input jack for Multimedia with PVR function.3) HDMI : High-<lefinition multimedia interface.
Note: Acceptable video signal 480P/576P/720P/1080l/1080P. 4) VGA: Input terminal of simulation signal of PC. 5) PC Audio In: Sound input terminal of VGA input. 6) Video In, Audio L/R In: Video and audio right/left input terminal. 7) Mini YPbPr: Connect the component video input terminal. 8) EARPHONE: This connection is for headphones to be attched to the TV. 9) RF: Antenna/close circuit TV or Digital TV terminal.
After Sales Support Telephone: 1800 330064
(8) [EJ • 0
0 (9) 0
12
Remote Control
2
3
4
5
6
8
9
10
13
-C) ,(8
- .. --I l l --1611 I D -
- I l l I i i -- -CCII m - -
' " ' ' " '
= (e) em ='° - -
=1 """' I-
i i ' i i
l ' S , t ' S O
A a - C - i i nll -ro 0 CD o•
C , C ) D 0 -!!! I!? J!!! Vi
Avoid dropping the remote,do not leave It on the floor where it may get stepped on.keep the remote dry.
Switches the set between ON and STANDBY. Switches the sound on or off. Figures 0-9 are used to directly input channel number. Sets the sleep timer. Returns to the channel selected last time. Teletext switching. Selects the different picture mode directly. Selects the different sound mode directly. Displays the source list of input signal. Returns to 1V viewing from any menu.
Selects a menu. Displays audio language menu In DlV menu. Decreaser.ncrease the option value. Selects the previous/next function option. Accepts your selection or displays the current mode. Selects a program. Shows the present screen information. Selects the screen aspect. Press to show the channel list. Increase/ decrease the sound level. This key does not operate for this 1V model.
l Use in TXT, 1V and USB.
Recalls your preferred subtitle In digital mode This key does not operate for this 1V model. This key does not operate for this 1V model. Displays the recorded menu. Displays the personal video recorder menu.
Play or Pause the movie/music/texVphoto in USB. This key does not operate for this 1V model. Slop the movie/muslc.'texVphoto In USB. This key does not operate for this 1V model. Skip to previous track or chapter. Skip to next track or chapter. Fast reverse. Fast forward. l-..,..,"".,... ,,. .. ,,,, . .,.
"'-''-"""""t.n.>....,,.,.G E
After Salas Support Telephone: 1800 330064
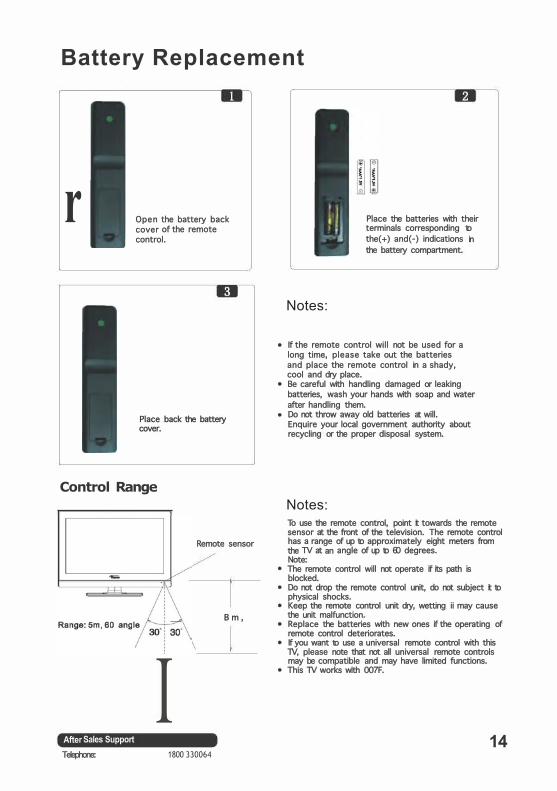
Battery Replacement
r Open the battery back cover of the remote control.
Place back the battery cover.
Control Range
Remote sensor
B m ,
IAfter Sales Support Telephone: 1800 330064
Notes:
Place the batteries with their terminals corresponding to the(+) and(-) indications in the battery compartment.
• If the remote control will not be used for along time, please take out the batteries and place the remote control in a shady,cool and dry place.
• Be careful with handling damaged or leakingbatteries, wash your hands with soap and water after handling them.
• Do not throw away old batteries at will. Enquire your local government authority about recycling or the proper disposal system.
Notes: To use the remote control, point it towards the remote sensor at the front of the television. The remote control has a range of up to approximately eight meters from the TV at an angle of up to 60 degrees. Note:
• The remote control will not operate if its path is blocked.
• Do not drop the remote control unit, do not subject it to physical shocks.
• Keep the remote control unit dry, wetting ii may causethe unit malfunction.
• Replace the batteries with new ones if the operating of remote control deteriorates.
• If you want to use a universal remote control with this TV, please note that not all universal remote controls may be compatible and may have limited functions.
• This TV works with 007F.
14
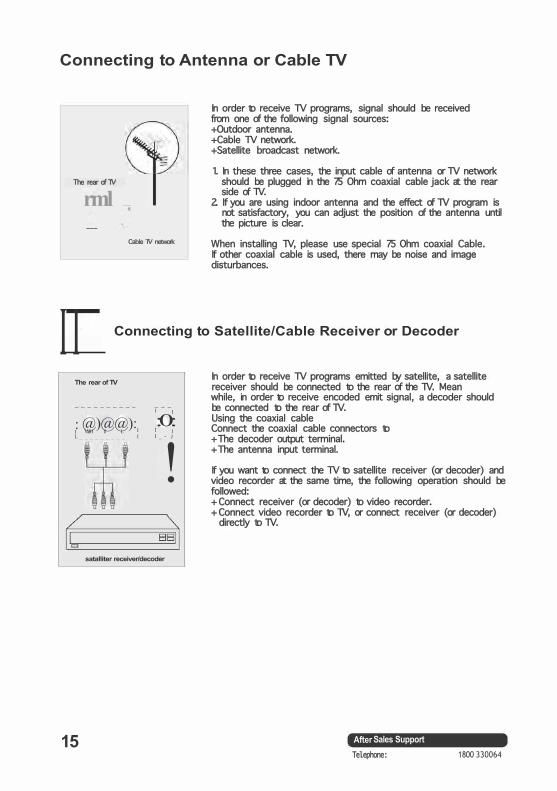
Connecting to Antenna or Cable TV
The rear of TV
rml ---
Cable TV network
In order to receive TV programs, signal should be received from one of the following signal sources: +Outdoor antenna.+Cable TV network. +Satellite broadcast network.
1. In these three cases, the input cable of antenna or TV network should be plugged in the 75 Ohm coaxial cable jack at the rear side of TV.
2. If you are using indoor antenna and the effect of TV program is not satisfactory, you can adjust the position of the antenna until the picture is clear.
When installing TV, please use special 75 Ohm coaxial Cable. If other coaxial cable is used, there may be noise and image disturbances.
I I Connecting to Satellite/Cable Receiver or Decoder
The rear of TV
: @)@@): I VldH ll L I L _ _ _ _ _ _ _ _ _ I
I I
:0: I I I _ - J
! satalliter receiver/decoder
15
In order to receive TV programs emitted by satellite, a satellite receiver should be connected to the rear of the TV. Mean while, in order to receive encoded emit signal, a decoder should be connected to the rear of TV. Using the coaxial cable Connect the coaxial cable connectors to + The decoder output terminal.+ The antenna input terminal.
If you want to connect the TV to satellite receiver (or decoder) and video recorder at the same time, the following operation should be followed: + Connect receiver (or decoder) to video recorder. + Connect video recorder to TV, or connect receiver (or decoder)
directly to TV.
After Sales Support Telephone: 1800 330064
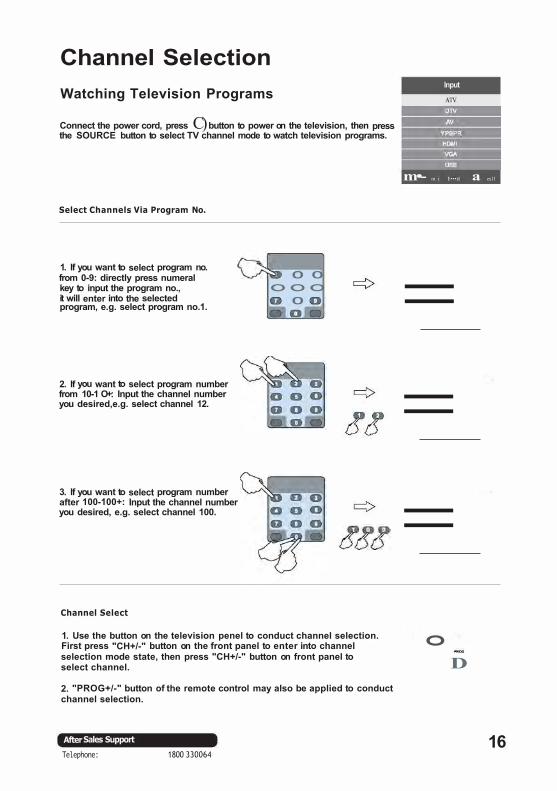
Channel Selection Watching Television Programs
Connect the power cord, press C) button to power on the television, then press the SOURCE button to select TV channel mode to watch television programs.
Select Channels Via Program No.
1. If you want to select program no. from 0-9: directly press numeral key to input the program no., it will enter into the selected program, e.g. select program no.1.
2. If you want to select program number from 10-1 O+: Input the channel number you desired,e.g. select channel 12.
3. If you want to select program number after 100-100+: Input the channel number you desired, e.g. select channel 100.
Channel Select
0 0 OOO0
1. Use the button on the television penel to conduct channel selection.First press "CH+/-" button on the front panel to enter into channelselection mode state, then press "CH+/-" button on front panel to select channel.
2. "PROG+/-" button of the remote control may also be applied to conduct channel selection.
After Sales Support
Telephone: 1800 330064
Input
ATV
m•- m i 11 ••• r:1 a ex11
= = = o
D
16
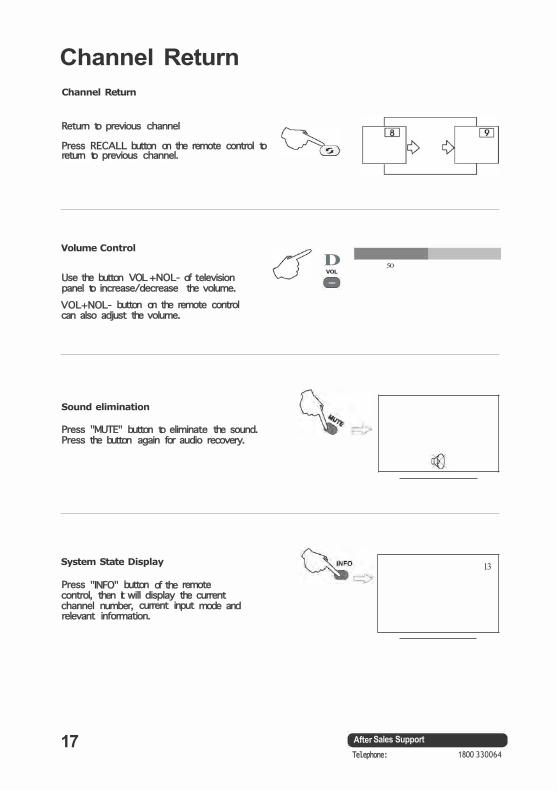
Channel Return Channel Return
Return to previous channel
Press RECALL button on the remote control to return to previous channel.
Volume Control
Use the button VOL +NOL- of television panel to increase/decrease the volume. VOL+NOL- button on the remote control can also adjust the volume.
Sound elimination
Press "MUTE" button to eliminate the sound. Press the button again for audio recovery.
System State Display
Press "INFO" button of the remote control, then it will display the current channel number, current input mode and relevant information.
17
D 50 VOL
13
After Sales Support Telephone: 1800 330064

TV and DTV searching If this is the first time you are turning on the TV and there are no programs in the TV memory, the Quick Start menu will appear on the screen. there are setups as follow:
m ® Auto Installation
-Setup 2-
Country:
Portugal
Sweden
Finland
Czech Republic
@ Auto Installation
-Setup 3-
Auto Power Off: Your TV has been set to power off after 4 hours of continuous viewing. if you want to change this setting. Please choose Off. This setting can also be changed in the MENU.
1 Hour
2 Hours
4 Hours
Previous Page • Next Page Mova Enter
®
@
After Sales Support
a:!iJ Exit
Telephone: 1800 330064
E N T E R -
E N T E R -
Previous Page • Next Page Move @lifill Enter a : !D Exit
@) Auto Installation
-Setup 4-
TV Connection: Please select the method of TV Connection. Cable
Previous Page • Next Page Move @lifill Enter a : !D Exit
18
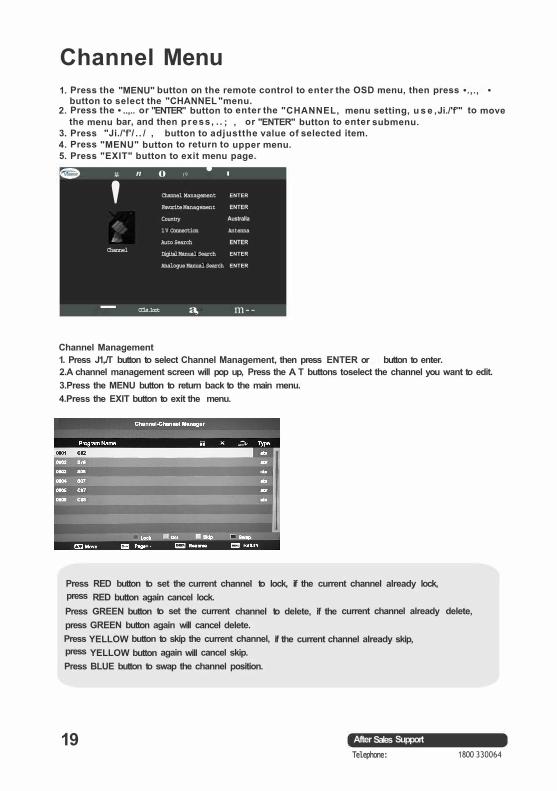
Channel Menu 1. Press the "MENU" button on the remote control to enter the OSD menu, then press • .,., •
button to select the "CHANNEL "menu.2. Press the • ..,.. or "ENTER" button to enter the "CHANNEL‚ menu setting, u s e ‚ Ji./'f'" to move
the menu bar, and then press‚ . . ; ‚ or "ENTER" button to enter submenu.3. Press "Ji./'f'/ . . / ‚ button to adjustthe value of selected item.4. Press "MENU" button to return to upper menu.5. Press "EXIT" button to exit menu page.
i;i n 0 (9 • Channel Management ENTER
Favorite Management ENTER ' Country Australla
1V Connection Antenna
Auto Search ENTER Channel
Digital Manual Search ENTER
Analogue Manual Search ENTER
-- CCls.1oot a , m--
Channel Management 1. Press J1,./T button to select Channel Management, then press ENTER or button to enter. 2.A channel management screen will pop up, Press the .A. T buttons toselect the channel you want to edit. 3.Press the MENU button to return back to the main menu. 4.Press the EXIT button to exit the menu.
Press RED button to set the current channel to lock, if the current channel already lock, press RED button again cancel lock. Press GREEN button to set the current channel to delete, if the current channel already delete, press GREEN button again will cancel delete. Press YELLOW button to skip the current channel, if the current channel already skip, press YELLOW button again will cancel skip. Press BLUE button to swap the channel position.
19 After Sales Support Telephone: 1800 330064
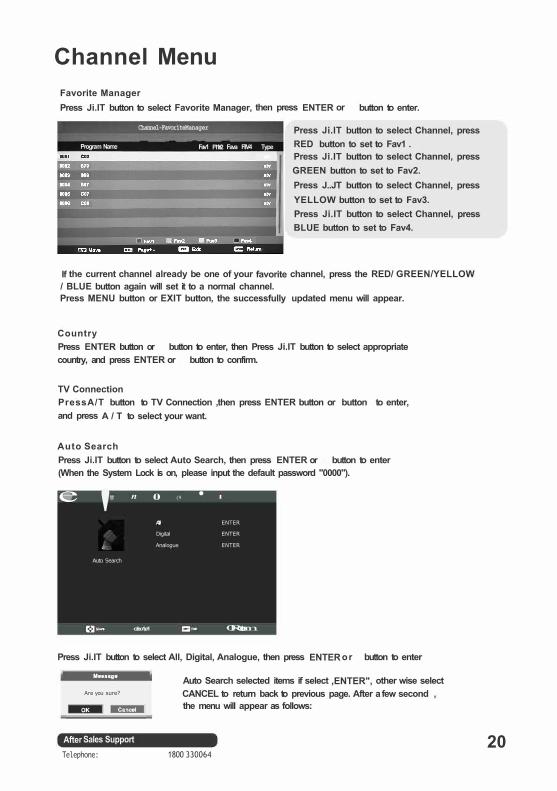
Channel Menu Favorite Manager Press Ji.IT button to select Favorite Manager, then press ENTER or button to enter.
Channel-Favorite Manager
- - -Program Name Fav1 F11¥2 Fava FIIV4 Type
Press Ji.IT button to select Channel, press RED button to set to Fav1 . Press Ji.IT button to select Channel, press GREEN button to set to Fav2. Press J..JT button to select Channel, press YELLOW button to set to Fav3. Press Ji.IT button to select Channel, press BLUE button to set to Fav4.
If the current channel already be one of your favorite channel, press the RED/ GREEN/YELLOW / BLUE button again will set it to a normal channel. Press MENU button or EXIT button, the successfully updated menu will appear.
Country Press ENTER button or button to enter, then Press Ji.IT button to select appropriate country, and press ENTER or button to confirm.
TV Connection PressA/T button to TV Connection ,then press ENTER button or button to enter, and press A / T to select your want.
Auto Search Press Ji.IT button to select Auto Search, then press ENTER or button to enter (When the System Lock is on, please input the default password "0000").
e !;! n 0 (9 • ' AJI ENTER
Digital ENTER
Analogue ENTER
Auto Search
c::lso1,e1 0Rotum
Press Ji.IT button to select All, Digital, Analogue, then press ENTER or button to enter
Are you sure?
After Sales Support Telephone:
Auto Search selected items if select ‚ENTER", other wise select CANCEL to return back to previous page. After a few second the menu will appear as follows:
1800 330064 20

Channel Menu When you select "OK'',then you can into the auto Search it is as shown below:
Digital Manual Search Press .._/Tbutton to Digital Manual Search then press ENTER or button to enter submenu.
i. n 0 C!l • Channel m ; ' I Frequency(KHz) 48500 ' BandWldth(MHz)
Star t
Strength Channel-Digital Ma
Quallly ""
c - l • - c::i - Cl= CCl-m
Select channel number by button or entering number directly.The strength and the quality shows at the button. Press Ok button on Star item to start current channel search. the manual searching UI and the auto searching UI are the same.
Analogue Manual Search( Only in ATV mode} Press the .._/Tbutton to Analogue Manual Search then press the OK button to confirm.
21
Current Channel: Display the current channel number. Frequency: Select AFC On to lock the desired frequency. Search: Press -<II/ button to start the manual tuning. Color System: Select the Colar system: Aulot'SECAM/PAL. Sound System: Select the sound system: BG/DK/I/UL'.
After Sales Support Telephone: 1800 330064
PC Menu PC {In VGA mode) Note: PC menu will not be available if there is no VGA input signal. 1. Press the "MENU" button on the remote control to enter the OSD menu, then press <II/
button to select the "Setup" menu. 2. Press the "Jt,./'f'" button to enter the "PC Setup"menu setting, use "Jt../'f'" to move the menu bar,
and then press "ENTER" or" <II/ " to adjust the value of selected item. 3. Press "Menu" button to return to upper menu. 4. Press "EXIT" button to exit menu page.
Auto Adjust Press the "Jt../'f' • button to select the "Auto Adjust" item, and then use "<II/ • or "ENTER" button to auto adjust the image. Note: This item will auto-adjust the picture display.
H Position ,V Position Press the "Jt../'f' • button to select the "H Position,V Position" item, and then use "<II/ • or "ENTER" button to enter submenu to move the image left, right, up, down.
Phase Press the "J,,./'f' • button to select the "Phase" item, and then use "<II/ • o r ‚ ENTER" button to enter submenu to adjust the pixel phase of picture display.
Clock Press the "J,,./'f'" button to select the "Clock" item, and then use "<II/ " or "ENTER" button to enter submenu to adjust .
After Sales Support Telephone: 1800 330064
22
Picture Menu Press MENU button to display the main menu. Press Jt./T button to select Picture in the main menu, then press ENTER button or button to enter.
g n 0 <9 • Picture Mode Standard
Brightness 50
Comra,t 50
Sharpness
Colour 50
Plcuture Tim 50
Colour Temp Standard
Noise Reduction Middle
--1. Press Jt./T button to select the option that you want to adjust in the Picture menu, and
then press ENTER button or button to enter. 2. Press .,., button to adjust or press Jt./T button to select. And press ENTER button or
button to select the sub menu. 3. After finishing your adjustment, press MENU button to save and return back to the
previous menu, and press EXIT button to exit the entire menu.
Picture Mode Press Jt./T button to select Picture Mode, then press ENTER button or to enter and press Jt./T button to select. (Available Picture Mode: User, Standard, Vivid, Soft, Optimal)
Brightness Press the <1111 buttons to increase or decreases the amount of white in the picture.(for User mode)
Contrast Press the <1111 buttons to adjust the difference between light and dark levels in the picture.(for User mode)
Sharpness Press the <1111 buttons to adjust the level of crispness in the edges between light and dark areas of the picture.(for User mode)
Colour Press the <1111 buttons to control the colour intensity.(for User mode)
Tint Press the <1111 buttons to adjust the balance between red and green levels. (Tint is only available for NTSC signal input via the SCART or AV IN.)
Colour Temperature Press Jt./T button to select Colour Temperature, then press ENTER button or button to enter and Jt./T button to select Standard, Cool, Warm.
Noise Reduction Press Jt./T button to select Noise Reduction, then press ENTER button or button to enter and Jt./T button to select Off, Low, Middle, High.
Reset Press Jt./T button to select Reset, then press ENTER button or button to enter the confirm menu, and then choose ENTER to reset the value.
23 After Sales Support Telephone: 1800 330064
Sound Menu Press MENU button to display the main menu. Press Ji.IT button to select Sound in the main menu, then press ENTER button or button to enter.
!;! n 0 l!l • Sound Mode Standard .... 50
Treble 50
0 EQ ENTER Sound Balance
Surround Off
AVL Off
Reset Enter
c-l•- c::i - Cl= =-m 1. Press Ji.IT button to select the option that you want to adjust in the Sound menu, then
press ENTER button or button to enter. 2. press ..,.I button to adjust or press Ji.IT to select, and press ENTER or button to
select submenu. 3. After finishing your adjustment, Press MENU button to save and return back to the
previous menu, or press EXIT button to exit the entire menu.
Sound Mode Press Ji.IT button to select Sound Mode, and then press ENTER or button to enter. And then press Ji.IT button to select. (Available Sound mode: User, Standard, Movie, Music, Speech).
Bass Press the <1111 buttons to control the relative intensity of lower-pitched sounds. (for user mode)
Treble Press the <1111 buttons to control the relative intensity of higher pitched sounds. (for user mode)
EQ Press Ji.IT button to select EQ, then press ENTER or button to enter and press Ji.IT button to select. (for user mode) Balance Press the ".A./T" button to select the "Balance" item, and then press ‚<Ill/ " or "ENTER" button to enter submenu to adjust the balance. Surround Press Ji.IT button to select Surround, then press ENTER or button to enter and press Ji.IT button to select ON or OFF. AVL Press Ji.IT button to select AVL, then press ENTER or button to enter and press Ji.IT button to select ON or OFF. Reset Press Ji.IT button to select Reset, then press ENTER button or button to enter the confirm menu, and then choose ENTER to reset the value.
After Sales Support Telephone: 1800 330064
24
Feature Menu Press MENU button to display the main menu. Press Jr,./T button to select Feature in the main menu, then press ENTER or to enter.
!;! n 0 (9 • Child Lock ENTER
Language ENTER
Clock ENTER
(!) SleepTimer Off
Auto Power Off Off
Feature Hearing Impaired Off
PVR ENTER
Hotel Mdoe ENTER
c - l • - c::i - Cl= lm-m
1. Press Jr,./T button to select the option that you want to adjust in the Feature menu, then press ENTER or button to enter.
2. Press .,.., button to adjust or press Jr,./Tbutton to select. 3. After finishing your adjustment, press MENU button to save and return back to the
previous menu and press EXIT button to exit the entire menu.
Child Lock Press Jr,./T button to select Child Lock, then press ENTER or button to enter. (Please input the default password "0000")
• Child LockPress J../T button to select Child Lock , then press ENTER or to enter the sub menu. Then press J../T button to select On or Off .You can change the value of Keypad Lock, Parental Lock and Change Pin Code when the Child Lock is in On mode.
• Keypad Lock Press J../T button to select Keypad Lock, then press ENTER or to enter the sub menu. Then press J../T button to select On or Off Then press ENTER or to confirm.
25 After Sales Support Telephone: 1800 330064
Feature Menu • Parental Lock
Press J../'r button to select Parental Rating, then press ENTERor button to enter the sub menu. Then press J../'r button to select Rate . Then press ENTER or button to confirm.
• Change Pin Code Press J../'r button to select Change Pin Code, then press ENTER or button to enter the sub menu. Enter: "Old password" New: "New password" Confirm: "Confirm new password"
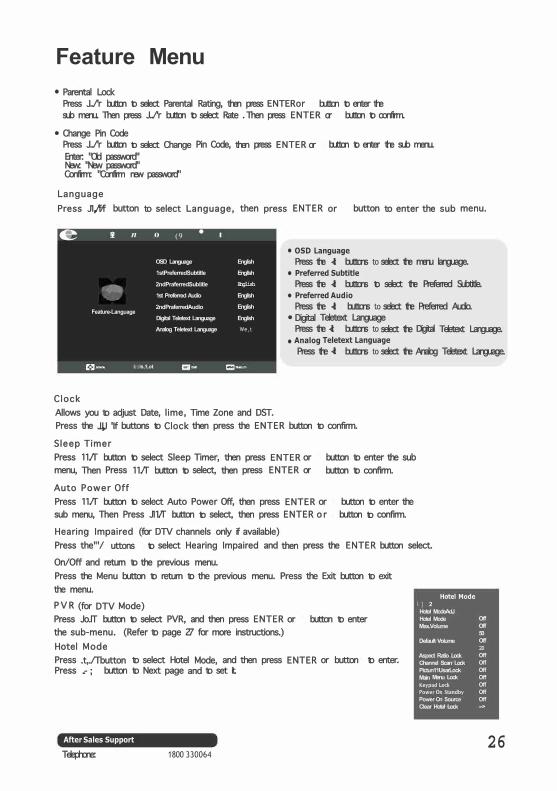
LanguagePress J1,,./'f/f button to select Language, then press ENTER or button to enter the sub menu.
e !i! n 0 (9 • • OSD Language
OSD Language English Press the <II buttons to select the menu language. 1stPreferredSubtitle Engllsh • Preferred Subtitle 2ndPraferredSublitle English
1st Preferred Audio Engllsh . 2ndPraferredAudio English
Feature-Language Digital Teletext Language English
Press the <II buttons to select the Preferred Subtitle. • Preferred Audio
Press the <II buttons to select the Preferred Audio. • Digital Teletext Language
Analog Teletext Language We,t Press the <II buttons to select the Digital Teletext Language. • Analog Teletext Language
Press the <II buttons to select the Analog Teletext Language. i:::is,1,ot
Clock Allows you to adjust Date, lime, Time Zone and DST. Press the JJ,,,J 'If buttons to Clock then press the ENTER button to confirm.
Sleep Timer Press 11./T button to select Sleep Timer, then press ENTER or button to enter the sub menu, Then Press 11./T button to select, then press ENTER or button to confirm.
Auto Power Off Press 11./T button to select Auto Power Off, then press ENTER or button to enter the sub menu, Then Press J11./T button to select, then press ENTER o r button to confirm.
Hearing Impaired (for DTV channels only if available) Press the"'/ uttons to select Hearing Impaired and then press the ENTER button select.
On/Off and return to the previous menu. Press the Menu button to return to the previous menu. Press the Exit button to exit the menu. P V R (for DTV Mode) Press Jo.IT button to select PVR, and then press ENTER or button to enter the sub-menu. (Refer to page 27 for more instructions.) Hotel Mode Press .t,./Tbutton to select Hotel Mode, and then press ENTER or button to enter. Press ..- ; button to Next page and to set it.
After Sales Support
Telephone: 1800 330064
Hotel Mode I ] 2 Hotel ModeAdJ Hotel Mode Max.Volume
Default Volume
Aspect Ratio Lock Channel Scan Lock Pictun11UsarLock Main Menu Lock Keypad Lock Power On Standby Power On Source Clear Hotel Lock
Off Off 50 Off 20 Off Off Off Off Off Off Off
26
PVR settings
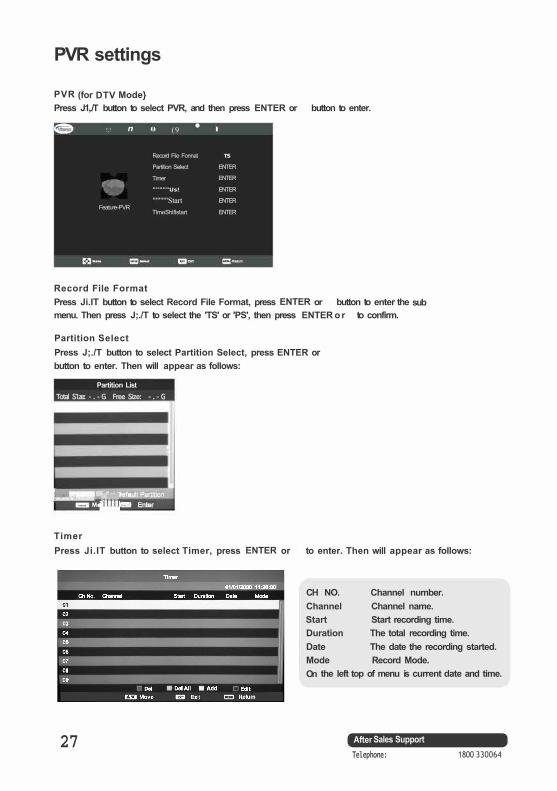
PVR (for DTV Mode} Press J1,./T button to select PVR, and then press ENTER or button to enter.
!;! n 0 (9 • Record File Fonnat TS
Partition Select ENTER
Timer ENTER
"""""Us! ENTER
"""""Start ENTER Feature-PVR
TlmeShlflstart ENTER
Record File Format Press Ji.IT button to select Record File Format, press ENTER or button to enter the sub menu. Then press J;./T to select the 'TS' or 'PS', then press ENTER or to confirm.
Partition Select Press J;./T button to select Partition Select, press ENTER or button to enter. Then will appear as follows:
Partition List Total S1ze: - . - G Free Size: - . - G
1 1• i = a . • • . , ...... ·illll B m i l .
Timer
I I
I
Press Ji.IT button to select Timer, press ENTER or to enter. Then will appear as follows:
27
CH NO. Channel Start Duration Date Mode
Channel number. Channel name. Start recording time. The total recording time. The date the recording started. Record Mode.
On the left top of menu is current date and time.
After Sales Support Telephone: 1800 330064
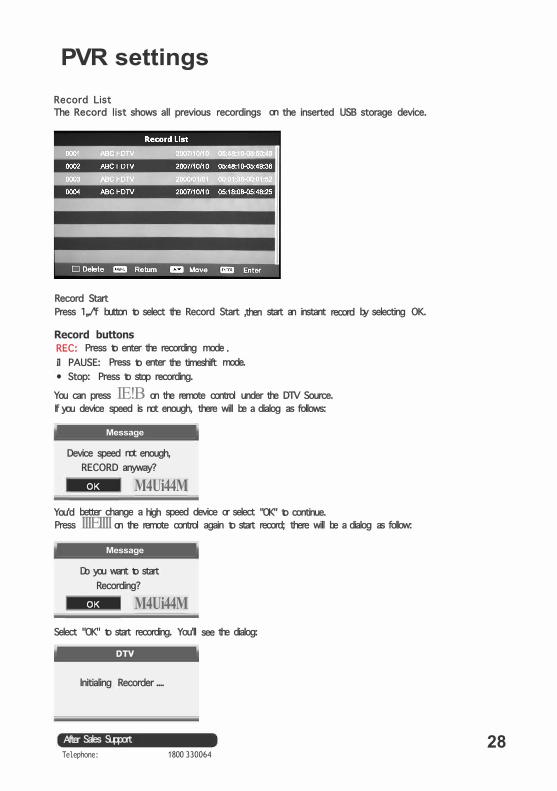
PVR settings Record List The Record list shows all previous recordings on the inserted USB storage device.
Record Start Press 1,,./'f button to select the Record Start ,then start an instant record by selecting OK.
Record buttons REC: Press to enter the recording mode . .i1 PAUSE: Press to enter the timeshift mode. • Stop: Press to stop recording.
You can press IE!B on the remote control under the DTV Source. If you device speed is not enough, there will be a dialog as follows:
Message
Device speed not enough, RECORD anyway?
M4Ui44M You'd better change a high speed device or select "OK" to continue. Press IIIEIIII on the remote control again to start record; there will be a dialog as follow:
Message
Do you want to start Recording?
M4Ui44M Select "OK" to start recording. You'll see the dialog:
lnitialing Recorder ....
After Sales Support Telephone: 1800 330064
28
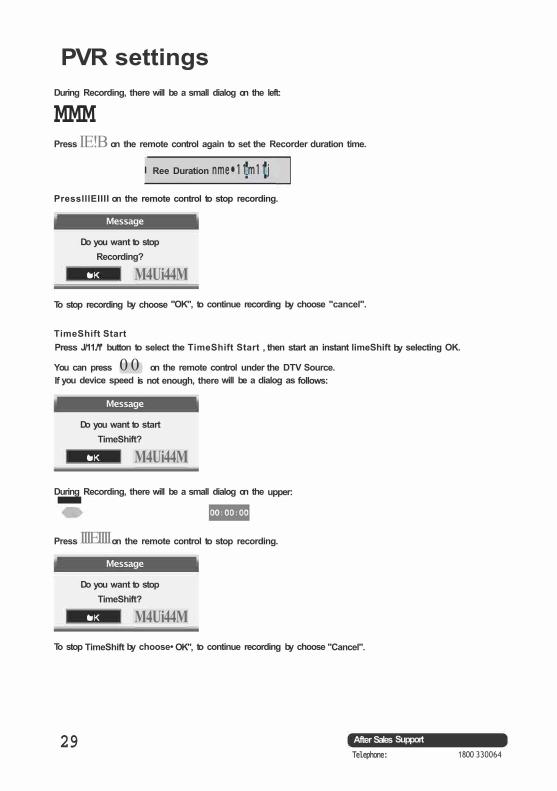
PVR settings During Recording, there will be a small dialog on the left:
MMM Press IE!B on the remote control again to set the Recorder duration time.
I Ree Duration nme•11m11j
PresslllEIIII on the remote control to stop recording.
Message
Do you want to stop Recording?
• M4Ui44M To stop recording by choose "OK", to continue recording by choose "cancel".
TimeShift Start Press J/11./'f' button to select the TimeShift Start , then start an instant limeShift by selecting OK.
You can press 0 0 on the remote control under the DTV Source. If you device speed is not enough, there will be a dialog as follows:
Message
Do you want to start TimeShift?
• M4Ui44M
During Recording, there will be a small dialog on the upper: -Press IIIEIIII on the remote control to stop recording.
Message
Do you want to stop TimeShift?
• M4Ui44M To stop TimeShift by choose• OK", to continue recording by choose "Cancel".
29 After Sales Support Telephone: 1800 330064
EPG (ELECTRONIC PROGRAM GUIDE) Press EPG button on the remote control to display the EPG daily mode menu.
0001 ABCHDTV
EPG Weekly Mode
10/10/2007 16:48:55 10/10/2007 16:38-10/10/2007 17:01 Jakersl - Dannan'sAmerican Cousin
Dannan is excited when her cousin, Gaddie, comes to visit from the USA. She gets jealous, however, when it appears that Ferny and Piggley like Gaddie
Wed 10/10 • Thu Fri Sat Sun Mon Tue Wed
16:38-17:01 Jakersl-Dannan'sAmerican Cousin
ABC TV Canberra 17:01-17:07 Lazy Lucy: A Photo Finish
ABC2 17:07-17:30 Bind: The Jungle Girl
ABC TV 17:30-17:43 Sitting Ducks -Iced Duck
ABC DiC Radio 17:43-17:59 Tracey McBean : Of Lice & Tracey
ABC DiG Jazz
Daily !SI Move
17:59-18:25 Naturally Sadile: Election
18:25-18:48 Daria - Murder, She Snored
• l'f Prev Day B Info
1. The current channel No. and channel name. 2. The current program's start-shop lime and program name. 3. The current dale and lime. Press J,,J'l//f button to select the channel or program. Press ..,., button to choose between the channel and program.
Next Day m l i Exit
Press RED button to switch between EPG weekly mode and EPG daily mode.
0001 ABCHD"TV
EPG Dally Mode
10/10/2007 16:48:55
10/10/2007 16:38-10/10/2007 17:01 Jakersl- Dannan'sAmerican Cousin Dan nan is excited when her cousin, Gaddie, comes to visit from the USA. She gets jealous, however, when it appears tt,at Famy and Piggley like Gaddie
To see programmers for the yesterday or further, press the YELLOW button to decrease the date. To see programmers for the next day or further, press BLUE button to increment the date.
Wed 10/10
ABC TV Canberra ABC2
ABC "TV ABCDICRadlo
ABCDiGJazz
Weekly 8 Move
Note:
16:00 16:30 17:00 17:30 18:00
No Event Info am - Bindi: Th... Sitli... Trac .. .
No Event Info Jakersl-... - Bindi: Th... Sitti... Trac .. .
No Event Info Second Opi.... Australia W... Differebnce .. .
No Event Info Jakersl-... No Event Info
Info at: abc. net. au/dig
Info at: abc. net. au/jazz
• Reminder , r Prav Day 11m Info
Next Day mu Exit
- EPG function is available only in DTV mode.
For more information about a program, press INFO. Press GREEN button once to add channel to the recorder list. Press GREEN button twice to Reminder the program, there will be a small logo or beside the program. Press EPG once more or EXIT once to cancel the operation. Means the channel is encoded channel.
-When viewing a channel which contains many programs, you may need to press and hold E P G button for about 2 seconds to display program guide.
After Sales Support 30 Telephone: 1800 330064

Setup Menu Press MENU button to display the main menu. Press Ji.IT button to select Setup in the main menu, then press ENTER or to enter.
!;! n 0 (9 II
OSDTlmer """'' PCSetup ENTER
HDMI Mode Under Scan .r Blue Screen o, Sotup Aspect Ratio 16:9
Reset TV Setting ENTER
Auto Installation ENTER
Software Upgrade ENTER
-- c::ih- m= ID-m
1. Press Ji.IT button to select the option that you want to adjust in the Setup menu, then press ENTER or button to enter.
2. Press <111/ button to adjust or press Jt./Tbutton to select. 3. After finishing your adjustment, press MENU button to save and return back to the
previous menu and press EXIT button to exit the entire menu.
OSDTimer Press Ji.IT button to select OSD Timer, then press ENTER or button to enter the sub menu, Then Press Ji.IT button to select.(Available OSD limer:5 Second, 10 Second, 15 Second, 20 Second, 25 Second, 30 Second, never), then press ENTER o r button to confirm.
PC Setup Press Ji.IT button to select PC Setup, then press ENTER or to enter the sub menu, Then Press to enter, then press ENTER or to confirm(when the PC signal is connected).
HDMI Mode Press Ji.IT button to select HDMI Mode, then press ENTER or to enter the sub menu, Then Press to select.(Available: Auto, User Scan, Over Scan ), then press ENTER or to confirm (when the HDMI signal is connected).
Blue Press Ji.IT button to select Blue, then press ENTER or to enter the sub menu, Then Press Ji.IT to select On or Off. Then press ENTER or to confirm.
Aspect Ratio Presslt./Tbutton to select the Aspect Ratio item ,and then use ENTER o r button to enter submenu to select the screen ratio.(Note: Aspect Ratio may not be adjustable if no available signals.)
Reset TV Setting Press Ji.IT button to select Reset TV Setting, and then press ENTER or to enter. The password menu will appear when the Child Lock is on. ( the default password is "0000")
Auto Installation Presslt./Tbutton to select the Auto Installation item ,and then use ENTER o r button to enter submenu to select Auto Installation. ( the default password is "0000")
Software Update(USB) Presslt./Tbutton to select the Software Update(USB) item ,and then use ENTER o r button to update software.
31 After Sales Support Telephone: 1800 330064
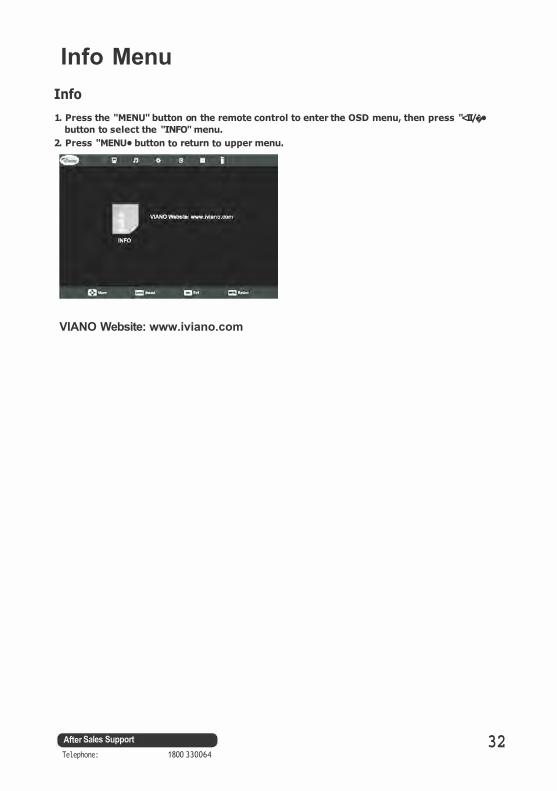
Info Menu Info 1. Press the "MENU" button on the remote control to enter the OSD menu, then press "<II/�•
button to select the "INFO" menu. 2. Press "MENU• button to return to upper menu.
VIANO Website: www.iviano.com
After Sales Support Telephone: 1800 330064
32
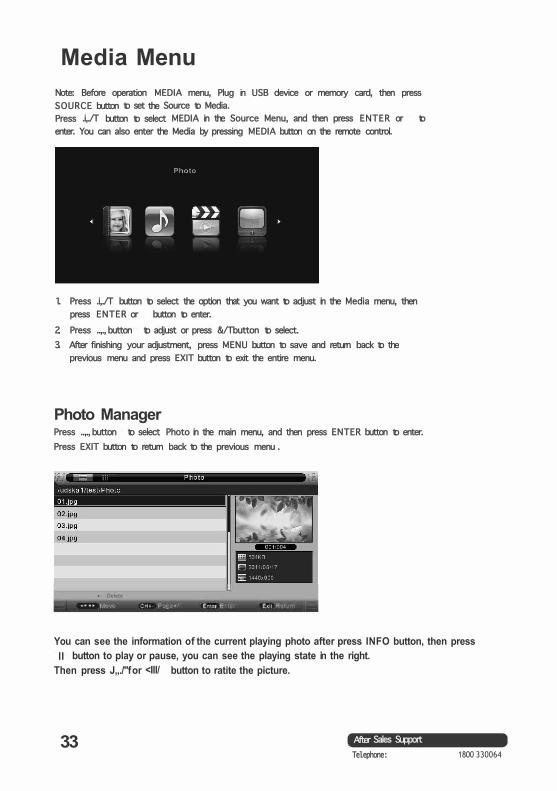
Media Menu Note: Before operation MEDIA menu, Plug in USB device or memory card, then press SOURCE button to set the Source to Media. Press .i,./T button to select MEDIA in the Source Menu, and then press ENTER or to enter. You can also enter the Media by pressing MEDIA button on the remote control.
1. Press .i,./T button to select the option that you want to adjust in the Media menu, then press ENTER or button to enter.
2. Press ..,., button to adjust or press &/Tbutton to select. 3. After finishing your adjustment, press MENU button to save and return back to the
previous menu and press EXIT button to exit the entire menu.
Photo Manager Press ..,., button to select Photo in the main menu, and then press ENTER button to enter. Press EXIT button to return back to the previous menu .
• Delete
You can see the information of the current playing photo after press INFO button, then press II button to play or pause, you can see the playing state in the right. Then press J,,./"f or <Ill/ button to ratite the picture.
33 After Sales Support Telephone: 1800 330064
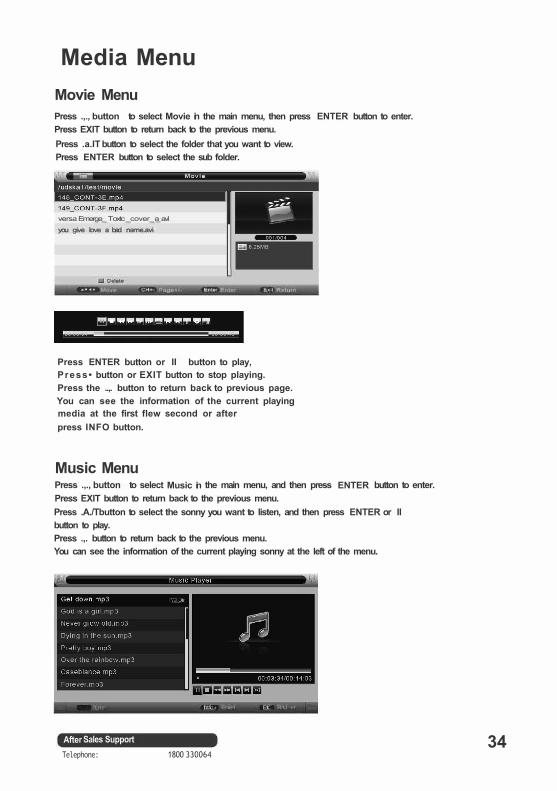
Media Menu Movie Menu Press .,., button to select Movie in the main menu, then press ENTER button to enter. Press EXIT button to return back to the previous menu. Press .a.IT button to select the folder that you want to view. Press ENTER button to select the sub folder.
versa Emerge_ T oxtc _cover_ a_ avl
you give love a bad name.avi
Press ENTER button or II button to play, Press• button or EXIT button to stop playing. Press the ..,. button to return back to previous page. You can see the information of the current playing media at the first flew second or after press INFO button.
Music Menu Press .,., button to select Music in the main menu, and then press ENTER button to enter. Press EXIT button to return back to the previous menu. Press .A./Tbutton to select the sonny you want to listen, and then press ENTER or II button to play. Press .,. button to return back to the previous menu. You can see the information of the current playing sonny at the left of the menu.
'.1J11 !:n11c Enle1 E 1t R 1J r
After Sales Support Telephone: 1800 330064
34
Media Menu PVR Menu Press <111/ button to select PVR in the main menu, then press ENTER button to enter. Press EXIT button to return back to the previous menu. Press Ji.IT button to select the folder that you want to view. Press ENTER button to select the sub folder.
HTVl(20100125_101600)
RT1. TV(20100125 101601)
RT1. TV(20100125_ 101701)
O.oot 8(20100406_090605)
0.-scl 8{?01()().100_090832)
0.o,;l •(20 I 00406 _ 090653) • Delete
Press ENTER button or II button to play, Press• button or EXIT button to stop playing. Press the <Ill button to return back to previous page. You can see the information of the current playing media at the first flew second or after press INFO button.
35 After Sales Support Telephone: 1800 330064
USB Multimedia Playback Format USB MULTIMEDIA PLAYBACK FORMAT
Media Ext. Video Audio Remark .mpg MPEG-1, MPEG-e
DivX, Xvid, MJPEG, .avi MPEG-4 SP/ASP,
H.264 .ts MPEG-2, H.264 Max Solution: 1920x1080
Movie .mov/. MPEG-4 SP/ASP, MP3,WMA, Max Data Rate: 20 Mbps mkv H.264 AAC,AC3 .dat MPEG-1
MPEG-4 SP/ASP, .mp4 H.264
MPEG-1, MPEG-2 Max Solution: 1920x1080 .vob MPEG-2 Max Data Rate: 40 Mbps .mo3 -- MP3 Sample Rate: 8K-48KHz .wma -- WMA Bit Rate: 32K-320Kbps
Music .m4a/a Sample Rate: 16K-48KHz
-- AAC Bit Rate: 32K-442Kbps ac Channel: Mono/Stereo .jpg Progressive JPEG Max Resolution:1024x768 .jpeg Baseline JPEG Max Resolution:8192x8192
photo .bmp BMP Max Resolution:6500x6500 Pixel Depth: 1/4/8/16/24/32 bpp
Non-Interlaced Max Resolution:3000x3000 .png Interlaced Max Resolution:1500x1500 File System: Hi Speed FS, FAT32,FAT16,NTFS(NTFS compressed file is not supported} Note: Licenses are required for Divx,MPEG,H.264,AC3, MP3,WMA and ACC.
Connection To Exterior Devices RCA terminal is used to connect the output device of DVD(480i/480p/576i/576p/720p/108Di)
Notes:
The rear ofTV
®®® ®@®
Y/Pb/Pr
E [: Video
1. Y-Pb-PrVideo use a common audio in. 2. Y-Pb-Pr of DVD is corresponding to Y-Pb-Pr ofTV.
After Sales Support Telephone: 1800 330064
DVD
C: E l ··:!I camera
Video recorder
36
Troubleshooting *Ensure that the batteries are installed with correct polarity(+ to+, - to-). *Ensure that the correct remote operating mode is set: TV, VCR etc. Symptom Possible cause Possible solution
No picture and sound. • The power cord is not • Plug the power cord into aplugged in. suitable outlet. • The wrong input source is • Select the correct input selected. source. • The input source has failed • Make sure the input to connect with the TV. source is correctly • Master Power switch is set to OFF. connected.
• Locate the Master Power switch on switch to ON position -depending on the model,this may be just to the left or right of where the power cord meets the base of the TV,on the back of the TV towards the base.orunder the lower edge of the screen.If you are not even getting a standby light.this master switch is probably still set to the OFFposition.
No power • Your TV is plugged into a • Plug your TV directly into the power-pack or multiple outlet wall socket. pack.
No sound. • The volume control is set • Press the VOL + button to to minimum. increase the volume. • The mute button on the • Press the mute (orVOL+)remote control is pressed. button to restore/increase • An incorrect sound system the volume. mode is set. • Set a correct sound
system mode from the main menu to match your TV.
No picture, or • The colour system setting • Select the appropriate Monochrome picture only. does not match the colour system setting.
program. • Select the appropriate • The sound system setting sound system setting. does not match the program.
37 After Salas Support Telephone: 1800 33 0064
Troubleshooting *Ensure that the batteries are installed with correct polarity(+ to+, - to-). *Ensure that the correct remote operating mode is set: TV, VCR etc. Symptom Possible cause Possible solution
Sound or picture • Some equipment that may • Keep interference causinginterference. cause interference is close equipment away from the
to the TV. TV. • More than one device is • Plug the power cord into plugged into the same another, separate power power outlet. outlet. • An incorrect sound system • Set a correct sound mode is set. system mode from the main
menu to match your TV.
If you cannot solve the problem, contact the after sales support line. NOTE: A few bright or dark dots occasionally appearing on the TV screen is normal. If you cannot solve the problem, contact the after sales support line on the number listed below. NO FAULT FOUND charge of minimum $115.00 in our terms.
After Sales Support 38 Telephone: 1800 330064
Frequently asked questions
•My tv does not turn on, the tv has no power
Ensure the tv is plugged in a working power source.
Most television 32 " or above come with 2 power switches, simply locate the second power
switch ( on the side or on the back of the television) and make sure it is turned on.
•My tv keeps turning off sometimes by itself
On the remote press the " Menu Button ", using the arrow buttons to navigate between menu
settings, search for all the settings such as" Auto-power off", "Sleep Timer''" Auto- Shutdown"
and make sure you switch all these settings to off.
•My remote control does not function properly
Make sure the batteries are new and inserted in properly.
•My tv does not have any channel
Ensure the TV is connected to a working digital Antenna (Note: analog is no longer in use in
Australia), after the tv has been connected, please run an "Auto Scan "or "Auto Search" to
scan all channels for first time use.
•My tv does not receive all channels, I do not have ABC channel etc ...
This is a reception issue because if the tuner was faulty, the tv would receive no signal at all
To fix, please try a different antenna or a different signal source and re-scan all channels.
•My other TV has all channels, but this tv only has few channels
39
This is a reception issue; a faulty plug could result in weaker reception, to fix simply replace the
plug and ensure it is properly connected to the TV and re-scan all channels. If possible, moving
the tv to a different location in the house can fix the issue.
After Salas Support Telephone: 1800 33 0064
•My tv channels are not in order, e.g: number 7 does not go to channel 7
Sometimes after the "Auto Scan" the order of the channels may vary. To organize the channel to
your preferred number, simply press the channel you want to re-organize and press the "menu"
button on the remote, search for the setting" Manual scan" Or "Manual Search", press ok and
keep scanning until you get the correct channel, the channel number will then be saved
automatically.
•My tv has DVD in-built, I do not know how to get it to work
Ensure the DVD disc is not damaged; insert it in the DVD tray properly. On the remote press the
"Source" button, locate the source "DVD "or "AV" and navigate to it.
•My DVD combo tv has 2 USB, the first one is at the back and the second one is on the DVD, I cannot
get the second one to work
The second USB shares the same port as the DVD; to use the second USB, press the "source"
button on the remote and navigate to DVD, then press ok to select.
•I try to play movies via USB but it does not detect the USB or movies are not playable
Please ensure the USB is formatted correctly, recommended format is FAT32
Ensure the format of the movies are within the supported formats of the tv; should the movies
be converted from a different format, ensure the format has been converted properly and not
corrupted in anyway, check with the software developer for best options.
•I have tried to connect my PC/laptop via HDMI but nothing displays
Most laptops and some PCs will automatically connect, some will require manual configuration,
please check with the laptop or PC manufacturer for instructions.
After ensuring the laptop/PC is properly configured and connected to the TV, on the remote
press source and navigate to HDMI ( HDMI 1 or HDMI 2 depending on which socket is in use)
•I want to connect my tv with my headphone but I cannot locate it on the TV
There is no direct socket for headphone output. Alternatively, please enquire within any
consumer electronics store and ask for RCA to 3.5 MM converter (Yellow and White RCA to 3.5
MM ), then simply connect it to the RCA sockets on the TV.
After Sales Support 40 Telephone: 1800 330064
•I want to reset the TV to its factory setting
On the remote press " Menu " button, locate the setting " Factory Reset "or " Reset to Original
setting " ( Wording may change depending on the model) and press ok
•I want to use the hard drive for program recording and video playback, what is the maximum hard
drive capacity that is supported and in what format?
The maximum capacity is 500 GB, the recommended format for all hard drive and USB is FAT32
41 After Salas Support Telephone: 1800 33 0064
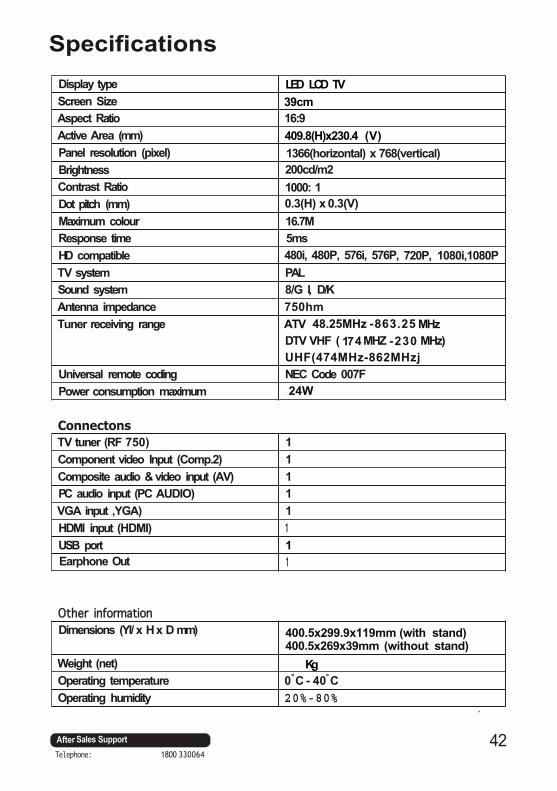
Specifications Display type LED LCD TV Screen Size 39cm Aspect Ratio 16:9 Active Area (mm) 409.8(H)x230.4 (V) Panel resolution (pixel) 1366(horizontal) x 768(vertical) Brightness 200cd/m2 Contrast Ratio 1000: 1 Dot pitch (mm) 0.3(H) x 0.3(V) Maximum colour 16.7M Response time 5ms HD compatible 480i, 480P, 576i, 576P, 720P, 1080i,1080P TV system PAL Sound system 8/G I, D/K Antenna impedance 750hm Tuner receiving range ATV 48.25MHz -863.25 MHz
DTV VHF ( 17 4 MHZ -230 MHz) UHF(474MHz-862MHzj
Universal remote coding NEC Code 007F Power consumption maximum 24W
Connectons TV tuner (RF 750) 1 Component video Input (Comp.2) 1 Composite audio & video input (AV) 1 PC audio input (PC AUDIO) 1 VGA input ,YGA) 1 HDMI input (HDMI) 1 USB port 1 Earphone Out 1
Other information Dimensions (YI/ x H x D mm) 400.5x299.9x119mm (with stand)
400.5x269x39mm (without stand) Weight (net) Kg Operating temperature 0°C - 40°C Operating humidity 20%-80%
After Sales Support 42 Telephone: 1800 330064