aalborg university library’s...aalborg university library, february 2014 aalborg university...
TRANSCRIPT

[email protected] Aalborg University Library, February 2014
Aalborg University Library’s
REFWORKS MANUAL
English edition
YOU WRITE IT.

ii
How to access RefWorks ................................................................................................................................................... 1
Access to your individual account..................................................................................................................................... 1
Creating and accessing a joint account ............................................................................................................................ 1
Groupcode ........................................................................................................................................................................ 1
Browser compatibility ............................................................................................................................................................ 1
Folders ................................................................................................................................................................................. 2
Create a folder .................................................................................................................................................................. 2
Delete, rename or clear a folder or create a subfolder to a folder .................................................................................... 2
Getting references into Refworks .......................................................................................................................................... 2
Direct export from a database ............................................................................................................................................... 3
BIBLIOTEK.DK ................................................................................................................................................................ 3
Export of a single reference ......................................................................................................................................... 3
Export of more than one reference ............................................................................................................................... 4
SCOPUS .......................................................................................................................................................................... 4
Export of references from Scopus ................................................................................................................................ 4
GOOGLE SCHOLAR ....................................................................................................................................................... 5
Setting your Google Scholar preferences .................................................................................................................... 5
Export of a single reference ......................................................................................................................................... 5
Export of references from Google Scholar using RefGrab-It ........................................................................................ 5
Import of a text file from a database...................................................................................................................................... 6
PUBMED .......................................................................................................................................................................... 6
Import of references from PubMed as a text file........................................................................................................... 6
Export of references from PubMed using RefGrab-It ................................................................................................... 6
VBN ...................................................................................................................................................................................... 7
VBN - backend ................................................................................................................................................................. 7
VBN – frontend ................................................................................................................................................................. 7
E-books ................................................................................................................................................................................. 8
EBRARY .......................................................................................................................................................................... 8
Activate the direct export functionality in Ebrary........................................................................................................... 8
Export of one reference ................................................................................................................................................ 8
Using the bookshelf feature in Ebrary .......................................................................................................................... 9
Create folders in your Bookshelf, and add references to the folders ............................................................................ 9
Export several references from your bookshelf folder to RefWorks ........................................................................... 9
SPRINGERLINK ............................................................................................................................................................ 10
Export of references from SpringerLink ..................................................................................................................... 10
Use RefWorks’ search facility: Search in online catalog or database ................................................................................. 10
Manually add new references ............................................................................................................................................. 11
RefGrab-It .......................................................................................................................................................................... 12
Add RefGrab-it Bookmarklet from Refworks ................................................................................................................... 12
Export data with RefGrab-It Bookmarklet from a webpage............................................................................................. 12
Converting references from RefMan to RefWorks ......................................................................................................... 13
Backup your RefWorks account ...................................................................................................................................... 14
Create a backup of your account .................................................................................................................................... 14
Restore your references to a new RefWorks account .................................................................................................... 14
Export of references from RefWorks to other reference management systems ......................................................... 14
How to export your references in the BibTeX format .................................................................................................. 14
TABLE OF CONTENTS

iii
Organizing your references ............................................................................................................................................. 15
Duplicates ....................................................................................................................................................................... 15
Search ............................................................................................................................................................................ 15
Edit a reference or a selection of references .................................................................................................................. 15
Delete or remove references .......................................................................................................................................... 15
Share your references ...................................................................................................................................................... 16
In-Text-Citations .................................................................................................................................................................. 16
Write-N-Cite 4 for Windows .............................................................................................................................................. 17
Installation of Write-N-Cite (version 4) for Windows ....................................................................................................... 17
Use of Write-N-Cite in a document ................................................................................................................................. 17
Create a bibliography in a document .............................................................................................................................. 17
Write-N-Cite 4 for MAC ..................................................................................................................................................... 18
Installation of Write-N-Cite for Mac ................................................................................................................................. 18
Inserting and editing in-text citations in your Word document ........................................................................................ 18
Insert a bibliography in your Word document ................................................................................................................. 18
Using RefWorks One line / Cite View .............................................................................................................................. 19
Refer to specific pages in your in-text-citations using One line/Cite View ...................................................................... 19
Create a bibliography from a folder or a list of references ........................................................................................... 20
RefMobile ............................................................................................................................................................................ 20
How to use RefMobile .................................................................................................................................................... 20
Help and support .............................................................................................................................................................. 21

1
How to access RefWorks
RefWorks is a web-based reference handling system, which can help you save and organize your references - make correct references and bibliographies in your documents and share your references with others. All students and employees at Aalborg University have an individual RefWorks account. You can access RefWorks from anywhere. It is possible for you to create an additional account which can be used as a joint account for groups or when you want to use the Refmobile facilities.
Access to your individual account
Creating and accessing a joint account
Groupcode
Browser compatibility RefWorks recommends the browsers Firefox or Internet Explorer. If using Internet Explorer 9 make sure to switch on Compatibility View. RefGrab-It is not compatible with Google Chrome and can cause problems in Safari. Make sure plug-ins are not deactivated in your browser.
HOW TO ACCESS REFWORKS
Access to your individual account 1. Find AUB’s homepage http://www.en.aub.aau.dk/ 2. Click on Reference Handling in the menu to the right 3. Click on Go to your individual account in RefWorks via the AAU access control 4. Now you come to the entry page for the AAU Access Control System 5. Both employees and students must use the AAU Access Control System in order to access their
individual RefWorks account 6. It is your official AAU e-mail and corresponding PIN code that serves as your login/password 7. Remember that your PIN code is personal and should never be shared
Creating and accessing a new account 1. Find AUB’s homepage on http://www.en.aub.aau.dk/ 2. Click on Reference Handling in the menu to the right 3. Click on: In cases of joint accounts, please go to RefWorks’s direct login 4. Use the menu to the left and create a new account by using Sign Up for an New Account in the upper
right corner 5. The new account can be an extra account for yourself or can be shared with others 6. You must use an AAU email when creating the account 7. You cannot customize the email in the new account unless it is to another AAU email
(p.t. you can also customize it to a gmail) 8. Share your login and password with your group members if it is a shared account 9. The new account must always be accessed via RefWorks’s direct login in the menu to the left
RefWorks direct login menu
Groupcode for access to RefWorks outside the campus network When you want to access RefWorks from outside the campus network, you’re sometimes asked to enter a groupcode. For Aalborg University, this groupcode is rwuaalborg. Afterwards you login through the AAU Access Control System.
2
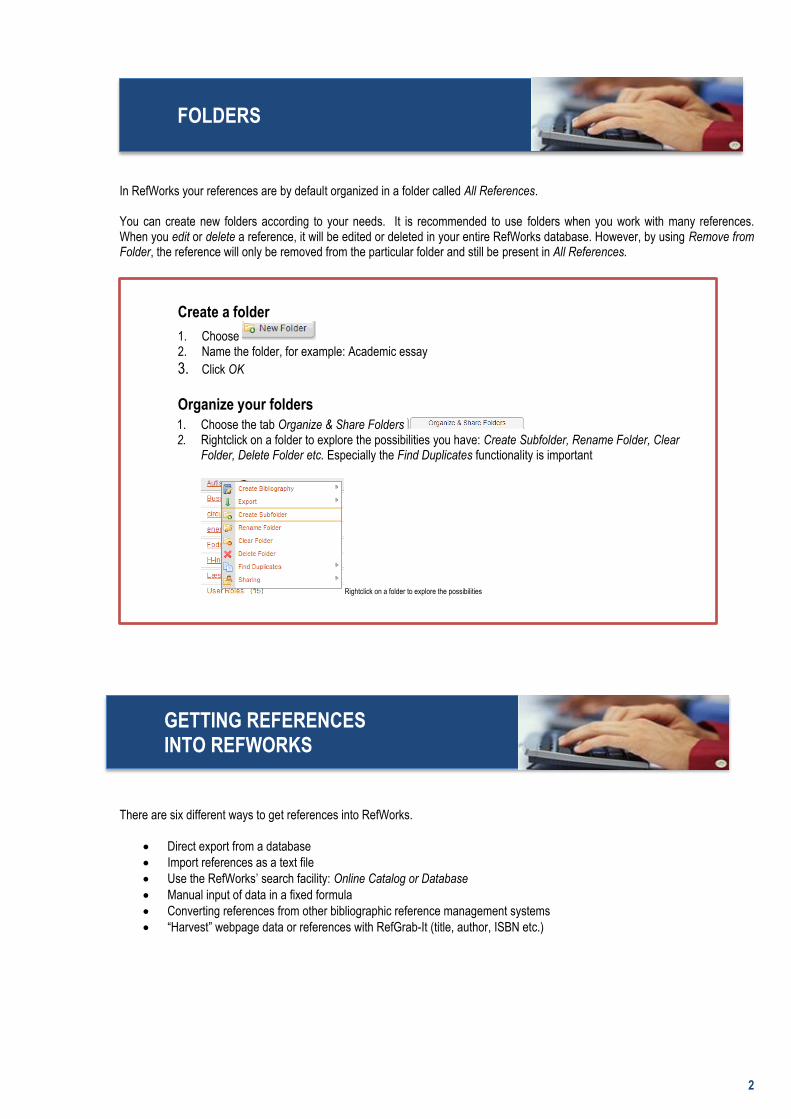
Folders
In RefWorks your references are by default organized in a folder called All References. You can create new folders according to your needs. It is recommended to use folders when you work with many references. When you edit or delete a reference, it will be edited or deleted in your entire RefWorks database. However, by using Remove from Folder, the reference will only be removed from the particular folder and still be present in All References.
Create a folder:
Delete, rename or clear a folder or create a subfolder to a folder:
Getting references into Refworks There are six different ways to get references into RefWorks.
Direct export from a database
Import references as a text file
Use the RefWorks’ search facility: Online Catalog or Database
Manual input of data in a fixed formula
Converting references from other bibliographic reference management systems
“Harvest” webpage data or references with RefGrab-It (title, author, ISBN etc.)
FOLDERS
GETTING REFERENCES INTO REFWORKS
Create a folder
1. Choose 2. Name the folder, for example: Academic essay
3. Click OK
Organize your folders
1. Choose the tab Organize & Share Folders 2. Rightclick on a folder to explore the possibilities you have: Create Subfolder, Rename Folder, Clear
Folder, Delete Folder etc. Especially the Find Duplicates functionality is important
Rightclick on a folder to explore the possibilities

3
Direct export from a database Below are examples of databases from which you can export directly to RefWorks. The databases are all listed on the AUB’s homepage www.en.aub.aau.dk under Databases
Bibliotek.dk
Scopus (part of SciVerse)
Google Scholar
BIBLIOTEK.DK You can export references in two ways from Bibliotek.dk. Remember first to make the setting “Enable export to records to RefWorks”.
You cannot make settings until you are logged in. Click on “Log in” and choose either “Create New Account” or “Log in”. When you are logged in click on “My account” and choose “Settings” (in the menu to the left). Checkmark “Enable export of records to Refworks” and “Save Settings”. Now you are ready to export references from Bibliotek.dk to Refworks.
Export of a single reference
Export of a single reference 1. Find bibliotek.dk on www.en.aub.aau.dk under Databases 2. Choose the English Edition of Bibliotek.dk
3. Make a search (e.g. for: Doing interviews by Kvale) 4. Click on “More info” under the reference 5. Click on Export to RefWorks (you see it to the right) 6. If you are not already logged in to RefWorks you sometimes have to go back to Bibliotek.dk and export
the references again after you have logged in to RefWorks 7. View the reference in RefWorks by clicking on View Last Imported Folder
8. Click on if you want to check the reference
9. Click on if you want to change or add information to the reference 10. Click on Save Reference to save the changes 11. Close the record 12. Select the reference and put it in a folder
DIRECT EXPORT FROM A DATABASE
4
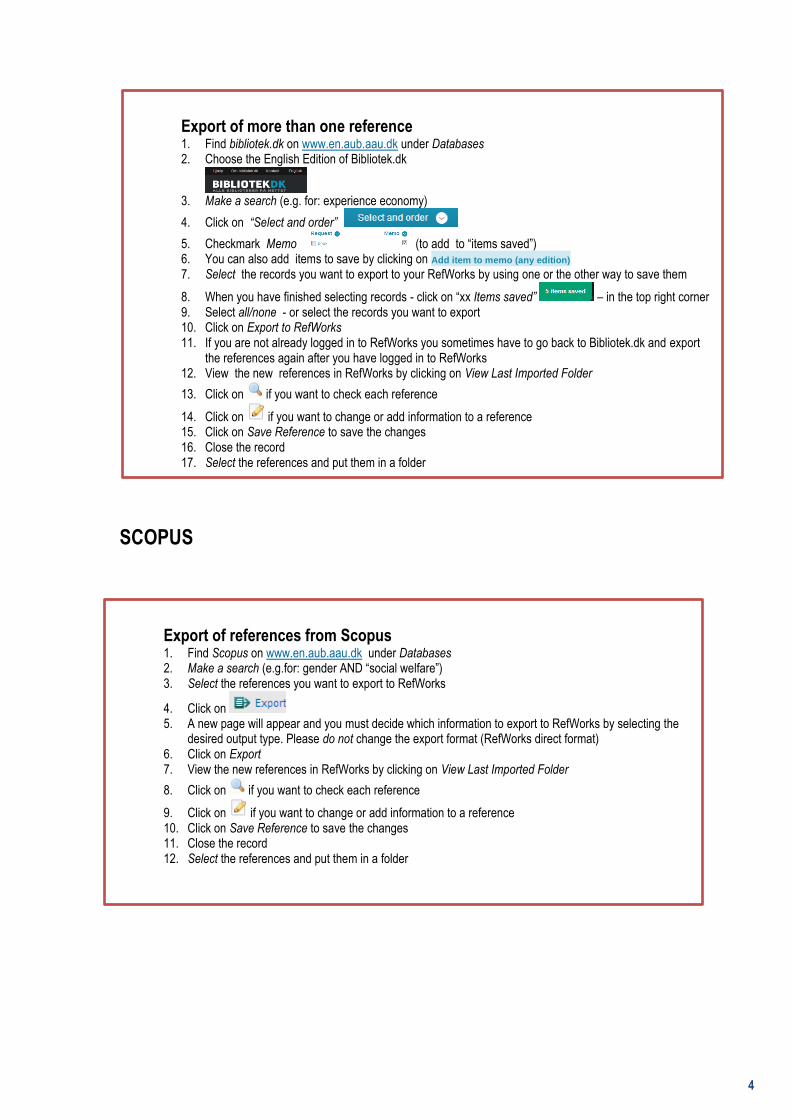
Export of more than one reference
SCOPUS
Export of references from Scopus
Export of more than one reference 1. Find bibliotek.dk on www.en.aub.aau.dk under Databases 2. Choose the English Edition of Bibliotek.dk
3. Make a search (e.g. for: experience economy)
4. Click on “Select and order”
5. Checkmark Memo (to add to “items saved”) 6. You can also add items to save by clicking on Add item to memo (any edition) 7. Select the records you want to export to your RefWorks by using one or the other way to save them
8. When you have finished selecting records - click on “xx Items saved” – in the top right corner 9. Select all/none - or select the records you want to export 10. Click on Export to RefWorks 11. If you are not already logged in to RefWorks you sometimes have to go back to Bibliotek.dk and export
the references again after you have logged in to RefWorks 12. View the new references in RefWorks by clicking on View Last Imported Folder
13. Click on if you want to check each reference
14. Click on if you want to change or add information to a reference 15. Click on Save Reference to save the changes 16. Close the record 17. Select the references and put them in a folder
Export of references from Scopus 1. Find Scopus on www.en.aub.aau.dk under Databases 2. Make a search (e.g.for: gender AND “social welfare”) 3. Select the references you want to export to RefWorks
4. Click on 5. A new page will appear and you must decide which information to export to RefWorks by selecting the
desired output type. Please do not change the export format (RefWorks direct format) 6. Click on Export 7. View the new references in RefWorks by clicking on View Last Imported Folder
8. Click on if you want to check each reference
9. Click on if you want to change or add information to a reference 10. Click on Save Reference to save the changes 11. Close the record 12. Select the references and put them in a folder
5
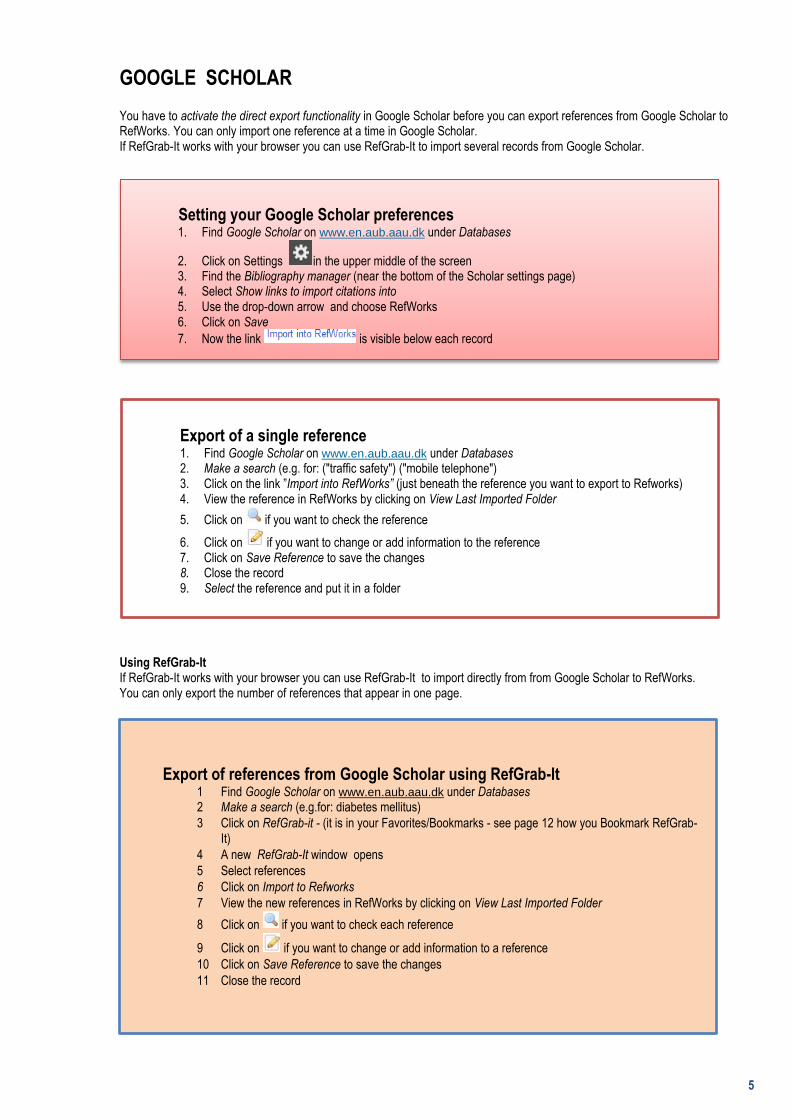
GOOGLE SCHOLAR You have to activate the direct export functionality in Google Scholar before you can export references from Google Scholar to RefWorks. You can only import one reference at a time in Google Scholar. If RefGrab-It works with your browser you can use RefGrab-It to import several records from Google Scholar.
Setting your Google Scholar preferences
Export of a single reference
Using RefGrab-It If RefGrab-It works with your browser you can use RefGrab-It to import directly from from Google Scholar to RefWorks. You can only export the number of references that appear in one page.
Export of references from Google Scholar using RefGrab-It
Setting your Google Scholar preferences 1. Find Google Scholar on www.en.aub.aau.dk under Databases
2. Click on Settings in the upper middle of the screen 3. Find the Bibliography manager (near the bottom of the Scholar settings page) 4. Select Show links to import citations into 5. Use the drop-down arrow and choose RefWorks 6. Click on Save
7. Now the link is visible below each record
Export of a single reference
1. Find Google Scholar on www.en.aub.aau.dk under Databases 2. Make a search (e.g. for: ("traffic safety") ("mobile telephone") 3. Click on the link ”Import into RefWorks” (just beneath the reference you want to export to Refworks) 4. View the reference in RefWorks by clicking on View Last Imported Folder
5. Click on if you want to check the reference
6. Click on if you want to change or add information to the reference 7. Click on Save Reference to save the changes 8. Close the record 9. Select the reference and put it in a folder
Export of references from Google Scholar using RefGrab-It 1 Find Google Scholar on www.en.aub.aau.dk under Databases 2 Make a search (e.g.for: diabetes mellitus)
3 Click on RefGrab-it - (it is in your Favorites/Bookmarks - see page 12 how you Bookmark RefGrab-It)
4 A new RefGrab-It window opens
5 Select references
6 Click on Import to Refworks
7 View the new references in RefWorks by clicking on View Last Imported Folder
8 Click on if you want to check each reference
9 Click on if you want to change or add information to a reference
10 Click on Save Reference to save the changes
11 Close the record
6
Import of a text file from a database
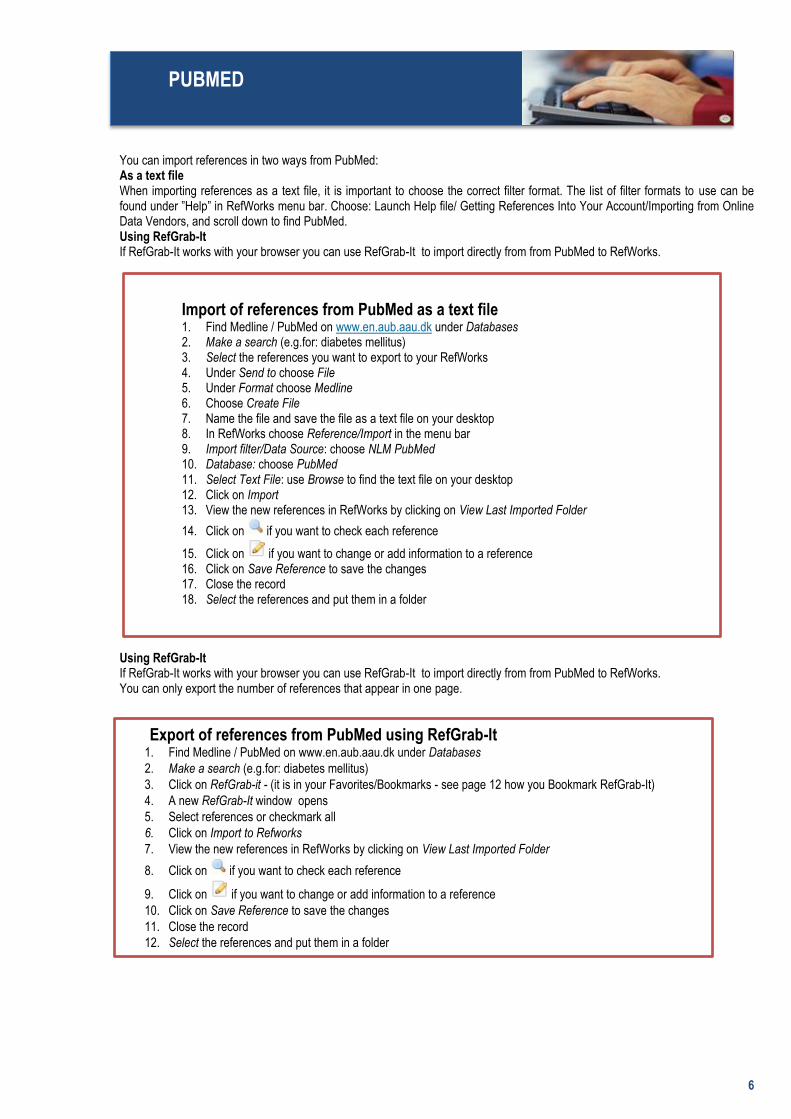
PUBMED You can import references in two ways from PubMed: As a text file When importing references as a text file, it is important to choose the correct filter format. The list of filter formats to use can be found under ”Help” in RefWorks menu bar. Choose: Launch Help file/ Getting References Into Your Account/Importing from Online Data Vendors, and scroll down to find PubMed. Using RefGrab-It If RefGrab-It works with your browser you can use RefGrab-It to import directly from from PubMed to RefWorks.
Import of references from PubMed as a text file
Using RefGrab-It If RefGrab-It works with your browser you can use RefGrab-It to import directly from from PubMed to RefWorks. You can only export the number of references that appear in one page.
Export of references from PubMed using RefGrab-It
PUBMED
Import of references from PubMed as a text file 1. Find Medline / PubMed on www.en.aub.aau.dk under Databases 2. Make a search (e.g.for: diabetes mellitus) 3. Select the references you want to export to your RefWorks 4. Under Send to choose File 5. Under Format choose Medline 6. Choose Create File 7. Name the file and save the file as a text file on your desktop 8. In RefWorks choose Reference/Import in the menu bar 9. Import filter/Data Source: choose NLM PubMed 10. Database: choose PubMed 11. Select Text File: use Browse to find the text file on your desktop 12. Click on Import 13. View the new references in RefWorks by clicking on View Last Imported Folder
14. Click on if you want to check each reference
15. Click on if you want to change or add information to a reference 16. Click on Save Reference to save the changes 17. Close the record 18. Select the references and put them in a folder
Export of references from PubMed using RefGrab-It 1. Find Medline / PubMed on www.en.aub.aau.dk under Databases
2. Make a search (e.g.for: diabetes mellitus)
3. Click on RefGrab-it - (it is in your Favorites/Bookmarks - see page 12 how you Bookmark RefGrab-It)
4. A new RefGrab-It window opens
5. Select references or checkmark all
6. Click on Import to Refworks
7. View the new references in RefWorks by clicking on View Last Imported Folder
8. Click on if you want to check each reference
9. Click on if you want to change or add information to a reference
10. Click on Save Reference to save the changes
11. Close the record
12. Select the references and put them in a folder
7
VBN
VBN - backend
VBN – frontend
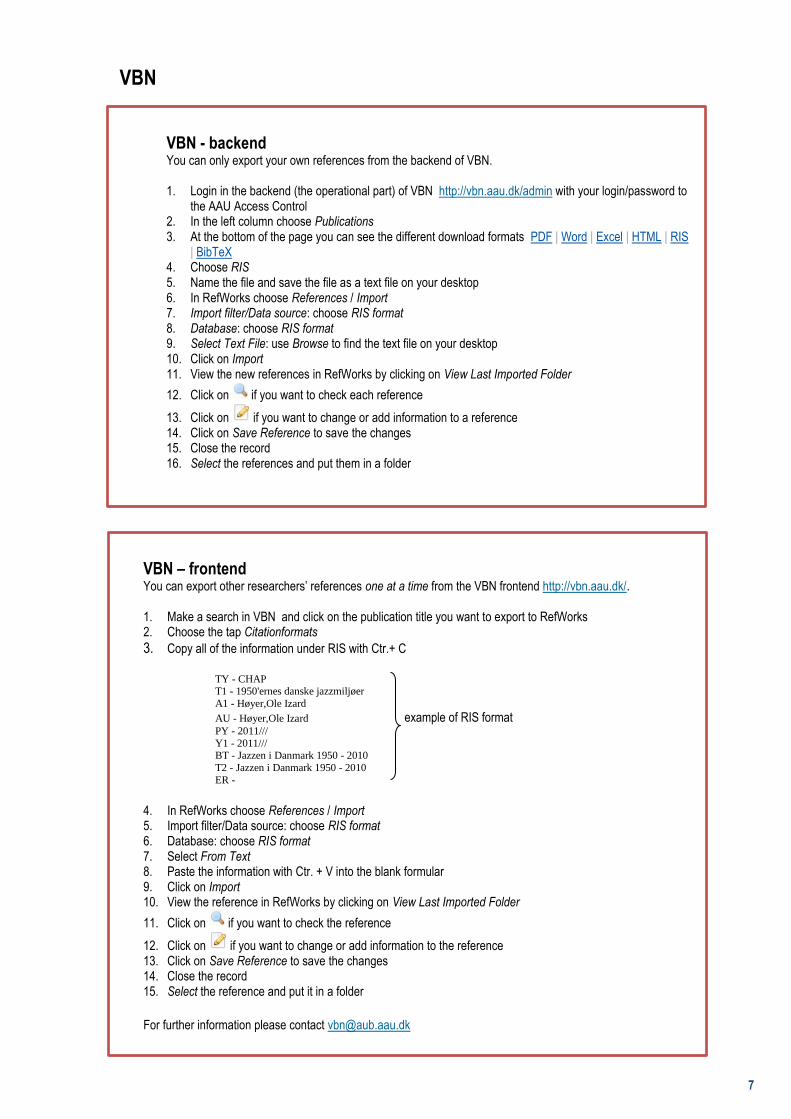
VBN - backend You can only export your own references from the backend of VBN.
1. Login in the backend (the operational part) of VBN http://vbn.aau.dk/admin with your login/password to
the AAU Access Control 2. In the left column choose Publications 3. At the bottom of the page you can see the different download formats PDF | Word | Excel | HTML | RIS
| BibTeX 4. Choose RIS 5. Name the file and save the file as a text file on your desktop 6. In RefWorks choose References / Import 7. Import filter/Data source: choose RIS format 8. Database: choose RIS format 9. Select Text File: use Browse to find the text file on your desktop 10. Click on Import 11. View the new references in RefWorks by clicking on View Last Imported Folder
12. Click on if you want to check each reference
13. Click on if you want to change or add information to a reference 14. Click on Save Reference to save the changes 15. Close the record 16. Select the references and put them in a folder
VBN – frontend You can export other researchers’ references one at a time from the VBN frontend http://vbn.aau.dk/.
1. Make a search in VBN and click on the publication title you want to export to RefWorks 2. Choose the tap Citationformats
3. Copy all of the information under RIS with Ctr.+ C
TY - CHAP T1 - 1950'ernes danske jazzmiljøer
A1 - Høyer,Ole Izard
AU - Høyer,Ole Izard example of RIS format PY - 2011///
Y1 - 2011/// BT - Jazzen i Danmark 1950 - 2010
T2 - Jazzen i Danmark 1950 - 2010
ER -
4. In RefWorks choose References / Import 5. Import filter/Data source: choose RIS format 6. Database: choose RIS format 7. Select From Text 8. Paste the information with Ctr. + V into the blank formular 9. Click on Import 10. View the reference in RefWorks by clicking on View Last Imported Folder
11. Click on if you want to check the reference
12. Click on if you want to change or add information to the reference 13. Click on Save Reference to save the changes 14. Close the record 15. Select the reference and put it in a folder
For further information please contact [email protected]
Export of references from Medline / PubMed using RefGrab-It 13. Find Medline / PubMed on www.en.aub.aau.dk under Databases
14. Make a search (e.g.for: diabetes mellitus)
15. Click on RefGrab-it - (it is in your Favorites/Bookmarks - see page 12 how you Bookmark RefGrab-It)
16. A new window with the title RefGrab-It opens
17. Select references or checkmark all
18. Click on Import to Refworks
19. View the new references in RefWorks by clicking on View Last Imported Folder
20. Click on if you want to check each reference
21. Click on if you want to change or add information to a reference
22. Click on Save Reference to save the changes
23. Close the record
24. Select the references and put them in a folder
8
E-books Below are 2 examples of exporting references from e-publishers.
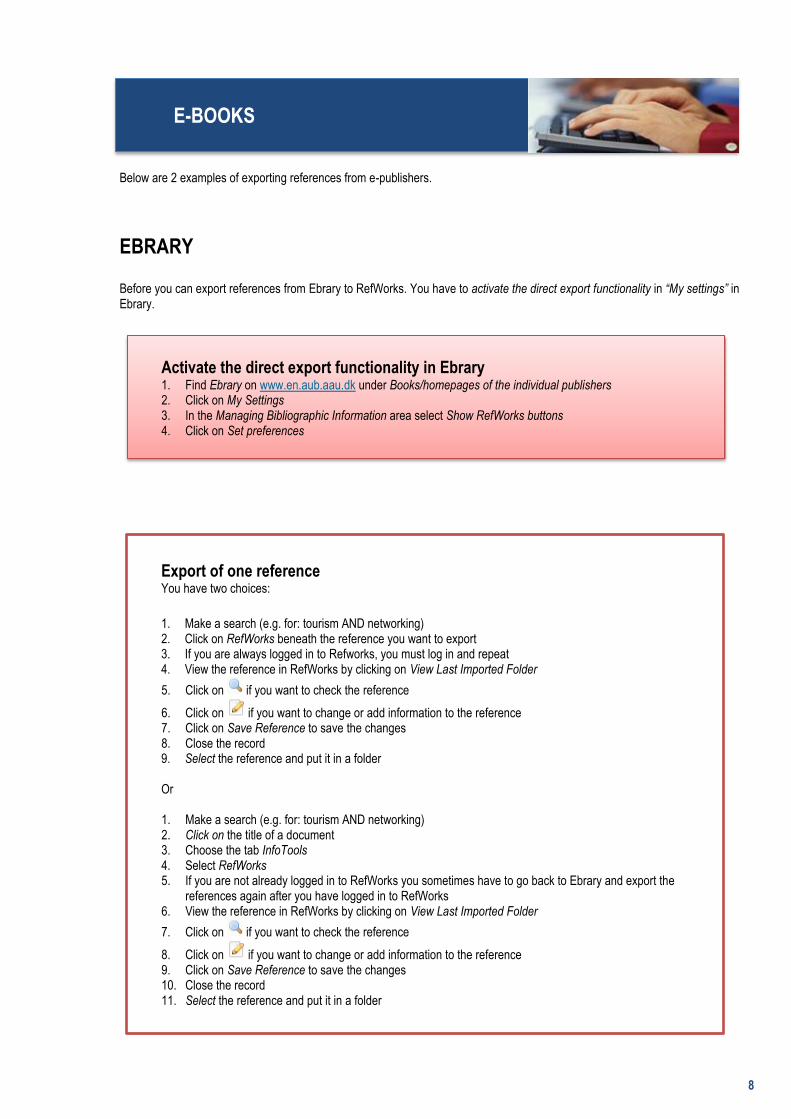
EBRARY Before you can export references from Ebrary to RefWorks. You have to activate the direct export functionality in “My settings” in Ebrary.
Activate the direct export functionality in Ebrary
Export of one reference
E-BOOKS
Activate the direct export functionality in Ebrary 1. Find Ebrary on www.en.aub.aau.dk under Books/homepages of the individual publishers 2. Click on My Settings 3. In the Managing Bibliographic Information area select Show RefWorks buttons 4. Click on Set preferences
Export of one reference You have two choices:
1. Make a search (e.g. for: tourism AND networking) 2. Click on RefWorks beneath the reference you want to export 3. If you are always logged in to Refworks, you must log in and repeat 4. View the reference in RefWorks by clicking on View Last Imported Folder
5. Click on if you want to check the reference
6. Click on if you want to change or add information to the reference 7. Click on Save Reference to save the changes 8. Close the record 9. Select the reference and put it in a folder
Or 1. Make a search (e.g. for: tourism AND networking) 2. Click on the title of a document 3. Choose the tab InfoTools 4. Select RefWorks 5. If you are not already logged in to RefWorks you sometimes have to go back to Ebrary and export the
references again after you have logged in to RefWorks 6. View the reference in RefWorks by clicking on View Last Imported Folder
7. Click on if you want to check the reference
8. Click on if you want to change or add information to the reference 9. Click on Save Reference to save the changes 10. Close the record 11. Select the reference and put it in a folder

9
Using the bookshelf feature in Ebrary
Using the bookshelf feature allows you to create folders and thereby export more than one reference at a time. You must Sign In before you can access and use the bookshelf feature in Ebrary
Create folders in your Bookshelf, and add references to the folders
Export several references from your bookshelf folder to RefWorks
Create folders in your Bookshelf, and add references to the folders 1. Click on Sign In in the top-right corner of Ebrary and sign in via the AAU Access Control System 2. Create one or more folders in your bookshelf 3. Select the Bookshelf tab 4. Click on Add Folder 5. Give the folder a name and click again on Add Folder 6. Make a search (e.g. for: tourism AND networking)
7. Add references to your bookshelf by using Add to My Bookshelf which you find beneath the title in the titles results list and also as an option when you have opened a title
8. Select the Bookshelf tab 9. To add references to a folder just drag the references over to the folder
Export several references from your bookshelf folder to RefWorks 1. Select the Bookshelf tab 2. Select the appropriate folder
3. Click on 4. If you are not already logged in to RefWorks you sometimes have to go back to Ebrary and export the folder
again after you have logged in to RefWorks 5. View the references in RefWorks by clicking on View Last Imported Folder
6. Click on if you want to check each reference
7. Click on if you want to change or add information to a reference 8. Click on Save Reference to save the changes 9. Close the record 10. Select the references and put them in a folder
10
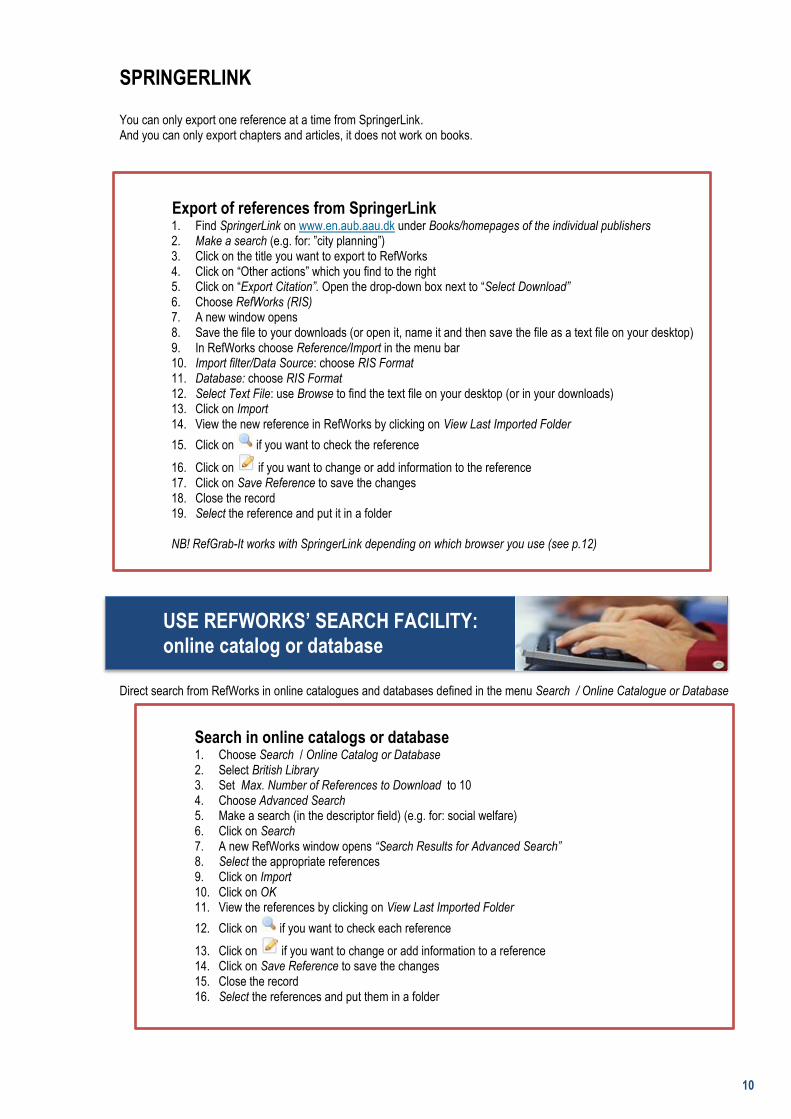
SPRINGERLINK You can only export one reference at a time from SpringerLink. And you can only export chapters and articles, it does not work on books.
Export of references from SpringerLink
Use RefWorks’ search facility: Search in online catalog or database
Direct search from RefWorks in online catalogues and databases defined in the menu Search / Online Catalogue or Database
USE REFWORKS’ SEARCH FACILITY: online catalog or database
Search in online catalogs or database 1. Choose Search / Online Catalog or Database 2. Select British Library 3. Set Max. Number of References to Download to 10 4. Choose Advanced Search 5. Make a search (in the descriptor field) (e.g. for: social welfare) 6. Click on Search 7. A new RefWorks window opens “Search Results for Advanced Search” 8. Select the appropriate references 9. Click on Import 10. Click on OK 11. View the references by clicking on View Last Imported Folder
12. Click on if you want to check each reference
13. Click on if you want to change or add information to a reference 14. Click on Save Reference to save the changes 15. Close the record 16. Select the references and put them in a folder
Export of references from SpringerLink 1. Find SpringerLink on www.en.aub.aau.dk under Books/homepages of the individual publishers 2. Make a search (e.g. for: ”city planning”) 3. Click on the title you want to export to RefWorks 4. Click on “Other actions” which you find to the right 5. Click on “Export Citation”. Open the drop-down box next to “Select Download” 6. Choose RefWorks (RIS) 7. A new window opens 8. Save the file to your downloads (or open it, name it and then save the file as a text file on your desktop) 9. In RefWorks choose Reference/Import in the menu bar 10. Import filter/Data Source: choose RIS Format 11. Database: choose RIS Format 12. Select Text File: use Browse to find the text file on your desktop (or in your downloads) 13. Click on Import 14. View the new reference in RefWorks by clicking on View Last Imported Folder
15. Click on if you want to check the reference
16. Click on if you want to change or add information to the reference 17. Click on Save Reference to save the changes 18. Close the record 19. Select the reference and put it in a folder NB! RefGrab-It works with SpringerLink depending on which browser you use (see p.12)

11
Manually add new references
MANUALLY ADD NEW REFERENCES
How to manually add references
1. Click on the button or use the menu References / Add New 2. Add the appropriate information in the fields as exemplified below 3. View fields used by: choose an Output style 4. Add to folder: Choose one of your folders 5. Ref. type: Journal Article 6. Source: Print 7. Author: Lundvall, Bengt-Åke 8. Title: Why all this fuss about codified and tacit knowledge? 9. Periodical, full: Industry and Corporate Change 10. Periodical, abbrev.: Ind corp change 11. Pub Year: 2002 12. Volume: 11 13. Issue: 2 14. Start Page: 245 15. Other Pages: 263 16. Click on Save Reference 17. Close the record
12
RefGrab-It
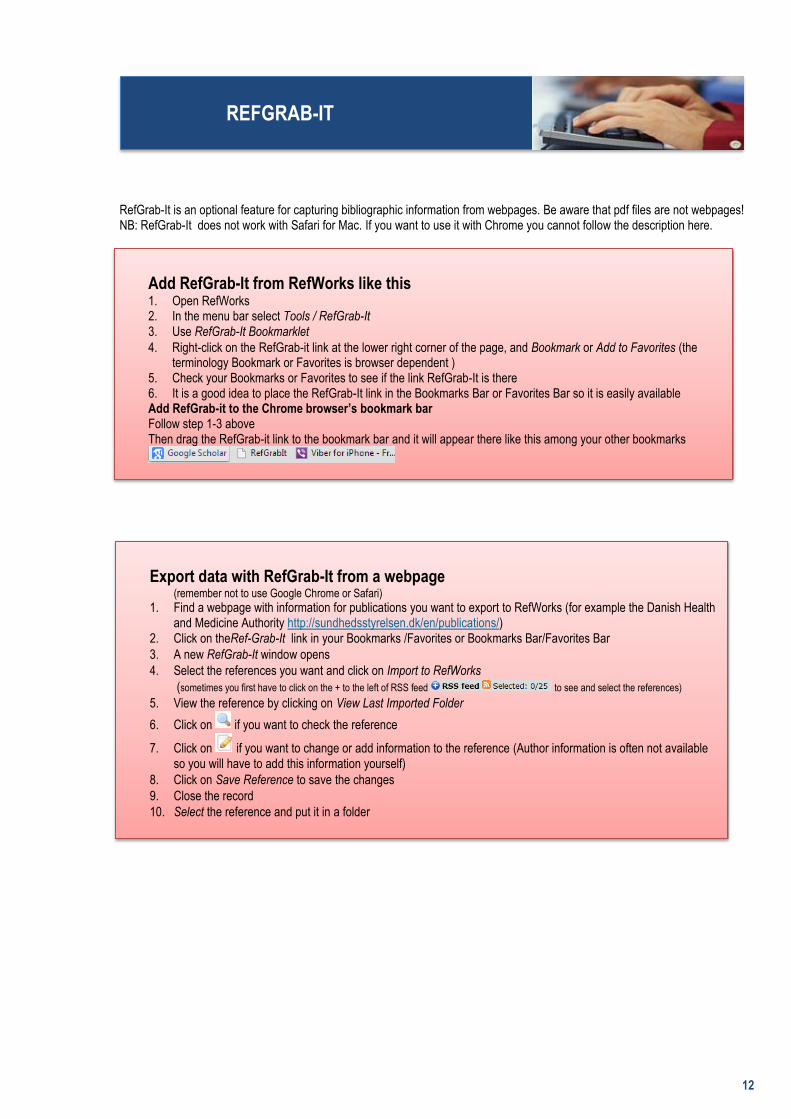
RefGrab-It is an optional feature for capturing bibliographic information from webpages. Be aware that pdf files are not webpages! NB: RefGrab-It does not work with Safari for Mac. If you want to use it with Chrome you cannot follow the description here.
Add RefGrab-it Bookmarklet from Refworks
Export data with RefGrab-It Bookmarklet from a webpage
REFGRAB-IT
Add RefGrab-It from RefWorks like this 1. Open RefWorks 2. In the menu bar select Tools / RefGrab-It 3. Use RefGrab-It Bookmarklet
4. Right-click on the RefGrab-it link at the lower right corner of the page, and Bookmark or Add to Favorites (the terminology Bookmark or Favorites is browser dependent )
5. Check your Bookmarks or Favorites to see if the link RefGrab-It is there 6. It is a good idea to place the RefGrab-It link in the Bookmarks Bar or Favorites Bar so it is easily available Add RefGrab-it to the Chrome browser’s bookmark bar Follow step 1-3 above Then drag the RefGrab-it link to the bookmark bar and it will appear there like this among your other bookmarks
Export data with RefGrab-It from a webpage
(remember not to use Google Chrome or Safari)
1. Find a webpage with information for publications you want to export to RefWorks (for example the Danish Health and Medicine Authority http://sundhedsstyrelsen.dk/en/publications/)
2. Click on theRef-Grab-It link in your Bookmarks /Favorites or Bookmarks Bar/Favorites Bar
3. A new RefGrab-It window opens
4. Select the references you want and click on Import to RefWorks
(sometimes you first have to click on the + to the left of RSS feed to see and select the references)
5. View the reference by clicking on View Last Imported Folder
6. Click on if you want to check the reference
7. Click on if you want to change or add information to the reference (Author information is often not available so you will have to add this information yourself)
8. Click on Save Reference to save the changes
9. Close the record
10. Select the reference and put it in a folder

13
Converting references from RefMan to RefWorks It is possible to convert references from other reference management systems to RefWorks. Here you only get a description of how to convert references from RefMan to RefWorks. For further information look under Help / Launch Help File in Refworks.
There may be problems with diacritic symbols – e.g. ^, (circumflex), ` (accent grave) etc. - and letters from non-Latin alphabets. If you experience problems you can do the following before you import the file to RefWorks:
Open the file with WordPad and save the file on your pc as a *txt file.
Then you can afterwards import the WordPad *txt file to RefWorks.
This operation should be able to handle the problem.
CONVERTING REFERENCES FROM REFMAN TO REFWORKS
Converting references from RefMan to RefWorks 1. Start Reference Manager 2. Select the references you want to convert to RefWorks (under Edit/mark all) 3. Use: File menu / Export 4. Choose: RIS format and the desired Reference Option 5. Name the file 6. Click on: Export 7. In RefWorks use: References / Import 8. Import Filter/Data Source: choose RIS Format 9. Database: choose: Reference Manager 10. Encoding: automatically changes to OEM – United States 11. Select Text File: use Browse and choose the file you just created in Reference Manager 12. Click on Import 13. View the references by clicking on View Last Imported Folder
14. Click on if you want to check each reference
15. Click on if you want to change or add information to a reference 16. Click on Save Reference to save the changes 17. Close the record 18. Select the references and put them in a folder

14
Backup your RefWorks account
If you want to keep your references and at a later time restore them to another RefWorks account at another institution or one you have created privately you have to perform a backup of your account. The function Backup/Restore only works on RefWorks accounts. NB! As long as Aalborg University Library subscribes to RefWorks you can use your RefWorks Account as an alumni, check how here: http://www.en.aub.aau.dk/digitalAssets/76/76356_refworks-alumni-handout.pdf
Create a backup of your account Restore your references to a new RefWorks account
Export of references from RefWorks to other reference management systems If you want to export your references to other reference management systems, you have to be aware that different systems use different standards of formats. If you don’t know which system you later on are going to use, you have to export your references in at least 2 formats that RefWorks offers and save the 2 files on your computer:
1. Bibliographic Software (EndNote, Reference Manager, ProCite) 2. BibTeX – Refworks ID
Here is an example of export of your RefWorks account to a file format BibTeX that can be uploaded to the freeware programmes Zotero and Mendeley (see list of free reference mananagement programmes here: http://en.wikipedia.org/wiki/Comparison_of_reference_management_software
How to export your references in the BibTeX format
BACKUP YOUR REFWORKS ACCOUNT
EXPORT OF REFERENCES FROM REFWORKS TO OTHER REFERENCE MANAGEMENT SYSTEMS
Create a backup of your account: 1. On the menu bar select Tools / Backup & Restore 2. Select Backup and decide which features to include 3. Click on Perform Backup 4. When the backup process starts you first get this message in the bottom right corner of the window
5. When the backup is completed a new window opens with the file 6. Save the backup file to your computer 7. The file name will be something like this RWUAalborgurn_pws_108123.rwb
Restore your references to a new RefWorks account: 1. On the menu bar select Tools / Backup & Restore 2. Select Restore 3. Find the file RWUAalborgurn_pws_108123.rwb on your computer 4. Click on Perform Restore
How to export your references in the BibTeX format: 1. On the menu bar select References / Export 2. Select export format: BibTeX - RefWorks ID 3. Click on Export References 4. Your exported reference file are shown in a new file download prompt in your browser 5. If you do receive a file download prompt, follow the instructions you get in RefWorks
6. To save the exported references - select File > Save As… from your browser menu. Then name and
save the file in the appropriate format (a text file) on your desktop

15
Organizing your references
Duplicates It is advisable to look for duplicates and delete duplicates while your references are still in the Last Imported Folder. The “Find Duplicates” feature will appear as a functionality several relevant places in Refworks. For example also under “Organize and Share Folders” (righclick on a folder and you get the option “Find Duplicates”).
1. Choose Duplicates under View in the menu bar 2. Choose either Exact Duplicates or Close Duplicates 3. A new window opens with the title Exact Duplicates or Close Duplicates
4. Delete the duplicates by clicking on the red cross 5. Deleted duplicates will be stored in 30 days in the folder Deleted References (can only be found under the menu under
View / Deleted References)
6. You can restore deleted references from the folder “ Deleted References” by clicking on the restore symbol
Search
From Search in the menu bar, you can search all your references or limit your search to a specific folder. The operators AND, OR, NOT can be used and you can add more search fields. You can browse for and edit author names, descriptors and journal titles.
Edit a reference or a selection of references
You can edit a single reference by choosing the Edit option next to each reference
You can edit a selection of references by using the Global Edit function
Delete or remove references
You can delete a single reference or a selection of references from Refworks. You can also remove a reference or a selection of references from a folder. Deleting or removing references are two quite different operations. Removing references only works on a single folder. Deleting references works on the all references throughout RefWorks.
Select a single reference or a selection of references
Click on the delete symbol to delete the reference or references. The references will be deleted from all folders where they appear and also from the All References folder. The references will stay for 30 days in the Deleted References folder, that you find in the menu bar under View / Deleted References
Open a folder and select one or more references. Click on the “Remove from Folder” symbol (the symbol only appears
when you have a single folder open), and the references will be removed from only the particular folder you have opened. If you have the same references in other folders, they will remain there, and the references will also remain in All References folder
ORGANIZING YOUR REFERENCES
16
Share your references
Apart from creating a joint account where each group member has the same rights, you can also share references from your personal account with other colleagues or students and still remain in charge to edit, delete or add new references. References/folders are sent as emails. You can also share your references or folders with all others at the AAU.
In-Text-Citations When you are writing your paper and want to insert citations in your Word document you can do it in 2 different ways. Either use the MS Word Add-in Write-N-Cite or use the One line/Cite View directly from your RefWorks account.
Write-N-Cite has a version for both MS Word for Windows and for MS Word for Mac. All other word processing software users should use One Line/Cite View to insert citations in their documents.
NB! “MS Word non-commercial use” is not compatible with Write-N-Cite, use istead “One line/Cite View”.
SHARE YOUR REFERENCES
Share references 1. Choose the tab Organize & Share Folders
2. Rightclick on next to the folder you want to share 3. Choose Sharing / Share Folder, and a new window opens 4. Click on Share 5. Choose which sharing options to give to the recipient of the folder
6. Click on and then click on
7. Rightclick on next to the folder you want to share and choose Email this share
8. Type the email address and maybe some information in the message form, and click on
9. You can always remove the Share function by clicking on and choose Remove Share 10. You can also share a folder with all at Aalborg University by using the Shared Folder Options 11. Choose Share Options and select Include in Aalborg University's shared area 12. Choose Category ( for example: computer Science) and click on Save 13. If you want to see or export the references/folders in Aalborg University’s Shared Area choose View / View
Shared Area in the menu bar
IN-TEXT-CITATIONS
17
Write-N-Cite 4 for Windows
Installation of Write-N-Cite (version 4) for Windows
Use of Write-N-Cite in a document
Create a bibliography in a document
WRITE-N-CITE 4 FOR WINDOWS
Installation of Write-N-Cite (version 4) for Windows Write-N-Cite for Windows is compatible with Windows XP, Windows 7 and Windows 8. It supports Word 2007, Word 2010 and Word 2013 1. Go to your RefWorks Account via Aalborg University Libray’s homepage http://www.en.aub.aau.dk/ 2. On RefWorks menu bar find Tools / Write-N-Cite 3. Download the version of Write-N-Cite that fits your computer (32-bit or 64-bit) 4. Save the .exe file to your computer 5. Important: Before leaving the download page please copy your Login Code onto your clipboard.To log in to
RefWorks via Write-N-Cite, you MUST copy and use this code on the Write-N-Cite 4 login screen. 6. Make sure that MS Word is not running when you run the.exe file 7. Confirm that you have all recent Windows and Office updates from Microsoft’s Update tool 8. Run the downloaded .exe file 9. Follow the steps of the installer. You may be prompted to install pre-requisites before the Write-N-Cite install
begins 10. Pre-requisites will appear as error messages for example: “Microsoft Visual Studio 2010 Tools for Office
Runtime (x86) needs to be installed for this installation to continue” 11. If you meet such error messages you have to go to www.microsoft.com and search for a program with exactly
the name of the error message and install it on your computer before you can continue the installation process. You may get other error messages and have to install other programs from www.microsoft.com before your installation of Write-N-Cite is successful
12. You can check the information for all software prerequisites here 13. When the installation is completed, open MS Word. You will see a new RefWorks tab in your Ribbon 14. Login to your RefWorks account by clicking the RefWorks tab’s login button. Only use the Login Code as
copied from the Write-N-Cite download page 15. If you did not copy your Login Code before, you can get it from the Write-N-Cite download page any
time. Each code is specific to your account. 16. After installing and logging in, there’s no need to log out when using your personal computer. Your account
will stay tied to the computer across sessions until you choose to log out
NB! If you have an older version of MS Word you must download the older version Write-N-Cite III
Use of Write-N-Cite4 in a document 1. Open Word 2. Click on the RefWorks tab 3. Write a text 4. Place the curser where you want to insert a citation (called an in-text-citation) in your Word document 5. Click on Insert Citation / Insert New 6. Choose a reference and click on OK (or Save) 7. Now the in-text-citation is added to the text in your Word document 8. Write some more text in your Word document and continue adding in-text-citations in this way 9. A citation can always be modified later by double clicking on the in-text-citation in the Word document. 10. A double click opens the Insert/Edit Citation menu. You can now for example insert a page number as suffix. 11. Sometimes you have to click on the + next to “Compose Citation” area in order to activate the suffix. It depends
on which type of computer, browser or Word edition you use 12. Click on OK (or Save), and the page number is added to your in-text-citation in your Word document
Create a bibliography in a document 1. Places the curser in your Word document where you want the bibliography 2. Click on the tab RefWorks 3. Under Style use the drop-down arrow and choose for example Harvard 4. Under Bibliography Options choose Insert Bibliography For more information on how to use Write-N-Cite check the Help file in your RefWorks account.

18
Write-N-Cite 4 for MAC
Installation of Write-N-Cite for Mac
Inserting and editing in-text citations in your Word document
Insert a bibliography in your Word document
WRITE-N-CITE 4 FOR MAC
Installation of Write-N-Cite for Mac
1. Go to your RefWorks Account via Aalborg University Libray’s homepage http://www.en.aub.aau.dk/ 2. On RefWorks menu bar find Tools / Write-N-Cite 3. Choose Write-N-Cite for Word (Mac) 4. Download the programme to your own computer following the installation instructions 5. The Write-N-Cite toolbar will appear on the screen, you can move it around as you please. 6. Log into Write-N-Cite using the login code you find under Tools / Write-N-Cite in RefWorks
NB! If you have the Danish version of Word you sometimes have to move the” Write-N-Cite Bundle” before Write-N-Cite works on your Mac. You can see how to do that here: http://www.en.aub.aau.dk/digitalAssets/61/61299_write_n_citemanual--28eng-29.pdf
Inserting and editing in-text citations in your Word document - and creating a bibliography
Insert an in-text-citation You have logged into Write-N-Cite
1. Open Word 2. Write a text 3. Place the curser where you want to insert your in-text-citation 4. On the RefWorks toolbar choose Insert Citation / Insert New 5. Choose a reference and click on OK (or Save) 6. Now the in-text-citation is added in your text 7. Write some more text in your Word document and continue adding in-text-citations in this way Referring to specific pages in the in-text-citation – using the Insert/Edit Citation menu 8. If you want to refer to a specific page in your in-text-citation you can use the suffix area and enter a page
number 9. Click on OK (or Save), and the page number is added to your in-text-citation in your Word document Editing an in-text-citation in your Word document 10. The in-text-citations can be modified or edited in your Word document any time 11. Just place the curser over the in-text-citation in the Word document and double click 12. The Insert/Edit Citation menu opens and you can edit the in-text-citation as you want 13. Cllick on OK (or Save) Create a bibliography in your Word document 1. Places the curser in your Word document where you want the bibliography 2. On the Refworks toolbar Style use the drop-down arrow and choose for example Harvard 3. On the RefWorks toolbar Bibliography Options use the drop-down arrow and choose Insert Bibliography 4. Check your document. The bibliography appears where you put the curser For more information on how to use Write-N-Cite check the Help file in your RefWorks account.

19
Using RefWorks One line / Cite View Use One line/Cite View with other software than MS Word, e.g. LaTex or Open Office.
The One line/Cite View is a view option in your Refworks account. You can also just click on the cite symbol that is present in all view options (Full View etc), but the One line/Cite View gives you a better view of all the references in for example a specific folder.
Example of how an in-text-citation looks Before formatting an in-text-citations in the original document it looks like this: {{538 Busca, Guido 2008;}} After formatting (in the Final… document) the same in-text-citation looks like this: (Busca, 2008)
NB: Always use the original document when you continue writing your paper.
Refer to specific pages in your in-text-citations using One line/Cite View
USING REFWORKS ONE LINE/CITE VIEW
Using One line/Cite View 1. Open Word and write a text 2. Place the cursor in the text where you want to insert an in-text-citation 3. Open RefWorks 4. Choose the folder you want to use 5. In RefWorks Change View to: One line/Cite View
6. Select a reference and click on the cite symbol 7. A Citation Viewer pops-up 8. Click on Select 9. Copy the citation (Ctr.+C) 10. Delete the citation in the Citation Viewer 11. Return to your document and use the paste function (Ctr.+V) to insert the reference 12. Go back and forth between the word document and RefWorks in order to insert more in-text-citations in this
way 13. Save the document - It is important that you save the document with the unformatted references before you
create a bibliography
Create a bibliography in your word document 14. In RefWorks click on the menu bar Bibliography / Format Document 15. A new window opens 16. Select an Output Style. Use the drop-down arrow and choose for example Harvard. To find out how
Harvard looks like, click on Preview 17. Select the document you want to format 18. A new window opens with a file download prompt – open the file and check the bibliography 19. If you do not receive a file download click on the answer from RefWorks in the lower right corner: Bibliography
Complete. If you do not receive a file download prompt click here or if you'd like the file emailed to you click here. 20. The file you receive from RefWorks is called “Final…..”, and you cannot use the Final… file to continue
writing in 21. Instead use the original file to continue writing your document, and create a bibliography whenever you need
to see how it looks or when you have finished writing it
Refer to specific pages in your in-text-citations using One line/Cite View If your in-text-citations are added with RefWorks One line/Cite View you can only include page numbers manually in this way:
If you for example want refer to a specific page in an in-text-citation (the example here is constructed to be using the Harvard output style when formatted) you can include /f p. 19; It will look like this {{538 Busca,Guido 2008/f p.19;}} before being formatted.
When formatting a document where you have included /f p.19; in the above in-text-citation you will receive a Final document where the in-text-citation looks like this (Busca, 2008, p. 19)
Final documents cannot be formatted again. All changes to existing in-text-citations or insertions of new in-text-citations with RefWorks One line/CiteView must therefore be made in the original and unformatted document.
There are other socalled switches than /f that you can use. Check other switches in the Refworks menu bar Help / Modifying an In-Text-Citation or Footnote http://www.refworks.com/refworks2/help/RefWorks2.htm / Writing your paper..../ Using One Line/Cite View / Modifying an In-Text-Citation or Footnote

20
Create a bibliography from a folder or a list of references This feature only works in the RefWorks interface (not in Write-N-Cite)
Use the function to:
1. Create a bibliography in a certain output style 2. Copy-paste the bibliography into a document 3. Send/print a list of references to colleagues
You can process the bibliography from: 1. All references 2. A specific folder 3. My list
Example:
1. In the menu bar choose Bibliography / Create Bibliography 2. A new windows opens 3. Choose References to Include From All References: mark your option (Selected (0), Page (25) or All in List (0) 4. Select Output Style: (choose for example) Vancouver 5. Click on Preview to find out how Vancouver Output Style looks 6. Select a File Type: (choose for example) Word for Windows (2000 or later) 7. Click on Create Bibliography 8. A new file download prompt should appear and you can open the document with the bibliography 9. Or alternatively you can click on the message from RefWorks in the lower right corner of RefWorks saying:
Completed. “Bibliography Complete. If you do not receive a file download prompt click here or if you'd like the file emailed to you click here”.
10. Name the file and save it on your computer
RefMobile
RefMobile works on mobile phones, smart phones and PDAs. RefMobile does not work with the AAU Access Control System, so first you have to sign up for a new RefWorks account, that can be used as an extra individual account or a joint Refworks account
How to use RefMobile
CREATE A BIBLIOGRAPHY FROM AF FOLDER OR A LIST OF REFERENCES
REFMOBILE
How to use RefMobile 1. Sign up for a new additional RefWorks account (can also be used as a joint account)
https://www.refworks.com/refworks2/default.aspx?r=authentication::init&groupcode=RWUAalborg - if you already have an additional account then use the log in credentials to this account
2. From your mobile phone etc. find the homepage www.refworks.com/mobile 3. Login using your additional or joint account login credentials 4. You are now logged in to your RefMobile account and can:
a. Search your account b. View and manage your folders c. Search the web and add references to your account using Smart Add

21
Help and support Use the RefWorks’ Help File on: http://www.refworks.com/refworks2/help/RefWorks2.htm Email the AUB RefWorks’ support team [email protected] Use the library’s RefWorks blog: http://refworkssupport.wordpress.com/
HELP AND SUPPORT