above and below sea level - ncetm · above and below sea level to help children to interpret ......
TRANSCRIPT

peo\g\pratchet\chapter4.doc 1
ABOVE AND BELOW SEA LEVEL
(Steve Pratchett 2009)
“Research into map understanding and map skills has provided some important pointers for the development of map skills programmes, in both the guidance for teachers and materials for children …. for example, the research has shown the importance of using models and vertical aerial photographs in appreciating views and knowledge of environments.” Catling (1996)
The Historical Context (see figure 1) On 6th August 1588, the Spanish Armada was anchored off Calais awaiting the arrival of their ally, the Duke of Parma with 30,000 of his troops crossing in barges from the then Spanish Netherland ports of Dunkerque and Nieuwport to Dover in England. This plan was foiled by Dutch sailors, the 'Sea Beggars', blockading the ports and the Armada waited in vain. On 7th August, the English fleet set eight ships ablaze and allowed them to drift before the south-westerly wind into the Armada anchored in a defensive formation. The Spanish captains panicked and cut their anchor ropes, broke formation and scattered. On 8th August, the English fleet engaged the Armada off Gravelines. A fierce battle raged all day. The winds changed from south-westerly to north-easterly and began driving the Armada towards the shoals and sandbanks of the Banks of Zeeland. The Spanish began desperately to take soundings to avoid running aground. This combined with a veering of the wind to the south-west saved the day and the Armada fled towards the North Sea.
"Towards evening after nine gruelling hours, heavy rain and wind brought the battle to an end. But worse was to come. Amid the wreckage and blood and the screams of wounded men, the winds blew the helpless Spanish ships towards the treacherous sandbanks. When dawn came the English moved in and the exhausted Spaniards prepared themselves for death. But the English were almost out of ammunition. No attack came. Slowly the Spaniards sounded their way through the shallow waters. At any moment they might feel the terrible lurch of the ship grounded on the sands. Then in the afternoon the wind changed and blew them away from the deadly sandbanks. The Duke of Medina wrote: "We were saved by the wind, by God's mercy it shifted to the south-west".
(Connatty 1987 p.30)

peo\g\pratchet\chapter4.doc 2
Above & Below Sea-Level Models “A model is valuable in helping pupils to understand the concept of a cross-section, which is most easily described as a slice through the landscape. The side of a relief model is, in effect, a section across the landscape”
(Boardman 1983 p. 65)
It was reading about the events in the life of the Armada at Gravelines that inspired the author to explore the idea of simulating depth soundings with primary children in various Devon schools.
Could the children 'become' captains of Spanish galleons desperately trying to sound their way out of the shoals of the banks of Zeeland?
The author produced an 'Above and Below Sea-Level Model' (see plate 1), which was to open up an Aladdin's cave of highly stimulating geographical and historical learning opportunities. The model's initial focus was the taking of soundings to produce a cross-section of the seabed. Each time the model was used, it led children down new avenues, from plotting the seabed to the interpretation of maritime charts; from the raising and examination of Armada treasures, to the sampling of the seabed. The model has since been used for some of the extension exercises presented at the end of this article. The author‟s model was an experimental design and may seem a rather daunting prospect for other teachers to replicate. There are much simpler alternatives that can be constructed easily by both children and teachers:
In plate 3, the model is simply made from a cardboard box with holes punched in a grid layout through the top. Real rocks have been inserted inside the box to create the seabed. In plate 4 & 5, the model is created with a fish tank, rocks and water. Depth soundings are taken at intervals along the ruler and used to plot a cross-section of the “seabed”. If the level of the water is lowered and raised children can simulate depth soundings and cross-sections at „high and low tides‟. In plate 2, a length of peg-board or plywood drilled with a matrix of holes is suspended across two chairs. The seabed can be simulated with real rocks or junk material such as boxes.
In the initial model (plate 1), the surface of the sea is simulated by a piece of plywood, painted blue and drilled with a network of holes forming a grid. The latter is marked out with indelible felt and numbered for grid referencing. Below this board are moveable pieces of non-toxic styrofoam sheet with which children can construct various configurations of a sea-bed.
peo\g\pratchet\chapter4.doc 3
Alternatives to styrofoam that have also been used in the model are real sand, rocks, sponge rubber and papier-mâché shapes. Rolls of sugar paper can be drawn across the front and back of the model and secured with Velcro to obscure the sea-bed from view. Soundings can be taken through the holes in the plywood „sea surface‟ using a length of doweling or a fishing weight suspended from a piece of string. Above sea-level are the French and English coasts, again made from styrofoam, which can be built up to create landforms. In a later case study coloured layers of styrofoam are used above and below sea level to help children to interpret atlas conventions for relief, (see plate 6a & 6b).
“Properly introduced, models do help children to appreciate the reality they are studying, giving greater precision to their learning.” Rowbotham (1998:157)
Accessories included: a model of a Spanish galleon, an English fire-ship, treasure chests containing cut-out colour photographs of treasures raised from wrecks of the Girona and Trinidad Valencera from the Armada 1588-1988 Discovery Pack, (see plate 7a & 7b), models of sunken wrecks, maritime charts of the English Channel (available from the Royal Navy Hydrographer), transparent compass rose acetates, English and Spanish flags. Key questions The following key questions provided a focus for the project:
What are sandbanks and why do they shift?
What are soundings, how did the Spanish captains make them and can we simulate what they did?
How is the seabed represented on a maritime chart?
How can we locate and represent the shape of and features on the seabed?
How can we sample the seabed?
What is a cross-section and how can we draw one?
How do we name a wind and what are the prevailing winds in the UK?
Why did the Armada take the route it did?
What can we tell about life on board a Tudor ship from the sunken treasure?
Key concepts
soundings, landshape, cross-section, relief, symbol, key, grid reference, navigation, channel, location, scale, route, wind direction (SW, NE), above and below sea-level, depth, sampling, historical evidence, artifact, map, maritime chart, hydrography
Introduction A class of 10 year-old children at Langley Junior School in Plymouth had been reading various extracts from the eventful voyage of the Armada. In the publication The Making of the United Kingdom pp. 48-51 there are 20 useful extracts from contemporary accounts of the Armada which children can be used to reconstruct its route on the map (p.53) and make a list of reasons for its defeat (p.52). This is an excellent resource, which although intended for secondary age pupils, can be easily modified for primary. It

peo\g\pratchet\chapter4.doc 4
helps children to uncover the interplay between geographical and historical factors in the Armada story. There are also many maps illustrating the route of the Armada and the location of wrecks around the British and Irish coasts, (see resource list). In plates 8a & 8b a child can be seen using an overhead projector to draw a UK map and plot the route of the Armada and its wrecks. The children then discussed the map and charts in figures 1, 2 & 3 in relation to the extract from Connatty (1987) above. It is important to note that children need previous experience of practical investigations into identifying wind direction with wind vanes, wind socks and compass roses if they are to understand the significant part played by SW and NE winds in the Gravelines episode, (see plates 11, 12) The children also used a plastic overlay wind rose on the map to explore the wind directions in relation to the sand banks of Zeeland, (see plate 9) These preliminary activities involved the children in finding out:
the geographical and historical reasons why the Armada took the route it did;
the combination of historical and geographical factors which led to the Armada's defeat;
wind direction and prevailing winds in the British Isles;
mapping the British Isles in 1588 and present day;
localities in Ireland where wrecks occurred and Spanish sailors escaped overland.
Activity: Making a cross-section of the seabed for the captain of a Spanish Galleon.
“Simulation approaches are useful to geographers because of their ability to illuminate and transmit understanding of parts of the subject at various levels. Those advantages most usually claimed include: the development of empathy with people and the realisation of the interdisciplinary nature of most “real life” situations.”
Walford (1988) p. 144.
Now that the children had researched primary and secondary source material and were familiar with the events that occurred in the English Channel, they were drawn into a simulation and role-play of the Battle of Gravelines and the Banks of Zeeland. Using the model, its Spanish galleons and English fire-ships, the children were then set the challenge of taking on the role of a Spanish captain:
“When you see the English fire-ships approaching you cut your anchor ropes in panic and now the NE winds are driving your galleon aground on the banks of Zeeland off the Spanish Netherlands. Can you find a way of taking depth soundings and navigating your way out of trouble?”
One group worked on a table top model (see plate 10), while a second group worked on another set across the gap between two chairs (see plate 11). This enabled each group to set up a 'treacherous sea-bed', to hide it from view with curtains and swap models for the exercise of navigating unknown waters. If children use the cardboard box version
peo\g\pratchet\chapter4.doc 5
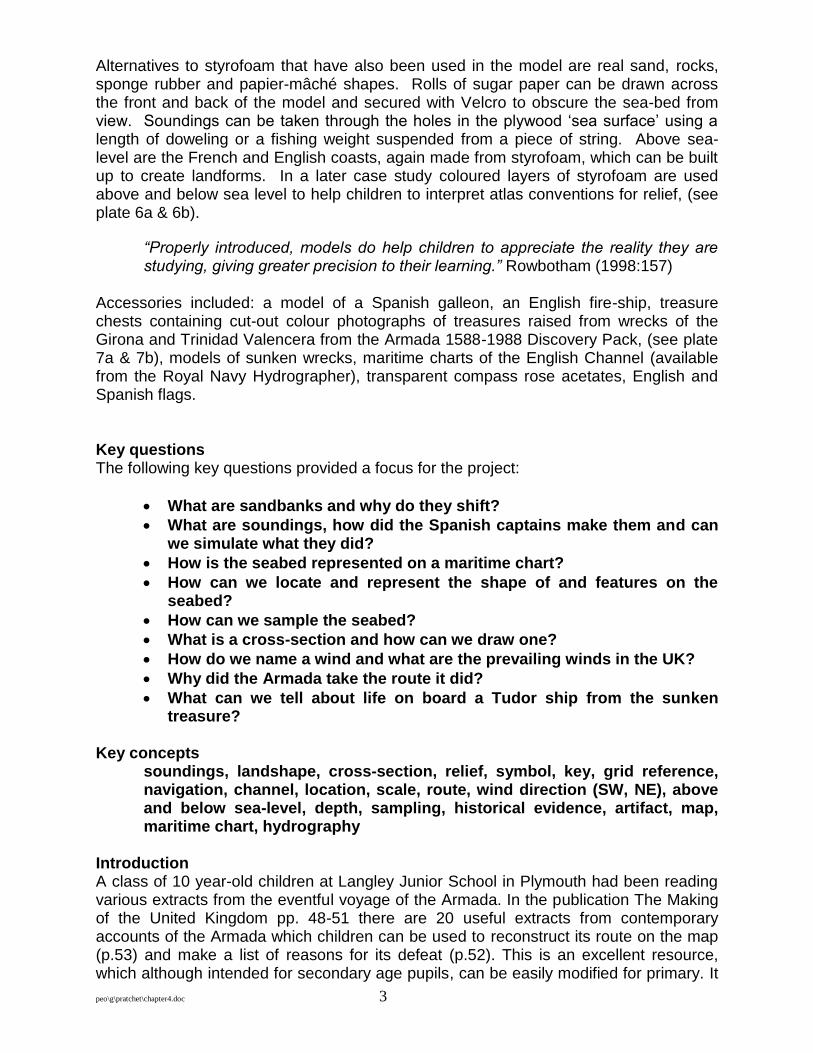
(plate 3) this would enable several groups to construct their seabed, seal it from sight and then swap the boxes around the class. Having looked at the maritime charts and discussed how the depths of the sea were recorded numerically in metres at various points all over the charts, the first task was to explore ways of taking similar soundings on the „Above and Below Sea-level‟ models. The children solved the problem in a variety of ways using lead weights tied on strings or wooden sticks (see plate 13). One child dropped a weight through a hole and looked up sheepishly when he realised he couldn't bring it back up again because he hadn't thought to tie it to a piece of string! The children were then introduced to a sounding lead and rope loaned by a local naval officer (see plate 12). Still carried on board ships today, it is very similar to those used in Elizabethan times. The rope had coloured tags at intervals which led the children to investigate the units of measurement used for soundings e.g. 1 fathom = 6 feet = 1.81 metres. The hole in the base of the lead weight gave rise to much discussion among the children. It is filled with tallow (sheep fat) so that a sample of the seabed can be brought to the surface, to help sailors discern whether they are above rock or sand. The children experimented with this idea using lard and a tray of sand. A discussion took place between the children and the author on how to record and communicate the shape of the sea-bed so that others could navigate across it safely. The distance between each hole on the model is 5 centimetres so a large piece of centimetre graph paper was introduced on which to record. When the paper lay on the floor, some children had problems moving between the vertical plane of the model and the horizontal plane of the paper (see plate 17 & 18). This was solved by placing the paper up against the side of the model. The surface of the sea could then be drawn and the stick or lead weight transferred from the hole in the model directly to the graph paper whilst remaining in the same vertical plane, (see plate 14). Children worked in pairs on a row of holes across the surface of the model taking soundings. One child devised a system of plugging the hole that she had just sounded with a pen cap to remind her where she had got to in her measurements, (see plate 15). Where the stick or string met the 'surface of the sea', children either marked it with a felt pen or kept their finger and thumb in position when transferring the reading to the graph paper. Each recording was spaced 5 centimetres apart and, when joined, produced a cross-section of the seabed. Four were produced as each pair worked along a different row of holes. As a result, these cross-sections had different profiles that could then be compared, (see fig. 5)
If the children mounted their cross sections on card they could cut them out and assemble them to give a more complete picture of the seabed
Fig 5: Comparing and assembling the different cross-sections

peo\g\pratchet\chapter4.doc 6
The sounding lines were recorded at 5 centimetre intervals along a length of squared centimetre paper, (see plates 17 & 18). They were then inked in with a spirit-based pen to prevent smudging when washed over with transparent watercolour paint, (see plate19) Colour washes were applied to colour-code the cross-section and distinguish between water and seabed, (see plate 20). The children devised a key and wrote an explanatory text for the cross-section. Their text addressed the following aspects:
modeling the sea-bed
taking the depth soundings
creating a cross-section
interpreting the cross-section
historical links with the soundings taken by the Armada off the Bank of Zeeland.
Activity: Locating and raising Armada treasure Several follow-up activities, using the same 'Above and Below Sea-Level' model, engaged the children in a highly motivating treasure hunt. Scenario 1: ‘The challenge of locating the sand & buried Armada treasure’ A treasure-chest was buried in a small patch of sand inside the model. The children were set the challenge of locating the sand and hence the “buried treasure”, (see plate 18). The author had placed photographs of Armada treasures inside the matchbox to engage the children in an historical extension activity of asking historical questions and interrogating historical artifacts, (see plates 7a & 7b). One of the frameworks used to scaffold the children‟s for interrogation of the Armada artefacts is from the Maritime Museum (1998) Armada 1588-1988 Discovery Pack p.12:
Object Size Material How was
it made? Significant details (inscriptions, missing bits, etc.)
Use Who might have owned or used it?
What does it tell us about ….class divisions, craft skills, etc.

peo\g\pratchet\chapter4.doc 7
“It is often difficult to complete each section of the grid, even after a search for clues. For a number of years the two wooden cups were described as gaming cups. Recently, it has been suggested that they may have held salt. Without additional evidence (from a contemporary Spanish picture for example), it will be difficult to decide which interpretation is probably correct.”
(National Maritime Museum 1998:12)
For further details on the process of looking at and historically questioning the artefacts see figure 4. On other occasions, just for fun the matchbox has contained chocolate coins wrapped in gold and silver paper which heightens the children's motivation! Locating the 'treasure chest' involved the children in not only depth sounding but also seabed sampling. The problem was solved by a 10 year-old girl who added Blu-tac to the end of her sounding stick. On reaching the sand, she found particles stuck to the Blu- tac. This is the modern day equivalent of the tallow wax (sheep‟s fat) inserted into a hole at the base of a Tudor sounding lead, (see plate 18). Scenario 2: Comparing cross-sections before and after the sinking to find the Armada wreck A second scenario involved children in creating a cross-section from the model, (see plate 19). Then, while they were out of the classroom, the author hid a 'sunken Spanish galleon' on the 'sea-bed', along with treasure chests containing colour photographs of Spanish artefacts from the wrecks of the Girona and Trinidad Valencera. These photographs had been cut out from a poster in the British Maritime Museum Armada Pack. On return, the children had to repeat their cross-section. An additional bag of chocolate coins on the wreck as a reward for perseverance adds an extra frissant! By laying the cross-sections that were made before and after the wreck was introduced alongside each other, the children could make comparisons and where the 'blip' occurred the sunken wreck was located. The wreck and 'treasure chests' were then raised and the contents led the children straight into addressing the KS2 4a National Curriculum history enquiry skill “how to find out about the past from a range of sources (for example… photographs, artefacts)” which developed their skills in making deductions from historical artifacts, (see fig. 4)
Is it worth the time? “Most model layouts have wonderful physical and human details. Give children simple open-ended questions to help them look at details and begin to develop key geographical concepts they will use to study the real world when they grow up………. It‟s often easier to see things for longer and go back to have another look whereas the real world changes so quickly”. (Halocha 2003)
Not only does this project generate good geography but look at the rich opportunities for history, mathematics and language. Activities this rich in cross-curriculum potential can justifiably “rob” hours from the core subjects and allow teacher and pupils to pursue their enthusiasms and interests. As Dearing rightly suggested, teachers should retain

peo\g\pratchet\chapter4.doc 8
the professional judgment and freedom to pursue their strengths and children‟s interests and,
“teach beyond the contents of the programmes of study in subjects where the school is particularly strong or where there is a need to respond to particular interests and aptitudes of pupils”.
Dearing (1993) para. 3.29 This is echoed more recently in the DCSF (2009:41) Independent Review of the Primary Curriculum Final Report, which argues that “by prescribing less there are more opportunities for teachers to choose their own contexts to develop children‟s knowledge, skills and understanding.” We relinquish this freedom at our peril and risk discouraging the innovative practitioner from entering or remaining in a profession where such creativity is stifled. Above all, the project excited and motivated the children. The notion that education should be about such memory-making experiences is endorsed by the DfES (2003) characteristics of “outstanding schools”
“The curriculum needs to be exciting, this means building in quality not quantity so that children learn first hand.” (p. 19) “In these schools children are engaged by learning that develops and stretches them and excites their imagination. They enjoy learning in many different ways; out of doors, through play, in small groups,……from each other, from adults…” (p.9) “They offer rich, exciting programmes of learning” (p.9) “There is no requirement for subjects to be taught discretely – they can be grouped, or taught through projects.” (p.17) “Make learning vivid and real: develop understanding through enquiry, creativity, e-learning and group problem solving.” (p.29)
More recently, the DCSF (2009) in the Independent Review of the Primary Curriculum Final Report has recommended that schools should create more opportunities for well-planned cross –curricular studies.
“There are times when it is right to marshal content from different subjects into well-planned, cross-curricular studies…….. It provides opportunities across the curriculum for children to use and apply what they have learned from discrete teaching. (Recommendation 25 p.15) “Helping schools to create coherent and more integrated learning experiences will cover a number of curriculum learning objectives at once and save valuable curriculum time.” (p.42)

peo\g\pratchet\chapter4.doc 9
Extension activities
Prevailing winds: Using various measuring devices such as wind vanes and wind socks, identify wind direction in the school grounds each day. Record this on a wind rose over a period of time and see if an emerging pattern of prevailing winds appears e.g. south westerly. Relate this to the events of Gravelines and why the Armada could not return back to Spain the way they came through the English Channel.
Routes and coastlines: Plot the route and wrecks of the Armada around the coasts of England, Scotland and Ireland and using video and photograph material identify physical features of the coastline where some of the galleons sank e.g. The Giant‟s Causeway in Northern Ireland.
Other possible uses for the ‘Above and Below Water’ models
Produce a maritime chart showing the depths of the sea under each hole in the model; (see fig 6)
Fig 6: Constructing an underwater contour map/chart
Locate and chart deep-water channels for piloting a ship into port;
Lower and raise the water level in the fish tank to simulate high and low tide and make cross-sections of each;
Put a model yacht with a keel in the fish tank. Draw the depth of a ship‟s keel onto the cross-section and explore possible channels through the rocks at high and low tide;
Plot routes from depth sounding hole to depth sounding hole avoiding hazards to navigation and using a transparent acetate compass rose and or grid references record a seabed profile of the route;
Model buoys and lighthouses on the model to warn sailors of rocks close to the surface and then devise symbols for these to add to the chart; (see plates 23-29)
Plan and chart an underwater diving route for a party of divers;
Hunt the wrecks and treasure by playing co-ordinate games, (a version of battleships);
peo\g\pratchet\chapter4.doc 10
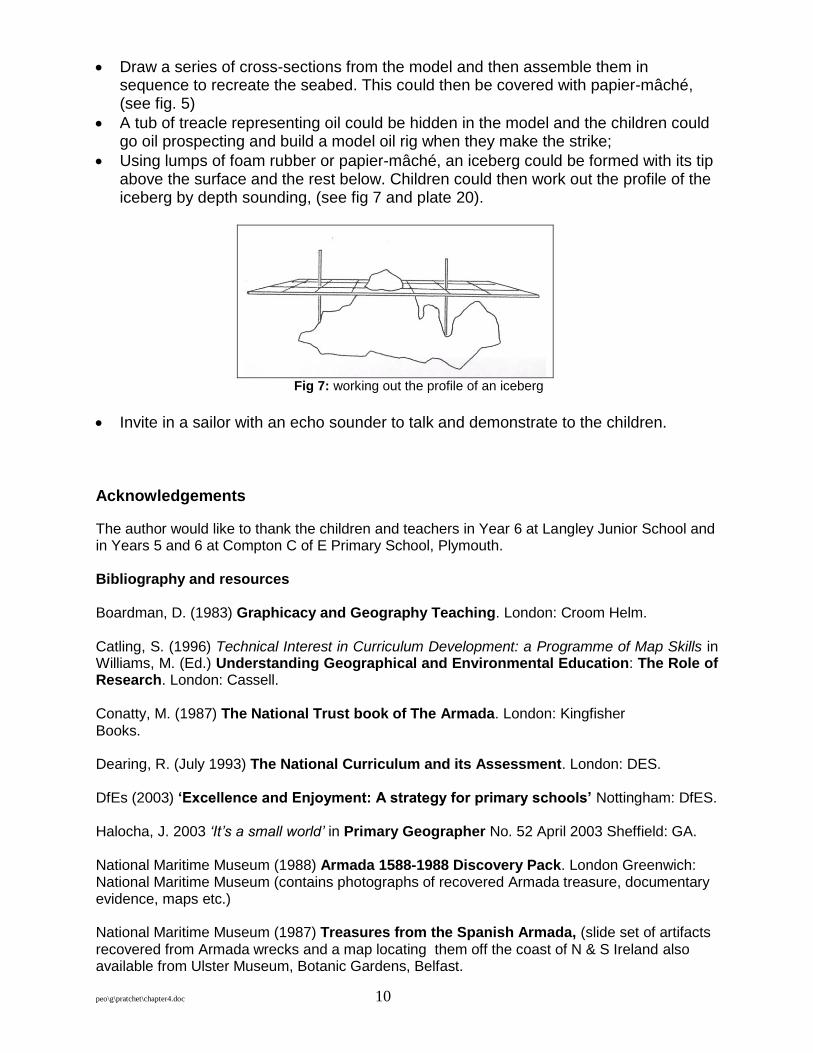
Draw a series of cross-sections from the model and then assemble them in sequence to recreate the seabed. This could then be covered with papier-mâché, (see fig. 5)
A tub of treacle representing oil could be hidden in the model and the children could go oil prospecting and build a model oil rig when they make the strike;
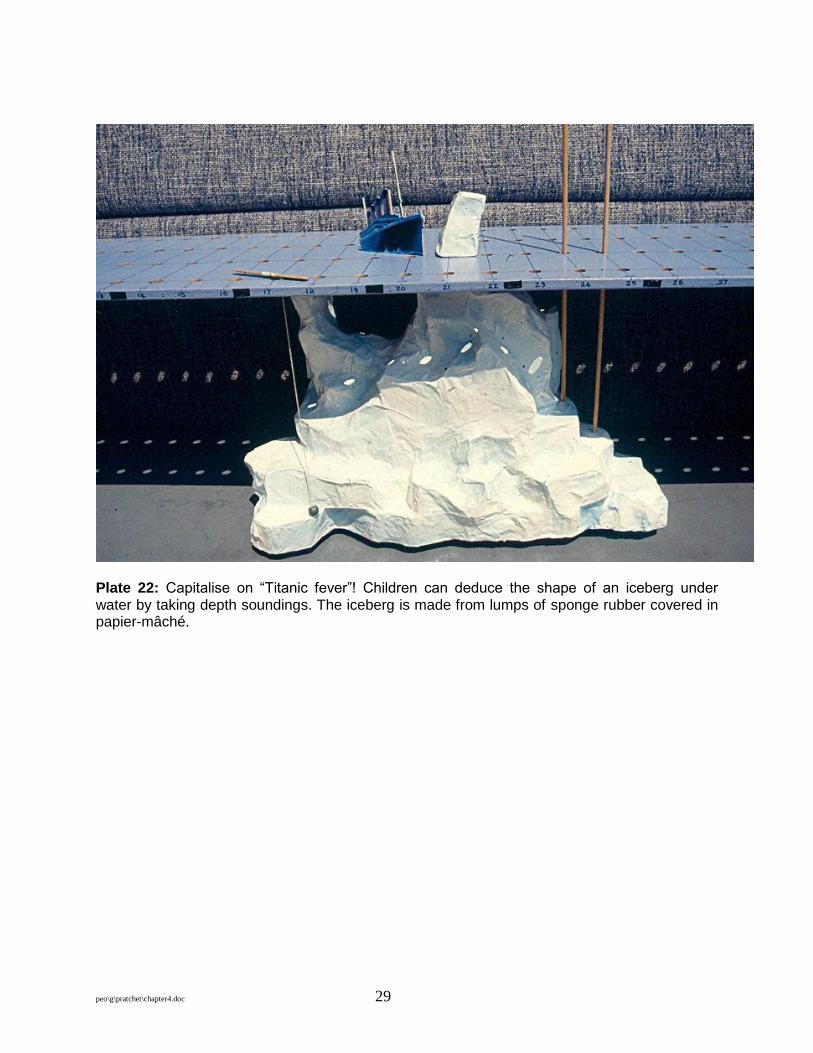
Using lumps of foam rubber or papier-mâché, an iceberg could be formed with its tip above the surface and the rest below. Children could then work out the profile of the iceberg by depth sounding, (see fig 7 and plate 20).
Fig 7: working out the profile of an iceberg
Invite in a sailor with an echo sounder to talk and demonstrate to the children. Acknowledgements
The author would like to thank the children and teachers in Year 6 at Langley Junior School and in Years 5 and 6 at Compton C of E Primary School, Plymouth. Bibliography and resources Boardman, D. (1983) Graphicacy and Geography Teaching. London: Croom Helm. Catling, S. (1996) Technical Interest in Curriculum Development: a Programme of Map Skills in Williams, M. (Ed.) Understanding Geographical and Environmental Education: The Role of Research. London: Cassell. Conatty, M. (1987) The National Trust book of The Armada. London: Kingfisher Books. Dearing, R. (July 1993) The National Curriculum and its Assessment. London: DES. DfEs (2003) ‘Excellence and Enjoyment: A strategy for primary schools’ Nottingham: DfES. Halocha, J. 2003 „It‟s a small world‟ in Primary Geographer No. 52 April 2003 Sheffield: GA. National Maritime Museum (1988) Armada 1588-1988 Discovery Pack. London Greenwich: National Maritime Museum (contains photographs of recovered Armada treasure, documentary evidence, maps etc.) National Maritime Museum (1987) Treasures from the Spanish Armada, (slide set of artifacts recovered from Armada wrecks and a map locating them off the coast of N & S Ireland also available from Ulster Museum, Botanic Gardens, Belfast.
peo\g\pratchet\chapter4.doc 11
Rowbotham, D. (1998) „Hardware Models‟ in Geographical Work in Primary & Middle Schools. Sheffield: Geographical Association. Simpkin, J. (1992) The Making of the United Kingdom. Spartacus Educational. Walford, R. (1988) „Games & Simulations‟ in Mills, D. (ed.) Geographical Work in Primary & Middle Schools. Sheffield: Geographical Association. Maritime Charts Under the Superintendance of Rear-Admiral D.W. Haslam, Hydrographer of the Royal Navy, Taunton, Devon:
English Channel Chart 2675 (Scale: 1:500 000)
Falmouth to Plymouth Chart 12167 9 (Scale: 1:75000)
The 400th Anniversary of the Spanish Armada (pub. 1988 and showing the Armada‟s route and events in the Channel.)
Copyright Steve Pratchett (2009)

peo\g\pratchet\chapter4.doc 12
Fig 1: Chronology of events regarding the Spanish Armada off the Banks of Zeeland

peo\g\pratchet\chapter4.doc 13
Figs 2 & 3: The nautical charts of the English Channel and UK waters from the Admiralty used with the children to illustrate how depths are recorded on a „map of the sea‟ Geography NC Key Stage 2 Programme of Study 2c: “In developing geographical skills, pupils should be taught to use atlases and globes and maps and plans at a range of scales

peo\g\pratchet\chapter4.doc 14
(Fig 4: Extract with adaptations from: National Maritime Museum (1998:11-12)
The Process of Looking
Scanning & Searching
Asking Questions Interpretation
A survey of all, or a group, of objects. Some, such as the wooden bowl and spoon, will be readily identified but others, such as the bosun‟s whistle, may not. The children‟s description of the objects could include an analysis of their different features: shape, size, materials, manufacture and use.
It is essential that children develop the ability to ask questions for themselves, based on personal observation, if they are to become independent learners. The questions may arise as a result of problems they have identified in the sources. They might ask why some of the objects are broken and how a particular object (perhaps the bosun‟s whistle or astrolabe) were used.
Searching for a significance or a meaning in the material, drawing on the insights provided by personal knowledge and experience. The wreck objects might lead children to conclusions about the class structure, the religious beliefs, the craft skills, or the economy of Spain in the 16
th
century, for example, depending on the focus of their enquiry. The interpretations that result will be of two kinds: the children‟s insights into the past, and their insights into their own society and perhaps their own lives.
Comparing and Classifying Comparing
Classifying
There are many ways in which the study of objects can be extended. One is to make comparisons or relationships between objects – for example, between the wooden bowl and spoon of ordinary members of the crew, and the pewter wine jug and goblet of the gentlemen.
Another is to classify them. The children might divide them by material, for example, or by ownership or use.
Drawing and Making As the true size of objects differs from that of the image, children could draw and cut out card copies to size, or make replicas in three dimensions. These could be used by children when making alternative classifications. Sometimes historians resolve problems of use or effectiveness of an object by making replicas of them, when the original is incomplete or too fragile to be tested.
Dating Objects Objects can be sorted into order in which they were made to develop a sense of chronology. The objects can also develop concepts of age and of change and continuity over time. How do we know that they are old? How can we date them? The dating of objects can be absolute (for example, the age of cons can be accurately fixed by using dates that are on them). As all the objects have been taken from ships wrecked in 1588, they are dated by their association with the wrecks. Often, historians have to rely on other features such as style and material.
Objects as Evidence It should become clear that objects can provide a great deal of evidence about daily life and work of people whose names we will never know, and about technology, manufacturing techniques and trade, evidence which is often missing from documents. On the other hand, objects can tell us much less about people‟s ideas and values, and other aspects of non-material culture. For these historians rely more on documentary evidence.
peo\g\pratchet\chapter4.doc 15
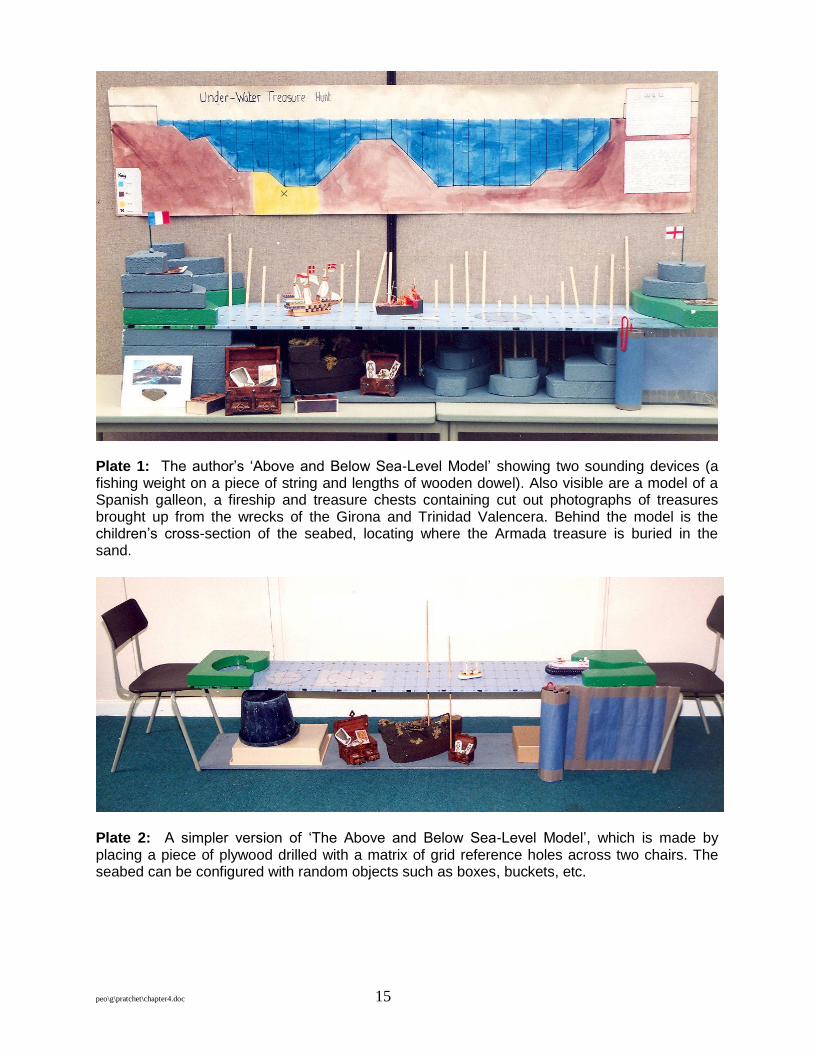
Plate 1: The author‟s „Above and Below Sea-Level Model‟ showing two sounding devices (a fishing weight on a piece of string and lengths of wooden dowel). Also visible are a model of a Spanish galleon, a fireship and treasure chests containing cut out photographs of treasures brought up from the wrecks of the Girona and Trinidad Valencera. Behind the model is the children‟s cross-section of the seabed, locating where the Armada treasure is buried in the sand.
Plate 2: A simpler version of „The Above and Below Sea-Level Model‟, which is made by placing a piece of plywood drilled with a matrix of grid reference holes across two chairs. The seabed can be configured with random objects such as boxes, buckets, etc.

peo\g\pratchet\chapter4.doc 16
Plate 3: A version of the „Above & Below Sea-level Model‟ made from a cardboard box.

peo\g\pratchet\chapter4.doc 17
Plate 4: A simpler version of „The Above and Below Sea-Level Model‟, using a fish tank of water and some rocks. The metre ruler allows depth soundings to be taken at any interval chosen. A paper curtain around the tank or food dye in the water can be used to obscure the seabed.
Plate 5: A cross-section of the “seabed” at the bottom of the fish tank, drawn by 10 year-old children. If the water level is lowered another cross-section can be drawn for “low tide”.
peo\g\pratchet\chapter4.doc 18
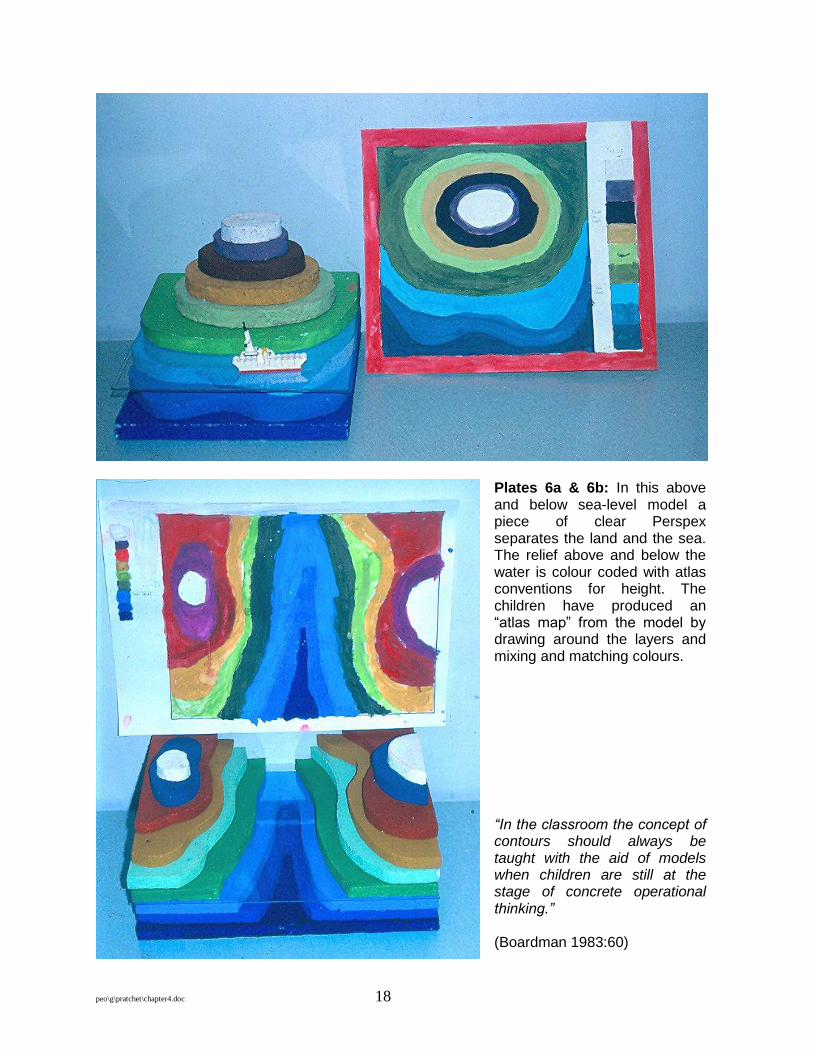
Plates 6a & 6b: In this above and below sea-level model a piece of clear Perspex separates the land and the sea. The relief above and below the water is colour coded with atlas conventions for height. The children have produced an “atlas map” from the model by drawing around the layers and mixing and matching colours. “In the classroom the concept of contours should always be taught with the aid of models when children are still at the stage of concrete operational thinking.” (Boardman 1983:60)

peo\g\pratchet\chapter4.doc 19
Plates 7a & 7b: The treasure chests containing cut-out colour photographs taken from the Armada 1588-1988 Discovery Pack of treasures raised from the wrecks of the Girona and Trinidad Valencera.
peo\g\pratchet\chapter4.doc 20
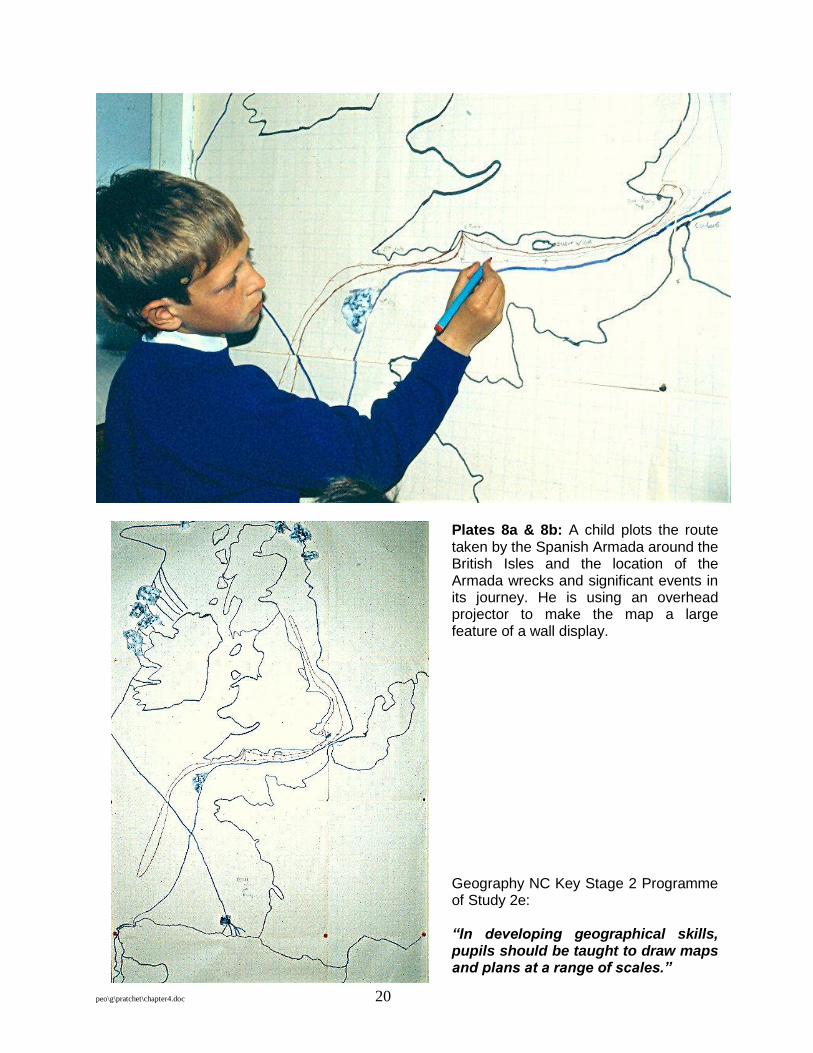
Plates 8a & 8b: A child plots the route taken by the Spanish Armada around the British Isles and the location of the Armada wrecks and significant events in its journey. He is using an overhead projector to make the map a large feature of a wall display. Geography NC Key Stage 2 Programme of Study 2e: “In developing geographical skills, pupils should be taught to draw maps and plans at a range of scales.”

peo\g\pratchet\chapter4.doc 21
Plate 9: A child is using a transparent overlay of a 16 point compass rose to identify and then mark the wind direction on the Shipping Forecast Areas map with a water-soluble OHT pen.
Plate 10: The children learn how to name a wind by the place it comes from (e.g. in this case the West and hence is a westerly wind). The child is walking from the West towards the wind vane which always points into the wind. Plate 11: A child uses a hairdryer to demonstrate how a wind vane points towards/into the wind and not the direction it is travelling in. There is a great cross-curricular opportunity here in D&T to design, make and test wind vanes and explore why they always point into the wind.

peo\g\pratchet\chapter4.doc 22
Plate 10: A group of children have constructed the seabed in the table-top model and are about to seal this off behind a curtain so the other group cannot see how it is configured.
Plate 11: A group of children are using books and boxes to construct the seabed in the model suspended across two chairs.

peo\g\pratchet\chapter4.doc 23
Plate 12: This is a sounding lead from a modern day naval ship in Plymouth; yes they still keep one in reserve! It has a hole in the end of the lead. In Tudor times this would contain tallow wax. The rope is calibrated for depth with coloured flags.
Photo 13: The children have swapped models and begin with some preliminary soundings to find out where the sea is deepest and shallowest. Some children are experimenting with doweling rods and one child is trying out a lead fishing weight suspended on a piece of string, which simulates the use of the sounding leads that would have been used by the ships of the Spanish and English fleets during Tudor times.

peo\g\pratchet\chapter4.doc 24
Plate 14: The author and a child discuss whether the sounding taken with a stick is recorded on the graph paper from sea-level down or the sea-bed up. Notice that holding the graph paper vertically against the face of the model is a strategy that helps the child perceive the relationship between depth finding and graph.
peo\g\pratchet\chapter4.doc 25
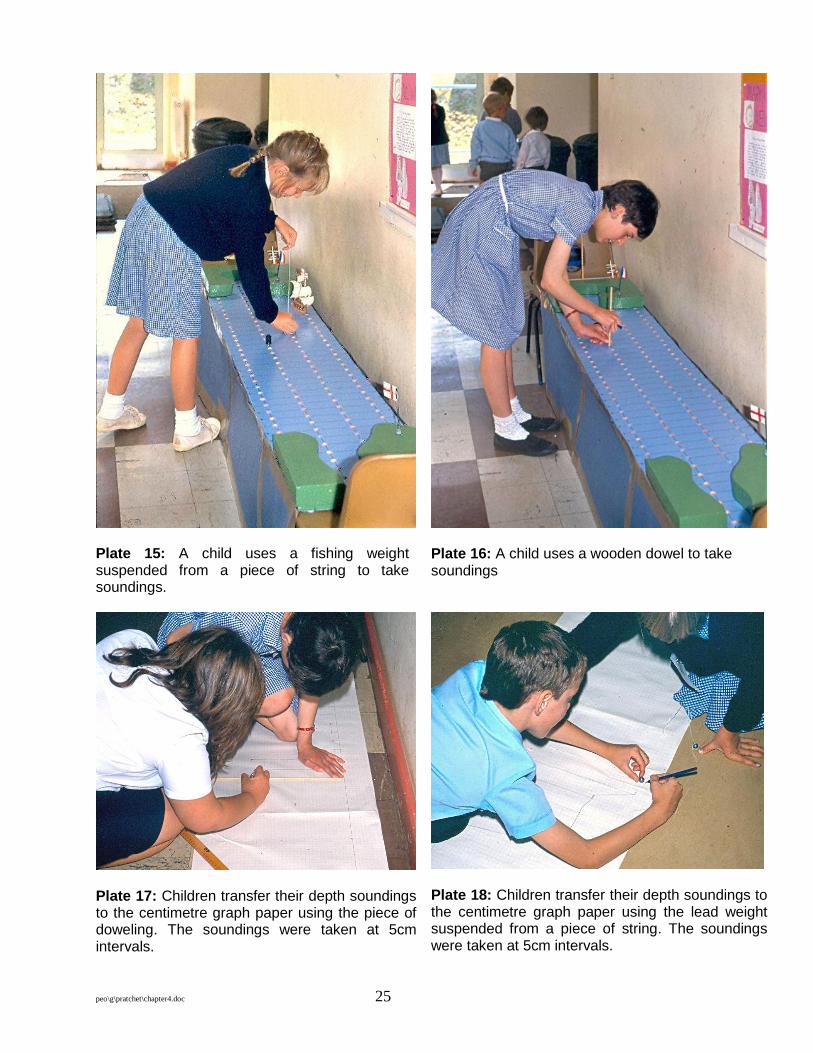
Plate 15: A child uses a fishing weight suspended from a piece of string to take soundings.
Plate 16: A child uses a wooden dowel to take soundings
Plate 17: Children transfer their depth soundings to the centimetre graph paper using the piece of doweling. The soundings were taken at 5cm intervals.
Plate 18: Children transfer their depth soundings to the centimetre graph paper using the lead weight suspended from a piece of string. The soundings were taken at 5cm intervals.

peo\g\pratchet\chapter4.doc 26
Photo 19: The children use a spirit-based pen to ink in their depth soundings so they will not run when colour washes are applied.
peo\g\pratchet\chapter4.doc 27
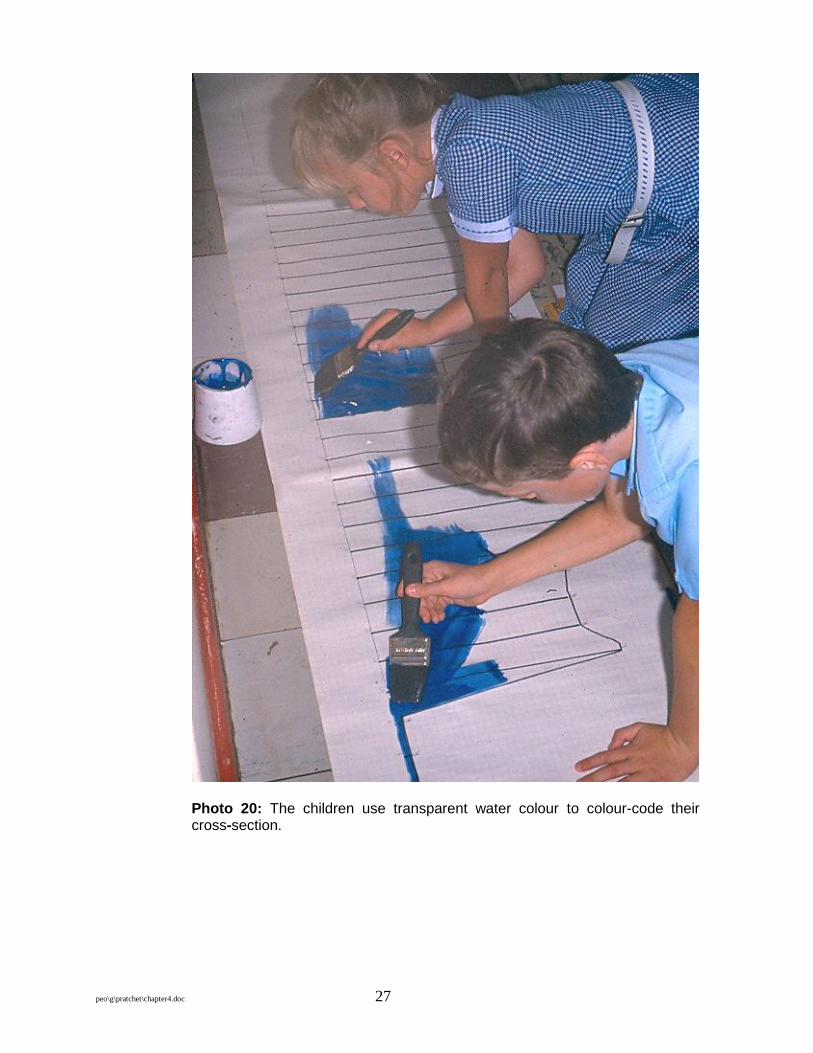
Photo 20: The children use transparent water colour to colour-code their cross-section.

peo\g\pratchet\chapter4.doc 28
Photo 18: A child solves the problem of sampling the seabed by attaching Blu-tac to the end of her dowel. Sand particles stuck to the Blu-tac indicated a sand bank while clean Blu-tac indicated rock.
Photo 21: The author hides a „sunken galleon‟ in the model. The children compare the cross-section made before and after the “shipwreck” to find any changes. If they locate the wreck correctly the reward is a bag of chocolate coins lying on the wreck!
peo\g\pratchet\chapter4.doc 29
Plate 22: Capitalise on “Titanic fever”! Children can deduce the shape of an iceberg under water by taking depth soundings. The iceberg is made from lumps of sponge rubber covered in papier-mâché.

peo\g\pratchet\chapter4.doc 30
The following photographs illustrate an element from author‟s (1999) maritime chart/depth finding project in collaboration with the RNLI and MCA, which is related to Air/sea Search & Rescue, where children try and discover the configuration of rocks on the seabed and plot the depths on the surface of the box to create a nautical chart.
Plate 23: The children are taking depth soundings with calibrated sticks and creating a maritime chart recording the depth in centimetres at each hole on a grid.
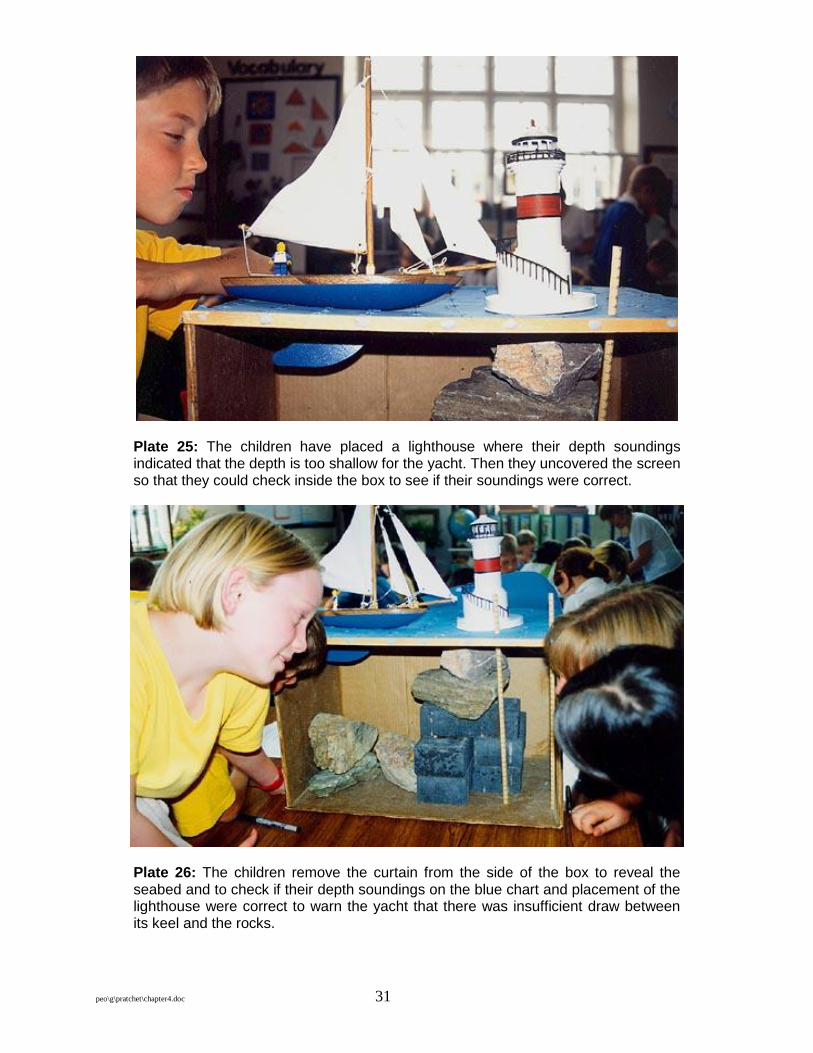
Plate 24: A toy yacht slides along a slot cut across the grid on top of the box. Its keel projects down into the box where rocks very near the surface are hidden. The children know the depth of the yacht‟s keel and have to decide from their soundings whether it will clear the rocks.
peo\g\pratchet\chapter4.doc 31
Plate 25: The children have placed a lighthouse where their depth soundings indicated that the depth is too shallow for the yacht. Then they uncovered the screen so that they could check inside the box to see if their soundings were correct.
Plate 26: The children remove the curtain from the side of the box to reveal the seabed and to check if their depth soundings on the blue chart and placement of the lighthouse were correct to warn the yacht that there was insufficient draw between its keel and the rocks.

peo\g\pratchet\chapter4.doc 32
Plate 27: The class teacher and children discuss the depths on the maritime chart used by the Plymouth lifeboat crew with the chart the children have made on top of their „above and below sea-level model‟.
Plate 28: Children examine the depth soundings on the maritime chart for the Plymouth lifeboat area and interpret the depths and symbols.

peo\g\pratchet\chapter4.doc 33
Plate 29: The cardboard „Above & Below Sea-level‟ box model being used by the children with a screen across the front so that they have to visualise the underwater terrain entirely from their depth soundings.