academic personnel recruitacademicaffairs.ucsd.edu/.../recruit_help_manual...academic personnel...
TRANSCRIPT

1.
Academic Personnel Recruit USER MANUAL Produced by UCIrvine’s Office of Information Technology — Revised July, 2012 UCSD Branded
ABOUT RECRUIT Faculty recruitment has long been a paper-intensive process, which creates an administrative burden both to increasingly over-assigned staff and faculty committees juggling multiple priorities. UCI’s AP Recruit was developed and deployed campus-wide in 2006 with the goal of streamlining this process. System design requirements included dynamic and secure interaction, from the job posting through the receipt of the application supporting reference letters and documents, and the archival of all materials in accordance with University policies and legal considerations.

AP Recruit User Manual
2.
HOW TO USE THIS MANUAL The purpose of this manual is to document RECRUIT’s functionality in order to aid Recruit
Administrators and trainers to help other users of the system. Permission is granted to copy, distribute
and/or modify this document for your educational use.
- UC Irvine’s RECRUIT Development Team

AP Recruit User Manual
3.
Table of Contents
HOW TO USE THIS MANUAL….. 2 WHAT YOU NEED TO KNOW BEFORE YOU START…. 4 THE ANALYST’S FUNCTIONS…. 5 News & Updates .................................................................................................................................... 6 Create the Basic Recruitment ................................................................................................................ 6 Configure the Recruitment .................................................................................................................... 9 View a Recruitment ............................................................................................................................. 11 Update a Recruitment …………………………………………………………………………………………13 Manage the Search Committee ........................................................................................................... 13 Manage the Applicant Pool .................................................................................................................. 15 Managing an Application ...................................................................................................................... 19
Overview .......................................................................................................................................... 19 Information ....................................................................................................................................... 20 Setting Requirements: Documents and References ......................................................................... 20 Comments & Flags .......................................................................................................................... 21 Visit/Seminar .................................................................................................................................... 21 Changing the Applicant's Status....................................................................................................... 22
Reviewing an Application ..................................................................................................................... 23 Creating the Diversity Reports ............................................................................................................. 25 What To Do When the Search Is Complete ......................................................................................... 27
Make Recruitment Inactive ............................................................................................................... 28 Re-activate the Recruitment ............................................................................................................. 28
HOW COMMITTEE REVIEWERS USE RECRUIT… 28 HOW THE APPLICANT USES RECRUIT…… 29 HOW REFERENCES USES RECRUIT.. 32 SUPPORT AND REPORTS: HOW ADMINS USE RECRUIT…. 33 ADMINISTRATIVE TOOLS .................................................................................................................. 34 ADMINISTRATIVE REPORTS ............................................................................................................. 36
APPENDIX A…. 39 NOTIFICATIONS SENT TO APPLICANTS .......................................................................................... 39 NOTIFICATIONS SENT TO REFERENCES ........................................................................................ 42
APPENDIX B…. 43 SUPPORTING RECRUIT USERS ....................................................................................................... 43 COMMON SUPPORT QUESTIONS .................................................................................................... 45

AP Recruit User Manual
4.
WHAT YOU NEED TO KNOW BEFORE YOU START At UC San Diego, to access RECRUIT you need to have a UCSD Single Sign-on account, UCSD’s authentication system for the campus community. The UCSD Single Sign-on is assigned to Faculty and Staff when they enter the payroll system, however it must first be activated. If you have never activated your UCSD Single Sign-on, contact your departmental DSA. You also need to have an assigned “role” in RECRUIT, which will determine what access level you have and what actions you can take. If you log into RECRUIT and only see News & Updates, you have not been assigned a role and should contact your departmental DSA for help. If you have an activated UCSD Single Sign-on account and have been assigned a role, you can log on to RECRUIT at—
https://apol-recruit.ucsd.edu/ A link is also available on UCSD’s Academic Personnel homepage —
http://academicaffairs.ucsd.edu/aps/index.html
All users, regardless of their roll will know they are logged into Recruit by looking at the top of the Recruit’s home page:
ROLES AND ASSIGNMENT OF ROLES Recruit Administrators are the primary supporters for end-users and they will manage future role assignments. Committee Chairs, Editors, and reviewers are assigned their roles on a recruitment-by-recruitment basis by the Department Analyst. The role you are assigned in RECRUIT determines the tasks you can perform and the screens you can see.
Recruit Administrators are the primary supporters for all other users and have the most Admin tool access and all the access rights of the roles listed below. Recruit User Managers act as gatekeepers, assigning, editing and removing user roles for others. Department Analysts create the recruitments for their Departments. They build search committees, view and manage all applicant files, short-list the candidates, and create & manage diversity reports. School Analysts have the same access rights as the Department Analyst but on the School

AP Recruit User Manual
5.
level. Committee Chairs have slightly more access rights than the Committee Reviewers but not as much as an Analyst. Chairs can review non-finalized applicants and may manage applicant files (though this is generally left to the Analyst). Committee Editors have the same access rights as Chairs. Editors generally assist the Department Analyst in managing the applications. Search Committee Reviewers have viewing rights to finalized applications and may comment on the files and flag applicants. Equity Advisors have access to view an application for a given recruitment, department, school, or tool and can manage (create & view) diversity reports for a given department, school, or tool. Central AP Analysts have access to download a CSV of applicant pool gender/ethnicity data. Diversity Analysts have access to view an application for given recruitment, department, school, or tool. They also can manage (create & view) diversity reports for a given department, school, or tool and can download a CSV of all diversity survey responses.
USING RECRUIT FOR ALL ACADEMIC POSITIONS As of May 2012, RECRUIT accepts all Academic Title Codes for online applicant management. This includes recruitments using Title Codes for Tenured/Tenure-track AND Other Academic Positions (non-tenured). For a complete list of Title Codes, log into RECRUIT and visit the Manage Recruitments tab in the online Help Docs. While this manual assumes the hiring departments have elected to use the full functionality of the system, RECRUIT may be used solely for the purpose of creating the Survey on Diversity and for managing the reports to be submitted to UCSD’s Office of Equal Opportunity and Diversity. To do so, Analysts will create a “Basic” recruitment and regulate the distribution of the surveys outside of the system.
THE ANALYST’S FUNCTIONS
The personnel analyst, creates recruitments, assigns search committees, manages the applicant

AP Recruit User Manual
6.
pools, and downloads data for reports on diversity. 1. Log into RECRUIT:
Recruit’s live site at UCSD: https://apol-recruit.ucsd.edu/ 2. Click on “UC Faculty & Administrators” (Fig 1.1). 3. When prompted, authenticate with your UCSD Single Sign-on and password.
Figure 1.1 Analysts log into Recruit using the Faculty & Administrators link.
NEWS & UPDATES
The landing page (Fig 1.2) is the same for all Faculty and Administrator roles, though the available tabs at the top (Fig 1.3) will differ depending on the user’s access rights. For example, committee reviewers will only see the Home tab and Applications tab. All users have the Help tab.
Analysts: If you only have the Home link, then your account has not been established yet and you must contact your departmental DSA for access to the system.
Figure 1.2 The landing page after logging into Recruit displays news and updates.
CREATE THE BASIC RECRUITMENT
Let’s say that a position with a specified salary control number is authorized for recruitment. A Recruitment Plan is developed and submitted with the ad text, and the plan is approved. The Analyst determines what, if any, recommendations are required and what documents must be submitted.
1. Click the Recruitments tab in the top menu bar.
Figure 1.3 Analyst’s tabs. Other roles’ tabs may differ depending on access rights.
2. Click the button, Create New Recruitment.
3. Read the Basic Overview page and click the Next button (Fig 1.4)

AP Recruit User Manual
7.
Figure 1.4 Basic overview page lists the steps to creating a new recruitment. 4. Fill in the Basic Information about the recruitment (Fig 1.5).
Figure 1.5 Fill in the basic information about the recruitment. Recruitment name. Choose a name that applicants will match up from the ad. Department. Select your department from the drop-down list. Academic year. This should be the year the recruitment is taking place and not necessarily the start
of the appointment for the eventual candidate. Salary control numbers. Optional. May be used to help analyst with tracking. Open date. Select year, month, and day by using drop-down arrows or pop-up calendar. Close date. This is the date that no new applications will be accepted. It can, however, always be extended. Final date. This is the last date for existing applicants to modify their applications. If you extend your closing date, then you need to change the Final Date as well. Search breadth. Choose if this position advertised broadly or specifically targeted. Initial search allocation. Is this position newly allocated or is it being re-listed from a previous academic year? Information URL. Optional. The URL will appear on Recruit’s apply page for applicants to link back to more information about the position.
5. Fill in the Title Codes and Specialties (Fig 1.6).
AP Recruit User Manual
8.
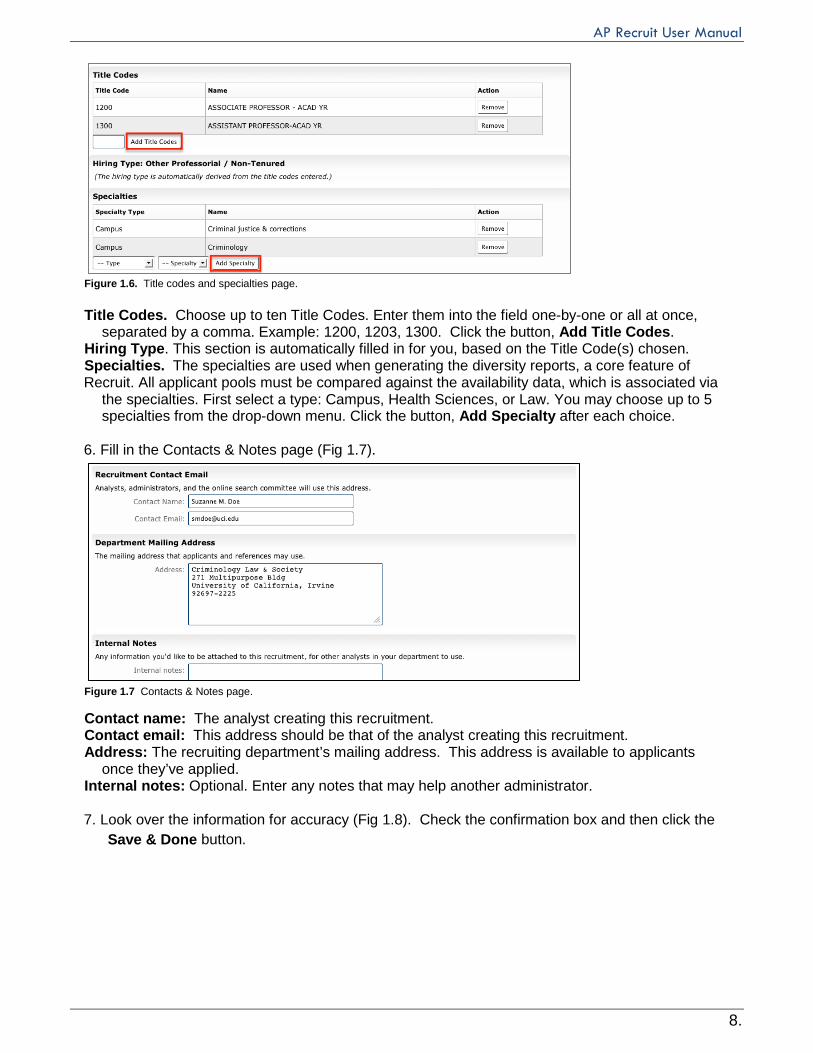
Figure 1.6. Title codes and specialties page. Title Codes. Choose up to ten Title Codes. Enter them into the field one-by-one or all at once,
separated by a comma. Example: 1200, 1203, 1300. Click the button, Add Title Codes. Hiring Type. This section is automatically filled in for you, based on the Title Code(s) chosen. Specialties. The specialties are used when generating the diversity reports, a core feature of
Recruit. All applicant pools must be compared against the availability data, which is associated via the specialties. First select a type: Campus, Health Sciences, or Law. You may choose up to 5 specialties from the drop-down menu. Click the button, Add Specialty after each choice.
6. Fill in the Contacts & Notes page (Fig 1.7).
Figure 1.7 Contacts & Notes page. Contact name: The analyst creating this recruitment. Contact email: This address should be that of the analyst creating this recruitment. Address: The recruiting department’s mailing address. This address is available to applicants
once they’ve applied. Internal notes: Optional. Enter any notes that may help another administrator. 7. Look over the information for accuracy (Fig 1.8). Check the confirmation box and then click the Save & Done button.

AP Recruit User Manual
9.
Figure 1.8. Review all information before saving.
Though the Basic recruitment is done, Applicants will not be able to see the position listed on RECRUIT’S Apply page (https://apol-recruit.ucsd.edu/apply) until it is configured for online applicant management.
You may configure the recruitment at this point or else choose “No, Done for Now” (Fig 1.9). If you choose the latter, you may resume configuring the recruitment later by locating it on the main Recruitments page, reachable via the top menu bar.
Figure 1.9 Confirmation screen once the Basic recruitment has been created.
CONFIGURE THE RECRUITMENT 1. Click Yes, Configure for Online Applicant Management in the confirmation box (Fig 1.9). 2. Read the Online Overview page and click the Next button (Fig 1.10).

AP Recruit User Manual
10.
Figure 1.10 The overview screen lists the steps to configuring the recruitment. 3. Define the required and optional documents, as well as the number and type of requested references. (Fig 1.11). NOTE - most information in this step cannot be changed after the first applicant has applied.
Figure 1.11 Set the requirements. Documents. The required documents defined cannot be changed once the first applicant applies. The default choices are: Curriculum Vitae (Required), Cover Letter (Optional), Statement of Research (Optional), Statement of Teaching (Optional), and Misc/Additional (Optional).
Add. Define additional documents, add a description, and make them required or optional. We recommend you add one or two optional documents for the applicant to use if needed, for example: “Extra Docs” or “Additional Docs”. Reorder. Adjust the order in which the requirements appear to the applicant when they apply. Edit. Change the name of any document, add a description, and switch it from required or optional. Delete. Remove a document from your list.
References. The reference requirements cannot be changed once the first applicant applies.
Type. Choose No References, Only Contact Information, or Letters of Recommendation. Number. Select the minimum-to-maximum range of reference letters required. Search Committee Reference Viewing Rights. Restrict letter viewing to certain members of the search committee if needed. Choose “All Reviewers”, “Only Faculty Members”, “Only Assistant, Associate & Full Professors”, “Only Associate & Full Professors”, or “Only Full Professors”.

AP Recruit User Manual
11.
4. Help Email Address. This is the address where questions from applicants will be directed (Fig 1.12). This address is also used in the “From” line in a number of other correspondences between the department, applicants, and references. Refer to the text on the screen for those specific situations. 5. “Thank You” Email Sent to References is a fully customizable template that Recruit sends to references after their letters of recommendation are uploaded into the system. The template states: “Thank you for submitting a letter of recommendation. Your letter is now available on-line for viewing by the faculty search committee. We would like to include your letter in the appointment file when an offer of employment is extended. If you have any concerns about this, please contact us by replying to this email.” See section in this manual, How the Reference Uses Recruit.
Figure 1.12 Contact information and reference template screen. 6. Confirm the requirements are correct. Look over the information for accuracy (Fig 1.13). Check the confirmation box and then click the Save & Done button.
Figure 1.13 Review all information before saving. VIEW A RECRUITMENT

AP Recruit User Manual
12.
1. To see a listing of all recruitments in the system that you are responsible for, click Recruitments in the top menu bar. If you do not see this link, your role in the system is not set to Recruit Analyst.
2. Use the filter panel to fine-tune your list of recruitments:
Submission Dates: Check which recruitments you want displayed. By default, you will see all, regardless of the submission date status.
Academic Year: This filter shows all your recruitments by their academic year. By default, the two most recent academic years will be checked.
Recruitment Type: Do you want to display only recruitments that have been configured for online applicants or only basic recruitments? By default, both will be checked.
Hiring Type: Decide whether you display recruitments with Tenured title codes or those without. By default, both are checked.
Other: Filter for those recruitments with applicants vs. those without. Or filter for all inactive recruitments.
3. Besides filters, try the Change Columns button and/or the Search box to help you zero in on the Recruitment you are looking for. 4. To see the details about a particular recruitment and/or update it, follow the links using either the JP# or “Recruitment Details” (Fig 1.14).
Figure 1.14 Reaching a recruitment’s detail screen. UPDATE A RECRUITMENT

AP Recruit User Manual
13.
On the Recruitment Details page, use the Edit Basic Recruitment button to update the position name, dates, etc., Use Update Online Applicant Requirements to change the document requirements, contact information, etc. (Fig 1.15).
Figure 1.15 The Recruitment Details screen provides information about the recruitment with edit capability. CREATE AND MANAGE THE SEARCH COMMITTEE Analysts assign committee roles so when the members log into Recruit, they will have access to review applicants’ files for a particular recruitment. An Editor may also be assigned. An Editor is useful because this person may act as the assistant to the Analyst. 1. As an Analyst, click the Recruitments tab in the top menu bar.
2. Find the recruitment and click the link, “Manage Search Committee” (Fig 1.16).
Figure 1.16 The Search Committee link.

AP Recruit User Manual
14.
3. There are two methods to add members to a search committee (Fig 1.17): 1. Use the Add members button for an extended search for faculty or staff or 2. Type in the qualifier in the Quick Add box and select a role from the adjacent drop-down menu.
Figure 1.17 Committee members selection and role assignment. Roles and access for committee members: Committee Chairs may manage the applicant pool, though this is generally left to the Analyst. Chairs see all candidates, regardless of whether their applications are complete or not. Editors have the same access rights as Chairs and are able to assist the analyst in managing the applicant pool. Reviewers have viewing rights only and see only finalized candidates - those who have completed the application process. Note: The designation between Core committee members (listed on AP-80a) and additional members is important because it helps to satisfy annual reporting requirements for the Office of the President regarding applicant pools and search committee membership. Add Core committee members plus any Additional members to the committee who were not listed on the original search plan. Additional roles have the same access rights as their core counterparts (Fig 1.18).
Figure 1.18 Choosing a role for committee members. If using the Add Members button, an expanded search box will open (Fig 1.19). Use the expanded search to search by name rather than by e-mail address. Or add an entire department’s faculty as reviewers, as shown in Fig 1.20. Click Save & Done when finished.
Figure 1.19 Add members to the committee using the expanded search.

AP Recruit User Manual
15.
Figure 1.20 An expanded search allows for quick adds of all faculty within a department. 4. Search Committee roles may be managed throughout the length of the search. Click “Change role” or “Remove” next to the names OR click the button, Manage Existing Members.
MANAGE THE APPLICANT POOL Analysts locate the applicant pool either on the Recruitments tab or the Applications tab. NOTE: Chairs, editors, and committee members have only the Applications tab for this purpose.
1. From the Recruitments tab. Find the position and click the link, “Applications”. The total numbers of applicants who have applied appear in parenthesis beside the link (Fig 1.21).
Figure 1.21 The Applications link shows that 9 people have applied. 2. From the Applications tab. Click the link, “View Applicants”. The total numbers of applicants who have applied appear beside the link (Fig 1.22).
Figure 1.22 The Applications link. Looking at the applicant pool list (Fig 1.23), Recruit offers some useful tools to locate the applications.

AP Recruit User Manual
16.
Figure 1.23 The list of applicants, showing the Search by date and Filter tools. Using Filters: Find the applicants by filtering the information that is displayed. The filter feature is available to all, including Analysts, Editors, Chairs, and Reviewers.
• Click the button, Show Filters. • Type in a designator in the box above the desired column. • In the action column, click “Filter”. • Click “Clear” to restore the list to its original state.
Search by Date: Locate applications based on Applied Date or Last Update.
• Click “Search by Date” to expand criteria. • Choose a date range. • Click “Search”. • Click “Clear” to restore the list to its original state.
Using Column Options: Increase or reduce column information.
• Click “Column Options”. • Check information to display (Fig 1.24). • Click the button, Save Columns.
Figure 1.24 Column options dialogue box. Download Applicant Data: An optional but useful tool used to create lists of applicant names, addresses, and other column criteria to take to a meeting or use for mail merging. The feature is available to all users, including Analysts, Editors, Chairs, and Reviewers. RECRUIT will build a comma-delimited file, “recruit_export.csv” consisting of the applications list and the data fields that have been pre-selected from the column options.
• Click the button, Download This Data.

AP Recruit User Manual
17.
• Depending on the web browser — • the file will download to the usual download area on the user’s computer OR • the file will open automatically in Excel OR • the browser will present a message asking the user to either OPEN or SAVE it.
Finalize/Unfinalize Applicants: When an applicant submits all required materials into RECRUIT, their application is complete and the program automatically finalizes the applicant — this is the point at which applications become visible to the Reviewers.
• Show all unfinalized applicants using the finder on the right side of the screen (Fig 1.25). • Check the “Unfinalized” box and click Go.
Figure 1.25 Showing unfinalized applicants.
• If an application is not complete, Analysts, Chairs, and Editors have the option to manually finalize
a candidate if this is in the best interest of the search. • Choose any applicant marked “Applied” in the Status column. • In the Actions column, click the link, “Finalize”. This applicant will now be visible to the search
committee even though the application is unfinished. • This link is a toggle. Click “Unfinalize” to undo this action.
Hide / Unhide an applicant: Recruit does not delete applications but any applicant may be hidden from the committee’s view. This is useful when an applicant has applied to the wrong position. Analysts, Chairs, and Editors have the ability to hide / unhide applicants.
• Choose any finalized applicant. • In the Actions column, click “Hide”. The Search Committee will no longer see this applicant. • To bring the applicant back into view, use the Show finder. Check the “Hidden” box and click Go.
Mark as Read: This is a way to quickly put a checkmark next to applicants that have been reviewed. The feature is available to Analysts, Editors, Chairs, and Reviewers. The checkmarks are private and only seen by the user. 1. Put a check in the empty box in the applicant's row. 2. Click the button, "Mark as read":
3. A green checkmark appears beside the box.
4. To restore to the original, check the box again and click the button Mark as unread.
Application modified since marked as read If an application was updated since you last marked it as read, an alert icon will replace the green checkmark. Modifications may include the applicant's personal, employment, degree information updates, changes to references, or any file uploads or deletions (including the letters of recommendations).
• Locate the applicant in the list.

AP Recruit User Manual
18.
• If modified since you marked it as read, an alert icon will replace the checkmark:
Add Personal Note: This is a way to jot a personal notes once an application has been reviewed. The feature is available to Analysts, Editors, Chairs, and Reviewers. The notes are private and only seen and managed by the note-writer. 1. Click the link, "Add" in the Personal Note column beside the applicant's name.
2. Notes may have up to 255 characters. 3. Click "Save". 4. To read the entire note, roll over it with the mouse. 5. To edit the note, roll over it with the mouse and click. 6. Click "Remove" to delete the note. Adding an Applicant: Analysts may add an application on behalf of someone. This is useful for high-level searches such as Dean recruitments. 1. Click the button, Add applicant.
2. Fill in all required information about the applicant: contact information, degree information, current employment information, and date the application will be added to the pool (Fig 1.26).
Figure 1.26 An analyst may add an applicant to the pool.
3. Decide to notify the applicant. This optional action sends an email to the applicant that an application has been created on their behalf. It does not send login instructions.

AP Recruit User Manual
19.
4. Click the button, Add & Manage Now.
5. Decide to activate the application. This optional action sends an email to the applicant that grants the applicant access with login instructions along with a prompt to take the Diversity Survey.
6. On the Manage Account Information screen, click the button, Activate applicant access (Fig 1.27).
Figure 1.27 Notifying the applicant that an application has been submitted in their behalf sends the login information.
MANAGING AN APPLICATION Only Analysts, Chairs, and Editors have the Manage link beside the name of each applicant. The Analyst and/or Editor roles usually do the tasks below. In the action column, click “Manage” to see an overview of the application (Fig 1.28): OVERVIEW
Figure 1.28 Manage applicant: The overview of an applicant’s file.
Applicant Documents. Click the hyperlinked filename to download them to your computer. Letters of Reference. Click the hyperlinked name of the reference to download their letter. Comments. Post and update a comment to share with your search committee peers.

AP Recruit User Manual
20.
Flags. (not pictured) Post a flag if the applicant has a specific skill. INFORMATION Click “Information” in the sidebar menu (Fig 1.29).
Figure 1.29 Manage applicant: The information screen.
Applicant Status. The default status of an applicant is “Applied.” In Figure 1.28, the applicant’s status is “Completed” — meaning, all required documents have been uploaded and letters of recommendation have been requested (if required by the recruitment). Editing the status is covered in detail in the section, “Changing the Applicant’s Status”. Applicant Information. The applicant’s address, email, username, personal web site, employment, and degree information are available and editable. DOCUMENTS & REFERENCES Click “Documents & References” in the sidebar menu (Fig 1.30).
Figure 1.30 Manage applicant: Full control over documents and references.
Application Documents. Fully manage the documents; view, upload or delete them if necessary. Documents may be uploaded as PDF files. Other valid file types include: zip, jpg, rar, tif, mov, bmp, 3gp, png, wmv, m4v, mp3, mp4, psd, swf, tiff.

AP Recruit User Manual
21.
References & Letters. Fully manage the references and their letters; add or delete a reference and/or upload letters that arrived outside the system (PDFs, etc). These tasks are possible even if the recruitment has been configured for “Contact Information Only.” COMMENTS & FLAGS Click “Comments & Flags in the sidebar menu (Fig 1.31).
Figure 1.31 Manage applicant: Comments and Flags. Flags. To flag an applicant, type a descriptor. Remember to click the button, Add Flag. Optionally use the checkbox if you want to hide the flag from reviewers. Comments. Comment to your search committee peers. Click Save Comment. Read the comments left by others. VISIT/SEMINAR Go to Visit/Seminar in the sidebar menu and click, “Schedule a visit/seminar (Fig 1.32).
Figure 1.32 Manage applicant: Optionally schedule the candidate’s visit/seminar in Recruit. Step 1: Information. Add a title, summary, and a bio of the applicant (Fig 1.33). Step 2: Schedule. Select dates and add an event description (Fig 1.34).
• Click Add Event.

AP Recruit User Manual
22.
• Click Save & Done.
Figures 1.33 and 1.34 Adding the details to the visit/seminar and scheduling associated events. After saving, you are returned to the main Visit/Seminar screen (Fig 1.34). This is where you find links to a formatted attendance sheet and a flyer that may be printed.
Figure 1.35 The Visit/Seminar information for a candidate. CHANGING THE APPLICANT’S STATUS Keeping the applicant's status up to date will make sure that the search committee is always aware of the current status and it also satisfies annual reporting requirements for the Office of the President. The applicant’s current status appears in a blue bar at the top of all the Manage Applicant screens.
To update the status of the applicant:

AP Recruit User Manual
23.
1. Click “Update status” 2. Select a status from the drop-down menu (Fig 1.36):
Figure 1.36 Status categories are selectable from the drop-down menu. Pre-shortlist. Selectable statuses include: No Longer Interested or Application Withdrawn. Shortlist. Selectable statuses include: Shortlist, Serious Consideration, Invite for Visit, or Final Candidate. NOTE - Although the status of an applicant may be changed at any time, adding an applicant to the shortlist is permanent. (Per University policy, a shortlisted applicant must always appear on the shortlist for accurate diversity reporting.) As statuses are changed, they are noted in chronological order on the Update Applicant Status screen. Offered. Return to the “Update status” link and select “Offered” from the drop-down menu. You may be asked to choose the particular Title Code for the candidate if multiple title codes were used for the recruitment (Fig 1.37). Also, if the recruitment had been cross-listed, you will be asked to select the primary department as well.
Figure 1.37 Select the title code associated with the candidate who is offered the position. Accept or Decline Offer. Return to the “Update status” link and select “Mark as Accepted” or “Mark as Declined” (Fig 1.38). If the candidate has declined, select a reason from the resulting choice menu (Fig 1.39).
Figure 1.38 Update offered status when Accepted or Declined is known.

AP Recruit User Manual
24.
Figure 1.39 Select a reason why the offer was declined. Mark Hired Applicants. Return to the “Update status” link as before and mark “Accepted” applicants as “Hired” (Fig 1.40). This provides the UC Office of the President the data needed for recruitment and retention reporting (which previously had to be collected manually).
Figure 1.40 Update status as “Hired”. REVIEWING AN APPLICATION Click the “Review” link in the Actions column. The applicant’s file will open as read-only (Fig 1.41). This is an at-a-glance view of all of the important applicant information, with access to documents and letters of reference, as well as the ability to leave a comment, flag the applicant, write a private note to yourself about the applicant, and mark the application as read when finished reviewing.
Figure 1.41 Reviewing an applicant’s file.
1. View the Current Application Information (left sidebar) • Mark this application as read when done. • Write a private note to yourself about the applicant. • Review the employment, degree and other information about the applicant.
2. Applicant Documents (CV, cover letter, etc) • The middle section contains the applicant’s required or optional documents.
AP Recruit User Manual
25.
• Click on the hyperlinked filename to open it. • For an alternate method for reviewing documents click “Use Document Viewer” at the top
right of the page. This will open the applicant's documents within the browser frame. NOTE - Files with .docx extensions (the newest version of Microsoft Office), will not open in the Document Viewer. If you are having trouble viewing any file, download the file to view it and do not use the Document Viewer.
3. Review the Letters of Reference • To the right, locate any references and letters (if these are requirements). • Click the “View detail” links to expand the reference’s contact information. • If the applicant has not yet requested a letter, this will be indicated below the Referee’s
name, “Letter of Reference not yet requested”. • Click the hyperlinked name of the Reference to download the letter or use the Document
Viewer link. 4. Comments
• Type or update your comment in the box provided in the My Comment section. Only one comment per owner is accepted. Comments are editable by the owner.
• Committee reviewers will be able to read all comments. Owner’s names are displayed. 5. Flags
• Place a flag on the applicant by typing in the My Flags box. Multiple flags are permitted. • Click the “Remove Flag” link to remove your flag.
NOTE- Most of the time committee members will be able to read one another’s flags, although the Department Analyst controls this when the recruitment is set up.
6. Visit/Seminar Schedule
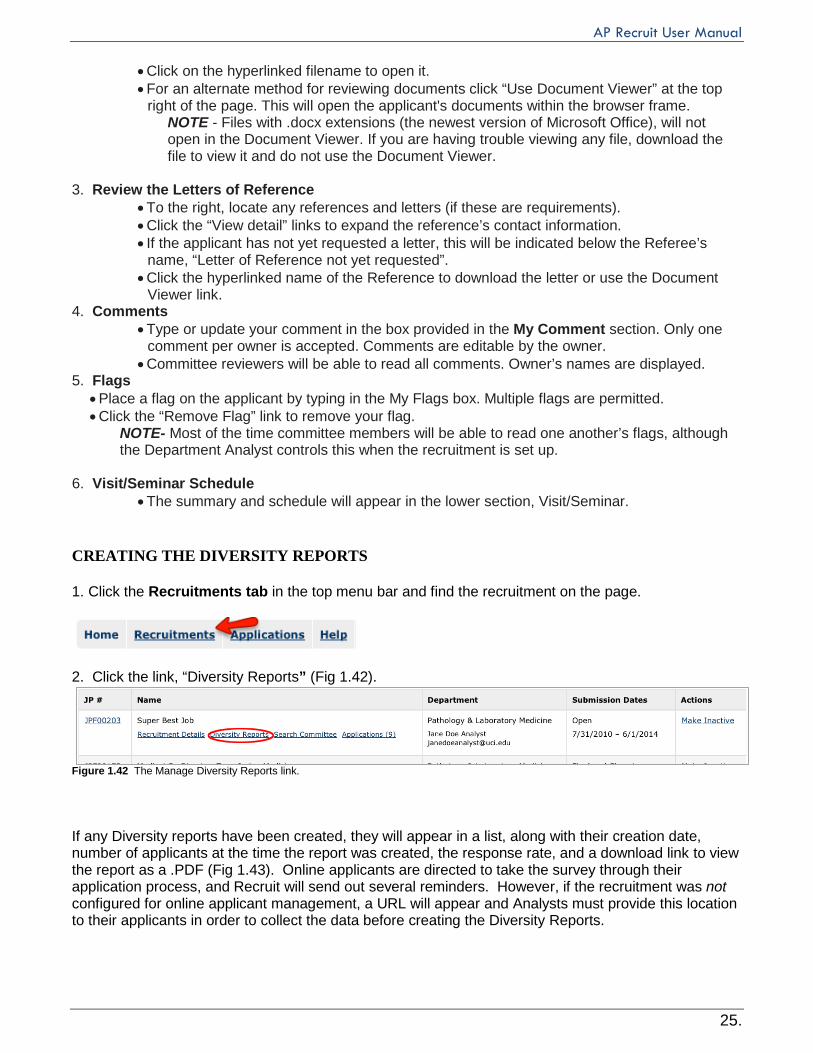
• The summary and schedule will appear in the lower section, Visit/Seminar. CREATING THE DIVERSITY REPORTS 1. Click the Recruitments tab in the top menu bar and find the recruitment on the page.
2. Click the link, “Diversity Reports” (Fig 1.42).
Figure 1.42 The Manage Diversity Reports link. If any Diversity reports have been created, they will appear in a list, along with their creation date, number of applicants at the time the report was created, the response rate, and a download link to view the report as a .PDF (Fig 1.43). Online applicants are directed to take the survey through their application process, and Recruit will send out several reminders. However, if the recruitment was not configured for online applicant management, a URL will appear and Analysts must provide this location to their applicants in order to collect the data before creating the Diversity Reports.

AP Recruit User Manual
26.
Figure 1.43 The Diversity Reports screen. URL shows only for Basic recruitments. 3. On the Diversity Reports screen, click the button, Create New Report. Reports may be created as often as necessary.
4. The Create New Report screen (Fig 1.44) shows how many applicants have applied online through Recruit and how many have been given a shortlist status. A fill-in box will be available for survey-only (Basic) recruitments (Fig 1.45). Click the button, Create Report, to generate the Diversity Report.
For Basic recruitments (those that have not been configured for online application management), a field is provided for the Analyst to type in the number of applications received outside the system:
Figure 1.44 The Create New Report screen. Figure 1.45 Fill in # of applicants for survey-only use of Recruit. 5. Back on the Diversity Reports screen click the “Download” link to view the report (Fig 1.43 above). 6. This opens a PDF showing the aggregated results of the Survey on Diversity for this particular recruitment (Fig 1.46).

AP Recruit User Manual
27.
Figure 1.46 The diversity survey’s aggregated results for a recruitment. WHAT TO DO WHEN THE SEARCH IS COMPLETE

AP Recruit User Manual
28.
Make Recruitment Inactive The search is complete when a candidate has formally accepted the offer and has been processed in the payroll system. At this point, Analysts may archive the recruitment, which is accomplished by inactivating it. This effectively hides the entire recruitment and applicant pool from all reviewers. 1. Click the Recruitments tab in the top menu bar and find the recruitment on the page.
2. Click the link, “Make inactive” (Fig 1.47).
Figure 1.47 The Make Inactive link effectively archives the recruitment. Re-activate the Recruitment To undo this action, first use the filters panel (Fig 1.48) 1. Place a checkmark next to “Show Inactive.” Depending on your computer, you may need to click the Filter button.
Figure 1.48 The filters panel. 2. Locate the recruitment in the list. 4. Click the link, “Make Active” in the Actions column. This recruitment is available once again to manage as before and the intact applicant pool is visible to the reviewers.
HOW COMMITTEE REVIEWERS USE RECRUIT

AP Recruit User Manual
29.
Committee reviewers log in using the UC Faculty & Administrators link on the RECRUIT homepage:
The interface is simplified for Reviewers. There are only 3 tabs at the top of the page:
After pressing the Applications tab, the reviewers see the names of those recruitments to which they have been given committee access, along with links to the applicant pools. The totals indicate only finalized applicants.
Reviewers see only those applicants who are finalized. Refer to the section, Manage the Applicant Pool (pp 14-16). Much of the same functionality is available to Reviewers: Using filters, search for applicants by date, column options, download applicant data, mark-as-read, and adding a personal note.
Clicking the hyperlinked name of an applicant opens their application to review. Refer to the section, Reviewing an Application. All of the same functionality is available to Reviewers:
HOW THE APPLICANT USES RECRUIT

AP Recruit User Manual
30.
1. Applicants locate the recruitment on Recruit’s apply page, https://apol-recruit.ucsd.edu/apply 2. They create their ApplicantID (unique username and password). 3. They fill in their contact information, highest degree information, current employment
information, etc. 4. Using their Dashboard, they provide files and references. Documents may be uploaded as PDF
files. Other valid file types include: zip, jpg, rar, tif, mov, bmp, 3gp, png, wmv, m4v, mp3, mp4, psd, swf, tiff.
5. Applicants returning to modify their application will log in on the apply page with their username and password.
6. Applicants who have forgotten their passwords may change it on the apply page by clicking the link in the login box, “Forgot your password?”
7. Applicants may apply for multiple positions, however each position requires its own ApplicantID (unique username and password).
8. “Contact Us” links appear in several locations before and after applicants are logged in. See section, “Supporting Recruit Users” in Appendix B.
The Applicant’s Dashboard Once all requirements are fulfilled, the application is completed. The applicant is “finalized”, meaning their application is visible to the committee reviewers. The applicant’s various tabs turn green and the Application Status on the Dashboard displays “Submitted” (Fig 2.1). Recruit will send a confirmation email when the application is complete. See Appendix A.
Figure 2.1 A completed application, as it appears to the applicant.
My Information. The applicant’s contact information, current employment information, highest degree information, and account information is editable by the applicant using the “Update” links (Fig 2.2).

AP Recruit User Manual
31.
Figure 2.2 Applicant’s “My Information” screen.
My Files. Applicants upload the necessary files using the “Upload Now” link (Fig 2.3).
Figure 2.3 Applicant’s “My Files” screen.
My References. Reference contact information is added and letters of recommendation are requested (Fig 2.4). The deadline to finish applications does not apply the receipt of letters. As long as the

AP Recruit User Manual
32.
applicant has notified the references, the application is complete. In other words, there is no deadline on when letters need to be uploaded.
Figure 2.4 Applicant’s “My References” screen.
Diversity Survey. Applicants read about the Diversity Survey (Fig 2.5) and click the link, “Submit diversity survey”. They fill out the 3-question survey (Fig 2.6).
Figure 2.5 Applicant’s Diversity Survey screen.
Figure 2.6 The Diversity Survey displayed to the applicant.
HOW REFERENCES USES RECRUIT

AP Recruit User Manual
33.
As part of the application process, the Applicant initiates an email request from their references IF letters of recommendation are a requirement to complete their application. The system sends the email along with instructions to the Reference to log into Recruit and upload a letter. Uploading a letter of reference 1. References receive an email with the subject line, "UC Irvine Recruit: Letter of Reference Requested" 2. The Reference is instructed to log into Recruit one of two ways:
• Using the Easy Login Link OR… • Using their email address with a token combination at
https://apol-recruit.ucsd.edu/reference
3. After logging into the system, the University of California Confidentiality Statement is displayed on the screen. The Reference must check the box below it before they can proceed (Fig 3.1).
Figure 3.1 The UC Confidentiality Statement is shown to the Reference before the letter can be uploaded. 4. References browse their computers and upload their letters (Fig 3.2).
Figure 3.2 The upload screen for references.
• References may upload one file. • Files must be uploaded as .PDF • Files must be less than 2MB in size. • Applicants will not be able to view the letters
from Recruit, but will be notified that it has been submitted.
References Thank You Email Recruit automatically sends a message thanking the Reference for their contribution. This email is editable by the Analyst when they are configuring the recruitment for online applicant management.
SUPPORT AND REPORTS: HOW ADMINS USE RECRUIT
AP Recruit User Manual
34.
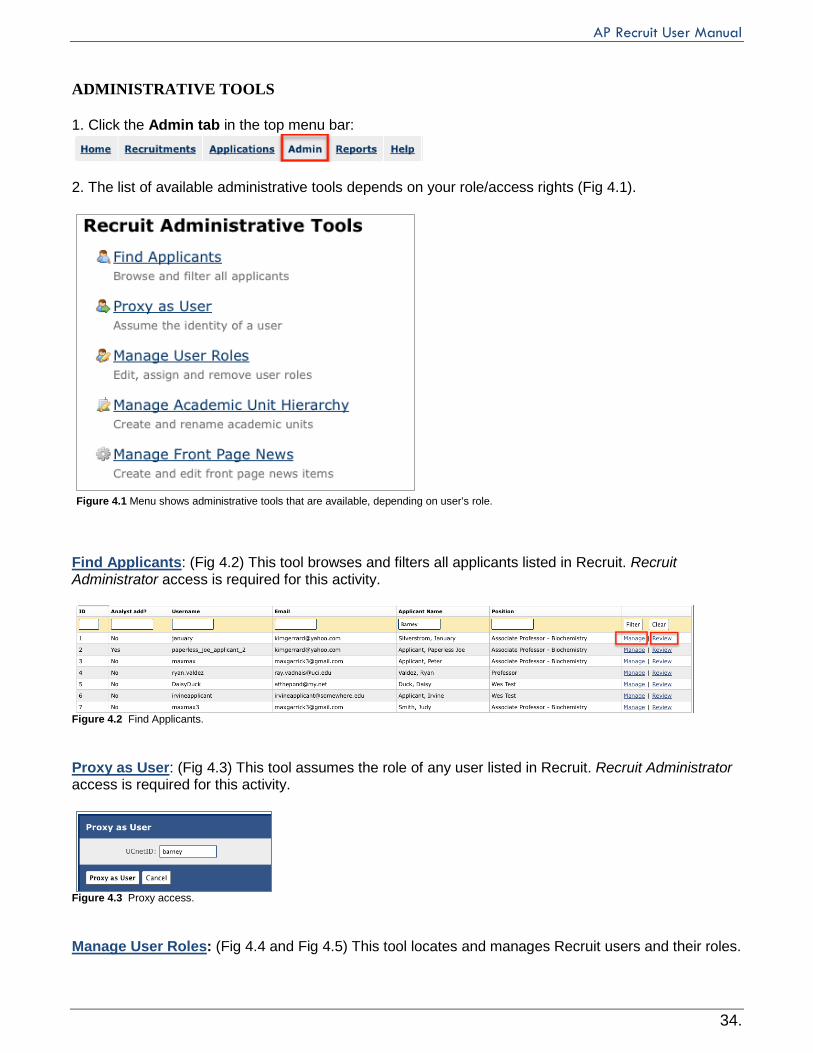
ADMINISTRATIVE TOOLS 1. Click the Admin tab in the top menu bar:
2. The list of available administrative tools depends on your role/access rights (Fig 4.1).
Figure 4.1 Menu shows administrative tools that are available, depending on user’s role.
Find Applicants: (Fig 4.2) This tool browses and filters all applicants listed in Recruit. Recruit Administrator access is required for this activity.
Figure 4.2 Find Applicants. Proxy as User: (Fig 4.3) This tool assumes the role of any user listed in Recruit. Recruit Administrator access is required for this activity.
Figure 4.3 Proxy access. Manage User Roles: (Fig 4.4 and Fig 4.5) This tool locates and manages Recruit users and their roles.

AP Recruit User Manual
35.
All faculty and employees (including student employees) will have access to Recruit because they are part of a nightly data feed, but they do not have the ability to “do” anything in Recruit until they have been given a role. Until they are assigned a role, they may log in and see the News and Updates page, but nothing more. This tool enables you assign roles, edit existing roles, and remove user access. Recruit Administrator or Recruit User Manager access is required for this activity.
Figure 4.4 Locate users by their sign-in name on the “View by users” tab.
Figure 4.5 Locate users by their roles. Manage Users: (Fig 4.6) This tool is useful to create users and their roles for training or demonstration purposes. NOTE TO OTHER CAMPUSES USING RECRUIT: This tool is only available if Recruit is configured on your campus for local authentication. Under Shibboleth, Recruit expects to be fed user directory data so this tool would be unavailable in order to prevent overwriting data. Recruit Administrator access is required for this tool.
Figure 4.6 Create, edit, and delete user accounts when Recruit is configured for Local Auth. Manage Academic Unit Hierarchy: (Fig 4.7) Use this tool when Departments, Schools or Divisions change their names or the data feed needs correcting. Warning: Incoming data feeds may overwrite

AP Recruit User Manual
36.
any manual updates. Currently this tool offers no way to delete and must be done by a programmer. Recruit Administrator access is required for this activity.
Figure 4.7 Use Manage Academic Unit Hierarchy to add new Departments or Schools.
Adding a New Department: You will need to find out the department code, which is typically the payroll home department code. This number should correspond with the "department code" column of the directory data feed.
• Find the School listed on the page and click the link, “Add Department”. • Fill in the name of the Department and click “Add”.
Adding or Renaming a School:
• Scroll to the bottom of the page and click “Add another School...” • OR find the School listed on the page and click the link, “Edit School”. • Fill in the name and click “Save Changes”.
NOTE: The School identifier (a.k.a. "abbreviation") is any short alphanumeric combination used for sorting Schools on various pages throughout Recruit.
Manage Front Page News: (Fig 4.8) Use the Front Page News Manager admin tool to write, edit, publish, and archive news items on the Home page after login. These posts are visible to all users except applicants and references. Post training dates, planned downtimes, holiday support notices, application enhancements, special instructions, or other announcements. Recruit Administrator access is required for this activity.
Figure 4.8 This admin tool’s interface shows current and archived news posts along with a “Create New Item” button. ADMINISTRATIVE REPORTS 1. Click the Reports tab in the top menu bar:

AP Recruit User Manual
37.
2. The list of available reports depends on your role/access rights (Fig 4.9).
Figure 4.9 Menu shows admin reports available (depending on user’s role). Recruitment Descriptions: (Fig 4.11) This report shows information on all recruitments in a given academic year such as position name, department name, initial search allocation, search breadth, title codes, etc. Recruit Administrator or Central AP Analyst access is required for this activity.
Figure 4.11 This description data supports UCOP’s faculty recruitment & retention reporting. Core Search Committee Composition: (Not pictured) Select the Academic Year from the dropdown menu to download a report containing diversity data on unnamed core search committee members. Core members are those individuals who were listed on the campus recruitment planning form and have been added to the search committee in Recruit by the Analyst. Gender and ethnicity for these individuals are derived from a central data feed. Recruit Administrator or Central AP Analyst access is required for this activity. Applicant Pool Composition: (Fig 4.10) Create a spreadsheet with the data required by UC’s Office of the President, consisting of applicant diversity information. Recruit Administrator or Central AP Analyst access is required for this activity. 1. Select the academic year from the drop down menu. 2. Check “All applicants” or “Only short-listed applicants”. 3. Click “Download Data”. The report shows the total number of responses given for gender and ethnicity per recruitment. Only recruitments for ladder rank positions (CTO codes 010, 011, 114, 124, 210, 211, S24) will be included in the downloaded spreadsheet.

AP Recruit User Manual
38.
Figure 4.10 The set-up interface for the UCOP Faculty Search Report. Hired Report : (Fig 4.13) Download a report of all hired applicants in a given academic year. Recruit Administrator or Diversity Analyst access is required for this activity.
Figure 4.13 The hired data supports UCOP’s faculty recruitment & retention reporting. Offer Report : (Fig 4.12) Download a report of those applicants offered positions in a given academic year and if they either accepted or declined (mapped to selected reasons). Analysts generate the data in this report when they update an applicant's status. Recruit Administrator or Diversity Analyst access is required for this activity.
Figure 4.12 The offer data supports UCOP’s faculty recruitment & retention reporting. Diversity Survey Responses. (Fig 4.14) Create a spreadsheet showing all diversity survey responses for a given academic year. Recruit Administrator or Diversity Analyst access is required for this activity. The filter-able report will show all applicants for a given recruitment including finalized, unfinalized, shortlisted and non-shortlisted. NOTE- as this report is so encompassing, it possibly will not match the per-position diversity report data.

AP Recruit User Manual
39.
Figure 4.14 The set-up interface for the Diversity Survey Responses report.
APPENDIX A NOTIFICATIONS SENT TO APPLICANTS
1. Notification that application was started
To: Hilda Haythere

AP Recruit User Manual
40.
From: "UCI No Reply" <[email protected]> Subject: UC Irvine Recruit: Application Started This is an email generated by UCI Recruit. Please do not reply to this message, as no one is able to respond to messages sent to this address. =================== Dear Hilda Haythere, Thank you for applying to the University of California, Irvine. =================== Application Details =================== Position Name: Adolescent Psychology Assistant Professor Department: Psychology & Social Behavior School: School of Social Ecology Username: onlinehilda Login link: https://recruit.ap.uci.edu/apply You may continue to modify your application until Dec 01, 2011. After Dec 01, 2011, no further updates are allowed. =================== Questions? =================== If you have any questions about your online application or the process, please contact us. https://recruit.ap.uci.edu/apply/contact/2 -UCI Recruit Team
2. Application completed notification
To: Hilda Haythere From: "UCI No Reply" <[email protected]> Subject: UC Irvine Recruit: Application Complete Dear Hilda Haythere, <<<< INSERTED ONLY IF SURVEY HAS NOT BEEN SUBMITTED >>>> Please complete a one-page survey to help us meet our obligation as a federal contractor. https://recruit.ap.uci.edu.edu/survey/take/4 <<<<< END OF TEXT FOR THE NON-SURVEY TAKERS >>>>> Thank you for successfully submitting your application! =================== Application Details =================== Position Name: Adolescent Psychology Assistant Professor Department: Psychology & Social Behavior School: School of Social Ecology Username: hildahay Status: Submitted Login link: https://recruit.ap.uci.edu/apply You may continue to modify your application until Dec 01, 2011. After Dec 01, 2011, no further updates are allowed. =================== Questions? =================== If you have any questions about your online application or the process, please contact us. https://recruit.ap.uci.edu/apply/contact/2 -UCI Recruit Team
3. Application completed notification (sent to non-survey takers 5 days before the last day to modify)
To: Fred Fryer

AP Recruit User Manual
41.
From: "UCI No Reply" <[email protected]> Subject: UC Irvine Recruit: Application Confirmation and Survey Request This is an email generated by UC Recruit. Please do not reply to this message, as no one is able to respond to messages sent to this address. =================== Dear Peter Applicant, We request that you complete the following survey by Oct 30, 2011. This survey helps UC meet our obligation as a federal contractor. https://recruit.ap.uci.edu/survey/take/1 =================== Application Details =================== Position Name: Associate Professor - Biochemistry Department: Biochemistry School: School of Biological Sciences Username: maxmax Status: Submitted Login link: https://recruit.ap.uci.edu/apply You may continue to modify your application until Oct 30, 2011. After Oct 30, 2011, no further updates are allowed. =================== Questions? =================== If you have any questions about your online application or the process, please contact us. https://demo.recruit.ap.uci.edu:443/apply/contact/1 - UC Recruit Team
4. Manually Created Application - Notification #1
To: Joanne Jones From: Anne deAnalyst Subject: UC Irvine Recruit: An application has been submitted on your behalf Dear Joanne Jones, An application has been established on your behalf for the position noted below and is on file at the University of California, Irvine. Position Name: Assistant Professor - Atmospheric Chemistry Department: Chemistry School: School of Physical Sciences Sincerely, Anne deAnalyst [email protected] Chemistry University of California, Irvine
5. Manually Created Application – Notification #2: Granting Access
To: Joanne Jones From: Anne deAnalyst

AP Recruit User Manual
42.
Subject: UC Irvine Recruit: Access Your Application Dear Joanne Jones, The application that was created in your behalf is ready for your inspection and/or management. Position Name: Assistant Professor - Atmospheric Chemistry Department: Chemistry School: School of Physical Sciences To access your application, log on within 72 hours by using the following link: https://recruit.ap.uci.edu/apply/activate/5/edcf751c3ccfa151b234802815a86c15 This will direct you to a page displaying your ApplicantID (login name) with an opportunity to choose a confidential password. This link will expire in 72 hours. Sincerely, Anne deAnalyst [email protected] Chemistry University of California, Irvine
NOTIFICATIONS SENT TO REFERENCES 1. Request for Letter of Reference (initiated by Applicant)
To: Joe Reference From: "UCI No Reply" <[email protected]> Subject: UC Irvine Recruit: Letter of Reference Requested ** Please do not reply to this message, as no one is able to respond to messages sent to this address. ** Hello Dr. Reference, Hilda Haythere is requesting a letter of reference from you for a position at the University of California, Irvine in the Psychology and Social Behavior department. Position Name: Adolescent Psychology Assistant Professor Department: Psychology and Social Behavior School: School of Social Ecology, UC Irvine Applicant Notes: Thank you so much, Dr. Reference! Easy Login Link: https://recruit.ap.uci.edu/r/a/144/48ape309622ezz38d988a50zz2ecd1639e1e9io If the Easy Login Link doesn't work for you, you can log in with the following information: URL: https://recruit.ap.uci.edu/reference Email: [email protected] Token: 48ae309622e38d988a502ecd1639e1e9 Please read the University of California's confidentiality policy regarding external letters of recommendation: Although a candidate may request to see the contents of letters of evaluation in accordance with California law and University policy, your identity will be held in confidence. The material made available will exclude the letterhead, the signature block, and material below the signature block. Therefore, material that would identify you, particularly information about your relationship to the candidate, should be placed below the signature block. In any legal proceeding or other situation in which the source of confidential information is sought, the University does its utmost to protect the identity of such sources.

AP Recruit User Manual
43.
At your convenience, please consider submitting a letter of reference using the information above. Thank you for your time, University of California, Irvine
2. Thank You for Submitting a Letter of Reference
To: Joe Reference From: Anna TheAnalyst Subject: UC Irvine Recruit: Thank you for your contribution Hello, Thank you for submitting a letter of recommendation. Your letter is now available on-line for viewing by the faculty search committee. We would like to include your letter in the appointment file when an offer of employment is extended. If you have any concerns about this, please contact Anne Analyst at [email protected]. Sincerely, Anna TheAnalyst On behalf of, the Psychology & Social Behavior Dept University of California, Irvine.
APPENDIX B SUPPORTING RECRUIT USERS Support personnel (“Happiness Engineers”) should expect to answer inquiries with these subject lines from applicants, references, and department users:
• Subject: UC Recruit: Question (Technical) • Subject: UC Recruit: Question (General) • Subject: UC Recruit: Reference Question (General) • Subject: Recruit: Contact Us

AP Recruit User Manual
44.
Subject lines containing the name of the recruitment are copies and are intended for the hiring department. There are numerous locations where an applicant can find the “Contact Us” link. The first point of contact is on the Apply page, where anyone can send us email and direct their question accordingly. (Fig 5.1, Fig 5.2, Fig 5.3).
Figure 5.1 The “Contact Us” form for Applicants with a technical question (not logged in).
Figure 5.2 The “Contact Us” form for Applicants with a general question (not logged in).
Figure 5.3 Applicants who cannot locate a position on the Apply page are given instructions to contact the department. Always check the footer of the sender’s email. The system provides time-stamps and other helpful information for supporters to investigate the issue. Fig 5.4 shows the contact form when Applicants are logged into their application.

AP Recruit User Manual
45.
Figure 5.4 A drop-down menu directs the message to either the hiring department or to technical support or Help Desks. COMMON SUPPORT QUESTIONS Q. Reference can’t upload the letter. This could be caused by a number of reasons.
1. The Referee may not have received the email request from the applicant. In this case, check the References section of the applicant’s file to see if the letter has been requested (see Fig 1.39).
• If the letter has not been requested, suggest the Referee contact the applicant to do so.
• If the letter has been requested, suggest the Referee check their spam folder. They should look for this email from Recruit: “Subject: UC Irvine Recruit: Letter of Reference Requested”.
2. The Referee has input the token incorrectly. This would produce the following screen error message.
Suggest they check their email and try again.
3. Sometimes the applicant changes their Reference’s contact information after notifying their reference, rendering the email/token combination invalid. The Referee would have received the following screen error message. Suggest they contact the applicant for instructions.
4. In rare instances, the applicant deletes the Reference after the notification email is sent, rendering the
email/token combination invalid. In this case, the Referee will receive the following screen error message:
Q.) The Referee has attached the letter of recommendation to the support mail.

AP Recruit User Manual
46.
The email should be forwarded to the Analyst who should upload it into the applicant’s file. See: “Managing An Application/Documents & References.” Q.) Applicant uses a dossier service, where letters of reference cannot be uploaded into the system. Our policy is for the applicant to contact the hiring department for consideration. The department usually allows the service to email the letters in confidence directly to the Analyst, who in turn can upload them into the applicant’s file. Q.) Reference has lost the token information and wants you to re-send it or provide another option to submit a letter of reference. Unfortunately we cannot issue replacement tokens, as they are automatically generated and encrypted for security reasons. The applicant should re-notify the reference through Recruit and a new email will be sent with a new token that neither we, nor the applicant can see or utilize. Q.) The Reference’s secretary needs to upload the letter of recommendation his/her behalf. The email with instructions to log into the system must be forwarded to the secretary by the Reference. The email will have the subject line: "UC Irvine Recruit: Letter of Reference Requested." If the reference has not received this email, the applicant needs to initiate it through the application process. Q. An Applicant can’t find the position that is advertised on the RECRUIT apply page. To address this issue, go to the Contact Us link on RECRUIT’s apply page. Click the tab, “Missing Position” and copy the text in the answer box into an email reply (see Fig 5.3). Q. The applicant has additional documents to upload, but there is no space for them. Applicants should contact the department directly for consideration.