acaia | lunar operation manualacaia.net/lunarmanual.pdf · make sure to read through this operation...
TRANSCRIPT
Using Your acaia Coffee Scale
IdentificationThe instructions in this operation manual apply to the acaia | lunar. You have purchased a quality precision weighing scale that requires handling with care. Make sure to read through this operation manual prior to using the scale.
acaia | lunar Operation Manual
a c a i a

CAUTION:
1. Any modification made without the consent of the manufacturer will result in the warranty being voided.
2. Risk of explosion if battery is replaced by an incorrect type. Dispose of used batteries according to the instructions.
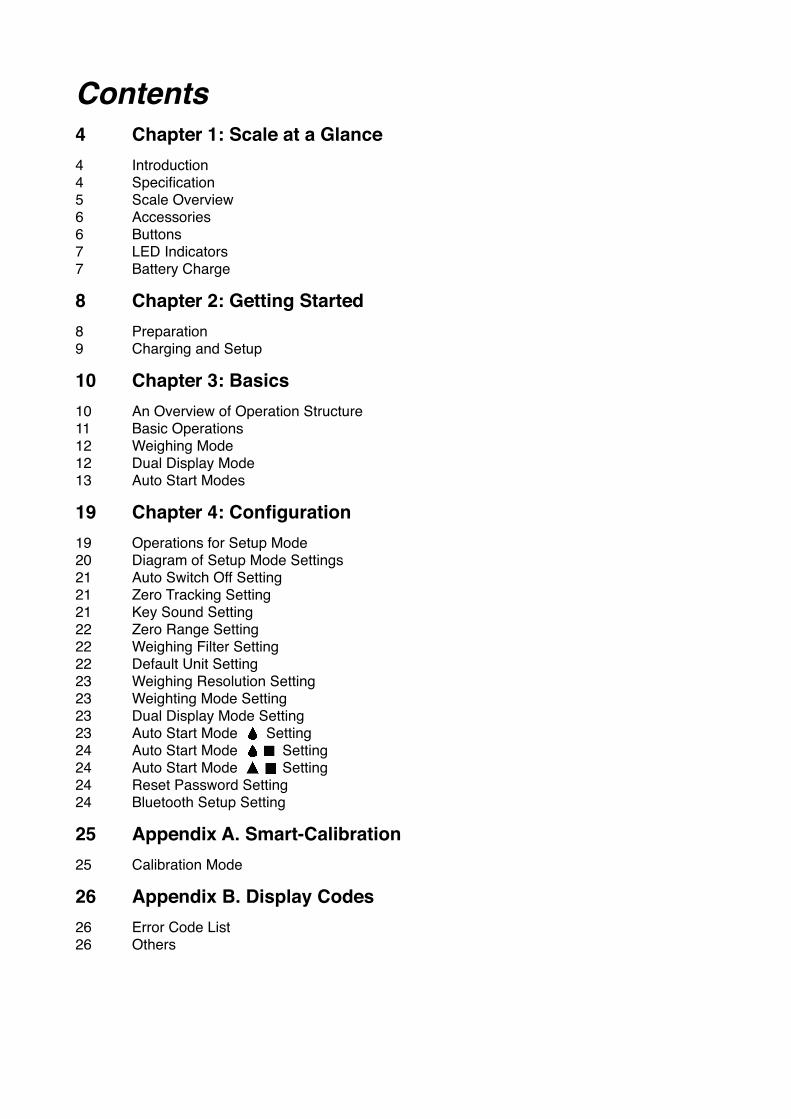
Contents4 Chapter 1: Scale at a Glance 4 Introduction 4 Specification 5 Scale Overview 6 Accessories 6 Buttons 7 LED Indicators 7 Battery Charge
8 Chapter 2: Getting Started 8 Preparation 9 Charging and Setup
10 Chapter 3: Basics 10 An Overview of Operation Structure 11 Basic Operations 12 Weighing Mode 12 Dual Display Mode 13 Auto Start Modes
19 Chapter 4: Configuration 19 Operations for Setup Mode 20 Diagram of Setup Mode Settings 21 Auto Switch Off Setting 21 Zero Tracking Setting 21 Key Sound Setting 22 Zero Range Setting 22 Weighing Filter Setting 22 Default Unit Setting 23 Weighing Resolution Setting 23 Weighting Mode Setting 23 Dual Display Mode Setting 23 Auto Start Mode Setting 24 Auto Start Mode Setting 24 Auto Start Mode Setting 24 Reset Password Setting 24 Bluetooth Setup Setting
25 Appendix A. Smart-Calibration 25 Calibration Mode
26 Appendix B. Display Codes 26 Error Code List 26 Others

Chapter 1: Scale at a GlanceIntroduction
3. Thank you for choosing one of our scales. The acaia | lunar is designed and manufactured to the most rigorous standard to give you the best coffee brewing experience. Start by checking that your acaia | lunar box contains all the parts listed below:
● acaia | lunar ● Micro USB cable ● acaia Scale Weight 100g ● Heat Resistant Pad
4. Next, follow the instructions in the Preparation and Installation sections in the manual to get started.
5. To take an advantage of its many features, carefully read through the operation manual containing step-by-step procedures, examples, and other information.
6. Warning: Incorrect handling of this product could possibly result in personal injury or physical damage.
Specifications
Aprox. weight 270g
Capacity 2000g / 70.54oz
Measuring Units g , oz
Weighing range
Maximum capacity 2000.0g 70.540oz
Division 0.1g 0.002 oz
Reference division 0.01g 0.0005 oz
Indication limit 2060.00g / 72.6600oz
Unit dimensions 105mm(W) x 105mm (L) x 15.5mm (H)
Electrical Requirements 5V/500mA
Power and Battery Lithium-ion rechargeable 3.7V 1100mA
Display 8 digit LED
Top Aluminum construction with acrylic window, touch sensitive buttons
Bottom Aluminum construction
Connectivity Bluetooth 4.0
Linearity +/- 0.2g
Chapter 1: Scale at a Glance �4
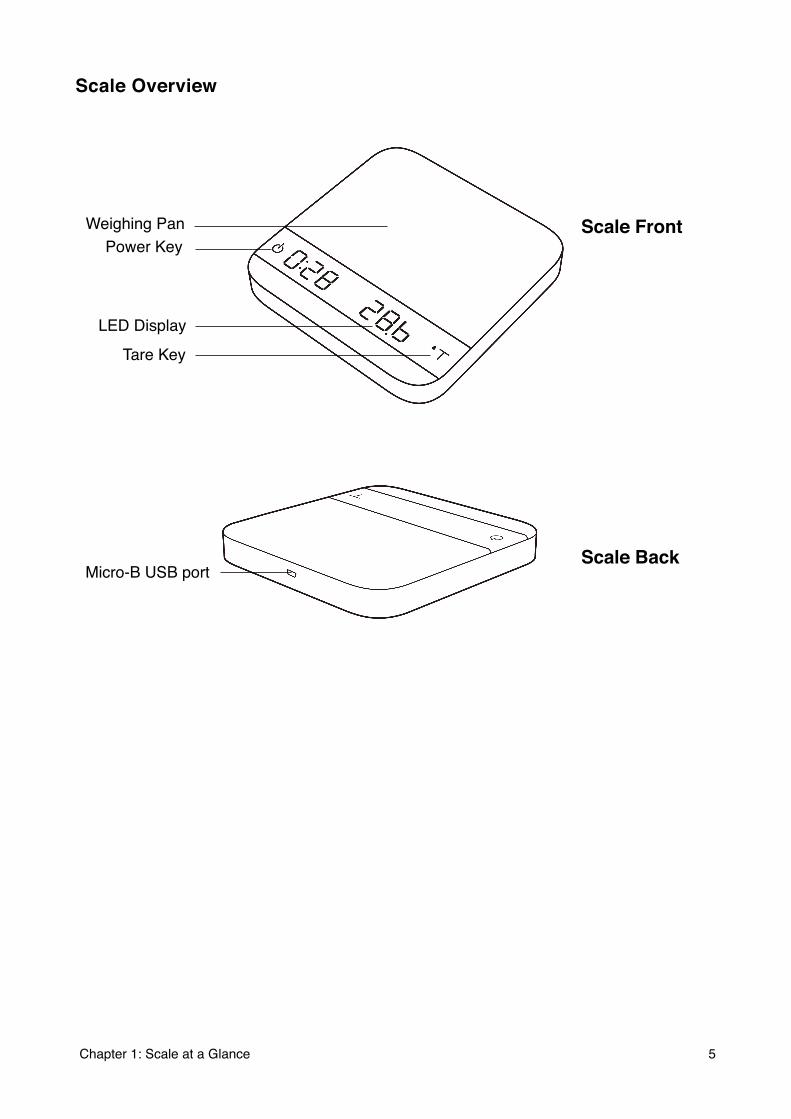
Scale Overview
Chapter 1: Scale at a Glance �5
Tare Key
Scale FrontPower Key
LED Display
Scale BackMicro-B USB port
Weighing Pan

Accessories
Buttons
* Please see Chapter 3: Basics for more details.
Function Example
PowerButton
Turn on Press and hold for 0.5 seconds to turn on the scale.
Turn off Double click to turn the scale off.
Switch mode While the scale is turned on, press and hold for 1 second to switch modes: Weighing Mode / Dual Display Mode / Auto Start Modes.
Start / pause / reset timer
While in Dual Display Mode, press to start/pause/reset timer.While in Auto Start Modes, press to reset timer while the timer is paused.
Back While in Setup Mode, press to go back to Weighing Mode(Default Setting).
Tare Button
Tare While in Weighing Mode/ Dual Display Mode/ Auto Start Modes, press to perform tare operation.
Tare and reset timer While in Auto Start Modes, double click Tare Button to zero weight and reset timer.
Switch option While in Setup Mode, press to switch options.
Confirm While in Setup Mode, press and hold for 1 second to confirm the option selected.
Enter calibration mode While in Weighing Mode, continuously press multiple times to enter Calibration Mode.
Chapter 1: Scale at a Glance �6
Micro USB Charging Cable
Micro-B
Type A
acaia Scale Weight100G
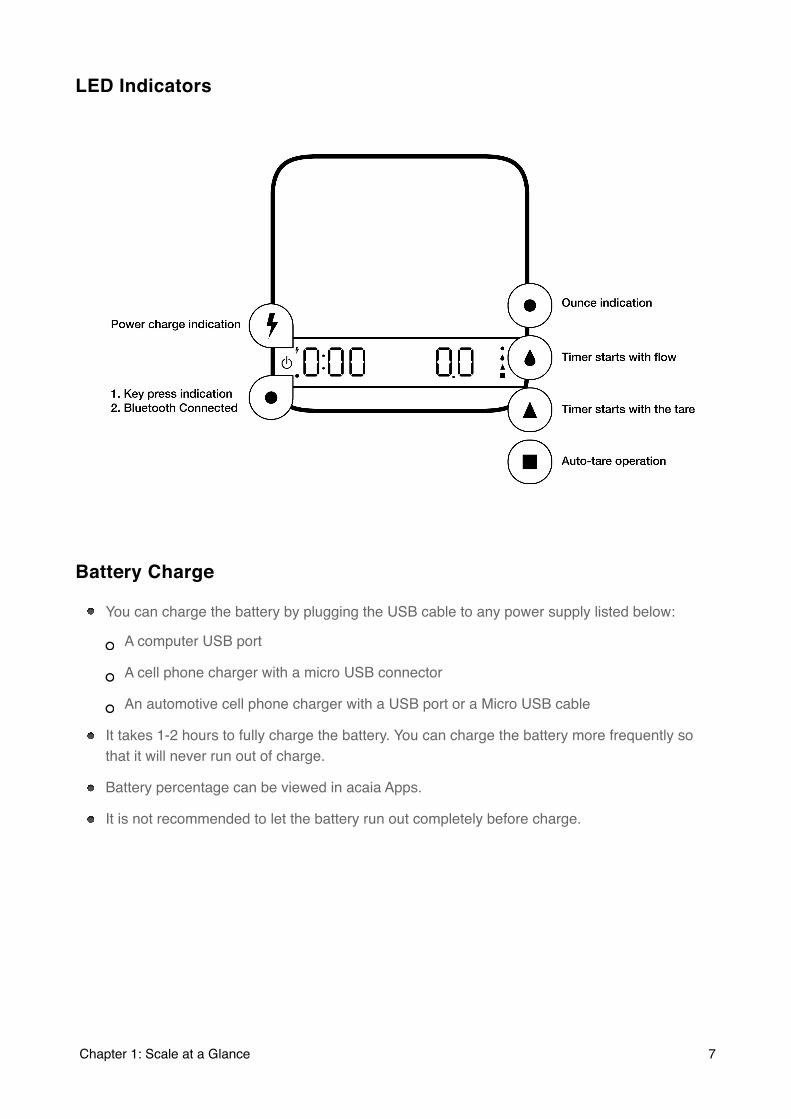
LED Indicators
Battery Charge
You can charge the battery by plugging the USB cable to any power supply listed below:
A computer USB port
A cell phone charger with a micro USB connector
An automotive cell phone charger with a USB port or a Micro USB cable
It takes 1-2 hours to fully charge the battery. You can charge the battery more frequently so that it will never run out of charge.
Battery percentage can be viewed in acaia Apps.
It is not recommended to let the battery run out completely before charge.
Chapter 1: Scale at a Glance �7
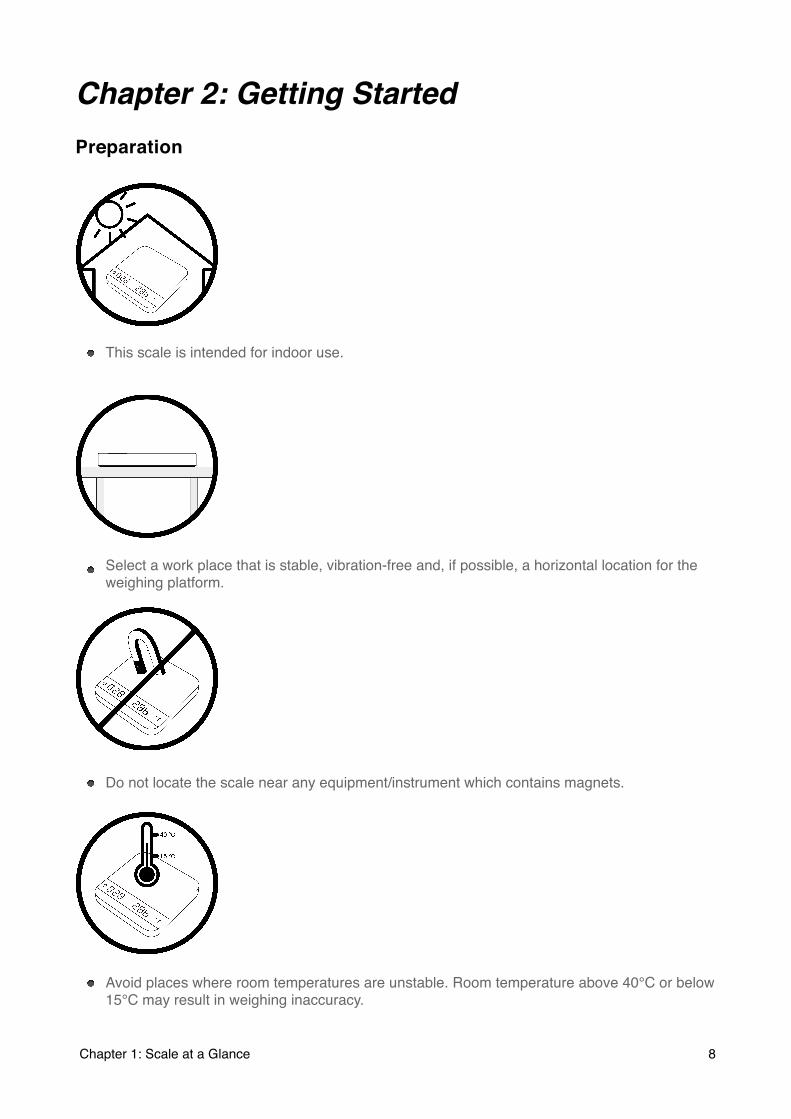
Chapter 2: Getting StartedPreparation
This scale is intended for indoor use.
Select a work place that is stable, vibration-free and, if possible, a horizontal location for the weighing platform.
Do not locate the scale near any equipment/instrument which contains magnets.
Avoid places where room temperatures are unstable. Room temperature above 40℃ or below 15℃ may result in weighing inaccuracy.
Chapter 1: Scale at a Glance �8
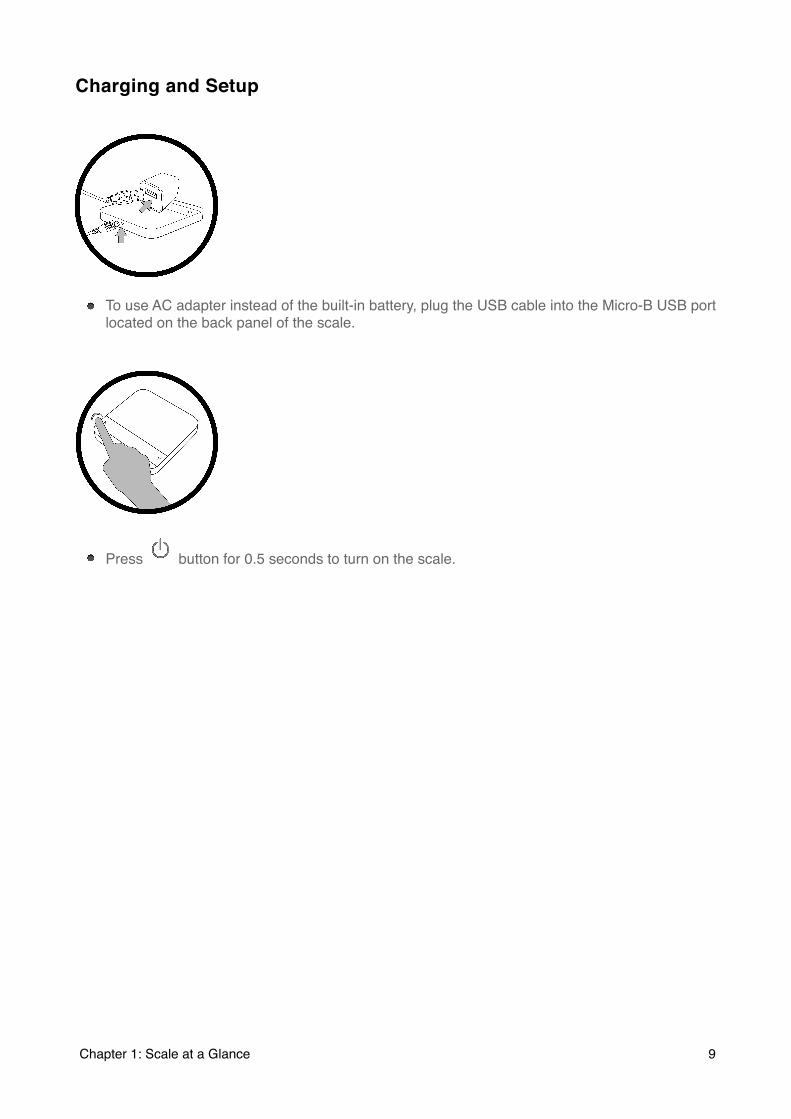
Charging and Setup
To use AC adapter instead of the built-in battery, plug the USB cable into the Micro-B USB port located on the back panel of the scale.
Press � button for 0.5 seconds to turn on the scale.
Chapter 1: Scale at a Glance �9

Chapter 3: BasicsAn Overview of Operation Structure
Chapter 3: Basics �10
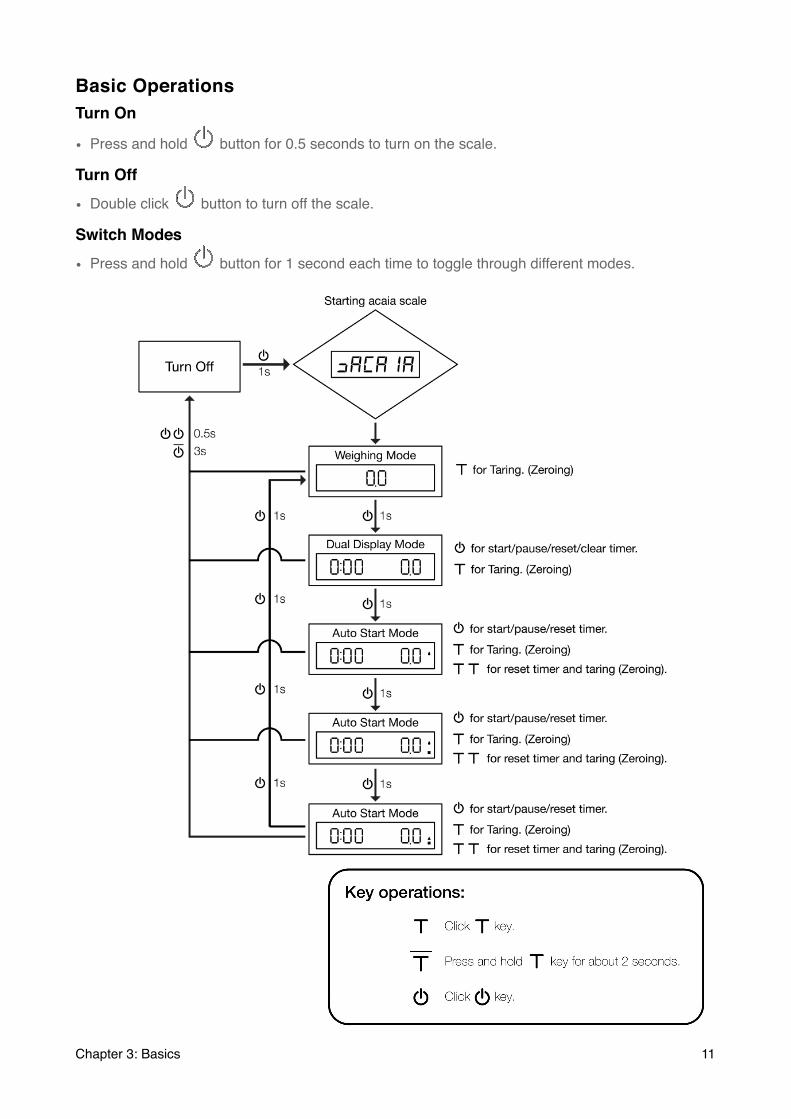
Basic OperationsTurn On
• Press and hold � button for 0.5 seconds to turn on the scale.
Turn Off
• Double click � button to turn off the scale.
Switch Modes
• Press and hold � button for 1 second each time to toggle through different modes.
Chapter 3: Basics �11

Weighing ModeDisplay
There are two different weighing units in Weighing Mode: grams and ounces. It can be identified if the upper right LED is light on. If the LED is light on, the weighing unit is ounce.
The readability is 0.1g or 0.002oz base on the weighing unit selected in Setup Mode.
For high resolution mode, the readability is 0.01g or 0.0005oz.
Note: To change default weighing unit, please see Chapter 4 Default Unit Setting for more information.
Operation
1. Press � button for tare (zero) operation.
2. Press and hold � button for 1 second to switch to Dual Display Mode.
Dual Display ModeDisplay
The LED display shows [ 0: 00 0.0] with timer on the left and the weight value on the right.
Operation
1. Press � button to start/pause/reset the timer.
2. Press � button to tare the weight.
3. Press and hold � button for 1 second to switch to Auto Start Mode(please insert the Droplet icon here).
Note1. The maximum time that can be displayed is 9 minutes and 59 seconds.
2. When the limit is reached, the timer still goes up until 999 minutes and 59 seconds. It can be observed by iOS/Android App.
Chapter 3: Basics �12
Auto Start ModesDisplay
1. The LED display shows [0: 00 0.0] with timer on the left and the weight value on the right.
2. The timer displays from [0:00] to [9:59] and then the timer will stop.
Status Icon
The icon indicator LED on the right side, if the status icon lights on, the scale is under Auto Start Mode.
1. Droplet : When the scale detects the water flow, the timer starts. The timer will stop when the water flow stops.
2. Triangle : The scale performs auto-tare operation when placing stable weight on the Lunar, then starts the timer
3. Square : When placing stable weight on the scale, the scale will perform auto-tare operation.
Chapter 3: Basics �13
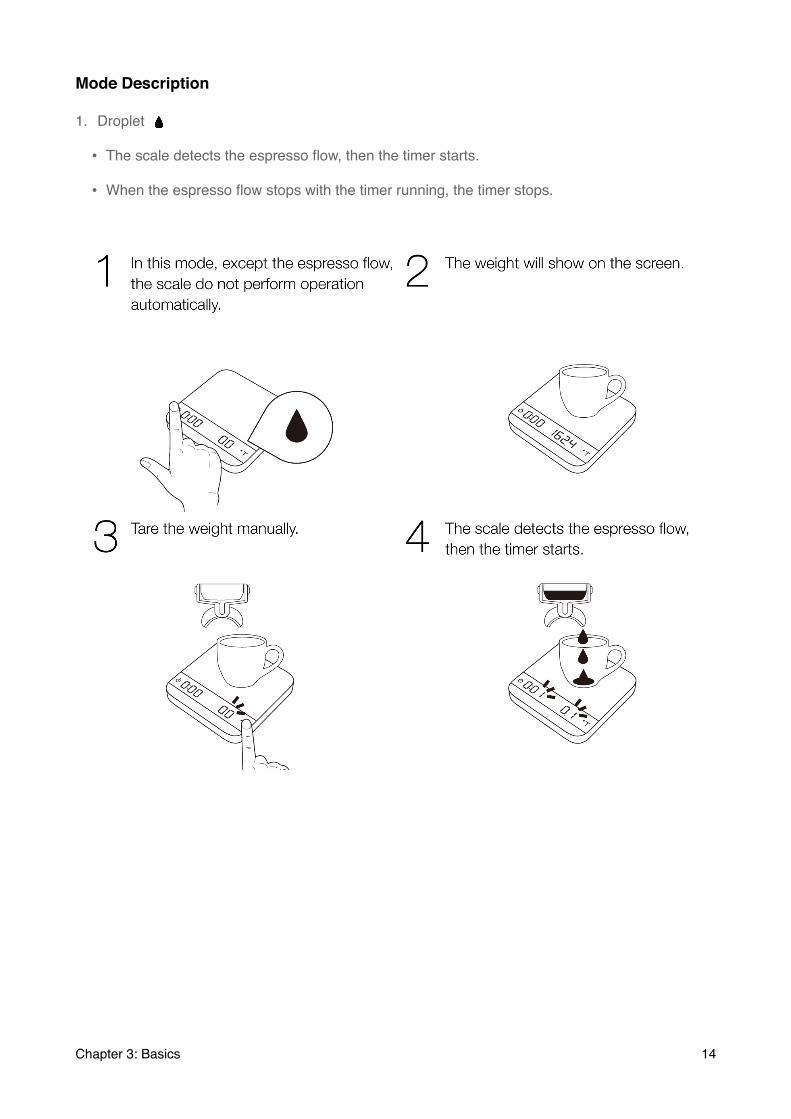
Mode Description
1. Droplet
• The scale detects the espresso flow, then the timer starts.
• When the espresso flow stops with the timer running, the timer stops.
Chapter 3: Basics �14

2. Droplet and Square
This mode is designed for baristas who would like to measure the time of the shot starting from the first few drops of espresso in a busy environment.
• When placing a stable weight on the scale, the scale will perform auto-tare operation.
• After the scale detects the espresso flow, the timer starts. The timer will stop when the espresso flow stops.
Chapter 3: Basics �15
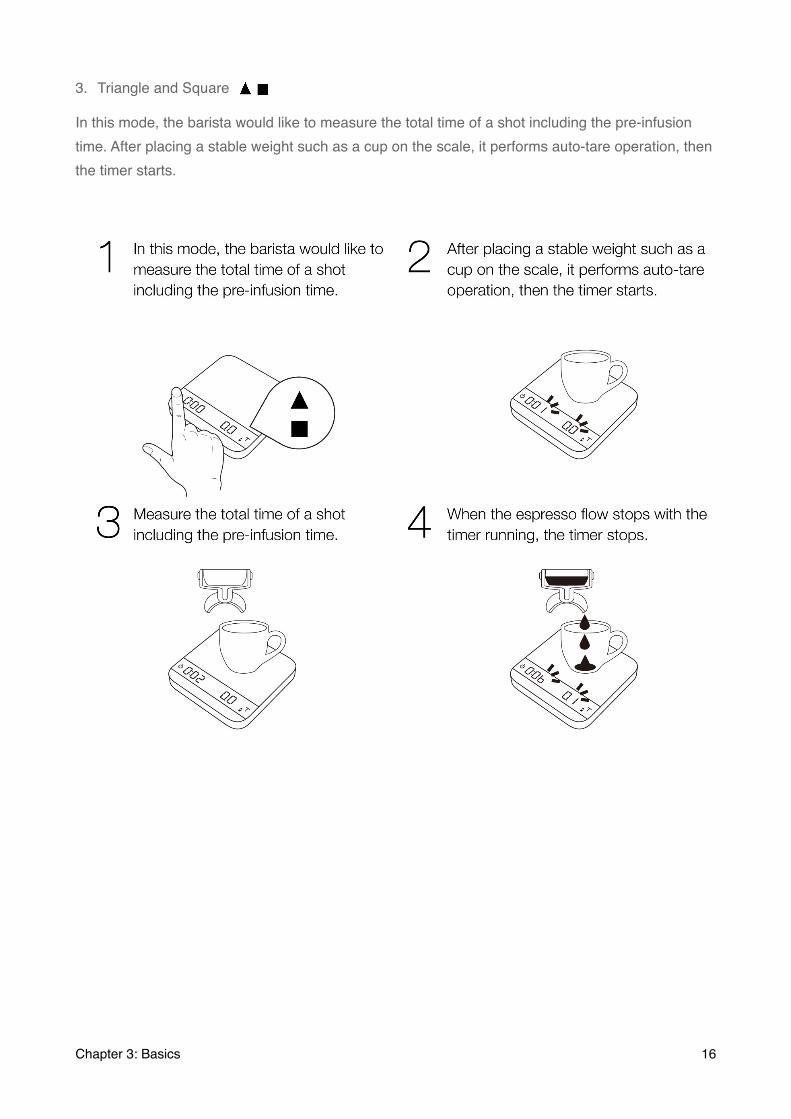
3. Triangle and Square
In this mode, the barista would like to measure the total time of a shot including the pre-infusion time. After placing a stable weight such as a cup on the scale, it performs auto-tare operation, then the timer starts.
Chapter 3: Basics �16

Note:
1. In all Auto Start Modes, the timer will stop when the espresso flow stops.
2. In all Auto Start Modes, if you do not operate the scale for 30 seconds, it will reset timer and perform tare operation.
3. In all Auto Start Modes, the timer will stop when a negative weight (i.e. removal of cup) is detected.
4. The scale will also display a previous stable weight that captures the coffee weight of the shot when you unloaded the cup.
Chapter 3: Basics �17
Operation
1. Press � button to start/pause/reset the timer.
2. Press� button for tare (zero) operation.
3. Press � button twice to reset timer and tare weight.
4. Press and hold � button for 1 second to switch to Auto Start Modes. If the Triangle and Square icon indicator are light on, press and button for 1 second will switch to Weighing Mode.
Chapter 3: Basics �18

Chapter 4: ConfigurationOperations for Setup ModeSteps to enter Setup Mode
1. Press and hold � button while turning ON the scale. When the LED display shows
[ :ACAIA ]and then [ SEt ] , press and hold � button for another 1 second without releasing
� button. Release both � and � buttons when the display shows [ F.0000 ] with the very left 0 flashing.
2. Press and hold � button for 1 second to move the flashing digit to the right. Repeat this step for
3 times.
3. Press and hold � button for 1 second to confirm the password, and to enter the first setting in
Setup Mode: the LED display shows [ SLEEP ].
Key Operations in Setup Mode1. Press � button to toggle through setting menu or the options under each setting.
2. Press and hold � button to enter each setting or to confirm the selected option.
3. Press � button to save changes and return Weighing Mode from setting menu.
Chapter 4: Configuration �19
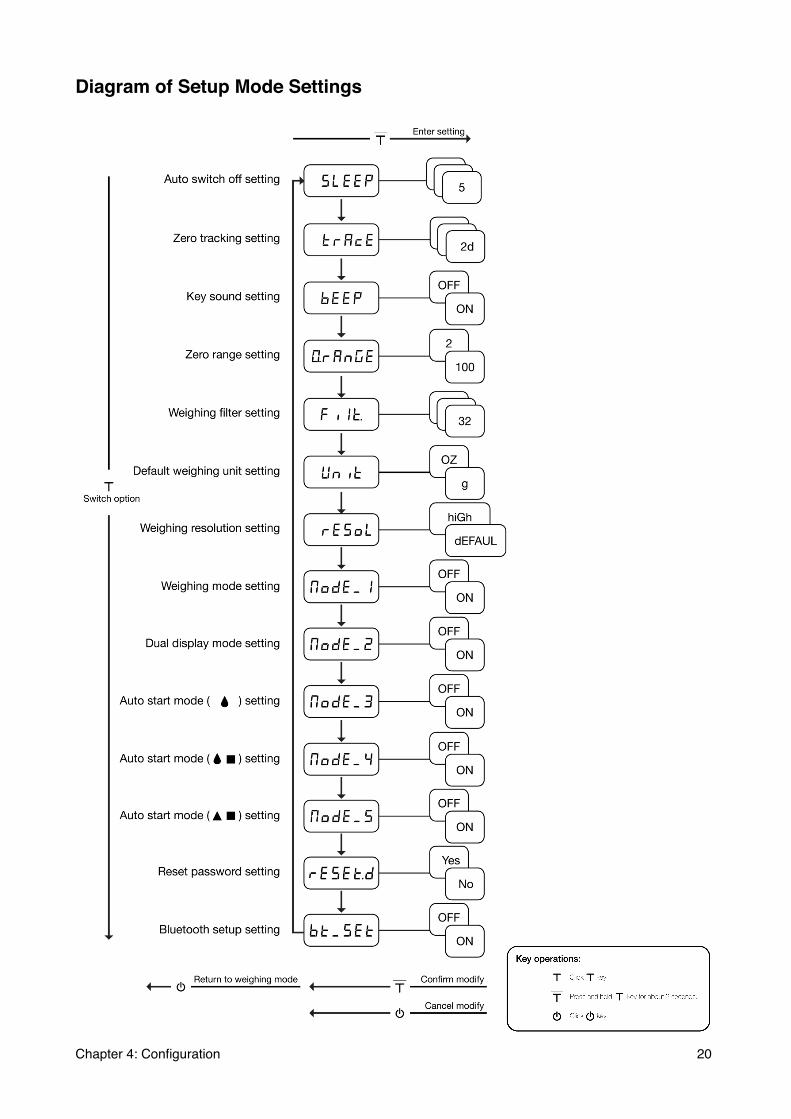
Diagram of Setup Mode Settings
Chapter 4: Configuration �20

Auto Switch Off Setting [ SLEEP ]
1. Auto Switch Off Settings can also be configured in the acaia Apps.
2. The number indicates the amount of time before the scale enters sleeping mode. For example, when 10 is selected, the scale enters sleeping mode after 10 minutes being idle, while the scale is disconnected from all mobile devices and no operation has been performed on the scale.
3. Press � button to toggle through the options.
4. Press and hold � button for 1 second until the next setting, [ trAcE ], is shown on LED to confirm the selected option.
Zero Tracking Setting [ trAcE ]
1. Zero Tracking is a function for maintaining the zero indication within certain limits automatically.
2. OFF: It is not recommended to turn off the Zero Tracking because the zero indication would draft easily as room temperature changes.
3. 0.5d~3d: For example, for standard resolution each division is 0.1g, 3d = 0.3g. When Zero Tracking is set to be 3d, any initial weight between +/- 0.3g on the weighing pan would be zeroed out gradually.
4. 2d is recommended in general for acaia | lunar.
5. Press and hold � button for 1 second until the next setting, [ bEEP ], is shown on LED to confirm the selected option.
Key Sound Setting [ bEEP ]
1. Key Sound Settings can also be configured in the acaia Apps
2. Set the Key Sound function off to turn off the beeping sound or on to turn on the beeping sound.
3. Press and hold � button for 1 second until the next setting, [ 0.rAnGE ], is shown on LED to confirm the selected option.
Chapter 4: Configuration �21
Zero Range Setting [ 0.rAnGE ]
1. Zero Range setting determines the range for which � button executes zero operation instead of tare operation.
2. When Zero Range is set to 2, the range for zero-setting will be 2% of the capacity, i.e., +/- 40g for acaia | lunar. By pressing � button, any weight within +/- 40g is zeroed out by zero operation while any weight lays outside the range is tared out by tare operation.
3. If Zero Range is set to 100, the range for zero-setting will be 100% of the capacity, i.e., +/- 2kg for acaia | lunar. Therefore, instead of tare operation, zero operation would be executed in this setting whenever � button is pressed.
4. Press and hold � button for 1 second until the next setting, [ Filt. ], is shown on LED to confirm the selected option.
5. Notice: The difference between zero operation and tare operation is that zero operation would simply ignore the weight and display as 0 while tare operation would deduct the weight from weighing result. However, zero operation does not increase the scale capacity.
Weighing Filter Setting [ Filt. ]
1. The number shown on LED display indicates the current filter parameter which determines the speed for load receptor to response to weight and to determine the weighing value. The larger the number, the more stable but slower the weighing result will be.
2. Press � button to change the parameter.
3. Press and hold � button for 1 second until the next setting, [ Unit ] is shown on the LED to confirm the selected parameter.
Default Unit Setting [ Unit ]
1. The Default Weighing Unit is set to be gram if [ 9 ] is selected and ounce if [ o2 ] is
selected.
2. Press � button to switch the Default Weighing Unit between gram and ounce.
3. Press and hold � button for 1 second until [ rESoL ] is shown on LED to confirm the selected option.
Chapter 4: Configuration �22
Weighing Resolution Setting [ rESoL ]
1. The default Weighing Resolution is set to [ dEFAUL ]: the division is 0.1g / 0.02oz.
2. Press� button to switch the weighing resolution between [ dEFAUL ] and [ hiGh ].
3. When the Weighing Resolution is set to high, division will be 0.01g/0.0005oz. The default display will show [ 0.00 ] in Weighing Mode.
4. Press and hold � button for 1 second until [ NoDE_1 ] is shown on LED to confirm the selected option.
5. Note : After setting Weighing Resolution to high, the default display will show [0:00 0.00] with timer in Dual Display Mode and Auto Start Modes.
Weighing Mode Setting [ NoDE_1 ]
1. The default Weighing Mode Setting is set to ON, which means this mode is enabled.
2. ON: The Weighing Mode is enabled.
3. OFF: The Weighing Mode is disabled.
4. Press and hold � button for 1 second until [ NoDE_2 ] is shown on LED to confirm the selected option.
Dual Display Mode Setting[ NodE_2 ]
1. The default Dual Display Mode Setting is set to ON, which means this mode is enabled.
2. ON: The Dual Display Mode is enabled.
3. OFF: The Dual Display Mode is disabled.
4. Press and hold � button for 1 second until [ NoDE_3 ] is shown on LED to confirm the selected option.
Auto Start Mode Setting[ NodE_3 ]
1. The default Auto Start Mode with Droplet Setting is set to ON, which means this mode is enabled.
2. ON: The Auto Start Mode with Droplet is enabled.
3. OFF: The Auto Start Mode with Droplet is disabled.
4. Press and hold � button for 1 second until [ NoDE_4 ] is shown on LED to confirm the selected option.
Chapter 4: Configuration �23
Auto Start Mode Setting[ NodE_4 ]
1. The default Auto Start Mode with Droplet and Square Setting is set to ON, which means this mode is enabled.
2. ON: The Auto Start Mode with Droplet and Square is enabled.
3. OFF: The Auto Start Mode with Droplet and Square is disabled.
4. Press and hold � button for 1 second until [ NodE_5] is shown on LED to confirm the selected option.
Auto Start Mode Setting[ NodE_5]
1. The default Auto Start Mode with Triangle and Square Setting is set to ON, which means this mode is enabled.
2. ON: The Auto Start Mode with Triangle and Square is enabled.
3. OFF: The Auto Start Mode with Triangle and Square is disabled.
4. Press and hold � button for 1 second until [ rESEt.d ] is shown on LED to confirm the selected option.
Reset Password Setting [ rESEt.d ]
1. Select [ YES ] to clear the bluetooth connection password.
2. Press and hold � button for 1 second until [ bt_SEt ] is shown on LED to clear the password.
Bluetooth Setup Setting [ bt_SEt ]
1. OFF: The bluetooth is disabled. The scale does not allow any bluetooth connection.
2. ON: The bluetooth is enabled. The scale allows bluetooth connection. User may connect the scale with acaia Apps.
3. Press and hold � button for 1 second until [ SLEEP ] is shown to confirm the modification.
Chapter 4: Configuration �24

Appendix A. Smart-CalibrationIf you decide to calibrate your scale, it will only be as good as the accuracy of the calibration weights you use.
*Note : If you use weights other than acaia Weights, we recommend standard weights with class F1 or F2.
Calibration Mode
1. While the scale is in Weighing Mode and the weighing unit is in gram, press � button quickly multiple times until LED display shows [ CAL ] and then [ 500.00 ].
2. Place a acaia 100 weights on scale and wait for the scale to execute calibration procedure.
3. The LED display shows [ _End_ ] when the calibration procedure is completed. You may unload the calibration weight when completed.
Note:
1. If your Weighing Mode is disabled, please refer to Chapter 4: Weighing Mode Setting to turn on.
2. If you use weights other than acaia Weights, we recommend standard weights with 100g*n. For example, 500g or 1000g.
Appendix A. Smart-Calibration �25
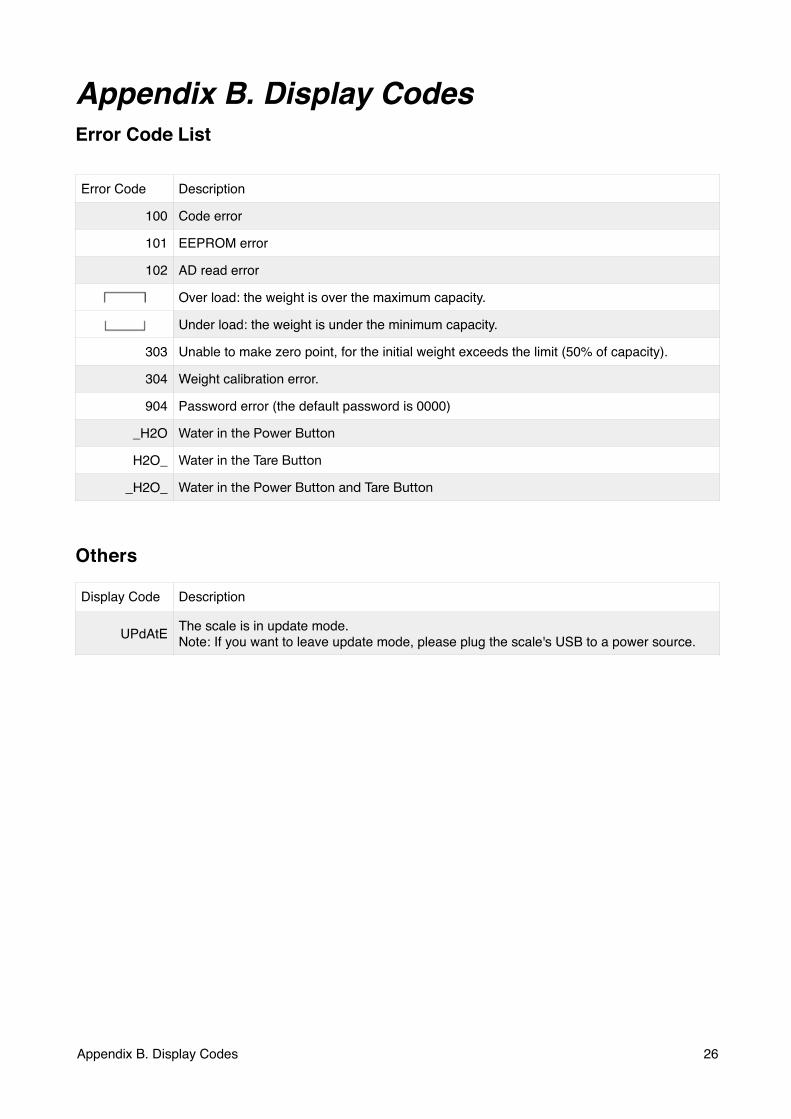
Appendix B. Display CodesError Code List
Others
Error Code Description
100 Code error
101 EEPROM error
102 AD read error
Over load: the weight is over the maximum capacity.
Under load: the weight is under the minimum capacity.
303 Unable to make zero point, for the initial weight exceeds the limit (50% of capacity).
304 Weight calibration error.
904 Password error (the default password is 0000)
_H2O Water in the Power Button
H2O_ Water in the Tare Button
_H2O_ Water in the Power Button and Tare Button
Display Code Description
UPdAtE The scale is in update mode.Note: If you want to leave update mode, please plug the scale's USB to a power source.
Appendix B. Display Codes �26

Copyright
The operation manual is protected by copyright. All rights reserved. No part of the operation manual may be reproduced, processed, duplicated or published in any form by photocopying, microfilming, reprinting or any other method, in particular electronic means, without the written agreement of acaia.
© acaia, Cupertino, CA, 2015.