access gateway 4.5, advanced edition - citrix.com · using microsoft windows 2003 server web...
TRANSCRIPT
Access Gateway 4.5, Advanced Edition
© 2012 Citrix Systems, Inc. All rights reserved. Terms of Use | Trademarks | Privacy Statement

Contents
Access Gateway 4.5, Advanced Edition 8
Access Gateway 4.5, Advanced Edition 9
Readme for Citrix Access Gateway 4.5, Advanced Edition 25
Getting Started with Access Gateway Advanced Edition 41
New Features in the 4.5 Release 43
Planning Your Access Strategy 44
Step 1: Evaluating Your Network Infrastructure 45
Step 2: Performing a Risk Analysis 47
Step 3: Developing Your Access Strategy 48
Evaluating Authentication Types 51
Planning for High Availability 53
Considering Users' Needs 54
Licensing Access Gateway Advanced Edition 55
Installing Citrix Licensing 56
Obtaining Licenses 57
Allocating New or Migrated Licenses 58
Downloading License Files 59
To copy licenses to the license server 60
Specifying the License Server 61
Adding Shortcuts to the License Management Console 62
Installing Advanced Access Control 63
Planning Your Installation 64
Server Requirements 67
Network Requirements 69
Account Requirements 70
Database Requirements 72
Access Gateway Requirements 73
Feature Requirements 74
HTML Preview Requirements 75
2

Live Edit Requirements 78
Email Synchronization Requirements 79
Web Email Requirements 80
Using Microsoft Windows 2003 Server Web Edition for Web Email 82
Endpoint Analysis Requirements 83
Authentication Software Requirements 84
Citrix XenApp Integration Requirements 86
SmartAccess Requirements 88
Multiple Access Platform Site and Credential CachingRequirements 89
SmoothRoaming Requirements 90
Requirements for Bypassing the Web Proxy 91
Third Party Portal Integration Requirements 92
User Device Requirements 93
Console Requirements 96
Installation Overview 97
Configuration and Management of Advanced Access Control 100
Configuring Advanced Access Control 101
Supported Configurations 102
Double-Hop DMZ Configurations 103
Deploying Double-Hop DMZ Configurations 106
Changing the Server Configuration 112
Configuring Your Server 113
Steps To Configuring a Server 115
Enabling Advanced Access Control 117
Using the Access Management Console 119
The Access Management Console User Interface 120
Finding Items in Your Deployment Using Discovery 121
Customizing Your Displays Using My Views 122
Configuring Your Farm with the Getting Started Panel 123
Linking to Citrix XenApp 124
Specifying Server Farms 125
Configuring Load Balance or Failover 126
Configuring Address Modes 127
Configuring Address Translation 128
Configuring the Access Gateway Address Mode 129
Associating Access Platform Sites 130
Configuring Logon Points 131
3
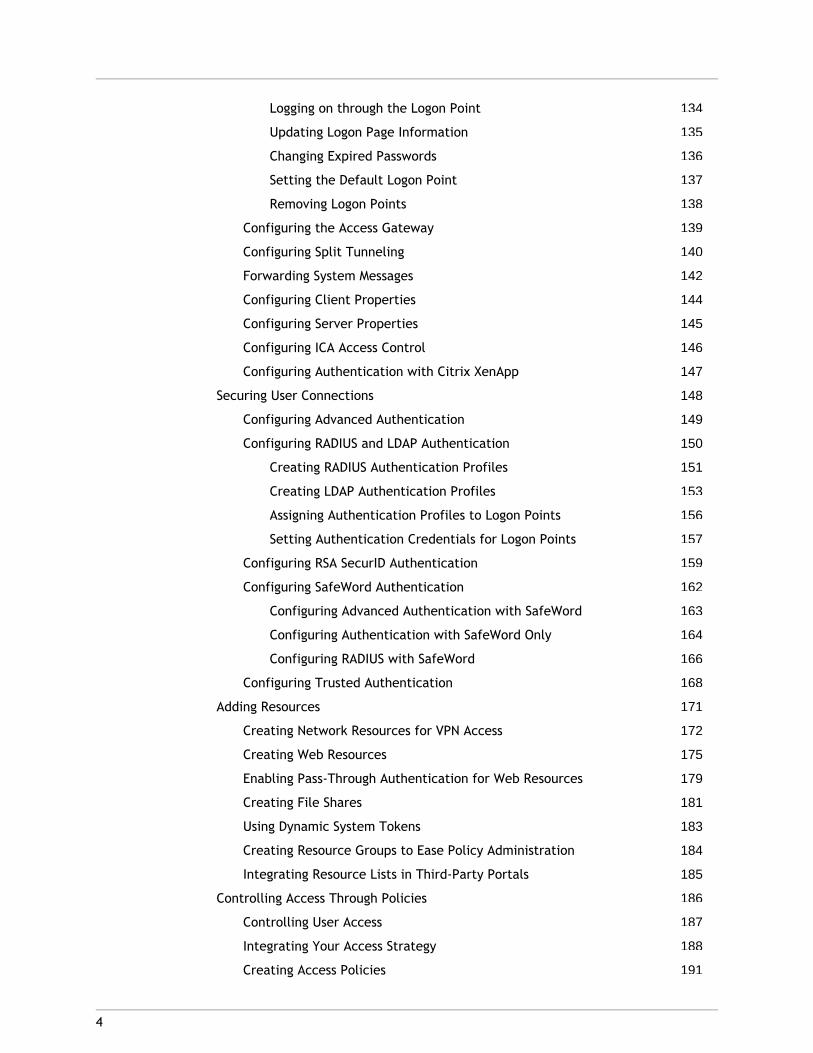
Logging on through the Logon Point 134
Updating Logon Page Information 135
Changing Expired Passwords 136
Setting the Default Logon Point 137
Removing Logon Points 138
Configuring the Access Gateway 139
Configuring Split Tunneling 140
Forwarding System Messages 142
Configuring Client Properties 144
Configuring Server Properties 145
Configuring ICA Access Control 146
Configuring Authentication with Citrix XenApp 147
Securing User Connections 148
Configuring Advanced Authentication 149
Configuring RADIUS and LDAP Authentication 150
Creating RADIUS Authentication Profiles 151
Creating LDAP Authentication Profiles 153
Assigning Authentication Profiles to Logon Points 156
Setting Authentication Credentials for Logon Points 157
Configuring RSA SecurID Authentication 159
Configuring SafeWord Authentication 162
Configuring Advanced Authentication with SafeWord 163
Configuring Authentication with SafeWord Only 164
Configuring RADIUS with SafeWord 166
Configuring Trusted Authentication 168
Adding Resources 171
Creating Network Resources for VPN Access 172
Creating Web Resources 175
Enabling Pass-Through Authentication for Web Resources 179
Creating File Shares 181
Using Dynamic System Tokens 183
Creating Resource Groups to Ease Policy Administration 184
Integrating Resource Lists in Third-Party Portals 185
Controlling Access Through Policies 186
Controlling User Access 187
Integrating Your Access Strategy 188
Creating Access Policies 191
4

Configuring Policy Settings to Control User Actions 193
Allowing Logon 197
Setting Conditions for Showing the Logon Page 198
Bypassing URL Rewriting 202
Limitations of Browser-Only Access 204
Creating Connection Policies 205
Creating Policy Filters 208
Creating Custom Filters 210
Creating Continuous Scan Filters 212
Granting Access to the Entire Network 214
Reviewing Policy Information with Policy Manager 215
Integrating Citrix XenApp 216
Linking from Advanced Access Control to Citrix XenApp 217
Integrating the Web Interface 218
Displaying Multiple Sites and Caching Credentials 220
Preserving Workspace Control 221
Coordinating Advanced Access Control and Web InterfaceSettings 223
Configuring File Type Association 224
Integrating Third-Party Portals 225
Verifying Requirements on User Devices 226
Configuring Endpoint Analysis 227
Creating Endpoint Analysis Scans 229
Scan Packages 231
Adding Rules to Scans 232
Using Scan Outputs in Other Scans 234
Editing Conditions and Rules 236
Using Data Sets in Scans 237
Adding Scan Packages 239
Scripting and Scheduling Scan Updates 241
Creating Continuous Scans 244
Creating Advanced Endpoint Analysis Scans 246
How the Citrix Endpoint Analysis Portal Works 247
How the Malware Scanner Works 249
Downloading Files from the Citrix Endpoint Analysis Portal 250
Creating an Advanced Endpoint Analysis Scan Policy 251
To import the custom .cab file to Advanced Access Control 252
5

To create an advanced endpoint analysis policy in AdvancedAccess Control 253
Configuring Additional Options for Advanced EndpointAnalysis Scans 254
Deploying the Advanced Endpoint Analysis Plug-in 256
To deploy the Advanced Endpoint Analysis Plug-in onAdvanced Access Control 257
Providing Secure Access to Corporate Email 258
Choosing an Email Solution 260
Providing Access to Published Email Applications 261
Providing Users with Secure Web-Based Email 262
Enabling Access to Web-Based Email 263
Integrating Web-Based Email Access with a Third-Party Portal 266
Providing Users with Secure Access to Email Accounts 267
Enabling Users to Attach Files to Web-Based Email 269
Enabling Access to Email on Small Form Factor Devices 271
Updating the Mapisvc.inf File 273
Rolling Out Advanced Access Control to Users 275
Developing a Client Software Deployment Strategy 276
Managing Client Software Using the XenApp Client Package 281
Downloading Client Software on Demand 284
Ensuring a Smooth Logon Experience with the Access Gateway Plug-in 286
Modifying the Logon Point Redirect URL 287
Modifying Web Browser Delay Settings 288
Modifying Ticket Lifetime Settings 289
Ensuring a Smooth Rollout 290
Web Browser Security Considerations 292
Customizing the Logon Error Message 294
Managing Your Access Gateway Environment 295
Managing Access Server Farms Remotely 296
Securing the Access Management Console Using COM+ 298
Adding and Removing Farms 301
Adding and Removing Access Gateway Appliances 302
Changing Service Account and Database Credentials 304
Modifying Server Roles for HTML Preview 305
Removing Servers from the Farm 306
Maintaining Availability of the Access Server Farm 307
Monitoring Sessions 310
Access Gateway Advanced Concepts 311
6

Auditing Access to Corporate Resources 312
Configuring Audit Logging 313
Interpreting Audit Events 317
Troubleshooting User Access to Resources 318
Performing Audit Log Maintenance 319
Scan Properties Reference 320
Antivirus Scan Packages 321
Web Browser Scan Packages 326
Firewall Scan Packages 330
User Device Identification Scan Packages 335
Miscellaneous Scan Packages 337
Operating System Scan Packages 338
Glossary 340
7
8
Access Gateway 4.5, Advanced Edition
Citrix Access Gateway is a universal SSL VPN appliance that provides a secure, always-on,single point-of-access to all applications and protocols. It has all of the advantages of IPSecand SSL VPNs, without their costly and cumbersome implementation and management. Withthe Advanced Edition, Access Gateway finely controls both the resources users can accessand what actions they can perform, facilitating regulatory compliance. Access Gatewaydelivers the best access experience for everyone: secure access to corporate data for thebusiness, easy access for users, and easy administration and management for IT.
Access Gateway Advanced Edition expands your Access Gateway environment withAdvanced Access Control software, which provides your users with the following standardfeatures:
● SmartAccess analyzes the access scenario and then delivers the appropriate level ofaccess without compromising security
● SmoothRoaming ensures that as users move between devices, networks, and locations,the appropriate level of access is configured automatically for each new access scenario
● Secure by Design that provides users with access that is inherently secure by design,protecting both the security of company information as well as the integrity of thenetwork
What's New
New Features in the 4.5 Release

9
Readme for Citrix Access Gateway 4.5,Advanced Edition
Readme Version: 1.0
Note:
● For a list of issues resolved in this release, see the Knowledge Base article CTX111111at http://support.citrix.com/article/CTX111111.
● For the latest critical updates for Citrix products, seehttp://support.citrix.com/criticalupdates.
● For information about new features see New Features in the 4.5 Release.
Contents● Finding Documentation
● Getting Support
● Known Issues in this Release
Finding DocumentationTo access complete and up-to-date product information, in the Citrix eDocs library, expandthe topics for Access Gateway 4.5, Advanced Edition.
Licensing Documentation
Licensing documentation is available in the Technologies node in Citrix eDocs.
Getting SupportCitrix provides technical support primarily through through Citrix Solutions Network (CSN).Our CSN partners are trained and authorized to provide a high level of support to ourcustomers. Contact your supplier for first-line support or use Citrix Online TechnicalSupport to find the nearest Citrix Solutions Advisor.
Citrix offers online technical support services on the Citrix Support Web site. The Support page includes links to downloads, the Citrix Knowledge Center, Citrix Consulting Services,

and other useful support pages.
Known Issues in this ReleaseThe following is a list of known issues in this release. Read it carefully before installingthe product.
● Installation Issues
● Other Known Issues
Installation IssuesImportant: Before you install this product, make sure you consult the Pre-InstallationUpdate Bulletin on the Citrix Support Web site.
The bulletin offers late-breaking information and links to critical updates to serveroperating systems and to Citrix installation files. Download and install the updates or youmay not be able to install this product properly.
● Upgrading from Access Gateway with Advanced Access Control 4.2
● Upgrading to Citrix Licensing for Windows
● Upgrading to Access Management Console 4.5
● Installing Citrix Access Gateway Advanced Edition
Upgrading from Access Gateway with AdvancedAccess Control 4.2
Installing Advanced Access Control 4.5 over Advanced Access Control 4.2 is notsupported
When attempting to upgrade servers running Advanced Access Control 4.2 to AdvancedAccess Control 4.5, installing the Version 4.5 software on servers running Version 4.2 resultsin incomplete or failed installations. Citrix recommends uninstalling Advanced AccessControl 4.2 before installing Advanced Access Control 4.5. For more information aboutupgrading existing Advanced Access Control servers, see "Incorrect instructions forupgrading servers running Access Gateway with Advanced Access Control 4.2" in the"Documentation Errata" section of this readme.
Cannot set display order of Web resources after upgrading from Version 4.2
After upgrading Advanced Access Control servers from Version 4.2 to Version 4.5, thedisplay order of Web resources cannot be set. This occurs when the configuration data for
Access Gateway 4.5, Advanced Edition
10

the access server farm includes access center data when migrated. Although the MigrationTool included with Access Gateway Advanced Edition does not migrate access center datafrom Version 4.2 farms, the presence of access center data in the farm configurationdatabase influences the presence of this issue. To resolve this issue, remove all accesscenters from the access server farm before migrating the farm configuration data.[#149357]
Upgrading to Citrix Licensing for WindowsTo use Access Gateway Advanced Edition, you must upgrade your Citrix License Server tothe version available on the product CD. Your existing license files are compatible with thenew license server. For information about upgrading your license server, see the Citrixwhitepaper Licensing: Migrating, Upgrading, and Renaming (CTX108655) in the CitrixKnowledge Center.
Upgrading to Access Management Console 4.5If you use the Access Management Console to manage multiple Citrix Access Suitecomponents, read this section before upgrading the Access Management Console to the 4.5release.
When you upgrade an Access Suite component to the 4.5 release, you must also upgrade theAccess Management Console to manage that component. However, by default, the new 4.5version of the console only supports 4.5 components. Therefore, if you plan to upgradesome, but not all, of your components to 4.5, you have two options for managing thesecomponents:
● Option 1: Use two different versions of the Access Management Console to manage theAccess Suite components (Recommended).
● Option 2: Use a single 4.5 version of the Access Management Console to manage theAccess Suite components. This option has limitations and cannot be used in allenvironments.
Each option is explained below.
Option 1: Using Two Versions of the Access Management Console to Manage the AccessSuite Components (Recommended)
If you upgrade some Access Suite components to the 4.5 release but not others, Citrixrecommends that you use two versions of the Access Management Console to manage theAccess Suite components. Each version of the Access Management Console must reside on aseparate computer.
● Use a 4.5 version of the Access Management Console to manage the Access Suitecomponents that you upgraded to the 4.5 release.
● Use the existing version of the Access Management Console to manage the Access SuiteComponents that are not upgraded.
Access Gateway 4.5, Advanced Edition
11

Specifically, you should do the following:
1. Install a new 4.5 version of the Access Management Console on a different computerthan the Access Management Console that manages the components from the earlierrelease.
Note: You can also publish the 4.5 version of the Access Management Console on aCitrix Presentation Server. Publishing the console allows you to access the consoleremotely and, as a result, manage different versions of the console from a singlecomputer.
2. Install the product extension(s) for the component(s) you plan to upgrade into the new4.5 version of the Access Management Console. For example, if you intend to upgradePassword Manager and Access Gateway Advanced Edition to the 4.5 release, install thePassword Manager 4.5 and Access Gateway Advanced Edition 4.5 extensions in theAccess Suite Console.
3. Upgrade the servers running the Access Suite components (the Password Manager andAccess Gateway Advanced Edition in this example.)
Option 2: Using a Single 4.5 Version of the Access Management Console to Manage theAccess Suite Components
In some environments you can use a single instance of the Access Management Console 4.5to manage Access Suite components from both the 4.5 release and earlier releases.
This option has these limitations:
● You cannot use the Access Management Console 4.5 to manage a Citrix PresentationServer 4.0. You should not use this option if your environment includes the CitrixPresentation Server unless you have at least one server running Presentation Server 4.5in each server farm.
● You can use the Access Management Console 4.5 to manage either the PasswordManager (4.1) or Access Gateway Advanced Edition (4.0 or 4.2). However, you mustinstall individual hot fixes for these components to manage them from the AccessManagement Console 4.5.
For example, you can do the following:
1. Upgrade the Password Manager from the 4.1 release to the 4.5 release.
2. Upgrade the Access Management Console from the 4.1 release to the 4.5 release andinstall the product extensions for the Password Manager 4.5 into the AccessManagement Console.
3. Install the hot fix in the Access Management Console that enables you to manage theAccess Gateway Advanced Edition (4.0 or 4.2) from the Access Management Console4.5.
When you have completed these steps, you can use the Access Management Console 4.5 tomanage the Password Manager 4.5 and the Access Gateway Advanced Edition 4.0 or 4.2.
You can also use this approach to manage the Access Gateway Advanced Edition 4.5 and thePassword Manager 4.1 from the Access Management Console 4.5. In this case, you mustinstall a hot fix for the Password Manager in the Access Management Console 4.5.
Access Gateway 4.5, Advanced Edition
12
[Back to Installation Issues]
Installing Citrix Access Gateway Advanced EditionSupport for Windows Multilingual User Interface (MUI)
Access Gateway Advanced Edition supports Microsoft's Windows Multilingual User InterfacePack (MUI). Please note the following points:
● You must have all language settings set to English when you install Advanced AccessControl.
● You must install the English version of Advanced Access Control.
● You install Windows MUI language packs for Windows Server 2003 after you haveinstalled Advanced Access Control.
● For non-English operating systems, you set up .NET Framework language support byinstalling the Microsoft .NET Framework Version 2.0 language pack. Language packs arelocated in the Support/DotNet folder on the Access Gateway Advanced Edition CD.Additionally, you can download the language packs from the Microsoft Web site.
Adding PDF Support to HTML Preview
HTML Preview does not render PDF documents for preview by default. If you want toprovide PDF documents through HTML Preview, you must also install pdftohtml.exe version0.36. This executable can be obtained from SourceForge athttp://pdftohtml.sourceforge.net/. Instructions for installing pdftohtml.exe appear inKnowledge Base article CTX107543, "Customizing HTML Preview in Advanced AccessControl", located on the Web at the Citrix Knowledge Center. Please read and review thisarticle before installing the pdftohtml software.
Support of UPN credentials for service accounts
Access Gateway Advanced Edition supports the use of logon credentials in the User PrincipleName (UPN) and Alternate UPN formats. Entering service account credentials in theseformats while using the Server Configuration wizard is not supported. [#137674]
Server configuration fails on servers that are not members of a domain
When running the Server Configuration utility after installing Advanced Access Control, theServer Configuration utility fails to complete the initial configuration. This occurs when theAdvanced Access Control server belongs to a Windows workgroup instead of a Windowsdomain. Advanced Access Control is not supported in networked environments that useWindows workgroups. To resolve this issue, ensure the computer on which you are installingAdvanced Access Control belongs to a valid Windows domain. [#144205]
Error occurs during installation and server configuration fails when using installationpath containing percent symbols
When installing Advanced Access Control using a custom Web site path that contains apercent symbol, an error message appears stating the SAMFilter.dll failed to register.
Access Gateway 4.5, Advanced Edition
13
Additionally, the Server Configuration utility fails to perform initial configuration ofAdvanced Access Control. To prevent this issue from occurring, use only alphanumericcharacters in custom paths defined during installation. [#139687]
Duplicate server names appear in the Console when a redeployed server rejoins thefarm
If an Advanced Access Control server is redeployed using the server name with which itoriginally joined the access server farm, the Manage Server Roles list in the AccessManagement Console displays the duplicate server names. [#140402]
Access Gateway with Advanced Access Control 4.2 Installation wizard does not detectsubsequent software versions
If Access Gateway Advanced Edition 4.5 is installed on a server and an installation of AccessGateway with Advanced Access Control 4.2 is attempted on the same server, theinstallation of Version 4.2 occurs without any notification that a different version of thesoftware is installed. After installation of Version 4.2 finishes, the Server Configurationwizard for Version 4.5 appears. If the wizard is completed and server configuration isallowed to run, an error message displays indicating the server configuration did notcomplete successfully. [#137661]
Server configuration fails when installing Advanced Access Control on a clonedcomputer
If Advanced Access Control is installed on a computer that has been cloned, or configuredusing an image created on a different computer, the Server Configuration utility does notcreate the SampleLogonPoint and the server configuration fails. This can occur if ASP.NET isnot registered with Internet Information Services (IIS). When a computer is configured withan image created on a different computer, the computer might not have ASP.NETregistered even if ASP.NET was registered on the computer from which the image wasderived. This can occur if a utility such as Altiris SIDgen is used to clone computers becausethe utility might not include IIS settings during the cloning process. To resolve this issue,register ASP.NET on the computer before you install Advanced Access Control.
To register IIS
● Locate aspnet_regiis.exe and then type aspnet_regiis.exe -i at the command prompt.
Uninstalling Citrix Access Gateway Server renders Access Management Console unusable
On a server where Advanced Access Control and the Access Management Console areinstalled, the Console no longer runs after uninstalling the Advanced Access Controlcomponent (listed in Control Panel as Citrix Access Gateway Server). Instead, a messageappears stating securitybroker.dll is missing or improperly registered. To resolve this issue,re-install the Access Management Console from the Access Gateway Advanced EditionServer CD. [#145472]
Uninstalling Citrix Access Gateway Console prevents uninstallation of Access GatewayServer
If you uninstall the Citrix Access Gateway Console component before uninstalling the CitrixAccess Gateway Server component, uninstallation of the Citrix Access Gateway Servercomponent fails. This issue occurs because the value of the server table cannot be deletedfrom the Advanced Access Control configuration database. To prevent this issue fromoccurring, uninstall the Citrix Access Gateway Server component before uninstalling other
Access Gateway 4.5, Advanced Edition
14

Advanced Access Control components. [#140397]
[Back to Installation Issues]
Other Known IssuesThis section includes information for the following products and components :
● Citrix Access Gateway Advanced Edition
● Advanced Access Control
● Citrix Access Gateway
● Citrix Presentation Server Integration
● Endpoint Analysis
● HTML Preview and Live Edit
● Resources and Policies
● Authentication
● Logon Agent and Logon Points
● Web Proxy and URL Rewriting
● Access Management Console
● Documentation Errata
Citrix Access Gateway Advanced EditionError message appears when editing ICA access control list
When editing an access control list from the ICA Access Control page in the gatewayproperties, an error message appears stating the IP range is already in use. This errormessage appears regardless of whether or not the IP range is actually in use. [#145838]
Intermittent licensing warnings may occur in double-hop DMZ deployments
In a double-hop DMZ deployment, the Access Gateway Proxy in the second DMZ reportsperiodically that licensing is not configured or is not configured correctly. This happenseven when licenses for all appliances and access servers in the deployment are valid. This isbecause the Access Gateway Proxy is not configured for Advanced Access Control and,therefore, expects appliance-based licensing to be configured. Typically, licensing for allthe appliances and access servers in a double-hop DMZ deployment is managed by the CitrixLicensing Server. These warnings do not affect functionality of the Access Gateway
Access Gateway 4.5, Advanced Edition
15

appliances or Advanced Access Control server in a double-hop DMZ configuration. [#143978]
Logon page is not visible after Advanced Access Control server is restarted
When Access Gateway Advanced Edition is deployed in a double-hop DMZ configuration,users cannot log on to the access server farm through the Access Gateway after theAdvanced Access Control server is restarted. To resolve this issue, restart the AccessGateway in the first DMZ. [#149672]
Secure Access Client does not launch correctly when using Netscape Navigator
When a user uses Netscape Navigator to download and install the Secure Access Client, theuser cannot connect to a logon point that requires the Client. When the attempt to connectfails, the user must close the browser and attempt to connect again. This occurs becauseNetscape Navigator does not download and open the AccessGatewayClientLaunch.vcagc fileproperly. To resolve this issue, the user must attempt to reconnect and use the SecureAccess Client to open the AccessGatewayClientLaunch.vcagc file when prompted. [#145366]
[Back to Other Known Issues]
Advanced Access ControlSession Viewer displays sessions for users denied access
When a user logs on to Advanced Access Control and is denied access, the Session Viewerutility displays a session for the user. Typically, the Session Viewer utility displays usersessions only when users log on successfully. [#141328]
Session Viewer displays incorrect values
When a user logs on to Advanced Access Control, the Session Viewer utility does not displaythe correct HomePage and Small Form Factor values. For example, if a user accesses theAccess Interface but no Web resources are configured, the Session Viewer displays theHomePage value as "Web Email" instead of "Home Page." The Small Form Factor value isdisplayed as "Yes" even if the browser in use is not on a small form factor device. [#141327]
Session Viewer incorrectly shows Live Edit Client is installed
When a user session is displayed in the Session Viewed utility, the Session Values panealways indicates the Live Edit Client is installed. This occurs even when the Live Edit Clientis not installed on the client device. [#137018]
Session Viewer does not display data for Two Factor Authentication Info value
When a user session is displayed in the Session Viewed utility, the Session Values pane doesnot display corresponding data for the Two Factor Authentication Info value. [#137026]
[Back to Other Known Issues]
Access Gateway 4.5, Advanced Edition
16

Citrix Access GatewayUsers must close browser before logging in again through Access Gateway
When terminating a session, users must close their browsers before logging in again throughthe Access Gateway appliance. This issue occurs when users access a logon point throughthe Access Gateway appliance and when endpoint analysis is configured on the AdvancedAccess Control server. [#137489]
Administration Tool does not appear when launched
When launching the Access Gateway Administration Tool from a shortcut on the Desktop,the Administration Tool appears beneath any other applications that might be open on theDesktop. It also does not appear in the Taskbar to indicate it is running. To make theAdministration Tool the focus of the Desktop, users must click on the Administration Toolwindow or press ALT+TAB. [#130170]
Failover to available Access Gateway appliances fails when users are required toauthenticate after network interruption
Failover to available appliances in an Access Gateway cluster does not occur when theconnection policy is configured to require authentication after a network interruption.When an appliance in the cluster becomes unavailable, users are directed to theunavailable appliance for authentication instead of to available appliances in the cluster.[#137066]
[Back to Other Known Issues]
Citrix Presentation Server IntegrationSupport of Web Interface for Citrix Presentation Server 4.0 and 4.2
The following are known issues when Web Interface for Citrix Presentation Server 4.0 or 4.2are used in an environment that includes Access Gateway Advanced Edition 4.5:
● Cookies written during user sessions exceed cookie limit in Internet Explorer
When users access an Access Platform site through the Access Interface using InternetExplorer, the number of cookies written by the Advanced Access Control server exceedsInternet Explorer's cookie limit of 20 per unique domain. When this happens, InternetExplorer discards the oldest cookies so that newer ones can be written. This results in aloss of session state during a typical user session and, consequently, a loss offunctionality. This issue also occurs when the Advanced Access Control server isconfigured to display multiple Access Platform sites. This issue does not occur whenusing Web Interface for Citrix Presentation Server 4.5 to provide access to publishedapplications through the Access Interface.
● Users are unable to set connection preferences from the Access Interface
When users log on to an Access Platform site through the Access Interface, they cannotcustomize the connection preferences for the site. For example, when users select
Access Gateway 4.5, Advanced Edition
17

options from the Connection Preferences page and click OK, the selections are notsaved. This occurs because Advanced Access Control causes the cookie set by WebInterface to expire. This issue does not occur when using Web Interface for CitrixPresentation Server 4.5 to provide access to published applications through the AccessInterface.
● Sessions are not shared when users access published applications
When users launch published applications through Advanced Access Control or an AccessPlatform site displayed in the Access Interface, the sessions that are created with eachaccess method are not shared. For example, when a user accesses a publishedapplication using file type association or Workspace Control, a session is created. Whenthe user disconnects from the application and then reconnects using an Access Platformsite displayed in the Access Interface, the session is not used. Instead, a new session iscreated. While the user's experience remains unaffected, administrators might noticethe server running Citrix Presentation Server experiences some decrease inperformance. This decrease varies depending on the usage of published applicationsthrough Advanced Access Control. This issue does not occur when using Web Interfacefor Citrix Presentation Server 4.5 to provide access to published applications throughthe Access Interface.
● Installation of Web Interface for Citrix Presentation Server 4.2 on Advanced AccessControl server is not supported
Installing Web Interface for Citrix Presentation Server 4.2 on the same server hostingVersion 4.5 of Advanced Access Control is not a supported installation scenario. To useVersion 4.5 of Advanced Access Control in an environment that includes Web Interfacefor Citrix Presentation Server 4.2, Advanced Access Control must be installed on aseparate server. This issue does not occur when installing Web Interface for CitrixPresentation Server 4.5 on a server hosting Version 4.5 of Advanced Access Control.
[#146399]
[Back to Other Known Issues]
Endpoint AnalysisNorton AntiVirus Personal scan accepts incorrect input for pattern file versionparameter
When configuring an endpoint analysis scan for Norton AntiVirus Personal, it is possible toenter a random numeric string for the pattern file version parameter as long as the stringincludes a period (for example, 123.45 or 12345.6879). Correct input for this parametershould be in the YYYYMMDD.NNN format, where YYYY is a 4-digit year, MM is a 2-digitmonth, DD is a 2-digit day, and NNN is the 3-digit version. This issue occurs because thescan package does not include any validation to ensure the numeric string entered for thisparameter is in the correct format. To ensure scans created from this package runcorrectly, ensure the pattern file version entered is in the correct format. [#145410]
Scan package does not detect international versions of McAfee VirusScan
Access Gateway 4.5, Advanced Edition
18

Scans created using the Citrix Scans for McAfee VirusScan endpoint analysis scan package donot detect international versions of McAfee VirusScan 11 installed on client computers.When the scan runs, the value returned for whether or not McAfee VirusScan is installed onthe client computer is "false" instead of "true." To work around this issue, ensure the CitrixScans for McAfee VirusScan endpoint analysis scan package can detect previousinternational versions of McAfee VirusScan. [#149616]
[Back to Other Known Issues]
HTML Preview and Live EditChanges to documents modified with the Live Edit Client are not saved
When modifying documents using the Live Edit Client on a Windows 2000 system, changesmade to these documents are not saved. To work around this issue, use the Live Edit Clienton a system running Windows XP. [#143735]
Large PDF documents do not display using Internet Explorer or Netscape Navigator
For Advanced Access Control servers configured to allow HTML Preview of PDF files, PDFdocuments over 5 MB do not display correctly when users access them using InternetExplorer or Netscape Navigator. When a user attempts to view a PDF document in one ofthese Web browsers, a blank page is displayed and the document does not appear. Toensure these PDF documents display correctly, access these documents using the FirefoxWeb browser. [#130219]
Preview option is offered to users even when no HTML Preview servers are available
When an Advanced Access Control server is configured with the HTML Preview server roleand an access policy exists that allows HTML Preview, the Preview option is offered to userswho access files through the Access Interface. However, when the server becomesunavailable, users can still select the Preview option to access documents. When usersselect the Preview option, they cannot preview files. To work around this issue, ensure youraccess server farm includes a sufficient number of servers that are assigned the HTMLPreview server role to provide redundancy in the event of server failure. [#141051]
[Back to Other Known Issues]
Resources and PoliciesUPN logon credentials are not passed through to Web resources
When users log on to Advanced Access Control using credentials in User Principal Name(UPN) or Alternate UPN format, the credentials are not passed through to published Webresources such as Microsoft Sharepoint and Outlook Web Access (OWA), even when policiesallow all users access to these resources. This issue occurs on servers using the Windows2000 operating system only. [#143565]
Access Gateway 4.5, Advanced Edition
19
Incorrect error message displays when creating duplicate continuous scans
When creating a duplicate of an existing continuous scan, an error message appears statingan unexpected error has occurred. Instead, the error message should state that the scanalready exists. To prevent this error message from occurring, assign a unique name to eachcontinuous scan. [#144981]
Renaming continuous scans invalidates continuous scan filters
If you rename a continuous scan, any continuous scan filters that reference the scanbecome invalid. This is because the continuous scan filter continues to reference the scanby its original name. To work around this issue, remove the original scan from thecontinuous scan filter. Then, add the updated scan. [#142084]
Continuous scan fails when name contains !, &, (, ) or "
If a continuous scan is created with a scan name that includes the characters !, &, (, ) or ",the scan does not run and users cannot access corporate resources. This issue applies toFile, Process, and Registry scans. To resolve this issue, avoid using these characters in scannames for continuous scans. [#147682]
Continouous scan filters cannot be modified when referencing scans containing symbols
If you attempt to modify a continuous scan filter that references a continuous scan thatcontains symbols (such as *, &, $, etc.), an error message appears stating the storedexpression is invalid or corrupt. As a workaround, use only alphanumeric characters incontinuous scan names. [#142083]
Download messages display incorrect file names
When downloading files through the Access Interface, the file download message displays"activator.asp" instead of the name of the file being downloaded. This does not effect thedownload of the file. [#138433]
Slow logon script execution results in delays in logon process
When a connection policy is configured to execute logon scripts, the time to execute thelogon scripts may result in varied logon experiences for users. Depending on the logonscript, users may experience delays in authentication lasting from a few seconds to severalminutes. Users could mistake this delay in the logon process as a failure to log onsuccessfully to the Advanced Access Control server. [#130185]
Visio Document Preview shows first page only
HTML Preview shows only the first page of multi-page Microsoft Visio documents. As aworkaround, inform authors of Visio files to limit their new files to single pages, such ascreating a separate file for each page of a multi-page diagram. Alternatively, users with theappropriate permission can open the file in Visio to view the entire contents. [#130201]
Multiple policies controlling the same resource might affect server performance
If multiple policies are assigned to one resource and each policy includes a different usergroup, users might experience delays when attempting to access the resource. To avoiddelays when accessing resources, remove unnecessary access policies or consolidateexisting access policies for each resource. [#137409]
Access Gateway 4.5, Advanced Edition
20

Policies applied to file share subfolders are not enforced correctly
A policy that is applied to a file share subfolder is not enforced correctly when it overlapsan existing policy that is applied to the parent directory. For example, an administratordefines a file share resource as \\server\CompanyFiles and configures a policy that allows allusers full access to the resource. The administrator defines another resource, a subfolderon the file share called DepartmentFiles (\\server\CompanyFiles\DepartmentFiles), andconfigures a policy that only allows users to preview files. Because the policies overlap, thepolicy applied to the subfolder DepartmentFiles is not enforced in favor of the policyapplied to the parent directory CompanyFiles. Therefore, users who access files in theDepartmentFiles subfolder are allowed full access.
To resolve this issue, redefine the subfolder so that the policy, when applied, does notoverlap the policy for the parent directory. In the above example, the administratorredefines the file share subfolder as \\server\FileShare\DepartmentFiles. When users accessfiles in this folder, they are allowed only to preview the files. [#140162]
Users are denied access to files that include pound (#) or ampersand (&) symbols in thefilename
Users who attempt to access through the Access Interface files that contain the pound (#)or ampersand (&) symbols in the filename receive an "Access Denied" message. This occurseven when policies exist that grant users access to these files. To resolve this issue, ensurethat filenames for files accessed through the Access Interface do not include these symbols.[#147848]
[Back to Other Known Issues]
AuthenticationIncorrect message appears when entering a blank password
When an Advanced Access Control server is configured with SafeWord authentication,entering a blank password to log on results in a message stating access is denied. Thismessage is incorrectly worded and should indicate that a blank password cannot be used tolog on. [#145477]
Support for customizing RSA SecurID and SafeWord passcode fields
By default, when Advanced Access Control is configured with RSA SecurID or SecureComputing SafeWord authentication, the logon page displays the labels "SecurID PASSCODE"or "SafeWord CODE" next to the fields in which users are required to enter their SecurID orSafeWord passcodes. Administrators might consider these labels an advertisement tomalicious users of an organization's authentication method. To prevent this, administratorscan change the default label text.
To customize the text of SecurID and SafeWord passcode field
1. From Windows Explorer, navigate to the virtual directory of the logon point thatcontains the logon page you want to change (for example,C:\Inetpub\wwwroot\CitrixLogonPoint\SampleLogonPoint).
Access Gateway 4.5, Advanced Edition
21
2. Using a text editor, open the Web.config file and locate the following keys:
<!-- add key="SecondaryAuthenticationPromptOverride" value="Password:" / -->
<!-- add key="SecondaryAuthenticationToolTipOverride" value="Enter Password" / -->
3. Uncomment each key and then enter the text values that you want to appear on thelogon page.
4. Save the Web.config file.
When you enable these keys, the text values you enter appear on the logon page when youconfigure the Advanced Access Control server with SecurID or SafeWord authentication.
[Back to Other Known Issues]
Logon Agent and Logon PointsAccess Interface displays blank page after logon
After logging on to the Advanced Access Control server, the Access Interface displays ablank page. This occurs when no resources are configured or when no access policies areconfigured for existing resources, and the logon point is configured to allow access. Toprevent displaying the Access Interface when no resources or access policies for resourceshave been configured, configure the access policy for the logon point to deny access.[#138546]
Internet Explorer displays page loading progress after page is loaded
When accessing resources through the Access Interface with Internet Explorer, the progressbar near the bottom of the browser continues to display loading progress of content evenwhen the page has finished loading. Clicking the Email, Applications, and Home tabs nearthe top of the Access Interface causes the progress bar to stop displaying loading progress.[#146348]
[Back to Other Known Issues]
Web Proxy and URL RewritingWeb proxy is not compatible with IBM iNotes 6 Web Access Redirect
In multiserver iNotes deployments that are load balanced with iNotes Web Access Redirect,the Web proxy rewrites only absolute URLs with the format "//www.thisurl.com/thispath."Additionally, the LTPA token resolves cookies on only one host path instead of all host pathswithin a multiserver iNotes deployment. This is because the Web proxy rewrites cookies toencode the host into the relative path. [#145196]
Access Gateway 4.5, Advanced Edition
22

[Back to Other Known Issues]
Access Management ConsoleFTP server address in Diagnostic Facility is incorrect
When a user sets the packaging details from the Diagnostic Facility node, the FTP serveraddress that appears by default is uploads.citrix.com. This address is incorrect. Instead, thecorrect FTP server address is ftpsupport.citrix.com. [#149763]
Access Management Console Snap-ins Fail to Initialize
Previous releases of the Access Management Console required version 1.1 of Microsoft's.NET Framework. Where later versions of the .NET Framework were also present, Citrixprovided a workaround in the form of a file called mmc.exe.config that ensured version 1.1was loaded. This workaround is no longer required and must be removed. If you do notremove the workaround, the console does not start and displays an error such as "Snap-infailed to initialize."
To prevent this issue, remove the file \Windows\system32\mmc.exe.config.
Important: Removing this file prevents previous releases of the console from working(because they rely on version 1.1 of .NET Framework). If you have earlier releases and donot wish to upgrade them, contact Citrix Technical Support for an alternativeworkaround.
[#150473]
[Back to Other Known Issues]
Documentation Errata
Access Gateway Advanced Edition Upgrade GuideIncorrect instructions for upgrading servers running Access Gateway with AdvancedAccess Control 4.2
In Chapter 1, Welcome, the section "Upgrading from Access Gateway with Advanced AccessControl" contains a table describing the steps required for upgrading to Access GatewayAdvanced Edition 4.5. This table includes the step "Upgrade to Advanced Access Control"which is incorrect. Instead, uninstall Advanced Access Control 4.2 from the server you wantto upgrade. Afterwards, you can install Advanced Access Control 4.5 and import migratedconfiguration data.
In Chapter 2, Upgrade Tasks, the section "Upgrading from Access Gateway with AdvancedAccess Control" includes a procedure for upgrading a server running Advanced AccessControl 4.2 to Advanced Access Control 4.5. This information is incorrect because installing
Access Gateway 4.5, Advanced Edition
23

Advanced Access Control 4.5 over an existing installation of Advanced Access Control 4.2results in an incomplete or failed installation. Instead, uninstall Advanced Access Control4.2 from the server you want to upgrade. Afterwards, you can install Advanced AccessControl 4.5 and import migrated configuration data.
Access Gateway 4.5, Advanced Edition
24

25
Readme for Citrix Access Gateway 4.5,Advanced Edition
Readme Version: 1.0
Note:
● For a list of issues resolved in this release, see the Knowledge Base article CTX111111at http://support.citrix.com/article/CTX111111.
● For the latest critical updates for Citrix products, seehttp://support.citrix.com/criticalupdates.
● For information about new features see New Features in the 4.5 Release.
Contents● Finding Documentation
● Getting Support
● Known Issues in this Release
Finding DocumentationTo access complete and up-to-date product information, in the Citrix eDocs library, expandthe topics for Access Gateway 4.5, Advanced Edition.
Licensing Documentation
Licensing documentation is available in the Technologies node in Citrix eDocs.
Getting SupportCitrix provides technical support primarily through through Citrix Solutions Network (CSN).Our CSN partners are trained and authorized to provide a high level of support to ourcustomers. Contact your supplier for first-line support or use Citrix Online TechnicalSupport to find the nearest Citrix Solutions Advisor.
Citrix offers online technical support services on the Citrix Support Web site. The Support page includes links to downloads, the Citrix Knowledge Center, Citrix Consulting Services,

and other useful support pages.
Known Issues in this ReleaseThe following is a list of known issues in this release. Read it carefully before installingthe product.
● Installation Issues
● Other Known Issues
Installation IssuesImportant: Before you install this product, make sure you consult the Pre-InstallationUpdate Bulletin on the Citrix Support Web site.
The bulletin offers late-breaking information and links to critical updates to serveroperating systems and to Citrix installation files. Download and install the updates or youmay not be able to install this product properly.
● Upgrading from Access Gateway with Advanced Access Control 4.2
● Upgrading to Citrix Licensing for Windows
● Upgrading to Access Management Console 4.5
● Installing Citrix Access Gateway Advanced Edition
Upgrading from Access Gateway with AdvancedAccess Control 4.2
Installing Advanced Access Control 4.5 over Advanced Access Control 4.2 is notsupported
When attempting to upgrade servers running Advanced Access Control 4.2 to AdvancedAccess Control 4.5, installing the Version 4.5 software on servers running Version 4.2 resultsin incomplete or failed installations. Citrix recommends uninstalling Advanced AccessControl 4.2 before installing Advanced Access Control 4.5. For more information aboutupgrading existing Advanced Access Control servers, see "Incorrect instructions forupgrading servers running Access Gateway with Advanced Access Control 4.2" in the"Documentation Errata" section of this readme.
Cannot set display order of Web resources after upgrading from Version 4.2
After upgrading Advanced Access Control servers from Version 4.2 to Version 4.5, thedisplay order of Web resources cannot be set. This occurs when the configuration data for
Readme for Citrix Access Gateway 4.5, Advanced Edition
26

the access server farm includes access center data when migrated. Although the MigrationTool included with Access Gateway Advanced Edition does not migrate access center datafrom Version 4.2 farms, the presence of access center data in the farm configurationdatabase influences the presence of this issue. To resolve this issue, remove all accesscenters from the access server farm before migrating the farm configuration data.[#149357]
Upgrading to Citrix Licensing for WindowsTo use Access Gateway Advanced Edition, you must upgrade your Citrix License Server tothe version available on the product CD. Your existing license files are compatible with thenew license server. For information about upgrading your license server, see the Citrixwhitepaper Licensing: Migrating, Upgrading, and Renaming (CTX108655) in the CitrixKnowledge Center.
Upgrading to Access Management Console 4.5If you use the Access Management Console to manage multiple Citrix Access Suitecomponents, read this section before upgrading the Access Management Console to the 4.5release.
When you upgrade an Access Suite component to the 4.5 release, you must also upgrade theAccess Management Console to manage that component. However, by default, the new 4.5version of the console only supports 4.5 components. Therefore, if you plan to upgradesome, but not all, of your components to 4.5, you have two options for managing thesecomponents:
● Option 1: Use two different versions of the Access Management Console to manage theAccess Suite components (Recommended).
● Option 2: Use a single 4.5 version of the Access Management Console to manage theAccess Suite components. This option has limitations and cannot be used in allenvironments.
Each option is explained below.
Option 1: Using Two Versions of the Access Management Console to Manage the AccessSuite Components (Recommended)
If you upgrade some Access Suite components to the 4.5 release but not others, Citrixrecommends that you use two versions of the Access Management Console to manage theAccess Suite components. Each version of the Access Management Console must reside on aseparate computer.
● Use a 4.5 version of the Access Management Console to manage the Access Suitecomponents that you upgraded to the 4.5 release.
● Use the existing version of the Access Management Console to manage the Access SuiteComponents that are not upgraded.
Readme for Citrix Access Gateway 4.5, Advanced Edition
27

Specifically, you should do the following:
1. Install a new 4.5 version of the Access Management Console on a different computerthan the Access Management Console that manages the components from the earlierrelease.
Note: You can also publish the 4.5 version of the Access Management Console on aCitrix Presentation Server. Publishing the console allows you to access the consoleremotely and, as a result, manage different versions of the console from a singlecomputer.
2. Install the product extension(s) for the component(s) you plan to upgrade into the new4.5 version of the Access Management Console. For example, if you intend to upgradePassword Manager and Access Gateway Advanced Edition to the 4.5 release, install thePassword Manager 4.5 and Access Gateway Advanced Edition 4.5 extensions in theAccess Suite Console.
3. Upgrade the servers running the Access Suite components (the Password Manager andAccess Gateway Advanced Edition in this example.)
Option 2: Using a Single 4.5 Version of the Access Management Console to Manage theAccess Suite Components
In some environments you can use a single instance of the Access Management Console 4.5to manage Access Suite components from both the 4.5 release and earlier releases.
This option has these limitations:
● You cannot use the Access Management Console 4.5 to manage a Citrix PresentationServer 4.0. You should not use this option if your environment includes the CitrixPresentation Server unless you have at least one server running Presentation Server 4.5in each server farm.
● You can use the Access Management Console 4.5 to manage either the PasswordManager (4.1) or Access Gateway Advanced Edition (4.0 or 4.2). However, you mustinstall individual hot fixes for these components to manage them from the AccessManagement Console 4.5.
For example, you can do the following:
1. Upgrade the Password Manager from the 4.1 release to the 4.5 release.
2. Upgrade the Access Management Console from the 4.1 release to the 4.5 release andinstall the product extensions for the Password Manager 4.5 into the AccessManagement Console.
3. Install the hot fix in the Access Management Console that enables you to manage theAccess Gateway Advanced Edition (4.0 or 4.2) from the Access Management Console4.5.
When you have completed these steps, you can use the Access Management Console 4.5 tomanage the Password Manager 4.5 and the Access Gateway Advanced Edition 4.0 or 4.2.
You can also use this approach to manage the Access Gateway Advanced Edition 4.5 and thePassword Manager 4.1 from the Access Management Console 4.5. In this case, you mustinstall a hot fix for the Password Manager in the Access Management Console 4.5.
Readme for Citrix Access Gateway 4.5, Advanced Edition
28

[Back to Installation Issues]
Installing Citrix Access Gateway Advanced EditionSupport for Windows Multilingual User Interface (MUI)
Access Gateway Advanced Edition supports Microsoft's Windows Multilingual User InterfacePack (MUI). Please note the following points:
● You must have all language settings set to English when you install Advanced AccessControl.
● You must install the English version of Advanced Access Control.
● You install Windows MUI language packs for Windows Server 2003 after you haveinstalled Advanced Access Control.
● For non-English operating systems, you set up .NET Framework language support byinstalling the Microsoft .NET Framework Version 2.0 language pack. Language packs arelocated in the Support/DotNet folder on the Access Gateway Advanced Edition CD.Additionally, you can download the language packs from the Microsoft Web site.
Adding PDF Support to HTML Preview
HTML Preview does not render PDF documents for preview by default. If you want toprovide PDF documents through HTML Preview, you must also install pdftohtml.exe version0.36. This executable can be obtained from SourceForge athttp://pdftohtml.sourceforge.net/. Instructions for installing pdftohtml.exe appear inKnowledge Base article CTX107543, "Customizing HTML Preview in Advanced AccessControl", located on the Web at the Citrix Knowledge Center. Please read and review thisarticle before installing the pdftohtml software.
Support of UPN credentials for service accounts
Access Gateway Advanced Edition supports the use of logon credentials in the User PrincipleName (UPN) and Alternate UPN formats. Entering service account credentials in theseformats while using the Server Configuration wizard is not supported. [#137674]
Server configuration fails on servers that are not members of a domain
When running the Server Configuration utility after installing Advanced Access Control, theServer Configuration utility fails to complete the initial configuration. This occurs when theAdvanced Access Control server belongs to a Windows workgroup instead of a Windowsdomain. Advanced Access Control is not supported in networked environments that useWindows workgroups. To resolve this issue, ensure the computer on which you are installingAdvanced Access Control belongs to a valid Windows domain. [#144205]
Error occurs during installation and server configuration fails when using installationpath containing percent symbols
When installing Advanced Access Control using a custom Web site path that contains apercent symbol, an error message appears stating the SAMFilter.dll failed to register.
Readme for Citrix Access Gateway 4.5, Advanced Edition
29
Additionally, the Server Configuration utility fails to perform initial configuration ofAdvanced Access Control. To prevent this issue from occurring, use only alphanumericcharacters in custom paths defined during installation. [#139687]
Duplicate server names appear in the Console when a redeployed server rejoins thefarm
If an Advanced Access Control server is redeployed using the server name with which itoriginally joined the access server farm, the Manage Server Roles list in the AccessManagement Console displays the duplicate server names. [#140402]
Access Gateway with Advanced Access Control 4.2 Installation wizard does not detectsubsequent software versions
If Access Gateway Advanced Edition 4.5 is installed on a server and an installation of AccessGateway with Advanced Access Control 4.2 is attempted on the same server, theinstallation of Version 4.2 occurs without any notification that a different version of thesoftware is installed. After installation of Version 4.2 finishes, the Server Configurationwizard for Version 4.5 appears. If the wizard is completed and server configuration isallowed to run, an error message displays indicating the server configuration did notcomplete successfully. [#137661]
Server configuration fails when installing Advanced Access Control on a clonedcomputer
If Advanced Access Control is installed on a computer that has been cloned, or configuredusing an image created on a different computer, the Server Configuration utility does notcreate the SampleLogonPoint and the server configuration fails. This can occur if ASP.NET isnot registered with Internet Information Services (IIS). When a computer is configured withan image created on a different computer, the computer might not have ASP.NETregistered even if ASP.NET was registered on the computer from which the image wasderived. This can occur if a utility such as Altiris SIDgen is used to clone computers becausethe utility might not include IIS settings during the cloning process. To resolve this issue,register ASP.NET on the computer before you install Advanced Access Control.
To register IIS
● Locate aspnet_regiis.exe and then type aspnet_regiis.exe -i at the command prompt.
Uninstalling Citrix Access Gateway Server renders Access Management Console unusable
On a server where Advanced Access Control and the Access Management Console areinstalled, the Console no longer runs after uninstalling the Advanced Access Controlcomponent (listed in Control Panel as Citrix Access Gateway Server). Instead, a messageappears stating securitybroker.dll is missing or improperly registered. To resolve this issue,re-install the Access Management Console from the Access Gateway Advanced EditionServer CD. [#145472]
Uninstalling Citrix Access Gateway Console prevents uninstallation of Access GatewayServer
If you uninstall the Citrix Access Gateway Console component before uninstalling the CitrixAccess Gateway Server component, uninstallation of the Citrix Access Gateway Servercomponent fails. This issue occurs because the value of the server table cannot be deletedfrom the Advanced Access Control configuration database. To prevent this issue fromoccurring, uninstall the Citrix Access Gateway Server component before uninstalling other
Readme for Citrix Access Gateway 4.5, Advanced Edition
30

Advanced Access Control components. [#140397]
[Back to Installation Issues]
Other Known IssuesThis section includes information for the following products and components :
● Citrix Access Gateway Advanced Edition
● Advanced Access Control
● Citrix Access Gateway
● Citrix Presentation Server Integration
● Endpoint Analysis
● HTML Preview and Live Edit
● Resources and Policies
● Authentication
● Logon Agent and Logon Points
● Web Proxy and URL Rewriting
● Access Management Console
● Documentation Errata
Citrix Access Gateway Advanced EditionError message appears when editing ICA access control list
When editing an access control list from the ICA Access Control page in the gatewayproperties, an error message appears stating the IP range is already in use. This errormessage appears regardless of whether or not the IP range is actually in use. [#145838]
Intermittent licensing warnings may occur in double-hop DMZ deployments
In a double-hop DMZ deployment, the Access Gateway Proxy in the second DMZ reportsperiodically that licensing is not configured or is not configured correctly. This happenseven when licenses for all appliances and access servers in the deployment are valid. This isbecause the Access Gateway Proxy is not configured for Advanced Access Control and,therefore, expects appliance-based licensing to be configured. Typically, licensing for allthe appliances and access servers in a double-hop DMZ deployment is managed by the CitrixLicensing Server. These warnings do not affect functionality of the Access Gateway
Readme for Citrix Access Gateway 4.5, Advanced Edition
31

appliances or Advanced Access Control server in a double-hop DMZ configuration. [#143978]
Logon page is not visible after Advanced Access Control server is restarted
When Access Gateway Advanced Edition is deployed in a double-hop DMZ configuration,users cannot log on to the access server farm through the Access Gateway after theAdvanced Access Control server is restarted. To resolve this issue, restart the AccessGateway in the first DMZ. [#149672]
Secure Access Client does not launch correctly when using Netscape Navigator
When a user uses Netscape Navigator to download and install the Secure Access Client, theuser cannot connect to a logon point that requires the Client. When the attempt to connectfails, the user must close the browser and attempt to connect again. This occurs becauseNetscape Navigator does not download and open the AccessGatewayClientLaunch.vcagc fileproperly. To resolve this issue, the user must attempt to reconnect and use the SecureAccess Client to open the AccessGatewayClientLaunch.vcagc file when prompted. [#145366]
[Back to Other Known Issues]
Advanced Access ControlSession Viewer displays sessions for users denied access
When a user logs on to Advanced Access Control and is denied access, the Session Viewerutility displays a session for the user. Typically, the Session Viewer utility displays usersessions only when users log on successfully. [#141328]
Session Viewer displays incorrect values
When a user logs on to Advanced Access Control, the Session Viewer utility does not displaythe correct HomePage and Small Form Factor values. For example, if a user accesses theAccess Interface but no Web resources are configured, the Session Viewer displays theHomePage value as "Web Email" instead of "Home Page." The Small Form Factor value isdisplayed as "Yes" even if the browser in use is not on a small form factor device. [#141327]
Session Viewer incorrectly shows Live Edit Client is installed
When a user session is displayed in the Session Viewed utility, the Session Values panealways indicates the Live Edit Client is installed. This occurs even when the Live Edit Clientis not installed on the client device. [#137018]
Session Viewer does not display data for Two Factor Authentication Info value
When a user session is displayed in the Session Viewed utility, the Session Values pane doesnot display corresponding data for the Two Factor Authentication Info value. [#137026]
[Back to Other Known Issues]
Readme for Citrix Access Gateway 4.5, Advanced Edition
32
Citrix Access GatewayUsers must close browser before logging in again through Access Gateway
When terminating a session, users must close their browsers before logging in again throughthe Access Gateway appliance. This issue occurs when users access a logon point throughthe Access Gateway appliance and when endpoint analysis is configured on the AdvancedAccess Control server. [#137489]
Administration Tool does not appear when launched
When launching the Access Gateway Administration Tool from a shortcut on the Desktop,the Administration Tool appears beneath any other applications that might be open on theDesktop. It also does not appear in the Taskbar to indicate it is running. To make theAdministration Tool the focus of the Desktop, users must click on the Administration Toolwindow or press ALT+TAB. [#130170]
Failover to available Access Gateway appliances fails when users are required toauthenticate after network interruption
Failover to available appliances in an Access Gateway cluster does not occur when theconnection policy is configured to require authentication after a network interruption.When an appliance in the cluster becomes unavailable, users are directed to theunavailable appliance for authentication instead of to available appliances in the cluster.[#137066]
[Back to Other Known Issues]
Citrix Presentation Server IntegrationSupport of Web Interface for Citrix Presentation Server 4.0 and 4.2
The following are known issues when Web Interface for Citrix Presentation Server 4.0 or 4.2are used in an environment that includes Access Gateway Advanced Edition 4.5:
● Cookies written during user sessions exceed cookie limit in Internet Explorer
When users access an Access Platform site through the Access Interface using InternetExplorer, the number of cookies written by the Advanced Access Control server exceedsInternet Explorer's cookie limit of 20 per unique domain. When this happens, InternetExplorer discards the oldest cookies so that newer ones can be written. This results in aloss of session state during a typical user session and, consequently, a loss offunctionality. This issue also occurs when the Advanced Access Control server isconfigured to display multiple Access Platform sites. This issue does not occur whenusing Web Interface for Citrix Presentation Server 4.5 to provide access to publishedapplications through the Access Interface.
● Users are unable to set connection preferences from the Access Interface
When users log on to an Access Platform site through the Access Interface, they cannotcustomize the connection preferences for the site. For example, when users select
Readme for Citrix Access Gateway 4.5, Advanced Edition
33

options from the Connection Preferences page and click OK, the selections are notsaved. This occurs because Advanced Access Control causes the cookie set by WebInterface to expire. This issue does not occur when using Web Interface for CitrixPresentation Server 4.5 to provide access to published applications through the AccessInterface.
● Sessions are not shared when users access published applications
When users launch published applications through Advanced Access Control or an AccessPlatform site displayed in the Access Interface, the sessions that are created with eachaccess method are not shared. For example, when a user accesses a publishedapplication using file type association or Workspace Control, a session is created. Whenthe user disconnects from the application and then reconnects using an Access Platformsite displayed in the Access Interface, the session is not used. Instead, a new session iscreated. While the user's experience remains unaffected, administrators might noticethe server running Citrix Presentation Server experiences some decrease inperformance. This decrease varies depending on the usage of published applicationsthrough Advanced Access Control. This issue does not occur when using Web Interfacefor Citrix Presentation Server 4.5 to provide access to published applications throughthe Access Interface.
● Installation of Web Interface for Citrix Presentation Server 4.2 on Advanced AccessControl server is not supported
Installing Web Interface for Citrix Presentation Server 4.2 on the same server hostingVersion 4.5 of Advanced Access Control is not a supported installation scenario. To useVersion 4.5 of Advanced Access Control in an environment that includes Web Interfacefor Citrix Presentation Server 4.2, Advanced Access Control must be installed on aseparate server. This issue does not occur when installing Web Interface for CitrixPresentation Server 4.5 on a server hosting Version 4.5 of Advanced Access Control.
[#146399]
[Back to Other Known Issues]
Endpoint AnalysisNorton AntiVirus Personal scan accepts incorrect input for pattern file versionparameter
When configuring an endpoint analysis scan for Norton AntiVirus Personal, it is possible toenter a random numeric string for the pattern file version parameter as long as the stringincludes a period (for example, 123.45 or 12345.6879). Correct input for this parametershould be in the YYYYMMDD.NNN format, where YYYY is a 4-digit year, MM is a 2-digitmonth, DD is a 2-digit day, and NNN is the 3-digit version. This issue occurs because thescan package does not include any validation to ensure the numeric string entered for thisparameter is in the correct format. To ensure scans created from this package runcorrectly, ensure the pattern file version entered is in the correct format. [#145410]
Scan package does not detect international versions of McAfee VirusScan
Readme for Citrix Access Gateway 4.5, Advanced Edition
34
Scans created using the Citrix Scans for McAfee VirusScan endpoint analysis scan package donot detect international versions of McAfee VirusScan 11 installed on client computers.When the scan runs, the value returned for whether or not McAfee VirusScan is installed onthe client computer is "false" instead of "true." To work around this issue, ensure the CitrixScans for McAfee VirusScan endpoint analysis scan package can detect previousinternational versions of McAfee VirusScan. [#149616]
[Back to Other Known Issues]
HTML Preview and Live EditChanges to documents modified with the Live Edit Client are not saved
When modifying documents using the Live Edit Client on a Windows 2000 system, changesmade to these documents are not saved. To work around this issue, use the Live Edit Clienton a system running Windows XP. [#143735]
Large PDF documents do not display using Internet Explorer or Netscape Navigator
For Advanced Access Control servers configured to allow HTML Preview of PDF files, PDFdocuments over 5 MB do not display correctly when users access them using InternetExplorer or Netscape Navigator. When a user attempts to view a PDF document in one ofthese Web browsers, a blank page is displayed and the document does not appear. Toensure these PDF documents display correctly, access these documents using the FirefoxWeb browser. [#130219]
Preview option is offered to users even when no HTML Preview servers are available
When an Advanced Access Control server is configured with the HTML Preview server roleand an access policy exists that allows HTML Preview, the Preview option is offered to userswho access files through the Access Interface. However, when the server becomesunavailable, users can still select the Preview option to access documents. When usersselect the Preview option, they cannot preview files. To work around this issue, ensure youraccess server farm includes a sufficient number of servers that are assigned the HTMLPreview server role to provide redundancy in the event of server failure. [#141051]
[Back to Other Known Issues]
Resources and PoliciesUPN logon credentials are not passed through to Web resources
When users log on to Advanced Access Control using credentials in User Principal Name(UPN) or Alternate UPN format, the credentials are not passed through to published Webresources such as Microsoft Sharepoint and Outlook Web Access (OWA), even when policiesallow all users access to these resources. This issue occurs on servers using the Windows2000 operating system only. [#143565]
Readme for Citrix Access Gateway 4.5, Advanced Edition
35

Incorrect error message displays when creating duplicate continuous scans
When creating a duplicate of an existing continuous scan, an error message appears statingan unexpected error has occurred. Instead, the error message should state that the scanalready exists. To prevent this error message from occurring, assign a unique name to eachcontinuous scan. [#144981]
Renaming continuous scans invalidates continuous scan filters
If you rename a continuous scan, any continuous scan filters that reference the scanbecome invalid. This is because the continuous scan filter continues to reference the scanby its original name. To work around this issue, remove the original scan from thecontinuous scan filter. Then, add the updated scan. [#142084]
Continuous scan fails when name contains !, &, (, ) or "
If a continuous scan is created with a scan name that includes the characters !, &, (, ) or ",the scan does not run and users cannot access corporate resources. This issue applies toFile, Process, and Registry scans. To resolve this issue, avoid using these characters in scannames for continuous scans. [#147682]
Continouous scan filters cannot be modified when referencing scans containing symbols
If you attempt to modify a continuous scan filter that references a continuous scan thatcontains symbols (such as *, &, $, etc.), an error message appears stating the storedexpression is invalid or corrupt. As a workaround, use only alphanumeric characters incontinuous scan names. [#142083]
Download messages display incorrect file names
When downloading files through the Access Interface, the file download message displays"activator.asp" instead of the name of the file being downloaded. This does not effect thedownload of the file. [#138433]
Slow logon script execution results in delays in logon process
When a connection policy is configured to execute logon scripts, the time to execute thelogon scripts may result in varied logon experiences for users. Depending on the logonscript, users may experience delays in authentication lasting from a few seconds to severalminutes. Users could mistake this delay in the logon process as a failure to log onsuccessfully to the Advanced Access Control server. [#130185]
Visio Document Preview shows first page only
HTML Preview shows only the first page of multi-page Microsoft Visio documents. As aworkaround, inform authors of Visio files to limit their new files to single pages, such ascreating a separate file for each page of a multi-page diagram. Alternatively, users with theappropriate permission can open the file in Visio to view the entire contents. [#130201]
Multiple policies controlling the same resource might affect server performance
If multiple policies are assigned to one resource and each policy includes a different usergroup, users might experience delays when attempting to access the resource. To avoiddelays when accessing resources, remove unnecessary access policies or consolidateexisting access policies for each resource. [#137409]
Readme for Citrix Access Gateway 4.5, Advanced Edition
36

Policies applied to file share subfolders are not enforced correctly
A policy that is applied to a file share subfolder is not enforced correctly when it overlapsan existing policy that is applied to the parent directory. For example, an administratordefines a file share resource as \\server\CompanyFiles and configures a policy that allows allusers full access to the resource. The administrator defines another resource, a subfolderon the file share called DepartmentFiles (\\server\CompanyFiles\DepartmentFiles), andconfigures a policy that only allows users to preview files. Because the policies overlap, thepolicy applied to the subfolder DepartmentFiles is not enforced in favor of the policyapplied to the parent directory CompanyFiles. Therefore, users who access files in theDepartmentFiles subfolder are allowed full access.
To resolve this issue, redefine the subfolder so that the policy, when applied, does notoverlap the policy for the parent directory. In the above example, the administratorredefines the file share subfolder as \\server\FileShare\DepartmentFiles. When users accessfiles in this folder, they are allowed only to preview the files. [#140162]
Users are denied access to files that include pound (#) or ampersand (&) symbols in thefilename
Users who attempt to access through the Access Interface files that contain the pound (#)or ampersand (&) symbols in the filename receive an "Access Denied" message. This occurseven when policies exist that grant users access to these files. To resolve this issue, ensurethat filenames for files accessed through the Access Interface do not include these symbols.[#147848]
[Back to Other Known Issues]
AuthenticationIncorrect message appears when entering a blank password
When an Advanced Access Control server is configured with SafeWord authentication,entering a blank password to log on results in a message stating access is denied. Thismessage is incorrectly worded and should indicate that a blank password cannot be used tolog on. [#145477]
Support for customizing RSA SecurID and SafeWord passcode fields
By default, when Advanced Access Control is configured with RSA SecurID or SecureComputing SafeWord authentication, the logon page displays the labels "SecurID PASSCODE"or "SafeWord CODE" next to the fields in which users are required to enter their SecurID orSafeWord passcodes. Administrators might consider these labels an advertisement tomalicious users of an organization's authentication method. To prevent this, administratorscan change the default label text.
To customize the text of SecurID and SafeWord passcode field
1. From Windows Explorer, navigate to the virtual directory of the logon point thatcontains the logon page you want to change (for example,C:\Inetpub\wwwroot\CitrixLogonPoint\SampleLogonPoint).
Readme for Citrix Access Gateway 4.5, Advanced Edition
37

2. Using a text editor, open the Web.config file and locate the following keys:
<!-- add key="SecondaryAuthenticationPromptOverride" value="Password:" / -->
<!-- add key="SecondaryAuthenticationToolTipOverride" value="Enter Password" / -->
3. Uncomment each key and then enter the text values that you want to appear on thelogon page.
4. Save the Web.config file.
When you enable these keys, the text values you enter appear on the logon page when youconfigure the Advanced Access Control server with SecurID or SafeWord authentication.
[Back to Other Known Issues]
Logon Agent and Logon PointsAccess Interface displays blank page after logon
After logging on to the Advanced Access Control server, the Access Interface displays ablank page. This occurs when no resources are configured or when no access policies areconfigured for existing resources, and the logon point is configured to allow access. Toprevent displaying the Access Interface when no resources or access policies for resourceshave been configured, configure the access policy for the logon point to deny access.[#138546]
Internet Explorer displays page loading progress after page is loaded
When accessing resources through the Access Interface with Internet Explorer, the progressbar near the bottom of the browser continues to display loading progress of content evenwhen the page has finished loading. Clicking the Email, Applications, and Home tabs nearthe top of the Access Interface causes the progress bar to stop displaying loading progress.[#146348]
[Back to Other Known Issues]
Web Proxy and URL RewritingWeb proxy is not compatible with IBM iNotes 6 Web Access Redirect
In multiserver iNotes deployments that are load balanced with iNotes Web Access Redirect,the Web proxy rewrites only absolute URLs with the format "//www.thisurl.com/thispath."Additionally, the LTPA token resolves cookies on only one host path instead of all host pathswithin a multiserver iNotes deployment. This is because the Web proxy rewrites cookies toencode the host into the relative path. [#145196]
Readme for Citrix Access Gateway 4.5, Advanced Edition
38
[Back to Other Known Issues]
Access Management ConsoleFTP server address in Diagnostic Facility is incorrect
When a user sets the packaging details from the Diagnostic Facility node, the FTP serveraddress that appears by default is uploads.citrix.com. This address is incorrect. Instead, thecorrect FTP server address is ftpsupport.citrix.com. [#149763]
Access Management Console Snap-ins Fail to Initialize
Previous releases of the Access Management Console required version 1.1 of Microsoft's.NET Framework. Where later versions of the .NET Framework were also present, Citrixprovided a workaround in the form of a file called mmc.exe.config that ensured version 1.1was loaded. This workaround is no longer required and must be removed. If you do notremove the workaround, the console does not start and displays an error such as "Snap-infailed to initialize."
To prevent this issue, remove the file \Windows\system32\mmc.exe.config.
Important: Removing this file prevents previous releases of the console from working(because they rely on version 1.1 of .NET Framework). If you have earlier releases and donot wish to upgrade them, contact Citrix Technical Support for an alternativeworkaround.
[#150473]
[Back to Other Known Issues]
Documentation Errata
Access Gateway Advanced Edition Upgrade GuideIncorrect instructions for upgrading servers running Access Gateway with AdvancedAccess Control 4.2
In Chapter 1, Welcome, the section "Upgrading from Access Gateway with Advanced AccessControl" contains a table describing the steps required for upgrading to Access GatewayAdvanced Edition 4.5. This table includes the step "Upgrade to Advanced Access Control"which is incorrect. Instead, uninstall Advanced Access Control 4.2 from the server you wantto upgrade. Afterwards, you can install Advanced Access Control 4.5 and import migratedconfiguration data.
In Chapter 2, Upgrade Tasks, the section "Upgrading from Access Gateway with AdvancedAccess Control" includes a procedure for upgrading a server running Advanced AccessControl 4.2 to Advanced Access Control 4.5. This information is incorrect because installing
Readme for Citrix Access Gateway 4.5, Advanced Edition
39
Advanced Access Control 4.5 over an existing installation of Advanced Access Control 4.2results in an incomplete or failed installation. Instead, uninstall Advanced Access Control4.2 from the server you want to upgrade. Afterwards, you can install Advanced AccessControl 4.5 and import migrated configuration data.
Readme for Citrix Access Gateway 4.5, Advanced Edition
40

41
Getting Started with Access GatewayAdvanced Edition
Access Gateway Advanced Edition expands your Access Gateway environment withAdvanced Access Control software, which provides your users with the following standardfeatures.
Smart AccessSmartAccess analyzes the access scenario and then delivers the appropriate level of accesswithout compromising security. Depending on who and where users are, what device andnetwork they are using, and the level of security on the client device, users are granteddifferent levels of access, such as the ability to preview, but not edit, documents.
Advanced Access Control provides SmartAccess through two key phases—sense and respond.In the sensing phase of SmartAccess, the system analyzes the users’ access scenario andthen responds with an appropriate level of access. “Granted” or “denied” are no longer theonly answers to an access attempt because organizations not only control which resourcesusers get access to based on their access scenario, but how they can use these resourceswhen they gain access.
For example, a user at an airport kiosk could be allowed to only preview or read emailattachments and files but would not be allowed to download, edit, or print these files.However, that same user working from home may be granted full download, editing, andprinting capabilities. In addition, Advanced Access Control integrates seamlessly with CitrixXenApp, formally known as Citrix Presentation Server, to give organizations this same levelof granular control over published applications.
SmoothRoamingAdvanced Access Control supports SmoothRoaming technology by ensuring that as usersmove between devices, networks, and locations, the appropriate level of access isconfigured automatically for each new access scenario.
Secure by DesignAdvanced Access Control provides users with access that is inherently secure by design,protecting both the security of company information as well as the integrity of the network.
SmartAccess, SmoothRoaming, and Secure by Design technologies work together bycombining the following features:
Integrated endpoint security. Provides continuous real-time monitoring to ensure that the device is safe to connect and remain connected to the network. Endpoint analysis further evaluates the integrity of connecting devices and allows you to tailor the level of access

you grant in policies according to analysis results.
VPN connectivity. Network resources enable direct SSL virtual private network (VPN)connectivity to servers, services, and networks within your organization’s local areanetwork (LAN).
Action controls. Allow administators to set policies that allow or deny viewing, editing, andsaving documents depending on the user’s identity, device, location and connection.
Mobile device awareness. Re-factors email and file interfaces for personal digitalassistants (PDAs) and small form factor devices.
Browser-only access. Provides access with any Web browser on any device to Web sites,files, and email. You can automatically render Microsoft Office documents for HTMLPreview.
Secure access to Web-based email and files. Provides access to email securely over theInternet through a Web-based user interface. Allows users to securely access MicrosoftOutlook and Lotus Notes in real time and synchronize information for offline use. Enablesaccess to corporate network file shares securely over the Internet through a Web-baseduser interface.
Advanced Citrix XenApp integration. You can use endpoint analysis and client location tocontrol which published applications are available to the user. This feature extendsSmartAccess for XenApp, the new name for Presentation Server, including the use ofAdvanced Access Control filters to control local client drive mapping, clipboard operations,and local printer mapping.
Multilingual support. Provides full server and client support for Japanese, German, French,and Spanish.
Standards-based encryption. Uses industry-standard SSL encryption to provide secureaccess to network resources.
Common management platform. Provides a unified framework containing client and serverconfiguration, licensing, monitoring, and reporting tools for administrative simplicity,business visibility, and security
Getting Started with Access Gateway Advanced Edition
42
43
New Features in the 4.5 Release
Access Gateway 4.5, Advanced Edition includes the following new features andenhancements:
● Support for UPN and Alternate UPN credentials. Users who log on to internal networkswith credentials specified in User Principal Name (UPN) or Alternate UPN format can logon to the Access Gateway and seamlessly access network resources such as publishedWeb sites, file shares, and Web email.
● Enhanced access to XenApp published applications. Published applications areaccessible as Access Platform sites from within the Access Interface, allowing users toquickly access and launch published applications. You can enable up to three AccessPlatform sites to display applications from multiple server farms.
● Support for third-party load balancers. In addition to its internal load balancingcapabilities, Access Gateway Advanced Edition supports configurations that includethird-party load balancers such as Citrix Netscaler. In the event an Advanced AccessControl server in a farm becomes unavailable, users are routed automatically toanother Advanced Access Control server.
● Enhanced access to documents hosted on Sharepoint 2003 sites. Microsoft Sharepointsites that are accessed through the Web proxy retain many of the menu-driven featuresusers need to work with files, such as Delete, Edit Properties, and Alert Me.
● Support for double-hop DMZ deployments. Organizations can provide an extra layer ofsecurity for their internal resources by deploying Access Gateway appliances in adouble-hop DMZ configuration.
● Policies dynamically determine best resource delivery method. You can configurepolicies to determine the best method for accessing resources based on users’connection bandwidth. Using the Citrix Bandwidth endpoint analysis scan, theconnection bandwidth is calculated and the result is used to determine whetherresources such as published applications are streamed or delivered to the user throughan ICA session.
44
Planning Your Access Strategy
Before you install Access Gateway Advanced Edition, you should evaluate yourinfrastructure and collect the information necessary to develop an access strategy thatmeets the specific needs of your organization.
Each of these steps is discussed in detail in the following sections. Consider documentingyour findings throughout this process to assist you in designing and scoping the overalleffort of the project, determining a realistic timeline for implementation, and settingbenchmarks against which to measure your overall progress.
● Step 1: Evaluating Your Network Infrastructure
● Step 2: Performing a Risk Analysis
● Step 3: Developing Your Access Strategy
● Evaluating Authentication Types
● Planning for High Availability
● Considering Users' Needs
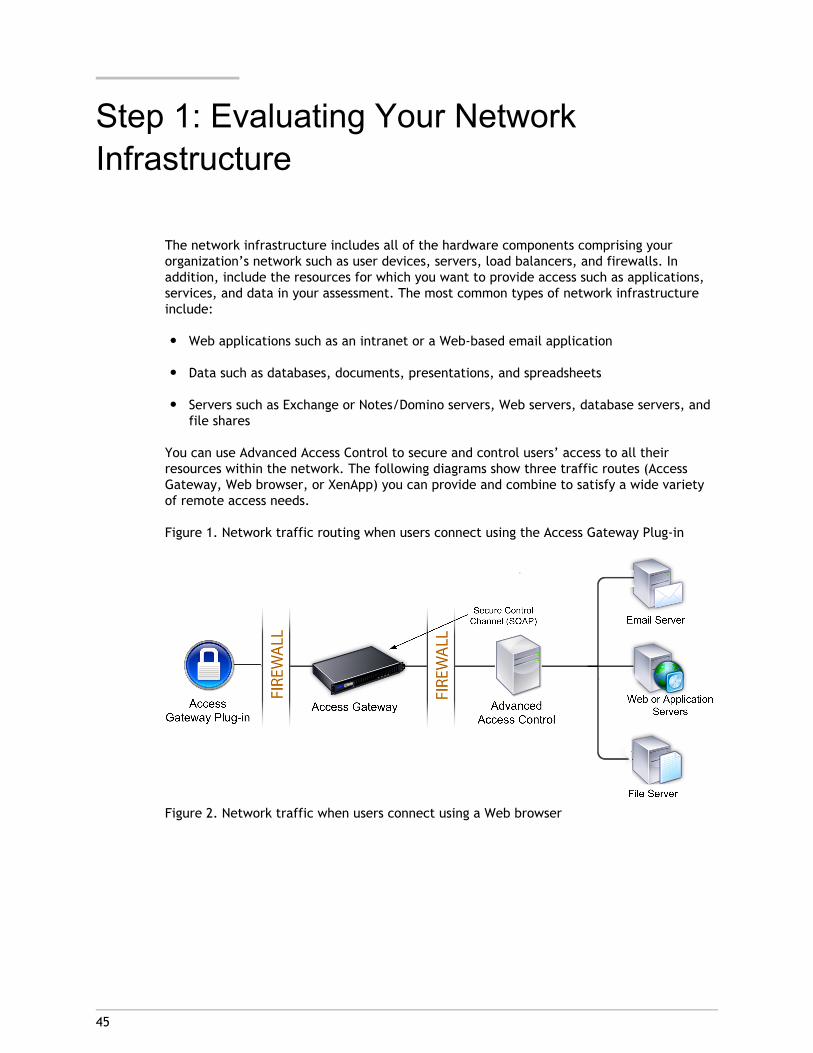
45
Step 1: Evaluating Your NetworkInfrastructure
The network infrastructure includes all of the hardware components comprising yourorganization’s network such as user devices, servers, load balancers, and firewalls. Inaddition, include the resources for which you want to provide access such as applications,services, and data in your assessment. The most common types of network infrastructureinclude:
● Web applications such as an intranet or a Web-based email application
● Data such as databases, documents, presentations, and spreadsheets
● Servers such as Exchange or Notes/Domino servers, Web servers, database servers, andfile shares
You can use Advanced Access Control to secure and control users’ access to all theirresources within the network. The following diagrams show three traffic routes (AccessGateway, Web browser, or XenApp) you can provide and combine to satisfy a wide varietyof remote access needs.
Figure 1. Network traffic routing when users connect using the Access Gateway Plug-in
Figure 2. Network traffic when users connect using a Web browser

Figure 3. Network traffic when users connect using Citrix online plug-ins
After you identify the elements within your network infrastructure, you can perform a riskanalysis and then develop a strategy for providing the appropriate level of access to theseresources.
Note: Advanced Access Control includes built-in load balancing support. Therefore, youdo not need to deploy a load balancer to manage requests made to Advanced AccessControl servers.
Step 1: Evaluating Your Network Infrastructure
46

47
Step 2: Performing a Risk Analysis
In the context of access control, vulnerabilities represent the possibility of unauthorizedusers gaining access to network resources. There are various methods of deriving risk,usually based on a combination of likelihood and consequence information. For example,when providing users with access to a specific network resource, how likely is a particularthreat and what damage could be done if that threat is realized?
The key elements to consider when determining the risks associated with providing accessto a network resource include the type of resource accessed, the sensitivity of the dataincluded in that resource, and the environment from which the resource is accessed. Due toits subjective nature and the resulting damage, it is difficult to quantify risk. However, thegoal of risk analysis is to ensure that your Advanced Access Control policies enable users toaccess network resources at an acceptable risk level.
For example, consider the benefits of enabling users to access confidential data comparedwith the possibility that this data is accidentally revealed to unauthorized users. If youranalysis reveals the risk is too great, you can create policies that further restrict access tothis data and, as a result, minimize the risk associated with providing access to this data.

48
Step 3: Developing Your Access Strategy
After you collect information about your network infrastructure, identify the networkresources for which you want to provide access, and perform a risk analysis, you are readyto develop your access strategy. This process includes determining how to integrateAdvanced Access Control into your existing network.
Securing Access and Resources with PoliciesPolicies extend the security of your network by controlling which resources users can accessand what actions users can perform on those resources. Before creating policies, consider:
● Resources. Identify the resources for which you want to provide access. Use the resultsof your risk analysis to assist you in this process.
● Users. Associate policies with the appropriate users.
● Access scenarios. Develop policies to support the scenarios in which users accessnetwork resources. A scenario is defined by the logon point used to access the network,endpoint analysis scan results, authentication type, or a combination thereof. Forexample, determine if users can access their email over the Internet using a laptopissued by the employer.
In addition, determine the actions users can perform when they gain access. Forexample, you can specify whether users can modify documents using a publishedapplication, preview a document as an HTML file, or connect to a file share.
For a detailed explanation about how to incorporate policies into your access strategy, seeControlling Access Through Policies.
Planning for Client RequirementsAdvanced Access Control includes two methods of verifying information on the user device.Continuous scans verify required files, processes, or registry entries on user devicesconnecting to your network. These scans run repeatedly during the user session to ensurethat the user device continues to meet your requirements. You can incorporate continuousscans into connection policies so that if a required file, process, or registry scan ceases tobe verified, the connection is terminated.
Endpoint analysis scans detect information about a user device, such as the operatingsystem version and service pack level. The scans run when a user tries to connect through alogon point. However, unlike continuous scans, endpoint analysis scans run only once persession. You can incorporate scan results into access policies, allowing you to base access toyour networks and resources on the information you gather about the user device. Forexample, you can prohibit access to your network by employees working from a homecomputer unless the computer is running a required version of antivirus software.

For more information about incorporating continuous and endpoint analysis scans into youraccess strategy, see Verifying Requirements on User Devices.
Traversing FirewallsAccess Gateway eases firewall traversal and provides a secure Internet gateway betweenAdvanced Access Control servers and user devices. Scenarios in which firewalls arecommonly used include:
● Demilitarized zones (DMZs). In this scenario, firewalls are used to create one-stage ortwo-stage DMZs to protect the internal network from Internet traffic. This deploymentrequires users external to the network to traverse firewalls protecting the internalnetwork before gaining access to network resources.
● Enclaves. In this scenario, firewalls limit traffic between specific segments of thenetwork. For example, hospital administrators may segment their local area network(LAN) so that access to sensitive information such as patient records is accessible onlyfrom specific enclaves within the network.
● Perimeter of access server farm. In this scenario, firewalls secure Advanced AccessControl servers from threats within the LAN by forming a secure perimeter around theaccess server farm. This deployment ensures that the access server farm is not directlyaccessible to users.
You can implement a combination of the above deployments to protect against differenttypes of threats. For more information about supported deployment scenarios, seeDeploying Access Gateway.
Protecting Sensitive DataSensitive data, often referred to as intellectual property, is any information, application,or service considered proprietary to the employer. Examples of intellectual propertyinclude financial documents, customer data, and employee records. The sensitivity of datais based on the assessment of impact if there is a loss of data confidentiality or integrity.When assessing the sensitivity of data consider:
● Regulatory requirements. More stringent privacy laws impose new levels ofconfidentiality on several business sectors including health care, insurance, andfinance. In addition, the global environment necessitates an awareness of regulations inany state or country in which your employer performs business.
● Legal ramifications. Determine if there are any legal implications related to theexposure of proprietary data; specifically, whether or not another party takes legalaction against your employer due to the exposure of confidential information tounauthorized users.
● Competitive impact. Determine if the loss of information results in your employersinability to remain competitive. For example, consider a scenario in which yourcompany’s “secret recipe” is made available to your competitors.
Step 3: Developing Your Access Strategy
49

● Corporate reputation. Determine the impact to your organization’s reputation ifcertain proprietary information is made available to unauthorized users. For example,consider a scenario in which your customers’ credit card information is accessed byunauthorized users. In addition to possible legal action, customers may lose faith inyour company’s ability to maintain their privacy and, as a result, choose to stop usingyour services.
The goal of intellectual property control is to prevent the exposure of sensitive data. UsingAdvanced Access Control, you can protect intellectual property through the use of thefollowing policy-based access control features:
● HTML Preview. You can configure Microsoft Office files such as Word and Excel so thatthey display as HTML files instead of their native file format. This allows users to viewbut not modify the document. In addition, the risks associated with temporary files aremitigated as the HTML files are removed from the user device’s cache when the userterminates the session. Therefore, no sensitive data is accidentally left on the userdevice after users log off.
● Citrix XenApp integration. You can configure files to open within a publishedapplication instead of a local application on a user device. This increases the protectionof intellectual property because proprietary data remains within the protected networkat all times.
In addition, you can share Advanced Access Control policy information with XenApp toselectively enable functionality for a specific published application session such asclient drive mapping and local printing. For more information about filters, seeControlling Access Through Policies.
Step 3: Developing Your Access Strategy
50
51
Evaluating Authentication Types
Authentication is the process of determining whether users are, in fact, who they declareto be. Advanced Access Control supports one-factor and double source authentication.
One-Factor AuthenticationOne-factor authentication is based on something users know such as a personalidentification number (PIN), password, or pass phrase. When implementing one-factorauthentication, users authenticate to Advanced Access Control by entering their user nameand password when they log on. Users are assumed to be valid because they enter thecorrect credentials.
The advantages of using one-factor authentication include:
● Advanced Access Control supports standard Windows- and LDAP-based one-factorauthentication. Therefore, no additional effort or implementation costs are associatedwith this authentication method.
● Passwords are easily revokable and replaceable in the event that they arecompromised.
● All users are familiar with user names and passwords.
The disadvantages of using one-factor authentication include:
● Passwords are highly susceptible to “social engineering” attacks where usersunknowingly provide their passwords to unauthorized users.
● Users can share passwords and as a result, it is not possible to rely on a password toensure that the authentication is genuine. In addition, after sharing passwords for aparticular purpose, users often forget to change their passwords. This allows multipleusers to authenticate using the same set of credentials.
Double Source AuthenticationDouble source authentication combines something a user knows with a second piece ofinformation. The second piece of information can be something the user has, such as ahardware token, or something a user knows, such as an additional password. AdvancedAccess Control integrates with RSA SecurID, SafeWord, and RADIUS to support double sourceauthentication.
The advantages of double source authentication include:

● It increases your overall confidence in the authentication process. Whether it is anadditional password or a one-time passcode generated from a hardware token,requiring users to provide an additional piece of information greatly mitigatesauthentication-related risks. For example, if a user’s main password is compromised, anattacker must obtain the user’s RADIUS password or hardware token to access thenetwork.
● Token-based solutions provide an additional benefit in that users cannot record theirauthentication information for later use. This ensures that users adhere to the basicpassword protection best practice of not saving proprietary authentication informationin electronic or paper format.
The disadvantages of double source authentication include:
● Implementation costs are significant. In addition to the software required to validateadvanced authentication information, token-based solutions also require the purchaseof hardware tokens.
● Tokens can be lost, stolen, or forgotten.
Consider the advantages and disadvantages of one-factor and double source authentication.One-factor authentication can provide a sufficient level of security. However, if yourorganization requires additional security, a double source authentication solution may bemore appropriate.
Evaluating Authentication Types
52

53
Planning for High Availability
Advanced Access Control includes built-in load balancing support. In addition, AdvancedAccess Control servers support industry-standard server clustering applications andtechniques to ensure high availability and maximum business continuity. When planningyour Advanced Access Control deployment, consider implementing one or more of thefollowing solutions:
● Database backups. Back up your Advanced Access Control SQL database to recoverfrom a variety of problems including database storage failures, application errors, anduser errors. In addition, backups are often critical when recovering from catastrophicdisasters such as hurricanes, fires, floods, and earthquakes.
● Hardware redundancy. Prevent downtime due to hardware failures by detecting afailing component before it actually fails and bypassing a failure when it does occur. Toachieve hardware redundancy, ensure your hardware meets the minimum requirementsas specified in Server Requirements. In addition, determine if redundancy is needed inthe following areas:
● Switches and routers transporting Advanced Access Control traffic
● Network cards on Advanced Access Control servers
● Database servers● Server redundancy. Each Advanced Access Control server within an access server farm
is configured for the HTML Preview server role by default. Therefore, each server youadd to your farm acts as a redundant server to minimize downtime in the event of aserver failure. If you do not want all servers in your farm assigned to this role, deployone or more servers for each Advanced Access Control server with this role enabled. Formore information about assigning the HTML Preview server role, see Modifying ServerRoles for HTML Preview.
● Database redundancy. A SQL database server stores all of Advanced Access Control’sdata. Therefore, to ensure that this data is always available to users, consider one ormore of the high availability strategies:
● Clustering
● Log shipping
● Network load balancing to switch SQL servers
● Stretch clustering
For more information about the above high availability solutions, refer to your SQLdocumentation.
54
Considering Users' Needs
When planning your access strategy, consider the needs of your users. This analysis helpsyou determine the type of access users need to perform effectively. Consider the followingissues:
● Productivity. Create policies that provide the appropriate level of access for users toremain efficient and productive.
● Access to resources. Evaluate which resources users need to access such as email, Webapplications, published applications, and file shares.
● User interface. Determine the default user interface you want users to see when theylog on. Advanced Access Control includes the Access Interface, a Web page that displaysa user’s available network resources and email. In addition, you can configure any Webapplication such as a Citrix Access Platform site or a third-party portal as the defaultuser interface.
● Working offline. Consider whether users periodically access the network to synchronizedata and work offline. For example, users who travel often could benefit from securelyaccessing their email in real-time and synchronizing data to their client device. Thisallows these employees to remain productive because they can continue to work evenwhile disconnected from the network.
● User devices. Advanced Access Control supports a range of user devices. Therefore,evaluate the hardware and software profile of your user devices including form factor,operating system, and Web browser, to ensure user devices in your environment meetthe minimum requirements of Advanced Access Control. For additional informationabout client device requirements, see User Device Requirements.
● Browser-only access. Determine if users need to access network file shares, Webemail, and internal Web sites from “locked down” user devices that do not permit thedownloading of any client software. In this scenario, a Web browser is the only clientsoftware needed to access the secure network.
Note: Not all Web applications support browser-only access. For more information,see Limitations of Browser-Only Access.

55
Licensing Access Gateway AdvancedEdition
Citrix Licensing limits the number of concurrent user sessions to the number of licensespurchased. If you purchase 100 licenses, you can have 100 concurrent user sessions at anytime. When a user ends a session, the license is released for the next user. A user whoconnects from more than one computer at the same time uses a license for each session.

56
Installing Citrix Licensing
Access Gateway Advanced Edition requires access to at least one shared or dedicatedlicense server running Citrix Licensing. If your product portfolio already includes otherCitrix products, you may already have a license server available to store and manage youruser licenses. If so, you can skip this step and proceed to obtain your license files.
Note:
Access Gateway Standard Edition uses a license server on the appliance and does notrequire a dedicated Citrix license server. You must use a dedicated license server for AccessGateway Advanced Edition. If you upgrade from Standard Edition and do not already have aCitrix license server, you need to install one.
You can install and configure Citrix Licensing before, during, or after you install AccessGateway Advanced Edition.
To install Citrix Licensing, follow the procedures in Getting Started with Citrix Licensing.
Because licensing is a crucial part of your product installation, Citrix strongly recommendsthat you read the licensing information in the Technologies node in Citrix eDocs beforeinstalling Citrix Licensing.

57
Obtaining Licenses
If you have not already done so, you must obtain license files to download and copy to yourlicense server. License files contain the licenses that you allocated for a specified licenseserver. You obtain these files from the Licensing area from My Citrix.
Before downloading a license file, be prepared with the case-sensitive name of the licenseserver that stores the license file and the number of licenses you want to allocate to thatserver.
Further details about the information to have ready and the steps for downloading licensefiles, see Getting Started with Citrix Licensing.
Licensing Grace PeriodA 96-hour grace period goes into effect at installation if you point your Access GatewayAdvanced Edition server to a license server with no product licenses installed. A graceperiod of 30 days goes into effect if communication with a license server is lost after havingcontacted the license server successfully at least once.
During the grace period, user sessions are not disconnected. If the grace period runs outbefore communication is established with a license server with the appropriate licenses, allactive user sessions are disconnected. If users log on during the grace period, theirconnection is established.

58
Allocating New or Migrated Licenses
For environments with a mixture of deployments (such as Access Gateway Standard Editionand Access Gateway Advanced Edition), you can allocate the desired number of licensesamong the different deployments when you generate your license files.
1. Go to the Citrix Web site and log on to My Citrix.
2. Choose Licensing > Fulfillment > Fulfill Eligible Products, choose the licensingprogram type of your license, and follow the on-screen instructions to select licenses. AProduct Fulfillment Certificate verifies license conversion and presents the resultinglicense codes.
After you generate new license codes, you must allocate licenses into license files that youcopy to the license server. Allocating licenses lets you choose the number of licenses toinclude in a license file; you can allocate all or some of your available licenses at a time.The license file is a digitally signed, text-only file that contains product licenses andinformation needed by the license server.
59
Downloading License Files
After you install the Access Gateway, you are ready to obtain your license files from Citrix.This process involves going to My Citrix to access your available licenses and generating alicense file.
Before going to the Citrix Web site, you need the following information:
● The license code. You can find the code on the Access Gateway CD, in an email youreceive from Citrix, or from My Citrix. If you are upgrading from an older version of theAccess Gateway, you can continue to use the existing license, if the license wasobtained from the Subscription Advantage Management-Renewal-Information system(SAMRI) and the Subscription Advantage date is not expired.
● Your user ID and password for My Citrix. You can register for this password on MyCitrix.
Note: If you cannot locate either of these items, contact Citrix Customer Care.
● How many licenses you want to include in the license file. You do not have todownload all of the licenses you are entitled to at once. For example, if your companypurchases 100 licenses, you can choose to download 50. At a later date, you canallocate the rest in another license file. Multiple license files can be installed on theAccess Gateway.
1. From a Web browser, go to http://www.citrix.com/ and click My Citrix.
2. Enter your user name and password. If this is your first time logging on to the site, youare asked for additional background information.
3. In My Tools, point to Choose a Toolbox and then click Activation System/ManageLicenses > View Licenses > Click to Allocate.
4. Follow the instructions to obtain your license file.
By default, the Citrix Activation System saves files to the last location used by the Save Ascontrol. License files have the extension .lic. In the event you cannot locate thedownloaded license file, search your computer for files that have an .lic extension.
Note: If you have trouble downloading license files, contact Citrix Customer Care.

60
To copy licenses to the license server
1. At the computer where the License Management Console is installed, log on using thecredentials that were configured in the License Management Console. This includes theadministrator credentials used to install the component or any other credentialsconfigured within the License Management Console after its installation.
2. From the Start menu, navigate to License Management Console.
3. In the License Management Console, on the Configuration tab, navigate to the LicenseFiles page.
4. On the License Files page, click Copy license file to License Server, browse to yourlicense file, and copy it to the license server.
5. Ensure that the license server recognizes the new file by performing one of thefollowing actions.
● In the License Management Console, from the Welcome page, click ConfigureLicense Server, followed by Update license data.
● If you are not using the License Management Console, you must initiate a reread ofthe file. At a command prompt, navigate to C:\Program Files\CitrixLicensing\LS\ andtype the following command:
lmreread -c @localhostWhen the license server recognizes the file, your Citrix products can be launched.
Important:
Do not edit license files without understanding their format. You can unintentionallycorrupt them and render the licensing system unusable.

61
Specifying the License Server
All computers in an access server farm must communicate with the same license server.You can specify the license server during initial installation through the ServerConfiguration Utility, or specify it later through the farm node of the Access ManagementConsole.
1. Click Start > All Programs > Citrix > Management Consoles > Access ManagementConsole.
2. From the console tree, select the server farm node and under Other Tasks, selectDefine license server.
3. Configure the following settings:
a. Host name. Type the name of the license server.
b. License server port number. This is the port number the product uses tocommunicate with the license server. Unless you must perform configurations toaccommodate a firewall or the default port is already in use, Citrix recommendsyou leave the port at its default setting.

62
Adding Shortcuts to the LicenseManagement Console
The License Management Console snap-in allows you to create a shortcut to one or morelicense servers. You have the option of installing the snap-in when you install the product orcan add it later from the product CD. Use the shortcut to run the License ManagementConsole remotely and administer licensing for your farm.
1. At the computer where the License Management Console is installed, log on using thecredentials that were configured in the License Management Console. This includes theadministrator credentials used to install the component or any other credentialsconfigured within the License Management Console after its installation.
2. From the Start menu, navigate to License Management Console.
3. From the console tree, click the Licensing node.
4. Under Common Tasks, click Add shortcut to license server.
5. For Server name, type the DNS name or IP address of the license server for your farm.
63
Installing Advanced Access Control
The installation of Advanced Access Control varies depending on your deployment scenario.You can install the logical server components on a single physical server or distributecomponents across multiple servers.
64
Planning Your Installation
As part of your access strategy, you must also plan for the installation of the AccessGateway Advanced Edition components and the requirements for the features you want toimplement. This section provides an overview of the tasks you must perform before andafter you install the Advanced Access Control software.
Pre-Installation TasksMany of the features of Access Gateway Advanced Edition require that certain componentsare installed or settings are configured before you install the Advanced Access Controlsoftware.
The following table provides an overview of these prerequisites to help you plan yourinstallation. References to additional information about each component or feature areincluded.
Component or Feature Required Task Additional Information
Access Gatewayappliance
Install appliance(s) Access Gateway StandardEdition Pre-InstallationChecklist
Getting Started with CitrixAccess Gateway StandardEdition
Configuration andManagement of the AccessGateway

Advanced AccessControl server
Ensure the server meets allhardware and softwarerequirements
● Supported version ofMicrosoft Windows
● Supported version ofMicrosoft Windows
● .NET Framework 2.0
● MDAC 2.7 or 2.8
Microsoft SQL Server UserAccount Requirements
Database Requirements
Set Web extensions
● ASP.NET (Allowed)
● Active Server Pages(Allowed)
● FrontPage ServerExtensions (Prohibited)
● WebDAV (Prohibited)
Ensure network configurationmeets requirements
Network Requirements
Ensure service account meetsrequirements
Service Account Requirements
Database server Install database server andcreate user account
Microsoft SQL Server UserAccount Requirements
Restart the server if installingon the Advanced AccessControl server
Installation Overview
License sever Install Citrix License Serveron the Advanced AccessControl server or a separateserver
Licensing Your Product
HTML Preview Install Microsoft Office(without Outlook) on theAdvanced Access Controlserver
HTML Preview Requirements
Planning Your Installation
65

Web email Install Microsoft ExchangeSystem Management Toolsand Microsoft ExchangeAdministrator 5.5 on theAdvanced Access Controlserver
Installing the MicrosoftExchange SystemManagement Tools andAdministrator Software
Update the mapisvc.inf fileon the Advanced AccessControl server
Installing the MicrosoftExchange SystemManagement Tools andAdministrator Software
RADIUS Authentication Install Visual J# .NET 2.0 RADIUS Requirements
RSA SecurIDAuthentication
Install RSA ACE/Agent forWindows
RSA SecurID Requirements
SafeWord Install SafeWord Agent SafeWord Requirements
Access ManagementConsole
If installing on a standaloneworkstation, ensure requiredsoftware is installed
Console Requirements
Post-Installation TasksThe following table provides an overview of tasks you perform immediately after installingthe Advanced Access Control software. References to additional information about eachcomponent or feature are included.
Component or Feature Required Task Additional Information
Access Gateway appliance Configure communicationwith Advanced AccessControl server(s)
Enabling Advanced AccessControl
HTML Preview To display PDF files, installand configure conversionsoftware
HTML PreviewRequirements
Planning Your Installation
66

67
Server Requirements
Before installing the software, verify that the servers you are using meet the hardware andsoftware requirements for Advanced Access Control.
Important: To ensure that installation of Advanced Access Control progresses smoothly,use servers that are not configured as domain controllers. During installation, AdvancedAccess Control adds a service account to the local Administrators group that is notpresent on a domain controller. If you attempt to install Advanced Access Control on adomain controller, the service account cannot be added and the installation fails.
System Requirements● Computer with a 550 MHz processor
● 768 MB of physical memory
● 9 GB of available hard disk space
● Microsoft Windows 2000 Server Family with Service Pack 4, or Windows Server 2003,Standard Edition, Web Edition, or Enterprise Edition with all service packs and updatesinstalled
● Internet Information Services (IIS) 5.0 or 6.0
● Microsoft Windows Installer 3.0 or 3.1
● Microsoft .NET Framework 2.0
● Microsoft Data Access Components (MDAC) Version 2.7 Refresh or 2.8
Important: You must install the Windows Installer(WindowsInstaller-KB884016-v2-x86.exe), the .NET Framework, and MDAC 2.7 Refresh(mdac_typ.exe) before you install Advanced Access Control. The Windows Installer, .NETFramework, and MDAC 2.7 Refresh executable files are located on the Advanced AccessControl Server CD-ROM.
To set Web services extensionsBefore installing Advanced Access Control, you must ensure the following Web servicesextensions are set appropriately in the Internet Information Services (IIS) Manager:
Extension Name Required for AdvancedAccess Control Installations?
Status in IIS Manager
ASP.NET Yes Allowed
Active Server Pages Yes Allowed

FrontPage ServerExtensions
No. Must be prohibited forthe Web proxy to functionproperly.
Prohibited
WebDAV No. Must be prohibited forOutlook Web Access (OWA)to display the contents ofusers’ inboxes.
Prohibited
1. Click Start > Programs or All Programs > Administrative Tools > Internet InformationServices (IIS) Manager.
2. Expand the local computer node and then select Web Services Extensions.
3. Make the following selections as required:
● Select ASP.NET and click Allow.
● Select Active Server Pages and click Allow.
● Select FrontPage Server Extensions and click Prohibit.
● Select WebDAV and click Prohibit.You may need to register ASP.NET if you installed the .NET Framework before installing IIS.To register ASP.NET, locate aspnet_regiis.exe and then at a command prompt, typeaspnet_regiis.exe -i.
Server Requirements
68

69
Network Requirements
Before installing Advanced Access Control, ensure that your network configuration meetsthe following requirements:
● The computers or resources that users access are connected to the Advanced AccessControl servers you deploy
● The Advanced Access Control server is one of the following:
● A member of the domain to which users who authenticate to the server belong
● A member of a domain that trusts and is trusted by the domain(s) of theauthenticating users
● In a multi-domain environment, trust relationships have been established so that usersin all domains can authenticate and access resources
● To provide access to the Internet, a Domain Naming System (DNS) host record resolvesto a public IP address for the Access Gateway appliance
Note: To configure Advanced Access Control successfully, the server must belong to adomain. If the Advanced Access Control server is a member of a workgroup and not adomain, the Server Configuration wizard does not run.
70
Account Requirements
The following information describes the server accounts required to install Advanced AccessControl.
Microsoft SQL Server User Account RequirementsWhen creating an access server farm, Advanced Access Control requests an account foraccess to SQL Server. The specified account must permit Advanced Access Control to createa database for the access server farm and then connect to the database.
To create the database during install, at a minimum, the account must be included in theDatabase Creators server role on SQL Server. After Advanced Access Control creates thedatabase, the database user must be assigned the db_datareader and db_datawriterpermissions.
SQL Server 2000 supports Windows Authentication mode, which requires Windows useraccounts for access, and Mixed Mode, which accepts Windows user accounts and SQL Serveraccounts.
When you first install Advanced Access Control and create an access server farm, Setupcreates a database with the same name as the access server farm. Setup does not createadditional databases when you add servers to an access server farm.
Note: The database creation and access requirements in this section apply to both SQLServer authentication and Windows authentication for database user accounts.
Service Account RequirementsWhen you install Advanced Access Control and create a new access server farm, the ServerConfiguration wizard prompts you for an account to use for communicating with servicesand servers in the farm. This account is referred to as the service account. You must specifyan existing account to be the service account. If you do not have a service account, createone prior to installing Advanced Access Control. Valid service accounts meet the followingrequirements:
● The service account must be a member of the local Administrators group on everyserver in the farm.
● The service account must not be disabled and not subject to password expiration orother credential changes. If the service account is removed, the access server farm willnot operate.
● The service account can be a local user account only if you are creating a single-serveraccess server farm and do not intend to scale the farm. You cannot install Advanced

Access Control on multiple servers with a local user account selected for the serviceaccount. Citrix strongly recommends using a domain account instead of a local useraccount when installing Advanced Access Control.
Important: If you specify a local user account as the service account, ensure the localuser account also has database owner permissions for the database Advanced AccessControl creates during Setup. If the local user account does not have database ownerpermissions, some features might not be available to users.
● In an Active Directory environment, when specifying the service account user name inUser Principal Name (UPN) or Alternate UPN format, you must enter the full domainname.
If necessary, you can change the service account after installing Advanced Access Control.
Note: If you are deploying Advanced Access Control in an environment where theRestricted Group policy is used to control the membership to the local Administratorsgroup, ensure the user associated with the service account is in one of the groups addedby the Restricted Group policy. For additional information, refer to the Resource Kit forWindows 2000 or Windows 2003.
Using Security Templates with the Service AccountYour corporate IT policy may require that security templates be applied to reduce theattack surface area of your Windows servers. The Highly Secure security template(HiSECWS.INF) removes the service account from the local Administrators group whenapplied after installing Advanced Access Control. After applying this security template, addthe service account back to the local Administrators group. Otherwise, Advanced AccessControl will not function correctly.
Account Requirements
71

72
Database Requirements
Access Gateway Advanced Edition supports the following database packages:
● Microsoft SQL Server 2005
● Microsoft SQL Server 2000 with Service Pack 4
● Microsoft SQL Server Express 2005
Note: If you install Microsoft SQL Server and you create a database before you installAdvanced Access Control, be sure to specify case-insensitive collation when you createthe database. This ensures the names you assign to resources remain unique and preventsresources with duplicate names from being created.

73
Access Gateway Requirements
The Access Gateway appliance is a universal SSL VPN appliance that provides users withcontrolled access to application and information resources. For information aboutrequirements for installing and using the Access Gateway appliance, see Introducing AccessGateway Standard Edition Hardware.

74
Feature Requirements
You can use Advanced Access Control to allow users to view, upload, or downloadWeb-based resources using any user device that has a Web browser. However, somefeatures such as Live Edit, use additional client software. Other features require additionalserver software. The following provides information to help you plan access to featuresdepending on a feature’s user device or server requirements:
● HTML Preview Requirements
● Live Edit Requirements
● Email Synchronization Requirements
● Web Email Requirements
● Using Microsoft Windows 2003 Server Web Edition for Web Email
● Endpoint Analysis Requirements
● Authentication Software Requirements
● Citrix XenApp Integration Requirements
● Requirements for Bypassing the Web Proxy
● Third Party Portal Integration Requirements

75
HTML Preview Requirements
HTML Preview enables users to view files such as Microsoft Office documents and AdobeAcrobat PDF files in HTML.
Installing Microsoft Office for HTML PreviewTo use HTML Preview to view Microsoft Office documents, the following software must beinstalled on a Web server in your access server farm:
● Microsoft Word 2000, XP, or 2003
● Microsoft Excel 2000, XP, or 2003
● Microsoft Powerpoint 2000, XP, or 2003
● Microsoft Visio 2002 or 2003
If you install these programs after installing Advanced Access Control, restart the CitrixActivation Engine Service using the server configuration console.
If you use HTML Preview with Microsoft Office documents, be aware of the followingconsiderations:
● Microsoft Outlook must be excluded from the Office installation because it interfereswith Advanced Access Control’s Web email functions.
● All devices deploying HTML Preview content to users should have adequate MicrosoftOffice licenses. For more information about licensing requirements, refer to yourMicrosoft Office Licensing Agreement.
● If multiple servers are configured for HTML Preview, these servers must have the sameversion of Microsoft Office installed. Otherwise, a document viewed with HTML Previewmay appear different to some users, depending on the version of Office rendering thedocument.
For more information about using HTML Preview to provide access to documents, seeAllowing HTML Preview.
Using Macros with HTML PreviewWhen using HTML Preview to access Microsoft Office documents, it is possible to run macrosembedded within these documents. Viewing a document containing macros could representa security risk to your deployment because the macros may run on the Advanced AccessControl server within the context of the service account.
Before implementing HTML Preview, evaluate each of the following strategies for mitigatingthis potential risk:

● Set macro security in each Microsoft Office application according to your organization’snetwork security policies
● Configure each Microsoft Office application to run in the context of a User account withlimited privileges
Important: These strategies do not provide protection against possible security risksrelated to functional issues in Microsoft Office applications (for example, Microsoft Wordfails when opening a document). As you evaluate these strategies, consider Microsoft’srecommendations for server and application security as well as your organization’sinformation security requirements.
To disable embedded macros in Microsoft Office1. Launch the Microsoft Office application installed on the Advanced Access Control
server.
2. Set the macro security level to the highest level available for the version of theMicrosoft Office application you are running.
3. Disable trust for all installed add-ins and templates.
For more information about setting macro security for Microsoft Office applications, referto the Microsoft Office documentation or the Microsoft Office Web site.
To configure Microsoft Office applications to rununder a User account
This procedure involves automating Office applications using an unattended user account.For more information about this approach and its accompanying considerations, refer toMicrosoft knowledgebase article 288367, How to configure Office applications to run undera specific user account.
1. Log on to the Advanced Access Control server as Administrator and create a new Useraccount.
2. Start the Office application you want to configure and press ALT+F11 to load the VisualBasic for Applications (VBA) editor.
3. Close the application and the VBA editor.
4. Click Start > Run and type DCOMCNFG to open the Component Services console.
5. From the DCOM Config node, locate the Office application you want to configure. Theyare listed as follows:
● Microsoft Excel Application
● Microsoft PowerPoint Presentation
● Microsoft Word Document6. Right-click the application and select Properties.
HTML Preview Requirements
76

7. Click the Security tab and perform the following tasks:
a. Under Launch and Activation Permissions, select Customize and then click Edit.
b. Add the User account you created and allow Local Launch and Local Activationpermissions. Ensure the SYSTEM, INTERACTIVE and Everyone accounts are present.
c. Under Access Permissions, select Customize and then click Edit.
d. Add the User account you created and allow the Local Access permission.8. On the Identity tab, select This user and enter the credentials of the User account you
created.
9. Restart the server.
Repeat these steps for each Office application you want to configure. After you restart theserver, start Task Manager and then start each application to verify it is running under thenew user account.
Using HTML Preview with PDF DocumentsIf you want to use HTML Preview with PDF documents, you must install software on theAdvanced Access Control server that converts the PDF file to HTML. For more informationabout configuring Advanced Access Control to view PDF files, see the Citrix KnowledgeCenter article Customizing HTML Preview in Advanced Access Control on the Citrix Web siteat http://support.citrix.com/article/ctx107543.
HTML Preview Requirements
77
78
Live Edit Requirements
Live Edit is a convenient way for users to work remotely with files such as Word documentsand Excel spreadsheets using a Web browser.
To use Live Edit, users must have the following software installed on their computers:
● Microsoft Internet Explorer 6.0 with Service Pack 1
● Live Edit Client ActiveX control
● An appropriate Microsoft Office editing application such as:
● Microsoft Word 2000, XP or 2003
● Microsoft Excel 2000, XP, or 2003
● Microsoft Powerpoint 2000, XP, or 2003
● Microsoft Visio 2002 or 2003
Note: After installing the Microsoft Office applications, run the application for the firsttime before using Live Edit. This ensures that any post-installation tasks are completedand allows the Live Edit Client to display documents for editing without delay.
For information about requirements for running the Live Edit Client, see User DeviceRequirements. For more information about using Live Edit to provide access to documents,see Allowing Live Edit.
79
Email Synchronization Requirements
Email synchronization allows users to synchronize their email folders on their user deviceswith their folders on Microsoft Exchange or Lotus Notes/Domino servers to prepare forworking offline.
Email synchronization requires the following components:
● Microsoft Outlook 2000, XP, or 2003; or Lotus Notes R5, R6, or R7 installed on the clientdevice
● Access Gateway Plug-in installed on the user device
● An email server running Microsoft Exchange or Lotus Notes/Domino
For more information about requirements for the Access Gateway Plug-in, see User DeviceRequirements. For more information about email synchronization, see Providing Users withSecure Access to Email Accounts.

80
Web Email Requirements
You can provide users with access to email resources using Web email. Using the includeddefault email interface, users can access their email accounts from a user device with onlya Web browser. This interface functions only with email servers using Microsoft Exchange.
Advanced Access Control also supports using Outlook Web Access, Lotus iNotes/Domino WebAccess, or other Web email interfaces. Outlook Web Access and iNotes do not operate onhandheld devices such as PDAs.
The following table lists the components required for each supported Web email platform.
Advanced AccessControl Web Email
Outlook Web Access iNotes/Domino WebAccess
Required EmailServer
Microsoft ExchangeServer, Versions2000 or 2003 withall service packsand critical updatesinstalled
Microsoft ExchangeServer, Versions2000 or 2003 withall service packsand critical updatesinstalled
IBM Lotus DominoServer, Versions R6or R7
Required ServerAdministrationTools
Microsoft ExchangeSystem ManagementTools
Microsoft Exchange5.5 Administrator
Microsoft ExchangeSystem ManagementTools
Microsoft Exchange5.5 Administrator
N/A
Supported WebBrowsers
Internet Explorer 7Internet Explorer6.0 SP1Safari 1.1 and 1.3Netscape Navigator8.0Mozilla Firefox 3.0Mozilla Firefox 2.0Mozilla Firefox 1.5
Internet Explorer 7Internet Explorer6.0 SP1
Internet Explorer 7Internet Explorer6.0 SP1
Default Email Interface RequirementsIf you are using Microsoft Exchange 2000 and you want to use the default Email Interface,you must install Microsoft Exchange System Management Tools and then update themapisvc.inf file on the Advanced Access Control server. For more information, see Updatingthe Mapisvc.inf File.

Installing the Microsoft Exchange SystemManagement Tools and Administrator Software
Microsoft Exchange System Management Tools and Microsoft Exchange 5.5 Administratorsupply the MAPI components that are required for Web email functionality. These tools aresupported on the following operating systems:
● Microsoft Windows 2000 Server Family with Service Pack 3 or 4
● Windows Server 2003, Standard Edition or Enterprise Edition
When using these tools, it is important that you:
● Install Microsoft Exchange System Management Tools and Microsoft Exchange 5.5Administrator on the server before installing Advanced Access Control or other softwaresuch as Microsoft Office. This ensures the required Messaging Application ProgrammingInterface (MAPI) components are installed correctly.
● Install the versions of Microsoft Exchange System Management Tools and MicrosoftExchange 5.5 Administrator that are included with the version of Microsoft Exchangeyou are using. If they do not match, Web email may not function correctly.
● Ensure the WebDAV Web service extension is set to “Prohibit” if you use Outlook WebAccess for your Web-based email interface. If this extension is set to “Allowed,” users’inboxes may not display correctly.
For information about configuring Web email, see Providing Users with Secure Web-BasedEmail.
Web Email Requirements
81

82
Using Microsoft Windows 2003 ServerWeb Edition for Web Email
If you are using Microsoft Windows Server 2003 Web Edition and you have MicrosoftExchange 2003 in your environment, you cannot install Microsoft Exchange SystemManagement Tools or Microsoft Exchange 5.5 Administrator. Instead, copy the MAPIcomponents to the %SystemRoot%/system32 directory of the Advanced Access Controlserver.
To install the MAPI components on a server runningMicrosoft Windows 2003 Server Web Edition
1. On the server running Microsoft Exchange 2003, copy the following files:
● mapi32.dll
● mapisvc.inf2. On the Advanced Access Control server, paste the files to the %SystemRoot/system32
directory.
User Profile Access RequirementsAdvanced Access Control stores MAPI user profiles in the Temp folder located in theAdvanced Access Control installation directory. Users configured for Web email must haveread/write access to this folder. Before installing Advanced Access Control, you must addthe users to the Users group on all Advanced Access Control servers. The installationprocess grants the Users group read/write access to the Temp folder.

83
Endpoint Analysis Requirements
You can configure endpoint analysis scans to be run on user devices to check them forprotective measures, such as operating system patches and antivirus software, before usersaccess resources.
Endpoint analysis scans require the Endpoint Analysis Plug-in that can be installed as anActiveX control, a plug-in for Netscape Navigator or Firefox, or as a Windows 32-bitapplication. To download and install the ActiveX control, users must be members of theAdministrators or Power Users group of the client device.
Important: If the Endpoint Analysis Plug-in is not installed on the user device, the usercan access only those resources for which a scan is not required.
For information about requirements for running the Endpoint Analysis Plug-in, see UserDevice Requirements. For more information about configuring endpoint analysis scans, seeCreating Endpoint Analysis Scans.

84
Authentication Software Requirements
Advanced Access Control supports using the following authentication methods to strengthenthe security of your deployment:
● Microsoft Active Directory
● Lightweight Directory Access Protocol (LDAP)
● Remote Authentication Dial-In User Service (RADIUS)
● RSA SecurID 5.2 or 6.0
● SafeWord PremierAccess and SafeWord for Citrix
LDAP RequirementsTo use LDAP with Access Gateway Advanced Edition, you must have an LDAP-compliantdirectory service in your environment such as Microsoft Active Directory, Novell eDirectory,or IBM Directory Server.
Important: User credentials specified in User Principle Name (UPN) or Alternate UPNformats are not supported when using LDAP as an authentication method.
RADIUS RequirementsTo use RADIUS with Access Gateway Advanced Edition, you must install the Microsoft VisualJ# .NET Version 2.0 executable file (vjredist.exe) on the server running Advanced AccessControl before you install the Advanced Access Control software. This executable file islocated in the JSharp20 folder on the Advanced Access Control Server CD-ROM.
Note: User credentials specified in User Principle Name (UPN) or Alternate UPN formatsare not supported when using RADIUS as an authentication method.
Supported RADIUS Authentication ProtocolsAccess Gateway Advanced Edition supports implementations of RADIUS that are configuredto use the Password Authentication Protocol (PAP) for user authentication. Otherauthentication protocols such as the Challenge-Handshake Authentication Protocol (CHAP)are not supported.
For more information about configuring RADIUS authentication and using RADIUS with logonpoints, see Creating RADIUS Authentication Profiles.
RSA SecurID RequirementsTo use RSA SecurID authentication with Access Gateway Advanced Edition, install the RSAACE/Agent for Windows software before installing the Advanced Access Control software. Ifyou install Advanced Access Control before you install the ACE/Agent, RSA SecurIDauthentication does not function correctly.
For information about requirements for installing RSA SecurID, refer to the RSA productdocumentation.
SafeWord RequirementsTo use SafeWord authentication with Access Gateway Advanced Edition:
● Obtain the latest version of the SafeWord Agent from Aladdin
● Install the SafeWord Agent software on the server before installing the Advanced AccessControl software
For information about requirements for installing SafeWord PremierAccess and SafeWord forCitrix, refer to the manufacturer's documentation for these products.
Authentication Software Requirements
85

86
Citrix XenApp Integration Requirements
To access resources published with Citrix XenApp using file type association or WebInterface, users must have Citrix online plug-ins on their user device.
Advanced Access Control supports integration with the following versions of CitrixPresentation Server and Citrix XenApp:
● Citrix XenApp 5.0
● Citrix Presentation Server 4.5
● Citrix Presentation Server 4.0
● MetaFrame Presentation Server 3.0
● MetaFrame XP 1.0 Feature Release 3 with Service Pack 4
● MetaFrame for UNIX 4.0
Note: Advanced Access Control supports application policies that are applied using CitrixXenApp Version 4.5 and Citrix Presentation Server Version 4.0. While Advanced AccessControl can communicate with older versions of Citrix Presentation Server, it does notallow application-specific policies to be applied.
You can configure the logon point to use either the Citrix online plug-ins or the Client forJava on demand when users access published resources.
Advanced Access Control supports using the following client software:
Client English Japanese German Spanish French
Citrix XenApp WebPlug-in Version 11.0
Yes Yes Yes Yes Yes
Citrix XenAppPlug-ins 11.0
Yes Yes Yes Yes Yes
Client for JavaVersion 9.4
Yes Yes Yes Yes Yes
For more information about requirements for running the Client for Java, see the Client forJava Administrator’s Guide. For more information about configuring Advanced AccessControl to access published resources, see Allowing File Type Association.
Citrix Presentation Server for UNIX Requirements
If you want to integrate Advanced Access Control with Citrix Presentation Server for UNIX,be aware of the following:
● Workspace Control is not supported
● SmartAccess is not supported

● Because the Web Interface requires users to enter a domain when logging on, usersmust enter the word “unix” as the domain to authenticate to the Web Interface throughAdvanced Access Control
Citrix XenApp Integration Requirements
87

88
SmartAccess Requirements
The SmartAccess feature enables organizations to better control how published applicationsare accessed and used.
You can use SmartAccess with Advanced Access Control to control which resources users canaccess, based on their access scenario, and what they can do within those resources afterthey get access. SmartAccess integrates with the Web Interface for Citrix XenApp to giveorganizations granular control over published applications. To use SmartAccess, you musthave the following components in your environment:
● Citrix Access Gateway Advanced Edition
● Citrix XenApp 5.0
● Citrix Presentation Server 4.0
Note: SmartAccess is not supported with Citrix Presentation Server for UNIX.
If you are using Web Interface to access published applications, you must also have thefollowing software:
● XenApp Advanced Configuration
● Access Management Console for Citrix Presentation Server 4.5
● Access Suite Console 4.0 for Citrix Presentation Server with the Web Interface Extension4.2 patch applied
● Web Interface for Citrix Presentation Server 4.0 or 4.5
You must also ensure that address translation and firewall settings are identical for the WebInterface and Advanced Access Control.

89
Multiple Access Platform Site andCredential Caching Requirements
Advanced Access Control supports displaying up to three Citrix Access Platform sites withinthe Access Interface. If the credentials used to log on to the Access Platform sites aredifferent from those used for Advanced Access Control, you can cache these credentials sousers are not required to reenter them. These features require:
● Web Interface for Citrix XenApp 5.0
● Web Interface for Citrix Presentation Server 4.0 or 4.5.
● Advanced Access Control to authenticate users with Active Directory credentials only.Credential caching is not supported for use with RADIUS, LDAP, RSA SecurID, orSafeWord.
90
SmoothRoaming Requirements
The SmoothRoaming features of Citrix XenApp provide users with uninterrupted access toinformation. These features include Workspace Control, Session Reliability, and DynamicSession Reconfiguration.
Note: Workspace Control is not supported with Citrix Presentation Server for UNIX.
You can use SmoothRoaming features with Advanced Access Control to enable users to movebetween user devices and gain access to all of their applications when they log on. To useSmoothRoaming, you must have Citrix XenApp 5.0, Presentation Server 4.5, or the Advancedor Enterprise edition of Citrix Presentation Server 3.0 or 4.0 installed on a server in yourenvironment. SmoothRoaming is not available with Citrix Presentation Server StandardEdition.

91
Requirements for Bypassing the WebProxy
If you want users to bypass the Web proxy when accessing a Web resource, you can allowthem to access the resource using the Access Gateway Plug-in. For information aboutrequirements for running the Access Gateway Plug-in, see User Device Requirements.

92
Third Party Portal IntegrationRequirements
Access Gateway Advanced Edition supports integration with third party portals such asMicrosoft SharePoint to provide convenient access to Web resources, file shares, Webemail, and published applications. To integrate Microsoft SharePoint you must have one ofthe following versions installed in your environment:
● Microsoft SharePoint 2001
● Microsoft SharePoint 2003
Typically, users can work with documents managed by SharePoint using menu-drivencommands. When users access the SharePoint site through the Web proxy, menu items thatrequire ActiveX to function are not available. The following table describes these menuitems:
Menu Item Requires ActiveX? Available to Users byDefault?
View Properties No Yes
Edit Properties No Yes
Edit in Microsoft Office Yes No
Delete No Yes
Check In No Yes
Check Out No Yes
Version History No Yes
Alert Me No Yes
Discuss Yes No
Create Document Workspace No YesAdditionally, custom menu items that require ActiveX to function are not available to userswhen Sharepoint is accessed through the Web proxy.
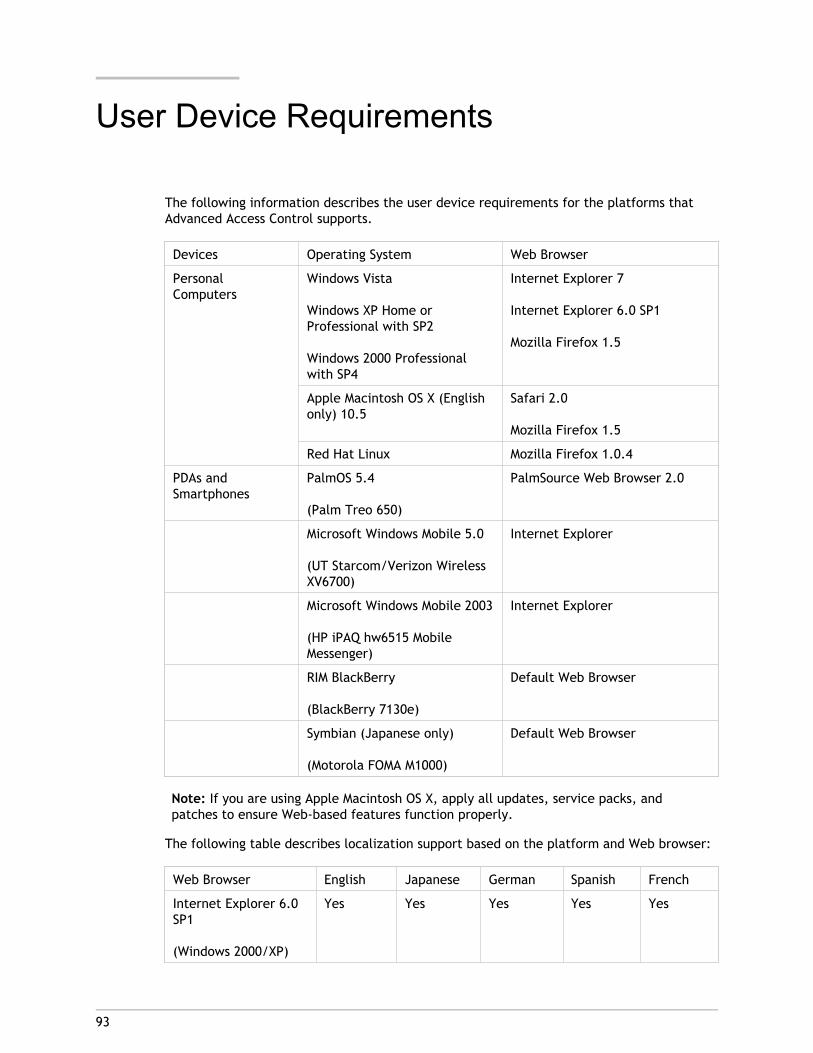
93
User Device Requirements
The following information describes the user device requirements for the platforms thatAdvanced Access Control supports.
Devices Operating System Web Browser
PersonalComputers
Windows Vista
Windows XP Home orProfessional with SP2
Windows 2000 Professionalwith SP4
Internet Explorer 7
Internet Explorer 6.0 SP1
Mozilla Firefox 1.5
Apple Macintosh OS X (Englishonly) 10.5
Safari 2.0
Mozilla Firefox 1.5
Red Hat Linux Mozilla Firefox 1.0.4
PDAs andSmartphones
PalmOS 5.4
(Palm Treo 650)
PalmSource Web Browser 2.0
Microsoft Windows Mobile 5.0
(UT Starcom/Verizon WirelessXV6700)
Internet Explorer
Microsoft Windows Mobile 2003
(HP iPAQ hw6515 MobileMessenger)
Internet Explorer
RIM BlackBerry
(BlackBerry 7130e)
Default Web Browser
Symbian (Japanese only)
(Motorola FOMA M1000)
Default Web Browser
Note: If you are using Apple Macintosh OS X, apply all updates, service packs, andpatches to ensure Web-based features function properly.
The following table describes localization support based on the platform and Web browser:
Web Browser English Japanese German Spanish French
Internet Explorer 6.0SP1
(Windows 2000/XP)
Yes Yes Yes Yes Yes

Mozilla Firefox 1.5
(Windows 2000/XP)
Yes Yes Yes Yes Yes
Safari 2.0 (Mac OS X) Yes No No No No
Mozilla Firefox 1.5
(Mac OS X)
Yes No No No No
Advanced Access Control delivers content to Web browsers by transmitting Web pagesencoded with HTML and JavaScript. In most cases, standard client configurations cansupport Advanced Access Control.
You must ensure the following settings are configured for each Web browser:
● Enable execution of client-side JavaScript
● Allow downloading of signed ActiveX controls
● Allow downloading of Java applets if you provide access to published applications andrestrict users to the Client for Java
For more information about configuring Web browsers for use with Advanced AccessControl, see Web Browser Security Considerations.
Live Edit Plug-in RequirementsThe Live Edit Plug-in is an ActiveX control that downloads automatically to a user's Webbrowser to provide remote editing capabilities for Microsoft Office documents.
To use the Live Edit Plug-in, the following software is required on users’ workstations:
● Microsoft Windows 2000 or Windows XP with all service packs and critical updates
● Microsoft Internet Explorer 6.0 SP1 or later with cookies enabled and permission to loadsigned ActiveX controls
Note: Windows 2000 or Windows XP users must be members of the Administrators orPower Users group to download and install ActiveX controls.
Endpoint Analysis Plug-in RequirementsThe Endpoint Analysis Plug-in collects user device information such as operating system,antivirus, or Web browser versions prior to users logging on to Advanced Access Control.The Endpoint Analysis Plug-in can be distributed as an ActiveX control, a browser plug-in, ora Windows 32-bit application.
To use the Endpoint Analysis Plug-in, the following software is required on users’workstations:
● Microsoft Windows 2000 or Windows XP with all service packs and critical updates
User Device Requirements
94

● Microsoft Internet Explorer 6.0 SP1 or later with cookies enabled and permission to loadsigned ActiveX controls if distributing the ActiveX control
● Mozilla Firefox 1.5 if distributing the browser plug-in
Note: Windows 2000 or Windows XP users must be members of the Administrators orPower Users group to download and install ActiveX controls.
Access Gateway Plug-in RequirementsThe Access Gateway Plug-in acts as a proxy between the user device and the AccessGateway appliance. The Access Gateway Plug-in can be distributed as a desktop applicationfor Microsoft Windows or Linux operating systems. The Access Gateway Plug-in isdownloaded and installed automatically when users enter the secure Web address of theAccess Gateway appliance and a logon point in a Web browser.
Note: Windows 2000 and Windows XP users must be members of the Administrators orPower Users group to install applications. Linux users must have the tcl and tk packagesinstalled to use the Access Gateway Plug-in.
The Access Gateway Plug-in is not supported in double-hop DMZ deployments. If you deployAccess Gateway Advanced Edition in a double-hop DMZ, users access resources only througha browser-only connection.
User Device Requirements
95

96
Console Requirements
The Access Management Console is the configuration and administration tool for AdvancedAccess Control. You can install the console on an Advanced Access Control server or on astandalone workstation.
The Console requires at least:
● Windows Server 2003, Standard Edition, Enterprise Edition, or Datacenter Edition withService Pack 1; Microsoft Windows Server 2003, 64-bit Edition; Windows XP Professionalwith Service Pack 2; or Windows 2000 Professional with Service Pack 4
● 25 MB of hard drive space
● .NET Framework Version 2.0
● Microsoft Data Access Components (MDAC) Version 2.7 Refresh
Important: If you install the console on the Advanced Access Control server, you mustinstall the .NET Framework and MDAC 2.7 Refresh (mdac_typ.exe) before you installAdvanced Access Control. The .NET Framework and MDAC 2.7 Refresh executable files arelocated on the Advanced Access Control Server CD-ROM.

97
Installation Overview
This overview includes the basic steps for installing Advanced Access Control. Citrixsupports deploying Advanced Access Control on a single server or on multiple servers.
To get started with Advanced Access Control, complete the following steps:
1. Before you begin installation, use Windows Update to ensure all Advanced AccessControl servers are patched with critical updates.
2. Ensure your servers meet all requirements for components and features you plan to use.
3. Install and configure Citrix Licensing. See the Readme for Citrix Licensing and theLicensing documentation in the Technologies node in Citrix eDocs.
Note: Citrix recommends performing this step before installing Advanced AccessControl to save time during server configuration and prevent user access delays dueto licensing issues. However, you can install the licensing server during or after serverconfiguration.
4. Install Advanced Access Control and the Access Management Console.
5. Install additional components, if applicable.
6. After you install components, visit the Citrix Support Web site to download and installcritical updates.
Installing Advanced Access ControlThe Advanced Access Control Setup wizard guides you through the process of installingAdvanced Access Control and its components.
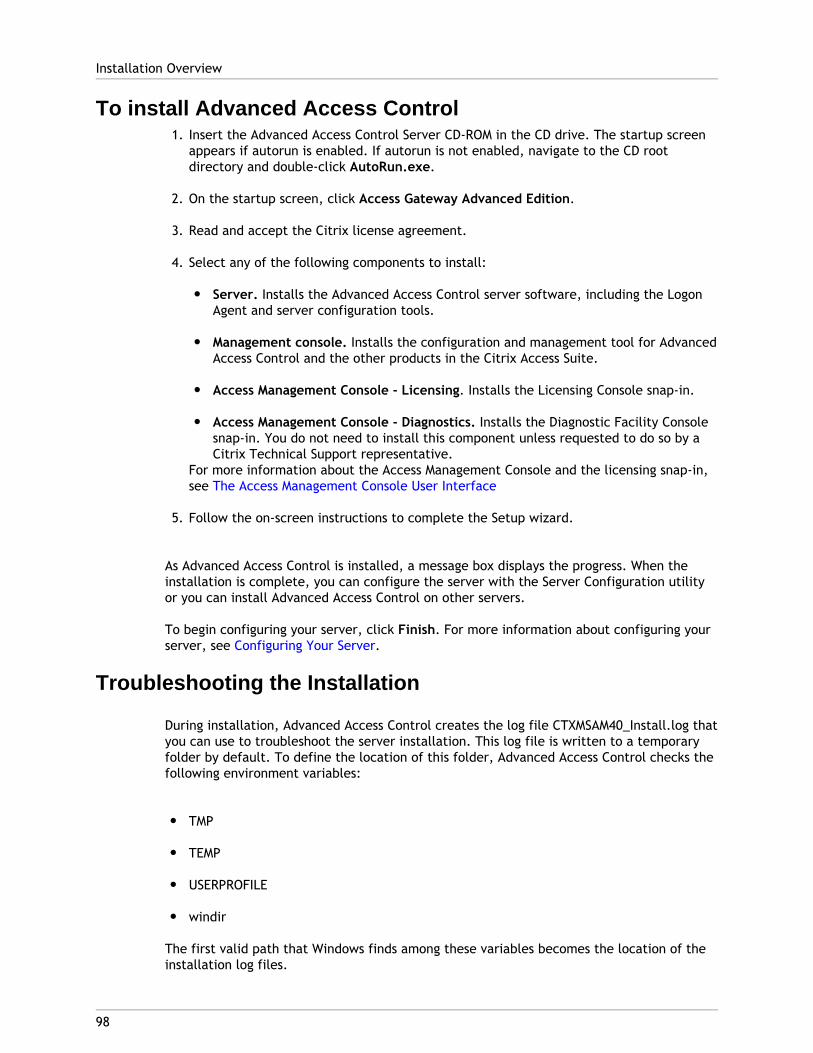
To install Advanced Access Control1. Insert the Advanced Access Control Server CD-ROM in the CD drive. The startup screen
appears if autorun is enabled. If autorun is not enabled, navigate to the CD rootdirectory and double-click AutoRun.exe.
2. On the startup screen, click Access Gateway Advanced Edition.
3. Read and accept the Citrix license agreement.
4. Select any of the following components to install:
● Server. Installs the Advanced Access Control server software, including the LogonAgent and server configuration tools.
● Management console. Installs the configuration and management tool for AdvancedAccess Control and the other products in the Citrix Access Suite.
● Access Management Console - Licensing. Installs the Licensing Console snap-in.
● Access Management Console - Diagnostics. Installs the Diagnostic Facility Consolesnap-in. You do not need to install this component unless requested to do so by aCitrix Technical Support representative.
For more information about the Access Management Console and the licensing snap-in,see The Access Management Console User Interface
5. Follow the on-screen instructions to complete the Setup wizard.
As Advanced Access Control is installed, a message box displays the progress. When theinstallation is complete, you can configure the server with the Server Configuration utilityor you can install Advanced Access Control on other servers.
To begin configuring your server, click Finish. For more information about configuring yourserver, see Configuring Your Server.
Troubleshooting the Installation
During installation, Advanced Access Control creates the log file CTXMSAM40_Install.log thatyou can use to troubleshoot the server installation. This log file is written to a temporaryfolder by default. To define the location of this folder, Advanced Access Control checks thefollowing environment variables:
● TMP
● TEMP
● USERPROFILE
● windir
The first valid path that Windows finds among these variables becomes the location of theinstallation log files.
Installation Overview
98

You can override this default path by typing /logfilepath folder_path at a commandprompt, where folder_path is the location where you want to store the installation logfiles.
Uninstalling Advanced Access Control
If you want to remove an Advanced Access Control component from a server, use Add orRemove Programs in Control Panel. Depending on the options you selected duringinstallation, remove these components in the following order:
● Citrix Access Gateway 4.5 Server
● Citrix Access Gateway 4.5 Console
● Citrix License Server Administration
● Citrix Access Management Console - Diagnostics
● Citrix Access Management Console - Framework
Note:
If you remove the Citrix Access Gateway Console component before removing the CitrixAccess Gateway Server component, the Server component cannot be removed successfully.
The Citrix License Server Administration and Citrix Access Management Console -Diagnostics components can be removed at any time in the uninstallation. However, theCitrix Access Management Console - Framework component must be removed last.
To remove Advanced Access Control components1. Choose Start > Control Panel > Add or Remove Programs.
2. In Add or Remove Programs, select an Advanced Access Control component.
3. Click Change or Remove. The wizard prompts for verification that you want to removethe software.
4. Click Yes or Next to remove the component.
Installation Overview
99

100
Configuration and Management ofAdvanced Access Control
After you have configured your license server and installed Advanced Access Control on yourserver, you can then configure Advanced Access Control to work with the Access Gatewayappliance and Citrix XenApp. This includes:
● Configuring Advanced Access Control
● Securing User Connections using authentication
● Adding Resources for network and Web access
● Controlling Access Through Policies
● Integrating Citrix XenApp
● Verifying Requirements on User Devices
● Providing Secure Access to Corporate Email
● Rolling Out Advanced Access Control to Users
● Managing Your Access Gateway Environment

101
Configuring Advanced Access Control
After you install Advanced Access Control, you configure each of your servers in the accessserver farm.
The following settings are configured:
● Configuring Your Server
● Linking to Citrix XenApp
● Configuring Logon Points
● Configuring the Access Gateway
● Configuring Split Tunneling
● Configuring Client Properties
● Configuring Server Properties
● Configuring ICA Access Control
● Configuring Authentication with Citrix XenApp

102
Supported Configurations
You can deploy Access Gateway Advanced Edition in a variety of ways to meet the needs ofyour organization. Supported configurations include:
● One or more Access Gateway appliances deployed in the DMZ and the Advanced AccessControl server deployed in the internal network
● One or more Access Gateway appliances deployed behind a load balancer in the DMZand the Advanced Access Control server deployed in the internal network
● A double-hop DMZ scenario where one or more Access Gateway appliances are deployedin the first DMZ, one or more Access Gateway appliances are deployed in the secondDMZ, and the Advanced Access Control server is deployed in the internal network
Access Gateway ConfigurationsDepending on your organization’s needs, you can deploy one or multiple Access Gatewayappliances. If your deployment includes a load balancer with multiple appliances, youconfigure each appliance with the same fully qualified domain name (FQDN) as the loadbalancer but you do not specify Access Gateway failover servers. The load balancer handlesfailover as well as load balancing.
If your deployment includes multiple appliances without a load balancer, you configureeach appliance with a unique FQDN and specify the other appliances as failover servers. Formore information about deploying the Access Gateway appliance, see Deploying AccessGateway.
Advanced Access Control ConfigurationsAdvanced Access Control supports the following access server farm configurations:
● Advanced Access Control on a single server.
Install Advanced Access Control on a single server. The server contains all requiredaccess server farm components, including the database server.
● Advanced Access Control on a single server and Microsoft SQL Server on a separateserver.
Install Microsoft SQL Server on a separate server. Install Advanced Access Control andspecify the SQL database server for the server farm database.
● Advanced Access Control on multiple servers.
Install Microsoft SQL Server on a separate database server. Install Advanced AccessControl on multiple servers.

103
Double-Hop DMZ Configurations
You can deploy two Access Gateway appliances in a double-hop DMZ to control access tonetwork resources through Advanced Access Control. In a double-hop DMZ configuration,three firewalls divide the DMZ into two stages to provide an extra layer of security for theinternal network. One Access Gateway resides in the first DMZ while one or more AccessGateway appliances reside in the second DMZ. The Advanced Access Control server residesin the internal network.
The Access Gateway in the first DMZ handles the client connections and performs thesecurity functions of an SSL VPN. This Access Gateway encrypts the client connections,determines how users are authenticated, and controls access to the servers in the internalnetwork.
The Access Gateway in the second DMZ serves as a proxy device. This Access Gatewayenables ICA traffic to traverse the second DMZ to complete connections to the access serverfarm using Citrix online plug-ins. Communications between the Access Gateway in the firstDMZ and the Secure Ticket Authority (STA) in the internal network are also proxied throughthe Access Gateway Proxy in the second DMZ.
Note: The term Access Gateway Proxy refers to the Access Gateway appliance deployedin the second DMZ.
When Access Gateway Advanced Edition is deployed in a double-hop DMZ configuration, theAccess Gateway appliance in the first DMZ can communicate with any number of appliancesin the second DMZ. However, the Access Gateway Proxy in the second DMZ cancommunicate with only one appliance in the first DMZ. Notification messages from theAdvanced Access Control server are proxied through the Access Gateway in the second DMZto the appliance in the first DMZ. For more information about communication between theAccess Gateway and Access Gateway Proxy, see Understanding the Relationship betweenthe Access Gateway and the Access Gateway Proxy.
In a double-hop DMZ deployment, users connect to the Access Gateway in the first DMZ witha Web browser and Citrix online plug-ins. The Access Gateway Plug-in is not supported in adouble-hop DMZ deployment. Users access the logon point on the Advanced Access Controlserver with a Web browser to access network resources. Users connect with Citrix onlineplug-ins to use the resources to which they have access such as published applications.
Important: The Access Gateway Plug-in is not supported in a double-hop DMZdeployment. You cannot use the Access Gateway Plug-in to access network resourceswhen Access Gateway appliances are deployed in a double-hop DMZ configuration.

Understanding the Relationship between the AccessGateway and the Access Gateway Proxy
Although the Access Gateway in the first DMZ can communicate with any number of AccessGateway Proxy appliances in the second DMZ, the Access Gateway Proxy in the second DMZcan communicate with only one Access Gateway in the first DMZ. If you deploy multipleAccess Gateway appliances in the first DMZ, you should configure each appliance tocommunicate only with the Access Gateway Proxy that is configured to communicate withthat specific Access Gateway.
For example, an administrator has two Access Gateway appliances in the first DMZ (namedAppliance 1 and Appliance 2) and four Access Gateway Proxy appliances in the second DMZ(named Appliance 4, Appliance 5, Appliance 6, and Appliance 7). The administratorconfigures Appliances 4 and 5 to communicate with Appliance 1; and Appliances 6 and 7communicate with Appliance 2, as illustrated below.
When configuring Appliance 1 in the first DMZ, the administrator enables communicationonly with the Access Gateway Proxy that is configured to communicate with Appliance 1.Therefore, the administrator configures Appliance 1 to communicate with Appliances 4 and5 only. Likewise, the administrator configures Appliance 2 to communicate with Appliances6 and 7 only. The illustration below shows this configuration.
Double-Hop DMZ Configurations
104

In this example, each Access Gateway in the first DMZ communicates with a subset of theAccess Gateway Proxy appliances in the second DMZ. This ensures the Proxy appliances areable to respond to the appropriate Access Gateway in the first DMZ. Otherwise,notifications from the Advanced Access Control server would be lost and users could not logon and use network resources.
Double-Hop DMZ Configurations
105
106
Deploying Double-Hop DMZConfigurations
Deploying Access Gateway Advanced Edition in a double-hop DMZ configuration involves thefollowing tasks:
● Installing the Access Gateway appliances in the first and second DMZs.
● Adding the IP addresses and FQDNs of the Advanced Access Control server, the AccessGateway in the first DMZ, and the Access Gateway Proxy in the second DMZ to the Hostsfile on the Access Gateway appliances in both DMZs and the Advanced Access Controlserver. This task is required if you are not using DNS in your environment.
● Configuring the Access Gateway Proxy in the second DMZ to communicate with theAccess Gateway in the first DMZ and the Advanced Access Control server.
● Configuring the Access Gateway in the first DMZ to communicate with the AccessGateway Proxy in the second DMZ.
● Configuring the Access Gateway in the first DMZ to communicate with the AdvancedAccess Control server.
Important: To deploy this configuration correctly, you must perform these tasks in thespecified order. For example, if you configure the Access Gateway in the first DMZ beforeyou configure the Access Gateway Proxy in the second DMZ, you will receive errors andcommunication between the appliances will not occur even if all the settings arecorrectly configured.
Step 1: Installing Access Gateway AppliancesFor a detailed description for installing the Access Gateway in the first DMZ and the AccessGateway Proxy in the second DMZ, see Step 1: Installing an Access Gateway in the First DMZand Step 4: Installing an Access Gateway in the Second DMZ. After you install theseappliances, proceed to Step 2.
Step 2: DNS Server and HOSTS File Requirements fora Double-Hop DMZ Deployment
A DNS server is a required component of a double-hop DMZ deployment. Entries in theHOSTS file are not required; however, they are used to enable the Access Gateway in thefirst DMZ to create a list of Advanced Access Control servers that users are allowed toaccess when logging on.
In a double-hop DMZ configuration, the DNS server enables the Access Gateway in the firstDMZ to communicate with the Access Gateway proxy in the second DMZ. To install the DNSserver, perform the following tasks:

● Install the DNS server in the first DMZ of the double-hop DMZ configuration.
● Configure the DNS server with the address of the Access Gateway Proxy in the secondDMZ. Perform this task before you complete the steps described in Step 4: ConfiguringCommunication between the Access Gateway and Access Gateway Proxy". Otherwise,the Access Gateway in the first DMZ cannot communicate with the Access GatewayProxy in the second DMZ.
In a double-hop DMZ configuration, the Access Gateway in the first DMZ communicates withthe Access Gateway Proxy in the second DMZ to transmit user requests for access tocorporate resources to the Advanced Access Control server. Although the Access Gateway inthe first DMZ does not communicate with the Advanced Access Control server directly, theAccess Gateway must be aware of the Advanced Access Control servers that users areallowed to access when logging on. To do this, you enter the IP addresses of the AdvancedAccess Control servers in your access server farm in one of the following locations:
● In the Hosts file of the Access Gateway in the first DMZ
● In the Servers running Advanced Access Control list located on the Advanced Optionstab in the Administration Tool
The HOSTS files on the Access Gateway appliances and the Advanced Access Control serverconsist of entries that are used to resolve FQDNs to IP addresses.
Use the Administration Tool on Access Gateway Standard Edition to add the followingentries to the HOSTS file:
● On the Access Gateway, add the FQDNs and IP addresses of the Access Gateway Proxy inthe second DMZ and the Advanced Access Control server
● On the Access Gateway Proxy, add the FQDNs and IP addresses of the Access Gateway inthe first DMZ and the Advanced Access Control server
On the Advanced Access Control server, use a text editor to add the FQDNs and IP addressesof the Access Gateway appliances in both DMZs to the Hosts file.
To add entries to the HOSTS file on the Access Gateway1. In the Administration Tool, on the Access Gateway Cluster tab, open the window for an
appliance.
2. Click the Name Service Providers tab.
3. Under Edit the HOSTS file, in IP address, enter the IP address of the Access GatewayProxy installed in the second DMZ.
4. In FQDN, enter the FQDN you want to associate with the IP address you entered in theprevious step. Click Add.
5. Repeat Steps 3 and 4 to add entries for any remaining Access Gateway Proxy appliancesinstalled in the second DMZ and for the Advanced Access Control server.
Deploying Double-Hop DMZ Configurations
107

To add entries to the HOSTS file on the Advanced Access
Control server1. In Windows Explorer, locate the HOSTS file in the %SystemRoot\system32\drivers\etc
directory.
2. Open the file using a text editor.
3. On a separate line, type the IP address and associated FQDN of each appliance.
4. Save the HOSTS file.
5. Repeat Steps 1 through 4 for each Advanced Access Control server in your farm.
Step 3: Configuring Communication with the AccessGateway Proxy and Advanced Access Control
For a double-hop DMZ configuration, you must first configure the Access Gateway Proxy inthe second DMZ to communicate with the Access Gateway in the first DMZ and with theAdvanced Access Control server in the internal network. After you complete this step, theAccess Gateway Proxy is ready to establish communication with the Access Gateway in thefirst DMZ.
Note: You can configure the Access Gateway Proxy to communicate with only one AccessGateway in the first DMZ. For more information about communication between theAccess Gateway and Access Gateway Proxy, see Understanding the Relationship betweenthe Access Gateway and the Access Gateway Proxy.
To configure communication between the Access Gateway
Proxy and the Access GatewayIf you have multiple appliances installed in the second DMZ, perform this procedure on eachappliance.
1. In the Administration Tool, on the Access Gateway Cluster tab, open the window for anappliance.
2. On the General Networking tab, in DMZ Configuration, select Second hop in doubleDMZ.
3. In Protocol, select either SOCKS over SSL or SOCKS.
4. In Port, the default port is either 443 (for secure connections) or 1080 (for unsecureconnections).
5. Click Advanced Access Control.
6. In FQDN of the first appliance in the DMZ, type the FQDN or IP address of the Access Gateway in the first DMZ. If you are using the SOCKS over SSL protocol, you must type the FQDN address. If you are using the SOCKS protocol, you can type either the FQDN or
Deploying Double-Hop DMZ Configurations
108

IP address.
7. Click Submit and restart the Access Gateway Proxy.
After you configure the Access Gateway Proxy, you can configure the Access Gateway in thefirst DMZ.
Step 4: Configuring Communication between theAccess Gateway and Access Gateway Proxy
In a double-hop DMZ configuration, the Access Gateway in the first DMZ communicates withthe Access Gateway Proxy in the second DMZ to deliver requests to the Advanced AccessControl server in the internal network.
Note: If you have multiple Access Gateway appliances installed in the first DMZ, you willneed to configure each of these appliances to communicate with a subset of AccessGateway Proxy appliances. For more information, see Understanding the Relationshipbetween the Access Gateway and the Access Gateway Proxy.
Deploying Double-Hop DMZ Configurations
109
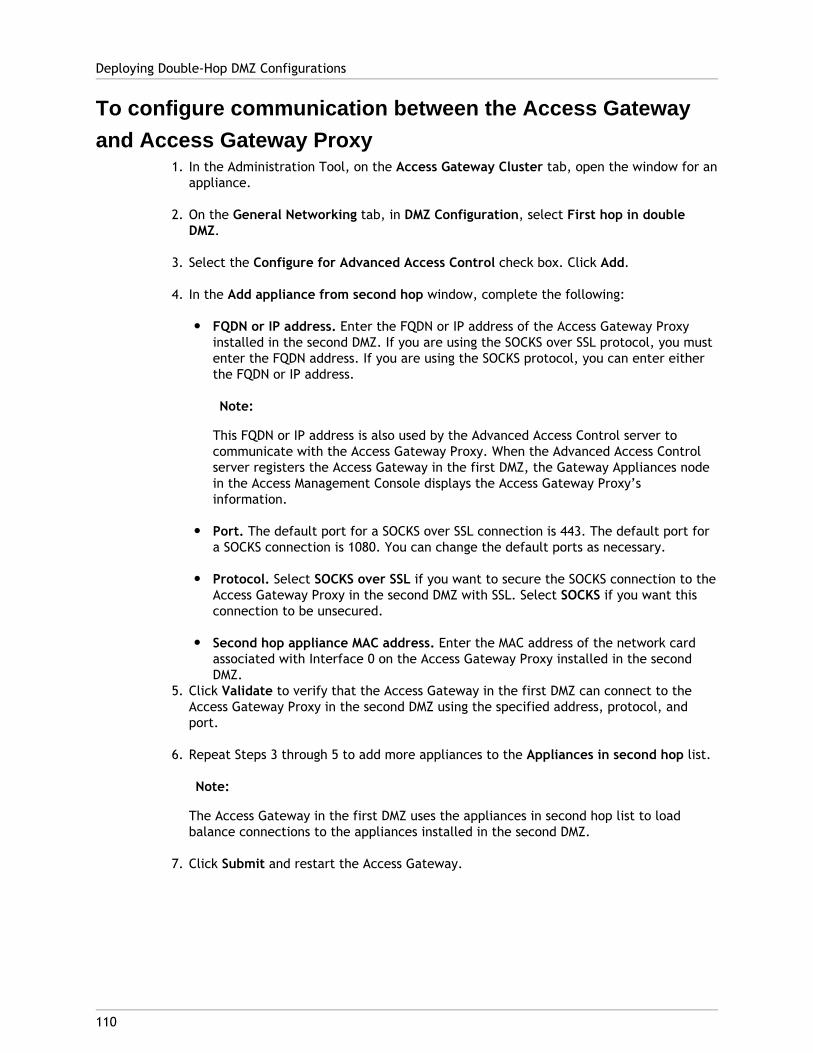
To configure communication between the Access Gateway
and Access Gateway Proxy1. In the Administration Tool, on the Access Gateway Cluster tab, open the window for an
appliance.
2. On the General Networking tab, in DMZ Configuration, select First hop in doubleDMZ.
3. Select the Configure for Advanced Access Control check box. Click Add.
4. In the Add appliance from second hop window, complete the following:
● FQDN or IP address. Enter the FQDN or IP address of the Access Gateway Proxyinstalled in the second DMZ. If you are using the SOCKS over SSL protocol, you mustenter the FQDN address. If you are using the SOCKS protocol, you can enter eitherthe FQDN or IP address.
Note:
This FQDN or IP address is also used by the Advanced Access Control server tocommunicate with the Access Gateway Proxy. When the Advanced Access Controlserver registers the Access Gateway in the first DMZ, the Gateway Appliances nodein the Access Management Console displays the Access Gateway Proxy’sinformation.
● Port. The default port for a SOCKS over SSL connection is 443. The default port fora SOCKS connection is 1080. You can change the default ports as necessary.
● Protocol. Select SOCKS over SSL if you want to secure the SOCKS connection to theAccess Gateway Proxy in the second DMZ with SSL. Select SOCKS if you want thisconnection to be unsecured.
● Second hop appliance MAC address. Enter the MAC address of the network cardassociated with Interface 0 on the Access Gateway Proxy installed in the secondDMZ.
5. Click Validate to verify that the Access Gateway in the first DMZ can connect to theAccess Gateway Proxy in the second DMZ using the specified address, protocol, andport.
6. Repeat Steps 3 through 5 to add more appliances to the Appliances in second hop list.
Note:
The Access Gateway in the first DMZ uses the appliances in second hop list to loadbalance connections to the appliances installed in the second DMZ.
7. Click Submit and restart the Access Gateway.
Deploying Double-Hop DMZ Configurations
110
Step 5: Configuring Communication between theAccess Gateway and Advanced Access Control
In a double-hop DMZ configuration, the Access Gateway in the first DMZ communicates withthe Advanced Access Control server through the Access Gateway Proxy in the second DMZ.To configure the Access Gateway in the first DMZ to communicate with the Advanced AccessControl server, see Enabling Advanced Access Control.
Deploying Double-Hop DMZ Configurations
111

112
Changing the Server Configuration
You can make changes to the access server farm configuration at any time from theconsole. When you install more than one Advanced Access Control server in an access serverfarm, you can configure additional servers to provide recovery, enhance performance, andincrease the server farm’s capacity to support additional users. For more information aboutmanaging Advanced Access Control servers, see Managing Your Access GatewayEnvironment.
113
Configuring Your Server
After you install Advanced Access Control, you configure your servers using the ServerConfiguration utility, which includes the following configuration tasks:
● Creating an access server farm
● Selecting a farm database and specifying a database server
● Specifying the Citrix Licensing Server
● Selecting a Web site path and securing Logon Agent traffic
● Enabling Advanced Access Control
Server Configuration OverviewThe Server Configuration utility allows you to perform preliminary configuration tasks suchas creating an access server farm and specifying a license server.
This utility sets up the account you specify as the service account. It adds the account tothe local Administrators group and grants the following local security policy rights:
● Act as part of the operating system
● Log on as a batch job
● Log on as a service
Important: The Server Configuration utility cannot create a SQL user account for accessto the farm database. You must create an account in SQL Enterprise Manager before youchange the user account for database access. The database user account must havesystem administrator privileges.
The Server Configuration utility does not add the service account to network shares.
The Server Configuration utility does not remove previous service accounts from the localsecurity policy or network shares. If this is a security concern, remove the old accountsafter updating the account information with the utility.
The Server Configuration utility performs the following operations:
● Verifies all account information
● Updates services
● Stops Advanced Access Control services
● Starts Advanced Access Control services

● Updates internal service account information
● Updates internal database account information
● Synchronizes the access server farm
Configuring Your Server
114
115
Steps To Configuring a Server
After installing Advanced Access Control, you can configure a server with the ServerConfiguration Utility.
1. Click Start > Programs > Citrix > Access Gateway > Server Configuration.
2. Create a new access server farm or add the server to an existing one.
● Create a new access server farm
Choose this option if you are creating an access server farm. The access server farmname becomes the SQL Server database name. Choosing this option requires you toenter licensing, service account, and database information.
● Join an existing access server farm
Choose this option if you are adding a server to an existing access server farm.Choosing this option requires you to enter service account and databaseinformation.
3. Specify whether to use an existing SQL Server database or to install a local databaseengine. The database server stores the configuration data for the access server farm.
● Microsoft SQL Server
Choose this option to use a supported version of Microsoft SQL Server as thedatabase server for the access server farm. SQL Server can run on the same serverrunning Advanced Access Control or on a separate database server.
Important: If you want to select a SQL Server database, be sure the SQL Serviceis running on the server you want to specify. If the SQL Service is not running, theServer Configuration utility cannot detect the server.
If you select Microsoft SQL Server as your database, the Server Configuration utilityprompts you to specify the server on which SQL Server is installed.
● Farm database server. Type the name of the database server.
● Access server farm name. Type the name of the access server farm you wantto create or join.
● Use the Service Account to access the configuration database. Choose thisoption to use the Advanced Access Control service account credentials to accessthe SQL database.
● Use SQL Authentication to access the configuration database. Choose thisoption to use the SQL database account credentials to access the SQL database.If you choose this option, you must also enter the database user name andpassword.
● Microsoft SQL Server Express

Choose this option if you want Advanced Access Control to install the necessarycomponents for a local database server and create a database for the access serverfarm. The Server Configuration utility searches for an instance of SQL ServerExpress labeled CitrixAAC. If this instance is not found, the Server Configurationutility installs this instance for you.
Note: Use the Microsoft SQL Server Express option for a pilot deployment ofAdvanced Access Control. Citrix recommends the use of Microsoft SQL Server forlarge-scale deployments.
4. If you are creating a new access server farm, the Server Configuration utility promptsyou to identify the license server you want to use to validate your installation ofAdvanced Access Control. You must select one of the following options to continueserver configuration.
● I would like to use an existing license server. Choose this option if you want tospecify a license server that you installed directly. In the Host name box, type thename of the license server you want to use. If the license server uses a port otherthan 27000, clear the Use default port check box and then type the correct port inthe License server port box.
● I would like to install a new license server on this computer. Choose this option ifyou want to install a license server on the same machine as the server runningAdvanced Access Control. When you complete the server configuration, AdvancedAccess Control installs the license server.
● I do not wish to configure licensing at this time. Choose this option if you want tospecify a license server later. If you do not specify a license server, users willreceive an “Access Denied” message when they attempt to log on to AdvancedAccess Control.
5. Select a Web Site path. The Web site path is the location where all Web content forAdvanced Access Control is installed. Review the Web site path that Advanced AccessControl detects to ensure it is valid for your deployment. To change the physical path
a. Select the Web site you want to change.
b. Click Use custom path for web content.
c. In Path, type the physical path you want to use for the Web site. You can also clickBrowse to navigate to the directory you want to specify.
6. Secure Web Site traffic with SSL. When you select a Web site path, you can also enablethe Secure Sockets Layer (SSL) protocol to secure communication with the Logon Agent.To secure Web site traffic, click the Secure traffic between the Logon Agent and theAuthentication Service check box.
Important: You must have the required digital certificates installed on the serverbefore configuring Advanced Access Control. This check box is not enabled unless SSLis enabled on the server.
7. Finish server configuration.
The Server Configuration utility displays a summary of your selected options andconfiguration settings. After you review the summary, click Next to initiate serverconfiguration. When configuration is complete, click Finish and proceed to enablingAdvanced Access Control to manage the Access Gateway appliance.
Steps To Configuring a Server
116
117
Enabling Advanced Access Control
To use the granular access control features of Advanced Access Control, you must enablethe Access Gateway appliance to communicate with the Advanced Access Control server.
Note: If you are deploying Access Gateway Advanced Edition in a double-hop DMZdeployment, you enable communication with Advanced Access Control after several othertasks are completed. For more information about these additional tasks, see Double-HopDMZ Configurations.
To enable communication with Advanced Access Control, you perform the following tasksusing the Access Gateway Administration Tool:
● On the Name Service Providers tab, enter the DNS and WINS information for yourAdvanced Access Control server.
● On the Routes tab, configure the IP routes as needed.
● On the Advanced Options tab, select Advanced Access Control and enter the serverinformation.
After you perform these tasks and restart the appliance, you use the Administration Tool tomanage appliance-specific settings only. For more information about using theAdministration Tool, see The Administration Tool.
Important:
When you enable Advanced Access Control to manage global Access Gateway appliancesettings, the corresponding settings in the Administration Tool are deactivated and anyexisting configuration values are removed. If you configured these settings with theAdministration Tool before enabling Advanced Access Control, you must configure thesesettings again in the Access Management Console. For more information about configuringthese settings in the console, see Configuring the Access Gateway.
If you disable appliance administration with Advanced Access Control, the global AccessGateway appliance settings you configured in the console are deactivated and existingconfiguration values are removed.

To enable Advanced Access Control1. In the Administration Tool, on the Access Gateway Cluster tab, open the window for an
appliance.
2. Click the Advanced Options tab.
3. To manage the Access Gateway cluster using the Access Management Console, selectAdvanced Access Control.
4. In Server running Advanced Access Control, type the IP address or FQDN of the serverthat is running Advanced Access Control.
Important: If you specify the FQDN of the server running Advanced Access Controland you cannot connect to the server, ensure you have entered the DNS servers youwant to use on the Name Service Providers tab of the Administration Tool. If youspecify the IP address of the server running Advanced Access Control, you do notneed to specify the DNS servers.
5. To encrypt communication between the Access Gateway appliance and the AdvancedAccess Control server, select Secure server communication.
6. Click Submit to save your changes.
7. Restart the Access Gateway.
Enabling Advanced Access Control
118

119
Using the Access Management Console
The Access Management Console extends your ability to manage your deployment byintegrating many of the administrative features of your Citrix products into the MicrosoftManagement Console (MMC). The is a standalone snap-in to the MMC. Managementfunctionality is provided through a number of management tools (extension snap-ins) thatyou can select when you install the or at any time later.
Installing the Access Management ConsoleBefore installing any snap-ins to the Access Management Console, ensure that you installedthe Access Management Console - Framework Version 4.5. If you try to install any snap-insbefore installing the Framework on your server, the installation fails. You cannot install anysnap-in if a newer version of the snap-in is present on your server. If you try to do so, theinstallation fails. Before you install an older version of a snap-in, first uninstall your existingsnap-in.
Users and AccountsYou must be a Citrix administrator to use the Access Management Console. You shouldtherefore ensure that the correct administrator privileges are in place before allowingothers to use the console.
Do not run the console in two sessions simultaneously on one computer using the same useraccount. Changes made on the console in one session can overwrite changes made in theother.
Deploying the Console to AdministratorsTo use the console to make changes to an Advanced Access Control deployment,administrators must have permission to run the Access Gateway Server COM+ application.For more information about granting COM+ permissions, see Securing the AccessManagement Console Using COM+.
To start the Access Management Console1. Click Start > All Programs > Citrix > Management Consoles > Access Management
Console.

120
The Access Management Console UserInterface
The main user interface of the Access Management Console consists of three panes:
● The left pane contains the console tree.
● The task pane in the middle displays administrative tasks and tools. This pane is notpresent in the Microsoft Management Console.
● The details pane on the right displays information about your deployment items andassociated tasks.
The following nodes are available under the top-level node in the console tree:
● Alerts. Lists the alerts created by all the items in your deployment. Double-click analert to drill down to the affected item.
● Search Results. Displays the results of any search that you performed. Click Search inthe task pane to perform a standard or advanced search.
● My Views. Allows you to customize the information that you display in the details pane.
In addition, nodes are created by some Access Management Console snap-ins when they areinstalled. Depending on your Access Management Console installation, the followingsnap-ins are available:
● Licensing. Launches the License Management Console that allows you to managelicenses for your Citrix products. For more information about the License ManagementConsole, see Getting Started with Citrix Licensing.
● Diagnostic Facility. Creates and packages trace logs and other system information toassist Citrix Technical Support in diagnosing problems.

121
Finding Items in Your Deployment UsingDiscovery
Before you can use the Access Management Console to manage the items in yourdeployment, you must run discovery. Discovery is not equivalent to locating items thatalready exist in the console tree, which you perform using Search in the task pane. Incontrast, discovery adds items to the console tree.
You discover items using the Run discovery task. The first time you open the console,discovery runs automatically. At any stage afterwards, run discovery to locate newlyinstalled products or components and to update the console if items were added to orremoved from your deployment. For example, if another instance of the console was usedto configure settings, you need to run discovery to add those updates.
1. Click Start > All Programs > Citrix > Management Consoles > Access ManagementConsole.
2. In the console tree, select Citrix Resources.
3. In the task pane, click Run discovery.
To run discovery for one component in the console tree, select the component and thenclick Run discovery.
Running discovery is something that you should consider doing on a regular basis to ensurethat you have the most up-to-date view of your deployment. Run discovery if:
● You installed or removed an Access Gateway or Advanced Access Control item orcomponent. The Console does not recognize any recently installed items or componentsuntil you run discovery.
● Items are added to or removed from an existing deployment. The console tree, thedetails pane, and the available tasks are “refreshed” only after discovery is completed.
● Your administrative privileges change or you change a custom administrator’sprivileges. Modifications to privileges do not take effect in the console until you rerundiscovery.

122
Customizing Your Displays Using MyViews
You can create custom displays of the details pane called My Views. These are configurabledisplays that give you quick access to items you need to examine regularly or items indifferent parts of the console tree that you want to group in the same display. Instead ofrepeatedly browsing the console tree, you can place the items in a single, easily retrieveddisplay. For example, you can create a My View to display policies for servers in differentaccess server farms.
123
Configuring Your Farm with the GettingStarted Panel
To help you configure your deployment, the Getting Started panel presents links to severalwizards that guide you through tasks such as configuring email and access policies.
To access the Getting Started Panel1. Click Start > All Programs > Citrix > Management Consoles > Access Management
Console.
2. In the navigation pane, select the Access Gateway node and under Other Tasks, clickGetting started.
You can also right-click the Advanced Access Control node or the farm node in the consoletree and then click All Tasks > Getting started.
By default, the Getting Started panel appears when you click the Advanced Access Controlnode. To prevent the Getting Started panel from appearing automatically, clear the Alwaysshow this page check box located near the bottom of the panel.

124
Linking to Citrix XenApp
You can link the access server farm to farms running Citrix XenApp. This allows you to offerpublished resources from XenApp through file type association or the Web Interface. Whenfile type association is allowed by policies, opening a document launches it in an associatedapplication running on a server.
To link your access server farm to farms running XenApp, you:
● Specify the farm(s) you want to link to your access server farm
● Configure load balancing or failover if the server farm includes multiple servers
● Configure address modes if the server farm is behind a firewall configured for NetworkAddress Translation (NAT)
Before you link your access server farm, ensure the following requirements are met inXenApp:
● Published resources are assigned to the same user groups assigned to resources in theaccess server farm.
● The option Allow connections made through Access Gateway is enabled for eachpublished resource. This option appears in the access control settings of the publishedresource properties.
● In each server’s properties, the option Trust requests sent to the XML Service isselected.

125
Specifying Server Farms
Create a list of the server farms that are available to users of Access Gateway. This list isused in logon point properties to specify which farms are available to users of the logonpoint. Each server farm you configure contains a list of servers you can use to specify loadbalancing or failover among servers within the farm.
To specify server farms1. Click Start > All Programs > Citrix > Management Consoles > Access Management
Console.
2. In the console tree, select the access server farm node and under Common Tasks, clickEdit farm properties.
3. Select the Presentation Server Farm page and click New.
4. In Citrix Presentation Server farm name, type the name or IP address of the farm towhich you want to link your access server farm.
Note:
Advanced Access Control accepts server farm names up to 50 characters long. If theserver farm name is longer than 50 characters, type the IP address instead.
5. If you want to secure the link between Advanced Access Control and Citrix XenApp,select the Secure communication with the farm by applying a secure protocol checkbox.
Note: To apply a secure protocol, you must have the appropriate client and servercertificates installed on the Advanced Access Control servers and Access Gatewayappliances.
6. Click Next and then click Add.
7. In the Server name box, type the machine name of the server running Citrix XenApp.

126
Configuring Load Balance or Failover
You can balance the load of requests sent to servers running Citrix XenApp. Requests followthe sequence of the server list in the XenApp Farm Properties. The initial request goes tothe first server on the list, the next request goes to the second server, and so on. After thelast server, the process starts again at the top of the list.
Important: Citrix recommends adding the data collector or master ICA browser server tothe server list to minimize unnecessary network traffic when resolution requests occurand to ensure application enumeration occurs smoothly.
You can use the list to sequence failover in case connectivity to a server becomesunavailable. Use failover support to ensure continued access to published resources.
The server list can sequence load balancing or failover support, but not both. By default,the server list is used for failover.
To implement load balancing or failover support1. Click Start > All Programs > Citrix > Management Consoles > Access Management
Console.
2. Select the access server farm node and click Edit farm properties.
3. On the Presentation Server Farms page, select the farm and click Edit. ThePresentation Server Farm Properties appear.
4. On the Servers page, use Up and Down to change the sequence of servers.
5. Select Load balance requests to servers or Set failover sequence of unavailableservers.
6. To change the bypass interval, change the value displayed in minutes. The default isfive minutes.
127
Configuring Address Modes
If your server farm is behind a firewall and the firewall is configured for Network AddressTranslation (NAT), you can define settings to determine the IP address of the serverincluded in ICA files.
To configure address modes for client IP addresses1. Click Start > All Programs > Citrix > Management Consoles > Access Management
Console.
2. Select the access server farm node and click Edit farm properties.
3. On the Presentation Server Farms page, select the farm and click Edit.
4. On the Address Mode page, click New.
5. In the Client IP Address box, type the incoming client IP address or range of IPaddresses for client requests in dot address format (for example, 255.255.255.255). ForAccess Gateway, the incoming address is the address of the Access Gateway appliance.
6. Select the Server Address Mode from the list:
● Normal. The IP address sent to the client is the actual address of the server. This isthe default setting.
● Alternate Address. The IP address sent to the client is the alternate address of theserver. Alternate addresses are configured on the XenApp server. To use thisoption, you must have a firewall with NAT enabled and alternate IP addressesassigned to the servers. For more information about setting alternate addresses,see Selecting the Access Method.
● Translated Address. The IP address sent to the client is based on the configuredaddress translation mappings. For more information, see Configuring AddressTranslation.
● Access Gateway. The IP address sent to the client is the actual address of theAccess Gateway appliance. To use this option, you must also define the AccessGateway settings. For more information, see Configuring the Access GatewayAddress Mode.
You can assign addressing modes for specific IP addresses or a range of IP addresses. Youcan use asterisks as wildcards (such as 10.12.128.*) to indicate a range of IP addresses.

128
Configuring Address Translation
If your server farm is behind a firewall, you can hide internal server addresses byperforming the following tasks:
● Map the internal IP address of each server to an external IP address
● Specify the client addresses that use the translated address
Note:
To use this option, you must have a firewall with Network Address Translation (NAT)enabled.
To map the internal IP address of a server1. Click Start > All Programs > Citrix > Management Consoles > Access Management
Console.
2. Select the access server farm node and click Edit farm properties.
3. On the Presentation Server Farms page, select the farm and click Edit. ThePresentation Server Farm Properties appear.
4. On the Address Mode page, click Address Translation.
5. Click New.
6. Enter the internal IP address and port of the XenApp server.
7. In the Translated address box, enter the external IP address and port that clients mustuse to connect to the server.
8. On the Address Mode page, click New to open the New Client Address Mode dialogbox. Add the client IP address or range of addresses for the clients that use thetranslated address you just configured. Select Translated Address from the ServerAddress Mode list.
The Address Translation settings apply only to the specified client IP addresses on theAddress Mode page.

129
Configuring the Access Gateway AddressMode
If you are providing applications through Citrix XenApp, you must configure the serveraddress mode. The server address mode determines which server IP address is sent to userswhen they open applications from the farm running Citrix XenApp.
To configure the Access Gateway address mode1. Click Start > All Programs > Citrix > Management Consoles > Access Management
Console.
2. Select the access server farm and click Edit farm properties.
3. On the Presentation Server Farms page, select the farm and click Edit.
4. On the Address Mode page, click Access Gateway.
5. Select the option to configure Access Gateway.
6. Enter the Access Gateway server name (exactly as it appears on the server certificate)and port.
7. If the servers in your server farm are behind a firewall and configured to use NATalternate addresses, select the option to use alternate addresses.

130
Associating Access Platform Sites
If you display multiple sites within the Access Interface and want to preserve WorkspaceControl functions, you must select an Access Platform site to associate with a XenApp farm.After you configure and publish an Access Platform site as a Web resource, you can selectthe site from the Web Interface page of the farm properties. For more information, seeDisplaying Multiple Sites and Caching Credentials.

131
Configuring Logon Points
The logon point defines the logon page for users and specifies settings that are applied touser sessions. These initial settings include the required authentication strength, the clientsoftware to use, the home page, and the accessible server farms. User sessions inherit theproperties of the logon point through which they connect.
To determine the logon points you will need, consider:
● The users who are accessing your deployment. For example, users in a particulardepartment may require their own logon point. Likewise, users with a specificrelationship to your organization, such as partners, may require their own logon point.
● The devices with which users access the logon point. For example, users who accessresources with small form factor devices such as a PDA may require a logon pointseparate from the logon point accessed with computers.
● The policies you want to create that restrict access to resources based on the logonpoint used. For example, users who authenticate from a specific logon point can accessspecific resources that are unavailable when using a different logon point.
For more information about using logon points in policies to control access to resources, seeControlling Access Through Policies.
To configure a logon point in your deployment, you perform the following tasks:
● Create the logon point using the console
● Deploy the logon point using the Server Configuration utility

To create a logon point1. Click Start > All Programs > Citrix > Management Consoles > Access Management
Console.
2. In the console tree, select Logon Points and under Common Tasks, click Create logonpoint.
3. Type a unique name and description for the new logon point.
4. Select a home page from the following options:
● Display the default navigation page. Displays the Access Interface, a built-indefault home page for users, with tabs for email, file shares, and Web applications.
● Display the home page application with the highest display priority. Displays theWeb application listed at the top of the display order list. To change the displaypriority, click Set Display Order.
5. On the Authentication and Authorization pages, select the authentication method andgroup authority you want to use when users log on. For more information aboutconfiguring authentication, see Securing User Connections.
6. On the Presentation Server Farms page, add the farms that you want to makeavailable to users through file type association. If you are using the Web Interface todeliver published applications, you do not need to add farms to the logon point. Formore information about using the Web Interface with Advanced Access Control, seeIntegrating Citrix XenApp.
7. Configure options for sound, windows, and Workspace Control.
Note:
Workspace Control allows users to reconnect to their open applications. If users havepop-up blockers enabled, they are prompted to allow each application to open in aseparate window.
8. On the Clients page, select the clients you want to deploy to users during logon.
9. On the Sessions Settings page, set the options for the method of prompting users fortheir domain and the number of days to warn users about password expiration.
Note:
Users who allow their passwords to expire cannot log on to Advanced Access Control.For more information about restoring access to these users, see Changing ExpiredPasswords.
10. On the Session Timeouts page, set the interval, in minutes, for the following time-outsettings:
● Maximum time for VPN client sessions. The length of time a session using theAccess Gateway Plug-in is allowed to remain active. The default value of zeromeans the session remains active indefinitely.
Configuring Logon Points
132

● Maximum time for traffic inactivity before session ends. The length of time abrowser-only session or a session using the Access Gateway Plug-in is allowed toremain active without any traffic activity detected. The default value is 20minutes. You may want to increase this value if users experience excessivetime-outs with features such as Live Edit that do not communicate with theAdvanced Access Control server to keep sessions active. If you enter zero for thissetting, the session will remain active regardless of inactivity.
● Maximum time for mouse and keyboard inactivity before VPN session ends. Thelength of time a session using the Access Gateway Plug-in is allowed to remainactive without any mouse or keyboard input detected. If you enter zero for thissetting, the session remains active regardless of inactivity.
11. On the Visibility page, select whether to show the logon page to users logging onthrough the Access Gateway or to set conditions for showing the logon page to userslogging on to Advanced Access Control directly. The default logon point is always visibleto users logging on through the Access Gateway. For more information about usingconditions for showing the logon page, see Setting Conditions for Showing the LogonPage.
To deploy a logon point1. Click Start > Programs or All Programs > Citrix > Access Gateway > Server
Configuration.
2. From the Configured Logon Points page, select the logon point you want to deploy.
3. Click Deploy.
To redeploy a renamed logon pointIf you rename an existing logon point, you must redeploy it to make it available to users. Toredeploy a renamed logon point, open the Server Configuration utility and select therenamed logon point. Click Update to redeploy the logon point.
Configuring Logon Points
133

134
Logging on through the Logon Point
When you deploy a logon point, a logon point folder is created in a virtual directory namedCitrixLogonPoint. A URL pointing to the logon point folder can be used to access thenetwork. For example:
https://appliancename/CitrixLogonPoint/logonpointname
where appliancename is the FQDN or IP address of the Access Gateway appliance andlogonpointname is the name of the logon point folder.
During installation, Advanced Access Control creates a logon point, calledSampleLogonPoint, that you can use for testing. To access this logon point, you type thefollowing URL:
https://appliancename/CitrixLogonPoint/SampleLogonPoint
where appliancename is the FQDN or IP address of the Access Gateway appliance.
Important: The sample logon point is designed for testing purposes only. Default policiescreated for the sample logon point allow all authenticated users to see the logon pageand to log on. After testing your configuration, replace the sample logon point or editthese policies to comply with your network security guidelines. For more information, seeControlling Access Through Policies.
Users can also access the default logon point by typing the following URL:
https://appliancename/
where appliancename is the FQDN or IP address of the Access Gateway appliance. For moreinformation about default logon points, see Setting the Default Logon Point.
For more information about distributing logon points to users, see Rolling Out AdvancedAccess Control to Users.

135
Updating Logon Page Information
The Access Gateway stores copies of the Web pages and graphic files that comprise thelogon pages users see when they access resources. You must update these files when you:
● Deploy a new logon point
● Customize an existing logon page
● Redeploy a renamed logon point
To update logon page files on the Access Gateway1. Click Start > All Programs > Citrix > Management Consoles > Access Management
Console.
2. In the console tree, expand Logon Points and select the logon point you want toupdate.
3. In Common Tasks, click Refresh logon page information.
If the Access Gateway is unavailable when you perform this task, the console displays anerror message indicating the Access Gateway appliance is out of date. If the AccessGateway becomes available when you rerun the task, the console displays a messageindicating the update was successful.

136
Changing Expired Passwords
The Session Settings page in the logon point properties allows you to specify the number ofdays to warn users about password expiration. Users can change their password at any timeduring this period and continue accessing resources through the logon point. Users whoallow their passwords to expire are denied access and are not prompted to change theirexpired passwords.
To restore access to users with expired passwords, select the User must change passwordat next logon check box in the user’s Windows account properties. The next time the userattempts to log on to Advanced Access Control, the user is prompted to change the expiredpassword.

137
Setting the Default Logon Point
Default logon points enable users to log on to the access server farm through the AccessGateway without specifying a logon point. You can designate a logon point as the defaultusing the console. When you install Advanced Access Control the SampleLogonPoint isdesignated as the default logon point. Only one logon point can be designated as thedefault at any time.
When you set a logon point as the default, the logon point becomes visible automatically tousers logging on through the Access Gateway. If, at a later time, you set a different logonpoint as the default, the logon point remains visible to these users. If you want the logonpoint to be visible only to users logging on to Advanced Access Control within the yournetwork, you must change the visibility settings in the logon point properties. For moreinformation about configuring logon points, see Configuring Logon Points.
To set a default logon point1. Click Start > All Programs > Citrix > Management Consoles > Access Management
Console.
2. In the console tree, expand Logon Points and select the logon point you want todesignate as the default.
3. Under Common Tasks, click Set as default logon point.

138
Removing Logon Points
To remove a logon point from your deployment, you perform the following tasks:
● Remove any policies associated with the logon point
● Delete the logon point from the console
● Remove the logon point’s virtual directory from the Advanced Access Control serverusing the Server Configuration utility
To delete a logon point from the console1. Click Start > All Programs > Citrix > Management Consoles > Access Management
Console.
2. In the console tree, expand Logon Points and then select the logon point you want todelete.
3. Under Common Tasks, click Delete logon point.
To remove a logon point’s virtual directory from theserver
1. Click Start > Programs or All Programs > Citrix > Access Gateway > ServerConfiguration.
2. On the Configured Logon Points page, select the logon point you want to remove.
3. Click Remove.

139
Configuring the Access Gateway
To enable the full range of access control features in Advanced Access Control, youconfigure the settings on the Advanced Options tab in the Access Gateway AdministrationTool. Additionally, you use the Access Management Console to configure the settings thatgovern all the appliances in your access server farm. These settings include:
● Enable split tunneling and specify the networks that can be accessed through the AccessGateway
● Capture system log messages
● Enable Simple Network Management Protocol (SNMP) logs
● Enable features that are controlled by the communication between Advanced AccessControl and the Access Gateway
● Create client access control lists (ACLs)
140
Configuring Split Tunneling
Split tunneling enables user devices to communicate with public Internet resources andyour network concurrently.
Enabling split tunneling can improve the efficiency of the client connection and minimizesthe occurrence of “Access Denied” messages when users access resources on the Internet oryour network. However, split tunneling requires you to configure a list of accessiblenetworks so that users can access internal network resources. If this list is not defined,users cannot access any network resources regardless of any policies granting access.
Disabling split tunneling maximizes the security of client connections and requires noadditional configuration for users to begin accessing network resources. When splittunneling is disabled, all network traffic sent by the Access Gateway Plug-in is routedthrough the Access Gateway, including traffic to public Internet Web sites. Therefore, whenusers log on through the Access Gateway, they can access only the resources you define. Ifa user tries to access a resource that you have not defined, such as a public Web site,access is denied by default.
To configure split tunneling1. Click Start > All Programs > Citrix > Management Consoles > Access Management
Console.
2. In the console tree, select Gateway Appliances and under Common Tasks, click Editgateway appliances properties.
3. On the Accessible Networks page, select or clear the option to enable split tunneling.
4. If you enable split tunneling, click New to configure the list of accessible networks.
5. In the New Accessible Network box, select the addressing method you want to use.
6. Enter the destination IP address and, depending on the selected addressing method, thecorresponding subnet mask or network prefix length.
Configuring Accessible NetworksAccessible networks are the networks and subnets that can be accessed through the AccessGateway when split tunneling is enabled for the Access Gateway Plug-in.
Users can access a server or subnode address provided that address is defined in one of theaccessible networks. When a user logs on using the Access Gateway Plug-in, the accesscontrol list (ACL) received during authorization governs the accessible networks available tothat user.

When using accessible networks, be aware of the following limitations:
● The Access Gateway can recognize only 24 accessible networks. If your organization hasa large number of subnets and you want to enable split tunneling, you may need todefine supersets of networks so that you can define all required networks within the 24recognized accessible networks.
● When you enable split tunneling, all network resources you create in the AccessManagement Console must fall within the accessible networks you define. If you createa network resource that falls outside of these accessible networks, users cannot accessthe resource regardless of any policies granting access.
When you define an accessible network in the Access Management Console, you specify thedestination using either an IP address and subnet mask or the Classless Inter-DomainRouting (CIDR) addressing scheme.
Configuring Split Tunneling
141

142
Forwarding System Messages
System message logs contain information that can help support personnel assist withtroubleshooting. You can forward system messages to a syslog server or enable SNMP logs.
To forward Access Gateway messages to a syslogserver
1. Click Start > All Programs > Citrix > Management Consoles > Access ManagementConsole.
2. In the console tree, select Gateway Appliances and under Common Tasks, click Editgateway appliances properties.
3. On the Syslog and SNMP page under Syslog Settings, type the IP address or the FQDN ofthe syslog server you want to capture system messages sent by the Access Gateway.
4. In Syslog facility, select the facility you want to use for captured messages. Select UserLevel for generic user processes. Select Local Use 0 - 7 if you defined one of thesefacilities for Access Gateway processes. For example, a syslog server may have LocalUse 0 defined for anonymous FTP processes while Local Use 1 is reserved for AccessGateway processes.
5. In Statistics broadcast interval, type the frequency in minutes at which you want theAccess Gateway to send system messages. If the broadcast interval is set to zero,broadcasting is continuous.
To enable logging of SNMP messagesWhen Simple Network Management Protocol (SNMP) is enabled, the Access Gateway reportsthe MIB-II system group (1.3.6.1.2.1). The Access Gateway reports Access Gateway-specificSNMP data.
1. Click Start > All Programs > Citrix > Management Consoles > Access ManagementConsole.
2. In the console tree, select Gateway Appliances and under Common Tasks, click Editgateway appliances properties.
3. On the Syslog and SNMP page under SNMP Settings, select Enable logging of SNMPmessages.
4. In SNMP server name or address, type the location of the SNMP server. This requiredfield is informational only.

5. In Name of SNMP contact or associate, type the contact. This field is informationalonly.
6. In SNMP Community, type the name of the community. This required field isinformational only.
7. In Port, type the port.
Forwarding System Messages
143
144
Configuring Client Properties
The Client Properties page of the Access Gateway appliances properties controls a varietyof settings that affect the interaction between the Access Gateway and the Access GatewayPlug-in.
To configure client properties1. Click Start > All Programs > Citrix > Management Consoles > Access Management
Console.
2. In the console tree, select Gateway Appliances and under Common Tasks, click Editgateway appliances properties.
3. On the Client Properties page, select any of the following check boxes:
● Require SSL client certificate for users connecting through Access Gatewayappliances. If you want additional authentication, select this option to requirecertificates for Windows computers. If a client certificate is required, it must beprovided by the network administrator. The certificate is installed separately intothe certificate store using the Microsoft Management Console. When thisrequirement is enforced, every computer that logs on through the Access Gatewaymust have an SSL client certificate that is in PKCS#12 format.
● Enable internal failover. Select this option to enable the Access Gateway Plug-in toconnect to the Access Gateway from inside the firewall if the Access Gateway IPaddress cannot be reached. When internal failover is configured, the user devicewill failover to the internal IP address of the Access Gateway if the external IPaddress cannot be reached. The must connect at least once to retrieve the failoverlist. This list is then cached in the registry.
Note: Internal failover is not available for browser-only access.
● Enable failover among Access Gateway appliances. You can configure an AccessGateway to failover to multiple Access Gateway appliances. Because the AccessGateway failover is active/active, you can use each Access Gateway as a primarygateway for a different set of users. For more information, see Configuring AccessGateway Failover.
145
Configuring Server Properties
The Server Properties page of the Access Gateway appliances properties controls settingsrelated to securing communications between the Access Gateway and and improving Voiceover IP connections.
To configure server properties1. Click Start > All Programs > Citrix > Management Consoles > Access Management
Console.
2. In the console tree, select Gateway Appliances and under Common Tasks, click Editgateway appliances properties.
3. On the Server Properties page, select Validate SSL certificates on backend.
Select this option to require the Access Gateway to validate SSL server certificates. Thisincreases security for internal connections originating from the Access Gateway.Validating SSL server certificates is an important security measure because it can helpprevent security breaches, such as man-in-the-middle attacks. The Access Gatewayrequires installing the proper root certificates that are used to sign the servercertificates.
4. Select the bulk encryption cipher you want to use for symmetric encryption of dataover SSL connections.
146
Configuring ICA Access Control
Citrix XenApp uses the Independent Computing Architecture (ICA) protocol forcommunication between its client software and servers. When using the Access Gateway asa proxy to tunnel ICA traffic without the Access Gateway Plug-in, you can control whichservers running XenApp that users can access. To do this, you provide an access control list(ACL) in the Access Management Console. When users request published applicationsthrough the Access Gateway, they are granted or denied access based on the ACL youprovide.
If you are using the Web Interface to deliver published applications through the AccessGateway, you must configure the Web Interface’s Secure Gateway settings with the FQDNof the Access Gateway.
Important: ACLs you specify are not applied when published applications are configuredas network resources.
To configure ICA access control1. Click Start > All Programs > Citrix > Management Consoles > Access Management
Console.
2. In the console tree, select Gateway Appliances and under Common Tasks, click Editgateway appliances properties.
3. On the ICA Access Control page, select the option to provide unrestricted access or usean ACL to restrict access to servers running Citrix XenApp.
4. To provide an ACL, click New.
5. In Start IP address and End IP address, type the range of IP addresses of the XenAppservers you want to include.
6. In Port, type the port number or enable the default port.
7. In Protocol, select the protocol you want to use.
● Select ICA to allow ICA/SOCKS connections to the selected servers. Typically, youwould use ICA for servers running XenApp that accept ICA/SOCKS connections.
● Select CGP to allow session reliability for connections to the selected servers.Typically, you would use session reliability for servers running XenApp that acceptsession reliability.
147
Configuring Authentication with CitrixXenApp
Citrix XenApp works with the Web Interface and the Secure Ticket Authority (STA) toprovide authentication and authorization for clients. To provide access to publishedapplications using the Web Interface through the Access Gateway, you must configure theSecure Ticket Authority (STA) settings in the gateway appliances properties. You alsoconfigure these settings to preserve Workspace Control when you enable the display ofmultiple Access Platform sites within the Access Interface.
To configure the Access Gateway to use the SecureTicket Authority
1. Click Start > All Programs > Citrix > Management Consoles > Access ManagementConsole.
2. In the console tree, select Gateway Appliances and under Common Tasks, click Editgateway appliances properties.
3. On the Secure Ticketing Authority page, click New.
4. Type the IP address or FQDN of the server where the STA is installed.
5. Select Use secure communication to secure the connection to the STA.
6. In STA Path, type the path of the STA.
7. In STA ID, type the ID of the STA or click Retrieve STA ID to automatically enter the IDbased on the server and path.

148
Securing User Connections
Access Gateway Advanced Edition supports authentication and authorization for usersconnecting from remote locations. Advanced Access Control supports several authenticationtypes including Active Directory, LDAP, RADIUS, RSA SecurID, and Secure ComputingSafeword products.
You can enable these authentication types by configuring the Logon Point Properties in theAccess Management Console. When you configure a logon point, you select theauthentication and authorization methods you want to use. For example, you can selectLDAP to authenticate users and Active Directory to authorize users to access certaincorporate resources.
● Configuring Advanced Authentication
● Configuring RADIUS and LDAP Authentication
● Configuring RSA SecurID Authentication
● Configuring SafeWord Authentication
● Configuring Trusted Authentication

149
Configuring Advanced Authentication
Advanced authenticating allows you to authenticate users using Active Directory andanother authentication type, such as RADIUS or SafeWord. This is also known as doublesource authentication.
Access Gateway Advanced Edition supports using Active Directory as the only authenticatorand group authority as well as with another authentication method such as RADIUS, RSASecurID, or SafeWord. When you configure advanced authentication, only Active Directory isallowed as the group authority for the logon point you want to use.
To use RADIUS with Access Gateway Advanced Edition, Visual J# .NET 2.0 must be installedon the Advanced Access Control server. See RADIUS Requirements.
To configure a logon point with advancedauthentication
If you are configuring advanced authentication with RADIUS, ensure you configure a RADIUSauthentication profile before you configure the logon point. See Creating RADIUSAuthentication Profiles.
1. Click Start > All Programs > Citrix > Management Consoles > Access ManagementConsole.
2. In the console tree, select the logon point you want to configure. For more informationabout creating a new logon point, see Configuring Logon Points.
3. On the Authentication page, under Advanced Authentication select the authenticationmethod you want to use with Active Directory.
4. On the Authorization page, only Active Directory is selected. If you are using a RADIUSprofile with Active Directory, select whether or not the RADIUS and Active Directoryservers use the same password.
If you are configuring advanced authentication with RADIUS, you need to set the RADIUSauthentication credentials for the logon point. For more information, see SettingAuthentication Credentials for Logon Points.
For more information about configuring advanced authentication for SecurID and SafeWordproducts, see Configuring RSA SecurID Authentication and Configuring AdvancedAuthentication with SafeWord.
150
Configuring RADIUS and LDAPAuthentication
To use RADIUS or LDAP authentication when users log on through a logon point, perform thefollowing tasks:
● Install and configure a RADIUS or LDAP server
● Create RADIUS or LDAP authentication profiles
● Assign the authentication profile to a logon point
● Set the authentication credentials for the logon point
To use RADIUS with Access Gateway Advanced Edition, Visual J# .NET 2.0 must be installedon the Advanced Access Control server. For more information, see RADIUS Requirements.

151
Creating RADIUS Authentication Profiles
Authentication profiles allow you to configure RADIUS settings at the farm level and applythem to one or more logon points. Creating a RADIUS authentication profile involves thefollowing tasks:
● Define RADIUS server authentication to specify the RADIUS servers you want to use, thetime-out period, and to configure server load balancing or failover
● Define RADIUS authorization using the attributes and values configured on your RADIUSserver
To define RADIUS authentication1. Click Start > All Programs > Citrix > Management Consoles > Access Management
Console.
2. In the console tree, select the access server farm node and under Common Tasks, clickEdit farm properties.
3. Select Authentication Profiles and then click New under RADIUS profiles. Type a nameand description to define the profile.
4. Click New to enter the RADIUS server and corresponding ports.
5. If you have multiple RADIUS servers, select to use the server list for one of thefollowing:
● Load balancing of requests to the servers. Requests follow the sequence of theserver list so that the initial request goes to the first server in the list, the nextrequest goes to the second server, and so on.
● Failover sequence of communication if servers become unavailable. In the eventconnectivity to a server becomes unavailable, connectivity with another server inthe list ensures RADIUS authentication services remain available to users.
6. Use the arrows to change a server’s position in the list.
7. Change the value in the Bypass failed servers for this time interval field if you want tospecify the amount of time an unavailable server should be bypassed. The default valueis 300 seconds.
8. If you want to audit RADIUS events, select Enable RADIUS auditing.
9. If you want to change the period in which the user authentication process times out forlack of a server response, change the value in the Cancel authentication after thistime field. By default, authentication times out after 30 seconds elapse.

To define RADIUS authorization1. From the RADIUS Profile Configuration dialog box, click Configure Authorization.
2. In Group attribute name, type the group name that is defined on your RADIUS server.
3. Type the Separator you want to use if multiple user groups are included in the RADIUSconfiguration. A separator can be a period, a semicolon, or a colon.
4. In the Vendor identifier field, type the vendor-specific code number that was enteredon your RADIUS server.
5. In the Vendor specified type field, type the vendor-assigned attribute number.
Creating RADIUS Authentication Profiles
152

153
Creating LDAP Authentication Profiles
Authentication profiles allow you to configure LDAP settings at the farm level and applythem to one or more logon points. When using LDAP authentication and Active Directoryauthorization, group names, including character and case, must be identical.

To create an LDAP authentication profile1. Click Start > All Programs > Citrix > Management Consoles > Access Management
Console.
2. In the console tree, select the access server farm node and under Common Tasks, clickEdit farm properties.
3. Select Authentication Profiles and then click New under LDAP profiles.
4. Type a name and description to define the profile.
5. Type the name or IP address of the LDAP server you want to use.
6. In Port, type the server port number that your LDAP server uses for LDAP requests.
7. In Administrator DN, type the distinguished name of the administrative user that hasaccess to your LDAP server and the rights to look up user entries in the LDAP repository.The following are examples of syntax for this field:
“domain/user name”“ou=administrators,dc=ace,dc=com”“[email protected]” (for Active Directory)“cn=Administrator,cn=Users,dc=ace,dc=com”
For Active Directory, the group name, specified as cn=groupname, is required. Thegroup name that is defined in the Access Gateway must be identical to the group namethat is defined on the LDAP server.
For other LDAP directories, the group name either is not required or, if required, isspecified as ou=groupname.
The Access Gateway binds to the LDAP server using the administrator credentials andthen searches for the user. After locating the user, the Access Gateway unbinds theadministrator credentials and rebinds with the user credentials.
8. In Base DN, type the distinguished name under which user lookups should begin. BaseDN is usually derived from the Bind DN by removing the user name and specifying thegroup where users are located. Examples of syntax for Base DN include:
“ou=users,dc=ace,dc=com”“cn=Users,dc=ace,dc=com”
9. In LDAP attribute for user logon names, type the attribute under which the AccessGateway should look for user logon names for the LDAP server that you are configuring.Depending on the directory service you are using, type one of the following attributes:
● For Active Directory, use the default sAMAccountName.
● For Novell eDirectory or Lotus Domino, use cn.
● For IBM Directory Server, use uid.
● For Sun ONE Directory , use uid or cn.
Creating LDAP Authentication Profiles
154

10. In LDAP group attribute, type the name of the group attribute the Access Gatewayshould use to obtain the groups associated with a user during authorization. Dependingon the directory service you are using, type one of the following attributes:
● For Active Directory, use the default memberOf.
● For Novell eDirectory, use groupMembership.
● For IBM Directory Server, use ibm-allGroups.
● For Sun ONE Directory, use nsRole.
Creating LDAP Authentication Profiles
155
156
Assigning Authentication Profiles toLogon Points
After you configure RADIUS or LDAP authentication profiles, you must assign these profilesto a logon point. You can assign authentication profiles in the logon point properties, on theAuthentication and Authorization pages.
You can use RADIUS profiles as the sole authentication method or as part of advancedauthentication with Active Directory. You can use LDAP profiles as the sole authenticationmethod only.
If you assign an LDAP profile to authenticate users, you can use Active Directory or an LDAPprofile to authorize users. If you assign a RADIUS profile for authentication, you can choosethe LDAP or RADIUS profile for authorization. When using a RADIUS profile forauthentication, you must use the same profile for authorization.
When you use RADIUS or LDAP profiles, you can specify how users access resources thatrequire Active Directory credentials. In an advanced authentication scenario where ActiveDirectory is the group authority, you can specify whether the Active Directory and RADIUSservers share the same password. In scenarios where RADIUS or LDAP authenticate andauthorize users, you can enable pass-through authentication to Active Directory. This allowsusers to access resources smoothly, without entering their Active Directory credentials. Todo this, you supply the default Active Directory domain. User accounts in the default ActiveDirectory domain match those on your RADIUS or LDAP servers.
To assign authentication profiles to a logon point1. Click Start > All Programs > Citrix > Management Consoles > Access Management
Console.
2. In the console tree, select the logon point you want to configure and under CommonTasks, click Edit logon point. For more information about creating a new logon point,see Configuring Logon Points.
3. On the Authentication page, select the RADIUS or LDAP profile you want to use toidentify users in your organization.
4. On the Authorization page, select the RADIUS or LDAP profile you want to use todetermine the level of access users receive when they authenticate successfully.
After you assign the authentication profile to the logon point, use the Server Configurationutility to set the authentication credentials for the profile.

157
Setting Authentication Credentials forLogon Points
Logon point authentication credentials consist of the global or server-specific RADIUSsecrets or LDAP passwords that you specify. Before you set the authentication credentials,ensure a RADIUS or LDAP authentication profile has been assigned to the logon point.
If your deployment is configured to use RADIUS authentication, and your RADIUS server isconfigured to use Password Authentication Protocol (PAP), you can strengthen userauthentication at the logon point by assigning a strong shared secret to the RADIUS server.Strong RADIUS shared secrets consist of random sequences of upper and lowercase letters,numbers, and punctuation and are at least 22 characters long. If possible, use a randomcharacter generation program to create RADIUS shared secrets.
To further protect RADIUS traffic, assign a different shared secret to each Access Gatewayappliance or each Advanced Access Control server. When you define users on the RADIUSserver, you can also assign a separate shared secret to each user. If you do this, you mustconfigure separately each Access Gateway realm that uses RADIUS authentication. If yousynchronize configurations among several Access Gateway appliances in a cluster, all theappliances will be configured with the same secret.
To assign RADIUS shared secrets1. On the Advanced Access Control server, click Start > Programs or All Programs > Citrix
> Access Gateway > Server Configuration.
2. Click Configured Logon Points and then select the logon point that you have configuredto use RADIUS authentication.
3. Click Authentication Credentials.
4. Under RADIUS Servers, select Global secret for all servers or Server specific secrets.
5. Type the global secret in the Authentication secret and Confirm authenticationsecret boxes.
6. For server-specific secrets, double-click the IP address of the RADIUS server and enterthe secret in the Server Credential box.
To assign LDAP server passwords1. On the Advanced Access Control server, click Start > Programs or All Programs > Citrix
> Access Gateway > Server Configuration.
2. Click Configured Logon Points and then select the logon point that you have configuredto use LDAP authentication.
3. Click Authentication Credentials.
4. Under LDAP Servers, select Global password for all servers or Server specific secrets.
5. Type the global password in the Authentication secret and Confirm authenticationsecret boxes.
6. For server-specific passwords, double-click the IP address of the LDAP server and enterthe password in the Server Credential box.
Setting Authentication Credentials for Logon Points
158
159
Configuring RSA SecurID Authentication
If you use RSA SecurID for authentication, you can configure Access Gateway AdvancedEdition to authenticate user access with the RSA ACE/Server. The Advanced Access Controlserver acts as an RSA Agent Host to authenticate users who attempt to log on.
You can configure the Advanced Access Control server to authenticate with RSA SecurID inthe following ways:
● With Active Directory, as an advanced authentication method
● As the only authentication method, where LDAP is used as the group authority
Configuring RSA SecurID authentication consists of the following tasks:
● Configure the Advanced Access Control server(s) as an RSA ACE/Agent and generate aSdconf.rec file
● Generate an Sdroot certificate file for the Advanced Access Control server(s) and installthe RSA ACE/Agent software
● Test authentication with the RSA SecurID server
● Configure a logon point for RSA SecurID authentication
If you are using RSA SecurID as the only authentication method, ensure you have performedthe following tasks prior to configuring the logon point:
● Create an LDAP authentication profile
● Assign the authentication profile to the logon point
● Set the authentication credentials for the logon point
For more information, see Creating LDAP Authentication Profiles, Assigning AuthenticationProfiles to Logon Points and Setting Authentication Credentials for Logon Points.
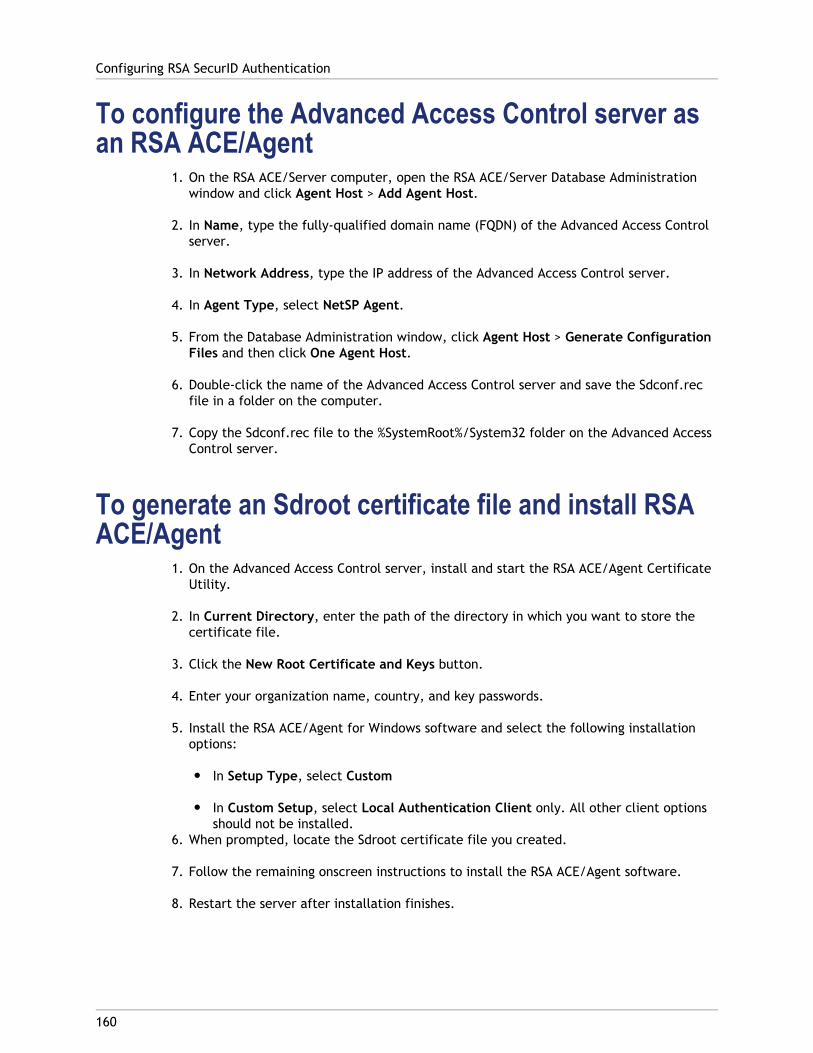
To configure the Advanced Access Control server asan RSA ACE/Agent
1. On the RSA ACE/Server computer, open the RSA ACE/Server Database Administrationwindow and click Agent Host > Add Agent Host.
2. In Name, type the fully-qualified domain name (FQDN) of the Advanced Access Controlserver.
3. In Network Address, type the IP address of the Advanced Access Control server.
4. In Agent Type, select NetSP Agent.
5. From the Database Administration window, click Agent Host > Generate ConfigurationFiles and then click One Agent Host.
6. Double-click the name of the Advanced Access Control server and save the Sdconf.recfile in a folder on the computer.
7. Copy the Sdconf.rec file to the %SystemRoot%/System32 folder on the Advanced AccessControl server.
To generate an Sdroot certificate file and install RSAACE/Agent
1. On the Advanced Access Control server, install and start the RSA ACE/Agent CertificateUtility.
2. In Current Directory, enter the path of the directory in which you want to store thecertificate file.
3. Click the New Root Certificate and Keys button.
4. Enter your organization name, country, and key passwords.
5. Install the RSA ACE/Agent for Windows software and select the following installationoptions:
● In Setup Type, select Custom
● In Custom Setup, select Local Authentication Client only. All other client optionsshould not be installed.
6. When prompted, locate the Sdroot certificate file you created.
7. Follow the remaining onscreen instructions to install the RSA ACE/Agent software.
8. Restart the server after installation finishes.
Configuring RSA SecurID Authentication
160
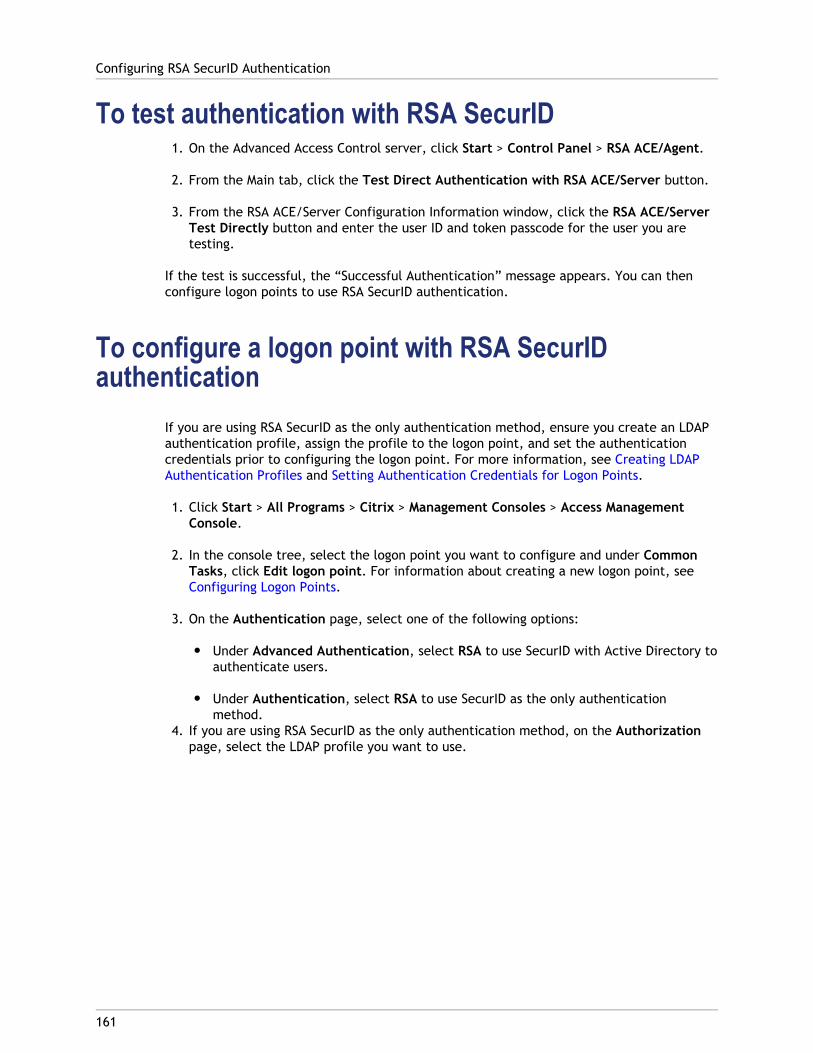
To test authentication with RSA SecurID1. On the Advanced Access Control server, click Start > Control Panel > RSA ACE/Agent.
2. From the Main tab, click the Test Direct Authentication with RSA ACE/Server button.
3. From the RSA ACE/Server Configuration Information window, click the RSA ACE/ServerTest Directly button and enter the user ID and token passcode for the user you aretesting.
If the test is successful, the “Successful Authentication” message appears. You can thenconfigure logon points to use RSA SecurID authentication.
To configure a logon point with RSA SecurIDauthentication
If you are using RSA SecurID as the only authentication method, ensure you create an LDAPauthentication profile, assign the profile to the logon point, and set the authenticationcredentials prior to configuring the logon point. For more information, see Creating LDAPAuthentication Profiles and Setting Authentication Credentials for Logon Points.
1. Click Start > All Programs > Citrix > Management Consoles > Access ManagementConsole.
2. In the console tree, select the logon point you want to configure and under CommonTasks, click Edit logon point. For information about creating a new logon point, seeConfiguring Logon Points.
3. On the Authentication page, select one of the following options:
● Under Advanced Authentication, select RSA to use SecurID with Active Directory toauthenticate users.
● Under Authentication, select RSA to use SecurID as the only authenticationmethod.
4. If you are using RSA SecurID as the only authentication method, on the Authorizationpage, select the LDAP profile you want to use.
Configuring RSA SecurID Authentication
161

162
Configuring SafeWord Authentication
The SafeWord product line provides secure authentication using a token-based passcode.Once the passcode is used, it is immediately invalidated by SafeWord and cannot be usedagain. Access Gateway Advanced Edition supports authentication with SafeWord for Citrixand SafeWord PremierAccess.
You can configure the Advanced Access Control server to authenticate with SafeWord in thefollowing ways:
● With Active Directory, as an advanced authentication method
● As the only authentication method, where LDAP is used as the group authority
● With RADIUS, where the Advanced Access Control server acts as a RADIUS client to aserver configured with Microsoft Internet Authentication Service (IAS)

163
Configuring Advanced Authentication withSafeWord
When you configure advanced authentication, Active Directory works with SafeWord toauthenticate users and determines the level of access users have once they log on. Toconfigure advanced authentication with SafeWord, perform the following tasks:
● Install and configure the SafeWord for Citrix Secure Access Manager Agent on theAdvanced Access Control server. Citrix strongly recommends obtaining the latestversion of the agent software from Aladdin to ensure SafeWord authentication issuccessful. Refer to the Aladdin product documentation for information aboutconfiguring the agent.
● Create a logon point and configure authentication and authorization using the AccessManagement Console.
To configure advanced authentication with SafeWord1. On the Advanced Access Control server, install the SafeWord for Citrix Secure Access
Manager agent software located on the SafeWord product CD. When prompted, acceptthe option to use the latest agent software from Aladdin and then select the SecureAccess Manager Agent option.
2. Restart the Advanced Access Control services. You can use the Server Configurationutility to restart all the services simultaneously.
3. Restart the Citrix Access Gateway Server COM+ application from the ComponentServices console.
4. Click Start > All Programs > Citrix > Management Consoles > Access ManagementConsole.
5. From the console tree, select the logon point you want to configure and under CommonTasks, click Edit logon point. For more information about creating a new logon point,see Configuring Logon Points.
6. On the Authentication page, under Advanced Authentication, select SafeWord.

164
Configuring Authentication with SafeWordOnly
When you configure SafeWord as the only authentication method for users, you must useLDAP as the group authority. If you want to use SafeWord as the sole authenticationmethod, perform the following tasks:
● Install and configure the SafeWord for Citrix Secure Access Manager Agent on theAdvanced Access Control server. Citrix recommends obtaining the latest version of theagent software from Aladdin to ensure SafeWord authentication is successful. Refer tothe product documentation for information about configuring the agent.
● Create an LDAP authentication profile that you can assign to the logon point as thegroup authority.
● Create a logon point and configure authentication and authorization using the AccessManagement Console.
● Set the authentication credentials for the logon point.
To configure authentication with SafeWord only1. On the Advanced Access Control server, install the SafeWord for Citrix Secure Access
Manager agent software located on the SafeWord product CD. When prompted, acceptthe option to use the latest agent software from Aladdin and then select the SecureAccess Manager Agent option.
2. Restart the Advanced Access Control services. You can use the Server Configurationutility to restart all the services simultaneously.
3. Restart the Citrix Access Gateway Server COM+ application from the ComponentServices console.
4. Create an LDAP authentication profile.
5. Click Start > All Programs > Citrix > Management Consoles > Access ManagementConsole.
6. From the console tree, select the logon point you want to configure and under CommonTasks, click Edit logon point.
7. On the Authentication page, select SafeWord.
8. On the Authorization page, select the LDAP authentication profile you want to use.
To complete the configuration, you need to set the authentication credentials for the logonpoint to which you assigned the LDAP profile. For more information, see SettingAuthentication Credentials for Logon Points.

Configuring Authentication with SafeWord Only
165

166
Configuring RADIUS with SafeWord
To authenticate users, SafeWord uses the RADIUS protocol, Microsoft InternetAuthentication Service (IAS), and a user database stored on an Active Directory server.
To use RADIUS with Access Gateway Advanced Edition, Visual J# .NET 2.0 must be installedon the Advanced Access Control server. For more information, see RADIUS Requirements.
If you want to use RADIUS with either SafeWord product, perform the following tasks:
● Configure Microsoft Internet Authentication Service (IAS) on a separate server andconfigure the Advanced Access Control server as a RADIUS client.
● Create a RADIUS authentication profile for the IAS server. If you want to use LDAP asthe group authority instead of RADIUS, you must also create an LDAP authenticationprofile. For more information, see Configuring RADIUS and LDAP Authentication.
● Assign the RADIUS authentication profile to the logon point. If you use LDAP as thegroup authority, you must also assign the LDAP authentication profile to the logonpoint. For more information, see Assigning Authentication Profiles to Logon Points.
● Set the RADIUS authentication credentials for the logon point. If you use LDAP as thegroup authority, you must also set the LDAP authentication credentials. For moreinformation, see Setting Authentication Credentials for Logon Points.
● On the SafeWord server, install and configure the SafeWord IAS Agent software.
To configure IAS and configure a RADIUS clientBefore proceeding, ensure IAS is installed on a server in your environment. You can installIAS using Add/Remove Programs in Control Panel. For more information, see the Windowsonline help.
1. Open the Microsoft Management Console (MMC) and install the snap-in for IAS.
2. In the left pane, right-click Remote Access Policies and select New Remote AccessPolicy. The New Remote Access Policy Wizard appears.
3. Complete the wizard, using the following settings:
● Set up a custom policy and then type a unique policy name.
● Select Windows Groups for the policy and select the group(s) containing the usersto be authenticated with SafeWord
● Select Grant remote access permission and click Edit Profile.

● On the Authentication tab, clear the check boxes selected by default and thenselect only Unencrypted authentication (PAP, SPAP).
● Click the Advanced tab and remove the attributes that appear by default. Then,add the Vendor Specific RADIUS Standard attribute.
● In the Vendor-specific Attribute Information box, select Yes to specify that theattribute conforms to the RADIUS RFC specification.
● Click Configure Attribute and enter the following settings:
● In Vendor-assigned attribute number, type 0.
● In Attribute Format, select String.
● In Attribute value, enter the group name(s) you specified for the policy. Forexample, if you specified the Sales and Finance groups, you enterCTXSUserGroups=sales;finance.
4. From the left pane of the MMC, right-click RADIUS Clients and select New RADIUSClient.
5. Type a name for the client and enter the IP address or the FQDN of the AdvancedAccess Control server.
6. Ensure RADIUS Standard is selected and then provide a shared secret that theAdvanced Access Control server can use to authenticate with the RADIUS server.
To configure the SafeWord IAS Agent1. Launch the IAS Agent by clicking Start > Programs or All Programs > Secure Computing
> SafeWord > IAS Agent > Configure IAS Agent.
2. Click Authentication Engine and enter the host name or IP address of theauthentication engine.
3. Click Groups and enter the user group and domain of the users using SafeWord tokens.
Configuring RADIUS with SafeWord
167

168
Configuring Trusted Authentication
To further strengthen your Access Gateway environment, you can ensure that each AccessGateway that connects to an Advanced Access Control server is a trusted device. To do this,you configure each Access Gateway to present a client certificate when prompted. Then,you configure each Advanced Access Control server to request the client certificate fromeach Access Gateway in your environment.
Configuring the Access Gateway for TrustedAuthentication
Before you configure the Access Gateway, ensure that:
● The Access Gateway uses SSL to communicate with the Advanced Access Control server.This is required because the virtual directories the Access Gateway must access on theAdvanced Access Control server are secured.
● The Access Gateway trusts the root certificate for the certificate authority that issuedthe client certificate. If not, you will need to install it as a trusted root certificate.
● You have obtained a client certificate from a recognized certificate authority so youcan install it on the Access Gateway.
To verify the Access Gateway is using SSL1. In the Administration Tool, on the Access Gateway Cluster tab, open the window for an
appliance.
2. Click the Advanced Options tab.
3. To enable SSL communication, select the Secure server communication check box.
To install the root certificate as a trusted certificateBefore you install the root certificate, check to be sure it conforms to the Base64 fileformat. Access Gateway does not recognize other formats as valid.
1. In the Administration Tool, on the Access Gateway Cluster tab, open the window for anappliance.
2. Click the Administration tab.
3. Next to Manage trusted root certificates, click Manage.
4. In Trusted Root Certificate Management, click the Manage tab.
5. Click Upload Trusted Root Certificate.

6. Select the root certificate you want to install.
7. Restart the Access Gateway.
After the Access Gateway restarts, verify the root certificate appears on the TrustedIssuers tab of the Trusted Root Certificate Management window. You can then install theclient certificate.
To install the client certificate on the Access Gateway1. In the Administration Tool, on the Access Gateway Cluster tab, open the window for an
appliance.
2. Click the Administration tab and next to Upload a .pem private key and signedcertificate, click Browse.
3. Navigate to the client certificate and enter the passphrase when prompted.
4. Restart the Access Gateway.
After you install the client certificate, you can configure the Advanced Access Controlserver to require the certificate from the Access Gateway.
Configuring Advanced Access Control for TrustedAuthentication
To configure the Advanced Access Control server to request the client certificate from eachAccess Gateway in your environment, you perform the following tasks:
1. Create or assign a server certificate
2. Add the root certificate from the certificate authority that issued the Access Gatewayclient certificate to the Certificate Trust List on the server
3. Configure the virtual directories that the Access Gateway will access to require clientcertificates
To create or assign a server certificate1. Click Start > All Programs > Administrative Tools > Internet Information Services (IIS)
Manager.
2. Expand the local computer node and the Web Sites node.
3. Right-click the Default Web Site node and click Properties.
4. Click the Directory Security tab and under Secure communications, click ServerCertificate.
5. Follow the onscreen instructions in the IIS Certificate Wizard to create a new servercertificate or assign an existing certificate.
Configuring Trusted Authentication
169

After the server certificate is assigned, you can add the root certificate to the server’sCertificate Trust List and configure the server to require client certificates.
To add the root certificate to the Advanced Access Control
server’s Certificate Trust List1. Open Internet Information Services (IIS) Manager and locate the Default Web Site node.
2. Right-click the Default Web Site node and click Properties.
3. Click the Directory Security tab and under Secure communications, click Edit.
4. Click Enable certificate trust list.
5. Click New and follow the instructions to complete the Certificate Trust List wizard. Thiswizard allows you to add the root certificate that matches the Access Gateway’s clientcertificate to the Certificate Trust List.
To configure the server to require client certificates1. In Internet Information Services (IIS) Manager, expand the Default Web Site node and
locate the CitrixGatewayConfigService node.
2. Right-click the CitrixGatewayConfigService node and click Properties.
3. On the Directory Security tab, under Secure communications, click Edit.
4. Click Require secure channel.
5. Under Client certificates, click Require client certificates.
6. In Internet Information Services (IIS) Manager, right-click the CitrixLogonAgentServicenode and select Properties.
7. On the Directory Security tab, under Secure communications, click Edit.
8. Click Require secure channel.
9. Under Client certificates, click Require client certificates.
Configuring Trusted Authentication
170

171
Adding Resources
To control your network resources with Advanced Access Control, you add them to theconsole and then create policies for them.
Resources include applications, Web sites, portals, file shares, services, servers, email, andemail synchronization—essentially any resource that you want to provide for user access.

172
Creating Network Resources for VPNAccess
Use network resources to define subnets or servers in your network that users can connectto directly through the Access Gateway using the Access Gateway Plug-in. By default, usersare denied access to network resources until you create policies that grant them accesspermission.
To create a network resource1. Click Start > All Programs > Citrix > Management Consoles > Access Management
Console.
2. In the console tree, select Network Resources and under Common Tasks, click Createnetwork resource.
3. In the New Network Resource wizard, enter a name and description for the resource.
4. On the Specify Servers and Ports page, click New to add network identification, port,and protocol information for the resource.
● To define entire subnets, specify network addresses with subnet masks. Forexample, to define all servers on the 10.x.x.x network, specify a subnet mask of255.0.0.0. To define a single server, you can define a specified network IP addresssuch as 10.2.3.4 with subnet mask 255.255.255.255.
● For Port, you can specify multiple ports or port ranges by separating each port witha comma and hyphenating ranges. For example, the entry “22,80,110-120” meansthat the resource uses port 22, port 80, and all ports between and including110-120.
● The Access Gateway Plug-in listens on the specified port.5. Specify whether or not to create a default policy. If you create a default policy, you
can edit its properties later.
After defining a network resource, you can create policies that control its user access andconnection settings.
The only access control permission you can grant for a network resource is to allow or denyaccess. Because users connect directly to the services defined by the specified port ornetwork subnode, the Web proxy is not used. Connecting to resources through the Webproxy is required if you want to tailor the level of access with action controls such as HTMLPreview and Live Edit.
When users connect with the Access Gateway Plug-in they can view a list of their networkresources in the client properties.

Using the Entire Network ResourceThe Entire Network resource is a built-in resource you can use to grant or deny the AccessGateway Plug-in access to all servers and services on the secure network.
The definition of the “entire network” might be limited in scope if you have enabled splittunneling in the global properties for the Access Gateway appliances. If split tunneling isenabled, the Entire Network resource does not override the definition of accessiblenetworks. In other words, when split tunneling is enabled, the Entire Network resourceequals the definition you have configured for accessible networks. For more informationabout split tunneling and accessible networks, see Configuring Split Tunneling.
Note: Entire Network includes all resources in the secure network, including servers orsubnets you add later. For example, if you create an access policy that includes EntireNetwork and later add a server to the network, the new server is controlled by thesettings of the existing policy.
For more information about creating policies that include Entire Network, see GrantingAccess to the Entire Network.
Defining Resources to Avoid ConflictsBecause you have multiple choices for configuring your network resources, you can createresources that overlap. For example, you can create a file share resource for File Share Bon Server A and also create a network resource for Server A. Both of these resourcesoverlap by including File Share B.
If you assign overlapping resources to different policies, it is possible to create conflictsbetween the action controls provided for the same network resource.
Overlapping definitions arise if you use network resources to provide access to entireservers, networks, or subnets and simultaneously use file shares and Web resources todefine parts of the same servers, networks, and subnets. The following bullets describe ascenario in which such an overlap exists:
● Server A is a file share server for which you define a network resource. A policyassigned to the network resource allows all company employees access to the serverwhen they use a trusted client device and the advanced authentication combination ofActive Directory with RSA SecurID.
● File Share B is a shared folder on Server A.
● You define File Share B as a file share resource for browser access. You assign this fileshare to a policy that allows access if users are using a logon point visible only from theinternal company network.
Although your intention with the second policy above is to restrict the access to File ShareB, the actual result is that the first policy allows users full access to File Share B through aVPN tunnel to the entire server.
To avoid conflicts:
Creating Network Resources for VPN Access
173

● Define network resources so that they do not overlap with browser-based resources (fileshares and Web resources).
● Assign overlapping resources to the same policy.
Creating Network Resources for VPN Access
174
175
Creating Web Resources
Web resources define the Web pages, sites, or applications that you want to secure withpolicies. You can group multiple URLs and define them as a single Web resource.
By default, users are denied access to a Web resource until you create policies that grantsaccess permission.
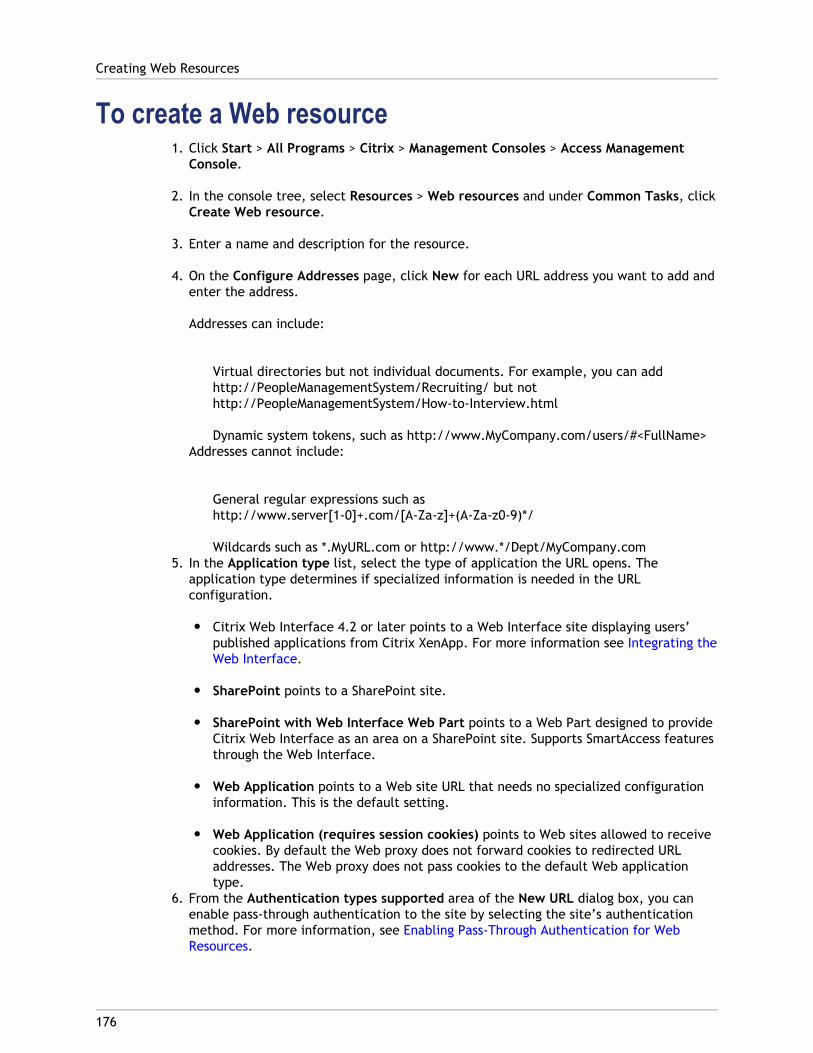
To create a Web resource1. Click Start > All Programs > Citrix > Management Consoles > Access Management
Console.
2. In the console tree, select Resources > Web resources and under Common Tasks, clickCreate Web resource.
3. Enter a name and description for the resource.
4. On the Configure Addresses page, click New for each URL address you want to add andenter the address.
Addresses can include:
Virtual directories but not individual documents. For example, you can addhttp://PeopleManagementSystem/Recruiting/ but nothttp://PeopleManagementSystem/How-to-Interview.html
Dynamic system tokens, such as http://www.MyCompany.com/users/#<FullName>Addresses cannot include:
General regular expressions such ashttp://www.server[1-0]+.com/[A-Za-z]+(A-Za-z0-9)*/
Wildcards such as *.MyURL.com or http://www.*/Dept/MyCompany.com5. In the Application type list, select the type of application the URL opens. The
application type determines if specialized information is needed in the URLconfiguration.
● Citrix Web Interface 4.2 or later points to a Web Interface site displaying users’published applications from Citrix XenApp. For more information see Integrating theWeb Interface.
● SharePoint points to a SharePoint site.
● SharePoint with Web Interface Web Part points to a Web Part designed to provideCitrix Web Interface as an area on a SharePoint site. Supports SmartAccess featuresthrough the Web Interface.
● Web Application points to a Web site URL that needs no specialized configurationinformation. This is the default setting.
● Web Application (requires session cookies) points to Web sites allowed to receivecookies. By default the Web proxy does not forward cookies to redirected URLaddresses. The Web proxy does not pass cookies to the default Web applicationtype.
6. From the Authentication types supported area of the New URL dialog box, you canenable pass-through authentication to the site by selecting the site’s authenticationmethod. For more information, see Enabling Pass-Through Authentication for WebResources.
Creating Web Resources
176
7. Select the option to publish in users’ lists of resources if you want this resource toappear on the Access Interface.
● The home page must be a page within the exact URL you specify in Step 3. Forexample, if you enter http://MyCompany.net for the resource address, you canspecify a page within that site, such as http://MyCompany.net/Finance.aspx.
● If your directory service uses the homepage token, you can enter #<HomePage> forthe URL home page. For more information about using tokens, see Using DynamicSystem Tokens.
Note: If you are enabling Advanced Access Control to display multiple Citrix AccessPlatform sites within the Access Interface, you must publish the site so you canassociate it with a server farm. For more information, see Displaying Multiple Sitesand Caching Credentials.
8. Select the option to use an interface that is common for all browser types if users arenot allowed to use ActiveX controls or use a variety of browser versions. Selecting thisoption presents users with a generic interface that does not require advanced browsertechnologies such as ActiveX.
9. Specify whether or not to create a default policy. If you create a default policy, youcan edit its properties later.
Including Related FilesFor Web sites, make sure when you create the resource that you include all the necessaryfiles required by the pages of the Web site, such as image files that might be stored in aseparate location or separate server. For example, if a site such as www.citrix.com usesimages stored on www.webimages.site.com, add the URL www.webimages.site.com to theWeb resource.
Configuring Sites Secured with SSLWhen creating Web resources that contain URL addresses secured with Secure Sockets Layer(SSL), you must ensure that all servers in the access server farm with the role of Web serverhave the root certificate for the secured URL addresses.
This requirement does not apply if the Web proxy is bypassed for access to the serverhosting the URL address. For more information about bypassing URL rewriting, seeBypassing URL Rewriting.
Web Resources that Keep Sessions AliveUser sessions for Web resources and applications normally time out according to thetime-out settings of the logon point through which users connect.
Creating Web Resources
177

Note that when users view a Web resource that uses a keep-alive mechanism, the sessionremains open until the user closes the window displaying the Web resource. An example ofsuch a resource is Microsoft Outlook Web Access, which performs regular polling to discovernew email messages. This polling keeps the user’s session open until the Outlook WebAccess window is closed.
Creating Web Resources
178

179
Enabling Pass-Through Authentication forWeb Resources
You can pass user credentials to Web servers on the secured network configured for Basic,Digest, or Integrated Windows Authentication. This feature avoids requiring users to entertheir credentials multiple times to access Web resources. For example, if a team Web sitein your organization is configured for Digest Authentication, you can pass the credentialswith which users log on to the Access Gateway to that site. If you do not enable the URLaddress to support Digest Authentication, users might be required to log on to the Web site.
Note that the authentication required for a Web site is determined by the settings of thesite’s host Web server.
When configuring a Web resource, you can enable its URL addresses to use one of thefollowing methods of pass-through authentication:
● Basic authentication. Credentials are passed to the Web site in plain text.
Important: Because credentials are passed in plain text, consider using SSL for Websites that use Basic pass-through authentication.
● Digest authentication. Hashed credentials are passed to the Web site using DigestAuthentication.
● Integrated Windows authentication. Hashed credentials are passed to the Web siteusing Integrated Authentication. NTLM or Kerberos authentication is used, depending onyour Web server configuration.
Caution: When using any of the three pass-through authentication methods, the targetWeb application is first presented with the credentials with which the user logged on tothe Access Gateway. Accessing Web sites that require a second, differing set ofcredentials through Access Gateway can result in the caching of the second set ofcredentials.
To specify pass-through authentication for a Web site1. Click Start > All Programs > Citrix > Management Consoles > Access Management
Console.
2. In the console tree, select the Web resource and under Common Tasks, click Edit Webresource.
3. On the URL Addresses page, select the Web site’s URL and click Edit.
4. In the Authentication types supported area, select the authentication method beingused by the Web site.
Configuring Sites with Form-Based AuthenticationWeb sites that require form-based authentication must be configured with the applicationtype of Web application.
Each URL defined in a Web resource is assigned an application type. For URLs that areassigned the application type Web Application, credentials are not passed and users mightneed to log on to the Web site. This is the default setting. You must use this option for sitesthat require form-based authentication.
Enabling Pass-Through Authentication for Web Resources
180
181
Creating File Shares
File shares are shared directories, folders, and files on your network that you want tosecure with policies.
You can group multiple shares and define them as a single resource. Grouping file sharesrequires you to create fewer policies, because each policy you create for the resourceapplies to all shares in the group.
By default, users are denied access to file shares until you create policies that grant themaccess permission.
To create a file share1. Click Start > All Programs > Citrix > Management Consoles > Access Management
Console.
2. In the console tree, select Resources > File Shares and under Common Tasks, clickCreate file share.
3. Enter a name and description for the resource.
4. On the Configure Addresses page, click New to add each shared item, for example,\\MyServer\Shared-Files-Folder.
● You can include addresses for specific document files as well as directories.
● You can use dynamic system tokens, such as #<username>. To use system tokens,the service account in the Server Configuration for Advanced Access Control mustbe a domain account and not a local machine account.
5. In the File Share dialog box, select Publish for users in their list of resources if youwant this resource to be listed on the Access Interface.
6. Specify whether or not to create a default policy. If you create a default policy, youcan edit its properties later.
If you do not select the option to publish a file share, users can still navigate to the share intheir browsers as long as a policy allows access to the file share. A file share that a user hasaccess to but which is not published can also be accessed if it appears embedded in a Webpage or email.
Uploading Large Documents to File SharesWhen users access a published file share through the Access Interface and policies allowthem to upload documents, users can upload documents up to 100 MB in size by default. Toenable users to upload larger documents, you must edit the Windows Registry.

Caution: Editing the Registry incorrectly can cause serious problems that may require youto reinstall your operating system. Citrix cannot guarantee that problems resulting fromthe incorrect use of Registry Editor can be solved. Use Registry Editor at your own risk.Be sure to back up the registry before you edit it.
To enable users to upload documents larger than 100MB
1. From Registry Editor, find the following key:HKEY_LOCAL_MACHINE\SOFTWARE\CITRIX\MSAM\FEI
2. Click Edit > New > DWORD Value and type MaxUploadSize in the right pane.
3. Right-click on the new value and select Modify.
4. In Value Data, type the maximum document size in kilobytes (KB). For example, tospecify a maximum size of 120 MB, you type 120000.
5. Under Base, select Decimal.
Creating File Shares
182

183
Using Dynamic System Tokens
You can use dynamic token replacement in Universal Naming Convention (UNC) or URLaddresses when defining resources that can retrieve dynamic information from thedirectory service. Dynamic token replacement provides replacement of strings with userattributes obtained from Active Directory.
Note: There is one attribute from Lightweight Directory Access Protocol (LDAP) orWindows NT Directory Services that you can use without Active Directory. This is the#<username> attribute. All other attributes require Active Directory.
For example, if an enterprise with thousands of employees provides each user with a uniquefile share named for the user, it is more efficient to use a token in place of the user namerather than listing each explicit file share to define the resource group.
To use system tokens the service account in the Server Configuration for Advanced AccessControl must be a domain account and not a local machine account.
Use the following syntax for token replacement:
#<Attribute>
Examples:
\\Public-shares\Departments\#<Department>\Reportshttp://inotes.my-server.com/mail/#<username>.nsf
Active Directory AttributesThe following attributes can be used with Active Directory.
#<Department>#<displayname>#<Division>#<domain>#<EmployeeId>#<FirstName>#<FirstNameInitial>#<FullName>#<HomeDirectory>#<HomePage>#<Initials>#<LastName>#<LastNameInitial>#<MiddleName>#<OtherName>#<UPN>#<username>

184
Creating Resource Groups to Ease PolicyAdministration
Resource groups enable you to group different types of resources into a single entity andapply policies to the group. Using resource groups requires fewer total policies and easespolicy administration. The basic steps for bundling resources are:
1. Decide which resources you want to provide to users under a specific access scenario.For example, make a list of all the resources (including email, Web sites, and fileshares) that your sales force needs to access from corporate laptops they use on theroad.
2. Ensure that each of the resources from Step 1 is configured in the console. Forexample, if you want to include five corporate Web sites and Web-based email, makesure you configure one or more Web resources that include these sites and configureWeb email before you create the resource group.
3. Create a resource group that includes all the resources you listed in Step 1.
4. Create a filter that includes your requirements for the access scenario. For example,you can create a filter that requires users to authenticate with RSA authentication, logon to your Sales logon point URL, and pass specified endpoint analysis scans of theclient device.
5. Create a policy for the resource group. Associate the policy with the filter you createdin Step 4 and select the action controls you want for each resource.
Resource group names or descriptions do not appear to users in published lists of resources.The name and description you define for a resource group is for administrative use only. Ifyou choose to publish a Web resource or file share, users see the resource’s description (notthe description of the resource group) in their lists of resources.
Each resource type has a wizard to guide you through adding the resource. These wizardsare available from Common Tasks when the Resources node is selected.
By default, users are denied access to any resource you define until you create policies thatgrant access permissions. This includes all resources and resource groups.
185
Integrating Resource Lists in Third-PartyPortals
If you provide users with the lists of Web resources or file shares included with AdvancedAccess Control, you can integrate these lists into any portal solution. For example, if youare using Microsoft SharePoint as a portal or information aggregation point, you can displayfor users their list of Web resources or file shares in the SharePoint portal.
To integrate user resource lists with a third-partyportal
1. Configure Web resources and files shares for users.
2. Configure your portal product’s Web site viewer to display one or both of the following:
● The Web resources list at http://servername/CitrixSessionInit/URLList.aspx
● The file share list at http://servername/citrixfei/myfiles.aspwhere servername is the name of a Web server running Access Gateway AdvancedEdition.

186
Controlling Access Through Policies
Policies provide granular control of access at the resource level. Use policies to controlwhich resources users can get to and what actions they can perform on those resources.You can leverage the power of filters to apply policies based on information detected aboutthe client device, who users are, the strength of their authentication, and where they arelogging on. Filters provide the flexibility to match policies with your access scenarios. Thissection discusses how to implement policies and formulate strategies to control resourcesaccording to the user scenario.
Policies extend the security of your network environment by enabling you to control:
● Access. You can control users’ ability to connect to your resources unless they meetsecurity requirements such as identity, authentication, antivirus, firewall, and clientsoftware.
● Actions. You can control specific actions that users perform on resources accessedthrough the browser, based on the user scenario.
● Connections. You can control Access Gateway Plug-in connections and apply settings tothose connections.
187
Controlling User Access
Policies help you secure your network even before users log on and allow you to extend thatsecurity down to the individual resource level. Policies enable you to:
● Provide connection privileges to trusted devices only. When you create policies forthe “Allow Logon” resource, you can deny connection privileges unless the user devicemeets your minimum security requirements verified through endpoint analysis scans.You can use connection policies with continuous scans to monitor Access GatewayPlug-in connections throughout the user session, disconnecting as soon as the clientdevice fails to meet your requirements.
● Allow logon permission only to trusted users and devices. When you configure logonpoint properties, you can hide the logon page from users with unknown user devices oruser devices that do not meet your security requirements. This feature prevents viruseson the user device from stealing the users’ credentials as they type them on the logonpage.
● Allowing or denying individual actions on resources. After users pass your securityrequirements for connecting, they must be granted explicit permission to a resourcebefore the resource is available to them. You control this access through policiesdefined for each resource or group of resources. For more information about creatingpolicies, see Creating Access Policies.
By default, users are not provided permission to access or take action on any resources onyour networks. You must define your resources for the farm and then create policies thatgrant access to them and control actions users can perform on them.
Advanced Access Control policies extend the operating system security settings and cannotoverride them. For example, if a user is denied access to a file share in the share’sWindows NT File System (NTFS) security settings, granting access to that file share throughAccess Gateway policies does not allow access to the file share.
Note: Access to applications and resources published by Citrix XenApp is not controlledby Advanced Access Control policies. Access to these resources depends on the propertiesof the logon point through which users log on and the permissions that users are assignedin Citrix XenApp.

188
Integrating Your Access Strategy
The way you define resources and create policies is influenced by your overall strategy forcontrolling access. The goal is to make sure users get the level of access that you cansecurely provide given the user situation.
Your strategy determines how you pool resources and design policies.
Pooling Resources By Access NeedsBefore defining resources and creating policies, pool resources into resource groups thatreflect their relative security requirements. When you define resources, group similarresources together.
For example, you might create a resource group that contains several file shares, Webresources, and email that require very restricted access when users are connectingremotely. In another resource group you might add Web resources and file shares and thatyou want users to have access to at all times, as long as they have a trusted client device.
Designing Policies From User ScenariosPlan policies according to a basic set of user scenarios, such as the ones presented in thenext table. Start with just a few scenarios. Define a few types of resources, pool them intoresource groups, and practice creating policies until you have enough policies to cover allthe user scenarios needed in your organization.
The following table provides a few example scenarios of user situations with differentaccess and actions that might be permitted:
User Device Resources Users Can Access Actions Users Can Take
Companycomputer runningrequired antivirussoftware
● All internal networks andfile systems
● Full email services
● Enterprise portals andWeb applications
● Published applicationsthrough Citrix XenApp
● Other applications
● Download files
● Upload files
● Edit files on the local clientdevice
● Edit files on servers runningCitrix XenApp
● Send documents as emailattachments

Remote clientdevice runningrequired antivirusand firewallsoftware
● Web applications
● Synchronized emailapplications
● Published applicationsthrough Citrix XenApp
● Limited access to filesystems
● Servers or services definedas network resources
● Edit and save documents withLive Edit ActiveX controlwithout needing to downloadand upload
● Limited client mapping orprinting documents on serversrunning Citrix XenApp
● Send documents as emailattachments
● Connect directly to networkresources through the AccessGateway using the AccessGateway Plug-in
Public kioskrunning a requiredbrowser
● Web applications
● Web-based email only
● Limited access topublished applications
● Preview documents as HTML
● No client mapping or printingdocuments on servers runningCitrix XenApp
Personal digitalassistant (PDA)
Web-based email only ● View Web-based email, whichsupports refactoring for smalldevices
● Preview documents as HTML,which supports refactoring forsmall devices
● Send documents as emailattachments
● No application access
Remote laptopsfor systemadministratorswho coveremergencies fromhome
Full access to individualmission critical applicationsdefined as network resourcesor the Entire Networkresource
Connect directly to networkresources through the AccessGateway using the Access GatewayPlug-in
After you develop an access strategy, you configure resources, policies, and filters incombinations that comply with and extend your security guidelines. Resources and policiesdefine the access control you allow. Filters define when and under what conditions theaccess is granted.
Differentiating Access Control and PublishingAllowing access to a resource through policy control is not the same as publishing theresource. When you define file shares and Web resources you can choose to publish theresource, which means it is listed for users on the Access Interface or third-party portals.
Integrating Your Access Strategy
189
The built-in file share and Web resource lists can also appear as plug-ins to third-partycorporate portals. For information about integrating resource lists in third-party portals,see Integrating Resource Lists in Third-Party Portals.
Enabling the Access permission to a Web resource permits the user to view it with abrowser. What the user can do with the item or which application is used to open itdepends on the group of policy settings you have defined for the resource. Simply enablingthe access permission for a resource does not provide a navigation to that resource. Forexample, if you enable the access permission to a URL address but do not publish it, userscan get to the URL only through a link embedded on a Web page or, if the resource isconfigured to bypass the Web proxy, by typing the URL directly in their browser.
You must create a Web resource or network resource for any application that you wantusers to have remote access to and you must create policies for these items grantingexplicit “Access” permission for users. Configuring file share access is slightly different thanfor Web resources, because you do not choose the “Access” permission in policies for fileshares. Users can view a file share resource through their browser if you publish theresource and if the operating system access control list (ACL) allows access permission tothe users. Policies for file shares define the users who can view the file share, the actionsthose users are allowed to take on the documents in those file shares, and the conditionsunder which they can take the actions.
Integrating Your Access Strategy
190

191
Creating Access Policies
You must create policies to provide users with access to resources. By default, users do nothave access privileges to any resource. When you create an access policy, you define whohas access, the conditions under which access is granted, and the granular access controlsthat are allowed or denied.
To create an access policy1. Click Start > All Programs > Citrix > Management Consoles > Access Management
Console.
2. In the console tree select Policies and under Common Tasks, choose Create accesspolicy.
3. In the New Access Policy wizard, name and describe the policy.
4. On the Select Resources page, select the resource groups and resources for the policyto control.
● Select Network Resources > Entire Network if you want this policy to controlaccess to all visible servers and services on the network.
● Select the Allow Logon resource if you want this policy to include the conditionsunder which the users are allowed to log on to the network.
Take care to review selections in the available resources tree. When you select or cleara category of resource, such as File Shares, all items grouped under that category areselected or cleared. Expand nodes to display the selections under each category.
5. On the Configure Settings page, enable each desired setting individually and selectAllow or Deny. Take care to review your selections in the settings tree.
It is possible to select policy settings on the Configure Settings page for types ofresources that you did not select for the policy to control. The policy applies settingsonly for the resources that are selected for the policy.
6. On the Select Filter page, select a filter that defines the conditions to be met for thepolicy to be enforced.
If you have not yet configured filters, you can edit the policy and assign a filter to itlater.
7. On the Select Users page, select the users to whom the policy applies.
Note: If multiple policies apply to a resource, a policy that denies an access permissiontakes precedence over other policies that allow the access permission.

Naming PoliciesAll policy names must be unique. Developing a consistent naming convention or practiceeases administration of policies. Because policies are defined per resource to providegranular control, you can potentially create many policies. The naming convention youdevelop should help you quickly identify the resource and, if possible, the level of accessyou are applying.
You can develop a convention that meets your organization’s needs. In general, the policyname should include the resource. One typical naming convention names policies byresource name and an access level phrase that coincides with your access strategy or thepermissions allowed. For example:
● Web resource X_full access_all users
● Web resource X_limited access_field users
● Web resource X_full access_administrators
● File share Z_all actions_all users
● File share Z_restricted actions_unknown devices
You can change the name of default policies.
To change a policy name1. Click Start > All Programs > Citrix > Management Consoles > Access Management
Console.
2. Select the policy in the right details pane of the console.
3. At the bottom of the details pane, click Edit policy properties.
4. In the policy Properties, change the name and save the policy.
Creating Access Policies
192
193
Configuring Policy Settings to ControlUser Actions
Policies for resources opened through the browser (Web resources, file shares, and email)enable you to control not only access, but also what actions users can perform with theresource.
Policy settings enable you to allow or deny specific action controls. Configure policysettings in the policy wizard or policy properties.
The policy settings that are available when you create a policy depend on the type ofresource you are securing and your environment. For example, if the access server farm isnot configured to link to a farm running Citrix XenApp, the file type association permissionsetting is not available.
Depending on the type of resource and your farm configuration, you can allow or deny thefollowing policy settings:
Access
Allows users access to the resource through a Web browser or Access Gateway Plug-inconnection.
For Web-based email, this setting allows all functionality provided by the Web-basedemail application, such as viewing and sending emails, managing the Calendar, andviewing an address book, but does not allow the ability to access email attachments.Accessing email attachments is allowed through the Email as Attachment setting.
For network resources, Access allows a direct connection to the resource using theAccess Gateway Plug-in. Access is the only permission you can set for network resources.
Bypass URL Rewriting
Allows the browser to retrieve a Web resource without the URL address of the resourcebeing rewritten by the Web proxy component of Advanced Access Control. By default,URL addresses are rewritten by the Web proxy.
For more information, see Bypassing URL Rewriting.
Download
Allows documents or email attachments to be sent to the user’s browser as HTTP contentand saved on the client device. The browser performs its default action depending on theMIME type of the content.
Email as Attachment
Allows users to attach documents to email. You can use this control to allow users toemail documents without having other action controls (such as Download) that requiresending the document to the user device.

File Type Association
Allows users to open documents in applications published through Citrix XenApp. You canuse this permission to allow users to open and edit documents on servers in the trustedenvironment and avoid sending the document to the user’s client device. You can use filetype association only for document types that are associated with a published applicationand only if the logon point properties are correctly configured.
HTML Preview
Allows users to view non-HTML content as HTML in a browser without needing to runadditional client software. Supports a wide range of client devices, including small formfactors. Users need this access control or download to view an HTML document in a fileshare. This feature is available only for document types for which there is conversionsoftware installed on a farm Web server. At least one Web server must have theconversion software installed and must be assigned to perform the HTML Preview serverrole.
Live Edit
Allows users to edit remote documents using the Live Edit Plug-in, an ActiveX control.Users can conveniently edit and save documents without needing to download and uploadthem.
Upload
Allows users to save new documents and overwrite existing files in a file share.
Allowing Access to Standard Web ContentThe only policy setting that applies for standard Web content is the Allow or Deny Accesssetting. Standard Web content includes those document types that you typically view with abrowser. These documents are simply downloaded to the client device as usual forbrowsing, and do not come under the varying levels of access control (HTML Preview or LiveEdit, for example) that you can apply to other document types.
The following document types are treated as standard Web content:
Text: HTML; CSS; XML; X-component
Applications: X-Java Script; S-Component
Images: GIF; JPEG; PNG
Allowing File Type AssociationAllowing file type association for a resource enables users to open the resource with anapplication running on Citrix XenApp. Providing file type association as the only means forediting resource documents can heighten security because it requires that editing occur onthe server and not on the client device.
Configuring Policy Settings to Control User Actions
194
For example, you might choose to grant file type association for a file share whereemployees post reports of ongoing project meetings, without providing the ability todownload or upload.
Providing file type association requires that:
● Users run Citrix online plug-ins software on the user device.
● Users connect through a logon point configured for Citrix XenApp.
● Users are assigned to the desired applications in Citrix XenApp.
● Citrix XenApp is configured to work with Advanced Access Control.
Allowing HTML PreviewHTML Preview enables users to view non-HTML content in a browser without requiring anyadditional client software. HTML Preview displays documents:
● For read-only permission
● On a wide range of devices when the associated application is not available
● On small form factor devices such as PDAs
HTML Preview is designed primarily for situations in which you want users to be able toview documents even if they don’t have an application installed on the client device thatcan display the document. For example, you might decide to allow HTML Preview foremployees who need to view documents on the road from public kiosks, PDAs, ornon-enterprise devices.
For more information about the requirements of providing HTML Preview in the farm, seeHTML Preview Requirements.
Allowing Email AttachmentsThe Email as Attachment access control is designed to allow users to email documents froma location on a remote server to a recipient, without having to download the document tothe client device. You might choose to allow Email as Attachment along with or in similarsituations as the HTML Preview.
For example, you might provide email attachment capability for employees on the roadwhen they are using unrecognized or untrusted client devices. These employees can viewdocuments, write their comments in a Web-based version of their email program, andattach the document to the email message. Users can take these actions withoutdownloading the document to the client device.
Configuring Policy Settings to Control User Actions
195
Allowing Live EditLive Edit is a convenience feature that allows users to edit remote documents with anActiveX control. Users can edit and save documents without needing to download andupload them.
The following notes explain how Live Edit works in combination with other action controlsyou can allow for the same resource:
● Live Edit allowed without other action controls. Users can save the document on thesource repository.
● Live Edit and Email As Attachment allowed. Users can save the document on the localclient device and email it from within the Live Edit session.
● Live Edit and Download allowed. Users can save the document on the local clientdevice.
● Live Edit and Upload allowed. Users can save the document on the local client device.Users can upload (save) the document to published file shares. Published file shareshave the option Publish for users in their list of resources selected in their properties.
For more information the requirements for using Live Edit in your environment, see LiveEdit Requirements.
Configuring Policy Settings to Control User Actions
196
197
Allowing Logon
The privilege of logging on is treated as a resource so you can secure the privilege throughpolicies, just as you do for other resources. This feature enables you to configure additionalrequirements, beyond the authentication of credentials, that users must meet to log on toyour network.
The resource is named Allow Logon. You can select the Allow Logon resource along withother resources when you create an access policy.
Users cannot log on until you create an access policy to allow them to do so.
To allow users to log on1. Click Start > All Programs > Citrix > Management Consoles > Access Management
Console.
2. Open the properties of an existing access policy or create a new access policy.
● To open an existing policy’s properties, select Policies and click Manage policies inCommon Tasks. Search for the policy you want, select it, right-click, and chooseEdit policy.
● To create a new access policy, select Policies in the console tree and click Createaccess policy in Common Tasks.
3. On the Resources page, select Allow Logon.
4. On the Settings page, locate the heading Allow Logon and select from under it Access.
5. Select Enable this policy to control this setting and select Allow, unless denied byanother policy.

198
Setting Conditions for Showing the LogonPage
The logon point sends the logon page to the user device browser, allowing users to entertheir credentials. You can make the display of the logon page conditional by requiring thatuser devices pass endpoint analysis scans before displaying the page.
This feature adds security to your logon page. For example, you can create an endpointanalysis scan that verifies that the user device is running your required level of antivirusprotection. User devices that are not running the required level of antivirus protectionmight host a virus or sniffing program to record a user’s keystrokes. Such programs canrecord and steal credentials as users log on.
You can set conditions for showing the logon page in logon point properties. If users do notmeet the specified conditions, they receive an Access Denied error when they attempt toopen the logon page URL.
If you do not set any conditions in the Visibility section of logon point properties, the logonpage is visible to any user who is allowed to browse to the URL.
To set conditions for showing the logon page1. Click Start > All Programs > Citrix > Management Consoles > Access Management
Console.
2. In the console tree, select the logon point and under Common Tasks, click Edit logonpoint.
3. In the logon point properties, select the Visibility page.
4. Select Show logon page.
5. If you want to show the logon page conditionally, use the logical expression builder todefine the conditions to be met by the connecting user device.
a. Insert the logical operators AND, OR, and NOT and click Endpoint Analysis Outputto choose from a list of your configured scans.
b. Review the resulting logical statement in the Expression preview.
Note: The expression builder appears unavailable until you have created endpointanalysis scans.
The Root object displayed in the expression builder does not affect expression logic.The root signals the beginning of your expression tree.
Example 1: An Expression Requiring One ScanTo create an expression that requires the user device to be running a required level ofMcAfee VirusScan, click Endpoint Analysis Output and choose the scan output for theantivirus application. The expression builder contains:
Citrix Scans for McAfee VirusScan.scan_name.Verified-McAfee-VirusScan
where scan_name is the name you assigned to the scan when you created it.
Example 2: Creating a Conditional Expression withOR
Assume that the conditions you want to set are reflected by the following statement: Showthe logon page to users with client devices that are running a required level of McAfeeVirusScan or McAfee VirusScan Enterprise. Before you build this conditional expression, youmust create an endpoint analysis scan for your required versions of McAfee VirusScan andMcAfee VirusScan Enterprise.
Note: This example requires you to have configured two endpoint analysis scans to verifywhether or not the client device is running McAfee VirusScan or McAfee VirusScanEnterprise. For information about creating scans, see Creating Endpoint Analysis Scans.
1. Select the Root object in the tree and click OR.
2. Click Endpoint Analysis Output and choose the scan output for McAfee Virus Scan.
3. Click Endpoint Analysis Output and choose the scan output for McAfee Virus ScanEnterprise.
The result of this example procedure looks like this in the expression tree:
ROOT OR Citrix Scans for McAfee VirusScan.scan_name.Verified- McAfee-VirusScan Citrix Scans for McAfee VirusScan Enterprise.scan_ name.Verified-McAfee-VirusScan-Enterprise
where scan_name is the name you assigned to the scans.
Example 3: Creating a Complex ConditionalExpression with NOT
Setting Conditions for Showing the Logon Page
199

The following example shows a conditional expression using the NOT operator. To pass thiscomplex condition, the client device must have your required version of McAfee VirusScanor McAfee VirusScan Enterprise, but the device cannot be connecting with the MozillaFirefox browser.
Note: This example requires you to have configured three endpoint analysis scans toverify whether or not the client device is running McAfee VirusScan or McAfee VirusScanEnterprise, and to also verify if the client device is connecting with the Mozilla Firefoxbrowser. For more information about creating scans, see Creating Endpoint AnalysisScans.
1. Select the Root object in the tree and click AND.
2. Click OR.
3. Click Endpoint Analysis Output and choose your scan output for McAfee VirusScan.
4. Click Endpoint Analysis Output and choose your scan output for McAfee VirusScanEnterprise.
5. Select the AND object that you created in Step 1 and click NOT.
6. Click Endpoint Analysis Output and choose your scan output for Mozilla Firefox.
The result of the example looks like this in the expression tree:
ROOT OR Citrix Scans for McAfee VirusScan.scan_name.Verified- McAfee-VirusScan Citrix Scans for McAfee VirusScan Enterprise.scan_ name.Verified-McAfee-VirusScan-Enterprise NOT Citrix Scans for Mozilla Firefox.scan_name. Verified-Mozilla-Firefox-Connecting
where scan_name is the name you assigned to the scans.
The Expression preview shows the following logical statement:
((Citrix Scans for McAfee VirusScan.scan_name.Verified-McAfee-VirusScan OR Citrix Scans for McAfee VirusScanEnterprise.scan_name.Verified-McAfee-VirusScan-Enterprise) AND (NOT Citrix Scans for Mozilla Firefox.scan_name.Verified-Mozilla-Firefox-Connecting))
where scan_name is the name you assigned to the scans.
Note the following about this example:
● Inserting the NOT operator results in an OR NOT logic by default. If you want logic forAND NOT, insert the AND operator before the NOT operator in your tree, as you did in
Setting Conditions for Showing the Logon Page
200

the above example.
● The Mozilla Firefox scan package verifies a minimum version number. In this example,we want to verify any known version. To detect all known versions, we can create thescan to verify that the client device is connecting with a minimum of version 0.1.
Setting Conditions for Showing the Logon Page
201

202
Bypassing URL Rewriting
By default, Access Gateway rewrites the URL addresses of Web resources using a built-inWeb proxy component. Web servers in the farm proxy the URL addresses of these internalresources. If you select the policy setting to bypass URL rewriting, you decrease your abilityto set differing levels of access. This occurs because some action controls (policy settings)are not available for the resource unless Web proxy URL rewriting is used.
In some documentation, this feature is referred to as bypassing the Web proxy.
You might decide to bypass URL rewriting to:
● Increase performance among the farm’s Web servers
● Provide end-to-end SSL connections between the client device browser and thedestination Web server hosting the resource
● Provide access to internal Web sites that do not allow or work well when their URLs arerewritten.
● Provide access to Web resources that are stored on a Web server hosting AdvancedAccess Control.
Considerations about URL Rewriting
Note the following considerations when deciding to use or bypass the URL rewriting feature:
● If you select Bypass URL rewriting for a Web resource, all URL addresses for the hostname are subject to the option and bypass the Web proxy. For example, if you selectthe option for the address
“http://www.server1.company.com/folder1/folder2/”,
all URL addresses hosted on server1.company.com bypass the Web proxy, even if thoseaddresses are not specified within the Web resource.
● Users cannot access Web resources stored on a Web server hosting Advanced AccessControl unless URL rewriting is bypassed. If you want to provide such access, you mustcreate a policy for the Web resources and select Bypass URL Rewriting in the policysettings.
● Ensure that the Web sites you make accessible are secure from vulnerabilities such ascross-site scripting and SQL injection. When the Web proxy is used to rewrite Webresource URLs (the default case), all resources appear to reside on the Web proxyserver. In such cases you cannot rely upon protection by the JavaScript “same origin”policy to prevent malicious scripts from one server accessing properties of resources onanother server, because resources from all servers appear to share the same origin.
To bypass URL Rewriting1. Select Bypass URL rewriting in the policy settings of the policy that controls access to
the Web resource.
Important: When defining resources that bypass URL rewriting, you must specifyentire servers, such as //server/. All URL addresses hosted on the specified serverare bypassed by the Web proxy, even if those URL addresses appear in the propertiesof other Web resources that are supposed to be routed through the Web proxy.
Bypassing URL Rewriting
203

204
Limitations of Browser-Only Access
If your Advanced Access Control deployment does not require any client software on userdevices, your deployment is considered to provide browser-only access. In this scenario,users need only a Web browser to access network resources.
Browser-only access to Web resources depends on the URL rewriting function of the Webproxy. Some Web applications do not handle URL rewriting well or do not allow the cookiemanagement needed for browser-only access. Such applications are better suited for thesimplified functionality of a common browser interface or client access through the AccessGateway.
For example, the more a Web application uses the following advanced technologies, theless likely it is to work smoothly with proxied URL rewriting:
● Flash animations
● Shockwave multimedia objects
● ActiveX controls
● Advanced Java scripting languages
Test the behavior of those Web applications that you plan to provide only through abrowser. If the applications do not behave as expected, consider the following alternatives:
● Bypass the Web proxy. You can choose for users to bypass the Web proxy. For remoteusers (and possibly internal users in deployments of secure enclaves), this means usingthe Access Gateway Plug-in. For more information about bypassing the proxy, seeBypassing URL Rewriting.
● Network resources. You can create a network resource to provide users direct accessto the application using the Access Gateway Plug-in. Network resources do not appearin published lists of users’ resources such as the Access Interface.
● Common browser interface. You can choose to use a basic browser-independentinterface that suppresses use of enhanced display or functionality.
To implement the common interface, open the Properties for the Web resource, choosethe URL Addresses page, and select Use the interface that is common for all browsertypes.
Note: You cannot incorporate the failover feature for Access Gateway appliances forusers accessing Web resources only with a browser.

205
Creating Connection Policies
Connection policies control connections that use the Access Gateway Plug-in. You canassign filters to connection policies to define when the policy applies.
Take care not to confuse connection policies with access policies:
Connection policies
Connection policies allow Access Gateway Plug-in connections and applies settings tothose connections. You must allow use of the Access Gateway Plug-in to establishconnections to any network resource and for email synchronization, because these typesof resources do not allow browser-only access.
Access policies
Access policies define access permissions that specified users have to resources underspecified conditions. For example, an access policy determines whether or not a group ofusers can access a certain file share and whether they can preview files in HTML or useLive Edit to modify the file.
One of the filters you can apply to a connection policy is a continuous scan filter. Acontinuous scan filter comprises a set of scans that continue to monitor the connectionduring the entire user session. As soon as the client device ceases to meet the requirementsdefined in the continuous scan filter, the connection is disconnected.

To create a connection policy1. Click Start > All Programs > Citrix > Management Consoles > Access Management
Console.
2. In the console tree, select Policies > Connection Policies and under Common Tasks,choose Create connection policy.
3. Name and describe the policy.
4. Configure the connection settings you want to apply by selecting each setting andchoosing Yes or No to allow or deny it. You must allow the setting Launch SecureAccess Client if access allowed to make additional settings available. Select fromamong the following settings:
● Authenticate after system resume forces authentication after the user device goesinto standby or hibernate mode.
● Authenticate after network interruption forces authentication if the networkconnection is interrupted.
● Enable split DNS allows failover to a user’s local DNS if the remote DNS is notavailable. By default, Access Gateway checks a user’s remote DNS only.
● Execute logon scripts runs Windows logon scripts when the connection isestablished.
● Desktop sharing allows users to share their desktop with other users who arelogged on to the Access Gateway using the Access Gateway Plug-in. Users can thenshare their desktop by right-clicking the Access Gateway icon in the Windowsnotification area and selecting Share Desktop.
5. If you want to give user devices a unique IP address, add and define the address poolsfrom which address aliases are assigned. On the Define IP Pool Configuration page,click New to add each available IP pool.
● For Access Gateway, enter the IP address of the Access Gateway appliance.
● For Gateway, enter the IP address of the default gateway if you use one. If you donot use a default gateway, you can leave this box blank.
● Each IP range should be valid but unused on the network.
● To avoid conflicting assignments, ensure that you configure a unique IP range orranges for each gateway appliance. You should not assign the same IP range orranges to multiple gateway appliances.
Note: If you add address pools, you must restart each Access Gateway appliancein the farm before the IP pool becomes available. You might want to schedule IPpool configuration for a convenient time.
6. Select filters that define the conditions for policy enforcement. You can select twotypes of filters:
● A filter defines requirements for logon points, endpoint analysis, authentication,and client certificates. This type of filter checks for your requirements once duringlogon.
Creating Connection Policies
206
● A continuous scan filter defines requirements of registry entries, files, or processesthat must be verified on the client device. This filter checks its requirementsthroughout the user session.
7. Select users and user groups to whom the policy applies.
Creating Policies for Citrix XenApp ConnectionsIf you create policies for Access Gateway Plug-in connections to Citrix XenApp, you must:
● Define at least one IP pool in the connection policy properties
● Create a network resource that includes the server or servers running XenApp
If no IP pools are defined, the user device is identified by the IP address of the AccessGateway appliance and connects directly to the server running XenApp without beingcontrolled by policies assigned to the network resources defined for the servers runningXenApp.
To prioritize connection policiesBecause multiple connection policies can apply to the same user, you can prioritizeconnection policies. The settings in policies with a higher ranking priority take precedenceover those in lower ranking policies.
1. Click Start > All Programs > Citrix > Management Consoles > Access ManagementConsole.
2. In the console tree, select Connection Policies and under Common Tasks, choose Setconnection policy priority.
3. Select a policy and use the arrow buttons to move its position in the ordered list. Thehighest priority policy appears at the top of the list.
Creating Connection Policies
207

208
Creating Policy Filters
Filters define the conditions under which the policy applies. Consider the following exampleof a policy statement:
Allow access and HTML Preview permission only to the Quarterly Sales Reports file share forSales department users when they log on from outside the secure network using an SSLclient certificate.
The filter part of the above policy statement is “when they log on from outside the securenetwork using an SSL client certificate.” If you authenticate remote workers through aspecific logon point, you can filter by the logon point and you can require the use of aclient certificate.
You can configure four types of conditions for a filter:
● Logon point. Applies the policy based on the URL with which the user connects to thenetwork.
● Authentication strength. Applies the policy based on the authentication being used.The options available in the filter depend on the authentication configurations you haveset up. For more information, see Securing User Connections.
● Endpoint analysis scan outputs. Applies the policy based on information gathered byendpoint analysis scans of the client device. You must configure scans before any scanoutputs are available to integrate into a filter.
● Client certificate requirements. Applies the policy based on the presence of specifiedcriteria in the SSL client certificate.
Filters are designed so you can name them and use the same filter for multiple policies.Each policy uses one filter only. To achieve the effect of using multiple filters, you can usethe custom filter feature to create complex filters that contain other filters.
To create a policy filterYou can create a filter before, at the same time, or after you create the policies you wantto associate with it.
1. Click Start > All Programs > Citrix > Management Consoles > Access ManagementConsole.
2. Open the New Filter wizard from one of the following locations:
a. In the console tree, select Policies > Filters and under Common Tasks, click Createfilter.
b. On the Select Filters page of a policy wizard, click New.3. Enter a name and description for the filter.
4. Select the option Create a typical filter.
5. If you want the policy to apply when users enter through specific logon points, selectthose logon points.
6. If you want the policy to apply based on the authentication used, select theauthentication.
7. If you want the policy to apply based on endpoint analysis scans of the user device,select the appropriate scan outputs.
8. If you want the policy to apply based on required information in an SSL clientcertificate, select Specify SSL client certificate matching criteria. You can requirethat the certificate contain specified values for common name, organization, ororganizational unit.
● You cannot specify SSL client certificate values for filtering unless the option torequire client certificates is selected in Access Gateway Global Properties (GatewayAppliances > Edit gateway appliances properties > Client Properties).
● Do not add quotation marks around the values you enter for common name,organization, or organizational unit.
Each type of filter condition is optional. For example, you can configure a filter based onlogon point only. Logically, the conditions defined in a filter are combined with the ANDlogical operator, and within a condition type, the settings are combined with an ORoperator. For example, if your filter settings specify Logon Point A, Logon Point B, and ScanOutput C, the policy is applied with the following logic:
(Logon Point A or Logon Point B) and Scan Output C
Creating Policy Filters
209

210
Creating Custom Filters
You can create custom filters that use logical expressions with the operators AND, OR, andNOT, allowing you to create filters of greater complexity than you can with typical filters.With typical filters you are limited to selecting conditions that the wizard combines withAND logic only. Because they are made from logical expressions, custom filters providemore complexity and flexibility, but they are harder to create.
Using custom filters is optional and not required for common configurations. For ease ofadministration, use typical policy filters.
To build a custom filter with logical expressions1. Click Start > All Programs > Citrix > Management Consoles > Access Management
Console.
2. In the console tree, select Policies > Filters and under Common Tasks, click Createfilter. The New Filter wizard opens.
3. Enter a name and description for the filter.
4. Select the option Create a custom filter.
5. On the Build Custom Filter page, use the logical expression builder to create anexpression that reflects the conditions you want met before the policy is enforced.
● Insert the logical operators AND, OR, and NOT along with elements for logon point,authentication, endpoint analysis output, client certificate, or another filter tocreate the logical expression.
● Note that the Root object displayed in the expression builder does not affectexpression logic. The root signals the beginning of your expression tree.
Example: Creating a Custom FilterAssume for this example that your network security strategy is to deny logon privileges toclient devices running Windows 2000 unless those devices have Windows 2000 Service Pack4 installed OR are running Internet Explorer 6.0. You want to build a filter for this scenariothat you can assign to a policy that includes the Allow Logon privilege.
Before creating the custom filter, create two scans as follows:
1. Use “Citrix Scans for Windows Service Pack” to create a scan with these settings:
● Rule conditions: operating system = Windows 2000; client device regional locale =all

● Property value to verify: Service Pack 4
2. Use “Citrix Scans for Internet Explorer” to create a scan with these settings:
● Rule conditions: operating system = Windows 2000; client device regional locale =all
● Property value to verify is the minimum required version: 6.03. On the Build Custom Filter page of the New Filter wizard, follow these steps to create
the logical expression:
a. Click OR from the Insert group box.
b. Click Endpoint Analysis Output and choose the scan output for Service Pack 4.
c. Select OR in the expression builder and click Endpoint Analysis Output again tochoose the scan output for Internet Explorer Version 6.0.
The result in the expression builder appears as:
ORCitrix Scans for Windows Service Pack.scan_name.Verified-Windows-Service-PackCitrix Scans for Internet Explorer.scan_name.Verified-Internet-Explorer
where scan_name is the name you assigned to the scans.
For more examples of using an expression builder, see Setting Conditions for Showing theLogon Page.
Creating Custom Filters
211

212
Creating Continuous Scan Filters
Continuous scan filters define the scan requirements for a connection policy. A continuousscan verifies one item (a file, registry entry, or process) on the user device. The filter caninclude one or more continuous scans for verification. When associated with a connectionpolicy, the filter defines all the requirements to be verified by continuous scans for theconnection policy to take effect.
Note that continuous scan filters, unlike regular policy filters, cannot be used by CitrixXenApp policies. For more information, see Integrating Citrix XenApp. For informationabout continuous scans, see Creating Continuous Scans.
To create a continuous scan filter1. Click Start > All Programs > Citrix > Management Consoles > Access Management
Console.
2. In the console tree, select Policies > Continuous Scan Filters and under CommonTasks, click Create filter in.
3. Enter a name and description for the filter.
4. On the Configure Requirements page, use the logical expression builder to create anexpression that reflects the conditions you want the user device to meet.
● Insert the logical operators AND, OR, and NOT and click either File Scan, ProcessScan, or Registry Scan to choose from your configured scans.
● Note that the Root object displayed in the expression builder does not affectexpression logic. The root signals the beginning of your expression tree.
Example 1: Conditional Expression Requiring OneScan
Assume that you want to create an expression that requires an antivirus program'sexecutable file to be installed on the user device and that you configured a file scan toverify this file. From the Configure Requirements page of the continuous scan filterwizard, click File Scan and choose the file scan. The result of this example procedure lookslike this in the expression tree:
ROOTscan_name
where scan_name is the name you assigned to the scan when you created it.
Example 2: Conditional Expression Requiring One ofTwo Scans
Assume that the conditions you want to set are reflected by the following statement: Userdevices must be running the process for a personal firewall from either Company A orCompany B. Before you build this conditional expression, you must create a process scan forCompany A's personal firewall process and another process scan for Company B's personalfirewall process.
1. Click OR.
2. Click Process Scan and choose the scan for Company A’s personal firewall process.
3. Click Process Scan and choose the scan for Company B’s personal firewall process.
The result of this example procedure looks like this in the expression tree:
ROOTORscan_name_CompanyA_processscan_name_CompanyB_process
where scan_name_CompanyA_process and scan_name_CompanyB_process are the namesyou assigned to the scans.
For more examples of using an expression builder, see Setting Conditions for Showing theLogon Page.
Creating Continuous Scan Filters
213

214
Granting Access to the Entire Network
The Entire Network resource represents all visible servers and services on your securenetwork. If policies allow connections and access to this resource, users logging on with theAccess Gateway Plug-in can access these servers or services through an SSL virtual privatenetwork tunnel created between the user device and the network. The Entire Networkresource is a built-in network resource, the properties of which cannot be edited ordeleted. To control the conditions under which the Entire Network resource is accessed,you must create access policies just as you do for all other types of resources.
You can use the Entire Network resource to:
● Quickly set up your deployment and test access
● Provide unlimited access to a special class of user, such as administrators who needwide access for disaster recovery or emergency operations
● Provide open access by default and later develop policies that deny access to specifiedresources according to your security plan
The general steps involved in granting access to the Entire Network include:
1. Create an access policy for the Entire Network resource allowing access to selectedusers.
2. Create a connection policy allowing user connections.
3. Filter the policies according to the conditions or requirements you want to impose.
Because the Entire Network resource includes all visible servers on the network, take careto allow access to this resource only under the conditions you intend. Access to thisresource is a powerful level of access.
215
Reviewing Policy Information with PolicyManager
Policy Manager enables you to search your policies by resource, users, and filters. You canuse keywords for your searches. The search results can assist with quick policy planning,management, or troubleshooting. The following are only a sample of the types ofinformation you can find quickly with Policy Manager:
● Find all the policies that affect a specified user or user group
● View all the policy settings that pertain to a specified resource
● List all policies that use a specified filter
● Find all policies that control the permission to logon
To search for policies and settings1. Click Start > All Programs > Citrix > Management Consoles > Access Management
Console.
2. In the console tree, click Policies and under Common Tasks, click Manage policies toopen the Policy Manager.
3. Use a mixture of keywords in the Resource, User, and Filter text boxes and clickSearch. For example, to find every policy assigned to “All authenticated users,” typeall in the User text box.
● By default all policies are shown when you open the Policy Manager. Clicking Clearat any time empties the search criteria boxes and returns to a view of all policies.
● Double-click a filter to open the filter’s properties. Double-click in any othercolumn to open the policy’s properties.
● Click a column heading to sort results alphabetically by that column’s entries. Clickthe same column again to reverse the sort order.
Note: Policy Manager does not present information about the filtered results of policycontrol with live connecting clients, such as the resulting set of access permissions afterendpoint analysis scans or continuous scans are taken into consideration.
216
Integrating Citrix XenApp
You can integrate Advanced Access Control and Citrix XenApp so that users can easilyaccess all of their resources, including published applications, from a common interface.For example, you can embed a Citrix Access Platform site within the Access Interface. TheAccess Interface is a navigation page shipped with Advanced Access Control that can listavailable published applications alongside other available resources such as Web resources,file shares, and so on.
In addition, you can share information collected by Advanced Access Control to extend thepolicy-based access control capabilities of Citrix XenApp. By integrating Advanced AccessControl filters within Citrix XenApp policies, you can control which published applicationsusers can access and what they can do within those applications once they get access. Thisallows you to create Citrix XenApp policies to accommodate different access scenariosbased on a variety of factors such as authentication strength, logon point, and user deviceinformation such as endpoint analysis.
For example, you can include endpoint analysis information collected by Advanced AccessControl within a Citrix XenApp policy to determine access to a published application. Inaddition, you can selectively enable client-side drive mapping, cut and paste functionality,and local printing based on the logon point used to access the published application.
The next section discusses the supported deployments as well as the procedures required tointegrate Citrix XenApp and Advanced Access Control. If you are passing Advanced AccessControl information into Citrix XenApp for policy evaluation, you must complete thefollowing steps as well:
● Create one or more filters within Advanced Access Control. For more information aboutcreating filters, see Creating Policy Filters.
● Create policies within Citrix XenApp that reference Advanced Access Control filters. Seethe Citrix XenApp documentation for more information about creating policies.
Note: Continuous scan filters, unlike regular policy filters, cannot be used by CitrixXenApp policies.
217
Linking from Advanced Access Control toCitrix XenApp
Complete the steps below to enable Citrix XenApp to allow connections from AdvancedAccess Control.
1. Ensure that published resources are assigned to the same user groups assigned toresources in the access server farm.
2. In Citrix XenApp:
● Enable Allow connections made through MetaFrame Secure Access Manager foreach published resource. This option appears in the access control settings of thepublished resource properties.
● In each server's properties, select the option Trust requests sent to the XMLService.
3. Complete the steps required to integrate published applications within yourdeployment. Integration options include:
● Citrix Access Platform site created by Web Interface. Display publishedapplications within a Citrix Access Platform site. For more information, seeIntegrating the Web Interface.
● File type association. Documents are launched in an associated application runningon a server in a Citrix XenApp farm. For more information, see Configuring FileType Association.
● Third-party portals. Embed a Citrix Access Platform site within a third-party portalsuch as Microsoft SharePoint. For more information, see Integrating Third-PartyPortals.

218
Integrating the Web Interface
Advanced Access Control provides several methods for integrating Citrix Access Platformsites created with the Web Interface including:
● Citrix Access Platform site embedded within the Access Interface. When the AccessInterface is selected as the default home page, a Citrix Access Platform site is displayedalongside file shares and Web applications. You can also configure the Access Interfaceto display up to three Citrix XenApp sites in a separate tab.
● Citrix Access Platform site configured as the default home page for a logon point. Oncelogged on, users are presented the Citrix Access Platform site.
Note: The Web Interface and its accompanying documentation is available in theTechnologies node on the Citrix eDocs Web site.
To integrate a Citrix Access Platform siteThis procedure requires that you use Version 4.2 of the Access Management Console tocreate and manage Citrix Access Platform sites integrated with Advanced Access Control.Version 4.0 of the console or command-line tool cannot be used to manage sites createdwith later versions of the console. In addition, once a Citrix Access Platform site isconfigured with the Advanced Access Control access method, users can access this site onlythrough Advanced Access Control. Attempts to directly access the site are denied.
Complete the following steps in Advanced Access Control.
1. Configure Citrix XenApp to communicate with Advanced Access Control. For moreinformation, see Integrating Citrix XenApp.
2. Create a Web resource for the Citrix Access Platform site with the following settings:
● Select Citrix Web Interface 4.2 or later as the application type
● Select the Publish for users in their list of resources check box3. Specify the appropriate policy settings for the Web resource referencing the Citrix
Access Platform site.
4. Provide access to the Citrix Access Platform site in one of the following ways:
● Display the Citrix Access Platform site as the default home page. Configure alogon point to display the application with the highest display priority as the homepage. Then, configure the Citrix Access Platform site as the application with thehighest priority.
● Embed a Citrix Access Platform site within the Access Interface. Configure a logon point to display the Access Interface as the home page. The Citrix Access
Platform site is embedded as a frame within the Access Interface.
For more information, see Configuring Logon Points.
5. In Web Interface, complete the following steps. For additional information aboutconfiguring Web Interface, see the Web Interface documentation.
a. Select Using Advanced Access Control when specifying an access method for thesite.
b. Enter the URL of the Advanced Access Control authentication service.
In both Web Interface and Advanced Access Control, ensure the Workspace Control, JavaClient fallback, and session time-out settings are configured properly. For moreinformation, see Coordinating Advanced Access Control and Web Interface Settings.
Integrating the Web Interface
219

220
Displaying Multiple Sites and CachingCredentials
You can embed multiple Citrix Access Platform sites within the Access Interface and cachethe credentials used to log on to those sites. You can display up to three Access Platformsites as well as enable each site to “remember” and “forget” users’ logon credentials.
Using Multiple Access Platform Sites from the AccessInterface
By enabling multiple Access Platform sites to display within the Access Interface, you canprovide access to published applications from multiple Citrix XenApp farms. To enableAdvanced Access Control to display these sites, you create and run a Visual Basic script thatmodifies the values of the CredentialCachingEnabled and MultipleWebInterfaceEnabledfields in the FarmSettings table of the configuration database. When you do this, the layoutof the Access Interface changes to accommodate up to three sites. Access Platform sitesappear in the Applications tab while Web email appears on the Email tab. File shares andpublished Web sites appear on the Home tab.
Using Credential CachingWhen users log on to Advanced Access Control, their credentials are passed through to theAccess Platform sites. If the credentials for Advanced Access Control match the credentialsfor the Access Platform site, users are automatically logged on to the site. Additionally, ifWorkspace Control is enabled at the logon point, published applications that weredisconnected in the previous session are automatically reconnected. If these credentialsdiffer, users are prompted to provide the correct credentials. After logging on, users canselect the Remember my logon check box to avoid re-entering their Access Platform sitecredentials. Users can also delete their cached credentials by clicking the Forget My Logonicon.
Note: If users choose to store credentials for an Access Platform site and their credentialsfor logging on to Advanced Access Control are later changed, Advanced Access Controlautomatically deletes the stored credentials the next time the users log on. The users arethen prompted to re-enter their credentials for the Access Platform site.
When you enable credential caching, Advanced Access Control stores the Access Platformsite credentials in the UserData table in the configuration database. When a user logs on,the Web proxy reads the encrypted credentials from the configuration database andforwards them to the Citrix Access Platform site. If credential caching is disabled or thecached credentials for the site are incorrect, users are prompted to enter the correctcredentials to log on to the Access Platform site.

221
Preserving Workspace Control
When users log on to Advanced Access Control, the credentials they enter are used toprovide Workspace Control with the Citrix XenApp farms specified in the access server farmproperties. If users enter one set of credentials to log on to Advanced Access Control and adifferent set of credentials to log on to the Access Platform site, they may not be able todisconnect or reconnect their applications when you enable multiple sites to be displayed.To preserve Workspace Control for users with differing sets of credentials, you perform thefollowing tasks:
● Associate each Citrix Access Platform site with its corresponding farm configured inAdvanced Access Control.
● Define the Secure Ticket Authority (STA) so the Access Gateway can authenticate usersto the farm. For more information about defining the STA, see ConfiguringAuthentication with Citrix XenApp.
To enable the display of multiple Citrix AccessPlatform sites and enable credential caching
1. On the Advanced Access Control server, create a .vbs file that contains the followingscript:
Dim objectDim farmsettingSet object =WScript.CreateObject("Citrix.Msam.Amc.BusinessObjects.FarmSettingManager")Set farmsetting = object.GetFarmSetting ()farmsetting.CredentialCachingEnabled = 1farmsetting.MultipleWebInterfaceEnabled = 1obj.UpdateFarmSetting (farmsetting)
2. Save and close the file.
3. Double-click the file to run the script.
To associate a Citrix Access Platform site with thecorresponding farm
Before you can associate an Access Platform site with a Citrix XenApp farm, you must configure the site as a Web resource and publish it for users to access from the Access Interface. If you do not select Publish for users in their list of resources when you configure the Access Platform site as a Web resource, the site is not available to associate
with a Citrix XenApp farm.
1. Click Start > All Programs > Citrix > Management Consoles > Access ManagementConsole.
2. In the console tree, select the access server farm node and under Common Tasks, clickEdit farm properties.
3. From the Presentation Server Farms page, select the farm and click Edit.
4. On the Web Interface page, select the site you want to associate with the farm.
To ensure Workspace Control functions for all users, you must define a STA in the gatewayproperties. For more information, see Configuring Authentication with Citrix XenApp.
Preserving Workspace Control
222

223
Coordinating Advanced Access Controland Web Interface Settings
Certain Citrix XenApp settings are available for configuration within Advanced AccessControl and Web Interface. However, because a Citrix Access Platform site integrated withAdvanced Access Control can be referenced by more than one logon point, it is possible forone logon point to embed a Citrix Access Platform site within its Access Interface pagewhile another logon point displays the site as its default home page. This can causeconflicts with certain published application settings. To ensure your settings work asintended, configure the settings as follows.
● Workspace Control. Disable all Advanced Access Control Workspace Control settings forall logon points that have a Citrix Access Platform site as their home page. This ensuresthat the settings configured within Web Interface are used. All other logon points canhave Workspace Control configured as desired.
● Java Client Fallback. Ensure that logon points using the Access Interface as their homepage have the same Java Client fallback settings as the Citrix Access Platform site.
● Session time-out. Ensure all logon points use the same settings as the Citrix AccessPlatform site.

224
Configuring File Type Association
When file type association is allowed, users opening a document launch it in an associatedapplication running with the server farm. For example, if a user opens a document within afile share configured with file type association, the document opens within a publishedapplication. File type association is available to Web resources, file shares, and Web-basedemail.
To configure file type association for file shares, Webresources, and Web-based email
Before you configure file type association, verify that published application settings inCitrix XenApp specify the associations you want. For example, if you want a publishedapplication to be launched for users when they open a bitmap image (.bmp) file, make surethat the application’s settings associate it with .bmp files.
1. Configure Citrix XenApp to communicate with Advanced Access Control. For moreinformation, see Integrating Citrix XenApp.
2. Specify the farm(s) you want to link to your access server farm. For more information,see Specifying Server Farms.
3. Specify the Citrix XenApp farms available to the logon point. For more information, seeConfiguring Logon Points.
4. Create an access policy for the file share, Web resource, or Web-based emailapplication and enable and allow the File Type Association action control. For moreinformation, see Configuring Policy Settings to Control User Actions.
225
Integrating Third-Party Portals
You can incorporate a Citrix Access Platform site into a third-party portal such asSharePoint to provide convenient access to published applications next to other Webapplications and content. You can integrate Advanced Access Control within thisdeployment to provide granular policy-based control over files, Web content andapplications, and published applications.
Note: Web Interface for Microsoft SharePoint is a Web Part that allows the integration ofa Web Interface within SharePoint. For more information about Web Interface forMicrosoft SharePoint, see the Citrix Web site. Generic third-party portals must supportthe display of IFRAME-based Web content to properly integrate a Citrix Access Platformsite.
To display a Citrix Access Platform site in a portal1. Configure Citrix XenApp to communicate with Advanced Access Control. For more
information, see Integrating Citrix XenApp.
2. Create a Web resource for the Citrix Access Platform site with the following settings:
● When integrating with SharePoint, select SharePoint with Web Interface Web Partapplication type
● When integrating with a generic third-party portal, select Citrix Web Interface 4.2or later application type
3. Enable the Publish for users in their list of resources check box.
4. Specify the appropriate policy settings for the Web resource referencing the CitrixAccess Platform site.
5. Create a Web resource for the SharePoint site or third-party portal containing the CitrixAccess Platform site and specify the appropriate policy settings.
6. In Web Interface, configure a Citrix Access Platform site to use Advanced Access Controlas its access method by:
a. Selecting Using Advanced Access Control when specifying an access method for thesite
b. Entering the URL of the Advanced Access Control authentication service7. In both Web Interface and Advanced Access Control, ensure the Workspace Control,
Java Client fallback, and session time-out settings are configured properly. For moreinformation, see Coordinating Advanced Access Control and Web Interface Settings.

226
Verifying Requirements on User Devices
Endpoint analysis is a process that scans a user device and detects information such as thepresence and version level of operating system, antivirus, firewall, or browser software.Use endpoint analysis to verify that the user device meets your requirements beforeallowing it to connect to your network. You can monitor files, processes, and registryentries on the user device throughout the user session to ensure that the device continuesto meet requirements.
You can use two types of scans:
● Endpoint analysis scans
Endpoint analysis scans detect information about the user device, such as the presenceand version level of operating system, antivirus, firewall, or browser software. Thisinformation can be included as a filter within an access policy or a connection policy.Endpoint analysis scans are run once, during logon.
● Continuous scans
Continuous scans are scans of the user device that occur repeatedly throughout thesession to ensure that the user device continues to meet requirements. The featureprevents, for example, users from changing the status of a user device requirementafter establishing the connection. Types of continuous scans include file scans, processscans, and registry scans. For more information, see Creating Continuous Scans.
You can incorporate detected information into policies, enabling you to grant differentlevels of access based upon the user device. For example, you can provide full access withdownload permission to users who connect from the field using corporate laptops that areup-to-date with antivirus and firewall software requirements. For users connecting fromkiosks or untrusted home computers, you can provide a more restricted level of access thatallows previewing documents only or editing the documents on remote servers withoutdownloading them.

227
Configuring Endpoint Analysis
Endpoint analysis performs these basic steps:
● Examines an initial set of information about the user device to determine which scansto apply
● Runs all applicable scans
● Compares property values detected on the user device against desired property valueslisted in your configured scans
● Produces an output verifying if desired property values are found
When a user tries to connect through a logon point, endpoint analysis checks the scans thatare filtered for the logon point. All scans with conditions met by the user device are run onthe user device using the Endpoint Analysis Client software. These scans return results(called scan outputs) of detected information or True or False results of required propertyvalues.
Note: The Citrix Scans for Macintosh and Citrix Scans for Browser Type do not requirethat the Endpoint Analysis Client software run on the user device. These scans can gathertheir results from information provided to the server from the user device directly,without using Endpoint Analysis client software.
Note that scans with conditions not matching the user device do not run on the user device;however, even these scans receive a default output defined by the scan package, such asFalse.
Endpoint analysis completes before the user session consumes a license.
To configure endpoint analysisFollow these general steps to configure endpoint analysis:
1. Identify the scan packages that check the properties you want to verify.
2. Create scans, configuring the conditions under which they run and the properties theyverify.
3. Add additional rules if you want a scan to apply to multiple scenarios.
4. Use scan outputs in policies when you configure policy filters.
5. Deploy client software to users.

You can log endpoint analysis events through the system Event Viewer. For moreinformation about auditing such events, see Auditing Access to Corporate Resources.
Configuring Endpoint Analysis
228

229
Creating Endpoint Analysis Scans
Scans verify specific properties of user devices connecting to your network, such as theinstalled version of an antivirus software product or verification that the machine belongsto a required domain.
Scans have rules that define when the scan is applied to a user device. Each rule includes aset of conditions, which are required attributes of the user device that must all be met forthe scan to be applied.
Creating a scan includes defining the prerequisite conditions under which the scan runs andconfiguring the properties to verify.
Note: For detailed information about the configurable properties of a specific scan, seethe Scan Properties Reference.
To create a scan1. Click Start > All Programs > Citrix > Management Consoles > Access Management
Console.
2. In the console tree, select the scan package for the properties you want to scan.
3. Under Common Tasks, click Create scan.
4. Name the scan.
5. Select the conditions that will define when the scan runs.
6. Provide a rule name for the set of conditions and properties you are configuring.
7. Select all acceptable values for each condition.
● The condition is met if the user device matches any of the values you select
● The wizard presents a separate page for each condition8. Configure the property values to verify.
● For example, to verify that a minimum version of an antivirus program is running onthe user device, enter the minimum version number.
● The wizard presents a separate page for each property value the scan verifies. Ifthe scan verifies multiple property values, the user device must meet therequirements for all specified values.
● Version numbers follow the typical syntax for the specific product and require atleast one decimal point; for example, 2.1 or 2.1.1.
For information about individual scan packages and the properties you can set for them, seeScan Properties Reference.
After creating a scan, you can add more rules to make the scan apply to multiple userscenarios.
Using Scan Outputs to Filter PoliciesYou can use endpoint analysis scan outputs to filter policy enforcement. Filtering with scanoutputs allows you to secure access to your network and resources based on properties ofthe user device, such as whether or not it is running required minimum levels of antivirus orfirewall software.
The following steps describe the general process for using scan outputs in policies.
1. Create a scan that verifies the properties you require.
2. Create a policy filter that uses the scan output from Step 1.
3. Create a policy and assign to it the filter you created in Step 2.
Steps 2 and 3 above can be combined in the policy wizard.
Using Scan Outputs to Filter Logon Page VisibilityYou can use the scanned information you discover about the user device to filter users’ability to see the logon page. For more information, see Setting Conditions for Showing theLogon Page.
Creating Endpoint Analysis Scans
230

231
Scan Packages
Scan packages enable you to create scans to verify the properties of a user device, such asthe installed version of an antivirus software product. Each package is designed to verifyspecific properties or software products.
Scan packages are listed in the console under the Endpoint Analysis node.
You can view individual properties of a scan package in the console, including a descriptionof its scan outputs. Look at the scan output descriptions when you want to know whichinformation about the user device is retrieved or verified.
A scan output can take two forms:
● Information about the user device. For example, the scan package Citrix Scans forTrend OfficeScan detects and retrieves a value that is the product version of TrendOfficeScan running on the user device, if any.
● A true/false Boolean verification indicating if the scan’s required property values weredetected.
To view the scan outputs produced by a scan package1. Click Start > All Programs > Citrix > Management Consoles > Access Management
Console.
2. In the console tree, select the scan package.
3. From the details pane on the right, select Properties from the display menu. The scanoutput table describes each output produced by the package.

232
Adding Rules to Scans
Rules are sets of conditions that define when to apply a scan and which property values tocheck. Multiple rules can apply to a single scan. The first rule of a scan is defined when youcreate the scan. After creating the scan, you can add more rules to make the scan apply tomultiple scenarios.
For example, the same scan can check for version X of an antivirus program on devicesrunning Windows NT-based operating systems. You can create a different rule to check forversion Y of the same antivirus program on devices running earlier Windows operatingsystems.
To add a rule1. Click Start > All Programs > Citrix > Management Consoles > Access Management
Console.
2. In the console tree, select the scan and under Common Tasks, click Create rule.
3. Follow the wizard prompts to define the rule’s name, condition settings, and propertyvalue settings.
Example: Adding Multiple Rules to a ScanAssume that your network security policy is to prevent access to client devices unless theyhave Service Pack 4 installed for Windows 2000 and Service Pack 2 installed for anymachines running Windows XP. You have an exception for employees in the Tokyo office,because the Tokyo IT department decided not to upgrade Windows XP to Service Pack 2until further testing takes place. You can use the same scan with different rules to verifythe correct service pack for all three of these scenarios.
Your environment includes a logon point named “Tokyo” that is used by your Tokyo officeusers. Logon points apply settings to the connections that initiate through their URLs.
The following steps create a scan that verifies these three service pack requirements.
1. Create a scan with the Citrix Scans for Windows Service Pack, selecting the Logon Pointcondition to configure
2. Create the first rule during scan creation with these settings:
● Conditions: set the Operating system to Windows 2000 and set the Logon point toall
● Property value to verify: set the minimum required service pack to Service Pack 43. Add a second rule to the same scan with these settings:

● Conditions: set the Operating system to WindowsXP and set the Logon point to allexcept Tokyo
● Property value to verify: set the minimum required service pack to Service Pack 2
4. Add a third rule to the same scan with these settings:
● Conditions: set the Operating system to WindowsXP and set the Logon point toTokyo
● Property value to verify: set the minimum required service pack to Service Pack 1
Adding Rules to Scans
233

234
Using Scan Outputs in Other Scans
You can use scan outputs as conditions in other scans. This feature allows you to make theresult of one scan a condition for another scan to run.
To create conditions from scan outputsYou can create conditions from scan outputs in the following three ways:
● Select Endpoint Analysis or select a specific scan in the console tree and click Editavailable conditions list in Common Tasks
● On the Select Conditions page of the Create Scan wizard, select Use Another Scan’sOutput as a Condition
● Select a scan output in the Properties view for a specific scan and click Createcondition
Example: Using a Scan Output as a ConditionAssume that you have two divisions, Sales and Finance, that are assigned their own domain.The Sales group requires all of its user devices connecting remotely to run AntivirusProgram A, but the Finance group requires its user devices to run Antivirus Program B.
Follow the steps below to verify that these user devices are running the required antivirusprogram version.
1. Create two scans using Citrix Scans for Domain Membership:
● A Sales domain scan to verify that user devices belong to the Sales domain
● A Finance domain scan to verify that user devices belong to the Finance domain2. Create a scan to check only Sales domain user devices for Antivirus Program A:
● On the Select Conditions page of the Create Scan wizard, select Use AnotherScan’s Output as a Condition and follow the prompts to identify the scan outputfor the Sales domain scan you created in Step 1
● Use the scan output “Verified-domain” from the Sales domain scan as your newcondition and require it to have a value of “True”
3. Create a scan to check only Finance domain user devices for Antivirus Program B:
● On the Select Conditions page of the Create Scan wizard, select Use Another Scan’s Output as a Condition and follow the prompts to identify the scan output

for the Finance domain scan you created in Step 1
● Use the scan output “Verified-domain” from the Finance domain scan as your newcondition and require it to have a value of “True”
You can use scan outputs in custom filters to achieve similar results for complex scenarios.
Using Scan Outputs in Other Scans
235

236
Editing Conditions and Rules
All rules for a scan share the scan’s list of available conditions. The available conditions arethe conditions that you can configure for the scan’s rules. Interdependencies exist betweenthe various rules and conditions of a scan.
If you edit the list of available conditions, be aware of the following considerations:
● If you add to a scan’s list of available conditions, all existing rules for the scan receivethe new condition with all possible values selected for use. To make sure you do notchange the conditions of existing rules in unexpected ways, check the properties for thescan’s rules after you add to the list of available conditions.
● To remove a condition from a scan’s available conditions list, you must first remove allrules that use the condition or select all possible values for the condition in every rulethat uses it.
Editing RulesYou can view all condition settings for a rule in the Properties display for the rule. Forexample, if you add to the conditions that are available for a scan, all existing rules of thatscan receive the condition you added with all the settings selected. You might need toadjust the settings that are automatically copied to existing rules.
To edit the condition settings for a rule1. Click Start > All Programs > Citrix > Management Consoles > Access Management
Console.
2. In the console tree, select the rule and click Properties from the display menu in thedetails pane on the right.

237
Using Data Sets in Scans
Some scans reference a data set of values to compare against values detected on the userdevice. For example, you might require multiple operating system updates on the userdevice and need to verify that the entire set of updates are present. Such a list of requiredupdates is an example of a data set. Data sets are stored in the farm database. You cancreate a data set by importing a comma-separated values (.csv) file or by enteringindividual values.
Lists
Lists are single-column data sets that indicate multiple required values for a singleproperty. Scan packages that use lists include:
● Citrix Scans for Windows Update verifies that user devices are running all of theupdates you list in a data set
● Citrix Scans for Internet Explorer Update verifies that use devices are running all ofthe updates you list in a data set
Maps
Maps, or double-column data sets, detect a value on the user device and map it toanother value used in the scan.
For example, Citrix Scans for MAC Address detects the MAC address for each networkinterface card (NIC) or network adapter on the user device. The scans reference adouble-column data set to map the address (the first column value) to a group name (thesecond column value). Scans use this mapping to verify the logical group to which theuser device belongs.
Creating Data SetsFollow the procedure below to create a named data set and then enter data into it. For alist (single-column data set), you can enter data manually or import it from a .csv file. Fora map (double-column data set), you must import initial data from a .csv file.
Note: Data set values can be treated as case-sensitive, depending on the scan packageusing the data set. If you are using such a package, avoid creating conflicting entries thatdiffer in case. For example, with the Citrix Scans for MAC Address package, it is possibleto create an entry for the same address and map it to two different groups. One entrymight map the address 00:50:8b:e8:f9:28 to the Finance group. Another entry can mapthe same address with different case lettering, 00:50:8B:E8:F9:28, to the Sales group.Such entries make scan results unreliable.

To create a data set1. Click Start > All Programs > Citrix > Management Consoles > Access Management
Console.
2. Select Endpoint Analysis in the console tree and under Common Tasks, click Managedata sets.
3. Select New.
4. Enter a name for the new data set.
5. Enter data in one of the following two ways:
● Enter a path to a .csv file containing initial data to import. You must use thismethod to create a double-column set.
● Leave the file path blank to create an empty single-column data set. Add values byediting the data set after you create it.
You can edit an existing data set from the Data Sets dialog box. To open Data Sets, selectEndpoint Analysis in the console tree and click Manage data sets in Common Tasks.
Example: Verifying a Set of Required UpdatesThis example describes the steps for creating a scan to verify that user devices are runningrequired updates for Version 6.0 of Internet Explorer.
1. Use the Citrix Scans for Internet Explorer scan package to create a scan that verifieswhether or not the user device is running Version 6.0 of Internet Explorer.
2. Create a single-column data set listing the Internet Explorer updates you require if theuser device is running Version 6.0. Example values for such a data set might beKB834707, KB867232, and KB889293.
3. Use the Citrix Scans for Internet Explorer Update scan package to create a scan tocheck for your required updates on user devices running Internet Explorer Version 6.0.
a. On the Select Conditions page of the Create Scan wizard, click Use AnotherScan’s Output as a Condition and identify the scan output that identifies productversion from the scan you created in Step 1. In the Define Values dialog box, namethis new condition and add the allowed value of 6.0.
Using Data Sets in Scans
238

239
Adding Scan Packages
Each scan package is designed to examine a set of properties for a specific softwareproduct. You can expand the default set of scan packages by importing new ones. Citrix,partners, or developers in your organization can develop additional scan packages using theEndpoint Analysis Software Development Kit (SDK) available on your product CD or theCitrix Web site at http://community.citrix.com/cdn.
To import a scan package1. Click Start > All Programs > Citrix > Management Consoles > Access Management
Console.
2. In the console tree, select a scan group or Endpoint Analysis and under CommonTasks, click Import scan package.
● If you want the package to appear in a scan group, you must select that scan group.
● If you select Endpoint Analysis during the importing, the scan package does notappear under a scan group and appears directly under the Endpoint Analysis node.
3. Browse to the scan package file and click OK.
Grouping ScansDefault scan groups for such categories as antivirus, firewall, and operating systemsoftware are provided in the console tree to help organize scan packages and their scans.Scan groups can help you find scan packages or scans more quickly. You can create andname your own groups.
Scan groups exist to organize items within the console tree only and have no effect on howscans run.
To create a scan group1. Click Start > All Programs > Citrix > Management Consoles > Access Management
Console.
2. In the console tree, select Endpoint Analysis and under Common Tasks, click Createscan group.
Adding Language Packs

A scan package developer can create language packs to expand the languages in which thepackage creates scans. For example, a developer can first develop a scan package forEnglish and decide later to add language packs for French, German, or Spanish asdevelopment proceeds. Language packs are typically distributed as .cab files.
To import a language pack for a scan package1. Click Start > All Programs > Citrix > Management Consoles > Access Management
Console.
2. In the console tree, select Endpoint Analysis and under Common Tasks, click Import.
Adding Scan Packages
240
241
Scripting and Scheduling Scan Updates
Two command utilities are available to assist you in writing scripts or scheduling scanupdates. You can run these utilities from a command prompt in the following defaultlocation on the server:
\\Program Files\Citrix\Access Gateway\MSAMExtensions\
Note: You must run discovery after using these utilities for the console to find and displaythe new values.
The next two sections describe each utility.
Updating Property Values in ScansYou can use the CtxEpaParamUpdate utility to update the required property values for ascan. For example, if you require user devices to have a specified pattern version level ofantivirus software, you can create a script to update the scan when you need to changewhich pattern file is being detected. This command is designed for use as a scheduled taskon a server with the Access Management Console installed.
Use the following syntax, including quotation marks:
“ctxepaparamupdate” package_uri package_version “scan_name” “rule_name” “param_name” “new_value”
where the parameters are:
Parameter Description
package_uri URI of the scan package to which the scan belongs. You can findthe URI information for a scan package in the management consoleProperties view for the scan package.
package_version Version of the scan package to which the scan belongs. You canfind the version information for a scan package in the managementconsole Properties view for the scan package.
scan_name Name of the scan in which the property is set.
rule_name Name of the rule in which the required property value is set.
param_name Parameter name for the required value. You can find theparameter name and its current setting in the management consolein the Properties view for the scan rule.

new_value The new value. If the required property has a restricted valuerange, this new value must be within that range.
Example: To update a scan with theCtxEpaParamUpdate utility
Let us assume you want to update an existing scan from the scan package Citrix Scans forMcAfee VirusScan Enterprise. To update the required engine version to 4.4 and the patternversion to 4641, type:
“C:\Program Files\Citrix\Access Gateway\MSAMExtensions\CtxEpaParamUpdate.exe” C:\Program Files\Citrix\Access Gateway\Bin\EPAPackages\CitrixVSEMcAfee.cab 1.0 “scan_name” “rule_name” “PatternVersion” “4641”
and also type:
“C:\Program Files\Citrix\Access Gateway\MSAMExtensions\CtxEpaParamUpdate.exe” C:\Program Files\Citrix\Access Gateway\Bin\EPAPackages\CitrixVSEMcAfee.cab 1.0 “scan_name” “rule_name” “EngineVersion” “4.4”
where scan_name and rule_name are the existing scan name and rule name.
Updating Data SetsYou can use CtxEpaDataSetUpdate to script or schedule updates to data sets. For example,you might prefer to create your own script to automate a task such as updating the patternfile number required for an antivirus program.
Use the following command options (switches) with this utility:
Switch option Description Syntax
/import Creates a new data set byimporting a .csv file
ctxepadatasetupdate /importfile_name.csv dataset_name
/reimport Replaces all contents of anexisting data set by importing anew .csv file
ctxepadatasetupdate /reimportfile_name.csv dataset_name
/export Exports the data set in a .csv file ctxepadatasetupdate /exportfile_name.csv dataset_name
/destroy Deletes the data set ctxepadatasetupdate /destroydataset_name
/add Adds an additional value to thespecified data set
ctxepadatasetupdate /adddataset_name key [value]
Scripting and Scheduling Scan Updates
242
/overwrite Replaces an entry in a mapping(double-column) data set
ctxepadatasetupdate /overwritedataset_name key value
/remove Deletes an entry in a data set ctxepadatasetupdate /removedataset_name key
Use the following parameters in the command options above:
Parameter Description
file_name.csv The name of the .csv file that contains the data set
dataset_name The name for the data set
key If the data set is a list (single-column data set), this is a value in thelist. If the data set is a map (double-column data set), this is the firstcolumn value.
value If the data set is a map (double-column data set), this is the secondcolumn value. If the data set is a list (single-column data set), thisparameter does not exist.
For more information about data sets, see Using Data Sets in Scans.
To locate official parameter names in scansYou can find parameter names from the scan properties in the console.
1. Click Start > All Programs > Citrix > Management Consoles > Access ManagementConsole.
2. In the console tree select a rule associated with the scan and choose the Propertiesview in the right details pane.
3. Select the row that displays the property and look in the Parameter Name column.
Scripting and Scheduling Scan Updates
243
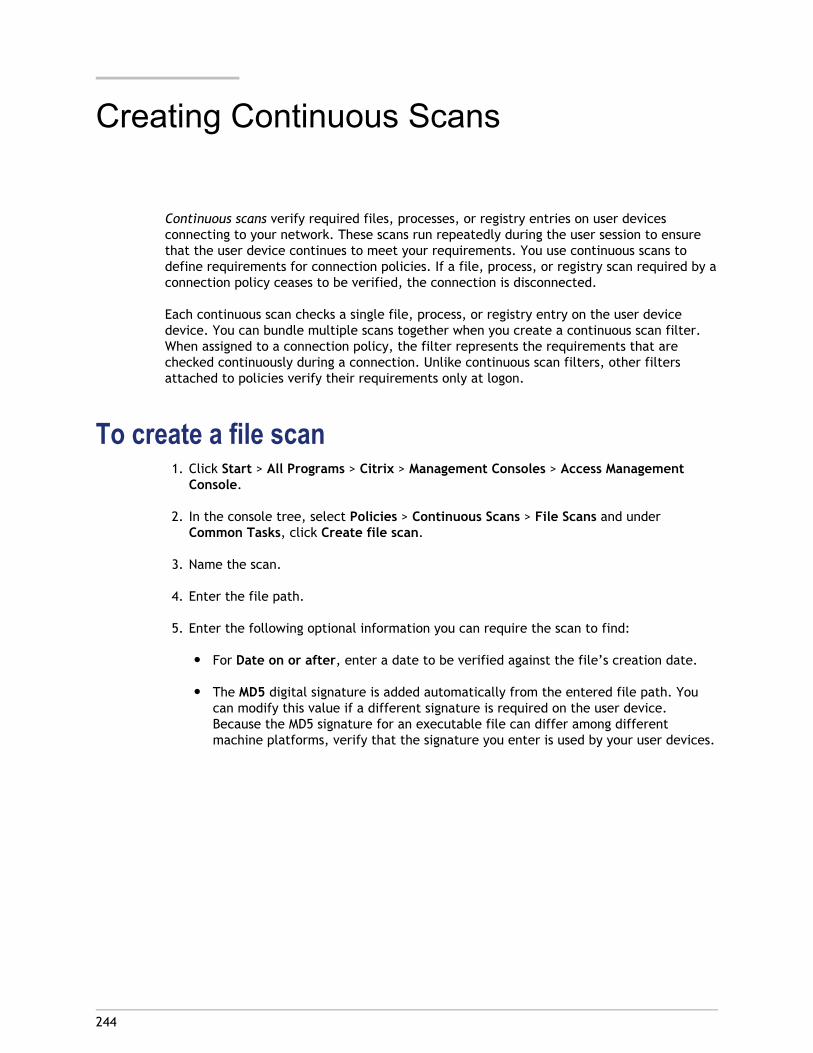
244
Creating Continuous Scans
Continuous scans verify required files, processes, or registry entries on user devicesconnecting to your network. These scans run repeatedly during the user session to ensurethat the user device continues to meet your requirements. You use continuous scans todefine requirements for connection policies. If a file, process, or registry scan required by aconnection policy ceases to be verified, the connection is disconnected.
Each continuous scan checks a single file, process, or registry entry on the user devicedevice. You can bundle multiple scans together when you create a continuous scan filter.When assigned to a connection policy, the filter represents the requirements that arechecked continuously during a connection. Unlike continuous scan filters, other filtersattached to policies verify their requirements only at logon.
To create a file scan1. Click Start > All Programs > Citrix > Management Consoles > Access Management
Console.
2. In the console tree, select Policies > Continuous Scans > File Scans and underCommon Tasks, click Create file scan.
3. Name the scan.
4. Enter the file path.
5. Enter the following optional information you can require the scan to find:
● For Date on or after, enter a date to be verified against the file’s creation date.
● The MD5 digital signature is added automatically from the entered file path. Youcan modify this value if a different signature is required on the user device.Because the MD5 signature for an executable file can differ among differentmachine platforms, verify that the signature you enter is used by your user devices.

To create a process scan1. Click Start > All Programs > Citrix > Management Consoles > Access Management
Console.
2. In the console tree, select Policies > Continuous Scans > Process Scans and underCommon Tasks, click Create process scan.
3. Name the scan.
4. Type the name or browse to the process.
5. The MD5 digital signature is added automatically from the entered file path. You canmodify this value if a different signature is required on the user device. The MD5 digitalsignature is not required and can be left blank. Because the MD5 signature for anexecutable file can differ among different machine platforms, verify that the signatureyou enter is used by your user devices.
To create a registry scan1. Click Start > All Programs > Citrix > Management Consoles > Access Management
Console.
2. In the console tree, select Policies > Continuous Scans > Registry Scans and underCommon Tasks, click Create registry scan.
3. Name the scan.
4. Type the Registry path, Registry type, Entry name, and Entry value.
Creating Continuous Scans
245

246
Creating Advanced Endpoint AnalysisScans
You can create advanced endpoint analysis scans using the Citrix Endpoint Analysis Portal,powered by OPSWAT. You can create custom endpoint analysis scans for a wide variety ofproducts. You use the Policy Generator on the Endpoint Analysis Portal to create policiesthat enable you to secure user devices.
In Advanced Access Control, you can use the Advanced Endpoint Analysis Scan policies tocontrol the visibility of a logon point.
For example, you can deny logon point visibility for users who fail the scan.
For a list of known issues with this release, see the readme Citrix Access Gateway 4.5,Advanced Edition with Advanced Endpoint Analysis powered by OPSWAT on the CitrixSupport Web site.
Related Information
How the Citrix Endpoint Analysis Portal Works
Downloading files from the Endpoint Analysis Portal
Creating an Endpoint Analysis Scan Policy
Deploying the Advanced Endpoint Analysis Plug-in

247
How the Citrix Endpoint Analysis PortalWorks
The Citrix Endpoint Analysis Portal allows you to create advanced endpoint scan packagesfor a wide variety of software products. When you create a policy, all available productsare shown in a tree view in the left pane of the Policy Generator. The hierarchy of the treeis vendor name > product name > product version. To select a product and version, simplyclick on the version and drag to the Selected Products tree on the right.
When you drag a product and version to the Selected Products tree, you create rules.When the Advanced Endpoint Analysis Plug-in scans the user device and a product is foundthat satisfies all the rules, the plug-in stops checking the user device.
If you select all the versions for a product or vendor, the .csv file contains a wildcard matchagainst versions. If a new version of the product is released by the vendor, the AdvancedEndpoint Analysis Plug-in recognizes the new version automatically due to the wildcardmatch.
Any time you change products within the Advanced Endpoint Analysis Portal, you mustcreate a new policy and upload it to the server.
The categories of product types that you can choose as part of the scan for end user devicesinclude:
● Antivirus software
● Antispyware software
● Antiphishing software
● Firewall software
● Hard disk encryption software
● Patch management
● Peer-to-peer networking
Peer-to-peer networking does not have any rules. By default, all peer-to-peer networkingproducts are blocked. The only rule you can chose decides which peer-to-peer networkingproducts to allow.
The Malware Scanner is a free tool that enables your advanced endpoint analysis solution toconduct an active scan of the current running processes and memory modules on a userdevice in only seconds. You can use the tool to detect malware threats, such as keystrokeloggers or viruses on the user device. The Malware Scanner is enabled by default. You candisable it using the Policy Generator. For more information about the Malware Scanner, seeHow the Malware Scanner Works.

The steps for creating and deploying a custom advanced endpoint analysis scan are asfollows:
1. Download the configuration file (CustomScan.cab) and Endpoint Analysis Plug-in(EPAPlugin.zip) from the Citrix Endpoint Analysis Portal for your version of AccessGateway.
2. In the Citrix Endpoint Analysis Portal, use the Policy Generator to choose from a varietyof products as requirements for user devices. You select the products that must beinstalled on the user device and then create a .csv file to download to the server.
3. In the management console, import the configuration file (CustomScan.cab) to theserver.
4. In the management console, create a scan using the .csv file after you import theconfiguration file.
5. Install the Advanced Endpoint Analysis Plug-in on the server.
6. Select the Advanced Endpoint Analysis Plug-in in the logon point. You must associatethe plug-in with a logon point to allow users to download the plug-in to the user device.When users log on to Access Gateway, the Advanced Endpoint Analysis Plug-indownloads to the user device and then scans the device for the required software.
Note: Steps 1 through 4 are identical if you are using Access Gateway 4.5, AdvancedEdition or Access Gateway 5.0. For each Access Gateway version, you follow differentprocedures for installing the Advanced Endpoint Analysis Plug-in.
For more information about installing the Advanced Endpoint Analysis Plug-in on AdvancedAccess Control, see To deploy the Advanced Endpoint Analysis Plug-in on Advanced AccessControl.
How the Citrix Endpoint Analysis Portal Works
248
249
How the Malware Scanner Works
The Malware Scanner is a free tool available from the Citrix Endpoint Analysis Portal. Whenusers log on, the Malware Scanner enforces an active scan of the currently runningprocesses and memory modules on the user device. You can use the Malware Scanner todetect threats, such as keystroke loggers or viruses on the user device. The MalwareScanner runs automatically and takes only a few seconds to scan the user device. Usersmust be connected to the Internet to run the Malware Scanner. The Malware Scannerconnects to the OPSWAT portal and information is sent to the site for verification.
You can use either the free version of the Malware Scanner or purchase the premiumversion through OPSWAT. If you purchase the premium version, you need to enter thelicense key on the Policy Generator tab in the Citrix Endpoint Analysis Portal. For moreinformation, see the OPSWAT Web site.
The Malware Scanner is enabled by default on the Policy Generator tab in the portal.
You can disable the Malware Scanner at any time.
Note: If you enable or disable the Malware Scanner, you must create the endpointanalysis policy again and upload the new .csv file to server.
To disable or enable the Malware Scanner1. Go to the Citrix Endpoint Analysis Portal and then click the Policy Generator tab.
2. Select Enforce Malware Scan.
250
Downloading Files from the CitrixEndpoint Analysis Portal
To create advanced endpoint analysis scans using the Citrix Endpoint Analysis Portal, youdownload the file CustomScan.cab from the Downloads tab. You must also download theAdvanced Endpoint Analysis Plug-in from the Endpoint Analysis Portal. After you associatethe plug-in with a logon point, when users log on, the plug-in downloads to the user deviceand then scans the user device.
OPSWAT updates these two files monthly. Each month you need to download the updatedfiles and then install them on your server. This provides support for the latest version ofsoftware products from manufacturers.
To download files from the Endpoint Analysis Portal1. Go to the Citrix Endpoint Analysis page and then click the Downloads tab.
2. Select the file CustomScan.cab for your version of Access Gateway and then clickDownload. Follow the prompts to save the file on your server.
3. Select the file EPAPlugin.zip for your Access Gateway version and then click Download.Follow the prompts to save the file on your server.
Next, you import the files to the server as a custom scan. You then create a customscan and deploy the Advanced Endpoint Analysis Plug-in with logon points.
For details, see To import the custom .cab file to Advanced Access Control.

251
Creating an Advanced Endpoint AnalysisScan Policy
You can use the Policy Generator on the Citrix Endpoint Analysis Portal to create anadvanced endpoint analysis scan policy. The policy can contain any of the products listed ineach of the categories in the left pane of the Policy Generator. When you select a productand version from a category, the Policy Generator shows you which category is enabled andthe number of rules you selected.
When you are finished building the policy, you then create and download a .csv file. Whenyou create a policy for an advanced endpoint analysis scan, you then upload the .cvs file toAdvanced Access Control.
1. Go to the Citrix Endpoint Analysis Portal and then click the Policy Generator tab.
2. In the left pane, double-click a policy type, such as Antiphishing.
3. In the right pane, select Check to enable.
When you select this check box, a list of available products appears.
4. Under Available Products, expand the product list and then drag one or more productsto the Selected Products pane.
5. Repeat Steps 3 and 4 for each product you want to add to the policy.
6. Click Finish & Export Policy and then save the .csv file to your computer.
Before you create the advanced endpoint analysis scan in Access Gateway, you need todownload the configuration file and Advanced Endpoint Analysis Plug-in from the portalpage. For detailed steps, see Downloading Files from the Citrix Endpoint Analysis Portal.
To create the Endpoint Analysis scan and associate it with a logon point in Advanced AccessControl, see To import the custom .cab file to Advanced Access Control.

252
To import the custom .cab file toAdvanced Access Control
After you download the endpoint analysis .cab file from the Citrix Endpoint Analysis Portal,you import the file to Advanced Access Control.
1. Click Start > All Programs > Citrix > Management Consoles > Access ManagementConsole.
2. In the console tree, expand the Advanced Access Control cluster (the default name isCitrixAAC).
3. Expand Endpoint Analysis Scans and then select a scan group.
Note: You can import the .cab file into any scan group listed under Endpoint AnalysisScans. Typically, you import the .cab to Custom Scans.
4. In the middle pane, under Common Tasks, click Import scan package.
5. In the Select Scan Package File dialog box, browse to and select the CustomScan.cabfile you downloaded from the Citrix Endpoint Analysis portal page and then click Open.
The Advanced Endpoint Scan appears under Custom Scans in the console tree. Next, youcan create a policy for the scan.
For more information, see To create an advanced endpoint analysis policy in AdvancedAccess Control.

253
To create an advanced endpoint analysispolicy in Advanced Access Control
After you import the endpoint analysis files to Advanced Access Control, you then uploadthe .csv file to Advanced Access Control and create the policy.
Note: If you have not already created the policy .csv file, you can do so by following thesteps in Creating an Advanced Endpoint Analysis Scan Policy. You can also generate a newpolicy file at any time.
1. Click Start > All Programs > Citrix > Management Consoles > Access ManagementConsole.
2. In the console tree, expand the Advanced Access Control cluster (the default name isCitrixAAC).
3. Under Custom Scans, select Advanced Endpoint Scan.
4. Under Common Tasks, click Create scan.
5. In the Create Scan dialog box, in Scan name, enter a name for the scan and then clickNext.
6. In Select Conditions, select Logon Point, and then click Next.
7. On the Define Rule page, in Rule name, enter a name for the rule and then click Next.
8. In Operating System, select one or more operating systems you want the scan to detectand then click Next.
9. In Configure Conditions, under Condition, select the logon points for the policy andthen click Next.
10. In Define Property to Verify, click Create Data Set.
11. In the New Data Set dialog box, in Enter a name for the data set, type a name.
12. In Enter a path to a .csv file to provide an initial set of data. To create an emptydata set, leave the field blank., click Browse.
13. Navigate to the .csv file you saved on your computer, click Open, click OK, and thenclick Finish.

254
Configuring Additional Options forAdvanced Endpoint Analysis Scans
When you create an endpoint analysis policy in the Citrix Endpoint Analysis Portal, you canselect additional options for enforcing requirements on user devices. You enable theoptions when you select the products to include in the advanced endpoint analysis scan.When you create the .csv file, these options are included in the file. Not all of the optionsare available for all products. For example, some antivirus products might not require usersto enable the software on the user device.
The options include:
● Is Product Authentic. Each service that is part of the product detected on the userdevice must be digitally signed. This option is available with antivirus, antispyware,firewall, patch management, and hard disk encryption policies.
● Real-Time Protection. Users must enable the software product on the user device topass the endpoint analysis scan. This option is available with antivirus and antispywarepolicies.
● Last Full System Scan. A scan of the user device must be successfully completed withinthe number of days provided. When you enable this option, enter the number of daysallowed since the last successful scan. This option is available with antivirus andantispyware policies.
● Last Update. You can specify the number of days since the software product was lastupdated. When you enable this option, enter the number of days allowed since the lastsuccessful scan. This option is available with antivirus and antispyware policies.
● Firewall Protection. Users must enable their firewall product for the user device topass this scan. This option is available for firewall policies only.
● Automatic Update. The selected patches in the policy must be set to automaticallydeploy the patches on the user device. If you select this option and automaticdeployment is not set on the user device, the device fails the scan. This option isavailable for Patch Management policies only.
● Missing Patches. You can specify the number of patches that can be missing from theuser device to pass the endpoint analysis scan. If the user device exceeds this limit, thescan fails. This option is available for Patch Management policies only.
● Antiphishing Protection. User devices must have at least one browser protected by therequired antiphishing product. This option is available for antiphishing policies only.
● Encryption Status. The hard drive of the user device must be encrypted to pass thescan. This option is available for hard disk encryption policies only.

To enable additional options in the Citrix EndpointAnalysis Portal
1. Go to the Citrix Endpoint Analysis Portal and then click the Policy Generator tab.
2. Select a product type on the right and then select Check to enable.
3. Under the product list, select the options you want to enable.
To configure global settings in the Citrix EndpointAnalysis Portal
You can configure global settings within the advanced endpoint analysis polices to allow ordeny access when users log on. You can allow or deny access based on the results of thescan. There are two global settings that you can configure. These include:
● Information was missing or unavailable. When the endpoint analysis scan runs on theuser device, if information is missing, you can choose whether the user device isallowed to pass or fail the scan. For example, if you select the product ClamAV, anantivirus product, and select Real-Time Protection, the scan might fail becauseClamAV does not require users to enable the product. In this instance, you can chooseto allow the scan to pass and allow users to log on. The default setting for this option isallow.
● Unexpected error occurred. Occasionally, there might be an internal error on the userdevice when the endpoint analysis scan runs. You can choose to allow or deny accessfrom the user device if an internal error occurs. The default setting for this option isdeny.
1. Go to the Citrix Endpoint Analysis Portal and then click the Policy Generator tab.
2. In the product list on the left, click Global Settings and then select your options.
Configuring Additional Options for Advanced Endpoint Analysis Scans
255

256
Deploying the Advanced EndpointAnalysis Plug-in
When you create advanced endpoint analysis policies from the Citrix Endpoint AnalysisPortal, you also need to download and then deploy the Advanced Endpoint Analysis Plug-in.The plug-in is software that downloads to the user device and then scans the device for theitems required in the endpoint analysis scan, such as antivirus or firewall software.
You download the Advanced Endpoint Analysis Plug-in from the Downloads tab in the CitrixEndpoint Analysis Portal and save it to your computer as a .zip file.
After you configure the custom endpoint analysis scan policy, you then install the EndpointAnalysis Plug-in on Advanced Access Control. For more information, see To deploy theAdvanced Endpoint Analysis Plug-in on Advanced Access Control.
To download the plug-in .zip package, see Downloading Files from the Citrix EndpointAnalysis Portal.
257
To deploy the Advanced EndpointAnalysis Plug-in on Advanced AccessControl
After you download the Advanced Endpoint Analysis Plug-in from the Citrix EndpointAnalysis Portal, you need to deploy the plug-in on Advanced Access Control.
1. Open the file epaplugin.zip and then open the file server_config.txt.
2. Copy the contents of the text file.
3. On the Advanced Access Control server, navigate to%systemroot%\Inetpub\wwwroot\CitrixLogonPoint\LogonPointName where LogonPointName is thename of the folder for the logon point.
4. Open the file web.config in a text editor and scroll to the bottom of the file.
5. Just before the closing appsettings tag (</appSettings>), select the following text and delete it:
<!-- <add key="ActiveXCabVersion" value="1,0,0,0" / /> --><!-- <add key=""ActiveXCLSID" value="16FCA83C-28C7-45af-B46A-870D430703B1"" /> --><!-- <add key="ActiveXPROGID" value="Custom.CAOControl.1.0" /> --><!-- <add key="NetscapePluginName" value="Custom Endpoint Analysis Client 1.0.0.0" /> --><!-- <add key="NetscapePluginMIMEType" value="application/vnd.custom.endpoint-analysis-10" /> -->
6. Paste the contents of the server_config.txt file into the web.config file.
7. Save and close the web.config file.
8. The deployment folder for the logon point contains an epaclients folder. Copy the EPAPlugin.exe fileyou downloaded from the Citrix Endpoint Analysis Portal and paste it into the epaclients folder.
9. Repeat Steps 3 through 7 for each logon point on each Advanced Access Control Server that will usethe Advanced Endpoint Analysis Plug-in.

258
Providing Secure Access to CorporateEmail
You can use Advanced Access Control to provide policy-based access to data on internalservers, including email servers. When you configure your content aggregation point—yourintranet or network portal—you can provide your users with secure access to their emailaccounts. Using access policies, you can determine what level of access to give users andthen what actions users can take after they are granted access.
With Advanced Access Control, you can:
● Integrate the email solution you are already using with the secure remote accessAdvanced Access Control provides. For example, if you are already using MicrosoftOutlook Web Access or Lotus iNotes/Domino Web Access to allow users to access theiremail over the Web, you can integrate either of those front ends with a contentaggregation point such as your intranet or network portal. Users then get remote accessto their email from this aggregation point, whether you decide to use the AccessInterface provided with Advanced Access Control or another portal solution you have inplace.
If you do not already use Outlook Web Access or iNotes/Domino Web Access to allowyour users to access their email over the Web, you can use the Web-based emailinterface provided with Advanced Access Control.
● Provide access to any email applications you publish with Citrix XenApp. You caninclude the links to published applications in a XenApp Web site.
● Provide users with the ability to securely connect to their email accounts on MicrosoftExchange or Lotus Notes/Domino servers. Users can access all email functions as well assynchronize their email data to their user devices for offline use.
● Provide users of small form factor devices, such as Personal Digital Assistants (PDAs),with secure remote access to email.
● Allow users to attach to email message files stored on network shares without having todownload the file to their local user device.
Similar to other resources accessible through Advanced Access Control, you control accessto email through policies. For example, you can create a policy to grant specific user groupsaccess to Web-based email and create another policy to prevent specific user groups fromsynchronizing the data in their email accounts to their user devices.
Additionally, you can create a policy that allows a specific user group to downloadattachments they receive using Web-based email and another policy that prevents adifferent user group from performing this action.
Note: If recipients access their email through Advanced Access Control and it contains an embedded link to a file share or Web resource, a policy allowing the recipients access to that resource is also required. However, if the email is sent to recipients not using Advanced Access Control to access their email, no additional permissions are required.

These users can view the attachment without policy restrictions.
Providing Secure Access to Corporate Email
259

260
Choosing an Email Solution
To decide which email solution to provide, look at what type of access your users need,what resources you already have in use in your network, and how much control you want tohave over user actions after they are granted access.
For example, if you want to allow users to securely access their email accounts over theInternet and you are already using Outlook Web Access, you can integrate the Outlook WebAccess interface on the Email tab of the Access Interface included with Advanced AccessControl.
Conversely, if you want to allow remote access to email and are not already using a Webfront-end to your email servers, you can use the Web-based email interface included withAdvanced Access Control.
The following table lists the types of access to email and what you should consider whendeciding whether or not to choose each option.
User DeviceRequirements
ServerRequirements
SmallFormFactorSupport
PolicyEnforcementWhenAccessing FileAttachments
Web-based emailwith Outlook WebAccess oriNotes/DominoWeb Access
Compatible Webbrowser; seeproductdocumentationfor additionalrequirements
Email server(MicrosoftExchange orLotusNotes/Domino)
No Yes
Web-based emailwith the AccessInterface
Compatible Webbrowser only (noother clientsoftwarerequired)
MicrosoftExchange(Notes/Dominonot supported inthisconfiguration)
Yes Yes
Synchronizationof email data touser devices
Email software(MicrosoftOutlook or LotusNotes) andAccess GatewayPlug-in
Email server(MicrosoftExchange orLotusNotes/Domino)
No No
Email applicationpublished withCitrix XenApp
Citrix onlineplug-ins
Citrix XenApp No No
261
Providing Access to Published EmailApplications
If you are using Citrix XenApp to provide access to email applications published on internalservers, you can easily integrate access to these applications with your Advanced AccessControl deployment.
Providing access to email through published applications extends the SmartAccesscapabilities of Advanced Access Control to XenApp by incorporating Advanced AccessControl policy information such as endpoint analysis within XenApp policies. In addition,requiring users to access email by launching applications published with XenApp is the mostsecure method of providing email access because data never leaves the secure network.
Note: You can combine email access methods if you want to provide more than onemethod of remote access. For example, in addition to providing access to published emailapplications, you can also configure a Web-based email solution.
To provide access to published email applications1. Publish and configure your email application for SmartAccess in XenApp.
2. Configure a Web Interface site. For more information, see Setting Up a Web InterfaceSite to Work with Access Gateway.

262
Providing Users with Secure Web-BasedEmail
With Advanced Access Control, you can provide access to email accounts using the followingWeb-based interfaces.
● The Web-based email interface included with Advanced Access Control allows users toaccess email accounts on Microsoft Exchange servers. Users do not need to download orinstall client software to access their email using this interface; they need to run only asupported browser.
Additionally, the Web-based email user interface included with Advanced AccessControl is the only way to provide Web-based email access to PDAs and other smallform factor devices.
● Microsoft Outlook Web Access allows users to access email accounts on MicrosoftExchange servers.
● Lotus iNotes/Domino Web Access allows users to access email accounts on LotusNotes/Domino servers.
Important: Advanced Access Control supports one back-end cluster— Notes/Domino orExchange—per access server farm. However, you can configure multiple Outlook WebAccess servers when using Exchange or multiple iNotes/Domino Web Access servers whenusing Lotus Notes/Domino.
If you are using a portal solution, you can integrate the Web-based email interface includedwith Advanced Access Control with these portal products. For more information, seeIntegrating Web-Based Email Access with a Third-Party Portal.
When you configure Web-based email access, users access their email from the Email tabon the Access Interface. If you prefer, you can configure Advanced Access Control so thatthe Web-based email interface is the default interface users see when they log on toAdvanced Access Control. For information about how to achieve this configuration, seeConfiguring Logon Points

263
Enabling Access to Web-Based Email
The basic steps to follow to enable access to Web-based email are:
● Configure Web-based email in Advanced Access Control
● Create policies to allow access to the email resource
To configure Web-based email for Microsoft ExchangeUse the following procedure to allow users to send and receive Web-based email withMicrosoft Exchange.
1. Click Start > All Programs > Citrix > Management Consoles > Access ManagementConsole.
2. In the console tree, select Web Email and under Common Tasks, click Configure Webemail.
3. Select Microsoft Exchange.
4. Select the Enable Web-based access check box.
5. Select one of the following Web-based interfaces:
● Email interface included with Advanced Access Control. Allows access to emailwithout the need for users to download or install client software; they need to runonly a supported browser.
● Specify the IP address, FQDN, or NetBIOS name of your Microsoft Exchangeserver.
● Display email as HTML to support advanced text formatting features includingnumbering, bullets, alignment, and linking to file shares and Web pages. Onlyenable this option when email messages originate from trusted sources withinyour corporate network.
Caution: If email messages originate from outside your corporate network,configure Web email to display messages in plain text. Failure to do so mayexpose your Advanced Access Control servers and client devices to attacks usingembedded malicious code within HTML-formatted messages. Displaying messagesas plain text mitigates these types of attacks. Therefore, Citrix recommendsconfiguring Web email to display messages in plain text when any email messagesoriginate from outside your corporate network.
● Use Microsoft Outlook Web Access. Allows access to email using Outlook WebAccess.

● Specify the application’s start page as well as the URLs for which theapplication requires access. The start page should resemblehttp://servername/exchange, where servername is the IP address, FQDN, orNetBIOS name of your Exchange server. If you use a load balancer to manageOutlook Web Access servers, enter the URL of the load balancer as the startpage and add the Outlook Web Access servers as URLs accessible by theapplication.
Note: To allow access to an entire server, add http://servername to the URLlist, where servername is the IP address, FQDN, or NetBIOS name of yourExchange server. This configuration is useful when providing access todedicated Microsoft Exchange servers.
● Enable the interface common for all browser types option to suppress thepresentation of browser-specific ActiveX controls and other advanced displaytypes. Citrix recommends this option if you have users who cannot downloadActiveX controls or who use a variety of browser versions.
Note: Citrix recommends that you first test your Web-based email applicationwith this option disabled. If your testing reveals that the application displaysimproperly, enable this option and verify that the issue no longer exists.
To configure Web-based Email for LotusNotes/Domino
Use the following procedure to allow users to send and receive Web-based email with LotusNotes/Domino.
1. Click Start > All Programs > Citrix > Management Consoles > Access ManagementConsole.
2. In the console tree, select Web Email and under Common Tasks, click Configure Webemail.
3. Select Lotus Notes/Domino or other email applications.
4. Select Enable Web-based access.
5. Specify the application’s start page as well as URLs for which the application requiresaccess. If you use a load balancer to manage iNotes servers, enter the URL of the loadbalancer as the start page and add the iNotes servers as URLs accessible by theapplication.
You can use dynamic token replacement to accommodate explicit links to individualuser database files. For example, enterhttp://servername/mail/#<username>.nsf, where servername is the NetBIOSname, IP address, or FQDN of your Lotus Notes/Domino server and the username tokenis replaced with the user’s user name obtained from Active Directory or Windows NTDirectory Services. For a complete list of tokens supported by Advanced Access Control,see Using Dynamic System Tokens.
Enabling Access to Web-Based Email
264

Note: To allow access to an entire server, add http://servername to the URL list,where servername is the IP address, FQDN, or NetBIOS name of your LotusNotes/Domino server. This configuration is useful when providing access to dedicatedLotus Notes/Domino servers.
6. Enable the interface common for all browser types option to suppress the presentationof browser-specific ActiveX controls and other advanced display types.
Citrix recommends this option if you have users who cannot download ActiveX controlsor who use a variety of browser versions.
Note: Citrix recommends that you first test your Web-based email application withthis option disabled. If your testing reveals that the application displays improperly,enable this option and verify that the issue no longer exists.
7. Select the appropriate version of Lotus iNotes/Domino Web Access from the availableemail application types.
When you are done configuring Web-based email, you must create a policy that allows usersto access email. To allow user access to email, create a policy following the steps inCreating Access Policies.
Note: For a recipient to access an email attachment through Advanced Access Control, anemail policy enabling the recipient at least one of the following is required: download,HTML Preview, or Live Edit. Web-based email attachments cannot be accessed throughfile type association.
To integrate the Web-Based email interface with athird-party portal
If you are using the Web-based email interface included with Advanced Access Control toprovide users with access to their email, you can integrate this interface into any portalsolution. For example, if you are using Microsoft SharePoint as your corporate portal orinformation aggregation point, you can display the Web-based email interface included withAdvanced Access Control in the SharePoint portal.
1. Configure the Web-based email interface included with Advanced Access Control. Forinstructions about how to do this, see Providing Users with Secure Web-Based Email.
2. Configure your portal product’s Web site viewer to display the Web-based emailinterface at http://servername/citrixfei/classic.asp, where servername is the name ofa Web server running Advanced Access Control.
Enabling Access to Web-Based Email
265
266
Integrating Web-Based Email Access witha Third-Party Portal
If you are using the Web-based email interface included with Advanced Access Control toprovide users with access to their email, you can integrate this interface into any portalsolution. For example, if you are using Microsoft SharePoint as your corporate portal orinformation aggregation point, you can display the Web-based email interface included withAdvanced Access Control in the SharePoint portal.
To integrate the Web-based email interface with athird-party portal
1. Configure the Web-based email interface included with Advanced Access Control. Forinstructions on how to do this, see Providing Users with Secure Access to EmailAccounts.
2. Configure your portal product’s Web site viewer to display the Web-based emailinterface at http://servername/citrixfei/classic.asp, where servername is the name ofa Web server running Advanced Access Control.

267
Providing Users with Secure Access toEmail Accounts
Use Advanced Access Control to allow users to securely access their email accounts onMicrosoft Exchange servers or Lotus Notes/Domino servers.
Important: To securely connect to email accounts and synchronize email to user devices,users must have the Access Gateway Plug-in installed on their user device.
When you configure this feature, roaming workers—whether connected over the Web orwithin the enterprise—can securely connect to their email accounts on the Exchange orLotus Notes/Domino server and synchronize their locally installed email application withthe data stored on the corporate email server. This allows users to work with theircalendars, tasks, and contacts in real time when working online, and then to synchronizetheir folders in preparation for working offline. Use this feature if you want remote userswith laptops to be able to securely access and synchronize email as they move betweenoffice workstations, laptops, and home workstations.
Note: Advanced Access Control does not control access to any attachments users receivewhen they connect to their email accounts through the Access Gateway Plug-in. If youenable and configure the email synchronization feature, users can access anyattachments they receive without policy-based restrictions.
The basic steps involved in allowing users to work with and synchronize their emailaccounts to their user devices are:
● Configure the email synchronization feature
● Create a policy to allow users to use the email synchronization feature
● Open the appropriate ports on the firewall between the Access Gateway and internalmail servers

To configure email synchronization1. Click Start > All Programs > Citrix > Management Consoles > Access Management
Console.
2. In the console tree, select Email Synchronization and under Common Tasks, chooseConfigure email synchronization.
3. Select Enable Email Synchronization.
4. Select the appropriate email server for your environment.
● If you select Microsoft Exchange, click New to enter the NetBIOS name, IP address,or FQDN of your Exchange server. Add additional Exchange servers if users connectto more than one server.
When you add an Exchange server, Advanced Access Control connects to thespecified host and determines the secondary port required for MessagingApplication Programming Interface (MAPI). Because this information is stored andnot dynamically updated, consider configuring your Exchange servers so that allMAPI ports remain static. If you do not configure your Exchange servers this way,you will need to reconfigure email synchronization in Advanced Access Control eachtime the Exchange server restarts.
● If you select Lotus Notes/Domino, enter the NetBIOS name, IP address, or FQDN ofyour Lotus Notes/Domino server. Port 1352 is used by default. Modify the port ifnecessary.
Note: If you are using a TCP/IP-based email application other than Exchange orNotes/Domino, you can use network resources to provide the same level offunctionality available with the email synchronization feature. For more informationabout configuring network resources, see Creating Network Resources for VPN Access.
When you are done configuring email synchronization, you must create a policy that allowsusers to access this resource.
To create a policy to allow email synchronization1. Create a policy to allow users to synchronize their email data to their user devices
following the steps in Creating Access Policies.
2. When you are done creating a policy to allow users to synchronize their email data totheir user devices, you must configure your firewall ports to allow users to connect.
To configure your firewall for email synchronization1. Open your firewall application.
2. Set the port status as required for your environment. If the traffic between your emailserver and the Access Gateway is secured, the data runs over port 443.
Providing Users with Secure Access to Email Accounts
268
269
Enabling Users to Attach Files toWeb-Based Email
You can configure Advanced Access Control to allow users to attach documents to newemail messages directly from Web resources and file shares. When you enable this feature,users can see and use the Send as attachment option from configured Web resources andfile shares. In addition, users can send files as email attachments when using the Live Editfeature. When a user selects this option, the file is attached to the Web-based emailinterface configured for your environment.
To configure Web email to support sending emailattachments
1. Click Start > All Programs > Citrix > Management Consoles > Access ManagementConsole.
2. In the console tree, select Email and under Common Tasks, choose Configure Webemail.
3. On the Enable Web-based Email page, select the Enable Send as Attachments for fileshares check box.
4. Additional configuration depends on the email application server selected.
● Microsoft Exchange. Specify the NetBIOS name, IP address, or FQDN of yourMicrosoft Exchange server. Advanced Access Control uses the Microsoft Exchangeserver configuration information to determine the MAPI server.
● Lotus Notes/Domino. Specify the name or IP address of the SMTP (Simple MailTransfer Protocol) and LDAP (Lightweight Directory Access Protocol) servers.
Note: If you are using Notes/Domino servers, ensure SMTP port relay outboundrestrictions do not prevent users outside of the corporate network from sendingemails. For example, you can configure Notes/Domino servers to allow allauthenticated users to send outgoing email. Refer to your Notes/Domino productdocumentation for additional information about configuring SMTP port relay outboundrestrictions.
5. Create a file share policy permitting the emailing of files as attachments. For moreinformation about the email as attachment permission, see Allowing EmailAttachments.
Restricting File Attachment Types

The Web-based email interface included with Advanced Access Control provides two levelsof security for file attachments. The first level of security includes file types blocked byAdvanced Access Control. The second level of security includes file types that can bedownloaded only to the user’s client device and cannot be accessed using HTML Preview,Live Edit, or file type association.
The default file types included in each level of security are defined in the table below.
File Type
Level 1 (Blocked FileTypes)
.ade .adp .app .asx .bas .bat .chm .cmd .com .cpl .crt .csh .exe
.fxp .hlp .hta .inf .ins .isp .js .jse .ksh .lnk .mda .mdb .mde
.mdt .mdw .mdz .msc .msi .msp .mst .ops .pcd .pif .prf .prg
.reg .scf .scr .sct .shb .shs .url .vb .vbe .vbs .wsc .wsf .wsh
Level 2 (DownloadOnly File Types)
.ade .adp .asx .bas .bat .chm .cmd .com .cpl .crt .dcr .dir .exe
.hlp .hta .htm .html .htc .inf .ins .isp .js .jse .lnk .mda .mdb
.mde .mdz .mht .mhtml .msc .msi .msp .mst .pcd .pif .plg .prf
.reg .scf .scr .sct .shb .shs .shtm .shtml .spl .stm .swf .url .vb
.vbe .vbs .wsc .wsf .wsh .xmlYou can add and remove file types from either security levels by using Registry Editor. If afile type is added to both levels, it is treated as a Level 1 file type.
Caution: Using Registry Editor incorrectly can cause serious problems that can requireyou to reinstall the operating system. Citrix cannot guarantee that problems resultingfrom incorrect use of Registry Editor can be solved. Use Registry Editor at your own risk.Make sure you back up the registry before you edit it.
To modify file attachment type security lists1. In Registry Editor, find the following key:
HKEY_LOCAL_MACHINE\SOFTWARE\Citrix\MSAM\FEI\FileExt
2. Edit the NoActivations value to modify Level 1 (blocked) file types and theDownloadOnly value to modify Level 2 (download only) file types.
Note: New file types must be separated by a new line with no additional spaces andcontain the preceding dot.
Enabling Users to Attach Files to Web-Based Email
270

271
Enabling Access to Email on Small FormFactor Devices
Using the Web-based email interface included with Advanced Access Control, you canprovide email access to users of specific PDAs and other small form factor devices. For a listof the supported small factor devices, see User Device Requirements.
To allow users of small form factor devices to access their email, choose one of theseoptions:
● Configure the Web-based email interface included with Advanced Access Control as thedefault Web-based email interface. If you configure the Advanced Access ControlWeb-based email interface as the default, all users access this interface for theirWeb-based email, regardless of the type of device from which they connect. Forinformation about how to make the Advanced Access Control Web-based emailinterface the default interface, see Providing Users with Secure Web-Based Email.
● Configure the Web-based email interface included with Advanced Access Control to bedisplayed specifically to users connecting from small form factor devices. Use thisconfiguration if you want users to see the Outlook Web Access interface when theyconnect from other device types.
If you configure the Web-based email interface included with Advanced Access Controlto be displayed specifically to users connecting from small form factor devices, thelogon point detects that the connection is from a small form factor device andautomatically presents the Advanced Access Control Web-based email interface.
To configure the Web-based email interface included with Advanced Access Control to bedisplayed specifically to users connecting from small form factor devices, follow theinstructions below.
Note: This feature is not available to Lotus iNotes/Domino Web Access users.

To configure the Web-based email interface for usewith small form factor devices
1. When configuring Web-based access to Exchange as described in Providing Users withSecure Web-Based Email, select one of the following options:
● Email interface included with Advanced Access Control. Displays the email interfaceincluded with Advanced Access Control for all users, regardless of the type ofconnecting device's form factor. Advanced Access Control detects the form factorof the connecting device and presents the appropriate interface for thatconnection. For example, Advanced Access Control displays a small interface forusers connecting with a small form factor device.
● Microsoft Outlook Web Access and enable the Provide support for small form factordevices feature. Advanced Access Control detects the form factor of the connectingdevice and displays the email interface included with Advanced Access Control forusers connecting with small form factor devices. Microsoft Outlook Web Access isprovided for standard form factor devices such as workstations and homecomputers.
Enabling Access to Email on Small Form Factor Devices
272
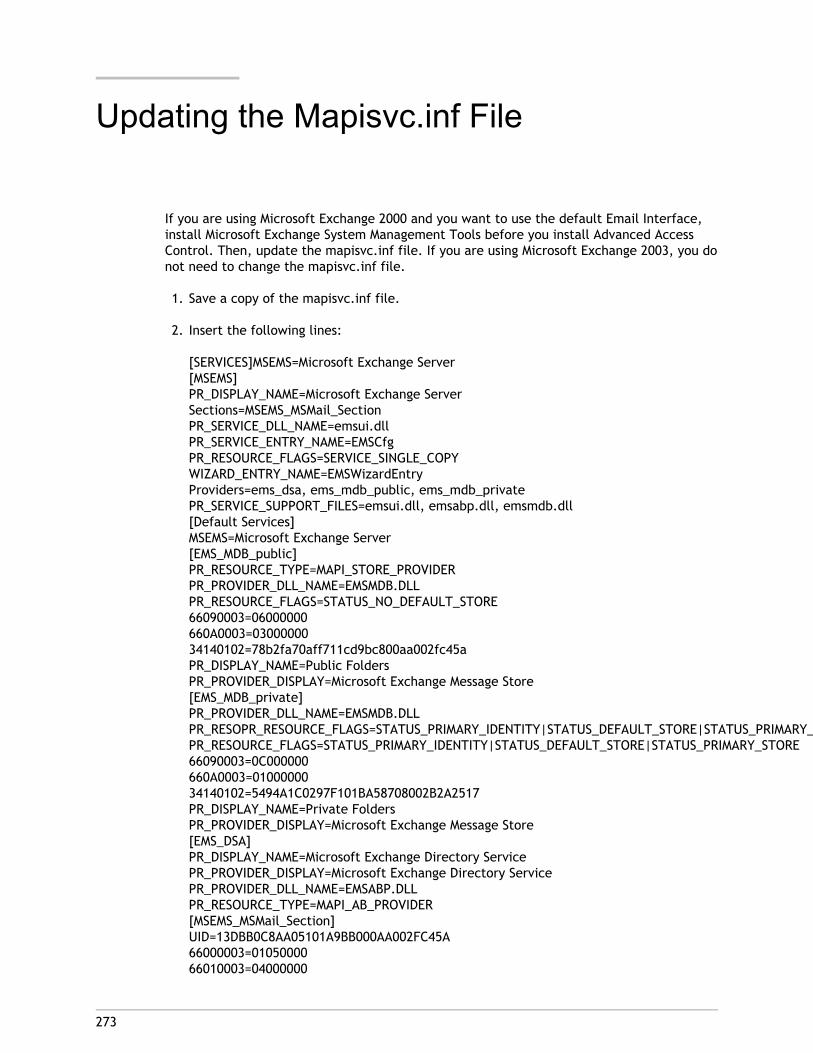
273
Updating the Mapisvc.inf File
If you are using Microsoft Exchange 2000 and you want to use the default Email Interface,install Microsoft Exchange System Management Tools before you install Advanced AccessControl. Then, update the mapisvc.inf file. If you are using Microsoft Exchange 2003, you donot need to change the mapisvc.inf file.
1. Save a copy of the mapisvc.inf file.
2. Insert the following lines:
[SERVICES]MSEMS=Microsoft Exchange Server [MSEMS] PR_DISPLAY_NAME=Microsoft Exchange Server Sections=MSEMS_MSMail_Section PR_SERVICE_DLL_NAME=emsui.dll PR_SERVICE_ENTRY_NAME=EMSCfg PR_RESOURCE_FLAGS=SERVICE_SINGLE_COPY WIZARD_ENTRY_NAME=EMSWizardEntry Providers=ems_dsa, ems_mdb_public, ems_mdb_private PR_SERVICE_SUPPORT_FILES=emsui.dll, emsabp.dll, emsmdb.dll [Default Services] MSEMS=Microsoft Exchange Server [EMS_MDB_public] PR_RESOURCE_TYPE=MAPI_STORE_PROVIDER PR_PROVIDER_DLL_NAME=EMSMDB.DLL PR_RESOURCE_FLAGS=STATUS_NO_DEFAULT_STORE 66090003=06000000 660A0003=03000000 34140102=78b2fa70aff711cd9bc800aa002fc45a PR_DISPLAY_NAME=Public Folders PR_PROVIDER_DISPLAY=Microsoft Exchange Message Store [EMS_MDB_private] PR_PROVIDER_DLL_NAME=EMSMDB.DLL PR_RESOPR_RESOURCE_FLAGS=STATUS_PRIMARY_IDENTITY|STATUS_DEFAULT_STORE|STATUS_PRIMARY_STOREURCE_TYPE=MAPI_STORE_PROVIDER PR_RESOURCE_FLAGS=STATUS_PRIMARY_IDENTITY|STATUS_DEFAULT_STORE|STATUS_PRIMARY_STORE 66090003=0C000000 660A0003=01000000 34140102=5494A1C0297F101BA58708002B2A2517 PR_DISPLAY_NAME=Private Folders PR_PROVIDER_DISPLAY=Microsoft Exchange Message Store [EMS_DSA] PR_DISPLAY_NAME=Microsoft Exchange Directory Service PR_PROVIDER_DISPLAY=Microsoft Exchange Directory Service PR_PROVIDER_DLL_NAME=EMSABP.DLL PR_RESOURCE_TYPE=MAPI_AB_PROVIDER [MSEMS_MSMail_Section] UID=13DBB0C8AA05101A9BB000AA002FC45A 66000003=01050000 66010003=04000000

66050003=03000000 66040003=02000000
3. Restart the Access Gateway Server COM+ application. For more information, seeRestarting COM+ Applications.
Updating the Mapisvc.inf File
274

275
Rolling Out Advanced Access Control toUsers
The last step in deployment is providing users with the information and tools necessary toaccess network resources. This process includes determining if your implementationrequires the distribution of client software and if so, developing a strategy for deployingthis software. In addition, training and other forms of communication detailing how yourdeployment impacts the workplace assist users as they transition to their new environment.
This section discusses the issues to consider when developing an overall plan for rolling outAccess Gateway Advanced Edition to users.
276
Developing a Client Software DeploymentStrategy
Software deployment is the process of distributing and installing software on user devices.If your organization already uses a software deployment solution, consider deployingAdvanced Access Control clients using the same technique. However, if you need to developa strategy, you must determine who is responsible for installing client software and thencreate a solution that supports this decision.
The following sections discuss issues to consider when determining who is responsible forinstalling client software as well as deployment methods supporting these use cases.
Determining Responsibility for Installing ClientSoftware
There are several methods of deploying client software ranging from automated solutionsthat download and install the software from a centralized location to posting an installationpackage to a network share and instructing users to manually install the software on theiruser device. Before you can determine how to deploy client software, you must determinewho is responsible for installing the software on the user device.
Depending on your organization’s needs, you, support personnel, users, or a combinationthereof may be responsible for this task. This decision is a result of several factorsincluding:
User needs and administrative costs
Consider the needs of your users because their collective experience is critical to theadoption of access control in your organization. If the needs of your users greatlyoutweigh the administrative costs associated with managing a deployment strategy,consider a plan that places the responsibility of installing client software on a teamspecializing in this area. Conversely, if the administrative costs associated with managinga deployment solution is too great for your organization, consider shifting thisresponsibility to individual users.
Technical abilities of your users
If your user base is not technically savvy, consider installing the software for them. Inthis scenario, a support department such as IT or Technical Support is responsible forinstalling the software. When deciding whether or not users should be responsible fortheir own installations, consider the possible support issues as well. Depending on thetechnical abilities of your users, the support costs associated with users installing theirown software could justify the implementation of a centrally managed deploymentstrategy. However, if your users are technically savvy, it may be more efficient for youto post the software to a network share and allow users to install the software from thislocation.

Number of user devices in your organization
Larger organizations benefit from centrally managed deployment strategies because theytend to scale well and yield a higher return on investment as compared to manualsolutions. For this reason, medium to larger sized organizations should consider usingtheir Microsoft Active Directory infrastructure or a standard third party deployment toolsuch as Systems Management Server.
However, for smaller organizations, the costs associated with planning and preparing anautomated deployment could outweigh the benefits. These companies should consideralternative deployment methods such as posting client software to a network share or anon-demand deployment solution. Both of these methods are described in detail in latersections.
Security requirements
If your organization configures user devices so that users do not have installation rightson their user devices, you must develop a strategy that allows someone withadministrative rights to perform the installation. In this scenario, larger organizationsshould consider a deployment tool such as Systems Management Server. Smallerorganizations should consider posting client installation packages to a file share andhaving someone with administrative rights manually install the software on each userdevice.
Management practices
If your organization maintains strong centralized control over client softwaredeployment—for example, if you use Microsoft Systems Management Server to helpcontrol software distribution—you can more reliably update user devices. Therefore, ifyour goal is to ensure that all users have the most up-to-date software, allowing them toinstall their own client software is not a recommended option. Rather, a team dedicatedto maintaining client software should be responsible for ensuring client software isinstalled and updated properly.
Cost factors
Consider the overall cost associated with each deployment option including planning,preparation, and training costs. In addition, determine if some of these costs arejustifiable because of the return on investment over a period of time. For example, thereturn on investment of a centrally managed solution is usually much better than that ofa manual solution over time.
Access to user devices
If your organization supports remote access scenarios such as using an Internet kiosk tocheck email, you will not have the ability to install client software on these devicesbefore users access the secure network. In these cases, consider an on-demanddeployment strategy where you configure Advanced Access Control so that clientsoftware is automatically downloaded to the user device only when required. However, ifaccess to user devices is readily available, consider deploying the client software prior tothe user accessing Advanced Access Control.
Weigh all of these factors when determining who should be responsible for installing theclient software on the user device. Then, select the deployment solution that makes themost sense for your organization.
Developing a Client Software Deployment Strategy
277

Supported Deployment OptionsAdvanced Access Control supports the following client deployment options:
Integration with enterprise software deployment tools
Deploy client software using a Microsoft Active Directory infrastructure or a standard thirdparty MSI deployment tool such as Systems Management Server. If you use a tool thatsupports Windows Installer packages, you can use the Access Client package to create asingle installation package containing the Advanced Access Control client software requiredfor your environment. Then, use your client deployment tool to deploy and install thesoftware on the appropriate user devices.
Advantages of using a centralized deployment tool include:
● Ability to adhere to security requirements. For example, you can install client softwarewithout enabling software installation privileges for non-administrative users.
● Control over software versions. You can deploy an updated version of client software toall users simultaneously.
● Scalability. Easily scales to support additional users.
● Positive user experience. You can deploy, test, and troubleshoot installation-relatedissues without involving users in this process.
Citrix recommends this option when administrative control over the installation of clientsoftware is preferred and access to user devices is readily available.
Network share point
Post your installation packages on a network share point. For example, you can use theAccess Client package to create an installation package containing the clients required foryour environment and post it to a network share. In addition, the Server CD containsinstallation packages for certain client software. Citrix recommends posting installationpackages to a share point when software is manually installed on user devices. Forexample, you can post client software installation packages to an FTP site for remote usersresponsible for installing client software on their home computers.
On demand
Configure the deployment of client software only when required. Users connect to theirnetwork and clients are automatically downloaded on an “as needed” basis. This option ispreferable when access to user devices is not readily available such as an Internet kiosk.
You can combine deployment options to create your deployment strategy. For example, youcan post the installation packages on a network share point for users within the securenetwork and also enable on-demand deployment of clients for those users connecting froman Internet kiosk.
The table below summarizes the deployment options supported for each client.
Developing a Client Software Deployment Strategy
278
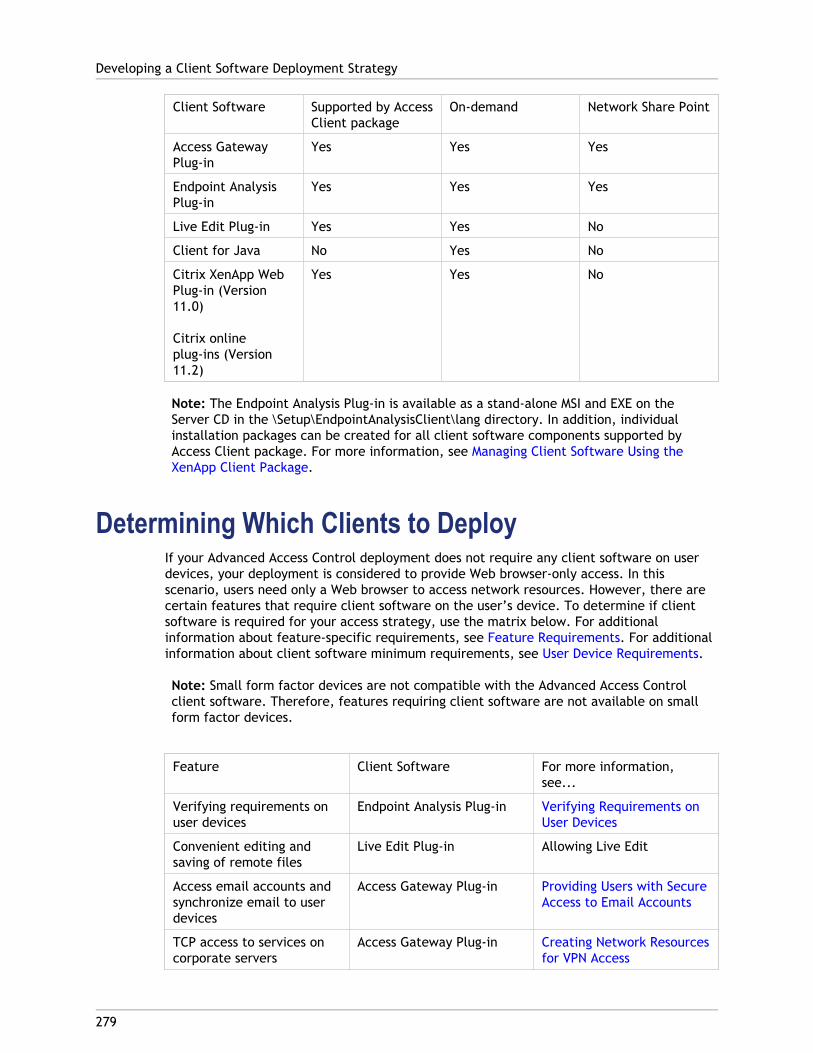
Client Software Supported by AccessClient package
On-demand Network Share Point
Access GatewayPlug-in
Yes Yes Yes
Endpoint AnalysisPlug-in
Yes Yes Yes
Live Edit Plug-in Yes Yes No
Client for Java No Yes No
Citrix XenApp WebPlug-in (Version11.0)
Citrix onlineplug-ins (Version11.2)
Yes Yes No
Note: The Endpoint Analysis Plug-in is available as a stand-alone MSI and EXE on theServer CD in the \Setup\EndpointAnalysisClient\lang directory. In addition, individualinstallation packages can be created for all client software components supported byAccess Client package. For more information, see Managing Client Software Using theXenApp Client Package.
Determining Which Clients to DeployIf your Advanced Access Control deployment does not require any client software on userdevices, your deployment is considered to provide Web browser-only access. In thisscenario, users need only a Web browser to access network resources. However, there arecertain features that require client software on the user’s device. To determine if clientsoftware is required for your access strategy, use the matrix below. For additionalinformation about feature-specific requirements, see Feature Requirements. For additionalinformation about client software minimum requirements, see User Device Requirements.
Note: Small form factor devices are not compatible with the Advanced Access Controlclient software. Therefore, features requiring client software are not available on smallform factor devices.
Feature Client Software For more information,see...
Verifying requirements onuser devices
Endpoint Analysis Plug-in Verifying Requirements onUser Devices
Convenient editing andsaving of remote files
Live Edit Plug-in Allowing Live Edit
Access email accounts andsynchronize email to userdevices
Access Gateway Plug-in Providing Users with SecureAccess to Email Accounts
TCP access to services oncorporate servers
Access Gateway Plug-in Creating Network Resourcesfor VPN Access
Developing a Client Software Deployment Strategy
279
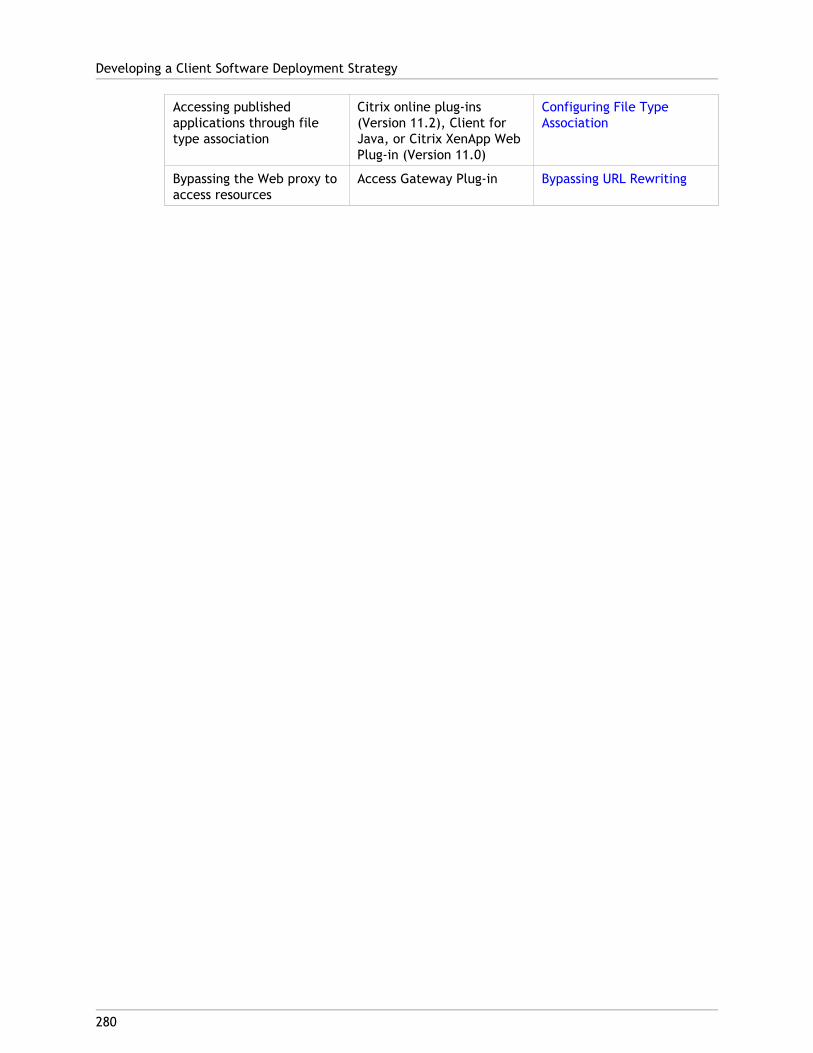
Accessing publishedapplications through filetype association
Citrix online plug-ins(Version 11.2), Client forJava, or Citrix XenApp WebPlug-in (Version 11.0)
Configuring File TypeAssociation
Bypassing the Web proxy toaccess resources
Access Gateway Plug-in Bypassing URL Rewriting
Developing a Client Software Deployment Strategy
280
281
Managing Client Software Using theXenApp Client Package
If you decide that you will control the deployment of client software, consider using theXenApp Client Package to create a Windows Installer package of specific client software.After creating the package, you can deploy it using your Microsoft Active Directoryinfrastructure or a standard third party MSI deployment tool such as Systems ManagementServer.
The XenApp Client Package contains a number of the client-side pieces of Citrix XenApp,allowing you to quickly and easily deploy and maintain the client-side software to yourusers using one convenient Windows Installer package. After you deploy your clientsoftware, you can update your installations simply by creating and deploying an updatedinstallation package using the latest version of the XenApp Client Package.
The XenApp Client Package is available in the Downloads section of the Citrix Web site, andcontains up-to-date client software and hotfixes for a number of the client-side software.
Client Software Available for the XenApp ClientPackage
Component Client-Side Software
Citrix XenApp Citrix online plug-ins, Citrix offline plug-in, Citrix XenApp Web Plug-in(Version 11.0)
Creating a Client Distribution PackageYou can run the Access Client package in administrative mode to select the client-sidesoftware pieces you want to package together. Enter the following command at a commandprompt to run in administrative mode:
msiexec.exe /a [path to msi file]
Select your client components and optionally customize the installation process of eachclient. To create an installation package for a specific piece of client component, selectonly that client. Additionally, you can choose to reduce the overall size of the finaldistribution package by selecting the option to remove unused files.
Distributing and Installing Your Client SoftwarePackage
After you create your client software package, you can make it available to your users on anetwork share point or distribute it using your Active Directory infrastructure.
User devices must meet the requirements of each client software component within yourpackage. For example, if you attempt to install a package that includes the Citrix onlineplug-ins and the Access Gateway Plug-in on a device that does not meet the requirementsfor the Access Gateway Plug-in, only the online plug-in is installed.
The Access Client package installs and upgrades all available clients, as specified when youbuild your software package. Every item included in your original client software packageshould be included in any subsequent upgrade packages you create.
For example, if you create a software package that includes the Endpoint Analysis Plug-inand the Citrix online plug-ins, subsequent upgrade packages must include both clientsoftware packages. If you create an upgrade package that includes only the EndpointAnalysis Plug-in the Access Client package uninstalls the Citrix online plug-in.
Important: The Gateway Client and Advanced Gateway Client are no longer supported byAdvanced Access Control and therefore, are removed from the Access Client package.However, the Access Client package now includes the Access Gateway Plug-in, the clientsoftware component that replaces the Gateway Client and Advanced Gateway Client. As aresult, the Access Client package uninstalls the Gateway Client and Advanced GatewayClient from all user devices. If users require the functionality previously available withthese clients, include the Access Gateway Plug-in in your package.
Conversely, if you later want to add the Access Gateway Plug-in to your environment,rebuild your package to include the Endpoint Analysis, Web, and Access Gateway plug-ins.When this installation package is run on user devices that have your original packageinstalled, the Access Gateway Plug-in is installed, while the Endpoint Analysis Plug-in andCitrix online plug-in will simply be verified as installed and not changed in any way.
To uninstall a client that was installed or upgraded using a Windows Installer package, usersmust run the Add or Remove Programs utility from Control Panel or run the installerpackage again and select the Remove option.
Important: To install the client software using the Windows Installer package, theWindows Installer Service must be installed on the user device. This service is present bydefault on Windows 2000 systems. To install clients on user devices running earlierversions of the Windows operating system, you must use the self-extracting executable orinstall the Windows Installer 2.0 Redistributable for Windows, available athttp://www.microsoft.com/.
For more information about the Access Client package, including a full list of includedclients, see the Download section of the Citrix Web site at http://www.citrix.com.
Managing Client Software Using the XenApp Client Package
282
Posting Client Software to a Share PointYou can post available client software on a network share point so users or supportpersonnel can install the client software at their convenience. You can use the AccessClient package to create installation packages for each client software component or asingle installation package containing all of your Advanced Access Control clients followingthe instructions above. Alternatively, for the Endpoint Analysis Plug-in, you can use theinstallation package available as an EXE or MSI in the \Setup\EndpointAnalysisClient\langdirectory of the Server CD.
Managing Client Software Using the XenApp Client Package
283

284
Downloading Client Software on Demand
You can configure client software so that it downloads and installs on the user device on an“as needed” basis. Advanced Access Control supports this type of deployment for theAccess Gateway Plug-in, Endpoint Analysis Plug-in, Citrix XenApp Web Plug-in (Version 11.0)or Citrix online plug-ins (Version 11.2) and Client for Java. Use this deployment option whendevices such as Internet kiosks are used to access the secure network.
On-demand deployment of the Access Gateway Plug-in is configured within connectionpolicies. If a connection policy is configured to launch the Access Gateway Plug-in,Advanced Access Control detects whether the plug-in is already installed on the userdevice. If the plug-in is detected, it is launched. If the plug-in is not detected, it isdownloaded to the user device and then launched. If the client software cannot bedownloaded to the user device, Advanced Access Control attempts to connect to resourcesusing browser-only access.
Important: Access to Web applications configured to bypass the Web proxy, emailsynchronization, and network resources require the Access Gateway Plug-in.
If you integrated Advanced Access Control with a farm running Citrix XenApp, you canspecify which client software to deploy for each logon point. This allows you to configurethe deployment of Citrix online plug-ins based on specific access scenarios. For example,you could configure on-demand client downloads for the logon point available to userslogging on over the Internet. However, you could disable this feature for the logon pointavailable to users from an enclave within the secure network.
The requirements for installing on-demand clients include configuring the Web browser toaccept client software such as ActiveX controls, plug-ins, and Java applets. In addition, toinstall the Access Gateway Plug-in, users running Windows Vista, Windows XP or Windows2000 must be members of the Power Users or Administrators group to install the softwareon their devices. For additional information about client software minimum requirements,see User Device Requirements.
You cannot configure the on-demand deployment of the Endpoint Analysis Plug-in. Rather,Advanced Access Control determines if, based on policies associated with that logon point,an endpoint analysis scan is required. If a scan is required, Advanced Access Control detectsif the Endpoint Analysis Plug-in is present on the user device. If the client software isdetected on the user device, the Endpoint Analysis Plug-in performs the appropriate scans.However, if the software is not detected, users are prompted to download and install theEndpoint Analysis Plug-in as an ActiveX control when running Internet Explorer or a plug-inwhen running Firefox.
If users refuse to allow the Endpoint Analysis Plug-in to install and scan the user device,they receive the same level of access they would if the policies associated with the scanswere denied. This level can be limited or no access. Consider deploying the EndpointAnalysis Plug-in in advance if you want to avoid the on-demand downloading of thissoftware.
Note: Some endpoint analysis information is cached on the user device. Users can emptythis cache through the Manage Endpoint Analysis tool (Start > Programs > Citrix >Endpoint Analysis Client).
To configure on-demand client deployment of Citrixonline plug-ins
1. Click Start > All Programs > Citrix > Management Consoles > Access ManagementConsole.
2. In the console tree, select the appropriate logon point and under Common Tasks,choose Edit Logon Point.
3. On the Clients page, select the clients you want to deploy to users on-demand from theoptions below.
● Web Client (ActiveX or Netscape plug-in). Select this option if your users do notalready have a Presentation Server Client installed on their client device.
Select Use the Client for Java if the Web Client cannot be used to deploy theClient for Java if the Web Client cannot be used or the user chooses not to allow itsdownload. In addition, you can configure the automated update of the Web Clientat logon (available for ActiveX only). This option provides an automated method ofupdating client software. Clear this option if you do not want to upgrade existinginstallations of the client on each user’s computer.
● Client for Java. Deployed in applet mode, this client does not require the user toinstall any software. The user’s browser caches the Java applet for the duration ofthe browser session. Select the Client for Java as an alternative for users whocannot use the Web Client software.
● None (use installed client). Select this option if you already deployed the requiredclient software to client devices.
To configure on-demand client deployment of theAccess Gateway Plug-in
1. Click Start > All Programs > Citrix > Management Consoles > Access ManagementConsole.
2. In the console tree, select Connection Policies.
3. Double-click the connection policy you want to edit.
4. On the Settings page, click Launch Secure Access Client and click Yes to allow thissetting for the connection.
Downloading Client Software on Demand
285
286
Ensuring a Smooth Logon Experiencewith the Access Gateway Plug-in
If users do not have the Access Gateway Plug-in installed when they log on, they mustdownload and install it. However, if the Access Gateway Plug-in does not install andconnect to the Access Gateway promptly, users will experience difficulty in accessing thehome page you designate for the logon point. To avoid this, you can perform the followingtasks:
● Enable the Web browser to redirect users to a URL outside of the internal network
● Modify the browser delay setting
● Modify the ticket lifetime setting

287
Modifying the Logon Point Redirect URL
When a user logs on to the Access Gateway, the Logon Agent verifies that the user isallowed to log on and, if required by policies, the user’s Web browser attempts to launchthe Access Gateway Plug-in. Afterward, the Web browser redirects the user to the homepage designated for the logon point. By default, the Web browser redirects the user to theSessionInit.aspx page using an internal URL after 10 seconds elapse. If the Access GatewayPlug-in does not launch successfully during this time, the user cannot access resources onthe internal network.
To ensure that users can access resources in this case, you can enable the Web browser toredirect users to an external URL. When you do this, users are redirected to theSessionInit.aspx page using the URL for the Access Gateway appliance (for example,https://AccessGatewayFQDN).
To modify the redirect URL1. In Windows Explorer, navigate to the logon point’s virtual directory. For example,
C:\inetpub\wwwroot\CitrixLogonPoint\logonpointname, where logonpointname is thename of the logon point.
2. Open the web.config file in a text editor and add the following line to the appSettingssection:
<add key=”AlwaysUseClientLessURL” value=”true”/>
3. Repeat steps 1-2 for all logon points you want to modify.

288
Modifying Web Browser Delay Settings
When a user launches the Access Gateway Plug-in and logs on to the Access Gateway, theuser’s Web browser delays displaying the home page while the Access Gateway Plug-inestablishes a connection with the Access Gateway. When using Mozilla Firefox, the AccessGateway Plug-in connects after the default time period elapses. By default, this delay lasts10 seconds. If the Access Gateway Plug-in does not connect within this time period, theWeb browser does not display the home page unless the user refreshes the browser.
To ensure that the Access Gateway Plug-in has sufficient time to connect and the homepage appears for Mozilla Firefox, you can increase the time period that the Web browserdelays displaying the home page. To do this, you modify theAdvancedGatewayClientActivationDelay key of the logon point’s web.config file. If youchoose to make this change on one server running Advanced Access Control, you must makethe same change on all servers in your access server farm.
To modify browser delay settings1. In Windows Explorer, navigate to the logon point’s virtual directory. For example,
C:\inetpub\wwwroot\CitrixLogonPoint\logonpointname, where logonpointname is thename of the logon point.
2. Open the web.config file in a text editor and locate the following line:
<add key=”AdvancedGatewayClientActivationDelay” value=”18” />
3. Change the key value to the length of time, in seconds, you want to allow the AccessGateway Plug-in to establish a connection with the Access Gateway.
4. Repeat steps 1-3 for all remaining servers running Advanced Access Control.
289
Modifying Ticket Lifetime Settings
When a user launches the Access Gateway Plug-in and logs on to the Access Gateway, theuser’s Web browser receives a ticket from the Citrix Authentication Service which must beused within a certain period of time. The default time period is 85 seconds. When theticket is used within this time period, the home page appears in the user’s Web browser. Ifthe Access Gateway Plug-in does not connect within this time period, the ticket expires andthe home page does not appear. The user must access the logon point again and receive anew ticket.
To ensure that the Access Gateway Plug-in has sufficient time to connect and tickets arepresented promptly, you can increase the lifetime of tickets issued to users. To do this, youmodify the Ticket Profile keys located in the web.config file of the Citrix AuthenticationService. If you choose to make this change on one server running Advanced Access Control,you must make the same change on all servers in your access server farm.
To modify the ticket lifetime settings1. In Windows Explorer, navigate to the Citrix Authentication Service Web directory
(C:\inetpub\wwwroot\CitrixAuthService).
2. Open the web.config file in a text editor and locate the following lines:
<add key=”TicketProfile_SGC_CGP”value=”MULTIUSE,85,1200,true,true” />
<add key=”TicketProfile_ASGC_CGP”value=”MULTIUSE,85,1200,true,true” />
3. Change the first numeric value in both keys to the length of time, in seconds, in whichyou want tickets to remain valid from the time of issue.
4. Repeat steps 1-3 for all remaining servers running Advanced Access Control.

290
Ensuring a Smooth Rollout
After your client software deployment strategy is implemented and tested, you are ready toprovide users with the information they need to access corporate resources throughAdvanced Access Control. To ensure all users are aware of the upcoming deployment ofAdvanced Access Control, consider a formal method of communication such as postinginformation on your corporate intranet, training sessions, and email.
If there are budgetary restrictions, determine if some of the costs of your deploymentstrategy actually improve the company’s bottom line. For example, the costs associatedwith user training could be justified if there is a significant savings as a result of fewersupport calls.
Topics to consider providing additional information to users include:
Client software
Depending on your client deployment strategy, users may need to install client softwareon their own device. In this scenario, provide users with the location of the file sharefrom which they can access the installation packages. If you implemented an on-demandclient software strategy, instruct users to accept these clients when prompted. Inaddition, inform users that failure to accept the installation of on-demand clients resultsin reduced functionality for that session.
Logon points
If users can access the secure network from multiple logon points, you must provideusers with the URLs for these logon points. For example, if you created two logonpoints—one for access from a network enclave and another for external access throughthe Internet—users will need the URLs for both logon points. Additional informationabout providing logon information to users is discussed in the next section.
Policy-based access
Inform users if you developed an access strategy that includes different levels of accessto corporate resources based on factors such as endpoint analysis results, authenticationtype, or logon point.
For example, you may create a policy that allows users to download a document whenaccessing it from within a network enclave and create another policy that denies thislevel of access when accessing the document from their home computer. Informing usersof this type of access control reduces user confusion as well as unnecessary support calls.
Providing Logon Information to UsersUsers can access a specific logon point by navigating to the following URL:
https://GatewayApplianceFQDN/CitrixLogonPoint/LogonPointName/
where GatewayApplianceFQDN is the fully qualified domain name (FQDN) of the AccessGateway server on which you deployed the logon point and LogonPointName is the name ofthe logon point.
For example, if the FQDN of the Access Gateway server is “companyserver.mydomain.com”and the logon point is “remote,” the URL for logging on ishttps://companyserver.mydomain.com/CitrixLogonPoint/remote.
Alternatively, users can access the default logon point by navigating to the following URL:
https://GatewayApplianceFQDN/
where GatewayApplianceFQDN is the fully qualified domain name (FQDN) of the AccessGateway server on which you deployed the logon point.
Ensuring a Smooth Rollout
291
292
Web Browser Security Considerations
Certain custom Web browser security settings can prevent users from accessing AdvancedAccess Control. Therefore, follow the guidelines below to ensure that users can access theappropriate servers within your network.
● For users to properly access network resources through Advanced Access Control, thefollowing browser settings must be enabled.
Cookies
Advanced Access Control uses per-session cookies that are not stored on disk.Therefore, third parties cannot access the cookies. Disallowing per-session cookiesprevents connections to Advanced Access Control. Users cannot log on to AdvancedAccess Control because logging on requires a session cookie.
File download
Disabling “File download” prevents the downloading of files from the corporatenetwork, the launching of any seamless ICA sessions, and access to internal Webservers outside the access server farm.
Scripting
Disabling active scripting makes Advanced Access Control inaccessible. Disabling Javaapplet scripting prevents users from launching published applications using Client forJava.
● Change the security settings only for zones that contain resources accessed throughAdvanced Access Control. If you fully trust the sites on your company’s intranet, youcan set the Local Intranet zone security level to Low. If you do not fully trust the siteson your intranet, keep the Local Intranet zone set to Medium-Low or Medium.
Several browser security settings required to access Advanced Access Control servers aredisabled under the High security settings. Therefore, if the security level for the LocalIntranet zone is set to High, customize the browser security settings as described in thenext section.
If you want to keep the default security settings but also customize individual securitysettings of your Advanced Access Control servers, you can configure each server in theaccess server farm as a “trusted site.” Configuring servers as trusted sites lets youcustomize their security settings without affecting the Internet and Local Intranet settings.
Important: If your access server farm requires SSL, make sure that SSL is required for allsites in the Trusted Site zone.

Customizing Web Browser Security SettingsThe following table lists additional Internet Explorer browser security settings required forthose deployment scenarios requiring client software. Most of these settings are availableon the Security tab in Internet Options.
Deployment Scenario Required Settings
Endpoint Analysis Plug-in● Run ActiveX controls and plug-ins (Enable)
● Script ActiveX controls marked safe for scripting(Enable)
● File download (Enable)
Live Edit Plug-in● Run ActiveX controls and plug-ins (Enable)
● Script ActiveX controls marked safe for scripting(Enable)
● File download (Enable)
Citrix XenApp Web Plug-in(Version 11.0)
Citrix online plug-ins(Version 11.2)
● Run ActiveX controls and plug-ins (Enable)
● Script ActiveX controls marked safe for scripting(Enable)
● File download (Enable)
Do not save encrypted pages to disk (Disable)
Client for Java● Java Permissions (High safety or Custom)
If you select Custom, set the following options:
● Run Unsigned Content (Run in sandbox)
● Run Signed Content (Prompt or Enable)
● Do not save encrypted pages to disk (Disable)
● All Additional Signed Permissions must also be set toPrompt or Enable
Web Browser Security Considerations
293

294
Customizing the Logon Error Message
Users may see an "Access Denied" page when attempting to access the logon page. This canoccur if users do not meet the requirements in a policy controlling the Allow Logonpermission or do not meet the requirements configured in logon point properties fordisplaying the logon page.
You can modify the "Access Denied" page to provide users with troubleshooting informationor redirect them to a different Web page that contains remedies for a specific problem thatis detected. In addition, because each logon point is associated with its own "Access Denied"page, you can customize this message to accommodate the specific access scenariosassociated with each logon point.
For example, you can customize a logon point's "Access Denied" page with frequently askedquestions and technical support contact information. Another possible "Access Denied" pagecustomization is to redirect users to a Web page containing links to client softwareinstallation packages.
You can create and deploy a logon point for the sole purpose of testing your modificationsto the "Access Denied" page. Then, when you are ready to incorporate the customized pageinto your production environment, copy the page to the appropriate location on the LogonAgent server.
The "Access Denied" message is generated by an ASP.NET user control that can be modifiedusing any text editor that supports ASCX files.
To edit the "Access Denied" message1. On an Advanced Access Control server, navigate to:
%systemdrive%:\Inetpub\wwwroot\Citrixlogonpoint\logonpointname, wherelogonpointname represents the name of the logon point associated with the page youwant to customize.
2. Make a backup copy of the disallowed.ascx file.
3. Edit disallowed.ascx. For example, if you have a troubleshooting site namedwww.gotoassist.com, add the following syntax to the end of disallowed.ascx:
<a href="http://www.gotoassist.com/ph/button">Click here to launch GoToAssist</a>
Caution: Do not modify the logic contained in the page because doing so can yieldundesirable results.
4. Repeat Steps 1 - 3 to customize the "Access Denied" message for other logon points.
5. Update logon page files on the Access Gateway as described in Updating Logon PageInformation.

295
Managing Your Access GatewayEnvironment
After configuring the servers in your access server farm, you perform a variety of tasks tomanage your deployment. These tasks help you ensure your deployment runs smoothly andefficiently.
● Managing Access Server Farms Remotely
● Securing the Access Management Console Using COM+
● Adding and Removing Farms
● Adding and Removing Access Gateway Appliances
● Changing Service Account and Database Credentials
● Modifying Server Roles for HTML Preview
● Removing Servers from the Farm
● Maintaining Availability of the Access Server Farm
● Monitoring Sessions
296
Managing Access Server FarmsRemotely
You can use the Access Gateway Administration Tool and the Access Management Consoleon remote computers to manage your access server farm. You can install the AdministrationTool from the Access Gateway Administration Portal. Use the Advanced Access ControlServer CD to install the Access Management Console.
To download and install the Administration Tool1. In a Web browser, type the URL of the Access Gateway and enter your administrator
credentials.
2. In the Access Gateway Administration Portal, click Downloads.
3. Under Administration, click Download Access Gateway Administration Tool Installer.
4. Select a location to save the installation application and click Save. The installationtool is downloaded to your computer.
5. After downloading the file, navigate to the location where it was saved and double-clickthe file.
6. To install the Administration Tool, follow the instructions in the wizard.
7. To start the Administration Tool, click Start > Programs > Citrix Access GatewayAdministration Tool > Citrix Access Gateway Administration Tool.
8. In Username and Password, type the Access Gateway administrator credentials. Thedefault user name and password are root and rootadmin.
To install the Access Management Console1. Insert the Server CD or start AutoRun.exe from the CD image.
2. Select Product Installations and Advanced Access Control to open Setup.
3. Accept the license agreement and proceed to the Components Selection page.
4. Select Management console and clear the selection of any other components selectedby default.
5. Proceed through the remainder of the wizard.

Controlling Access by Multiple ConsolesWhen a Console connects to an access server farm, other Console instances can activelymanage the server farm at the same time. If any changes are made to the sameconfiguration settings, Advanced Access Control writes the first change saved to thedatabase based on the timestamp at which the change occurred. If two changes are savedsimultaneously, the change with the earlier timestamp prevails.
You are notified if an instance of the console connects to a farm and another instance isdetected. If you make any configuration changes, they may be overridden depending onwhen each Console instance saves each change. Choose Yes to acknowledge and close themessage.
Important: Administering Advanced Access Control using multiple Console instancessimultaneously can result in data corruption and inconsistent server performance. Citrixrecommends you use only one Console instance at a time to administer access serverfarms.
Using Groups in Policy AssignmentsIt is generally good practice to assign policies to domain user groups or account authoritygroups only. If, however, you use the console on a remote computer and assign thecomputer’s local users to a policy, you may receive an error message when editing thepolicy from another Console. You can remove or edit such a policy using the console on theserver running Advanced Access Control.
Managing Access Server Farms Remotely
297
298
Securing the Access ManagementConsole Using COM+
Depending on your organization’s needs, you can allow other administrators to manage youraccess server farm. Using COM+ role-based security, you can specify the users who canmake changes to your access server farm using the Access Management Console.
During installation, Advanced Access Control creates the following security roles for theAccess Gateway Server COM+ application:
● Administrators. Users in this role are allowed to make changes to the Advanced AccessControl environment using the console.
● Non Appliance Administrators. Users in this role are allowed to make changes toresources and policies only. Users assigned to this role are not allowed to modifygateway appliance settings. Users assigned to this role must not be assigned to theAdministrators role as well. If the user is assigned to both roles, the Non ApplianceAdministrators role is not enforced.
● System. This role includes the service account and other local accounts that requireaccess to the Access Gateway Server COM+ application.
If you add users to the Administrators or Non Appliance Administrators roles, they may haveaccess to the API published by the application in addition to the console. Consider all riskscarefully before adding other users to the Administrators role.
Important: The accounts appearing in the System role are required for Advanced AccessControl to function. You must also close the Access Management Console before addingusers to the Administrators or Non Appliance Users role. If these System accounts aremodified or if the console is open when COM+ security is applied, your access server farmcould stop functioning and you might lose data.

To allow administrators to use the AccessManagement Console
1. Close the Access Management Console if it is open.
2. Click Start > All Programs > Citrix > Management Consoles > Access ManagementConsole.
3. In the console tree, expand Component Services > Computers > My Computer > COM+Applications.
4. Expand Access Gateway Library > Roles and select the role that is appropriate for theuser(s) you want to add:
● To allow administrators to access appliance and farm settings with the console,expand Administrators.
● To allow administrators to access farm settings only, expand Non ApplianceAdministrators.
5. Right-click Users and select New.
6. Enter the user account(s) you want to add and click OK.
7. Restart the Access Gateway Library COM+ application.
8. Repeat steps 4-7 for the Access Gateway Server COM+ application.
Restarting COM+ ApplicationsRestart the Access Gateway Server COM+ application when:
● You add users to the Administrators or Non Appliance Administrators role so they canmake changes to your deployment using the Access Management Console.
● Components such as logon points or the Web proxy function incorrectly, as apreliminary troubleshooting measure.
● You modify components that access the Access Gateway Server COM+ application, suchas Web email. For example, if you modify mapisvc.inf to enable Microsoft Exchange2000 to work with the default Email Interface, you restart the Access Gateway ServerCOM+ application to ensure the modifications are recognized at runtime.
Securing the Access Management Console Using COM+
299

To restart the Access Gateway Server COM+ application1. Click Start > Programs or All Programs > Administrative Tools > Component Services.
2. From the Component Services window, expand Computers > My Computer > COM+Applications.
3. Right-click Access Gateway Server and select Shut down.
4. Right-click Access Gateway Server and select Start.
Securing the Access Management Console Using COM+
300
301
Adding and Removing Farms
If your deployment consists of multiple access server farms, you can manage them using asingle Console. To do this, you add the other access server farms to the console tree.
To add access server farms1. Click Start > All Programs > Citrix > Management Consoles > Access Management
Console.
2. In the console tree, select the Access Gateway node and under Common Tasks, clickAdd access server farm.
3. In the Server box, type the machine name or the IP address of any server in the farmyou want to add.
4. Click OK. The Access Management Console connects to the access server farm anddisplays the farm node in the console tree.
Note: To manage multiple access server farms from Console instances running on othermachines, you must add the farms to each Console.
To remove access server farms1. Click Start > All Programs > Citrix > Management Consoles > Access Management
Console.
2. In the console tree, expand the Access Gateway node and select the farm you want toremove.
3. Under Common Tasks, click Remove farm.
302
Adding and Removing Access GatewayAppliances
You can add and remove Access Gateway appliances in your access server farm.
To add Access Gateway appliances to your accessserver farm
1. Install and configure the appliance as described in Installing the Access GatewayStandard Edition Appliance for the First Time.
2. In the Access Gateway Administration Tool, enable the Advanced Access Control toadminister the appliances. For information, see Enabling Advanced Access Control.
3. Click Start > All Programs > Citrix > Management Consoles > Access ManagementConsole.
4. In the console, run discovery.
To remove Access Gateway appliances from youraccess server farm
1. In the Access Gateway Administration Tool, disable gateway administration with theAdvanced Access Control and remove all access server farm information.
2. Click Start > All Programs > Citrix > Management Consoles > Access ManagementConsole.
3. In the console, remove the Access Gateway appliance.
When you remove an appliance from the console, you remove only the registrationinformation from the access server farm database. If you do not remove all access serverfarm information from the Access Gateway Administration Tool before removing theappliance from the console, the Advanced Access Control registers the appliance again anddisplays it in the Gateway Appliances node when you run discovery.

To disable Access Gateway administration with theconsole
1. Start the Access Gateway Administration Tool and select the appliance you want toremove.
2. Click the Advanced Options tab and then clear the Advanced Access Control -includes an access server farm check box.
3. In Server running Advanced Access Control, remove the name of the server runningAdvanced Access Control.
4. Click Submit to save your changes.
5. Restart the Access Gateway.
To remove a gateway appliance from the console1. Click Start > All Programs > Citrix > Management Consoles > Access Management
Console.
2. In the console tree, expand Gateway Appliances and select the gateway appliance youwant to remove.
3. Click Remove appliance and then click Yes to remove the gateway appliance from thefarm.
Adding and Removing Access Gateway Appliances
303

304
Changing Service Account and DatabaseCredentials
You can change the credentials of the service account or SQL access account if either ofthese accounts is deleted, is disabled, or changes passwords. If the credentials are notchanged, Advanced Access Control does not function.
Use the Server Configuration utility to change the credentials of these accounts. You canrun the Server Configuration utility at any time without interrupting farm operations.However, the console must be closed on the machine on which it is running. If the consoleis running remotely and the account credentials are changed, the console displays an errormessage. Close and reopen the console to correct the problem.
The Server Configuration utility and the account information are stored on each serverrunning Advanced Access Control. To use the Server Configuration utility, you must log onto the server as an administrator.
To change account credentials1. On the server running Advanced Access Control, click Start > Programs or All Programs
> Citrix > Advanced Access Control > Server Configuration.
2. Click Service Account to change the user name, password, or domain of the serviceaccount. For information about requirements for valid service accounts, see ServiceAccount Requirements.
3. Click Server Farm Information to change the farm database server, farm name, ordatabase authentication method.

305
Modifying Server Roles for HTML Preview
Each server running Advanced Access Control is assigned the HTML Preview server role bydefault. If you do not want all servers in your farm to perform this role, you can enable ordisable it on a per-server basis.
To modify server roles1. Click Start > All Programs > Citrix > Management Consoles > Access Management
Console.
2. In the console tree, select Servers and under Common Tasks, click Manage serverroles.
3. Select or clear the check boxes for each server you want to assign to or remove fromthe HTML Preview role.
306
Removing Servers from the Farm
When you remove servers from the farm, the services the server provided to your farm areno longer available. If you want to keep these services, ensure they are enabled on otherservers in your farm.
To remove servers from an access server farm1. Click Start > All Programs > Citrix > Management Consoles > Access Management
Console.
2. Run discovery to ensure Advanced Access Control detects all servers in the farm.
3. In the console tree, expand the Servers node and select the server you want toremove.
4. Under Common Tasks, click Remove server.

307
Maintaining Availability of the AccessServer Farm
Advanced Access Control maintains all configuration, session, and user data for the accessserver farm in a SQL database on the database server. If the database server becomesunavailable, Advanced Access Control cannot retrieve data in response to user or serverrequests. If the Advanced Access Control server becomes unavailable, users cannot log onto the server or access resources. This section describes how you can maximize theavailability of your access server farm.
● Create a backup of the SQL database.
After you create the initial backup, you should ensure the database is backed upregularly at appropriate intervals. Additionally, you should verify the data can berestored from the backups.
● Cluster the database server.
This allows another database server to continue farm operations in the event the firstdatabase server becomes unavailable. The clustered servers appear to Advanced AccessControl as a single database server.
● Cluster the Advanced Access Control server.
As with the database server, clustering allows another Advanced Access Control serverto continue operations for an unavailable server. Users can continue to log on to theserver and access resources.
Exporting and Importing Configuration DataYou can export and import your farm configuration data using the Access ManagementConsole. This can be helpful when, for example, you want to save the configuration datafrom a farm in a staging environment and copy it to a farm in a production environment.
When you export your farm configuration, a .cab file is created which consists ofcompressed XML files containing the following data:
● Global farm settings such as display order of home page applications, license server,and authentication profiles
● XenApp farm settings
● Network and Web resource settings
● Logon point settings
● Policy settings
● Endpoint analysis settings
● Continuous scan settings
● Access Gateway appliance settings
Data that is not exported includes:
● Access server farm name
● Data that is valid only when the Advanced Access Control server is running, such as usersession data
● Server information such as computer names
After you export your farm configuration, you can import the .cab file to restore theconfiguration on another server running the same version of Advanced Access Control.
Before you export your farm configuration, be aware of the following conditions:
● You can import only .cab files that were exported using the same version of AdvancedAccess Control. For example, if you export the configuration of a farm running Version4.5 of Advanced Access Control, you can import the configuration data only on anotherAdvanced Access Control server running Version 4.5. If you import the configurationdata on a server running a different version of Advanced Access Control, the importfails.
Note: If you want to import configuration data from a previous version of AdvancedAccess Control, you must first use the Migration Tool to prepare your data for importinto a farm running Version 4.5. For more information about migrating to Version 4.5from a previous version of Advanced Access Control, see the Access GatewayAdvanced Edition Upgrade Guide on the Citrix Support Web site.
● Incremental export or import of farm configuration data is not supported. You canexport or import only entire farm configurations.
● When you import farm configuration data, the existing farm configuration is deletedand replaced with the imported data.
Note: Before you import farm configuration data, Citrix recommends creating a backup ofthe SQL database for the farm.
Maintaining Availability of the Access Server Farm
308

To export your access server farm configuration1. Click Start > All Programs > Citrix > Management Consoles > Access Management
Console.
2. In the console tree, select the farm node and then under Other Tasks, click ExportFarm.
3. Enter the location where you want to create the .cab file.
When you click Next, the XML files are compressed into a .cab file and saved to thelocation you specified.
To import your access server farm configuration1. Click Start > All Programs > Citrix > Management Consoles > Access Management
Console.
2. In the console tree, select the farm node and then under Other Tasks, click ImportFarm.
3. Enter the location of the .cab file you want to import.
When you click Next, the .cab file is decompressed and the existing configuration data isreplaced with the imported data.
Maintaining Availability of the Access Server Farm
309

310
Monitoring Sessions
The Access Gateway Advanced Edition Session Viewer is a session monitoring tool thatallows administrators to review user access to the access server farm and terminate usersessions.
Note: You must have administrative privileges to run the Session Viewer. An AdvancedAccess Control session is not required to run the Session Viewer.
Session Viewer displays data from the server on which you are logged or from otherAdvanced Access Control servers. This data includes:
● Client device IP address
● User name used to log on
● Installed clients
● Logon point accessed and default home page
● Name of the Advanced Access Control server the user is accessing
To access the Session Viewer1. Click Start > All Programs > Citrix > Access Gateway > Session Viewer.
When you select a session from the Sessions pane, the data for that session displays in theSession Values pane. You can sort sessions by clicking the column headings in the Sessionspane.
To terminate sessions1. Click Start > All Programs > Citrix > Access Gateway > Session Viewer.
2. From the Sessions pane, select the user session(s) you want to terminate.
3. Click Delete.
If the user attempts to access resources after you terminate the session, an error pageappears and the user must log on again.

311
Access Gateway Advanced Concepts
The following topics provide information about configuring additional settings on the AccessGateway.
● Auditing Access to Corporate Resources
● Scan Properties Reference

312
Auditing Access to Corporate Resources
The event logging capabilities in Advanced Access Control ensure you collect theinformation needed to monitor access to network resources. Event logs allow you to:
● Prove compliance with regulatory requirements
● Prove compliance with internal, corporate-specific requirements
● Take proactive measures to address existing vulnerabilities such as evaluating incidentscircumventing intended access and modifying your access strategy to resolve theseissues
● Assist support personnel in troubleshooting issues related to accessing networkresources

313
Configuring Audit Logging
You can configure Advanced Access Control to record specific user activities for auditingpurposes. For example, you can monitor endpoint analysis scan results; successful logonattempts; and unsuccessful attempts to access resources such as Web email, file shares,and so on. Before configuring event log settings, determine the information you need tocollect and enable logging only for the associated events. This approach ensures loggingdoes not impact system performance or use unnecessary hard disk space. In addition,limiting logging to only the information relevant to the auditing process streamlines theevaluation of this data.
The table below describes the events available for logging.
Event Description
Endpoint analysisresults
Logs all endpoint analysis results. Three events are generated foreach check of the client device. The first event contains the rawendpoint analysis data from the client device. The second eventcontains the check results (true/false) based on analysis withinAdvanced Access Control. The third event contains the results(true/false) specific to the requirements for displaying the logonpage.
Logon page denied Logs an event when a logon page is not displayed to the user dueto your configured requirements.
Logon allowed Logs an event when a successful Windows NT authentication ispassed to the domain controller. Events are not logged when auser sends valid credentials but is denied access due to policyrestrictions.
Logon denied Logs an event when an unsuccessful Windows NT authentication ispassed to the domain controller or when the Allow Logon policydenies a user access to the logon page.
User logged off Logs an event when a user terminates a session.
Session timed out Logs an event when a session times out. The session time-outvalue is configured as a logon point setting.
Web resources -HTML MIME type
Logs an event for successful access to HTML content within a Webresource such as HTML and ASP pages.
Web resources -other MIME type
Logs an event for successful access to non-HTML content within aWeb resource such as JavaScript, Flash, XML, and so on.
Web resources -image MIME type
Logs an event for successful access to images referenced within aWeb resource such as a GIF or JPEG file.
File shares Logs an event for successful access to file shares or documentswithin a file share.

Web email Logs an event for successful access to Web-based email includingOutlook Web Access, iNotes, and Advanced Access Control’s Webemail interface. Outlook Web Access and iNotes use the sameevent ID (304) while Advanced Access Control’s Web emailinterface uses event ID (306).
Resource accessdenied
Logs an event for unsuccessful access to any resource within anaccess server farm. For Web resources, only unsuccessful accessto the HTML MIME type is logged. Unsuccessful access to other orimage MIME types is not logged.
Important: Audit log configuration is set at the access server farm level and applies to allresources within the farm. Therefore, if your access server farm is distributed acrossmultiple servers, audit logs are written to each server within the farm.
The general steps involved in configuring event logging are:
● Specify the events to log for the access server farm. Use the Access ManagementConsole to specify the type of events logged by servers within an access server farm.
● Configure log settings for each server within the farm. Use the Windows Event Viewerto configure log settings for each server including specifying the maximum log size,determining when to overwrite events, and so on. By default, the maximum size of theCitrixAGE Audit log is 5120KB and is retained for seven days before being overwritten.New events are not added if the maximum log size is reached and there are no eventsolder than this period. If this configuration does not meet your auditing needs, considerincreasing the size of the log file as well as modifying the event overwrite settings.
● Consolidate event logs into a single view. Each server within an access server farmmaintains its own event log. Use the Event Log Consolidator in Advanced Access Controlto collect event log data from all servers within the farm and display this data in asingle, consolidated view. After the data is collected by the Event Log Consolidator, youcan perform additional analysis by running a variety of reports based on user access,resource access, and so on.
Configuring Audit Logging
314

To select events to be logged for an access serverfarm
1. Click Start > All Programs > Citrix > Management Consoles > Access ManagementConsole.
2. In the console tree, select the access server farm you want to audit and under CommonTasks, click Edit farm properties.
3. On the Event Logging page, select from among the auditing options described below.
● Endpoint analysis scan results
● Allowed and denied access to resources (Web resources, file shares, and Web email)
● Logon point data including logon page denial, logon denial, logon allowed, user logoff, and session time-out
Note: To generate session-based reports in the Event Log Consolidator, you mustenable the “Logon allowed” event.
To configure log settings for Advanced AccessControl servers
You must be logged on as an administrator or as a member of the Administrators group toconfigure Advanced Access Control auditing information within the Windows Event Viewer.
After auditing is enabled and configured within Advanced Access Control, you can use theWindows Event Viewer to configure audit log settings including:
● Specifying the maximum log size
● Determining when to overwrite events
Important: By default, the maximum size of the CitrixAGE Audit log is 5120KB and isretained for seven days before being overwritten. New events are not added if themaximum log size is reached and there are no events older than this period. If thisconfiguration does not meet your auditing needs, consider increasing the size of the logfile as well as modifying the event overwrite settings.
1. Open the Windows Event Viewer of a server running Advanced Access Control.
2. Select CitrixAGE Audit from the console tree.
3. Configure logging properties as appropriate.
4. Repeat this step for all servers in the farm.
Configuring Audit Logging
315

To consolidate event logging results1. Click Start > All Programs > Citrix > Management Consoles > Access Management
Console.
2. In the console tree, select Access Gateway and under Other Tasks, click View Events.
3. In the Event Log Consolidator, click File > Configure.
4. In the Polling Interval box, specify the time interval (in seconds) at which the EventLog Consolidator collects audit log data from Advanced Access Control servers.
5. Under Available Farms, select the access server farm for which you want to viewauditing data.
6. Click File > Collect to begin polling Advanced Access Control servers.
Important: Excessive logging and polling can impact a system’s performance. Therefore,avoid logging unnecessary events for an access server farm. In addition, avoidunnecessary polling of audit log data by the Event Log Consolidator.
Configuring Audit Logging
316

317
Interpreting Audit Events
Audit information is written to the Windows Event Viewer and contains information specificto the audit event as described in the table below.
Field Description
DateTime Date and time of the request.
UserName Name of the authenticated user accessing the resource.
ServiceName Name of the Advanced Access Control component logging therequest.
Status Status of the request (accepted, denied, or completed).
Machine Name Name of the server logging the event.
Session ID Reference number assigned to a session upon successful userauthentication and license validation. This number is used to tracksession events such as logon allowed, user logged off, and sessiontimed out.
PolicyReference Reference number for denied attempts. This number is alsodisplayed to users when access is denied.
EPAReference Reference number for endpoint analysis scans. This number isreferenced by endpoint analysis before a user is authenticated toassociate a session ID with scan results.
Resource Name or URI (Uniform Resource Identifier) of the resourcerequested.
Data Additional data specific to a message.Although logging is enabled at the access server farm level, each server maintains its ownlog file. To gather logging information from all servers within the farm into a single view,use the Event Log Consolidator.
To view logging results1. Click Start > All Programs > Citrix > Management Consoles > Access Management
Console.
2. In the console tree, select Access Gateway and under Common Tasks, click ViewEvents.
3. Sort events or generate reports to assist in the evaluation of this data.
318
Troubleshooting User Access toResources
There are a variety of reasons why a user might not be able to access a network resourceranging from failed endpoint analysis scans, incorrect authentication credentials,policy-based restrictions, and so on. Often, it is not possible for users to know why accesswas denied and therefore, they rely on support personnel for assistance in troubleshootingthese issues.
For each denial of access to a resource or failed endpoint analysis check, a unique value isdisplayed in the user’s browser. This information is also written to the event log as thePolicyReference or EPAReference value, respectively. For this reason, consider instructingusers to record reference numbers and provide this information to support personnelbecause it expedites the troubleshooting process. Support personnel can use thisinformation to quickly search and identify the specific event and begin troubleshooting theproblem. In addition, support personnel can use the table from Interpreting Audit Events asa resource when evaluating events.
319
Performing Audit Log Maintenance
Several third-party tools provide advanced maintenance of Windows event logs. Forexample, the Windows Event Viewer and Event Log Consolidator do not support automaticrotation of logs without overwriting existing log data. If your organization requires archivingof log data on a regular basis, consider a third-party tool that automates this process.
However, there may be situations when using the Event Log Consolidator or Windows EventViewer to perform basic maintenance tasks is appropriate. For example, you may need toreimage a server within your access server farm. To ensure no audit data is lost, you canuse the Windows Event Viewer to save the audit log prior to reimaging the server.
The decision regarding how to manage and maintain audit logs depends on your corporateneeds. Therefore, when determining how to manage audit data, evaluate the auditingneeds of your organization and ensure that your solution satisfies these needs.
320
Scan Properties Reference
Scan packages contain the software you need to create scans to detect information aboutuser devices. When creating scans, you typically specify one or more property values thatyou’re looking for, such as an operating system version or service pack level. This referencetopic lists the properties you can configure for Citrix scan packages.
For information about creating scans, see Creating Endpoint Analysis Scans.
Note: This topic is available from the online help system of any server running theAdvanced Access Control software. If you need information about specific propertieswhile creating scans, use your online help to locate this reference topic.
Scan packages are organized alphabetically within the following groups by the type ofproduct or properties being scanned.

321
Antivirus Scan Packages
You can create a scan package to check client devices for antivirus software.
Citrix Scans for McAfee VirusScanDetects if the required version of McAfee VirusScan software (personal edition) is runningon the client device.
Supported Versions● At least up to VirusScan 2006 v.11.0.209
Properties You Can SpecifyProperty Name Description/Format
Minimum required fileversion
Note that this property is mislabeled and appearsincorrectly as "Minimum required engine version." Useformat N.N, where N is an integer. You can find the fileversion number in the "Version" Tab from the properties ofthe file mcvsshld.exe.
Scan OutputsScan Output Name Description
Program Version This is the version of the key program executable file. Themajor and minor version numbers are the same as thosedisplayed in the program user interface. The rest of theversion number may be ignored when reported.
Verified-McAfee-VirusScan This Boolean output indicates if the required minimumversion of the application is running on the client device.
Citrix Scans for McAfee VirusScan EnterpriseDetects if McAfee VirusScan software (Enterprise edition) is running on the client device.
Supported Versions● At least up to VirusScan Enterprise v.8.0i Pattern 4825
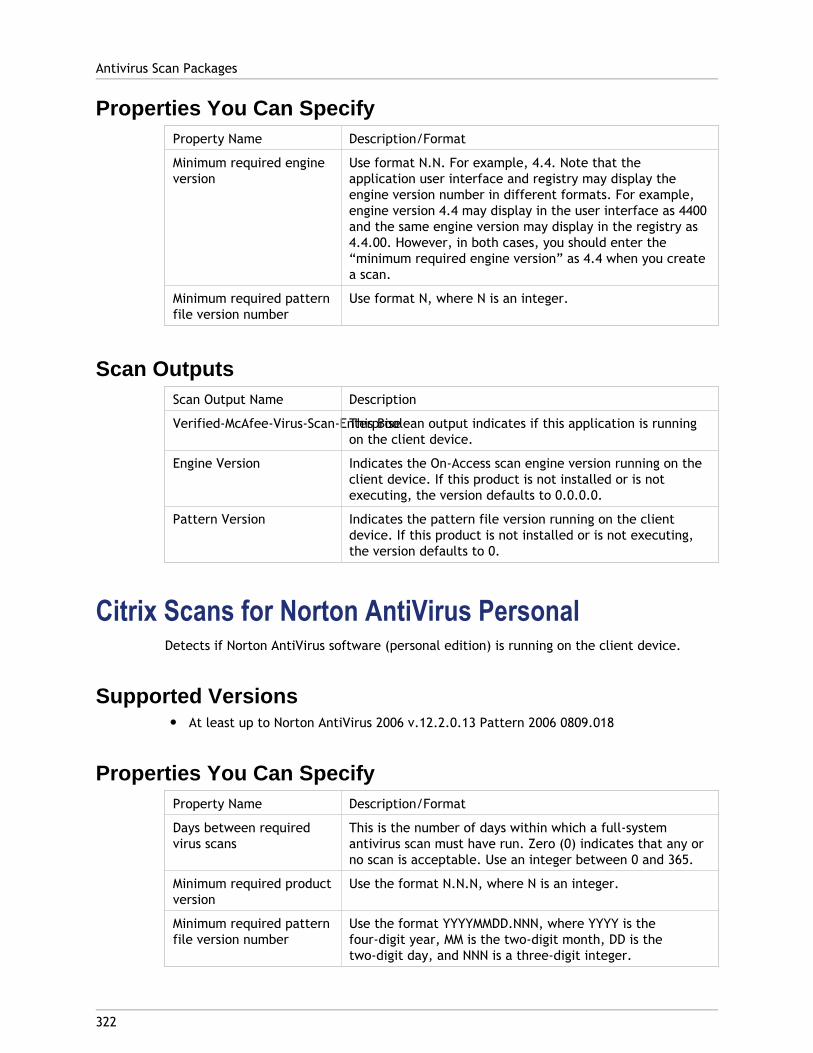
Properties You Can SpecifyProperty Name Description/Format
Minimum required engineversion
Use format N.N. For example, 4.4. Note that theapplication user interface and registry may display theengine version number in different formats. For example,engine version 4.4 may display in the user interface as 4400and the same engine version may display in the registry as4.4.00. However, in both cases, you should enter the“minimum required engine version” as 4.4 when you createa scan.
Minimum required patternfile version number
Use format N, where N is an integer.
Scan OutputsScan Output Name Description
Verified-McAfee-Virus-Scan-EnterpriseThis Boolean output indicates if this application is runningon the client device.
Engine Version Indicates the On-Access scan engine version running on theclient device. If this product is not installed or is notexecuting, the version defaults to 0.0.0.0.
Pattern Version Indicates the pattern file version running on the clientdevice. If this product is not installed or is not executing,the version defaults to 0.
Citrix Scans for Norton AntiVirus PersonalDetects if Norton AntiVirus software (personal edition) is running on the client device.
Supported Versions● At least up to Norton AntiVirus 2006 v.12.2.0.13 Pattern 2006 0809.018
Properties You Can SpecifyProperty Name Description/Format
Days between requiredvirus scans
This is the number of days within which a full-systemantivirus scan must have run. Zero (0) indicates that any orno scan is acceptable. Use an integer between 0 and 365.
Minimum required productversion
Use the format N.N.N, where N is an integer.
Minimum required patternfile version number
Use the format YYYYMMDD.NNN, where YYYY is thefour-digit year, MM is the two-digit month, DD is thetwo-digit day, and NNN is a three-digit integer.
Antivirus Scan Packages
322

Scan OutputsScan Output Name Description
Verified-Norton-Antivirus Indicates if this application is running on the client device.
Product version Indicates the software version running on the client device.If this product is not installed or is not executing, theversion defaults to 0.0.0.0.
Pattern version Indicates the pattern file version running on the clientdevice. If this product is not installed or is not executing,the version defaults to 0.0.0.0.
Citrix Scans for Symantec AntiVirus EnterpriseDetects if Symantec AntiVirus Enterprise software is running on the client device.
Supported Versions● At least up to Symantec AntiVirus Enterprise v10.0.0.359 Pattern 2006 0809.018
Properties You Can SpecifyProperty Name Description/Format
Minimum required productversion
Use the format N.N.N, where N is an integer.
Minimum required patternfile version number
Use the format YYYYMMDD.NNN, where YYYY is thefour-digit year, MM is the two-digit month, DD is thetwo-digit day, and NNN is a three-digit integer.
Scan OutputsScan Output Name Description
Verified-Symantec-AV-EnterpriseIndicates if this application is running on the client device.
Product version Indicates the software version running on the client device.If this product is not installed or is not executing, theversion defaults to 0.0.0.0.
Pattern version Indicates the pattern file version running on the clientdevice. If this product is not installed or is not executing,the version defaults to 0.0.0.0.
Citrix Scans for Trend OfficeScanDetects if Trend OfficeScan antivirus software is running on the client device.
Antivirus Scan Packages
323

Supported Versions● At least up to Version 7.3 Pattern 3.645.00
Properties You Can SpecifyProperty Name Description/Format
Minimum required productversion
Use the format N.N, where N is an integer.
Minimum required patternfile version number
The three-digit short form of the pattern file versionrunning on the client device. Use the format N, where N isan integer. For example, for version 2.763, 763 is the shortform you enter.
Scan OutputsScan Output Name Description
Verified-Trend-OfficeScan Indicates if this application is running on the client device.
Product Version Indicates the software version running on the client device.If this product is not installed or is not executing, theversion defaults to 0.0.0.0.
Pattern Version Indicates the pattern file version running on the clientdevice. If this product is not installed or is not executing,the version defaults to -1.
Citrix Scans for Windows Security Center AntivirusDetects if the Windows Security Center reports that the client device is using antivirussoftware. There are no properties for you to specify in this scan beyond specifying theconditions under which the scan is applied.
Note that accurate scan results require that antivirus software be monitored through theWindows Security Center. If an antivirus software product does not register properly withthe Windows Security Center, it is possible for the scan to indicate incorrectly that theclient device has no antivirus software enabled. Test to ensure that Windows SecurityCenter correctly registers the antivirus software products you deem acceptable or checkthe Windows Security Center documentation for details of the products it supports.
Supported Versions● Windows XP SP2 - Security Center
Antivirus Scan Packages
324

Scan OutputsProperty Name Description/Format
Antivirus Enabled Indicates (True/False) if the Windows Security Centerreports that the client device is using antivirus software.
Antivirus Scan Packages
325
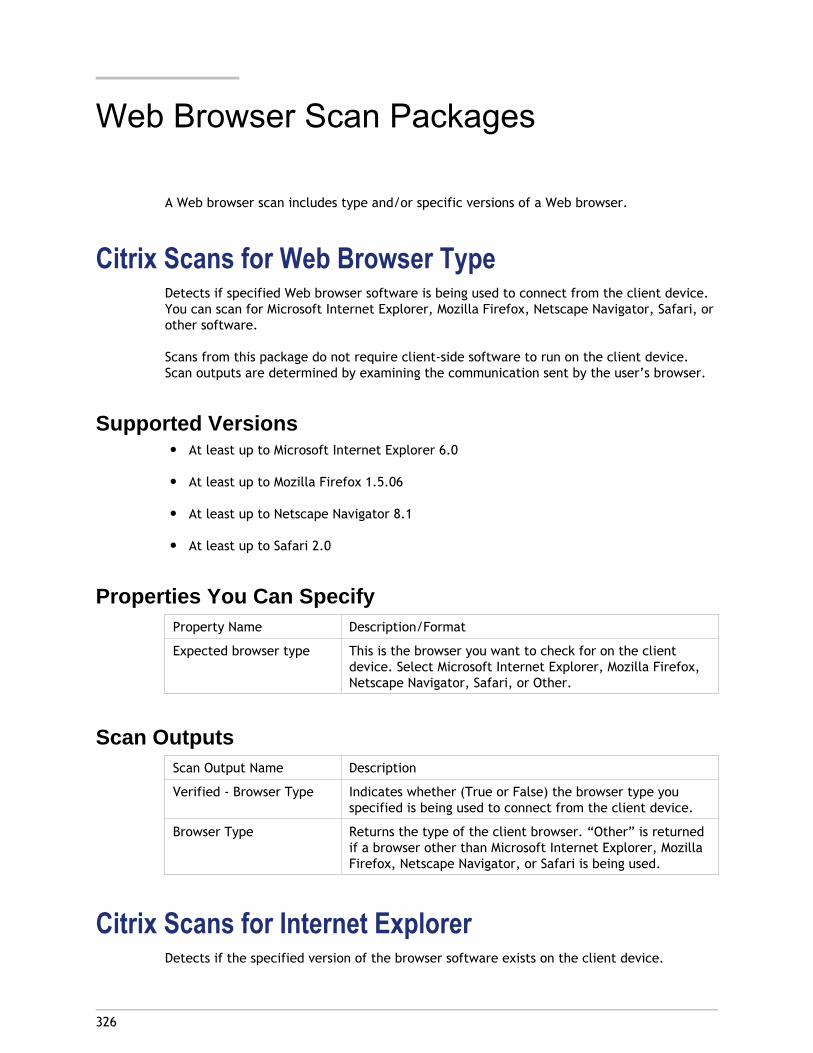
326
Web Browser Scan Packages
A Web browser scan includes type and/or specific versions of a Web browser.
Citrix Scans for Web Browser TypeDetects if specified Web browser software is being used to connect from the client device.You can scan for Microsoft Internet Explorer, Mozilla Firefox, Netscape Navigator, Safari, orother software.
Scans from this package do not require client-side software to run on the client device.Scan outputs are determined by examining the communication sent by the user’s browser.
Supported Versions● At least up to Microsoft Internet Explorer 6.0
● At least up to Mozilla Firefox 1.5.06
● At least up to Netscape Navigator 8.1
● At least up to Safari 2.0
Properties You Can SpecifyProperty Name Description/Format
Expected browser type This is the browser you want to check for on the clientdevice. Select Microsoft Internet Explorer, Mozilla Firefox,Netscape Navigator, Safari, or Other.
Scan OutputsScan Output Name Description
Verified - Browser Type Indicates whether (True or False) the browser type youspecified is being used to connect from the client device.
Browser Type Returns the type of the client browser. “Other” is returnedif a browser other than Microsoft Internet Explorer, MozillaFirefox, Netscape Navigator, or Safari is being used.
Citrix Scans for Internet ExplorerDetects if the specified version of the browser software exists on the client device.
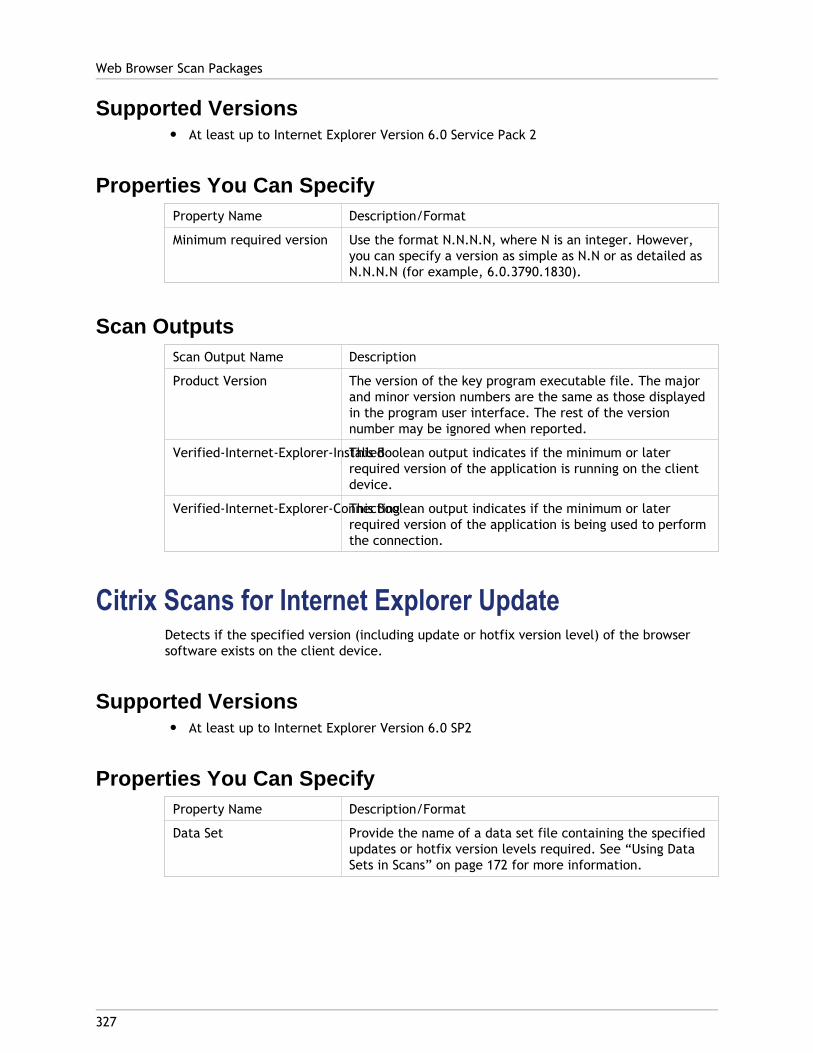
Supported Versions● At least up to Internet Explorer Version 6.0 Service Pack 2
Properties You Can SpecifyProperty Name Description/Format
Minimum required version Use the format N.N.N.N, where N is an integer. However,you can specify a version as simple as N.N or as detailed asN.N.N.N (for example, 6.0.3790.1830).
Scan OutputsScan Output Name Description
Product Version The version of the key program executable file. The majorand minor version numbers are the same as those displayedin the program user interface. The rest of the versionnumber may be ignored when reported.
Verified-Internet-Explorer-InstalledThis Boolean output indicates if the minimum or laterrequired version of the application is running on the clientdevice.
Verified-Internet-Explorer-ConnectingThis Boolean output indicates if the minimum or laterrequired version of the application is being used to performthe connection.
Citrix Scans for Internet Explorer UpdateDetects if the specified version (including update or hotfix version level) of the browsersoftware exists on the client device.
Supported Versions● At least up to Internet Explorer Version 6.0 SP2
Properties You Can SpecifyProperty Name Description/Format
Data Set Provide the name of a data set file containing the specifiedupdates or hotfix version levels required. See “Using DataSets in Scans” on page 172 for more information.
Web Browser Scan Packages
327

Scan OutputsScan Output Name Description
Verified-Internet-Explorer-PatchIndicates if the updates specified in the data set arepresent on the client device.
Citrix Scans for Mozilla FirefoxDetects if the specified version of the Mozilla Firefox browser exists on the client device.The scan package uses the published Windows registry settings.
Supported Versions● At least up to Firefox Version 1.5.06
Properties You Can SpecifyProperty Name Description/Format
Minimum required version Use the format N.N.N.N, where N is an integer. However,you can specify a version as simple as N.N or as detailed asN.N.N.N (for example, 1.0.3.3).
Scan OutputsScan Output Name Description
Product Version The version of the key program executable file. The majorand minor version numbers are the same as those shown inthe program user interface. The rest of the version numbermay be ignored when reported.
Verified-Mozilla-Firefox-InstalledThis Boolean output indicates if the minimum or laterrequired version of the application is running on the clientdevice.
Verified-Mozilla-Firefox-ConnectingThis Boolean output indicates if the minimum or laterrequired version of the application is being used to performthe connection.
Citrix Scans for Netscape NavigatorDetects if the specified version of the Netscape Navigator browser exists on the clientdevice. The scan package uses the published Windows registry settings.
Supported Versions● At least up to Netscape Navigator Version 8.1
Web Browser Scan Packages
328

Properties You Can SpecifyProperty Name Description/Format
Minimum required version Use the format N.N.N.N, where N is an integer. However,you can specify a version as simple as N.N or as detailed asN.N.N.N (for example, 8.0.3.3).
Scan OutputsScan Output Name Description
Product Version The version of the key program executable file. The majorand minor version numbers are the same as those shown inthe program user interface. The rest of the version numbermay be ignored when reported.
Verified-Netscape-Navigator-InstalledThis Boolean output indicates if the minimum or laterrequired version of the application is running on the clientdevice.
Verified-Netscape-Navigator-ConnectingThis Boolean output indicates if the minimum or laterrequired version of the application is being used to performthe connection.
Web Browser Scan Packages
329

330
Firewall Scan Packages
You can create a scan package that checks for personal firewall software on the clientdevice.
Citrix Scans for McAfee Desktop FirewallDetects if the specified version of the firewall software exists on the client device.
Supported Versions● At least up to McAfee Desktop Firewall 8.5 Build 260
Properties You Can SpecifyProperty Name Description/Format
Minimum required versionnumber or combinedversion and build number
To specify the version number, use the format N.N, whereN is an integer. To specify the version and build number,use the format N.N.NNN, where N is an integer.
Scan OutputsScan Output Name Description
Version The version of the key program executable file. The majorand minor version numbers are the same as those displayedin the program user interface. The rest of the versionnumber may be ignored when reported.
Verified-McAfee-Desktop-FirewallThis Boolean output indicates if the required minimumversion of the application is running on the client device.
Citrix Scans for McAfee Personal Firewall PlusDetects if the specified version of the firewall software exists on the client device.
Supported Versions● At least up to McAfee Personal Firewall Plus 2006 Version 7.1.113

Properties You Can SpecifyProperty Name Description/Format
Minimum required versionnumber
N.N, where N is an integer.
Scan OutputsScan Output Name Description
Version The version of the key program executable file. The majorand minor version numbers will be the same as thosedisplayed in the program user interface. The rest of theversion number may be ignored when reported.
Verified-McAfee-Personal-Firewall-PlusThis Boolean output indicates if the required minimumversion of the application is running on the client device.
Citrix Scans for Microsoft Windows FirewallDetects if the specified version of the Microsoft Windows Firewall or Internet ConnectionFirewall (ICF) exists on the client device.
Supported VersionsThe scan can detect the following firewalls on these operating systems:
● Microsoft Windows XP Home and Professional: ICF
● Microsoft Windows XP Home and Professional Service Pack 1: ICF
● Microsoft Windows XP Home and Professional Service Pack 1: Windows Firewall
● Microsoft Windows 2003: ICF
Properties You Can SpecifyProperty Name Description/Format
Windows Firewall withoutexceptions is required
Select True if you require Windows Firewall to be activewithout exceptions. Select False if you require ICF to beactive on all connections or if you require Windows Firewallto be active (with exceptions). See “Adding Rules to Scans”on page 169 for an example showing how to add multiplerules with exceptions to a scan.
Firewall Scan Packages
331

Scan OutputsScan Output Name Description
Verified-Windows-Firewall This Boolean output indicates if the required minimumversion of the application is running on the client device.
Citrix Scans for Norton Personal FirewallDetects if the specified version of Norton Personal Firewall exists on the client device.
Supported Versions● At least up to Norton Personal Firewall 2006 Version 9.1.0.33
Properties You Can SpecifyProperty Name Description/Format
Minimum required versionnumber
Use the format N.N, where N is an integer.
Scan OutputsScan Output Name Description
Version The version of the key program executable file. The majorand minor version numbers are the same as those displayedin the program user interface. The rest of the versionnumber may be ignored when reported.
Version-Norton-Personal-FirewallThis Boolean output indicates if the required version of theapplication is running on the client device.
Citrix Scans for Windows Security Center FirewallDetects if the Windows Security Center reports that the client device is using a firewall.The Windows Security Center allows you to monitor various security items on a client devicerunning the Windows XP SP2 operating system. There are no properties for you to specify inthis scan beyond specifying the conditions under which the scan is applied.
Note that accurate scan results require that the firewall be monitored through the WindowsSecurity Center on the client device. If a firewall product does not register properly withthe Windows Security Center, it is possible for the scan to indicate incorrectly that theclient device has no firewall enabled. Test to ensure that Windows Security Centercorrectly registers the firewall products you deem acceptable or check the WindowsSecurity Center documentation for details of the products it supports.
Firewall Scan Packages
332

Supported Versions● Windows XP SP2 - Security Center
Scan OutputsProperty Name Description/Format
Firewall Enabled Indicates if (True/False) the Windows Security Centerreports that the client device is using a firewall.
Citrix Scans for ZoneAlarmDetects if the specified version of the free ZoneAlarm firewall exists on the client device.
Supported Versions● At least up to ZoneAlarm 2006 Version 6.5.731.00
Properties You Can SpecifyProperty Name Description/Format
Minimum required versionnumber
Use the format N.N, where N is an integer.
Scan OutputsScan Output Name Description
Version The version of the key program executable. The major andminor version numbers are the same as those displayed inthe program user interface. The rest of the version numbermay be ignored when reported.
Verified-ZoneAlarm This Boolean output indicates if the required minimumversion of the application is running on the client device.
Citrix Scans for ZoneAlarm ProDetects if the specified version of the ZoneAlarm Pro firewall exists on the client device.
Supported Versions● At least up to ZoneAlarm 2006 Version 6.5.731.00
Firewall Scan Packages
333
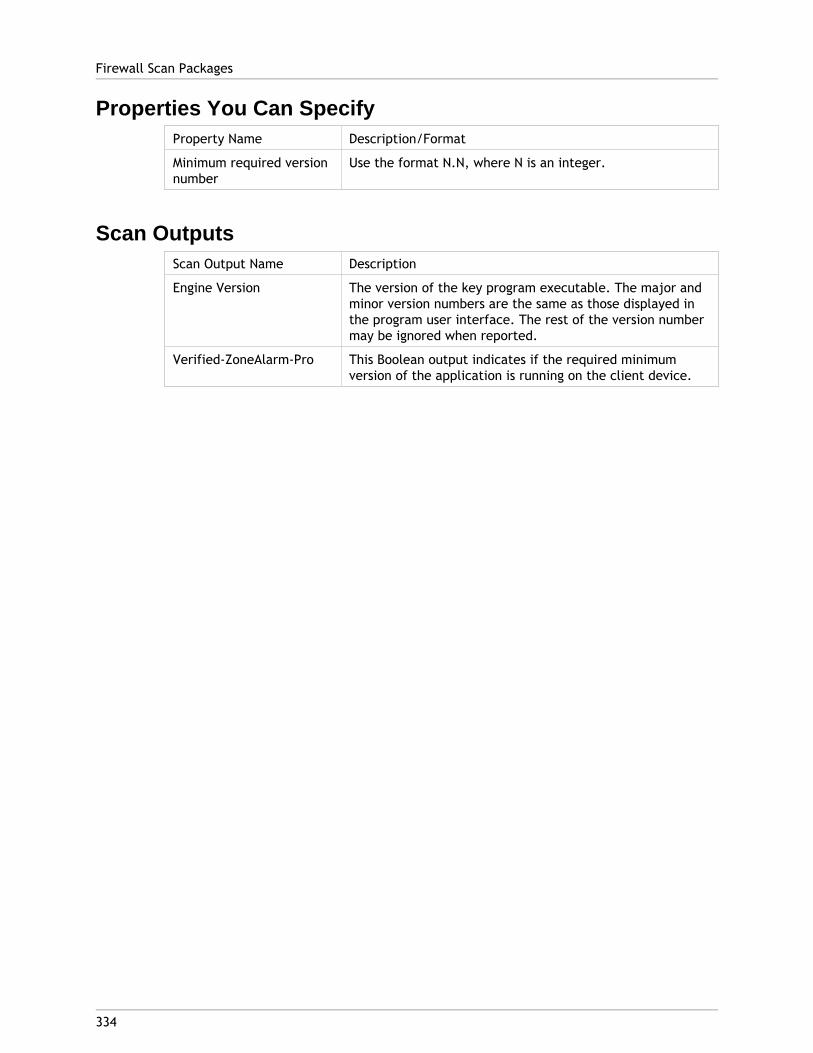
Properties You Can SpecifyProperty Name Description/Format
Minimum required versionnumber
Use the format N.N, where N is an integer.
Scan OutputsScan Output Name Description
Engine Version The version of the key program executable. The major andminor version numbers are the same as those displayed inthe program user interface. The rest of the version numbermay be ignored when reported.
Verified-ZoneAlarm-Pro This Boolean output indicates if the required minimumversion of the application is running on the client device.
Firewall Scan Packages
334

335
User Device Identification Scan Packages
You can create scans for specific user device properties. These settings include membershipin a domain and the MAC address of the user device.
Citrix Scans for Domain MembershipDetects if the user device belongs to a specified domain.
Properties You Can SpecifyProperty Name Description/Format
A client domain name isrequired
True means the user device must belong to a nameddomain. False means the user device is not required tobelong to a domain.
Domain name A valid domain name. Workgroup names are not valid.
Scan OutputsScan Output Name Description
Domain The name of the domain that the user device belongs to. Ifa client domain name is not required, the output is“unknown.”
Verified-Domain Indicates if the user device belongs to the specifieddomain.
Citrix Scans for MAC AddressDetects the media access control (MAC) address for each network interface card (NIC) ornetwork adapter on the user device and compares the address against a data set containingthe list of group names mapped to valid MAC addresses.
This scan requires you to create a double-column data set listing valid MAC addressesmapped to group names. The scan detects the network adapter (the first value or column inthe data set) and maps that address to a group name (the second value or column in thedata set). Scans use this mapping to verify to which group the user device belongs. The MACaddresses in the data set should be in the format NN:NN:NN:NN:NN:NN, such as00:11:11:06:B3:E9. Note that you should use a colon (:) as the separator in this formatrather than a hyphen (-).
Important: This scan package treats data as case sensitive. Avoid creating conflicting entries that differ in case. For example, it is possible to create an entry for the same address and map it to two different groups. One entry might map the address
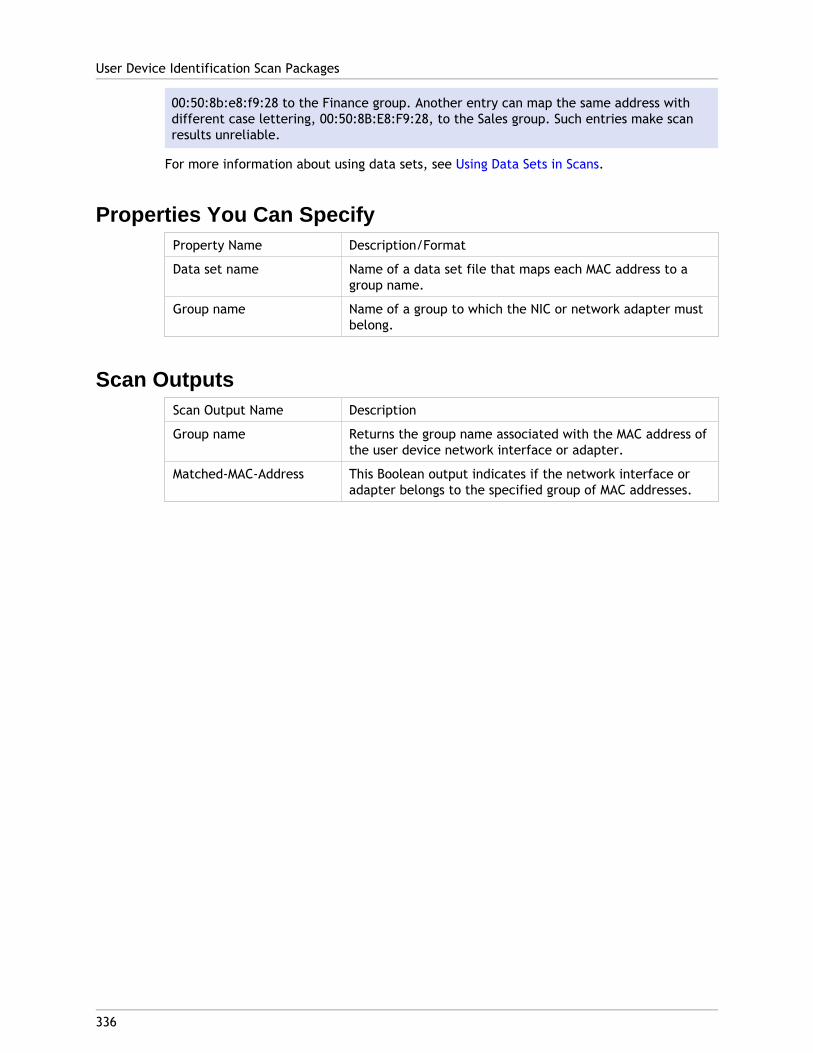
00:50:8b:e8:f9:28 to the Finance group. Another entry can map the same address withdifferent case lettering, 00:50:8B:E8:F9:28, to the Sales group. Such entries make scanresults unreliable.
For more information about using data sets, see Using Data Sets in Scans.
Properties You Can SpecifyProperty Name Description/Format
Data set name Name of a data set file that maps each MAC address to agroup name.
Group name Name of a group to which the NIC or network adapter mustbelong.
Scan OutputsScan Output Name Description
Group name Returns the group name associated with the MAC address ofthe user device network interface or adapter.
Matched-MAC-Address This Boolean output indicates if the network interface oradapter belongs to the specified group of MAC addresses.
User Device Identification Scan Packages
336

337
Miscellaneous Scan Packages
You can create miscellaneous scan packages that includes checking the connectionbandwidth.
Citrix Bandwidth ScanDetermines the connection bandwidth between the client and the Access Gatewayappliance. You can use the results of this scan in policies to determine, for example,whether published applications can be launched.
This scan determines the bandwidth of a client’s connection by reading an image file andcalculating the time it takes to read the file during the time the scan runs. The image file,citrix_bw.gif, is located in the themes/default/images folder of the logon point’s virtualdirectory. To change the size of this image file, overwrite this file with another of the samename.
Note that the accuracy of scan results is affected by the time allotted for the scan to run aswell as the size of the image file. For example, users on slow connections may experienceprolonged logon times if the image file is 72 MB and the scan runs for 120 seconds. If thescan runs for 5 seconds, however, the correct bandwidth may not be calculated. Test toensure there is a balance between the size of the image file and the time allotted for thescan to run so that users with high bandwidth and low bandwidth connections have similarlogon experiences.
Properties You Can SpecifyProperty Name Description/Format
Desired Bandwidth The level at which a connection is considered “highbandwidth.”
Time The maximum length of time the scan is allowed to run.
Scan OutputsScan Output Name Description
Bandwidth This Boolean output indicates if the client connectionmeets the specified bandwidth.

338
Operating System Scan Packages
You can create a scan package to check for specific operating system versions. Theseinclude Macintosh, Windows, and Windows Upate.
Citrix Scans for MacintoshDetects whether or not the client device is running the Mac OS system software.
Scans from this package do not require client-side software to run on the client device.Scan outputs are determined by examining the communication sent by the user’s browser.
There are no properties for you to specify in this scan beyond specifying the conditionsunder which the scan is applied.
Supported Versions● Mac OS X
Scan OutputsProperty Name Description/Format
Client Is Macintosh Reports whether or not the client device is running Mac OSsystem software.
Citrix Scans for Microsoft Windows Service PackDetects if the operating system software on the client device is running at a requiredminimum service pack level.
Properties You Can SpecifyProperty Name Description/Format
Minimum required servicepack
Select a Windows service pack version from the drop-downmenu. Select None to detect a base, unpatched operatingsystem version.

Scan OutputsScan Output Name Description
Service Pack Returns the service pack version running on the clientdevice.
Verified-Windows-Service-PackThis Boolean output indicates if the required minimumservice pack level is met.
Citrix Scans for Microsoft Windows UpdateDetects whether a set of specified operating system updates are installed on the clientdevice.
Note: This scan package requires you to create a single-column data set listing theupdate names you wish to detect.
Properties You Can SpecifyProperty Name Description/Format
Data set name Name of a data set file that contains a single column list ofupdates appropriate for the detected operating system.
Scan OutputsScan Output Name Description
Verified-Windows-Updates This Boolean output indicates if the updates specified in thedata set file exist on the client device.
Operating System Scan Packages
339

340
Glossary
Access Gateway Administration Desktop
A window where administrators can monitor Access Gateway network activity. Toolsincluded in the Administration Desktop include the Citrix Real-Time Monitor, EtherealNetwork Analyzer, xNetTools, My traceroute, fnetload, Gnome System Monitor, and theWorkplace Switcher.
Note: The Administration Desktop is not available in Access Gateway 4.6, StandardEdition or later. The functions of the Administration Desktop are included in the AccessGateway Administration Tool.
Access Gateway Administration Portal
A Web-based interface for performing administration tasks for Access Gatewayappliances. From the Administration Portal you can download other administration toolsfor remote use, such as the Access Gateway Administration Tool.
Access Gateway Administration Tool
A 32-bit management console downloaded from the Administration Portal and installedon a Windows computer in the secure network. The Administration Tool can administerindividual settings for all Access Gateway appliances in a cluster.
Access Gateway Plug-in
Citrix software used to connect users to network resources. In Standard Edition, usersaccess a secure URL to download the software and authenticate to the Access Gatewayappliance. In Advanced Edition, administrators create a connection policy to require useof the software when users access specific logon points. Users may download thesoftware after they authenticate.
Access Interface
The user-facing Web page that displays the available network resources, including URLs,email, and files.
access policy
A policy that enforces configuration settings for user access under specified conditions.See also connection policy.
access scenario
The access scenario includes all the information about the user and the user device usedto apply policies. Depending on the type of policy being evaluated, the access scenariocan include the user identity, the client device, client device details discovered throughendpoint analysis scans, the authentication method employed, the logon point used toenter the network, and so on.
access server farm

A logical grouping of servers on which Advanced Access Control Services run. An accessserver farm consists of one or more computers on the network that run Advanced AccessControl components such as the Web Server, database server, and so on. Thesecomponents work together to provide access to network resources such as Web sites, fileshares, and email. See also server farm.
accessible networks
The IP addresses of the computers in the secure network to which the Access Gateway isallowed to connect.
action controls
The permissions that users are granted for working with files through Access GatewayAdvanced Edition such as Download, Send as Email, and file type association.
activation server
A server that performs file activation services such as HTML Preview, Download, and LiveEdit. It houses the Activation Host Service and Activation Engine Service; the ActivationHost Service acts as a “sandbox” for the Activation Engine Service to activate a file.
activation services
A service that provides stateless load balanced file activation including HTML Preview,Download, and Live Edit.
Advanced Access Control
Software components and features in Access Gateway Advanced Edition which enablegranular policy-based access control. Advanced Access Control allows you to control useraccess based on such factors as user location and authentication, endpoint analysis, andverification of the client device.
Allow Logon
A permission (the ability to log on) that is controlled by policy. The Allow Logonpermission is treated as a resource to enable administrators to add criteria for users tomeet in addition to the usual authentication process.
application policy
A policy that can be configured for any software program, including Web applications,when you are using the Access Gateway appliance. Application policies allow you torestrict applications to a specified network path and to make access to the applicationdependent upon endpoint policies.
authentication profile
An authentication profile contains configuration settings that define the authenticationto be used with a logon point.
authentication type
The type of authentication being used, such as RADIUS, LDAP, SafeWord, and so on.
Glossary
341

authorization rejection page
The user-facing Web page that displays when a client environment does not possess thebaseline requirements for accessing network resources.
browser-only access
The ability to access network resources without requiring any client-side software otherthan a Web browser.
Citrix Activation System (CAS)
The Citrix license management system available from a secure area of the Citrix Web sitethat allows customers to generate license files for Access Suite products. CAS stores adownloadable copy of all license files generated and can display a list of licensesregistered to an organization.
Citrix administrator
System administrator responsible for installing, configuring, and maintaining computersrunning any product in the Citrix product line.
Citrix online plug-ins
Citrix software that enables users from a variety of client devices to connect tocomputers running Citrix XenApp.
Citrix XML Service
A Windows service that provides communication between Citrix XenApp and AccessGateway, Web Interface, and some Citrix online plug-ins.
client device
See user device.
Client for Java
A Java applet that supports the launching and embedding of published applications.
cluster
A group of like hardware components (such as Access Gateway appliances or AdvancedAccess Control servers) that can be managed as a single entity.
condition
(1) In general terms, a condition is any configurable requisite for the enforcement of apolicy. Policies can have multiple types of conditions, such as endpoint analysis or logonpoint or authentication conditions.
(2) In endpoint analysis, a condition is a single required attribute of the user deviceevaluated during endpoint analysis, such as the operating system or browser being used.A rule is a set of conditions that are evaluated against the user device. If the user devicemeets all the conditions in a scan’s rule, the scan is applied and run on the client device.
Glossary
342

connection policy
A policy that allows Access Gateway Plug-in connections and applies settings to thoseconnections. You must allow use of the Access Gateway Plug-in to establish connectionsto any network resource and for email synchronization, because these types of resourcesdo not allow browser-only access.
continuous scan
Scans of the user device that occur repeatedly throughout the session to ensure that theuser device continues to meet requirements. The feature prevents, for example, usersfrom changing the status of a user device requirement after establishing the connection.Types of continuous scans include file scans, process scans, and registry scans.
continuous scan filter
A filter that defines the continuous scan requirements for a connection policy. Acontinuous scan verifies one item (a file, registry entry, or process) on the user device.The filter can include one or more continuous scans for verification. When associatedwith a connection policy, the filter defines all the requirements to be verified bycontinuous scans for the connection policy to take effect.
device-specific presentation
The automatic display of content that is appropriate to the device when a user uses anon-PC device, such as a PDA.
disconnected session
A client session in which the client is no longer connected to an application on CitrixXenApp, but the user’s applications are still running. A user can reconnect to adisconnected session. If the user does not do so within a specified time-out period, theserver automatically terminates the session.
email synchronization
A comparison of separate email account instances resulting in both instances containingthe same information. This feature allows remote users to access email in real timewhen working online and synchronize their folders in preparation for working offline.
email synchronization group
A list of email servers that can be accessed for email synchronization.
enclave deployment
A deployment scenario in which a network is segmented or fragmented in a manner (suchas with firewalls) that forces users to log on through a specific logon point.
endpoint analysis
A process that scans a user device and detects information such as the presence andversion level of operating system, antivirus, firewall, or browser software. Endpointanalysis can verify that the user device meets your requirements before allowing it toconnect. This information can be included as a filter within a policy to determine theappropriate level of access to network resources. Endpoint analysis scans are run against
Glossary
343

the user device once, during logon. See also continuous scan.
Endpoint Analysis Plug-in
An ActiveX control or browser plug-in used to discover information about a device’sconfiguration (such as the operating system, antivirus pattern, and so on).
Endpoint Analysis SDK
The software development kit that allows customers and partners to modify and createendpoint analysis packages.
endpoint policy
An endpoint policy is a Boolean expression that defines the files, processes, or registryentries that must be on the client computer before users can connect to networkresources through the Access Gateway appliance. You can create and use endpointpolicies on the appliance only. If you are using Access Gateway Advanced Edition, thisfunctionality is configured through the logon point properties, where you can specify therequirements to be met by the user device before the user is shown the logon page.
endpoint requirement
A file, process, or registry entry that must be on the user device. An endpointrequirement is configured with Access Gateway Standard Edition administration and thenused to create an endpoint policy that is then added to one or more user groups.
endpoint resource
A file, process, or registry entry that must be on the user device to log on. In AccessGateway Standard Edition, a group of endpoint resources is used to create an endpointpolicy.
file activation
The actions a user can take on a file including HTML Preview, Live Edit, downloading,opening in a published application through file type association, and sending the file asan email attachment.
file scan
A type of continuous scan that validates a specified file on the user device.
filter
Configured criteria, including endpoint analysis, logon point, and authentication type,that can be used by policies to determine access to network resources. A filter is a singlenamed entity that can be used in multiple policies. A filter may include another filter aspart of its criteria. An access policy may have only one filter, but each filter can beassociated with multiple access policies.
In addition, filters created in Access Gateway Advanced Edition can be used in CitrixXenApp, which extends the SmartAccess capabilities to published applications.
HTML Preview
Glossary
344
The name of the service that allows documents to be previewed in HTML rather thandownloaded in their native format. This feature also refers to the role that anadministrator can assign to a server for performing this service.
Independent Computing Architecture (ICA)
The architecture that Citrix uses to separate an application’s logic from its userinterface. With ICA, only keystrokes, mouse clicks, and screen updates pass between theclient and server on the network, while all the application’s logic executes on the server.
intellectual property control
The protection of intellectual property or sensitive information using features such asHTML Preview, file type association, and client drive mapping. The goal of intellectualproperty control is to prevent the exposure of sensitive company data.
Live Edit
The feature that allows users to edit remote documents using the Live Edit Plug-in. Userscan conveniently edit and save documents without needing to download or upload them.
Live Edit Plug-in
The ActiveX control that integrates with a user’s local editing application to support theLive Edit feature.
local users
Users who are created in Access Gateway Standard Edition. Local users are configuredwhen they do not require authentication using other authentication types such asRADIUS, SafeWord, RSA SecurID, or LDAP. A realm for local authentication must beconfigured on the Access Gateway appliance for local users to connect. Authenticationcredentials are checked against the local user list if the user name does not match theauthentication server’s list of users.
logon point
The URL from which users access network resources. The logon point settings determineaccess to server farms, Access Interface configuration, and other session-specificsettings. In addition, a logon point can be used as a filter within policies.
Microsoft SQL Server Desktop Engine (MSDE)
A fully SQL Server-compatible data engine. SQL Server Express 2005, the newest versionof MSDE, can be used in Access Gateway Advanced Edition for data storage in place ofMicrosoft SQL Server. See also SQL Server Express.
network resource
A network resource defines subnets or servers in the secure network that users canconnect to through the Access Gateway using the Access Gateway Plug-in over specifiedports. After defining network resources, you can create policies that control their useraccess and connection settings.
pass-through authentication
Glossary
345

The ability for Access Gateway to pass the user’s authentication information to anothernetwork resource requiring this information. Pass-through authentication is used forsingle sign-on to the Web Interface in an Access Gateway deployment.
policy-based access control
The ability to grant granular access to users based on their access scenario.
policy priority
A ranking system that allows you to prioritize policies to resolve conflicts when multiplepolicies apply to the same situation. The settings of a higher priority policy takeprecedence over conflicting settings in a lower priority policy.
preauthentication policy
A policy that allows users to log on if a set of scans validate the user device.Preauthentication policies can be created only using the Access Gateway AdministrationTool. If you are using Access Gateway Advanced Edition, you can create a logon policy forsimilar functionality.
process scan
A type of continuous scan that verifies that a specified process is running on the userdevice.
published application
An application installed on a server or server farm that is configured for multiuser accessfrom clients through Citrix XenApp.
realm
A realm is used in Access Gateway Standard Edition to configure authentication. Realmsare replaced in the Advanced Edition by authentication profile settings. The Defaultrealm authenticates against the local user list on the Access Gateway. Additional realmsfor LDAP, SafeWord, RADIUS, Gemalto Protiva, NTLM, and RSA SecurID can be created orcan be used as the Default realm.
registry scan
A type of continuous scan that validates a registry setting on the user device.
resource group
A resource group combines multiple resources of differing types into one named resourceso that policies can be applied to the aggregate.
resources
The file shares, Web resources, email, and applications available through the AccessGateway.
rule
Glossary
346

In endpoint analysis, a rule is a set of conditions that define when to apply a scan andwhich property values to check. Multiple rules can apply to a single scan. The first rule ofa scan is defined when you create the scan. After creating the scan, you can add morerules to make the scan apply to multiple scenarios.
scan
A process that verifies specific properties of user devices connecting to your network,such as the installed version of an antivirus software product or verification that thedevice belongs to a required domain.
scan output
A result of an endpoint analysis scan run on a connecting user device to detect or verifyinformation about the user device. There are two types of scan outputs. One type is aproperty value that is detected and reported about the user device, such as the versionnumber of an antivirus program running on the device. Another type is a simple Boolean(True or False) result indicating whether or not the user device passed the requirementsof the scan.
scan package
A package of code that allows administrators to configure endpoint analysis scans. Eachscan package is designed to examine a set of properties for a specific software product.You can expand the default set of scan packages by importing new ones. Citrix, partners,or developers in your organization can develop additional scan packages using theEndpoint Analysis Software Development Kit (SDK).
Secure Sockets Layer (SSL)
A standards-based security protocol for encryption, authentication, and messageintegrity. It is used to secure the communications between two computers across apublic network, authenticate the two computers to each other based on a separatetrusted authority, and ensure that the communications are not tampered with. SSLsupports a wide range of ciphersuites. The most recent version of SSL is Transport LayerSecurity (TLS).
server farm
A group of computers running Citrix XenApp and managed as a single entity, with someform of physical connection between servers and a database used for the farm’s datastore. See also, access server farm.
session reliability
Part of the collection of features that comprise SmoothRoaming, Session Reliabilityenables ICA sessions to remain active and on the user’s screen when networkconnectivity is interrupted. Session Reliability incorporates the Common GatewayProtocol (CGP) which restores the user’s session quickly and transparently.
small form factor device
A user device, such as a PDA, with limited display capabilities.
SmartAccess
Glossary
347

A feature that allows organizations to control which resources users get access to, basedon their access scenario, and what they can do with those resources when they getaccess. In addition, this functionality integrates with Citrix XenApp to give organizationsthis same level of granular control over published applications.
SmoothRoaming
The ability to access information continuously across devices, locations, and networks.This feature includes Workspace Control, session reliability, and dynamic displayreconfiguration.
split DNS
A feature that enables failover to a user’s local DNS if the default remote DNS isunavailable.
split tunneling
A feature enabling the user device to send only the traffic destined for the securednetwork through the VPN tunnel. With split tunneling, group-based policies apply to theinternal network interface only. For connections from inside of the firewall, group-basedpolicies do not apply to traffic to external resources or resources local to the network;that traffic is not encrypted.
SQL Server Express
The newest version of MSDE. See Microsoft SQL Server Desktop Engine (MSDE) for moreinformation.
trusted
Refers to a user, service, or resource that is specifically allowed to access the securenetwork.
untrusted
Refers to a user, service, or resource that is specifically disallowed from accessing thesecure network.
user device
Any hardware device used to access network resources.
user groups
In Access Gateway Standard Edition, a user group consists of a collection of users,policies, and resources. User groups can be configured to correspond with user groupsconfigured on authentication servers. All local users are automatically added to theDefault user group. Users can also be added to other user groups you have configured.
Web-based email
A method of receiving, composing, and sending email using a Web browser instead of alocal email application.
Web proxy
Glossary
348

The URL rewriting component of Access Gateway Advanced Edition.
Web resource
A set of URLs or Web applications that consists of virtual directory paths such ashttp://mycompany/mydocument. A Web resource is one of the network resourcesavailable to users through the Access Gateway.
Web server
A computer that delivers Web pages to browsers and other files to applications usingHyperText Transfer Protocol (HTTP).
XenApp Client Package
The tool administrators use to manage the distribution and upgrade of Citrix onlineplug-ins. Allows administrators to quickly and easily deploy client-side software to endusers with one convenient Windows Installer package.
Glossary
349