accessories tutorial 7.8
TRANSCRIPT

8/3/2019 Accessories Tutorial 7.8
http://slidepdf.com/reader/full/accessories-tutorial-78 1/54
PCBU ACCESSORIES
Table of Contents
1. ACCESSORIES PARTS - SALE
1.1 Locate and Create Account
1.2 Create Quote
1.3 Add Part List in Quote
1.4 Create Order from quote1.5 Add Part Details in Order
1.6 Fulfill All & Generate Pick ticket
1.7 Pick up the Parts
1.8 Deliver the Parts
1.9 Generate Invoice
2. ACCESSORIES PARTS - PROCUREMENT
2.1.1 Create Purchase Order
2.1.2 Create an Order Template1 of 54

8/3/2019 Accessories Tutorial 7.8
http://slidepdf.com/reader/full/accessories-tutorial-78 2/54
2.1.3 Add Part List in PO
2.1.4 Search Placed Order
2.2.1 Receive the Order
2.2.2 Add Part Details in Receiving
2.2.3 Process Receipt
2.3 Create Account as Vendor
2.4.1 Create Vendor Purchase Order
2 .4.2 Add Part Details
2.4.3 Receive the Vendor Purchase Order
3. ACCESSORIES PARTS - INVENTORY
3.1 Create New Warehouse
3.2 Associate Parts
3.3 Browse the Part Master
3.4 Cycle Counts
3.5 Inventory Adjustment
4. EXCEPTIONS – ACCESSORIES PARTS
4.1.1 Create Return Order
4.1.2 Add parts in Return Order
4.1.3 Receive Return Order
4.2.1 Create Internal Order
4.2.2 Transfer the Stock
4.2.3 Receive Internal Order
4.3 Direct OTC Sales Order - Locating Parts Manually
4 .4 Deallocate the parts
4 .5 Receiving Alternate Parts in PO
4 .6 Delivery Challan
Accessories Parts - SaleThis chapter explains the process of Counter Sale of Accessories Parts.Please refer to following guidelines to carry out the transactions in the
system
The Situation:
2 of 54
Chapter
1

8/3/2019 Accessories Tutorial 7.8
http://slidepdf.com/reader/full/accessories-tutorial-78 3/54
A person from ‘Modern Auto parts’, a workshop, walks into your dealership.
He shows a list of few Accessories parts required for the workshop.
His owner has asked a quotation for all these Parts. After giving him the
quotation, you confirm with the Owner on Phone and he places the Order for
the same. Lets see how we can fulfill his request and generate the Invoice
after delivering the Parts to the customer.
In the following exercise, you will explore the following:
1. Account
2. OTC Order
3. Order Fulfillment
4. Pick Ticket
5. Invoice
1 .1 Locate & Create Account
1. Click on Accounts Screen Tab.
3 of 54

8/3/2019 Accessories Tutorial 7.8
http://slidepdf.com/reader/full/accessories-tutorial-78 4/54
2. In Account Home page displayed, Account can be searched
with respect to Name and Site .The Account is searched in “All
Visible Accounts” View by default.
3. In the Name Field give the Account name. [E.g. MODERN
SPARE PARTS.]
4. Click GO button.
5. If the Account is still not found, it indicates that it does not
exist, change show to My Accounts and then click the New Button.
6. Click ”Cancel” in the message box to proceed to create new
account.
7. Fill in the Name, Site, Std Code, Main Phone# of the New
Account.
8. Click on drop-down arrow in Account Type field to select
appropriate Account Type
from the list. [E.g: Account Type for “Modern Spares” can be
“Workshop”]
4 of 54

8/3/2019 Accessories Tutorial 7.8
http://slidepdf.com/reader/full/accessories-tutorial-78 5/54

8/3/2019 Accessories Tutorial 7.8
http://slidepdf.com/reader/full/accessories-tutorial-78 6/54
• The steps 13 to 16 can be followed to enter the contact person’s
details associated with the account for future references. It is not
mandatory to enter the Contact details.
1 .2 Create Quote
1. Click on the Account screen and Query for the required account.
2. Click on the Quote View Tab.
3. Click the New Button.
4. Step off the record or Press [Ctrl]+[S] keys to Save.
5. Click the Quote # Hyperlink to go to Quote Details.
6 of 54

8/3/2019 Accessories Tutorial 7.8
http://slidepdf.com/reader/full/accessories-tutorial-78 7/54
Back to Content
1 .3 Add the Part List in Quote
1. Click the Account screen, and query for the account name.
2. Select the required account and click on Quote view tab.
3. If the Quote is created click on Quote # hyperlink to got the Quote screen.
4. In the Price List field, click the Select button. (The Price Lists Pick Applet will
pop up.)
4. Select a Price List and click Ok in the Price List pick applet.
Click on the Menu button to Save the record of press [Ctrl] + [S] key
7 of 54

8/3/2019 Accessories Tutorial 7.8
http://slidepdf.com/reader/full/accessories-tutorial-78 8/54
5. Click the New Button .
6. Click the Select Button in the Part # Field. (The Part List Pick Applet will pop
up).
7. Query/ Select the Part # from the Parts Pick List and click Ok in the Pick Applet.
8. Enter the required quantity in the Quantity Field.
9. Enter the discount amount or discount% for the part line item.
10. Save the record.
11. To add more Parts click New Button again and repeat Step 6 to 11.
12. After entering all the Parts, you can enter the Discount amount / Discount % on
the Total Order value in the fields in Quote upper applet.
NOTE:
If the Price List is not selected in the Quote the Parts price will not getcalculated for the part list. Only those price lists that are affective till date
are shown in the Price List Pick applet.
The part no. can be directly typed in the Part # field instead of choosing
from the Pick applet. The Part description appears when the part is selected.
Back to Content
8 of 54

8/3/2019 Accessories Tutorial 7.8
http://slidepdf.com/reader/full/accessories-tutorial-78 9/54
1 .4 Create Order from Quote
1. Click on Account Screen and query for the Account Name.
2. Click on the Quote View tab.
3. Query for the Quote name and drill down on the Quote # hyperlink .
4. Click the Order View .
5. Click on the Order Button. (An Order of type OTC Sales will be seen).
6. Click on Order # Hyperlink.
Back to Content
1 .5 Add Part Details in Order
1. Click on Order Screen.
2. Change the show to ‘OTC Sales’
3. Query for the Order # hyperlink .
9 of 54
8/3/2019 Accessories Tutorial 7.8
http://slidepdf.com/reader/full/accessories-tutorial-78 10/54
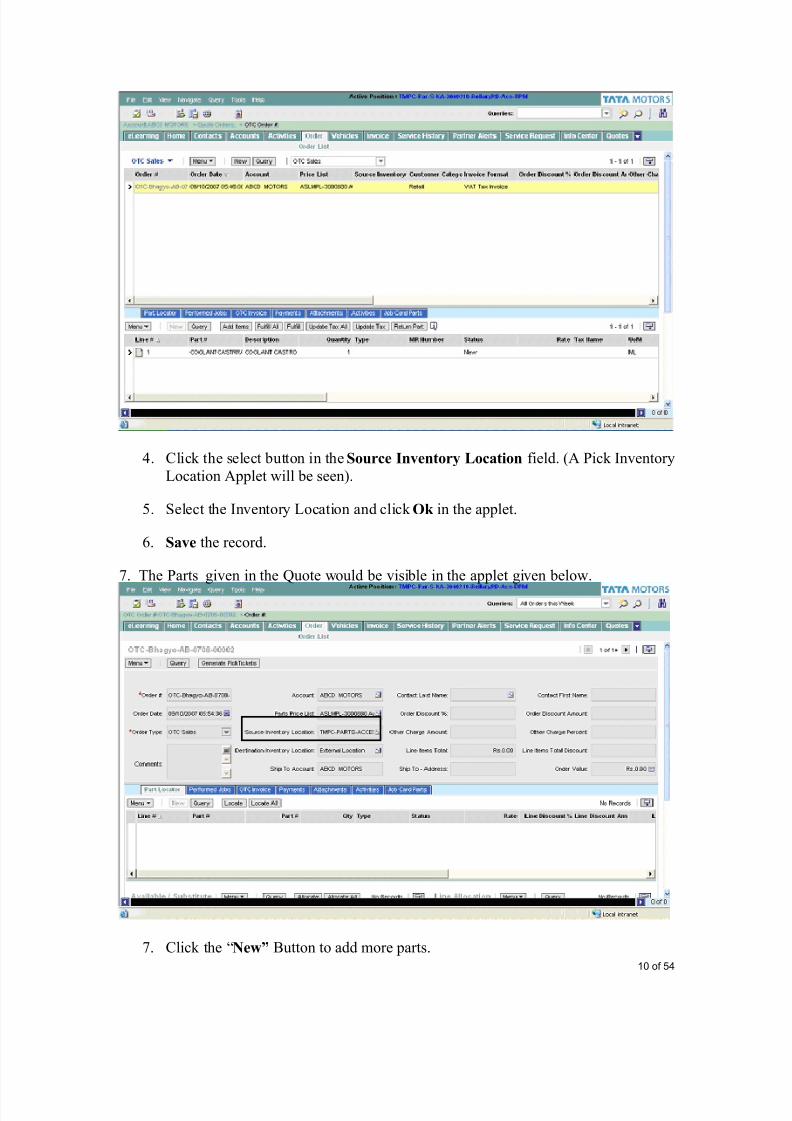
4. Click the select button in the Source Inventory Location field. (A Pick Inventory
Location Applet will be seen).
5. Select the Inventory Location and click Ok in the applet.
6. Save the record.
7. The Parts given in the Quote would be visible in the applet given below.
7. Click the “New” Button to add more parts.10 of 54

8/3/2019 Accessories Tutorial 7.8
http://slidepdf.com/reader/full/accessories-tutorial-78 11/54
8. Click the Select Button in the Part # Field. (The Part List Pick Applet will pop
up).
9. Select the Part # from the Pick Parts List and click Ok in the Pick Applet.
10. Enter the quantity in the Quantity Field.
11. Enter the discount amount or discount % for the part
12. Save the record.
13. To add more Parts click New Button again and repeat from Step 6.
NOTE:
When the Order is created from the Quote, the Parts Price List and Parts
details are listed as were selected in the Quote.
The New button in Parts Detail applet will not be enabled is Source
Inventory Location is not selected.
The Warehouse Locations that are visible in the Pick applet should start
with name such as TMPV – PARTS followed by Name of the Warehouse.
1 .6 Fulfill All & Generate Pick Ticket
1. Click on the Order Screen.
2. Query for the required Order no.
3. View the list of added parts in the Order in the appletbelow.
4. Ensure that all the parts are added in the list.
5. Click “Fulfill All” Button
11 of 54

8/3/2019 Accessories Tutorial 7.8
http://slidepdf.com/reader/full/accessories-tutorial-78 12/54
6. If no Line item is visible in Actions Applet then click on
Query and then Go button in Actions Applet [OR simply
press [Alt] + [Enter] keys
7. Verify that the action type as “Allocate” and the Location
has appeared in the Line item in Actions Applet.
12 of 54

8/3/2019 Accessories Tutorial 7.8
http://slidepdf.com/reader/full/accessories-tutorial-78 13/54
8. Click on the Pick Ticket # hyperlink to go to Pick Ticket
screen.
NOTE:
The action is generated when Fulfill All button is clicked. This searches the
Part no and the desired quantity and reserves for the selected OTC sales
order. The action view tab line item is visible across each Part line item.
Fulfill All generates the action when all the parts in the Order are available
in the required quantity.
Back to Content
1 .7 Pick Up the Parts1. Drill down on the Pick Ticket# hyperlink in the Actions
Applet
2. To take the print of the Pick Ticket, click on My Reports
button and select Pick Ticket for the option.
3. Click on “Pick” or “Pick All” Button.
13 of 54

8/3/2019 Accessories Tutorial 7.8
http://slidepdf.com/reader/full/accessories-tutorial-78 14/54
4. The picked quantity value will be reflected in the Quantity
Field. Changes in the quantity can be made if required. (for
e.g. if 10 parts are allocated, the number can be reduced).
5. Save the record. [Ctrl] + [S]
NOTE:
The Pick button can be used to update the quantities part by part. Pick All
will pick all the parts listed in the Pick Ticket.
The Quantity field by default shows the Allocated Quantity. Picked quantity
is equal to or less than the Allocated Quantity. Picked Quantity is the actual
quantity of the part taken for the warehouse.
Back to Content
1 .8 Deliver the Parts
1. Click on the “Process Shipment” Button. (This will change
the status of Pick Ticket from “Open” to “Closed”).
2. Save the record. (Ctrl+S).
3. Click the Back Arrow in the tool bar.
14 of 54

8/3/2019 Accessories Tutorial 7.8
http://slidepdf.com/reader/full/accessories-tutorial-78 15/54
4. In Actions applet below “Allocated” Status of the parts a
new line item with the Status “Shipped” will be seen. (This
indicates that the parts have been shipped i.e. the parts have
been shipped out from the Inventory).
NOTE:
After the Process Shipment, the Pick Ticket cannot be reused. Its status is
changed to Closed. The parts quantity in the warehouse gets reduced when
the Shipped Action is generated.
1 .9 Generate Invoice
1. Ensure that the Actions are generated for the Part List in the
OTC Sales Order.
2. Click on OTC Invoice View Tab.
3. Click on the “Parts Invoice” Button.
15 of 54

8/3/2019 Accessories Tutorial 7.8
http://slidepdf.com/reader/full/accessories-tutorial-78 16/54
4 Click on the Invoice # hyperlink
4. To view the Invoice, Go to View, select Reports, [Or Click on My Reports
button on the menu select Spares Invoice VAT (Here do not select
“Accessories Invoice –VAT to create Invoice)
NOTE:16 of 54

8/3/2019 Accessories Tutorial 7.8
http://slidepdf.com/reader/full/accessories-tutorial-78 17/54
All the part line items having the Invoice flag marked as yes will appear in
the Invoice. The Prices in the Invoice appear as per the selected Parts Price
List. The Discounts appear as entered on Order level.
Back to Content
Accessories Parts - Procurement
This chapter demonstrates you how to create the purchase Order and
receive the shipment for the procured parts.
The Situation:
As an efficient Accessories Part Manager, you constantly analyze the
Accessories parts inventory, so that you have sufficient stock at all the
time …
From this study, you prepare a list of parts those are nearing to minimum
level. Now you would place a Purchase Order for all such Parts to TM
This Module will explore the following:
1. Purchase Order
17 of 54
Chapter
2

8/3/2019 Accessories Tutorial 7.8
http://slidepdf.com/reader/full/accessories-tutorial-78 18/54
2. Purchase Order Receiving
3. Placing Order in SAP
Back to Content
2 .1.1 Create Purchase Order
1. Click on the Sitemap button on the Menu.
2. Click on Purchase Orders Link .
3. Click on SAP Purchase Orders link .
4. Click on the New button in the Purchase Order applet ( An Order # is
automatically generated ).
5. Step off the record and Save the record by pressing < CTRL+ S >
simultaneously.
6. Toggle from Purchase Order –Accessories to Purchase Order – Detail.
18 of 54

8/3/2019 Accessories Tutorial 7.8
http://slidepdf.com/reader/full/accessories-tutorial-78 19/54
7. Click the Select Template button to select templates to add parts from a specific
template after changing the toggle view to Purchase Orders - Detail. (Steps to
create a template is given below)
8. Click on the select button in the Sold To Party field.
9. Select the appropriate Sold To Party code from the Pop up list applet.
10. Then click on OK button.
11. Now the Dealer Code will be reflected in the Sold To Party Dealer Code field.
12. Select the Accessories Order Type , Order Reason.
13. Select the Ship to Account, Bill to Company, Payer and PO price list .
14. Save by pressing <CTRL+S> simultaneously.
Back to Content
2 .1.2 Create an Order Template
1. Click on the Sitemap button on the Menu
2. Click on Purchase Orders Link.
3. Click on Order Template Link.
19 of 54

8/3/2019 Accessories Tutorial 7.8
http://slidepdf.com/reader/full/accessories-tutorial-78 20/54
4. Click New to add a new template.
5. Give relevant details such as Name and Description. for the Template.
6. Click New to add parts in to Template.
7. We can also delete parts if required, by pressing the Delete button.
8. To Save Step out of the Record or Press [Ctrl + S].
Back to Content
2 .1.3 Add the Part List in the PO
1. Toggle From Purchase Order to Purchase order -Detail
2. Click on the New button.( A new record will be generated where
you can enter the Part # that you wish to order)
20 of 54
8/3/2019 Accessories Tutorial 7.8
http://slidepdf.com/reader/full/accessories-tutorial-78 21/54
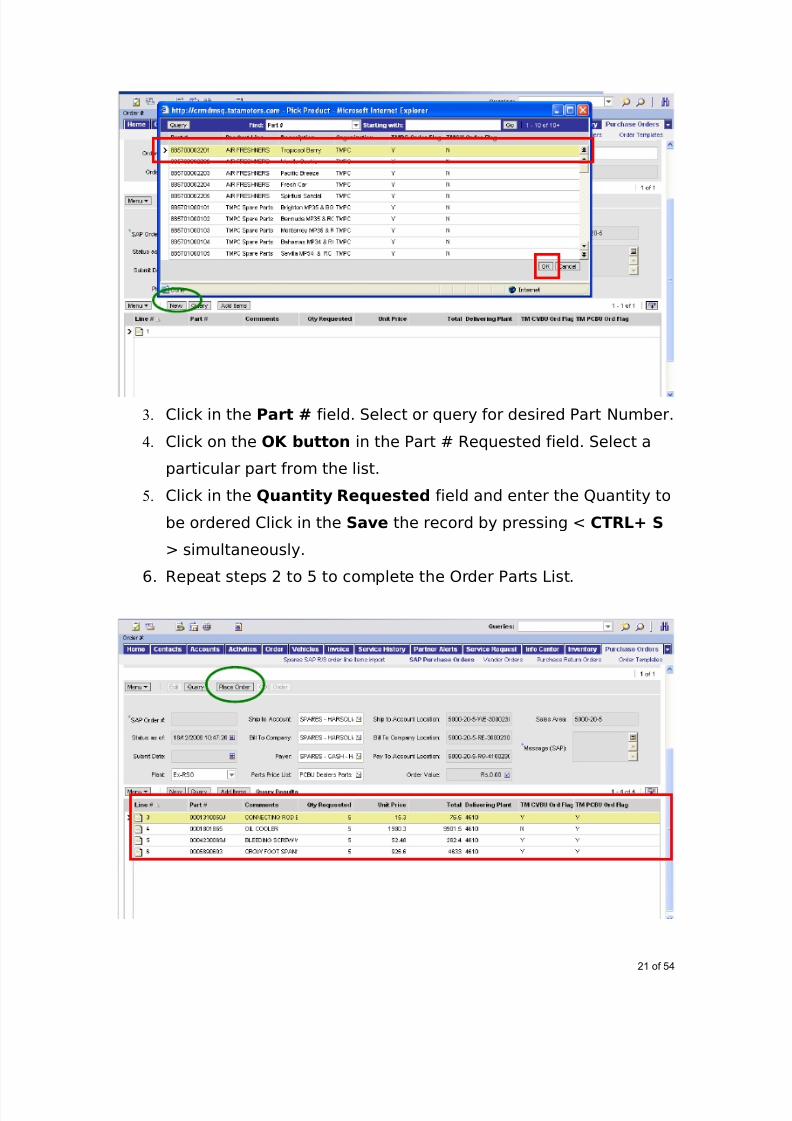
3. Click in the Part # field. Select or query for desired Part Number.
4. Click on the OK button in the Part # Requested field. Select a
particular part from the list.
5. Click in the Quantity Requested field and enter the Quantity to
be ordered Click in the Save the record by pressing < CTRL+ S
> simultaneously.
6. Repeat steps 2 to 5 to complete the Order Parts List.
21 of 54

8/3/2019 Accessories Tutorial 7.8
http://slidepdf.com/reader/full/accessories-tutorial-78 22/54
7. Save the record by pressing < CTRL+ S > simultaneously.
8. After entering all the Part Details click on Place Order button.
NOTE:
The Price of the Part will appear when the PO Price List is selected for the
Order.The Part No. can be directly entered in Part Requested # field instead
of selecting from the Pick applet. By default the Part Requested Quantity is
1.The Purchase Order cannot be edited after the Place Order button is
clicked.
Back to Content
2 .1.4 Search Placed Order
1. Click on Sitemap button.
2. Click on Purchase Orders link.
3. Click on All SAP Orders-Accessories link. (This takes you to the
screen that lists all the created Purchase Orders)
4. Click on Query button in Purchase Orders-Accessories
applet.
5. Enter the Order number in the Order # field and then click on
Go.6. Scroll Down to View the Parts List
The Situation:
You had placed a casual order for TATA Motors for the Accessories parts.
As per the information, the shipment has arrived and you have received the
TM invoice, that mentions the Order Number.
Now you will search this Order and receive the shipment for the same.
In this exercise you will explore:
1. How to Receive the Purchase Order
2. How to enter the Part Details for shipped parts
3. How to enter the Part details for the parts that are not shipped.
Back to Content
22 of 54

8/3/2019 Accessories Tutorial 7.8
http://slidepdf.com/reader/full/accessories-tutorial-78 23/54
2 .2.1 Receive the Order
1. Click on the Sitemap button.
2. Click on Receiving link.
3. Click on All Pending Orders PO/RO.
4. This gives list of All Pending Purchase Orders and All Pending
Return Orders. So we have to first search the placed Purchase
Order.
5. Click on Query button in the Pending Purchase/Return
Orders applet.
6. Click in the Order# field.
7. Enter the Order number of the placed order and then click on Go.
8. After the Order is found a “Purchase Order” Hyperlink is generated in
the Receive Type field.
23 of 54

8/3/2019 Accessories Tutorial 7.8
http://slidepdf.com/reader/full/accessories-tutorial-78 24/54
9. Click on the “Purchase Order” hyperlink.
Back to Content
2.2.2 Add Part Details in Receiving
1. Click on Receiving Screen.
2. Query for the Purchase Order to be received.
3. In Line Items applet select the particular Line Item that you want to receive, byclicking on that particular record.
4. Click on the New button in the Received Line Item applet.
5. A record will be generated with default values in Actual Recd Quantity, Status,Condition and Location, which user can change if required. Enter details like
Challan#, Challan Date, Challan Qty.
24 of 54

8/3/2019 Accessories Tutorial 7.8
http://slidepdf.com/reader/full/accessories-tutorial-78 25/54
6. Save the record by pressing < CTRL+ S > simultaneously.
7. Repeat Steps 1 to 6 if more parts are to be received.
NOTE:
The quantity value is taken from the Purchase Order, Location value is theDefault Inventory Location mentioned at division level, Status is defaulted
to On Hand and Condition as Good.
1. A message will pop up asking you whether you are sure you want to
delete the selected record in the Received Line Item applet.
2. Click on OK if you are sure you want to delete the Part Details
3. When you click on OK , the selected record in the Received Line Item
applet gets deleted.
4. Save by pressing < CTRL+S > simultaneously.
5. Repeat steps 1 to 7 if more Part Details are to be removed.
Back to Content
2 .2.3 Process Receipt
1. Ensure that all the Part details for received parts are entered. All the
received Parts are in Status “On Hand” and Condition (Good/ Defective) is
selected.
2. Click on the Process Receipt button in the Receive Purchase Order
applet.
25 of 54

8/3/2019 Accessories Tutorial 7.8
http://slidepdf.com/reader/full/accessories-tutorial-78 26/54
3. The Received quantity field for each Part detail will be populated as per
the receiving Line items entered.
4. Click on Menu button in Receive Line Item applet.
5. Click on Edit Record.
6. Click on the Drop down button in the Status field.
7. Click on Closed ( if all the Parts are received) or Partially Received (if
few parts are still pending to be received).
8. Save by pressing < CTRL+S > simultaneously.
NOTE:
After “Process Receipt” the details in the Order cannot be modified.
The status of the Order which is received partially will not change
automatically.
All partially received orders can be edited and new receiving Line items can
be entered whenever the next shipment arrives.
Received Quantity < or = Order Quantity.
Back to Content
2.3 Create Account as Vendor
* For placing the Order to the Manufacturer/Vendor other than TM you would create an
Account with the Vendor’s name. Please follow the steps below.26 of 54

8/3/2019 Accessories Tutorial 7.8
http://slidepdf.com/reader/full/accessories-tutorial-78 27/54
1. Click on Accounts Screen Tab. It will display Account Home
Page.
2. On the Account Home Page, Enter the Account Name, Click on
Go Button. This will search for the Account in All Visible
Accounts. If no records are found
3. In Account Screen Tab, change the option as ‘My Accounts’.
4. Click on New button. (Since we are creating a New Vendor
Account )
5. Click on Cancel in the message box that appears.
6. Enter details like Name, Site, and Main Phone #.
7. Save the record. < CTRL + S >. (The Account name turns into a
hyperlink)
8. In the applet below, Click on the Drop down in the Account
Type field.
9. Select Account Type as Vendor.
10. Save <CTRL + S>.
Back to Content
2.4.1 Create Purchase Order for Vendor
27 of 54

8/3/2019 Accessories Tutorial 7.8
http://slidepdf.com/reader/full/accessories-tutorial-78 28/54
1. Click on Sitemap button.
2. Click on Purchase Orders link.
3. Click on Vendor Orders link.
4. Click on New button in Vendor Order applet. (An order # is
automatically generated )
5. Save the record. < CTRL + S >
6. Click on the Select button in the Account field in the PO
Accessories Parts applet that appears below.
7. Click on the Select button.
8. It shows the List of Accounts of Type: “Vendor”.
28 of 54

8/3/2019 Accessories Tutorial 7.8
http://slidepdf.com/reader/full/accessories-tutorial-78 29/54
9. Select the Vendor Name and click on OK button.
10. Save the record. < CTRL + S >
11. The Order # will be automatically generated.
Back to Content
2.4.2 Add Part Details
1. Click on Select button in Parts Price List field in the Vendor
Order applet.
2. Select a Particular Price List from the List that pops up and click
on OK button.
3. Save. < CTRL + S >
4. Click on the New button in the applet displayed below..
29 of 54
8/3/2019 Accessories Tutorial 7.8
http://slidepdf.com/reader/full/accessories-tutorial-78 30/54
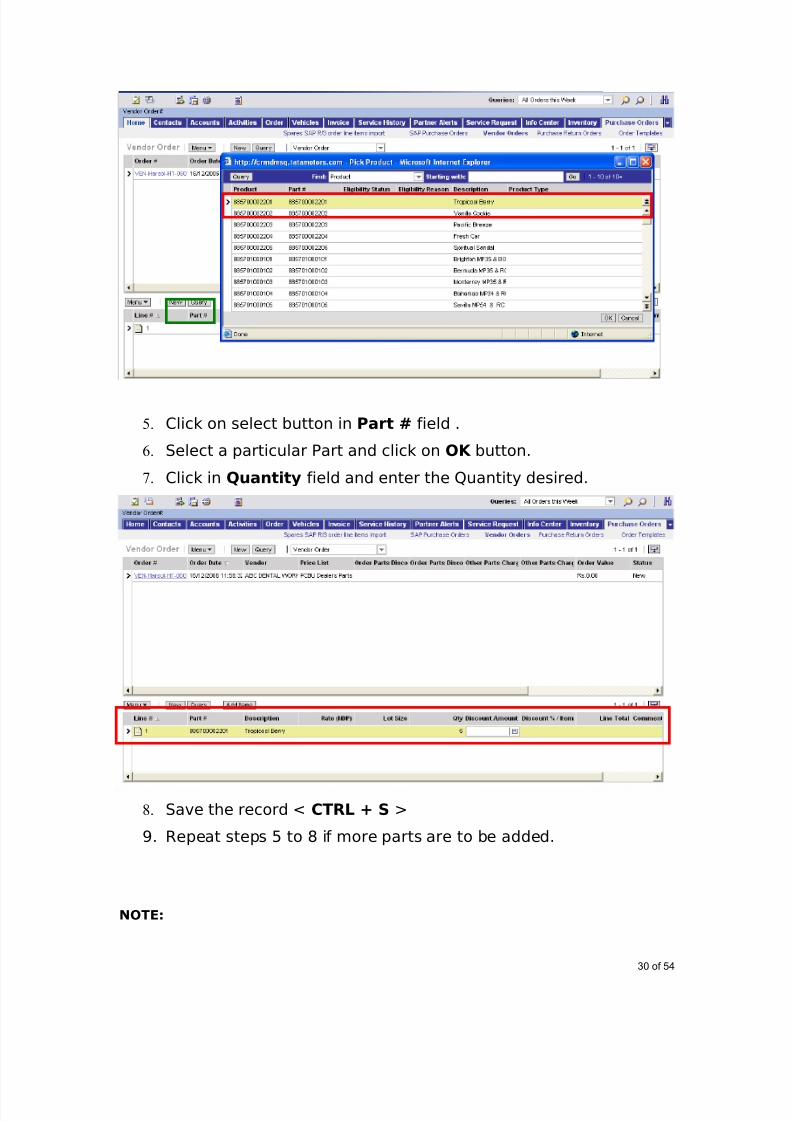
5. Click on select button in Part # field .
6. Select a particular Part and click on OK button.
7. Click in Quantity field and enter the Quantity desired.
8. Save the record < CTRL + S >
9. Repeat steps 5 to 8 if more parts are to be added.
NOTE:
30 of 54

8/3/2019 Accessories Tutorial 7.8
http://slidepdf.com/reader/full/accessories-tutorial-78 31/54
The part details can be added by directly typing the Part # in the Part #field.
Part description is populated automatically.
Back to Content
2.4.3 Receive the Vendor Purchase Order
1. You will search for the PO2. Drill down on the PO # hyperlink
For the details steps please refer to the steps for Receiving the
Purchase Order above
Back to Content
Accessories Parts - InventoryThis chapter will demonstrate you the basic process of setting up yourInventory / Warehouse for the parts.
The Situation:Inventory Management is all about managing the stock wisely.
Stocking the goods in proper place is an important task of managing
inventory.
You have a new warehouse, where you are going to stock some of the
goods.
Lets see how to create a warehouse for keeping all the spare parts.
In this chapter you will explore the following:
1. Creating New Warehouse31 of 54
Chapter
3

8/3/2019 Accessories Tutorial 7.8
http://slidepdf.com/reader/full/accessories-tutorial-78 32/54
2. Setting up the Product Inventory
Back to Content
3 .1 Create New WareHouse
1. Click on the Sitemap button.
2. Click on Inventory link.
3. Click on All Inventory Locations.
1. Click on New button in Inventory Locations applet.
32 of 54

8/3/2019 Accessories Tutorial 7.8
http://slidepdf.com/reader/full/accessories-tutorial-78 33/54
2. Enter the name as “ TMPC-PARTS -ACCESSORIES” followed by the
Warehouse Name
3. Click in the Type field and select Type as Warehouse.
4. Click in the Ownership field and select “Owned”.
5. Also Select the Product Type to “ Spare Part”
6. Click on select button in “Inventory Location Team” field. A pick applet isdisplaying “inventory Location Team” users appears.
7. Click on New button. A Pick applet with all the Employee names is displayed.
8. Query for the Position “*DPE*” in the pop up applet.
9. Click on “Add” button to add the employees with DPE position.
33 of 54

8/3/2019 Accessories Tutorial 7.8
http://slidepdf.com/reader/full/accessories-tutorial-78 34/54
10. Click on Ok button to close the Pick Applet. The employees you have added will
be present in the Inventory Location Team.
11. Save < CTRL + S >
12. The Inventory Name appears as a hyperlink.
34 of 54

8/3/2019 Accessories Tutorial 7.8
http://slidepdf.com/reader/full/accessories-tutorial-78 35/54
3 .2 Associate Parts
1. Click on Inventory Screen
2. Select PDQ: “All Warehouse Inventory Locations”
3. Query for the Warehouse you have created.
4. Step off the record to save, or press < CTRL + S >
Back to Content
3 .3 Browse the Part Master
1. Click on the Sitemap button.
2. Click on Part Browser.
35 of 54

8/3/2019 Accessories Tutorial 7.8
http://slidepdf.com/reader/full/accessories-tutorial-78 36/54
3. Enter the name of the Inventory Location in the Inventory Location field and
click on Go.
4. Corresponding details will be seen in the Inventory Level applet.
5. View the stock.
36 of 54

8/3/2019 Accessories Tutorial 7.8
http://slidepdf.com/reader/full/accessories-tutorial-78 37/54
Back to Content
3 .4 Cycle Counts
INTRODUCTION: At times you find actual physical stock is not same as your stock shown
in the application. To get the actual picture of the inventory in the system, it is a regular process to check this difference and keep both the stocks in line. Lets see how in Siebel
we can adjust the stock..
Steps:
1. Login with DPM Id.
2. Go to the Sitemap screen
3. Click on Inventory.
4. Click on All Inventory Locations.
5. Select the name of the Inventory locations [e.g : this can be your Warehouse]
for which you need to carry the cycle count.
6. From the options available below, Inventory Screen tab, Select ‘Cycle Count’option.
7. Fill in the Count Basis for the parts to carry on the cycle count. i.e. whether the
Cycle count basis is ABC (based on Inventory Currency value) or XYZ (based onConsumption rate i.e. fast moving parts or slow moving parts)
37 of 54
8/3/2019 Accessories Tutorial 7.8
http://slidepdf.com/reader/full/accessories-tutorial-78 38/54
8. Fill in the Frequency, Period A/X, Period B/Y, Period C/Z.
a. Frequency: It decides the number of phases the cycle count needs to be
completed.
b. Period A/X: It decides after how many number of days the cycle count
needs to be completed.
For Example: Suppose my Count Basis is ABC and if the Frequency is 1 and the Period
A/X is 30, this means the cycle count for all A category of parts has to be done in everyonce in a month, and this cycle count has to be completed in one go. Had the Frequency
been 3, then that means in every 30days, the part count needs to be completed in 3
phases.
9. Select the start date and end date for which you need to perform the cycle count.
10. Click Generate Counts button
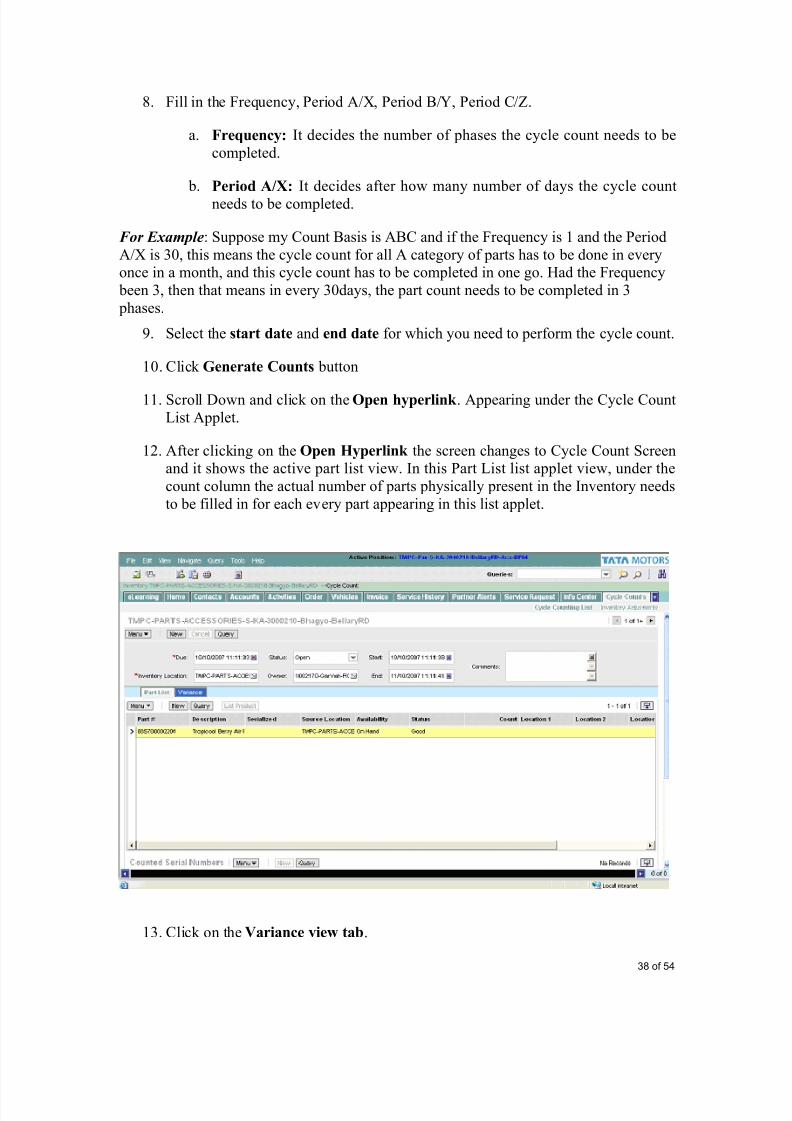
11. Scroll Down and click on the Open hyperlink . Appearing under the Cycle Count
List Applet.
12. After clicking on the Open Hyperlink the screen changes to Cycle Count Screenand it shows the active part list view. In this Part List list applet view, under the
count column the actual number of parts physically present in the Inventory needs
to be filled in for each every part appearing in this list applet.
13. Click on the Variance view tab.
38 of 54

8/3/2019 Accessories Tutorial 7.8
http://slidepdf.com/reader/full/accessories-tutorial-78 39/54
14. In this list applet check the Original (Numbers as per Siebel system), Count
(Actual and physical count which is physically present now in that particular
inventory location), and Variance (the difference between the Count and Originali.e. Variance = Count - Original)
3.5 Inventory Adjustment
15. Select the parts, which need to be adjusted for the variances. To select all the
parts in this list applet click on Ctrl + A,Click on Adjust button.
16. Scroll down and go to the Inventory Transaction view. If this view is not present
then from then from the drop down menu select the Inventory Transaction, thissection of the screen now changes to Inventory transactions. This screen will
show to the transaction date and time, transaction #, Source inventory and
Destination inventory, and the Quantity in the destination inventory. To validatethis transaction check the Commit check box and Save.
Note: Unless you check this Commit check box, there will not be any adjustment done in
the system inventory even though you have pressed the Adjust button.
39 of 54

8/3/2019 Accessories Tutorial 7.8
http://slidepdf.com/reader/full/accessories-tutorial-78 40/54
17. In this Inventory Transaction screen click on the Destination Location hyperlink
18. Click on the Product Inventory view tab.
19. Query for the Part Number against which the adjustment and commit has beenticked.
20. Click on GO button
21. Scroll down to the Inventory Level screen and see the quantity, which has now been changed from initial quantity to the adjusted quantity.
Back to Content
40 of 54

8/3/2019 Accessories Tutorial 7.8
http://slidepdf.com/reader/full/accessories-tutorial-78 41/54
Exceptions – Accessories Parts This chapter will demonstrate you how to handle different situations inAccessories module in the application.
The Situation:
‘Perfect Auto Parts’, a workshop had purchased 10 G/KIT OIL SUMP from you
a few days back.
Now the customer wants to return few of them and place order of some new
parts. Being an old customer of yours, you accept the parts that are returned
by them.
In this situation, you will explore the following:
1. Return Order
2. Process Return
3. Receiving in Inventory
Back to Content
4 .1.1 Create Return Order
1. Click Order Screen tab.
2. Click on the Drop down arrow in the Show window and change the view from
OTC Sales to All Return Orders.
41 of 54
Chapter
4

8/3/2019 Accessories Tutorial 7.8
http://slidepdf.com/reader/full/accessories-tutorial-78 42/54
8/3/2019 Accessories Tutorial 7.8
http://slidepdf.com/reader/full/accessories-tutorial-78 43/54
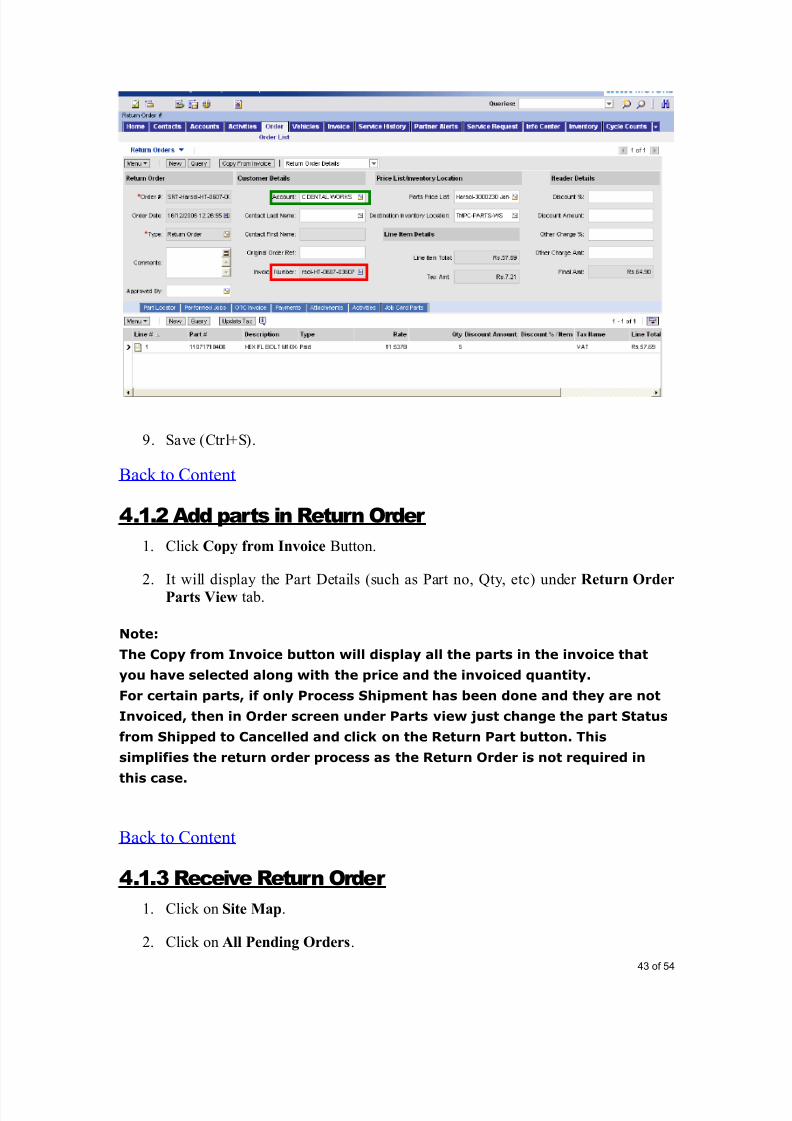
9. Save (Ctrl+S).
Back to Content
4 .1.2 Add parts in Return Order
1. Click Copy from Invoice Button.
2. It will display the Part Details (such as Part no, Qty, etc) under Return Order
Parts View tab.
Note:
The Copy from Invoice button will display all the parts in the invoice that
you have selected along with the price and the invoiced quantity.
For certain parts, if only Process Shipment has been done and they are not
Invoiced, then in Order screen under Parts view just change the part Status
from Shipped to Cancelled and click on the Return Part button. This
simplifies the return order process as the Return Order is not required in
this case.
Back to Content
4 .1.3 Receive Return Order
1. Click on Site Map.
2. Click on All Pending Orders.
43 of 54

8/3/2019 Accessories Tutorial 7.8
http://slidepdf.com/reader/full/accessories-tutorial-78 44/54
3. Query for the Return Order no. in Order # field.
4. Click on Return Order hyperlink .
5. Under Received Line Items applet click New.
6. Enter all the relevant details such as Qty, Status, Condition, Location, etc. byclicking the
Drop down Button and Select Button in the respective fields.
7. Save (Ctrl+S). As soon as the data is saved Received Qty gets updated.
8. Click Process Receipt Button.
44 of 54

8/3/2019 Accessories Tutorial 7.8
http://slidepdf.com/reader/full/accessories-tutorial-78 45/54
Note:
The Return Order is received in the same manner as Purchase Order.
You can enter the condition of the part while receiving the Return Order. E.g the
condition can be mentioned as “Damaged” if the customer has returned the parts
because it was damaged. The Location for the part can be selected if the Part is
associated in Product Inventory for that location.
The Situation:You own 2 warehouses, one at Kharghar and another at Tardeo. One of
your customers has placed an order of 100 ASSY CAP.
When you inspected Khraghar warehouse, you found that this much
stock is not available in it, but you can always demand it from Tardeo.
You want to transfer the Accessories parts from Tardeo warehouse in
Kharghar.
In this exercise you will explore the following:
1. Internal Order
2. Fulfilling Internal Order
3. Receiving the Internal Order
Back to Content
4 .2.1 Create Internal Order
1. Click on Order screen.
45 of 54

8/3/2019 Accessories Tutorial 7.8
http://slidepdf.com/reader/full/accessories-tutorial-78 46/54
2. Click on All Internal Orders.
3. Click on New button in Internal Orders applet. A new record having an Order #
will be generated.
4. Click in the “Account” field. Select the Account from the Pick applet.
5. Save the record. < CTRL + S >
6. Click on select button in “Source Inventory Location” field.
7. Select the warehouse from where you want to transfer the stock [ e.g : TardeoWarehouse in the above example] and click on OK button.
46 of 54

8/3/2019 Accessories Tutorial 7.8
http://slidepdf.com/reader/full/accessories-tutorial-78 47/54
8. Click on select button in “Destination Inventory Location” field.
9. Select the warehouse where you want to have the transfered the stock [ e.g :
Kharghar Warehouse in the above example] and click on OK button.
10. Scroll down and Click on New button .
11. Click in Part # field.
12. Click on select button in Part # field.
13. Select the required part to order and click on OK button.
14. Click in Qty field and enter the required quantity.
15. Save the record. < CTRL + S >
16. Repeat Steps 10 to 15 if more parts are to be added.
Back to Content
4 .2.2 Transfer the Stock
1. Click on Order Screen and Select the view in Show drop down box as “All
Internal Orders”
2. Select the required Internal Order.
47 of 54

8/3/2019 Accessories Tutorial 7.8
http://slidepdf.com/reader/full/accessories-tutorial-78 48/54
3. Click on “Fulfill All” button to locate the required parts from the warehouse and
generate the pick ticket.
4. Press [Alt+Enter] keys to refresh the Actions view tab.
5. Click on Pick Ticket Hyperlink in Actions Applet.
6. Click on Pick / Pick All. [This process is same as done in OTC sales]
7. Change Picked Quantity if required.
8. Save the record. < CTRL + S >
9. Click on “Process Shipment” in the Pick Ticket applet.
48 of 54

8/3/2019 Accessories Tutorial 7.8
http://slidepdf.com/reader/full/accessories-tutorial-78 49/54
Back to Content
4 .2.3 Receiving the Internal Order
1. Click on Sitemap button.
2. Click on Receiving screen.
3. Click on All Pending Orders - Internal
4. Click on Query button in Pending Internal Orders applet.
5. Enter the Internal Order number in the Order # field.
6. Click on Go button.
7. Click on “Internal Order” Hyperlink.
49 of 54

8/3/2019 Accessories Tutorial 7.8
http://slidepdf.com/reader/full/accessories-tutorial-78 50/54
8. Select the part detail line item that you wish to receive in Line Items applet.
9. Click on New button in Received Line Item applet.
10. Enter details such as Qty, Status , Condition , Location , Part #.
11. Save the record.
12. Repeat steps 8 to 11 to receive remaining parts.
13. Click on “Process Receipt” in Receive Internal Order applet.
Note:
The Status of the part should be selected On Hand while receiving.
50 of 54

8/3/2019 Accessories Tutorial 7.8
http://slidepdf.com/reader/full/accessories-tutorial-78 51/54
Back to Content
4 .3 Direct OTC Sales Order- Locating Parts Manually
The Situation:Your customer from ‘Bharat Workshop’ has ordered some parts. You
have created OTC Sales Order for him with required quantities.
When you were fulfilling the order, you found that all the parts are not
reserved for the customer.
In this case, you will have to look for the parts, which demand could not
be fulfilled.
Lets see how in application, you can locate and reserve the parts
yourself …
In the above situation, the customer account exists in yoursystem. In this case you will create an OTC sales order directly.
Since all the parts could not be fulfilled, you will locate andAllocate the parts manually for the customer.
1. Click on Order Screen Tab.
2. Select “OTC Sales Order” from the Show drop down box.
3. Click on New Button.
4. Click on the Hyperlink of Order #.
5. Follow the steps as given earlier to enter the Order Details and add the parts.
6. Click on “Fulfill All” button. Click on Query then Go.
If the actions tab does not show any actions, follow the steps below:
7. Click on Parts Locator View Tab.
51 of 54

8/3/2019 Accessories Tutorial 7.8
http://slidepdf.com/reader/full/accessories-tutorial-78 52/54
8. Under Parts View Tab, Click “Locate” or “Locate All” Button. This will locate
the parts from the selected inventory location.
9. Click on “Allocate” or “Allocate All”. This will reserve the stock for the order.
10. Scroll up, and click on “Generate Pick Ticket” Button.
11. Click on Actions Applet.
12. Click on the hyperlink of Pick Ticket #.
13. Follow the steps as explained earlier for Pick the parts and Process Shipment.
NOTE:
After clicking on Allocate buttons, it allows to change the allocated quantity.
If the quantity is not entered, the Order Quantity will be allocated for the
Order.
Back to Content
4 .4 De-allocate the Parts
The Situation:
A customer from ‘Modern Workshop’ has walked in to buy TOP Rings 2
nos. When you fulfilled the order, and about to pick the parts from the
warehouse, customer changed his mind and asked for some other part.
But you have reserved the stock of TOP Rings for the customer.
This situation how to cancel the reserved stock before ProcessShipment of the parts
1. Search the OTC sales Order.
2. In the Actions Applet, the inventory transactions such as “Allocate” is generated
after Fulfill All or manual allocation of the parts.
3. Select the part you want to de-allocate in the parts details view. [Top Rings in the
above example]
4. Click on the Menu button of the Actions view tab.
52 of 54

8/3/2019 Accessories Tutorial 7.8
http://slidepdf.com/reader/full/accessories-tutorial-78 53/54
5. Select the option De-allocate
6. This will remove the reserved quantity of that part.
7. You can enter another part in the order as required by the customer.
NOTE:
The de-allocation will take place only when the Process shipment has not
taken place. After Process shipment, you will have to Receive the part by
Return Order.
Back to Content
4.5 Receiving Alternate Part in PO
The Situation:
You had placed an Order to TM a few months back.
You have received the shipment today and you find that the part shipped
is different than an ordered part but is a substitute.How will you receive the shipment?
This will show how to receive an Alternate Part in for thePurchase Order
1. Click on Receiving Screen
2. Select the Purchase Order you want to receive.
3. Select the Part that you want to update the line item
53 of 54

8/3/2019 Accessories Tutorial 7.8
http://slidepdf.com/reader/full/accessories-tutorial-78 54/54
4. In the Receiving Line item details, click on the Part No field and change it to the
substitute part no. you have received.
5. Follow the same steps as given in the Receiving Purchase Order to complete the
receiving.
Back to Content
4 .6 Delivery Challan
The Situation:
A person from ‘Golden Chemical Company Company’ company arrives in
the dealership, and asks for ASSY.CAP in 5 Nos.
Since you have old relationship with them, you deliver the parts. The
Invoice will be settled for them on a monthly basis.
When the parts are to be shipped out of your premises, without
generating an Invoice, delivery Challan can be used.
1. Create OTC Sales Order, Add Parts and Fulfill as given in the earlier steps.
2. Drill down on the Pick Ticket # hyperlink, it takes you to the Shipment screen
3. Click on My reports icon and select Delivery Challan report
4. This document can be printed and given to the customer instead of Invoice
5. Invoice can be generated later on for that OTC Sales Order.
6. For each line item of the Part, there is an Invoice Flag. Uncheck the Invoice Flagfor the parts you do not want to invoice. Then Generate Parts Invoice.
Back to Content