acclaim 10 new features - epicor acclaim 10 new features documentation updates date description...
TRANSCRIPT
i
ACCLAIM 10 NEW FEATURES
DOCUMENTATION UPDATES
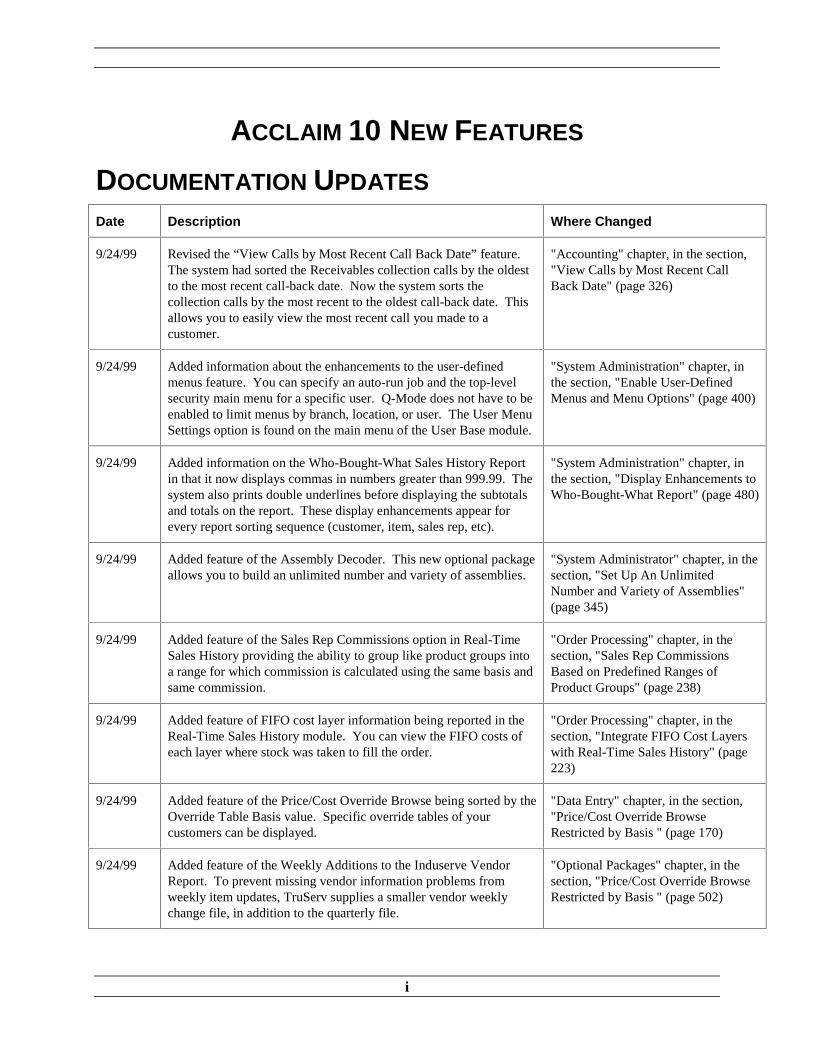
Date Description Where Changed
9/24/99 Revised the “View Calls by Most Recent Call Back Date” feature.The system had sorted the Receivables collection calls by the oldestto the most recent call-back date. Now the system sorts thecollection calls by the most recent to the oldest call-back date. Thisallows you to easily view the most recent call you made to acustomer.
"Accounting" chapter, in the section,"View Calls by Most Recent CallBack Date" (page 326)
9/24/99 Added information about the enhancements to the user-definedmenus feature. You can specify an auto-run job and the top-levelsecurity main menu for a specific user. Q-Mode does not have to beenabled to limit menus by branch, location, or user. The User MenuSettings option is found on the main menu of the User Base module.
"System Administration" chapter, inthe section, "Enable User-DefinedMenus and Menu Options" (page 400)
9/24/99 Added information on the Who-Bought-What Sales History Reportin that it now displays commas in numbers greater than 999.99. Thesystem also prints double underlines before displaying the subtotalsand totals on the report. These display enhancements appear forevery report sorting sequence (customer, item, sales rep, etc).
"System Administration" chapter, inthe section, "Display Enhancements toWho-Bought-What Report" (page 480)
9/24/99 Added feature of the Assembly Decoder. This new optional packageallows you to build an unlimited number and variety of assemblies.
"System Administrator" chapter, in thesection, "Set Up An UnlimitedNumber and Variety of Assemblies"(page 345)
9/24/99 Added feature of the Sales Rep Commissions option in Real-TimeSales History providing the ability to group like product groups intoa range for which commission is calculated using the same basis andsame commission.
"Order Processing" chapter, in thesection, "Sales Rep CommissionsBased on Predefined Ranges ofProduct Groups" (page 238)
9/24/99 Added feature of FIFO cost layer information being reported in theReal-Time Sales History module. You can view the FIFO costs ofeach layer where stock was taken to fill the order.
"Order Processing" chapter, in thesection, "Integrate FIFO Cost Layerswith Real-Time Sales History" (page223)
9/24/99 Added feature of the Price/Cost Override Browse being sorted by theOverride Table Basis value. Specific override tables of yourcustomers can be displayed.
"Data Entry" chapter, in the section,"Price/Cost Override BrowseRestricted by Basis " (page 170)
9/24/99 Added feature of the Weekly Additions to the Induserve VendorReport. To prevent missing vendor information problems fromweekly item updates, TruServ supplies a smaller vendor weeklychange file, in addition to the quarterly file.
"Optional Packages" chapter, in thesection, "Price/Cost Override BrowseRestricted by Basis " (page 502)

ii
8/19/99 Added an Important! note for the scheduled POs feature. The noteindicates that if the Scheduled POs feature is enabled and youdecide to print a requirements report through a JCM, you must makesure that the Look Ahead # of Days parameter is added to the JCM.
“Scheduled Purchase Orders” section(Page 254)
7/1/99 References for further information on User Base, E-mail and theInternet, AIX Information, and the Operator’s Manual have beenchanged to refer to either the System Administration or the SystemUtilities manual.
Throughout the manual.
6/30/99 Many new features have been added to the system:Invoice View browse found in Order View and Order BrowseView Service Work Order Information in Real-Time Sales HistoryDirect Ship confirmation amounts carry over to New Payables EntryEdited Costs on ScratchPads transfer to New Orders and QuotesWBW records can be added in Real-Time Sales HistoryA Submenu System for Hidden Options is now availableEDI-VMI for Square D POS ReportingFile Layout Browse is added to Object BrowseAccounting screen field names changed from Batch to GroupMultiple Bins Company Option to process Primary BinsReturn Item Code to Purchase Order from Stock Card820 Send Documents created for Electronic Funds TransferAlert a Message Group to Received EDI Documents
Throughout the manual.
6/24/99 Revised note under the Bin Number browse to indicate that you mustrun two hidden options if the first hidden option does not runautomatically from LIB-UPDATE.
"Data Entry" chapter, in the section,"Primary Bin Number Added to BinNumber Browse" (page 130)
6/18/99 Added section on enabling the Defaults Screen on the screen enablebrowse. This must be completed before you set predefined defaultsor field-level security.
"Data Entry" chapter (page 90)
6/18/99 Added information on the Reset option in that it now removesPROSeries and Real-Time Sales History transaction information.
“System Administration” chapter, inthe section, “Reset RemovesPROSeries And Real-Time SalesHistory Information” (page 422)
6/18/99 Added information on the WB keystroke appearing at the Itemprompt in order entry. You can access the Who-Bought-Whatinformation for an item by using this option.
“System Administration” chapter, inthe section, “Access WBWInformation Browse from the ItemPrompt in Order Entry” (page 380)
6/18/99 Added section on how to stop the printing process of several reportsby pressing [F4] to abort the process.
“System Administration” chapter, inthe section, “Stop Printing Process ofReports” (page 457)
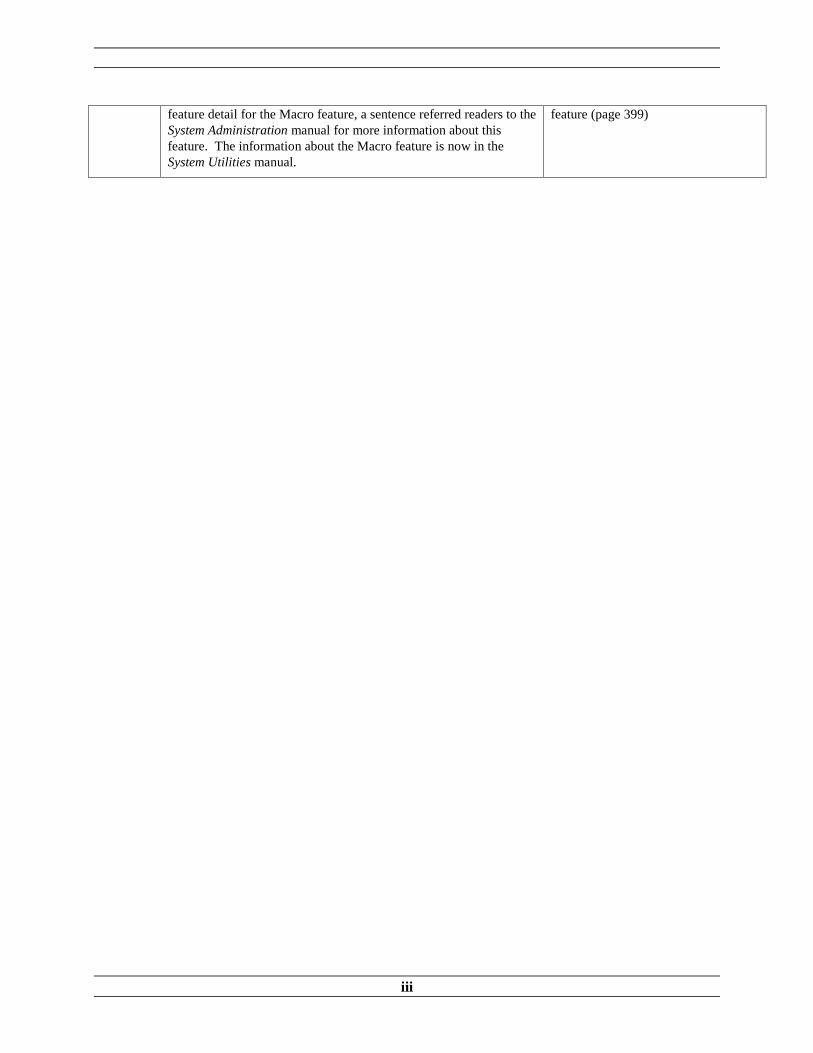
4/23/99 Changed a sentence to refer readers to the System Utilities manualfor more information about the Macro feature. Previously, in the
“System Administration” chapter, inthe feature detail about the Macro
iii
feature detail for the Macro feature, a sentence referred readers to theSystem Administration manual for more information about thisfeature. The information about the Macro feature is now in theSystem Utilities manual.
feature (page 399)
iv
Summary of New FeaturesFeature Detail
ACCLAIM 10NEW FEATURES

v
The documentation in this publication is provided pursuant to a Sales and Licensing Contract for theProphet 21® System entered into by and between Prophet 21 and the Purchaser to whom thisdocumentation is provided (“License Agreement”). In addition, the licensed software to which thisdocumentation refers may be supported in accordance with a customer support agreement by and betweenthe same parties (“Support Agreement”). All warranties, conditions of use, transfer restrictions, and otherprovisions in the License Agreement or Support Agreement which are applicable to Licensed Software, areapplicable to this publication. In addition, this publication may include inadvertent technical inaccuraciesor typographical errors for which Prophet 21 is not responsible. Changes may be periodically made to thispublication; these changes will be incorporated in new editions of the publication. Any questions about thematerial contained in the publication should be addressed to the Prophet 21 Customer Support Departmentat 1-800-ITS-PR21.
Nothing in this statement amends or extends the terms of your agreement with Prophet 21, including anywarranties that may be included in our products. Warranties for such agreements are set forth in youragreement with Prophet 21.
Improvements and/or changes to the Licensed Software described in this publication may be made byProphet 21 at any time without notice.
DOCUMENTATION CONVENTIONS
♦ The eyeglass symbol ($) indicates a field on which you can browse.
♦ The star (�) indicates the default for a field.
♦ To allow for the widest possible parameters when printing a report or performing afunction, accept the defaults for all of the parameter fields. To accept the defaults,either escape through all the fields, or press [Enter] without specifying any values.Generally, samples in the documentation are shown using the default values.
♦ Start and End parameters define the limits to a range of information you will print ona report. If information does not appear on a report, it may be because theinformation was excluded from the Start, End range.
♦ For a detailed explanation on how maintenance screens function, refer to the TourGuide manual.
♦ Use the search tool in Adobe Acrobat Reader to find which manual describes aspecific module, job, or function.
10/1/99
Prophet 21 Acclaim® Version 10
The Prophet 21 system and Prophet 21 Acclaim are registered trademarks, and Prophet 21 and ScratchPad are trademarks of Prophet 21.All other trademarks and registered trademarks are the property of their respective companies.

vi
Table of Contents
SUMMARY OF NEW FEATURES _____________________________________27
System-Wide Changes _______________________________________________27Browses _________________________________________________________28
Data Entry _________________________________________________________29Company ________________________________________________________30Customer ________________________________________________________31Purchase Pricing __________________________________________________31Invoice Recall _____________________________________________________31PO Recall ________________________________________________________31Product Group Change______________________________________________31Sales Tax ________________________________________________________31Sales Pricing______________________________________________________32Notepad _________________________________________________________32Item ____________________________________________________________32Item Change______________________________________________________32Bin Numbers______________________________________________________32Catalog __________________________________________________________33Auxiliary Tables ___________________________________________________33Vendor __________________________________________________________33
Order Processing____________________________________________________33Order ___________________________________________________________33Sales History _____________________________________________________34Expedite Order ____________________________________________________35Expedite Quote____________________________________________________35Quotations _______________________________________________________35Quote-Order ______________________________________________________35Pricing & Availability ________________________________________________36Front Counter _____________________________________________________36Ship ____________________________________________________________37Ship-Edit_________________________________________________________37Ship-Edit_________________________________________________________37Invoice __________________________________________________________37
Inventory __________________________________________________________37Purchase ________________________________________________________37
vii
Inventory History___________________________________________________38Expedite Purchase _________________________________________________38PO Print _________________________________________________________38PO Return Print ___________________________________________________38Item List _________________________________________________________39Item Ledger ______________________________________________________39Item Adjust _______________________________________________________39Material Receipt ___________________________________________________39Expedite Transfer __________________________________________________39Expedite Return ___________________________________________________39
Accounting_________________________________________________________40Payables_________________________________________________________40Receivables ______________________________________________________41Ledger __________________________________________________________41
System Administration________________________________________________41Workflow_________________________________________________________42User Base________________________________________________________42QREBITEM_______________________________________________________42QPURGE ________________________________________________________43PROSHUTDOWN__________________________________________________43FULL CHECK _____________________________________________________43SpoolQ __________________________________________________________43PROACTIVE______________________________________________________43Utility Command ___________________________________________________43
Optional Packages __________________________________________________43Assembly and Lot Billing_____________________________________________43Assembly Decoder _________________________________________________43Consigned Inventory________________________________________________44Electrical Features _________________________________________________44Rentals __________________________________________________________44Rebate Journal ____________________________________________________44Blanket Orders ____________________________________________________44Catalog __________________________________________________________44Customized Items / On-Site Order Entry ________________________________45Lot Numbers______________________________________________________45Multiple Bins ______________________________________________________45Welding _________________________________________________________45Credit Card _______________________________________________________45Document Imaging _________________________________________________45Service and Maintenance ____________________________________________46Induserve ________________________________________________________46
Third Party Packages ________________________________________________46

viii
FaxFX___________________________________________________________46Profit$ ___________________________________________________________46EDI _____________________________________________________________46
1 SYSTEM-WIDE CHANGES __________________________________________49Accessing Acclaim 10 Online Help_____________________________________49From the Toolbox __________________________________________________49
Pressing [F1] ____________________________________________________50Navigating Through Online Help_______________________________________51Search All Help____________________________________________________52New Features _____________________________________________________53FAQs ___________________________________________________________54
FAQs by Function ________________________________________________55Find Key Words ___________________________________________________56
Search FAQs____________________________________________________56Menu Help _______________________________________________________58Browse Help ______________________________________________________58Screen Help ______________________________________________________59
Packages Retired on Acclaim 10________________________________________60
LOGOFF Confirmation Prompt No Longer Exists ___________________________61
User-friendly Messages_______________________________________________62
Determine Default Print Queue by User ID ________________________________64Printer Options ____________________________________________________64
Submenu System for Hidden Options ____________________________________66Utilities __________________________________________________________66
2 DATA ENTRY _____________________________________________________67
Purge Foreign Currency Entries ________________________________________67Company ________________________________________________________67
Quebec Language Laws Company Option ________________________________68Company ________________________________________________________68Invoice __________________________________________________________70
New Option in Customer Ranking _______________________________________71
Line-Item Information in Quote View _____________________________________72Quote View_______________________________________________________72
Browse for Common Customized Items __________________________________73

ix
Customized Item Maintenance ________________________________________73Order, Front Counter, and POS _______________________________________75
PowrDrill To Access the Order View Screen at the Item Browse________________76Item Browse ______________________________________________________76
View Previously Purchased Items at the Item Browse________________________77Purchase and Vendor Return _________________________________________77
Reindex the Order Browse For Suspended and Pick-up Orders by Order NumberDuring Order Entry __________________________________________________80
Order and Front Counter ____________________________________________80Suspended Orders _______________________________________________80
Front Counter _____________________________________________________80Pick-Up Orders __________________________________________________80
PowrDrill to View DS, NS, and LPU Orders Associated with Purchase Orders_____82Purchase Orders Browse ____________________________________________82
PowrDrill to View Detailed Receivables and Payables Information in the CustomerRecord and Vendor Record____________________________________________84
Customer Maintenance _____________________________________________84Vendor Maintenance _______________________________________________84
New PowrDrill to View ScratchPad Line Items _____________________________86Pricing & Availability ________________________________________________86
PowrDrill on Catalog Items to View Purchase Pricing Information_______________88Company ________________________________________________________88Order, Front Counter, and Pricing & Availability ___________________________88
Predefined Defaults for Data Entry Modules _______________________________90Company ________________________________________________________90
Field-Level Security in Data Entry Modules________________________________94Disable Fields by User ID and Branch_________________________________94Company-Wide Security ___________________________________________95
New Module For Entering Business Contacts ______________________________97Contacts _________________________________________________________97
Customer Contact Maintenance _____________________________________98Add Mode _____________________________________________________99View Mode ____________________________________________________99Edit Mode ____________________________________________________100Browsing_____________________________________________________100
Vendor Contact Maintenance ______________________________________102Personal Contact Maintenance _____________________________________103
x
Customer Contact Report _________________________________________104Vendor Contact Report ___________________________________________105Personal Contact Report __________________________________________105
Customer and Vendor Maintenance___________________________________105Adding New Contacts ____________________________________________106
Customer and Vendor Change Modules _______________________________107Toolbox_________________________________________________________107
Branch Default Overrides ____________________________________________109
Fast Edit Price/Cost Override Tables ___________________________________110Sales Pricing_____________________________________________________110
Browse on Open Backorders for a Customer _____________________________111Order/Expedite Order ______________________________________________111
View Address Information in a Customer Browse __________________________113
E-mail Address in Ship-To Information __________________________________114Customer _______________________________________________________114
Receivables Options in Customer Maintenance ___________________________115Customer Maintenance ____________________________________________115
Product Group Change Module________________________________________116Product Group ___________________________________________________116
Four-digit County ID ________________________________________________121Sales Tax _______________________________________________________121
Sort Product Group Browse by Name ___________________________________122
New Functionality in State Maintenance _________________________________124Auxiliary Tables __________________________________________________124Enter___________________________________________________________124Edit ____________________________________________________________125Rebuild _________________________________________________________126
Build Alternate Item Reference During Item Code Change and Catalog Code Change128
Primary Bin Number Added to Bin Number Browse ________________________130Bin Numbers_____________________________________________________130
Order Line-Item Notes on POs and Requirement Reports ___________________131Purchase Orders _________________________________________________132Requirement Report _______________________________________________133
xi
Catalog Notes on Purchase Orders_____________________________________134Notepad ________________________________________________________134Purchase Orders _________________________________________________135
View Notes Display in Navigation Mode in Maintenance Screens______________136Data Entry (Maintenance Screens)____________________________________136
Access the Auxiliary Tables Module from the Jump To Box __________________138Jump To Box ____________________________________________________138
Print Options For PROACTIVE ________________________________________139
No Duplicate Message for Files Online __________________________________140
Copy MFG Class Information _________________________________________141
Use Price and Cylinder Rental Rate Override Tables to Calculate Prices and InvoiceCharges__________________________________________________________142
Sales Pricing_____________________________________________________142Cylinder Price Override Tables _____________________________________142Cylinder Rental Rate Override Tables ________________________________143
Enter a Cylinder Rental Rate Override Table ____________________________144Edit a Cylinder Rental Rate Override Table _____________________________146Delete a Specific Cylinder Rental Rate Override Table ____________________146Delete a Range of Cylinder Rental Rate Override Table ___________________146Print a Cylinder Rental Rate Override Report____________________________147
Process Credit Card Transactions______________________________________149
Save Data to COLD Storage __________________________________________150
Sort the Lot Number Browse in Pricing & Availability _______________________151Pricing & Availability _______________________________________________151Sorting by Lot Number _____________________________________________152
Lot Number Browse by Lot Number _________________________________152Sorting by Quantity ________________________________________________152
Lot Number Browse by Quantity ____________________________________153Sorting by Settings ________________________________________________153
Lot Number Browse by Settings ____________________________________154
Multiple Bins Form Options Affect Primary Bins ___________________________155Company _______________________________________________________155
Selectively Reprint Vendor Returns_____________________________________157
Parameters for PO Print and PO Return Print _____________________________158PO Print ________________________________________________________158

xii
PO Return Print __________________________________________________158
Specify Vendor Invoice Discount/Net Terms by Number of Months After Invoice Date160Vendor Maintenance ______________________________________________160Payables________________________________________________________162
New Enhancements to Customer and Vendor Maintenance __________________163Customer Maintenance and Vendor Maintenance ________________________163Customer _______________________________________________________163Vendor _________________________________________________________165Company _______________________________________________________165
Statements ____________________________________________________167Example: Shipping Paper _________________________________________168
Ship-Edit________________________________________________________168
Price/Cost Override Browse Restricted by Basis___________________________170Sales Pricing_____________________________________________________170
3 ORDER PROCESSING_____________________________________________173
Quantity in Terms of Order Unit________________________________________173Company _______________________________________________________173Quotations ______________________________________________________174Ship ___________________________________________________________175Invoice _________________________________________________________176Front Counter ____________________________________________________177
Print Order Acknowledgement Immediately_______________________________178Company _______________________________________________________178Order __________________________________________________________178
Unconfirm a Shipment _______________________________________________180Ship Edit ________________________________________________________180
Remove POs and Returns by Vendor Code and Class ______________________181Expedite Purchase ________________________________________________181Expedite Return __________________________________________________182
Print Messages in Invoice ____________________________________________183
Express Stock Information as a Sales Unit and Order Unit ___________________185Company _______________________________________________________185Pricing & Availability _______________________________________________187
Profit Percentage Warning Appears for Low Profit Items ____________________190Company _______________________________________________________190
xiii
Front Counter, Order ______________________________________________191
WBW Transaction History Pulled Directly Onto Orders and Customer Returns ___193Order, Front Counter, Customer Returns _______________________________193
Acclaim Customer Maintenance Screen Appears at “N”ew Customer Prompt ____195Company _______________________________________________________195Order, Front Counter ______________________________________________195
Enter Transaction Notepads in Expedite Modules__________________________196
Option Help in Expedite Order_________________________________________197
View Next Open Order in Expedite Order ________________________________198
Deletion Prohibited Message__________________________________________199
Default Sales Category Setting ________________________________________200
Expiration Date for Quotations_________________________________________201Quotation Expiration Period Company Option ___________________________201Quote Entry _____________________________________________________202Expedite Quote___________________________________________________203Company _______________________________________________________203Cancel a Range of Quotations _______________________________________205Quotation Report _________________________________________________205
Print Quotations during Quote Entry ____________________________________206Company Order Processing Options __________________________________206Quote Entry _____________________________________________________207
“This is Your Credit” on Invoiced Credit Memos ___________________________208
Generate POs in Order Entry _________________________________________209User Base_______________________________________________________209Order, Front Counter, Quote Order, EDI Order __________________________210
View Shipment Header Information in Expedite Order ______________________212Expedite Order ___________________________________________________212
Edit Shipping Route Information _______________________________________213
Quotation Report by Taker # __________________________________________214Expedite Quote___________________________________________________214
Edit Invoice Batch# During Ship Confirmation_____________________________216
Enter Notes in Ship Edit _____________________________________________217
xiv
Ship Edit ________________________________________________________217
Sales History Automatically Built _______________________________________218
Delete Completed Orders ____________________________________________219Sales History ____________________________________________________219
Sales History Conversion ____________________________________________220
Sales Category in Sales History _______________________________________222
Integrate FIFO Cost Layers with Real-Time Sales History ___________________223Sales History ____________________________________________________223
Keyword Index in WBW______________________________________________226
Cost and Profit Information in Sales Comparison __________________________228
Print Invoices after Adjusting Tax Schedule Information _____________________229
Edited Costs on ScratchPads are Used when Creating Quotations and Orders ___230Company _______________________________________________________230Pricing & Availability _______________________________________________231
An Invoice View PowrDrill works in Order View and Order Browse_____________232Order __________________________________________________________232
Orders with One Shipment and One Invoice ___________________________234Orders with Multiple Shipments and Invoices __________________________235Orders with an Item Having Multiple Shipments and Invoices______________236
Expedite Order ___________________________________________________237
Sales Rep Commissions Based on Predefined Ranges of Product Groups ______238Company _______________________________________________________238Sales History ____________________________________________________239
Product Group Ending Maintenance _________________________________239Add a Product Group Ending Range _______________________________240Edit a Product Group Ending Range _______________________________240Delete a Product Group Ending Range _____________________________241
Sales Rep Commission Report _____________________________________241Sample: Sales Rep Commission Report – Summary Format_____________243
4 INVENTORY _____________________________________________________244
Edit External PO# __________________________________________________244
View Vendor Phone Numbers in Selective Purchasing ______________________245
xv
Print POs Immediately After Generation _________________________________246Company _______________________________________________________246Purchase _______________________________________________________247
Default Buyer Number by User ID ______________________________________248User Base_______________________________________________________248Purchase _______________________________________________________248
Enhancements to the Transfer Backorder List_____________________________250Expedite Transfer _________________________________________________250Sample: Sorted Transfer Backorder List _______________________________250
Purchase Price Schedule Costing Default________________________________251Company _______________________________________________________251Purchase _______________________________________________________252
Items Added to Purchase Orders Are Affected By Purchasing Pricing Schedules _253Purchase _______________________________________________________253
Scheduled Purchase Orders __________________________________________254Company _______________________________________________________254Purchase _______________________________________________________255Enter Release Dates, Quantities, and Ship Dates ________________________256Evaluate “Due In” Stock On Scheduled Purchase Orders __________________257
Purchase Stock Card_____________________________________________257Pricing & Availability _____________________________________________258Purchase ______________________________________________________259Item __________________________________________________________260
View Line-Item Detail for Items on Scheduled Purchase Orders _____________262From Commitment Schedule Browse ________________________________262From POs/Transfer Line Item Browse ________________________________263
Exclude Certain Scheduled PO Releases From Requirement Calculations _____264Purchase _______________________________________________________264
Selective Purchasing Summary Screen Appears for DS and Type A LPU PurchaseOrders ___________________________________________________________265
Purchase _______________________________________________________265
Purchase Conversion Unit Appears on Direct Ship and Local Pick-up PurchaseOrders ___________________________________________________________266
Company _______________________________________________________266Purchase _______________________________________________________266Purchase Order Print (PO-Print)______________________________________267Material Receipt __________________________________________________268
Inventory History Modifications ________________________________________270
xvi
Inventory History__________________________________________________270
User ID and Time Fields on the Stock Adjustments and Nonstock AdjustmentsRegisters _________________________________________________________273
Enter Item from Stock Card Screen on Purchase Order _____________________274Purchase _______________________________________________________274
Item Adjust Codes 90 – 97 Subtracted from PTD Sales _____________________276
Item Adjust Code 5 on Returns of Nonstock Items _________________________277Front Counter and Order ___________________________________________277Item Adjust ______________________________________________________277
Enter Short Codes during Material Receipt _______________________________279
Edit Vendor Returns and Transfers after Printing __________________________281Expedite Return __________________________________________________281Expedite Transfer _________________________________________________281
5 ACCOUNTING ___________________________________________________282
Build the Sales and COGS Autobatches on an Invoice-By-Invoice Basis ________282Company _______________________________________________________282
Cannot Clear Monthly Journals Until Daily Journals are Cleared ______________284
Enter Days Instead of Dates in Payables and Receivables___________________285
References to Batch and Batch ID Renamed to Entry and Entry ID ____________287Payables________________________________________________________287
Invoice Processing / New Payable _________________________________287Expense Journal_______________________________________________288Payables Due Report ___________________________________________288Payables Future Due Report _____________________________________289User Options__________________________________________________289User Options / Company Options __________________________________290View Options / Payables_________________________________________290
Receivables _____________________________________________________291Payment Processing / Payment Entry ______________________________291Receivable Processing / Receivable Entry ___________________________291Deposit Journal________________________________________________291Payment Plan Invoice Register____________________________________292Cash Receipts Journal __________________________________________292Unallocated Payments Report ____________________________________293Manual Receivables Journal______________________________________293
xvii
Foreign Currency Journal ________________________________________294View Options / Invoice View ______________________________________294User Options__________________________________________________294
Print Memo on Payables Checks_______________________________________296Company _______________________________________________________296Payables________________________________________________________297
PO# field is 12 Characters____________________________________________298Payables________________________________________________________298
Prevent / Allow Duplicate Vendor Invoice Numbers ________________________299Payables________________________________________________________299Recurring Invoices ________________________________________________300
Payables Detail in Check Register _____________________________________301Payables________________________________________________________301Sample: Check Register ___________________________________________302
Exclude Requisitions on Reports_______________________________________303Discrepancy Journal_______________________________________________303
Unreconciled Receivings Report ____________________________________304
Edit Distribution Account Numbers _____________________________________305
Check Reconciliation Ending Date Parameter_____________________________306Payables________________________________________________________306
Include Credit Default on Payables Aged Report __________________________307Payables________________________________________________________307
Print Foreign Currency on Checks______________________________________308Payables________________________________________________________308
Shipping Instructions Appear on Direct Ship Confirmation Screen _____________309Payables________________________________________________________309
Invoice Amounts on New Payable Screen Default to Costs on Direct ShipConfirmation Screen ________________________________________________310
Payables________________________________________________________310
New Parameter on Expense Journal Parameter Screen _____________________312Payables________________________________________________________312
Cash Collection Call Report Enhancements ______________________________314Receivables _____________________________________________________314Sample: Cash Collection Call Report _________________________________315

xviii
New User-friendly Message___________________________________________316
New Parameters on Aged Receivables Report ____________________________317Receivables _____________________________________________________317
Navigate Through the Cash Collection Screen ____________________________318
View Comment Number in Invoice View _________________________________319Receivables _____________________________________________________319
Print Cash Receipts Journal by Entry sequence ___________________________320Receivables _____________________________________________________320
Sales Tax Adjustments During Payment Entry ____________________________321Company _______________________________________________________321Receivables _____________________________________________________321
Example_______________________________________________________324
Accrued AP Expense Autobatch Default Area Removed ____________________325
View Calls by Most Recent Call-Back Date _______________________________326Receivables _____________________________________________________326
Fast Edit Or Create a User-Defined Report Section ________________________327Ledger _________________________________________________________327
Unused Account Numbers Removed from Ledger Autobatch Default Accounts ___330Ledger _________________________________________________________330
Direct Bill Amounts Posted to General Ledger ____________________________331Ledger _________________________________________________________331
Print or Reprint Service Charge Invoices after the Service Charge Journal isCommitted ________________________________________________________332
Receivables _____________________________________________________332
6 SYSTEM ADMINISTRATION ________________________________________333
Access the Command Terminal from AIX ________________________________333
New Order Data File, ORDSHD _______________________________________334
Send Cover Sheets with Faxes ________________________________________335Company _______________________________________________________335
Determine Whether to Send Parameter Sheet with Faxes ___________________337Company _______________________________________________________337

xix
Fax Invoices Directly Through Invoice, Front Counter, PRFRONT, and CylinderInvoices __________________________________________________________339
Invoice, Front Counter, PRFRONT, and Cylinder Invoices__________________339
Fax Vendor Overdue Report to Vendors _________________________________341Expedite Purchase ________________________________________________341
Retired Company Options in Acclaim 10 and Real-Time Sales History__________342Company _______________________________________________________342
Company Order Processing Options _________________________________342Company Assembly Options _______________________________________343Company Accounting Options ______________________________________343
Set Up An Unlimited Number and Variety of Assemblies ____________________345Access Assembly Decoder Menu_____________________________________345Setting up Your Series / Assembly ____________________________________346Defining Your Components _________________________________________348Testing Your Assembly_____________________________________________351
Found Items __________________________________________________352Entering an Assembly on an Order____________________________________352
Select Your Assembly and Enter the Series Code From a Browse __________353Select Your Assembly by Manually Entering your Series Code_____________354Complete the Assembly Order Entry Screen___________________________355
Change Values Of Variables ________________________________________356Copy An Existing Series to a New Similar Series_________________________358Delete An Existing Series ___________________________________________358
Reorganize User-Defined Sales History _________________________________360Company _______________________________________________________360Sales History ____________________________________________________360
New Item and Vendor Ranking Reports _________________________________361Sales History ____________________________________________________361
Print an Item Ranking Report with Turns______________________________362Print a Vendor Ranking Report with Turns ______________________________365Reset Item Ranking with Turns Information _____________________________366
Add Who-Bought-What Records to Real-Time Sales History _________________367Sales History ____________________________________________________367
View Options ___________________________________________________367Company _______________________________________________________369
Acclaim Screens ________________________________________________369
AIX User ID in Acclaim Header ________________________________________370
Unlimited Number of Stocking Locations_________________________________371
xx
Enable French Menus _______________________________________________372User-Base_______________________________________________________372
Security on Payables and Receivables Browse and PowrDrill ________________374
Reindex the Override Browse by Default Type ____________________________375Price / Cost Overrides _____________________________________________375
Settings: Price or Cost Override ____________________________________377
New Keystroke Accesses Original Browse _______________________________378
Setting in Item Browse Defaults to Item Preference Option in Same Customer Session379Toolbox_________________________________________________________379
Access WBW Information Browse from the Item Prompt in Order Entry _________380Order, Front Counter ______________________________________________380
Use E-Shopper to Access Stock Availability Information from Other Prophet 21Systems__________________________________________________________381
Company _______________________________________________________381Pricing & Availability _______________________________________________381P21 Mail ________________________________________________________382
New Macros Feature Allows JCM-Like Functionality in All Areas of the System___384Creating Single Macros via System-Recorded Keystrokes _________________384Record the Macro_________________________________________________385Stop the Macro ___________________________________________________387Play the Macro ___________________________________________________387Edit the Macro ___________________________________________________389Key Sequence Field _______________________________________________390
Erasing the Macro _______________________________________________393Creating Single or Queue (Multiple) Macros via Manually Entering Keystrokes__393Macro Maintenance _______________________________________________395
Job Macros (Single Macros) _______________________________________396Queue Macros (Multiple Macros)____________________________________396
Copying Macros __________________________________________________398
Enable User-Defined Menus and Menu Options ___________________________400User Base_______________________________________________________400View and Create User-Defined Menus _________________________________401
Menus on a Company-Wide Basis __________________________________401Menus Limited to Branch__________________________________________401Menus Limited to Location_________________________________________401Menus Limited to User____________________________________________402
Creating a User-Defined Menu_______________________________________404Types of Jobs ____________________________________________________405
xxi
Menus / Submenus________________________________________________405Editing Menu Options on User-Defined menus _________________________406
Adding User-Defined Menu Options___________________________________407Adding Prophet 21 Menu Options_____________________________________407Script Jobs ______________________________________________________409Job Jobs ________________________________________________________409Set an Auto Run Job and Top-Level Main Menu for a Specific User __________410
Several New Auxiliary Tables Added To Auxiliary Table Browse and Module ____412Auxiliary Tables __________________________________________________412
Access System Databases and Files ___________________________________414Object Browse ___________________________________________________414Field Names _____________________________________________________416Indexes_________________________________________________________418
Access FIND Mode in Several Data Maintenance Screens___________________420Sales Pricing_____________________________________________________420Module _________________________________________________________421Key Fields_______________________________________________________421
Reset Removes PROSeries And Real-Time Sales History Information _________422
Use and Track Foreign Currencies in the Sales and Purchasing Cycles_________423Foreign Currencies in the Sales Cycle _________________________________423
Company ______________________________________________________423Enter a Default Currency in Customer and Vendor Maintenance ___________424
Customer Maintenance ____________________________________________424Order, Front Counter, Quote Entry __________________________________426
Order _______________________________________________________426Expedite Order _________________________________________________427Ship, Invoice ___________________________________________________428Receivables____________________________________________________428
Foreign Currencies in the Purchasing Cycle_____________________________430Vendor Maintenance _____________________________________________431
Currencies on Payables Reports _____________________________________432Set Your Currency Exchange Date and Time __________________________434New Recurring Invoice Screen _____________________________________435New Payable Screen _____________________________________________435Release Payables Screen _________________________________________436
Schedule Tasks Through the P21 Scheduler _____________________________437Toolbox_________________________________________________________437Create a New Task________________________________________________438Edit a Task ______________________________________________________440Delete a Task ____________________________________________________440
xxii
Calendar________________________________________________________441Reminder______________________________________________________441
P21 Mail ________________________________________________________441
System Job _______________________________________________________443
Track Service Level for Blanket Order Releases___________________________445Item List ________________________________________________________445
User-friendly Message_______________________________________________446PROSHUTDOWN_________________________________________________446
Specify Ranges of Codes in Workflow___________________________________447Workflow________________________________________________________447Sample: Workflow Event Report _____________________________________448
New Workflow Events _______________________________________________449Data Change screen_______________________________________________450Edit of PO Expected Date Past Req Date screen_________________________451New customer at Order Entry ________________________________________452Quantity Adjustments (Ship Edit) _____________________________________452Stock Outs Due to Material Allocation screen____________________________453Suspended Orders Screen __________________________________________454
Real-time Transactions in Item Ledger __________________________________456
Stop Printing Process of Reports_______________________________________457Report_______________________________________________________458Module ______________________________________________________458
System Indicates Arrival of P21 Mail ____________________________________461P21 Mail ________________________________________________________461Workflow________________________________________________________462
Forward Messages to Message Groups _________________________________463
New Branch Parameters _____________________________________________465Workflow________________________________________________________465
Stock Location Token _______________________________________________466
User-friendly Message_______________________________________________467
New Message in Full Check/File Expand ________________________________468
New Messages in SpoolQ ____________________________________________469
xxiii
Files Offline Message _______________________________________________470
QREBITEM Modifications ____________________________________________471Stock __________________________________________________________471Rental (Allocated Qty) _____________________________________________473Rental (On Rent/On Lease Qtys) _____________________________________474Rebuild Stock Item Status Parameter Screen ___________________________475
Sample: Rebuild Item Stock Status Report____________________________476
QPURGE Modifications ______________________________________________477Orders _________________________________________________________477Orders By Date Range _____________________________________________478Sales History ____________________________________________________479
Display Enhancements to Who-Bought-What Report _______________________480Sales History ____________________________________________________480
7 OPTIONAL PACKAGES____________________________________________481
Default Consignment prompt in Order Entry ______________________________481Consignment Order Entry Default Company Option_______________________481Order Entry______________________________________________________482
Allocate Material to All Orders, Including Blanket Orders ____________________483Company _______________________________________________________483Example ________________________________________________________485Material_________________________________________________________485
Enhancements to the Consignment Module ______________________________486Main Menu ______________________________________________________486Enter/Edit Beginning Balances _______________________________________486Print Physical Inventory Worksheet ___________________________________486Enter/Edit Physical Inventory Counts __________________________________487Monthly Post of Physical Inventory____________________________________488Print Comparison Report ___________________________________________488
Sample: Consignment Comparison Report ___________________________488
Omit Item Codes on Showroom Quotations For Electrical Features Package ____489Quotation Print ___________________________________________________489Quote Entry _____________________________________________________490
Order / Quote Amount And Header Prints To AIX File ______________________491
Rebate Journal Company Options and Screen Parameters __________________492Company _______________________________________________________492Rebate Journal ___________________________________________________492
xxiv
Service Work Order Information in Real-Time Sales History__________________495Sales History ____________________________________________________495
View__________________________________________________________495Reporting______________________________________________________498
CONTRACT PROFITABILITY REPORT __________________________________498SAMPLE: CONTRACT PROFITABILITY REPORT ___________________________499REPAIR PROFITABILITY REPORT _____________________________________499SAMPLE: REPAIR PROFITABILITY REPORT ______________________________500
Company _______________________________________________________501
Weekly Additions to Induserve Vendor Report ____________________________502Induserve _______________________________________________________502
Sample: Weekly Vendor Report ____________________________________503Sample: Quarterly Vendor Report ___________________________________503
8 EDI ____________________________________________________________505
Browse on Translation Tables while Editing and Deleting ____________________505EDI Setup _______________________________________________________505
Display Overlay Entries while editing Translation Tables ____________________507EDI Setup _______________________________________________________507
View Transaction Sets from Trading Partner Interchange Information __________509EDI Setup _______________________________________________________509
Network Name Verification in Interchange Information ______________________511EDI Setup _______________________________________________________511
Subelement Separator Default is Changed _______________________________512EDI Setup _______________________________________________________512
Browse for Supported Mapping Entry Numbers by Transaction Set ____________513EDI Setup _______________________________________________________513
Print Trading Partner Overlay Maps and Element Qualifier Tables (EQTs)_______517EDI Setup _______________________________________________________517
Sample: Map of ASC Elements to P21 Fields Report ____________________518Sample: Element Qualifier Table Report ______________________________518
Display X12 Segment Information when Editing ___________________________520EDI Setup _______________________________________________________520
View Previous Screens When Selecting Raw EDI Documents for Printing _______521EDI Doc ________________________________________________________521
Print the Self-Documentation for Existing Trading Partner Overlays ____________522
xxv
EDI Setup _______________________________________________________522Sample: Trading Partner Overlay Self-Documentation ___________________523
Display Documents for a Specific Trading Partner _________________________524EDI Doc ________________________________________________________524
Display Element ID X12 Values when Editing the Overlays for Send Type TransactionSets _____________________________________________________________525
EDI Setup _______________________________________________________525
Enhancements to Trading Partner Information ____________________________527EDI Setup _______________________________________________________527EDI Documents __________________________________________________529
Auto Import ____________________________________________________529Manual Import __________________________________________________530AIX Exported/Imported Documents Journal____________________________530Sample: EDI Event Journal – Exported/Imported EDI Documents __________531
EDI Expedite Purchase ______________________________________________533Main Menu ______________________________________________________533Update _________________________________________________________533Journal _________________________________________________________534
Sample: EDI PO Update Journal____________________________________534
Journal for Deleted EDI Orders ________________________________________536EDI Order _______________________________________________________536
Non-Printable Document Control Characters are Converted to Viewable ASCIICharacters________________________________________________________537
EDI Setup _______________________________________________________537EDI Doc ________________________________________________________537
Display the Prophet 21 Order Number and the EDI Order Number in the 855 SendComments Field ___________________________________________________539
EDI Doc ________________________________________________________539
Determine When the 856 Document is Available to Build ____________________540EDI Doc ________________________________________________________540
Create Default Values in Translation Tables ______________________________541EDI Setup _______________________________________________________541
Creating 820 Send Documents for Electronic Funds Transfer ________________543EDI Setup _______________________________________________________543
Authentication of the 820 Send Transaction Set ________________________544TRADING PARTNER INTERCHANGE INFORMATION _________________________546
EDI Doc ________________________________________________________546

xxvi
Building EDI Documents __________________________________________546Preparing EDI Documents for Sending _______________________________549The Built 820s Journal____________________________________________550
Alert a Message Group to Received EDI Documents _______________________552EDI Communications ______________________________________________552EDI Setup _______________________________________________________552
Square D POS Reporting Accesses Real-Time Sales History_________________555Company _______________________________________________________555EDI Documents __________________________________________________556
EDI 2000 _________________________________________________________558
Build Multiple 810 Transaction Sets for the Same Invoice____________________560EDI 2000 _______________________________________________________560

27
This list is organized by system area and module. Each feature that is included in the standard version 10 releaseis marked with the checkmark symbol (á). Each feature that is an enhancement to one of our optional packages ismarked with “opkg!”. Some of these options are mentioned more than once because they affect more than onearea of the system.
SYSTEM-WIDE CHANGES
á Packages are retired on Acclaim 10. (Page 60) Due to system enhancements and development, severalpackages are retired on Acclaim 10.
á The LOGOFF confirmation prompt no longer appears. (Page 61) When you run the job LOGOFF,you no longer see the confirmation prompt “Do you want to Logoff? (Y N).”
á User-friendly messages. (Page 62) When the system cannot accept your selection, it displays accurate,easy-to-understand messages. Eight messages have been added to the system, because of your suggestionsand feedback!
á Determine default print queue by user ID. (Page 64) The system allows you to determine a defaultAIX print queue on a user-by-user basis. You determine this default in the User Base module.
á New functionality of State field. (Page 124) You can now enter and / or edit states in State Maintenancein the Auxiliary Tables module, giving you the option to customize this database. When you browse onany State field, you can view and reindex the browse by country, name, and abbreviation. In addition, aRebuild option allows you to delete your customizations and only use the default state database.
á View notes display in navigation mode in the maintenance screens. (Page 136) Notes created toappear in view mode appear in navigation mode of maintenance screens. You no longer have to selectview mode to display notes in these screens. Notes that are created to appear in both view and edit modewill only be displayed once.
á You can now access the Auxiliary Tables module from the jump to box. (Page 138) You can nowaccess the Auxiliary Tables module by entering the following at the jump to box: AUX-TABLE.
á Sales History is automatically built. (Page 218) The system provides real-time data by automaticallybuilding sales history information. You no longer have to manually build Sales History.
Opkg! Determine whether to send a fax cover sheet. (Page 335) A company-wide option allows you tocontrol whether you send a cover sheet with your faxes.
á Retired company options on Acclaim 10. (Page 342) Several company options no longer appear onAcclaim 10.
á AIX user ID in Acclaim header. (Page 370) AIX user ID now appears in Acclaim header so that userscan know their AIX user IDs in Acclaim.
SUMMARY OF NEWFEATURES
SUMMARY OF NEW FEATURES
28
ACCLAIM 10 NEW FEATURES
á Define 9999 stocking locations. (Page 371) You can now set up 9999 stocking locations.
á Enable French menus. (Page 372) By setting an option in the User Base module, Acclaim menus areconverted to French.
á Macros feature allows JCM functionality in all areas of the system. (Page 384) Macros allow users toperform JCM-like functions in all areas of the system. Now, you can facilitate the automation of allessential tasks, including those in the Accounting modules.
á Manually complete specific fields in several data maintenance screens without the systemautomatically launching a browse. (Page 420). When you manually enter data in the key fields inseveral data maintenance screens, Find mode appears and the system does not automatically launch abrowse. You can access Find mode in the following maintenance screens: Sales Pricing, OverrideTables, Purchase Pricing, Customized Items, Customer Alt Ship-To, Sales Tax, Tax Exemption, InvoiceRecall, PO Recall, Customer, Vendor, and Personal Contact Maintenance, Price / Cost OverrideMaintenance, and Rebate Journal.
á Schedule tasks for yourself and other users through the P21 Scheduler. (Page 422) The P21Scheduler, available from the Toolbox menu, allows you to schedule your own and other users’ tasks, andsend reminders when tasks are due. In addition, the system automatically sends e-mail messages to notifyanother user when a task has been created for them.
á Reset option removes PROSeries and Real-Time Sales History transaction information. (Page 422)When you perform a Reset to remove all “play” data from your system, the system now removestransaction information in the PROSeries and Real-Time Sales History databases.
á Use and track foreign currencies in the sales and purchasing cycles. (Page 423) By setting a companysystem option, you can set default “home” currencies. In addition, you can specify foreign currencies forspecific customers and vendors. You can include this foreign currency information on several payablesand receivables screens and reports.
á Item Ledger is automatically built. (Page 456) The system provides real-time data by automaticallybuilding item-ledger transactions to Item Ledger history. You no longer have to manually build ItemLedger history.
á Stop the printing process of several reports. (Page 457) You can now press [F4] to abort or halt theprinting process of several reports.
á The system indicates the arrival of new P21 Mail. (Page 461) Every time you receive a new P21 mailitem, the system displays the word, “MAIL” in the status bar and you hear a tone.
á A submenu system of hidden options is available. (Page 66) There is a submenu system for hiddenoptions to display them in specific groupings.
BROWSES
á Line item information in Quote View. (Page 72) A view box allows you to view Quote Quantity andNet Price for each line-item in the Quote Line-Item by Line # browse.
Opkg! Browse for common customized items. (Page 73) At the Item prompt during order entry and Pricing &Availability, and at the Customer prompt in Customized Item Maintenance, you can browse and select acommon customized item.
á From the Item browse, PowrDrill to view the Order View screen. (Page 76 ) When you browse onstock or catalog items, a new PowrDrill option allows you to access the Order View screen.
á When entering a purchase order or vendor return, view items you previously purchased for avendor at the item browse. (Page 77) When you enter a purchase order or vendor return, you can indexthe item browse to view and select items you previously purchased for the vendor you specified. You canalso PowrDrill to view specific purchase orders that include that item.
á Reindex the order browse for suspended and pick-up orders by order number. (Page 80) Forsuspended and pick-up orders, you can now reindex the browse by order number.
á PowrDrill on a direct ship, local pickup, or nonstock purchase order from the purchase orderbrowse and view the order associated with it. (Page 82) When you PowrDrill on a direct ship,
SUMMARY OF NEW FEATURES
29
ACCLAIM 10 NEW FEATURES
nonstock, or local pickup purchase order from within the purchase order browse, there is a new option thatallows you to view the order associated with this purchase order.
á PowrDrill to view detailed receivables information in the customer record and payables informationin the vendor record. (Page 84) In Customer and Vendor Maintenance, there is a new PowrDrill menuthat allows you to view detailed receivables and payables information.
á In Pricing & Availability, PowrDrill to view ScratchPad line-items. (Page 86) A PowrDrill optionallows you to view ScratchPad line-item information from the Transaction History Browse in Pricing &Availability.
á A new PowrDrill option allows you to view purchasing pricing information for catalog items. (Page88) At the item browse in the order processing modules, you can now PowrDrill on catalog items andview any purchase pricing information available for those items.
á View open backorders in the customer browse. (Page 111) When you browse order information for aspecific customer, you can set the browse to display only open backorders.
á View address information in the customer browse. (Page 113) The customer browse has a display boxthat displays address information. In addition, an S indicates if the customer has an alternate ship-toaddress.
Opkg! In Pricing & Availability, browse to index lot numbers by lot number, quantity, and lot numbersfrom selected locations. (Page 151) In Pricing & Availability, when you select an item that has lotnumbers, you can choose to index the browse by lot number and quantity.
á Security on Payables and Receivables Browse and PowrDrill. (Page 374) Users who do not havesecurity access to view payables and receivables information cannot access these options from any browseor PowrDrill.
á Reindex Price / Cost Override Browse by default overrides. (Page 375) You can now reindex theprice / cost override browse by default branch and company override tables. You can then reindex theDefault Override Browse by basis, item code, or override type.
á A new keystroke combination allows you to return to an original browse after selecting severalPowrDrill menus. (Page 378) After selecting several PowrDrill options from various PowrDrill menus,the new keystroke [Ctrl] [B] allows you to quickly access the original browse you launched.
á Setting in Order Processing Item Browse defaults from Browse Options screen. (Page 379) Whenyou enable the Reset Order Processing Browse option, the Item browse in order processing alwaysdefaults to the setting in the Order Processing Item Preference option. This allows you to reindex theItem browse many times, but still have the setting revert to your item preference option while in the samecustomer session.
á A new keystroke allows you to access the Who-Bought-What Information Browse from the Itemprompt in order entry. (Page 380) When you type WB and press [Enter] at the Item prompt in orderentry, the Who-Bought-What Information Browse appears.
DATA ENTRY
á Predefine defaults for data entry modules. (Page 90) You can set predefined defaults for the Customer,Vendor, Item, Item Location, and Catalog modules. When you enter a new customer, vendor, item, orcatalog item, the system automatically displays the predefined data in the appropriate fields.
á Field-level security. (Page 94) You can assign field-level security in the Customer, Vendor, Item, ItemLocation, and Catalog modules.
á The Contacts module allows you to enter multiple business contacts for customers, vendors, andusers of Prophet 21® Acclaim system. (Page 97) The new module, Contacts, allows you to entercontacts for customers, vendors, and system users. You can also print reports that display all of thisinformation. You can view these contacts from any customer prompt, any vendor prompt, from theContact field in Customer and Vendor Maintenance, or the Toolbox browse.
SUMMARY OF NEW FEATURES
30
ACCLAIM 10 NEW FEATURES
á New functionality of State field. (Page 124) You can now enter and / or edit states in State Maintenancein the Auxiliary Tables module, giving you the option to customize this database. When you browse onany State field, you can view and reindex the browse by country, name, and abbreviation. In addition, aRebuild option allows you to delete your customizations and only use the default state database.
á Manually complete the key fields in Customer Contact Maintenance without the systemautomatically launching a browse. (Page 420). When you manually complete the Customer Code,Ship To, and Contact fields in Customer Contact Maintenance, Find mode appears and the system doesnot automatically launch a browse.
á Manually complete the key fields in Vendor Contact Maintenance without the system automaticallylaunching a browse. (Page 420). When you manually complete the Vendor Code and Contact fields inVendor Contact Maintenance, Find mode appears and the system does not automatically launch a browse.
á Manually complete the key fields in Personal Contact Maintenance without the systemautomatically launching a browse. (Page 420). When you manually complete the User ID and Contactfields in Personal Contact Maintenance, Find mode appears and the system does not automatically launcha browse.
COMPANY
á Purge Foreign Currency entries. (Page 67) You can now purge currency types that you no longer use.
á New company option for Quebec language laws. (Page 68) There is a new company option that printsinvoices so they abide by the Quebec language laws.
á Print order acknowledgements immediately after accepting them in Order or Quote Order. (Page178) A company option allows you to print order acknowledgements immediately after accepting theacknowledgement in Order or Quote Order.
á New Forms Layout option, Print Address 3 and Country. (Page 163) A new Company Forms Layoutoption allows you to print the data in the Address 3 and Country fields in Customer and VendorMaintenance on shipping papers, invoices, statements, payables, purchase and front counter orders, andquotations.
á Print quantities in term of order units. (Page 173) A company option allows you to print quantities interms of the order unit on order processing forms.
á New Order Processing Company Options screen that allows you to express stock information as asales unit and order unit in Pricing & Availability. (Page 185) A new Order Processing CompanyOptions screen allows you to set the defaults for the O-Ut (order unit) and S-Ut (sales unit) fields inPricing & Availability.
á Profit percentage warning appears for low profit items. (Page 190) A new company optiondetermines whether a warning message appears when you enter an item during order entry with a profitpercentage that is lower than the value set in the Low Profit % field in the Company module.
á Set a default for the Pur Price Schd Costing field in Purchase. (Page 251) The system provides acompany option that determines the default value of the Pur Price Schd Costing field when you generatepurchase orders or requirement reports for direct ship and local pick up orders.
á New company option that builds the sales (INV) and cost of goods (CSLD) autobatches on aninvoice-by-invoice basis. (Page 282) Through a new Company Accounting option, you can now chooseto build the sales and COGS autobatch information on an invoice-by-invoice basis. These autobatches arebuilt after you print every invoice.
á Print memo on payables checks. (Page 296) A new payables company option allows you to include amemo when you print a payables check.
Opkg! Determine whether to send a fax cover sheet. (Page 335) A company-wide option allows you tocontrol whether you send a cover sheet with your faxes.
Opkg! Allocate material to all orders including blanket orders. (Page 483) You can set a company optionthat allocates material to the oldest order first, regardless of whether the order is a backorder, transferorder, or blanket order.
SUMMARY OF NEW FEATURES
31
ACCLAIM 10 NEW FEATURES
CUSTOMER
á New option in customer ranking. (Page 71) The system provides a new option when you generatecustomer ranking reports. This option allows you to include master account or sub account information onthe Customer Profit Ranking Report and the Customer Sales Ranking Report.
á E-mail address in Ship-To Information. (Page 114) The system provides an E-mail field in theCustomer Ship-To Information screen.
á Receivables options in Customer Maintenance. (Page 115) There is a new section in CustomerMaintenance that allows you to set a customer’s receivable default options. The fields on this screen aresimilar to the fields on the Customer Options screen in the Receivables module.
á Enhancements to Customer and Vendor Maintenance. (Page 163) There are several newenhancements to the Customer and Vendor Maintenance screens, including the following: the telephoneand fax number fields have been expanded from 12 to 30 characters; Address 3, Country, and Websitefields have been added. A new Company Forms Layout option allows you to print the data in the Address3 and Country fields information on shipping papers.
á Manually complete key fields in Customer Alt-Ship Maintenance without the system automaticallylaunching a browse. (Page 420). When you manually complete the Customer Code and Ship To fieldsin Customer Alt-Ship Maintenance, Find mode appears and the system does not automatically launch abrowse.
PURCHASE PRICING
á Manually complete key fields in Purchase Pricing Schedule Maintenance without the systemautomatically launching a browse. (Page 420). When you manually complete the Vendor Number andDiscount Group fields in Purchase Pricing Schedule Maintenance, Find mode appears and the systemdoes not automatically launch a browse.
INVOICE RECALL
á Manually complete key fields in Invoice Recall without the system automatically launching abrowse. (Page 420). When you manually complete the Invoice #, Customer, and Date fields in InvoiceRecall, Find mode appears and the system does not automatically launch a browse.
PO RECALL
á Manually complete key fields in PO Recall without the system automatically launching a browse.(Page 420). When you manually complete the PO#, Vendor, and Date fields in PO Recall, Find modeappears and the system does not automatically launch a browse.
PRODUCT GROUP CHANGE
á New Product Group Change module allows you to change product group numbers. (Page 116). TheProduct Group Change module allows you to change one or fast enter a range of product groups, print aproposed list, and perform product group changes.
SALES TAX
á Four-digit county ID. (Page 121) When you enter or edit a sales tax schedule, you can enter a four-digitcounty ID.
á Manually complete key fields in Sales Tax Maintenance without the system automatically launchinga browse. (Page 420). When you manually complete the Branch and Schd# fields in Sales TaxMaintenance, and these fields and Exemp# in Sales Tax Exemption Matrix Maintenance, Find modeappears and the system does not automatically launch a browse.
SUMMARY OF NEW FEATURES
32
ACCLAIM 10 NEW FEATURES
SALES PRICING
á Set up override tables for individual branches. (Page 109) You can now set up overrides that onlyapply to a particular branch.
á Apply fast edits to all price/cost override tables. (Page 110) New parameters on the fast edit screen forprice/cost override tables now include an option to fast edit all schedules, regardless of pricing or costingmethod. This allows you to easily edit customer pricing.
á Reindex Price / Cost Override Browse by default overrides. (Page 375) You can now reindex theprice / cost override browse by default branch and company override tables. You can then reindex theDefault Override Browse by basis, item code, or override type.
á Manually complete key fields in Sales Pricing Schedule and Price / Cost Override TableMaintenance screens without the system automatically launching a browse. (Page 420) When youmanually complete the Schedule, Vendor, and Group fields in Sales Pricing Schedule Maintenance andthe Customer, Basis, and Item in Price / Cost Override Table Maintenance, Find mode appears and thesystem does not automatically launch a browse.
á Price/Cost Override Browse sorted by the Override Table Basis. (Page 170) The price/cost overridetable browse can be indexed by the values entered in the table’s Basis field. This feature displays specificoverride tables of your customers.
NOTEPAD
á Order line-item notes appear on POs and PO requirement reports. (Page 131) Notes for direct ship,local pick up, and nonstock order items appear on purchase requirement reports and purchase orders.
á Catalog notes appear on purchase orders. (Page 134) The Notepad module allows you to print acatalog note on a purchase order.
á View notes display in navigation mode in the maintenance screens. (Page 136) Notes created toappear in view mode appear in navigation mode of maintenance screens. You no longer have to selectview mode to display notes in these screens. Notes that are to appear in both view and edit mode will notbe displayed twice.
ITEM
á Sort product group browse by name. (Page 122) A new index option allows you to sort the productgroup browse by product group names.
á Copy MFG Class from Item database to Catalog database. (Page 141) The system now allows you tocopy the MFG class from the item database to the catalog database, or vice versa.
ITEM CHANGE
á Build alternate item references during item code change and catalog code change.(Page 128) The Item Change module and the Catalog Code Change module have been modified so thatthey automatically create alternate item references when you perform a code change. The system createsthe old code as an alternate item reference for the new item code.
BIN NUMBERS
á Primary bin number appears in Bin Number browse. (Page 130) In the Bin Number Browse, theprimary bin numbers appear with an asterisk next to them.

SUMMARY OF NEW FEATURES
33
ACCLAIM 10 NEW FEATURES
CATALOG
á Sort product group browse by name. (Page 122) A new index option allows you to sort the productgroup browse by product group names.
á Copy MFG Class from Catalog database to Item database. (Page 141) The system now allows you tocopy the MFG class from the catalog database to the item database, or vice versa.
AUXILIARY TABLES
á Sort product group browse by name. (Page 122) A new index option allows you to sort the productgroup browse by product group names.
á New functionality of State Maintenance. (Page 124) In State Maintenance, you can now enter and / oredit states, which gives you the option to customize this database. You can also browse and reindex thebrowse by country, name and abbreviation. In addition, a Rebuild option allows you to delete yourcustomizations and only use the default state database.
VENDOR
á Specify the net and discount terms for vendor’s invoices by a number of months after the invoicedate. (Page 160) PRNN, a new option in the Discount Terms section of Vendor Maintenance, allows youto specify the net or discount terms for vendor’s invoices by a number of months after the invoice date.
á Enhancements to Customer and Vendor Maintenance. (Page 163) There are several newenhancements to the Customer and Vendor Maintenance screens, including the following: the telephoneand fax number fields have been expanded from 12 to 30 characters; Address 3, Country, and Websitefields have been added. A new Company Forms Layout option allows you to print the data in the Address3 and Country fields on shipping papers.
ORDER PROCESSING
ORDER
Opkg! Browse for common customized items. (Page 73) At the Item prompt during order entry and Pricing &Availability, you can browse and select a common customized item.
á Reindex the order browse for suspended and pick-up orders by order number. (Page 80) Forsuspended and pick-up orders, you can now reindex the browse by order number.
á View open backorders in the customer browse. (Page 111) When you browse order information for aspecific customer, you can set the browse to display open orders only or open backorders only.
Opkg! In Pricing & Availability, browse to index lot numbers by lot number, quantity, and lot numbersfrom selected locations. (Page 151) In Pricing & Availability, when you select an item that has lotnumbers, you can choose to index the browse by lot number and quantity.
á Print order acknowledgements immediately after accepting them in order entry. (Page 178) Acompany option allows you to print order acknowledgements immediately after accepting theacknowledgement in order entry.
á Profit percentage warning appears for low profit items. (Page 190) A new company optiondetermines whether a warning message appears when you enter an item during order entry with a profitpercentage that is lower than the value set in the Low Profit % field in the Company module.
á Who-bought-what transaction information for regular items is pulled directly onto orders andcustomer returns. (Page 193) When you select an item from a previous transaction at the Item prompt

SUMMARY OF NEW FEATURES
34
ACCLAIM 10 NEW FEATURES
during order entry or customer returns, who-bought-what transaction information is pulled directly ontothe order or customer return with the item.
á Acclaim Customer Maintenance screen appears at “N”ew Customer prompt. (Page 195) When youenter a new customer during order entry, the Acclaim Customer Maintenance screen appears.
á In Expedite Order, a “Deletion Prohibited” message appears when cancelling items associated witha purchase order. (Page 199) A “Deletion Prohibited” message appears when you try to cancel an itemon an item or an order that is associated with an open purchase order.
á Default Sales Category setting. (Page 200) You can determine a default setting for the Sales Categoryfield. This setting, set in the User Base module, is determined on a user ID basis.
á Generate POs during order entry. (Page 209) You can generate purchase orders for direct ship,nonstock, and LPU items during order entry. This allows you to have a faster customer response time bygenerating POs immediately after you enter the order. This option, set in the User Base module, isdetermined on a user ID basis.
á Edit Shipping Route field in the Order Header screen. (Page 213) The system allows you to edit theShipping Route field when you edit the Order Header screen.
á Item adjust code 5 is created on the Nonstock Adjustments Register for customer returns. (Page277) The system now creates a code 5 on the Nonstock Adjustments Register for vendor returns ofnonstock material. This code balances inventory for a vendor return that is created automatically after acustomer return is entered.
á Setting in Order Processing Item Browse defaults from Browse Options screen. (Page 379) Whenyou enable the Reset Order Processing Browse option, the Item browse in order processing alwaysdefaults to the setting in the Order Processing Item Preference option. This allows you to reindex theItem browse many times, but still have the setting revert to your item preference option while in the samecustomer session.
á Invoice information is available for orders that have been invoiced. (Page 232) An Invoice ViewPowrDrill is found in Order View and Order Browse.
SALES HISTORY
á Delete completed orders from Expedite Order. (Page 219) You can purge completed orders or line-items with invoices dates on or before a specified deletion date.
á Build Acclaim 10 WBW records into Progress WBW tables from current WBW files. (Page 220)You can build your current who-bought-what files into Progress WBW tables. This allows you to takeadvantage of Progress sales history.
á Sales category in Sales History. (Page 222) The system saves the sales category in Who-Bought-Whatwhen building sales history. You can access the sales category through CorVu and ODBC.
á Keyword index in WBW. (Page 226) The WBW browse by item has been modified to include akeyword index. This index searches the Item Code and Description One fields for a selected string. Whenyou enter a keyword, the system searches all entries in WBW in one browse, including stock items,catalog items, and nonstock items.
á View cost and profit information in Sales Comparison. (Page 228) You can now view cost and profitinformation in Sales Comparison.
á Retired company options on Acclaim 10 and Progress sales history. (Page 342) Several companyoptions do not appear if you are using Acclaim 10 with Progress sales history enabled.
á Reorganize user-defined sales history. (Page 360) If your user-defined sales history keys includecustomer code, vendor code, or salesman number, reorganizing sales history also updates these fields onthe report.
á Rank items and vendors by invoiced sales amounts. (Page 361) A new report option allows you torank items and vendors according to the amounts of their sales.
á Add transactions in Who-Bought-What. (Page 367) Who-Bought-What records can be added manuallyinto Real-Time Sales History.
SUMMARY OF NEW FEATURES
35
ACCLAIM 10 NEW FEATURES
á Integrate FIFO Cost Layers with Real-Time Sales History (Page 223) FIFO cost layer information isreported in the Real-Time Sales History module. You can view the FIFO costs of each layer where stockwas taken to fill the order.
á Sales Rep Commissions based on Predefined Ranges of Product Groups. (Page 238) The Sales RepCommissions option in the Real-Time Sales History module provides the ability to group like productgroups into a range for which commission is calculated using the same basis and same commission.
á Consignment default in Order Entry. (Page 481) The system provides a company option to determinethe Consignment default during order entry.
á Display enhancements to Who-Bought-What Report. (Page 480) System displays numbers greaterthan 999.99 with commas and separates the individual entries and the totals and subtotals by doubleunderlines (===).
EXPEDITE ORDER
á Enter header and line-item transaction notepads in Expedite Order. (Page 196) There is a “P” forNotepad prompt in Expedite Order that allows you to enter header and line-item transaction notepads.
á Option help in Expedite Order. (Page 197) The order header screen in Expedite Order has a new helpmenu for options.
á View next open order in Expedite Order. (Page 198) In the order header view screen, you can view thenext open order by selecting the Next Open Order option.
á View shipment header information after a sales history build. (Page 212) The system keeps shipmentheader information in Expedite Order after sales history is built, until the order is deleted from the system.
EXPEDITE QUOTE
á Enter header and line-item transaction notepads in Expedite Quote. (Page 196) There is a “P” forNotepad prompt in Expedite Quote that allows you to enter header and line-item transaction notepads.
QUOTATIONS
á Print quantities in term of order units. (Page 173) A company option allows you to print quantities interms of the order unit on quotes.
á Print order acknowledgement immediately after generation in Quote Order. (Page 178) You canprint an order acknowledgement immediately after accepting the order in Quote Order.
á Assign an expiration date to a quotation. (Page 201) The system tracks expiration dates for quotations.When you enter an expiration date on a quote, the system will display this date in Expedite Order, and itwill print the expiration date on the quote and on the Quotation Report. You can also use the expirationdate as a parameter when cancelling a range of quotes.
á Print quotations during quote entry. (Page 206) The system allows you to print quotationsimmediately after accepting them in Quote Entry.
á Sequence Quotation Report by Taker #. (Page 214) You can sequence the Quotation Report inExpedite Quote by Taker #.
QUOTE-ORDER
á Generate POs during order entry. (Page 209) You can generate purchase orders for direct ship,nonstock, and LPU items in the Quote Order module. This allows you to have a faster customer responsetime by generating POs immediately after you enter the order. This option, set in the User Base module, isdetermined on a user ID basis.
SUMMARY OF NEW FEATURES
36
ACCLAIM 10 NEW FEATURES
PRICING & AVAILABILITY
á Express stock information as a sales unit and order unit. (Page 185) Two new fields in Pricing &Availability allow you to enter the sales and order unit value of an item, giving you now two ways toexpress stock information. You can set the defaults for these fields in Company Order ProcessingOptions.
á Setting in Order Processing Item Browse defaults from Browse Options screen. (Page 379) Whenyou enable the Reset Order Processing Browse option, the Item browse in order processing alwaysdefaults to the setting in the Order Processing Item Preference option. This allows you to reindex theItem browse many times, but still have the setting revert to your item preference option while in the samecustomer session.
á Access stock availability information from other Prophet 21 systems via e-mail. (Page 381) E-Shopper, the new Item PowrDrill option, allows you to inquire and receive stock availability informationfrom other Prophet 21 systems via e-mail.
á Edited costs on ScratchPads are used when creating quotations and orders. (Page 230) If aScratchPad item’s cost is edited, this edited cost appears on quotes and orders generated from theScratchPad.
FRONT COUNTER
Opkg! Browse for common customized items. (Page 73) At the Item prompt during order entry and Pricing &Availability, you can browse and select a common customized item.
á Reindex the order browse for suspended and pick-up orders by order number. (Page 80) Forsuspended and pick-up orders, you can now reindex the browse by order number.
Opkg! In Pricing & Availability, browse to index lot numbers by lot number, quantity, and lot numbersfrom selected locations. (Page 151) In Pricing & Availability, when you select an item that has lotnumbers, you can choose to index the browse by lot number and quantity.
á Print quantities in term of order units. (Page 173) A company option allows you to print quantities interms of the order unit on sales tickets.
á Profit percentage warning appears for low profit items. (Page 190) A new company optiondetermines whether a warning message appears when you enter an item during order entry with a profitpercentage that is lower than the value set in the Low Profit % field in the Company module.
á Acclaim Customer Maintenance screen appears at “N”ew Customer prompt. (Page 195) When youenter a new customer during order entry, the Acclaim Customer Maintenance screen appears.
á “This is your credit” appears on invoiced credit memos. (Page 208) Previously, the system printed“This is your invoice” at the bottom of credit memos. Now, “This is your credit” appears on the bottom ofcredit memos.
á Generate POs during front counter order entry. (Page 209) You can generate purchase orders fordirect ship, nonstock, and LPU items while entering a front counter order. This allows you to have a fastercustomer response time by generating POs immediately after you enter the order. This option, set in theUser Base module, is determined on a user ID basis.
á Edit Shipping Route field in the Order Header screen. (Page 213) The system allows you to edit theShipping Route field when you edit the Order Header screen.
á Item adjust code 5 is created on the Nonstock Adjustments Register for customer returns. (Page277) The system now creates a code 5 on the Nonstock Adjustments Register for vendor returns ofnonstock material. This code balances inventory for a vendor return that is created automatically after acustomer return is entered.
á Setting in Order Processing Item Browse defaults from Browse Options screen. (Page 379) Whenyou enable the Reset Order Processing Browse option, the Item browse in order processing alwaysdefaults to the setting in the Order Processing Item Preference option. This allows you to reindex the

SUMMARY OF NEW FEATURES
37
ACCLAIM 10 NEW FEATURES
Item browse many times, but still have the setting revert to your item preference option while in the samecustomer session.
SHIP
á Print quantities in term of order units. (Page 173) A company option allows you to print quantities interms of the order unit on quotes.
SHIP-EDIT
á Edit Invoice Batch# during confirmation. (Page 216) The system allows you to edit the invoice batchnumber of a shipment before and after a shipment has been confirmed.
á Enter notes in Ship Edit. (Page 217) The system allows you to enter notes in the header information andthe line-item transaction information in the Ship Edit module.
SHIP-EDIT
á Unconfirm shipments. (Page 180) You can now set the Confirmed field in the Edit/Confirm screenback to N to “unconfirm” a shipment.
INVOICE
á Invoices are now real time. Invoices are no longer built through a batch process. Invoices are now realtime.
á Print quantities in term of order units. (Page 173) A company option allows you to print quantities interms of the order unit on quotes.
á Print messages in the body of the invoice. (Page 183) The system prints any error message or full filemessage in the body of the invoice.
á Print a problem invoice immediately after you correct the problem. (Page 229) If a shipment has aproblem that prevents it from invoicing, you can correct the problem and immediately print the invoice,without waiting for 24 hours.
á New company option that builds the sales (INV) and cost of goods (CSLD) autobatches on aninvoice-by-invoice basis. (Page 282) Through a new Company Accounting option, you can now chooseto build the sales and COGS autobatch information on an invoice-by-invoice basis. These autobatches arebuilt after you print every invoice.
INVENTORY
PURCHASE
á View vendor phone number in selective purchasing. (Page 245) Vendor phone numbers display belowthe address fields in the selective purchasing screen. The phone number for both the primary vendor andthe alternate vendor appear.
á Print POs immediately after generation. (Page 246) The system provides the option to print purchaseorders immediately after accepting them in the Purchase module. You can set this option in the InventoryControl company options.
á Default buyer number by user ID. (Page 248) The system tracks the Buyer # by user ID. The systemuses this default, set up in the User Base module, during purchase order entry as the default for the Buyer# field in the PO header.
SUMMARY OF NEW FEATURES
38
ACCLAIM 10 NEW FEATURES
á Set a default for the Pur Price Schd Costing field in Purchase. (Page 251) The system provides acompany option that determines the default value of the Pur Price Schd Costing field when you generatepurchase orders or requirement reports for direct ship and local pick up orders.
á Items are added to a selectively generated purchase order in Purchase are affected by purchasepricing schedules. (Page 253) Items that are added to a purchase order via the Add to this PO ViaAutomatic Purchasing and Add Items Manually options on the Editing Options screen are discountedby purchase pricing schedules.
á Enter a scheduled purchase order. (Page 254) You can now enter a scheduled purchase order for anyitems that you want to purchase. This allows you to purchase specific quantities of an item to be shippedfrom the vendor at a specific time. You can also exclude quantities on scheduled purchase orders fromrequirements calculations if their expected date falls after a specified number of days.
á The Selective Purchasing summary screen appears for direct ship and type A local pick-up orders.(Page 265) When you choose to selectively purchase a direct ship and local pick-up order, the selectivepurchasing summary screen appears, allowing you to edit, cancel, accept and print purchase orderinformation.
á User ID and Time fields on the Stock Adjustments Register and the Nonstock Adjustment Register.(Page 273) The Stock Adjustments Register and the Nonstock Adjustments Register show the user ID ofthe user who made an entry on the register, as well as the time when the entry was made.
á Enter an item from the Stock Card View screen on a purchase order. (Page 274) When youselectively purchase items on a purchase order, you can now enter an item directly from the Stock CardView screen.
INVENTORY HISTORY
á Modifications to the Inventory History module. (Page 270) You can now view purchase orders foreach type of inventory history. You can also PowrDrill to PO Recall from this Purchase Orders browse.
EXPEDITE PURCHASE
á PowrDrill on a purchase order and view any direct ship, nonstock, or local pickup orders associatedwith it. (Page 82) There is a new option on the PowrDrill that allows you to view direct ship, nonstock orlocal pickup orders associated with the purchase order you selected.
á Enter header and line-item transaction notepads in Expedite Purchase. (Page 196) There is a “P” forNotepad prompt in Expedite Purchase that allows you to enter header and line-item transaction notepads.
á Edit External PO# field in Expedite Purchase. (Page 244) In Expedite Purchase, the system allowsyou to edit the external purchase order number for purchase orders and requisitions.
PO PRINT
á Catalog notes appear on purchase orders. (Page 134) The Notepad module allows you to print acatalog note on a purchase order.
á Additional parameters for purchase order printing. (Page 158) The system offers a parameter screenwhen you print purchase orders.
PO RETURN PRINT
á Selectively reprint groups of vendor returns. (Page 157) The system provides an option that allowsyou to select the vendor returns you want to reprint.
á Additional parameters for vendor return printing. (Page 158) The system offers a parameter screenwhen you print vendor returns.
SUMMARY OF NEW FEATURES
39
ACCLAIM 10 NEW FEATURES
ITEM LIST
á Track service level for blanket order releases. (Page 445) The system determines if a blanket orderwas a hit or miss on the Service Level Report in Item List based on whether the release was made on timerather than whether the total order can be filled at the time of order entry.
ITEM LEDGER
á Item Ledger is automatically built. (Page 456) The system provides real-time data by automaticallybuilding item-ledger transactions to Item Ledger history. You no longer have to manually build ItemLedger history.
ITEM ADJUST
á Item adjust codes 90 – 97 are subtracted from PTD sales. (Page 276) Only stock adjustments usingcodes 90 through 97 are subtracted from PTD sales demand.
á Item adjust code 5 is created on the Nonstock Adjustments Register for customer returns. (Page277) The system now creates a code 5 on the Nonstock Adjustments Register for vendor returns ofnonstock material. This code balances inventory for a vendor return that is created automatically after acustomer return is entered.
MATERIAL RECEIPT
á Remove completed POs by vendor code and vendor class. (Page 181) A parameter screen allows youto determine ranges of purchase orders to remove them by vendor codes and classes.
á Short code recognition in Material Receipt. (Page 279) Previously, when receiving by the item code,the system did not allow you to enter short codes. Now, you can enter short codes when receivingmaterial by item code.
Opkg! Allocate material to all orders including blanket orders. (Page 483) You can set a company optionthat allocates material to the oldest order first, regardless of whether the order is a backorder, transferorder, or blanket order.
EXPEDITE TRANSFER
á Enhancements to the Transfer Backorder List. (Page 250) The Transfer Backorder Report nowdisplays free stock available at the source location. In addition, you can sort this report by source location,destination location, and item code.
EXPEDITE RETURN
á Remove completed vendor returns by vendor code and vendor class. (Page 181) A parameter screenallows you to determine ranges of completed vendor returns to remove them by vendor codes and classes.
á Enter header and line-item transaction notepads in Expedite Return. (Page 196) There is a “P” forNotepad prompt in Expedite Return that allows you to enter header and line-item transaction notepads.
á Edit transfers and vendor returns after they have been printed. (Page 281) You can edit quantitiesand amounts of transfers and vendor returns. You can edit the quantity of a return after you have printedthe return but before it has been confirmed. You can edit the quantity of a transfer after you have printedthe transfer but before you have received material. The system will print any edits when you reprint thevendor return or transfer.

SUMMARY OF NEW FEATURES
40
ACCLAIM 10 NEW FEATURES
ACCOUNTING
á New company option that builds the sales (INV) and cost of goods (CSLD) autobatch on an invoice-by-invoice basis. (Page 282) Through a new Company Accounting option, you can now choose to buildthe sales and COGS autobatch information on an invoice-by-invoice basis. These autobatches are builtafter you print every invoice.
á Cannot clear monthly External Cash Receipts or External Cash Receipts Journals until the dailyjournals are cleared. (Page 284) The system no longer prompts you to clear the monthly External CashReceipts or the monthly External Cash Disbursements Journals until the daily journals are cleared.
á Retired company options. (Page 342) The following accounting company options no longer appear onthe Accounting Company Options screen: Acclaim Ledger; Acclaim Payables; Acclaim Receivables.
á Enter days instead of dates in the Payables and Receivables modules. (Page 285) You can now entera number of days from today’s date in any date field in Payables and Receivables.
á All references to batch or batch ID in Payables and Receivables have been renamed to Entry andEntry ID. (Page 287) To more clearly define the function of invoices and payments, all screen referencesto Batch and Batch ID in Payables and Receivables have been changed to Entry and Entry ID.
PAYABLES
á Specify the net and discount terms for vendor’s invoices by a number of months after the invoicedate. (Page 160) PRNN, a new option in the Discount Terms section of Vendor Maintenance, allows youto specify the net or discount terms for vendor’s invoices by a number of months after the invoice date.
á Print memo on payables checks. (Page 296) A new company option allows you to include a memowhen you print payables checks.
á PO# field in Payables can fit up to 12 characters. (Page 298) The PO# field in Payables can now fit upto 12 characters, which allows you to insert a longer external purchase order number.
á Create or prevent duplicate vendor invoice numbers. (Page 299) A new payables company optionprevents you from creating two invoices with the same invoice number. The option can also be set toallow you to enter two invoices with the same invoice number, and the word DUPLICATE appears.
á Show payables detail when printing check register. (Page 301) An option allows you to includepayables information when you print the Check Register. This allows you to see more information aboutpayment history when you review the Check Register.
á Exclude requisitions from reports. (Page 303) There are new parameters that allow you to excluderequisitions from the Discrepancy Journal and the Unreconciled Receivings Report.
á Edit vendor invoice distribution account numbers. (Page 305) You can change the distributionaccount information until the payable has been committed on the Expense Journal. You can edit thisinformation regardless of whether the Discrepancy Journal has been committed.
á Specify an ending date for check reconciliation. (Page 306) You can specify an ending date whenreconciling checks. The system omits from reconciliation all the checks that have a check date after theending date that you specify.
á New default setting for credits on the Payables Aged Report. (Page 307) The Include Credits field onthe Payables Aged Report parameters screen now defaults to ALL.
á Print individual currency type on checks. (Page 308) You can now print foreign currency types onchecks. The system prints a different label, depending on the currency type of the check.
á Shipping instructions appear on the Direct Ship Confirmation screen. (Page 309 ) When you enter apayable for a direct ship order in Payables, the shipping instructions appear on the Direct ShipConfirmation screen.
á Invoice and net amounts on New Payable screen default to costs entered on the Direct ShipConfirmation screen. (Page 310) When you enter a payable for a direct ship purchase order, the invoiceand net amounts on the New Payable screen default to the freight costs and confirmed item costs on theDirect Ship Confirmation screen.
SUMMARY OF NEW FEATURES
41
ACCLAIM 10 NEW FEATURES
á New parameter on Expense Journal parameter screen. (Page 312) On the Expense Journal parameterscreen, the Acct# Mask parameter allows you to limit the report to accounts matching a given mask.
RECEIVABLES
á Enhancements to the Cash Collection Call Report. (Page 314) The Cash Collection Call Report hasnew options that allow you to print collection call notes, customer notes, and aging information.
á New message in Receivables module. (Page 316) When the Unique Batch ID company option is set toY in PROSeries Receivables, the system now displays a message if you enter anon-unique Batch ID.
á New parameters for Aged Receivables report. (Page 317) There are new parameters that allow you tolimit the Aged Receivables report by invoice date.
á Use [Page Up] and [Page Down] in the Cash Collection screen. (Page 318) You can navigate throughthe Cash Collection screen by using the [Page Up] and [Page Down] keys.
á View comment number on Invoice View. (Page 319) When you are viewing invoice information, youcan see the comment number. The system now displays the comment number beneath the due date on theView Invoice screen.
á Print Cash Receipts Journal by entry sequence. (Page 320) A new Sequence option on the CashReceipts Journal parameter screen allows you to print the report in entry sequence.
á Sales tax adjustments during payment entry. (Page 321) Acclaim allows you to update sales taxschedules with any debit/credit write-offs that occur during customer payment entry in the Receivablesmodule.
á Print or reprint invoices after the Service Charge Journal is committed. (Page 332) You can nowprint or reprint service charge invoices, regardless of whether the Service Charge Journal has beencommitted.
á Cash Collection screen displays calls sorted by most recent call-back date for each customer. (Page326) The system now sorts a customer’s calls by the most recent call-back date. This allows you to easilyview the most recent call you made to a customer.
LEDGER
á Accrued AP Expense autobatch default area removed. (Page 325) The accrued AP expense autobatchdefault area is no longer available on the autobatch default setup and deletion screens. The function of thePayables Expense Journal has been expanded, which eliminates the need for an accrued AP expenseautobatch.
á New option that allows you to fast edit a user-defined report section. (Page 327) The new option,Fast Edit Section Information, allows you to fast edit an existing report section and create a new sectionfrom an existing section.
á Default accounts removed from some receivables and payables accounts. (Page 330) Unused accountnumbers have been removed from the following receivables and payables autobatch defaults: CR, SVC,EXP, CD, and VOID. This feature removes the requirement that these account# fields have valid valueswhen you edit your autobatch defaults.
á Direct bill amount posted to general ledger. (Page 331) The system now autobatches direct billamounts and posts them to the general ledger.
SYSTEM ADMINISTRATION
á An AIX command exists to access the command terminal. (Page 332) There is a new AIX commandthat allows you to access the command terminal from any AIX prompt: rootp21.
á New order data file contains line-item ship detail records. (Page 333) All ship detail information hasbeen removed from the ORDD file and put into the new data file, ORDSHD.

SUMMARY OF NEW FEATURES
42
ACCLAIM 10 NEW FEATURES
Opkg! Automatically fax the Vendor Overdue Report to vendors. (Page 341) Using the third-party packageFaxFX, you can fax the Vendor Overdue Report to your vendors. Each vendor will receive the section ofthe report listing that vendor’s overdue items.
á Retired company options on Acclaim 10 and Progress sales history. (Page 342) Several companyoptions no longer appear on Acclaim 10 with standard sales history enabled, and on Acclaim 10 withProgress sales history enabled.
á Security on Payables and Receivables Browse and PowrDrill. (Page 374) Users who do not havesecurity access to view payables and receivables information cannot access these options from any browseor PowrDrill.
á Macros feature allows JCM functionality in all areas of the system. (Page 384) Macros allow users toperform JCM-like functions in all areas of the system. Now, you can facilitate the automation of allessential tasks, including those in the Accounting modules.
á Enable user-defined menus and menu options. (Page 400) Create, edit, or delete user-defined menus.These menus can be company-wide, or branch, location, or user-specific.
á Several new auxiliary tables in Auxiliary Table browse and module. (Page 412) The followingauxiliary tables have been added to the Auxiliary Table module: Notepad Classes, Sales Categories, CostChange Codes, Purchase Classes, Sales Classes, Purchase Discount Groups, Sales Discount Groups, andStock Adjustment Codes. In addition, the Sales Rep and Taker menus have been consolidated into onemenu.
á Access information on system databases and files. (Page 414) The File Layout option on the Objectbrowse allows you to view and access system databases, files, and the fields and indexes associated withsystem files.
WORKFLOW
á Specify a range of codes for Workflow events. (Page 447) The Workflow module allows you to specifya range of customers, vendors, or items for which to trigger an event.
á New Workflow events. (Page 449) There are six new types of workflow events for which you canactivate notification: data change modules; items out of stock due to material allocation; new customersentered during order entry; suspended orders; quantity adjustments made in Ship Edit; when the expecteddate for a purchase order is changed to a date after the required date of an associated order.
á Enter a new message group while entering or editing a Workflow event. (Page 462) The systemallows you to easily set up new message groups while you are entering or editing a Workflow event.
á Forward messages to message groups. (Page 463) You can forward messages to message groups.
á New branch parameters. (Page 465) There are two new parameters for which you can enter a range ofbranches.
á There is a new stock location token. (Page 466) You can now enter a new token in the Text field thatindicates the location that is out of free stock.
USER BASE
á Generate POs during order entry. (Page 209) The Edit User Logon Information screen has a new fieldthat allows you to generate purchase orders immediately after accepting an order.
QREBITEMá There are several modifications to the QREBITEM module. (Page 471) The menus in QREBITEM
have been updated to include an option for Rentals. In addition, QREBITEM now offers a report thatdetails any item changes.

SUMMARY OF NEW FEATURES
43
ACCLAIM 10 NEW FEATURES
QPURGEá There are several modifications to the QPURGE module. (Page 477) The menu and screens in
QPURGE have been updated.
PROSHUTDOWNá User-friendly messages. (Page 446) If you have Progress software, you must run PROSHUTDOWN
before running the Kill All Active Ports option. If you run **STOP, the system now displays a messageasking you to run PROSHUTDOWN first.
FULL CHECKá New message in FULL CHECK. (Page 467) When run FULL-CHECK, the system displays a new
message if you need to expand a file.
á New message in FULL CHECK/File Expand. (Page 468) If multiple users attempt to access FullCheck/File Expand, the system displays a new message.
SPOOLQá New messages when you print to SpoolQ. (Page 469) When you print to SpoolQ and the files SPQUED
and SPQUEX or the files PRSPOD and PRSPOX are full, the system displays a message asking you topurge SpoolQ or expand the files that are full.
PROACTIVEá Printer options for PROACTIVE. (Page 139) You can now print the information displayed for
PROACTIVE.
UTILITY COMMAND
á No duplicate message for files online. (Page 140) If you type ON at Utility Command and the files arealready online, the system does not display a DUPLICATE message next to each file name. This savesyou time and keystrokes.
OPTIONAL PACKAGES
ASSEMBLY AND LOT BILLING
Opkg! Retired company options on Acclaim 10. (Page 342) Several company options no longer appear onAcclaim 10.
ASSEMBLY DECODER
Opkg! New optional package allows you to create an unlimited number and variety of assemblies. (Page345) The Assembly Decoder allows you to control the quantity of each component the system builds in anassembly, include multiple other components in the assembly when you add one, and test your assembliesbefore you enter them in order entry. In addition, you can substitute one component for another, delete acomponent from an assembly, copy one assembly into a new one, and delete an entire assembly from yoursystem.

SUMMARY OF NEW FEATURES
44
ACCLAIM 10 NEW FEATURES
CONSIGNED INVENTORY
Opkg! Consignment default in Order Entry. (Page 481) The system provides a company option to determinethe Consignment default during order entry
Opkg! Enhancements to the Consignment module. (Page 486) There are several enhancements to theEnter/Edit Beginning Balance screen. In addition, part number and bin number information appears onboth the Physical Inventory Worksheet and the Physical Inventory Counts screen. The system alsorestricts posting of physical inventory until all discrepancies are cleared. In addition, you can print aConsignment Comparison Report that details stock discrepancies between physical inventory and theconsignment location.
ELECTRICAL FEATURES
Opkg! Omit item codes on showroom quotations. (Page 489) A new option on the Quote Print Defaults screenallows you suppress item codes on showroom quotations.
RENTALS
Opkg! There are several modifications to the QREBITEM module. (Page 471) The menus in theQREBITEM have been updated to include an option for Rentals. In addition, QREBITEM now offers areport that details any item changes.
REBATE JOURNAL
Opkg! Manually complete the key fields in Rebate Journal without the system automatically launching abrowse. (Page 420). When you manually complete the Product Group and Customer Code fields inRebate Journal, Find mode appears and the system does not automatically launch a browse.
Opkg! Rebate Journal Company Options are Moved to the Rebate Journal parameter screen. (Page 492)For more flexibility in running the Rebate Journal, several Rebate Journal Company Options have beenplaced on the Rebate Journal Report parameters screen.
BLANKET ORDERS
Opkg! Track service level for blanket order releases. (Page 445) The system determines if a blanket orderwas a hit or miss on the Service Level Report in Item List based on whether the release was made on timerather than whether the total order can be filled at the time of order entry.
CATALOG
Opkg! Copy MFG Class from Catalog database to Item database. (Page 141) The system now brings theMFG class from the catalog database to the item database or vice versa when you use the copy option inthe Catalog and Item modules.
SUMMARY OF NEW FEATURES
45
ACCLAIM 10 NEW FEATURES
CUSTOMIZED ITEMS / ON-SITE ORDER ENTRY
Opkg! Browse for common customized items. (Page 73) At the Item prompt during order entry and Pricing &Availability, and at the Customer prompt in Customized Item Maintenance, you can browse and select acommon customized item.
Opkg! Manually complete key fields in Customized Item Maintenance without the system automaticallylaunching a browse. (Page 420). When you manually complete the Customer Code and Part Numberfields in Customized Item Maintenance, Find mode appears and the system does not automatically launcha browse.
LOT NUMBERS
Opkg! Lot Numbers browse modifications in Pricing & Availability. (Page 151) There are two modificationsto the Lot Number browse in Pricing & Availability. You can now index by quantity and location, inaddition to expiration date and company-wide quantities.
Opkg! In Pricing & Availability, browse to index lot numbers by lot number, quantity, and lot numbersfrom selected locations. (Page 151) In Pricing & Availability, when you select an item that has lotnumbers, you can choose to index the browse by lot number and quantity.
MULTIPLE BINS
Opkg! New company option determines whether primary bins are affected by form options. (Page 155)The new company option, Process Primary Bins, determines whether the multiple bin form options affectprimary bin numbers in the same way they affect multiple bin numbers.
WELDING
Opkg! Maintain price and cylinder rental rate override tables. (Page 142) You can now use override tablesto calculate cylinder prices in various areas throughout the system. You can also use cylinder rental rateoverride tables to calculate invoice charges during cylinder invoicing.
CREDIT CARD
Opkg! Process credit card transactions. (Page 149) You can now enter credit card information directlythrough the Prophet 21 system, eliminating the need for any separate terminals or printers. You canreceive credit card authorizations during order entry, and post transactions during invoicing. You can alsoenter credit card payments against open receivables.
DOCUMENT IMAGING
Opkg! Save data to COLD storage. (Page 150) With this new Document Imaging package, you can now storeyour data in COLD (Computer Output to Laser Disc) storage in a specific format that is concurrent withBluebird Systems’ software.

SUMMARY OF NEW FEATURES
46
ACCLAIM 10 NEW FEATURES
SERVICE AND MAINTENANCE
Opkg! Service Work Order Information is shown in Real-Time Sales History. (Page 495) Service andMaintenance information displays on Acclaim screens and browses. Invoice line-item view, a repairhistory browse, and several profitability reports benefit from the new Real-Time Sales History module.
INDUSERVE
Opkg! Weekly Additions to the Vendor Report. (Page 502) To prevent missing vendor information problemsfrom weekly item updates, TruServ supplies a smaller weekly vendor change file, in addition to thequarterly file. The Vendor Report displays changes for both the weekly and quarterly periods.
THIRD PARTY PACKAGES
FAXFX
Opkg! Determine whether to send a fax cover sheet. (Page 335) A company-wide option allows you tocontrol whether you send a cover sheet with your faxes.
Opkg! Determine whether to send a parameter sheet when faxing Prophet 21 reports. (Page 337) Acompany-wide option allows you to determine if a parameter sheet is sent when you fax reports.
Opkg! Fax invoices directly through the Invoice, Front Counter, Master Front Counter Printer(PRFRONT), and Cylinder Invoice modules. (Page 339) Previously, if you wanted to fax an invoicethrough the Invoice, Front Counter, PRFRONT, or Invoice modules, you had to first print the fax toanother output device before you could fax it. Now, you can fax an invoice directly through thesemodules.
Opkg! Automatically fax the Vendor Overdue Report to vendors. (Page 341) Using the third-party packageFaxFX, you can fax the Vendor Overdue Report to your vendors. Each vendor will receive the section ofthe report listing that vendor’s overdue items.
PROFIT$
Opkg! Dollar amount of the order or quote appears in AIX file. (Page 491) The dollar amount associatedwith an order or quote created in the Prophet 21 system appears in the output AIX file.
EDI
Opkg! Browse on Translation Tables during edit and delete modes. (Page 505) When you edit or deletetranslation tables, you can browse on existing translation tables linked to specific trading partners.
Opkg! Display Overlay Entries while editing Translation Tables. (Page 507) An option to display theoverlay entries for all transaction sets of a trading partner is available when editing translation tables.
Opkg! View Transaction Sets from the Trading Partner Interchange Information. (Page 509) An optionhas been added to the interchange information screen to view all transaction sets for a specific tradingpartner.

SUMMARY OF NEW FEATURES
47
ACCLAIM 10 NEW FEATURES
Opkg! Verify the Network Name upon entry in the Interchange Information. (Page 511) The system checksthe Network Name for validity when it’s entered in the Trading Partner Interchange Information.
Opkg! Change to the Subelement Separator Default. (Page 512) The Subelement Separator field found in theTrading Partner Interchange Information defaults to a greater than (>) symbol.
Opkg! Browse for Supported Mapping Entry Numbers by Transaction Set. (Page 513) A browse on the P21Field Table # field displays mapping entry numbers by transaction set.
Opkg! Print Trading Partner Overlay Maps and Element Qualifier Tables. (Page 517) Printing maps andelement qualifier tables for a selected overlay can be accomplished through the Transaction Set Editscreen.
Opkg! Display X12 Segment Information when Editing. (Page 520) When a segment is edited in theTransaction Set Edit screen, all X12 segment information for the selected segment is displayed.
Opkg! View Previous Screens when Choosing a Raw Document to Print. (Page 521) An option has beenadded to the Print Raw EDI Document screen to view documents on prior screens.
Opkg! Print the Documentation for Existing Trading Partner Overlays. (Page 522) A Self-Documentationoption has been added to the EDI Setup Utilities menu to print the existing overlays of your tradingpartners.
Opkg! Display Documents for a Specific Trading Partner. (Page 524) The system provides an option to viewall raw EDI documents for a selected trading partner.
Opkg! Display Element ID X12 Values when Editing the Overlay for Send Type Transaction Sets. (Page525) Element ID X12 values appear in the Default Value area of ID type elements that have a P21 FieldTable Number value of Static.
Opkg! Enhancements to Trading Partner Information. (Page 527) New options in the trading partnerinformation section direct where enveloped documents are saved. Each document can be saved to andexported from an AIX directory. There are also new options to archive purged documents and display anInternet address.
Opkg! Use EDI Expedite Purchase to update your purchase orders with changes from purchase orderacknowledgements. (Page 533) The EDI Expedite Purchase module has been created to update EDIpurchase orders with the changes received from corresponding purchase order acknowledgements. Youcan print a journal that records all the processed changes.
Opkg! Journal for Deleted EDI Orders. (Page 536) A journal has been added to the EDI Order Options menuto track those EDI orders that have been deleted from the system.
Opkg! Non-Printable Document Control Characters are converted to Viewable ASCII Characters. (Page537) The ASCII value of non-printable control characters is shown when viewing Trading PartnerInterchange Information and EDI raw documents.
Opkg! Display the Prophet 21 Order Number and the EDI Order Number in the 855 SEND CommentsField. (Page 539) The Comments section of the Print Raw EDI Document screen shows the Prophet 21Order Number and the EDI Order Number (the Customer PO Number) contained in the 855 SendTransaction Set.
Opkg! Control when the 856 Document is Available to be Built. (Page 540) The 856 Build Defaults optioncontrols when the 856 send document is available to be built. You can decide whether the document

SUMMARY OF NEW FEATURES
48
ACCLAIM 10 NEW FEATURES
should be available for building after shipping papers are printed, or after the order is confirmed in theShip Edit module.
Opkg! Create Default Values in Translation Tables. (Page 541) You can enter a default mapping value in atranslation table. When the overlay element is checking the translation table entries for a match on theoriginal value, and a match cannot be found, the system uses the default value.
Opkg! Create an 820 Send document for trading partners who require electronic funds transfer. (Page543) The TP Information section of the EDI Setup Trading Partner option allows you to create 820 senddocuments to send payments electronically to your trading partners.
Opkg! Message notification is sent whenever an EDI document is received. (Page 552) Alert a specifiedmessage group whenever a trading partner’s documents are received.
Opkg! Square D POS Reporting works with Real-Time Sales History. (Page 555) The Square D POS reportcan be enabled through the Company/Packages/VMI menus. The system can then access Real-Time SalesHistory to build an AIX file of Square D POS information.
Opkg! The new EDI 2000 software offers many enhancements to the EDI package. (Page 558) Thisenhanced EDI software includes many new features such as non-stop document processing, extendeddescription mapping entries, and payables integration.
Opkg! Build multiple 810 transaction sets for the same invoice. (Page 560) An option in the TP Informationsection of the EDI 2000 package allows you to build multiple 810 transaction sets from one invoice.

49
Acclaim 10 puts the answers to your questions at your fingertips with Acclaim 10 online help. This featureprovides answers to the most frequently asked questions, as well as information about Acclaim menus, browses,and screens.
ACCESSING ACCLAIM 10 ONLINE HELP
FROM THE TOOLBOX
Press [F7] to access the Toolbox. The following screen appears:
1 SYSTEM-WIDE CHANGES
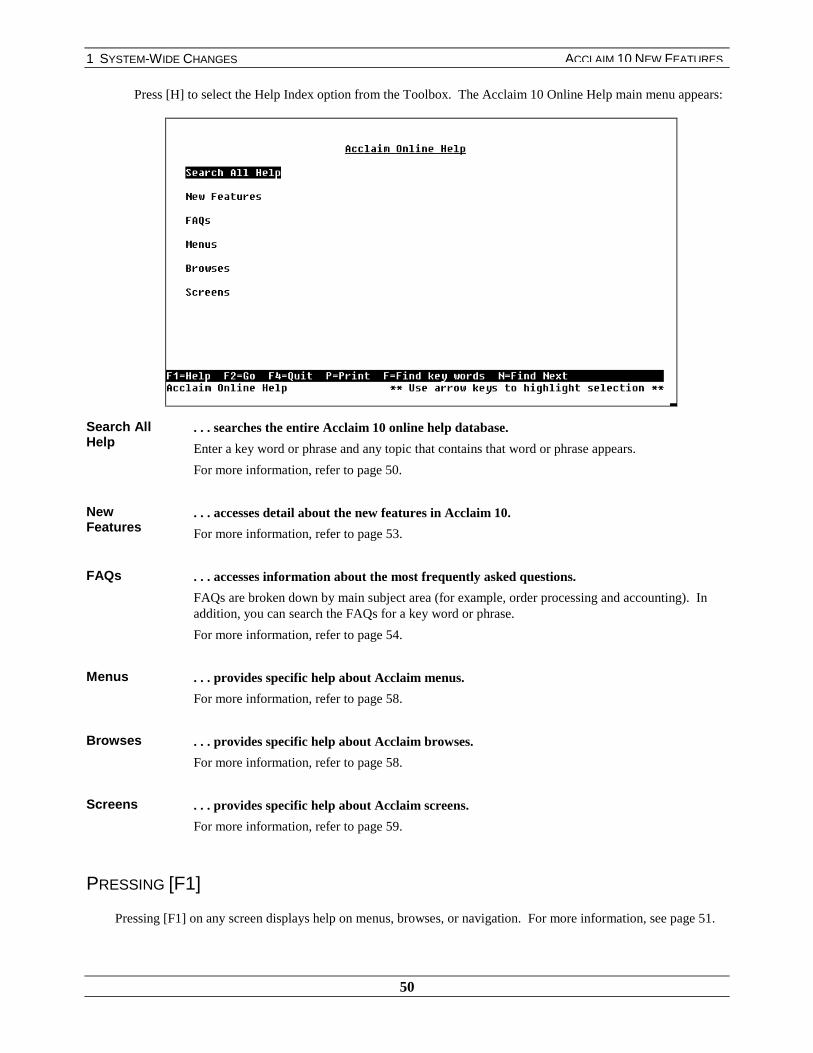
1 SYSTEM-WIDE CHANGES
50
ACCLAIM 10 NEW FEATURES
Press [H] to select the Help Index option from the Toolbox. The Acclaim 10 Online Help main menu appears:
Search AllHelp
. . . searches the entire Acclaim 10 online help database.
Enter a key word or phrase and any topic that contains that word or phrase appears.
For more information, refer to page 50.
NewFeatures
. . . accesses detail about the new features in Acclaim 10.
For more information, refer to page 53.
FAQs . . . accesses information about the most frequently asked questions.
FAQs are broken down by main subject area (for example, order processing and accounting). Inaddition, you can search the FAQs for a key word or phrase.
For more information, refer to page 54.
Menus . . . provides specific help about Acclaim menus.
For more information, refer to page 58.
Browses . . . provides specific help about Acclaim browses.
For more information, refer to page 58.
Screens . . . provides specific help about Acclaim screens.
For more information, refer to page 59.
PRESSING [F1]
Pressing [F1] on any screen displays help on menus, browses, or navigation. For more information, see page 51.
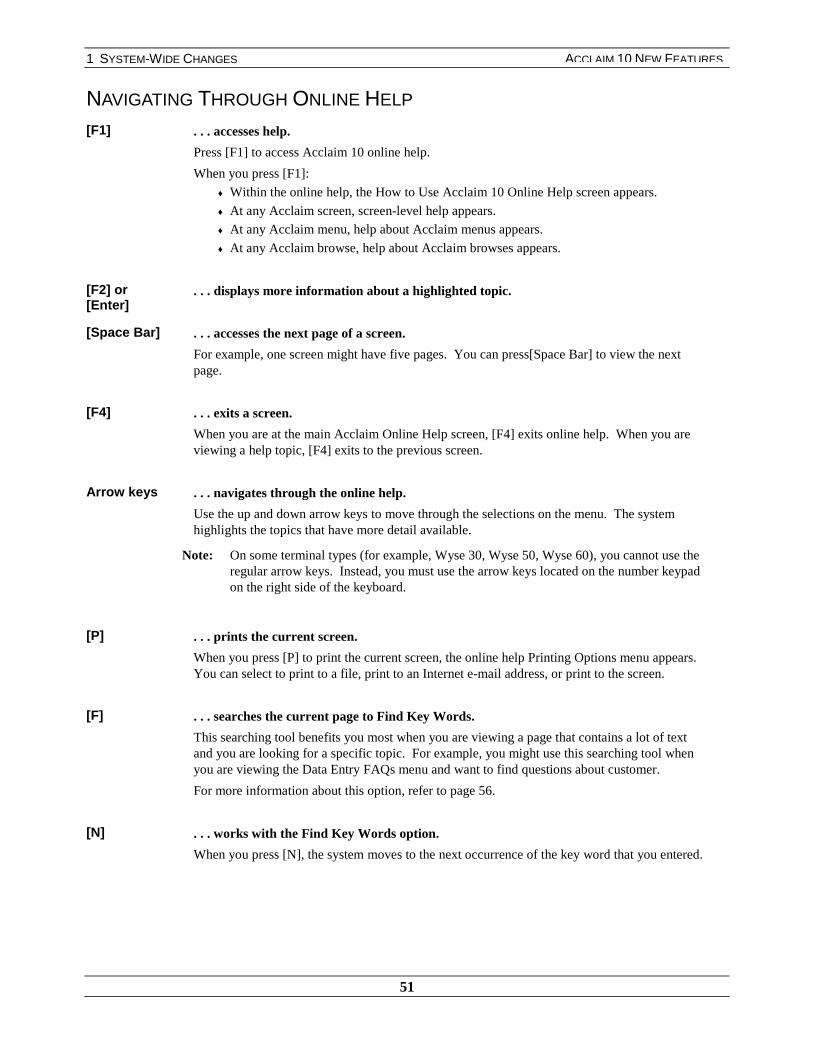
1 SYSTEM-WIDE CHANGES
51
ACCLAIM 10 NEW FEATURES
NAVIGATING THROUGH ONLINE HELP
[F1] . . . accesses help.
Press [F1] to access Acclaim 10 online help.
When you press [F1]:
♦ Within the online help, the How to Use Acclaim 10 Online Help screen appears.
♦ At any Acclaim screen, screen-level help appears.
♦ At any Acclaim menu, help about Acclaim menus appears.
♦ At any Acclaim browse, help about Acclaim browses appears.
[F2] or[Enter]
. . . displays more information about a highlighted topic.
[Space Bar] . . . accesses the next page of a screen.
For example, one screen might have five pages. You can press[Space Bar] to view the nextpage.
[F4] . . . exits a screen.
When you are at the main Acclaim Online Help screen, [F4] exits online help. When you areviewing a help topic, [F4] exits to the previous screen.
Arrow keys . . . navigates through the online help.
Use the up and down arrow keys to move through the selections on the menu. The systemhighlights the topics that have more detail available.
Note: On some terminal types (for example, Wyse 30, Wyse 50, Wyse 60), you cannot use theregular arrow keys. Instead, you must use the arrow keys located on the number keypadon the right side of the keyboard.
[P] . . . prints the current screen.
When you press [P] to print the current screen, the online help Printing Options menu appears.You can select to print to a file, print to an Internet e-mail address, or print to the screen.
[F] . . . searches the current page to Find Key Words.
This searching tool benefits you most when you are viewing a page that contains a lot of textand you are looking for a specific topic. For example, you might use this searching tool whenyou are viewing the Data Entry FAQs menu and want to find questions about customer.
For more information about this option, refer to page 56.
[N] . . . works with the Find Key Words option.
When you press [N], the system moves to the next occurrence of the key word that you entered.
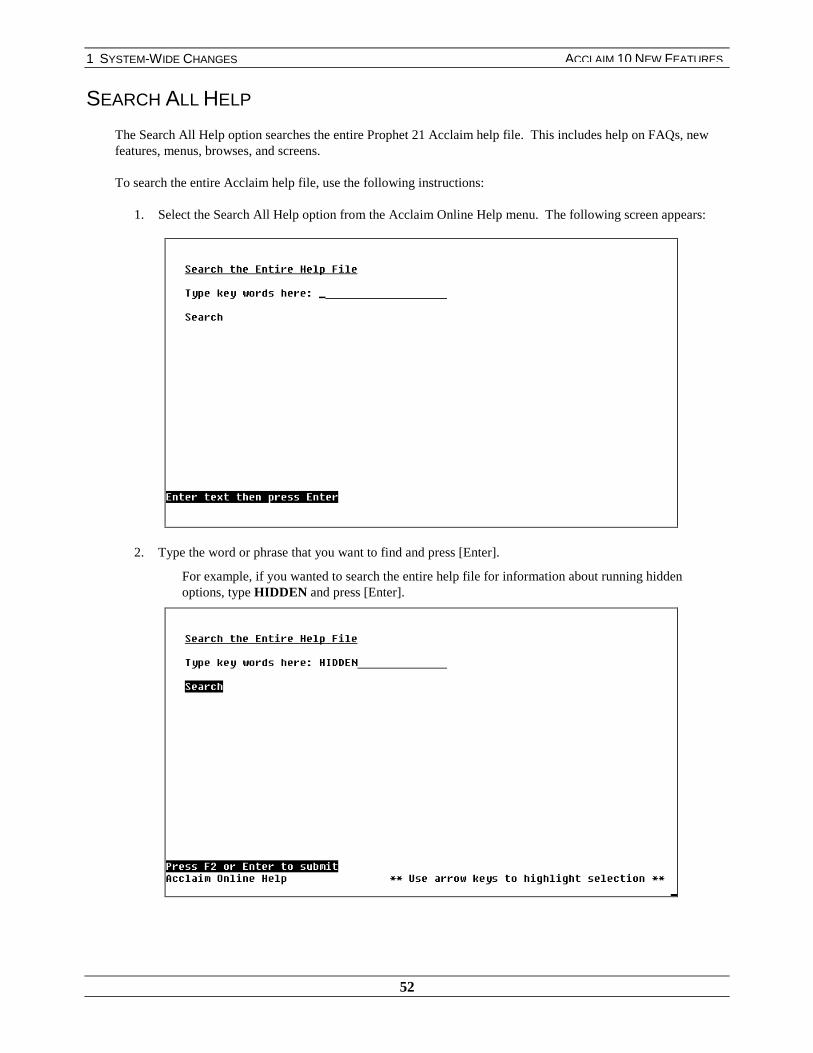
1 SYSTEM-WIDE CHANGES
52
ACCLAIM 10 NEW FEATURES
SEARCH ALL HELP
The Search All Help option searches the entire Prophet 21 Acclaim help file. This includes help on FAQs, newfeatures, menus, browses, and screens.
To search the entire Acclaim help file, use the following instructions:
1. Select the Search All Help option from the Acclaim Online Help menu. The following screen appears:
2. Type the word or phrase that you want to find and press [Enter].
For example, if you wanted to search the entire help file for information about running hiddenoptions, type HIDDEN and press [Enter].

1 SYSTEM-WIDE CHANGES
53
ACCLAIM 10 NEW FEATURES
3. Press [F2] to begin the search. The system displays all matches for the word or phrase that you entered.Any occurrence of the word appears in the search results. The search word might be in either the topictitle or the topic detail.
In our example, the system found nine matches of the word “hidden.” That is, it found everyoccurrence of the term “hidden” in the online help.
4. Highlight a topic and press [Enter] to view the detail, or press [F4] to exit.
NEW FEATURES
The New Features option provides a summary of all of the new features in Acclaim 10.
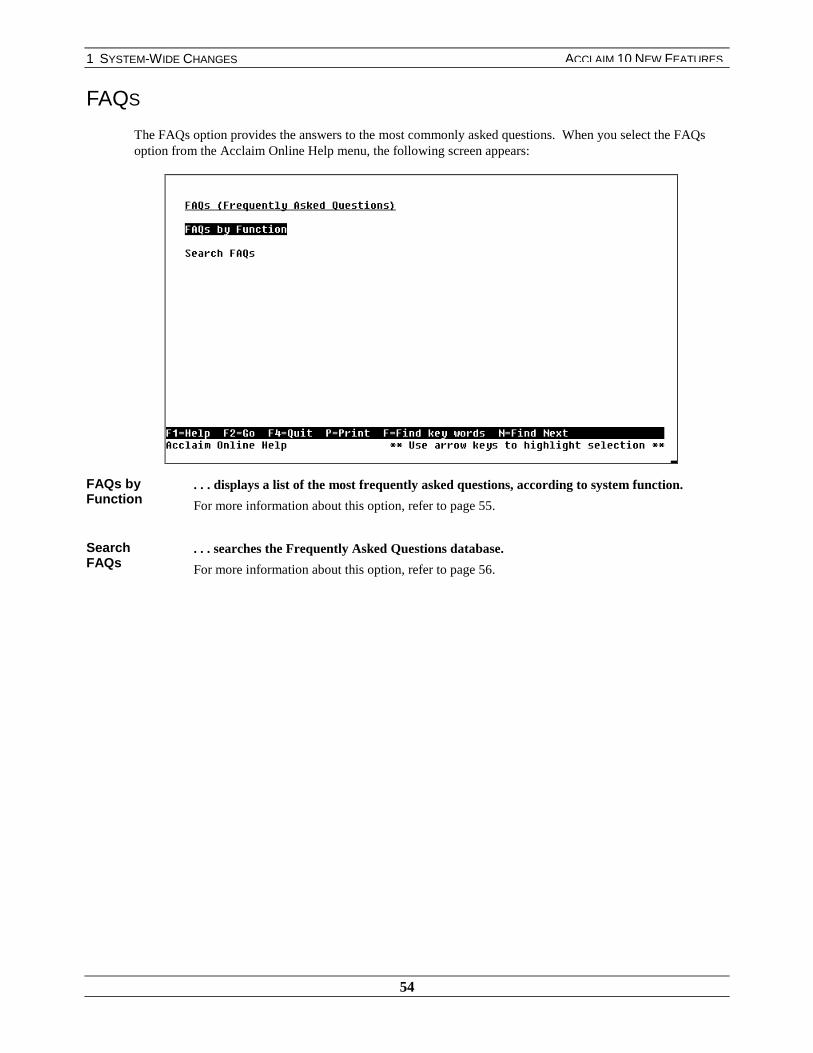
1 SYSTEM-WIDE CHANGES
54
ACCLAIM 10 NEW FEATURES
FAQS
The FAQs option provides the answers to the most commonly asked questions. When you select the FAQsoption from the Acclaim Online Help menu, the following screen appears:
FAQs byFunction
. . . displays a list of the most frequently asked questions, according to system function.
For more information about this option, refer to page 55.
SearchFAQs
. . . searches the Frequently Asked Questions database.
For more information about this option, refer to page 56.

1 SYSTEM-WIDE CHANGES
55
ACCLAIM 10 NEW FEATURES
FAQS BY FUNCTION
When you select the FAQs by Function option from the FAQs menu, the following screen appears:
Select a system function to access answers to the most frequently asked questions about that area of the system.
For example, if you have a question about customer maintenance, select the Data Entry option. A listof the frequently asked questions about the Data Entry modules appears:
Select a topic and press [F2] or [Enter] to display more information.
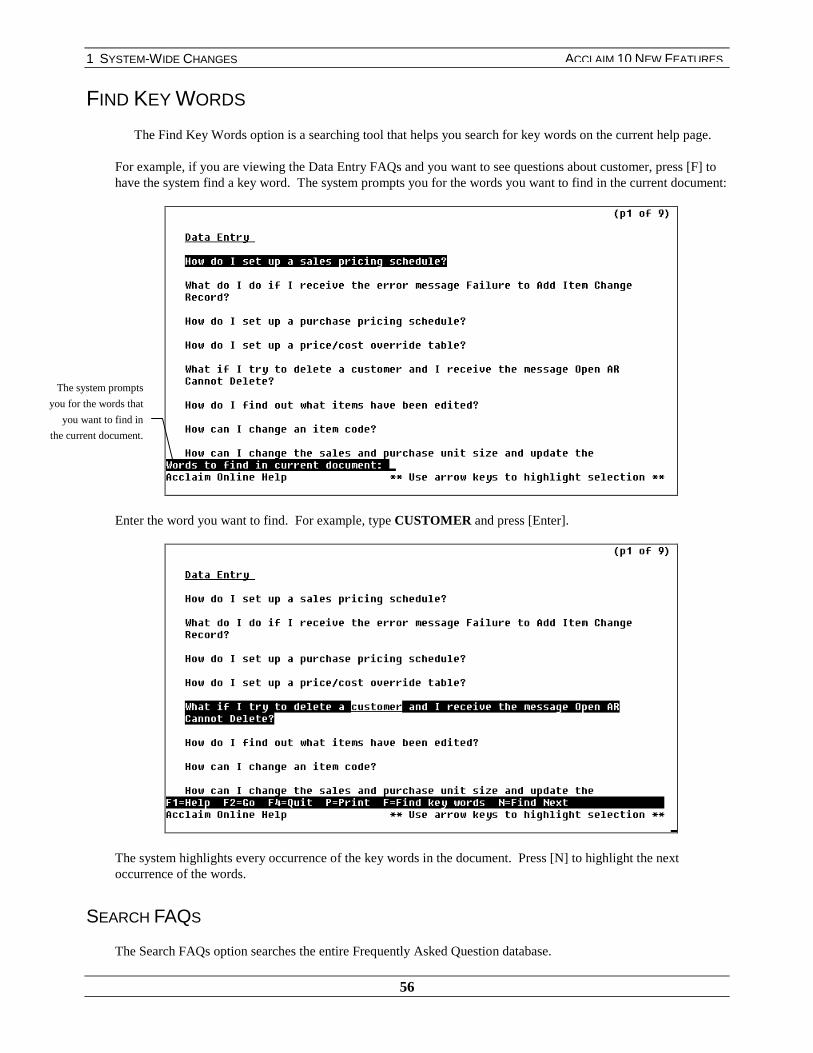
1 SYSTEM-WIDE CHANGES
56
ACCLAIM 10 NEW FEATURES
FIND KEY WORDS
The Find Key Words option is a searching tool that helps you search for key words on the current help page.
For example, if you are viewing the Data Entry FAQs and you want to see questions about customer, press [F] tohave the system find a key word. The system prompts you for the words you want to find in the current document:
Enter the word you want to find. For example, type CUSTOMER and press [Enter].
The system highlights every occurrence of the key words in the document. Press [N] to highlight the nextoccurrence of the words.
SEARCH FAQS
The Search FAQs option searches the entire Frequently Asked Question database.
The system prompts
you for the words that
you want to find in
the current document.

1 SYSTEM-WIDE CHANGES
57
ACCLAIM 10 NEW FEATURES
To search the all of the FAQs, use the following instructions:
1. Select the Search FAQs option from the FAQs menu. The following screen appears:
2. Type the word or phrase that you want to find and press [Enter].
For example, if you want to search the entire help file for information about override tables, typeOVERRIDE TABLES and press [Enter].
3. Press [F2] to begin the search. The system searches the entire FAQ database and displays all matches forthe word or phrase that you entered. Any occurrence of the word in the FAQs appears in the search result.
In our example, the system found two matches of the phrase “override tables.”
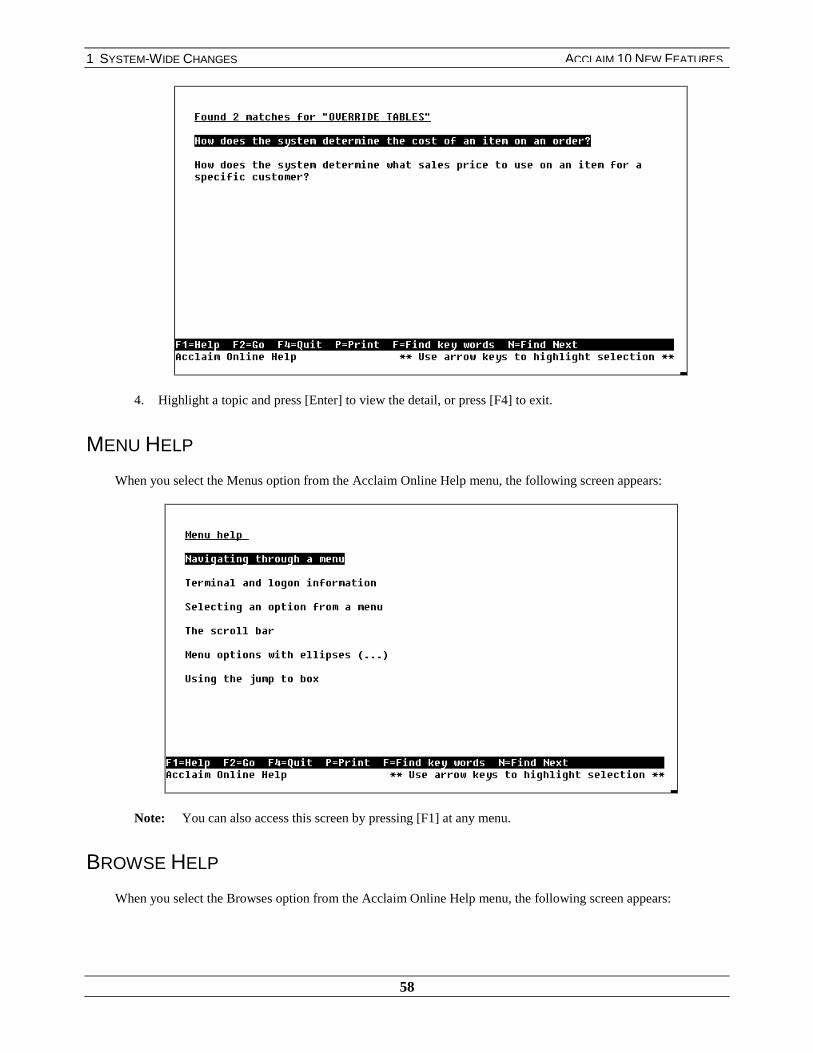
1 SYSTEM-WIDE CHANGES
58
ACCLAIM 10 NEW FEATURES
4. Highlight a topic and press [Enter] to view the detail, or press [F4] to exit.
MENU HELP
When you select the Menus option from the Acclaim Online Help menu, the following screen appears:
Note: You can also access this screen by pressing [F1] at any menu.
BROWSE HELP
When you select the Browses option from the Acclaim Online Help menu, the following screen appears:
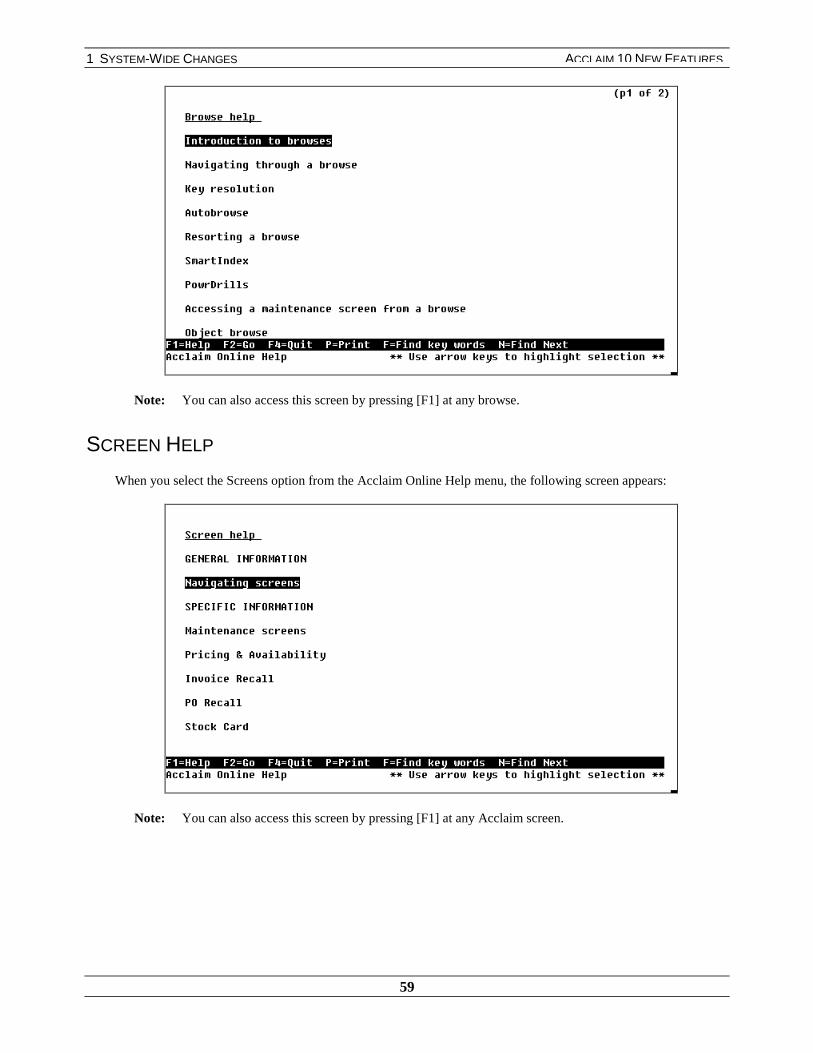
1 SYSTEM-WIDE CHANGES
59
ACCLAIM 10 NEW FEATURES
Note: You can also access this screen by pressing [F1] at any browse.
SCREEN HELP
When you select the Screens option from the Acclaim Online Help menu, the following screen appears:
Note: You can also access this screen by pressing [F1] at any Acclaim screen.

1 SYSTEM-WIDE CHANGES
60
ACCLAIM 10 NEW FEATURES
PACKAGES RETIRED ON ACCLAIM 10Due to system enhancements and development, the following packages are retired on Acclaim 10.
♦ Item Report
♦ Flexwriter
♦ Filewriter
♦ Distributed Processing
♦ EDX (and its associated modules COMCALL and COMTRANS)

1 SYSTEM-WIDE CHANGES
61
ACCLAIM 10 NEW FEATURES
LOGOFF CONFIRMATION PROMPT NO LONGEREXISTS
When you run the job LOGOFF, the system no longer displays the confirmation prompt “Do you want to logoff?(Y N).”
When you run the job LOGOFF, the system automatically brings you to either an AIX prompt or a Job prompt.
For more information about logging off the system, refer to the System Administration manual.

1 SYSTEM-WIDE CHANGES
62
ACCLAIM 10 NEW FEATURES
USER-FRIENDLY MESSAGES
When the system cannot accept your selection, it displays accurate easy-to-understand messages. There are eightnew messages that display throughout the system. These messages are described as follows:
♦ When the Unique Batch ID company option is set to Y in Receivables, the system displays a message ifyou enter a non-unique Batch ID. The message is similar to the following:
♦ On previous levels of the software, when you ran PROSHUTDOWN, the system would display a messagewhich read “If you use the ‘kill all active ports option in **STOP to stop your system, you must run thisoption first.” This message is not relevant to PROSHUTDOWN, therefore it no longer appears when yourun PROSHUTDOWN.
♦ If you have Progress software, you must run PROSHUTDOWN before running the Kill All Active Portsoption. If you run **STOP, the system displays a message asking you to run PROSHUTDOWN first.This message is similar to the following example:
♦ When you run FULL-CHECK, the system displays a message similar to the following if you need toexpand a file.
♦ Only one user can access Full Check/File Expand. If multiple users attempt to access Full Check/FileExpand, the system displays a message similar to the following:
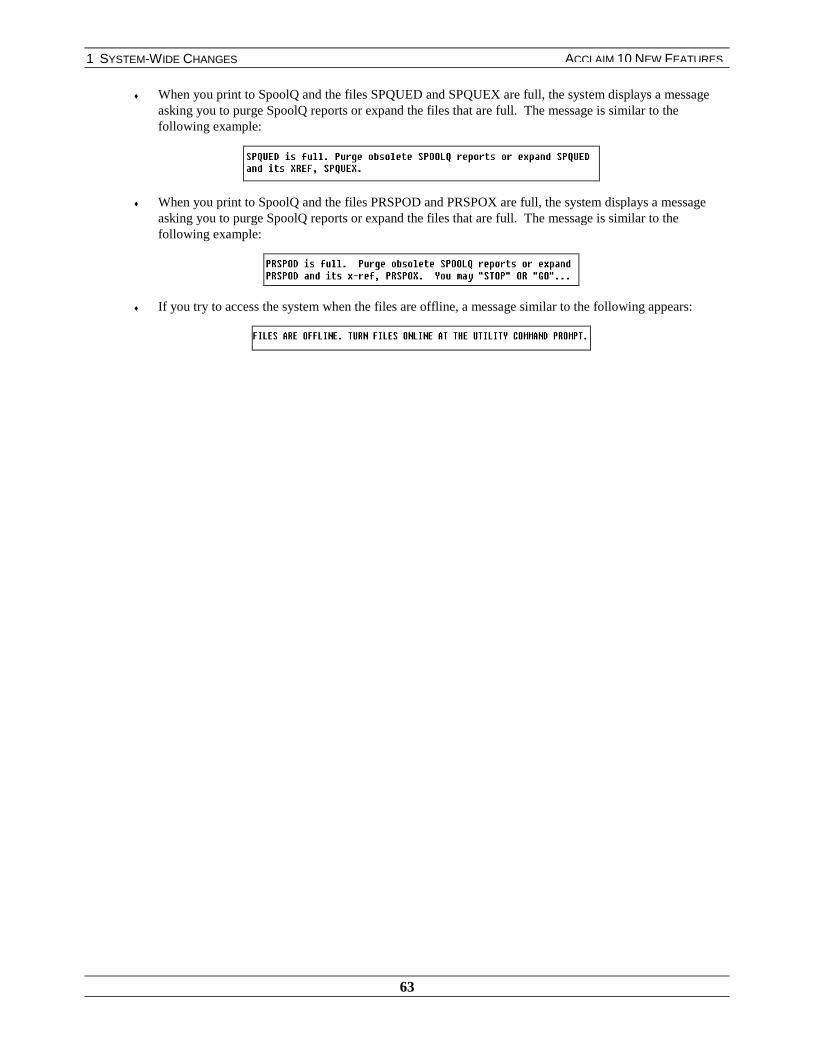
1 SYSTEM-WIDE CHANGES
63
ACCLAIM 10 NEW FEATURES
♦ When you print to SpoolQ and the files SPQUED and SPQUEX are full, the system displays a messageasking you to purge SpoolQ reports or expand the files that are full. The message is similar to thefollowing example:
♦ When you print to SpoolQ and the files PRSPOD and PRSPOX are full, the system displays a messageasking you to purge SpoolQ reports or expand the files that are full. The message is similar to thefollowing example:
♦ If you try to access the system when the files are offline, a message similar to the following appears:

1 SYSTEM-WIDE CHANGES
64
ACCLAIM 10 NEW FEATURES
DETERMINE DEFAULT PRINT QUEUE BY USER IDThe system allows you to determine a default AIX print queue on a user-by-user basis. You determine this defaultin the User Base module.
When you access the user information in User Base, a screen similar to the following appears:
AIX Queue . . . determines the default AIX print queue for the specified user.
You can scan on the AIX Queue field. For more information about scanning, refer to the XLScans manual.
For more information about the fields in the previous screen, refer to the System Administration manual.
PRINTER OPTIONS
When you try to print something, the Printer Options screen appears similar to the following example.
You can
determine a
default AIX
printer Queue.
When you select
the Print to AIX
queue option, the
system uses the
default set up in
User Base.
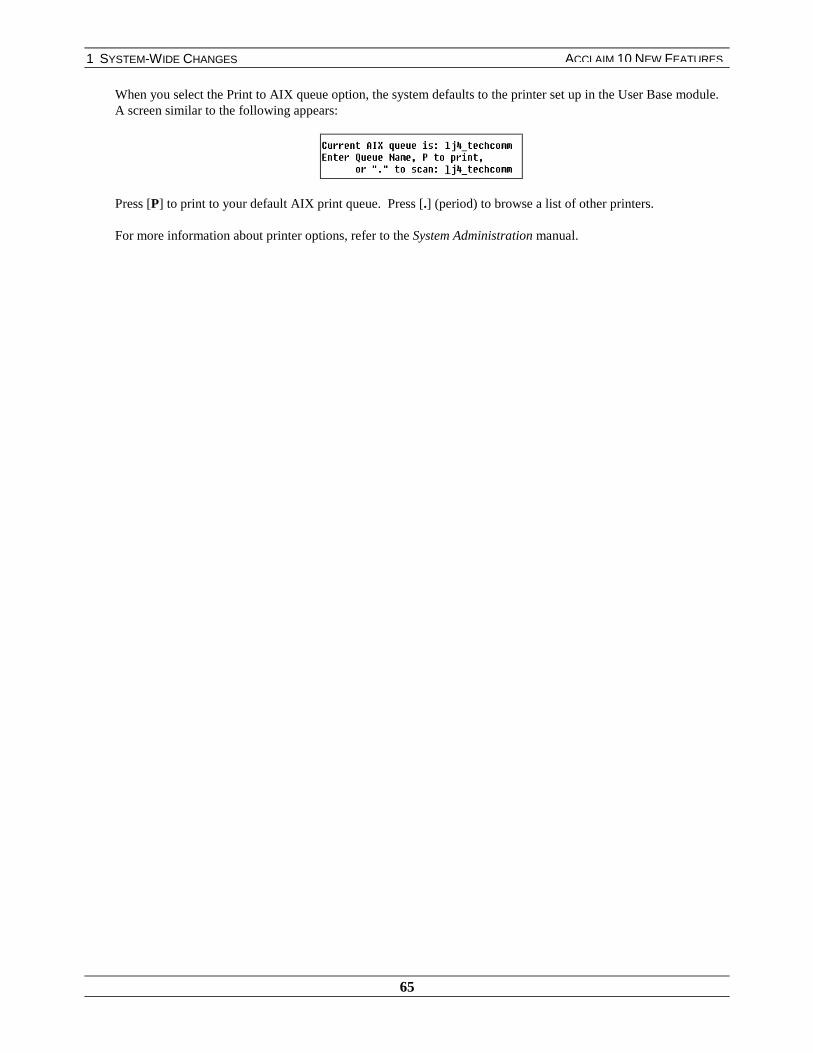
1 SYSTEM-WIDE CHANGES
65
ACCLAIM 10 NEW FEATURES
When you select the Print to AIX queue option, the system defaults to the printer set up in the User Base module.A screen similar to the following appears:
Press [P] to print to your default AIX print queue. Press [.] (period) to browse a list of other printers.
For more information about printer options, refer to the System Administration manual.

1 SYSTEM-WIDE CHANGES
66
ACCLAIM 10 NEW FEATURES
SUBMENU SYSTEM FOR HIDDEN OPTIONS
Because the system offers many hidden options, a submenu displaying the main categories for the different sets ofhidden options has been developed.
UTILITIES
The Hidden Option menu is accessed through the System Administration/Utilities/Hidden Options menus. Q-mode and H-Mode must be enabled to view the Hidden Options selection:
When you select the Hidden Options choice, a submenu appears of the different categories where hiddenoptions are found:
Use the up and down arrow keys to highlight the category you wish to view. Press [Enter] to enter thecategory into the Hidden Option field. Press [Enter] again so that the Hidden Option menu title changes to thecategory you wish to view. You can browse on the specific hidden options that are available in this category:
For more information on running hidden options, refer to the System Administration manual.
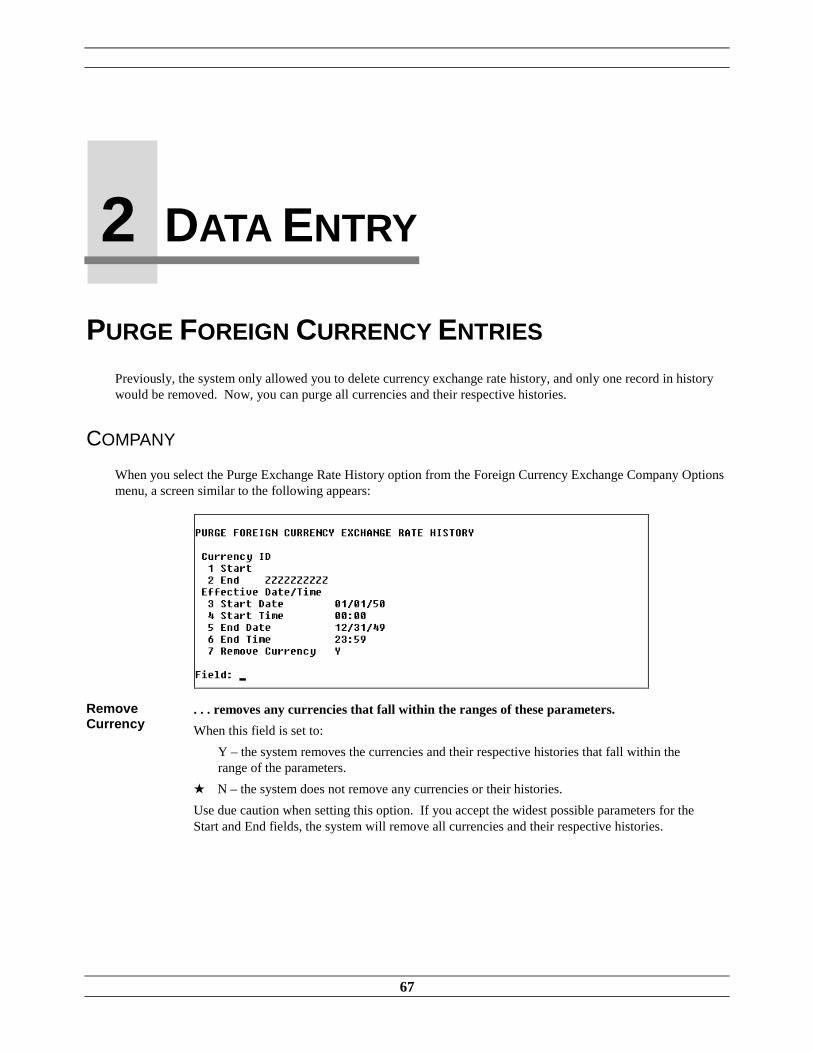
67
PURGE FOREIGN CURRENCY ENTRIES
Previously, the system only allowed you to delete currency exchange rate history, and only one record in historywould be removed. Now, you can purge all currencies and their respective histories.
COMPANY
When you select the Purge Exchange Rate History option from the Foreign Currency Exchange Company Optionsmenu, a screen similar to the following appears:
RemoveCurrency
. . . removes any currencies that fall within the ranges of these parameters.
When this field is set to:
Y – the system removes the currencies and their respective histories that fall within therange of the parameters.
★ N – the system does not remove any currencies or their histories.
Use due caution when setting this option. If you accept the widest possible parameters for theStart and End fields, the system will remove all currencies and their respective histories.
2 DATA ENTRY
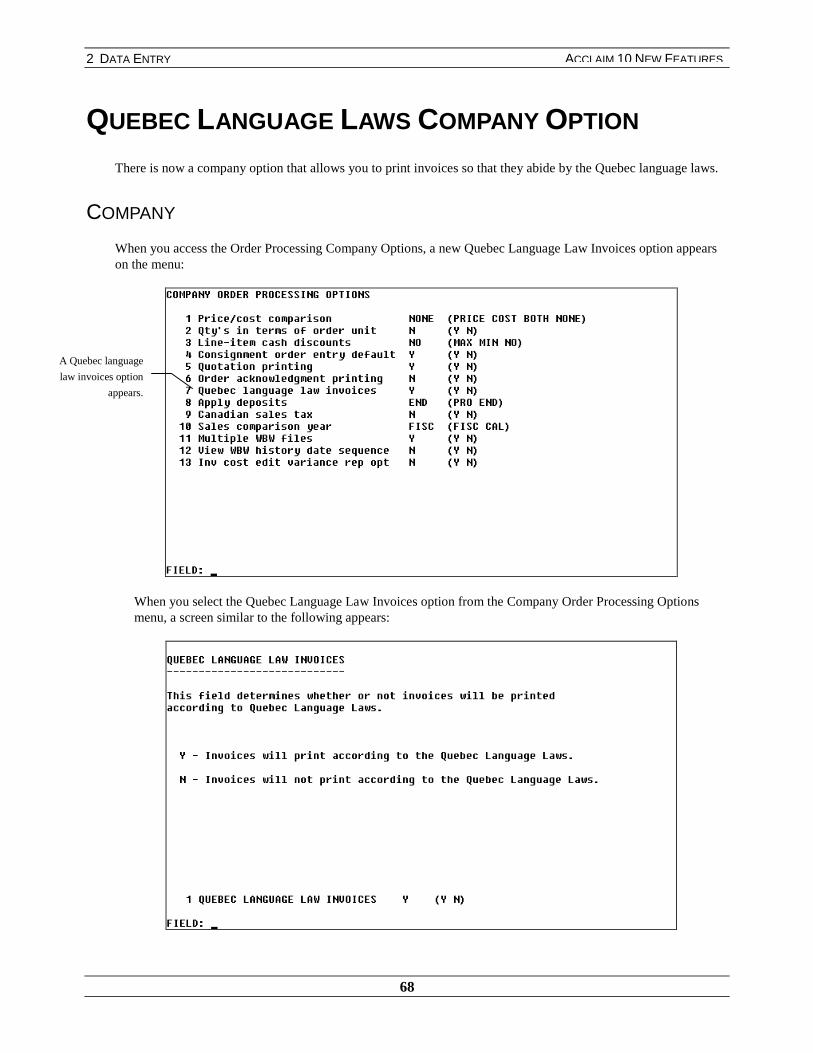
2 DATA ENTRY
68
ACCLAIM 10 NEW FEATURES
QUEBEC LANGUAGE LAWS COMPANY OPTION
There is now a company option that allows you to print invoices so that they abide by the Quebec language laws.
COMPANY
When you access the Order Processing Company Options, a new Quebec Language Law Invoices option appearson the menu:
When you select the Quebec Language Law Invoices option from the Company Order Processing Optionsmenu, a screen similar to the following appears:
A Quebec language
law invoices option
appears.

2 DATA ENTRY
69
ACCLAIM 10 NEW FEATURES
QuebecLanguageLawInvoices
. . . determines whether invoices will print according to the Quebec language laws.
When this field is set to
Y – the invoices print according to Quebec language laws.
★ N – the invoices do not print according to Quebec language laws.
For more information about company options, refer to the Company Setup manual.

2 DATA ENTRY
70
ACCLAIM 10 NEW FEATURES
INVOICE
When you set the Quebec Language Law Invoices company option to Y, the system prints all invoices accordingto Quebec language laws, as shown by the following sample:
For more information about invoices, refer to the Shipping and Invoice Processing manual.
Invoices print according
to Quebec language
laws.

2 DATA ENTRY
71
ACCLAIM 10 NEW FEATURES
NEW OPTION IN CUSTOMER RANKING
The system provides a new option when you generate customer ranking reports. Customers not associated withmaster accounts (“regular” customers) are always included on the report. This new option allows you to includemaster account or sub account information on the Customer Profit Ranking Report and the Customer SalesRanking Report.
When you access customer ranking information from the Customer module, a screen similar to the followingappears:
CustomerType
. . . determines whether master or sub account information appears on the CustomerRanking report.
When this field is set to
★ MAST – the report includes all “regular” customers and those customers set as masteraccounts. Customers set as sub accounts are not included.
SUB – the report includes all “regular” customers and those customers set as sub accounts.Customers set as master accounts are not included.
BOTH – the report includes all “regular” customers, as well as customers set as masteraccounts and customers set as sub accounts.
The Customer
Type field allows
you to include
master account
information or
sub account
information from
customer ranking
reports.
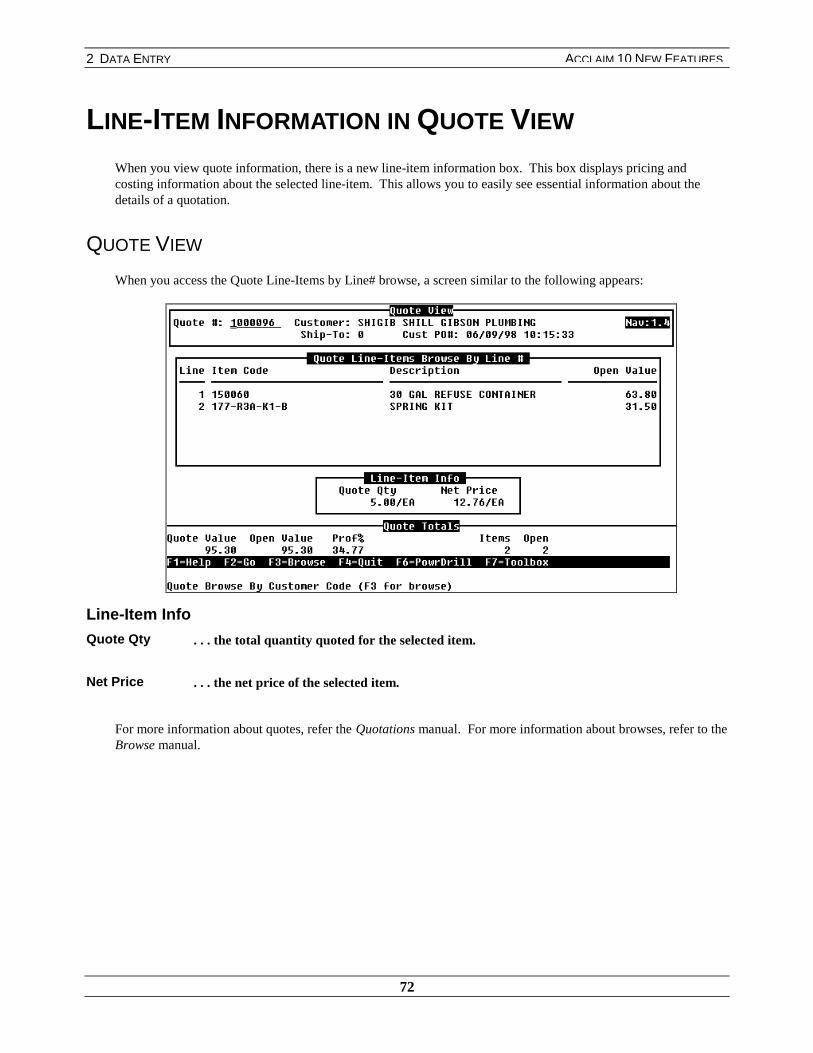
2 DATA ENTRY
72
ACCLAIM 10 NEW FEATURES
LINE-ITEM INFORMATION IN QUOTE VIEW
When you view quote information, there is a new line-item information box. This box displays pricing andcosting information about the selected line-item. This allows you to easily see essential information about thedetails of a quotation.
QUOTE VIEW
When you access the Quote Line-Items by Line# browse, a screen similar to the following appears:
Line-Item Info
Quote Qty . . . the total quantity quoted for the selected item.
Net Price . . . the net price of the selected item.
For more information about quotes, refer the Quotations manual. For more information about browses, refer to theBrowse manual.

2 DATA ENTRY
73
ACCLAIM 10 NEW FEATURES
BROWSE FOR COMMON CUSTOMIZED ITEMS
Previously, you could only browse for customized items of the customer initially specified in Customized ItemMaintenance. Now, there is a new option that allows you to browse for customized items of both primary andcommon ID customers in Customized Item Maintenance, during order entry, and in Pricing & Availability.
CUSTOMIZED ITEM MAINTENANCE
At the Customer prompt in Customized Item Maintenance, index the browse by customer and select the primarycustomer you want. When you press [Tab] to reindex at the customized item browse for the primary customer, thenew option Settings appears:
Settings . . . allows you to select a common ID customer.
When you select Settings, the system then allows you to select either your primary customer orone of the primary customer’s common ID customers. Choosing a common ID customer givesyou access to that customer’s customized items.
When you select the Settings option, the Customized Items Settings screen appears, allowing you to select acommon ID customer.
The new
option
Settings
appears.

2 DATA ENTRY
74
ACCLAIM 10 NEW FEATURES
The first customer displayed in the Common ID Customer field will always default to the primary customer.To select a common ID customer, press [F3] to browse.
For example, on the previous screen, the primary customer is CASSUP, and CASSUP’s common IDcustomers are AMEMAC and CESELS.
Note: If the primary customer does not have any customized items associated with it, the first customerdisplayed in this field defaults to the first common ID customer.
When you select a common ID customer, you can view and select the primary customer’s common customizeditems.
The Customized
Items Settings
screen appears.
The primarycustomerappears in thetop section ofthe screen.
The commoncustomizeditems appearin the itembrowse.
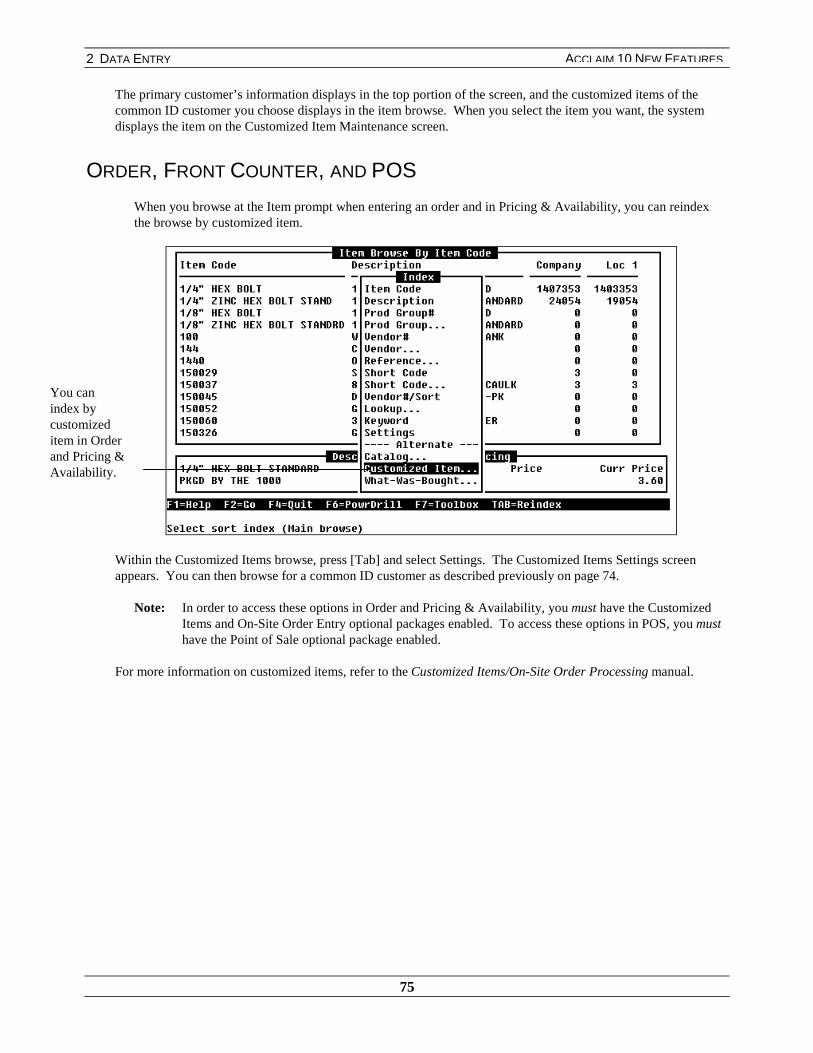
2 DATA ENTRY
75
ACCLAIM 10 NEW FEATURES
The primary customer’s information displays in the top portion of the screen, and the customized items of thecommon ID customer you choose displays in the item browse. When you select the item you want, the systemdisplays the item on the Customized Item Maintenance screen.
ORDER, FRONT COUNTER, AND POS
When you browse at the Item prompt when entering an order and in Pricing & Availability, you can reindexthe browse by customized item.
Within the Customized Items browse, press [Tab] and select Settings. The Customized Items Settings screenappears. You can then browse for a common ID customer as described previously on page 74.
Note: In order to access these options in Order and Pricing & Availability, you must have the CustomizedItems and On-Site Order Entry optional packages enabled. To access these options in POS, you musthave the Point of Sale optional package enabled.
For more information on customized items, refer to the Customized Items/On-Site Order Processing manual.
You canindex bycustomizeditem in Orderand Pricing &Availability.

2 DATA ENTRY
76
ACCLAIM 10 NEW FEATURES
POWRDRILL TO ACCESS THE ORDER VIEW SCREENAT THE ITEM BROWSE
There is a new PowrDrill option at the Item browse that allows you to access the Order View screen.
ITEM BROWSE
You have selected the item you want to view on the order at the Item browse during order entry. Press [F6] toaccess the PowrDrill and select Orders. Select the order you want to view on the Order Line-Items Browse screen.Press [F6] again to access the PowrDrill menu. A screen similar to the following appears:
OrderView
. . . allows you to access the Order View screen.
When you select Order View, the line-item information on the order displays on the Order View screen.
For more information about browses, PowrDrills, and the Order View screen, refer to the Browse manual.

2 DATA ENTRY
77
ACCLAIM 10 NEW FEATURES
VIEW PREVIOUSLY PURCHASED ITEMS AT THE ITEMBROWSE
When you enter a purchase order or vendor return, there is a new option at the item browse that allows you to viewand select items you previously purchased for a vendor.
In addition, you can also PowrDrill on a specific item to view purchase orders that included that item. This featureallows you to have inventory history at your fingertips.
Note: Like inventory history, you must have already received material for at least one part of a line item onthe purchase order in order to view it among the list of purchase orders that include the item youhighlighted.
PURCHASE AND VENDOR RETURN
When you press [Tab] to index the item browse when entering a purchase order or vendor return, the new optionWhat Was Purchased appears.
What WasPurchased
. . . allows you to view the items that you previously purchased for the vendor youspecified.
When you select What Was Purchased, the system displays the items that you previously purchased for the vendor.

2 DATA ENTRY
78
ACCLAIM 10 NEW FEATURES
You can select an item from among this list, or you can highlight the item and PowrDrill to view purchase ordersthat included the item. When you select an item, the system pulls the item code from the item record onto themain screen.
If you want to view purchase orders that include a specific item, highlight the item and press [F6] to PowrDrill. Ascreen similar to the following appears:
Select Purchase Orders to view purchase orders that include this item.
PowrDrill to
view purchase
orders that
include the
item you
selected.

2 DATA ENTRY
79
ACCLAIM 10 NEW FEATURES
When you select a purchase order from the Purchase module, the system pulls the following information onto themain purchasing screen: the item code and description from the highlighted purchase order; the external purchaseorder number (if one exists); the product group; and the discount group.
When you select a vendor return from the Vendor Return module, the system pulls the following information: theitem code and description from the highlighted purchase order; the external purchase order number (if one exists);the product group; discount group, cost; unit size and name. In addition, the original purchase order numberappears with a prefix of ORIG. If the item is a nonstock item, the manufacturer’s code will also appear.
For more information on browses and PowrDrills, refer to the Browse manual.
View
purchase
orders that
include the
item you
highlighted.

2 DATA ENTRY
80
ACCLAIM 10 NEW FEATURES
REINDEX THE ORDER BROWSE FOR SUSPENDEDAND PICK-UP ORDERS BY ORDER NUMBER DURINGORDER ENTRY
You can now reindex the order browse for suspended and pick-up orders by order number.
ORDER AND FRONT COUNTER
SUSPENDED ORDERS
When you select the Resume option from the Order or Front Counter menus and browse at the customer or ordernumber prompt, you can reindex the Suspended Order Browse by order number.
When you press [Tab] to index the browse, the new index option Order # appears, similar to the following screen:
FRONT COUNTER
PICK-UP ORDERS
When you select the Pick-Up Orders option from the Front Counter menu and browse at the order number orcustomer prompt, you can reindex the Suspended Order Browse by order number.
The new option
Order # appears
on the Suspended
Order Browse.
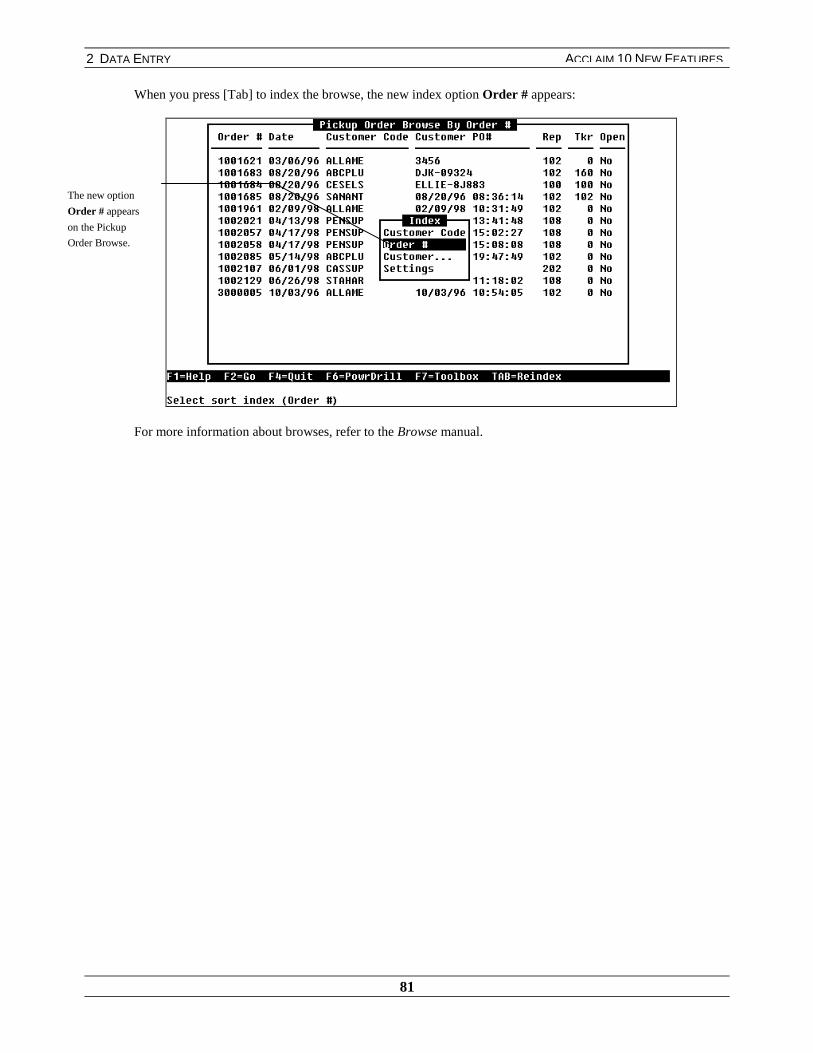
2 DATA ENTRY
81
ACCLAIM 10 NEW FEATURES
When you press [Tab] to index the browse, the new index option Order # appears:
For more information about browses, refer to the Browse manual.
The new option
Order # appears
on the Pickup
Order Browse.
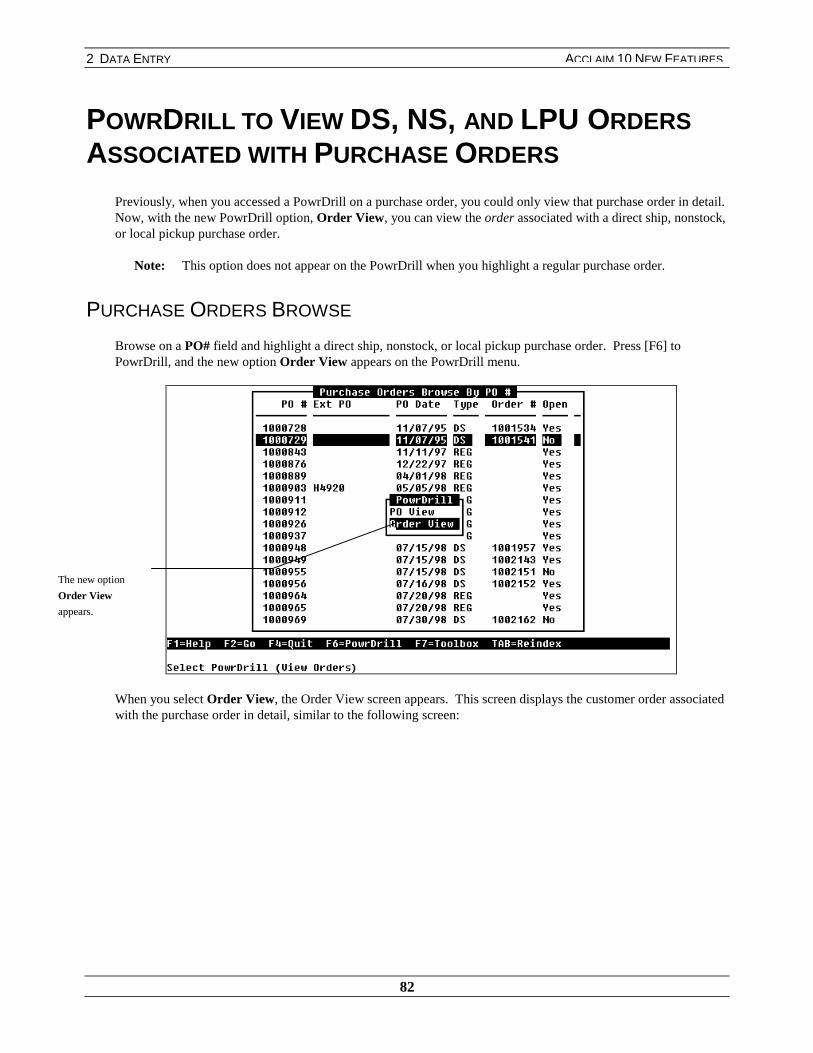
2 DATA ENTRY
82
ACCLAIM 10 NEW FEATURES
POWRDRILL TO VIEW DS, NS, AND LPU ORDERSASSOCIATED WITH PURCHASE ORDERS
Previously, when you accessed a PowrDrill on a purchase order, you could only view that purchase order in detail.Now, with the new PowrDrill option, Order View, you can view the order associated with a direct ship, nonstock,or local pickup purchase order.
Note: This option does not appear on the PowrDrill when you highlight a regular purchase order.
PURCHASE ORDERS BROWSE
Browse on a PO# field and highlight a direct ship, nonstock, or local pickup purchase order. Press [F6] toPowrDrill, and the new option Order View appears on the PowrDrill menu.
When you select Order View, the Order View screen appears. This screen displays the customer order associatedwith the purchase order in detail, similar to the following screen:
The new option
Order View
appears.

2 DATA ENTRY
83
ACCLAIM 10 NEW FEATURES
For more information about PowrDrills, refer to the Browse manual.

2 DATA ENTRY
84
ACCLAIM 10 NEW FEATURES
POWRDRILL TO VIEW DETAILED RECEIVABLES ANDPAYABLES INFORMATION IN THE CUSTOMER RECORDAND VENDOR RECORD
Previously, when you browsed at the Customer prompt in Customer Maintenance and at the Vendor prompt inVendor Maintenance, and selected the Receivables and Payables options respectively from the PowrDrill menu,you could only view limited invoice information.
Now, there is an additional PowrDrill menu that allows you to view detailed receivables and payables informationwhen you view invoices in Customer and Vendor Maintenance.
CUSTOMER MAINTENANCE
Browse at the Customer Code field in Customer Maintenance, highlight a customer and choose Receivables fromthe PowrDrill menu. The View Invoices screen appears.
Here, you can highlight an invoice and PowrDrill to view detailed receivables information. A PowrDrill menusimilar to the following appears:
VENDOR MAINTENANCE
Browse at the Vendor Code field in Vendor Maintenance, highlight a vendor and choose Payables from thePowrDrill menu. The View Payables screen appears.
A new PowrDrill
menu appears.

2 DATA ENTRY
85
ACCLAIM 10 NEW FEATURES
Here, you can select a payable and PowrDrill to view detailed payables information. A PowrDrill menusimilar to the following appears:
For more information on the previous PowrDrills, refer to the Browse manual.
A new PowrDrill
menu appears.

2 DATA ENTRY
86
ACCLAIM 10 NEW FEATURES
NEW POWRDRILL TO VIEW SCRATCHPAD LINE ITEMS
A PowrDrill option allows you to view ScratchPad line-item information from the Transaction History Browse inPricing & Availability.
PRICING & AVAILABILITY
After you’ve selected a customer and item that have sales history, PowrDrill on the item and select the Historyoption. From the Transaction History Browse, highlight a transaction that has a Type of SPAD.
When you PowrDrill on the ScratchPad transaction, the new option, ScratchPad Line View appears.
ScratchPadLine View
. . . accesses the ScratchPad Line Maintenance screen.
When you select ScratchPad Line View, the ScratchPad Line Maintenance screen appears for the item youselected.
7KH�QHZ
RSWLRQ�
6FUDWFK3DG
/LQH�9LHZ
DSSHDUV�

2 DATA ENTRY
87
ACCLAIM 10 NEW FEATURES
A screen similar to the following appears:
For more information on ScratchPad, refer to the Order manual.

2 DATA ENTRY
88
ACCLAIM 10 NEW FEATURES
POWRDRILL ON CATALOG ITEMS TO VIEW PURCHASEPRICING INFORMATION
At the item browse in the order processing modules in the system, you can now PowrDrill on catalog items andview purchase pricing information available for those items.
COMPANY
In order to view this PowrDrill option, you must enable the Company Inventory Control option, Catalog DiscountCosting. This option appears on the second screen of the Company Inventory Control Options screen.
ORDER, FRONT COUNTER, AND PRICING & AVAILABILITY
At the item browse during order entry, PowrDrill on a catalog item with available purchase pricing information.The new PowrDrill option, Purch Pricing Schds appears, similar to the following screen:
When you select the Purch Pricing Schds option, the purchase pricing schedule associated with the catalog itemappears, similar to the following screen:
7KH�QHZ
3RZU'ULOO
RSWLRQ��3XUFK
3ULFLQJ�6FKGV
DSSHDUV�
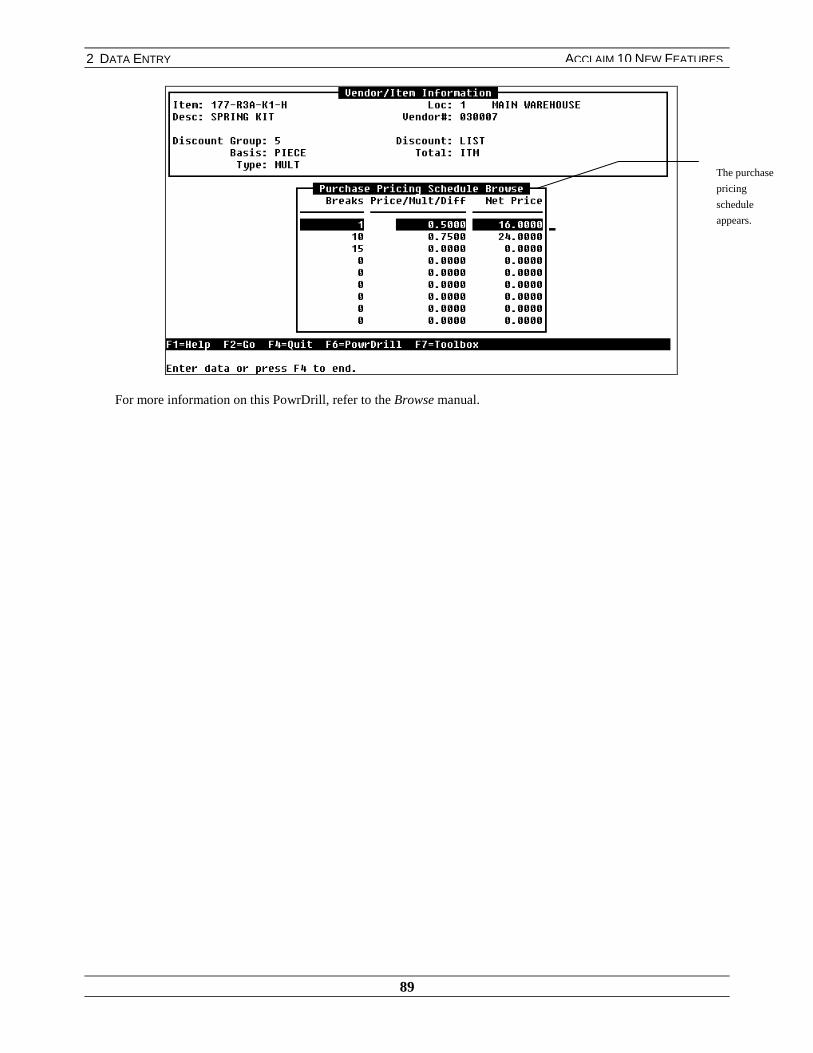
2 DATA ENTRY
89
ACCLAIM 10 NEW FEATURES
For more information on this PowrDrill, refer to the Browse manual.
The purchase
pricing
schedule
appears.

2 DATA ENTRY
90
ACCLAIM 10 NEW FEATURES
PREDEFINED DEFAULTS FOR DATA ENTRY MODULES
You can set predefined defaults for fields in the Customer, Vendor, Item, Item Location, and Catalog modules.When you enter a new customer, vendor, item, or catalog item using the Acclaim maintenance screens, theappropriate fields automatically display the default data that you established. In addition, you can set security onany field in the data entry module so they are not accessible for users who do not have the appropriate security.For more information on setting security, refer to page 94.
For example, the system default for the Freight Code field in Customer Maintenance is P, whichmeans “prepaid freight.” You might always charge your customer for freight, so you would like tochange the default to “B,” which means “bill the customer.” You change the default for the FreightCode field in Customer Maintenance from P to B. This saves time when entering customers, becauseFreight Code defaults to B for every customer.
This feature helps you increase your productivity by allowing you to enter data more quickly because you don’thave to change the fields that include system defaults.
COMPANY
When you select the Acclaim Screens option from the Options menu in Company, a screen similar to thefollowing appears.
Note: This feature works the same way for Customer Maintenance, Vendor Maintenance, ItemMaintenance, Item Location Maintenance, and Catalog Maintenance. Because the feature functionsthe same way for all of these options, only the Customer Maintenance is described in the followingexample.
Before you change the defaults for the option you want, you must first enable the Defaults Screen on the ScreenEnable Browse. Highlight Defaults and press [Enter].

2 DATA ENTRY
91
ACCLAIM 10 NEW FEATURES
When you select Defaults, the Screen Enable Maintenance screen appears. On the Browse field, press [F3] andselect Enable.
Press [F2] to save your changes, and [F4] to return to the Screen Enable Browse.
From the Screen Enable Browse screen, highlight the Customer Maintenance option and press [Enter]. Thefollowing menu appears.
When you select the Screen Defaults option from the PowrDrill menu, a screen similar to the following appears:
Select Defaults.
Set the Browse
field to Enable.

2 DATA ENTRY
92
ACCLAIM 10 NEW FEATURES
Screen Defaults
CustomerMaintenance
. . . indicates the screen for which you are setting the defaults.
Defaults Browse
Default ID . . . lists the options for which you can establish defaults.
You can establish defaults by user ID, branch, or company. This setting allows you todetermine how specific you would like your security to be.
When you first access this screen, the Defaults Browse is blank. To add a default ID to thebrowse, press [Insert].
When you select a Default ID from the Defaults Browse, a screen similar to the following appears:
The information that you enter on this screen automatically appears when you add a new customer record. In thisscreen, you are entering the default information for new customer records; therefore, you should enter informationthat you want to appear for every new customer.

2 DATA ENTRY
93
ACCLAIM 10 NEW FEATURES
For example, if you offer a 2% discount to your customers if they pay within 10 days, you can setthese discount terms as the default in the Customer Maintenance Default screen.
Once you are finished, press [F2] to accept your changes.
After you establish your default information, the system automatically displays the default information in theappropriate fields when you add a new customer record.
Navigation in the Customer Maintenance Default screen functions in the same way as the Customer Maintenancescreen. For more information about the Customer Maintenance screen, refer to the Customer Information manual.
Note: If you establish company-wide defaults for Item Location Maintenance, the system populates all ofthe location information when you create a new item record.
You can set
defaults for every
customer record.
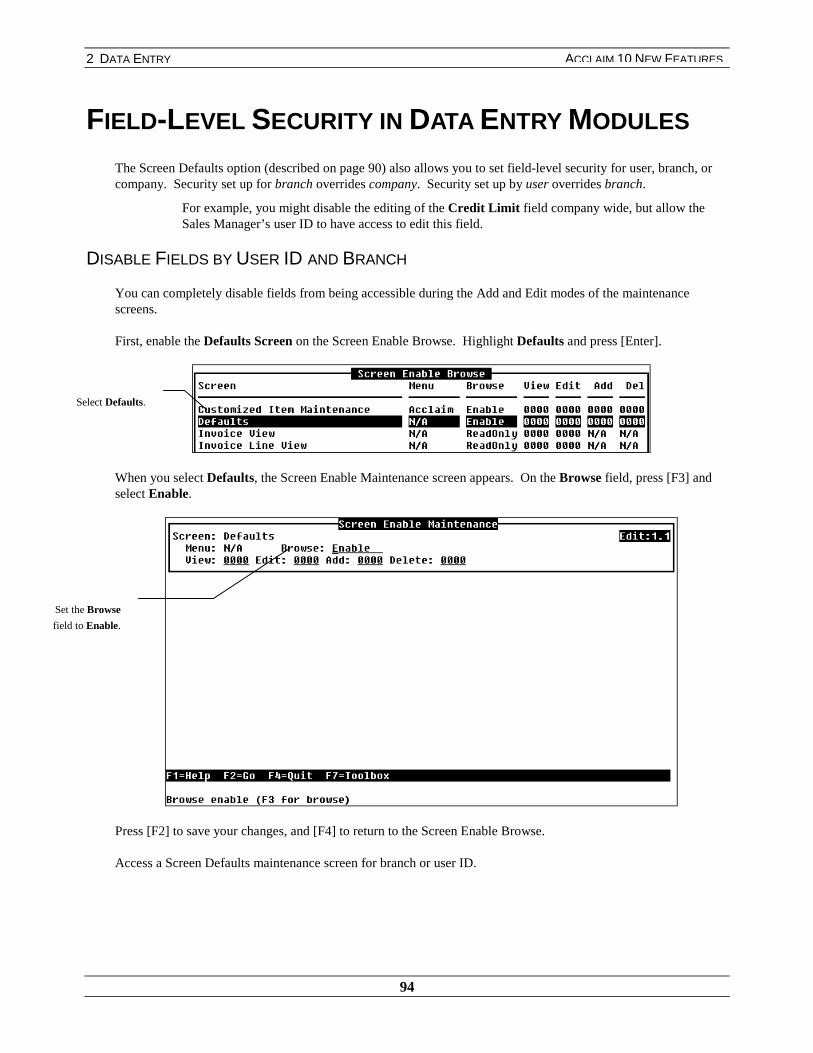
2 DATA ENTRY
94
ACCLAIM 10 NEW FEATURES
FIELD-LEVEL SECURITY IN DATA ENTRY MODULES
The Screen Defaults option (described on page 90) also allows you to set field-level security for user, branch, orcompany. Security set up for branch overrides company. Security set up by user overrides branch.
For example, you might disable the editing of the Credit Limit field company wide, but allow theSales Manager’s user ID to have access to edit this field.
DISABLE FIELDS BY USER ID AND BRANCH
You can completely disable fields from being accessible during the Add and Edit modes of the maintenancescreens.
First, enable the Defaults Screen on the Screen Enable Browse. Highlight Defaults and press [Enter].
When you select Defaults, the Screen Enable Maintenance screen appears. On the Browse field, press [F3] andselect Enable.
Press [F2] to save your changes, and [F4] to return to the Screen Enable Browse.
Access a Screen Defaults maintenance screen for branch or user ID.
Select Defaults.
Set the Browse
field to Enable.
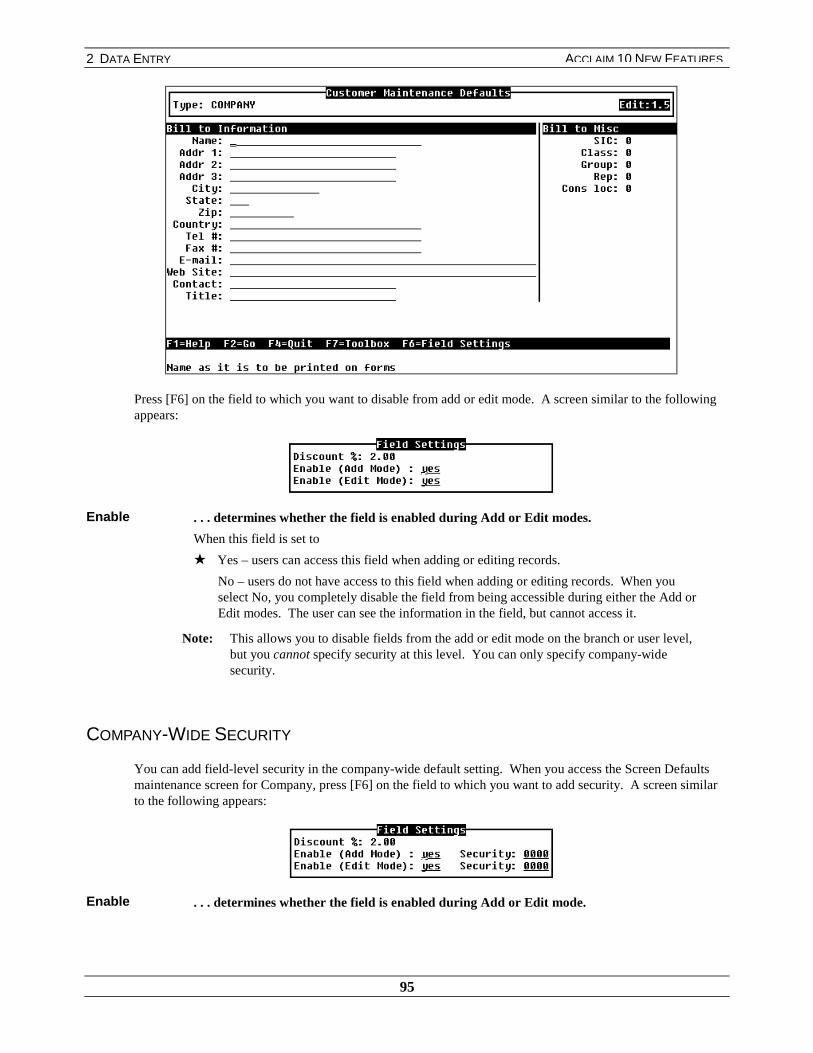
2 DATA ENTRY
95
ACCLAIM 10 NEW FEATURES
Press [F6] on the field to which you want to disable from add or edit mode. A screen similar to the followingappears:
Enable . . . determines whether the field is enabled during Add or Edit modes.
When this field is set to
★ Yes – users can access this field when adding or editing records.
No – users do not have access to this field when adding or editing records. When youselect No, you completely disable the field from being accessible during either the Add orEdit modes. The user can see the information in the field, but cannot access it.
Note: This allows you to disable fields from the add or edit mode on the branch or user level,but you cannot specify security at this level. You can only specify company-widesecurity.
COMPANY-WIDE SECURITY
You can add field-level security in the company-wide default setting. When you access the Screen Defaultsmaintenance screen for Company, press [F6] on the field to which you want to add security. A screen similarto the following appears:
Enable . . . determines whether the field is enabled during Add or Edit mode.

2 DATA ENTRY
96
ACCLAIM 10 NEW FEATURES
Security . . . sets security levels for access to the field.
This field works independently of the security that you set in Acclaim Screens. If someone hassecurity to view, add, or edit a customer record, this security setting determines whether theyhave security to add or edit a specific field.
For example, users can have security to access the customer record so they can edit addressinformation, but they don’t have security to edit sensitive discount term information.
Note: You can only set security at the company level. You cannot set security by branch oruser ID.

2 DATA ENTRY
97
ACCLAIM 10 NEW FEATURES
NEW MODULE FOR ENTERING BUSINESS CONTACTS
There is a new module called Contacts that allows you to enter contact information for customers, vendors, andusers of the Prophet 21 Acclaim system. Now, from any vendor or customer browse, the toolbox, or theContact field in Customer and Vendor Maintenance, you can view this contact information. You can alsoprint reports for each type of contact.
CONTACTS
From the Data Entry menu, select Contacts. The Contacts module appears:
CustomerContactMaintenance
. . . accesses the Customer Contact Maintenance screen, where you can enter contactinformation for customers.
For more information on this option, refer to page 98.
VendorContactMaintenance
. . . accesses the Vendor Contact Maintenance screen, where you can enter contactinformation for vendors.
For more information on this option, refer to page 102.
PersonalContactMaintenance
. . . accesses the Personal Contact Maintenance screen, where you can enter contactinformation for users of Prophet 21 Acclaim.
For more information on this option, refer to page 103.
CustomerContactReport
. . . accesses the parameter screen for the Customer Contact Report. You can print thisreport to view all customer contacts.
For more information on this option, refer to page 104.
The Contacts
module appears.

2 DATA ENTRY
98
ACCLAIM 10 NEW FEATURES
VendorContactReport
. . . accesses the parameter screen for the Vendor Contact Report. You can print thisreport to view all vendor contacts.
For more information on this option, refer to page 105.
PersonalContactReport
. . . accesses the parameter screen for the Personal Contact Report. You can print thisreport to view contacts for users of the Prophet system.
A specific user can only print a Personal Contact Report displaying their personal contacts. Thesystem administrator (“P21” User ID) can print a report for every user, viewing all personalcontacts entered in the system.
For more information on this option, refer to page 105.
CUSTOMER CONTACT MAINTENANCE
When you select Customer Contact Maintenance from the Contact module, a screen similar to the followingappears:
CustomerCode$
. . . customer for whom you want to enter a contact.
Ship To . . . full name of the customer.
The system automatically completes this field when you enter a customer code.
Contact . . . person you want as your contact for the customer.
Enter the name of the contact.
Title . . . position of your contact at their company.

2 DATA ENTRY
99
ACCLAIM 10 NEW FEATURES
Department . . . name of the department in which your contact works at their company.
Telephone . . . contact’s business telephone number.
Fax . . . contact’s business fax number.
E-mail . . . contact’s business e-mail address.
Notes . . . special information about the contact.
For example, you might want to indicate what days your contact is out of the office, or anyspecific responsibilities they might have that are relevant to you.
Add Mode
To enter a new contact, press [Insert] or [Ctrl] [A] at the Customer Code field on the Customer Contact Maintenancescreen. In add mode, select a customer and complete the parameters. The screen should now look similar to thefollowing:
View Mode
To view an existing contact, browse at the Customer Code field on the Customer Contact Maintenance screen, selecta contact and press [Enter]. The contact’s record you specified will appear, similar to the following screen:
In add mode,
enter a new
contact.
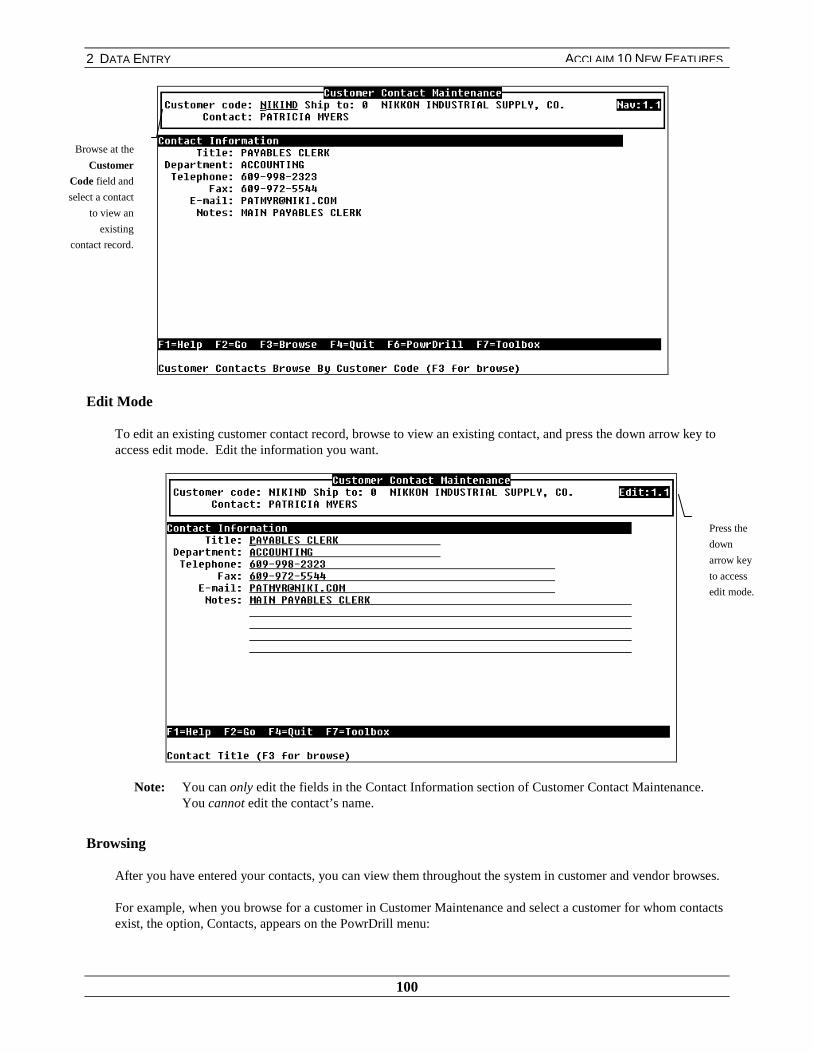
2 DATA ENTRY
100
ACCLAIM 10 NEW FEATURES
Edit Mode
To edit an existing customer contact record, browse to view an existing contact, and press the down arrow key toaccess edit mode. Edit the information you want.
Note: You can only edit the fields in the Contact Information section of Customer Contact Maintenance.You cannot edit the contact’s name.
Browsing
After you have entered your contacts, you can view them throughout the system in customer and vendor browses.
For example, when you browse for a customer in Customer Maintenance and select a customer for whom contactsexist, the option, Contacts, appears on the PowrDrill menu:
Press the
down
arrow key
to access
edit mode.
Browse at the
Customer
Code field and
select a contact
to view an
existing
contact record.
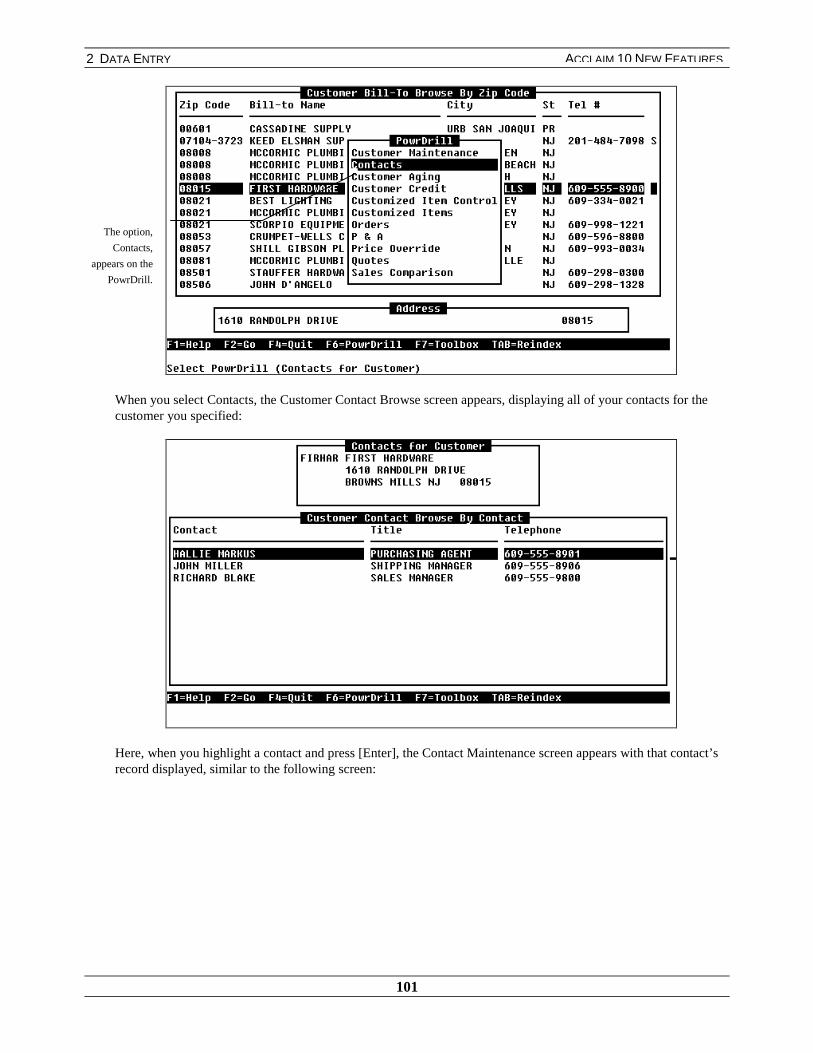
2 DATA ENTRY
101
ACCLAIM 10 NEW FEATURES
When you select Contacts, the Customer Contact Browse screen appears, displaying all of your contacts for thecustomer you specified:
Here, when you highlight a contact and press [Enter], the Contact Maintenance screen appears with that contact’srecord displayed, similar to the following screen:
The option,
Contacts,
appears on the
PowrDrill.

2 DATA ENTRY
102
ACCLAIM 10 NEW FEATURES
You can also reindex this browse by contact name, department, and ship-to information. When you press [Tab] toreindex the browse, a screen similar to the following appears:
VENDOR CONTACT MAINTENANCE
To enter contact information for vendors, select Vendor Contact Maintenance from the Contacts module. Ascreen similar to the following appears:
You can
reindex the
browse by
contact,
department, or
ship-to
information.

2 DATA ENTRY
103
ACCLAIM 10 NEW FEATURES
The fields on the previous screen are very similar to the fields on the Customer Contact Maintenance screen,except this screen pertains to vendor contacts. For more information on the fields on this screen, refer to theCustomer Contact Maintenance section on page 98.
PERSONAL CONTACT MAINTENANCE
To enter contact information for system users, select Personal Contact Maintenance from the Contacts module.A screen similar to the following appears:
The fields on the previous screen are similar to the fields on the Customer Contact Maintenance screen, exceptthis screen pertains to personal contacts for system users. Two new fields on this screen are Addr 3 andCountry, which allow you to enter more detailed address information for your contact.
The personal contacts entered on this screen are specific to the user ID. Contacts entered by a specific user canonly be viewed by that user. The system administrator (“P21” User ID) has access to all personal contacts.
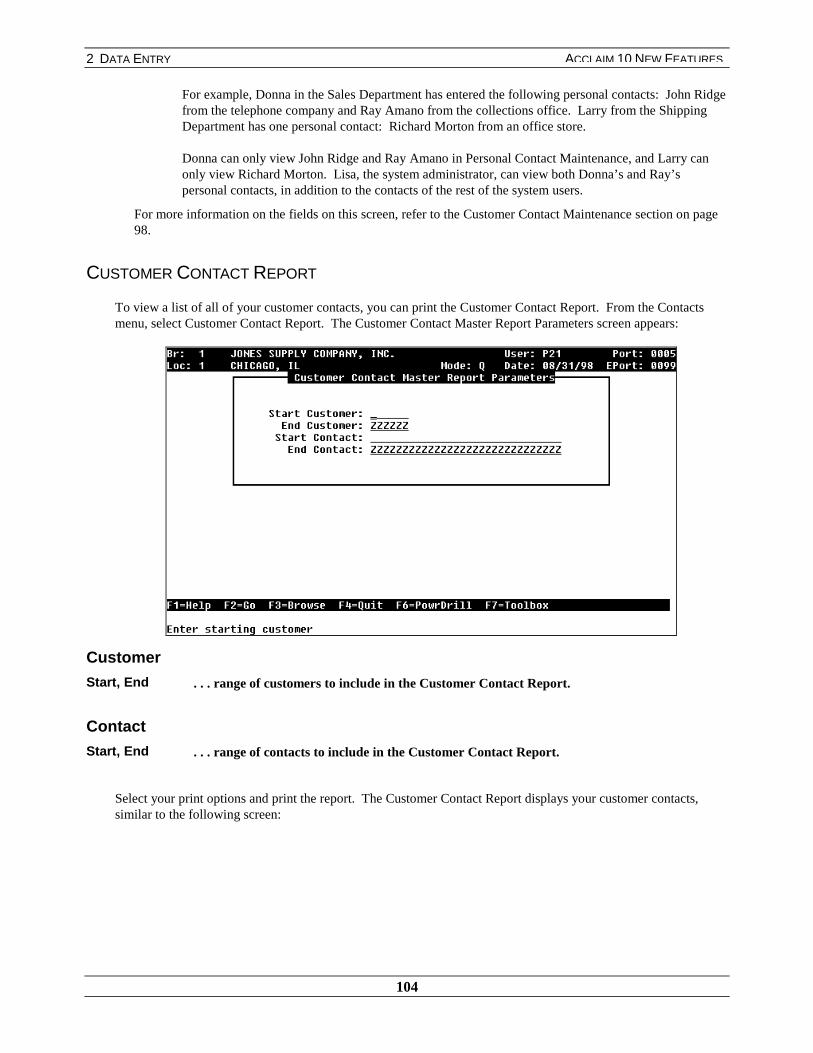
2 DATA ENTRY
104
ACCLAIM 10 NEW FEATURES
For example, Donna in the Sales Department has entered the following personal contacts: John Ridgefrom the telephone company and Ray Amano from the collections office. Larry from the ShippingDepartment has one personal contact: Richard Morton from an office store.
Donna can only view John Ridge and Ray Amano in Personal Contact Maintenance, and Larry canonly view Richard Morton. Lisa, the system administrator, can view both Donna’s and Ray’spersonal contacts, in addition to the contacts of the rest of the system users.
For more information on the fields on this screen, refer to the Customer Contact Maintenance section on page98.
CUSTOMER CONTACT REPORT
To view a list of all of your customer contacts, you can print the Customer Contact Report. From the Contactsmenu, select Customer Contact Report. The Customer Contact Master Report Parameters screen appears:
Customer
Start, End . . . range of customers to include in the Customer Contact Report.
Contact
Start, End . . . range of contacts to include in the Customer Contact Report.
Select your print options and print the report. The Customer Contact Report displays your customer contacts,similar to the following screen:

2 DATA ENTRY
105
ACCLAIM 10 NEW FEATURES
VENDOR CONTACT REPORT
To view a list of all of your vendor contacts, you can print the Vendor Contact Report. From the Contacts menu,select Vendor Contact Report. This screen and the report itself are very similar to the Customer Contact Report.For more information on these screens, refer to the Customer Contact Report section on page 104.
PERSONAL CONTACT REPORT
To view a list of all of your personal contacts, you can print the Personal Contact Report. From the Contactsmenu, select Personal Contact Report. This screen and the report itself are very similar to the CustomerContact Report.
A specific user can only print a Personal Contact Report displaying their personal contacts. The systemadministrator (“P21” User ID) can print a report for every user, viewing all personal contacts entered in thesystem.
For more information on these screens, refer to the Customer Contact Report section on page 104.
CUSTOMER AND VENDOR MAINTENANCE
In Customer and Vendor Maintenance, you can now browse on the Contact field for a customer or vendor withexisting contacts. Although Contact is not a new field on these screens, you now have the ability to browse onthis field and select a contact from among those you entered in the Contacts module.
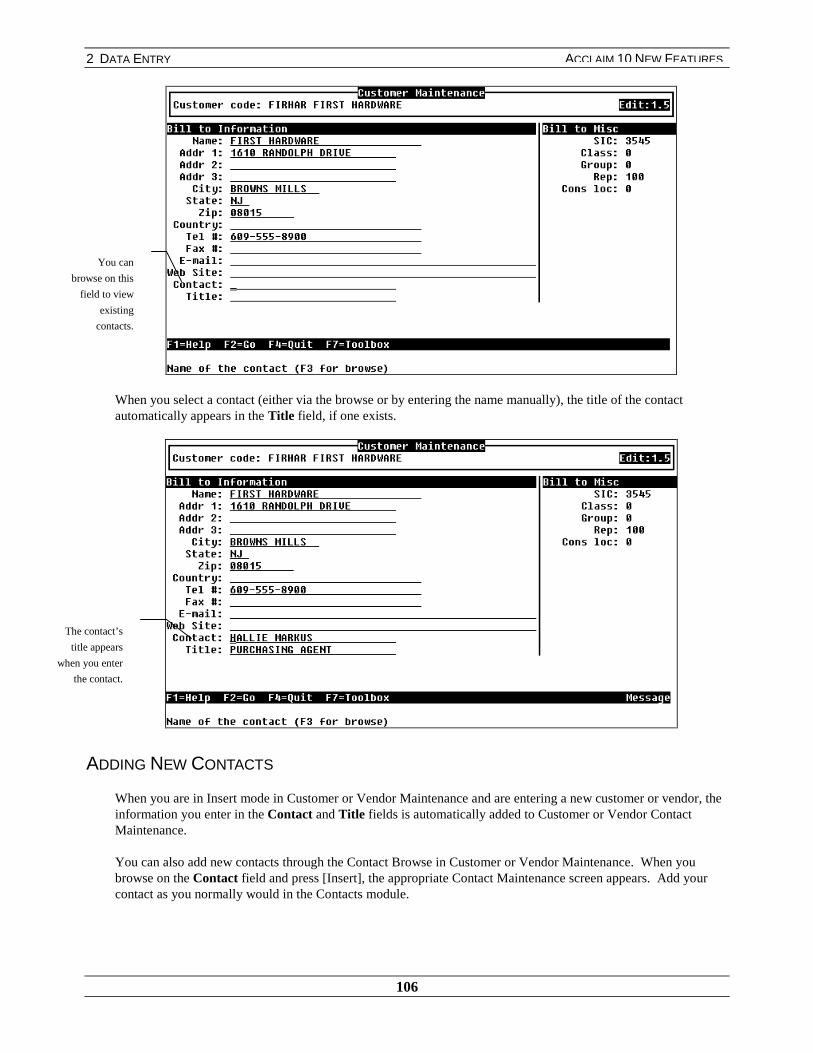
2 DATA ENTRY
106
ACCLAIM 10 NEW FEATURES
When you select a contact (either via the browse or by entering the name manually), the title of the contactautomatically appears in the Title field, if one exists.
ADDING NEW CONTACTS
When you are in Insert mode in Customer or Vendor Maintenance and are entering a new customer or vendor, theinformation you enter in the Contact and Title fields is automatically added to Customer or Vendor ContactMaintenance.
You can also add new contacts through the Contact Browse in Customer or Vendor Maintenance. When youbrowse on the Contact field and press [Insert], the appropriate Contact Maintenance screen appears. Add yourcontact as you normally would in the Contacts module.
You can
browse on this
field to view
existing
contacts.
The contact’s
title appears
when you enter
the contact.
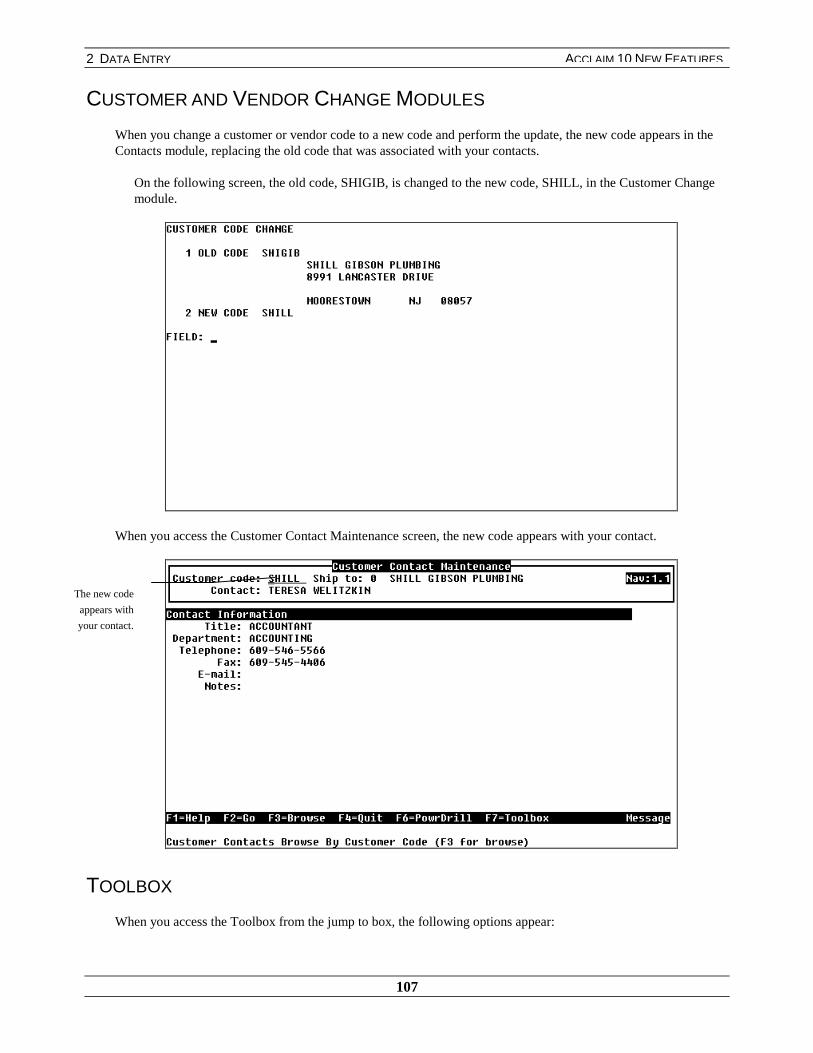
2 DATA ENTRY
107
ACCLAIM 10 NEW FEATURES
CUSTOMER AND VENDOR CHANGE MODULES
When you change a customer or vendor code to a new code and perform the update, the new code appears in theContacts module, replacing the old code that was associated with your contacts.
On the following screen, the old code, SHIGIB, is changed to the new code, SHILL, in the Customer Changemodule.
When you access the Customer Contact Maintenance screen, the new code appears with your contact.
TOOLBOX
When you access the Toolbox from the jump to box, the following options appear:
The new code
appears with
your contact.
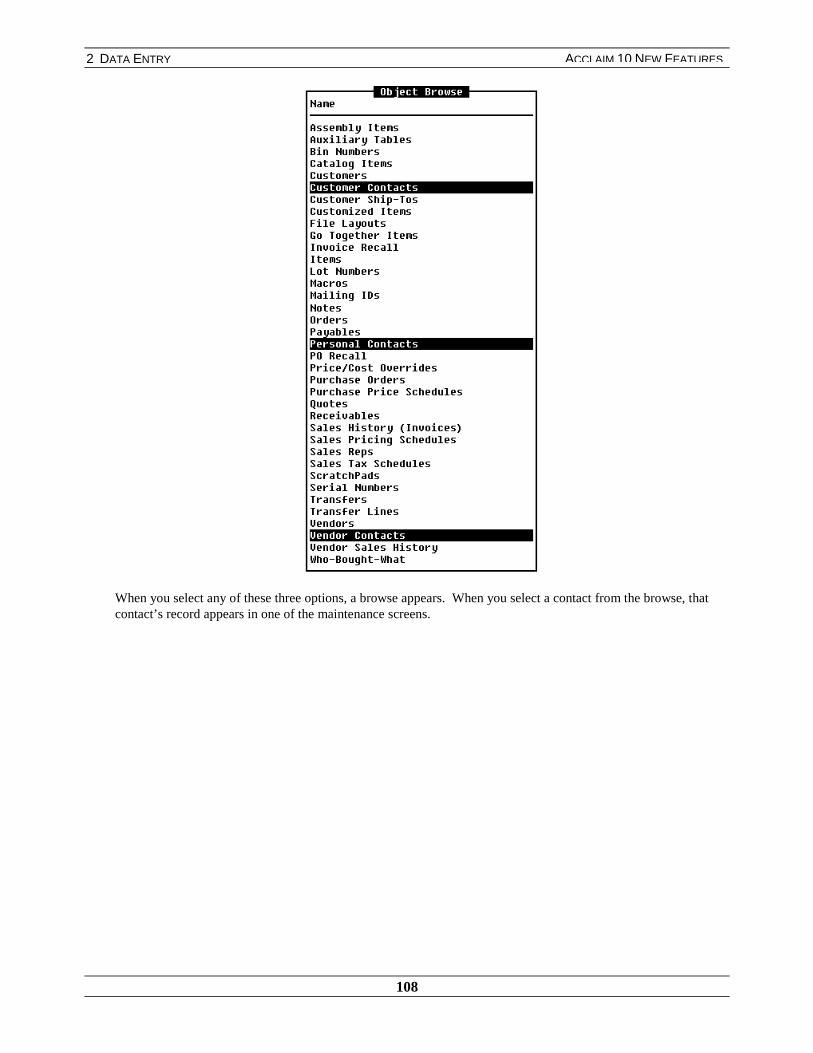
2 DATA ENTRY
108
ACCLAIM 10 NEW FEATURES
When you select any of these three options, a browse appears. When you select a contact from the browse, thatcontact’s record appears in one of the maintenance screens.

2 DATA ENTRY
109
ACCLAIM 10 NEW FEATURES
BRANCH DEFAULT OVERRIDES
In addition to creating override tables for one particular customer, you can set up overrides that only apply to aparticular branch. Rather than specifying a particular customer, enter four asterisks (****) followed by the branchnumber in the Customer field.
Note: If you want to set up company-wide overrides, enter six asterisks (******) in the Customer field.
When the system determines a price or cost from an override table, the system first searches for a specificcustomer override table. If the system cannot find a customer override, the system then searches for a branchdefault override, followed by a company-wide default override.
For more information about override tables, refer to the Pricing Schedules and Override Tables manual.
Enter four
asterisks
followed by the
branch number.
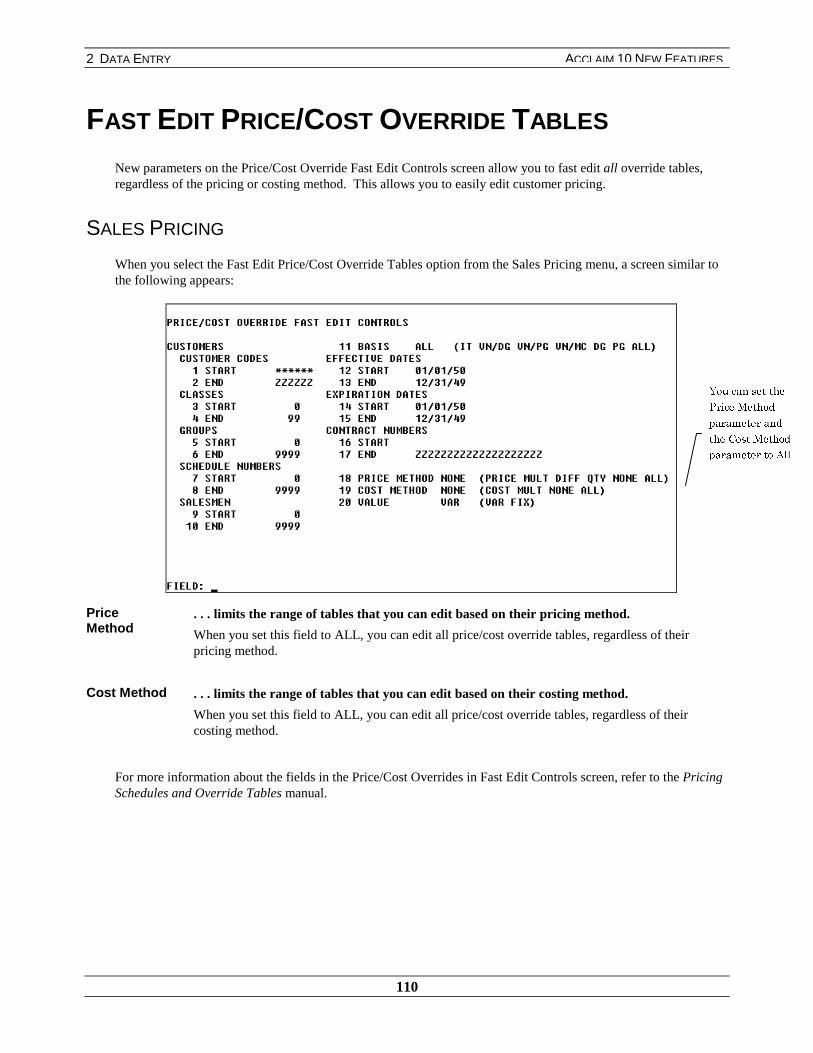
2 DATA ENTRY
110
ACCLAIM 10 NEW FEATURES
FAST EDIT PRICE/COST OVERRIDE TABLES
New parameters on the Price/Cost Override Fast Edit Controls screen allow you to fast edit all override tables,regardless of the pricing or costing method. This allows you to easily edit customer pricing.
SALES PRICING
When you select the Fast Edit Price/Cost Override Tables option from the Sales Pricing menu, a screen similar tothe following appears:
PriceMethod
. . . limits the range of tables that you can edit based on their pricing method.
When you set this field to ALL, you can edit all price/cost override tables, regardless of theirpricing method.
Cost Method . . . limits the range of tables that you can edit based on their costing method.
When you set this field to ALL, you can edit all price/cost override tables, regardless of theircosting method.
For more information about the fields in the Price/Cost Overrides in Fast Edit Controls screen, refer to the PricingSchedules and Override Tables manual.
<RX�FDQ�VHW�WKH
3ULFH�0HWKRG
SDUDPHWHU�DQG
WKH�&RVW�0HWKRG
SDUDPHWHU�WR�$OO�

2 DATA ENTRY
111
ACCLAIM 10 NEW FEATURES
BROWSE ON OPEN BACKORDERS FOR A CUSTOMER
A new option allows you to limit a browse to only view open backorders for a customer.
ORDER/EXPEDITE ORDER
When you browse on customer orders, the system displays a list of all orders for the selected customer. Press[Tab] to access the reindex menu. A screen similar to the following appears:
When you select the Settings option from the Index menu, the following screen appears:
BackordersOnly?
. . . displays backorders only.
From the order browse, you have the option of viewing regular orders and backorders, orbackorders only.
When this field is set to
No – displays regular orders and backorders.
Yes – displays only those orders that are backorders.
Select the
Settings option
from the Index
menu.
A new option appears
in the Order Settings
menu.
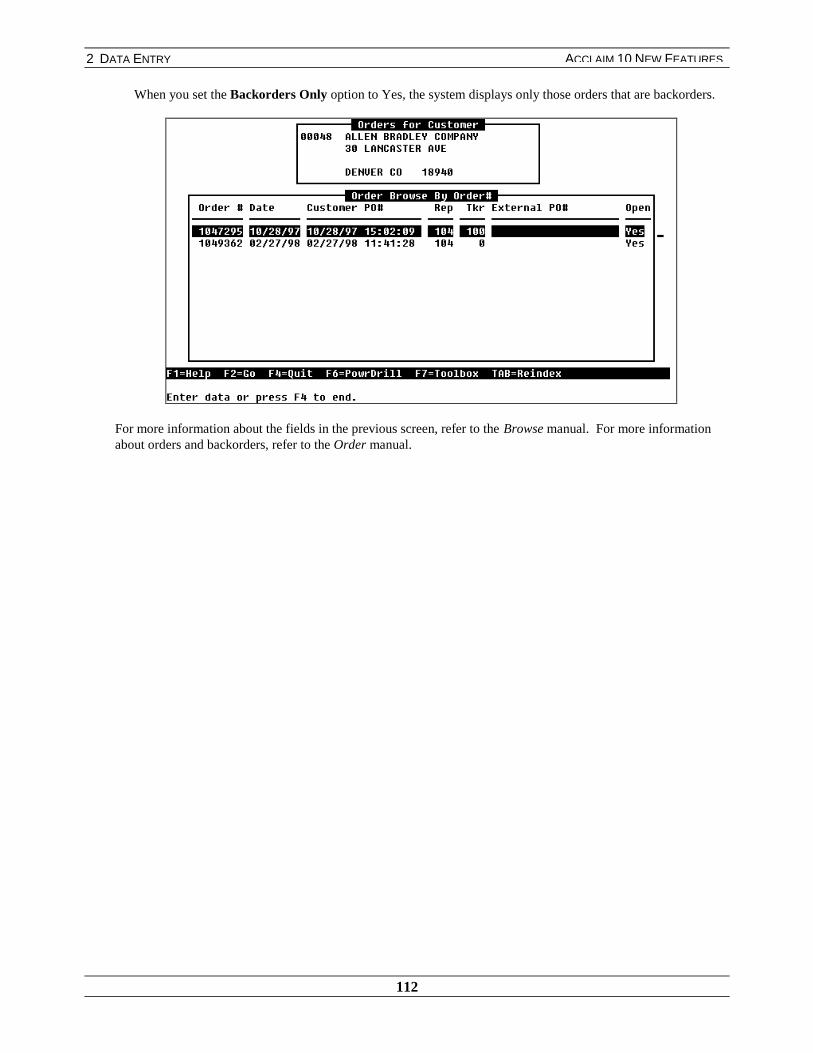
2 DATA ENTRY
112
ACCLAIM 10 NEW FEATURES
When you set the Backorders Only option to Yes, the system displays only those orders that are backorders.
For more information about the fields in the previous screen, refer to the Browse manual. For more informationabout orders and backorders, refer to the Order manual.
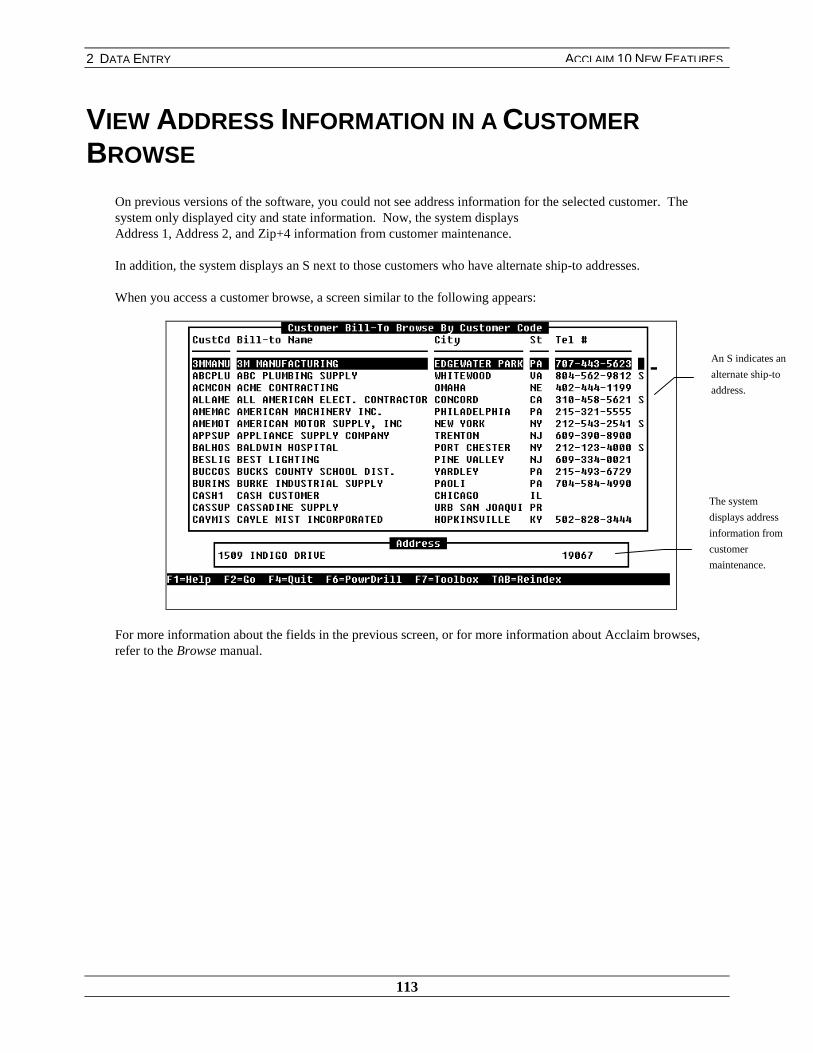
2 DATA ENTRY
113
ACCLAIM 10 NEW FEATURES
VIEW ADDRESS INFORMATION IN A CUSTOMERBROWSE
On previous versions of the software, you could not see address information for the selected customer. Thesystem only displayed city and state information. Now, the system displaysAddress 1, Address 2, and Zip+4 information from customer maintenance.
In addition, the system displays an S next to those customers who have alternate ship-to addresses.
When you access a customer browse, a screen similar to the following appears:
For more information about the fields in the previous screen, or for more information about Acclaim browses,refer to the Browse manual.
The system
displays address
information from
customer
maintenance.
An S indicates an
alternate ship-to
address.

2 DATA ENTRY
114
ACCLAIM 10 NEW FEATURES
E-MAIL ADDRESS IN SHIP-TO INFORMATION
The system provides an E-mail field in the Customer Ship-To Information and Alternate Ship-To Informationscreens. This increases efficiency because employees can obtain important customer information in one centralarea.
CUSTOMER
E-mail . . . customer’s ship-to electronic mail address.
E-mail is 30 characters and holds letters, numbers, or symbols, such as @.
For more information about the other fields in this screen, refer to the Customer Information manual.

2 DATA ENTRY
115
ACCLAIM 10 NEW FEATURES
RECEIVABLES OPTIONS IN CUSTOMER MAINTENANCE
There is a new section in Customer Maintenance that allows you to enter a customer’s receivable defaults. Now,you can set these defaults in the customer record and on the Customer Options screen in Receivables.
CUSTOMER MAINTENANCE
The last section in Customer Maintenance is entitled, “Receivables Options.” You can set a customer’s receivabledefaults in this section.
The values on the previous screen and on the Customer Options screen in Receivables do not override each other.Any changes you make to the values in Customer Maintenance or Receivables will change the other screenautomatically.
For example, if you change the value of the Statement field in Customer Maintenance from ALL toNONE, the value of the Statement field in Receivables will automatically change to NONE.
For further information on the fields on the Statement Other Receivable Defaults screen, refer to the Receivablesmanual.
The
Receivables
Options screen
appears.

2 DATA ENTRY
116
ACCLAIM 10 NEW FEATURES
PRODUCT GROUP CHANGE MODULE
Use the new Product Group Change module to change the product group that is associated with an item or agroup of items. These changes are reflected in your sales history when you reorganize your who-bought-whatinformation.
Note: This feature applies to both standard sales history and Progress sales history. You do not have toconvert your standard sales history to Progress sales history to use this feature.
PRODUCT GROUP
To access the Product Group Change module, choose this option from the Data Change module or enter thefollowing at the jump to box: PG-CHANGE [Enter].
When you access the Data Change module, the new option, Product Group, appears.
ProductGroup
. . . accesses the Product Group Change module.
Product
Group appears
on the Data
Change
module.
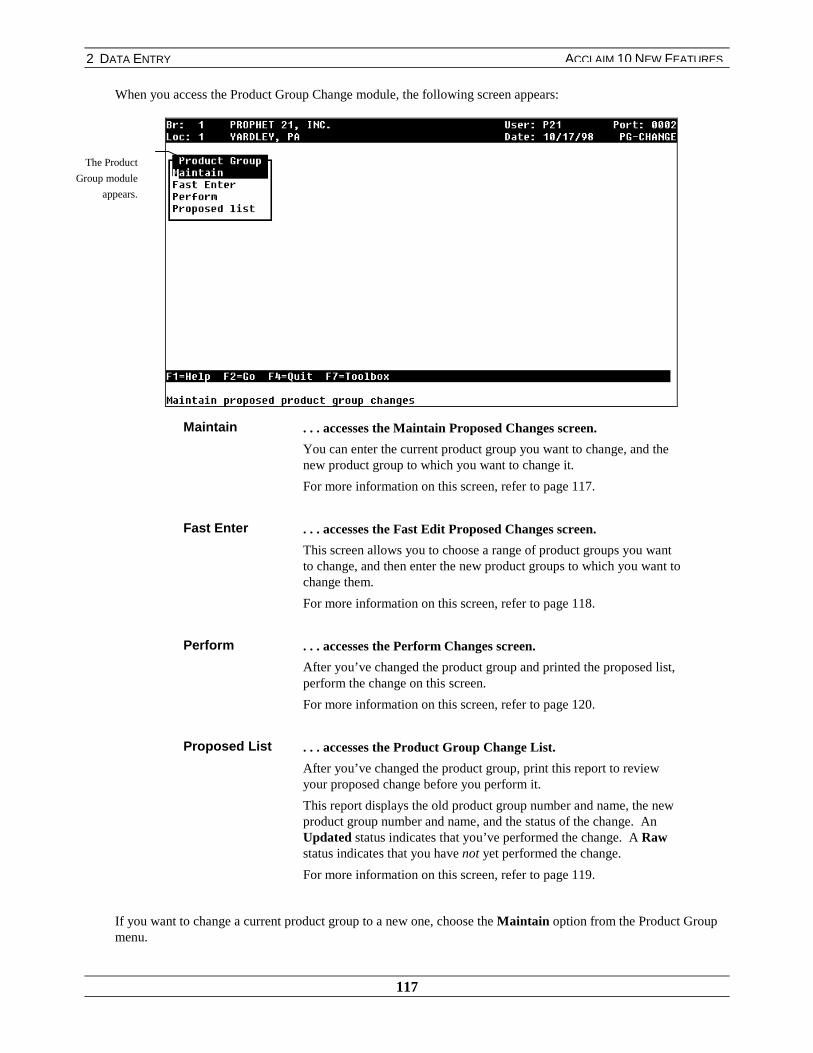
2 DATA ENTRY
117
ACCLAIM 10 NEW FEATURES
When you access the Product Group Change module, the following screen appears:
Maintain . . . accesses the Maintain Proposed Changes screen.
You can enter the current product group you want to change, and thenew product group to which you want to change it.
For more information on this screen, refer to page 117.
Fast Enter . . . accesses the Fast Edit Proposed Changes screen.
This screen allows you to choose a range of product groups you wantto change, and then enter the new product groups to which you want tochange them.
For more information on this screen, refer to page 118.
Perform . . . accesses the Perform Changes screen.
After you’ve changed the product group and printed the proposed list,perform the change on this screen.
For more information on this screen, refer to page 120.
Proposed List . . . accesses the Product Group Change List.
After you’ve changed the product group, print this report to reviewyour proposed change before you perform it.
This report displays the old product group number and name, the newproduct group number and name, and the status of the change. AnUpdated status indicates that you’ve performed the change. A Rawstatus indicates that you have not yet performed the change.
For more information on this screen, refer to page 119.
If you want to change a current product group to a new one, choose the Maintain option from the Product Groupmenu.
The Product
Group module
appears.
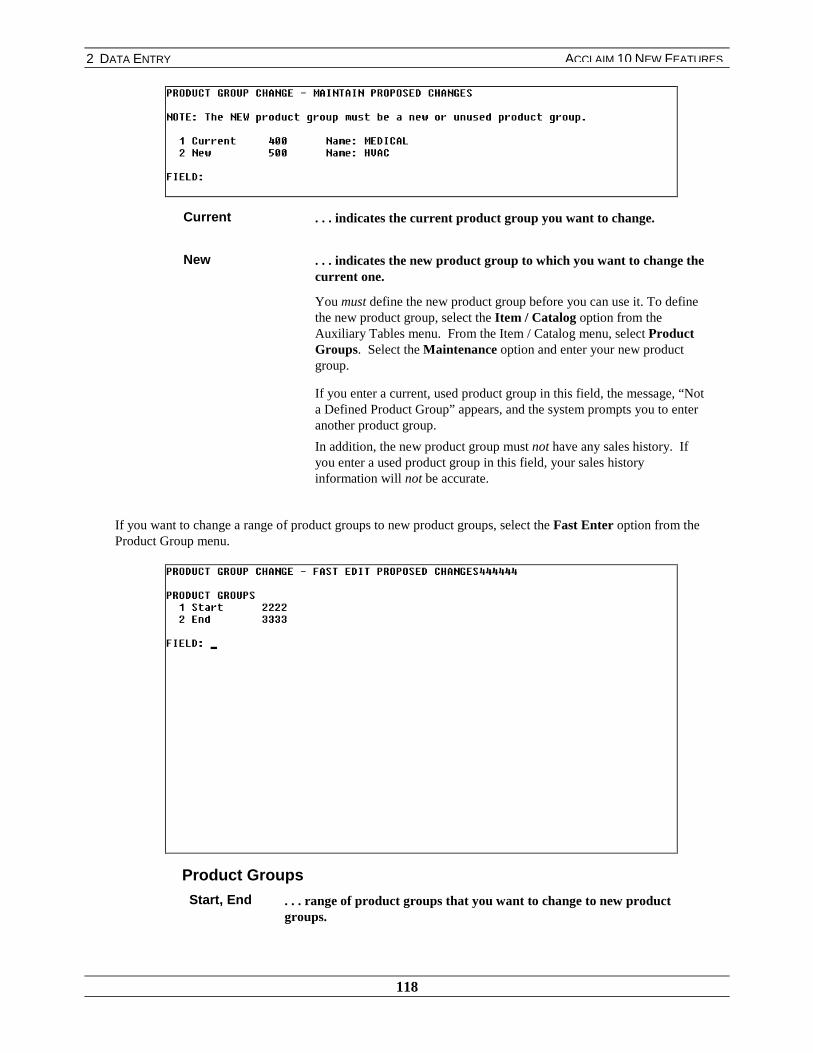
2 DATA ENTRY
118
ACCLAIM 10 NEW FEATURES
Current . . . indicates the current product group you want to change.
New . . . indicates the new product group to which you want to change thecurrent one.
You must define the new product group before you can use it. To definethe new product group, select the Item / Catalog option from theAuxiliary Tables menu. From the Item / Catalog menu, select ProductGroups. Select the Maintenance option and enter your new productgroup.
If you enter a current, used product group in this field, the message, “Nota Defined Product Group” appears, and the system prompts you to enteranother product group.
In addition, the new product group must not have any sales history. Ifyou enter a used product group in this field, your sales historyinformation will not be accurate.
If you want to change a range of product groups to new product groups, select the Fast Enter option from theProduct Group menu.
Product Groups
Start, End . . . range of product groups that you want to change to new productgroups.
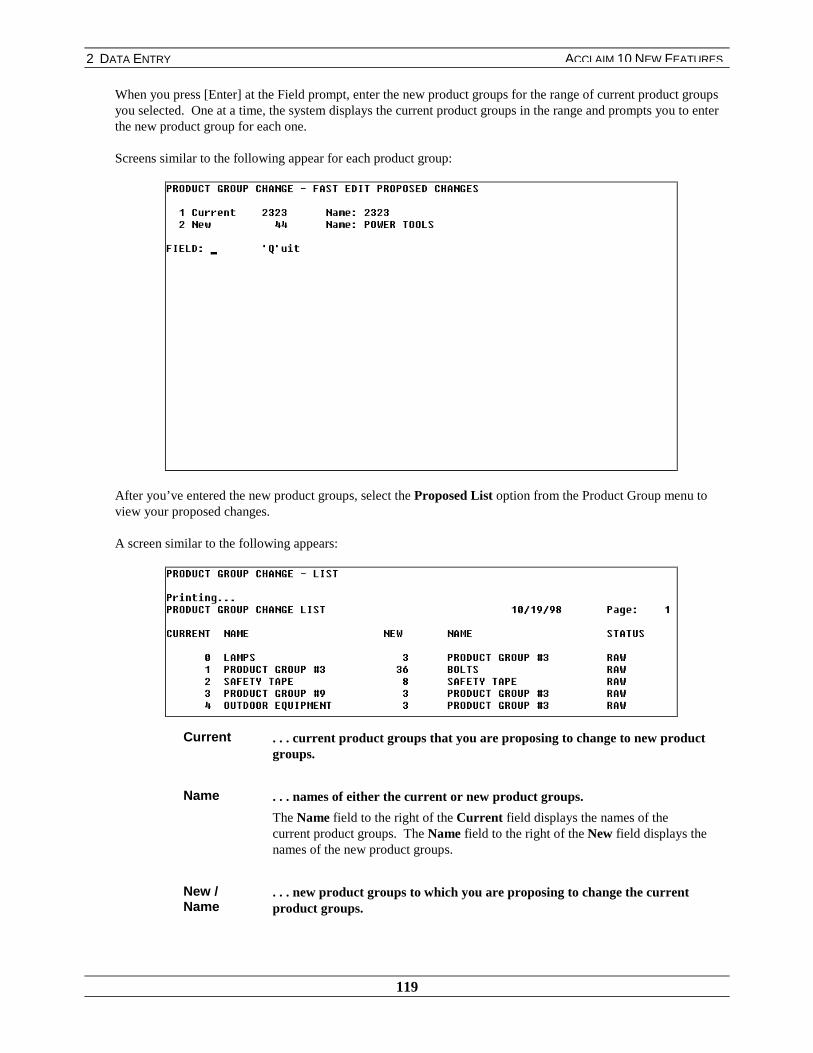
2 DATA ENTRY
119
ACCLAIM 10 NEW FEATURES
When you press [Enter] at the Field prompt, enter the new product groups for the range of current product groupsyou selected. One at a time, the system displays the current product groups in the range and prompts you to enterthe new product group for each one.
Screens similar to the following appear for each product group:
After you’ve entered the new product groups, select the Proposed List option from the Product Group menu toview your proposed changes.
A screen similar to the following appears:
Current . . . current product groups that you are proposing to change to new productgroups.
Name . . . names of either the current or new product groups.
The Name field to the right of the Current field displays the names of thecurrent product groups. The Name field to the right of the New field displays thenames of the new product groups.
New /Name
. . . new product groups to which you are proposing to change the currentproduct groups.

2 DATA ENTRY
120
ACCLAIM 10 NEW FEATURES
Status . . . status of the product group changes.
Raw – the product group change has been proposed but the update has not yetbeen performed.
Updated – the product group change has been proposed and the update has beenperformed.
After the system displays the proposed list of product group changes, it prompts you to delete the product groupsyou have already updated. To delete these updated changes from the proposed list, enter [Y]. To save them and tocontinue to view them on the proposed list, enter [N].
A screen similar to the following appears:
To update the proposed changes, select the Perform option from the Product Group menu. To perform the update,enter [Y] when the system prompts you to proceed.
Note: In order to perform the update, no other terminals can be active.
Several screens appear, indicating that the system is performing the update.
After you’ve performed the update, you can view these changes when you reorganize your who-bought-whatinformation.

2 DATA ENTRY
121
ACCLAIM 10 NEW FEATURES
FOUR-DIGIT COUNTY ID
SALES TAX
When you enter or edit a sales tax schedule, the system allows you to enter a four-digit county ID.
For more information about entering or editing a sales tax schedule, refer to the Sales Tax Information manual.
You can now
enter a four-digit
County ID.
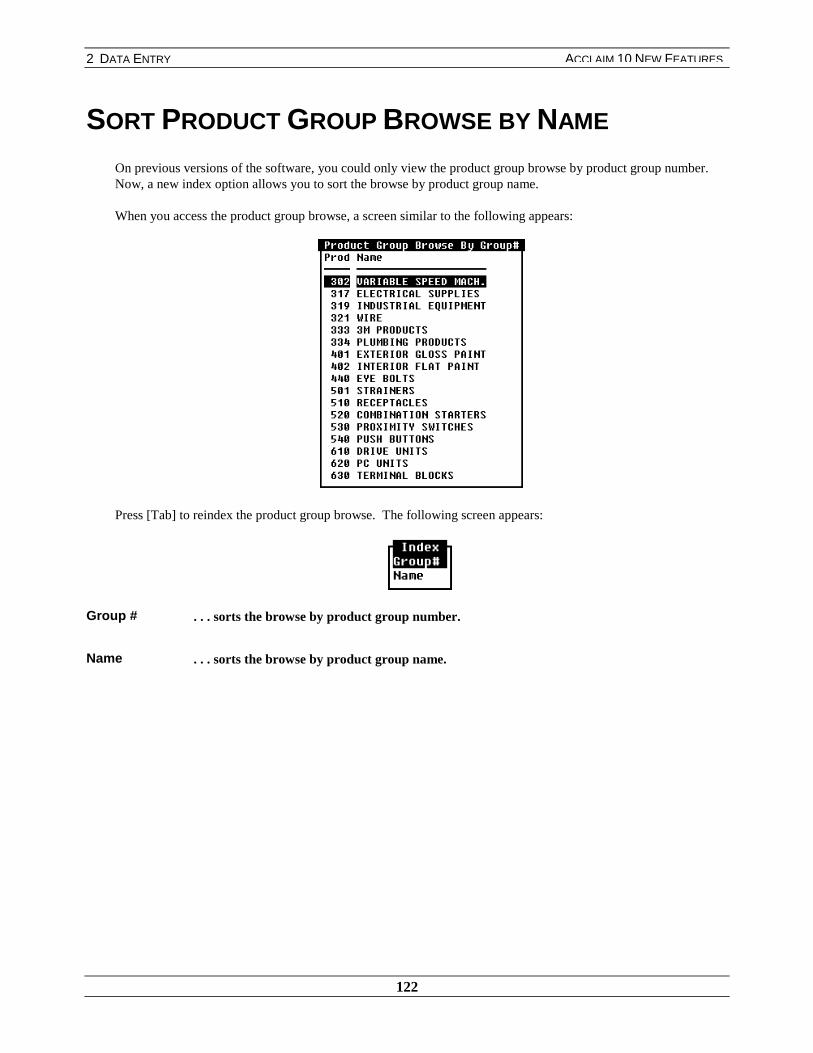
2 DATA ENTRY
122
ACCLAIM 10 NEW FEATURES
SORT PRODUCT GROUP BROWSE BY NAME
On previous versions of the software, you could only view the product group browse by product group number.Now, a new index option allows you to sort the browse by product group name.
When you access the product group browse, a screen similar to the following appears:
Press [Tab] to reindex the product group browse. The following screen appears:
Group # . . . sorts the browse by product group number.
Name . . . sorts the browse by product group name.

2 DATA ENTRY
123
ACCLAIM 10 NEW FEATURES
When you select the Name option from the Index menu, the system sorts the product group browse by name.
For more information about browses, refer to the Browse manual.

2 DATA ENTRY
124
ACCLAIM 10 NEW FEATURES
NEW FUNCTIONALITY IN STATE MAINTENANCE
Previously, you could only view the State Maintenance browse by abbreviation and state name. Now, you cancustomize your own state database by entering and editing states. In addition, you can view and reindex thebrowse by country, abbreviation, and state name.
AUXILIARY TABLES
Select Address from the Auxiliary Tables menu and States from the Address menu. When you selectMaintenance from the States menu, the new State Maintenance screen appears, similar to the following:
Abbr$
. . . defines the abbreviation of the state you enter or select.
Name . . . defines the name of the state you enter or select.
Country . . . defines the country of the state you enter or select.
In State Maintenance, you can enter a new state or edit an existing state.
ENTER
To enter a new state, press [Insert] and enter the abbreviation, name, and country of the state you want.
Note: Both the Name and Country fields are optional. You only need to enter a state abbreviation to createa state entry.

2 DATA ENTRY
125
ACCLAIM 10 NEW FEATURES
EDIT
To edit an existing state, enter the abbreviation in the Abbr field or browse and select a state.
When you browse on the Abbr field, the State Browse appears, displaying the abbreviation, name, and country ofthe states listed. This list includes the default information, consisting of all US states that have zip codes and allthe provinces of Canada, in addition to any other states you have entered in the database.
You can view this browse from any State field throughout the system.
When you browse, a screen similar to the following appears:
Select a state and edit the name and country information.
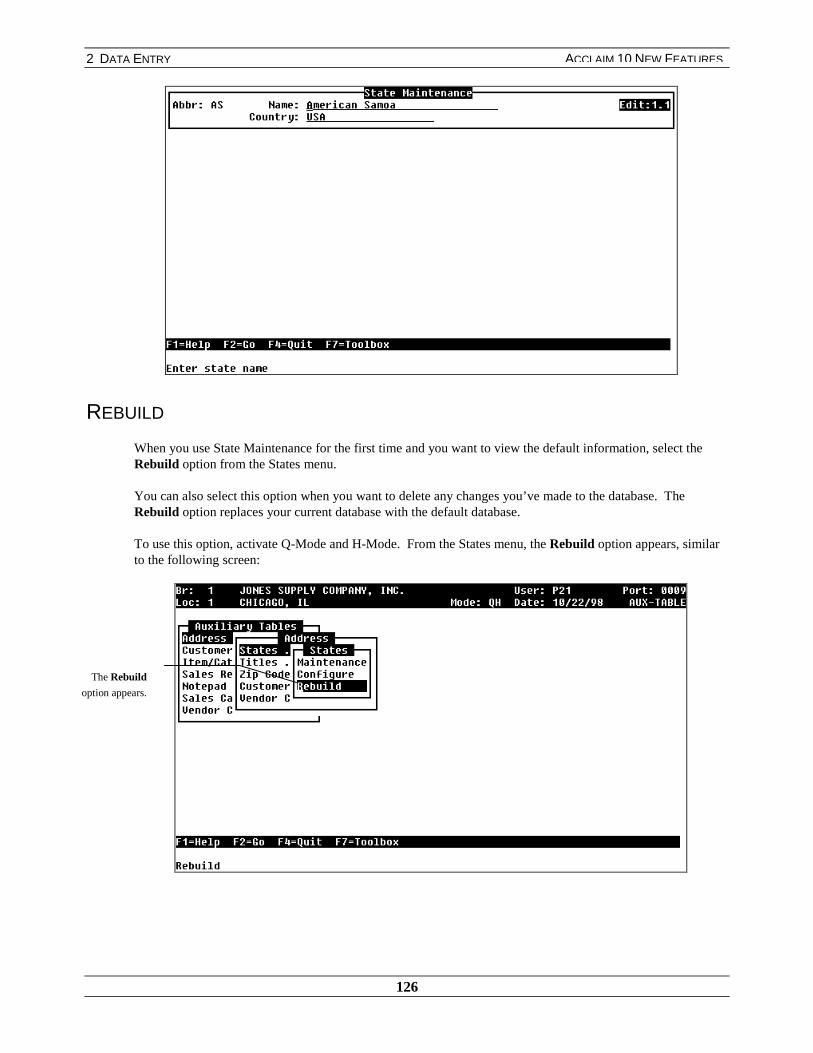
2 DATA ENTRY
126
ACCLAIM 10 NEW FEATURES
REBUILD
When you use State Maintenance for the first time and you want to view the default information, select theRebuild option from the States menu.
You can also select this option when you want to delete any changes you’ve made to the database. TheRebuild option replaces your current database with the default database.
To use this option, activate Q-Mode and H-Mode. From the States menu, the Rebuild option appears, similarto the following screen:
The Rebuild
option appears.
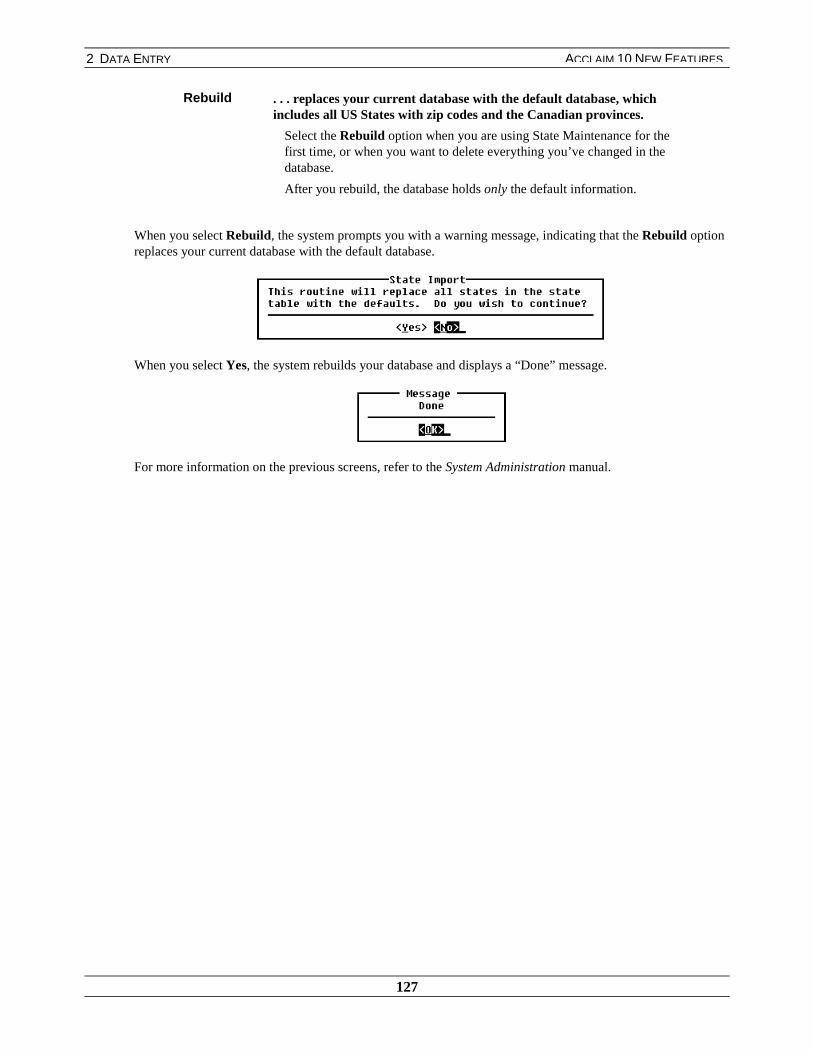
2 DATA ENTRY
127
ACCLAIM 10 NEW FEATURES
Rebuild . . . replaces your current database with the default database, whichincludes all US States with zip codes and the Canadian provinces.
Select the Rebuild option when you are using State Maintenance for thefirst time, or when you want to delete everything you’ve changed in thedatabase.
After you rebuild, the database holds only the default information.
When you select Rebuild, the system prompts you with a warning message, indicating that the Rebuild optionreplaces your current database with the default database.
When you select Yes, the system rebuilds your database and displays a “Done” message.
For more information on the previous screens, refer to the System Administration manual.
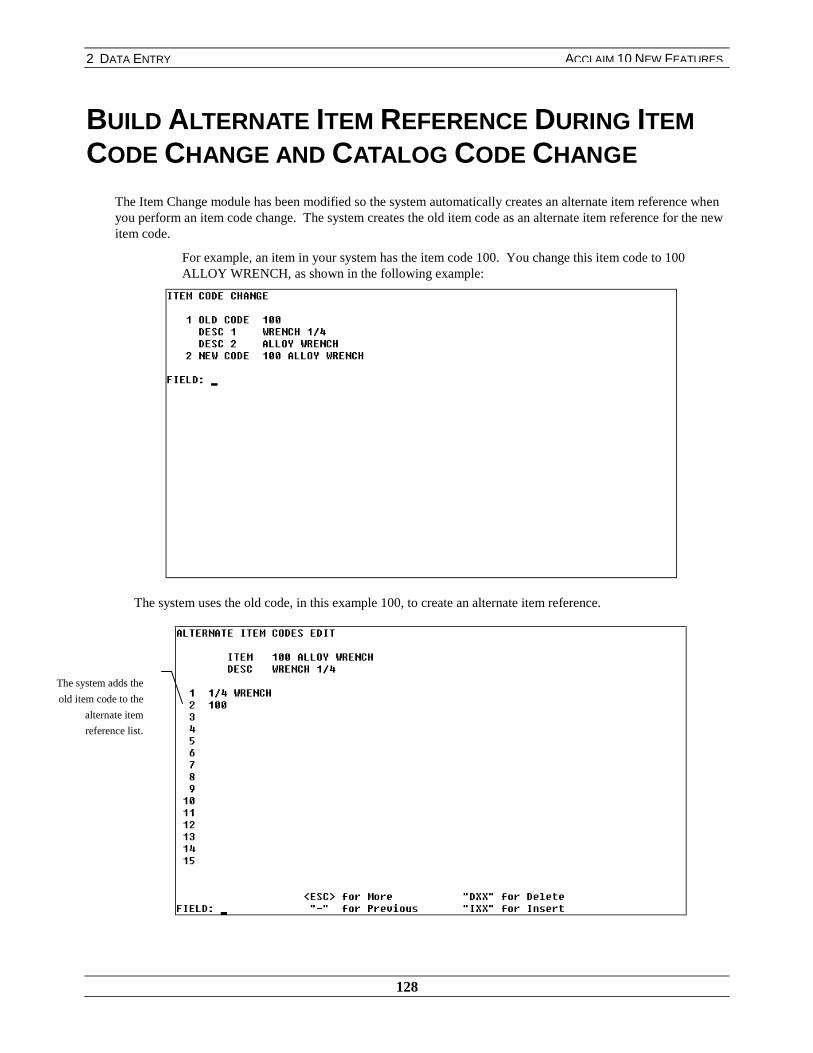
2 DATA ENTRY
128
ACCLAIM 10 NEW FEATURES
BUILD ALTERNATE ITEM REFERENCE DURING ITEMCODE CHANGE AND CATALOG CODE CHANGE
The Item Change module has been modified so the system automatically creates an alternate item reference whenyou perform an item code change. The system creates the old item code as an alternate item reference for the newitem code.
For example, an item in your system has the item code 100. You change this item code to 100ALLOY WRENCH, as shown in the following example:
The system uses the old code, in this example 100, to create an alternate item reference.
The system adds the
old item code to the
alternate item
reference list.

2 DATA ENTRY
129
ACCLAIM 10 NEW FEATURES
An alternate item reference may already exist for the item code you are changing. In this example, the old itemcode already had an alternate item reference, ¼ WRENCH. The system simply attaches this existing alternateitem reference to the new item code. The old item code is added to the alternate item reference list.
Note: The Catalog Code Change module has been modified in the same way. The system automaticallycreates an alternate catalog reference in the alternate item database when you perform a catalog codechange. The system creates the old catalog code as an alternate catalog reference for the new catalogcode.
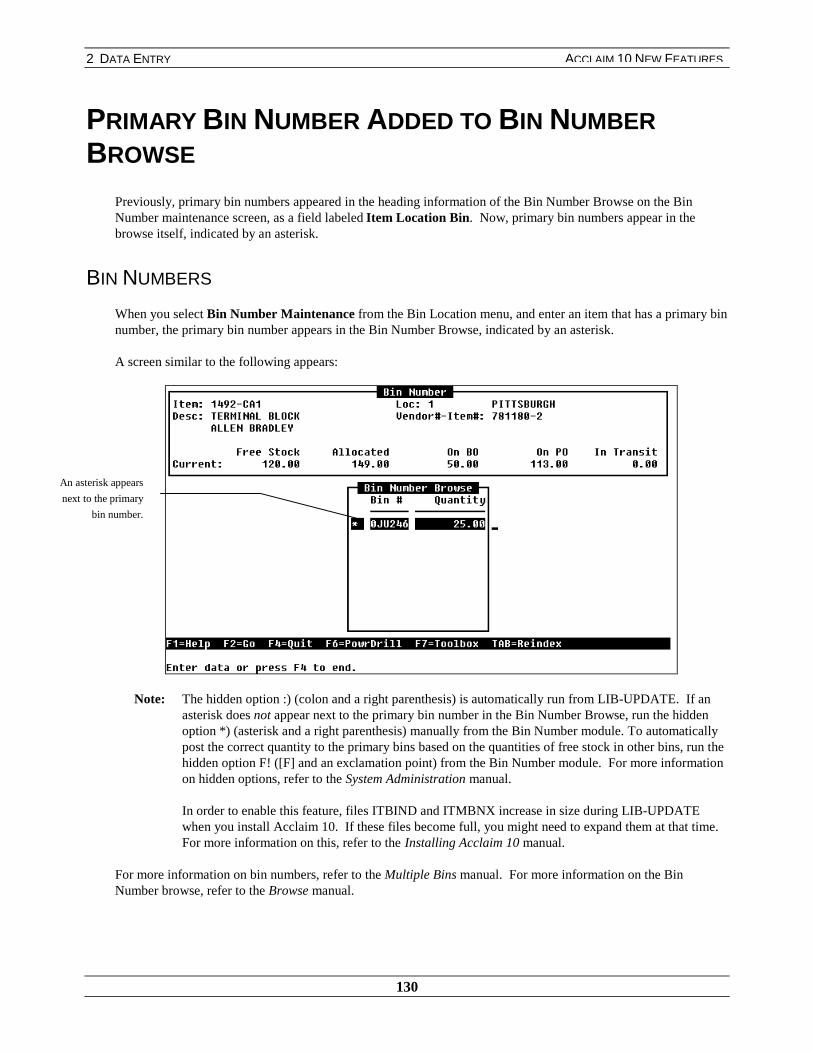
2 DATA ENTRY
130
ACCLAIM 10 NEW FEATURES
PRIMARY BIN NUMBER ADDED TO BIN NUMBERBROWSE
Previously, primary bin numbers appeared in the heading information of the Bin Number Browse on the BinNumber maintenance screen, as a field labeled Item Location Bin. Now, primary bin numbers appear in thebrowse itself, indicated by an asterisk.
BIN NUMBERS
When you select Bin Number Maintenance from the Bin Location menu, and enter an item that has a primary binnumber, the primary bin number appears in the Bin Number Browse, indicated by an asterisk.
A screen similar to the following appears:
Note: The hidden option :) (colon and a right parenthesis) is automatically run from LIB-UPDATE. If anasterisk does not appear next to the primary bin number in the Bin Number Browse, run the hiddenoption *) (asterisk and a right parenthesis) manually from the Bin Number module. To automaticallypost the correct quantity to the primary bins based on the quantities of free stock in other bins, run thehidden option F! ([F] and an exclamation point) from the Bin Number module. For more informationon hidden options, refer to the System Administration manual.
In order to enable this feature, files ITBIND and ITMBNX increase in size during LIB-UPDATEwhen you install Acclaim 10. If these files become full, you might need to expand them at that time.For more information on this, refer to the Installing Acclaim 10 manual.
For more information on bin numbers, refer to the Multiple Bins manual. For more information on the BinNumber browse, refer to the Browse manual.
An asterisk appears
next to the primary
bin number.
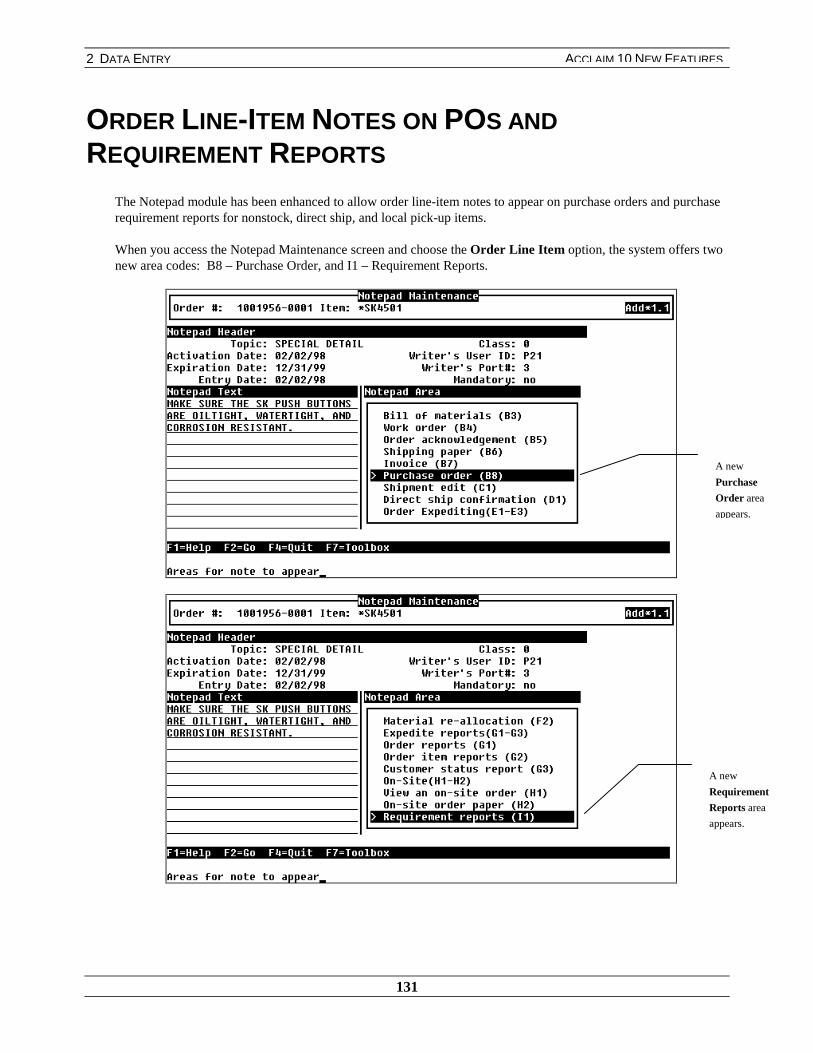
2 DATA ENTRY
131
ACCLAIM 10 NEW FEATURES
ORDER LINE-ITEM NOTES ON POS ANDREQUIREMENT REPORTS
The Notepad module has been enhanced to allow order line-item notes to appear on purchase orders and purchaserequirement reports for nonstock, direct ship, and local pick-up items.
When you access the Notepad Maintenance screen and choose the Order Line Item option, the system offers twonew area codes: B8 – Purchase Order, and I1 – Requirement Reports.
A new
Purchase
Order area
appears.
A new
Requirement
Reports area
appears.

2 DATA ENTRY
132
ACCLAIM 10 NEW FEATURES
PURCHASE ORDERS
You can select an order line-item note to display on a purchase order. When you select the purchase order as adisplay area, the note prints on the PO similar to the following example:
For more information on purchase orders, refer to the Purchasing manual.
The note appearson the purchase
order.
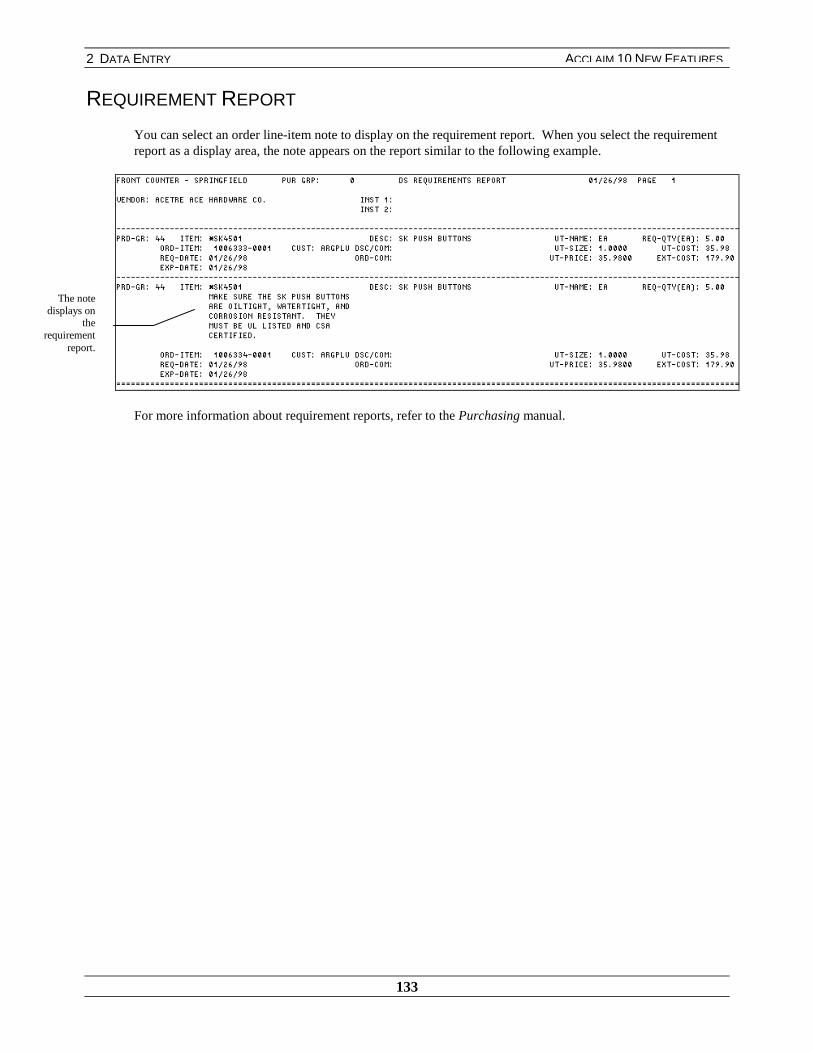
2 DATA ENTRY
133
ACCLAIM 10 NEW FEATURES
REQUIREMENT REPORT
You can select an order line-item note to display on the requirement report. When you select the requirementreport as a display area, the note appears on the report similar to the following example.
For more information about requirement reports, refer to the Purchasing manual.
The notedisplays on
therequirement
report.
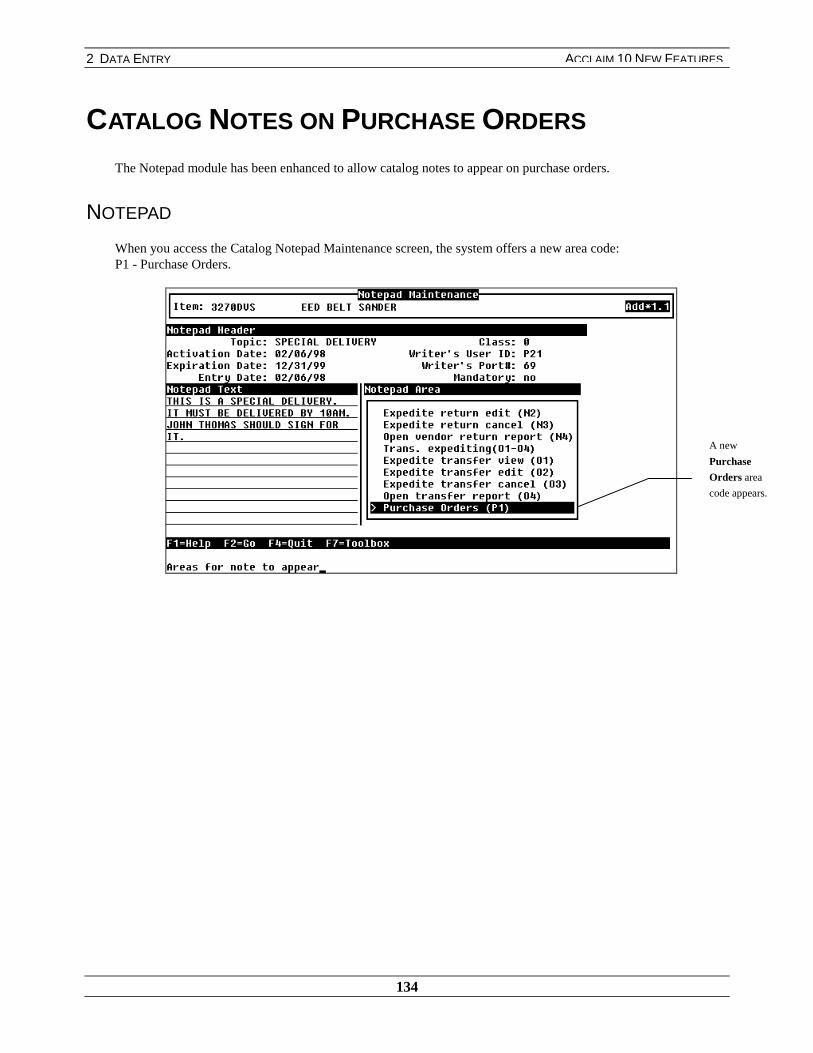
2 DATA ENTRY
134
ACCLAIM 10 NEW FEATURES
CATALOG NOTES ON PURCHASE ORDERS
The Notepad module has been enhanced to allow catalog notes to appear on purchase orders.
NOTEPAD
When you access the Catalog Notepad Maintenance screen, the system offers a new area code:P1 - Purchase Orders.
A new
Purchase
Orders area
code appears.
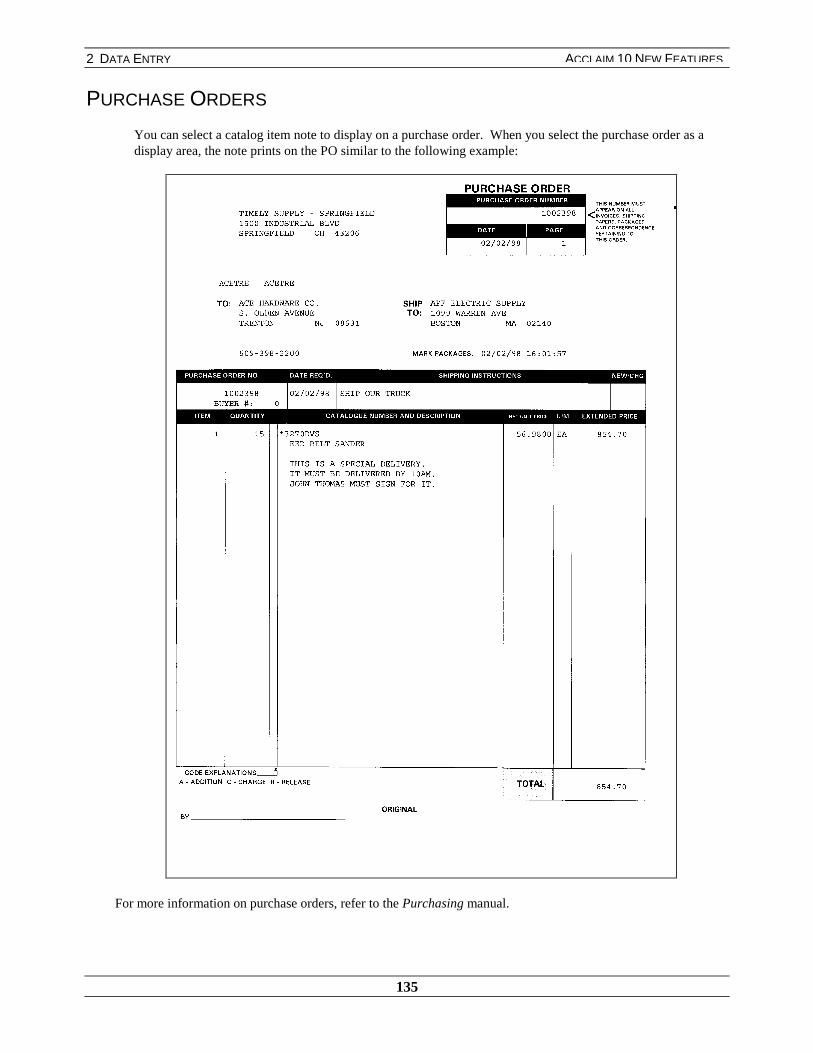
2 DATA ENTRY
135
ACCLAIM 10 NEW FEATURES
PURCHASE ORDERS
You can select a catalog item note to display on a purchase order. When you select the purchase order as adisplay area, the note prints on the PO similar to the following example:
For more information on purchase orders, refer to the Purchasing manual.

2 DATA ENTRY
136
ACCLAIM 10 NEW FEATURES
VIEW NOTES DISPLAY IN NAVIGATION MODE INMAINTENANCE SCREENS
Previously, notes that are created to appear in view mode would only display in the selected maintenance screensin view mode. Now, notes display in the selected maintenance screens in navigation mode, which is the firstscreen that appears.
Notes that are to appear in both view and edit mode will only be displayed once. If you have selected for the noteto appear in view and edit mode, and you just viewed the note in navigation mode, it will not display in edit mode.
DATA ENTRY (MAINTENANCE SCREENS)
You’ve entered a note in the Notepad module and assigned it to appear in view mode in a maintenance screen.From the maintenance screen you selected, the note will display in navigation mode after you complete the firstfield of information.
For example, you’ve entered a note for a specific customer and selected the note to display in viewmode on the Customer Maintenance screen. When you access the Customer Maintenance screen andenter a customer in navigation mode, the note topic appears, similar to the following screen:
When you press [Enter], the topic and text of the note appears, similar to the following screen:
The note
topic
displays in
navigation
mode.

2 DATA ENTRY
137
ACCLAIM 10 NEW FEATURES
Note: If you selected for the note to appear in both view and edit mode, the note will only appear in the firstmode you select – either edit or navigation mode. To display a note in edit mode when accessing themaintenance screen through a menu, only select edit mode for the maintenance screen you want in theNotepad module.
For more information about entering notes, refer to the Notepad manual.
The topic
and text of
the note
appear.
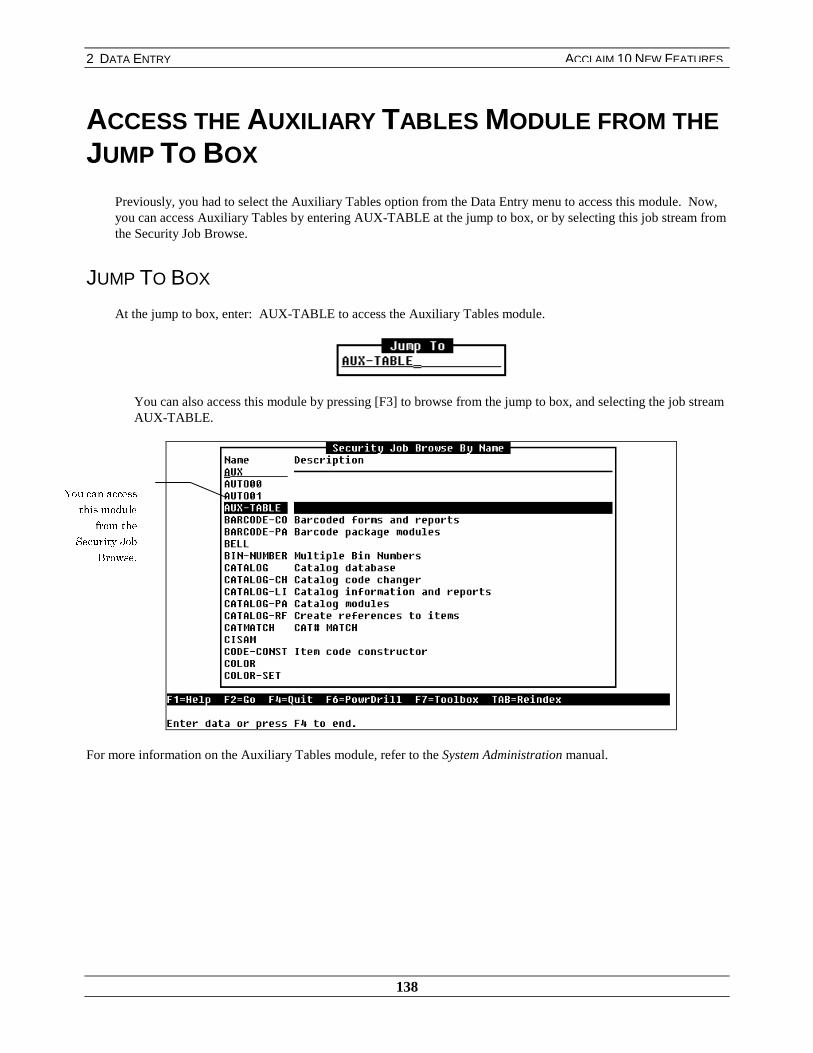
2 DATA ENTRY
138
ACCLAIM 10 NEW FEATURES
ACCESS THE AUXILIARY TABLES MODULE FROM THEJUMP TO BOX
Previously, you had to select the Auxiliary Tables option from the Data Entry menu to access this module. Now,you can access Auxiliary Tables by entering AUX-TABLE at the jump to box, or by selecting this job stream fromthe Security Job Browse.
JUMP TO BOX
At the jump to box, enter: AUX-TABLE to access the Auxiliary Tables module.
You can also access this module by pressing [F3] to browse from the jump to box, and selecting the job streamAUX-TABLE.
For more information on the Auxiliary Tables module, refer to the System Administration manual.
<RX�FDQ�DFFHVV
WKLV�PRGXOH
IURP�WKH
6HFXULW\�-RE
%URZVH�
2 DATA ENTRY
139
ACCLAIM 10 NEW FEATURES
PRINT OPTIONS FOR PROACTIVEPreviously, you could only view the information that PROACTIVE displayed on the screen. Now, when yourun PROACTIVE, the Printer Options screen appears, allowing you to select a printer and print the output fromPROACTIVE.
For more information about PROACTIVE, refer to the System Administration manual.
2 DATA ENTRY
140
ACCLAIM 10 NEW FEATURES
NO DUPLICATE MESSAGE FOR FILES ONLINE
On previous versions of the software, if you turned files online more than once, the system displayed aDUPLICATE message next to the files that were already online.
The system no longer displays the file names of those files that are already online. This feature allows you to bemore efficient because it saves you from paging through the list of DUPLICATE file names.

2 DATA ENTRY
141
ACCLAIM 10 NEW FEATURES
COPY MFG CLASS INFORMATION
When using the Copy Items in the Item and Catalog modules, the system now brings the MFG class from one itemdatabase to the other database
When you select the Copy option from the Item or Catalog menu, a screen similar to the following appears:
For more information about the fields in the Item Copy Specification screen, refer to the Item Information manual.
MFG Class is a
new option.
2 DATA ENTRY
142
ACCLAIM 10 NEW FEATURES
USE PRICE AND CYLINDER RENTAL RATE OVERRIDETABLES TO CALCULATE PRICES AND INVOICECHARGES
Now, you can use price override tables to calculate prices for cylinders in various areas throughout the system.You can use the cylinder rental rate override tables to calculate invoice charges during cylinder invoicing if anentry exists for the given customer and cylinder / discount group.
By assigning the cylinders effective and expiration dates for the override tables, you can price cylinders for aspecific amount during a specific period of time. This allows you flexibility in pricing cylinders for customerorders.
Note: You cannot enter a cylinder cost override table.
To use this feature, you must have the Company Acclaim Screens option Price / Cost Overrides setto XL or Both. For more information on this option, refer to the Company Setup manual.
SALES PRICING
CYLINDER PRICE OVERRIDE TABLES
You can set up price override tables for a particular cylinder or cylinder group. To enter a price override tablefor a particular customer and cylinder, you can now set the basis of the override table to CYL (cylinder), whichthen allows you to define the cylinder. You also have the option on this screen to edit the cylinder rental rateoverride table.
When you select the Price / Cost Overrides option from the Override Table menu, select the Enter option fromthe Price / Cost Overrides menu.
Note: Do not select the Maintenance option from the Price / Cost Overrides menu. You will not be able toenter a cylinder price override table on this screen.
When you enter a price override for a cylinder, a screen similar to the following appears:
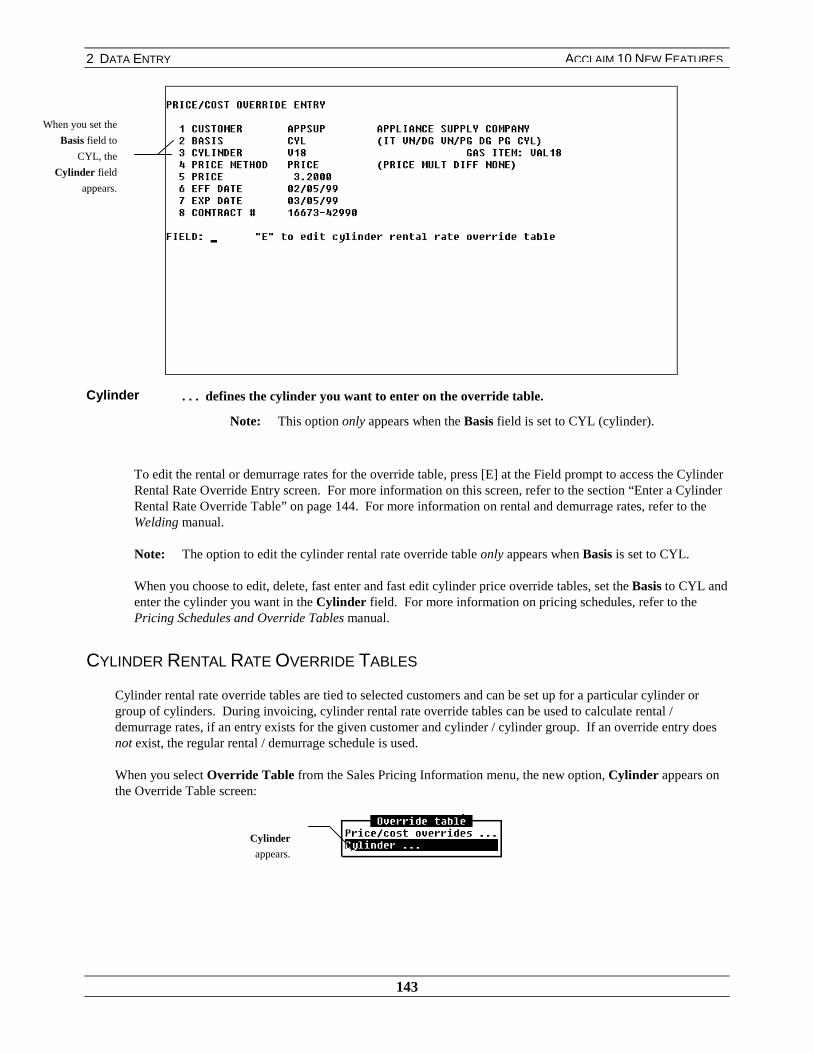
2 DATA ENTRY
143
ACCLAIM 10 NEW FEATURES
Cylinder . . . defines the cylinder you want to enter on the override table.
Note: This option only appears when the Basis field is set to CYL (cylinder).
To edit the rental or demurrage rates for the override table, press [E] at the Field prompt to access the CylinderRental Rate Override Entry screen. For more information on this screen, refer to the section “Enter a CylinderRental Rate Override Table” on page 144. For more information on rental and demurrage rates, refer to theWelding manual.
Note: The option to edit the cylinder rental rate override table only appears when Basis is set to CYL.
When you choose to edit, delete, fast enter and fast edit cylinder price override tables, set the Basis to CYL andenter the cylinder you want in the Cylinder field. For more information on pricing schedules, refer to thePricing Schedules and Override Tables manual.
CYLINDER RENTAL RATE OVERRIDE TABLES
Cylinder rental rate override tables are tied to selected customers and can be set up for a particular cylinder orgroup of cylinders. During invoicing, cylinder rental rate override tables can be used to calculate rental /demurrage rates, if an entry exists for the given customer and cylinder / cylinder group. If an override entry doesnot exist, the regular rental / demurrage schedule is used.
When you select Override Table from the Sales Pricing Information menu, the new option, Cylinder appears onthe Override Table screen:
When you set the
Basis field to
CYL, the
Cylinder field
appears.
Cylinder
appears.
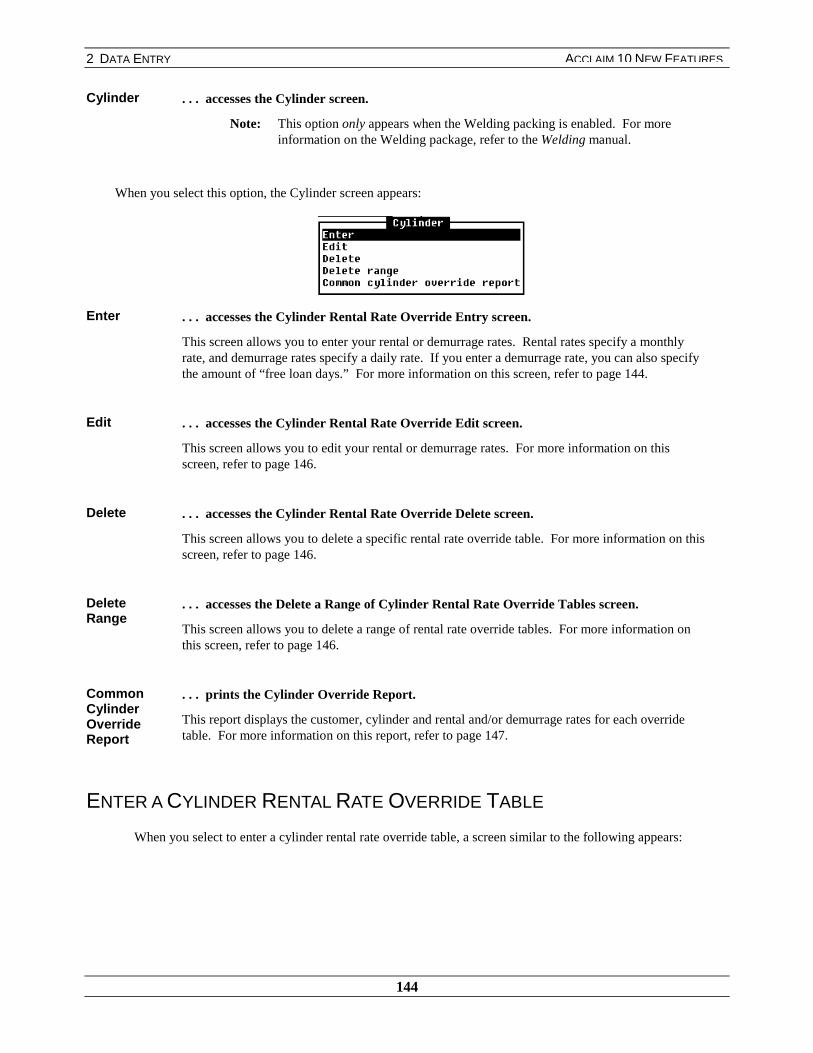
2 DATA ENTRY
144
ACCLAIM 10 NEW FEATURES
Cylinder . . . accesses the Cylinder screen.
Note: This option only appears when the Welding packing is enabled. For moreinformation on the Welding package, refer to the Welding manual.
When you select this option, the Cylinder screen appears:
Enter . . . accesses the Cylinder Rental Rate Override Entry screen.
This screen allows you to enter your rental or demurrage rates. Rental rates specify a monthlyrate, and demurrage rates specify a daily rate. If you enter a demurrage rate, you can also specifythe amount of “free loan days.” For more information on this screen, refer to page 144.
Edit . . . accesses the Cylinder Rental Rate Override Edit screen.
This screen allows you to edit your rental or demurrage rates. For more information on thisscreen, refer to page 146.
Delete . . . accesses the Cylinder Rental Rate Override Delete screen.
This screen allows you to delete a specific rental rate override table. For more information on thisscreen, refer to page 146.
DeleteRange
. . . accesses the Delete a Range of Cylinder Rental Rate Override Tables screen.
This screen allows you to delete a range of rental rate override tables. For more information onthis screen, refer to page 146.
CommonCylinderOverrideReport
. . . prints the Cylinder Override Report.
This report displays the customer, cylinder and rental and/or demurrage rates for each overridetable. For more information on this report, refer to page 147.
ENTER A CYLINDER RENTAL RATE OVERRIDE TABLE
When you select to enter a cylinder rental rate override table, a screen similar to the following appears:

2 DATA ENTRY
145
ACCLAIM 10 NEW FEATURES
Customer$
. . . specifies the customer to which the override table applies.
Cylinder$
. . . specifies the cylinder to which the override table applies.
Rental
Rate PerMonth
. . . specifies the rate of the override table per month.
Note: You must enter a value in this field to access the other fields on this screen andto complete the override table.
Demurrage
Rate PerDay
. . . specifies the rate of the override table per day.
Note: You must enter a value in this field to access the other fields on this screen andto complete the override table.
Loan FreeDays
. . . specifies the number of cost-free days that the customer can loan the cylinder.
Note: If the Cylinders field on the Company Cylinder Tracking Options screen is set to GRP (group), theoverride is tied to the given customer and cylinder group. In this case, a Group field appears belowCustomer on the Cylinder Rental Rate Override Entry screen. If this field appears, enter the group towhich you want the override table to apply. For more information on this setting, refer to the Weldingmanual.

2 DATA ENTRY
146
ACCLAIM 10 NEW FEATURES
EDIT A CYLINDER RENTAL RATE OVERRIDE TABLE
When you select to edit a cylinder rental rate override table, the Cylinder Rental Rate Override Edit screenappears. Enter the customer and cylinder of the override table, and edit the rental or demurrage rates accordingly.
Note: This screen is very similar to the Cylinder Rental Rate Override Entry screen. For more informationon the fields on this screen, refer to page 144.
DELETE A SPECIFIC CYLINDER RENTAL RATE OVERRIDE TABLE
When you select Delete Cylinder Rental Rate Override Tables, you can delete a specific override table. Whenyou enter the customer and cylinder of the override table, the system prompts you to proceed with the deletion,similar to the following screen:
Note: This screen is very similar to the Cylinder Rental Rate Override Entry screen. For more informationon the fields on this screen, refer to page 144.
DELETE A RANGE OF CYLINDER RENTAL RATE OVERRIDE TABLE
When you select to delete a range of override tables, a screen similar to the following appears:
Press [Y] toproceed with the
deletion.
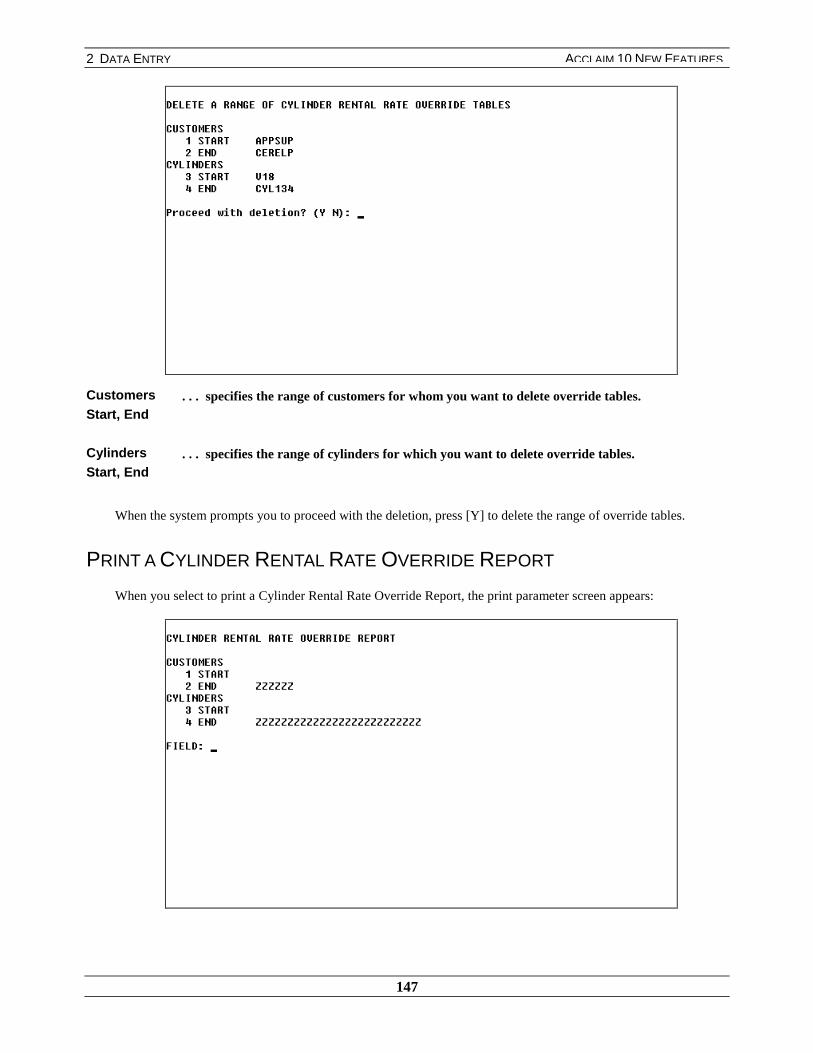
2 DATA ENTRY
147
ACCLAIM 10 NEW FEATURES
CustomersStart, End
. . . specifies the range of customers for whom you want to delete override tables.
CylindersStart, End
. . . specifies the range of cylinders for which you want to delete override tables.
When the system prompts you to proceed with the deletion, press [Y] to delete the range of override tables.
PRINT A CYLINDER RENTAL RATE OVERRIDE REPORT
When you select to print a Cylinder Rental Rate Override Report, the print parameter screen appears:
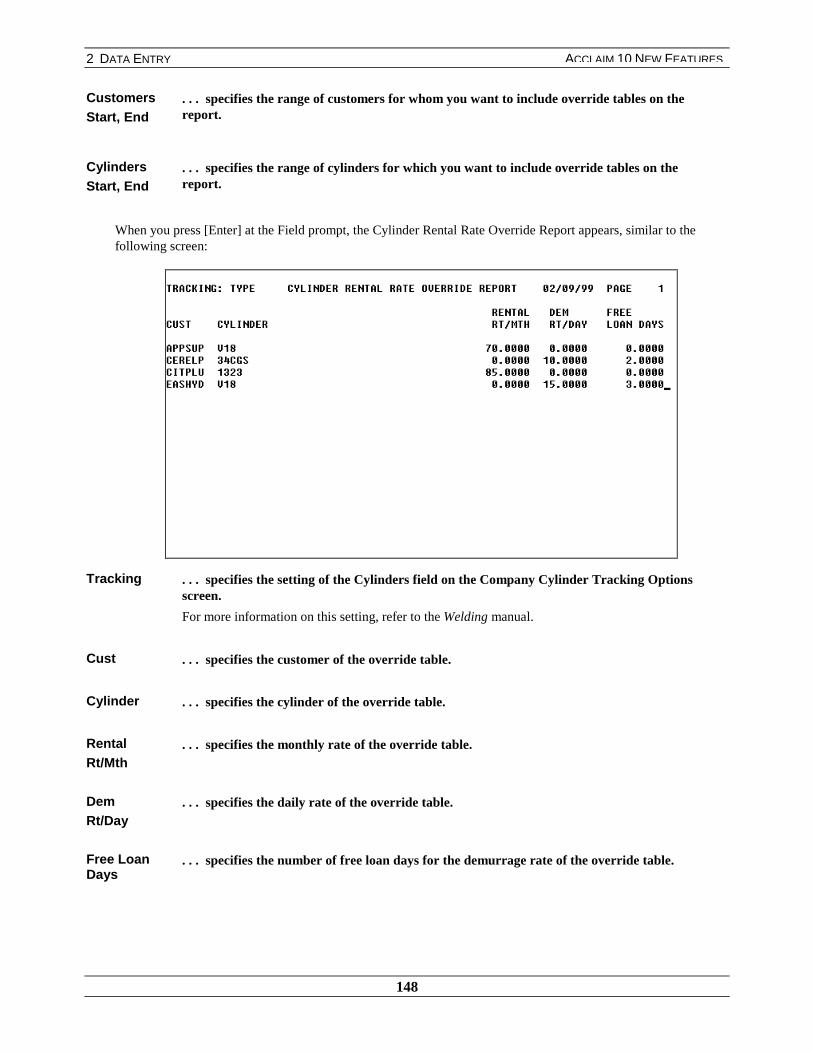
2 DATA ENTRY
148
ACCLAIM 10 NEW FEATURES
CustomersStart, End
. . . specifies the range of customers for whom you want to include override tables on thereport.
CylindersStart, End
. . . specifies the range of cylinders for which you want to include override tables on thereport.
When you press [Enter] at the Field prompt, the Cylinder Rental Rate Override Report appears, similar to thefollowing screen:
Tracking . . . specifies the setting of the Cylinders field on the Company Cylinder Tracking Optionsscreen.
For more information on this setting, refer to the Welding manual.
Cust . . . specifies the customer of the override table.
Cylinder . . . specifies the cylinder of the override table.
RentalRt/Mth
. . . specifies the monthly rate of the override table.
DemRt/Day
. . . specifies the daily rate of the override table.
Free LoanDays
. . . specifies the number of free loan days for the demurrage rate of the override table.

2 DATA ENTRY
149
ACCLAIM 10 NEW FEATURES
PROCESS CREDIT CARD TRANSACTIONS
This new optional package allows you to process credit card transactions. By integrating Southern DataComm’sProtoBase, you can enter credit card information directly through the Prophet system, eliminating the need for anyseparate terminals or printers. You can receive credit card authorizations during order entry, post transactionsduring invoicing, and enter payments against open receivables.
Through the Credit Card module, you can perform the following functions:
♦ Open a new batch of credit card transactions
♦ Transmit stored credit card transactions to the financial institution, which charges the cardholders’ accountsand moves the funds to the merchant’s account
♦ Manually post a credit card transaction, which adds a credit card transaction to the current batch
♦ Print a summary of transactions in the current batch
♦ Print a report on the status of all credit card transactions stored in the system
♦ Determine the length of time that a credit card authorization will still be valid after the initial authorization
♦ Process authorization reversals
♦ Specify whether freight and additional charges are automatically added to the credit card transaction amount
You can enter credit card information in the Order, Front Counter, and Point of Sale modules, and you can editcredit card information in Expedite Order. The system adds each credit card order that is invoiced to the day’sopen batch and stores it within an AIX file. When the batch is closed and settled by transmitting it via a modem tothe financial institution, the cardholder’s accounts are charged for the invoices and payments are transferred to theaccount in the Prophet 21 system. When you enter customer payments, you can select to enter a credit cardpayment. The system then dials out to the financial institution to acquire authorization for the transaction.
For more information, refer to the Credit Card manual.
2 DATA ENTRY
150
ACCLAIM 10 NEW FEATURES
SAVE DATA TO COLD STORAGE
The new Document Imaging package allows you to store your data in COLD (computer output to laser disc) in aspecific format that is concurrent with Bluebird Systems’ software.
Document generated from the Prophet 21 system, including reports, shipping papers, and invoices that are printedto an AIX file, AIX queue, fax, forms package, HTML, e-mail, or text e-mail, can also be saved to uniquely namedfiles in COLD storage. After these documents are saved, the third party document imaging system retrieves,indexes, and stores the files according to the setup of the document imaging system.
You can save the following documents to COLD storage:
♦ Reports
♦ ScratchPads
♦ Quotes
♦ Purchase Orders
♦ Requisitions
♦ Transfers
♦ Material Receipt Documents
♦ Shipping Papers
♦ Invoices
♦ Cylinder Invoices
♦ Front Counter Forms
♦ Rental Forms
♦ Customer Statements
♦ Itemized Billing Statements
♦ Payables Checks
♦ Material Safety Data Sheets
You can set the default for the Save to COLD storage? Prompt in the Company module. When you choose toprint one of the above documents to either an AIX file, AIX queue, fax, form, HTML, e-mail, or text e-mail, thesystem prompts you to save to COLD storage.
When you save your document to COLD storage, the system saves it in ODOC format according to BluebirdSystems’ filename requirements. This filename consists of a 1-4 character name describing the document type,followed by a four-digit sequence number. All filenames have a .dat extension.
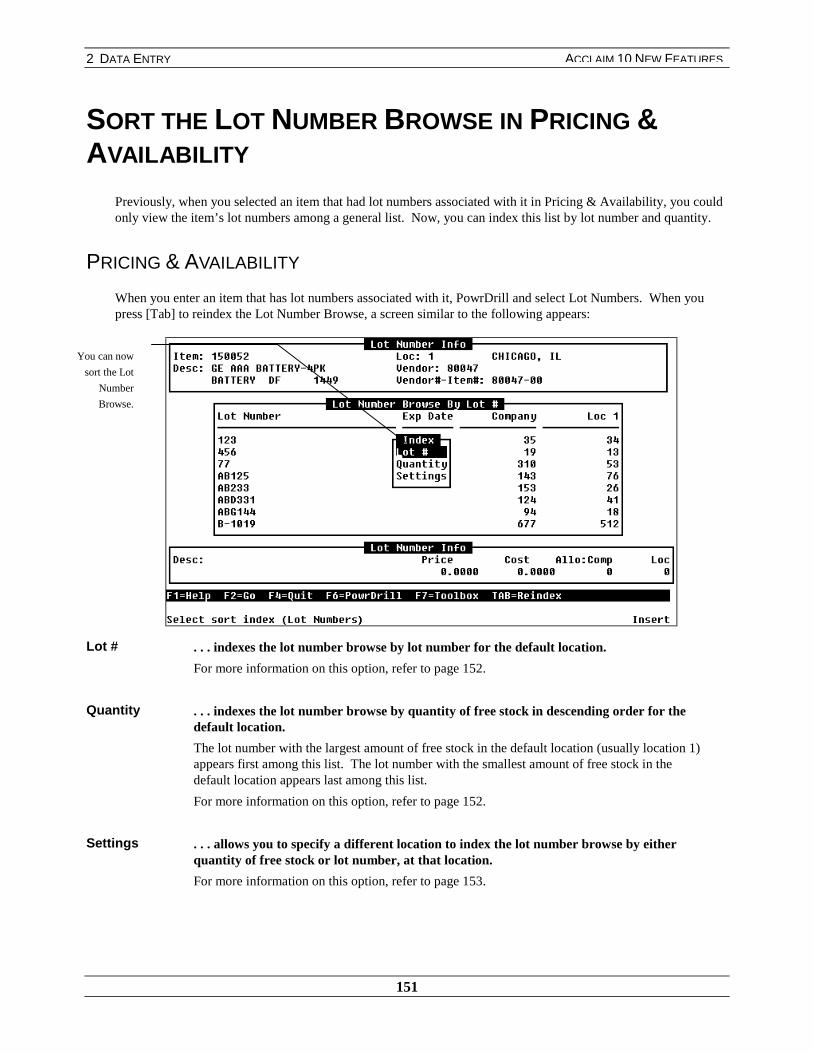
2 DATA ENTRY
151
ACCLAIM 10 NEW FEATURES
SORT THE LOT NUMBER BROWSE IN PRICING &AVAILABILITY
Previously, when you selected an item that had lot numbers associated with it in Pricing & Availability, you couldonly view the item’s lot numbers among a general list. Now, you can index this list by lot number and quantity.
PRICING & AVAILABILITY
When you enter an item that has lot numbers associated with it, PowrDrill and select Lot Numbers. When youpress [Tab] to reindex the Lot Number Browse, a screen similar to the following appears:
Lot # . . . indexes the lot number browse by lot number for the default location.
For more information on this option, refer to page 152.
Quantity . . . indexes the lot number browse by quantity of free stock in descending order for thedefault location.
The lot number with the largest amount of free stock in the default location (usually location 1)appears first among this list. The lot number with the smallest amount of free stock in thedefault location appears last among this list.
For more information on this option, refer to page 152.
Settings . . . allows you to specify a different location to index the lot number browse by eitherquantity of free stock or lot number, at that location.
For more information on this option, refer to page 153.
You can now
sort the Lot
Number
Browse.
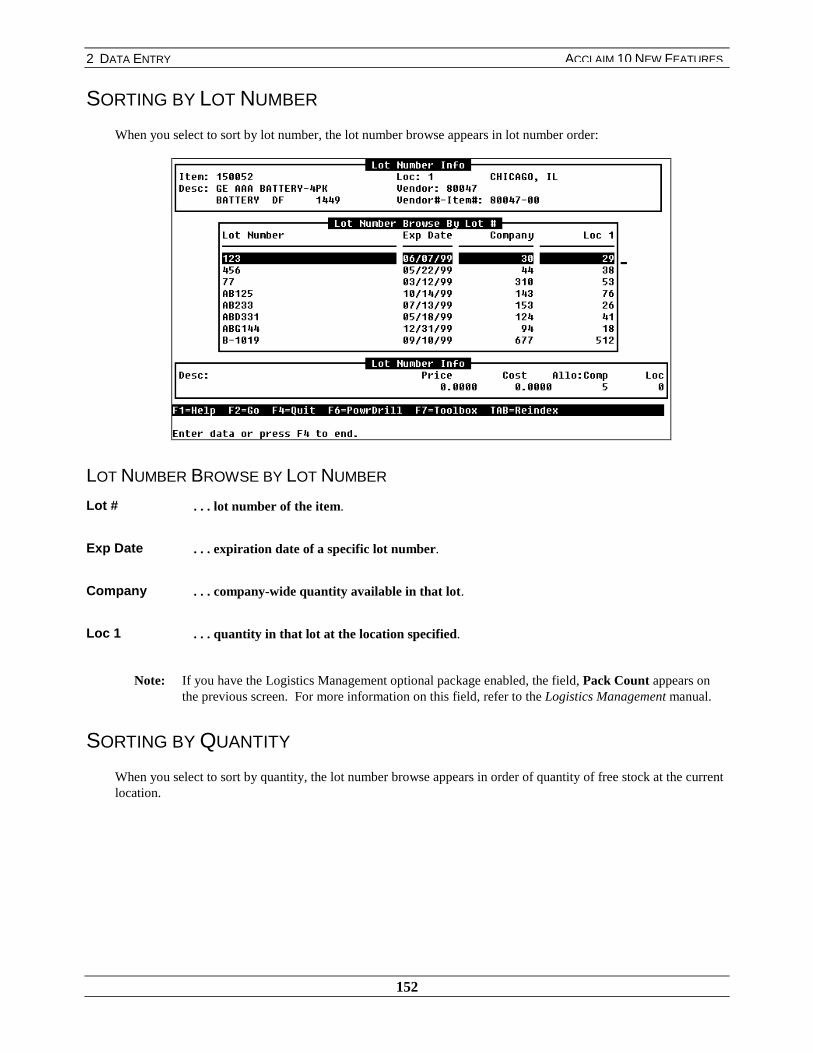
2 DATA ENTRY
152
ACCLAIM 10 NEW FEATURES
SORTING BY LOT NUMBER
When you select to sort by lot number, the lot number browse appears in lot number order:
LOT NUMBER BROWSE BY LOT NUMBER
Lot # . . . lot number of the item.
Exp Date . . . expiration date of a specific lot number.
Company . . . company-wide quantity available in that lot.
Loc 1 . . . quantity in that lot at the location specified.
Note: If you have the Logistics Management optional package enabled, the field, Pack Count appears onthe previous screen. For more information on this field, refer to the Logistics Management manual.
SORTING BY QUANTITY
When you select to sort by quantity, the lot number browse appears in order of quantity of free stock at the currentlocation.
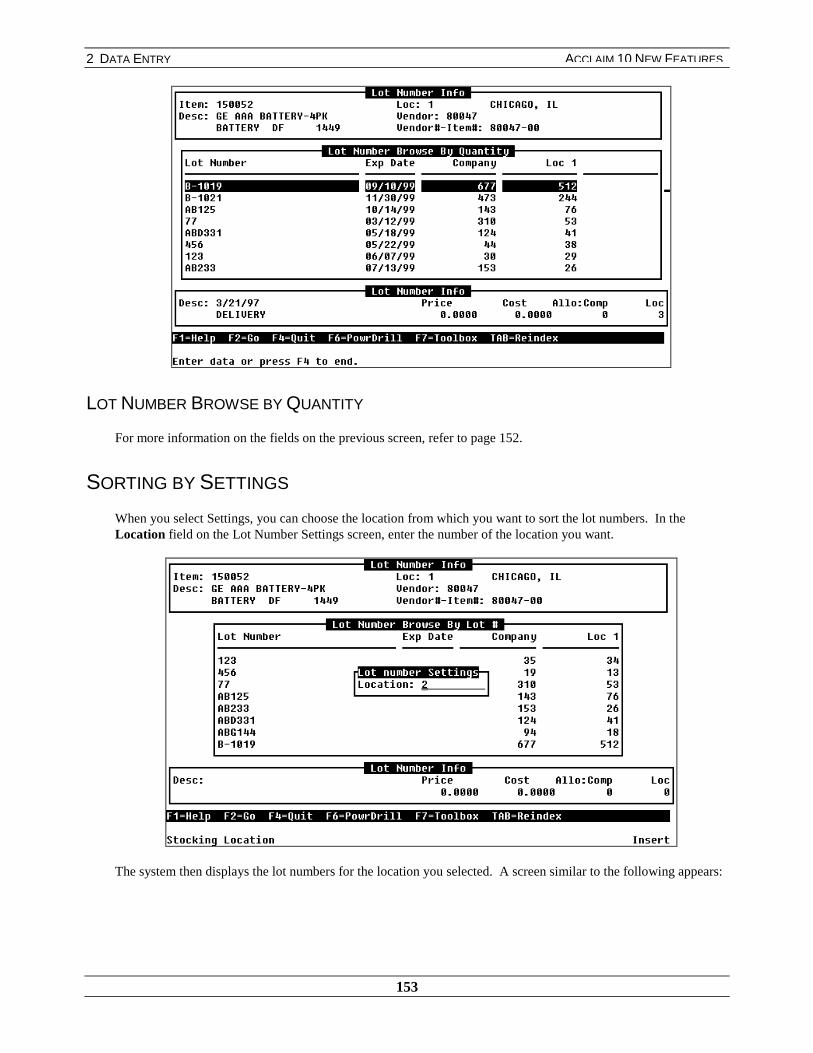
2 DATA ENTRY
153
ACCLAIM 10 NEW FEATURES
LOT NUMBER BROWSE BY QUANTITY
For more information on the fields on the previous screen, refer to page 152.
SORTING BY SETTINGS
When you select Settings, you can choose the location from which you want to sort the lot numbers. In theLocation field on the Lot Number Settings screen, enter the number of the location you want.
The system then displays the lot numbers for the location you selected. A screen similar to the following appears:

2 DATA ENTRY
154
ACCLAIM 10 NEW FEATURES
LOT NUMBER BROWSE BY SETTINGS
For more information on the fields in the previous browse, refer to page 153.
The system displays the lot numbers for the location you selected by either lot number or quantity, depending onwhich option you most recently chose.
For example, if you selected to view the Lot Number Browse by Quantity for location 1 (the defaultlocation), and then chose the Settings option to view lot numbers for location 3, the system woulddisplay the lot numbers for location 3 by quantity.
For more information on the previous screens, refer to the Browse manual. For more information on lot numbers,refer to the Lot Numbers manual.
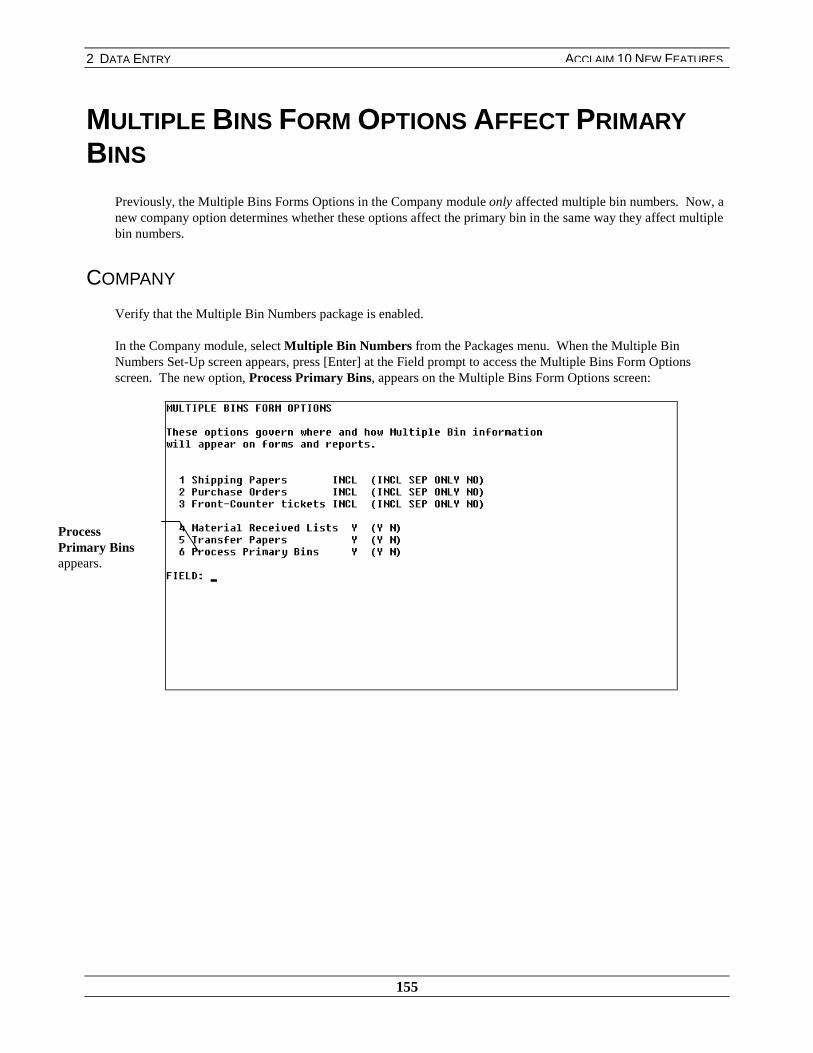
2 DATA ENTRY
155
ACCLAIM 10 NEW FEATURES
MULTIPLE BINS FORM OPTIONS AFFECT PRIMARYBINS
Previously, the Multiple Bins Forms Options in the Company module only affected multiple bin numbers. Now, anew company option determines whether these options affect the primary bin in the same way they affect multiplebin numbers.
COMPANY
Verify that the Multiple Bin Numbers package is enabled.
In the Company module, select Multiple Bin Numbers from the Packages menu. When the Multiple BinNumbers Set-Up screen appears, press [Enter] at the Field prompt to access the Multiple Bins Form Optionsscreen. The new option, Process Primary Bins, appears on the Multiple Bins Form Options screen:
ProcessPrimary Binsappears.
2 DATA ENTRY
156
ACCLAIM 10 NEW FEATURES
ProcessPrimaryBins
. . . determines whether primary bins are affected by the multiple bins form options.
If this field is set to:
★ Y – primary bins are affected by the multiple bins form options.
If Shipping Papers and Front Counter Tickets are set to:
INCL – multiple bin and/or primary bin numbers for items appear on the shipping paperor front counter ticket with their individual bin numbers and quantities.
SEP –multiple bin and/or primary bin numbers for items print on a bin printing ticketwith their individual bin numbers and quantities.
ONLY – picking ticket only prints for items with multiple bin and/or primary binnumbers, and displays their individual bin numbers and quantities.
If the Transfer Papers option is set to:
Y – Multiple and primary bin numbers print on transfer papers
N – Multiple and primary bin numbers do not print on transfer papers
Note: Purchase Orders and Material Received Lists are not affected by the ProcessPrimary Bins option.
Primary bins always print on purchase orders if the Purchase Orders option isset to INCL. If this option is set to ONLY or SEP, primary bins print on aseparate purchase order.
N – primary bins are not affected by the multiple bins form options.
If the Transfer Papers option is set to:
Y – Only multiple bin numbers print on transfer papers
N – Multiple and primary bin numbers do not print on transfer papers
For more information on multiple bins, refer to the Multiple Bins manual.
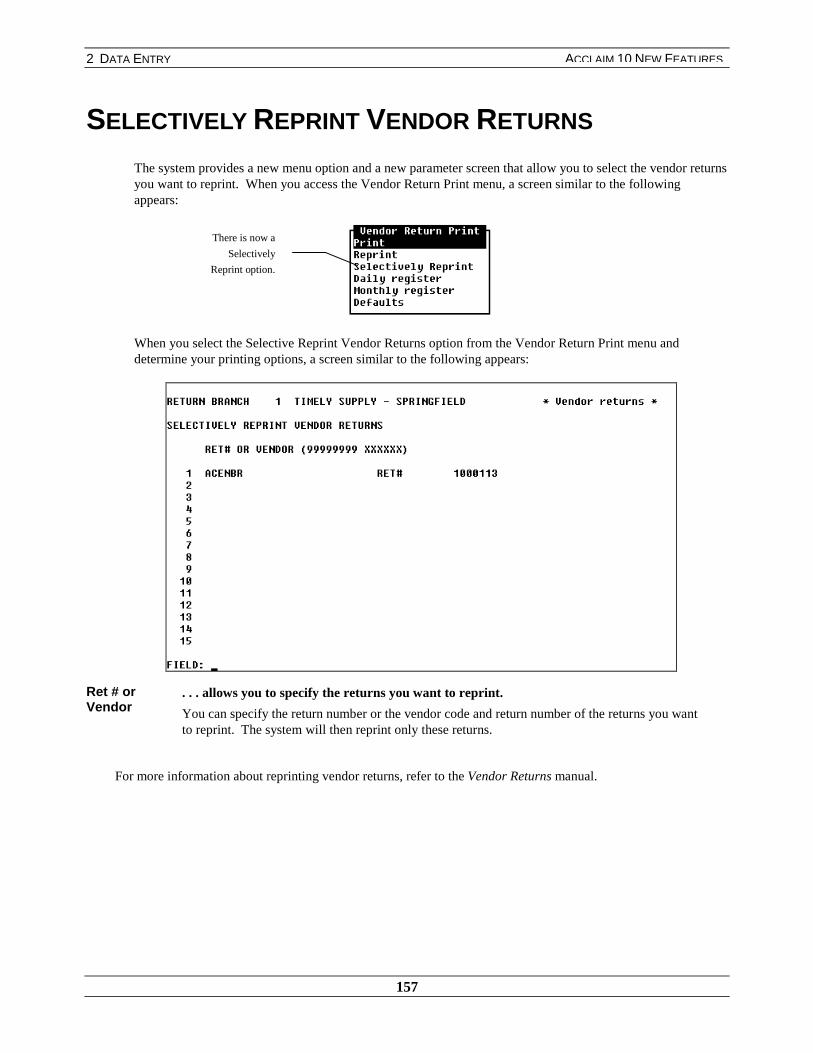
2 DATA ENTRY
157
ACCLAIM 10 NEW FEATURES
SELECTIVELY REPRINT VENDOR RETURNS
The system provides a new menu option and a new parameter screen that allow you to select the vendor returnsyou want to reprint. When you access the Vendor Return Print menu, a screen similar to the followingappears:
When you select the Selective Reprint Vendor Returns option from the Vendor Return Print menu anddetermine your printing options, a screen similar to the following appears:
Ret # orVendor
. . . allows you to specify the returns you want to reprint.
You can specify the return number or the vendor code and return number of the returns you wantto reprint. The system will then reprint only these returns.
For more information about reprinting vendor returns, refer to the Vendor Returns manual.
There is now a
Selectively
Reprint option.

2 DATA ENTRY
158
ACCLAIM 10 NEW FEATURES
PARAMETERS FOR PO PRINT AND PO RETURNPRINT
PO PRINT
The system provides a parameter screen when you print purchase orders. This parameter screen allows you tolimit the printing by vendor, purchase order number, and purchase order date. These parameters offer increasedflexibility when processing purchase orders.
When you choose to print purchase orders, a screen similar to the following appears:
Vendor
Start, End . . . range of vendors for which purchase orders will print.
PO#
Start, End . . . range of purchase order numbers for which purchase orders will print.
PO Date
Start, End . . . range of purchase order dates for which purchase orders will print.
PO RETURN PRINT
The system provides a parameter screen when you print vendor returns. This parameter screen allows you to limitthe printing by vendor, return number, and return date. These parameters offer increased flexibility whenprocessing vendor returns.
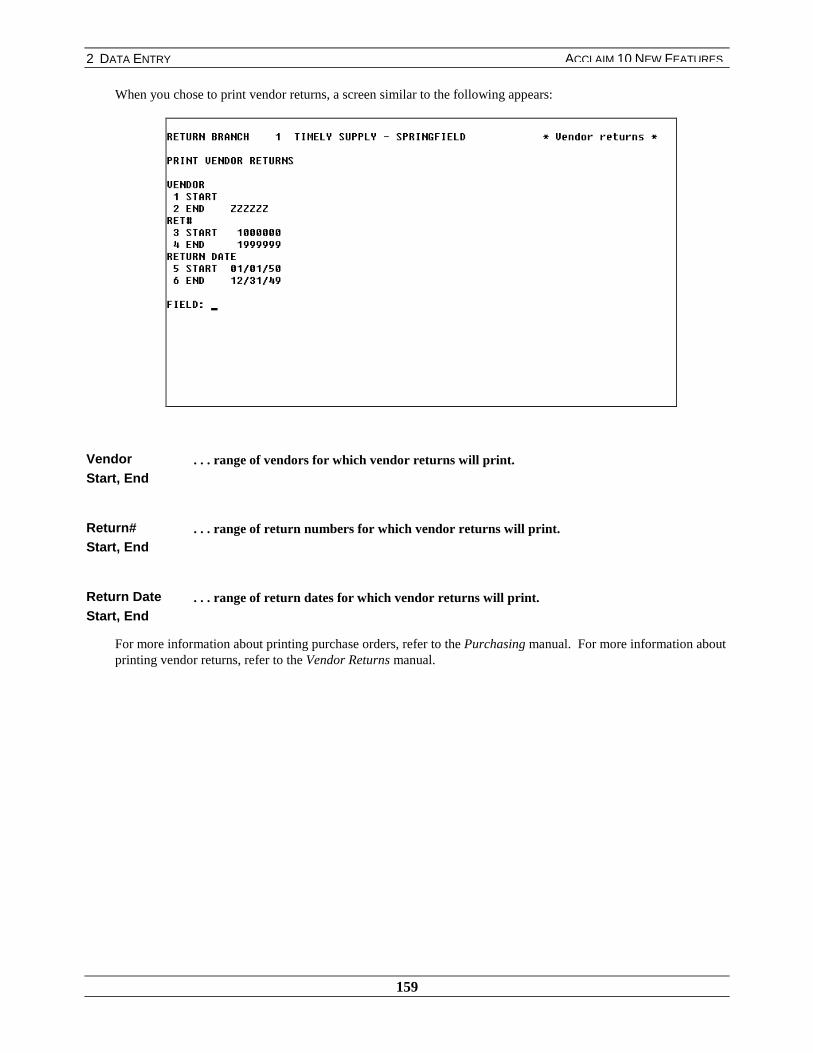
2 DATA ENTRY
159
ACCLAIM 10 NEW FEATURES
When you chose to print vendor returns, a screen similar to the following appears:
VendorStart, End
. . . range of vendors for which vendor returns will print.
Return#Start, End
. . . range of return numbers for which vendor returns will print.
Return DateStart, End
. . . range of return dates for which vendor returns will print.
For more information about printing purchase orders, refer to the Purchasing manual. For more information aboutprinting vendor returns, refer to the Vendor Returns manual.

2 DATA ENTRY
160
ACCLAIM 10 NEW FEATURES
SPECIFY VENDOR INVOICE DISCOUNT/NET TERMS BYNUMBER OF MONTHS AFTER INVOICE DATE
You can now specify the discount or net terms of a vendor invoice by a number of months after the first day of themonth after the invoice date. Previously, the system only allowed you to specify the discount and net terms by anumber of days after the invoice date. Now, you have the option of specifying a number of days or months, by selectingthe INV, PROX, or PRNN options in the Date field in Vendor Maintenance.
VENDOR MAINTENANCE
In the Discount Terms section of Vendor Maintenance, you can set the discount terms or net terms as a number ofmonths after the first day of the month after the invoice date.
When you browse on the Date field, the system offers the new option, PRNN, which allows you to specify the discountand/or net terms by months. When the Date field is set to PRNN, you can then specify how many months by inserting avalue in the Months field. To specify a specific day in the month, insert a value in the Day 1 and/or Day 2 fields.
Fields Day 1 and Day 2 are similar when the Date field is set to PRNN to when the Date field is set to PROX. WhenPRNN terms specify a Day 1 value but not a Day 2 value, the discount or net date is set to Day 1 of the number ofmonths specified after the first day of the month after the invoice date.
For example, for discount terms:
Date: PRNN
Day 1: 10
Months: 03
Invoice Date 07/01/98 Discount Date 11/10/98
Invoice Date 05/25/98 Discount Date 09/10/98
When PRNN terms specify a Day 1 and Day 2 value, the discount or due date is set to Day 1 if the invoice date fallsbetween the 16th and 31st of the month. If the invoice date falls between the 1st and 15th of the month, the discount ordue date is set to Day 2.
For example, for net terms:
Date: PRNN
Day 1: 03
Day 2: 25
Months: 02
Invoice Date 05/15/98 Due Date 08/25/98
Invoice Date 06/25/98 Due Date 09/03/98
When you view the Discount Terms section of Vendor Maintenance, a screen similar to the following appears:

2 DATA ENTRY
161
ACCLAIM 10 NEW FEATURES
PRNN . . . allows you to specify the discount and net terms of an invoice by a number of monthsafter the first day of the month after the invoice date.
Months . . . specifies the number of months after the invoice date.
If the Date field is set to PRNN, insert a value in this field to indicate the number of monthsafter day one of the following month that an invoice is due. In the Day 1 and/or Day 2 fields,insert the day of the month by which you want to set these terms.
For example, for net terms:
Date: PRNN
Day 1: 15
Day 2: 02
Months: 04
Invoice Date 07/02/98 Due Date 12/02/98
Invoice Date 04/16/98 Due Date 09/15/98
Note: If you set the Date field to PRNN and leave the default of 0 (zero) in fields Day 1 and Day 2, the daywill default to the 1st of the month you specified.
For example, for net terms:
Date: PRNN
Day 1: 0
Day 2: 0
Months: 04
Invoice Date 03/08/98 Due Date 08/01/98
Invoice Date 08/21/98 Due Date 01/01/98
You can now
select the PRNN
option in the
Date field.
If the Date field
is set to PRNN,
specify the
number of
months in the
Months field.
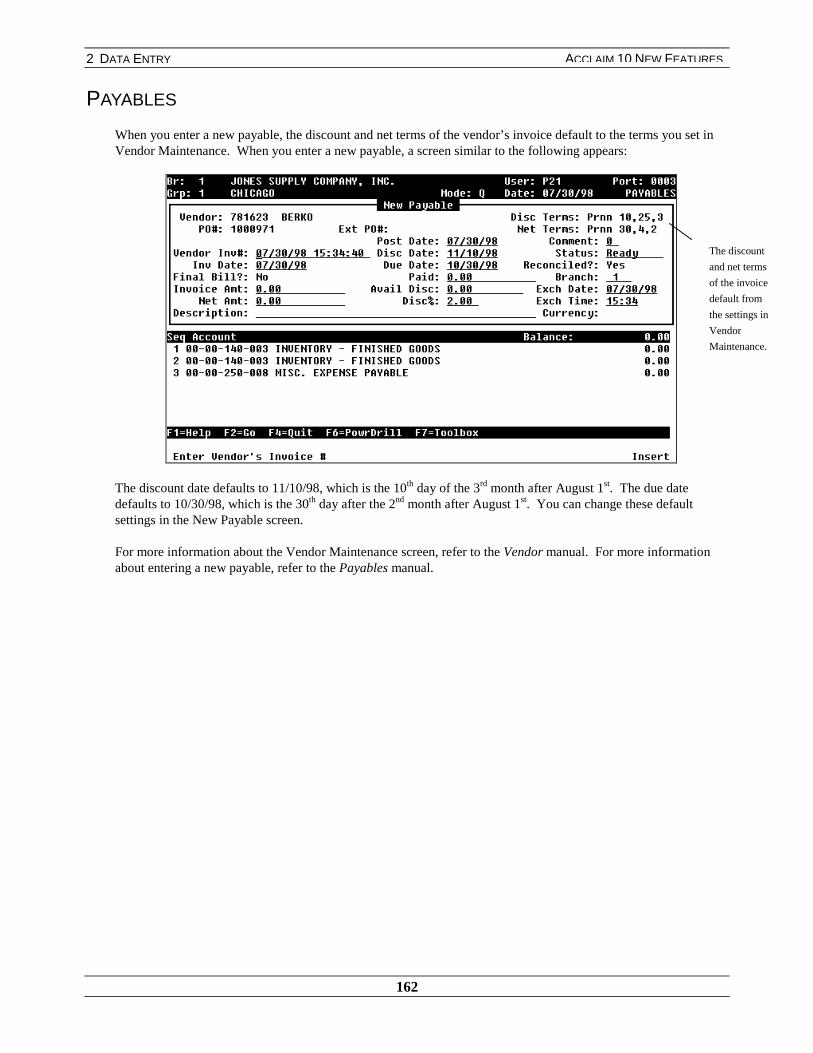
2 DATA ENTRY
162
ACCLAIM 10 NEW FEATURES
PAYABLES
When you enter a new payable, the discount and net terms of the vendor’s invoice default to the terms you set inVendor Maintenance. When you enter a new payable, a screen similar to the following appears:
The discount date defaults to 11/10/98, which is the 10th day of the 3rd month after August 1st. The due datedefaults to 10/30/98, which is the 30th day after the 2nd month after August 1st. You can change these defaultsettings in the New Payable screen.
For more information about the Vendor Maintenance screen, refer to the Vendor manual. For more informationabout entering a new payable, refer to the Payables manual.
The discount
and net terms
of the invoice
default from
the settings in
Vendor
Maintenance.
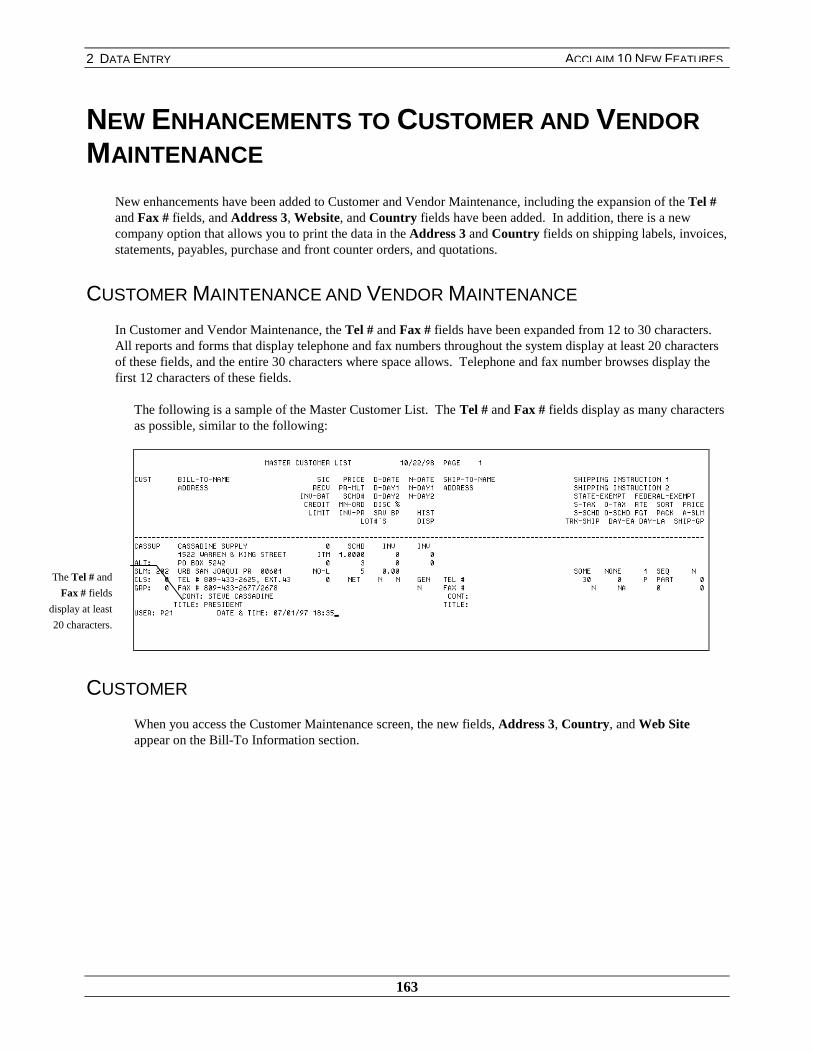
2 DATA ENTRY
163
ACCLAIM 10 NEW FEATURES
NEW ENHANCEMENTS TO CUSTOMER AND VENDORMAINTENANCE
New enhancements have been added to Customer and Vendor Maintenance, including the expansion of the Tel #and Fax # fields, and Address 3, Website, and Country fields have been added. In addition, there is a newcompany option that allows you to print the data in the Address 3 and Country fields on shipping labels, invoices,statements, payables, purchase and front counter orders, and quotations.
CUSTOMER MAINTENANCE AND VENDOR MAINTENANCE
In Customer and Vendor Maintenance, the Tel # and Fax # fields have been expanded from 12 to 30 characters.All reports and forms that display telephone and fax numbers throughout the system display at least 20 charactersof these fields, and the entire 30 characters where space allows. Telephone and fax number browses display thefirst 12 characters of these fields.
The following is a sample of the Master Customer List. The Tel # and Fax # fields display as many charactersas possible, similar to the following:
CUSTOMER
When you access the Customer Maintenance screen, the new fields, Address 3, Country, and Web Siteappear on the Bill-To Information section.
The Tel # and
Fax # fields
display at least
20 characters.

2 DATA ENTRY
164
ACCLAIM 10 NEW FEATURES
A screen similar to the following appears:
Address 3 . . . defines another line for the bill-to address.
Country . . . defines the country of the customer’s bill-to address.
Web Site . . . defines the customer’s web site address.
You can edit these fields via the Fast Edit option in the Customer module.
The Address 3 and Country fields also appear on the Ship-To Information section of Customer Maintenance.
When you access this section, a screen similar to the following appears:
Address 3
appears.
Country
appears.
Web Site
appears.
Address 3 and
Country fields
appear on the
Ship- To
Information
section.
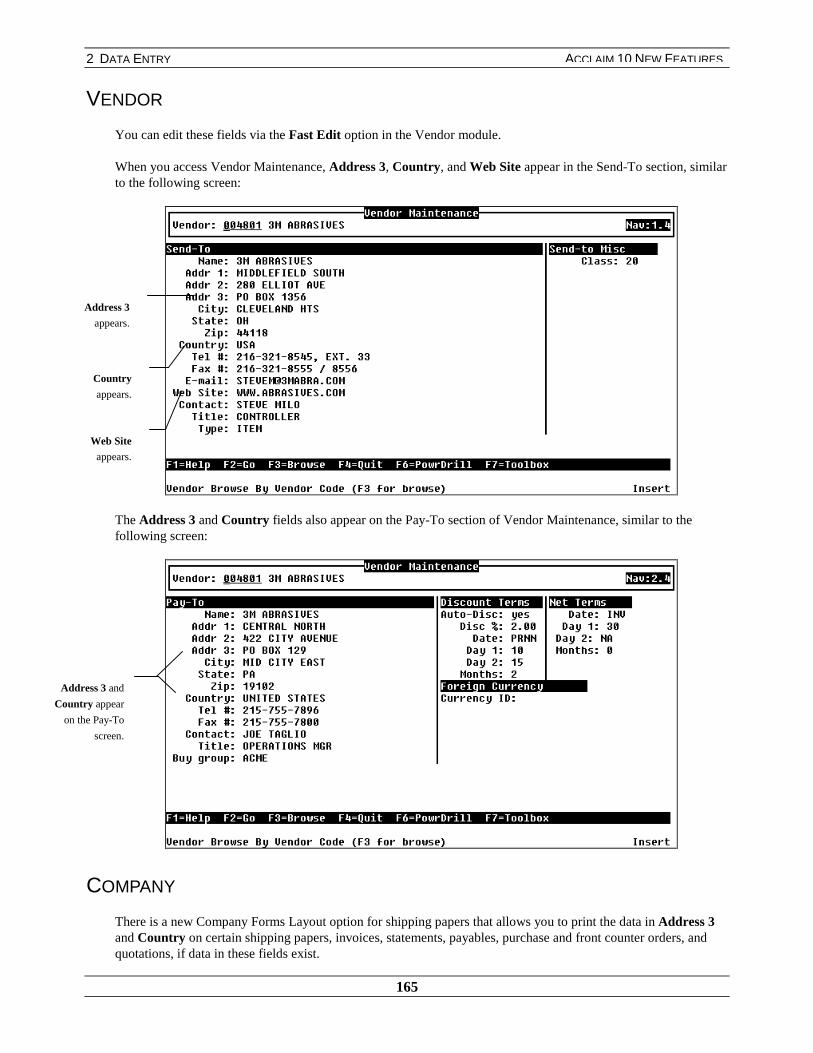
2 DATA ENTRY
165
ACCLAIM 10 NEW FEATURES
VENDOR
You can edit these fields via the Fast Edit option in the Vendor module.
When you access Vendor Maintenance, Address 3, Country, and Web Site appear in the Send-To section, similarto the following screen:
The Address 3 and Country fields also appear on the Pay-To section of Vendor Maintenance, similar to thefollowing screen:
COMPANY
There is a new Company Forms Layout option for shipping papers that allows you to print the data in Address 3and Country on certain shipping papers, invoices, statements, payables, purchase and front counter orders, andquotations, if data in these fields exist.
Address 3
appears.
Country
appears.
Web Site
appears.
Address 3 and
Country appear
on the Pay-To
screen.

2 DATA ENTRY
166
ACCLAIM 10 NEW FEATURES
Select the relevant option from the Forms Layout menu in the Company module. When you choose formats B,C, D, and E, the options to print Address 3 and Country appear.
Note: This information cannot be printed on formats A and G due to insufficient space on the shippingpaper.
For example, if you want to print the data in Address 3 and Country on shipping papers, select Shipping.From the Shipping Paper Format Selections screen, select shipping paper format B.The option to print Address 3 and Country on your shipping paper appears, similar to the following screen:
Print AddressLine 3
. . . determines whether the data in the Address Line 3 field displays onthe selected document.
When this field is set to
Y – Address 3 displays on the selected document.
★ N – Address 3 does not display on the selected document.
Note: If you set this option to Y and have the Barcodes optionalpackage enabled, the barcodes that print on the top of yourdocument will be half their usual size. Therefore, they willhave a height of ¼ inch, instead of ½ inch. These barcodesare smaller in order to accommodate Address 3.
Print Countryin Place ofCustomer PO
. . . determines whether the data in the Country field displays on theselected document.
The contents of the Country field will replace the Customer PO field,even if the Country field is blank.
When this field is set to
Y – Country displays on the selected document.
★ N – Country does not display on the selected document.
Note: Because there are no customer purchase order numbers on purchase orders, the second option on thePurchase Order Format screen is Print Country instead of Print Country in Place of Customer PO.
Print Address
Line 3 and Print
Country in Place
of Customer PO
appears.
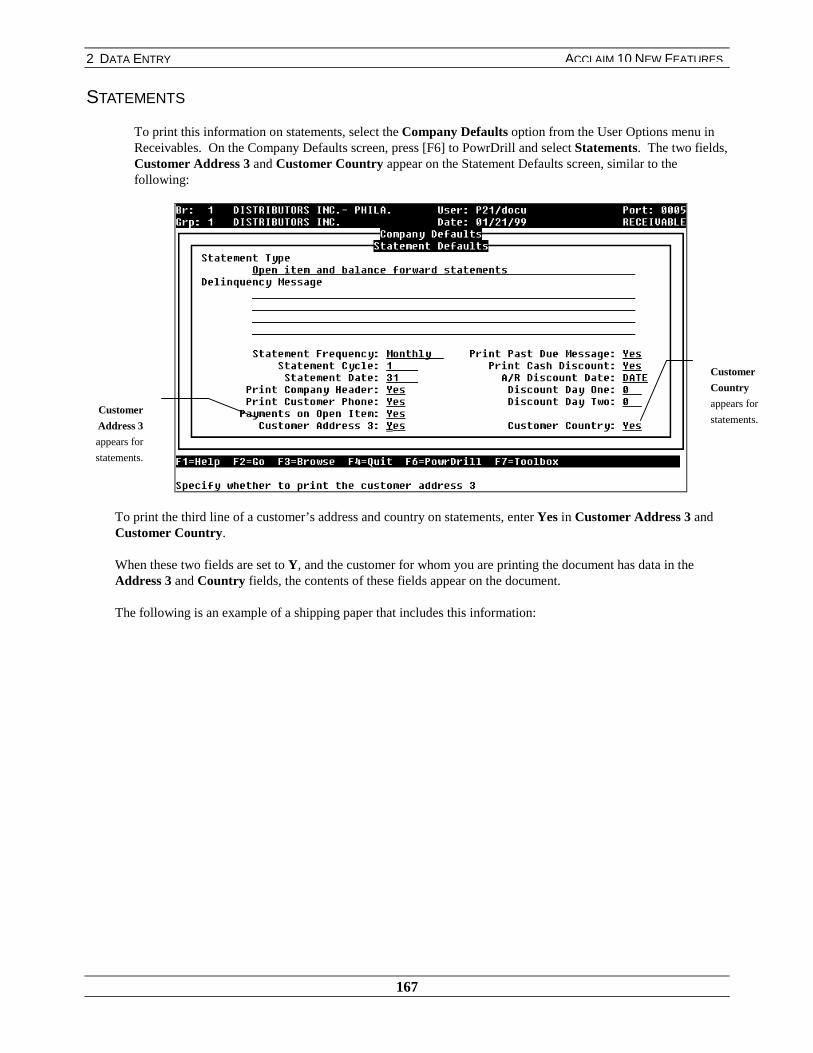
2 DATA ENTRY
167
ACCLAIM 10 NEW FEATURES
STATEMENTS
To print this information on statements, select the Company Defaults option from the User Options menu inReceivables. On the Company Defaults screen, press [F6] to PowrDrill and select Statements. The two fields,Customer Address 3 and Customer Country appear on the Statement Defaults screen, similar to thefollowing:
To print the third line of a customer’s address and country on statements, enter Yes in Customer Address 3 andCustomer Country.
When these two fields are set to Y, and the customer for whom you are printing the document has data in theAddress 3 and Country fields, the contents of these fields appear on the document.
The following is an example of a shipping paper that includes this information:
Customer
Address 3
appears for
statements.
Customer
Country
appears for
statements.

2 DATA ENTRY
168
ACCLAIM 10 NEW FEATURES
EXAMPLE: SHIPPING PAPER
SHIP-EDIT
When you access the Ship Edit confirmation screen, the contents of the Address 3 and Country fields appear onthe Ship-To address of the header.
Address 3 and
Country appear.
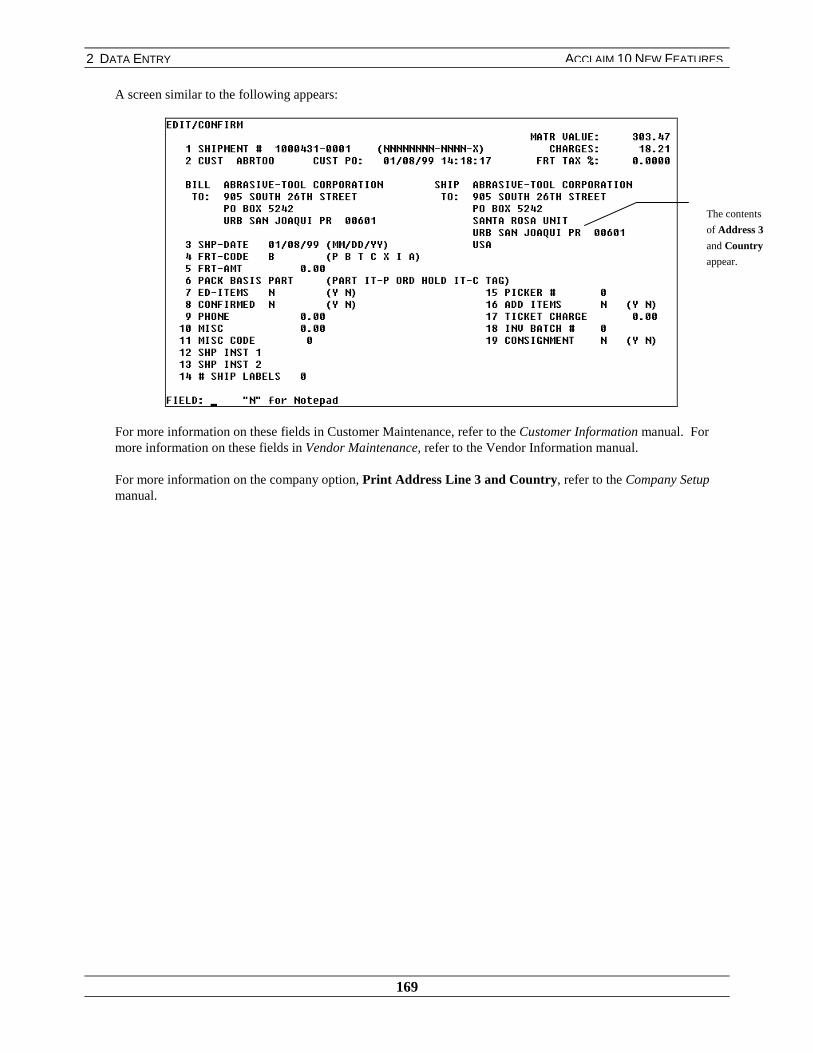
2 DATA ENTRY
169
ACCLAIM 10 NEW FEATURES
A screen similar to the following appears:
For more information on these fields in Customer Maintenance, refer to the Customer Information manual. Formore information on these fields in Vendor Maintenance, refer to the Vendor Information manual.
For more information on the company option, Print Address Line 3 and Country, refer to the Company Setupmanual.
The contents
of Address 3
and Country
appear.

2 DATA ENTRY
170
ACCLAIM 10 NEW FEATURES
PRICE/COST OVERRIDE BROWSE RESTRICTED BYBASIS
SALES PRICING
The price/cost override table browse can be indexed by the values entered in the table’s Basis field. This featuredisplays specific override tables of your customers. It appears when the browse is initially sorted by customer ordefault customer.
To access this option, choose the Override Table option on the Sales Pricing Information menu. Select thePrice/Cost Overrides option from the Override Table menu:
Choose the Maintenance option from the Price/Cost Overrides menu. On the Customer field, press [F3] to viewyour customers. The browse must be sorted by customer, so if it is sorted by another field, press [Tab] to reindexthe browse by customer:
3UHVV�>7DE@WR�GLVSOD\WKH�,QGH[FKRLFHV
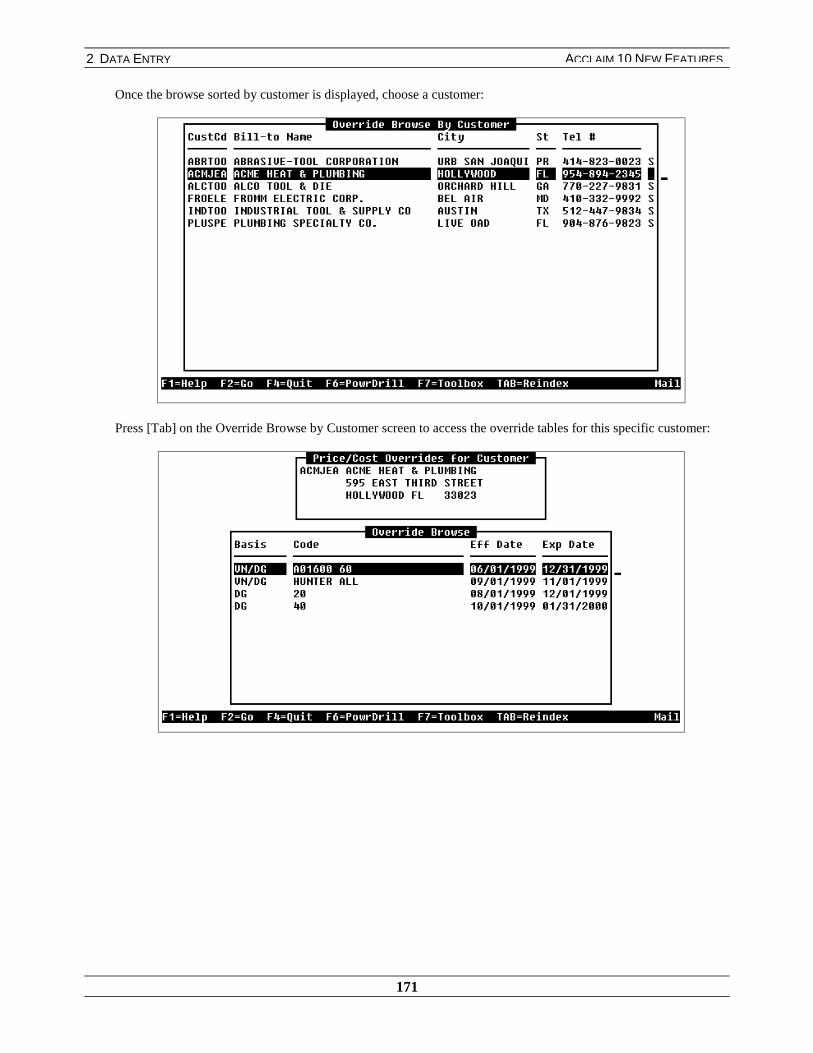
2 DATA ENTRY
171
ACCLAIM 10 NEW FEATURES
Once the browse sorted by customer is displayed, choose a customer:
Press [Tab] on the Override Browse by Customer screen to access the override tables for this specific customer:
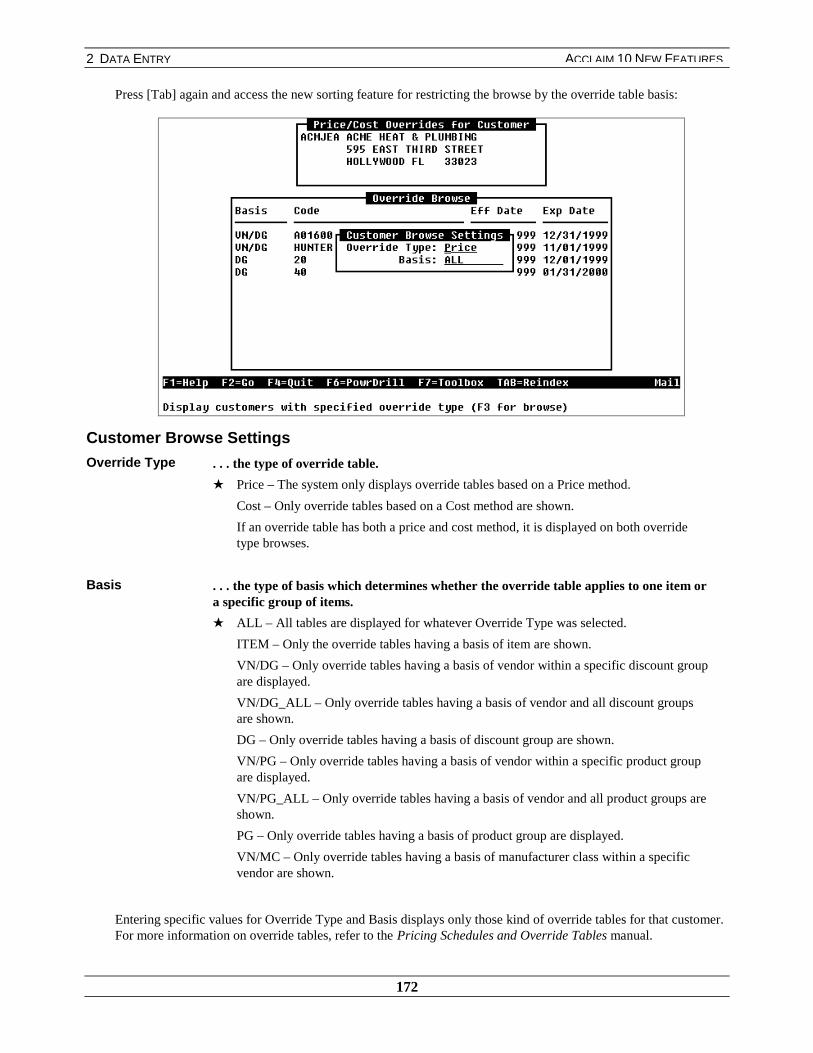
2 DATA ENTRY
172
ACCLAIM 10 NEW FEATURES
Press [Tab] again and access the new sorting feature for restricting the browse by the override table basis:
Customer Browse Settings
Override Type . . . the type of override table.
★ Price – The system only displays override tables based on a Price method.
Cost – Only override tables based on a Cost method are shown.
If an override table has both a price and cost method, it is displayed on both overridetype browses.
Basis . . . the type of basis which determines whether the override table applies to one item ora specific group of items.
★ ALL – All tables are displayed for whatever Override Type was selected.
ITEM – Only the override tables having a basis of item are shown.
VN/DG – Only override tables having a basis of vendor within a specific discount groupare displayed.
VN/DG_ALL – Only override tables having a basis of vendor and all discount groupsare shown.
DG – Only override tables having a basis of discount group are shown.
VN/PG – Only override tables having a basis of vendor within a specific product groupare displayed.
VN/PG_ALL – Only override tables having a basis of vendor and all product groups areshown.
PG – Only override tables having a basis of product group are displayed.
VN/MC – Only override tables having a basis of manufacturer class within a specificvendor are shown.
Entering specific values for Override Type and Basis displays only those kind of override tables for that customer.For more information on override tables, refer to the Pricing Schedules and Override Tables manual.

173
QUANTITY IN TERMS OF ORDER UNIT
The system now prints order, backorder, and shipped/invoiced quantities in terms of the order unit on quotations,sales tickets, shipping papers, and invoices. For this feature to work, you must enable Multiple Units. For moreinformation, refer to the Multiple Units manual.
COMPANY
When the Order Processing company option Qty’s in Terms of Order Units is set to Y, the system expressessales units in terms of the order unit size on shipping papers and invoices.
Qtys inTerms ofOrder Unit
. . . determines if quantities will print in terms of order unit on order processing forms.
When this field is set to
Y – quantities are displayed in terms of order unit
★ N – quantities are displayed in terms of eaches
3 ORDER PROCESSING
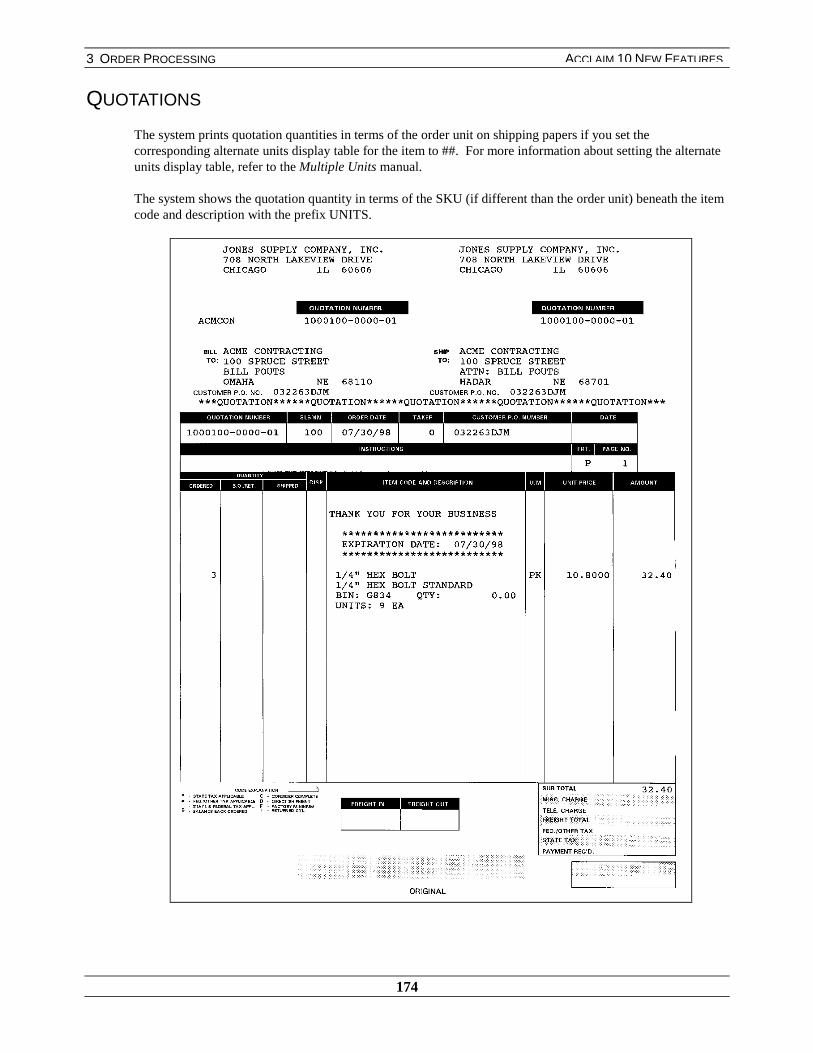
3 ORDER PROCESSING
174
ACCLAIM 10 NEW FEATURES
QUOTATIONS
The system prints quotation quantities in terms of the order unit on shipping papers if you set thecorresponding alternate units display table for the item to ##. For more information about setting the alternateunits display table, refer to the Multiple Units manual.
The system shows the quotation quantity in terms of the SKU (if different than the order unit) beneath the itemcode and description with the prefix UNITS.
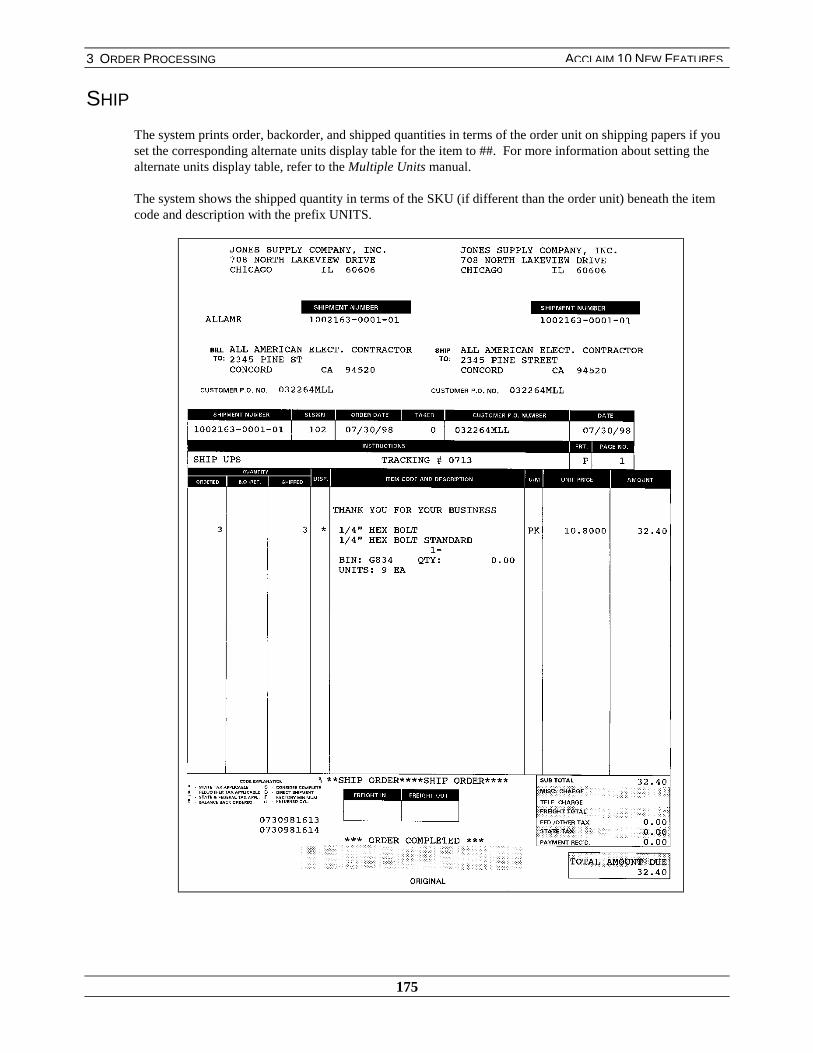
3 ORDER PROCESSING
175
ACCLAIM 10 NEW FEATURES
SHIP
The system prints order, backorder, and shipped quantities in terms of the order unit on shipping papers if youset the corresponding alternate units display table for the item to ##. For more information about setting thealternate units display table, refer to the Multiple Units manual.
The system shows the shipped quantity in terms of the SKU (if different than the order unit) beneath the itemcode and description with the prefix UNITS.

3 ORDER PROCESSING
176
ACCLAIM 10 NEW FEATURES
INVOICE
The system prints order, backorder, and invoiced quantities in terms of the order unit on shipping invoices ifyou set the corresponding alternate units display table for the item to ##. For more information on setting thealternate units display table, refer to the Multiple Units manual.
The system shows the invoiced quantities in terms of SKU (if different than the order unit) beneath the itemcode and description with the prefix UNITS.
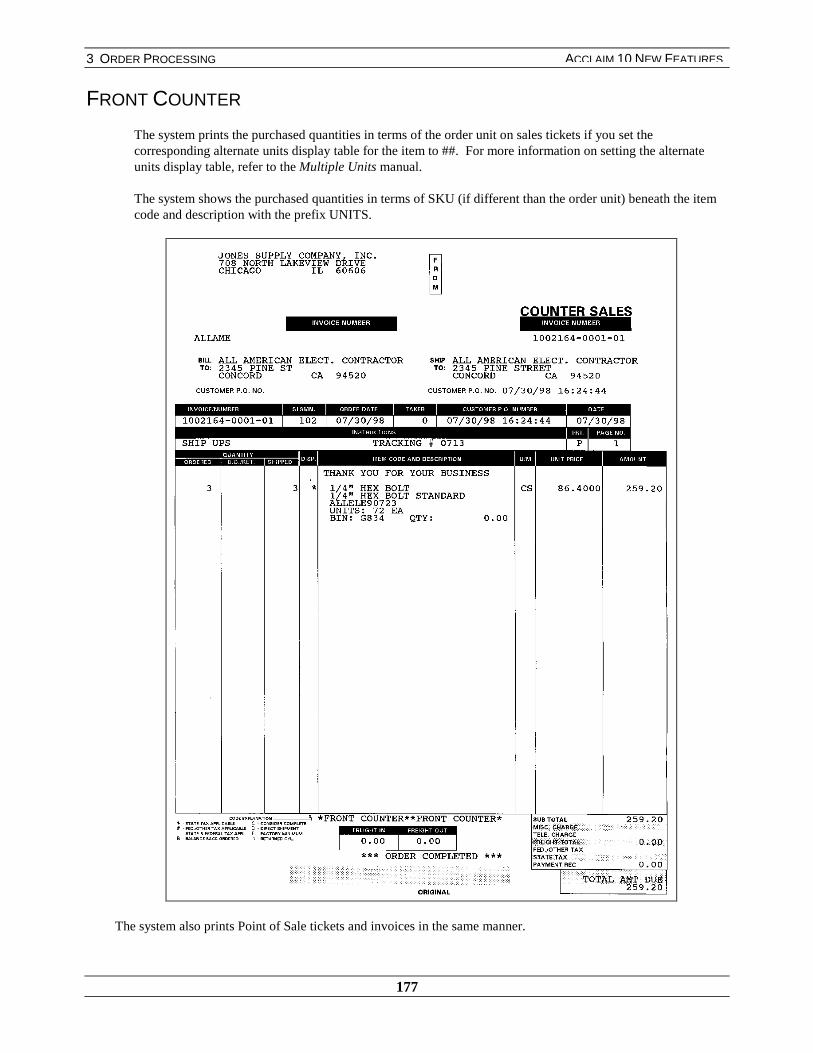
3 ORDER PROCESSING
177
ACCLAIM 10 NEW FEATURES
FRONT COUNTER
The system prints the purchased quantities in terms of the order unit on sales tickets if you set thecorresponding alternate units display table for the item to ##. For more information on setting the alternateunits display table, refer to the Multiple Units manual.
The system shows the purchased quantities in terms of SKU (if different than the order unit) beneath the itemcode and description with the prefix UNITS.
The system also prints Point of Sale tickets and invoices in the same manner.

3 ORDER PROCESSING
178
ACCLAIM 10 NEW FEATURES
PRINT ORDER ACKNOWLEDGEMENT IMMEDIATELY
You can print order acknowledgments immediately after you generate the order in order entry or Quote Order.
COMPANY
The system provides a new Order Processing company option that allows you to determine whether you can printorder acknowledgements immediately after you generate an order in order entry or when converting a quote to anorder.
When you select the Order acknowledgements Printing option from the Order Processing company option menu, ascreen similar to the following appears:
OrderAcknowledgement Printing
. . . determines whether order acknowledgements can be printed from Order and QuoteOrder.
When this field is set to
Y – you have an option to print order acknowledgements from order entry and Quote Order
★ N – you cannot print order acknowledgements from order entry and Quote Order
ORDER
When you set the Order Acknowledgement Printing company option to Y, you can print order acknowledgmentsin order entry and Quote Order immediately after you accept the order. The system displays a new Accept andPrint Order Acknowledgement option, similar to the following example:
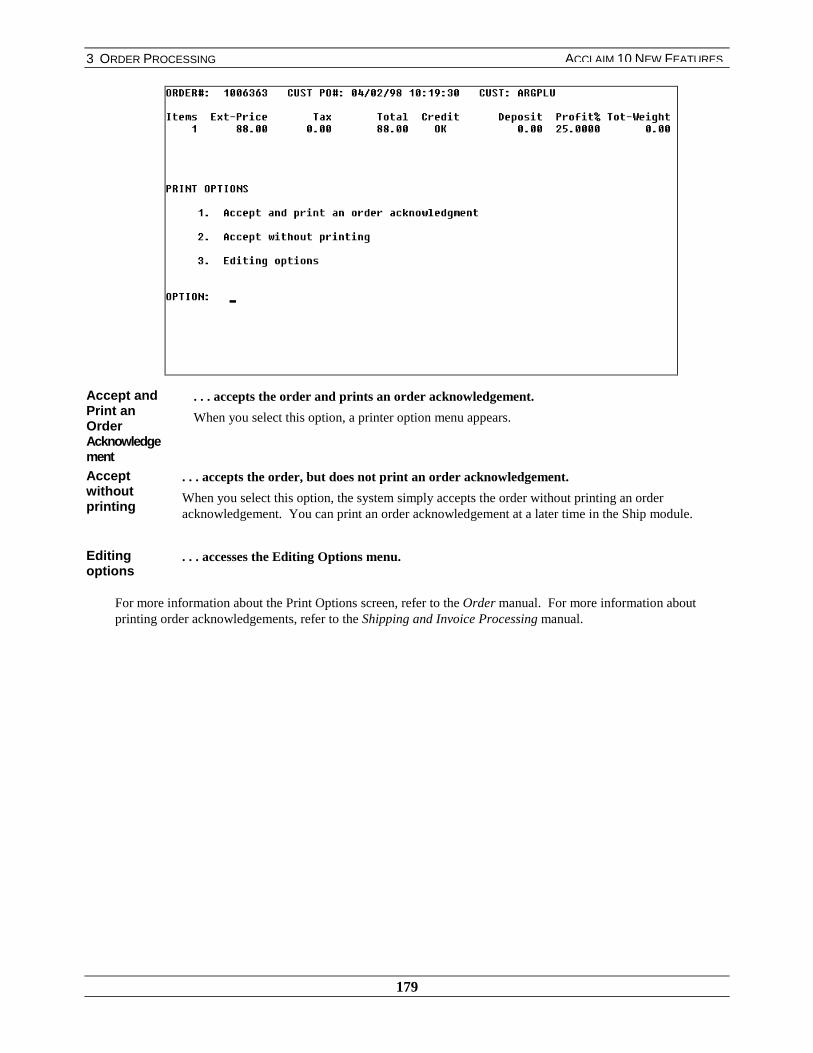
3 ORDER PROCESSING
179
ACCLAIM 10 NEW FEATURES
Accept andPrint anOrderAcknowledgement
. . . accepts the order and prints an order acknowledgement.
When you select this option, a printer option menu appears.
Acceptwithoutprinting
. . . accepts the order, but does not print an order acknowledgement.
When you select this option, the system simply accepts the order without printing an orderacknowledgement. You can print an order acknowledgement at a later time in the Ship module.
Editingoptions
. . . accesses the Editing Options menu.
For more information about the Print Options screen, refer to the Order manual. For more information aboutprinting order acknowledgements, refer to the Shipping and Invoice Processing manual.
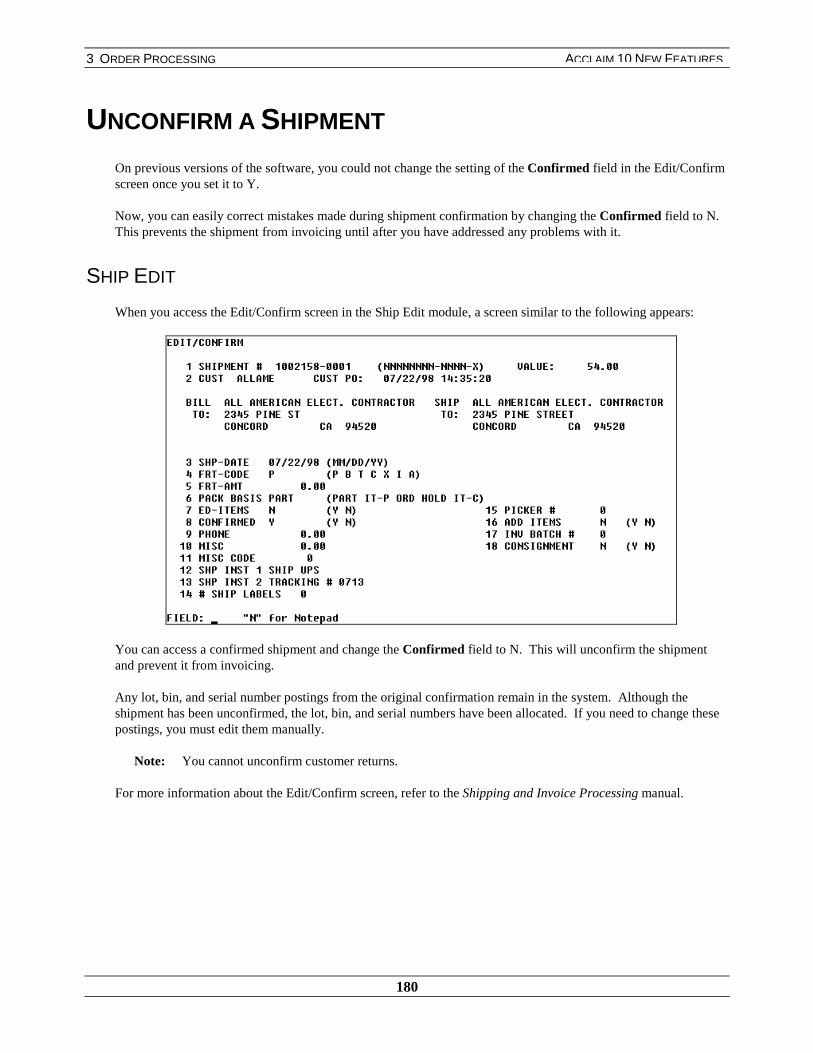
3 ORDER PROCESSING
180
ACCLAIM 10 NEW FEATURES
UNCONFIRM A SHIPMENT
On previous versions of the software, you could not change the setting of the Confirmed field in the Edit/Confirmscreen once you set it to Y.
Now, you can easily correct mistakes made during shipment confirmation by changing the Confirmed field to N.This prevents the shipment from invoicing until after you have addressed any problems with it.
SHIP EDIT
When you access the Edit/Confirm screen in the Ship Edit module, a screen similar to the following appears:
You can access a confirmed shipment and change the Confirmed field to N. This will unconfirm the shipmentand prevent it from invoicing.
Any lot, bin, and serial number postings from the original confirmation remain in the system. Although theshipment has been unconfirmed, the lot, bin, and serial numbers have been allocated. If you need to change thesepostings, you must edit them manually.
Note: You cannot unconfirm customer returns.
For more information about the Edit/Confirm screen, refer to the Shipping and Invoice Processing manual.

3 ORDER PROCESSING
181
ACCLAIM 10 NEW FEATURES
REMOVE POS AND RETURNS BY VENDOR CODE ANDCLASS
On previous versions of the software, the system could remove POs and vendor returns by date. Now, you canlimit the range of purchase orders or vendor returns that you want to remove by vendor code and vendor class.
EXPEDITE PURCHASE
When you select the Remove option from the Expedite Purchase menu, a screen similar to the following appears:
VendorStart, End
. . . limits the range of the purge by vendor code.
VendorClassStart, End
. . . limits the range of the purge by vendor class.
Last Date ofActivity
. . . limits the purge by the last date of activity.
Only those purchase order records with a Purchase Order Date, Last Receive Date, and LastInvoice Date earlier than the date that you specify in this Last Date of Activity field will beincluded in the range of PO records that are deleted.
SkipUnreconciled POs
. . . determines whether unreconciled POs will be purged.
When this field is set to
★ Y – the system does not delete the purchase order records that have not been reconciledthrough the Payables module.
N – all purchase order records are deleted, even if they are unreconciled.
For more information about removing completed purchase orders, refer to the Purchasing manual.
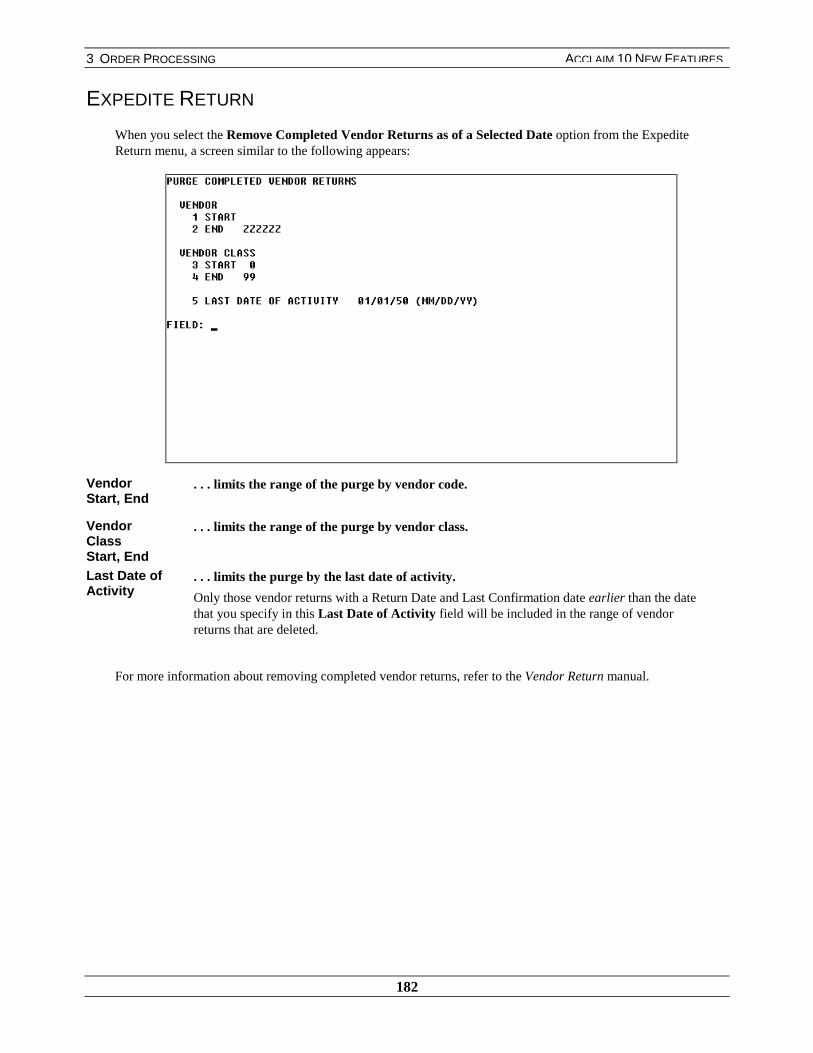
3 ORDER PROCESSING
182
ACCLAIM 10 NEW FEATURES
EXPEDITE RETURN
When you select the Remove Completed Vendor Returns as of a Selected Date option from the ExpediteReturn menu, a screen similar to the following appears:
VendorStart, End
. . . limits the range of the purge by vendor code.
VendorClassStart, End
. . . limits the range of the purge by vendor class.
Last Date ofActivity
. . . limits the purge by the last date of activity.
Only those vendor returns with a Return Date and Last Confirmation date earlier than the datethat you specify in this Last Date of Activity field will be included in the range of vendorreturns that are deleted.
For more information about removing completed vendor returns, refer to the Vendor Return manual.
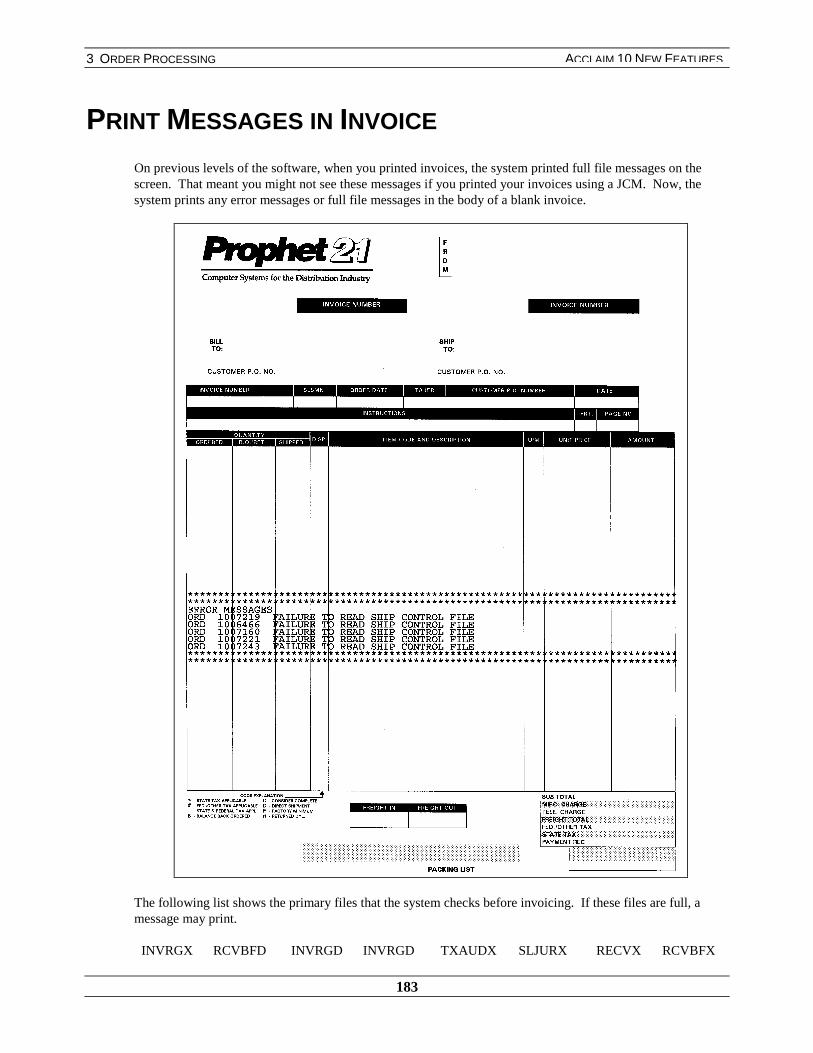
3 ORDER PROCESSING
183
ACCLAIM 10 NEW FEATURES
PRINT MESSAGES IN INVOICE
On previous levels of the software, when you printed invoices, the system printed full file messages on thescreen. That meant you might not see these messages if you printed your invoices using a JCM. Now, thesystem prints any error messages or full file messages in the body of a blank invoice.
The following list shows the primary files that the system checks before invoicing. If these files are full, amessage may print.
INVRGX RCVBFD INVRGD INVRGD TXAUDX SLJURX RECVX RCVBFX

3 ORDER PROCESSING
184
ACCLAIM 10 NEW FEATURES
COMJRX RCVNMX COMJND RCSLMX CSINVX TXAUDD RECVD CSINVD

3 ORDER PROCESSING
185
ACCLAIM 10 NEW FEATURES
EXPRESS STOCK INFORMATION AS A SALES UNITAND ORDER UNIT
Previously, you could only express your stock information and prices in a single unit of measure in Pricing &Availability. Now, you have the flexibility of expressing your stock as a sales unit and order unit. This isespecially useful if you bought your stock from your vendor as one unit value (e.g., DZ 12), and you want to sell itto your customer as a different unit value (e.g., EA 1).
A new company order processing screen and fields allow you to set the defaults of these units in Pricing &Availability.
COMPANY
When you access the Options menu from the Company Information menu, Acclaim Options appears.
Select Acclaim Options to view the Acclaim Options menu. The new option, Order Processing Options appears.
When you select Order Processing Options, the Order Processing Company Options screen appears, similar to thefollowing:
Acclaim
Options
appears.
Order Processing
Options appears.
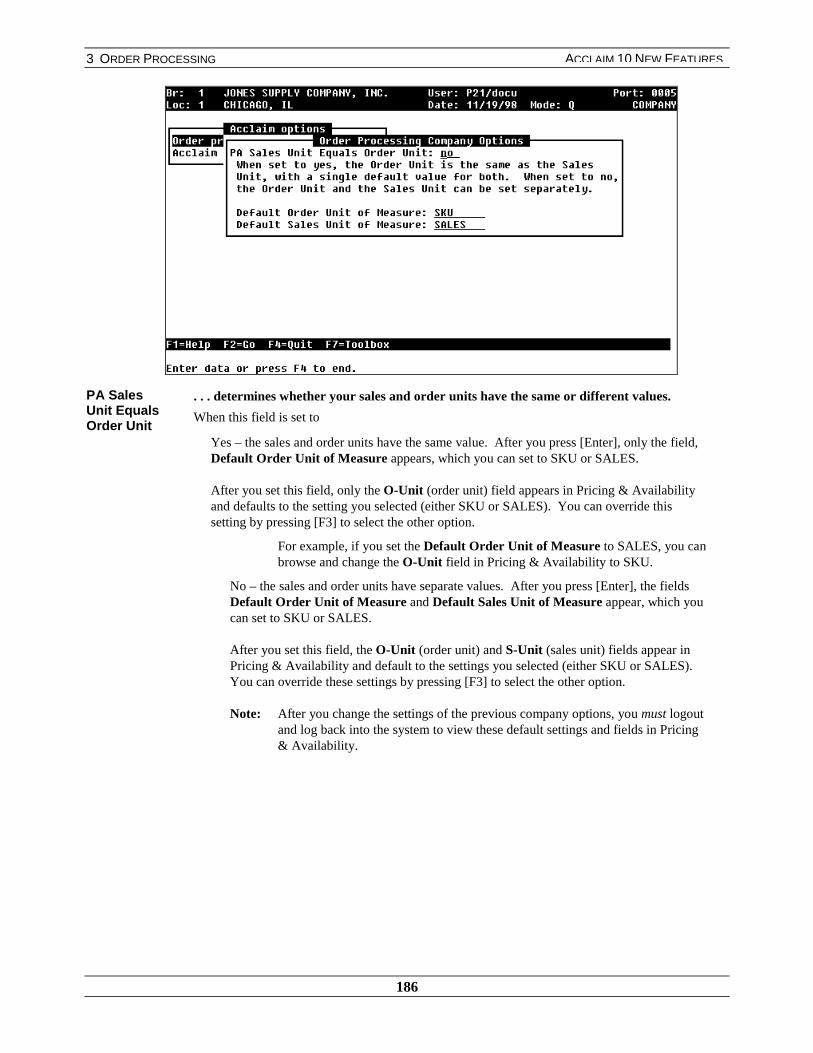
3 ORDER PROCESSING
186
ACCLAIM 10 NEW FEATURES
PA SalesUnit EqualsOrder Unit
. . . determines whether your sales and order units have the same or different values.
When this field is set to
Yes – the sales and order units have the same value. After you press [Enter], only the field,Default Order Unit of Measure appears, which you can set to SKU or SALES.
After you set this field, only the O-Unit (order unit) field appears in Pricing & Availabilityand defaults to the setting you selected (either SKU or SALES). You can override thissetting by pressing [F3] to select the other option.
For example, if you set the Default Order Unit of Measure to SALES, you canbrowse and change the O-Unit field in Pricing & Availability to SKU.
No – the sales and order units have separate values. After you press [Enter], the fieldsDefault Order Unit of Measure and Default Sales Unit of Measure appear, which youcan set to SKU or SALES.
After you set this field, the O-Unit (order unit) and S-Unit (sales unit) fields appear inPricing & Availability and default to the settings you selected (either SKU or SALES).You can override these settings by pressing [F3] to select the other option.
Note: After you change the settings of the previous company options, you must logoutand log back into the system to view these default settings and fields in Pricing& Availability.
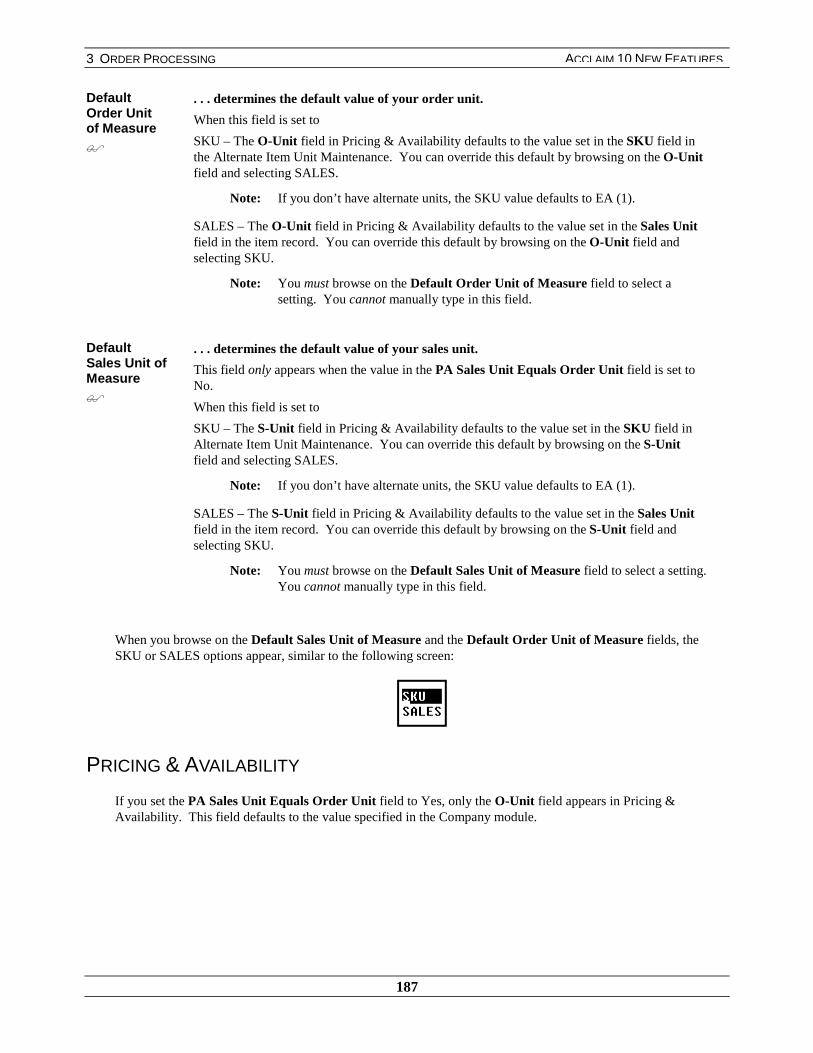
3 ORDER PROCESSING
187
ACCLAIM 10 NEW FEATURES
DefaultOrder Unitof Measure$
. . . determines the default value of your order unit.
When this field is set to
SKU – The O-Unit field in Pricing & Availability defaults to the value set in the SKU field inthe Alternate Item Unit Maintenance. You can override this default by browsing on the O-Unitfield and selecting SALES.
Note: If you don’t have alternate units, the SKU value defaults to EA (1).
SALES – The O-Unit field in Pricing & Availability defaults to the value set in the Sales Unitfield in the item record. You can override this default by browsing on the O-Unit field andselecting SKU.
Note: You must browse on the Default Order Unit of Measure field to select asetting. You cannot manually type in this field.
DefaultSales Unit ofMeasure$
. . . determines the default value of your sales unit.
This field only appears when the value in the PA Sales Unit Equals Order Unit field is set toNo.
When this field is set to
SKU – The S-Unit field in Pricing & Availability defaults to the value set in the SKU field inAlternate Item Unit Maintenance. You can override this default by browsing on the S-Unitfield and selecting SALES.
Note: If you don’t have alternate units, the SKU value defaults to EA (1).
SALES – The S-Unit field in Pricing & Availability defaults to the value set in the Sales Unitfield in the item record. You can override this default by browsing on the S-Unit field andselecting SKU.
Note: You must browse on the Default Sales Unit of Measure field to select a setting.You cannot manually type in this field.
When you browse on the Default Sales Unit of Measure and the Default Order Unit of Measure fields, theSKU or SALES options appear, similar to the following screen:
PRICING & AVAILABILITY
If you set the PA Sales Unit Equals Order Unit field to Yes, only the O-Unit field appears in Pricing &Availability. This field defaults to the value specified in the Company module.
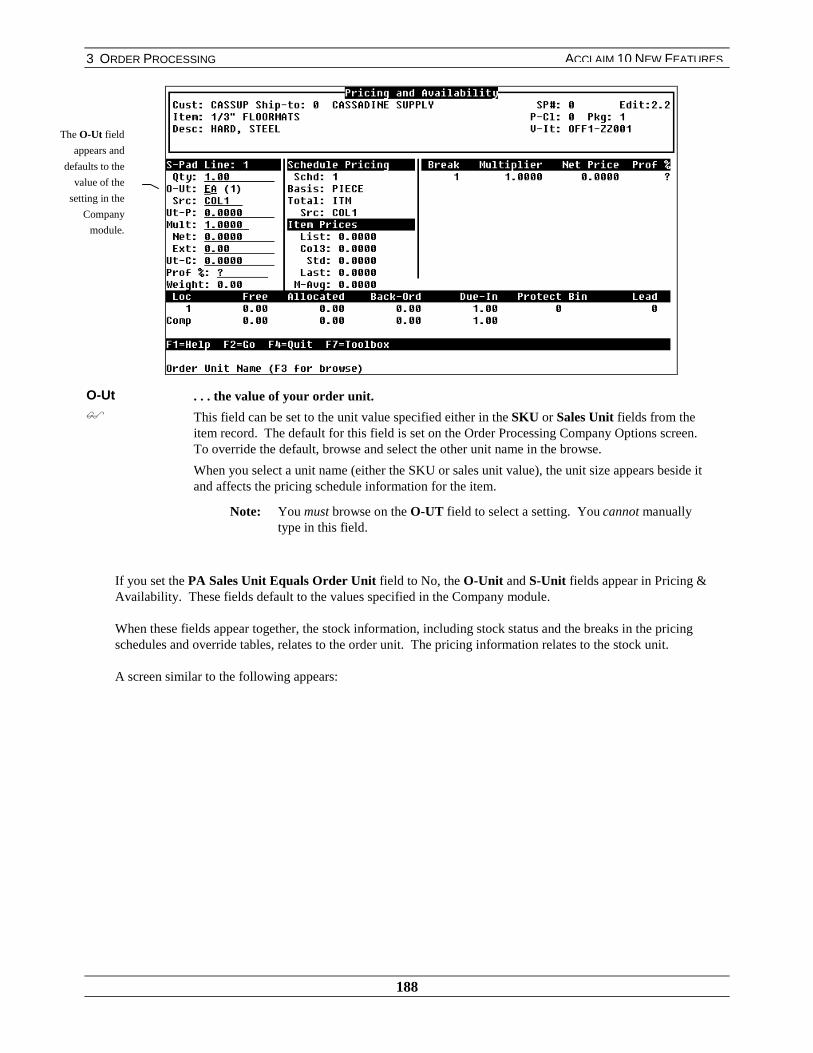
3 ORDER PROCESSING
188
ACCLAIM 10 NEW FEATURES
O-Ut$
. . . the value of your order unit.
This field can be set to the unit value specified either in the SKU or Sales Unit fields from theitem record. The default for this field is set on the Order Processing Company Options screen.To override the default, browse and select the other unit name in the browse.
When you select a unit name (either the SKU or sales unit value), the unit size appears beside itand affects the pricing schedule information for the item.
Note: You must browse on the O-UT field to select a setting. You cannot manuallytype in this field.
If you set the PA Sales Unit Equals Order Unit field to No, the O-Unit and S-Unit fields appear in Pricing &Availability. These fields default to the values specified in the Company module.
When these fields appear together, the stock information, including stock status and the breaks in the pricingschedules and override tables, relates to the order unit. The pricing information relates to the stock unit.
A screen similar to the following appears:
The O-Ut field
appears and
defaults to the
value of the
setting in the
Company
module.
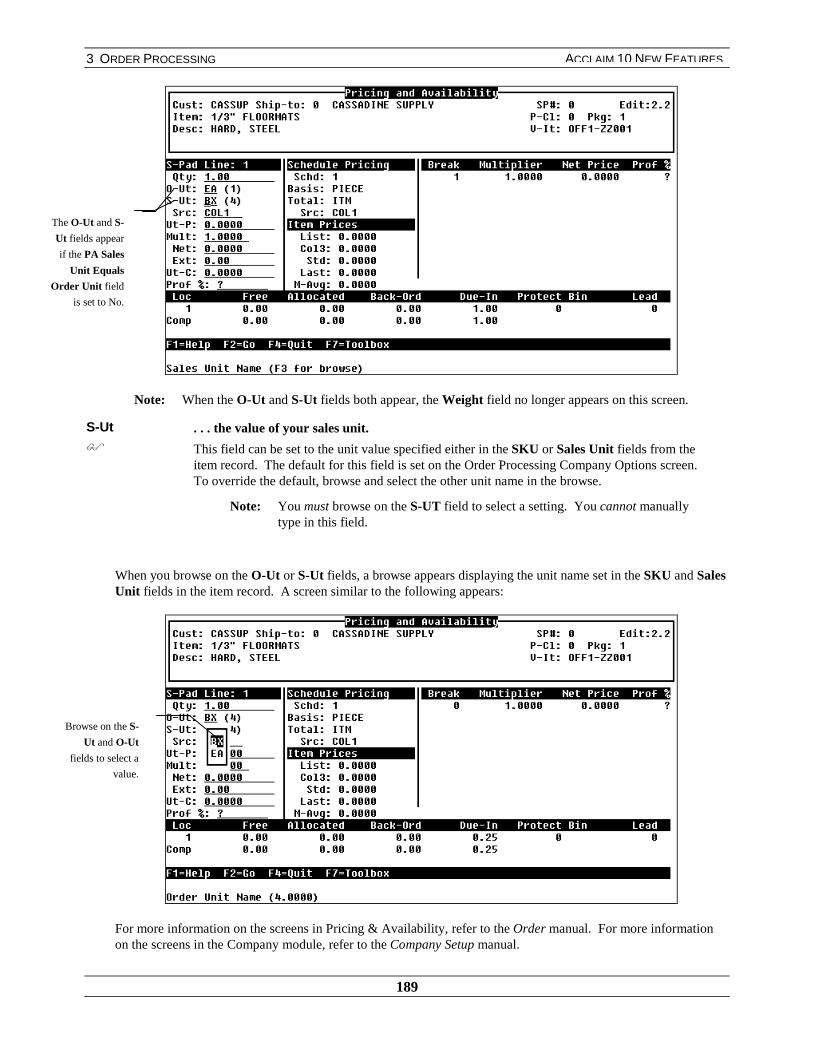
3 ORDER PROCESSING
189
ACCLAIM 10 NEW FEATURES
Note: When the O-Ut and S-Ut fields both appear, the Weight field no longer appears on this screen.
S-Ut$
. . . the value of your sales unit.
This field can be set to the unit value specified either in the SKU or Sales Unit fields from theitem record. The default for this field is set on the Order Processing Company Options screen.To override the default, browse and select the other unit name in the browse.
Note: You must browse on the S-UT field to select a setting. You cannot manuallytype in this field.
When you browse on the O-Ut or S-Ut fields, a browse appears displaying the unit name set in the SKU and SalesUnit fields in the item record. A screen similar to the following appears:
For more information on the screens in Pricing & Availability, refer to the Order manual. For more informationon the screens in the Company module, refer to the Company Setup manual.
The O-Ut and S-
Ut fields appear
if the PA Sales
Unit Equals
Order Unit field
is set to No.
Browse on the S-
Ut and O-Ut
fields to select a
value.
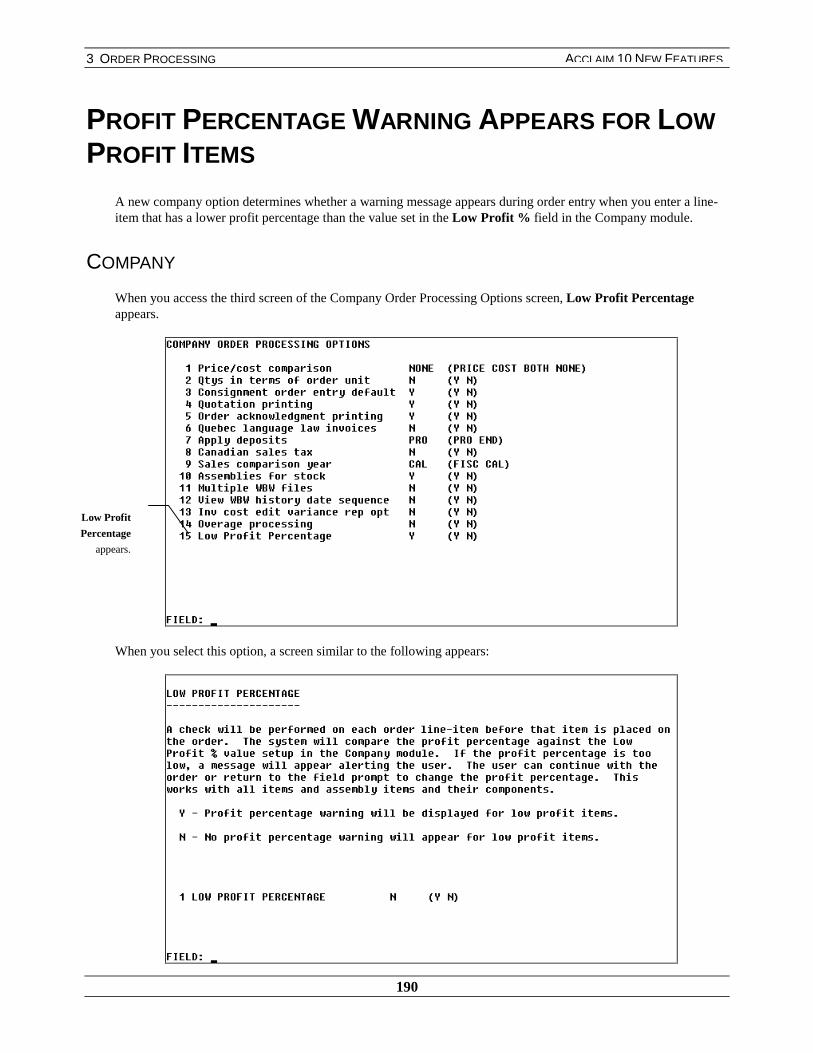
3 ORDER PROCESSING
190
ACCLAIM 10 NEW FEATURES
PROFIT PERCENTAGE WARNING APPEARS FOR LOWPROFIT ITEMS
A new company option determines whether a warning message appears during order entry when you enter a line-item that has a lower profit percentage than the value set in the Low Profit % field in the Company module.
COMPANY
When you access the third screen of the Company Order Processing Options screen, Low Profit Percentageappears.
When you select this option, a screen similar to the following appears:
Low Profit
Percentage
appears.

3 ORDER PROCESSING
191
ACCLAIM 10 NEW FEATURES
Low ProfitPercentage
. . . determines whether a warning message appears for low profit items.
When this field is set to
Y – a warning message appears when you enter an item during order entry that has a profitpercentage that is lower than the value in the Low Profit % field in the Company module.When this message appears, you can either enter a different item with an appropriate profitpercentage, or change the profit percentage of the item you entered to be equal to or greaterthan the value in the Low Profit % field.
★ N – a warning message does not appear when you enter an item during order entry that hasa profit percentage that is lower than the value in the Low Profit % field in the Companymodule.
FRONT COUNTER, ORDER
For example, the value in the Low Profit % field on the Company Order Processing screen is 10. You enter anitem during order entry that has a profit percentage of 8.2.
Because the item has a profit percentage that is lower than the value in the Low Profit % field in the Companymodule, a warning message appears after you press [Enter] at the Field prompt, similar to the following screen:
The item’s profit
percentage is 8.2.

3 ORDER PROCESSING
192
ACCLAIM 10 NEW FEATURES
To enter a different item, press [C] to continue and enter another item at the Item prompt.
To change the profit percentage of the item you selected, press [R] to return to the Field prompt. At the Fieldprompt, press [H] to access the Options menu, and then press [P] for Price. In the Prof % field, enter a value thatis equal to or greater than the value in the Low Profit % field in the Company module.
For more information on the company option, Low Profit Percentage, refer to the Company Setup manual. Formore information on the profit percentage of an item, refer to the Item Information manual.
A warning
message appears.

3 ORDER PROCESSING
193
ACCLAIM 10 NEW FEATURES
WBW TRANSACTION HISTORY PULLED DIRECTLYONTO ORDERS AND CUSTOMER RETURNS
Previously, when you entered an item on an order or a customer return, item information was pulled directly fromthe Item record. Now, you can pull who-bought-what information from a specific transaction when you select anitem during order entry and when you enter a customer return. This is especially useful when you are enteringcustomer returns, and you want to make sure that you are returning the item to the customer on the same basis thatthey bought it.
For example, Abrasive-Tool Corporation bought 3 coated abrasive sheets for $11.00 each. Typically,this item costs $15.00 each, but they received a special discount when the order was entered. Theynow want to return all 3 sheets. By pulling item information from their original order, you can ensurethat they receive in return the exact amount for which they originally paid, and not the amount thatappears on the item record.
ORDER, FRONT COUNTER, CUSTOMER RETURNS
When you browse at the Item prompt during order entry and customer returns, press [Tab] to reindex and selectWhat-Was-Bought.
In the Item browse, highlight the item you want, and press [F6] to PowrDrill. When you select the Who-Bought-What option, the Invoice browse appears. From the Invoice browse, select the transaction you want.The who-bought-what information is pulled back onto the order or customer return.
Note: You can also launch the Who-Bought-What browse by typing WB at the item prompt in Order Entry.
The following information is pulled with the item onto regular and front counter orders:
♦ Item code
♦ Description 1 and 2
♦ Product Group
♦ Sales Class
♦ Vendor Number
♦ Sales Unit
♦ Sales Size
♦ Price
♦ Price Multiplier
Note: Not all of the who-bought-what information that is pulled with the item visibly appears with the itemwhen you enter it on an order. However, this information stays with the transaction and can beviewed when you view the transaction in detail.
The previous information is included on customer returns, in addition to the following:
♦ Cost information
♦ The order number of the transaction and the date it was originally entered appears in the Description 3field (Desc 3)
♦ The customer purchase order number appears in the Description 4 field (Desc 4)

3 ORDER PROCESSING
194
ACCLAIM 10 NEW FEATURES
When you view a customer return in Detail mode, this additional information appears, similar to the followingscreen:
For more information on who-bought-what information, refer to the Sales History manual. For moreinformation on the Who-Bought-What browse, refer to the Browse manual.
The order
number appears
in Desc 3, and
the customer
purchase order
number appears
in Desc 4.
Cost
information
appears.
3 ORDER PROCESSING
195
ACCLAIM 10 NEW FEATURES
ACCLAIM CUSTOMER MAINTENANCE SCREENAPPEARS AT “N” EW CUSTOMER PROMPT
When you enter a customer at the “N”ew Customer Code and Alt Ship-To prompts during order entry, theAcclaim Customer Maintenance screen appears.
COMPANY
To enter a new customer during order entry, the Company User ID Based option, Cust Creation at OrderEntry must be enabled. For more information on this option, refer to the Company Setup manual.
ORDER, FRONT COUNTER
When you press [N] at the “N”ew Customer Prompt during order entry, the Acclaim Customer Maintenancescreen appears. In addition, when you press [N] at the “N”ew Alt Ship-To prompt, the Acclaim Customer Alt-Ship Maintenance screen appears.
For more information on the Customer Maintenance screen, refer to the Customer Information manual. Formore information on creating a customer during order entry, refer to the Order manual.

3 ORDER PROCESSING
196
ACCLAIM 10 NEW FEATURES
ENTER TRANSACTION NOTEPADS IN EXPEDITEMODULES
The system provides a “P” for Notepad prompt in Expedite Order, Expedite Quote, Expedite Return, ExpeditePurchase, and Expedite Rentals. This prompt gives you the ability to create transaction notepads for the headerinformation of the order or the line-item information. The improved notepad features for the expedite moduleswill enhance your internal communication by allowing you to enter notes after the transaction has been accepted.
When you access an expedite module, press H to access the Option Help screen. A screen similar to the followingappears:
When you select this option, the normal Notepad entry screen appears.
For more information about notepads, refer to the Notepad manual.
There is a “P” for
Notepad option.

3 ORDER PROCESSING
197
ACCLAIM 10 NEW FEATURES
OPTION HELP IN EXPEDITE ORDER
The order header screen in Expedite Order has a new help menu for options, which includes the ability to view thenext open order.
On previous levels of the software, the system displayed option prompts at the bottom of the screen. Now, there isonly the “H”elp option. If you press [H] at the Option prompt, the system displays an Option Help screen. Thishelp screen is similar to the following example:
“N”extOrder
. . . accesses the next order.
Next “O”penOrder
. . . accesses the next open order.
Note “P”ad . . . allows you to enter a note for this order.
“E”dit . . . allows you to edit the order.
“C”ancel . . . cancels the order.
View“S”hipments
. . . displays shipment information for the order.
[Esc] toView Line-Items
. . . displays line-item information for the order.
For more information about the order header view screen, refer to the Expedite Order manual.

3 ORDER PROCESSING
198
ACCLAIM 10 NEW FEATURES
VIEW NEXT OPEN ORDER IN EXPEDITE ORDER
The system allows you to view the next open order in the order header view screen. To view the next open order,select the Next Open Order option by pressing [O].
For more information about the order header view screen, refer to the Expedite Order manual.
Press [O] to view
the next open
order.

3 ORDER PROCESSING
199
ACCLAIM 10 NEW FEATURES
DELETION PROHIBITED MESSAGE
The system displays a message indicating that you cannot cancel an order or an item on an order that isassociated with an open purchase order. When you attempt to cancel the item or order, the system displays anerror message similar to the following example:
This message appears if you try to cancel an item that appears on a direct ship purchase order or on a localpick-up purchase order.
$�´'HOHWLRQ
3URKLELWHGµ
PHVVDJH�DSSHDUV�
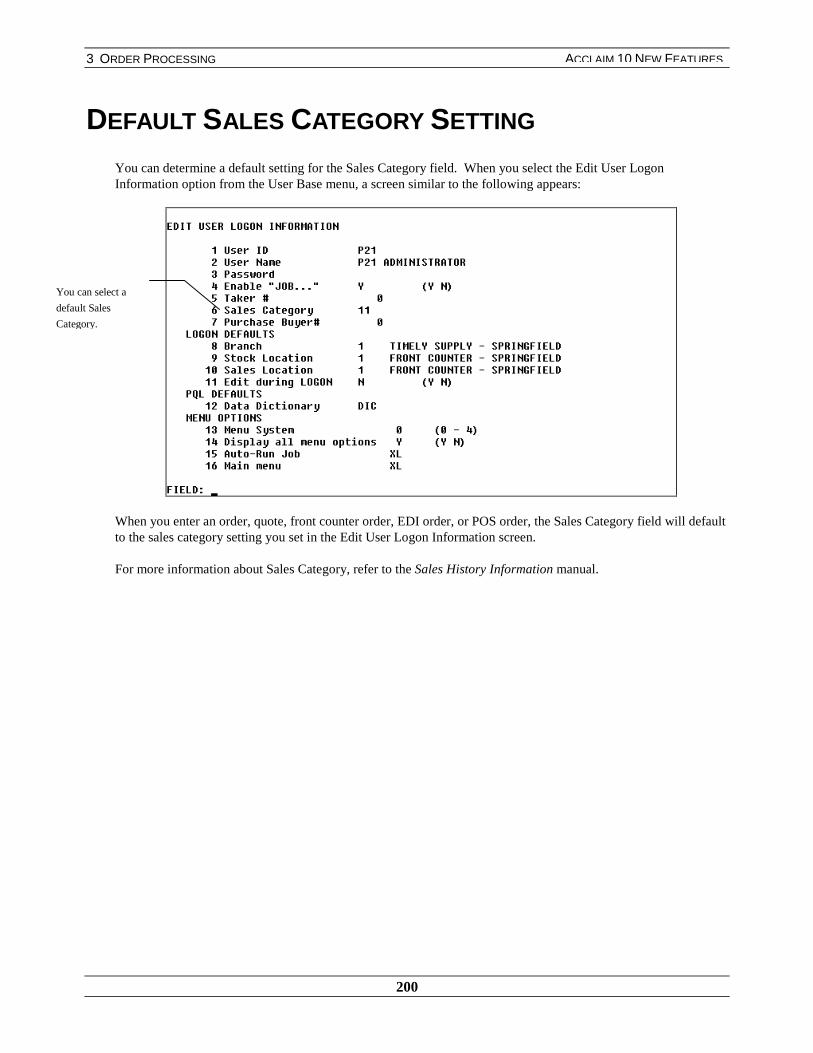
3 ORDER PROCESSING
200
ACCLAIM 10 NEW FEATURES
DEFAULT SALES CATEGORY SETTING
You can determine a default setting for the Sales Category field. When you select the Edit User LogonInformation option from the User Base menu, a screen similar to the following appears:
When you enter an order, quote, front counter order, EDI order, or POS order, the Sales Category field will defaultto the sales category setting you set in the Edit User Logon Information screen.
For more information about Sales Category, refer to the Sales History Information manual.
You can select a
default Sales
Category.
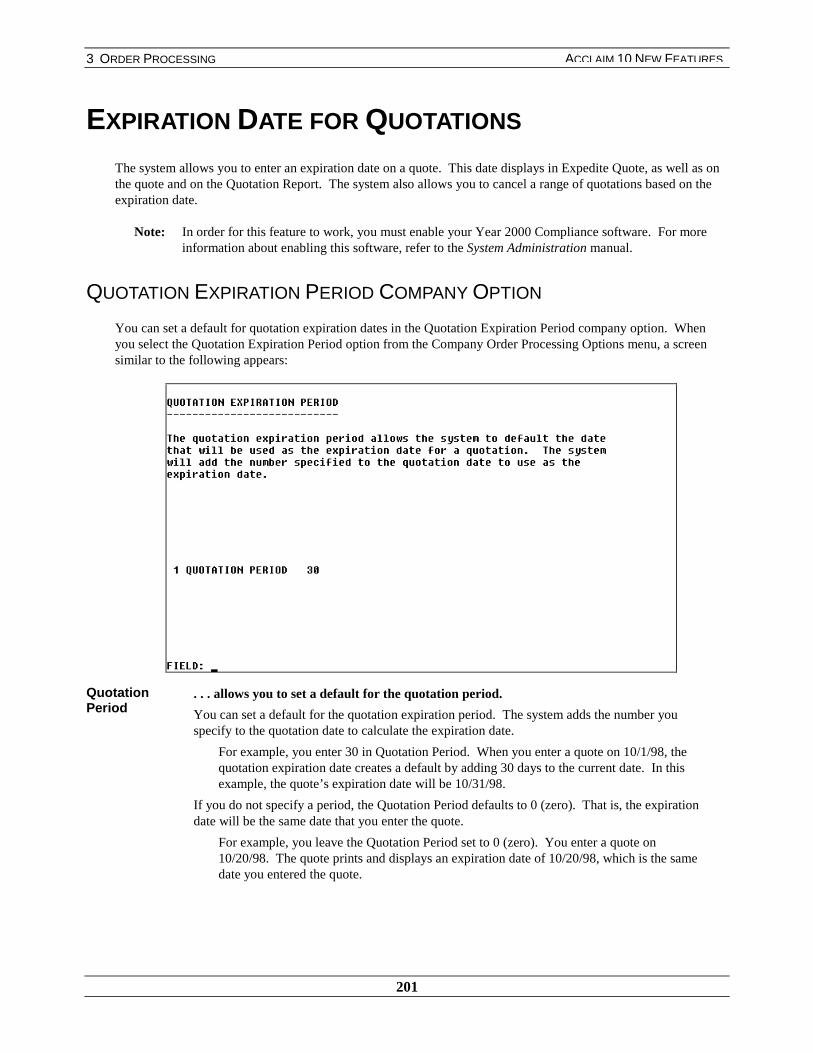
3 ORDER PROCESSING
201
ACCLAIM 10 NEW FEATURES
EXPIRATION DATE FOR QUOTATIONS
The system allows you to enter an expiration date on a quote. This date displays in Expedite Quote, as well as onthe quote and on the Quotation Report. The system also allows you to cancel a range of quotations based on theexpiration date.
Note: In order for this feature to work, you must enable your Year 2000 Compliance software. For moreinformation about enabling this software, refer to the System Administration manual.
QUOTATION EXPIRATION PERIOD COMPANY OPTION
You can set a default for quotation expiration dates in the Quotation Expiration Period company option. Whenyou select the Quotation Expiration Period option from the Company Order Processing Options menu, a screensimilar to the following appears:
QuotationPeriod
. . . allows you to set a default for the quotation period.
You can set a default for the quotation expiration period. The system adds the number youspecify to the quotation date to calculate the expiration date.
For example, you enter 30 in Quotation Period. When you enter a quote on 10/1/98, thequotation expiration date creates a default by adding 30 days to the current date. In thisexample, the quote’s expiration date will be 10/31/98.
If you do not specify a period, the Quotation Period defaults to 0 (zero). That is, the expirationdate will be the same date that you enter the quote.
For example, you leave the Quotation Period set to 0 (zero). You enter a quote on10/20/98. The quote prints and displays an expiration date of 10/20/98, which is the samedate you entered the quote.
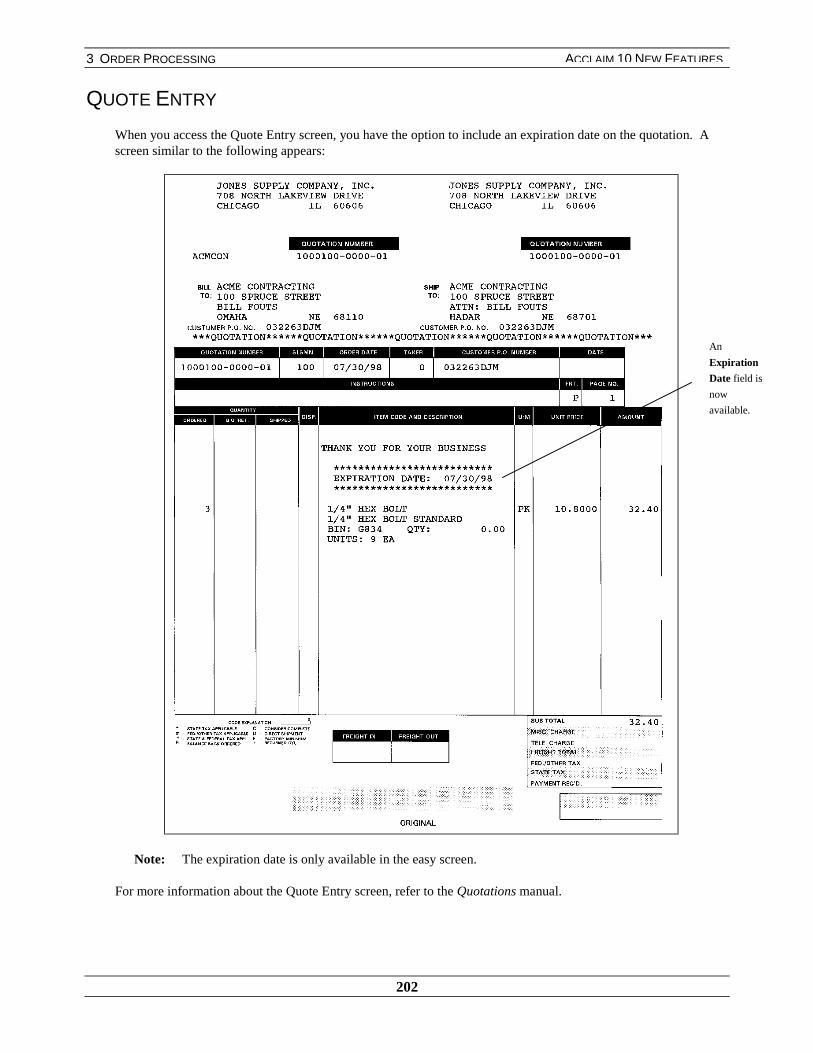
3 ORDER PROCESSING
202
ACCLAIM 10 NEW FEATURES
QUOTE ENTRY
When you access the Quote Entry screen, you have the option to include an expiration date on the quotation. Ascreen similar to the following appears:
Note: The expiration date is only available in the easy screen.
For more information about the Quote Entry screen, refer to the Quotations manual.
An
Expiration
Date field is
now
available.
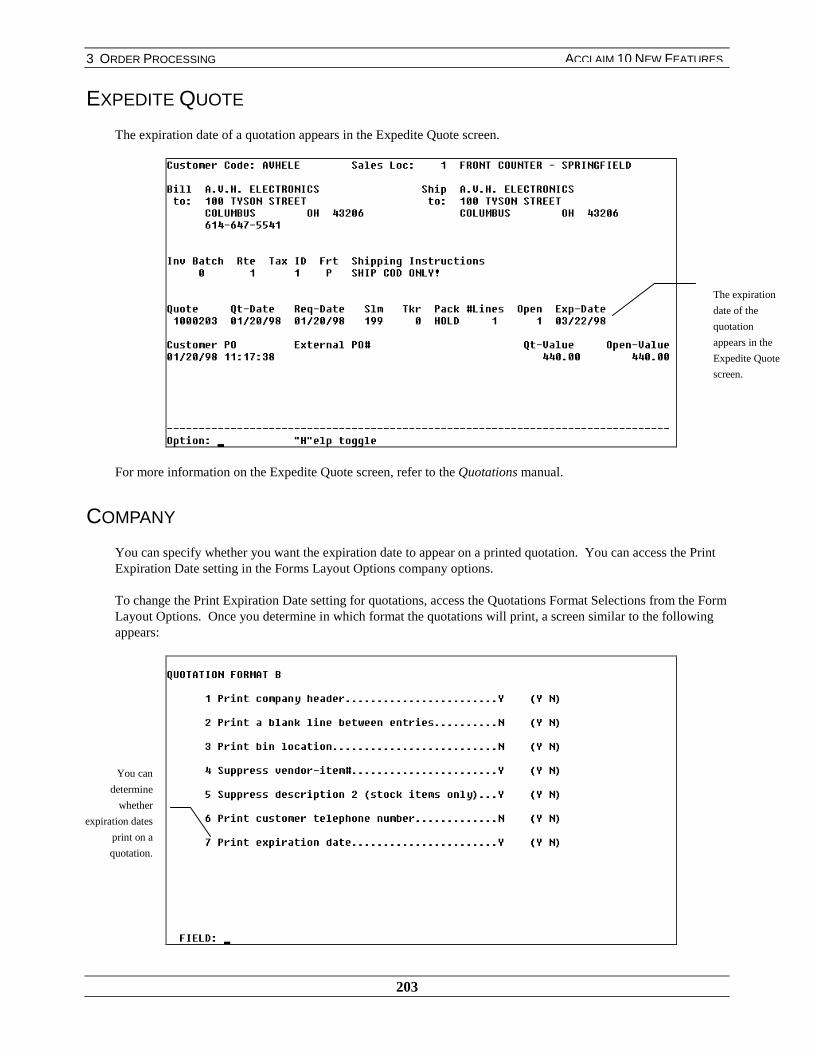
3 ORDER PROCESSING
203
ACCLAIM 10 NEW FEATURES
EXPEDITE QUOTE
The expiration date of a quotation appears in the Expedite Quote screen.
For more information on the Expedite Quote screen, refer to the Quotations manual.
COMPANY
You can specify whether you want the expiration date to appear on a printed quotation. You can access the PrintExpiration Date setting in the Forms Layout Options company options.
To change the Print Expiration Date setting for quotations, access the Quotations Format Selections from the FormLayout Options. Once you determine in which format the quotations will print, a screen similar to the followingappears:
The expiration
date of the
quotation
appears in the
Expedite Quote
screen.
You can
determine
whether
expiration dates
print on a
quotation.
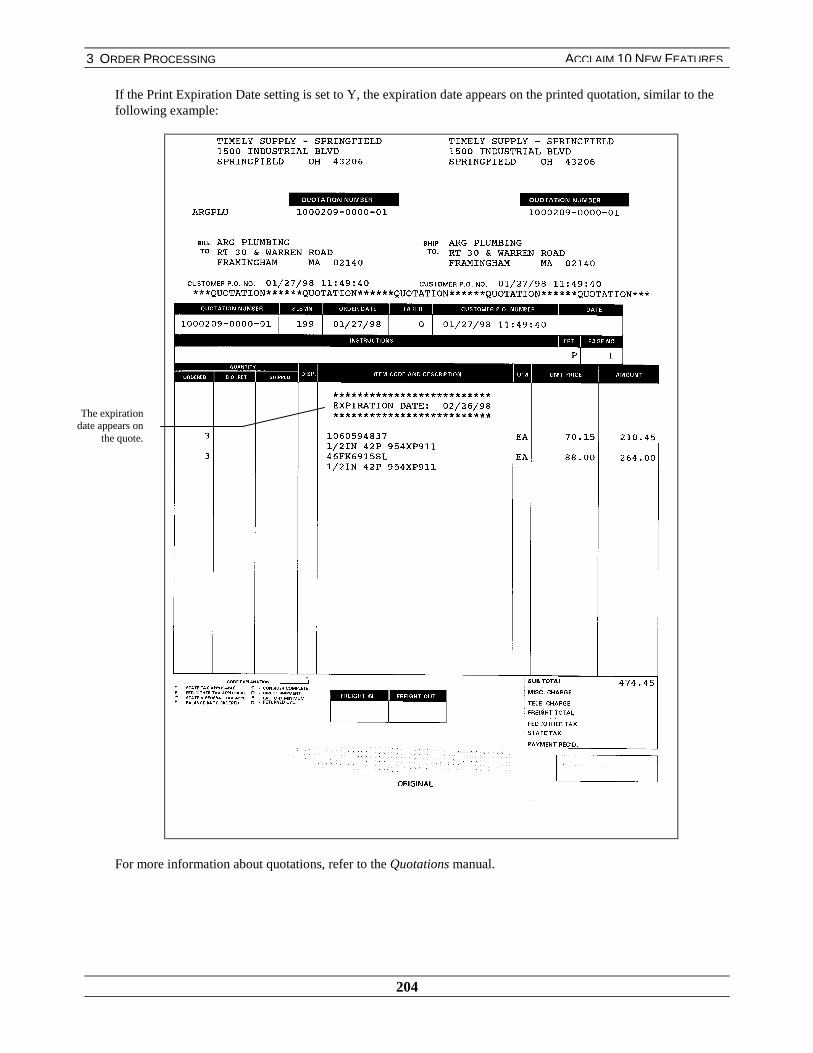
3 ORDER PROCESSING
204
ACCLAIM 10 NEW FEATURES
If the Print Expiration Date setting is set to Y, the expiration date appears on the printed quotation, similar to thefollowing example:
For more information about quotations, refer to the Quotations manual.
The expirationdate appears on
the quote.
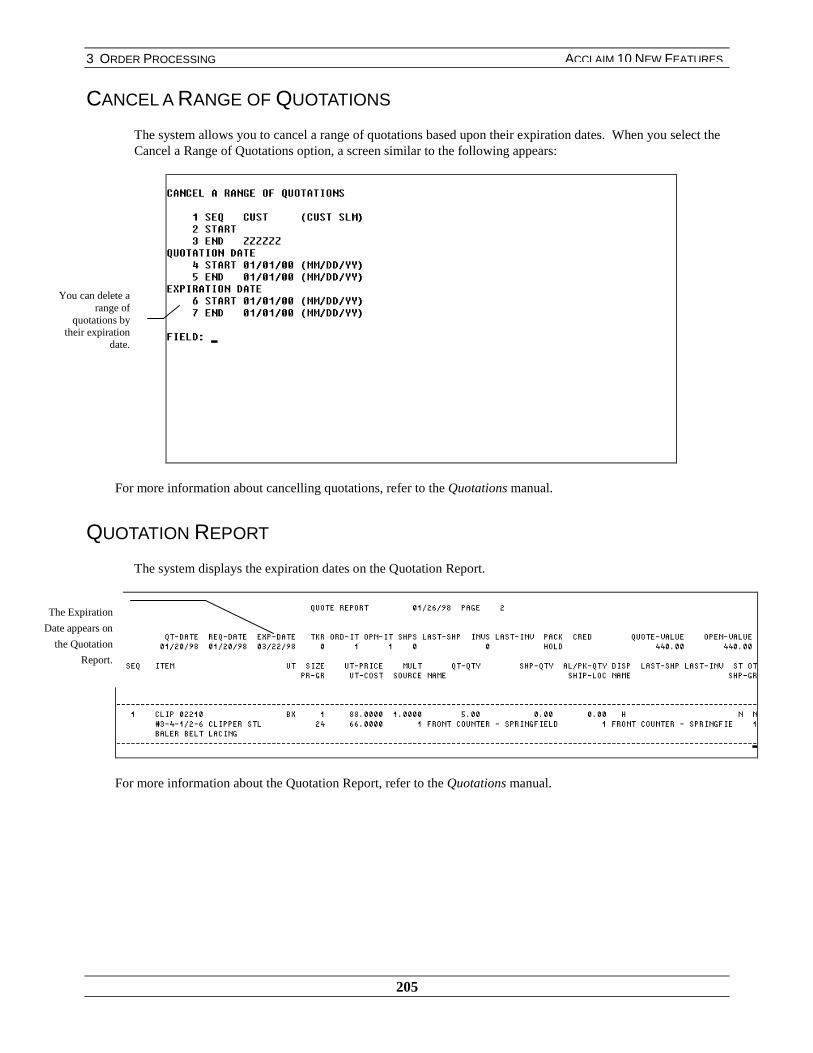
3 ORDER PROCESSING
205
ACCLAIM 10 NEW FEATURES
CANCEL A RANGE OF QUOTATIONS
The system allows you to cancel a range of quotations based upon their expiration dates. When you select theCancel a Range of Quotations option, a screen similar to the following appears:
For more information about cancelling quotations, refer to the Quotations manual.
QUOTATION REPORT
The system displays the expiration dates on the Quotation Report.
For more information about the Quotation Report, refer to the Quotations manual.
The Expiration
Date appears on
the Quotation
Report.
You can delete arange of
quotations bytheir expiration
date.
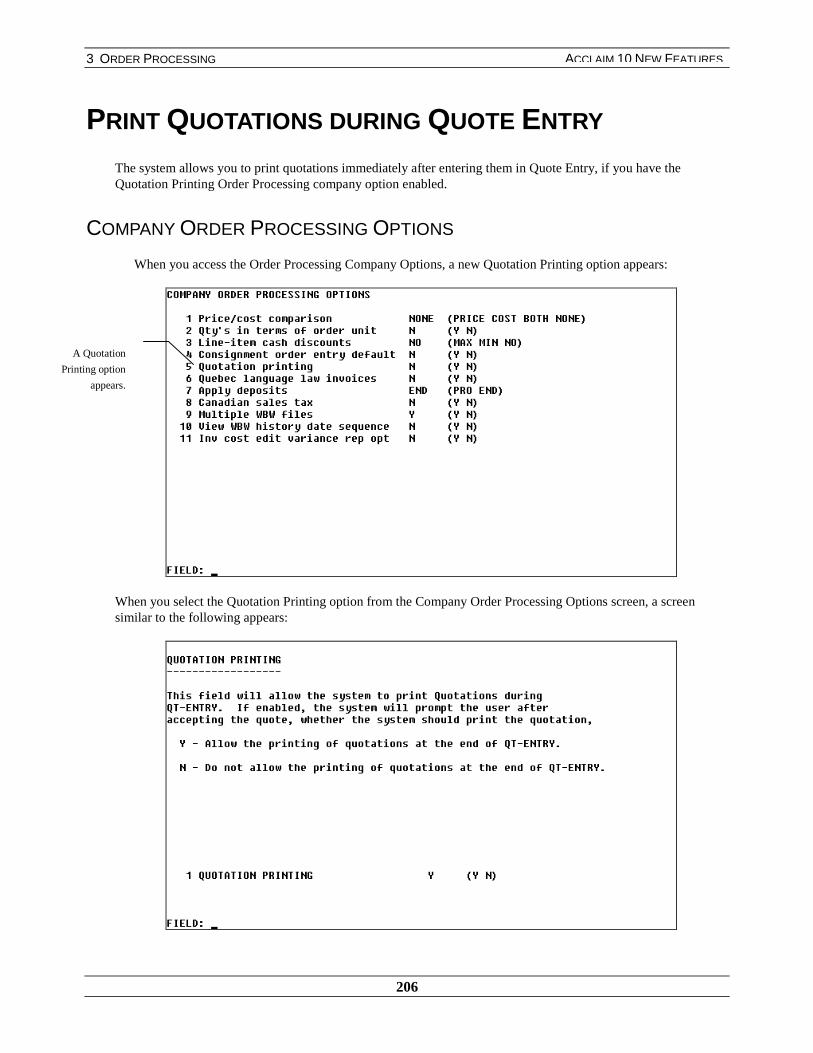
3 ORDER PROCESSING
206
ACCLAIM 10 NEW FEATURES
PRINT QUOTATIONS DURING QUOTE ENTRY
The system allows you to print quotations immediately after entering them in Quote Entry, if you have theQuotation Printing Order Processing company option enabled.
COMPANY ORDER PROCESSING OPTIONS
When you access the Order Processing Company Options, a new Quotation Printing option appears:
When you select the Quotation Printing option from the Company Order Processing Options screen, a screensimilar to the following appears:
A Quotation
Printing option
appears.

3 ORDER PROCESSING
207
ACCLAIM 10 NEW FEATURES
QuotationPrinting
. . . determines whether the system will prompt you to print quotations immediately afterentering them in Quote Entry.
When Quotation Printing is set to
★ Y - the system prompts you to print quotations immediately after entering them in QuoteEntry
N - the system will not prompt you to print quotations after entering them in Quote Entry
QUOTE ENTRY
When you set the Quotation Printing Company Order Processing Option to yes, the system prompts you to printquotations immediately after entering them in Quote Entry. After you accept a quotation, a screen similar to thefollowing appears:
Print aQuotation
. . . prints a quotation.
When you select Print a Quotation, a Printer Options screen appears. For more informationabout printer options, refer to the System Administration manual.
Exit WithoutPrinting
. . . exits the quote without printing.
When you select Exit Without Printing, the system accepts the quote but does not print it.
EditingOptions
. . . returns to the Editing Options menu.
When you select Editing Options, the system returns to the Editing Options menu. You can thenreview the quote, cancel the quote, or perform any of the other editing options.
For more information about the Editing Options menu, refer to the Quotations manual.
For more information about Quote Entry, refer to the Quotations manual.
The system
prompts you to
print a quotation
after accepting it
in Quote Entry.

3 ORDER PROCESSING
208
ACCLAIM 10 NEW FEATURES
“T HIS IS YOUR CREDIT” ON INVOICED CREDITMEMOS
Previously, the system printed “This is your invoice” on the bottom of credit memos. Now, the system prints“This is your credit.”
When you print an invoiced credit memo from Front Counter, POS Entry, or Invoice, the system displays“This is your credit” on the bottom of the credit memo.
The credit memo
indicates that it is a
credit, not an
invoice.

3 ORDER PROCESSING
209
ACCLAIM 10 NEW FEATURES
GENERATE POS IN ORDER ENTRY
You now have the ability to generate purchase orders for direct ship, nonstock, and LPU items during order entry.This allows you to provide your customers with a faster response by generating POs immediately after you enterthe order.
USER BASE
The Edit User Logon Information screen has a new field: Generate POs From Order Entry. This field allows youto determine which users have the functionality to generate purchase orders from order entry. The Edit UserLogon Information screen appears as follows:
GeneratePOs fromOrder Entry
. . . determines if a PO will be generated immediately after you enter an order.
When this field is set to
Y – after you accept an order with a direct ship item, nonstock backorder item, or LPUitem, the system prompts you to generate a purchase order.
★ N – you cannot generate a purchase order immediately after you generate an order.Purchasing is done through the Purchase module.
For more information on the other fields in the Edit User Logon Information screen, refer to the SystemAdministration manual.
This field allows
you to determine if
a user can generate
purchase orders
from order entry.

3 ORDER PROCESSING
210
ACCLAIM 10 NEW FEATURES
ORDER, FRONT COUNTER, QUOTE ORDER, EDI ORDER
If the Generate POs from Order Entry field in the Edit User Logon Information screen is set to Y, you cangenerate purchase orders immediately after you enter an order. After you accept the order in the summaryscreen, the system checks for direct ship, nonstock backordered items, and LPU items on the current order. Ifone of these items is on the order, the system prompts you to create a purchase order. The following screenappears:
If you select N, the system does not generate purchase orders. You can generate purchase orders at a later timethrough the Purchase module.
If you select Y to generate purchase orders, the system displays a browse of all the vendors that have direct ship,nonstock backorder, and LPU items on the order. From this browse, you can select a vendor for which to generatea purchase order. The browse appears similar to the following screen:
Order# . . . order number for which you are generating purchase orders.
Seq# . . . sequence number of the items.
Vendor . . . vendor code associated with the item.
Name . . . vendor name associated with the item.
Disposition . . . indicates the disposition of the item.

3 ORDER PROCESSING
211
ACCLAIM 10 NEW FEATURES
Once you select a vendor, the system displays the purchase order header information screen, which contains theinformation of the vendor that you selected. You need to confirm each item to purchase, and make any necessarymodifications. The system prompts you to accept, edit, or cancel the purchase order after you complete the itemselection.
This process is similar to the selective purchasing method in the Purchase module. For more information aboutselective purchasing, refer to the Purchasing manual.
If you exit the PO Generation Scan screen without purchasing all the items, the following message appears:
The items that you did not purchase can still be purchased later in the Purchase module.

3 ORDER PROCESSING
212
ACCLAIM 10 NEW FEATURES
VIEW SHIPMENT HEADER INFORMATION IN EXPEDITEORDER
Previously, you could not view shipment header information in Expedite Order after building sales history. Now,you can view shipment header information even after you build sales history. The system allows you to view thisinformation until the order is deleted from the system based on the order deletion date. This allows you to serviceyour customers and expedite orders more efficiently, because the shipment information is at your fingertips.
EXPEDITE ORDER
When you select to view a shipment that has been built into sales history, a screen similar to the following appears:
Note: If you select the shipment, the system will not display line-item information. The system uses theline-item information to build Sales History and Who-Bought-What information.
For more information about viewing shipment header information, refer to the Expedite Order manual. For moreinformation about Sales History, refer to the Sales History Information manual.

3 ORDER PROCESSING
213
ACCLAIM 10 NEW FEATURES
EDIT SHIPPING ROUTE INFORMATION
When you select the Edit Order Header option from the Editing Options menu in Order Entry or Front Counter,a screen similar to the following appears:
The system now allows you to edit the Shipping Route field.
For more information on the Order Header screen, refer to the Order manual.
You can now
edit this
field.

3 ORDER PROCESSING
214
ACCLAIM 10 NEW FEATURES
QUOTATION REPORT BY TAKER #You can sequence the Quotation Report in Expedite Quotation by Taker #.
EXPEDITE QUOTE
The Quotation Report parameters allow you to sequence the Quotation Report by Taker #. When you sequencethe report by Taker #, the system prompts you for the Start and End range of Takers.
The Quotation Report sequenced by Taker # prints similar to the following example:
The report prints
in
Taker #
sequence.
You can nowsequence the
Quotation Reportby Taker.

3 ORDER PROCESSING
215
ACCLAIM 10 NEW FEATURES
Sorting the Quotation Report by Taker # allows you to easily analyze the taker information by dividing thereport and giving each taker his or her appropriate quotation information. The report inserts a page breakbetween each taker number, which allows you to easily divide the report. In addition, the report displays thetotals for each taker.
For more information about the Quotation Report, refer to the Quotations manual

3 ORDER PROCESSING
216
ACCLAIM 10 NEW FEATURES
EDIT INVOICE BATCH# DURING SHIP CONFIRMATION
The system allows you to edit the invoice batch number of a shipment before and after the shipment has beenconfirmed.
When you access the Edit/Confirm screen in the Ship Edit module, a new Inv Batch # field appears.
When you edit the invoice batch number on a confirmed order, the system adds this to the ShipmentConfirmation Register.
Note: If you enabled the Logistics Management optional package, editing the invoice batch number causesthe Shipment Confirmation Register to display the dollar amount of the order twice. That is, thesystem displays the dollar amount once when you confirm the order and again when you edit theinvoice batch number.
For more information about the Edit/Confirm screen, refer to the Shipping and Invoice Processing manual
You can edit the
Invoice Batch #.

3 ORDER PROCESSING
217
ACCLAIM 10 NEW FEATURES
ENTER NOTES IN SHIP EDIT
SHIP EDIT
The system allows you to enter notes in the header and line-item transaction screens in Ship Edit. You canattach a note to the entire shipping paper by pressing [N] in the header view screen.
You can also attach a note to a specific item on the shipment. When you choose to edit items, a screen similarto the following appears:
When you select [N] at the Edit/Confirm header view screen or [P] at the Edit Item screen, the standard NotepadEntry screen appears. For more information about notes, refer to the Notepad manual.
Press [N] to
enter a note
for the entire
shipping
paper.
Press [P] to
enter a note
for a specific
item.

3 ORDER PROCESSING
218
ACCLAIM 10 NEW FEATURES
SALES HISTORY AUTOMATICALLY BUILT
Acclaim 10 provides Real-Time Sales History. This means that the system automatically updates your saleshistory information every time you print an invoice, and you do not have to run an option to build this information.
In addition, we have improved the structure of the Sales History data for Acclaim 10. On previous versions ofthe software, there were several types of Sales History files (for example, WBW files, customer sales historyfiles, vendor sales history files, etc.). Now Acclaim 10 provides single source transaction files that store allSales History information.
There are several advantages and benefits that Real-Time Sales History provides: you can verify reportsagainst specific transactions, you can generate who-bought-what reports more quickly, and you have moreflexibility when generating Sales History reports.
There are many new indexes in the who-bought-what transaction files. This means that who-bought-whatreports generally generate more quickly than they did on previous versions of the software, especially whenyou limit the data range of these reports by date.
In addition, the Sales History reports now have a great deal of flexibility that allows you to decide what formatand what sorting options you want at the time that you print the report. There are five different sort levels thatallow you to select 11 different sort options and three different report formats. Summary reports allow you tochoose to view PTD, YTD, or LYTD information.
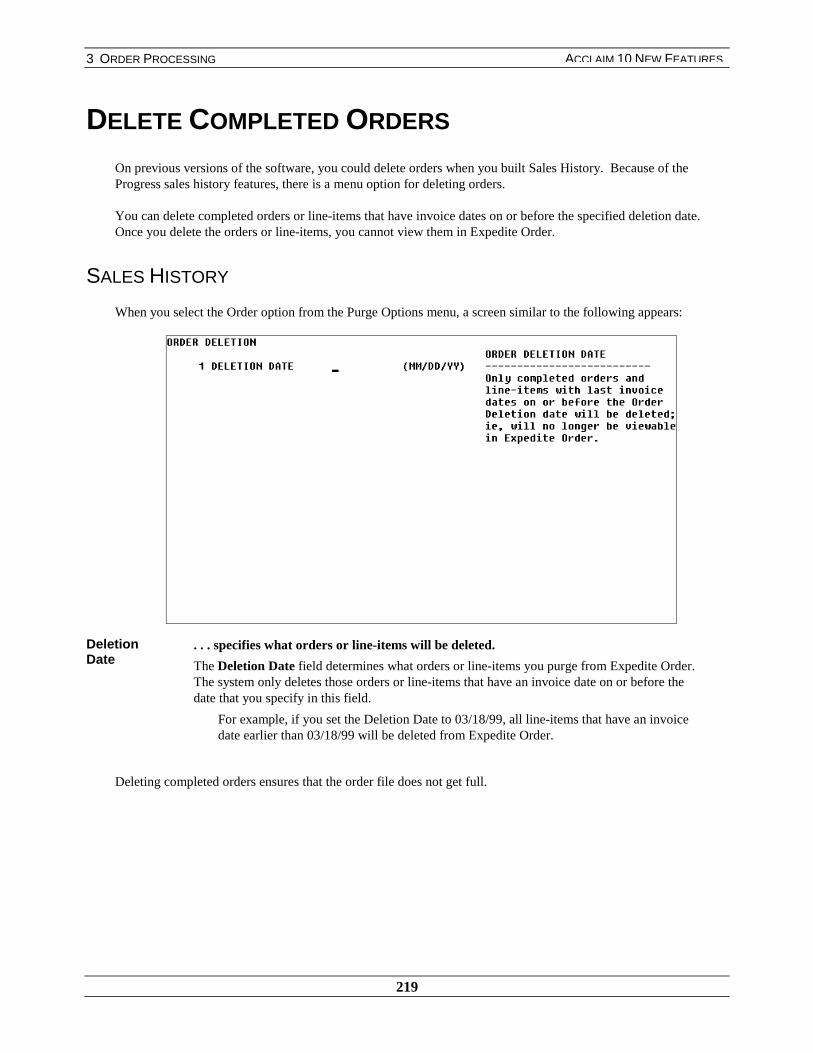
3 ORDER PROCESSING
219
ACCLAIM 10 NEW FEATURES
DELETE COMPLETED ORDERS
On previous versions of the software, you could delete orders when you built Sales History. Because of theProgress sales history features, there is a menu option for deleting orders.
You can delete completed orders or line-items that have invoice dates on or before the specified deletion date.Once you delete the orders or line-items, you cannot view them in Expedite Order.
SALES HISTORY
When you select the Order option from the Purge Options menu, a screen similar to the following appears:
DeletionDate
. . . specifies what orders or line-items will be deleted.
The Deletion Date field determines what orders or line-items you purge from Expedite Order.The system only deletes those orders or line-items that have an invoice date on or before thedate that you specify in this field.
For example, if you set the Deletion Date to 03/18/99, all line-items that have an invoicedate earlier than 03/18/99 will be deleted from Expedite Order.
Deleting completed orders ensures that the order file does not get full.

3 ORDER PROCESSING
220
ACCLAIM 10 NEW FEATURES
SALES HISTORY CONVERSION
Note: This feature is for users who have not converted their data to Progress sales history. If you have notconverted your Sales History data during the installation, you can complete the procedure at any time.Be sure you have a total copy before performing the conversion.
You can convert your current who-bought-what files into Progress WBW tables. This allows you to takeadvantage of the new Progress sales history features.
To convert your Sales History files, type P21PRO-HIST at the jump to box and press [Enter]. The system promptsyou to enter a password. Once you enter the correct password, the following screen appears:
ProceedWith Exportof SalesHistoryData?
. . . exports Sales History data from your current files to Progress files.
When this field is set to
Y – the system converts Sales History data.
N – the system does not convert Sales History data.
If necessary, you can stop the conversion by pressing [F4]. When you press [F4] to stop the conversion, thefollowing screen appears:
You can start the conversion again and the system will continue from where you left off. The bottom of themessage indicates what time you started the conversion, and the percentage of the conversion that is complete.Press [Enter] to continue.
To restart the conversion, type P21PRO-HIST at the jump to box. The system will continue the conversion fromthe point that you stopped it.

3 ORDER PROCESSING
221
ACCLAIM 10 NEW FEATURES
When the conversion finishes, the following screen appears:
This screen displays the time you started the conversion, the number of records that converted, the percentage ofrecords that converted, and the time the conversion finished. For more detailed information on the Sales Historyconversion process, refer to the Sales History Information manual.

3 ORDER PROCESSING
222
ACCLAIM 10 NEW FEATURES
SALES CATEGORY IN SALES HISTORY
The system saves the sales category in Who-Bought-What when building sales history. You can access thisinformation using CorVu and ODBC.
Note: The sales category is not included for items in which history has already been built.
For more information about the Sales Category module, refer to the Sales History Information manual.

3 ORDER PROCESSING
223
ACCLAIM 10 NEW FEATURES
INTEGRATE FIFO COST LAYERS WITH REAL-TIMESALES HISTORY
SALES HISTORY
FIFO cost layer information is reported in the Real-Time Sales History module. You can view the FIFO costs ofeach layer where stock was taken to fill the order.
The Sales History conversion program (P21PRO-HIST) alters current Who-Bought-What FIFO records so thatthey can be viewed in the Real-Time Sales History module. In addition, every time an invoice is printed, the Real-Time Sales History module is updated with FIFO layer information for all affected line-items.
After you access the View Options in the Real-Time Sales History module, select either the Invoices, the Who-Bought-What, or the What-Was-Bought option. Choose a customer and an item. When the invoices appear forthis specific customer and item, press [F6] for the PowrDrill. The FIFO Layers option is displayed.

3 ORDER PROCESSING
224
ACCLAIM 10 NEW FEATURES
Selecting the FIFO Layers option displays the FIFO information for that item on the specific order:
After viewing this screen, press [F4] to return to the Invoice Browse screen. Using the PowrDrill feature, selectthe Invoice Line View option:
7KH�),)2OD\HULQIRUPDWLRQPDNLQJ�XSWKHLQYRLFHGTXDQWLW\�LVGL O G

3 ORDER PROCESSING
225
ACCLAIM 10 NEW FEATURES
The Invoice Line View screen appears. Press [Ctrl][N] to advance to the next screen. Note that the Specific CostSource field displays the cost as sourced from FIFO layers for this item:
For more information on FIFO costing and layering, refer to the FIFO Inventory Costing manual.
FIFO costsare indicated
in theSpecific CostSource field.

3 ORDER PROCESSING
226
ACCLAIM 10 NEW FEATURES
KEYWORD INDEX IN WBWThe WBW by Item browse has been modified to include a keyword index. This index searches the Item Code andDescription One field for a string of words that you select. The keyword search in WBW by Item differs from thekeyword search in the Item browse because the system searches all items with WBW in one browse. Thisincludes stock items, nonstock items, and catalog items.
When you access the Index menu in the WBW by Item browse, a screen similar to the following appears:
When you select to reindex by keyword, you are first prompted to specify the words for which you want to search:
You can index
the WBW by
Item browse
by a keyword.

3 ORDER PROCESSING
227
ACCLAIM 10 NEW FEATURES
You can enter one word, or you can enter a list of words separated by commas. The system searches Item Codeand Description 1 for the keyword or words you specify. The system will display a list of only those items thatcontain all of the keywords you specify.
For example, if you type BOLT at the Keyword prompt and press [Enter], the system will display alist of all items that contain the word “bolt” in the item code or description 1 fields. A list similar tothe following displays.
For more information about the fields that appear in the previous screens, or for more information about indexing abrowse, refer to the Browse manual.
Only those items
that contain all of
the keywords
you specify will
appear.
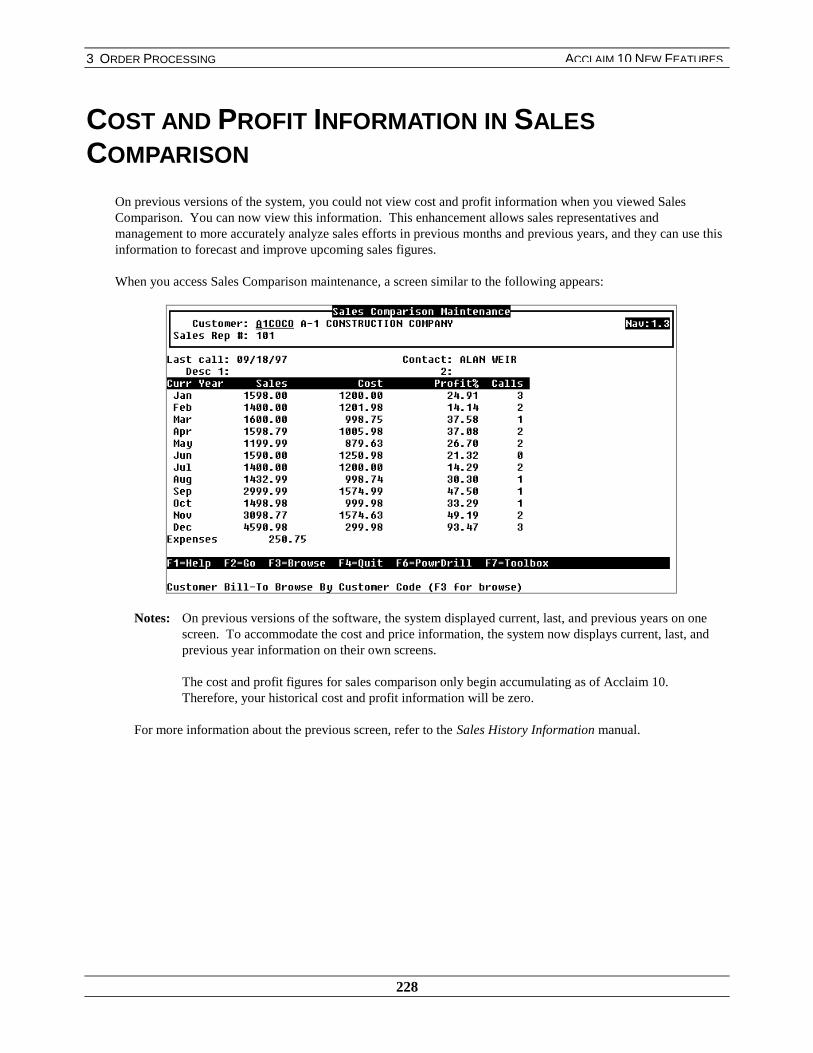
3 ORDER PROCESSING
228
ACCLAIM 10 NEW FEATURES
COST AND PROFIT INFORMATION IN SALESCOMPARISON
On previous versions of the system, you could not view cost and profit information when you viewed SalesComparison. You can now view this information. This enhancement allows sales representatives andmanagement to more accurately analyze sales efforts in previous months and previous years, and they can use thisinformation to forecast and improve upcoming sales figures.
When you access Sales Comparison maintenance, a screen similar to the following appears:
Notes: On previous versions of the software, the system displayed current, last, and previous years on onescreen. To accommodate the cost and price information, the system now displays current, last, andprevious year information on their own screens.
The cost and profit figures for sales comparison only begin accumulating as of Acclaim 10.Therefore, your historical cost and profit information will be zero.
For more information about the previous screen, refer to the Sales History Information manual.

3 ORDER PROCESSING
229
ACCLAIM 10 NEW FEATURES
PRINT INVOICES AFTER ADJUSTING TAX SCHEDULEINFORMATION
On previous levels of the software, if a shipment had an invalid tax schedule that prevented it from invoicing, youwould have to wait 24 hours to print this invoice again.
Now, you no longer have to wait 24 hours. Once you correct the problem, you can immediately print the invoice.
For more information about invoices, refer to the Shipping and Invoice Processing manual.
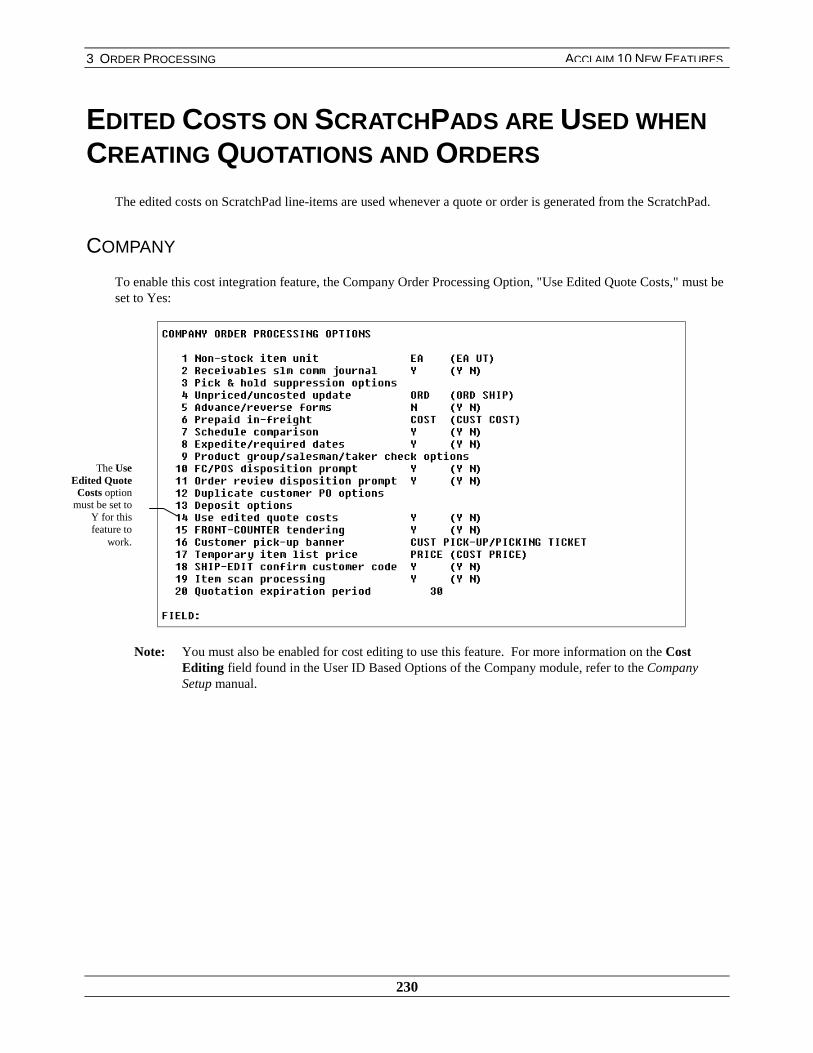
3 ORDER PROCESSING
230
ACCLAIM 10 NEW FEATURES
EDITED COSTS ON SCRATCHPADS ARE USED WHENCREATING QUOTATIONS AND ORDERS
The edited costs on ScratchPad line-items are used whenever a quote or order is generated from the ScratchPad.
COMPANY
To enable this cost integration feature, the Company Order Processing Option, "Use Edited Quote Costs," must beset to Yes:
Note: You must also be enabled for cost editing to use this feature. For more information on the CostEditing field found in the User ID Based Options of the Company module, refer to the CompanySetup manual.
The UseEdited Quote
Costs optionmust be set to
Y for thisfeature to
work.
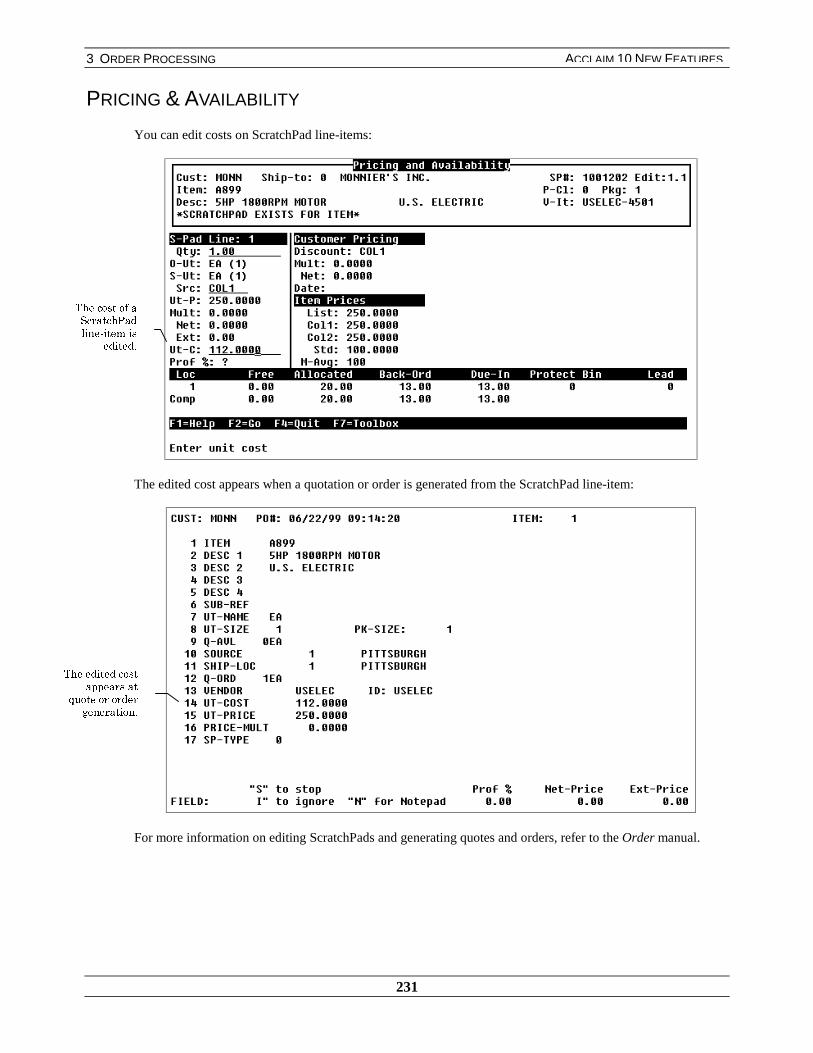
3 ORDER PROCESSING
231
ACCLAIM 10 NEW FEATURES
PRICING & AVAILABILITY
You can edit costs on ScratchPad line-items:
The edited cost appears when a quotation or order is generated from the ScratchPad line-item:
For more information on editing ScratchPads and generating quotes and orders, refer to the Order manual.
7KH�FRVW�RI�D6FUDWFK3DGOLQH�LWHP�LV
HGLWHG�
7KH�HGLWHG�FRVWDSSHDUV�DW
TXRWH�RU�RUGHUJHQHUDWLRQ�
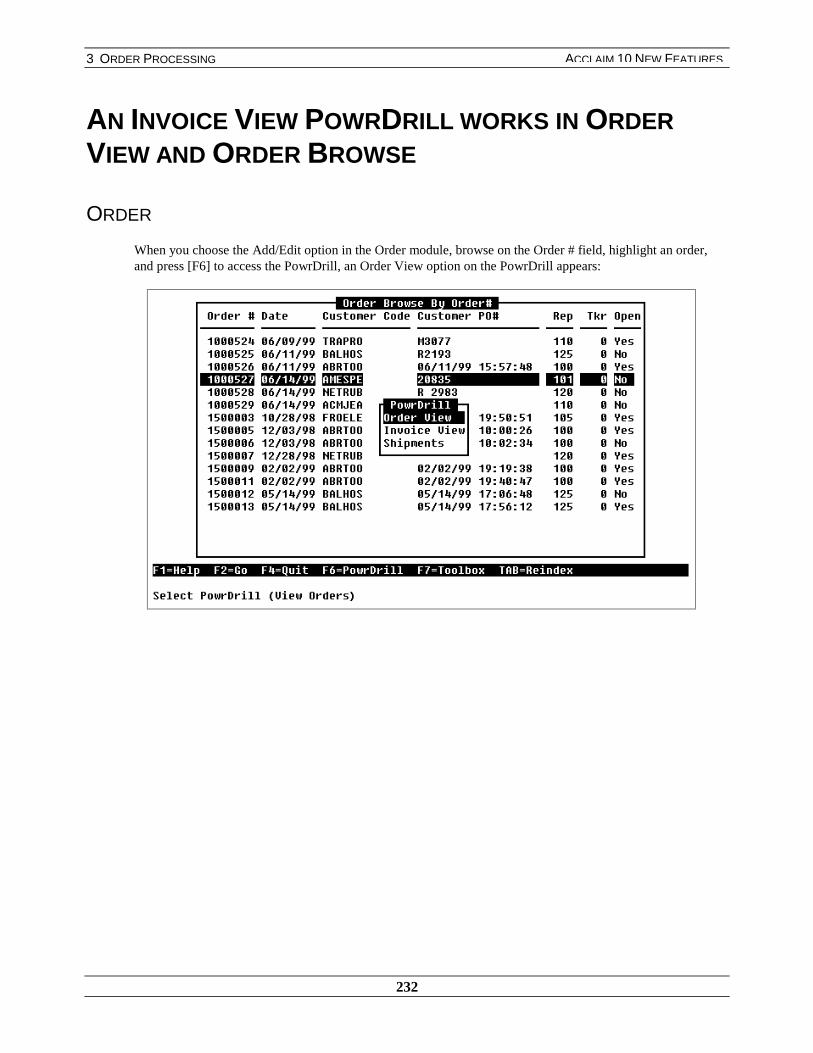
3 ORDER PROCESSING
232
ACCLAIM 10 NEW FEATURES
AN INVOICE VIEW POWRDRILL WORKS IN ORDERVIEW AND ORDER BROWSE
ORDER
When you choose the Add/Edit option in the Order module, browse on the Order # field, highlight an order,and press [F6] to access the PowrDrill, an Order View option on the PowrDrill appears:

3 ORDER PROCESSING
233
ACCLAIM 10 NEW FEATURES
Selecting this option displays a screen similar to the following:
From the Order # field of the Order View screen, press [F6] for the PowrDrill. The following screen appears:

3 ORDER PROCESSING
234
ACCLAIM 10 NEW FEATURES
ORDERS WITH ONE SHIPMENT AND ONE INVOICE
The Invoice View option indicates that there was only shipment and invoice for the order. Selecting thisoption takes you to the Invoice View screen. This screen shows invoice header information:
Pressing the [Tab] key displays more details about the total order:

3 ORDER PROCESSING
235
ACCLAIM 10 NEW FEATURES
ORDERS WITH MULTIPLE SHIPMENTS AND INVOICES
If an order has more than one shipment and invoice, the PowrDrill displays a different invoice option:
The Invoices option indicates that the order had multiple shipments and invoices. You choose which shipmentyou wish to examine for invoice information. When you select the Invoices option, a screen similar to thefollowing displays:
Select which shipment you wish to view, and the following PowrDrill screen appears:
You can choose to view either the Invoice View screen, previously shown, or the invoice in the Invoice Recallmodule.

3 ORDER PROCESSING
236
ACCLAIM 10 NEW FEATURES
ORDERS WITH AN ITEM HAVING MULTIPLE SHIPMENTS AND INVOICES
From the Order View screen, use the down arrow to access the line-items. To see a list of available PowrDrillsfor an item, press [F6]. A screen similar to the following displays:
If this line-item has been invoiced, one of the available PowrDrills is either Invoice Line View or Invoices.
If Invoice Line View appears, the line-item had only one shipment and invoice. Selecting this option takes youdirectly to the Invoice Line View screen, previously shown.
If an Invoices option appears, the line-item had more than one shipment and invoice. You select whichshipment to examine. An Invoice Line View screen appears similar for each item, similar to the following:
(DFK�OLQH�LWHP�FDQKDYH�D
GLIIHUHQWVHW�RI
3RZU'ULOOVWKDW�UHODWH
WR�LW�
3 ORDER PROCESSING
237
ACCLAIM 10 NEW FEATURES
For more information on the screen fields, refer to the Order and Browse manuals.
EXPEDITE ORDER
The same PowrDrills, as explained in the prior Order section, also work within the Order Browse when it is usedwithin the Expedite Order module. The Order Browse can be accessed in the View, Edit, Release, and Canceloptions. For more information on the screen fields, refer to the Expedite Order and Browse manuals.
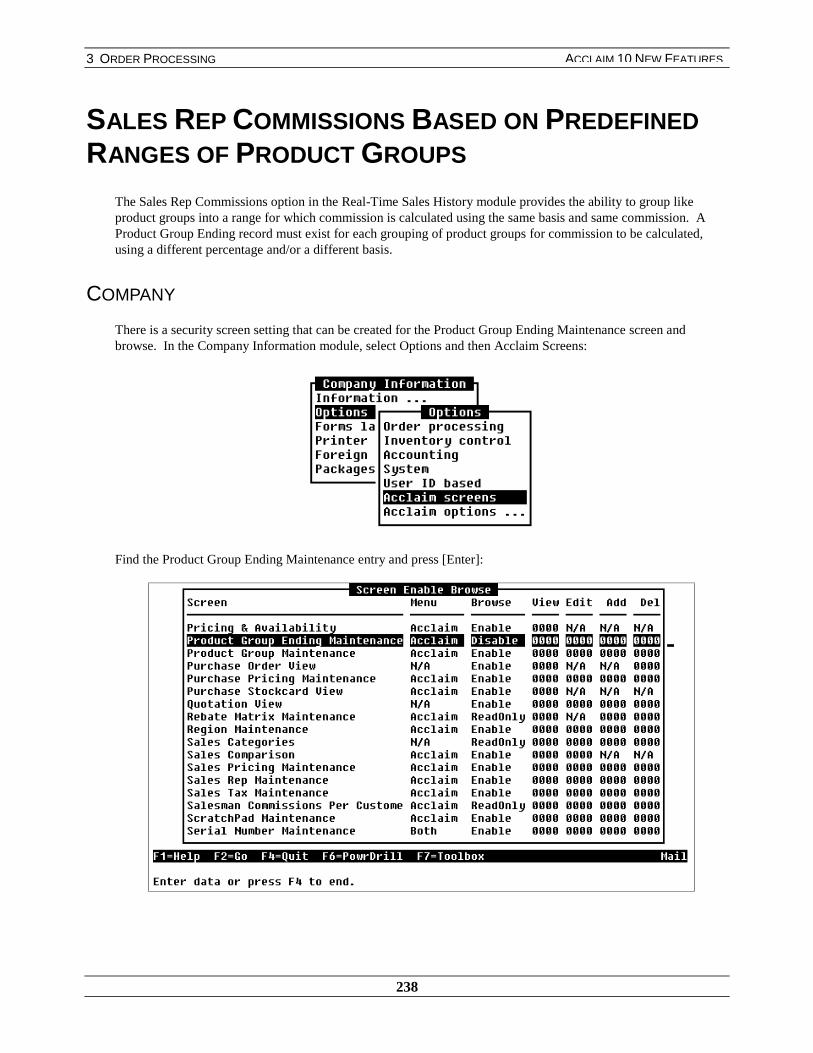
3 ORDER PROCESSING
238
ACCLAIM 10 NEW FEATURES
SALES REP COMMISSIONS BASED ON PREDEFINEDRANGES OF PRODUCT GROUPS
The Sales Rep Commissions option in the Real-Time Sales History module provides the ability to group likeproduct groups into a range for which commission is calculated using the same basis and same commission. AProduct Group Ending record must exist for each grouping of product groups for commission to be calculated,using a different percentage and/or a different basis.
COMPANY
There is a security screen setting that can be created for the Product Group Ending Maintenance screen andbrowse. In the Company Information module, select Options and then Acclaim Screens:
Find the Product Group Ending Maintenance entry and press [Enter]:

3 ORDER PROCESSING
239
ACCLAIM 10 NEW FEATURES
When the Product Group Ending Maintenance entry is chosen, the following screen appears:
Set the Browse field to Enable to activate the security feature for this section of the system. There is no XL screenequivalent to this screen so the Menu field should always be set to Acclaim. The browse and security fields forthis screen behave similarly to the same fields in all other Acclaim browses and screens.
SALES HISTORY
PRODUCT GROUP ENDING MAINTENANCE
To start calculating commission on a range of product groups, Product Group Ending records need to be created inthe Real-Time Sales History module. In the Real-Time Sales History module, choose the Reporting option, thenthe Sales Rep Commissions option on the Reporting menu, and then the Product Group Ending Maintenanceoption:
The following screen appears:
Product GroupEnding$
. . . highest product group number of a range of product groups.
The Product Group Ending number is inclusive in the grouping.
Group EndingName
. . . title for the product group ending range.
Basis . . . basis for commission calculation.
★ GR – Commission is to be calculated against the gross sales amount of the order.
PR – Commission is to be calculated against the net profit amount.
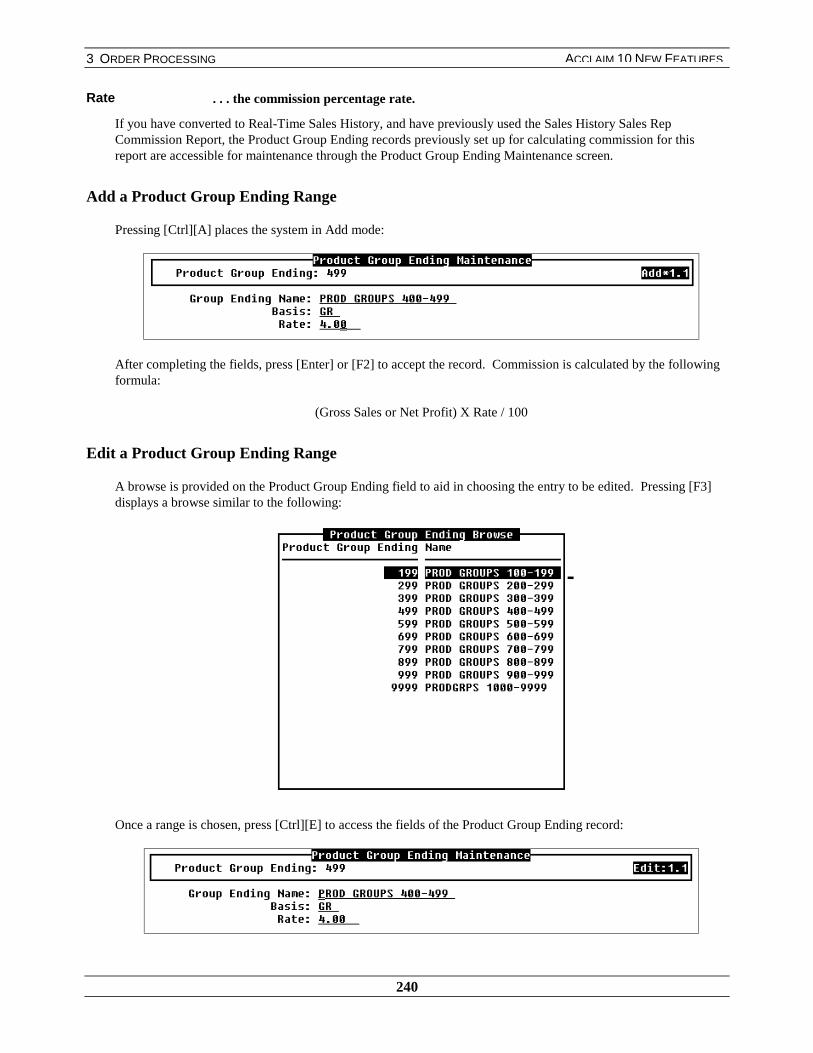
3 ORDER PROCESSING
240
ACCLAIM 10 NEW FEATURES
Rate . . . the commission percentage rate.
If you have converted to Real-Time Sales History, and have previously used the Sales History Sales RepCommission Report, the Product Group Ending records previously set up for calculating commission for thisreport are accessible for maintenance through the Product Group Ending Maintenance screen.
Add a Product Group Ending Range
Pressing [Ctrl][A] places the system in Add mode:
After completing the fields, press [Enter] or [F2] to accept the record. Commission is calculated by the followingformula:
(Gross Sales or Net Profit) X Rate / 100
Edit a Product Group Ending Range
A browse is provided on the Product Group Ending field to aid in choosing the entry to be edited. Pressing [F3]displays a browse similar to the following:
Once a range is chosen, press [Ctrl][E] to access the fields of the Product Group Ending record:
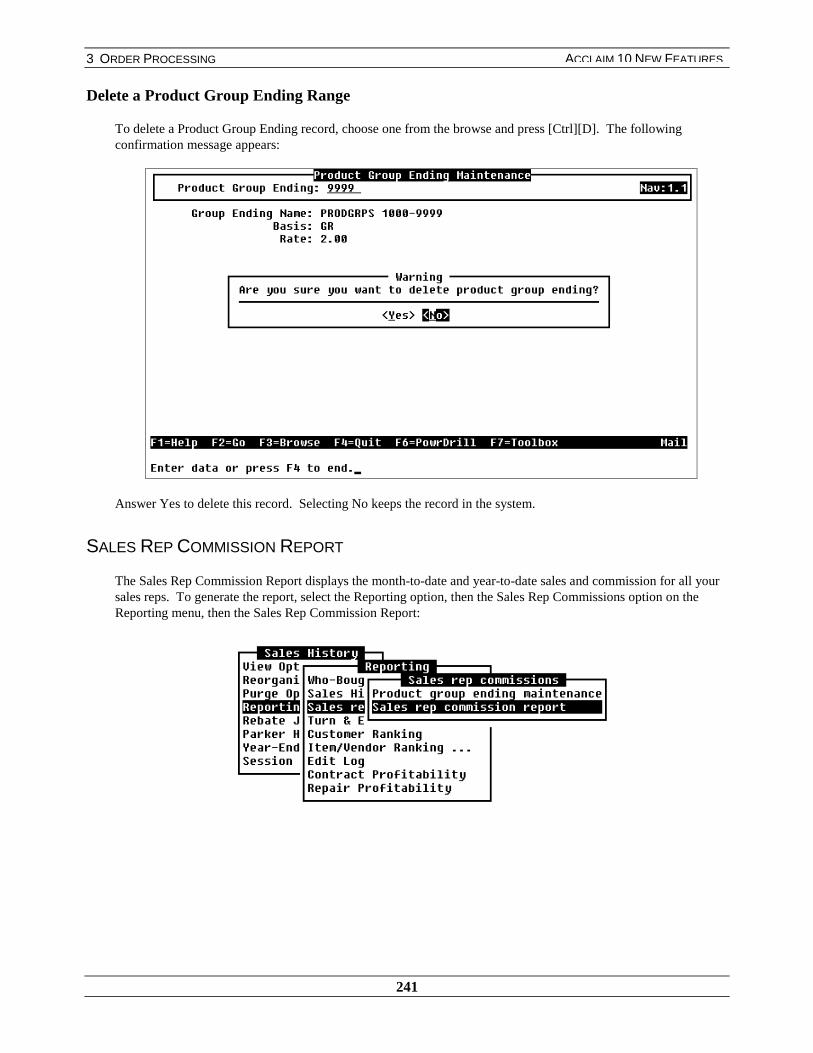
3 ORDER PROCESSING
241
ACCLAIM 10 NEW FEATURES
Delete a Product Group Ending Range
To delete a Product Group Ending record, choose one from the browse and press [Ctrl][D]. The followingconfirmation message appears:
Answer Yes to delete this record. Selecting No keeps the record in the system.
SALES REP COMMISSION REPORT
The Sales Rep Commission Report displays the month-to-date and year-to-date sales and commission for all yoursales reps. To generate the report, select the Reporting option, then the Sales Rep Commissions option on theReporting menu, then the Sales Rep Commission Report:
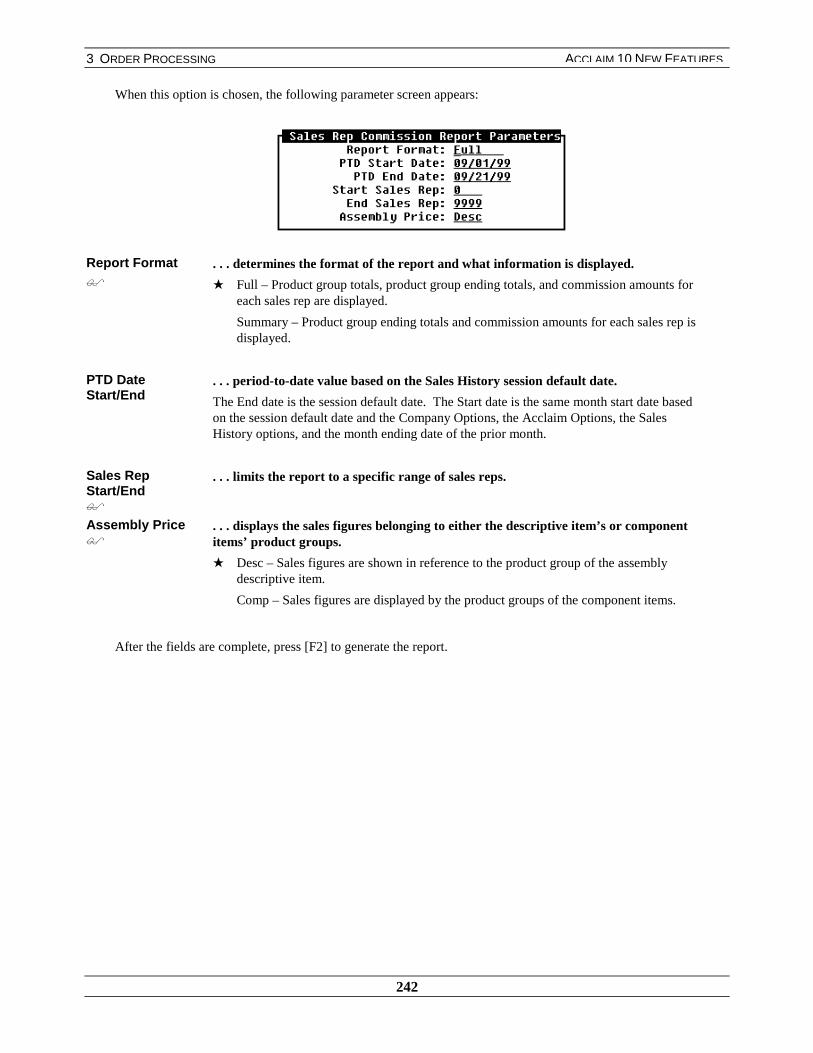
3 ORDER PROCESSING
242
ACCLAIM 10 NEW FEATURES
When this option is chosen, the following parameter screen appears:
Report Format$
. . . determines the format of the report and what information is displayed.
★ Full – Product group totals, product group ending totals, and commission amounts foreach sales rep are displayed.
Summary – Product group ending totals and commission amounts for each sales rep isdisplayed.
PTD DateStart/End
. . . period-to-date value based on the Sales History session default date.
The End date is the session default date. The Start date is the same month start date basedon the session default date and the Company Options, the Acclaim Options, the SalesHistory options, and the month ending date of the prior month.
Sales RepStart/End$
. . . limits the report to a specific range of sales reps.
Assembly Price$
. . . displays the sales figures belonging to either the descriptive item’s or componentitems’ product groups.
★ Desc – Sales figures are shown in reference to the product group of the assemblydescriptive item.
Comp – Sales figures are displayed by the product groups of the component items.
After the fields are complete, press [F2] to generate the report.

3 ORDER PROCESSING
243
ACCLAIM 10 NEW FEATURES
Sample: Sales Rep Commission Report – Summary Format
Sales RepName
. . . sales rep code and name of the salesman.
Product GroupEnding Recordand Description
. . . product group ending number and its definition.
MTD-Sales . . . month-to-date sales for this sales rep and product group range.
MTD-Prof . . . .month-to-date profit dollars for this sales rep and product group range.
PR% . . . profit percent of the monthly sales for this sales rep and product group range.
COMM% . . . commission percent of the monthly sales for this sales rep and product group range.
COMM . . . commission dollars for this sales rep based on the rep’s monthly sales.
YTD-Sales . . . year-to-date sales for this sales rep and product group range.
YTD-Prof . . . year-to-date profit dollars for this sales rep and product group range.
PR% . . . profit percent of the yearly sales for this sales rep and product group range.
COMM% . . . commission percent of the yearly sales for this sales rep and product group range.
COMM . . . commission dollars for this sales rep based on the rep’s yearly sales.

244
EDIT EXTERNAL PO#The system allows you to edit the external purchase order number for purchase orders, requisitions, and vendorreturns. This increases employee productivity by allowing all editing to be done in one central area.
In Expedite Purchase and Expedite Return, when you edit a purchase order, requisition, or vendor return, a screensimilar to the following appears:
For example, a vendor may ask you to attach a vendor-defined purchase order number to a PO or requisition. Nowyou can attach an external purchase order number to the PO in Expedite Purchase. When you edit the ExternalPO# field, you can edit the external PO number and include the vendor-defined external purchase order number.
4 INVENTORY
You can edit the
external purchase
order number.

4 INVENTORY
245
ACCLAIM 10 NEW FEATURES
VIEW VENDOR PHONE NUMBERS IN SELECTIVEPURCHASING
Vendor phone numbers appear below the address fields in the selective purchasing screens. The phone numbersfor both primary vendor and the alternate vendor appear.
For more information about the purchasing screen, refer to the Purchasing manual. For more information aboutvendors, refer to the Vendor Information manual.
The vendors’
phone numbers
display.
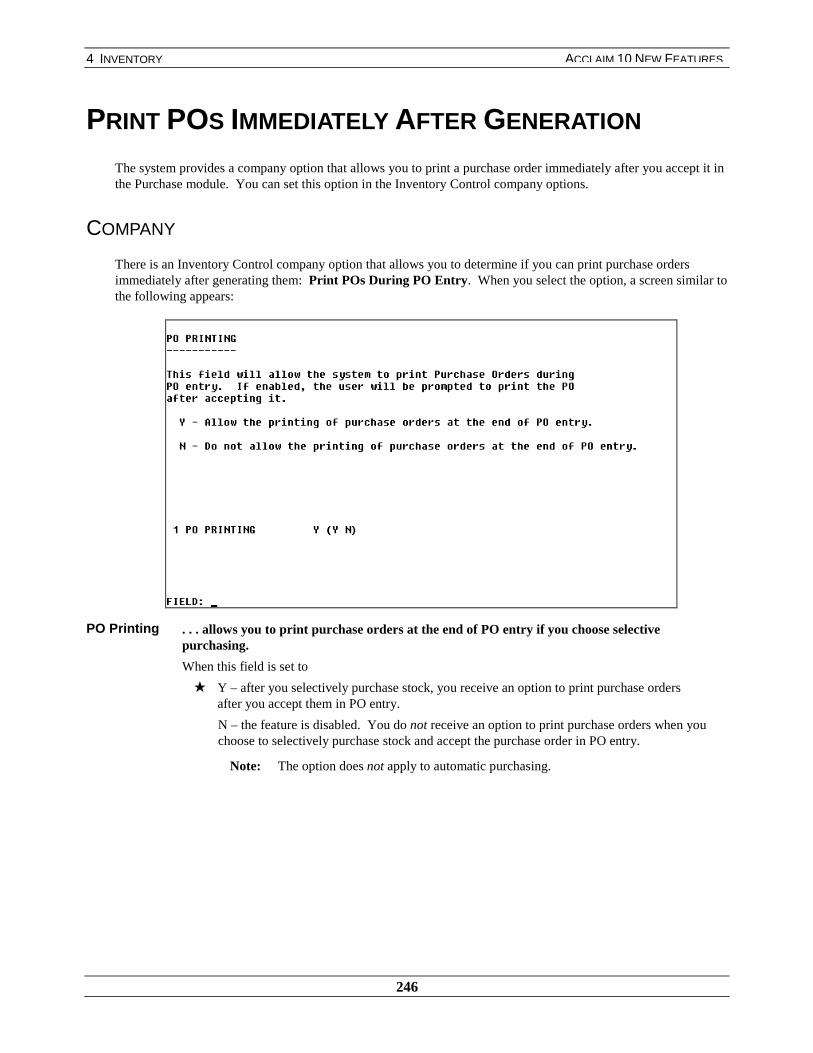
4 INVENTORY
246
ACCLAIM 10 NEW FEATURES
PRINT POS IMMEDIATELY AFTER GENERATION
The system provides a company option that allows you to print a purchase order immediately after you accept it inthe Purchase module. You can set this option in the Inventory Control company options.
COMPANY
There is an Inventory Control company option that allows you to determine if you can print purchase ordersimmediately after generating them: Print POs During PO Entry. When you select the option, a screen similar tothe following appears:
PO Printing . . . allows you to print purchase orders at the end of PO entry if you choose selectivepurchasing.
When this field is set to
★ Y – after you selectively purchase stock, you receive an option to print purchase ordersafter you accept them in PO entry.
N – the feature is disabled. You do not receive an option to print purchase orders when youchoose to selectively purchase stock and accept the purchase order in PO entry.
Note: The option does not apply to automatic purchasing.

4 INVENTORY
247
ACCLAIM 10 NEW FEATURES
PURCHASE
If you set the Print POs During PO Entry option in the Inventory Control company options and selectivelypurchase stock, the system offers an Accept & Print PO option in the Purchase Summary screen.
For more information about the Purchasing Summary screen, refer to the Purchasing manual. For moreinformation about the company option, Print POs During PO Entry, refer to the Company Setup manual.
A new option
appears that
allows you to
accept and print
purchase orders.
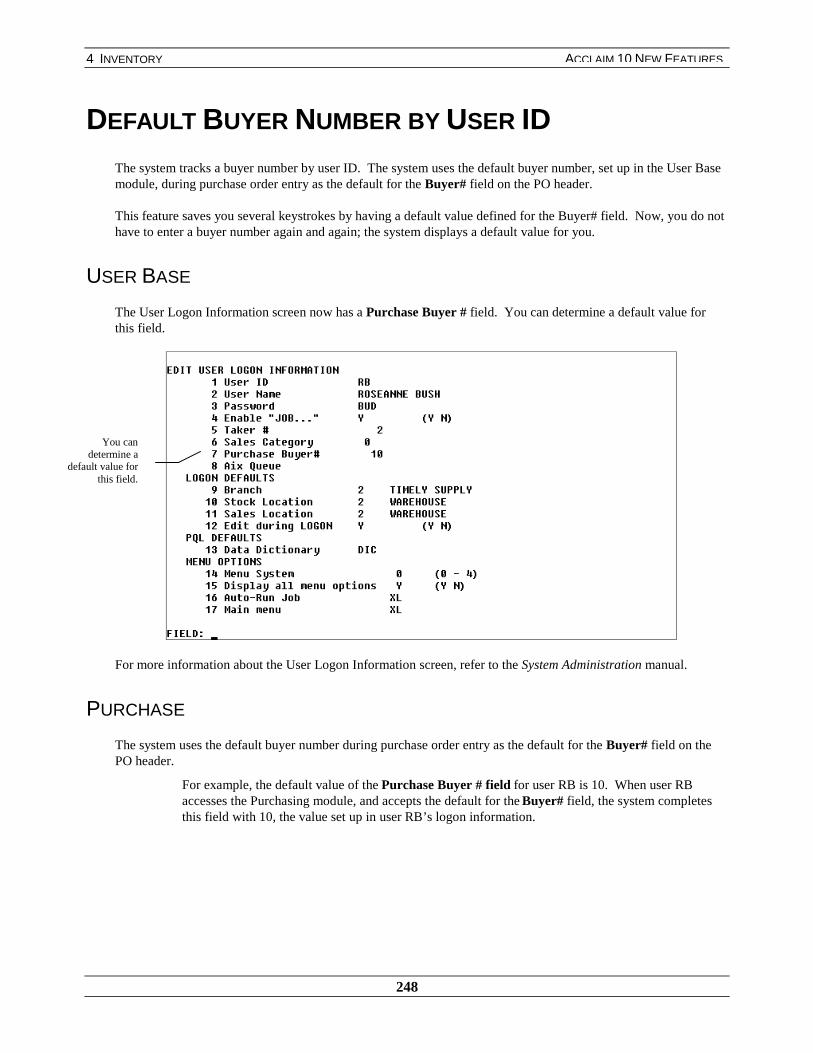
4 INVENTORY
248
ACCLAIM 10 NEW FEATURES
DEFAULT BUYER NUMBER BY USER IDThe system tracks a buyer number by user ID. The system uses the default buyer number, set up in the User Basemodule, during purchase order entry as the default for the Buyer# field on the PO header.
This feature saves you several keystrokes by having a default value defined for the Buyer# field. Now, you do nothave to enter a buyer number again and again; the system displays a default value for you.
USER BASE
The User Logon Information screen now has a Purchase Buyer # field. You can determine a default value forthis field.
For more information about the User Logon Information screen, refer to the System Administration manual.
PURCHASE
The system uses the default buyer number during purchase order entry as the default for the Buyer# field on thePO header.
For example, the default value of the Purchase Buyer # field for user RB is 10. When user RBaccesses the Purchasing module, and accepts the default for the Buyer# field, the system completesthis field with 10, the value set up in user RB’s logon information.
You candetermine a
default value forthis field.
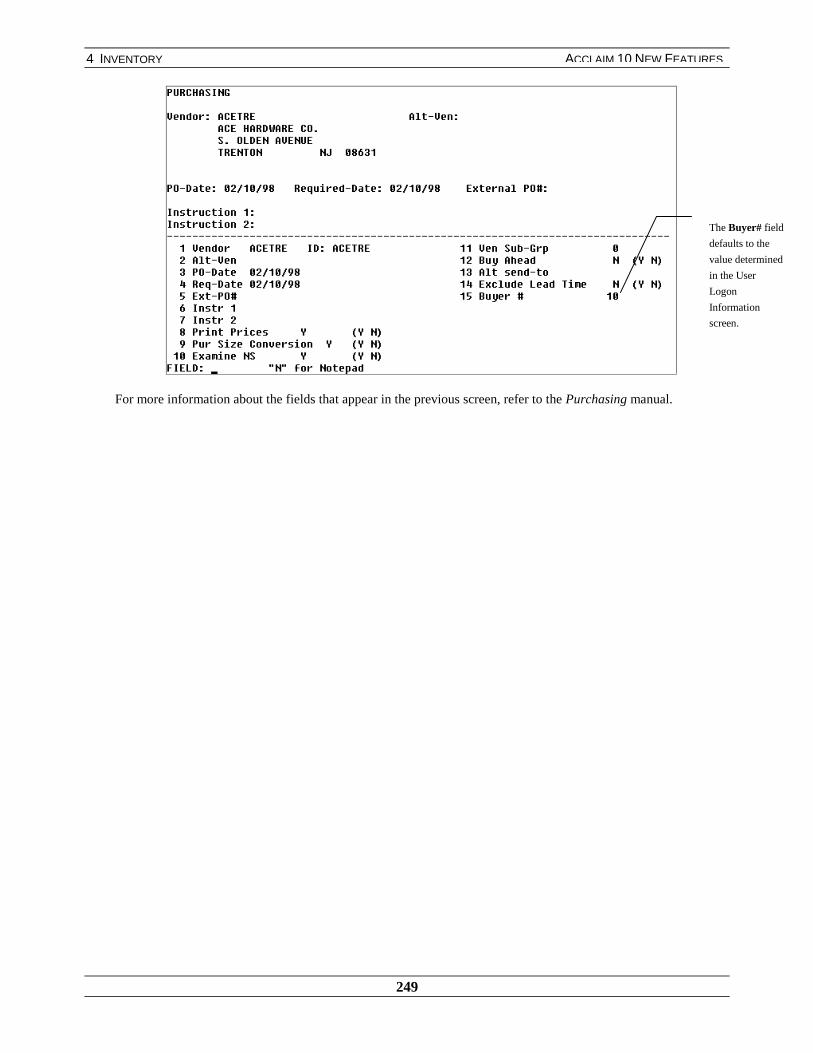
4 INVENTORY
249
ACCLAIM 10 NEW FEATURES
For more information about the fields that appear in the previous screen, refer to the Purchasing manual.
The Buyer# field
defaults to the
value determined
in the User
Logon
Information
screen.
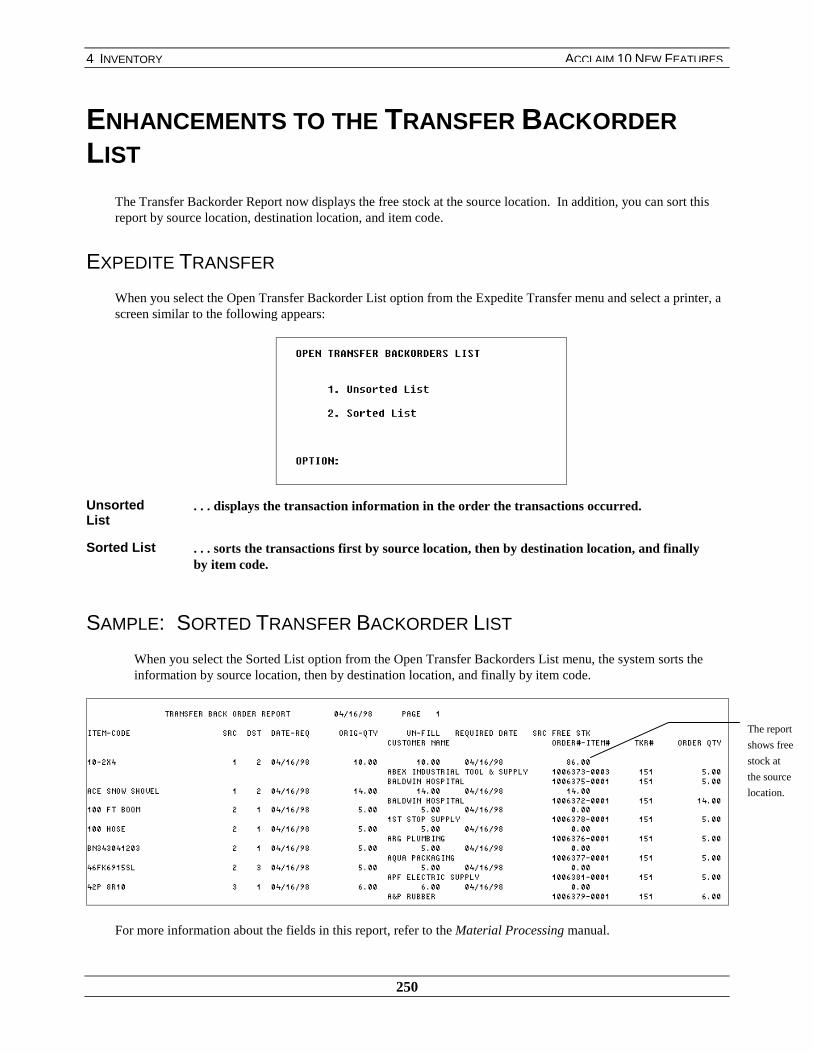
4 INVENTORY
250
ACCLAIM 10 NEW FEATURES
ENHANCEMENTS TO THE TRANSFER BACKORDERLIST
The Transfer Backorder Report now displays the free stock at the source location. In addition, you can sort thisreport by source location, destination location, and item code.
EXPEDITE TRANSFER
When you select the Open Transfer Backorder List option from the Expedite Transfer menu and select a printer, ascreen similar to the following appears:
UnsortedList
. . . displays the transaction information in the order the transactions occurred.
Sorted List . . . sorts the transactions first by source location, then by destination location, and finallyby item code.
SAMPLE: SORTED TRANSFER BACKORDER LIST
When you select the Sorted List option from the Open Transfer Backorders List menu, the system sorts theinformation by source location, then by destination location, and finally by item code.
For more information about the fields in this report, refer to the Material Processing manual.
The report
shows free
stock at
the source
location.
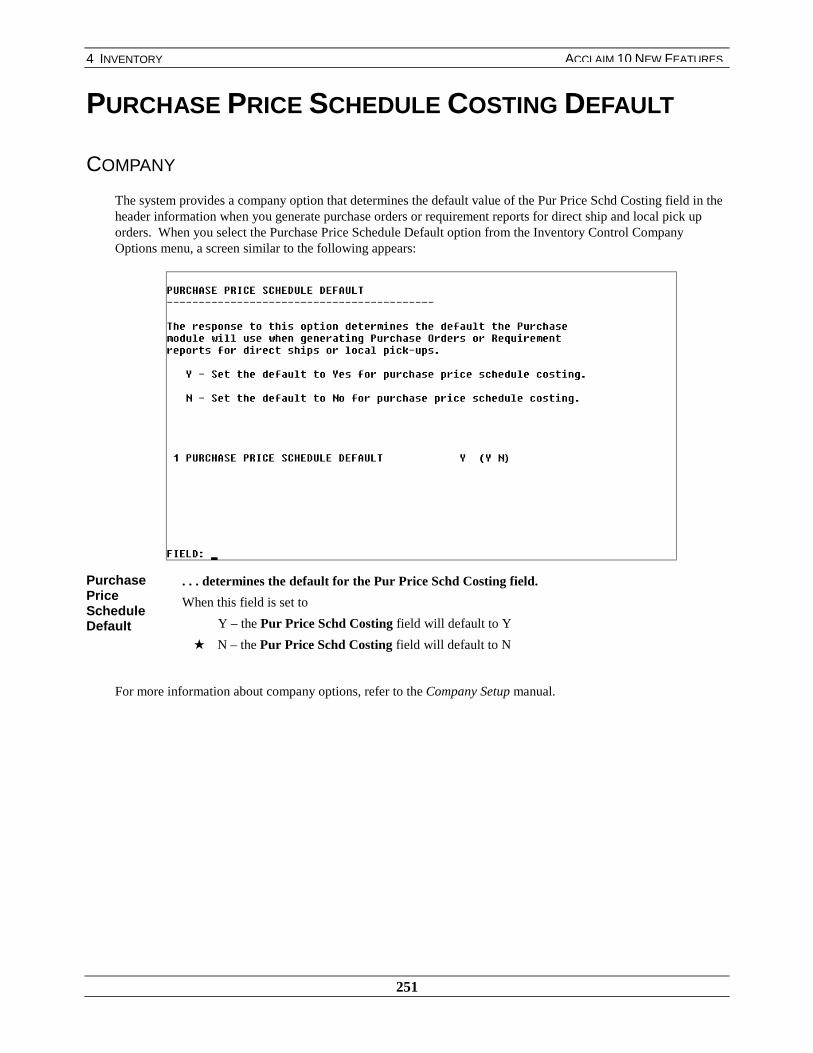
4 INVENTORY
251
ACCLAIM 10 NEW FEATURES
PURCHASE PRICE SCHEDULE COSTING DEFAULT
COMPANY
The system provides a company option that determines the default value of the Pur Price Schd Costing field in theheader information when you generate purchase orders or requirement reports for direct ship and local pick uporders. When you select the Purchase Price Schedule Default option from the Inventory Control CompanyOptions menu, a screen similar to the following appears:
PurchasePriceScheduleDefault
. . . determines the default for the Pur Price Schd Costing field.
When this field is set to
Y – the Pur Price Schd Costing field will default to Y
★ N – the Pur Price Schd Costing field will default to N
For more information about company options, refer to the Company Setup manual.
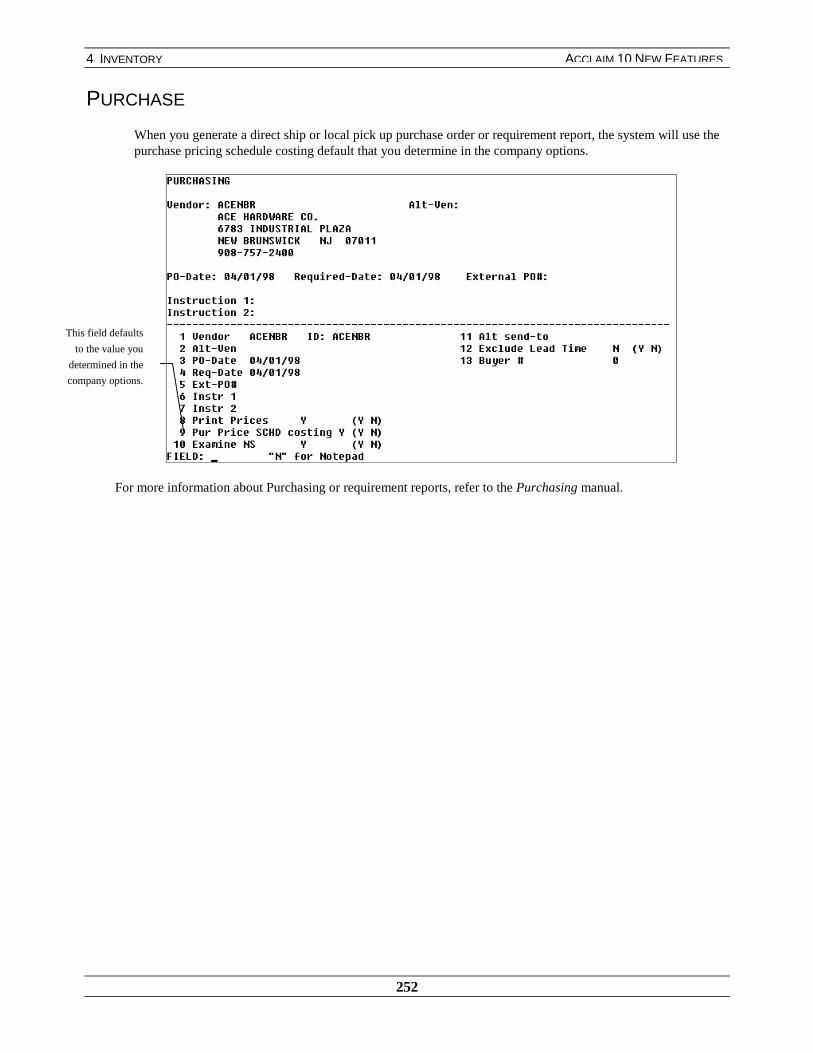
4 INVENTORY
252
ACCLAIM 10 NEW FEATURES
PURCHASE
When you generate a direct ship or local pick up purchase order or requirement report, the system will use thepurchase pricing schedule costing default that you determine in the company options.
For more information about Purchasing or requirement reports, refer to the Purchasing manual.
This field defaults
to the value you
determined in the
company options.

4 INVENTORY
253
ACCLAIM 10 NEW FEATURES
ITEMS ADDED TO PURCHASE ORDERS AREAFFECTED BY PURCHASING PRICING SCHEDULES
Previously, when you added items to a selectively generated purchase order, those additional items were notaffected by any purchase pricing schedule that existed. Now, the system discounts additional stock and nonstockitems by any relevant purchase pricing schedule.
PURCHASE
After you enter items on a purchase order and decide to enter additional items via the options, Add to this PO ViaAutomatic Purchasing and Add Items Manually on the Editing Options screen, the system applies any discountsto those items included in any existing purchase pricing schedule.
Note: The “add to purchase order” options only appear on the Editing Options screen when you selectivelygenerate a purchase order.
For more information on these options, refer to the Purchase manual. For more information on purchasepricing schedules, refer to the Pricing Schedules and Override Tables manual.
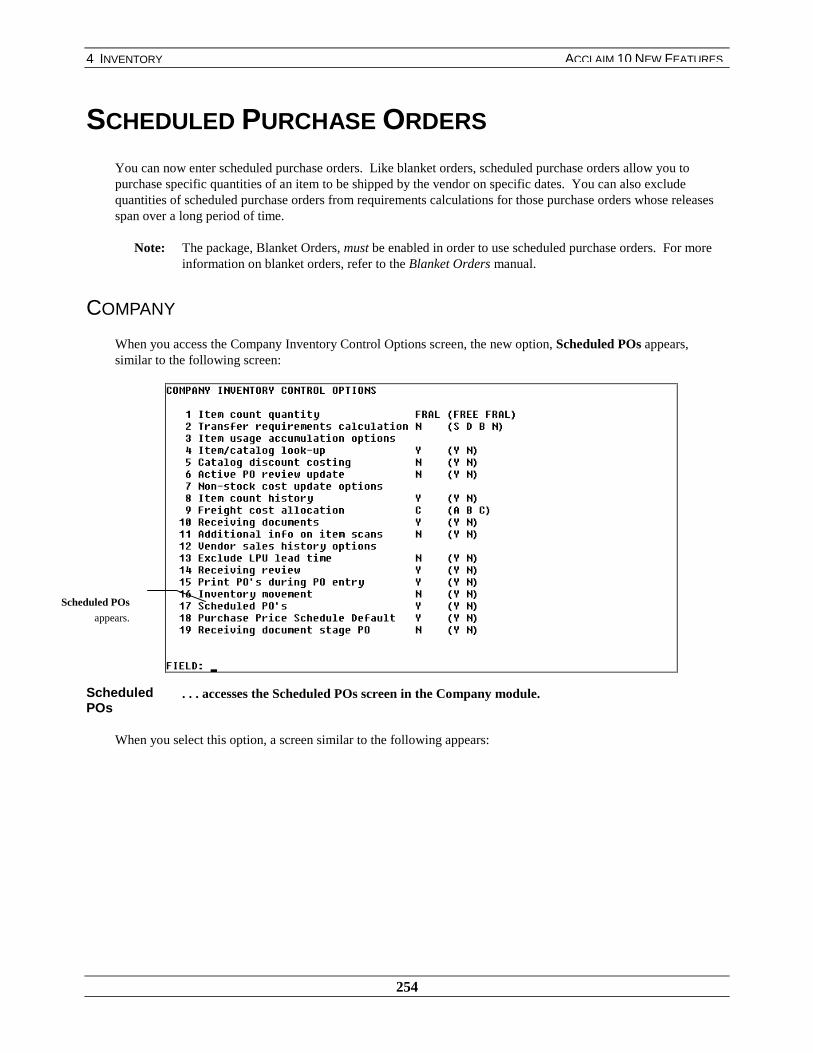
4 INVENTORY
254
ACCLAIM 10 NEW FEATURES
SCHEDULED PURCHASE ORDERS
You can now enter scheduled purchase orders. Like blanket orders, scheduled purchase orders allow you topurchase specific quantities of an item to be shipped by the vendor on specific dates. You can also excludequantities of scheduled purchase orders from requirements calculations for those purchase orders whose releasesspan over a long period of time.
Note: The package, Blanket Orders, must be enabled in order to use scheduled purchase orders. For moreinformation on blanket orders, refer to the Blanket Orders manual.
COMPANY
When you access the Company Inventory Control Options screen, the new option, Scheduled POs appears,similar to the following screen:
ScheduledPOs
. . . accesses the Scheduled POs screen in the Company module.
When you select this option, a screen similar to the following appears:
Scheduled POs
appears.
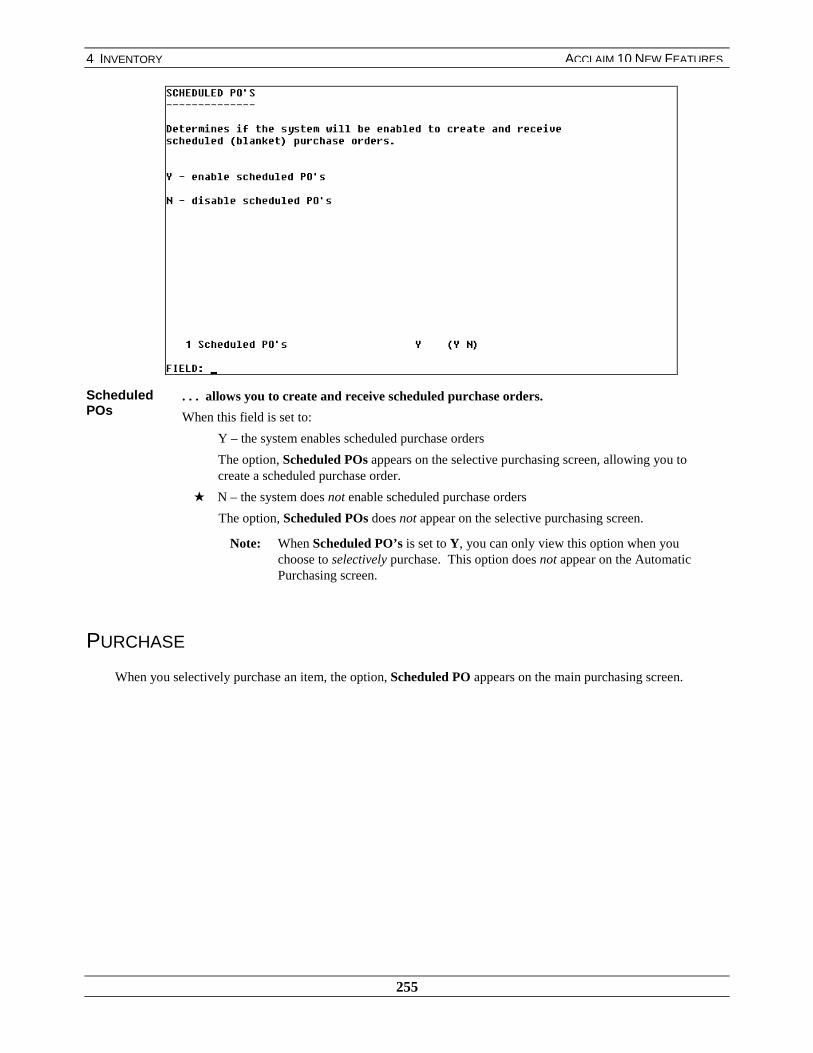
4 INVENTORY
255
ACCLAIM 10 NEW FEATURES
ScheduledPOs
. . . allows you to create and receive scheduled purchase orders.
When this field is set to:
Y – the system enables scheduled purchase orders
The option, Scheduled POs appears on the selective purchasing screen, allowing you tocreate a scheduled purchase order.
★ N – the system does not enable scheduled purchase orders
The option, Scheduled POs does not appear on the selective purchasing screen.
Note: When Scheduled PO’s is set to Y, you can only view this option when youchoose to selectively purchase. This option does not appear on the AutomaticPurchasing screen.
PURCHASE
When you selectively purchase an item, the option, Scheduled PO appears on the main purchasing screen.

4 INVENTORY
256
ACCLAIM 10 NEW FEATURES
ScheduledPO
. . . allows you to enter a scheduled purchase order.
When this field is set to:
Y – a scheduled purchase order is created
After you enter each item on the scheduled purchase order, the Release ScheduleInformation screen appears, allowing you to enter the required date, release quantity, andship date of the release.
When this option is set to Y, the system always prompts you with a release schedule forevery item. If you enter an item for which you want to purchase in one release as youwould on a regular purchase order, enter the entire quantity to be shipped at one time andset the ship date to today’s date. This is especially helpful if you want to enter a nonstockitem on the purchase order.
For more information, refer to the following section “Enter Release Dates, Quantities, andShip Dates.”
Important! When you enable scheduled purchase orders, the system adds the Look Ahead #of Days parameter to the Stock Requirements Report. Therefore, if you print aStock Requirements Report through a JCM, make sure you add this parameter toyour JCM specs.
★ N – a scheduled purchase order is not created
When this option is set to N, the system will not prompt you with a release schedule forany item you enter on the purchase order.
ENTER RELEASE DATES, QUANTITIES, AND SHIP DATES
When you enter Y in the Scheduled PO field, enter the item you want on the scheduled purchase order. Whenyou press [Enter], the Release Schedule Information screen appears, which allows you to enter the release dates,quantities for each release, and ship dates.
A screen similar to the following appears:
Scheduled
PO appears.
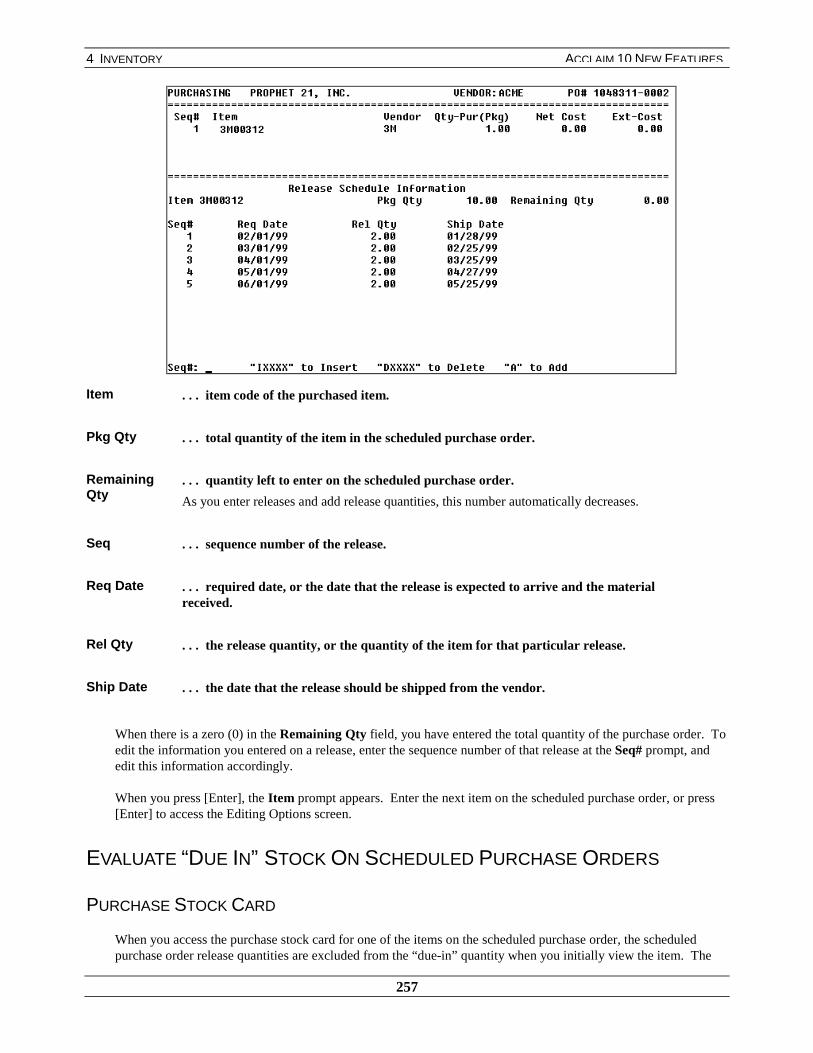
4 INVENTORY
257
ACCLAIM 10 NEW FEATURES
Item . . . item code of the purchased item.
Pkg Qty . . . total quantity of the item in the scheduled purchase order.
RemainingQty
. . . quantity left to enter on the scheduled purchase order.
As you enter releases and add release quantities, this number automatically decreases.
Seq . . . sequence number of the release.
Req Date . . . required date, or the date that the release is expected to arrive and the materialreceived.
Rel Qty . . . the release quantity, or the quantity of the item for that particular release.
Ship Date . . . the date that the release should be shipped from the vendor.
When there is a zero (0) in the Remaining Qty field, you have entered the total quantity of the purchase order. Toedit the information you entered on a release, enter the sequence number of that release at the Seq# prompt, andedit this information accordingly.
When you press [Enter], the Item prompt appears. Enter the next item on the scheduled purchase order, or press[Enter] to access the Editing Options screen.
EVALUATE “DUE IN” STOCK ON SCHEDULED PURCHASE ORDERS
PURCHASE STOCK CARD
When you access the purchase stock card for one of the items on the scheduled purchase order, the scheduledpurchase order release quantities are excluded from the “due-in” quantity when you initially view the item. The

4 INVENTORY
258
ACCLAIM 10 NEW FEATURES
new option, Look Ahead Days, allows you to “look ahead” a specified number of days into the future to view the“due-in” quantity, or the amount of stock on scheduled purchase orders that you are expecting to receive at thattime. To view what your “due-in” quantity will be for your scheduled purchase orders, enter a value in the LookAhead Days field, and the Due-In field changes accordingly.
Look AheadDays
. . . specifies the number of days that the system “looks” into the future to evaluate the totalamount of stock that is “due in” from scheduled purchase orders.
For example, the current date is 2/10/99. The expected date on the first releaseof one scheduled purchase order is 2/20/99, and the release quantity is 150. Theexpected date on the second release of the first scheduled purchase order is2/26/99, and the release quantity is 200.
If you enter 12 in the Look Ahead Days field, the system “looks ahead” to2/22/99, 12 days from the current date. The amount of stock “due in” on2/22/99 is 150, from the first release. If you enter 18 in the Look Ahead Daysfield, the system “looks ahead” to 2/28/99, 18 days from the current date. Thetotal amount of stock “due in” on 2/28/99 is 350 – 150 that is due in on 2/22/99,and 200 that is due in on 2/26/99.
Note: The Due-In value includes total stock due in only and for all scheduledpurchase orders. The Due-In field does not include quantities of non-scheduledpurchase orders.
PRICING & AVAILABILITY
You can also specify the Look Ahead Days in Pricing & Availability. When you enter an item that is included ona scheduled purchase order, the Look field appears in the header of this screen, similar to the following:
Look Ahead
Days
appears.
The Due In
quantity changes as
the system “looks
ahead” to the
number of look
ahead days.
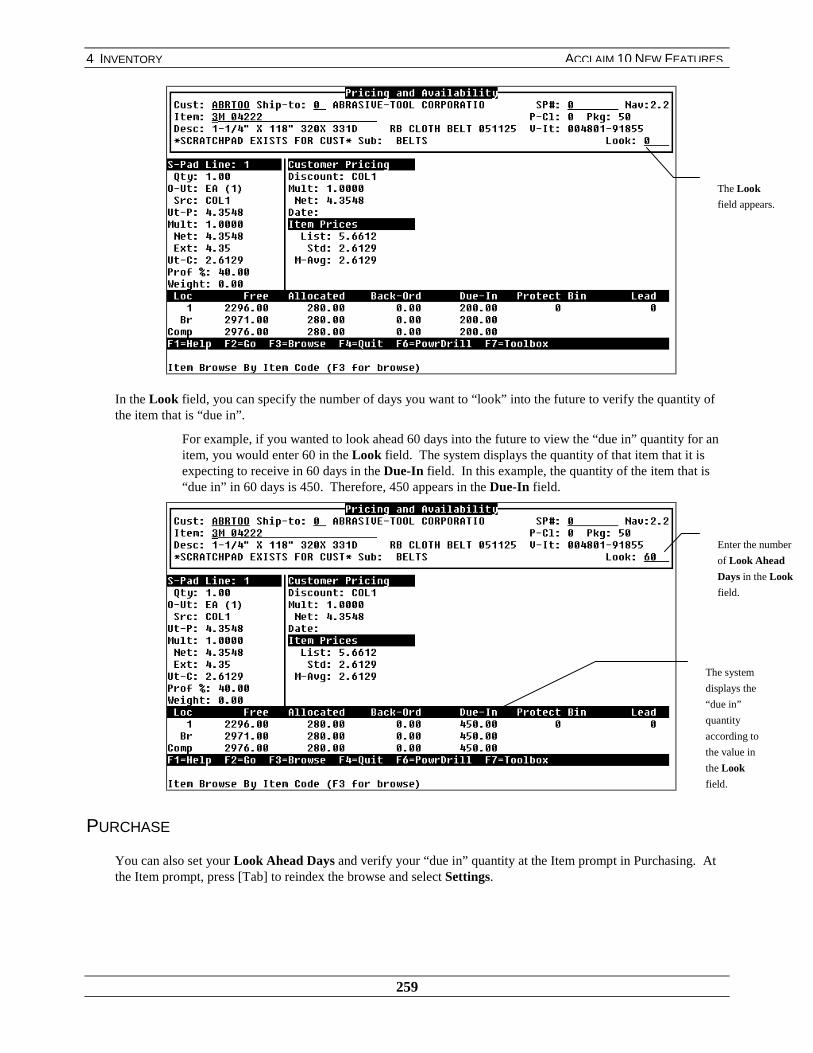
4 INVENTORY
259
ACCLAIM 10 NEW FEATURES
In the Look field, you can specify the number of days you want to “look” into the future to verify the quantity ofthe item that is “due in”.
For example, if you wanted to look ahead 60 days into the future to view the “due in” quantity for anitem, you would enter 60 in the Look field. The system displays the quantity of that item that it isexpecting to receive in 60 days in the Due-In field. In this example, the quantity of the item that is“due in” in 60 days is 450. Therefore, 450 appears in the Due-In field.
PURCHASE
You can also set your Look Ahead Days and verify your “due in” quantity at the Item prompt in Purchasing. Atthe Item prompt, press [Tab] to reindex the browse and select Settings.
The Look
field appears.
The system
displays the
“due in”
quantity
according to
the value in
the Look
field.
Enter the number
of Look Ahead
Days in the Look
field.

4 INVENTORY
260
ACCLAIM 10 NEW FEATURES
Look Ahead Days appears on the Item Settings menu, similar to the following:
When you enter a value in the Look Ahead Days field, the system displays the quantity it expects to receive in thenumber of days you specify in the Due-In field under the “Descriptions and Requirements” section of this screen.
For example, if you wanted to look ahead 60 days into the future to view the “due in” quantity for anitem, you would enter 60 in the Look Ahead Days field. The system displays the quantity of thatitem that it is expecting to receive in 60 days in the Due-In field.
In this example, the quantity of the item that is “due in” in 60 days is 450. Therefore, 450 appears inthe Due-In field, similar to the following:
ITEM
You can also set your Look Ahead Days and verify your “due in” quantity at the Item prompt in the Item module.When you select View from the Item information menu and select an item, you can press [D] at the Field promptto enter a value for your Look Ahead Days.
Look Ahead
Days appears.
The Due-In
quantity
changes
according to
the value in
Look Ahead
Days.

4 INVENTORY
261
ACCLAIM 10 NEW FEATURES
After you select an item, the following screen appears:
When you press [D] at the Field prompt, enter a value in Lookahead Days field.
When you enter a value in this field and press [Enter], the system displays the quantity it expects to receive onany purchase orders in the number of days you specify in the Qty On P.O. field on this screen.
For example, if you wanted to look ahead 60 days into the future to view the “due in” quantity for anitem, you would enter 60 in the Lookahead Days field. The system displays the quantity of that itemthat it is expecting to receive on purchase orders in 60 days in the Qty On P.O. field.
In this example, the quantity of the item that is expected on all purchase orders in 60 days is 450.Therefore, 450 appears in the Qty On P.O. field.
Press [D] to
enter a value
for your Look
Ahead Days.
Enter the
Look Ahead
Days.
The system
displays the
quantity of the
item expected on
purchase orders
in 60 days.

4 INVENTORY
262
ACCLAIM 10 NEW FEATURES
VIEW LINE-ITEM DETAIL FOR ITEMS ON SCHEDULED PURCHASE ORDERS
FROM COMMITMENT SCHEDULE BROWSE
You can view line-item information for items on scheduled purchase orders from the Commitment ScheduleBrowse. When you select an item from Stock Card View and press [F6] to PowrDrill, select CommitmentSchedule from the PowrDrill menu. On the Commitment Schedule Browse screen, the system displays all thereleases and purchase orders for the item you selected. To view detailed line-item information for the item on ascheduled purchase order, Powrdrill on an item with a type of SPO (SPO appears in the Type field).
The new option Scheduled PO Line View appears on following PowrDrill menu:
When you select Scheduled PO Line View, the system displays line-item information for the item on thescheduled purchase order. This screen is very similar to the Order Line View screen. The fields that do not appearon the Order Line View screen are described below.
The option
Scheduled
PO Line
View
appears.

4 INVENTORY
263
ACCLAIM 10 NEW FEATURES
Expected . . . specifies the date you are expecting to receive the item.
Quantities
Rel Qty . . . specifies the quantity of the item for this scheduled purchase order release.
Recv Qty . . . specifies the quantity of the item you received for this scheduled purchase order release.
Open Qty . . . specifies the remaining open quantity of the item for this scheduled purchase orderrelease.
Last Rcvd . . . specifies the quantity of the item that you most recently received for this scheduledpurchase order release.
FROM POS/TRANSFER LINE ITEM BROWSE
You can also view line-item information for items on scheduled purchase orders from the POs/Transfer Line ItemBrowse. When you select an item from Stock Card View and press [F6] to PowrDrill, select POs/Transfers fromthe PowrDrill menu. On the POs/Transfer Line Item Browse screen, the system displays all the transfers andpurchase orders for the item you selected. To view detailed line-item information for the item on a scheduledpurchase order, Powrdrill on an item with a type of SPO (SPO appears in the Type field).
The new option Scheduled PO Line View appears, similar to the following:
When you select this option, the Scheduled Purchase Order Line View screen appears.
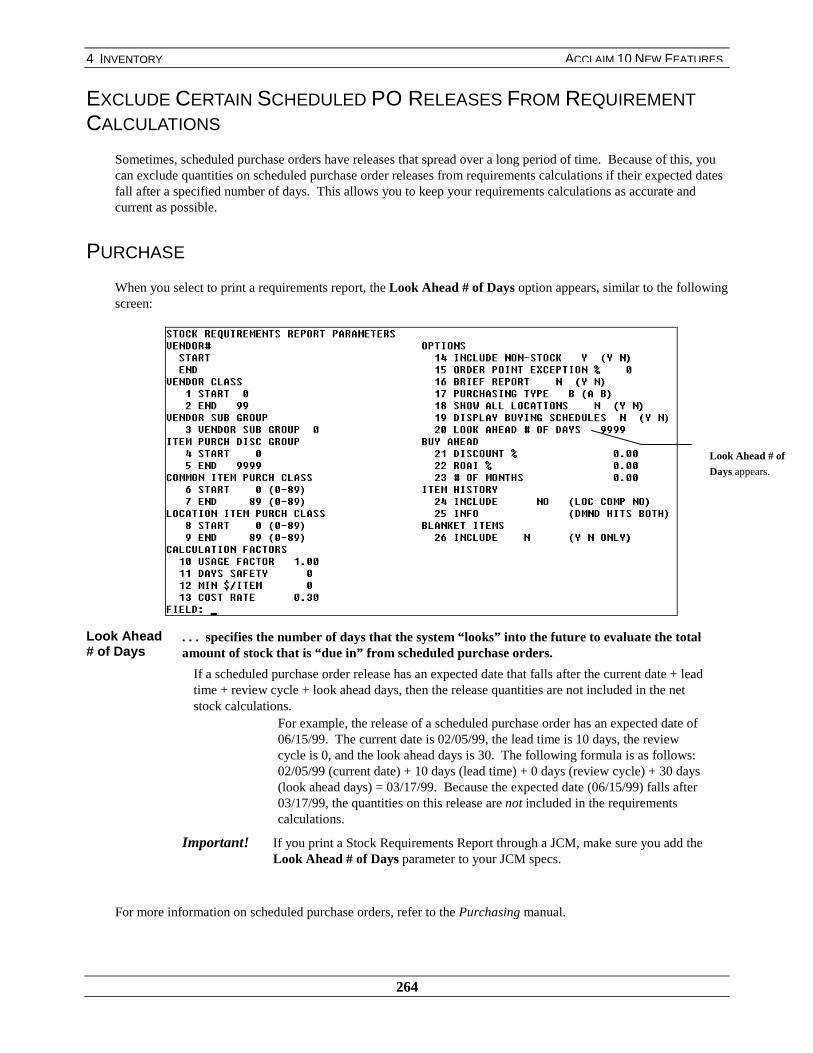
4 INVENTORY
264
ACCLAIM 10 NEW FEATURES
EXCLUDE CERTAIN SCHEDULED PO RELEASES FROM REQUIREMENTCALCULATIONS
Sometimes, scheduled purchase orders have releases that spread over a long period of time. Because of this, youcan exclude quantities on scheduled purchase order releases from requirements calculations if their expected datesfall after a specified number of days. This allows you to keep your requirements calculations as accurate andcurrent as possible.
PURCHASE
When you select to print a requirements report, the Look Ahead # of Days option appears, similar to the followingscreen:
Look Ahead# of Days
. . . specifies the number of days that the system “looks” into the future to evaluate the totalamount of stock that is “due in” from scheduled purchase orders.
If a scheduled purchase order release has an expected date that falls after the current date + leadtime + review cycle + look ahead days, then the release quantities are not included in the netstock calculations.
For example, the release of a scheduled purchase order has an expected date of06/15/99. The current date is 02/05/99, the lead time is 10 days, the reviewcycle is 0, and the look ahead days is 30. The following formula is as follows:02/05/99 (current date) + 10 days (lead time) + 0 days (review cycle) + 30 days(look ahead days) = 03/17/99. Because the expected date (06/15/99) falls after03/17/99, the quantities on this release are not included in the requirementscalculations.
Important! If you print a Stock Requirements Report through a JCM, make sure you add theLook Ahead # of Days parameter to your JCM specs.
For more information on scheduled purchase orders, refer to the Purchasing manual.
Look Ahead # of
Days appears.
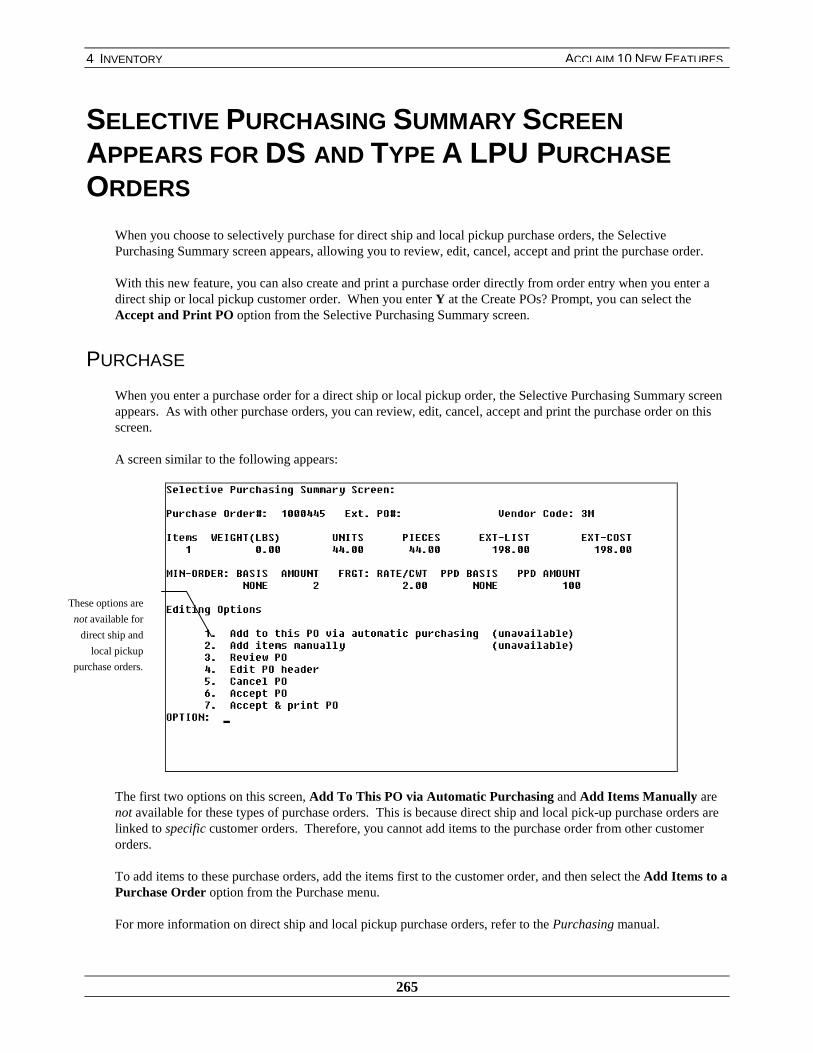
4 INVENTORY
265
ACCLAIM 10 NEW FEATURES
SELECTIVE PURCHASING SUMMARY SCREENAPPEARS FOR DS AND TYPE A LPU PURCHASEORDERS
When you choose to selectively purchase for direct ship and local pickup purchase orders, the SelectivePurchasing Summary screen appears, allowing you to review, edit, cancel, accept and print the purchase order.
With this new feature, you can also create and print a purchase order directly from order entry when you enter adirect ship or local pickup customer order. When you enter Y at the Create POs? Prompt, you can select theAccept and Print PO option from the Selective Purchasing Summary screen.
PURCHASE
When you enter a purchase order for a direct ship or local pickup order, the Selective Purchasing Summary screenappears. As with other purchase orders, you can review, edit, cancel, accept and print the purchase order on thisscreen.
A screen similar to the following appears:
The first two options on this screen, Add To This PO via Automatic Purchasing and Add Items Manually arenot available for these types of purchase orders. This is because direct ship and local pick-up purchase orders arelinked to specific customer orders. Therefore, you cannot add items to the purchase order from other customerorders.
To add items to these purchase orders, add the items first to the customer order, and then select the Add Items to aPurchase Order option from the Purchase menu.
For more information on direct ship and local pickup purchase orders, refer to the Purchasing manual.
These options are
not available for
direct ship and
local pickup
purchase orders.

4 INVENTORY
266
ACCLAIM 10 NEW FEATURES
PURCHASE CONVERSION UNIT APPEARS ON DIRECTSHIP AND LOCAL PICK-UP PURCHASE ORDERS
Previously, direct ship and local pick-up purchase orders displayed an item’s quantity only in terms of eaches.Now, a new parameter on the purchasing screen allows you to display the quantity on these purchase orders interms of the purchase conversion unit.
In addition, during material receipt for local pick-up orders, the order and open quantities are expressed in terms ofthe purchase unit.
COMPANY
In order to enable this feature, the Company Inventory Control option, Purchase Size Conversion Dflt must beenabled. This option is located on the first screen of Company Inventory Control Options.
PURCHASE
When you purchase a direct ship or local pick-up purchase order, the new parameter, Pur Size Conversionappears on the Purchase parameter screen.
A screen similar to the following appears:
Pur Size
Conversion
appears.
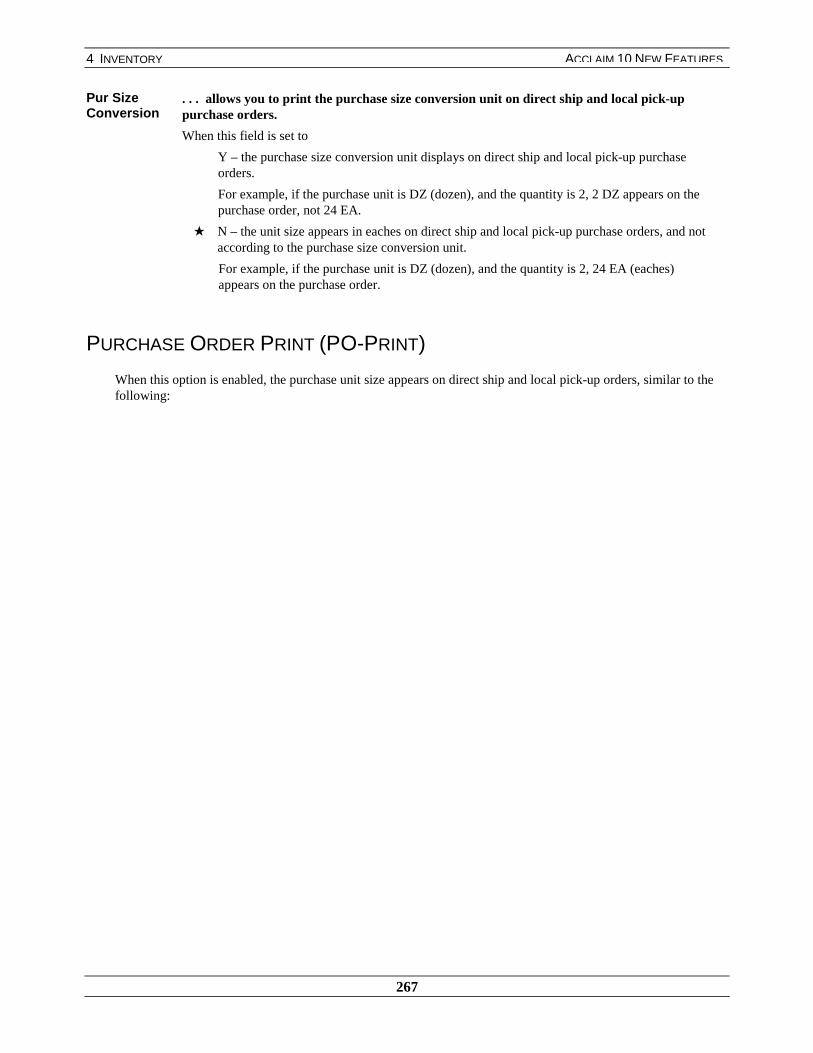
4 INVENTORY
267
ACCLAIM 10 NEW FEATURES
Pur SizeConversion
. . . allows you to print the purchase size conversion unit on direct ship and local pick-uppurchase orders.
When this field is set to
Y – the purchase size conversion unit displays on direct ship and local pick-up purchaseorders.
For example, if the purchase unit is DZ (dozen), and the quantity is 2, 2 DZ appears on thepurchase order, not 24 EA.
★ N – the unit size appears in eaches on direct ship and local pick-up purchase orders, and notaccording to the purchase size conversion unit.
For example, if the purchase unit is DZ (dozen), and the quantity is 2, 24 EA (eaches)appears on the purchase order.
PURCHASE ORDER PRINT (PO-PRINT)
When this option is enabled, the purchase unit size appears on direct ship and local pick-up orders, similar to thefollowing:

4 INVENTORY
268
ACCLAIM 10 NEW FEATURES
MATERIAL RECEIPT
When the purchase size conversion option is enabled for local pick-up purchase orders, the system displays thepurchase unit on the material receiving document.
When you receive material against a local pick-up purchase order, the open and order quantity are expressed interms of the purchase unit. In addition, the purchase unit appears beside the Receiving Quantity field (RCV-QTY) before you enter the quantity in this field.
Purchase unit
size appears
on purchase
order.
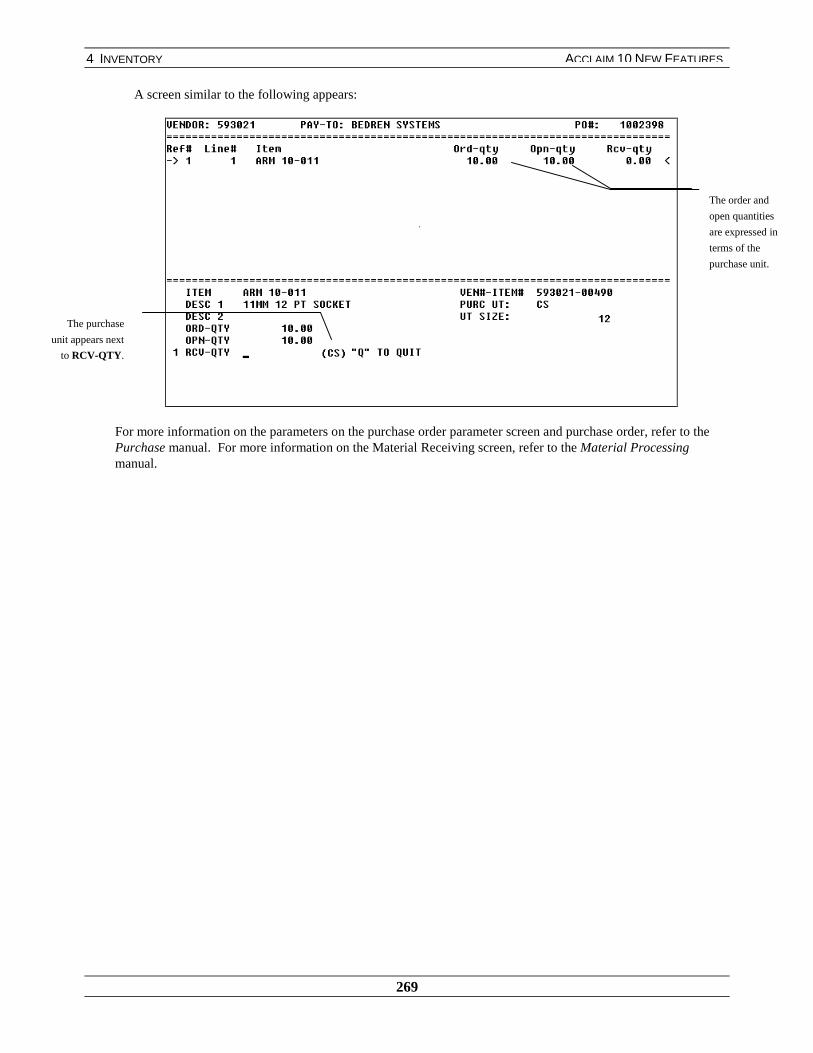
4 INVENTORY
269
ACCLAIM 10 NEW FEATURES
A screen similar to the following appears:
For more information on the parameters on the purchase order parameter screen and purchase order, refer to thePurchase manual. For more information on the Material Receiving screen, refer to the Material Processingmanual.
The order and
open quantities
are expressed in
terms of the
purchase unit.
The purchase
unit appears next
to RCV-QTY.

4 INVENTORY
270
ACCLAIM 10 NEW FEATURES
INVENTORY HISTORY MODIFICATIONS
Previously, you could only view inventory history by item and vendor. Now, the Inventory History module hasbeen modified to give you the ability to view What-Was-Purchased and What-Was-Received inventory history bypurchase order number.
INVENTORY HISTORY
When you select What-Was-Purchased and What-Was-Received from the Inventory History module, the newPO History View option appears, similar to the following screen:
PO HistoryView
. . . accesses the purchase orders browse for What-Was-Purchased and What-Was-Receivedinventory history.
When you select this option, a purchase order browse appears, listing all the vendors for whom purchase ordersexist for the type of history you selected.
For example, if you select PO History View from the What-Was-Received Options menu, a browseappears displaying all vendors for whom purchase orders exist for material received.
A screen similar to the following appears:
The PO History
View option
appears.

4 INVENTORY
271
ACCLAIM 10 NEW FEATURES
Press [Tab] to reindex this browse by purchase order number, and select PO#.
The system reindexes the browse by purchase order number, similar to the following screen:
In Inventory History, you can also view a purchase order in PO Recall by pressing [F6] to PowrDrill on a purchaseorder from the Purchase Orders browse and selecting the PO Recall option.

4 INVENTORY
272
ACCLAIM 10 NEW FEATURES
Select PO Recall to view the PO Recall browse, similar to the following screen:
For more information on inventory history and the previous screens, refer to the Inventory History manual.
PowrDrill to view the
PO Recall option.

4 INVENTORY
273
ACCLAIM 10 NEW FEATURES
USER ID AND TIME FIELDS ON THE STOCKADJUSTMENTS AND NONSTOCK ADJUSTMENTSREGISTERS
The Stock Adjustments Register and the Nonstock Adjustments Register have two new fields: User ID and Time.The registers display the user ID of the user who made a stock adjustment, as well as the time when the entry wasmade on the register.
The registers look similar to the following example:
For more information about the Stock Adjustments Register and the Nonstock Adjustments Register, refer to theInventory Control manual.

4 INVENTORY
274
ACCLAIM 10 NEW FEATURES
ENTER ITEM FROM STOCK CARD SCREEN ONPURCHASE ORDER
Previously, you could only view item information on the Stock Card View screen while you were in the Purchasemodule. If you wanted to enter an item on a purchase order that you viewed in Stock Card, you had to exit theStock Card View screen and access the Purchase module separately.
Now, when you choose to selectively purchase an item, you can enter an item from the Stock Card screen directlyonto a purchase order.
PURCHASE
When you choose to selectively purchase an item, press [C] at the Item prompt to access the Stock Card Viewscreen. On the Stock Card View screen, select the item you want to enter on the purchase order.
To enter the item you selected on the purchase order, do one of the following:
♦ Press [F2]
♦ Press [F6] and select Return Item to Purchase from the PowrDrill menu:
Return Itemto Purchase
. . . enters the item you select from the Stock Card View screen directly onto the purchaseorder.
When you select the Return Item to Purchase option or press [F2], the system returns you to the Purchase screen,and completes the item code, description, and unit sizes of the item you selected.
Return Item to
Purchase
appears.
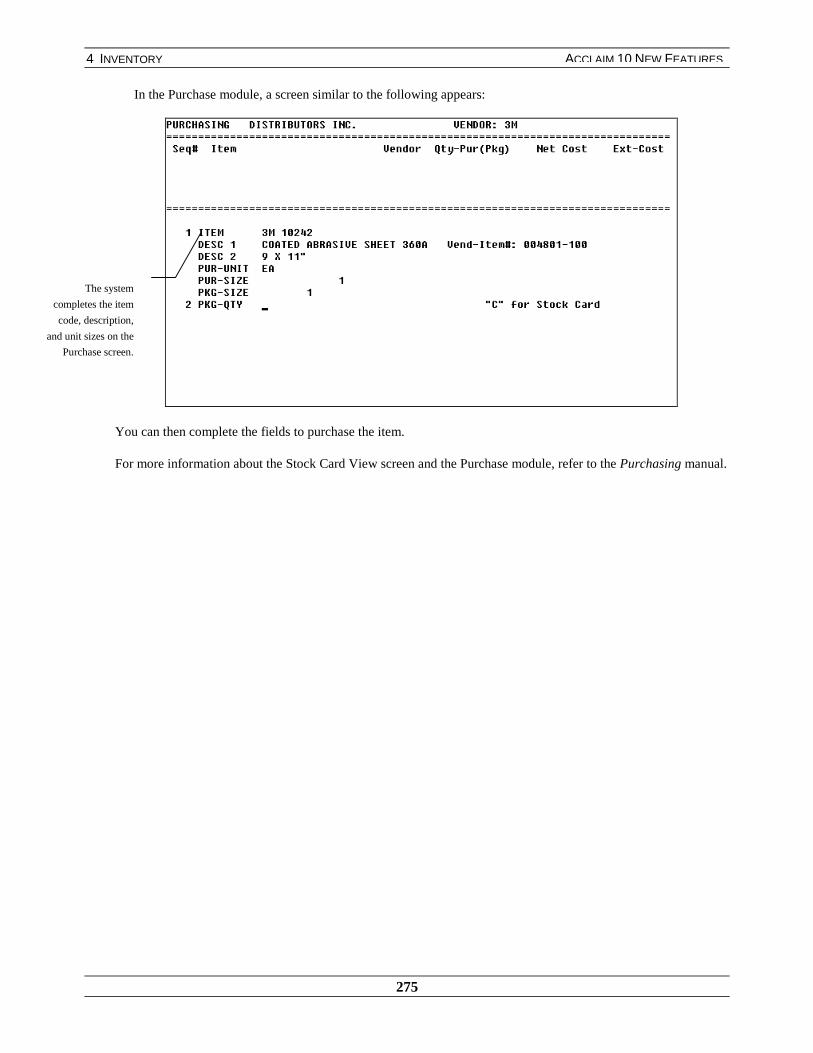
4 INVENTORY
275
ACCLAIM 10 NEW FEATURES
In the Purchase module, a screen similar to the following appears:
You can then complete the fields to purchase the item.
For more information about the Stock Card View screen and the Purchase module, refer to the Purchasing manual.
The system
completes the item
code, description,
and unit sizes on the
Purchase screen.

4 INVENTORY
276
ACCLAIM 10 NEW FEATURES
ITEM ADJUST CODES 90 – 97 SUBTRACTED FROMPTD SALES
Only stock adjustments using codes 90 through 97 are subtracted from PTD sales demand. Previously, the systemsubtracted codes 90 – 99 from PTD sales demand.
Codes 98 and 99 are suppressed from updating PTD sales because:
♦ Code 98 is used by the Inventory Movement module uses when the “Include DS and P&D costs in theInvoice Register Inventory Costs” company option is set to N.
♦ Reserved codes—like code 99—should not affect PTD sales.
When you access the Stock Adjustment screen, the system displays a message indicating that adjustmentsmade using codes 90 – 97 will be subtracted from period-to-date sales demand.
For more information about stock adjustments, refer to the Inventory Control manual.
Only adjustments
made using
codes 90 through
97 are subtracted
from PTD sales.
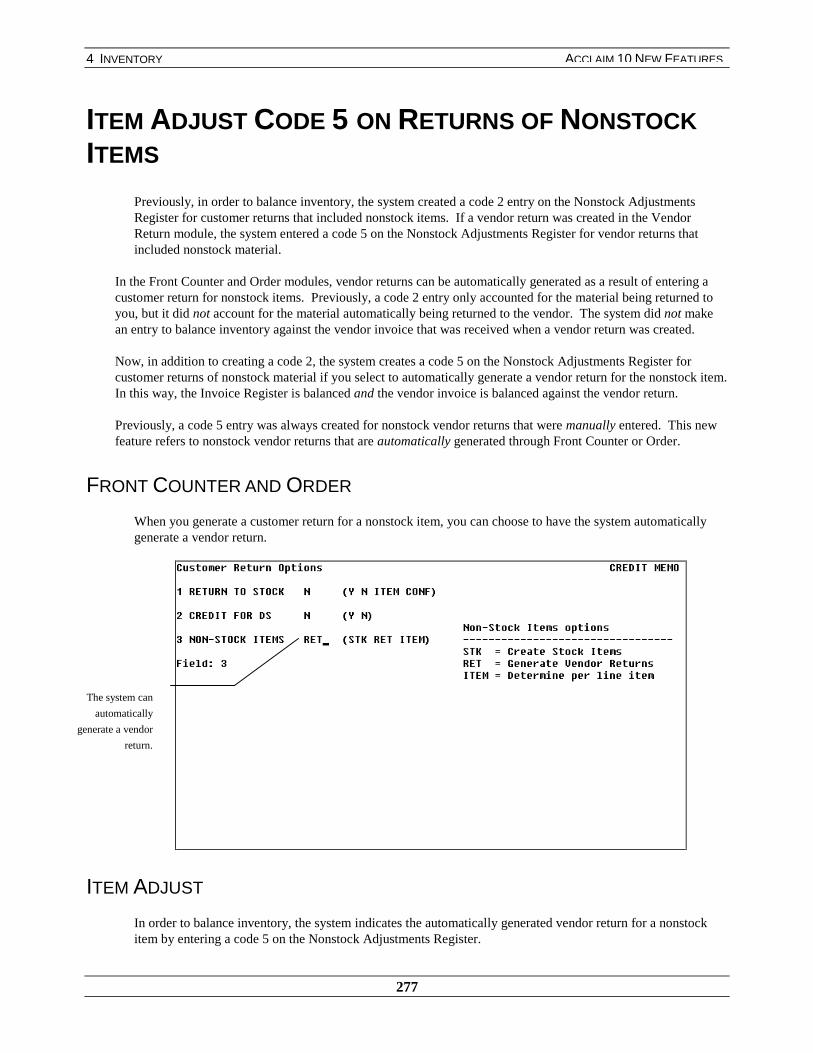
4 INVENTORY
277
ACCLAIM 10 NEW FEATURES
ITEM ADJUST CODE 5 ON RETURNS OF NONSTOCKITEMS
Previously, in order to balance inventory, the system created a code 2 entry on the Nonstock AdjustmentsRegister for customer returns that included nonstock items. If a vendor return was created in the VendorReturn module, the system entered a code 5 on the Nonstock Adjustments Register for vendor returns thatincluded nonstock material.
In the Front Counter and Order modules, vendor returns can be automatically generated as a result of entering acustomer return for nonstock items. Previously, a code 2 entry only accounted for the material being returned toyou, but it did not account for the material automatically being returned to the vendor. The system did not makean entry to balance inventory against the vendor invoice that was received when a vendor return was created.
Now, in addition to creating a code 2, the system creates a code 5 on the Nonstock Adjustments Register forcustomer returns of nonstock material if you select to automatically generate a vendor return for the nonstock item.In this way, the Invoice Register is balanced and the vendor invoice is balanced against the vendor return.
Previously, a code 5 entry was always created for nonstock vendor returns that were manually entered. This newfeature refers to nonstock vendor returns that are automatically generated through Front Counter or Order.
FRONT COUNTER AND ORDER
When you generate a customer return for a nonstock item, you can choose to have the system automaticallygenerate a vendor return.
ITEM ADJUST
In order to balance inventory, the system indicates the automatically generated vendor return for a nonstockitem by entering a code 5 on the Nonstock Adjustments Register.
The system can
automatically
generate a vendor
return.
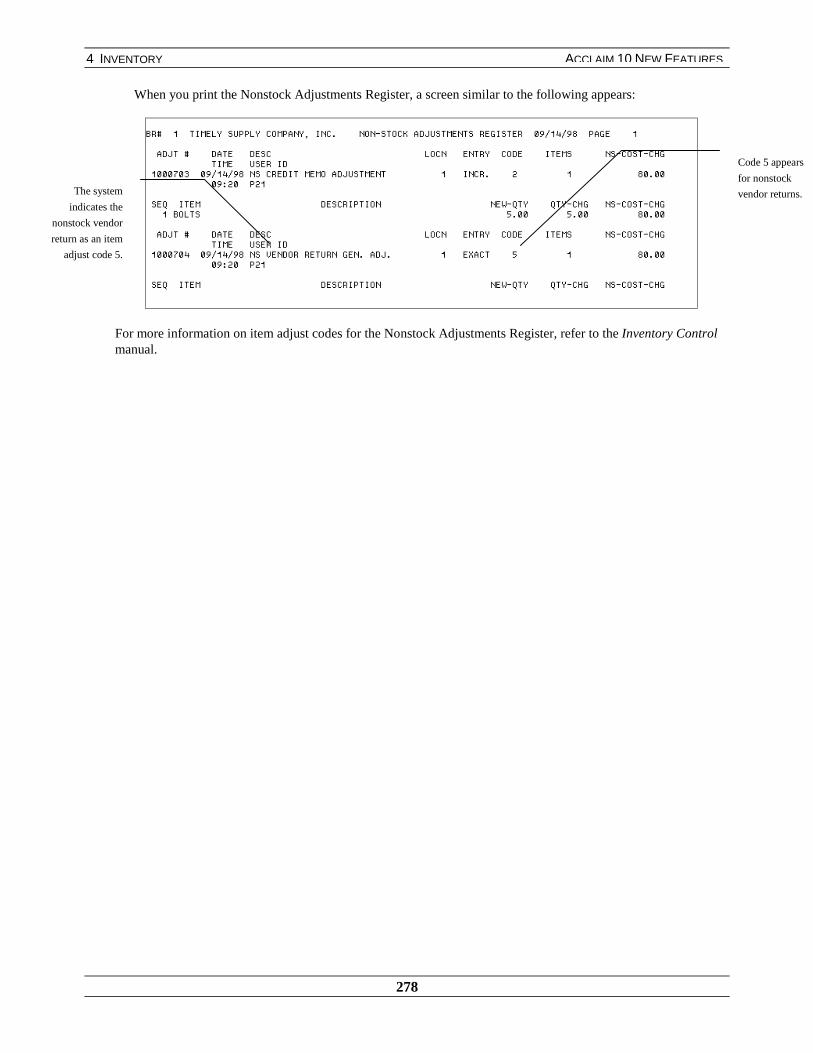
4 INVENTORY
278
ACCLAIM 10 NEW FEATURES
When you print the Nonstock Adjustments Register, a screen similar to the following appears:
For more information on item adjust codes for the Nonstock Adjustments Register, refer to the Inventory Controlmanual.
Code 5 appears
for nonstock
vendor returns.The system
indicates the
nonstock vendor
return as an item
adjust code 5.
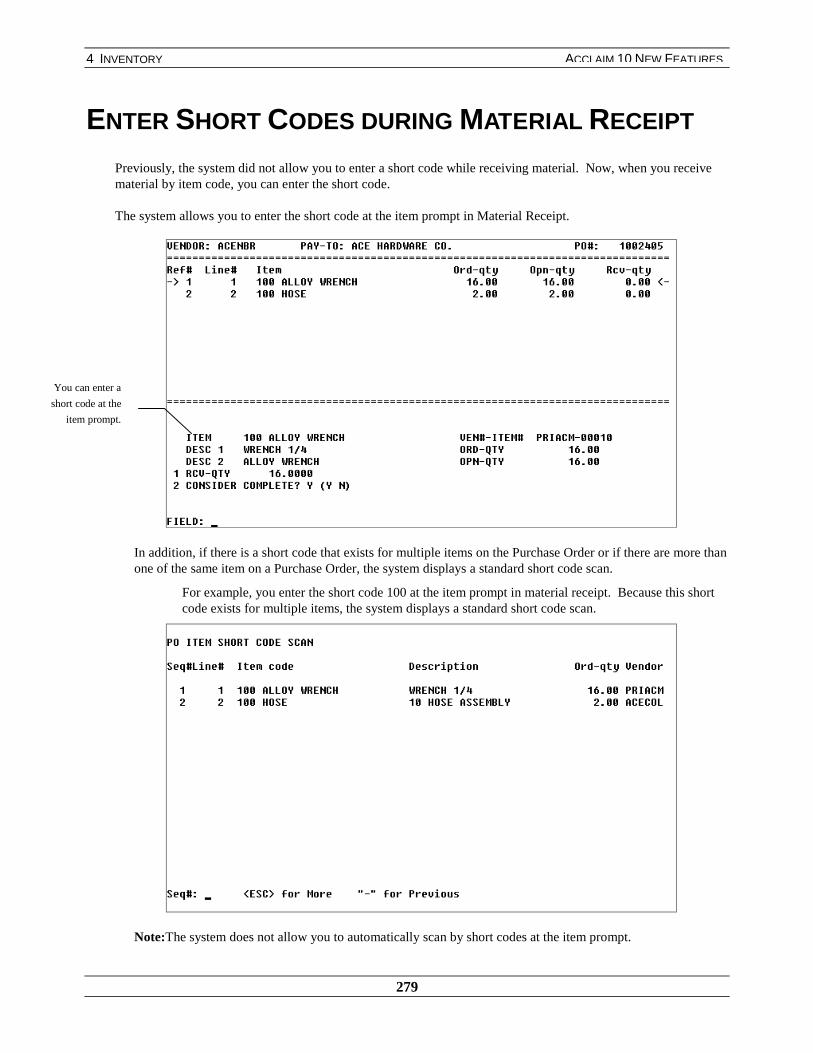
4 INVENTORY
279
ACCLAIM 10 NEW FEATURES
ENTER SHORT CODES DURING MATERIAL RECEIPT
Previously, the system did not allow you to enter a short code while receiving material. Now, when you receivematerial by item code, you can enter the short code.
The system allows you to enter the short code at the item prompt in Material Receipt.
In addition, if there is a short code that exists for multiple items on the Purchase Order or if there are more thanone of the same item on a Purchase Order, the system displays a standard short code scan.
For example, you enter the short code 100 at the item prompt in material receipt. Because this shortcode exists for multiple items, the system displays a standard short code scan.
Note: The system does not allow you to automatically scan by short codes at the item prompt.
You can enter a
short code at the
item prompt.
4 INVENTORY
280
ACCLAIM 10 NEW FEATURES
For more information about the fields in the previous screens, refer to the Material Processing manual.

4 INVENTORY
281
ACCLAIM 10 NEW FEATURES
EDIT VENDOR RETURNS AND TRANSFERS AFTERPRINTING
You can edit quantities and amounts of transfers and vendor returns. You can edit the quantity of a return afteryou have printed the return but before it has been confirmed. You can edit the quantity of a transfer after you haveprinted the transfer but before you have received material. The system will print any edits when you reprint thevendor return or transfer.
EXPEDITE RETURN
You can now edit costs and quantities of a vendor return after you have printed the return. The system allows youto edit returns until they have been partially or completely confirmed. Any edits you make will be printed whenyou reprint the vendor return.
EXPEDITE TRANSFER
You can now edit costs and quantities of a transfer after you have printed the transfer. The system allows you toedit transfers until the material has been received. Any edits you make will be printed when you reprint thetransfer.
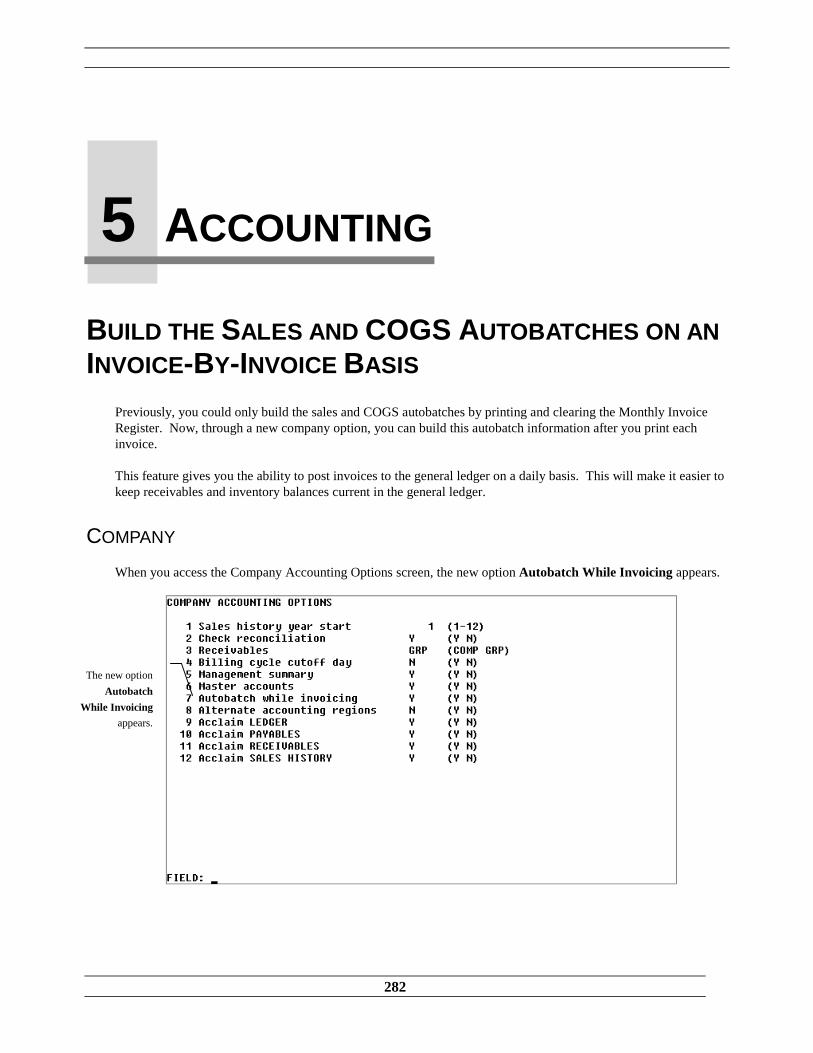
282
BUILD THE SALES AND COGS AUTOBATCHES ON ANINVOICE-BY-INVOICE BASIS
Previously, you could only build the sales and COGS autobatches by printing and clearing the Monthly InvoiceRegister. Now, through a new company option, you can build this autobatch information after you print eachinvoice.
This feature gives you the ability to post invoices to the general ledger on a daily basis. This will make it easier tokeep receivables and inventory balances current in the general ledger.
COMPANY
When you access the Company Accounting Options screen, the new option Autobatch While Invoicing appears.
5 ACCOUNTING
The new option
Autobatch
While Invoicing
appears.
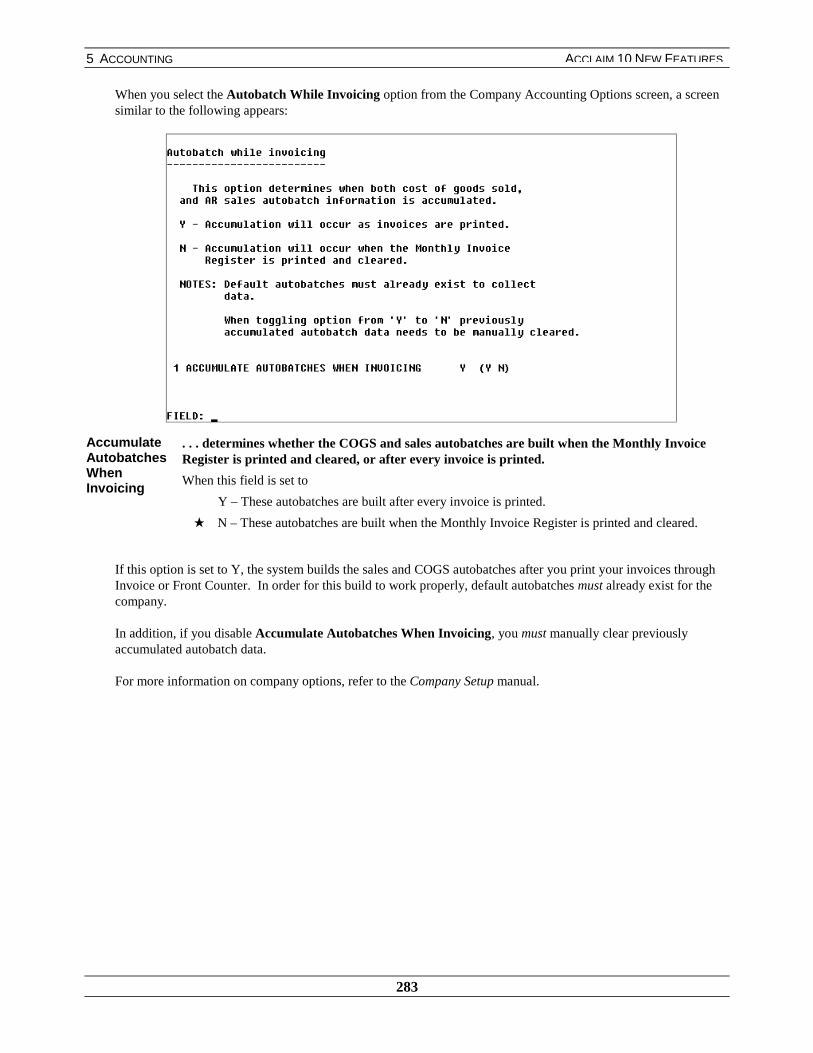
5 ACCOUNTING
283
ACCLAIM 10 NEW FEATURES
When you select the Autobatch While Invoicing option from the Company Accounting Options screen, a screensimilar to the following appears:
AccumulateAutobatchesWhenInvoicing
. . . determines whether the COGS and sales autobatches are built when the Monthly InvoiceRegister is printed and cleared, or after every invoice is printed.
When this field is set to
Y – These autobatches are built after every invoice is printed.
★ N – These autobatches are built when the Monthly Invoice Register is printed and cleared.
If this option is set to Y, the system builds the sales and COGS autobatches after you print your invoices throughInvoice or Front Counter. In order for this build to work properly, default autobatches must already exist for thecompany.
In addition, if you disable Accumulate Autobatches When Invoicing, you must manually clear previouslyaccumulated autobatch data.
For more information on company options, refer to the Company Setup manual.
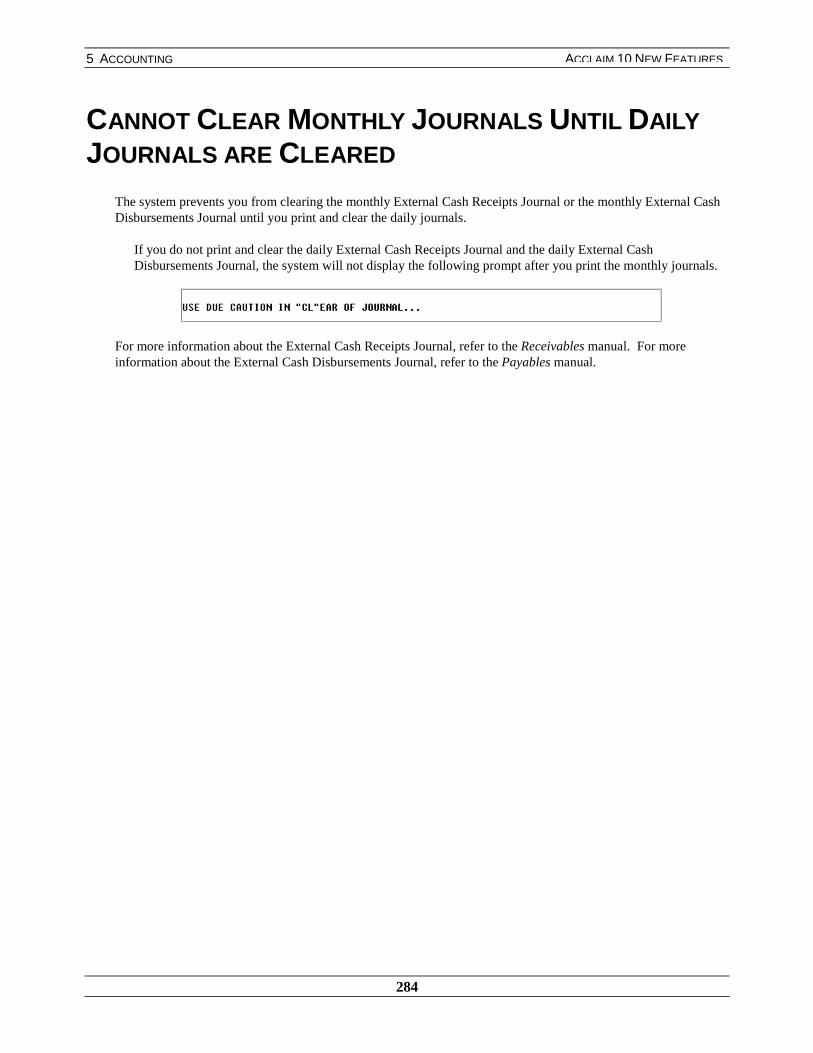
5 ACCOUNTING
284
ACCLAIM 10 NEW FEATURES
CANNOT CLEAR MONTHLY JOURNALS UNTIL DAILYJOURNALS ARE CLEARED
The system prevents you from clearing the monthly External Cash Receipts Journal or the monthly External CashDisbursements Journal until you print and clear the daily journals.
If you do not print and clear the daily External Cash Receipts Journal and the daily External CashDisbursements Journal, the system will not display the following prompt after you print the monthly journals.
For more information about the External Cash Receipts Journal, refer to the Receivables manual. For moreinformation about the External Cash Disbursements Journal, refer to the Payables manual.
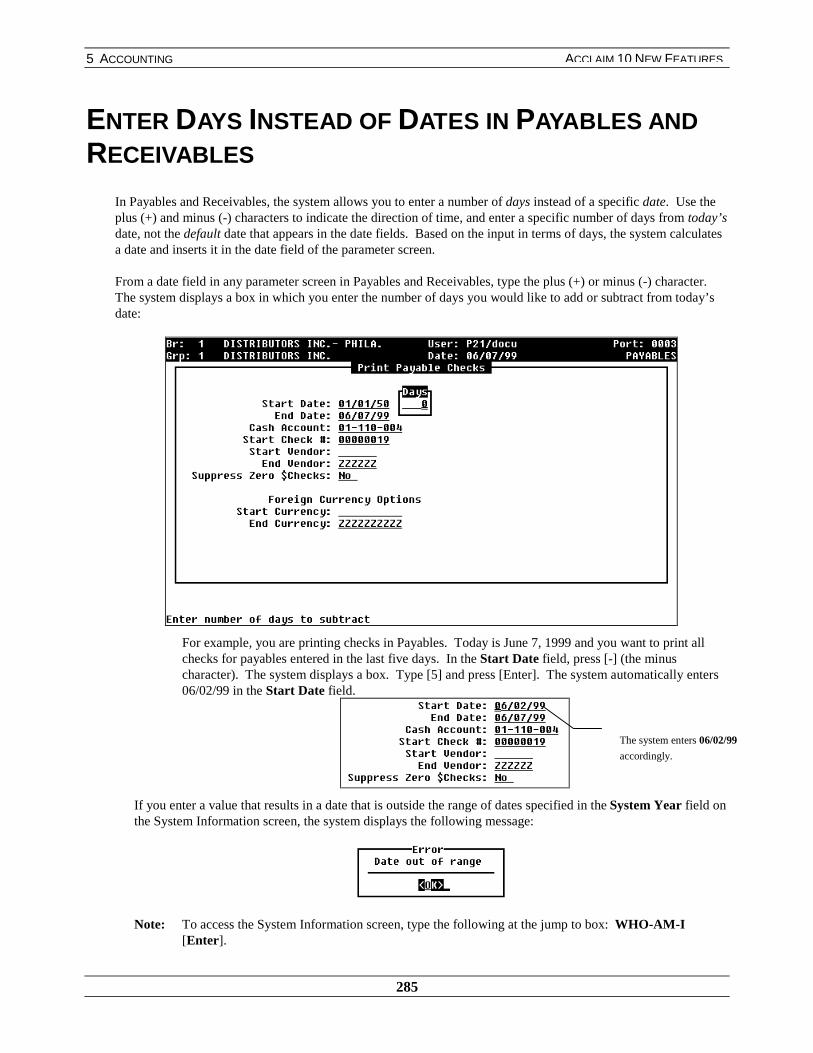
5 ACCOUNTING
285
ACCLAIM 10 NEW FEATURES
ENTER DAYS INSTEAD OF DATES IN PAYABLES ANDRECEIVABLES
In Payables and Receivables, the system allows you to enter a number of days instead of a specific date. Use theplus (+) and minus (-) characters to indicate the direction of time, and enter a specific number of days from today’sdate, not the default date that appears in the date fields. Based on the input in terms of days, the system calculatesa date and inserts it in the date field of the parameter screen.
From a date field in any parameter screen in Payables and Receivables, type the plus (+) or minus (-) character.The system displays a box in which you enter the number of days you would like to add or subtract from today’sdate:
For example, you are printing checks in Payables. Today is June 7, 1999 and you want to print allchecks for payables entered in the last five days. In the Start Date field, press [-] (the minuscharacter). The system displays a box. Type [5] and press [Enter]. The system automatically enters06/02/99 in the Start Date field.
If you enter a value that results in a date that is outside the range of dates specified in the System Year field onthe System Information screen, the system displays the following message:
Note: To access the System Information screen, type the following at the jump to box: WHO-AM-I[Enter].
The system enters 06/02/99
accordingly.

5 ACCOUNTING
286
ACCLAIM 10 NEW FEATURES
For example, the range of dates specified in the System Year field on the System Information screenis 1950 – 2014. In the Start Date, you specify the year 2022. Because 2022 is outside of the daterange specified in your System Year field, the system is not able to process this date. Therefore, theprevious error message appears.
If you receive this message, press [Enter]. The system returns you to the date field.
If you want to exit without specifying a number of days, press [F4].
For more information on the various date fields in Payables module, refer to the Payables manual. For moreinformation on the various date fields in the Receivables module, refer to the Receivables manual.

5 ACCOUNTING
287
ACCLAIM 10 NEW FEATURES
REFERENCES TO BATCH AND BATCH ID RENAMEDTO ENTRY AND ENTRY ID
Previously, Batch and Batch ID described a group of invoices and payments. Now, to more clearly andaccurately define these transactions, all screen references to Batch and Batch ID have been changed to Entry andEntry ID.
Important! This feature is purely a change in the text on the screen; there is no change in the functionality of theseoptions.
PAYABLES
The following screens now display Entry and Entry ID, instead of Batch and Batch ID:
Invoice Processing / New Payable
When you select to enter a new payable, the Entry ID screen appears:
When you browse on the Entry ID field, the Entry ID browse appears, similar to the following:
When you select to print the Expense Journal, Payables Due Report, and the Future Due Report, the Start andEnd Entry ID fields appear, similar to the following:
Entry ID
appears.
Entry ID
appears.
Entry ID and
Entry ID
Description
appear.
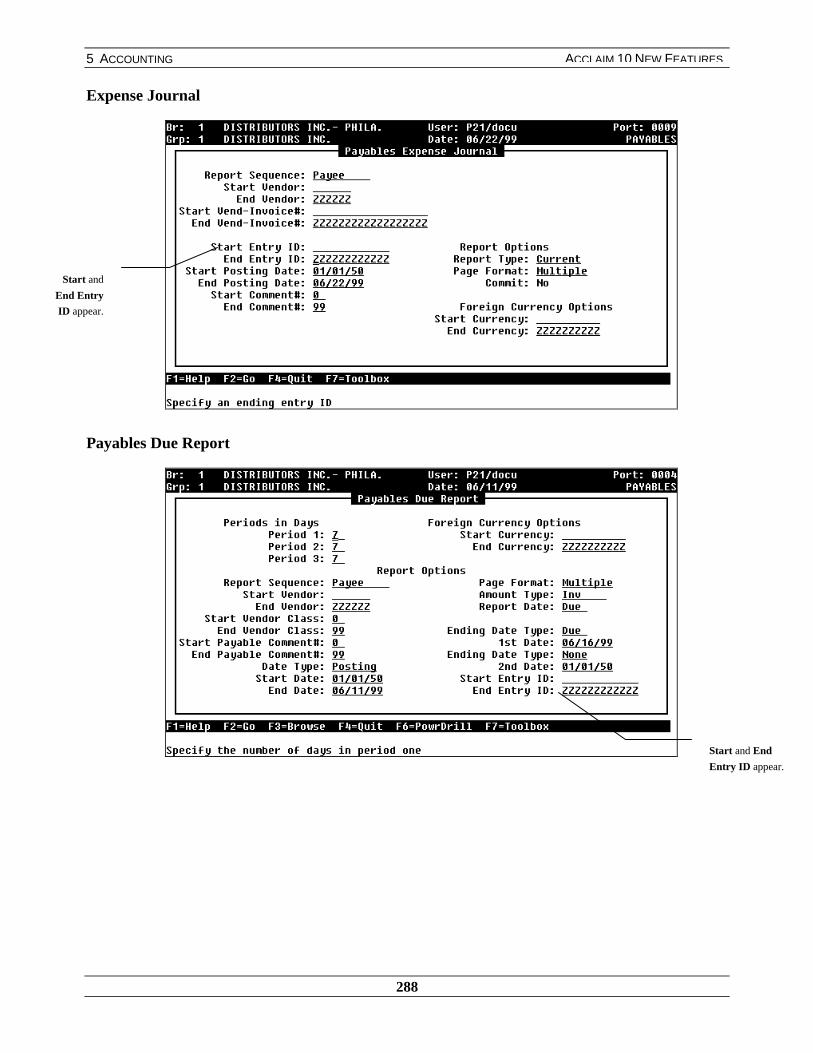
5 ACCOUNTING
288
ACCLAIM 10 NEW FEATURES
Expense Journal
Payables Due Report
Start and
End Entry
ID appear.
Start and End
Entry ID appear.
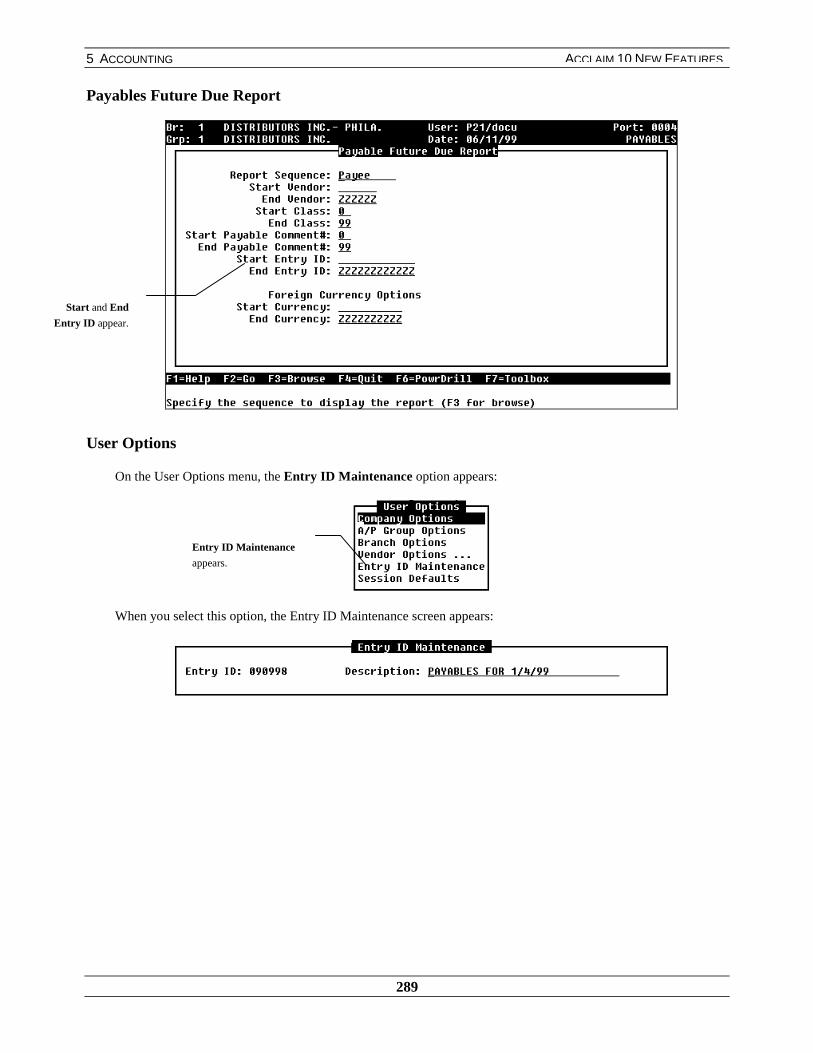
5 ACCOUNTING
289
ACCLAIM 10 NEW FEATURES
Payables Future Due Report
User Options
On the User Options menu, the Entry ID Maintenance option appears:
When you select this option, the Entry ID Maintenance screen appears:
Start and End
Entry ID appear.
Entry ID Maintenance
appears.
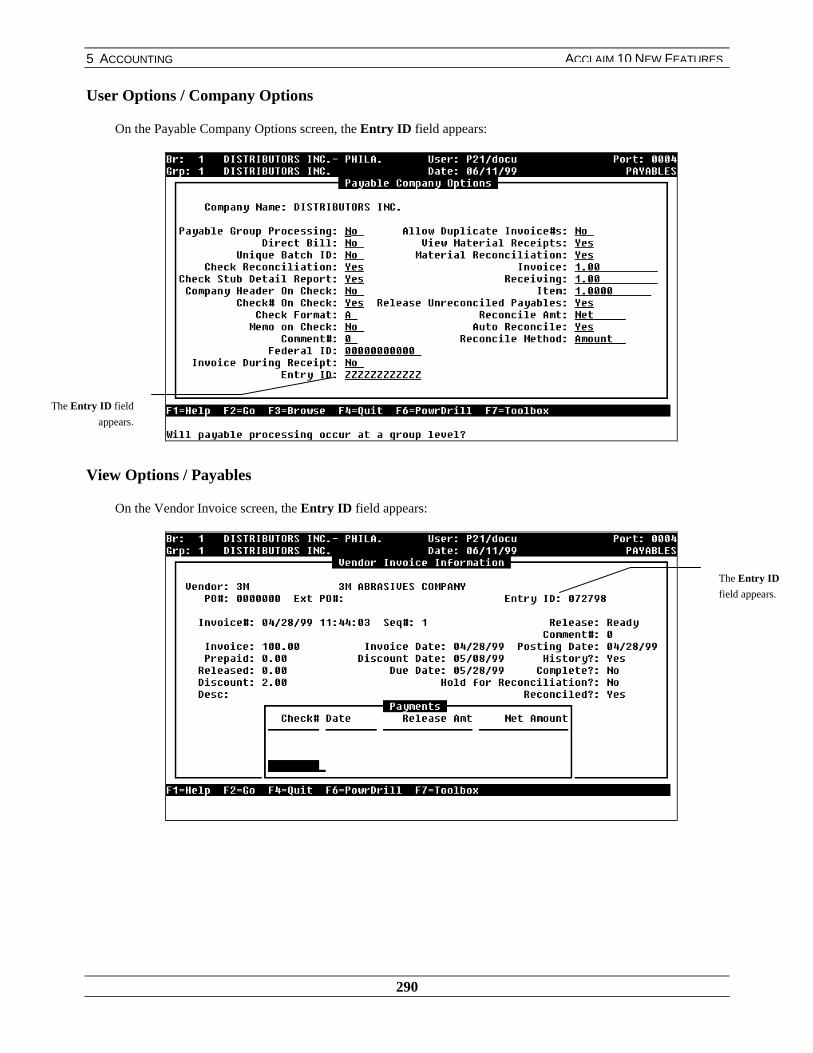
5 ACCOUNTING
290
ACCLAIM 10 NEW FEATURES
User Options / Company Options
On the Payable Company Options screen, the Entry ID field appears:
View Options / Payables
On the Vendor Invoice screen, the Entry ID field appears:
The Entry ID field
appears.
The Entry ID
field appears.
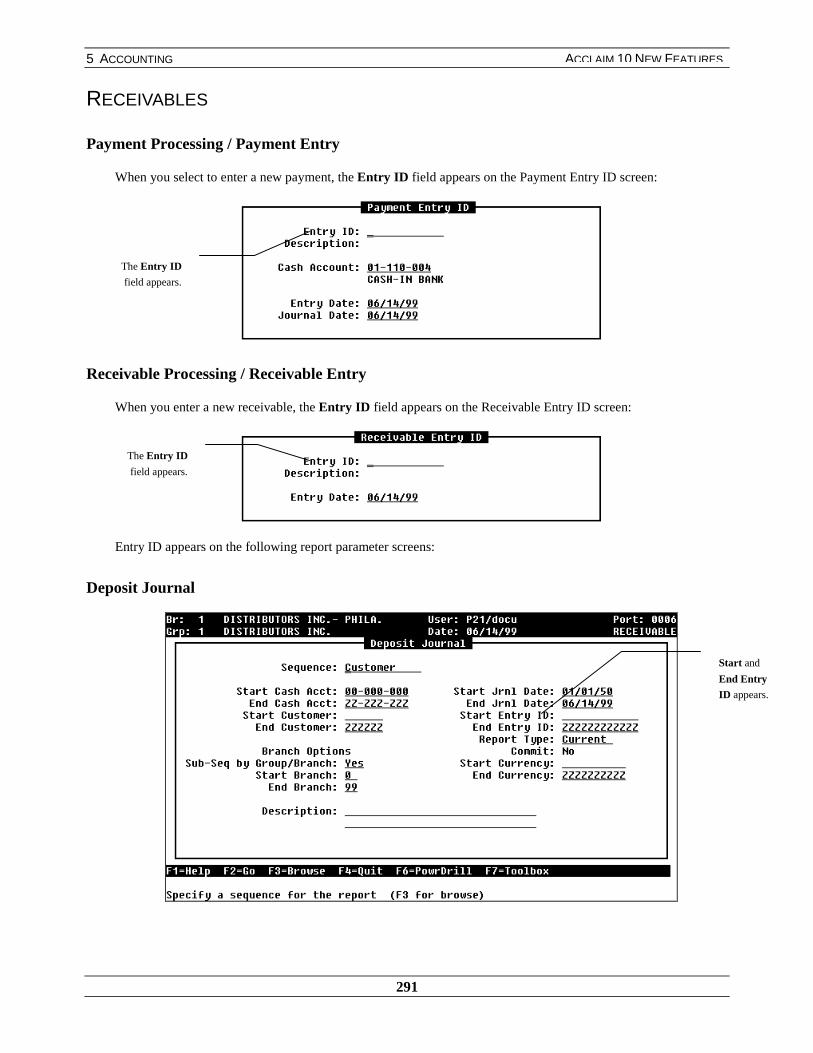
5 ACCOUNTING
291
ACCLAIM 10 NEW FEATURES
RECEIVABLES
Payment Processing / Payment Entry
When you select to enter a new payment, the Entry ID field appears on the Payment Entry ID screen:
Receivable Processing / Receivable Entry
When you enter a new receivable, the Entry ID field appears on the Receivable Entry ID screen:
Entry ID appears on the following report parameter screens:
Deposit Journal
The Entry ID
field appears.
The Entry ID
field appears.
Start and
End Entry
ID appears.

5 ACCOUNTING
292
ACCLAIM 10 NEW FEATURES
Payment Plan Invoice Register
Cash Receipts Journal
Start and End
Entry ID
appears.
Start and End
Entry ID appear.

5 ACCOUNTING
293
ACCLAIM 10 NEW FEATURES
Unallocated Payments Report
Manual Receivables Journal
Start and End
Entry ID appear.
Start and End
Entry ID appear.

5 ACCOUNTING
294
ACCLAIM 10 NEW FEATURES
Foreign Currency Journal
View Options / Invoice View
When you select to view invoices, the Entry ID field appears:
User Options
When you select User Options from the Accounts Receivable menu, Entry ID Maintenance appears on the UserOptions menu:
Start and End
Entry ID
appear.
The Entry
ID field
appears.
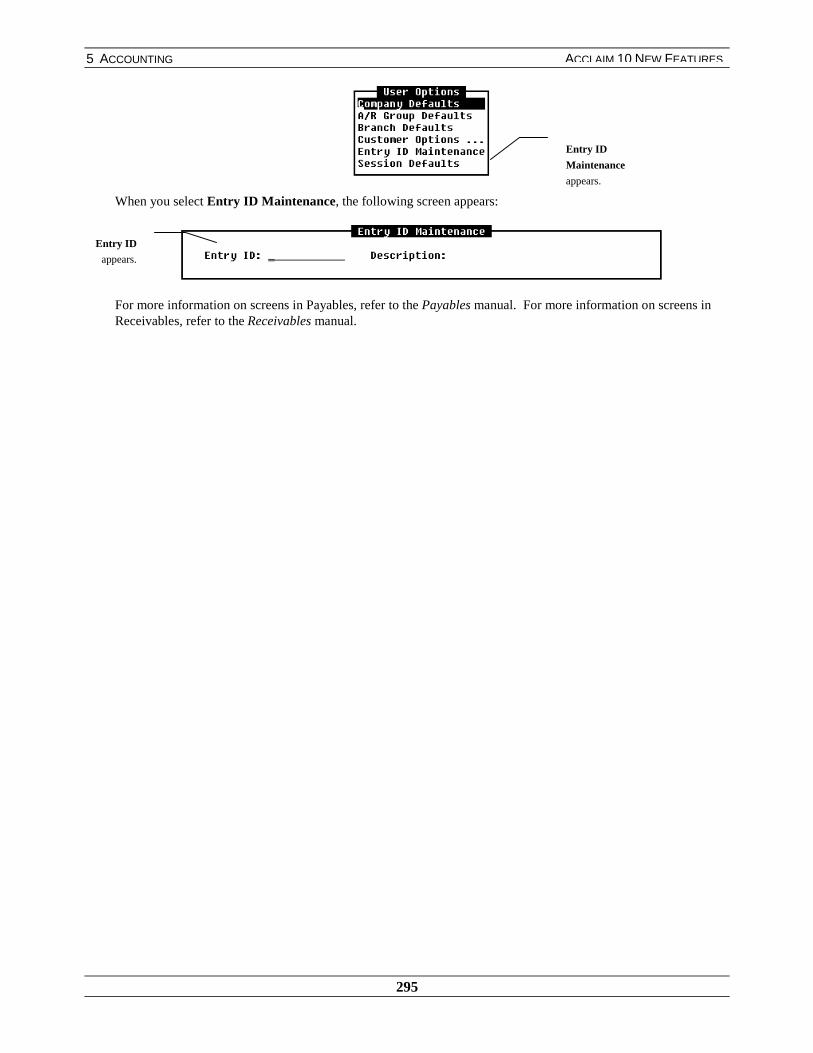
5 ACCOUNTING
295
ACCLAIM 10 NEW FEATURES
When you select Entry ID Maintenance, the following screen appears:
For more information on screens in Payables, refer to the Payables manual. For more information on screens inReceivables, refer to the Receivables manual.
Entry ID
Maintenance
appears.
Entry ID
appears.
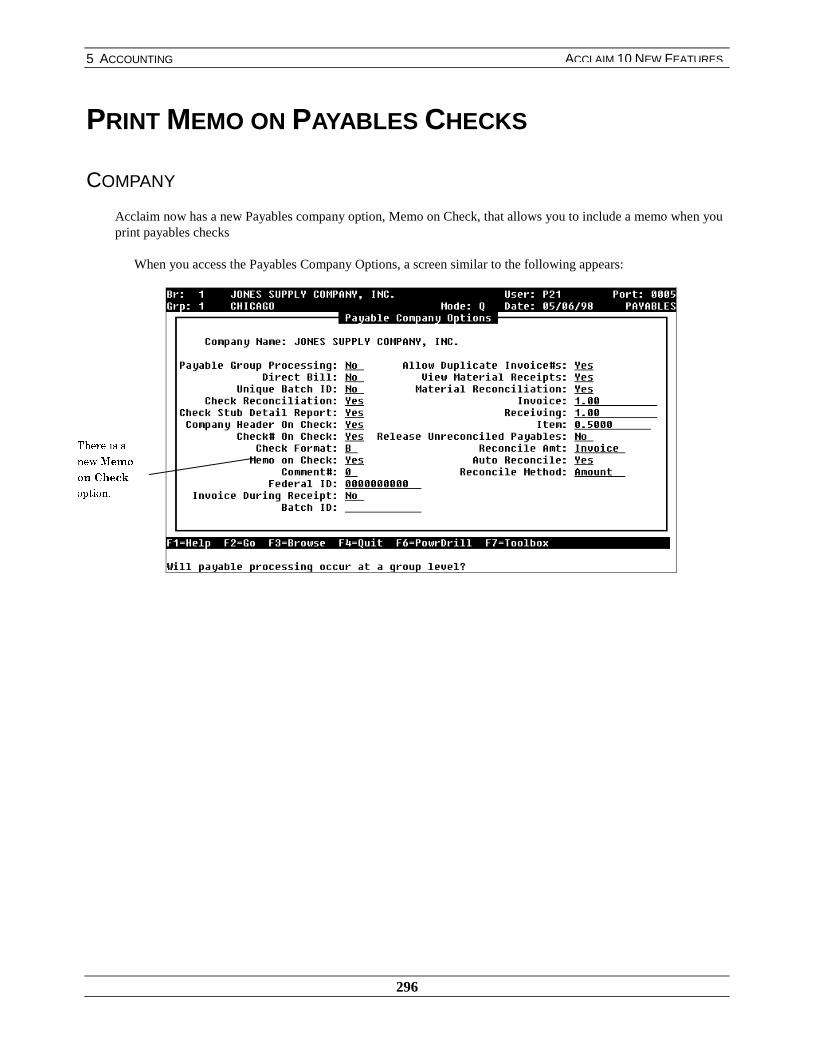
5 ACCOUNTING
296
ACCLAIM 10 NEW FEATURES
PRINT MEMO ON PAYABLES CHECKS
COMPANY
Acclaim now has a new Payables company option, Memo on Check, that allows you to include a memo when youprint payables checks
When you access the Payables Company Options, a screen similar to the following appears:
7KHUH�LV�D
QHZ�0HPR
RQ�&KHFN
RSWLRQ�

5 ACCOUNTING
297
ACCLAIM 10 NEW FEATURES
PAYABLES
When you set the Memo on Check option to Yes, the system prints any memos that have been entered on thecheck. On previous versions of the software, memos were for viewing purposes only and did not print anywhereon the check.
Note: For more information about entering a memo on a check, refer to the Payables manual.
The memo appears on a
printed check.
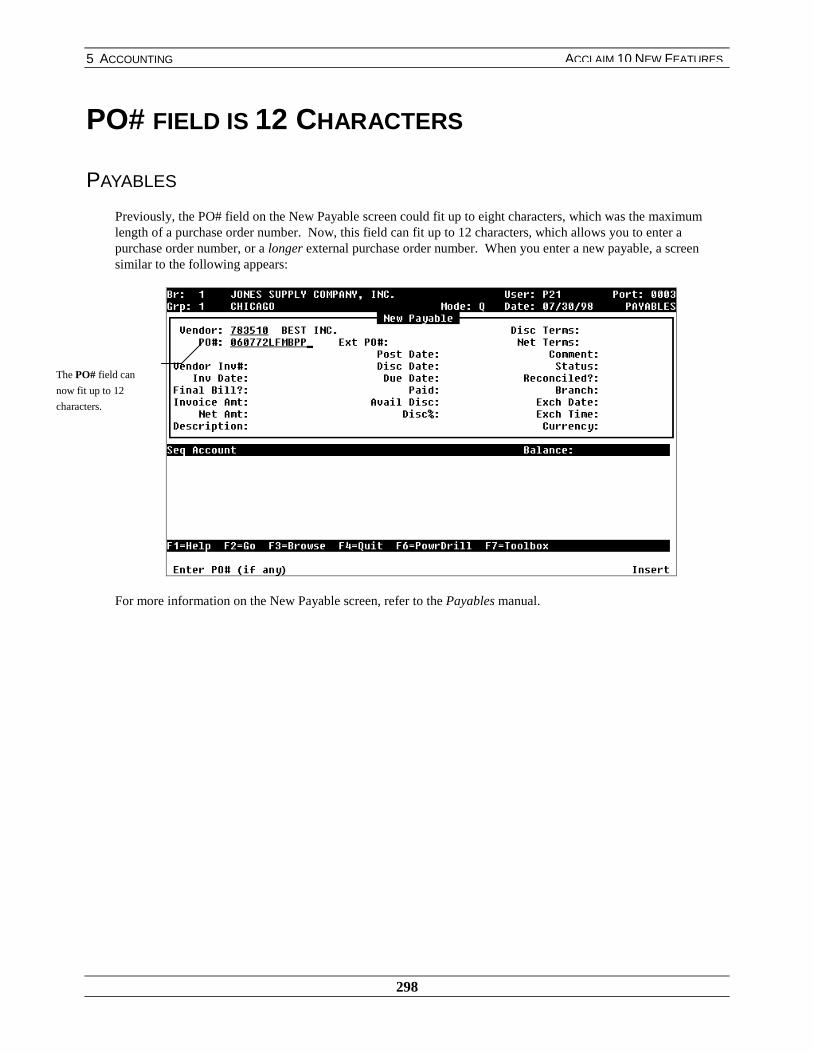
5 ACCOUNTING
298
ACCLAIM 10 NEW FEATURES
PO# FIELD IS 12 CHARACTERS
PAYABLES
Previously, the PO# field on the New Payable screen could fit up to eight characters, which was the maximumlength of a purchase order number. Now, this field can fit up to 12 characters, which allows you to enter apurchase order number, or a longer external purchase order number. When you enter a new payable, a screensimilar to the following appears:
For more information on the New Payable screen, refer to the Payables manual.
The PO# field can
now fit up to 12
characters.
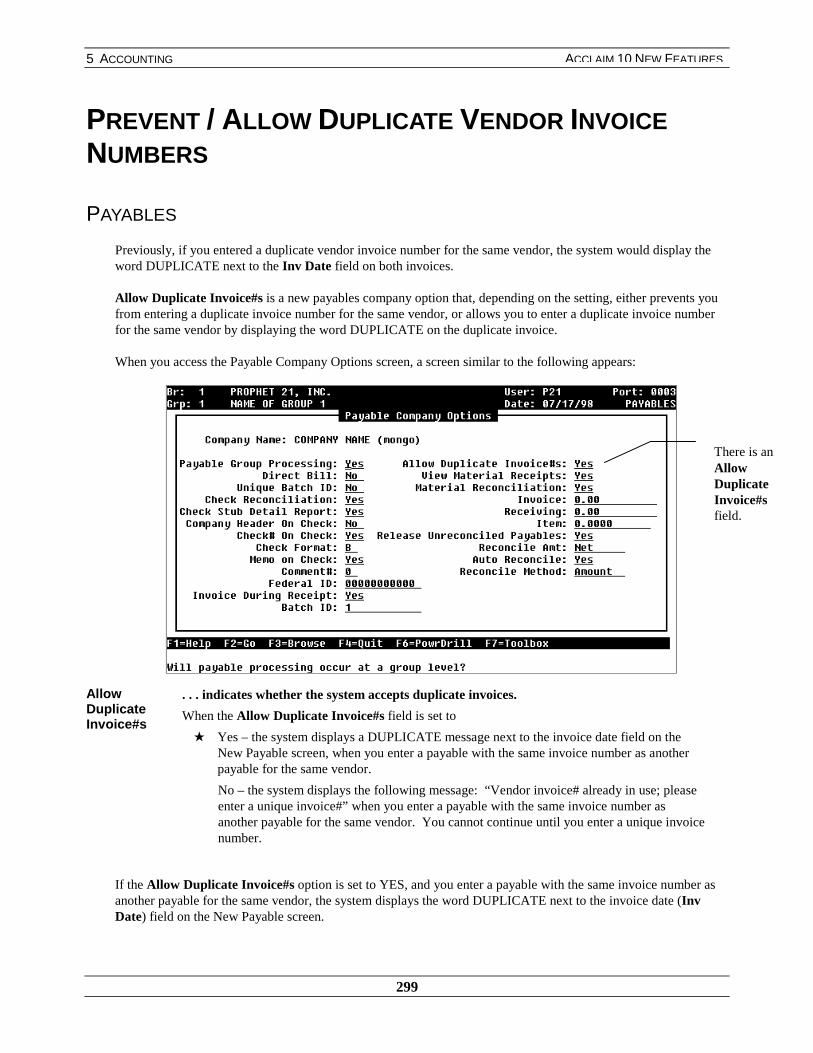
5 ACCOUNTING
299
ACCLAIM 10 NEW FEATURES
PREVENT / ALLOW DUPLICATE VENDOR INVOICENUMBERS
PAYABLES
Previously, if you entered a duplicate vendor invoice number for the same vendor, the system would display theword DUPLICATE next to the Inv Date field on both invoices.
Allow Duplicate Invoice#s is a new payables company option that, depending on the setting, either prevents youfrom entering a duplicate invoice number for the same vendor, or allows you to enter a duplicate invoice numberfor the same vendor by displaying the word DUPLICATE on the duplicate invoice.
When you access the Payable Company Options screen, a screen similar to the following appears:
AllowDuplicateInvoice#s
. . . indicates whether the system accepts duplicate invoices.
When the Allow Duplicate Invoice#s field is set to
★ Yes – the system displays a DUPLICATE message next to the invoice date field on theNew Payable screen, when you enter a payable with the same invoice number as anotherpayable for the same vendor.
No – the system displays the following message: “Vendor invoice# already in use; pleaseenter a unique invoice#” when you enter a payable with the same invoice number asanother payable for the same vendor. You cannot continue until you enter a unique invoicenumber.
If the Allow Duplicate Invoice#s option is set to YES, and you enter a payable with the same invoice number asanother payable for the same vendor, the system displays the word DUPLICATE next to the invoice date (InvDate) field on the New Payable screen.
There is anAllowDuplicateInvoice#sfield.
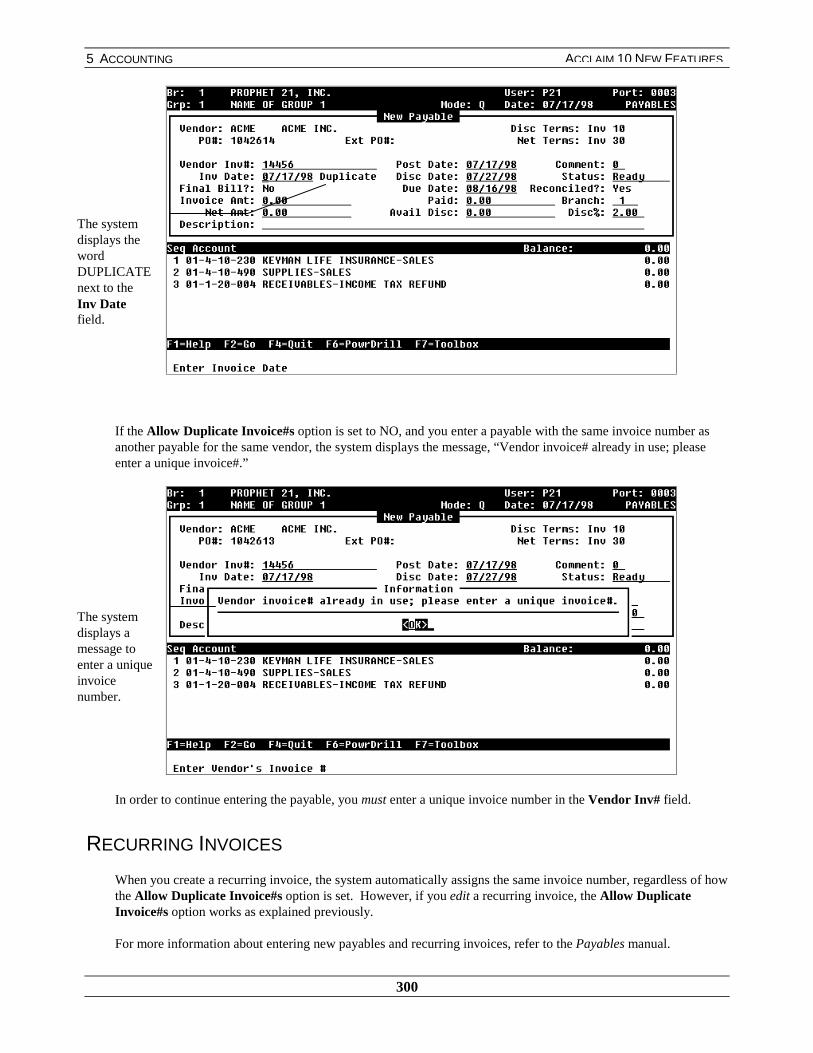
5 ACCOUNTING
300
ACCLAIM 10 NEW FEATURES
If the Allow Duplicate Invoice#s option is set to NO, and you enter a payable with the same invoice number asanother payable for the same vendor, the system displays the message, “Vendor invoice# already in use; pleaseenter a unique invoice#.”
In order to continue entering the payable, you must enter a unique invoice number in the Vendor Inv# field.
RECURRING INVOICES
When you create a recurring invoice, the system automatically assigns the same invoice number, regardless of howthe Allow Duplicate Invoice#s option is set. However, if you edit a recurring invoice, the Allow DuplicateInvoice#s option works as explained previously.
For more information about entering new payables and recurring invoices, refer to the Payables manual.
The systemdisplays thewordDUPLICATEnext to theInv Datefield.
The systemdisplays amessage toenter a uniqueinvoicenumber.

5 ACCOUNTING
301
ACCLAIM 10 NEW FEATURES
PAYABLES DETAIL IN CHECK REGISTER
An option allows you to show payables detail when you print the Check Register. This allows the historical checkregisters to show more information about payment history.
PAYABLES
When you select the Check Register option from the Check Processing menu, a screen similar to the followingappears:
IncludePayables
. . . determines whether payables detail will appear on the check register.
When this field is set to
Yes – extra payables detail is included on the Check Register. The information on theCheck Register includes the following: check number, payee, pay-to information, checkdate, group number, gross, discount, and net amounts, the vendor-invoice number, theinvoice date, and the current payments for the gross, discount, and net amounts.
★ No - no extra payables detail is included on the Check Register. The information includedon the Check Register includes the check number, payee, pay-to information, check date,group number, and gross, discount, and net amounts
For more information on the options that appear in the Check Register screen, refer to the Payables manual.
The Include
Payables option
allows you to
include payables
detail on the
check register.

5 ACCOUNTING
302
ACCLAIM 10 NEW FEATURES
SAMPLE: CHECK REGISTER
For more information about the information that appears in this report, refer to the Accounting Reports andJournals manual.
The register
displays
payables
detail.

5 ACCOUNTING
303
ACCLAIM 10 NEW FEATURES
EXCLUDE REQUISITIONS ON REPORTS
On previous versions of the software, the system included requisitions on the Unreconciled Receivings Report.There are now parameters that allow you to print the Unreconciled Receivings Report and the Discrepancy Journaland the reports without showing requisitions.
DISCREPANCY JOURNAL
When you choose to print the Payables Discrepancy Journal, a parameter screen similar to the following appears:
IncludeRequisitions
. . . determines whether requisitions will appear on the report.
When this field is set to
Yes – requisitions are included on the Discrepancy Journal
★ No – requisitions are excluded from the Discrepancy Journal
The Include
Requisitions
parameter allows
you to exclude
requisitions from
the journal.
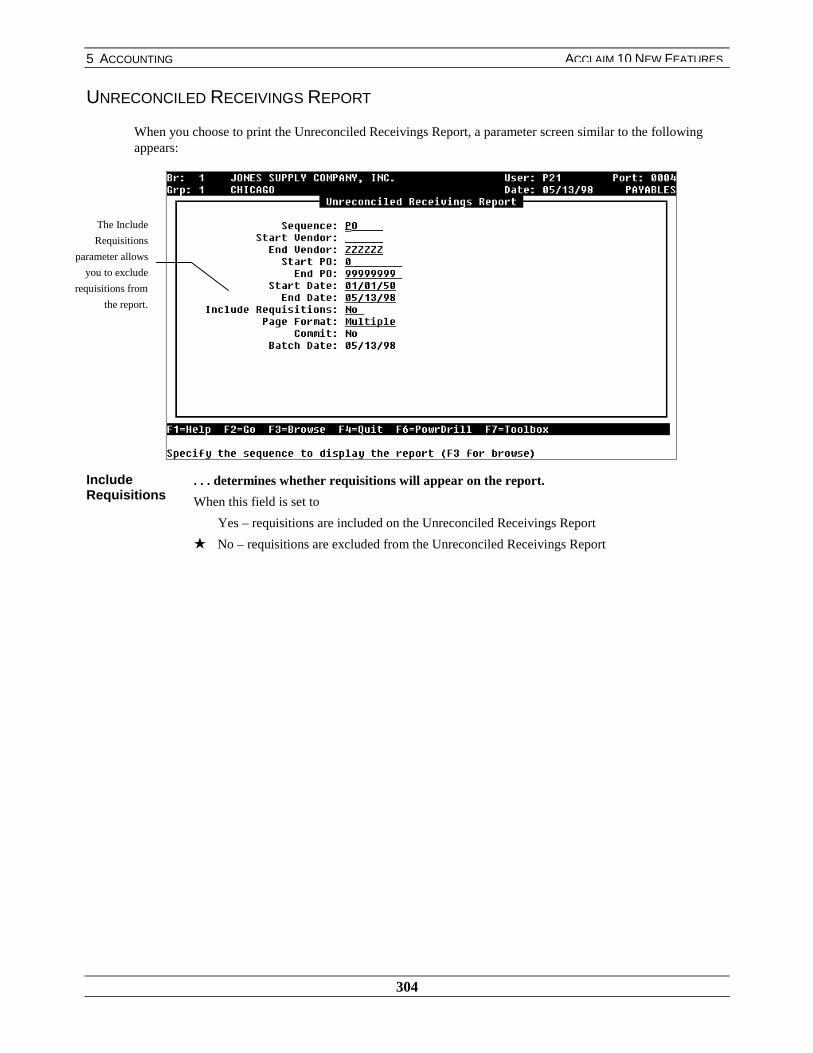
5 ACCOUNTING
304
ACCLAIM 10 NEW FEATURES
UNRECONCILED RECEIVINGS REPORT
When you choose to print the Unreconciled Receivings Report, a parameter screen similar to the followingappears:
IncludeRequisitions
. . . determines whether requisitions will appear on the report.
When this field is set to
Yes – requisitions are included on the Unreconciled Receivings Report
★ No – requisitions are excluded from the Unreconciled Receivings Report
The Include
Requisitions
parameter allows
you to exclude
requisitions from
the report.

5 ACCOUNTING
305
ACCLAIM 10 NEW FEATURES
EDIT DISTRIBUTION ACCOUNT NUMBERS
On previous versions of the software, you could edit the distribution account numbers when you entered aninvoice until either the Expense Journal or the Discrepancy Journal was committed, or until the payable waspartially or completely released.
Now, you can change the distribution account information, regardless of whether the Discrepancy Journal wascommitted. You can edit these account numbers until the payable has been committed on the Expense Journal orthe payable is completely released.
For more information about editing payables information, the Expense Journal, or the Discrepancy Journal, referto the Payables manual.
You can change
the distribution
account numbers
until the payable
has been
committed on the
Expense Journal.
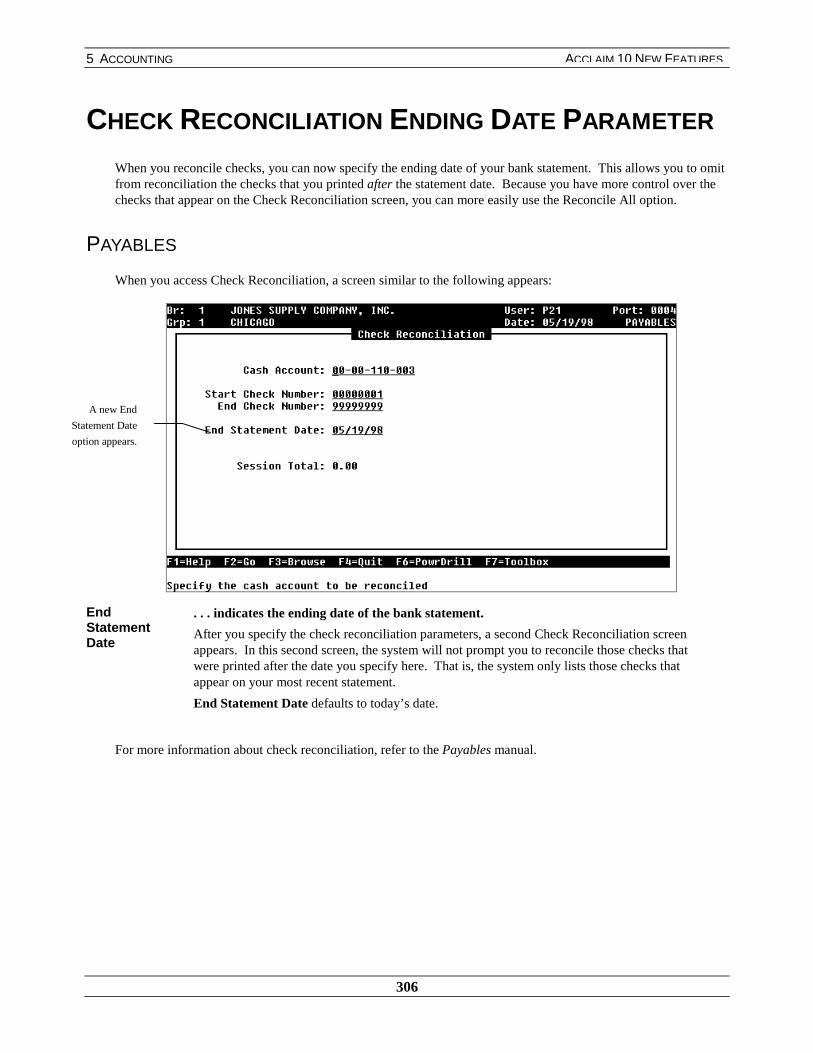
5 ACCOUNTING
306
ACCLAIM 10 NEW FEATURES
CHECK RECONCILIATION ENDING DATE PARAMETER
When you reconcile checks, you can now specify the ending date of your bank statement. This allows you to omitfrom reconciliation the checks that you printed after the statement date. Because you have more control over thechecks that appear on the Check Reconciliation screen, you can more easily use the Reconcile All option.
PAYABLES
When you access Check Reconciliation, a screen similar to the following appears:
EndStatementDate
. . . indicates the ending date of the bank statement.
After you specify the check reconciliation parameters, a second Check Reconciliation screenappears. In this second screen, the system will not prompt you to reconcile those checks thatwere printed after the date you specify here. That is, the system only lists those checks thatappear on your most recent statement.
End Statement Date defaults to today’s date.
For more information about check reconciliation, refer to the Payables manual.
A new End
Statement Date
option appears.
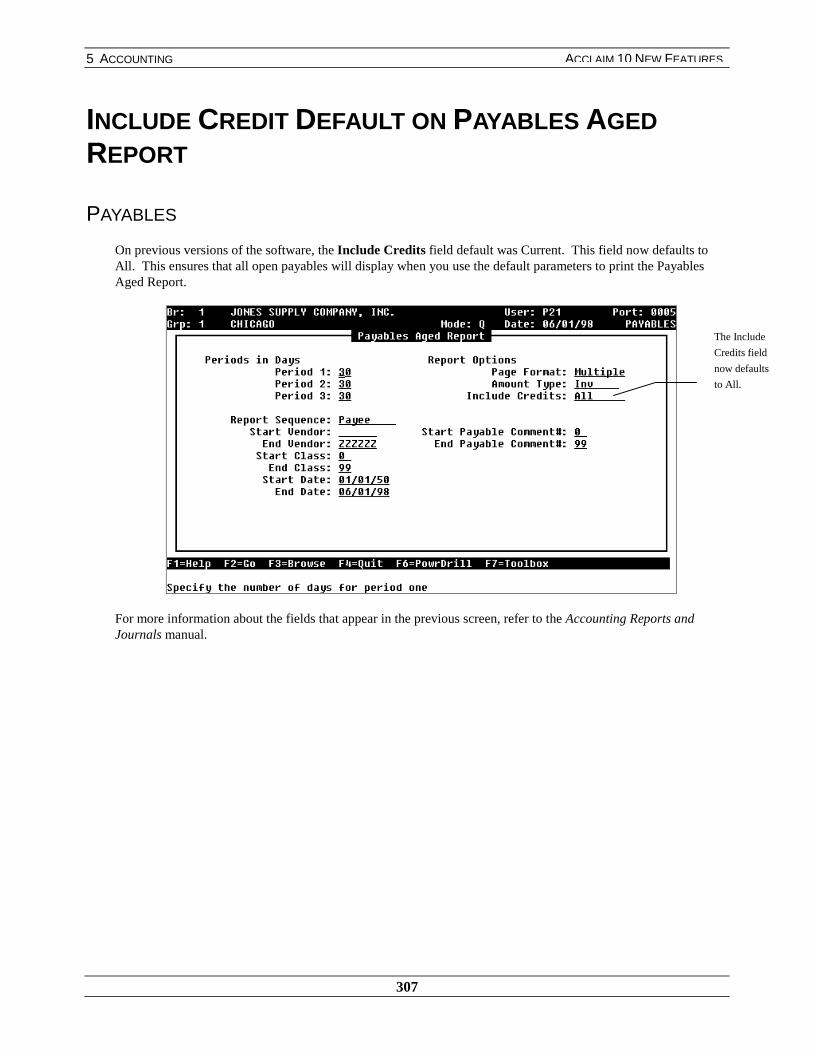
5 ACCOUNTING
307
ACCLAIM 10 NEW FEATURES
INCLUDE CREDIT DEFAULT ON PAYABLES AGEDREPORT
PAYABLES
On previous versions of the software, the Include Credits field default was Current. This field now defaults toAll. This ensures that all open payables will display when you use the default parameters to print the PayablesAged Report.
For more information about the fields that appear in the previous screen, refer to the Accounting Reports andJournals manual.
The Include
Credits field
now defaults
to All.
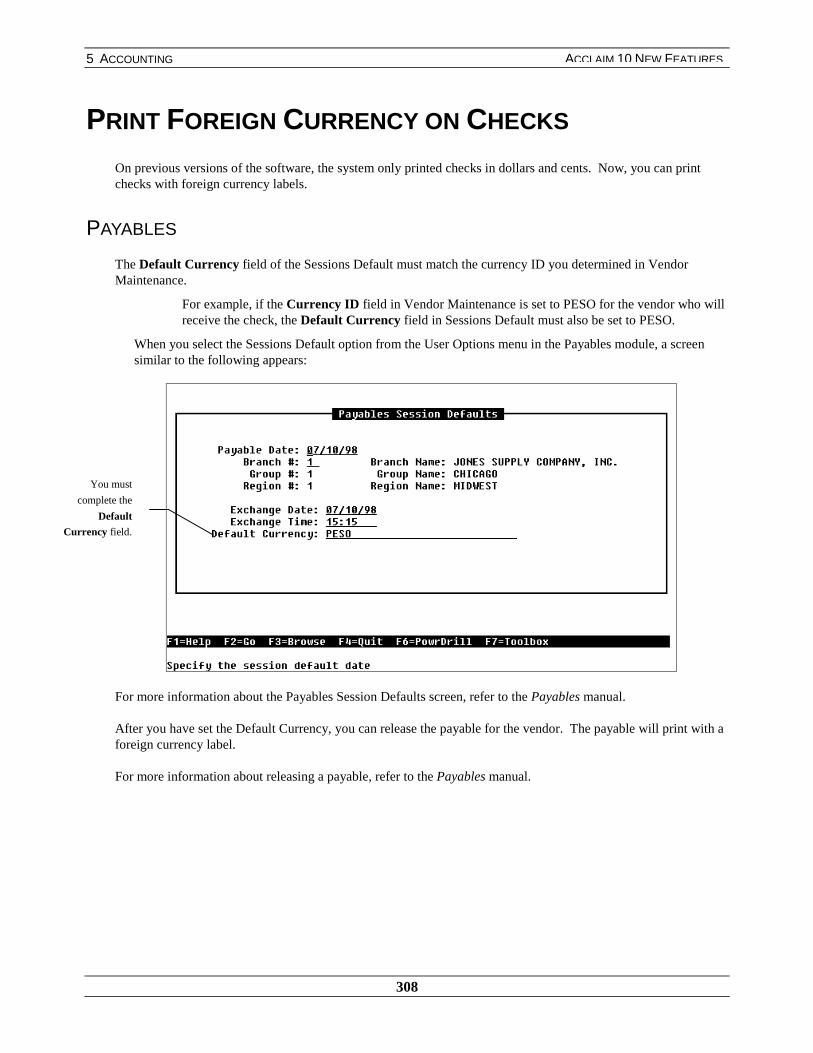
5 ACCOUNTING
308
ACCLAIM 10 NEW FEATURES
PRINT FOREIGN CURRENCY ON CHECKS
On previous versions of the software, the system only printed checks in dollars and cents. Now, you can printchecks with foreign currency labels.
PAYABLES
The Default Currency field of the Sessions Default must match the currency ID you determined in VendorMaintenance.
For example, if the Currency ID field in Vendor Maintenance is set to PESO for the vendor who willreceive the check, the Default Currency field in Sessions Default must also be set to PESO.
When you select the Sessions Default option from the User Options menu in the Payables module, a screensimilar to the following appears:
For more information about the Payables Session Defaults screen, refer to the Payables manual.
After you have set the Default Currency, you can release the payable for the vendor. The payable will print with aforeign currency label.
For more information about releasing a payable, refer to the Payables manual.
You must
complete the
Default
Currency field.

5 ACCOUNTING
309
ACCLAIM 10 NEW FEATURES
SHIPPING INSTRUCTIONS APPEAR ON DIRECT SHIPCONFIRMATION SCREEN
PAYABLES
Previously, when you entered shipping instructions for a direct ship order, those instructions would not appear onthe Direct Ship Confirmation screen in Payables. Now, the system includes these instructions on this screen.
You’ve entered shipping instructions on a direct ship order and purchased for it. After you enter the vendor andpurchase order number on the New Payable screen, the Direct Ship Confirmation screen appears with the shippinginstructions you entered:
For more information on the previous screen, refer to the Payables manual. For more information on direct shiporders, refer to the Order manual.
The shipping
instructions
appear on the
Direct Ship
Confirmation
screen.
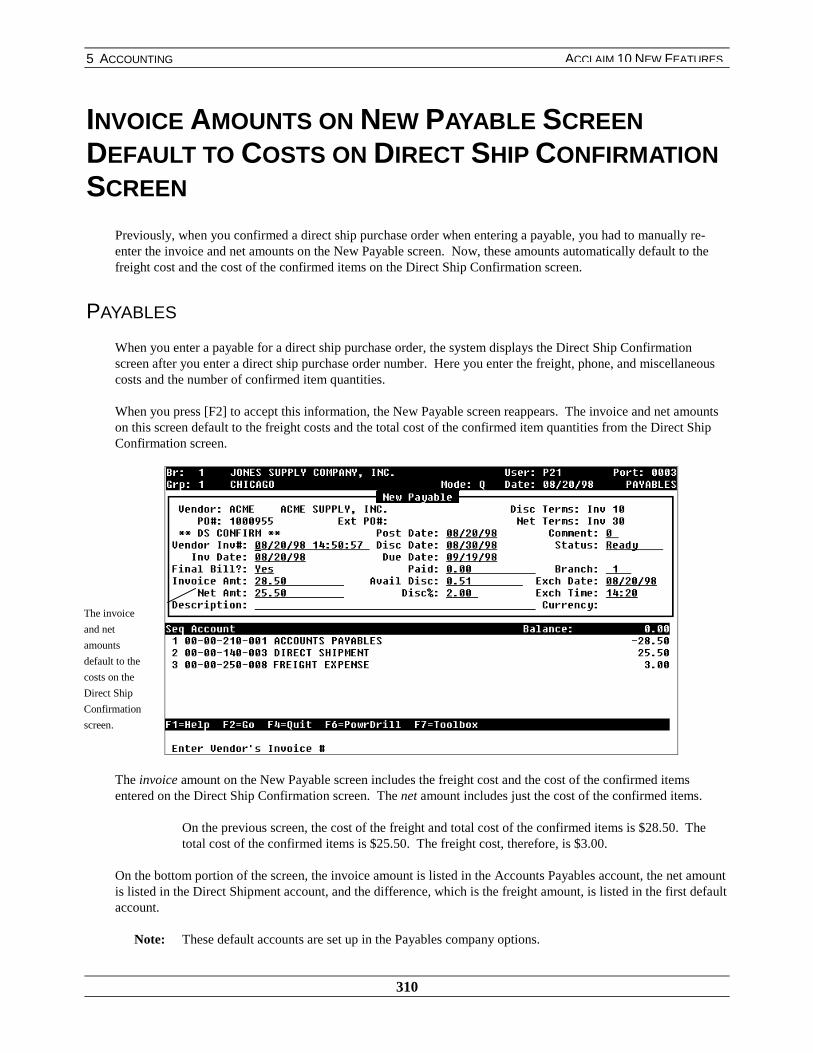
5 ACCOUNTING
310
ACCLAIM 10 NEW FEATURES
INVOICE AMOUNTS ON NEW PAYABLE SCREENDEFAULT TO COSTS ON DIRECT SHIP CONFIRMATIONSCREEN
Previously, when you confirmed a direct ship purchase order when entering a payable, you had to manually re-enter the invoice and net amounts on the New Payable screen. Now, these amounts automatically default to thefreight cost and the cost of the confirmed items on the Direct Ship Confirmation screen.
PAYABLES
When you enter a payable for a direct ship purchase order, the system displays the Direct Ship Confirmationscreen after you enter a direct ship purchase order number. Here you enter the freight, phone, and miscellaneouscosts and the number of confirmed item quantities.
When you press [F2] to accept this information, the New Payable screen reappears. The invoice and net amountson this screen default to the freight costs and the total cost of the confirmed item quantities from the Direct ShipConfirmation screen.
The invoice amount on the New Payable screen includes the freight cost and the cost of the confirmed itemsentered on the Direct Ship Confirmation screen. The net amount includes just the cost of the confirmed items.
On the previous screen, the cost of the freight and total cost of the confirmed items is $28.50. Thetotal cost of the confirmed items is $25.50. The freight cost, therefore, is $3.00.
On the bottom portion of the screen, the invoice amount is listed in the Accounts Payables account, the net amountis listed in the Direct Shipment account, and the difference, which is the freight amount, is listed in the first defaultaccount.
Note: These default accounts are set up in the Payables company options.
The invoice
and net
amounts
default to the
costs on the
Direct Ship
Confirmation
screen.
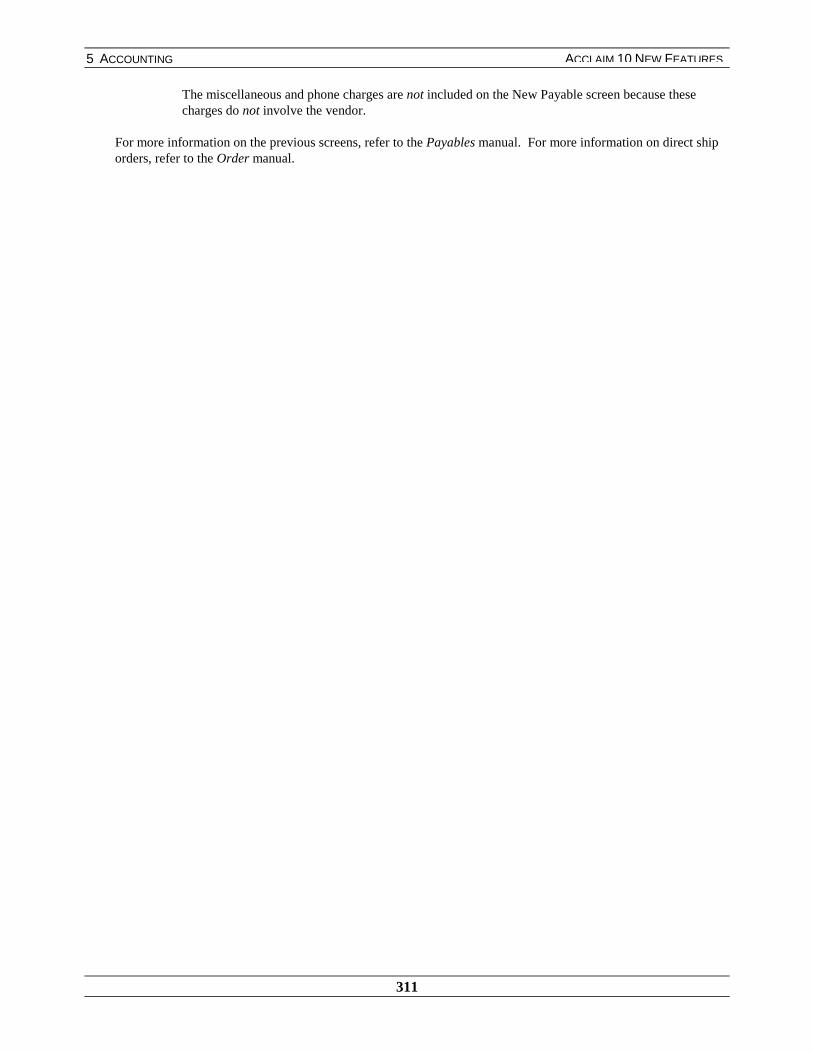
5 ACCOUNTING
311
ACCLAIM 10 NEW FEATURES
The miscellaneous and phone charges are not included on the New Payable screen because thesecharges do not involve the vendor.
For more information on the previous screens, refer to the Payables manual. For more information on direct shiporders, refer to the Order manual.
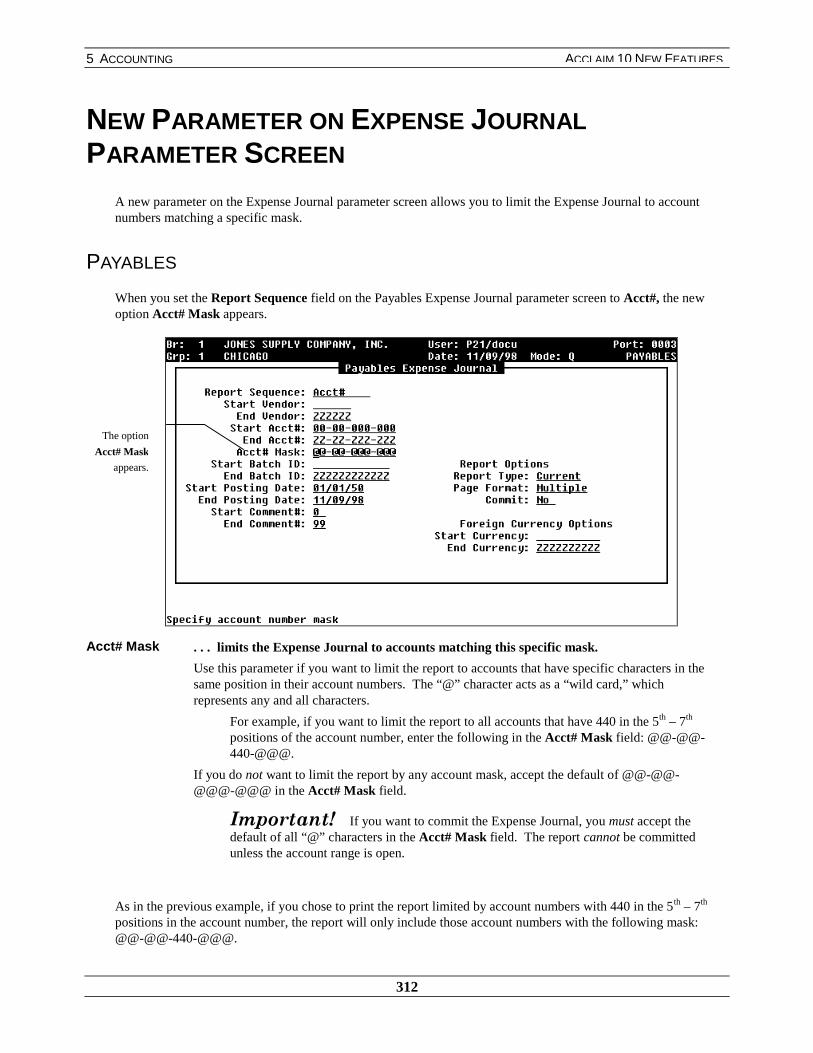
5 ACCOUNTING
312
ACCLAIM 10 NEW FEATURES
NEW PARAMETER ON EXPENSE JOURNALPARAMETER SCREEN
A new parameter on the Expense Journal parameter screen allows you to limit the Expense Journal to accountnumbers matching a specific mask.
PAYABLES
When you set the Report Sequence field on the Payables Expense Journal parameter screen to Acct#, the newoption Acct# Mask appears.
Acct# Mask . . . limits the Expense Journal to accounts matching this specific mask.
Use this parameter if you want to limit the report to accounts that have specific characters in thesame position in their account numbers. The “@” character acts as a “wild card,” whichrepresents any and all characters.
For example, if you want to limit the report to all accounts that have 440 in the 5th – 7th
positions of the account number, enter the following in the Acct# Mask field: @@-@@-440-@@@.
If you do not want to limit the report by any account mask, accept the default of @@-@@-@@@-@@@ in the Acct# Mask field.
,PSRUWDQW� If you want to commit the Expense Journal, you must accept thedefault of all “@” characters in the Acct# Mask field. The report cannot be committedunless the account range is open.
As in the previous example, if you chose to print the report limited by account numbers with 440 in the 5th – 7th
positions in the account number, the report will only include those account numbers with the following mask:@@-@@-440-@@@.
The option
Acct# Mask
appears.

5 ACCOUNTING
313
ACCLAIM 10 NEW FEATURES
A screen similar to the following appears:
For more information on the previous screens and the Expense Journal, refer to the Payables manual.
The report only
includes accounts
with 440 in the
5th-7th characters
in the account
number.

5 ACCOUNTING
314
ACCLAIM 10 NEW FEATURES
CASH COLLECTION CALL REPORT ENHANCEMENTS
There are three new parameters for the Cash Collection Call Report. These parameters allow you to printcustomer notes, aging, and call notes on the Cash Collection Call Report.
RECEIVABLES
When you select the Report – Collections option from the Cash Collection menu in Receivables, a menu similar tothe following appears:
Customer Options
Print CustNotes
. . . determines whether customer notes print.
Customer notes are notepads that you attach to the customer to display in the AR Aging Reportarea.
When this field is set to
Y – customer notes print on the Cash Collection Call Report.
★ N – customer notes do not print on the Cash Collection Call Report.
Print Aging . . . determines whether aging information print.
When this field is set to
Y – aging information prints on the Cash Collection Call Report.
★ N – aging information does not print on the Cash Collection Call Report.
New options
have been added
to the Cash
Collection Call
Report screen. A Print Call
Notes option has
been added to the
Cash Collection
Call Report
screen.
5 ACCOUNTING
315
ACCLAIM 10 NEW FEATURES
Call Options
Print CallNotes
. . . determines whether call notes print.
Call notes are notes that you insert in Collections Maintenance.
When this field is set to
★ Y – call notes print on the Cash Collection Call Report.
N – call notes do not print on the Cash Collection Call Report.
For more information on the other fields that appear in this screen, refer to the Receivables manual.
SAMPLE: CASH COLLECTION CALL REPORT
A Cash Collection Call Report now prints similar to the following example.
For more information about the Cash Collection Call Report, refer to the Accounting Reports and Journalsmanual.

5 ACCOUNTING
316
ACCLAIM 10 NEW FEATURES
NEW USER-FRIENDLY MESSAGE
When the Unique Batch ID company option is set to Y in PROSeries Receivables, the system displays a messageif you enter a non-unique Batch ID. The message is similar to the following:
For more information about entering Batch IDs, refer to the Receivables manual.
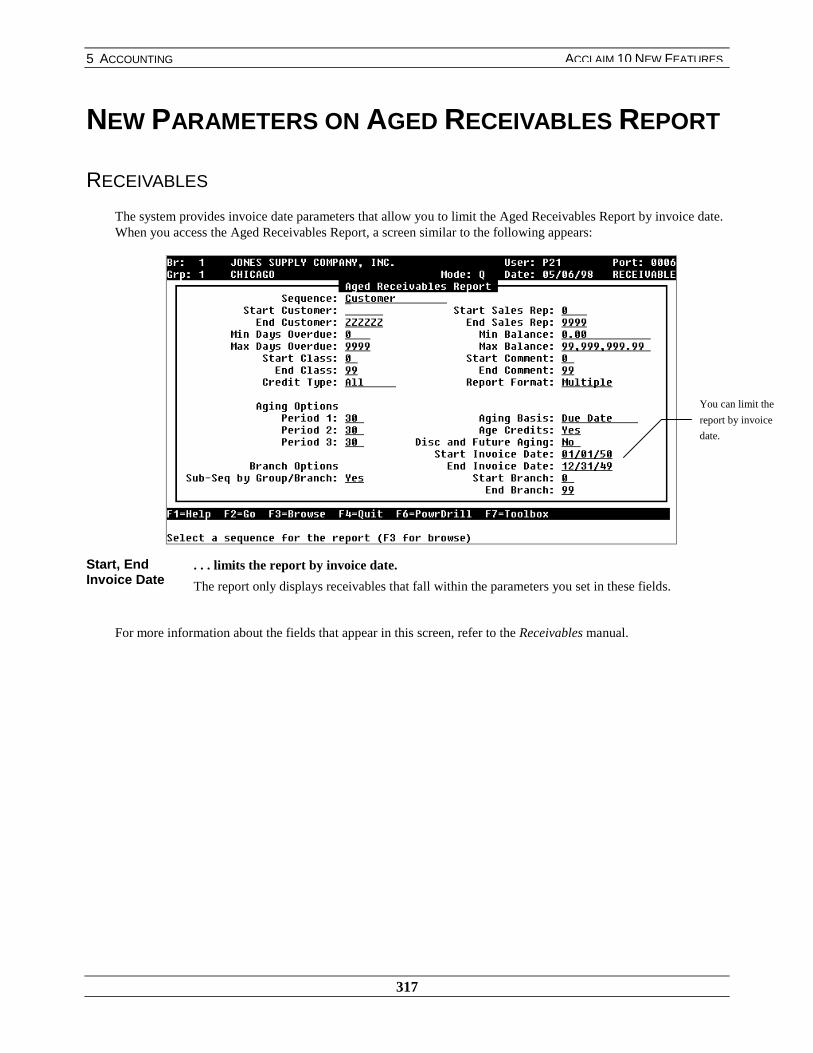
5 ACCOUNTING
317
ACCLAIM 10 NEW FEATURES
NEW PARAMETERS ON AGED RECEIVABLES REPORT
RECEIVABLES
The system provides invoice date parameters that allow you to limit the Aged Receivables Report by invoice date.When you access the Aged Receivables Report, a screen similar to the following appears:
Start, EndInvoice Date
. . . limits the report by invoice date.
The report only displays receivables that fall within the parameters you set in these fields.
For more information about the fields that appear in this screen, refer to the Receivables manual.
You can limit the
report by invoice
date.
5 ACCOUNTING
318
ACCLAIM 10 NEW FEATURES
NAVIGATE THROUGH THE CASH COLLECTIONSCREEN
On previous versions of the software, you could only use the arrow keys to navigate through the list of invoicesand the list of calls on the Cash Collection Screen. Now, you can navigate through this information using the[Page Up] and [Page Down] keys.
For more information about the Cash Collection screen, refer to the Receivables manual.
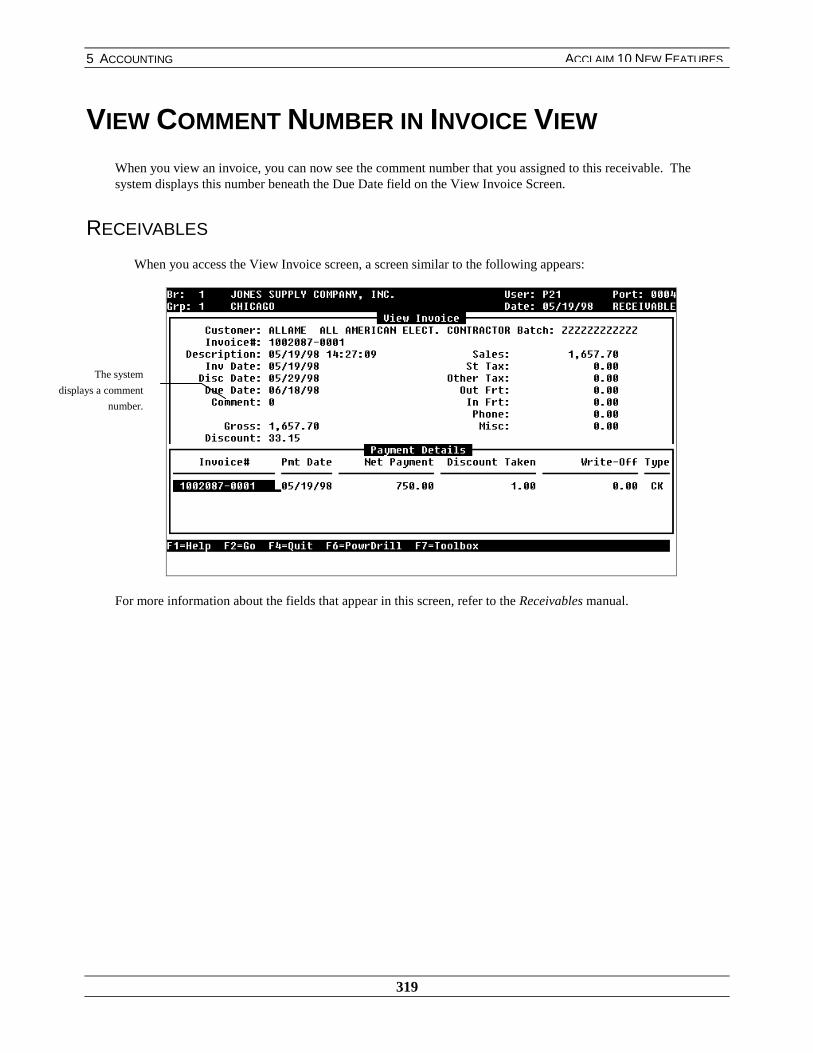
5 ACCOUNTING
319
ACCLAIM 10 NEW FEATURES
VIEW COMMENT NUMBER IN INVOICE VIEW
When you view an invoice, you can now see the comment number that you assigned to this receivable. Thesystem displays this number beneath the Due Date field on the View Invoice Screen.
RECEIVABLES
When you access the View Invoice screen, a screen similar to the following appears:
For more information about the fields that appear in this screen, refer to the Receivables manual.
The system
displays a comment
number.

5 ACCOUNTING
320
ACCLAIM 10 NEW FEATURES
PRINT CASH RECEIPTS JOURNAL BY ENTRYSEQUENCE
A new Sequence option on the Cash Receipts Journal parameter screen allows you to sort the report by entrysequence. This enhancement to management reporting allows you to further analyze your receivable payments.
RECEIVABLES
When you access the Cash Receipts Journal, a parameter screen similar to the following appears:
Sequence$
. . . determines what sequence the report will appear.
When this field is set to
★ Customer – the report sorts by Customer.
Journal Date – the report sorts by Journal Date.
Cash Account – the report sorts by Cash Account numbers.
Entry – the report sorts by entry sequence
For more information about the other fields that appear in this parameter screen, refer to the Receivables manual.
The Sequence
field allows you
to sort the report
by entry date.
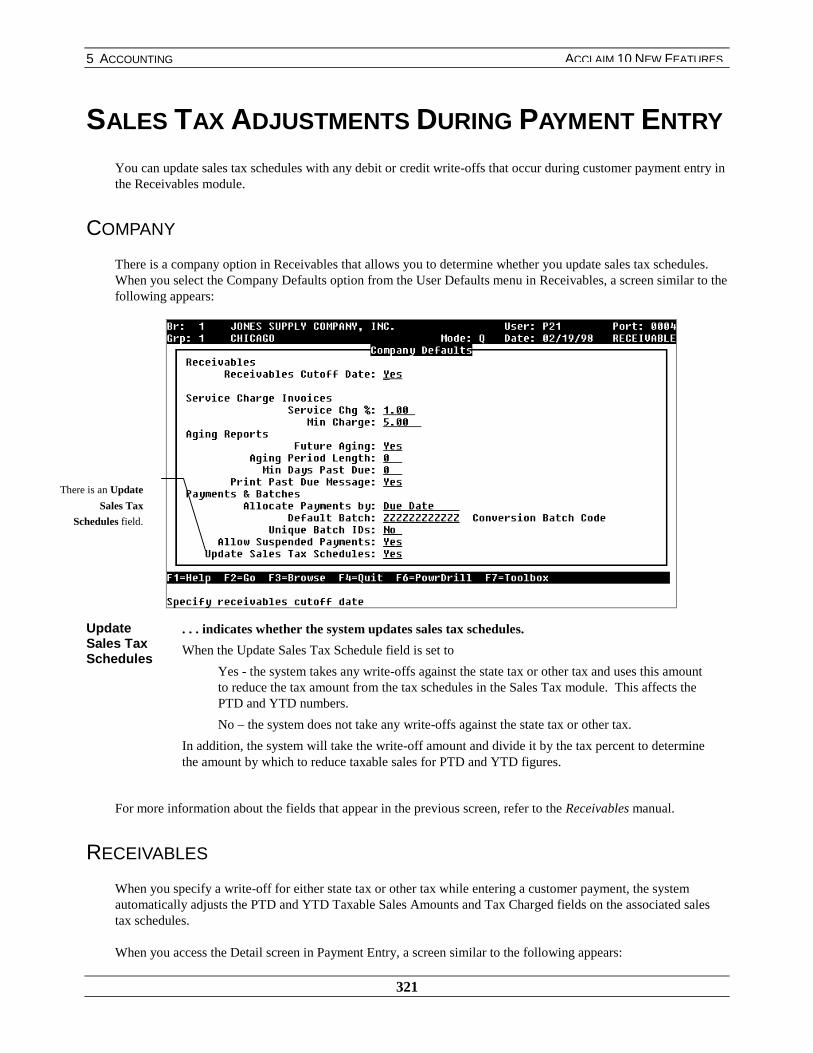
5 ACCOUNTING
321
ACCLAIM 10 NEW FEATURES
SALES TAX ADJUSTMENTS DURING PAYMENT ENTRY
You can update sales tax schedules with any debit or credit write-offs that occur during customer payment entry inthe Receivables module.
COMPANY
There is a company option in Receivables that allows you to determine whether you update sales tax schedules.When you select the Company Defaults option from the User Defaults menu in Receivables, a screen similar to thefollowing appears:
UpdateSales TaxSchedules
. . . indicates whether the system updates sales tax schedules.
When the Update Sales Tax Schedule field is set to
Yes - the system takes any write-offs against the state tax or other tax and uses this amountto reduce the tax amount from the tax schedules in the Sales Tax module. This affects thePTD and YTD numbers.
No – the system does not take any write-offs against the state tax or other tax.
In addition, the system will take the write-off amount and divide it by the tax percent to determinethe amount by which to reduce taxable sales for PTD and YTD figures.
For more information about the fields that appear in the previous screen, refer to the Receivables manual.
RECEIVABLES
When you specify a write-off for either state tax or other tax while entering a customer payment, the systemautomatically adjusts the PTD and YTD Taxable Sales Amounts and Tax Charged fields on the associated salestax schedules.
When you access the Detail screen in Payment Entry, a screen similar to the following appears:
There is an Update
Sales Tax
Schedules field.

5 ACCOUNTING
322
ACCLAIM 10 NEW FEATURES
Enter the amount that was incorrectly charged in the Write-Off field. The system divides this amount by thetax percentage on the tax schedule and makes an adjustment in the taxable amount on the tax schedule.
You can enter a negative amount in the Write-Off field. A negative amount adds to the Taxable Sales Amount andTax Charged fields on the sales tax schedule.
Note: The system does not differentiate between taxable sales and taxable freight. It is assumed that anywrite-off for sales tax comes from taxable sales; therefore, the taxable freight field is not adjusted onthe sales tax schedule.
For more information about the Payment Allocation Details screen, refer to the Receivables manual.
For this feature to function properly, you must autobatch sales tax via Sales Tax, not AR Revenue. This meansthat you must create the autobatch for sales tax by printing and clearing the Invoiced Sales Tax Report, not theInvoice Register.
When you autobatch by sales tax, you need to specify the “sales tax clearing” account as the write-off accountwhenever you make a sales tax adjustment.
For example, you invoice a customer for $106.00 ($100.00 sales amount, plus $6.00 sales tax). Whenyou clear the Monthly Invoice Register, you get the following batch:
Debit AR 106
Credit Sales -100
Credit Sales Tax Clearing -6
Your customer sends a payment for $100.00. The system makes a sales tax adjustment for $6.00.When you reset the Invoiced Sales Tax Report, you get the following batch.
Debit Cash 100
Sales Tax Clearing 6
Credit AR -106
(QWHU�WKH
DPRXQW�WKDW
ZDV�LQFRUUHFWO\
FKDUJHG�LQ�WKH
:ULWH�2II
ILHOG
5 ACCOUNTING
323
ACCLAIM 10 NEW FEATURES
The reason you need to specify the “sales tax clearing” account as the write-off account at paymententry is to offset the original credit made to the sales tax clearing account at invoicing time.
The balance at the end of any given month in the “sales tax clearing” account should be zero after theMonthly Invoice Register and Invoiced Sales Tax autobatches have been created and posted.

5 ACCOUNTING
324
ACCLAIM 10 NEW FEATURES
If you have separate Sales Tax Payable accounts for the GL for each Sales Tax schedule, tax should be written offto the Sales Tax Clearing account. To facilitate this, you can set up the Sales Tax Clearing account in the GLDefaults in Receivables User Options.
EXAMPLE
A – Invoice an order with a sales tax amount of $5. When the invoice autobatches, the INV batch includes:
Accounts Receivable + $5
Sales Tax Clearing - $5
B – When the Invoiced Sales Tax Report is autobatched, the STAX autobatch shows:
Sales Tax Clearing - $5
PA State Tax Payable - $5
C – When the write off of $5 is performed in the Detail are of payment entry, the Sales Tax schedule is updatedand appropriately decreases the PRD sales tax amount by $5. The STAX Posting shows:
Sales Tax Clearing - $5
PA State Tax Payable + $5
D – The write off is recorded on the Cash Receipts Journal and when autobatched shows:
Accounts Receivable - $5
Sales Tax Clearing + $5
If you perform a write off in the same period that the invoice was generated, postings B and C do not occurbecause the offset each other on the Invoiced Sales Tax Report.

5 ACCOUNTING
325
ACCLAIM 10 NEW FEATURES
ACCRUED AP EXPENSE AUTOBATCH DEFAULT AREAREMOVED
The accrued AP expense autobatch default area is no longer available on the autobatch default setup and deletionscreens. This autobatch is not needed in the Ledger module because the function of the Acclaim Payables ExpenseJournal has been expanded, which eliminated the need for an accrued AP expense autobatch.
If you have set up autobatch defaults for this area on an earlier version of Acclaim, these autobatches will stillprint on the report.
When you access the Enter/Edit Autobatch Defaults screen, it now appears similar to the following example:
For more information about the Enter/Edit Autobatch Default screen, refer to the Ledger manual.
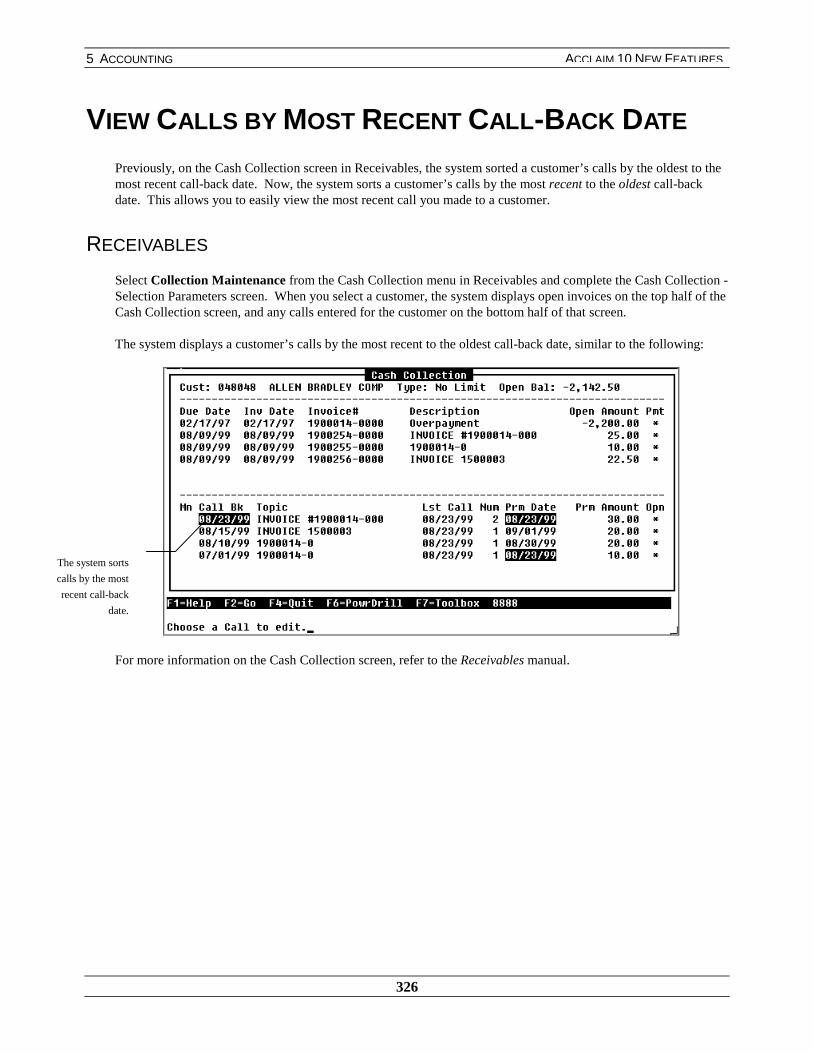
5 ACCOUNTING
326
ACCLAIM 10 NEW FEATURES
VIEW CALLS BY MOST RECENT CALL-BACK DATE
Previously, on the Cash Collection screen in Receivables, the system sorted a customer’s calls by the oldest to themost recent call-back date. Now, the system sorts a customer’s calls by the most recent to the oldest call-backdate. This allows you to easily view the most recent call you made to a customer.
RECEIVABLES
Select Collection Maintenance from the Cash Collection menu in Receivables and complete the Cash Collection -Selection Parameters screen. When you select a customer, the system displays open invoices on the top half of theCash Collection screen, and any calls entered for the customer on the bottom half of that screen.
The system displays a customer’s calls by the most recent to the oldest call-back date, similar to the following:
For more information on the Cash Collection screen, refer to the Receivables manual.
The system sorts
calls by the most
recent call-back
date.
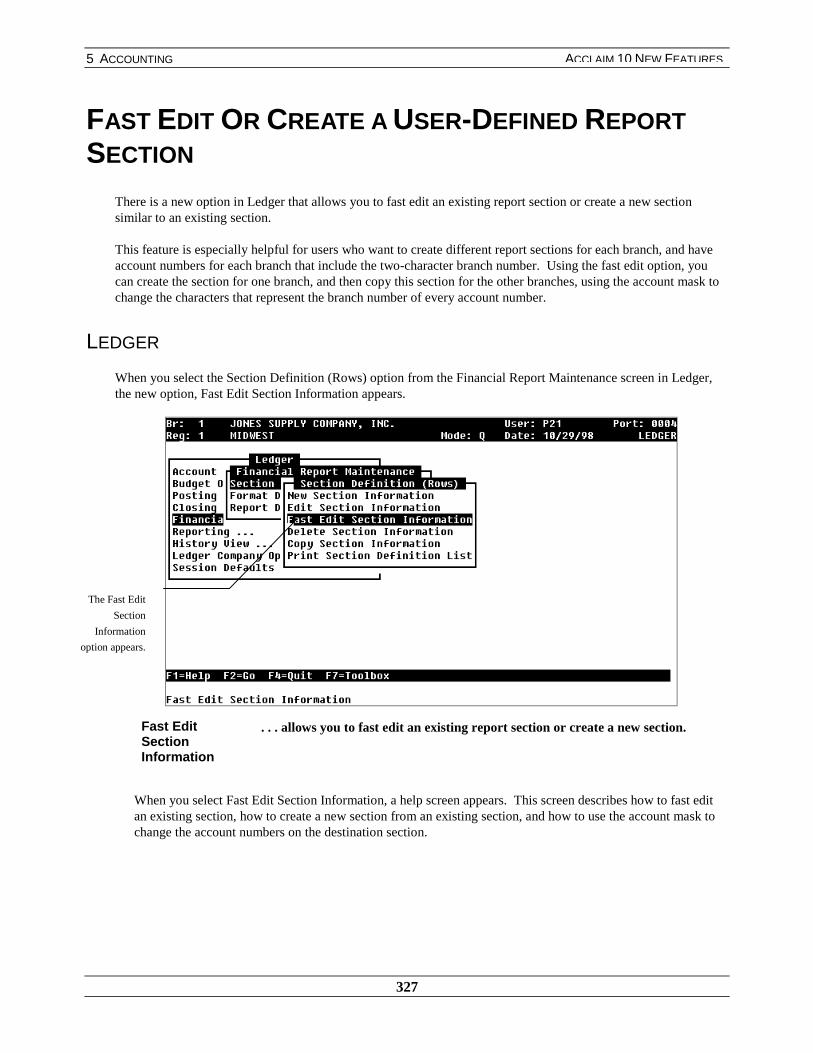
5 ACCOUNTING
327
ACCLAIM 10 NEW FEATURES
FAST EDIT OR CREATE A USER-DEFINED REPORTSECTION
There is a new option in Ledger that allows you to fast edit an existing report section or create a new sectionsimilar to an existing section.
This feature is especially helpful for users who want to create different report sections for each branch, and haveaccount numbers for each branch that include the two-character branch number. Using the fast edit option, youcan create the section for one branch, and then copy this section for the other branches, using the account mask tochange the characters that represent the branch number of every account number.
LEDGER
When you select the Section Definition (Rows) option from the Financial Report Maintenance screen in Ledger,the new option, Fast Edit Section Information appears.
Fast EditSectionInformation
. . . allows you to fast edit an existing report section or create a new section.
When you select Fast Edit Section Information, a help screen appears. This screen describes how to fast editan existing section, how to create a new section from an existing section, and how to use the account mask tochange the account numbers on the destination section.
The Fast Edit
Section
Information
option appears.
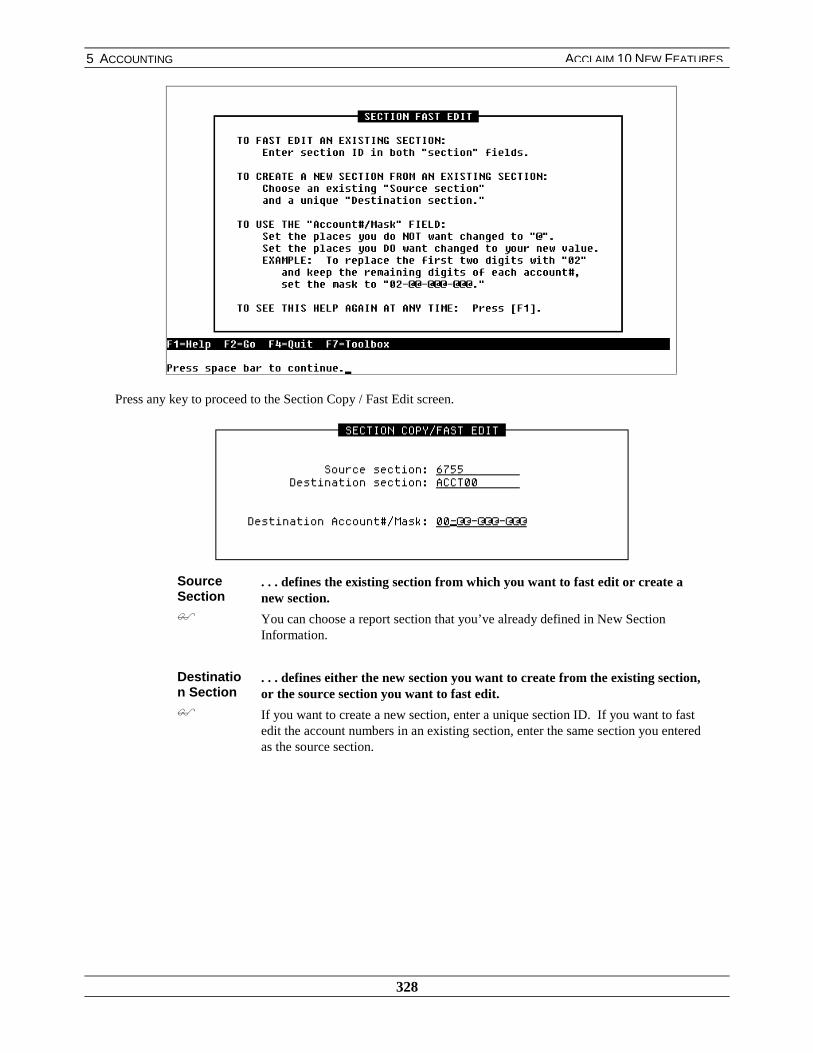
5 ACCOUNTING
328
ACCLAIM 10 NEW FEATURES
Press any key to proceed to the Section Copy / Fast Edit screen.
SourceSection$
. . . defines the existing section from which you want to fast edit or create anew section.
You can choose a report section that you’ve already defined in New SectionInformation.
Destination Section$
. . . defines either the new section you want to create from the existing section,or the source section you want to fast edit.
If you want to create a new section, enter a unique section ID. If you want to fastedit the account numbers in an existing section, enter the same section you enteredas the source section.

5 ACCOUNTING
329
ACCLAIM 10 NEW FEATURES
Destination Account#/Mask
. . . defines the account mask for the destination section.
The account mask determines how ACT and RNG detail lines are modified whenyou fast edit or copy the section.
Each @ character in the mask represents the character in that position in the sourcesection account number. This character is copied directly to the destination sectionaccount number. All characters in the mask that are not @ are copied as thosecharacters in the destination section account number.
For example, if the source section line is account 01-444-212 and the mask is 02-@@@-@@@, account 02-444-212 is copied to the destination section. Oneexception to this is that if account 02-444-212 does not exist, the account listed foran ACT line in the destination section is identical to that in the source section. Inthe previous example, the destination section account would be 01-444-212.
If the mask has only @ characters, the effect of a fast copy is the same as a regularsection copy.
Using the example on the previous screen, from source section ID 6755, a new section, ACCT00, was created.The accounts in section ACCT00 all have account numbers that begin with 00 (two zeros).
Note: To access the Section Fast Edit help screen at any time while you are viewing the Section Copy / FastEdit screen, press [F1]. To return to the Section Copy / Fast Edit screen, press any key.
After you have completed the parameters on this screen and press [Enter], the message, “Copied” appears.This indicates that the fast edit or new section was created successfully. A screen similar to the followingappears:
If you choose an existing section for the destination section other than the source section, the system promptsyou to replace the section you selected.
If you select Yes, the system deletes the destination section and replaces it with a copy of the source section. Ifyou select No, the system does not delete the destination section. However, the system also does not copy thedestination section. In this way, the system does not allow you to choose an existing destination section that isdifferent than the source section.
To view the section ID you modified or created, choose Print Section Definition List from the Section Definition(Rows) menu and print the report.
For more information on financial report sections, refer to the Accounting Reports and Journals manual.
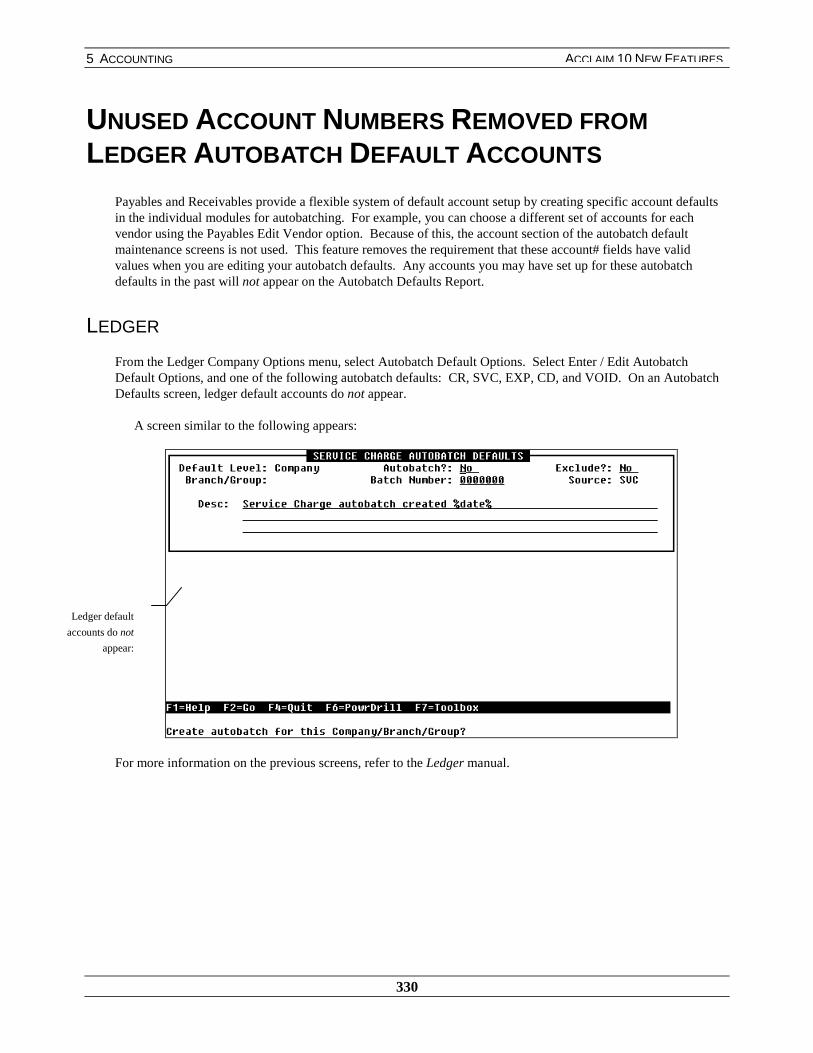
5 ACCOUNTING
330
ACCLAIM 10 NEW FEATURES
UNUSED ACCOUNT NUMBERS REMOVED FROMLEDGER AUTOBATCH DEFAULT ACCOUNTS
Payables and Receivables provide a flexible system of default account setup by creating specific account defaultsin the individual modules for autobatching. For example, you can choose a different set of accounts for eachvendor using the Payables Edit Vendor option. Because of this, the account section of the autobatch defaultmaintenance screens is not used. This feature removes the requirement that these account# fields have validvalues when you are editing your autobatch defaults. Any accounts you may have set up for these autobatchdefaults in the past will not appear on the Autobatch Defaults Report.
LEDGER
From the Ledger Company Options menu, select Autobatch Default Options. Select Enter / Edit AutobatchDefault Options, and one of the following autobatch defaults: CR, SVC, EXP, CD, and VOID. On an AutobatchDefaults screen, ledger default accounts do not appear.
A screen similar to the following appears:
For more information on the previous screens, refer to the Ledger manual.
Ledger default
accounts do not
appear:
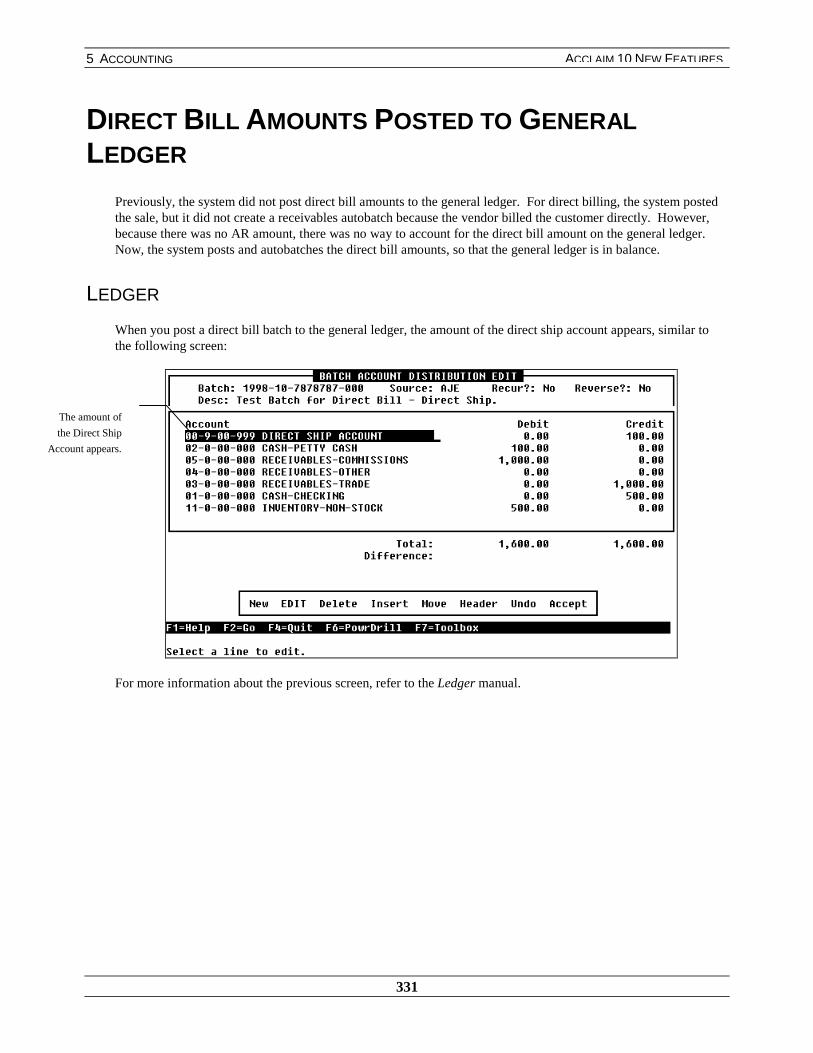
5 ACCOUNTING
331
ACCLAIM 10 NEW FEATURES
DIRECT BILL AMOUNTS POSTED TO GENERALLEDGER
Previously, the system did not post direct bill amounts to the general ledger. For direct billing, the system postedthe sale, but it did not create a receivables autobatch because the vendor billed the customer directly. However,because there was no AR amount, there was no way to account for the direct bill amount on the general ledger.Now, the system posts and autobatches the direct bill amounts, so that the general ledger is in balance.
LEDGER
When you post a direct bill batch to the general ledger, the amount of the direct ship account appears, similar tothe following screen:
For more information about the previous screen, refer to the Ledger manual.
The amount of
the Direct Ship
Account appears.
5 ACCOUNTING
332
ACCLAIM 10 NEW FEATURES
PRINT OR REPRINT SERVICE CHARGE INVOICESAFTER THE SERVICE CHARGE JOURNAL ISCOMMITTED
RECEIVABLES
Previously, you could only print or reprint service charge invoices until the Service Charge Journal was committedto history. Now, the system allows you to print these invoices, even if you have committed the Service ChargeJournal.
When you select the Print Service Charge Invoices option from the Statements menu and complete theparameters, the system prints your service charge invoices.
Note: To reprint service charge invoices, set the Print field on the Print Service Charge Invoice Parametersscreen to REPRINT.
For more information on service charge invoices, refer to the Receivables manual.

333
ACCESS THE COMMAND TERMINAL FROM AIXThere is now an AIX command that allows you to access the Prophet 21 command terminal from any AIXprompt.
At the AIX root prompt (the pound sign [#]), type rootp21 and press [Enter]. The system accesses the Prophet 21system as if you were logged into the command terminal.
Only one person can be logged onto the command terminal at one time. If someone is already logged onto thecommand console and you run this command, the system displays the following message:
You must be logged into AIX as the root user. If you run this command and you are not logged in as root, thesystem displays the following message:
For more information about AIX or the command terminal, refer to the System Administration manual.
6 SYSTEM ADMINISTRATION
6 SYSTEM ADMINISTRATION
334
ACCLAIM 10 NEW FEATURES
NEW ORDER DATA FILE, ORDSHDPreviously, the main order file ORDD included line-item ship detail information. Now, the line-item ship detailrecords have been moved from ORDD to a new file, ORDSHD. The cross-reference file for ORDSHD isORDSHX.
By moving the ship detail information to a new file, you now have more space in ORDD. Because of this, youare not forced to delete order information as frequently in order to create this space. Leaving orders on yoursystem for a longer period of time gives you the ability to keep more order history in Expedite Order.
For more information on these files, refer to the System Administration manual.
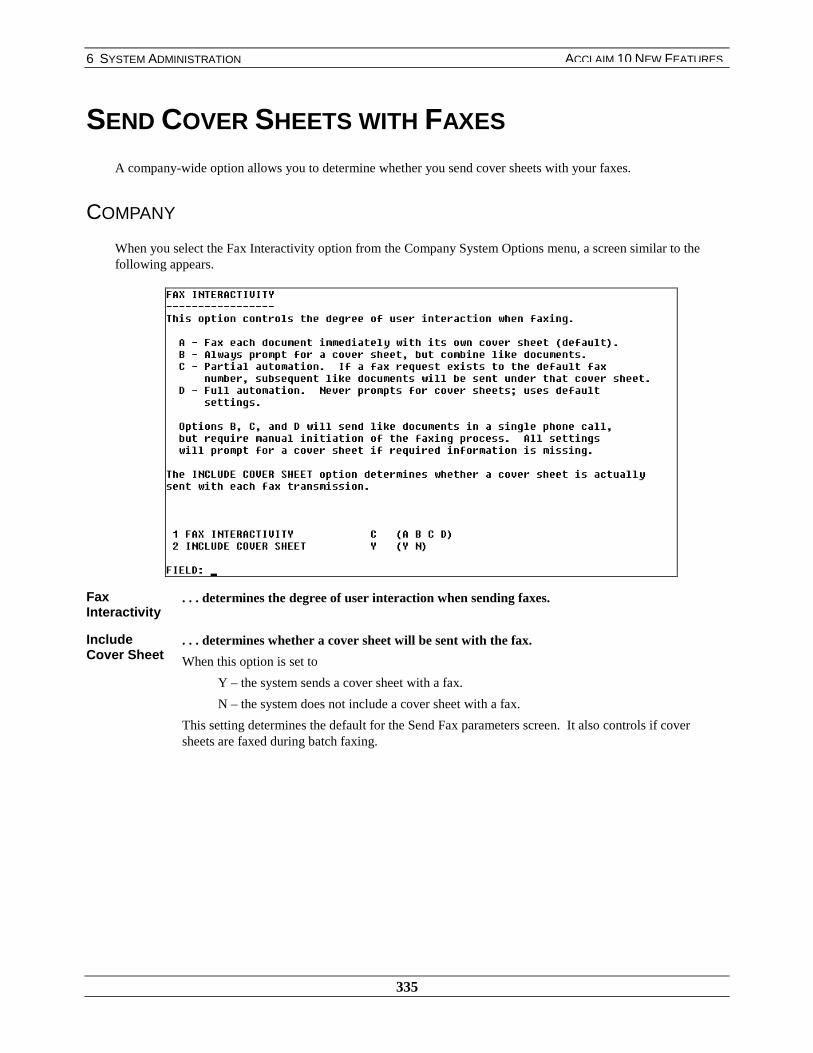
6 SYSTEM ADMINISTRATION
335
ACCLAIM 10 NEW FEATURES
SEND COVER SHEETS WITH FAXES
A company-wide option allows you to determine whether you send cover sheets with your faxes.
COMPANY
When you select the Fax Interactivity option from the Company System Options menu, a screen similar to thefollowing appears.
FaxInteractivity
. . . determines the degree of user interaction when sending faxes.
IncludeCover Sheet
. . . determines whether a cover sheet will be sent with the fax.
When this option is set to
Y – the system sends a cover sheet with a fax.
N – the system does not include a cover sheet with a fax.
This setting determines the default for the Send Fax parameters screen. It also controls if coversheets are faxed during batch faxing.

6 SYSTEM ADMINISTRATION
336
ACCLAIM 10 NEW FEATURES
When you select to print a fax, a screen similar to the following appears:
IncludeCover Sheet
. . . determines whether the system includes a cover sheet with the fax.
This field defaults to the value that you set in the Include Cover Sheet field in the FaxInteractivity Company System option. You can override this default by manually changing thisvalue on this screen.
,PSRUWDQW� When you use batch faxing, the Fax cover sheet does not display. In these instances, thesystem uses the value that you set in the Include Cover Sheet field in the Fax companysystem option to determine whether a cover sheet will be included with the fax. If thatoption is set to yes, cover sheets will be faxed.
For more information about company options, refer to the Company Setup manual. For more information aboutsending information through Fax, refer to the Fax manual.
A new field
appears giving
you the option to
print a cover
sheet.
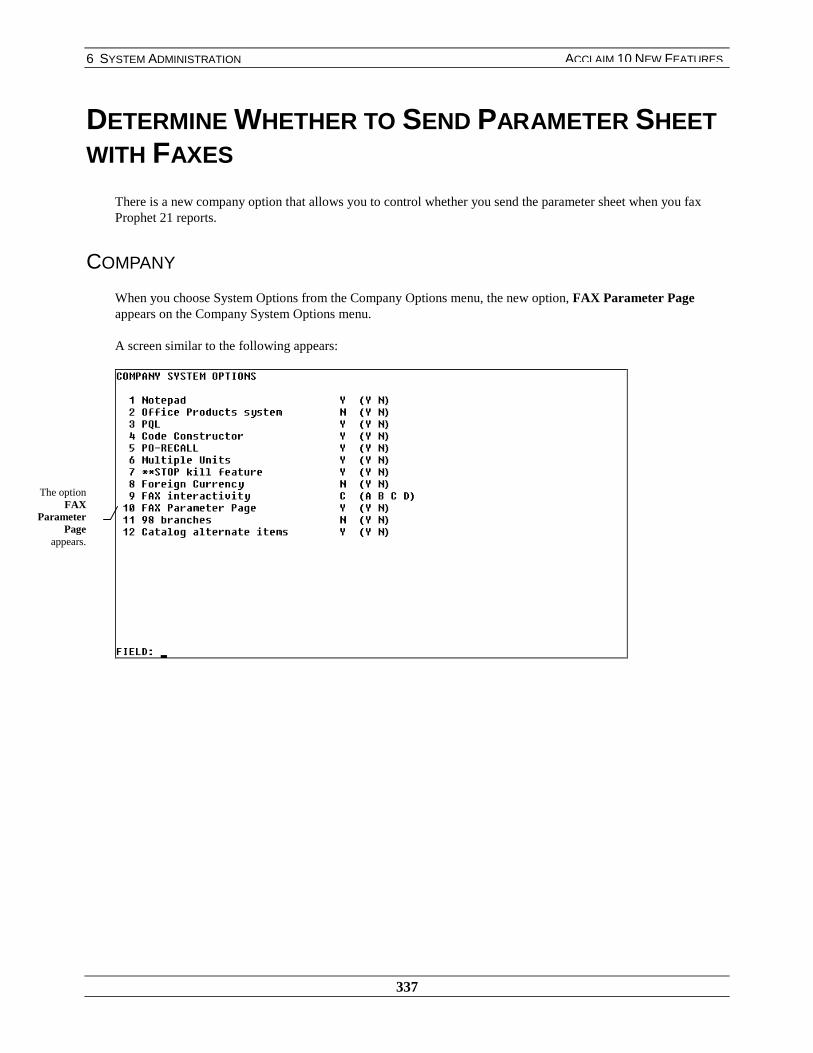
6 SYSTEM ADMINISTRATION
337
ACCLAIM 10 NEW FEATURES
DETERMINE WHETHER TO SEND PARAMETER SHEETWITH FAXES
There is a new company option that allows you to control whether you send the parameter sheet when you faxProphet 21 reports.
COMPANY
When you choose System Options from the Company Options menu, the new option, FAX Parameter Pageappears on the Company System Options menu.
A screen similar to the following appears:
The optionFAX
ParameterPage
appears.

6 SYSTEM ADMINISTRATION
338
ACCLAIM 10 NEW FEATURES
FAXParameterPage
. . . determines whether you send a parameter page with faxes.
You must have the Fax optional package enabled in order to view this option.
When you select this option, the following screen appears:
ParameterPage
. . . determines whether you send a parameter sheet when you fax reports.
When this option is set to
Y – the system sends a parameter sheet when you fax reports.
N – the system does not include a parameter sheet when you fax reports.
For more information on the previous screens, refer to the Company Setup manual. For more information aboutFax, refer to the Fax manual.
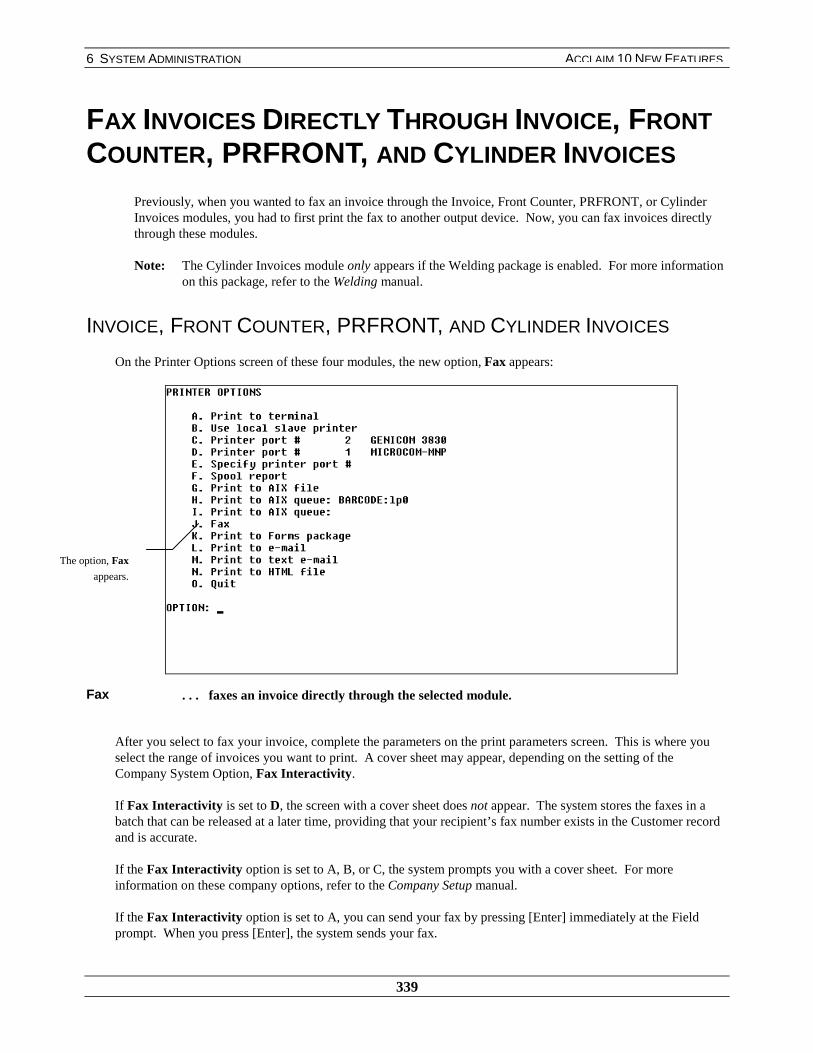
6 SYSTEM ADMINISTRATION
339
ACCLAIM 10 NEW FEATURES
FAX INVOICES DIRECTLY THROUGH INVOICE, FRONTCOUNTER, PRFRONT, AND CYLINDER INVOICES
Previously, when you wanted to fax an invoice through the Invoice, Front Counter, PRFRONT, or CylinderInvoices modules, you had to first print the fax to another output device. Now, you can fax invoices directlythrough these modules.
Note: The Cylinder Invoices module only appears if the Welding package is enabled. For more informationon this package, refer to the Welding manual.
INVOICE, FRONT COUNTER, PRFRONT, AND CYLINDER INVOICES
On the Printer Options screen of these four modules, the new option, Fax appears:
Fax . . . faxes an invoice directly through the selected module.
After you select to fax your invoice, complete the parameters on the print parameters screen. This is where youselect the range of invoices you want to print. A cover sheet may appear, depending on the setting of theCompany System Option, Fax Interactivity.
If Fax Interactivity is set to D, the screen with a cover sheet does not appear. The system stores the faxes in abatch that can be released at a later time, providing that your recipient’s fax number exists in the Customer recordand is accurate.
If the Fax Interactivity option is set to A, B, or C, the system prompts you with a cover sheet. For moreinformation on these company options, refer to the Company Setup manual.
If the Fax Interactivity option is set to A, you can send your fax by pressing [Enter] immediately at the Fieldprompt. When you press [Enter], the system sends your fax.
The option, Fax
appears.

6 SYSTEM ADMINISTRATION
340
ACCLAIM 10 NEW FEATURES
If you do not want to send your fax, enter –1 at the Field prompt, similar to the following screen:
When you enter –1 at the Field prompt, the system does not fax the invoice. The following screen appears:
If you included more than one invoice in your range on the parameter screen, the system prompts you to continuewith the other invoices included in the batch:
When you enter Y to this prompt, the next cover sheet of the next invoice appears. When you enter N to thisprompt, the system stops faxing the invoices, and you are returned to the main screen.
For more information on faxing invoices, refer to the Fax manual.
Enter –1 at
the Field
prompt.
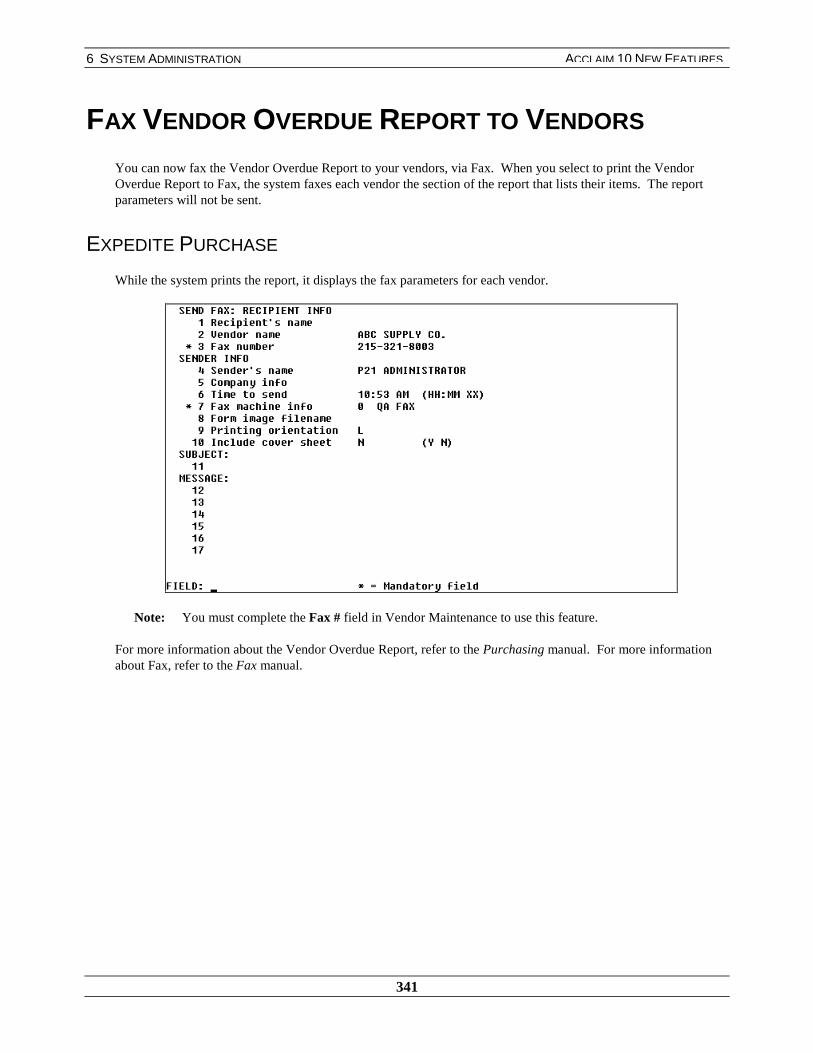
6 SYSTEM ADMINISTRATION
341
ACCLAIM 10 NEW FEATURES
FAX VENDOR OVERDUE REPORT TO VENDORS
You can now fax the Vendor Overdue Report to your vendors, via Fax. When you select to print the VendorOverdue Report to Fax, the system faxes each vendor the section of the report that lists their items. The reportparameters will not be sent.
EXPEDITE PURCHASE
While the system prints the report, it displays the fax parameters for each vendor.
Note: You must complete the Fax # field in Vendor Maintenance to use this feature.
For more information about the Vendor Overdue Report, refer to the Purchasing manual. For more informationabout Fax, refer to the Fax manual.
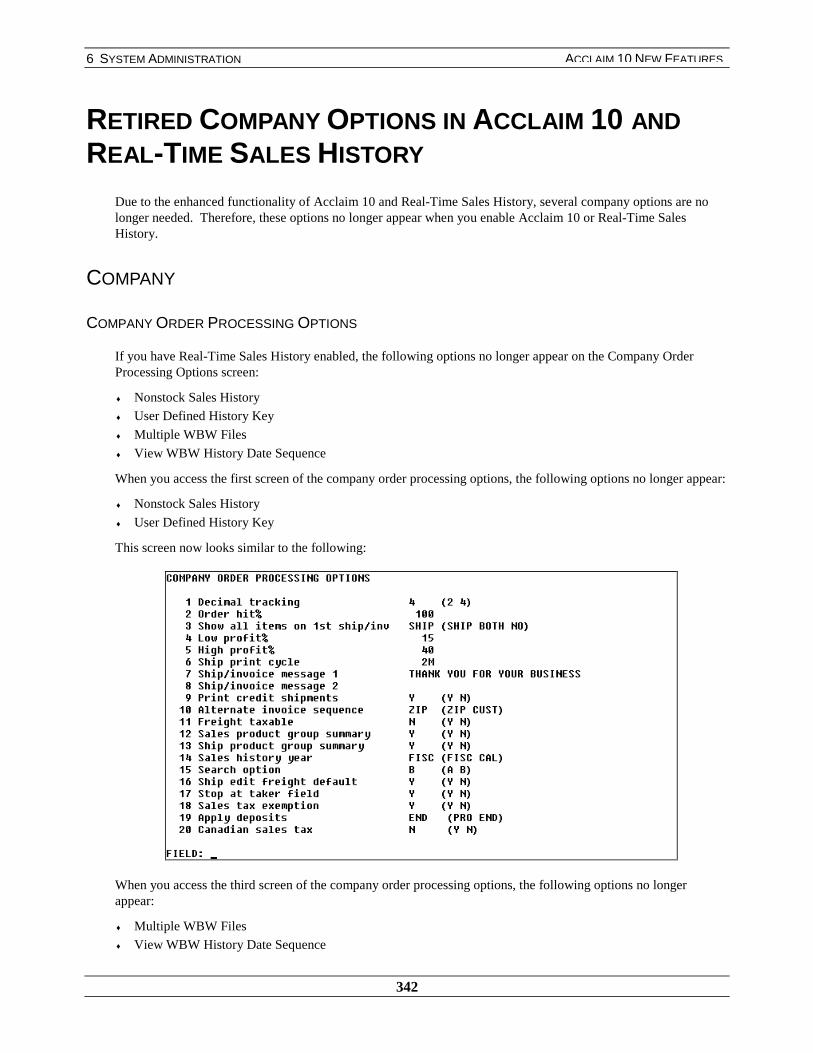
6 SYSTEM ADMINISTRATION
342
ACCLAIM 10 NEW FEATURES
RETIRED COMPANY OPTIONS IN ACCLAIM 10 ANDREAL-TIME SALES HISTORY
Due to the enhanced functionality of Acclaim 10 and Real-Time Sales History, several company options are nolonger needed. Therefore, these options no longer appear when you enable Acclaim 10 or Real-Time SalesHistory.
COMPANY
COMPANY ORDER PROCESSING OPTIONS
If you have Real-Time Sales History enabled, the following options no longer appear on the Company OrderProcessing Options screen:
♦ Nonstock Sales History
♦ User Defined History Key
♦ Multiple WBW Files
♦ View WBW History Date Sequence
When you access the first screen of the company order processing options, the following options no longer appear:
♦ Nonstock Sales History
♦ User Defined History Key
This screen now looks similar to the following:
When you access the third screen of the company order processing options, the following options no longerappear:
♦ Multiple WBW Files
♦ View WBW History Date Sequence
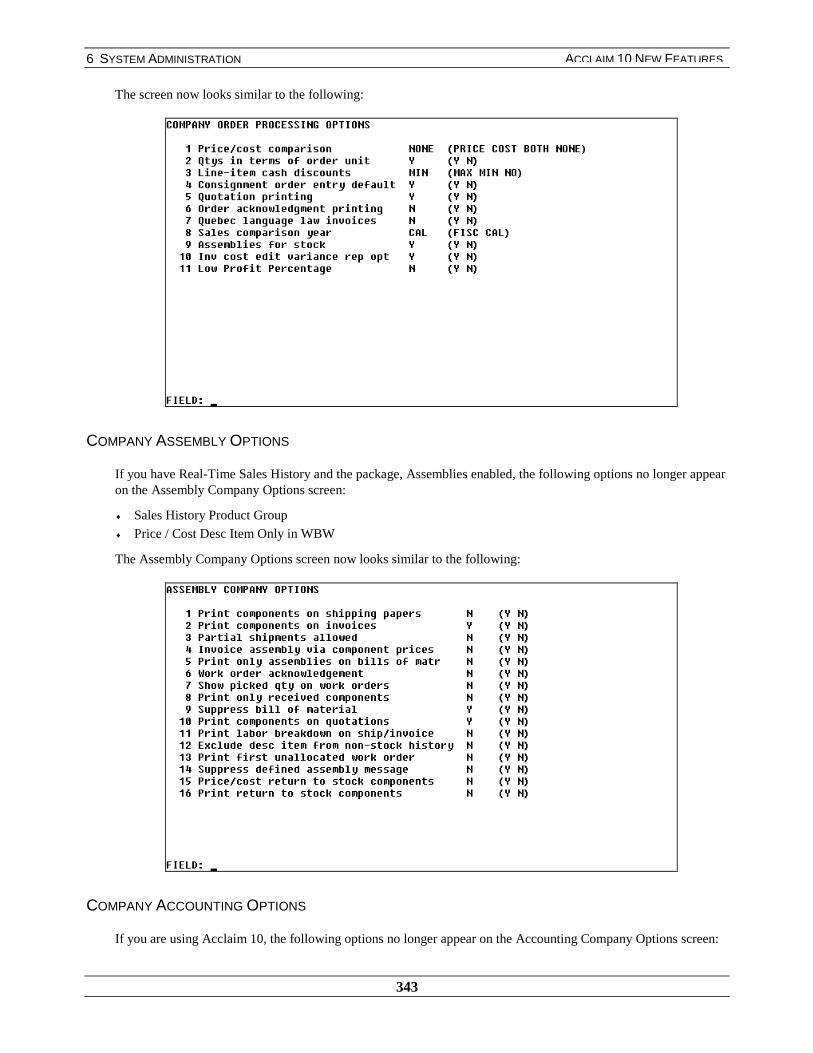
6 SYSTEM ADMINISTRATION
343
ACCLAIM 10 NEW FEATURES
The screen now looks similar to the following:
COMPANY ASSEMBLY OPTIONS
If you have Real-Time Sales History and the package, Assemblies enabled, the following options no longer appearon the Assembly Company Options screen:
♦ Sales History Product Group
♦ Price / Cost Desc Item Only in WBW
The Assembly Company Options screen now looks similar to the following:
COMPANY ACCOUNTING OPTIONS
If you are using Acclaim 10, the following options no longer appear on the Accounting Company Options screen:

6 SYSTEM ADMINISTRATION
344
ACCLAIM 10 NEW FEATURES
♦ Acclaim Ledger
♦ Acclaim Payables
♦ Acclaim Receivables
♦ Acclaim Sales History
The Company Accounting Options screen now looks similar to the following:
For more information on the previous screens, refer to the Company Setup manual.
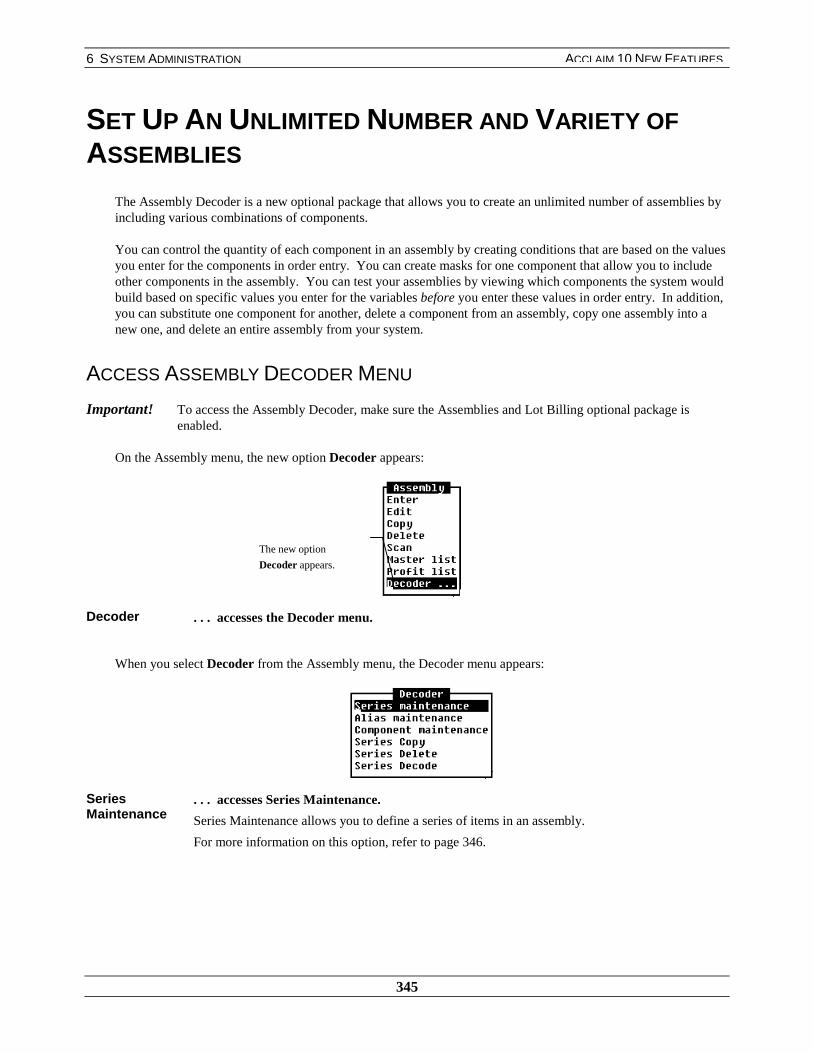
6 SYSTEM ADMINISTRATION
345
ACCLAIM 10 NEW FEATURES
SET UP AN UNLIMITED NUMBER AND VARIETY OFASSEMBLIES
The Assembly Decoder is a new optional package that allows you to create an unlimited number of assemblies byincluding various combinations of components.
You can control the quantity of each component in an assembly by creating conditions that are based on the valuesyou enter for the components in order entry. You can create masks for one component that allow you to includeother components in the assembly. You can test your assemblies by viewing which components the system wouldbuild based on specific values you enter for the variables before you enter these values in order entry. In addition,you can substitute one component for another, delete a component from an assembly, copy one assembly into anew one, and delete an entire assembly from your system.
ACCESS ASSEMBLY DECODER MENU
Important! To access the Assembly Decoder, make sure the Assemblies and Lot Billing optional package isenabled.
On the Assembly menu, the new option Decoder appears:
Decoder . . . accesses the Decoder menu.
When you select Decoder from the Assembly menu, the Decoder menu appears:
SeriesMaintenance
. . . accesses Series Maintenance.
Series Maintenance allows you to define a series of items in an assembly.
For more information on this option, refer to page 346.
The new option
Decoder appears.

6 SYSTEM ADMINISTRATION
346
ACCLAIM 10 NEW FEATURES
AliasMaintenance
. . . accesses Variable Alias Maintenance.
Variable Alias Maintenance allows you to change the value of a variable in a series mask. Thisis especially helpful if you want to substitute one component for another one, or if you want todelete a component from an assembly.
For more information on this option, refer to page 356.
ComponentMaintenance
. . . accesses Component Table Maintenance.
Component Table Maintenance allows you to define the components in an assembly. You cancreate conditions for adding the components that include variables dependent on the values youenter in order entry, and masks that allow you to add certain components when you add others.
For more information on this option, refer to page 348.
Series Copy . . . accesses the Series Copy Options.
The Series Copy Options allow you to quickly copy one series to another. This is helpful whenyou want to create a series that is very similar to an existing one. It is easier to copy one seriesand modify it than to manually enter all the information for a new series.
For more information on this option, refer to page 358.
SeriesDelete
. . . accesses the Series Delete Options.
The Series Delete Options allow you to delete an entire series, and all of its aliases andconditions.
For more information on this option, refer to page 358.
SeriesDecode
. . . accesses the Decode Assembly screen.
The Decode Assembly screen allows you to test your assemblies. When you enter a “test” code,the system displays which components it would build into the assembly. This allows you to testyour assemblies before you enter them in order entry.
For more information on this option, refer to page 351.
SETTING UP YOUR SERIES / ASSEMBLY
When you select Series Maintenance from the Decoder menu, you can enter a series name and mask to describethe assembly.
Note: To enter a new series, press [Insert] to access Add mode.

6 SYSTEM ADMINISTRATION
347
ACCLAIM 10 NEW FEATURES
A screen similar to the following appears:
Series Name
$. . . name of the assembly that identifies the product line.
The series name is only informational.
Mask . . . formula that defines how the system interprets the descriptive item in the series.
Note: The descriptive item refers to the assembly, or series, as a whole. Componentsrefer to the individual items in the assembly.
The mask consists of constants and variables that the system uses to identify the descriptiveitem. All characters that are enclosed in brackets [ ], are literals, or constants. All charactersnot enclosed in brackets are considered variables, and can be any combination of characters.
On the previous screen, the mask [AL] XX YY ZZ indicates that “AL” (for Alpha) must beincluded at the beginning of the descriptive item and the variables XX, YY, and ZZ representthree kinds of items and each of the items’ quantities. In this example, XX represents cables,YY represents adapters, and ZZ represents switches.
Note: You must enter spaces between all brackets and variables in the mask, eventhough you do not insert spaces between these characters when you are enteringthe descriptive item during order entry.
To define the variables in your mask, enter your components and set up their conditions inComponent Table Maintenance. For more information on Component Table Maintenance, referto page 348.
VendNumber
$
. . . number of the vendor who sells the assembly.
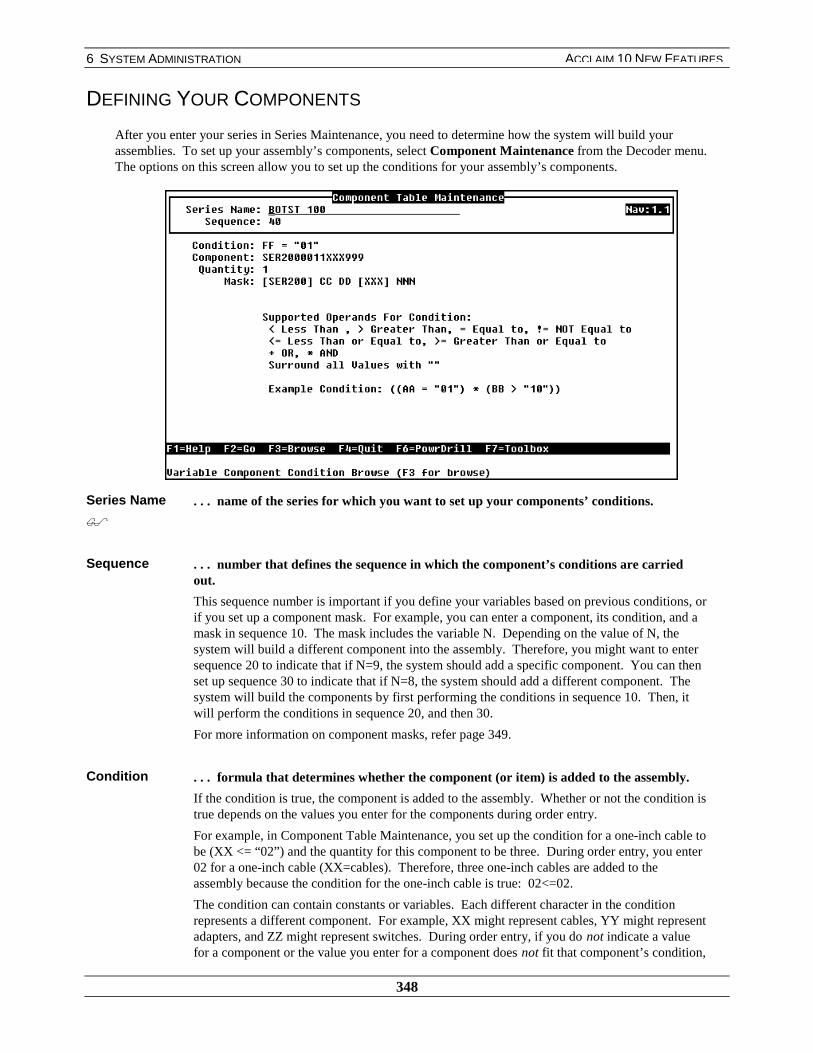
6 SYSTEM ADMINISTRATION
348
ACCLAIM 10 NEW FEATURES
DEFINING YOUR COMPONENTS
After you enter your series in Series Maintenance, you need to determine how the system will build yourassemblies. To set up your assembly’s components, select Component Maintenance from the Decoder menu.The options on this screen allow you to set up the conditions for your assembly’s components.
Series Name
$. . . name of the series for which you want to set up your components’ conditions.
Sequence . . . number that defines the sequence in which the component’s conditions are carriedout.
This sequence number is important if you define your variables based on previous conditions, orif you set up a component mask. For example, you can enter a component, its condition, and amask in sequence 10. The mask includes the variable N. Depending on the value of N, thesystem will build a different component into the assembly. Therefore, you might want to entersequence 20 to indicate that if N=9, the system should add a specific component. You can thenset up sequence 30 to indicate that if N=8, the system should add a different component. Thesystem will build the components by first performing the conditions in sequence 10. Then, itwill perform the conditions in sequence 20, and then 30.
For more information on component masks, refer page 349.
Condition . . . formula that determines whether the component (or item) is added to the assembly.
If the condition is true, the component is added to the assembly. Whether or not the condition istrue depends on the values you enter for the components during order entry.
For example, in Component Table Maintenance, you set up the condition for a one-inch cable tobe (XX <= “02”) and the quantity for this component to be three. During order entry, you enter02 for a one-inch cable (XX=cables). Therefore, three one-inch cables are added to theassembly because the condition for the one-inch cable is true: 02<=02.
The condition can contain constants or variables. Each different character in the conditionrepresents a different component. For example, XX might represent cables, YY might representadapters, and ZZ might represent switches. During order entry, if you do not indicate a valuefor a component or the value you enter for a component does not fit that component’s condition,

6 SYSTEM ADMINISTRATION
349
ACCLAIM 10 NEW FEATURES
the system will not add that component to the assembly.
For example, the condition for a five-inch adapter is YY>“05”, and the quantity for thiscomponent is two. During order entry, you enter 03 for the adapter. The system does not buildthe five-inch adapter into the assembly because the condition for it is not true: 03>05.
The condition can be described using the following characters: =, !=, >=, <=, >, <. You canalso use the addition sign (+) for “or”, an asterisk (*) for “and”, and parentheses to enclose thecondition. Enclose all values in quotes (“ ”).
Note: The != sign means “does not equal”.
Other examples of conditions are the following:
♦ (XX <= “03”)
♦ YY != “1”
♦ (XX >= “03”) * (YY > “5”) + (ZZ= “2”)
Component
$. . . item in the assembly for which you are specifying the condition.
When you browse on this field, you can select the item you want from the Item Browse.
Quantity . . . amount of the item you want.
If the condition for the component is true, the quantity of the component is added to theassembly. The quantity can be written as a constant or a variable equation. The equation canonly be written using the following mathematical functions: addition (+), subtraction (-),multiplication (*), and division (/).
For example, if the condition is true and the quantity for the component is four, then the systemadds four of that component to the assembly. If the condition is true, the quantity for thecomponent is YY + 1, and you entered four of that component during order entry, the systemadds 5, or 4 + 1 of that component to the assembly.
Mask . . . code or formula that allows you to create a variable for the component.
You can create a mask for the component to further specify the component’s conditions. This isespecially helpful if you know that one component should always go with another component inan assembly.
For example, if you want to make sure you include a five-inch adapter everytime you enter a nine-inch cable, you could enter a mask for the nine-inch cablethat forces the system to include a five-inch adapter.
Using this example, in the series BOTST 100, sequence 40, the component for anine-inch cable is SER2000011XXX999. The “999” part of this componentidentifies it as a nine-inch cable. The mask for this component is [SER200] CCDD [XXX] NNN. NNN represents the cable and DD represents the adapter.
In this same series, you can specify that the five-inch adapter always goes withthe nine-inch cable by making sure that when NNN=999, the system adds thefive-inch adapter. In sequence 150 of the same series, the condition states thefollowing: NNN=999. If this is true, the system will add one of the componentA-005 (1 appears in the Quantity field and A-005 appears in the Componentfield). Therefore, the formula for the mask is [SER200] CC 05 [XXX] 999.
The following screen appears:

6 SYSTEM ADMINISTRATION
350
ACCLAIM 10 NEW FEATURES
You can further define your selection by defining other parts of this mask. Ifyou want to make sure that every time you add a nine-inch cable, you add afive-inch adapter and an eleventh-inch switch, you can further define anotherpart of the mask.
Using this example, the “CC” in the mask [SER200] CC DD [XXX] NNNrepresents a switch. You can add sequence 145 to the series BOTST 100 anddefine CC to make sure that the nine-inch cable with the five-inch adapteralways goes with the eleventh-inch switch by setting the following condition:(NNN = “999”) * (DD = “11”). If this condition is true, then add three of thecomponent B&D-14309, which is the eleventh-inch switch.
The screen looks similar to the following:
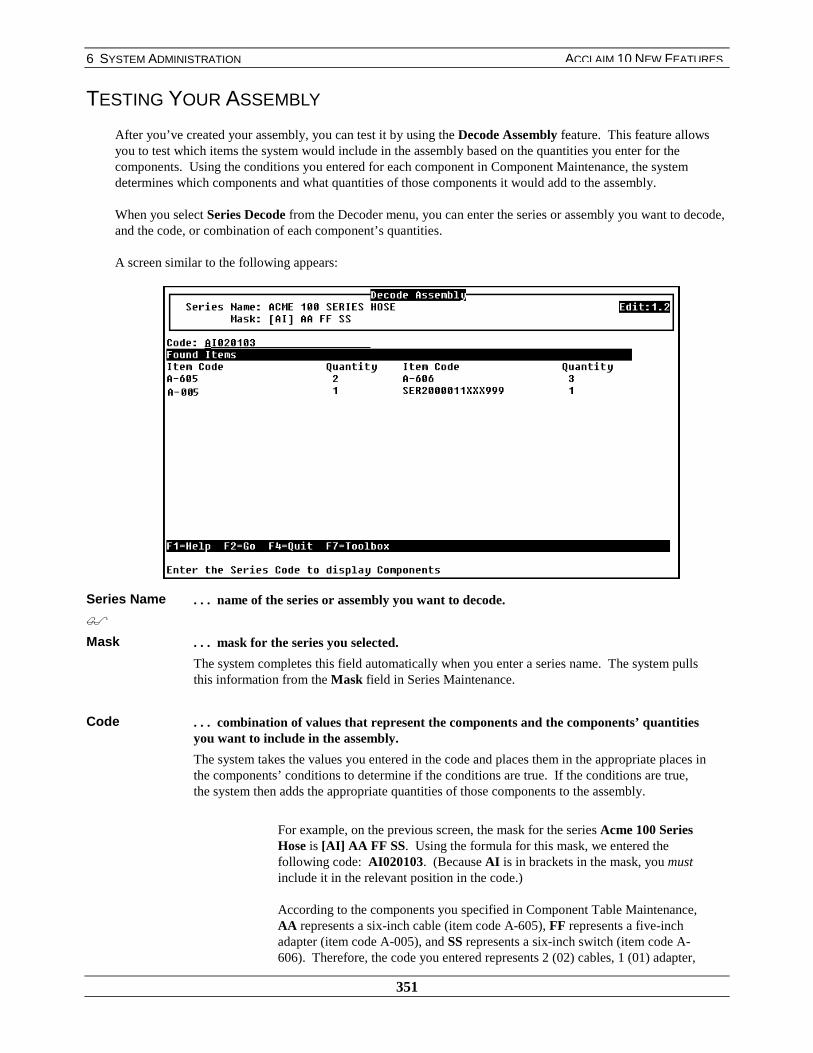
6 SYSTEM ADMINISTRATION
351
ACCLAIM 10 NEW FEATURES
TESTING YOUR ASSEMBLY
After you’ve created your assembly, you can test it by using the Decode Assembly feature. This feature allowsyou to test which items the system would include in the assembly based on the quantities you enter for thecomponents. Using the conditions you entered for each component in Component Maintenance, the systemdetermines which components and what quantities of those components it would add to the assembly.
When you select Series Decode from the Decoder menu, you can enter the series or assembly you want to decode,and the code, or combination of each component’s quantities.
A screen similar to the following appears:
Series Name
$. . . name of the series or assembly you want to decode.
Mask . . . mask for the series you selected.
The system completes this field automatically when you enter a series name. The system pullsthis information from the Mask field in Series Maintenance.
Code . . . combination of values that represent the components and the components’ quantitiesyou want to include in the assembly.
The system takes the values you entered in the code and places them in the appropriate places inthe components’ conditions to determine if the conditions are true. If the conditions are true,the system then adds the appropriate quantities of those components to the assembly.
For example, on the previous screen, the mask for the series Acme 100 SeriesHose is [AI] AA FF SS. Using the formula for this mask, we entered thefollowing code: AI020103. (Because AI is in brackets in the mask, you mustinclude it in the relevant position in the code.)
According to the components you specified in Component Table Maintenance,AA represents a six-inch cable (item code A-605), FF represents a five-inchadapter (item code A-005), and SS represents a six-inch switch (item code A-606). Therefore, the code you entered represents 2 (02) cables, 1 (01) adapter,

6 SYSTEM ADMINISTRATION
352
ACCLAIM 10 NEW FEATURES
and 3 (03) switches.
The system then takes the values you entered and places them in the appropriateplaces in the components’ conditions to determine if the conditions are true.
The condition for the six-inch cable (AA) is the following: AA>“1”. The valueyou entered is 02. Therefore, because the condition 02>01 is true, the systemadds the value in the Quantity field for this component, which is also 2.
The condition for the five-inch cable (FF) is the following: FF=“1”. The valueyou entered is 01. Therefore, because the condition 01=01 is true, the systemadds the value in the Quantity field, which is 1. The condition for the five-inchcable also includes the following mask: [SER200] CC DD [XXX] NNN.Another sequence was set up in the series to indicate that when one five-inchcable is added, the system adds one plug, which is componentSER2000011XXX999. Therefore, the system adds one of this item.
The condition for the six-inch switch (SS) is the following: SS<=“3”. Thevalue you entered is 03. Therefore, because the condition 03<=03 is true, thesystem adds the value in the Quantity field, which is 3.
Note: If any of the previous conditions were not true for any of the components, thesystem would not include those components in the assembly.
Found Items
Item Code . . . item code of the item that the system would add to the assembly.
The values you entered in the code and the conditions of each component determine whether thesystem adds those components, or items, to the assembly.
Quantity . . . quantity of the item that the system would add to the assembly.
If the conditions for the components are true, the system adds the quantity of the item youentered in the Quantity field in Component Table Maintenance to the assembly.
Note: If you enter a code on the Decode Assembly screen and no items appear in the “Found Items” section,the system did not find any items that it would add to the assembly. Using the values you entered inthe code, the system did not find any of the components’ conditions to be true.
ENTERING AN ASSEMBLY ON AN ORDER
At the Item prompt during order entry, press [A] and [Enter] to proceed to Assembly mode.
At the Item prompt, you can either enter the code manually, or press [S] for Series to access the Series Entryscreen. This screen allows you to browse for the series you want and enter the variables in the series mask.

6 SYSTEM ADMINISTRATION
353
ACCLAIM 10 NEW FEATURES
A screen similar to the following appears:
To enter your assembly by using the Series Entry screen, proceed to the following section, “Select Your Assemblyand Enter the Series Code From a Browse.” To enter your assembly by manually entering your series code,proceed to the section, “Proceed to the section, “Complete the Assembly Order Entry Screen” on page 355 tocomplete entering your assembly on the order.
Select Your Assembly by Manually Entering your Series Code” on page 354.
SELECT YOUR ASSEMBLY AND ENTER THE SERIES CODE FROM A BROWSE
To enter your assembly by selecting it from a browse and matching the series mask with the component quantitiesyou want, press [S] for Series at the Item prompt.
The Series Entry screen appears, similar to the following:
(QWHU�WKH
VHULHV�FRGH�\RX
ZDQW��RU�SUHVV
>6@�WR�DFFHVV
WKH�6HULHV
(QWU\�VFUHHQ�

6 SYSTEM ADMINISTRATION
354
ACCLAIM 10 NEW FEATURES
Series Name
$. . . name of the series you want to enter on the order.
Mask . . . mask of the series you selected.
The system automatically completes this field when you select the series name. The systempulls this information from the Series Maintenance screen.
VariableEntry
. . . allows you to enter the quantities of each component, according to the series mask.
When you press the down arrow key to access this field, you can enter values for the variablesin the mask.
After you enter the values you want, a screen similar to the following appears:
Press [F2] to save your changes. The system builds the assembly components based on thevalues you entered, and prompts you to complete the assembly order entry screen.
Proceed to the section, “Complete the Assembly Order Entry Screen” on page 355 to complete entering yourassembly on the order.
SELECT YOUR ASSEMBLY BY MANUALLY ENTERING YOUR SERIES CODE
To manually enter your series code, enter it at the Item prompt and press [Enter].
The system first searches the defined assembly database for the code you entered. If the system does not find thecode in the database, the code does not indicate a defined assembly. The system indicates this with the followingmessage: **NOT A DEFINED ASSEMBLY** Proceed to Decode Mode? (Y, N).
Caution! Make sure that you do not have an item code that matches a series mask. If you enter a series mask thatmatches an existing item code, we recommend that you change the series mask. You can do one of thefollowing:
♦ You can copy the entire series into a new series and then change the series mask in the new series
♦ You can use the Alias Maintenance option to change the value of one of the variables of themask
For information on copying a series into a mask, refer to page 358. For information on using the AliasMaintenance option, refer to page 356.
A screen similar to the following appears:

6 SYSTEM ADMINISTRATION
355
ACCLAIM 10 NEW FEATURES
When you press [N] and [Enter], the system treats the code you entered as a normal free-form assembly. In thiscase, you would manually select each individual item and add them to the assembly.
When you press [Y] and [Enter], you can complete the fields on the Assembly Order Entry screen. Proceed to thefollowing section.
COMPLETE THE ASSEMBLY ORDER ENTRY SCREEN
The system completes the description, size, lab, and source fields, and then prompts you to enter a quantity. Enterthe quantity you want. The system completes the remaining fields. The system completes the Vendor field withthe vendor number and ID from the Vendor field in Series Maintenance.
A screen similar to the following appears:
Important! If you entered a hose assembly, the O.A.L field (Overall Length) appears instead of the Size field onthe previous screen. Make sure you enter the correct value in this field before you press [Enter] at the
The systemprompts you tolet it decode thevalues for theassembly youwant.

6 SYSTEM ADMINISTRATION
356
ACCLAIM 10 NEW FEATURES
Field prompt. When you enter the correct value in the O.A.L. field, the system will decode and buildyour hose assembly correctly.
When you press [Enter] at the Field prompt, the system decodes the series you entered and displays thecomponents that it will add to the assembly, similar to the following screen:
Note: The system uses the values you entered for the components and the components’ conditions todetermine which components it will add to the assembly. For more information on this procedure,refer to page 351.
CHANGE VALUES OF VARIABLES
You can use aliases to substitute any value you entered as a variable in a series mask for another value. This isespecially helpful if you want to delete an entire line of items that you are using in an assembly, or when yourun out of stock and need to use a substitute item in an assembly.
To use aliases for variables in your assemblies, select the Alias Maintenance option from the Decoder menu.When you complete the fields on the Variable Alias Maintenance screen, a screen similar to the followingappears:
The system
displays the
components it
adds to the
assembly.

6 SYSTEM ADMINISTRATION
357
ACCLAIM 10 NEW FEATURES
Series Name
$. . . name of the series from which you want to change a variable.
Variable . . . variable in the series mask of which you want to change a value.
For example, if the series mask is: [AI] AA FF SS and you want to change the value of the AAvariable, you would enter AA in this field.
From Value . . . original value of the variable you want to change.
For example, the AA in the series mask represents a five-inch cable, and the condition foradding this component to your assembly is AA=1. Because this item no longer exists and youwant to make sure you delete it from your assemblies, you can make the condition not true bychanging all “1” values of AA to 10. Therefore, you would enter “1” in the From Value field.
To Value . . . new value of the variable you want to change.
Using the example given in the From Value field, you would enter “10” in the To Value field.
You can also use the alias option to substitute one component for another. For example, sequence 10 for aseries has the following condition: AA<= “5”, add the component A-606. Sequence 20 in the same series hasthe following condition: AA> “5”, add the component B-606. You could make sure that for every orderrequesting two of component A-606, the system puts component B-606 in the assembly.
Therefore, you would enter the following in the previous fields:
Variable: AA
From Value: 2
To Value: 6
The system then changes all orders that currently have a code indicating two of component A-606 to now havea code indicating six of component B-606. Therefore, because the condition for A-606 is AA<= “5”, and 06
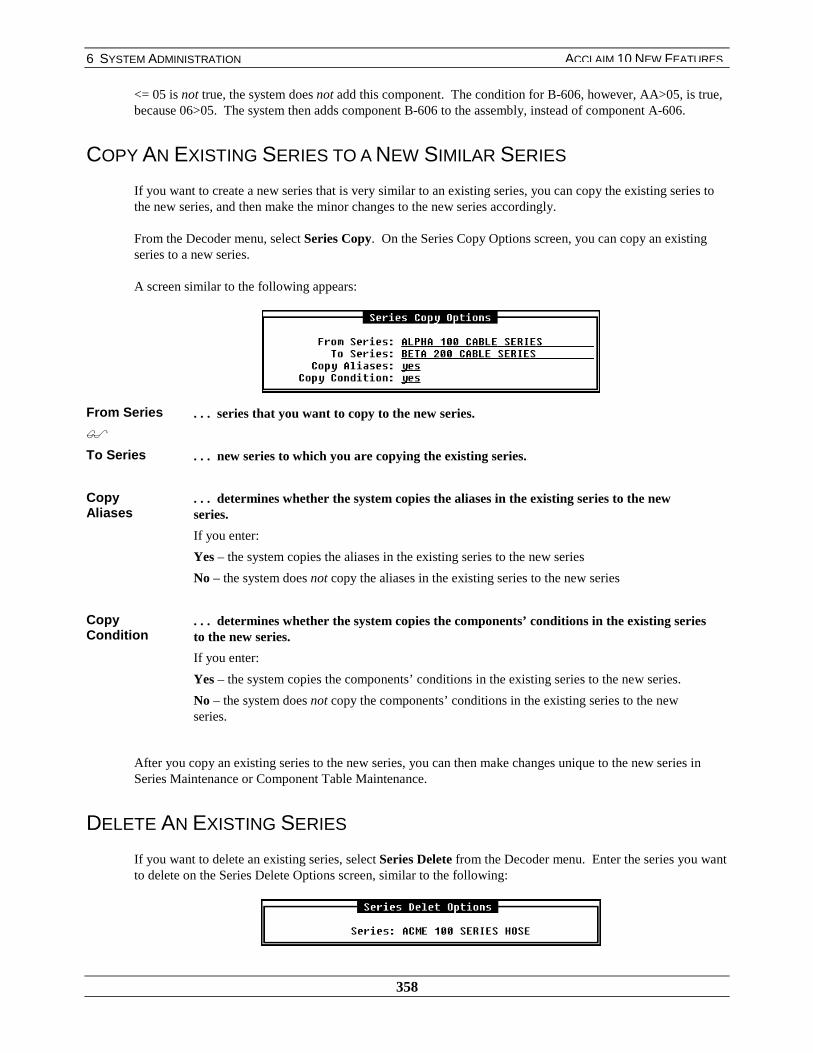
6 SYSTEM ADMINISTRATION
358
ACCLAIM 10 NEW FEATURES
<= 05 is not true, the system does not add this component. The condition for B-606, however, AA>05, is true,because 06>05. The system then adds component B-606 to the assembly, instead of component A-606.
COPY AN EXISTING SERIES TO A NEW SIMILAR SERIES
If you want to create a new series that is very similar to an existing series, you can copy the existing series tothe new series, and then make the minor changes to the new series accordingly.
From the Decoder menu, select Series Copy. On the Series Copy Options screen, you can copy an existingseries to a new series.
A screen similar to the following appears:
From Series
$. . . series that you want to copy to the new series.
To Series . . . new series to which you are copying the existing series.
CopyAliases
. . . determines whether the system copies the aliases in the existing series to the newseries.
If you enter:
Yes – the system copies the aliases in the existing series to the new series
No – the system does not copy the aliases in the existing series to the new series
CopyCondition
. . . determines whether the system copies the components’ conditions in the existing seriesto the new series.
If you enter:
Yes – the system copies the components’ conditions in the existing series to the new series.
No – the system does not copy the components’ conditions in the existing series to the newseries.
After you copy an existing series to the new series, you can then make changes unique to the new series inSeries Maintenance or Component Table Maintenance.
DELETE AN EXISTING SERIES
If you want to delete an existing series, select Series Delete from the Decoder menu. Enter the series you wantto delete on the Series Delete Options screen, similar to the following:
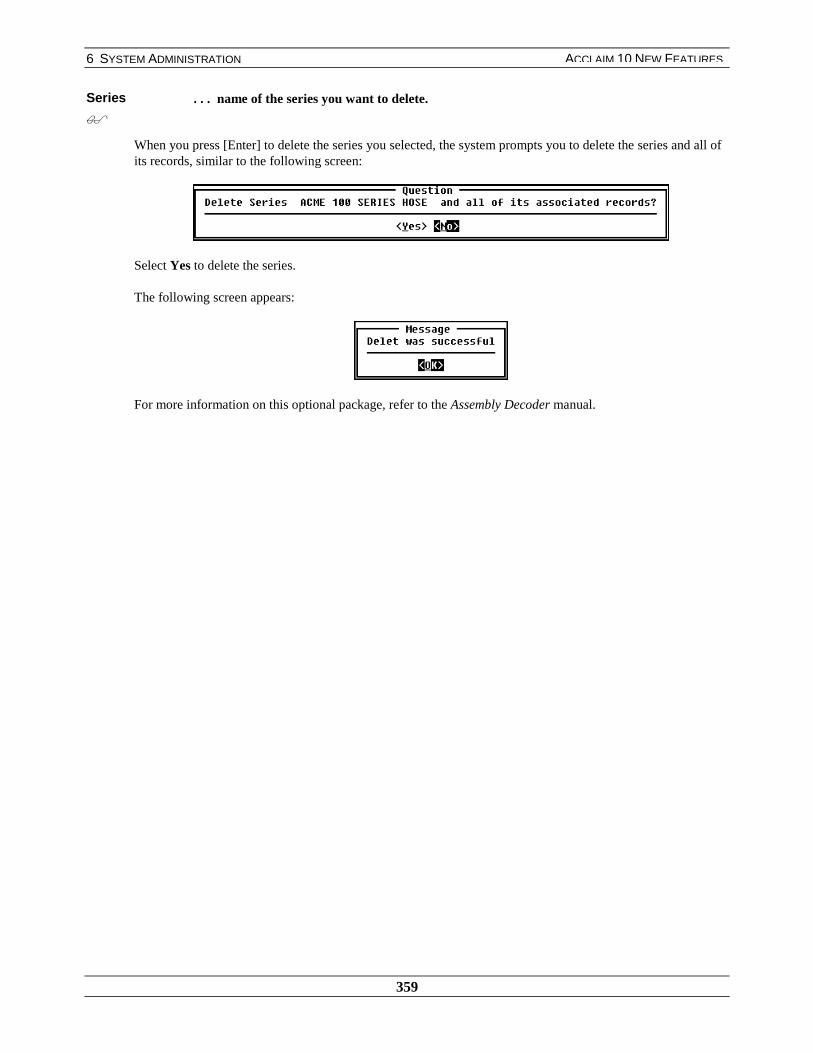
6 SYSTEM ADMINISTRATION
359
ACCLAIM 10 NEW FEATURES
Series
$. . . name of the series you want to delete.
When you press [Enter] to delete the series you selected, the system prompts you to delete the series and all ofits records, similar to the following screen:
Select Yes to delete the series.
The following screen appears:
For more information on this optional package, refer to the Assembly Decoder manual.

6 SYSTEM ADMINISTRATION
360
ACCLAIM 10 NEW FEATURES
REORGANIZE USER-DEFINED SALES HISTORY
Note: This feature only affects sales history, not Real-Time Sales History.
Previously, you could only reorganize the sales history that came standard with the Prophet 21 system. Now, youcan reorganize your user-defined sales history, if your user-defined sales history keys include customer code,vendor code, or salesman.
COMPANY
When you select the User Defined History Key option in Company Order Processing options and press [Enter] toaccess the User Defined History Key Specification screen, your user-defined history keys display on the bottomportion of the screen.
As shown in the following screen, if your keys include vendor code, customer code, or salesman number,reorganizing sales history will affect these fields.
SALES HISTORY
If you have the corresponding user-defined sales history keys, choosing the Reorganize option in Sales Historywill update these fields on your user-defined sales history report.
For example, you change an item’s vendor from 3M Abrasives to Furnacas Electric Co. In Sales History, whenyou reorganize by vendor ID and enter 004801 (3M Abrasives) in the Current field and 783087 (FurnacasElectric Co.) in the New field, the sales history information is reorganized under the new vendor, Furnacas ElectricCo, and prints on the user-defined report.
For more information on reorganizing sales history, refer to the Sales History Information manual.
If your keys
include vendor
code, customer
code, or
salesman
number,
reorganizing
sales history
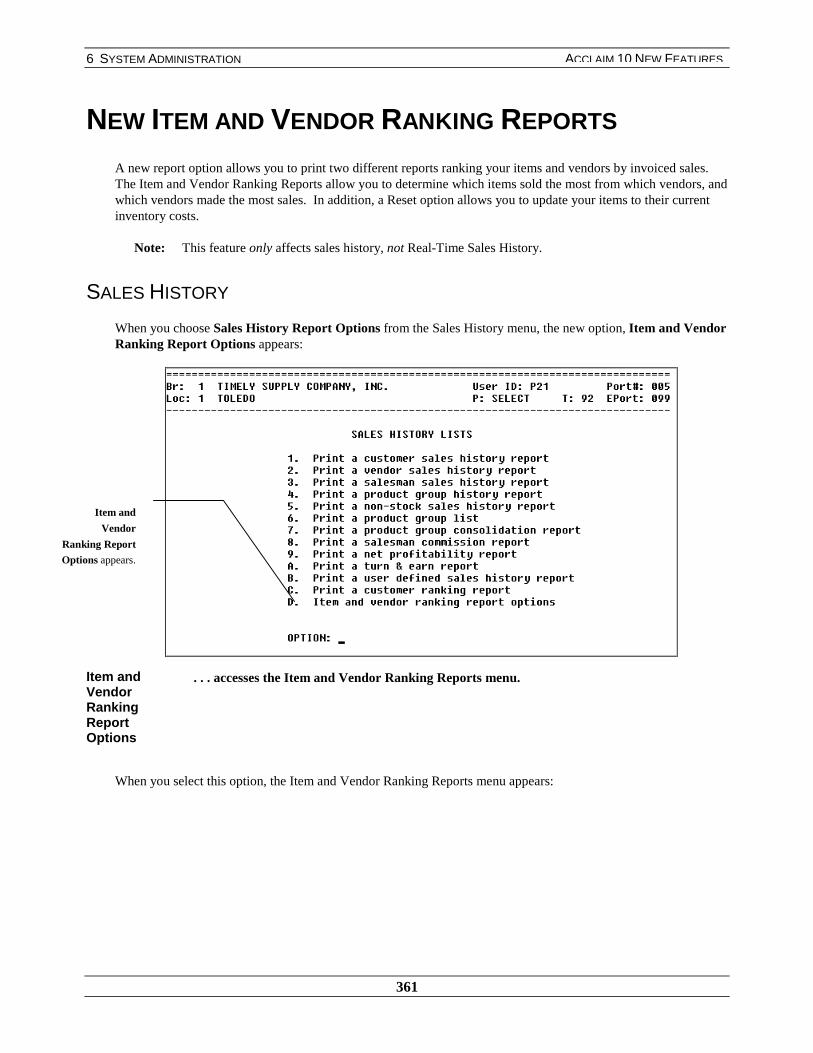
6 SYSTEM ADMINISTRATION
361
ACCLAIM 10 NEW FEATURES
NEW ITEM AND VENDOR RANKING REPORTS
A new report option allows you to print two different reports ranking your items and vendors by invoiced sales.The Item and Vendor Ranking Reports allow you to determine which items sold the most from which vendors, andwhich vendors made the most sales. In addition, a Reset option allows you to update your items to their currentinventory costs.
Note: This feature only affects sales history, not Real-Time Sales History.
SALES HISTORY
When you choose Sales History Report Options from the Sales History menu, the new option, Item and VendorRanking Report Options appears:
Item andVendorRankingReportOptions
. . . accesses the Item and Vendor Ranking Reports menu.
When you select this option, the Item and Vendor Ranking Reports menu appears:
Item and
Vendor
Ranking Report
Options appears.

6 SYSTEM ADMINISTRATION
362
ACCLAIM 10 NEW FEATURES
Print an ItemRankingReport withTurns
. . . prints a report that shows items ranked by sales or sales costs for each vendor.
For more information on this option, refer to page 362.
Print aVendorRankingReport withTurns
. . . prints a report that shows vendors ranked by sales or sales costs.
For more information on this option, refer to page 365.
Reset ItemRankingwith TurnsInformation
. . . resets the period-to-date sales and sales cost and updates the current inventory costsof each item.
Note: The sales and cost of each item for the current period is tracked during invoiceprocessing.
For more information on this option, refer to page 365.
PRINT AN ITEM RANKING REPORT WITH TURNS
When you select to print an item ranking report with turns and select a printer, the following parameter screenappears:

6 SYSTEM ADMINISTRATION
363
ACCLAIM 10 NEW FEATURES
Report By . . . determines whether the report is based on items sold company-wide or only forspecific locations.
When this option is set to
★ LOC – the report is based on items sold for specific locations. When this option isselected, you can specify the locations you want to include in the Location field.
COMP – the report is based on items sold company-wide.
Note: Location detail information is not included on the report when this field is set toCOMP.
LocationStart, End
. . . determines the range of locations on which the report is based.
Note: When Report By is set to COMP, this field is not accessible.
VendorStart, End
. . . determines the range of vendors on which the report is based.
VendorClassStart, End
. . . determines the range of vendor classes on which the report is based.
VendorClassSeq
. . . determines whether the items are sorted in terms of 12 months’ sales or costs.
When this field is set to
SALES – the items on the report are sorted in terms of 12 months’ sales
★ COST – the items on the report are sorted in terms of 12 months’ cost
The sales and cost of items that have more than six months but less than 12 months of historyare estimated by projecting the current history figures. Items with less than 6 months of historyare not included in the vendor totals.

6 SYSTEM ADMINISTRATION
364
ACCLAIM 10 NEW FEATURES
When you press [Enter] at the Field prompt, the Item Ranking Report with Turns appears, similar to the followingscreen:
Vendor . . . vendor from whom the items on the report were sold.
Class . . . vendor class of the vendor from whom the items on the report were sold.
Item . . . items sold from the specified vendor.
Desc . . . description of the corresponding item.
Sales-Cost . . . 12-month sales cost accumulations for the item.
Sales . . . 12-month sales accumulations for the item.
PR% . . . profit percentage of the item.
Profit percentage is calculated using the following formula:
Profit % = 12 months sales – 12 months sales costs / 12 months sales X 100
Invt-Cost . . . cost of the ordered item based on how the cost basis is set (standard cost, company-wide moving average, location moving average).
Avg InvtCost
. . . average cost of the item from a 12-month history.
Turn . . . turns of the item.
Turns are calculated using the following formula:
Turns = 12 month sales cost / average inventory cost
Vendor, location, and grand totals print at the end of the report.

6 SYSTEM ADMINISTRATION
365
ACCLAIM 10 NEW FEATURES
PRINT A VENDOR RANKING REPORT WITH TURNS
The parameter screen of the Vendor Ranking Report is identical to the parameter screen for the Item RankingReport. For more information on the fields on this screen, refer to the section “Print an Item Ranking Report withTurns” on page 362.
When you choose to print the Vendor Ranking Report, a screen similar to the following appears:
Vendor . . . vendor code.
Name . . . vendor name.
Sales-Cost . . . 12-month sales cost accumulations of the vendor.
Sales . . . 12-month sales accumulations of the vendor.
PR% . . . the vendor’s profit percentage.
Profit percentage is calculated using the following formula:
Profit % = 12 months sales – 12 months sales costs / 12 months sales X 100
Invt-Cost . . . cost of the ordered items based on how the cost basis is set (standard cost, company-wide moving average, location moving average).
Avg InvtCost
. . . average cost of the items from a 12-month history.
Turn . . . turns of the vendor’s items.
Turns are calculated using the following formula:
Turns = 12 month sales costs / average inventory cost

6 SYSTEM ADMINISTRATION
366
ACCLAIM 10 NEW FEATURES
RESET ITEM RANKING WITH TURNS INFORMATION
When you select to reset item ranking with turns information, the system prompts you with the following message:
When you press [Y], the system resets the period-to-date sales and sales costs and updates the current inventorycosts of each item. While the system is performing the reset, a “Please Wait” message appears. When the reset iscomplete, a “Reset Complete” message appears:
When you press [N], the system returns you to the Sales History Lists screen.
For more information about sales history reports, refer to the Sales History Information manual.

6 SYSTEM ADMINISTRATION
367
ACCLAIM 10 NEW FEATURES
ADD WHO-BOUGHT-WHAT RECORDS TO REAL-TIMESALES HISTORY
You can manually add Who-Bought What records to correct errors in the Real-Time Sales History module. Thisfeature has an Acclaim screen security setting for protection. To use the feature, you must be logged in as P21with Q-Mode enabled.
SALES HISTORY
VIEW OPTIONS
The Invoice Line View screen is accessed through the Sales History/View Options/Invoices options in the SalesHistory module. After pressing the Invoices option, the invoice browse by invoice date screen appears. Highlightthe invoice you wish to view, and press [F6] to display the available browses:

6 SYSTEM ADMINISTRATION
368
ACCLAIM 10 NEW FEATURES
Choose Invoice View to display the header and line-items of the invoice. Press the down arrow key to accessthe line-items. Highlight the line-item you wish to view and press [F6] to see the Invoice Line ViewPowrDrill:
Select the Invoice Line View PowrDrill to see detailed information on the invoiced line-item. You can addinformation to this section by pressing [Ctrl][A]. The following screen appears for add mode:
For more information on adding Who-Bought-What transactions, refer to the Sales History Information manual.

6 SYSTEM ADMINISTRATION
369
ACCLAIM 10 NEW FEATURES
COMPANY
ACCLAIM SCREENS
Security can be set for this Who-Bought-What add transaction feature by a setting in the CompanyInformation/Options menu. Choose the Acclaim Screens option off the Options menu to display the screenenable browse screen. Type invoice to access the invoice viewing browses:
To change the security setting of an Acclaim screen, select the screen whose security is to be changed andpress [Enter]. The Screen Enable Maintenance screen appears. For more information on changing the securitysetting, refer to the System Administrator manual.
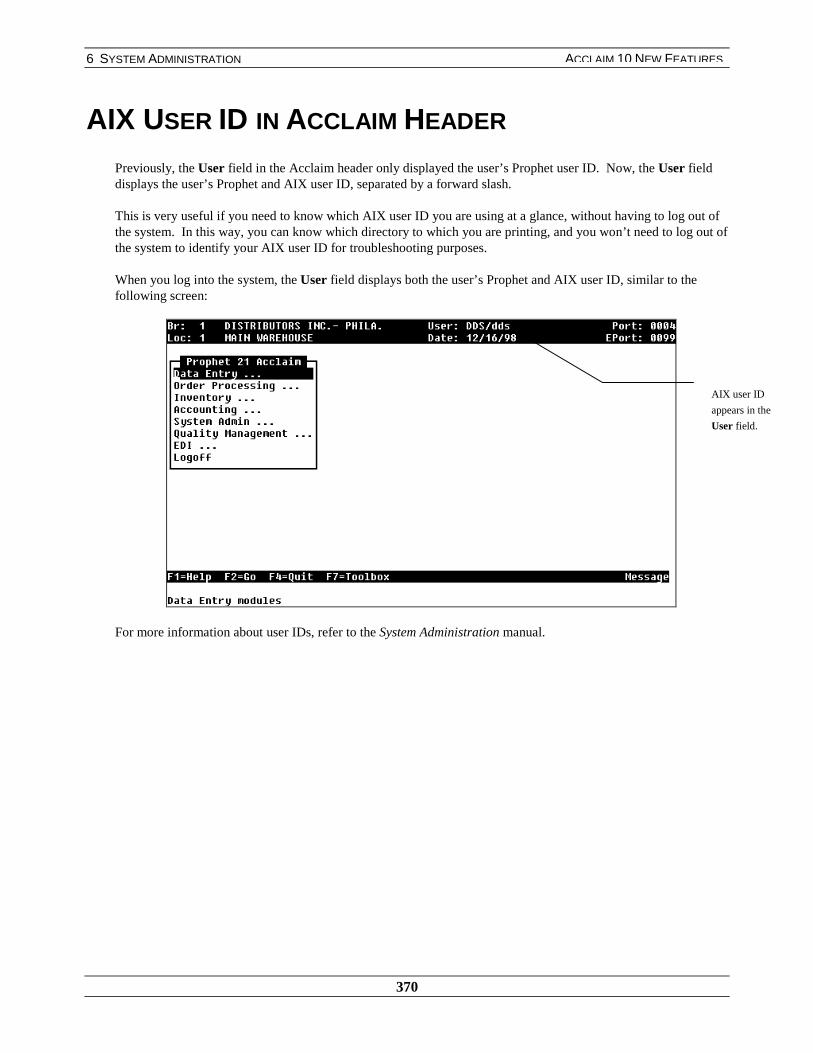
6 SYSTEM ADMINISTRATION
370
ACCLAIM 10 NEW FEATURES
AIX USER ID IN ACCLAIM HEADER
Previously, the User field in the Acclaim header only displayed the user’s Prophet user ID. Now, the User fielddisplays the user’s Prophet and AIX user ID, separated by a forward slash.
This is very useful if you need to know which AIX user ID you are using at a glance, without having to log out ofthe system. In this way, you can know which directory to which you are printing, and you won’t need to log out ofthe system to identify your AIX user ID for troubleshooting purposes.
When you log into the system, the User field displays both the user’s Prophet and AIX user ID, similar to thefollowing screen:
For more information about user IDs, refer to the System Administration manual.
AIX user ID
appears in the
User field.

6 SYSTEM ADMINISTRATION
371
ACCLAIM 10 NEW FEATURES
UNLIMITED NUMBER OF STOCKING LOCATIONS
Previously, the system only allowed you to define 89 stocking locations. Now, you can set up 9999 stockinglocations. This feature is especially helpful for customers with numerous locations.
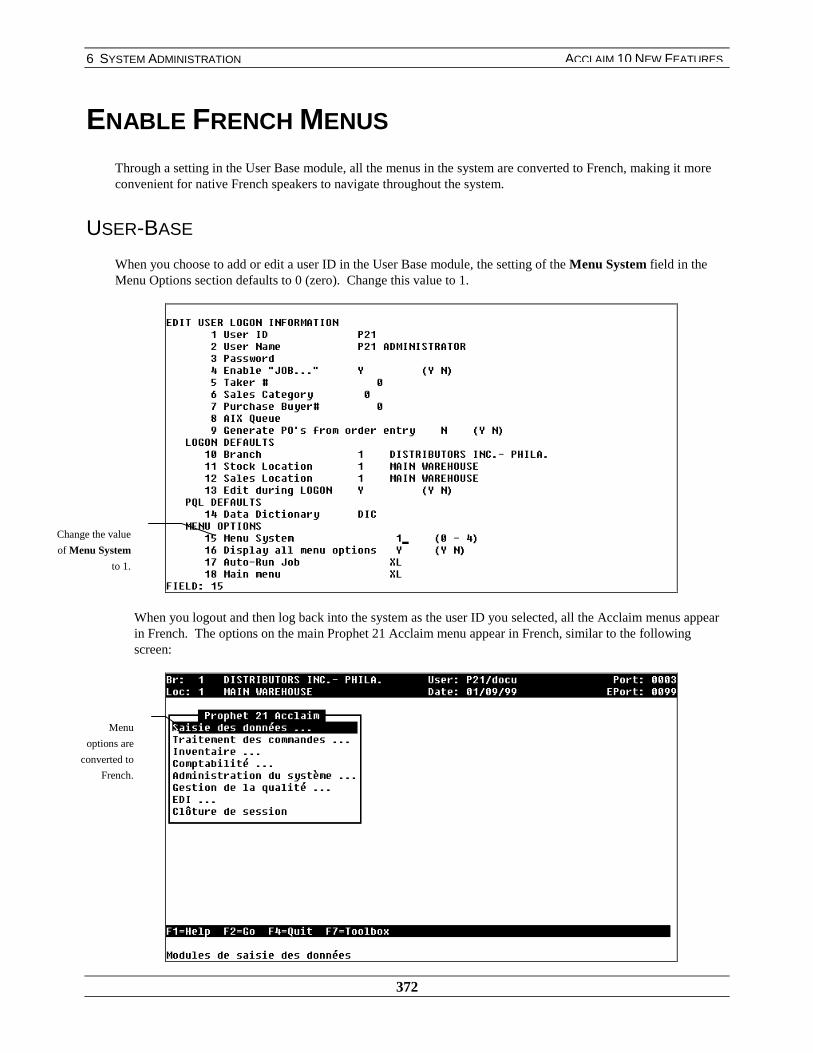
6 SYSTEM ADMINISTRATION
372
ACCLAIM 10 NEW FEATURES
ENABLE FRENCH MENUS
Through a setting in the User Base module, all the menus in the system are converted to French, making it moreconvenient for native French speakers to navigate throughout the system.
USER-BASE
When you choose to add or edit a user ID in the User Base module, the setting of the Menu System field in theMenu Options section defaults to 0 (zero). Change this value to 1.
When you logout and then log back into the system as the user ID you selected, all the Acclaim menus appearin French. The options on the main Prophet 21 Acclaim menu appear in French, similar to the followingscreen:
Menu
options are
converted to
French.
Change the value
of Menu System
to 1.

6 SYSTEM ADMINISTRATION
373
ACCLAIM 10 NEW FEATURES
Note: When this option is set, information on individual screens, including fields and parameters, stillappear in English.
To convert the menus back to English, change the Menu System option for your user ID back to 0 (zero), and thenlogout and log back into the system. The menus appear in English again.
For more information on setting this option in the User Base module, refer to the System Administration manual.
6 SYSTEM ADMINISTRATION
374
ACCLAIM 10 NEW FEATURES
SECURITY ON PAYABLES AND RECEIVABLESBROWSE AND POWRDRILL
Previously, users who did not have security access to the viewing options in Payables and Receivables could stillaccess these options via a PowrDrill or browse. This feature prevents users who don’t have security permissionsfrom accessing these options.
For example, Joe Phillips in the Shipping Department does not have security access to view payables orreceivables. Therefore, when he PowrDrills on a customer who has open receivables in Customer Maintenance, hecannot view the Receivables option. When Joe PowrDrills on a vendor with open payables information in VendorMaintenance, he cannot view the Payables option. In addition, when he accesses the Toolbox and selects theBrowse option, the Payables or Receivables options do not appear.
For more information on security settings, refer to the System Administration manual.

6 SYSTEM ADMINISTRATION
375
ACCLAIM 10 NEW FEATURES
REINDEX THE OVERRIDE BROWSE BY DEFAULT TYPE
You can now reindex the Price / Cost Override Browse by default branch and company overrides. You can thenreindex the Default Override Browse by basis, item code, or override type.
PRICE / COST OVERRIDES
When you browse at the Customer prompt on the Price / Cost Override Table Maintenance screen and select [Tab]to reindex the browse, the option, Default Overrides appears, similar to the following screen:
DefaultOverrides
. . . reindexes the Override Browse by default type.
When you select this option, default branch and company overrides appear, similar to the following screen:
Code . . . asterisk-number combination that defines the company or branchdefault override.
Default company overrides contain six asterisks, and default branch overridescontain four asterisks, followed by the two-digit number of the branch. If thebranch is a single digit, a zero is placed before it.
For example, if you enter a default branch override for branch 2, the code is:****02.
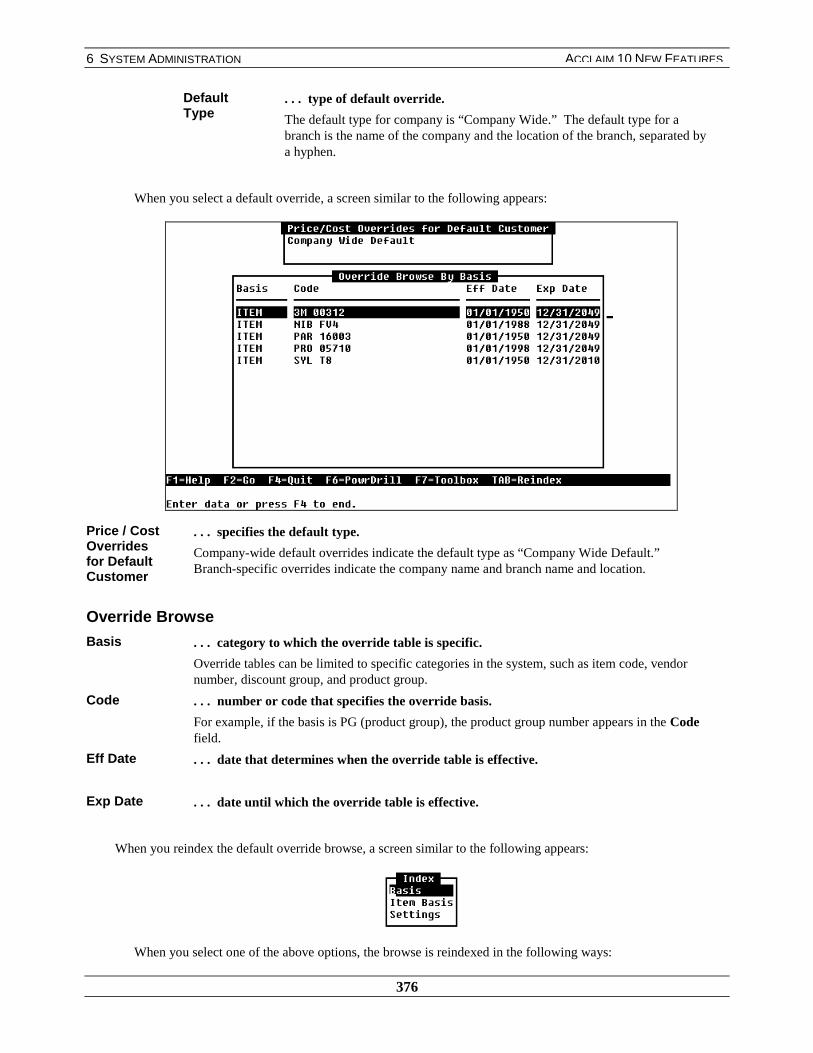
6 SYSTEM ADMINISTRATION
376
ACCLAIM 10 NEW FEATURES
DefaultType
. . . type of default override.
The default type for company is “Company Wide.” The default type for abranch is the name of the company and the location of the branch, separated bya hyphen.
When you select a default override, a screen similar to the following appears:
Price / CostOverridesfor DefaultCustomer
. . . specifies the default type.
Company-wide default overrides indicate the default type as “Company Wide Default.”Branch-specific overrides indicate the company name and branch name and location.
Override Browse
Basis . . . category to which the override table is specific.
Override tables can be limited to specific categories in the system, such as item code, vendornumber, discount group, and product group.
Code . . . number or code that specifies the override basis.
For example, if the basis is PG (product group), the product group number appears in the Codefield.
Eff Date . . . date that determines when the override table is effective.
Exp Date . . . date until which the override table is effective.
When you reindex the default override browse, a screen similar to the following appears:
When you select one of the above options, the browse is reindexed in the following ways:

6 SYSTEM ADMINISTRATION
377
ACCLAIM 10 NEW FEATURES
Basis . . . by override basis.
Item Basis . . . by item code.
When you select this option, only the default overrides that have ITEM as a basis appear. Thisis because these overrides are created for a specific item, with a specific item code.
Settings . . . by price or cost override.
When you select the Settings option, you can choose a cost or price override type. For moreinformation on this option, refer to “Settings: Price or Cost Override” on page 377.
SETTINGS: PRICE OR COST OVERRIDE
When you select the Settings option, press [F3] to browse and select the override type you want.
A screen similar to the following appears:
Customer Browse Settings
OverrideType
. . . specifies the override type you want to view for the default override you selected.
When this field is set to:
Cost: a browse displaying cost overrides for the default override you selected appears.
Price: a browse displaying price overrides for the default override you selected appears.
For more information on the default override browse, refer to the Browse manual. For more information on priceand cost overrides, refer to the Sales Pricing manual.

6 SYSTEM ADMINISTRATION
378
ACCLAIM 10 NEW FEATURES
NEW KEYSTROKE ACCESSES ORIGINAL BROWSE
Because it is possible to drill down into many PowrDrill menus from a browse or screen, a new keystrokecombination, [Ctrl][B], returns you to your starting point. This new keystroke saves you the inconvenience ofhaving to exit each of the PowrDrill menus in order to access your original screen.
After accessing several PowrDrill menus, press [Ctrl][B]. The system automatically returns you to the originalbrowse or screen you selected.
For more information, refer to the Browse manual.
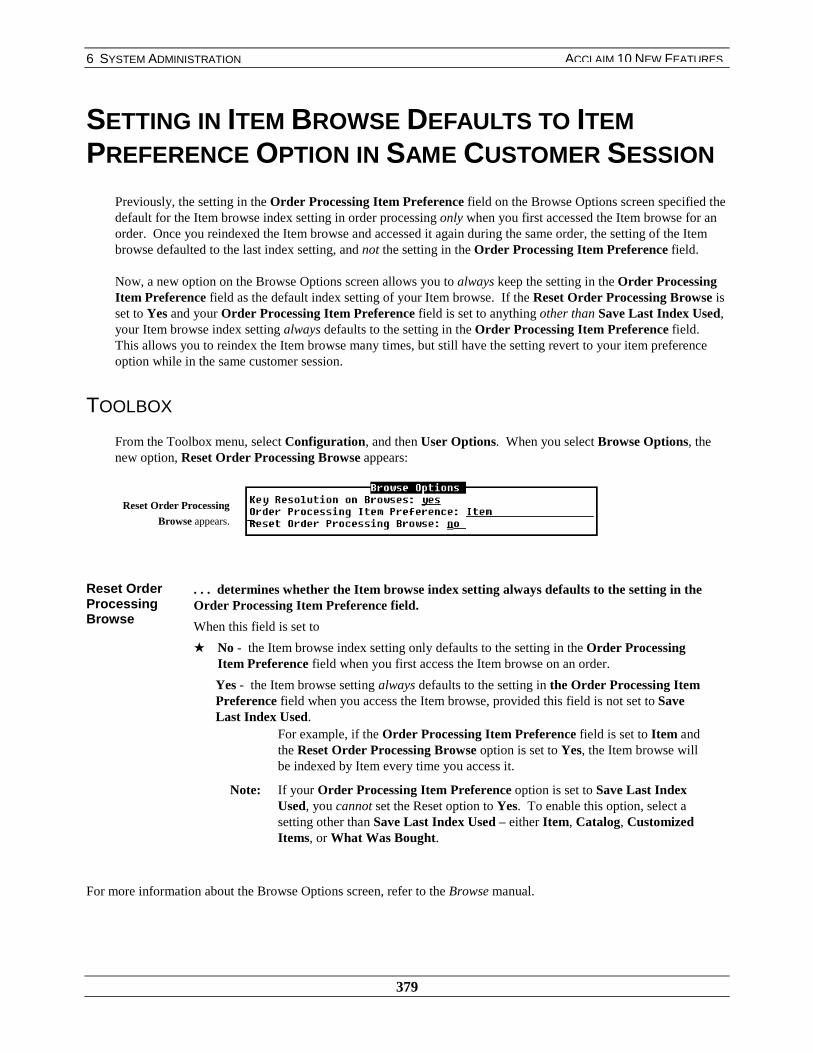
6 SYSTEM ADMINISTRATION
379
ACCLAIM 10 NEW FEATURES
SETTING IN ITEM BROWSE DEFAULTS TO ITEMPREFERENCE OPTION IN SAME CUSTOMER SESSION
Previously, the setting in the Order Processing Item Preference field on the Browse Options screen specified thedefault for the Item browse index setting in order processing only when you first accessed the Item browse for anorder. Once you reindexed the Item browse and accessed it again during the same order, the setting of the Itembrowse defaulted to the last index setting, and not the setting in the Order Processing Item Preference field.
Now, a new option on the Browse Options screen allows you to always keep the setting in the Order ProcessingItem Preference field as the default index setting of your Item browse. If the Reset Order Processing Browse isset to Yes and your Order Processing Item Preference field is set to anything other than Save Last Index Used,your Item browse index setting always defaults to the setting in the Order Processing Item Preference field.This allows you to reindex the Item browse many times, but still have the setting revert to your item preferenceoption while in the same customer session.
TOOLBOX
From the Toolbox menu, select Configuration, and then User Options. When you select Browse Options, thenew option, Reset Order Processing Browse appears:
Reset OrderProcessingBrowse
. . . determines whether the Item browse index setting always defaults to the setting in theOrder Processing Item Preference field.
When this field is set to
★ No - the Item browse index setting only defaults to the setting in the Order ProcessingItem Preference field when you first access the Item browse on an order.
Yes - the Item browse setting always defaults to the setting in the Order Processing ItemPreference field when you access the Item browse, provided this field is not set to SaveLast Index Used.
For example, if the Order Processing Item Preference field is set to Item andthe Reset Order Processing Browse option is set to Yes, the Item browse willbe indexed by Item every time you access it.
Note: If your Order Processing Item Preference option is set to Save Last IndexUsed, you cannot set the Reset option to Yes. To enable this option, select asetting other than Save Last Index Used – either Item, Catalog, CustomizedItems, or What Was Bought.
For more information about the Browse Options screen, refer to the Browse manual.
Reset Order Processing
Browse appears.

6 SYSTEM ADMINISTRATION
380
ACCLAIM 10 NEW FEATURES
ACCESS WBW INFORMATION BROWSE FROM THEITEM PROMPT IN ORDER ENTRY
You can now access the Who-Bought-What Information browse from the Item prompt in order entry.
ORDER, FRONT COUNTER
Type WB at the Item prompt in order entry.
When you press [Enter], the Who-Bought-What Information browse appears.
For more information on the Who-Bought-What Information browse, refer to the Browse manual.
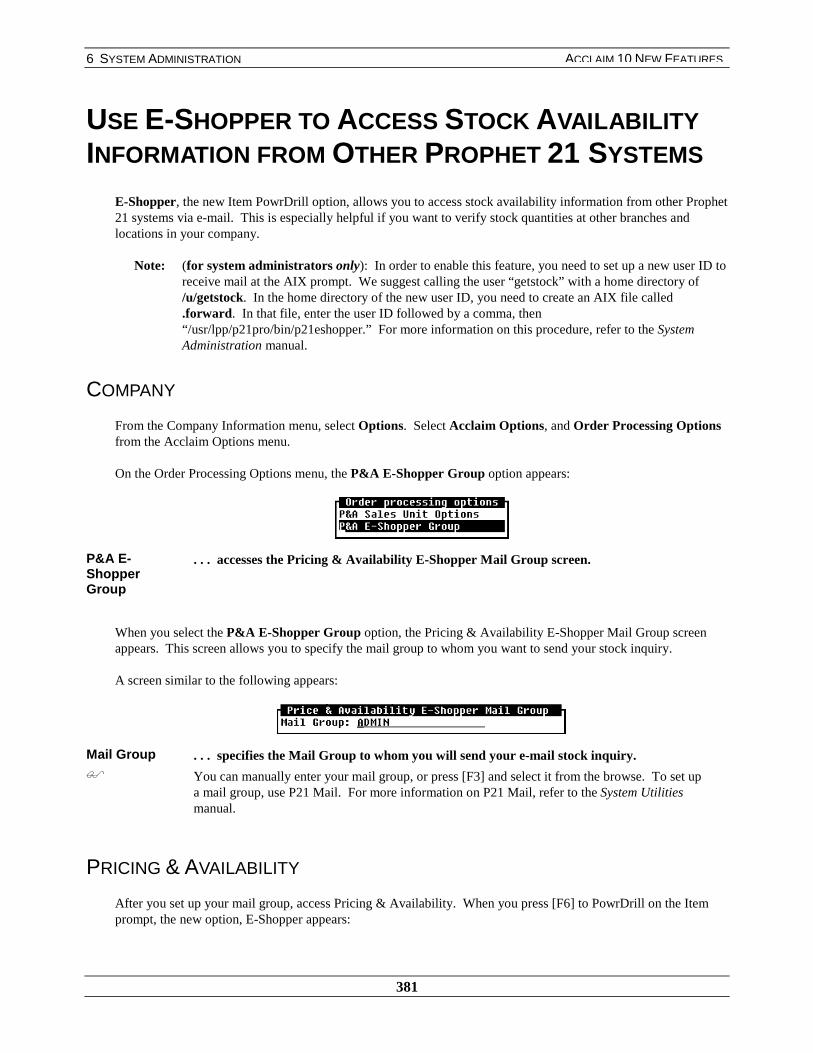
6 SYSTEM ADMINISTRATION
381
ACCLAIM 10 NEW FEATURES
USE E-SHOPPER TO ACCESS STOCK AVAILABILITYINFORMATION FROM OTHER PROPHET 21 SYSTEMS
E-Shopper, the new Item PowrDrill option, allows you to access stock availability information from other Prophet21 systems via e-mail. This is especially helpful if you want to verify stock quantities at other branches andlocations in your company.
Note: (for system administrators only): In order to enable this feature, you need to set up a new user ID toreceive mail at the AIX prompt. We suggest calling the user “getstock” with a home directory of/u/getstock. In the home directory of the new user ID, you need to create an AIX file called.forward. In that file, enter the user ID followed by a comma, then“/usr/lpp/p21pro/bin/p21eshopper.” For more information on this procedure, refer to the SystemAdministration manual.
COMPANY
From the Company Information menu, select Options. Select Acclaim Options, and Order Processing Optionsfrom the Acclaim Options menu.
On the Order Processing Options menu, the P&A E-Shopper Group option appears:
P&A E-ShopperGroup
. . . accesses the Pricing & Availability E-Shopper Mail Group screen.
When you select the P&A E-Shopper Group option, the Pricing & Availability E-Shopper Mail Group screenappears. This screen allows you to specify the mail group to whom you want to send your stock inquiry.
A screen similar to the following appears:
Mail Group$
. . . specifies the Mail Group to whom you will send your e-mail stock inquiry.
You can manually enter your mail group, or press [F3] and select it from the browse. To set upa mail group, use P21 Mail. For more information on P21 Mail, refer to the System Utilitiesmanual.
PRICING & AVAILABILITY
After you set up your mail group, access Pricing & Availability. When you press [F6] to PowrDrill on the Itemprompt, the new option, E-Shopper appears:

6 SYSTEM ADMINISTRATION
382
ACCLAIM 10 NEW FEATURES
E-Shopper . . . sends an e-mail stock availability inquiry to the selected Mail Group.
When you select this option, the system automatically e-mails the recipients in the Mail Groupto verify the available stock of the selected item in their Prophet 21 systems.
After you select E-Shopper and the system sends the e-mail message, the Prophet 21 systems included in the MailGroup automatically send an e-mail in return, indicating the stock quantity of the specific item.
For example, your Mail Group is called Admin, and includes the e-mail addresses of the Philadelphiaand Pittsburgh branches in your company. The item you select in Pricing & Availability is RotaryScrew. When you PowrDrill on this item and select E-Shopper, the system automatically sends an e-mail to the Philadelphia and Pittsburgh branches to inquire about their stock availability of the RotaryScrew.
The Prophet 21 systems in the Philadelphia and Pittsburgh branches automatically send an e-mail inresponse, stating the quantity of the Rotary Screw. If the Philadelphia branch has 374 Rotary Screws,the message from the Philadelphia branch is: Rotary Screw 374. If the Pittsburgh branch has 150Rotary Screws, the message from the Pittsburgh branch is: Rotary Screw 150.
P21 MAIL
In the e-mail message you receive from the systems included in the Mail Group, GETSTOCK appears in theSubject field, and the name and quantity of the item appears in the Text field.
The message looks similar to the following:
E-Shopper
appears.
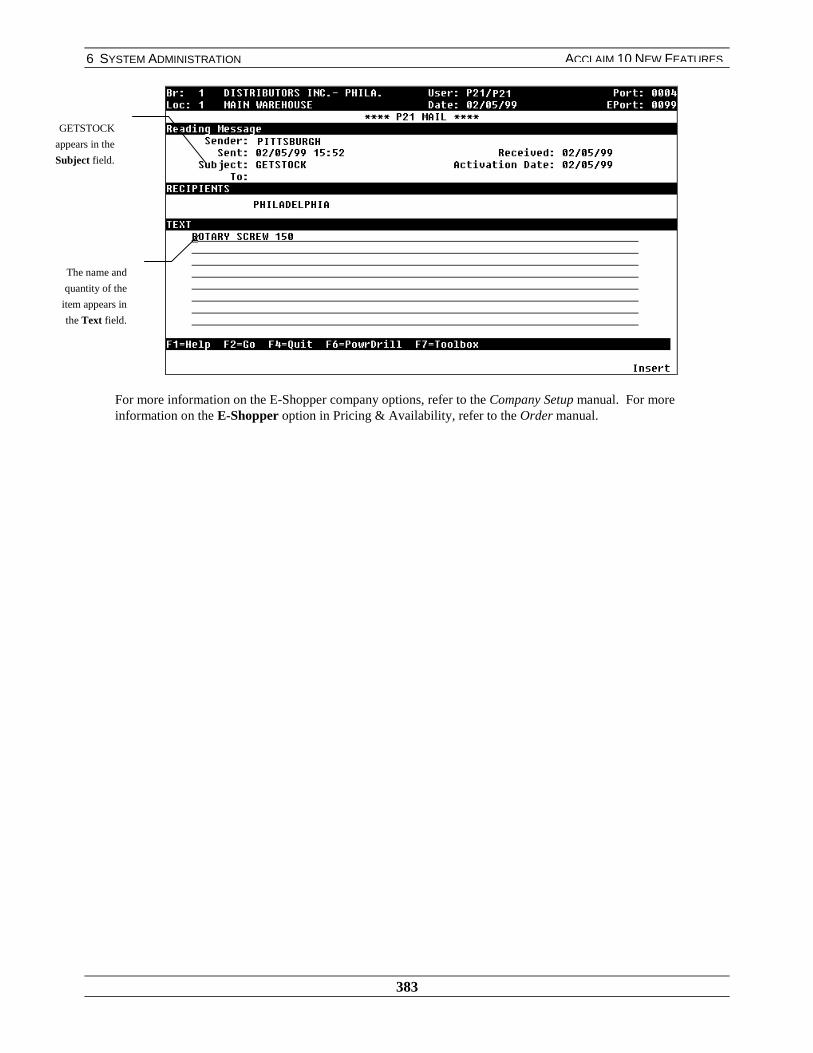
6 SYSTEM ADMINISTRATION
383
ACCLAIM 10 NEW FEATURES
For more information on the E-Shopper company options, refer to the Company Setup manual. For moreinformation on the E-Shopper option in Pricing & Availability, refer to the Order manual.
GETSTOCK
appears in the
Subject field.
The name and
quantity of the
item appears in
the Text field.
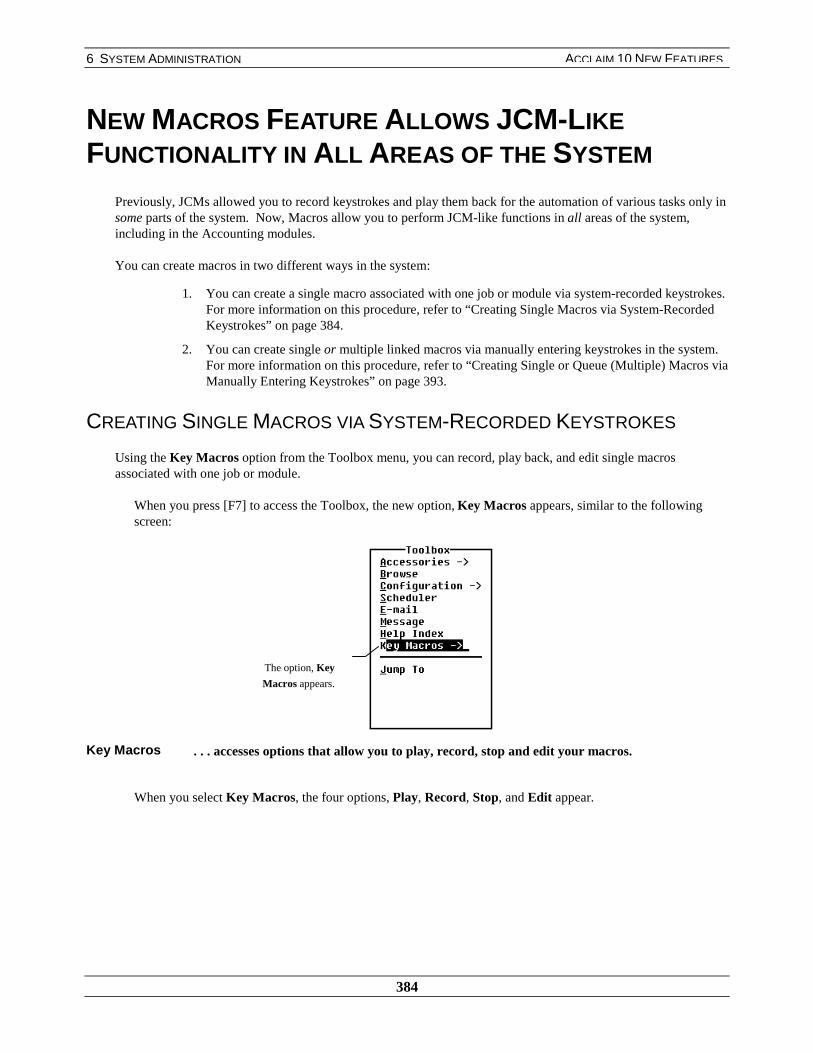
6 SYSTEM ADMINISTRATION
384
ACCLAIM 10 NEW FEATURES
NEW MACROS FEATURE ALLOWS JCM-LIKEFUNCTIONALITY IN ALL AREAS OF THE SYSTEM
Previously, JCMs allowed you to record keystrokes and play them back for the automation of various tasks only insome parts of the system. Now, Macros allow you to perform JCM-like functions in all areas of the system,including in the Accounting modules.
You can create macros in two different ways in the system:
1. You can create a single macro associated with one job or module via system-recorded keystrokes.For more information on this procedure, refer to “Creating Single Macros via System-RecordedKeystrokes” on page 384.
2. You can create single or multiple linked macros via manually entering keystrokes in the system.For more information on this procedure, refer to “Creating Single or Queue (Multiple) Macros viaManually Entering Keystrokes” on page 393.
CREATING SINGLE MACROS VIA SYSTEM-RECORDED KEYSTROKES
Using the Key Macros option from the Toolbox menu, you can record, play back, and edit single macrosassociated with one job or module.
When you press [F7] to access the Toolbox, the new option, Key Macros appears, similar to the followingscreen:
Key Macros . . . accesses options that allow you to play, record, stop and edit your macros.
When you select Key Macros, the four options, Play, Record, Stop, and Edit appear.
The option, Key
Macros appears.
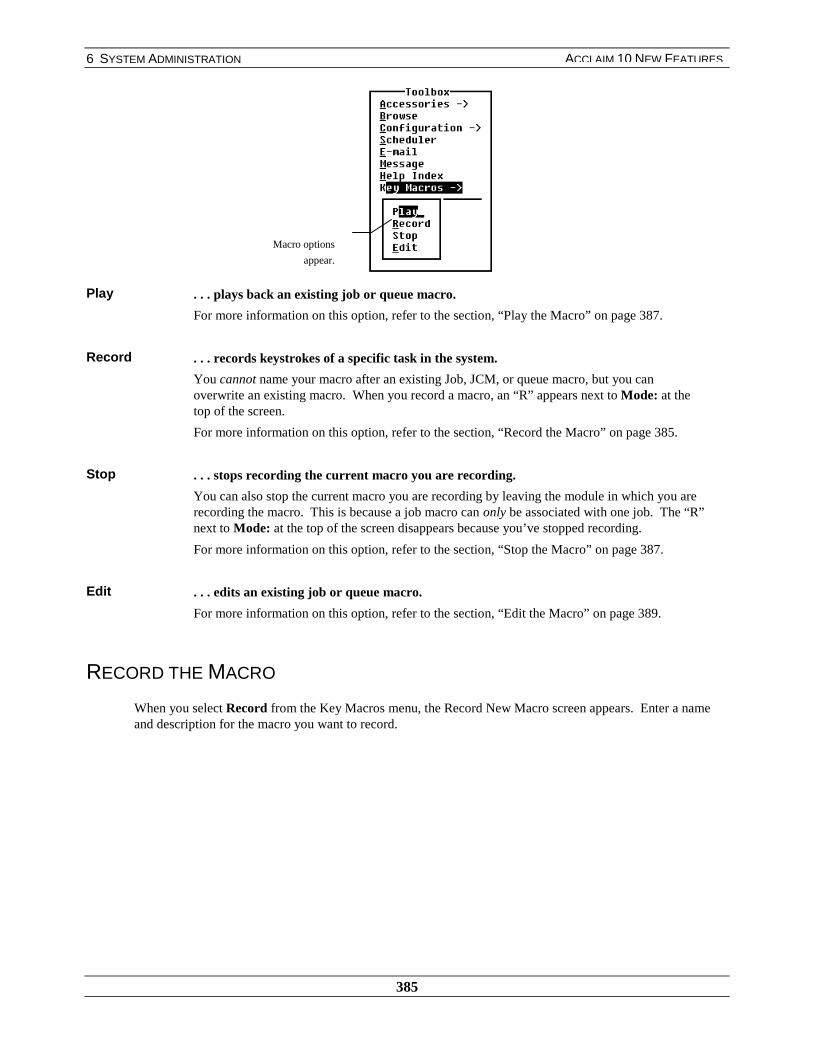
6 SYSTEM ADMINISTRATION
385
ACCLAIM 10 NEW FEATURES
Play . . . plays back an existing job or queue macro.
For more information on this option, refer to the section, “Play the Macro” on page 387.
Record . . . records keystrokes of a specific task in the system.
You cannot name your macro after an existing Job, JCM, or queue macro, but you canoverwrite an existing macro. When you record a macro, an “R” appears next to Mode: at thetop of the screen.
For more information on this option, refer to the section, “Record the Macro” on page 385.
Stop . . . stops recording the current macro you are recording.
You can also stop the current macro you are recording by leaving the module in which you arerecording the macro. This is because a job macro can only be associated with one job. The “R”next to Mode: at the top of the screen disappears because you’ve stopped recording.
For more information on this option, refer to the section, “Stop the Macro” on page 387.
Edit . . . edits an existing job or queue macro.
For more information on this option, refer to the section, “Edit the Macro” on page 389.
RECORD THE MACRO
When you select Record from the Key Macros menu, the Record New Macro screen appears. Enter a nameand description for the macro you want to record.
Macro options
appear.

6 SYSTEM ADMINISTRATION
386
ACCLAIM 10 NEW FEATURES
A screen similar to the following appears:
Macro . . . a 10-character field that specifies the name of the macro you want to record.For example, if want to record running the Unallocated Payments Report, you can enterUNALLOC in the Macro field.
Desc . . . a 40-character field that describes the macro you want to record.For example, if want to record running the Unallocated Payments Report, you can enterUNALLOCATED PAYMENTS REPORT in the Desc field.
After you name and describe the macro, press [Enter] to start recording it.
For example, if you want to record the Unallocated Payments Report, run the report accordingly.
An “R” appears next to the Mode: field, similar to the following screen:
R Mode
appears when
you record a
macro.

6 SYSTEM ADMINISTRATION
387
ACCLAIM 10 NEW FEATURES
STOP THE MACRO
After you have finished the task for the macro or you just want to stop recording it, exit the module in which youare recording the macro, or select the Stop option from the Key Macros menu.
When you stop a macro, the system prompts you with a message similar to the following:
The macro includes all keystrokes you entered up until you stopped recording it.
Note: After you stop the macro, R Mode disappears on the top right side of the screen.
PLAY THE MACRO
After you’ve recorded the macro, you can play it back by typing the name of the macro at the jump to box, or byselecting the Play option on the Key Macros menu.
When you select Play, the Macro Browse screen appears, similar to the following screen:
Name . . . name of the macro.

6 SYSTEM ADMINISTRATION
388
ACCLAIM 10 NEW FEATURES
Type . . . type of the macro.
There are two types of macros, Job and Queue.
Job – a single macro associated with a job or module.
Queue – multiple macros that run in sequence. To create queue macros, use the Macrosmodule.
For more information on creating queue macros, refer to the section, “Queue Macros (MultipleMacros)” on page 396.
Job . . . job or module that the macros affect.
If the macro is a job macro, this field lists the job or module in which the macro was created.For example, if your macro runs the Unallocated Payments Report,“Receivables” appears in the Job field because this report is run in theReceivables module.
If the macro is a queue macro, this field remains blank, because a queue macro can consist ofmultiple jobs and/or modules.
Desc . . . description of the macro.
When you select [Tab] to reindex the browse, a screen similar to the following appears:
You can reindex the browse in the following ways:
Name . . . by name.
Job . . . by job.
This option reindexes the browse by the job or module that each macro affects.
For example, if 5 macros affect the Company module, Company is listed 5 separate times (nextto each respective macro).
Type . . . by type.
Job… . . . by each unique job.
This option only lists the unique names of the jobs or modules that the macros affect.
For example, if 5 macros affect the Company module, Company is only listed once.
You can also access the Macro Maintenance screen from the Macro Browse by pressing [F6] to PowrDrill on amacro.
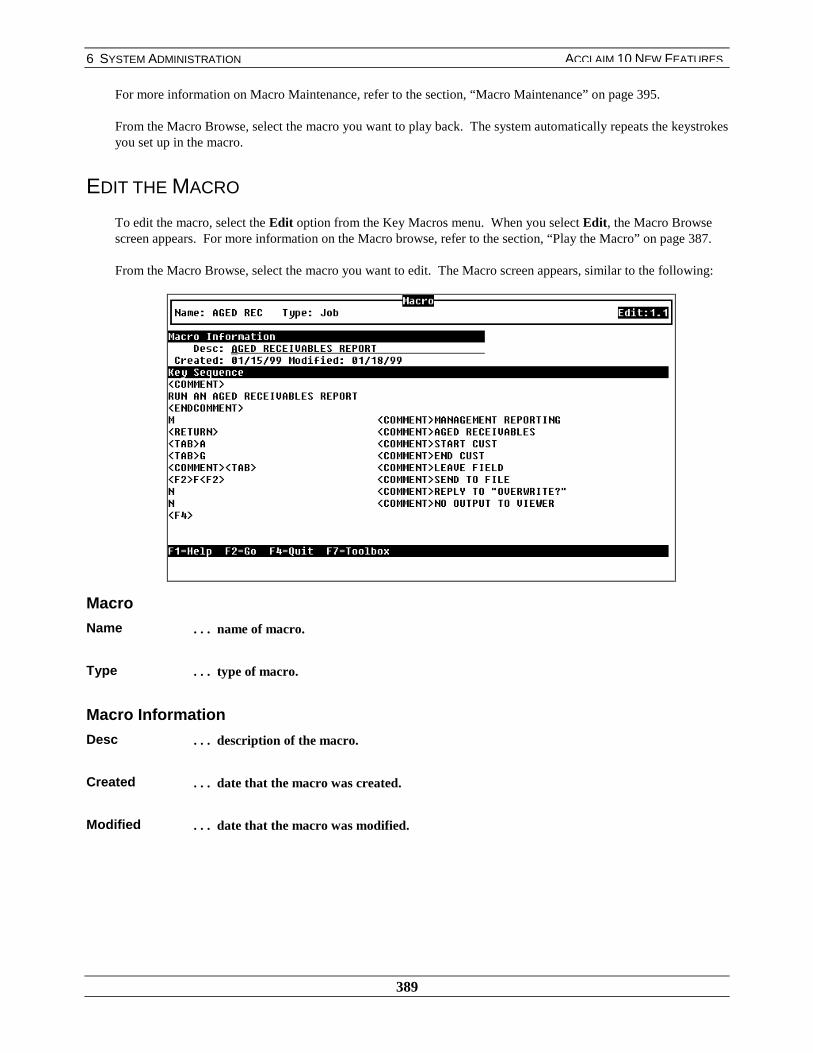
6 SYSTEM ADMINISTRATION
389
ACCLAIM 10 NEW FEATURES
For more information on Macro Maintenance, refer to the section, “Macro Maintenance” on page 395.
From the Macro Browse, select the macro you want to play back. The system automatically repeats the keystrokesyou set up in the macro.
EDIT THE MACRO
To edit the macro, select the Edit option from the Key Macros menu. When you select Edit, the Macro Browsescreen appears. For more information on the Macro browse, refer to the section, “Play the Macro” on page 387.
From the Macro Browse, select the macro you want to edit. The Macro screen appears, similar to the following:
Macro
Name . . . name of macro.
Type . . . type of macro.
Macro Information
Desc . . . description of the macro.
Created . . . date that the macro was created.
Modified . . . date that the macro was modified.

6 SYSTEM ADMINISTRATION
390
ACCLAIM 10 NEW FEATURES
KeySequence$
. . . keystrokes that define the macro.
The left side of the Key Sequence field displays the actual keystrokes that make up the macro.The right side displays any comments you insert about the corresponding keystrokes. You canbrowse on this field to select “token” keys, or special keys like F2, ESC, or RETURN.
For more information on this option, refer to the section, “Key Sequence Field” on page 390.
KEY SEQUENCE FIELD
The Key Sequence field on the Macro screen displays the keystrokes that define the macro and any comments youinsert about those keystrokes. Special keys, (e.g. F2, ESCAPE, RETURN) are referred to as tokens, and aresurrounded by the greater than and less than signs <>.
For example, if your macro describes printing the Aged Receivables Report, the first keystroke couldbe pressing [M] from the Receivables module to select Management Reporting. Therefore, “M”appears as the first keystroke on the left side of the Key Sequence field. On the right side, yourcomment could be “Management Reporting.”
The first line of the Key Sequence field would appear as follows:
M <COMMENT> MANAGEMENT REPORTING
Because Aged Receivables Report is the first option on the Management Reporting menu, your nextkeystroke is pressing [Return] to select this option. Therefore, <RETURN> appears as the nextkeystroke on the left side of Key Sequence. On the right side, your comment could be “AgedReceivables Report.”
The second line of the Key Sequence field would appear as follows:
<RETURN> <COMMENT> AGED RECEIVABLES REPORT
In the Key Sequence field, you can type and delete text as needed. When you type the name of a token, thesystem completes its name after you enter one or two characters. For example, after you type the following: <D,the system automatically enters <DOWN>.
Note: If you manually type the keystrokes, be sure to include the greater than and less than signs <> aroundthe “token” keys. For example, if you want to type “Return” as a keystroke, type the following:<RETURN>.
You can also browse for a list of tokens by pressing [F3].

6 SYSTEM ADMINISTRATION
391
ACCLAIM 10 NEW FEATURES
When you press [F3] to browse, a screen similar to the following appears:
Function Keys
<F1> . . . inserts the F1 key token in the key sequence.
<F2> . . . inserts the F2 key token in the key sequence.
<F3> . . . inserts the F3 key token in the key sequence.
<F4> . . . inserts the F4 key token in the key sequence.
<F6> . . . inserts the F6 key token in the key sequence.
<F7> . . . inserts the F7 key token in the key sequence.
<F8> . . . inserts the F8 key token in the key sequence.
<ESCAPE> . . . inserts the Escape key token in the key sequence.
Navigation
<UP> . . . inserts the up arrow key token in the key sequence.

6 SYSTEM ADMINISTRATION
392
ACCLAIM 10 NEW FEATURES
<DOWN> . . . inserts the down arrow key token in the key sequence.
<LEFT> . . . inserts the left arrow key token in the key sequence.
<RIGHT> . . . inserts the right arrow key token in the key sequence.
<HOME> . . . inserts the Home key token in the key sequence.
<END> . . . inserts the End key token in the key sequence.
<PGUP> . . . inserts the Page Up key token in the key sequence.
<PGDOWN> . . . inserts the Page Dn key token in the key sequence.
Edit
<INSERT> . . . inserts the Insert key token in the key sequence.
<DELETE> . . . inserts the Delete key token in the key sequence.
<BACKSPACE> . . . inserts the Backspace key token in the key sequence.
<TAB> . . . inserts the Tab key token in the key sequence.
<BACKTAB> . . . inserts the token that represents pressing the Shift and Tab keys to enter abackwards Tab in the key sequence.
<RETURN> . . . inserts the Return, or Enter key token in the key sequence.
<SPACE> . . . inserts the Space Bar key token in the key sequence.
Comments
<COMMENT> . . . inserts the <COMMENT> token.
Insert the <COMMENT> token before any comments, or description of thecorresponding keystroke.
For example, if the keystroke is <RETURN> for selecting the AgedReceivables Report, the comment could be “Aged ReceivablesReport.”
The comments should appear on the right side of the corresponding keystroke.
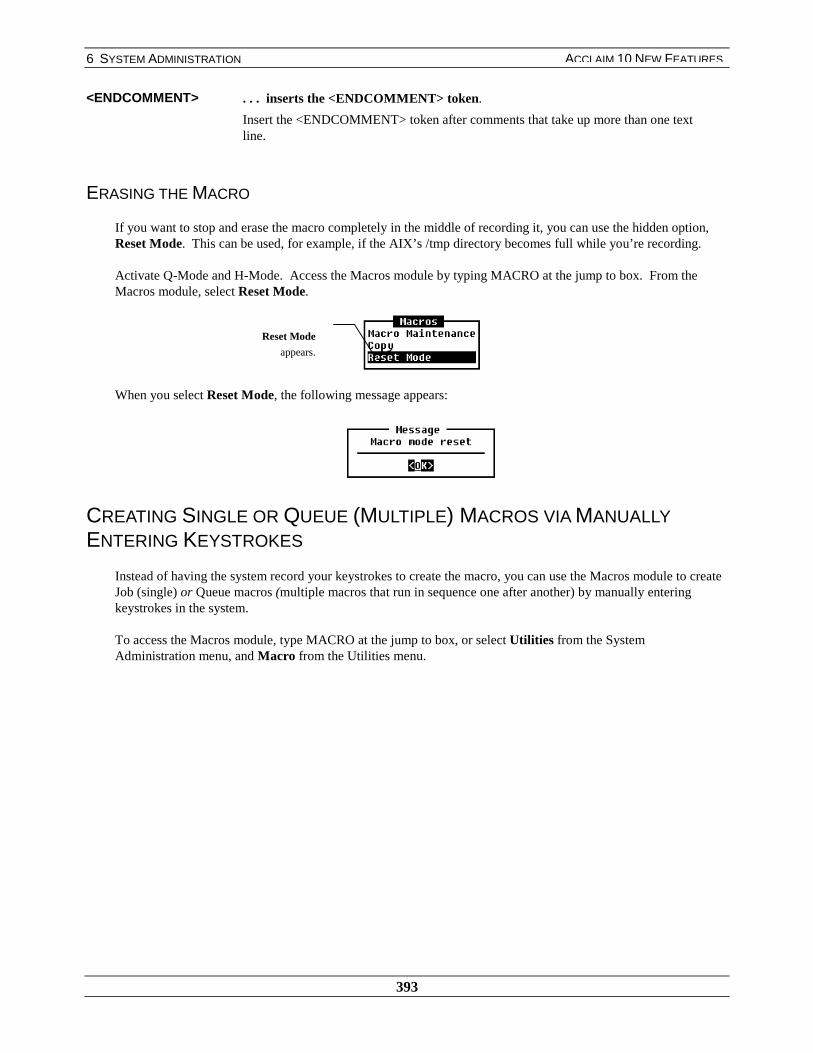
6 SYSTEM ADMINISTRATION
393
ACCLAIM 10 NEW FEATURES
<ENDCOMMENT> . . . inserts the <ENDCOMMENT> token.
Insert the <ENDCOMMENT> token after comments that take up more than one textline.
ERASING THE MACRO
If you want to stop and erase the macro completely in the middle of recording it, you can use the hidden option,Reset Mode. This can be used, for example, if the AIX’s /tmp directory becomes full while you’re recording.
Activate Q-Mode and H-Mode. Access the Macros module by typing MACRO at the jump to box. From theMacros module, select Reset Mode.
When you select Reset Mode, the following message appears:
CREATING SINGLE OR QUEUE (MULTIPLE) MACROS VIA MANUALLYENTERING KEYSTROKES
Instead of having the system record your keystrokes to create the macro, you can use the Macros module to createJob (single) or Queue macros (multiple macros that run in sequence one after another) by manually enteringkeystrokes in the system.
To access the Macros module, type MACRO at the jump to box, or select Utilities from the SystemAdministration menu, and Macro from the Utilities menu.
Reset Mode
appears.

6 SYSTEM ADMINISTRATION
394
ACCLAIM 10 NEW FEATURES
Macro . . . accesses the Macros module.
The Macros module appears, similar to the following screen:
Macros
Macro Maintenance . . . accesses the Macros screen.
On the Macros screen, you can view, edit, add, and delete macros. You can also set upqueue macros and manually enter the keystrokes for both your job or queue macros.
For more information on this option, refer to page 395.
6HOHFW�0DFUR
IURP�WKH
8WLOLWLHV�PHQX�
7KH�0DFURV
PHQX�DSSHDUV�

6 SYSTEM ADMINISTRATION
395
ACCLAIM 10 NEW FEATURES
Copy . . . accesses the Copy Macro screen.
On the Copy Macro screen, you can copy an existing macro to a new macro. Thisallows you to create similar macros quickly.
For more information on this option, refer to page 398.
MACRO MAINTENANCE
The Macro screen that appears when you select the Macro Maintenance option is the same screen that appearsvia the Edit option on the Key Macros menu. However, when you access this screen via the Macros module, youcan view, add, edit, and delete macros, like the other maintenance screens throughout the system. You can alsocreate queue macros, and manually enter, instead of record the keystrokes for the macro.
The Macro screen appears in View mode, similar to the following:
Like other maintenance screens, press [Ctrl] [E] or the down arrow key to access Edit mode.
View mode
appears.
Access Edit
mode.

6 SYSTEM ADMINISTRATION
396
ACCLAIM 10 NEW FEATURES
When you press [Delete] to delete a macro, the system prompts you with the following message:
From View mode, Press [Insert] to enter a new macro and access Add Mode.
JOB MACROS (SINGLE MACROS)
Complete the parameters on the Macro screen as you did via the Edit option from the Key Macros menu. Verifythat Job is entered in the Type field. On the line next to the Type field, enter the job or module in which you arecreating the macro. In the Key Sequence field, type the keystrokes of your macro. To browse for tokens, press[F3].
After you create your macro, you can play it back and edit it as needed.
QUEUE MACROS (MULTIPLE MACROS)
Similar to JCMs, you can link one macro after another by creating a queue macro.
In the Type field on the Macro screen, press [F3] and select Queue.
Access
Add
mode.

6 SYSTEM ADMINISTRATION
397
ACCLAIM 10 NEW FEATURES
The Queue field appears, replacing the Key Sequence field, similar to the following screen:
Queue$
. . . defines the macros that are included in the queue.
In the Queue field, enter the names of the macros you want to include in the queue.
The name of the macro and its description appear in the Queue field, similar to the following screen:
Select
Queue.
The Queue field
appears.

6 SYSTEM ADMINISTRATION
398
ACCLAIM 10 NEW FEATURES
When you run the queue macro, the single macros you have included in the queue run in sequence. This isespecially helpful for end of day procedures.
COPYING MACROS
If you want to create similar macros, you can copy an existing macro to a new one. You can then easily edit thenew macro as needed.
When you select the Copy option from the Macros menu, a screen similar to the following appears:
From: . . . the name of the existing macro you want to copy.
To: . . . the name of the new macro to which you want to copy the existing macro.
7KH�&RS\
0DFUR�VFUHHQ
DSSHDUV�
Name and
description of
macros appear.
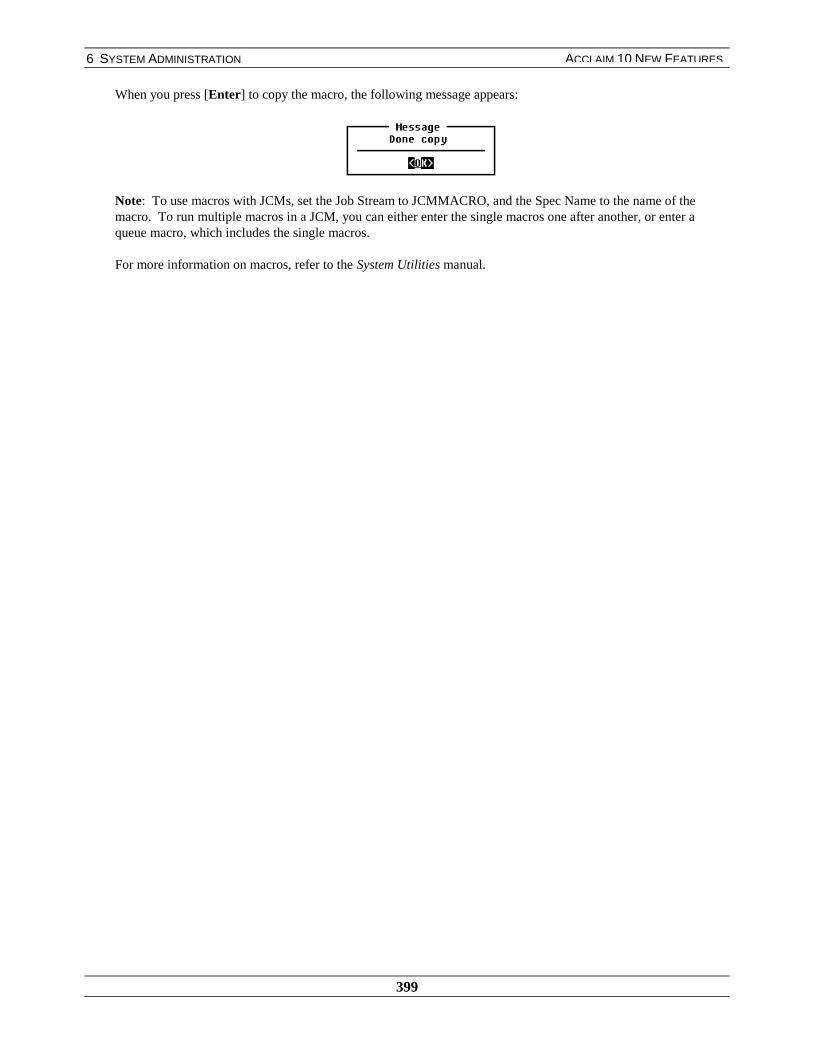
6 SYSTEM ADMINISTRATION
399
ACCLAIM 10 NEW FEATURES
When you press [Enter] to copy the macro, the following message appears:
Note: To use macros with JCMs, set the Job Stream to JCMMACRO, and the Spec Name to the name of themacro. To run multiple macros in a JCM, you can either enter the single macros one after another, or enter aqueue macro, which includes the single macros.
For more information on macros, refer to the System Utilities manual.
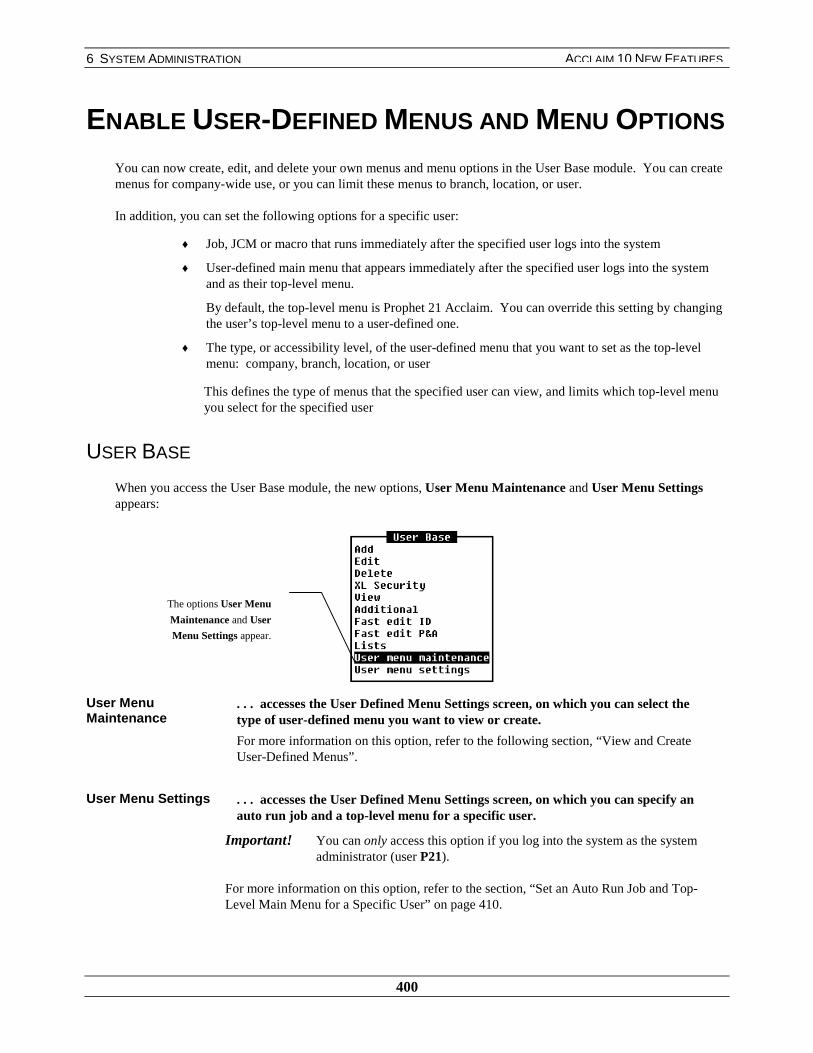
6 SYSTEM ADMINISTRATION
400
ACCLAIM 10 NEW FEATURES
ENABLE USER-DEFINED MENUS AND MENU OPTIONS
You can now create, edit, and delete your own menus and menu options in the User Base module. You can createmenus for company-wide use, or you can limit these menus to branch, location, or user.
In addition, you can set the following options for a specific user:
♦ Job, JCM or macro that runs immediately after the specified user logs into the system
♦ User-defined main menu that appears immediately after the specified user logs into the systemand as their top-level menu.
By default, the top-level menu is Prophet 21 Acclaim. You can override this setting by changingthe user’s top-level menu to a user-defined one.
♦ The type, or accessibility level, of the user-defined menu that you want to set as the top-levelmenu: company, branch, location, or user
This defines the type of menus that the specified user can view, and limits which top-level menuyou select for the specified user
USER BASE
When you access the User Base module, the new options, User Menu Maintenance and User Menu Settingsappears:
User MenuMaintenance
. . . accesses the User Defined Menu Settings screen, on which you can select thetype of user-defined menu you want to view or create.
For more information on this option, refer to the following section, “View and CreateUser-Defined Menus”.
User Menu Settings . . . accesses the User Defined Menu Settings screen, on which you can specify anauto run job and a top-level menu for a specific user.
Important! You can only access this option if you log into the system as the systemadministrator (user P21).
For more information on this option, refer to the section, “Set an Auto Run Job and Top-Level Main Menu for a Specific User” on page 410.
The options User Menu
Maintenance and User
Menu Settings appear.
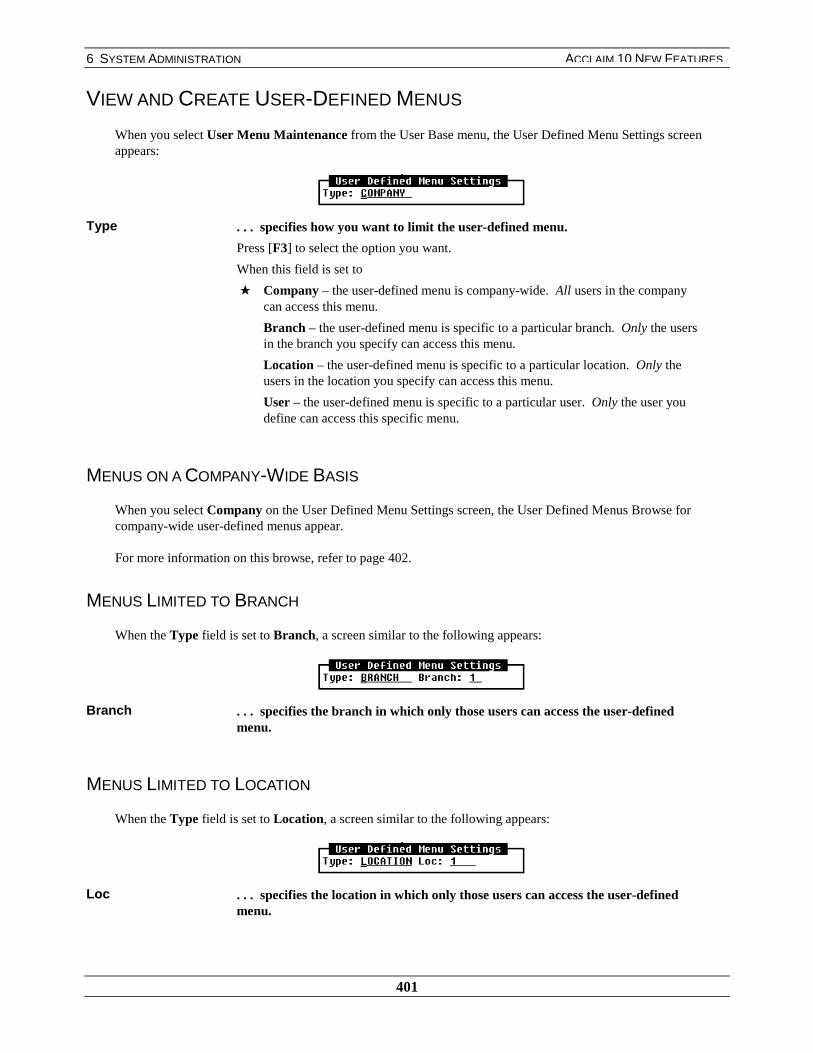
6 SYSTEM ADMINISTRATION
401
ACCLAIM 10 NEW FEATURES
VIEW AND CREATE USER-DEFINED MENUS
When you select User Menu Maintenance from the User Base menu, the User Defined Menu Settings screenappears:
Type . . . specifies how you want to limit the user-defined menu.
Press [F3] to select the option you want.
When this field is set to
★ Company – the user-defined menu is company-wide. All users in the companycan access this menu.
Branch – the user-defined menu is specific to a particular branch. Only the usersin the branch you specify can access this menu.
Location – the user-defined menu is specific to a particular location. Only theusers in the location you specify can access this menu.
User – the user-defined menu is specific to a particular user. Only the user youdefine can access this specific menu.
MENUS ON A COMPANY-WIDE BASIS
When you select Company on the User Defined Menu Settings screen, the User Defined Menus Browse forcompany-wide user-defined menus appear.
For more information on this browse, refer to page 402.
MENUS LIMITED TO BRANCH
When the Type field is set to Branch, a screen similar to the following appears:
Branch . . . specifies the branch in which only those users can access the user-definedmenu.
MENUS LIMITED TO LOCATION
When the Type field is set to Location, a screen similar to the following appears:
Loc . . . specifies the location in which only those users can access the user-definedmenu.

6 SYSTEM ADMINISTRATION
402
ACCLAIM 10 NEW FEATURES
MENUS LIMITED TO USER
When the Type field is set to User, a screen similar to the following appears:
User . . . specifies the user who can access the user-defined menu.
After you set your menu settings and press [Enter], the User Defined Menus Browse appears for the type of user-defined menu you selected.
For example, you select Location in the Type field and 2 in the Loc field on the User Defined MenuSettings screen. When you create a menu from the User Defined Menu Browse, that menu is specificto location 2. You can only view that menu in the browse when you select location 2 on the UserDefined Menu Settings screen.
For example, the following screen displays location-specific user-defined menus:
Name . . . contents from the Run Name field on the User Defined Menu Maintenancescreen for the selected job.
For more information on the Run Name field, refer to page 404.
Title . . . contents of the Title field on the User Defined Menu Maintenance screen forthe selected job.
For more information on the Title field, refer to page 404.
Desc . . . contents of the Description field on the User Defined Menu Maintenancescreen for the selected job.
For more information on the Description field, refer to page 404.
Menus for
Location 1
appear.
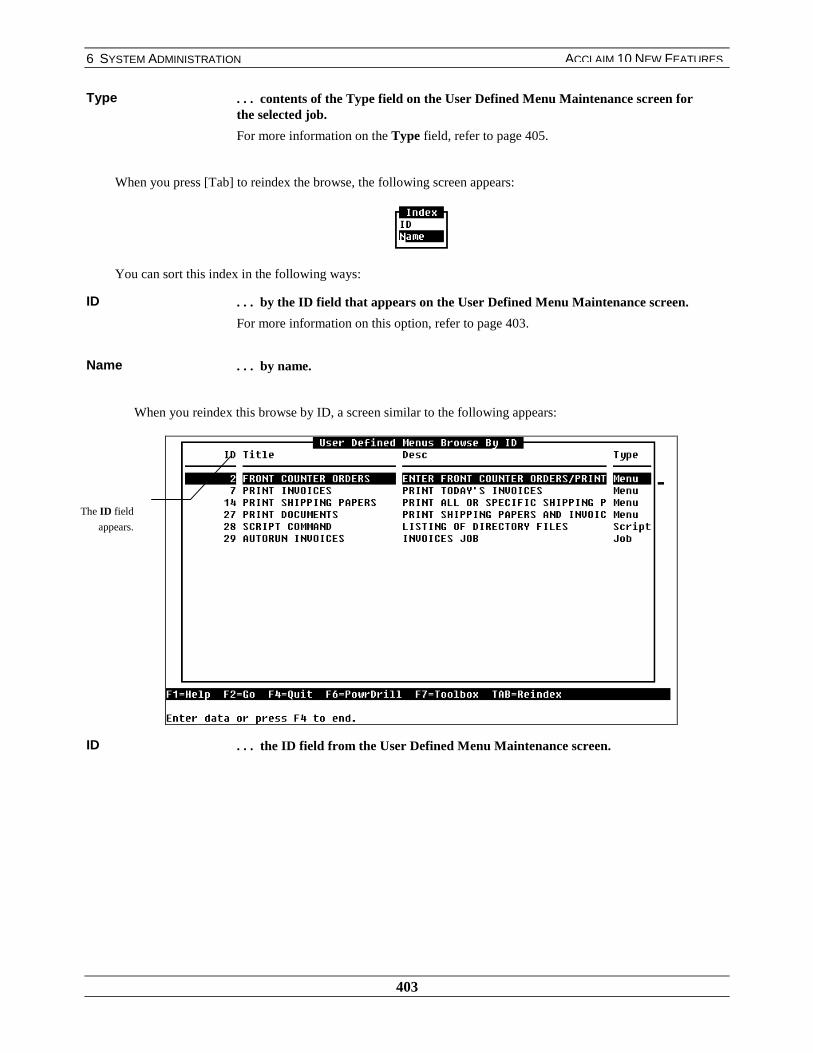
6 SYSTEM ADMINISTRATION
403
ACCLAIM 10 NEW FEATURES
Type . . . contents of the Type field on the User Defined Menu Maintenance screen forthe selected job.
For more information on the Type field, refer to page 405.
When you press [Tab] to reindex the browse, the following screen appears:
You can sort this index in the following ways:
ID . . . by the ID field that appears on the User Defined Menu Maintenance screen.
For more information on this option, refer to page 403.
Name . . . by name.
When you reindex this browse by ID, a screen similar to the following appears:
ID . . . the ID field from the User Defined Menu Maintenance screen.
The ID field
appears.
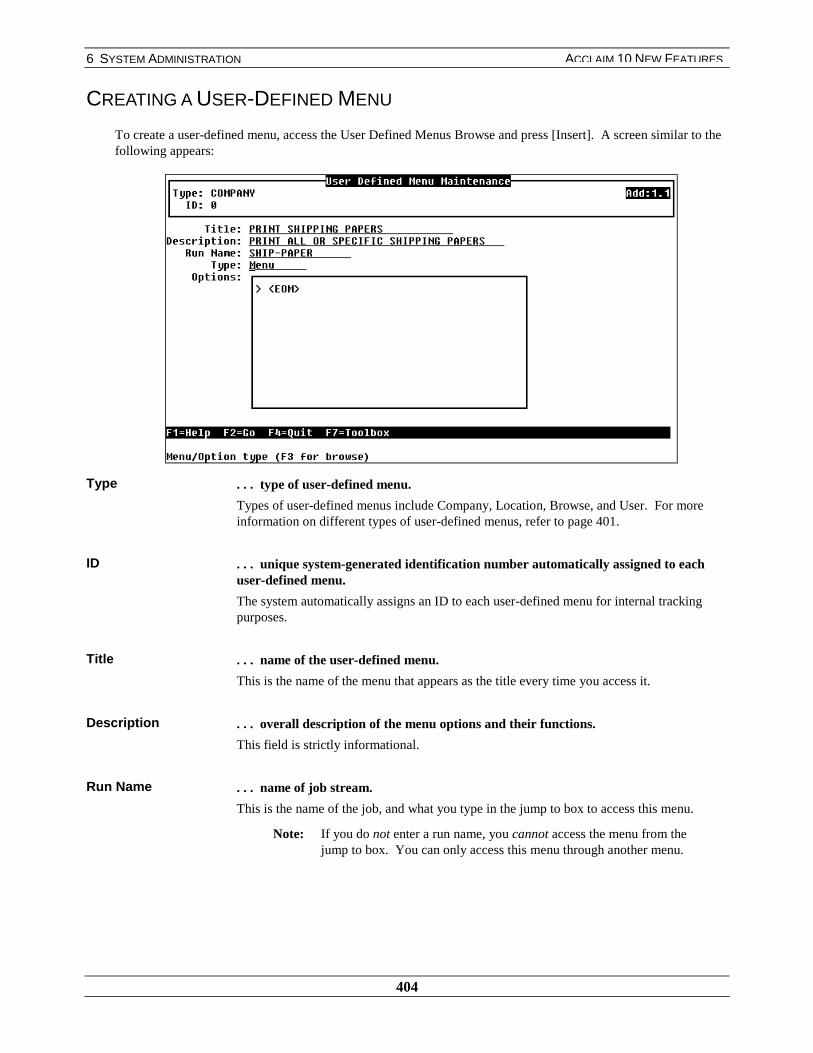
6 SYSTEM ADMINISTRATION
404
ACCLAIM 10 NEW FEATURES
CREATING A USER-DEFINED MENU
To create a user-defined menu, access the User Defined Menus Browse and press [Insert]. A screen similar to thefollowing appears:
Type . . . type of user-defined menu.
Types of user-defined menus include Company, Location, Browse, and User. For moreinformation on different types of user-defined menus, refer to page 401.
ID . . . unique system-generated identification number automatically assigned to eachuser-defined menu.
The system automatically assigns an ID to each user-defined menu for internal trackingpurposes.
Title . . . name of the user-defined menu.
This is the name of the menu that appears as the title every time you access it.
Description . . . overall description of the menu options and their functions.
This field is strictly informational.
Run Name . . . name of job stream.
This is the name of the job, and what you type in the jump to box to access this menu.
Note: If you do not enter a run name, you cannot access the menu from thejump to box. You can only access this menu through another menu.
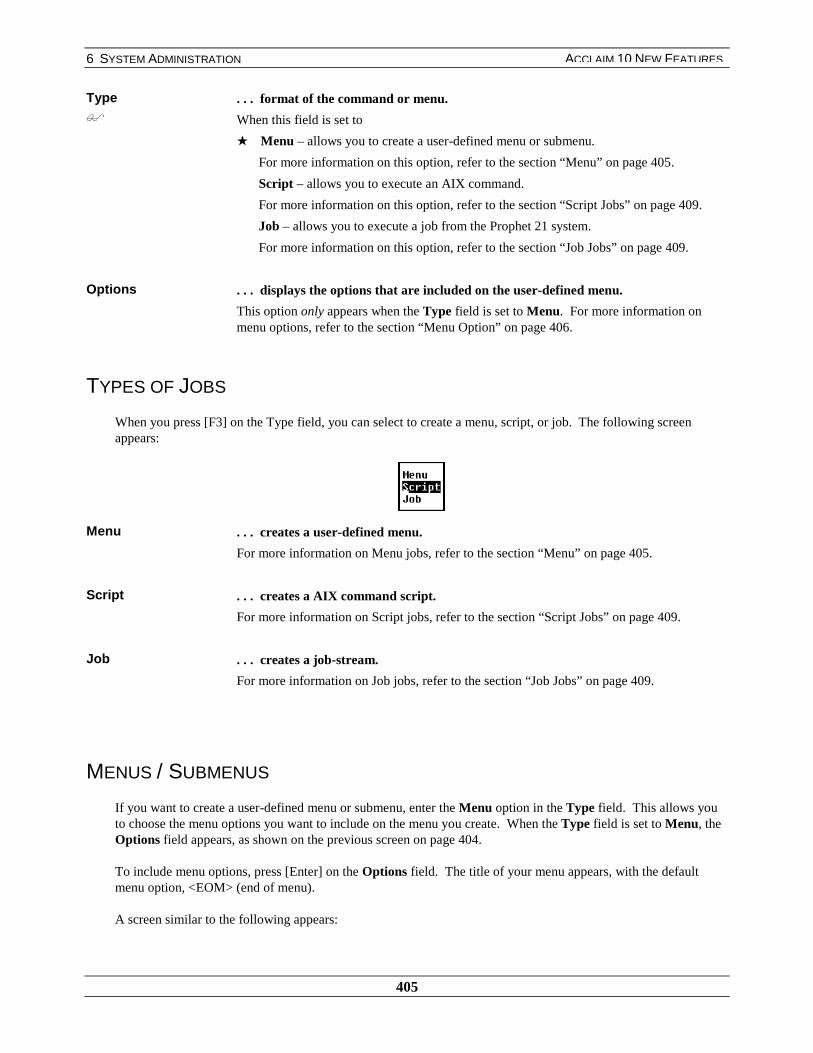
6 SYSTEM ADMINISTRATION
405
ACCLAIM 10 NEW FEATURES
Type$
. . . format of the command or menu.
When this field is set to
★ Menu – allows you to create a user-defined menu or submenu.
For more information on this option, refer to the section “Menu” on page 405.
Script – allows you to execute an AIX command.
For more information on this option, refer to the section “Script Jobs” on page 409.
Job – allows you to execute a job from the Prophet 21 system.
For more information on this option, refer to the section “Job Jobs” on page 409.
Options . . . displays the options that are included on the user-defined menu.
This option only appears when the Type field is set to Menu. For more information onmenu options, refer to the section “Menu Option” on page 406.
TYPES OF JOBS
When you press [F3] on the Type field, you can select to create a menu, script, or job. The following screenappears:
Menu . . . creates a user-defined menu.
For more information on Menu jobs, refer to the section “Menu” on page 405.
Script . . . creates a AIX command script.
For more information on Script jobs, refer to the section “Script Jobs” on page 409.
Job . . . creates a job-stream.
For more information on Job jobs, refer to the section “Job Jobs” on page 409.
MENUS / SUBMENUS
If you want to create a user-defined menu or submenu, enter the Menu option in the Type field. This allows youto choose the menu options you want to include on the menu you create. When the Type field is set to Menu, theOptions field appears, as shown on the previous screen on page 404.
To include menu options, press [Enter] on the Options field. The title of your menu appears, with the defaultmenu option, <EOM> (end of menu).
A screen similar to the following appears:

6 SYSTEM ADMINISTRATION
406
ACCLAIM 10 NEW FEATURES
To add menu options, press [Insert]. You have the option to either add existing menu options from the system, oruser-defined menus that you’ve already created.
The following screen appears:
User Option . . . accesses the User Defined Menus Browse.
When you press [Enter] to select an existing user-defined menu from this browse, yourexisting user-defined menu appears as an option on your new user-defined menu.
For example, your existing user-defined menu is called Print Range, which prints andreprints a range of shipping papers. Your new user-defined menu is called PrintShipping Papers. After you select Print Range, it becomes the new option on themenu, Print Shipping Papers.
For more information on this option, refer to page 406.
Menu Option . . . accesses the existing Prophet 21 menus, beginning with the main menu.
To access the menu options you want to include on your menu, access the appropriatemenu option and press [Space Bar]. An asterisk appears next to the option you selected,and this option is then included on your user-defined menu. If you select a menu optionand then want to delete it, press [Space Bar] again, and the option will be deleted fromthe menu.
For more information on this option, refer to the section “Adding Prophet 21 MenuOptions” on page 407.
EDITING MENU OPTIONS ON USER-DEFINED MENUS
You can edit the name and description of a menu option you’ve added to your user-defined menu by pressing[Ctrl] [E]. When you highlight a menu option and press [Ctrl] [E], a screen similar to the following appears:
The user-defined
menu appears.
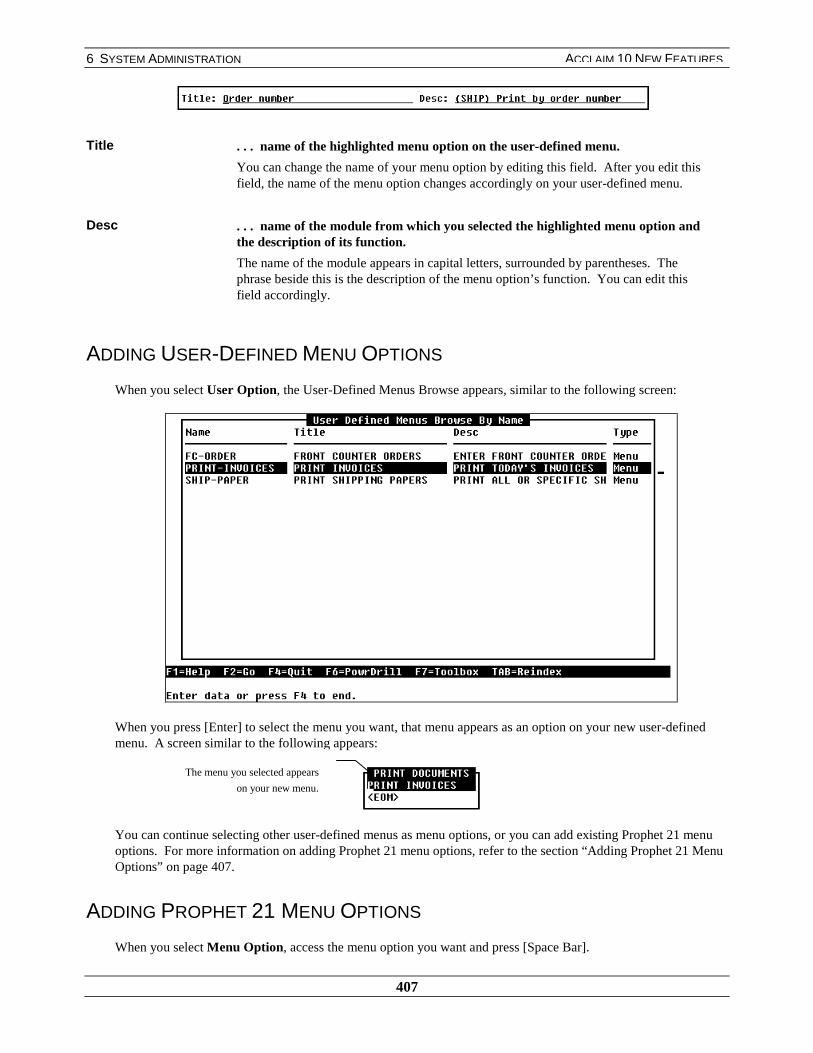
6 SYSTEM ADMINISTRATION
407
ACCLAIM 10 NEW FEATURES
Title . . . name of the highlighted menu option on the user-defined menu.
You can change the name of your menu option by editing this field. After you edit thisfield, the name of the menu option changes accordingly on your user-defined menu.
Desc . . . name of the module from which you selected the highlighted menu option andthe description of its function.
The name of the module appears in capital letters, surrounded by parentheses. Thephrase beside this is the description of the menu option’s function. You can edit thisfield accordingly.
ADDING USER-DEFINED MENU OPTIONS
When you select User Option, the User-Defined Menus Browse appears, similar to the following screen:
When you press [Enter] to select the menu you want, that menu appears as an option on your new user-definedmenu. A screen similar to the following appears:
You can continue selecting other user-defined menus as menu options, or you can add existing Prophet 21 menuoptions. For more information on adding Prophet 21 menu options, refer to the section “Adding Prophet 21 MenuOptions” on page 407.
ADDING PROPHET 21 MENU OPTIONS
When you select Menu Option, access the menu option you want and press [Space Bar].
The menu you selected appears
on your new menu.
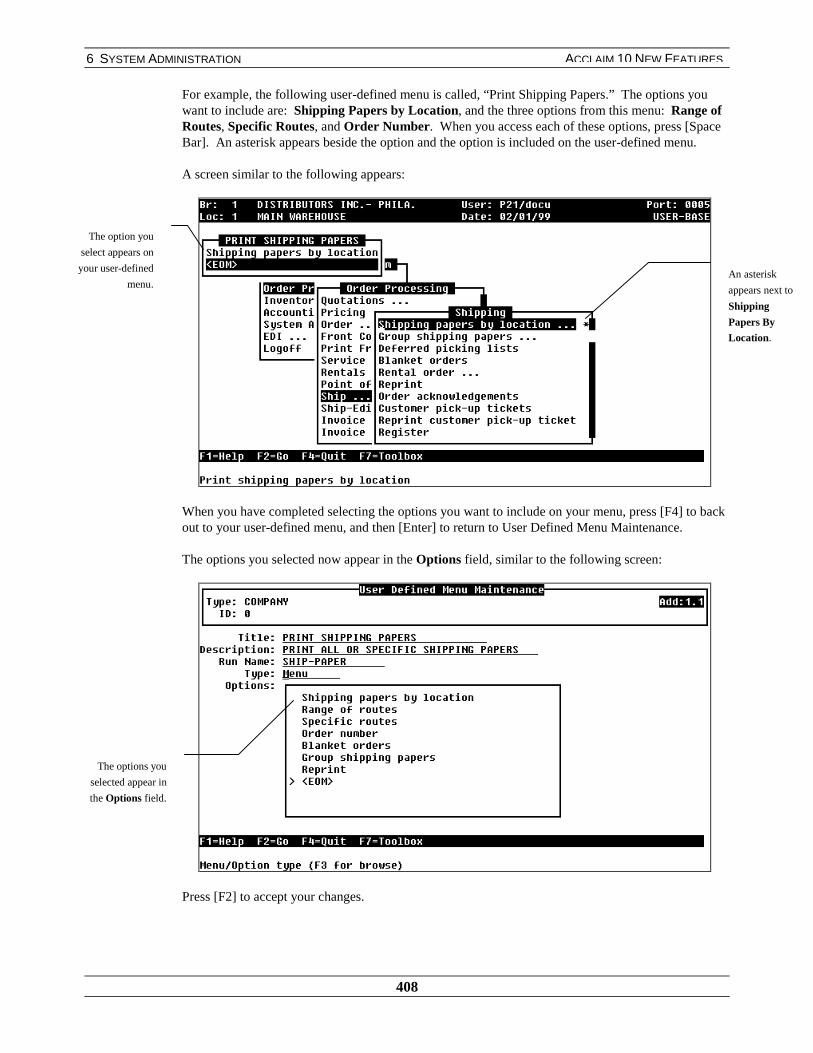
6 SYSTEM ADMINISTRATION
408
ACCLAIM 10 NEW FEATURES
For example, the following user-defined menu is called, “Print Shipping Papers.” The options youwant to include are: Shipping Papers by Location, and the three options from this menu: Range ofRoutes, Specific Routes, and Order Number. When you access each of these options, press [SpaceBar]. An asterisk appears beside the option and the option is included on the user-defined menu.
A screen similar to the following appears:
When you have completed selecting the options you want to include on your menu, press [F4] to backout to your user-defined menu, and then [Enter] to return to User Defined Menu Maintenance.
The options you selected now appear in the Options field, similar to the following screen:
Press [F2] to accept your changes.
An asterisk
appears next to
Shipping
Papers By
Location.
The option you
select appears on
your user-defined
menu.
The options you
selected appear in
the Options field.

6 SYSTEM ADMINISTRATION
409
ACCLAIM 10 NEW FEATURES
SCRIPT JOBS
If you want to perform a job by executing an AIX command through a script, select the Script option in the Typefield. This option allows you to execute an AIX command quickly and efficiently.
When you select Script in the Type field, the Command field appears, allowing you to enter a Unix command. Ascreen similar to the following appears:
Command . . . specifies the Unix command of the Script job.
To execute this command, enter the Run Name at the jump to box.
JOB JOBS
If you want to create a job, select the Job option in the Type field. This option allows you to automatically run aProphet job. When you select Job in the Type field, a screen similar to the following appears:
The Command
field appears.
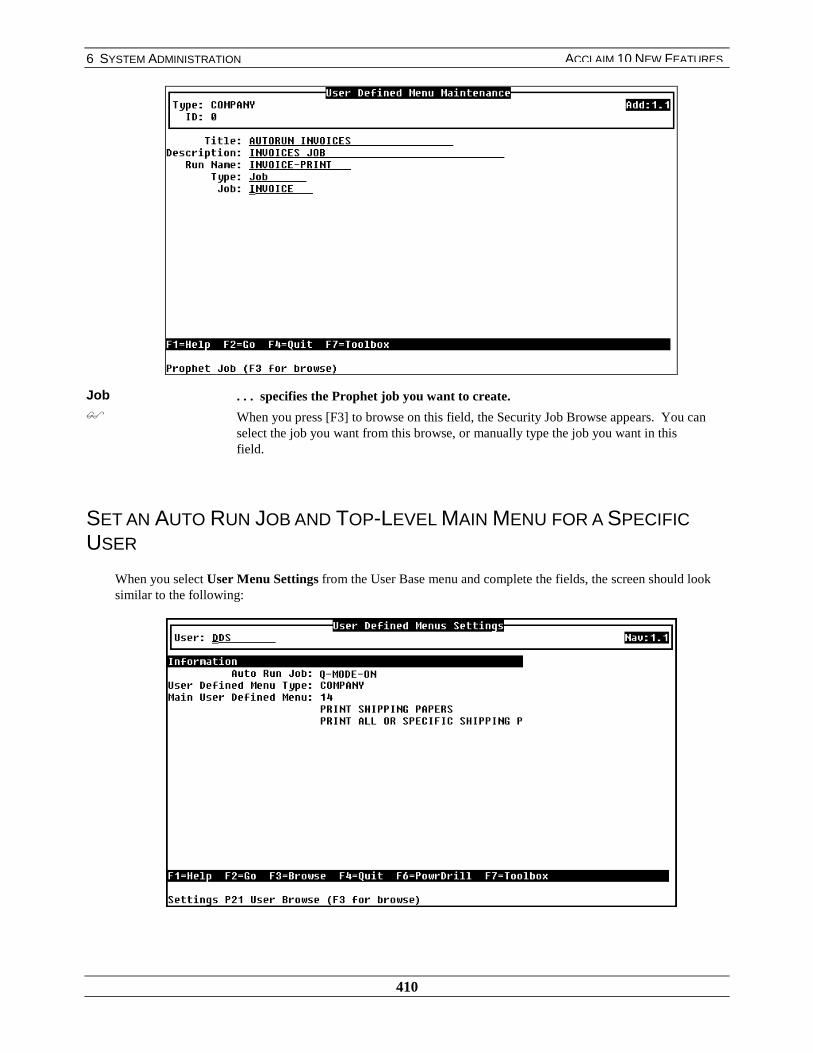
6 SYSTEM ADMINISTRATION
410
ACCLAIM 10 NEW FEATURES
Job$
. . . specifies the Prophet job you want to create.
When you press [F3] to browse on this field, the Security Job Browse appears. You canselect the job you want from this browse, or manually type the job you want in thisfield.
SET AN AUTO RUN JOB AND TOP-LEVEL MAIN MENU FOR A SPECIFICUSER
When you select User Menu Settings from the User Base menu and complete the fields, the screen should looksimilar to the following:

6 SYSTEM ADMINISTRATION
411
ACCLAIM 10 NEW FEATURES
User$
. . . specifies the user for which you want to set the auto run job and the top-levelmenu.
Auto Run Job$
. . . specifies the job, JCM, or macro that will run automatically after the specifieduser logs onto the system.
For example, you might want to make sure that user DDS always works in Q-Mode.Therefore, you would enter Q-Mode-On in this field to ensure that Q-Mode is alwaysactivated when DDS logs into the system.
Note: You can browse on this field to access the Security Job Browse andselect a job name.
The setting you enter in this field overrides the setting in the Auto RunJob field on the Edit User Logon Information screen.
User Defined MenuType
. . . specifies the type, or accessibility level of the user-defined menu.
Press [F3] on this field to select Company, Location, Branch, or User. This allowsyou to both specify the type of user-defined menus that the user you selected can access,and determines which user-defined menus you can select from the Main User DefinedMenu field.
For example, you want to make sure that user DDS can only access theBranch 1 user-defined menus. Therefore, you would enter DDS in theUser field, Branch in the User Defined Menu Type field, and 1 in theBranch field. When you browse on the Main User Defined Menufield to select user DDS’s top-level menu, you can only select one of theBranch 1 user-defined menus from this browse.
Main User DefinedMenu$
. . . specifies the user-defined top-level menu for the user you specified.
This is the user-defined menu that appears after the specified user logs into the systemand their auto job runs (if you specified one for them). In addition, this is the user’stop-level menu, which means that this is the menu that remains on their screen afterthey pressed [F4] to exit every other menu they accessed. By default, every user’s top-level menu is Prophet 21 Acclaim. The setting in this field overrides the default for theuser you specify.
For example, you created a Print Shipping Paper menu for user DDS inthe Shipping Department. Because this user accesses the options youcreated on this menu the most, you want to make this menu DDS’s top-level one. Therefore, you would browse and select Print-ShippingPaper in this field for user DDS.
When you select the menu you want in this field, the system displaysthe ID, title, and description of the menu.
Important! The default for this field is a question mark (?). Therefore, when youwant to delete the contents of this field, make sure you press [?] and [F2]to make and save this change.
For more information about user-defined menus, refer to the System Administration manual.

6 SYSTEM ADMINISTRATION
412
ACCLAIM 10 NEW FEATURES
SEVERAL NEW AUXILIARY TABLES ADDED TOAUXILIARY TABLE BROWSE AND MODULE
The Auxiliary Table module and browse has been modified to include several new auxiliary tables.
AUXILIARY TABLES
When you access the Auxiliary Tables module, the three new options Sales Reps / Takers, Notepad Classes,and Sales Categories appear:
Sales Reps /Takers
. . . accesses the Sales Rep / Taker maintenance screen and configuration options.
Notepad Classes . . . accesses the Notepad Class maintenance screen and configuration options.
Sales Categories . . . accesses the Sales Category maintenance screen and configuration options.
When you select the Item / Catalog option from the Auxiliary Tables menu, the following new options appear onthe Item / Catalog menu: Cost Change Codes, Purchase Classes, Purchase Discount Groups, Sales Classes,Sales Discount Groups, and Stock Adjustment Codes.
The following screen appears:
Cost ChangeCodes
. . . accesses the Item Cost Change Code maintenance screen and configurationoptions.
Purchase Classes . . . accesses the Purchase Class maintenance screen and configuration options.
Sales Reps/Takers, Notepad
Classes, and Sales Categories
appear.
6 SYSTEM ADMINISTRATION
413
ACCLAIM 10 NEW FEATURES
Purchase DiscountGroups
. . . accesses the Purchase Discount Group maintenance screen and configurationoptions.
Sales Classes . . . accesses the Sales Class maintenance screen and configuration options.
Sales DiscountGroups
. . . accesses the Sales Discount Group maintenance screen and configurationoptions.
Stock AdjustmentCodes
. . . accesses the Stock Adjustment Code maintenance screen and configurationoptions.
These new auxiliary tables can be accessed from the Auxiliary Table Browse from the Toolbox menu, and from abrowse on the appropriate fields in the individual modules. In addition to the Maintenance and Configurationoptions, the Rebuild option has been added to the following new auxiliary tables: Sales Discount Groups,Purchase Discount Groups, Sales Classes, Purchase Classes, and Notepad Classes.
The new auxiliary tables function in the same way as the other existing auxiliary tables. For further informationon auxiliary tables, refer to the System Administration manual.

6 SYSTEM ADMINISTRATION
414
ACCLAIM 10 NEW FEATURES
ACCESS SYSTEM DATABASES AND FILES
You can now access system databases, files, and the fields and indexes that make up system files through a newoption on the Object Browse. This information allows you to understand in which databases the system files arelocated, and the field names and indexes associated with the system files. This feature is especially helpful forwriting CorVu reports and ODBC / JDBC queries.
Note: For IQ and PQL reports, we recommend using the file layouts printed in the Intelligence Query andProphet Query Language manuals, respectively.
OBJECT BROWSE
When you select Browse from the Toolbox, the Object browse appears. The new option, File Layouts,appears:
File Layouts . . . accesses the File Layout browse.
The File Layout browse includes a list of system databases. You can select thesedatabases to view more information about their system files and descriptions.
File Layouts
appears.

6 SYSTEM ADMINISTRATION
415
ACCLAIM 10 NEW FEATURES
When you select the File Layouts option, the File Layout Browse appears:
DataEntry/Order/Inventory
. . . accesses the files that are in the Data Entry/Order/Inventory database.
AR/AP/Misc . . . accesses the files that are in the AR/AP/Misc database.
General Ledger . . . accesses the files that are in the General Ledger database.
When you select one of the previous databases, a list of the system files and their descriptions appear.
File Name . . . name of the system file.
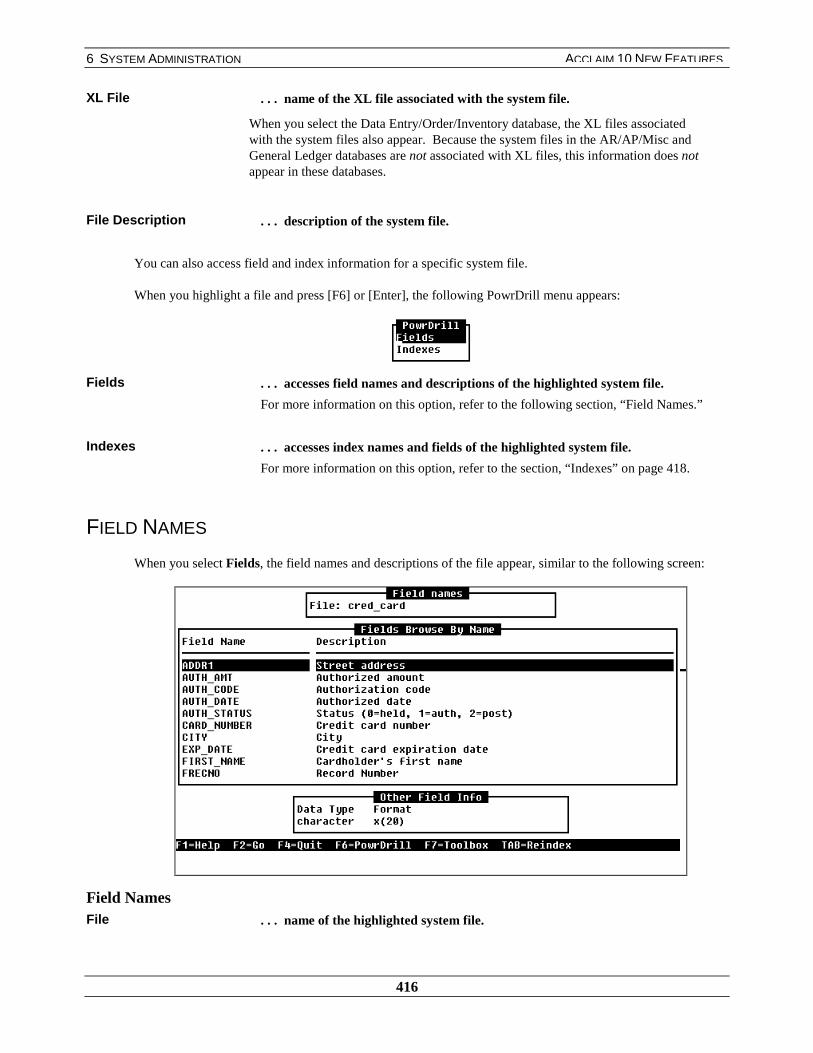
6 SYSTEM ADMINISTRATION
416
ACCLAIM 10 NEW FEATURES
XL File . . . name of the XL file associated with the system file.
When you select the Data Entry/Order/Inventory database, the XL files associatedwith the system files also appear. Because the system files in the AR/AP/Misc andGeneral Ledger databases are not associated with XL files, this information does notappear in these databases.
File Description . . . description of the system file.
You can also access field and index information for a specific system file.
When you highlight a file and press [F6] or [Enter], the following PowrDrill menu appears:
Fields . . . accesses field names and descriptions of the highlighted system file.
For more information on this option, refer to the following section, “Field Names.”
Indexes . . . accesses index names and fields of the highlighted system file.
For more information on this option, refer to the section, “Indexes” on page 418.
FIELD NAMES
When you select Fields, the field names and descriptions of the file appear, similar to the following screen:
Field NamesFile . . . name of the highlighted system file.
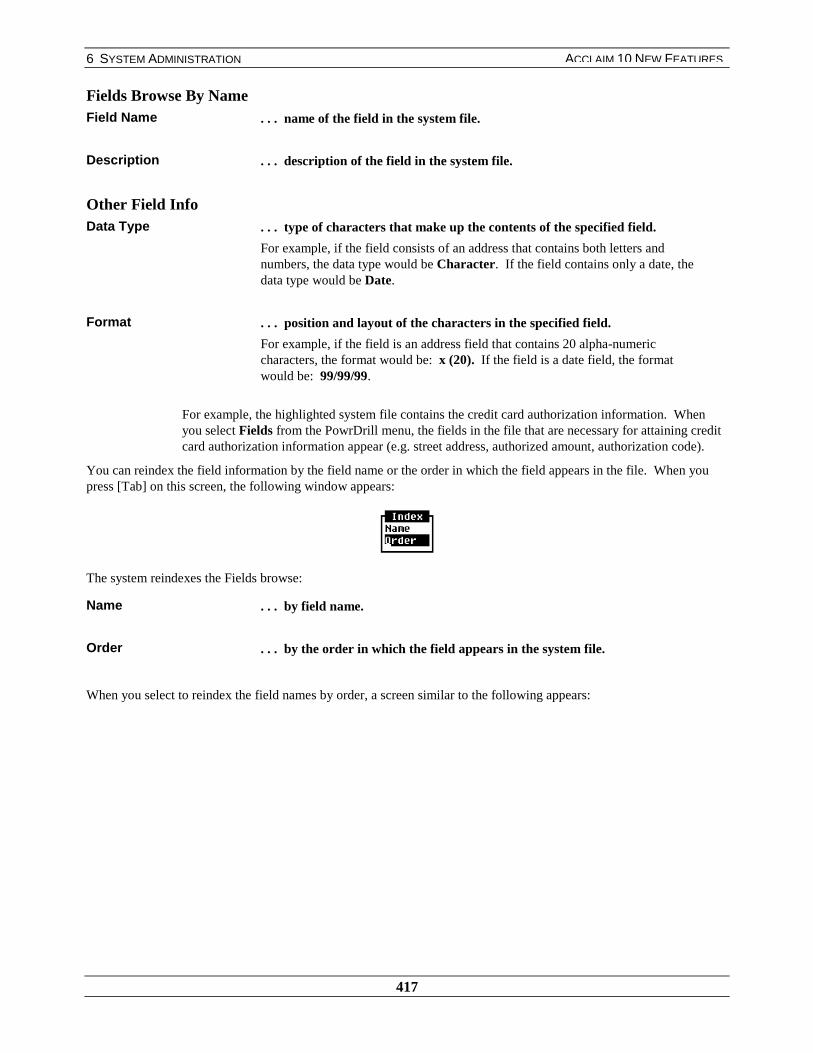
6 SYSTEM ADMINISTRATION
417
ACCLAIM 10 NEW FEATURES
Fields Browse By NameField Name . . . name of the field in the system file.
Description . . . description of the field in the system file.
Other Field InfoData Type . . . type of characters that make up the contents of the specified field.
For example, if the field consists of an address that contains both letters andnumbers, the data type would be Character. If the field contains only a date, thedata type would be Date.
Format . . . position and layout of the characters in the specified field.
For example, if the field is an address field that contains 20 alpha-numericcharacters, the format would be: x (20). If the field is a date field, the formatwould be: 99/99/99.
For example, the highlighted system file contains the credit card authorization information. Whenyou select Fields from the PowrDrill menu, the fields in the file that are necessary for attaining creditcard authorization information appear (e.g. street address, authorized amount, authorization code).
You can reindex the field information by the field name or the order in which the field appears in the file. When youpress [Tab] on this screen, the following window appears:
The system reindexes the Fields browse:
Name . . . by field name.
Order . . . by the order in which the field appears in the system file.
When you select to reindex the field names by order, a screen similar to the following appears:

6 SYSTEM ADMINISTRATION
418
ACCLAIM 10 NEW FEATURES
INDEXES
When you select Indexes from the PowrDrill menu, a screen similar to the following appears:
Index Names
File . . . name of the highlighted system file.
Index Browse
Index-Name . . . name of the index.
Index Fields . . . fields of each index.
The Ord field
appears, listing
the order in
which the field
names appear in
the file.
6 SYSTEM ADMINISTRATION
419
ACCLAIM 10 NEW FEATURES
For more information on the Object browse, refer to the Browse manual.

6 SYSTEM ADMINISTRATION
420
ACCLAIM 10 NEW FEATURES
ACCESS FIND MODE IN SEVERAL DATAMAINTENANCE SCREENS
When you are in navigation mode in several data maintenance screens, a record can be selected by manuallycompleting a key field or selecting it from a browse. If the key field you enter is not valid, a browse isautomatically launched.
Previously, when you completed one key field, the system would launch a browse for records composed ofmultiple key fields. Now, after the first field is entered for records with multiple key fields, the Find modeindicator is displayed and the remaining key fields are enabled. When you specify valid values for the remainingkey fields or press [F4], Find mode disappears and Navigation mode replaces it.
Note: You can still press [F3] to access a browse on the multiple key fields if necessary.
You can access Find mode in the following maintenance screens: Sales Pricing, Override Tables, PurchasePricing, Customized Items, Customer Alt Ship-To, Sales Tax, Tax Exemption, Invoice Recall, and PO Recall.
SALES PRICING
When you enter data in the Schedule, Vendor, and Group fields on the Sales Pricing Schedule Maintenancescreens in order to access a sales pricing schedule, Find mode appears, allowing you to enter this informationwithout searching through a browse.
A screen similar to the following appears:
After the system accesses the appropriate record, navigation mode reappears.
You can enter information in the following key fields in the following modules without having to search through abrowse. When you access these fields, Find mode appears:
Find
mode
appears.

6 SYSTEM ADMINISTRATION
421
ACCLAIM 10 NEW FEATURES
MODULE KEY FIELDS
Customer Maintenance Customer Code, Ship To
Sales Tax Branch, Schd#, Exemp#
Sales Pricing Schedule, Vendor, Group
Price / Cost Override Table Maintenance Customer, Basis, Prod Gr
Purchase Pricing Vendor Number, Discount Group
Invoice Recall Invoice #, Customer, Date
PO Recall PO#, Vendor, Date
Customized Items Customer Code, Part Number
Customer Contact Maintenance Customer Code, Ship To, Contact
Vendor Contact Maintenance Vendor Code, Contact
Personal Contact Maintenance User-ID, Contact
Rebate Journal Product Group, Customer Code

6 SYSTEM ADMINISTRATION
422
ACCLAIM 10 NEW FEATURES
RESET REMOVES PROSERIES AND REAL-TIMESALES HISTORY INFORMATION
Previously, when you performed a Reset to remove all “play” data from your system, the system did not clearPROSeries information. Now, PROSeries and Real-Time Sales History information is cleared as well as the otherdata cleared by Reset. This allows you to practice and teach in the Accounting and Real-Time Sales Historymodules without creating actual transactions.
For more information on the Reset program, refer to the Implementation Guide.

6 SYSTEM ADMINISTRATION
423
ACCLAIM 10 NEW FEATURES
USE AND TRACK FOREIGN CURRENCIES IN THESALES AND PURCHASING CYCLES
IR #6951
Previously there was no way to handle foreign currency with customers/receivables; all orders had to be entered inthe home currency. For vendors, you could always purchase in the foreign currency, and the amounts were stilltracked in the foreign currency; the changes have to do with the reporting on these figures; previously the systemused one exchange rate per currency when printing payables reports. Now the exchange rate is determined by theexchange date and time stored with each payable and check.
By enabling a company option, currency information now appears in Customer and Vendor Maintenance, theorder processing modules, and on payables and receivables screens and reports. In addition, you can set a default“home” currency, which allows you to specify a default currency for your customers and vendors.
When you enter business transactions with customers or vendors located in foreign countries, the system uses theappropriate exchange rate to obtain the home currency value. In payables, you can set your exchange date andtime, to process payables with the most up-to-date currency exchange rate information.
FOREIGN CURRENCIES IN THE SALES CYCLE
Now, by setting a company system option and running a hidden option, you can enter a default “home” currency,which appears as the default for your customers in Customer Maintenance and order entry. This allows you tomaintain your sales and inventory costs in your own country’s currency. In addition, you can specify foreigncurrencies for specific customers by setting the Currency ID field in Customer Maintenance.
COMPANY
When you access the Company System Options screen and select the Foreign Currency option, a screen similarto the following appears:
6 SYSTEM ADMINISTRATION
424
ACCLAIM 10 NEW FEATURES
Foreign Currency . . . determines whether the foreign currency option is enabled on your system.
When this option is set to
Y – the foreign currency option is enabled on the system
When this option is enabled, the system verifies that the customer and order filesare long enough to accommodate the additional fields related to this feature. If anyfiles need to be expanded, a message appears, instructing you to run LIB-UPDATEto resize these files.
★ N – the foreign currency option is not enabled on the system
Home Currency ID . . . official abbreviation of the default currency in your system.
Typically, your home currency ID is the currency of the country in which you arelocated.
For example, if you are located in the United States, your homecurrency would be U$, the official abbreviation for US dollars.
Home CurrencyDescription
. . . name of your home currency.For example, if you enter U$ as the home currency ID, the homecurrency description would be US dollars.
ENTER A DEFAULT CURRENCY IN CUSTOMER AND VENDOR MAINTENANCE
There is a new Currency ID field in Customer and Vendor Maintenance, that allows you to enter a currency for aspecific customer or vendor. To enter your home currency as the default for this field, run the hidden option $Hfrom the Company module. For more information on hidden options, refer to the System Administration manual.
CUSTOMER MAINTENANCE
You can assign a foreign currency to a specific customer in Customer Maintenance. This allows you to set up acustomer with a foreign currency in which they normally buy. The currency that you enter in CustomerMaintenance serves as the default for all of the customer’s orders and quotes. If you do not want to enter an orderor quote for that customer in their default currency, you can override this default during order entry, and specifyanother one at that time.
When you access the third screen of Customer Maintenance, the Foreign Currency section and the Currency IDfield appears, similar to the following screen:

6 SYSTEM ADMINISTRATION
425
ACCLAIM 10 NEW FEATURES
Currency ID$
. . . default currency ID for the specified customer.
The value you enter in this field serves as the default currency during order entry. Thisfield is especially useful if a certain customer usually buys in a specific foreigncurrency.
For example, if you have a customer who lives in Italy and buysmerchandise in lira, you might want to enter LIRA in this field.
When you press [F3] to browse on the Currency ID field, the Exchange Rate Browse appears, similar to thefollowing screen:
Currency . . . official abbreviation or ID of a specific currency.
Description . . . name of the currency.
The Currency
ID field
appears.
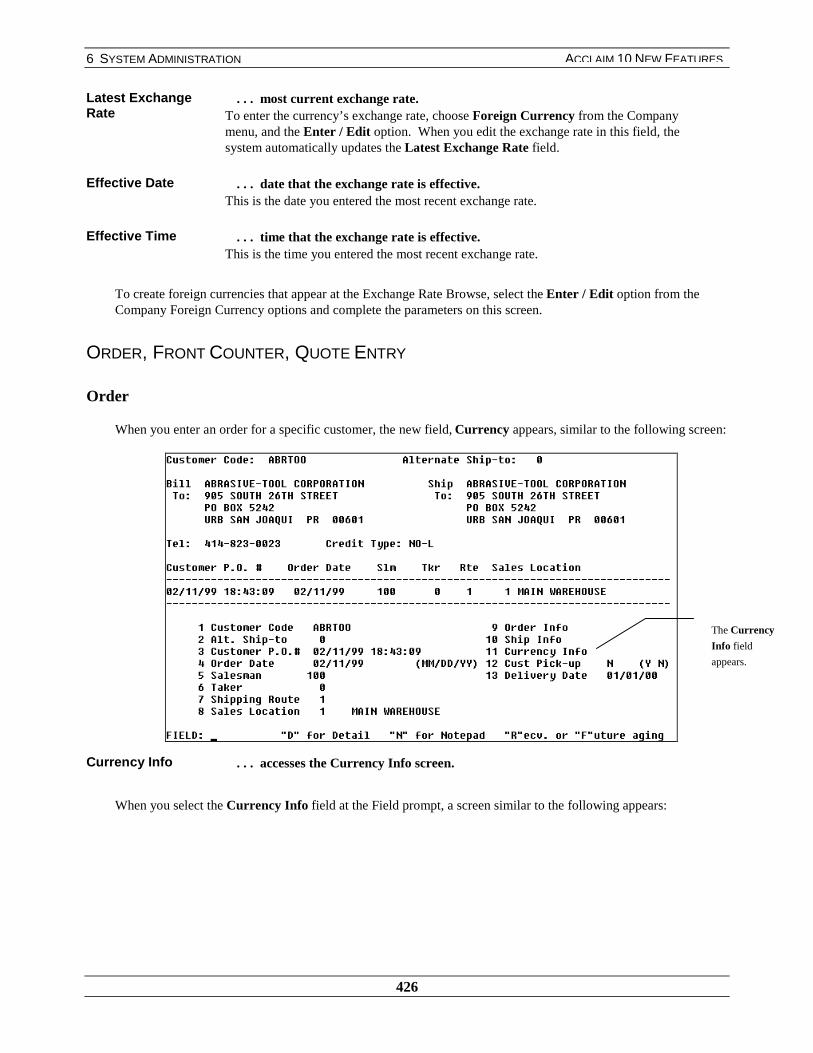
6 SYSTEM ADMINISTRATION
426
ACCLAIM 10 NEW FEATURES
Latest ExchangeRate
. . . most current exchange rate.To enter the currency’s exchange rate, choose Foreign Currency from the Companymenu, and the Enter / Edit option. When you edit the exchange rate in this field, thesystem automatically updates the Latest Exchange Rate field.
Effective Date . . . date that the exchange rate is effective.This is the date you entered the most recent exchange rate.
Effective Time . . . time that the exchange rate is effective.This is the time you entered the most recent exchange rate.
To create foreign currencies that appear at the Exchange Rate Browse, select the Enter / Edit option from theCompany Foreign Currency options and complete the parameters on this screen.
ORDER, FRONT COUNTER, QUOTE ENTRY
Order
When you enter an order for a specific customer, the new field, Currency appears, similar to the following screen:
Currency Info . . . accesses the Currency Info screen.
When you select the Currency Info field at the Field prompt, a screen similar to the following appears:
The Currency
Info field
appears.

6 SYSTEM ADMINISTRATION
427
ACCLAIM 10 NEW FEATURES
Currency ID . . . currency in which you are entering the order.This field defaults from the Currency ID field in Customer Maintenance. You canoverride this default by selecting this option and entering the currency you want.
Apply . . . determines if and when the system incorporates fluctuations in foreigncurrency values and exchange rates.
When this field is set to
★ ORD – the system uses the exchange rate specified during order entry to calculateforeign currency values until the order is invoiced, regardless of any fluctuations ofthe exchange rates you enter in the Company Foreign Currency options.INV – the system incorporates fluctuations in exchange rates that you enter in theCompany Foreign Currency options to calculate foreign currency values until theorder is invoiced.
For example, you set Apply to ORD and enter 1.8 as the exchange rate.If you change the exchange rate in the Company Foreign Currency options to 1.5,the system still uses the exchange rate of 1.8. If you set Apply to INV, the systemuses the exchange rate of 1.5.
Exchange Rate . . . exchange rate of the specified currency.This field defaults from the exchange rates you specify in the Company Foreign Currencyoptions. You can change this value by editing this field.
EXPEDITE ORDER
You can edit currency information on an order by selecting Edit from the Expedite Order menu, entering the ordernumber, and choosing Invoice Information from the Editing Options menu. The Edit Currency Info optionappears on the next screen, similar to the following:
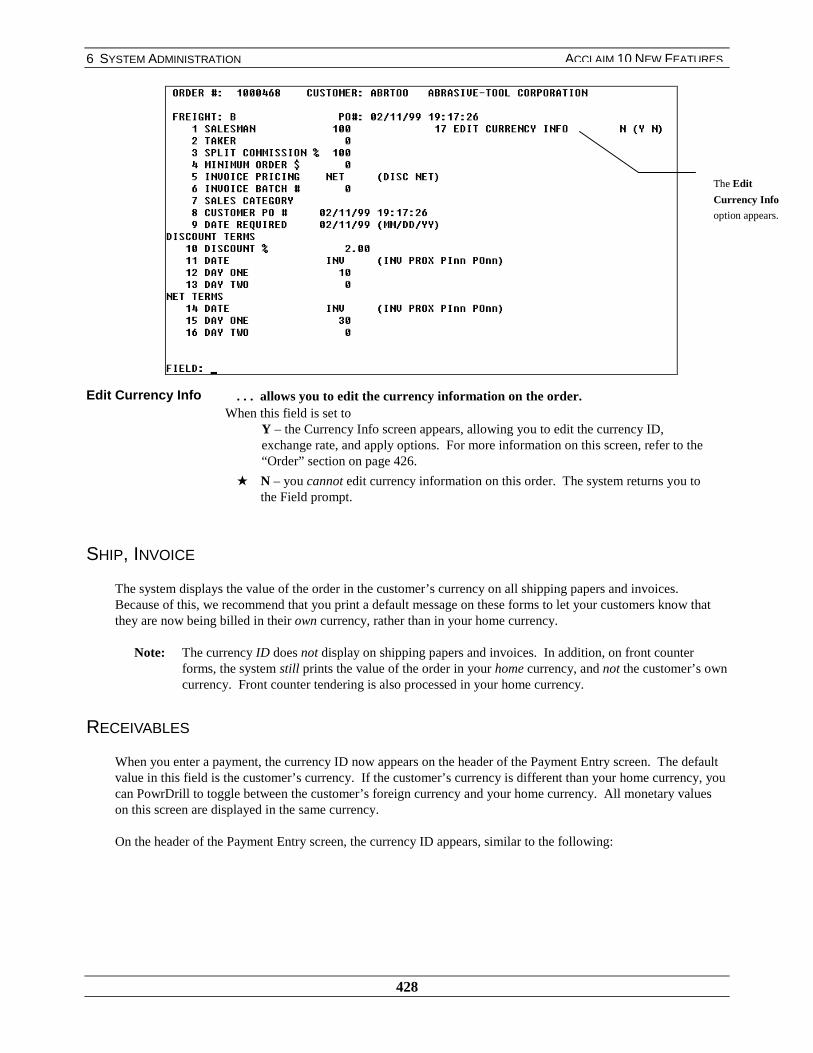
6 SYSTEM ADMINISTRATION
428
ACCLAIM 10 NEW FEATURES
Edit Currency Info . . . allows you to edit the currency information on the order.When this field is set to
Y – the Currency Info screen appears, allowing you to edit the currency ID,exchange rate, and apply options. For more information on this screen, refer to the“Order” section on page 426.
★ N – you cannot edit currency information on this order. The system returns you tothe Field prompt.
SHIP, INVOICE
The system displays the value of the order in the customer’s currency on all shipping papers and invoices.Because of this, we recommend that you print a default message on these forms to let your customers know thatthey are now being billed in their own currency, rather than in your home currency.
Note: The currency ID does not display on shipping papers and invoices. In addition, on front counterforms, the system still prints the value of the order in your home currency, and not the customer’s owncurrency. Front counter tendering is also processed in your home currency.
RECEIVABLES
When you enter a payment, the currency ID now appears on the header of the Payment Entry screen. The defaultvalue in this field is the customer’s currency. If the customer’s currency is different than your home currency, youcan PowrDrill to toggle between the customer’s foreign currency and your home currency. All monetary valueson this screen are displayed in the same currency.
On the header of the Payment Entry screen, the currency ID appears, similar to the following:
The Edit
Currency Info
option appears.
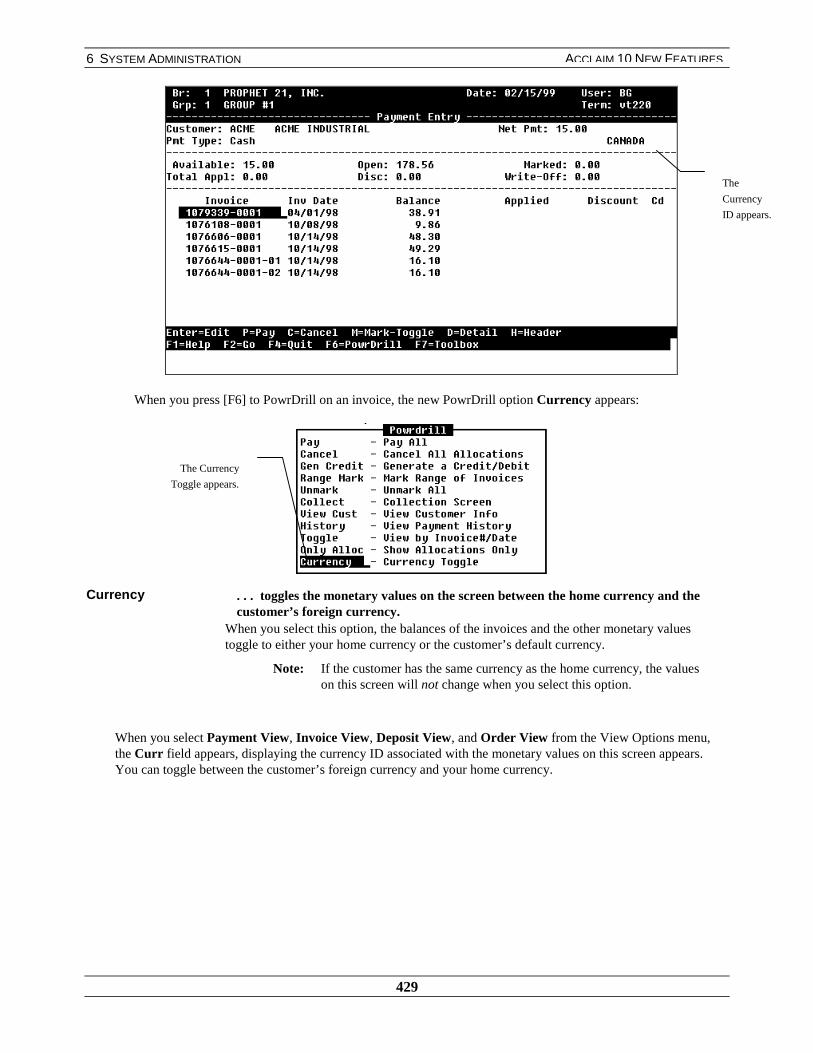
6 SYSTEM ADMINISTRATION
429
ACCLAIM 10 NEW FEATURES
When you press [F6] to PowrDrill on an invoice, the new PowrDrill option Currency appears:
Currency . . . toggles the monetary values on the screen between the home currency and thecustomer’s foreign currency.
When you select this option, the balances of the invoices and the other monetary valuestoggle to either your home currency or the customer’s default currency.
Note: If the customer has the same currency as the home currency, the valueson this screen will not change when you select this option.
When you select Payment View, Invoice View, Deposit View, and Order View from the View Options menu,the Curr field appears, displaying the currency ID associated with the monetary values on this screen appears.You can toggle between the customer’s foreign currency and your home currency.
The
Currency
ID appears.
The Currency
Toggle appears.
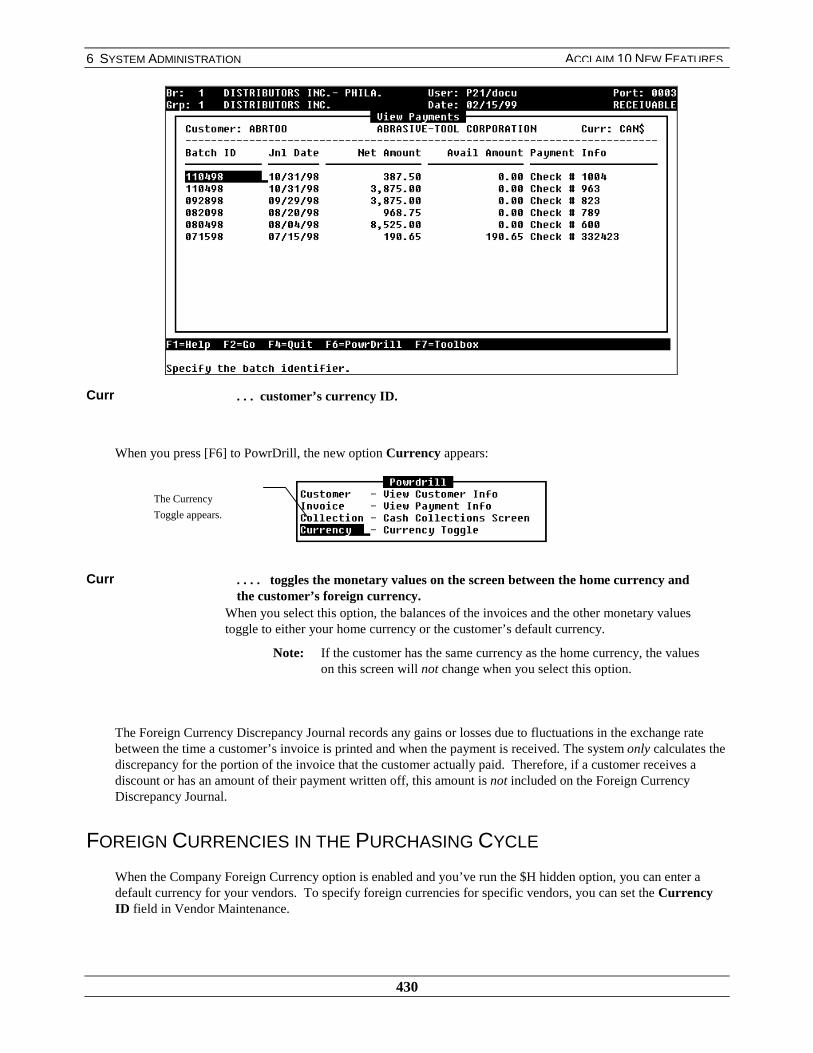
6 SYSTEM ADMINISTRATION
430
ACCLAIM 10 NEW FEATURES
Curr . . . customer’s currency ID.
When you press [F6] to PowrDrill, the new option Currency appears:
Curr . . . . toggles the monetary values on the screen between the home currency andthe customer’s foreign currency.
When you select this option, the balances of the invoices and the other monetary valuestoggle to either your home currency or the customer’s default currency.
Note: If the customer has the same currency as the home currency, the valueson this screen will not change when you select this option.
The Foreign Currency Discrepancy Journal records any gains or losses due to fluctuations in the exchange ratebetween the time a customer’s invoice is printed and when the payment is received. The system only calculates thediscrepancy for the portion of the invoice that the customer actually paid. Therefore, if a customer receives adiscount or has an amount of their payment written off, this amount is not included on the Foreign CurrencyDiscrepancy Journal.
FOREIGN CURRENCIES IN THE PURCHASING CYCLE
When the Company Foreign Currency option is enabled and you’ve run the $H hidden option, you can enter adefault currency for your vendors. To specify foreign currencies for specific vendors, you can set the CurrencyID field in Vendor Maintenance.
The Currency
Toggle appears.

6 SYSTEM ADMINISTRATION
431
ACCLAIM 10 NEW FEATURES
VENDOR MAINTENANCE
You can assign a foreign currency to a specific vendor in Vendor Maintenance. This allows you to set up a vendorwith a foreign currency in which they normally sell. The currency that you enter in Vendor Maintenance appearson many payables reports. You can edit this field accordingly if the vendor’s currency changes.
When you access the second screen of Vendor Maintenance, the Foreign Currency section and the Currency IDfield appears, similar to the following screen:
Currency ID$
. . default currency ID for the specified vendor.
The value you enter in this field serves as the default currency during purchasing. Thisfield is especially useful if a certain vendor usually sells in a specific foreign currency.
For example, if you have a vendor who lives in France and sellsmerchandise in francs, you might want to enter FRANCS in this field.
Previously, you could process payables and print reports using only one currency at a time. Now, you canprint all foreign currencies on payables reports. A currency column now appears, showing the currency foreach entry.
Because of this, the Default Currency field no longer appears on the Payables Session Defaults screen, similar tothe following:
The
Currency
ID field
appears.

6 SYSTEM ADMINISTRATION
432
ACCLAIM 10 NEW FEATURES
CURRENCIES ON PAYABLES REPORTS
Previously, you could only print payables in the currency you specified in the Default Currency field on thePayables Session Defaults screen. Now, with a new Start and End Currency parameter, you can print onecurrency, a range of currencies, or all foreign currencies. These parameters allow you to print a specific currencyor currencies on the report you select.
The following screen is an example parameter screen for the Expense Journal:
The Default
Currency field
no longer
appears on this
screen.
The Start and
End Currency
parameter
appears.
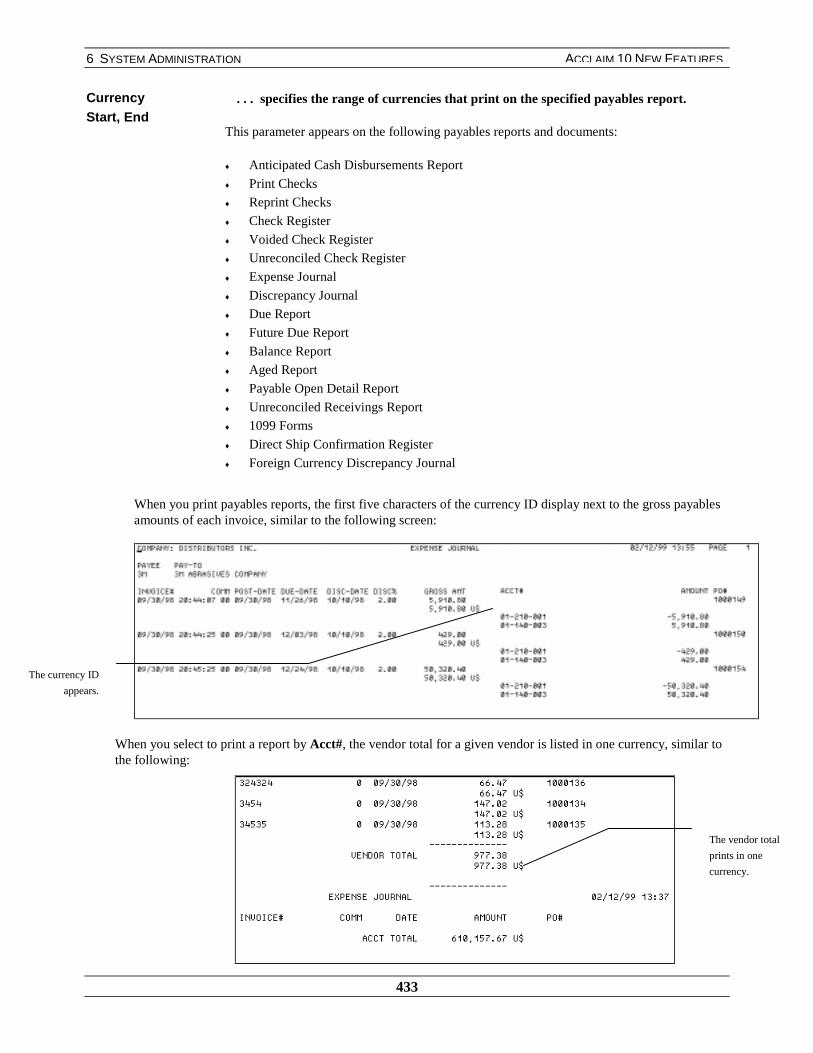
6 SYSTEM ADMINISTRATION
433
ACCLAIM 10 NEW FEATURES
CurrencyStart, End
. . . specifies the range of currencies that print on the specified payables report.
This parameter appears on the following payables reports and documents:
♦ Anticipated Cash Disbursements Report
♦ Print Checks
♦ Reprint Checks
♦ Check Register
♦ Voided Check Register
♦ Unreconciled Check Register
♦ Expense Journal
♦ Discrepancy Journal
♦ Due Report
♦ Future Due Report
♦ Balance Report
♦ Aged Report
♦ Payable Open Detail Report
♦ Unreconciled Receivings Report
♦ 1099 Forms
♦ Direct Ship Confirmation Register
♦ Foreign Currency Discrepancy Journal
When you print payables reports, the first five characters of the currency ID display next to the gross payablesamounts of each invoice, similar to the following screen:
When you select to print a report by Acct#, the vendor total for a given vendor is listed in one currency, similar tothe following:
The currency ID
appears.
The vendor total
prints in one
currency.

6 SYSTEM ADMINISTRATION
434
ACCLAIM 10 NEW FEATURES
If there is more than one currency on various invoices for a specific vendor, the system takes the total amount ofthe invoices and lists it with just one of the currencies. In this case, the home currency amount is correct, but theforeign currency total is not correct. If the currency for a specific vendor changes, you should print the report forone currency at a time by specifying the currency parameter.
For example, if the total amount for 3M Abrasives is 29 lira and 6 pesos, the system might print 35lira or 35 pesos for the vendor total, which is incorrect. Because of the multiple currencies, you firstneed to limit the currency on the report parameter screen to LIRA. When you print the report, thevendor total will be 29 lira. Then, limit the currency on the parameter screen to PESO. When youprint the report, the vendor total will be 6 pesos.
Note: If you limit the Expense Journal in Account# sequence by one currency, the system prints the accounttotal in both the foreign currency and home currency. If you do not limit the report by one currency,the system prints the account total only in the home currency. To verify the breakdown of thedifferent currencies, view the “Currency Breakdown” section at the end of the report.
In the Expense Summary section of the Expense Journal, the system prints the first five characters of thecurrency ID next to a breakdown of the totals of each account, similar to the following screen:
In addition, the system prints a breakdown of the total payables for each currency in the Branch Expenses area,similar to the following screen:
SET YOUR CURRENCY EXCHANGE DATE AND TIME
Previously, the system used the exchange date and time set on the Payables Session Defaults screen to look upthe exchange rate used to convert foreign currency amounts to the home default currency on reports andjournals. If you changed the exchange date and time on the Payables Session Defaults screen and then printedthe report, the exchange rate used might be different than the exchange rate in effect at the time you entered thepayable. Therefore, the home currency data on the report could be inaccurate (although the foreign currencyfigures would be unaffected).
Now, there are exchange date and time fields on the New Recurring Invoice Entry screen, New Payable screen,the Release Payables screen, and the Edit / Delete Payable screen. These fields default from the Payables
The Currency
IDs display.
Breakdown of each
currency appears.
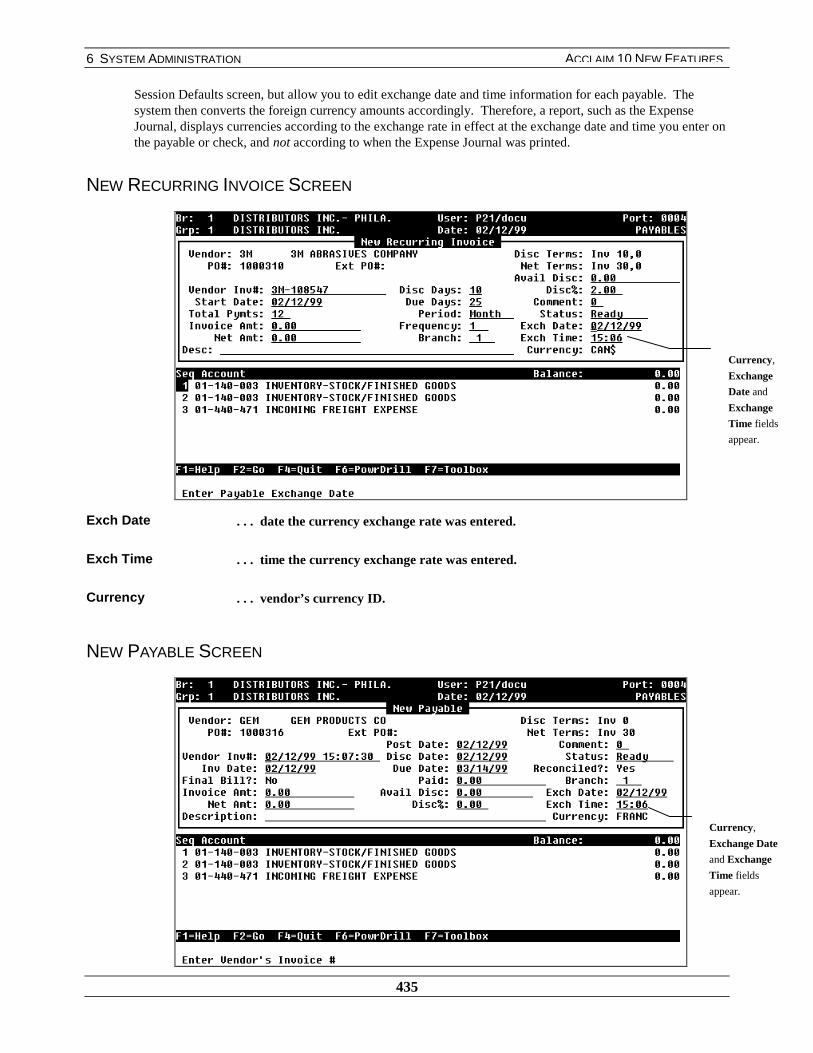
6 SYSTEM ADMINISTRATION
435
ACCLAIM 10 NEW FEATURES
Session Defaults screen, but allow you to edit exchange date and time information for each payable. Thesystem then converts the foreign currency amounts accordingly. Therefore, a report, such as the ExpenseJournal, displays currencies according to the exchange rate in effect at the exchange date and time you enter onthe payable or check, and not according to when the Expense Journal was printed.
NEW RECURRING INVOICE SCREEN
Exch Date . . . date the currency exchange rate was entered.
Exch Time . . . time the currency exchange rate was entered.
Currency . . . vendor’s currency ID.
NEW PAYABLE SCREEN
Currency,
Exchange
Date and
Exchange
Time fields
appear.
Currency,
Exchange Date
and Exchange
Time fields
appear.
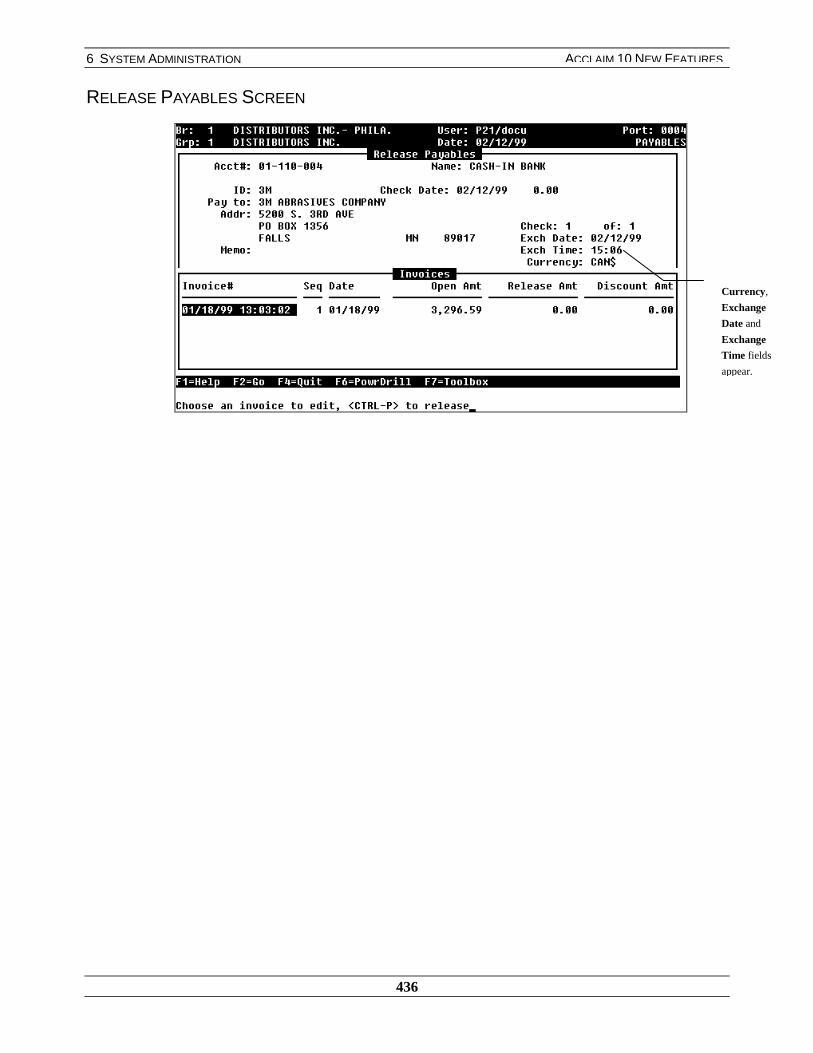
6 SYSTEM ADMINISTRATION
436
ACCLAIM 10 NEW FEATURES
RELEASE PAYABLES SCREEN
Currency,
Exchange
Date and
Exchange
Time fields
appear.

6 SYSTEM ADMINISTRATION
437
ACCLAIM 10 NEW FEATURES
SCHEDULE TASKS THROUGH THE P21 SCHEDULER
The new P21 Scheduler allows you to create, edit, and delete tasks for yourself and other users. It also gives youthe ability to send reminder notices when tasks are due. If you create a task for another user, the systemautomatically sends an e-mail message via P21 Mail.
TOOLBOX
When you access the Toolbox menu, the Scheduler option appears, similar to the following screen:
Scheduler . . . accesses the P21 Scheduler.
Note: For more information about the other options on this screen, refer to the Tour Guide manual.
When you select the Scheduler option, the P21 Scheduler screen appears. Current tasks appear on this screen,similar to the following:
Due Date . . . date that the task should be completed.
For more information on this option, refer to page 439.
Select
Scheduler.
Current tasks
appear on this
screen.
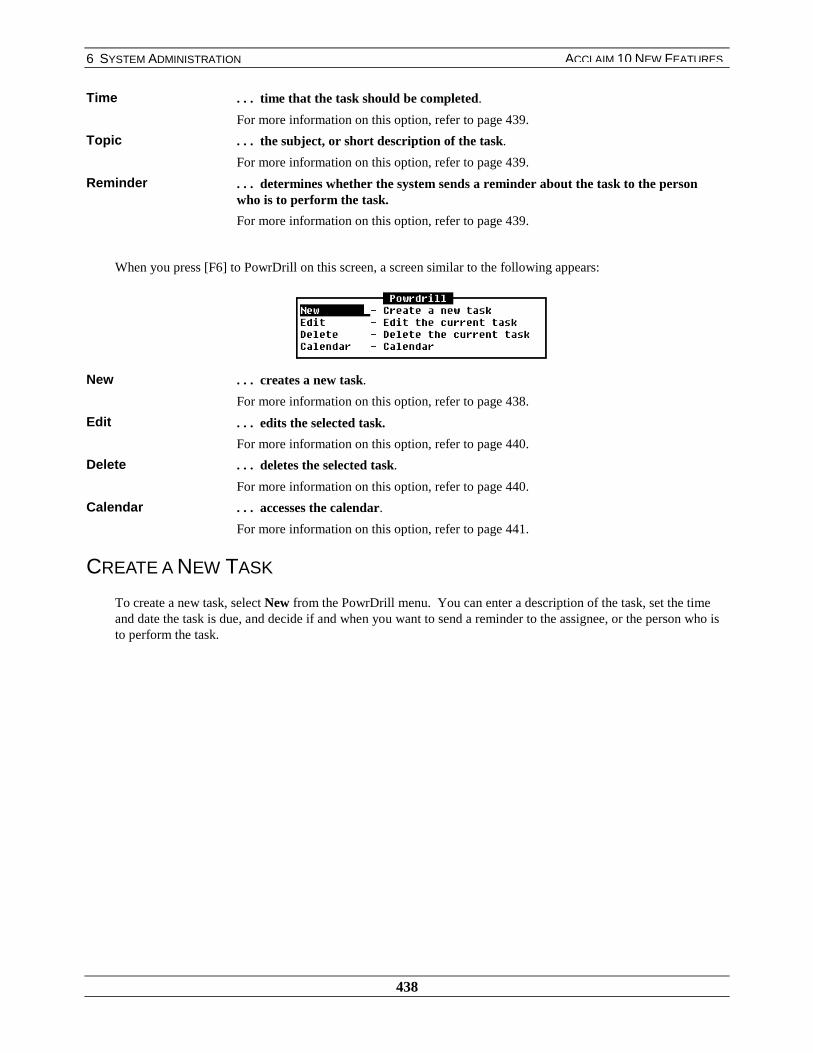
6 SYSTEM ADMINISTRATION
438
ACCLAIM 10 NEW FEATURES
Time . . . time that the task should be completed.
For more information on this option, refer to page 439.
Topic . . . the subject, or short description of the task.
For more information on this option, refer to page 439.
Reminder . . . determines whether the system sends a reminder about the task to the personwho is to perform the task.
For more information on this option, refer to page 439.
When you press [F6] to PowrDrill on this screen, a screen similar to the following appears:
New . . . creates a new task.
For more information on this option, refer to page 438.
Edit . . . edits the selected task.
For more information on this option, refer to page 440.
Delete . . . deletes the selected task.
For more information on this option, refer to page 440.
Calendar . . . accesses the calendar.
For more information on this option, refer to page 441.
CREATE A NEW TASK
To create a new task, select New from the PowrDrill menu. You can enter a description of the task, set the timeand date the task is due, and decide if and when you want to send a reminder to the assignee, or the person who isto perform the task.
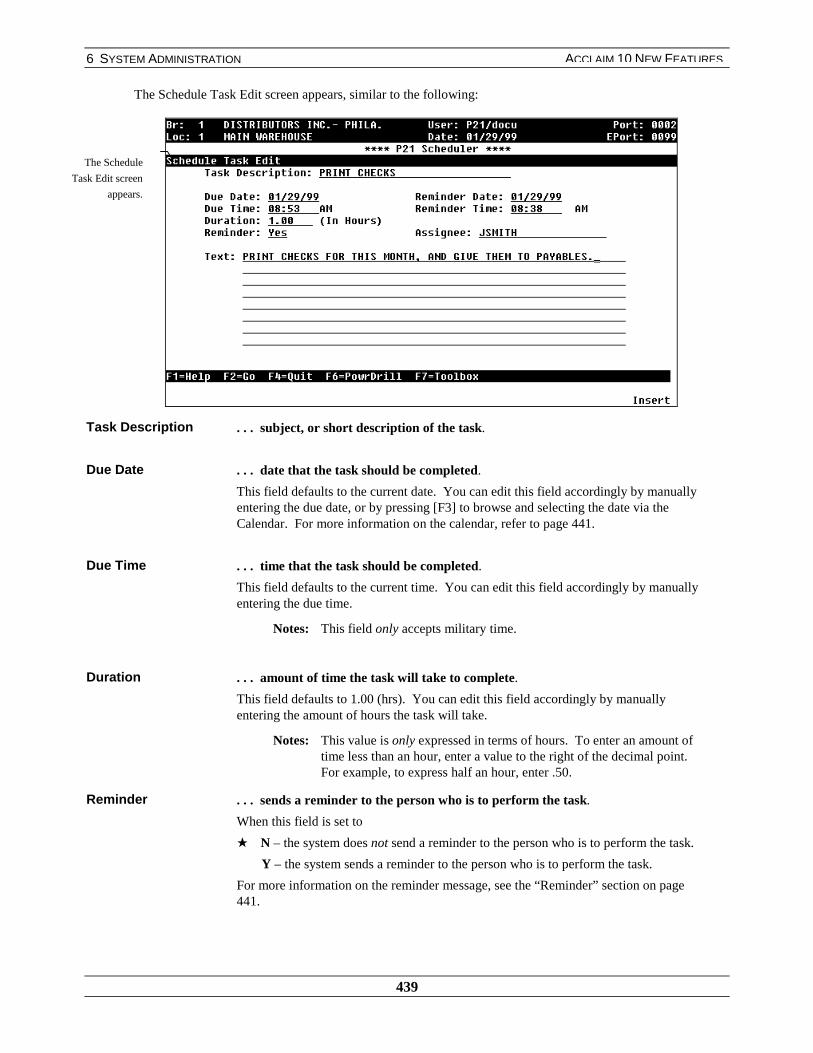
6 SYSTEM ADMINISTRATION
439
ACCLAIM 10 NEW FEATURES
The Schedule Task Edit screen appears, similar to the following:
Task Description . . . subject, or short description of the task.
Due Date . . . date that the task should be completed.
This field defaults to the current date. You can edit this field accordingly by manuallyentering the due date, or by pressing [F3] to browse and selecting the date via theCalendar. For more information on the calendar, refer to page 441.
Due Time . . . time that the task should be completed.
This field defaults to the current time. You can edit this field accordingly by manuallyentering the due time.
Notes: This field only accepts military time.
Duration . . . amount of time the task will take to complete.
This field defaults to 1.00 (hrs). You can edit this field accordingly by manuallyentering the amount of hours the task will take.
Notes: This value is only expressed in terms of hours. To enter an amount oftime less than an hour, enter a value to the right of the decimal point.For example, to express half an hour, enter .50.
Reminder . . . sends a reminder to the person who is to perform the task.
When this field is set to
★ N – the system does not send a reminder to the person who is to perform the task.
Y – the system sends a reminder to the person who is to perform the task.
For more information on the reminder message, see the “Reminder” section on page441.
The Schedule
Task Edit screen
appears.
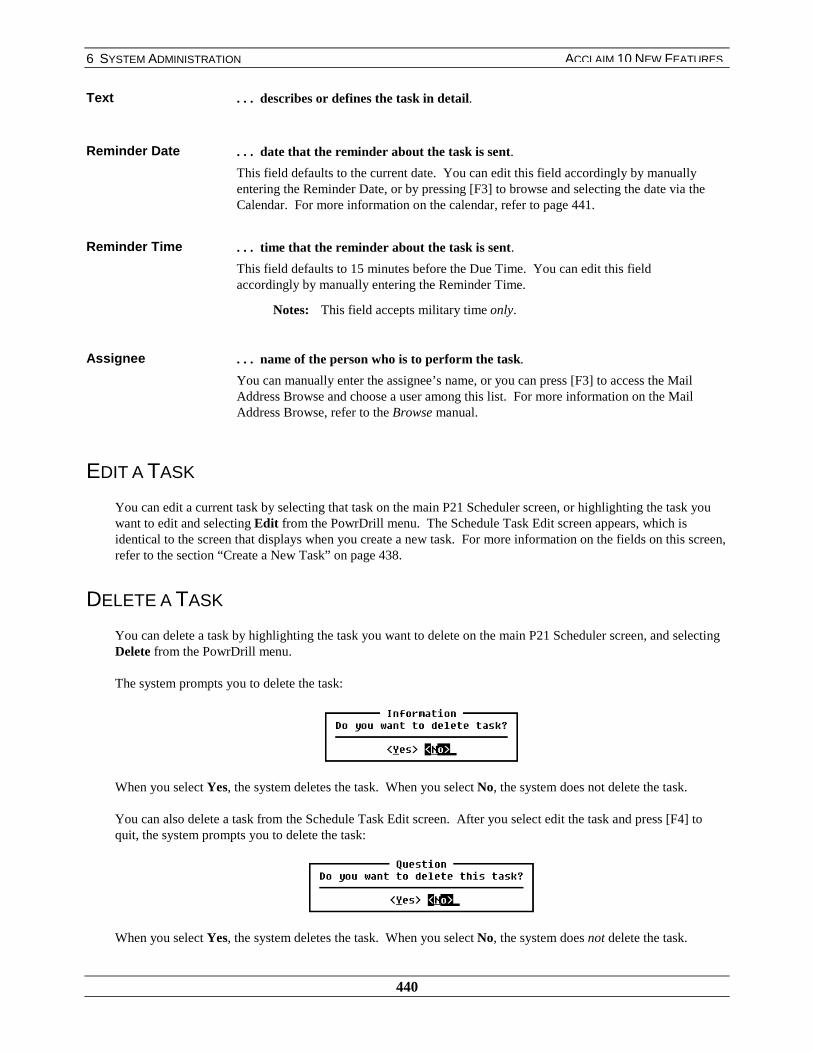
6 SYSTEM ADMINISTRATION
440
ACCLAIM 10 NEW FEATURES
Text . . . describes or defines the task in detail.
Reminder Date . . . date that the reminder about the task is sent.
This field defaults to the current date. You can edit this field accordingly by manuallyentering the Reminder Date, or by pressing [F3] to browse and selecting the date via theCalendar. For more information on the calendar, refer to page 441.
Reminder Time . . . time that the reminder about the task is sent.
This field defaults to 15 minutes before the Due Time. You can edit this fieldaccordingly by manually entering the Reminder Time.
Notes: This field accepts military time only.
Assignee . . . name of the person who is to perform the task.
You can manually enter the assignee’s name, or you can press [F3] to access the MailAddress Browse and choose a user among this list. For more information on the MailAddress Browse, refer to the Browse manual.
EDIT A TASK
You can edit a current task by selecting that task on the main P21 Scheduler screen, or highlighting the task youwant to edit and selecting Edit from the PowrDrill menu. The Schedule Task Edit screen appears, which isidentical to the screen that displays when you create a new task. For more information on the fields on this screen,refer to the section “Create a New Task” on page 438.
DELETE A TASK
You can delete a task by highlighting the task you want to delete on the main P21 Scheduler screen, and selectingDelete from the PowrDrill menu.
The system prompts you to delete the task:
When you select Yes, the system deletes the task. When you select No, the system does not delete the task.
You can also delete a task from the Schedule Task Edit screen. After you select edit the task and press [F4] toquit, the system prompts you to delete the task:
When you select Yes, the system deletes the task. When you select No, the system does not delete the task.
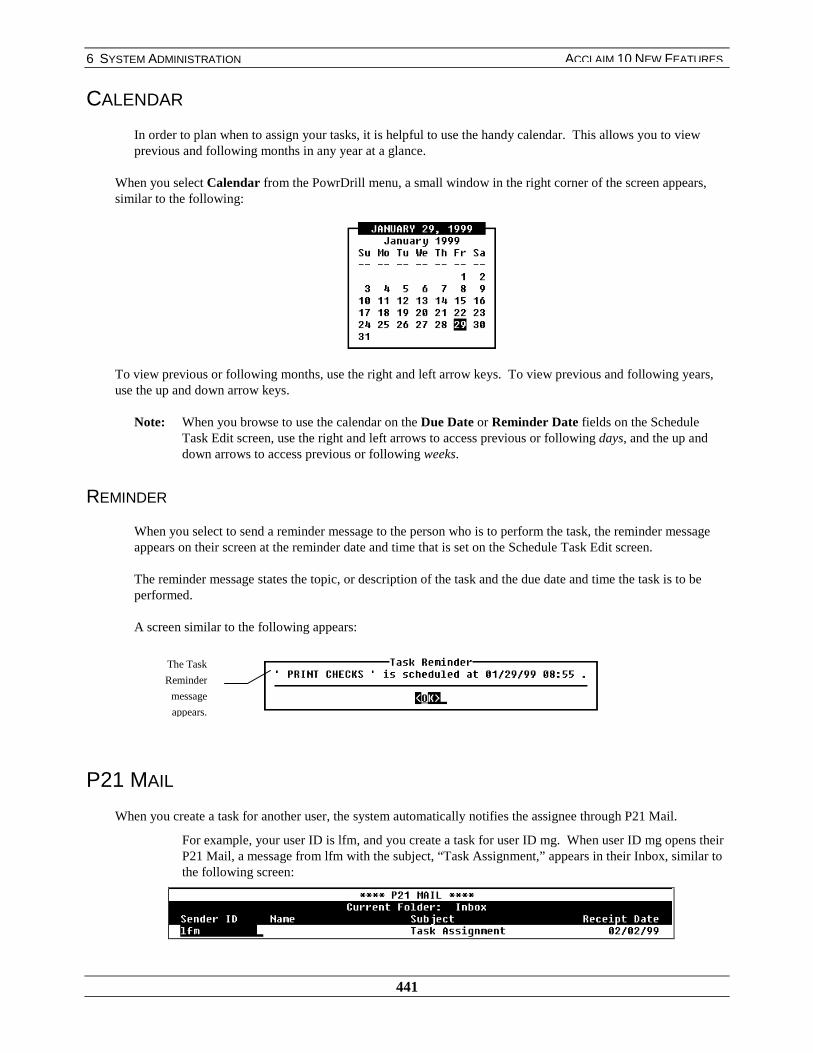
6 SYSTEM ADMINISTRATION
441
ACCLAIM 10 NEW FEATURES
CALENDAR
In order to plan when to assign your tasks, it is helpful to use the handy calendar. This allows you to viewprevious and following months in any year at a glance.
When you select Calendar from the PowrDrill menu, a small window in the right corner of the screen appears,similar to the following:
To view previous or following months, use the right and left arrow keys. To view previous and following years,use the up and down arrow keys.
Note: When you browse to use the calendar on the Due Date or Reminder Date fields on the ScheduleTask Edit screen, use the right and left arrows to access previous or following days, and the up anddown arrows to access previous or following weeks.
REMINDER
When you select to send a reminder message to the person who is to perform the task, the reminder messageappears on their screen at the reminder date and time that is set on the Schedule Task Edit screen.
The reminder message states the topic, or description of the task and the due date and time the task is to beperformed.
A screen similar to the following appears:
P21 MAIL
When you create a task for another user, the system automatically notifies the assignee through P21 Mail.
For example, your user ID is lfm, and you create a task for user ID mg. When user ID mg opens theirP21 Mail, a message from lfm with the subject, “Task Assignment,” appears in their Inbox, similar tothe following screen:
The Task
Reminder
message
appears.

6 SYSTEM ADMINISTRATION
442
ACCLAIM 10 NEW FEATURES
When you open this message, the topic, due date and time, and the person who created the taskappears, similar to the following screen:
The sender,
topic, due date
and time displays
in the Text field.

6 SYSTEM ADMINISTRATION
443
ACCLAIM 10 NEW FEATURES
SYSTEM JOB
You can access software levels and other system administration information through the SYSTEM job. This joballows you to easily determine your level of various system functions. When you type SYSTEM in the jump tobox, a screen similar to the following appears:
ApplicationsSoftwareVersion
. . . current version of the Prophet 21 software and the date it was developed.
Progress4GL&RDBMSVersion
. . . the level of Progress that is on your system.
Several third party packages, like Profit$, require a certain Progress 6 level. This field allowsyou to easily determine if you have the appropriate level.
ProgressPatch
. . . current version of Progress.
The Progress Patch field indicates the version of the Progress operating system that runs theProphet 21 source code.
Acclaim 9.1Library
. . . date the Prophet 21 Progress source code was compiled.
Product Level . . . the system product level and the date it was last updated.
The product level is the level of Prophet 21’s operating system, which runs on AIX. The productlevel controls all utility commands and Prophet 21 commands. Certain utility commands andProphet 21 commands are only available as of a certain product level.
Product AppLevel
. . . the system product application level and the date it was last updated.
The product application level allows the Prophet 21 application to communicate with third-partypackages. Certain third-party packages require a specific product application level.

6 SYSTEM ADMINISTRATION
444
ACCLAIM 10 NEW FEATURES
Last Run ofJob LIB-UPDATE
. . . shows the date when you last ran the job LIB-UPDATE.
You run the job LIB-UPDATE during a library update.
This date may represent the last time you loaded a software update. But, because you can run thejob LIB-UPDATE independently of loading a software update, this date does not alwaysrepresent the last time you performed a software update.
CompanyNumber
. . . a unique number, assigned by Prophet 21, used to identify each Prophet 21 customer.
Uptime . . . indicates the amount of time that has elapsed since the last system reboot.
The Uptime command prints the current time, the length of time the system has been up, thenumber of users online, and the load average.
The load average is the number of runnable processes over the preceding 5, 10, and 15 minuteintervals.
Certain system changes or certain AIX changes only take effect after you reboot the system. Ifthe uptime indicates that the system has not been rebooted since your last product level update orproduct application level update, you need to reboot the system.
LastPROBACKUP
. . . the date and time when you performed the last backup of your Progress data.
The system should display BACKUP COMPLETE next to this field. If it does not readBACKUP COMPLETE, contact the System Administration team in Software Support.
Last AIXBackup
. . . the date and time of the last backup of the AIX operating system.
We recommend that you perform an AIX backup weekly. The Last AIX Backup date allows youto easily determine when the last backup was completed.
AIX Version . . . the current level of the AIX operating system.

6 SYSTEM ADMINISTRATION
445
ACCLAIM 10 NEW FEATURES
TRACK SERVICE LEVEL FOR BLANKET ORDERRELEASES
ITEM LIST
The system determines if a blanket order was a hit or miss on the Service Level Report based on whether therelease was made on time. That is, the system checks whether the blanket order is a hit or miss for each release ona blanket order as the release date becomes current.
For example, on March 12 you enter a blanket order for 300 pens: 100 to be shipped on March 12,100 to be shipped on April 12, and 100 to be shipped on May 12. The system previously updated theservice level report to determine whether all 300 pens were in inventory on the date of the originalorder.
Now, the system updates the service level report three times. That is, the system determines whetherthe individual release quantities are available on each individual release date (March 12, April 12, andMay 12).
The following sample is an example of the service level report. This report now includes blanket orderinformation.
For more information about the service level report, refer to the Item Reporting manual. For more informationabout blanket orders, refer to the Blanket Order manual.

6 SYSTEM ADMINISTRATION
446
ACCLAIM 10 NEW FEATURES
USER-FRIENDLY MESSAGE
PROSHUTDOWN
If you have Progress software, you must run PROSHUTDOWN before running the Kill All Active Ports option. Ifyou run **STOP, the system displays a message asking you to run PROSHUTDOWN first. This message issimilar to the following example:
On previous levels of the software, when you ran PROSHUTDOWN, the system would display a message thatread “If you use the ‘kill all active ports option in **STOP to stop your system, you must run this option first.”This message is not relevant to PROSHUTDOWN; therefore, it no longer appears when you runPROSHUTDOWN.
For more information about PROSHUTDOWN, refer to the System Administrator manual.
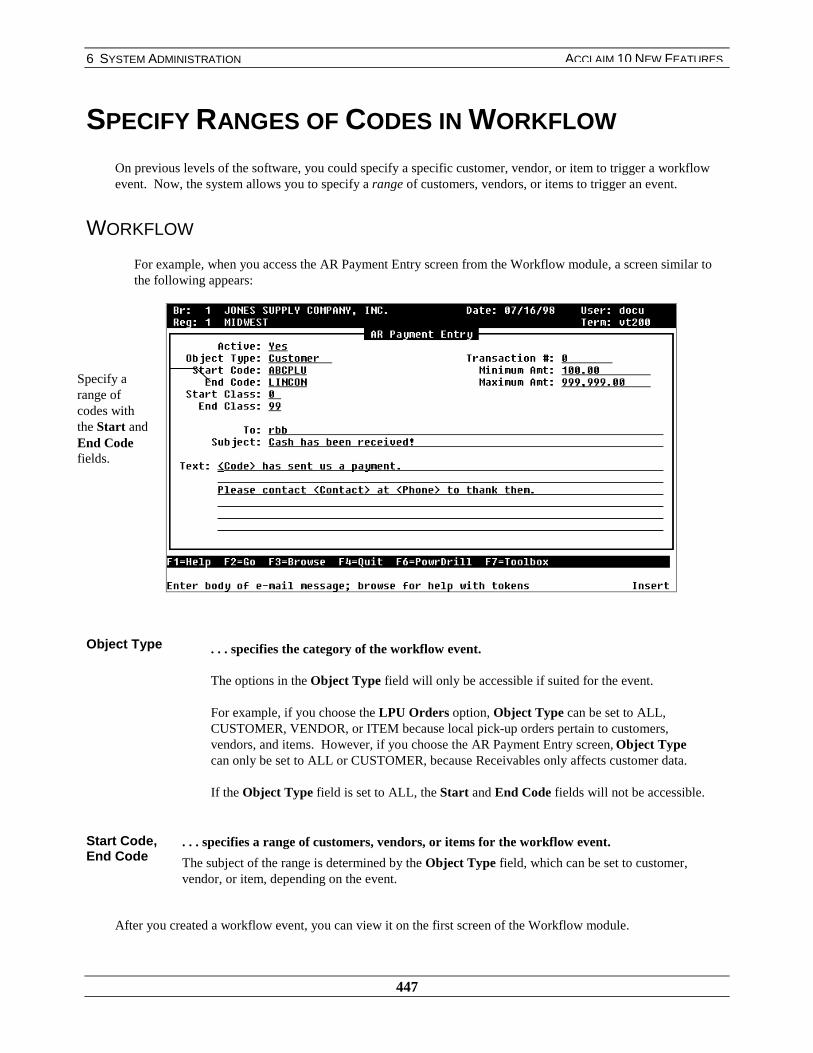
6 SYSTEM ADMINISTRATION
447
ACCLAIM 10 NEW FEATURES
SPECIFY RANGES OF CODES IN WORKFLOW
On previous levels of the software, you could specify a specific customer, vendor, or item to trigger a workflowevent. Now, the system allows you to specify a range of customers, vendors, or items to trigger an event.
WORKFLOW
For example, when you access the AR Payment Entry screen from the Workflow module, a screen similar tothe following appears:
Object Type . . . specifies the category of the workflow event.
The options in the Object Type field will only be accessible if suited for the event.
For example, if you choose the LPU Orders option, Object Type can be set to ALL,CUSTOMER, VENDOR, or ITEM because local pick-up orders pertain to customers,vendors, and items. However, if you choose the AR Payment Entry screen, Object Typecan only be set to ALL or CUSTOMER, because Receivables only affects customer data.
If the Object Type field is set to ALL, the Start and End Code fields will not be accessible.
Start Code,End Code
. . . specifies a range of customers, vendors, or items for the workflow event.
The subject of the range is determined by the Object Type field, which can be set to customer,vendor, or item, depending on the event.
After you created a workflow event, you can view it on the first screen of the Workflow module.
Specify arange ofcodes withthe Start andEnd Codefields.
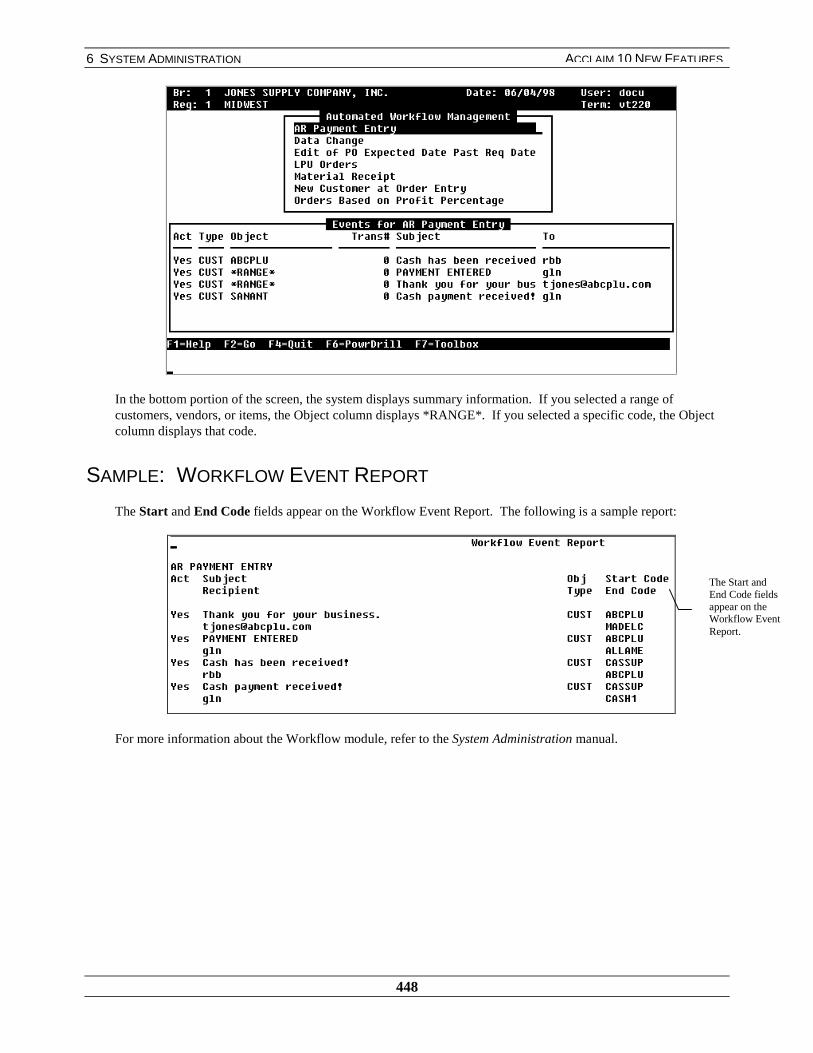
6 SYSTEM ADMINISTRATION
448
ACCLAIM 10 NEW FEATURES
In the bottom portion of the screen, the system displays summary information. If you selected a range ofcustomers, vendors, or items, the Object column displays *RANGE*. If you selected a specific code, the Objectcolumn displays that code.
SAMPLE: WORKFLOW EVENT REPORT
The Start and End Code fields appear on the Workflow Event Report. The following is a sample report:
For more information about the Workflow module, refer to the System Administration manual.
The Start andEnd Code fieldsappear on theWorkflow EventReport.
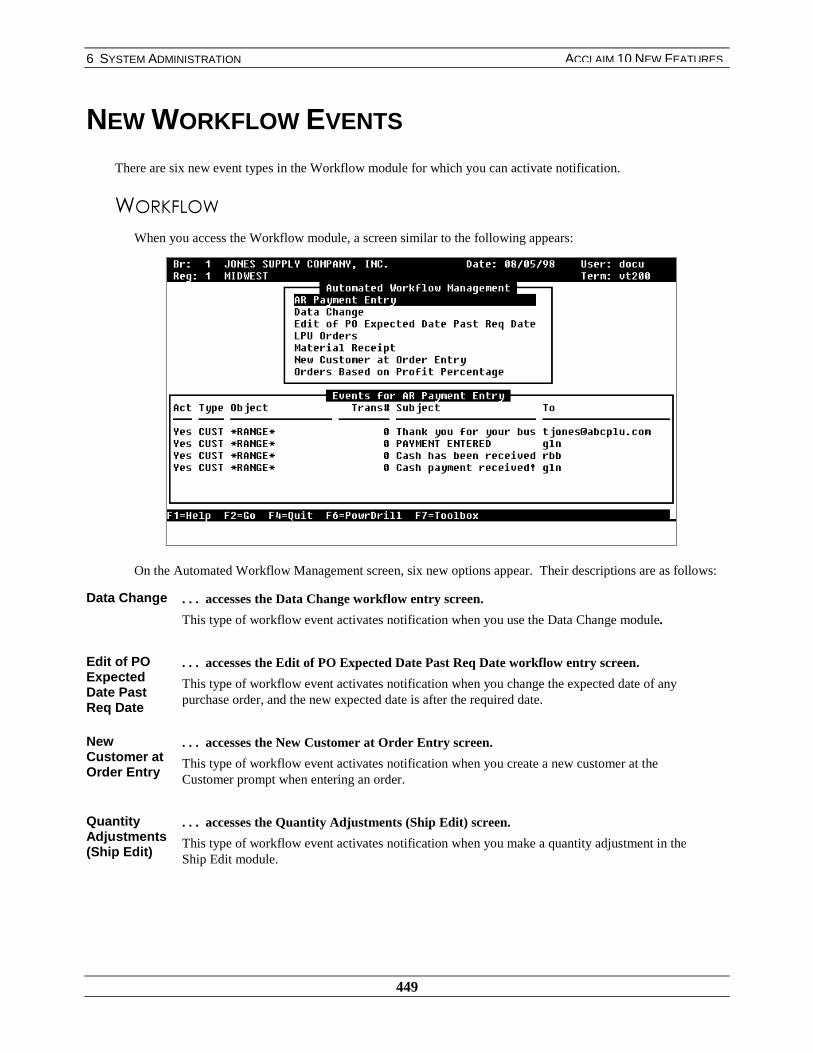
6 SYSTEM ADMINISTRATION
449
ACCLAIM 10 NEW FEATURES
NEW WORKFLOW EVENTS
There are six new event types in the Workflow module for which you can activate notification.
:25.)/2:
When you access the Workflow module, a screen similar to the following appears:
On the Automated Workflow Management screen, six new options appear. Their descriptions are as follows:
Data Change . . . accesses the Data Change workflow entry screen.
This type of workflow event activates notification when you use the Data Change module.
Edit of POExpectedDate PastReq Date
. . . accesses the Edit of PO Expected Date Past Req Date workflow entry screen.
This type of workflow event activates notification when you change the expected date of anypurchase order, and the new expected date is after the required date.
NewCustomer atOrder Entry
. . . accesses the New Customer at Order Entry screen.
This type of workflow event activates notification when you create a new customer at theCustomer prompt when entering an order.
QuantityAdjustments(Ship Edit)
. . . accesses the Quantity Adjustments (Ship Edit) screen.
This type of workflow event activates notification when you make a quantity adjustment in theShip Edit module.

6 SYSTEM ADMINISTRATION
450
ACCLAIM 10 NEW FEATURES
Stock OutsDue ToMaterialAllocation
. . . accesses the Stock Outs Due To Material Allocation screen.
This type of workflow event activates notification when an item is out of stock, due to materialallocation through order entry or material receipt.
SuspendedOrders
. . . accesses the Suspended Order screen.
This type of workflow event activates notification when you suspend a customer order.
Note: On the Automated Workflow Management screen, use your down arrow key to scroll down and viewQuantity Adjustments (Ship Edit), Stock Outs Due to Material Allocation, and Suspended Orders.
DATA CHANGE SCREEN
When you select Data Change from the Automated Workflow Management screen and select to enter an event, ascreen similar to the following appears:
When you press [F3] on the Object Type field, the following browse appears:
You can browse on the Object Type field to trigger for the workflow message.
All . . . sends a message when you use the Data Change module for any object type.
If you select ALL, the Start and End Code and Start and End Class fields will be inaccessible.
Customer . . . sends a message when you use the Data Change module for a customer.
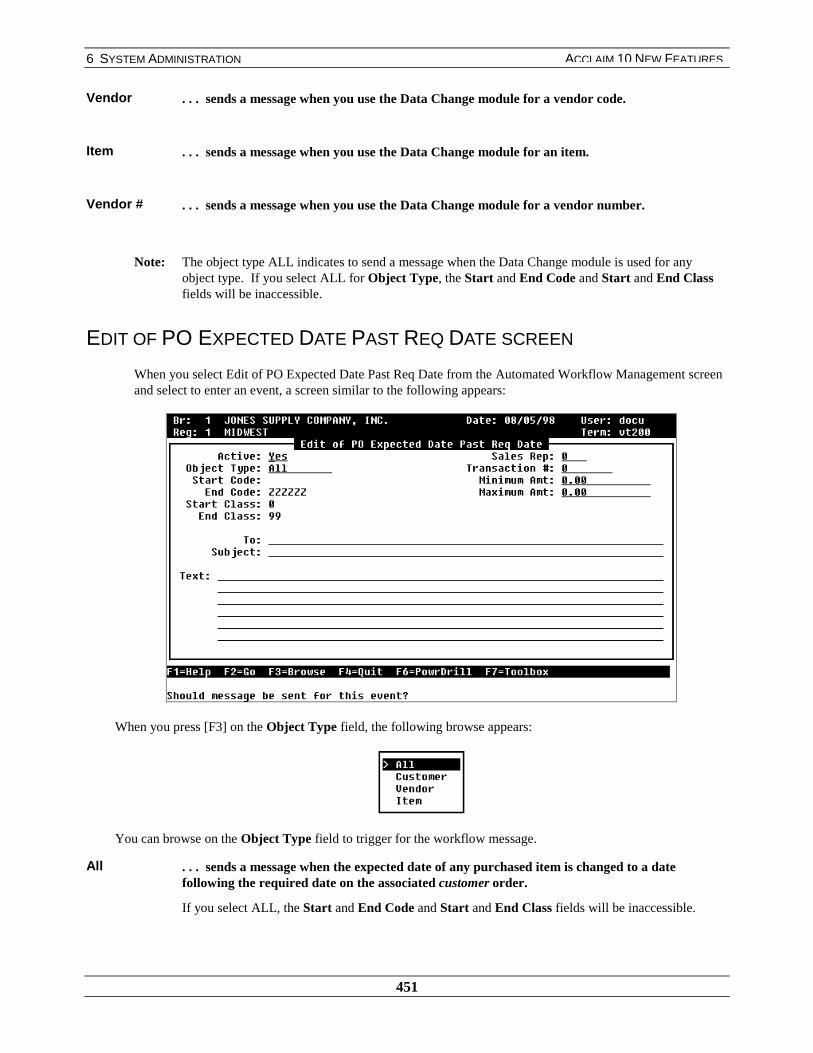
6 SYSTEM ADMINISTRATION
451
ACCLAIM 10 NEW FEATURES
Vendor . . . sends a message when you use the Data Change module for a vendor code.
Item . . . sends a message when you use the Data Change module for an item.
Vendor # . . . sends a message when you use the Data Change module for a vendor number.
Note: The object type ALL indicates to send a message when the Data Change module is used for anyobject type. If you select ALL for Object Type, the Start and End Code and Start and End Classfields will be inaccessible.
EDIT OF PO EXPECTED DATE PAST REQ DATE SCREEN
When you select Edit of PO Expected Date Past Req Date from the Automated Workflow Management screenand select to enter an event, a screen similar to the following appears:
When you press [F3] on the Object Type field, the following browse appears:
You can browse on the Object Type field to trigger for the workflow message.
All . . . sends a message when the expected date of any purchased item is changed to a datefollowing the required date on the associated customer order.
If you select ALL, the Start and End Code and Start and End Class fields will be inaccessible.
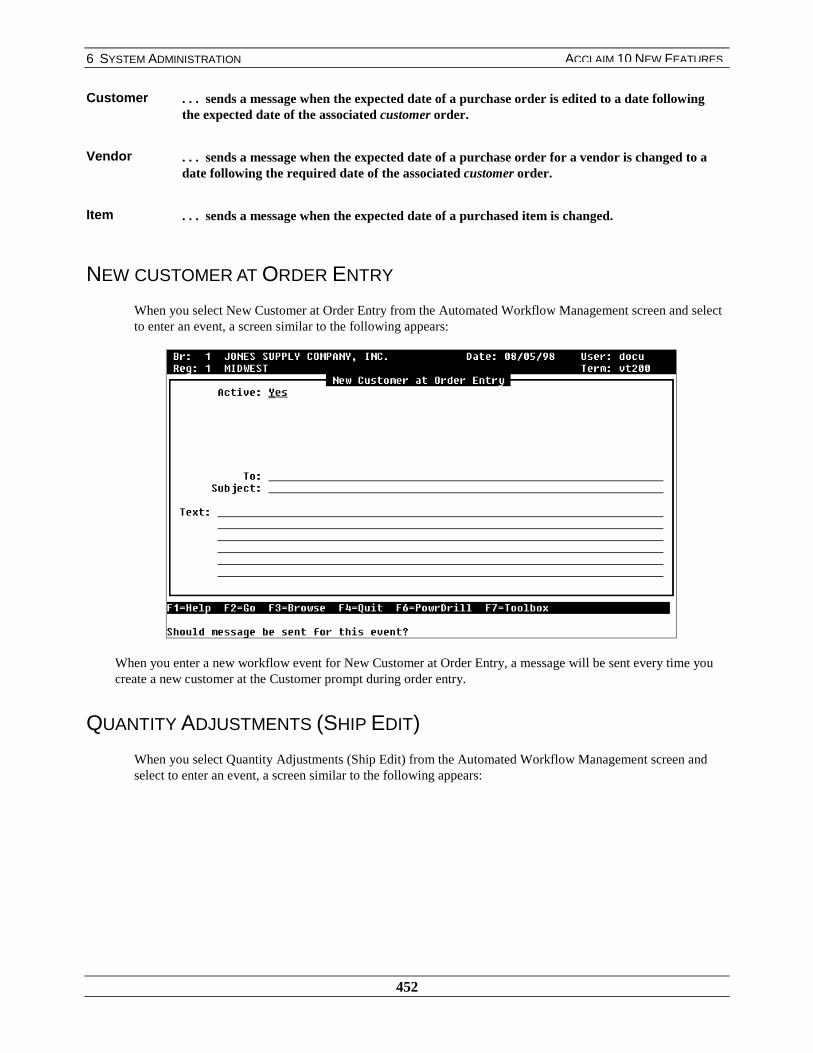
6 SYSTEM ADMINISTRATION
452
ACCLAIM 10 NEW FEATURES
Customer . . . sends a message when the expected date of a purchase order is edited to a date followingthe expected date of the associated customer order.
Vendor . . . sends a message when the expected date of a purchase order for a vendor is changed to adate following the required date of the associated customer order.
Item . . . sends a message when the expected date of a purchased item is changed.
NEW CUSTOMER AT ORDER ENTRY
When you select New Customer at Order Entry from the Automated Workflow Management screen and selectto enter an event, a screen similar to the following appears:
When you enter a new workflow event for New Customer at Order Entry, a message will be sent every time youcreate a new customer at the Customer prompt during order entry.
QUANTITY ADJUSTMENTS (SHIP EDIT)
When you select Quantity Adjustments (Ship Edit) from the Automated Workflow Management screen andselect to enter an event, a screen similar to the following appears:

6 SYSTEM ADMINISTRATION
453
ACCLAIM 10 NEW FEATURES
When you press [F3] on the Object Type field, the following browse appears:
You can browse on the Object Type field to trigger for the workflow message.
All . . . sends a message when the quantity on any order is changed.
If you select ALL, the Start and End Code and Start and End Class fields will be inaccessible.
Customer . . . sends a message when the quantity on an order for a customer is changed.
Item . . . sends a message when the order quantity for an item is changed.
STOCK OUTS DUE TO MATERIAL ALLOCATION SCREEN
When you select Stock Outs Due to Material Allocation from the Automated Workflow Management screenand select to enter an event, a screen similar to the following appears:

6 SYSTEM ADMINISTRATION
454
ACCLAIM 10 NEW FEATURES
When you press [F3] on the Object Type field, the following browse appears:
You can browse on the Object Type field to trigger for the workflow message.
All . . . sends a message when any stock outs exist due to material allocation, either throughorder entry or material receipt.
If you select ALL, the Start and End Code and Start and End Class fields will be inaccessible.
Vendor . . . sends a message when an item associated with a specific vendor is out of stock due tomaterial allocation, either through order entry or material receipt.
Item . . . sends a message when an item is out of stock due to material allocation, either throughorder entry or material receipt.
SUSPENDED ORDERS SCREEN
When you select Suspended Orders from the Automated Workflow Management screen and select to enter anevent, a screen similar to the following appears:
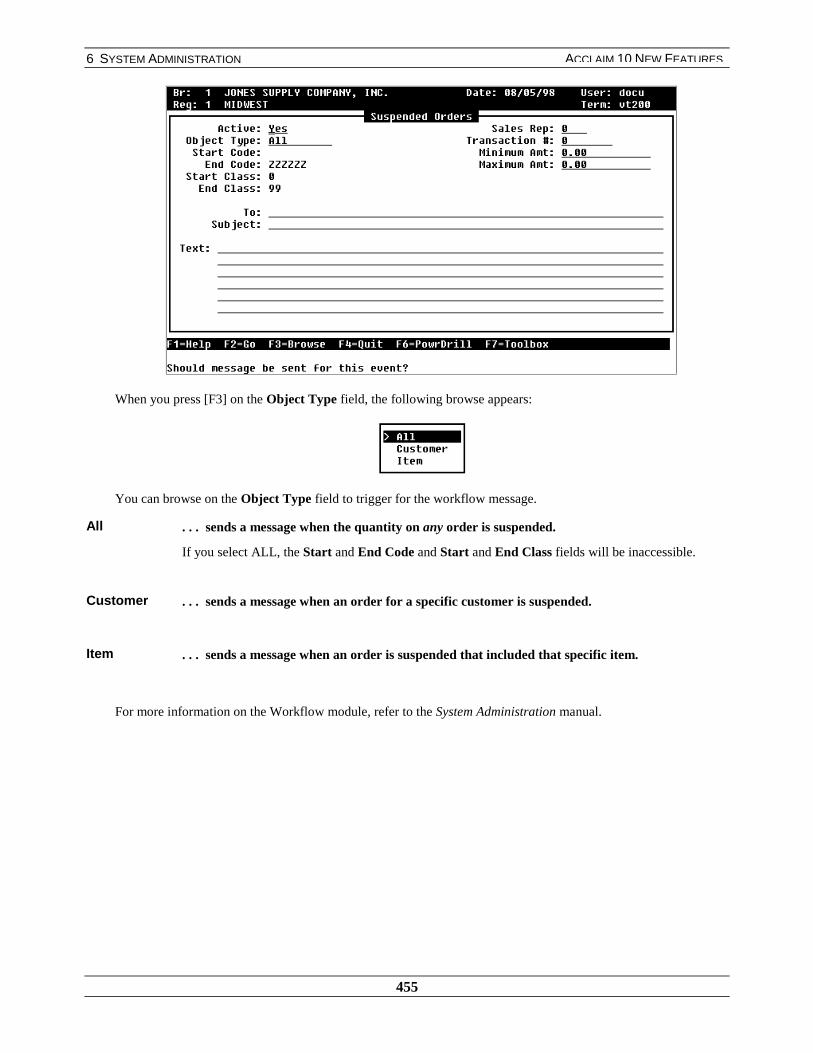
6 SYSTEM ADMINISTRATION
455
ACCLAIM 10 NEW FEATURES
When you press [F3] on the Object Type field, the following browse appears:
You can browse on the Object Type field to trigger for the workflow message.
All . . . sends a message when the quantity on any order is suspended.
If you select ALL, the Start and End Code and Start and End Class fields will be inaccessible.
Customer . . . sends a message when an order for a specific customer is suspended.
Item . . . sends a message when an order is suspended that included that specific item.
For more information on the Workflow module, refer to the System Administration manual.
6 SYSTEM ADMINISTRATION
456
ACCLAIM 10 NEW FEATURES
REAL-TIME TRANSACTIONS IN ITEM LEDGER
The system automatically builds item-ledger transactions to Item Ledger history. You no longer have to manuallybuild Item Ledger history. On previous levels of the software, transactions were recorded in a temporary file. Atthe close of each business day, you had to manually build information from the temporary file to the Item Ledgerhistory file. Now, the system automatically updates this information to the Item Ledger history file once thetransaction is complete.
When you enter certain transactions in the following modules, the system automatically builds the transaction inItem Ledger history:
♦ Order
♦ Quote Order
♦ Front Counter
♦ Print Front
♦ Expedite Order
♦ Invoice
♦ Ship Edit
♦ Material
♦ Transfer
♦ Purchase
♦ Expedite Purchase
♦ Item Adjust
♦ Item Count
When you enter certain transactions in the following Optional Packages, the system automatically updates the ItemLedger history.
♦ POS Entry
♦ On-Site
♦ Assembly/Work Edit
♦ Secondary Processing
For more information about Item Ledger, and the specific transaction information that is recorded in Item LedgerHistory, refer to the Inventory Control manual.
Building Item Ledger is no longer part of your daily closing procedures. You may want to remove it from yourend-of-day process.
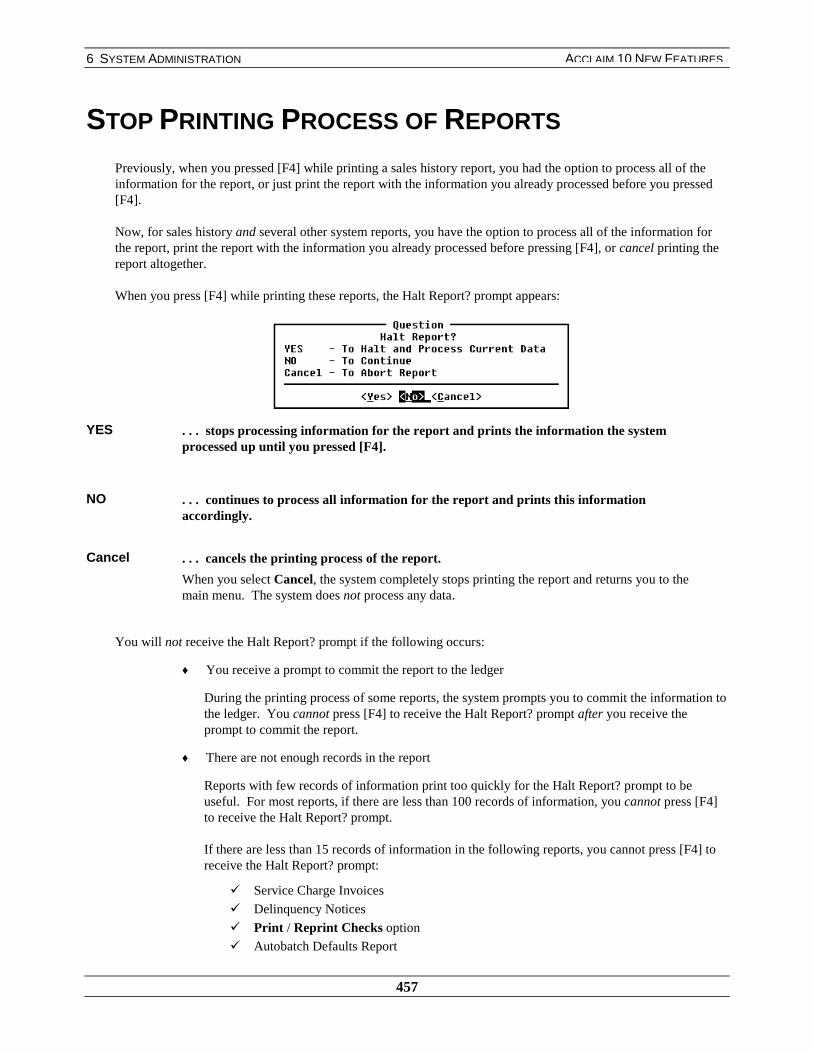
6 SYSTEM ADMINISTRATION
457
ACCLAIM 10 NEW FEATURES
STOP PRINTING PROCESS OF REPORTS
Previously, when you pressed [F4] while printing a sales history report, you had the option to process all of theinformation for the report, or just print the report with the information you already processed before you pressed[F4].
Now, for sales history and several other system reports, you have the option to process all of the information forthe report, print the report with the information you already processed before pressing [F4], or cancel printing thereport altogether.
When you press [F4] while printing these reports, the Halt Report? prompt appears:
YES . . . stops processing information for the report and prints the information the systemprocessed up until you pressed [F4].
NO . . . continues to process all information for the report and prints this informationaccordingly.
Cancel . . . cancels the printing process of the report.
When you select Cancel, the system completely stops printing the report and returns you to themain menu. The system does not process any data.
You will not receive the Halt Report? prompt if the following occurs:
♦ You receive a prompt to commit the report to the ledger
During the printing process of some reports, the system prompts you to commit the information tothe ledger. You cannot press [F4] to receive the Halt Report? prompt after you receive theprompt to commit the report.
♦ There are not enough records in the report
Reports with few records of information print too quickly for the Halt Report? prompt to beuseful. For most reports, if there are less than 100 records of information, you cannot press [F4]to receive the Halt Report? prompt.
If there are less than 15 records of information in the following reports, you cannot press [F4] toreceive the Halt Report? prompt:
á Service Charge Invoices
á Delinquency Notices
á Print / Reprint Checks option
á Autobatch Defaults Report
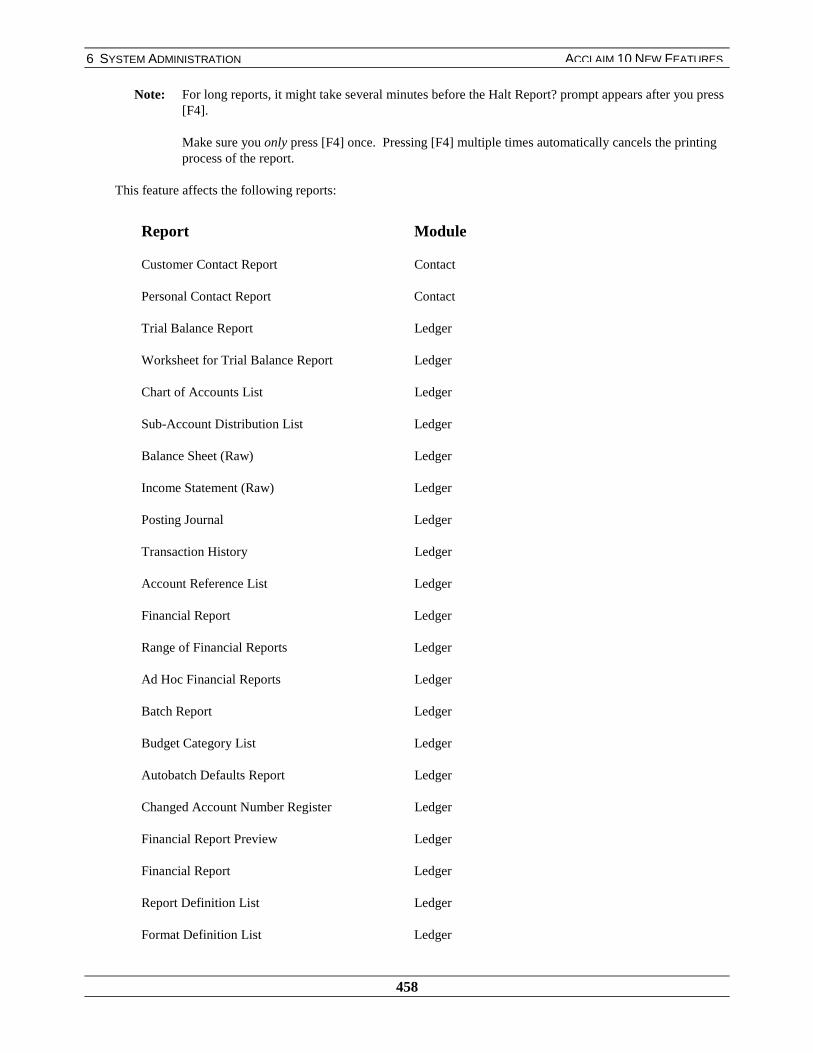
6 SYSTEM ADMINISTRATION
458
ACCLAIM 10 NEW FEATURES
Note: For long reports, it might take several minutes before the Halt Report? prompt appears after you press[F4].
Make sure you only press [F4] once. Pressing [F4] multiple times automatically cancels the printingprocess of the report.
This feature affects the following reports:
Report Module
Customer Contact Report Contact
Personal Contact Report Contact
Trial Balance Report Ledger
Worksheet for Trial Balance Report Ledger
Chart of Accounts List Ledger
Sub-Account Distribution List Ledger
Balance Sheet (Raw) Ledger
Income Statement (Raw) Ledger
Posting Journal Ledger
Transaction History Ledger
Account Reference List Ledger
Financial Report Ledger
Range of Financial Reports Ledger
Ad Hoc Financial Reports Ledger
Batch Report Ledger
Budget Category List Ledger
Autobatch Defaults Report Ledger
Changed Account Number Register Ledger
Financial Report Preview Ledger
Financial Report Ledger
Report Definition List Ledger
Format Definition List Ledger
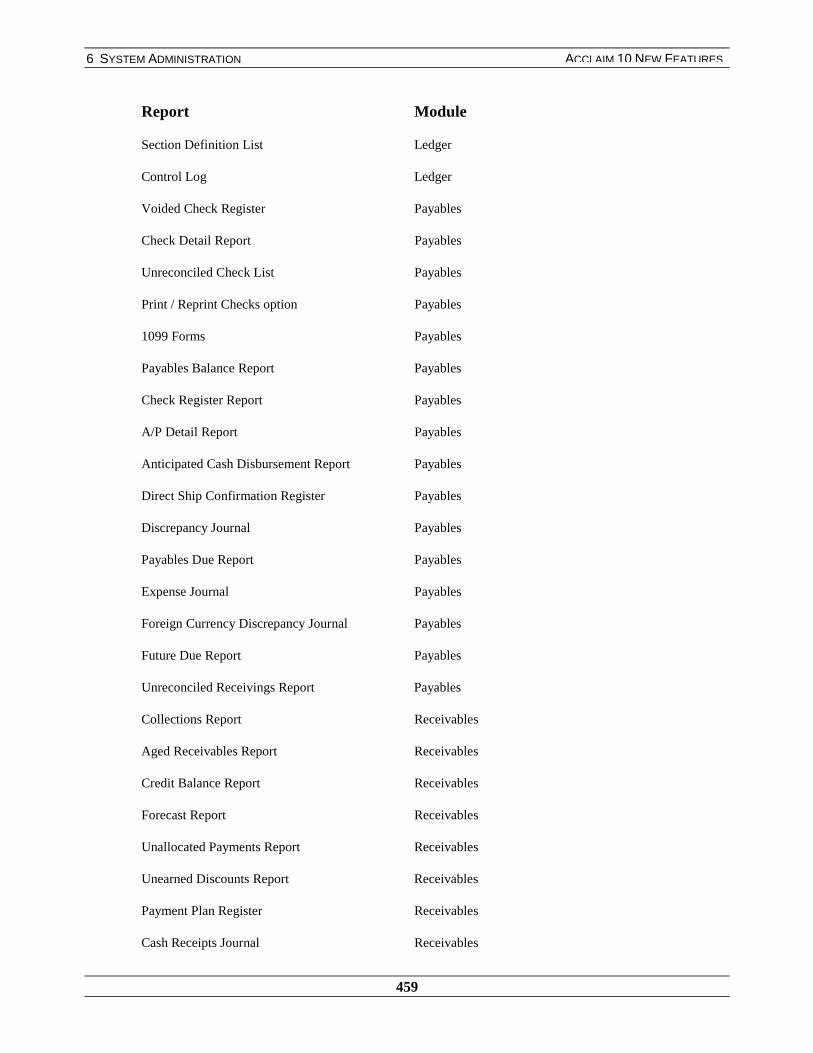
6 SYSTEM ADMINISTRATION
459
ACCLAIM 10 NEW FEATURES
Report Module
Section Definition List Ledger
Control Log Ledger
Voided Check Register Payables
Check Detail Report Payables
Unreconciled Check List Payables
Print / Reprint Checks option Payables
1099 Forms Payables
Payables Balance Report Payables
Check Register Report Payables
A/P Detail Report Payables
Anticipated Cash Disbursement Report Payables
Direct Ship Confirmation Register Payables
Discrepancy Journal Payables
Payables Due Report Payables
Expense Journal Payables
Foreign Currency Discrepancy Journal Payables
Future Due Report Payables
Unreconciled Receivings Report Payables
Collections Report Receivables
Aged Receivables Report Receivables
Credit Balance Report Receivables
Forecast Report Receivables
Unallocated Payments Report Receivables
Unearned Discounts Report Receivables
Payment Plan Register Receivables
Cash Receipts Journal Receivables
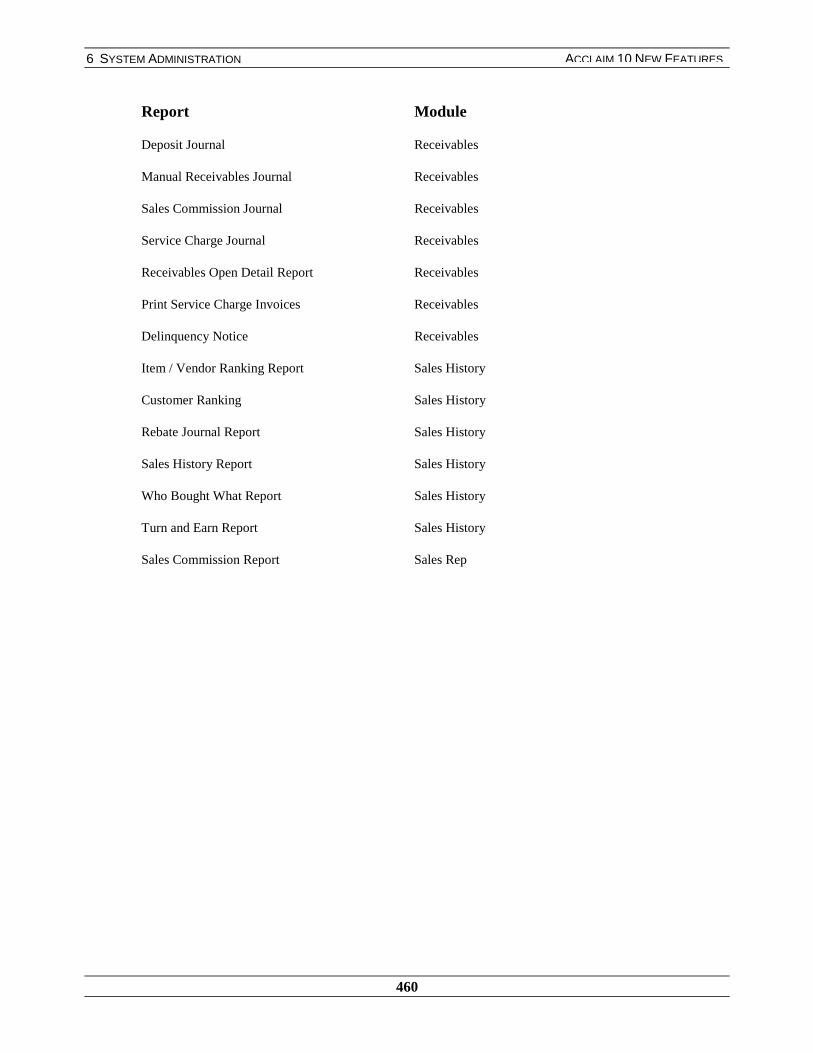
6 SYSTEM ADMINISTRATION
460
ACCLAIM 10 NEW FEATURES
Report Module
Deposit Journal Receivables
Manual Receivables Journal Receivables
Sales Commission Journal Receivables
Service Charge Journal Receivables
Receivables Open Detail Report Receivables
Print Service Charge Invoices Receivables
Delinquency Notice Receivables
Item / Vendor Ranking Report Sales History
Customer Ranking Sales History
Rebate Journal Report Sales History
Sales History Report Sales History
Who Bought What Report Sales History
Turn and Earn Report Sales History
Sales Commission Report Sales Rep

6 SYSTEM ADMINISTRATION
461
ACCLAIM 10 NEW FEATURES
SYSTEM INDICATES ARRIVAL OF P21 MAIL
Now, every time you receive a new P21 mail item, the following occurs:
♦ The system displays the word, “MAIL” in the status bar at the bottom of the screen
♦ You hear a tone
Note: You will only hear a tone once, upon arrival of the mail item.
P21 MAIL
When you receive a new mail item in P21 Mail, the word, “MAIL” appears in the status bar:
In addition to this message, you will hear a tone, provided you have a sound card installed on your PC.
For more information on P21 mail, refer to the System Utilities manual.
Mail appears in
the status bar.

6 SYSTEM ADMINISTRATION
462
ACCLAIM 10 NEW FEATURES
Create New Message Groups in Workflow
The system now allows you to enter a new message group while you are entering or editing a Workflow event.This feature allows you to easily set up new groups without leaving the Workflow module.
WORKFLOW
When you select to enter or edit a Workflow event, you can browse on the To field. Pressing [F3] at the To fieldproduces a screen similar to the following:
When you select the Group option and press [F6] to access the Options menu, a screen similar to the followingappears:
Sort byName
. . . sorts the browse by group name.
Sort byDescription
. . . sorts the browse by a description of each group.
New Group . . . creates a new message group.
When you select this option, the Mail Group Maintenance screen appears, allowing you to enter anew mail group.
For more information about the Mail Group Maintenance screen, refer to the System Utilitiesmanual.

6 SYSTEM ADMINISTRATION
463
ACCLAIM 10 NEW FEATURES
FORWARD MESSAGES TO MESSAGE GROUPS
This new feature allows you to forward messages to message groups. You can forward received messages tospecific ports, specific user IDs, or message groups. A message group represents a group of individual user IDs ora group of ports.
When you select to read a message, a screen similar to the following appears:
When you select the “F”orward option, a screen similar to the following appears:
You can use the “F”orward option to forward a message to a specific port, specific user ID, or message group.When you select to forward the message to a group, a screen similar to the following appears:
A new
“F”orward
option
appears
You can select to
forward the
message to a
“G”roup.

6 SYSTEM ADMINISTRATION
464
ACCLAIM 10 NEW FEATURES
The system prompts you to enter a group name. If necessary, you can enter:
♦ a dot (.) to scan all of the available message groups
♦ a comma (,) to scan only those groups whose type has been set to USER
♦ a semi-colon (;) to scan only those groups whose type has been set to GROUP
After you enter a valid message group name, the system prompts you to proceed. When you select Y to proceed,the system forwards the message to all the members of the specified group.
For more information about the Message module refer to the System Administration manual.
The system
prompts you to
enter a valid
message group
name.
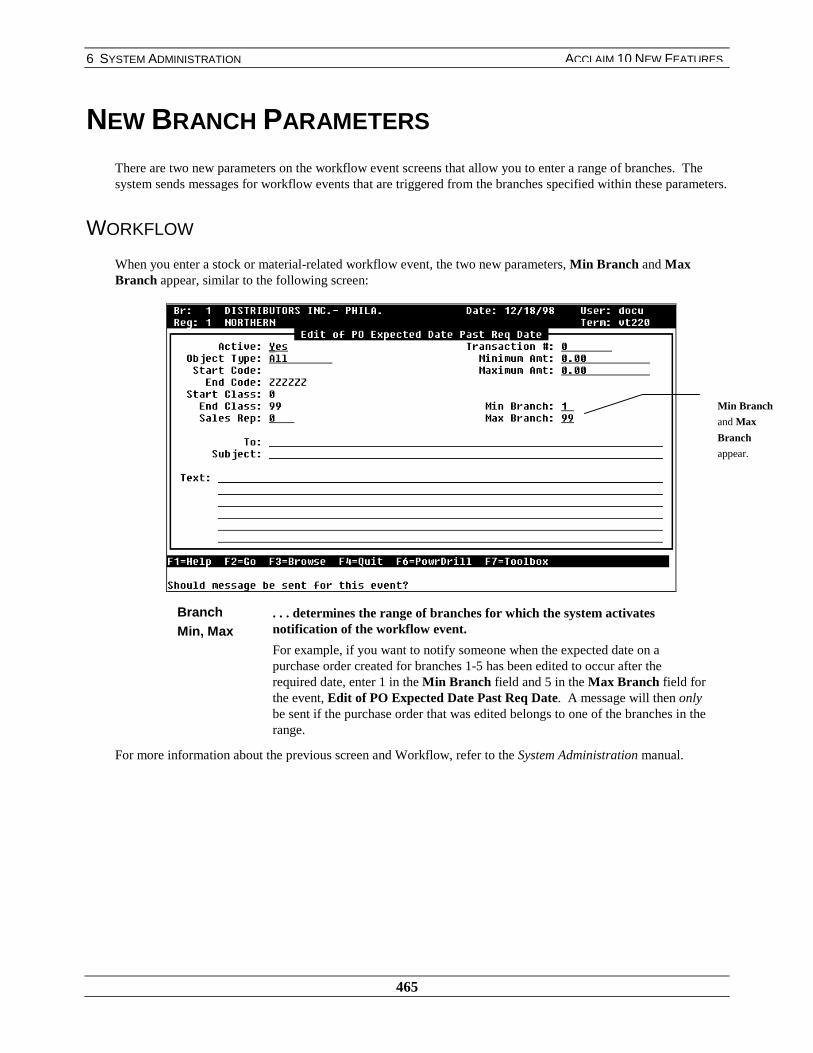
6 SYSTEM ADMINISTRATION
465
ACCLAIM 10 NEW FEATURES
NEW BRANCH PARAMETERS
There are two new parameters on the workflow event screens that allow you to enter a range of branches. Thesystem sends messages for workflow events that are triggered from the branches specified within these parameters.
WORKFLOW
When you enter a stock or material-related workflow event, the two new parameters, Min Branch and MaxBranch appear, similar to the following screen:
BranchMin, Max
. . . determines the range of branches for which the system activatesnotification of the workflow event.
For example, if you want to notify someone when the expected date on apurchase order created for branches 1-5 has been edited to occur after therequired date, enter 1 in the Min Branch field and 5 in the Max Branch field forthe event, Edit of PO Expected Date Past Req Date. A message will then onlybe sent if the purchase order that was edited belongs to one of the branches in therange.
For more information about the previous screen and Workflow, refer to the System Administration manual.
Min Branch
and Max
Branch
appear.
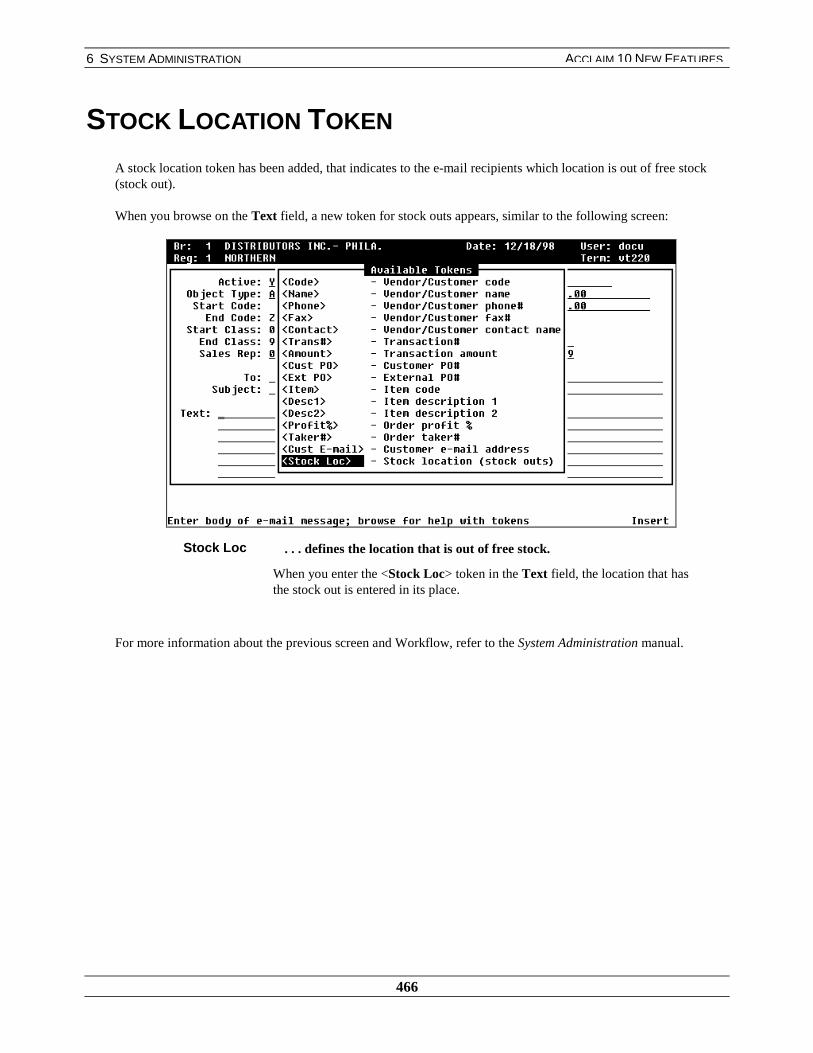
6 SYSTEM ADMINISTRATION
466
ACCLAIM 10 NEW FEATURES
STOCK LOCATION TOKEN
A stock location token has been added, that indicates to the e-mail recipients which location is out of free stock(stock out).
When you browse on the Text field, a new token for stock outs appears, similar to the following screen:
Stock Loc . . . defines the location that is out of free stock.
When you enter the <Stock Loc> token in the Text field, the location that hasthe stock out is entered in its place.
For more information about the previous screen and Workflow, refer to the System Administration manual.

6 SYSTEM ADMINISTRATION
467
ACCLAIM 10 NEW FEATURES
USER-FRIENDLY MESSAGE
When you run FULL-CHECK, the system displays a message similar to the following if you need to expand a file:
For more information about FULL-CHECK, refer to the System Administration manual.
A message tells
you to expand the
file.

6 SYSTEM ADMINISTRATION
468
ACCLAIM 10 NEW FEATURES
NEW MESSAGE IN FULL CHECK/FILE EXPAND
Only one user can access Full Check/File Expand. If multiple users attempt to access Full Check/File Expand, thesystem displays a message similar to the following:
For more information about Full Check/File Expand, refer to the System Administration manual.

6 SYSTEM ADMINISTRATION
469
ACCLAIM 10 NEW FEATURES
NEW MESSAGES IN SPOOLQWhen you print to SpoolQ and the files SPQUED and SPQUEX are full, the system displays a message asking youto purge SpoolQ reports or expand the files that are full. The message is similar to the following example:
When you print to SpoolQ and the files PRSPOD and PRSPOX are full, the system displays a message asking youto purge SpoolQ reports or expand the files that are full. The message is similar to the following example:
For more information about SpoolQ, refer to the System Utilities manual.

6 SYSTEM ADMINISTRATION
470
ACCLAIM 10 NEW FEATURES
FILES OFFLINE MESSAGE
If you try to access the system when the files are offline, a system similar to the following appears:
For more information about turning files online and offline, refer to the System Administration manual.
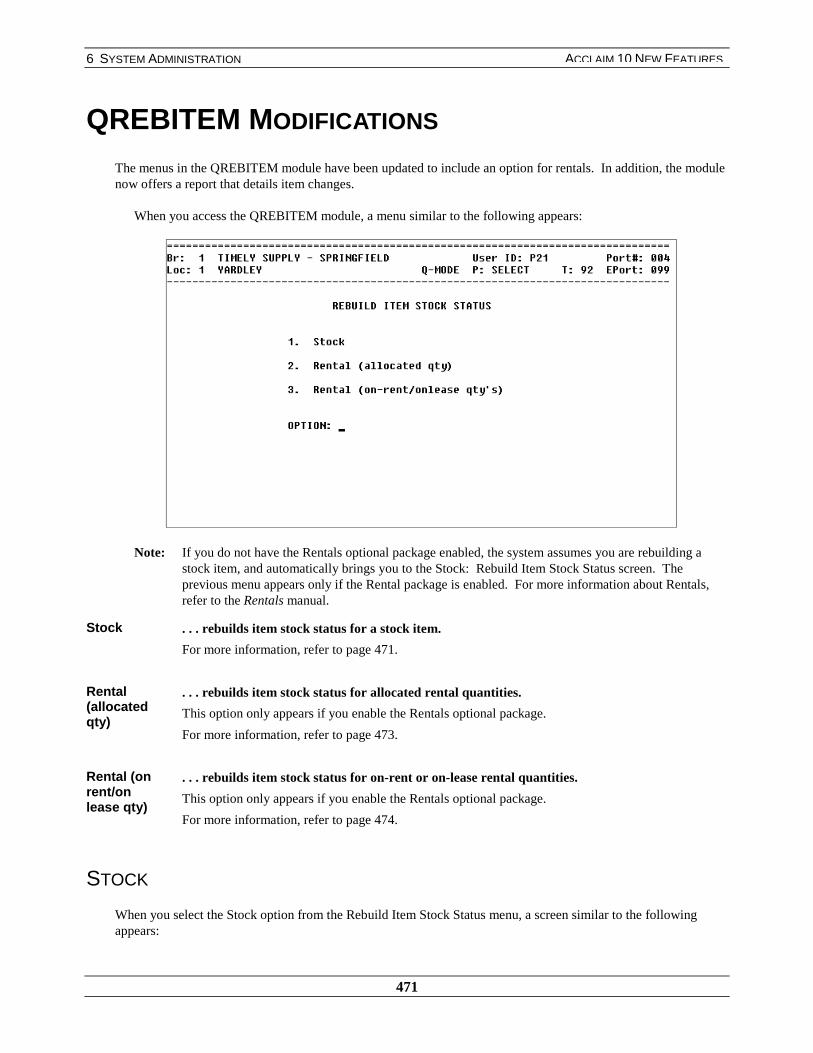
6 SYSTEM ADMINISTRATION
471
ACCLAIM 10 NEW FEATURES
QREBITEM MODIFICATIONS
The menus in the QREBITEM module have been updated to include an option for rentals. In addition, the modulenow offers a report that details item changes.
When you access the QREBITEM module, a menu similar to the following appears:
Note: If you do not have the Rentals optional package enabled, the system assumes you are rebuilding astock item, and automatically brings you to the Stock: Rebuild Item Stock Status screen. Theprevious menu appears only if the Rental package is enabled. For more information about Rentals,refer to the Rentals manual.
Stock . . . rebuilds item stock status for a stock item.
For more information, refer to page 471.
Rental(allocatedqty)
. . . rebuilds item stock status for allocated rental quantities.
This option only appears if you enable the Rentals optional package.
For more information, refer to page 473.
Rental (onrent/onlease qty)
. . . rebuilds item stock status for on-rent or on-lease rental quantities.
This option only appears if you enable the Rentals optional package.
For more information, refer to page 474.
STOCK
When you select the Stock option from the Rebuild Item Stock Status menu, a screen similar to the followingappears:

6 SYSTEM ADMINISTRATION
472
ACCLAIM 10 NEW FEATURES
Proceed? . . . rebuilds the stock item status of all stock items at all locations.
Y – rebuilds the stock item status of all stock items.
N – exits without rebuilding the stock item status of stock items.
Note: You must make sure you have invoiced all confirmed direct ship orders before runningQREBITEM.
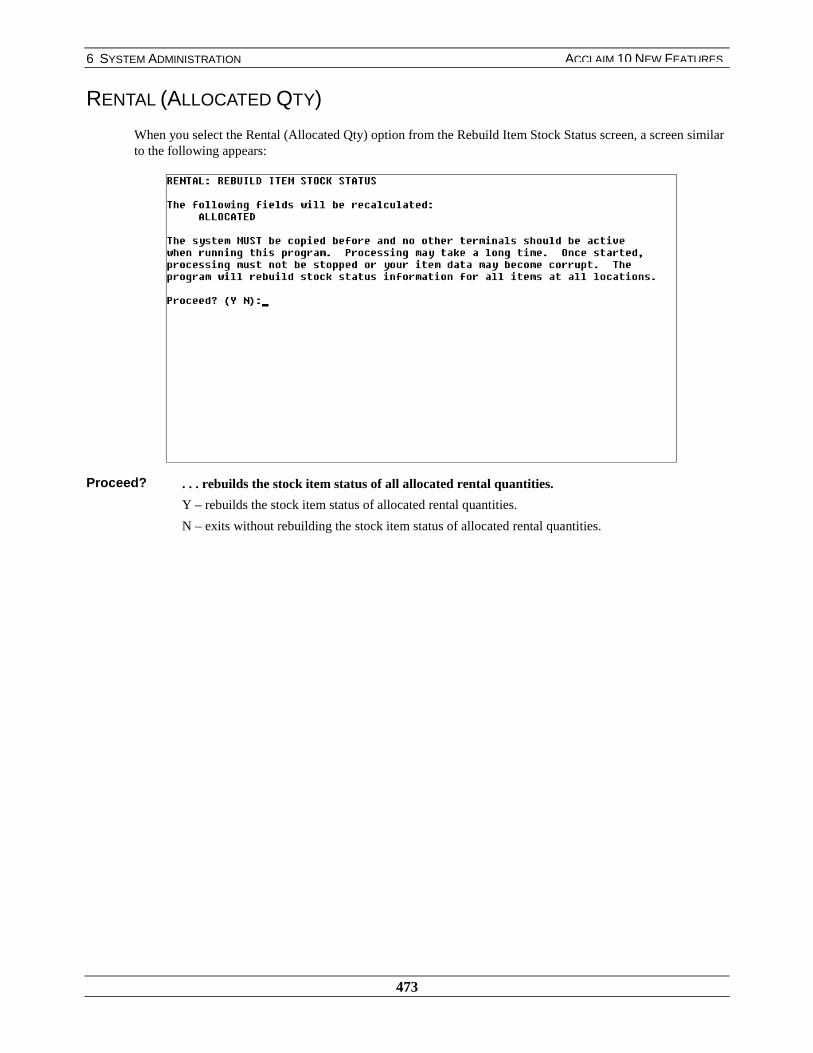
6 SYSTEM ADMINISTRATION
473
ACCLAIM 10 NEW FEATURES
RENTAL (ALLOCATED QTY)
When you select the Rental (Allocated Qty) option from the Rebuild Item Stock Status screen, a screen similarto the following appears:
Proceed? . . . rebuilds the stock item status of all allocated rental quantities.
Y – rebuilds the stock item status of allocated rental quantities.
N – exits without rebuilding the stock item status of allocated rental quantities.
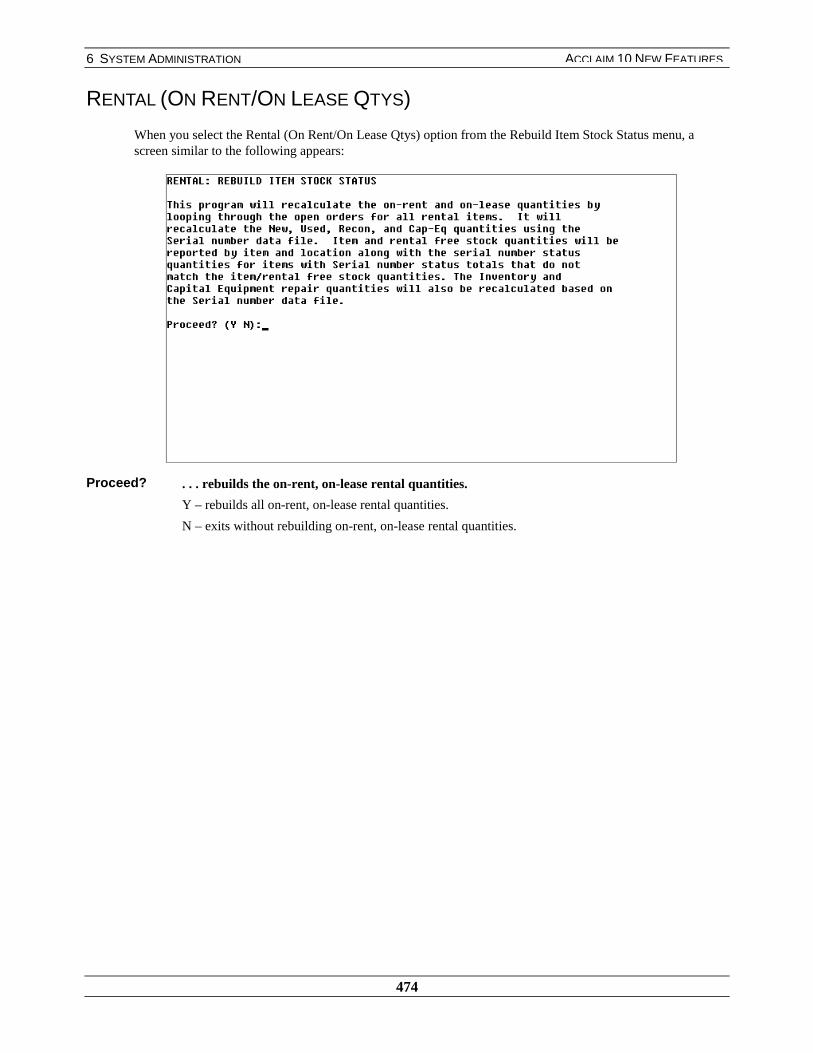
6 SYSTEM ADMINISTRATION
474
ACCLAIM 10 NEW FEATURES
RENTAL (ON RENT/ON LEASE QTYS)
When you select the Rental (On Rent/On Lease Qtys) option from the Rebuild Item Stock Status menu, ascreen similar to the following appears:
Proceed? . . . rebuilds the on-rent, on-lease rental quantities.
Y – rebuilds all on-rent, on-lease rental quantities.
N – exits without rebuilding on-rent, on-lease rental quantities.
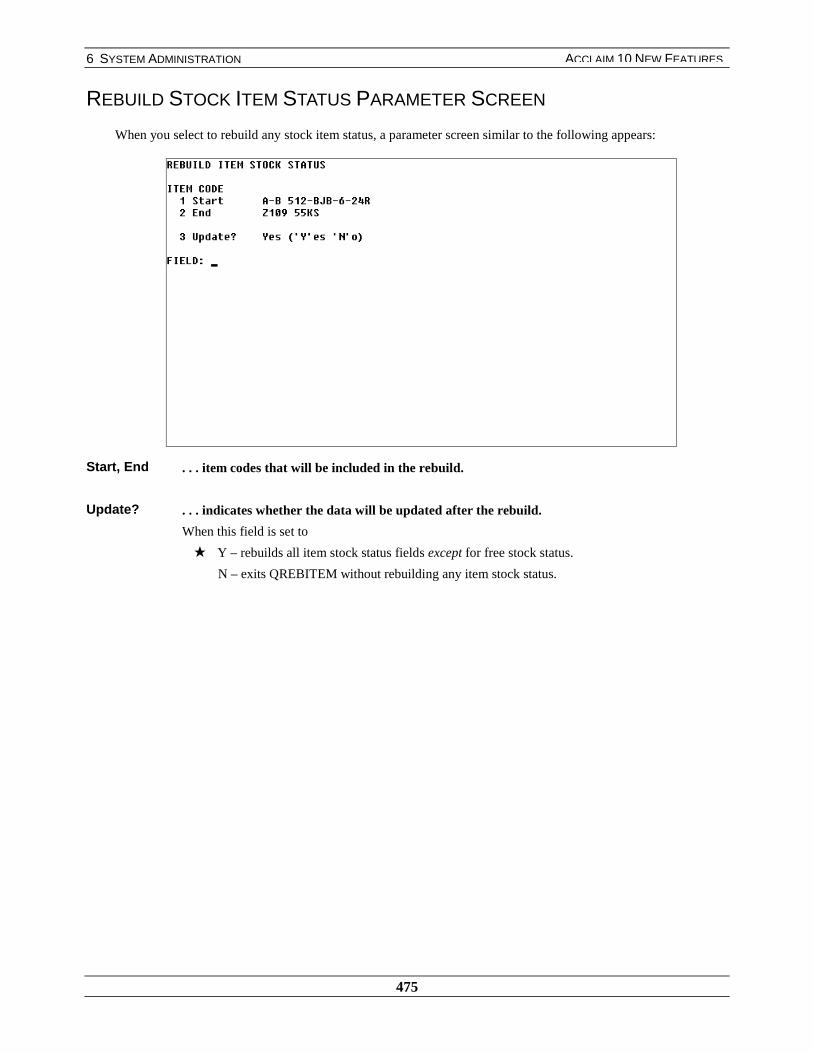
6 SYSTEM ADMINISTRATION
475
ACCLAIM 10 NEW FEATURES
REBUILD STOCK ITEM STATUS PARAMETER SCREEN
When you select to rebuild any stock item status, a parameter screen similar to the following appears:
Start, End . . . item codes that will be included in the rebuild.
Update? . . . indicates whether the data will be updated after the rebuild.
When this field is set to
★ Y – rebuilds all item stock status fields except for free stock status.
N – exits QREBITEM without rebuilding any item stock status.

6 SYSTEM ADMINISTRATION
476
ACCLAIM 10 NEW FEATURES
SAMPLE: REBUILD ITEM STOCK STATUS REPORT
After you have determined the parameters, the system always prints a report that displays any item changes.Only those items and locations with changes appear on the report. The report appears similar to the followingexample:
Item Code . . . unique code used to identify the item.
Location . . . location number where a change occurred.
On PO . . . quantity of items on purchase orders.
Old indicates the previous stock status on purchase orders.
New indicates the stock status on purchase orders as changed by QREBITEM.
In-Transit . . . quantity of items in transit.
Old indicates the previous stock status in transit.
New indicates the stock status in transit as changed by QREBITEM.
Allocated . . . quantity of allocated items.
Old indicates the previous stock status of allocated stock.
New indicates the stock status of allocated stock as changed by QREBITEM.
Backordered . . . quantity of backordered items.
Old indicates the previous stock status of backordered stock.
New indicates the stock status of backordered stock as changed by QREBITEM.
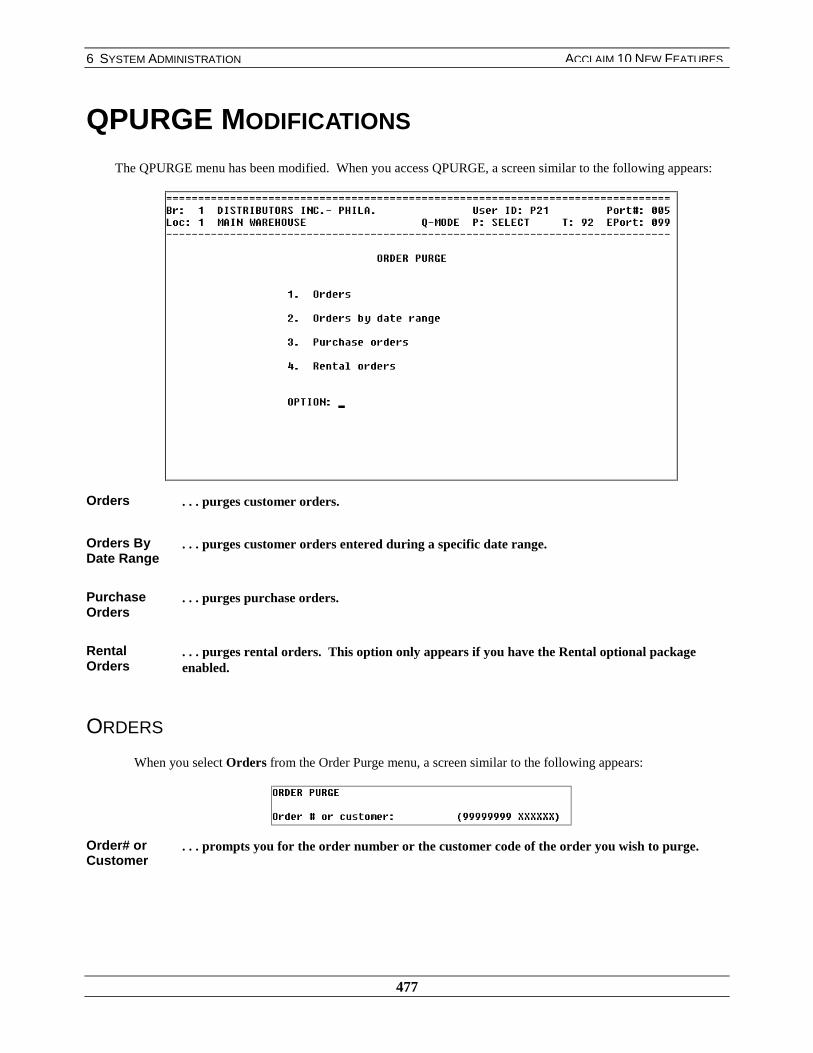
6 SYSTEM ADMINISTRATION
477
ACCLAIM 10 NEW FEATURES
QPURGE MODIFICATIONS
The QPURGE menu has been modified. When you access QPURGE, a screen similar to the following appears:
Orders . . . purges customer orders.
Orders ByDate Range
. . . purges customer orders entered during a specific date range.
PurchaseOrders
. . . purges purchase orders.
RentalOrders
. . . purges rental orders. This option only appears if you have the Rental optional packageenabled.
ORDERS
When you select Orders from the Order Purge menu, a screen similar to the following appears:
Order# orCustomer
. . . prompts you for the order number or the customer code of the order you wish to purge.

6 SYSTEM ADMINISTRATION
478
ACCLAIM 10 NEW FEATURES
After you determine the order you would like to purge, the system displays an order purge review screen,similar to the following example:
If you choose to cancel an item from the Order Purge Review screen, the system displays a screen similar tothe following:
ORDERS BY DATE RANGE
When you select Orders By Date Range from the Order Purge menu, a screen similar to the following appears:
More
information is
available in the
Review screen.
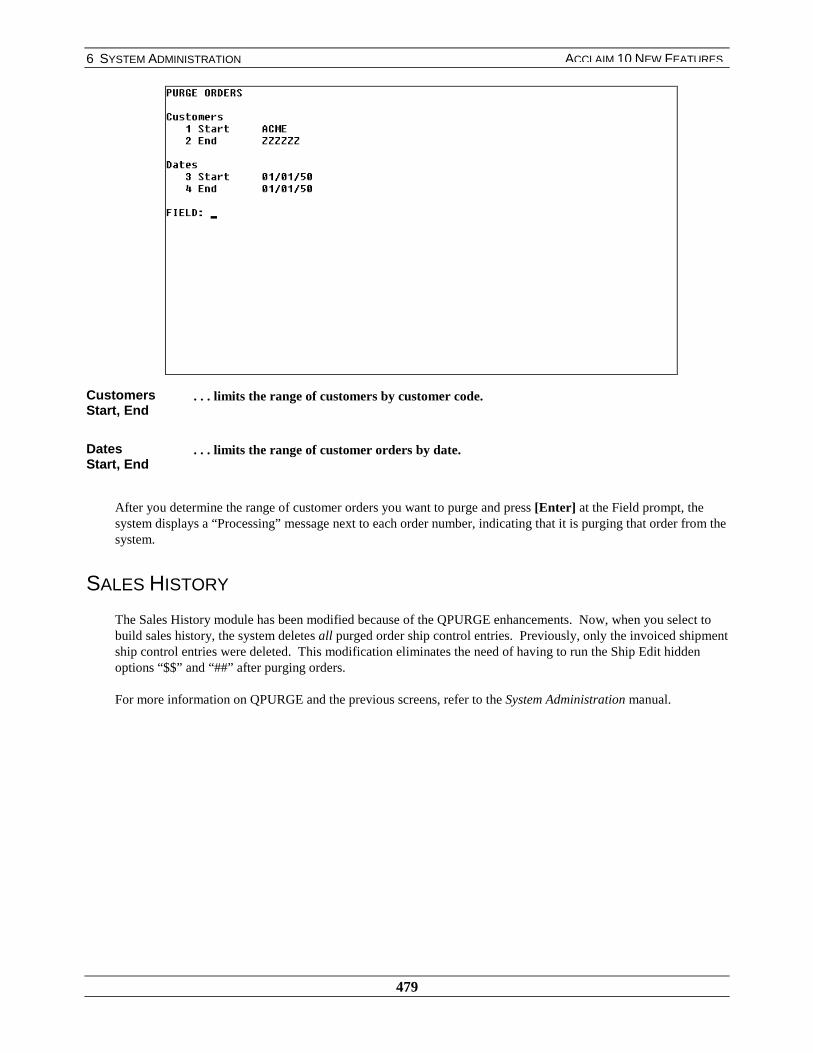
6 SYSTEM ADMINISTRATION
479
ACCLAIM 10 NEW FEATURES
CustomersStart, End
. . . limits the range of customers by customer code.
DatesStart, End
. . . limits the range of customer orders by date.
After you determine the range of customer orders you want to purge and press [Enter] at the Field prompt, thesystem displays a “Processing” message next to each order number, indicating that it is purging that order from thesystem.
SALES HISTORY
The Sales History module has been modified because of the QPURGE enhancements. Now, when you select tobuild sales history, the system deletes all purged order ship control entries. Previously, only the invoiced shipmentship control entries were deleted. This modification eliminates the need of having to run the Ship Edit hiddenoptions “$$” and “##” after purging orders.
For more information on QPURGE and the previous screens, refer to the System Administration manual.

6 SYSTEM ADMINISTRATION
480
ACCLAIM 10 NEW FEATURES
DISPLAY ENHANCEMENTS TO WHO-BOUGHT-WHATREPORT
There are two new enhancements to the Who-Bought-What Report in Sales History. The system now displayscommas in numbers greater than 999.99, and prints double underlines (= = =) between the individual entries andthe subtotals and totals on the report. These enhancements appear for all sequences (Customer, Item, Sales Rep,etc.), and in all report formats.
SALES HISTORY
Select Reporting from the Sales History menu, and Who-Bought-What from the Reporting menu. When youcomplete the report parameters and print the report, the system displays all numbers greater than 999.99 withcommas, and displays double underlines (= = =) before displaying the subtotals and totals of the report.
For more information on the Who-Bought-What Report, refer to the Sales History manual.
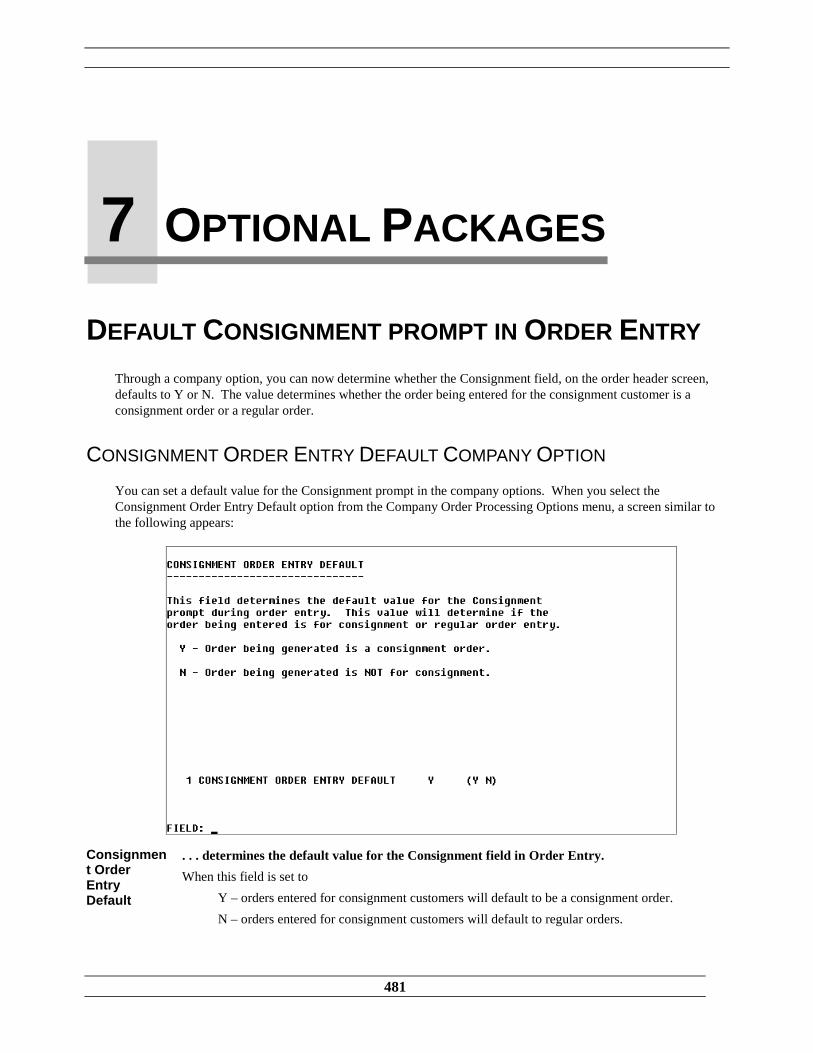
481
DEFAULT CONSIGNMENT PROMPT IN ORDER ENTRY
Through a company option, you can now determine whether the Consignment field, on the order header screen,defaults to Y or N. The value determines whether the order being entered for the consignment customer is aconsignment order or a regular order.
CONSIGNMENT ORDER ENTRY DEFAULT COMPANY OPTION
You can set a default value for the Consignment prompt in the company options. When you select theConsignment Order Entry Default option from the Company Order Processing Options menu, a screen similar tothe following appears:
Consignment OrderEntryDefault
. . . determines the default value for the Consignment field in Order Entry.
When this field is set to
Y – orders entered for consignment customers will default to be a consignment order.
N – orders entered for consignment customers will default to regular orders.
7 OPTIONAL PACKAGES
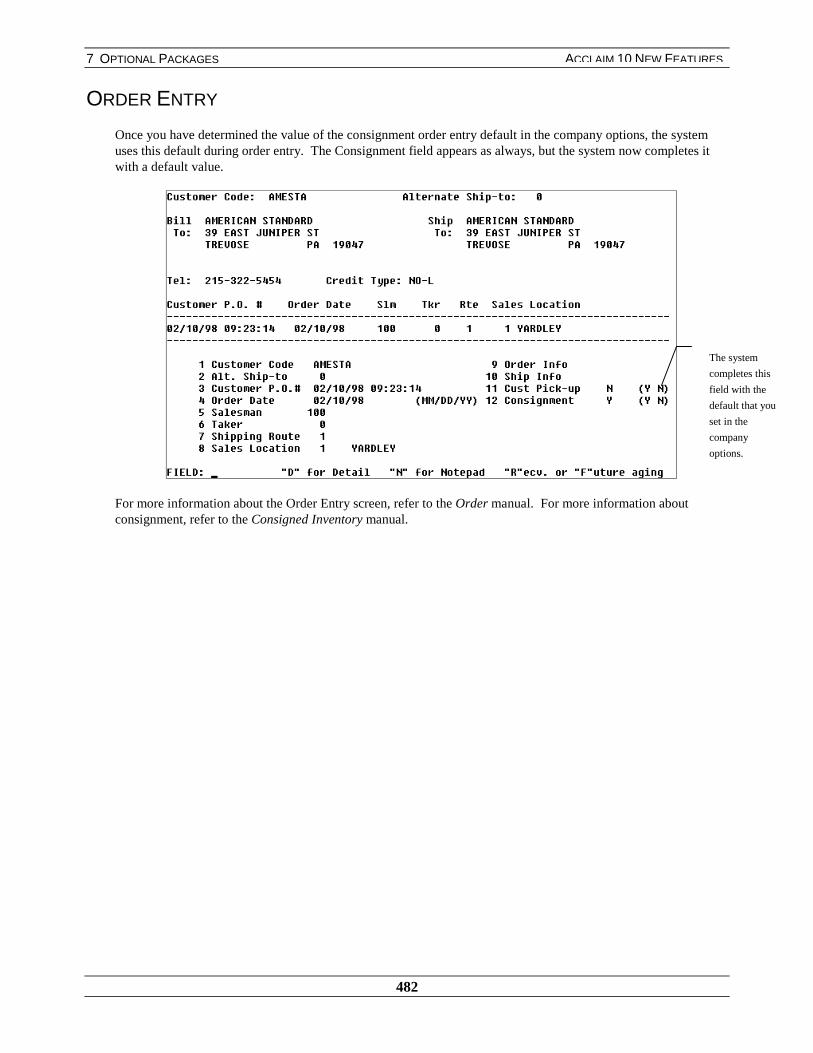
7 OPTIONAL PACKAGES
482
ACCLAIM 10 NEW FEATURES
ORDER ENTRY
Once you have determined the value of the consignment order entry default in the company options, the systemuses this default during order entry. The Consignment field appears as always, but the system now completes itwith a default value.
For more information about the Order Entry screen, refer to the Order manual. For more information aboutconsignment, refer to the Consigned Inventory manual.
The system
completes this
field with the
default that you
set in the
company
options.

7 OPTIONAL PACKAGES
483
ACCLAIM 10 NEW FEATURES
ALLOCATE MATERIAL TO ALL ORDERS, INCLUDINGBLANKET ORDERS
On previous versions of the software, the system allocated material to orders based on a certain hierarchy. Thesystem would first fill blanket orders that reached their release dates, then backorders, and finally transferbackorders
The system now provides a company option that allows you to allocate material to all orders regardless of the typeof order. That is, you can now allocate material to the oldest order first, based on the order date. It does notmatter if the order is a customer backorder, transfer backorder, or blanket order. This feature automates theallocation process and allows you to expedite orders quickly and efficiently.
COMPANY
There is a new option in the Blanket Orders Company Options: Allocation by Date Options.
There is a new
option on the
Blanket Orders
Company Options
menu.
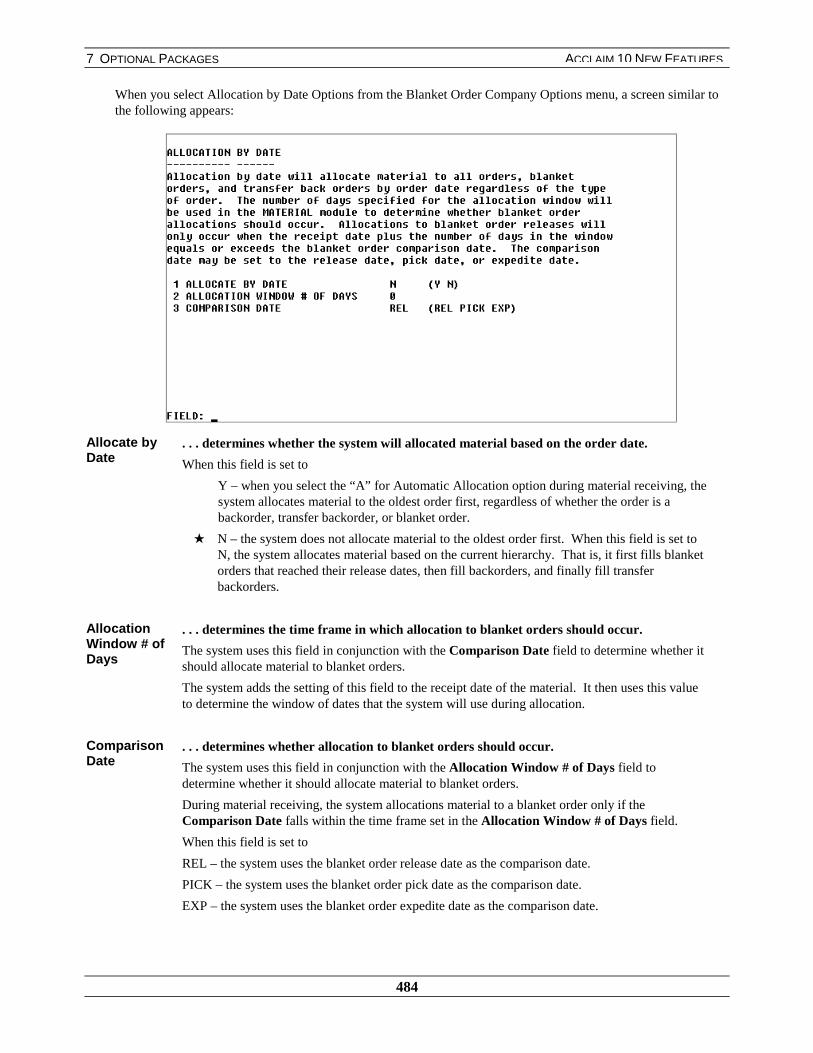
7 OPTIONAL PACKAGES
484
ACCLAIM 10 NEW FEATURES
When you select Allocation by Date Options from the Blanket Order Company Options menu, a screen similar tothe following appears:
Allocate byDate
. . . determines whether the system will allocated material based on the order date.
When this field is set to
Y – when you select the “A” for Automatic Allocation option during material receiving, thesystem allocates material to the oldest order first, regardless of whether the order is abackorder, transfer backorder, or blanket order.
★ N – the system does not allocate material to the oldest order first. When this field is set toN, the system allocates material based on the current hierarchy. That is, it first fills blanketorders that reached their release dates, then fill backorders, and finally fill transferbackorders.
AllocationWindow # ofDays
. . . determines the time frame in which allocation to blanket orders should occur.
The system uses this field in conjunction with the Comparison Date field to determine whether itshould allocate material to blanket orders.
The system adds the setting of this field to the receipt date of the material. It then uses this valueto determine the window of dates that the system will use during allocation.
ComparisonDate
. . . determines whether allocation to blanket orders should occur.
The system uses this field in conjunction with the Allocation Window # of Days field todetermine whether it should allocate material to blanket orders.
During material receiving, the system allocations material to a blanket order only if theComparison Date falls within the time frame set in the Allocation Window # of Days field.
When this field is set to
REL – the system uses the blanket order release date as the comparison date.
PICK – the system uses the blanket order pick date as the comparison date.
EXP – the system uses the blanket order expedite date as the comparison date.
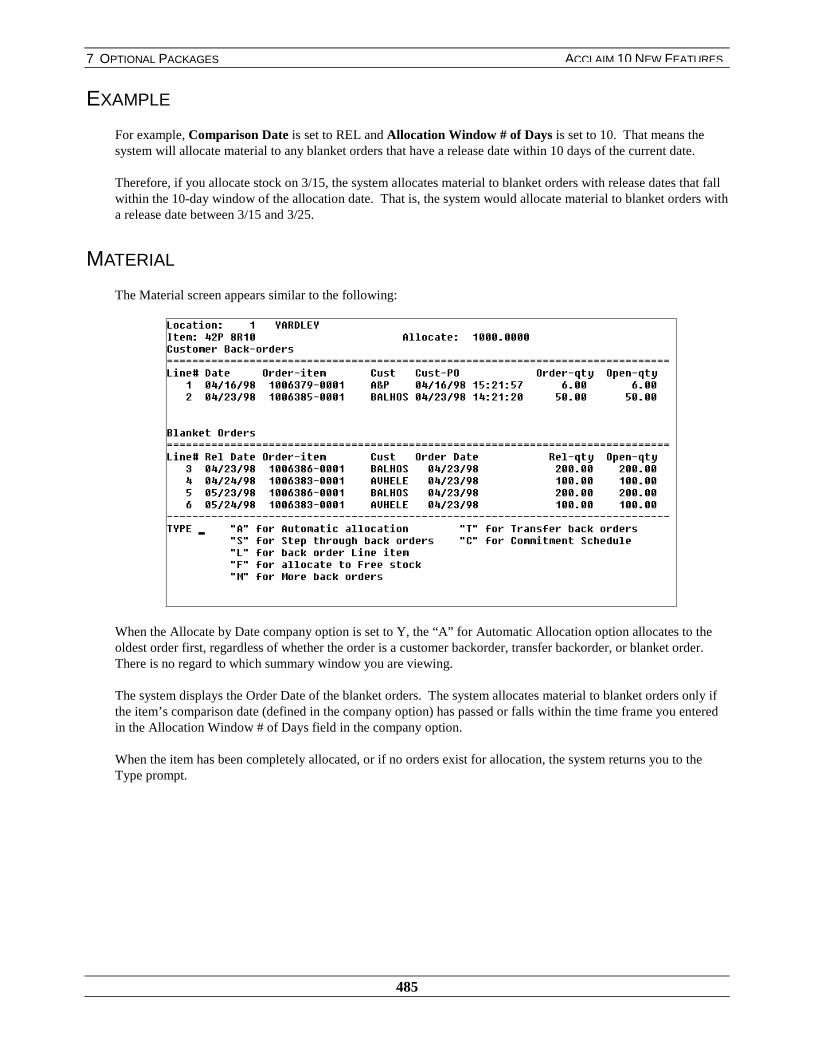
7 OPTIONAL PACKAGES
485
ACCLAIM 10 NEW FEATURES
EXAMPLE
For example, Comparison Date is set to REL and Allocation Window # of Days is set to 10. That means thesystem will allocate material to any blanket orders that have a release date within 10 days of the current date.
Therefore, if you allocate stock on 3/15, the system allocates material to blanket orders with release dates that fallwithin the 10-day window of the allocation date. That is, the system would allocate material to blanket orders witha release date between 3/15 and 3/25.
MATERIAL
The Material screen appears similar to the following:
When the Allocate by Date company option is set to Y, the “A” for Automatic Allocation option allocates to theoldest order first, regardless of whether the order is a customer backorder, transfer backorder, or blanket order.There is no regard to which summary window you are viewing.
The system displays the Order Date of the blanket orders. The system allocates material to blanket orders only ifthe item’s comparison date (defined in the company option) has passed or falls within the time frame you enteredin the Allocation Window # of Days field in the company option.
When the item has been completely allocated, or if no orders exist for allocation, the system returns you to theType prompt.
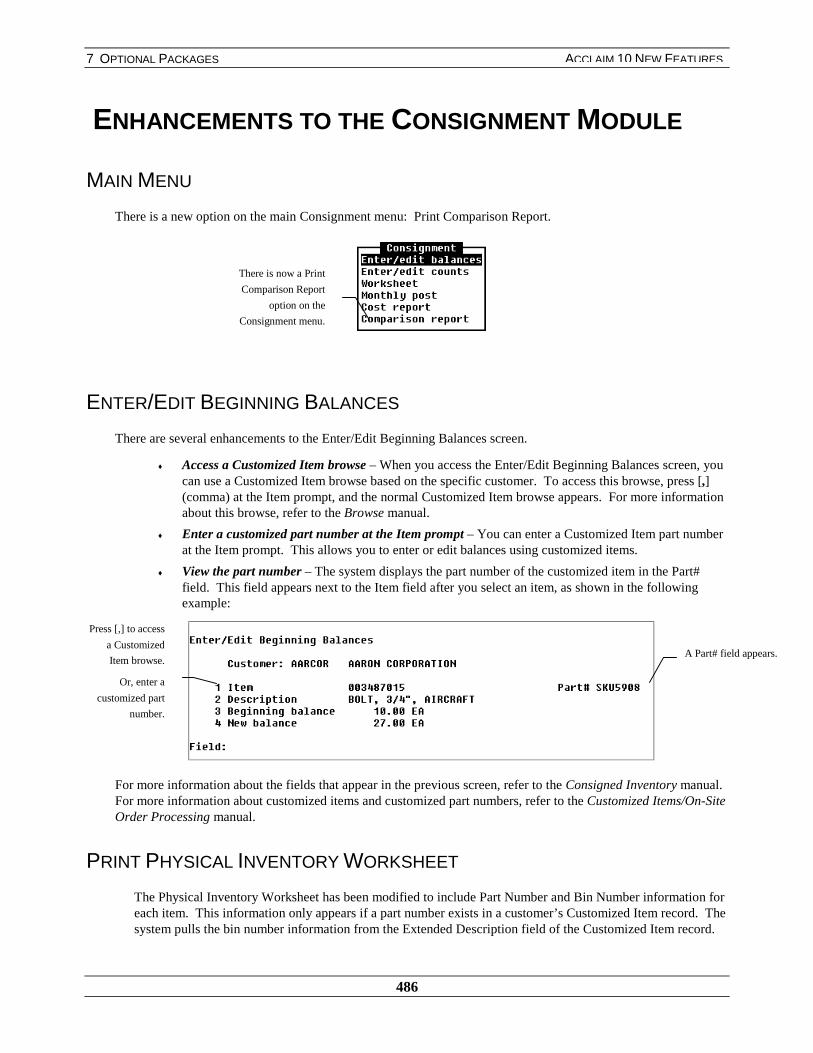
7 OPTIONAL PACKAGES
486
ACCLAIM 10 NEW FEATURES
ENHANCEMENTS TO THE CONSIGNMENT MODULE
MAIN MENU
There is a new option on the main Consignment menu: Print Comparison Report.
ENTER/EDIT BEGINNING BALANCES
There are several enhancements to the Enter/Edit Beginning Balances screen.
♦ Access a Customized Item browse – When you access the Enter/Edit Beginning Balances screen, youcan use a Customized Item browse based on the specific customer. To access this browse, press [,](comma) at the Item prompt, and the normal Customized Item browse appears. For more informationabout this browse, refer to the Browse manual.
♦ Enter a customized part number at the Item prompt – You can enter a Customized Item part numberat the Item prompt. This allows you to enter or edit balances using customized items.
♦ View the part number – The system displays the part number of the customized item in the Part#field. This field appears next to the Item field after you select an item, as shown in the followingexample:
For more information about the fields that appear in the previous screen, refer to the Consigned Inventory manual.For more information about customized items and customized part numbers, refer to the Customized Items/On-SiteOrder Processing manual.
PRINT PHYSICAL INVENTORY WORKSHEET
The Physical Inventory Worksheet has been modified to include Part Number and Bin Number information foreach item. This information only appears if a part number exists in a customer’s Customized Item record. Thesystem pulls the bin number information from the Extended Description field of the Customized Item record.
There is now a Print
Comparison Report
option on the
Consignment menu.
A Part# field appears.
Press [,] to access
a Customized
Item browse.
Or, enter a
customized part
number.
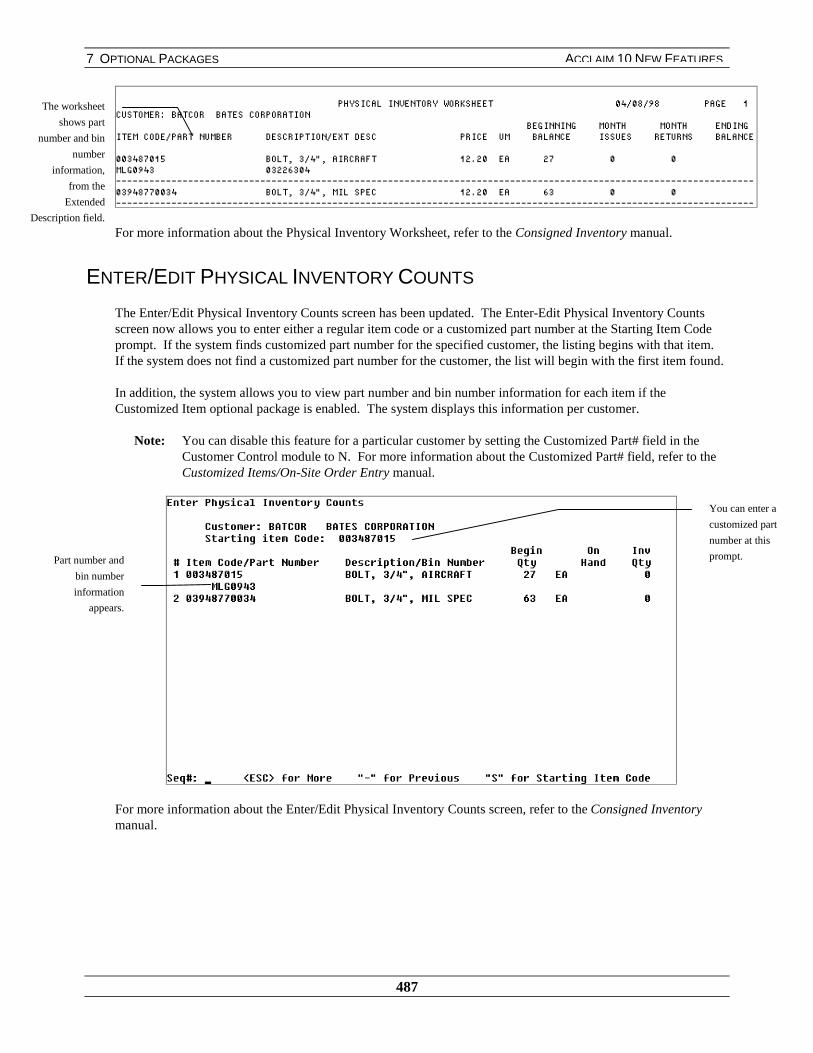
7 OPTIONAL PACKAGES
487
ACCLAIM 10 NEW FEATURES
For more information about the Physical Inventory Worksheet, refer to the Consigned Inventory manual.
ENTER/EDIT PHYSICAL INVENTORY COUNTS
The Enter/Edit Physical Inventory Counts screen has been updated. The Enter-Edit Physical Inventory Countsscreen now allows you to enter either a regular item code or a customized part number at the Starting Item Codeprompt. If the system finds customized part number for the specified customer, the listing begins with that item.If the system does not find a customized part number for the customer, the list will begin with the first item found.
In addition, the system allows you to view part number and bin number information for each item if theCustomized Item optional package is enabled. The system displays this information per customer.
Note: You can disable this feature for a particular customer by setting the Customized Part# field in theCustomer Control module to N. For more information about the Customized Part# field, refer to theCustomized Items/On-Site Order Entry manual.
For more information about the Enter/Edit Physical Inventory Counts screen, refer to the Consigned Inventorymanual.
The worksheet
shows part
number and bin
number
information,
from the
Extended
Description field.
Part number and
bin number
information
appears.
You can enter a
customized part
number at this
prompt.

7 OPTIONAL PACKAGES
488
ACCLAIM 10 NEW FEATURES
MONTHLY POST OF PHYSICAL INVENTORY
On previous levels of the software, you were able to post physical inventory even if there were discrepancies.Now, you cannot post physical until you clear all discrepancies.
If there are any discrepancies between the stock in the consignment location and the Physical stock in physicalinventory, the system displays the following message:
Once you have cleared all of the discrepancies, you can post physical inventory.
PRINT COMPARISON REPORT
On previous levels of the software, you could print a Consignment Comparison Report that listed all items onconsignment. Now, when you select the Print Comparison Report option, the system prints a report that details thediscrepancies between the stock in physical inventory and the stock in the consignment location. That is, thereport will only display the items that are causing a discrepancy. The report also displays each item by customer,to help you easily determine the cause of the discrepancy.
SAMPLE: CONSIGNMENT COMPARISON REPORT
Item Code . . . unique code used to identify the item.
Customer . . . unique code used to identify each customer.
Loc# . . . consignment location number.
Consigned . . . total quantity of this item that is consigned.
In Stock . . . total quantity of this item in stock.
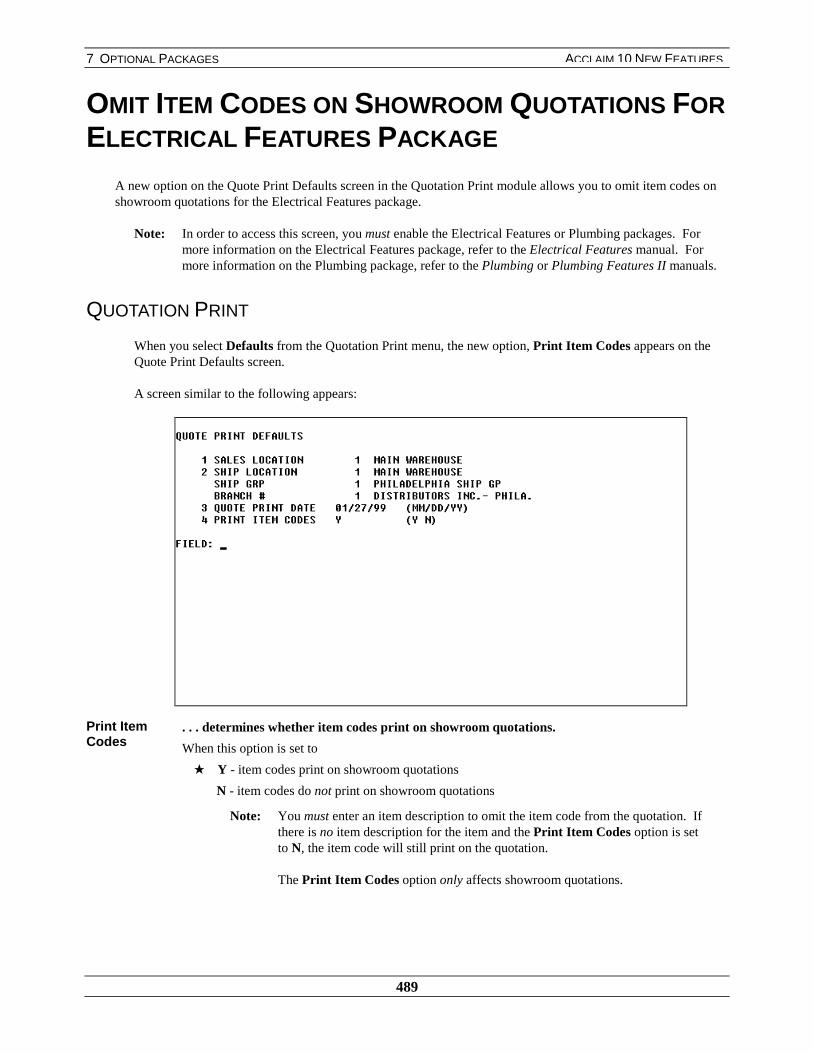
7 OPTIONAL PACKAGES
489
ACCLAIM 10 NEW FEATURES
OMIT ITEM CODES ON SHOWROOM QUOTATIONS FORELECTRICAL FEATURES PACKAGE
A new option on the Quote Print Defaults screen in the Quotation Print module allows you to omit item codes onshowroom quotations for the Electrical Features package.
Note: In order to access this screen, you must enable the Electrical Features or Plumbing packages. Formore information on the Electrical Features package, refer to the Electrical Features manual. Formore information on the Plumbing package, refer to the Plumbing or Plumbing Features II manuals.
QUOTATION PRINT
When you select Defaults from the Quotation Print menu, the new option, Print Item Codes appears on theQuote Print Defaults screen.
A screen similar to the following appears:
Print ItemCodes
. . . determines whether item codes print on showroom quotations.
When this option is set to
★ Y - item codes print on showroom quotations
N - item codes do not print on showroom quotations
Note: You must enter an item description to omit the item code from the quotation. Ifthere is no item description for the item and the Print Item Codes option is setto N, the item code will still print on the quotation.
The Print Item Codes option only affects showroom quotations.

7 OPTIONAL PACKAGES
490
ACCLAIM 10 NEW FEATURES
QUOTE ENTRY
When you set Print Item Codes to N and print a Showroom Quote, item codes do not appear on the quotation,similar to the following:
For more information on showroom quotations and the Print Item Codes option, refer to the ElectricalFeatures manual.
Item codes do not
print on showroom
quotations if Print
Item Codes is set
to N.
7 OPTIONAL PACKAGES
491
ACCLAIM 10 NEW FEATURES
ORDER / QUOTE AMOUNT AND HEADER PRINTS TOAIX FILE
Previously, when you generated and accepted an order or quote on the Prophet 21 system, only the order or quotenumber printed to the output file. Now, the order or quote amount with the header, “Amount,” prints to this outputfile. Therefore, when you view the AIX file that the system eventually imports to Profit$, the order or quoteamount, along with the order or quote number, appears.
For more information on Profit$, refer to the Profit$ manual.

7 OPTIONAL PACKAGES
492
ACCLAIM 10 NEW FEATURES
REBATE JOURNAL COMPANY OPTIONS AND SCREENPARAMETERS
COMPANY
Rebate information consists of the who-bought-what history for your customers with special costing arrangements.Special costing includes edited costs, custom item fixed costs, and cost overrides. The purchase cost minus thisspecial or sales cost is the rebate amount.
A company option controls how the special cost is determined. The following screen appears when you select theRebate Journal Options choice from the Packages menu in the Company module.
Cost Method . . . determines what sales cost is used in calculating the rebate amount.
Company – The system uses the value set in the Cost Basis field of the Company InventoryControl record. For example, moving average cost is used if C-AVG is set in this field.
★ First – The cost is taken from the first break of the purchase pricing schedule.
Last – The cost is taken from the last break of the purchase pricing schedule.
REBATE JOURNAL
The Rebate Journal Report lists rebate information for selected vendors, customers, and items. Invoiced line-itemsthat match the matrix and cost basis requirements are awarded rebates and are displayed.
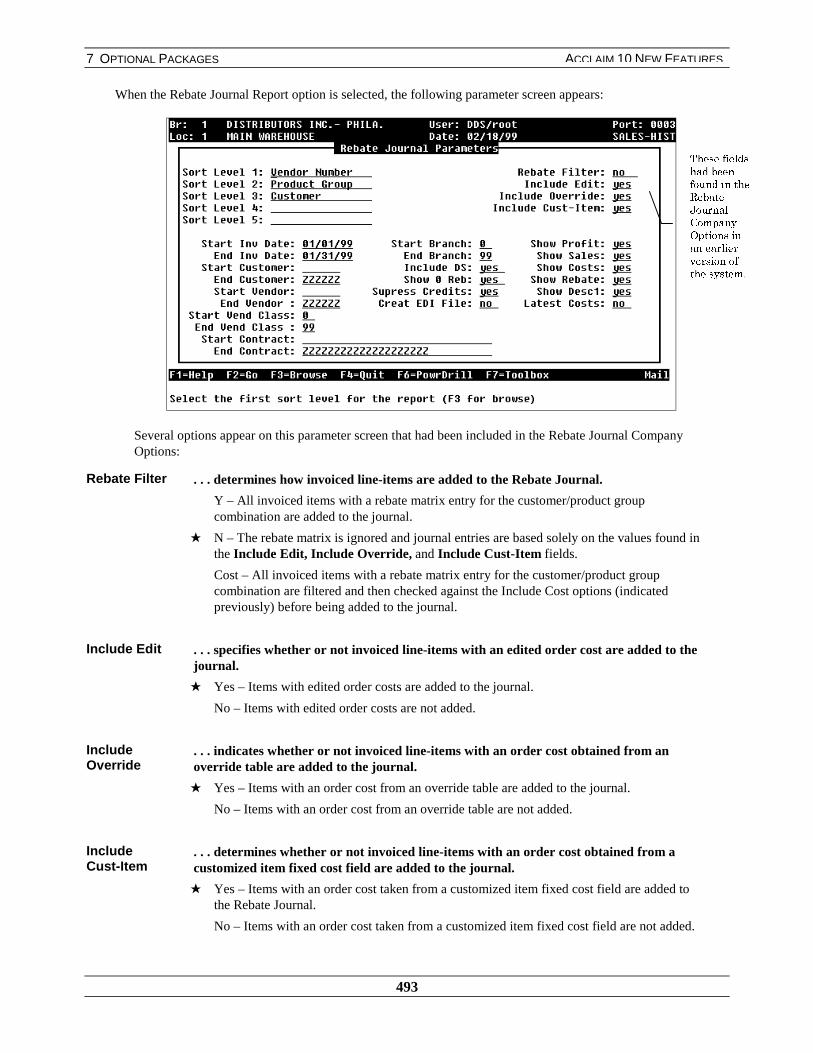
7 OPTIONAL PACKAGES
493
ACCLAIM 10 NEW FEATURES
When the Rebate Journal Report option is selected, the following parameter screen appears:
Several options appear on this parameter screen that had been included in the Rebate Journal CompanyOptions:
Rebate Filter . . . determines how invoiced line-items are added to the Rebate Journal.
Y – All invoiced items with a rebate matrix entry for the customer/product groupcombination are added to the journal.
★ N – The rebate matrix is ignored and journal entries are based solely on the values found inthe Include Edit, Include Override, and Include Cust-Item fields.
Cost – All invoiced items with a rebate matrix entry for the customer/product groupcombination are filtered and then checked against the Include Cost options (indicatedpreviously) before being added to the journal.
Include Edit . . . specifies whether or not invoiced line-items with an edited order cost are added to thejournal.
★ Yes – Items with edited order costs are added to the journal.
No – Items with edited order costs are not added.
IncludeOverride
. . . indicates whether or not invoiced line-items with an order cost obtained from anoverride table are added to the journal.
★ Yes – Items with an order cost from an override table are added to the journal.
No – Items with an order cost from an override table are not added.
IncludeCust-Item
. . . determines whether or not invoiced line-items with an order cost obtained from acustomized item fixed cost field are added to the journal.
★ Yes – Items with an order cost taken from a customized item fixed cost field are added tothe Rebate Journal.
No – Items with an order cost taken from a customized item fixed cost field are not added.
7KHVH�ILHOGVKDG�EHHQIRXQG�LQ�WKH5HEDWH-RXUQDO&RPSDQ\2SWLRQV�LQDQ�HDUOLHUYHUVLRQ�RIWKH�V\VWHP�
7 OPTIONAL PACKAGES
494
ACCLAIM 10 NEW FEATURES
For more details on the Rebate Journal Parameters screen, refer to the Rebate Journal manual.

7 OPTIONAL PACKAGES
495
ACCLAIM 10 NEW FEATURES
SERVICE WORK ORDER INFORMATION IN REAL-TIMESALES HISTORY
Real-Time Sales History displays service work order information. Information on equipment (service contract #,serial #, and customer code), labor (actual labor hours, technician, and labor topic and description), and itempart/work codes (covered by contract) are stored.
SALES HISTORY
VIEW
Invoice Line-Item View can be accessed through the Repair History option on the Sales History/View Optionsmenu:
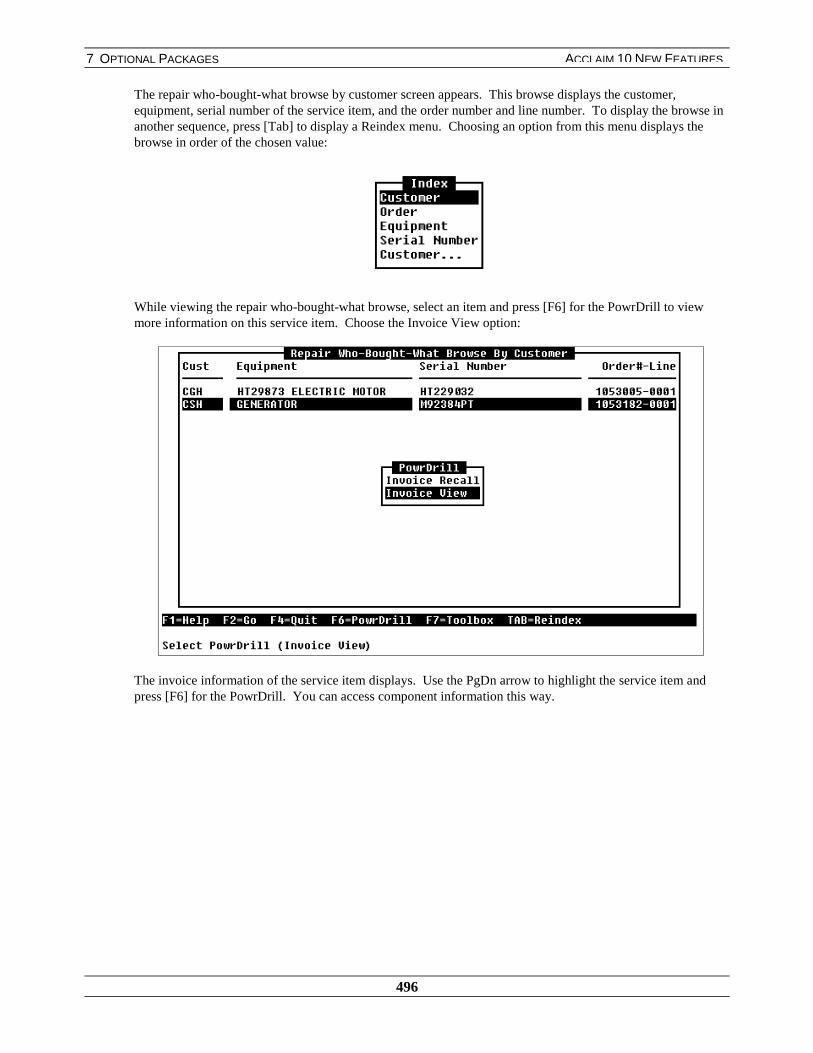
7 OPTIONAL PACKAGES
496
ACCLAIM 10 NEW FEATURES
The repair who-bought-what browse by customer screen appears. This browse displays the customer,equipment, serial number of the service item, and the order number and line number. To display the browse inanother sequence, press [Tab] to display a Reindex menu. Choosing an option from this menu displays thebrowse in order of the chosen value:
While viewing the repair who-bought-what browse, select an item and press [F6] for the PowrDrill to viewmore information on this service item. Choose the Invoice View option:
The invoice information of the service item displays. Use the PgDn arrow to highlight the service item andpress [F6] for the PowrDrill. You can access component information this way.
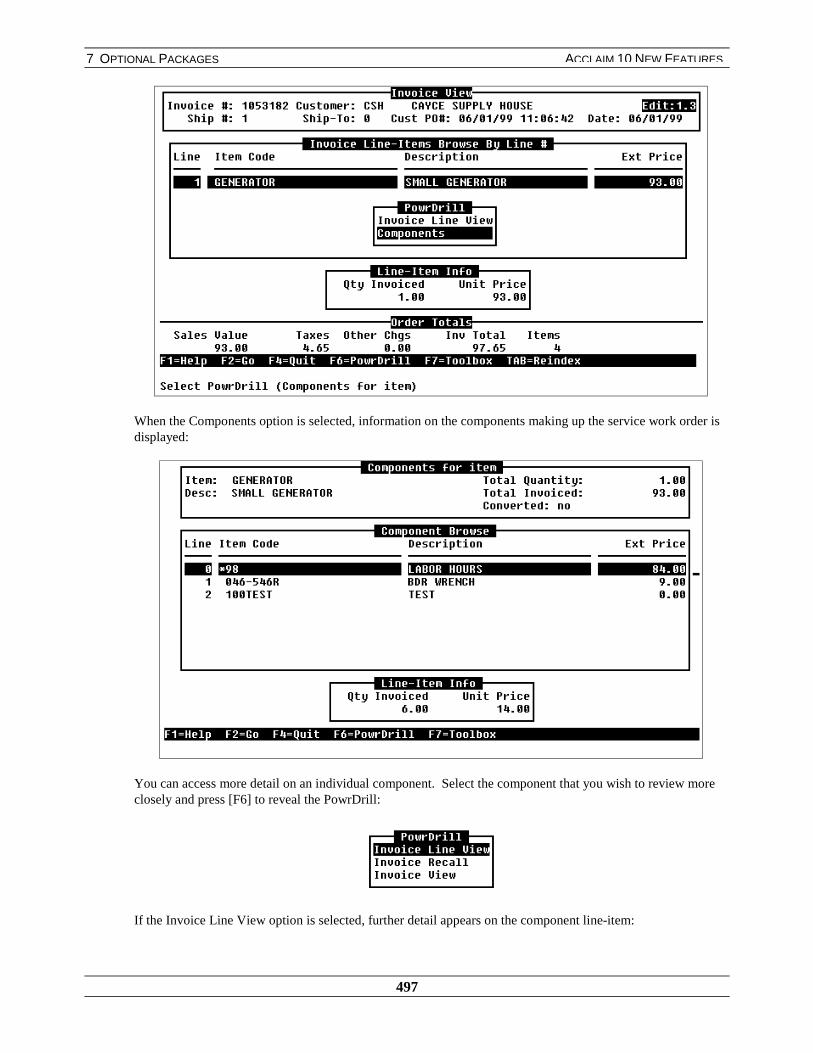
7 OPTIONAL PACKAGES
497
ACCLAIM 10 NEW FEATURES
When the Components option is selected, information on the components making up the service work order isdisplayed:
You can access more detail on an individual component. Select the component that you wish to review moreclosely and press [F6] to reveal the PowrDrill:
If the Invoice Line View option is selected, further detail appears on the component line-item:

7 OPTIONAL PACKAGES
498
ACCLAIM 10 NEW FEATURES
REPORTING
In the Reporting option of the Real-Time Sales History module, two profitability reports display informationon service items.
CONTRACT PROFITABILITY REPORT
When the Contract Profitability Report option is selected, the following parameters screen appears:
Contract #Start/End
. . . only contract numbers that were created between and including the start and endvalues are shown on the report.
Billing DateStart/End
. . . only work orders billed between and including the dates entered are displayed.
ServicingDateStart/End
. . . only items having service performed between and including the dates entered areshown.
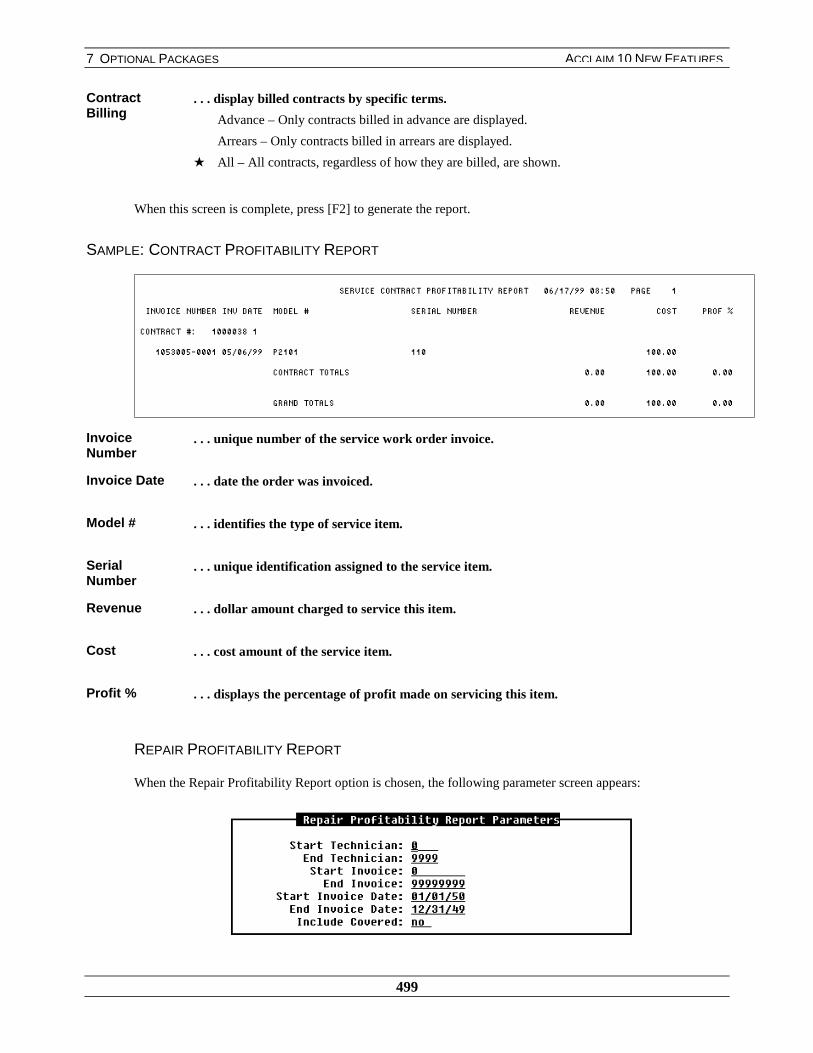
7 OPTIONAL PACKAGES
499
ACCLAIM 10 NEW FEATURES
ContractBilling
. . . display billed contracts by specific terms.
Advance – Only contracts billed in advance are displayed.
Arrears – Only contracts billed in arrears are displayed.
★ All – All contracts, regardless of how they are billed, are shown.
When this screen is complete, press [F2] to generate the report.
SAMPLE: CONTRACT PROFITABILITY REPORT
InvoiceNumber
. . . unique number of the service work order invoice.
Invoice Date . . . date the order was invoiced.
Model # . . . identifies the type of service item.
SerialNumber
. . . unique identification assigned to the service item.
Revenue . . . dollar amount charged to service this item.
Cost . . . cost amount of the service item.
Profit % . . . displays the percentage of profit made on servicing this item.
REPAIR PROFITABILITY REPORT
When the Repair Profitability Report option is chosen, the following parameter screen appears:

7 OPTIONAL PACKAGES
500
ACCLAIM 10 NEW FEATURES
TechnicianStart/End
. . . only work orders assigned to the specified technicians are displayed on the report.
The report is sequenced by work order within technician.
InvoiceStart/End
. . . only work orders with invoice numbers among the specified range are shown.
Invoice DateStart/End
. . . only work orders with invoice created during the specified dates are displayed.
IncludeCovered
. . . indicates that a part or work code is covered under the terms of a service contract.
Yes – Service line-items, parts, and work codes that are covered are reported.
No – Items, parts, and work codes not covered are reported.
When this screen is complete, press [F2] to generate the report.
SAMPLE: REPAIR PROFITABILITY REPORT
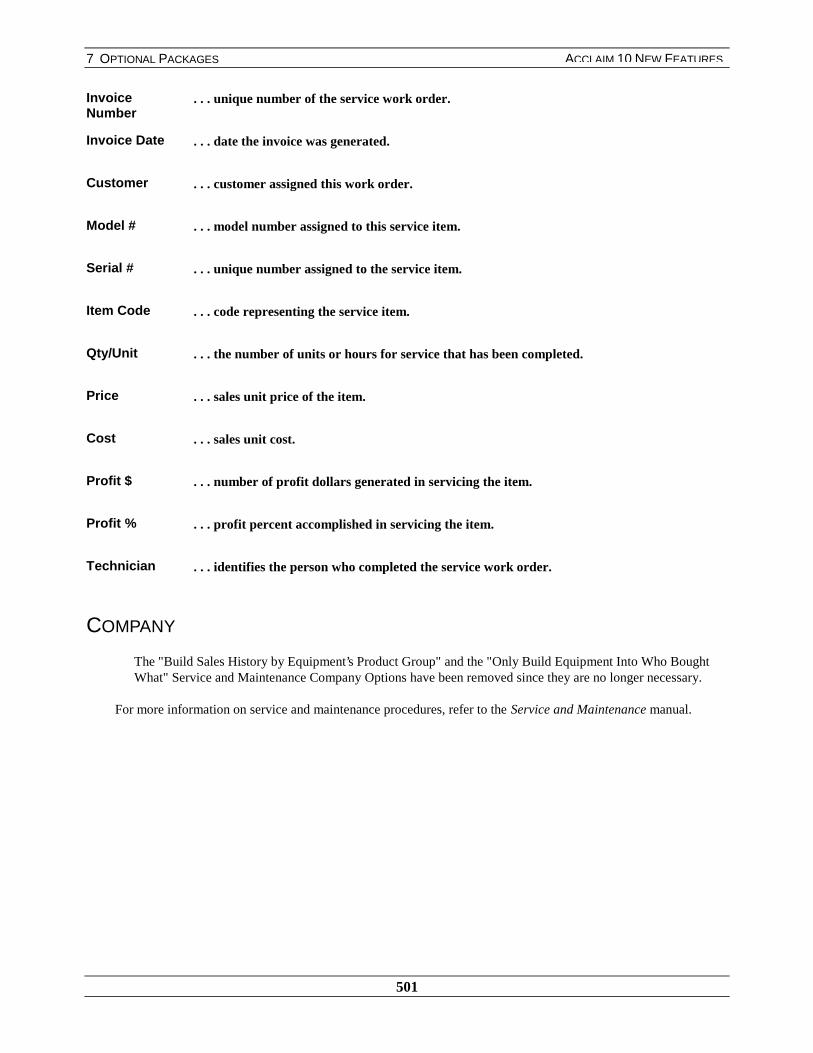
7 OPTIONAL PACKAGES
501
ACCLAIM 10 NEW FEATURES
InvoiceNumber
. . . unique number of the service work order.
Invoice Date . . . date the invoice was generated.
Customer . . . customer assigned this work order.
Model # . . . model number assigned to this service item.
Serial # . . . unique number assigned to the service item.
Item Code . . . code representing the service item.
Qty/Unit . . . the number of units or hours for service that has been completed.
Price . . . sales unit price of the item.
Cost . . . sales unit cost.
Profit $ . . . number of profit dollars generated in servicing the item.
Profit % . . . profit percent accomplished in servicing the item.
Technician . . . identifies the person who completed the service work order.
COMPANY
The "Build Sales History by Equipment’s Product Group" and the "Only Build Equipment Into Who BoughtWhat" Service and Maintenance Company Options have been removed since they are no longer necessary.
For more information on service and maintenance procedures, refer to the Service and Maintenance manual.

7 OPTIONAL PACKAGES
502
ACCLAIM 10 NEW FEATURES
WEEKLY ADDITIONS TO INDUSERVE VENDOR REPORT
INDUSERVE
Because performing a Pricing-Service process may change a ServiStar franchisee’s vendor records, you can print areport to display these changes. TruServ supplies a quarterly file to its members of new vendor information.However, new item information is transmitted on a weekly basis. Some of these items may come from a vendorwhose information has not yet been supplied by TruServ. To prevent missing vendor information problems,TruServ supplies a smaller weekly change file, in addition to the quarterly file. The Vendor Report displayschanges for both the weekly and quarterly periods.
The Weekly Vendor Report uses the weekly file taken from the TruServ CIS system (/tmp/induserv/vendor.zip).This file is received from the CIS PC by selecting the Data Transfer menu option. When this option is chosen,the following screen appears:
To continue, select *.zip – Weekly vend/ctlg files as a receive file. One of the files that the system retrieves isvendor.zip. If the vendor.zip file exists, the system unzips it and renames it vendor.dat.
Note: When the *.zip – Weekly vend/ctlg files option is selected, the system attempts to receive severaldifferent files. The system tries to receive vendor.zip (new or changed vendors), catalog.zip (catalogupdate), promo.zip (promotional items), and direct.zip (direct mail data).
To print the Additions to Vendors Report, select the Vendor Report option from the Induserv main menu:
When the Vendor Report option is chosen, a screen similar to the following appears:

7 OPTIONAL PACKAGES
503
ACCLAIM 10 NEW FEATURES
Report Type . . . determines the amount of information that displays on the report.
W – Information on vendors who are new during the past week are displayed on the report.
Q – Information on new or changed vendors over the last quarter are displayed on the report.
When you press [Enter] at the Field prompt, the system prints a report of those vendors who were added to theProphet 21 vendor database as a result of the most current Pricing-Service upload. The report prints indifferent formats depending on the report type you chose. The Quarterly Vendor Report displays more detailedinformation than the Weekly Vendor Report.
SAMPLE: WEEKLY VENDOR REPORT
TruServ # . . . the number assigned to the vendor by TruServ.
VendorName
. . . the name of the vendor.
When you add any new vendor to the P21 vendor database, make sure to include the vendor’s TruServ number inthe Send-To Contact field of the vendor record. This ensures that the TruServ vendor number cross-referenceindex file gets updated properly.
SAMPLE: QUARTERLY VENDOR REPORT
ADDITIONS TO VENDORS REPORT 11/11/96 PAGE: 1
VENDOR NAME: ZETA CONSUMER PRODUCTS@MC ADDRESS 1: 29 NOBLESTOWN ROADCITY: CARNEGIEZIP CODE: 15106SERVISTAR #: 3002
VENDOR NAME: TEXACO LUBRICANTS COADDRESS 1: PO BOX 4427CITY: HOUSTONZIP CODE: 77210SERVISTAR #: 3004
VENDOR NAME: GEORGIA PACIFIC CORP@GDS ADDRESS 1: 4350 EMERY IND PKWYCITY: CLEVELANDZIP CODE: 44128SERVISTAR #: 3007
VendorName
. . . name of the vendor.
Address 1 . . . main address of the vendor.
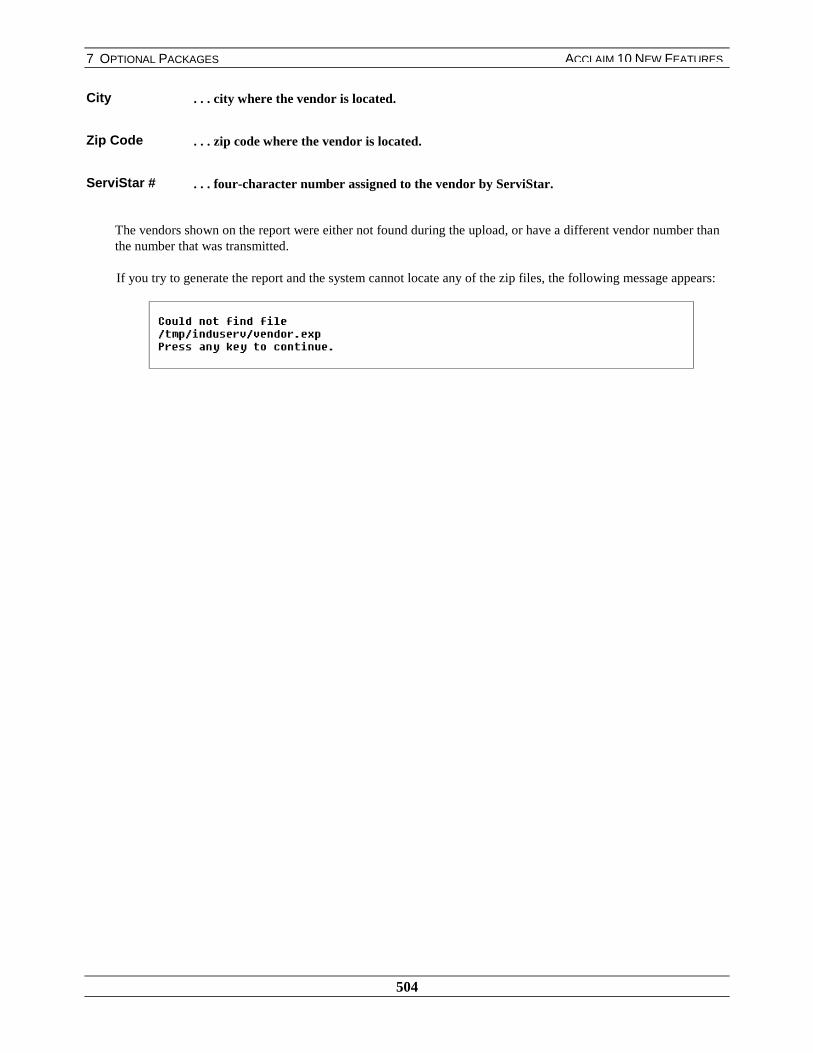
7 OPTIONAL PACKAGES
504
ACCLAIM 10 NEW FEATURES
City . . . city where the vendor is located.
Zip Code . . . zip code where the vendor is located.
ServiStar # . . . four-character number assigned to the vendor by ServiStar.
The vendors shown on the report were either not found during the upload, or have a different vendor number thanthe number that was transmitted.
If you try to generate the report and the system cannot locate any of the zip files, the following message appears:

505
BROWSE ON TRANSLATION TABLES WHILE EDITINGAND DELETING
EDI SETUP
You can browse on translation tables in both the Edit and Delete options of the Translation Table option found onthe Trading Partner menu. After the Edit or Delete option is selected, and you have entered a valid TradingPartner ID, a browse can be performed on the Table Name field:
When the browse is invoked, the Translation Table Scan appears:
Seq# . . . sequence number of the translation table shown on the browse.
8 EDI

8 EDI
506
ACCLAIM 10 NEW FEATURES
Table Name . . . name of the translation table linked to this trading partner.
Description . . . definition of the translation table name.
For more information about editing and deleting translation tables, refer to the EDI Setup manual.
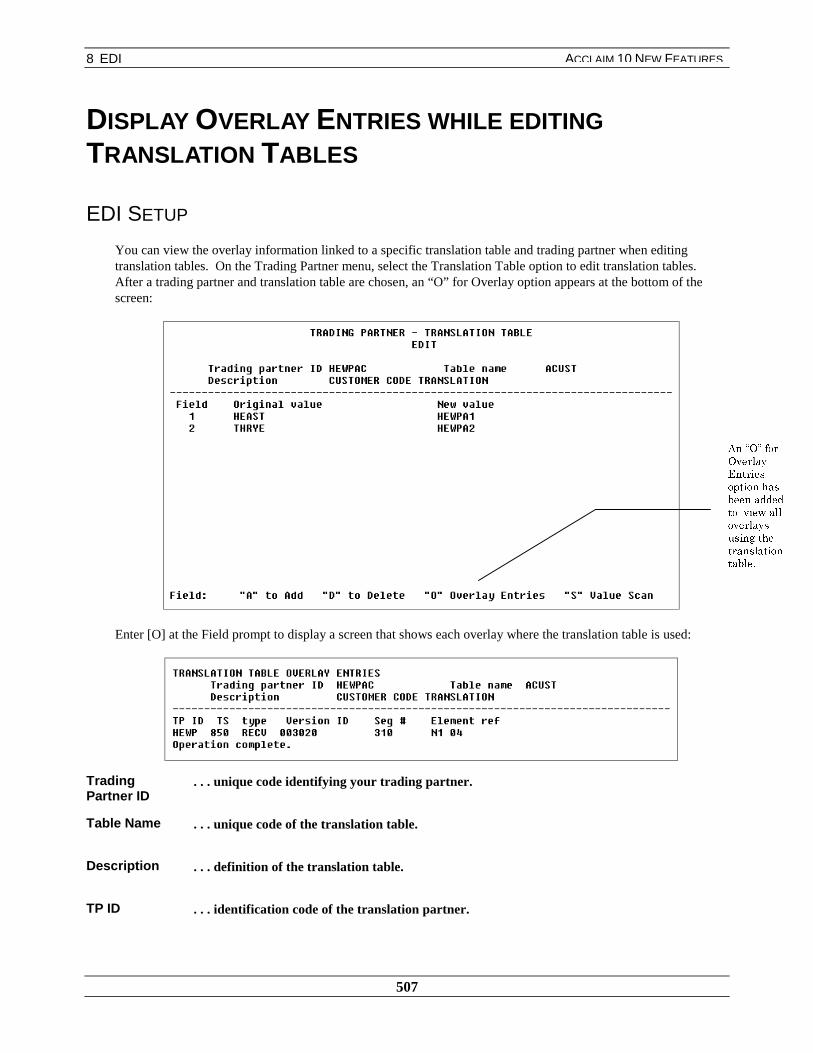
8 EDI
507
ACCLAIM 10 NEW FEATURES
DISPLAY OVERLAY ENTRIES WHILE EDITINGTRANSLATION TABLES
EDI SETUP
You can view the overlay information linked to a specific translation table and trading partner when editingtranslation tables. On the Trading Partner menu, select the Translation Table option to edit translation tables.After a trading partner and translation table are chosen, an “O” for Overlay option appears at the bottom of thescreen:
Enter [O] at the Field prompt to display a screen that shows each overlay where the translation table is used:
TradingPartner ID
. . . unique code identifying your trading partner.
Table Name . . . unique code of the translation table.
Description . . . definition of the translation table.
TP ID . . . identification code of the translation partner.
$Q�´2µ�IRU2YHUOD\(QWULHVRSWLRQ�KDVEHHQ�DGGHGWR��YLHZ�DOORYHUOD\VXVLQJ�WKHWUDQVODWLRQWDEOH�

8 EDI
508
ACCLAIM 10 NEW FEATURES
TS . . . identifies the transaction set in which this table is located.
Type . . . the kind of transaction set, usually SEND or RECV.
Version ID . . . identifies the ASC X12 version used for this overlay.
Seg# . . . identifies where in the transaction set that the translation table is located.
Element ref . . . pinpoints where in the segment that the translation table is found.
This feature displays the location information of the translation table in trading partner overlays. Both Send andReceive document types appear for all trading partner overlay versions.
For more information on trading partners and translation tables, refer to the EDI Setup manual.
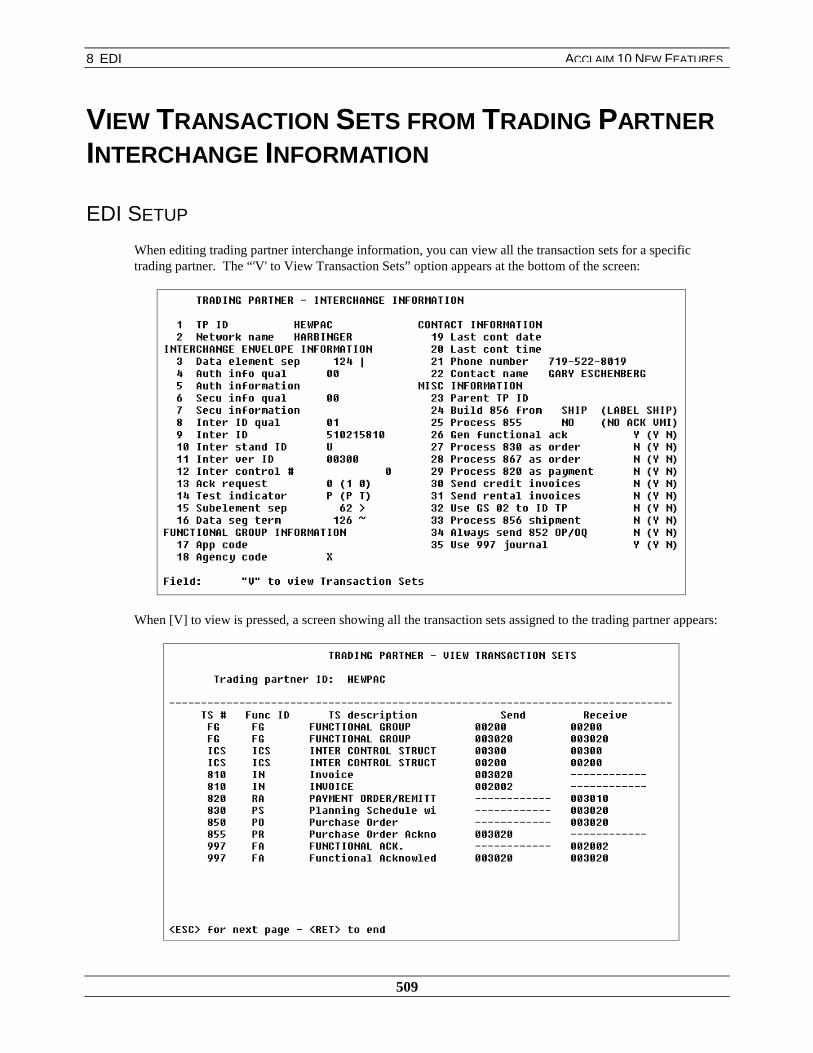
8 EDI
509
ACCLAIM 10 NEW FEATURES
VIEW TRANSACTION SETS FROM TRADING PARTNERINTERCHANGE INFORMATION
EDI SETUP
When editing trading partner interchange information, you can view all the transaction sets for a specifictrading partner. The “'V' to View Transaction Sets” option appears at the bottom of the screen:
When [V] to view is pressed, a screen showing all the transaction sets assigned to the trading partner appears:
8 EDI
510
ACCLAIM 10 NEW FEATURES
TS# . . . identifies the number of the transaction set.
Func ID . . . identifies the type of transaction set by the functional group code.
TSDescription
. . . definition of the transaction set.
Send . . . ICS or ASC X12 version of the document that is sent to this trading partner.
Receive . . . ICS or ASC X12 version of the document that is received from this trading partner.
For more information on trading partners and transaction sets, refer to the EDI Setup manual.

8 EDI
511
ACCLAIM 10 NEW FEATURES
NETWORK NAME VERIFICATION IN INTERCHANGEINFORMATION
EDI SETUP
When you enter a network name in the Trading Partner Interchange Information screen, the system verifies itsexistence in the Network Information section of EDI Setup. If the network name already exists, its entry into theInterchange Information screen is accepted. If the network name does not exist, the system rejects it on theInterchange Information screen.
Choosing Enter on the Interchange Information menu displays the following screen:
For more information on entering Trading Partner Network Names, refer to the EDI Setup manual.
,I�WKHQHWZRUN
QDPH�GRHVQRW�H[LVW�LQ
WKH�V\VWHP��LWLV�UHMHFWHG�DWWKH�1HWZRUN
1DPH

8 EDI
512
ACCLAIM 10 NEW FEATURES
SUBELEMENT SEPARATOR DEFAULT IS CHANGED
EDI SETUP
The Subelement Separator field in the Trading Partner Interchange Information screen defaults to 62 >. It haddefaulted to 47 /. This change prevents the likelihood of the subelement separator being included in youroutbound data, therefore eliminating the possibility of an error on your trading partner’s system.
When you choose the Enter option on the Trading Partner Interchange Information menu and complete thefields, the following screen appears:
For more information on entering Trading Partner Interchange Information, refer to the EDI Setup manual.
The SubelementSeparator field
defaults to 62 >.
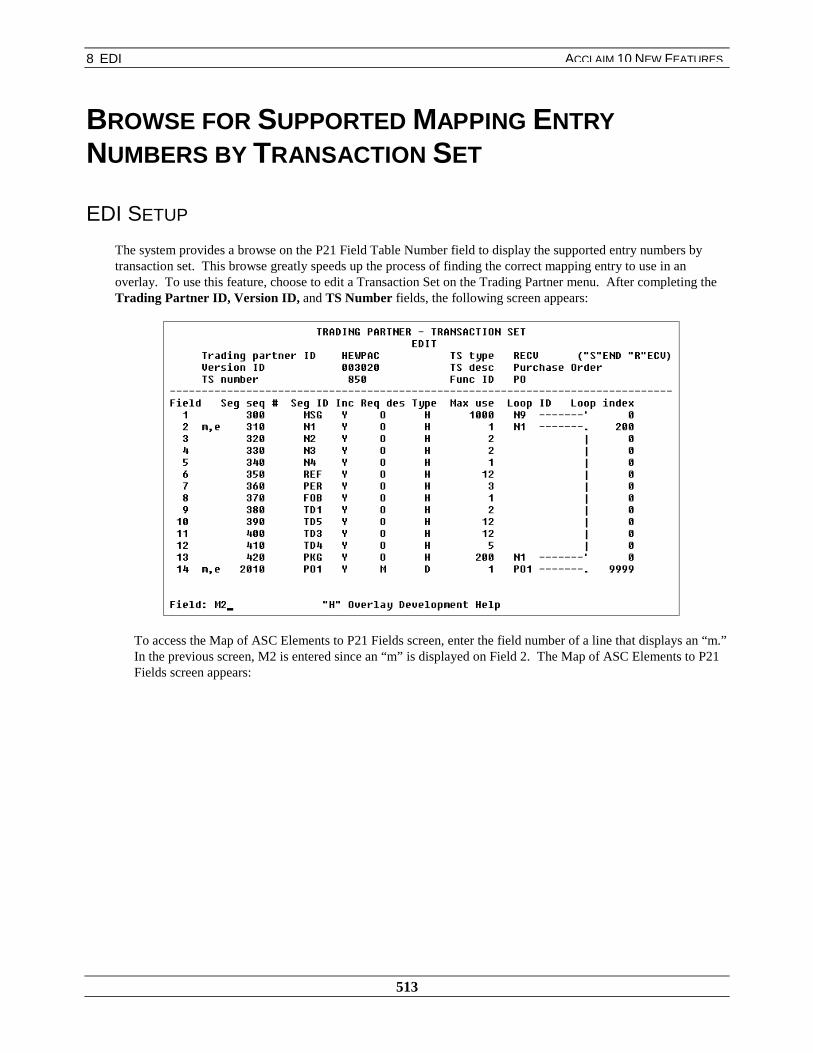
8 EDI
513
ACCLAIM 10 NEW FEATURES
BROWSE FOR SUPPORTED MAPPING ENTRYNUMBERS BY TRANSACTION SET
EDI SETUP
The system provides a browse on the P21 Field Table Number field to display the supported entry numbers bytransaction set. This browse greatly speeds up the process of finding the correct mapping entry to use in anoverlay. To use this feature, choose to edit a Transaction Set on the Trading Partner menu. After completing theTrading Partner ID, Version ID, and TS Number fields, the following screen appears:
To access the Map of ASC Elements to P21 Fields screen, enter the field number of a line that displays an “m.”In the previous screen, M2 is entered since an “m” is displayed on Field 2. The Map of ASC Elements to P21Fields screen appears:
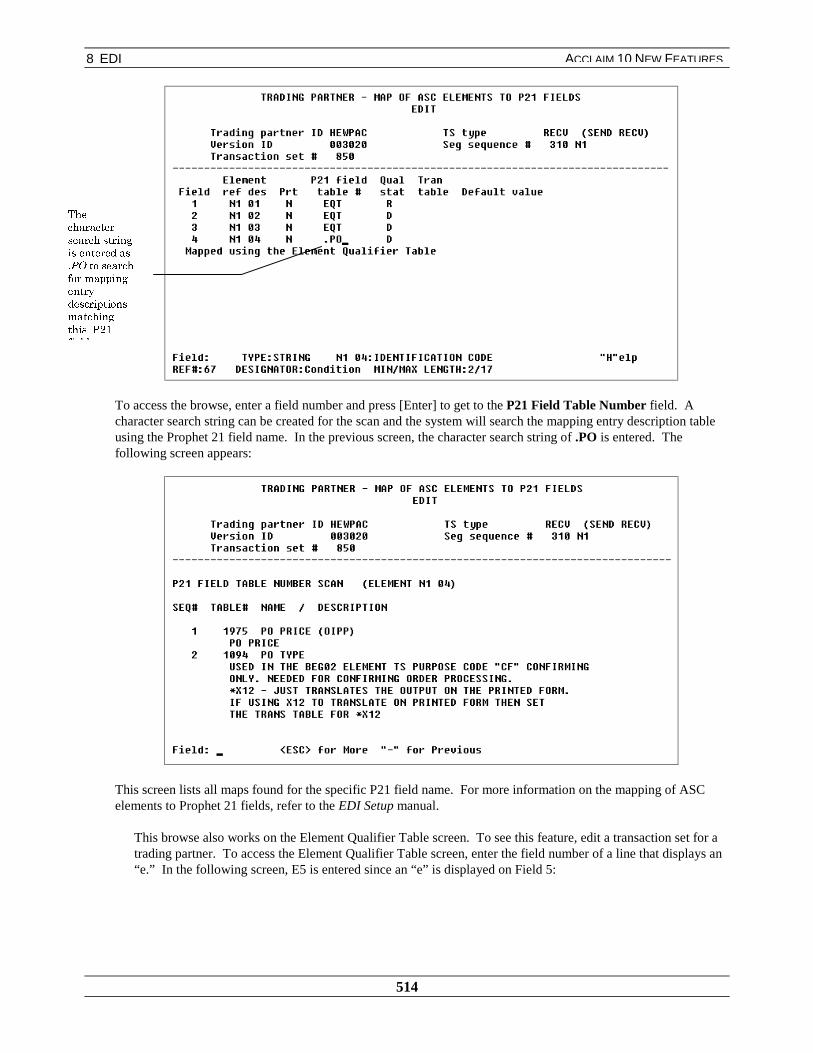
8 EDI
514
ACCLAIM 10 NEW FEATURES
To access the browse, enter a field number and press [Enter] to get to the P21 Field Table Number field. Acharacter search string can be created for the scan and the system will search the mapping entry description tableusing the Prophet 21 field name. In the previous screen, the character search string of .PO is entered. Thefollowing screen appears:
This screen lists all maps found for the specific P21 field name. For more information on the mapping of ASCelements to Prophet 21 fields, refer to the EDI Setup manual.
This browse also works on the Element Qualifier Table screen. To see this feature, edit a transaction set for atrading partner. To access the Element Qualifier Table screen, enter the field number of a line that displays an“e.” In the following screen, E5 is entered since an “e” is displayed on Field 5:
7KHFKDUDFWHUVHDUFK�VWULQJLV�HQWHUHG�DV�32�WR�VHDUFKIRU�PDSSLQJHQWU\GHVFULSWLRQVPDWFKLQJWKLV��3��IL OG

8 EDI
515
ACCLAIM 10 NEW FEATURES
The Element Qualifier Table appears. Enter a field number and press [Enter] to get to the P21 Field Table Numberfield. The browse, as described previously, searches the mapping entry description table using the character searchstring that is entered.
In the prior screen, the search string of .ITEM is entered to display all maps found for the P21 field namesbeginning with ITEM:
The charactersearch string of.ITEM isentered to findmatchingentriesbeginning withITEM.

8 EDI
516
ACCLAIM 10 NEW FEATURES
For more information on mapping entries and transaction sets, refer to the EDI Setup manual.
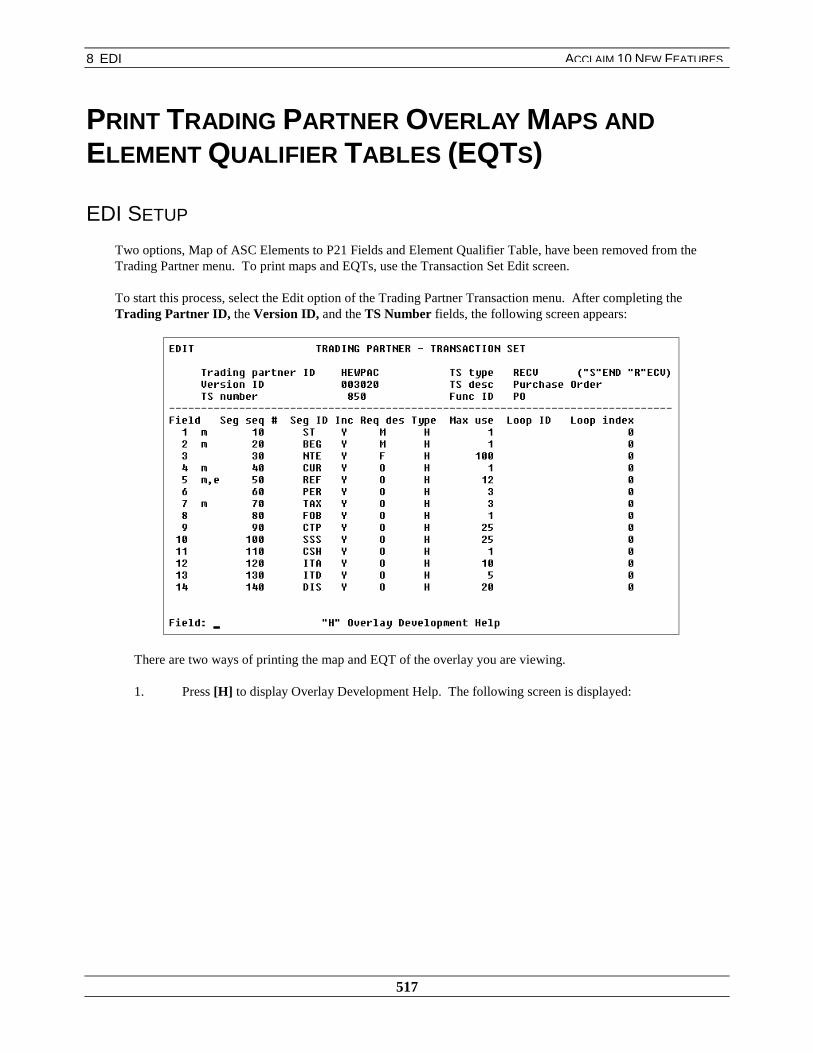
8 EDI
517
ACCLAIM 10 NEW FEATURES
PRINT TRADING PARTNER OVERLAY MAPS ANDELEMENT QUALIFIER TABLES (EQTS)
EDI SETUP
Two options, Map of ASC Elements to P21 Fields and Element Qualifier Table, have been removed from theTrading Partner menu. To print maps and EQTs, use the Transaction Set Edit screen.
To start this process, select the Edit option of the Trading Partner Transaction menu. After completing theTrading Partner ID, the Version ID, and the TS Number fields, the following screen appears:
There are two ways of printing the map and EQT of the overlay you are viewing.
1. Press [H] to display Overlay Development Help. The following screen is displayed:

8 EDI
518
ACCLAIM 10 NEW FEATURES
Press [P] to print the map and EQT of the overlay.
2. Press [P] at the Field prompt of the Trading Partner Transaction Set Edit screen. A sample of theMap of ASC Elements to P21 Fields Report and Element Qualifier Table Report follow:
SAMPLE: MAP OF ASC ELEMENTS TO P21 FIELDS REPORT
SAMPLE: ELEMENT QUALIFIER TABLE REPORT
8 EDI
519
ACCLAIM 10 NEW FEATURES
For more information on mapping and transaction sets, refer to the EDI Setup manual.
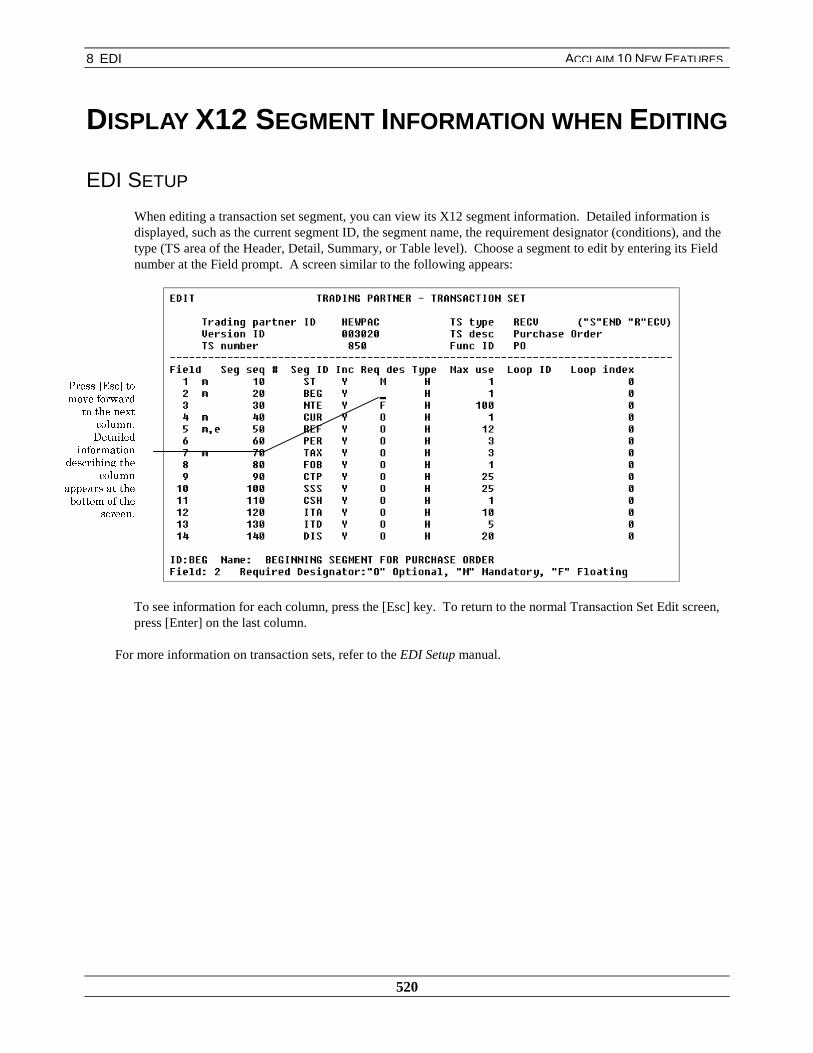
8 EDI
520
ACCLAIM 10 NEW FEATURES
DISPLAY X12 SEGMENT INFORMATION WHEN EDITING
EDI SETUP
When editing a transaction set segment, you can view its X12 segment information. Detailed information isdisplayed, such as the current segment ID, the segment name, the requirement designator (conditions), and thetype (TS area of the Header, Detail, Summary, or Table level). Choose a segment to edit by entering its Fieldnumber at the Field prompt. A screen similar to the following appears:
To see information for each column, press the [Esc] key. To return to the normal Transaction Set Edit screen,press [Enter] on the last column.
For more information on transaction sets, refer to the EDI Setup manual.
3UHVV�>(VF@�WRPRYH�IRUZDUG
WR�WKH�QH[WFROXPQ�'HWDLOHG
LQIRUPDWLRQGHVFULELQJ�WKH
FROXPQDSSHDUV�DW�WKHERWWRP�RI�WKH
VFUHHQ�

8 EDI
521
ACCLAIM 10 NEW FEATURES
VIEW PREVIOUS SCREENS WHEN SELECTING RAWEDI DOCUMENTS FOR PRINTING
EDI DOC
An option has been added to the Print Raw EDI Document screen to view prior screens of EDI documents. Whenthe Print Raw option is selected, the following screen appears:
Pressing the hyphen [-] displays the prior screen of raw EDI documents that can be printed. For more informationabout printing raw EDI documents, refer to the EDI Documents manual.
7KH�´�´�IRU3UHYLRXVRSWLRQ�KHOSV\RX�YLHZSULRU�VFUHHQVRILQIRUPDWLRQ�
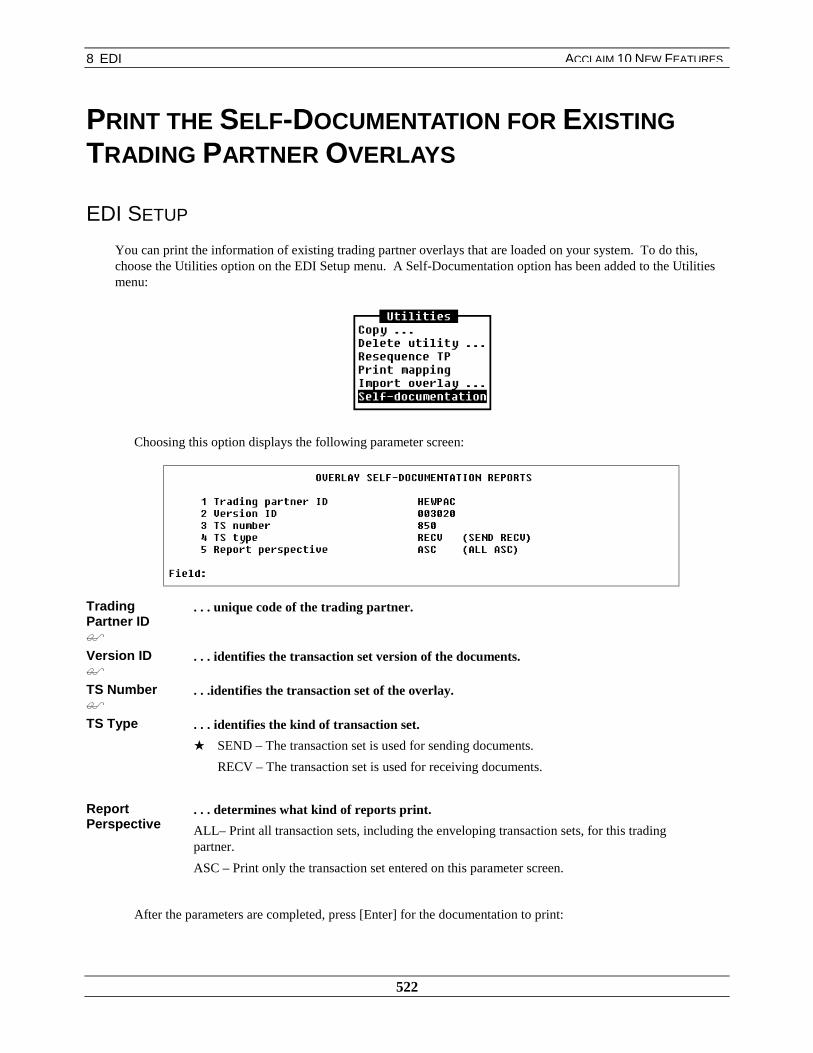
8 EDI
522
ACCLAIM 10 NEW FEATURES
PRINT THE SELF-DOCUMENTATION FOR EXISTINGTRADING PARTNER OVERLAYS
EDI SETUP
You can print the information of existing trading partner overlays that are loaded on your system. To do this,choose the Utilities option on the EDI Setup menu. A Self-Documentation option has been added to the Utilitiesmenu:
Choosing this option displays the following parameter screen:
TradingPartner ID$
. . . unique code of the trading partner.
Version ID$
. . . identifies the transaction set version of the documents.
TS Number$
. . .identifies the transaction set of the overlay.
TS Type . . . identifies the kind of transaction set.
★ SEND – The transaction set is used for sending documents.
RECV – The transaction set is used for receiving documents.
ReportPerspective
. . . determines what kind of reports print.
ALL– Print all transaction sets, including the enveloping transaction sets, for this tradingpartner.
ASC – Print only the transaction set entered on this parameter screen.
After the parameters are completed, press [Enter] for the documentation to print:

8 EDI
523
ACCLAIM 10 NEW FEATURES
SAMPLE: TRADING PARTNER OVERLAY SELF-DOCUMENTATION
For more information on trading partners and transaction sets, refer to the Electronic Data Interchange – Setupmanual.
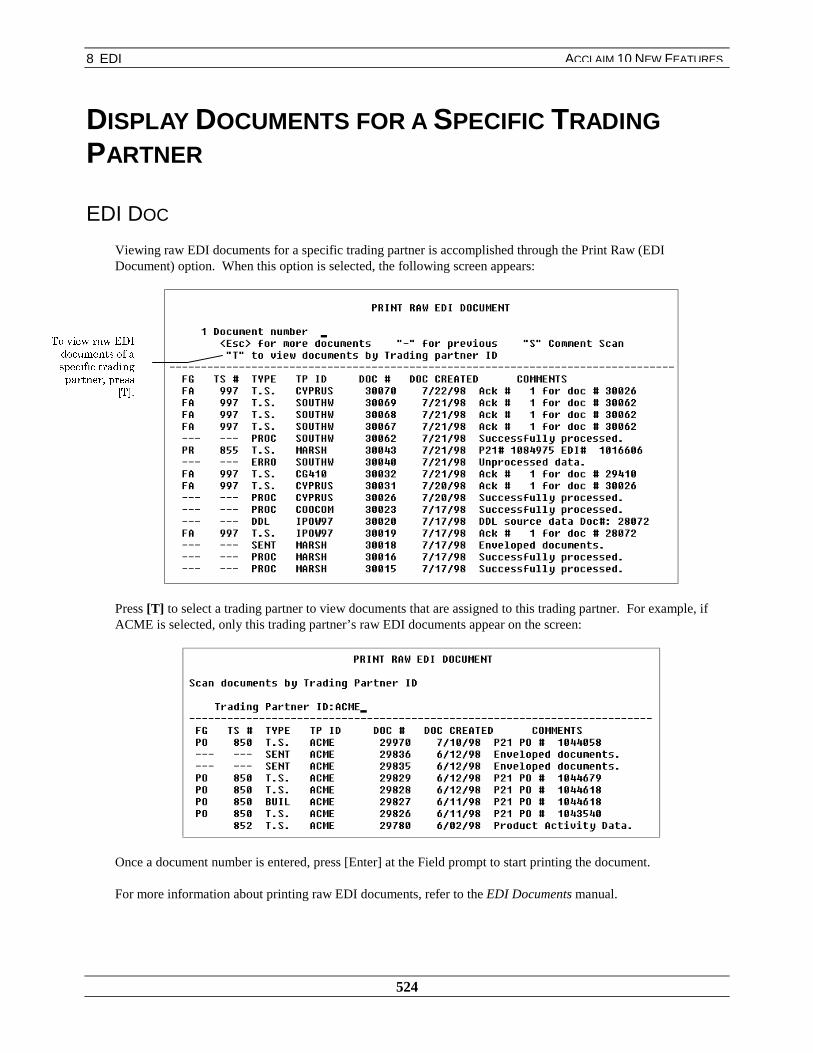
8 EDI
524
ACCLAIM 10 NEW FEATURES
DISPLAY DOCUMENTS FOR A SPECIFIC TRADINGPARTNER
EDI DOC
Viewing raw EDI documents for a specific trading partner is accomplished through the Print Raw (EDIDocument) option. When this option is selected, the following screen appears:
Press [T] to select a trading partner to view documents that are assigned to this trading partner. For example, ifACME is selected, only this trading partner’s raw EDI documents appear on the screen:
Once a document number is entered, press [Enter] at the Field prompt to start printing the document.
For more information about printing raw EDI documents, refer to the EDI Documents manual.
7R�YLHZ�UDZ�(',GRFXPHQWV�RI�DVSHFLILF�WUDGLQJSDUWQHU��SUHVV
>7@�

8 EDI
525
ACCLAIM 10 NEW FEATURES
DISPLAY ELEMENT ID X12 VALUES WHEN EDITINGTHE OVERLAYS FOR SEND TYPE TRANSACTION SETS
EDI SETUP
While editing a transaction set, you can view the element ID X12 values for any ID type element that has a P21Field Table Number value of Static. This feature saves time by not having to search for the values in the segmentdictionary and element value table. To see this feature, edit a Trading Partner Transaction Set and edit the map ofone of the segment fields.
In the previous screen, M2 was entered to display the following mapping screen:

8 EDI
526
ACCLAIM 10 NEW FEATURES
A browse can be performed on the Default Value field of any field line-item that has a P21 Field TableNumber value of STATIC. In the previous screen, Field 1 is selected since its P21 Field Table Number valueis STATIC. Press [Esc] to tab to the Default Value column and execute the browse. The following browsescreen appears on the Default Value field:
For more information on trading partners and transaction sets, refer to the EDI Setup manual.

8 EDI
527
ACCLAIM 10 NEW FEATURES
ENHANCEMENTS TO TRADING PARTNERINFORMATION
EDI SETUP
Document sourcing, document archiving, and Internet address fields have been added to the TradingPartner Information section of the EDI Setup module. For document sourcing, each document builtfor this trading partner can be generated to an AIX file in the specified directory. For documentarchiving, purged EDI documents can be archived and compressed into an AIX directory.
When you select the Enter Trading Partner Information menu option, the following screen appears:
TP ID . . . unique code for the trading partner.
TP Name . . . name of the trading partner.
Document Sourcing
ExportEnvelopedDocument
. . . describes where enveloped documents are placed for this trading partner.
As documents are prepared (enveloped) for this trading partner, their destination is determinedby the value entered in this field.
★ P21 – The document is built into the Prophet 21 document file where ASC X12 documentsare stored in the system.
AIX– Each document that is built is generated to an AIX file in the specified directory,using the document number as the filename to identify each document. The raw EDIdocuments are not saved into the Prophet 21 document file.

8 EDI
528
ACCLAIM 10 NEW FEATURES
Export AIXDirectory
. . . identifies the location of the export AIX directory.
The default value is /tmp/edi/exp/tpid, where tpid is the Trading Partner ID. This directory iscreated only when the field is completed and the record is saved. If you edit the filename, thesystem removes the old AIX directory and creates the new one. If you delete the trading partnerrecord, the system prompts you to remove the AIX directory.
Import AIXDirectory
. . . identifies the location of the import AIX directory.
The default value is /tmp/edi/imp/tpid, where tpid is the Trading Partner ID. This directory iscreated only when the field is completed and the record is saved. If you edit the filename, thesystem removes the old AIX directory and creates the new one. If you delete the trading partnerrecord, the system prompts you to remove the AIX directory.
ImportedFilesMaintenance
. . . provides file maintenance for this AIX area after the file import has been performed.
★ D – The files are deleted from the import directory once they are imported into the system.
R – After importation, the files are saved in the import directory and are renamed with anextension of .old. If a file has an .old extension, it is not imported into the system.
Auto AIXImport
. . . allows automatic importation of documents for this trading partner in the EDIDocuments module.
Y – Automatically import all documents for this trading partner into the EDI Documentsmodule.
★ N – Only one document at a time from this trading partner can be imported into the EDIDocuments module.
Document ArchivingCompressPurgedDocumentsin AIX
. . . allows the purged raw EDI documents for this trading partner to become compressedand archived to an AIX directory.
This field is linked to the Purge Raw EDI Documents option found in the EDI Documentsmodule. When this option is selected and the purge parameters are entered, each raw EDIdocument is moved to an AIX file with its document number as the filename. When the purgeis complete, the deleted documents are archived into the /tmp/edi directory for those tradingpartners who have a Yes setting in this field. This file is stored in the format“arc.(date&time).(port#).Z,” so, for example a file can have a name likearc.1126981544.0010.Z.
Y – Compress and archive the deleted documents of this trading partner for retrieval later,if needed.
★ N – Do not archive or save this trading partner’s documents.
Internet Address
E-mailAddress
. . . holds the common domain naming format of the Internet Protocol (I.P.) address.
The field is informational only but is to be used in the future for EDI’s Internet compatibility.
This is a 40-character field.
For more information on trading partners, refer to the EDI Setup manual.
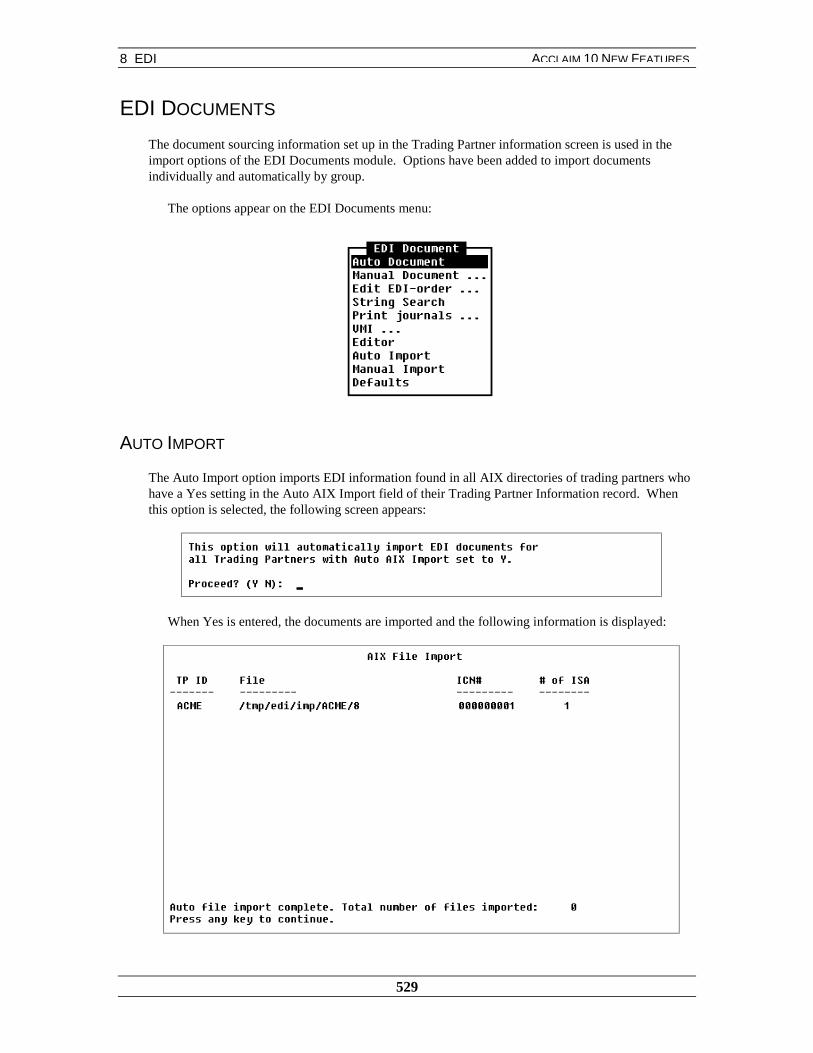
8 EDI
529
ACCLAIM 10 NEW FEATURES
EDI DOCUMENTS
The document sourcing information set up in the Trading Partner information screen is used in theimport options of the EDI Documents module. Options have been added to import documentsindividually and automatically by group.
The options appear on the EDI Documents menu:
AUTO IMPORT
The Auto Import option imports EDI information found in all AIX directories of trading partners whohave a Yes setting in the Auto AIX Import field of their Trading Partner Information record. Whenthis option is selected, the following screen appears:
When Yes is entered, the documents are imported and the following information is displayed:
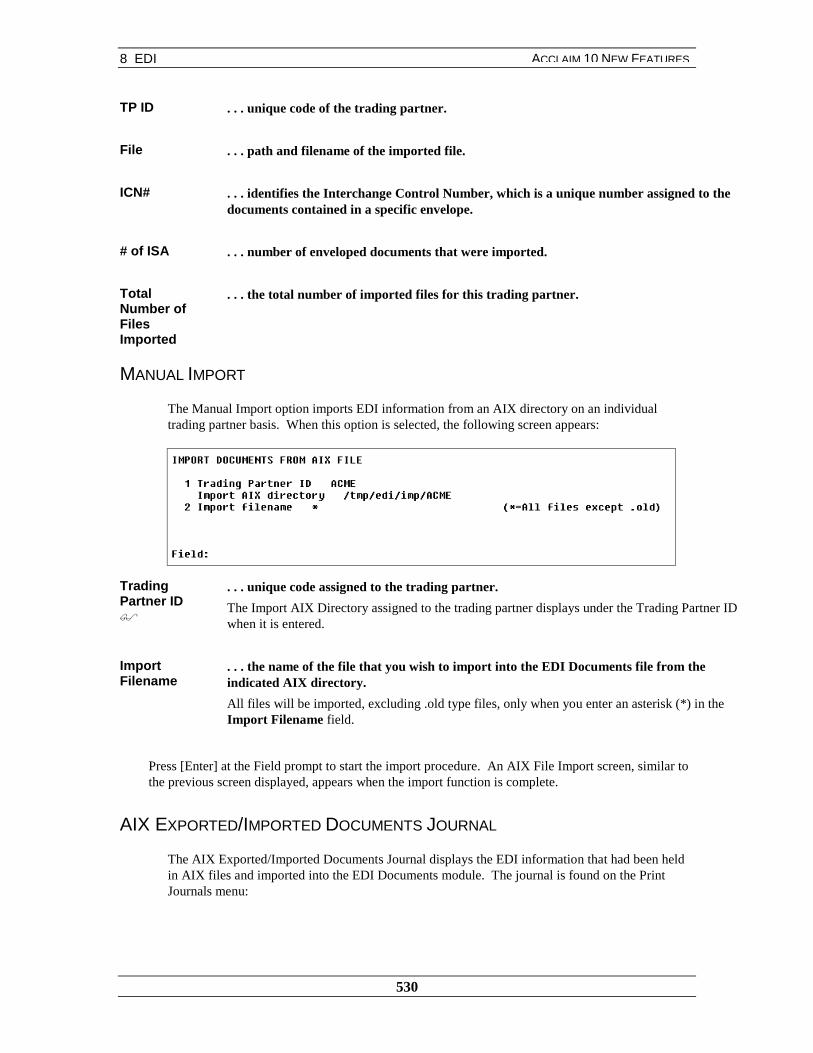
8 EDI
530
ACCLAIM 10 NEW FEATURES
TP ID . . . unique code of the trading partner.
File . . . path and filename of the imported file.
ICN# . . . identifies the Interchange Control Number, which is a unique number assigned to thedocuments contained in a specific envelope.
# of ISA . . . number of enveloped documents that were imported.
TotalNumber ofFilesImported
. . . the total number of imported files for this trading partner.
MANUAL IMPORT
The Manual Import option imports EDI information from an AIX directory on an individualtrading partner basis. When this option is selected, the following screen appears:
TradingPartner ID$
. . . unique code assigned to the trading partner.
The Import AIX Directory assigned to the trading partner displays under the Trading Partner IDwhen it is entered.
ImportFilename
. . . the name of the file that you wish to import into the EDI Documents file from theindicated AIX directory.
All files will be imported, excluding .old type files, only when you enter an asterisk (*) in theImport Filename field.
Press [Enter] at the Field prompt to start the import procedure. An AIX File Import screen, similar tothe previous screen displayed, appears when the import function is complete.
AIX EXPORTED/IMPORTED DOCUMENTS JOURNAL
The AIX Exported/Imported Documents Journal displays the EDI information that had been heldin AIX files and imported into the EDI Documents module. The journal is found on the PrintJournals menu:
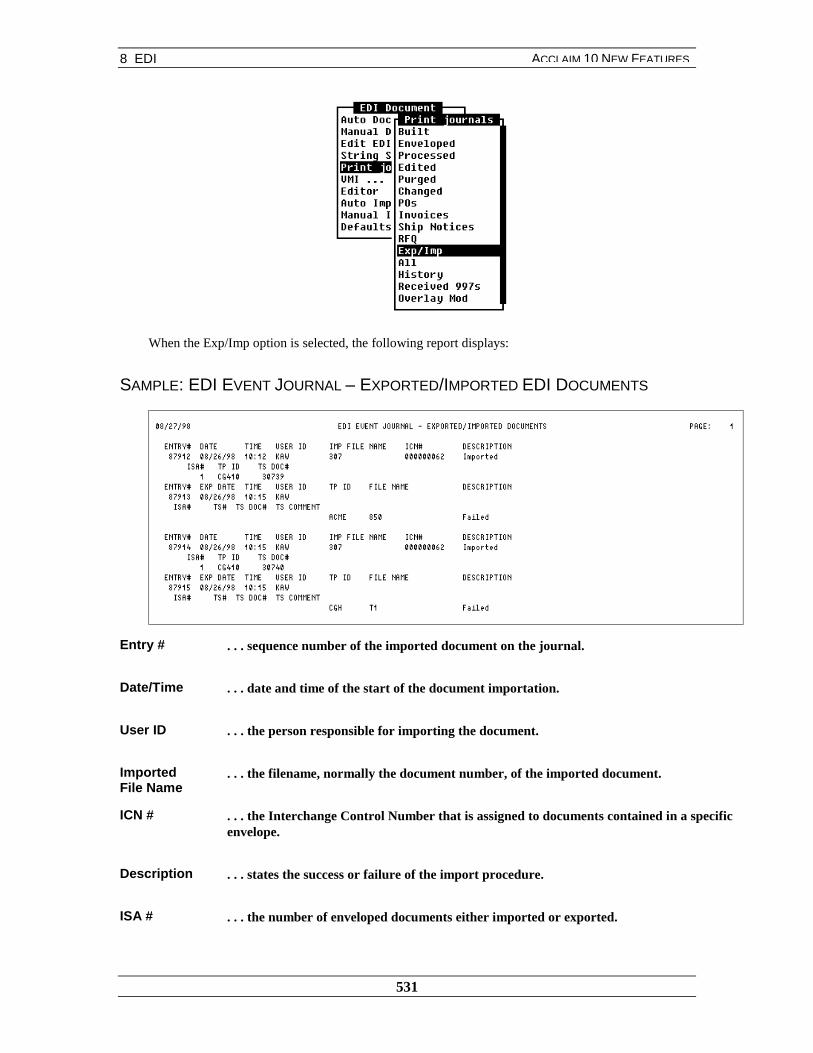
8 EDI
531
ACCLAIM 10 NEW FEATURES
When the Exp/Imp option is selected, the following report displays:
SAMPLE: EDI EVENT JOURNAL – EXPORTED/IMPORTED EDI DOCUMENTS
Entry # . . . sequence number of the imported document on the journal.
Date/Time . . . date and time of the start of the document importation.
User ID . . . the person responsible for importing the document.
ImportedFile Name
. . . the filename, normally the document number, of the imported document.
ICN # . . . the Interchange Control Number that is assigned to documents contained in a specificenvelope.
Description . . . states the success or failure of the import procedure.
ISA # . . . the number of enveloped documents either imported or exported.
8 EDI
532
ACCLAIM 10 NEW FEATURES
TP ID . . . unique code identifying the trading partner.
TS Doc # . . . the transaction set document number.
For more information on exporting and importing EDI documents, refer to the EDI Documentsmanual.

8 EDI
533
ACCLAIM 10 NEW FEATURES
EDI EXPEDITE PURCHASE
The EDI Expedite Purchase module is used to update your purchase orders with changes receivedfrom their corresponding purchase order acknowledgements. When an expected date, cost, orquantity change is received from a purchase order acknowledgement for any of your PO line-items,your purchase order can be updated automatically using the EDI Expedite Purchase module. Toensure that the correct line-items are changed on the correct purchase order, the vendor must includethe PO number and line-item numbers on the corresponding purchase order acknowledgement.
Each vendor whose purchase order acknowledgment will be processed in the EDI Expedite PurchaseOrder module must have an ACK setting in the Process 855 field of the Trading Partner InterchangeInformation record. As you receive purchase order acknowledgements from these vendors, theyshould be processed in the usual fashion in the EDI Documents module. After the POacknowledgements have been processed in the EDI Documents module, they are used to update youroriginal POs in the EDI Expedite Purchase module. This procedure should be carried out on a dailybasis.
MAIN MENU
The EDI Expedite Purchase module is located under the Vendor PO option of the EDI main menu.When you choose the Vendor PO option, the following screen appears:
Update . . . processes the changes to open vendor purchase order items.
Journal . . . displays the changes accepted to open vendor purchase orders.
UPDATE
The Update option processes the 855 Purchase Order Acknowledgements and updates thecorresponding open EDI purchase order line-items. When this option is selected, the followingscreen appears:

8 EDI
534
ACCLAIM 10 NEW FEATURES
Vendor$
. . . identifies the vendor whose open purchase order line-items will be updated by 855purchase order acknowledgement information.
The only vendors who can be entered in this field are those whose Trading Partner InterchangeInformation record has an ACK setting in the Process 855 field. For more information on theProcess 855 field, refer to the Electronic Data Interchange - Setup manual.
The browse displays only those vendors who have processed 855 transaction sets in the EDIDocuments module and have the Process 855 field set to YES.
Entering a vendor and pressing [Enter] at field starts the update process. When the update results inchanges to your original PO line-item costs, these changes are reflected in the Purchase Order CostChange Register, found in the Expedite Purchase module.
JOURNAL
The EDI PO Update Journal records all changes made to open vendor purchase order line-itemsfrom the Update process in the EDI Expedite Purchase module. When this option is selected, thefollowing parameter screen appears:
PO #$
. . . enter the EDI purchase order number that you wish to display.
Pressing [Enter] on the completed parameter screen displays a report similar to the following:
SAMPLE: EDI PO UPDATE JOURNAL
Entry # . . . sequence number of the reported change from the update process.
Date/Time . . . date and time the change was processed.
User ID . . . login ID of the person who performed the update process.
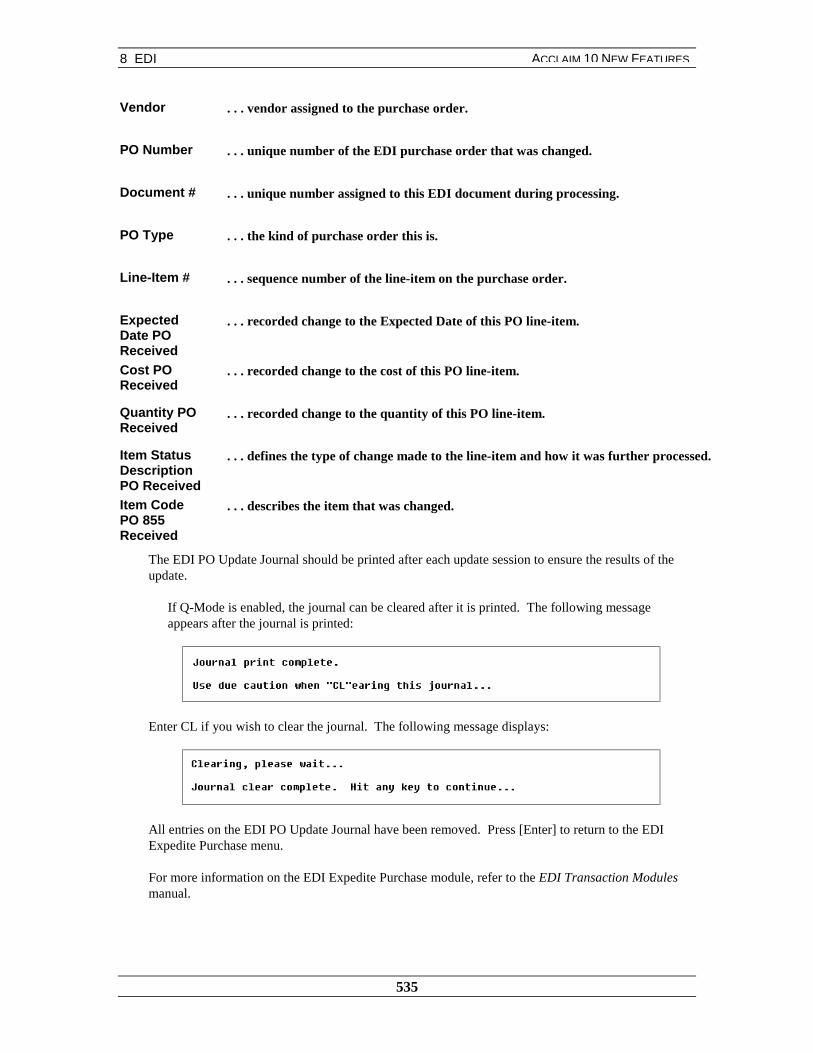
8 EDI
535
ACCLAIM 10 NEW FEATURES
Vendor . . . vendor assigned to the purchase order.
PO Number . . . unique number of the EDI purchase order that was changed.
Document # . . . unique number assigned to this EDI document during processing.
PO Type . . . the kind of purchase order this is.
Line-Item # . . . sequence number of the line-item on the purchase order.
ExpectedDate POReceived
. . . recorded change to the Expected Date of this PO line-item.
Cost POReceived
. . . recorded change to the cost of this PO line-item.
Quantity POReceived
. . . recorded change to the quantity of this PO line-item.
Item StatusDescriptionPO Received
. . . defines the type of change made to the line-item and how it was further processed.
Item CodePO 855Received
. . . describes the item that was changed.
The EDI PO Update Journal should be printed after each update session to ensure the results of theupdate.
If Q-Mode is enabled, the journal can be cleared after it is printed. The following messageappears after the journal is printed:
Enter CL if you wish to clear the journal. The following message displays:
All entries on the EDI PO Update Journal have been removed. Press [Enter] to return to the EDIExpedite Purchase menu.
For more information on the EDI Expedite Purchase module, refer to the EDI Transaction Modulesmanual.
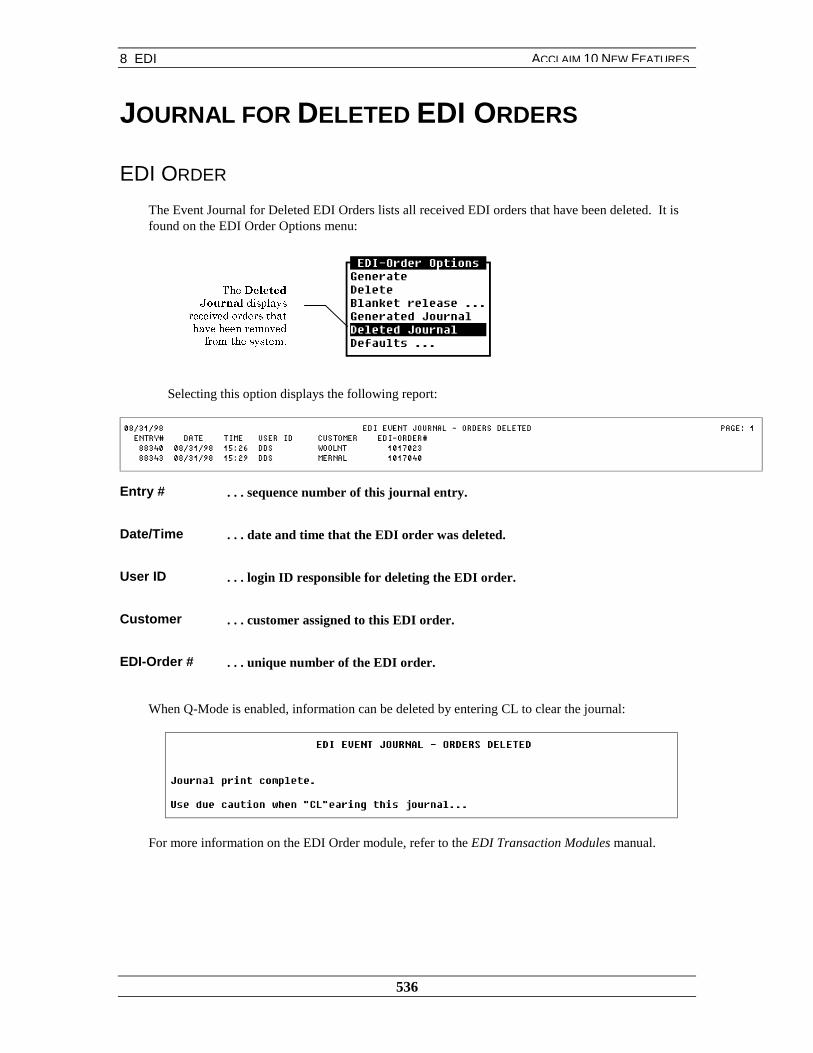
8 EDI
536
ACCLAIM 10 NEW FEATURES
JOURNAL FOR DELETED EDI ORDERS
EDI ORDER
The Event Journal for Deleted EDI Orders lists all received EDI orders that have been deleted. It isfound on the EDI Order Options menu:
Selecting this option displays the following report:
Entry # . . . sequence number of this journal entry.
Date/Time . . . date and time that the EDI order was deleted.
User ID . . . login ID responsible for deleting the EDI order.
Customer . . . customer assigned to this EDI order.
EDI-Order # . . . unique number of the EDI order.
When Q-Mode is enabled, information can be deleted by entering CL to clear the journal:
For more information on the EDI Order module, refer to the EDI Transaction Modules manual.
7KH�'HOHWHG-RXUQDO�GLVSOD\V
UHFHLYHG�RUGHUV�WKDWKDYH�EHHQ�UHPRYHG
IURP�WKH�V\VWHP�

8 EDI
537
ACCLAIM 10 NEW FEATURES
NON-PRINTABLE DOCUMENT CONTROLCHARACTERS ARE CONVERTED TO VIEWABLEASCII CHARACTERS
EDI SETUP
The ASCII value of unprintable control characters can be seen when you enter or edit TradingPartner Interchange Information. When you select the Edit option of the Trading PartnerInterchange Information, a screen similar to the following appears:
The ASCII value of the data element separator and the data segment terminator fields aredisplayed to the right of each field. For example in the previous screen, the Data ElementSeparator field value of 13 is the ^M keys in ASCII.
EDI DOC
When you print a raw EDI document using the Print Raw option in the EDI Doc module, thesystem displays the ASCII values for the unprintable control characters:
The ASCIIvalues are shown
for fields, DataElement Sep andData Seg Term.

8 EDI
538
ACCLAIM 10 NEW FEATURES
The system converts the element separator into the broken bar and the segment terminator into thetilde. These non-printable characters are only converted on the display and printed report. The EDIdocument still contains the original control character values. The Element Separator and SegmentControl characters are displayed at the bottom of the screen.
For more details on trading partner interchange information, refer to the EDI Setup manual.
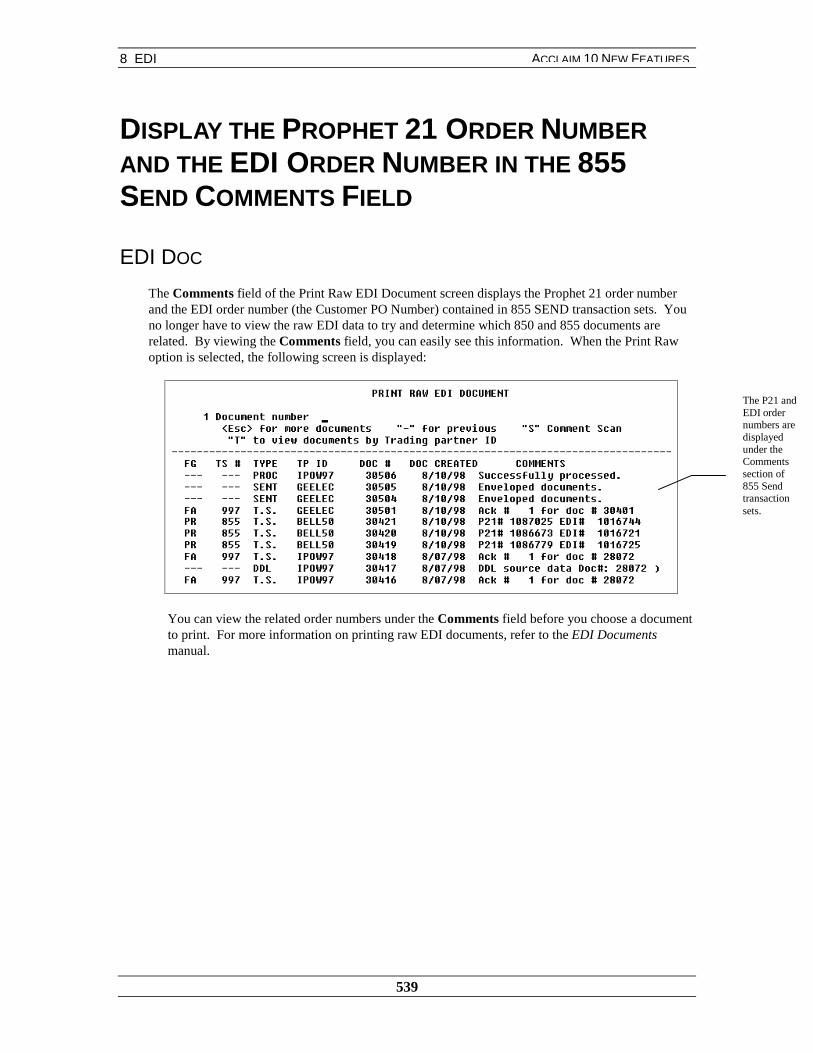
8 EDI
539
ACCLAIM 10 NEW FEATURES
DISPLAY THE PROPHET 21 ORDER NUMBERAND THE EDI ORDER NUMBER IN THE 855SEND COMMENTS FIELD
EDI DOC
The Comments field of the Print Raw EDI Document screen displays the Prophet 21 order numberand the EDI order number (the Customer PO Number) contained in 855 SEND transaction sets. Youno longer have to view the raw EDI data to try and determine which 850 and 855 documents arerelated. By viewing the Comments field, you can easily see this information. When the Print Rawoption is selected, the following screen is displayed:
You can view the related order numbers under the Comments field before you choose a documentto print. For more information on printing raw EDI documents, refer to the EDI Documentsmanual.
The P21 andEDI ordernumbers aredisplayedunder theCommentssection of855 Sendtransactionsets.
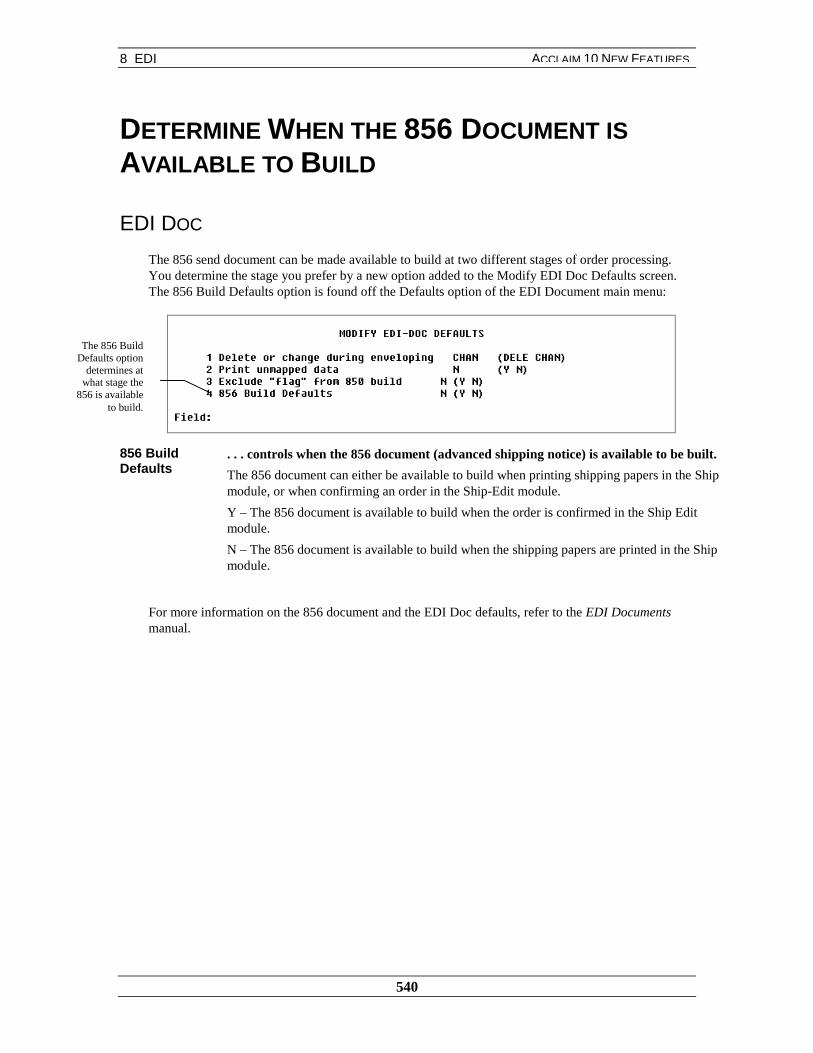
8 EDI
540
ACCLAIM 10 NEW FEATURES
DETERMINE WHEN THE 856 DOCUMENT ISAVAILABLE TO BUILD
EDI DOC
The 856 send document can be made available to build at two different stages of order processing.You determine the stage you prefer by a new option added to the Modify EDI Doc Defaults screen.The 856 Build Defaults option is found off the Defaults option of the EDI Document main menu:
856 BuildDefaults
. . . controls when the 856 document (advanced shipping notice) is available to be built.
The 856 document can either be available to build when printing shipping papers in the Shipmodule, or when confirming an order in the Ship-Edit module.
Y – The 856 document is available to build when the order is confirmed in the Ship Editmodule.
N – The 856 document is available to build when the shipping papers are printed in the Shipmodule.
For more information on the 856 document and the EDI Doc defaults, refer to the EDI Documentsmanual.
The 856 BuildDefaults option
determines atwhat stage the
856 is availableto build.

8 EDI
541
ACCLAIM 10 NEW FEATURES
CREATE DEFAULT VALUES IN TRANSLATIONTABLES
EDI SETUP
Default mapping values can be added to translation tables that are used in case a match isn’t foundbetween the set values in the translation table and the original mapping value found in thedocument. Translation tables must be used in a trading partner’s overlay before default mappingvalues can be used. The following screen displays an ASC to P21 Map utilizing a translationtable:
For more information on setting up translation tables and transaction sets, refer to the EDI Setupmanual.
When you edit the translation table, you set up the default value by placing “(DEFAULT)” in theOriginal Value field of the translation table. An example of a translation table using a default valueis shown in the following screen:
$�WUDQVODWLRQWDEOH�PXVW
DSSHDU�LQ�WKHRYHUOD\�IRUGHIDXOWPDSSLQJYDOXHV�WRZRUN�

8 EDI
542
ACCLAIM 10 NEW FEATURES
Note: This screen can vary depending on where the translation table is being used.
The value found in the New Value field is mapped as the data. For more information on defaultvalues and translation tables, refer to the EDI Setup manual.
Default valuesare set by
entering(DEFAULT) in
the OriginalValue field.

8 EDI
543
ACCLAIM 10 NEW FEATURES
CREATING 820 SEND DOCUMENTS FORELECTRONIC FUNDS TRANSFER
EDI SETUP
An 820 send document can be created for your trading partners who require electronic funds transfer.Information is saved when checks are printed from Payables that is used to later generate 820 sendtransaction sets. Certain requirements must be met for an 820 transaction set to be generated for atrading partner:
♦ The payee must be an actual trading partner set up in the system
♦ The payee, or trading partner, must have an 820 send transaction set established in the system
After you set up the payee as a trading partner, and establish the payee’s 820 send transaction set, youneed to set specific fields in the Trading Partner Information record.
When the TP Information option is selected from EDI Setup’s Trading Partner menu, and EDI 2000 isenabled, two screens appear for each trading partner:
7KH�����6HQGILHOG�FRQWUROVKRZ�WKH����VHQG�GRFXPHQWLV�VHQW�
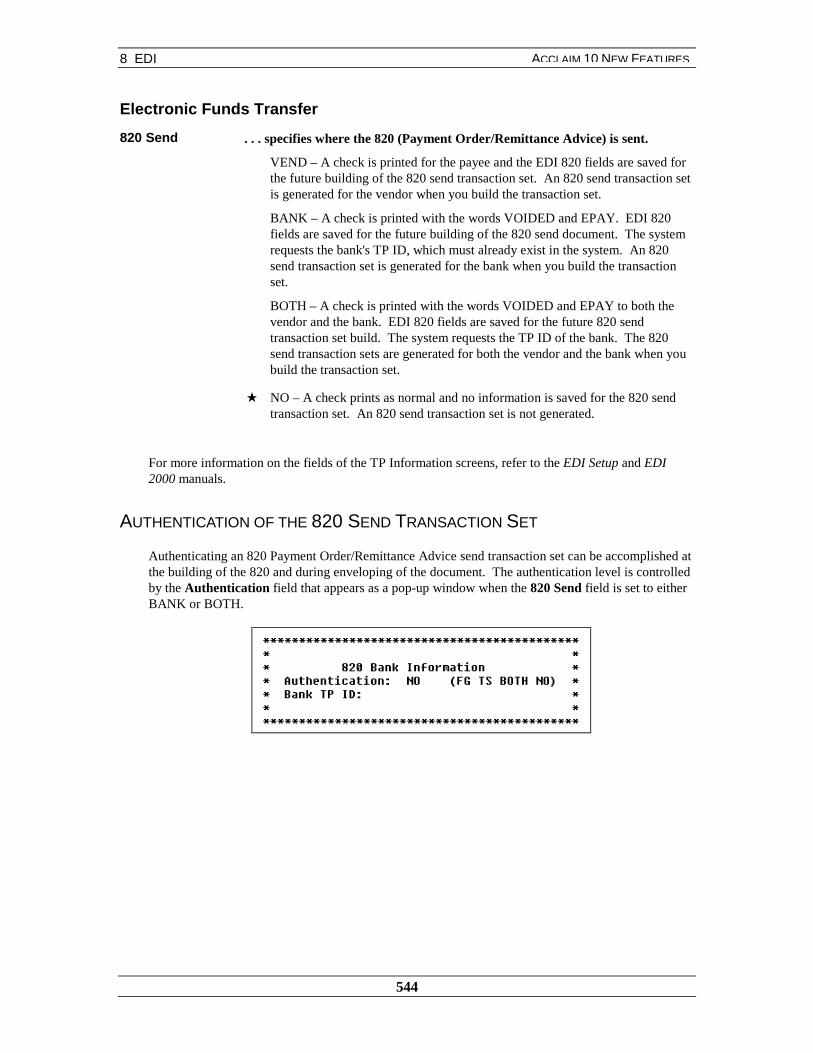
8 EDI
544
ACCLAIM 10 NEW FEATURES
Electronic Funds Transfer
820 Send . . . specifies where the 820 (Payment Order/Remittance Advice) is sent.
VEND – A check is printed for the payee and the EDI 820 fields are saved forthe future building of the 820 send transaction set. An 820 send transaction setis generated for the vendor when you build the transaction set.
BANK – A check is printed with the words VOIDED and EPAY. EDI 820fields are saved for the future building of the 820 send document. The systemrequests the bank's TP ID, which must already exist in the system. An 820send transaction set is generated for the bank when you build the transactionset.
BOTH – A check is printed with the words VOIDED and EPAY to both thevendor and the bank. EDI 820 fields are saved for the future 820 sendtransaction set build. The system requests the TP ID of the bank. The 820send transaction sets are generated for both the vendor and the bank when youbuild the transaction set.
★ NO – A check prints as normal and no information is saved for the 820 sendtransaction set. An 820 send transaction set is not generated.
For more information on the fields of the TP Information screens, refer to the EDI Setup and EDI2000 manuals.
AUTHENTICATION OF THE 820 SEND TRANSACTION SET
Authenticating an 820 Payment Order/Remittance Advice send transaction set can be accomplished atthe building of the 820 and during enveloping of the document. The authentication level is controlledby the Authentication field that appears as a pop-up window when the 820 Send field is set to eitherBANK or BOTH.
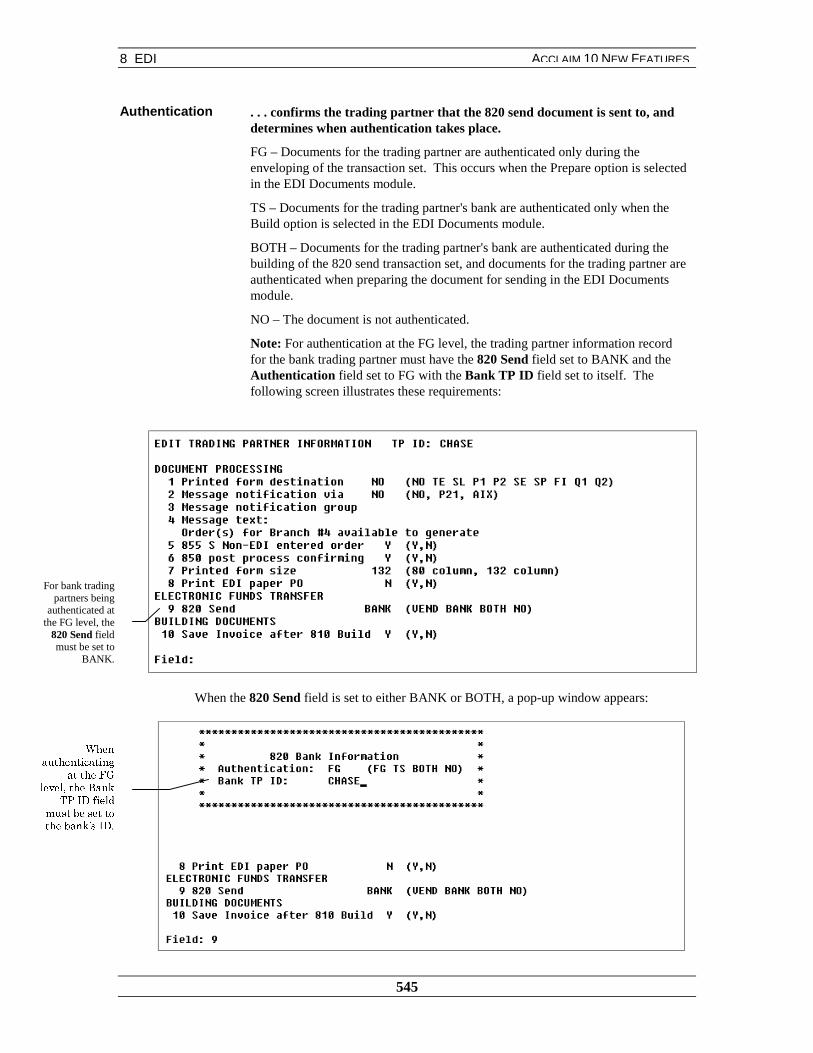
8 EDI
545
ACCLAIM 10 NEW FEATURES
Authentication . . . confirms the trading partner that the 820 send document is sent to, anddetermines when authentication takes place.
FG – Documents for the trading partner are authenticated only during theenveloping of the transaction set. This occurs when the Prepare option is selectedin the EDI Documents module.
TS – Documents for the trading partner's bank are authenticated only when theBuild option is selected in the EDI Documents module.
BOTH – Documents for the trading partner's bank are authenticated during thebuilding of the 820 send transaction set, and documents for the trading partner areauthenticated when preparing the document for sending in the EDI Documentsmodule.
NO – The document is not authenticated.
Note: For authentication at the FG level, the trading partner information recordfor the bank trading partner must have the 820 Send field set to BANK and theAuthentication field set to FG with the Bank TP ID field set to itself. Thefollowing screen illustrates these requirements:
When the 820 Send field is set to either BANK or BOTH, a pop-up window appears:
For bank tradingpartners being
authenticated atthe FG level, the
820 Send fieldmust be set to
BANK.
:KHQDXWKHQWLFDWLQJ
DW�WKH�)*OHYHO��WKH�%DQN
73�,'�ILHOGPXVW�EH�VHW�WRWKH�EDQNV�,'�
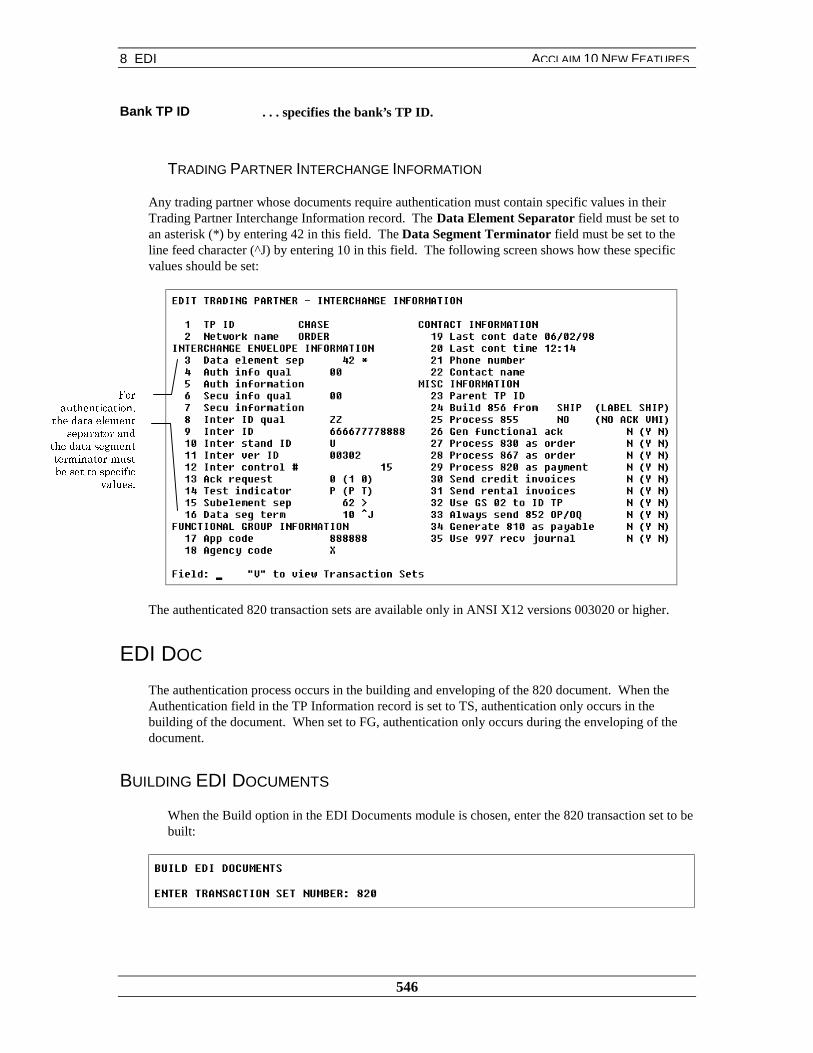
8 EDI
546
ACCLAIM 10 NEW FEATURES
Bank TP ID . . . specifies the bank’s TP ID.
TRADING PARTNER INTERCHANGE INFORMATION
Any trading partner whose documents require authentication must contain specific values in theirTrading Partner Interchange Information record. The Data Element Separator field must be set toan asterisk (*) by entering 42 in this field. The Data Segment Terminator field must be set to theline feed character (^J) by entering 10 in this field. The following screen shows how these specificvalues should be set:
The authenticated 820 transaction sets are available only in ANSI X12 versions 003020 or higher.
EDI DOC
The authentication process occurs in the building and enveloping of the 820 document. When theAuthentication field in the TP Information record is set to TS, authentication only occurs in thebuilding of the document. When set to FG, authentication only occurs during the enveloping of thedocument.
BUILDING EDI DOCUMENTS
When the Build option in the EDI Documents module is chosen, enter the 820 transaction set to bebuilt:
)RUDXWKHQWLFDWLRQ�
WKH�GDWD�HOHPHQWVHSDUDWRU�DQG
WKH�GDWD�VHJPHQWWHUPLQDWRU�PXVWEH�VHW�WR�VSHFLILF
YDOXHV�

8 EDI
547
ACCLAIM 10 NEW FEATURES
The system prompts for a trading partner with an 820 send document:
It is important to note that if the trading partner’s 820 Send field is set to either BANK or BOTHin the TP Information record, you need only enter the TP ID of this vendor whose 820 sendtransaction sets are to be built. Based on the information in the TP Information record, the systemdetermines whether the bank or the vendor receives the transaction set.
Once the trading partner is entered, a list of all released payables to be built for that trading partnerappears:
To build documents, change the Incl value to YES for any line-item to be built and press [S] to start.If the authentication level is set to FG or NO, the document is built in the normal way. If theauthentication level is set to TS or BOTH, the following prompt appears:
The password that is entered must exactly match the password agreed upon by the two trading partiesas the password that generates the secret key information that is used in the authentication process. Ifan incorrect password is entered, the authentication process will continue, but the document will failauthentication on the receiving side.
When a password is entered, the user must verify the password by reentering it. Upon reentry, thedocument builds and the authentication process proceeds.

8 EDI
548
ACCLAIM 10 NEW FEATURES
Once a built document is authenticated, it cannot be edited or altered in any way or theauthentication process on the receiving side will fail. If an attempt to edit a secured document ismade, the following message appears:
Note: Due to the fact that password entry is required for authentication of the 820 senddocument, the Automated Document Maintenance (ADM) feature may not be used tobuild 820 send transaction sets requiring authentication at the TS level, or envelopedocuments requiring authentication at the FG level.

8 EDI
549
ACCLAIM 10 NEW FEATURES
PREPARING EDI DOCUMENTS FOR SENDING
When the Prepare option in the EDI Documents module is chosen, enter the trading partner whosedocuments are to be enveloped:
To envelope documents, change the Incl value to YES for any line-item to be prepared and press [S]to start. If the authentication level is set to TS or NO, the document is enveloped in the normal way.If the authentication level is set to FG or BOTH, the following prompt appears:
The password that is entered must exactly match the password agreed upon by the two trading parties.This password generates the secret key information that is used in the authentication process. If anincorrect password is entered, the authentication process will continue, but the document will failauthentication on the receiving side.
When a password is entered, the user must verify the password by reentering it. Upon reentry, thedocument is enveloped and the authentication process proceeds.
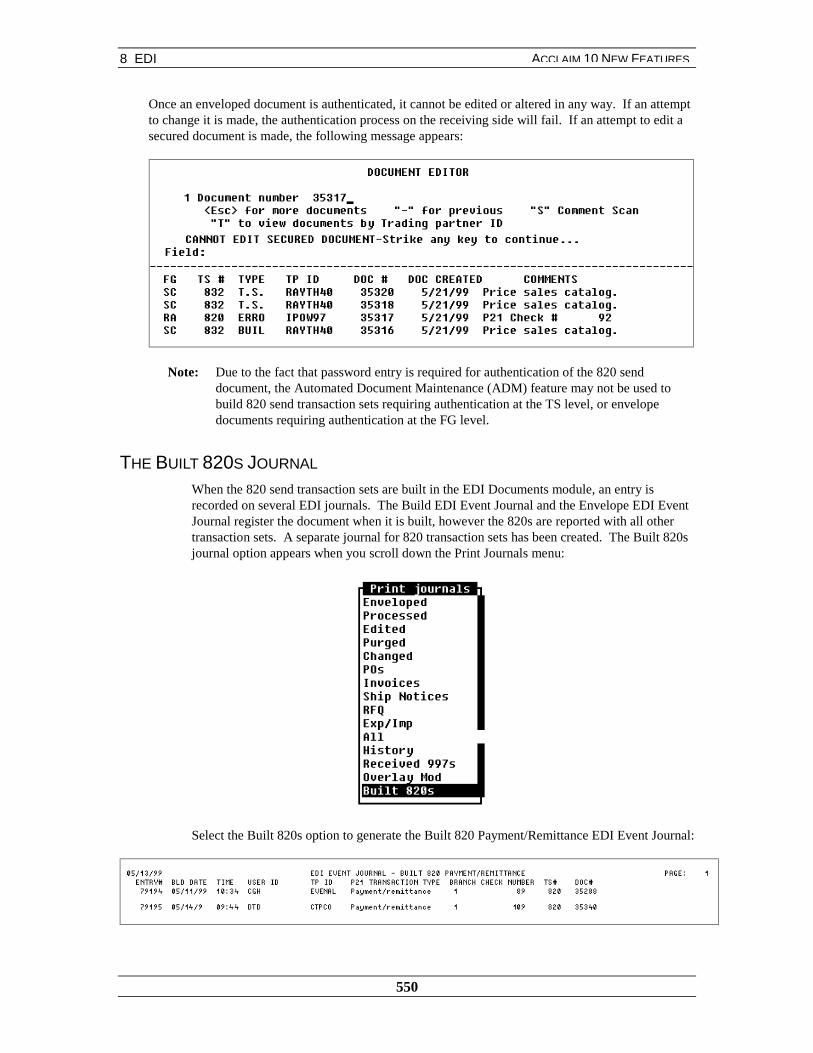
8 EDI
550
ACCLAIM 10 NEW FEATURES
Once an enveloped document is authenticated, it cannot be edited or altered in any way. If an attemptto change it is made, the authentication process on the receiving side will fail. If an attempt to edit asecured document is made, the following message appears:
Note: Due to the fact that password entry is required for authentication of the 820 senddocument, the Automated Document Maintenance (ADM) feature may not be used tobuild 820 send transaction sets requiring authentication at the TS level, or envelopedocuments requiring authentication at the FG level.
THE BUILT 820S JOURNAL
When the 820 send transaction sets are built in the EDI Documents module, an entry isrecorded on several EDI journals. The Build EDI Event Journal and the Envelope EDI EventJournal register the document when it is built, however the 820s are reported with all othertransaction sets. A separate journal for 820 transaction sets has been created. The Built 820sjournal option appears when you scroll down the Print Journals menu:
Select the Built 820s option to generate the Built 820 Payment/Remittance EDI Event Journal:

8 EDI
551
ACCLAIM 10 NEW FEATURES
Entry# . . . identifies the entry number of the 820 send transaction on this journal.
Bld Date/Time . . . date and time the 820 send document was built.
User ID . . . login ID of the person who built the 820 send document.
TP ID . . . unique ID of the trading partner.
P21 TransactionType
. . . description of the kind of transaction created in the system.
Branch . . . identifies the branch where the check was generated.
Check Number . . . displays the check number of the check that was created for the 820send transaction set.
TS# . . . number that identifies the type of transaction set.
Doc# . . . unique number of the document or transaction set that was createdwith the 820 send build.
For more information on the Built 820 Payment/Remittance EDI Event Journal, refer to the EDI 2000manual. Information on the Build and Envelope EDI Event Journals is found in the EDI Documentsmanual.
Note: Due to the fact that password entry is required for authentication of the 820 senddocument, the ADM (Automated Document Maintenance) feature may not be used tobuild 820 sends requiring authentication at the TS level or envelope documents requiringauthentication at the FG level.

8 EDI
552
ACCLAIM 10 NEW FEATURES
ALERT A MESSAGE GROUP TO RECEIVED EDIDOCUMENTS
EDI COMMUNICATIONS
Whenever an EDI document is received from a trading partner, a message can be sent either throughthe Prophet 21 Message module or AIX mail to a specified message group. Message creation isdetermined by a defaults option found in the EDI Communications module:
When the Defaults option is selected, the following screen appears:
Modify EDI-COM Defaults
MessageNotificationRECV Docs
. . . determines whether or not a message is sent to the message group identified in thetrading partner information record.
Y – A message is sent to the message group for each received document.
★ N – A message is not sent.
EDI SETUP
The message group for received documents from the trading partner is defined in the TP Informationsection of the EDI Setup module. Choose the TP Information option on the Trading Partner menu:
7KH�'HIDXOWVRSWLRQ�FRQWUROVWKH�DELOLW\�WR
VHQG�PHVVDJHV�

8 EDI
553
ACCLAIM 10 NEW FEATURES
When EDI 2000 is enabled, a second screen similar to the following appears in the TP Informationsection of the Trading Partner module:
MessageNotificationVia
. . . determines whether or not a message is sent when an EDI document is received fromthis trading partner.
★ No – No message is sent.
P21 – A message is sent to the P21 Message module.
AIX – A message is sent to AIX mail.
MessageNotificationGroup
. . . identifies the group who is to receive the message.
The message group must be previously set up in either the P21 Message module or in AIX mail.
For more information on these fields and any other field on this screen, refer to the EDI 2000manual.
The TPInformationsection holds themessage groupinformation.
7KH�PHVVDJHQRWLILFDWLRQ
ILHOGV�FRQWUROKRZ�DQG�ZKHUHWKH�PHVVDJH�LV
VHQW�ZKHQ�DGRFXPHQW�LV
UHFHLYHG�
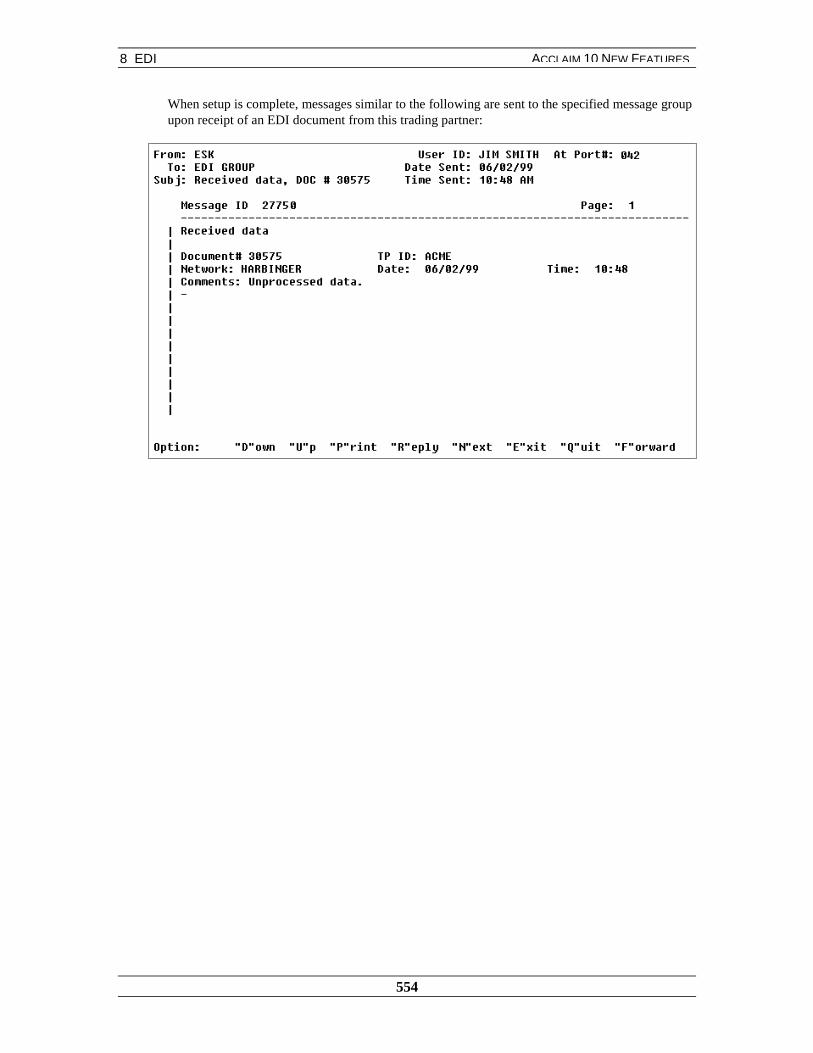
8 EDI
554
ACCLAIM 10 NEW FEATURES
When setup is complete, messages similar to the following are sent to the specified message groupupon receipt of an EDI document from this trading partner:
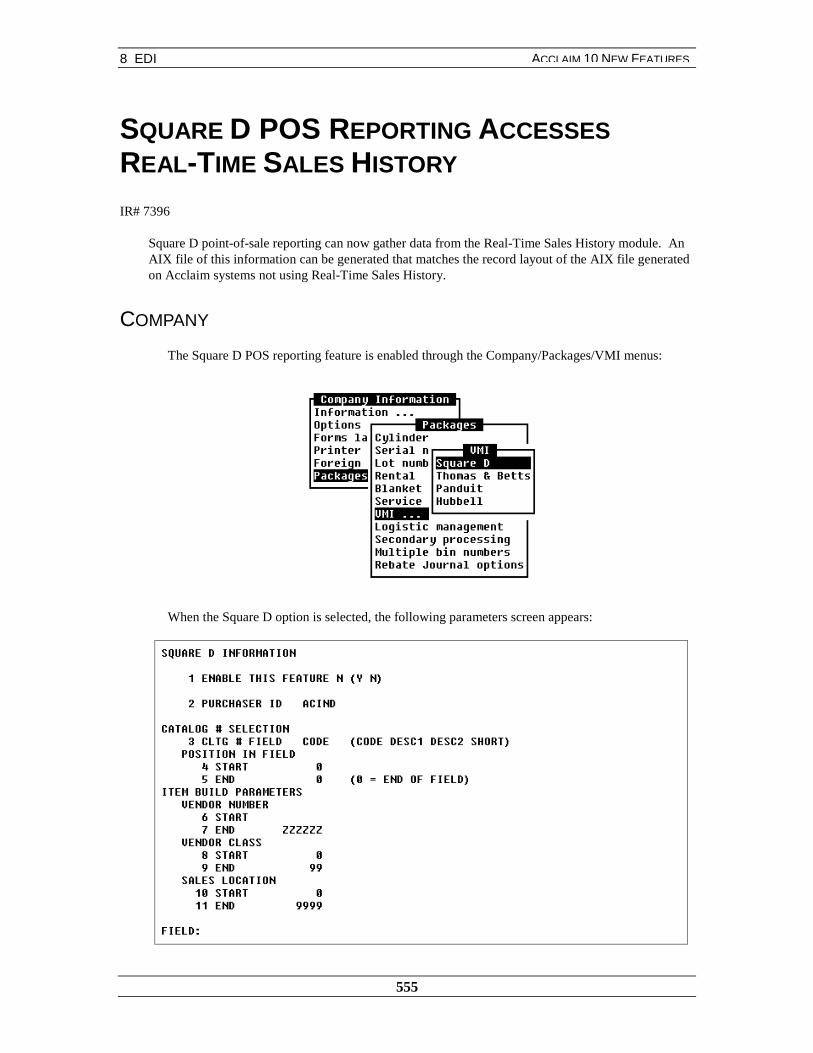
8 EDI
555
ACCLAIM 10 NEW FEATURES
SQUARE D POS REPORTING ACCESSESREAL-TIME SALES HISTORY
IR# 7396
Square D point-of-sale reporting can now gather data from the Real-Time Sales History module. AnAIX file of this information can be generated that matches the record layout of the AIX file generatedon Acclaim systems not using Real-Time Sales History.
COMPANY
The Square D POS reporting feature is enabled through the Company/Packages/VMI menus:
When the Square D option is selected, the following parameters screen appears:
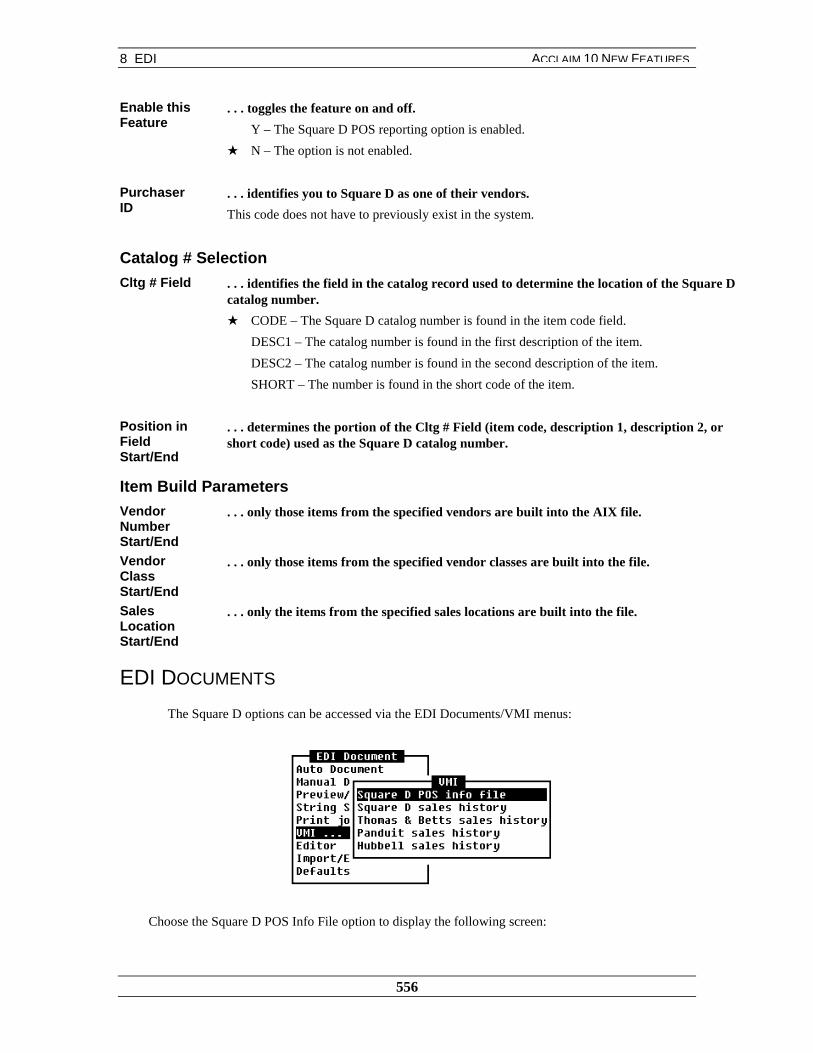
8 EDI
556
ACCLAIM 10 NEW FEATURES
Enable thisFeature
. . . toggles the feature on and off.
Y – The Square D POS reporting option is enabled.
★ N – The option is not enabled.
PurchaserID
. . . identifies you to Square D as one of their vendors.
This code does not have to previously exist in the system.
Catalog # Selection
Cltg # Field . . . identifies the field in the catalog record used to determine the location of the Square Dcatalog number.
★ CODE – The Square D catalog number is found in the item code field.
DESC1 – The catalog number is found in the first description of the item.
DESC2 – The catalog number is found in the second description of the item.
SHORT – The number is found in the short code of the item.
Position inFieldStart/End
. . . determines the portion of the Cltg # Field (item code, description 1, description 2, orshort code) used as the Square D catalog number.
Item Build Parameters
VendorNumberStart/End
. . . only those items from the specified vendors are built into the AIX file.
VendorClassStart/End
. . . only those items from the specified vendor classes are built into the file.
SalesLocationStart/End
. . . only the items from the specified sales locations are built into the file.
EDI DOCUMENTS
The Square D options can be accessed via the EDI Documents/VMI menus:
Choose the Square D POS Info File option to display the following screen:
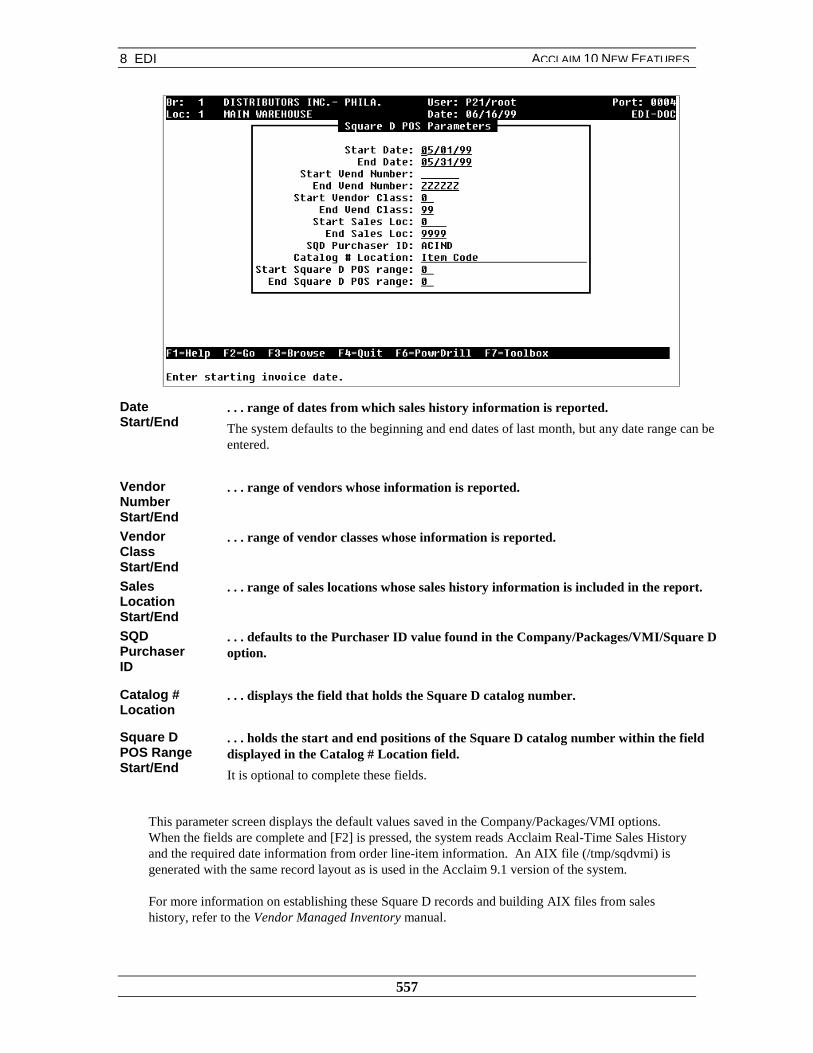
8 EDI
557
ACCLAIM 10 NEW FEATURES
DateStart/End
. . . range of dates from which sales history information is reported.
The system defaults to the beginning and end dates of last month, but any date range can beentered.
VendorNumberStart/End
. . . range of vendors whose information is reported.
VendorClassStart/End
. . . range of vendor classes whose information is reported.
SalesLocationStart/End
. . . range of sales locations whose sales history information is included in the report.
SQDPurchaserID
. . . defaults to the Purchaser ID value found in the Company/Packages/VMI/Square Doption.
Catalog #Location
. . . displays the field that holds the Square D catalog number.
Square DPOS RangeStart/End
. . . holds the start and end positions of the Square D catalog number within the fielddisplayed in the Catalog # Location field.
It is optional to complete these fields.
This parameter screen displays the default values saved in the Company/Packages/VMI options.When the fields are complete and [F2] is pressed, the system reads Acclaim Real-Time Sales Historyand the required date information from order line-item information. An AIX file (/tmp/sqdvmi) isgenerated with the same record layout as is used in the Acclaim 9.1 version of the system.
For more information on establishing these Square D records and building AIX files from saleshistory, refer to the Vendor Managed Inventory manual.
8 EDI
558
ACCLAIM 10 NEW FEATURES
EDI 2000There are many enhancements contained within the EDI 2000 package. Some of the features include:
♦ Automated Document Maintenance – ADM
You are able to process and generate a range of documents. Automated EDI documenthandling allows you to build, process, delete, and print EDI documents using selectableparameters.
♦ Tracking network expense
Every time data is sent to and received from your VAN (Value-Added Network), you arecharged (usually by the character). You can track your network expenses as they occur anddetermine what it costs to do business with a trading partner.
♦ Selectable printed form size 80 to 132
All EDI documents can be printed in 80 character-wide format. This enables you to use 8 ½X 11 paper, which is easier to handle and file.
♦ Reprinting a printed form
Reprint a received document to reproduce the printed form without creating a duplicate orderin the system.
♦ Non-stop document processing
During document processing, the system sets aside any document that has an error andcontinues processing those that have no problems. A report identifies the documents witherrors and provides helpful solutions.
♦ EDI Operations
With the EDI Operations module, you can create automatic dial-in schedules. Pick-up anddelivery times can be defined and other related tasks can be automated. Any errors that occurduring the processing are reported to a designated person.
♦ Deleting a document before building
You can delete a document before it is built. This eliminates the possibility of transmitting adocument that was meant for deletion.
♦ Document to Document Link – DDL
Customize the overlay for receiving data from your trading partners so that informationtransmitted to you can be included on documents sent back to them.
♦ 820 Send Electronic Funds Transfer – EFT
If you have Acclaim Payables, you will be able to send payments electronically to yourvendors. This eliminates the need to mail checks.
♦ Extended Description Mapping – EDM
Transaction sets contain mapping entries to save data in extended description fields. Yourcustomers can send any data they wish and can have that information print on shipping papersand invoices.

8 EDI
559
ACCLAIM 10 NEW FEATURES
♦ Confirming order handling
The system reports that the EDI purchase order that you receive is a new order or aconfirmation of an order already entered in the system. The Confirming EDI Orders Journaldisplays the areas of the confirming order that are different to those of the manually-enteredorder.
♦ EDI Payables
The vendor invoices you receive through EDI can be integrated with Acclaim Payables. TheEDI Payables module processes 810 Receive documents from your trading partners so thatthey don’t have to be manually posted to payables.
♦ Trading Partner Information Table
The Trading Partner Information Table contains parameters to control various EDI 2000features, such as document sourcing and document processing. A master list that displays thisinformation can be printed by trading partner.
For more information on the EDI 2000 package, refer to the EDI 2000 manual.

8 EDI
560
ACCLAIM 10 NEW FEATURES
BUILD MULTIPLE 810 TRANSACTION SETS FORTHE SAME INVOICE
EDI 2000
You can generate multiple 810 transaction sets from the same invoice by setting the Save Invoiceafter 810 Build option to Y. Invoice information is not deleted after the 810 transaction set is built,so that you can use this information to rebuild another 810 transaction set. This option should only beused for testing the setup of the 810 transaction set.
When EDI 2000 is enabled, a second screen appears under the TP Information option of the EDISetup module:
Save Invoiceafter 810Build
. . . determines whether or not invoice information is deleted after the 810 transactionbuild.
Y – Invoice information is saved so that the 810 transaction set can be rebuilt from thesame invoice.
★ N – Invoice information is deleted and the 810 transaction set cannot be rebuilt.
For more information on the Save Invoice after 810 Build option and the EDI 2000 package, refer tothe EDI 2000 manual.
Save invoiceinformation to
rebuild the 810transaction set by
setting the SaveInvoice after
810 Build fieldto Y.