accountant's assistant handbook - tax and accounting software
TRANSCRIPT

Accountant’s Assistant® Handbook version 2007.x.x

TL 17249 (4/23/07) Copyright Information © Text copyright 1998-2007 by Thomson Tax & Accounting. All rights reserved. © Video display images copyright 1998-2007 by Thomson Tax & Accounting. All rights reserved. Thomson Tax & Accounting hereby grants licensees of CS Professional Suite software the right to reprint this document solely for their internal use. Trademark Information The trademarks used herein are trademarks and registered trademarks used under license. All other brand and product names mentioned in this handbook are trademarks or registered trademarks of their respective holders.

Accountant’s Assistant Handbook iii
Contents 1 Welcome! ........................................................................................................................1
Using this handbook .................................................................................................................... 1 Learning about Windows ............................................................................................................. 2 Learning about Accountant’s Assistant ....................................................................................... 2 Where to begin............................................................................................................................. 3
Restoring the CBS sample client data...................................................................................... 3 2 Accountant’s Assistant Overview ................................................................................5
Accountant’s Assistant features ................................................................................................... 5 Integration with your Creative Solutions Accounting software ................................................... 7 The CBS processing cycle ........................................................................................................... 8 The Accountant’s Assistant main window................................................................................... 9 Comprehensive help topics ........................................................................................................ 10 Menu options ............................................................................................................................. 11 Keyboard shortcuts .................................................................................................................... 12
3 Client Bookkeeping Solution Overview.....................................................................15 Benefits for you and your clients ............................................................................................... 16 What makes CBS different from other client accounting software? .......................................... 17 Client Bookkeeping Solution features ....................................................................................... 19 Overview of CBS CheckWriter ................................................................................................. 21 Overview of CBS PayCheck...................................................................................................... 23 Overview of CBS Accounts Payable ......................................................................................... 26 Overview of CBS Accounts Receivable .................................................................................... 28 Overview of CBS Financial Statements..................................................................................... 30 Overview of direct deposit in CBS ............................................................................................ 31
4 Client Setup in CSA .....................................................................................................33 Setup overview........................................................................................................................... 33
Setup timing........................................................................................................................... 33 Multiple companies on one computer.................................................................................... 34 Master license........................................................................................................................ 34
Setup steps in CSA..................................................................................................................... 34 Transferring data between CSA and CBS ............................................................................. 35 CSA client properties............................................................................................................. 36

Contents
iv Accountant’s Assistant Handbook
Employee templates............................................................................................................... 40 Payroll departments ............................................................................................................... 42 CheckWriter vendors............................................................................................................. 43 Checkbooks ........................................................................................................................... 45 Check layouts ........................................................................................................................ 46 Transactions........................................................................................................................... 47 Payroll information................................................................................................................ 48 Additional setup steps in CSA for CBS Accounts Receivable clients................................... 53 Custom help from accountant................................................................................................ 53 Custom bitmap....................................................................................................................... 54
5 Client Setup in Accountant’s Assistant.....................................................................55 Miscellaneous information......................................................................................................... 55
CheckWriter tab..................................................................................................................... 56 PayCheck tab ......................................................................................................................... 64 Accounts Payable tab............................................................................................................. 68 Accounts Receivable tab ....................................................................................................... 71 Financial Statements tab........................................................................................................ 73
Journals ...................................................................................................................................... 78 Security ...................................................................................................................................... 79 Bookkeeping Activity Monitor .................................................................................................. 81 File locations.............................................................................................................................. 83 Account groups .......................................................................................................................... 84 Payroll item restrictions ............................................................................................................. 84 Other setup options .................................................................................................................... 86
Employee templates............................................................................................................... 86 PayCheck tax information ..................................................................................................... 86 PayCheck items ..................................................................................................................... 87
Generating an accountant’s transfer file for the client .............................................................. 88 6 Client Setup in CBS .....................................................................................................93
Setting up the CBS client software ............................................................................................ 94 Client license ......................................................................................................................... 94 Importing client transfer files ................................................................................................ 94
Company properties ................................................................................................................... 96 Set up checkbooks...................................................................................................................... 98
Verifying the checkbook information.................................................................................... 98 Entering a beginning balance............................................................................................... 100
Checkbook reconciliation ........................................................................................................ 101 Importing spreadsheet data ...................................................................................................... 103 Other setup options .................................................................................................................. 104
Select default checkbooks ................................................................................................... 104 Select data-entry options ..................................................................................................... 105
CBS PayCheck setup ............................................................................................................... 109

Contents
Accountant’s Assistant Handbook v
CBS Accounts Payable setup................................................................................................... 113 YTD vendor detail ............................................................................................................... 113 YTD 1099 amounts ............................................................................................................. 115
CBS Accounts Receivable setup.............................................................................................. 116 Default GL accounts............................................................................................................ 116 Customers ............................................................................................................................ 117 Invoice items ....................................................................................................................... 119 Payment terms ..................................................................................................................... 120 Finance charges ................................................................................................................... 121 Sales tax codes..................................................................................................................... 122 Glossary items ..................................................................................................................... 123 Invoice and statement layouts.............................................................................................. 124
CBS Financial Statements setup .............................................................................................. 125 Financial statement options ................................................................................................. 126 Financial statement collections............................................................................................ 127
A final word about CBS........................................................................................................... 128 7 Processing Client Information..................................................................................129
Client processing...................................................................................................................... 129 Regular processing by the client.......................................................................................... 129 Client reports ....................................................................................................................... 131 Client export files ................................................................................................................ 131
Retrieving client data ............................................................................................................... 134 Backups of client data in CSA............................................................................................. 134 Receiving data from your client .......................................................................................... 135 Effect of transferred data on CSA ....................................................................................... 138 Information received from the client’s export file ............................................................... 139
Validating client transactions................................................................................................... 140 Client notes to the accountant.............................................................................................. 140 Editing accounts .................................................................................................................. 141 Helpful reports..................................................................................................................... 141
Transferring client data from Accountant’s Assistant to CSA................................................. 144 Updating client files ................................................................................................................. 146
CBS information to generate ............................................................................................... 147 License selection ................................................................................................................. 147
Client import of the accountant’s transfer file ......................................................................... 148 Client access to your firm’s website through CBS .............................................................. 148
Appendix A: Installation Instructions .........................................................................149 System requirements ................................................................................................................ 149 Installing the Accountant’s Assistant software ........................................................................ 150 Installing the CBS software ..................................................................................................... 150
When the installation is complete........................................................................................ 151
Contents
vi Accountant’s Assistant Handbook
Appendix B: Converting CBS Clients from WS2 to CSA .........................................153 For all users converting clients from WS2 to CSA.................................................................. 153 Performing a conversion .......................................................................................................... 154 Verifying data in CSA ............................................................................................................. 156
Templates ............................................................................................................................ 156 Payroll departments ............................................................................................................. 157 Localities ............................................................................................................................. 157 Deductions........................................................................................................................... 157 Security................................................................................................................................ 158
Creating an accountant’s transfer file for the CBS client to import ........................................ 158 At the client’s office................................................................................................................. 159
Appendix C: Importing Client Data from Other Accounting Products ...................161 Appendix D: Creating a CBS Demonstration Version Company .............................163
CBS Sample Company.cbs.................................................................................................. 163 Demonstration Company.cbs............................................................................................... 165

Accountant’s Assistant Handbook 1
1 Welcome!
Thomson Tax & Accounting develops software products that are designed to provide you with the tools you need to conduct your accounting business more efficiently and more profitably. The Accountant’s Assistant® module of the Creative Solutions Accounting™
(CSA) software integrates with your Write-Up CS™ software to transfer information to and retrieve information from your Client Bookkeeping Solution® (CBS) clients. Accountant’s Assistant supports data transfers for all modules of the CBS client software and requires no other bridges to transfer information between CSA and CBS.
Accountant’s Assistant also enables you to import client data from certain other client accounting software programs, including Best Software BusinessWorks® or BusinessWorks® Gold, Intuit QuickBooks® Pro or QuickBooks® Enterprise Edition, Paychex® General Ledger Reporting Service, Peachtree Complete® Accounting, Microsoft Office Accounting, or Microsoft Office Accounting Express.
Using this handbook This handbook is designed to introduce you to the concepts, terminology, and features of Accountant’s Assistant. It provides an overview of the features available in the Accountant’s Assistant module, including the following topics:
Using the Accountant’s Assistant main window, shortcut bar, menu commands, and shortcut keys.
Selecting features for your client’s CBS program and generating the transfer and setup files for your client’s software.

Welcome!
2 Accountant’s Assistant Handbook
Setting up the clients CBS program in their offices.
Retrieving data from your client’s CBS program into Accountant’s Assistant.
Processing transactions and notes from your client in Accountant’s Assistant.
Transferring client data to the Write-Up CS software within CSA.
Generating transactions from CSA for your client to import into CBS for preparing interim financial statements.
Using the comprehensive help in Accountant’s Assistant.
Learning about Windows This handbook assumes that you’re already familiar with using Microsoft® Windows® and its conventions. For help on using your Windows system, click the Start button on the Windows taskbar and then choose Help. (If you are using Windows XP, choose Help and Support from the Start menu.)
Learning about Accountant’s Assistant The primary documentation for the Accountant’s Assistant module is provided in the program’s comprehensive help topics, accessible from the Help menu within the Accountant’s Assistant main window. A detailed discussion on using these help topics is available starting on page 10 of this handbook.
Appendix A of this handbook provides information about installing the Accountant’s Assistant and Client Bookkeeping Solution software.

Welcome!
Accountant’s Assistant Handbook 3
Where to begin Please read each section of this guide. You may find it helpful to restore the CBS01 - CBS Training Company into CSA; this sample client is included on the Client Bookkeeping Solution CD (in the d:\Training\CSA folder, where d represents the letter of your CD drive).
Restoring the CBS sample client data 1. Open CSA.
2. Choose File / Restore.
3. Insert the Client Bookkeeping Solution CD into the CD drive on your computer. In the Restore Clients dialog, change the backup location to the d:\Training\CSA folder (where d represents the CD drive).
Note: If you press and hold down the SHIFT key while inserting the CD, the automatic installation program will not start. If the automatic installation program does start, simply click the Cancel button and then exit the installation program.
4. Highlight CBS01 - CBS Training Company in the list on the left and click the Select button. The CBS01 company is now listed in the right Selected pane.

Welcome!
4 Accountant’s Assistant Handbook
5. Click the Restore button. When CSA has finished restoring the
client data, click the Done button in the Restore Status dialog.
As you’re working in the program, you may want to view the help for each window or dialog from the help browser.
Note: Also on the Client Bookkeeping Solution CD (in the d:\Sample folder) is the Demo 1 – CBS Sample Company. You may restore this client in CSA if you want to add or change available features when demonstrating CBS for a client.

Accountant’s Assistant Handbook 5
2 Accountant’s Assistant Overview
Accountant’s Assistant is the software that integrates directly with your CSA software. It provides the link that allows data to transfer smoothly between your CSA software and your client’s CBS modules.
Accountant’s Assistant features Beginning with the client’s existing data in CSA, you use
Accountant’s Assistant to customize the CBS features that will be available to the client and then to prepare an accountant’s transfer file that contains the client’s initial CBS setup files. Any function you decide to lock out from the client’s software (by removing that feature from the Selected Features list in the Security dialog) will not appear in any of the windows or menus in the client’s CBS software.
Note: You should mark the CBS client checkbox in the General Information tab of the File / Client Properties dialog to designate the client as a CBS client. If the client will be using the noncalculating payroll features of CBS CheckWriter,™ you should also mark the Non-calculating Payroll client checkbox.
When preparing setup information for the client in Accountant’s Assistant, you can set up the Bookkeeping Activity Monitor to instruct the client’s CBS software to automatically generate report information for you whenever certain trigger activities occur within the client’s CBS program. As the accountant, you can define which CBS bookkeeping events should be reported to you. The activity report can be sent back to you via email attachment or along with the client’s export information.

Accountant’s Assistant Overview
6 Accountant’s Assistant Handbook
After importing data from the accountant’s transfer file that you created, your client can begin processing transactions in CBS. At the end of each processing period, the client will create an export file of the company’s transactions to send to you. You use Accountant’s Assistant to retrieve the information from the client’s export file so you can review and edit the transactions before transferring them to CSA.
Note: The client can export data from CBS CheckWriter, CBS Accounts Payable, and CBS Accounts Receivable at any interval you specify. However, CBS PayCheck™ data must be exported on a monthly basis.
Regardless of how many of your clients are using CBS, you need only a single installation of Accountant’s Assistant.
Use Accountant’s Assistant to select CSA information to generate and create an accountant’s transfer file to send the information to your client. You can transmit the information for the accountant’s transfer file on a form of removable media, attached to an email message, or transmitted via private portal on a web page if running CBS ASP (which is the Application Service Provider version of CBS that is available to clients via the NetClient CS™ portals).
Note: The phrase “generate an accountant’s transfer file” in this handbook means the process of generating CBS client files — regardless of the medium on which those files are stored and then transmitted. The data resulting from this process is automatically stored in the appropriate format without requiring other bridges or translation steps.

Accountant’s Assistant Overview
Accountant’s Assistant Handbook 7
Integration with your Creative Solutions Accounting software
When you retrieve transactions from a CBS client’s exported data, those transactions transfer seamlessly through the Accountant’s Assistant module and then into your CSA program and other CS Professional Suite software.
CBS promotes clear, accurate, and timely communication between you and your client. When processing transactions in his or her own office, your client can attach a note to any transaction to provide you with additional information or to ask a specific question. At the end of the processing period you’ve specified during the client’s setup, your client creates an export file. You then retrieve the data into Accountant’s Assistant for initial processing and then transfer it to CSA. You use that same data to prepare financial statements and tax reporting documents for the client. You can also send adjusting transactions back to the client’s CBS company database.

Accountant’s Assistant Overview
8 Accountant’s Assistant Handbook
The CBS processing cycle The following figure highlights the normal CBS processing cycle. This cycle allows you and your CBS client to work efficiently by minimizing the time either of you spends waiting for the other to process data. Chapter 7 of this handbook covers the CBS processing cycle in detail.
Accountant’s Assistant Overview
Accountant’s Assistant Handbook 9
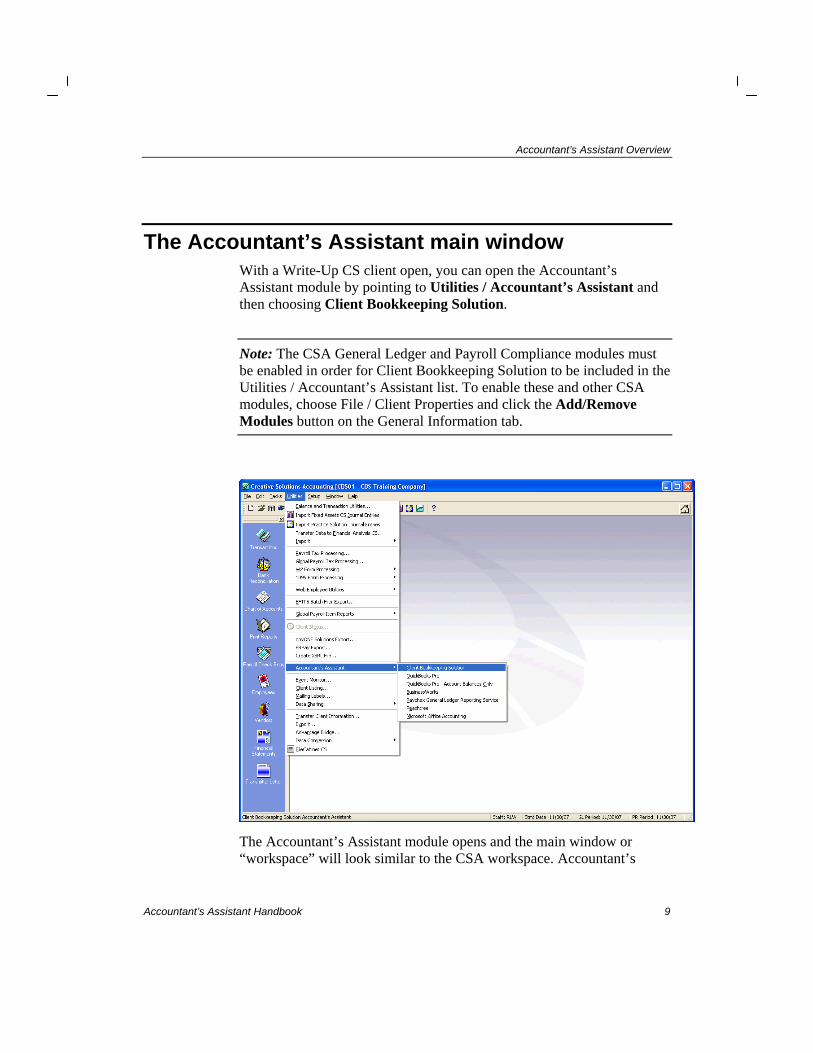
The Accountant’s Assistant main window With a Write-Up CS client open, you can open the Accountant’s Assistant module by pointing to Utilities / Accountant’s Assistant and then choosing Client Bookkeeping Solution.
Note: The CSA General Ledger and Payroll Compliance modules must be enabled in order for Client Bookkeeping Solution to be included in the Utilities / Accountant’s Assistant list. To enable these and other CSA modules, choose File / Client Properties and click the Add/Remove Modules button on the General Information tab.
The Accountant’s Assistant module opens and the main window or “workspace” will look similar to the CSA workspace. Accountant’s

Accountant’s Assistant Overview
10 Accountant’s Assistant Handbook
Assistant has its own menu bar, status bar, and shortcut bar. The status bar shows the statement date, the current GL period, and the current payroll period for the open client.
Note: If you have one or more clients who are using BusinessWorks, QuickBooks Pro, Paychex General Ledger Reporting Service, Peachtree Complete Accounting, or Microsoft Office Accounting, you can import client data for such a client by pointing to Utilities / Accountant’s Assistant and then choosing the applicable product for import. For more information and procedures for importing client data from these software products, choose Help / CSA Help Topics, click the Index button in the help browser, search on Accountant’s Assistant, and then select the topic called Importing Client Data for non-CBS Products via Accountant’s Assistant (PDF).
Comprehensive help topics As with all CS Professional Suite products, the primary documentation for both Accountant’s Assistant and Client Bookkeeping Solution is provided in comprehensive help topics, which are accessible from the Help menu in each product. These topics cover basic procedures and overview information, as well as context-sensitive help for each data-entry window or dialog.
Note: Your CBS client has access to all help documentation created for the CBS CheckWriter program. Note, however, that your client can access the help topics for the CBS add-on modules only if they are licensed for those modules. In addition, if you’ve disabled the CheckWriter payroll or checkbook reconciliation functions during the client setup process, those help topics will not be available to the client.
As you are reading this guide, you will find it helpful to examine the help topics related to each feature of Accountant’s Assistant. Choose Help / Accountant’s Assistant Help Topics.
Accountant’s Assistant Overview
Accountant’s Assistant Handbook 11
In the Accountant’s Assistant help browser, click a topic in the left frame to view it in the right frame.
Press F1 or CTRL+F1 from any window or dialog in the program to open a help topic for that window or dialog.
Click the Contents button to view topics organized by chapters.
Click the Index button to view topics organized by keywords.
Click the Search button, enter a word or phrase to search for, and
then click the button to search for topics that contain a specific word or phrase.
For optimal viewing of the help topics, maximize the help browser
by clicking the button in the upper-right corner of the help browser.
To print the selected topic, right-click in the topic and choose Print from the context menu.
Both Accountant’s Assistant and CBS include a number of documents in Portable Document Format (PDF). To view or print any of these documents, you must have Adobe® Reader® version 5.0.5 or higher installed on your computer. If you do not have Adobe Reader installed, open CSA and choose Help / On the Web / Adobe Reader to access the Adobe website from which you can download and install the Reader. If your clients do not have Adobe Reader installed on their computers, they can install it by running the Adobe Acrobat Reader.exe file from the Client Bookkeeping Solution CD.
Menu options When you open Accountant’s Assistant, the menu bar across the top of the CSA application window changes to enable you to perform various tasks or access features specific to Accountant’s Assistant. The following table lists functions that are accessible from the menu bar in the Accountant’s Assistant main window. (Note that some commands on the Edit menu do not appear unless certain windows are open.)

Accountant’s Assistant Overview
12 Accountant’s Assistant Handbook
File menu Printing and previewing reports; closing Accountant’s Assistant.
Edit menu Cutting, copying, and pasting text; deleting notes; viewing checkbook balances; editing general ledger accounts; resetting the client file location for export and retrieval of CBS data.
Tasks menu Retrieving data from the client’s export file; generating an accountant’s transfer file for the client; processing transactions; transferring transactions to CSA; recreate prior generated files.
Setup menu Entering miscellaneous client setup information; specifying journals; setting security options; specifying settings for the Bookkeeping Activity Monitor; specifying file locations; restricting payroll items; setting up employee templates; setting up or modifying payroll items and payroll tax tables; setting up account groups.
Window menu Arranging the open windows in your Accountant’s Assistant workspace.
Help menu Opening the Accountant’s Assistant help browser.
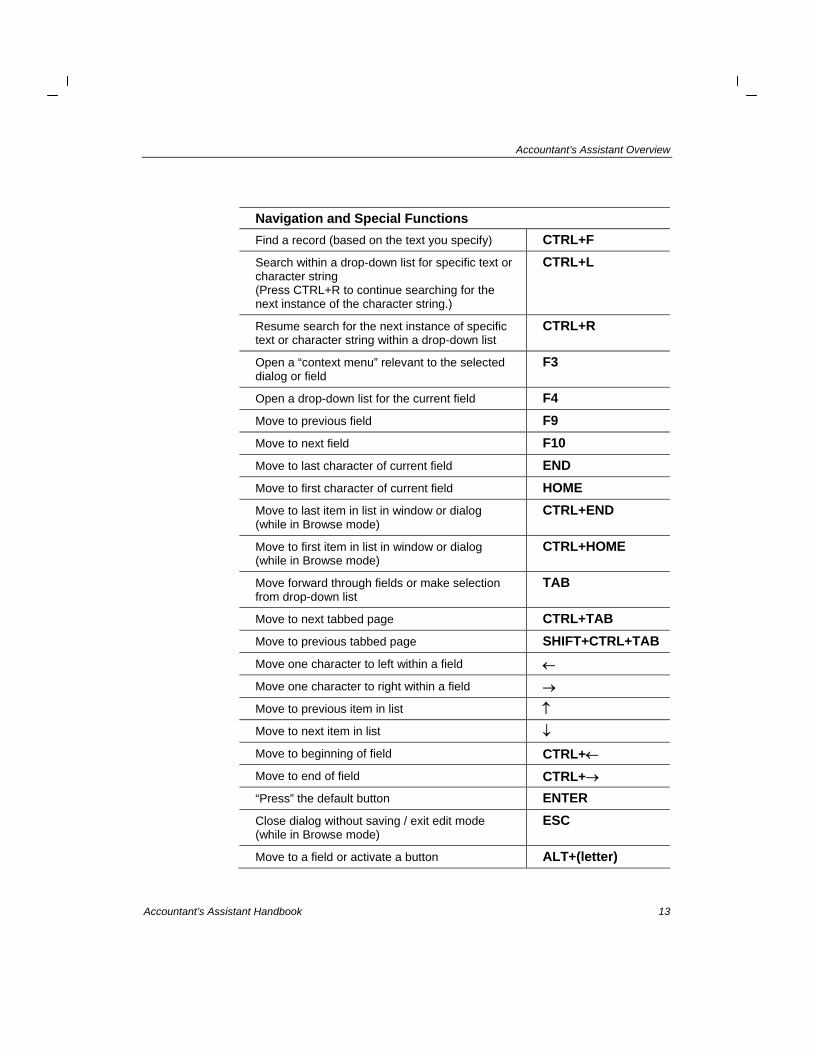
Keyboard shortcuts Keyboard shortcuts are special keys (such as F1 or ESC) that you use either alone or in combination with the SHIFT, CTRL, or CTRL+SHIFT keys. These keyboard shortcuts enable you to access various types of help, to quickly navigate through fields in windows and dialogs, to open drop-down lists, and so forth, without having to use the mouse.
Accessing help View topic help on the active window or dialog F1 or CTRL+F1 Editing Cut CTRL+X Copy CTRL+C Paste CTRL+V Undo last change CTRL+Z
Accountant’s Assistant Overview
Accountant’s Assistant Handbook 13
Navigation and Special Functions Find a record (based on the text you specify) CTRL+F Search within a drop-down list for specific text or character string (Press CTRL+R to continue searching for the next instance of the character string.)
CTRL+L
Resume search for the next instance of specific text or character string within a drop-down list
CTRL+R
Open a “context menu” relevant to the selected dialog or field
F3
Open a drop-down list for the current field F4 Move to previous field F9 Move to next field F10 Move to last character of current field END Move to first character of current field HOME Move to last item in list in window or dialog (while in Browse mode)
CTRL+END
Move to first item in list in window or dialog (while in Browse mode)
CTRL+HOME
Move forward through fields or make selection from drop-down list
TAB
Move to next tabbed page CTRL+TAB Move to previous tabbed page SHIFT+CTRL+TAB Move one character to left within a field ← Move one character to right within a field → Move to previous item in list ↑ Move to next item in list ↓ Move to beginning of field CTRL+← Move to end of field CTRL+→ “Press” the default button ENTER Close dialog without saving / exit edit mode (while in Browse mode)
ESC
Move to a field or activate a button ALT+(letter)

Accountant’s Assistant Overview
14 Accountant’s Assistant Handbook

Accountant’s Assistant Handbook 15
3 Client Bookkeeping Solution Overview
Client Bookkeeping Solution is a unique software program that you provide to your clients who want to maintain accurate and comprehensive bookkeeping records while relying on you, their accountant, for the more complex accounting work. There are five modules available for CBS.
CBS CheckWriter is the core module of CBS. Your clients use it to streamline tasks such as data entry for vendor checks and noncalculating payroll checks, check printing, and report preparation. If you enable the direct deposit feature through Intercept, your clients can direct deposit vendor checks. Starting with CBS version 2006.3.1, your clients can import CheckWriter transactions from a Microsoft Excel spreadsheet.
Disclaimer: InterceptEFT is an unaffiliated third party that some of our customers have engaged to provide direct deposit, tax payments, ACH processing, or credit card merchant services.
The optional CBS PayCheck module adds full-featured calculatingpayroll to CBS CheckWriter. With CBS PayCheck, your clients canhandle multiple departments, federal tax withholdings, any numberof state and local tax withholdings, as well as special deductioncalculations for both salaried and hourly employees, and it offers anumber of specialized payroll reports. If you enable the directdeposit feature through Intercept, your clients can direct depositpayroll checks. Starting with CBS version 2006.3.1, your clients canimport employee time data from an Excel spreadsheet.

Client Bookkeeping Solution Overview
16 Accountant’s Assistant Handbook
2006.2.0, if you process accounts payable data for your client in CBS, you can upload open payables information for your client to remotely approve for payment via their NetClient CS portals.
The optional CBS Accounts Receivable module allows the client todefine finance charge assessment conditions, create recurring andmemorized receivable transactions, design invoices and statementswith the robust layout editor, format large blocks of text to use asdescriptions on invoices and statements, and customize data-entrymessages that are displayed to notify them of a customer’s accountstatus. Starting with Client Bookkeeping Solution version 2006.2.0,your client can import finance charge, payment term, sales tax,customer, and invoice item data from a spreadsheet.
The optional CBS Financial Statements module is also available. Ifyou choose to license your client for CBS Financial Statements, yourclient can generate interim financial statements using any of thepredefined financial statement forms for balance sheet, incomestatement, cash flow (direct and indirect), and trial balance.
Benefits for you and your clients Thomson Tax & Accounting designs integrated software solutions to help professionals like you provide excellent service for your clients, which in turn helps to build your practice. When you provide the Client Bookkeeping Solution software to your business clients, you include those clients in the same timesaving and work-saving information loop that you’re already enjoying in your own office with your CS Professional Suite software products.
CBS offers a win-win opportunity for both you and your clients. Your clients get a bookkeeping program that takes advantage of all the power and easy-to-use features of Windows. The CBS software can help them manage their businesses better, and it can grow with them. You get the work-saving benefits of using standard setup procedures and of client data that transfers in standard formats, all of which minimize errors and reduce turnaround time. You will have more time available to offer your clients additional, value-added services.
The optional CBS Accounts Payable module provides additionaldata-entry options to enter payables, track deadlines, and controldiscounts taken or lost. If you enable the direct deposit feature, yourclients can direct deposit vendor checks. Starting with CBS version

Client Bookkeeping Solution Overview
Accountant’s Assistant Handbook 17
Because you are the software provider, you are free to set the terms both for your clients’ use of the software and for the support you provide. CBS can ultimately help you save hours of staff time, get financial reports into your clients’ hands faster, and build long-term relationships with your clients.
What makes CBS different from other client accounting software?
There are plenty of other checkwriting and accounting packages on the market that are available to small businesses, but CBS is fundamentally different from those packages in a number of important ways.
Both the CBS software and the marketing concept are designed tostrengthen the bond between you and your clients. After you’vepurchased a CBS Master License, you can purchase additional CBSclient modules from Thomson Tax & Accounting to provide to yourclients under whatever pricing and support arrangements you choose.
Note: You can update license information both for your own firm’s CSA modules and for all of your CBS clients at any time from within CSA via download from CS Connect.®
You decide which CBS features you want to set up for each client. Inaddition, you retain control over W-2s, 1099 forms, payrollreporting, and preparation of professional financial statements.
Because you are the software provider for your client, we’ve evenincluded the following features that let you customize CBS for eachclient.
You can use your firm’s own bitmap image as the opening“splash” screen in place of the default CBS image.
You can provide a customized help file that your clients canaccess from the CBS Help menu.
You can provide direct access to your firm’s website from theCBS Help menu.

Client Bookkeeping Solution Overview
18 Accountant’s Assistant Handbook
CBS takes advantage of the client data already in your CSAprogram. When setting up a new CBS client, you can transfer mostof the setup data, including the Chart of Accounts, vendorinformation, and employee information.
Most accounting software packages for small businesses cannotaccept the client’s “I don’t know” as a data-entry item. With CBS, aclient who doesn’t know the appropriate account number or checkdistribution to use for a transaction can attach an electronic note toyou and leave certain fields blank in the data-entry window. Whenyou retrieve the client’s data, you read the attached notes and thenmake any data corrections that may be necessary. Each of your CBSclients can benefit by being able to record questions as they ariseinstead of trying to remember and explain the details of particulartransactions at a later date.
Most accounting software packages for small businesses do noteasily feed client data back to you; instead they require you either tore-enter the data or to develop intermediate data bridges in order toprepare financial statements or annual tax returns. CBS has built-inprovisions for the client to import data from and export data to you,the accountant.
CBS accommodates the timing differences between you and yourclients that inevitably arise whenever data must transfer from oneoffice to the other and then back again. Your clients must be able towrite checks continuously without having to wait for you to updateinformation in their programs.

Client Bookkeeping Solution Overview
Accountant’s Assistant Handbook 19
Client Bookkeeping Solution features Security and passwords
CBS allows you (as the accountant) to restrict who — if anyone — has access to certain features in the client’s CBS software. This feature allows the “Administrator” in the client’s office to choose individualized security settings and passwords for each employee. (Note that you may use your own accountant’s password while at your client’s office to access virtually any feature in the client’s CBS software, even features that are currently hidden from all users in the client’s office.)
Multi-user mode If your client is licensed to run CBS in multi-user mode, multiple users in the client’s office may simultaneously access the same company database. If the client has a single-user license, only one user at a time may access a given company database.
Quick data entry As in CSA, CBS has a shortcut bar that lets the user move rapidly among the data-entry windows. CBS also includes options that allow the client to automatically save and recall memorized transactions, which help your client work quickly and accurately, making the client’s bookkeeping and checkwriting work easier.
For maximum performance during data entry, the client can choose Edit / Quick Add Mode or press CTRL+Q to switch to Quick-add mode. CBS will not display the listview pane at the bottom of the data-entry window or dialog, enabling the program to store transactions without having to update the listview pane display.
Continuous processing With CBS, your clients can enter transactions in an uninterrupted stream of processing without worrying about transaction dates that fall after the next export date. The client’s export file includes only transactions dated on or before the export date. Transactions dated after the export date simply remain in CBS until their appropriate export date.

Client Bookkeeping Solution Overview
20 Accountant’s Assistant Handbook
Notes to accountant A special feature of CBS is the Note to Accountant that your client can attach to any checkbook item or journal entry transaction with an unresolved question. If the client leaves an amount undistributed for any reason, CBS automatically attaches a note. The note serves as a flag to make you aware of a potential problem. Accountant’s Assistant facilitates your review of all such notes before you transfer the client’s data to CSA.
Online banking The CBS online banking feature makes it easy for clients to retrieve transactions from their financial institutions, pay bills online, and transfer funds (provided their financial institutions support these services). CBS can retrieve transactions directly from the financial institution’s servers or from downloaded files in the OFX and QFX file formats typically used by financial institutions. (OFX is the format commonly used by Microsoft Money version 2001 or higher; QFX is the format used by QuickBooks version 2001 or higher.)
For a list of financial institutions that support online services through CBS, choose Checkbook / Setup in CBS, click the Financial Institution Information tab, and then click the Update List button.
Export to accountant At the end of each processing period, your client creates an export file from CBS. Note that if the client uses the optional CBS PayCheck module, the client can choose to export CBS PayCheck data separately from the other CBS modules.
The export file created by CBS CheckWriter contains transaction data for all checkbooks, journal entries, and all other files required to update your CSA data.
Transfer transactions to CBS You can transfer to the client transactions that you enter directly in CSA or transactions that were entered in CBS and then modified in CSA. When you generate a transfer file for your client in Accountant’s Assistant, you will be prompted to select the transactions to include and send to your client.

Client Bookkeeping Solution Overview
Accountant’s Assistant Handbook 21
Overview of CBS CheckWriter CBS CheckWriter includes the following features, but you control which of these features are available to each client when preparing the client’s initial setup files in Accountant’s Assistant. Using CBS CheckWriter, your clients can:
Set up as many as 100 different checkbook accounts, each of whichremains completely separate.
Set up memorized transactions for quick and easy data entry.
Designate vendor or noncalculating payroll checks as unprinted orhandwritten items.
Consolidate multiple unprinted checks into a single check forindividual payees.
Print checks, either singly or in batches.
Monitor checking account balances.
Set up passwords for each designated user within the company, withcustomized security settings for each user.
Modify check layouts or create new layouts, using the layout editor.
Access transaction data from their financial institution, pay billsonline, or transfer funds through the CBS online banking features.
Create direct deposit records that can be processed by InterceptEFT.
Disclaimer: InterceptEFT is an unaffiliated third party that some of our customers have engaged to provide direct deposit, tax payments, ACH processing, or credit card merchant services.
Download CBS software updates from the Internet.
Checkbook reconciliation When setting up a CBS client in Accountant’s Assistant, you can enable the CBS checkbook reconciliation features for the client. With these features enabled, your clients can:
Enter bank statement information directly into the CBS checkbookreconciliation window.

Client Bookkeeping Solution Overview
22 Accountant’s Assistant Handbook
Connect directly to their financial institutions via Internet connection(using the online banking feature) to view and to automaticallyreconcile checkbook transactions.
Note: If you do not want your client to have access to the checkbook reconciliation features in CBS, simply mark the Disable Checkbook Reconciliation checkbox on the CheckWriter tab of the Setup / Miscellaneous Information dialog in Accountant’s Assistant.
CheckWriter checks and reports Your CBS client can print a combination of both checks and reports from the CheckWriter tab in the File / Queue Reports dialog, if they have the proper security rights to do so. The following CheckWriter reports are available.
Unprinted Regular Checks List and Unprinted Payroll ChecksList. Show checks entered for a checkbook but not yet printed. Yourclient can use these reports to verify the accuracy of the data beforeprinting checks.
Printed Regular Checks List and Printed Payroll Checks List.List printed regular or payroll checks recorded for the selectedcheckbook.
Checkbook Register report. Lists checks, deposits, other bankitems, adjustments, and the checkbook balance for a checkbook overthe time period specified.
Deposits List. Lists deposits recorded for the selected checkbook.
Other Bank Items List. Lists other bank items recorded for theselected checkbook.
Checkbook Reconciliation. (Assuming the checkbookreconciliation features have been enabled for the client) lists detailedcheckbook reconciliation activity for the selected checkbook.
Skipped Check Numbers List. Lists any unused check numbers andblocks of check numbers for a checkbook.

Client Bookkeeping Solution Overview
Accountant’s Assistant Handbook 23
Journal Entries List. Lists journal entries.
Unprinted Checks Journal Entry List. Shows the journal entry forunprinted checks.
Chart of Accounts List. Lists the accounts available to the client forthe distribution of amounts of checks, deposits, other bank items, orjournal entries.
Transactions List. Lists transactions (checks, deposits, other bankitems, and journal entries) in order by account number. If the clientchooses Current Export Period, this report reflects transactions thatwould be exported to your Accountant’s Assistant module.
Memorized Transaction List. Lists the memorized transactions setup for CBS CheckWriter and CBS Accounts Payable transactions.
1099 Transaction Activity. Lists transactions for all 1099 vendors.
Vendor List. Lists information about each vendor.
Employee List. Lists information about each employee.
Blank MICR Checks. Lists all blank MICR checks that the clientattempted to print.
Overview of CBS PayCheck CBS PayCheck is an extension of your CSA payroll. It allows your clients to calculate and print payroll checks (without having to calculate payroll checks by hand) and then enter the distribution of gross pay and withholdings on a ledger. Using CBS PayCheck, your clients can:
Enter fully calculating payroll checks as unprinted or handwrittenitems.
Maintain payroll data for both hourly and salaried employees.
Handle payroll data for multi-department employees, and supportmulti-department reporting requirements.

Client Bookkeeping Solution Overview
24 Accountant’s Assistant Handbook
Automatically calculate the necessary tax and withholdinginformation, including state and local withholding, required forprocessing payroll checks.
Handle several different gross pay types and a variety of deductions,including 401(k) contributions and cafeteria-plan deductions.
Handle sophisticated calculations for situations in which anemployee has local withholding on only a portion of the total wages.
Track benefits such as sick and vacation time.
Create direct deposit records that can be processed by InterceptEFT.
Disclaimer: InterceptEFT is an unaffiliated third party that some of our customers have engaged to provide direct deposit, tax payments, ACH processing, or credit card merchant services.
Print checks, either singly or in batches.
CBS PayCheck uses a monthly export frequency. Your client can export CBS PayCheck information along with CBS CheckWriter information, or data from the two modules may be exported separately.
When you transfer the payroll files from Accountant’s Assistant to CSA, all of the information you need for FUTA payments and state unemployment reports is complete and ready to print; FICA information is precalculated for the 941 report. You can then process information for W-2s and other payroll reports in CSA.
Reports and checks Your CBS PayCheck client can choose to print any combination of checks and reports from the PayCheck tab in the File / Queue Reports dialog. The following reports are available.
Unprinted Checks List. Lists all payroll checks entered but not yetprinted for the selected checkbook. Your client can use this report toverify the accuracy of each payroll check before printing the checks.
Printed Checks List. Lists the check numbers, dates, payees, andamounts for all CBS PayCheck checks that have been printed for theselected checkbook.

Client Bookkeeping Solution Overview
Accountant’s Assistant Handbook 25
PayCheck Items Report. Lists information for a selected pay item,tax withholding item, deduction item, or PayCheck Item report groupfor one or more employees and within the period specified.
Earnings Report. Tracks current, quarterly, and year-to-date hours,earnings, and withholdings for all or selected employees. Alsoprovides aggregate calculations for tax withholdings.
Earnings Summary. Summarizes the current, quarterly, and year-to-date employee hours, earnings, tax withholdings, and deductionsby payroll item or by PayCheck Item report group.
Employee List. Displays the basic information for all or selectedemployees.
SUTA Employee List. Lists earnings subject to SUTA and therelated tax for a single state by employee.
Workers’ Compensation Report. Lists employee ID and name,social security number, hours, total wages, excess wages, and taxablewages.
Deductions List. Lists the deduction items set up for all or selectedemployees.
Employee Benefits Report. Lists year-to-date used and accruedinformation for each employee’s benefit accruals.
PayCheck Items List. Shows detailed information for all PayCheckitems, for a selected item, group of items, or item type.
Data Entry Worksheet. Prints a worksheet to help organize payrolldata entry information and verify employee check data.
Payroll Journal. Shows payroll information for each employee aswell as payroll distributions, FICA, and federal withholding totals forall employees included in the report.

Client Bookkeeping Solution Overview
26 Accountant’s Assistant Handbook
Overview of CBS Accounts Payable CBS Accounts Payable adds several additional windows for accounts payable setup, payables data entry, and accounts payable reporting. By using CBS Accounts Payable, your client can gain tighter control over cash requirements and vendor payments. Using CBS Accounts Payable, your clients can:
Define an unlimited number of payment terms to use in calculatingdiscounts for timely payments and easily track vendor discounts.
Handle either cash-basis or accrual-basis reporting.
Set up memorized transactions for recurring fixed expenses.
Set up an unlimited number of vendors. When you set up the clientfiles in Accountant’s Assistant, you choose the type of vendors toretrieve from the client for subsequent transfer to CSA.
Print vendor checks, either singly or in batches.
Track 1099 amounts and cash requirements.
Consolidate multiple invoices from a vendor into a single check.
Export journal entries to the accountant’s General Ledger for allpayable transactions.
Maintain fiscal-year-to-date information for all AP vendors, as wellas calendar-year-to-date information for Form 1099 vendors.
Designate the entry to the General Ledger as either a reversing entry(by using expense accounts) or a perpetual entry (by using thetraditional accounts payable method).
Set up default GL account distributions for each vendor. If needed,the client may override the defaults for particular payables.
If your client also uses the CBS PayCheck module, CBS AccountsPayable can track payroll liabilities automatically — in effecttreating employees’ payroll withholdings as payables to the variousfederal and state tax authorities.

Client Bookkeeping Solution Overview
Accountant’s Assistant Handbook 27
Handle payments to businesses or individuals for multiple 1099types or where only a portion of a payment is reportable on Form1099.
Create direct deposit records that can be processed by InterceptEFT.
Disclaimer: InterceptEFT is an unaffiliated third party that some of our customers have engaged to provide direct deposit, tax payments, ACH processing, or credit card merchant services.
Handle check printing for full or partial payments of payables, aswell as prepayments.
Record cash payments, EFT payments, credit memos, andhandwritten checks.
Remotely authorize payment of open payables via their NetClient CSportal.
Reports and checks Your client may select from a variety of print options for most reports. The Accounts Payable tab in the File / Queue Reports dialog includes the following:
Cash Requirements Report. Lists and totals all open AP items,showing exactly how much cash is required before checks areprinted. Also shows the total of unapplied credit amounts orprepayments affecting the amount of cash required.
Cash Req Projection. Lists expected cash outflow based on currentopen transactions and expected open transactions based on thememorized information currently assigned to vendors.
Aging Schedule. Shows current and overdue open items in aselected range and for the specific time periods your client defines.
Payable / Payment List. Lists CBS payables and/or payments basedon a selected date range or for the last data-entry session.
Purchases Journal. Lists purchases for the period your clientspecifies, sorted by general ledger account, vendor ID, vendor name,or payee name.

Client Bookkeeping Solution Overview
28 Accountant’s Assistant Handbook
Vendor Activity Report. Tracks all vendor activity for the currentprocessing period or for both the current and prior periods.
Vendor List. Shows information about vendors in the company’sdatabase.
Overview of CBS Accounts Receivable CBS Accounts Receivable includes several additional windows and reports that enable your client to create invoices and process payments, track cash receipts, and produce invoices and statements. It helps your CBS clients manage their businesses better by providing a clear picture at all times of which customers owe money, how much they owe, and on what schedule. Using CBS Accounts Receivable, your clients can:
Set up CBS to handle either cash-basis or accrual-basis reporting.
Handle an unlimited number of receivables transactions, customers,invoice items, sales tax codes, sort codes for reporting, and financecharge assessment conditions.
Define an unlimited number of payment terms. CBS automaticallycalculates discount amounts available, but the client may overridethese amounts in special circumstances, such as a change in thediscount terms.
Associate default receivable transactions with any number ofcustomers. The client can set up these transactions as on-demand, ona calendar schedule (weekly, monthly, quarterly, and so forth), orbased on a specific balance due.
Use any of the predefined invoice and statement formats or modifythem to fit their needs using the Layout Editor.
Change information in a transaction record at any time before thetransaction is finalized.
Customize data-entry messages that CBS displays when a customer’srecord is accessed.
AP Transactions List. Displays information on all AP transactionsthat would transfer to the accountant if the client were to export.

Client Bookkeeping Solution Overview
Accountant’s Assistant Handbook 29
Export journal entries to the accountant’s General Ledger for allreceivable transactions, which you can then process using either thecash-basis or the accrual-basis accounting method.
Import spreadsheet data for customers, invoice items, sales tax,payment terms, and finance charges.
Reports A variety of print options are available for most reports. The Accounts Receivable tab in the File / Queue Reports dialog includes the following options.
AR Deposit Journal. Enables your client to reconcile customerpayments to deposited funds.
Aging Schedule. Shows current and overdue open items in aselected range and for the specific time periods your client defines.
Customer Ledger. Lists all or selected invoice or paymenttransactions for a specific customer, customer group, customer type,salesperson, or sales department.
Invoice/Payment List. Provides a listing and total for all or selectedinvoices and/or payments.
Memorized Transaction List. Lists the information entered formemorized transactions in CBS Accounts Receivable.
AR Transactions List. Displays information on all receivabletransactions that would transfer to the accountant if the client were toexport.
Receipts Projection. Lists expected cash inflow based on currentopen transactions and expected open transactions (based onmemorized transactions currently assigned to customers).
Sales Tax Report. Lists information necessary to complete requiredentity tax returns.
Sales Report. Lists sales transactions for a specific customer,customer group, customer type, salesperson, or sales department.

Client Bookkeeping Solution Overview
30 Accountant’s Assistant Handbook
Sales by Item/Service Report. Displays the quantity sold and thepercentage profit earned for all or for specified sales or service items.
Invoice Items List. Provides information about all predefined salesitems or service items that have been entered by the client for use ona customer invoice.
Customer List. Lists up-to-date information for all customers or fora selected subset of customers.
Overview of CBS Financial Statements If you choose to enable the CBS Financial Statements module for your clients, they can generate standard interim financial statements in CBS.
A number of predefined financial statement layouts are included for your clients to use, including balance sheet, income statement, cash flow (direct and indirect), and trial balance statements.
The client can specify individual print options for each statement.
The client can group financial statements together to form acollection and specify individual print options for each statement inthe collection. The client can then select the collection to printinstead of selecting individual statements each time.
The client can specify the starting page number and restart the pagenumbering for each financial statement or collection of financialstatements.
The client can choose to do any of the following:
Use whole numbers for percentages, amounts, or both.
Include accounts with zero-amount balances.
Print the GL account numbers.
Collate financial statements if printing multiple copies of anystatements.

Client Bookkeeping Solution Overview
Accountant’s Assistant Handbook 31
Print location/department detail, subtotals, and/or companytotals.
Specify location/department groups for financial statementreporting.
Specify the number of periods to include as “current.”
Specify the number of prior years to include in comparativereports.
Overview of direct deposit in CBS You can choose to enable the direct deposit feature for your CBS clients through InterceptEFT. When using these features, a client can generate electronic payment system (EPS) records to transmit to InterceptEFT. InterceptEFT will then create Automated Clearing House (ACH) files and submit them to the appropriate financial institutions.
Disclaimer: InterceptEFT is an unaffiliated third party that some of our customers have engaged to provide direct deposit, tax payments, ACH processing, or credit card merchant services.
Important! Before any of your CBS clients can transmit direct deposit transactions to InterceptEFT, they must first fill out and submit the appropriate forms to establish an account with InterceptEFT.
You may want to refer your client to the “Client Bookkeeping Solution Guide to Direct Deposit” for detailed information on using the direct deposit features. This PDF is available from the Client Bookkeeping Solution Help Topics dialog.
Note: To give your client access to the direct deposit features in CBS, simply mark the Enable InterceptEFT Direct Deposit checkbox on the CheckWriter or PayCheck tabs of the Setup / Miscellaneous Information dialog in Accountant’s Assistant and generate a disk that includes CheckWriter miscellaneous information or PayCheck miscellaneous information.

Client Bookkeeping Solution Overview
32 Accountant’s Assistant Handbook

Accountant’s Assistant Handbook 33
4 Client Setup in CSA
Setup overview If you are already using Creative Solutions Accounting to process accounting data for a client, you should be able to complete some initial setup steps in your office to quickly set up the client for CBS. Then you must complete a few other setup steps in your client’s office before CBS is ready for them to use.
If you are new to CBS, it is strongly recommended that you install and use the CBS client modules in your own office before installing them in any client’s office. You would treat your own firm as your first CBS “client.” This is the best way to become familiar with both the setup and the processing procedures.
Setup timing You can set up your client’s CBS CheckWriter software at any time that works for both you and your client. However, if you will also be setting up the client with CBS PayCheck, the best time for the initial setup is right after you complete your normal monthly processing for the client in CSA.

Client Setup in CSA
34 Accountant’s Assistant Handbook
Multiple companies on one computer With the proper license for each client company, you can set up a client’s CBS software to accommodate more than one company database. See page 94 for more information about licensing your CBS client. Setup for the second and additional companies is identical to setup for the first company, except the client needs to install the CBS software only once.
Master license Each time you purchase a CBS module, you will need to update your Master License file, which contains the company names, addresses, and license information for all of the client modules you have purchased to date. To obtain updated license information, open CSA; choose File / CS Connect; mark the Retrieve Licenses checkbox and then click the Call Now button. Note that you must have an active Internet connection to download license files.
Your client’s CBS software derives the appropriate name and address information from this licensing information and displays it both in its opening (password) display and in the File / Company Properties dialog.
Setup steps in CSA This section summarizes the items and options you need to set up in CSA before you complete the initial setup of your client in CBS. In general, the more information you set up in CSA and transfer over to your client, the less initial setup you will need to do in CBS. It is highly recommended that you first set up the specific items discussed in this section.
Note: This section assumes that data for this new CBS client already exists in CSA. If the client does not exist in CSA, you need to add the client there before you can begin to complete any of the steps outlined in this section. For more information on adding a client, search on Setting up from the index in the CSA help browser, and select the topic called a client in CSA.

Client Setup in CSA
Accountant’s Assistant Handbook 35
Transferring data between CSA and CBS To begin, you need to decide on the process by which you will send data to and receive data from the client. It is highly recommended that you make a backup copy of all data before you generate information for your client.
Email. If you intend to use email to send and receive data, verify that both you and your client have access to the Internet and have email programs capable of sending and receiving attachments. If your email program has a MAPI email client installed, it will support email attachments. Please note that Thomson Tax & Accounting cannot actively support those third-party programs, but you should be able to get answers to many of your questions from the help for the email program.
Disk or other removable media. If you intend to transfer information by floppy disk, you will need one or more floppy disks formatted to be readable by both your computer and your client’s computer. If you use a CD to transfer data, you must first save the file to a location on your hard drive, and then copy it to a CD.
CBS ASP. If your client is using the ASP version of CBS (rather than the desktop version of the CBS software), please consult the PDF document entitled “Working with CBS ASP Clients,” which is available from the Accountant’s Assistant help.
Starting with CSA version 2006.2.0 and CBS version 2006.3.0, you can use the one-step / two-step integration for exporting data from CBS to CSA. The CheckWriter tab of the Setup / Miscellaneous Information dialog includes the following options.
Export and Retrieve CBS Data. (One-step) You may want to mark this checkbox in the following situations.
Your client uses CBS ASP, and you use CSA in the Virtual Office CS™ environment.
You process data for the client in CBS through Virtual Office CS, and you use CSA in Virtual Office CS.

Client Setup in CSA
36 Accountant’s Assistant Handbook
You enter data in CBS for your clients, and you use CSA to process that data in your office. Note that both CBS and CSA must be installed on the same computer or network location in order to share data.
If you mark this checkbox, when you click the Retrieve button, Accountant’s Assistant automatically exports and retrieves the client data in one step. For additional information, search on Exporting and retrieving CBS data from your client from the index in the CSA help browser.
Export via the Internet. (Two-step) Mark this checkbox to have your CBS clients export their data (and optionally a client backup) to a secure Thomson Tax & Accounting server. You can then retrieve the export data from the same location, thus eliminating the need for your clients to provide you with an export file on removable media or in an email message. Note that this option requires an active Internet connection.
If your client uses MAPI compliant email software, CBS automatically displays a prompt when the export is complete. The prompt asks if the client would like to notify you that the export data is available via the Internet.
For more information on this feature, search on Exporting and retrieving CBS data from your client from the index in the CSA help browser, and then select the topic called Export via the Internet (two-step process).
CSA client properties The first thing you need to do is designate the CSA client as a CBS client, so that CSA knows to validate data as appropriate for CBS processing. (For example, CBS does not support employee IDs over 30,000.)
1. With the CBS01 client open in CSA, click the Client Properties button on the toolbar or choose File / Client Properties to open the Properties dialog.

Client Setup in CSA
Accountant’s Assistant Handbook 37
2. Verify the information on the General Information tab and mark the CBS Client checkbox. If the client will be using the (noncalculating) payroll features in CBS CheckWriter, also mark the Non-calculating Payroll client checkbox.
Note: If you will be processing payroll for the client in CSA (rather than having the client process payroll in CBS), do not mark either checkbox.
3. Click the Add/Remove Module(s) button.
4. In the Add/Remove Module(s) dialog, mark at least the General Ledger module and the Payroll Compliance module checkboxes.

Client Setup in CSA
38 Accountant’s Assistant Handbook
Note: If your client will be using CBS PayCheck to process payroll, do not mark the Payroll CS checkbox.
5. Click OK to return to the Client Properties dialog.
6. If you will be sending data from the accountant’s transfer file to your client via email, click the Advanced Properties button and enter your client’s email address in the E-mail address field.
7. Click the General Ledger tab and verify the information on this tab. Verify that the Chart of Accounts mask is appropriate. CBS does not allow the client to change the mask, and the client will not be able to add accounts that do not fit the mask.

Client Setup in CSA
Accountant’s Assistant Handbook 39
Notes
CBS version 2006.2.0 or higher supports the same Chart of Accounts mask that CSA supports. Note, however, that CBS versions prior to 2006.2.0 can accept only numeric GL accounts of up to 11 characters (including a single decimal) for the account mask. The CBS mask can have no more than 4 Ls or Ds for locations / departments and no more than 3 Cs to the right of the decimal.
Make sure you have set up an “Undistributed Amounts” account (CSA automatically sets this up as account 999 when you create the client). The client can then use this account during data entry if the correct account number is not known. In general, you would not want to make this account the same as your “suspense” or “holding” account, if present.

Client Setup in CSA
40 Accountant’s Assistant Handbook
8. If the client will be using CBS PayCheck: Click the Payroll tab and specify all states for which state withholding or SUTA will be required. Also, verify the information entered when you initially set up the CSA client.
9. Click OK to close the Client Properties dialog and save the changes
you have made.
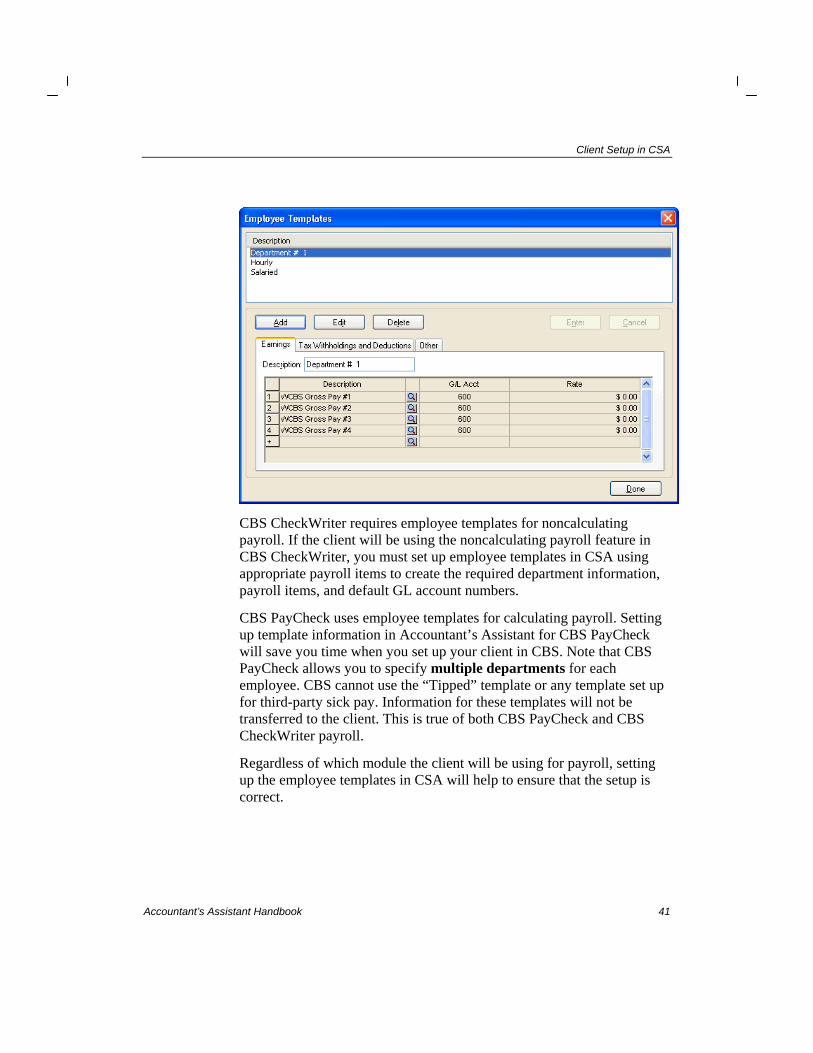
Employee templates Choose Setup / Employee Templates.
CBS relies heavily on the use of templates for setting up employee records. These templates provide common sets of default information for various groups of employees — for example, Officers, Salaried Employees, Hourly Employees, Tipped Wage Employees, and so forth. You can edit the existing default employee templates or add any templates you may need.
Client Setup in CSA
Accountant’s Assistant Handbook 41
CBS CheckWriter requires employee templates for noncalculating payroll. If the client will be using the noncalculating payroll feature in CBS CheckWriter, you must set up employee templates in CSA using appropriate payroll items to create the required department information, payroll items, and default GL account numbers.
CBS PayCheck uses employee templates for calculating payroll. Setting up template information in Accountant’s Assistant for CBS PayCheck will save you time when you set up your client in CBS. Note that CBS PayCheck allows you to specify multiple departments for each employee. CBS cannot use the “Tipped” template or any template set up for third-party sick pay. Information for these templates will not be transferred to the client. This is true of both CBS PayCheck and CBS CheckWriter payroll.
Regardless of which module the client will be using for payroll, setting up the employee templates in CSA will help to ensure that the setup is correct.

Client Setup in CSA
42 Accountant’s Assistant Handbook
Payroll departments Choose Setup / Payroll Departments.
Use the Departments dialog to add any departments the client will need. CBS groups employees into departments for payroll functions. The client can set up as many as 9,999 departments per company.
You must set up at least one department before you can transfer data from CSA and Accountant’s Assistant to CBS. When you create a new CSA client, the program automatically adds a “Default Department,” but if you add departments you may delete the Default Department.
The noncalculating payroll features in CBS CheckWriter allow each employee to be assigned to only one department (the Home department). Any employees set up in CSA with multiple departments will transfer to CBS with only the home department. Data entry for noncalculating payroll data in CBS CheckWriter uses fixed descriptions, so you don’t need to customize department setup. Department information retrieved from CBS CheckWriter into Accountant’s Assistant is limited to the GL account number.

Client Setup in CSA
Accountant’s Assistant Handbook 43
Note: Starting with CBS version 2006.3.1, you can set up your client’s CheckWriter payroll (noncalculating payroll) such that the client can see detailed payroll item descriptions (instead of the default descriptions) in the payroll check entry window and the Setup / View NCP Payroll Departments dialog. To do this, mark the Enable Payroll Item Descriptions checkbox on the CheckWriter tab of the Setup / Miscellaneous Information dialog in Accountant’s Assistant.
CBS PayCheck allows the client to specify multiple departments for each employee.
CheckWriter vendors
Choose Setup / Vendors or click the Vendors icon on the shortcut bar.
It is recommended that you update the current vendor information in CSA before generating the accountant’s transfer file to send to your client. This is normally the most convenient route because most of the vendor information will already be present in CSA as a by-product of generating prior 1099 forms. However, you may add all vendor information at the client’s site later if the information is not readily available in your CSA client files. These changes will then transfer back to CSA as part of the client’s exported data.

Client Setup in CSA
44 Accountant’s Assistant Handbook
If you are adding CBS Accounts Payable for an existing CBS client, CheckWriter vendors automatically appear in CBS Accounts Payable as 1099 vendors if marked as such. The client may set up an unlimited number of vendors in CBS Accounts Payable. However, only vendors marked as 1099 vendors transfer to CSA unless you mark the Allow non-1099 vendors for CheckWriter, Agent, and Other checkboxes on the CheckWriter tab of the Setup / Miscellaneous Information dialog in Accountant’s Assistant.
You will need to specify a default 1099 form type (on the CheckWriter tab of the Setup / Miscellaneous Information dialog in Accountant’s Assistant). If the client has not assigned a 1099 form type to a new vendor added in CBS, Accountant’s Assistant assigns this default 1099 form type during data retrieval.

Client Setup in CSA
Accountant’s Assistant Handbook 45
Checkbooks 1. Choose Setup / Checkbook. Use the Checkbook window to define
one or more checkbooks for the client.
Note: Your client must have at least one checkbook set up (with check layouts assigned) in their company database before they can enter any payroll check information for an employee in CBS. You can set up the checkbook for your client in CSA, or you or your client can set it up in CBS. When you set up a checkbook in CSA, the program transfers all checkbook information (except for any third-party sick pay or impound checkbooks) to CBS.
2. Enter the following information on the General tab:
Description Operating
Bank name Society Bank
Address 101 Main Street Fullerton, CA 94176
Account number 12-123456789
G/L account # 101
3. Click the Enter button to save the checkbook.

Client Setup in CSA
46 Accountant’s Assistant Handbook
4. Click Done to close the Checkbook window.
Check layouts In the CBS company for your own firm, edit or add the check layouts that any of your CBS clients may need. You or your client will need to assign one or more check layouts to each checkbook when setting up the client’s CBS program. Although you can create new layouts in the Layout Editor, you will generally find it easier to copy an existing one and modify it.
When you have completed the layouts you want for your client, you must select that layout in a checkbook and then back up the layouts by choosing File / Backup / Layouts in CBS. You can send or take a copy of this backup file to your client’s office and restore it so your client has the necessary layouts. Note that CBS backs up only those layouts that have been selected in the Checkbook / Setup window.

Client Setup in CSA
Accountant’s Assistant Handbook 47
Important! You cannot edit or add CBS layouts in CSA. You must do this in the CBS Layout Editor.
Transactions You can create or modify checks and journal entries in CSA and then transfer them to your CBS client.
Note: The CBS client must be using CBS version 2004.4.0 or higher to import transactions that were modified or created in CSA.
Once the client imports these transactions, the client cannot edit the transaction, and the transactions will not be exported back to you. If these transactions update the checkbook register and you have enabled the checkbook reconciliation feature in CBS, these transactions will be available for the client to clear during checkbook reconciliation.
If you edit an accounts payable check in CSA, the program will transfer that check adjustment to CBS as a CheckWriter check. The program will adjust the balances shown on the financial statements and the CheckWriter Transactions List report, but it will not adjust the balances on any accounts payable reports. To correctly adjust an incorrect posting on an invoice, the client must make the appropriate changes to the source payable.
The following transaction types will not be available for transfer to CBS.
Accounts payable, accounts receivable, trial balance, budget, and reversing journal entries
Payroll checks
Adjusting journal entries
Tax adjustments
Memorized transactions
Client Setup in CSA
48 Accountant’s Assistant Handbook
Transactions entered in CSA prior to installing CSA version 2004.4.1 or higher
Transactions imported from The Write-Up Solution® II (WS2)
Transactions that were retrieved from CBS and have not been modified in CSA
Note: Although the program does not transfer payroll checks themselves, it does create a payroll journal entry containing enough information (check number and amount) to complete a checkbook reconciliation that you can transfer.
For more details on transferring transactions from CSA to CBS, search on Transferring from the index in the CSA help browser, and then select the topic called transactions from CSA to a CBS client.
Payroll information Choose Setup / System Configuration and then choose the type of
payroll item (Pay, Withholding, or Deduction) to set up.
Use this dialog for payroll setup for a client who will be using CBS to process payroll. If your client does not plan to issue payroll checks (either calculating or noncalculating), you may skip this section.
You can set up pay, withholding, and deduction items in CSA and then transfer the items to your client’s CBS program. Note that any payroll item you add will be available globally, not just for this client.

Client Setup in CSA
Accountant’s Assistant Handbook 49
When generating client data, you can choose to transfer all CSA global payroll items (by marking the Generate all payroll items checkbox on the CheckWriter or PayCheck tabs of the Setup / Miscellaneous Information dialog in Accountant’s Assistant) or only those used in employee records and employee templates for this client.
SDI, SUI, and local withholding Choose Setup / System Configuration / Withholding Items to set
up the SDI, SUI, and local withholding types in CSA.

Client Setup in CSA
50 Accountant’s Assistant Handbook
You can then select the desired withholding item on the Tax Withholding and Deductions tab of the Setup / Employee Templates dialog.
Note: You can set up these payroll items in CBS in the Setup / PayCheck Items window and then select the items on the Tax W/H and Deds tab of the Setup / PayCheck Employees window.
Tip pay If your client has employees who need to report tips, you may need to set up special payroll items for this category. CBS PayCheck accommodates Reported Tips type pay items; however, CBS CheckWriter does not.
For CheckWriter payroll (noncalculating) you can use the default pay item WCBS Reported Tips and the default deduction item WCBS Tip Deduction when setting up the employee or the employee template.
Payroll data-entry options In CSA, choose the various FICA, FUTA, and SUTA treatment options to suit the client’s specific needs, and also indicate whether you want

Client Setup in CSA
Accountant’s Assistant Handbook 51
automatic payroll journal entries. When doing so, keep the following in mind:
If the client will be using CBS PayCheck, CBS will automatically calculate FICA-SS and FICA-Med. A client using noncalculating payroll can choose to enter one FICA amount and have the program automatically calculate the FICA-Med and put the remaining amount in FICA-SS. To do this, choose the Adjust FICA-Med to <x>% of Gross Pay option on the Payroll tab of the Company Properties dialog in CBS.
CBS automatically accrues FUTA liabilities when necessary. To review the rates and limits in CSA, choose Setup / System Configuration / Payroll Tax Information / Federal.
To have CBS accrue SUTA liabilities automatically, you need to specify the SUTA rates and limits for each applicable state in CSA. To do this, choose File / Client Properties, click the Payroll tab, and click the SUTA Details button for each state.
To accrue SUTA liabilities, you also need to set up the GL account numbers for each employee (on the Other tab of the Employees window, or on the Employee Templates dialog). If you do not want to accrue the SUTA liabilities, do not enter the GL account numbers on the Other tab of the Employees window.
If you are setting up a new CSA client, note that the Create payroll journal entry checkbox is marked by default in the Payroll Journal Entry Options dialog (accessed by clicking the Payroll Journal Entry button on the Payroll tab of the File / Client Properties dialog). If you do not want the program to create automatic payroll journal entries, be sure to clear that checkbox.
Advance EIC payment information If your client has employees who are eligible for an advance Earned Income Credit (EIC) payment, use the EIC Adv-Both Spouse, EIC Adv-Single/Head of Household, or EIC Adv-One Spouse pay item on the Earnings tab of the Setup / Employee Templates dialog or the Setup / Employees window.

Client Setup in CSA
52 Accountant’s Assistant Handbook
Mid-quarter payroll setup You could set up payroll information for your client in CSA or CBS, but in most cases, it is easiest to set up a client for CBS PayCheck at the start of a calendar year or quarter, and when you already have after-the-fact payroll employee data, payroll items, and payroll account numbers available in CSA that you can transfer to your client.
If you are not already using CSA for after-the-fact or calculating payroll for this client and if you want to perform payroll functions for a client who will begin processing payroll in CBS in mid-quarter, then you should take the following steps to update your CSA program and ensure that you are accurately tracking 941 liabilities.
1. Enter the client’s employee information in CSA in the Setup / Employees window. For more information on setting up employees, search on Employees [Setup menu] from the index in the CSA help browser, and then select the topic called Adding a new employee.
2. While in Add or Edit mode, choose Edit / Earnings History. Enter the employee’s earnings in the appropriate fields. If you are entering earnings for prior periods, you can enter the totals in January or on a month-by-month basis.
3. Advance the payroll period in CSA (by choosing File / Select Period to Process) to the month you want to begin processing payroll in CBS. When you create the initial accountant’s transfer file to set up payroll for a CBS client, the files will include all quarter-to-date and year-to-date payroll information through the current period.
4. If the client has already issued payroll checks during the current period, have the client record them as handwritten checks (by marking the Handwritten checkbox in the Checkbook data-entry window) in CBS. Do not include these earnings when setting up the employee in CSA.
A client using noncalculating payroll in CBS CheckWriter should select Payroll Chk from the drop-down list in the Type field to record those handwritten checks.
A client using CBS PayCheck should select PayCheck from the Type drop-down list.

Client Setup in CSA
Accountant’s Assistant Handbook 53
5. The client should record all unprinted payroll checks for the current period.
Additional setup steps in CSA for CBS Accounts Receivable clients If the client will be using CBS Accounts Receivable, you will need to create reversing entries (in the Tasks / Transaction Entry window) for all open receivable transactions that the client will need to add in CBS. Alternatively, you could use the Special export option feature on the Accounts Receivable tab of the Setup / Miscellaneous Information dialog in Accountant’s Assistant to import a beginning balance journal entry as a memo. For help with this option, search on Enable from the index in the CSA help browser, and then select the topic called memo transactions for CBS AR.
Custom help from accountant If you have specific information that your clients need to know (such as how to distribute certain kinds of checks or common deposits, how to transmit the export file, which reports you want the client to send to you along with the export file, and so forth) you can provide a custom help file to supplement the comprehensive help that is already available in CBS. The client can access the custom help file in CBS by choosing Help / Help from Your Accountant.
Creating a custom help file You can save the file in any format (such as HTML, RTF, DOC, TXT, etc.) that can be easily read by the client. You must name the file AcctHelp.*, where * represents the file extension applicable to the file format. Follow these steps to include a custom help file.
1. Use any word processing program to create a file that includes the information you want to share with your clients. This file is client-specific, so you can set it up individually for each client. If you want, you can also copy generic information from client to client.
2. Copy the help file onto a form of removable media or to a different folder from the accountant’s transfer file on your hard drive. If you are using a disk, make sure it is formatted, and date it and label it with the client’s ID if the information is client-specific.

Client Setup in CSA
54 Accountant’s Assistant Handbook
3. Take or send the setup file to your client’s office when you install CBS on your client’s computer. During the installation process, mark the Install your accountant’s setup files for Help (optional) checkbox in the Installation Type dialog that opens when the installation first starts.
If you send the client a custom help file after they have installed CBS, you can have the client save the help file in the Help subfolder of the folder in which their CBS program is installed. (The default location is c:\Program Files\Client Bookkeeping Solution\Help.) CBS will look for the custom help file when it starts.
Custom bitmap Because you are the software provider for your CBS clients, the program allows you to provide your own bitmap file to replace the normal CBS image that appears when the clients open CBS.
1. Create a bitmap image using a graphics program such as Microsoft Paint. Note, however, that Thomson Tax & Accounting cannot support this or any other graphics program you may be using. Please refer to the documentation that came with your graphics program for information on how to create a bitmap image.
The optimal size for your customized bitmap image is 300 x 217 pixels. However, CBS will stretch or shrink it to size as needed. The appearance of your bitmap image may differ depending on the screen resolution. You may want to try the customized bitmap on a variety of computers or change resolution on one computer to determine the best configuration.
2. Save your customized bitmap and then copy it to a form of removable media. (Do not copy your bitmap image onto the same disk or folder used for the accountant’s transfer file.)
3. Take or send the setup file to your client’s office when you install CBS on your client’s computer. During the installation process, mark the Install your accountant’s setup files for Splash display (optional) checkbox in the Installation Type dialog.

Accountant’s Assistant Handbook 55
5 Client Setup in Accountant’s Assistant
During the initial client setup, you will probably choose to transfer all of the major data such as the Chart of Accounts, vendor and employee data, payroll tax tables, and so forth. Subsequently, you may occasionally need to transfer updated information selectively to update the client’s files — even though the client may have already started processing for a new period. The only client files affected will be those you select to include in the accountant’s transfer file. All of the client’s other CBS data files remain unchanged.
From the CSA main window, choose Utilities / Accountant’s Assistant / Client Bookkeeping Solution.
Miscellaneous information In Accountant’s Assistant, choose Setup / Miscellaneous
Information.
Use the tabbed pages in the Miscellaneous Information dialog to set up the various options you can make available to your client. As the provider and licensor for your client’s software, you have complete control over the level of access your client has to their CBS program. You can enable more advanced options for more experienced clients, or you can limit a client to just a few simple tasks.

Client Setup in Accountant’s Assistant
56 Accountant’s Assistant Handbook
CheckWriter tab
Client configuration Use the drop-down list in the Export frequency field to define the client’s export frequency for the CBS CheckWriter module. Also enter the preferred date for the client’s next export. Setting the frequency on this tab does not affect the frequency set up for the CBS PayCheck module. (CBS PayCheck data must be exported monthly.)

Client Setup in Accountant’s Assistant
Accountant’s Assistant Handbook 57
CBS automatically calculates the next export date based on the frequency and export date you set up, and Accountant’s Assistant pulls that information into the Next export date field when you retrieve information from your client’s export file. The following table shows the program-calculated export dates for each available frequency.
Export Frequency
Program-calculated export dates
Annually For a calendar year client: 12/31 For a fiscal year client: actual date of fiscal year end
Quarterly For a calendar year client: 3/31, 6/30, 9/30, 12/31 For a fiscal year client: actual end of quarter dates
Monthly 1/31, 2/28 or 29, 3/31, and so forth
Every 4 weeks Every 28 days, beginning with the next export date
Twice monthly 16th and the last day of each calendar month
Weekly Every 7 days, beginning with the next export date
Note: If your CSA GL period is not within the same fiscal year as the first export date (for example, if your GL period is 12/31/06 and the next export date is 1/31/07), you will not be able to generate data without allowing the program to advance the client’s fiscal year. This will not affect the GL date and is only relevant for the data generated for the client.
Use the Export and Retrieve CBS Data checkbox to easily export and retrieve your client’s data in one easy step. For certain software configurations, when you click the Retrieve button, Accountant’s Assistant automatically exports and retrieves the client data in one step. For additional information, search on Exporting and retrieving CBS data from your client from the index in the CSA help browser.
Use the Export via the Internet checkbox to have your client’s export files placed on a secure Thomson Tax & Accounting server each time they export. You will then be able to retrieve the export files from the same server, thus eliminating the need for your client to provide you with an export disk or attaching the export file to an email message. You may

Client Setup in Accountant’s Assistant
58 Accountant’s Assistant Handbook
optionally mark the Include client backup with export data checkbox to include a pre-export copy of the CBS company data with the export file.
For more information on this feature, search on Exporting and retrieving CBS data from your client from the index in the CSA help browser, and then select the topic called Export via the Internet (two-step process).
Note: You and your client must both have an active Internet connection to use the Export via the Internet option.
General ledger accounts Undistributed. Enter the general ledger account number for
undistributed amounts (999, for example). This is the account number the client can use if they are uncertain about which account number to specify. The program also uses this account number for unspecified accounts when you choose the Edit / Replace Blank Accounts command from the Tasks / Process Transactions window, prior to transferring client data from Accountant’s Assistant to CSA.
Unprinted Checks JE acct. If you enter a reference for the automatic Unprinted checks JE field in the Transaction references group box on this tab, you also need to enter an account number in this Unprinted checks JE acct field.
If you do not specify an account for unprinted checks and the client is using the CBS Financial Statements module, CBS will generate financial statements using the cash-basis accounting method for the unprinted checks.
The following fields apply for a client who will be using the checkbook reconciliation features. Note that these are the default GL account numbers, but your client may overwrite these numbers.
Bank service charges. CBS uses this account when your client enters bank service charges during the checkbook reconciliation.
Client Setup in Accountant’s Assistant
Accountant’s Assistant Handbook 59
Interest income. CBS uses this account when your client enters interest income during checkbook reconciliation.
Auto balancing adjustment. CBS uses this account when your client needs to have the program make a balancing adjustment to reconcile a checkbook.
To enable the CBS checkbook reconciliation features for the client, you also need to enable access in the security settings for each appropriate user within the client’s office. (To do this, select Checkbook Reconciliation on the CheckWriter tab of the Setup / Security dialog in Accountant’s Assistant. Note that you may also select the security setting that allows the user to finalize an out-of-balance reconciliation.)
Note: The CBS help includes a special PDF document to guide your client when using the checkbook reconciliation features in CBS. Search on Checkbook reconciliation:Checkbook Reconciliation in Client Bookkeeping Solution (PDF) from the Index tab of the CBS Help Topics dialog.
Email options If you plan to send data for the accountant’s transfer file to the client via email, mark the E-mail client data when Generating checkbox. When you generate a transfer file for the client, Accountant’s Assistant will automatically attach these files to an email message to the client (using the client email address entered on the Contact tab of the File / Client Properties / Advanced Properties dialog in CSA).
Enter your own email address in the E-mail address for client Export data field provided. The program will use the address you enter in this field for each email message your client sends to you with data from the export file.
Transaction references In CSA and CBS, any transaction with a reference number of 100 or greater is treated as a check record, unless specified otherwise on the General Ledger tab of the File / Client Properties dialog. You may use up to 4 decimal places to enter references (provided that the total number of

Client Setup in Accountant’s Assistant
60 Accountant’s Assistant Handbook
characters is no greater than 6). Any transaction with a reference number less than 100 or with an alphanumeric reference is treated as a journal entry and must be a balanced entry. The transaction references you enter when preparing the client’s setup information will help you recognize the different types of transactions your client will be exporting to you at the end of each CBS period.
Deposits. Enter the reference for Accountant’s Assistant to assign to this client’s deposit transactions. The default is 2.
Journal entries. Enter the reference for Accountant’s Assistant to assign to journal entries and other bank items exported from the client’s CBS program.
Unprinted checks JE. For an accrual-basis client, use this field to include an automatic journal entry for the amount of unprinted checks when you retrieve client data into Accountant’s Assistant. To use the automatic journal entry function, enter a transaction reference in this field. The journal entry date will be the same as the client’s export date. Note that you must also choose a general ledger account number from the drop-down list for the Unprinted checks JE acct field. For a cash-basis client, leave this field blank.
Note: The Unprinted Checks JE settings in the Accountant’s Assistant Miscellaneous Information dialog serve as a toggle. If you leave both the Unprinted checks JE reference field and the Unprinted checks JE acct field blank, the data retrieval will not include the JE. If you want to have the JE included, however, you should complete both of these fields.
Restricted account ranges To allow your client general access to the Chart of Accounts while restricting access to particular accounts, you can specify any accounts that you would like to restrict your client from using.

Client Setup in Accountant’s Assistant
Accountant’s Assistant Handbook 61
Note: If this client is set up to accommodate multiple departments and/or locations, the program automatically restricts combined accounts. If you specify a combining account in the Restricted account ranges grid, all department or location accounts associated with that account would also be restricted.
CheckWriter Payroll By default, CheckWriter (noncalculating) payroll is enabled, but you can disable the noncalculating payroll features in CBS CheckWriter. If you mark the Disable CheckWriter payroll checkbox, none of the noncalculating payroll entry or employee database features will appear in the client’s CBS CheckWriter program, and help topics related to noncalculating payroll will also be inaccessible in the client’s program.
If the client will be using CBS PayCheck, we recommend that you disable noncalculating payroll features by marking the Disable CheckWriter payroll checkbox.
Important! A client who has been using CBS CheckWriter noncalculating payroll but will now be adding CBS PayCheck should first delete any unprinted noncalculating payroll checks before importing data from your new accountant’s transfer file. After importing that new setup information, the client will no longer be able to access any of the noncalculating payroll features.
Checkbook reconciliation Checkbook reconciliation features are enabled by default for a new CBS client, but you c an disable it.
Important! If you do not want the client to have access to the checkbook reconciliation features of CBS, be sure to mark the Disable Checkbook Reconciliation checkbox. The client will still be able to view bank statement data using the Checkbook / View Bank Transactions command in CBS.

Client Setup in Accountant’s Assistant
62 Accountant’s Assistant Handbook
Generate all payroll items If your client will be using CheckWriter payroll, you can generate all payroll items for that client by marking this checkbox. Regardless of this setting, CheckWriter payroll items are defined in the payroll departments, so the CheckWriter payroll client will not be able to view or select payroll items in CBS.
Note that the Generate all payroll items checkbox is also on the PayCheck tab of the Miscellaneous Information dialog. When you mark the checkbox on the CheckWriter tab, Accountant’s Assistant automatically marks the checkbox on the PayCheck tab.
InterceptEFT Direct Deposit The CBS direct deposit features are disabled by default for a new CBS client. If you want the client to have access to the direct deposit features of CBS, mark the Enable InterceptEFT Direct Deposit checkbox.
Note that the Enable InterceptEFT Direct Deposit checkbox is also on the PayCheck tab of the Miscellaneous Information dialog. When you mark the checkbox on the CheckWriter tab, Accountant’s Assistant automatically marks the checkbox on the PayCheck tab.
For more information on setting up direct deposit in CBS, search on Direct Deposit:in Client Bookkeeping Solution from the Index tab of the Client Bookkeeping Solution Help Topics dialog.
Note: CSA direct deposit items are transferred to CBS as direct deposit items.
Enable payroll item descriptions If your client will be using CheckWriter payroll, you can mark the Enable Payroll Item Descriptions checkbox to allow the client to see the actual payroll item descriptions for their employees. For example, CBS would use “Salary” as a pay item instead of “CBS Gross Pay #1.”

Client Setup in Accountant’s Assistant
Accountant’s Assistant Handbook 63
Vendor types and 1099 items If your client will issue multiple types of 1099s to its vendors and
you want the client to assign the form type for any new vendors, mark the Allow Selection of 1099 Item checkbox. The list of 1099 items is generated from the global list in CSA (from the Setup / System Configuration / 1099 Items dialog). The client will then be able to assign the form type to vendor distributions.
Specify the default 1099 type to use for this client’s vendors by selecting the appropriate option from the drop-down list. If you have marked the Allow Selection of 1099 Item checkbox, and the client makes a 1099 form selection for a distribution, the program does not use the default. If you do not select a form for a vendor, the program automatically uses the default 1099 type when it retrieves data from the client’s export file and transfers it to CSA, unless the vendor already exists in CSA and a form type has been assigned to the CSA vendor.
Note: When setting security options for the client (on the CheckWriter tab of the Setup / Security dialog in Accountant’s Assistant), you may choose whether to enable the Edit vendor Form 1099 totals option.
For CBS CheckWriter clients not using CBS Accounts Payable, you may choose to include all vendor types by marking the Allow non-1099 vendors for CheckWriter option. You may then also choose to mark the Agents and/or Other checkbox. (Note that for a CBS Accounts Payable client, the program automatically selects all vendors for transfer to the client.)
For clients licensed for both CBS CheckWriter and CBS Accounts Payable, Accountant’s Assistant uses the Allow non-1099 vendors checkboxes on the CheckWriter tab of the Setup / Miscellaneous Information dialog to determine the types of vendors to add to CSA when you retrieve the client’s export data.

Client Setup in Accountant’s Assistant
64 Accountant’s Assistant Handbook
PayCheck tab For clients using optional the CBS PayCheck module, click the PayCheck tab to set up miscellaneous information for that client module.
Client configuration Enter the default payroll calculation frequency most often used by
this client for creating payroll checks, or select it from the drop-down list. For example, if the client creates payroll checks on a weekly basis, select Weekly from the drop-down list.

Client Setup in Accountant’s Assistant
Accountant’s Assistant Handbook 65
Note that the client can change the frequency on the PayCheck tab of the Company Properties dialog. This will be the new default frequency for the company database. The client can also change the frequency during check data entry; however, this change will affect only the current data-entry session.
CBS exports PayCheck data on a monthly basis only (at month end).
Enter the preferred month-end date for the client’s next monthly export. CBS automatically calculates the next export date based on a monthly frequency and the export date you enter; Accountant’s Assistant pulls that information from CBS when you retrieve information from your client’s export file.
401(k) information Top-heavy limit. Enter the dollar amount of the 401(k) plan top-
heavy employee wage limit for this client.
Non-top-heavy limit. Enter the dollar amount of the 401(k) plan non-top-heavy employee wage limit for this client.
Deduction. Choose the appropriate 401(k) deduction item by selecting it from the drop-down list.
Whole-dollar rounding Mark the checkbox for any of the items to have CBS PayCheck automatically round to the nearest whole dollar. The program will round the corresponding category of withholding when calculating that amount during payroll entry. The program rounds down amounts with pennies less than 50 and rounds up amounts with pennies greater than or equal to 50.
Update earnings options for checks Choose the appropriate option to specify the method for updating employee earnings from checks during the retrieval into Accountant’s Assistant.

Client Setup in Accountant’s Assistant
66 Accountant’s Assistant Handbook
Generate all payroll items To generate all CSA payroll items for a client who will be using CBS PayCheck, mark this checkbox. If you do not mark this checkbox, the program will generate only payroll items that are used in this client’s employee records and employee templates, although it always generates EIC-type pay items.
Note that the Generate all payroll items checkbox is also on the CheckWriter tab of the Miscellaneous Information dialog. When you mark the checkbox on the PayCheck tab, Accountant’s Assistant automatically marks the checkbox on the CheckWriter tab.
CBS direct deposit feature The CBS direct deposit features are disabled by default for a new CBS client. If you want the client to have access to the direct deposit features of CBS, mark the Enable InterceptEFT Direct Deposit checkbox.
Note that the Enable InterceptEFT Direct Deposit checkbox is also on the CheckWriter tab of the Miscellaneous Information dialog. When you mark the checkbox on the PayCheck tab, Accountant’s Assistant also marks the checkbox on the CheckWriter tab.
For more information on setting up direct deposit in CBS, search on Direct Deposit:in Client Bookkeeping Solution from the Index tab of the Client Bookkeeping Solution Help Topics dialog.
Payroll journal entry This section applies both to calculating payroll in CBS PayCheck and to noncalculating payroll in CBS CheckWriter.
Create payroll journal entry. Accountant’s Assistant is set by default to automatically create payroll journal entries based on your client’s payroll checks. If you want to disable this feature, clear this checkbox.
Important! If you do not want the client’s software to accrue SUTA / FUTA or FICA, then do not set up account numbers for these items on the Other tab in the Setup / Employee Templates dialog or in the Setup / Employees window in CSA.

Client Setup in Accountant’s Assistant
Accountant’s Assistant Handbook 67
Summary versus Detail. To record individual checks as GL transactions when you retrieve payroll checks into Accountant’s Assistant, choose the Detail option. Otherwise, choose the Summary option to write a summary entry to the Process Transactions window in Accountant’s Assistant.
Reference. Enter any non-check, non-balancing entry reference (the default is P89). This reference is used for the summary payroll transactions written to the Process Transactions window.
Post date of the payroll entry. Choose the appropriate option to specify the date to be assigned as the entry date for payroll journal entries created during retrieval of payroll information from your client.
Deductions and withholdings Exclude deductions. Choose the appropriate selection from the drop-down list for this field.
None. The program calculates all of the deductions, whether the corresponding checkbox is marked in the Exclude Deductions grid or not. When your client imports data from the accountant’s transfer file, the program will mark the Calculate all deductions checkbox in the File / Company Properties / PayCheck tab in CBS.
All. The program does not calculate any of the deductions, whether the corresponding checkbox is marked in the Exclude Deductions grid or not. When your client imports data from the accountant’s transfer file, the program will clear the Calculate all deductions checkbox and all deduction items in the File / Company Properties / PayCheck tab in CBS.
Selected. The program calculates only the deductions you have not marked in the Exclude Deductions grid. The grid lists all available deductions. You can mark the deduction items you do not want CBS PayCheck to calculate.

Client Setup in Accountant’s Assistant
68 Accountant’s Assistant Handbook
Accounts Payable tab For a client using the optional CBS Accounts Payable module, click the Accounts Payable tab to set up miscellaneous information for that optional module.
Retrieval options Before you retrieve payable transactions into Accountant’s Assistant, you can choose to retrieve detailed or summary payables journal entries.

Client Setup in Accountant’s Assistant
Accountant’s Assistant Handbook 69
AP reference Enter the accounts payable reference that you want the program to assign to the AP journal entry when you retrieve your client’s payable transactions. Note that the reference can be alphanumeric.
AP GL account Enter the appropriate general ledger account number to use as the default for accounts payable transactions and new vendor setup, or choose the account number from the drop-down list. Note that your client may override this default account number either at the vendor level (on a record in the vendor database) or on an individual payable item.
Discount method When your CBS client prints or enters a handwritten accounts payable check to pay an open payable, CBS determines the discount availability by comparing the payable’s payment date with the discount date. To indicate the discount method to be used for payable transactions, choose one of the discount methods (Net purchase method, Discounts taken, or Discounts lost).
Note: The CBS client may change the discount method on the Accounts Payable tab of the File / Company Properties dialog. For information and examples of each type of discount method, search on Discounts:discount tracking in CBS Accounts Payable from the Index tab of the Client Bookkeeping Solution Help Topics dialog.
Cash-basis client To designate the client as a cash-basis client for accounts payable transactions, mark this checkbox. If this checkbox is not marked, the program will treat the client’s accounts payable data as accrual-basis.
CBS Accounts Payable will not generate a journal entry for the payable amount at export for a cash-basis client, and items in the Purchases Journal in CBS Accounts Payable will print according to the date of payment instead of the date of the payable. A cash-basis AP client may choose to manually apply partial payment distributions, but this option is not available to an accrual-basis client.

Client Setup in Accountant’s Assistant
70 Accountant’s Assistant Handbook
Create reversing JE for accrual basis client To have the program automatically create a reversing journal entry for an accrual-basis client, mark this checkbox. The program posts checks through the AP expense account. To designate an accrual client for perpetual accrual (without a reversing entry), leave this checkbox unmarked. Checks are posted through the GL account for accounts payable.
When using this option, you should always select to post transactions to the current period when transferring data to CSA.
Consolidate AP check distributions To create one consolidated distribution for each unique GL account, mark this checkbox. For example, if the client issues a single check for three separate payables distributed to account 501, the program will transfer just one entry for account 501 to CSA.
Enable remote payment authorization If you process your client’s payables from your own firm, mark this checkbox to enable your client to remotely select and authorize payables to be paid via the client’s NetClient CS portal. You can then use the dialogs in the Utilities / Remote Authorization menu in CBS to upload payables; download, import, and process authorizations; maintain the authorization queue; and view the Export Transmission log.
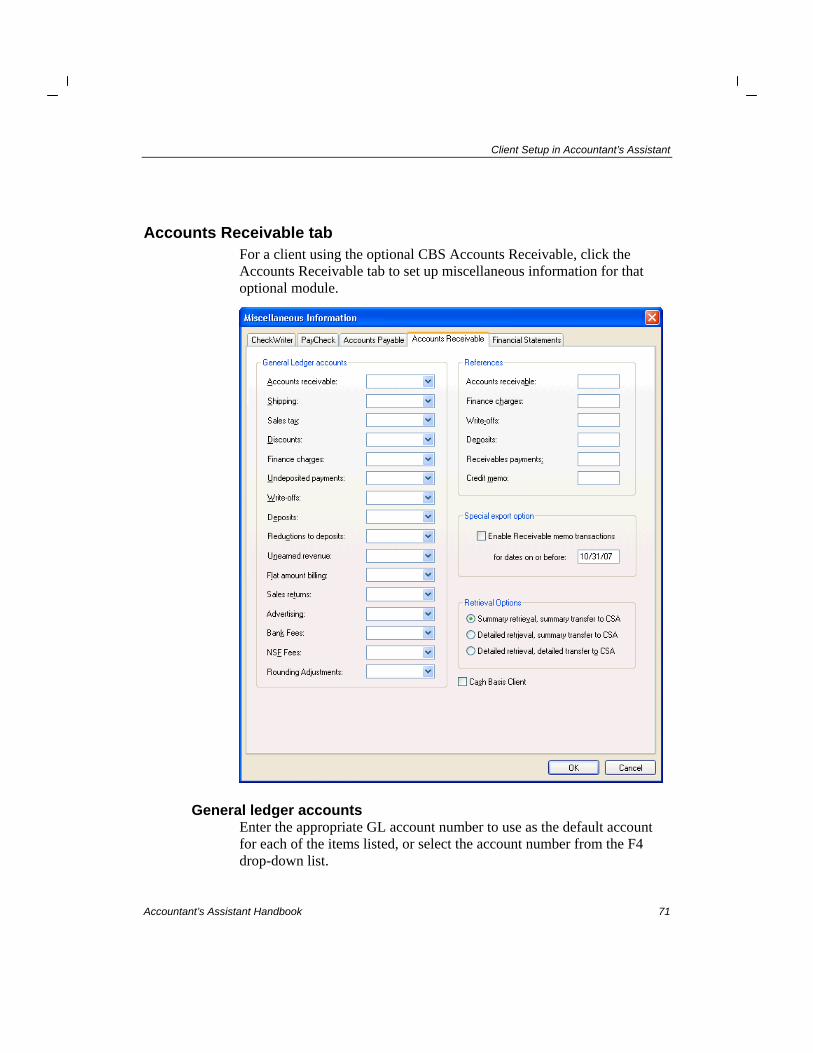
Client Setup in Accountant’s Assistant
Accountant’s Assistant Handbook 71
Accounts Receivable tab For a client using the optional CBS Accounts Receivable, click the Accounts Receivable tab to set up miscellaneous information for that optional module.
General ledger accounts Enter the appropriate GL account number to use as the default account for each of the items listed, or select the account number from the F4 drop-down list.

Client Setup in Accountant’s Assistant
72 Accountant’s Assistant Handbook
You must select a default GL account for the Accounts receivable, Undeposited payments, and Unearned revenue accounts. If you do not enter these accounts here, the client will be prompted to select these accounts during the import from accountant procedure.
References For each of the items listed in this section, enter an alphanumeric reference for the program to use when retrieving the client’s receivable transactions.
Special export option To enable memo transactions for receivable transactions dated on or before the date that you specify, mark this checkbox. This feature is especially helpful if you are converting a client to CBS from another software program and have already posted AR transactions for prior periods.
The client’s first export of accounts receivable transactions would include memo transactions only (that do not post to the GL) for any receivable transactions dated on or before the date you enter here.
Note: Clients doing a first-time setup of CBS Accounts Receivable will need to enter any open transactions from previous periods to have those transactions properly close with new activity.
Retrieval options Before you retrieve accounts receivable transactions into Accountant’s Assistant, you can choose to retrieve detailed or summary receivable journal entries.
Cash-basis client To designate the client as a cash-basis client for receivable transactions, mark this checkbox. If this checkbox is not marked, the program treats the client’s accounts receivable data as accrual-basis.
CBS Accounts Receivable will not create a journal entry for the receivable amount at export for a cash-basis client, and items in the Sales Journal in CBS Accounts Receivable will print according to the date the

Client Setup in Accountant’s Assistant
Accountant’s Assistant Handbook 73
payment was received instead of the date of the invoice. A cash-basis accounts receivable client may choose to manually apply partial payment distributions, but this option is not available to an accrual-basis accounts receivable client.
Financial Statements tab If you license your CBS clients for the optional CBS Financial Statements module, they can print their own interim financial statements from CBS. Click the Financial Statements tab to set up miscellaneous information for that optional module.

Client Setup in Accountant’s Assistant
74 Accountant’s Assistant Handbook
Edit header and footer text You can specify the title (heading) for each report type, text for a disclaimer that will print on the second line of the report heading, and up to three lines of text to print in the footer on all statements. To do this, click the Edit Header and Footer Text button.
Statement descriptions You can specify text to use for the section heading and/or subtotal description for each section of the Balance Sheet and Income Statement. If you do not specify text for these, CBS will use the default description.
Year end close Retain Client Budget Amounts (checkbox). If you generate
financial information for a CBS client who uses a budget that you do not maintain within Write-Up CS, you can preserve the client’s budget amounts by marking this checkbox.
Client Setup in Accountant’s Assistant
Accountant’s Assistant Handbook 75
Note: The client cannot enter budget amounts, but they can use the Budget Options for Fiscal Year End Close dialog (accessed by clicking the Budget Options button on the Financial Statements tab of the File / Company Properties dialog in CBS) to maintain budget amounts.
It is important to note that if the GL date in CSA is in an historical fiscal period compared to your client’s current export period, the import and subsequent posting of current activity would rerun the client’s year-end close based on the newly imported balances. The year-end close uses the budget options as selected in the Financial Statements tab of the File / Company Properties dialog in CBS. By default, that setting is Use budget provided by my accountant and it overrides the Retain Client Budget Amounts setting in Accountant’s Assistant, causing the budget balances to be replaced with the balances you provided. Should this inadvertently override the client’s calculated budget, you can change the year-end budget option and regenerate a transfer file with the prior-year balances for the client to import into CBS and re-establish the client budget amounts.
Close Locations Individually (checkbox). If the Chart of Accounts mask includes Ls, this checkbox will be available. If you mark this checkbox, CSA will display the Year End Close dialog for each location when closing the year for location clients in CSA.
To specify the year-end close information, click the Year End Close Distributions button. If you have previously closed the client in CSA, this should already be set up. You must complete this information before generating Financial Statement Information for the CBS client. If you do not set this up, CSA will stop the generate process and display a message prompt asking you to return to this dialog.

Client Setup in Accountant’s Assistant
76 Accountant’s Assistant Handbook
Post date for transactions You can choose to use the transaction date or the current export period date as the post date for transactions entered in CBS after balances have been imported from CSA. By default, the Current Export Period option will be selected.
Whole dollar presentation Offset GL Account. Enter or select the GL account to be used to
insert any difference on the Balance Sheet caused by using whole numbers (rounding).
Threshold. Enter the maximum dollar amount allowed to insert a difference on the balance sheet. If you enter 0.00 in this field, the offset account will not include any differences caused by using whole numbers, and the statement may be out of balance by the amount of the difference. If you leave this field blank, the program will always insert any differences in the offset account.
Statement of cash flow If you set up separate accounts for acquisition and disposal of fixed assets that close into one account at the end of the year, mark the Use separate Acquisition and Disposal Accounts checkbox and set up the additional GL account groups.

Client Setup in Accountant’s Assistant
Accountant’s Assistant Handbook 77
Note: To complete the financial statement setup for your CBS client, you should review and update the GL account groups. The CBS financial statements use only the groups as defined in the Setup / Account Groups dialog in Accountant’s Assistant.
If you mark this checkbox, the Define Cash Flow Account Groups button will be active. You must click the button to open the Account Groups dialog, where you can define account groups to use for this type of cash flow statement. These account groups will be available only through Accountant’s Assistant if this checkbox is marked. You cannot add or delete groups in this dialog; you can only define them.

Client Setup in Accountant’s Assistant
78 Accountant’s Assistant Handbook
Note: The account groups listed in this dialog (when accessed from the Financial Statements tab of the Setup / Miscellaneous Information dialog) include only the default account groups.
Journals In Accountant’s Assistant, choose Setup / Journals.
Use the Journals dialog to specify the journal to which the program will retrieve transactions into CSA.
Note that you must mark the Use separate journals in transaction data entry checkbox on the General Ledger tab of the CSA File / Client Properties dialog if you want to use separate journals when entering transaction data. This will also enable the Journals command in the Setup menu within Accountant’s Assistant. Depending on which CBS modules you will provide to your client, you may need to use the journal fields in one or more group boxes in this dialog.

Client Setup in Accountant’s Assistant
Accountant’s Assistant Handbook 79
Security In Accountant’s Assistant, choose Setup / Security.
Use the Security dialog to define the passwords to allow user access to various functions within the client’s CBS program. A password may consist of up to eight alphanumeric characters and may include spaces.
Important! Each user must have a unique password. If the Administrator has not been set up with a unique password, the Administrator cannot add other users. Therefore, to allow multiple users within the client company to use CBS, you should assign a password for the Accountant, the Administrator, and each User. If you assign passwords to one or more users but do not assign a password to the Accountant or Administrator classification, the user settings will not be included with the initial setup information imported into CBS.

Client Setup in Accountant’s Assistant
80 Accountant’s Assistant Handbook
There are four default users set up in the Security dialog. In general, you control the Accountant and Administrator classifications.
The Accountant has rights to all the features in CBS. If you use the Accountant’s password while at your client’s office, you can open any window or dialog in the CBS client modules, including those you have restricted for the client. The default Accountant’s password is CBS ACCT. (The password is not case sensitive.) Note that anyone using the Administrator’s password in your client’s office may assign passwords and specify access rights in the File / Security window (provided that you enable the security function for the Administrator when setting up access restrictions in the Accountant’s Assistant Security dialog).
To completely disable and hide a feature for everyone in the client company, simply select that option for the No One classification. No one in the client’s office (other than you, the Accountant) will be able to see or access that feature, whether or not they have been assigned User rights to that feature.
You may define an unlimited number of users and associated passwords, and you may select different features for each user. A new user set up in CBS with access to the Security feature will be able to set up additional users and edit their own user settings.
Important! If you set up a user in Accountant’s Assistant with the same password as a user in CBS, the program will overwrite the user in CBS with the user set up in Accountant’s Assistant, thereby deleting the CBS user.
If you will be downloading CBS program updates yourself via CBS Connect to send to the client, note that the Apply CBS updates security option is selected by default for the Administrator. When setting up a new CBS client, note that the Download and apply CBS updates security option is selected by default for the Administrator.

Client Setup in Accountant’s Assistant
Accountant’s Assistant Handbook 81
Module-specific security To set security options for a specific CBS module, click the appropriate tab in the Security dialog. Then you can either edit the settings for an existing user or add a new user to the list. For more information on editing or adding a user’s Security settings, search on Security [Setup menu] (Accountant’s Assistant) from the index in the CSA help browser, and then select the topic called Security [Setup menu] (Accountant’s Assistant).
While there are varying levels of security available, someone using the Administrator’s password would generally have a greater level of access than someone using a User password.
To change existing CBS security settings for any user in your client’s office, modify the settings in the appropriate tabbed page of the Security dialog in Accountant’s Assistant as needed and then generate a new transfer file for the client. Your client can import the security information from an updated transfer file at any time. (Note, however, that payroll items are included with each transfer file, and so the client would need to respond Yes or No when prompted about overwriting existing payroll items during the Import from Accountant procedure.)
Bookkeeping Activity Monitor From the Accountant’s Assistant main window, choose Setup / Bookkeeping Activity Monitor and specify the events (if any) to be reported. The events table is stored in a file within the larger file transmitted to the client for import into CBS. (If you subsequently generate a new events table file and the client imports that file into CBS, it will simply overwrite the existing file.)
1. Let’s define two activities to monitor. Select Adjustment from the drop-down list in the Activity column, enter Adjustment Activity in the Description column, and enter 1 in the Amount column.
2. In the second row, select Balance from the Activity column, enter Low Balance Warning as the description, and 1000 as the amount.

Client Setup in Accountant’s Assistant
82 Accountant’s Assistant Handbook
3. Click the Reporting Defaults button. You can have CBS transmit
the client’s events log (in XML format) and export data to you and then have Accountant’s Assistant retrieve the data, and/or you can have it transmitted to you as an email attachment.
If you mark the E-mail Activity Report checkbox in the Reporting dialog, also specify the appropriate email addresses in the To and Cc fields for individuals within your own accounting firm.

Client Setup in Accountant’s Assistant
Accountant’s Assistant Handbook 83
4. Click OK to close the Reporting dialog, and then click Done in the Bookkeeping Activity Monitor dialog.
Note: For more details, search on Bookkeeping Activity Monitor [Setup menu] from the index in the Accountant’s Assistant help browser.
File locations In Accountant’s Assistant, choose Setup / File Locations.
Use the File Locations dialog to specify the default locations for the program to place files or look for files when performing functions such as generating the accountant’s transfer file, retrieving client data, or retrieving Master License files. If your firm maintains a website, you can also specify the address of your website (the URL) in this dialog.
If you enter a website address in the Accountant’s web page field, your client’s CBS program will include an Accountant’s Web Page command on the Help menu. When the client chooses that command, the program will open your website in the client’s web browser.

Client Setup in Accountant’s Assistant
84 Accountant’s Assistant Handbook
Account groups If you license your client for the CBS Financial Statements module, you must set up the applicable account groups for your clients. The account groups listed in the Setup / Account Groups dialog in Accountant’s Assistant include only those used by CBS financial statements. This list is a subset of account groups listed in CSA. Only the account groups included in Accountant’s Assistant will transfer to the client, so it is important that you review these GL account assignments before generating the accountant’s transfer file.
Any changes made to account groups within Accountant’s Assistant will also be reflected in the other Account Group dialogs within CSA.
Payroll item restrictions In Accountant’s Assistant, choose Setup / Payroll Item
Restrictions.
Use this dialog to restrict certain payroll items from transferring to CBS.

Client Setup in Accountant’s Assistant
Accountant’s Assistant Handbook 85
All pay, withholding, and deduction items are global items within CSA — that is, they can affect all clients. The items are listed first by item type and then alphabetically. If you mark any payroll items in this dialog, those items will not be included in the transfer file that you create for the CBS client.
A grayed cell in the Restricted column indicates that the CSA payroll item in that row will never be transferred to CBS. Note that there are six types of pay items that never transfer to CBS: Allocated Tips, Indirect Tips, Tips Deemed to be Wages Reduction, Tipped Wages, Tips Deemed to be Wages, and EIC Advance.
Important! All payroll items used by the client are always included when you generate transfer files from Accountant’s Assistant. Because payroll items are global in CSA, any changes you make to a payroll item for one client could affect other clients — so be sure to review the payroll items and their settings before generating a transfer file for a client.

Client Setup in Accountant’s Assistant
86 Accountant’s Assistant Handbook
Other setup options
Employee templates The Setup / Employee Templates dialog in Accountant’s Assistant is similar to the dialog accessible from the CSA main window and applies both to noncalculating payroll in CBS CheckWriter and to calculating payroll in CBS PayCheck.
You may use this dialog to set up client-specific global information from within Accountant’s Assistant. Any information you add, change, or remove from this dialog will also be changed in CSA. You can change the information as often as necessary for your own processing.
PayCheck tax information The commands listed in this section enable you to set up global payroll information for the client from within Accountant’s Assistant. Any information you add, change, or remove using these commands automatically alters the global setup information in CSA, and vice versa. This enables you to add and edit pay, withholding, and deduction items, or to edit federal, state, and local tax information either from Accountant’s Assistant or from the CSA main window.
The Setup / PayCheck Tax Information menu includes a number of predefined federal and state tax tables. You can also set up local tax tables from this menu. Refer to the CSA help topics for more information.
Federal tax tables To set the annual wage limit and rates for FICA-SS, FICA-Med, and FUTA for the current payroll year and to set the federal withholding allowance, choose Setup / PayCheck Tax Information / Federal and update the amounts as needed. You may or may not need to change the amounts and rates on this dialog each year. If you do need to make updates, obtain the appropriate figures from the current Circular E and enter them here. Then you can create a single new accountant’s transfer file for all of your CBS PayCheck clients to use to update the payroll tax tables.

Client Setup in Accountant’s Assistant
Accountant’s Assistant Handbook 87
To update annualized federal withholding tables or EIC advance payment tables for your CBS PayCheck clients, click the Tables button on the Federal Tax Tables dialog. The Married, Single, EIC - Single Cert., and EIC - Both Cert. tables are already present and are always included with the payroll items generated, but you can create additional custom tables using Circular E as your guide.
State tax tables To select a state and update information for annualized state withholding for CBS PayCheck, choose Setup / PayCheck Tax Information / State and then choose the appropriate state(s) to update. The program maintains a separate set of tables for each state, and you may need to use only certain tables, depending on the specific state. Please note that all tables should reflect annual (not monthly) amounts.
Local tax tables To select or add a new locality and update information for local withholding, choose Setup / PayCheck Tax Information / Local. The program maintains a separate set of tables for each locality. Please note that all tables should reflect annual (not monthly) amounts.
PayCheck items This section applies only to clients using CBS PayCheck. To add, edit, or delete PayCheck item information, choose Setup / PayCheck Tax Information and then choose Pay Items, Deduction Items, or Withholding Items.
Important! CBS PayCheck items are the same as CSA payroll items. Each time you choose Setup / PayCheck Tax Information / Pay Items, Deduction Items, or Withholding Items, the program automatically displays PayCheck items that are based on your current CSA payroll items. Write-Up CS users who are not licensed users of Payroll CS™ will find additional information for PayCheck items available within Accountant’s Assistant that are not available from the CSA main window.

Client Setup in Accountant’s Assistant
88 Accountant’s Assistant Handbook
Generating an accountant’s transfer file for the client
Accountant’s Assistant allows you to select the CSA information to include in the accountant’s transfer file for your clients.
When you finish setting up details in Accountant’s Assistant, you will need to generate an accountant’s transfer file containing the client’s initial setup files.
1. In Accountant’s Assistant, choose Tasks / Generate, or click the
Generate icon on the shortcut bar.
2. In the Generate Client Information dialog, highlight the type of information to include in the left pane and click the Select button. For the initial setup, you must select at least the following items (depending on the add-on modules selected).
CBS CheckWriter License Files Checkbooks Security Chart of accounts CheckWriter miscellaneous information
CBS PayCheck Payroll Items (see notes below) Employee Templates (see notes below) Security PayCheck miscellaneous information
CBS Accounts Payable Security A/P miscellaneous information
CBS Accounts Receivable Security A/R miscellaneous information
CBS Financial Statements Security Chart of accounts Financial Statement information CheckWriter miscellaneous information
(fiscal year end) and GL account for unprinted checks

Client Setup in Accountant’s Assistant
Accountant’s Assistant Handbook 89
Notes
For CBS CheckWriter clients, Accountant’s Assistant transfers vendor data to CBS based on options specified on the CheckWriter tab of the Setup / Miscellaneous Information dialog.
Accountant’s Assistant automatically generates custom lists for ZIP codes, cities, and state and local entities.
After the initial setup, you may occasionally need to transfer selective information to update the client’s files. Accountant’s Assistant will always generate the following items:
State and local custom lists Employee templates Payroll items Chart of Accounts (if generating financial statement data) CheckWriter Miscellaneous information (if generating
financial statement data)

Client Setup in Accountant’s Assistant
90 Accountant’s Assistant Handbook
Other than those items, only the items you select to include will be affected; all of the client’s other CBS data remain unchanged.
If you generate the transfer file to a floppy disk, you should label the disk “accountant’s transfer file” and include the date and the client’s ID. Note that the process of creating a transfer file to update the client’s CBS configuration is identical to the process of creating the accountant’s transfer file for the initial setup.
3. Click the Generate button.
4. When you select License Files in the Generate Client Information dialog, Accountant’s Assistant will prompt you to select the licensee. The list includes all clients for whom you have purchased a Client Bookkeeping Solution license, your own firm license, and a demonstration company license.
For the purposes of this handbook, highlight Demonstration Company and click the Generate button. To generate client information for a client, you would select that client’s name.

Client Setup in Accountant’s Assistant
Accountant’s Assistant Handbook 91
5. In the Select additional module licenses to generate dialog, mark the checkbox for each add-on module to include in the client’s CBS software.
Note: You will see this dialog if you generate licenses for the demonstration company or for your own firm. However, you will not see this dialog if you generate licenses for your client, unless they are a CBS ASP client.
6. Click the Generate button.
7. If this is the first time you generate data for this client, or if your current general ledger period is earlier than or the same as your next export date, the program displays the following message.
Click OK to continue with the generate process.

Client Setup in Accountant’s Assistant
92 Accountant’s Assistant Handbook
8. Accountant’s Assistant will prompt you when the generate is complete. Click OK.
Each time you purchase a new CBS client module, you will need to obtain updated license information via CS Connect. The client license information includes the client company’s name and address and the CBS modules and versions the client is licensed to use.
By default CSA will save the transfer information you generate for a client. To designate a disk drive or a folder on a hard drive as the destination for the transfer information, specify the path in the Setup / File Locations dialog before generating the client information.
For further details about how existing information in the client’s CBS program is affected when you transfer file, search on Effect of from the index in the CSA help browser, and then select the topic called importing accountant’s transfer disk on the CBS client’s files.

Accountant’s Assistant Handbook 93
6 Client Setup in CBS
Once you generate the initial transfer file, you are ready to set up CBS in your client’s office and import the initial setup data to CBS. You need to complete the following before you begin the installation process.
Verify that your client’s computer system meets or exceeds the minimum system requirements to install and run Client Bookkeeping Solution. The minimum system requirements for CS Professional Accounting software products are listed on the Thomson Tax & Accounting website at CS.Thomson.com or Go.Thomson.com.
Note that CS Professional Suite products are designed for professional production work. Our system requirements are based on the assumption that professional accounting firms and their clients replace their computer hardware and operating systems approximately every three years. While our software may operate on less powerful hardware and operating systems, we do not believe it will perform at a level suitable for production work in those environments. Of course, as processing speed and RAM are increased, software performance will also improve.
Verify that you have a copy of each of the following for your client.
Client Bookkeeping Solution CD
Client Bookkeeping Solution CheckWriter Getting Started guide
Client Bookkeeping Solution Tutorial
Printed copies of any other CBS getting started guides relevant to the client. These are available by searching on Getting Started from the Index tab of the CBS Help Topics dialog.

Client Setup in CBS
94 Accountant’s Assistant Handbook
Be sure that you have generated the initial client setup files to import into your client’s CBS program.
(Optional) Verify that a setup file has been prepared and includes either the special accountant’s help file or your custom bitmap image, or both.
If you customized any check or form layouts in your own CBS software, verify that you have a copy of the layout backup.
If you back up your client data to floppy disks, prepare several blank, formatted floppy disks for a backup of your client’s CBS company and layout data immediately after installation and initial setup.
For information on installing the CBS software in your client’s office, refer to Appendix A starting on page 149.
Setting up the CBS client software
Client license You must have a valid CBS company database to use the program. You must first import the license information for that company by using the accountant’s transfer file you prepared in Accountant’s Assistant.
Importing client transfer files
Importing from accountant Use the following steps to import information from the accountant’s transfer file:
1. Open Client Bookkeeping Solution.
2. Choose File / Import / From Accountant or click the Import from
Accountant icon on the CBS shortcut bar.

Client Setup in CBS
Accountant’s Assistant Handbook 95
3. CBS will search for company setup information in the accountant’s transfer file that you have prepared.
If the import path is pointing to a floppy drive, CBS will prompt you to insert disk #1 into the drive. At the message prompt, click OK.
If the import path is on the hard drive, CBS will automatically begin to copy the client setup files from the specified location.
Note: To change the import path in CBS, choose Utilities / Options and click the CBS Data Folders tab.
If the client is licensed for the optional CBS Accounts Receivable module and you did not select GL account numbers for the client on the Accounts Receivable tab of the Miscellaneous Information dialog in Accountant’s Assistant, the program will prompt you to select a GL account number for several accounts receivable accounts. Select the applicable account at each prompt.
4. After the import from the accountant’s transfer file is complete:
For a new CBS company: The program will prompt you to enter your password to open the company database.
For an existing CBS company: The program will display a message prompt stating that the files were imported successfully. Click OK.

Client Setup in CBS
96 Accountant’s Assistant Handbook
Importing data from an accountant’s transfer file sent via email If you transmitted data from the accountant’s transfer file to the client via email, your client will first need to save the ZIP file attachment to the location on his or her hard drive, network, or removable media that is specified in the Import from Accountant field on the CBS Data Folders tab of the Utilities / Options dialog.
After the ZIP file has been saved in the correct location, choose File / Import / From Accountant.
Note: If the security for the email program you or your clients use blocks files with a ZIP file extension, you should rename the file to use a different file extension. Your client would then need to change the file extension back to ZIP before importing the data into CBS.
Company properties Once the import process is complete, you should verify the general company database information.
In CBS, choose File / Company Properties.

Client Setup in CBS
Accountant’s Assistant Handbook 97
Review the information on each of the tabbed pages, including the next scheduled export date and Accountant’s company ID, and export settings.

Client Setup in CBS
98 Accountant’s Assistant Handbook
Set up checkbooks
Verifying the checkbook information Follow these steps to set up a new checkbook and/or verify that the checkbook information is complete and correct.
1. In CBS, choose Checkbook / Setup.
2. In the Checkbook Setup window, enter the name of the checkbook or select the name from the drop-down list. You can also click the checkbook name in the listview pane at the bottom of the window.
3. Enter or verify the general checkbook information.
4. You must select a check layout for all new checkbooks transferred from CSA. For each applicable check type, select a corresponding check layout from the drop-down list.
5. If the client will be using the CBS online banking features, click the
Financial Institution Information tab to select and validate the bank account information.

Client Setup in CBS
Accountant’s Assistant Handbook 99
6. If you enable the Setup / Edit MICR Information security option for
your client, you can click the MICR Information tab and specify the MICR setup information for this checkbook.

Client Setup in CBS
100 Accountant’s Assistant Handbook
7. Click the Save button and then close the Checkbook Setup window.
Entering a beginning balance Checkbook balances are not transferred from CSA to CBS, so you need to record an adjustment in the Checkbook window to specify the beginning balance for any new checkbook transferred to the client.
1. Choose Checkbook / Open and select Operating.
2. In the Checkbook data-entry window, select Adjustment from the drop-down list in the Type field.
3. Enter the applicable date, adjustment description, and beginning balance amount.
4. Click the Save button and then close the Checkbook data-entry
window.

Client Setup in CBS
Accountant’s Assistant Handbook 101
Checkbook reconciliation If you enabled the checkbook reconciliation feature for the client, enter any uncleared items already reflected in CSA.
1. Choose Checkbook / Reconcile (or click the Checkbook
Reconciliation icon on the CheckWriter shortcut bar) and then select the checkbook to work with.

Client Setup in CBS
102 Accountant’s Assistant Handbook
Note: The CBS Sample Company.cbs client (included with the Client Bookkeeping Solution software) was used for the illustrations in the Checkbook reconciliation section.
2. Click the Summary tab to enter information from the client’s most recent bank statement.

Client Setup in CBS
Accountant’s Assistant Handbook 103
3. Click the Add button to enter the uncleared items that are already in CSA; select the type for each item (Historical In Transit, Check, Deposit, or Other Item).
Importing spreadsheet data The CBS spreadsheet import utility allows your client to import the following types of data from a Microsoft Excel spreadsheet into CBS:
Finance charges
Payment terms
Sales tax
Time entry
CheckWriter transactions
Customers
Invoice items

Client Setup in CBS
104 Accountant’s Assistant Handbook
Choose Utilities / Spreadsheet Import. In the Import Spreadsheet Data dialog, select the spreadsheet from which to import data and to define the spreadsheet setup. You must enter data in all fields before initiating the import process.
For detailed information on importing spreadsheet data in CBS, search on Import spreadsheet data:importing spreadsheet data from the Index tab of the CBS Help Topics dialog.
Other setup options
Select default checkbooks After entering and verifying all the checkbook information, you may choose a default checkbook to use for each module.
Choose Checkbook / Default Checkbook.

Client Setup in CBS
Accountant’s Assistant Handbook 105
Select data-entry options 1. Choose Utilities / Options and select the data entry options for CBS.
The options you select on this tab apply to all CBS users.

Client Setup in CBS
106 Accountant’s Assistant Handbook
2. Click the CBS Data Folders tab to specify the default folder locations for the backup files, export files, etc.
When the checkbook setup is complete, you should enter and print one or two checks from each checkbook to ensure that the client’s check layout(s) and printer configuration will work properly.

Client Setup in CBS
Accountant’s Assistant Handbook 107
Select print options for reports You can set the default checkbook, as well as the print options and default number of copies for each CBS report to print in the File / Queue Reports dialog.
Choose File / Queue Reports (or click the Reports icon on the shortcut bar for any of the CBS modules) and click the Options button for each report you want to print.

Client Setup in CBS
108 Accountant’s Assistant Handbook
Select print options for checks
Choose File / Print Checks (or click the Check Printing icon on the CheckWriter shortcut bar) to specify check printing default options.
Note: If you enable the Print Blank MICR Checks security option for your client, your client can use the fields in the Blank MICR Checks group box to specify options for printing blank checks with MICR encoding.

Client Setup in CBS
Accountant’s Assistant Handbook 109
CBS PayCheck setup If your client will be producing calculating payroll checks in CBS, complete the following steps to set up employees in CBS PayCheck. Personal data for each employee, PayCheck items for earnings, withholdings, all deductions, and payroll account numbers transfer over from your CSA files, if you selected those items when preparing the accountant’s transfer file in Accountant’s Assistant.
1. Choose Setup / PayCheck Employees or click the Employees icon on the PayCheck shortcut bar, and check the following information.
2. Confirm that each employee’s information is correct on the General, Personal, Departments, and Employer Expenses tabs. Finish filling in any additional information that did not transfer from CSA.

Client Setup in CBS
110 Accountant’s Assistant Handbook
3. Click the Benefits tab and enter the required information for beginning balance, year-to-date amount accrued, and year-to-date amount used (all amounts are in hours) for each benefit accrual. If necessary, change the default settings for method, allowance, and limit defaults inherited from the employee template.

Client Setup in CBS
Accountant’s Assistant Handbook 111
4. Click the Earnings tab and open the Additional Employee-Level Pay Item Information dialog for each PayCheck item by clicking the Details button for each item. Review and complete the general ledger account number for the PayCheck item and also the wage information fields (including the wage type, rate, and frequency).
Note that you can select a different pay frequency for each PayCheck item (for example, a weekly or hourly PayCheck item and a quarterly bonus PayCheck item). If the wage type is Use of Accrual, you must select the appropriate benefit accrual.

Client Setup in CBS
112 Accountant’s Assistant Handbook
Important!
For benefit accrual items (such as vacation or sick time):
For a salaried employee, complete the Rate field using the annual salary.
For an hourly employee, complete the Rate field using the corresponding hourly rate for that pay item.
For salary rates, enter the annual salary.
5. If the client begins using CBS PayCheck at any time other than the beginning of the calendar year, click the Details button to access the <Employee Name> Details dialog. For each employee, review and edit as necessary the hours worked and amounts earned or withheld for each PayCheck item (pay and withholding) for the current period, the current quarter, and the year to date.
6. On the Tax W/H and Deds tab, click the Details button for each tax withholding item (not including the two FICA items) to open the Additional Employee-Level Deduction Item Information dialog where you can review and complete the necessary fields for federal, state, local, SDI, and SUI withholdings (as applicable). This includes the general ledger account number, the appropriate state or locality, the employee’s marital status and withholding table, the number of allowances claimed, and more.
7. Also on the Tax W/H and Deds tab, click the Details button for each deduction item to review and edit as necessary the general ledger account number, calculation specifics, and limit options for that deduction. From the Additional Employee-Level Deduction Item Information dialog, click the Tax Calculation Details button to open the Edit Deduction - Tax Calculation Details dialog and review the global tax calculation settings for the deduction.
Note: If you have enabled the CBS direct deposit features for your client, refer to the “Client Bookkeeping Solution Guide to Direct Deposit” PDF (available from the CBS Help Topics dialog) for details on setting up PayCheck employees for direct deposit.

Client Setup in CBS
Accountant’s Assistant Handbook 113
8. When you have finished with an employee record, click the Save button to save your edits and choose the next employee from the listview pane at the bottom of the PayCheck Employees window.
Employee template setup CBS PayCheck uses employee templates to maintain default payroll information you can use when adding PayCheck employees. If you or your client need additional employee templates, you may add them in Accountant’s Assistant on the Setup / Employee Templates dialog, or the client can set them up directly in CBS PayCheck if they have security access to the Setup / Employee Templates window.
Payroll department setup Payroll departments are client-specific. CBS uses them for reporting purposes and to distribute certain payroll setup information to individual employees. Even if the client does not actually have multiple departments, you can use departments to group employees who work in different physical locations or who represent different job families, and so forth. You specify a default employee template for each department. You may set up department information in CSA in the Setup / Payroll Departments dialog. Or the client may set up department information in CBS in the Setup / PayCheck Departments window.
CBS Accounts Payable setup When you add CBS Accounts Payable for a client already using CBS CheckWriter, any vendors in the client’s company database will be available automatically for CBS Accounts Payable.
YTD vendor detail You can add year-to-date payable and payment amounts to the expanded CBS Accounts Payable vendor database.
1. Choose Tasks / AP Transactions or click the AP Transactions icon on the Payables shortcut bar.

Client Setup in CBS
114 Accountant’s Assistant Handbook
2. In the AP Transactions window, choose Edit / Enter AP History. CBS displays the following message prompt. Click OK.
3. In the AP Transactions window, notice that the Historical notation
appears in the title bar, upper-right corner, and status bar.
4. Enter and save the information for the closed historical items. CBS
marks these items as exported. You may enter one summary amount for both YTD payables and payments, or you may create detailed records for each closed payable item as far back as the beginning of the fiscal year. Continue entering all open items that you do not want to include in the current month’s Purchases Journal or to export and transfer to the client’s General Ledger in CSA.

Client Setup in CBS
Accountant’s Assistant Handbook 115
5. When you have finished entering the historical and open items, choose Edit / Enter AP History again to toggle off that command, or exit the AP Transactions window.
YTD 1099 amounts If the client will not be entering year-to-date transaction detail and the client imported a vendor into CBS without a 1099 amount, you may enter a 1099 adjustment amount.
1. Choose Setup / Vendors or click the Vendors icon on the Payables shortcut bar.
2. In the AP Vendors window, highlight the desired vendor and choose Edit / 1099 Totals.
3. In the Vendor 1099 Totals dialog, select the year to view and then click the Details button associated with the 1099 item to adjust.
4. In the Vendor 1099 Item Adjustment dialog, enter the adjustment
amount and then click OK.

Client Setup in CBS
116 Accountant’s Assistant Handbook
CBS Accounts Receivable setup Prior to entering any transactions in CBS Accounts Receivable, you or your client need to set up the information discussed in this section.
Default GL accounts Verify information on the Accounts Receivable tab of the File / Company Properties dialog. At a minimum, you must specify account numbers for the Accounts Receivable, Shipping, Flat amount billing sales, Undeposited payments, and Unearned Revenue accounts.
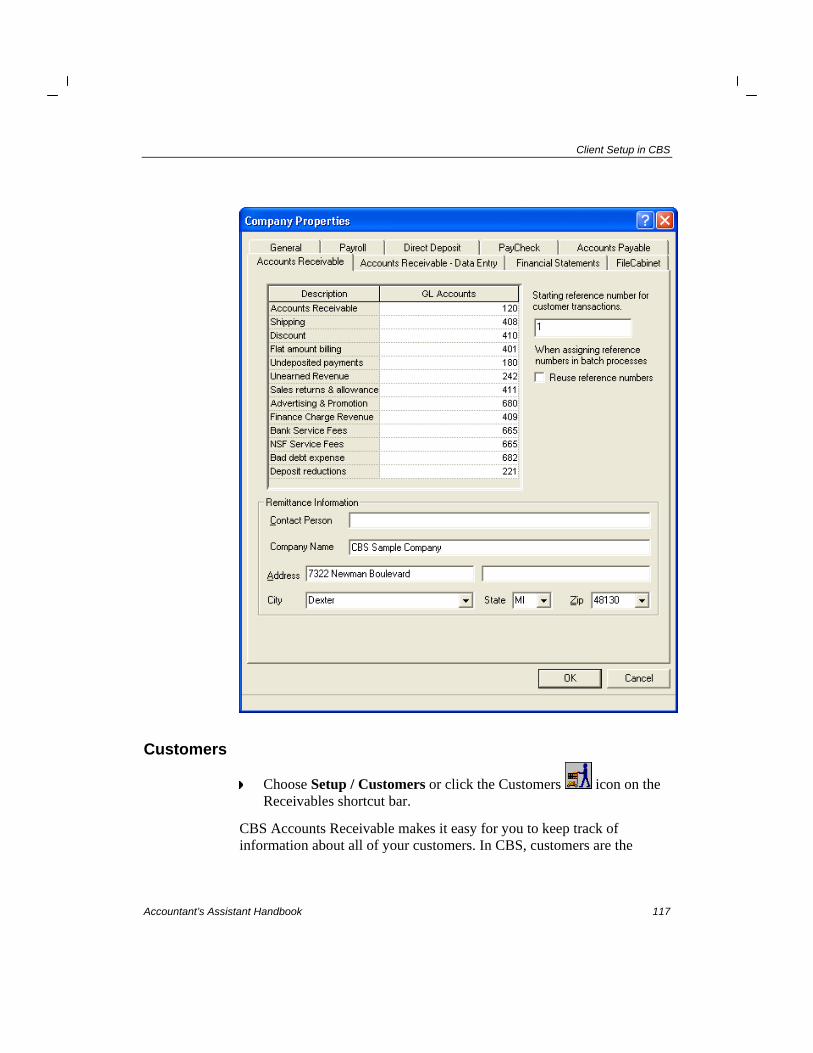
Client Setup in CBS
Accountant’s Assistant Handbook 117
Customers
Choose Setup / Customers or click the Customers icon on the Receivables shortcut bar.
CBS Accounts Receivable makes it easy for you to keep track of information about all of your customers. In CBS, customers are the

Client Setup in CBS
118 Accountant’s Assistant Handbook
entities that purchase the goods and/or services provided by your company. You can store an unlimited number of customers in the company database.
Note: CBS includes a spreadsheet import capability that allows your client to import customer information from a Microsoft Excel spreadsheet. For more information, search on Import spreadsheet data:importing spreadsheet data from the Index tab of the CBS Help Topics dialog.

Client Setup in CBS
Accountant’s Assistant Handbook 119
Invoice items Choose Setup / Invoice Items.
Use the Invoice Items window to add invoice items to be used on the Items tab of the Tasks / Receivable Transactions window. There are four types of invoice items in CBS — item, service, format, and credit.
Note: CBS includes a spreadsheet import capability that allows your client to import invoice item information from a Microsoft Excel spreadsheet. For more information, search on Import spreadsheet data:importing spreadsheet data from the Index tab of the CBS Help Topics dialog.

Client Setup in CBS
120 Accountant’s Assistant Handbook
Payment terms Choose Setup / Payment Terms.
Use the Payment Terms window to add or update an unlimited number of payment terms for both accounts payable and accounts receivable transactions. CBS uses payment terms to automatically calculate the discount and due dates for a transaction (based on the transaction date), in addition to the discount amount (based on the transaction amount).
Note: CBS includes a spreadsheet import capability that allows your client to import payment term information from a Microsoft Excel spreadsheet. For more information, search on Import spreadsheet data:importing spreadsheet data from the Index tab of the CBS Help Topics dialog.

Client Setup in CBS
Accountant’s Assistant Handbook 121
Finance charges Choose Setup / Finance Charges.
You can set up an unlimited number of finance charges to be used in this company database.
Note: CBS includes a spreadsheet import capability that allows your client to import finance charge information from a Microsoft Excel spreadsheet. For more information, search on Import spreadsheet data:importing spreadsheet data from the Index tab of the CBS Help Topics dialog.

Client Setup in CBS
122 Accountant’s Assistant Handbook
Sales tax codes Choose Setup / Sales Tax.
Use the Sales Tax dialog to define state or local sales taxes that apply to the products or services your client’s company provides.
Note: CBS includes a spreadsheet import capability that allows your client to import sales tax information from a Microsoft Excel spreadsheet. For more information, search on Import spreadsheet data:importing spreadsheet data from the Index tab of the CBS Help Topics dialog.

Client Setup in CBS
Accountant’s Assistant Handbook 123
Glossary items Choose Setup / Glossary Items.
Use the Glossary Items window as a tool to create a collection of preset and preformatted user-defined text and/or format entries. You can use these items to provide descriptive information about invoices and invoice items on printed invoice and statement forms.

Client Setup in CBS
124 Accountant’s Assistant Handbook
Invoice and statement layouts
Choose File / Print Forms or click the Forms icon on the Receivables shortcut bar.
Use the Print Forms dialog to select the invoices and statements to print. You can specify activity to include, invoice date and number, which forms to use when printing the selected invoices and statements, and the number of each form to print.

Client Setup in CBS
Accountant’s Assistant Handbook 125
CBS Financial Statements setup If you enable the CBS Financial Statements module for a client, the client can generate interim financial statements using any of the predefined statements included with this optional CBS module.
Choose File / Queue Reports and click the Financial Statements tab.

Client Setup in CBS
126 Accountant’s Assistant Handbook
Important! When creating financial statement information, CBS uses the end date of the period prior to the next export period as the client’s date to begin posting transactions.
Any data entered after that date will be added to the CSA balances.
Any transactions dated in a prior fiscal year are posted to the current CBS period based on the export date.
Any transactions dated in a future period are not posted until the period in which they become current.
If the next export date specified on the CheckWriter tab of the Setup / Miscellaneous Information dialog in Accountant’s Assistant is the same as the GL period end date, Accountant’s Assistant uses the GL period end date as the last GL posting period end date when generating financial statement data for the client. This does not affect your CSA data.
Financial statement options On the Financial Statements tab of the Queue Reports dialog, click
the Details button associated with each financial statement to specify individual print options.

Client Setup in CBS
Accountant’s Assistant Handbook 127
Financial statement collections Your clients can save time by grouping together multiple financial statements that they print on a regular basis to form a collection of statements. This is similar to the report profiles you use in CSA. The clients select print options for the individual financial statements in the collection, and when they want to print financial statements they can then select that collection instead of selecting the individual statements.
On the Financial Statements tab of the Queue Reports dialog, select Collection from the Statement type column, enter a description for the collection in the Statement description column, and then click the Jump to record button.

Client Setup in CBS
128 Accountant’s Assistant Handbook
A final word about CBS It is strongly recommended that you back up the client’s data after completing the initial setup.
Choose File / Backup / Database and then File / Backup / Layouts.
Make two sets of backup disks — one to leave with the client and the second to take with you to your own office. Please encourage your client to back up their company data on a regular basis.
Note: CBS automatically creates a copy of the client’s backup file and stores it in an archive subfolder on the hard drive where the CBS program is installed. By default, this backup location is c:\Program Files\Client Bookkeeping Solution\Data\Archive\Backups.
Before leaving your client’s office, you should demonstrate CBS to the client to highlight some of the features and procedures the client will use. Instruct your client to review the Client Bookkeeping Solution CheckWriter Getting Started guide, any PDF documents of any other relevant getting started guides, the Client Bookkeeping Solution Tutorial, and the CBS help topics before they start to enter transactions. You should also provide instructions to your client on how and when to export CBS data and how to transmit the export file (and any printed reports that you require) to your firm’s office.
Because backing up client data at certain times can be critical to your success with CBS, the program automatically backs up the data and stores the files for you.

Accountant’s Assistant Handbook 129
7 Processing Client Information
Client processing The majority of work that you will perform with the Accountant’s Assistant module involves the cyclic processing of information to and from each Client Bookkeeping Solution client. This chapter provides details on the procedures for getting updated data and programs to your client, as well as the steps involved in the retrieving and processing of each CBS client’s exported data.
Regular processing by the client For details on the processing cycle from the client’s point of view, please refer to the “Processing Overview” help topic in CBS.
Database backups You should stress to your client the importance not only of making backup copies of company data at frequent intervals, but also of creating a final backup copy just prior to each export — to retain as an archive either on a reliable form of removable media or in a network folder. The export file the client creates is not the same as a backup file. While an export file contains only the information for the export period, a backup file contains a “snapshot” of the client’s company database file at that point in time, including historical data. Possession of a current backup file of company data will enable the client to restore all of the working data in the event of some type of data corruption or a catastrophe such as a hard drive failure, fire, or computer theft.

Processing Client Information
130 Accountant’s Assistant Handbook
CBS automatically creates a copy of each backup and export file and stores the files in the Archive folder where the CBS program files are installed (for example, in C:\Program Files\Client Bookkeeping Solution\Data\Archive). The program creates these files even if the client did not mark the Create automatic backups checkbox on the General tab of the Utilities / Options dialog.
Important! The client should be very careful to do a final backup of current company data before creating an export file. If the client were to send you an unreadable export file, or if the export file were to be lost in transit, the only way for the client to create another one would be to restore the prior data from a backup file and export again. You may want to recommend that your client send you both a backup file and the export file at the end of each CBS export period.
Example If you discover the client’s export file for June 30 is unreadable but the client has already begun processing for July, have your client do either of the following:
Recreate the export file and send it to you.
1. Save the current July data to backup on a form of removable media or to a separate folder on the hard drive (such as C:\Backup).
2. Restore the June data from the pre-export backup file and then choose File / Export to Accountant to create a new export file.
3. Restore the July data from the backup file and continue processing the July transactions.
Send you a copy of the export file that CBS automatically created in the CBS data archive subfolder on the hard drive where the CBS program is installed. By default, this backup location is c:\Program Files\Client Bookkeeping Solution\Data\Archive\Export.

Processing Client Information
Accountant’s Assistant Handbook 131
We suggest that you teach all of your CBS clients to make clearly labeled backup files on a regular schedule and store them in a safe place. As an additional form of protection, you may also want to maintain an offsite set of each client’s pre-export backup disks.
Client reports Your client should print any reports he or she needs — plus any reports that your own firm may require — before creating the export file. For more help on printing reports, see the CBS help. Choose Client Bookkeeping Solution Help Topics from the Help menu, click the Index tab, and search on Queue Reports. Note that your client can also send reports to you via email from the Print Preview window. For details, search on Print Preview from the Index tab of the CBS Help Topics dialog.
Note: If licensed to use FileCabinet CS, a client using CBS can easily store and retrieve electronic images of printed checks, reports, and (if also using CBS Accounts Receivable) invoices and statements.
Client export files The client creates an export file at the end of each CBS export period by choosing the Export to Accountant command from the File menu when they are processing data in their own office. If your client uses CBS ASP or if you process your client’s data in CBS on Virtual Office CS, you most likely will be exporting the data yourself. Depending on who processes the client data, there are multiple options available for the export process.
In all export processes, CBS first prompts the client to back up the data and then opens the Export Dates dialog for the client to select the CBS module(s) for which to export data. CBS calculates the next export date during the export process. CBS displays the new CheckWriter export date and PayCheck date, if applicable, in the status bar at the bottom of the CBS application workspace.

Processing Client Information
132 Accountant’s Assistant Handbook
Note: The program automatically creates a copy of each export file in the Archive folder where the CBS program files are installed (by default, this locations is c:\Program Files\Client Bookkeeping Solution\Data\Archive\Exports).
Client Export The client may create an export file (with a filename extension of EXPORTDATA) locally at their office and then transfer it to you by a means you have agreed upon. The client will start the export process by choosing File / Export to Accountant in CBS. Once the client has verified which modules to export and clicks Continue in the Export Dates dialog, CBS copies the export data to the location specified in the Utilities / Options / CBS Data Folders tab. If the export path is a floppy drive, CBS will prompt the client to insert the disk in the appropriate drive.
After the client’s CBS program creates the export data on the user-specified export path, the program asks if the client wants to email the export data to the accountant. If the client clicks Yes, CBS will create an email message and attach a single, compressed file containing the same export file that was copied to the client’s export path. The message will use the address that you specified on the Accountant’s Assistant Setup / Miscellaneous Information / CheckWriter tab, or the client can manually type in the recipient’s email address.
Note: The client must have a MAPI compliant email program for the program to display the prompt asking if they would like to email the export data to the accountant.
Exporting and retrieving CBS data in one step If your client uses CBS ASP or if you enter data in CBS for your client, you can use the one-step integration to have CBS export the client’s data and then have Accountant’s Assistant automatically retrieve that data when you click the Retrieve button.

Processing Client Information
Accountant’s Assistant Handbook 133
To enable this export option, mark the Export and Retrieve CBS Data option on the CheckWriter tab of the Setup / Miscellaneous Information dialog in Accountant’s Assistant.
When you are ready to export at the end of the processing period for the CBS client, close the CBS company database. In Accountant’s Assistant, choose Tasks / Retrieve. The program prompts you to back up the CSA client database and then prompts you to back up the CBS company database; it is recommended you click Yes for both prompts. Once the backups are completed, the export process will begin. Once the export has completed successfully, CSA automatically starts the retrieval of the data.
For additional information, search on Exporting and retrieving CBS data from your client from the index in the CSA help browser.
Exporting via the Internet You can set up your client’s CBS software to use the two-step integration for exporting data. With the two-step integration, your client will export data to a location on a secure Thomson Tax & Accounting server. You can then retrieve that data into CSA in your office. This time-saving process eliminates the need to use a form of removable media for export files or the need to have your client email you a copy of the export file.
To enable this export option, you must mark the Export via the Internet checkbox on the CheckWriter tab of the Setup / Miscellaneous Information dialog in Accountant’s Assistant. Optionally, you can also mark the Include client backup with export data checkbox to include a pre-export backup of the CBS company database with the export file. To transmit these settings to your client, you must include the CheckWriter Miscellaneous information when you generate data for your client. (If you did not mark the checkboxes when you originally set up your CBS client, you may create a new transfer file containing the CheckWriter Miscellaneous information for your client at any time.)
When the client’s export file and backup (if included) are available on the Thomson Tax & Accounting server, if your client is using MAPI-complaint email software, CBS will send you an email message to let you know that the files are waiting for you to retrieve them.

Processing Client Information
134 Accountant’s Assistant Handbook
Note: You and your client must both have an Internet connection in order to use the Export via the Internet option.
For additional information, search on Exporting and retrieving CBS data from your client from the index in the CSA help browser, and then select the topic called Export via the Internet (two-step process).
Retrieving client data At the end of each export period, you or your client will create an export file. Export data typically includes all of the transactions dated on or before the export date that were not previously exported, and they are transmitted in the format needed for processing in Accountant’s Assistant. The program will not retrieve transactions with dates after the export date until the appropriate period.
Backups of client data in CSA Before you retrieve data from the client’s export file, we recommend that you first make a backup copy of your CSA client data. Next, make sure you’ve set the CSA general ledger and payroll periods to the appropriate dates relative to the client data you are about to retrieve.
Payroll transactions are transferred into CSA based on the option selected on the PayCheck tab of the Setup / Miscellaneous Information dialog in Accountant’s Assistant, either the current payroll period ending date or the month of the check date.
Note: If client data from a previous retrieval still exists in your Accountant’s Assistant program, the program will display a message prompt asking if you want to remove the old client data and continue with the procedure or to discontinue the retrieval process.

Processing Client Information
Accountant’s Assistant Handbook 135
Receiving data from your client
Retrieving client export data from removable media If you receive your client’s export data on a form of removable media, you need to set the Retrieve path in the Setup / File Locations dialog to the correct folder. For example, if the export file is on a floppy disk, the Retrieve path should be set to A:\. Alternatively, you can copy the export file to a destination on your hard drive and set the Retrieve path to that location. When you choose Tasks / Retrieve in Accountant’s Assistant, the program automatically retrieves the export files from the specified location.
Retrieving client export data via email If you receive the client’s export data via email, you first need to save the EXPORTDATA file attachment to the location on your hard drive, network, or floppy disk specified in the Retrieve field of the Setup / File Locations dialog in Accountant’s Assistant. When the EXPORTDATA file has been saved in the correct location, verify that the correct client is open in CSA. In Accountant’s Assistant, choose Tasks / Retrieve, and the program automatically retrieves the export files from the specified location.
Exporting and retrieving CBS data If you choose the one-step integration method for exporting and retrieving client data, CBS automatically exports the client data and then Account’s Assistant automatically retrieves it with the click of a button.
During the export, if the program finds more than one copy of a CBS company database containing the CSA client ID of the client for whom you are running the process, the program opens the Select CBS Client dialog. Select the correct CBS company file to export and click OK. The program saves the selection for future export and retrieve processes. You can reset these by choosing Edit / Client File Location.

Processing Client Information
136 Accountant’s Assistant Handbook
Once the export has completed successfully, CSA automatically starts retrieving the client data. Once the retrieval is complete, you will have a chance to review the data before transferring it to CSA.
If the retrieval fails or if you cancel the retrieve process for any reason, CSA temporarily stores a copy of the export file in your CSA client data folder within a CBSExport subfolder. For example, if you are retrieving data for client CSWRI01, the export file would be stored in d:\WINCSI\CSAData\CSWRI01\CBSExport, where d represents the hard drive or network location where you store your CSA client data. If you choose Tasks / Retrieve again, you will be prompted to try and retrieve the export file again.
Yes: If you click Yes, Accountant’s Assistant will start the retrieve process again, trying to retrieve the export file located in the CBSExport subfolder.
No: If you click No, you will be prompted to start the export and retrieve CBS data process again. If you click Yes at this second prompt, the export and retrieve CBS data process will start again and the program exports your next period in CBS.
Important! If you are not ready to export data for the next processing period in CBS, be sure to restore a pre-export backup of the CBS company database before starting a new export and retrieve CBS data process.

Processing Client Information
Accountant’s Assistant Handbook 137
For additional information, search on Exporting and retrieving CBS data from your client from the index in the CSA help browser.
Exporting via the Internet If you choose the two-step integration method, the client’s export file(s) will be waiting to be retrieved from the secure Thomson Tax & Accounting server as soon as the export is complete.
In Accountant’s Assistant, choose Tasks / Retrieve to begin retrieving the export data from the server. If more than one export file exists for the client, the program will display the Select Export File dialog, which lists the export files found and the export dates for each file. Select the correct file and click OK and the retrieval process will continue.
The program deletes the export file from the server and copies it to the d:\WINCSI\CSASys\CBSArchive\Export folder, where d represents the hard drive or network location where the program files are installed for your Write-Up CS and other CS Professional Suite Accounting Products v.2006.2.x or higher. If you set up your client’s CBS software to include a backup of the CBS company database during the client’s export, the program places the backup file in the d:\ WINCSI\CSASys\CBSArchive\Backup folder.

Processing Client Information
138 Accountant’s Assistant Handbook
Effect of transferred data on CSA Use the Tasks / Retrieve command to retrieve the client’s export data into Accountant’s Assistant.
When you retrieve data, all information is stored in a “holding area” that allows you to review it and to correct the account numbers on transactions before transferring the data to CSA. You perform the actual transfer by choosing Tasks / Transfer to CSA. Once you’ve transferred the information to CSA, it’s as if you had entered it directly into the data-entry windows and dialogs within CSA. The big difference, of course, is that the client did the data-entry work.
The temporary holding area that Accountant’s Assistant uses to store retrieved data is maintained in the same database as the client’s other CSA information. Consequently, when you make a backup file in CSA, you will be backing up both the ongoing CSA client data and the newly retrieved client data.
You may transfer the client’s nonpayroll transactions either into the current period in CSA or into the appropriate GL period in CSA based on the transaction date; you make the selection when prompted by the program. However, the program transfers transactions dated in a prior fiscal year into the current GL period.
The program transfers payroll checks into the appropriate prior month based on the transaction date. However, the program transfers a payroll check dated in a prior calendar year into the current payroll period. Accountant’s Assistant never transfers any payroll transactions to a future month.
Reminders
You may need to edit the client’s account groups and financial statement formats to accommodate any new account numbers your client may have created. If you have deleted any account numbers since you last transferred data to your client, verify that the program did not add those account numbers again when you retrieved your client’s most recent export file. If any were, delete them again and
Processing Client Information
Accountant’s Assistant Handbook 139
either update the client’s Chart of Accounts by sending a new transfer file or ask the client to delete them (if the client has rights to edit the Chart of Accounts). After retrieving client data but before transferring it to CSA, you may find it helpful to print the Chart of Accounts Diagnostic Report in Accountant’s Assistant.
If your client uses CBS PayCheck, after retrieving client data but before transferring it to CSA, you should print the Pay Item Diagnostic Report to show any new pay items your client may have added in CBS PayCheck. These pay items must be manually added to the pay items in CSA.
If you mark the Create reversing JE for Accrual Basis client checkbox on the Accounts Payable tab of the Setup / Miscellaneous Information dialog in Accountant’s Assistant, the program displays a message prompt telling you that one or more transactions have a date that is in a prior GL period for the current fiscal year. Click Yes.
Information received from the client’s export file Accountant’s Assistant retrieves the following types of transactions from the client’s export file.
Regular checks
Deposits
Other bank items
Journal entries
Cash disbursement entries
Automatic Unprinted Checks Journal Entry (created during retrieval)
Actual payroll checks created in either CBS CheckWriter or CBS PayCheck do not appear in the Tasks / Process Transactions window, but they do transfer to CSA along with all other transactions. In the Process Transactions window, however, you are able to view the summary payroll journal entries automatically created by Accountant’s Assistant.
CBS does not include any check layouts with the client’s export data.

Processing Client Information
140 Accountant’s Assistant Handbook
For detailed information on how exported data from each of the CBS client modules could affect your own program when you retrieve data from a client, search on Effect of from the index in the CSA help browser, and then select the topic called client’s export data on the accountant’s files.
Validating client transactions After retrieving your client’s transactions into Accountant’s Assistant, the next step is to process the transactions in the Tasks / Process Transactions window and to review any notes that might be attached to them. By default, transactions are listed in the order they were entered, but you can click a column-heading (order entered, reference, date, or account number) button to sort by that field. Once you’re satisfied that all of the account numbers are complete and accurate, you can transfer the client transactions into CSA before doing any final editing that might be necessary.
Client notes to the accountant The CBS client modules allow your client to attach a temporary note to any transaction. For any transaction with a missing account number, CBS itself automatically attaches a note if your client has not already done so. Each non-payroll transaction with an attached note is marked by a note icon in the left margin in the Process Transactions window. You can view the current transaction’s temporary note, if any, in the Note field and then decide on the proper classification of the transaction.
To process transactions, we recommend that you first print any notes from your client using the Notes Report in Accountant’s Assistant and also print each of the diagnostic reports. Then, in the Process Transactions window, scroll through the transactions, make any necessary account number corrections, and delete the notes. If the notes require you to take action (such as supplying missing account numbers), be sure to complete the appropriate actions before transferring the files to CSA.

Processing Client Information
Accountant’s Assistant Handbook 141
Editing accounts To make changes to a transaction from your client before transferring it to CSA, choose Edit / Edit Accounts. In the Edit Accounts dialog simply enter or select the correct account number from the drop-down list to change the account number for the transaction. If your client transferred transactions with no account numbers, click the Next Blank Account button to automatically find the next transaction without an account number.
After editing your client’s transactions and accounts and deleting all temporary notes, you’re ready to transfer the client data from Accountant’s Assistant to CSA.
Note: If you will be sending transactions to your CBS client to correct account distributions, you should replace blank accounts (by choosing Edit / Replace Blank Accounts from within the Tasks / Process Transactions window in Accountant’s Assistant) and then transfer the transactions to CSA. You can then edit the transactions in CSA and select the correct account distributions. Any changes to account distributions you make in Accountant’s Assistant will not be available when generating transactions from CSA to CBS. Only the transactions modified in CSA will be available.
Helpful reports Accountant’s Assistant has several reports that can assist you as you process client transactions. Be sure to print a copy of each report prior to transferring the client’s transactions to CSA. The following options are available in the Print Reports dialog.
Notes Report. This report lists notes the client has attached to CBS transactions, and they generally concern actions you need to take to resolve questions involving missing data or account distributions. If the client uses the payroll features in CBS CheckWriter or CBS PayCheck, Accountant’s Assistant prints CBS CheckWriter notes first, followed immediately by the payroll notes. If the client uses CBS Accounts Payable, Accountant’s Assistant prints the accounts

Processing Client Information
142 Accountant’s Assistant Handbook
payable notes last. The program prompts you to delete all notes immediately after they have been printed.
Unprinted Checks Journal Entry Report. This report details the (optional) Unprinted Checks Journal Entry that Accountant’s Assistant can automatically create during the retrieval of transactions from the client’s export file. Note that Accountant’s Assistant excludes checks dated beyond the export period from this report.
Transaction Report. This report includes all transactions retrieved from the client’s export file.
Chart of Accounts Diagnostics Report. This report provides detail on general ledger accounts the client has added, changed, or deleted from the Chart of Accounts window in CBS.
Vendor Diagnostics Report. This report provides detail on vendor data retrieved from the client’s export file, including vendors the client has added, changed, or deleted from the Vendors window in CBS.
Employee Diagnostics Report. This report provides detail on employees the client has added, changed, or deleted in CBS.
PayCheck Items Diagnostics Report. This report shows which new PayCheck items the client added in CBS PayCheck, and it also lists any changes made to departments.
Unprocessed Receivable Payments List. This report provides details for payments that were either undeposited or unapplied at the time of export. The program posts these transactions to the general ledger account designated on the Accounts Receivable tab of the Setup / Miscellaneous Information dialog in Accountant’s Assistant.
Activity Report. This report lists detail for CBS client activities that reached “trigger” values during the interval specified on the Setup / Bookkeeping Activity Monitor dialog in Accountant’s Assistant. (You can set up the Bookkeeping Activity Monitor to transmit the activity detail back to the accountant’s office along with the client’s export data or via email attachment.)

Processing Client Information
Accountant’s Assistant Handbook 143
Master License Report. This report lists all clients that are licensed to use CBS and all modules you have purchased for them.
Transactions Available to Generate Report. This report lists all transactions that you can generate for your CBS client. This includes any transactions added in CSA or retrieved from CBS and then edited in CSA. You should print this report before generating data for your client.
Reconciling CBS Accounts Payable report totals You will find it helpful to ask the client to prepare a copy of the Aging Schedule and the AP Transactions List to aid you in reconciling the accounts payable entry to the client records. Note that you determine the options for retrieval of vendor data and you will need to advise the client about which specific options to select for those reports. For more information, search on Reconciling:accounts payable reports (PDF) from the Index tab of the CBS Help Topics dialog.
Reconciling CBS Accounts Receivable report totals The “Reconciling CBS Accounts Receivable Report Totals” PDF document is available to help your CBS Accounts Receivable clients prepare specific reports just prior to export. The document specifies the option settings for those reports and other tips that will enable you, the accountant, to reconcile the reports with the accounts receivable information that is actually exported by the client, retrieved into Accountant's Assistant, and then transferred to the General Ledger in CSA. You or your client may print or view that document by searching on Reconciling:accounts receivable reports from the Index tab of the CBS Help Topics dialog.
In order to match the report information to the export data that actually transfers to CSA, the client will need to follow the guidelines specified in this PDF document for the following accounts receivable reports:
AR Transactions List
AR Deposit Journal
Aging Schedule
Customer Ledger

Processing Client Information
144 Accountant’s Assistant Handbook
Sales by Item/Service Report
Sales Report
Invoice/Payment List (with separate settings required for reconciling write-offs, finance charges, credit memos, and the Unearned Revenue account)
Deposit Detail List (for reconciling the Undeposited Payments account)
Transferring client data from Accountant’s Assistant to CSA
After you’ve completed all preliminary processing in Accountant’s Assistant, you need to transfer the transactions to CSA in order to prepare financial statements and other reports for your client.
To transfer the transactions, choose Tasks / Transfer to CSA, or
click the Transfer to CSA icon on the Accountant’s Assistant shortcut bar.
Here is what actually happens during the transfer of data from Accountant’s Assistant to CSA:
All general ledger and payroll transactions are moved out of Accountant’s Assistant into CSA. These transactions will be added to any transactions in the client’s file. CBS transactions transfer into the CSA periods based on transaction date and on the settings for both the general ledger and payroll periods. Because of its data file configurations, CSA can handle future-period dates only for nonpayroll transactions.
Nonpayroll transactions dated prior to the current general ledger period but in the current fiscal year transfer either into the corresponding general ledger period based on transaction date or into the current general ledger period (based on your response to the program prompt).

Processing Client Information
Accountant’s Assistant Handbook 145
Nonpayroll transactions dated within or after the current general ledger period transfer into the appropriate general ledger periods. (Note that transactions dated after the client’s export date are not exported by the client’s CBS program.)
Nonpayroll transactions dated in a prior fiscal year transfer into the current general ledger period.
If Accountant’s Assistant encounters any payroll transactions dated after the current payroll period during the retrieval process, the program displays a message alerting you to change to the appropriate CSA payroll period before retrieving.
The automatic payroll journal entry is treated like a nonpayroll transaction.
Chart of Accounts information from the client’s program is merged into the Chart of Accounts information in CSA. (CSA does not automatically delete accounts.)
Vendor information from the client’s program is merged into the vendor information in CSA. (CSA does not automatically delete vendors.)
Note: If you make any changes to vendor transactions that affect the vendor year-to-date balance in the CSA Setup / Vendors window after you transfer them to CSA, you need to generate the edited transaction (or update the 1099 amounts if security allows for CBS Accounts Payable clients).
For an accrual-basis client, Accountant’s Assistant creates an automatic reversing journal entry for the net amount of the unprinted checks as of the date the client generated the export file. You can enable this feature in Accountant’s Assistant on the CheckWriter tab of the Setup / Miscellaneous Information dialog.
Note: When transferring reversing entries to CSA, the GL date and the client data export date must be the same.

Processing Client Information
146 Accountant’s Assistant Handbook
CSA merges employee information from the client’s program with the employee information in CSA. It updates the CSA employee earnings records to reflect the noncalculating payroll checks entered in CBS CheckWriter or to reflect calculating payroll checks and earnings record adjustments entered in CBS PayCheck.
Note: Checks dated in a prior payroll year will be treated as if dated within the current CSA payroll period.
If you selected the Create Payroll Journal Entry option on the PayCheck tab of the Setup / Miscellaneous Information dialog in Accountant’s Assistant or on the File / Client Properties / Payroll tab in CSA, the program creates an automatic payroll journal entry before transferring transactions from Accountant’s Assistant to CSA.
Updating client files When first setting up the client, you created an accountant’s transfer file to initialize the client’s CBS company database with the data already present in your CSA program. Unlike other checkwriting programs, this program is designed so you can update your client’s data files at any time — even after the client has already started entering transactions. Generating a transfer file to update the client’s database is virtually identical to the process you went through to prepare the client’s initial accountant’s transfer file. Subsequent to the initial setup, you need to update only the file(s) in which you have changed or added information. Use the Tasks / Generate dialog within Accountant’s Assistant to generate an updated transfer file for the client.
During the entire time you are processing the client’s exported data, the client is free to enter new transactions and to print checks. If you need to update any setup information, the client may import a new transfer file at any time throughout the period. The updated information will apply to all new transactions subsequently created.

Processing Client Information
Accountant’s Assistant Handbook 147
CBS information to generate Items selected in the Tasks / Generate dialog within Accountant’s Assistant will be included in the accountant’s transfer file for the client. The items to select for transfer will depend on which modules the client is licensed for and which client files need to be updated.
For detailed information on how the transfer will affect the information already present in the client’s files, search on Effect of from the index in the CSA help browser, and then select the topic called importing accountant’s Transfer Disk on the CBS client’s files.
License selection The program prompts you to select the client module license to use. Note that when setting up your own accounting firm as a CBS company, when setting up a CBS demonstration company, or when setting up a CBS ASP client, the program displays a message prompt asking you to select which (if any) add-on modules to include with CBS CheckWriter. It is not necessary to choose all of the modules for which you are licensed unless you want to do so. For more information on setting up a Demonstration Company, see Appendix D of this handbook.
Important! Before a client begins processing payroll checks in CBS PayCheck for a new calendar year, you need to update the federal, state, and local tax tables in Accountant’s Assistant and include the updated tables on a new accountant’s transfer file for your client. To update the tax tables after installing the most current version of the Creative Solutions Accounting software, choose Setup / System Configuration / Payroll Tax Information / Update.

Processing Client Information
148 Accountant’s Assistant Handbook
Client import of the accountant’s transfer file Your client can import the update information that you’ve generated in an accountant’s transfer file by choosing File / Import / From Accountant.
As long as you understand the implications of changing the client’s data files and are careful when selecting information to transfer, the client can safely import the updated information at any time.
Note: Your client may import data from an accountant’s transfer file that contains updated employee information (including earnings records) even after creating new payroll checks. Earnings records in CBS are as of the start of the month, with subsequent payroll checks and earnings adjustments kept separately and merged as part of the client’s Export to Accountant process. CBS PayCheck uses both the start-of-month earnings record and any checks or adjustments when displaying earnings records on the Earnings and Tax W/H and Deductions tabs of the Setup / PayCheck Employees window in CBS when calculating new payroll checks.
Client access to your firm’s website through CBS If your firm maintains a website, you may enter your web page address (URL) in the Setup / File Locations dialog in Accountant’s Assistant to facilitate your client’s access to your site. The client may then link to the specified URL by choosing the Accountant’s Web Page command from the CBS Help menu.
Note: If your client is using the ASP version of CBS from a private portal on your firm’s website, please consult the Working with CBS ASP Clients PDF document, which is available from the Accountant’s Assistant Help browser.

Accountant’s Assistant Handbook 149
Appendix A: Installation Instructions
System requirements For the latest system requirements information for CS Professional Suite products, please visit our website at CS.Thomson.com or Go.Thomson.com. Note that CS Professional Suite products are designed for professional production work. Our system requirements are based on the assumption that professional accounting firms replace their computer hardware and operating systems approximately every three years. While our software may operate on less powerful hardware and operating systems, we do not believe it will perform at a level suitable for production work in those environments. Of course, as processing speed and RAM are increased, software performance will also improve.
Note: The system requirements for the Client Bookkeeping Solution client modules are similar to those for other CS Professional Suite software. When reviewing those requirements on the Thomson Tax & Accounting website, please note the additional requirements unique to CBS for disk space, for supported printers, and for running CBS in multi-user mode.
Appendix A: Installation Instructions
150 Accountant’s Assistant Handbook
Installing the Accountant’s Assistant software Accountant’s Assistant is a module of the Creative Solutions Accounting software and works in conjunction with Write-Up CS. It is not a standalone program, so you must have a licensed version of Write-Up CS to be able to use Accountant’s Assistant.
The Accountant’s Assistant software is included with the CS Professional Suite Accounting Products software. For information on installing the software and obtaining the licenses, please refer to the CS Professional Suite Accounting Products Installation and Program Essentials guide. To open a PDF version of that guide in the Adobe Reader, search on Installation and Program Essentials guide (PDF) from index in the CSA help browser.
Installing the CBS software For detailed information on installing the Client Bookkeeping Solution software (including information for installing on a network), please refer to the installation chapter of the Client Bookkeeping Solution CheckWriter Getting Started guide. This section provides just a brief outline of the installation material included in the getting started guide.
To install the Client Bookkeeping Solution software, you first need to close all other applications, including any background virus protection software. Insert the Client Bookkeeping Solution CD in the CD drive. The installation program will start automatically after a few seconds. (For a client using a network setup, be sure to review the installation options listed in the Client Bookkeeping Solution CheckWriter Getting Started guide.)
Note: Both you and your clients can install CBS via download from the Internet. The installation program is available at CBSDownload.com.

Appendix A: Installation Instructions
Accountant’s Assistant Handbook 151
During the installation process, follow the instructions that appear in each dialog. Your client will have the option to install the accountant’s setup files for custom help, which contains an optional help file customized by you. The accountant’s setup files for the splash display contains a custom bitmap that CBS will display when the client opens CBS. If you have created either or both of these files for your client, the client must mark the applicable checkboxes when they install CBS.
When the installation is complete You can start CBS from the Windows Start menu by pointing to All Programs and selecting Client Bookkeeping Solution. Or, if you chose to have the installation program create a shortcut on the Windows desktop, double-click the shortcut icon.
After completing the installation and starting the CBS program, be sure to open CBS Connect to download and apply any CBS program updates that may be available. (This step is not required for a client using the ASP version of the software.)
User Bulletins provide detailed information for accountants about new features and changes to the software. To view the user bulletins related to CBS, click the CBS User Bulletins link on the Support page of our website at CS.Thomson.com.

Appendix A: Installation Instructions
152 Accountant’s Assistant Handbook

Accountant’s Assistant Handbook 153
Appendix B: Converting CBS Clients from WS2 to CSA
This appendix provides important information for users who are converting Client Bookkeeping Solution clients from The Write-Up Solution II (WS2) to Write-Up CS within the Creative Solutions Accounting (CSA) software.
Note: For information on converting a client from The Checkbook Solution (DOS) to Client Bookkeeping Solution, please search on Converting client data from the index in the CSA help browser, and select the topic called Converting a CBS (DOS) client to CBS in CSA.
For all users converting clients from WS2 to CSA Before converting a CBS client from WS2 to CSA, you must completely process all client export data. After converting the client data, you will lose any client export data that has not already been processed.
It is also recommended that you ask your client not to process payroll after their final export but before you convert the client to CSA and create a new accountant’s transfer file for the client to import.
Appendix B: Converting CBS Clients from WS2 to CSA
154 Accountant’s Assistant Handbook
Note: For receivable transactions, Accountant’s Assistant converts only printed and exported transactions, so it is highly recommended that your client complete the Export to Accountant procedure just prior to running the import from CBS (DOS).
Performing a conversion Before you begin converting a WS2 client to CSA, be sure that the client data is ready to be converted. The steps in this section apply only for a client already using Client Bookkeeping Solution.
1. From the CSA Utilities menu, point to Data Conversion and then choose Write-Up Solution II.
2. In the Location of WS2 system field, enter the drive and folder where your WS2 program files are currently located, or click the Browse button to search for the correct folder.
3. In the Location of WS2 data field, enter the drive and folder where your WS2 data files are currently located, or click the Browse button to search for the correct folder.
4. In the WS2 client to convert field, choose the client you want to convert by selecting it from the drop-down list.
5. You may mark one or more of the following checkboxes, as appropriate for the selected client:
Convert account groups. The program adds converted account groups to the default account groups provided with your CSA General Ledger module. Note that these cannot be used in CBS.
Convert after-the-fact payroll and vendor data.
Convert employee earnings. The conversion utility creates global pay items from the wages in WS2, and it converts any monthly, quarterly, and annual earnings amounts for each employee. You should choose this option if converting a noncalculating payroll client.

Appendix B: Converting CBS Clients from WS2 to CSA
Accountant’s Assistant Handbook 155
Important! Do not mark this checkbox if the client is using CBS PayCheck. The program converts payroll items and earnings information for a client using CBS PayCheck to CSA payroll items in CBS when the client imports data from the first accountant’s transfer file from Accountant’s Assistant into CBS.
The employees’ payroll items and earnings information in CSA will be updated by each client export file that you retrieve into Accountant’s Assistant.
Include payroll items with zero amounts. Converts all payroll items for an employee. Otherwise, only the payroll items with year-to-date earnings for an employee will convert.
Convert transactions. When converting a CBS client, this checkbox should be marked so that transactions and account balances are converted.
Convert Accountant’s Utilities data. Converts data from Client Bookkeeping Solution Accountant’s Utilities (CBS AU). Data from Checkbook Solution Accountant’s Utilities (CBS for DOS) will not be converted. Note any localities are not converted from CBS AU Display UAUUL. After completing the conversion process, you will need to go into Accountant’s Assistant and (from Setup / PayCheck Tax Information / Local dialog) add any localities that existed in CBS AU. Also, if you have used CBS AU Display UAUSPMt to mark specific deductions to turn off, then you will need to go into Accountant’s Assistant and (from Setup / Miscellaneous Information / PayCheck tab) select those deductions in the grid provided.
6. Choose one of the following options:
Create new CSA client. Enter the WS2 client ID for the new CSA client.

Appendix B: Converting CBS Clients from WS2 to CSA
156 Accountant’s Assistant Handbook
Important! If you would like to use a client ID in the CSA program different from the one used in WS2, prior to the first export of client data you or your client must change the client ID in the CBS program (on the Database Management tab of the Utilities / Administrator Utilities dialog) to match to CSA program.
Convert into current client. For this option, the client database must already be open in CSA. No payroll information is converted and only information on the General Ledger tab of the Client Properties dialog is overwritten. This option is meant to be used for an existing Payroll CS client for whom you need to add the General Ledger module.
7. Click the Convert button. Data will be converted as described in the Write-Up Solution II to Creative Solutions Accounting Conversion Guide. To view this guide, search on Converting client data from the index in the CSA help browser, and then select the topic called from WS2 to Write-Up CS.
Verifying data in CSA After you have finished the conversion process, you should verify your information in CSA.
Templates In CSA, choose Setup / Employee Templates and modify the existing templates or add new ones.
If your client is a noncalculating payroll client, the program uses the template information as the department information for the employees. (If you will be importing client data from CBS (DOS), these templates are also used as the employee templates for PayCheck employees. CSA does provide three default templates that you can copy and modify to suit the client’s specific needs.)
Appendix B: Converting CBS Clients from WS2 to CSA
Accountant’s Assistant Handbook 157
If your client does not need to process employees with tips, it is recommended that you delete the Tipped template provided by the program.
If your client will be processing tips and you want to use the Tipped template, you must delete the pay items that are restricted in CBS. The following pay item types are considered restricted and will never transfer to CBS: Allocated Tips, Indirect Tips, TDW Reduction, Tipped Wages, and Tips Deemed to be Wages.
For clients offering pre-tax deductions, you need to set up only the deduction item. Corresponding pay items are no longer needed for CBS versions 2001.5.5 and higher.
Payroll departments After you have finished setting up the employee templates in CSA, choose Setup / Payroll Departments to assign the templates to departments. Also select GL Department and GL Location accounts if the client’s Chart of Accounts mask includes a D for departments or L for locations and the employee templates will be using GL combining account types.
Localities In Accountant's Assistant, choose Setup / PayCheck Tax Information / Local, and add any localities that existed in CBS AU and enter any necessary information.
Deductions If you have used CBS AU Display UAUSPMt to mark specific deductions to turn off, then in Accountant’s Assistant you need to choose Setup / Miscellaneous Information / PayCheck tab and mark the deductions you want to exclude in the grid provided.

Appendix B: Converting CBS Clients from WS2 to CSA
158 Accountant’s Assistant Handbook
Security In Accountant’s Assistant, choose Setup / Security to review and, if necessary, modify the security settings for each of the CBS client modules to enable the features you want the client to use.
Creating an accountant’s transfer file for the CBS client to import
It is strongly recommended that you convert at least one WS2 client with earnings before generating your first accountant’s transfer file for a CBS client.
1. From the Accountant’s Assistant main window, choose Tasks / Generate.
2. In the Generate Client Information dialog, double-click License Files, Security, and Payroll Items to select them.
3. Click the Generate button. If you are converting a client from CBS (DOS), or if this client processes noncalculating payroll checks through CBS CheckWriter, you also need to select Employee Templates.
4. In the Choose Licensee dialog, highlight the appropriate client and click the Generate button.
Important! You must generate this transfer file and retrieve it into CBS before the client creates their next export file. If this step is not performed, you will not be able to retrieve the client’s export data into CSA (you would only be able to retrieve it into WS2).

Appendix B: Converting CBS Clients from WS2 to CSA
Accountant’s Assistant Handbook 159
At the client’s office Before you travel to a client’s office, we strongly recommend that you first perform these steps for a CBS client at your own office. This will enable you to see how the conversion process works and help you to know what to expect.
1. At the client’s office, install the CBS client module(s) from the Client Bookkeeping Solution CD, 2001.5.x or greater and then open CBS.
2. If you are converting the client from The Checkbook Solution (DOS), first choose File / Import / From CBS For DOS.
3. Open the client company in CBS.
4. Choose File / Backup / Database to back up the company data.
5. Choose File / Import / From Accountant to import data from the accountant’s transfer file created in Accountant’s Assistant. After this import, the client is considered a CSA client and will now be able to export data only to Accountant’s Assistant and CSA (not to CBS AU and WS2).
Note: If your client uses CBS PayCheck, please be aware that your tax ID codes will change. The PayCheck items will have the same functionality as before; only the tax ID code that is referenced will be different. If you imported data from CBS for DOS, please review the appropriate User Bulletin for more details on steps you need to take in CBS before you can begin processing data for the client in CBS.
Important! For additional information regarding the conversion of payroll clients, search on Converting client data from the index in the CSA help browser, and then select the topic called Converting a CBS (DOS) client to CBS in CSA.

Appendix B: Converting CBS Clients from WS2 to CSA
160 Accountant’s Assistant Handbook

Accountant’s Assistant Handbook 161
Appendix C: Importing Client Data from Other Accounting Products
For details on importing data from various client accounting packages, please refer to the PDF document entitled “Importing Client Data from non-CBS Client Accounting Products via Accountant's Assistant.” To open that document in the Adobe Reader, open CSA, search on Accountant’s Assistant from the index in the CSA help browser, and then select the topic called Importing Client Data for Non-CBS Products via Accountant’s Assistant (PDF).

Appendix C: Importing Client Data from Other Accounting Products
162 Accountant’s Assistant Handbook

Accountant’s Assistant Handbook 163
Appendix D: Creating a CBS Demonstration Version Company
A Client Bookkeeping Solution demonstration version company allows your client to experiment with using the CBS client modules to enter transactions and to produce actual checks and printed reports. When demonstrating the CBS software for an existing Write-Up CS client or for a potential new client, you can use one of the sample databases included with CBS, or you can create data that is customized specifically for the client.
Note: The Export to Accountant feature is not enabled for either the CBS Sample Company license or the Demonstration Company license.
CBS Sample Company.cbs A fast way to allow your client to see the features and benefits of CBS is to use one of the sample company databases that are provided with the CBS software. The sample data in the CBS Sample Company allows the client to access all features of the CBS client modules except checkbook reconciliation and Export to Accountant.
1. During the installation of the CBS software on the client’s computer, mark the Sample data checkbox in the Features to Install dialog.
2. When the installation is complete, start the CBS program and choose File / Open Company.

Appendix D: Creating a CBS Demonstration Version Company
164 Accountant’s Assistant Handbook
3. In the Open Company Database window, choose either CheckWriter Sample Company or CBS Sample Company.
You and your client are now free to experiment with the sample data, adding or modifying it as you like and printing any of the CBS reports.
Sample company with modifications To demonstrate the checkbook reconciliation feature or to disable certain features of the CBS software for a specific client and exclude these features from appearing in the demonstration version that the client will see, rather than having the client install the sample data during the installation of CBS, do the following:
1. Insert the CS Professional Suite Accounting Products CD into the CD drive.
2. From the CSA main menu, choose File / Restore.
3. In the Restore Clients dialog, choose Clients from the drop-down list in the first field. Click the Change Backup Location button.
4. In the Modify Location dialog, navigate to the CBSClients folder on the CS Professional Suite Accounting Products CD. Click OK.
5. In the Restore Clients dialog, select DEMO1, CBS Sample Company and then click the Select button to move it to the Selected pane on the right.
6. Open the sample company in CSA.
7. Start Accountant’s Assistant by pointing to Accountant’s Assistant on the CSA Utilities menu and then choosing Client Bookkeeping Solution.
8. In Accountant’s Assistant, enable the checkbook reconciliation features or make other desired setup changes and then choose Tasks / Generate.

Appendix D: Creating a CBS Demonstration Version Company
Accountant’s Assistant Handbook 165
9. In the Generate Client Information dialog, select License Files and any other types of information that you want to include for the client and then click the Generate button.
10. Double-click the Demonstration Company in the Choose Licensee dialog.
11. (Optional) In the Select Additional Modules to Generate dialog, mark the checkboxes for the appropriate modules. Note that CBS CheckWriter always transfers. Click OK.
12. At the client’s office, start the CBS program. If you did not install the sample data, do so now.
13. Import the Demonstration Company database by choosing File / Import from Accountant.
Demonstration Company.cbs You may want to create a more convincing demonstration of CBS by using the client’s own data from Write-Up CS.
1. Follow the initial setup steps covered in Chapter 6 of this handbook just as if you were setting up a new CBS client.
2. When you generate data for the accountant’s transfer file with the client’s initial setup files, Accountant’s Assistant displays the list of clients for whom you have licensed CBS. Included on that list is the Demonstration Company license. Select this license for the client.
3. Install the CBS software on the client’s computer. During the installation process, do not install the sample data.
4. Start CBS on the client’s computer.
5. In CBS, choose Import / From Accountant from the File menu and import the data from the transfer file containing the Demonstration Company.cbs database information that you created in steps 1 and 2 above.

Appendix D: Creating a CBS Demonstration Version Company
166 Accountant’s Assistant Handbook
Important! The Export to Accountant feature has been disabled for the Demonstration Company license, so your client will not be able to export data using this license.
6. If you and the client decide to use CBS, you may generate a valid client license with Accountant’s Assistant. The program will retain any data you entered while using the Demonstration Company license.