accounts receivable billing and collections - az and... · afis | ar billing and collections 5 1....
TRANSCRIPT

Accounts Receivable
Billing and Collections
Training Guide Version 4.0
AFIS | AR Billing and Collections
1
Table of Contents
About This Training Guide ..................................................................................................... 4
Training Guide Description .................................................................................................................... 4
Training Guide Objectives ..................................................................................................................... 4
1. Overview of Accounts Receivable .................................................................................... 5
1.1. Accounts Receivable Lifecycle .................................................................................................... 5
1.2. Customer Setup .......................................................................................................................... 7
1.3. Accounts Receivable Event Types ............................................................................................. 10
1.4. Accounts Receivable Inquiry Pages .......................................................................................... 11
2. Create a Receivable Document...................................................................................... 15
2.1. Receivable Document Components ......................................................................................... 16
2.2. Receivable Document Data Entry ............................................................................................. 24
2.3. Create a Receivable Document ................................................................................................ 26
2.4. Bill a Vendor for Refund ........................................................................................................... 31
2.5. Create a Receivable from a Template ...................................................................................... 32
2.6. One-Time/Miscellaneous Customer Receivable....................................................................... 36
2.7. Summary Receivable ................................................................................................................ 40
2.8. Create a Recurring Receivable .................................................................................................. 42
2.9. Research Receivables................................................................................................................ 45
3. Receivable Modification ............................................................................................... 49
3.1. Receivable Modification ........................................................................................................... 49
3.2. Modify Receivable for Dispute ................................................................................................. 53
3.3. Receivable Cancellation ............................................................................................................ 56
4. Generate Bills ............................................................................................................... 59
4.1. Statements and Invoices ........................................................................................................... 59
4.2. Billing Configuration ................................................................................................................. 60
4.3. Control Billing Output ............................................................................................................... 68
4.4. Generate Statements................................................................................................................ 71
4.5. Generate Invoices ..................................................................................................................... 75
4.6. Reprint Statements or Invoices ................................................................................................ 78

AFIS | AR Billing and Collections
2
4.7. Generate or Reprint Invoices - Online ...................................................................................... 78
5. Collections Processing ................................................................................................... 79
5.1. Set Up Collection Processing Controls ...................................................................................... 79
5.2. Track Collection Activities ......................................................................................................... 85
5.3. Track Delinquent Accounts ....................................................................................................... 85
5.4. Apply Finance Charges .............................................................................................................. 85
5.5. Manage Past Due Statements .................................................................................................. 86
5.6. Manage Past Due Invoices ........................................................................................................ 88
5.7. Set Up Payment Plans – Department ....................................................................................... 89
5.8. Generate Payment Plan – Batch Job ........................................................................................ 90
6. Referral to Collection Agency ........................................................................................ 91
6.1. Create a Referral to Collection Agency Document ................................................................... 91
6.2. Referral to Collection Agency Batch Job ................................................................................... 94
6.3. Modify a Referral to Collection Agency Document .................................................................. 94
6.4. Cancel a Referral to Collection Agency Document ................................................................... 94
6.5. Research Referral to Collection Agency Documents ................................................................ 94
7. Write-Off Uncollectable Amounts ................................................................................. 95
7.1. Create a Write-Off Document .................................................................................................. 95
7.2. Modify a Write-Off Document .................................................................................................. 98
7.3. Cancel a Write-Off Document .................................................................................................. 98
7.4. Research Write-Off Documents ................................................................................................ 99
8. Cash Adjustments ....................................................................................................... 100
8.1. State Treasury Cash Adjustment ............................................................................................ 100
10.2 Department Treasury Cash Adjustment ................................................................................. 100
9. Accounts Receivable Reporting ................................................................................... 102
Appendix A – Required fields for Setup ............................................................................. 104
Billing Profile (BPRO) Fields Requiring Prior Setup ........................................................................... 104
Appendix B – Terminology ................................................................................................ 108
Terminology ...................................................................................................................................... 108
Appendix C – List of Acronyms .......................................................................................... 112
List of Acronyms ................................................................................................................................ 112

AFIS | AR Billing and Collections
3
Appendix D – Accounts Receivable Configuration .............................................................. 114
Accounts Receivable Configuration .................................................................................................. 114
9.1. Billing Profile ........................................................................................................................... 115
9.2. Billing Instructions .................................................................................................................. 116
9.3. Finance Charge Eligibility ........................................................................................................ 117
9.4. Finance Charge Setup ............................................................................................................. 118
9.5. Billing Rates............................................................................................................................. 118
9.6. Other Tables ........................................................................................................................... 119

AFIS | AR Billing and Collections
4
About This Training Guide
TRAINING GUIDE DESCRIPTION
AFIS (Arizona Financial Information System) Accounts Receivable functionality supports the billing,
tracking, and collection of money owed to the State. This guide introduces the AFIS Accounts Receivable
features for creating receivables, billing, and collections processing..
TRAINING GUIDE OBJECTIVES
In this training guide, you will:
Examine the Accounts Receivable area of AFIS
Review the configuration of Accounts Receivable tables
Create a Receivable document for various business scenarios
Perform Receivable maintenance
Review the Billing process
Review the Collections process
Create a Referral to Collection Agency document
Create a Write-Off document
AFIS | AR Billing and Collections
5
1. Overview of Accounts Receivable
Learning Objectives
In this lesson, you will:
Review the Accounts Receivable lifecycle
Examine the Customer Setup process
Identify the Accounts Receivable Event Types
Identify the Accounts Receivable Inquiry Pages
Lesson Overview
The Accounts Receivable (AR) processes in AFIS cover the billing of customers for goods or services
rendered, processing collection activities, and recording the receipt of money owed. The focus of this
course is the management of Receivables owed to the State. Revenue is recognized at the time goods
and services are provided by creating a Receivable. AFIS records revenue and receivable information
using Receivable (RE) document. Alternatively, there are options to bill for unearned revenue. This
lesson will provide an overview of the Accounts Receivable business area including a review of the
Accounts Receivable lifecycle, the setup of customers and customer accounts, and the event types and
inquiry pages that are available to Accounts Receivable users.
1.1. Accounts Receivable Lifecycle
The Accounts Receivable lifecycle, as shown in Figure 1 below, generally begins with the need to bill a
State customer. A Receivable is an accounting event created in AFIS to trigger the billing for goods or
services provided or in anticipation of the receipt of money. Accounts Receivable generates invoices,
statements, or both, to bill customers. When a payment is received, a Cash Receipt records the
collection of money. If no payment is received, finance charges may apply. Receivables can be modified,
reduced, referred to collections, or written off.

AFIS | AR Billing and Collections
6
Figure 1: Accounts Receivable Lifecycle
AFIS | AR Billing and Collections
7
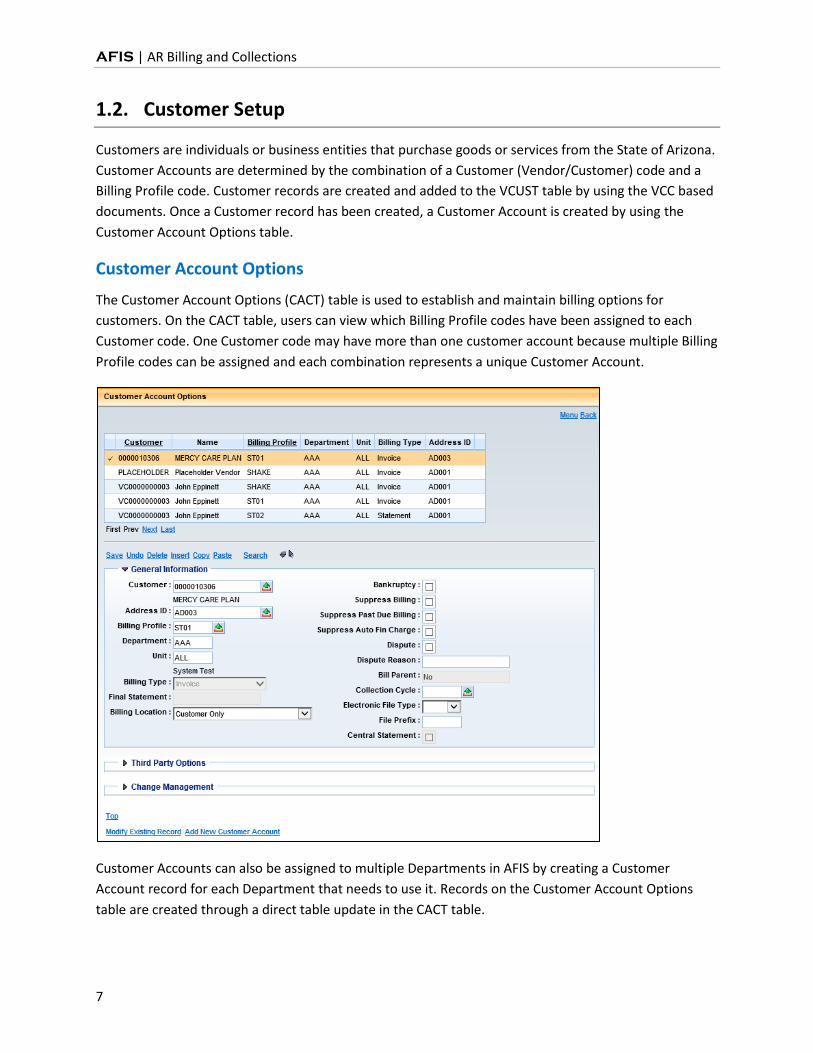
1.2. Customer Setup
Customers are individuals or business entities that purchase goods or services from the State of Arizona.
Customer Accounts are determined by the combination of a Customer (Vendor/Customer) code and a
Billing Profile code. Customer records are created and added to the VCUST table by using the VCC based
documents. Once a Customer record has been created, a Customer Account is created by using the
Customer Account Options table.
Customer Account Options
The Customer Account Options (CACT) table is used to establish and maintain billing options for
customers. On the CACT table, users can view which Billing Profile codes have been assigned to each
Customer code. One Customer code may have more than one customer account because multiple Billing
Profile codes can be assigned and each combination represents a unique Customer Account.
Customer Accounts can also be assigned to multiple Departments in AFIS by creating a Customer
Account record for each Department that needs to use it. Records on the Customer Account Options
table are created through a direct table update in the CACT table.

AFIS | AR Billing and Collections
8
ACTIVITY 1.1
Review the Customer Account Options Table
Scenario
You want to look up Customer Accounts by Department and Billing Profile so you will use the Customer
Account Options (CACT) table.
Setup
User is logged into the AFIS Home Page.
Steps
A. Navigate to the Customer Account Options table.
1. In the Jump to field, enter CACT.
2. Click Go. The Customer Account Options table opens.

AFIS | AR Billing and Collections
9
B. Explore the Customer Account Options table.
1. In the Customer Account Options table, click Search. The Search window opens.
2. In the Search window, in the Customer field, enter the Vendor/Customer ID from your student data card.
3. Click Ok. The grid on the Customer Account Options table lists all of the Customer Accounts that have been created for that Customer code, by Billing Profile and by Department.
4. Observe the information in the General Information section for the first record.
5. When you are finished, click the Home in the Primary Navigation Panel to return to the Home Page.

AFIS | AR Billing and Collections
10
1.3. Accounts Receivable Event Types
Event Types are codes used by the system that represent a business process. Event Types define data
elements that must be entered on the accounting line, drive updates to vendor/customer account
information tables, and drive the creation of posting lines. This topic identifies the Event Types used in
Accounts Receivable.
Table 1 below lists the permitted Event Types used on the Accounts Receivable transaction documents.
The possible Event Types vary by document code, and most document codes have a default Event Type
that is used unless otherwise specified.
Table 1: Accounts Receivable Document Event Types
Document
Code
Document Name Event Type Function
RE Receivable
AR01 (default) Bill Earned Revenue
AR10 Bill Unearned Revenue
AR31 Bill Vendor Refund- Non Budgetary
AR50 Bill to Asset
AR52 Bill to Liability
LN34 Bill Loan Principal Repayment
LS15 Bill Capital Lease Principal Payment
LS16 Bill Capital Lease Interest Payment
TR20 Bill for Return of Unused Travel Advance
RETRI TRIRIGA Receivable AR01 (default) Bill Earned Revenue
AR10 Bill Unearned Revenue
AR31 Bill Vendor Refund – Non Budgetary
AR50 Bill to Asset
AR52 Bill to Liability
CARE Cost Accounting Receivable
ARC3 (default) Bill Earned Revenue – Cost Reimbursement
AR10 Bill Unearned Revenue
AFIS | AR Billing and Collections
11
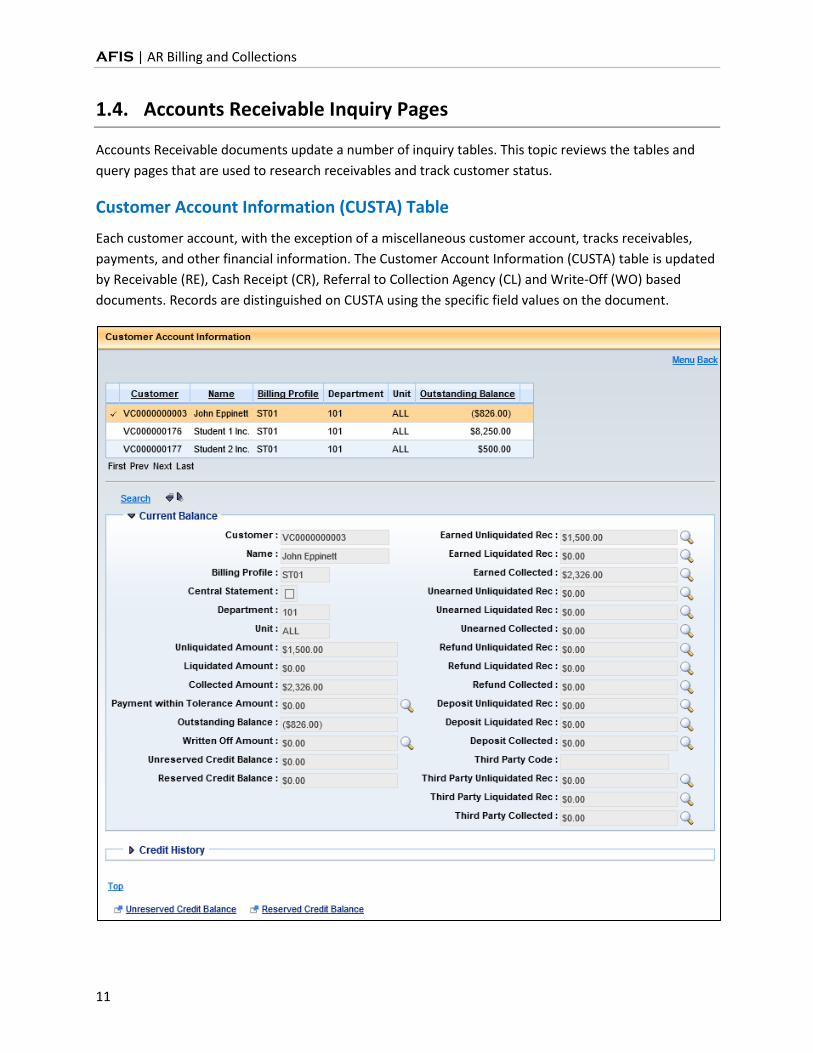
1.4. Accounts Receivable Inquiry Pages
Accounts Receivable documents update a number of inquiry tables. This topic reviews the tables and
query pages that are used to research receivables and track customer status.
Customer Account Information (CUSTA) Table
Each customer account, with the exception of a miscellaneous customer account, tracks receivables,
payments, and other financial information. The Customer Account Information (CUSTA) table is updated
by Receivable (RE), Cash Receipt (CR), Referral to Collection Agency (CL) and Write-Off (WO) based
documents. Records are distinguished on CUSTA using the specific field values on the document.
AFIS | AR Billing and Collections
12
CUSTA tracks the outstanding balance owed by the customer in the Current Balance Section. Several
fields are calculated to provide an overall perspective of the account.
The following fields on CUSTA are calculated to present the overall status of the customer account.
Un-liquidated Amount – The total amount of unpaid bills
Liquidated Amount – The total billed amount that has been paid
Collected Amount – The total amount that has been paid, whether billed or not, not including advances and pre-payments
Outstanding Balance – The total amount owed for the customer account. Calculated as the total amount billed, less all amounts collected that were billed (including advances and pre-payments)
Unreserved Credit Balance – The total unreserved credit balance on the customer account caused by overpayments.
Reserved Credit Balance - The total credit balance on the customer account that is designated for a special purpose.

AFIS | AR Billing and Collections
13
Customer Information (CUSTS) Table
The Customer Information (CUSTS) table is updated by the same AR documents that update the CUSTA
table. The difference is that the CUSTS table shows a customer’s activity summarized across all of
his/her billing profiles. The fields on CUSTS are the same as those in CUSTA.
AFIS | AR Billing and Collections
14
Receivable History and Reference Query (RDET)
The Receivable History and Reference Query (RDET) displays all document activity related to an RE based document. When a cash receipt references an RE, it updates the RDET.

AFIS | AR Billing and Collections
15
2. Create a Receivable Document
Learning Objectives
In this lesson, you will:
Examine the Receivable document components
Review Receivable document data entry
Create a Receivable document
Examine the requirements to bill a vendor for a refund
Create a Receivable from a template
Create a Receivable for a one-time customer
Examine the Summary Receivable process
Create a Recurring Receivable using Future Document Triggering
Research Receivables on inquiry tables
Lesson Overview
A Receivable (RE) based document is used to bill external customers for goods or services. The RE based
document is an accounting transaction that triggers the billing process and tracks receivable events in
order to recognize that money earned now will be received in the future. This lesson examines some of
the uses for the RE based document and the process of creating a Receivable document to meet certain
needs. This is the same process for creating an RETRI document; however, the RETRI document is used
for TRIRIGA related billing. Additionally, Cost Accounting functionality and the reimbursement process in
Advantage can be used to automatically generate CARE documents. However, the setup necessary to
facilitate this process is discussed within the Cost Accounting training guide.

AFIS | AR Billing and Collections
16
2.1. Receivable Document Components
Documents in AFIS are made of various components, also called sections. A Receivable document has
four components accessible from the Document Navigation Panel that are used in the document
creation process. Figure 2 below illustrates the relationship between the components.
Header – Stores values that apply to the entire RE based document
Vendor – Stores customer account information, AR Dept, AR Unit, and billing and collection details; RE based documents support one vendor line
Accounting – Used to record Chart of Accounts elements; multiple Accounting lines are allowed and each line contains an Event Type
Posting – Represents the postings for each accounting line
Figure 2: Receivable Document Components
Header
Vendor Line 1
Accounting
Line 1
Accounting
Line 2
Posting Line Posting Line

AFIS | AR Billing and Collections
17
Receivable Header Component
The Header component stores values that apply to the entire RE based document. The General
Information tab contains descriptive fields, along with date information common to most document
headers. It also shows the total amount of the document, the closed amount, and dispute information.
The following fields are included on the General Information tab:
Document Name – Free-form text field used to identify the document. The text entered does not print on invoices or statements
Record Date – The date the receivable event occurred. Defaults to the current system date. This date is your invoice date, and it is used to calculate the Due Date for billing and collection activities
Budget FY, Fiscal Year, Period – Indicates the accounting period of the event. Defaults to the budget fiscal year, fiscal year and period of the Record Date. These fields are normally left blank except for cross fiscal year processing
Document Description – Free-form text field used to identify the purpose of the document. The text entered does not print on invoices or statements.
Reclassification Date – On this date, the Future Document Triggering (FDT) feature will create a modification of the document to adjust the original accounting and load it to the document catalog for processing. Reclassification will change billed unearned revenue to billed earned revenue.
Reclassification Held – Checking this box will generate the document in “Held” status when reclassifying unearned revenue to earned revenue.
Document Dispute Status – Used to indicate that the customer has disputed the bill. The default value is Not Applicable

AFIS | AR Billing and Collections
18
Amount fields on the General Information tab do not allow data entry. The Actual Amount is the total
dollar amount of the RE based document. The Closed Amount is the dollar amount that has been
received, which is recorded on a Cash Receipt (CR) based document that references the Receivable. The
difference between these two amounts is the open amount of the RE based document.
The Additional Amounts tab displays a summary of activity that has been processed against the RE
based document. Cash Receipt (CR), Referral to Collection Agency (CL), and Write-Off (WO) based
documents are reflected here. Amounts on this page also break out fees included in the Receivable.
The Additional Dates tab displays the dates the RE based document is modified by the Finance Charge
process (offline job). These dates will not be updated when the user manually applies finance charges
through a Receivable Modification.
The Extended Description field is located on the Extended Description tab of the Header. This field is
similar to the Document Description field except it can store up to 1500 characters. This field does
appear on the invoice.

AFIS | AR Billing and Collections
19
Receivable Vendor Component
Creating an RE based document requires a valid and active Vendor/Customer code from the VCUST
table. The Customer code determines who is being billed by the RE based document.
In the Vendor section, the General Information tab contains the name, billing profile, and address
information of the customer, as well as the AR Department and Unit information.
The following fields are available on the General Information tab:
Vendor Customer – The customer being billed
Billing Profile – The billing profile code associated with the customer account
Traveler ID – The unique identifier for the traveler
Address Code – The code that corresponds to the address designated for billing; will usually default based on customer entered
Vendor Contact ID – The code that corresponds to the customer contact information; will usually default based on customer entered
AR Dept – The department used for validating the billing profile and customer account
AR Unit – The unit used for validating the billing profile and customer account. This should match the AR Unit on the Billing Profile.
Receivable Type – Select Regular (default) or Summary

AFIS | AR Billing and Collections
20
In the Vendor section, the Billing/Collection Information tab contains the dates and information used for
billing and collections. Some values established for invoice billing and collection processing on the Billing
Profile (BPRO) and Customer Account Options (CACT) tables can be overridden on this tab.
The following fields are available on the Billing/Collection Information tab:
Due Date – The date that payment is due for the Receivable. When billing with invoices, the due date will be calculated by using the Record Date and the Due Date Lag on the Billing Profile (BPRO) or System Options (SOPT) tables. Alternatively, a date may be manually entered. When billing with statements, the due date cannot be entered on the RE based document; the Due Date will be populated by the Statement process when the respective statement is generated.
Invoice Print Date – The date the invoice will be printed
Billing Location – The location where the receivable is to be sent. Required if the billing type is Invoices, Statements, or Both. Valid values are: Customer Only (Default), Third Party Only, Third Party with Customer Copy, Parent Address Only, or Parent Address with Customer Copy
Collection Cycle – This value overwrites the collection cycle entered on the CACT/BPRO tables
Invoice Instructions – When billing with invoices, the billing instructions from the Billing Profile code will default on the RE based document. To add, change, or remove the invoice instructions that are inferred from the Billing Profile, users can click the Invoice Instructions pick list to select the appropriate Billing Instruction code. This field is not applicable when Statement Billing is used
Status fields – Indicates if the Receivable has been referred for write-off or a collection agency
Payment Plan – Indicates that the Receivable is associated with a payment plan on the Payment Plan table
Legal Action – Indicates the Receivable has been referred for legal action. Automatic finance charges will not be applied to RE documents that have this option selected

AFIS | AR Billing and Collections
21
Bankruptcy – Used to suppress further billing and collections against a customer. This field is inferred from the CACT table. If the user unchecks this flag manually on the RE based document, then the system will not override the flag
Suppress Invoice Billing – Used to suppress the printing of an invoice
Suppress Past Due Invoice Billing – Used to suppress the printing of past due notifications
Suppress Auto Finance Charge – Stops finance charges from being applied to the RE based document by the automatic finance charge process
The Employee Information tab is used for recording the Payroll information for an employee and
contains the following fields:
Employee ID – Pick list to VCUST that must be valid for the Vendor Customer code that is populated on the RE based document
Employee Status – Status of the employee, value is inferred from VCUST if left blank
Payroll AR Number – Optional field to record additional information related to the employee or Receivable
AR Date – Optional field to record additional information related to the employee or Receivable
Pay Period End Date – Optional field to record the Pay Period End Date associated with the employee or Receivable

AFIS | AR Billing and Collections
22
Receivable Accounting Component
The Accounting component records the Chart of Accounts information used when posting the document
to the ledgers and performs updates to the applicable budgets. One RE based document can contain
one or more Accounting lines. Users must click Insert New Line before entering information into the
Accounting component.
In the Accounting section, the General Information tab contains descriptive fields and date information.
The following fields are available on the General Information tab:
Event Type – Used to determine which posting codes will be inferred and bring in data entry rules for transaction referencing, customer codes, vendor codes, and all defined Chart of Accounts elements. The default value for an RE based document is AR01 (Billed Earned Revenue). Other Event Type codes are used to accommodate different business functions
Line Type – Defines the purpose of the current line (principal, interest or fees). The default Line Type is A – Principal. To track manually calculated sales tax amounts, use the H – Tax line type.
Accounting Template – Used to infer accounting elements if necessary
Line Description – Allows the user to record a description for the accounting line. This field may appear on the invoice as a description for the transaction line. If a billing rate is used, but no line description is provided, the billing rate will provide the description on the

AFIS | AR Billing and Collections
23
invoice. If no billing rate is used and no line description is provided, then the line type name will appear as the transaction line description, on the invoice.
Line Amount or Billing Rate and Quantity– Enter the dollar amount of the current line or use a billing rate and quantity to calculate this amount. If a billing rate is used and no line description is used, then the billing rate name will appear on the invoice for the transaction line.
The Reference tab is used to specify a reference to a final document by document code, department and
ID. The reference tab must also specify the line being referenced and shows the reference type.
The Fund Accounting tab contains Chart of Accounts elements that define the budget structure or
account that will be updated by the receivable line. The Chart of Accounts data entry requirements are
defined by the Event Type entered on the Accounting line.
The Detail Accounting tab contains decentralized Chart of Accounts (COA) elements that help to further
identify the Receivable and apply it to particular Location, Activity, Function, Reporting, Task, and
Program codes.

AFIS | AR Billing and Collections
24
Receivable Posting Component
The Posting component displays the accounting impact of the RE based document. No data can be
entered into the Posting section; Posting lines are generated from the rest of the document data. Users
can click the Eye icon to expand the posting details.
Each Accounting line entered into the Accounting section has its own Posting line(s). The Posting section
will only display the Posting lines for one Accounting line at a time.
2.2. Receivable Document Data Entry
The data entry requirements on a Receivable (RE) based document are discussed in this topic. Some
fields can be inferred from other fields, accounting template values, or function values.
Header
There are no required fields on this section.
Vendor
In the Receivable Vendor section, on the General Information tab, the following fields are required:
Vendor Customer – Enter a valid Vendor/Customer code or select from the pick list
Billing Profile – Enter a value or select from the pick list
Legal Name, Address Code, Address Line, City, State, Zip, Country – These fields are auto populated based on the Vendor/Customer code unless the Vendor/Customer type is Miscellaneous
Vendor Contact ID – This field is auto populated based on the Vendor/Customer code unless the Vendor/Customer type is Miscellaneous
AR Dept – This field is auto populated based on the Document ID
AR Unit – This field is auto populated based on the option set for the AR Dept on the Department table, but may need to be changed, if for instance, the default value is ALL Units, but the Billing Profile only allows for a specific Unit within the Department.
Receivable Type – Select Regular (default) or Summary
In the Vendor section, on the Billing/Collection Information tab enter the due date and invoice print date, or let these dates default to the current system date.
AFIS | AR Billing and Collections
25
Accounting
When entering data in the Accounting section, users must first click Insert New Line. An Accounting
Template or Function code can be used to infer Chart of Accounts elements in the Accounting section.
In the Receivable Accounting section, on the General Information tab, the following fields are required:
Event Type – Select the appropriate Event Type from the pick list, or allow to default
Line Type – Select the appropriate Line Type from the pick list, or allow to default
Line Amount – Enter the Line Amount dollar amount, or optionally use the billing rate to automatically calculate this line amount
Billing Rate – Instead of entering a flat line amount, select a billing rate code from the pick list.
Quantity – If using a billing rate, enter the quantity associated with the billing rate used.
On the Fund Accounting tab, users must enter the required Chart of Accounts elements if an Accounting
Template or Function is not used. Table 2 below lists the minimum required elements on the Fund
Accounting tab.
Table 2: Chart of Accounts Fields
COA Element Notes
Fund Required
Sub-Fund Conditionally required depending on Department configuration
Object Conditionally required for Event Types posting to expenditure, i.e. vendor refund
Revenue Conditionally required for Event Types posting to revenue
Department Required
Unit Required
BSA Conditionally required for Event Types posting to asset or liability account
Additional Accounting lines may be entered into this section or created from existing lines using the
Copy and Paste features.
Posting
There is no data entry performed in the Posting section. After the document is validated, users can click
the Posting section to review the posting information and the eye icon to view posting details located in
the Fund Accounting and Detail Accounting tabs.

AFIS | AR Billing and Collections
26
2.3. Create a Receivable Document
Receivable (RE) documents can be created by navigating to the Document Catalog.
ACTIVITY 1.2
Create a Receivable Document
Scenario
You have received a request to create a Receivable to record $500 worth of services that your
department provided to a customer. The Receivable document will record the amount as Bill Earned
Revenue in order to collect the $500 from the customer.
Setup
User is logged into the AFIS Home Page.
Steps
A. Navigate to the Document Catalog and create a Receivable document.
1. In the Secondary Navigation Panel, click Search.
2. Click Document Catalog.
3. Click Create.
4. In the Code field, enter RE.
5. In the Dept field, enter the data from your student data card.
6. Check the Auto Numbering check box.
7. Click Create. The document is created with a Document ID, and shown as Ver: 1, Function: New, Phase: Draft. The document ID will become the Invoice ID.
AFIS | AR Billing and Collections
27
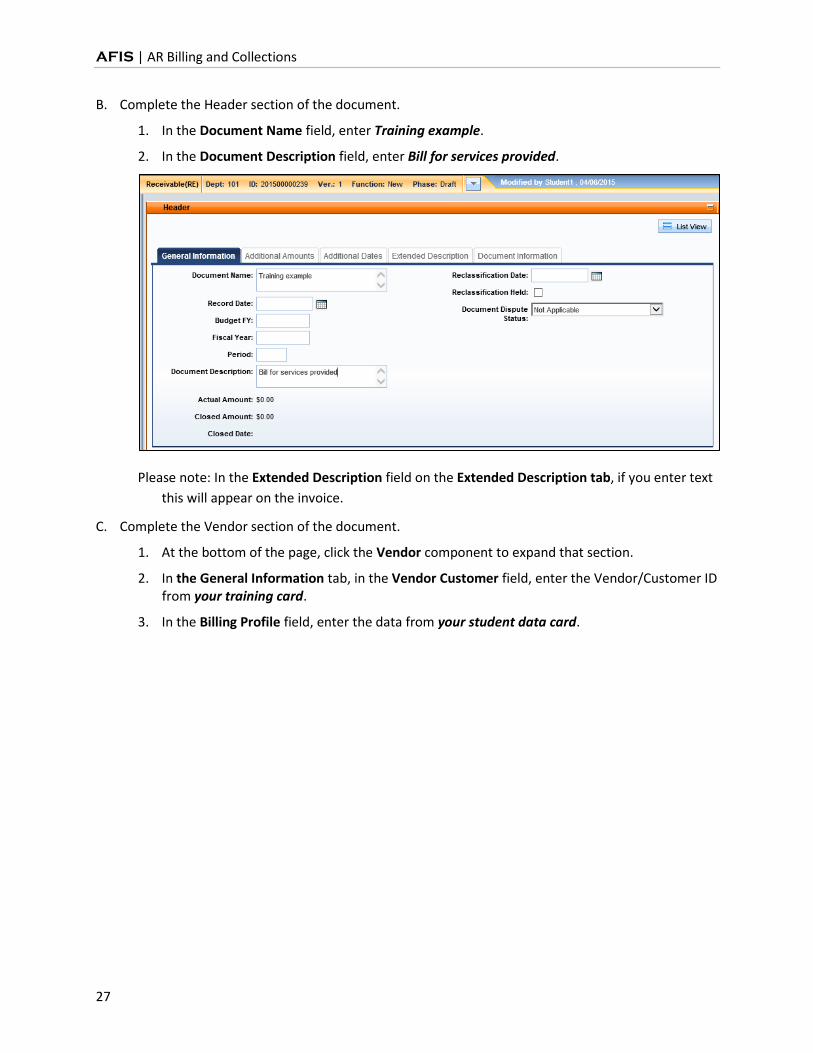
B. Complete the Header section of the document.
1. In the Document Name field, enter Training example.
2. In the Document Description field, enter Bill for services provided.
Please note: In the Extended Description field on the Extended Description tab, if you enter text
this will appear on the invoice.
C. Complete the Vendor section of the document.
1. At the bottom of the page, click the Vendor component to expand that section.
2. In the General Information tab, in the Vendor Customer field, enter the Vendor/Customer ID from your training card.
3. In the Billing Profile field, enter the data from your student data card.
AFIS | AR Billing and Collections
28
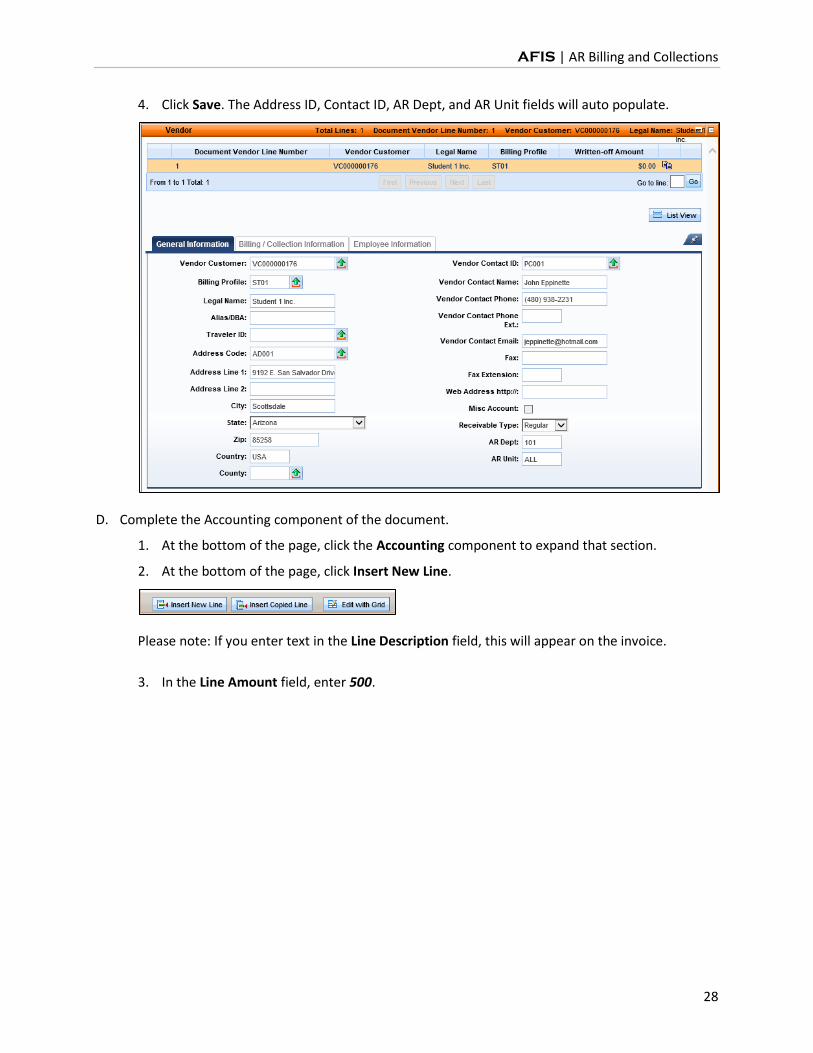
4. Click Save. The Address ID, Contact ID, AR Dept, and AR Unit fields will auto populate.
D. Complete the Accounting component of the document.
1. At the bottom of the page, click the Accounting component to expand that section.
2. At the bottom of the page, click Insert New Line.
Please note: If you enter text in the Line Description field, this will appear on the invoice.
3. In the Line Amount field, enter 500.

AFIS | AR Billing and Collections
29
4. Click Save. The Event Type field defaults to AR01 and the Line Type defaults to A (Principal).
5. Click the Fund Accounting tab.
6. In the Fund field, enter the data from your student data card.
7. In the Sub Fund field, enter the data from your student data card.
8. In the Revenue field, enter 4339.
9. In the Department field, enter the data from your student data card.
10. In the Unit field, enter the data from your student data card.
11. In the Appr Unit field, enter the data from your student data card.
12. Click the Detail Accounting tab.
13. In the Activity field, enter the data from your student data card.
14. In the Task field, enter the data from your student data card.

AFIS | AR Billing and Collections
30
15. In the Sub Task field, enter the data from your student data card.
E. Check the RE document for errors and submit it.
1. Click Validate to check for errors. If any errors exist, correct the errors and click Validate again. If the Validation is successful, the following message is displayed in the upper left corner of the screen: “Document validated successfully.”
2. Click the Posting section.
3. Click the Eye icon. Review and verify the posting line generated correctly reflect the values entered on the Accounting section.
4. Click Submit to submit the document for approval. If submission is successful, the following message is displayed in the upper left corner of the screen: “Document submitted successfully.”
5. Click the Home in the Primary Navigation Panel to return to the Home Page.

AFIS | AR Billing and Collections
31
2.4. Bill a Vendor for Refund
When a vendor is overpaid or a return is processed, a Receivable (RE) based document can be created to
bill the vendor for a refund of the amount owed. The vendor must be set up as a customer on the
Vendor Customer table in order to create a Receivable for an amount owed by a vendor. For a vendor
refund Receivable, the data entry requirements are mostly the same, except that the Event Type and
Chart of Accounts elements required are different from a standard Receivable.
In the Accounting section, the following Event Type should be used:
AR31 – Bill Vendor Refund – Non Budgetary, posts to a balance sheet account, credits the expected refund to a holding account; requires Fund and BSA
All other document data entry requirements are identical. Following completion of data entry, the
document is validated and submitted to workflow for approval.
AFIS | AR Billing and Collections
32
2.5. Create a Receivable from a Template
It is possible to create a Receivable document that is based on a template that was previously created
and saved in AFIS. The template stores all commonly used information, and only that information that is
unique to the document needs to be entered in order to complete the document.
ACTIVITY 1.3
Create a Receivable Document from a Template
Scenario
You have received a request to create a Receivable that is nearly identical to a Receivable that you
create every month for the same customer. You will use a template that you created previously as the
basis for the new Receivable document.
Setup
User is logged into the AFIS Home Page.
Steps
A. Navigate to the Document Catalog and locate the Receivable template.
1. In the Secondary Navigation Panel, click Search.
2. Click Document Catalog.
3. In the Code field, enter RE.
4. In the Dept field, enter the data from your student data card.
5. Click Document State, to expand that section.
6. In the Phase field, select Template from the drop down menu.

AFIS | AR Billing and Collections
33
7. Click Browse.
8. In the results in the grid below, click the ID link for Activity 4.6 for the RE document template to open the template.
B. Create a new Receivable based on the template.
1. In the template, at the bottom of the screen click Copy.
2. In the Copy Document screen, in the Document Department Code field, enter the data from your student data card.

AFIS | AR Billing and Collections
34
3. Check the Auto Numbering check box.
4. Click Copy Document. The document is created with a Document ID, and shown as Ver: 1, Function: New, Phase: Draft.
C. Complete the Receivable document.
1. In the Header section, in the Document Description field, enter Monthly bill.
2. Click the Vendor section.
3. Verify the information has copied over from the template.

AFIS | AR Billing and Collections
35
4. Click the Accounting section.
5. Verify the information has copied over from the template.
6. Click Save.
D. Check the RE document for errors and submit it.
1. Click Validate to check for errors. If any errors exist, correct the errors and click Validate again. If the Validation is successful, the following message is displayed in the upper left corner of the screen: “Document validated successfully.”
2. Click Submit to submit the document for approval. If submission is successful, the following message is displayed in the upper left corner of the screen: “Document submitted successfully.”
3. Click Home in the Primary Navigation Panel to return to the Home Page.

AFIS | AR Billing and Collections
36
2.6. One-Time/Miscellaneous Customer Receivable
When creating a Receivable (RE) based document for a one-time or miscellaneous customer, the
miscellaneous customer code is entered in the Vendor section. This requires that the user enters the
necessary billing and contact information for the customer since none of that information will be
inferred from the customer code. Receivables that use miscellaneous customers do not update the
CUSTA and CUSTS billing tables.
A Statewide miscellaneous customer code of MISCCUSTOM is available in AFIS. The Department can link
this customer code with a department billing profile in the CACT table, to create a customer account.
ACTIVITY 1.4
Create a Receivable Document for a One-Time Customer
Scenario
You have received a request to create a Receivable to record $500 worth of services that your
department provided to a customer. The customer does not exist in AFIS so you will create the
Receivable using the Miscellaneous customer code which will allow you to enter the name and address
for the customer.
Setup
User is logged into the AFIS Home Page.
Steps
A. Navigate to the Document Catalog and create a Receivable document.
1. In the Secondary Navigation Panel, click Search.
2. Click Document Catalog.
3. Click Create.
4. In the Code field, enter RE.
5. In the Dept field, enter the data from your student data card.

AFIS | AR Billing and Collections
37
6. Check the Auto Numbering check box.
7. Click Create. The document is created with a Document ID, and shown as Ver: 1, Function: New, Phase: Draft.
B. Complete the Header section of the document.
1. In the Document Name field, enter Training Example.
2. In the Document Description field, enter Bill for services provided.
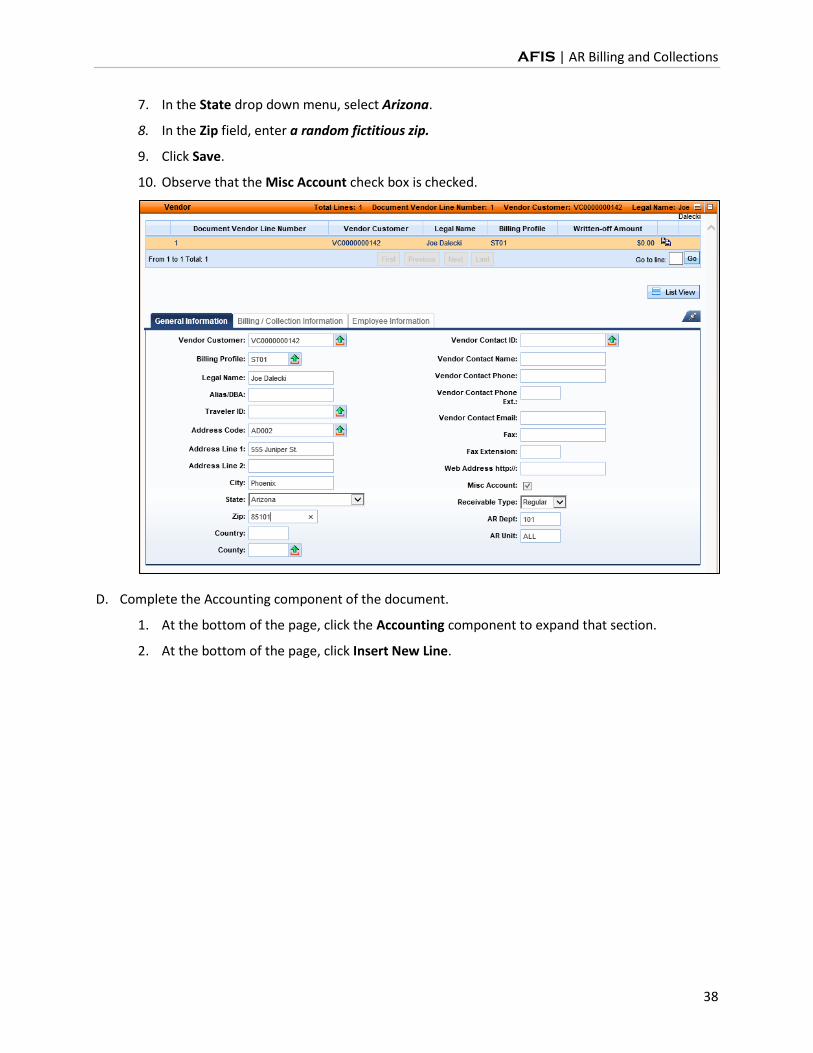
C. Complete the Vendor section of the document.
1. At the bottom of the page, click the Vendor component to expand that section.
2. In the General Information tab, in the Vendor Customer field, enter VC0000000142.
3. In the Billing Profile field, enter the data from your student data card.
4. In the Legal Name field, enter your name.
5. In the Address Line 1 field, enter a random fictitious address.
6. In the City field, enter a random fictitious city.
AFIS | AR Billing and Collections
38
7. In the State drop down menu, select Arizona.
8. In the Zip field, enter a random fictitious zip.
9. Click Save.
10. Observe that the Misc Account check box is checked.
D. Complete the Accounting component of the document.
1. At the bottom of the page, click the Accounting component to expand that section.
2. At the bottom of the page, click Insert New Line.
AFIS | AR Billing and Collections
39
3. In the Line Amount field, enter 500.
4. Click the Fund Accounting tab.
5. In the Fund field, enter the data from your student data card.
6. In the Sub Fund field, enter the data from your student data card.
7. In the Revenue field, enter 4339.
8. In the Department field, enter the data from your student data card.
9. In the Unit field, enter the data from your student data card.
10. In the Appr Unit field, enter the data from your student data card.
11. Click the Detail Accounting tab.
12. In the Activity field, enter the data from your student data card.
13. In the Function field, enter the data from your student data card.
14. In the Task field, enter the data from your student data card.

AFIS | AR Billing and Collections
40
15. In the Sub Task field, enter the data from your student data card.
E. Check the RE document for errors and submit it.
1. Click Validate to check for errors. If any errors exist, correct the errors and click Validate again. If the Validation is successful, the following message is displayed in the upper left corner of the screen: “Document validated successfully.”
2. Click Submit to submit the document for approval. If submission is successful, the following message is displayed in the upper left corner of the screen: “Document submitted successfully.”
3. Click Home in the Primary Navigation Panel to return to the Home Page.
2.7. Summary Receivable
A summary receivable is a Receivable document with the Receivable Type of Summary which does not
require a Billing Profile. Summary receivables are used to facilitate budget control and for reporting. In
order to create a summary receivable, a Miscellaneous customer must be configured in AFIS. They do
not generate a bill, are not eligible for finance charge accrual, and are not picked up in the past-due
collection process. They also do not appear on the CUSTS and CUSTA tables.
AFIS | AR Billing and Collections
41
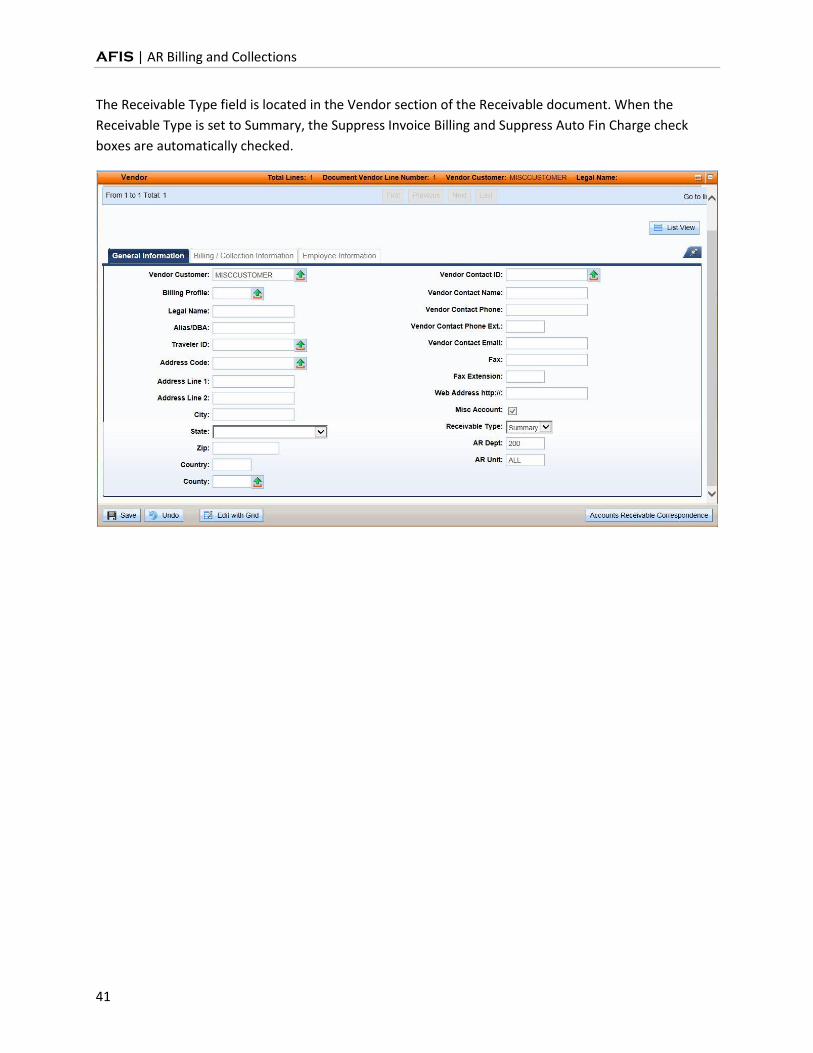
The Receivable Type field is located in the Vendor section of the Receivable document. When the
Receivable Type is set to Summary, the Suppress Invoice Billing and Suppress Auto Fin Charge check
boxes are automatically checked.

AFIS | AR Billing and Collections
42
2.8. Create a Recurring Receivable
Departments may need to create Receivable (RE) based document for the same customer(s) on a
recurring basis (weekly, monthly, yearly). For these types of receivables, a recurring Receivable may be
created, eliminating the need to re-enter information on RE based documents on a regular basis. This
process uses the Future Document Triggering table.
Future Document Triggering Table
Once an RE based document is completed, validated, and submitted, it is routed to workflow for
approval. When all approvals are applied the document moves to a Final phase. Documents in a Final
state can be used to set up a recurring Receivable on the Future Document Triggering (FDT) table.
Users with proper security authorization may access and update the FDT table using the RE based
document’s Document Menu. From that option, the user is directed to the Future Document Triggering
page. Document information is inferred to a new record.
The FDT table has the ability to create documents in Draft/Held status by selecting the Hold Document
check box. This gives the user the opportunity to review the RE based document before submitting it for
approval. Otherwise, the recurring RE based document(s) is submitted and routed for approval during
the nightly cycle. A subset of users with access to the FDT table also has access to select the Bypass
Approvals check box. If selected, the recurring RE based document is submitted to Final during the
nightly cycle.

AFIS | AR Billing and Collections
43
The following fields determine the frequency of recurrence:
Frequency Type 1 – Choose: One time future, Weekly, Monthly by Day, Monthly by Date
Frequency Type 2 – Indicate the weekly or monthly recurrence pattern
Frequency Type 3 – Specify the day of the week, day of the month, or date in the month
The following fields specify additional information for the record:
Recurring – This radio button is automatically populated on a new record
Start Date – The date the recurring RE based document should start
End Date – The date the recurring RE based document should end; will not allow an end date beyond the current fiscal year
Expire Date – The date the trigger record will be removed from online view; if left blank, this will calculate 6 months from the Start Date
Carry Forward Amount – Select if the Line Amount field on the original document should be copied forward to recurring documents
Once the nightly Future Document Triggering job is complete, users will be able to check for the
recurring documents on the FDT table, by searching for the original Receivable. All related recurring
Receivable’s will be listed in the grid on the FDT table. The Page Search function or Jump to field can be
used to go directly to the FDT table.
ACTIVITY 1.5
Set up a Recurring RE Document
Scenario
You have received a request to set up a recurring Receivable document for a customer that needs to be
billed on the first day of every month for the next year.
Setup
User is logged into the AFIS Home Page.
Steps
A. Locate and open the Final RE document in the Document Catalog.
1. In the Secondary Navigation Panel, click Search.
2. Click Document Catalog.
3. In the Code field, enter RE.
4. In the Dept field, enter the data from your student data card.
5. In the ID field, enter the data from your student data card.
6. Click Browse.

AFIS | AR Billing and Collections
44
7. Click the ID link for the document in the results. The document opens.
B. Navigate to the Future Document Triggering table.
1. In the RE document, click the Document Menu.
2. In the Document Menu, click Document Future Triggering.
C. Create a record on the FDT table.
1. Click Insert. The Doc Code, Doc Dept, and Doc ID fields are auto populated with the RE document information. The Recurring radio button is automatically checked.
2. In the Start Date field, enter today’s date.
3. In the Frequency Type 1 field drop down menu, select Monthly by Date.
4. In the Frequency Type 2 field drop down menu, select Every Month.
5. In the Frequency Type 3 field drop down menu, select 1st.
6. Select the Hold Document check box to enable a review of the document before it is submitted.

AFIS | AR Billing and Collections
45
7. Click Save. The Active check box is checked. The Carry Forward Amount check box is not checked.
8. Click Back to return to the document.
9. Click the Home in the Primary Navigation Panel to return to the Home Page.
2.9. Research Receivables
Receivable documents are tracked on the Customer Account Information (CUSTA), Customer
Information (CUSTS), and Receivable Search (RESTA) tables. The CUSTA table has drill down features
(Magnifying Glass) that can be used to research the specific documents that have impacted certain field
amounts. Clicking the magnifying glass icon next to a field will direct the user to the Detailed Transaction
Listing page.
ACTIVITY 1.6
Research Receivables and Customer Accounts
Scenario
You want to check the accounting impact of Receivables for customer accounts on the CUSTA, CUSTS,
and RESTA tables.
Setup
User is logged into the AFIS Home Page.
Steps
A. Navigate to and review the CUSTA updates.
1. In the Jump to field, enter CUSTA.
2. Click Go. The Customer Accounting Information table opens along with a Search pop up window.
3. In the Search window, in the Customer field, enter the Vendor/Customer ID from your training card.
4. In the Billing Profile field, enter the data from your student data card.

AFIS | AR Billing and Collections
46
5. Click Ok. The CUSTA records for the customer and billing profile are displayed.
6. Review the record; observe the Earned Unliquidated Rec field.
7. Click the Magnifying Glass icon next to the Earned Unliquidated Rec field. The Detailed Transaction Listing is displayed.

AFIS | AR Billing and Collections
47
8. Click Ok to return to the CUSTA table.
B. Navigate to and review the CUSTS updates.
1. In the Jump to field, enter CUSTS.
2. Click Go. The Customer Information table opens along with a Search pop up window.
3. In the Search window, in the Customer field, enter the Vendor/Customer ID from your student data card.
4. Click Ok.
5. Review the record; observe the values in the balance fields.

AFIS | AR Billing and Collections
48
C. Navigate to and review the RESTA updates.
1. In the Jump to field, enter RESTA.
2. Click Go. The Receivable Search page opens.
3. In the Customer field, enter the Vendor/Customer ID from your student data card.
4. Click Browse.
5. Review the records, using the navigation buttons below the grid to look through the documents.
6. Observe the information displayed in the Due and Outstanding columns for each document in the results.
7. Click a Doc ID link in the grid to open that document.
8. Review the document.
9. Click Close.
10. Click the Home in the Primary Navigation Panel to return to the Home Page.

AFIS | AR Billing and Collections
49
3. Receivable Modification
Learning Objectives
In this lesson, you will:
Create a modified Receivable
Modify a Receivable for customer dispute
Cancel a Receivable
Lesson Overview
Receivable (RE) based documents must be corrected when they contain incorrect data. This is often
accomplished through a modification of the document. Modifications can change the dispute status,
dollar amounts, and accounting details. In a Final state Receivable, some values cannot be modified,
such as the customer and billing profile. In such cases, the document must be discarded and recreated.
3.1. Receivable Modification
An agency may need to modify an RE based document to correct accounting errors, add customer
dispute information, or to modify amounts. Users modify an existing document by clicking the Edit
button from inside the document. This creates a new version of the document, in Draft phase. Version
numbers are assigned automatically, in sequential order.
Line Amounts
The Receivable Line Amount can be changed by entering the correct value on the affected Accounting
line. The Line Amount can be reduced by an amount equal to or less than the Outstanding Amount
shown on the Additional Information tab. For example, if $25 has already been collected against a $100
Receivable Accounting line, the line can be reduced by up to $75. The Line Amount can be increased at
any time by any amount.
Event Types and Chart of Accounts Elements
To change the Event Type and Chart of Accounts elements, the current Accounting line must be closed
and a new line created with the correct values. The line is closed by reducing the Line Amount by the
current Outstanding Amount. If the line has been partially closed, there is no change to the Posting lines
of the closed amount.

AFIS | AR Billing and Collections
50
Accounting Lines
New lines may also be added to the RE document through a modification. In the Accounting section, the
Insert New Line button creates a new blank line. Alternatively, the copy and paste features can be used
to create a new line from an existing line.
Lines can be closed on the document by changing the Line Amount to zero.
Adjustment Reason
When completing an RE modification, each Accounting line that is changed requires a valid Reason code
is entered in order to validate and submit the document. The Reason code specifies the reason for the
modification and helps in the document review process.
ACTIVITY 1.7
Create a Receivable Modification to Correct Errors
Scenario
Errors have been discovered in a Final state Receivable document. You will create a modification to
correct the errors and submit the document.
Setup
User is logged into the AFIS Home Page.
Steps
A. Search for an existing Receivable document.
1. In the Secondary Navigation Panel, click Search.
2. Click Document Catalog.
3. In the Code field, enter RE.
4. In the Dept field, enter the data from your student data card.
5. In the ID field, enter the data from your student data card.

AFIS | AR Billing and Collections
51
6. Click Browse.
7. Click the document ID link to open the document.
B. Create a new Draft version of the Receivable document.
1. At the bottom of the document, click Edit.
2. Observe that a new document has been created, with a Version: 2, Function: Modification and Phase: Draft.
C. Correct the Accounting information in the document.
1. Click the Accounting section to expand that section.
2. In the grid, observe the existing Accounting lines.
3. In the details for the first Accounting line, in the Line Amount field, change the value to 400.

AFIS | AR Billing and Collections
52
4. In the Reason field, select REDRE (Reduce Receivable Amount) from the pick list.
D. Change the Line Type for the second Accounting line.
1. In the Accounting line grid, click the Second Accounting line to display the details for that line.
2. In the Line Type field, select D (Admin Fee) from the pick list.
3. In the Reason field, select RECLASS (Reclassification) from the pick list.
4. Click the Fund Accounting tab.
5. In the Revenue field, enter 4314.

AFIS | AR Billing and Collections
53
E. Check the RE modification document for errors and submit it.
1. Click Validate to check for errors. If any errors exist, correct the errors and click Validate again. If the Validation is successful, the following message is displayed in the upper left corner of the screen: “Document validated successfully.”
2. Click Submit to submit the document for approval. If submission is successful, the following message is displayed in the upper left corner of the screen: “Document submitted successfully.”
3. Click the Home in the Primary Navigation Panel to return to the Home Page.
3.2. Modify Receivable for Dispute
A department may need to record a customer that is in dispute by modifying the Receivable’s Document
Disputed Status field in the Header section to Disputed. In the Vendor section, on the Billing/Collection
tab, the Suppress Auto Fin Charge check box must be checked and a reason must be entered on each
Accounting line. If the Auto Fin Charge should still apply, then do not check this box, and instead apply
an override to the document, to override the error requiring this.
ACTIVITY 1.8
Modify a Receivable to Record Dispute
Scenario
A customer has disputed a bill they received. You need to update the Receivable document in AFIS to
reflect the dispute.
Setup
User is logged into the AFIS Home Page.
Steps
A. Search for an existing Receivable document.
1. In the Secondary Navigation Panel, click Search.
2. Click Document Catalog.
3. In the Code field, enter RE.
4. In the Dept field, enter the data from your student data card.
5. In the Doc ID field, enter the data from your student data card.
6. Click Browse.
7. Click the document ID link to open the document.

AFIS | AR Billing and Collections
54
B. Create a new Draft version of the Receivable document.
1. At the bottom of the document, click Edit.
2. Observe that a new document has been created, with a Version: 2, Function: Modification and Phase: Draft.
C. Complete the Header section of the document.
1. In the Document Description field, enter Customer disputes bill.
2. In the Document Dispute Status field, select Disputed from the drop down menu.
D. Complete the Vendor section of the document.
1. Click the Vendor section to expand that section.
2. Click the Billing/Collections tab.

AFIS | AR Billing and Collections
55
3. Check the Suppress Auto Fin Charge check box.
E. Complete the Accounting section of the document.
1. Click the Accounting section to expand that section.
2. In the Reason field, select RECLASS (Reclassification) from the pick list.

AFIS | AR Billing and Collections
56
F. Check the RE modification document for errors and submit it.
1. Click Validate to check for errors. If any errors exist, correct the errors and click Validate again. If the Validation is successful, the following message is displayed in the upper left corner of the screen: “Document validated successfully.”
2. Click Submit to submit the document for approval. If submission is successful, the following message is displayed in the upper left corner of the screen: “Document submitted successfully.”
3. Click Home in the Primary Navigation Panel to return to the Home Page.
3.3. Receivable Cancellation
In AFIS, the Discard feature is used to either remove a draft version of a document completely or to
cancel a document in a Final phase. Cancelling a Final phase document will reverse the accounting
impact and customer tracking updates however; the document will remain in the system. Cancellation is
not used for Write-Off purposes; see Section 9 of this guide for procedures to Write-Off Uncollectable
Amounts.
Discard a Draft Document
To remove a draft version of a document, open the document and click Discard. A prompt appears to
confirm the action. Clicking Ok will close and remove the draft from AFIS.
Cancel a Final Document
There are times when a Receivable document must be cancelled. For example, if the wrong customer or
billing profile were entered on the RE based document, it must be cancelled and recreated using the
correct information. Receivables that have been referenced by another document cannot be discarded.
When Discard is used on a document in Final state, it will create a Draft Cancellation version of the
document. Only a few fields are available for data entry on a Draft Cancellation version of a document,
and no data entry is required. Submitting a Draft Cancellation version routes the document to workflow
for approval.

AFIS | AR Billing and Collections
57
ACTIVITY 1.9
Cancel a Receivable Document
Scenario
A previously submitted and approved Receivable document needs to be cancelled out and its accounting
impact reversed.
Setup
User is logged into the AFIS Home Page.
Steps
A. Search for an existing Receivable document.
1. In the Secondary Navigation Panel, click Search.
2. Click Document Catalog.
3. In the Code field, enter RE.
4. In the Dept. field, enter the data from your student data card.
5. In the Doc ID field, enter the data from your student data card.
6. Click Browse.
7. Click the document ID link to open the document.
B. Create a new Draft Cancellation version of the Receivable document.
1. At the bottom of the document, click Discard.
2. In the message window that appears, click Ok to confirm the action.
3. Observe that a new document has been created, with a Version: 2, Function: Cancellation and Phase: Draft.
C. Submit the Receivable cancellation document.
1. Click Validate to check for errors. If any errors exist, correct the errors and click Validate again. If the Validation is successful, the following message is displayed in the upper left corner of the screen: “Document validated successfully.”
2. Click Submit to submit the document for approval. If submission is successful, the following message is displayed in the upper left corner of the screen: “Document submitted successfully.”
3. Click Close. The original Receivable document is displayed.

AFIS | AR Billing and Collections
58
4. Click Close. The Document Catalog is displayed.
5. Observe that two versions of the RE document now exist. Version 1 is in Historical (Final) status and Version 2 is in Cancellation (Final) status.
6. Click Home in the Primary Navigation Panel to return to the Home Page.

AFIS | AR Billing and Collections
59
4. Generate Bills
Learning Objectives
In this lesson, you will:
Review statement and invoices
Examine the Billing configuration and setup
Review how to control billing output
Examine the process of generating statements
Examine the process of generating invoices
Review how to reprint statements or invoices
Examine the on-demand printing features
Lesson Overview
The Accounts Receivable features of AFIS provide the ability to generate statements and invoices in
order to request payment from customers based on receivables entered into the system. This process is
enabled through the setup of reference tables and submission of batch processes. The table setup
defines billing controls such as: frequency, receivable selection, and invoice and statement presentation.
The batch processes produce the statements and invoices while recording the activity in AFIS.
4.1. Statements and Invoices
A statement is a presentation of a customer account at a certain point in time that includes the total
outstanding amount owed. The statement typically includes the customer’s previous balance, recent
transactions, and payments received during the last billing period. Various fields that are manually
inputted will display on the statement, professional verbiage and proper grammar/spelling should
always be used.
An invoice requests payment from a customer. An invoice includes the details of a specific receivable
such as cost per unit, total cost, and applicable tax. An invoice also provides a payment due date.
Customers may be notified by statements, invoices, or both statements and invoices. Both statements
and invoices are used to communicate an outstanding balance to customers, are produced though AFIS
batch processing, can be printed and mailed or issued electronically, and require setup of reference
tables to define processing parameters.

AFIS | AR Billing and Collections
60
Statements and invoices differ in the presentation format and the production schedule. Invoices are
produced for each final Receivable (RE) based document, during the next nightly Invoice Generation
process, while statements reflect all accounts receivable processing and follow the schedule determined
on the Billing Profile (monthly, quarterly, etc.).
A Department specific logo can also be printed on both current and past due invoices and statements.
Department logos are attached to the Department (DEPT) table. The DEPT table is central table
maintained by GAO.
4.2. Billing Configuration
Billing processes are managed through online table configuration. The System Options (SOPT), Billing
Profile (BPRO), and Customer Account Options (CACT) tables store values that impact billing. Several
configurable billing features must be enabled, system-wide, on the System Options table. These features
can be customized on the Billing Profile and Customer Account Options tables to support various billing
requirements.
Billing Profiles define the characteristics of a bill. Billing Profiles are assigned to a Department and Unit,
however, a value of ALL may be used to permit State-wide use. Customization options available on the
Billing Profile table are:
Designate use of invoices, statements, or both
Establish a minimum billing amount
Define the frequency of statement generation
Select instructions to be written on invoices, statements, and other notifications
Establish Collection and Write-Off rules
Specify finance charges to be applied to past due receivables
Customer Accounts are a combination of a Customer code and a Billing Profile. Customer Accounts are
defined on the Customer Account Options table. Customers may have multiple accounts that support a
different billing condition.
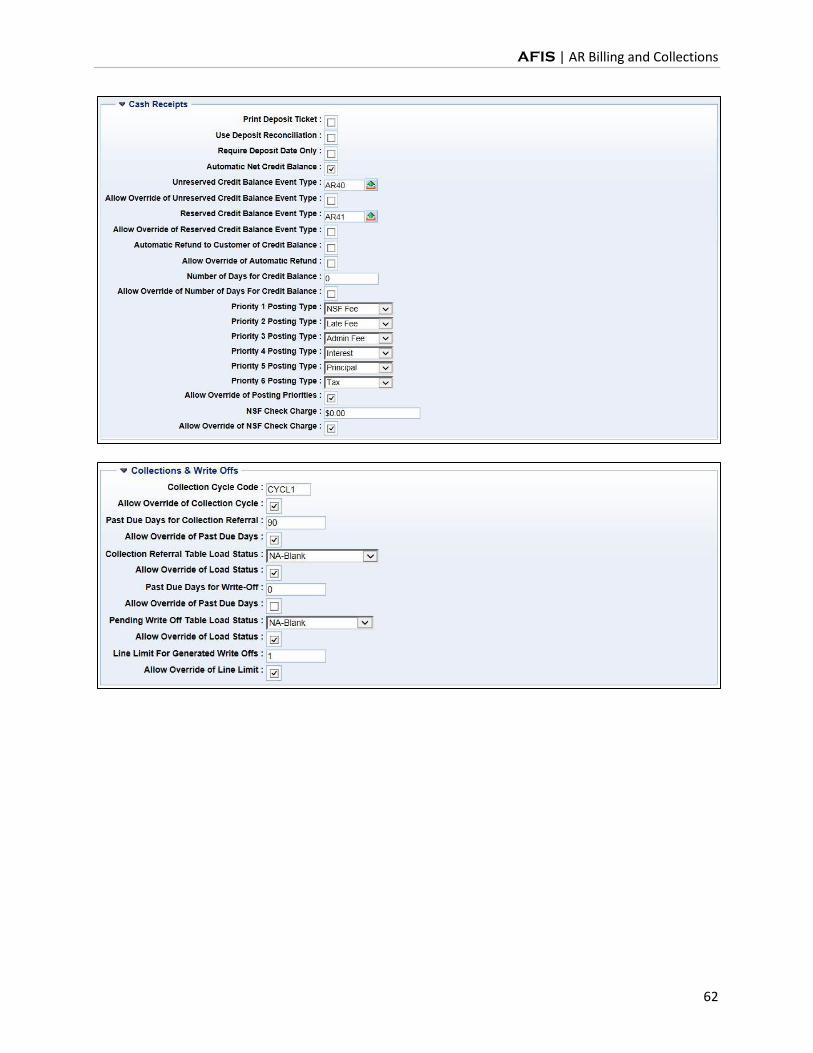
System Options Table
The System Options (SOPT) table Revenue section, Receivables tab, contain default parameters for the
billing process when not defined on the Billing Profile (BPRO) table. The recommended approach is to
define these parameters on BPRO instead of SOPT. Some of the key fields on the SOPT include:
Receivable Due Date Lag – The number of days after Receivable Date that the receivable is due. This is when late fees and interest will be applied
Minimum Billing Amount – The minimum amount necessary to issue an invoice or statement

AFIS | AR Billing and Collections
61
Minimum Negative Billing Amount – The negative minimum amount that a customer account must total in order to be selected for the automatic billing process. This only applies to customers who receive statements and does not affect the printing or emailing of invoices
Default Collection Cycle – Collection parameters used in the collection process that record the number of days past the due date that customers are notified of overdue bills through past due notices and collection letters
Allow Override – These options on the SOPT permit the entry of a different value for the corresponding field on the Billing Profile table
Priority Posting Type fields- These fields impact the sequence in which a payment should be applied to an outstanding receivable. The SOPT record provides the standard sequence as approved by the AG’s Office. They can be overridden in the Billing Profile.
The System Options table is displayed below.
AFIS | AR Billing and Collections
62

AFIS | AR Billing and Collections
63
Billing Instructions Table
The Billing Instructions (BINST) table defines the text that will print on statements, invoices, and other
correspondence sent to customers. Each record on the Billing Instructions table defines a Department
and Unit that may use the instruction. The Billing Instruction code is the table identifier for the record.
The Name and Instruction Text fields allow the user to define and write the text that will be printed
when the instruction is referenced.
Billing Profile Table
The Billing Profile (BPRO) table defines the rules for a bill. The General Information tab controls the
production of statements and invoices. Some of the key fields on the BPRO table are:
Department – Controls the department that may use the Billing Profile. An ALL Department provides the default billing record if a specific Billing Profile record is not available.
Unit – Controls the unit that may use the Billing Profile. An ALL Unit provides the default billing record if a specific Billing Profile record is not available.
Name – A brief identifier for the Billing Profile
Billing Type – Defines the method of billing; options are Both, Invoice, Statement, Cost Accounting Billing and No Billing Required
Invoice Instruction – Optional. Used when Billing Type is Invoice; values are chosen from the BINST table

AFIS | AR Billing and Collections
64
The Billing Profile table provides information regarding the status of statement generation. The
following fields are system maintained by the Statement Generation batch process:
Last Statement End Date – The closing date of the last statement issued
Next Statement End Date – The end date of the current statement cycle
Next Statement Print Date – The date the statements in the current cycle will be issued
Final Statement – If Billing Type changes from either Statement or Both to Invoice, this box is checked
The Options and Controls section of the Billing Profile contains fields that are defined on the System
Options table, but can be overridden on the Billing Profile table if that option is granted by the System
Options table.

AFIS | AR Billing and Collections
65
Customer Account Options Table
The Customer Account Options (CACT) table associates customers with Billing Profiles. Users can change
the electronic billing options, define who will receive the bill, and prohibit the issuance of bills on the
CACT table.
The following fields on the CACT table are related to billing and collection processing and are not
inferred from other tables:
Customer – The unique identifier assigned to the customer on the Vendor Customer table
Address ID – The code that represents the billing address for the Customer from the Vendor Customer table
Billing Profile – The code that defines the billing rules for the Customer Account from the Billing Profile table
Department – The Department that may use the Customer Account; can be set to ALL
Unit – The Unit that may use the Customer Account; can be set to ALL
Billing Location – The location where the receivable is to be sent
Bankruptcy – Indicates that the customer is in bankruptcy proceedings; automatically suppresses billing, past due billing and automatic finance charges
Note: This flag can be set automatically across multiple CACT records for the same customer by setting the Bankruptcy flag on a VCM based document.
AFIS | AR Billing and Collections
66
Suppress Billing – Prevents bills from printing
Suppress Past Due Billing – Prevents collection letters from printing
Suppress Auto Fin Charge – Prevents the automatic application of finance charges on the customer account
Collection Cycle – Specifies the details regarding when dunning and/or collection letters will be sent; value overrides the corresponding field on the Billing Profile table
ACTIVITY 1.10
Research Statement Generation
Scenario
You want to view the details of a billing profile associated with a customer.
Setup
User is logged into the AFIS Home Page.
Steps
A. Navigate to the Customer Account Options table and search for the customer.
1. In the Jump to field, enter CACT.
2. Click Go.
3. In the CACT table, click Search.
4. In the Search window, in the Customer field, enter the data from your student data card.
5. Click Ok.

AFIS | AR Billing and Collections
67
B. Determine which Billing Profile to research.
1. In the grid, observe that the Billing Type of Invoice for the customer is related to a Billing Profile.
2. Make a note of the Billing Profile associated with the Customer and Billing Type.
C. Navigate to the Billing Profile table.
1. In the Jump to field, enter BPRO.
2. Click Ok.
3. In the BPRO table, click Search.
4. In the Search window, in the Billing Profile field, enter the data from your student data card.
5. In the Search window, in the Department field, enter ALL.
6. Click Ok.
7. View the details of the Billing Profile.
8. Click the Home in the Primary Navigation Panel to return to the Home Page.

AFIS | AR Billing and Collections
68
4.3. Control Billing Output
Billing requires the flexibility to perform special processing, including:
Correcting billing details
Printing a replacement bill
Suppressing the printing of bills
Suppressing the printing of bills for small amounts
Accounting for liquidated amounts on bills
Changing the billing type
Billing Correction
Erroneously billed amounts are corrected by modifying the Receivable (RE) based document. For Invoice
billing, the Invoice (INVQ) record for the Receivable will be updated with Print Status of Modified
Pending.
For statement billing, the Statement Detail (STATD) table will be updated with a new record for the
Receivable which reflects the difference in the billing amount. In both cases, the record will be included
in the next Billing Generation batch process.
If the Receivable is modified before the original bill is generated, the adjusted amount of the Receivable
will appear on the bill; the original and modification will not be distinguishable.

AFIS | AR Billing and Collections
69
Replacement Bills
Bills can be reproduced by changing the Print Status on the Statement (STMTQ) or Invoice (INVQ) tables
to Replacement Pending. The replacement invoice or statement will be reprinted during the subsequent
billing process.

AFIS | AR Billing and Collections
70
Billing Minimum
A Billing Minimum prevents generation of a bill when the balance due is low. The Billing Minimum is set
on the System Options (SOPT) table. SOPT also has an option to allow the system-wide minimum to be
overridden on the Billing Profile (BPRO) table.
Suppress Billing
Suppressing billing prevents the printing of invoices and statements. The Suppress Billing option can be
applied to a specific Receivable, Customer Account, or Billing Profile.
The RE based document has a Suppress Invoice Billing check box on the Billing/Collection Information
tab of the Vendor section. When this option is checked, the Receivable will be posted to INVQ with the
Print Status of Suppress. The Receivable will be included by the Invoice Generation batch process
however; an invoice will not be printed. The Receivable will produce an invoice if it is modified and the
Suppress Invoice Billing check box is unchecked.
When the Suppress Billing check box on the Customer Account table is checked, printing of all invoices
and statements for a Customer and Billing Profile combination is prevented, effective immediately.
Documents will continue to update the INVQ, STMTQ, and STATD tables.
Billing can be suppressed on BPRO by changing the Billing Type to No Billing Required. This will prevent
any new records from updating the INVQ, STMTQ and STATD tables. If the Billing Type is later enabled
on the Billing Profile, billing will begin for new documents.
Liquidation and Fees
Fees, such as Administrative, Interest, or Late fees, are distinguished on Receivable documents by
specifying the Line Type. On an invoice, fees are presented individually and separate from non-fee
charges. On statements, all amounts are summarized by Receivable.
Receivables may be liquidated prior to printing the invoice or statement. If an RE based document is
fully liquidated before the invoice is generated, no invoice will be generated. If a Receivable is partially
liquidated, the invoice will show the full amount of the charges and include a summary of the
liquidations. The total due is the difference. For statements, the Receivable and liquidated amount,
whether full or partial, is shown.
Changing Billing Type
When the Billing Type for a Billing Profile is changed from Statement or Both to Invoice, the Final
Statement flag is automatically enabled. The final statement is generated during the Next Statement
print process. It includes all activity up to that point in time. All future accounting activity will be
included by the invoice generation process.

AFIS | AR Billing and Collections
71
If the Billing Type for a Billing Profile is changed from Invoice to Statement or Both, the system adds all
open balances to the Statement Detail (STATD) table, creating the prior balance for the first statement
generated during the next statement period.
4.4. Generate Statements
Statements are created by the centralized Generate Statements batch process which is run during the
nightly cycle. The Generate Statements batch process determines the records to include, produces the
statements and register, and provides online indication of records included on the statements.
Records chosen by the batch process are based on dates from the Billing Profile (BPRO) and Statement
Detail (STATD) tables. On the BPRO, records are chosen if the Billing Type is Statement or Both and the
Next Statement End Date is less than or equal to the current date. On the STATD, records are chosen if
the Billing Profile was selected, there is no date in the Statement field, and the Post date is less than or
equal to the Billing Profile Next Statement End Date.

AFIS | AR Billing and Collections
72
Statement Data
Statements reflect Receivable, Cash Receipt, Write-Off, and Payment Voucher (customer refunds)
document activity. The document activity is reflected on the Statement (STMTQ) and Statement Detail
(STATD) tables when the BPRO Billing Type is Statement or Both. STMTQ presents data summarized by
Customer Account and Statement Date. A distinct record is stored for each statement issued. A record
with no Statement Date relates to data not yet presented on a statement.

AFIS | AR Billing and Collections
73
The STATD table stores the documents that have been (or will be) on a statement. All records with the
save value in the Customer, BPRO, Department, Unit, and Statement fields are included in one
statement. The statement is blank for items that have not yet been selected by the Statement
Generation batch process.

AFIS | AR Billing and Collections
74
The Statement Generation batch process creates records on the STATD table with the value Prior
Account Balance in the Line Group column. These records preserve account balances as of the end of
the statement cycle. The Statement field value will be blank for the newest record.
Sample Statement

AFIS | AR Billing and Collections
75
Online Updates
The Statement Generation batch process updates the STATD, STMTQ, BPRO, and Statement Print
History (STMTHS) tables.
STATD – Statement is updated for all selected records and a new prior account balance record is added
STMTQ – A new record is inserted for the Customer Account and Statement Date with a Print Status of Printed
BPRO – The Last Statement End Date, Next Statement End Date, and Next Statement Print Date fields are updated
STMTHS – A new record is inserted that records the statement printing
Statements and Reports
The Statement Generation batch process produces a statement register report, statements, and a PDF
file of the statements. The statement register lists all statements issued, including original and
replacement statements. The register also identifies statements that would normally be generated
however, were not because either the generation was suppressed or the balance was below the
minimum.
The statements produced can be accessed from the Report Search on the secondary navigation panel
and the Generate Statement option. Then search for the file by the applicable date and department.
4.5. Generate Invoices
Invoices are created by the centralized Generate Invoices batch process which is run during the nightly
cycle. The Generate Invoices batch process determines the records to include, produces the invoices and
register, and provides an online indication of the invoices produced.

AFIS | AR Billing and Collections
76
Records chosen by the batch process are based on values from the Billing Profile (BPRO) and Invoice
(INVQ) table. On BPRO, records are chosen when the Billing Type is either Invoice or Both. On the INVQ,
records are chosen when the Billing Profile was selected, the Print Status is Original Pending, Modified
Pending, or Replacement Pending, and the Outstanding Amount of the RE is greater than zero.
Invoice Data
Invoices reflect Receivable (RE) based document activity. The document activity is reflected on the
Invoice (INVQ) table when the BPRO Billing Type is Invoice or Both. Each Receivable becomes an Invoice
and the RE based document number is the Invoice number. When the Receivable is posted to the INVQ
table, the Print Status is Original Pending. This status indicates that the Invoice has not yet been
produced for the Receivable.
Online Updates
The Invoice Generation batch process updates both the INVQ and the Invoice Print History (INVHS)
tables.
INVQ – Updated to show the new Print Status
INVHS – A new record is added for each invoice printed that shows the Form, Printed date, and the customer’s address
Invoices and Reports
The Invoice Generation process produces an invoice register report, invoices, and a PDF file of the
invoices. The invoice register lists all invoices issued, including original and replacement invoices. The
register also identifies Invoices that would normally be generated however, were not because either the
generation was suppressed or the balance was below the minimum.
The invoices produced can be accessed from the Report Search on the secondary navigation panel and
the Generate Invoice option. Then search for the file by the applicable date and department.

AFIS | AR Billing and Collections
77
Sample Invoice

AFIS | AR Billing and Collections
78
4.6. Reprint Statements or Invoices
In order to reprint previously printed statements or invoices, the Print Status field for the record must
be modified. For invoices, the record can be located on the INVQ table. For statements, the record can
be located on the STMTQ table. Once the record is located, the Print Status field can be changed to
Replacement Pending. This causes the record to be selected by the Generate Invoices and Statements
batch jobs.
4.7. Generate or Reprint Invoices - Online
The on-demand print process allows users to print from a Receivable document. The on-demand print
process changes the print status on the Invoice (INVQ) table to "Printed" and records information about
the Receivable, including the User ID of the user who requested the on-demand print, on the Invoice
Print History (INVHS) table. Suppressed invoices can also be printed online. Statements can only be
printed through the Generate Statements batch process and not online.

AFIS | AR Billing and Collections
79
5. Collections Processing
Learning Objectives
In this lesson, you will:
Identify the collection processing control setup
Review the tracking of collection activities
Review the tracking of delinquent accounts
Manage past due statements and invoices
Examine the finance charge setup and application process
Examine the payment plan setup and generation process
Lesson Overview
Collection processing in AFIS refers to the capability of the system to issue past due statements and
invoices, apply finance charges, refer an account to a collection agency, and institute payment plans.
These features can be applied individually or in combination with each other.
5.1. Set Up Collection Processing Controls
Collection controls that define the collection process for past due receivables are set up on several
individual tables: the Dunning Message (DNGM), Collection Letter (COLL), Collection Control (COLLC),
and Collection Agency Agreement (COLLA) tables. In addition, finance charges are setup on the Finance
Charge Eligibility (FCEG) and Finance Charge Setup (FNCHG) tables.

AFIS | AR Billing and Collections
80
Past Due Notices and Collection Letters
The Dunning Message (DNGM) table stores all of the possible messages that can be sent to customers
with past due accounts.
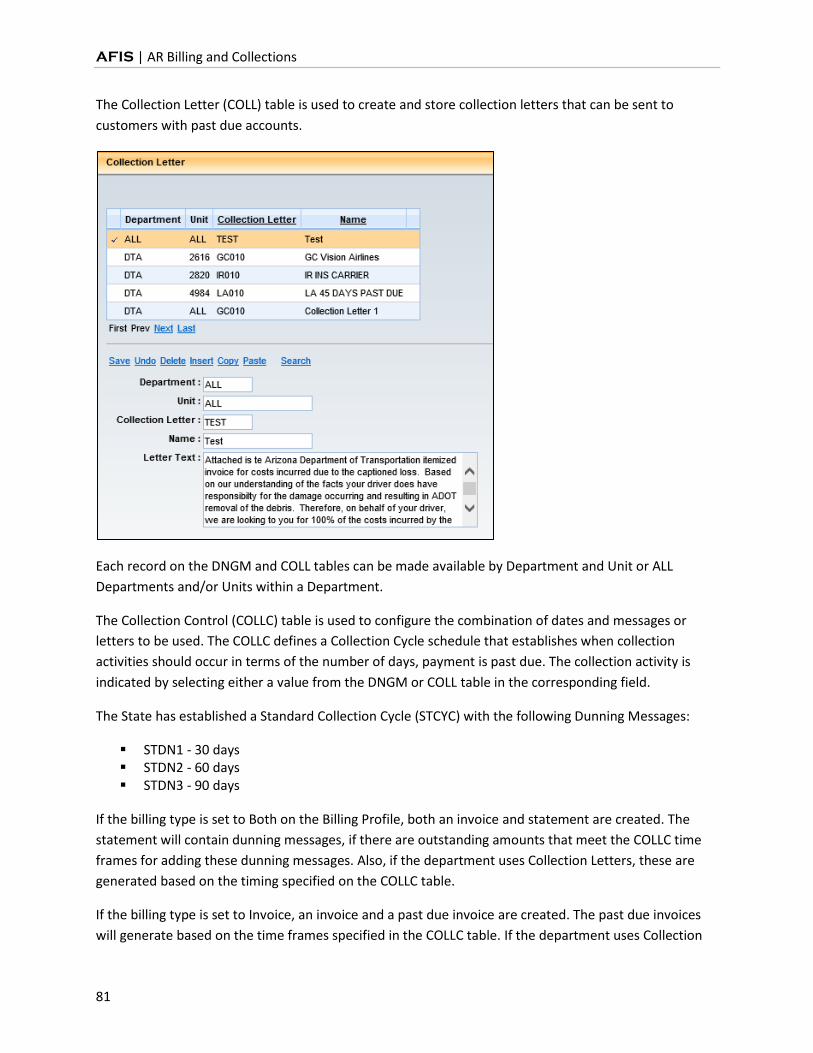
AFIS | AR Billing and Collections
81
The Collection Letter (COLL) table is used to create and store collection letters that can be sent to
customers with past due accounts.
Each record on the DNGM and COLL tables can be made available by Department and Unit or ALL
Departments and/or Units within a Department.
The Collection Control (COLLC) table is used to configure the combination of dates and messages or
letters to be used. The COLLC defines a Collection Cycle schedule that establishes when collection
activities should occur in terms of the number of days, payment is past due. The collection activity is
indicated by selecting either a value from the DNGM or COLL table in the corresponding field.
The State has established a Standard Collection Cycle (STCYC) with the following Dunning Messages:
STDN1 - 30 days STDN2 - 60 days STDN3 - 90 days
If the billing type is set to Both on the Billing Profile, both an invoice and statement are created. The
statement will contain dunning messages, if there are outstanding amounts that meet the COLLC time
frames for adding these dunning messages. Also, if the department uses Collection Letters, these are
generated based on the timing specified on the COLLC table.
If the billing type is set to Invoice, an invoice and a past due invoice are created. The past due invoices
will generate based on the time frames specified in the COLLC table. If the department uses Collection
AFIS | AR Billing and Collections
82
Letters, these will generate, based on the timing specified on the COLLC table. The Past Due Statement
is actually the Collection Letter.
The centralized Past Due Invoice batch job runs on a nightly basis, as well as on-request, and generates a
past due notice or collection letter for each invoice that meets the Collection Control criteria for a
Collection Cycle. The Invoice (INVQ) and Invoice Print History (INVHS) tables are updated after the batch
job has run.
The past due notice/collection letter provides the overdue balances for a single invoice. Details on the
notice include the customer name, customer number, invoice number, billing address, past due amount,
late fee, interest charge, and other charges and the dunning message text. If the Department
determines the printed notice/letter is correct, the notification is sent to the customer.
Collection Agency Agreements
Each record on the Collection Agency Agreement (COLLA) table is called a collection agreement. The
COLLA defines the vendors that are contracted with the State to take over collections. The collection
agreement may be available to a specific Department or Unit, or available for ALL to use, like the
Attorney General’s Office collection agreement (AGO). The duration of the collection agreement is
enforced on the COLLA table. The COLLA table tracks the value of all Receivables referred to the vendor
and the amount collected.
AFIS | AR Billing and Collections
83
Finance Charge Setup
The Finance Charge Eligibility (FCEG) table makes Event Types eligible for the finance charge process.
Event Type eligibility is further controlled by Department and Unit. In order for a record to be eligible,
the Eligible for Finance Charge check box must be checked.
AFIS | AR Billing and Collections
84
The Finance Charge Setup (FNCHG) table defines Finance Charge codes and Interest Type (Simple or
Compound). The schedule must be defined using a Frequency while other values that support the
schedule are also required. The FNCHG also includes Chart of Accounts fields to define the account to
which finance charges will be applied through the finance charge process.

AFIS | AR Billing and Collections
85
5.2. Track Collection Activities
The Customer Information (CUSTS) and Customer Account Information (CUSTA) tables track the status
of Receivables, Cash Receipts, and Collection activities. The CUSTS table summarizes all activity for the
customer across all Billing Profiles, while the CUSTA table summarizes the customer activity by Billing
Profile, Department, and Unit. Both the CUSTS and CUSTA tables include the same result fields.
Both the CUSTS and CUSTA tables have a Credit History section. The fields in this section keep track of
collection activities recorded in AFIS.
5.3. Track Delinquent Accounts
Reports are used to track the status of customer payments. The reports display similar receivable
information presented in a different manner. The available reports are listed in section 11 of this
document.
5.4. Apply Finance Charges
AFIS automatically applies finance charges through the Finance Charge chain job. Finance charges are
applied to open, past due, receivable lines when the Event Type is defined as eligible on the Finance
Charge Eligibility (FCEG) table and the Finance Charge Fees are indicated on the SOPT, BPRO, or Revenue
Source (RSRC) tables. Finance charges can also be applied manually to a Receivable document. The
Finance Charge chain job will not automatically apply finance charges after a receivable has been
referred to collections by referencing the Receivable (RE) based document on a Referral to Collection
Agency (CL) document.
Finance Charge Chain Job
The Finance Charge job creates a new version of the Receivable document. The amount of the Finance
Charge is calculated based on the fee or rate on the Finance Charge Setup (FNCHG) table. The calculated
finance charges are summarized by Event Type, Line Type, and accounting elements from the FNCHG
and then added to the Receivable. The new version of the Receivable is automatically submitted. This
AFIS | AR Billing and Collections
86
modified Receivable updates the Invoice (INVQ) and/or Statement (STMTQ, STATD) tables. An invoice
and/or statement will be generated as scheduled.
Finance Charge Manual Process
Finance charges can also be manually added to a Receivable by modifying the RE based document and
adding a new line for the finance charges. No manually entered finance charges on the Receivable are
compared to the values in the Finance Charge Eligibility (FCEG) and Finance Charge Setup (FNCHG)
tables. These tables are only used for the process whereby finance charges are automatically applied.
5.5. Manage Past Due Statements
AFIS automatically generates past due notices and collection letters in order to notify customers of
overdue account balances. A past due statement is generated when a customer has an unpaid balance,
the unpaid balance is overdue by the number of days indicated on the collection cycle, the Billing Type is
Statement or Both, and the Suppress Past Due check box on the CACT is not checked.

AFIS | AR Billing and Collections
87
The Past Due Statement is actually the Collection Letter. The Past Due Statement batch process creates
the past due statements. Each past due statement includes phrasing to distinguish it from the original
statement. Overdue receivables are identified with the original due date and payment instructions. The
Statement Print History (STMTHS) table is updated to record the printing of a collection letter or past
due notice.

AFIS | AR Billing and Collections
88
5.6. Manage Past Due Invoices
AFIS automatically generates past due notices and collection letters in order to notify customers of
overdue account balances. A past due invoice is generated when a customer has an unpaid balance, the
unpaid balance is overdue by the number of days indicated on the collection cycle, the Billing Type is
Invoice, the Bankruptcy flag is not checked for the customer on CACT, and the Suppress Past Due check
box on the CACT is not checked.
The Past Due Invoice batch process creates the past due invoices. Each past due invoice includes
phrasing to distinguish it from the original invoice. Overdue receivables are identified with the original
due date and payment instructions. The Invoice Print History (INVHS) table is updated to record the
printing of a collection letter or past due notice.

AFIS | AR Billing and Collections
89
5.7. Set Up Payment Plans – Department
Departments that have statutory authority and the specialized security role to offer payment plans can
set up the necessary tables in AFIS for the process to run. The Payment Plan (PSCHD) table allows users
to view and establish payment plan information for a Receivable. Users establish a payment plan to
provide a more flexible payment plan for customers to pay their receivables. Users allow customers to
pay for receivables in smaller amounts at several due dates instead of a lump sum by one due date.
Users can only establish a payment plan for Receivables that are processed and open. Receivables do
not have to be past due in order to establish a payment plan. Once payment plan information for a
Receivable has been established, AFIS does not charge additional interest, late fees, and other finance
charges to the Receivable. These charges may be applied manually to a Receivable, if necessary.
The grid at the bottom of the PSCHD table is called the Payment Plan Detail and allows users to track the
progress of the payment plan. If the Create Schedule option is selected, the Status field is set to Pending,
and no record lines exist on the Payment Plan Detail grid, then AFIS will generate Payment Plan Detail
records. Alternatively, the user also has the option to manually create the payment plan details on this
page by clicking the Insert button in the detail section. An entry will need to be created for each line
desired for the payment plan.

AFIS | AR Billing and Collections
90
5.8. Generate Payment Plan – Batch Job
AFIS supports the establishment of payment plans for any outstanding receivables, regardless of
whether or not that receivable is past due. A payment plan allows the department to establish an
agreed-upon periodic payment amount and a corresponding due date in order for the customer to
satisfy the outstanding balance on the receivable. Once a payment schedule is established for a
receivable, additional interest, late fees, and other finance charges are suppressed however, they can
still be applied manually. Other collection proceedings are also suppressed unless manually applied. A
summary receivable cannot have a payment schedule established. A receivable must already be
processed and accepted for a payment schedule to be set up.
The Generate Payment Plan batch job process provides information about the payment plan and the
print status of the notices for the payment plans. The process utilizes the Department Code, Unit Code,
Billing Profile and Form Type entered by the user and selects records from the Payment Plan Print Table,
based on the form type, to generate any of the following Notices:
Agreement Notice
Cancellation Notice
Completion Notice
The Generation Payment Plan Form batch job process will create payment plan notices when one of the
following has occurred:
The payment plan is activated in the system (Agreement Notice)
The payment plan is cancelled or completed in the system (Cancellation or Completion Notices)
A payment plan notice has been selected for printing or reprinting in the Payment Plan Print (PPPT) table
AFIS | AR Billing and Collections
91
6. Referral to Collection Agency
Learning Objectives
In this lesson, you will:
Create a Referral to Collection Agency document
Review the batch process for creating Referral to Collection Agency documents
Review the modification and cancellation of Referral to Collection Agency documents
Research collection documents
Lesson Overview
When a Receivable is past due, the collection process can begin. A Receivable document can be used as
a reference for a Referral to Collection Agency (CL) document.
6.1. Create a Referral to Collection Agency Document
Referral to Collection Agency (CL) documents can be created either by a Batch job, or manually by using
the Copy Forward feature from a Receivable document.
When using the Batch process to generate the CL document, the standard process is that accounts that
are 90 days past due will have a CL document automatically generated through the Batch process, as
configured on the SOPT table. Prior to the batch process, the agency should review Receivables that are
scheduled to generate CL documents on the Pending Referral to Collection Agency (COLLR) table. If the
Receivable is currently being worked on, and should not be referred to the Collection Agency yet, then
the Collection Status can be changed to Not Applicable. Later, if the Receivable should be referred to the
Collection Agency, the Collection Status can be changed back to Approved for Collection. Security access
to the COLLR table is provided to a separate Collection security role and is not included in the main AR
security roles.
Alternatively, if the agency is not using the batch process, or would like to create the CL document, in
advance of the Batch job picking it up, the CL can be created manually. When using Copy Forward to
manually create a CL document, all of the information from the referenced Receivable is copied into the
CL document. There is no data entry required on a CL document. Information in the Header can be
modified or added to, if necessary.

AFIS | AR Billing and Collections
92
The AR module in AFIS allows an agency to record receivables through an RE document and tracks these receivables throughout the AR lifecycle. If an RE becomes past due, the RE can be copied forward to a collection referral (CL) document to denote that this debt is in collection and is being pursued by a collection unit within the agency, or by the Office of the Attorney General (OAG). If the collection efforts are not successful, then the CL document should later be copied forward to the write-off (WO) document to remove the receivable and reduce agency revenue in AFIS. If it is known that an RE is uncollectible, this document can alternatively be copied forward right to a WO document. This QRG provides instructions for processing a CL document and a WO document. However, please
note that if the write-off request involves an NSF receivable, the instructions in “Handling an NSF –
Department Process” QRG should be followed instead. When complete, the CL document, whether
created through the Batch or manually, is validated and submitted to workflow for approval following
the process outlined in Section 8.1 above.
Once a CL document is processed, AFIS does not charge additional interest, late fees, and other finance
charges to the receivable. These charges may be applied manually, if necessary.
ACTIVITY 1.11
Create a Referral to Collection Agency Document Using Copy Forward
Scenario
There is a bankruptcy on a Receivable and it needs to be referred to the collection group for special
handling.
Setup
User is logged into the AFIS Home Page.
Steps
A. Search for an existing Receivable document.
1. In the Secondary Navigation Panel, click Search.
2. Click Document Catalog.
3. In the Code field, enter RE.
4. In the Dept field, enter the data from your student data card.
5. In the Doc ID field, enter the data from your student data card.
6. Click Browse.
7. Click the document ID link to open the document.
B. Create a Referral to Collection Agency document using Copy Forward.
1. At the bottom of the document, click Copy Forward.

AFIS | AR Billing and Collections
93
2. In the Copy Forward screen, in the Doc. Department Code field, enter the data from your student data card.
3. Check the Auto Numbering check box.
4. In the Target Doc Type grid, select CL (Send Receivable to Collection).
5. Click OK to create the Referral to Collection Agency document.
C. Check the Referral to Collection Agency document for errors and submit it.
1. Click Validate to check for errors. If any errors exist, correct the errors and click Validate again. If the Validation is successful, the following message is displayed in the upper left corner of the screen: “Document validated successfully.”
2. Click Submit to submit the document for approval. If submission is successful, the following message is displayed in the upper left corner of the screen: “Document submitted successfully.”
3. Click the Home in the Primary Navigation Panel to return to the Home Page.

AFIS | AR Billing and Collections
94
6.2. Referral to Collection Agency Batch Job
The Select for Collection batch job selects Receivable documents that are greater than the number of
days past due as specified on the System Options (SOPT) table for collection processing. Once the
documents are selected, the Generate Collection chain job generates the Referral to Collection Agency
(CL) documents.
The Referral to Collection Agency (CL) document is able to reference Receivables containing Accounting
lines with the Event Types of Billed Earned Revenue or Billed Vendor Refund. Receivables containing
Accounting lines with outstanding balances and any other Event Types cannot be referenced on the
collection document. Summary receivables, regardless of event type, and regular receivables with a
billing profile code that specifies a Billing Type of No Billing Required cannot be sent for collection.
6.3. Modify a Referral to Collection Agency Document
Modifications are not permitted for Referral to Collection Agency documents. If corrections are
required, the document must be discarded and recreated.
6.4. Cancel a Referral to Collection Agency Document
A Referral to Collection Agency (CL) document can be cancelled if necessary by using the Discard feature
from within the document. Discarding a Draft version of a document will remove the document from the
system. Discarding a Final version of a document will create a Cancellation Draft version of the
document, and change the original to Historical (Final) phase.
6.5. Research Referral to Collection Agency Documents
All updates to a customer account can be researched using the Customer Account Information (CUSTA)
and Receivable History and Reference Query (RDET) pages. The RDET has a link to the Receivable Search
(RESTA) page.

AFIS | AR Billing and Collections
95
7. Write-Off Uncollectable Amounts
Learning Objectives
In this lesson, you will:
Create a Write-Off document
Modify a Write-Off document
Cancel a Write-Off document
Review the process of researching Write-Off documents
Lesson Overview
When a department determines that a specific Receivable based document or Referral to Collection
Agency (CL) document needs to be written off because it is uncollectible, a Write-Off (WO) document
can be created that references the RE, RETRI, or CL document. This lesson will examine the WO
document creation process.
7.1. Create a Write-Off Document
Write-Off (WO) documents are created manually by using the Copy Forward feature from a Receivable
(RE) based document or Referral to Collection Agency (CL) document. When using Copy Forward to
create a WO document, all of the information from the referenced RE/CL is copied into the WO
document. There is no data entry required on a WO document. Information in the Header can be
modified or added to, and the percentage of the Write-Off can be set to an amount other than 100% on
the Vendor section, if necessary. If setting the Write-Off to an amount other than 100%, the Auto Apply
button will also need to be clicked on the Header.
When complete, the WO document is validated and submitted to workflow for approval following the
process outlined above.
A Write-Off – Attorney General (WOAGA) document can also be created by the Attorney General’s
Office for receivables that were referred to this Office for collections, but deemed to be uncollectible.
The Attorney General’s Office completes the same steps above to manually Copy Forward the Referral
to Collection Agency (CL) document, but the workflow only consists of the Attorney General’s Office
approver and a GAO approver.

AFIS | AR Billing and Collections
96
ACTIVITY 1.12
Create a Write-Off Document Using Copy Forward
Scenario
A Receivable document that was sent to collections has been deemed uncollectible, and must be written
off. You will create the Write-Off document using Copy Forward.
Setup
User is logged into the AFIS Home Page.
Steps
A. Search for an existing Referral to Collection Agency document.
1. In the Secondary Navigation Panel, click Search.
2. Click Document Catalog.
3. In the Code field, enter CL.
4. In the Dept field, enter the data from your student data card.
5. In the Doc ID field, enter the data from your student data card.
6. Click Browse.
7. Click the document ID link to open the document.
B. Create a Write-Off document using Copy Forward.
1. At the bottom of the document, click Copy Forward.
2. In the Copy Forward screen, in the Doc. Department Code field, enter the data from your student data card.
3. Check the Auto Numbering check box.
4. In the Target Doc Type grid, select WO (Write-Off).

AFIS | AR Billing and Collections
97
5. Click OK to create the Write-Off document.
6. Click the Accounting component.
7. Review the information on the General Information tab.
C. Check the Write-Off document for errors and submit it.
1. Click Validate to check for errors. If any errors exist, correct the errors and click Validate again. If the Validation is successful, the following message is displayed in the upper left corner of the screen: “Document validated successfully.”
2. Click Submit to submit the document for approval. If submission is successful, the following message is displayed in the upper left corner of the screen: “Document submitted successfully.”
3. Click the Home in the Primary Navigation Panel to return to the Home Page.

AFIS | AR Billing and Collections
98
7.2. Modify a Write-Off Document
Users can perform manual modifications to a Write-Off (WO) based document, if necessary. This may be
necessary, if a partial payment was received for the customer, since a Write-Off document cannot be
referenced on a Cash Receipt document.
AFIS will not allow any adjustment to the Write-Off Accounting Line Amount for an amount greater than
the Outstanding Amount on the referenced Receivable/Referral to Collection Agency Accounting line.
In the Header, the Document Name and Document Description fields can be modified. In the Vendor
section Collection Information tab, the WO Percent field can be modified. In the Accounting section
General Information tab, the Line Description, Line Amount, and Reason fields can be modified. Once
the modifications are complete, the document is validated and submitted. Upon submission, any
modifications are reflected in the Receivable status.
A Write-Off modification follows the same approval process as the original Write-Off document outlined
in AR-TB-017 above.
7.3. Cancel a Write-Off Document
A Write-Off (WO) based document can be cancelled if necessary by using the Discard feature from
within the document. Discarding a Draft version of a document will remove the document from the
system. Discarding a Final version of a document will create a Cancellation Draft version of the
document, and change the original to Historical (Final) phase.
Discarding a Final version of the WO based document may be necessary, if a full payment was received
from the customer, since a Write-Off document cannot be referenced on a Cash Receipt document.

AFIS | AR Billing and Collections
99
7.4. Research Write-Off Documents
All updates to a customer account can be researched using the Customer Account Information (CUSTA)
and Receivable History and Reference Query (RDET) pages. The RDET has a link to the Receivable Search
(RESTA) page.

AFIS | AR Billing and Collections
100
8. Cash Adjustments
Learning Objectives
In this lesson, you will:
Review the State Treasurer Reconciling Adjustment process
Review the Department Treasurer Reconciling Adjustment Modification process
Lesson Overview
This lesson is intended to serve as a broad overview of the cash reconciliation adjustment process so
that users are familiar with the documents involved in the correction of reconciled cash receipts, which
are part of the AR security role.
8.1. State Treasury Cash Adjustment
Reconciling Adjustments can be created by the Treasurer’s Office. They are used for State Treasurer
Cash Adjustment (STAD) documents.
The Event Types used during this process are:
ARS1 – Unfavorable Deposit Adjustment
ARS2 – Favorable Deposit Adjustment
ARS3 – NSF Receivable
ARS4 – Credit Card Unfavorable Adjustment (Fees and Chargebacks)
ARS5 – Credit Card Favorable Adjustment
10.2 Department Treasury Cash Adjustment
The other type of adjustment is done at the Department level. Generally, once a State Treasurer
Adjustment (STADJ) document is used to process a reconciling adjustment, the Department determines
a course of action and processes a Department Adjustment (DADJ) document which clears the STADJ
document and also updates the Accounting Journal (JACTG) table.
The Copy Forward feature can be used from the STADJ document to create the DADJ document. The
DADJ is then submitted for Department approval. To verify that the reconciling adjustment has been
created successfully users can look it up using the Accounting Journal (JACTG).
The Event Types used during this process are:
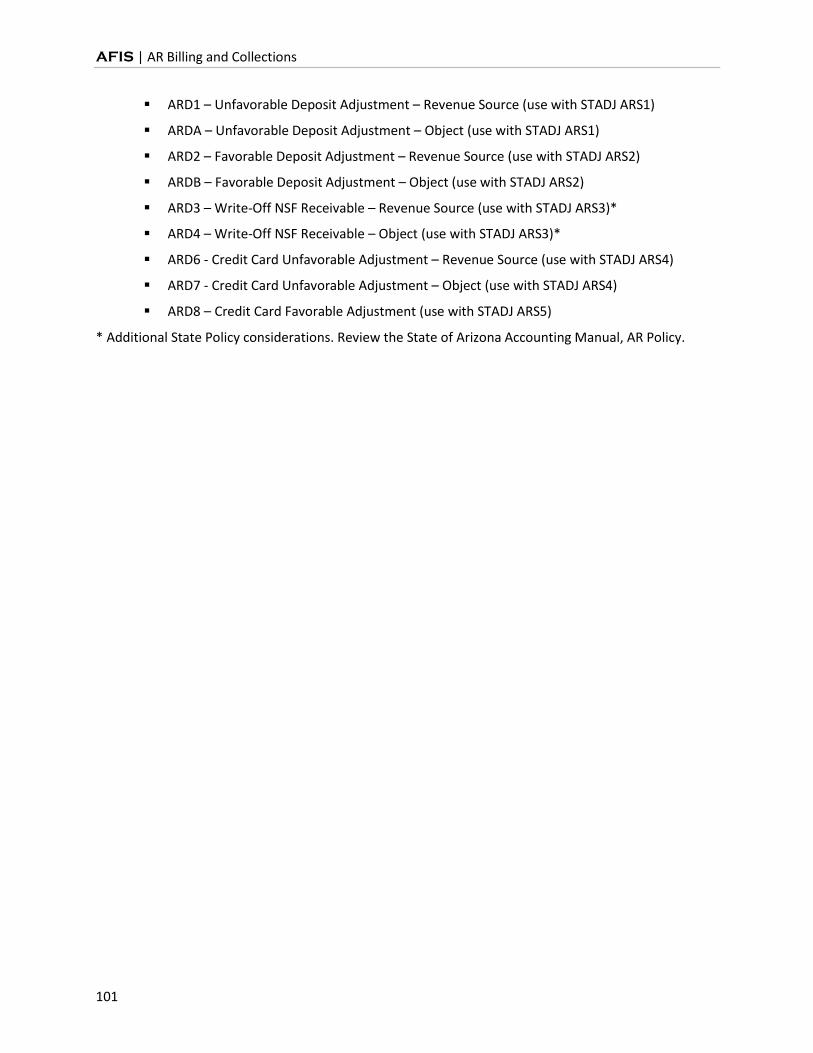
AFIS | AR Billing and Collections
101
ARD1 – Unfavorable Deposit Adjustment – Revenue Source (use with STADJ ARS1)
ARDA – Unfavorable Deposit Adjustment – Object (use with STADJ ARS1)
ARD2 – Favorable Deposit Adjustment – Revenue Source (use with STADJ ARS2)
ARDB – Favorable Deposit Adjustment – Object (use with STADJ ARS2)
ARD3 – Write-Off NSF Receivable – Revenue Source (use with STADJ ARS3)*
ARD4 – Write-Off NSF Receivable – Object (use with STADJ ARS3)*
ARD6 - Credit Card Unfavorable Adjustment – Revenue Source (use with STADJ ARS4)
ARD7 - Credit Card Unfavorable Adjustment – Object (use with STADJ ARS4)
ARD8 – Credit Card Favorable Adjustment (use with STADJ ARS5)
* Additional State Policy considerations. Review the State of Arizona Accounting Manual, AR Policy.

AFIS | AR Billing and Collections
102
9. Accounts Receivable Reporting
Learning Objectives
In this lesson, you will:
Review reports for AR tracking
Lesson Overview
AFIS includes several reports for monitoring AR activities.
AR Reports
The key reports needed to support the AFIS AR business processes are listed below. Included with some
of the reports are the data elements (prompts) that are available.
AFIS Reports
Aging by Customer, by Department, and Past Due Report - The report contains a listing of aging
receivables sorted by fund, department, and vendor/customer. The report also contains information
such as invoice number, invoice date, and payment due dates. The outstanding amounts are grouped by
the number of days overdue: 0 to 30 days, 31 to 60 days, 61 to 90 days, over 90 days, and over 1 year.
RSRC Summary Report - The Revenue Source Summary Report is used to track all accounts receivable revenue transactions during a user-defined date range. The Revenue Source Summary Report will be organized into uncollected revenue, written-off revenue, and collected revenue.
Aging Receivables Report - The Aging Receivables Report classifies outstanding Receivables by the
amount of time they are overdue. On the report, the Receivables can be classified as not due, 0-30 days
overdue, 31-60 days overdue, 61-90 days overdue and over 90 days overdue. The Receivables with no
due date are attributed to the No Due Date column.
InfoAdvantage Reports
FIN-AZ-AR-C035-RDD - Open Items - Accounts Receivable - Report is a detailed listing of open
Accounts Receivable documents
FIN-AZ-AR-N183-RDD - Accounts Receivables Status Report
FIN-AZ-AR-N185-RDD - Customer History Report - Year to Date - This report provides detailed
customer history for receivable and related activities
FIN-AZ-AR-N337-RDD - Invoice Aging by Department and Fund - This report lists Aged
Receivables by Fund and Department
FIN-AZ-DEBT-N379 - Loan Outstanding Summary - This report shows the Loan Instrument
Outstanding Summary in terms of Outstanding Principal out of the Total Loan Amount and the
Outstanding Interest as on given date. In addition, it also shows the loan terms specific
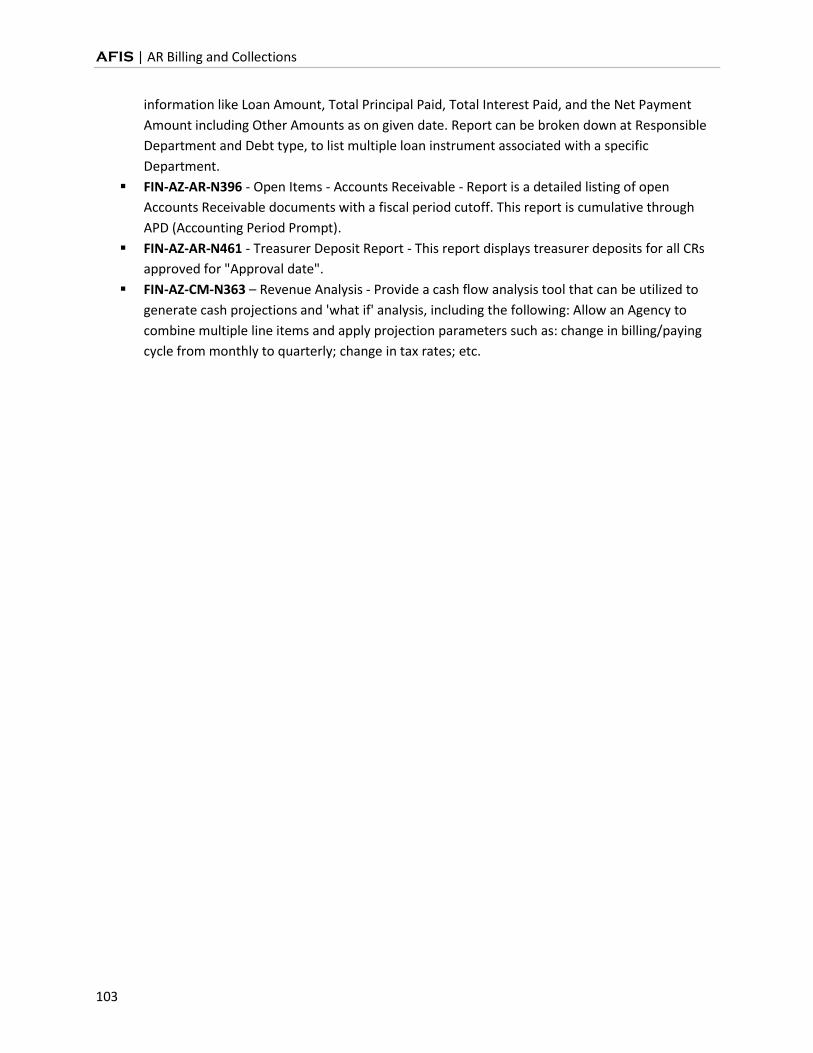
AFIS | AR Billing and Collections
103
information like Loan Amount, Total Principal Paid, Total Interest Paid, and the Net Payment
Amount including Other Amounts as on given date. Report can be broken down at Responsible
Department and Debt type, to list multiple loan instrument associated with a specific
Department.
FIN-AZ-AR-N396 - Open Items - Accounts Receivable - Report is a detailed listing of open
Accounts Receivable documents with a fiscal period cutoff. This report is cumulative through
APD (Accounting Period Prompt).
FIN-AZ-AR-N461 - Treasurer Deposit Report - This report displays treasurer deposits for all CRs
approved for "Approval date".
FIN-AZ-CM-N363 – Revenue Analysis - Provide a cash flow analysis tool that can be utilized to
generate cash projections and 'what if' analysis, including the following: Allow an Agency to
combine multiple line items and apply projection parameters such as: change in billing/paying
cycle from monthly to quarterly; change in tax rates; etc.

AFIS | AR Billing and Collections
104
Appendix A – Required fields for Setup
BILLING PROFILE (BPRO) FIELDS REQUIRING PRIOR SETUP
Table 3: BPRO Fields Requiring Prior Setup
Billing Profile Field Table Used to complete Supplementary Setup
General Information Section
Department
Unit
Billing Profile
Name
Billing Type
Invoice Instruction BINST
Collection Agreement COLLA
Decrease Accounting Template
Central Remit
Output Distribuiton
Central Statement
Day Not in Month
Weekend Holiday
Statement Frequency
Statement Month
Statement Day
Expanded Statement
Statement Instruction BINST
Organization / Contact Information Section
Pay To
Remit To Name
Remit to Divison
Street 1
Street 2
City
State
Zip
County
Country
Contact CNTAC
Options and Controls Section
Receivable Due Date Lag
Priority 1 Positng Type

AFIS | AR Billing and Collections
105
Priority 2 Positng Type
Priority 3 Positng Type
Priority 4 Positng Type
Priority 5 Positng Type
Priority 6 Positng Type
Collection Cycle COLLC, DNGM & COLL
Past Due Days for Collection Referral
Collection Referral Table Load Status
Past Due Days for Write-Off
Potentially Uncollectible Load Status
Write Off Document Line Limit
Past Due Days for Intercept
Intercept Table Load Status
Minimum Billing Amount
Minimum Negative Billing Amount
Minimum Past Due Amount for Finance Charge
Finance Charge Fee 1 FCEG & FNCHG
Finance Charge Fee 2 FCEG & FNCHG
Finance Charge Fee 3 FCEG & FNCHG
Finance Charge Fee 4 FCEG & FNCHG
Finance Charge Fee 5 FCEG & FNCHG
Finance Charge Fee Override
Grace Period Days
NSF Charge
Automatic Refund to Customer of Credit Balance
Unreserved Credit Balance Event Type
Reserved Credit Balance Event Type
Number of Days for a Credit Balance
Enable Notification for Internal Debt
SPEC Accounts Section
Billed Unearned Receivable
Billed Unearned Receivable Sub Account
Billed Earned Receivable
Billed Earned Receivable Sub Account
Billed Unearned Revenue
Billed Unearned Sub Revenue
Collected Unearned Revenue
Collected Unearned Sub Revenue
Earned Receivable
Earned Receivable Sub Account
Allowance for Bad Debt
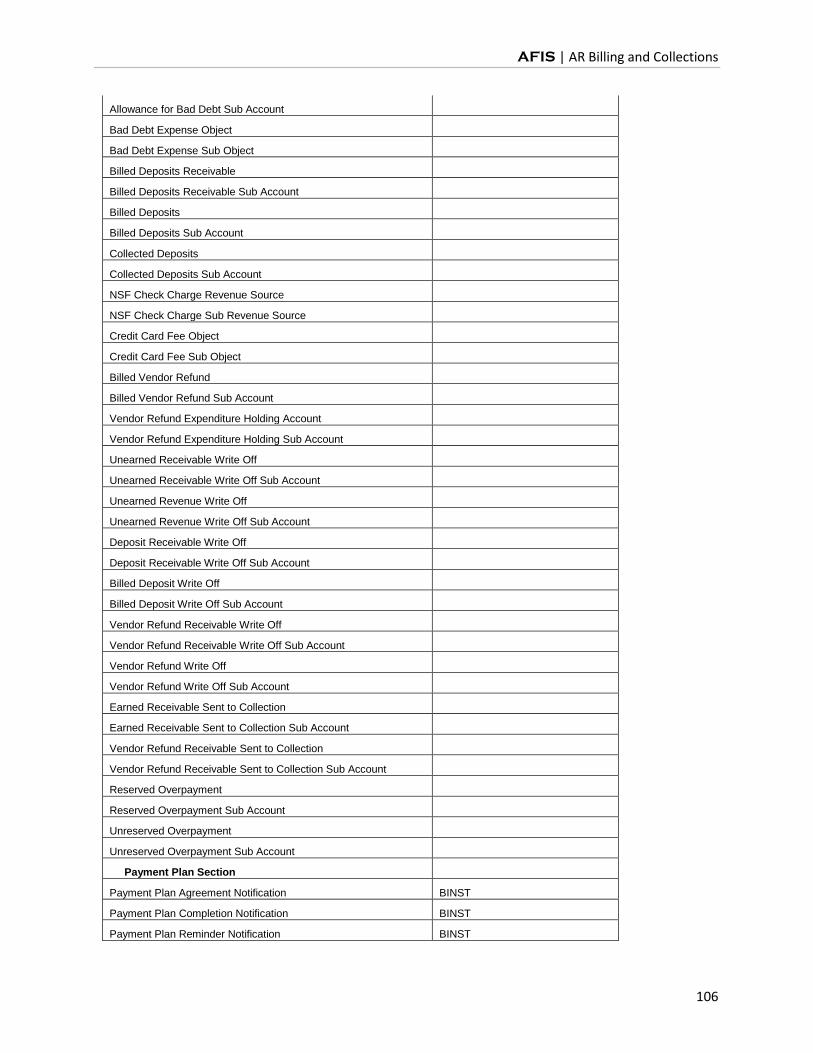
AFIS | AR Billing and Collections
106
Allowance for Bad Debt Sub Account
Bad Debt Expense Object
Bad Debt Expense Sub Object
Billed Deposits Receivable
Billed Deposits Receivable Sub Account
Billed Deposits
Billed Deposits Sub Account
Collected Deposits
Collected Deposits Sub Account
NSF Check Charge Revenue Source
NSF Check Charge Sub Revenue Source
Credit Card Fee Object
Credit Card Fee Sub Object
Billed Vendor Refund
Billed Vendor Refund Sub Account
Vendor Refund Expenditure Holding Account
Vendor Refund Expenditure Holding Sub Account
Unearned Receivable Write Off
Unearned Receivable Write Off Sub Account
Unearned Revenue Write Off
Unearned Revenue Write Off Sub Account
Deposit Receivable Write Off
Deposit Receivable Write Off Sub Account
Billed Deposit Write Off
Billed Deposit Write Off Sub Account
Vendor Refund Receivable Write Off
Vendor Refund Receivable Write Off Sub Account
Vendor Refund Write Off
Vendor Refund Write Off Sub Account
Earned Receivable Sent to Collection
Earned Receivable Sent to Collection Sub Account
Vendor Refund Receivable Sent to Collection
Vendor Refund Receivable Sent to Collection Sub Account
Reserved Overpayment
Reserved Overpayment Sub Account
Unreserved Overpayment
Unreserved Overpayment Sub Account
Payment Plan Section
Payment Plan Agreement Notification BINST
Payment Plan Completion Notification BINST
Payment Plan Reminder Notification BINST

AFIS | AR Billing and Collections
107
Payment Plan Cancellation Notification BINST
Automatic NSF Check Cancellation
Automatic Cancellation After Number of Missed Payments Minimum Days Between Payment Plan Start Date & First Due Date
Payment Plan Print Date Lag

AFIS | AR Billing and Collections
108
Appendix B – Terminology
TERMINOLOGY
The terms listed in Error! Reference source not found. below are used throughout this guide.
Table 4: Terminology
Term Description
Accounting Line The fields in a document’s Accounting component where users, at a minimum, enter a set of Chart of Accounts codes comprising a funding distribution and an Event Type (may use default).
Accounting Template (ACTPL)
A predefined set of elements that can be inferred to a document accounting line as a soft inference, meaning accounting elements may still be entered on a transaction that are not overwritten by elements defined on the Accounting Template.
Address ID, Address Code
The code that identifies addresses for a vendor or customer. These are established as part of Vendor/Customer setup.
Address Type A pre-defined code that categorizes the purpose of each address associated with a Vendor/Customer on VCUST. For customers, the address type is Billing.
Agency A State agency is a ‘Department’ in AFIS. The Dept field is used to capture agency information.
Billing Location Indicates where an invoice or statement for the receivable will be sent.
Billing Profile (BPRO) table
The table that stores the rules that define the creation and management of customer bills, such as billing type, billing instructions, collection parameters, and special accounts options are defined on the Billing Profile (BPRO) table.
Billing Rate (BILLR) table
Stores information used to automatically calculate receivable amounts, for example: Rate Code, Charge per Unit, Unit of Measure.
Billing Type Indicates the type of billing and is an option on the BPRO page. Valid values are: Invoice, Statement, Both, No Billing Required, and Cost Accounting Billing.
Cash Receipt (CR, CACR, CRTRI or CRWP) document
An Accounts Receivable document used to record all monies collected, including collections against outstanding receivables, customer accounts, pre-payments, non-sufficient funds (NSF), and cash-basis collections with no document or customer account reference. CACR, CRTRI and CRWP documents are an Accounts Receivable document with all of the fields of a CR document, but set apart specifically for Cost Accounting, TRIRIGA, or Web Portal credit card related cash receipt activity, respectively.
Collections Processing
Actions taken to receive payment from customers with delinquent bills.
Collection Referral (CL) document
The Referral to Collection Agency (CL) document allows you to refer receivables that are significantly past due to a collection agency, like the Attorney General’s Office.
Copy Forward Feature that enables a user to copy pertinent information from a finalized existing document into a new Document Type whose purpose is to reference or liquidate the source document.

AFIS | AR Billing and Collections
109
Term Description
Customer A business or individual set up within the AR functionality that owes the State money.
Customer Account The combination of Customer, Department, Unit and Billing Profile, creating a unique entity for receivable activity processing.
Customer code The unique identifier assigned to a customer. A customer can also be a vendor, allowing users to enter information only one time when an entity doing business with the State is both a vendor (payable) and a customer (receivable). Unique address types for payables and receivables are required in order to pay a vendor or bill a customer.
Department – Treasury Adjustment Clearing (DADJ) document
The Department – Treasury Adjustment Clearing (DADJ) document is used by the agency to clear the activity from the State Treasurer – Treasury Adjustment Clearing (STADJ) document, relating to Unfavorable/Favorable Deposit Adjustments, NSFs or Unfavorable/Favorable Credit Card Adjustments.
Document Catalog A central location where documents can be generated and reviewed.
Documents Electronic forms used to enter and record financial transactions and activities.
Dunning Message A notice informing a customer of a past due balance.
Event Type (ETYP) Identifies and records the type of financial activity for an accounting line of a document. For all accounting based documents, and certain non-accounting documents, every accounting line must have an Event Type. You can either enter the Event Type or use the default provided by the system.
Function A Chart of Accounts element that can be inferred to a document accounting line as a hard inference, meaning any accounting elements already entered will be overwritten by the Function and changing fields inferred by Function is not allowed.
Fund (FUND) The Chart of Accounts element that represents a self-balancing set of accounts.
Fund Accounting The Chart of Accounts view that measures funds and general ledger accounts. Fund accounting comprises elements such as fund, Department, appropriation unit, revenue source, object of expenditure, and balance sheet account.
Future Document Triggering
Allows users to set up, maintain, and trigger the creation of documents in the future on a user-defined frequency.
Grid A list of records displayed in a table format. Up to 10 records are typically displayed at one time.
Inferred Values that are automatically populated based on previous entries in the system.
Inquiries Display summary and detailed information from successfully processed documents, for viewing only.
Invoice A form requesting payment for a specific receivable.
Invoice Generation The offline process that produces invoice forms and the invoice register.
Jump To Used to navigate directly to a specified page within AFIS.
Page Search Used to find and navigate to any page in AFIS.
Parent Also referred to as the Headquarters account, the parent is set up on the VCUST table. The Headquarters or parent represents the legal entity or ownership entity of an organization. Multiple vendors or customers can be associated with one parent.
AFIS | AR Billing and Collections
110
Term Description
Past Due Invoice or Statement
A notice informing a customer of a past due balance.
Past Due Receivable
An amount that has not been liquidated by the due date.
Phase A point in time within the document processing lifecycle. Common phases are Draft, Pending, and Final.
Posting Code (PSCD)
A code associated with instructions that tell AFIS what debits and credits to create against a given budget. Debits and credits post to various accounting journals and ledgers (summaries of journals) for tracking purposes and reporting.
Posting Line The component of a document with the most detailed accounting information. It is a common source of information used to update most of the system.
Receivable (RE, CARE or RETRI) document
An RE is an Accounts Receivable document used to bill external customers for goods or services. It is an accounting transaction that triggers the billing process and tracks receivable events to recognize that money earned now will be received in the future. CARE and RETRI documents are an Accounts Receivable document with all of the fields of an RE document, but set apart specifically for Cost Accounting or TRIRIGA related billing, respectively.
Accounts Receivable Correspondence History (RCHT) Table
The Accounts Receivable Correspondence History (RCHT) page allows you to view all correspondence information for a customer. This page is updated by the Invoice Print History (INVHS) table, Statement Print History (STMTHS) table, Payment Plan Print History (PPPHS) table, and the Accounts Receivable Correspondence Update page.
Accounts Receivable Correspondence Update (RCUHT) Table
The Accounts Receivable Correspondence Update page allows the addition or modification of records to the Accounts Receivable Correspondence History (RCHT) table. These records detail the manual correspondence(s) of a user to a customer regarding receivables.
Reference Tables Used to store information within AFIS.
Secondary Navigation Panel
A menu that changes depending on what type of page the user is on. The Home Page includes standard options and access to History and Favorites. Multi-page tables include menus to navigate through sections of a table. Documents include menus to navigate through sections and features of a document.
State Treasurer – Treasury Adjustment (STADJ) document
The State Treasurer – Treasury Adjustment Clearing (DADJ) document is used by the Treasurer’s Office to record cash adjustments to the agency, relating to Unfavorable/Favorable Deposit Adjustments, NSFs or Unfavorable/Favorable Credit Card Adjustments.
Statement A form reflecting the status of a customer account and requesting payment for due amounts.
Statement Generation
The offline process that produces statement forms and the statement register.
System Options (SOPT)
A table that provides a set of characteristics that guide budget and accounting activities. Each control or option that is set on SOPT is associated with a business rule that drives events and actions throughout AFIS.
TRIRIGA System Statewide application used by the State of Arizona for Facilities Management.

AFIS | AR Billing and Collections
111
Term Description
Vendor Code The unique identifier assigned to the vendor. A vendor can also be a customer, allowing users to enter information only one time when a contact is both a vendor (payable) and a customer (receivable). Unique address types for payable and receivables are required in order to pay the vendor or bill the customer.
Vendor/Customer (VCUST) table
The primary repository for vendor and customer information. Records may be defined for use as a vendor, a customer, or both. Records are added to this table through a Vendor Customer Creation (VCC) based document and modified through a Vendor Customer Modification (VCM) based document. Multiple VCC & VCM based documents are available depending on the user establishing the vendor or customer.
Workflow An online routing and approval process.
Write-Off (WO or WOAGA) document
The Write-Off (WO) document allows you to process a transaction to write-off receivable or collection documents in AFIS that are deemed uncollectible, upon approval in AFIS from the Attorney General’s Office and the General Accounting Office. A WOAGA document is an Accounts Receivable document with all of the fields of a WO document, but set a part for use by the Attorney General’s Office to initiate the write-off, for those accounts that have been referred to their Office for collections.

AFIS | AR Billing and Collections
112
Appendix C – List of Acronyms
LIST OF ACRONYMS
Error! Reference source not found. lists the acronyms used in this guide.
Table 5: Acronyms
Acronym Definition
ACTPL Accounting Template
AFIS Arizona Financial Information System
APYCRBAL Apply Credit Balance
AR Accounts Receivable
BILLR Billing Rate
BINST Billing Instructions
BPRO Billing Profile
BSA Balance Sheet Account
CA Cost Allocation
CACT Customer Account Options
CARE Cost Accounting Receivable
CBALDQ Cash Balance Detail Query
CL Referral to Collection Agency
COA Chart of Accounts
COLL Collection Letter
COLLA Collection Agency Agreement
COLLC Collection Control
COLLR Pending Referral to Collection Agency
CNTAC Contact
CACR Cost Accounting Cash Receipt
CR Cash Receipt
CRTRI Cash Receipt – Real Estate
CRWP Cash Receipt – Web Portal
CUSTA Customer Account Information
CUSTS Customer Information
DADJ Department – Treasury Adjustment Clearing
DEPT Department
DNGM Dunning Message
EFT Electronic Funds Transfer
FBALDQ Fund Balance Detail Query
FCEG Finance Charge Eligibility
FDT Future Document Triggering
FNCHG Finance Charge Setup
INVHS Invoice Print History
INVQ Invoice
JACTG Accounting Journal
AFIS | AR Billing and Collections
113
JLBC Joint Legislative Budget Committee
PPPHS Payment Plan Print History
PPPT Payment Plan Print
PSCHD Payment Plan
RCBD Reserved Credit Balance Table
RCHT Accounts Receivable Correspondence History Table
RCUHT Accounts Receivable Correspondence Update Table
RDET Receivable History and Reference
RE Receivable
RETRI Receivable TRIRIGA document
REDCRBAL Reduce Credit Balance
RESTA Receivable Search
RSRC Revenue Source
SOPT System Options
SPEC Special Accounts
STADJ State Treasurer – Treasury Adjustment
STATD Statement Detail
STMTHS Statement Print History
STMTQ Statement
UCBD Unreserved Credit Balance Table
VCUST Vendor Customer
WO Write-Off
WOAGA Write-Off Attorney General

AFIS | AR Billing and Collections
114
Appendix D – Accounts Receivable Configuration
ACCOUNTS RECEIVABLE CONFIGURATION
Accounts Receivable Configuration
Proper configuration of the Accounts Receivable tables is extremely important to maintaining an
accurate and efficient billing system. There are many tables in AFIS that work together to provide the
structure that customer accounts depend on. This lesson examines the key tables for Customer Account
and Billing configuration and their function in the Accounts Receivable business area.

AFIS | AR Billing and Collections
115
9.1. Billing Profile
The Billing Profile (BPRO) table defines the basic characteristics of a customer bill. A single Billing Profile
can be assigned to one or many customers. A Billing Profile and a customer code together constitute a
customer account.
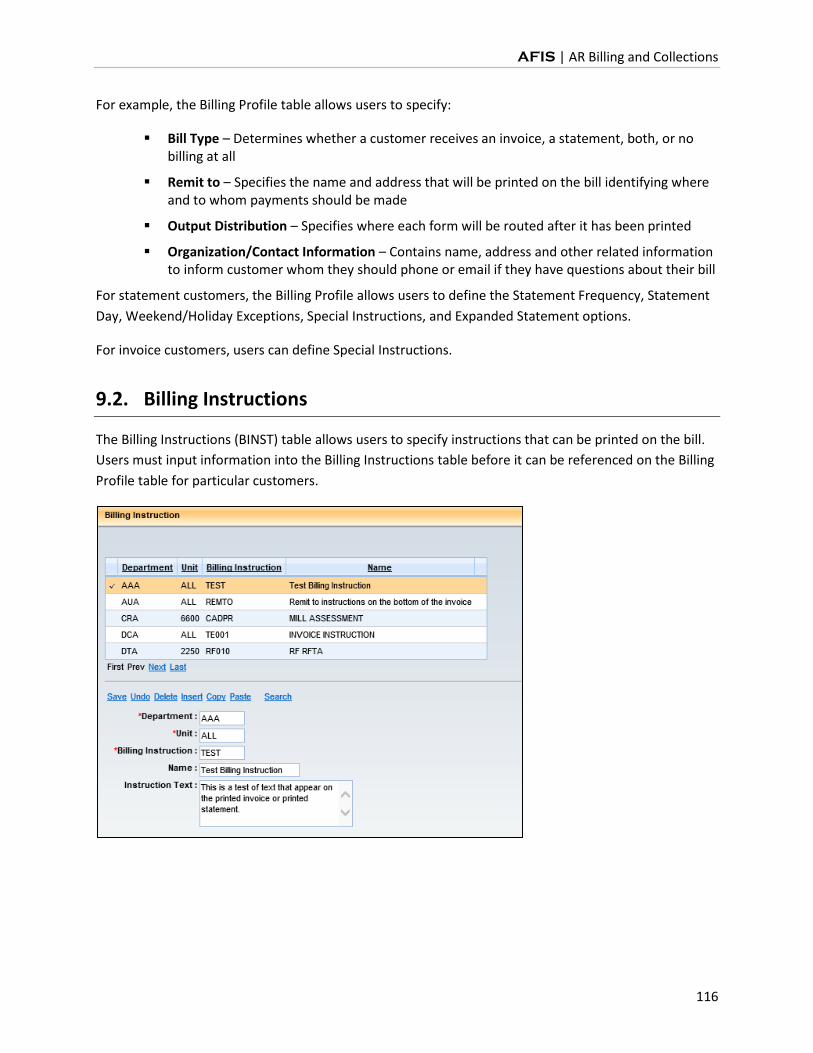
AFIS | AR Billing and Collections
116
For example, the Billing Profile table allows users to specify:
Bill Type – Determines whether a customer receives an invoice, a statement, both, or no billing at all
Remit to – Specifies the name and address that will be printed on the bill identifying where and to whom payments should be made
Output Distribution – Specifies where each form will be routed after it has been printed
Organization/Contact Information – Contains name, address and other related information to inform customer whom they should phone or email if they have questions about their bill
For statement customers, the Billing Profile allows users to define the Statement Frequency, Statement
Day, Weekend/Holiday Exceptions, Special Instructions, and Expanded Statement options.
For invoice customers, users can define Special Instructions.
9.2. Billing Instructions
The Billing Instructions (BINST) table allows users to specify instructions that can be printed on the bill.
Users must input information into the Billing Instructions table before it can be referenced on the Billing
Profile table for particular customers.

AFIS | AR Billing and Collections
117
9.3. Finance Charge Eligibility
The Finance Charge Eligibility (FCEG) table allows users to define whether AFIS is to assess finance
charges for a particular Event Type through the automated Finance Charge Batch process. This setup is
not necessary if finance charges will be manually applied. Changes to Finance Charge Eligibility records
take effect immediately and do not apply retroactively to past finance charges.

AFIS | AR Billing and Collections
118
9.4. Finance Charge Setup
Finance charges can be assessed automatically on delinquent receivables based on setup options
specified on the Finance Charge Setup (FNCHG), System Options (SOPT), Billing Profile (BPRO), and
Revenue Source (RSRC) tables. The finance charge process generates two types of fees:
Flat Fee – A one-time or periodic penalty fee
Interest – A variable fee which is calculated as a percentage of the outstanding amount and is charged periodically
The finance charge process consists of:
Setting up the characteristics of the fees that can be used in the finance charge process
Setting up the fees that apply on a system-wide level or on a billing profile level
Running the offline process that determines the amount of penalties and interest to be assessed to overdue receivables and applies these penalties and interest to the receivable.
Up to five separate finance charge fees can be assigned to a specific billing profile, and if applicable a grace period can be defined here. Note that finance charges stop accruing after a receivable has been referred to collections by referencing the Receivable (RE) based document on a Referral to Collection Agency (CL) document.
9.5. Billing Rates
The Billing Rate (BILLR) table stores information used to automatically calculate receivable amounts, for
example; Rate Code, Charge per Unit, or Unit of Measure. Users can also define the start and stop dates
for the billing rate to be in effect.
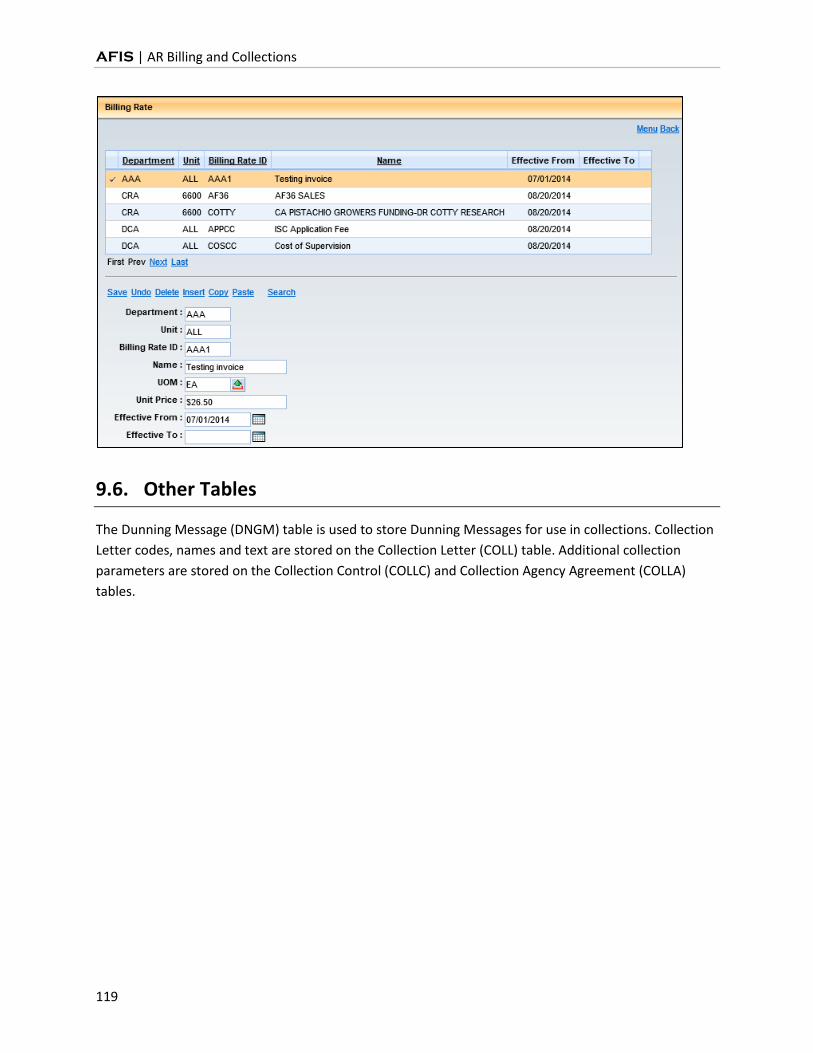
AFIS | AR Billing and Collections
119
9.6. Other Tables
The Dunning Message (DNGM) table is used to store Dunning Messages for use in collections. Collection
Letter codes, names and text are stored on the Collection Letter (COLL) table. Additional collection
parameters are stored on the Collection Control (COLLC) and Collection Agency Agreement (COLLA)
tables.
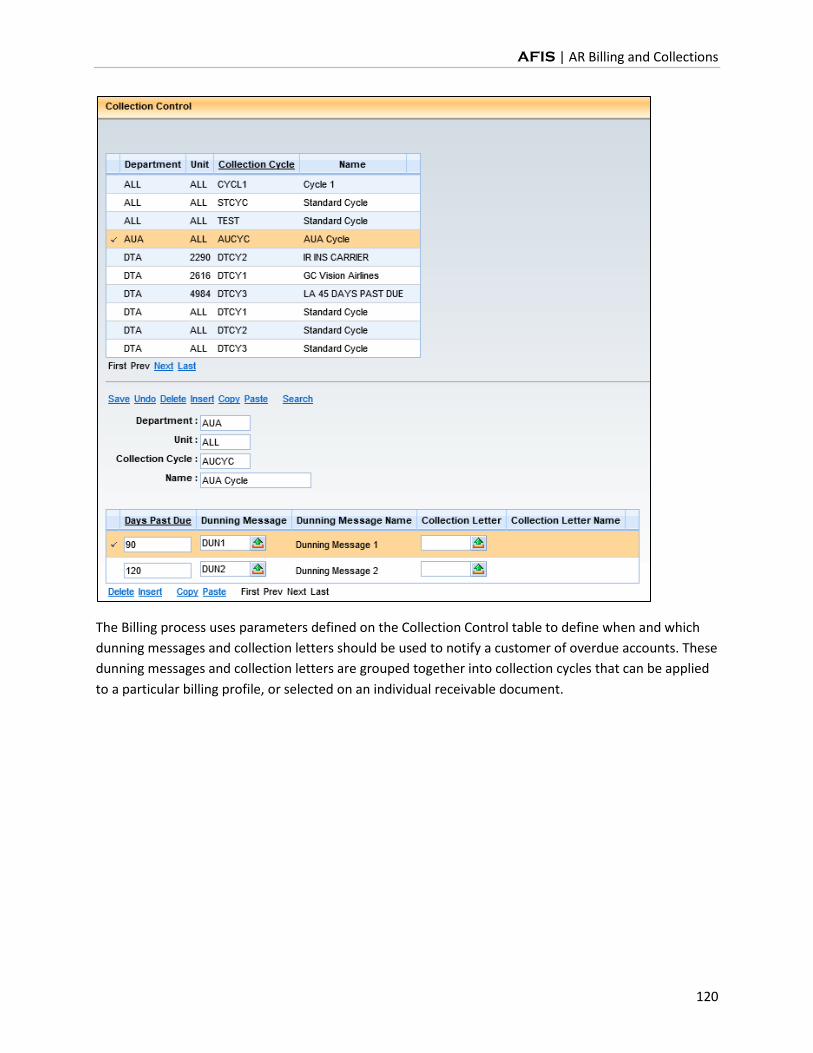
AFIS | AR Billing and Collections
120
The Billing process uses parameters defined on the Collection Control table to define when and which
dunning messages and collection letters should be used to notify a customer of overdue accounts. These
dunning messages and collection letters are grouped together into collection cycles that can be applied
to a particular billing profile, or selected on an individual receivable document.

AFIS | AR Billing and Collections
121