accuroute desktop v2.2 installation guide
TRANSCRIPT
Omtool, Ltd.6 Riverside DriveAndover, MA 01810Phone: +1/1 978 327 5700Toll-free in the US: +1/1 800 886 7845Fax: +1/1 978 659 1300
Omtool Europe25 Southampton BuildingsLondonWC2A 1ALUnited KingdomPhone: +44/0 20 3043 8580Toll-free in the UK: +44/0 80 0011 2981Fax: +44/0 20 3043 8581
Web: http://www.omtool.com
AccuRoute® Desktop Client Installation Guide
For AccuRoute v3.01
March 5, 2010

AccuRoute Desktop Client Installation Guide
© 2010, Omtool, Ltd. All Rights Reserved.
AccuRoute®, Genifax™, Image-In™, ObjectArchive™, Omtool™, Swiftwriter® and the Company logo are trademarks of the Company. Trade names and trademarks of other companies appearing in this document are the property of their respective owners. Omtool product documentation is provided as part of the licensed product. As such, the documentation is subject to the terms outlined in the End User License Agreement. (You are presented with the End User License Agreement during the product installation. By installing the product, you consent to the terms therein.)
Permission to use the documentation is granted, provided that this copyright notice appears in all copies, use of the documentation is for informational and non-commercial or personal use only and will not be copied or posted on any network computer or broadcast in any media, and no modifications to the documentation are made. Accredited educational institutions may download and reproduce the documentation for distribution in the classroom. Distribution outside the classroom requires express written permission. Use for any other purpose is expressly prohibited by law.
Omtool and/or its suppliers make no guaranties, express or implied, about the information contained in the documentation. Documents and graphics contained therein could include typographical errors and technical inaccuracies. Omtool may make improvements or changes to the documentation and its associated product at any time.
Omtool support and sales
Online resourcesThe Omtool web site provides you with 24-hour access to documentation, software updates and other downloads, and detailed technical information that can help you troubleshoot issues. Go to http://www.omtool.com/support and log in using your customer number. Then click one of the following:
KNOWLEDGE BASE to access technical articles.
DOWNLOADS & DOCS to access online documentation, software updates, and downloads.
Customer service and technical supportContact Omtool Customer Service or Technical Support using any of the following methods:
Phone: 888 303 8098 (toll-free in the US)
Fax: 978 659 1301
E-mail: [email protected] or [email protected]
Technical support requires an active support contract. For more information, go to http://www.omtool.com/support/entitlements.cfm.
Sales, consulting services, licenses, and trainingContact Omtool Sales using any of the following methods:
Phone: 978 327 5700 or 800 886 7845 (toll-free in the US)
Fax: 978 659 1300
E-mail: [email protected]
© 2010 by Omtool, Ltd. All rights reserved. Omtool, AccuRoute and the Company logo are trademarks of the Company. Trade names and trademarks of other companies appearing in this document are the property of their respective owners.

CON-1
© 2010 by Omtool, Ltd. All rights reserved. Omtool, AccuRoute and the Company logo are trademarks of the Company. Trade names and trademarks of other companies appearing in this document are the property of their respective owners.
Contents
Section 1: IntroductionIntroduction to AccuRoute Desktop ...............................................................................................................................................1-1Integration with DMS applications ....................................................................................................................................................1-1Methods of submitting messages to the Omtool Server .............................................................................................................1-2
AccuRoute Desktop...........................................................................................................................................................1-2AccuRoute Web Client .....................................................................................................................................................1-3Omtool COM API ..............................................................................................................................................................1-3Network scanning devices ................................................................................................................................................1-3
Components of AccuRoute Desktop...............................................................................................................................................1-3AccuRoute Desktop...........................................................................................................................................................1-3AccuRoutePDF printer ......................................................................................................................................................1-4Send To AccuRoute Desktop ..........................................................................................................................................1-5
Workflows for messages and Embedded Directives ....................................................................................................................1-7Deployment summary..........................................................................................................................................................................1-7Related documentation........................................................................................................................................................................1-7
AccuRoute v3.01 documentation....................................................................................................................................1-7AccuRoute Desktop user guides.....................................................................................................................................1-8Omtool DMS Libraries installation and integration guides .......................................................................................1-8Omtool DMS Libraries quick start guides for AccuRoute Desktop users............................................................1-8
Section 2: RequirementsServer requirement...............................................................................................................................................................................2-1
Additional server requirements.......................................................................................................................................2-1Client requirements..............................................................................................................................................................................2-2
Supported e-mail applications ..........................................................................................................................................2-2Note about connecting to AccuRoute Server installed on Windows 2008 system ...........................................2-3
Section 3: InstallationAccessing the setup files ......................................................................................................................................................................3-1Installing AccuRoute Desktop ............................................................................................................................................................3-1
Running the AccuRoute Desktop setup in silent mode.............................................................................................3-4Uninstalling AccuRoute Desktop.......................................................................................................................................................3-6
Section 4: Required configurationConfiguring server-client connectivity for AccuRoute Desktop................................................................................................4-1
Choosing a connectivity method.....................................................................................................................................4-1Configuring server-client connectivity methods..........................................................................................................4-2Implementing connectivity methods...............................................................................................................................4-3
Preconfiguring AccuRoute Desktop with the connection string ...............................................................................................4-5Configuring Group permissions for AccuRoute Desktop ...........................................................................................................4-6Note about connecting to AccuRoute Server installed on Windows 2008 system..............................................................4-7
© 2010 by Omtool, Ltd. All rights reserved. Omtool, AccuRoute and the Company logo are trademarks of the Company. Trade names and trademarks of other companies appearing in this document are the property of their respective owners.
CON-2
Section 5: Optional configurationConfiguring address book integration in the AccuRoute Desktop setup................................................................................5-1Using AccuRoute Desktop with a DMS connector ......................................................................................................................5-2Configuring MyAccuRoute on the Omtool Server .......................................................................................................................5-3Configuring the Watch Folders application on the Omtool Server..........................................................................................5-4Modifying the AccuRoute Desktop configuration file...................................................................................................................5-5
Section 6: ViewsIntroduction to views...........................................................................................................................................................................6-1
Views versus user preferences ........................................................................................................................................6-1View files installed with AccuRoute Desktop ..............................................................................................................6-2Views associated with AccuRoute Desktop features .................................................................................................6-3Inheritance ............................................................................................................................................................................6-3Overrides..............................................................................................................................................................................6-4
Guidelines for modifying view files....................................................................................................................................................6-4View section.........................................................................................................................................................................6-5General section ...................................................................................................................................................................6-6Defaults section...................................................................................................................................................................6-8UI section........................................................................................................................................................................... 6-13Transformations section................................................................................................................................................. 6-19FaxCoverpages section................................................................................................................................................... 6-21FaxAccessCodes section................................................................................................................................................ 6-23ConfirmationList section................................................................................................................................................ 6-25Recipients section ............................................................................................................................................................ 6-27Attachments section........................................................................................................................................................ 6-30RoutingSheets section..................................................................................................................................................... 6-33
Section 7: TroubleshootingError when profiling DOCX and XLSX type documents to a Worksite v8.2 repository ..................................................7-1AccuRoute Desktop fails to connect to AccuRoute Server installed on Windows 2003 system .....................................7-2When composing a Batch-Standard or a Standard Routing Sheet, I get an error .................................................................7-2
Appendix: Control identifiersStandard view and Print To view.......................................................................................................................................................8-1
General controls for the standard view and Print To view......................................................................................8-1Additional controls for the Print To view only ...........................................................................................................8-4Controls for menus ............................................................................................................................................................8-4Controls for toolbar buttons...........................................................................................................................................8-7Controls for the Message Options dialog box.............................................................................................................8-7
Send To view....................................................................................................................................................................................... 8-10
Appendix: Frequently asked questionsHow do I configure the access code to include billing data? ......................................................................................................9-1How do I hide the E-mail copy to field?...........................................................................................................................................9-2Can the client connect automatically without prompting the user on startup?.....................................................................9-3Can I add the user’s e-mail address to the E-mail copy to field? ...............................................................................................9-4How do I set the default server in the Connect to Server dialog box?...................................................................................9-4How do I set the default cover page for fax recipients? ..............................................................................................................9-6Can I set the file formats that are valid for a destination type? .................................................................................................9-7

CON-3
© 2010 by Omtool, Ltd. All rights reserved. Omtool, AccuRoute and the Company logo are trademarks of the Company. Trade names and trademarks of other companies appearing in this document are the property of their respective owners.
Appendix: Setting up AccuRoute Desktop for an Omtool Server clusterIntroduction......................................................................................................................................................................................... 10-1Copying server and client resources to a high availability server........................................................................................... 10-1Editing the registry on the Omtool Server .................................................................................................................................. 10-2Editing the AccuRoute Desktop configuration file ..................................................................................................................... 10-3

© 2010 by Omtool, Ltd. All rights reserved. Omtool, AccuRoute and the Company logo are trademarks of the Company. Trade names and trademarks of other companies appearing in this document are the property of their respective owners.
CON-4

© 2010 by Omtool, Ltd. All rights reserved. Omtool, AccuRoute and the Company logo are trademarks of the Company. Trade names and trademarks of other companies appearing in this document are the property of their respective owners.
1-1AccuRoute Desktop Installation Guide
Section 1: Introduction
Section 1: IntroductionThis guide contains instructions on installing and configuring AccuRoute Desktop v3.01. The intended audience of this guide is an administrator and with knowledge of the Omtool Server.
This section includes:
Introduction to AccuRoute Desktop (1-1)
Integration with DMS applications (1-1)
Methods of submitting messages to the Omtool Server (1-2)
Components of AccuRoute Desktop (1-3)
Workflows for messages and Embedded Directives (1-7)
Deployment summary (1-7)
Related documentation (1-7)
Introduction to AccuRoute DesktopAccuRoute takes the guesswork out of document delivery. The first document routing solution of its kind, the AccuRoute software is a versatile document messaging suite enabling users to send documents—electronic and hard copy—to multiple and varied destinations like document repositories, network printers, fax numbers, and e-mail. It features the Embedded Directive, an encoded key containing document routing instructions.
AccuRoute’s unmatched routing capabilities are presented to the user as AccuRoute Desktop, an intelligent client-side application that resembles a desktop email client. Using AccuRoute Desktop, users can create Embedded Directives and Routing Sheets and use them to streamline their common document routing practices.
AccuRoute Desktop also features a desktop printer that generates PDF files and a Windows Send To shortcut; both invoke AccuRoute Desktop automatically, allowing the user to send documents that are already open on the desktop or saved on the network.
Integration with DMS applicationsAccuRoute Desktop supports Omtool DMS Libraries v3.01 and later. The Omtool DMS Libraries are a modular set of DLL files for document management systems and document repositories. They enable Omtool applications such as the AccuRoute Desktop to communicate with your company's document management system or other document repository. Specifically, the Omtool DMS Libraries allow Omtool applications to authenticate users to the DMS application so that users can profile documents and save them in the DMS application.
Periodically Omtool releases updates to the Omtool DMS Libraries. Updates can include support for new document management applications and resolutions to issues in previous releases.

AccuRoute Desktop Installation Guide
Section 1: Introduction
© 2010 by Omtool, Ltd. All rights reserved. Omtool, AccuRoute and the Company logo are trademarks of the Company. Trade names and trademarks of other companies appearing in this document are the property of their respective owners.
1-2
Methods of submitting messages to the Omtool ServerThe highly intelligent Embedded Directive technology requires each message to be submitted directly to the Omtool Server for processing and routing to the final destinations. There are several ways messages can be submitted to the Omtool Server; each method is explained in the figure below and in the following sub sections.
Figure 1-A: Methods of submitting messages to the Omtool Server
AccuRoute DesktopAccuRoute Desktop is the client-side desktop application that allows network users to:
create and save Embedded Directives (EDs). These EDs can be used to submit messages directly to the Omtool Server and generate Routing Sheets.
© 2010 by Omtool, Ltd. All rights reserved. Omtool, AccuRoute and the Company logo are trademarks of the Company. Trade names and trademarks of other companies appearing in this document are the property of their respective owners.
1-3AccuRoute Desktop Installation Guide
Section 1: Introduction
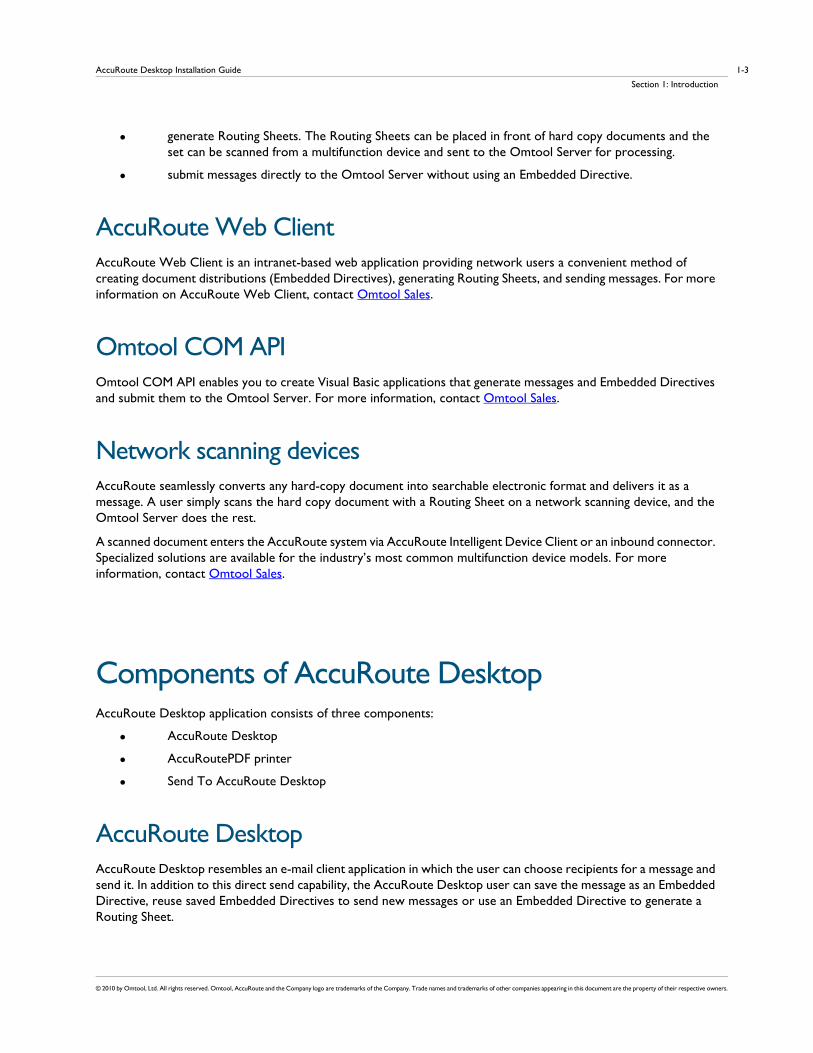
generate Routing Sheets. The Routing Sheets can be placed in front of hard copy documents and the set can be scanned from a multifunction device and sent to the Omtool Server for processing.
submit messages directly to the Omtool Server without using an Embedded Directive.
AccuRoute Web ClientAccuRoute Web Client is an intranet-based web application providing network users a convenient method of creating document distributions (Embedded Directives), generating Routing Sheets, and sending messages. For more information on AccuRoute Web Client, contact Omtool Sales.
Omtool COM APIOmtool COM API enables you to create Visual Basic applications that generate messages and Embedded Directives and submit them to the Omtool Server. For more information, contact Omtool Sales.
Network scanning devicesAccuRoute seamlessly converts any hard-copy document into searchable electronic format and delivers it as a message. A user simply scans the hard copy document with a Routing Sheet on a network scanning device, and the Omtool Server does the rest.
A scanned document enters the AccuRoute system via AccuRoute Intelligent Device Client or an inbound connector. Specialized solutions are available for the industry’s most common multifunction device models. For more information, contact Omtool Sales.
Components of AccuRoute DesktopAccuRoute Desktop application consists of three components:
AccuRoute Desktop
AccuRoutePDF printer
Send To AccuRoute Desktop
AccuRoute DesktopAccuRoute Desktop resembles an e-mail client application in which the user can choose recipients for a message and send it. In addition to this direct send capability, the AccuRoute Desktop user can save the message as an Embedded Directive, reuse saved Embedded Directives to send new messages or use an Embedded Directive to generate a Routing Sheet.
AccuRoute Desktop Installation Guide
Section 1: Introduction
© 2010 by Omtool, Ltd. All rights reserved. Omtool, AccuRoute and the Company logo are trademarks of the Company. Trade names and trademarks of other companies appearing in this document are the property of their respective owners.
1-4
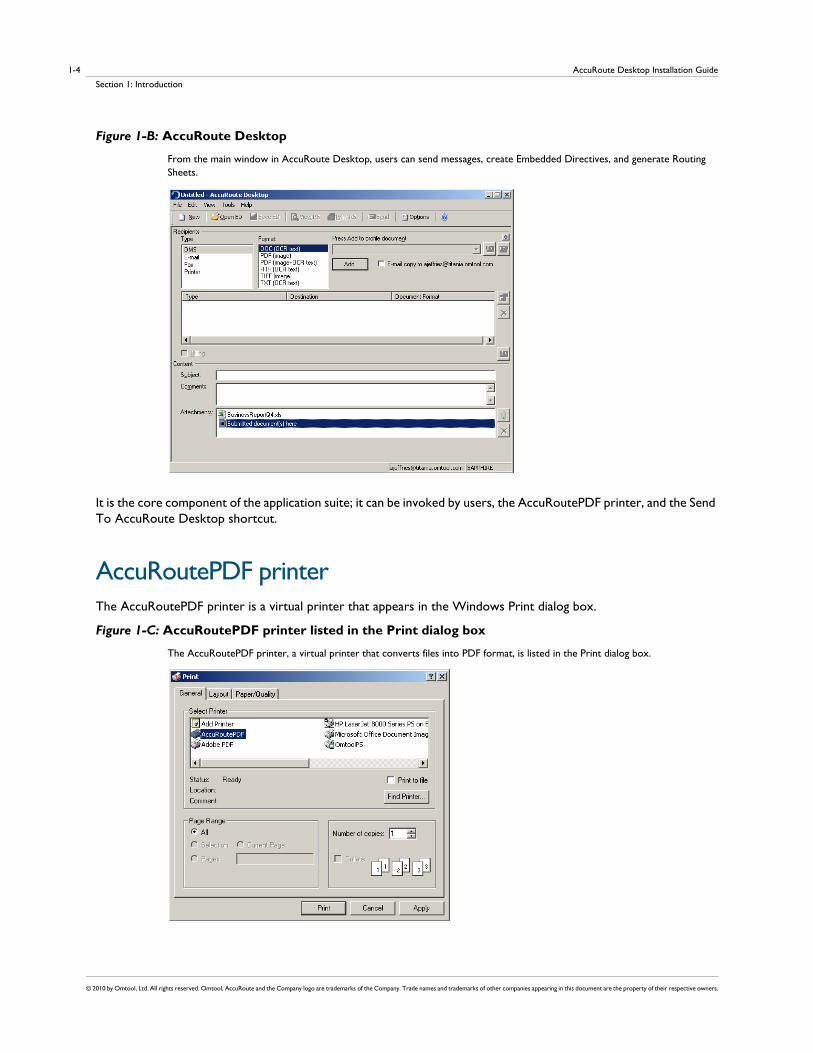
Figure 1-B: AccuRoute Desktop
From the main window in AccuRoute Desktop, users can send messages, create Embedded Directives, and generate Routing Sheets.
It is the core component of the application suite; it can be invoked by users, the AccuRoutePDF printer, and the Send To AccuRoute Desktop shortcut.
AccuRoutePDF printerThe AccuRoutePDF printer is a virtual printer that appears in the Windows Print dialog box.
Figure 1-C: AccuRoutePDF printer listed in the Print dialog box
The AccuRoutePDF printer, a virtual printer that converts files into PDF format, is listed in the Print dialog box.

© 2010 by Omtool, Ltd. All rights reserved. Omtool, AccuRoute and the Company logo are trademarks of the Company. Trade names and trademarks of other companies appearing in this document are the property of their respective owners.
1-5AccuRoute Desktop Installation Guide
Section 1: Introduction
When a document is printed to the AccuRoutePDF printer, the printer converts the document into PDF format and then launches AccuRoute Desktop (in Print To view) with the PDF file attached to the form. The user can send a message or create an Embedded Directive with the attachment.
Figure 1-D: AccuRoute Desktop “Print To” view with a PDF attachment
After the AccuRoutePDF printer converts a file into PDF format, AccuRoute Desktop starts in “Print To” view and the PDF file is attached.
The AccuRoutePDF printer uses the Xerox Walk-Up Printing Driver 2.0. This general purpose Xerox driver produces the highest possible quality PDF documents for AccuRoute Desktop. It surpasses the performance of all other drivers that Omtool tested, and resolves miscellaneous quality issues that were observed with other drivers.
Send To AccuRoute DesktopThe Send To AccuRoute Desktop option is listed in the Windows Explorer right-click menu for files.
Figure 1-E: Send To AccuRoute Desktop shortcut
The right-click menu shows the Windows shortcut Send To AccuRoute Desktop.
AccuRoute Desktop Installation Guide
Section 1: Introduction
© 2010 by Omtool, Ltd. All rights reserved. Omtool, AccuRoute and the Company logo are trademarks of the Company. Trade names and trademarks of other companies appearing in this document are the property of their respective owners.
1-6
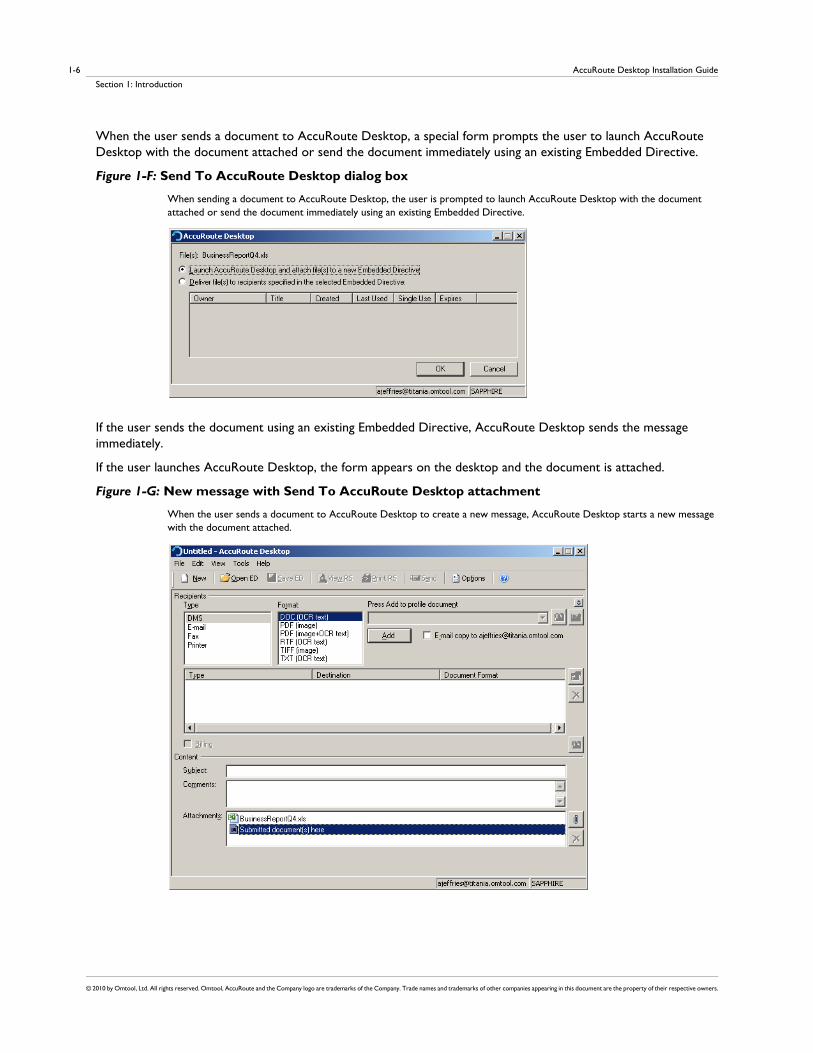
When the user sends a document to AccuRoute Desktop, a special form prompts the user to launch AccuRoute Desktop with the document attached or send the document immediately using an existing Embedded Directive.
Figure 1-F: Send To AccuRoute Desktop dialog box
When sending a document to AccuRoute Desktop, the user is prompted to launch AccuRoute Desktop with the document attached or send the document immediately using an existing Embedded Directive.
If the user sends the document using an existing Embedded Directive, AccuRoute Desktop sends the message immediately.
If the user launches AccuRoute Desktop, the form appears on the desktop and the document is attached.
Figure 1-G: New message with Send To AccuRoute Desktop attachment
When the user sends a document to AccuRoute Desktop to create a new message, AccuRoute Desktop starts a new message with the document attached.
© 2010 by Omtool, Ltd. All rights reserved. Omtool, AccuRoute and the Company logo are trademarks of the Company. Trade names and trademarks of other companies appearing in this document are the property of their respective owners.
1-7AccuRoute Desktop Installation Guide
Section 1: Introduction
Workflows for messages and Embedded DirectivesAccuRoute Desktop supports the following work:
Sending messages - When AccuRoute Desktop submits a message to the Omtool Server, the server queues it in the Dispatch component. The Dispatch component analyzes the message and determines its path through the Omtool Server’s processing queues. It directing the message to the appropriate workflow component where it is processed for delivery. After AccuRoute Desktop has submitted the message to the Omtool Server, it can be tracked using the Omtool Server Administrator.
Creating and updating Embedded Directives - When AccuRoute Desktop creates a new Embedded Directive or updates an existing Embedded Directive, the Omtool Server updates the Embedded Directive in the message database.
Generating and displaying Routing Sheets - When AccuRoute Desktop creates a Routing Sheet or displays a previously generated Routing Sheet, it uses the Embedded Directive properties and the AccuRoutePDF printer to compose a Routing Sheet on the desktop and display using the default PDF viewing application.
Deployment summary
To deploy AccuRoute Desktop:
1 Verify that server and client requirements have been met. (Go to Section 2: Requirements.)
2 Install AccuRoute Desktop (Go to Section 3: Installation.)
3 Configure required configurations on the serverAccuRoute Desktop (Go to Section 4: Required configuration.)
4 Configure additional configuration that may be required for AccuRoute Desktop deployment. (Go to Section 5: Optional configuration.)
5 Customize AccuRoute Desktop views if necessary. (Go to Section 6: Views.)
Related documentation
AccuRoute v3.01 documentationFor all other documentation relevant to AccuRoute v3.1, consult the AccuRoute v3.1 documentation home page.
AccuRoute Desktop Installation Guide
Section 1: Introduction
© 2010 by Omtool, Ltd. All rights reserved. Omtool, AccuRoute and the Company logo are trademarks of the Company. Trade names and trademarks of other companies appearing in this document are the property of their respective owners.
1-8
AccuRoute Desktop user guidesAccuRoute Desktop user guide - http://www.omtool.com/documentation/AccuRoute/v3.01/AccuRouteDesktop/AccuRouteDesktopUserGuide.pdf
AccuRoute Desktop quick start guide - http://www.omtool.com/documentation/AccuRoute/v23/AccuRouteDesktop/AccuRouteDesktopV222QuickStartGuide.pdf
Omtool DMS Libraries installation and integration guidesAccutrac XE - http://www.omtool.com/documentation/dmslibraries/v23/AccutracXE/OmtoolDMSLibrariesV22AccutracXEInstallGuide.pdf
DM - http://www.omtool.com/documentation/dmslibraries/v22/DM/OmtoolDMSLibrariesV22DMInstallGuide.pdf
DOCS Open - http://www.omtool.com/documentation/dmslibraries/v22/DOCSOpen/OmtoolDMSLibrariesV22DOCSOpenInstallGuide.pdf
DocuShare - http://www.omtool.com/documentation/dmslibraries/v22/DocuShare/OmtoolDMSLibrariesV22DocuShareInstallGuide.pdf
FileShare - http://www.omtool.com/documentation/dmslibraries/v22/FileShare/OmtoolDMSLibrariesV22FileShareInstallGuide.pdf
LegalKEY - http://www.omtool.com/documentation/dmslibraries/v22/LegalKEY/OmtoolDMSLibrariesV22LegalKEYInstallGuide.pdf
MyFolder - http://www.omtool.com/documentation/dmslibraries/v22/MyFolder/OmtoolDMSLibrariesV22MyFolderInstallGuide.pdf
SharePoint - http://www.omtool.com/documentation/dmslibraries/v22/SharePoint/OmtoolDMSLibrariesV22SharePointInstallGuide.pdf
Single Page Image Files - http://www.omtool.com/documentation/dmslibraries/v22/SinglePage/OmtoolDMSLibrariesV22SinglePageImageFilesInstallGuide.pdf
WorkSite - http://www.omtool.com/documentation/dmslibraries/v22/WorkSite/OmtoolDMSLibrariesV22WorkSiteInstallGuide.pdf
WORLDOX - http://www.omtool.com/documentation/DMSLibraries/V22/WORLDOX/OmtoolDMSLibrariesV22WORLDOXInstallGuide.pdf
Omtool DMS Libraries quick start guides for AccuRoute Desktop users
Sending a message to Accutrac XE using AccuRoute Desktop - http://www.omtool.com/documentation/dmslibraries/v22/AccutracXE/OmtoolDMSLibrariesV22AccutracXEQuickStartGuide.pdf
Sending a message to DM using AccuRoute Desktop - http://www.omtool.com/documentation/dmslibraries/v22/DM/OmtoolDMSLibrariesV22DMQuickStartGuide.pdf
© 2010 by Omtool, Ltd. All rights reserved. Omtool, AccuRoute and the Company logo are trademarks of the Company. Trade names and trademarks of other companies appearing in this document are the property of their respective owners.
1-9AccuRoute Desktop Installation Guide
Section 1: Introduction
Sending a message to DOCS Open using AccuRoute Desktop - http://www.omtool.com/documentation/dmslibraries/v22/DOCSOpen/OmtoolDMSLibrariesV22DOCSOpenQuickStartGuide.pdf
Sending a message to DocuShare using AccuRoute Desktop - http://www.omtool.com/documentation/dmslibraries/v22/DocuShare/OmtoolDMSLibrariesV22DocuShareQuickStartGuide.pdf
Sending a message to FileShare using AccuRoute Desktop - http://www.omtool.com/documentation/dmslibraries/v22/FileShare/OmtoolDMSLibrariesV22FileShareQuickStartGuide.pdf
Sending a message to LegalKEY using AccuRoute Desktop - http://www.omtool.com/documentation/dmslibraries/v22/LegalKEY/OmtoolDMSLibrariesV22LegalKEYQuickStartGuide.pdf
Sending a message to MyFolder using AccuRoute Desktop - http://www.omtool.com/documentation/dmslibraries/v22/MyFolder/OmtoolDMSLibrariesV22MyFolderQuickStartGuide.pdf
Sending a message to PowerDOCS using AccuRoute Desktop - http://www.omtool.com/documentation/dmslibraries/v22/PowerDOCS/OmtoolDMSLibrariesV22PowerDOCSQuickStartGuide.pdf
Sending a message to SharePoint using AccuRoute Desktop - http://www.omtool.com/documentation/dmslibraries/v22/SharePoint/OmtoolDMSLibrariesV22SharePointQuickStartGuide.pdf
Sending a message to Single Page Image Files using AccuRoute Desktop - http://www.omtool.com/documentation/dmslibraries/v22/SinglePage/OmtoolDMSLibrariesV22SinglePageImageFilesQuickStartGuide.pdf
Sending a message to WorkSite using AccuRoute Desktop and the Enhanced Profile Dialog - http://www.omtool.com/documentation/dmslibraries/v22/WorkSite/OmtoolDMSLibrariesV22WorkSiteEnhancedQuickStartGuide.pdf
Sending a message to WorkSite using AccuRoute Desktop and the Standard Profile Dialog - http://www.omtool.com/documentation/dmslibraries/v22/WorkSite/OmtoolDMSLibrariesV22WorkSiteStandardQuickStartGuide.pdf
Sending a message to WORLDOX using AccuRoute Desktop - http://www.omtool.com/documentation/dmslibraries/v22/WORLDOX/OmtoolDMSLibrariesV22WORLDOXQuickStartGuide.pdf

AccuRoute Desktop Installation Guide
Section 1: Introduction
© 2010 by Omtool, Ltd. All rights reserved. Omtool, AccuRoute and the Company logo are trademarks of the Company. Trade names and trademarks of other companies appearing in this document are the property of their respective owners.
1-10

© 2010 by Omtool, Ltd. All rights reserved. Omtool, AccuRoute and the Company logo are trademarks of the Company. Trade names and trademarks of other companies appearing in this document are the property of their respective owners.
2-1AccuRoute Desktop Installation Guide
Section 2: Requirements
Section 2: RequirementsThis section includes:
Server requirement (2-1)
Client requirements (2-2)
Supported e-mail applications (2-2)
Note about connecting to AccuRoute Server installed on Windows 2008 system (2-3)
Server requirementAccuRoute v3.01
Note For AccuRoute Server running on Windows 2008 64 bit system - Allow Dynamic RPC for the local port 135. For instructions, see Note about connecting to AccuRoute Server installed on Windows 2008 system (2-3)
Additional server requirementsAccuRoute Desktop v3.01 supports the following methods of server-client connectivity: DCOM, HTTP, and HTTPS. Additional requirements apply for HTTP and HTTPS:
AccuRoute Intelligent Device Client must be configured for HTTP or HTTPS connectivity.
Important AccuRoute v3.01 installs the AccuRoute Intelligent Device Client as part of the server install. No separate client installation is necessary.
AccuRoute Desktop Installation Guide
Section 2: Requirements
© 2010 by Omtool, Ltd. All rights reserved. Omtool, AccuRoute and the Company logo are trademarks of the Company. Trade names and trademarks of other companies appearing in this document are the property of their respective owners.
2-2
For HTTPS connectivity only - Windows component Certificate Services must be installed on the system running AccuRoute Intelligent Device Client and a CA certificate must be configured for the Default Web Site in IIS.
For Windows 2008 64 bit servers only - Allow Dynamic RPC for the local port 135. For instructions, see
Client requirementsThe client where you install AccuRoute Desktop must meet the following requirements:
Pentium®-class processor
Windows 2008/2003 SP2/ XP Professional/Vista or later
20 MB hard disk space
64 MB RAM (128 recommended)
Acrobat® Reader® 9.x/8.x/7.x
Important AccuRoute Desktop has been qualified with Windows Terminal Services and Remote Desktop Connection.
Supported e-mail applicationsAccuRoute Desktop can integrate with the address book in the following e-mail applications:
Microsoft® Outlook® 2007(Outlook Express not supported)
Notes 6.5/6.0/5.0
Novell GroupWise 6.0/5.5
When AccuRoute Desktop is configured to integrate with an address book for a supported e-mail application, the e-mail application must be selected as the Windows default e-mail application. For more information, consult Windows help.
© 2010 by Omtool, Ltd. All rights reserved. Omtool, AccuRoute and the Company logo are trademarks of the Company. Trade names and trademarks of other companies appearing in this document are the property of their respective owners.
2-3AccuRoute Desktop Installation Guide
Section 2: Requirements
Note about connecting to AccuRoute Server installed on Windows 2008 system
To allow AccuRoute Desktop to connect to AccuRoute Server running on Windows 2008 system:
1 In the Windows 2008 system, open the Server Manager.
2 Select WINDOWS FIRE WALL WITH ADVANCED SECURITY.
3 Select INBOUND RULES under it, on the right select NEW RULE.
4 Create a new Windows Firewall Inbound Rule.
5 Select PORT.
6 Select TCP and enter port 135 (you will change this port after the rule is created).
7 Select ALLOW THE CONNECTION.
8 Select DOMAIN, PRIVATE, PUBLIC.
9 Name the rule as appropriate, for example DCOM RPC (or something else).
10 After rule is created enter the rule's properties.
11 Go to the PROTOCOLS AND PORTS page.
12 Change LOCAL PORT 135 to DYNAMIC RPC.
13 Press OK to save your changes.

AccuRoute Desktop Installation Guide
Section 2: Requirements
© 2010 by Omtool, Ltd. All rights reserved. Omtool, AccuRoute and the Company logo are trademarks of the Company. Trade names and trademarks of other companies appearing in this document are the property of their respective owners.
2-4

© 2010 by Omtool, Ltd. All rights reserved. Omtool, AccuRoute and the Company logo are trademarks of the Company. Trade names and trademarks of other companies appearing in this document are the property of their respective owners.
3-1AccuRoute Desktop Installation Guide
Section 3: Installation
Section 3: InstallationThis section includes:
Accessing the setup files (3-1)
Installing AccuRoute Desktop (3-1)
Running the AccuRoute Desktop setup in silent mode (3-4)
Uninstalling AccuRoute Desktop (3-6)
Accessing the setup files The AccuRoute Desktop setup files are located in the C:\PROGRAM FILES\OMTOOL\OMTOOL SERVER\CLIENTS\ACCUROUTEDESKTOP directory of the system running the AccuRoute Server. If you are installing AccuRoute Desktop in the same system, simply navigate to this folder to access the setup files.
If you are installing AccuRoute Desktop in a separate system, ensure that proper access permissions have been set up for you to access the C:\PROGRAM FILES\OMTOOL\OMTOOL SERVER\CLIENTS\ACCUROUTEDESKTOP directory from the system where you are installing the application. You can also copy the setup files to a shared network directory.
Installing AccuRoute DesktopIf a previous version of AccuRoute Desktop is installed on the system, it is automatically upgraded to AccuRoute Desktop v3.01 when you run the setup.
AccuRoute Desktop Installation Guide
Section 3: Installation
© 2010 by Omtool, Ltd. All rights reserved. Omtool, AccuRoute and the Company logo are trademarks of the Company. Trade names and trademarks of other companies appearing in this document are the property of their respective owners.
3-2
Note If your AccuRoute Client version is older than 2.2.3, it is removed and AccuRoute Desktop v3.01 is installed when you run the setup.
You can install the AccuRoute Desktop from the Omtool Server or the client. This procedure includes instructions for both methods.
Note If your AccuRoute Server is running on a Windows 2008 system, see Note about connecting to AccuRoute Server installed on Windows 2008 system (2-3).
To install AccuRoute Desktop:
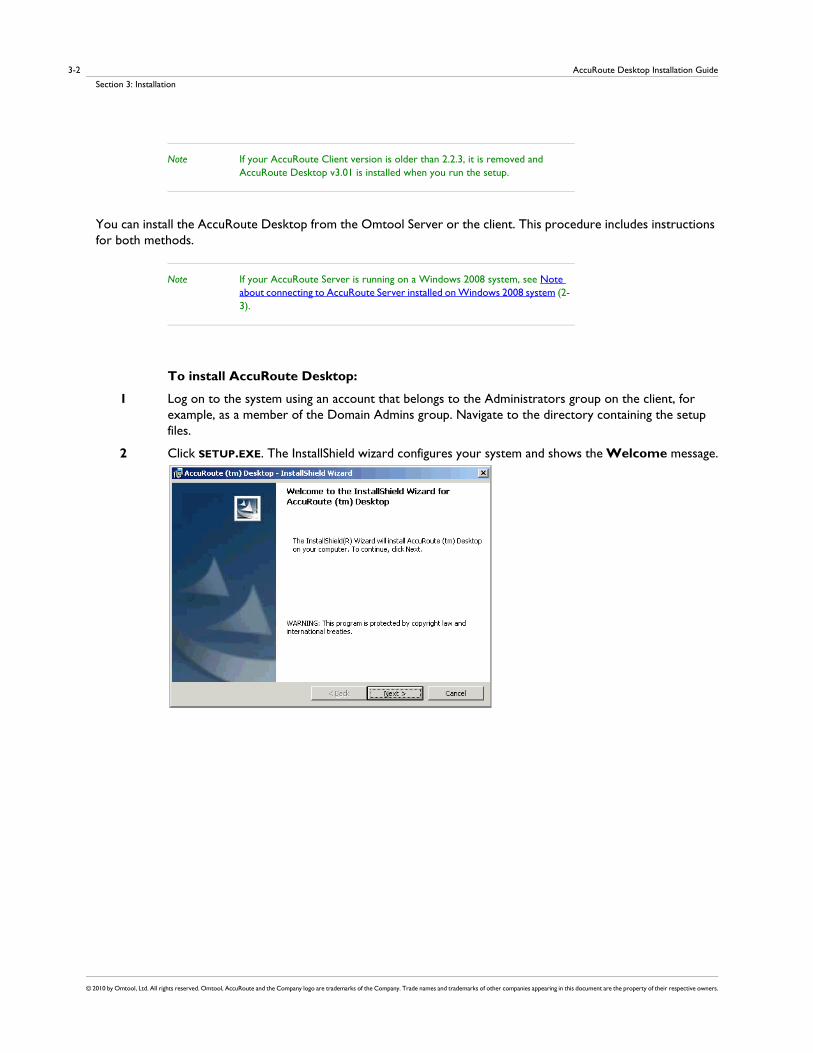
1 Log on to the system using an account that belongs to the Administrators group on the client, for example, as a member of the Domain Admins group. Navigate to the directory containing the setup files.
2 Click SETUP.EXE. The InstallShield wizard configures your system and shows the Welcome message.
© 2010 by Omtool, Ltd. All rights reserved. Omtool, AccuRoute and the Company logo are trademarks of the Company. Trade names and trademarks of other companies appearing in this document are the property of their respective owners.
3-3AccuRoute Desktop Installation Guide
Section 3: Installation
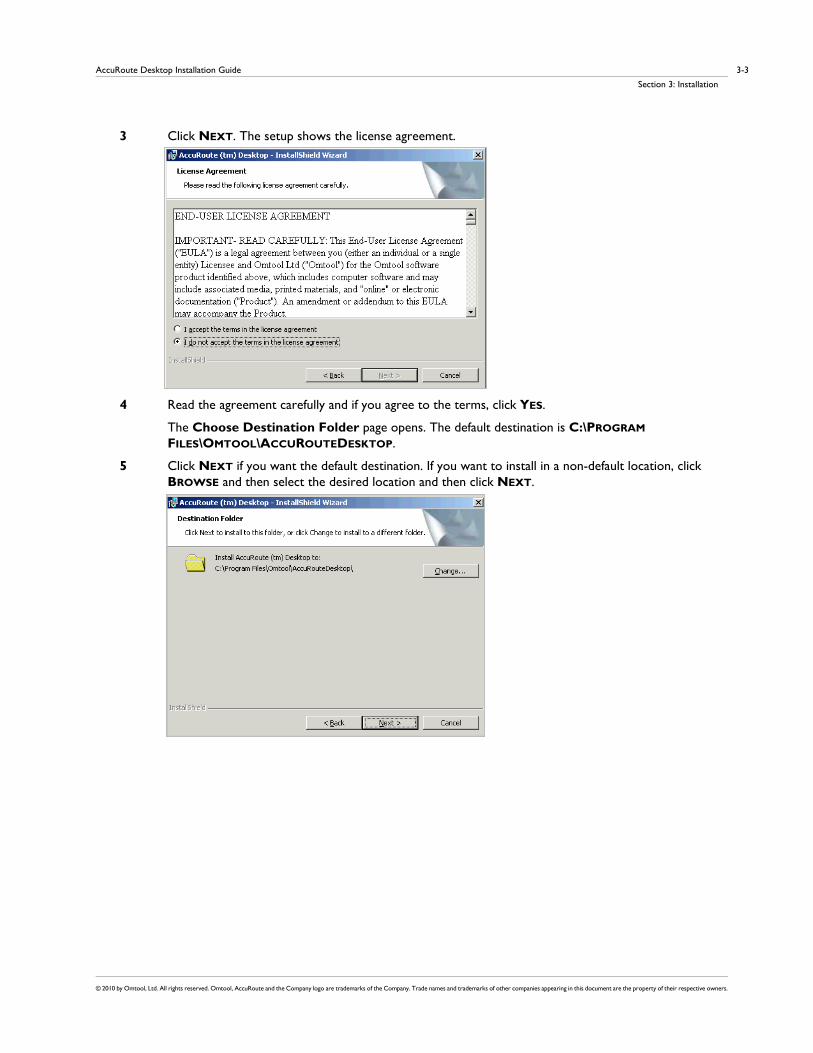
3 Click NEXT. The setup shows the license agreement.
4 Read the agreement carefully and if you agree to the terms, click YES.
The Choose Destination Folder page opens. The default destination is C:\PROGRAM FILES\OMTOOL\ACCUROUTEDESKTOP.
5 Click NEXT if you want the default destination. If you want to install in a non-default location, click BROWSE and then select the desired location and then click NEXT.

AccuRoute Desktop Installation Guide
Section 3: Installation
© 2010 by Omtool, Ltd. All rights reserved. Omtool, AccuRoute and the Company logo are trademarks of the Company. Trade names and trademarks of other companies appearing in this document are the property of their respective owners.
3-4
The Ready to Install the Program page opens.
6 Click NEXT to begin the installation.
When installation is complete, you see the InstallShield Wizard Complete message.
7 Click FINISH to close the wizard.
8 Go to Required configuration on 4-1.
Running the AccuRoute Desktop setup in silent mode
To run the AccuRoute Desktop setup in silent mode:
1 Log on to the Omtool Server with an account that belongs to the Administrators group on the client, for example, a member of the Domain Admins group.
2 Open a command prompt.

© 2010 by Omtool, Ltd. All rights reserved. Omtool, AccuRoute and the Company logo are trademarks of the Company. Trade names and trademarks of other companies appearing in this document are the property of their respective owners.
3-5AccuRoute Desktop Installation Guide
Section 3: Installation
3 Change the current directory to the one containing the setup files. The default location is C:\PROGRAM FILES\OMTOOL\OMTOOL SERVER\CLIENTS\ACCUROUTEDESKTOP.
4 Run: setup.exe /s /v”/qn”
This installs AccuRoute Desktop to the default location:C:\PROGRAM FILES\OMTOOL\ACCUROUTEDESKTOP.
Note To install AccuRoute Desktop for all users in silent mode, see Installing AccuRoute Desktop for all users in silent mode (3-5)
5 Optionally, to o change the location, set the property INSTALLDIR, runsetup.exe /s /v”/qn INSTALLDIR=<short name path>” where <short name path> is the short name path to the target folder. (The entire path must be in short name format. For example, if the long path is J:\PROGRAM FILES\OMTOOL\ACCUROUTEDESKTOP, then the short path is J:\PROGRA~1\OMTOOL\ACCURO~1.)
Tip The command for short name conversions is dir /x. Run this command in any directory to return the short names of all folders in that directory. For example, to do a short name conversion on J:\Program Files, change the current directory to J:\ and run dir /x.
6 Verify that AccuRoute Desktop is installed on the client by navigating to …\OMTOOL\ACCUROUTEDESKTOP on the client and verifying that the AccuRoute Desktop program files are installed.
Installing AccuRoute Desktop for all users in silent modeIn order to install AccuRoute Desktop for all users in silent mode:
1 Start by following the instructions in Running the AccuRoute Desktop setup in silent mode (3-4).
2 In step 4, where you run the setup file, add the following argument ALLUSERs=2:
setup.exe /s /v"/qn ALLUSERS=2
Note The ALLUSERS argument is required in order for the install to complete successfully and also to install the AccuroutePDF printer. If you do not use this argument, and you log into the system using a user credential that is different than one who ran the install, the AccuRoute Desktop does not show in Add/Remove Program list.
AccuRoute Desktop Installation Guide
Section 3: Installation
© 2010 by Omtool, Ltd. All rights reserved. Omtool, AccuRoute and the Company logo are trademarks of the Company. Trade names and trademarks of other companies appearing in this document are the property of their respective owners.
3-6
3 Sign in as a different user and verify that AccuRoute Desktop is listed in START> ALL PROGRAMS > ADD/REMOVE PROGRAMS.
Uninstalling AccuRoute Desktop
To uninstall AccuRoute Desktop:
1 Click START > CONTROL PANEL > ADD/REMOVE PROGRAMS.
2 Select ACCUROUTE DESKTOP and click REMOVE.
3 Follow the prompts to remove the application.
4 To verify that AccuRoute Desktop is removed from the client, browse the directory structure on the client and verify that …\OMTOOL\ACCUROUTEDESKTOP has been removed. (The Omtool directory remains if other Omtool applications are installed on the client.)
© 2010 by Omtool, Ltd. All rights reserved. Omtool, AccuRoute and the Company logo are trademarks of the Company. Trade names and trademarks of other companies appearing in this document are the property of their respective owners.
4-1AccuRoute Desktop Installation Guide
Section 4: Required configuration
Section 4: Required configurationThis section includes:
Configuring server-client connectivity for AccuRoute Desktop (4-1)
Preconfiguring AccuRoute Desktop with the connection string (4-5)
Configuring Group permissions for AccuRoute Desktop (4-6)
Note about connecting to AccuRoute Server installed on Windows 2008 system (4-7)
Configuring server-client connectivity for AccuRoute DesktopAccuRoute Desktop supports multiple server-client connectivity methods. Choose an appropriate method for the target environment and then complete the required configuration.
Choosing a connectivity methodAccuRoute Desktop supports the following methods of server-client connectivity: DCOM, HTTP, and secure HTTP.
At the beginning of a session, AccuRoute Desktop establishes a connection to the Omtool Server—either by connecting directly using DCOM or submitting the request to AccuRoute Intelligent Device Client. The initial connection validates the user’s permissions to run AccuRoute Desktop and solicits a response from the Omtool Server.
AccuRoute Desktop v3.01 does not maintain a constant connection to the Omtool Server during the session. Instead, AccuRoute Desktop requests and submits data to the Omtool Server on demand. For example, when the user tries to open an Embedded Directive, AccuRoute Desktop requests a list of the user’s Embedded Directives from the Omtool server.
This connectivity behavior brings an added benefit to environments with an Omtool Server cluster. AccuRoute Desktop can continue a session even when the Omtool Server cluster enters a failover state and the alternative Omtool Server becomes active. Although a momentary delay can occur during the failover transition, AccuRoute Desktop establishes a connection to whichever Omtool Server is active.

AccuRoute Desktop Installation Guide
Section 4: Required configuration
© 2010 by Omtool, Ltd. All rights reserved. Omtool, AccuRoute and the Company logo are trademarks of the Company. Trade names and trademarks of other companies appearing in this document are the property of their respective owners.
4-2
AccuRoute Desktop determines how the client connects to the Omtool Server. On startup, AccuRoute Desktop reads the connection string and analyzes the first 5 characters. (The connection string is either preconfigured in AccuRouteclient.xml or entered in the Connect To Server dialog box.) If the first 5 characters of the connection string are http:, AccuRoute Desktop uses HTTP connectivity. If the first 5 characters of the connection string are https, AccuRoute Desktop uses secure HTTP connectivity. For all other values, AccuRoute Desktop uses DCOM connectivity.
Note For HTTP or secure HTTP connectivity, AccuRoute Intelligent Device Client is required. Additionally, if the environment has an Omtool Server cluster, then AccuRoute Intelligent Device Client must be configured to support an Omtool Server cluster. For more information, consult the AccuRoute Intelligent Device Client chapter of the AccuRoute Server Installation and Configuration Guide.
Configuring server-client connectivity methodsTo configure server-client connectivity, follow the instructions for the appropriate connectivity method:
DCOM - The DCOM connectivity method facilitates a direct connection between AccuRoute Desktop and the Omtool Server. Go to DCOM on 4-2.
HTTP - The HTTP connectivity method facilitates a connection between AccuRoute Desktop and AccuRoute Intelligent Device Client on the web server. (AccuRoute Intelligent Device Client is a web service extension that handles requests for AccuRoute Desktop and the Omtool Server). Go to HTTP on 4-3.
Secure HTTP -The secure HTTP connectivity method facilitates a secure connection between AccuRoute Desktop and AccuRoute Intelligent Device Client on the web server. (AccuRoute Intelligent Device Client is a web service extension that handles requests for AccuRoute Desktop and the Omtool Server.) Go to Secure HTTP on 4-3.
DCOMThe DCOM configuration on the client running AccuRoute Desktop must give access permissions to the Omtool Server account.
Windows 2008 and 2003
To configure DCOM permissions on Windows 2008 and on Windows 2003:
1 Log in to the system where you will install Omtool Server using the login credentials of the local Administrators group.
2 Click START and select RUN. Enter dcomcnfg and click OK. The Component Services snap-in opens.
3 Expand COMPONENT SERVICES > COMPUTERS. Right-click MY COMPUTER and select PROPERTIES from the menu options.
4 Click the COM SECURITY tab.
5 Under Launch and Activation Permissions, click the EDIT LIMITS button, and then click the ADD button.

© 2010 by Omtool, Ltd. All rights reserved. Omtool, AccuRoute and the Company logo are trademarks of the Company. Trade names and trademarks of other companies appearing in this document are the property of their respective owners.
4-3AccuRoute Desktop Installation Guide
Section 4: Required configuration
6 Add ANONYMOUS LOGON in the Permissions list, select the ALLOW CHECK BOX TO ALLOW THE LOCAL LAUNCH permission, LOCAL ACTIVATION permission, REMOTE LAUNCh permission, and REMOTE ACTIVATION permission for the selected group
7 Click OK twice to save changes.
8 Restart the system for these configuration changes to take effect.
Windows XP
To give the Omtool Server account access permissions to a Windows XP client:
1 Click START and select RUN. Enter dcomcnfg and click OK. The COMPONENT SERVICES snap-in appears.
2 Expand COMPONENT SERVICES > COMPUTERS. Right-click MY COMPUTER and select PROPERTIES.
3 Click the Default COM Security tab.
4 Assign access permissions to the Omtool Server account:
a Click EDIT DEFAULT in the Access Permissions section. The ACCESS PERMISSION dialog box appears.
b Click ADD, enter the user name of the Omtool Server account, click CHECK NAMES to resolve the account name, and click OK to add the user.
c Go to the Group or user names section and select the Omtool Server account. Then go to the Permissions for <Omtool Server account> section, locate ACCESS PERMISSION in the list and verify that ALLOW is selected.
d Click OK to close the ACCESS PERMISSION dialog box.
5 Click OK to save your changes and close the MY COMPUTER PROPERTIES dialog box.
HTTPHTTP connectivity requires AccuRoute Intelligent Device Client. For more information, consult the AccuRoute Intelligent Device Client section in the server installation guide. No additional client configuration is required.
Secure HTTPSecure HTTP connectivity requires AccuRoute Intelligent Device Client, and it must be configured to accept secure HTTP requests. For more information, consult the AccuRoute Intelligent Device Client section in the server installation guide. No additional client configuration is required.
Implementing connectivity methodsOn startup, AccuRoute Desktop must be able to establish a connection to the Omtool Server. This requires a connection string which represents either the location of the Omtool Server (DCOM connectivity) or the web address of the virtual directory where AccuRoute Intelligent Device Client is installed (HTTP and secure HTTP connectivity).
To establish a connection to the Omtool Server, AccuRoute Desktop does one of the following:
Reads the connection string in AccuRouteclient.xml and connects to the Omtool Server automatically.
AccuRoute Desktop Installation Guide
Section 4: Required configuration
© 2010 by Omtool, Ltd. All rights reserved. Omtool, AccuRoute and the Company logo are trademarks of the Company. Trade names and trademarks of other companies appearing in this document are the property of their respective owners.
4-4
Reads all connection strings in AccuRouteclient.xml and prompts the user select a connection string. By default, the user can also enter a connection string manually.
Because AccuRoute Desktop can be customized for users and groups, both scenarios can occur in the same environment. Both methods require implementation. For more information, see
Entering the connection string manually during login (4-4)
Preconfiguring AccuRoute Desktop with the connection string (4-5)
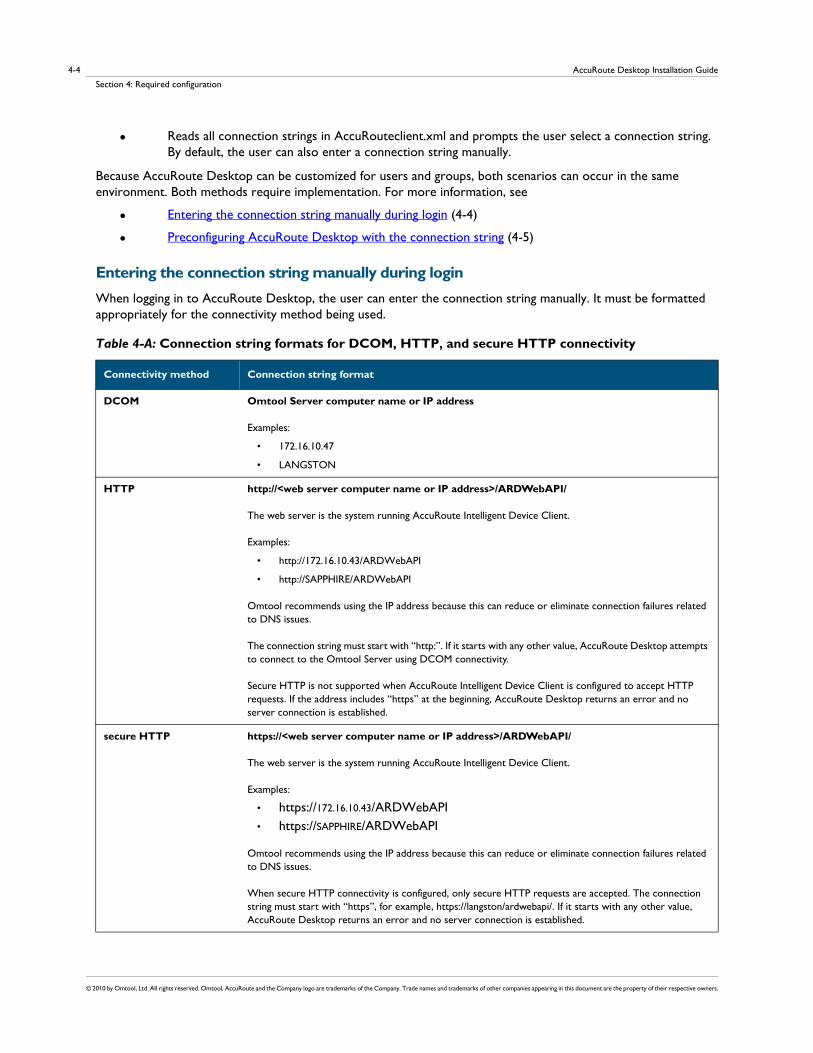
Entering the connection string manually during loginWhen logging in to AccuRoute Desktop, the user can enter the connection string manually. It must be formatted appropriately for the connectivity method being used.
Table 4-A: Connection string formats for DCOM, HTTP, and secure HTTP connectivity
Connectivity method Connection string format
DCOM Omtool Server computer name or IP address
Examples:
• 172.16.10.47
• LANGSTON
HTTP http://<web server computer name or IP address>/ARDWebAPI/
The web server is the system running AccuRoute Intelligent Device Client.
Examples:
• http://172.16.10.43/ARDWebAPI
• http://SAPPHIRE/ARDWebAPI
Omtool recommends using the IP address because this can reduce or eliminate connection failures related to DNS issues.
The connection string must start with “http:”. If it starts with any other value, AccuRoute Desktop attempts to connect to the Omtool Server using DCOM connectivity.
Secure HTTP is not supported when AccuRoute Intelligent Device Client is configured to accept HTTP requests. If the address includes “https” at the beginning, AccuRoute Desktop returns an error and no server connection is established.
secure HTTP https://<web server computer name or IP address>/ARDWebAPI/
The web server is the system running AccuRoute Intelligent Device Client.
Examples:
• https://172.16.10.43/ARDWebAPI• https://SAPPHIRE/ARDWebAPI
Omtool recommends using the IP address because this can reduce or eliminate connection failures related to DNS issues.
When secure HTTP connectivity is configured, only secure HTTP requests are accepted. The connection string must start with “https”, for example, https://langston/ardwebapi/. If it starts with any other value, AccuRoute Desktop returns an error and no server connection is established.

© 2010 by Omtool, Ltd. All rights reserved. Omtool, AccuRoute and the Company logo are trademarks of the Company. Trade names and trademarks of other companies appearing in this document are the property of their respective owners.
4-5AccuRoute Desktop Installation Guide
Section 4: Required configuration
Preconfiguring AccuRoute Desktop with the connection stringThe AccuRoute Desktop configuration file, AccuRouteclient.xml, can be configured with the connection string so that AccuRoute Desktop automatically displays the connection string in the server menu or connects to the Omtool Server immediately.
Omtool strongly recommends this configuration. It can eliminate or reduce issues that can occur when users do not format the connection string correctly.
To configure AccuRoute Desktop to connect to the Omtool Server automatically:
Go to Appendix B: Frequently asked questions and see Can the client connect automatically without prompting the user on startup? (9-3).
To configure AccuRoute Desktop to display the connection string in the server menu:
1 Locate AccuRouteclient.xml on the client on the Omtool Server located in …\Omtool\Omtool Server\Clients\AccuRoute Desktop.
If any modifications are made to the AccuRoute Desktop setup on the Omtool Server and the environment has an Omtool Server cluster, Omtool strongly recommends repeating this procedure on the alternative Omtool server.
2 Open the file in Notepad or in an XML editor.
3 Go to the Servers section. (Search on Servers if necessary.)
4 Add the following lines:<Servers> <Server default="true"> <prServerName>[connection string]</prServerName> </Server></Servers>The attribute default determines whether the connection string is selected by default in the login dialog box:
If true, then the connection string is selected by default in the server menu.
If false or omitted, then the connection string is listed in the server menu. The list order follows the same order the servers are listed here in the configuration file. If only one server is listed, then the connection string is selected by default in the server menu.
For more information on setting a default server, go to Servers (5-8).
5 Verify that the connection string is formatted correctly. (Go to Table 4-A: Connection string formats for DCOM, HTTP, and secure HTTP connectivity on 4-4.)
6 Save the file and close it.
7 Start AccuRoute Desktop and verify that it is configured correctly.
AccuRoute Desktop Installation Guide
Section 4: Required configuration
© 2010 by Omtool, Ltd. All rights reserved. Omtool, AccuRoute and the Company logo are trademarks of the Company. Trade names and trademarks of other companies appearing in this document are the property of their respective owners.
4-6
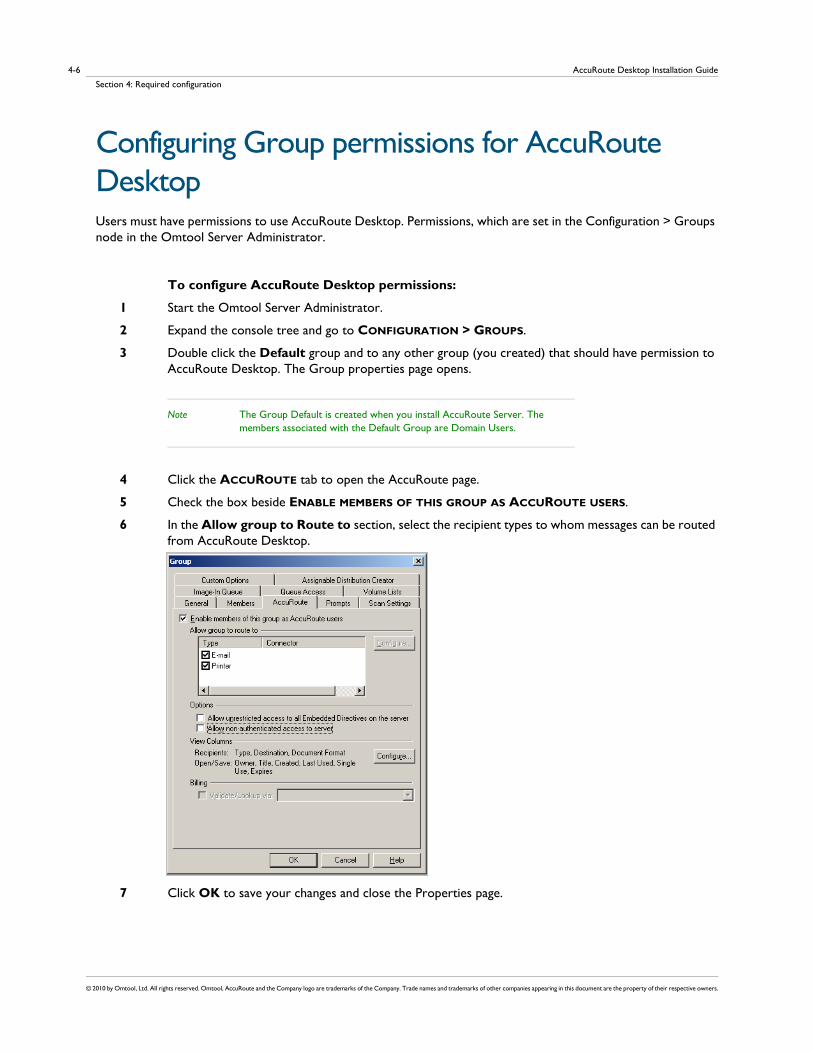
Configuring Group permissions for AccuRoute DesktopUsers must have permissions to use AccuRoute Desktop. Permissions, which are set in the Configuration > Groups node in the Omtool Server Administrator.
To configure AccuRoute Desktop permissions:
1 Start the Omtool Server Administrator.
2 Expand the console tree and go to CONFIGURATION > GROUPS.
3 Double click the Default group and to any other group (you created) that should have permission to AccuRoute Desktop. The Group properties page opens.
Note The Group Default is created when you install AccuRoute Server. The members associated with the Default Group are Domain Users.
4 Click the ACCUROUTE tab to open the AccuRoute page.
5 Check the box beside ENABLE MEMBERS OF THIS GROUP AS ACCUROUTE USERS.
6 In the Allow group to Route to section, select the recipient types to whom messages can be routed from AccuRoute Desktop.
7 Click OK to save your changes and close the Properties page.
© 2010 by Omtool, Ltd. All rights reserved. Omtool, AccuRoute and the Company logo are trademarks of the Company. Trade names and trademarks of other companies appearing in this document are the property of their respective owners.
4-7AccuRoute Desktop Installation Guide
Section 4: Required configuration
Tip Permissions determine whether users can run AccuRoute Desktop and which routing destination are available to them. Access to other features is controlled through views. (Go to Views on 6-1.)
For environments with an Omtool Server cluster, it is not necessary to repeat these procedures on the alternate Omtool Server. This information is stored in the Omtool Server database which is shared by both Omtool Servers in the cluster.
Note about connecting to AccuRoute Server installed on Windows 2008 systemTo connect to an AccuRoute Server installed on a Windows 2008 system, follow the instructions in Note about connecting to AccuRoute Server installed on Windows 2008 system (2-3).
If you are connecting to an AccuRoute Server running on a Windows 2003 system, check AccuRoute Desktop fails to connect to AccuRoute Server installed on Windows 2003 system (7-2).

AccuRoute Desktop Installation Guide
Section 4: Required configuration
© 2010 by Omtool, Ltd. All rights reserved. Omtool, AccuRoute and the Company logo are trademarks of the Company. Trade names and trademarks of other companies appearing in this document are the property of their respective owners.
4-8

© 2010 by Omtool, Ltd. All rights reserved. Omtool, AccuRoute and the Company logo are trademarks of the Company. Trade names and trademarks of other companies appearing in this document are the property of their respective owners.
5-1AccuRoute Desktop Installation Guide
Section 5: Optional configuration
Section 5: Optional configurationThis section includes:
Using AccuRoute Desktop with a DMS connector (5-2)
Configuring MyAccuRoute on the Omtool Server (5-3)
Modifying the AccuRoute Desktop configuration file (5-5)
Configuring address book integration in the AccuRoute Desktop setupAddress book integration in AccuRoute Desktop enables users to add message recipients from the same address book they use to send e-mail messages. Because AccuRoute Desktop supports all contacts in the address book, including global and personal contacts, users can quickly access all the message recipients they can access from their email application. Supported email applications include:
Outlook
Notes
GroupWise.
The address book configuration is stored on the client, so AccuRoute Desktop can be configured to support different address books on different clients. However, each installation of AccuRoute Desktop supports only one address book: Outlook, Notes, or GroupWise. Address book integration can also be disabled.
Omtool recommends configuring address book integration in the AccuRoute Desktop setup on the Omtool Server. This ensures that no configuration is required on the client after AccuRoute Desktop is installed.
By default, AccuRoute Desktop is configured to support the Outlook address book. If the default configuration is correct, skip this procedure.
Tip The address book configuration is stored in AccuRouteclient.xml. There are additional properties in this file that can be modified before AccuRoute Desktop is installed on the client. Go to Modifying the AccuRoute Desktop configuration file on 5-5.

AccuRoute Desktop Installation Guide
Section 5: Optional configuration
© 2010 by Omtool, Ltd. All rights reserved. Omtool, AccuRoute and the Company logo are trademarks of the Company. Trade names and trademarks of other companies appearing in this document are the property of their respective owners.
5-2
To configure address book integration in the AccuRoute Desktop setup:
1 Log on to the system running the Omtool Server. Navigate to …\OMTOOL\OMTOOL SERVER\CLIENTS\ACCUROUTEDESKTOP\PROGRAM FILES\OMTOOL\ACCUROUTEDESKTOP.
2 Open AccuRouteclient.xml in Notepad or an XML editor.
3 Go to prMailType and modify the value of this property using one of the following values:
Outlook (default)
LotusNotes
Groupwise
None
Note None disables address book integration. When address book integration is disabled, the user must enter the destination address of all recipients manually.
4 Save your changes and close the file.
To configure address book integration in the system running AccuRoute Desktop
1 Log on to the system running the Omtool Server. Copy the updated file AccuRouteclient.xml from …\OMTOOL\OMTOOL SERVER\CLIENTS\ACCUROUTEDESKTOP\PROGRAM FILES\OMTOOL\ACCUROUTEDESKTOP
2 Now go to the client system where AccuRoute Desktop is already installed. Paste the file in …\OMTOOL\ACCUROUTEDESKTOP and replace the existing file.
Important For environments with an Omtool Server cluster, Omtool strongly recommends repeating this procedure on the alternate Omtool Server.
Using AccuRoute Desktop with a DMS connectorAccuRoute Desktop can be configured to integrate with document management systems and other specialized applications that extend the functionality of pre-existing document storage and retrieval methods. For more information on configuring DMS connectors, consult the Omtool DMS Libraries documentation. For general information on DMS connectors, contact Omtool sales.
© 2010 by Omtool, Ltd. All rights reserved. Omtool, AccuRoute and the Company logo are trademarks of the Company. Trade names and trademarks of other companies appearing in this document are the property of their respective owners.
5-3AccuRoute Desktop Installation Guide
Section 5: Optional configuration
Configuring MyAccuRoute on the Omtool ServerThe MyAccuRoute feature streamlines a workflow; it enables the Omtool Server to process all messages from the same user with the same Embedded Directive. For example, suppose that a user is responsible for scanning hard copy documents at a scanning station and routing them all to the location where another user indexes and archives those documents. When MyAccuRoute is configured for the user, the Omtool Server always applies the Embedded Directive specified in the user’s My AccuRoute configuration which specifies the destination to route the scanned documents to.
The key aspect of this configuration is that the Omtool Server must be able to identify the sender so that it can apply the Embedded Directive that is selected in the user’s MyAccuRoute configuration. The previous example that describes a user at a scanning station presumes that the user logs in to the scanning station and that this data accompanies the scan to the Omtool Server. There are other scenarios in which the user might be submitting messages repeatedly from AccuRoute Desktop.
Tip Omtool offers customized solutions for some device manufacturers including Xerox, HP, Sharp and Ricoh. Contact Omtool Sales for more information.
The configuration that supports MyAccuRoute has two required components:
MyAccuRoute configuration on the client - The user must create an Embedded Directive and select it in the My AccuRoute configuration in AccuRoute Desktop. For more information, consult the AccuRoute Desktop user guide.
Outbound rule on the Omtool Server - An outbound rule must identify the criteria for the message, for example, if the sender is John Smith, and set the action so that the Omtool Server processes the message using MyAccuRoute.
To create an outbound rule on the Omtool Server for MyAccuRoute:
1 Start the Omtool Server Administrator.
2 Expand RULES in the console tree.
3 Right-click OUTBOUND and select NEW > RULE. The rules wizard appears on the desktop.
4 Click the ADD in the SPECIFY THE CRITERIA FOR THIS RULE window. Select ORIGINATOR E-MAIL in the list of criteria and click NEXT. Select IS, enter the e-mail address of the AccuRoute Desktop user, and click ADD. (Add any other users who utilize the My AccuRoute feature if necessary.) Click FINISH. The criteria WHERE DESTINATION IS AN E-MAIL ADDRESS IS <E-MAIL ADDRESS> appears in the list. Click NEXT.
5 Click the ADD in the SPECIFY THE ACTIONS TO TAKE FOR THIS RULE window. Select ROUTE TO EMBEDDED DIRECTIVE MANAGER and click NEXT. Select USE MYACCUROUTE and click FINISH. The action USE THE EMBEDDED DIRECTIVE MANAGER TO DETERMINE ACTIONS appears in the list. Click NEXT.
6 Click NEXT in the IF ANY ACTION(S) FAIL DO THE FOLLOWING window.
7 Verify that STOP PROCESSING OTHER RULES is selected and click FINISH.
MyAccuRoute is configured on the Omtool Server. Notify users that they must configure MyAccuRoute before they can begin using this feature.
AccuRoute Desktop Installation Guide
Section 5: Optional configuration
© 2010 by Omtool, Ltd. All rights reserved. Omtool, AccuRoute and the Company logo are trademarks of the Company. Trade names and trademarks of other companies appearing in this document are the property of their respective owners.
5-4
For environments with an Omtool Server cluster, it is not necessary to repeat this procedure on the alternate Omtool Server. This information is stored in the Omtool Server database which is shared by both Omtool Servers in the cluster.
Configuring the Watch Folders application on the Omtool ServerWatch Folders is a desktop application installed with AccuRoute Desktop. A watch folder is:
an ordinary folder residing on the client system running AccuRoute Desktop
has been identified in AccuRoute Desktop as a “watch folder”
has been associated with an Embedded Directive.
When the AccuRoute Desktop user wants to send a message using the Embedded Directive that has been associated with the watch folder, the user copies files to the watch folder, and AccuRoute Desktop processes those files as a message. In this way, the watch folder functions as an automatic sending queue.
The Watch Folders application enables users to streamline their most common workflows. Consider the following example. An executive assistant sends out a packet of materials each week to a group of people who meet weekly to discuss operations. The executive assistant simply gathers the files that should be distributed to group members and copies them to the watch folder that was set up for this purpose. AccuRoute Desktop immediately processes the files in the folder as a single message and distributes those files using the Embedded Directive that is associated with the watch folder.
The configuration that supports the Watch Folders application has two required components:
Watch Folders configuration on the AccuRoute Desktop client - The user must configure the Watch Folders application and identify the local folders that should be designated as watch folders. For more information consult the AccuRoute Desktop user guide.
Outbound rule configuration on the Omtool Server - An outbound rule must identify outbound messages with an Embedded Directive and allow the Embedded Directive Manager component to process these messages using the Embedded Directive specified in the user’s Watch Folders configuration.

© 2010 by Omtool, Ltd. All rights reserved. Omtool, AccuRoute and the Company logo are trademarks of the Company. Trade names and trademarks of other companies appearing in this document are the property of their respective owners.
5-5AccuRoute Desktop Installation Guide
Section 5: Optional configuration
To create an outbound rule on the Omtool Server for the Watch Folders application:
1 Start the Omtool Server Administrator.
2 Expand RULES in the console tree.
3 Right-click OUTBOUND and select NEW > RULE. The rules wizard appears on the desktop.
4 Click the ADD in the SPECIFY THE CRITERIA FOR THIS RULE window. Select EMBEDDED DIRECTIVE in the list of criteria and click NEXT. Select IS, enter *, and click ADD. Click FINISH. The criteria WHERE EMBEDDED DIRECTIVE IS * appears in the list. Click NEXT.
5 Click the ADD in the SPECIFY THE ACTIONS TO TAKE FOR THIS RULE window. Select ROUTE TO EMBEDDED DIRECTIVE MANAGER and click NEXT. Select USE SENDER-SPECIFIED EMBEDDED DIRECTIVE and click FINISH. The action USE THE EMBEDDED DIRECTIVE MANAGER TO DETERMINE ACTIONS appears in the list. Click NEXT.
6 Click NEXT in the IF ANY ACTION(S) FAIL DO THE FOLLOWING window.
7 Verify that STOP PROCESSING OTHER RULES is selected and click FINISH.
Note This rule identifies all outbound messages with an Embedded Directive. If the Omtool Server has more than one rule that identifies messages with an Embedded Directive, review the list of rules and verify that the rule order produces the correct results.
The Watch Folders application is configured on the Omtool Server. Notify users that they must configure the Watch Folders application before they can begin using this feature.
For environments with an Omtool Server cluster, it is not necessary to repeat this procedure on the alternate Omtool Server. This information is stored in the Omtool Server database which is shared by both Omtool Servers in the cluster.
Modifying the AccuRoute Desktop configuration fileThe AccuRoute Desktop configuration file, AccuRouteclient.xml, provides configuration data to AccuRoute Desktop on startup. The configuration data includes the name of the view that AccuRoute Desktop loads on startup in standard mode, the e-mail application that provides address book support to AccuRoute Desktop, the search folders that contain view files and Routing Sheet template files, and the Omtool Server in the network.
AccuRouteclient.xml can be modified before or after AccuRoute Desktop is installed on the client. If AccuRouteclient.xml is modified after AccuRoute Desktop is installed on the client, push the file out to …\Omtool\AccuRouteDesktop on the client and replace the existing file.
AccuRoute Desktop Installation Guide
Section 5: Optional configuration
© 2010 by Omtool, Ltd. All rights reserved. Omtool, AccuRoute and the Company logo are trademarks of the Company. Trade names and trademarks of other companies appearing in this document are the property of their respective owners.
5-6
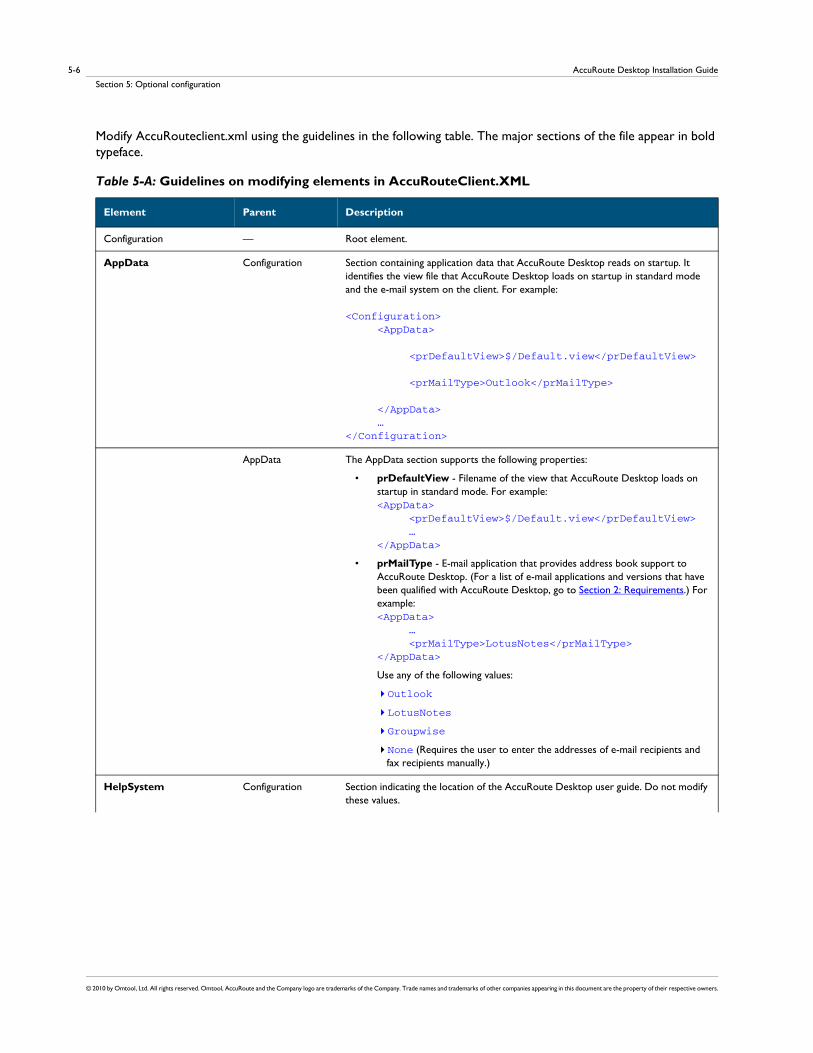
Modify AccuRouteclient.xml using the guidelines in the following table. The major sections of the file appear in bold typeface.
Table 5-A: Guidelines on modifying elements in AccuRouteClient.XML
Element Parent Description
Configuration — Root element.
AppData Configuration Section containing application data that AccuRoute Desktop reads on startup. It identifies the view file that AccuRoute Desktop loads on startup in standard mode and the e-mail system on the client. For example:
<Configuration> <AppData>
<prDefaultView>$/Default.view</prDefaultView>
<prMailType>Outlook</prMailType>
</AppData> …</Configuration>
AppData The AppData section supports the following properties:
• prDefaultView - Filename of the view that AccuRoute Desktop loads on startup in standard mode. For example: <AppData> <prDefaultView>$/Default.view</prDefaultView> …</AppData>
• prMailType - E-mail application that provides address book support to AccuRoute Desktop. (For a list of e-mail applications and versions that have been qualified with AccuRoute Desktop, go to Section 2: Requirements.) For example: <AppData> … <prMailType>LotusNotes</prMailType></AppData>
Use any of the following values:
Outlook
LotusNotes
Groupwise
None (Requires the user to enter the addresses of e-mail recipients and fax recipients manually.)
HelpSystem Configuration Section indicating the location of the AccuRoute Desktop user guide. Do not modify these values.
© 2010 by Omtool, Ltd. All rights reserved. Omtool, AccuRoute and the Company logo are trademarks of the Company. Trade names and trademarks of other companies appearing in this document are the property of their respective owners.
5-7AccuRoute Desktop Installation Guide
Section 5: Optional configuration
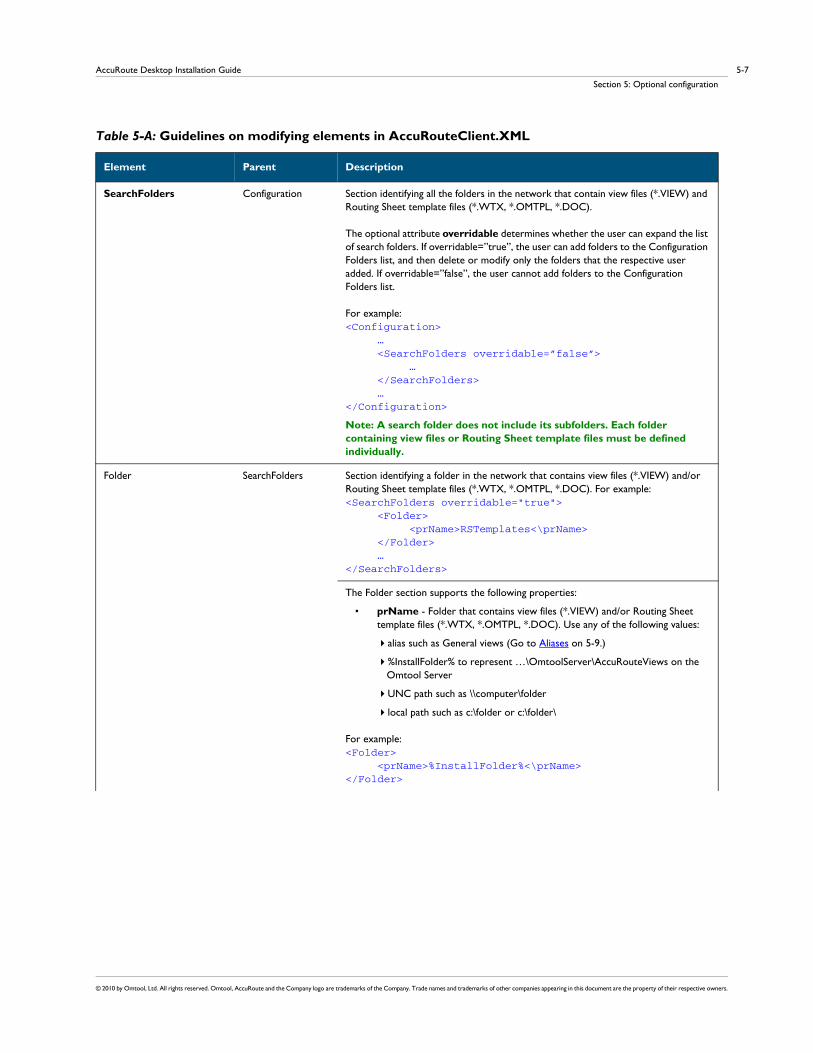
SearchFolders Configuration Section identifying all the folders in the network that contain view files (*.VIEW) and Routing Sheet template files (*.WTX, *.OMTPL, *.DOC).
The optional attribute overridable determines whether the user can expand the list of search folders. If overridable=”true”, the user can add folders to the Configuration Folders list, and then delete or modify only the folders that the respective user added. If overridable=”false”, the user cannot add folders to the Configuration Folders list.
For example: <Configuration> … <SearchFolders overridable=”false”> … </SearchFolders> …</Configuration>
Note: A search folder does not include its subfolders. Each folder containing view files or Routing Sheet template files must be defined individually.
Folder SearchFolders Section identifying a folder in the network that contains view files (*.VIEW) and/or Routing Sheet template files (*.WTX, *.OMTPL, *.DOC). For example:<SearchFolders overridable="true"> <Folder> <prName>RSTemplates<\prName> </Folder> …</SearchFolders>
The Folder section supports the following properties:
• prName - Folder that contains view files (*.VIEW) and/or Routing Sheet template files (*.WTX, *.OMTPL, *.DOC). Use any of the following values:
alias such as General views (Go to Aliases on 5-9.)
%InstallFolder% to represent …\OmtoolServer\AccuRouteViews on the Omtool Server
UNC path such as \\computer\folder
local path such as c:\folder or c:\folder\
For example:<Folder> <prName>%InstallFolder%<\prName></Folder>
Table 5-A: Guidelines on modifying elements in AccuRouteClient.XML
Element Parent Description

AccuRoute Desktop Installation Guide
Section 5: Optional configuration
© 2010 by Omtool, Ltd. All rights reserved. Omtool, AccuRoute and the Company logo are trademarks of the Company. Trade names and trademarks of other companies appearing in this document are the property of their respective owners.
5-8
Servers Configuration Section defining the Omtool Servers in the network.
AccuRoute Desktop must establish a connection to the Omtool Server before allowing a user to begin a session. The optional attribute autoconnect determines whether AccuRoute Desktop prompts the user to login and select an Omtool Server. Use true to enable autoconnect, or false to disable autoconnect. For example: <Configuration> … <Servers autoconnect="true">
<Server default="true">
<prServerName>LANGSTON</prServerName>
</Server>
</Servers> …</Configuration>
If autoconnect=”true”, AccuRoute Desktop connects to the Omtool Server automatically. AccuRoute Desktop authenticates the user based on the user login to the e-mail application. Consider the following autoconnect scenarios:
• If the e-mail application is configured to start automatically and autoconnect=”true”, AccuRoute Desktop suppresses the CONNECT TO SERVER dialog box on startup and connects to the Omtool Server automatically.
• If the e-mail application is configured to prompt the user to select an identity/profile and autoconnect=”true”, the user selects an e-mail identity/profile and then AccuRoute Desktop connects to the Omtool Server.
• If the element prMailType uses the value None (See the description of prMailType on 5-6.) and autoconnect=”true”, the user must complete the CONNECT TO SERVER dialog box on startup. After providing a name and e-mail address, the user must select ALWAYS CONNECT TO THIS SERVER. Then AccuRoute Desktop connects to the Omtool server automatically.
Note: If autoconnect=”true”, include only one Omtool Server in the <Servers> section or set default=”true” on the Omtool Server that AccuRoute Desktop should connect to automatically.
If autoconnect=”false” or if the attribute is not set, AccuRoute Desktop prompts the user to select an Omtool Server and log in. A list menu displays all the Omtool Servers defined in this section.
Table 5-A: Guidelines on modifying elements in AccuRouteClient.XML
Element Parent Description

© 2010 by Omtool, Ltd. All rights reserved. Omtool, AccuRoute and the Company logo are trademarks of the Company. Trade names and trademarks of other companies appearing in this document are the property of their respective owners.
5-9AccuRoute Desktop Installation Guide
Section 5: Optional configuration
Server Servers An Omtool Server in the network.
The optional attribute default determines whether the server is the default selection. Use one of the following values: true to indicate the default server, or false (default).
If default=”true”, AccuRoute Desktop displays the server as the first item in the server list menu. This item is selected by default. If configured to autoconnect (Go to Servers on 5-8.), AccuRoute Desktop connects to the default server automatically.
If default=”false” and multiple servers are included in this section, or if this attribute is not present and multiple servers are included in this section, the Omtool Server is not the default server.
The following code sample shows SAPPHIRE as the default server:<Servers> … <Server default="true">
<prServerName>SAPPHIRE</prServerName>
</Server> …</Servers>
The Server section supports the following properties:
prServerName - Connection string. It must be formatted appropriately for the server-client connectivity method. (Go to Table 4-A: Connection string formats for DCOM, HTTP, and secure HTTP connectivity on 4-4.) For example:<Server> <prServerName>SAPPHIRE</prServerName></Server>
Aliases Configuration Section defining aliases for search folders. A search folder is a folder in the network that contains view files (*.VIEW) and/or Routing Sheet template files (*.WTX, *.OMTPL, *.DOC). (See the description of prName on 5-7.) For example:<Configuration> … <Aliases> <Alias>
<prAlias>General views</prAlias> <prValue>\\LANGSTON\ OmtoolServer\AccuRouteViews\ </prValue>
</Alias> … </Aliases> …</Configuration>
Table 5-A: Guidelines on modifying elements in AccuRouteClient.XML
Element Parent Description

AccuRoute Desktop Installation Guide
Section 5: Optional configuration
© 2010 by Omtool, Ltd. All rights reserved. Omtool, AccuRoute and the Company logo are trademarks of the Company. Trade names and trademarks of other companies appearing in this document are the property of their respective owners.
5-10
Alias Aliases Section defining an alias for a search folder. A search folder is a folder in the network that contains view files (*.VIEW) and/or Routing Sheet template files (*.WTX, *.OMTPL, *.DOC). (See the description of prName on 5-7.) For example:<Aliases> <Alias> <prAlias>General views</prAlias> <prValue>\\LANGSTON\ OmtoolServer\AccuRouteViews\ </prValue>
</Alias> …</Aliases>
Important! Do not delete the default alias $/. It is required for the AccuRoutePDF printer and the Send To AccuRoute Desktop feature.
The default alias is defined in AccuRouteclient.xml:
<Aliases> <Alias> <prAlias>$/</prAlias> <prValue>\\server\AccuRouteViews\</prValue>
</Alias> …</Aliases>
The Alias section supports the following properties:
• prAlias - Alias, or friendly name, for a search folder. A search folder is a folder in the network that contains view files (*.VIEW) and/or Routing Sheet template files (*.WTX, *.OMTPL, *.DOC). (See the description of prName on 5-7.) For example: <Alias> <prAlias>General views</prAlias> …</Alias>
• prValue - Path to the search folder. Use one of the following values:
%InstallFolder% to represent …\OmtoolServer\AccuRouteViews on the Omtool Server
UNC path such as \\computer\folder or \\computer\folder\
local path such as c:\folder or c:\folder\
For example:<Alias> … <prValue>%InstallFolder%</prValue></Alias>
Table 5-A: Guidelines on modifying elements in AccuRouteClient.XML
Element Parent Description
© 2010 by Omtool, Ltd. All rights reserved. Omtool, AccuRoute and the Company logo are trademarks of the Company. Trade names and trademarks of other companies appearing in this document are the property of their respective owners.
6-1AccuRoute Desktop Installation Guide
Section 6: Views
Section 6: ViewsThis section includes:
Introduction to views (6-1)
Guidelines for modifying view files (6-4)
Introduction to viewsA view is configuration file for an AccuRoute Desktop form. All three components of the AccuRoute Desktop application suite use forms. For example, AccuRoute Desktop uses the standard form that is linked to the view file Default.VIEW. Each view file is comprised of XML data that determines the look and feel of the application, and the features that are available to the user.
Tip Omtool provides guidelines on modifying view files so that administrators or programmers can customize views for the target environment. For a fee, an Omtool Technical Support engineer can assist with view file modifications or customize view files for the target environment. For more information, contact Omtool Technical Support. (Go to Omtool support and sales on the inside front cover.)
Do not modify any views before using AccuRoute Desktop. Use the application in its default configuration, generate a list of specifications for deployment, and then customize the application. View files are stored on the Omtool Server and can be updated anytime—even after AccuRoute Desktop has been installed on clients.
Views versus user preferencesViews always takes precedence over user preferences in AccuRoute Desktop. This allows administrators to use views to enforce user and group policies. (If a user sets preferences that conflict with the view, then the conflicting settings are not saved.)

AccuRoute Desktop Installation Guide
Section 6: Views
© 2010 by Omtool, Ltd. All rights reserved. Omtool, AccuRoute and the Company logo are trademarks of the Company. Trade names and trademarks of other companies appearing in this document are the property of their respective owners.
6-2
View files installed with AccuRoute DesktopThe following view files are installed on the Omtool Server and reside in …\Omtool\AccuRouteViews:
Default.VIEW - View that AccuRoute Desktop loads on startup in standard mode.
Important Do not delete, rename, or move this file. It is required for AccuRoute Desktop to work correctly.
DirectSend.OMV - View that AccuRoute Desktop loads when the user sends a document to AccuRoute Desktop using the Send To AccuRoute Desktop shortcut in Windows.
Print To.OMV - View that AccuRoute Desktop loads when the user prints a document to the AccuRoutePDF printer.
AccuRoute Client-Safe.OMV - Backup copy of Default.VIEW. Do not modify this file.
Any *.VIEW file that resides in …\AccuRouteViews or in search folders appears in the View menu in AccuRoute Desktop and allows users to change views on demand. (This statement assumes that the View menu in AccuRoute Desktop is visible to users and that the particular search folder is defined for the view.)
All *.OMV files are invisible to AccuRoute Desktop, so they cannot be displayed as view options in the AccuRoute Desktop View menu. (For example, DirectSend.OMV, Print To.OMV, and AccuRoute Client-Safe.OMV do not appear as view options in AccuRoute Desktop. These views are reserved for special applications, such as the Send To AccuRoute Desktop feature and the AccuRoutePDF printer, and are not designed for general purposes.)
Figure 6-A: View menu in AccuRoute Desktop
The View menu, which allows the user to change the current view, includes the default view (Default) and custom views (AllUsers, Managers, MarketingUsers, SalesUsers, and SuperUsers).
© 2010 by Omtool, Ltd. All rights reserved. Omtool, AccuRoute and the Company logo are trademarks of the Company. Trade names and trademarks of other companies appearing in this document are the property of their respective owners.
6-3AccuRoute Desktop Installation Guide
Section 6: Views
Views associated with AccuRoute Desktop featuresUsers can use custom views when running AccuRoute Desktop in standard mode.
AccuRoute Desktop loads Default.VIEW by default. The view that AccuRoute Desktop loads is determined by the property prDefaultView in AccuRouteclient.xml. This property can be modified for individual users. For more information go to Modifying the AccuRoute Desktop configuration file (5-5).
Send To AccuRoute Desktop loads DirectSent.OMV which is located in …\AccuRouteViews on the Omtool Server. The view can be modified as necessary, but it cannot be customized for different users and groups and cannot be moved to a different location.
The AccuRoutePDF printer loads PrintTo.OMV which is located in …\AccuRouteViews on the Omtool Server. The view can be modified as necessary, but it cannot be customized for different users and groups and cannot be moved to a different location.
InheritanceA view can inherit configuration data from another view. Using this concept called inheritance, AccuRoute Desktop can be deployed with a hierarchal set of views that meet the needs of users and groups.
In an environment that utilizes view inheritance, the view with the most general configuration data is called the base view, and the view that determines the AccuRoute Desktop configuration on the client is called the derived view. Any view that occurs between the base view and the derived view is called an intermediate view. For example, the view lineage can be comprised of the base view, multiple intermediate views, and the derived view.
While view inheritance can be used to propagate settings to other views, it provides versatility at the feature level. A view can override data that is inherited from another view. (Go to Overrides on 6-4.)
Two-view exampleConsider the following example of view inheritance using two views:
organization.view
department.view
AccuRoute Desktop on the client is configured to load department.view. Since department.view inherits configuration data from organization.view, organization.view is the base view and department.view is the derived view.
Three-view exampleConsider a more sophisticated example of view inheritance using three views:
organization.view
site.view
department. view
AccuRoute Desktop on the client is configured to load department.view. Department.view inherits configuration data from site.view, and site.view inherits configuration data from organization.view. Department.view is the derived view, site.view is the intermediate view, and organization.view is the base view.

AccuRoute Desktop Installation Guide
Section 6: Views
© 2010 by Omtool, Ltd. All rights reserved. Omtool, AccuRoute and the Company logo are trademarks of the Company. Trade names and trademarks of other companies appearing in this document are the property of their respective owners.
6-4
OverridesA derived view can override data that is inherited from the base view. Conversely, the base view can allow or prevent the derived view from overriding all or part of the view configuration. (The attribute overridable can be set on the view itself, on general sections such as <General>, and on more specific sections such as <Recipient>. which belongs to the <Defaults> section.)
This concept of overrides is detailed thoroughly in the next section that contains guidelines on modifying view files.
Guidelines for modifying view filesModify view files using the guidelines in the following tables:
View section (6-5)
General section (6-6)
Defaults section (6-8)
UI section (6-13)
Transformations section (6-19)
FaxCoverpages section (6-21)
FaxAccessCodes section (6-23)
ConfirmationList section (6-25)
Recipients section (6-27)
Attachments section (6-30)
RoutingSheets section (6-33)
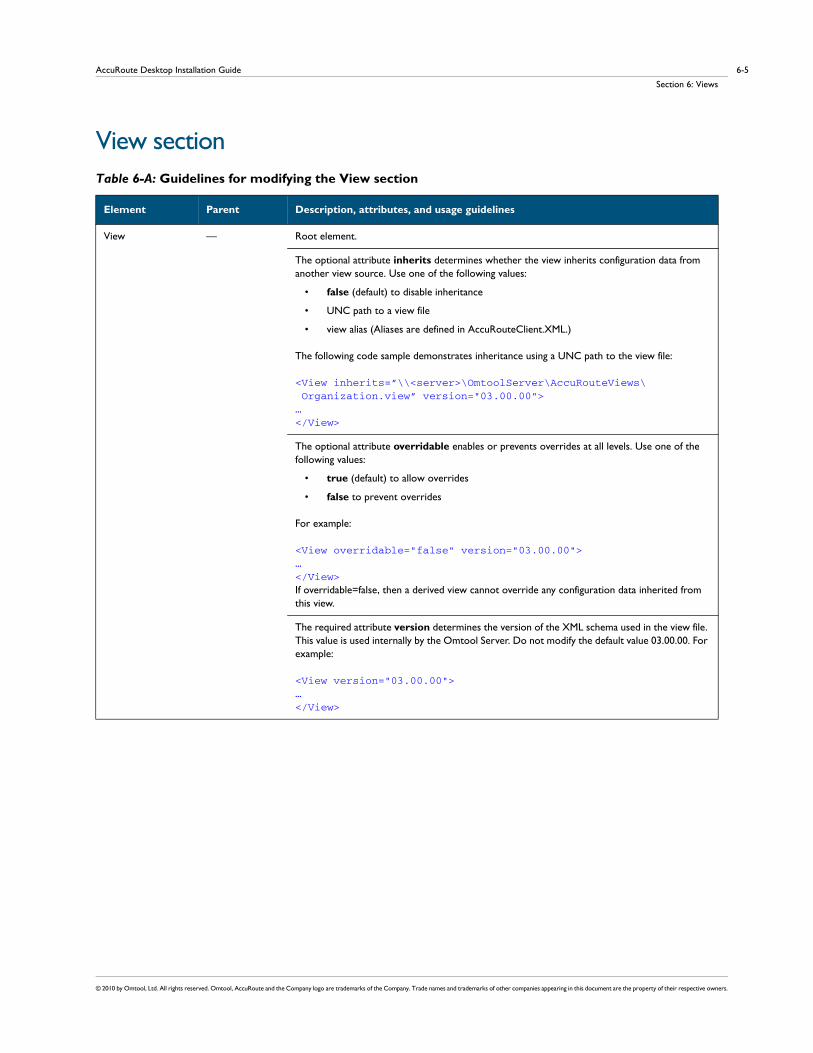
© 2010 by Omtool, Ltd. All rights reserved. Omtool, AccuRoute and the Company logo are trademarks of the Company. Trade names and trademarks of other companies appearing in this document are the property of their respective owners.
6-5AccuRoute Desktop Installation Guide
Section 6: Views
View sectionTable 6-A: Guidelines for modifying the View section
Element Parent Description, attributes, and usage guidelines
View — Root element.
The optional attribute inherits determines whether the view inherits configuration data from another view source. Use one of the following values:
• false (default) to disable inheritance
• UNC path to a view file
• view alias (Aliases are defined in AccuRouteClient.XML.)
The following code sample demonstrates inheritance using a UNC path to the view file:
<View inherits=”\\<server>\OmtoolServer\AccuRouteViews\ Organization.view” version="03.00.00">…</View>
The optional attribute overridable enables or prevents overrides at all levels. Use one of the following values:
• true (default) to allow overrides
• false to prevent overrides
For example:
<View overridable="false" version="03.00.00">…</View>If overridable=false, then a derived view cannot override any configuration data inherited from this view.
The required attribute version determines the version of the XML schema used in the view file. This value is used internally by the Omtool Server. Do not modify the default value 03.00.00. For example:
<View version="03.00.00">…</View>
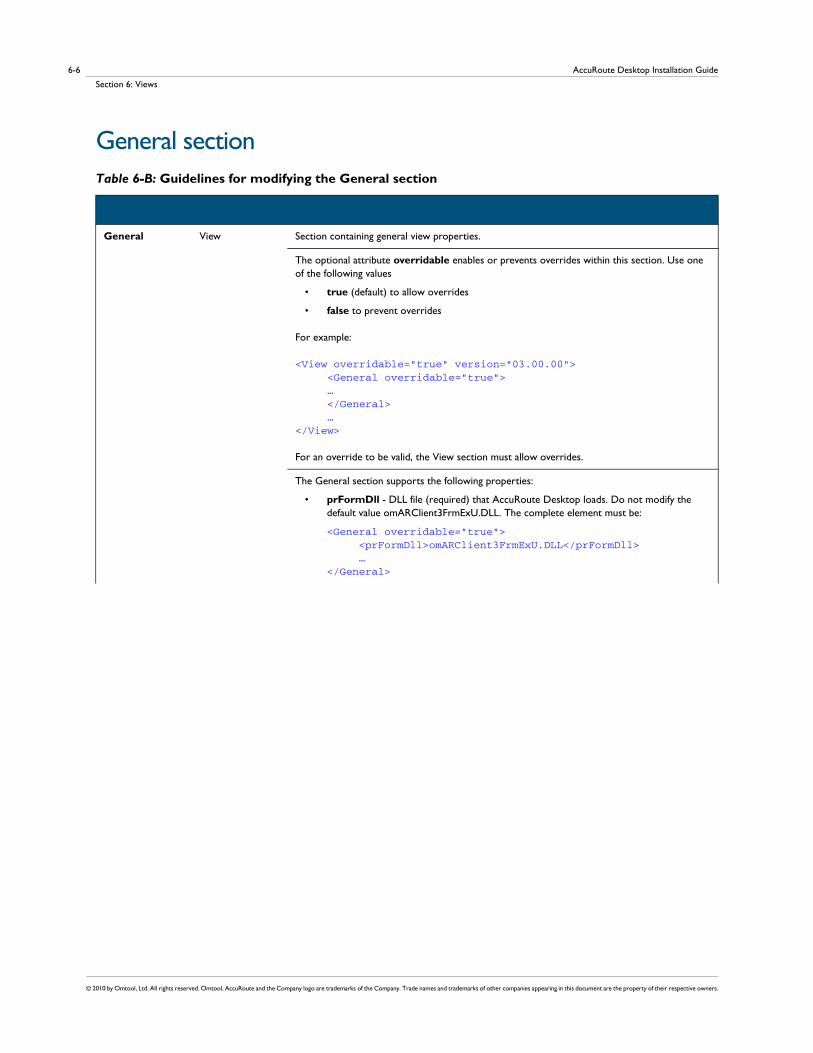
AccuRoute Desktop Installation Guide
Section 6: Views
© 2010 by Omtool, Ltd. All rights reserved. Omtool, AccuRoute and the Company logo are trademarks of the Company. Trade names and trademarks of other companies appearing in this document are the property of their respective owners.
6-6
General sectionTable 6-B: Guidelines for modifying the General section
General View Section containing general view properties.
The optional attribute overridable enables or prevents overrides within this section. Use one of the following values
• true (default) to allow overrides
• false to prevent overrides
For example:
<View overridable="true" version="03.00.00"> <General overridable="true"> … </General> …</View>
For an override to be valid, the View section must allow overrides.
The General section supports the following properties:
• prFormDll - DLL file (required) that AccuRoute Desktop loads. Do not modify the default value omARClient3FrmExU.DLL. The complete element must be:
<General overridable="true"> <prFormDll>omARClient3FrmExU.DLL</prFormDll> …</General>

© 2010 by Omtool, Ltd. All rights reserved. Omtool, AccuRoute and the Company logo are trademarks of the Company. Trade names and trademarks of other companies appearing in this document are the property of their respective owners.
6-7AccuRoute Desktop Installation Guide
Section 6: Views
General continued
The General section supports the following properties:
• prFormDll - DLL file (required) that AccuRoute Desktop loads. Do not modify the default value omARClient3FrmExU.DLL. The complete element must be:
<General overridable="true"> <prFormDll>omARClient3FrmExU.DLL</prFormDll> …</General>
• prName - Name (required) that the Omtool Server uses to identify the view type. Use one of the following values:
AccuRouteClient for standard and Print To views
DirectSend for the Send To view
The following code sample shows a standard view that uses the required value AccuRouteClient:
<General overridable="true"> … <prName>AccuRouteClient</prName> …</General>
• prShowDocInTitle - Boolean value that determines whether the title of the message, Embedded Directive, or template appears in the window title for AccuRoute Desktop. Use one of the following values:
0 to omit the title
1 (default) to include the title
For example:
<General overridable="true">… … <prShowDocInTitle>0</prShowDocInTitle>… …</General>
• prShowScanLocation - Boolean value that determines whether the prompt SUBMITTED DOCUMENT(S) HERE appears in the attachments list. Use one of the following values:
0 to hide the prompt
1 (default) to show the prompt
For example:
<General overridable="true"> … <prShowScanLocation>0</prShowScanLocation> …</General>
Table 6-B: Guidelines for modifying the General section

AccuRoute Desktop Installation Guide
Section 6: Views
© 2010 by Omtool, Ltd. All rights reserved. Omtool, AccuRoute and the Company logo are trademarks of the Company. Trade names and trademarks of other companies appearing in this document are the property of their respective owners.
6-8
Defaults sectionTable 6-C: Guidelines for modifying the Defaults section
Element Parent Description, attributes, and usage guidelines
Defaults View Section containing default view properties.
The optional attribute overridable enables or prevents overrides within this section. Use one of the following values:
• true (default) to allow overrides
• false to prevent overrides
For example:
<View overridable="true" version="03.00.00"> … <Defaults overridable="true"> … </Defaults> …</View>
For an override to be valid, the View section must allow overrides.
EmbeddedDirective Defaults Section containing defaults for Embedded Directives.
The optional attribute overridable enables or prevents overrides within this section. Use one of the following values:
• true (default) to allow overrides
• false to prevent overrides
For example:
<Defaults overridable="true"> <EmbeddedDirective overridable="true"> … </EmbeddedDirective> …</Defaults>
For an override to be valid, the View section and Defaults section must allow overrides.

© 2010 by Omtool, Ltd. All rights reserved. Omtool, AccuRoute and the Company logo are trademarks of the Company. Trade names and trademarks of other companies appearing in this document are the property of their respective owners.
6-9AccuRoute Desktop Installation Guide
Section 6: Views
The EmbeddedDirective section supports the following properties:
• prUseOnlyOnce - Use one of the following values:
0 (default) for multiple use
1 for single use
For example:
<EmbeddedDirective overridable="true"> … <prUseOnlyOnce>1</prUseOnlyOnce> …</EmbeddedDirective>
• prRemoveEmbeddedDirective - Use one of the following values:
0 (default) to retain the Routing Sheet in the message
1 to remove the Routing Sheet from the message prior to delivery
For example:
<EmbeddedDirective overridable="true"> … <prRemoveEmbeddedDirective>0 </prRemoveEmbeddedDirective> …</EmbeddedDirective>
• prExpiresInterval - Number of days that an Embedded Directive remains valid for use. For example:
<EmbeddedDirective overridable="true"> … <prExpiresInterval>365</prExpiresInterval> …</EmbeddedDirective>
• prAccuRouteCCMySelf - Use one of the following values:
0 (default) to omit the sender as a CC recipient
1 to include the sender as a CC recipient
For example:
<EmbeddedDirective overridable="true"> … <prAccuRouteCCMySelf>1</prAccuRouteCCMySelf> …</EmbeddedDirective>
Table 6-C: Guidelines for modifying the Defaults section
Element Parent Description, attributes, and usage guidelines
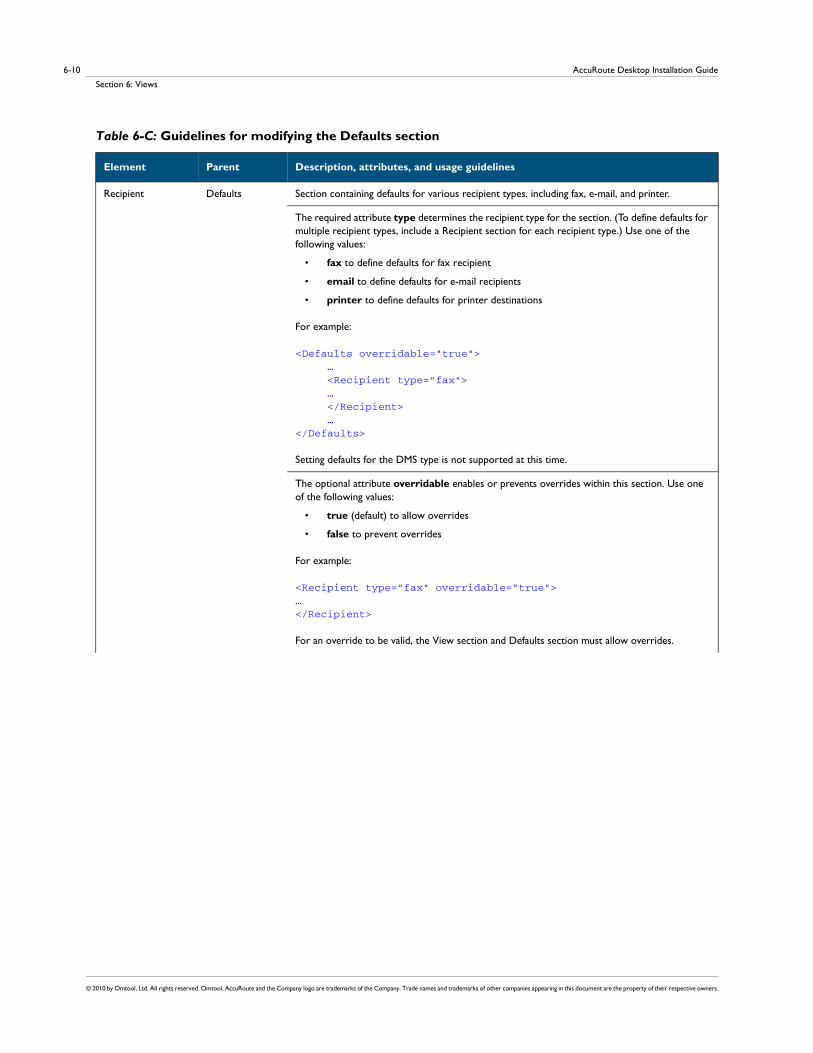
AccuRoute Desktop Installation Guide
Section 6: Views
© 2010 by Omtool, Ltd. All rights reserved. Omtool, AccuRoute and the Company logo are trademarks of the Company. Trade names and trademarks of other companies appearing in this document are the property of their respective owners.
6-10
Recipient Defaults Section containing defaults for various recipient types, including fax, e-mail, and printer.
The required attribute type determines the recipient type for the section. (To define defaults for multiple recipient types, include a Recipient section for each recipient type.) Use one of the following values:
• fax to define defaults for fax recipient
• email to define defaults for e-mail recipients
• printer to define defaults for printer destinations
For example:
<Defaults overridable="true"> … <Recipient type="fax"> … </Recipient> …</Defaults>
Setting defaults for the DMS type is not supported at this time.
The optional attribute overridable enables or prevents overrides within this section. Use one of the following values:
• true (default) to allow overrides
• false to prevent overrides
For example:
<Recipient type="fax" overridable="true">…</Recipient>
For an override to be valid, the View section and Defaults section must allow overrides.
Table 6-C: Guidelines for modifying the Defaults section
Element Parent Description, attributes, and usage guidelines
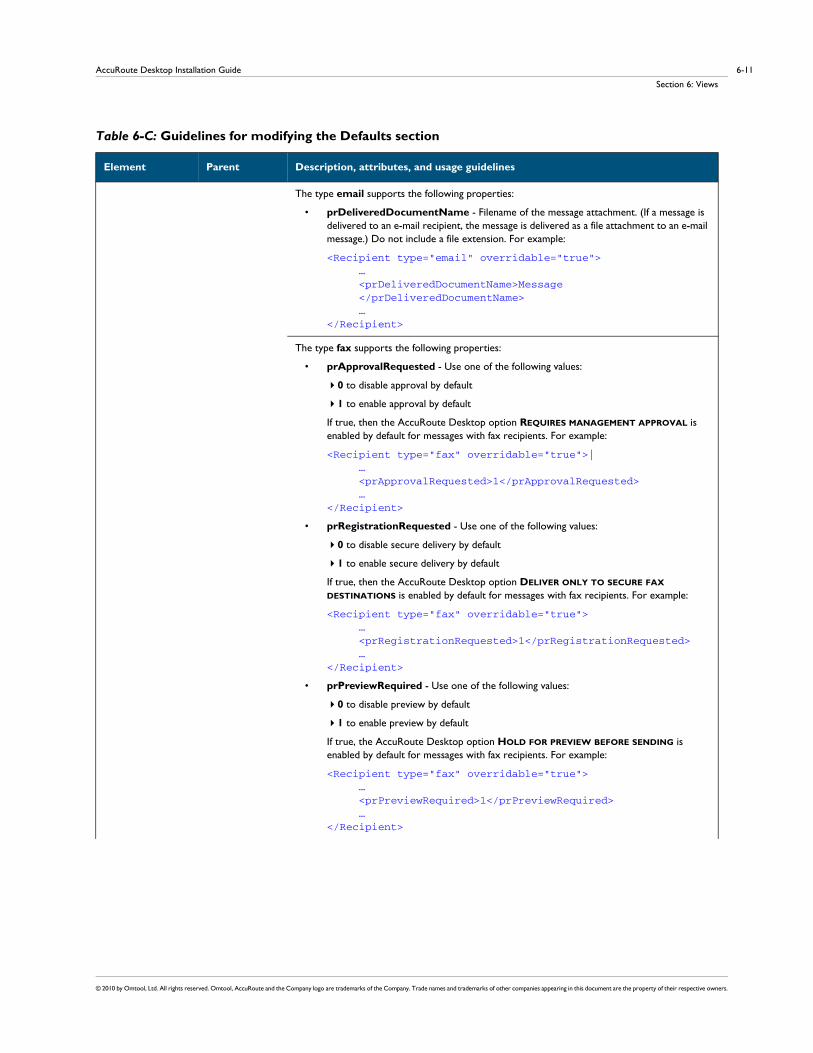
© 2010 by Omtool, Ltd. All rights reserved. Omtool, AccuRoute and the Company logo are trademarks of the Company. Trade names and trademarks of other companies appearing in this document are the property of their respective owners.
6-11AccuRoute Desktop Installation Guide
Section 6: Views
The type email supports the following properties:
• prDeliveredDocumentName - Filename of the message attachment. (If a message is delivered to an e-mail recipient, the message is delivered as a file attachment to an e-mail message.) Do not include a file extension. For example:
<Recipient type="email" overridable="true"> … <prDeliveredDocumentName>Message </prDeliveredDocumentName> …</Recipient>
The type fax supports the following properties:
• prApprovalRequested - Use one of the following values:
0 to disable approval by default
1 to enable approval by default
If true, then the AccuRoute Desktop option REQUIRES MANAGEMENT APPROVAL is enabled by default for messages with fax recipients. For example:
<Recipient type="fax" overridable="true">| … <prApprovalRequested>1</prApprovalRequested> …</Recipient>
• prRegistrationRequested - Use one of the following values:
0 to disable secure delivery by default
1 to enable secure delivery by default
If true, then the AccuRoute Desktop option DELIVER ONLY TO SECURE FAX DESTINATIONS is enabled by default for messages with fax recipients. For example:
<Recipient type="fax" overridable="true"> … <prRegistrationRequested>1</prRegistrationRequested> …</Recipient>
• prPreviewRequired - Use one of the following values:
0 to disable preview by default
1 to enable preview by default
If true, the AccuRoute Desktop option HOLD FOR PREVIEW BEFORE SENDING is enabled by default for messages with fax recipients. For example:
<Recipient type="fax" overridable="true"> … <prPreviewRequired>1</prPreviewRequired> …</Recipient>
Table 6-C: Guidelines for modifying the Defaults section
Element Parent Description, attributes, and usage guidelines

AccuRoute Desktop Installation Guide
Section 6: Views
© 2010 by Omtool, Ltd. All rights reserved. Omtool, AccuRoute and the Company logo are trademarks of the Company. Trade names and trademarks of other companies appearing in this document are the property of their respective owners.
6-12
Recipient continued • prPriority - Message priority. Use one of the following values:
0 for high priority
5 for normal priority (default)
10 for low priority.
If this property is included, the AccuRoute Desktop option DELIVERY PRIORITY displays the default value set by the property. For example:
<Recipient type="fax" overridable="true"> … <prPriority>10</prPriority> …</Recipient>
• prDateSendAfter - Send after date for messages with a fax recipient. Use date format, such as MM/DD/YYYY. For example:
<Recipient type="fax" overridable="true"> … <prDateSendAfter>06/30/2006</prDateSendAfter> …</Recipient>
The type printer supports the following properties:
• prPrintNumberOfCopies - Number of copies for messages with a printer destination. Default is 1. For example:
<Recipient type="printer" overridable="true"> … <prPrintNumberOfCopies>3</prPrintNumberOfCopies> …</Recipient>
Table 6-C: Guidelines for modifying the Defaults section
Element Parent Description, attributes, and usage guidelines

© 2010 by Omtool, Ltd. All rights reserved. Omtool, AccuRoute and the Company logo are trademarks of the Company. Trade names and trademarks of other companies appearing in this document are the property of their respective owners.
6-13AccuRoute Desktop Installation Guide
Section 6: Views
UI sectionTable 6-D: Guidelines for modifying the UI section
Element Parent Description, attributes, and usage guidelines
UI View Section containing view properties pertaining to the user interface, such as the configuration of controls, menus, and toolbars
The optional attribute overridable enables or prevents overrides within this section. Use one of the following values:
• true (default) to allow overrides
• false to prevent overrides
For example:
<View overridable="true" version="03.00.00"> … <UI overridable="true"> … </UI> …</View>
For an override to be valid, the View section must allow overrides.
Form
Menu
Toolbar
Options
UI The UI element supports the following sections:
• <View><UI><Form> - Pertains to controls in the user interface.
• <View><UI><Menu> - Pertains to a menu item in the user interface.
• <View><UI><Toolbar> - Pertains to the toolbar in the user interface.
• <View><UI><Options> - Pertains to the Message Options dialog box.
Form
Menu
Toolbar
Options
The optional attribute overridable enables or prevents overrides within this section. Use one of the following values:
• true (default) to allow overrides
• false to prevent overrides
The following code sample enables overrides to the form:
<Form overridable="true">…</Form>
For an override to be valid, the View section and UI section must allow overrides.
Menu
Toolbar
The optional attribute visible determines whether the control is visible. Use one of the following values:
• true (default) to display the control
• false to hide the control.
The following code sample hides the toolbar:
<Toolbar visible="false" overridable="false">…</Toolbar>
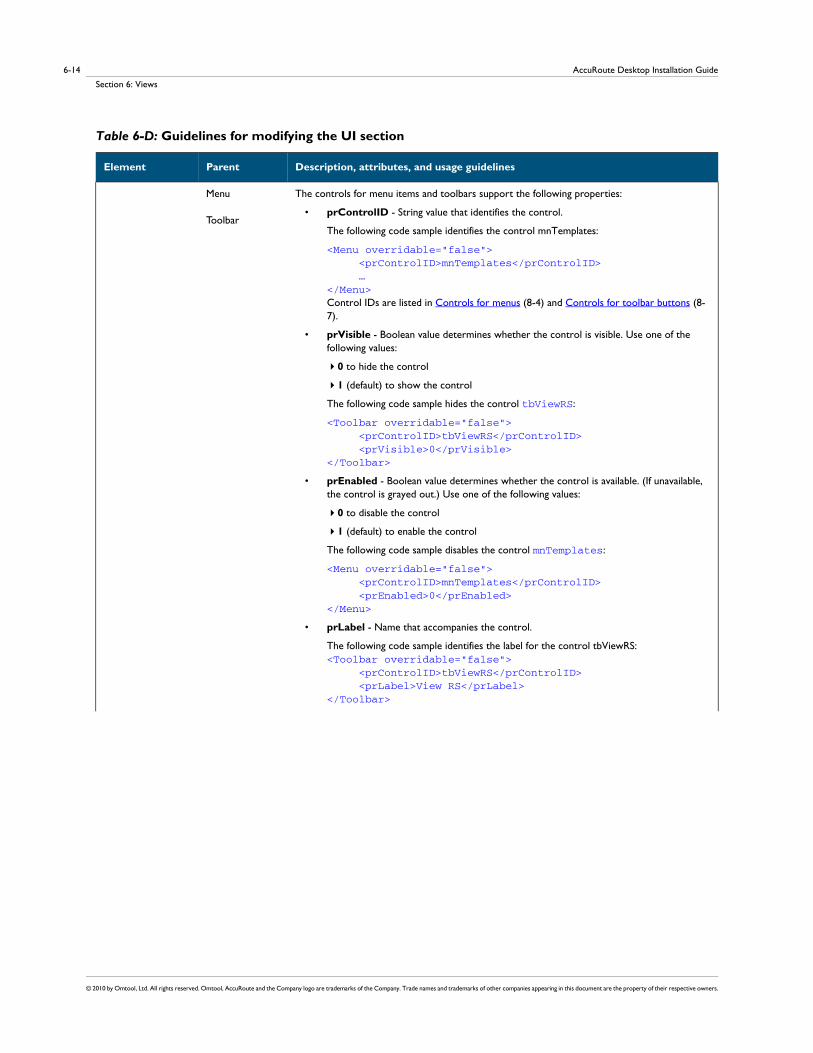
AccuRoute Desktop Installation Guide
Section 6: Views
© 2010 by Omtool, Ltd. All rights reserved. Omtool, AccuRoute and the Company logo are trademarks of the Company. Trade names and trademarks of other companies appearing in this document are the property of their respective owners.
6-14
Menu
Toolbar
The controls for menu items and toolbars support the following properties:
• prControlID - String value that identifies the control.
The following code sample identifies the control mnTemplates:
<Menu overridable="false"> <prControlID>mnTemplates</prControlID> …</Menu>Control IDs are listed in Controls for menus (8-4) and Controls for toolbar buttons (8-7).
• prVisible - Boolean value determines whether the control is visible. Use one of the following values:
0 to hide the control
1 (default) to show the control
The following code sample hides the control tbViewRS:
<Toolbar overridable="false"> <prControlID>tbViewRS</prControlID> <prVisible>0</prVisible></Toolbar>
• prEnabled - Boolean value determines whether the control is available. (If unavailable, the control is grayed out.) Use one of the following values:
0 to disable the control
1 (default) to enable the control
The following code sample disables the control mnTemplates:
<Menu overridable="false"> <prControlID>mnTemplates</prControlID> <prEnabled>0</prEnabled></Menu>
• prLabel - Name that accompanies the control.
The following code sample identifies the label for the control tbViewRS:<Toolbar overridable="false"> <prControlID>tbViewRS</prControlID> <prLabel>View RS</prLabel></Toolbar>
Table 6-D: Guidelines for modifying the UI section
Element Parent Description, attributes, and usage guidelines

© 2010 by Omtool, Ltd. All rights reserved. Omtool, AccuRoute and the Company logo are trademarks of the Company. Trade names and trademarks of other companies appearing in this document are the property of their respective owners.
6-15AccuRoute Desktop Installation Guide
Section 6: Views
Control
General
Fax
Form
Options
The Form and Options elements support the following sections:
• <View><UI><Form><Control> - Pertains to a control in the user interface.
• <View><UI><Options><General> - Pertains to controls on the General tab in the Message Options dialog box.
• <View><UI><Options><Fax> - Pertains to controls on the Fax tab in the Message Options dialog box.
• <View><UI><Options><E-mail> - Pertains to controls on the E-mail tab in the Message Options dialog box.
Control
General
Fax
The optional attribute overridable enables or prevents overrides within this section. Use one of the following values:
• true (default) to allow overrides
• false to prevent overrides
The following code sample enables overrides to the control btMenuToggle:
<Control overridable="true"> <prControlID>btMenuToggle</prControlID> <prVisible>0</prVisible></Control>
For an override to be valid, the View section and UI section, as well as the respective parent element of this attribute (Form section or Options section), must allow overrides.
General
Fax
The optional attribute visible determines whether the control is visible. Use one of the following values:
• true (default) to display the control
• false to hide the control
The following code sample hides the Fax tab in the Message Options dialog box:
<Fax visible="false" overridable="false"></Fax>
Table 6-D: Guidelines for modifying the UI section
Element Parent Description, attributes, and usage guidelines
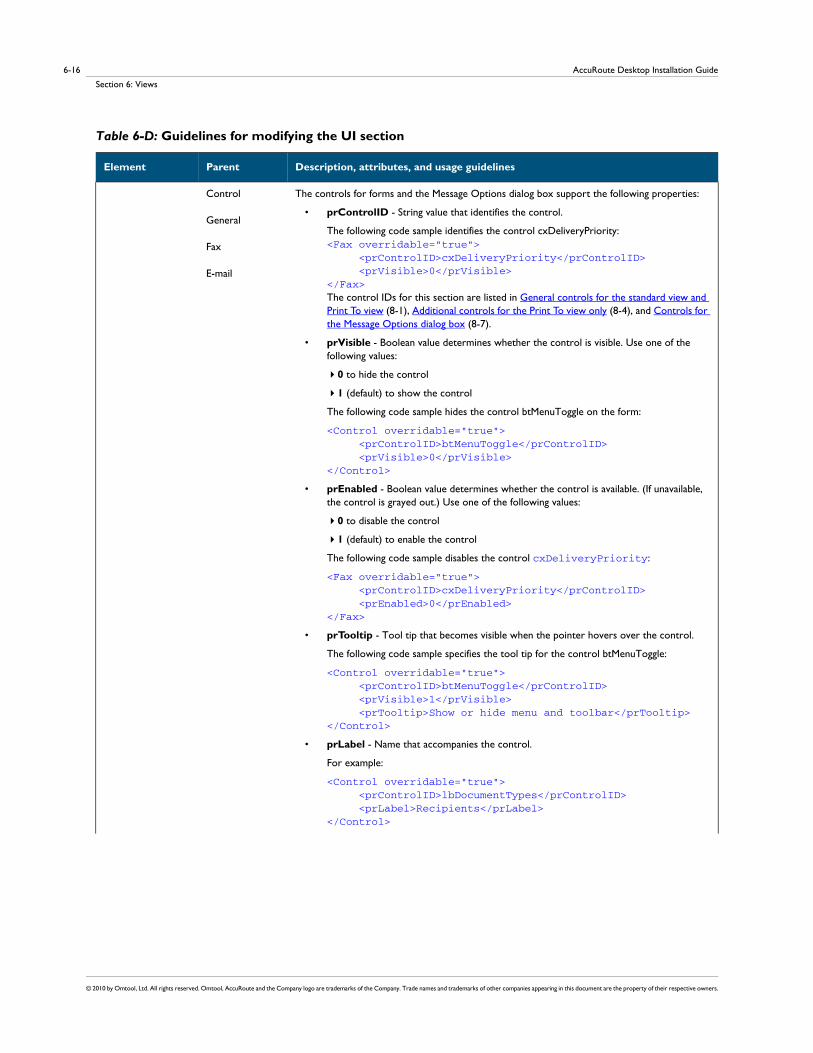
AccuRoute Desktop Installation Guide
Section 6: Views
© 2010 by Omtool, Ltd. All rights reserved. Omtool, AccuRoute and the Company logo are trademarks of the Company. Trade names and trademarks of other companies appearing in this document are the property of their respective owners.
6-16
Control
General
Fax
The controls for forms and the Message Options dialog box support the following properties:
• prControlID - String value that identifies the control.
The following code sample identifies the control cxDeliveryPriority:<Fax overridable="true"> <prControlID>cxDeliveryPriority</prControlID> <prVisible>0</prVisible></Fax>The control IDs for this section are listed in General controls for the standard view and Print To view (8-1), Additional controls for the Print To view only (8-4), and Controls for the Message Options dialog box (8-7).
• prVisible - Boolean value determines whether the control is visible. Use one of the following values:
0 to hide the control
1 (default) to show the control
The following code sample hides the control btMenuToggle on the form:
<Control overridable="true"> <prControlID>btMenuToggle</prControlID> <prVisible>0</prVisible></Control>
• prEnabled - Boolean value determines whether the control is available. (If unavailable, the control is grayed out.) Use one of the following values:
0 to disable the control
1 (default) to enable the control
The following code sample disables the control cxDeliveryPriority:
<Fax overridable="true"> <prControlID>cxDeliveryPriority</prControlID> <prEnabled>0</prEnabled></Fax>
• prTooltip - Tool tip that becomes visible when the pointer hovers over the control.
The following code sample specifies the tool tip for the control btMenuToggle:
<Control overridable="true"> <prControlID>btMenuToggle</prControlID> <prVisible>1</prVisible> <prTooltip>Show or hide menu and toolbar</prTooltip></Control>
• prLabel - Name that accompanies the control.
For example:
<Control overridable="true"> <prControlID>lbDocumentTypes</prControlID> <prLabel>Recipients</prLabel></Control>
Table 6-D: Guidelines for modifying the UI section
Element Parent Description, attributes, and usage guidelines
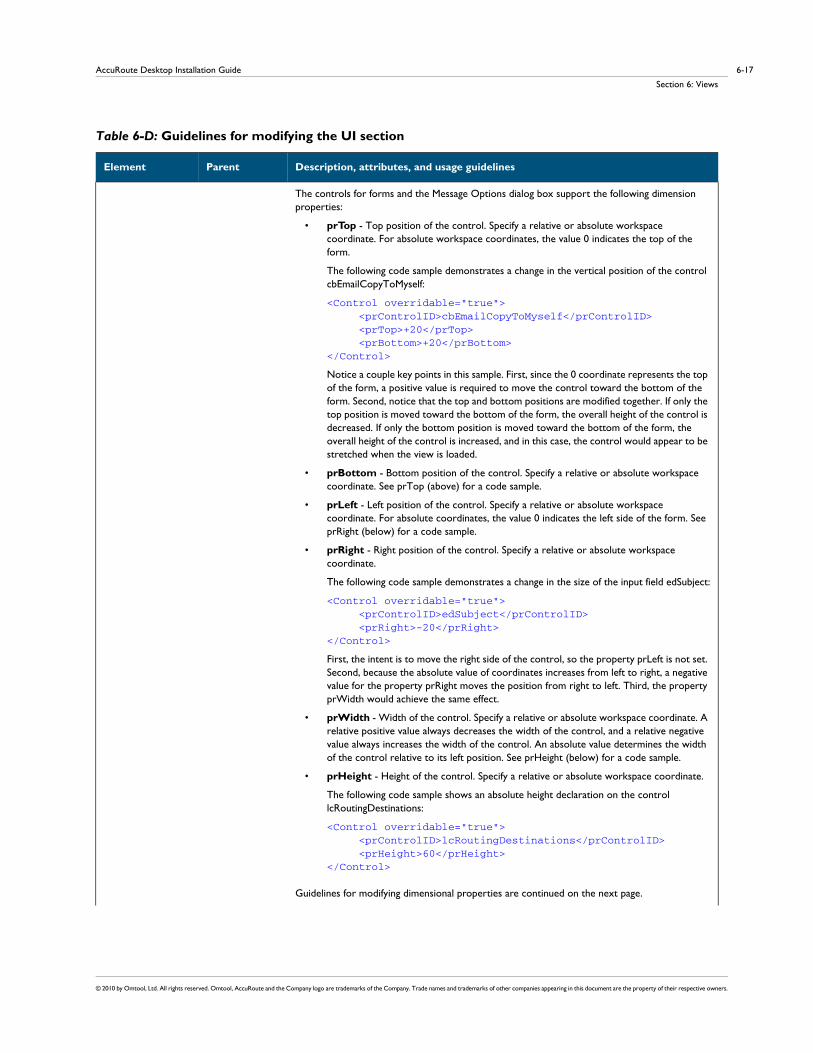
© 2010 by Omtool, Ltd. All rights reserved. Omtool, AccuRoute and the Company logo are trademarks of the Company. Trade names and trademarks of other companies appearing in this document are the property of their respective owners.
6-17AccuRoute Desktop Installation Guide
Section 6: Views
The controls for forms and the Message Options dialog box support the following dimension properties:
• prTop - Top position of the control. Specify a relative or absolute workspace coordinate. For absolute workspace coordinates, the value 0 indicates the top of the form.
The following code sample demonstrates a change in the vertical position of the control cbEmailCopyToMyself:
<Control overridable="true"> <prControlID>cbEmailCopyToMyself</prControlID> <prTop>+20</prTop> <prBottom>+20</prBottom></Control>
Notice a couple key points in this sample. First, since the 0 coordinate represents the top of the form, a positive value is required to move the control toward the bottom of the form. Second, notice that the top and bottom positions are modified together. If only the top position is moved toward the bottom of the form, the overall height of the control is decreased. If only the bottom position is moved toward the bottom of the form, the overall height of the control is increased, and in this case, the control would appear to be stretched when the view is loaded.
• prBottom - Bottom position of the control. Specify a relative or absolute workspace coordinate. See prTop (above) for a code sample.
• prLeft - Left position of the control. Specify a relative or absolute workspace coordinate. For absolute coordinates, the value 0 indicates the left side of the form. See prRight (below) for a code sample.
• prRight - Right position of the control. Specify a relative or absolute workspace coordinate.
The following code sample demonstrates a change in the size of the input field edSubject:
<Control overridable="true"> <prControlID>edSubject</prControlID> <prRight>-20</prRight></Control>
First, the intent is to move the right side of the control, so the property prLeft is not set. Second, because the absolute value of coordinates increases from left to right, a negative value for the property prRight moves the position from right to left. Third, the property prWidth would achieve the same effect.
• prWidth - Width of the control. Specify a relative or absolute workspace coordinate. A relative positive value always decreases the width of the control, and a relative negative value always increases the width of the control. An absolute value determines the width of the control relative to its left position. See prHeight (below) for a code sample.
• prHeight - Height of the control. Specify a relative or absolute workspace coordinate.
The following code sample shows an absolute height declaration on the control lcRoutingDestinations:
<Control overridable="true"> <prControlID>lcRoutingDestinations</prControlID> <prHeight>60</prHeight></Control>
Guidelines for modifying dimensional properties are continued on the next page.
Table 6-D: Guidelines for modifying the UI section
Element Parent Description, attributes, and usage guidelines

AccuRoute Desktop Installation Guide
Section 6: Views
© 2010 by Omtool, Ltd. All rights reserved. Omtool, AccuRoute and the Company logo are trademarks of the Company. Trade names and trademarks of other companies appearing in this document are the property of their respective owners.
6-18
Use the following guidelines when modifying a dimensional property:
• Each control is independent of others in the view. When modifying the size or position of a control, be careful that you do not hide a control behind another one.
• Numerical values for dimensional properties use can be relative or absolute. For example, if the value is +20, the view increases the default dimension by 20 workspace coordinates. Similarly, if the value is -20, the view decreases the default dimension by 20 workspace coordinates. Or if the value is 435, the view sets the dimension on the control at the x- or y-coordinate 435.
If making an absolute declaration on a dimensional property, consider the following:
• For Standard and Print To views, 0 represents the top of the form, 445 represents the bottom, 0 represents the left side; and 646 represents the right side.
• For Send To views, 0 represents the top of the form, 215 represents the bottom, 0 represents the left side, and 545 represents the right side.
• For message options dialog boxes, 0 represents the top of the form, 265 represents the bottom, 0 represents the left side, and 435 represents the right side.
Table 6-D: Guidelines for modifying the UI section
Element Parent Description, attributes, and usage guidelines

© 2010 by Omtool, Ltd. All rights reserved. Omtool, AccuRoute and the Company logo are trademarks of the Company. Trade names and trademarks of other companies appearing in this document are the property of their respective owners.
6-19AccuRoute Desktop Installation Guide
Section 6: Views
Transformations sectionTable 6-E: Guidelines for modifying the Transformations section
Element Parent Description, attributes, and usage guidelines
Transformations View Section containing definitions of data transformations. The view configuration can effect data transformations on message properties, recipient properties, Embedded Directive properties, and template variables.
The optional attribute overridable enables or prevents overrides within this section. Use one of the following values:
• true (default) to allow overrides
• false to prevent overrides
For example:
<View overridable="true" version="03.00.00"> … <Transformations overridable="true"> … </Transformations> …</View>
For an override to be valid, the View section must allow overrides.
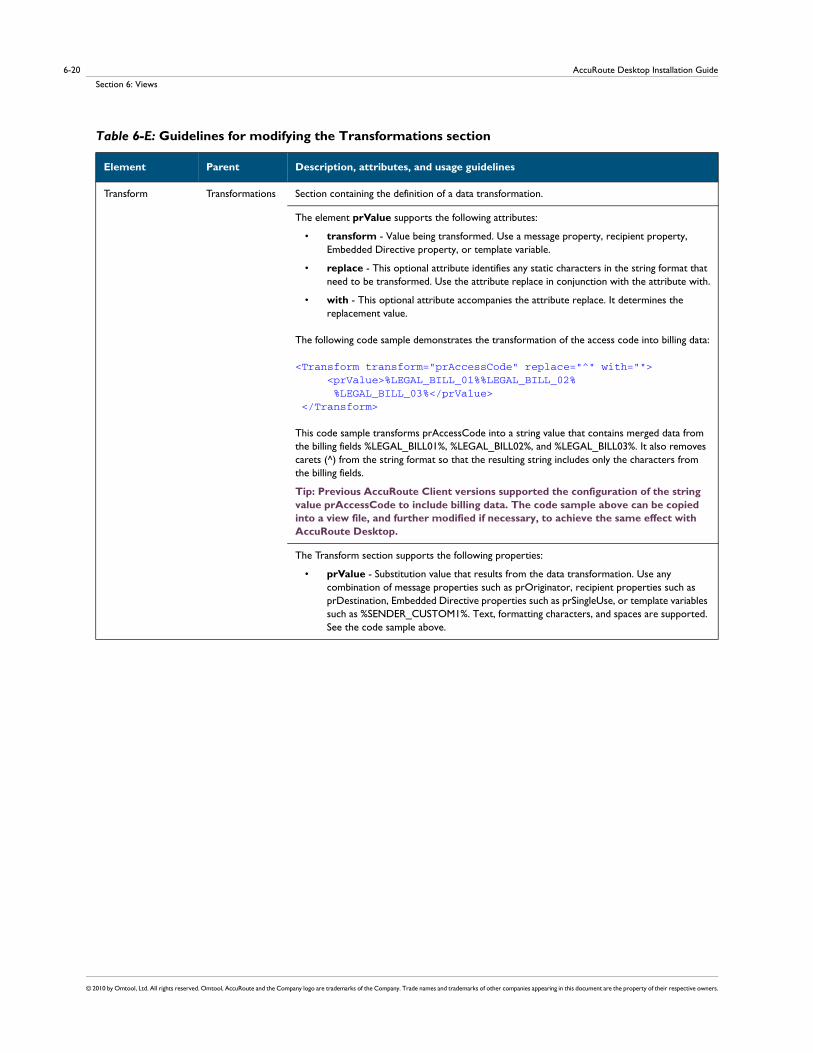
AccuRoute Desktop Installation Guide
Section 6: Views
© 2010 by Omtool, Ltd. All rights reserved. Omtool, AccuRoute and the Company logo are trademarks of the Company. Trade names and trademarks of other companies appearing in this document are the property of their respective owners.
6-20
Transform Transformations Section containing the definition of a data transformation.
The element prValue supports the following attributes:
• transform - Value being transformed. Use a message property, recipient property, Embedded Directive property, or template variable.
• replace - This optional attribute identifies any static characters in the string format that need to be transformed. Use the attribute replace in conjunction with the attribute with.
• with - This optional attribute accompanies the attribute replace. It determines the replacement value.
The following code sample demonstrates the transformation of the access code into billing data:
<Transform transform="prAccessCode" replace="^" with=""> <prValue>%LEGAL_BILL_01%%LEGAL_BILL_02% %LEGAL_BILL_03%</prValue> </Transform>
This code sample transforms prAccessCode into a string value that contains merged data from the billing fields %LEGAL_BILL01%, %LEGAL_BILL02%, and %LEGAL_BILL03%. It also removes carets (^) from the string format so that the resulting string includes only the characters from the billing fields.
Tip: Previous AccuRoute Client versions supported the configuration of the string value prAccessCode to include billing data. The code sample above can be copied into a view file, and further modified if necessary, to achieve the same effect with AccuRoute Desktop.
The Transform section supports the following properties:
• prValue - Substitution value that results from the data transformation. Use any combination of message properties such as prOriginator, recipient properties such as prDestination, Embedded Directive properties such as prSingleUse, or template variables such as %SENDER_CUSTOM1%. Text, formatting characters, and spaces are supported. See the code sample above.
Table 6-E: Guidelines for modifying the Transformations section
Element Parent Description, attributes, and usage guidelines
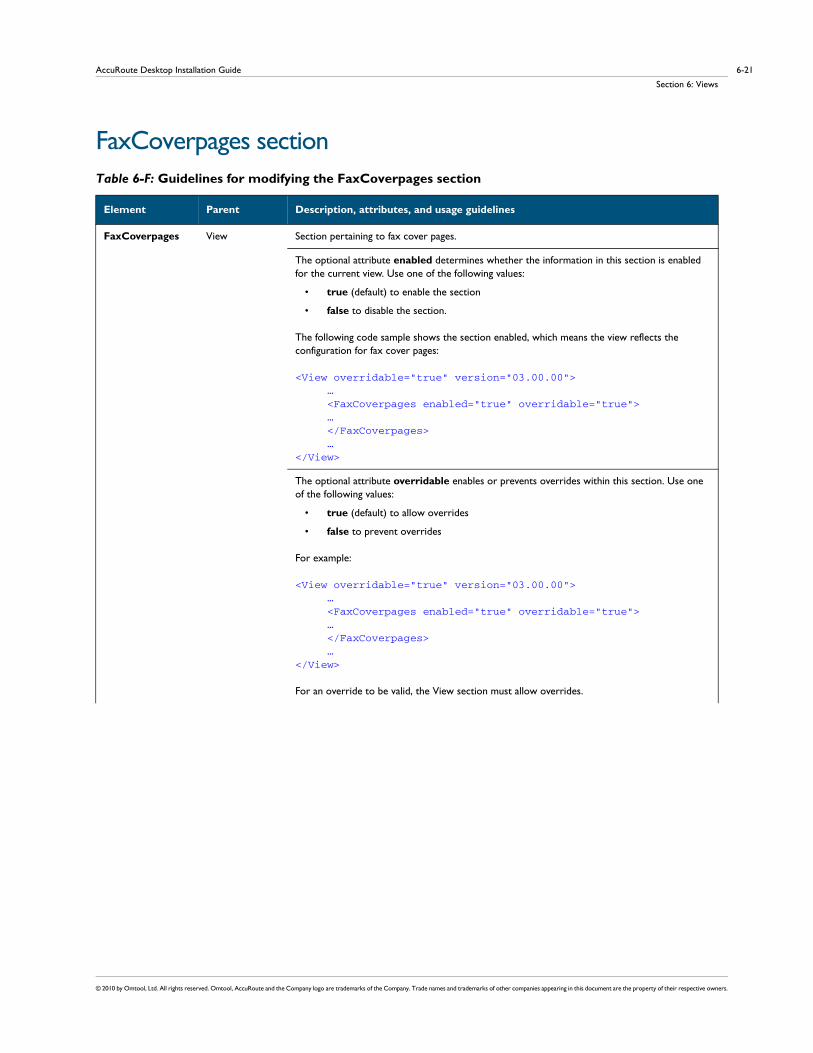
© 2010 by Omtool, Ltd. All rights reserved. Omtool, AccuRoute and the Company logo are trademarks of the Company. Trade names and trademarks of other companies appearing in this document are the property of their respective owners.
6-21AccuRoute Desktop Installation Guide
Section 6: Views
FaxCoverpages sectionTable 6-F: Guidelines for modifying the FaxCoverpages section
Element Parent Description, attributes, and usage guidelines
FaxCoverpages View Section pertaining to fax cover pages.
The optional attribute enabled determines whether the information in this section is enabled for the current view. Use one of the following values:
• true (default) to enable the section
• false to disable the section.
The following code sample shows the section enabled, which means the view reflects the configuration for fax cover pages:
<View overridable="true" version="03.00.00"> … <FaxCoverpages enabled="true" overridable="true"> … </FaxCoverpages> …</View>
The optional attribute overridable enables or prevents overrides within this section. Use one of the following values:
• true (default) to allow overrides
• false to prevent overrides
For example:
<View overridable="true" version="03.00.00"> … <FaxCoverpages enabled="true" overridable="true"> … </FaxCoverpages> …</View>
For an override to be valid, the View section must allow overrides.

AccuRoute Desktop Installation Guide
Section 6: Views
© 2010 by Omtool, Ltd. All rights reserved. Omtool, AccuRoute and the Company logo are trademarks of the Company. Trade names and trademarks of other companies appearing in this document are the property of their respective owners.
6-22
FaxCoverpage FaxCoverpages Section defining the fax cover page options that should appear in the view.
The attribute default, if true, denotes the cover page that should be selected by default in the view. Use one of the following values:
• true to denote the default cover page
• false (default)
The following code sample denotes that the cover page is the default selection:
<FaxCoverpages enabled="true"> <FaxCoverpage default="true"> … </FaxCoverpage> …</FaxCoverpages>
The attribute default can be enabled for one cover page only.
The FaxCoverpage section supports the following properties:
• prTemplateFilename - The filename of the cover page template. Do not include the file extension.
The following code sample shows two cover pages that should appear in the cover page drop-down menu. The second cover page is denoted as the default:
<FaxCoverpage> <prTemplateFilename>Sales </prTemplateFilename></FaxCoverpage><FaxCoverpage default="true"> <prTemplateFilename>InvestorRelations </prTemplateFilename></FaxCoverpage>
Table 6-F: Guidelines for modifying the FaxCoverpages section
Element Parent Description, attributes, and usage guidelines
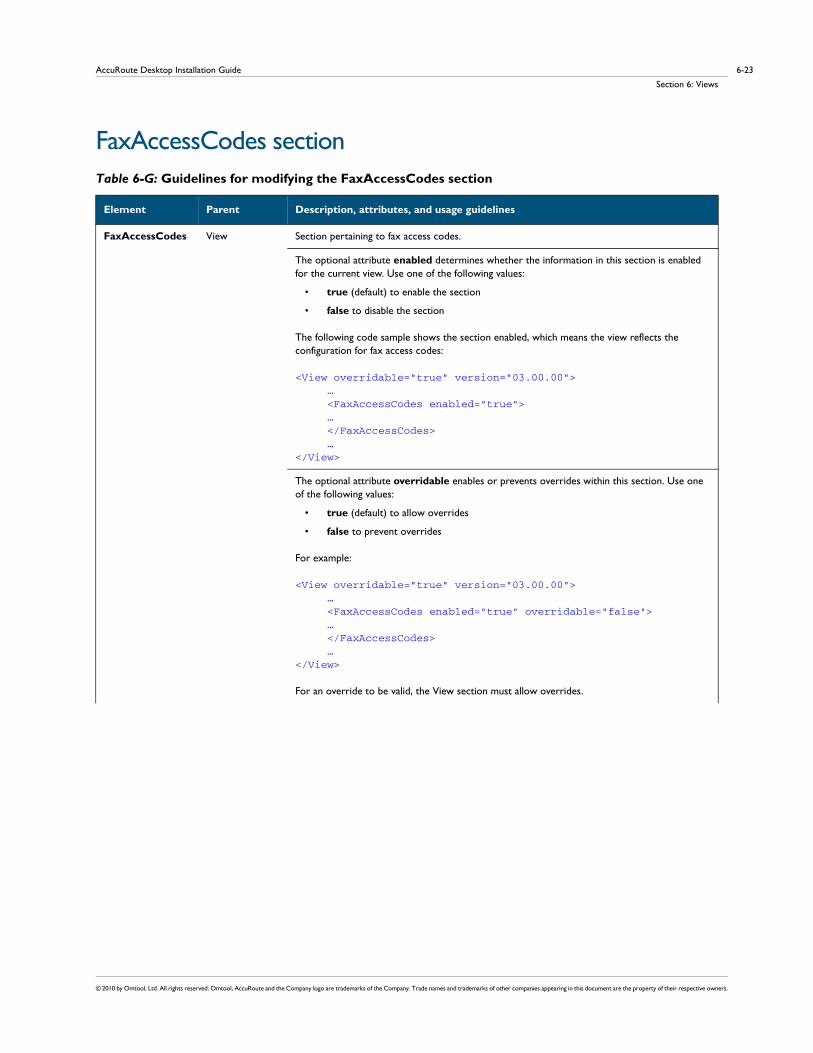
© 2010 by Omtool, Ltd. All rights reserved. Omtool, AccuRoute and the Company logo are trademarks of the Company. Trade names and trademarks of other companies appearing in this document are the property of their respective owners.
6-23AccuRoute Desktop Installation Guide
Section 6: Views
FaxAccessCodes sectionTable 6-G: Guidelines for modifying the FaxAccessCodes section
Element Parent Description, attributes, and usage guidelines
FaxAccessCodes View Section pertaining to fax access codes.
The optional attribute enabled determines whether the information in this section is enabled for the current view. Use one of the following values:
• true (default) to enable the section
• false to disable the section
The following code sample shows the section enabled, which means the view reflects the configuration for fax access codes:
<View overridable="true" version="03.00.00"> … <FaxAccessCodes enabled="true"> … </FaxAccessCodes> …</View>
The optional attribute overridable enables or prevents overrides within this section. Use one of the following values:
• true (default) to allow overrides
• false to prevent overrides
For example:
<View overridable="true" version="03.00.00"> … <FaxAccessCodes enabled="true" overridable="false"> … </FaxAccessCodes> …</View>
For an override to be valid, the View section must allow overrides.
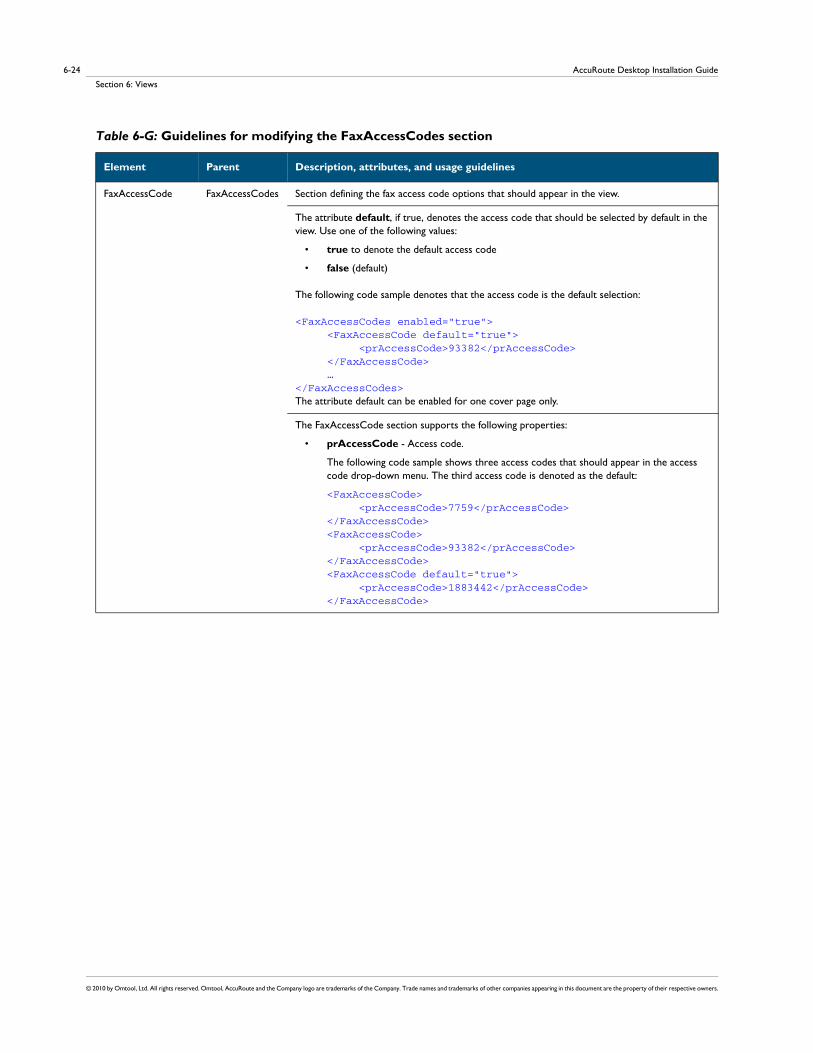
AccuRoute Desktop Installation Guide
Section 6: Views
© 2010 by Omtool, Ltd. All rights reserved. Omtool, AccuRoute and the Company logo are trademarks of the Company. Trade names and trademarks of other companies appearing in this document are the property of their respective owners.
6-24
FaxAccessCode FaxAccessCodes Section defining the fax access code options that should appear in the view.
The attribute default, if true, denotes the access code that should be selected by default in the view. Use one of the following values:
• true to denote the default access code
• false (default)
The following code sample denotes that the access code is the default selection:
<FaxAccessCodes enabled="true"> <FaxAccessCode default="true"> <prAccessCode>93382</prAccessCode> </FaxAccessCode> …</FaxAccessCodes>The attribute default can be enabled for one cover page only.
The FaxAccessCode section supports the following properties:
• prAccessCode - Access code.
The following code sample shows three access codes that should appear in the access code drop-down menu. The third access code is denoted as the default:
<FaxAccessCode> <prAccessCode>7759</prAccessCode></FaxAccessCode><FaxAccessCode> <prAccessCode>93382</prAccessCode></FaxAccessCode><FaxAccessCode default="true"> <prAccessCode>1883442</prAccessCode></FaxAccessCode>
Table 6-G: Guidelines for modifying the FaxAccessCodes section
Element Parent Description, attributes, and usage guidelines

© 2010 by Omtool, Ltd. All rights reserved. Omtool, AccuRoute and the Company logo are trademarks of the Company. Trade names and trademarks of other companies appearing in this document are the property of their respective owners.
6-25AccuRoute Desktop Installation Guide
Section 6: Views
ConfirmationList sectionTable 6-H: Guidelines for modifying the ConfirmationList section
Element Parent Description, attributes, and usage guidelines
ConfirmationList View Section that defines the list of default destinations for delivery confirmation.
The optional attribute overridable enables or prevents overrides within this section. Use one of the following values:
• true (default) to allow overrides
• false to prevent overrides
For example:
<View overridable="true" version="03.00.00"> … <ConfirmationList overridable="false" notifyon="successandfailure"> </ConfirmationList> …</View>
For an override to be valid, the View section must allow overrides.
The attribute notifyon determines the conditions in which a delivery confirmation message is sent. Use one of the following values:
• failure to send a delivery confirmation only when message delivery fails
• successandfailure to send a delivery confirmation when message delivery succeeds or fails.
If this attribute is not present, no delivery confirmation message is sent.
The following code sample shows a confirmation destination that is configured to receive delivery confirmation whenever message delivery succeeds or fails:
<View overridable="true" version="03.00.00"> … <ConfirmationList overridable="false" notifyon="successandfailure"> </ConfirmationList> …</View>
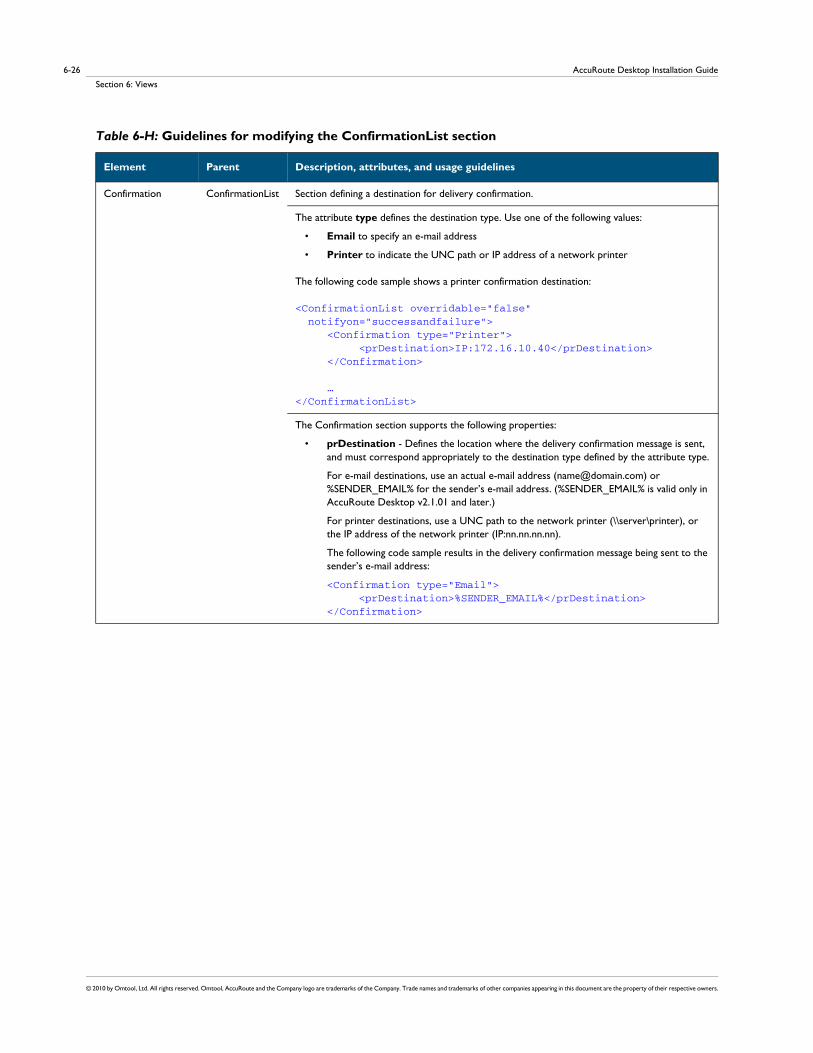
AccuRoute Desktop Installation Guide
Section 6: Views
© 2010 by Omtool, Ltd. All rights reserved. Omtool, AccuRoute and the Company logo are trademarks of the Company. Trade names and trademarks of other companies appearing in this document are the property of their respective owners.
6-26
Confirmation ConfirmationList Section defining a destination for delivery confirmation.
The attribute type defines the destination type. Use one of the following values:
• Email to specify an e-mail address
• Printer to indicate the UNC path or IP address of a network printer
The following code sample shows a printer confirmation destination:
<ConfirmationList overridable="false" notifyon="successandfailure"> <Confirmation type="Printer"> <prDestination>IP:172.16.10.40</prDestination> </Confirmation>
…</ConfirmationList>
The Confirmation section supports the following properties:
• prDestination - Defines the location where the delivery confirmation message is sent, and must correspond appropriately to the destination type defined by the attribute type.
For e-mail destinations, use an actual e-mail address ([email protected]) or %SENDER_EMAIL% for the sender’s e-mail address. (%SENDER_EMAIL% is valid only in AccuRoute Desktop v2.1.01 and later.)
For printer destinations, use a UNC path to the network printer (\\server\printer), or the IP address of the network printer (IP:nn.nn.nn.nn).
The following code sample results in the delivery confirmation message being sent to the sender’s e-mail address:
<Confirmation type="Email"> <prDestination>%SENDER_EMAIL%</prDestination></Confirmation>
Table 6-H: Guidelines for modifying the ConfirmationList section
Element Parent Description, attributes, and usage guidelines
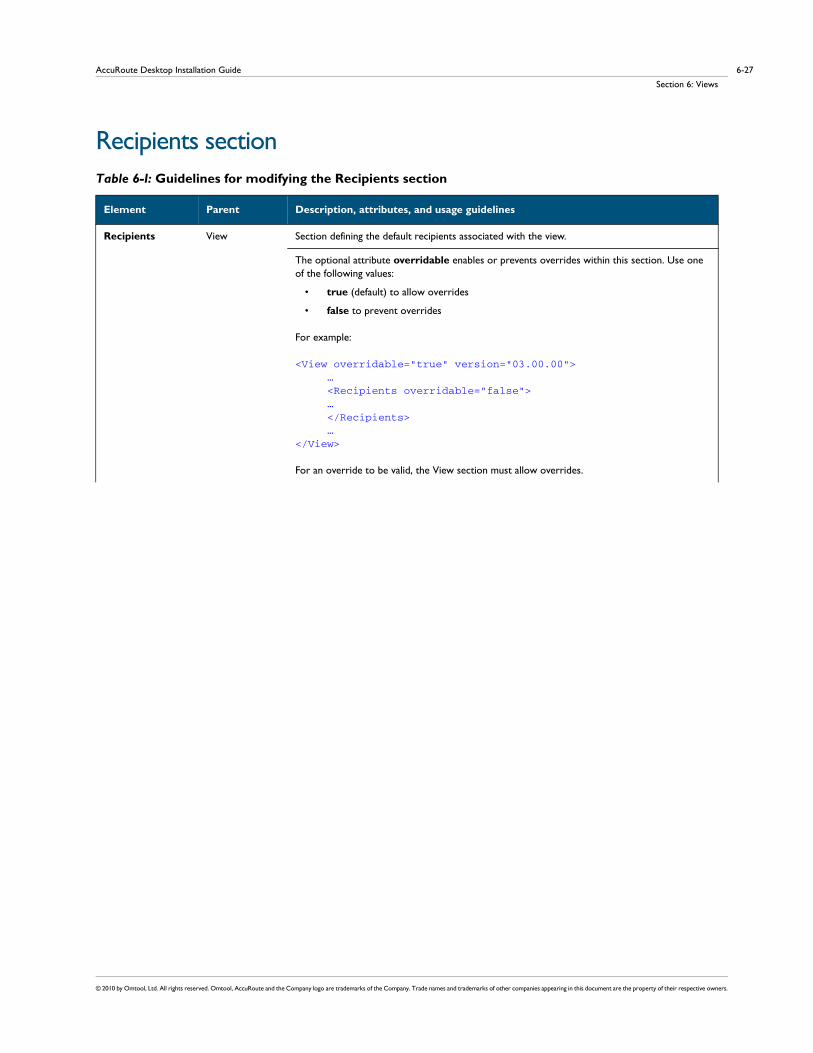
© 2010 by Omtool, Ltd. All rights reserved. Omtool, AccuRoute and the Company logo are trademarks of the Company. Trade names and trademarks of other companies appearing in this document are the property of their respective owners.
6-27AccuRoute Desktop Installation Guide
Section 6: Views
Recipients sectionTable 6-I: Guidelines for modifying the Recipients section
Element Parent Description, attributes, and usage guidelines
Recipients View Section defining the default recipients associated with the view.
The optional attribute overridable enables or prevents overrides within this section. Use one of the following values:
• true (default) to allow overrides
• false to prevent overrides
For example:
<View overridable="true" version="03.00.00"> … <Recipients overridable="false"> … </Recipients> …</View>
For an override to be valid, the View section must allow overrides.

AccuRoute Desktop Installation Guide
Section 6: Views
© 2010 by Omtool, Ltd. All rights reserved. Omtool, AccuRoute and the Company logo are trademarks of the Company. Trade names and trademarks of other companies appearing in this document are the property of their respective owners.
6-28
Recipient Recipients Section defining a default recipient associated with the view.
The optional attribute visible determines whether the additional recipients are visible on the form. Use one of the following values:
• true (default) to display additional recipients
• false to hide additional recipients
The following code sample hides the additional e-mail recipient specified in the view configuration:
<Recipients overridable="false"> <Recipient visible="false" type="Email"> … </Recipient> …</Recipients>
The required attribute type defines the destination type. Use one of the following values:
• Email to specify an e-mail address
• Printer to indicate the UNC path or IP address of a network printer
• Fax to specify a fax destination
The following code sample specifies that the recipient destination type is e-mail:
<Recipients overridable="false"> <Recipient visible="false" type="Email"> … </Recipient> …</Recipients>
Table 6-I: Guidelines for modifying the Recipients section
Element Parent Description, attributes, and usage guidelines
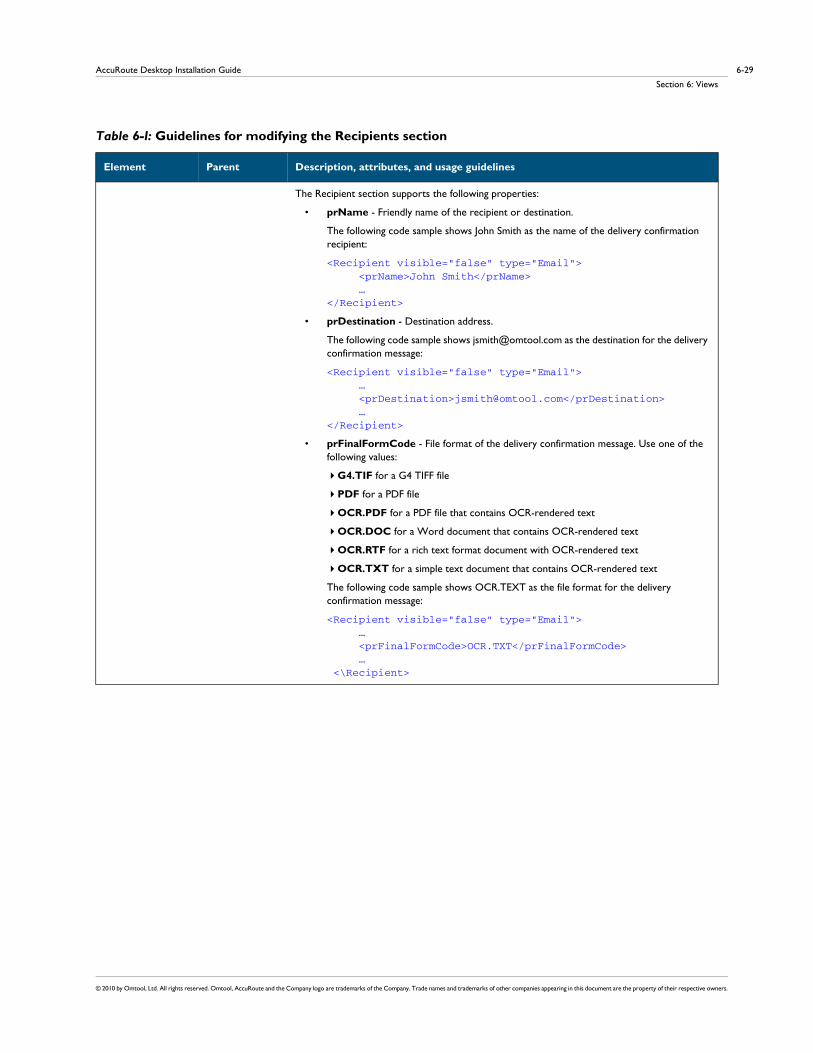
© 2010 by Omtool, Ltd. All rights reserved. Omtool, AccuRoute and the Company logo are trademarks of the Company. Trade names and trademarks of other companies appearing in this document are the property of their respective owners.
6-29AccuRoute Desktop Installation Guide
Section 6: Views
The Recipient section supports the following properties:
• prName - Friendly name of the recipient or destination.
The following code sample shows John Smith as the name of the delivery confirmation recipient:
<Recipient visible="false" type="Email"> <prName>John Smith</prName> …</Recipient>
• prDestination - Destination address.
The following code sample shows [email protected] as the destination for the delivery confirmation message:
<Recipient visible="false" type="Email"> … <prDestination>[email protected]</prDestination> …</Recipient>
• prFinalFormCode - File format of the delivery confirmation message. Use one of the following values:
G4.TIF for a G4 TIFF file
PDF for a PDF file
OCR.PDF for a PDF file that contains OCR-rendered text
OCR.DOC for a Word document that contains OCR-rendered text
OCR.RTF for a rich text format document with OCR-rendered text
OCR.TXT for a simple text document that contains OCR-rendered text
The following code sample shows OCR.TEXT as the file format for the delivery confirmation message:
<Recipient visible="false" type="Email"> … <prFinalFormCode>OCR.TXT</prFinalFormCode> … <\Recipient>
Table 6-I: Guidelines for modifying the Recipients section
Element Parent Description, attributes, and usage guidelines
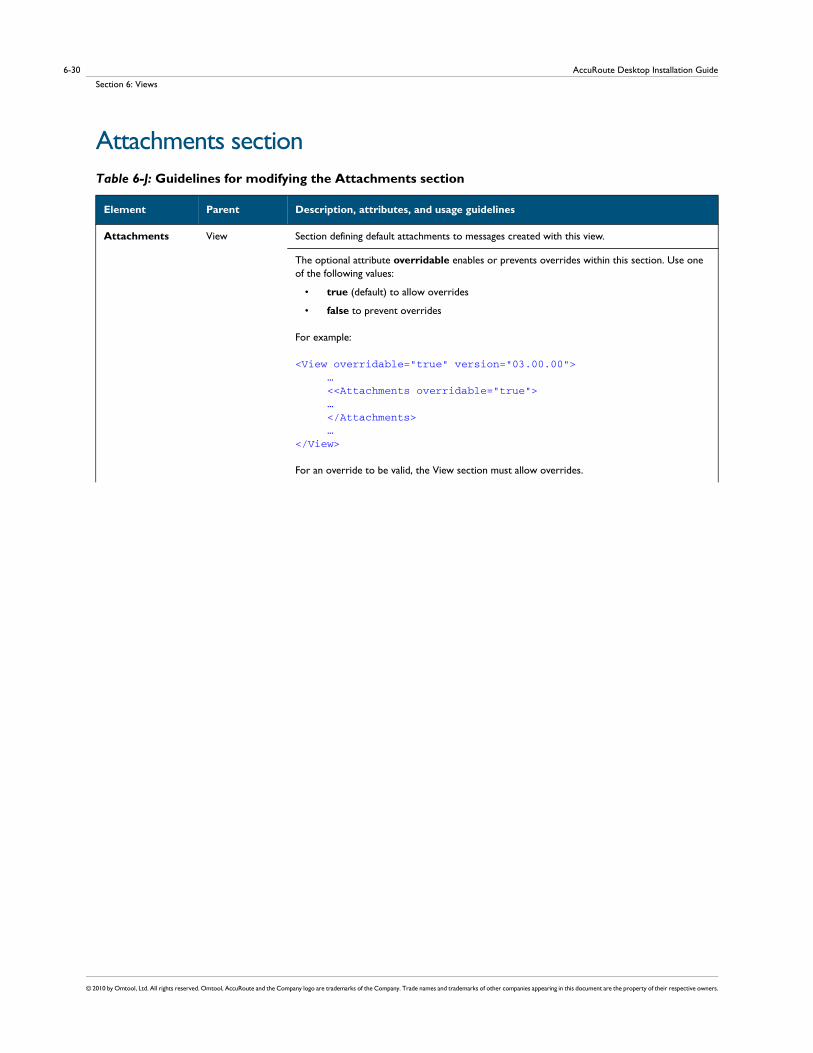
AccuRoute Desktop Installation Guide
Section 6: Views
© 2010 by Omtool, Ltd. All rights reserved. Omtool, AccuRoute and the Company logo are trademarks of the Company. Trade names and trademarks of other companies appearing in this document are the property of their respective owners.
6-30
Attachments sectionTable 6-J: Guidelines for modifying the Attachments section
Element Parent Description, attributes, and usage guidelines
Attachments View Section defining default attachments to messages created with this view.
The optional attribute overridable enables or prevents overrides within this section. Use one of the following values:
• true (default) to allow overrides
• false to prevent overrides
For example:
<View overridable="true" version="03.00.00"> … <<Attachments overridable="true"> … </Attachments> …</View>
For an override to be valid, the View section must allow overrides.
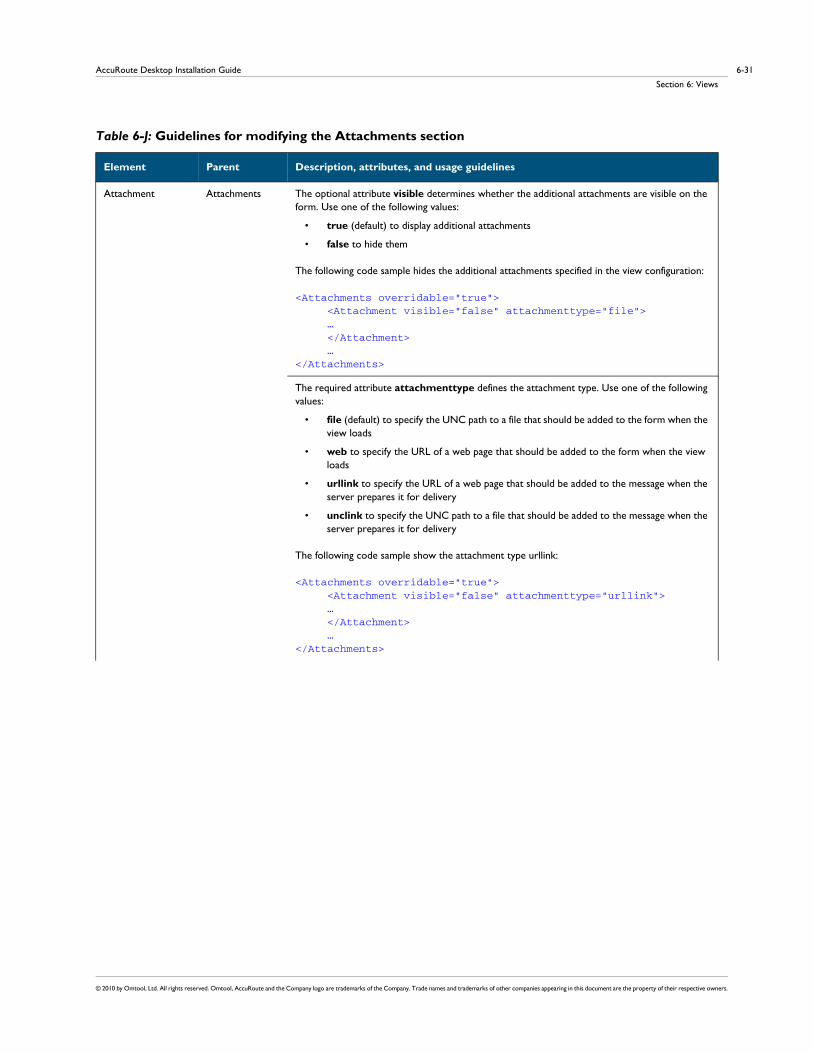
© 2010 by Omtool, Ltd. All rights reserved. Omtool, AccuRoute and the Company logo are trademarks of the Company. Trade names and trademarks of other companies appearing in this document are the property of their respective owners.
6-31AccuRoute Desktop Installation Guide
Section 6: Views
Attachment Attachments The optional attribute visible determines whether the additional attachments are visible on the form. Use one of the following values:
• true (default) to display additional attachments
• false to hide them
The following code sample hides the additional attachments specified in the view configuration:
<Attachments overridable="true"> <Attachment visible="false" attachmenttype="file"> … </Attachment> …</Attachments>
The required attribute attachmenttype defines the attachment type. Use one of the following values:
• file (default) to specify the UNC path to a file that should be added to the form when the view loads
• web to specify the URL of a web page that should be added to the form when the view loads
• urllink to specify the URL of a web page that should be added to the message when the server prepares it for delivery
• unclink to specify the UNC path to a file that should be added to the message when the server prepares it for delivery
The following code sample show the attachment type urllink:
<Attachments overridable="true"> <Attachment visible="false" attachmenttype="urllink"> … </Attachment> …</Attachments>
Table 6-J: Guidelines for modifying the Attachments section
Element Parent Description, attributes, and usage guidelines
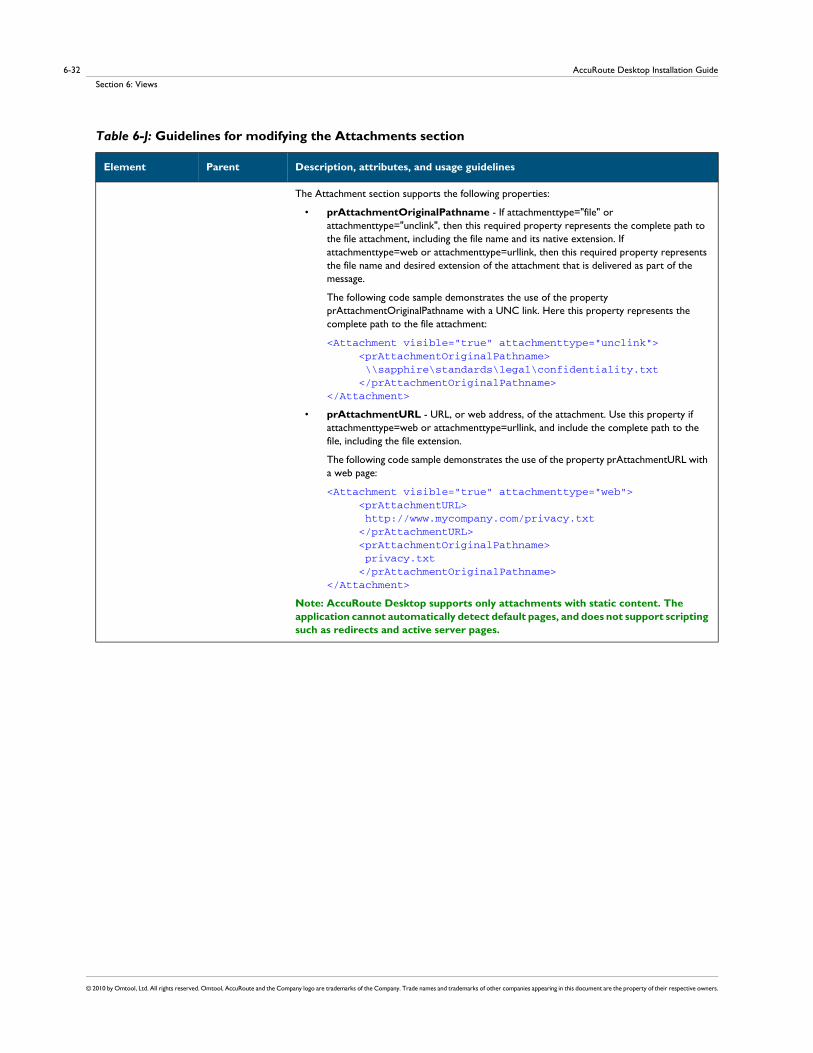
AccuRoute Desktop Installation Guide
Section 6: Views
© 2010 by Omtool, Ltd. All rights reserved. Omtool, AccuRoute and the Company logo are trademarks of the Company. Trade names and trademarks of other companies appearing in this document are the property of their respective owners.
6-32
The Attachment section supports the following properties:
• prAttachmentOriginalPathname - If attachmenttype="file" or attachmenttype="unclink", then this required property represents the complete path to the file attachment, including the file name and its native extension. If attachmenttype=web or attachmenttype=urllink, then this required property represents the file name and desired extension of the attachment that is delivered as part of the message.
The following code sample demonstrates the use of the property prAttachmentOriginalPathname with a UNC link. Here this property represents the complete path to the file attachment:
<Attachment visible="true" attachmenttype="unclink"> <prAttachmentOriginalPathname> \\sapphire\standards\legal\confidentiality.txt </prAttachmentOriginalPathname></Attachment>
• prAttachmentURL - URL, or web address, of the attachment. Use this property if attachmenttype=web or attachmenttype=urllink, and include the complete path to the file, including the file extension.
The following code sample demonstrates the use of the property prAttachmentURL with a web page:
<Attachment visible="true" attachmenttype="web"> <prAttachmentURL> http://www.mycompany.com/privacy.txt </prAttachmentURL> <prAttachmentOriginalPathname> privacy.txt </prAttachmentOriginalPathname></Attachment>
Note: AccuRoute Desktop supports only attachments with static content. The application cannot automatically detect default pages, and does not support scripting such as redirects and active server pages.
Table 6-J: Guidelines for modifying the Attachments section
Element Parent Description, attributes, and usage guidelines

© 2010 by Omtool, Ltd. All rights reserved. Omtool, AccuRoute and the Company logo are trademarks of the Company. Trade names and trademarks of other companies appearing in this document are the property of their respective owners.
6-33AccuRoute Desktop Installation Guide
Section 6: Views
RoutingSheets sectionTable 6-K: Guidelines for modifying the RoutingSheets section
Element Parent Description, attributes, and usage guidelines
RoutingSheets View Section defining the Routing Sheets associated with the view.
Routing Sheet styles available to an AccuRoute Desktop user come from three sources:
• ...\Omtool\OmtoolServer\Languages\ENU\EmbeddedDirectives folder on the Omtool Server
• search folders defined in the AccuRoute Desktop configuration file (AccuRouteclient.xml)
• search folders specified by the AccuRoute Desktop user (if AccuRoute Desktop allows the user to add search folders)
This section enables you to replace, add, or remove a Routing Sheet style from any of these sources.
The optional attribute overridable enables or prevents overrides within this section. Use one of the following values:
• true (default) to allow overrides
• false to prevent overrides
For example:
<View overridable="true" version="03.00.00"> … <RoutingSheets overridable="true"> … </RoutingSheets> …</View>
For an override to be valid, the View section must allow overrides.
The required attribute action determines the function of the RoutingSheets section.
Use one of the following values:
replace to replace the Routing Sheet styles from all three possible Routing Sheet style sources with the Routing Sheet styles defined in this section
modify to add a Routing Sheet style to the view, remove a Routing Sheet style, or set a Routing Sheet style as the default
The following code sample demonstrates a RoutingSheets section that replaces the existing Routing Sheet styles in the view with the styles defined in the section. (This is an abbreviated example that shows the general structure of the section where the Routing Sheet action is to be defined.)
<View overridable="true" version="03.00.00"> … <RoutingSheets overridable="true" action="replace"> … </RoutingSheets> …</View>
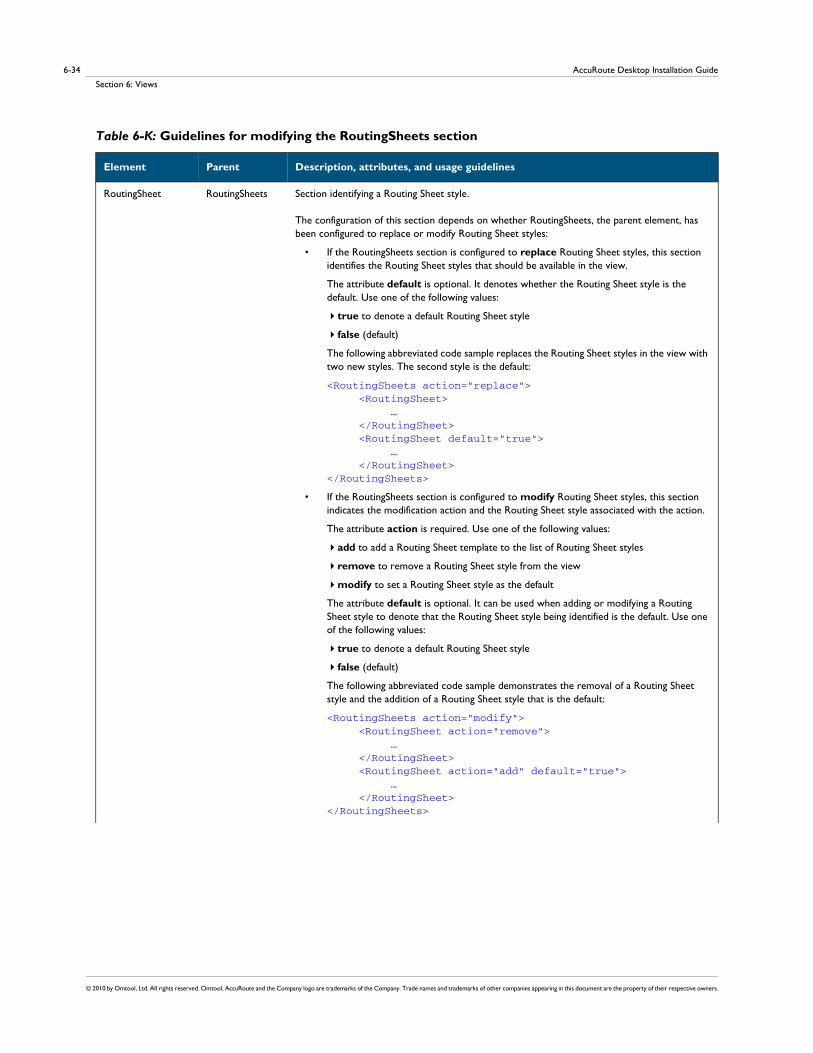
AccuRoute Desktop Installation Guide
Section 6: Views
© 2010 by Omtool, Ltd. All rights reserved. Omtool, AccuRoute and the Company logo are trademarks of the Company. Trade names and trademarks of other companies appearing in this document are the property of their respective owners.
6-34
RoutingSheet RoutingSheets Section identifying a Routing Sheet style.
The configuration of this section depends on whether RoutingSheets, the parent element, has been configured to replace or modify Routing Sheet styles:
• If the RoutingSheets section is configured to replace Routing Sheet styles, this section identifies the Routing Sheet styles that should be available in the view.
The attribute default is optional. It denotes whether the Routing Sheet style is the default. Use one of the following values:
true to denote a default Routing Sheet style
false (default)
The following abbreviated code sample replaces the Routing Sheet styles in the view with two new styles. The second style is the default:
<RoutingSheets action="replace"> <RoutingSheet> … </RoutingSheet> <RoutingSheet default="true"> … </RoutingSheet></RoutingSheets>
• If the RoutingSheets section is configured to modify Routing Sheet styles, this section indicates the modification action and the Routing Sheet style associated with the action.
The attribute action is required. Use one of the following values:
add to add a Routing Sheet template to the list of Routing Sheet styles
remove to remove a Routing Sheet style from the view
modify to set a Routing Sheet style as the default
The attribute default is optional. It can be used when adding or modifying a Routing Sheet style to denote that the Routing Sheet style being identified is the default. Use one of the following values:
true to denote a default Routing Sheet style
false (default)
The following abbreviated code sample demonstrates the removal of a Routing Sheet style and the addition of a Routing Sheet style that is the default:
<RoutingSheets action="modify"> <RoutingSheet action="remove"> … </RoutingSheet> <RoutingSheet action="add" default="true"> … </RoutingSheet></RoutingSheets>
Table 6-K: Guidelines for modifying the RoutingSheets section
Element Parent Description, attributes, and usage guidelines

© 2010 by Omtool, Ltd. All rights reserved. Omtool, AccuRoute and the Company logo are trademarks of the Company. Trade names and trademarks of other companies appearing in this document are the property of their respective owners.
6-35AccuRoute Desktop Installation Guide
Section 6: Views
The RoutingSheet section supports the following properties:
• prName and prDescription - Use these properties to identify a Routing Sheet style when adding, modifying, or replacing a Routing Sheet style in the view.
prName represents the filename of the Routing Sheet template, for example, GeneralRoutingSheet.omtpl.
prDescription represents the description of the Routing Sheet template. The description of a Routing Sheet template is defined in the text file that has the same filename as the Routing Sheet template file. For example, Simple.OMTPL contains the template data and Simple.TXT contains the description.
The following code sample demonstrates the addition of the Routing Sheet template CorporateStandard.OMTPL:
<RoutingSheets action="modify"> <RoutingSheet action="add"> <prDescription>CorporateStandard</prDescription> <prName>CorporateStandard.omtpl</prName> </RoutingSheet> …</RoutingSheet>
• prPath - Use this property to identify a Routing Sheet style when removing a Routing Sheet style from the view. It represents the path to the Routing Sheet template file including the filename and extension.
Use wildcard expressions to indicate multiple Routing Sheet styles with common:
filenames (CorporateStandard.*)
file types (*.OMTPL)
descriptions (*Standard)
paths (\\sapphire\Omtool\OmtoolServer\Languages\ENU\EmbeddedDirectives\*)
The following code sample removes Routing Sheet styles from the view using a wildcard expression:
<RoutingSheets overridable="false" action="modify"> <RoutingSheet action="remove"> <prPath>\\sapphire\RoutingSheetStyles\*</prPath> </RoutingSheet> …</RoutingSheets>
Table 6-K: Guidelines for modifying the RoutingSheets section
Element Parent Description, attributes, and usage guidelines

AccuRoute Desktop Installation Guide
Section 6: Views
© 2010 by Omtool, Ltd. All rights reserved. Omtool, AccuRoute and the Company logo are trademarks of the Company. Trade names and trademarks of other companies appearing in this document are the property of their respective owners.
6-36

© 2010 by Omtool, Ltd. All rights reserved. Omtool, AccuRoute and the Company logo are trademarks of the Company. Trade names and trademarks of other companies appearing in this document are the property of their respective owners.
7-1AccuRoute Desktop Installation Guide
Section 7: Troubleshooting
Section 7: TroubleshootingThis section includes:
Error when profiling DOCX and XLSX type documents to a Worksite v8.2 repository (7-1)
AccuRoute Desktop fails to connect to AccuRoute Server installed on Windows 2003 system (7-2)
When composing a Batch-Standard or a Standard Routing Sheet, I get an error (7-2)
Error when profiling DOCX and XLSX type documents to a Worksite v8.2 repository Problem: When I try and profile a document of type DOCX or XLSX from AccuRoute Desktop v3.01 to a Worksite repository v8.2, the SAVE button is disabled and profiling fails.
Solution: When profiling a document from AccuRoute Desktop to WorkSite, the file type must be defined and cannot be blank. In this case, the TYPE field is blank which is the reason for the SAVE button is disabled.
WorkSite servers prior to v8.5 do not have the "out of the box" DOCX and XLSX file extensions in the registered file types. In order to use DOCX and XLSX file types, the WorkSite Administrator must add support for them by adding them to the list of registered types on the WorkSite server for a particular database. Once added, the Type field will be pre-populated in the new profile dialog for the DOCX, XLSX extensions.
To add the DOCX and XLSX document types in the Worksite server
1 Go to Worksite DMS 8.2 server system.
2 Navigate to START> ALL PROGRAMS> INTERWOVEN SERVER> DATABASE ADMINISTRATION. The Worksite Database management page opens.
3 Select TYPE to see the default file types supported list.
4 Right click and select ADD. The ADD TYPE page opens.
5 In the DESCRIPTION and ALIAS fields, specify appropriate values.
6 In the DMS extension field, enter %V.
7 In the App. Extension field enter DOCX.
8 Click OK
DOCX file format is added as a new file type and displayed along with the existing file types.
9 Similarly add the XLSX extension (In the App. Extension field enter XLSX. )
After you have added the file types, you can successfully profile documents with file types DOCX and XLSX to the Worksite v8.2 repository.

AccuRoute Desktop Installation Guide
Section 7: Troubleshooting
© 2010 by Omtool, Ltd. All rights reserved. Omtool, AccuRoute and the Company logo are trademarks of the Company. Trade names and trademarks of other companies appearing in this document are the property of their respective owners.
7-2
AccuRoute Desktop fails to connect to AccuRoute Server installed on Windows 2003 systemProblem:
AccuRoute Desktop cannot connect to AccuRoute Server installed on a Windows 2003 system.
Solution:
This may be happening because the Windows firewall on the Windows 2003 system is turned on.
You can turn off the firewall and test whether the AccuRoute Desktop application is connecting to the AccuRoute Server. The other workaround to this problem is to add port 135 to the "Exception list" by keeping the Firewall "ON". Here are the steps:
To add port 135 to Exceptions list on Windows 2003 server:
1 Go to the EXCEPTIONS tab of the Windows Firewall sheet.
2 Click ADD PORT.
3 Enter a name as appropriate, for example, DCOM RPC.
4 Enter port number of 135.
5 Verify TCP is selected.
6 Press OK to save your changes.
Now you can connect to the AccuRoute Server without any issues.
When composing a Batch-Standard or a Standard Routing Sheet, I get an errorProblem: I am using AccuRoute Desktop v3.01 to create a Batch-Standard or a Standard Routing Sheet. The Routing Sheet compose fails and I get the error:
Failed to compose Routing Sheet to PDF.(0x80e00325) Unknown error 0x80E00325
Important The AccuRoute Desktop v3.01 is connected to AccuRoute Server running on Windows 2008 64 bit system.
Solution: This is related to a Microsoft Office internal issue.

© 2010 by Omtool, Ltd. All rights reserved. Omtool, AccuRoute and the Company logo are trademarks of the Company. Trade names and trademarks of other companies appearing in this document are the property of their respective owners.
7-3AccuRoute Desktop Installation Guide
Section 7: Troubleshooting
The workaround is to create the folder "desktop" in the path WINDOWS$FOLDER]\SYSWOW64\CONFIG\SYSTEMPROFILE\DESKTOP, for example in C:\WINDOWS\SYSWOW64\CONFIG\SYSTEMPROFILE\DESKTOP.
This desktop folder does not exist on Windows 2008 64 systems by default thereby causing Office automation to fail in unexpected ways.
For more information, see http://social.msdn.microsoft.com/Forums/en-US/innovateonoffice/thread/b81a3c4e-62db-488b-af06-44421818ef91?prof=required.

AccuRoute Desktop Installation Guide
Section 7: Troubleshooting
© 2010 by Omtool, Ltd. All rights reserved. Omtool, AccuRoute and the Company logo are trademarks of the Company. Trade names and trademarks of other companies appearing in this document are the property of their respective owners.
7-4
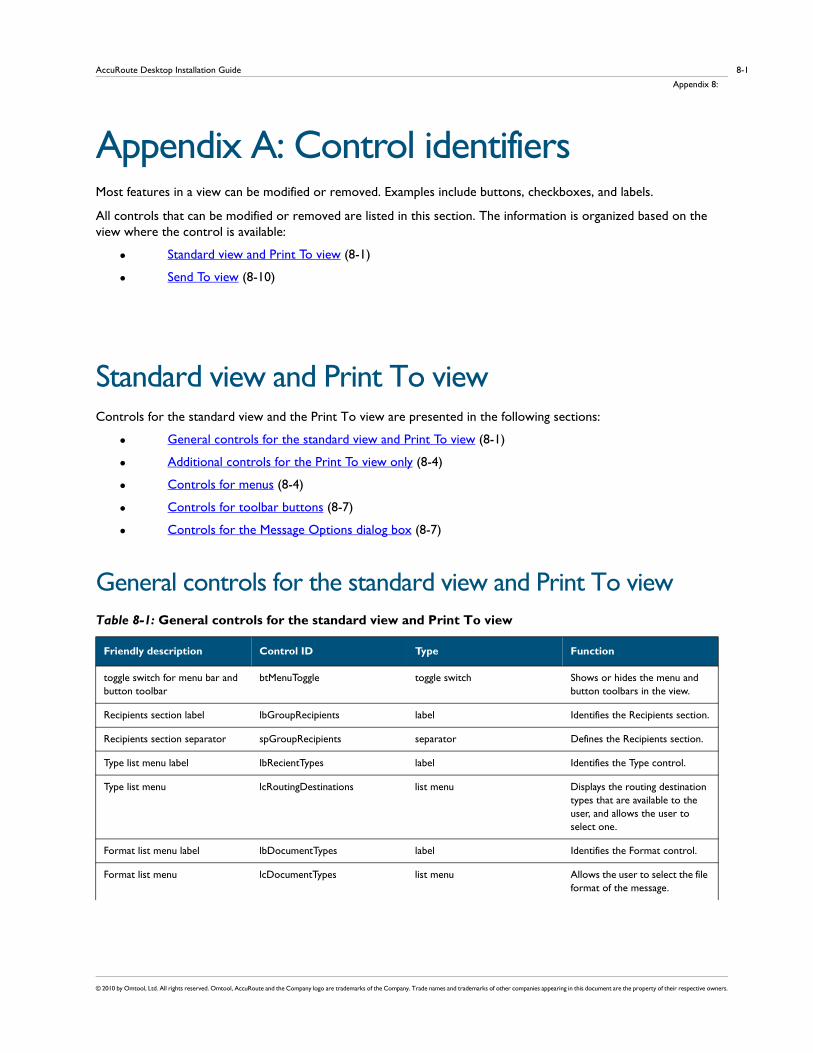
© 2010 by Omtool, Ltd. All rights reserved. Omtool, AccuRoute and the Company logo are trademarks of the Company. Trade names and trademarks of other companies appearing in this document are the property of their respective owners.
8-1AccuRoute Desktop Installation Guide
Appendix 8:
Appendix A: Control identifiersMost features in a view can be modified or removed. Examples include buttons, checkboxes, and labels.
All controls that can be modified or removed are listed in this section. The information is organized based on the view where the control is available:
Standard view and Print To view (8-1)
Send To view (8-10)
Standard view and Print To viewControls for the standard view and the Print To view are presented in the following sections:
General controls for the standard view and Print To view (8-1)
Additional controls for the Print To view only (8-4)
Controls for menus (8-4)
Controls for toolbar buttons (8-7)
Controls for the Message Options dialog box (8-7)
General controls for the standard view and Print To viewTable 8-1: General controls for the standard view and Print To view
Friendly description Control ID Type Function
toggle switch for menu bar and button toolbar
btMenuToggle toggle switch Shows or hides the menu and button toolbars in the view.
Recipients section label lbGroupRecipients label Identifies the Recipients section.
Recipients section separator spGroupRecipients separator Defines the Recipients section.
Type list menu label lbRecientTypes label Identifies the Type control.
Type list menu lcRoutingDestinations list menu Displays the routing destination types that are available to the user, and allows the user to select one.
Format list menu label lbDocumentTypes label Identifies the Format control.
Format list menu lcDocumentTypes list menu Allows the user to select the file format of the message.
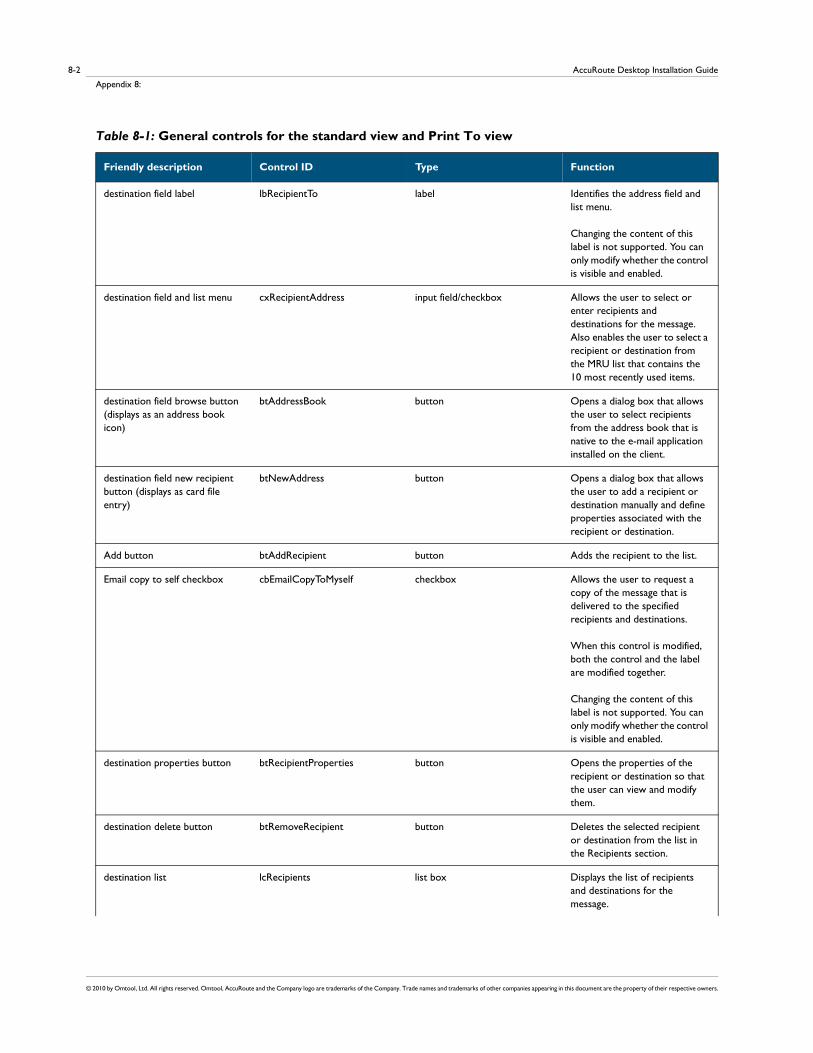
AccuRoute Desktop Installation Guide
Appendix 8:
© 2010 by Omtool, Ltd. All rights reserved. Omtool, AccuRoute and the Company logo are trademarks of the Company. Trade names and trademarks of other companies appearing in this document are the property of their respective owners.
8-2
destination field label lbRecipientTo label Identifies the address field and list menu.
Changing the content of this label is not supported. You can only modify whether the control is visible and enabled.
destination field and list menu cxRecipientAddress input field/checkbox Allows the user to select or enter recipients and destinations for the message. Also enables the user to select a recipient or destination from the MRU list that contains the 10 most recently used items.
destination field browse button (displays as an address book icon)
btAddressBook button Opens a dialog box that allows the user to select recipients from the address book that is native to the e-mail application installed on the client.
destination field new recipient button (displays as card file entry)
btNewAddress button Opens a dialog box that allows the user to add a recipient or destination manually and define properties associated with the recipient or destination.
Add button btAddRecipient button Adds the recipient to the list.
Email copy to self checkbox cbEmailCopyToMyself checkbox Allows the user to request a copy of the message that is delivered to the specified recipients and destinations.
When this control is modified, both the control and the label are modified together.
Changing the content of this label is not supported. You can only modify whether the control is visible and enabled.
destination properties button btRecipientProperties button Opens the properties of the recipient or destination so that the user can view and modify them.
destination delete button btRemoveRecipient button Deletes the selected recipient or destination from the list in the Recipients section.
destination list lcRecipients list box Displays the list of recipients and destinations for the message.
Table 8-1: General controls for the standard view and Print To view
Friendly description Control ID Type Function
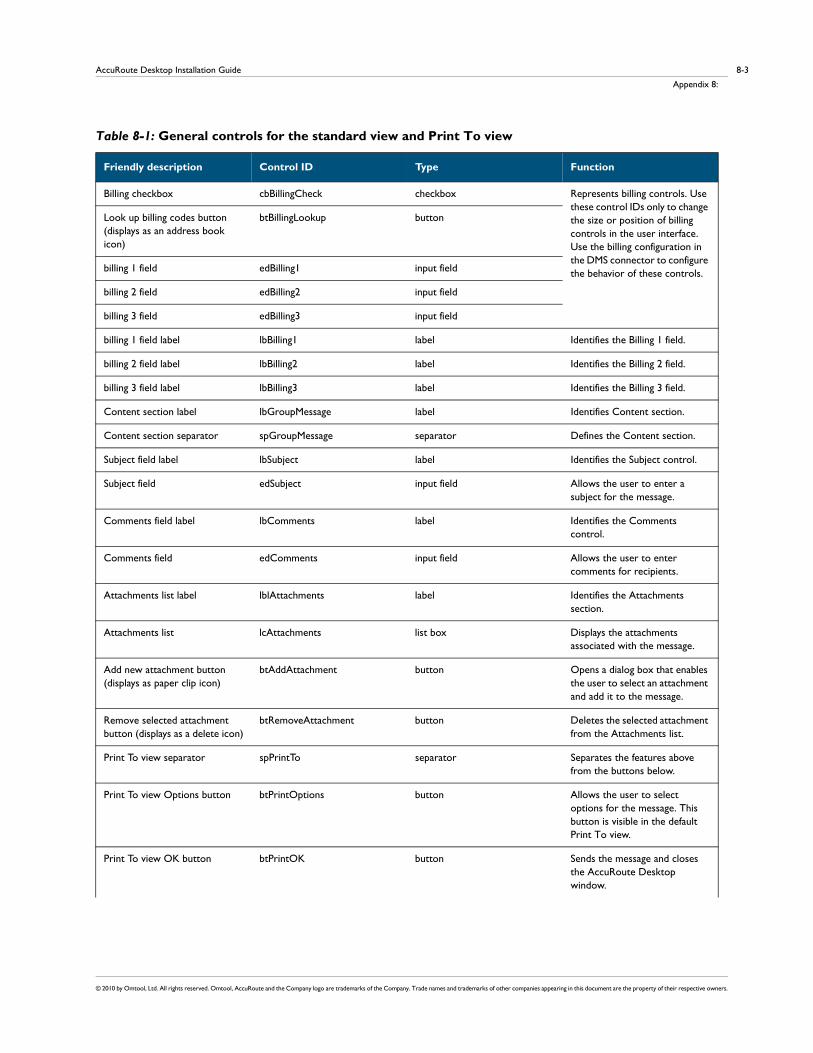
© 2010 by Omtool, Ltd. All rights reserved. Omtool, AccuRoute and the Company logo are trademarks of the Company. Trade names and trademarks of other companies appearing in this document are the property of their respective owners.
8-3AccuRoute Desktop Installation Guide
Appendix 8:
Billing checkbox cbBillingCheck checkbox Represents billing controls. Use these control IDs only to change the size or position of billing controls in the user interface. Use the billing configuration in the DMS connector to configure the behavior of these controls.
Look up billing codes button (displays as an address book icon)
btBillingLookup button
billing 1 field edBilling1 input field
billing 2 field edBilling2 input field
billing 3 field edBilling3 input field
billing 1 field label lbBilling1 label Identifies the Billing 1 field.
billing 2 field label lbBilling2 label Identifies the Billing 2 field.
billing 3 field label lbBilling3 label Identifies the Billing 3 field.
Content section label lbGroupMessage label Identifies Content section.
Content section separator spGroupMessage separator Defines the Content section.
Subject field label lbSubject label Identifies the Subject control.
Subject field edSubject input field Allows the user to enter a subject for the message.
Comments field label lbComments label Identifies the Comments control.
Comments field edComments input field Allows the user to enter comments for recipients.
Attachments list label lblAttachments label Identifies the Attachments section.
Attachments list lcAttachments list box Displays the attachments associated with the message.
Add new attachment button (displays as paper clip icon)
btAddAttachment button Opens a dialog box that enables the user to select an attachment and add it to the message.
Remove selected attachment button (displays as a delete icon)
btRemoveAttachment button Deletes the selected attachment from the Attachments list.
Print To view separator spPrintTo separator Separates the features above from the buttons below.
Print To view Options button btPrintOptions button Allows the user to select options for the message. This button is visible in the default Print To view.
Print To view OK button btPrintOK button Sends the message and closes the AccuRoute Desktop window.
Table 8-1: General controls for the standard view and Print To view
Friendly description Control ID Type Function
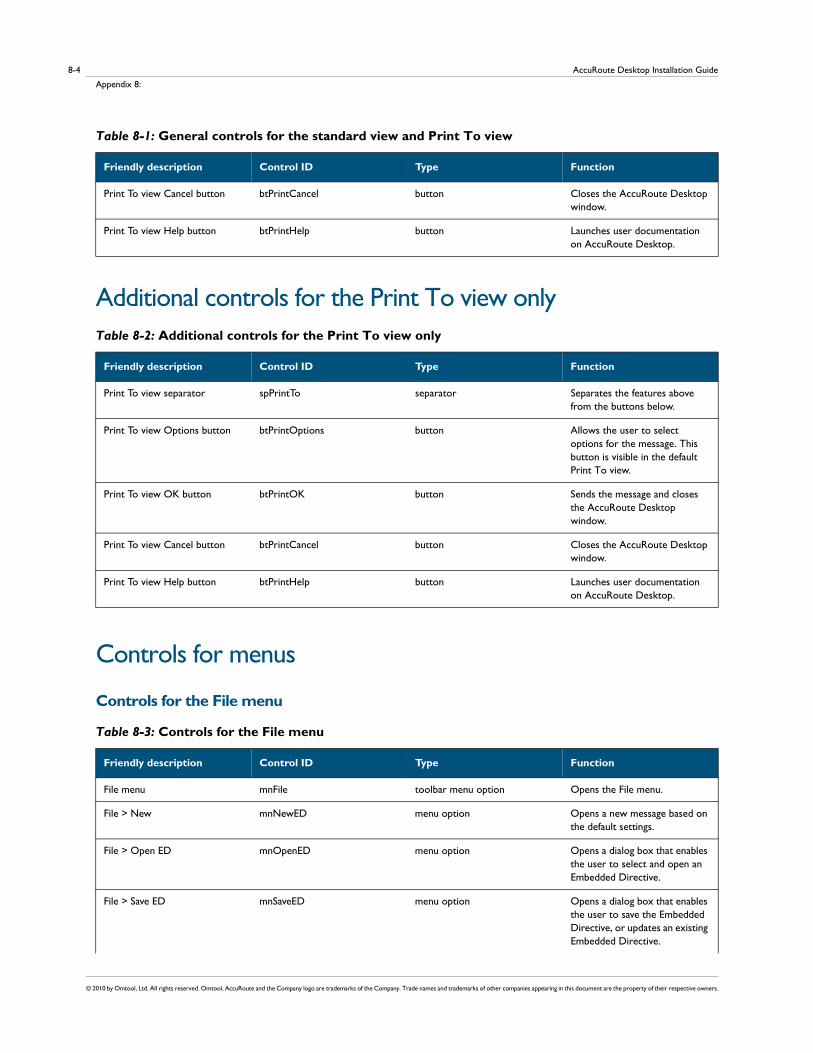
AccuRoute Desktop Installation Guide
Appendix 8:
© 2010 by Omtool, Ltd. All rights reserved. Omtool, AccuRoute and the Company logo are trademarks of the Company. Trade names and trademarks of other companies appearing in this document are the property of their respective owners.
8-4
Additional controls for the Print To view only
Controls for menus
Controls for the File menu
Print To view Cancel button btPrintCancel button Closes the AccuRoute Desktop window.
Print To view Help button btPrintHelp button Launches user documentation on AccuRoute Desktop.
Table 8-2: Additional controls for the Print To view only
Friendly description Control ID Type Function
Print To view separator spPrintTo separator Separates the features above from the buttons below.
Print To view Options button btPrintOptions button Allows the user to select options for the message. This button is visible in the default Print To view.
Print To view OK button btPrintOK button Sends the message and closes the AccuRoute Desktop window.
Print To view Cancel button btPrintCancel button Closes the AccuRoute Desktop window.
Print To view Help button btPrintHelp button Launches user documentation on AccuRoute Desktop.
Table 8-3: Controls for the File menu
Friendly description Control ID Type Function
File menu mnFile toolbar menu option Opens the File menu.
File > New mnNewED menu option Opens a new message based on the default settings.
File > Open ED mnOpenED menu option Opens a dialog box that enables the user to select and open an Embedded Directive.
File > Save ED mnSaveED menu option Opens a dialog box that enables the user to save the Embedded Directive, or updates an existing Embedded Directive.
Table 8-1: General controls for the standard view and Print To view
Friendly description Control ID Type Function
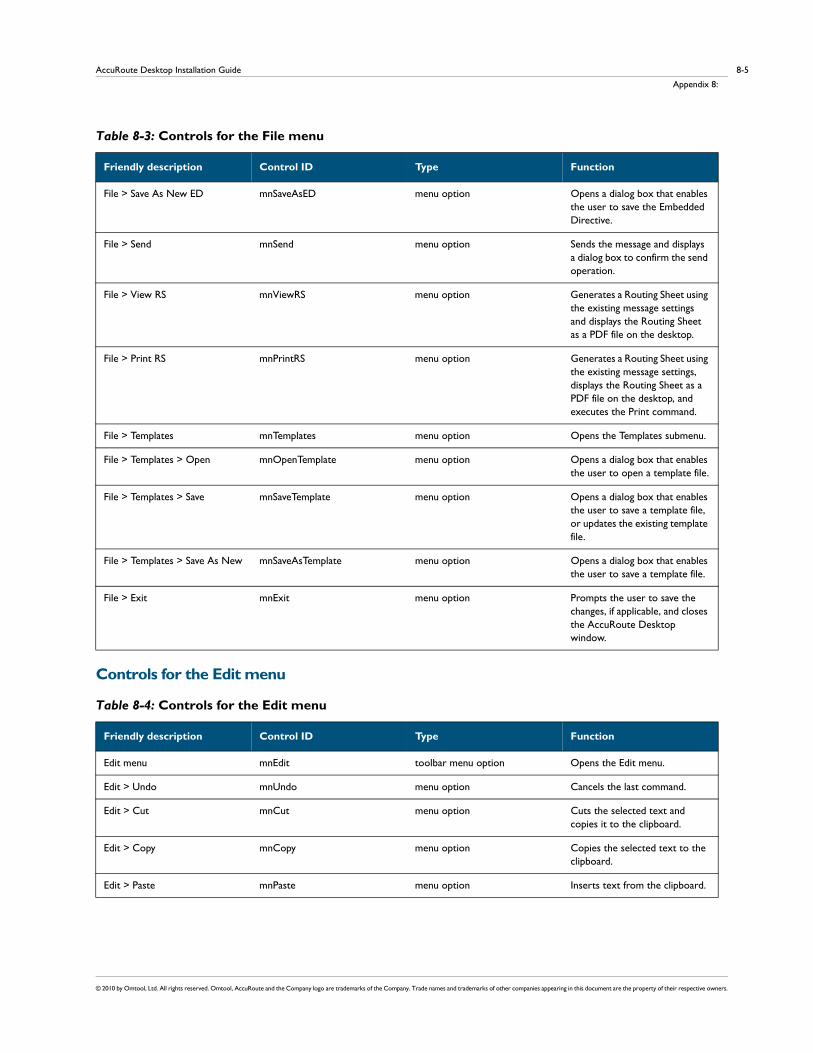
© 2010 by Omtool, Ltd. All rights reserved. Omtool, AccuRoute and the Company logo are trademarks of the Company. Trade names and trademarks of other companies appearing in this document are the property of their respective owners.
8-5AccuRoute Desktop Installation Guide
Appendix 8:
Controls for the Edit menu
File > Save As New ED mnSaveAsED menu option Opens a dialog box that enables the user to save the Embedded Directive.
File > Send mnSend menu option Sends the message and displays a dialog box to confirm the send operation.
File > View RS mnViewRS menu option Generates a Routing Sheet using the existing message settings and displays the Routing Sheet as a PDF file on the desktop.
File > Print RS mnPrintRS menu option Generates a Routing Sheet using the existing message settings, displays the Routing Sheet as a PDF file on the desktop, and executes the Print command.
File > Templates mnTemplates menu option Opens the Templates submenu.
File > Templates > Open mnOpenTemplate menu option Opens a dialog box that enables the user to open a template file.
File > Templates > Save mnSaveTemplate menu option Opens a dialog box that enables the user to save a template file, or updates the existing template file.
File > Templates > Save As New mnSaveAsTemplate menu option Opens a dialog box that enables the user to save a template file.
File > Exit mnExit menu option Prompts the user to save the changes, if applicable, and closes the AccuRoute Desktop window.
Table 8-4: Controls for the Edit menu
Friendly description Control ID Type Function
Edit menu mnEdit toolbar menu option Opens the Edit menu.
Edit > Undo mnUndo menu option Cancels the last command.
Edit > Cut mnCut menu option Cuts the selected text and copies it to the clipboard.
Edit > Copy mnCopy menu option Copies the selected text to the clipboard.
Edit > Paste mnPaste menu option Inserts text from the clipboard.
Table 8-3: Controls for the File menu
Friendly description Control ID Type Function

AccuRoute Desktop Installation Guide
Appendix 8:
© 2010 by Omtool, Ltd. All rights reserved. Omtool, AccuRoute and the Company logo are trademarks of the Company. Trade names and trademarks of other companies appearing in this document are the property of their respective owners.
8-6
Controls for the View menu
Controls for the Tools menu
Controls for the Help menu
Table 8-5: Controls for the View menu
Friendly description Control ID Type Function
View menu mnView toolbar menu option Opens the View menu.
Table 8-6: Controls for the Tools menu
Friendly description Control ID Type Function
Tools menu mnTools toolbar menu option Opens the Tools menu.
Tools > View Configuration mnViewServerCapabilities menu option Opens a window that displays all the configuration data that impacts AccuRoute Desktop.
Tools > Configuration Folders mnSearchFolders menu option Opens a window that displays the folders containing view files and Routing Sheet template files.
Tools > Configure DMS mnConfigureDMS menu option Opens a submenu containing the DMS applications detected on the client.
Tools > Preferences mnDefaults menu option Opens a window that enables the user to configure options for AccuRoute Desktop.
Tools > Message Options mnOptions menu option Opens a window that enables the user to configure options for the message.
Table 8-7: Controls for the Help menu
Friendly description Control ID Type Function
Help menu mnHelp toolbar menu option Opens the Help menu.
Help > About AccuRoute Desktop
mnHelpContents menu option Opens a dialog box that displays information on AccuRoute Desktop.
Help > AccuRoute Desktop Help
mnHelpAbout menu option Launches user documentation on AccuRoute Desktop.
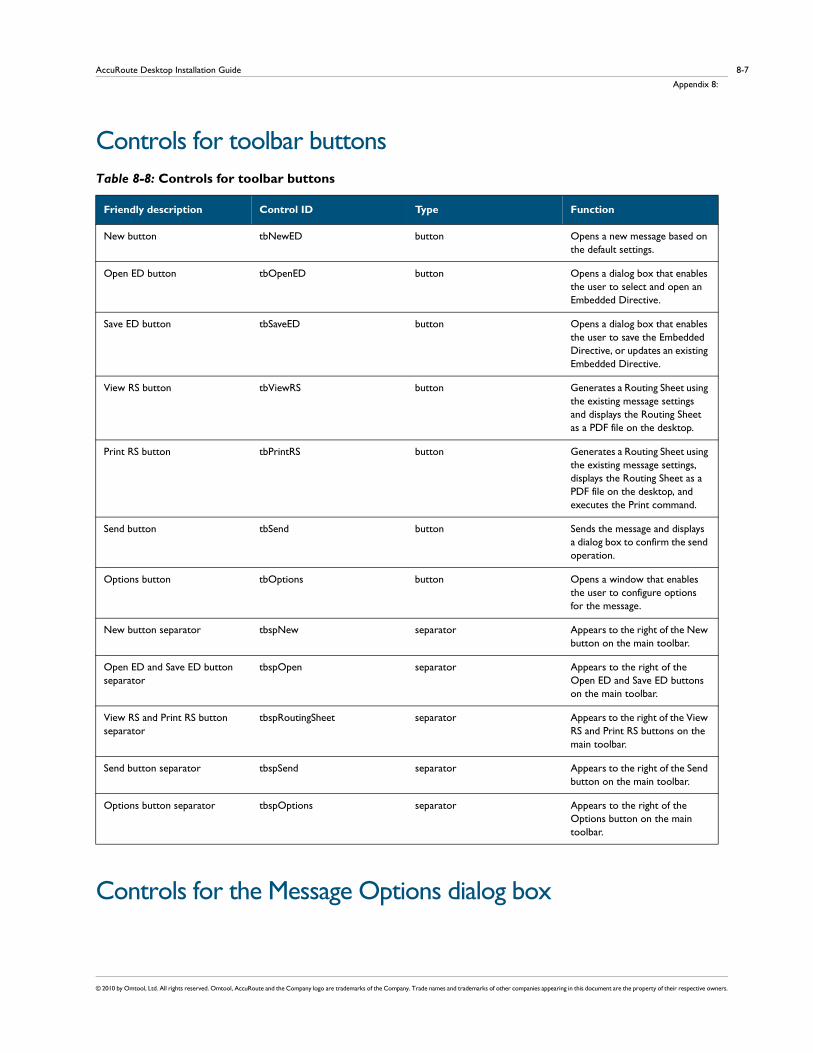
© 2010 by Omtool, Ltd. All rights reserved. Omtool, AccuRoute and the Company logo are trademarks of the Company. Trade names and trademarks of other companies appearing in this document are the property of their respective owners.
8-7AccuRoute Desktop Installation Guide
Appendix 8:
Controls for toolbar buttons
Controls for the Message Options dialog box
Table 8-8: Controls for toolbar buttons
Friendly description Control ID Type Function
New button tbNewED button Opens a new message based on the default settings.
Open ED button tbOpenED button Opens a dialog box that enables the user to select and open an Embedded Directive.
Save ED button tbSaveED button Opens a dialog box that enables the user to save the Embedded Directive, or updates an existing Embedded Directive.
View RS button tbViewRS button Generates a Routing Sheet using the existing message settings and displays the Routing Sheet as a PDF file on the desktop.
Print RS button tbPrintRS button Generates a Routing Sheet using the existing message settings, displays the Routing Sheet as a PDF file on the desktop, and executes the Print command.
Send button tbSend button Sends the message and displays a dialog box to confirm the send operation.
Options button tbOptions button Opens a window that enables the user to configure options for the message.
New button separator tbspNew separator Appears to the right of the New button on the main toolbar.
Open ED and Save ED button separator
tbspOpen separator Appears to the right of the Open ED and Save ED buttons on the main toolbar.
View RS and Print RS button separator
tbspRoutingSheet separator Appears to the right of the View RS and Print RS buttons on the main toolbar.
Send button separator tbspSend separator Appears to the right of the Send button on the main toolbar.
Options button separator tbspOptions separator Appears to the right of the Options button on the main toolbar.

AccuRoute Desktop Installation Guide
Appendix 8:
© 2010 by Omtool, Ltd. All rights reserved. Omtool, AccuRoute and the Company logo are trademarks of the Company. Trade names and trademarks of other companies appearing in this document are the property of their respective owners.
8-8
Controls on the General tab
Table 8-9: Controls on the General tab (Message Options dialog box)
Friendly description Control ID Type Function
Embedded Directive section lbGroupRoutingSheet label Identifies the Embedded Directive section.
Embedded Directive section spGroupRoutingSheet separator Defines the Embedded Directive section.
Routing Sheet Style list menu lbStyles label Identifies the Routing Sheet Style list menu.
Routing Sheet Style list menu cxRoutingSheets list menu Enables the user to select the Routing Sheet style.
Retain Routing Sheet in delivered document checkbox
cbRetainRoutingSheet checkbox Allows the user to request that the Routing Sheet be included as part of the message.
Single use checkbox cbSingleUse checkbox Allows the user to enable the single use property for the Embedded Directive.
Expires after checkbox cbExpiresAfter checkbox Allows the user to enable expiration for the Embedded Directive.
Expires after date control dtExpires date control Enables the user to select the expiration date for the Embedded Directive.
Confirmation section label lblGroupConfirmation label Identifies the Confirmation section.
Confirmation section separator spGroupConfirmation separator Identifies the Confirmation section.
None radio button rbNotificationNone button Enables the user to select None as the confirmation option for the message,
Failure only radio button rbNotificationFailure button Enables the user to select Failure only as the confirmation option for the message,
Success or Failure radio button rbNotificationSuccessFailure button Enables the user to select Success or Failure as the confirmation option for the message,
Printer checkbox cbConfirmToPrinter checkbox Enables printer confirmation for the message. Makes the Printer field available when enabled.
Printer field edPrinterNotification input field Allows the user to enter a printer destination.
Printer field browse button btPrinterBrowse button Allows the user to browse the network and select a printer for confirmation.

© 2010 by Omtool, Ltd. All rights reserved. Omtool, AccuRoute and the Company logo are trademarks of the Company. Trade names and trademarks of other companies appearing in this document are the property of their respective owners.
8-9AccuRoute Desktop Installation Guide
Appendix 8:
Controls on the Fax tab
E-mail checkbox cbConfirmToEmail checkbox Enables e-mail confirmation for the message. Makes the E-mail field available when enabled.
E-mail field edEmailNotification input field Allows the user to enter an e-mail destination.
E-mail browse button btEmailBrowse button Allows the user to browse the address book and select a user for e-mail confirmation.
Table 8-10: Controls on the Fax tab (Message Options dialog box)
Friendly description Control ID Type Function
Cover sheet section label lbGroupCoversheet label Identifies the Cover sheet section.
Cover sheet section separator spGroupCoversheet separator Defines the Cover sheet section.
Use cover sheet checkbox cbUseCoverpage checkbox Allows the user to request a cover sheet for fax recipients.
Style field lblCoverpage label Identifies the Style field.
Style field and list menu cxCoverpages input field/list menu Allows the user to enter the name of a cover sheet style or to choose a style from the list menu.
Delivery section label lbGroupDelivery label Identifies the Delivery section.
Delivery section separator spGroupDelivery separator Defines the Delivery section.
Use access code checkbox cbUseAccessCode checkbox Makes the Use access code field available when enabled.
Use access code field cxAccessCodes input field/list menu Allows the user to enter an access code or to choose an access code from the list menu.
Hold for preview before sending checkbox
cbHoldForPreview checkbox Allows the user to request a preview of the message.
Requires management approval checkbox
cbManagerApproval checkbox Allows the user to request management approval for the message.
Deliver only to secure fax destinations checkbox
cbSecureDelivery checkbox Allows the user to request secure delivery for the message.
Do not deliver before checkbox cbHoldDelivery checkbox Allows the user to request delayed delivery of the message.
Do not deliver before date control
dtHoldDate date control Allows the user to choose the date for delivery.
Table 8-9: Controls on the General tab (Message Options dialog box)
Friendly description Control ID Type Function

AccuRoute Desktop Installation Guide
Appendix 8:
© 2010 by Omtool, Ltd. All rights reserved. Omtool, AccuRoute and the Company logo are trademarks of the Company. Trade names and trademarks of other companies appearing in this document are the property of their respective owners.
8-10
Controls on the E-mail tab
Send To view
Do not deliver before time control
dtHoldTime time control Allows the user to choose the time for delivery.
Delivery Priority list menu label lbDeliveryPriority label Identifies the Delivery Priority option.
Delivery Priority list menu cxDeliveryPriority list menu Allows the user to select a priority level from the list menu.
Table 8-11: Controls on the E-mail tab (Message Options dialog box)
Friendly description Control ID Type Function
Attachment file name field label lbAttachmentName label Identifies the Attachment file name field.
Attachment file name field edAttachmentName input field Allows the user to enter the file name of the message for e-mail recipients.
Table 8-12: Controls for the Send To view
Friendly description Control ID Type Function
User prompt label lblAction label Prompts the user to select a radio button. If you remove this label, the filenames still appear in the view.
Launch AccuRoute Desktop and attach file(s) to a new Embedded Directive radio button
rcCreateNewED button Allows the user to send the file as an attachment to a new Embedded Directive.
Deliver file(s) to recipients specified in the selected Embedded Directive radio button
rcSendUsingExisting button Allows the user to send the file as an attachment to an existing Embedded Directive. Makes the Embedded Directive list menu available.
Embedded Directive list menu cEmbeddedDirectives checkbox Allows the user to select an existing Embedded Directive.
OK button btOk button Executes the requested action.
Cancel button btCancel button Closes the window.
Table 8-10: Controls on the Fax tab (Message Options dialog box)
Friendly description Control ID Type Function
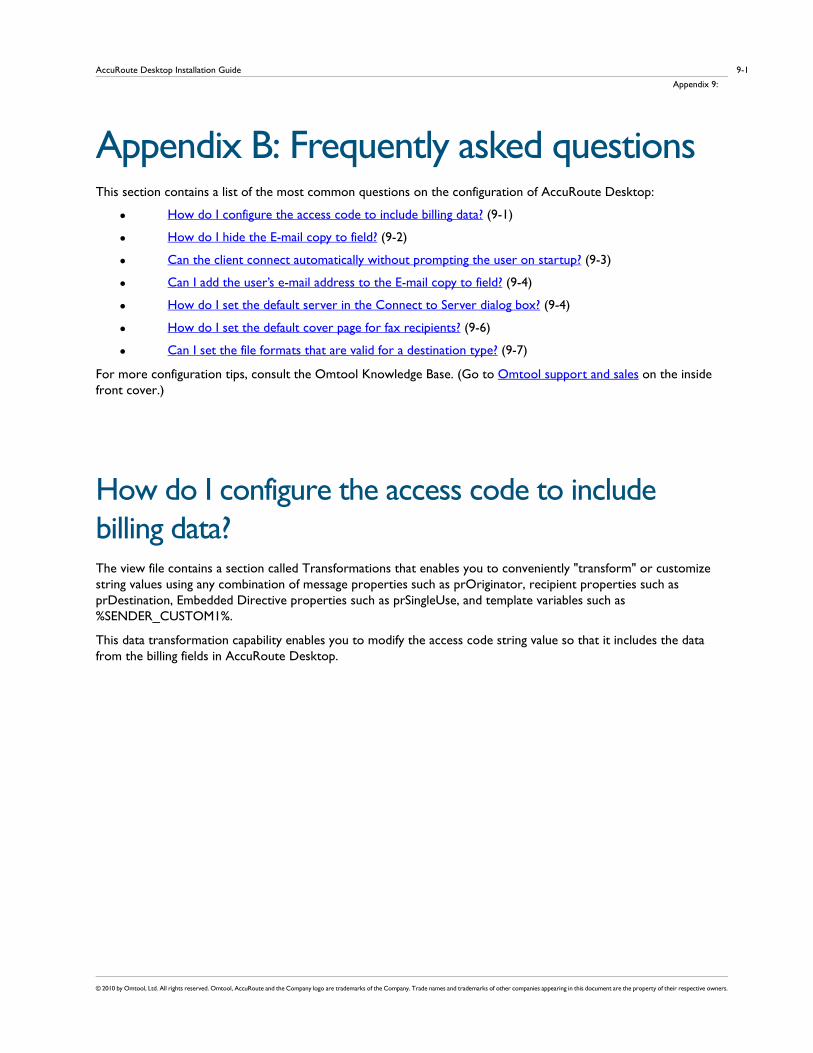
© 2010 by Omtool, Ltd. All rights reserved. Omtool, AccuRoute and the Company logo are trademarks of the Company. Trade names and trademarks of other companies appearing in this document are the property of their respective owners.
9-1AccuRoute Desktop Installation Guide
Appendix 9:
Appendix B: Frequently asked questionsThis section contains a list of the most common questions on the configuration of AccuRoute Desktop:
How do I configure the access code to include billing data? (9-1)
How do I hide the E-mail copy to field? (9-2)
Can the client connect automatically without prompting the user on startup? (9-3)
Can I add the user’s e-mail address to the E-mail copy to field? (9-4)
How do I set the default server in the Connect to Server dialog box? (9-4)
How do I set the default cover page for fax recipients? (9-6)
Can I set the file formats that are valid for a destination type? (9-7)
For more configuration tips, consult the Omtool Knowledge Base. (Go to Omtool support and sales on the inside front cover.)
How do I configure the access code to include billing data?The view file contains a section called Transformations that enables you to conveniently "transform" or customize string values using any combination of message properties such as prOriginator, recipient properties such as prDestination, Embedded Directive properties such as prSingleUse, and template variables such as %SENDER_CUSTOM1%.
This data transformation capability enables you to modify the access code string value so that it includes the data from the billing fields in AccuRoute Desktop.
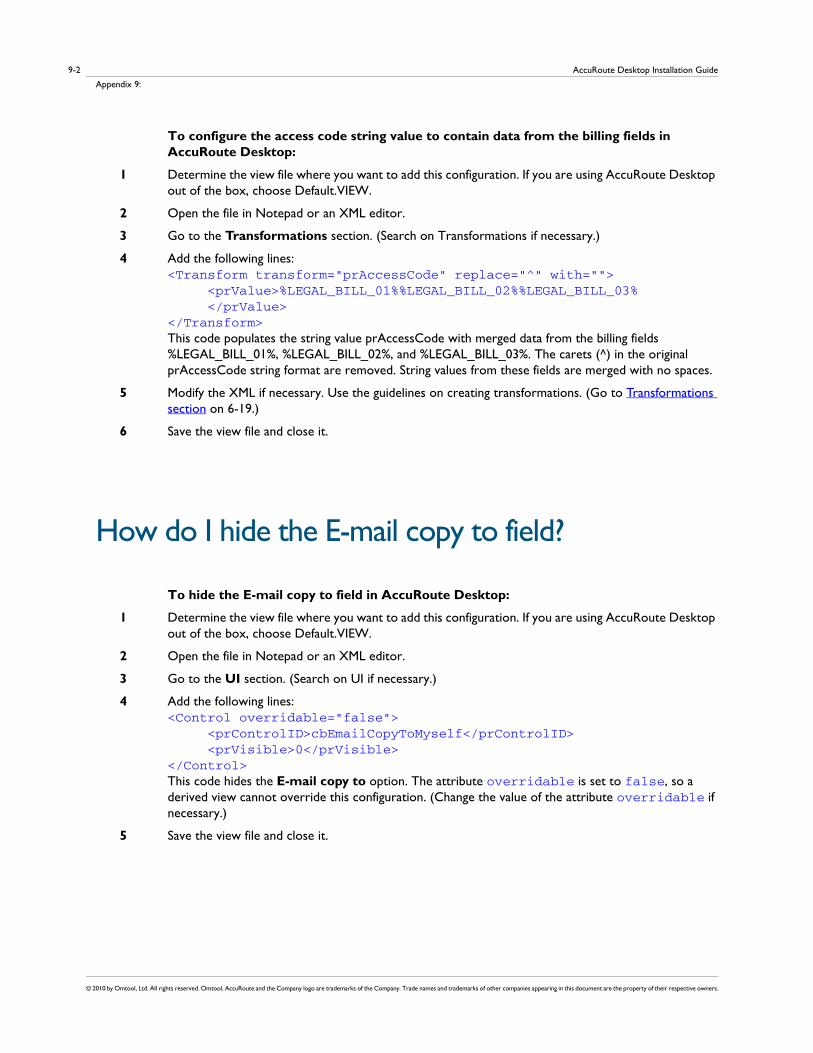
AccuRoute Desktop Installation Guide
Appendix 9:
© 2010 by Omtool, Ltd. All rights reserved. Omtool, AccuRoute and the Company logo are trademarks of the Company. Trade names and trademarks of other companies appearing in this document are the property of their respective owners.
9-2
To configure the access code string value to contain data from the billing fields in AccuRoute Desktop:
1 Determine the view file where you want to add this configuration. If you are using AccuRoute Desktop out of the box, choose Default.VIEW.
2 Open the file in Notepad or an XML editor.
3 Go to the Transformations section. (Search on Transformations if necessary.)
4 Add the following lines:<Transform transform="prAccessCode" replace="^" with=""> <prValue>%LEGAL_BILL_01%%LEGAL_BILL_02%%LEGAL_BILL_03% </prValue></Transform>This code populates the string value prAccessCode with merged data from the billing fields %LEGAL_BILL_01%, %LEGAL_BILL_02%, and %LEGAL_BILL_03%. The carets (^) in the original prAccessCode string format are removed. String values from these fields are merged with no spaces.
5 Modify the XML if necessary. Use the guidelines on creating transformations. (Go to Transformations section on 6-19.)
6 Save the view file and close it.
How do I hide the E-mail copy to field?
To hide the E-mail copy to field in AccuRoute Desktop:
1 Determine the view file where you want to add this configuration. If you are using AccuRoute Desktop out of the box, choose Default.VIEW.
2 Open the file in Notepad or an XML editor.
3 Go to the UI section. (Search on UI if necessary.)
4 Add the following lines:<Control overridable="false"> <prControlID>cbEmailCopyToMyself</prControlID> <prVisible>0</prVisible></Control>This code hides the E-mail copy to option. The attribute overridable is set to false, so a derived view cannot override this configuration. (Change the value of the attribute overridable if necessary.)
5 Save the view file and close it.
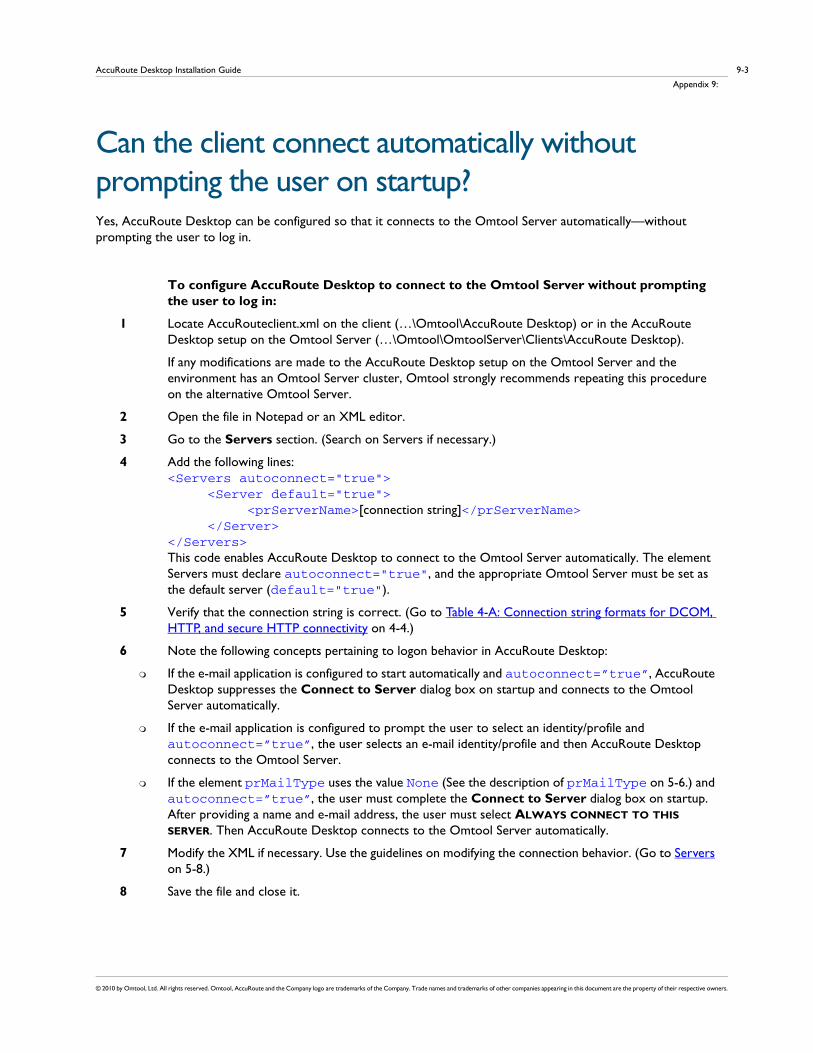
© 2010 by Omtool, Ltd. All rights reserved. Omtool, AccuRoute and the Company logo are trademarks of the Company. Trade names and trademarks of other companies appearing in this document are the property of their respective owners.
9-3AccuRoute Desktop Installation Guide
Appendix 9:
Can the client connect automatically without prompting the user on startup?Yes, AccuRoute Desktop can be configured so that it connects to the Omtool Server automatically—without prompting the user to log in.
To configure AccuRoute Desktop to connect to the Omtool Server without prompting the user to log in:
1 Locate AccuRouteclient.xml on the client (…\Omtool\AccuRoute Desktop) or in the AccuRoute Desktop setup on the Omtool Server (…\Omtool\OmtoolServer\Clients\AccuRoute Desktop).
If any modifications are made to the AccuRoute Desktop setup on the Omtool Server and the environment has an Omtool Server cluster, Omtool strongly recommends repeating this procedure on the alternative Omtool Server.
2 Open the file in Notepad or an XML editor.
3 Go to the Servers section. (Search on Servers if necessary.)
4 Add the following lines:<Servers autoconnect="true"> <Server default="true"> <prServerName>[connection string]</prServerName> </Server></Servers>This code enables AccuRoute Desktop to connect to the Omtool Server automatically. The element Servers must declare autoconnect="true", and the appropriate Omtool Server must be set as the default server (default="true").
5 Verify that the connection string is correct. (Go to Table 4-A: Connection string formats for DCOM, HTTP, and secure HTTP connectivity on 4-4.)
6 Note the following concepts pertaining to logon behavior in AccuRoute Desktop:
If the e-mail application is configured to start automatically and autoconnect=”true”, AccuRoute Desktop suppresses the Connect to Server dialog box on startup and connects to the Omtool Server automatically.
If the e-mail application is configured to prompt the user to select an identity/profile and autoconnect=”true”, the user selects an e-mail identity/profile and then AccuRoute Desktop connects to the Omtool Server.
If the element prMailType uses the value None (See the description of prMailType on 5-6.) and autoconnect=”true”, the user must complete the Connect to Server dialog box on startup. After providing a name and e-mail address, the user must select ALWAYS CONNECT TO THIS SERVER. Then AccuRoute Desktop connects to the Omtool Server automatically.
7 Modify the XML if necessary. Use the guidelines on modifying the connection behavior. (Go to Servers on 5-8.)
8 Save the file and close it.
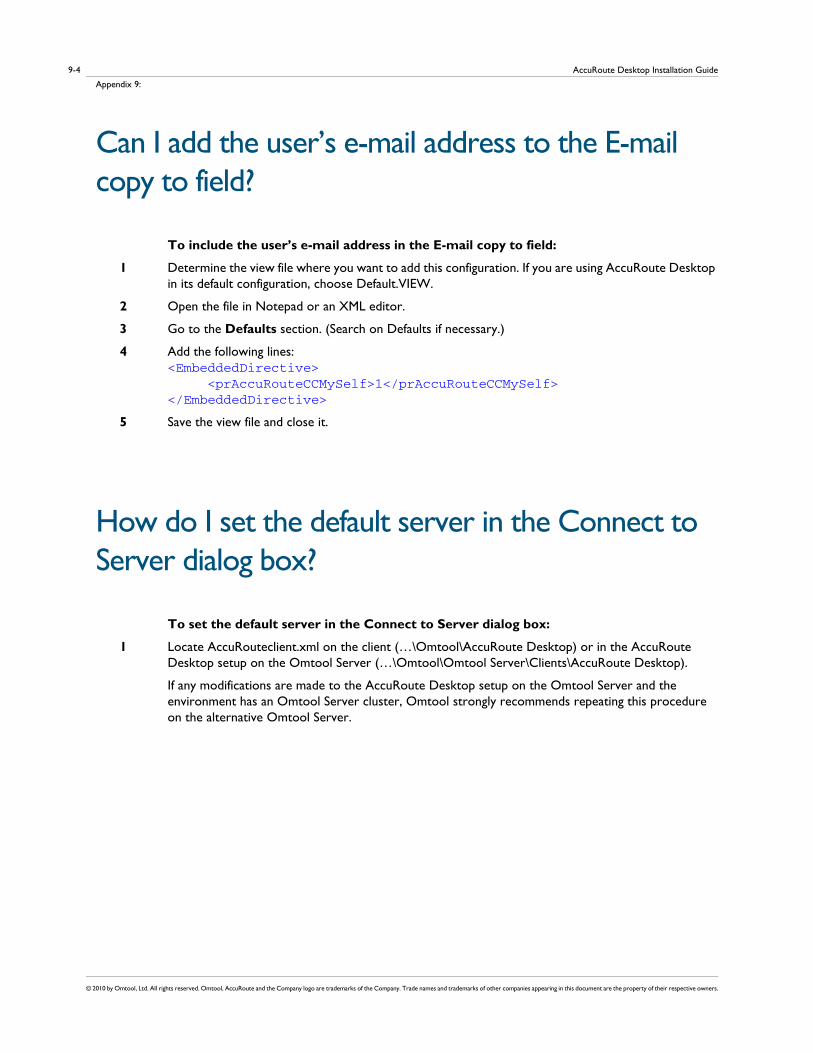
AccuRoute Desktop Installation Guide
Appendix 9:
© 2010 by Omtool, Ltd. All rights reserved. Omtool, AccuRoute and the Company logo are trademarks of the Company. Trade names and trademarks of other companies appearing in this document are the property of their respective owners.
9-4
Can I add the user’s e-mail address to the E-mail copy to field?
To include the user’s e-mail address in the E-mail copy to field:
1 Determine the view file where you want to add this configuration. If you are using AccuRoute Desktop in its default configuration, choose Default.VIEW.
2 Open the file in Notepad or an XML editor.
3 Go to the Defaults section. (Search on Defaults if necessary.)
4 Add the following lines:<EmbeddedDirective> <prAccuRouteCCMySelf>1</prAccuRouteCCMySelf></EmbeddedDirective>
5 Save the view file and close it.
How do I set the default server in the Connect to Server dialog box?
To set the default server in the Connect to Server dialog box:
1 Locate AccuRouteclient.xml on the client (…\Omtool\AccuRoute Desktop) or in the AccuRoute Desktop setup on the Omtool Server (…\Omtool\Omtool Server\Clients\AccuRoute Desktop).
If any modifications are made to the AccuRoute Desktop setup on the Omtool Server and the environment has an Omtool Server cluster, Omtool strongly recommends repeating this procedure on the alternative Omtool Server.

© 2010 by Omtool, Ltd. All rights reserved. Omtool, AccuRoute and the Company logo are trademarks of the Company. Trade names and trademarks of other companies appearing in this document are the property of their respective owners.
9-5AccuRoute Desktop Installation Guide
Appendix 9:
2 Open the file in Notepad or an XML editor.
3 Go to the Servers section. (Search on Servers if necessary.)
It should look similar to the following and contain all available Omtool Servers in your environment:<Servers> <Server> <prServerName>[server A connection string]</prServerName> </Server> <Server> <prServerName>[server B connection string]</prServerName> </Server> <Server> <prServerName>[server C connection string]</prServerName> </Server></Servers>
4 Set the attribute default on the Omtool Server that should be selected by default in the Connect to Server dialog box that appears on startup.
The following example shows server A as the default server:<Servers> <Server default="true"> <prServerName>[server A connection string]</prServerName> </Server>…</Servers>
5 Save the file and close it.
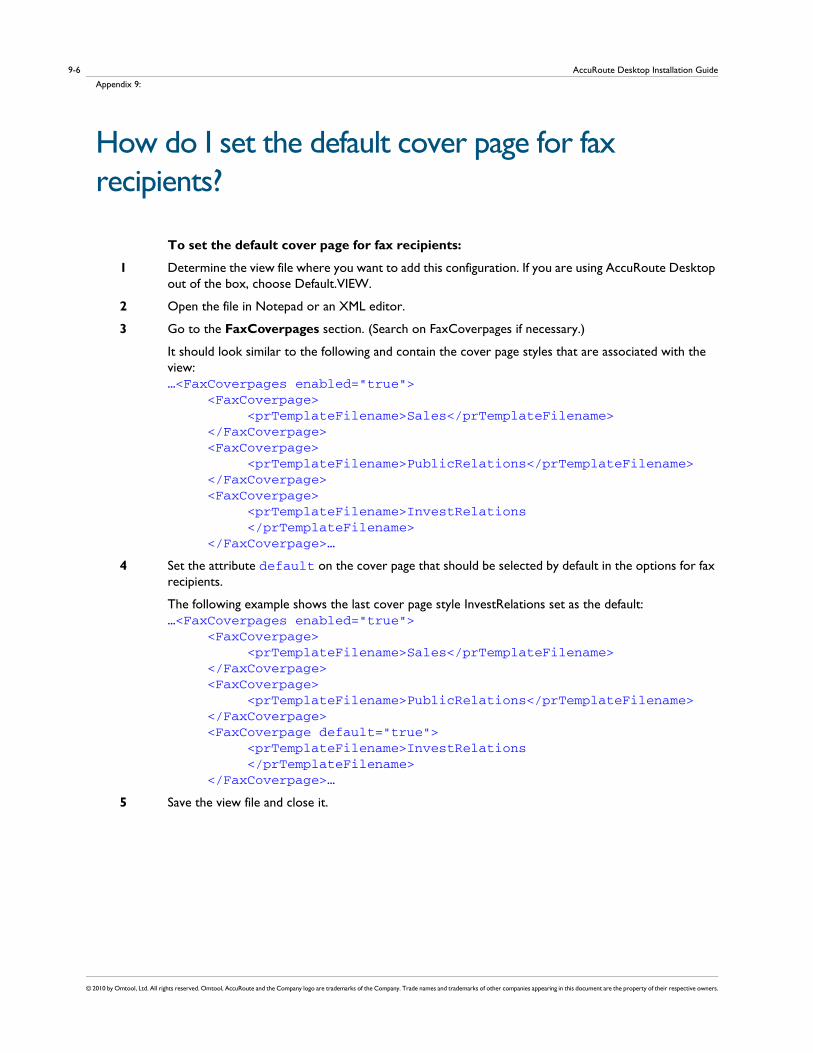
AccuRoute Desktop Installation Guide
Appendix 9:
© 2010 by Omtool, Ltd. All rights reserved. Omtool, AccuRoute and the Company logo are trademarks of the Company. Trade names and trademarks of other companies appearing in this document are the property of their respective owners.
9-6
How do I set the default cover page for fax recipients?
To set the default cover page for fax recipients:
1 Determine the view file where you want to add this configuration. If you are using AccuRoute Desktop out of the box, choose Default.VIEW.
2 Open the file in Notepad or an XML editor.
3 Go to the FaxCoverpages section. (Search on FaxCoverpages if necessary.)
It should look similar to the following and contain the cover page styles that are associated with the view:…<FaxCoverpages enabled="true"> <FaxCoverpage> <prTemplateFilename>Sales</prTemplateFilename> </FaxCoverpage> <FaxCoverpage> <prTemplateFilename>PublicRelations</prTemplateFilename> </FaxCoverpage> <FaxCoverpage> <prTemplateFilename>InvestRelations </prTemplateFilename> </FaxCoverpage>…
4 Set the attribute default on the cover page that should be selected by default in the options for fax recipients.
The following example shows the last cover page style InvestRelations set as the default:…<FaxCoverpages enabled="true"> <FaxCoverpage> <prTemplateFilename>Sales</prTemplateFilename> </FaxCoverpage> <FaxCoverpage> <prTemplateFilename>PublicRelations</prTemplateFilename> </FaxCoverpage> <FaxCoverpage default="true"> <prTemplateFilename>InvestRelations </prTemplateFilename> </FaxCoverpage>…
5 Save the view file and close it.
© 2010 by Omtool, Ltd. All rights reserved. Omtool, AccuRoute and the Company logo are trademarks of the Company. Trade names and trademarks of other companies appearing in this document are the property of their respective owners.
9-7AccuRoute Desktop Installation Guide
Appendix 9:
Can I set the file formats that are valid for a destination type?Yes. Using the Omtool Server Administrator, you can configure the types of file formats that are valid for each destination type that you make available to users. This configuration is part of Registered Users, so the configuration can apply to individual users or to the default user which impacts all non-registered users.
To configure the file formats that are valid for a destination type:
1 Start the Omtool Server Administrator.
2 Do one of the following:
For a registered user: Click REGISTERED USERS in the console tree and double-click a user in the details pane.
For all non-registered users: Right-click REGISTERED USERS and select USER DEFAULTS.
3 Click the AccuRoute tab.
4 Select a destination type in the list and click CONFIGURE.
5 Click the Final Forms tab. The list displays all the file formats that are supported for the destination type. Configure the file formats as desired:
To remove a final form as a valid file format for a destination type: Clear ENABLED.
To set a final form as the default selection for a destination type: View the properties of a file format and select DEFAULT.
6 Save your changes. (When you click OK on the Registered Users dialog box, a progress bar indicates that your changes are being saved.)

AccuRoute Desktop Installation Guide
Appendix 9:
© 2010 by Omtool, Ltd. All rights reserved. Omtool, AccuRoute and the Company logo are trademarks of the Company. Trade names and trademarks of other companies appearing in this document are the property of their respective owners.
9-8
© 2010 by Omtool, Ltd. All rights reserved. Omtool, AccuRoute and the Company logo are trademarks of the Company. Trade names and trademarks of other companies appearing in this document are the property of their respective owners.
APP-1AccuRoute Desktop Installation Guide
Appendix: Setting up AccuRoute Desktop for an Omtool Server cluster
Appendix C: Setting up AccuRoute Desktop for an Omtool Server clusterThis section includes:
Introduction (10-1)
Copying server and client resources to a high availability server (10-1)
Editing the registry on the Omtool Server (10-2)
Editing the AccuRoute Desktop configuration file (10-3)
IntroductionFor an environment with an Omtool Server cluster, additional configurations are necessary before you install AccuRoute Desktop. For installation instructions, see Installing AccuRoute Desktop (3-1).
Resources that are utilized by the Omtool Server and AccuRoute Desktop clients need to be relocated to a high availability server. This ensures that the active server in the cluster and all clients have uninterrupted access to them.
These resources include:
view files
Routing Sheet templates and cover page templates
Copy these resources to a high availability server, and then edit the registry on the Omtool Server and the configuration file in the AccuRoute Desktop setup so that the Omtool Server and AccuRoute Desktop clients can begin using the resources on the high availability server immediately.
Copying server and client resources to a high availability serverBefore completing this procedure, choose a high availability server. Omtool recommends using the same high availability server where the Omtool Server message database is located. If a different server is used, then it must be located in the same domain as the Omtool Server or in a different domain that has a bidirectional trust with the Omtool Server’s domain. Access to the folders containing these resources is granted through the sharing and security rights on the folder itself.

AccuRoute Desktop Installation Guide
Appendix: Setting up AccuRoute Desktop for an Omtool Server cluster
© 2010 by Omtool, Ltd. All rights reserved. Omtool, AccuRoute and the Company logo are trademarks of the Company. Trade names and trademarks of other companies appearing in this document are the property of their respective owners.
APP-2
To copy server and client resources to the high availability server:
1 Go to …\OMTOOL\OMTOOL SERVER\ directory on the Omtool Server.
2 Copy and paste \ACCUROUTEVIEWS to the high availability server and wait for the files to be copied.
3 Go to \ACCUROUTEVIEWS on the high availability server and verify that its sharing and security permissions allow clients running AccuRoute Desktop to access it:
a Right-click ACCUROUTEVIEWS and select PROPERTIES.
b Click the Sharing tab.
c Verify that the folder is shared as AccuRouteViews.
d Click PERMISSIONS and verify that Everyone has Read access to the folder.
4 Go to …\OMTOOL\OMTOOL SERVER\ on the Omtool Server.
5 Copy and paste \LANGUAGES to the high availability server and wait for the files to be copied.
6 Go to \LANGUAGES on the high availability server and set the sharing and security permissions:
a Right-click LANGUAGES and select PROPERTIES.
b Click the Sharing tab.
c Select SHARE THIS FOLDER. and verify that the share name is Languages.
d Click PERMISSIONS and verify that Everyone has Read access to the folder.
e Click OK to close the Permissions dialog box, and click OK to save the changes to the folder properties.
Editing the registry on the Omtool ServerThe location of \LANGUAGES is stored in the registry on the Omtool Server. Instead of moving the location of the Languages folder, you can when needed, move the logical \TEMPLATES. It is in the same location as \LANGUAGES.
The logical \TEMPLATES can point to any UNC path (or other path) as long as it maintains the same sub-folder structure as the original, thereby allowing a single copy of the templates to be maintained for the clustered server.
The default value for the \TEMPLATES logical is the same as the LANGUAGES folder, located in: \HKEY_LOCAL_MACHINE\SOFTWARE\OMTOOL\GENIFAX\CURRENT VERSION\LOGICALS.
All folders except the "Resources" folders in the default install LANGUAGES folder can be moved as templates.
Note Resources must remain on each individual machine.
© 2010 by Omtool, Ltd. All rights reserved. Omtool, AccuRoute and the Company logo are trademarks of the Company. Trade names and trademarks of other companies appearing in this document are the property of their respective owners.
APP-3AccuRoute Desktop Installation Guide
Appendix: Setting up AccuRoute Desktop for an Omtool Server cluster
Editing the AccuRoute Desktop configuration fileAccuRoute Desktop is installed on clients with a configuration file that defines the locations of resources to which the client needs access. This configuration file must be modified to include the new location of view files. Optionally, it can be edited to include the location of the folder containing Routing Sheet templates.
Note This procedure updates the AccuRoute Desktop setup. This ensures that no configuration is required on the client after installation.
1 To update the AccuRoute Desktop setup with the new location of the folder containing view files:
2 Go to \OMTOOL\OMTOOL SERVER\CLIENTS\ACCUROUTEDESKTOP\PROGRAM FILES\OMTOOL\ACCUROUTEDESKTOP on the Omtool Server.
3 Open AccuRouteclient.xml in Notepad.
4 Go to the Aliases section. (Search on SearchFolders if necessary.)
5 Locate the following alias:
<Alias><prValue>$/</prValue></Alias>
6 Replace $/ with \\[server]\AccuRouteViews where [server] is the computer name or IP address of the high availability server.
Note The AccuRouteViews folder is shared, and its share name is AccuRouteViews, so the path to this resource is always \\[server]\AccuRouteViews.
7 Save the file and close it.
Note Omtool strongly recommends repeating this procedure on the alternate Omtool Server.

AccuRoute Desktop Installation Guide
Appendix: Setting up AccuRoute Desktop for an Omtool Server cluster
© 2010 by Omtool, Ltd. All rights reserved. Omtool, AccuRoute and the Company logo are trademarks of the Company. Trade names and trademarks of other companies appearing in this document are the property of their respective owners.
APP-4