acdseevideoconverter - acdsee...
TRANSCRIPT
ACDSeeVideo Converter
Page 1 of 25
Contents
Welcome to ACDSee Video Converter 2
Set and Forget 2
Convert Videos and Audio Among All Popular File Formats 2
Adding and Converting Videos 3
Adding Files to the Input Video List 3
CPU Performance Graphic 3
Convert One or More Videos to a Different Format 4
Viewing Video Details 6
Saving Detailed Settings 6
Viewing the Conversion Log 7
Stopping Video Conversion 7
Removing Files from the Input Video List 7
Previewing Videos 8
Adjusting Video Output Volume 9
Taking Snapshots 10
Clipping Videos 11
Setting the ACDSee Video Converter Options 12
Changing the ACDSee Video Converter Skin 15
Burning a DVD Disc 16
Creating an ISO 17
Ripping a DVD 18
Uploading Your Videos to YouTube® 19
Supported Formats and Devices 21
Supported Input Video Formats 21
Supported Output Video Formats 21
Supported Output Devices 22

ACDSeeVideo Converter
Page 2 of 25
Welcome to ACDSee Video ConverterACDSeeVideo Converter is a simple-to-use HD video converter that can convert video files between most popularmedia formats at high quality and speed. Its smart video aspect ratio algorithm helps you get rid of distractingblack borders and make full use of your mobile media player screen. You can also use it to extract your favoriteMP3 audio from downloaded video files.
Set and Forget
Designed to be used with your mobilemedia player, ACDSee Video Converter lets you create a to-do list of videos toconvert, and set the program to shut down after conversion is completed, or pause/re-start the conversion at yourconvenience.
Convert Videos and Audio Among All Popular File Formats
Convert between all kinds of video and audio formats, including AVI, MP4, MKV, FLV, 3GP, 3G2, WMV, MOV, VOB,MPG, PSP, M4V, VCD, DVD, ARM, ASF, AVS, SWF, MPEG, MTV, OGG, H261, H263, H264, MP3 and more. See acomplete list of supported formats and devices.
ACDSeeVideo Converter
Page 3 of 25
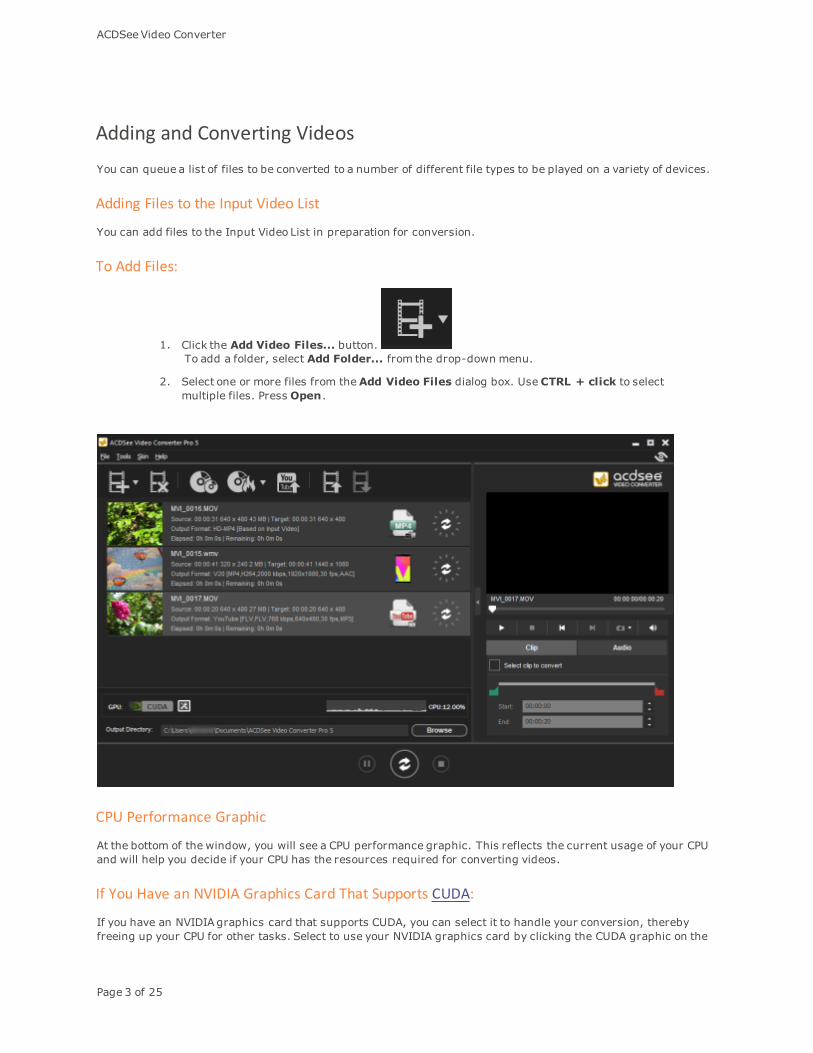
Adding and Converting VideosYou can queue a list of files to be converted to a number of different file types to be played on a variety of devices.
Adding Files to the Input Video List
You can add files to the Input Video List in preparation for conversion.
To Add Files:
1. Click the Add Video Files... button.To add a folder, select Add Folder... from the drop-down menu.
2. Select one or more files from theAdd Video Files dialog box. Use CTRL + click to selectmultiple files. Press Open.
CPU Performance Graphic
At the bottom of the window, you will see a CPU performance graphic. This reflects the current usage of your CPUand will help you decide if your CPU has the resources required for converting videos.
If You Have an NVIDIA Graphics Card That Supports CUDA:
If you have an NVIDIA graphics card that supports CUDA, you can select it to handle your conversion, therebyfreeing up your CPU for other tasks. Select to use your NVIDIA graphics card by clicking the CUDA graphic on the

ACDSeeVideo Converter
Page 4 of 25
left side. You can also make this change on the Performance tab of the Options dialog.
Please note that if your video card does not support CUDA, this option will be disabled.
Convert One or More Videos to a Different Format
After you have added your files to the Input Video List, you can convert them to a wide variety of formats.
To Convert Videos:
1. Select the video you would like to convert. If you would like to select multiple files, do one of the following:
Drag your cursor over the files.
Press CTRL while clicking the specific files you want.
2. Your files display an icon of their current format. Ex.) Click this icon to open the ChooseFormat dialog box. Configure your format settings as described in the table below.
Choose Format Dialog Box
Output Type Select the output type you would like to convert your files to fromthe drop-down menu according to the device you would like toplay your video on.
Output Format Select the specific device from the drop-down menu of optionsavailable for the output type you selected. Next, select from thedrop-down menu of parameters for that device.
Format Details This section displays the format details of the output you haveselected, including:
Video Frame Size
VideoBitrate
VideoCodec
Audio Codec
File Format
This section also includes the Detailed Settings button. Click theDetailed Settings button and configure the options as describedin the Detailed Settings Dialog Box table below.
Split Split By If you would like to split your video, check the Split By checkboxand select whether you would like to split your video by:
Size (in MB)
or
Time (in minutes)
Apply to all Check this box to apply the above settings to all of the files in theInput Video List.

ACDSeeVideo Converter
Page 5 of 25
3. Once a new Output Type has been selected, the Detailed Settings button becomes enabled. Click theDetailed Settings button to alter additional video and audio parameters.
Changes madewithin the Detailed Settings dialog can be saved as a User-Defined Profile.
Detailed Settings Dialog Box
Format
Video Parameters Codec Video codec specifies the type of video data compression youwould like ACDSee VideoConverter to use.
Size Select the video image size.
Bitrate Select the bitrate to determine how much data will go to thescreen per second on playback. A higher bitrate allows for ahigher quality picture, however, it also increases the file size.
Frame Rate Select the frame rate to determine how quickly the picturerefreshes.
Audio Parameters Codec Codec specifies the type of audio data compression you wouldlike ACDSee Video Converter to use.
Sample Rate Sampling describes the data rate of a sound recording. Ahigher sample rate allows for higher quality sound, however,it also increases the file size.
Channel From the drop-down menu, select1 to have the same soundcome out of the left and right speakers, or, 2, to havedifferent sound come out of the left speaker versus the right.
Bitrate Select the bitrate to determine how much audio data will go tothe speakers per second on playback. A higher bitrate allowsfor a higher quality sound, however, it also increases the filesize.
4. ClickOK to close the Detailed Settings dialog box.
5. ClickOK to close the Choose Format dialog box.
6. To specify further conversion and completion settings, such as setting where your completed files shouldbe placed, see Setting the ACDSee Video Converter Options.
7. Click the Convert button to begin the conversion.
Once converted, you can locate the output video by right-clicking the file and selecting Locate OutputVideo.
ACDSeeVideo Converter converts all files in the Input Video List. If you have converted a file and then addanother file to convert, remove the previously converted file from the list, unless you would like to convertit to another format.
ACDSeeVideo Converter
Page 6 of 25
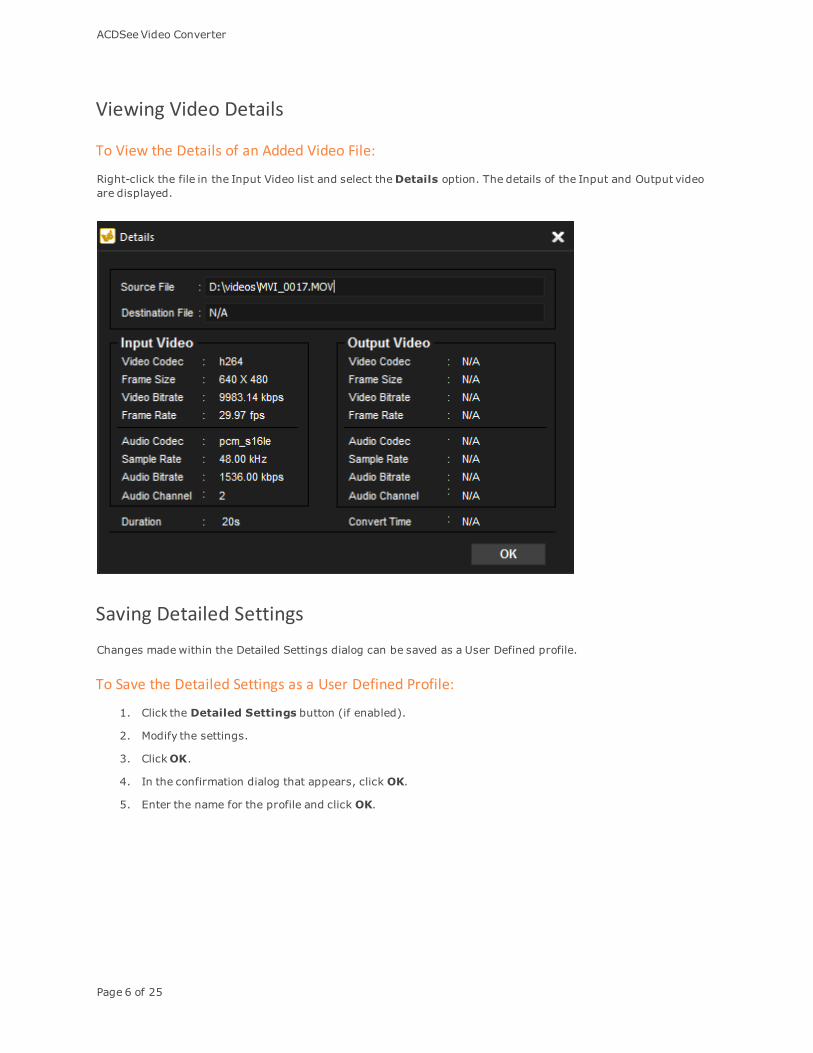
Viewing Video Details
To View the Details of an Added Video File:
Right-click the file in the Input Video list and select theDetails option. The details of the Input and Output videoare displayed.
Saving Detailed SettingsChanges madewithin the Detailed Settings dialog can be saved as a User Defined profile.
To Save the Detailed Settings as a User Defined Profile:
1. Click the Detailed Settings button (if enabled).
2. Modify the settings.
3. ClickOK.
4. In the confirmation dialog that appears, click OK.
5. Enter the name for the profile and click OK.
ACDSeeVideo Converter
Page 7 of 25
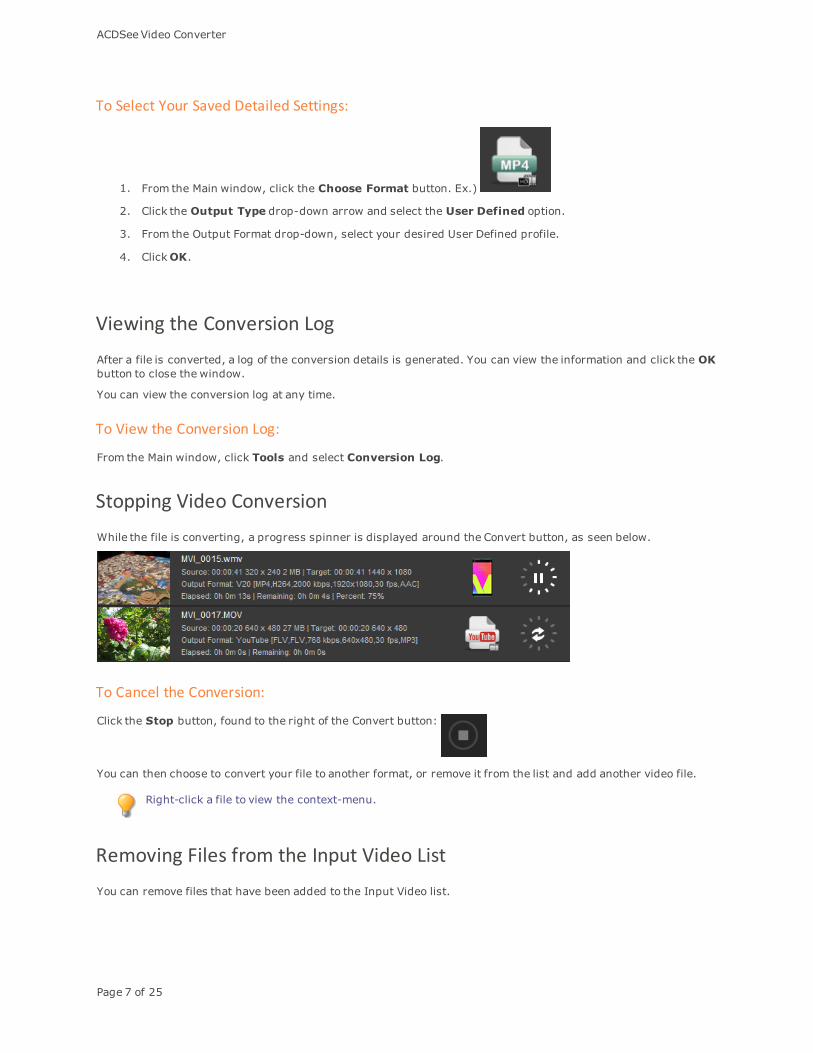
To Select Your Saved Detailed Settings:
1. From the Main window, click the Choose Format button. Ex.)
2. Click the Output Type drop-down arrow and select the User Defined option.
3. From the Output Format drop-down, select your desired User Defined profile.
4. ClickOK.
Viewing the Conversion LogAfter a file is converted, a log of the conversion details is generated. You can view the information and click the OKbutton to close the window.
You can view the conversion log at any time.
To View the Conversion Log:
From the Main window, click Tools and select Conversion Log.
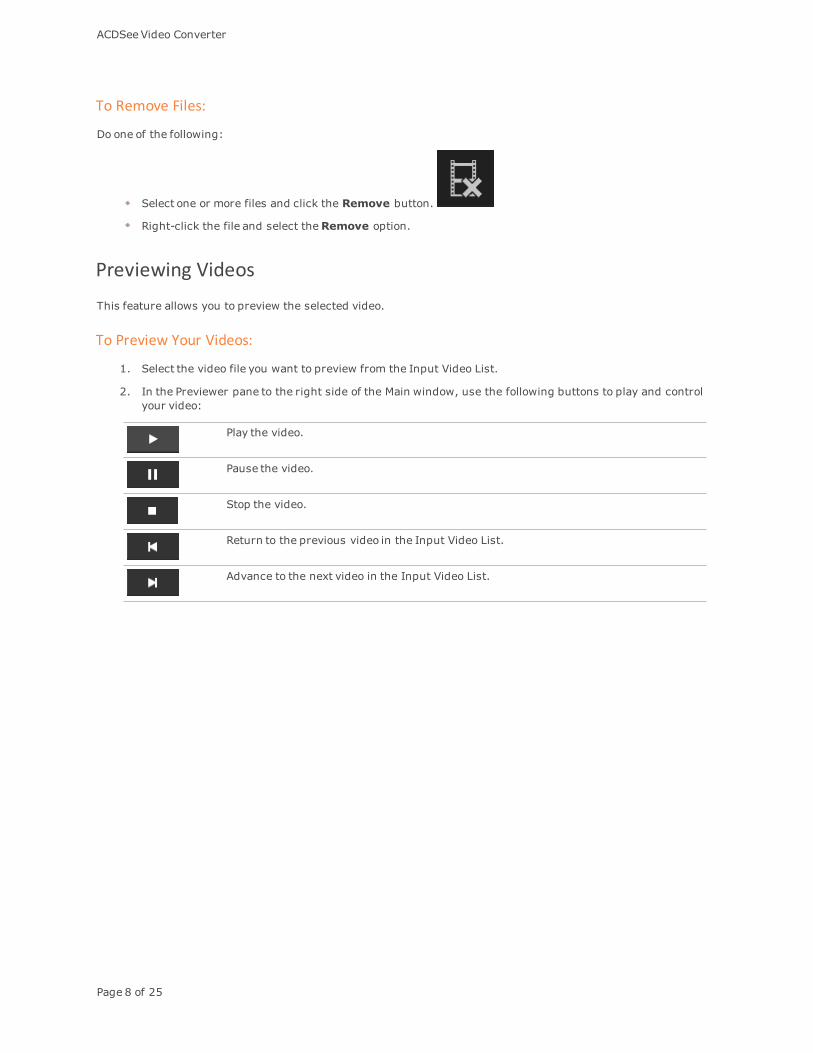
Stopping Video ConversionWhile the file is converting, a progress spinner is displayed around the Convert button, as seen below.
To Cancel the Conversion:
Click the Stop button, found to the right of the Convert button:
You can then choose to convert your file to another format, or remove it from the list and add another video file.
Right-click a file to view the context-menu.
Removing Files from the Input Video ListYou can remove files that have been added to the Input Video list.
ACDSeeVideo Converter
Page 8 of 25
To Remove Files:
Do one of the following:
Select one or more files and click the Remove button.
Right-click the file and select theRemove option.
Previewing VideosThis feature allows you to preview the selected video.
To Preview Your Videos:
1. Select the video file you want to preview from the Input Video List.
2. In the Previewer pane to the right side of the Main window, use the following buttons to play and controlyour video:
Play the video.
Pause the video.
Stop the video.
Return to the previous video in the Input Video List.
Advance to the next video in the Input Video List.
ACDSeeVideo Converter
Page 9 of 25
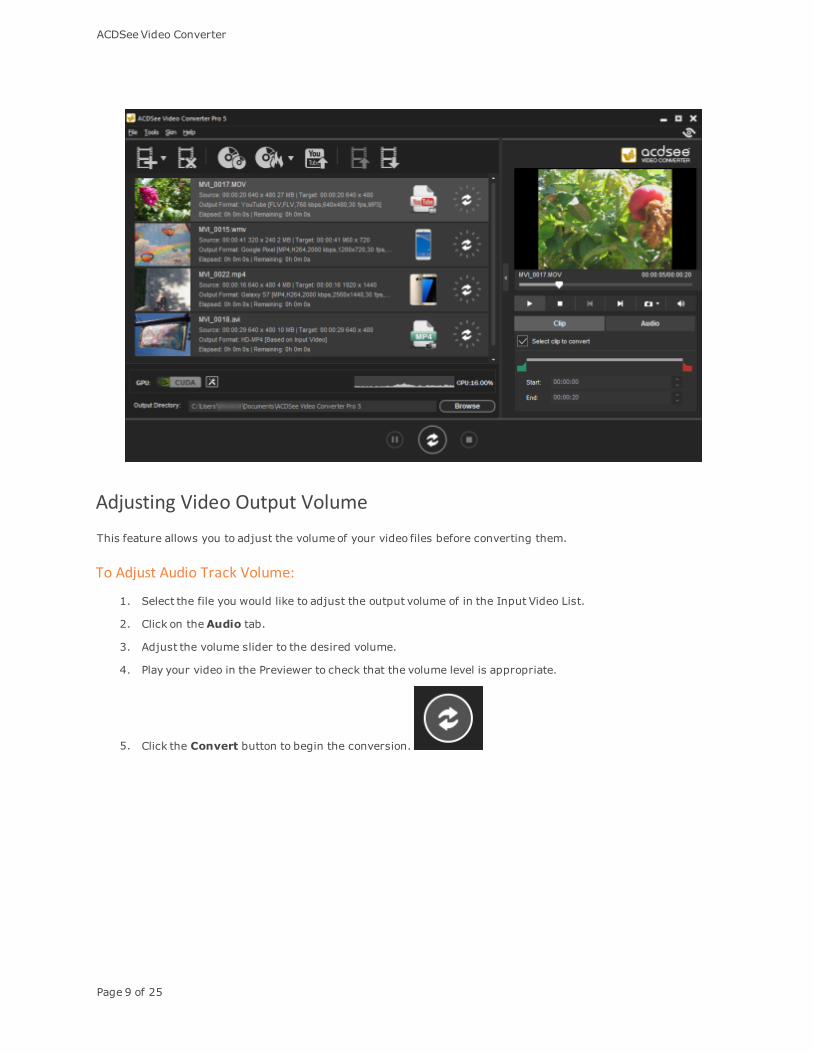
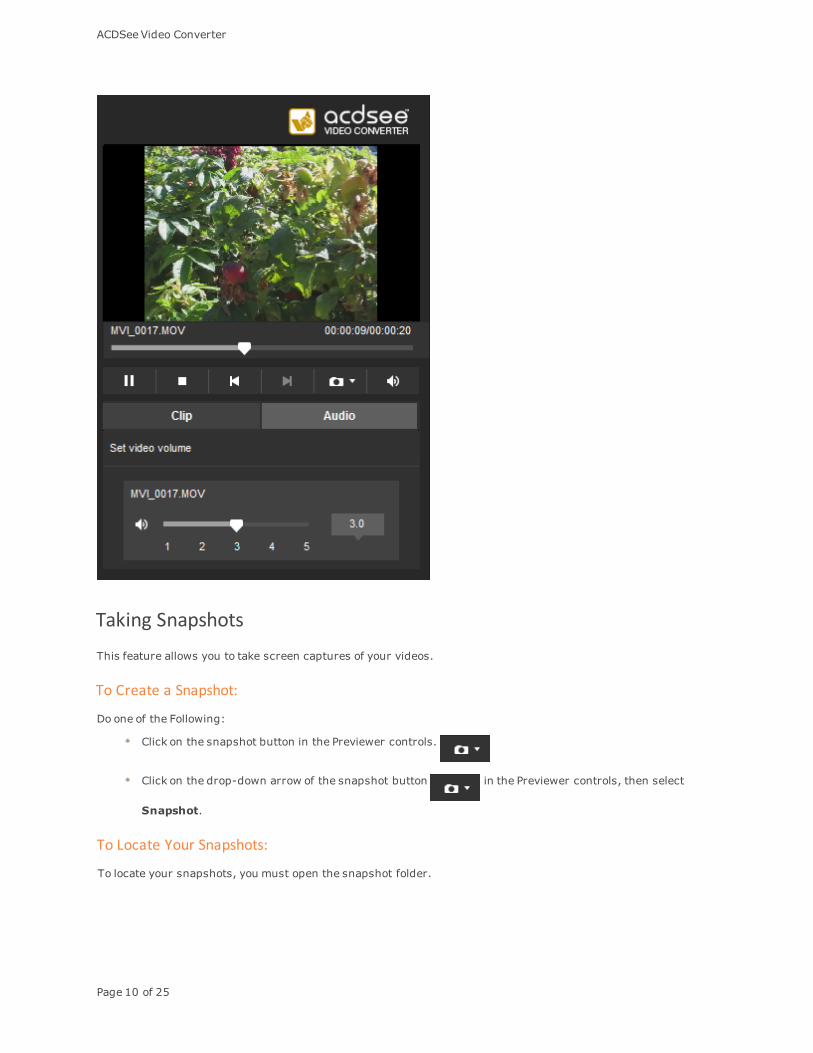
Adjusting Video Output VolumeThis feature allows you to adjust the volumeof your video files before converting them.
To Adjust Audio Track Volume:
1. Select the file you would like to adjust the output volume of in the Input Video List.
2. Click on theAudio tab.
3. Adjust the volume slider to the desired volume.
4. Play your video in the Previewer to check that the volume level is appropriate.
5. Click the Convert button to begin the conversion.
ACDSeeVideo Converter
Page 10 of 25
Taking SnapshotsThis feature allows you to take screen captures of your videos.
To Create a Snapshot:
Do one of the Following:
Click on the snapshot button in the Previewer controls.
Click on the drop-down arrow of the snapshot button in the Previewer controls, then select
Snapshot.
To Locate Your Snapshots:
To locate your snapshots, you must open the snapshot folder.
ACDSeeVideo Converter
Page 11 of 25
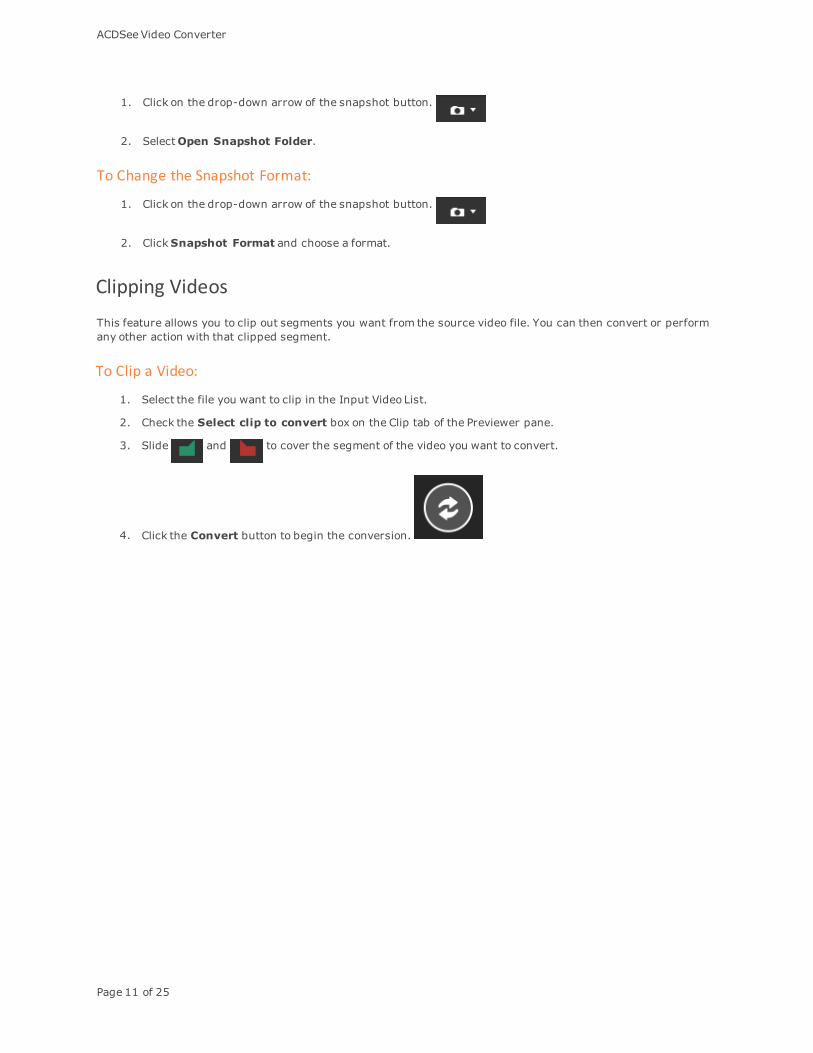
1. Click on the drop-down arrow of the snapshot button.
2. SelectOpen Snapshot Folder.
To Change the Snapshot Format:
1. Click on the drop-down arrow of the snapshot button.
2. ClickSnapshot Format and choose a format.
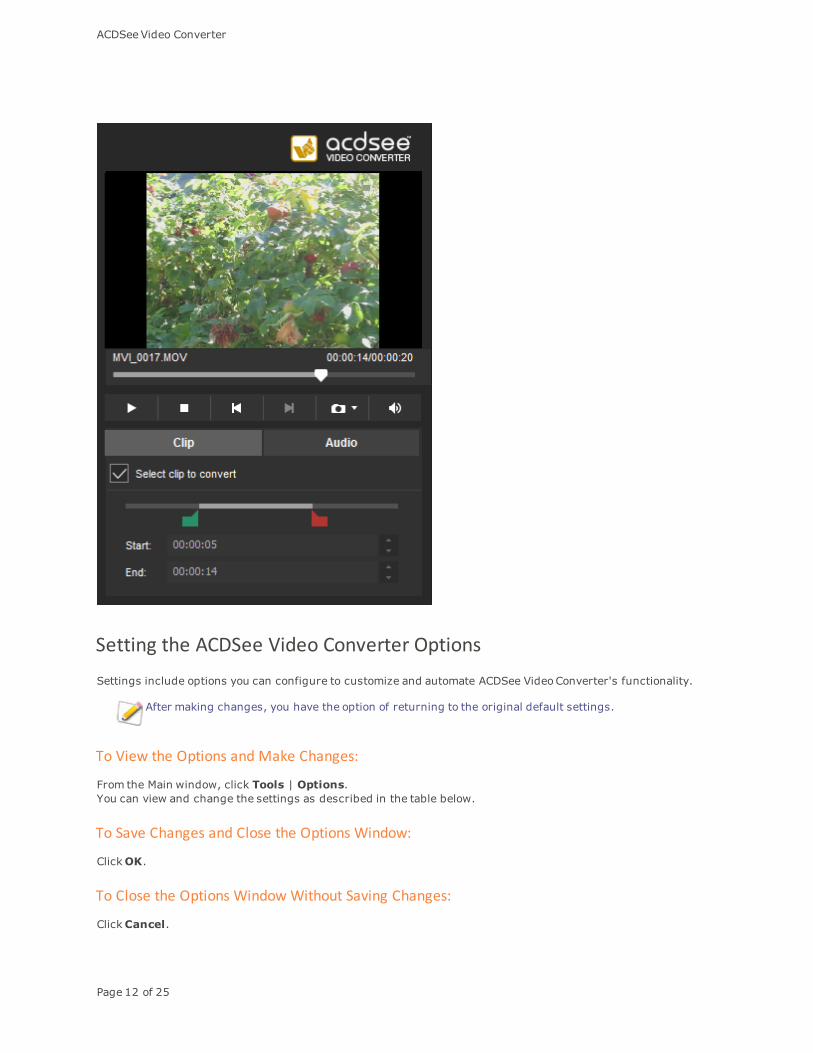
Clipping VideosThis feature allows you to clip out segments you want from the source video file. You can then convert or performany other action with that clipped segment.
To Clip a Video:
1. Select the file you want to clip in the Input Video List.
2. Check the Select clip to convert box on the Clip tab of the Previewer pane.
3. Slide and to cover the segment of the video you want to convert.
4. Click the Convert button to begin the conversion.
ACDSeeVideo Converter
Page 12 of 25
Setting the ACDSee Video Converter OptionsSettings include options you can configure to customize and automate ACDSee VideoConverter's functionality.
After making changes, you have the option of returning to the original default settings.
To View the Options and Make Changes:
From the Main window, click Tools | Options.You can view and change the settings as described in the table below.
To Save Changes and Close the Options Window:
ClickOK.
To Close the Options WindowWithout Saving Changes:
ClickCancel.

ACDSeeVideo Converter
Page 13 of 25
To Return to the Original Default Settings:
ClickReset.
The Options Dialog Box
ACDSeeVideo Converter
Page 14 of 25
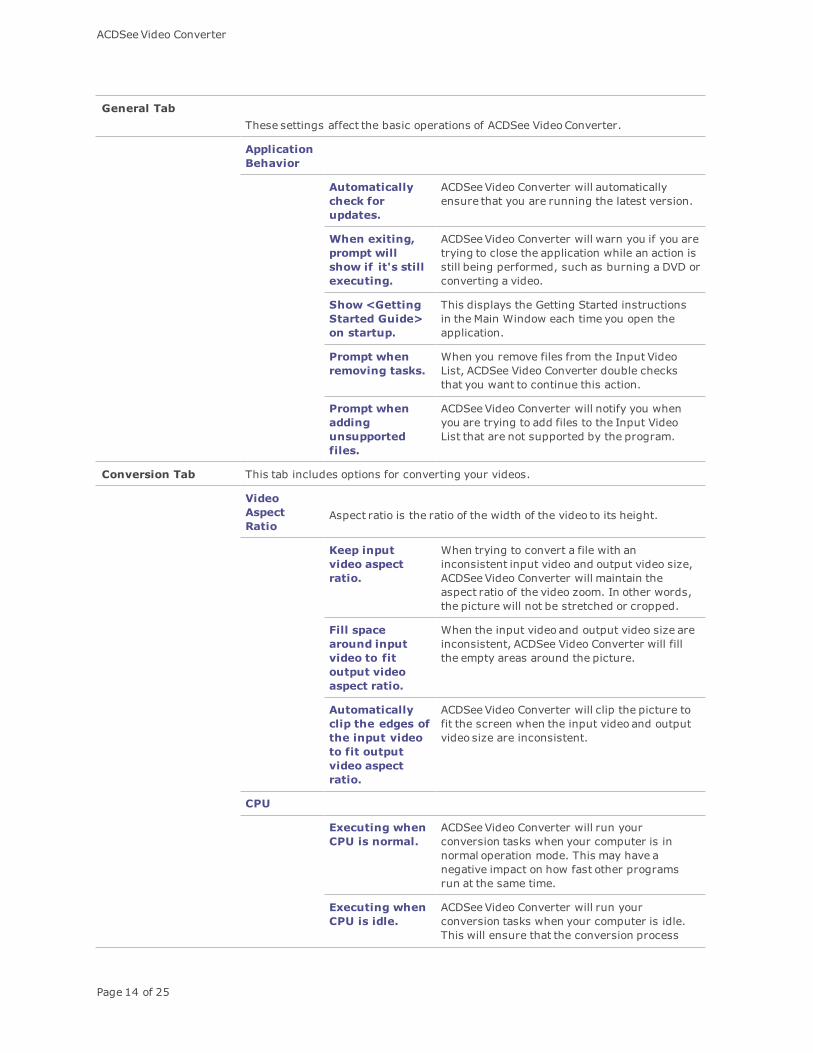
General TabThese settings affect the basic operations of ACDSee VideoConverter.
ApplicationBehavior
Automaticallycheck forupdates.
ACDSeeVideo Converter will automaticallyensure that you are running the latest version.
When exiting,prompt willshow if it's stillexecuting.
ACDSeeVideo Converter will warn you if you aretrying to close the application while an action isstill being performed, such as burning a DVD orconverting a video.
Show <GettingStarted Guide>on startup.
This displays the Getting Started instructionsin the Main Window each time you open theapplication.
Prompt whenremoving tasks.
When you remove files from the Input VideoList, ACDSee Video Converter double checksthat you want to continue this action.
Prompt whenaddingunsupportedfiles.
ACDSeeVideo Converter will notify you whenyou are trying to add files to the Input VideoList that are not supported by the program.
Conversion Tab This tab includes options for converting your videos.
VideoAspectRatio
Aspect ratio is the ratio of the width of the video to its height.
Keep inputvideo aspectratio.
When trying to convert a file with aninconsistent input video and output video size,ACDSeeVideo Converter will maintain theaspect ratio of the video zoom. In other words,the picture will not be stretched or cropped.
Fill spacearound inputvideo to fitoutput videoaspect ratio.
When the input video and output video size areinconsistent, ACDSee Video Converter will fillthe empty areas around the picture.
Automaticallyclip the edges ofthe input videoto fit outputvideo aspectratio.
ACDSeeVideo Converter will clip the picture tofit the screen when the input video and outputvideo size are inconsistent.
CPU
Executing whenCPU is normal.
ACDSeeVideo Converter will run yourconversion tasks when your computer is innormal operation mode. This may have anegative impact on how fast other programsrun at the same time.
Executing whenCPU is idle.
ACDSeeVideo Converter will run yourconversion tasks when your computer is idle.This will ensure that the conversion process
ACDSeeVideo Converter
Page 15 of 25
will not have a negative impact on how fastother programs run.
Performance Tab These settings control CPU usage.
GPU Graphics Processing Unit
Enable GPUAcceleration
This option will be enabled if your computer hasan NVIDIA graphics card that supports CUDA.The encoding will be processed by your NVIDIAgraphics card, rather than your CPU. This willfree your CPU up to run other programs quicklyduring the conversion process and willaccelerate conversion, particularly for outputvideos with an H.264 encoder. Select thisoption to convert faster.
ConvertingQuality
FastMediumSlow
Select your video's conversion speed. The Fastsetting will convert quickly, but will notpreserve video quality as well as the Slowsetting.
Number ofTasks
You can select up to three concurrent conversion tasks.
Completion TabThese settings define how the program responds after conversion is complete.
ConversionCompletionSettings
OutputDirectory
You can select the location where you would likethe converted files to be placed.
Shownotification for... seconds whenall tasks arecompleted.
Select how long you would like to receivenotification for once your conversion tasks havebeen completed.
Play sound ...when a task iscompleted.
Select a sound to be played as notification onceyour conversion tasks have been completed.
Close ACDSeeVideo Converterafter completingall tasks.
Check this option to have ACDSee VideoConverter close when all conversion tasks havebeen completed.
Changing the ACDSee Video Converter SkinYou can change the look of ACDSee Video Converter by choosing between various skins.
ACDSeeVideo Converter
Page 16 of 25
To Change Skins:
1. Select the Skin drop-down from the Main toolbar.
2. Choose a skin from the drop-down list.
Burning a DVD DiscYou can burn your video files onto DVD to watch on your TV or computer.
To Burn Your Video to DVD:
1. Insert a blank DVD into your disc drive. Your operating system may prompt you about what action youwould like to take with your blank DVD. Close these dialogs.
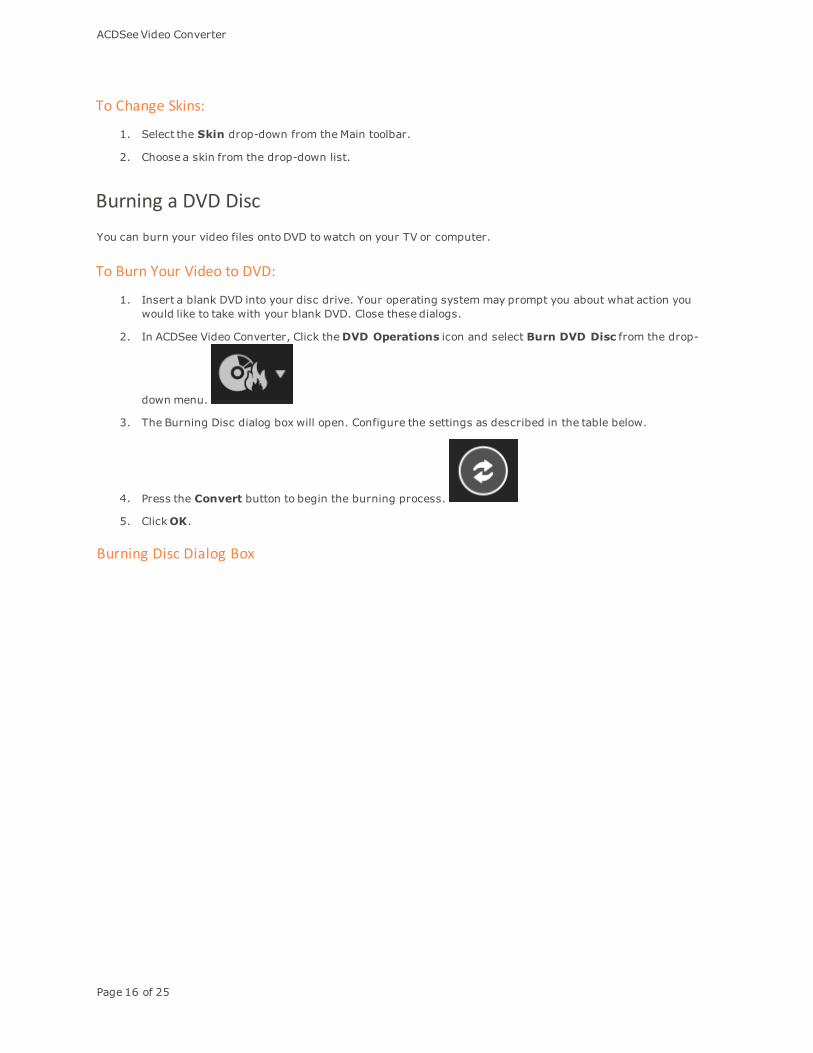
2. In ACDSee Video Converter, Click theDVD Operations icon and select Burn DVD Disc from the drop-
down menu.
3. The Burning Disc dialog box will open. Configure the settings as described in the table below.
4. Press the Convert button to begin the burning process.
5. ClickOK.
Burning Disc Dialog Box
ACDSeeVideo Converter
Page 17 of 25
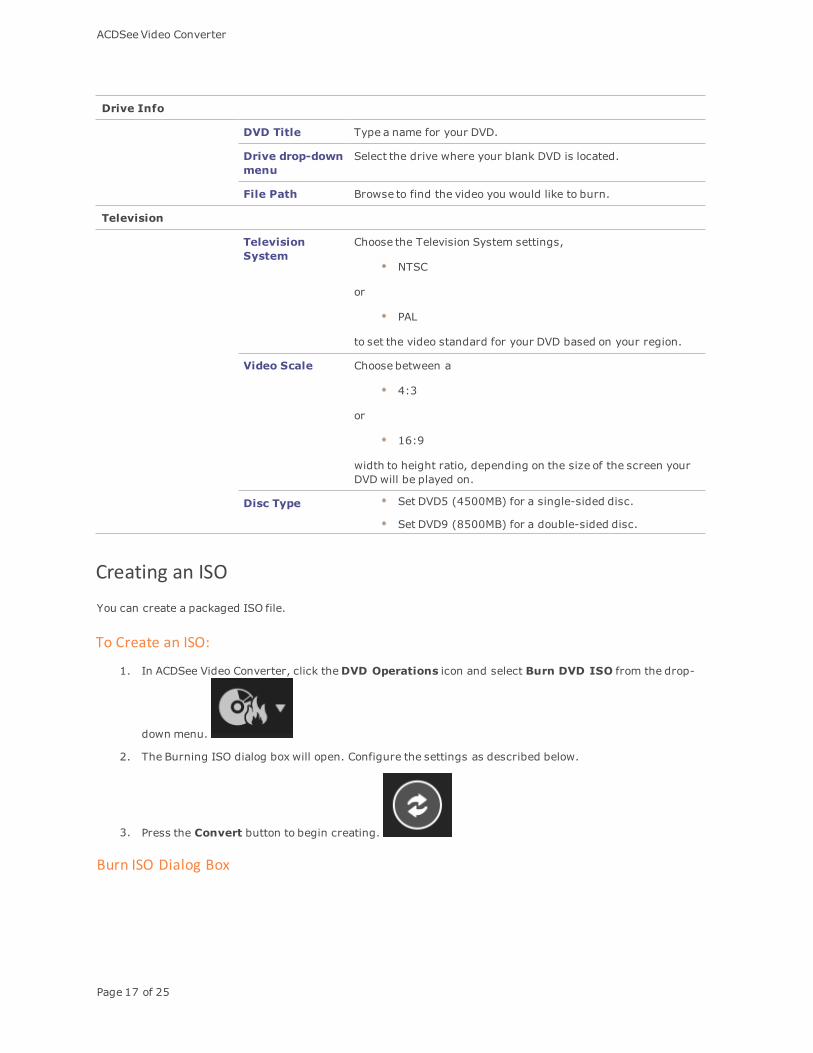
Drive Info
DVD Title Type a name for your DVD.
Drive drop-downmenu
Select the drive where your blank DVD is located.
File Path Browse to find the video you would like to burn.
Television
TelevisionSystem
Choose the Television System settings,
NTSC
or
PAL
to set the video standard for your DVD based on your region.
Video Scale Choose between a
4:3
or
16:9
width to height ratio, depending on the size of the screen yourDVD will be played on.
Disc Type Set DVD5 (4500MB) for a single-sided disc.
Set DVD9 (8500MB) for a double-sided disc.
Creating an ISOYou can create a packaged ISO file.
To Create an ISO:
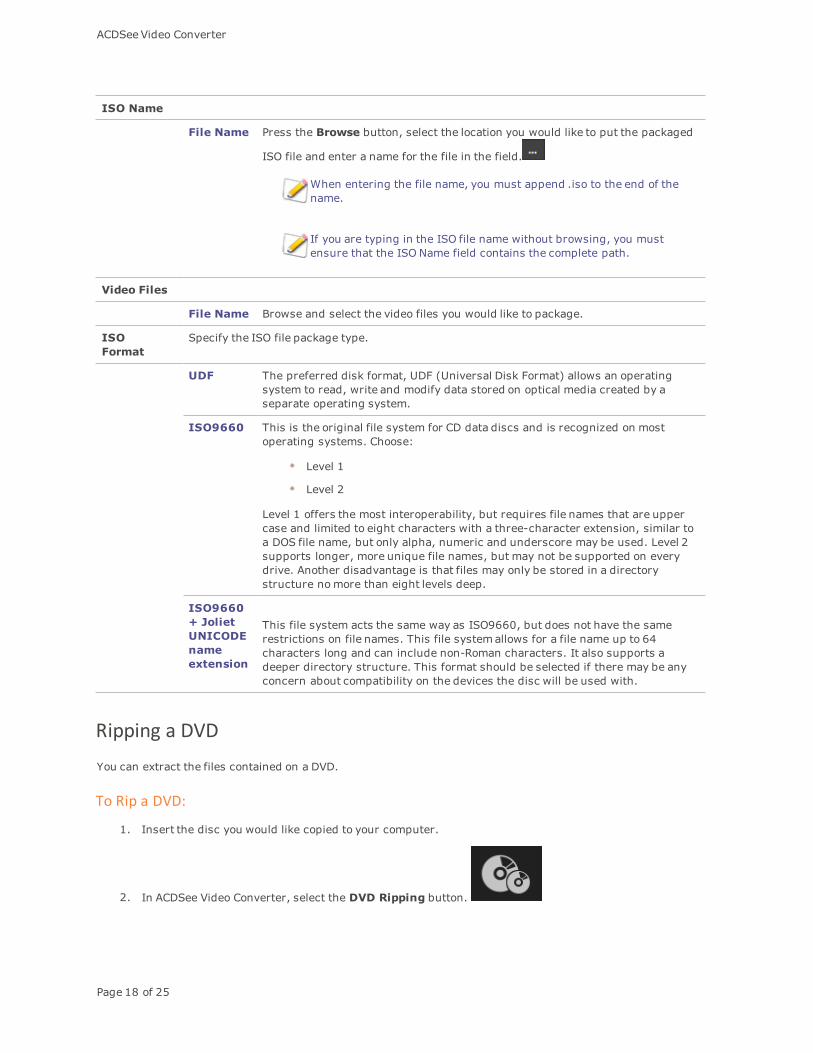
1. In ACDSee Video Converter, click theDVD Operations icon and select Burn DVD ISO from the drop-
down menu.
2. The Burning ISO dialog box will open. Configure the settings as described below.
3. Press the Convert button to begin creating.
Burn ISO Dialog Box
ACDSeeVideo Converter
Page 18 of 25
ISO Name
File Name Press the Browse button, select the location you would like to put the packaged
ISO file and enter a name for the file in the field.
When entering the file name, you must append .iso to the end of thename.
If you are typing in the ISO file name without browsing, you mustensure that the ISO Name field contains the complete path.
Video Files
File Name Browse and select the video files you would like to package.
ISOFormat
Specify the ISO file package type.
UDF The preferred disk format, UDF (Universal Disk Format) allows an operatingsystem to read, write and modify data stored on optical media created by aseparate operating system.
ISO9660 This is the original file system for CD data discs and is recognized on mostoperating systems. Choose:
Level 1
Level 2
Level 1 offers the most interoperability, but requires file names that are uppercase and limited to eight characters with a three-character extension, similar toa DOS file name, but only alpha, numeric and underscore may be used. Level 2supports longer, more unique file names, but may not be supported on everydrive. Another disadvantage is that files may only be stored in a directorystructure nomore than eight levels deep.
ISO9660+ JolietUNICODEnameextension
This file system acts the same way as ISO9660, but does not have the samerestrictions on file names. This file systemallows for a file name up to 64characters long and can include non-Roman characters. It also supports adeeper directory structure. This format should be selected if there may be anyconcern about compatibility on the devices the disc will be used with.
Ripping a DVDYou can extract the files contained on a DVD.
To Rip a DVD:
1. Insert the disc you would like copied to your computer.
2. In ACDSee Video Converter, select the DVD Ripping button.
ACDSeeVideo Converter
Page 19 of 25
3. In the Ripping Disc dialog box, select the Source Disc, (what drive your DVD is located on), from the drop-down menu.
4. Under Output Directory, click Browse to specify where you would like the copied files to go.
5. Press OK.
6. Press the Convert button to begin copying.
Uploading Your Videos to YouTube®You can upload your video content to YouTube to share privately with friends or publicly with the YouTubecommunity.
To Upload Your Videos to YouTube:
1. Click the Upload to YouTube button and fill in the fields in theUpload dialog box, asdescribed in the table below.
2. ClickOK.
3. Click the Convert button. Your video will be uploaded to YouTube as soon as the progressspinner is complete. If you have opted to share your video on Facebook or Twitter, they will now open inyour browser and prompt you to enter your user name and password.
4. Navigate to YouTube.com to see or share your video.
Upload Dialog Box
ACDSeeVideo Converter
Page 20 of 25
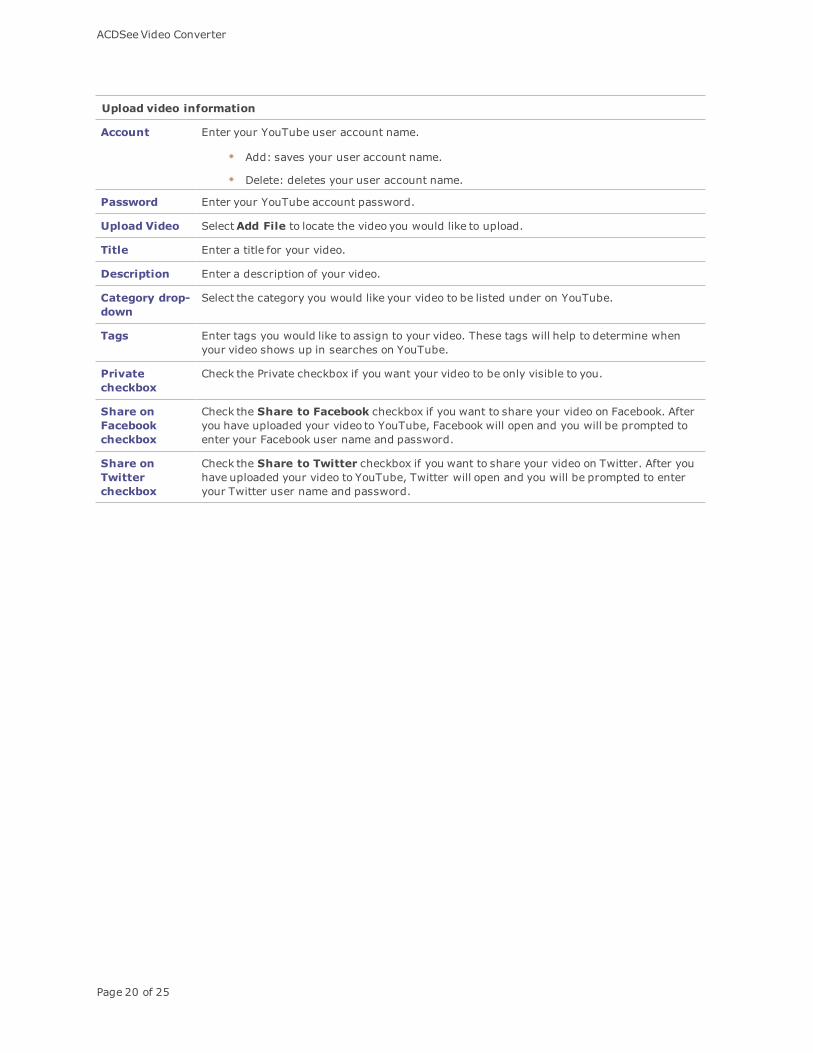
Upload video information
Account Enter your YouTube user account name.
Add: saves your user account name.
Delete: deletes your user account name.
Password Enter your YouTube account password.
Upload Video SelectAdd File to locate the video you would like to upload.
Title Enter a title for your video.
Description Enter a description of your video.
Category drop-down
Select the category you would like your video to be listed under on YouTube.
Tags Enter tags you would like to assign to your video. These tags will help to determine whenyour video shows up in searches on YouTube.
Privatecheckbox
Check the Private checkbox if you want your video to be only visible to you.
Share onFacebookcheckbox
Check the Share to Facebook checkbox if you want to share your video on Facebook. Afteryou have uploaded your video to YouTube, Facebook will open and you will be prompted toenter your Facebook user name and password.
Share onTwittercheckbox
Check the Share to Twitter checkbox if you want to share your video on Twitter. After youhave uploaded your video to YouTube, Twitter will open and you will be prompted to enteryour Twitter user name and password.

ACDSeeVideo Converter
Page 21 of 25
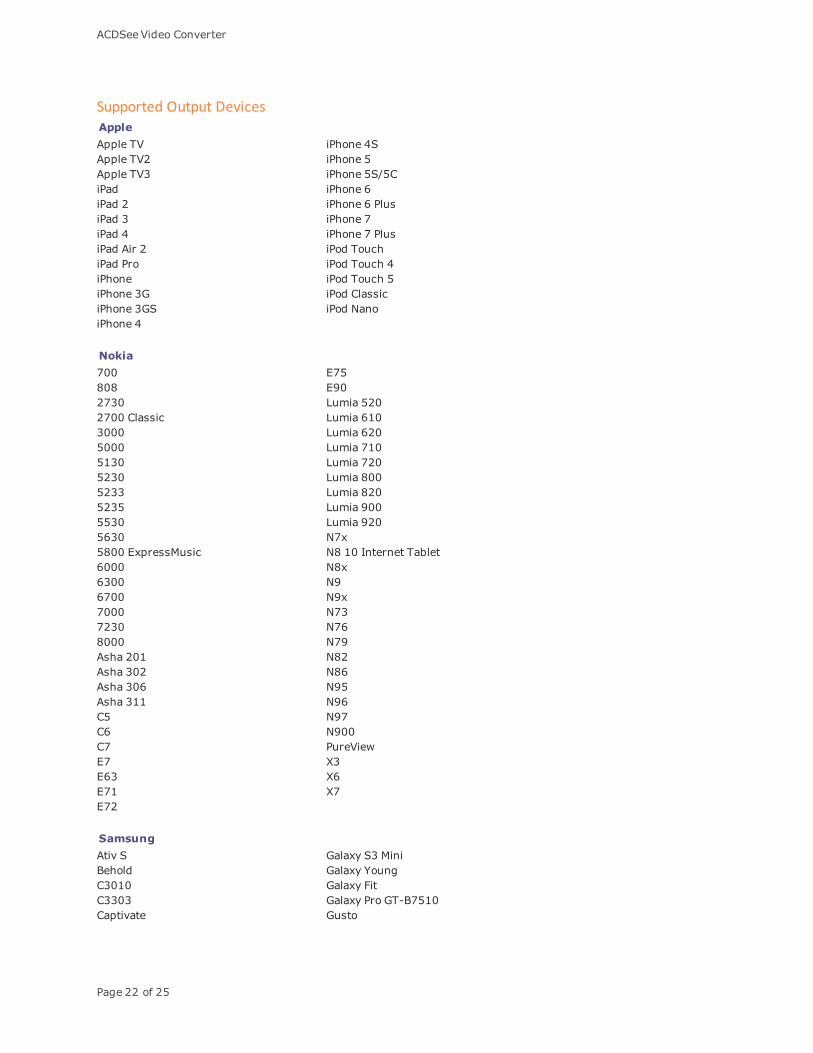
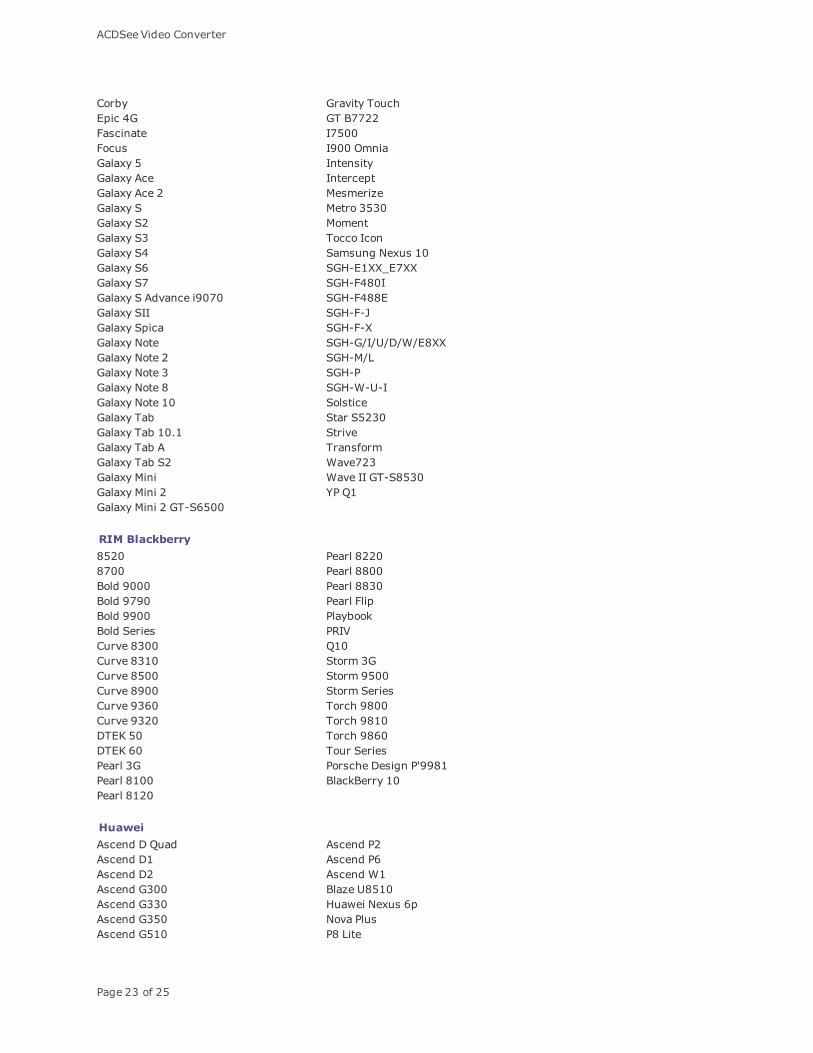
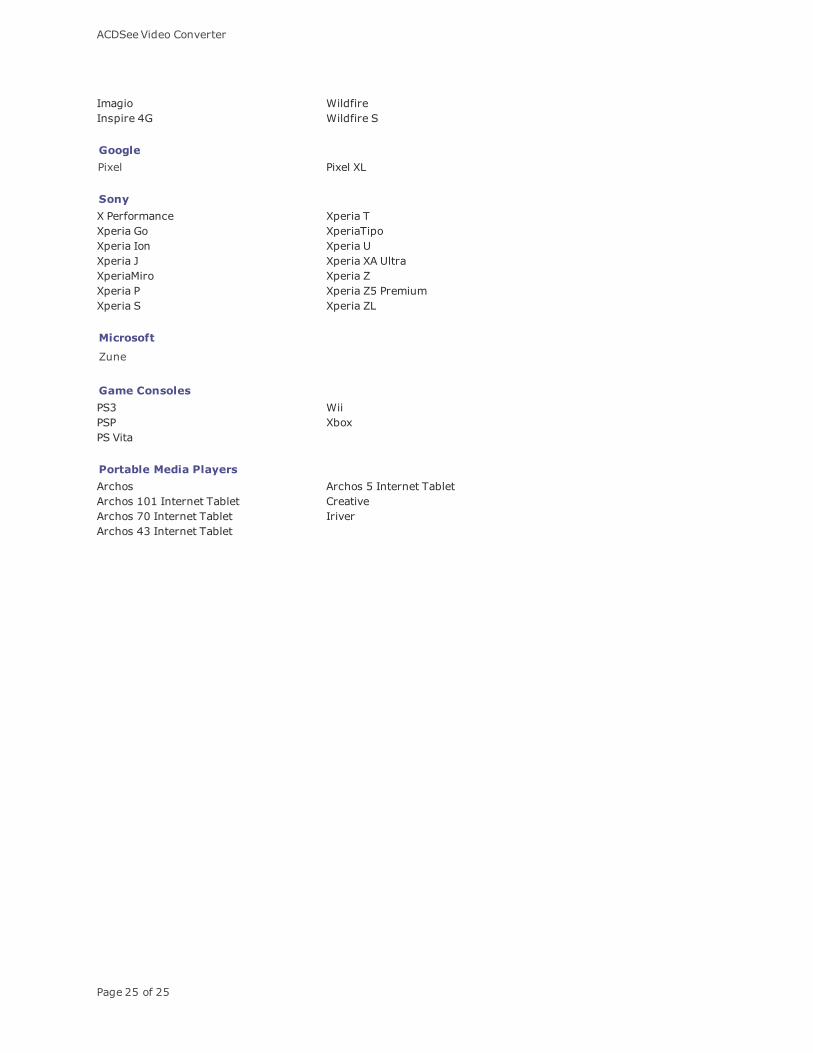
Supported Formats and Devices
Supported Input Video Formats3g2 mtv3gp mve4xm mxfasf nsvavi nutavs nuvcpk oggdif pvadv r3ddxa rmf4v rmvbflic roqflv rplh261 seqh263 smkh264 strm1v swfm2ts thpm2v tsm4v vqamjpg vidmjpeg vobmkv vromov wc3mp4 webmmpg wmvmpeg y4mmts yuv
Supported Output Video Formats3gp mp3asf mp4avi mpeg1dv oggflv tsm4v vobmkv wmamov wmv
ACDSeeVideo Converter
Page 22 of 25
Supported Output DevicesAppleApple TV iPhone 4SApple TV2 iPhone 5Apple TV3 iPhone 5S/5CiPad iPhone 6iPad 2 iPhone 6 PlusiPad 3 iPhone 7iPad 4 iPhone 7 PlusiPad Air 2 iPod TouchiPad Pro iPod Touch 4iPhone iPod Touch 5iPhone 3G iPod ClassiciPhone 3GS iPod NanoiPhone 4
Nokia700 E75808 E902730 Lumia 5202700 Classic Lumia 6103000 Lumia 6205000 Lumia 7105130 Lumia 7205230 Lumia 8005233 Lumia 8205235 Lumia 9005530 Lumia 9205630 N7x5800 ExpressMusic N8 10 Internet Tablet6000 N8x6300 N96700 N9x7000 N737230 N768000 N79Asha 201 N82Asha 302 N86Asha 306 N95Asha 311 N96C5 N97C6 N900C7 PureViewE7 X3E63 X6E71 X7E72
SamsungAtiv S Galaxy S3 MiniBehold Galaxy YoungC3010 Galaxy FitC3303 Galaxy Pro GT-B7510Captivate Gusto
ACDSeeVideo Converter
Page 23 of 25
Corby Gravity TouchEpic 4G GT B7722Fascinate I7500Focus I900 OmniaGalaxy 5 IntensityGalaxy Ace InterceptGalaxy Ace 2 MesmerizeGalaxy S Metro 3530Galaxy S2 MomentGalaxy S3 Tocco IconGalaxy S4 Samsung Nexus 10Galaxy S6 SGH-E1XX_E7XXGalaxy S7 SGH-F480IGalaxy S Advance i9070 SGH-F488EGalaxy SII SGH-F-JGalaxy Spica SGH-F-XGalaxy Note SGH-G/I/U/D/W/E8XXGalaxy Note 2 SGH-M/LGalaxy Note 3 SGH-PGalaxy Note 8 SGH-W-U-IGalaxy Note 10 SolsticeGalaxy Tab Star S5230Galaxy Tab 10.1 StriveGalaxy Tab A TransformGalaxy Tab S2 Wave723Galaxy Mini Wave II GT-S8530Galaxy Mini 2 YP Q1Galaxy Mini 2 GT-S6500
RIM Blackberry8520 Pearl 82208700 Pearl 8800Bold 9000 Pearl 8830Bold 9790 Pearl FlipBold 9900 PlaybookBold Series PRIVCurve 8300 Q10Curve 8310 Storm 3GCurve 8500 Storm 9500Curve 8900 Storm SeriesCurve 9360 Torch 9800Curve 9320 Torch 9810DTEK 50 Torch 9860DTEK 60 Tour SeriesPearl 3G Porsche Design P'9981Pearl 8100 BlackBerry 10Pearl 8120
HuaweiAscend D Quad Ascend P2Ascend D1 Ascend P6Ascend D2 Ascend W1Ascend G300 Blaze U8510Ascend G330 Huawei Nexus 6pAscend G350 Nova PlusAscend G510 P8 Lite

ACDSeeVideo Converter
Page 24 of 25
Ascend G7 VisionAscend Mate Virgin Media VM720Ascend P1 LTE Y 100
LGAlly VS740 LGOptimus 3DArena GT950 LG V20Banter AX265 LG X PowerBanter UX265 Neon GW370Bliss UX700 OptimusGoogle Nexus 4 Optimus 2xEgoWiFi Optimus 4X HD P880Prada 3.0 Optimus G ProSpectrum Optimus L3Chocolate Touch VX8575 Optimus L7Dare VX9700 Optimus One P500enV Touch VX11000 Optimus VuFathom VS750 P500GB210 PrimeGD510 Cookie Pop QuantumGM200 Spyder 2 LG840GW820 Tritan UX840Incite CT810 Versa VX9600KM900 Arena VortexKP500 VU CU915KP500 Cookie VU CU920KS360 Xenon GR500LG G5
HTC8X Legend8S Magic7 Mozart MyTouch 3G7 Pro MyTouch 4GAria OneArrive One SChaCha One SVDesire HD One VDesire C One XDesire S One X+Desire X One XLDiamond Pro 7Dream RadarDroid Eris Radar C110EDroid Incredible RhymeDroid Incredible 2 SalsaEvo 3D SensationEVO 4G Sensation XEExplorer Sensation XLFlyer SurroundGratia T-Mobile G1HD2 TattooHD 7 ThunderboltHero TitanHTC Nexus 9 Touch HDIncredible S Vivid
ACDSeeVideo Converter
Page 25 of 25
Imagio WildfireInspire 4G Wildfire S
GooglePixel Pixel XL
SonyX Performance Xperia TXperia Go XperiaTipoXperia Ion Xperia UXperia J Xperia XA UltraXperiaMiro Xperia ZXperia P Xperia Z5 PremiumXperia S Xperia ZL
Microsoft
Zune
Game ConsolesPS3 WiiPSP XboxPS Vita
Portable Media PlayersArchos Archos 5 Internet TabletArchos 101 Internet Tablet CreativeArchos 70 Internet Tablet IriverArchos 43 Internet Tablet