acl 780/781 economy combo tester - aclstaticide.com 780 manual 18.pdf · the acl 780 economy combo...
TRANSCRIPT
ACL 780/781 Operation Manual Rev. March 16, 2018, MKB
ACL Incorporated Tel: 847-981-9212 840 W. 49th Place Page 1 of 13 [email protected] Chicago, IL 60609 USA www.aclstaticide.com
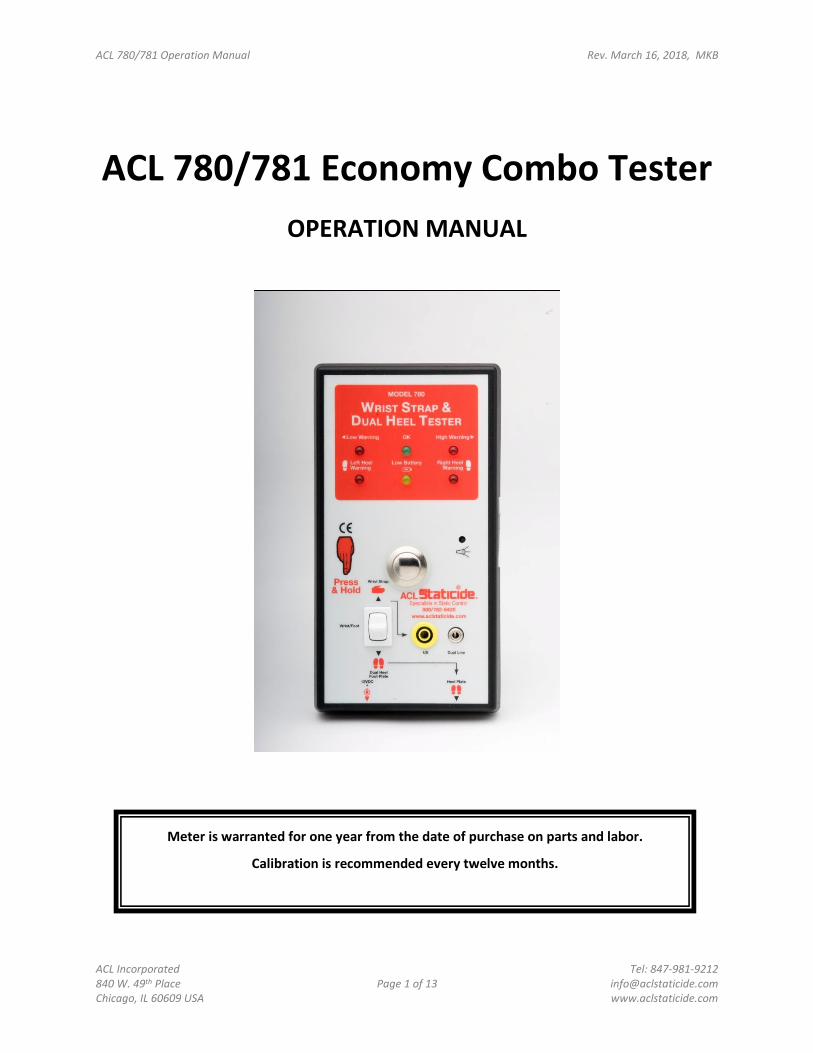
ACL 780/781 Economy Combo Tester
OPERATION MANUAL
Meter is warranted for one year from the date of purchase on parts and labor.
Calibration is recommended every twelve months.

ACL 780/781 Operation Manual Rev. March 16, 2018, MKB
ACL Incorporated Tel: 847-981-9212 840 W. 49th Place Page 2 of 13 [email protected] Chicago, IL 60609 USA www.aclstaticide.com
INTRODUCTION
Get the performance of a state-of-the-art tester for a cost-effective price. The 780/781 Economy
Combo Tester will individually and simultaneously test each wrist strap and heel grounder for proper
connection and resistivity values in less than three seconds. With speed, ease and clarity, colored LED
shows test results. No computer is necessary for pass/fail testing so you don’t pay for features you don’t
need.
FEATURES
• Tests wrist strap and heel grounders individually and simultaneously
• No switch flipping or foot changing
• Automatic calibration
• Measures from 105 ohms (100 kilohms) to 108 (100 megohms), with an option to 109 (1000
megohms)
• Conforms to US ANSI/ESD S20.20 guideline for an electrostatic protected area (EPA)
• Adjustable resistivity limits
• NIST-traceable calibration certificate included
• AC or DC powered
• OK, failure warning, and low battery LED display; buzzer sound
• Can be mounted on the wall or used on optional heavy-duty stand
ACL 780 includes Tester and Heavy Duty Footplate (as shown below).
ACL 781 includes Tester, Heavy Duty Footplate and Stand.

ACL 780/781 Operation Manual Rev. March 16, 2018, MKB
ACL Incorporated Tel: 847-981-9212 840 W. 49th Place Page 3 of 13 [email protected] Chicago, IL 60609 USA www.aclstaticide.com
SPECIFICATIONS
• Display: red, yellow, and green LED with buzzer sound
• Accuracy: ± 15%
• Weight: 1.0 lb (454 g)
• Environment: 32°F to 100°F (0°C to 38°C); 15% to 85% RH.
• Testing Range: 105 – 108 ohms
• Wrist Straps:
o High Range: 2M, 5M, 10M, 25M, 35M, 50M, 75M, 100M ohms
o Low Range: 500k, 750k ohms
• Footwear:
o High Range: 2M, 5M, 10M, 25M, 35M, 50M, 75M, 100M ohms
o Low Range: 500k, 750k ohms
INSTALLATION GUIDE
1. Select a suitable site near an AC power outlet if adapter is to be used. If outlet is unavailable, use 9-
volt alkaline battery. Do not use both, as the battery may overheat.
2. If testing heel grounders, select location for foot plate.
3. If wall-mounting, select a location approximately five feet up from the floor. Before mounting, it is
recommended to plug the footplate lead into the meter to ensure there is enough wire available to
reach tester.
4. The meter can be attached to a wall, work surface, or stand using two adhesive-backed hook and
loop strips provided.
OPERATION
It is important to test wrist straps and footwear daily to ensure their proper function and to minimize
charge generation on the human body, which may cause damage to integrated circuits. Wrist straps and
heel grounders are the primary means by which electrical charges are drained from the body. Too fast a
drain will cause sparking, field generation, and failures. Too low an electrical path can cause electrical
shock. Too high an electrical path can cause integrated circuit damage. To adapt to ISO certification, the
results should be recorded and monitored.

ACL 780/781 Operation Manual Rev. March 16, 2018, MKB
ACL Incorporated Tel: 847-981-9212 840 W. 49th Place Page 4 of 13 [email protected] Chicago, IL 60609 USA www.aclstaticide.com
Wrist Straps
The 780/781 Economy Combo Tester will verify that there is a safe and continuous electrical path
between the user, wrist strap and the ground cord. When using the meter for wrist strap testing or
monitoring, the following is suggested:
1. Position the selector switch located on the front of the meter into the wrist strap position.
2. Put the wrist strap on with the ground cord attached. Be sure the strap is in snug contact with the
wrist. Dry skin, hair, or foreign contaminants may cause failures for well functioning wrist straps that
are within specification.
3. Insert the end of the ground cord into the wrist jack located on the front of the Combo Tester.
4. Press and hold test button until the LED illuminates.
5. If the green “OK” LED illuminates, the wrist strap is functioning within the resistance specification
range and therefore may be used while handling static-sensitive devices.
6. If the red “High Warning” or red “Low Warning” LED illuminates and the buzzer activates, the
worker must test the wrist strap cord immediately. To test a faulty cord, leave the cord plugged into
the meter and detach the wrist cord from the strap. Press the wrist strap metal snap-end of the cord
against the metal test button, avoiding skin contact. If the cord tests fail, replace the cord.
7. If the cord passes, tighten the band cuff around wrist and retest using the cord. If it continues to fail,
apply ESD hand lotion to wrist area and repeat test. Replace wristband if failure continues.
Footwear
1. Position the footplate on the floor directly in front of the Combo Tester. Check to ensure the plate
does not slide when the meter is being used.
2. Insert the 3.5mm stereo plug into socket marked “Heel Plate” on the base of the meter.
3. Position the selector switch on the front of the meter to the “Dual Heel Foot Plate” position.
4. Stand on the foot plate making sure that each foot is aligned on the left or right stainless steel pad.
5. Press and hold test button until an LED illuminates.
6. If the green “OK” LED illuminates, the ESD shoes or heel grounders are functioning within
specifications.
7. If either of the “Low Warning” or “High Warning” red LEDs illuminate accompanied by the activation
of the buzzer for either foot, then the user should check the shoe or heel grounder. Check heel
grounder for good skin contact and dirt contamination.
ACL 780/781 Operation Manual Rev. March 16, 2018, MKB
ACL Incorporated Tel: 847-981-9212 840 W. 49th Place Page 5 of 13 [email protected] Chicago, IL 60609 USA www.aclstaticide.com
Wrist Straps & Footwear
The ACL 780 Economy Combo Tester will test both feet and wrist strap simultaneously. If there is a
failure, the meter defaults in the following order: right foot, left foot, wrist.
1. Position the selector switch between the wrist and heel positions, in the “Wrist/Foot” position.
2. Position the foot plate on the floor directly in front of the Combo Tester. Check to ensure the plate
does not slide when the meter is being used.
3. Insert the 3.5mm stereo plug into socket marked “Heel Plate” on the base of the meter.
4. Stand on the foot plate making sure that each foot is aligned on the left or right stainless steel pad.
5. Put the wrist strap on with the ground cord attached. Be sure the strap is in snug contact with the
wrist. Dry skin, hair, or foreign contaminants may cause failures for functioning wrist straps that are
within specification.
6. Insert the end of the wrist strap’s ground cord into the wrist jack located on the front of the Combo
Tester.
7. Press and hold the metal test button until an LED illuminates.
8. If the green “OK” LED illuminates, then the ESD shoes or heel grounders and wrist strap are
functioning within specifications.
9. If there is a failure, the meter defaults in the following order: right foot, left foot, wrist. If either of
the “Low Warning” or “High Warning” red LEDs glow accompanied by the activation of the buzzer
for either foot, then the user should check the shoe or heel grounder. Check heel grounder for good
skin contact and dirt contamination.
10. If either red “High Warning” or red “Low Warning” LED illuminates and the buzzer activates, the user
must test the wrist strap cord immediately. To test a faulty cord, leave the cord plugged into the
meter and detach the wrist cord from the strap. Press the wrist strap metal snap-end of the cord
against the test button, avoiding skin contact. If the cord tests fail, replace the cord.
11. If the cord passes, tighten the band cuff around wrist and retest using the cord. If it continues to fail,
apply ESD hand lotion to wrist area and repeat test. Replace wristband if failure continues.
ACL 780/781 Operation Manual Rev. March 16, 2018, MKB
ACL Incorporated Tel: 847-981-9212 840 W. 49th Place Page 6 of 13 [email protected] Chicago, IL 60609 USA www.aclstaticide.com
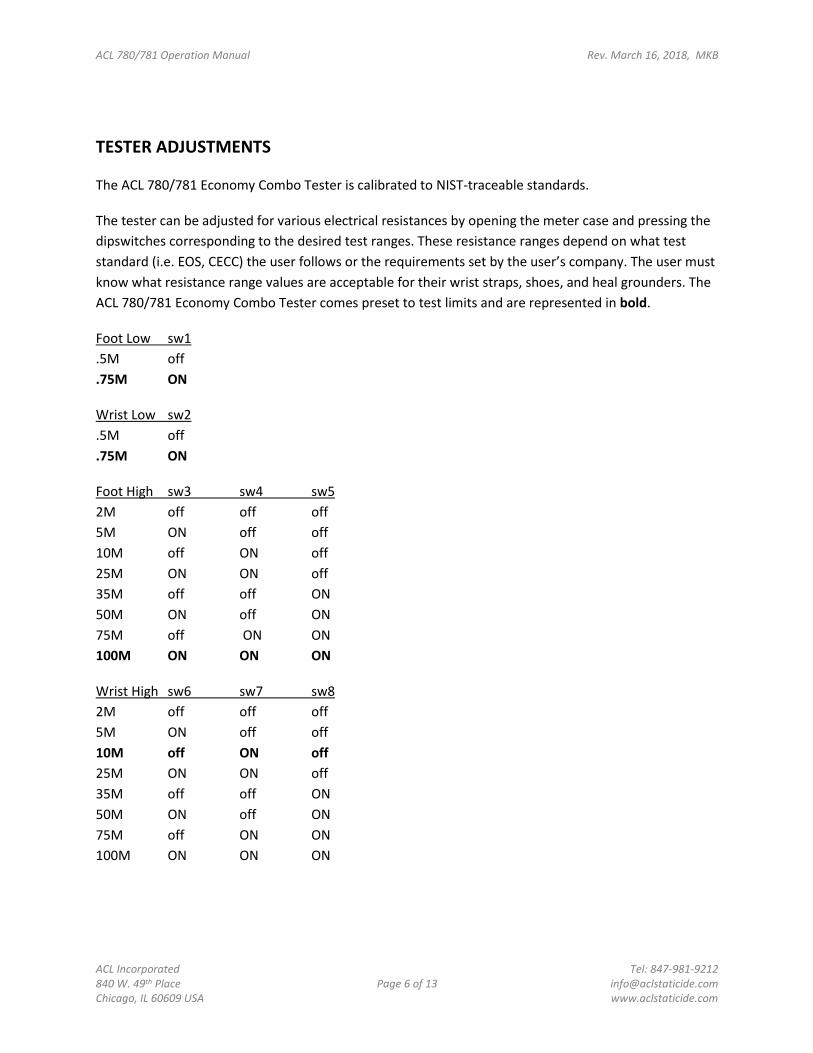
TESTER ADJUSTMENTS
The ACL 780/781 Economy Combo Tester is calibrated to NIST-traceable standards.
The tester can be adjusted for various electrical resistances by opening the meter case and pressing the
dipswitches corresponding to the desired test ranges. These resistance ranges depend on what test
standard (i.e. EOS, CECC) the user follows or the requirements set by the user’s company. The user must
know what resistance range values are acceptable for their wrist straps, shoes, and heal grounders. The
ACL 780/781 Economy Combo Tester comes preset to test limits and are represented in bold.
Foot Low sw1
.5M off
.75M ON
Wrist Low sw2
.5M off
.75M ON
Foot High sw3 sw4 sw5
2M off off off
5M ON off off
10M off ON off
25M ON ON off
35M off off ON
50M ON off ON
75M off ON ON
100M ON ON ON
Wrist High sw6 sw7 sw8
2M off off off
5M ON off off
10M off ON off
25M ON ON off
35M off off ON
50M ON off ON
75M off ON ON
100M ON ON ON

ACL 780/781 Operation Manual Rev. March 16, 2018, MKB
ACL Incorporated Tel: 847-981-9212 840 W. 49th Place Page 7 of 13 [email protected] Chicago, IL 60609 USA www.aclstaticide.com
CALIBRATION CHECK
The ACL 780/781 Economy Combo Tester can be adjusted to various electrical resistance specifications
(limits) depending on what test standard (i.e. ESDA for US and CECC for Europe) the user follows or what
a company requires. To change settings, open the ACL 780/781 Economy Combo Tester and adjust the
dip-switches to desired resistance value. (See below for values.)
If calibration traceable to NIST is desired, send to the ACL Meter Department in order to determine and
trace accuracy. Remember the ACL 780/781 Economy Combo Tester cannot be calibrated. The meter’s
accuracy can only be checked. The meter has resistor and capacitor on the circuit board. Every time the
tester is used, it self-calibrates against this 1% resistor.
1. Purchase 1% resistors on each side of the resistance value that is set in the meter. Factory
settings (in bold) require the following resistors.
a. Foot Low (.75M) 675k & 825k
b. Wrist Low (.75M) 675k & 825k
c. Foot High (100M) 90M & 110M
d. Wrist High (10M) 9M & 11M
2. Solder, clip or twist wires to both ends of the resistors.
a. Attach one end of the resistor to the stainless steel button on the front of the meter
using an alligator clip and piece of aluminum tape. Alternatively, the banana plug can
be held to the button.
b. Attach the other end of the resistor to the receptacle that is being tested using the
appropriate plug attachment: banana plug or stereo plug for wrist, stereo plug for
testing footplate. When the feet are checked, both the right and left leg of the circuit
must have a load on the wire. If not, the unloaded leg will buzz. To accomplish this, a
stereo plug with two pigtail wires must be used. Each of these two wires must have a
resistance load on one end. The other end must be attached to the button using an
alligator clip and piece of aluminum tape or help to the button.
3. To begin test:
a. Position selector switch to “Wrist” setting when testing the wrist limits or the “Foot”
setting when testing the foot limits. Remember when testing feet a stereo plug is
inserted into the jack that usually has the foot plate plug inserted. The other end has the
resistor attached.
b. When testing wrist limits, plug resistor in wrist strap plug-in. When testing foot limits,
insert two resistors into the plug-in jack usually used for the foot plate.
4. Press the test button and compare to the resistance range to be calibrated.
5. Release the test button and compare the pass or fail response to limits being tested.
6. Since the meter is self-calibrating and self-zoning there is no adjustment necessary.

ACL 780/781 Operation Manual Rev. March 16, 2018, MKB
ACL Incorporated Tel: 847-981-9212 840 W. 49th Place Page 8 of 13 [email protected] Chicago, IL 60609 USA www.aclstaticide.com
CALIBRATION USING THE ACL 9500 CALIBRATION BOX
The unit comes with two cables: one single line banana-to-banana wire, and one split wire with a monaural
termination on one end and stackable banana plugs at the Y end. When using the spit-cable, stack the banana
plugs into each other, so it can plug into the same resister.
TO TEST WRIST STRAP FOR A PASS
1. Position the selector switch on the combo tester to “WRIST STRAP”.
2. With the single wire cable, connect one end of the cable into the wrist jack on tester and the other end
into the resister rated below the desired limit. Example, if 10v is the tester’s set max limit, the red cable
plugs into the resister marked “9M OK”.
3. With the Y-cable, connect the stacked end of the Y-cable to the common point banana jack labeled "To
Push" on the ACL 9500 calibration box. Use the single-wire end of the Y-cable to make contact with the
button on the meter. The cable needs to make contact with the button as it is being depressed.
4. Press the power button on the meter (making sure that the wire is making contact with the button) and
observe the LED lights on tester. Green is pass. Red is Fail.
ACL 780/781 Operation Manual Rev. March 16, 2018, MKB
ACL Incorporated Tel: 847-981-9212 840 W. 49th Place Page 9 of 13 [email protected] Chicago, IL 60609 USA www.aclstaticide.com
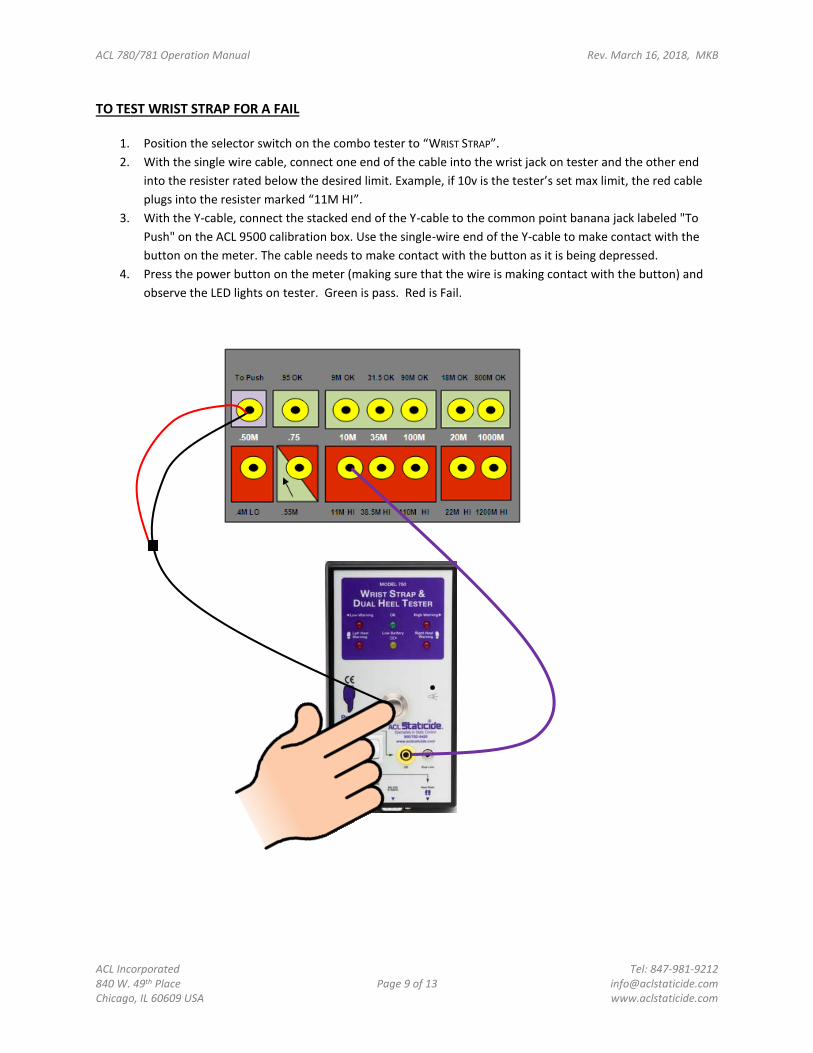
TO TEST WRIST STRAP FOR A FAIL
1. Position the selector switch on the combo tester to “WRIST STRAP”.
2. With the single wire cable, connect one end of the cable into the wrist jack on tester and the other end
into the resister rated below the desired limit. Example, if 10v is the tester’s set max limit, the red cable
plugs into the resister marked “11M HI”.
3. With the Y-cable, connect the stacked end of the Y-cable to the common point banana jack labeled "To
Push" on the ACL 9500 calibration box. Use the single-wire end of the Y-cable to make contact with the
button on the meter. The cable needs to make contact with the button as it is being depressed.
4. Press the power button on the meter (making sure that the wire is making contact with the button) and
observe the LED lights on tester. Green is pass. Red is Fail.

ACL 780/781 Operation Manual Rev. March 16, 2018, MKB
ACL Incorporated Tel: 847-981-9212 840 W. 49th Place Page 10 of 13 [email protected] Chicago, IL 60609 USA www.aclstaticide.com
TO TEST FEET FOR A PASS
1. Position the selector switch on the combo tester to “DUAL HEEL FOOT PLATE”.
2. With the Y-cable, connect the monaural plug into the foot plate jack on tester. Plug the stacked end of
the cable into the resister rated below the desired limit. Example, if 100v is the tester’s set max limit, the
red cable plugs into the resister marked “90M OK”.
3. With the single cable, connect one end to the common point banana jack labeled "To Push" on the ACL
9500 calibration box. Use the other end to make contact with the button on the meter. The cable needs
to make contact with the button as it is being depressed.
4. Press the power button on the meter (making sure that the wire is making contact with the button) and
observe the LED lights on tester. Green is pass. Red is Fail.

ACL 780/781 Operation Manual Rev. March 16, 2018, MKB
ACL Incorporated Tel: 847-981-9212 840 W. 49th Place Page 11 of 13 [email protected] Chicago, IL 60609 USA www.aclstaticide.com
TO TEST FEET FOR A FAIL
1. Position the selector switch on the combo tester to “DUAL HEEL FOOT PLATE”.
2. With the Y-cable, connect the monaural plug into the foot plate jack on tester. Plug the stacked end of
the cable into the resister rated below the desired limit. Example, if 100v is the tester’s set max limit, the
red cable plugs into the resister marked “110M HI”.
3. With the single cable, connect one end to the common point banana jack labeled "To Push" on the ACL
9500 calibration box. Use the other end to make contact with the button on the meter. The cable needs
to make contact with the button as it is being depressed.
4. Press the power button on the meter (making sure that the wire is making contact with the button) and
observe the LED lights on tester. Green is pass. Red is Fail.

ACL 780/781 Operation Manual Rev. March 16, 2018, MKB
ACL Incorporated Tel: 847-981-9212 840 W. 49th Place Page 12 of 13 [email protected] Chicago, IL 60609 USA www.aclstaticide.com
OPTIONAL ACL 740 DOOR RELAY WIRING AND SPECIFICATIONS
Units that are ordered with an ACL 740 door-opening relay option will be equipped with two pigtail
wires found on the right side of the unit. There are two male bayonet type plugs attached to these
wires. There are two unwired female jacks attached to these male plugs, which can be attached to the
open/close schematics on the door/bell circuit board (connected to the door mechanism). The relay in
the ACL 780/781 Economy Combo Tester is a single throw, low voltage single pole normally open relay.
When the user passes a test, the relay is activated and remains closed for about 3 – 5 seconds after the
user releases the test button. Units manufactured after 1/30/2006 have an activation time adjust
trimpot in them which can be used to set the door open time.
The relay is rated .5 amps at 24 volts. Please refer to the schematics of a footplate door opening
mechanism. Substitute the two wire door wires for the two-wire connection of the door foot-switch or
hand-switch.
ACL 740 door opening option:
Both wires connect to customer’s door
relay.
The wires can be disconnected from the
meter via bayonet connection.
ACL 780/781 Operation Manual Rev. March 16, 2018, MKB
ACL Incorporated Tel: 847-981-9212 840 W. 49th Place Page 13 of 13 [email protected] Chicago, IL 60609 USA www.aclstaticide.com
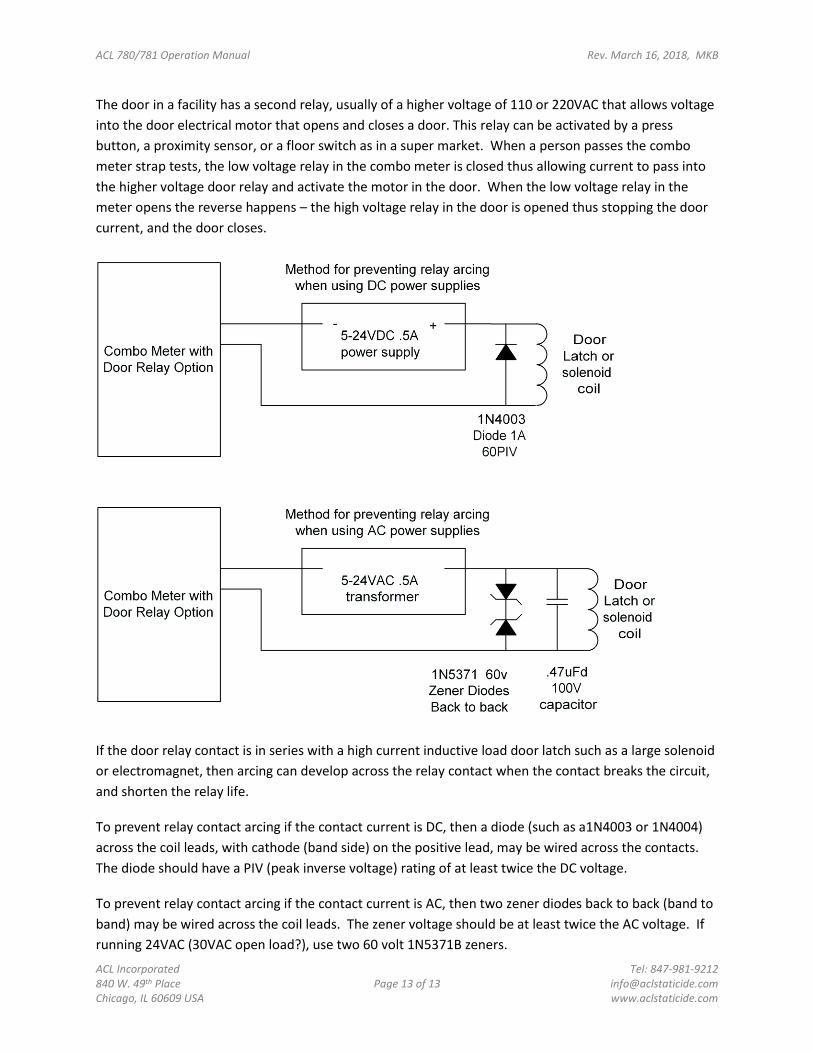
The door in a facility has a second relay, usually of a higher voltage of 110 or 220VAC that allows voltage
into the door electrical motor that opens and closes a door. This relay can be activated by a press
button, a proximity sensor, or a floor switch as in a super market. When a person passes the combo
meter strap tests, the low voltage relay in the combo meter is closed thus allowing current to pass into
the higher voltage door relay and activate the motor in the door. When the low voltage relay in the
meter opens the reverse happens – the high voltage relay in the door is opened thus stopping the door
current, and the door closes.
If the door relay contact is in series with a high current inductive load door latch such as a large solenoid
or electromagnet, then arcing can develop across the relay contact when the contact breaks the circuit,
and shorten the relay life.
To prevent relay contact arcing if the contact current is DC, then a diode (such as a1N4003 or 1N4004)
across the coil leads, with cathode (band side) on the positive lead, may be wired across the contacts.
The diode should have a PIV (peak inverse voltage) rating of at least twice the DC voltage.
To prevent relay contact arcing if the contact current is AC, then two zener diodes back to back (band to
band) may be wired across the coil leads. The zener voltage should be at least twice the AC voltage. If
running 24VAC (30VAC open load?), use two 60 volt 1N5371B zeners.