acoustic wave multi-disc changer - bose corporation setting up english selecting a location for your...
TRANSCRIPT
Acoustic Wave
®
Multi-Disc Changer
Owner�s Giuide
AWMDC_OG.book Page 1 Monday, September 8, 2003 2:33 PM
2
Fra
nçais
Esp
añ
ol
En
glish
Safety Information
Please read this owner’s guidePlease take the time to follow the instructions in this owner’s guide carefully. It will help you set up and operate your system properly and enjoy all of its advanced features. Please save this owner’s guide for future reference.
WARNING: To reduce the risk of fire or electrical shock, do not expose the product to rain or moisture.
WARNING: The apparatus shall not be exposed to dripping or splashing, and objects filled with liquids, such as vases, shall not be placed on the apparatus. As with any electronic products, use care not to spill liquids into any part of the system. Liquids can cause a failure and/or a fire hazard.
CAUTION: To reduce the risk of electric shock, do not disassemble this product unless you are qualified. Refer servicing to quali-fied service personnel.
CAUTIONRISK OF ELECTRICAL SHOCK
DO NOT OPEN
CAUTION: TO REDUCE THE RISK OF ELECTRIC SHOCK,DO NOT REMOVE COVER (OR BACK).
NO USER-SERVICABLE PARTS INSIDE.REFER SERVICING TO QUALIFIED PERSONNEL.
AVISRISQUE DE CHOC ÉLECTRIQUE
NE PAS OUVRIR
ATTENTION : POUR RÉDUIRE LE RISQUE DE DÉCHARGEÉLECTRIQUE, NE RETIREZ PAS LE COUVERCLE (OU
L’ARRIÈRE). IL NE SE TROUVE À L’INTÉRIEUR AUCUNEPIÈCE POUVANT ÊTRE RÉPARÉE PAR L’USAGER.S’ADRESSER À UN RÉPARATEUR COMPÉTENT.
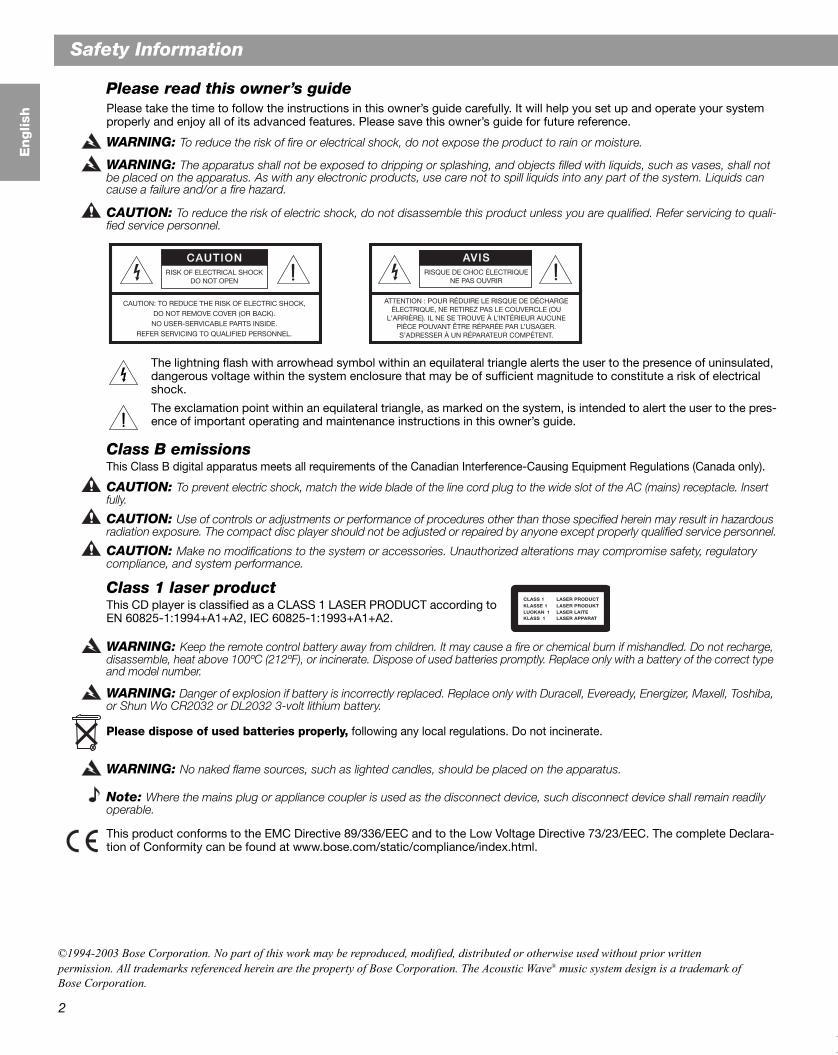
The lightning flash with arrowhead symbol within an equilateral triangle alerts the user to the presence of uninsulated, dangerous voltage within the system enclosure that may be of sufficient magnitude to constitute a risk of electrical shock.
The exclamation point within an equilateral triangle, as marked on the system, is intended to alert the user to the pres-ence of important operating and maintenance instructions in this owner’s guide.
Class B emissionsThis Class B digital apparatus meets all requirements of the Canadian Interference-Causing Equipment Regulations (Canada only).
CAUTION: To prevent electric shock, match the wide blade of the line cord plug to the wide slot of the AC (mains) receptacle. Insert fully.
CAUTION: Use of controls or adjustments or performance of procedures other than those specified herein may result in hazardous radiation exposure. The compact disc player should not be adjusted or repaired by anyone except properly qualified service personnel.
CAUTION: Make no modifications to the system or accessories. Unauthorized alterations may compromise safety, regulatory compliance, and system performance.
Class 1 laser productCLASS 1 LASER PRODUCTKLASSE 1 LASER PRODUKTLUOKAN 1 LASER LAITEKLASS 1 LASER APPARAT
This CD player is classified as a CLASS 1 LASER PRODUCT according to EN 60825-1:1994+A1+A2, IEC 60825-1:1993+A1+A2.
WARNING: Keep the remote control battery away from children. It may cause a fire or chemical burn if mishandled. Do not recharge, disassemble, heat above 100ºC (212ºF), or incinerate. Dispose of used batteries promptly. Replace only with a battery of the correct type and model number.
WARNING: Danger of explosion if battery is incorrectly replaced. Replace only with Duracell, Eveready, Energizer, Maxell, Toshiba, or Shun Wo CR2032 or DL2032 3-volt lithium battery.
Please dispose of used batteries properly, following any local regulations. Do not incinerate.
WARNING: No naked flame sources, such as lighted candles, should be placed on the apparatus.
Note: Where the mains plug or appliance coupler is used as the disconnect device, such disconnect device shall remain readily operable.
This product conforms to the EMC Directive 89/336/EEC and to the Low Voltage Directive 73/23/EEC. The complete Declara-tion of Conformity can be found at www.bose.com/static/compliance/index.html.
©1994-2003 Bose Corporation. No part of this work may be reproduced, modified, distributed or otherwise used without prior written permission. All trademarks referenced herein are the property of Bose Corporation. The Acoustic Wave® music system design is a trademark of Bose Corporation.
XPED_Safety.fm Page 2 Tuesday, October 10, 2006 2:08 PM
3
Contents
En
glish
Fra
nç
ais
De
utsc
hN
ed
erla
nd
s
Setting Up Your Multi-Disc Changer . . . . . . . . . . . . . . . . . . . . . . . . . . . . . . . . . . . . . . . . . . . . . . . . 4Before you begin . . . . . . . . . . . . . . . . . . . . . . . . . . . . . . . . . . . . . . . . . . . . . . . . . . . . . . . . . . . . . 4
Benefits of the multi-disc changer . . . . . . . . . . . . . . . . . . . . . . . . . . . . . . . . . . . . . . . . . . . . 4Unpacking the carton . . . . . . . . . . . . . . . . . . . . . . . . . . . . . . . . . . . . . . . . . . . . . . . . . . . . . . . . . 4Selecting a location for your music system and changer . . . . . . . . . . . . . . . . . . . . . . . . . . . . . 5Seating your Acoustic Wave
®
music system on the multi-disc changer . . . . . . . . . . . . . . . . . . 5Connecting the multi-disc changer to your Acoustic Wave
®
music system . . . . . . . . . . . . . . . 6
Using Your Acoustic Wave
®
Multi-Disc Changer . . . . . . . . . . . . . . . . . . . . . . . . . . . . . . . . . . . . . . . 7Operating with one remote control . . . . . . . . . . . . . . . . . . . . . . . . . . . . . . . . . . . . . . . . . . . . . . 7Turning your complete system on and off . . . . . . . . . . . . . . . . . . . . . . . . . . . . . . . . . . . . . . . . . 8Loading/unloading discs into the multi-disc changer . . . . . . . . . . . . . . . . . . . . . . . . . . . . . . . . 8
Two display panels, two sets of information . . . . . . . . . . . . . . . . . . . . . . . . . . . . . . . . . . . . 9Playing the multi-disc changer . . . . . . . . . . . . . . . . . . . . . . . . . . . . . . . . . . . . . . . . . . . . . . . . . . 10Playing the other sound sources . . . . . . . . . . . . . . . . . . . . . . . . . . . . . . . . . . . . . . . . . . . . . . . . 11Controlling both units as a complete system . . . . . . . . . . . . . . . . . . . . . . . . . . . . . . . . . . . . . . . 12
Adding External Components . . . . . . . . . . . . . . . . . . . . . . . . . . . . . . . . . . . . . . . . . . . . . . . . . . . . . . 13Connecting other sound sources . . . . . . . . . . . . . . . . . . . . . . . . . . . . . . . . . . . . . . . . . . . . . . . . 13
Choose the component(s) you want to connect . . . . . . . . . . . . . . . . . . . . . . . . . . . . . . . . . 13Making the power connection last . . . . . . . . . . . . . . . . . . . . . . . . . . . . . . . . . . . . . . . . . . . . 14
Playing an auxiliary component . . . . . . . . . . . . . . . . . . . . . . . . . . . . . . . . . . . . . . . . . . . . . . . . . 14
Maintaining Your System . . . . . . . . . . . . . . . . . . . . . . . . . . . . . . . . . . . . . . . . . . . . . . . . . . . . . . . . . 15Replacing the remote control battery . . . . . . . . . . . . . . . . . . . . . . . . . . . . . . . . . . . . . . . . . . . . . 15Troubleshooting . . . . . . . . . . . . . . . . . . . . . . . . . . . . . . . . . . . . . . . . . . . . . . . . . . . . . . . . . . . . . 16Customer Service . . . . . . . . . . . . . . . . . . . . . . . . . . . . . . . . . . . . . . . . . . . . . . . . . . . . . . . . . . . . 16Warranty . . . . . . . . . . . . . . . . . . . . . . . . . . . . . . . . . . . . . . . . . . . . . . . . . . . . . . . . . . . . . . . . . . . 17Technical Information . . . . . . . . . . . . . . . . . . . . . . . . . . . . . . . . . . . . . . . . . . . . . . . . . . . . . . . . . 17
Bose Corporation. . . . . . . . . . . . . . . . . . . . . . . . . . . . . . . . . . . . . . . . . . . . . . . . . . . .inside back cover
For your records
The serial number for the Acoustic Wave
®
multi-disc changer is located on the back panel.
Changer serial number:
Purchase date:
We suggest you keep your sales receipt together with this owner’s guide.
AWMDC_OG.book Page 3 Monday, September 8, 2003 2:33 PM
4
En
gli
sh
Setting Up Your Multi-Disc Changer
Before you begin...
Thank you for selecting the Bose
®
Acoustic Wave
®
multi-disc changer, designed as an acces-sory for the Acoustic Wave
®
music system. As a high-quality solution for your multi-disc needs, the changer also provides an attractive pedestal for the system and a connection hub for auxiliary components.
Choosing the convenient option of connecting other sound sources to the changer allows you to enjoy the full impact of their sound through your Acoustic Wave
®
music system.
Benefits of the multi-disc changer
• Hours of uninterrupted CD play
• New multi-disc remote control, that provides simplified, all-in-one system operation
• One button press turns on the changer, FM or AM radio or CD, or selects an auxiliary com-ponent
• Compact design that complements the lines of your Acoustic Wave
®
music system
• Option of hearing auxiliary audio sources through your Acoustic Wave
®
music system
• Quality construction and performance
Unpacking the carton
Carefully unpack your Acoustic Wave
®
music system multi-disc changer. Save all packing materials for possible future use. The original packing materials provide the safest way to transport your new multi-disc changer.
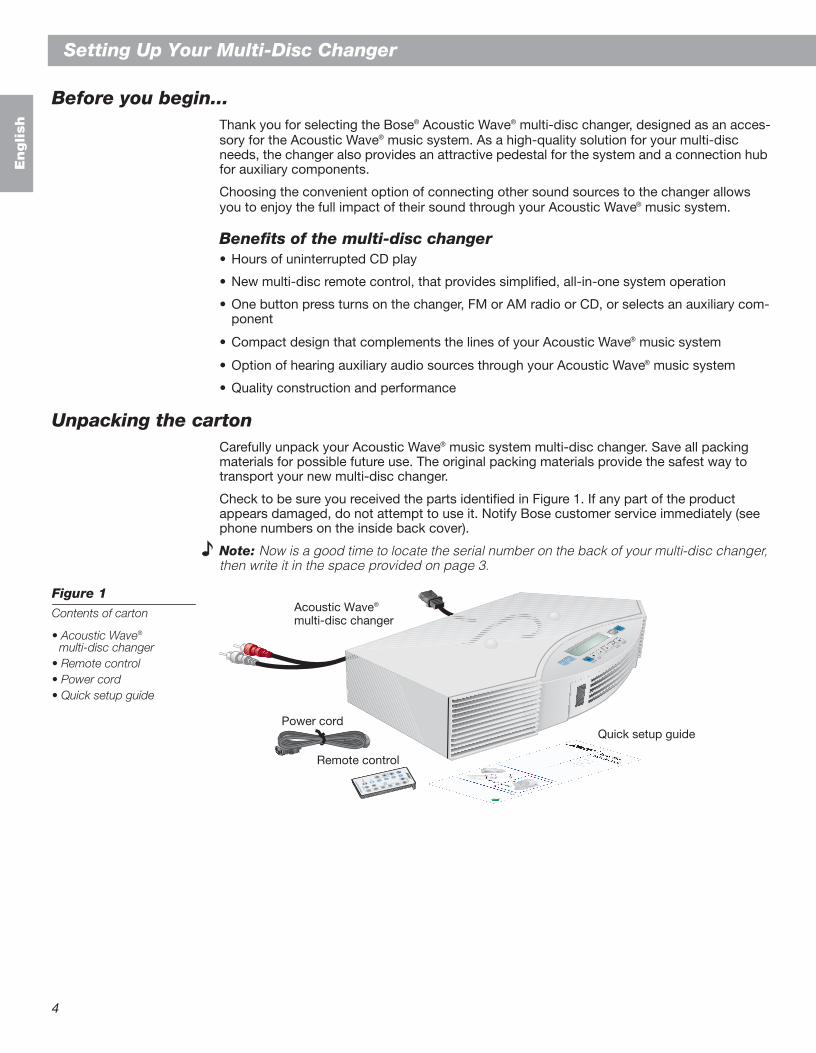
Check to be sure you received the parts identified in Figure 1. If any part of the product appears damaged, do not attempt to use it. Notify Bose customer service immediately (see phone numbers on the inside back cover).
Note:
Now is a good time to locate the serial number on the back of your multi-disc changer, then write it in the space provided on page 3.
Figure 1
Contents of carton
• Acoustic Wave
®
multi-disc changer
• Remote control• Power cord• Quick setup guide
AUX 1AUX 2
ON/OFF
Play/PauseStop
Next DiscRandom
Power cordQuick setup guide
Remote control
Acoustic Wave® multi-disc changer
AWMDC_OG.book Page 4 Monday, September 8, 2003 2:33 PM
5
Setting Up
En
glish
Selecting a location for your music system and changer
The Acoustic Wave
®
multi-disc changer is designed to fit right under your Acoustic Wave
®
music system. Before you connect the two, however, select a good location for the stacked units.
CAUTION:
Setting up the two units separately (on different shelves of an entertainment cen-ter, for example) is not recommended. Doing so will prevent proper communication between the two and will adversely affect operation.
When choosing the location, remember that the tonal quality of your Acoustic Wave
®
music system, as with any high-performance sound system, will vary with room placement.
Feel free to try different locations, but keep in mind that…
• The Acoustic Wave
®
music system is designed to sound best when placed on a shelf, counter, desk, or table top, 30 to 48 inches (75-120 cm) from the floor.
• The CD player in the Acoustic Wave
®
music system needs an allowance of several inches for the CD cover on top of the music system to open.
• The music system should be near the horizontal center of a wall and 6 inches (15 cm) or less from the surface behind it.
• To increase the bass response, move the unit toward any corner of the room; to decrease bass response, move it away from the corner.
Seating your Acoustic Wave
®
music system on the multi-disc changer
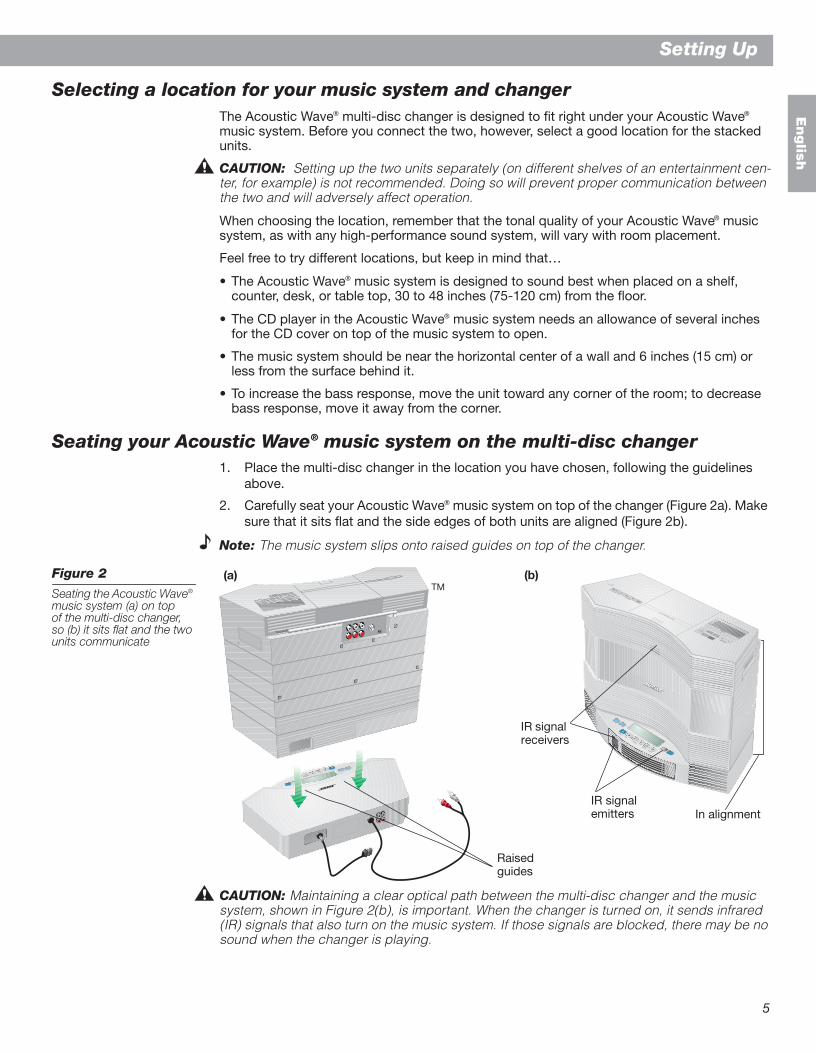
1. Place the multi-disc changer in the location you have chosen, following the guidelines above.
2. Carefully seat your Acoustic Wave
®
music system on top of the changer (Figure 2a). Make sure that it sits flat and the side edges of both units are aligned (Figure 2b).
Note:
The music system slips onto raised guides on top of the changer.
Figure 2
Seating the Acoustic Wave
®
music system (a) on top of the multi-disc changer, so (b) it sits flat and the two units communicate
CAUTION:
Maintaining a clear optical path between the multi-disc changer and the music system, shown in Figure 2(b), is important. When the changer is turned on, it sends infrared (IR) signals that also turn on the music system. If those signals are blocked, there may be no sound when the changer is playing.
PRESETS
1
2
3
4
5
1
FM
AM
‹›
1
AUX
ON/OFFSEEK/TUNE
VOLUME
ACOUSTIC WAVE® MUSIC SYSTEM
CD PLAY/PAUSE
RANDOM REPEAT
STOP
SKIP/SCAN
AUX 1
AUX 2
ON/OFF
Play/PauseStop
Next DiscRandom
Skip/Scan
AUX 1AUX 2
ON/OFF
Play/PauseStop
Next DiscRandom
(a) (b)
Raised guides
IR signal emitters
IR signal receivers
In alignment
TM
AWMDC_OG.book Page 5 Monday, September 8, 2003 2:33 PM

6
Setting Up
En
gli
sh
Connecting the multi-disc changer to your Acoustic Wave
®
music system
On the back of the multi-disc changer there are two cables (Figure 3) that connect to your Acoustic Wave
®
music system.
1. Insert the two connectors of the AUX input cable into
AUX IN
jacks on the back of the Acoustic Wave
®
music system. Be sure to match the colors of the connectors and jacks:
red to red, and white to white
.
2. Insert the plug of the AC power cable into the AC power receptacle on the back of the Acoustic Wave
®
music system.
Figure 3
Connecting the multi-disc changer to the Acoustic Wave
®
music system
Note:
The changer comes supplied with a detachable power cord, similar to the one provided with the Acoustic Wave
®
music system. You will need to use only one of these two supplied power cords.
3. Plug the small end of the detachable power cord into the power jack on the back of the changer (Figure 4).
CAUTION:
If you will be connecting auxiliary components to the changer, refer to “Connect-ing other sound sources” on page 13.
4. Plug the other end of the power cord into an AC (mains) wall outlet and your setup is complete.
Figure 4
Plugging in the power cord
Note:
When the multi-disc changer turns on after you plug it in, “PLEASE WAIT” flashes on its display for a few seconds. When the flashing stops, you can load and play the changer.
AC power cable AUX input cablePower jack
TM
AWMDC_OG.book Page 6 Monday, September 8, 2003 2:33 PM
7
En
glish
Using Your Acoustic Wave
®
Multi-Disc Changer
Operating with one remote control
The remote control included with your Acoustic Wave
®
multi-disc changer allows you to con-trol functions of both the multi-disc changer and your Acoustic Wave
®
music system. There-fore, we suggest you
put away the remote that came with your Acoustic Wave
®
music system
and use only this Acoustic Wave
®
multi-disc changer remote.
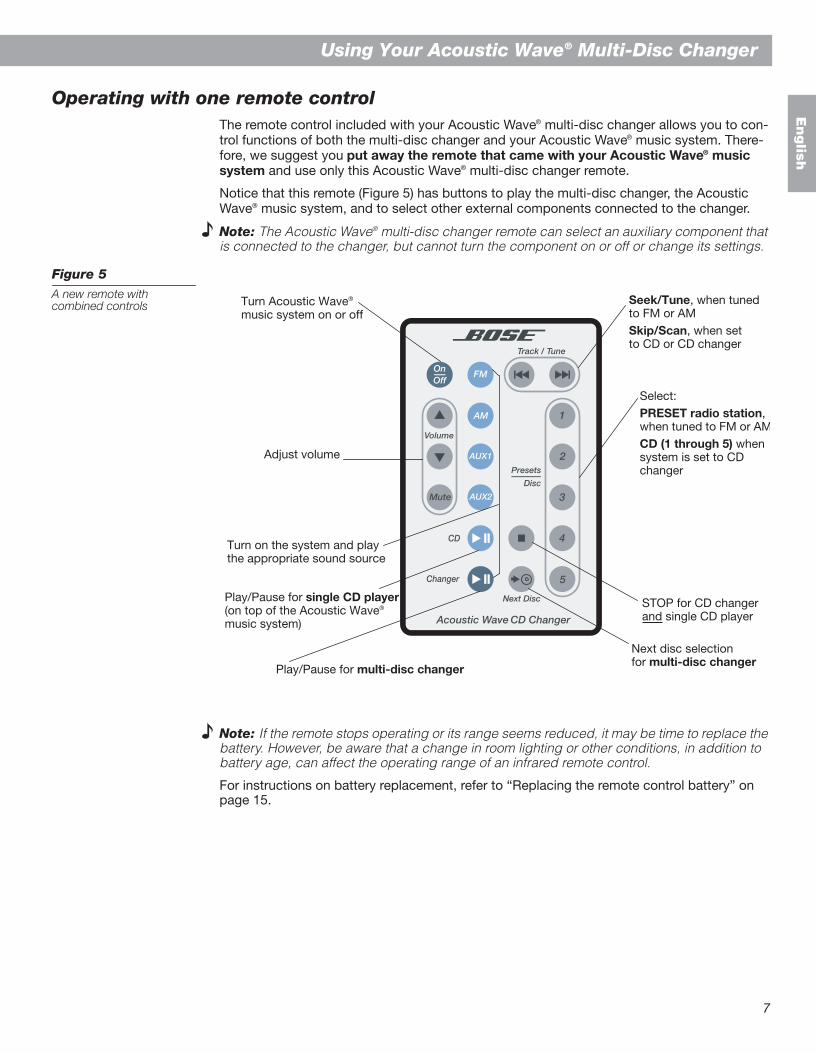
Notice that this remote (Figure 5) has buttons to play the multi-disc changer, the Acoustic Wave
®
music system, and to select other external components connected to the changer.
Note:
The Acoustic Wave
®
multi-disc changer remote can select an auxiliary component that is connected to the changer, but cannot turn the component on or off or change its settings.
Figure 5
A new remote withcombined controls
Note:
If the remote stops operating or its range seems reduced, it may be time to replace the battery. However, be aware that a change in room lighting or other conditions, in addition to battery age, can affect the operating range of an infrared remote control.
For instructions on battery replacement, refer to “Replacing the remote control battery” on page 15.
Turn Acoustic Wave® music system on or off
Select: PRESET radio station, when tuned to FM or AMCD (1 through 5) when system is set to CD changer
Adjust volume
Play/Pause for multi-disc changer
Seek/Tune, when tuned to FM or AMSkip/Scan, when set to CD or CD changer
Play/Pause for single CD player (on top of the Acoustic Wave® music system)
Turn on the system and play the appropriate sound source
STOP for CD changer and single CD player
Next disc selection for multi-disc changer
AWMDC_OG.book Page 7 Monday, September 8, 2003 2:33 PM
8
Using Your Acoustic Wave
®
Multi-Disc Changer
En
gli
sh
Turning your complete system on and off
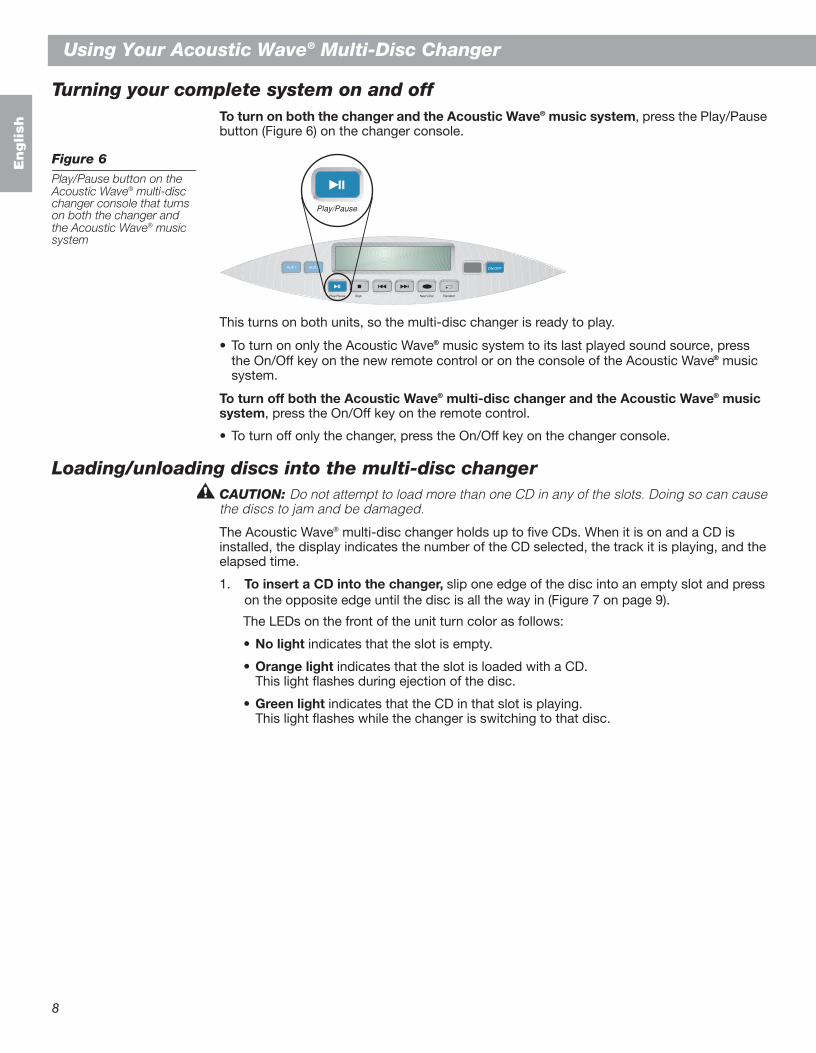
To turn on both the changer
and the Acoustic Wave
®
music system
, press the Play/Pause button (Figure 6) on the changer console.
Figure 6
Play/Pause button on the Acoustic Wave
®
multi-disc changer console that turns on both the changer and the Acoustic Wave
®
music system
This turns on both units, so the multi-disc changer is ready to play.
• To turn on only the Acoustic Wave
®
music system to its last played sound source, press the On/Off key on the new remote control or on the console of the Acoustic Wave
®
music system.
To turn off both the Acoustic Wave
®
multi-disc changer and the Acoustic Wave
®
music system
, press the On/Off key on the remote control.
• To turn off only the changer, press the On/Off key on the changer console.
Loading/unloading discs into the multi-disc changer
CAUTION:
Do not attempt to load more than one CD in any of the slots. Doing so can cause the discs to jam and be damaged.
The Acoustic Wave
®
multi-disc changer holds up to five CDs. When it is on and a CD is installed, the display indicates the number of the CD selected, the track it is playing, and the elapsed time.
1.
To insert a CD into the changer,
slip one edge of the disc into an empty slot and press on the opposite edge until the disc is all the way in (Figure 7 on page 9).
The LEDs on the front of the unit turn color as follows:
•
No light
indicates that the slot is empty.
•
Orange light
indicates that the slot is loaded with a CD.This light flashes during ejection of the disc.
•
Green light
indicates that the CD in that slot is playing.This light flashes while the changer is switching to that disc.
Play/Pause Stop Next Disc Random
AUX 1 AUX 2 ON/OFF
Play/Pause
AWMDC_OG.book Page 8 Monday, September 8, 2003 2:33 PM

9
Using Your Acoustic Wave® Multi-Disc Changer
En
glish
Figure 7Inserting a disc into the CD changer
Note: To keep track of the order of CDs in the slots, you may find it useful to keep the CD cases stacked in the same order near the multi-disc changer.
To hear the CD you have just inserted, press the Play/Pause button on the console.
To remove a CD from a changer slot, press the button to the right of the LED for that slot. Allow a few seconds for the mechanism to respond.
Two display panels, two sets of informationWhen the two units first turn on, displays on both consoles light up (Figure 8a). The Acoustic Wave® music system displays AUX to show that the CD changer or one of the components connected to it is selected. It also shows the volume setting. The Acoustic Wave® multi-disc changer display indicates what is playing on the changer. LEDs next to the CD slots on the front of the changer light up as CDs are installed (Figure 8b).
Figure 8Console displays (a) and LEDs (b) indicating a CD on the changer is playing
What else the displays tell youThe display on the Acoustic Wave® music system shows when one of its sound sources is selected. It also displays the number – 1 to 100 – of the volume setting. When the single CD player is in use, it shows the track number and the elapsed playing time.
When the multi-disc changer is playing, its display shows which disc and track are playing and the elapsed time.
AUX 1
AUX 2
ON/OFF
Play/PauseStop
Next DiscRandom
Skip/Scan
Eject
1
2
3
4
5
Eject
1
2
3
4
5
PRESETS
1
2
3
4
5
1
FM
AM
‹›
1
AUX
ON/OFFSEEK/TUNE
VOLUME
ACOUSTIC WAVE® MUSIC SYSTEM
CD PLAY/PAUSE
RANDOM REPEAT
STOP
SKIP/SCAN
LED indicators
Green light indicates the slot is in use after the CD is inserted
TM
Eject
1
2
3
4
5
Play/Pause Stop Next Disc CD Mode
AUX 1 AUX 2 ON/OFF
CHANGER
DISC TRACK
Acoustic Wave Music System
AUX VOLUME
CD Play/Pause Stop Skip/Scan CD Mode
1 2 3 4 5
FM AM
Seek/TuneVolume
On/OffAUX
Presets
(a)
(b)
Acoustic Wave® music system display
Acoustic Wave® multi-disc changer display
Acoustic Wave® multi-disc changer front panelCD indicator LED
AUX indicator
Elapsed time
CD playDisc selected
Track playing
AWMDC_OG.book Page 9 Monday, September 8, 2003 2:33 PM
10
Using Your Acoustic Wave® Multi-Disc Changer
En
gli
sh
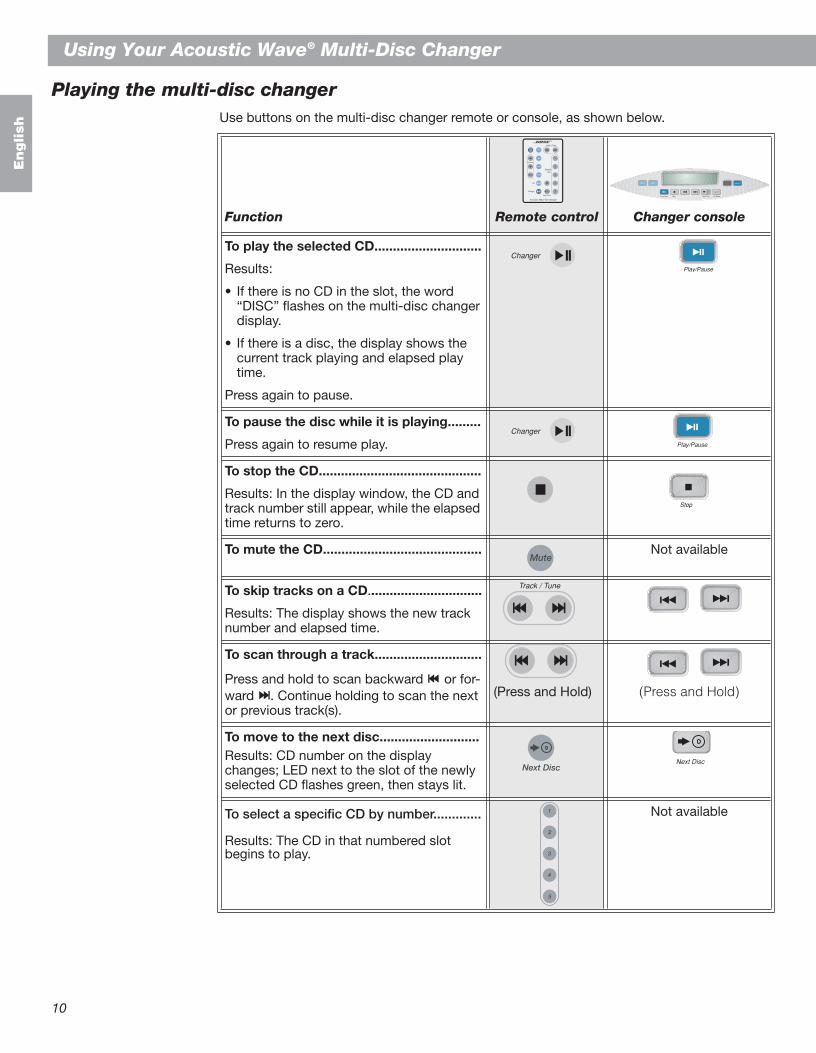
Playing the multi-disc changerUse buttons on the multi-disc changer remote or console, as shown below.
Function Remote control Changer console
To play the selected CD.............................
Results:
• If there is no CD in the slot, the word “DISC” flashes on the multi-disc changer display.
• If there is a disc, the display shows the current track playing and elapsed play time.
Press again to pause.
To pause the disc while it is playing.........
Press again to resume play.
To stop the CD............................................
Results: In the display window, the CD and track number still appear, while the elapsed time returns to zero.
To mute the CD........................................... Not available
To skip tracks on a CD...............................
Results: The display shows the new track number and elapsed time.
To scan through a track.............................
Press and hold to scan backward or for-ward . Continue holding to scan the next or previous track(s).
(Press and Hold) (Press and Hold)
To move to the next disc...........................Results: CD number on the display changes; LED next to the slot of the newly selected CD flashes green, then stays lit.
To select a specific CD by number.............
Results: The CD in that numbered slot begins to play.
Not available
Play/Pause Stop Next Disc CD Mode
AUX 1 AUX 2 ON/OFF
Changer
Play/Pause
Changer
Play/Pause
Stop
Track / Tune
ac / u e
Next Disc
AWMDC_OG.book Page 10 Monday, September 8, 2003 2:33 PM
11
Using Your Acoustic Wave® Multi-Disc Changer
En
glish
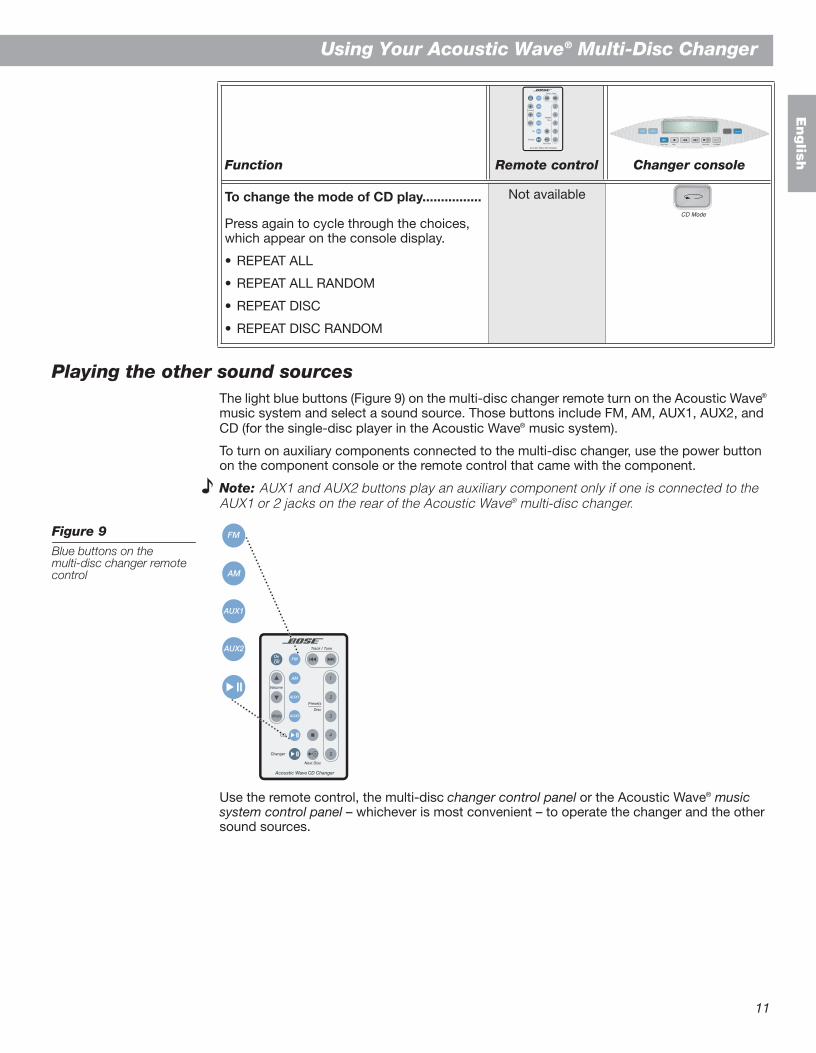
Playing the other sound sourcesThe light blue buttons (Figure 9) on the multi-disc changer remote turn on the Acoustic Wave® music system and select a sound source. Those buttons include FM, AM, AUX1, AUX2, and CD (for the single-disc player in the Acoustic Wave® music system).
To turn on auxiliary components connected to the multi-disc changer, use the power button on the component console or the remote control that came with the component.
Note: AUX1 and AUX2 buttons play an auxiliary component only if one is connected to the AUX1 or 2 jacks on the rear of the Acoustic Wave® multi-disc changer.
Figure 9Blue buttons on the multi-disc changer remote control
Use the remote control, the multi-disc changer control panel or the Acoustic Wave® music system control panel – whichever is most convenient – to operate the changer and the other sound sources.
Function Remote control Changer console
To change the mode of CD play................
Press again to cycle through the choices, which appear on the console display.
• REPEAT ALL
• REPEAT ALL RANDOM
• REPEAT DISC
• REPEAT DISC RANDOM
Not available
Play/Pause Stop Next Disc CD Mode
AUX 1 AUX 2 ON/OFF
CD Mode
AWMDC_OG.book Page 11 Monday, September 8, 2003 2:33 PM

12
Using Your Acoustic Wave® Multi-Disc Changer
En
gli
sh
Play/Pause
Controlling both units as a complete systemThe Acoustic Wave® multi-disc remote control can change some of the Acoustic Wave® music system settings and select and play its sources, as well as operating the changer functions.
Note: For details on how the Acoustic Wave® music system functions and the options avail-able for controlling it, refer to the owner’s guide that came in the carton with the system.
Function Remote control Changer console System control panel
To turn on the Acoustic Wave® music system to its last source played................(NOT the CD changer)
Not available
To turn on and select the CD changer...... Not available
To change mode of single CD play......... Not available Not available
To set radio presets....................................(with the radio station selected)
Press and hold down the button that you want to assign to the selected station.
Results: A brief beep registers your setting.
Not available
To tune to a preset radio station............... (with the radio on)
Not available
To play an auxiliary component.................
� First, turn on the power for that compo-nent by pressing the Power button on its remote or console.
� Take note of whether the component is connected to the AUX1 or AUX2 jacks on the back of the changer.
� Then, press the appropriate button.
Not available
Play/Pause Stop Next Disc CD Mode
AUX 1 AUX 2 ON/OFF
Acoustic Wave Music System
AUX VOLUME
CD Play/Pause Stop Skip/Scan CD Mode
1 2 3 4 5
FM AM
Seek/TuneVolume
On/OffAUX
Presets
OnOff
On/Off
Changer
Play/Pause
CD Mode
1 2 3 4 5
Presets
1 2 3 4 5
Presets
AUX1 AUX2or AUX 1AUX 2Or
AWMDC_OG.book Page 12 Monday, September 8, 2003 2:33 PM
13
En
glish
Using External Components
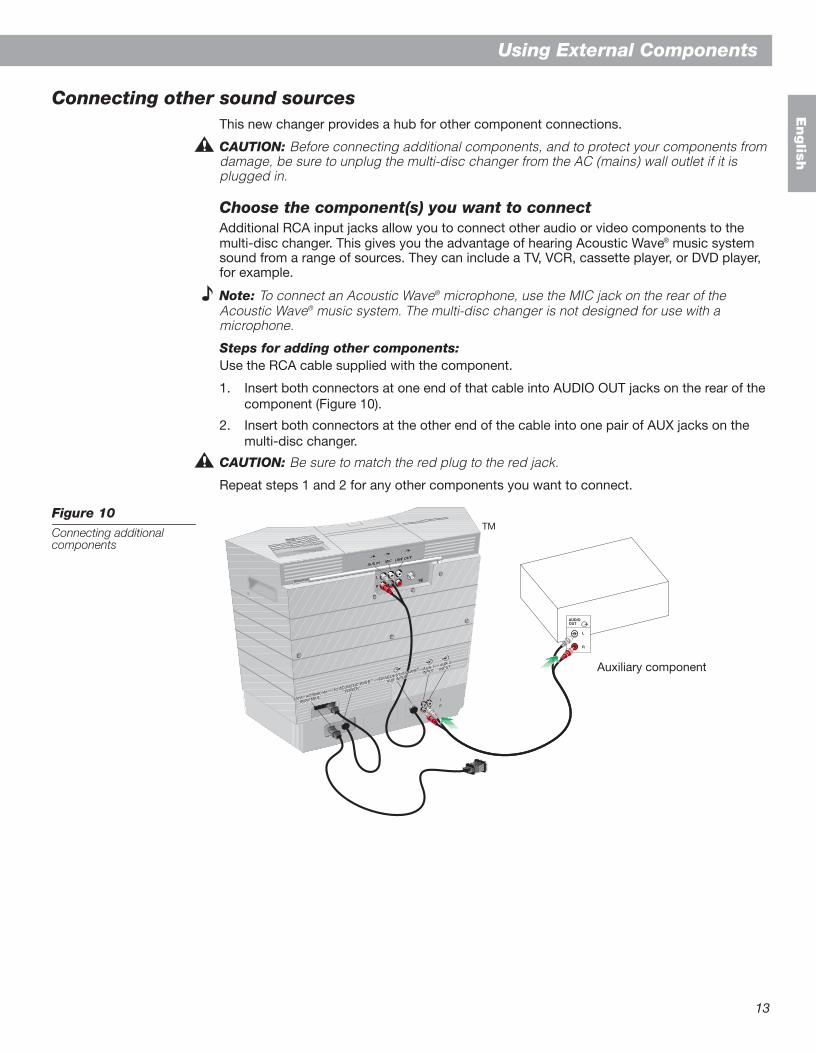
Connecting other sound sourcesThis new changer provides a hub for other component connections.
CAUTION: Before connecting additional components, and to protect your components from damage, be sure to unplug the multi-disc changer from the AC (mains) wall outlet if it is plugged in.
Choose the component(s) you want to connectAdditional RCA input jacks allow you to connect other audio or video components to the multi-disc changer. This gives you the advantage of hearing Acoustic Wave® music system sound from a range of sources. They can include a TV, VCR, cassette player, or DVD player, for example.
Note: To connect an Acoustic Wave® microphone, use the MIC jack on the rear of the Acoustic Wave® music system. The multi-disc changer is not designed for use with a microphone.
Steps for adding other components:Use the RCA cable supplied with the component.
1. Insert both connectors at one end of that cable into AUDIO OUT jacks on the rear of the component (Figure 10).
2. Insert both connectors at the other end of the cable into one pair of AUX jacks on the multi-disc changer.
CAUTION: Be sure to match the red plug to the red jack.
Repeat steps 1 and 2 for any other components you want to connect.
Figure 10Connecting additional components
L
R
Auxiliary component
TM
AWMDC_OG.book Page 13 Monday, September 8, 2003 2:33 PM
14
Using external components
En
gli
sh
Special requirement for adding a turntableTo connect a turntable, you need to first connect a phono preamplifier (with RIAA equaliza-tion) to the changer.
1. Plug one end of the stereo audio cable into the output jacks of the preamplifier.
2. Plug the other end of the cable into one set of AUX IN jacks on your changer, matching red to the red jack marked R (right) and black or white to the white jack marked L (left).
3. Plug the turntable cable into the preamplifier.
CAUTION: Be sure to match the red plug to the red jack. This ensures proper polarity of the signal for an accurate balance of low-to-high frequencies.
Making the power connection lastWhen the additional components are connected, insert the multi-disc changer power plug into an AC power outlet.
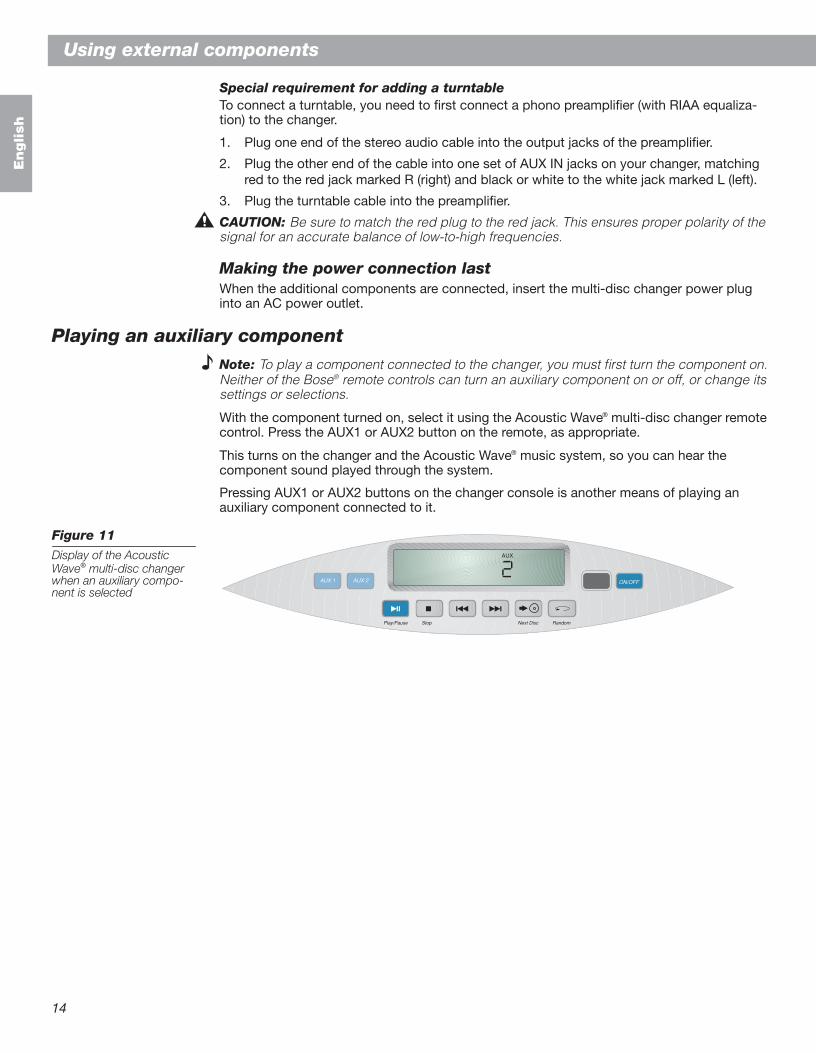
Playing an auxiliary componentNote: To play a component connected to the changer, you must first turn the component on. Neither of the Bose® remote controls can turn an auxiliary component on or off, or change its settings or selections.
With the component turned on, select it using the Acoustic Wave® multi-disc changer remote control. Press the AUX1 or AUX2 button on the remote, as appropriate.
This turns on the changer and the Acoustic Wave® music system, so you can hear the component sound played through the system.
Pressing AUX1 or AUX2 buttons on the changer console is another means of playing an auxiliary component connected to it.
Figure 11Display of the Acoustic Wave® multi-disc changer when an auxiliary compo-nent is selected
Play/Pause Stop Next Disc Random
AUX 1 AUX 2 ON/OFF
AUX
AWMDC_OG.book Page 14 Monday, September 8, 2003 2:33 PM
15
En
glish
Maintaining Your System
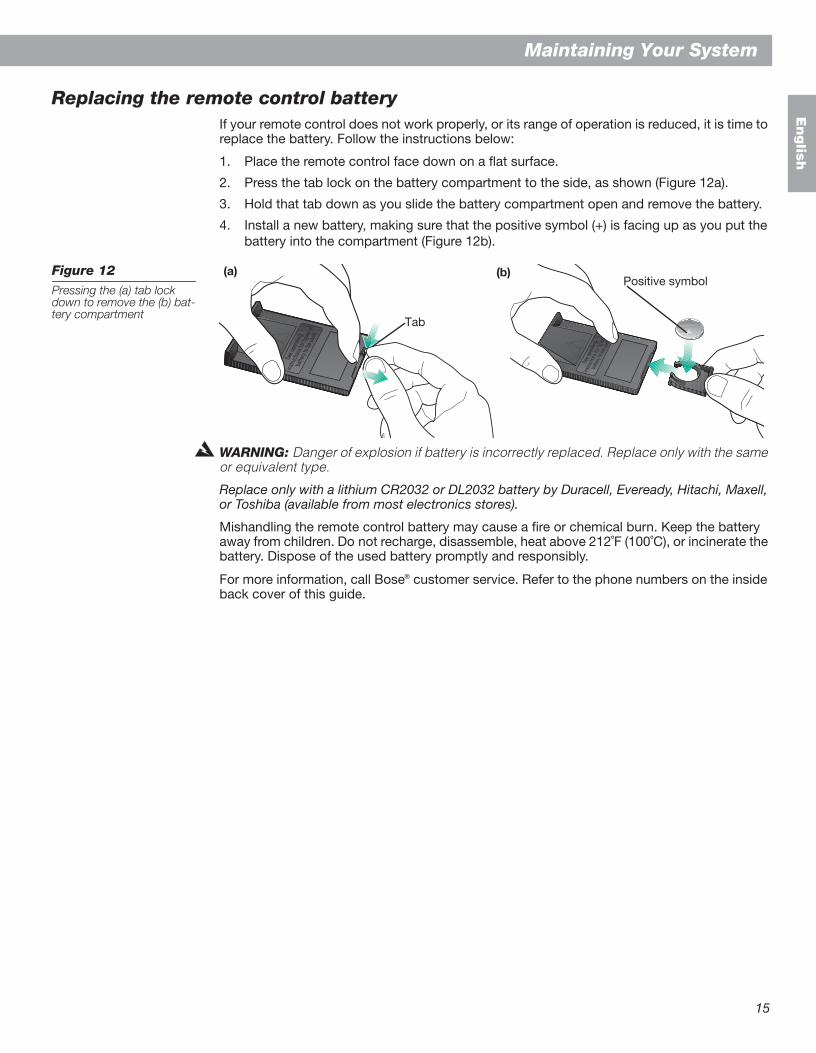
Replacing the remote control batteryIf your remote control does not work properly, or its range of operation is reduced, it is time to replace the battery. Follow the instructions below:
1. Place the remote control face down on a flat surface.
2. Press the tab lock on the battery compartment to the side, as shown (Figure 12a).
3. Hold that tab down as you slide the battery compartment open and remove the battery.
4. Install a new battery, making sure that the positive symbol (+) is facing up as you put the battery into the compartment (Figure 12b).
Figure 12Pressing the (a) tab lock down to remove the (b) bat-tery compartment
WARNING: Danger of explosion if battery is incorrectly replaced. Replace only with the same or equivalent type.
Replace only with a lithium CR2032 or DL2032 battery by Duracell, Eveready, Hitachi, Maxell, or Toshiba (available from most electronics stores).
Mishandling the remote control battery may cause a fire or chemical burn. Keep the battery away from children. Do not recharge, disassemble, heat above 212˚F (100˚C), or incinerate the battery. Dispose of the used battery promptly and responsibly.
For more information, call Bose® customer service. Refer to the phone numbers on the inside back cover of this guide.
See o
perat
ing
instru
ction
s for
type
s of
batte
ry to
be us
ed
See o
perat
ing
instru
ction
s for
type
s of
batte
ry to
be us
ed
Positive symbol
Tab
(a) (b)
AWMDC_OG.book Page 15 Monday, September 8, 2003 2:33 PM
16
Maintaining Your System
En
gli
sh
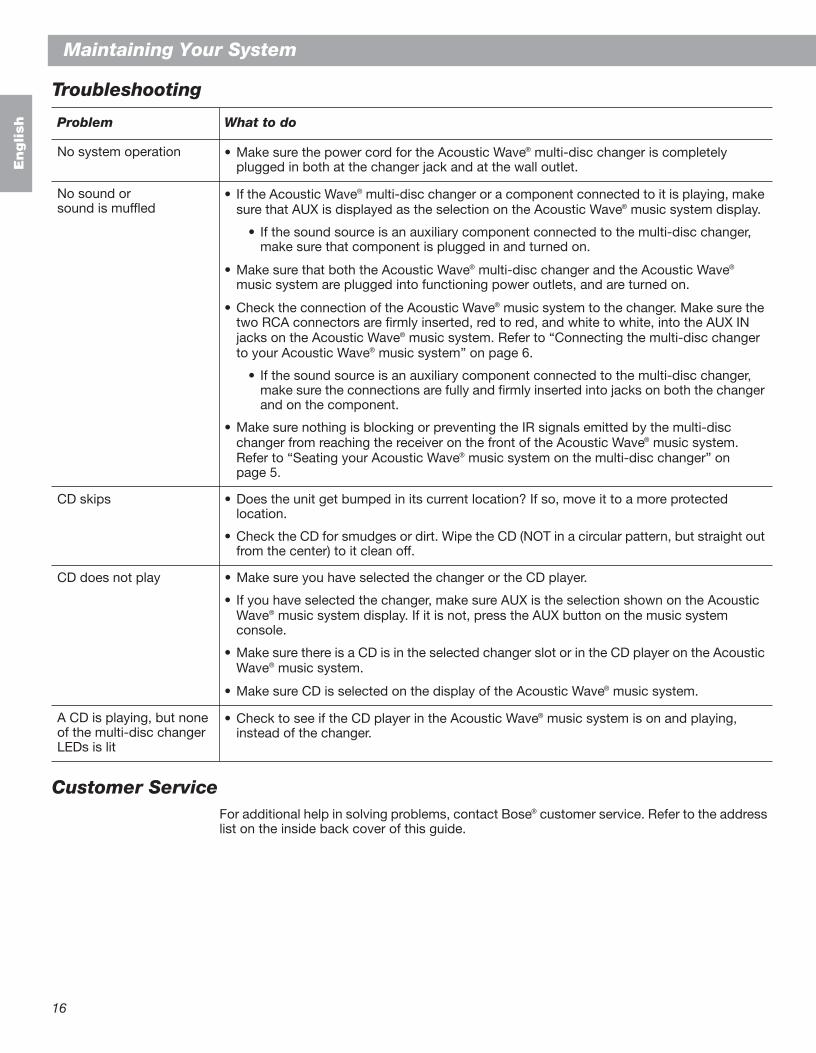
Troubleshooting
Customer ServiceFor additional help in solving problems, contact Bose® customer service. Refer to the address list on the inside back cover of this guide.
Problem What to do
No system operation • Make sure the power cord for the Acoustic Wave® multi-disc changer is completely plugged in both at the changer jack and at the wall outlet.
No sound or sound is muffled
• If the Acoustic Wave® multi-disc changer or a component connected to it is playing, make sure that AUX is displayed as the selection on the Acoustic Wave® music system display.
• If the sound source is an auxiliary component connected to the multi-disc changer, make sure that component is plugged in and turned on.
• Make sure that both the Acoustic Wave® multi-disc changer and the Acoustic Wave® music system are plugged into functioning power outlets, and are turned on.
• Check the connection of the Acoustic Wave® music system to the changer. Make sure the two RCA connectors are firmly inserted, red to red, and white to white, into the AUX IN jacks on the Acoustic Wave® music system. Refer to “Connecting the multi-disc changer to your Acoustic Wave® music system” on page 6.
• If the sound source is an auxiliary component connected to the multi-disc changer, make sure the connections are fully and firmly inserted into jacks on both the changer and on the component.
• Make sure nothing is blocking or preventing the IR signals emitted by the multi-disc changer from reaching the receiver on the front of the Acoustic Wave® music system. Refer to “Seating your Acoustic Wave® music system on the multi-disc changer” on page 5.
CD skips • Does the unit get bumped in its current location? If so, move it to a more protected location.
• Check the CD for smudges or dirt. Wipe the CD (NOT in a circular pattern, but straight out from the center) to it clean off.
CD does not play • Make sure you have selected the changer or the CD player.
• If you have selected the changer, make sure AUX is the selection shown on the Acoustic Wave® music system display. If it is not, press the AUX button on the music system console.
• Make sure there is a CD is in the selected changer slot or in the CD player on the Acoustic Wave® music system.
• Make sure CD is selected on the display of the Acoustic Wave® music system.
A CD is playing, but none of the multi-disc changer LEDs is lit
• Check to see if the CD player in the Acoustic Wave® music system is on and playing, instead of the changer.
AWMDC_OG.book Page 16 Monday, September 8, 2003 2:33 PM

17
Maintaining Your System
En
glish
WarrantyWhat is covered:All parts defective in material or workmanship.
For how long:Two years from the purchase date.
What we will do:We will, at our sole option, repair or replace any defective parts free of charge.
What you must do:A. Call Bose® Customer Service and ask for shipping instructions.
B. Properly pack the unit, if possible, in the original carton for shipping.
Other conditions:This warranty is fully transferable for the one-year period following purchase.
THE PROVISIONS OF THIS WARRANTY ARE IN LIEU OF ANY OTHER WARRANTY, WHETHER EXPRESS OR IMPLIED, WRITTEN OR ORAL, INCLUDING ANY WARRANTY OF MERCHANTABILITY OR FITNESS FOR A PARTICULAR PURPOSE. BOSE CORPORATION’S MAXIMUM LIABILITY SHALL NOT EXCEED THE ACTUAL PURCHASE PRICE PAID BY YOU FOR THE PRODUCT. IN NO EVENT SHALL BOSE BE LIABLE FOR SPECIAL, INCIDENTAL, CONSEQUENTIAL, OR INDIRECT DAMAGES.
This warranty does not cover a defect that has resulted from improper or unreasonable use or maintenance, accident, improper packing, or unauthorized tampering, alteration, or modifica-tion as determined solely by us. This warranty is void if the label bearing the serial number has been removed or defaced.
Other Legal Rights:This warranty gives you specific legal rights, and you may also have other rights which vary from state to state or country to country. Some places do not allow limitations on implied war-ranties or the exclusion or limitation of incidental or consequential damages, so the above limitations or exclusions may not apply to you.
Technical Information
Multi-disc changer power rating220-240V~ 50/60 Hz 15W
In combination with the Acoustic Wave® music system, 80W maximum
Dimensions31/4"H x 18"W x 83/8"D(8.7 cm x 45.7 cm x 21.1 cm)
Weight6.7 lb (3.1 kg)
ColorGraphite Gray or Platinum White
AWMDC_OG.book Page 17 Monday, September 8, 2003 2:33 PM
19
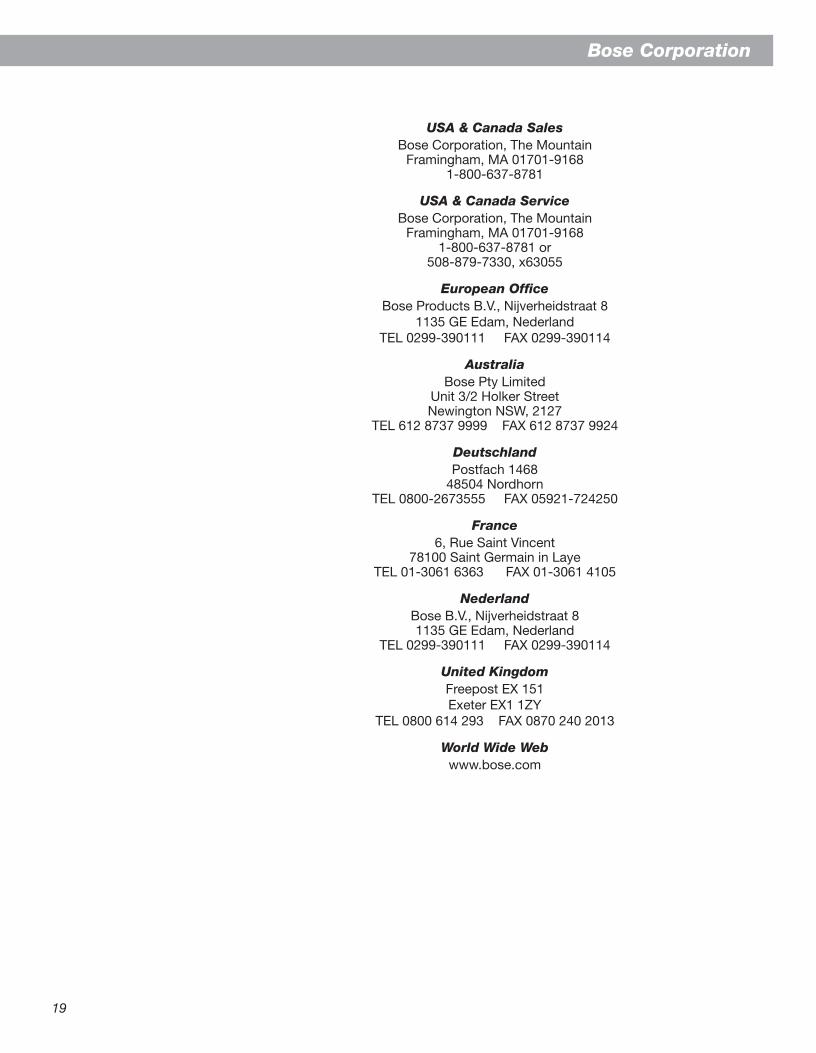
Bose Corporation
USA & Canada SalesBose Corporation, The Mountain
Framingham, MA 01701-91681-800-637-8781
USA & Canada ServiceBose Corporation, The Mountain
Framingham, MA 01701-91681-800-637-8781 or
508-879-7330, x63055
European OfficeBose Products B.V., Nijverheidstraat 8
1135 GE Edam, NederlandTEL 0299-39011155 FAX 0299-390114
AustraliaBose Pty Limited
Unit 3/2 Holker StreetNewington NSW, 2127
TEL 612 8737 999955FAX 612 8737 9924
DeutschlandPostfach 1468
48504 NordhornTEL 0800-2673555 55FAX 05921-724250
France6, Rue Saint Vincent
78100 Saint Germain in LayeTEL 01-3061 6363555FAX 01-3061 4105
NederlandBose B.V., Nijverheidstraat 8 1135 GE Edam, Nederland
TEL 0299-39011155 FAX 0299-390114
United KingdomFreepost EX 151Exeter EX1 1ZY
TEL 0800 614 29355FAX 0870 240 2013
World Wide Webwww.bose.com
AWMDC_OG.book Page 19 Monday, September 8, 2003 2:41 PM
©2003 Bose CorporationThe Mountain, Framingham, MA 01701-9168 USA303025 AM Rev. 00 JN30964
AWMDC_OG.book Page 20 Monday, September 8, 2003 2:41 PM