activity: converting existing data to kml - uconn...
TRANSCRIPT

Putting Maps, Images and Data on the Web
1
Activity: Converting Existing Data to KML Requirements You must have DNRGarmin for this activity.
Preparation: The link will take you to the DNRGarmin Application page. Scroll down to the Download Program section (almost at the bottom of the page). Click on the DNRGarmin 5.4.1 link. Save and unzip the file to a folder on your computer. Open the folder and double-click on dnrgarminsetup54.exe. Select Run. An installation wizard will open. Accept all program defaults (just click the Next button) and click Accept on the License Agreement page. After the program has been installed, click Finish to close the wizard. http://www.dnr.state.mn.us/mis/gis/tools/arcview/extensions/DNRGarmin/DNRGarmin.html
Activity 1. Open DNRGarmin In Windows, go to the Start Menu > Programs > DNRGarmin. A window will open identifying the connection has failed. Click OK to ignore the error message, we will not be downloading data directly from a GPS in this exercise.

Putting Maps, Images and Data on the Web
2
2. A Note About Projections Geospatial data is always stored in coordinates. Coordinates can be either unprojected (also called “geographic” coordinates) like latitude and longitude, or projected coordinates such as State Plane or Universal Transverse Mercator (UTM). In order to display correctly within an Earth Browser (like Google Earth, Google Maps, Virtual Earth), your geospatial data will have to be stored in (or converted to) latitude and longitude. Luckily for you, DNRGarmin makes it easy to “unproject” data stored in projected coordinates. See the Insert below for instructions. **Note: Do not do this step for this exercise; the data you are working with is already stored in latitude and longitude. Use this as a reference in the case when you are using your own data and the coordinates need to be unprojected. From the Main Menu, select Edit > Unproject Coordinates. DNRGarmin will unproject the coordinates stored in the y_proj and x_proj fields and add lat/long values to your table. These values will be used to describe the geographic position of your placemarks in the KML.
3. Set the Projection We have to tell DNRGarmin that your data is not projected (that is, it is stored in latitude and longitude). From the Main Menu, select File > Set Projection. Click the NONE button on the bottom of the DNR Garmin Properties page. This will set the projection to WGS84 (latitude, longitude). Click OK to close the window.
No lat/long values in
original data
Projected coordinates

Putting Maps, Images and Data on the Web
3
4. Load a Source Dataset DNRGarmin allows you to convert geospatial data stored in a variety of format to KML. Source data can be saved in textfiles (.txt), shapefiles (.shp), database files (Excel) (.dbf), GPS files (.gpx), and KML. Data can be imported or saved to any of these formats. In this exercise, you will import a GIS shapefile (most common format for geospatial data) and save the data to KML. The KML can then be opened in an Earth Browser such as Google Earth or Google Maps. Click on the Data Table icon on the bottom left corner of the DNRGarmin interface.
This will expand the data table portion of the window. At this point, it should be empty. From the Main Menu, click File > Load From > File. The first step in the process is to import the source data from an existing shapefile stored on your computer.

Putting Maps, Images and Data on the Web
4
In the Open window, browse to your C:\Data folder and select U6_Points_of_Interest.shp. Click Open at the bottom of the window. An Identify Fields window will appear. Click the down arrow next to ident and select PT_NAME. Next, click the down arrow to the right of comment and select DESCRIPTIO. Finally, click OK at the bottom of the Identify Fields window. Click OK to close the DNRGarmin message window that appears once the data is imported.

Putting Maps, Images and Data on the Web
5
5. Inspect Your Data Notice that the data table is now populated with information. Each record in the table represents a point that exists within the shapefile. The ident field contains the point name. The lat/long and y_proj/x_proj fields represent the geographic location of each point in unprojected (latitutude and longitude) and projected coordinates. The comment field contains text describing the point. Take a minute to look at the data. When you convert this dataset to KML, each of these points will become placemarks that can be viewed in an Earth Browser.
6. Save the Data to KML The final step in converting your data to KML is to export it. When you export it you will indicate KML as the file format for the saved dataset and DNRGarmin will do the rest of the work for you! From the Main Menu in DNRGarmin, select File > Save to > File.
Records

Putting Maps, Images and Data on the Web
6
In the Save As window, browse to your C:\Data folder. Change the Save as type: to Google Earth Format (*.kml). Next to File name: type in “U6_Points_of_Interest.kml” Click Save to convert your shapefile to KML. You should see a window appear indicating that the file was written successfully. Click OK to close it. Close DNRGarmin. The file has successfully been converted from a shapefile format to KML. We will now open the KML inside Google Earth and view the results.
Putting Maps, Images and Data on the Web
7
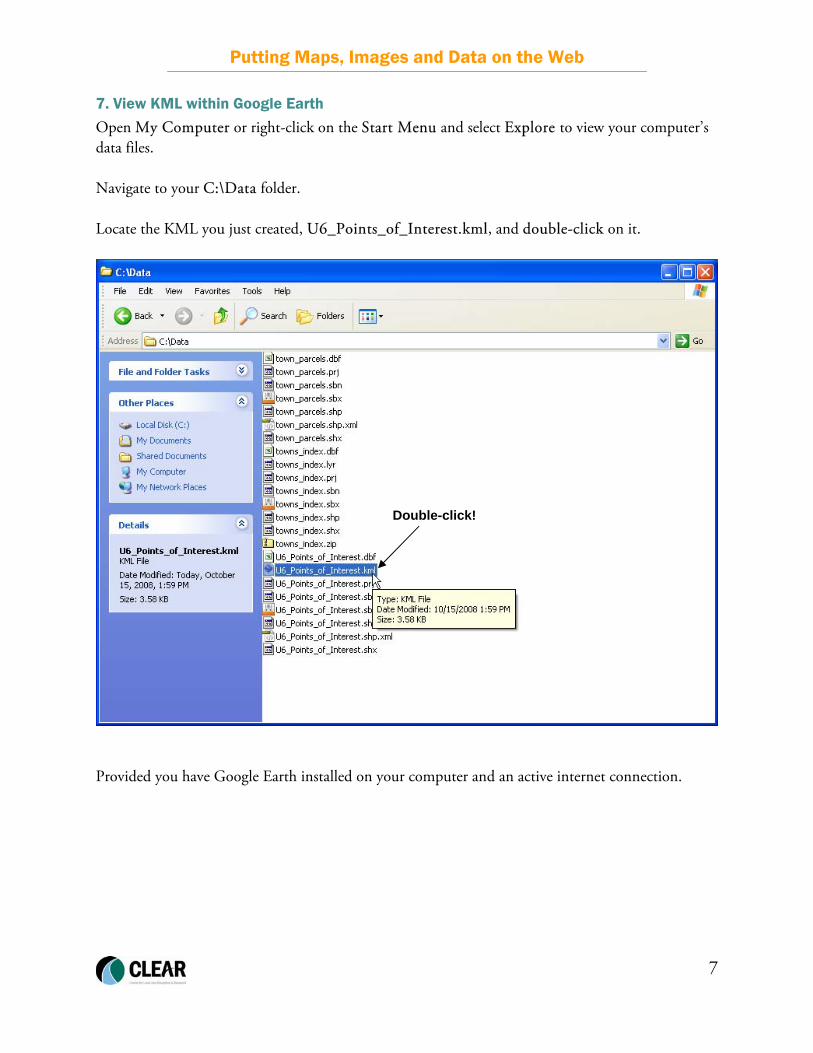
7. View KML within Google Earth Open My Computer or right-click on the Start Menu and select Explore to view your computer’s data files. Navigate to your C:\Data folder. Locate the KML you just created, U6_Points_of_Interest.kml, and double-click on it.
Provided you have Google Earth installed on your computer and an active internet connection.
Double-click!

Putting Maps, Images and Data on the Web
8
8. Explore the Data Google Earth will read the KML and display its contents within its browser window. Take a minute to explore the data points. Notice that the KML was added to the Places window on the left panel of the Google Earth interface. Click on the + sign next to U6_Points_of_Interest.kml to expand the contents of the file. You will see each point listed along with the text that was stored in the comment field of your shapefile. Each point is also placed on the map based on the coordinate information that was stored in the lat and long fields. Try clicking on a point on your map. An information window should open. The text that was stored in the comment field will also be visible within this window.

Putting Maps, Images and Data on the Web
9
9. Edit a Placemark KML can easily be created, edited and saved within Google Earth (see the Creating KML within Google Earth activity for more detailed instructions). Here we’ll have you update the properties for a placemark and resave the KML. Locate the Destination: John Denver Beach placemark in the Places window (it’s near the bottom of the list). Double click on it. Google Earth will zoom into the placemark. Right-click on the placemark on the map and select Properties from the menu that appears.

Putting Maps, Images and Data on the Web
10
An Edit Placemark window will appear. Here you can change the name, description, and appearance of the placemark. Click on the yellow thumbtack icon on the upper right corner. A window with a number of different icons will appear. Choose a different icon if you wish to identify the location of the placemark. On the Description tab, add additional text about the placemark. This will appear in the window that opens when the placemark is clicked on in the map.
When you have finished updating the placemark, click OK in the Edit Placemark window. Notice your placemark has been updated.

Putting Maps, Images and Data on the Web
11
10. Save Your Updated KML To save changes to your KML, right-click on the file name, U6_Points_of_Interest.kml in the Places window and select “Save Place As”. In the Save File window, browse to your C:\Data folder. Change the Save as type: to Kml (*kml). Click on U6_Points_of_Interest.kml and click Save. When asked if you wish to replace the existing file, select Yes. This will overwrite the original KML that was created in DNRGarmin with the updated one you just created in Google Earth.
Putting Maps, Images and Data on the Web
12
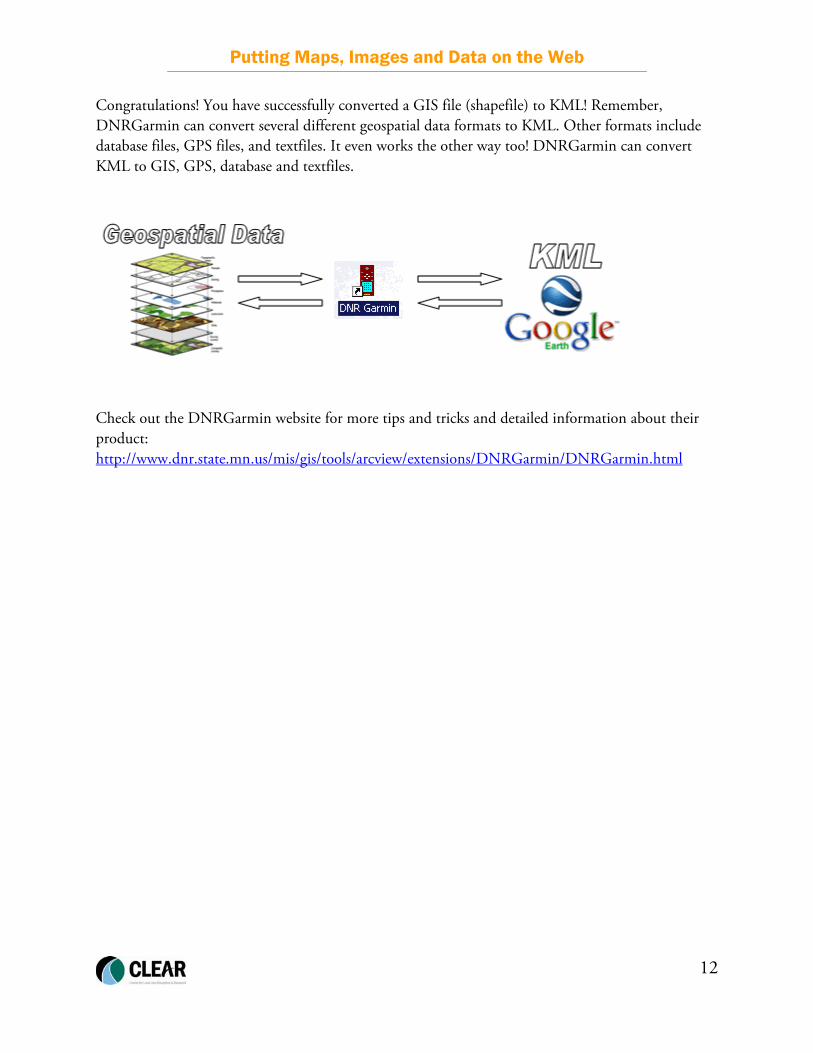
Congratulations! You have successfully converted a GIS file (shapefile) to KML! Remember, DNRGarmin can convert several different geospatial data formats to KML. Other formats include database files, GPS files, and textfiles. It even works the other way too! DNRGarmin can convert KML to GIS, GPS, database and textfiles.
Check out the DNRGarmin website for more tips and tricks and detailed information about their product: http://www.dnr.state.mn.us/mis/gis/tools/arcview/extensions/DNRGarmin/DNRGarmin.html