activity workbook for case manager learning in iapplymams.rmit.edu.au/9rz5aedyq9m9.docx · web...
TRANSCRIPT

iApply (International Admissions System)RMIT International
Assessment User Navigation Guide and Activity workbook
August 2014Version 1.0

Introduction
This User Navigation Guide and Activity Workbook is used in Group Learning sessions for people who want to learn how to assess in iApply, the RMIT International Admissions System.
The details and images for the steps in this Workbook follow a specific work scenario to illustrate the actions that a Case Manager does across the workflow of assessing an application from an International Student for admission to programs at RMIT University.
Publication DateAugust 2014 (Version 1.0)
Filename: document.docx

Understanding the Workbook Format
This User Navigation Guide and Activity Workbook uses different colors, styles and boxes to aid you.
A red box provides you with learning text.
A Blue word describes a button you click on.
A Red word describes the menu item or the tab that you click on.
A thick red box holds activities (questions) for you to complete
A green box provides you with hints and tips
A purple box provides you with what’s changed from previous process

Contents
Assessment Page.....................................................................................................................................1
1.0 Comments.......................................................................................................................................21.1 General comments....................................................................................................................21.2 Application specific comments..................................................................................................3
2.0 Application......................................................................................................................................52.1 Applicant Details.......................................................................................................................52.2 Submitted Application Details...................................................................................................7
3.0 Other Applications..........................................................................................................................8
4.0 Assessment.....................................................................................................................................94.1 Academic..................................................................................................................................94.2 English....................................................................................................................................124.3 Additional Requirements.........................................................................................................174.4 Forward / Return.....................................................................................................................274.5 Application History..................................................................................................................29
5.0 Decision.........................................................................................................................................305.1 Outcome..................................................................................................................................305.2 Credits.....................................................................................................................................385.3 Conditions...............................................................................................................................405.4 Program Glossary...................................................................................................................445.5 Fees & OSHC.........................................................................................................................46
6.0 Actions...........................................................................................................................................48
7.0 Documents....................................................................................................................................497.1 Quick View Documents...........................................................................................................52
8.0 Single View....................................................................................................................................53
©2014 RMIT International Ver 1.0

Assessment Page
When you begin to assess an application, you will see a series of tabs and sections that have been designed to guide you through the assessment process. Some tabs provide information only, and other tabs require action by you. This section covers what you need to know and do in each tab.
On this iApply Assessment page, you will also see certain alerts which have been set up to drawn your attention to certain information. Some examples of alerts include: ‘Under 18’, ‘Sponsor’, and ‘Migrated’. iApply will also prompt you to whether International has delegated authority to make offers (“Decision Authority: Central’).
To begin assessment, click on Assess in the Application menu. Comments tab will be displayed by default.
For more information on the assessment page, refer to your navigation guide and the QRC #3 – Assessment page.
©2014 RMIT International Ver 1.0 Page 1

1.0 Comments
Comments can be added to an application to provide additional information to other staff who may be viewing the application. You can add additional information relating to the applicant or particular information that is only relevant to the application.
There are two types of comments:1. General comments – Additional information relates to the applicant.2. Application specific comments – Additional information relates to specific program.
Both “General” and “Application Specific” accordions are open by default
Instructions 1. Click on Comments tab
2. Click on ADD next to General comment or Application Specific comment to enter additional information relates to applicant.
1.1 General comments
Page 2 Ver 1.0 ©2014 RMIT International

1.2 Application specific comments
What’s changed?
©2014 RMIT International Ver 1.0 Page 3
System comment via user’s action (e.g. Reopen for assessment, Return for progression)

In the previous iApply release, the comments tab is used to
1. Message applicant
2. Add a comment and display all other comments (user input or system input)
3. Forward / Return an application.
Activity Aa. Add a general comment
b. Hide information within “Application Specific” accordion.
Page 4 Ver 1.0 ©2014 RMIT International

2.0 Application
iApply captures submitted application and stores it in the “Application” tab for reference. You can edit certain applicant details from here. - Personal details (Name, Gener, DOB, Mobile phone)- Addresses (Home and mailing address)- Residency (Country of birth, Citizenship, Dual citizenship)- Passport (Passport number, Passport expiry)- Representation (Agent, Sponsor)- Personal representation (Proxy)
Note: When applicant’s personal details have been updated in iApply, you are required to update the same information in SAMS.
2.1 Applicant Details
Instructions1. In the assessment page, click on Application tab
2. Click Applicant Details accordion (This accordion is open by default)
©2014 RMIT International Ver 1.0 Page 5

3. To edit (Personal details, Home/Mailing address, Residency, Passport, Agent, Sponsor, or Personal representation), click on Edit button next to the section you wish to edit.
What’s changed?In the previous iApply release, you can only edit certain personal details such as:
1. Title
2. First and Family name
3. Mobile phone
4. Home country and Mailing address
Activity Ba. Change applicant’s first name
b. Change applicant’s passport details
c. Edit student’s sponsor
Page 6 Ver 1.0 ©2014 RMIT International

2.2 Submitted Application Details
Instructions1. In the assessment page, click on Application tab
2. Click Submitted Application Details accordion
©2014 RMIT International Ver 1.0 Page 7

3.0 Other ApplicationsTo be introduced as part of “Application Preference” deliverable.
To be introduced as part of Application Preferences deliverable.
Page 8 Ver 1.0 ©2014 RMIT International

4.0 Assessment
Every application is assessed against agreed criteria (entry requirements) set by RMIT. Case manager is required to capture the comparability decisions for the applicant. Once you have completed the comparability assessment for an applicant, iApply will carry your assessment decision into future applications (or against other elements of a package) lodged by the applicant. You will still be required to determine the eligibility of the applicant for their preferred program against academic entry requirements, English requirements, and other requirements as set by RMIT.
Once you have completed your assessment against all the requirements, the information will be displayed in the assessment overview area which is displayed at the top right corner of assessment page.
4.1 Academic
Instructions (Academic accordion)1. Click Assessment tab.
2. Click on Academic accordion to display academic qualification information (open by default)
3. To enter a new academic qualification, click Add next to “Academic qualification” and proceed to complete the relevant fields before clicking Save.
©2014 RMIT International Ver 1.0 Page 9

4. To edit the existing academic qualification, click Edit next to the existing academic qualifications and complete/Edit the required fields before clicking Save.
Page 10 Ver 1.0 ©2014 RMIT International

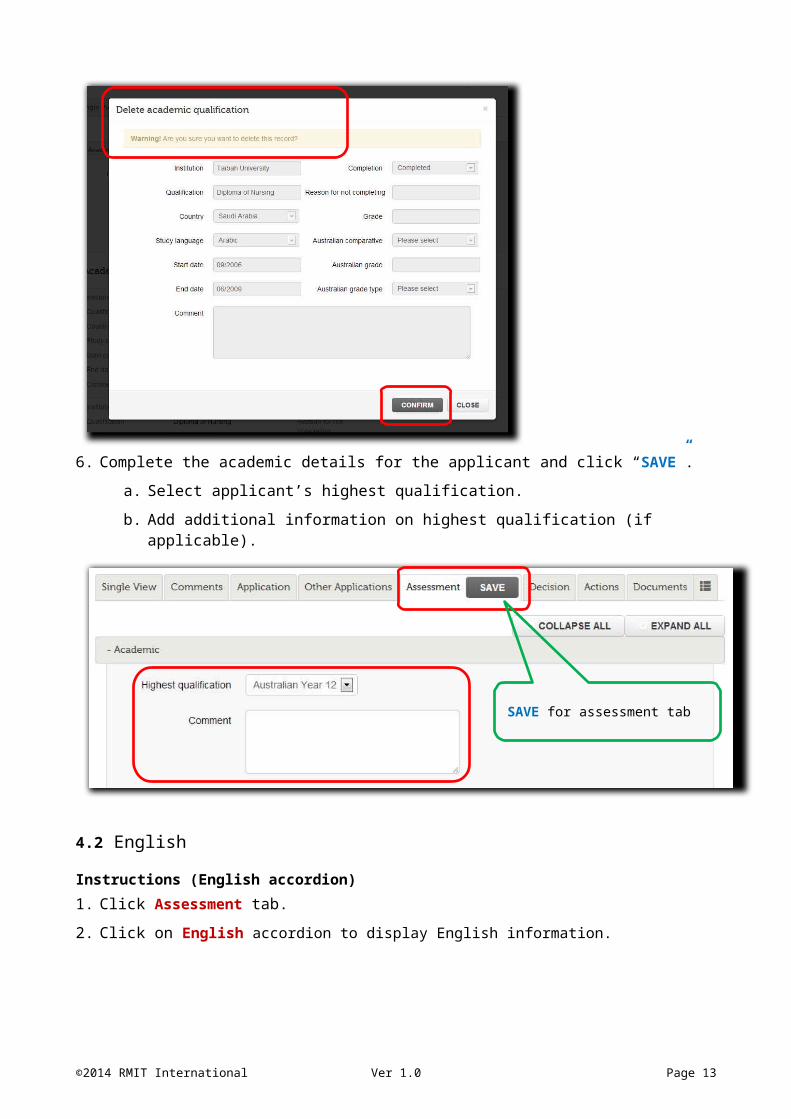
5. To delete the existing academic qualification, click Delete next to the existing academic qualifications and click on Confirm to delete.
©2014 RMIT International Ver 1.0 Page 11

6. Complete the academic details for the applicant and click “SAVE”.
a. Select applicant’s highest qualification.
b. Add additional information on highest qualification (if applicable).
4.2 English
Instructions (English accordion)1. Click Assessment tab.
2. Click on English accordion to display English information.
Page 12 Ver 1.0 ©2014 RMIT International
SAVE for assessment tab

3. To add a new English proficiency test, click Add next to English tests and proceed to complete the relevant fields before clicking Save.
©2014 RMIT International Ver 1.0 Page 13
4. To edit the existing English proficiency test details, click Edit and edit the fields before clicking Save.
Page 14 Ver 1.0 ©2014 RMIT International

5. To delete the existing English test, click Delete next to the existing English test and click on Confirm to delete.
6. To add English proficiency comment, click Add next to English proficiency comments.
©2014 RMIT International Ver 1.0 Page 15

7. To edit existing English proficiency comment, click Edit next to English proficiency comments.
8. Complete the English details for the applicant and click “SAVE”.
a. Select applicant’s English information that is being used.
b. Determine duration of EAP (if required)
Page 16 Ver 1.0 ©2014 RMIT International

4.3 Additional Requirements
The “Additional Requirements” accordion is used to enter the details of additional requirements such as work experience, professional membership, folios, personal statements, and research.
If there is an additional requirement such as (Folio, Interview, Work experience, etc), you are required to select the necessary information. The comment field can be used to store related information regarding additional requirement.
If there is no additional requirement, please select “Not required”
Instructions (Additional Requirements accordion) 1. Click Assessment tab.
2. Click on Additional Requirements accordion to display additional requirements information.
©2014 RMIT International Ver 1.0 Page 17

3. For Research section (this section will only appear for research application only):
a. To add research proposed title, click Add next to the research proposed title and proceed to complete the blank fields before clicking Save.
Page 18 Ver 1.0 ©2014 RMIT International

b. To edit research proposed title, click Edit next to the research proposed title and proceed to edit the fields before clicking Save.
c. To add new Supervisor, click Add next to Supervisor and complete the blank fields before clicking Save.
©2014 RMIT International Ver 1.0 Page 19

d. To edit existing Supervisor, click Edit next to the existing Supervisor and proceed to edit the fields before clicking Save.
e. To delete existing Supervisor, click Delete next to the existing Supervisor and click on Confirm to delete.
Page 20 Ver 1.0 ©2014 RMIT International

f. To add research comment, click Add next to research comment and complete the blank fields before clicking Save.
g. To edit existing research comment, click Edit next to research comment and proceed to edit the fields before clicking Save.
©2014 RMIT International Ver 1.0 Page 21

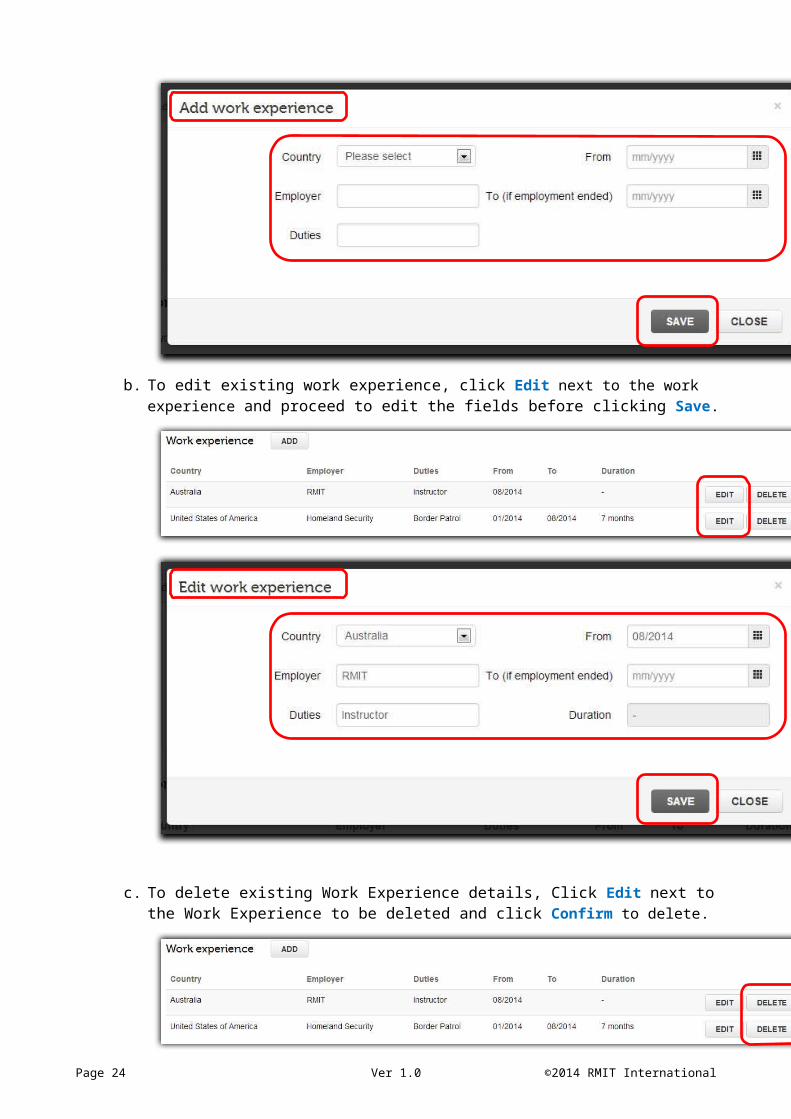
4. For Work Experience:
a. To add work experience, click Add next to the work experience and proceed to complete the blank fields before clicking Save.
b. To edit existing work experience, click Edit next to the work experience and proceed to edit the fields before clicking Save.
Page 22 Ver 1.0 ©2014 RMIT International

c. To delete existing Work Experience details, Click Edit next to the Work Experience to be deleted and click Confirm to delete.
d. To add work experience comment, click Add next to work experience comment and complete the blank fields before clicking Save.
©2014 RMIT International Ver 1.0 Page 23

e. To edit existing work experience comment, click Edit next to work experience comment and proceed to edit the fields before clicking Save.
5. For Professional Membership:
a. To add professional membership, click Add next to the professional membership and proceed to complete the blank fields before clicking Save.
Page 24 Ver 1.0 ©2014 RMIT International
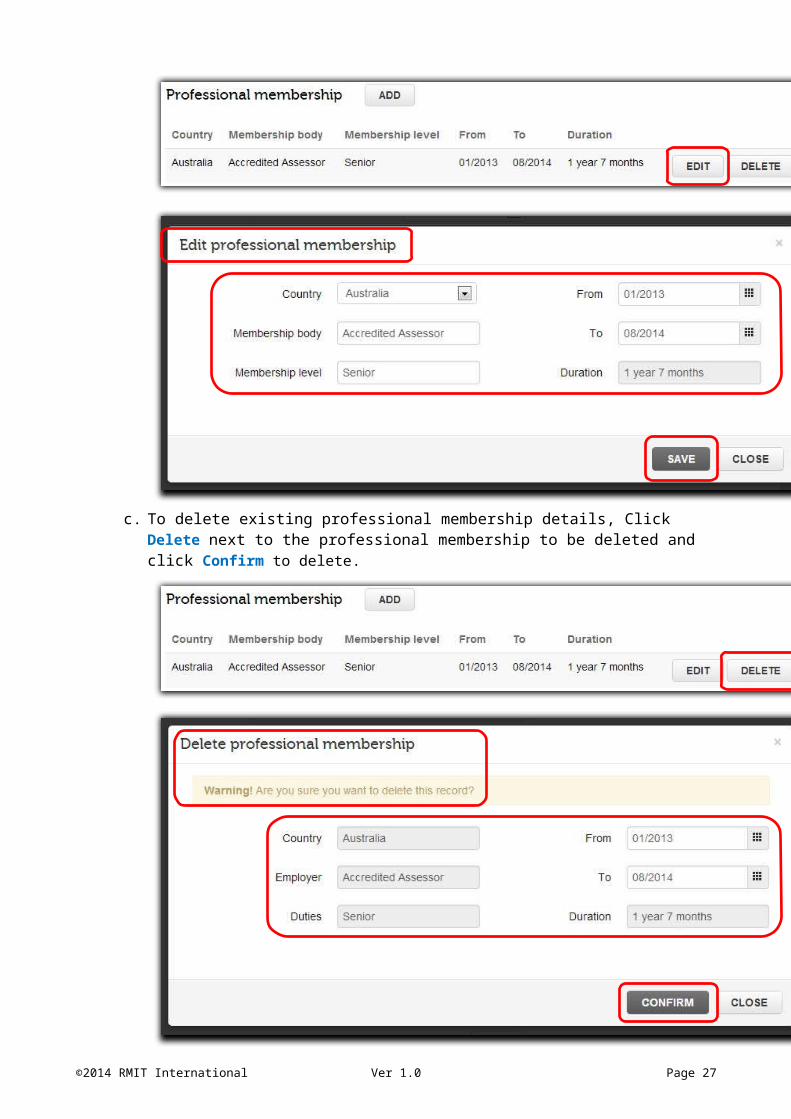
b. To edit existing professional membership, click Edit next to the professional membership and proceed to edit the fields before clicking Save.
c. To delete existing professional membership details, Click Delete next to the professional membership to be deleted and click Confirm to delete.
©2014 RMIT International Ver 1.0 Page 25

d. To add professional membership comment, click Add next to professional membership comment and complete the blank fields before clicking Save.
e. To edit existing professional membership comment, click Edit next to professional membership comment and proceed to edit the fields before clicking Save.
Page 26 Ver 1.0 ©2014 RMIT International

6. Complete additional requirement consideration and click “SAVE”.
a. Select if there is any additional requirement.
b. Add additional information on additional requirement (if applicable).
Activity Ca. Update applicant’s highest qualification to Bachelor Degree
b. Delete one of the qualification.
c. Add English test of any type.
d. If you are currently assessing research application, add one supervisor. If you are not assessing research application, Update additional requirements consideration to Folio and Save.
e. Add one work experience for applicant.
4.4 Forward / Return
Case manager is able to forward an application to a Selection Officer, other Case Manager, or other RMIT staff member who has access to iApply. iApply will notify the person that they have received an application from you and the reason(s) for the forward. That person can then Forward it onto someone else or return the application to the Case Manager who sent it. Forwarded applications are parked in the responsible Case Manager’s Forwarded queue.
The comments and decisions made by the Selection Officer, other Case Manager, or other RMIT staff member are recorded in Forward/Return accordion.
Instructions (Forward/Return accordion) 1. Click Assessment tab.
2. Click on Forward/Return accordion to display contents.
©2014 RMIT International Ver 1.0 Page 27
3. Choose selection against who you are forwarding the application to.
a. International Case Manager - Select from drop down menu.
b. Selection Officer - Select from drop down menu.
c. Other staff member (must have iApply access) Enter staff e-number or name
4. Select a reason for the Forward and include a message to the person being forwarded (if applicable).
5. Click Forward to send.
Activity Da. Forward your application to International Case Manager next to you.
b. Go to your assess queue and return the assessment. If you have forwarded your application to other staff member or selection officer, go to your forwarded queue and recall application.
Page 28 Ver 1.0 ©2014 RMIT International

4.5 Application History
Application history provide you with all historical event occurred to this application (e.g date and time the application was forwarded to selection officer, when the application was made pending, etc.
Instructions (Forward/Return accordion) 1. Click Assessment tab.
2. Click on Application History accordion to display contents.
©2014 RMIT International Ver 1.0 Page 29

5.0 Decision
Once an outcome has been made, the application decision needs to be finalised. If applicant is successful, this means that case manager need to generate an offer letter for the applicant. The Offer Letter will be the only official PDF correspondence received by the applicant and must contain the program fees, OSHC quotes, conditions for entry and any other relevant program information.
The other possible outcome is Deny. Refer to Instructions (Deny) on how to DENY an application. At the point of Deny, you can choose to create a new program for new assessment if applicant can be offered a pathway or an alternative program.
5.1 Outcome
Once the application has been assessed, the outcome of application (or package) is recorded in iApply within the Outcome accordion. As a Case Manager, you should not provide an outcome on the application until you have completed all required assessment.
Instructions (Offer) 1. Click Decision tab
2. Click on Outcome accordion to display decision options.
3. Select Offer. 4. Select the Basis of entry from the drop down menu.
5. Click on Update.
Page 30 Ver 1.0 ©2014 RMIT International

Add and Remove a Program from a Package
Case manager is able to add and remove programs from an application before an offer is made. For example, we might add an ELICOS program to the application if the English proficiency requirement is not met.
The additional program can be added without creating or data entering a new application.
Instructions (Add a Program) - Steps 2 to 4 are only required if the Add button does not appear.1. Click Decision tab.
2. Select Offer. 3. Select the Basis of entry from the drop down menu.
4. Click on Update.
5. Click Add to package.
6. Enter program keywords
©2014 RMIT International Ver 1.0 Page 31

7. Select intake for new program
8. Select from the drop down menu and reorder the programs in completion order and click Save. (Only ELICOS program start at order “0”)
Instructions (Remove a Program) - Remove button will only visible when there is more than 1 program.- Steps 2 to 4 are only required if the Add button does not appear.
1. Click Decision tab.
2. Select Offer. 3. Select the Basis of entry from the drop down menu.
Page 32 Ver 1.0 ©2014 RMIT International

4. Click on Update.
5. Click on Delete next to the program you wish to remove (a pop up window will appear).
6. Select the basis for removal from drop down menu and click Confirm.
7. Select from the drop down menu and reorder the programs in the order to be undertaken and click Save. If you have removed the first academic program (highlighted) from a package you will be required to update the outcome of the application.
NOTE ON REMOVAL OF PROGRAMIf you removed the first academic program from a package, you will be required to complete the assessment and eligibility of the application.
©2014 RMIT International Ver 1.0 Page 33

Instructions (Deny – no other possible options) 1. Click Decision tab.
2. Click on Outcome accordion to display decision options.
3. Select Deny.
4. Select the Basis for denial from drop down menu.
5. Enter a descriptive reason in the Description for applicant text box as to why the applicant was rejected and any outcome that may happen as a result. NOTE: Your entered text will be sent to the applicant (see screenshot below).
6. Click on Update.
7. Click on Actions tab
8. Select “Issue outcome – Deny” and click GO.
Page 34 Ver 1.0 ©2014 RMIT International

Alternate program / PathwayWhen you Deny an application, you will have the option of offering alternate program or pathway by creating a new program in your assess queue without going through the whole application process.
Instructions (Deny – Offer alternate program or pathway)1. Click Decision tab.
2. Click on Outcome accordion to display decision options.
3. Select Deny.
4. Select the Basis for denial from drop down menu.
©2014 RMIT International Ver 1.0 Page 35

5. Enter a descriptive reason in the Description for applicant text box as to why the applicant was rejected and any outcome that may happen as a result. NOTE: Your entered text will be sent to the applicant (see screenshot below).
6. Click on Update. (The outcome in assessment overview will be updated as Deny)
7. Click on Create Program. (a pop up window will appear)
Page 36 Ver 1.0 ©2014 RMIT International

8. Insert keywords in the add a program pop up. (e.g BP254 or account), choose the program you wish to add, and click Next.
9. Select intake for new program and click Save. (The new program added to case manager’s assess queue.)
10. Click Actions tab.
©2014 RMIT International Ver 1.0 Page 37

11. Select “Issue outcome – Deny” and click GO.
12. Locate the new program in your assess queue and commence new assessment.
Activity Ea. Update the outcome as Offer.
b. Deny the application and offer a different program.
c. If you are assessing a package program, remove one of the program in the package. If you are assessing a single program, add a program to the package.
5.2 Credits
Credit and exemption entered into iApply will appear on the applicant’s offer letter. Credit granted can be specific, unspecified or in block.
When granting credit, it is important to enter the remaining duration of the offer program after the credit is granted. For some programs, an applicant with advanced standing cannot commence in certain intakes due to credit granted.
In addition to this, the Remaining Duration entry is used when iApply is working out the OSHC quote for the applicant.
Instructions (Credits accordion)1. Click on Credits accordion.
2. To add click on Add (a pop up window will appear).
Page 38 Ver 1.0 ©2014 RMIT International

3. Enter Course, Course Name and Credit Points in field and enter the Basis of Exemption field.
4. To edit details relating to credit granted, click Edit next to the program to edit and a pop up window will appear, and click Save once changes have been completed.
5. To remove credit granted, click Delete next to the program to delete and a pop up window will appear, and click Confirm to delete the credit.
6. Once all credit has been entered, you can change the duration of the program as a result of exemptions given by clicking Change Duration (if required)
©2014 RMIT International Ver 1.0 Page 39

7. If required to change the duration you are also required to click Get intakes. From the drop down menu select the same intake and click Save.
Activity Fa. Add a credit with 12 credit points for the application.
b. Add another credit with 48 credit points for the application.
c. Delete the credit with 12 credit points.
5.3 Conditions
Conditions can be added and removed (if added by mistake) from an application. Conditions can be lifted from an offer or acceptance.
The type of condition is used to identify which program the condition applies to.Generic conditions – These will always be used against the lead program (highlighted program).Program conditions – These should only be used in package programs.
Instructions (Adding, Editing or Removing Conditions)1. Click on Decision tab.
2. Click on Conditions accordion.
3. Click Add to add a condition.
Page 40 Ver 1.0 ©2014 RMIT International

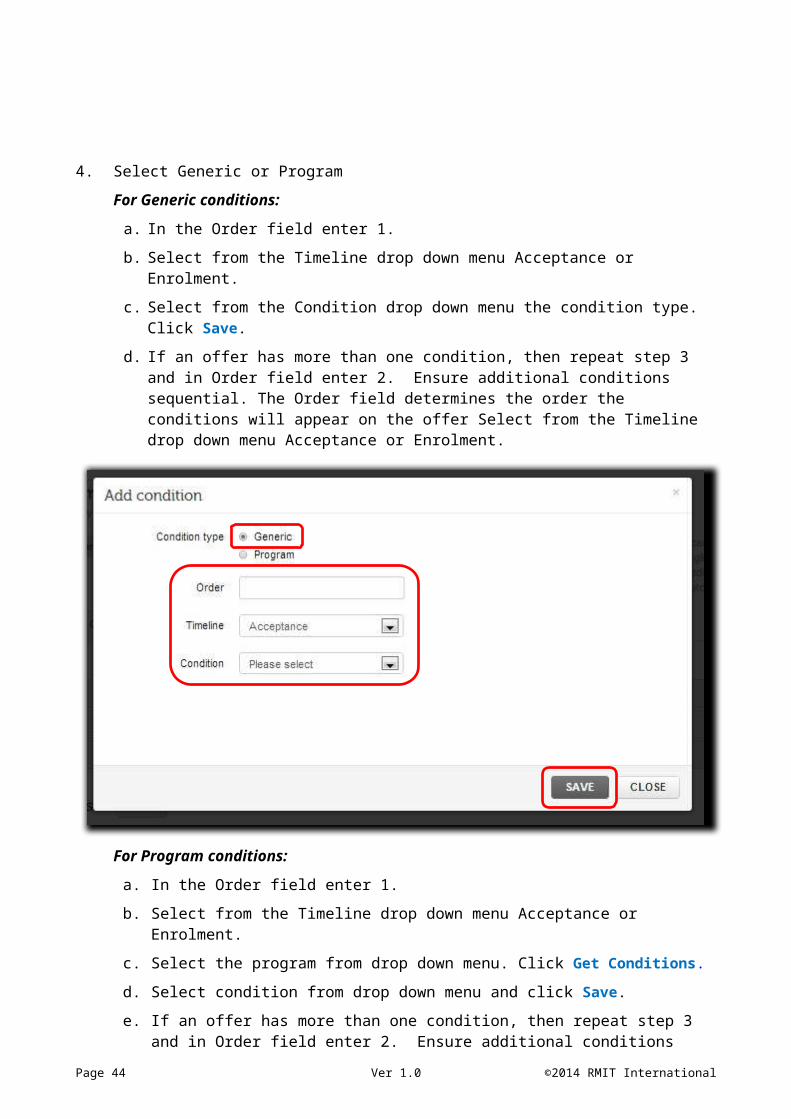
4. Select Generic or Program
For Generic conditions: a. In the Order field enter 1.
b. Select from the Timeline drop down menu Acceptance or Enrolment.
c. Select from the Condition drop down menu the condition type. Click Save.
d. If an offer has more than one condition, then repeat step 3 and in Order field enter 2. Ensure additional conditions sequential. The Order field determines the order the conditions will appear on the offer Select from the Timeline drop down menu Acceptance or Enrolment.
For Program conditions: a. In the Order field enter 1.
b. Select from the Timeline drop down menu Acceptance or Enrolment.
c. Select the program from drop down menu. Click Get Conditions.
d. Select condition from drop down menu and click Save.
e. If an offer has more than one condition, then repeat step 3 and in Order field enter 2. Ensure additional conditions sequential. The Order field determines the order the conditions will appear on the offer Select from the Timeline drop down menu Acceptance or Enrolment.
©2014 RMIT International Ver 1.0 Page 41

5. To edit text within a condition, click Edit next to the condition, make the necessary changes and click Save.
6. To remove a condition, click Delete next to the condition and click Confirm to delete.
Removing a conditionThe removal of a condition is to be performed if the condition was added by mistake. If you are lifting condition due to satisfactory requirement by applicant, you are required to lift the condition. Instructions for lifting conditions in the next page.
Page 42 Ver 1.0 ©2014 RMIT International

Instructions (Lifting Conditions)1. Click on Decision tab.
2. Click on Conditions accordion.
3. Click Lift next to the condition to lift a condition. (Note: It is quite heavy though, you might want to be extra careful doing this).
4. Select one of the following options:
a. Not yet met – Default selection when a condition has been addedb. Checked and met – When applicant has met the requirementc. No longer applicable – When the condition is no longer relevantd. Checked and not met (Deny) – when application did not satisfy the requirement
5. Enter outcome comment (if require additional information).
6. Click Save.
Activity Ga. Add one condition to the highlighted program.
b. Edit the condition you have just added.
©2014 RMIT International Ver 1.0 Page 43

5.4 Program Glossary
Program Glossary is an additional information for applicant but is not a condition for entry into a program. Program Glossary can be added and removed (if added by mistake) from an application.
Instructions (Program Glossary accordion)1. Click on Decision tab.
2. Click on Program Glossary accordion.
3. To add program glossary, click on Add (a pop up window will appear).
4. Select program and click Get Glossaries.
5. Select Glossary and click Save.
Page 44 Ver 1.0 ©2014 RMIT International
6. To edit a program glossary, click Edit next to the program glossary, make the necessary changes and click Save.
7. To remove a program glossary, click Delete next to the program glossary and click Confirm to delete.
©2014 RMIT International Ver 1.0 Page 45

Activity Ha. Add under 18 glossary to the highlighted program.
5.5 Fees & OSHC
Instructions1. Click Decision tab.
2. Click Fees & OSHC accordion to generate the program(s) fees, deposits and OSHC quote amounts.
3. Click Generate Fees and Quotes.
4. Click Edit Deposit Amount (if required) to amend deposit amount.
Page 46 Ver 1.0 ©2014 RMIT International

5. Enter new deposit and click Save.
6. Under OSHC Quote, click Edit Coverage Dates.
7. Edit Commencement and/or End dates (if required) to amend coverage dates. Click Save.
©2014 RMIT International Ver 1.0 Page 47

6.0 Actions
Once the application has been assessed, the outcome of the application (or package) is recorded in iApply using the Outcome tab. As a Case Manager, you should not provide an outcome on the application until you have completed all the required assessment.
Instructions1. Click Actions tab.
2. Select Issue Outcome. Note that the type of offer you make is based on your assessment of the application and can be one of the following:a. Direct Entry Offer (unconditional)b. Direct Entry Offer (conditional)c. Direct Entry Package (conditional)
3. Select radio button against the appropriate outcome and click Go. You will be prompted to review the letter before the system generates the Offer Letter.
HINT: Letter generationiApply will not let you generate an offer if the full assessment has not occurred.
Page 48 Ver 1.0 ©2014 RMIT International

7.0 Documents
As part of application submission, applicant is required to submit supporting documents such as academic transcripts. These documents are stored in the documents tab. You will be able to upload additional documents in this tab. A maximum of 10MB is recommended for the upload to be successful. In the documents tab, you are also able to request additional documents to the applicant and email documents reminder if the applicant has not responded for a period of time.
Instructions (Add/Edit documents)1. Click Documents tab.
2. To add document, click on Add under the document library.
3. Insert all applicable fields and click Save.
©2014 RMIT International Ver 1.0 Page 49

4. To edit document data, select the document and click on Edit.
5. Make the necessary changes and click Save.
Instructions (Requesting additional documents to applicant)1. Click Documents tab.
2. Click on Add under requested documents.
Page 50 Ver 1.0 ©2014 RMIT International

3. Select one or more documents from pre-populated fields.
4. Enter message to applicant for additional information (if required) and click Send Request.
Instructions (To email applicant for documents request reminder)1. Click Documents tab.
2. To request additional document, click on Email Documents Reminder under requested documents.
©2014 RMIT International Ver 1.0 Page 51

7.1 Quick View Documents
Quick view documents functionality is built to aid user for easier access to applicant’s documents at any time without losing the current working screen. Quick View Documents will be visible in all tabs except when user is in Documents tab.
Instructions
1. Click on next to documents tab.
2. A small window will slide in from the right side.
Page 52 Ver 1.0 ©2014 RMIT International

8.0 Single View
The “Single View” tab is a one stop shop for users who want to view all information without having to navigate through different tabs. All information displayed is read only and no changes to the information can be made.
Instructions 1. Click on Single View tab
2. Click on relevant accordion to reveal required information.
©2014 RMIT International Ver 1.0 Page 53

Activity Ia. Reveal all information within each accordion at once.
b. Hide all information within each accordion at once.
c. Click on each individual accordion to reveal and close all information within that accordion.
Congratulations, you have completed the Learning Session!
Page 54 Ver 1.0 ©2014 RMIT International

.
©2014 RMIT International Ver 1.0 Page 55