adapter tutorial - oracle | hardware and software
TRANSCRIPT
Reference: 2005/04/26
Adapter Tutorial
Tutorial 11 : File DB Integrations – Handling of opaque data types The Oracle Adapter for Databases is used for invoking stored procedures and performing data manipulation operations and queries and does not require coding. It supports a rich set of databases – Oracle, DB2, Microsoft SQL, Sybase, Informix and can support any standard JDBC 1.x, 2.0 compliant database. The Oracle Adapter for Files rapidly integrates information stored in a variety of formats and supports both File Read and Write operations.
1. Tutorial 11 : File DB Integrations – Handling of opaque data types 1
Overview 1 Configuring the File Adapter Read Operation 1 Configuring the DB Adapter Write Blob operation 4 Configuration of DB Adapter Query Service 8 Configuration of File Adapter Write Service 8 Configuring an end to end BPEL process 10 Deployment and testing of the BPEL process 16
Overview The Oracle AS Adapter for Database and Files are part of the Oracle BPEL Process Manager install and is a JCA 1.5 Resource Adapter. The Adapter Framework (AF) is used for the bidirectional integration of the JCA 1.5 resource adapters with BPEL Process Manager. Adapter FW is based on open standards and employs the Web Service Invocation Framework (WSIF) technology for exposing the underlying JCA Interactions as Web Services. This example showcases the following:
(1) A File Adapter Read operation polling a particular input directory to read an input file containing JPEG data (opaque data) and raising it to the BPEL PM process.
(2) A Database Adapter Merge operation to write the above opaque contents as a blob to a table. (3) A Database Query operation for querying the contents of the above table (4) A File Adapter Write operation to write the above query results to an output file. Both the input and output files will contain the same JPEG data after successful process run.
Configuring the File Adapter Read Operation The Oracle Adapters have an easy-to-use Adapter Wizard that is supported on both JDeveloper and Eclipse platforms. This example showcases the steps for the JDeveloper IDE and is pretty much the same for the Eclipse IDE as well.

2. Launch JDeveloper. This is bundled with the BPEL Process Manager product. 3. Drag & drop an empty BPEL project 4. Drag & drop a Partner Link activity. 5. Select the Adapter Wizard (no 3) option. 6. Select the File Adapter option 7. Follow the Adapter wizard screens as shown in the below figures: 8. Name the Adapter Service
9. Select the “Read File” option in the next screen
10. Enter the Input directory information and the file pattern matching options as shown in the below figure: 11.
12.
13.

14. Enter the polling interval and the time when the file should be picked up. The “Minium File Age” refers to the time interval that needs to be elapsed post the last modified timestamp before the file can be picked up by the Adapter for processing.This enables a large file to be completely copied into the directory before it is retrieved for processing.
. 15. Turn off the native format translation as the data is opaque
16. This completes the creation of the Adapter Service
17. Complete the Partner Link as shown below:

Configuring the DB Adapter Write Blob operation
18. Run the “create.sql” found under the sql folder.
19. Launch JDeveloper. This is bundled with the BPEL Process Manager product. 20. Drag & drop an empty BPEL project 21. Drag & drop a Partner Link activity. 22. Select the Adapter Wizard (no 3) option. 23. Select the Database Adapter option 24. Follow the Adapter wizard screens as shown in the below figures: 25. Name the Adapter Service 26. Specify the design-time Database connection parameters and the JNDI name for the run-time
connection.

27. Select the “Insert or Update” option in the next screen
28. Follow the steps shown in the screen shot. There is only one table so you can just select the Next option for wizard steps 4-6:
29.
30. To define the Where clause, select Add and specify the name of the variable (“pk” in this example)
passed in the Where clause.

31. Launch the Query Builder wizard by selecting the Edit button at the bottom of the Expression Builder
pane.
32. This completes the creation of the Where clause.

33. This completes the creation of the Adapter Service.
34. Complete the Partner Link activity as shown in the below figure:
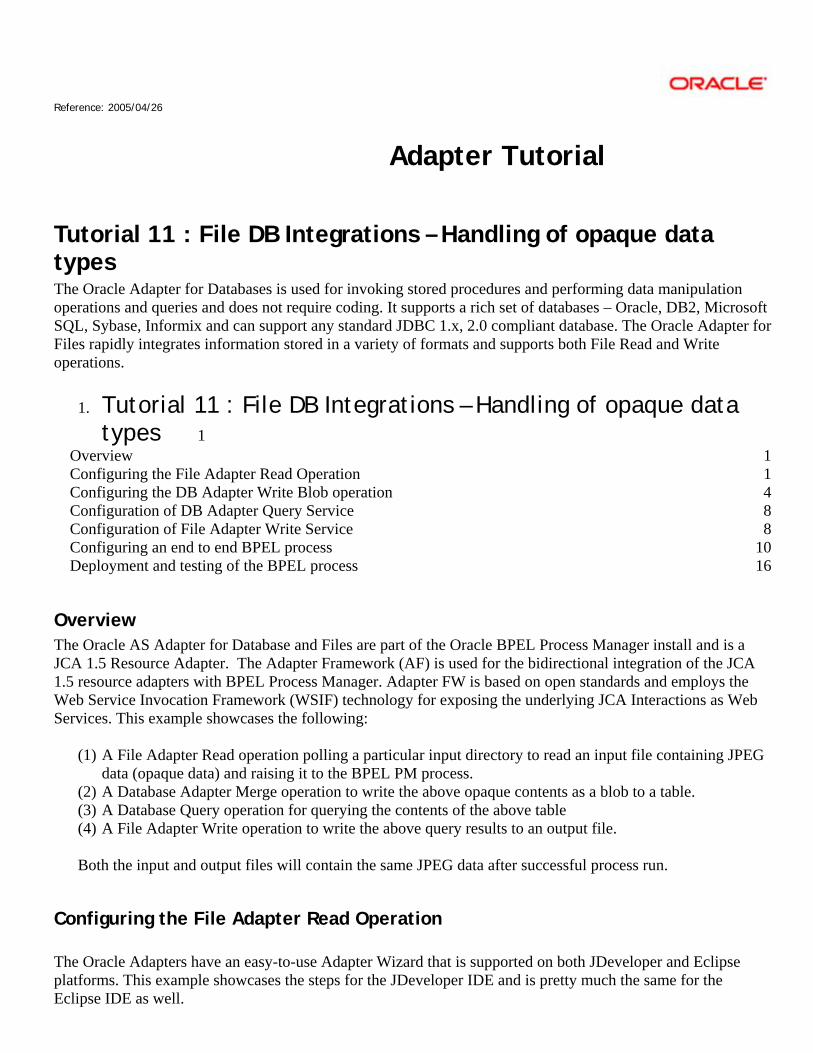
Configuration of DB Adapter Query Service This is similar to the Configuration of the DB Adapter Merge Service.
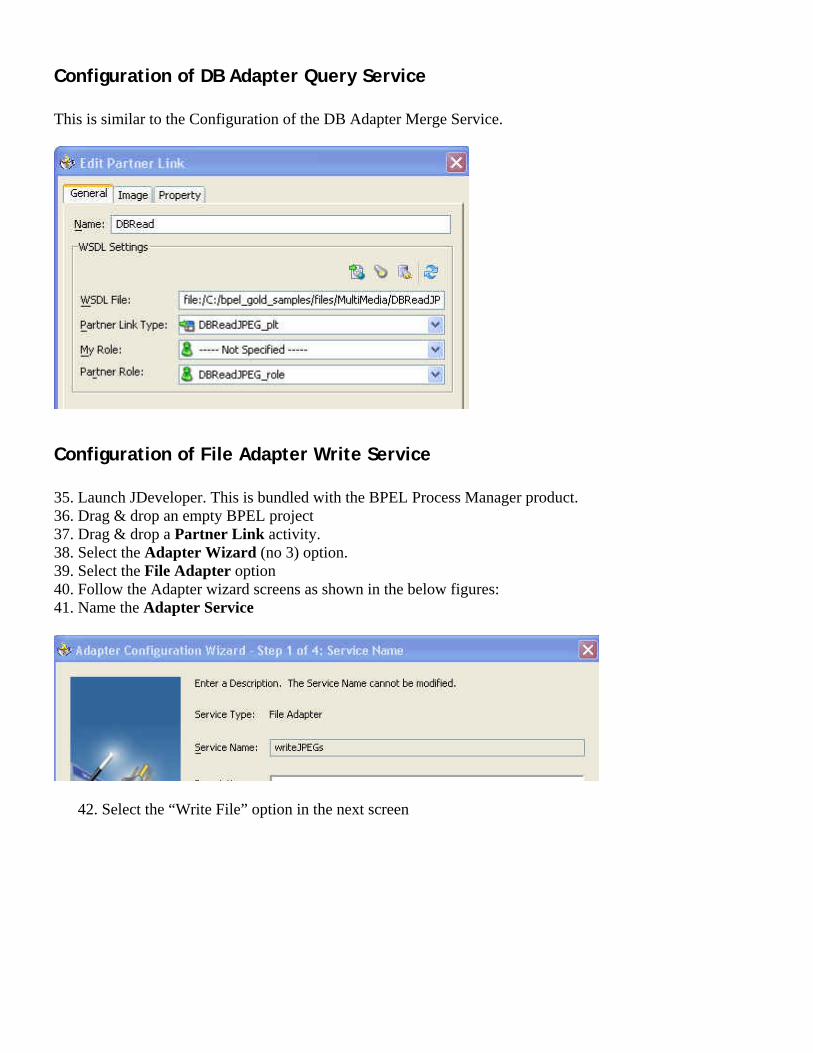
Configuration of File Adapter Write Service 35. Launch JDeveloper. This is bundled with the BPEL Process Manager product. 36. Drag & drop an empty BPEL project 37. Drag & drop a Partner Link activity. 38. Select the Adapter Wizard (no 3) option. 39. Select the File Adapter option 40. Follow the Adapter wizard screens as shown in the below figures: 41. Name the Adapter Service
42. Select the “Write File” option in the next screen
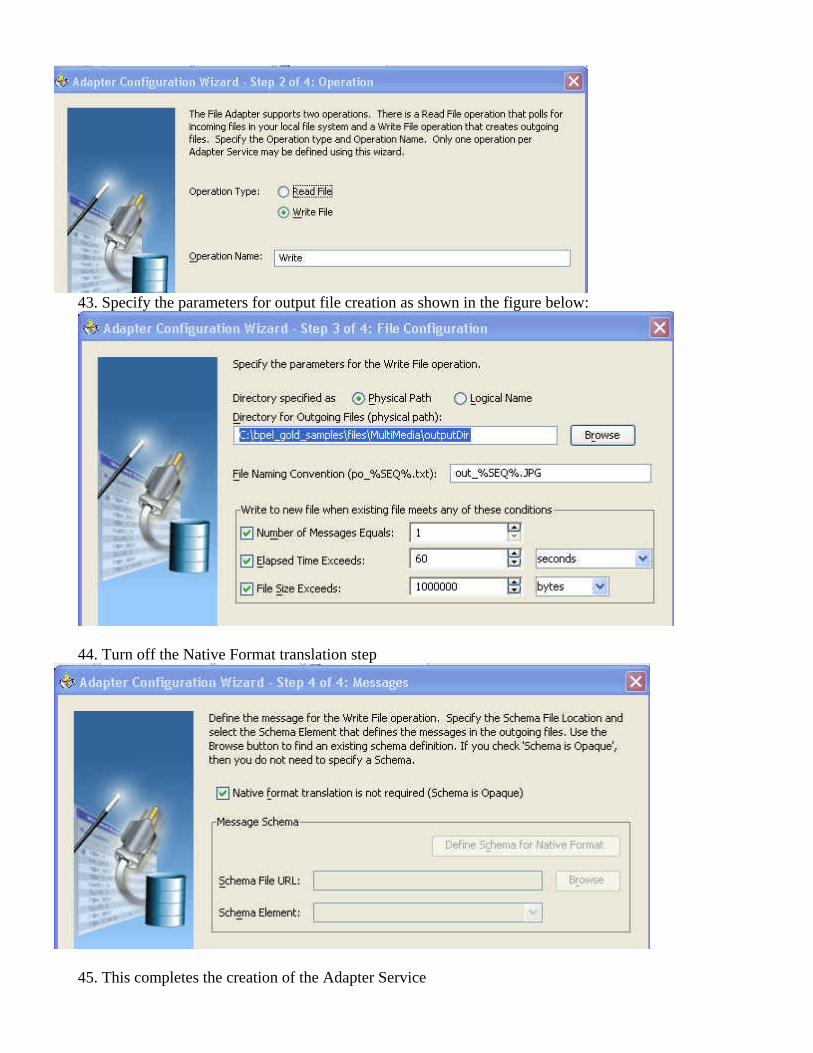
43. Specify the parameters for output file creation as shown in the figure below:
44. Turn off the Native Format translation step
45. This completes the creation of the Adapter Service

46. Complete the configuration of the Partner Link service as shown in the figure.
Configuring an end to end BPEL process
47. Configure a receive activity to point to the File Adapter Read Service as shown below
48. Select “create Instance” option and select the auto-generation option for the global variable
49. Drag & drop an invoke activity and point to the DB Adapter Merge Service as shown in the figure.
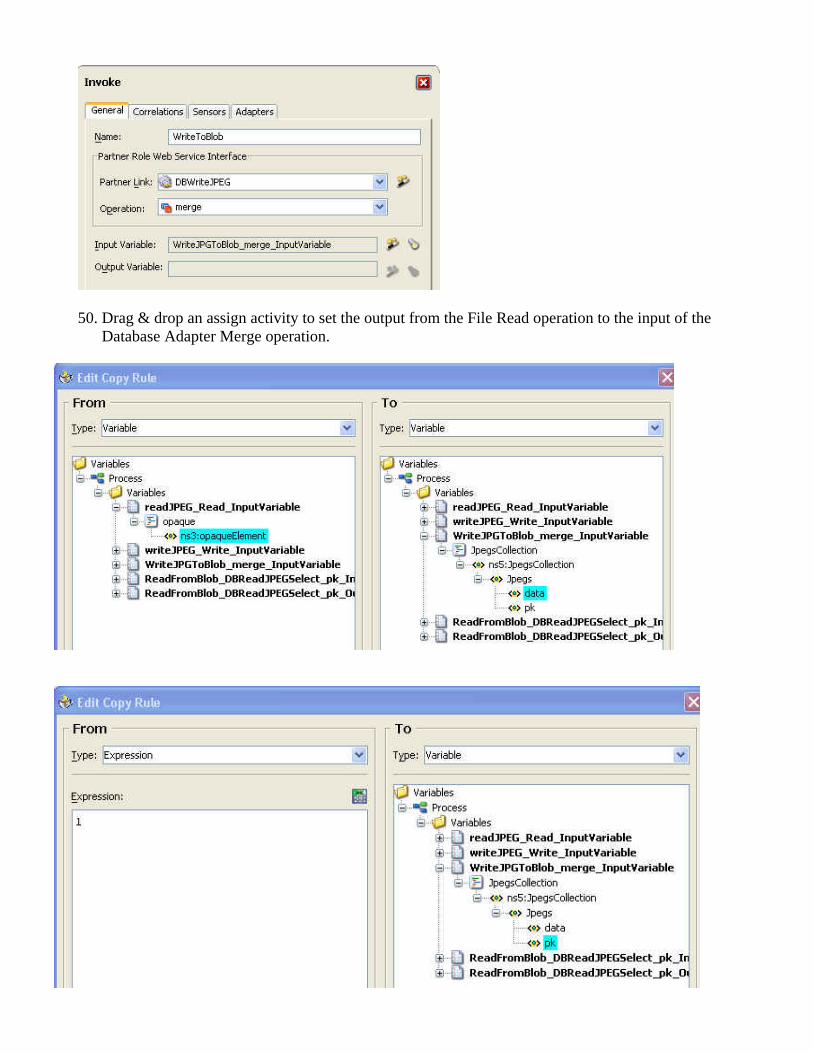
50. Drag & drop an assign activity to set the output from the File Read operation to the input of the
Database Adapter Merge operation.

51. The BPEL process showcasing the integration of File Adapter Read Service and the DB Adapter Merge Service is as shown in the following figure:
52. Drag & drop an invoke activity to the DB Adapter Query Service
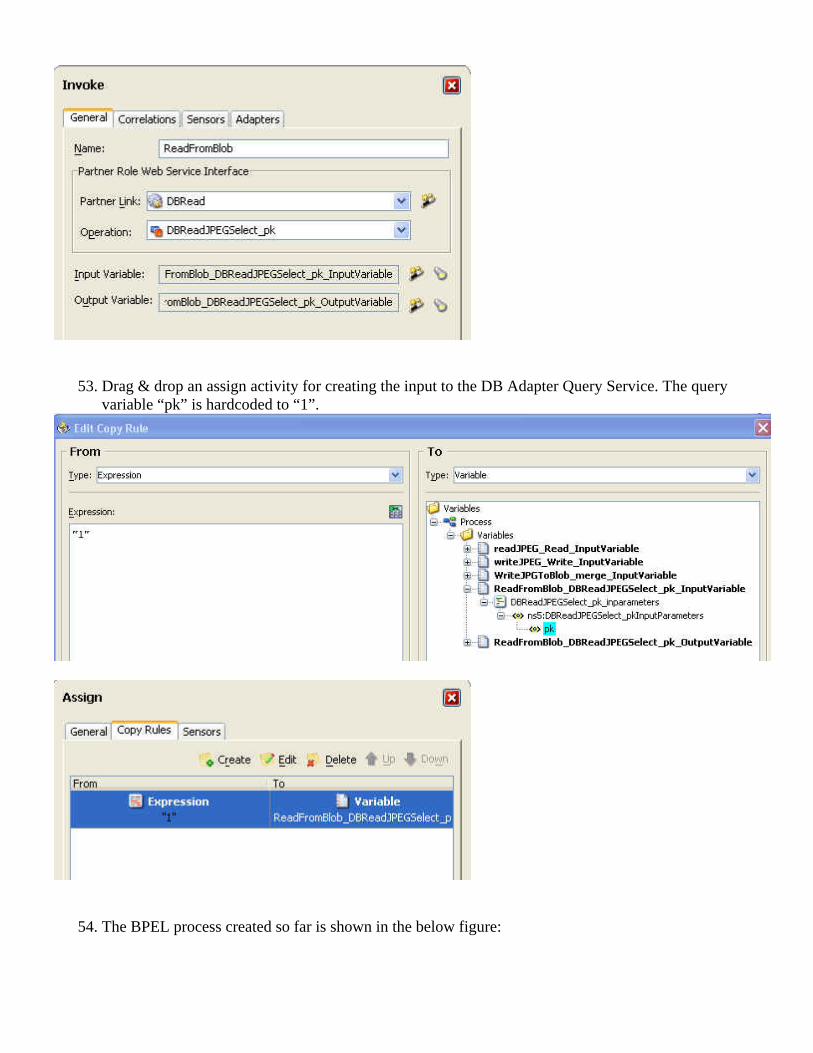
53. Drag & drop an assign activity for creating the input to the DB Adapter Query Service. The query variable “pk” is hardcoded to “1”.
54. The BPEL process created so far is shown in the below figure:

55. Drag & drop an invoke activity to the File Adapter Write Service

56. Drag & drop an assign activity to set the output of the DB Adapter Query Service to the input of the File Adapter Write Service.
57. The end to end BPEL process is as shown in the figure:

Deployment and testing of the BPEL process
58. Set the OC4J-ra.xml of the Oracle AS Adapter for Database Adapter to point to the run-time connection parameters as shown in the following figure.
<connector-factory location="eis/DB/LocalConnection" connector-name="Database Adapter"> <config-property name="driverClassName" value="oracle.jdbc.driver.OracleDriver"/> <config-property name="connectionString" value="jdbc:oracle:thin:@localhost:1521:orcl"/> <config-property name="userName" value="ichub"/> <config-property name="password" value="welcome1"/> <config-property name="minConnections" value="5"/> <config-property name="maxConnections" value="5"/> <config-property name="minReadConnections" value="1"/> <config-property name="maxReadConnections" value="1"/> <config-property name="usesExternalConnectionPooling" value="false"/> <config-property name="dataSourceName" value=""/> <config-property name="usesExternalTransactionController" value="false"/>

<config-property name="platformClassName" value="oracle.toplink.internal.databaseaccess.Oracle9Platform"/> <config-property name="usesNativeSequencing" value="true"/> <config-property name="sequencePreallocationSize" value="50"/> <config-property name="tableQualifier" value=""/> </connector-factory>
59. Deploy the BPEL process and Restart the BPEL server. 60. Test the BPEL process by copying the JPEG in the zip file to the input directory. 61. The output as seen in the BPEL Console is hown in the figure. An output file which is an exact copy of
the input file is created in the output directory.