adenovirus production a to z, revised 11.17 - calvin kuo labkuolab.stanford.edu/microsoft word -...
TRANSCRIPT
Adenovirus production A to Z, revised 11.17.08 Cecile Chartier and Calvin Kuo, Stanford University A. Clone fragment of interest into shuttle vector/Ad donor
The fragment of interest containing the transgene is cloned into recombination intermediate i.e. Add2, Add5 in the correct orientation for expression. This is a small shutlle vector with a CMV promoter containing flanking regions of adeno homology for later homologous recombination into the 36kb adenovirus type 5 genome. We check these shuttle vectors with the transgene inserted for protein expression at this point by transfection into 293T cells. If this intermediate does not express protein, it is unlikely that the final adenovirus will express protein. Remember to include Kozak, start and stop codons and any relevant epitope tags. Often we produce secreted proteins and these require a signal peptide as well. In this case we usually use the endogenous signal peptide unless we have expression problems, in which case we fuse heterologous signal peptides (i.e. hGH, IgK etc).
B. Preparation of vector, insert and competent bacteria for homologous
recombination
1. Preparation of linearized Ad genome (VECTOR). The principle of recombination here involves selection of positive recombinants by gap repair. The vector (linearized Ad genome) is cut exaustively with the rare 8 bp cutters such as PacI or SwaI to reduce transformation background from vector alone. 1. Vector (Ad type 5 genome with E1 and E3 deletions) such as Ad PDGFRβ - 20 µg 2. Cut with PacI or SwaI over 36-48 h adding enzyme a total of 3 times to exaustively digest 3. Extract 1x with phenol/chl/IAA, precipitate with 1/10 vol NaOAc pH 5.2 and 2.5 vol EtOH 4. 70% EtOH wash, dry 5. resusp in TE approx 50-100 ng/µl
2. Preparation of fragment with transgene flanked by 5’ and 3’ adeno homology regions (INSERT). Cut 5 µg of Add (shuttle vector/Ad donor) containg transgene of interest from step A above with PacI/MfeI UNLESS there are internal PacI/MfeI sites. The objective is to excise the transgene along with 5’ and 3’ flanking homology regions. If there is an internal Pac site we typically use an I-SceI flanked cassette. If there are internal MfeI sites, try PvuII, XcmI or PflMI. Note: on CM6 files, MfeI does not appear on the map—the isoschizomer MunI appears instead for some reason. 1. Isolate upper fragment (NOT the background 3kb) 2. Gel isolate into TE 20 µl 3. Check isolated fragment on gel
3. Preparation of competent cells (BJ) BJ cells are recA(+) to promote recombination between the vector prepared in step 1 and the fragment/insert prepared in step 2. They should be kept on ice in the cold room after preparation, and can be used up to 3 days after preparation.
1. take BJ cells streaked on LB without AMP plate, or BJ frozen stock in LB without AMP 2. grow overnight in LB no AMP 3. next day inoculate 1 ml of O/N culture into 100ml LB no amp 4. grow to OD approx 0.5 (3 hours?) All subsequent steps on ice:
5. spin down bacteria at 3500 rpm, 5 min tabletop 4C 6. freshly prepare 50 ml of 50 mM CaCl2 from a 1M CaCl2 stock. Filter sterilize, keep on ice. 7. gently resusp in 40 ml of CaCl2 50 mM F/S (freshly diluted from 1M CaCl2 stock F/S) 8. incubate 30 min on ice 9. spin down again 3500 rpm 5 min 4C 10. resusp 2 ml of CaCl2 50 mM F/S 11. keep on ice o/n, can use for 2-3 d after prep, competency increases after 1st 24 hrs. we
typically use them the day after preparation. C. Recombination
Here, the vector prepared in step 1 and the fragment/insert prepared in step 2 are recombined by heat shock transformation of both into recA+ BJ bacteria. If recombination occurs, a circular plasmid will be reconstituted with the 36 kb adeno vector with the insert recombined correctly. This will grow as an ampicillin/carbenicillin-resistant plasmid..
1. prepare 37C waterbath
2. Combine the following on ice in eppendorf:
Take 50 ng of linearized Ad genome (from 1B) i.e. 0.5 µl + purified PacI/MfeI digest fragment (100 ng) i.e. 2-4 µl BJ competent bugs 100 µl
DO NOT FORGET TO DO A VECTOR ALONE CONTROL with the BJ! 3. Ice 15 min 4. 37C heat shock, 90 sec 5. Ice 2 min 6. Add 200 µl of LB WITHOUT ANTIBIOTIC, 37C heat block, 30 min 7. Plate on LB carb plates, incubate o/n 37C D. Miniprep of BJ DNA and retransformation into DH5α
BJ bacteria give very poor DNA; therefore we use Qiagen minipreps (or equivalent) rather than boiling minipreps. We don’t bother doing restriction digests on the BJ DNA because of poor
yield and quality. Rather, the BJ DNA is then re-transformed into DH5α (or XL1-Blue, etc) so that we can eventually get good quality DNA out.
Combine the following on ice: Take 2.5 µl of Qiagen minprep
Add 25 µl of DH5α Ice 30 min heat shock 37C waterbath, 90 sec Add 100 µl LB NO ANTIBIOTIC 37C 1 hour in heat block plate out on LB Carb plates O/N 37C The next day, pick colonies into 3 ml LB Carb and incubate O/N again. E. DH5α Miniprep
The DH5a DNA liquid culture is then miniprepped by either Qiagen or boiling methods. Qiagen DNA is more versatile – can transfect or sequence it, but boiling is cheaper. We usually use Qiagen miniprep DNA.
F. Restriction analysis of final Ad recombinants
Typically use RI and Sal, have to compare against parental Ad SNP or Ad Flk1-Fc pattern. Usually run a 0.6% gel to optimally resolve large fragments.
G. Maxiprep DNA
We maxiprep the DNA (usually Qiagen) and then re-confirm the restriction digest. This serves as a stock of the adenoviral plasmid and provides very clean DNA for transfection of 293 cells (for generating adeno plaques).
H. Tranfection of 293 cells for generation of adenoviral plaques
Here, the adenoviral maxiprep DNA from G. is linearized with PacI, producing a large >30kb fragment which contains the Ad genome with the gene of interest cloned in, as well as a 2kb stuffer fragment. The pool containing both fragments is transfected into 293 cells, which are then overlaid with low-melting point agarose. Linearization is important because circular Ad DNA can not undergo replication , whereas linear Ad DNA is the preferred replicative form. The 2 kb stuffer fragment that is also transfected is irrelevant. PacI is an infrequent 8 bp cutter allowing liberation of the PacI-flanked Ad DNA.
Materials Required: 293 cells (not 293T), passage <=50 autoclaved aliquots of 5%LMP agarose in ddH20 (usually 20 ml per aliquot) DMEM/ 5% FCS/ PSG PBS/2% FCS 0. Linearize 10 µg of the adeno DNA maxiprep from step G. with PacI. Extract 1x with
phenol/chl/IAA and ppt with 1/10 vol NaOAc pH 5.2, wash with 70% EtOH, dry and resuspend in 50 µl TE. Confirm digest with PacI on gel and note released 2 kb band
and the large 34+ kb adenoviral genome. We will transfect this mixture of the 2 bands in later steps—it is hard to gel purify large DNA ie 34 kb.
1. The night before transfection, seed 1 x 10⁶ early passage 293 cells per well in a 60 mm dish.
2. The next day, transfect 0.5-2 µg PacI digest (varies if not recombining into E1) by calcium phosphate. Try not to let ppt lie for >15h if possible since cells will round up and monolayer will not be very smooth in later steps. Move cells to adeno incubator. All subsequent cultures will be in adeno incubator
3. The next day, prepare the following: Melt the 5% LMP agarose in microwave, do not over cook. Place in 65C waterbath or hyb oven. Warm DMEM/5%FCS/PSG in 37C waterbath. Once these are at the correct temperature, combine 1 part 5% LMP agarose in ddH20 + 4 parts DMEM/5% FCS/PSG. This mixture makes 1% LMP agarose final. Warning, if you do not prewarm both components prior to combining them, the mixture may prematurely harden. Once combined this mixture can be kept at 37C (i.e. placed in the tc incubator) without fear of hardening. You will need 2 ml of this per well so plan accordingly and make some extra.
4. Suck off media in adeno hood and overlay carefully (side of well) 2 ml of (1 part 5% LMP agarose in ddH20: 4 parts DMEM/5% FCS/PNS/L glut) prepared in step 3. Add to side of the well so as not to disturb the fragile 293 cell monolayer. After finished, bleach the aspirator line in the adeno hood.
5. Let sit 30 min to harden and then in 5% adeno incubator 6. . 4-5 days later, or when overlay gets yellowish, repeat steps 4-6. 7. Plaques should appear after 7-10d. If plaques are not appearing you can continue to
re-layer every 5-7 days but this is in general not a good sign. 8. Pick plaques with a sterile 1 ml tissue culture pipette and use pipetteman to squeeze
out plug into 0.5 ml of .PBS/2% FCS in a sterile Nunc freezing vial . 9. Freeze at –70C.
I. Expansion of adenoviral plaques
The small adeno plaques need to be expanded to produce large scale amounts of virus. This is accomplished by serial passage through T25, T75 and if necessary T150 flasks of subconfluent 293 cells. 1. Plate 293 cells (don’t need to be early passage) at 1 x 10⁶ cells in T25 flasks in
DMEM/10%FCS/PSG the night before. Theoretically should be 30-50% confluent or so the next day. Remember to make an extra flask for a “no virus” control.
2. The next day after seeding of 293 cells, freeze thaw frozen plaques previously prepared in Step H. step 8. These plaques are already in 0.5 ml PBS/2% FCS. Perform 3 rounds of freeze thaw by alternating between 37 C waterbath and dry ice/EtOH mixture. Gently vortex between each freeze thaw. Add 150 µl of the freeze-thawed plaque to the T25’s with 293 cells and mix well. Don’t add virus to the “no virus” T25. Put in adeno incubator. Should get confluent lysis in 2-7 days depending on titer added, although unfortunately this takes longer sometimes. Short lysis times i.e.2-4 days are a good sign and you may be able to skip the T75 amplification step, and use 0.1 ml from the T25 per each T175 flask (step J). Longer lysis times (i.e. >7
days) are a bad sign and you will probably want to reamplify 0.1 ml on a T25 or 0.5 ml on a T75 (see step 4).
3. Collect entire media + lysed cells. Freeze thaw x 3 as in step 2. Spin down debris at 3000 rpm, 4C, 5 min in tc centrifuge and keep supernatant as your crude viral stock.
4. Seed approx 3 x 10⁶ 293 cells in T75 flasks the night before. A 1:4 split from a heavily confluent 150 mm dish is ok as well. Add to 0.5 ml of T25 freeze-thaw to T75 dish of 50-80% confluent 293 cells, and wait for lysis as in step 3. After lysis has been achieved, collect entire media + lysed cells (approx 15 ml). Freeze thaw x 3 as in step 2. Spin down debris at 3000 rpm, 4C, 5 min in tc centrifuge and keep supernatant as a second batch of crude viral stock.
5. This T75 viral stock is sufficient usually to infect the T175s used in the large scale adeno prep (step J). However if lysis occurs slowly in the T175s it may be necessary to take 500 µl- 1 ml of the T75 stock to infect a subconfluent T175 flask, and to make a T175 viral stock as in step 4 for use in the maxiprep.
6. For secreted proteins, we check the supernatants of the T25/T75/T150 flasks for protein expression by Western or ELISA.
J. Large Scale Adeno Maxiprep For infection of tissue culture cells, a T25 or T75 flask is more than sufficient. However, for i.v. injection of mice, a large scale prep will be necessary. For initial evaluation we do a 10 x T175 flask prep, although we scale up later to 30 flask preps for frequently used viruses.
1. Take 5 (or 15) freshly confluent 150 mm flasks of 293 cells, and reseed all the cells into 10 (or 30) x T175 flasks (roughly 7.5 x 10⁶ 293 cells per T175 flask).
2. The next day, add 500 µl/flask of your T75 or T150 stock from step H. Alternatively can use purified virus at 1:1 moi (i.e. 7.5 x 10⁶ pfu per T175 flask). If purified virus is used as starter, can be used directly in CsCl, although most of our viruses are already dialyzed in sucrose.
3. Wait for lysis – theoretically 2 days although this can take longer with wimpy viruses or insufficient amount of virus used in the initial infection. Again, extended lysis times (i.e. > 7 days) are a bad sign (low titer).
4. Harvest lysed cells + media by centrifugation at 1200 rpm, 5 min in tc centrifuge. For 10 flask prep, carefully remove supernatant except for 8 ml (total volume of cells + media). Put 8 ml cells + media at –80C. I For 30 flask prep, carefully remove supernatant except for 16 ml (total volume of cells + media) and put 16 ml cells + media at –80C. Can keep supernatant for purification of recombinant secreted proteins – can get 200- 1000 µg protein from this .
5. Freeze thaw this 8 ml x 3 three times at 37 C alternating with dry ice/EtOH. Proceed to CsCl gradient protocol (step K).
K. CsCl banding of adenovirus The crude viral stock from step J is sequentially purified over 2 CsCl gradients. These separate empty capsids away from intact virus. The first gradient is δ=1.25 g/ml CsCl solution in 1X TD layered over δ=1.4 g/ml CsCl solution in 1X TD (see required materials above). The second is δ=1.34 g/ml CsCl. These are both equilibrium gradients so spinning for longer periods than recommended is ok. Materials required:
1. 10X TD Buffer: NaCl 80 g KCl 3.8 g ddH2O to 900 ml Add: Na2HPO4 2.5 g Tris Base 30g Adjust pH to 7.4 with HCl Adjust volume to 1L with ddH2O Filter sterilize (0.22 µM) and store at 4C 2. CsCl solutions: Prepare in 1x TD buffer (using 10X TD buffer as a stock solution) and adjust the density by weighing the solution!!!! Very important that density and pH are accurate to ensure adequate banding of virus and ensure against precipitation of virus. Approximate CsCl quantities for 100 ml of each solution: 1.25 g/ml density: 36.16 g 1.34 g/ml density: 51.20 g 1.40 g/ml density: 62.0 g Filter sterilize (0.22 µM) and store at 4C 3. 2X formulation buffer: 100 mM Tris-HCl pH 7.4 10 mM EDTA 100 mM NaCl 1 mM MgCl2 50% glycerol Filter sterilize (0.22 µM) and store at 4C 4. Ultracentrifuge + SW41 rotor + SW41 swinging buckets 5. Beckman ultracentrifuge tubes 14x89mm 6. Mineral Oil 7. 20G needles 8. 3 ml syringes 9. Dialysis Buffer: 10 mM Tris pH 8.5 2 mM MgCl2 4% sucrose for 4L total, add 40 ml 1M Tris base pH 8.5 + 8 ml 1M MgCl2 + 160g sucrose Filter sterilize 0.22 µM. Put into 4 x 1L beakers + magnetic stir bar that have been previously autoclaved. Refrigerate overnight prior to use.
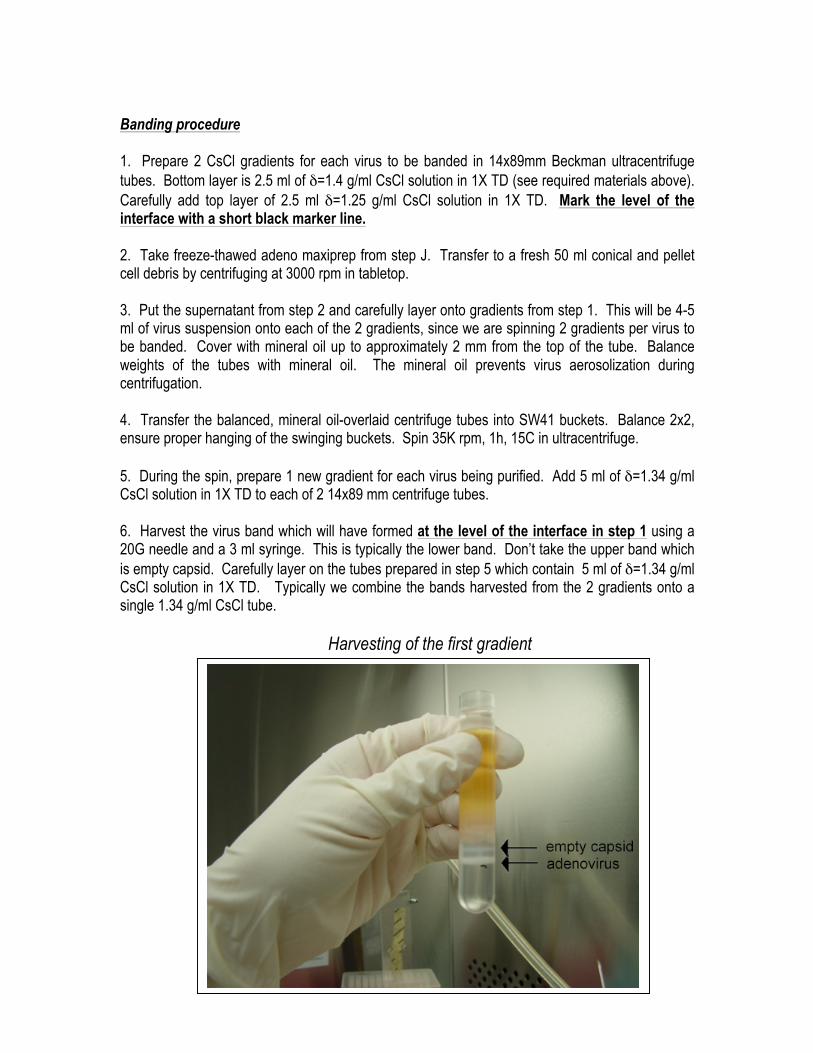
Banding procedure 1. Prepare 2 CsCl gradients for each virus to be banded in 14x89mm Beckman ultracentrifuge tubes. Bottom layer is 2.5 ml of δ=1.4 g/ml CsCl solution in 1X TD (see required materials above). Carefully add top layer of 2.5 ml δ=1.25 g/ml CsCl solution in 1X TD. Mark the level of the interface with a short black marker line. 2. Take freeze-thawed adeno maxiprep from step J. Transfer to a fresh 50 ml conical and pellet cell debris by centrifuging at 3000 rpm in tabletop. 3. Put the supernatant from step 2 and carefully layer onto gradients from step 1. This will be 4-5 ml of virus suspension onto each of the 2 gradients, since we are spinning 2 gradients per virus to be banded. Cover with mineral oil up to approximately 2 mm from the top of the tube. Balance weights of the tubes with mineral oil. The mineral oil prevents virus aerosolization during centrifugation. 4. Transfer the balanced, mineral oil-overlaid centrifuge tubes into SW41 buckets. Balance 2x2, ensure proper hanging of the swinging buckets. Spin 35K rpm, 1h, 15C in ultracentrifuge. 5. During the spin, prepare 1 new gradient for each virus being purified. Add 5 ml of δ=1.34 g/ml CsCl solution in 1X TD to each of 2 14x89 mm centrifuge tubes. 6. Harvest the virus band which will have formed at the level of the interface in step 1 using a 20G needle and a 3 ml syringe. This is typically the lower band. Don’t take the upper band which is empty capsid. Carefully layer on the tubes prepared in step 5 which contain 5 ml of δ=1.34 g/ml CsCl solution in 1X TD. Typically we combine the bands harvested from the 2 gradients onto a single 1.34 g/ml CsCl tube. Harvesting of the first gradient
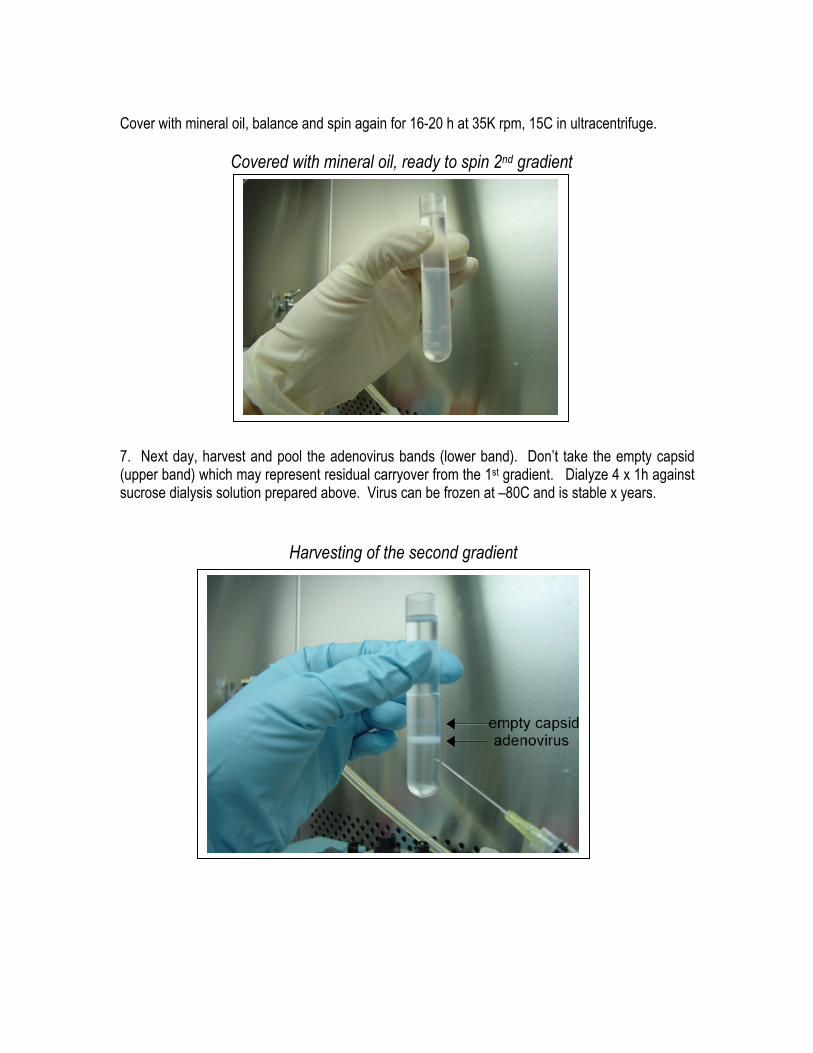
Cover with mineral oil, balance and spin again for 16-20 h at 35K rpm, 15C in ultracentrifuge. Covered with mineral oil, ready to spin 2nd gradient 7. Next day, harvest and pool the adenovirus bands (lower band). Don’t take the empty capsid (upper band) which may represent residual carryover from the 1st gradient. Dialyze 4 x 1h against sucrose dialysis solution prepared above. Virus can be frozen at –80C and is stable x years.
Harvesting of the second gradient
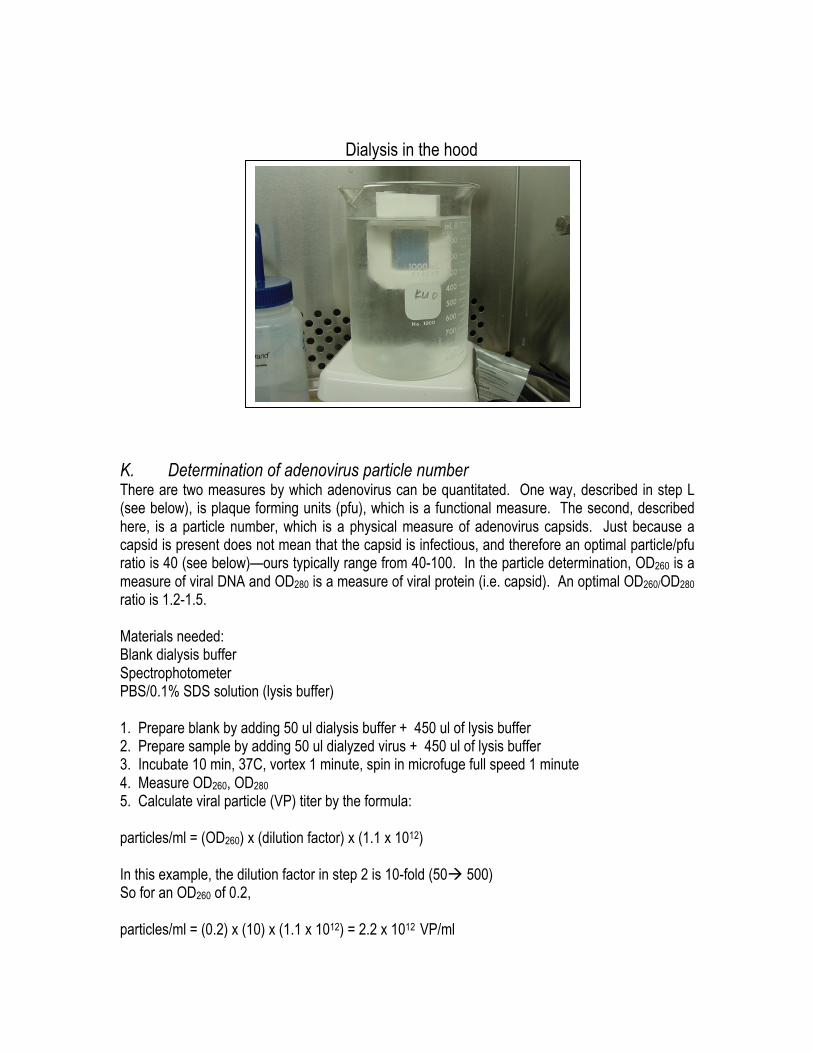
Dialysis in the hood K. Determination of adenovirus particle number There are two measures by which adenovirus can be quantitated. One way, described in step L (see below), is plaque forming units (pfu), which is a functional measure. The second, described here, is a particle number, which is a physical measure of adenovirus capsids. Just because a capsid is present does not mean that the capsid is infectious, and therefore an optimal particle/pfu ratio is 40 (see below)—ours typically range from 40-100. In the particle determination, OD260 is a measure of viral DNA and OD280 is a measure of viral protein (i.e. capsid). An optimal OD260/OD280 ratio is 1.2-1.5. Materials needed: Blank dialysis buffer Spectrophotometer PBS/0.1% SDS solution (lysis buffer) 1. Prepare blank by adding 50 ul dialysis buffer + 450 ul of lysis buffer 2. Prepare sample by adding 50 ul dialyzed virus + 450 ul of lysis buffer 3. Incubate 10 min, 37C, vortex 1 minute, spin in microfuge full speed 1 minute 4. Measure OD260, OD280 5. Calculate viral particle (VP) titer by the formula: particles/ml = (OD260) x (dilution factor) x (1.1 x 10¹²) In this example, the dilution factor in step 2 is 10-fold (50à 500) So for an OD260 of 0.2, particles/ml = (0.2) x (10) x (1.1 x 1012) = 2.2 x 10¹² VP/ml
NOTE: non-dialyzed virus can be assayed, although the blank needs to be changed from 50 µl dialysis buffer to 50 µl CsCl = δ 1.34 g/ml L. Adenovirus Titering
materials required: 293 cells (not 293T), passage <=50 autoclaved aliquots of 5%LMP agarose in ddH20 DMEM/ 5% FCS/ PSG PBS/2% FCS 1. The night before, seed 5 x 10⁵ early passage 293 cells per 6 well dish in DMEM/10%FCS/PSG. Seed 2 x 6 well dishes for each virus to be titered since duplicate determinations are typically performed. 2. Melt the 5% LMP agarose in microwave, do not over cook. Place in 65C waterbath or hyb oven. Warm DMEM/5%FCS/PSG in 37C waterbath. Once these are at the correct temperature, combine 1 part 5% LMP agarose in ddH20 + 4 parts DMEM/5% FCS/PNS/L glut. This mixture makes 1% LMP agarose final. Warning, if you do not prewarm both components prior to combining them, the mixture may prematurely harden. Once combined this mixture can be kept at 37C without fear of hardening. You will need 2 ml of this per well so plan accordingly and make some extra. 3. Make dilutions of virus in PBS/2% FCS in sterile tubes (i.e. cryotubes) 6à600 µl (102 dil) 6à600 µl (104 dil) 6à600 µl (106 dil) 60+540 µl (107 dil) 60+540 µl (108 dil) 60+540 µl (109 dil) 60+540 µl (1010 dil) 60+540 µl (1011 dil) I do not vortex these dilutions and just mix by tapping the tubes manually. 4. Suck off media from the 6 well dishes and place 250 µl of virus dilutions per well. I add it right in the middle of the well and let it spread out and mix gently. Place at 37C for 30 min. When doing many dishes at once I time the infection for 30 min for consistency and perform each step in this section in the same plate order. 5. Add 2 ml of (1 part 5% LMP agarose in ddH20 + 4 parts DMEM/5% FCS/PNS/L glut.) mixture that has either been freshly combined or sitting at 37C. 5. Let sit at room temp 20 min and confirm that the agarose overlay has hardened . Then move to 5% incubator at 37C. 6. At day 5, would re-layer with 2 ml as in step 5.
7. Adeno plaques should appear as lytic areas, and should be apparent as early as day 5. We typically count plaques at day 10 and 14. We are conservative and if plaques are forming a cluster we only count them as a single plaque, since big plaques can give rise to satellite baby plaques. 8. Titer is calculated by the formula : titer (pfu/ml) = (# of plaques) x (dilution factor )/ (0.250 ml) where # of plaques is the number of plaques in that well. dilution factor is i.e. 108 0.250 is fixed and which is the initial volume of the virus dilution used for infection as in step 3 So for instance, if in the 108 dilution well you have 25 plaques, titer (pfu/ml) = (25) x (108 )/ (0.250 ml)= 1 x 10¹⁰/ml
Y. Protein analysis of transgene expression in A549 cells A549 cells are commonly used as a cell line which is easily infected by adeno but which does not support viral replication since it is E1-deficient (as opposed to E1(+) 293 cells). Transgene expression by the adeno can be performed to confirm protein expression and the absence of large contaminating proteins (for example if the prep was grossly contaminated by other viruses). We have not personally had gross contamination but we have seen examples of such from other people, so this is not such a bad idea. Z. Extraction and analysis of adenoviral DNA
This is for analyzing the viral DNA to confirm that the correct DNA has been packaged. This is recommended for every maxi prep for quality control. To 200 µl of purified virus (either CsCl or sucrose-dialyzed is ok) add the following in the adeno hood: Virus 200 µl 1M Tris pH 7.5 or 8 5 µl 0.5M EDTA pH 8 5 µl 20% SDS 12.5 µl proteinase K (Roche, 15 mg/ml) 1.6 µl ddH2O 275 µl -------- 500 µl Incubate 2h, 37C in the adeno tc incubator Extract 1x with phenol/chl/IAA Precipitate with 1/10 vol 3M NaOAc pH 5.2 and 2.5 vol EtOH Wash 75% EtOH, dry/speedvac Resusp pellet in 30 µl TE
Quantitate DNA with spectrophotometer Remember that the packaged viral DNA is linear, whereas the adenoviral expression plasmid generated in step C-E is circular. We typically do a RI/Sal digest of 500 ng of the extracted DNA. As a positive control, use 500 ng of the adeno maxiprep from step G digested with PacI + RI + SalI. This additional digest is necessary to linearize the adenovirus plasmid so that it is comparable to the linear DNA extracted from the virus. An additional 2 kb band is generated by this PacI digestion.