adjustable air ride e 03-09 (w211) & cls 06-11 (c219...
TRANSCRIPT

Adjustable Air Ride E 03-09 (W211) & CLS 06-11 (C219) Class Instructions
Make sure the key is out of the ignition and no power is on. Spray a little WD40 or similar lubricant on the factory Link ends before removal. Front: 1. Jack up each corner and locate the stock ride height sensor Link straight inside the wheel well above the tire. 2. Remove the stock Link by using an adjustable wrench. Slide it over the Link and twist firmly but gently close to the control arm side. Once 1 side is off the other comes off easily by bending it backwards. Still be gentle enough as to not break the sensor arm. 3. Set the new Adjustable Links so that they are equal in length. Lengthening the Link from the factory length will lower the vehicle. Each 5mm longer then stock will lower approx. ¾ - 1 inch. Don’t have to lock them tight just snug. 4. Install Adjustable Links with long end up. May need pliers to squeeze on. Rear: 1. Jack up the vehicle and support it on stands. 2. Look above the rear differential and locate the stock ride height sensor. 3. Remove the 2 10mm bolts that hold the sensor in place. 4. Remove the sway bar end with a long flat screwdriver by prying it off. It is a little tricky, very tight up there. 5. Once removed lower the sensor with the stock Link attached. 6. Remove other end from sensor. 7. Install the adjustable Link the same way the stock one came off. In the rear shortening the Link will lower the vehicle. Each 5mm shorter then stock will lower approx. ¾ - 1 inch. 8. Feed the Link back over the differential. Reinstall sensor and bolts but Make sure the sensor arm is pointing up. If it isn’t when you put the car back on the ground it will lower all the way down. 9. Reach above the differential to hold the Link as you use the screwdriver to push it up and on to the ball. Start the vehicle, raise it up and down and move it forward and back to get the suspension active to the new settings. If you are not happy with the height you can easily re-adjust. For the front to lower more or less remove 1 side of the Link by using a 10mm wrench. Usually 2 turns is about a ¼ inch in height. In the rear you can adjust the Link by popping off the side that’s connected to the sway bar. Reach up and use the screwdriver to turn it while its still attached to the sensor. There is sufficient room to do it, just a bit tight. Re-attach after a few turns. Depending how low you make the vehicle a wheel alignment may be required to reduce tire wear. There is an extra keeper in the Kit for the rear Link. If you return your vehicle back to stock the original Link is extremely difficult to re attach on the sway bar side. On the stock Link remove the original and replace with the extra one. Make sure to insert it the same direction. Thank you for the purchase. If you have any questions please don't hesitate to ask anytime via phone or Email. John Vranic. 604-780-7734 www.adjustableairride.com
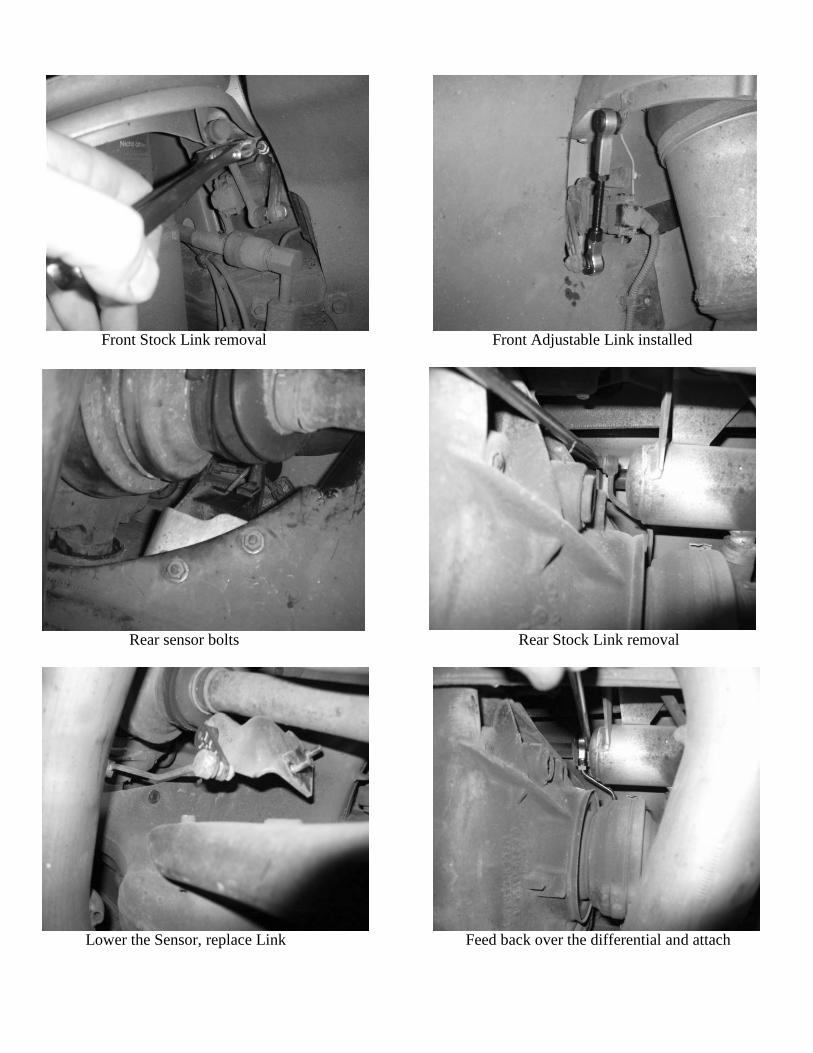
Front Stock Link removal Front Adjustable Link installed
Rear sensor bolts Rear Stock Link removal
Lower the Sensor, replace Link Feed back over the differential and attach