administering online tests - testwiz · to score or items, teachers will need to log into testwiz,...
TRANSCRIPT
© 2018 Certica Solutions, Inc. All rights reserved. www.CerticaSolutions.com 877.456.8949 [email protected]
TestWiz™ Administering Online Tests:
Printing Online Test Tickets and Taking the Test
Updated: January 24, 2018
2
© 2018 Certica Solutions, Inc. All rights reserved.
This guide and the software described in this guide are furnished under a license accompanying the software and may be used only in accordance with the terms of such license. By using this guide, you agree to the terms and conditions of that license. TestWiz and the TestWiz logo are trademarks or registered trademarks of Certica Solutions, Inc. in the United States and other countries. All other product names mentioned herein may be trademarks or registered trademarks of their respective companies.

3
Overview To administer online tests, you need to first print Online Test Tickets for students. These tickets have the information that students need to take a specific test online and to tie their responses and scores to their TestWiz student records. The last section of this document, “Taking the Test Online” on page 8, describes the online test taking process from a student’s perspective.
Prerequisites Before you can print Online Test Tickets:
• There needs to be a Test Specification that was created from an Item Bank. A Test Administration file must also be in place. (See the document titled, Creating Tests Using an Item Bank.)
• Student names and teacher or course assignments must be in place.
Printing Online Test Tickets To print individual tickets or to print a sheet of ticket information, follow these steps:
1. Choose Online Test Tickets from the Test Management menu in Utilities.
The Print Test Documents page appears.
4
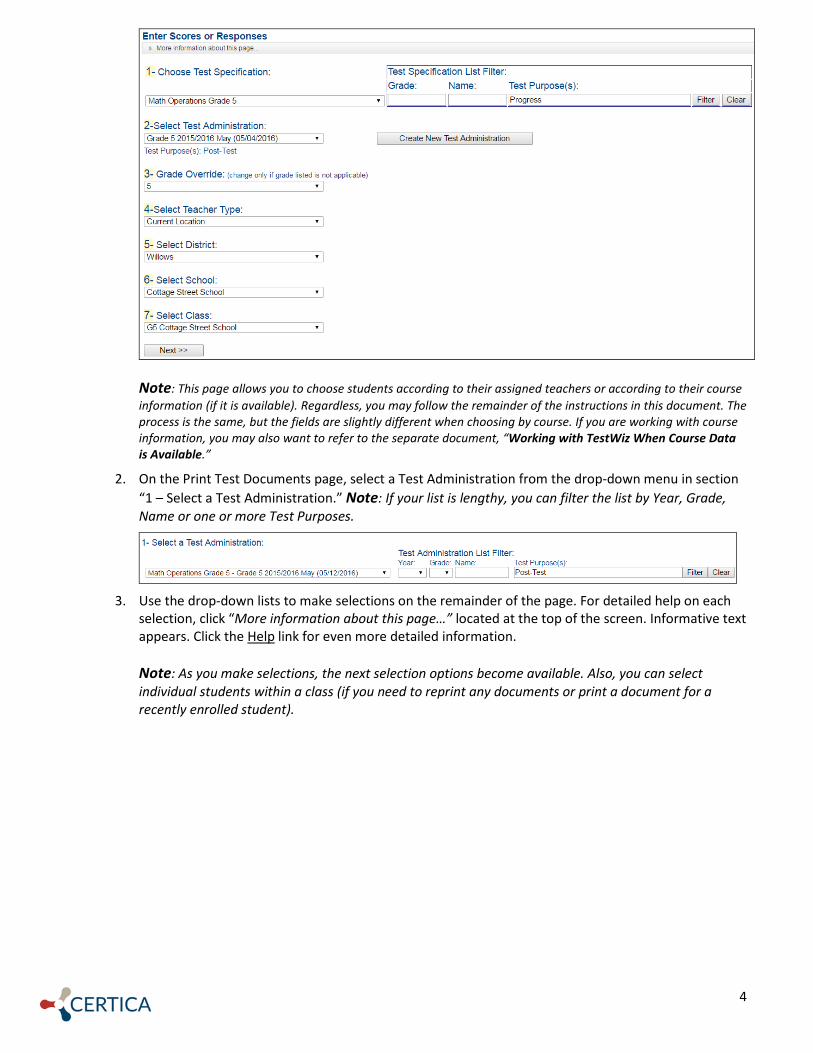
Note: This page allows you to choose students according to their assigned teachers or according to their course information (if it is available). Regardless, you may follow the remainder of the instructions in this document. The process is the same, but the fields are slightly different when choosing by course. If you are working with course information, you may also want to refer to the separate document, “Working with TestWiz When Course Data is Available.”
2. On the Print Test Documents page, select a Test Administration from the drop-down menu in section “1 – Select a Test Administration.” Note: If your list is lengthy, you can filter the list by Year, Grade, Name or one or more Test Purposes.
3. Use the drop-down lists to make selections on the remainder of the page. For detailed help on each
selection, click “More information about this page…” located at the top of the screen. Informative text appears. Click the Help link for even more detailed information. Note: As you make selections, the next selection options become available. Also, you can select individual students within a class (if you need to reprint any documents or print a document for a recently enrolled student).

5
4. Under section 5-Online Tests, you have the option to print individual tickets (appropriate for older
students who can understand their individual tickets) or a list of all the ticket information for every student on one page (useful for a teacher of younger students).
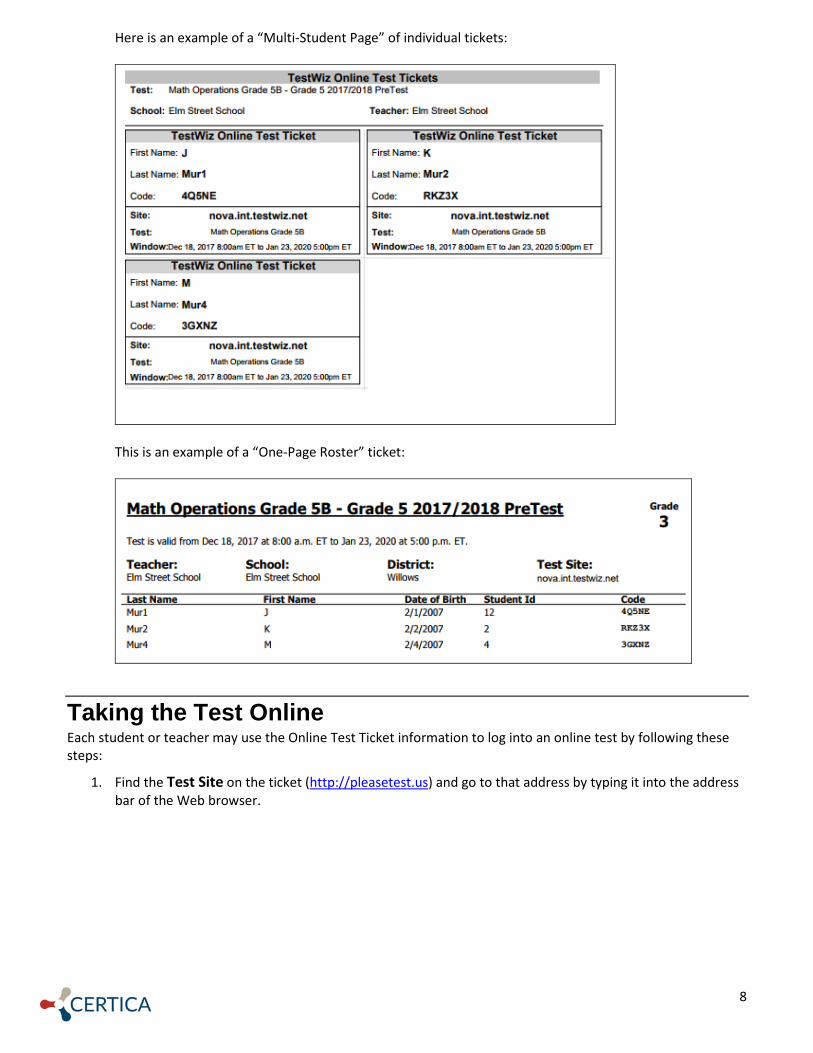
• Choose One Page Roster to print full-page individual student tickets.
• Choose Multi-Student Page to print up to 10 individual student tickets per page. After you print these tickets, you may cut them up and distribute. (Note: The multi-student tickets do not include any special instructions. To include special instructions, print individual page tickets.)
• Choose One Page Roster to print a one-page summary of all the ticket information. Refer to the samples of each type of ticket in “Sample Tickets” beginning on page 7.
5. In the 5-Online Tickets section, click the Online Tickets button.
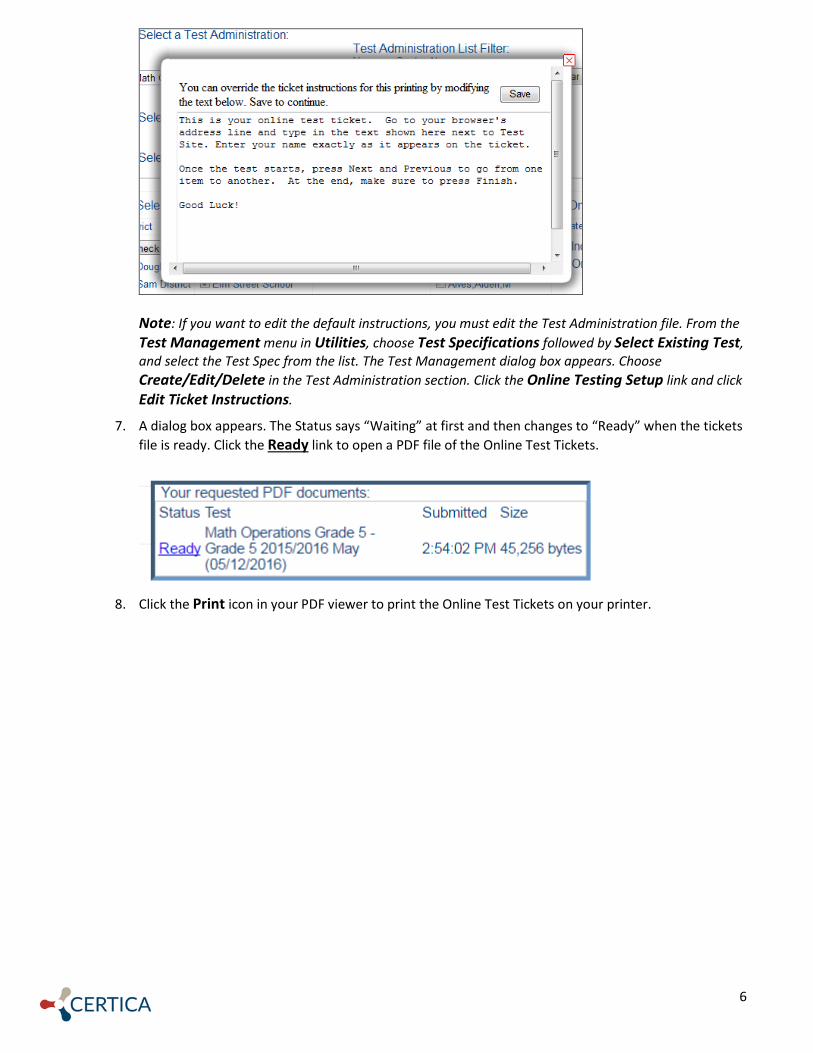
6. If you are printing individual page tickets, a dialog box appears with the default test ticket instruction text. If you want to edit it for just this set of tickets, do so here. Click Save/Close to continue.
6
Note: If you want to edit the default instructions, you must edit the Test Administration file. From the Test Management menu in Utilities, choose Test Specifications followed by Select Existing Test, and select the Test Spec from the list. The Test Management dialog box appears. Choose Create/Edit/Delete in the Test Administration section. Click the Online Testing Setup link and click Edit Ticket Instructions.
7. A dialog box appears. The Status says “Waiting” at first and then changes to “Ready” when the tickets file is ready. Click the Ready link to open a PDF file of the Online Test Tickets.
8. Click the Print icon in your PDF viewer to print the Online Test Tickets on your printer.
7
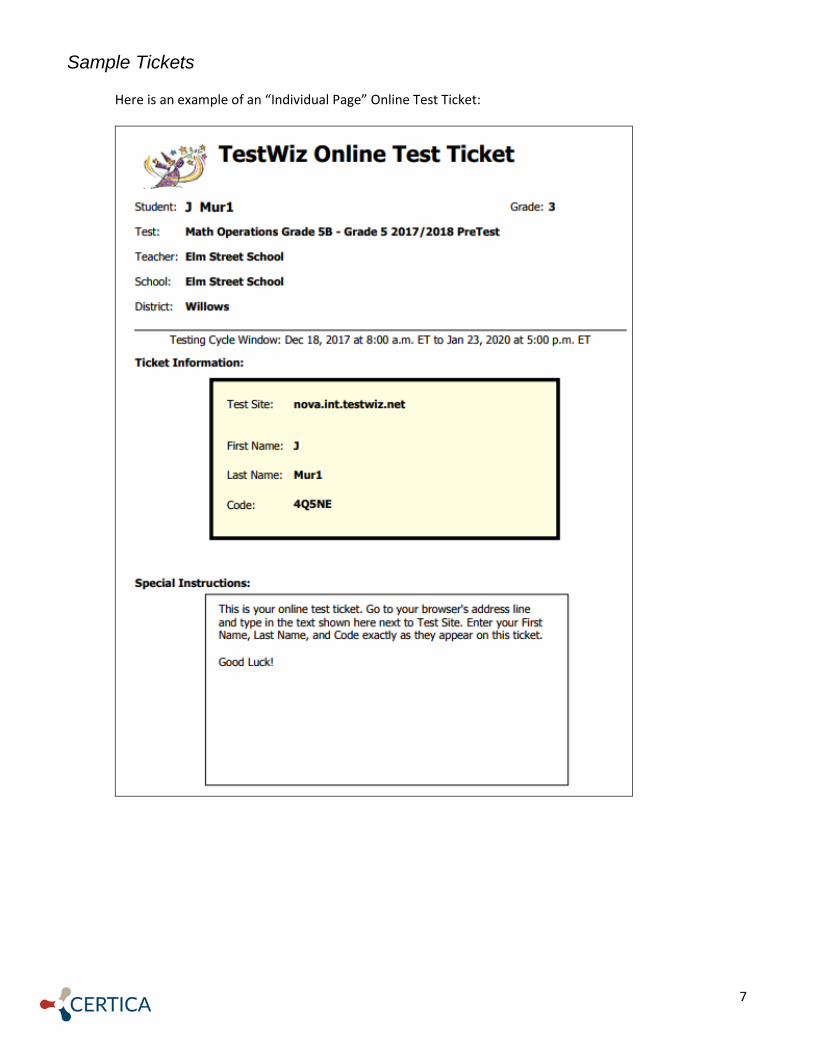
Sample Tickets Here is an example of an “Individual Page” Online Test Ticket:
8
Here is an example of a “Multi-Student Page” of individual tickets:
This is an example of a “One-Page Roster” ticket:
Taking the Test Online Each student or teacher may use the Online Test Ticket information to log into an online test by following these steps:
1. Find the Test Site on the ticket (http://pleasetest.us) and go to that address by typing it into the address bar of the Web browser.
9
2. Once you are at the test site, enter the First Name and Last Name as they appear on the test ticket.
(Capitalization is not required.)
3. Enter the Code as shown on the ticket. (Capitalization is not required.)
4. Click Start Test to log in. Once a student is logged into the test, be aware of the following:
• Some introductory information explains how many questions are on the test and how to navigate using the buttons on the screen, which are:
Goes to the next item
Goes back to the previous item
Goes to the last item
Goes to the first item
Stops and scores the test when you are finished with the test
Clears the entire answer
• If there are passages to read, these appear to the left or the right of the item. For example:

10
If students want to widen or shrink the passage, they may use the mouse to click and drag the divider that is located between the passage and the question. Note: To specify whether the passages display to the left or the right, you may edit the Test Administration file: From the Test Management menu in Utilities, choose Test Specifications followed by Select Existing Test, and select the test from the list. A dialog box of options appears. Choose Create/Edit/Delete in the Test Administration section. Click the Online Testing Setup link.
• If the item refers to more than one passage, they are presented on separate tabs. For example:
• Some items are technology-enhanced items (TEIs) that require students to interact with the item by
clicking or clicking and dragging text or images. For example, in the item below, students need to click and drag one of the item choices into the empty box.

11
• Open Response (OR) and Text Entry (TE) items can be answered in the space provided. However, if mathematical expressions or work must be shown, students should be given paper and directed to show work or math on paper.
TE items are automatically scored, but OR items are not. To score OR items, teachers will need to log into TestWiz, review the online responses and any written material, and then enter scores using the Enter Scores or Responses option under Test Management in the Utilities section of TestWiz. Refer to the document, Entering Scores or Item Responses for more information on manually entering scores. Note: TE items answered online must match exactly to the correct answers stored in TestWiz or no points are given. However, teachers can review answers and overwrite scores to TE items as needed by using the Enter Scores or Responses option under Test Management in the Utilities section of TestWiz.
• Students may click Clear Response (located to the right of the question number) to remove an entire answer and either leave it blank or start over.
• Students should click the Finish button when done. • Students may log in and return to the test later if necessary.
Results are processed in TestWiz immediately, and reports are available after any student takes any portion of the test.
Related Documents Refer to these separate documents as needed. To get to them, go to the Welcome page of TestWiz.Net and click Help Documents on the left sidebar.
• Creating Tests Using an Item Bank—details on creating a test and making it available online.
• Printing Test Details—how to get information about any custom test to see the answers, item details, etc.
12
• Viewing and Printing Reports—more information on creating and customizing reports.
Contact Information Please contact Certica Solutions for help using TestWiz.
Toll-free Help line: 877-456-8949
Alternate line: 978-456-3464
Email: [email protected]
FAX: 978-456-3391