administering windows azure pack -...
TRANSCRIPT

Administering Windows Azure Pack for Windows ServerMicrosoft Corporation
Published date: October 17, 2013
CopyrightThis document is provided "as-is". Information and views expressed in this document, including URL and other Internet website references, may change without notice.
Some examples depicted herein are provided for illustration only and are fictitious. No real association or connection is intended or should be inferred.
This document does not provide you with any legal rights to any intellectual property in any Microsoft product. You may copy and use this document for your internal, reference purposes. You may modify this document for your internal, reference purposes.
© 2013 Microsoft Corporation. All rights reserved.
Microsoft, Active Directory, Internet Explorer, Hyper-V, Silverlight, SQL Server, Windows, Windows Azure, and Windows PowerShell are trademarks of the Microsoft group of companies. All other trademarks are property of their respective owners.

ContentsAdministering Windows Azure Pack - Overview.............................................................................7
Provision and configure services in Windows Azure Pack..............................................................7
Provision Virtual Machine Clouds...................................................................................................8Provisioning Virtual Machine Clouds topics.................................................................................8
Understanding the Virtual Machine Clouds architecture.................................................................8Using Service Provider Foundation with System Center to deliver VM Clouds...........................9VM Cloud architecture topics.....................................................................................................10
How is the management portal for administrators associated with Service Provider Foundation?.................................................................................................................................................. 10See Also.................................................................................................................................... 12
How is Service Provider Foundation associated with Windows Azure Pack Usage Service?.......12See Also.................................................................................................................................... 13
How is Service Provider Foundation associated with Service Management Automation?............13See Also.................................................................................................................................... 15
How is communication secured between the portal, Service Provider Foundation, and other components?............................................................................................................................. 15See Also.................................................................................................................................... 17
Requirements for using VM Clouds..............................................................................................17Add Service Provider Foundation Service Account as VMM Administrator...............................20Other Requirements for Using VM Clouds................................................................................20See Also.................................................................................................................................... 20
Create VM Networks for Windows Azure Pack.............................................................................21Step 1: Create a logical network................................................................................................21Step 2: Create an IP pool for the logical network.......................................................................23Step 3: Create an uplink port profile..........................................................................................24Step 4: Create a logical switch referencing the port profile........................................................24Step 5: Assign the logical switch to the host..............................................................................25Step 6: Assign the logical network to the cloud.........................................................................26Step 7: Create a VM network....................................................................................................27
Register the Service Provider Foundation Endpoint for Virtual Machine Clouds..........................28Before Registering the Service Provider Foundation.................................................................28Registering the Service Provider Foundation in Windows Azure Pack......................................28

See Also.................................................................................................................................... 29
Register Service Management Automation for Virtual Machine Clouds........................................29See Also.................................................................................................................................... 30
Register Service Reporting for Virtual Machine Clouds................................................................30See Also.................................................................................................................................... 31
Using SQL Server or MySQL with Windows Azure Pack..............................................................31Install SQL Server..................................................................................................................... 31Install MySQL............................................................................................................................ 31
Install and configure the SQL Server and MySQL resource providers..........................................32
Configure SQL Server and MySQL Application databases for tenant use....................................33Connect to the SQL Server instance.........................................................................................33Connect to the MySQL instance................................................................................................34Create groups............................................................................................................................ 34
Configure SQL AlwaysOn Availability Groups in Windows Azure Pack.........................................35Prerequisites............................................................................................................................. 35Actions in the management portal for administrators.................................................................36Actions in SQL Server...............................................................................................................36References................................................................................................................................ 36
Deploy Service Management Automation.....................................................................................37Deployment topics..................................................................................................................... 37
System requirements for Service Management Automation.........................................................37Hardware requirements.............................................................................................................38
Software requirements...........................................................................................................38Running Service Management Automation on Windows Azure virtual machines...................39Security Requirements...........................................................................................................39
Security requirements for Service Management Automation........................................................40Section Heading........................................................................................................................ 40
Subsection Heading...............................................................................................................40
How to install the Service Management Automation web service.................................................40Install the Service Management Automation web service..........................................................41
How to install the Service Management Automation runbook worker...........................................43Install a runbook worker............................................................................................................43
How to install the Service Management Automation PowerShell module.....................................43Install the Service Management Automation PowerShell module..............................................44
Install Service Management Automation from a Command Prompt window.................................44
Windows Installer files...............................................................................................................44Powershell module installation options......................................................................................45Web service installation options................................................................................................45Runbook worker installation options..........................................................................................47See also.................................................................................................................................... 48
Post-installation tasks for Service Management Automation........................................................48Replace untrusted Self-Signed Certificates with trusted certificates..........................................49
How to uninstall Service Management Automation.......................................................................49
Integrate Service Reporting in Windows Azure Pack....................................................................50
Administer Windows Azure Pack for Windows Server..................................................................50
Administer User Accounts and Subscriptions...............................................................................51Administer accounts and create notifications............................................................................52See Also.................................................................................................................................... 53
Administer Plans and Add-ons......................................................................................................53Plan and add-on overview.........................................................................................................53Important considerations for authoring plans and add-ons........................................................56Create and publish a plan..........................................................................................................57
Step 1: Author a plan..............................................................................................................57Step 2. Set properties for a plan.............................................................................................57Step 3: Modify a plan.............................................................................................................58Step 4: Configure a plan........................................................................................................58Step 5: Advertise a plan.........................................................................................................58Step 6: Change access to a plan...........................................................................................59Step 7: Clone a plan...............................................................................................................59
Step 8: Author an add-on...........................................................................................................59See Also.................................................................................................................................... 60
Windows Azure Pack subscription states......................................................................................60
Administer Virtual Machine Clouds...............................................................................................62Administering VM Clouds topics................................................................................................62
Add VMM stamps to Virtual Machine Clouds................................................................................62See Also.................................................................................................................................... 62
Using automation with Virtual Machine Clouds.............................................................................63Objects that can be associated with runbooks..........................................................................64See Also.................................................................................................................................... 66
Using gallery Items in Virtual Machine Clouds..............................................................................66See Also.................................................................................................................................... 69

Known issues with Virtual Machine Clouds...................................................................................69Deleting a subscription or user account does not automatically delete virtual machines and
networks associated with that subscription............................................................................69Refreshing the query to list virtual machines, networks, and their status..................................69Searching for virtual machines or networks with names containing Unicode characters...........70See Also.................................................................................................................................... 70
Administer Service Management Automation...............................................................................70Administration topics................................................................................................................. 70
Establish trust between Service Management Automation and Service Provider Foundation......71
Scaling Service Management Automation up or down..................................................................71Initial recommendations.........................................................................................................72SQL Server recommendations...............................................................................................72Scale out Service Management Automation...........................................................................72
How to purge the Service Management Automation database.....................................................72
Common runbook tasks................................................................................................................73Common tasks..........................................................................................................................73
How to schedule a runbook..........................................................................................................73
How to start a runbook..................................................................................................................74
View the status of a runbook job...................................................................................................74
How to use the runbook dashboard..............................................................................................75
How to change log settings for a runbook.....................................................................................76
Set or change the Service Management Automation endpoint.....................................................76
Migrate from Windows Azure Services for Windows Server.........................................................77Known issues with migrating data.............................................................................................78Before you uninstall the Service Management Portal................................................................78After you install Windows Azure Pack.......................................................................................81
Windows Azure Pack terminology.................................................................................................82
Accessibility information for Windows Azure Pack........................................................................84Windows features...................................................................................................................... 84
Keyboard shortcuts................................................................................................................84Use high-contrast mode.........................................................................................................85
Browser features....................................................................................................................... 85More information........................................................................................................................85

Administering Windows Azure Pack - OverviewThe Administering Windows Azure Pack for Windows Server guide provides information about provisioning services in Windows Azure Pack and administering users and subscriptions. Use the information in this guide after you have followed the deployment procedures in “Deploy Windows Azure Pack for Windows Server.”
The following information is available in this guide:
Provision and configure services in Windows Azure Pack
Provides information about how to configure services (or resource providers) so you can offer those services to your tenants.
Administer Windows Azure Pack for Windows Server
Provides information about how to create and administer user accounts, subscriptions, and plans. This information also covers administering the individual services, such as the Virtual Machine Clouds.
Migrate from Windows Azure Services for Windows Server
Provides information on how to migrate data from Windows Azure Services to Windows Azure Pack.
Windows Azure Pack terminology
Provides an overview of the terminology used in Windows Azure Pack.
Accessibility information for Windows Azure Pack
Provides information for using Windows Azure Pack with assistive technologies.
Provision and configure services in Windows Azure PackAfter you deploy and configure the base components of Windows Azure Pack for Windows Server, you need to deploy and configure the services (or resource providers) that you want to make available to customers.
Use the following information to provision resource providers:
Deploy Windows Azure Pack: Web Sites Provision Virtual Machine Clouds Using SQL Server or MySQL with Windows Azure Pack Integrate Service Bus into Windows Azure Pack
See the Deployment and Manageability Options in Service Bus for Windows Server section for information about using Service Bus in Windows Azure Pack.
7

Deploy Service Management Automation Integrate Service Reporting in Windows Azure Pack
Provision Virtual Machine CloudsAfter you have deployed Windows Azure Pack, you must provision Virtual Machine Clouds to use the VM Clouds service. A basic VM Clouds service only requires you to configure the management portal for administrators to associate with Service Provider Foundation. However, as the topics under Understanding the Virtual Machine Clouds architecture explain, to use the full breadth of offerings included as part of VM Clouds service, you must also associate the VM Clouds service with Service Management Automation and Windows Azure Pack Usage Service. The topics in this section provide an architectural overview of how VM Clouds integrates with Service Management Automation and Windows Azure Pack Usage Service, and also provides instructions on how to associate these components using the management portal for administrators.
Provisioning Virtual Machine Clouds topics Understanding the Virtual Machine Clouds architecture
Provides architectural overview of the VM Clouds service and how it associates with other components.
Requirements for using VM Clouds
Lists down the requirements for using VM Clouds with Windows Azure Pack.
Register the Service Provider Foundation Endpoint for Virtual Machine Clouds
Provides instructions on how to register the Service Provider Foundation endpoint with management portal for administrators.
Register Service Management Automation for Virtual Machine Clouds
Provides instructions on how to register the Service Management Automation endpoint with Service Provider Foundation.
Register Service Reporting for Virtual Machine Clouds
Provides instructions on how to register the Windows Azure Pack usage service with Service Provider Foundation.
Understanding the Virtual Machine Clouds architectureThe Windows Azure Pack for Windows Server aims to have parity of experiences across different deployment locations such as enterprise datacenters, hosting providers, and Windows Azure. To achieve this, Windows Azure Pack delivers Windows Azure technologies to run inside
8

datacenters, enabling you to offer rich, self-service, multi-tenant services that are consistent with Windows Azure. The following illustration depicts how Windows Azure Pack delivers an experience on par with Windows Azure.
System Center 2012 R2 along with Service Provider Foundation provides the basis for enabling Windows Azure technologies on Windows Server. In this section, we look at the detailed architecture of how System Center 2012 R2 and Service Provider Foundation enable the VM Clouds service in Windows Azure Pack. For the overall Windows Azure Pack architecture, see The Windows Azure Pack Architecture.
For a list of topics that contain more details about the information covered here, see VM Cloud architecture topics.
Using Service Provider Foundation with System Center to deliver VM CloudsThere are two parts to the VM Clouds in Windows Azure Pack – management portal for administrators and management portal for tenants. The management portal for administrators enables hosting or enterprise service providers to set up the infrastructure against which virtual machines can be provisioned. End users use the management portal for tenants to sign up for plans that include the VM Clouds service, enabling them to provision virtual machines. In this section we look at how the management portal for administrators is associated with the underlying System Center 2012 R2 and Service Provider Foundation to enable the VM Clouds in Windows Azure Pack.
There are four key areas to look at with respect to the VM Clouds architecture.
How does the management portal for administrators associate with Service Provider Foundation?
How does Service Provider Foundation associate with the Usage Service for Windows Azure Pack?
Note
9

How does Service Provider Foundation associate with Service Management Automation? How is the communication secured between the different pieces in the technology stack?
Each topic in this section describes the architecture for VM Clouds with the aim to answer these questions.
VM Cloud architecture topics How is the management portal for administrators associated with Service Provider
Foundation?
Describes how the management portal for administrators ties up with Service Provider Foundation and VMM to deliver the VM Clouds service.
How is Service Provider Foundation associated with Windows Azure Pack Usage Service?
Describes how Service Provider Foundation is associated with the Usage Service in management portal for administrators to collect and report usage data.
How is Service Provider Foundation associated with Service Management Automation?
Describes how Service Provider Foundation works with Service Management Automation (SMA) to associate VM Clouds with Runbooks.
How is communication secured between the portal, Service Provider Foundation, and other components?
Describes how a secure communication channel is established between management portal for administrators, Service Management API, Service Provider Foundation, and the VMM server.
How is the management portal for administrators associated with Service Provider Foundation?Service Provider Foundation is available as part of System Center 2012 Orchestrator and exposes an extensible OData API over a REST web service that provides a programmatic interface to Microsoft System Center Virtual Machine Manager (VMM) (or management ‘stamp’, as each instance of VMM Server is referred to). Service Provider Foundation can be configured to interact with a maximum of five stamps. Stamps, in turn, are a logical boundary that includes System Center Virtual Machine Manager, one or more virtual machine hosts, and the virtual machines that are managed in the context of the System Center Virtual Machine Manager instance that is included in the stamp. A good example for use of stamps can be datacenters that are spread across the geographies. For example, you can have one stamp that represents a data center in Asia, while you have another stamp that represents a data center in Europe. For more information on Service Provider Foundation, stamps, and other related concepts and components, see Service Provider Foundation. The following illustration depicts how
10

management portal for administrators, Service Management API, and Service Provider Foundation integrate to provide the VM Clouds service.
You will typically have more than one instance of Operations Manager associated with multiple instances of VMM Server.
From the management portal for administrators, when you register the Service Provider Foundation endpoint with the portal, you essentially register a connection between the Service Management API and Service Provider Foundation. Because Service Provider Foundation provides a programmatic interface to the stamps, it enables service providers and large enterprise organizations to design and implement multi-tenant self-service portals that integrate IaaS capabilities available through System Center 2012 R2. Once you register Service Provider Foundation with the management portal for administrators, you extend that ability to the portal as well via the Service Management API. After you register the Service Provider Foundation endpoint:
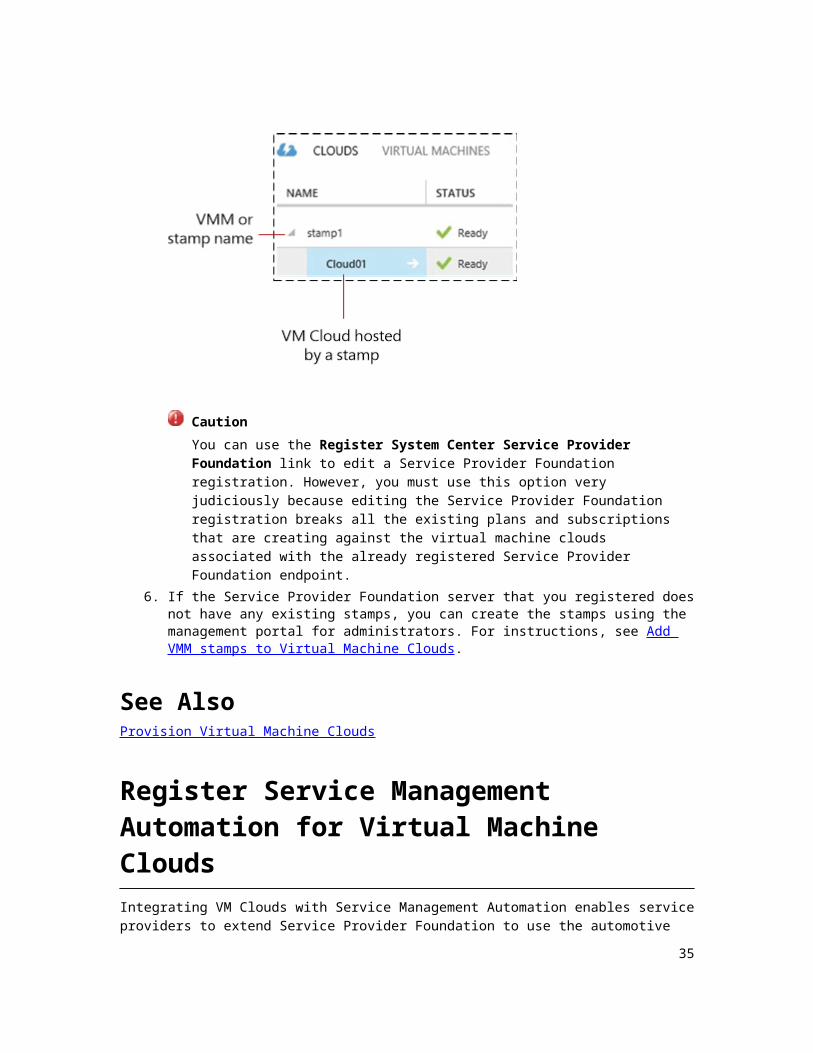
Any stamps that you create in spshort are listed as stamps in the management portal for administrators.
Any clouds that you create in the VMM server (that has Service Provider Foundation installed) appear as clouds in the management portal for administrators.
You can register more stamps with Service Provider Foundation by using the management portal for administrators.
You can remove the association between a stamp and Service Provider Foundation.
For more information on how to register a Service Provider Foundation endpoint with the management portal for administrators, see Register the Service Provider Foundation Endpoint for Virtual Machine Clouds.
Note
11

See AlsoUnderstanding the Virtual Machine Clouds architecture
How is Service Provider Foundation associated with Windows Azure Pack Usage Service?With the cloud’s ability to provide users with elastic consumption where they use the services they want at the time they want, it’s imperative to have a pay-as-you-go and pay-per-usage metering and billing system. Achieving this requires significant capabilities for collecting data, analyzing it, and then reporting the usage. Windows Azure Pack provides consistent usage collection for every service offered by all resource providers such as Web Site, Virtual Machine, Service Bus, SQL, and MYSQL servers. In this section, we look at how System Center Virtual Machine Manager, Service Provider Foundation, and management portal for administrators integrate to provide usage and metering for VM Clouds. The three key components for aggregating usage data are VMM, Service Provider Foundation, and the Usage Service in Windows Azure Pack.
Virtual Machine Manager collects data for all virtual machines and hosts managed by Virtual Machine Manager. This includes metrics on usage of CPU, memory, storage, network, as well as virtual machine status information like whether the instances are started or stopped. By default, this data is stored in the VMM database for only a month, beyond which the data is moved to the Operations Manager Data Warehouse. Service Provider Foundation acts as an interface to retrieve this data by providing usage metering to any client, such as management portal for administrators, that wants to collect it. This data comprises all the usage metering metrics for all the virtual machines that a tenant uses, provided that those virtual machines are being monitored by System Center 2012 – Operations Manager and that the data is being stored in Operations Manager Data Warehouses. The role of Service Provider Foundation is to collect metrics from all the VMM instances and aggregate them for billing and analysis purposes.
The Usage Service in Windows Azure Pack contains the following components:
Usage Collector – Usage collector consists of a scheduler that triggers the collection of information from the different resource providers in a circular fashion. It interacts with each resource provider one by one, if the provider returns with an empty response it moves to the next provider in the cycle.
Usage (REST API) – The Usage REST API exposes a REST endpoint for data access. This is used to allow access to the content in the usage database.
Usage Database – Data from the usage collector stored in the central data repository
The following illustration represents how the Service Provider Foundation usage endpoint communicates with the Usage Service in Windows Azure Pack.
12

This is how the communication flows between the different components:
The Usage Collector, a component of the Usage Service, collects usage data from every resource provider. For VM Clouds, Usage Collector interacts with the usage endpoint of Service Provider Foundation to collect usage data such as CPU, memory, or disk usage.
Service Provider Foundation usage endpoint retrieves data from the VMM and the Operations Manager Data Warehouse and returns the data to the Usage Collector service.
Usage Collector stores the data in a Usage Database. Usage REST API can be used to access the usage data from the database for billing.
To associate the Service Provider Foundation usage endpoint with the Windows Azure Pack Usage Service, you must register the Service Provider Foundation usage endpoint from the VM Clouds QuickStart tab. For more information, see Register Service Reporting for Virtual Machine Clouds.
See AlsoUnderstanding the Virtual Machine Clouds architecture
How is Service Provider Foundation associated with Service Management Automation?Service Provider Foundation integrates with the management portal for administrators and Microsoft System Center Virtual Machine Manager to provide capabilities to administer and provision virtual machines on the go. Service Provider Foundation can also be extended to
13

integrate with other business operations and tool using Service Management Automation (a variant of System Center Orchestrator for management portal for administrators), to provide capabilities to service providers and organizations to extend their offerings. For example, you could think of a scenario where every time a service administrator changes an existing plan, you want to run an automated task that propagates that change across all pre-existing subscriptions of that plan. In this section, we look at the architecture and flow of how this integration is achieved.
When you register Service Management Automation, you register the endpoint of the server where the Service Management Automation web service is running. Registering the Service Management Automation endpoint enables you to associate Runbooks with the VM Clouds infrastructure as well as other general usage of automation.
After you have registered the Service Management Automation web service, the Runbooks created under the Automation tab (and that include “SPF” among one or more tag values), are available under the VM Clouds tab for associating with events in Service Provider Foundation. The VM Clouds tab already has a list of objects and corresponding events that can be associated with Runbooks. Let us understand how the communication happens between Service Provider Foundation and the SMA using an example. Assume that service administrators want to execute a Runbook, which deletes all the user resources on VMM, every time after a subscription is deleted. To achieve this, from the VM Clouds tab, the service administrator uses an existing object (e.g. Subscription), selects the appropriate action (e.g. Delete), and associates these with the Runbook (e.g. Delete-Subscription). Once this is done, every time a subscription is deleted, the following actions occur in the background:
1. When the portal performs an operation using the Service Provider Foundation, Service Provider Foundation checks for a preconfigured action associated with operation. If there’s an associated action, Service Provider Foundation retrieves the Runbook information associated with that action.
14

2. Service Provider Foundation makes the appropriate call to perform the intended operation, which as per the example, is to delete a subscription.
3. Service Provider Foundation then goes ahead and invokes the associated Runbook using the Service Management Automation web service already registered with the portal. Here, even if the Runbook fails to execute, the Service Provider Foundation call to delete the subscription is not blocked.
4. Finally, Service Provider Foundation sends the response for the core operation (deleting the subscription) back to the portal while the runbook executes because the automation is triggered asynchronously.
For information on how to register the Service Management Automation endpoint, see Register Service Management Automation for Virtual Machine Clouds. For information on how to associate objects and actions in Service Provider Foundation with runbooks, see Using automation with Virtual Machine Clouds.
See AlsoUnderstanding the Virtual Machine Clouds architecture
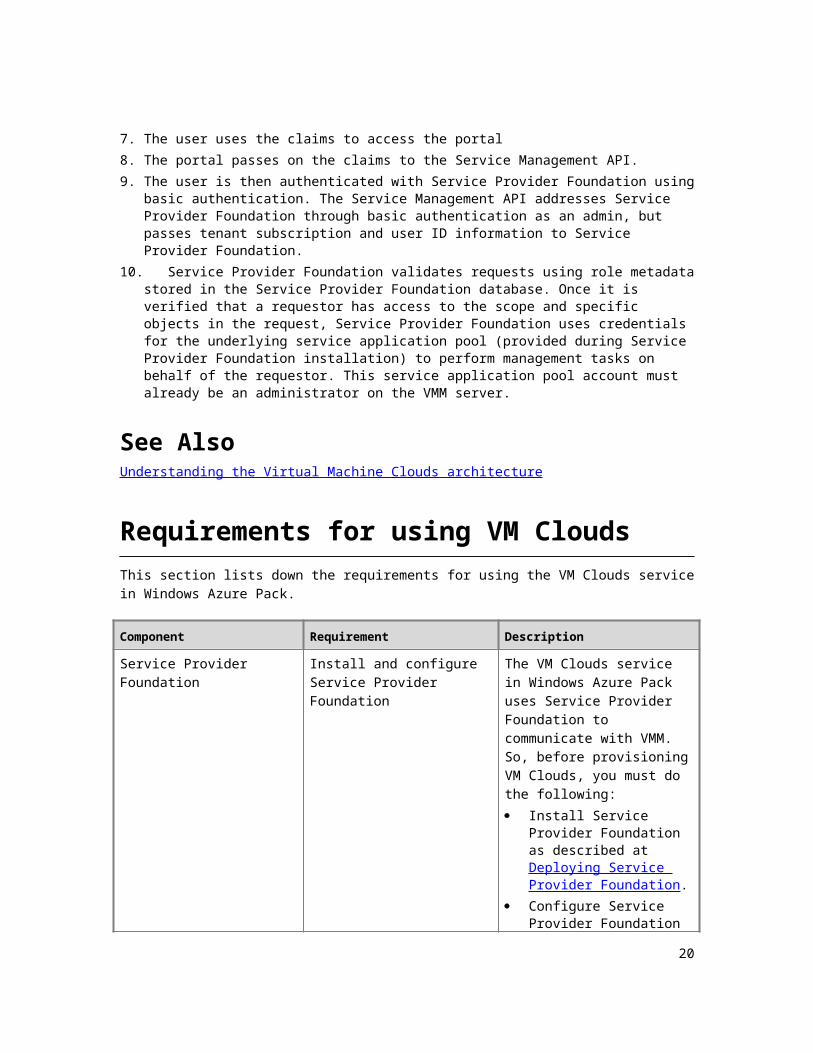
How is communication secured between the portal, Service Provider Foundation, and other components?With different components (management portal for administrators, Service Management API, Service Provider Foundation, and VMM) involved in delivering the VM Clouds service, it is imperative that communication happens over secure channels between each component. The following illustration shows how a user is authenticated between the management portal for administrators, Service Management API, Service Provider Foundation, and VMM.
15

1. A user, without claims, accesses the portal.2. Portal redirects the user to the Secure Token Service (STS).3. STS redirects the user to a login page4. The user enters the credentials in the login page5. The user is authenticated against the STS6. In response, the STS issues a claim token to the user
16

7. The user uses the claims to access the portal8. The portal passes on the claims to the Service Management API.9. The user is then authenticated with Service Provider Foundation using basic authentication.
The Service Management API addresses Service Provider Foundation through basic authentication as an admin, but passes tenant subscription and user ID information to Service Provider Foundation.
10. Service Provider Foundation validates requests using role metadata stored in the Service Provider Foundation database. Once it is verified that a requestor has access to the scope and specific objects in the request, Service Provider Foundation uses credentials for the underlying service application pool (provided during Service Provider Foundation installation) to perform management tasks on behalf of the requestor. This service application pool account must already be an administrator on the VMM server.
See AlsoUnderstanding the Virtual Machine Clouds architecture
Requirements for using VM CloudsThis section lists down the requirements for using the VM Clouds service in Windows Azure Pack.
Component Requirement Description
Service Provider Foundation Install and configure Service Provider Foundation
The VM Clouds service in Windows Azure Pack uses Service Provider Foundation to communicate with VMM. So, before provisioning VM Clouds, you must do the following:
Install Service Provider Foundation as described at Deploying Service Provider Foundation.
Configure Service Provider Foundation for use with Windows Azure Pack as described at Configuring Portals for Service Provider Foundation.
Cloud In the underlying VMM server that is associated with the Service Provider Foundation
For clouds to work with Windows Azure Pack, you must ensure that the clouds are
17

Component Requirement Description
endpoint, you must have created a cloud.
created with the following considerations:
You must create a cloud from host groups. For instructions, see How to Create a Private Cloud from Host Groups.
You must have already created logical networks that can be associated with the cloud. For instructions, see How to Create a Logical Network in VMM.
You must have already created a VM library share. For instructions, see How to Add a VMM Library Server or VMM Library Share.
You must assign the right amount of capacity to the cloud. The capacity that you assign to the cloud governs the resources that will be available to the tenants while provisioning virtual machines using VM Clouds.
You must not select any of the available capability profiles (ESX Server, Hyper-V, XenServer) while creating the cloud. If you do so, tenants will not be able to deploy virtual machine roles using the VM Clouds service.
VM Templates In the underlying VMM Server, you must have created virtual templates that can be used by tenants to provision standalone virtual machines using VM Clouds.
While creating virtual machine templates, you must ensure the following:
While selecting a source, make sure the VHD you select has the option to connect to the virtual
18

Component Requirement Description
machine using remote desktop.
While configuring the hardware settings, make sure you do not select any of the cloud capability profiles (XenServer, ESX Server, Hyper-V) available.
While configuring the operating system, make sure you do not set the Guest OS Profile drop-down to None. You must specify a valid value for this drop-down.
For instructions, see How to Create a Virtual Machine Template.
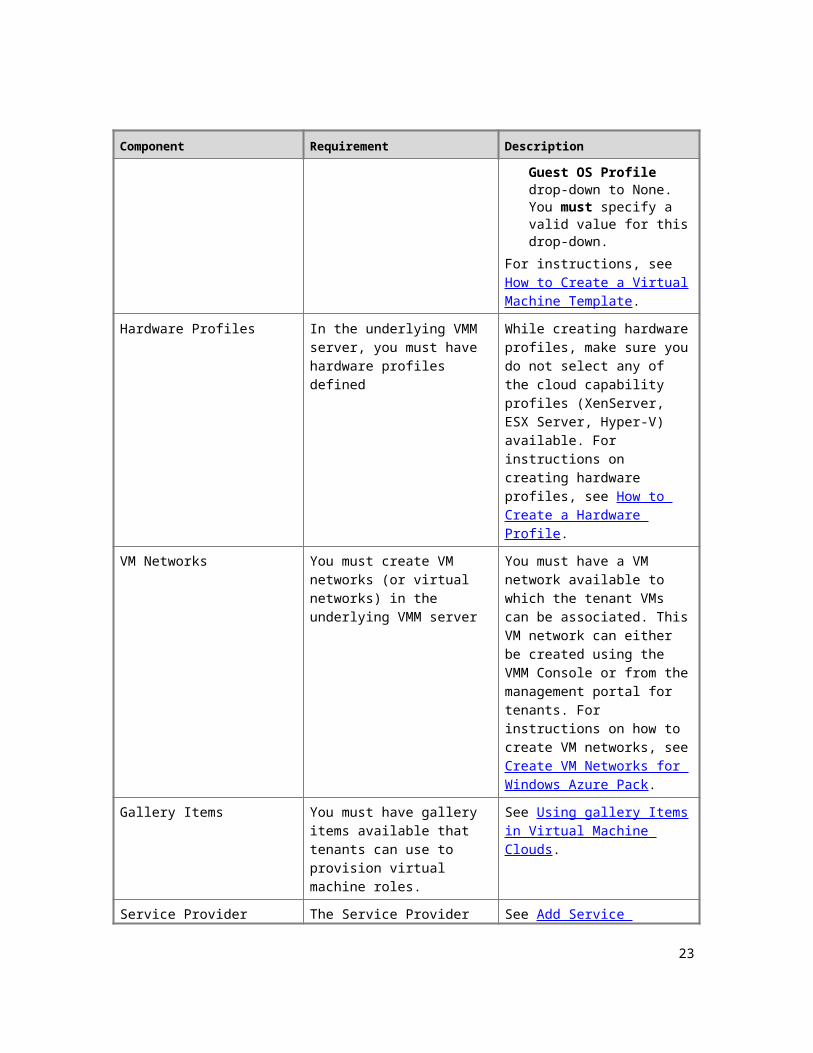
Hardware Profiles In the underlying VMM server, you must have hardware profiles defined
While creating hardware profiles, make sure you do not select any of the cloud capability profiles (XenServer, ESX Server, Hyper-V) available. For instructions on creating hardware profiles, see How to Create a Hardware Profile.
VM Networks You must create VM networks (or virtual networks) in the underlying VMM server
You must have a VM network available to which the tenant VMs can be associated. This VM network can either be created using the VMM Console or from the management portal for tenants. For instructions on how to create VM networks, see Create VM Networks for Windows Azure Pack.
Gallery Items You must have gallery items available that tenants can use to provision virtual machine roles.
See Using gallery Items in Virtual Machine Clouds.
19
Component Requirement Description
Service Provider Foundation service account
The Service Provider Foundation service account must be added to the administrator user role in the VMM server
See Add Service Provider Foundation Service Account as VMM Administrator.
Add Service Provider Foundation Service Account as VMM Administrator1. On the computer running Service Provider Foundation, open the Computer Management
MMC.2. Expand System Tools, expand Local Users and Groups, and then click Groups.3. Double click the SPF_Admin user group and note the user name.4. Log on to the compute running the VMM server and start the VMM Console.5. In the VMM Console, in the Settings workspace, expand Security, and then click User
Roles.6. From the right-pane, double-click the Administrator user role to open Administrator
Properties.7. In the Administrator Properties dialog box, click Add to add the user name from Step 3, and
then click OK.
Other Requirements for Using VM CloudsYou must make the following considerations while using VM Clouds.
If you are using VM Clouds with Service Management Automation to trigger runbooks, Service Management Automation web service certificate must be trusted on the computer running Service Provider Foundation.
Because Service Provider Foundation and VMM can be used with VMWare, you can use VM Clouds to provision virtual machines on VMWare. However, you can only provision standalone virtual machines on VMWare using VM Clouds but not virtual machine roles.
To connect to virtual machines provisioned using VM Clouds, you must log in to the management portal for tenants from a computer Windows 8.1 or a Windows Server 2012 R2.
See AlsoProvision Virtual Machine Clouds
20

Create VM Networks for Windows Azure PackThis topic provides information on how to create virtual machine (VM) networks that can be used for virtual machines provisioned using VM Clouds. VM networks are the same as virtual networks in the Windows Azure Pack management portal for tenants. The instructions in topic can be used by VMM administrators in the following ways:
To create logical networks – VMM administrators can create logical networks that will be available to tenants in the management portal for tenants. Tenants can create their own VM networks (or virtual networks) on top of such logical networks. To achieve this, follow step 1 through step 6 in the table below.
To create VM networks – VMM administrators can themselves create VM networks that can be used directly by tenants. VM networks created by administrators can be added to hosting plans and any tenant that subscribes to such plans will have the admin-created VM networks available for use. To achieve this, follows step 1 through step 7 in the table below.
Steps
Step 1: Create a logical network
Step 2: Create an IP pool for the logical network
Step 3: Create an uplink port profile
Step 4: Create a logical switch referencing the port profile
Step 5: Assign the logical switch to the host
Step 6: Assign the logical network to the cloud
Step 7: Create a VM network
Step 1: Create a logical networkA logical network is used to organize and simplify network assignments for hosts, virtual machines and services. As part of logical network creation, you can create network sites to define the VLANs, IP subnets, and IP subnet/VLAN pairs that are associated with the logical network in each physical location.
1. Open the VMM console and from the Fabric workspace, expand Networking, right-click Logical Networks, and click Create Logical Networks.
2. In the Create Logical Network wizard, on the Name tab, enter a name for the network, and choose any of the following approach. The options you select in this dialog box will reflect on what the administrators and tenants will have available while creating VM
21

networks:
Select the One Connected Network option, and then select the Allow VM Networks created on this logical network to use network virtualization checkbox
The logical networks will be available to administrators and the tenants for creating VM networks.
Select the One Connected Network option, and then do not select the Allow VM Networks created on this logical network to use network virtualization checkbox.
The logical networks will be available only to the administrators for creating VM networks.
Select the VLAN-based independent networks option.
The logical networks will be available only to the administrators for creating VM networks.
Click Next.3. On the Network Site tab, click Add to add a new network site. A network site associates
one or more subnets, VLANs, and subnet/VLAN pairs with a logical network. It also enables you to define the host groups to which the network site is available. Perform the following steps:a. Select the All Hosts check box or select the host that this logical network must be
22
associated with.b. Click Insert row, and provide the subnet.c. Provide a network site name or retain the default value.
Click Next.4. Click Finish to create the logical network.
For detailed steps on creating logical networks, see How to Create a Logical Network in VMM.
Step 2: Create an IP pool for the logical networkTo ensure that each virtual machine has an IP address which can be used on the host network, you must create an IP address pool. The IP address pool assigns static IP addresses.
1. In the VMM console, right-click the logical network you created, and then click Create IP Pool.
2. In the Create Static IP Address Pool wizard, in the Name tab, provide a name for the IP pool, from the Logical network drop-down select the logical network you created earlier, and then click Next.
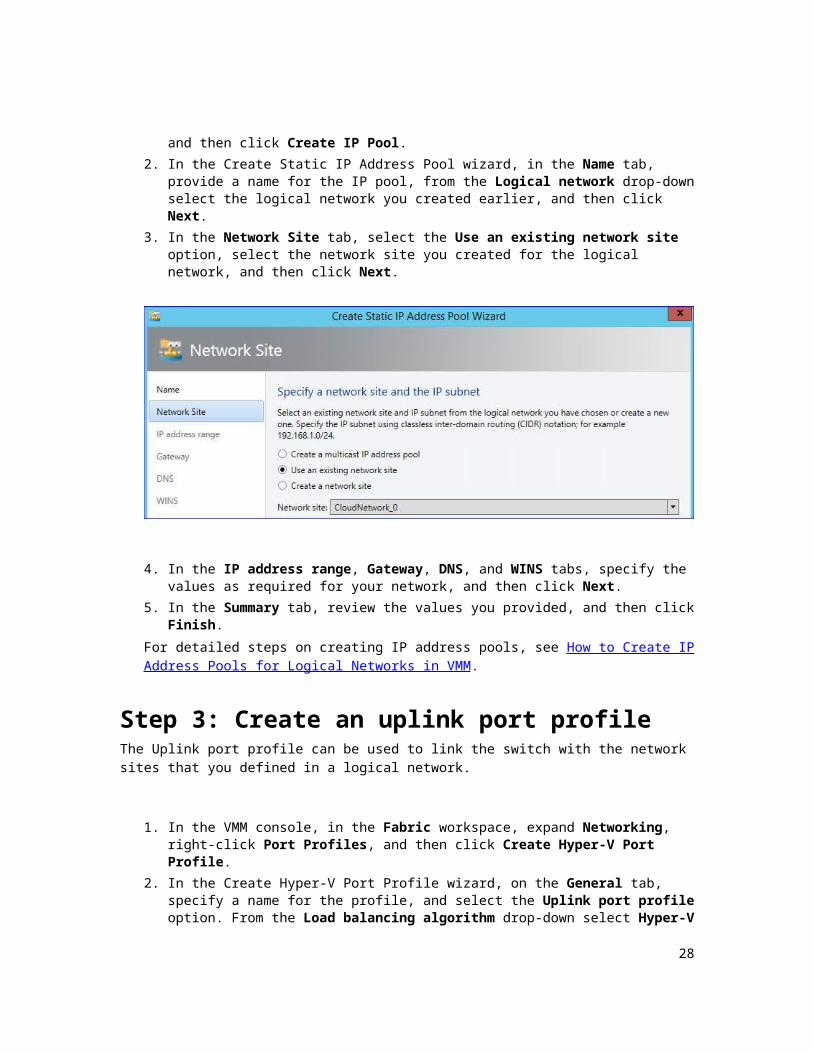
3. In the Network Site tab, select the Use an existing network site option, select the network site you created for the logical network, and then click Next.
4. In the IP address range, Gateway, DNS, and WINS tabs, specify the values as required for your network, and then click Next.
5. In the Summary tab, review the values you provided, and then click Finish.
For detailed steps on creating IP address pools, see How to Create IP Address Pools for Logical Networks in VMM.
23
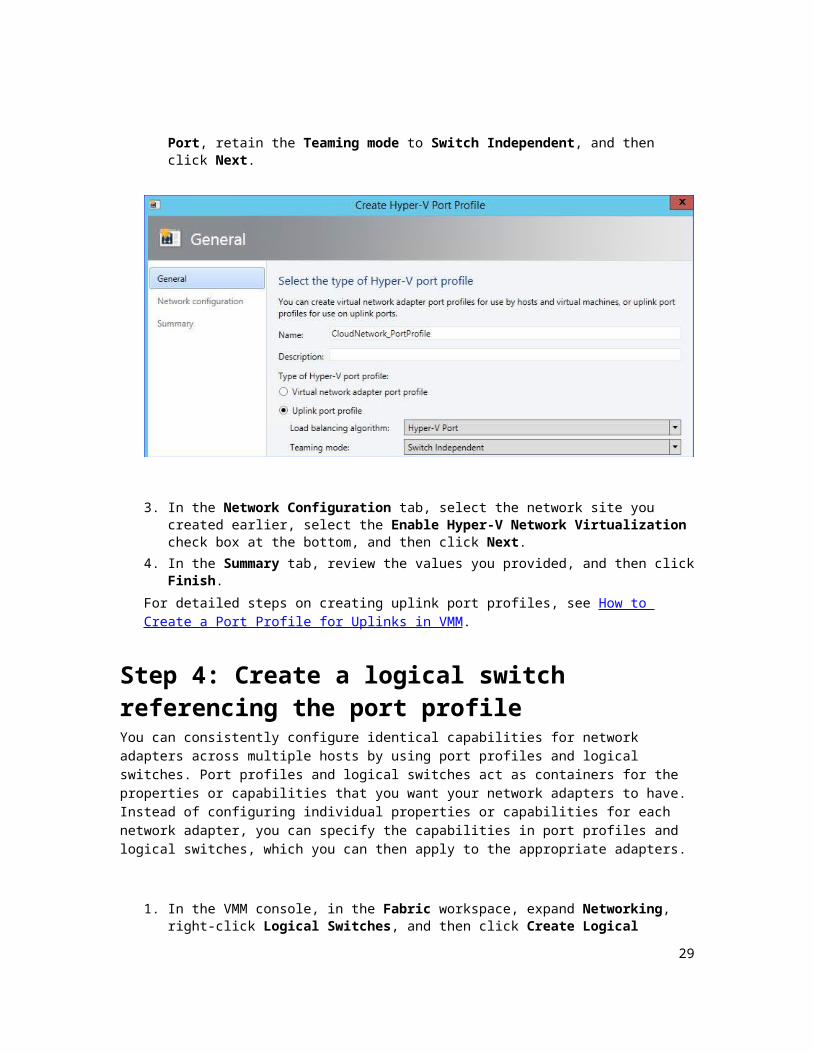
Step 3: Create an uplink port profileThe Uplink port profile can be used to link the switch with the network sites that you defined in a logical network.
1. In the VMM console, in the Fabric workspace, expand Networking, right-click Port Profiles, and then click Create Hyper-V Port Profile.
2. In the Create Hyper-V Port Profile wizard, on the General tab, specify a name for the profile, and select the Uplink port profile option. From the Load balancing algorithm drop-down select Hyper-V Port, retain the Teaming mode to Switch Independent, and then click Next.
3. In the Network Configuration tab, select the network site you created earlier, select the Enable Hyper-V Network Virtualization check box at the bottom, and then click Next.
4. In the Summary tab, review the values you provided, and then click Finish.
For detailed steps on creating uplink port profiles, see How to Create a Port Profile for Uplinks in VMM.
Step 4: Create a logical switch referencing the port profileYou can consistently configure identical capabilities for network adapters across multiple hosts by using port profiles and logical switches. Port profiles and logical switches act as containers for the properties or capabilities that you want your network adapters to have. Instead of configuring
24

individual properties or capabilities for each network adapter, you can specify the capabilities in port profiles and logical switches, which you can then apply to the appropriate adapters.
1. In the VMM console, in the Fabric workspace, expand Networking, right-click Logical Switches, and then click Create Logical Switch.
2. In the Create Logical Switch Wizard, review the information in the Getting Started tab, and then click Next.
3. On the General tab, specify a name for the logical switch, and then click Next.4. In the Extensions tab, select the extensions as required, and then click Next.5. On the Uplink tab, click Add, and from the Add Uplink Port Profile dialog box, select
the port profile, you created earlier. Click OK and then click Next.
6. On the Virtual Port tab, add any virtual ports (if you created), and then click Next.7. On the Summary tab, review the values you provided earlier, and then click Finish.
For detailed steps on creating logical switches, see How to Create a Logical Switch in VMM.
Step 5: Assign the logical switch to the hostThe next step is to assign the logical switch you created earlier to a host.
1. In the VMM console, in the VMs and Services workspace, expand All Hosts, right-click the host with which you want to associate the logical switch, and then click Properties.
2. In the host properties dialog box, click the Virtual Switches tab, and from the right pane, do the following:
25

a. Click New Virtual Switch and then click New Logical Switch.b. In the Logical switch list, select the logical switch that you want to use.c. Under Adapter, select the physical adapter that you want to apply the logical switch
to.d. In the Uplink Port Profile list, select the uplink port profile that you want to apply.
3. Click OK.
For detailed steps on assigning logical switches to hosts, see Configure network settings on a host by applying a logical switch.
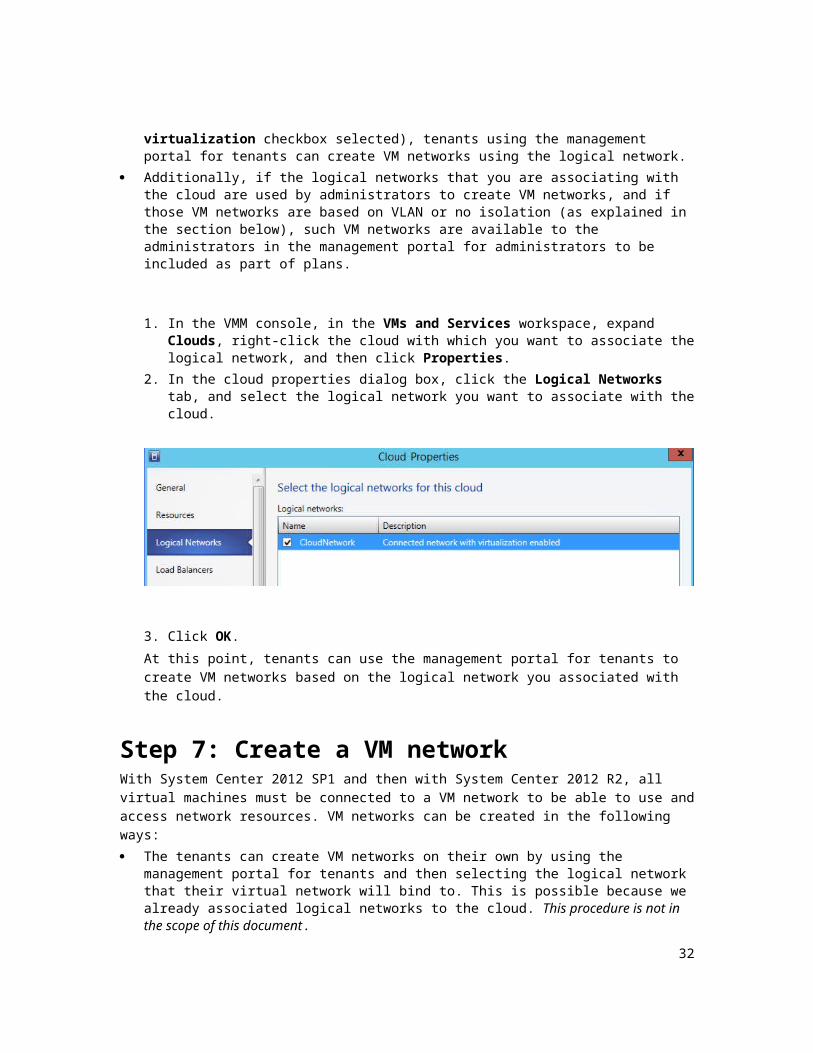
Step 6: Assign the logical network to the cloudWhen you assign a logical network to the cloud, you accomplish the following:
If the logical networks that you are associating with the cloud have network virtualization enabled (meaning, they have the Allow VM Networks created on this logical network to use network virtualization checkbox selected), tenants using the management portal for tenants can create VM networks using the logical network.
Additionally, if the logical networks that you are associating with the cloud are used by administrators to create VM networks, and if those VM networks are based on VLAN or no isolation (as explained in the section below), such VM networks are available to the administrators in the management portal for administrators to be included as part of plans.
1. In the VMM console, in the VMs and Services workspace, expand Clouds, right-click the cloud with which you want to associate the logical network, and then click Properties.
2. In the cloud properties dialog box, click the Logical Networks tab, and select the logical
26

network you want to associate with the cloud.
3. Click OK.
At this point, tenants can use the management portal for tenants to create VM networks based on the logical network you associated with the cloud.
Step 7: Create a VM networkWith System Center 2012 SP1 and then with System Center 2012 R2, all virtual machines must be connected to a VM network to be able to use and access network resources. VM networks can be created in the following ways:
The tenants can create VM networks on their own by using the management portal for tenants and then selecting the logical network that their virtual network will bind to. This is possible because we already associated logical networks to the cloud. This procedure is not in the scope of this document.
The fabric administrators can create VM networks that can be associated with plans. Once tenants subscribe to those plans, the VM networks available with the plan are available to the tenants while provisioning the virtual machines. However, for a VM network to be associated with a plan, the network must be based on VLAN or no isolation. Follow the steps below to create VM networks as a fabric administrator.
1. In the VMM console, in the VMs and Services workspace, right-click VM Networks, and then click Create VM Network.
2. Follow the steps at How to Create a VM Network in VMM in System Center 2012 R2 to create the required VM networks.
27
Register the Service Provider Foundation Endpoint for Virtual Machine CloudsService Provider Foundation exposes an extensible OData web service that interacts with Virtual Machine Manager (VMM) and enables service providers to design and implement multi-tenant self-service portals to provide IaaS capabilities. This topic provides instructions on how to register the Service Provider Foundation endpoint with management portal for administrators to enable the VM Clouds service from the portal. For information on how Service Provider Foundation associates with management portal for administrators, see How is the management portal for administrators associated with Service Provider Foundation?
Before Registering the Service Provider FoundationYou must consider the following before registering the Service Provider Foundation.
Make sure you have installed and configured Service Provider Foundation as described at Deploying Service Provider Foundation.
Make sure you have reviewed the requirements for using VM Clouds in Windows Azure Pack. For more information, see Requirements for using VM Clouds
Registering the Service Provider Foundation in Windows Azure PackPerform the following steps to register Service Provider Foundation in Windows Azure Pack.
1. From the management portal for administrators, click the VM Clouds tab.From the VM Clouds tab, click the QuickStart ( ) view.3. From the Quick Start view on the VM Clouds tab, click Register System Center
Service Provider Foundation and enter the URL for the Service Provider Foundation server. The endpoint URL is constructed as https://<server name>:8090, where the server name is the fully qualified domain name (FQDN) of the server that has Service Provider Foundation installed. The colon and the port specification are required. The default port for Service Provider Foundation is 8090.
4. Provide the user name and password that is used for the VMM, Admin, Usage, and Provider Application Pool identities in Internet Information Services (IIS) where Service Provider Foundation is installed.
5. Click the check mark. Once the registration is complete, all the VMMs (or stamps) that are already associated with the Service Provider Foundation endpoint you registered are listed under the Clouds tab. In addition, any stamps that you will create against the registered Service Provider Foundation endpoint in the future will be listed as stamps in
To register the Service Provider Foundation endpoint
28
the Clouds tab. You can expand the stamp to see all the clouds provisioned on the stamp.
CautionYou can use the Register System Center Service Provider Foundation link to edit a Service Provider Foundation registration. However, you must use this option very judiciously because editing the Service Provider Foundation registration breaks all the existing plans and subscriptions that are creating against the virtual machine clouds associated with the already registered Service Provider Foundation endpoint.
6. If the Service Provider Foundation server that you registered does not have any existing stamps, you can create the stamps using the management portal for administrators. For instructions, see Add VMM stamps to Virtual Machine Clouds.
See AlsoProvision Virtual Machine Clouds
Register Service Management Automation for Virtual Machine CloudsIntegrating VM Clouds with Service Management Automation enables service providers to extend Service Provider Foundation to use the automotive capabilities of the Service Management Automation web service. When you register Service Management Automation for VM Clouds, you register the endpoint of the server where the Service Management Automation web service is running. This topic provides instructions on how to register the Service Management Automation endpoint with respect to the VM Clouds service so that events in the VM Clouds infrastructure
29

can be associated with Runbooks available as part of the Service Management Automation web service. For information on how Service Provider Foundation integrates with Service Management Automation, see How is Service Provider Foundation associated with Service Management Automation?.
You must also trust the Service Management Automation web service certificate on the computer running Service Provider Foundation to successfully invoke the runbooks from the VM Clouds context.
1. From the management portal for administrators, click the VM Clouds tab.From the VM Clouds tab, click the QuickStart ( ) view.3. From the Quick Start view on the VM Clouds tab, click Register Service Management
Automation for VM Clouds and then provide the URL and the port for the Service Management Automation web service endpoint.
4. Click the check mark.
You can now associate runbooks with events that occur within the context of VM Clouds. For instructions, see Using automation with Virtual Machine Clouds.
See AlsoProvision Virtual Machine Clouds
Register Service Reporting for Virtual Machine CloudsThe VM Clouds service can be associated with Windows Azure Pack’s Usage Service to provide IaaS usage data that can be further used for customer billing. This topic provides instructions on how to integrate Service Provider Foundation with Windows Azure Pack Usage Service. For information on how Service Provider Foundation leverages the Windows Azure Pack Usage Service, see How is Service Provider Foundation associated with Windows Azure Pack Usage Service?
1. From the management portal for administrators, click the VM Clouds tab.From the VM Clouds tab, click the QuickStart ( ) view.3. From the Quick Start view on the VM Clouds tab, click Register Service Reporting
Provider, and then enter the Service Provider Foundation usage endpoint, using the same user name and password that were used to install Service Provider Foundation.
Note
To register SMA for VM Clouds
To register Usage Service for VM Clouds
30

4. Click the check mark. This associates the Service Provider Foundation usage endpoint with the Windows Azure Pack usage service.
See AlsoProvision Virtual Machine Clouds
Using SQL Server or MySQL with Windows Azure PackYou can add one or more Microsoft SQL Server or MySQL Server instances for tenants to deploy and use. Tenants also use these databases with the Web Sites service.
Use the following information to make databases available for tenants:
Install and configure the SQL Server and MySQL resource providers. Install separate instances of SQL Server and MySQL for tenant use. These instances are in
addition to the SQL instances used by Windows Azure Pack or the Web Sites service. (Scroll down for instructions, if you have not previously installed SQL Server or MySQL.)
Configure SQL Server and MySQL Application databases for tenant use. This makes the instances available for use with the Web Sites service or for standalone use.
Optionally create groups to organize your servers.
If you are using SQL Server, you can use SQL AlwaysOn Availability Groups with Windows Azure Pack. This enables you to provide a highly available database service to your tenants. See Configure SQL AlwaysOn Availability Groups in Windows Azure Pack for information.
Install SQL ServerWindows Azure Pack supports SQL Server 2008 SP3, SQL Server 2008 R2 SP2, and SQL Server 2012 SP1.
If you have not previously installed SQL Server, follow the instructions in the SQL Server TechNet library to install it: Installation for SQL Server 2012.
Install MySQLYou can install MySQL Windows 5.1 from the Microsoft Web Platform Installer. Use the following steps:
1. In the Web Platform Installer, search for MySQL Windows 5.1.2. In the search results, click Add next to MySQL Windows 5.1, and then click Install.3. In the Prerequisites window, enter a password for the default database admin account
To install MySQL
31
(root). Type the password again to confirm it, and then click Continue.4. Review the list of software to be installed, and then click I Accept.
MySQL is downloaded and installed.
5. Click Finish to close the install window.6. Next, ensure that MySQL is accessible:
Test IP connectivity and name resolution. Open TCP 3306 Inbound in Windows Firewall for each computer running MySQL. Enable remote access to MySQL.
Install and configure the SQL Server and MySQL resource providersThe SQL Server and MySQL resource providers enable provisioning Microsoft SQL and MySQL databases for tenant use. These resource providers are installed by default if you deploy the express configuration on a single system; if you deploy the distributed configuration, you need to install the resource providers manually.
You can install these resource providers on the same computer where you installed the Admin Service Management API or on separate computers.
If you are installing the resource providers on a separate computer from Windows Azure Pack, ensure that you have installed the Microsoft Web Platform Installer.
Use the following steps to install the resource providers.
1. Log into the computer where you want to install the resource provider.2. Open the Web Platform Installer.3. Click the Products tab, and then click Windows Azure. Click Add next to Windows
Azure Pack: SQL Server Extension or Windows Azure Pack: MySQL Extension, and then click Install.
4. Review the software to be installed. You can view the privacy information for the extension by clicking Privacy Terms.
Accept the terms and conditions on the Prerequisites page by clicking I Accept. The installation will begin.
5. When the installation is complete, ensure that all Internet Explorer windows are closed, and then click Continue in the Web Platform Installer to launch the Configuration site.
6. The Configuration site (https://localhost:30101) will open in Internet Explorer. If the security certificate warning page is displayed, click Continue to this website (not recommended).
To install the SQL Server or MySQL resource provider
32
7. On the Database Server Setup page, enter the name of the database server. This is the database server that was configured when you installed the Windows Azure Pack core components.
8. Select the type of authentication to use – SQL Server or Windows.
If you choose SQL Server authentication, enter the database server admin user name (sa) and password.
9. Enter the passphrase for the Configuration Store (this passphrase was configured when the core components were installed), and then click the next arrow.
10. Indicate whether you want to participate in the Customer Experience Improvement Program (CEIP) and whether you want to use Microsoft Update to keep the resource provider up to date. Click the next arrow.
The CEIP collects information about how customers use Microsoft programs, as well as the problems you encounter. This information is used to improve our products and features.
Participation in CEIP is voluntary. If you choose to participate in CEIP, your computer automatically sends information to Microsoft about how you use this product.
11. Review the features to be configured, and then click the check mark.
Next, configure the resource providers in the management portal for administrators. See Configure SQL Server and MySQL Application databases for tenant use.
Configure SQL Server and MySQL Application databases for tenant useUse the following information to configure SQL Server and MySQL in Windows Azure Pack. Once you have connected to the SQL or MySQL instances, you can organize your database instances into groups.
Connect to the SQL Server instanceUse the following steps in the management portal for administrators to connect your newly installed SQL instance to Windows Azure Pack.
1. In the management portal for administrators, click SQL Servers in the left navigation pane.
2. At the bottom of the window, click New or Add, and then click Connect to to add the new instance.
3. Enter the SQL Server instance information: group name, server name, administrator user name (sa), administrator password, and the size of the hosting server (in GBs).
To connect to SQL Server
33

4. Click Connect.A message will be displayed at the bottom of the window indicating whether the action succeeded or failed.
5. Click OK.
The SQL Server instance you just added is now displayed in the list of SQL Servers. Click the instance to view the details. You can confirm the hosting server’s capacity on the Dashboard and the list of databases in the instance on the Databases tab.
Connect to the MySQL instanceUse the following steps in the management portal for administrators to connect your newly installed MySQL instance to Windows Azure Pack.
1. In the management portal for administrators, click MySQL Servers in the left navigation pane.
2. At the bottom of the window, click New or Add, and then click Connect to to add the new instance.
3. Enter the MySQL Server instance information: group name, server name, administrator user name, administrator password, and the size of the hosting server (in GBs).
4. Click Connect.A message will be displayed at the bottom of the window indicating whether the action succeeded or failed.
5. Click OK.
The MySQL Server instance you just added is now displayed in the list of SQL Servers. Click the instance to view the details. You can confirm the hosting server’s capacity on the Dashboard and the list of databases in the instance on the Databases tab.
Create groupsYou can use groups to organize your SQL server or MySQL instances.
1. On the SQL Servers dashboard, click Add, and then click Create a Group.2. Choose the type of group you want to create. You have two choices: Standalone
servers or High availability (Always on enabled).If you want to use the SQL AlwaysOn availability groups feature, as described in Configure SQL AlwaysOn Availability Groups in Windows Azure Pack, choose High availability (Always on enabled).
3. If you chose to create a standalone server group, enter a name for the group.
To connect to MySQL
To create a SQL Server group
34
4. If you chose to create a high availability group, enter a name for the group and enter the path to the network file share.
5. Click Create a group
After the SQL Server group is created, you can add SQL servers to it from the Groups list.
1. On the MySQL Servers dashboard, click Add, and then click Create a Group.2. Enter a name for the group.3. Click Create a group
After the MySQL Server group is created, you can add MySQL servers to it from the Groups list.
Configure SQL AlwaysOn Availability Groups in Windows Azure PackYou can use the SQL AlwaysOn Availability Groups feature with the SQL Server service in Windows Azure Pack. The SQL AlwaysOn Availability Groups feature is available in Microsoft SQL Server 2012 Enterprise Edition and is a high-availability and disaster recovery solution that provides an enterprise-level alternative to database mirroring. This feature reduces the dependency of the tenant database on the fallibility of a single SQL instance.
For more information about SQL AlwaysOn Availability Groups, go to http://msdn.microsoft.com/en-us/library/hh510230.aspx.
Contained database creation is the core change that enables this feature. A contained database is a database that is isolated from other databases and from the instance of SQL Server that hosts the database. Details about contained databases can be found at http://msdn.microsoft.com/en-us/library/ff929071.aspx. Contained database creation enables administrators to add the databases to availability groups and initiate replication. Contained users are created against instance level users. In case of failover, all contained databases and contained users are replicated. The user continues to have access to the databases on the secondary without creating new logins on the secondary instance.
PrerequisitesEnsure the following before using SQL AlwaysOn Availability Groups:
The list of prerequisites for setting up SQL AlwaysOn Availability Groups can be found here. To enable SQL AlwaysOn Availability Groups, run the following script on every SQL instance
before creating SQL database through the Windows Azure Pack:
sp_configure ‘contained database authentication’, 1
RECONFIGURE
To create a MySQL Server group
35
GO
Ensure that all the secondary servers are configured as part of the AlwaysOn Availability Group before adding the availability group listener.
After the availability group listener has been used with Windows Azure Pack, avoid changing the above containment setting of the associated instance.
Provision a file share required for SQL AlwaysOn database, as described in the prerequisites.
Actions in the management portal for administratorsDo the following:
Create an availability group in SQL with the corresponding availability group listener. See http://msdn.microsoft.com/en-us/library/ff878399.aspx for details.
Configure the AlwaysOn Group Listener to use the default port 1433.
Create a SQL group of type “High availability (AlwaysOn enabled).” Specify a file share that is accessible to all primary and secondary servers that will be a part
of this SQL Server group. Add the availability group listener to the group you created above. If you add a secondary server to the availability group after you have added the listener to
Windows Azure Pack, ensure that repair connection for the listener is triggered on the SQL Server extension on the management portal for administrators. Otherwise, tenants will not be able to create new databases or resize, alter, or delete existing databases.
Actions in SQL ServerThe administrator will need to perform the following actions in SQL Server itself:
Purge the file share specified for each SQL Server High Availability (AlwaysOn enabled) group regularly to free space. There is no automated process to do this.
Add a SQL Server Policy to the SQL Server management pack to track occurrences of failover. Once you add this policy, the management pack will automatically detect it and use it as a health model.
ReferencesThe following topics provide additional information about using the SQL AlwaysOn Availability Groups feature:
Security Best Practices with Contained Databases Limitations of contained databases SQL Server AlwaysOn Solutions Guide for High Availability and Disaster Recovery
Note
36

AlwaysOn Architecture Guide: Building a High Availability and Disaster Recovery Solution by Using AlwaysOn Availability Groups
Deploy Service Management AutomationService Management Automation is a workflow management solution for Windows Azure Pack for Windows Server. It enables you to automate the creation, monitoring, and deployment of resources in your environment. This document describes Service Management Automation deployment.
Deployment topics System requirements for Service Management Automation
Provides an overview of the hardware, software, and security requirements to deploy Service Management Automation.
How to install the Service Management Automation web service
Provides step-by-step instructions to install the Service Management Automation web service.
How to install the Service Management Automation runbook worker
Provides step-by-step instructions to install a Service Management Automation runbook worker.
How to install the Service Management Automation PowerShell module
Provides step-by-step instructions to install a Service Management Automation PowerShell module.
Install Service Management Automation from a Command Prompt window
Provides complete documentation of the available command-line options for installing Service Management Automation.
Post-installation tasks for Service Management Automation
Provides instructions to use after you install Service Management Automation.
How to uninstall Service Management Automation
Provides step-by-step instructions to install for uninstalling Service Management Automation.
System requirements for Service Management AutomationThis topic describes the minimum hardware and software configurations that are required for a full installation of Service Management Automation.
37
Hardware requirementsThe following recommended configurations should be used.
Performance component Recommendation
Virtual machines Three, each with a runbook worker and web service installed
Load-balanced incoming traffic
Minimum of two cores and 4 GB of RAM for each virtual machine
60 GB of available disk space
SQL Server One computer with 8 GB of RAM and eight cores
NoteOne month of data under heavy load (12 jobs per minute for a month) results in 20 GB of disk space usage. Job purging should be used to keep this usage from growing beyond this amount.
Software requirementsThe following software must be installed for each role.
Role Prerequisites
Runbook worker Windows Server 2012 R2
Windows PowerShell 4.0
Automation web service Windows Server 2012 R2
SQL Server 2012 (not Express edition)
Internet Information Services (IIS) 7.5 (hosts the web service)
IIS Basic Authentication
IIS Windows Authentication
IIS URL Authorization
ASP.NET 4.5
.NET Framework 3.5 (for the Setup program)
38

Role Prerequisites
.NET Framework 4.5
WCF HTTP Activation
Windows PowerShell module Windows PowerShell 4.0
Before installing the web service, use the following procedure to install .NET Framework 4.5 and HTTP Activation on Windows Server 2012 R2:
1. On the Windows Start screen, click the Server Manager tile.2. On the Manage menu in the Server Manager console, click Add Roles and Features.3. Follow the wizard until you reach the Features page.4. Expand .NET Framework 4.5 Features.5. Select .NET Framework 4.5 if it isn’t already selected.6. Expand WCF Services.7. Select HTTP Activation if it isn’t already selected.8. Click Next, and follow the prompts to finish the installation.
Running Service Management Automation on Windows Azure virtual machinesService Management Automation runs on Windows Azure just as it does on physical computer systems.
Service Management Automation was tested by Microsoft by installing and using it in a Windows Azure virtual machine. The testing concluded that Service Management Automation was fully functional and operated exactly the same as it does on physical hardware. Stability and performance benchmarks inside a Windows Azure virtual machine were at a level where no special considerations were needed.
Security RequirementsThe following ports must be opened for each role.
Role Requirement
Runbook worker None
Automation web service Default value: 9090. Configurable at install time port defaults to 9090. The installation program for Service Management Automation automatically opens the web service port on the
To install .NET Framework 4.5 and HTTP Activation
39

Role Requirement
local firewall.
Windows PowerShell module None
The following certificates are required for each component.
Role Requirement
Runbook worker None
Automation web service A certificate that can be used for Secure Sockets Layer (SSL) encryption over HTTPS. The installation program for Service Management Automation can be used to generate a self-signed certificate.
Windows PowerShell module None
Security requirements for Service Management AutomationInsert introduction here.
Section HeadingInsert section body here.
Subsection HeadingInsert subsection body here.
How to install the Service Management Automation web serviceThe Service Management Automation service endpoint enables you to automate IT administration and business processes by using Windows PowerShell workflow-based runbooks in Windows Azure Pack for Windows Server.
Use the following information to install and configure the Automation web service in Windows Azure Pack. The Service Management Automation PowerShell module is a required prerequisite
40

of the Service Management Automation web service, so you must install the Service Management Automation PowerShell module before you deploy the Service Management Automation web service.
You can also install the Service Management Automation components by using an unattended installation. For more information, see Installing Service Management Automation from a Command Prompt.
Install the Service Management Automation web serviceThe Service Management Automation web service endpoint provides the connection between Service Management Automation and Windows Azure Pack. The Service Management Automation web service can be installed from the System Center 2012 R2 Orchestrator installation software.
Install the web service on any machine that can communicate with Windows Azure Pack and an instance of SQL Server.
1. In the folder where you downloaded the System Center 2012 R2 Orchestrator installation software, click Setup to start the Setup wizard.
2. Under Service Management, click Web Service, and then click Install.3. Complete the product registration information, and then click Next.4. Review and accept the license terms, and then click Next.5. Select Service Management Automation Web Service, and then click Next.
This will launch the prerequisite check.
6. Review the results of the check. If all items are installed, click Next.
NoteIf you see an X next to any of the prerequisite software, you must install the item, and then run the prerequisite check again. You cannot complete installation of the service endpoint until you pass the prerequisite check.
7. Provide the following information for the database the endpoint to use, and then click Next.
Server Enter the name of the database server. By default, this is localhost.
The format is sqlserver\instance, where \instance is optional.
Port number Enter the port number that you want to use for the database. The default is 1433.
To install the Service Automation web service
41

Database name Enter the name of the database. The default is SMA.
Authentication Credentials Select the type of authentication that you want to use. You can use Windows authentication or SQL Server authentication.
If you choose SQL Server authentication, enter the user name and password for the computer running SQL Server.
8. Provide the following information to configure the Internet Information Settings (IIS) for the web service, and then click Next.
Domain security group or users with access
Enter a security group or one or more users who can grant access to the web service.
Application pool name SMA
This name is not configurable.
Application pool credentials Specify the credentials to use for the application pool. These are the credentials that the web service will run under.
9. Enter the port number for the web service to use. By default, this is 9090.10. Choose the security certificate to use to encrypt communication between Windows Azure
Pack and the Service Management Automation web service endpoint.
You can have the installer generate a self-signed certificate to use, or you can select an existing certificate in your local certificate store.
Click Next.11. Review the location for the web service files. You can accept the default or specify a
different location. Click Next.12. Indicate whether you want to participate in the Customer Experience Improvement
Program (CEIP) and whether you want to use Microsoft Update to keep your software up-to-date. Click Next.
13. Review the installation summary, and then click Install.After the installation is complete, install a runbook worker as described in How to install the Service Management Automation runbook worker.
42

How to install the Service Management Automation runbook workerThe Service Management Automation web service endpoint enables you to automate IT administration and business processes by using Windows PowerShell workflow-based runbooks in Windows Azure Pack for Windows Server.
Use the following information to install and configure the Automation runbook worker in Windows Azure Pack. Before installing or uninstalling an Automation runbook worker, ensure that you have stopped the Runbook Worker service (rbsvc) on the computer where the runbook worker is installed. For instructions on how to avoid any data loss when removing a runbook worker, including Windows PowerShell cmdlets and scripting help for this operation, see the overview of runbook worker deployments.
You can also install the Service Management Automation components by using an unattended installation. For more information, see Install Service Management Automation from a Command Prompt.
Install a runbook workerThe Service Management Automation runbook worker provides the functionality to run Automation runbooks. The Service Management Automation runbook worker can be installed from the System Center 2012 R2 Orchestrator installation software. Install the runbook worker on a physical or virtual machine that has access to the same SQL Server instance that the Service Management Automation web service is using.
1. In the folder where you downloaded the System Center 2012 R2 Orchestrator installation software, click Setup to start the Setup wizard.
2. Under Service Management, click Runbook Worker, and then click Install.3. Follow the instructions in the Setup wizard.
After the installation is complete, use administrative credentials to configure Automation in the Windows Azure Pack management portal.
How to install the Service Management Automation PowerShell moduleThe Service Management Automation service endpoint enables you to automate IT administration and business processes by using Windows PowerShell workflow-based runbooks in Windows Azure Pack for Windows Server.
To install the runbook worker
43

Use the following information to install and configure the Service Management Automation PowerShell module. The Service Management Automation PowerShell module is a required prerequisite for the Service Management Automation web service, so you must install the Service Management Automation PowerShell module before you deploy the Service Management Automation web service.
You can also install the Service Management Automation components by using an unattended installation. For more information, see Installing Service Management Automation from a Command Prompt.
Install the Service Management Automation PowerShell moduleThe Service Management Automation PowerShell module provides the Windows PowerShell cmdlets that are used to administer Service Management Automation. The Service Management Automation PowerShell module can be installed from the System Center 2012 R2 Orchestrator installation software.
1. In the folder where you downloaded the System Center 2012 R2 Orchestrator installation software, start the Setup wizard.
2. Under Service Management, click PowerShell administration, and then click Install.3. Follow the instructions in the Setup wizard.
Install Service Management Automation from a Command Prompt windowYou can install the features of Service Management Automation by using commands in the Command Prompt window to guide the Windows Installer program for an unattended install.
Windows Installer filesYour installation media contains Windows Installer files for each Service Management Automation of the following features:
PowerShell module: PowershellModuleInstaller.msi Web service: WebServiceInstaller.msi Runbook worker: WorkerInstaller.msi
To install the Service Management Automation PowerShell module
Note
44

The installation options must be entered at a command prompt. An answer file is not supported.
PowerShell module installation optionsThe Service Management Automation PowerShell module is a required prerequisite of the Service Management Automation web service, so you must install the Service Management Automation PowerShell module before you deploy the Service Management Automation web service. The PowerShell module installer takes no parameters. For example, you could use the following command:
msiexec.exe /i PowershellModuleInstaller.msi
Web service installation optionsThe following variables can be specified at a command prompt to override default behaviors.
Installation item
Command line switch Valid values
IIS application pool
APPOOLACCOUNT String
IIS application pool
APPOOLPASSWORD String
IIS application pool
ADMINGROUPMEMBERS String (a comma-separated list of users to add to the IIS Administrators group)
SQL Server database
CREATEDATABASE "Yes" or "No" (the default value is "No")
SQL Server database
DATABASEAUTHENTICATION SQL, Windows (the default value is Windows). If DATABASEAUTHENTICATION = SQL, you must also specify SQLUSER and SQLPASSWORD
SQL Server database
SQLUSER String
SQL Server database
SQLPASSWORD String
SQL Server database
SQLSERVER In the format "Server name, port number." (The default values are “localhost, 1433.” Supply a port number of 0 to specify a dynamic port.)
45
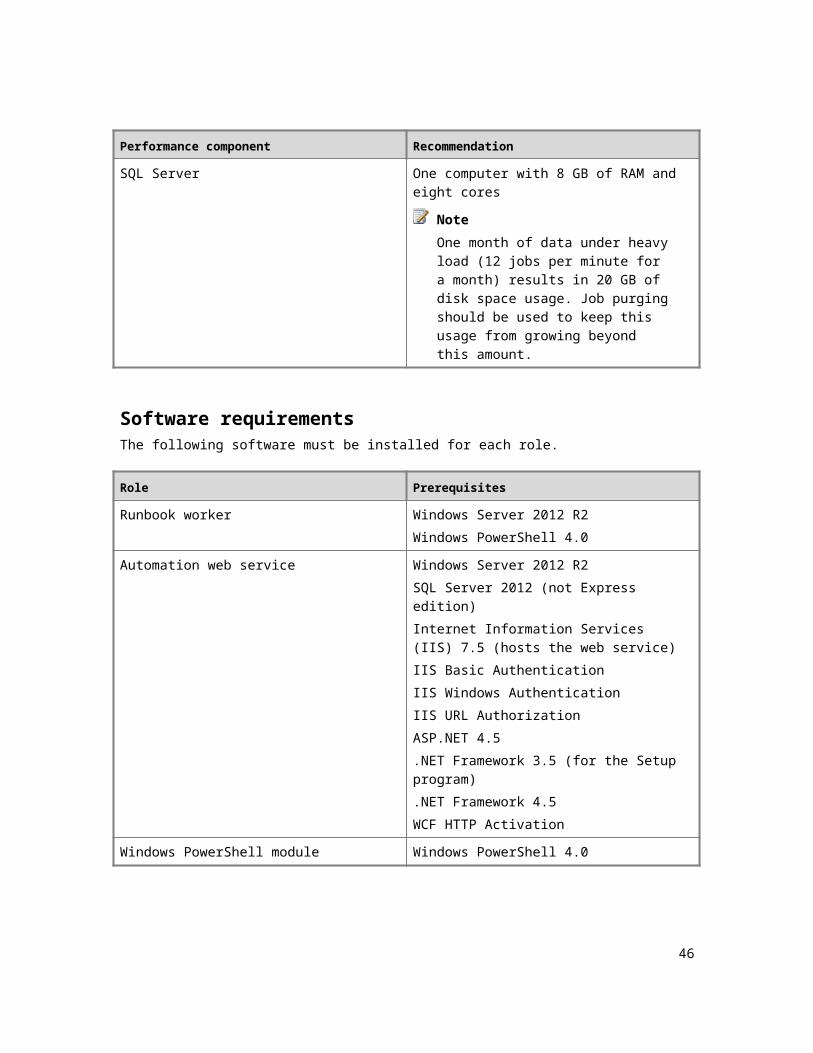
SQL Server database
SQLINSTANCE String (optional server instance name)
SQL Server database
SQLDATABASE String (the default database name value is SMA)
IIS web service
SITENAME String (the default value is "SMA")
IIS web service
WEBSERVICEPORT Integer (the default value is "9090")
IIS web service
INSTALLFOLDER String (the default value is c:\inetpub\Service Management Automation)
IIS web service
USESSL “Yes” or “No” (the default value is “Yes”)
IIS web service
SPECIFYCERTIFICATE “Yes” or “No” (the default value is “No”). A certificate is automatically created if you specify "No." If you select "Yes," also provide CERTIFICATESERIAL.
IIS web service
CERTIFICATESERIAL Serial number of an existing certificate in concatenated hexadecimal format and with no spaces between digits, for example: “45C324C02318F48D4A9C4FC832B2CDCC”
Event tracing (ETW)
ETWMANIFEST “Yes” or “No” (the default value is “Yes”)
Software Quality Metrics (SQM) for Customer Experience Improvement Program (CEIP) reporting
SENDCEIPREPORTS “Yes” or “No” (the default value is “No”)
Automatic Microsoft Update
MSUPDATE “Yes” (opt-in) or “No” (no change; this is the default value)
Product key PRODUCTKEY String
46

If logging is desired, use the Msiexec.exe command and specify the log path. For example, you could use the following command (be sure to use the name of your SQL Server instance).
msiexec.exe /i WebServiceInstaller.msi /L*v C:\Andreas\WebServiceInstaller.log
CREATEDATABASE=“Yes” SQLSERVER="localhost" DATABASEAUTHENTICATION="Windows"
SQLDATABASE="SMA123"
Runbook worker installation optionsA runbook worker cannot be installed on the same computer as another runbook worker. Also, you must install the runbook worker on a computer that has access to the same SQL Server instance that the Service Management Automation web service is using.
The following variables can be specified at a command prompt to override default behaviors.
Installation item Command line switch Valid values
Windows service SERVICEACCOUNT String
Windows service SERVICEPASSWORD String
SQL Server database CREATEDATABASE “Yes” or “No” (the default value is “No”)
SQL Server database DATABASEAUTHENTICATION SQL Server or Windows (the default value is Windows)
SQL Server database SQLUSER String
SQL Server database SQLPASSWORD String
SQL Server database SQLSERVER In the format “Server name, port number” (The default values are “localhost, 1433.” Supply a port number of 0 to specify a dynamic port.)
SQL Server database SQLINSTANCE String (optional server instance name)
SQL Server database SQLDATABASE String (the default database name value is SMA)
File install location INSTALLFOLDER String (the default value is C:\Program Files\Microsoft System Center 2012 R2\Service Management Automation)
47

Event tracing (ETW) ETWMANIFEST “Yes” or “No” (the default value is “Yes”)
Software Quality Metrics (SQM) for Customer Experience Improvement Program (CEIP) reporting
SENDCEIPREPORTS “Yes” or “No” (the default value is “No”)
Automatic Microsoft Update
MSUPDATE “Yes” (opt-in) or “No” (no change; this is the default value)
Product key PRODUCTKEY String
If logging is desired, use the Msiexec.exe command and specify the log path. For example, you could use the following command (be sure to use the name of your SQL Server instance).
msiexec.exe /i WorkerInstaller.msi /L*v C:\Andreas\WorkerInstaller.log
CREATEDATABASE=“Yes” SQLSERVER="localhost" DATABASEAUTHENTICATION="Windows"
SQLDATABASE="SMA123"
If you install additional runbook workers, you must run the Windows PowerShell cmdlet New-SmaRunbookWorkerDeployment to properly configure the runbook worker.
1. Stop the Runbook server service (RunbookService.exe) on each computer on which a runbook worker is installed.
2. Run the following Windows PowerShell command:
New-SmaRunbookWorkerDeployment -<ComputerName> –<WebServiceEndpoint>3. Restart the Runbook server service on each computer on which a runbook worker is installed.
See alsoInstall Service Management Automation
Post-installation tasks for Service Management AutomationAfter you install Service Management Automation, perform the following best practices.
Note
48

Replace untrusted Self-Signed Certificates with trusted certificatesEach Service Management Automation component is installed on an Internet Information Services (IIS) website that, by default, is configured with a self-signed certificate. Because these self-signed certificates are not issued by any of the trusted root certification authorities that your browser loads on startup, your browser displays a security warning when you attempt to connect to any of the sites. We recommend that you replace the self-signed certificates with certificates that are issued by a trusted root certification authority to avoid this experience.
How to uninstall Service Management AutomationYou can use the following procedures to uninstall a Service Management Automation web console, runbook worker, or PowerShell module. Before uninstalling an Automation runbook worker, ensure that you have stopped the Runbook Worker service (rbsvc) on the computer where the runbook worker is installed. For instructions on how to avoid any data loss when removing a runbook worker, including Windows PowerShell cmdlets and scripting help for this operation, see the overview of runbook worker deployments.
1. On the computer on which the web service is installed, click Start, and then click Control Panel.
2. Under Programs, click Uninstall a program.3. Under Name, double-click System Center 2012 R2 Service Management Automation
Web Service.4. Follow the prompts, and the Uninstalling features page appears and uninstallation
progress is displayed.
1. Ensure that you have prepared for removing the runbook worker as described in the overview of runbook worker deployments.
2. On the computer on which the runbook worker is installed, click Start, and then click Control Panel.
3. Under Programs, click Uninstall a program.4. Under Name, double-click System Center 2012 R2 Service Management Automation
Runbook Worker.5. Follow the prompts, and the Uninstalling features page appears and uninstallation
progress is displayed.
To uninstall a Service Management Automation web service
To uninstall a Service Management Automation runbook worker
To uninstall a Service Management Automation PowerShell module49

1. On the computer on which the PowerShell module is installed, click Start, and then click Control Panel.
2. Under Programs, click Uninstall a program.3. Under Name, double-click System Center 2012 R2 Service Management Automation
PowerShell.4. Follow the prompts, and the Uninstalling features page appears and uninstallation
progress is displayed.
Integrate Service Reporting in Windows Azure PackWindows Azure Pack for Windows Server uses the Service Reporting feature provided with System Center 2012 R2 to deliver usage data about virtual machines both to administrators and to tenants. The Service Reporting feature uses a SQL agent job to collect data (using SQL Server Integration Services) and then process that data for use in reports.
You can use the data collected by Service Reporting to create detailed views for each tenant showing the consumptions of computational, memory, storage, and networking resources for virtual machines provisioned by the VM Clouds service in Windows Azure Pack.
The Service Reporting feature is installed as an optional component of System Center 2012 R2 (specifically by using the Orchestrator setup). Service Reporting aggregates data from both Operations Manager (used to collect data from VMM) and Windows Azure Pack; because of this, if you want to use Service Reporting, you need to install Operations Manager along with your VMM deployment.
Use the following information to install and configure Service Reporting in Windows Azure Pack:
Getting Started with Service Reporting Deploying Service Reporting Operating Service Reporting
Administer Windows Azure Pack for Windows ServerThe following topics provide information for administering Windows Azure Pack for Windows Server:
Administer User Accounts and Subscriptions Windows Azure Pack subscription states Administer Plans and Add-ons
50
Administer Virtual Machine Clouds Administer Service Management Automation
Administer User Accounts and SubscriptionsAn account is the highest level of control. A tenant signs up to create an account. Each account can have one or more subscriptions to the plans offered by the hosting service provider. Each subscription is associated with only one plan, but a tenant can have multiple subscriptions.
A plan can have one or more add-ons associated with it. If the administrator has enabled self-service subscription management, a tenant can do the following:
Subscribe to one or more plans. Each subscription is associated with one plan.
You can enable or disable this ability. See the procedure "To Configure User Accounts", later in this topic.
Subscribe to add-ons that are associated with a plan. Upload a management certificate. Assign one or more co-administrators to a subscription who can manage services within the
subscription. Delete a subscription. This action also deletes all resources (such as web sites, databases,
and virtual machines) associated with subscription. Delete an account. This action deletes all subscriptions that belonged to the account.
As an administrator, you can perform the following tasks on accounts and subscriptions:
Create a user account for a tenant and also remove it. Add a subscription to a tenant's account. Suspend, activate, or delete a subscription. Add and remove email notifications. Enable or disable self-service subscription management. (Default is enable) Require account validation (default is no), reset the account's password, configure the
required password strength, and enable or disable Forgot Password (default is disabled). Note that these particular options are not available if Windows Azure Pack is configured for Active Directory Federation Services (AD FS).
If you suspend a subscription, you can continue to modify the plan associated with the subscription but the tenant will not be able to access any the plan's resources including access to web sites and databases. Virtual machines will continue to run, but not be accessible by the tenant.
A subscription has the following states:
Active Suspended Pending delete and deleted Out-of-sync (not associated with a plan)
51
You can do the following, and also the tenant, on an individual subscription:
Add and remove co-administrators to the subscription. Add and remove add-ons that are associated with the subscription's plan. You cannot remove
an add-on while it is being used by the tenant.
Administer accounts and create notificationsBoth the tenant and the hosting service provider can create an account, and subscribe to a plan. When a hosting service provider creates an account for a tenant, that account must be associated with a plan.
The hosting service provider can also create notifications for tenants such as sending a link to reset passwords. An SMTP server is required to implement notifications.
1. In the management portal, click User Accounts.2. Specify an email address, a password.3. Choose a plan for the tenant. This will create a subscription to the plan in addition to
creating the user account.4. Click Create.
The command bar provides options to suspend an account, reset its password, or delete an account.
1. In the management portal, click User Accounts.2. Click the Notifications tab.3. Select a rule and specify settings to send the notification.
You can also add a new rule and set the event to associate with the rule. Click the Settings tab to configure the SMTP server.
1. In the management portal, click User Accounts.2. Click the Configure tab.3. You can configure the following values:
Password strength Enable or disable tenant subscription management Have a tenant's account (email address) validated. Use the "Forgot Password" feature. Note that this option does not appear if the
hosting service provider chooses to opt out of implementing this feature of Windows Azure Pack.
To create an account for a tenant
To create a notification
To configure user accounts
52

See AlsoAdminister Windows Azure Pack for Windows Server
Administer Plans and Add-ons
Windows Azure Pack subscription states
Administer Plans and Add-onsAs a hosting service provider, you can compose offerings of services in the form of plans. Tenants consume these service offerings by subscribing to a plan.
The following illustration shows how plans and add-ons provide a flexible framework of choices for your tenants.
Plan and add-on overviewA tenant cannot access services unless that tenant is subscribed to at least one plan. Plans, also known as service plans, define the collection of services that are offered to a tenant according to a scope as determined by the hosting service provider. You can set a usage quota on each service. This scope of various plans is typically defined by the capabilities of the resource providers, the pricing structure that a tenant can choose from, and for other business or organizational reasons.
The services that you provide in your plan or add-on must be already provisioned and configured so that they will be available during the authoring process. Provisioning resources includes creating web sites, virtual machines, and databases.
A plan that offers VM clouds is associated with a specific Virtual Machine Manager server and a Virtual Machine Manager cloud within that VMM server. When the tenant subscribes to this plan
53

and instantiates a virtual machine, the system will deploy that virtual machine with the specified properties on the associated cloud in Virtual Machine Manager.
If you want to provide an additional service for authoring, you must add that resource provider to the Windows Azure Pack.
Add-ons are optional services on a plan that the tenant can choose to include in the subscription. You can think of add-ons as services that are available as a-la-carte options in addition the core services that the plan provides. An add-on can only increase the quota or start existing services in a plan. It cannot provide any additional services that plan does not provide.
Quotas provide a set of limits against every service in a plan. Only administrators can adjust quota levels.
The Windows Azure Pack allows you to define plans for which your tenants can choose to subscribe, and thereby choose only those plans that they qualify for based on billing and other business logic factors.
After establishing an account, a tenant can do the following:
Subscribe to one or more plans. Each subscription is associated with one plan. Buy add-ons that are associated with a plan. Upload a management certificate. Designate one or more co-administrators for subscriptions who can manage services within a
subscription.
As an administrator, you can perform the following tasks on plans and add-ons:
Author a new plan or add-on
The authoring process for a plan and for an add-on are similar, but vary on detailed options for the services that are currently provisioned that can be added to the plan or add-on.
You can set also quotas in plans for resource usage and include gallery items.
Clone a plan or add-on
You can clone a plan or add-on for the purpose of revamping an existing one. You would need to clone the plan or add-on, decommission the old one, and enable tenants to subscribe to the new (cloned) plan or add-on.
Change Access
You can change the access to public, private, or decommissioned depending on its current state.
Delete a plan or add-on
The following table lists states and status values for plans and add-ons.
Plan states and status Add-on states and status
Public
Tenants can subscribe to a plan only when the plan is public.
Private
Available
The add-on has not been purchased by the tenant.
Acquired
54

Plan states and status Add-on states and status
The initial state after creation. A tenant cannot view or subscribe to private plan but an administrator can add subscriptions for tenants to private plans. This capability allows you to create hidden plans that are known only to administrators.
Decommissioned
Plan is active, but will not accept any new subscriptions.
Configured or Not Configured
If configured, the plan has a specified maximum number of allowed subscriptions or specified as unlimited. A plan will remain in a not configured state if it has at least one service that is not configured.
Update in progress
The plan is being updated.
Out-of-sync
The usage quota for a service in the plan cannot be updated or has another issue.
The add-on has been purchased.
Active
The add-on is liked to a plan.
Decommissioned
Add-on is active, but will not accept any new subscriptions.
Configured or Not Configured
If configured, the add-on has a specified maximum number of allowed subscriptions or specified as unlimited. An add-on will remain in a not configured state if it has at least one service that is not configured.
Out-of-sync
The usage quota for a service in the add-on cannot be updated or has another issue.
As an administrator, you can perform the following tasks on a plan:
Delete a plan if the plan has no subscriptions Clone a plan Change state of the plan (private, public or decommissioned) Add and remove add-ons Configure the invitation code so that tenants can be allowed to subscribe to the plan Configure the maximum number of allowed subscriptions per user account or set to unlimited Advertise a plan
You can add, edit, and delete advertisements that are shown on the tenant portal when a tenant views available plans. You can also import and export XML content for the details of your advertisement.
As an administrator, you can perform the following tasks on an add-on:
Delete an add-on if the add-on has no subscriptions Clone an add-on Change state of the add-on (private, public or decommissioned) Configure the maximum number of allowed purchases of an add-on per plan or set unlimited Advertise an add-on
55

You can add, edit, and delete advertisements that are shown on the tenant portal when a tenant views available add-ons
Important considerations for authoring plans and add-onsConsider the following when you author and administer plans and add-ons:
Create plans that have a sufficient selection of resources to provide in your plans. You can only delete a plan if it there are no tenants subscribed to the plan. You cannot remove a service from a plan if there is there is a subscription that is using the
service. When you clone a plan, all plan properties are copied over including quotas, configurations,
and advertisements. Only the Administrator can add and remove an add-on to a plan. You cannot add an add-on to a plan if that plan is in a decommissioned state. Anything you add to a plan should not be removed from Virtual Machine Manager (VMM) until
you update the plan to not include those items. Taking this precaution prevents tenants from trying to take action on items that are no longer deployable directly through VMM, as well alleviating any difficulty in administrating the plans.
When adding hardware profiles and VM templates to plans, the VM Generation data field indicates either 1 or 2, that provides information on the older and new architectures for virtual machines. Generation 1 emulates the traditional Pentium II server architecture, and Generation 2 provides a newer 64-bit architecture that based on Unified Extensible Firmware Interface (UEFI) rather than BIOS.
The following additional settings for defining a plan with Virtual Machine Clouds settings do not affect the operations or capabilities of the management portal for tenants: Create, view, and restore virtual machine checkpoints View and restore virtual machine checkpoints Save virtual machine states Store virtual machines to the library and deploy virtual machines from the library Except for the Connect to the console of virtual machines setting, these options can
be accessed only by using Windows PowerShell or by APIs that are able to access the Service Provider Foundation endpoints.
VM plans provide a Custom Settings with a Name field. You can use this field as a tag value for runbooks to use to complete automation tasks.
Create and publish a planThis section describes the steps to author a plan for Windows Azure Pack.
56
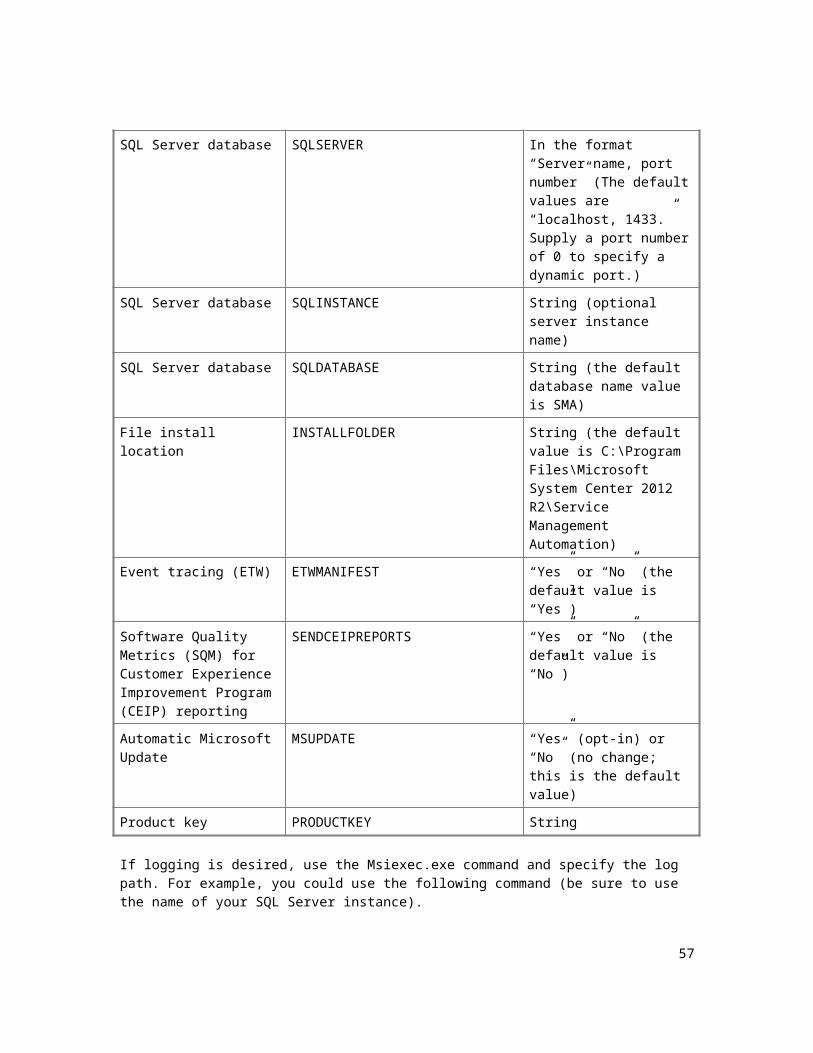
Step 1: Author a planTo authoring a plan, you must specify the services that you want to have included with the plan, and specify the add-ons that you want tenants to optionally add to their subscription.
1. In the management portal, click Plans, and then click New.2. Click Create Plan.3. On the Authoring a Hosting Plan wizard, do the following:
Specify a friendly name for the plan. Select one or more of the following services to include in the hosting plan, provided
that they have been previously provisioned. For each service, specify the available resource for that service. Website Clouds VM Clouds Service Bus Clouds SQL Servers MySQL Servers
Select one or more of the available add-ons to include in the plan. For each add-on, specify the available resource for that service.
The plan that you created should be listed on the Plans tab in the content pane. Now you can modify the plan by adding and removing services and add-ons, configure its access, set the maximum subscription limit, and advertise the plan.
Step 2. Set properties for a planAfter you create a plan, you must specify values for specific properties of the plan, depending on the services in the plan.
1. In the management portal, click Plans.2. Click the plan you want to modify. The plan's Dashboard appears.
The Dashboard includes statistics, a list of services, and a list of add-ons. If applicable, additional property settings for the plan are displayed, which can include the following:
Configurable features and resources for the service. For example, templates, hardware profiles, and networks for virtual machine clouds.
Quotas for usage limits.3. After all the applicable properties have been set, click Save on the command bar.
You can now author an add-on at any time. Feel free to do the procedure Step 8: Author an add-on before continuing with the next step.
To author a plan
To set properties for a plan
57
Step 3: Modify a plan After you create a plan, you can add and remove services of the plan and also add and remove add-ons.
1. In the management portal, click Plans.2. Click the plan you want to modify. The plan's Dashboard appears.3. To add a service, click Add Service on the command bar to be presented with the list of
available services that you can add to your plan. To remove a service, select the service to be removed and click Remove Service.
Step 4: Configure a planBefore a plan can be made public, it must be configured. A configured plan has a specified invitation code so that tenants who know the code can subscribe to the plan. Configuring a plan also requires that you specify the maximum number of allowable subscriptions.
1. In the management portal, click Plans.2. Click the plan you want to configure. The plan's Dashboard appears.3. Specify usage quota values for the services in the plan.4. Click the Settings tab.5. Specify an invitation code so that tenants can sign up for your plan on the management
portal for tenants. You must provide prospective tenants with the invitation code.6. Specify a value for the maximum number of allowed subscriptions per account, or select
the unlimited check box. This value is the maximum number of times that a tenant can add this plan to their subscription.
7. On the command bar, click Save.
Step 5: Advertise a plan You can add, edit, and delete advertisements that are shown on the tenant portal when a tenant views available plans. You can also export plan details to XML or publish them to the Microsoft Web Hosting Gallery.
1. In the management portal, click Plans.2. Click the plan you want to advertise. The plan's Dashboard appears.3. Click the Advertise tab.4. On the command bar, click Add Advertisement and provide the text that advertises your
plan, such as the number of virtual machines, resource capabilities, marketing
To modify a plan
To configure a plan
To advertise a plan
58

promotions, and so on.
You can also edit and delete advertisements.
5. On the content pane, click Export plan details into XML file to save for your records.6. On the content pane, click Import plan details to Web Hosting Gallery to publish your
plan to the Microsoft Web Hosting Gallery.
Step 6: Change access to a planAfter you have authored a plan, made the required configurations, and provided the required settings, you are ready to make the plan public so that tenants can subscribe to it.
You will also need to change the access if you want to make the plan private again or decommission it. For a list of possible states, see States of plans and add-ons.
1. In the management portal, click Plans.2. Select the plan.3. On the command bar, click Change Access.4. Choose the state that you want to apply to the plan.
Step 7: Clone a planYou can clone a plan to use as a template for creating other plans.
1. In the management portal, click Plans.2. Select the plan.3. On the command bar, click Clone Plan.4. Specify the name for the cloned plan.
The cloned plan will have all the services, add-ons, configurations, and property values of the plan from which it was cloned.
Step 8: Author an add-onAuthoring an add-on is similar to authoring a plan except that you are choosing a service, or services, that you want to provide as optional to your subscribers.
1. On the All Items navigation pane, click Plans, and then click New.2. Click Create Add-On.3. On the Authoring a Hosting Add-On wizard, do the following:
To change access to a plan
To clone a plan
To author an add-on
59
Specify a friendly name for the add-on. Select one or more of the available services to include in the add-on.
The add-on that you created should be listed on the Add-ons tab in the content pane.
You can modify, configure, and specify settings for an add-on as you do for plans. These tasks include the following:
Add and remove services from an add-on. Configure an add-on by setting the maximum number of times the add-on can be added
to a plan, or by setting it to unlimited. Advertise an add-on by adding, editing, removing text advertisements. Unlike plans, add-
on advertisements details cannot be exported to XML files or be published in the Microsoft Web Hosting Gallery.
Change access to an add-on. For a list of possible states, see States of plans and add-ons.
Clone an add-on.
See AlsoAdminister Windows Azure Pack for Windows Server
Administer User Accounts and Subscriptions
Windows Azure Pack subscription states
Windows Azure Pack subscription statesWhen a tenant signs up for a plan a subscription is created to contain the tenant’s information. As an administrator you can create subscriptions for tenants, as well as suspend or delete subscriptions. You can do any of these tasks from the User Accounts view.
There are five possible states for subscriptions:
State Description
Active Ready for tenant use.
Active (Out of sync) The subscription has been created, but the information in the Windows Azure Pack database needs to be refreshed.
Suspended The subscription has been temporarily closed but can be reactivated.
Suspended (Out Of Sync) The subscription has been suspended but the information in the Windows Azure Pack database needs to be refreshed.
60

State Description
Failed to Delete The action to delete the subscription failed. Check the event log for more information.
The following diagram shows the subscription workflow. You can use this workflow to troubleshoot issues with subscriptions.
The Windows Azure Pack subscription states
Administer Virtual Machine CloudsOnce you have configured VM Clouds, you might need to perform regular administrative tasks associated with it. This section provides instructions on how to perform those tasks in the VM Clouds infrastructure.
Administering VM Clouds topics Add VMM stamps to Virtual Machine Clouds
Provides instructions on how to add stamps to VM Clouds.
61

Using automation with Virtual Machine Clouds
Provides instructions on how to associate VM Clouds with Service Management Automation runbooks.
Using gallery Items in Virtual Machine Clouds
Provides instructions on how to create gallery items for VM Clouds.
Known issues with Virtual Machine Clouds
Lists down the know issues with VM Clouds, and their probable workarounds.
Add VMM stamps to Virtual Machine CloudsIn the topic How is the management portal for administrators associated with Service Provider Foundation?, we saw that once you configured the VM Clouds service, the stamps that are already existing in Service Provider Foundation are listed as stamps under the Clouds tab on the management portal for administrators. Once you have configured the VM Clouds service to use the Service Provider Foundation endpoint, you can also associate more stamps with Service Provider Foundation, directly from the management portal for administrators. This topic provides instructions on how to add more stamps to a Service Provider Foundation server.
1. From the management portal for administrators, from the command bar, click New, click VM Clouds, and then click Connect To.
2. Specify the fully qualified domain name (FQDN) of the VMM server or stamp. Optionally, you can also provide the port number or the remote desktop gateway FQDN for the VMM server.
3. Click Register. The VMM Server (or stamp) that you specified, as well the clouds existing on that stamp, will be listed under the Clouds tab on the portal.
See AlsoAdminister Virtual Machine Clouds
Using automation with Virtual Machine CloudsYou can use automation in Windows Azure Pack to orchestrate and integrate best-practice tasks to drive down the cost of datacenter operations, while improving the reliability of IT processes. You can integrate Service Management Automation with VM Clouds to trigger runbooks every time a specific event occurred in the VM Clouds infrastructure. The topic Register Service Management Automation for Virtual Machine Clouds provides instructions on how to associate
To add stamps to VM Cloud
62

VM Clouds with Service Management Automation. This topic provides instructions on how to associate Service Management Automation runbooks with events occurring in the context of VM Clouds. If you want to understand how VM Clouds integrates with Service Management Automation at an architectural level, see How is Service Provider Foundation associated with Service Management Automation?
For VM Clouds to trigger runbooks in Service Management Automation, the Service Management Automation web service certificate must be trusted on the computer running Service Provider Foundation.
1. From the management portal for administrators, click the VM Clouds tab.2. From the VM Clouds tab, click the Automation view.3. From the Automation view, from the command bar, click Add, and specify the following:
a. For Object, select a VM Clouds object, an action on which triggers a Runbook. For the list of objects and the descriptions, see Objects that can be associated with runbooks.
b. For Action, select the action that must occur on the selected object for a Runbook to be triggered.
c. For Runbook, select the Runbook that is triggered every time the specified action occurs on the selected object.
NoteFor a Runbook to be available in this drop-down, it must include the “SPF” tag. For instructions on how to tag Runbooks, see Editing Runbook Properties. If you are using a non-Roman alphabet keyboard, repeat the following steps three times to include the “SPF” tag:
i. Press and hold the ALT key.ii. Press the + key on the number pad.iii. Type the Unicode value 0053 for the letter S.iv. Release the ALT key.v. Repeat these steps two more times by typing values 0050 (for P) and 0046 (for
F).d. Select the Enable checkbox to enable the association between the object, the action,
and the Runbook. This check box can be particularly useful in scenarios where you want the association between the runbooks and events in VM Clouds to come into effect at a later date or time.
e. Click the check mark to save your changes.
Note
To associate runbooks with events in VM Clouds
63
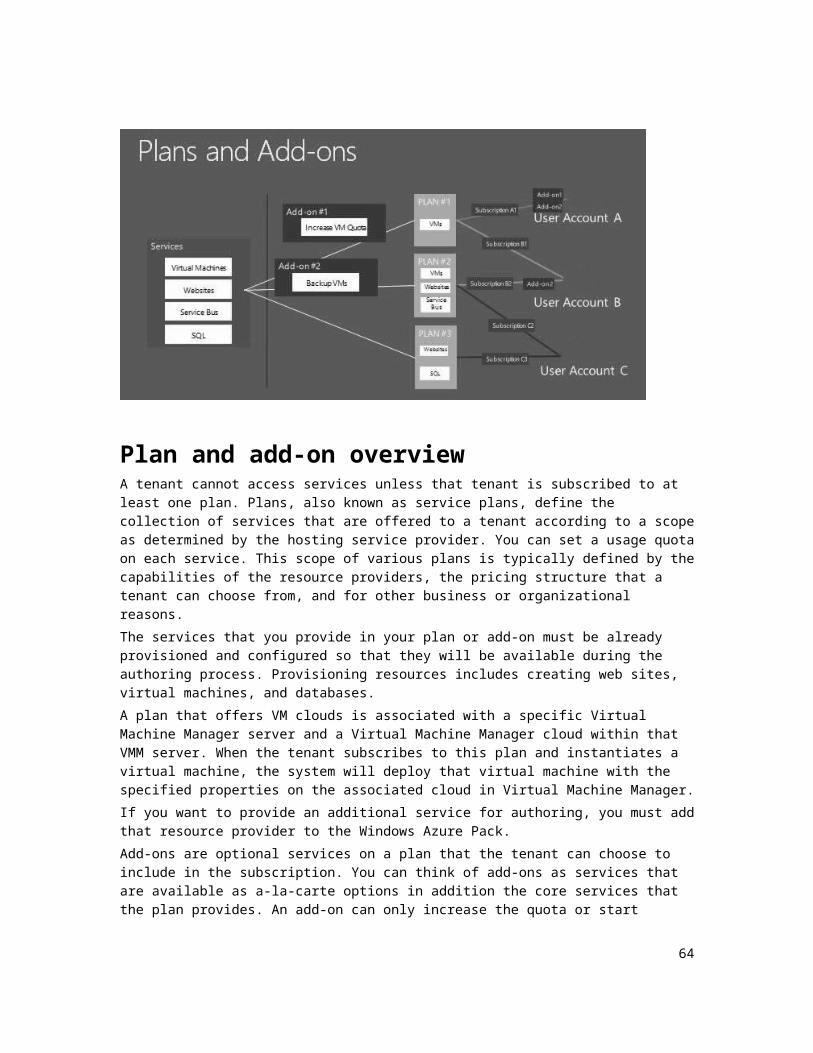
Objects that can be associated with runbooksThe following table lists the objects that can be associated with runbooks, and their description.
Objects with the MicrosoftCompute prefix are for Azure compatible virtual machine roles. Objects with the SPF prefix are for actions related to admin API/portal. Objects with the VMM prefix are for actions against the tenant API/portal. Object with no prefix denotes the RDFE/portal object for new subscriptions.
Object Description
MicrosoftCompute CloudService Represents a container for VMRole. Multiple VM roles can be created under a CloudService.
MicrosoftCompute VM Represents a child VM within a VM role.
MicrosoftCompute VMRole Represents the scalable tier for peer VM nodes
MicrosoftCompute VMRoleVMDisk Represents the disks attached to a VMRole.
SPF Orchestrator Event Registration The object that creates a mapping between an event in the API and the associated automation.
SPF Role Represents a user role that maps to an SSU (self-service user) in VMM.
SPF Server Represents any server registered with SPF.
SPF SpfSetting Represents a connection string for either a database connection or for a portal endpoint connection to an Operations Manager data warehouse.
SPF Stamp Represents a VMM server or stamp
SPF Tenant Represents a tenant and is created every time a tenant is created.
SPF TrustedIssuer Represents a trusted party used for claims-based authentication.
SPF VM Represents a virtual machine object.
SPF VMRole Represents a virtual machine role object.
SPF VMRoleGalleryItem Represents a gallery item object that encapsulates the template using which multi-node VM tiers can be created.
Subscription Represents a subscription objects that is created every time a tenant subscribes to a
64

Object Description
plan
VMM BGPPeer Represents the border gateway protocol
VMM HardwareProfile Represents the hardware profiles in VMM the define the hardware attributes of a VM
VMM Job Represents a task in VMM and indicates the status of operation in VMM.
VMM NATConnection Represents a container of NATRule objects.
VMM NATRule Represents the inbound port-mapping rule for a VM network.
VMM RunAsAccount Represents the VMM RunAs account.
VMM Service Represents a VMM service.
VMM ServiceTemplate Represents a VMM service template.
VMM StaticIPAddressPool Represents a VMM static IP address pool.
VMM UserRole Represents a VMM user role. A user role can be self-service user, tenant admin, or administrator. This object can be used for applying permissions and scopes.
VMM VirtualDiskDrive Represents a VMM virtual disk drive.
VMM VirtualDVDDrive Represents a VMM virtual DVD drive.
VMM VirtualMachine Represents a standalone virtual machine.
VMM VirtualNetworkAdapter Represents a VMM virtual network adapter (vNIC).
VMM VirtualSCSIAdapter Represents a VMM virtual SCSI adapter.
VMM VMCheckpoint Represents a VMM checkpoint.
VMM VMNetwork Represents a VM network or a virtual network. A virtual machine is connected to a VM network using a virtual network adapter (vNIC).
VMM VMNetworkGateway Represents a VMM network gateway. A gateway allows border gateway protocol, NAT, and VPN to be configured on a VM network.
VMM VMSubnet Represents a VM subnet and defines subnet ranges within a VM network.
65
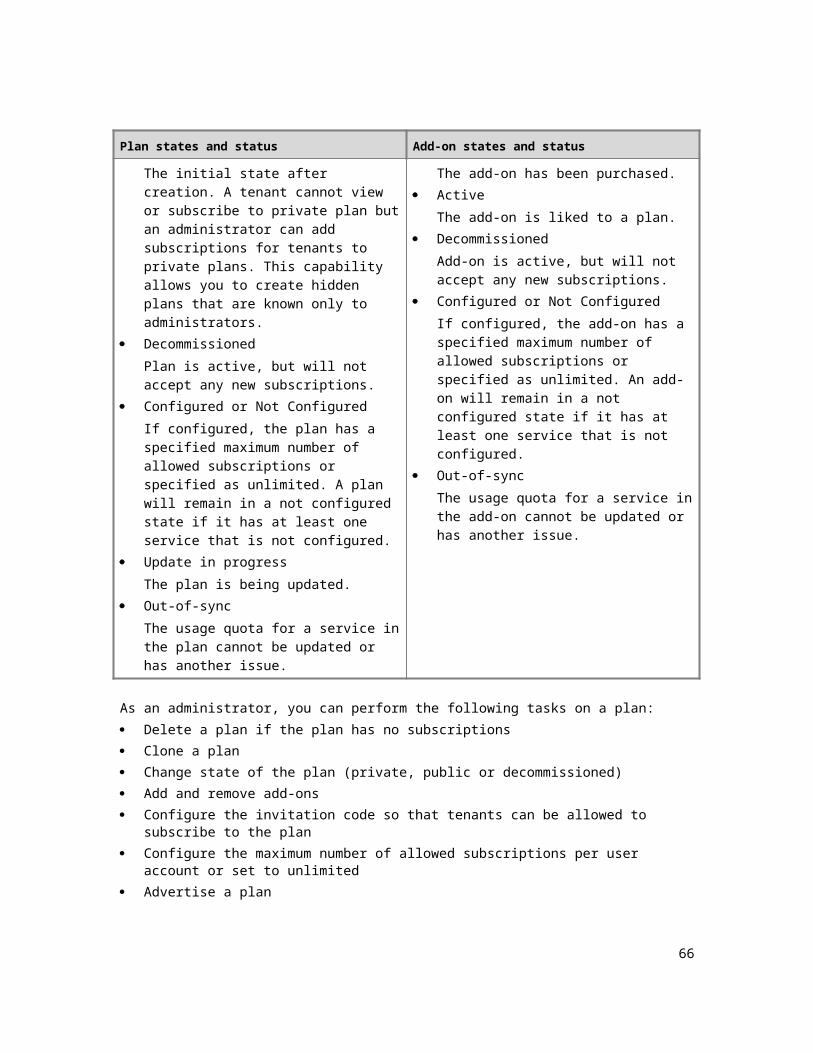
Object Description
VMM VMTemplate Represents a VMM virtual machine template used to create virtual machines.
VMM VPNConnection Represents a VMM VPN connection. This is mapped to the site-to-site VPN connection in the portal. It allows virtual machines on a VM network to connect remotely to another site.
VMM VPNNetworkRoute Represents a VMM VPN network route. Routes allow virtual machines on a VM network to be able to locate other computers on the remote network on the other end of the VPN connection.
See AlsoAdminister Virtual Machine Clouds
Using gallery Items in Virtual Machine CloudsGallery items in Windows Azure Pack are virtual machine roles that enable a hosting provider to make offerings available to their tenants by using a standard and reusable artifact. This topic provides instructions on how to use gallery items in VM Clouds to provision virtual machines. Using gallery items in VM Clouds involves the following broad set of steps:
You can also look at the walkthrough at http://go.microsoft.com/fwlink/?LinkId=327556 for more information on how to use gallery items in Windows Azure Pack.
Steps Links
Create a resource definition Resource Definition Package
Create a resource extension Resource Extension Package
Create and configure the VHD Create and Configure the VHD
Import resource extension into VMM Install Resource Extension Package
Import resource definition into the management portal for administrators
To import resource definition into the management portal for administrators
Note
66

Steps Links
Make gallery item public To make a gallery item public
Add gallery item to plan You can associate gallery items and plans in two ways:
From the Plans tab – To add gallery item to a plan (from the Plans tab)
From the VM Clouds tab – To add gallery item to a plan (from the VM Clouds tab)
NoteOnce you have added a gallery item to a plan, it might take a few minutes for the new gallery items to reflect in the tenant subscriptions.
1. In the management portal for administrators, click the VM Clouds tab, and then click the Gallery view.
2. On the Gallery view, from the command bar, click Import.3. In the Import to Gallery dialog box, browse to the location of the gallery item (resource
definition file) to import. A gallery item has the .resdefpkg extension.
NoteYou cannot upload a gallery item with the same version number again. To do so, you must first delete the existing gallery item from the management portal for administrators and then upload the updated one. However, you can upload the same gallery item with different version numbers.
4. Click the check mark to import the gallery item.
1. A new gallery item is by default imported as Private. To change the state, on the Gallery view, select a gallery item row, and from the command bar, click Make Public.
Note
The state of the gallery item governs whether users of the management portal for tenants can use that gallery item while provisioning virtual machines. Even though you can add both public and private gallery items to plans, for a tenant who is subscribed to a plan that has both public and private gallery items, only the public gallery items are available while creating virtual machines.
2. In the pop-out message, click Yes.
To import resource definition into the management portal for administrators
To make a gallery item public
67

1. In the management portal for administrators, click the Plans tab, and then click a plan to open the plans dashboard.
2. In the plans dashboard, under Plan Services, click Virtual Machine Clouds.3. In the Virtual Machine Clouds page, under the Gallery section, click Add Gallery
Items.4. In the Select gallery items to add to this plan dialog box, select the gallery item that
you want to add to the plan, and then click the check mark.
NoteBefore you add a the gallery item to a plan, the resource extension page for the gallery item must already be imported in the underlying VMM server, as described at Install Resource Extension Package.
5. From the command bar, click Save to save changes to the plan. A tenant who subscribes to this plan can use this gallery item to provision virtual machines.
6. Alternatively, you can also add a gallery item to a plan from the Gallery view on the VM Clouds tab. Click the gallery item to open the gallery item dashboard, click the Plans view,
1. In the management portal for administrators, click the VM Clouds tab, and then click the Gallery view.
2. From the Name column, click a gallery item name to open the dashboard for the gallery item.
3. Click the Plans view to list the plans, if any, which are already associated with the gallery item.
4. From the command bar, click Add and in the Add Gallery Item to Plans and Subscriptions screen, select the plan to which you want to add the gallery item. The plans that are available for selection meet the following criteria: The plan must include the VM Clouds service. This is because gallery items will only
be used by users that want to provision virtual machines using the VM Clouds service.
The plan does not already include the gallery item being added If the gallery item being added includes a resource extension, the plan must be
hosted on VM Clouds that has that resource extension available5. Click the check mark to save your changes.
See AlsoAdminister Virtual Machine Clouds
To add gallery item to a plan (from the Plans tab)
To add gallery item to a plan (from the VM Clouds tab)
68

Known issues with Virtual Machine CloudsThis topic lists down some known issues, with workarounds, related to VM Clouds.
Deleting a subscription or user account does not automatically delete virtual machines and networks associated with that subscriptionDeleting a subscription or user account does not automatically clean up and remove the tenant assets such as virtual machines and networks provisioned by the tenant. Specifically, if you want to remove a subscription or account, you should first use the Virtual Machines view and the Networks view in the VM Clouds tab, to search for and remove the virtual machines and networks owned by that subscription or account. Once you have deleted the virtual machines and networks, you can delete the subscription or account.
Refreshing the query to list virtual machines, networks, and their statusYou can use the Virtual Machines view and the Networks view in the VM Clouds tab to search for virtual machines and networks, respectively, for a given query. However, the query output is not refreshed automatically to show any change in the query results. Administrators must run the query again to reflect any changes to the query results.
For example, if an administrator runs a query when a tenant just provisioned a new virtual machine, the state for that virtual machine in the query result will show as “Creating”. The query results will continue to show the same state, even after the virtual machine has completely started, unless the administrator refreshes the query. The only other situation when the query result is refreshed, but only for a specific virtual machine, is when the administrator takes an action on that virtual machine.
Searching for virtual machines or networks with names containing Unicode charactersIn some versions of Internet Explorer, using the management portal for administrators to search for virtual machines or networks containing Unicode characters in their name might not give the desired result. To fix this, you must change the following settings for Internet Explorer.
1. From Internet Explorer, from the Tools menu, click Internet Options.2. In the Internet Options dialog box, click the Advanced tab, and then within the
International section, clear the Send UTF-8 URLs check box.3. Click OK.
69
See AlsoAdminister Virtual Machine Clouds
Administer Service Management AutomationService Management Automation must be administered separately from Windows Azure Pack for Windows Server. These topics describe how to administer Service Management Automation.
Administration topics Scaling Service Management Automation up or down
Describes how to approach and implement adding runbook workers and web services to or removing them from Service Management Automation.
How to purge the Service Management Automation database
Describes how to approach and implement to install a Service Management Automation PowerShell module.
Establish trust between Service Management Automation and Service Provider Foundation
Provides an overview of how to establish trust relationships between other Windows Azure Pack components and Service Management Automation.
Extending Service Management Automation with RunbooksDescribes the default runbooks that ship with Service Management Automation and how to add additional runbooks.
Establish trust between Service Management Automation and Service Provider FoundationFor Service Provider Foundation to successfully call the Service Management Automation web service, the Service Management Automation web service certificate must be trusted by the server on which Service Provider Foundation is installed. This topic applies whether you are using a self-signed certificate or a certification authority certificate for your Service Management Automation web service.
1. Log on to the computer that is running Service Provider Foundation.2. In a web browser, connect to the Service Management Automation web service endpoint.
This procedure assumes that Internet Explorer is being used and that it is being run with elevated privileges.
3. Click Continue to this website (not recommended).
To trust the Service Management Automation certificate
70

4. In the browser address bar, click Certificate Error, and then click View Certificates on the Certificate Invalid pop-up.
5. In the Certificate dialog box, click Install Certificate.6. In the Certificate Import wizard, select the Local Machine option and click Next.7. Select the Place all certificates in the following store option, and then click Browse.8. In the Select Certificate Store dialog box, click Trusted People, and then click OK.9. Click Next, and then review your choices and click Finish.10. If the import is successful, click OK to close the Certificate dialog box.
Service Provider Foundation should now be able to successfully call the Service Management Automation web service.
For detailed guidance to understand, create, test, and publish runbooks, see Authoring Runbooks in Service Management Automation.
Scaling Service Management Automation up or downUse the guidance in this section to scale out a machine tier in a service that is deployed in Service Management Automation. You can add runbook workers and web services to add additional capacity for runbook processing.
Initial recommendationsThe recommended configuration is 3 virtual machines, each with an installed a runbook worker and web service. The incoming web traffic should be load balanced. The machines should each be at least each two cores and contain a minimum of 4 GB of RAM, along with 60 GB of storage. Only one PowerShell module should be installed.
SQL Server recommendationsFor the SQL Server database, 8 GB of RAM and 8 cores are recommended.
1 month of data under heavy load (12 jobs per minute for a month) results in 20 GB of database space usage. By default, job purging should keep the space usage from growing much beyond this. For more on settings for database purging, see How to purge the Service Management Automation database.
Scale out Service Management AutomationIf runbook jobs are running slowly, you might want to increase the number of runbook workers that are sharing workloads. New runbook worker/web service instances must be installed on their own virtual machines.
71

Before installing or uninstalling a Service Management Automation runbook worker, ensure that you have stopped the Runbook Worker service (rbsvc) on the computer where the runbook worker is installed. For instructions on how to avoid any data loss when removing a runbook worker, including Windows PowerShell cmdlets and scripting help for this operation, see the overview of runbook worker deployments.
How to purge the Service Management Automation databaseIn Service Management Automation, database purging is automatic, but you can adjust it to your needs.
To enable the automatic database purge, you must enable the SQL Server Agent (MSSQLSERVER) service for Automatic start. The service is not turned on by default, but it is frequently started by SQL Server database administrators for other tasks.
If the SQL Server Agent service is not running, the purge will not occur and eventually the customer will experience performance issues, first in the portal. and then with the back end.)
The job task that performs purge can be set up in the installer even if the customer is not running the SQL Server Agent service. But it will not do anything until the service is enabled.
The database purge job is automatic, but it can be regulated by the Service Management Automation administrator.
By default, the database purge job runs every 15 minutes, and it runs only if there are records to purge.
Records are purged only if they are older than the default duration of 30 days. This time is configurable by using the Set-SmaAdminConfiguration cmdlet and setting the –PurgeJobsOlderThanCountDays parameter.
If the total job record count exceeds the MaxJobRecords parameter set by the same Set-SmaAdminConfiguration cmdlet, then more job records will be purged. The default value for this parameter is 120,000 records.
Common runbook tasksRunbooks in Windows Azure Pack for Windows Server are Windows PowerShell workflows that provide the ability to automate administrative processes for managing and deploying cloud servers or any other function that a Windows PowerShell script can perform.
72
Common tasksThe following are some of the most common runbook tasks to perform using Automation in Windows Azure Pack. For more detailed guidance to understand, create, test, and publish runbooks, see Authoring Runbooks in Service Management Automation.
Set or change the Service Management Automation endpoint
Enables Windows Azure Pack to access the Service Management Automation web service.
How to change log settings for a runbook
The amount and type of data that is logged.
How to use the runbook dashboard
Resources and operations that are available on the runbook dashboard.
View the status of a runbook job
Completion status, errors, and details for runbook jobs.
How to start a runbook
Start a runbook from Windows Azure Pack.
How to schedule a runbook
Attach one or more schedules to a runbook.
How to schedule a runbookThe Schedule tab for a runbook in the Automation feature of Windows Azure Pack for Windows Server enables you to view and change the schedules that are associated with a runbook. A runbook can be associated with more than one schedule. For example, you can set up a weekly schedule, and also run the runbook on the first of each month.
1. In the management portal, click Automation.2. Click Runbooks.3. Click the name of the runbook to which you want to attach a schedule.4. Click Schedule.5. In the Command bar, click Schedule, and then do one of the following:
Click Add New to create a new schedule for the runbook. Click Use Existing to attach an existing schedule to the runbook.
6. After you create or select a schedule, you can click View Details to review the schedule.
The runbooks will run according to your attached schedules.
For more detailed guidance to understand, create, test, and publish runbooks, see Authoring Runbooks in Service Management Automation.
To add a schedule
73
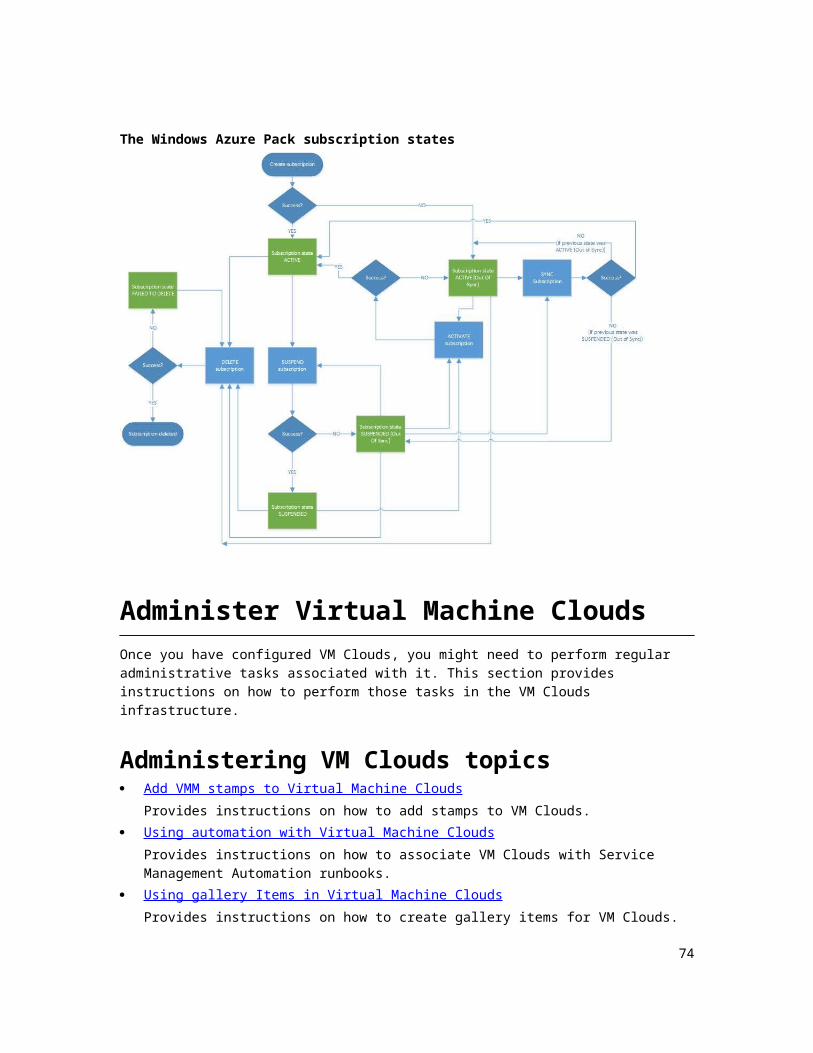
How to start a runbookThe Runbooks page in the Automation feature of Windows Azure Pack provides a list of existing runbooks, plus commands to start, import, export, or delete a runbook. The Runbooks page displays information about all runbooks. You can filter the list by job status (for example, Completed) or by a time interval. If the runbook is attached to one or more schedules, it will run at the scheduled times.
1. In the management portal, click Automation.2. Click Runbooks.3. Select a runbook and click Start.
Check the runbook logs to stay informed of its progress.
For more detailed guidance to understand, create, test, and publish runbooks, see Authoring Runbooks in Service Management Automation.
View the status of a runbook jobThe Dashboard tab for a selected runbook job enables you to view information about the job, such as runbook name, job status, and input and return parameters. You can use this page to obtain the account name of the person who started the runbook, for audit purposes. You can use the Command bar command to stop, suspend, or resume a runbook job, depending on the job’s current status.
1. In the management portal, click Automation.2. Click Runbooks.3. Click the name of the runbook for which you want to view runbook jobs.4. Click the Jobs tab.5. Click the name of the runbook job that you want to view.6. Click the Dashboard tab.7. View the details for the job, or Stop, Resume, or Suspend the job.
For more detailed guidance to understand, create, test, and publish runbooks, see Authoring Runbooks in Service Management Automation.
To start a runbook
To view the status of a runbook job
74
How to use the runbook dashboardThe runbook dashboard page displays summary information about runbook jobs for a selected runbook. A runbook job is a single time-stamped record from when a runbook is run. Click the check box icon next to a job state; for example, Stopped) to show or hide its colored graph line. You can adjust the graph to show absolute or relative scale, or change the time interval being displayed.
The dashboard graph includes the following information..
Value Definition
Failed The number of jobs that did not compile successfully. Typical reasons for failure include a workflow name that is not valid, and activities that are not recognized.
Stopped The number of jobs that were stopped by the administrator before they were completed.
Suspended The number of jobs that were suspended due to errors before they were completed. A suspended job can be stopped or resumed.
Completed The number of jobs that were completed successfully.
Running The number of jobs that are currently running.
For more detailed guidance to understand, create, test, and publish runbooks, see Authoring Runbooks in Service Management Automation.
How to change log settings for a runbookThe Configure tab for a selected runbook enables you to specify settings for the runbook, including runtime log settings and the description field (maximum 512 characters).
1. In the management portal, click Automation.2. Click Runbooks.3. Click the name of the runbook for which you want to change logging settings.4. Click the Configure tab.5. Turn the following on or off:
To change log settings
75

Log debug records Log verbose records Log progress records
For more information about controlling the amount of log data that is retained, see How to purge the Service Management Automation database.
For more detailed guidance to understand, create, test, and publish runbooks, see Authoring Runbooks in Service Management Automation.
Set or change the Service Management Automation endpointThe QuickStart tab for Automation in Windows Azure Pack for Windows Server provides a link that enables you to set up or change the Service Management Automation endpoint. If the Service Management Automation endpoint is not yet registered, click Register the Service Management Automation endpoint to configure it. To change the Service Management Automation endpoint settings after an endpoint has been set up, click Current Service Management Automation endpoint.The Service Management Automation endpoint requires the following information:
The service URL and port. The port number is set when you install Service Management Automation.
The user name of a user account that can access the Service Management Automation web service. Accounts with access to the Service Management Automation web service are also set during installation.
The access password for the user account.
For more detailed guidance to understand, create, test, and publish runbooks, see Authoring Runbooks in Service Management Automation.
Migrate from Windows Azure Services for Windows ServerWindows Azure Pack for Windows Server improves upon the functionality and features offered in Windows Azure Services for Windows Server (also referred to as the Service Management Portal and Service Management API) and is intended as a replacement portal. You can migrate your data from Windows Azure Services to Windows Azure Pack. The following table indicates the migration status for the different data sets in Windows Azure Services during and after the migration to Windows Azure Pack.
76
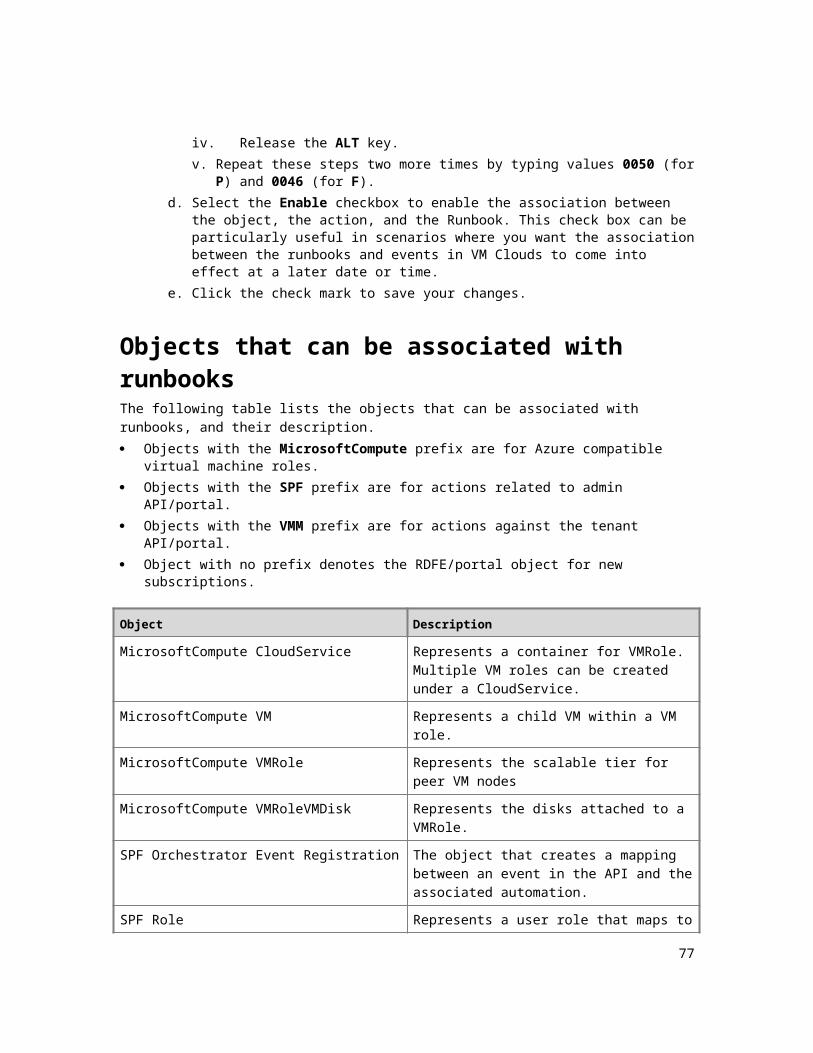
Resource Data/Function Migrated to Windows Azure Pack?
Windows Azure Services core Web.Config AppSettings No
Web.Config ConnectionString No
IIS Settings (such as host name or custom port)
No
Encrypted Web.Config Yes
Tenant password No. Set to expired after migration.
Firewall settings No
Custom resource provider No
Custom theming kit No. You need to reapply.
Virtual Machines Existing VM roles No. You need to create new VM roles.
Standalone VMs Yes
Web Sites Yes
Usage Yes
SQL Server and MySQL Yes, although you will need to follow the steps below.
Migrating to Windows Azure Pack requires work both before you install Windows Azure Pack and after. Use the following information to migrate.
Known issues with migrating dataThe following issues and restrictions apply to data migrated from Windows Azure Services for Windows Server. Where possible, a workaround is provided. Review this information before you migrate your data.
Issue: Some existing plans have the status of “Not configured” after the migration.
Workaround: The SQL and MySQL quota information is lost for plans without subscriptions. Reapply the quota to these plans.
Issue: Tenants cannot log into the management portal due to an expired password.
Workaround: Reset the tenant passwords. Because of a change to the way that Windows Azure Pack secures passwords, existing passwords have been changed to expired.
Issue: Existing tenants cannot create new databases.
77

Workaround: Suspend and then reactivate the account for any tenant that encounters this issue.
Issue: Existing tenants cannot delete existing databases.
Workaround: Repair the connection to existing SQL Server and MySQL instances.
Issue: Plan advertisement and invitation codes are lost after you migrate your data.
Workaround: Re-apply the advertisements and invitation codes to your plans.
Before you uninstall the Service Management PortalBefore you uninstall Windows Azure Services from your environment, use the following steps to preserve your data:
1. Ensure that all resource providers that you have installed with Windows Azure Services are running and accessible.
2. Stop the Windows Activation Process service on all machines in your deployment. This stops any new changes from coming into the Windows Azure Services databases. Use the following command to stop the service:
net stop was
3. Back up all databases.4. On the SQL Server instance that contains the Service Management databases, create copies
of the Microsoft.MgmtSvc.Store database named Microsoft.MgmtSvc.MySQL and Microsoft.MgmtSvc.SQLServer. Use the following steps:a. Start the SQL Server agent service:
net start slqserveragent
b. Grant the SQL Server agent access to the Service Management data folder:
icacls "C:\Program Files\Microsoft SQL Server\MSSQL11.MSSQLSERVER\MSSQL\DATA" /T /C /E /G "NT Service\SQLSERVERAGENT":F
c. In SQL Server Management Studio, right-click Microsoft.MgmtSvc.Store, and then click Tasks -> Copy database.
d. Follow the instructions in the wizard. Use “Microsoft.MgmtSvc.MySQL” as the name of the copied database.
e. From a Windows PowerShell prompt, use the following cmdlets to uninstall the Management and SQL Server schemas from the Microsoft.MgmtSvc.MySQL database:
$server = "mysqlserver"
$sa = "sa"
$sapswd = "123!sdf"
Uninstall-MgmtSvcDatabase -Schema Management -Server $server -UserName $sa -Password $sapswd -Database Microsoft.MgmtSvc.MySQL
78

Uninstall-MgmtSvcDatabase -Schema SQLServer -Server $server -UserName $sa -Password $sapswd -Database Microsoft.MgmtSvc.MySQL
Remove-MgmtSvcDatabaseUser -Schema Management -Server $server -UserName $sa -Password $sapswd -Database Microsoft.MgmtSvc.MySQL -User MgmtSvc-AdminAPI
Remove-MgmtSvcDatabaseUser -Schema Management -Server $server -UserName $sa -Password $sapswd -Database Microsoft.MgmtSvc.MySQL -User MgmtSvc-Monitoring
Remove-MgmtSvcDatabaseUser -Schema Management -Server $server -UserName $sa -Password $sapswd -Database Microsoft.MgmtSvc.MySQL -User MgmtSvc-TenantAPI
Remove-MgmtSvcDatabaseUser -Schema Management -Server $server -UserName $sa -Password $sapswd -Database Microsoft.MgmtSvc.MySQL -User MgmtSvc-TenantPublicAPI
Remove-MgmtSvcDatabaseUser -Schema Management -Server $server -UserName $sa -Password $sapswd -Database Microsoft.MgmtSvc.MySQL -User MgmtSvc-UsageCollector_Management
Remove-MgmtSvcDatabaseUser -Schema SQLServer -Server $server -UserName $sa -Password $sapswd -Database Microsoft.MgmtSvc.MySQL -User MgmtSvc-SQLServer
Remove-MgmtSvcDatabaseUser -Schema MySQL -Server $server -UserName $sa -Password $sapswd -Database Microsoft.MgmtSvc.MySQL -User MgmtSvc-MySQL
f. Run the following commands to uninstall the MySQL schema from the Microsoft.MgmtSvc.Store database:
Uninstall-MgmtSvcDatabase -Schema MySQL -Server $server -UserName $sa -Password $sapswd -Database Microsoft.MgmtSvc.Store
Remove-MgmtSvcDatabaseUser -Schema Management -Server $server -UserName $sa -Password $sapswd -Database Microsoft.MgmtSvc.Store -User MgmtSvc-AdminAPI
Remove-MgmtSvcDatabaseUser -Schema Management -Server $server -UserName $sa -Password $sapswd -Database Microsoft.MgmtSvc.Store -User MgmtSvc-Monitoring
Remove-MgmtSvcDatabaseUser -Schema Management -Server $server -UserName $sa -Password $sapswd -Database Microsoft.MgmtSvc.Store -User MgmtSvc-TenantAPI
79

Remove-MgmtSvcDatabaseUser -Schema Management -Server $server -UserName $sa -Password $sapswd -Database Microsoft.MgmtSvc.Store -User MgmtSvc-TenantPublicAPI
Remove-MgmtSvcDatabaseUser -Schema Management -Server $server -UserName $sa -Password $sapswd -Database Microsoft.MgmtSvc.Store -User MgmtSvc-UsageCollector_Management
Remove-MgmtSvcDatabaseUser -Schema MySQL -Server $server -UserName $sa -Password $sapswd -Database Microsoft.MgmtSvc.Store -User MgmtSvc-MySQL
g. Return to SQL Server Management Studio and right-click Microsoft.MgmtSvc.Store again, then click Tasks -> Copy database.
h. Save the database as “Microsoft.MgmtSvc.SQLServer.”
If errors occur while you are copying the database, run the command in step b. again to re-grant access to the required files.
i. From a Windows PowerShell prompt, use the following cmdlets to uninstall the Management and SQL Server schemas from the Microsoft.MgmtSvc.SQLServer database:
Uninstall-MgmtSvcDatabase -Schema Management -Server $server -UserName $sa -Password $sapswd -Database Microsoft.MgmtSvc.SQLServer
Uninstall-MgmtSvcDatabase -Schema SQLServer -Server $server -UserName $sa -Password $sapswd -Database Microsoft.MgmtSvc.Store
Remove-MgmtSvcDatabaseUser -Schema Management -Server $server -UserName $sa -Password $sapswd -Database Microsoft.MgmtSvc.SQLServer -User MgmtSvc-AdminAPI
Remove-MgmtSvcDatabaseUser -Schema Management -Server $server -UserName $sa -Password $sapswd -Database Microsoft.MgmtSvc.SQLServer -User MgmtSvc-Monitoring
Remove-MgmtSvcDatabaseUser -Schema Management -Server $server -UserName $sa -Password $sapswd -Database Microsoft.MgmtSvc.SQLServer -User MgmtSvc-TenantAPI
Remove-MgmtSvcDatabaseUser -Schema Management -Server $server -UserName $sa -Password $sapswd -Database Microsoft.MgmtSvc.SQLServer -User MgmtSvc-TenantPublicAPI
Remove-MgmtSvcDatabaseUser -Schema Management -Server $server -UserName $sa -Password $sapswd -Database
Tip
80

Microsoft.MgmtSvc.SQLServer -User MgmtSvc-UsageCollector_Management
Remove-MgmtSvcDatabaseUser -Schema SQLServer -Server $server -UserName $sa -Password $sapswd -Database Microsoft.MgmtSvc.Store -User MgmtSvc-SQLServer
Remove-MgmtSvcDatabaseUser -Schema SQLServer -Server $server -UserName $sa -Password $sapswd -Database Microsoft.MgmtSvc.SQLServer -User MgmtSvc-SQLServer
j. Revoke permissions and stop the SQL Server agent by running the following commands:
icacls "C:\Program Files\Microsoft SQL Server\MSSQL11.MSSQLSERVER\MSSQL\DATA" /T /C /E /R "NT Service\SQLSERVERAGENT"
net stop sqlserveragent
k. Use the Add and Remove Programs tool to uninstall all programs that start with “Service Management” from all machines in your existing deployment.
l. Restart your machines.
After you install Windows Azure PackAfter you have installed and configured the Windows Azure Pack core components, as described in Deploy Windows Azure Pack for Windows Server, do the following:
1. Install the Windows Azure Pack: Web Sites service. This is a new version of the Web Sites service that you used in the Service Management portal.
2. Upgrade any other resource providers you want to use, including the Virtual Machines service, which uses the System Center 2012 R2 version of Virtual Machine Manager.
3. Run the following cmdlet to migrate subscription data from resource providers:
Update-MgmtSvcV1Data -DisableCertificateValidation
If you receive a 404 – File or directory not found error, it means that the resource provider that you are trying to migrate is not functional. If this occurs, you will need to manually set the quota information for plans related to that resource provider.
If you have a plan without subscriptions, you will see a warning message telling you that the quota synchronization for that plan cannot be completed. The plan will be marked as “Not configured” and you will need to manually configure it in the management portal for administrators.
4. Log into the management portal for administrators and reset the password for the tenant portal. Because of a change to the way that Windows Azure Pack secures passwords, existing passwords have been set to expired. Make sure to communicate the new password to your tenants, as they will see a “Password has expired” error when they attempt to log into the portal using the old password.
Note
81
Windows Azure Pack terminologyThe following terms are used in Windows Azure Pack for Windows Server.
Management portal for administrators
The Windows Azure Pack portal interface used by hosting service providers to configure and manage resource clouds; user accounts; and tenant offers, quotas and pricing.
Management portal for tenants
A customizable self-service portal that tenants use to subscribe to and manage services such as Web Sites, Virtual Machines, and Service Bus.
Hosting service provider
A service provider that offers scalable infrastructure services to multiple customers.
Tenant
A tenant is a subscriber, typically an organization, that uses the cloud services created and provisioned by a hosting service provider.
Runbook
A runbook consists of tasks and process steps that are performed in a given order. In Windows Azure Pack, runbooks are used to implement automation of administrative tasks.
Association
The connection between a VM cloud and a runbook.
Plan
Defines one or more services that will be made available to tenants. You can specify usage quotas for the resources in the plan.
Add-on
An optional service that a tenant can add to a plan.
Subscription
The tenant’s agreement to pay for the plan services to which they sign up (or
82
subscribe).
Co-administrator
Another user or tenant that can manage the services in a tenant’s subscription.
Gallery
A collection of templates that can be used by tenants, as predefined images, to provision their virtual machines. The gallery items can include base operating system images as well as images with preinstalled applications. Gallery items are uploaded to the gallery by administrators and are then associated with plans. When a tenant subscribes to a plan, all the gallery items associated with that plan are available to the tenant.
Quota
Defines the resources available and the maximum amount of those resources that can be used for a plan. You can set quotas for the following items:
Cores
RAM
Storage
Virtual machines
Usage
The amount of resources in a plan consumed over a period of time.
Resource provider
Services provided through Windows Azure Pack are implemented as resource providers. For example, SQL Server or MySQL. 3rd party vendors can also create their own custom resource providers. The Windows Azure Pack Developers Kit provides information on creating custom resource providers.
Block list
A block list is used to restrict customer or tenant worker processes from accessing certain IP address ranges in the Web Sites service in Windows Azure Pack.
Billing adapter
A billing adapter is software that captures tenant usage data and recent event notification from a Windows Azure Pack installation. The data captured can be used to
83

calculate tenant billing information or used for analytics processing. A billing adapter can also provide pricing information to a Windows Azure Pack Installation. More information on creating a billing adapter is provided in the Windows Azure Pack Developers Kit.
Accessibility information for Windows Azure PackMicrosoft is committed to making its products and services easier for you to use. The following information describes the accessibility features for Windows Azure Pack for Windows Server.
Windows featuresMost accessibility features that are offered through Windows are available when you use Windows Azure Pack.
Keyboard shortcutsKeyboard shortcuts are combinations of two or more keys that, when they are pressed, can be used to perform a task that would typically require a mouse of other pointing device. Keyboard shortcuts make it easier to interact with your computer. This saves you time and effort as you work with Windows and other programs.
Most programs provide accelerator keys that can make it easier to work with menus and other commands. Check the menus and other commands. Check with menus of programs for accelerator keys. If a letter is underlined in a menu, it usually means that pressing the ALT key in combination with the underlined key will have the same effect as clicking that command.
Use high-contrast modeYou can turn on the high-contrast mode in the Windows Control Panel to make the screen easier to see if you have low-vision.
1. On the Start screen, type control panel, and then press ENTER.2. Click Ease of Access.3. In the Ease of Access Center, click Optimize visual display.4. In the High Contrast area, click Choose a high contrast theme to open Personalization.
Choose the high contrast theme that is best for your needs.
84

Browser featuresWindows Azure Pack is a web portal – because of this, Windows Azure Pack is dependent on the accessibility features in the following supported browsers:
Internet Explorer 9 and 10 Chrome 15 Firefox 8.0 Safari 5.1
Use the following links to find information about accessibility in Internet Explorer:
Accessibility in Internet Explorer 10 (http://go.microsoft.com/fwlink/?LinkId=324865)
Accessibility in Internet Explorer 9 (http://go.microsoft.com/fwlink/?LinkId=324867)
For information about the accessibility features of Chrome 15, Firefox 8.0, and Safari 5.1, see the product information for your specific browser.
More informationMicrosoft builds accessibility into our products that enable everyone to personalize their PCs to make them safer and easier to see, hear, and use. Accessibility is a fundamental consideration during product design, development, testing, and release. To learn more about accessibility features available, visit the Microsoft Accessibility (http://go.microsoft.com/fwlink/?LinkId=324869) web site.
85