administration guide - beta release v1 · administration guide beta release v1.0 6/10/13 — 4...
TRANSCRIPT

Copyright © 2013 IMECOM Group, Inc
Administration Guide - Beta Release
V1.0

Administration Guide Beta Release V1.0
6/10/13 — 2
About This Manual
This manual applies to version V1.0 Beta of the Imecom FlowVox™ Enterprise Server/Client
solution. This manual is a comprehensive Administration Guide explaining the FlowVox
Enterprise Server and Client configuration and administration.
Copyright Notice
© 2013 IMECOM GROUP, Inc. All rights reserved. No part of this document may be
reproduced, transmitted, transcribed, or translated into any language in any form by any
means without the written permission of Imecom Group, Inc.
Imecom, the Imecom logo, FlowVox, Use it, Use it Suite, Use it Messaging, DM, DM Server,
DM Fax Server, DM Controller, DM Processing Unit, DM Fax Gateway are registered
trademarks of Imecom Group, Inc. and Prologue Software Group.
All other company, brand and product names are the property, trademarks, or registered
trademarks of their respective holders.
The information contained in this document is subject to change without prior notice. Unless
expressly stated to the contrary, the companies, names and data used in the examples are
purely fictitious.
For More Information
Since 1989, Imecom Group has been providing enterprise fax server solutions, network fax
software, and image printer driver software to companies or all sizes across the world. In
2013 we widened our product suite to include a unified messaging platform, FlowVox. For
more information on Imecom Group and our product offerings, please visit
http://www.imecominc.com and http://www.flowvox.com or call us at +1 603.569.0600.
Imecom Group, Inc.
8 Governor Wentworth Highway
Wolfeboro, NH 03894
U.S.A.
Phone: 603.569.0600
Fax: 603.569.0609
http://www.imecominc.com
http://www.flowvox.com
Administration Guide Beta Release V1.0
6/10/13 — 3
Table of Contents
About This Manual ............................................................................................... 2
Copyright Notice ................................................................................................. 2
For More Information ........................................................................................... 2
About FlowVox™ ................................................................................................... 4
I. System Requirements..................................................................................... 5
Setting up the Java Environment ............................................................................. 5
Windows: JAVA_HOME Environment Variable .......................................................... 5
Enterprise Server Platform System Requirements ...................................................... 6
Client System Requirements ................................................................................... 7
II. Asterisk Specific Configuration ......................................................................... 8
Setting up the Asterisk API Manager ...................................................................... 8
MeetMe Conferencing .......................................................................................... 9
Enable ARI on FreePBX ........................................................................................ 9
Enable CDR on AsteriskPBX .................................................................................. 9
Asterisk Configuration Files polled by FlowVox ...................................................... 10
Port Configuration AsteriskPBX to Enterprise Server .............................................. 10
III. Installation ............................................................................................... 11
Installation Overview ........................................................................................... 11
FlowVox Enterprise Server Installation ................................................................... 12
Enterprise Server Installation Procedure............................................................... 12
Next Adminitrative Steps: .................................................................................. 14
FlowVox Client Installation ................................................................................... 15
FV Client Installation Procedure .......................................................................... 15
Connecting a Client ........................................................................................... 17
Port Configuration .............................................................................................. 17
IV. Administrative Set-up ................................................................................... 18
Admin Log in ...................................................................................................... 18
Administrator Control Panel .................................................................................. 19
Add Users ........................................................................................................ 19
Extensions........................................................................................................ 20
Logging via Asterisk Server Settings .................................................................... 21
Contacts List Services ........................................................................................ 22

Administration Guide Beta Release V1.0
6/10/13 — 4
About FlowVox™
FlowVox by IMECOM is a Java- based Enterprise Server/Communication Controller Client
solution that provides users an easy-to-use interface for managing phone calls via the Open
Source Asterisk platform
The FlowVox Enterprise Server resides on a highly available computer system within a
company's network. It interfaces via cloud to the AsteriskPBX. The FlowVox Communication
Controller Client interfaces with the Enterprise Server and offers a multi-functional, user-
friendly and intuitive graphical user interface. Administrative setup and configuration is
easily performed via the FlowVox Client interface with administrative privileges.
FlowVox allows users to make, receive, park, transfer, and conference calls with simple,
smooth drag-and-drop or right-click mouse actions. FlowVox also includes a voice mail
component that enables user to manage voice mails via the FlowVox Client interface and
listen to voice mail messages using existing computer speakers or a traditional desk phone
handset. FlowVox increases user productivity through an unified communication approach,
which will be functionally expanded in subsequent releases.
The also interface allows the user to change settings, i.e. status indicators, window docking
behavior, to their personal preferences.
Figure 1: Diagram of typical FlowVox network set-up

Administration Guide Beta Release V1.0
6/10/13 — 5
I. System Requirements
Setting up the Java Environment The FlowVox Enterprise Server-Client solution is Java-based and should run on the
supported operating systems as long as the Java environment is set up correctly with the
supported versions.
Windows: JAVA_HOME Environment Variable
Verify that the Java environment is set up on each system serving as a FlowVox Enterprise
server or hosting a FlowVox Client.
1. Go to Control Panel\System and Security\System
2. Select Advanced System Settings in the left frame.
3. Click the Environment Variables button.
You should have an entry similar to the highlighted JAVA_HOME variable in the
screen shot below:
If the JAVA_HOME variable is not present, create it by clicking the New button and
specifying the path to your Java installation directory.

Administration Guide Beta Release V1.0
6/10/13 — 6
Enterprise Server Platform System Requirements The Enterprise Server should be installed on a highly available computer system within the
company's secure network. The computer's firewall needs to be set up to allow traffic on
communication ports (6789, 2221). The Enterprise Server needs to be able to access the
Internet for licensing.
The Enterprise Server at a minimum should be a x86-64 Intel Pentium compatible Computer
with
a 1 GHz Processor,
4 GB of RAM,
500 GB hard-drive,
Network adapter for Internet access, and
a way for daily back-up services.
No other hardware is required for the initial set-up of the FlowVox Enterprise Server.
Table 1: Minimum Version Overview
Java Platform Oracle JDK/JRE 1.7 or higher
(http://java.com/en/download/index.jsp)
Open JDK
Apache ANT apache-ant-1.8.4
Operating System Linux CentOS
Linux Ubuntu
RedHat
Configuration
Interface
FreePBX 2.8, 2.9, 2.10
Telephony Interface Asterisk PBX 1.8 or higher
Amazon's AWS/EC2 network
Administration Guide Beta Release V1.0
6/10/13 — 7
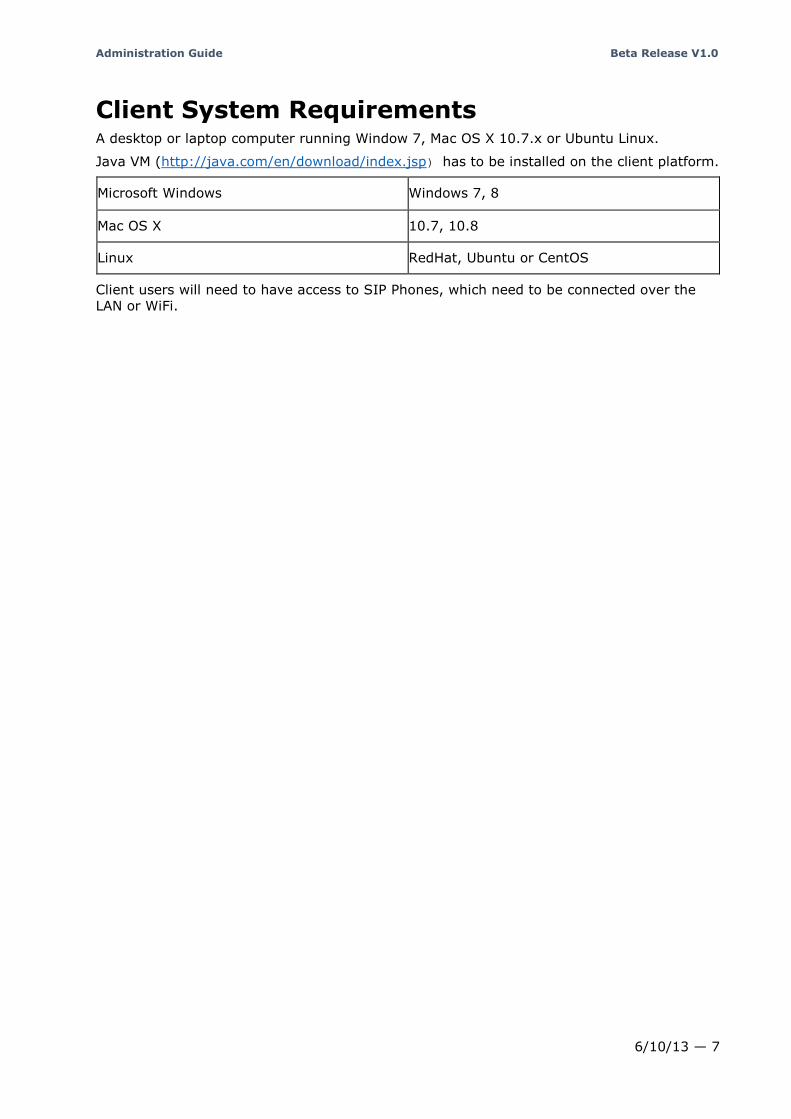
Client System Requirements A desktop or laptop computer running Window 7, Mac OS X 10.7.x or Ubuntu Linux.
Java VM (http://java.com/en/download/index.jsp) has to be installed on the client platform.
Microsoft Windows Windows 7, 8
Mac OS X 10.7, 10.8
Linux RedHat, Ubuntu or CentOS
Client users will need to have access to SIP Phones, which need to be connected over the
LAN or WiFi.

Administration Guide Beta Release V1.0
6/10/13 — 8
II. Asterisk Specific Configuration
AsteriskPBX Configuration The FlowVox Enterprise Server/Communication Control Client Solution interfaces with an
AsteriskPBX. For basic installation and configuration of your AsteriskPBX refer to your
system documentation.
As part of most Host applications that provide an interface to the Asterisk system (like
FreePBX, TrixBox, etc.), the Asterisk Management System needs to be utilized to enable and
run the Asterisk Recording Interface (ARI) and MeetMe application. Asterisk configuration
flags need to be enabled for features to work correctly with FlowVox. The following
highlights specific configuration settings required for proper operation with the FlowVox
system.
Setting up the Asterisk API Manager
1. Log in to you Asterisk interface.
2. Setup an API Manager user, this user supplies the credentials in the properties file
needed to connect the FlowVox Enterprise Server to the Asterisk Server. The API
Manager's credentials needs to match the information used later when setting up the
Enterprise Server. (FlowVox name in screen shot is just an example.)

Administration Guide Beta Release V1.0
6/10/13 — 9
MeetMe Conferencing
MeetMe is used for the FlowVox client conferencing support. The MeetMe application MUST
be selected to manage conferencing properly. If this application has not been enabled during
the initial installation and setup of the PBX, it can be enabled later via the PBX
Administration UI under Advanced Settings.
Enable ARI on FreePBX
ARI is used for the FlowVox client voicemail support. ARI is a voicemail/recording utility that
comes with AMP. The FlowVox client application interfaces with ARI and the administrator
can control several settings:
Default Language
Change Password
Sound file quality
Incoming Call Recording Settings
Outbound Call Recording Settings
To support playing recordings, such as voicemail and other .wav files to extensions, the ARI
Framework is required for both FlowVox and the FreePBX User Portal.
By default the ARI Framework is not enabled in a FreePBX installation. The following steps
show how to enable ARI in the FreePBX from the Web interface (logged in as admin):
1. Select Admin -> Module Admin
2. Select "Basic" repository
3. Click the "Check Online" button.
4. In the Admin section of the listed modules, find "FreePBX ARI Framework". This
needs to be "Enabled" but is likely marked as "Disabled". Select to Update & Enable.
5. Select "Process" which will enable the ARI Framework after downloading the latest
version.
6. The ARI Framework will show as "Enabled" when it is running.
7. Hit the red "Apply Config" button to apply the configuration update to the Asterisk
server.
Enable CDR on AsteriskPBX
In order to properly see the call records users must enable call records on their
AsteriskPBXs. Look for the following files and set to matching values:
cdr_manager.conf:
[general]
enabled=yes
cdr.conf:
[general]
enabled=yes

Administration Guide Beta Release V1.0
6/10/13 — 10
Asterisk Configuration Files polled by FlowVox
FlowVox uses many of the Asterisk configuration files and their default values. Screen shots
and examples might differ based on these defaults and your actual site set-up. For example
FlowVox uses the Asterisk default setting for parking positions, in this case 8 numbered 71
through 78. Your specific site set-up might vary.
The following configuration files are polled by FlowVox. The FlowVox Enterprise Server looks
for these files at their default installation directory.
/etc/asterisk/sip.conf
/etc/asterisk/sip_general_additional.conf
/etc/asterisk/sip_general_custom.conf
/etc/asterisk/sip_nat.conf
/etc/asterisk/sip_registrations_custom.conf
/etc/asterisk/sip_registrations.conf
/etc/asterisk/sip_custom.conf
/etc/asterisk/sip_additional.conf
/etc/asterisk/sip_custom_post.conf
/etc/asterisk/voicemail.conf
/etc/asterisk/meetme.conf
Port Configuration AsteriskPBX to Enterprise Server
The following ports have to be enabled for proper communication between the AsteriskPBX
and the FlowVox Enterprise Server (use 0.0.0.0/0 as source for all to allow any IP addresses
to access the PBX):
ICMP: ALL
TCP:
22 (SSH)
80 (HTTP)
43 (HTTPS)
5038 (for use of Asterisk Manager)
5060-5061 (SIP)
UDP:
ALL (optionally 10000-20000 or any desired RTP port range instead of ALL)
5060 (SIP)

Administration Guide Beta Release V1.0
6/10/13 — 11
III. Installation
Installation Overview When deploying FlowVox by Imecom the following installation process should be followed.
The Administrator in charge of deploying FlowVox needs to follow these general steps, which
are explained in detail under their respective topics:
1) Install the Enterprise Server software on a highly available networked computer within
the company's corporate network.
2) On the Enterprise Server computer in the install directory modify the
FlowVoxES.properties properties file to point to the Asterisk server and API Manager
User account.
3) Start the Enterprise Server.
4) Install the Client Interface software on another networked computer (for Admin/IT
purposes the client may be installed on same machine as Enterprise Server).
5) Log-in to the Client Interface as the default administrative user (admin/admin).
a) Enter the Enterprise Server IP address (localhost if installed on same machine as
Enterprise Server for Admin/IT purposes only).
b) Enter the Server socket port 6789.
c) Enter the Server FTP port 2221.
d) Change the admin password via the File/Settings menu.
e) Add the users to have access to the Enterprise Server.
f) Assign Extensions to configured users.
6) Install Client software on all FlowVox user computers.
Administration Guide Beta Release V1.0
6/10/13 — 12
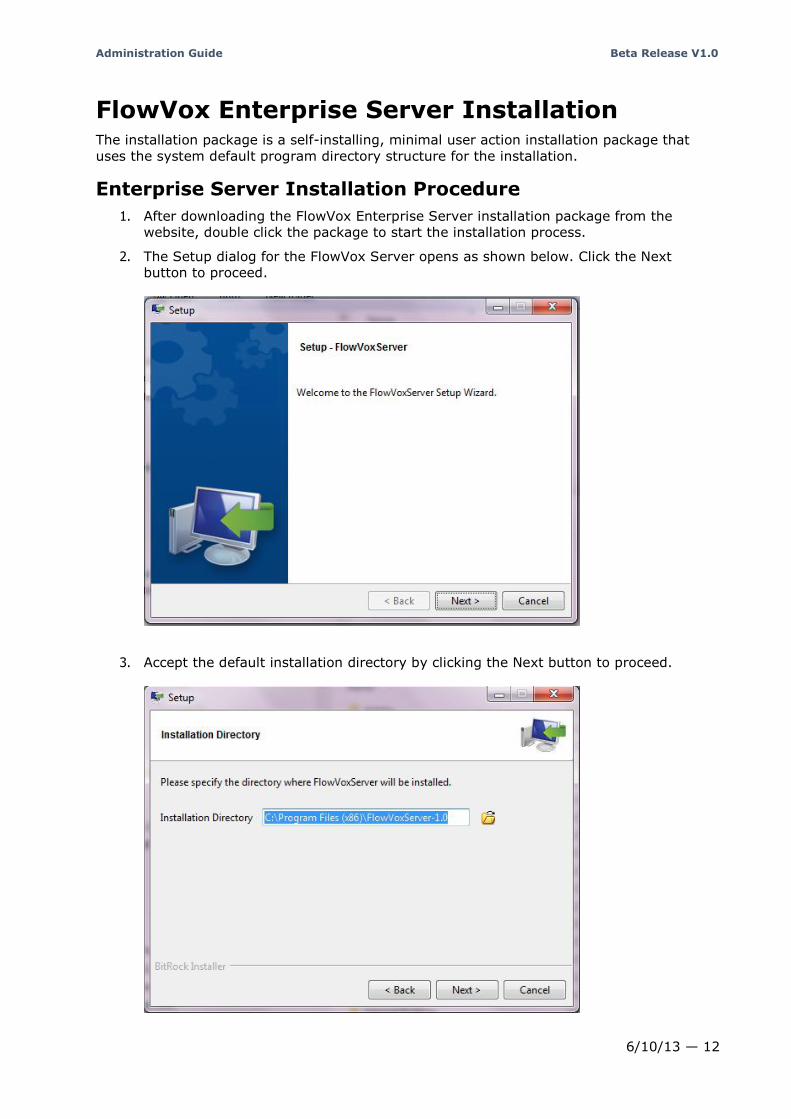
FlowVox Enterprise Server Installation The installation package is a self-installing, minimal user action installation package that
uses the system default program directory structure for the installation.
Enterprise Server Installation Procedure
1. After downloading the FlowVox Enterprise Server installation package from the
website, double click the package to start the installation process.
2. The Setup dialog for the FlowVox Server opens as shown below. Click the Next
button to proceed.
3. Accept the default installation directory by clicking the Next button to proceed.

Administration Guide Beta Release V1.0
6/10/13 — 13
4. The Ready to Install dialog opens, click Next to start the installation.
5. Once the installation is completed you will see the Completing the FlowVoxServer
Setup Wizard dialog. Click the Finish button to close the dialog.
6. Go to the installation directory, by default C:\Program Files (x86)\FlowVoxServer-1.0
7. Open the FlowVoxES.properties file in WordPad.

Administration Guide Beta Release V1.0
6/10/13 — 14
8. Edit the file to point to you Asterisk server:
a. In the row flowvox_enterpriseserver_asteriskserver_managerusername=
enter manager username.
b. In the row flowvox_enterpriseserver_asteriskserver_managerpassword=
enter the password.
c. In the row flowvox_enterpriseserver_asteriskserver_ipaddress=
enter the IP address.
9. Save the FlowVoxES.properties file and exit. (do not change the file name)
10. Start the FlowVox Enterprise server application. This can be done in two ways:
a. Double-click the FlowVox Enterprise Server icon on your desktop or
b. In a command line shell cd to C:\Program Files (x86)\FlowVoxServer-1.0 ,
type run-windows-server.bat and hit Enter.
Note: Make sure the shell window stays open to indicate a running
Enterprise Server process. Verify successful server start through the OS
processes dialog in TaskManager.
Next Adminitrative Steps:
Install the FlowVox Client on another networked computer.
Note: For Admin/IT purposes the client may be installed on the same
machine as the Enterprise Server, pointing to localhost under Server IP
address in the log-in screen.
Start the FlowVox Client and enter users and associated extensions.

Administration Guide Beta Release V1.0
6/10/13 — 15
FlowVox Client Installation The FlowVox Communication Controller Client installation package can be downloaded from
the FlowVox website.
FV Client Installation Procedure
1. After downloading the FlowVox Client installation package from the website, double
click the package to start the installation process.
2. The Setup dialog for the FlowVox Client opens as shown below. Click the Next button
to proceed.
3. Accept the default installation directory by clicking the Next button to proceed.

Administration Guide Beta Release V1.0
6/10/13 — 16
4. The Ready to Install dialog opens, click Next to start the installation.
5. Once the installation is completed you will see the Completing the FlowVoxClient
Setup Wizard dialog. Click the Finish button to close the dialog.
6. Once the FV Client is installed on the designated system, you can start the software
from the Start menu, desktop icon or by opening a command shell to the install
directory C:\Program Files (x86)\FlowVoxClient-1.0 type run-windows-
client.bat and hit Enter.

Administration Guide Beta Release V1.0
6/10/13 — 17
Connecting a Client
Port Configuration
To be able to communicate with the FlowVox Enterpriser Server the following
communication port configuration needs to be set on the computer hosting the client
application.
Protocol Port: Proprietary 6789; HTTP 80; FTP 2221
Note: The Protocol Port configuration is done during initial user log-in through the FlowVox Client interface.

Administration Guide Beta Release V1.0
6/10/13 — 18
IV. Administrative Set-up
Admin Log in Open the FlowVox Client interface via the FlowVox program icon in your start menu. The
FlowVox Client opens up with the Login dialog.
Note: Every client user needs to be configured for authentication before the client
can access the server. The only pre-configured user is the default administrative user (admin/admin).
Logging into the FlowVox Client:
1. In the top text field, next to the user icon, enter your username.
2. In the middle text field, next to the lock, enter your password. At initial login this will
be an administrator supplied password. Once you are logged in, you can use the
File/Settings menu to change to a private password.
3. On initial log in, click into the empty Enterprise Server IP address field to open the
Server setup dialog:
a) In the Server IP Address field enter the IP Address to access the system that hosts
the FlowVox Enterprise Server. Use localhost if Enterprise Server resides on same
machine for Admin/IT purposes only.
b) Enter the Server Socket port of 6789, if not already populated.
c) Enter the Server FTP port of 2221, if not already populated.
d) Click Done on the Server Information dialog.
Note: The substeps above should only be necessary at initial log in. In the
case that multiple Enterprise Servers are used, the Server IP Address may
be changed as desired, the port information from step b and c should not be touched after initial set up.
4. Click the arrow to enter the client’s main user panel or just hit the Enter key.

Administration Guide Beta Release V1.0
6/10/13 — 19
Administrator Control Panel Use the View/Admin Control Panel menu to open the Administrator Control Panel:
Administrators use the Administrator Control Panel to
provision Users,
provision Extensions,
specify logging levels under Asterisk Server Settings and
configure Contacts List Services
Add Users
To add users to FlowVox the Administrator uses the Users button on the Administrator
Control Panel. Clicking the Users button, opens the Users dialog.
1. Click the Add User button to open the user information input dialog.
Administration Guide Beta Release V1.0
6/10/13 — 20
2. Enter a new User Name.
3. Enter a new Display Name.
4. Select the Role for the new user.
5. Specify recording option for the new user.
6. Specify an initial default Password for the new user.
7. Click Done to complete the new user addition.
Note: The Group field is not used in this beta release.
Repeat steps 1 through 8 for every new user to be configured on FlowVox.
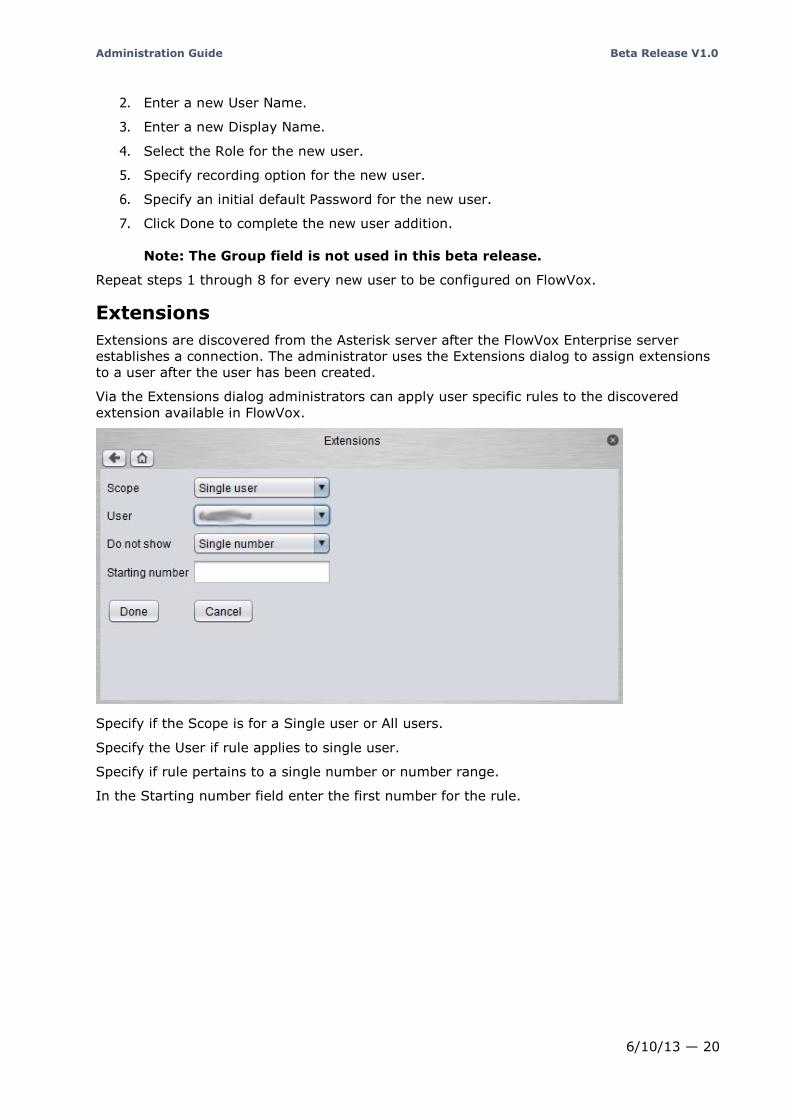
Extensions
Extensions are discovered from the Asterisk server after the FlowVox Enterprise server
establishes a connection. The administrator uses the Extensions dialog to assign extensions
to a user after the user has been created.
Via the Extensions dialog administrators can apply user specific rules to the discovered
extension available in FlowVox.
Specify if the Scope is for a Single user or All users.
Specify the User if rule applies to single user.
Specify if rule pertains to a single number or number range.
In the Starting number field enter the first number for the rule.

Administration Guide Beta Release V1.0
6/10/13 — 21
Logging via Asterisk Server Settings
The FlowVox Enterprise server creates a FlowVoxServer.log file in the default
installation directory.
The amount of information in the log files will differ greatly, based on the debug level set in
ClientGui->View->Admin Control Panel->Asterisk Server Settings.
The default of 0 will always show errors and unknown events that we get from Asterisk
(likely with different versions). The higher levels may be required at any time to resolve
Asterisk interface issues.
Under the Asterisk Server Settings dialog, the Administrator can change the server logging
level.
Administration Guide Beta Release V1.0
6/10/13 — 22
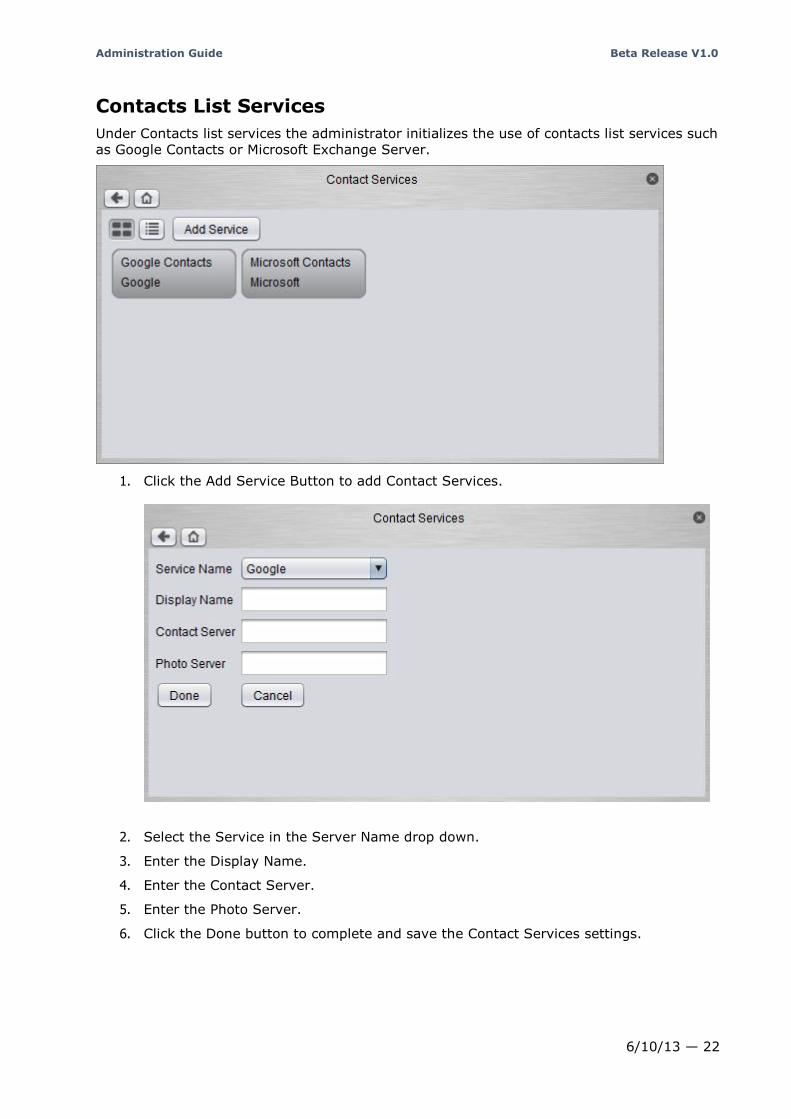
Contacts List Services
Under Contacts list services the administrator initializes the use of contacts list services such
as Google Contacts or Microsoft Exchange Server.
1. Click the Add Service Button to add Contact Services.
2. Select the Service in the Server Name drop down.
3. Enter the Display Name.
4. Enter the Contact Server.
5. Enter the Photo Server.
6. Click the Done button to complete and save the Contact Services settings.