administrator guideh10032. · hp_backup_and_recovery_manager.pdf. ... system with the recovery...
TRANSCRIPT
Administrator Guide
HP Backup and Recovery Manager

© Copyright 2007 Hewlett-PackardDevelopment Company, L.P. The informationcontained herein is subject to change withoutnotice.
Microsoft and Windows are trademarks ofMicrosoft Corporation in the U.S. and othercountries.
The only warranties for HP products andservices are set forth in the express warrantystatements accompanying such products andservices. Nothing herein should be construedas constituting an additional warranty. HPshall not be liable for technical or editorialerrors or omissions contained herein.
This document contains proprietaryinformation that is protected by copyright. Nopart of this document may be photocopied,reproduced, or translated to anotherlanguage without the prior written consent ofHewlett-Packard Company.
Administrator Guide
Business PCs
First Edition (February 2007)
Document Part Number: 440208–001

About This Book
WARNING! Text set off in this manner indicates that failure to follow directions could result inbodily harm or loss of life.
CAUTION: Text set off in this manner indicates that failure to follow directions could result indamage to equipment or loss of information.
NOTE: Text set off in this manner provides important supplemental information.
ENWW iii

iv About This Book ENWW

Table of contents
HP Backup and Recovery Manager Administrator GuideVersions of HP Backup and Recovery Manager ............................................................................ 2
Portables .................................................................................................................. 2Desktops .................................................................................................................. 2
Backup types ........................................................................................................................... 3Recovery Points ......................................................................................................... 3Entire Drive Backups .................................................................................................. 3File and data backups ............................................................................................... 4Notes about the different backup types ........................................................................ 4
Differences between versions ..................................................................................................... 5Installation ............................................................................................................................... 6
Software options ....................................................................................................... 6Getting the software for an image ............................................................................... 6Deploying in an enterprise environment ....................................................................... 6Deploying a single version of the software across different models of systems ................... 7Installing on multiple partitions .................................................................................... 7Reimaging a hard drive ............................................................................................. 7
Managing HP Backup and Recovery Manager ............................................................................ 8Enforcing policies/scheduling ..................................................................................... 8Passwords ................................................................................................................ 9Compression .......................................................................................................... 10Encryption .............................................................................................................. 10Integrated F11 hotkey support .................................................................................. 10Enabling/disabling features ..................................................................................... 10Master Boot Record (MBR) reset after reloading custom operating system ....................... 10
Reminders ............................................................................................................................. 11Basic reminder functionality ...................................................................................... 11Disabling the reminder message ............................................................................... 11
Backups ................................................................................................................................ 12Offline backups ...................................................................................................... 12Sector or file-based backups ..................................................................................... 12Integrity validation .................................................................................................. 12Backups and RAID support ....................................................................................... 12Backup option storage location ................................................................................. 12Bandwidth limiting .................................................................................................. 13Backup failover ....................................................................................................... 13Entire Drive Backup on local drive ............................................................................. 13Scheduled backups ................................................................................................. 13Manual backups ..................................................................................................... 13
ENWW v

Recovery Points ........................................................................................ 14Saving components .................................................................................. 14
Recovery ............................................................................................................................... 14Recovery Partition ................................................................................................... 14Recovery Media Creator .......................................................................................... 15Operating system .................................................................................................... 15Recovery media ...................................................................................................... 15How to recover ....................................................................................................... 16Recovery media creation .......................................................................................... 17Removing the Recovery Partition ................................................................................ 17PC Recovery ........................................................................................................... 18Restoring an entire image or individual files ............................................................... 19
Recovering individual files ......................................................................... 21PC recovery ............................................................................................. 25
Restoration and name duplication ............................................................................. 29Operating system PID .............................................................................................. 29File explorer for recovering files ................................................................................ 29Filter in both directions ............................................................................................. 29
Uninstallation ........................................................................................................................ 29What is removed? ................................................................................................... 29Uninstalling the application ...................................................................................... 29
Expert options ........................................................................................................................ 30
Index ................................................................................................................................. 31
vi ENWW
HP Backup and Recovery ManagerAdministrator Guide
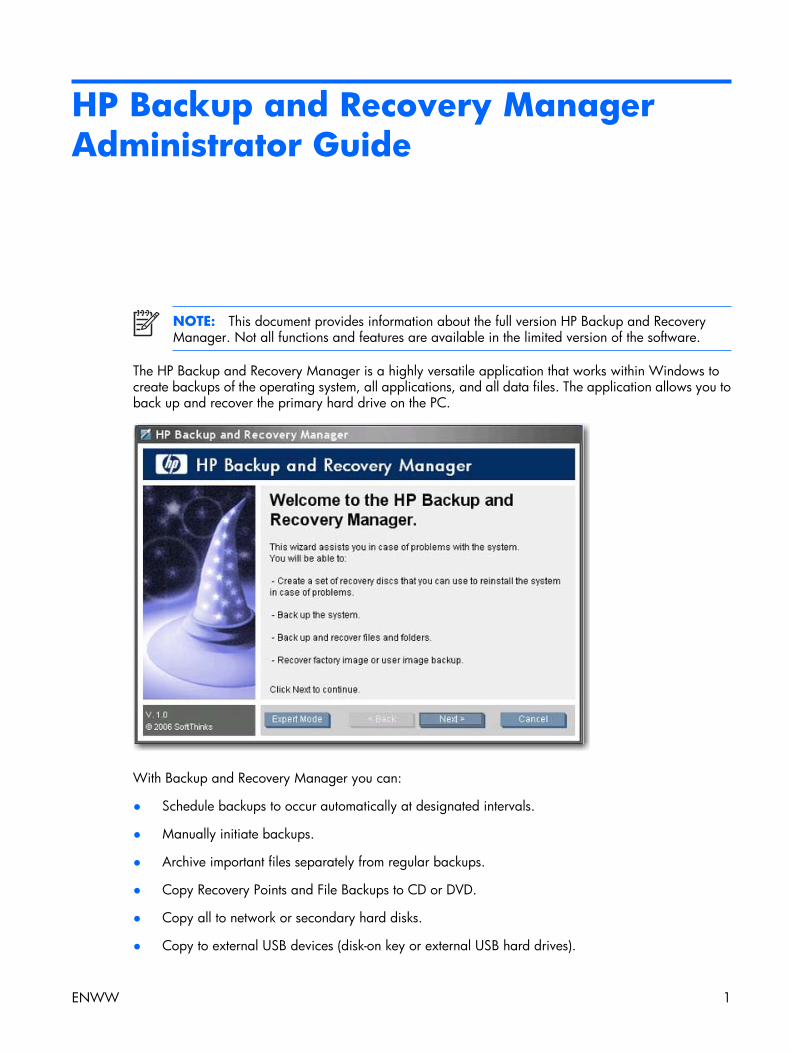
NOTE: This document provides information about the full version HP Backup and RecoveryManager. Not all functions and features are available in the limited version of the software.
The HP Backup and Recovery Manager is a highly versatile application that works within Windows tocreate backups of the operating system, all applications, and all data files. The application allows you toback up and recover the primary hard drive on the PC.
With Backup and Recovery Manager you can:
● Schedule backups to occur automatically at designated intervals.
● Manually initiate backups.
● Archive important files separately from regular backups.
● Copy Recovery Points and File Backups to CD or DVD.
● Copy all to network or secondary hard disks.
● Copy to external USB devices (disk-on key or external USB hard drives).
ENWW 1

For more information about HP Backup and Recovery Manager, see the HP Backup and RecoveryManager Datasheet at http://h20331.www2.hp.com/Hpsub/downloads/HP_Backup_and_recovery_Manager.pdf.
Versions of HP Backup and Recovery ManagerThere are two different versions of HP Backup and Recovery Manager
● Portables
● Desktops
NOTE: Portables offers a separate Rescue CD that you can use to restore your computer. Youcan also create Recovery CDs on Portables. Desktops does not currently offer a Rescue CD — youto create your own Recovery CD set.
NOTE: For Portables, there is an update to version 2.3G that you must obtain from a Softpaq.Search www.hp.com for this update.
PortablesTo locate HP Backup and Recovery Manager on Portables, note that there are two folders with HP Backupand Recovery Manager files — C:\SWSETUP\SFT and C:\SWSETUP\SFT_REC. The SFT_REC versionexpands on the hard drive to almost the same contents as SFT, and a link is placed on the desktop toallow a user to install it. The SFT version has an extra directory and files, which are used only in the factoryimage.
The Portable version of Backup and Recovery Manager also includes a component that allows you to backup to the HP 3-in-1 NAS Docking Station.
Desktops
When you create Recovery Media, you can also create ISO files versus directly creating a CD/DVD withHP Backup and Recovery Manager. If you want to go through the back door to get the ISO file, then
2 HP Backup and Recovery Manager Administrator Guide ENWW
navigate to the ISO’s directory in the Backup and Recovery partition (e.g. D:\ISOS) and locate the HPBackup and Recovery ISO file. To explore the Recovery Partition, in the command window typeregsvr32 shellvrtf.dll /u.
NOTE: For Portables, no pre-existing ISO files are present. You must have HP Backup andRecovery Manager create the ISO files.
Backup typesHP Backup and Recovery Manager offers more options than typical backup software, including:
● Recovery Points
● Entire Drive Backups
● File and data backups
Desktops and Portables allow backing up from the following:
● Desktop—You can backup from recommended locations.
● Portables—You can perform advanced backups from specific locations.
For detailed instructions about performing the various types of backups, see Restoring an entire image orindividual files on page 19
Recovery PointsRecovery Points are point in time backups that incrementally back up the computer. The Initial RecoveryPoint is a large backup of the entire system, known as the Restore Image. The Initial Recovery Point iscreated automatically. All subsequent Recovery Points capture only new user data created since theprevious Recovery Point. The Initial Recovery Point backup is large and takes longer to perform as itcontains the initial base image; however, subsequent incremental Recovery Point backups can be smallenough to fit on a CD, depending on the size of data backed up.
You can use a Recovery Point to restore a system to a blank hard drive. For Portables, use the Rescue CDor the first disc of the Recovery Media Creator set or the Recovery Partition to restore a system imageusing a Recovery Point. For Desktops, this procedure requires the Recovery Partition. You can restore asystem with the Recovery Media Creator set, and then restore the Recovery Point.
For more information about recovery and restoration, see Restoring an entire image or individual fileson page 19.
NOTE: Once you finish the media creation process, you cannot use HP Backup and RecoveryManager to create additional copies of the Initial Recovery Point.
Entire Drive BackupsEntire Drive Backups allow you to backup the entire system, including Windows partition data. EntireDrive Backups do not include the Recovery Partition.
Since the Entire Drive Backup backs up the Windows partition, this type of backup is more of a lowmaintenance backup where space is not a concern (i.e., backup to a network share or an external USBhard drive). Entire Drive Backups can take longer to execute than Recovery Points, depending on the sizeof the Windows partition.
ENWW Backup types 3

NOTE: You do not need to restore the Initial Recovery Point before using an incremental RecoveryPoint or Entire Drive Backup to restore a system.
NOTE: You cannot recover individual files or folders from Recovery Points or Entire DriveBackups. You can only recover individual files and folders if you perform the backup using theindividual file and folder backup functionality.
File and data backupsYou can perform backups of individual files and folders. File backups allow you to back up specific fileswithout having to recreate lengthy Recovery Points or Entire Drive Backups.
You can also specify file type backups. For example, you can set HP Backup and Recovery Manager toback up all .doc files.
Notes about the different backup typesYou can use previously-created Recovery Points or Entire Drive Backups to restore a system to a blankhard drive; however, the procedure between Portables and Desktops differs. For Portables, you can usethe Rescue CD to perform this function. For Desktops, you must recover the system using the RecoveryMedia Creator, and then restore the Recovery Point or Entire Drive Backup.
You can place any of the backup types onto media (CD, DVD). The only limitation is file size. For example,you can save a Recovery Point to CD, as long as the file size is smaller than the amount of room availableon the CD (typically 700MB on a blank CD). You can save larger backups that do not fit onto media tonetwork drives.
You cannot create a “recovery media” from the “File and folder backups” category. This means that whileyou can restore individual files and folders, you cannot restore an image onto a blank hard drive usingindividual files and folder backups.
In HP Backup and Recovery Manager, you can only explore individual backup files saved using the Backup individual files and folders option. You cannot restore individual files from Recovery Points orEntire Drive Backups.
Backup and Recovery Manager utilizes Windows PE (Windows Pre-Installation Environment) to restorebackups.
4 HP Backup and Recovery Manager Administrator Guide ENWW

Differences between versionsThe following table provides differences between the different versions of HP Backup and RecoveryManager.
Software Component Desktops Portables
Rescue CD Currently no Rescue CD.You must create your ownrecovery CDs.
Included Rescue CD to use if you removethe Recovery Partition during installationof HP Backup and Recovery Manager.Rescue CD allows you to restore EntireDrive Backups, Recovery Points, or file/folder backups.
If you installed HP Backup and RecoveryManager in a de-featured mode (noRecovery Partition), then you cannotcreate Recovery Points.
SafeBoot support
SafeBoot encryption provides encryption preventsintrusions to a hard drive when the machine is in use.
No. Under considerationfor future release.
Yes
Quad byte support (specific Asian languages) Yes No
Scheduling Advanced File BackupSupported. User can selectwhat type of backup, time,and where to store it.
Advanced file backup scheduling but norecommended locations.
Installation Unattended installationcapability.
For end user installation, option availableto install creating or not creating RecoveryPartition.
Creating a Recovery Partition: Fullfunctional HP Backup and RecoveryManager.
Not creating Recovery Point: Onlybackup/restore of files/folders, EntireDrive Backup, and scheduling.
Encryption Files backed up with nativeMS Encryption (EFS). Youcan encrypt, and apassword protects thebackup archive using. Youcan only decrypt the fileson the same Windowsinstallation with the sameadministrator credentials/account.
Files backed up “decrypted”. You mustselect encryption and/or passwordprotection to secure backup archive usingST encryption method. You can restorethose files to any Windows installation.
HP 3-in-1 NAS Docking Station support in folder menus No Yes
ENWW Differences between versions 5
InstallationHP Backup and Recovery Manager is preinstalled on both Desktop and Portable computers. Additionally,on Portable computers, an end-user installation version is located in the C:\SWSETUP\SFT_RECfolder.
NOTE: There are two folders with HP Backup and Recovery Manager files — C:\SWSETUP\SFTand C:\SWSETUP\SFT_REC. The SFT_REC version expands on the hard drive to almost the samecontents as SFT, and a link is placed on the desktop to allow a user to install it. The SFT versionhas an extra directory and files, which are used only in the factory image.
NOTE: Desktops uses a COMPAQ folder instead of a SWSETUP folder on Windows XP.
Software optionsThe HP Backup and Recovery Manager is available in two forms:
● Shipped preinstalled on the computer
● On the Supplemental CD with Workstations and Desktops, and in the C:\SWSETUP\SFT_RECfolder on Portables. You can burn the C:\SWSETUP\SFT_REC folder to CD and run the .exe fromthe CD to install.
When preinstalled on the computer, HP Backup and Recovery Manager is automatically part of theRecovery Partition, and when created, the Recovery Disc Set. This application is already resident on thecomputer and is automatically deployed again when the system is recovered. When included as part ofan HP hardware purchase, the HP Backup and Recovery Manager is easily installed by running thesetup.exe application from the CD.
HP provides upgraded versions of the Backup and Recovery Manager software on the Web for Portables.The upgrade is in the same download location as drivers and other bundled software updates.
For Portables, the software is preinstalled. Run the setup.exe file from the C:\SWSETUP\SFT_REC folder.
Getting the software for an imageIf you want to use your own custom image, select the software you want from the C:\SWSETUP folder.
Alternately, for Desktops you can burn the ISO images that are available on the Recovery Partition, loada clean operating system, and choose which software offerings you want to install.
NOTE: HP Backup and Recovery Manager is available only on systems on which it camepreinstalled. Systems that did not come with the HP Backup and Recovery Manager preinstalledare not licensed to use the software.
Deploying in an enterprise environmentYou can deploy HP Backup and Recovery Manager in an enterprise environment using the followingoptions:
● Desktops—You can install HP Backup and Recovery Manager and create a backup in an unattendedfashion using the command SETUP.EXE –S –Q
● Portables—Automated installations are not supported; therefore, HP Backup and Recovery Managermust be preloaded, with interactive installation per system thereafter.
6 HP Backup and Recovery Manager Administrator Guide ENWW

Deploying a single version of the software across different modelsof systems
A single version of HP Backup and Recovery Manager supports many different models/systems; therefore,you can install a single version on any supported system.
Installing on multiple partitionsInstalling Backup and Recovery Manager on a drive with multiple partitions is supported for Desktops, butnot supported for Portables. However, you can add partitions after installing Backup and RecoveryManager.
The following workaround may allow you to install the application:
1. Reformat a 75-GB disk.
2. Use RDEPLOY to create a 50-GB C partition and lay down the Factory/Gold unbooted image thatcontains v2.3i.
3. Using WinPE, use DISKPART to create an empty 20-GB D partition.
4. Allow the factory image to completely install HP Backup and Recovery Manager and all associatedsoftware.
Reimaging a hard driveHP Backup and Recovery Manager supports installation on multiple partitions in Desktops. It does notsupport installing with multiple partitions for Portables. You can add additional partitions and disks afterinstallation.
After laying down an image on a previously-imaged system with HP Backup and Recovery Manager,DISKPART running from WinPE may not “unlock” or “clean” the hard drive so you can re-image it.
In this situation, WinPE creates a PAGEFILE.SYS on the hard drive due to the WINBOM.INI in the HPBackup and Recovery partition. DISKPART cannot alter the C partition when WinPE accesses it.
To re-image the hard drive in this instance, either:
● Edit the WinPE build to prevent using the WINBOM.INI in the HP Backup and Recovery partition
or
● Remove WINBOM.INI from the HP Backup and Recovery partition.
1. Rebuild the WinPE CD image so the registry points to a known good WINBOM.INI. The path andfile name specified by the registry key is: HKEY_LOCAL_MACHINE\SOFTWARE\Microsoft\Factory\Winbom.
NOTE: In general, WinPE might pick up other WINBOM.INI files elsewhere in the system.To make sure you are using the correct WINBOM.INI file, use the registry setting.
2. Rename or delete WINBOM.INI in the HP Backup and Recovery partition, and then reboot WinPE.
In the case of reimaging, deleting the WINBOM.INI file is an option, but if you do this when you donot want to re-image, HP Backup and Recovery will not work after WINBOM.INI is deleted.
ENWW Installation 7
The workaround involves renaming all the WINBOM.INI files (other than on the X:\ drive sinceWinPE boots to X:\) before running FACTORY.EXE, and then renaming all the other WINBOM.INIfiles back after FACTORY.EXE is finished as shown below. Please note that if something goes wrongbefore WINBOM.INI files are renamed to their original name, other utilities like HP Backup andRecovery Manager will not work.
for %%a in (a,b,c,d,e,f,g,h,i,j,k,l,m,n,o,p,q,r,s,t,u,v,w,y,z) DO if exist %%a:\winbom.ini ren %%a:\winbom.ini winbom.tmp
factory –winpe
for %%a in (a,b,c,d,e,f,g,h,i,j,k,l,m,n,o,p,q,r,s,t,u,v,w,y,z) DO if exist %%a:\winbom.ini ren %%a:\winbom.tmp winbom.ini
For performance reasons, the WINBOM.INI in HP Backup and Recovery Manager has thePageFileSize=64 line that creates the PAGEFILE.SYS on C:.
NOTE: After re-imaging a machine and then attempting to install Backup and RecoveryManager, an computer may not be bootable and may have a blinking cursor on the upper lefthand corner. If this occurs, ensure MBR reset when you laid down the operating system image.
Managing HP Backup and Recovery ManagerThe following sections provide information about management of Backup and Recovery Manager.
NOTE: You cannot manage HP Backup and Recovery Manager using Microsoft WindowsManagement Instrumentation (WMI).
Enforcing policies/schedulingThe HP Backup and Recovery Manager provides a scheduling utility that after configured, requires nouser intervention. HP recommends that the backup schedule be created immediately to ensure continuedsystem and data security.
8 HP Backup and Recovery Manager Administrator Guide ENWW
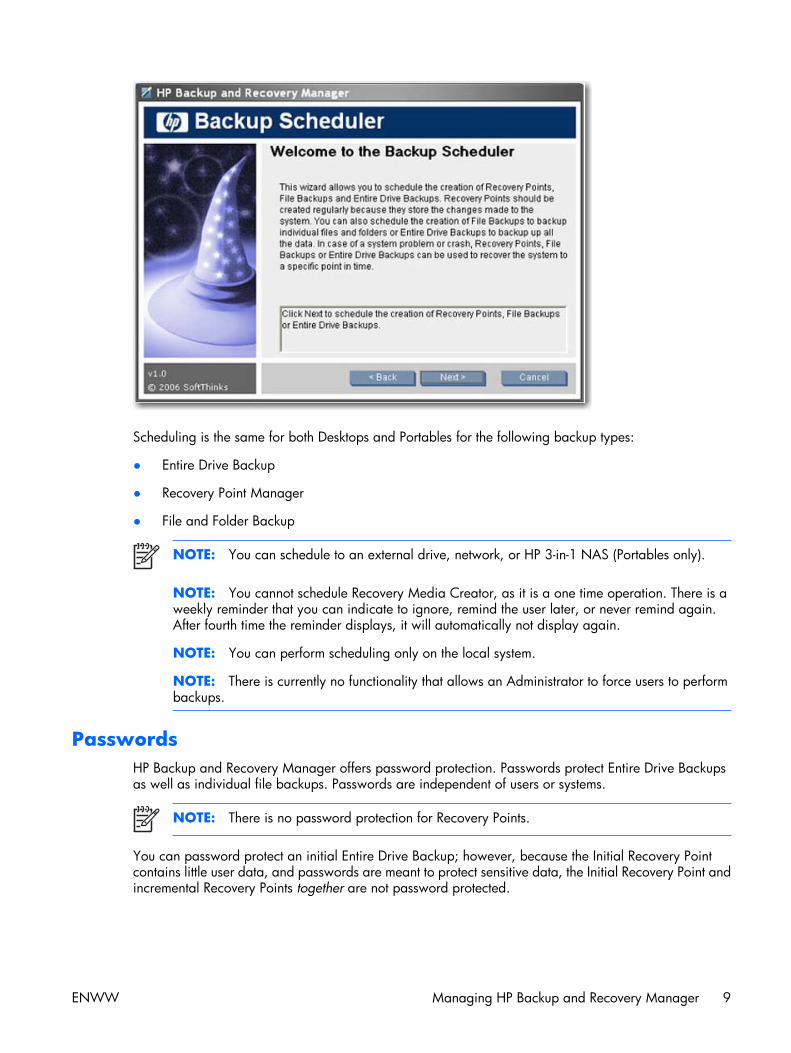
Scheduling is the same for both Desktops and Portables for the following backup types:
● Entire Drive Backup
● Recovery Point Manager
● File and Folder Backup
NOTE: You can schedule to an external drive, network, or HP 3-in-1 NAS (Portables only).
NOTE: You cannot schedule Recovery Media Creator, as it is a one time operation. There is aweekly reminder that you can indicate to ignore, remind the user later, or never remind again.After fourth time the reminder displays, it will automatically not display again.
NOTE: You can perform scheduling only on the local system.
NOTE: There is currently no functionality that allows an Administrator to force users to performbackups.
PasswordsHP Backup and Recovery Manager offers password protection. Passwords protect Entire Drive Backupsas well as individual file backups. Passwords are independent of users or systems.
NOTE: There is no password protection for Recovery Points.
You can password protect an initial Entire Drive Backup; however, because the Initial Recovery Pointcontains little user data, and passwords are meant to protect sensitive data, the Initial Recovery Point andincremental Recovery Points together are not password protected.
ENWW Managing HP Backup and Recovery Manager 9
CompressionHP Backup and Recovery Manager uses compression. The compression ratio depends on the data on thedisk and can range between 30% and 70%.
EncryptionYou can encrypt “individual file and folder” backups. You can password protect backup types. Theencryption algorithm is a simple encode based on logical XORs and bit rotations. Only HP Backup andRecovery Manager can read the encryption.
NOTE: The backup should not be considered as “protected” since no password/key is involved.
When backing up encrypted files in an EFS file system, the files backed up remain encrypted.
Backup and Recovery Manager will recover ProtectTools encrypted files. Note that you can only recoverencrypted files on the system where they were created unless the Embedded Security credential data ismigrated to the new system where the files will be recovered. Information on migrating Embedded Securitycredential data is provided in the ProtectTools help files.
Integrated F11 hotkey supportHP Backup and Recovery Manager supports the integrated F11 hotkey for the HP Boot Recovery Partition.The functionality of HP Backup and Recovery Manager is not affected by a BIOS with the integrated F11hotkey.
If the F11 BIOS is enabled (through setup), then the BIOS will check for the existence of the volume labelentry that identifies the Recovery Partition.
Enabling/disabling featuresYou currently cannot customize HP Backup and Recovery Manager. There are no user actions that canenable/disable features. Only HP development can remove or disable features.
Master Boot Record (MBR) reset after reloading custom operatingsystem
If you format a hard disk on a computer with HP Backup and Recovery Manager installed, then install anew operating system but do not reset the Master Boot Record, the following message displays each timethe computer boots: Warning: Your system recovery partition was removed. Press F10 tostart the system recovery anyway or another key to delete the recovery partition.
HP Backup and Recovery Manager modifies the default MBR, which also displays the Press F11 torestore your system message. If the Recovery Partition is erased, the MBR will print the recoverypartition error message each time the computer is booted, requiring that the user press a key to continuethe boot up process. To eliminate this prompt, reset the MBR to the default value.
10 HP Backup and Recovery Manager Administrator Guide ENWW

There are several ways to reset the MBR:
● Boot from DOS and type:
� FDISK /MBR
or
� GDISK /MBR (utility available from ghost)
● Boot to WinPE 2.0 and type: Bootsect –nt52 c: /force.
WinPE 2.0 and bootsect.exe are part of the WAIK that you can download from Microsoft.
These steps do not alter any other data on the disk.
Another option is to erase the disk under WinPE using the CLEAN command available in diskpart.
RemindersThe following sections provide information about the window that pops-up to remind users to createrecovery media.
Basic reminder functionalityUpon installation, the HP Backup and Recovery Manager will remind the user to create the Recovery DiscSet immediately to ensure that there is a backup in a place other than the primary hard drive. This remindercan be delayed for a week at a time. On the fourth display, an additional option appears that allows youto permanently disable the reminder.
Disabling the reminder messageYou can control the pop-up reminder for creating recovery media.
ENWW Reminders 11
If the reminder delay has lapsed, by default HP Backup and Recovery displays a pop-up window whenusers log in. If you do not want all end-users burning recovery media, contact Post-Sales to get a tool thatdisables the reminder pop-up window. Additionally, you can change the following registry key to stop thereminder program from running: [HKEY_LOCAL_MACHINE\SOFTWARE\Microsoft\Windows\CurrentVersion\Run] "Reminder"=-
NOTE: HP highly recommends creating the Recovery Disc Set immediately.
BackupsSee the following sections for information about using backups.
Offline backupsOffline backup/restore is not required.
Most backups are created in Windows and recovered offline in a WinPE environment. The exception is“individual file and folder” backups, which can be created in Windows or WinPE and recovered inWindows (but not in WinPE).
Sector or file-based backupsBackups are sector or file-based as follows:
● An Entire Drive Backup and the Initial Recovery Point are sector-based backups.
● Subsequent Recovery Points and individual file and folder backups are file-based backups.
Integrity validationTo validate the integrity of backups, HP Backup and Recovery Manager uses date, time stamp, file size,and attribute checks.
Backups and RAID supportHP Backup and Recovery Manager supports hardware RAID (available on Workstations) andsemihardware RAID (available on select 2006 Desktop models). Software RAID, such as the ability tocreate dynamic disks and volumes with Microsoft Windows XP, is not supported.
Backup option storage locationPlease see the following information about location of backups:
● For end-user installations, the Initial Recovery Point is always created in the Recovery Partition.
● You can create Entire Drive Backups locally in the user partition or external locations such as anetwork or other drives.
● You can create Recovery Points in the user partition, on a secondary hard drive, on a the network,or to optical media.
12 HP Backup and Recovery Manager Administrator Guide ENWW
● You can create individual file and folder backups locally or externally to a network, other drives, oroptical media.
● For factory installations, the backup image is first stored on the Windows partition and later movedto the Recovery Partition depending upon customer actions (i.e., launching Recovery Media Creator,performing Entire Drive Backups, or creating Recovery Points).
Bandwidth limitingYou cannot limit bandwidth when backing up to the network.
Backup failoverYou cannot perform an automatic failover to a second local disk when there is a backup.
Entire Drive Backup on local driveThere is a locked down folder at C:\System Recovery where the Entire Drive Backup is stored, andyou can not use HP Backup and Recovery Manager in Windows to remove the backup if necessary.Therefore, if you accidentally make an Entire Drive Backup on the local drive, and you then attempt tocreate another EDB on top of it, if there is not enough space in the partition, the EDB process aborts, andyou cannot delete the old Entire Drive Backup from the C:\ drive.
Scheduled backupsThe HP Backup and Recovery Manager provides a convenient scheduling utility. Once configured,scheduled backups require no user intervention. HP recommends that you create the backup scheduleimmediately to ensure continued system and data security.
The Scheduler is located at Start > All Programs > HP Backup & Recovery > HP BackupScheduler.
NOTE: Scheduled backups may require user interaction if a password was used when creatingthe schedule.
You can schedule any backup that you can create manually, including:
● Recovery Points
● Entire Drive Backups
● File Backups
Manual backupsThe HP Backup and Recovery Manager allows you to manually or automatically create individual filebackups, entire drive backups, or recovery points. The manual backup option is useful for creating singlearchives that you can back up to a network, hard drive, or CD/DVD disc.
You can perform manual backups by clicking:
1. Start > All Programs > HP Backup & Recovery > HP Backup and Recovery Manager.
2. Click Next.
ENWW Backups 13
3. Select Back up to protect system settings and important data files.
4. Select the type of backup you want to perform, and then follow the wizard.
Recovery PointsHP Backup and Recovery Manager allows you to delete or move to CD/DVD the Recovery Points createdon the hard drive to free up hard disk space.
Because Recovery Points are incremental, deleting one Recovery Point also deletes all subsequent RecoveryPoints. However, Recovery Point location is independent of the others. For example, Recovery Pointscreated on the network are incremental, but independent of Recovery Points stored on an external harddrive. Deleting a Recovery Point from the network location affects only the Recovery Points in that location.
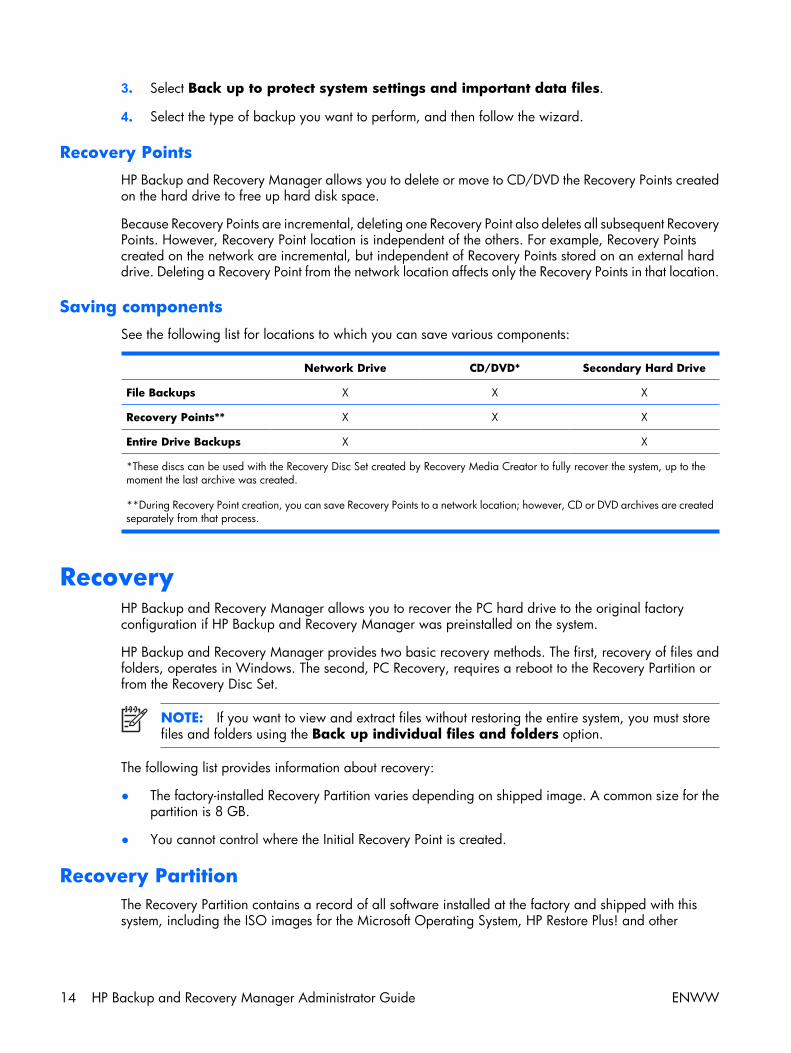
Saving componentsSee the following list for locations to which you can save various components:
Network Drive CD/DVD* Secondary Hard Drive
File Backups X X X
Recovery Points** X X X
Entire Drive Backups X X
*These discs can be used with the Recovery Disc Set created by Recovery Media Creator to fully recover the system, up to themoment the last archive was created.
**During Recovery Point creation, you can save Recovery Points to a network location; however, CD or DVD archives are createdseparately from that process.
RecoveryHP Backup and Recovery Manager allows you to recover the PC hard drive to the original factoryconfiguration if HP Backup and Recovery Manager was preinstalled on the system.
HP Backup and Recovery Manager provides two basic recovery methods. The first, recovery of files andfolders, operates in Windows. The second, PC Recovery, requires a reboot to the Recovery Partition orfrom the Recovery Disc Set.
NOTE: If you want to view and extract files without restoring the entire system, you must storefiles and folders using the Back up individual files and folders option.
The following list provides information about recovery:
● The factory-installed Recovery Partition varies depending on shipped image. A common size for thepartition is 8 GB.
● You cannot control where the Initial Recovery Point is created.
Recovery PartitionThe Recovery Partition contains a record of all software installed at the factory and shipped with thissystem, including the ISO images for the Microsoft Operating System, HP Restore Plus! and other
14 HP Backup and Recovery Manager Administrator Guide ENWW

supplemental and recovery products, as appropriate. The HP Backup and Recovery Manager uses thisrecord to recover the system hard drive. Removing the Recovery Partition destroys this record.
If necessary, you may remove the Recovery Partition. However, before doing so, you should run theRecovery Media Creator to create a disc backup of the software on the Recovery Partition, including allISO images.
The Recovery Partition is a primary NTFS partition and is not completely hidden from users andadministrators. However, the partition is protected so the user cannot view the contents using WindowsExplorer and easily access files. No sectors in the partition are marked as bad.
Recovery Media CreatorCreating a Recovery Disc Set is one of the most important things you can do for PC hard drive security.
1. Launch HP Backup and Recovery Manager.
2. After the Welcome Screen, select Create factory software recovery CDs or DVDs torecover the system.
3. Follow the wizard.
This wizard makes it possible to create the recovery discs directly or to save the discs to the hard driveas ISO images. You can save these ISO images to disc later using another application.
Operating systemWinPE is the media operating system used for a full PC Recovery (F11 key restore). HP does not supportaccessing the underlying operating system using a command line prompt with tools such as diskpart,format, etc.
The Recovery Partition holds the WinPE operating system, the HP Backup and Recovery files needed toboot into the partition, and the Initial Recovery Point. When preinstalled at the factory, the partition alsocontains the Microsoft operating system and Restore Plus! Additionally, desktop and workstation systemscontain supplemental ISOs.
Recovery mediaOnce a set of Recovery Media is created, you can no longer create another set. Or, if you remove theRecovery Partition, you cannot create Recovery Points. Please note that removing the Recovery Partitionhas much more significant effects to Desktop systems. Portables has a Rescue CD that you can use torecover previously-created Entire Drive Backups or Recovery Points. Desktops has no such function;therefore, once the Recovery Partition is removed, most functionality is gone.
Network connectivity is available when booting from the recovery media using WinPE-supported networkdrivers. The network is available when booting from the Recovery Partition, but is not available whenbooting from recovery media burned onto optical discs.
NOTE: You can browse the network to previously created backups by booting to the first disc ofthe Recovery Disc Set.
Creating a Recovery Disc Set is one of the most important things that you can do for hard drive security.Use the Recovery Media Creator to create a Recovery Disc Set.
ENWW Recovery 15
To access the Recovery Media Creator:
1. Click Start > All Programs > HP Backup & Recovery > HP Backup and RecoveryManager.
2. After the Welcome Screen, select Create recovery CDs or DVDs to recover the system.
3. Follow the wizard.
This wizard makes it possible to create the recovery discs directly or to save the discs to the hard driveas ISO images. You can later save these ISO images to disc using another application.
NOTE: This application cannot burn these ISO images to disc once saved to hard drive but willcreate the Recovery Disc Set and any other backups or Recovery Point discs.
The Initial Recovery Point is stored to disc by the Recovery Disc Set. You cannot save the Initial RecoveryPoint to disc multiple times.
How to recoverHP Backup and Recovery Manager provides two basic recovery methods. The first, recovery of files andfolders, operates in Windows. The second, PC Recovery, requires a reboot to the Recovery Partition orfrom the Recovery Disc Set.
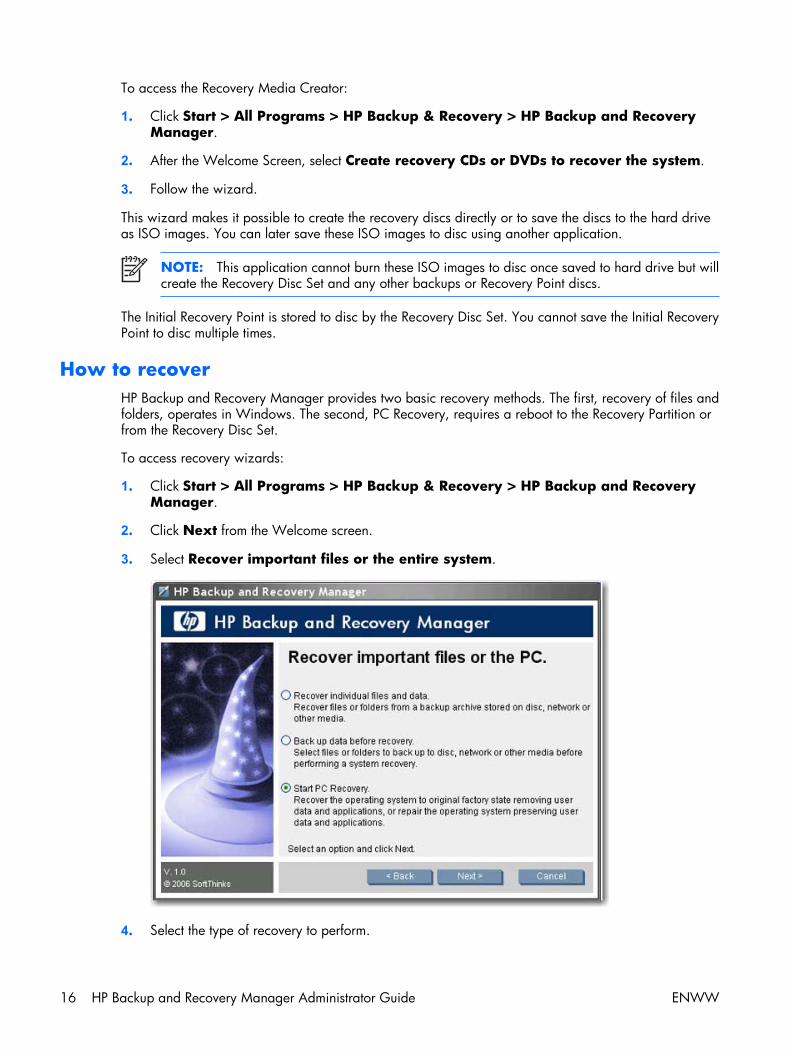
To access recovery wizards:
1. Click Start > All Programs > HP Backup & Recovery > HP Backup and RecoveryManager.
2. Click Next from the Welcome screen.
3. Select Recover important files or the entire system.
4. Select the type of recovery to perform.
16 HP Backup and Recovery Manager Administrator Guide ENWW

Recovery media creationIf you launch either the ISO creation or media burning process, HP Backup and Recovery rememberswhere you left off:
● Even if you try to switch between creating ISO files and burning media.
● Even if you let the ISO creation process complete and you restart it again, you see the following:
You cannot reset HP Backup and Recovery Manager so it will let you restart the recovery media creationprocess. Contact Post-Sales support if you want to change to a different media type after you havelaunched the process.
Removing the Recovery PartitionThe Recovery Partition contains a record of all software installed at the factory and shipped with a system,including the ISO images for the operating system, HP Restore Plus!, and other supplemental and recoveryproducts. HP Backup and Recovery Manager uses this record to recover the system hard drive. Removingthe Recovery Partition destroys this record.
NOTE: ISO images are not available on Portables unless you create them.
On some computers with small hard drives, the Recovery Partition may consume much needed hard drivespace. Because of this, you can remove the Recovery Partition. However, before doing so you should runthe Recovery Media Creator to create a disc backup of the software on the Recovery Partition, includingall ISO images.
ENWW Recovery 17

To remove the Recovery Partition:
1. Select Start > All Programs > HP Backup & Recovery > Remove HP RecoveryPartition.
2. Follow the wizard.
On Portables, if you remove the Recovery Partition or do not have a Recovery Partition during installationof HP Backup and Recovery Manager (no Recovery Point installation), You can recover orphaned EntireDrive Backups/Recovery Points using first recovery CD, first disc of the System Recovery set, or the RescueCD. Desktops does not have this ability.
PC RecoveryPC Recovery allows you to recover from a system error or to return the PC hard drive to an earlier statein time. HP Backup and Recovery Manager must run PC Recovery from the Recovery Partition. There aretwo ways to get to PC Recovery.
To get to PC Recovery from Windows:
1. Click Start > All Programs > HP Backup & Recovery > HP Backup and RecoveryManager.
2. After the Welcome Screen, select Recover important files or the entire system, and thenclick Next.
3. Select PC Recovery, and then click Next.
The system reboots before continuing to PC Recovery.
To get to PC Recovery when Windows is unavailable:
Turn on the PC.
Press F11 on the keyboard immediately when “Press F11 for Emergency Recovery” appears.
18 HP Backup and Recovery Manager Administrator Guide ENWW
HP Backup and Recovery Manager allows you to back up important files before performing a PC Recovery.
NOTE: If a hard drive is replaced, you can recover using recovery media that you previouslycreated.
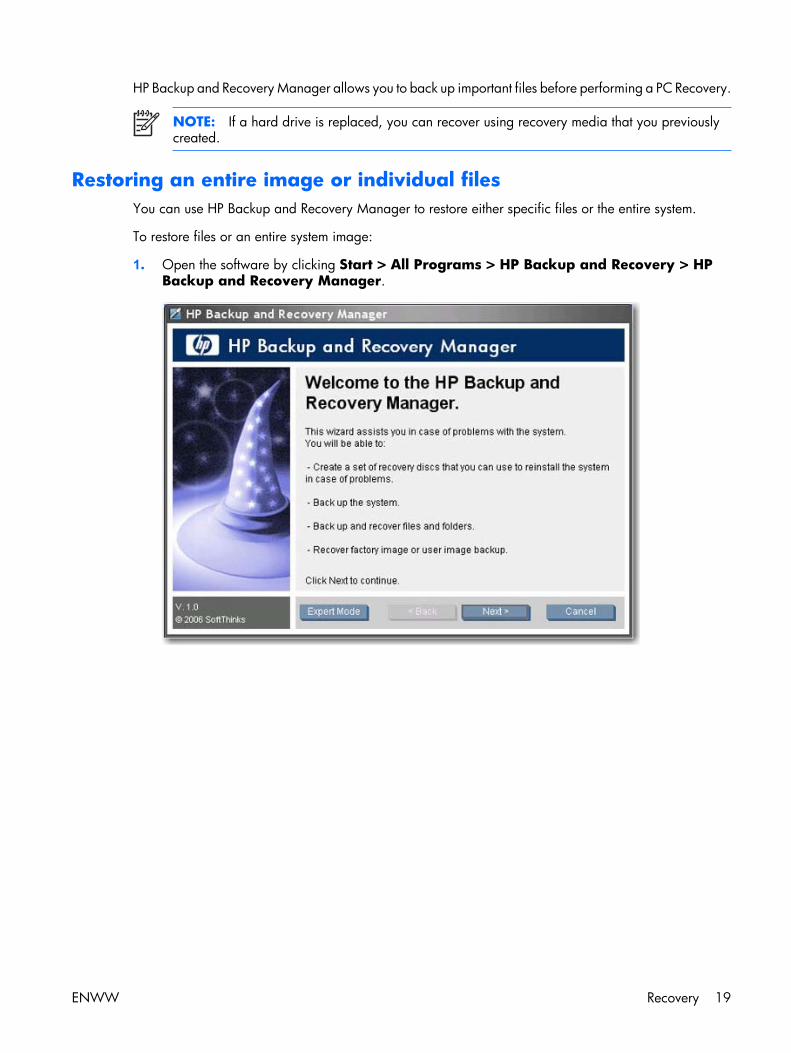
Restoring an entire image or individual filesYou can use HP Backup and Recovery Manager to restore either specific files or the entire system.
To restore files or an entire system image:
1. Open the software by clicking Start > All Programs > HP Backup and Recovery > HPBackup and Recovery Manager.
ENWW Recovery 19
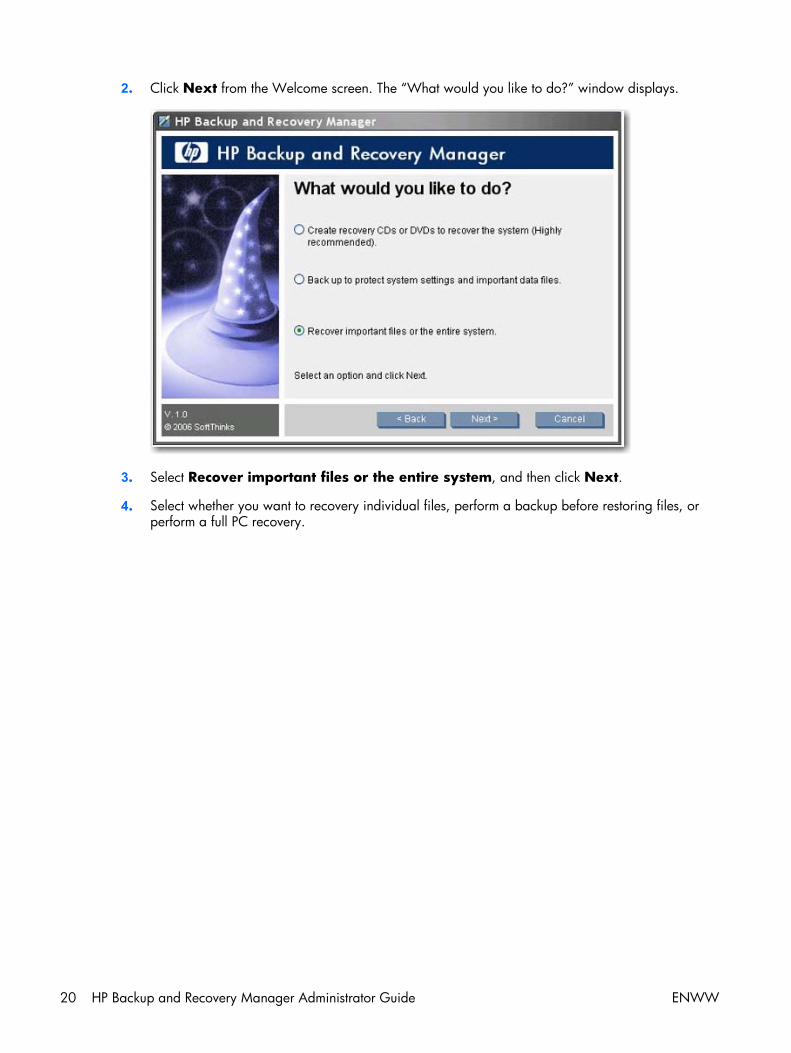
2. Click Next from the Welcome screen. The “What would you like to do?” window displays.
3. Select Recover important files or the entire system, and then click Next.
4. Select whether you want to recovery individual files, perform a backup before restoring files, orperform a full PC recovery.
20 HP Backup and Recovery Manager Administrator Guide ENWW
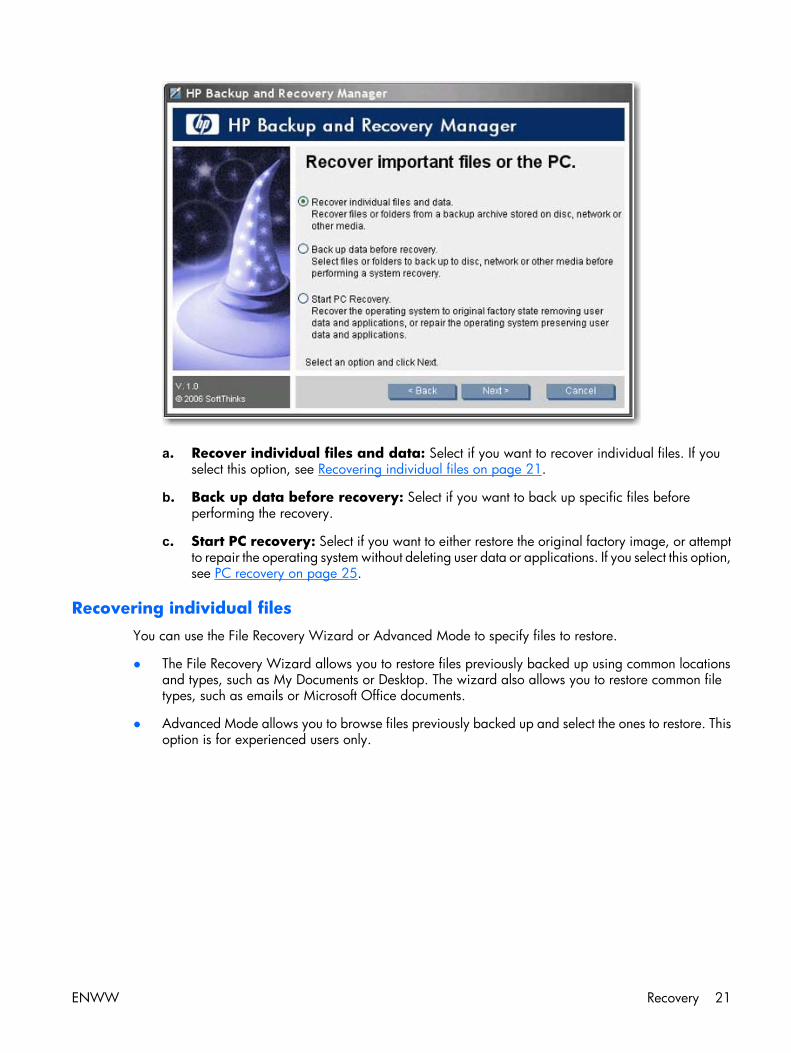
a. Recover individual files and data: Select if you want to recover individual files. If youselect this option, see Recovering individual files on page 21.
b. Back up data before recovery: Select if you want to back up specific files beforeperforming the recovery.
c. Start PC recovery: Select if you want to either restore the original factory image, or attemptto repair the operating system without deleting user data or applications. If you select this option,see PC recovery on page 25.
Recovering individual filesYou can use the File Recovery Wizard or Advanced Mode to specify files to restore.
● The File Recovery Wizard allows you to restore files previously backed up using common locationsand types, such as My Documents or Desktop. The wizard also allows you to restore common filetypes, such as emails or Microsoft Office documents.
● Advanced Mode allows you to browse files previously backed up and select the ones to restore. Thisoption is for experienced users only.
ENWW Recovery 21
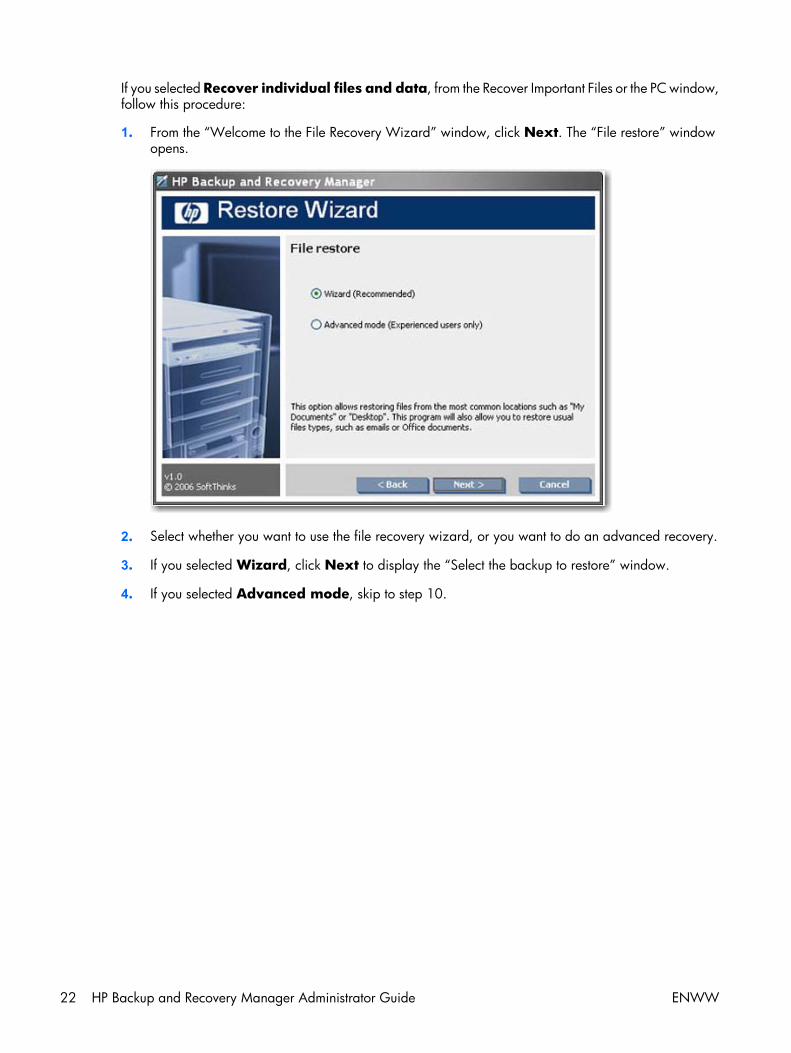
If you selected Recover individual files and data, from the Recover Important Files or the PC window,follow this procedure:
1. From the “Welcome to the File Recovery Wizard” window, click Next. The “File restore” windowopens.
2. Select whether you want to use the file recovery wizard, or you want to do an advanced recovery.
3. If you selected Wizard, click Next to display the “Select the backup to restore” window.
4. If you selected Advanced mode, skip to step 10.
22 HP Backup and Recovery Manager Administrator Guide ENWW
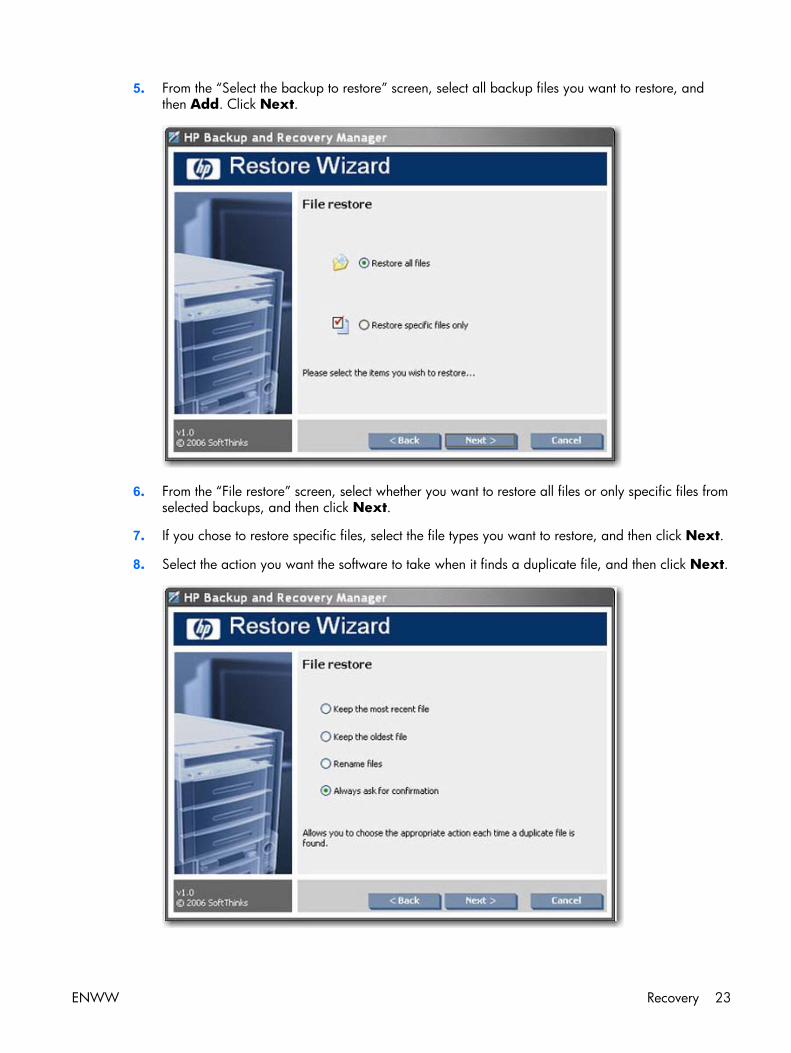
5. From the “Select the backup to restore” screen, select all backup files you want to restore, andthen Add. Click Next.
6. From the “File restore” screen, select whether you want to restore all files or only specific files fromselected backups, and then click Next.
7. If you chose to restore specific files, select the file types you want to restore, and then click Next.
8. Select the action you want the software to take when it finds a duplicate file, and then click Next.
ENWW Recovery 23

9. Click Start to begin the restore.
10. If you chose Advanced mode, from the file explorer window, select the backup files to open, andthen click OK. The password dialog box opens.
11. If the backup is password protected, type the password required to open the backup file, and thenclick OK. You can password protect all backup files.
12. Navigate to the files to restore, or restore using common file types and locations.
24 HP Backup and Recovery Manager Administrator Guide ENWW
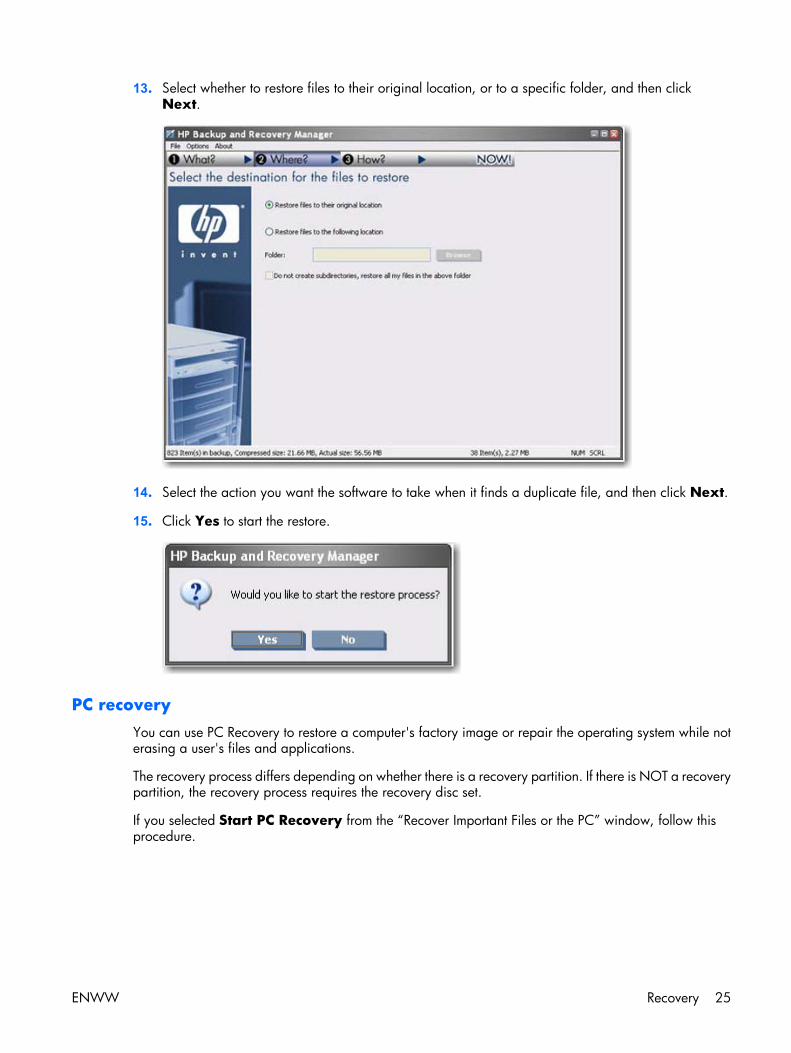
13. Select whether to restore files to their original location, or to a specific folder, and then clickNext.
14. Select the action you want the software to take when it finds a duplicate file, and then click Next.
15. Click Yes to start the restore.
PC recoveryYou can use PC Recovery to restore a computer's factory image or repair the operating system while noterasing a user's files and applications.
The recovery process differs depending on whether there is a recovery partition. If there is NOT a recoverypartition, the recovery process requires the recovery disc set.
If you selected Start PC Recovery from the “Recover Important Files or the PC” window, follow thisprocedure.
ENWW Recovery 25

1. You must reboot the system whether or not there is a Recovery Partition. If there is no RecoveryPartition, insert the first disc of the Recovery Disc Set, and then click Next to reboot the system.Restarting the system boots it under WinPE so you can access system recovery options.
2. After the system has rebooted, select whether you want to recover to a specific time, return to factorysettings, or back up files.
26 HP Backup and Recovery Manager Administrator Guide ENWW

a. If you selected Recover PC to a specific point in time, click Next and go to step 3.
b. If you selected Recover PC's factory installed operating system, drivers, utilities,and applications, follow the wizard to restore your computer to the original factory image.
c. If you selected Back up files, follow the File Backup Wizard.
3. Select the Recovery Point or Entire Drive Backup from which you want to restore your computer.
4. If you selected a recent Recovery Point that will recover the PC to the point in time at which theRecovery Point was created, all Recovery Points after the selected Recovery Point will be deleted from
ENWW Recovery 27

the hard drive. Recovery Points prior to the one selected are not deleted. Click Yes and OK to startthe recovery process.
5. If you selected the last created Recovery Point, select whether you want to browse the hard drive toselect files to preserve, and then click Next.
6. If you chose to preserve files, after the system loads files, select the type of files to preserve, orclick Other Files to browse the hard drive and select files. Click Next.
28 HP Backup and Recovery Manager Administrator Guide ENWW

7. Click Yes to confirm you want to perform the recovery.
8. After the recovery is complete, click Restart to reboot the computer. You have to reboot after therecovery process.
Restoration and name duplicationThe backups created by Backup and Recovery Manager are only intended to be recovered onto the systemon which the backup was created. However, you can restore Backup and Recovery Manager media onother machines. Please note that Backup and Recovery Manager does not control the operating system;therefore, nothing is used to avoid duplication of name, IP, SID, etc.
The operating system is not controlled by HP Backup and Recovery Manager.
Operating system PIDThe user is not prompted about the operating system PID.
File explorer for recovering filesHP Backup and Recovery Manager allows you to restore or recover individual files. There is a file explorertype of interface for finding and recovering “Individual file and folder” backups in Advanced Mode.
Filter in both directionsYou can filter in both directions for both recovery and file backup. Different types of backups andrecoveries have different filtering options. Entire Drive Backups and the Initial Recovery Point have nofiltering options. Recovery Points and “Individual file and folder” backups have separate sets of filteringoptions.
UninstallationThe installation program includes a method for uninstalling the application.
What is removed?When uninstalling the HP Backup and Recovery Manager, all components, features, Recovery Points,Entire Drive Backups, and the Recovery Partition are removed from the system. File Backups areindependent executable files and are not affected by the uninstall. The Recovery Disc Set or the originalapplication CD are required to reinstall the application.
NOTE: HP recommends creating the Recovery Disc Set before uninstalling HP Backup andRecovery Manager. This protects the Microsoft Windows CD, HP Restore Plus! CD, andsupplemental CDs that may reside in the Recovery Partition.
Uninstalling the applicationTo uninstall HP Backup and Recovery Manager, go to Control Panel > Add or RemovePrograms.
1. Open the Windows Start Menu.
2. Select the Control Panel.
ENWW Uninstallation 29

3. Click Add or Remove Programs.
4. Select HP Backup and Recovery Manager.
5. Click Remove.
6. Follow the wizard to complete the uninstallation.
Expert optionsThe HP Backup and Recovery Manager includes an expert mode that takes experienced users directly tothe following backup and recovery options:
● Create system recovery discs – Creates a Recovery Disc Set of CDs or DVDs using the RecoveryMedia Creator.
● Backup entire hard drive – Creates an Entire Drive Backup.
● Backup individual files and data – Creates a File Backup on network, hard drive, or disc.
● Create or manage recovery points – Creates Recovery Points on the network or hard drive, as wellas deletes existing Recovery Points or moves them to CD or DVD discs.
● Schedule backups – Creates schedules for Recovery Points and Entire Drive Backups.
NOTE: Scheduling file backups is performed using the Backup file and folder option, notusing the scheduler.
● Recover individual files and data – Recover files stored in a File Backup.
● Start PC Recovery – Reboot the PC to the Recovery Partition and recover using the Initial RecoveryPoint and subsequent Recovery Points.
30 HP Backup and Recovery Manager Administrator Guide ENWW

Index
AAsian language support
version differences 5
Bbackup
file based 12backup types 3backups
and RAID 12bandwidth limiting 13failover 13integrity 12manual 13offline 12scheduled 13sector 12storage location 12
bandwidth limiting 13
Ccompression 10custom images 6customization 10
Ddeploying 6deploying single version to different
systems 7desktop
scheduling 3software 6
Desktop version 2desktops
unattended installation 6differences between versions 5disabling features 10disabling reminders 11docking station 5
EEFS 5enabling features 10encryption
version differences 5Entire Drive Backups 3expert options 30
Ffaiilover, backup 13features
enabling and disabling 10File Backups 4file based backups 12file explorer 29file location 6files removed during
uninstallation 29filter in both directions 29
Hhow to recover 16HP 3–in-1 NAS Docking Station 5
Iimages 6individual file recovery 29installation
version differences 5installing
multiple partitions 7systems without
preinstallation 6integrity of backups 12ISO images 17
Mmanaging HP Backup and Recovery
Manager 8manual backups 13
media, recovery 15, 17multiple partitions 7
Ooffline backups 12operating system 15operating system PID 29
Ppasswords 9PC recovery 18, 25PID 29policies 8portable
scheduling 3software 6
Portable version 2portables
automated installation 6
Qquad byte support
version differences 5
RRAID 12recovery 14Recovery Disc Set 15recovery media 15recovery media creation 17Recovery Media Creator 15Recovery Partition
removing 17Recovery Point
creation location 14visibility 15
Recovery Points 3, 14reminders 11removing Recovery Partition 17
ENWW Index 31

Rescue CDversion differences 5
restoration 14restoration and name
duplication 29restoring image 19restoring individual files 19, 21,
29
SSafeboot
version differences 5saving components 14schedling
version differences 5scheduled backups 13scheduling 8scheduling rules 9sector backups 12software options 6storage location, backups 12
Ttypes of backups 3
Uunattended installation 6uninstallation 29
Vversion differences 5versions 2visibility of Recovery Partition 15
WWindows PE (Pre-Installation
Environment) 4
32 Index ENWW